

Panasonic KX-TG4500B, KX-TG4500 User Manual
Operating Instructions
1
ANSWER ON
2
3
4
5
6
7
8
9
0
S
S
P
-P
P
-P
H
O
H
N
O
NE
E
Digital Cordless Phone System
Model No.
5.8 GHz Expandable
KX-TG4500
This unit is compatible with Caller ID. To use this feature you must
subscribe to the appropriate service offered by your service provider.
Charge the cordless handset battery for 7 hours before initial use.
Please read these Operating Instructions before using the unit and save
them for future reference.
For assistance, visit our website:
http://www.panasonic.com/phonehelp for customers in the U.S.A. or
Puerto Rico.

Table of Contents
Introduction
Accessory information . . . . . . . . . . . . . . 5
Expanding your phone . . . . . . . . . . . . . . 6
Important safety instructions . . . . . . . . . 7
For best performance . . . . . . . . . . . . . . . 9
System capabilities. . . . . . . . . . . . . . . . 10
Preparation
Installation . . . . . . . . . . . . . . . . . . . . . . 11
Installing the backup battery in the
base unit . . . . . . . . . . . . . . . . . . . . . 11
Connecting the base unit handset
and AC adaptor . . . . . . . . . . . . . . . . 12
Connecting the line cords . . . . . . . . 13
Connecting the AC adaptor to the
charger . . . . . . . . . . . . . . . . . . . . . . 15
If you subscribe to a DSL service . . 15
Installing the battery in the
cordless handset . . . . . . . . . . . . . . . 16
Battery charge . . . . . . . . . . . . . . . . 16
Controls and display. . . . . . . . . . . . . . . 18
Controls . . . . . . . . . . . . . . . . . . . . . 18
Using softkeys and navigation keys 21
Displays . . . . . . . . . . . . . . . . . . . . . 23
Setting-up the unit before use . . . . . . . 24
Setting the date and time . . . . . . . . 24
Setting the display language . . . . . . 24
Selecting the line mode . . . . . . . . . 25
Selecting the dialing mode . . . . . . . 25
Registering additional cordless
handsets . . . . . . . . . . . . . . . . . . . . . 25
Making/Answering Calls
Making calls . . . . . . . . . . . . . . . . . . . . . 28
Answering calls . . . . . . . . . . . . . . . . . . 32
Using additional lines during
a conversation . . . . . . . . . . . . . . . . . . . 34
Intercom . . . . . . . . . . . . . . . . . . . . . . . . 35
Making an intercom call . . . . . . . . . 35
Answering intercom calls . . . . . . . . 35
Transferring a call. . . . . . . . . . . . . . . . . 36
Placing a call on hold . . . . . . . . . . . . . . 37
Swapping between two external calls . 37
Conference calls. . . . . . . . . . . . . . . . . . 38
Useful features during a call. . . . . . . . . 39
Joining in a conversation . . . . . . . . 39
Call privacy . . . . . . . . . . . . . . . . . . . 39
Recording a conversation . . . . . . . . 40
Muting your conversation . . . . . . . . 40
Using the PAUSE key (for PBX
line or long distance calls) . . . . . . . . 41
Using the FLASH key . . . . . . . . . . . 41
For call waiting service users . . . . . 41
Temporary tone dialing . . . . . . . . . . 42
Phonebook
Using the Phonebook . . . . . . . . . . . . . . 43
Storing names and numbers in the
Phonebook . . . . . . . . . . . . . . . . . . . 43
Finding and calling a Phonebook
item . . . . . . . . . . . . . . . . . . . . . . . . . 44
Editing Phonebook items . . . . . . . . 45
Erasing Phonebook items . . . . . . . . 46
Chain dial . . . . . . . . . . . . . . . . . . . 46
Caller ID Service
Using caller ID service . . . . . . . . . . . . . 47
Caller list . . . . . . . . . . . . . . . . . . . . . . . . 48
Viewing and calling back using the
caller list . . . . . . . . . . . . . . . . . . . . . 48
Editing a caller’s phone number
before calling back . . . . . . . . . . . . . 49
Storing caller information in the
Phonebook . . . . . . . . . . . . . . . . . . . 50
Erasing caller information . . . . . . . . 50
Voice Mail System
Voice Mail System . . . . . . . . . . . . . . . . 51
Setting the mailbox password . . . . . 51
Listening to messages from the
base unit . . . . . . . . . . . . . . . . . . . . . 52
Listening to messages with the
cordless handset . . . . . . . . . . . . . . . 55
Creating and sending messages . . . 57
Transferring a call to a personal
mailbox . . . . . . . . . . . . . . . . . . . . . . 58
Checking the remaining recording
time and number of messages . . . . 59
Erasing all messages stored in a
mailbox . . . . . . . . . . . . . . . . . . . . . . 59
User greetings . . . . . . . . . . . . . . . . . 60
Personal greetings . . . . . . . . . . . . . 60
Turning the cordless handset
answer mode on or off . . . . . . . . . . 62
Remote access
Remote access. . . . . . . . . . . . . . . . . . . 63
Accessing the voice mail system
remotely . . . . . . . . . . . . . . . . . . . . . 63
Automated Attendant
System
Automated Attendant System. . . . . . . . 66
How the Automated Attendant
System works . . . . . . . . . . . . . . . . . 66
2 For assistance, please visit http://www.panasonic.com/phonehelp

Table of Contents
Setting the Automated Attendant
System . . . . . . . . . . . . . . . . . . . . . . 67
Call transfer status . . . . . . . . . . . . . 69
Call operator status . . . . . . . . . . . . . 70
Answering System
Setting the Answering System . . . . . . 71
Turning on the Answering System . 71
Defining the number of rings . . . . . . 71
Selecting the pre-recorded
greeting message . . . . . . . . . . . . . . 71
Recording a greeting message . . . . 72
Selecting a greeting message . . . . . 72
Changing a recorded message . . . . 72
Erasing a greeting message . . . . . . 72
Turning off the Answering System . 72
Programmable Settings
Guide to programming . . . . . . . . . . . . . 73
Base programming . . . . . . . . . . . . . 73
Cordless handset programming . . . 75
Initializing base unit and cordless
handset(s) . . . . . . . . . . . . . . . . . . . . . . 76
Clearing settings . . . . . . . . . . . . . . . 76
Clearing the Caller List . . . . . . . . . 77
Clearing the Phonebook . . . . . . . . . 77
Clearing the redial list . . . . . . . . . . . 78
Erasing messages . . . . . . . . . . . . . 78
Ringer settings . . . . . . . . . . . . . . . . . . . 79
Selecting the ringer volume . . . . . . 79
Selecting the ringer pattern . . . . . . . 79
Call options. . . . . . . . . . . . . . . . . . . . . . 80
Auto talk . . . . . . . . . . . . . . . . . . . . . 80
Caller ID edit . . . . . . . . . . . . . . . . . . 81
Setting up ring groups . . . . . . . . . . . 81
Display options . . . . . . . . . . . . . . . . . . . 82
Adjusting the LCD contrast . . . . . . 82
Changing the name of the
cordless handset . . . . . . . . . . . . . . . 82
Telephone settings . . . . . . . . . . . . . . . . 83
Selecting the flash time . . . . . . . . . . 83
Line selection for outgoing calls . . . 83
Setting up the telephone line . . . . . . . . 84
Restricting calls . . . . . . . . . . . . . . . . 84
Message alert . . . . . . . . . . . . . . . . . 85
Call screening (monitoring) . . . . . . . 85
Notify alert . . . . . . . . . . . . . . . . . . . . 85
Automatically deleting messages . . 87
Checking the remaining recording
time and number of messages . . . . 87
Music on hold . . . . . . . . . . . . . . . . . . . . 87
Turning the music on hold feature
on or off . . . . . . . . . . . . . . . . . . . . . . 87
Recording music on hold . . . . . . . . 88
Erasing the current music on hold .89
Other options . . . . . . . . . . . . . . . . . . . . 89
Selecting key tone . . . . . . . . . . . . . . 89
Adjusting the time automatically . . . 89
Re-registering a cordless handset
with the base unit . . . . . . . . . . . . . . 89
Storing speed dial numbers . . . . . . 90
Customer support . . . . . . . . . . . . . . 91
Programming with direct commands . . 92
Using direct commands on the
base unit . . . . . . . . . . . . . . . . . . . . . 92
Using mailbox direct commands on
the base unit . . . . . . . . . . . . . . . . . . 93
Using direct commands on the
cordless handset . . . . . . . . . . . . . . . 94
Useful Information
Wall mounting the charger . . . . . . . . . . 95
Cordless handset rechargeable
battery replacement . . . . . . . . . . . . . . . 96
Backup battery replacement. . . . . . . . . 96
Headset (optional) . . . . . . . . . . . . . . . . 97
Belt clip . . . . . . . . . . . . . . . . . . . . . . . . . 98
Reset button . . . . . . . . . . . . . . . . . . . . . 99
Adding another phone . . . . . . . . . . . . . 99
Error messages . . . . . . . . . . . . . . . . . 100
Display messages . . . . . . . . . . . . . 100
Voice messages . . . . . . . . . . . . . . 102
Troubleshooting . . . . . . . . . . . . . . . . . 103
General use . . . . . . . . . . . . . . . . . . 103
Programmable settings . . . . . . . . . 104
Making/answering calls, paging . . 104
Phonebook . . . . . . . . . . . . . . . . . . 105
Caller ID . . . . . . . . . . . . . . . . . . . . 106
Recharging the battery
(cordless handset) . . . . . . . . . . . . . 107
Voice mail system/
automated attendant system/
answering system . . . . . . . . . . . . . 108
Frequently asked questions . . . . . . . . 109
The base unit . . . . . . . . . . . . . . . . 109
The cordless handset . . . . . . . . . . 109
Messages and voice mail . . . . . . . 110
Calls . . . . . . . . . . . . . . . . . . . . . . . 111
Lines . . . . . . . . . . . . . . . . . . . . . . . 111
FCC and other information . . . . . . . . . 112
Warranty . . . . . . . . . . . . . . . . . . . . . . . 115
Specifications . . . . . . . . . . . . . . . . . . . 117
Customer services . . . . . . . . . . . . . . . 118
Index
Index . . . . . . . . . . . . . . . . . . . . . . . . . . 119
For assistance, please visit http://www.panasonic.com/phonehelp 3

Introduction
Thank you for purchasing your new Panasonic cordless phone system.
We recommend keeping a record of the following information for future reference.
Serial No.
Name and address of dealer
Caller ID and Call Waiting Service, where available, are telephone service provider
services. After subscribing to Caller ID, this phone will display a caller’s name and phone
number. Call Waiting Caller ID, which displays a second caller’s name and phone
number while the user is engaged in another call, requires a subscription to both Caller
ID and Call Waiting with Caller ID services (CWID).
1
1. The serial number can be found on the bottom of the unit.
Date of purchase
Attach your purchase receipt here.
4 For assistance, please visit http://www.panasonic.com/phonehelp
Introduction
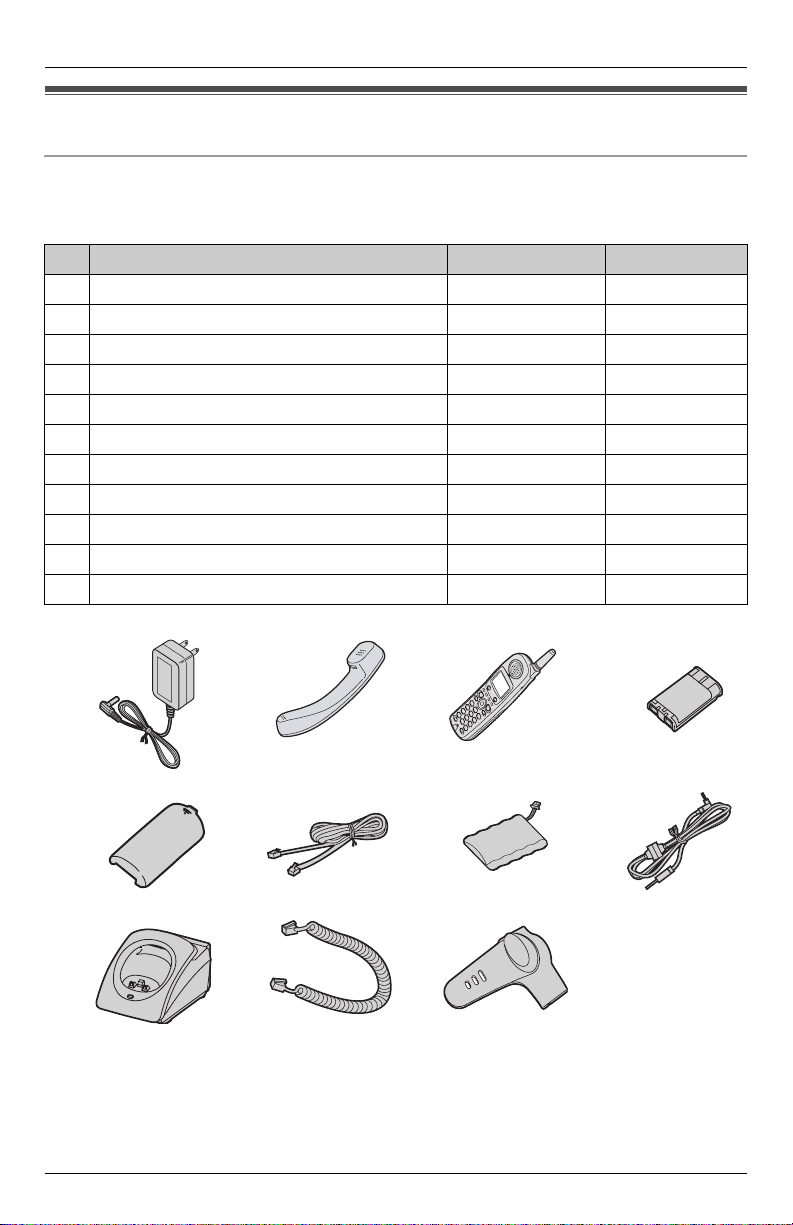
Accessory information
Included accessories
To order replacement accessories, call 1-800-332-5368.
TTY users (hearing or speech impaired users) can call 1-866-605-1277.
No. Accessory items Order number Quantity
1 AC adaptor (for base unit and charger) PQLV256Z 2
2 Base unit handset PQJXF0201Z 1
3 Cordless handset KX-TG4500BR 1
4 Cordless handset battery HHR-P104 1
5 Cordless handset battery cover PQYNTG4500BR 1
6 4-wire telephone line cord PQJA10088Z 2
7 Backup battery HHR-P516 1
8 Audio cable PQJA10165Z 1
9 Charger PQLV30046ZA 1
10 Handset cord PQJA212V 1
11 Belt clip PQKE10377Z5 1
1234
5678
91011
For assistance, please visit http://www.panasonic.com/phonehelp 5
Introduction
Expanding your phone
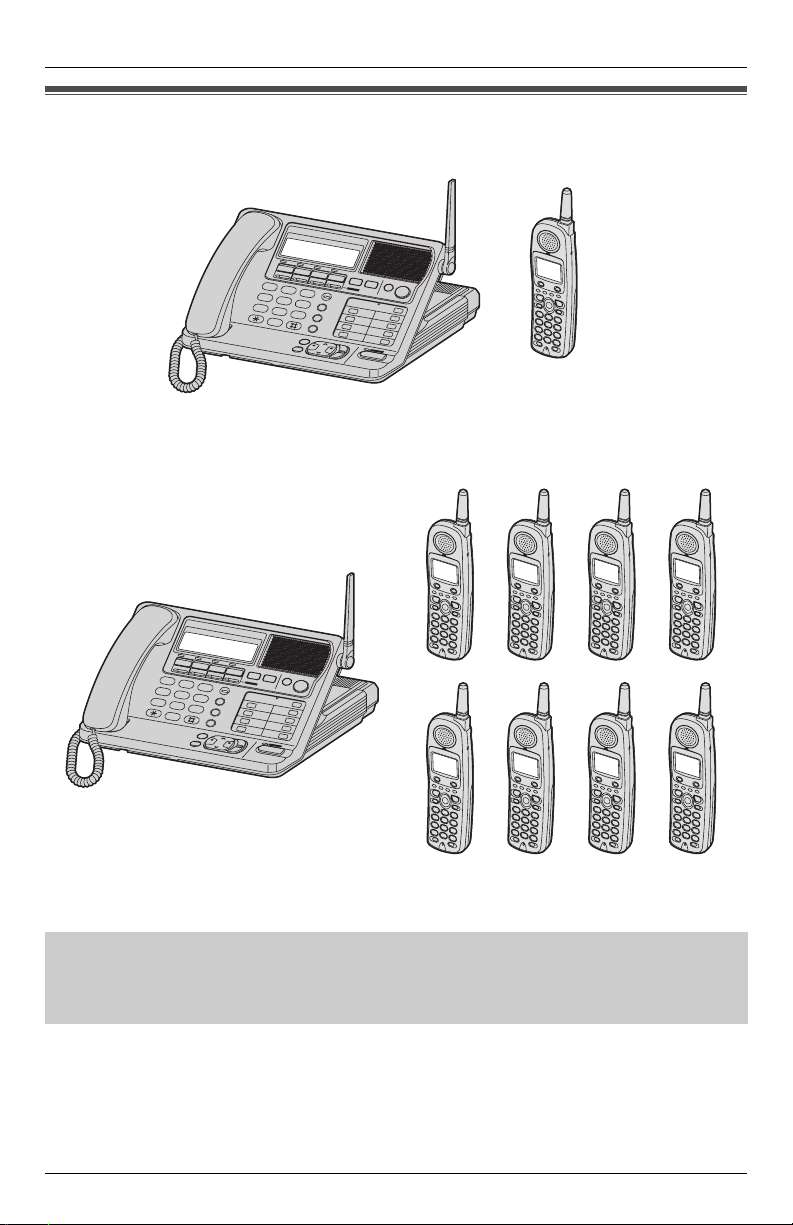
KX-TG4500 includes one cordless handset and one base unit.
1
2
4
5
7
8
0
AN
SWE
R
O
N
3
6
9
S
S
P
-
P
P
-
H
P
O
H
N
O
N
E
E
KX-TGA450KX-TG4500
The system can be expanded by adding up to seven accessory cordless handsets, sold
separately.
A maximum of eight cordless handsets can be registered to the base unit.
1
2
4
5
7
8
0
ANSWER ON
3
6
9
S
SP
P
-P
-P
H
O
H
N
O
N
E
E
The included cordless handset is pre-registered at the factory, and assigned an extension
number of 1.
After purchasing accessory cordless handsets, you must register each to the base unit.
The model number of the accessory cordless handset is KX-TGA450.
A charger unit is included with each accessory cordless handset.
To order accessory cordless handsets, contact your dealer or call 1-800-211-PANA
(1-800-211-7262) to locate a dealer.
(Please read the accessory cordless handset’s Installation Manual for more information).
6 For assistance, please visit http://www.panasonic.com/phonehelp

Important safety instructions
When using this unit, basic safety
precautions should always be followed to
reduce the risk of fire, electric shock, or
personal injury.
1. Read and understand all instructions.
2. Follow all warnings and instructions
marked on this unit.
3. Unplug this unit from power outlets
before cleaning. Do not use liquid or
aerosol cleaners. Use a damp cloth for
cleaning.
4. Do not use this unit near water, for
example near a bathtub, wash bowl, or
kitchen sink.
5. Place the unit securely on a stable
surface. Serious damage and/or injury
may result if the unit falls.
6. Do not cover slots and openings on the
unit. They are provided for ventilation
and protection against overheating.
Never place the unit near radiators, or
in a place where proper ventilation is
not provided.
7. This equipment should only be
connected to a power supply as
described on the unit. If you are not
sure of the type of power supplied to
your home, consult your dealer or local
power company.
8. Do not place objects on the power
cord. Install the unit where no one can
step or trip on the cord.
9. Do not overload power outlets or
extension cords. This can result in the
risk of fire or electric shock.
10. Never push any objects through slots
in this unit. This may result in the risk of
fire or electric shock. Never spill any
liquid on the unit.
11. To reduce the risk of electric shock, do
not disassemble this unit. Take the unit
to an authorized service center when
service is required. Opening or
removing covers may expose you to
dangerous voltages or other risks.
For assistance, please visit http://www.panasonic.com/phonehelp 7
Introduction
Incorrect reassembly can cause
electric shock when the unit is
subsequently used.
12. Unplug this unit from power outlets and
refer servicing to an authorized service
center when the following conditions
occur:
A. When the power cord is damaged
or frayed.
B. If liquid has been spilled into the
unit.
C. If the unit has been exposed to rain
or water.
D. If the unit does not work normally
by following the operating
instructions. Adjust only controls
covered by the operating
instructions. Improper adjustment
may require extensive work by an
authorized service center.
E. If the unit has been dropped or
physically damaged.
F. If the unit exhibits a distinct change
in performance.
13. Avoid using telephones during
thunderstorms, except cordless types.
There may be a remote risk of an
electric shock from lightning.
14. Do not use this unit to report a gas leak
when in the vicinity of the leak.
SAVE THESE
INSTRUCTIONS

Introduction
CAUTION:
Installation
L Never install telephone wiring during a
lightning storm.
L Never install telephone jacks in wet
locations unless the jack is specifically
designed for wet locations.
L Never touch uninsulated telephone
wires or terminals unless the telephone
line has been disconnected at the
network interface.
L Use caution when installing or modifying
telephone lines.
L Do not touch the plug with wet hands.
L The AC adaptor is used as the main
disconnect device. Ensure that the AC
outlet is installed near the unit and is
easily accessible.
L When installing the base unit and
cordless handset(s), ensure that
antennas are not mounted in a position
where they may cause injury. Particular
care should be taken to ensure that
antennas are not placed at eye level.
Battery
To reduce the risk of fire or injury to
persons, read and follow these
instructions.
L Use only the battery(ies) specified.
L Do not dispose of the battery(ies) in a
fire. They may explode. Check with local
waste management codes for special
disposal instructions.
L Do not open or damage the battery(ies).
Released electrolyte is corrosive and
may cause burns or injury to the eyes or
skin. The electrolyte may be toxic if
swallowed.
L Exercise care when handling the
battery(ies). Do not allow conductive
materials such as rings, bracelets or
keys to touch the battery(ies). This may
cause a short circuit and the battery(ies)
and/or the conductive material may
overheat and cause burns.
L Charge the battery(ies) provided with or
identified for use with this product only in
accordance with the instructions and
limitations specified in this manual.
WARNING:
L To prevent the risk of fire or electrical
shock, do not expose this product to rain
or any type of moisture.
L Unplug this unit from power outlets if it
emits smoke, an abnormal smell or
makes an unusual noise. These
conditions can cause fire or electric
shock. Confirm that smoke has stopped
and contact the Panasonic Call Center
at 1-800-211-PANA (1-800-211-7262).
L The base unit handset and cordless
handset earpieces are magnetised and
may retain small ferrous objects.
Medical
L Consult the manufacturer of any
personal medical devices, such as
pacemakers or hearing aids, to
determine if they are adequately
shielded from external RF (radio
frequency) energy. The unit operates in
the frequency range of 5.8 GHz and the
power output level can range from 0.04
to 0.25 watts. Do not use the unit in
health care facilities if any regulations
posted in the area instruct you not to do
so. Hospitals or health care facilities
may be using equipment that could be
sensitive to external RF (radio
frequency) energy.
8 For assistance, please visit http://www.panasonic.com/phonehelp

For best performance
Base unit location/noise
The base unit and cordless handset(s) use
radio waves to communicate with each
other.
For maximum distance and noise-free
operation, we recommend the following:
L Placing the unit away from electrical
appliances such as a TV, personal
computer or another cordless phone.
L Placing the base unit in a HIGH and
CENTRAL location with no obstructions
such as walls.
L Raising the antenna vertically.
L If you use the cordless handset near a
microwave oven which is being used,
noise may be heard. Move away from
the microwave oven and closer to the
base unit.
L If you use the cordless handset near the
base unit of another cordless phone,
noise may be heard. Move away from
the other base unit and closer to your
base unit.
Environment
L Keep the unit away from electrical noise
generating devices such as fluorescent
lamps and motors.
L The unit should be kept free from
excessive smoke, dust, high
temperature, and vibration.
L The unit should not be exposed to direct
sunlight.
L Do not place heavy objects on top of the
unit.
L When you leave the unit unused for a
long period of time unplug it from the
power outlet.
L The unit should be kept away from heat
sources such as heaters and kitchen
stoves. It should not be placed in rooms
where the temperature is less than 5 °C
(41 °F) or greater than 40 °C (104 °F).
Damp basements should also be
avoided.
L The maximum calling distance may be
shortened when the unit is used in the
following places: near obstacles such as
Introduction
hills, concrete walls, tunnels, subways,
or near metal objects such as wire
fences, etc.
L Operating near appliances operating
near 5.8 GHz may cause interference.
Move away from these electrical
appliances.
Routine care
L Wipe the outer surface of the unit with a
soft cloth. Do not use benzine, thinner,
or any abrasive powder.
For assistance, please visit http://www.panasonic.com/phonehelp 9
Introduction
System capabilities
The unit can accomodate up to four external telephone lines, which are provided by a
telephone service provider, or up to two intercom calls.
The capabilities of the unit can be expanded by registering up to eight cordless handsets
at the base unit (page 25).
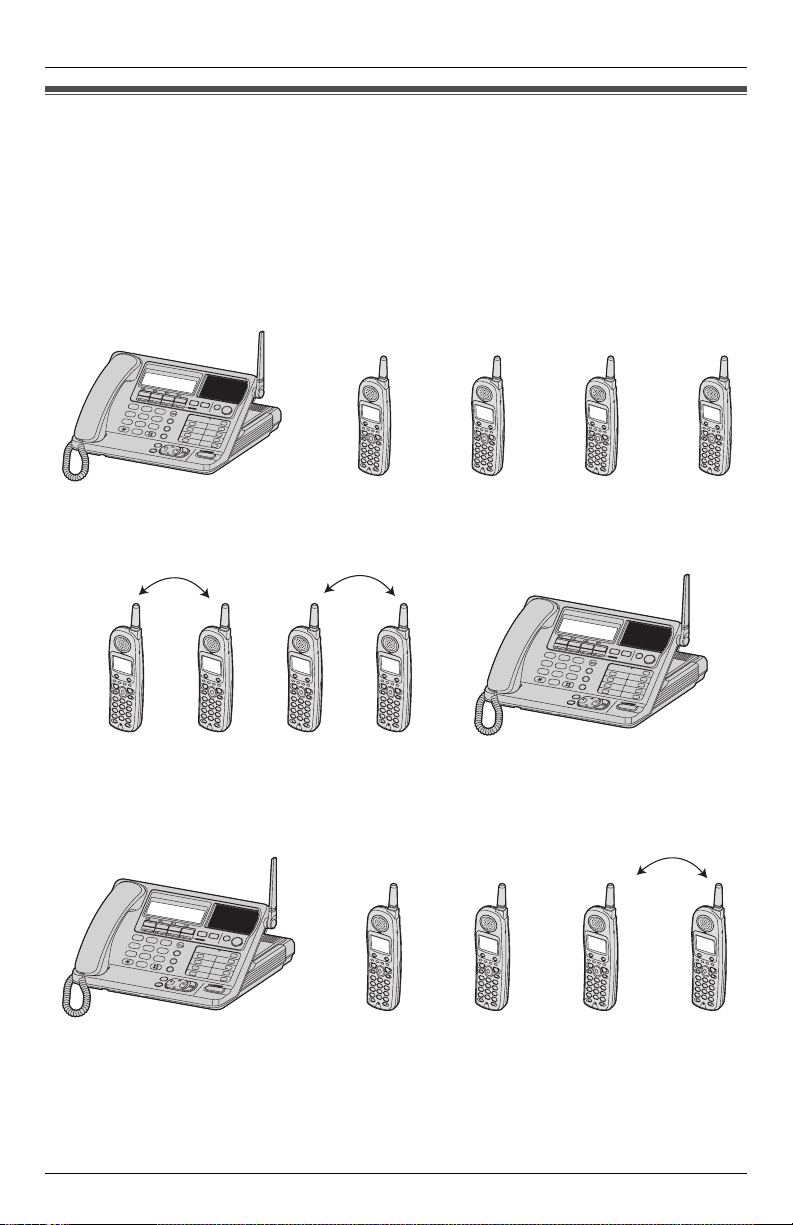
How many external calls and intercom calls can be conducted at one time?
The unit allows four simultaneous external calls with the base unit and three cordless
handsets, or with four cordless handsets1.
Ex. External call
on line1.
1
ANSWER ON
2
3
4
5
6
7
8
9
0
S
S
P
-P
P
-P
H
O
H
N
O
NE
E
External
call on
line2.
OR
External
call on
line3.
Two intercom calls can be conducted on four cordless handsets while the base unit
simultaneously makes an external call. For example, two pairs of cordless handsets can
be engaged in separate intercom calls while the base unit is engaged in an external call.
Ex.
Intercom call 1 Intercom call 2
External call on
line 1, 2, 3, or 4.
1
2
3
4
5
6
7
8
9
0
External
call on
line4.
ANSWER ON
S
S
P
-P
P
-P
H
O
H
N
O
N
E
E
Up to three external calls can be conducted on cordless handsets or the base unit while a
fourth cordless handset simultaneously conducts an intercom call with the base unit or
another cordless handset. For example, the base unit and two cordless handsets can be
engaged in separate external calls while two other cordless handsets can conduct an
intercom call together.
Ex.
External call
on line1.
1
2
3
4
5
6
7
8
9
0
External
call on
ANSWER ON
S
S
P
-P
P
-P
H
O
H
N
O
NE
E
line2.
External
call on
line3.
Intercom
call
In the above three cases:
L All other cordless handsets are in the standby mode.
1.
The number of cordless handsets that can be used simultaneously will vary depending
on the availability of external and internal calls, and the usage of mailboxes.
10 For assistance, please visit http://www.panasonic.com/phonehelp
Preparation
Installation
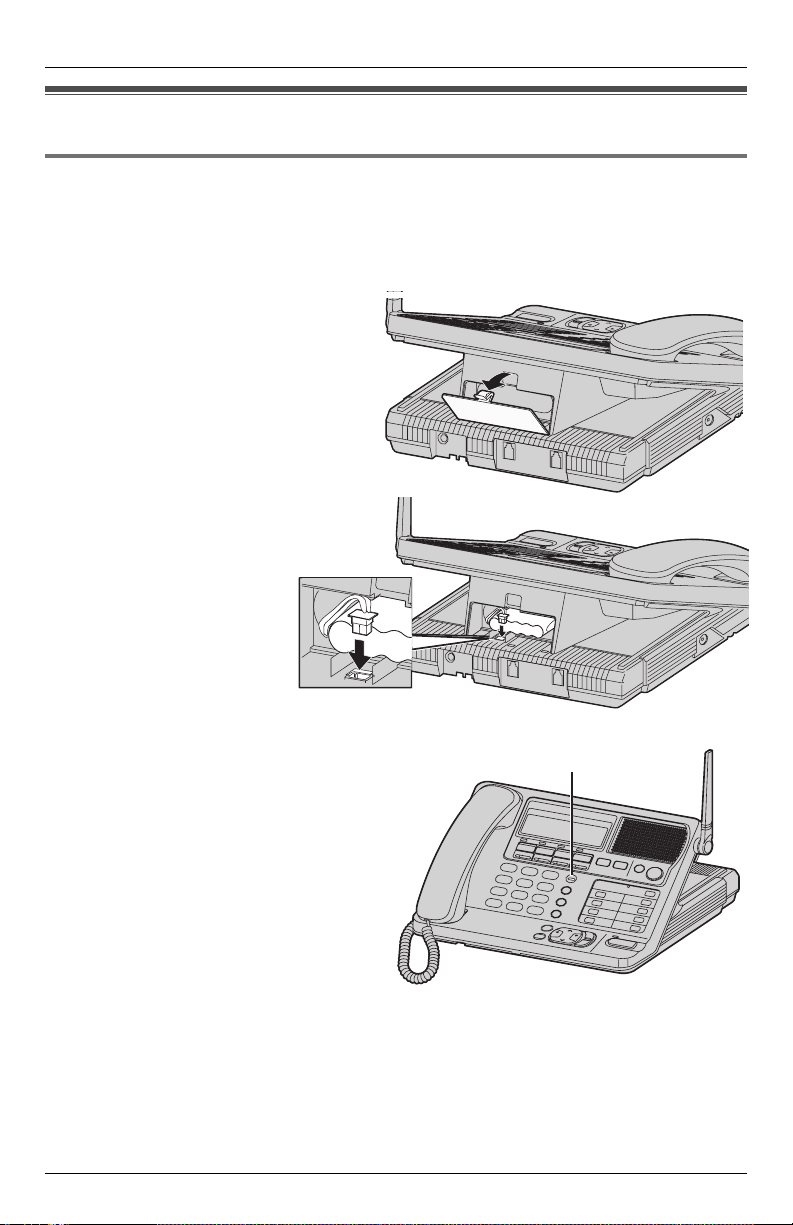
Installing the backup battery in the base unit
A rechargeable NiMH battery works as emergency power during a power failure. The fully
charged backup battery provides the base unit with a minimum of 20 minutes operation.
The battery is charged in the base unit while the AC adaptor is connected (page 12). It
takes approximately 16 hours to charge fully.
1 Open the battery cover.
2 Install the backup battery in the
battery compartment. Plug in
battery connector as
shown, and close the
battery cover.
BATTERY indicator:
L The BATTERY indicator lights while the
battery is being charged. (This is
normal.)
L During a power failure (or if the AC
adaptor is disconnected), the BATTERY
indicator shows the battery strength:
Blinking slowly: The unit is operating
from the battery backup.
Blinking fast: The battery is not
connected, defective or
non-chargeable.
Note:
L The battery cannot be overcharged.
L If the backup battery has been discharged, the unit will not work during a power failure.
If required, the unit can be replaced with a standard telephone to restore service during
the power outage.
For assistance, please visit http://www.panasonic.com/phonehelp 11
BATTERY
indicator
Preparation
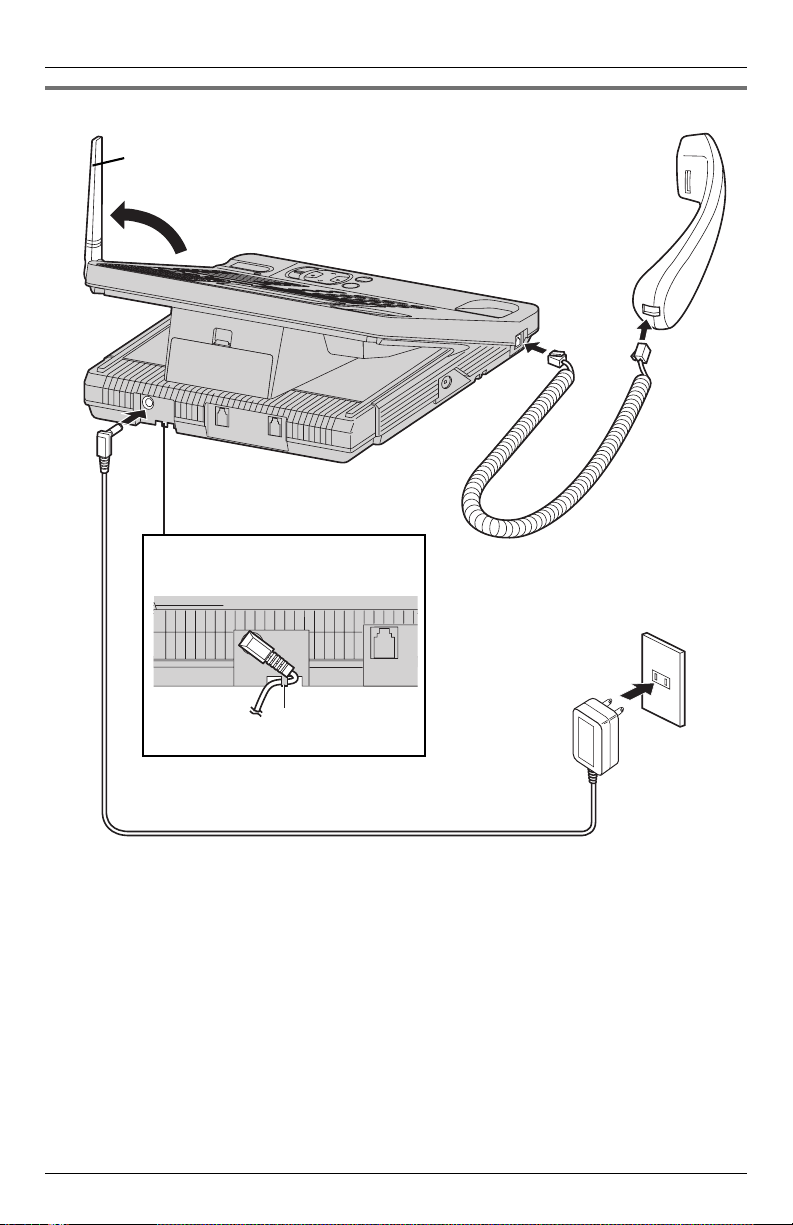
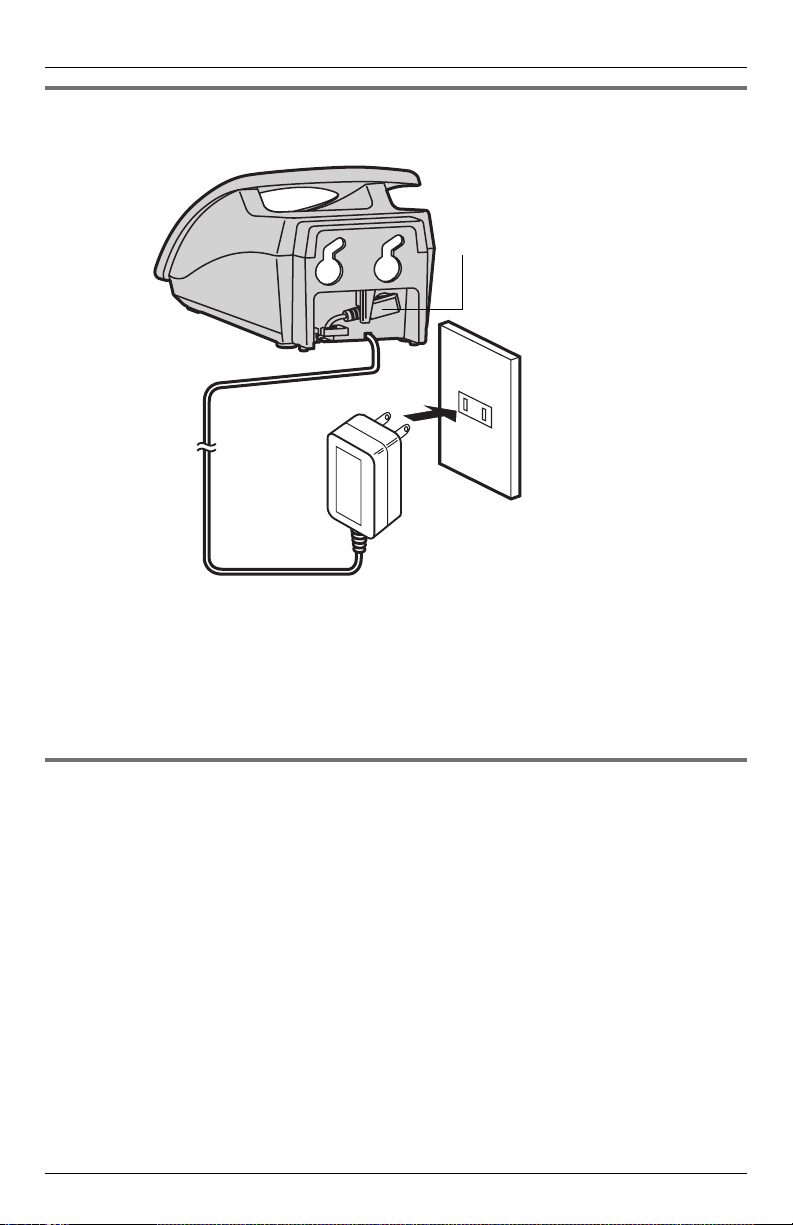
Connecting the base unit handset and AC adaptor
Raise the antenna.
Fasten the AC adaptor cord to
prevent accidental disconnection.
Hook
Corded
Handset
Handset
Cord
Power Outlet
(AC 120 V, 60 Hz)
AC Adaptor
PQLV256
L Use only a Panasonic handset with the KX-TG4500.
L Use only the included Panasonic AC Adaptor PQLV256 (Order No. PQLV256Z).
L The AC adaptor must remain connected at all times. (It is normal for the adaptor to feel
warm during use.)
L The AC adaptor should be connected to a vertically-oriented or floor-mounted AC outlet.
Do not connect the AC adaptor to a ceiling-mounted AC outlet, as the weight of the
adaptor may cause it to become disconnected.
L The BATTERY indicator lights while the AC adaptor is connected with the backup
battery installed (page 11), this is normal.
L When placing the unit, care should be taken to place it so that the base unit antenna
does not cause a danger. Particular care should be taken to ensure that the antenna is
not placed at eye level or in a position that may pose a risk to people’s eyes.
12 For assistance, please visit http://www.panasonic.com/phonehelp
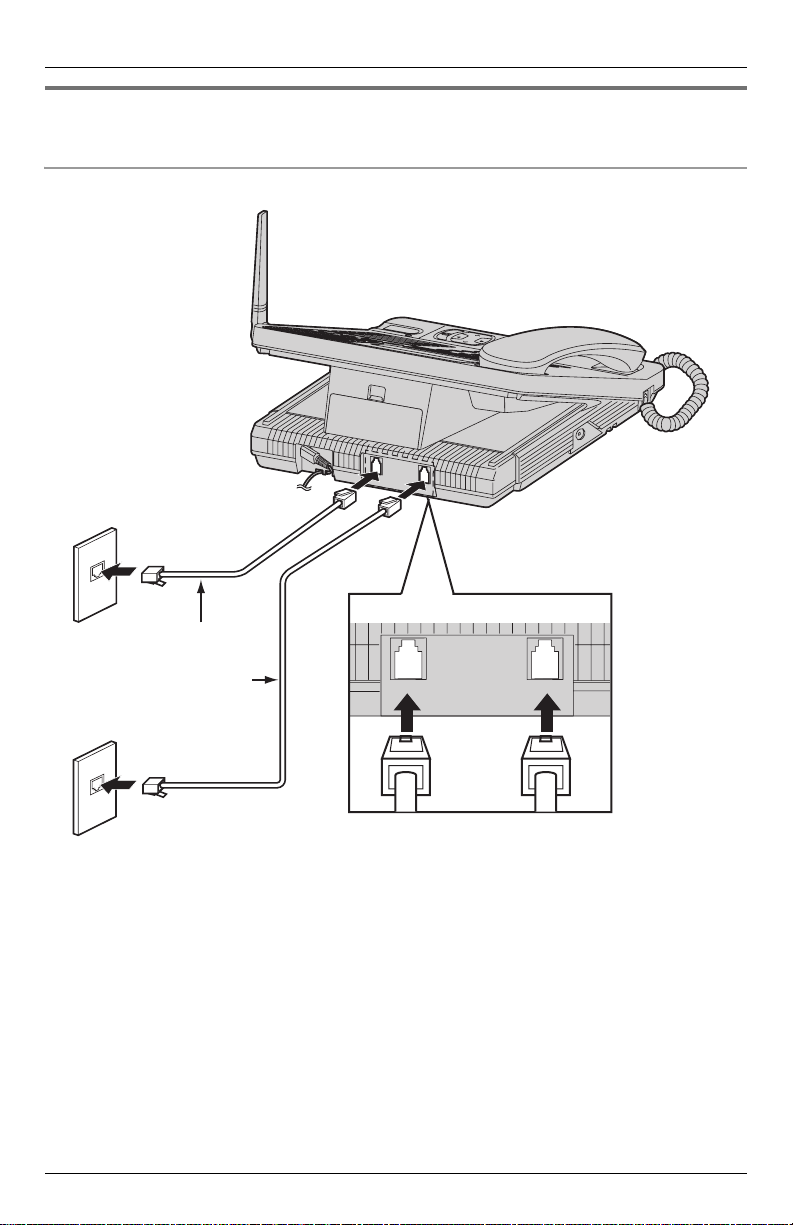
Connecting the line cords
Connect the telephone line cords to the base unit.
To connect two two-line telephone jacks
Two-Line Telephone
Jacks (RJ14C)
Preparation
LINE3
LINE4
LINE1
LINE2
4-Wire
Telephone
Line Cord
LINE 3/4
LINE 1/2
For assistance, please visit http://www.panasonic.com/phonehelp 13
Preparation
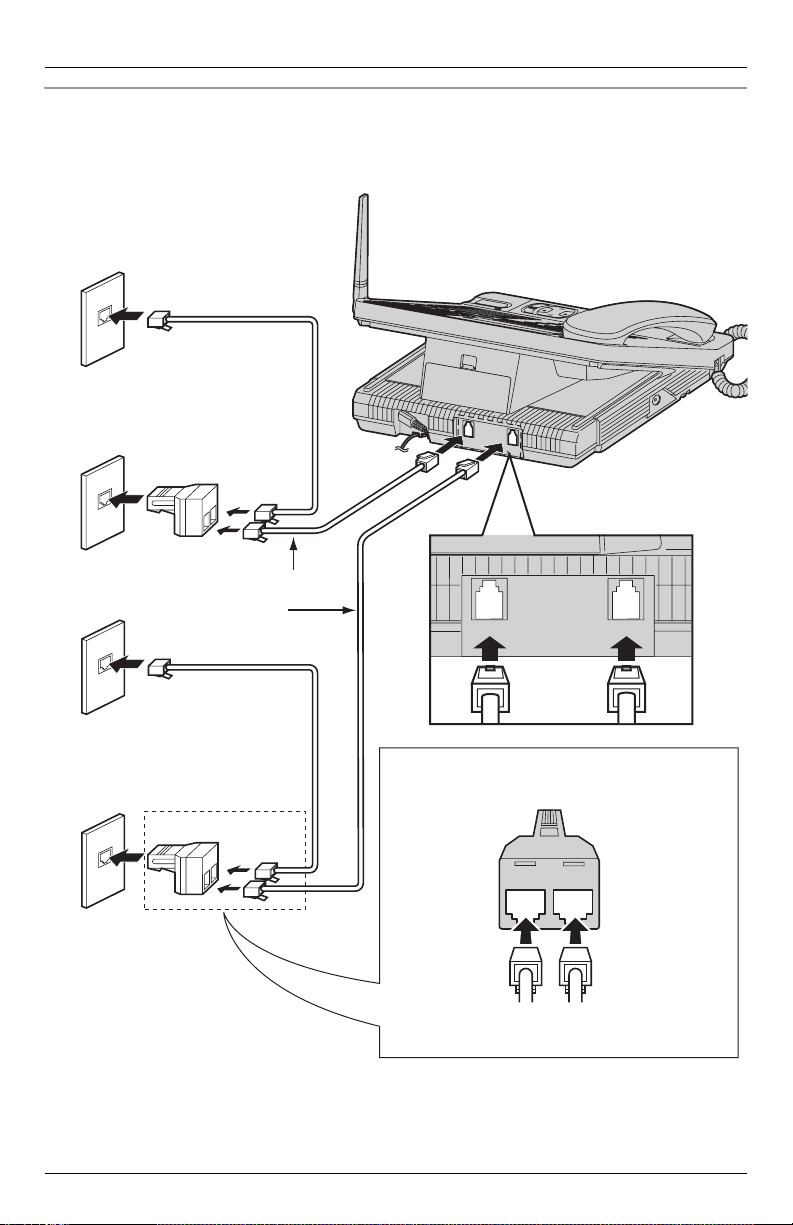
To connect four single-line telephone jacks
For this connection, please purchase two Panasonic T-adaptors KX-J24 and two 2-wire
telephone line cords (PQJA10088Z). To order, call the accessories telephone number
shown on page 5.
Single-Line
Telephone Jacks
(RJ11C)
2-Wire Telephone
LINE4
LINE3
Line Cord
T-Adaptor
(KX-J24)
4-Wire Telephone
Line Cord
LINE 3/4
LINE 1/2
2-Wire Telephone
Line Cord
LINE2
Connect the telephone line cords to the
T-adaptor KX-J24.
T-Adaptor (KX-J24)
2-LINE
LINE 2
PHONE
LINE1
4-Wire Telephone
Line Cord
2-Wire Telephone
Line Cord
14 For assistance, please visit http://www.panasonic.com/phonehelp
Connecting the AC adaptor to the charger
Fasten the AC adaptor cord in the
retaining clip to prevent it from
being disconnected.
AC Adaptor
PQLV256
Preparation
Power Outlet
(AC 120 V, 60 Hz)
L Use only the included Panasonic AC ADAPTOR PQLV256 (Order No. PQLV256Z).
L The AC adaptor must remain connected at all times. (It is normal for the adaptor to feel
warm during use.)
L The charger can be wall mounted, if required (page 95).
If you subscribe to a DSL service
L Please attach a noise filter (contact your DSL provider) to the telephone line between
the base unit and the telephone line jack in the event of the following:
– Noise is heard during conversations.
– Caller ID features (page 47) do not function properly.
For assistance, please visit http://www.panasonic.com/phonehelp 15
Preparation
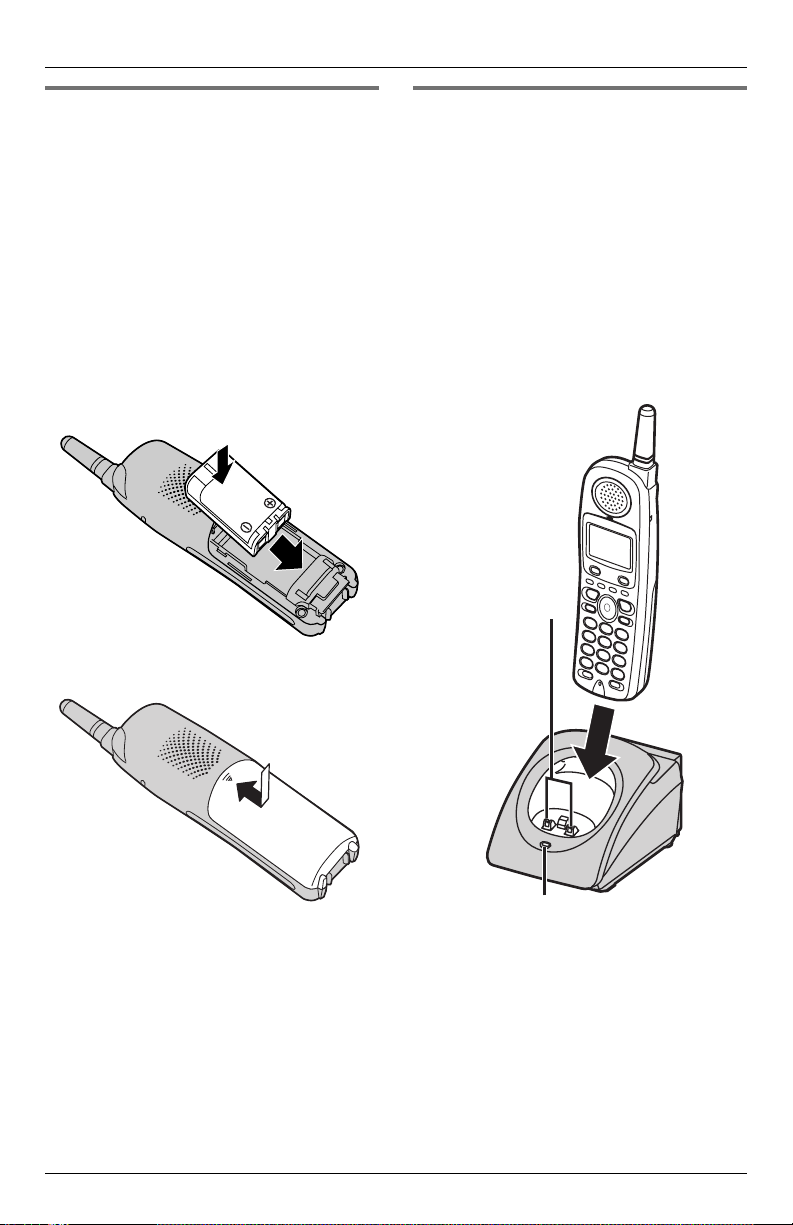
Installing the battery in the cordless handset
1 Insert the battery, and press it down
until it fits in position within the
compartment.
Note:
L The end of the battery with the metal
terminals should be inserted first and
should be at the foot of the cordless
handset.
L The flat side of the battery should fit
against the inside of the battery
compartment as shown.
2 Close the cover.
Battery charge
Place the cordless handset on the charger
and charge for 7 hours before initial use.
Make sure that the cordless handset faces
forward as shown.
L The CHARGE indicator will light, and
“Charging” is displayed.
L When the battery is fully charged,
“Charge completed” is displayed.
L A discharged battery may charge quickly
and feel warm during the charging
process. This is normal.
Charge
contacts
CHARGE indicator
Note:
L To ensure that the battery charges
correctly, clean the charge contacts of
the cordless handset and charger
monthly with a soft, dry cloth. Clean
more often if the unit is subject to
grease, dust or high humidity.
16 For assistance, please visit http://www.panasonic.com/phonehelp

Preparation
Battery strength
You can confirm the battery strength on the
cordless handset display.
Battery icon Battery strength
5 Fully charged
6 Medium
7 Low
When flashing: needs to
be recharged.
8 Discharged
Recharging the battery
Recharge the battery when:
–“Recharge battery” is displayed and
“7” flashes on the cordless handset
display.
– the cordless handset beeps every 60
seconds while it is in use.
Note:
L Recharge the cordless handset battery
for more than 15 minutes or the display
will continue showing the indication.
L When the battery is about to fail, the
cordless handset will display “Charge
for 7 hrs” and 8. The cordless
handset will not work unless the battery
is charged.
Battery performance
After your Panasonic battery is fully
charged, you can expect the following
performance:
Operation Operating time
While in use
Up to 15 hours
1
(talking)
While not in use
(standby)
2
1. Maximum talk time acheived after several recharge cycles.
2. The cordless handset is off the charger
but not in use.
Up to 8 days
Note:
L Battery power is consumed whenever
the cordless handset is off the charger,
even when the cordless handset is not in
use. The longer you leave the cordless
handset off the charger, the shorter you
can actually talk on the cordless
handset. Actual battery performance
depends on a combination of how often
the cordless handset is in use and how
often it is not in use.
L Once the battery is fully charged, you do
not have to charge it again until
“Recharge battery” is displayed and
“7” flashes. This will maximize the
battery life.
L If you want to keep the battery fully
charged at all times, place the cordless
handset on the charger when the
cordless handset is not in use. The
battery cannot be overcharged.
For assistance, please visit http://www.panasonic.com/phonehelp 17
Preparation
Controls and display
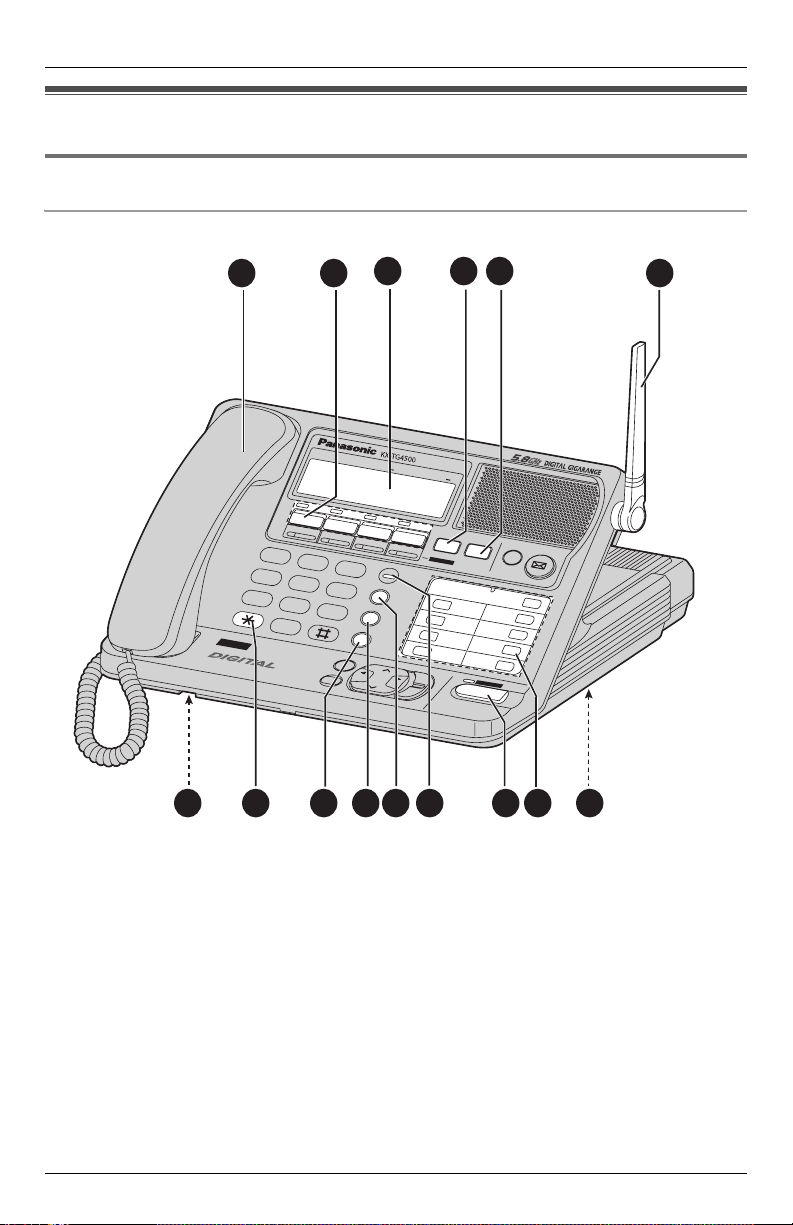
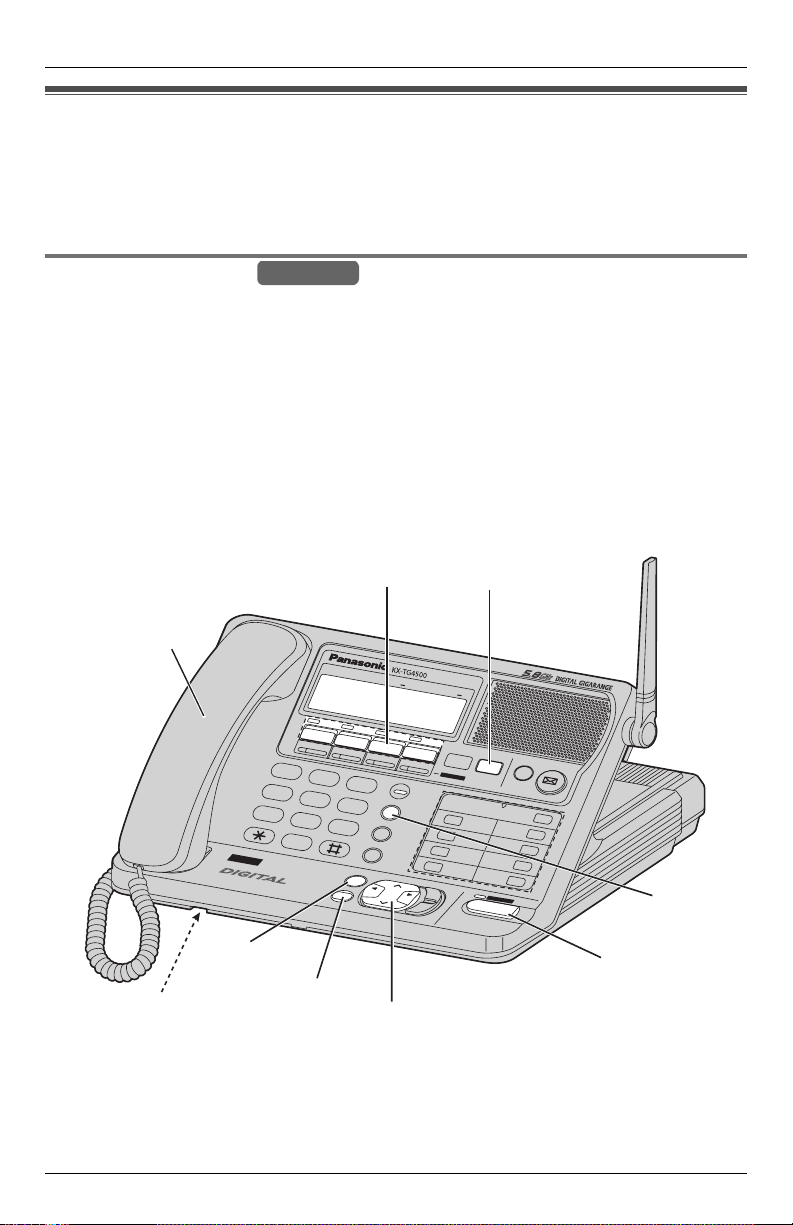
Controls
Base unit
1 2
LINE
1
LINE
2
A
BC
1
G
H
I
4
P
QR
S
7
8
OP
ER
T
O
0
N
E
4
L
INE
VOICE MAIL SYSTE
M
1 Corded handset
2 LINE 1, 2, 3 and 4, and indicators
3Display
4 {CONF}
5 {HOLD}
6 Antenna
7 {RESET} button
8 {INTERCOM}/{TRANSFER}, ({ALL},
{1} to {8})
9 {SP-PHONE}/{HEADSET} and
indicator
10 {BATTERY} indicator
D
E
F
2
3
J
K
L
M
N
O
5
6
TU
V
WX
YZ
PAUSE/EDIT
9
CALL WAIT/FLASH
EXIT/STOP
CLEAR
B
A
C
K
3 4 5
A
UTO
M
AT
E
D A
TTE
NDA
NT
LINE
3
LINE
4
CONF
HOLD
TRANSFER
H
E
MUTE
ALL
6
7
8
S
S
P
-P
P-P
H
O
H
N
ON
E
E
AD
S
ET
ANSWER ON
BATTERY
REDIAL
L
S
E
A
INTERCOM /
1
2
3
4
M
E
N
U
OU
D
/
R
C
FW
H
D
ENTER
11 {REDIAL}
12 {PAUSE}/{EDIT}
13 {CALL WAIT}/{FLASH}
14 {TONE}
15 Microphone
VOICE MAIL
5
789101112131415
6
18 For assistance, please visit http://www.panasonic.com/phonehelp
A
D
E
T
A
M
UTO
A
LINE
2
LINE
1
LINE
C
B
A
123
KL
J
HI
G
456
V
TU
RS
Q
P
789
PE
O
E
N
O
T
E
N
LI
4
C
I
O
V
1 2 3
T
N
A
D
N
TE
T
F
N
O
C
4
LINE
3
F
E
D
M
R
0
M
E
S
AN
Y
R
TTE
A
B
L
IA
D
E
R
O
N
IT
D
/E
E
S
U
A
P
Z
Y
X
W
/F
IT
A
W
LL
A
C
EX
M
E
T
S
Y
IL S
A
Preparation
IL
A
M
ICE
O
V
MUTE
OLD
H
N
O
R
WE
OM
C
R
E
T
IN
1
2
3
H
S
IA
IT/STOP
R
LEA
C
L
L
A
R
E
F
S
AN
R
/ T
4
/
UD
LO
H
ARC
SE
K
C
A
B
5
6
7
8
E
N
O
H
P
-
P
S
NU
ME
WD
F
ENTER
ET
ADS
HE
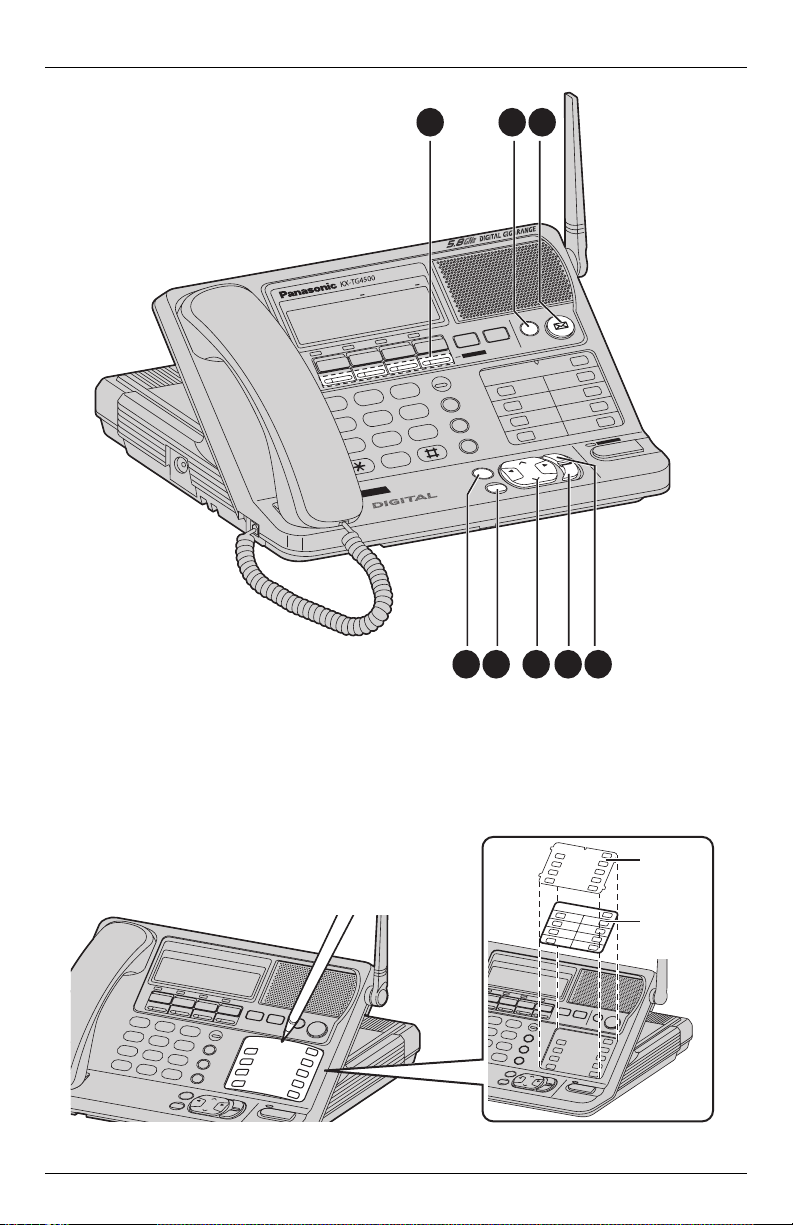
1 {ANSWER ON}
2 {MUTE}
3 F ({VOICE MAIL})
4 {MENU}
Memory card:
Remove the memory card and use it as a name
index for the cordless handset(s).
For assistance, please visit http://www.panasonic.com/phonehelp 19
45678
5 {ENTER}
6 Navigator key ({<}, {>}, {f}, {g})
7 {CLEAR}
8 {EXIT}/{STOP}
Cover
Memory
Card
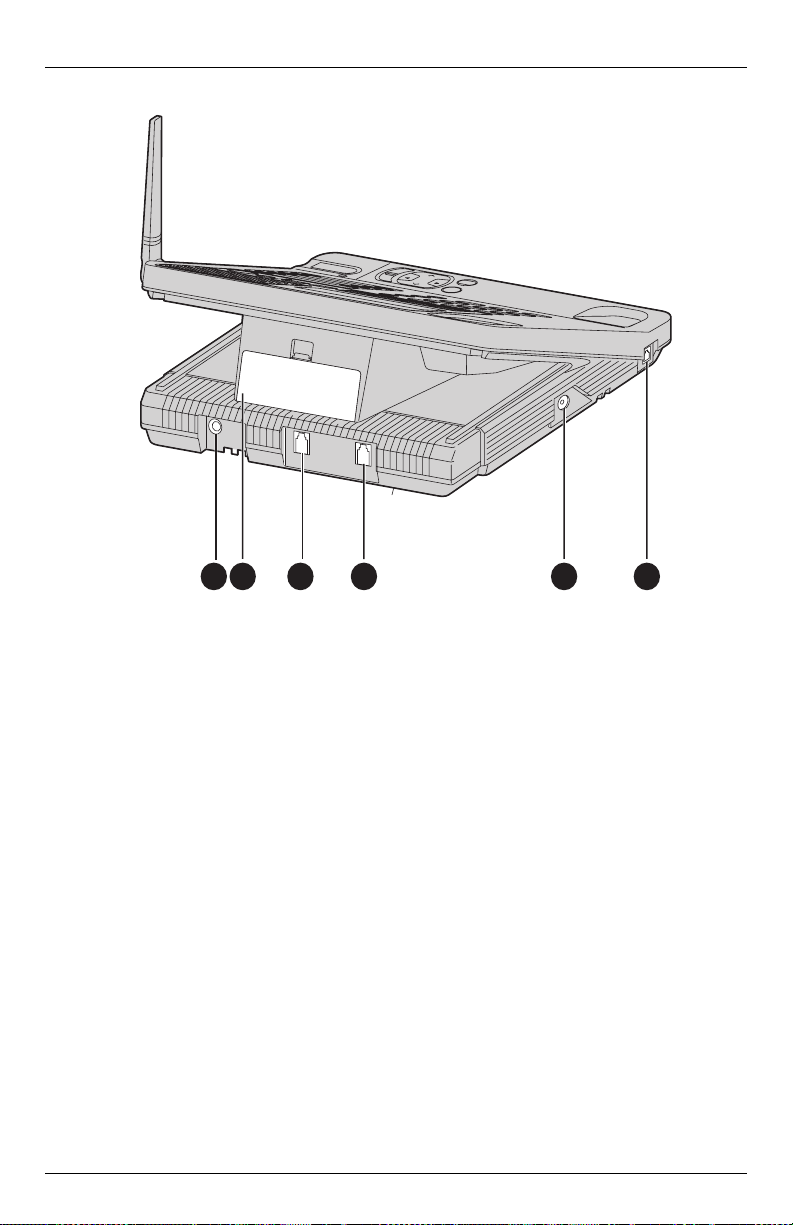
Preparation
1 2 3 4 5 6
1 AC adaptor socket
2 Backup battery cover
3 Line 3/4 jack
4 Line 1/2 jack
5 Headset jack
6 Base handset socket
20 For assistance, please visit http://www.panasonic.com/phonehelp
Preparation
4
L
2
REDIAL
L WA
M / CLEAR
HOLD
TONE
OFF
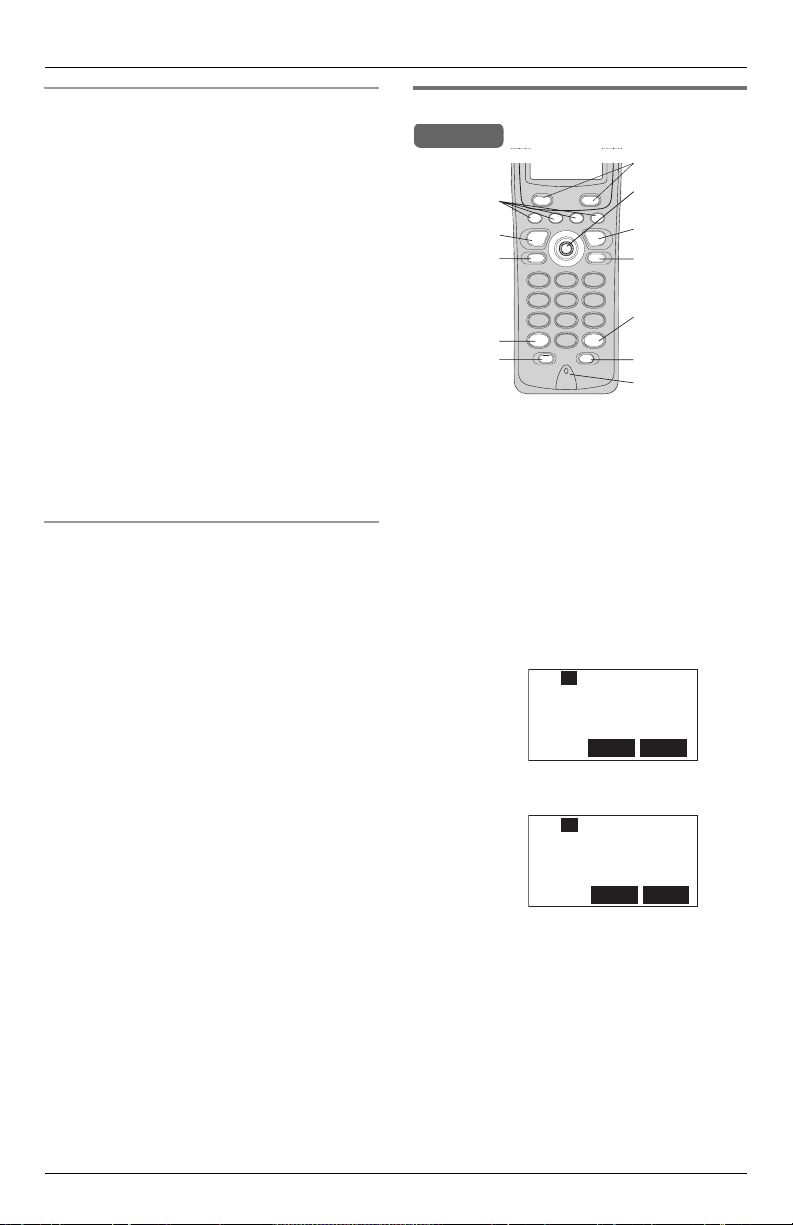
Cordless handset
17
16
15
14
13
12
11
10
9
L
TALK
SP-PHONE
TONE
1
1
4
7
PAUSE
REDIAL
3
4
2
L
L
L
OFF
HOLD
IN TERCO M / CLEAR
3
2
6
5
9
8
0
FLA SH
CALL WA
IT
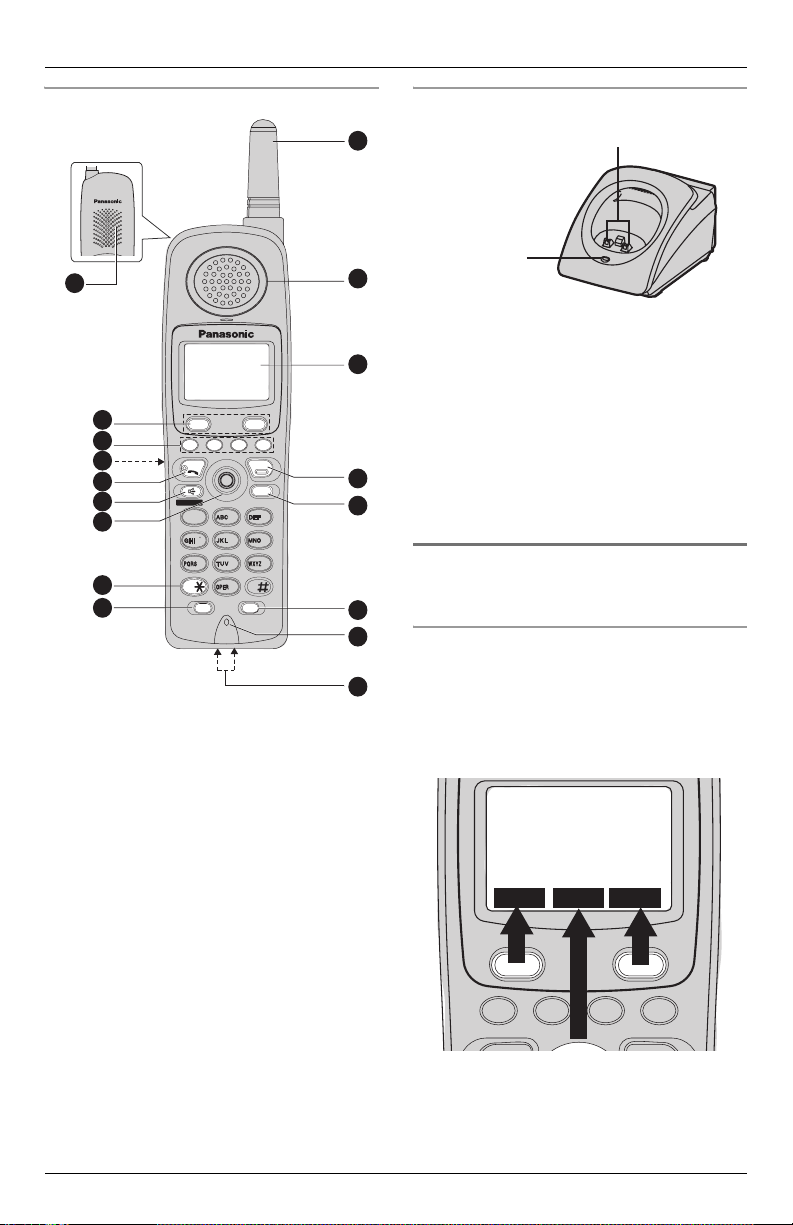
1 Ringer indicator
Message indicator
2 Receiver
3Display
4 {OFF}
5 {HOLD}/{INTERCOM}/{CLEAR}
6 {FLASH}/{CALL WAIT}
7 Microphone
8 Charge contacts
9 {PAUSE}/{REDIAL}
10 {*} (TONE)
11 Joystick and {MENU}/{OK}
12 {s} (SP-PHONE)
13 {C} (TALK)
14 Headset jack
15 LINE keys
16 Softkeys
17 Speaker
Charger
1
2
Charge contacts
CHARGE
indicator
CHARGE indicator:
L The CHARGE indicator lights when the
3
battery is charging.
Note:
L The cordless handset battery requires
charging when the battery indicator on
4
5
the display blinks slowly and the battery
low alarm sounds every 60 seconds
(page 17).
Using softkeys and navigation keys
6
7
Using the cordless handset’s softkeys
Two softkeys and the joystick are used to
8
select functions displayed directly above
each key. Functions displayed above each
key will change depending on the state of
use.
1:Handset 1
1 missed call
1:45PM JUL.25
M.box Menu Phb
2
For assistance, please visit http://www.panasonic.com/phonehelp 21
Preparation
The cordless handset’s softkeys:
Display
function
Add
Back
Action
Adds a new record
Moves to the previous step
in a menu process
Call
Change
Calls the current contact
Changes the current
greeting
Conf
Edit
End
Erase
M.box
Menu
Phb
Mute
Creates a conference call
Edits the current record
Ends recording
Erases the current record
Enters the mailbox
Displays the main menu
Enters the Phonebook
Mutes the conversation
during a call
Next
Moves to the next step in a
menu process
No
OK
Option
Aborts the current action
Accepts the current option
Displays the available
options
Save
Search
Select
Start
Yes
Saves the current record
Searches the records
Selects the current option
Starts recording
Confirms the current
action
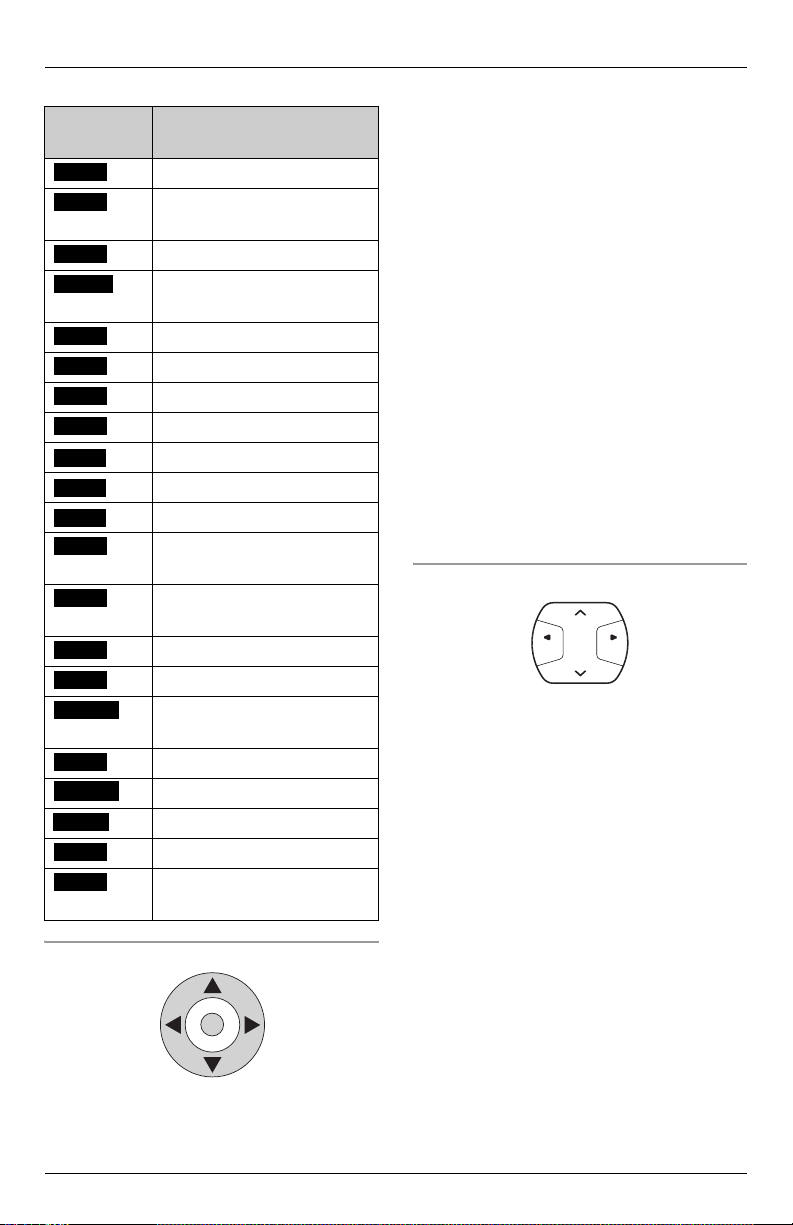
Using the cordless handset’s joystick
The cordless handset’s joystick can be
used to navigate through menus and
select items shown on the display. Use the
{^}, {V}, {f}, {g} keys to move the
cursor around the screen, then press the
{MENU}/{OK} key in the center to select
an item.
The joystick’s up {^} and down {V} keys
are also used to scroll through the function
menu (page 75), the Caller List (page 48),
and the Phonebook (page 43). The up {^}
and down {V} keys also increase {^} and
decrease {V} the receiver/speaker
volumes while in talk mode (page 31).
The {g} key is used to select an item in
the displayed menu.
The {f} and {g} keys move the cursor
backwards and forwards when inserting a
Phonebook item.
The {f} and {g} keys repeat or skip
recorded messages.
The {f} key returns you to the previous
screen.
Using the base unit’s navigator key
LOUD/
SEARCH
FWDBACK
The {>} and {<} keys increase and
decrease the base unit speaker volumes
and increase or decrease the volume while
in talk mode (page 29). The {>} and {<}
keys also scroll up and down through the
displayed menu, toggle between number
entry and name entry when in Phonebook
number entry mode (page 43), and opens
the Caller List when pressed in standby
mode (page 48).
The {g} key selects an item in the
displayed menu.
The {f} and {g} keys move the cursor
backwards or forwards when inserting a
Phonebook item.
The {f} and {g} keys repeat or skip
recorded messages.
The {f} key returns you to a previous
screen.
22 For assistance, please visit http://www.panasonic.com/phonehelp
Preparation
Displays
Base
1. Handset In-Use icon
2
1
0:Base
3
76543
2. Auto Attendant icon
8
L1 L2 L3 L4
12:00AM JAN. 1
1 The handset in-use icon indicates the
status of the registered cordless
handset(s). If a cordless handset is in
talk or intercom mode, or listening to
messages, the relevant number is
displayed.
2 If you turn the automated attendant
system on (page 66), the relevant line
icon is displayed.
3 The time and date are displayed on the
last line in standby mode. The display
shows the dialed number, call status,
programming options, Phonebook
items, etc. If you subscribe to a Caller
ID service, caller information will be
displayed (page 47).
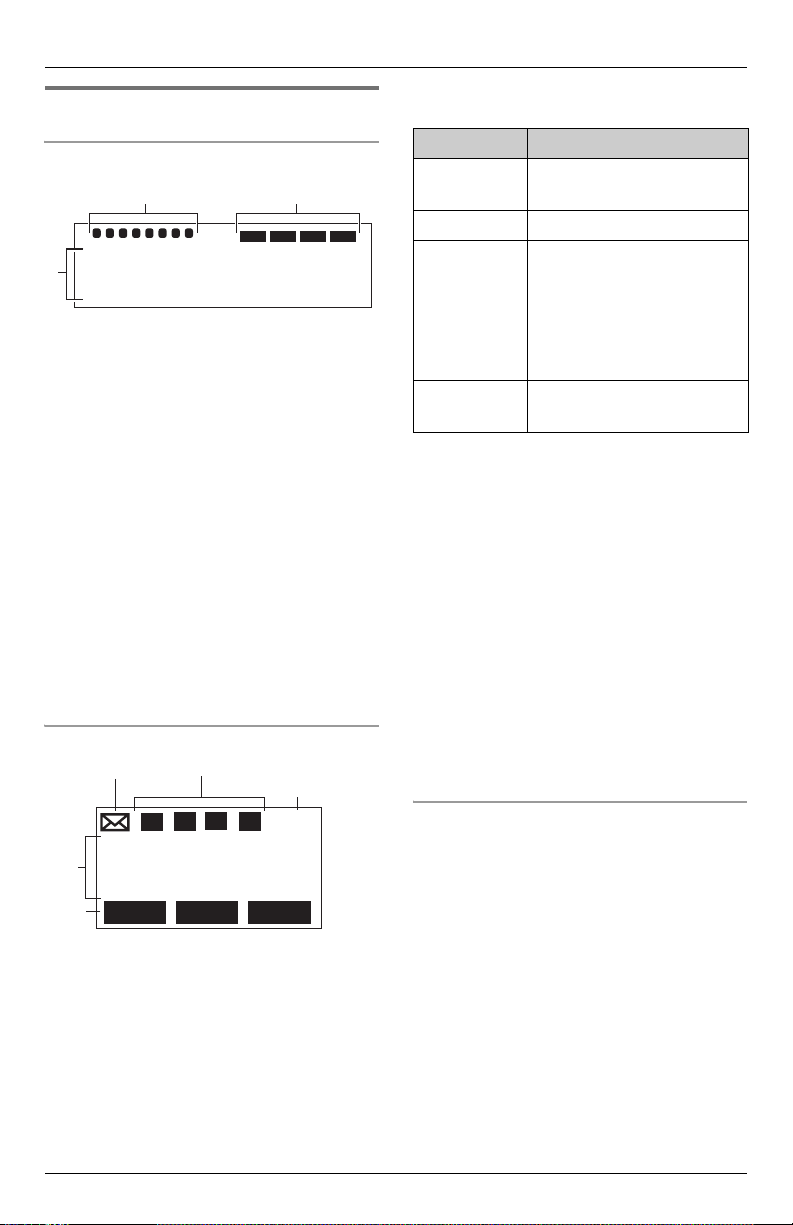
Cordless handset
L1
2. Line Status icon
L3
L2
L4
3 Battery icon
2
1. Voice Mail icon
1:Handset 1
4
11:05AM FEB.14
5
M.box
Menu
Phb
1 The F flashes if there is at least one
new message in your mailbox
(page 55). It is also displayed during
message playback.
2 The line status icons function as
follows:
Line Status Meaning
Off
The line is free.
(invisible)
On The line is in use.
Flashing A call is on hold
(page 37). The
automated attendant or
answering system is
responding to a call
(pages 66 and 71).
Flashing
A call is being received.
quickly
3 The battery icon indicates the battery
strength (page 17).
4 The cordless handset number (1 to 8) is
displayed in standby mode. The display
shows the time and date, dialed
number, call status, programming
options, and Phonebook items, etc. If
you subscribe to a Caller ID service,
caller information will also be displayed
(page 47).
5 The currently available softkeys are
displayed; this is dependent on the
status of the handset. For a full list of
softkeys, refer to page 22.
Backlit LCD displays
Both the base unit and cordless handset
have a backlit LCD display.
The lighted cordless handset display will
stay on for about ten seconds after
pressing a key.
For assistance, please visit http://www.panasonic.com/phonehelp 23
Preparation
Setting-up the unit before use
Setting the date and time
Base Unit
We recommend that you set the date and
time.
Voice Date/Time Stamp: After each
message playback, a synthesized voice
will announce the date and time that the
message was recorded (pages 53 and
55).
Note:
L If a power failure occurs, the date/time
will be retained for at least 20 minutes
with the backup battery fully charged
(page 11). Re-adjust if the date/time is
incorrect.
L For Caller ID service users (page 47)
– If the time is set to adjust automatically
(page 89), the Caller ID information
can set the clock after the first ring if
the time is incorrect.
– If the time is set to adjust
automatically, the Caller ID
information will automatically adjust
the clock for daylight saving time.
1 While in standby mode, press {MENU}.
2 Scroll to “Date and time” by pressing
{<} or {>}, then press {ENTER}.
3 Set the date and time using the keypad
keys ({0} to {9}). Use the {f} or {g}
keys to move the cursor to the digit to
change, then press the correct number
key.
L Enter the time in 12-hour notation. Do
not use military time.
4 Press {<} or {>} and hold, to select
“AM” or “PM”.
Example:
Date: 04.28.2006
Time: 02:37 AM
>
=PM
ENTER=Save
5 Press {ENTER}.
L Confirmation tone is heard.
Setting the display language
Base Unit
You can select either “English” or
“Español” as the display language. The
default is “English”. You must program
the base unit and each cordless handset
separately.
Note:
L Changing the display language also
changes the voice prompts to the
selected language.
Specifying the base unit language
Handset
1 Press {MENU}.
2 Scroll to “Initial setting” by
pressing {<} or {>}, then press
{ENTER}.
3 Scroll to “Change language” by
pressing {<} or {>}, then press
{ENTER}.
4 Press {<} or {>} to select the desired
language.
5 Press {ENTER}.
L Confirmation tone is heard.
Specifying cordless handset language
1 Press {MENU}.
2 Scroll to “Initial setting” by
pressing {V} or {^}, then press .
Select
3 Scroll to “Change language” by
pressing {V} or {^}, then press .
Select
4 Press {V} or {^} to select the desired
language.
5 Press .
Save
L Confirmation tone is heard.
24 For assistance, please visit http://www.panasonic.com/phonehelp

Preparation
Selecting the line mode
Base Unit
The line mode for all lines is preset to “B”
and generally should not be changed. If
the line indicator on the base unit does not
light properly, or the line status icons are
not displayed on the cordless handset
properly, the line mode selection is
incorrect. Set line mode to “A”. Each line
has its own setting.
1 Press {MENU}.
2 Scroll to “Initial setting” by
pressing {<} or {>}, then press
{ENTER}.
3 Scroll to “Set telephone line” by
pressing {<} or {>}, then press
{ENTER}.
4 Scroll to “Set line mode” by pressing
{<} or {>}, then press {ENTER}.
L The current settings are displayed.
5 Press {f} or {g} to select a line.
6 Press {<} or {>} to select the desired
setting.
7 Press {ENTER}.
L Confirmation tone is heard.
Selecting the dialing mode
Base Unit
If your lines have a touch-tone service, set
to “Tone”. If rotary or pulse service is used,
set to “Pulse”. Select the mode for each
line.
The default is “Tone”.
1 Press {MENU}.
2 Scroll to “Initial setting” by
pressing {<} or {>}, then press
{ENTER}.
3 Scroll to “Set telephone line” by
pressing {<} or {>}, then press
{ENTER}.
4 Scroll to “Set dial mode” by pressing
{<} or {>}, then press {ENTER}.
L The current settings are displayed.
Example:
Dial mode
L1 L2 L3 L4
Tone
Tone Tone Tone
5 Use the {f} or {g} keys to select the
line to be set.
6 Press {<} or {>} to select “Pulse” or
“Tone”.
7 Press {ENTER}.
L Confirmation tone is heard.
Registering additional cordless handsets
The included cordless handset is preregistered at the factory and assigned the
handset number 1. Do not try to register
handset number 1 which has
“1:Handset 1” on the display.
Optional cordless handsets must be
registered at the base unit. You can add up
to seven additional cordless handsets.
Only one cordless handset can be
registered at a time. The handset number
is used as the extension number.
The model number of the optional cordless
handset is KX-TGA450. To order, contact
your dealer or call 1-800-211-PANA(7262)
to locate a dealer.
Note:
L Ensure that the base unit and cordless
handset are in standby mode.
L Registration must be completed within
one minute.
L The cordless handset cannot be
registered if the base unit is not in
registration mode.
For assistance, please visit http://www.panasonic.com/phonehelp 25

Preparation
Registering
Handset and Base Unit
You can register handsets in two ways,
both are described below. The latter way
uses direct commands. For a complete list
of direct commands refer to pages 92
through 94.
Method 1:
1 From the base unit, press {MENU}.
2 Scroll to “Initial setting” by
pressing {<} or {>}, then press
{ENTER}.
3 Scroll to “Registration” by pressing
{<} or {>}, then press {ENTER}.
4 Scroll to “HS registration” by
pressing {<} or {>}, then press
{ENTER}.
L The handset registration screen is
displayed.
Press MENU, #, 123 on
the handset, then
press ENTER on base.
5 Press {ENTER}.
6 From the cordless handset, press
.
OK
Registration.
Press MENU, #,
123 on the base,
then press
L The cordless handset attempts to
register to the base unit.
L After linking to the base unit, the
completion screen is displayed and
confirmation tone is heard on both the
base unit and registered cordless
handset.
L Once successfully linked, “
registered
base unit and the cordless handset.
Repeat to register additional cordless
handsets.
” is displayed on both the
2
OK
Handset
L To rename the cordless handset to
something memorable, refer to
page 82.
Method 2:
1 From the base unit, press {MENU},
followed by {#}, {1}, {2}, {3}.
Press MENU, #, 123 on
the handset, then
press ENTER on base.
2 Press {ENTER}.
3 From the handset, press {MENU},
followed by {#}, {1}, {2}, {3}.
Registration.
Press MENU, #,
123 on the base,
then press
Back
4 Press .
L The cordless handset attempts to
L After linking to the base unit, the
L Once successfully linked, “
L To rename the cordless handset to
OK
register to the base unit.
completion screen is displayed and
confirmation tone is heard on both the
base unit and registered cordless
handset.
registered
base unit and the cordless handset.
Repeat to register additional cordless
handsets.
something memorable, refer to
page 82.
” is displayed on both the
2
OK
Handset
26 For assistance, please visit http://www.panasonic.com/phonehelp

De-registering a cordless handset
Base Unit
Note:
L De-registering a cordless handset clears
all data on the base unit for the selected
cordless handset (for example, Alert
phone number, Alert on/off, greeting
messages, etc.).
1 While the base unit is in standby mode,
press {MENU}.
2 Scroll to “Initial setting” by
pressing {<} or {>}, then press
{ENTER}.
3 Scroll to “Registration” by pressing
{<} or {>}, then press {ENTER}.
4 Scroll to “Deregistration” by
pressing {<} or {>}, then press
{ENTER}.
Example:
L The numbers of the currently registered
cordless handsets are displayed.
L If there are no cordless handsets
registered, an error beep is heard and
an error message displayed
(page 100).
Deregistering
HS No.: 1234----
<> ENTER=Select
5 Press {f} or {g} to move to the
cordless handset to be de-registered.
6 Press {ENTER}.
7 Press {ENTER} again to confirm the
operation.
L The completion screen is displayed and
confirmation tone is heard.
Preparation
For assistance, please visit http://www.panasonic.com/phonehelp 27
Making/Answering Calls
Making calls
Four external calls can be handled simultaneously on separate telephone lines by the
base unit and three cordless handsets (or by four cordless handsets). Additionally, two
intercom calls can be handled simultaneously. The maximum operating number may
decrease depending on the state of use.
Using the base unit
Base Unit
When you lift the base unit handset or press {SP-PHONE} to make a call, the unit
automatically selects an available line (to change the line selection, see page 83) and you
can dial a phone number. To hang up, replace the handset or press {SP-PHONE}.
Note:
L You can also pre-dial the phone number before lifting the base unit handset (page 29).
L If the base unit and three cordless handsets or four other cordless handsets are in use,
you may not be able to make a call. In this case “The system is busy. Please try
again later.” is displayed.
L If the unit detects a problem, an error message is displayed (page 100).
Corded
handset
Line keys and indicators
LINE
1
LINE
2
A
BC
4
L
INE
VOICE MAIL SYSTE
1
G
H
I
4
P
QR
S
7
8
OP
ER
T
O
0
N
E
M
D
E
F
2
3
J
K
L
M
N
O
5
6
TU
V
WX
YZ
PAUSE/E
9
CALL WAIT/FLASH
EXIT/STOP
CLEAR
B
A
C
K
S
E
LINE
BATTERY
REDIAL
DIT
L
OU
D
A
R
C
H
{HOLD}
A
UTO
M
AT
E
D A
TTE
NDANT
3
LINE
4
CONF
HOLD
TRANSFER
H
E
MUTE
ALL
7
8
S
S
P
-P
P-P
H
O
H
N
ON
E
E
AD
S
ET
ANSWER ON
INTERCOM /
1
2
3
4
M
E
N
U
/
F
W
D
ENTER
VOICE MAIL
5
6
{REDIAL}
{EXIT}/{STOP}
{SP-PHONE} and
indicator
Microphone
{CLEAR}
{<}, {>}
28 For assistance, please visit http://www.panasonic.com/phonehelp

Making/Answering Calls
Holding a handsfree conversation
1 Press {SP-PHONE}.
L The SP-PHONE indicator lights.
L An available line is automatically
selected and the line indicator lights (to
change the line selection, see
page 83).
L You can select a line by pressing an
unlit LINE key, instead of pressing
{SP-PHONE}.
2 Dial the phone number.
L If you misdial, press {SP-PHONE}, and
start again from step 1.
3 When the other party answers, talk into
the microphone.
4 When you finish talking, press
{SP-PHONE} or place the handset on
the base unit (if the call was switched to
the handset).
L The SP-PHONE indicator light goes
out.
For best performance:
L Talk alternately with the caller in a quiet
room.
L If the other party has difficulty hearing
you, press {<} to decrease the speaker
volume.
L You can switch to the handset by lifting it
up. To switch back to the speakerphone,
press {SP-PHONE}.
L Press {SP-PHONE} again to switch
back to the handset.
Dialing after confirming the entered
number
1 Enter the phone number.
L To correct a digit, press {CLEAR}.
Enter the correct number.
L If a pause is required when dialing,
press {PAUSE} where needed
(page 41).
L To delete all digits, press and hold
{CLEAR}.
2 Press {SP-PHONE}.
L You can press a line key instead of
pressing {SP-PHONE}.
L The line number is displayed.
3 When the other party answers, talk into
the handset or microphone.
4 When you have finished speaking,
replace the handset or press
{SP-PHONE}.
Adjusting the base unit handset volume
Three levels (high/medium/low) are
available for the handset volume.
Press {<} or {>} repeatedly during a call
to increase or decrease the volume.
L Each time you press {<} or {>}, the
volume level will change.
Adjusting the speakerphone volume
Eight volume levels (high to low) are
available for the speaker volume.
Press {<} or {>} repeatedly during a call
to increase or decrease the volume.
L Each time you press {<} or {>}, the
volume level will change.
Adjusting the volume if you have an
optional headset
Refer to “To connect an optional headset
to the base unit” on page 97 for details on
attaching a headset.
Three volume levels are available.
Press {<} or {>}repeatedly during a call
to increase or decrease the volume.
L Each time you press {<} or {>} the
volume level will change.
Redialing the last number dialed
1 Lift the base unit handset or press
{SP-PHONE}.
L You can press a line key instead of
{SP-PHONE}.
2 Press {REDIAL}.
L The last dialed phone number from the
base unit is redialed.
For assistance, please visit http://www.panasonic.com/phonehelp 29
Making/Answering Calls
Making a call using the redial list
The last 10 different phone numbers dialed
from the base unit are stored in the redial
list.
1 Press {REDIAL}.
L The last number dialed is displayed.
No items stored” is displayed,
L If “
the list is empty.
2 Press {<} or {>} repeatedly to scroll
through the list, or press {REDIAL}
repeatedly to display the desired
number.
L To exit the list, press {EXIT}.
3 Lift the base unit handset or press
{SP-PHONE}.
L You can press a line key instead of
{SP-PHONE}.
Dialing speed dial numbers
Refer to “Storing speed dial numbers” on
page 90 for details of how to set-up speed
dial keys.
1 While in standby mode, press and hold
a dial key ({0} to {9}) for more than
three seconds.
L The assigned speed dial for the key is
displayed.
L If a speed dial number has not been
assigned to this key, “
displayed.
No Number” is
2 Lift the base unit handset or press
{SP-PHONE}.
L You can press a line key instead of
{SP-PHONE}.
L The speed dial number is called.
Note:
L The speed dial function can be used with
the base unit handset or in handsfree
mode (page 29).
Using the cordless handset
Handset
Softkeys
Line keys
{C}
{s}
{*}
{REDIAL}/
{PAU SE}
Joystick
{OFF}
{HOLD}/
{INTERCOM}/
{CLEAR}
{#}
{CALL WAIT}/
{FLASH}
Microphone
1 Press {C} or {s}.
L An available line is automatically
selected and the line is displayed (to
change the line selection, see page
83).
L You can select a line by pressing {L1},
{L2}, {L3}, or {L4}, instead of pressing
{C} or
L “
{s}.
Talk” or “SP-phone” is displayed.
2 Dial the phone number.
L The dialed number is displayed.
Example:
Talk
L1
Line1
2
10123456789
MuteMenu
L After a few seconds the display will
show the length of the call.
Example:
L1
Talk Line1
2
00-00-08
Menu Mute
3 When finished talking, press {OFF} or
place the cordless handset on the
charger.
Note:
L If the base unit and three cordless
handsets or four cordless handsets are
in use, you may not be able to make a
call. In this case “The system is
busy. Please try again later.”
is displayed.
30 For assistance, please visit http://www.panasonic.com/phonehelp
 Loading...