

Page 1
– 1 –
For assistance, please call: 1-800-211-PANA(7262)
PQQX13366YA-BM S0402-2062
Installing the battery
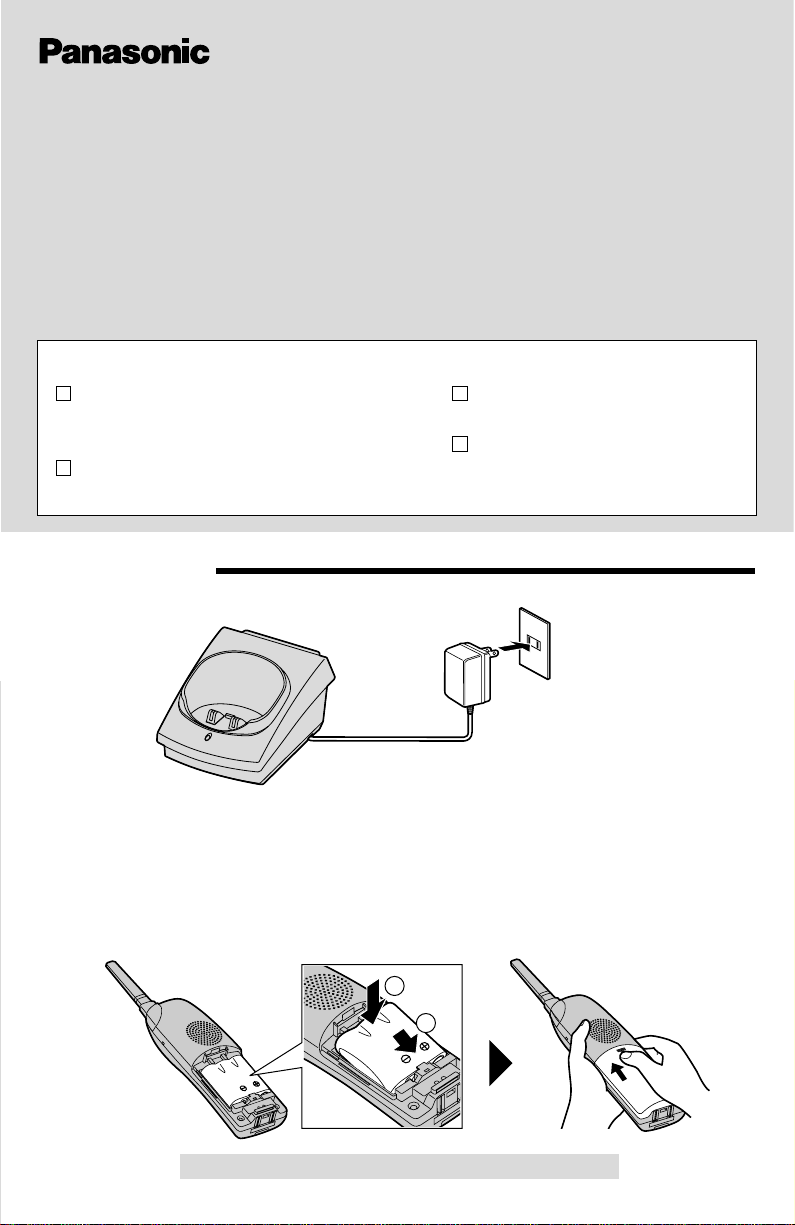
Insert the battery into the handset as shown, matching the correct polarity (#).
Press the battery down until it places into the compartment ($). Close the cover.
Installation!
Connecting the Charger unit
1
2
Power Outlet
(AC 120 V, 60 Hz)
AC Adaptor
CHARGEGE
•USE ONLY WITH Panasonic AC ADAPTOR KX-TCA1 (Order No. KX-TCA1-G).
•The AC adaptor must remain connected at all times. (It is normal for the adaptor to feel
warm during use.)
Installation Manual
PLEASE READ BEFORE USE AND SAVE.
KX-TGA270S is the optional cordless handset for the KX-TG2700/KX-TG2720/
KX-TG2730/KX-TG2740.
This installation manual only describes the steps necessary to start up the
handset. Please read the KX-TG2700/KX-TG2720/KX-TG2730/KX-TG2740
operating instructions for further details.
2.4GHz Expandable Cordless Handset
Model No. KX-TGA270S
Charger Unit ...................................one
Charger Order No. PQLV30013ZS
AC Adaptor
Order No.
KX-TCA1-G (KX-TCA1)
Handset Cover................................one
Order No. PQKK10126Z1
Battery..............................one
Order No. PQPP511SVC (P-P511)
Belt Clip............................one
Order No. PQKE10340Z1
Accessories (included) For extra orders, call 1-800-332-5368.
Page 2
– 2 –
• Clean the charge contacts of the handset and the charger with a soft, dry cloth
once a month. Clean more often if the unit is subject to grease, dust or high
humidity. Otherwise the battery may not charge properly.
Handset battery information
After your Panasonic battery is fully charged:
CHARGE
Indicator
Charge Contacts
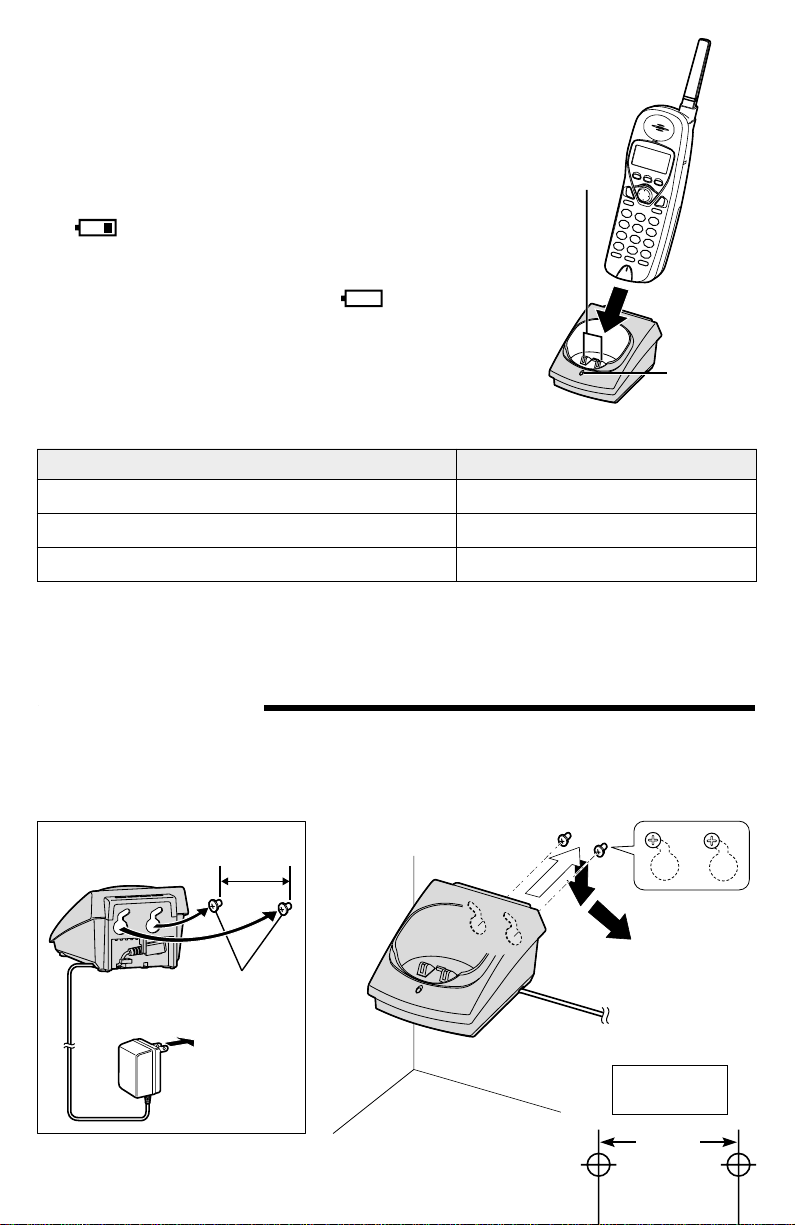
Charging the battery
Place the handset on the charger and charge for
about 15 hours before initial use.
• The CHARGE indicator lights, a beep sounds and
“Charging” will be displayed.
• Recharge the battery when:
– “
Recharge battery” is displayed,
– “” flashes on the display, or
– the handset beeps intermittently while it is in use.
•
If the battery has been discharged, the handset will
display “Charge for 15HRS” and “” when you
place the handset on the charger. The handset will not
work. Keep charging.
Operation Operating time
While in use (TALK)
While not in use (Standby)
While using the Reception Booster feature
Up to 4.5 hours
Up to 11 days
Up to 3.5 hours
(MUTE) Button and
Indicator
O KO K
[-]
Press MUTE on
base unit, then
OK on handset to
register handset
A
B
Wall Mounting!
The charger can be wall mounted. Connect the AC adaptor. Install screws using
the wall template below. Mount the charger (#). Slide it down ($) then slide
down to the right (%) until it is secured.
$
#
%
Wall
Template
2.45 cm
(
15
⁄
16
")
Screws
To Power
Outlet
2.45 cm
(
15
⁄
16
")
Page 3
– 3 –
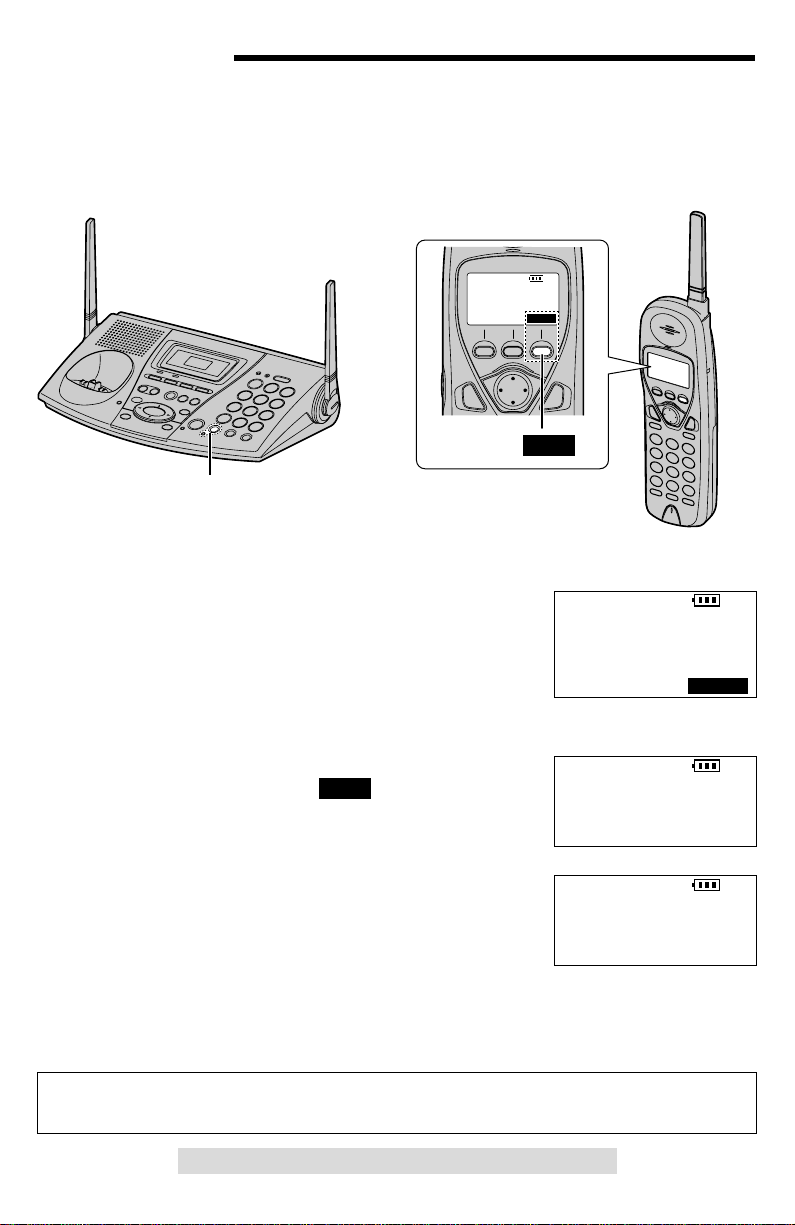
The handset display shows the instructions as shown
on the right.
1
Base unit: Press (MUTE).
•The MUTE indicator light flashes.
2
Handset:
#Press the right soft key ( ).
$Wait until a long beep sounds and the display
shows the registered number. The registration
will be then complete.
•The registered number “[1]”to “[8]” is shown on the top right of the display.
•You can stop registration by pressing (OFF) on the handset and pressing (MUTE) on the
base unit.
OK
SP
PRIVACY
[-]
Press MUTE on
base unit, then
OK on handset to
register handset
OK
Ex. Extension number 2
SP
PRIVACY
[-]
Handset
Registering
SP
PRIVACY
[2]
Handset [2]
Registered
Registration!
This cordless handset must be registered at the KX-TG2700/KX-TG2720/
KX-TG2730/KX-TG2740 base unit. The handset will be assigned the extension
number at registration. Only one handset can be registered at a time.
Make sure the base unit and the other handsets are not being used.
Registration must be completed within 1 minute.
(MUTE) Button and
Indicator
O KO K
[-]
Press MUTE on
base unit, then
OK on handset to
register handset
Soft key ( )
OK
•The illustration of the base unit is the KX-TG2730.
To cancel the handset registration, please see the KX-TG2700/KX-TG2720/
KX-TG2730/KX-TG2740 Operating Instructions.
A
B
For assistance, please call: 1-800-211-PANA(7262)
Page 4

– 4 –
Belt Clip!
You can hang the handset on your belt or pocket using the belt clip.
To attach the belt clip
A
B
Optional Headset!
Plugging an optional headset into the handset allows a hands-free phone
conversation. Please use only the Panasonic KX-TCA88 headset.
To order, call the accessories telephone number on page 1.
Connecting the headset
Open the headset jack cover, and connect the headset to the headset jack as
shown.
H
Headset Jack
To remove the belt clip
While pressing the top of the clip (A),
pull the right edge in the direction of the
arrow (B).
Page 5

For assistance, please call: 1-800-211-PANA(7262)
– 5 –
FCC and Other Information!
When programming emergency numbers and/or making test calls to emergency numbers:
1. Remain on the line and briefly explain to the dispatcher the reason for the call before
hanging up.
2. Perform such activities in the off-peak hours, such as early morning hours or late
evenings.
This device complies with Part 15 of the FCC Rules. Operation is subject to the following
two conditions: (1) This device may not cause harmful interference, and (2) this device
must accept any interference received, including interference that may cause undesired
operation.
Privacy of communications may not be ensured when using this phone.
CAUTION:
Any changes or modifications not expressly approved by the party responsible for
compliance could void the user’s authority to operate this device.
Note:
This equipment has been tested and found to comply with the limits for a Class B digital
device, pursuant to Part 15 of the FCC Rules. These limits are designed to provide
reasonable protection against harmful interference in a residential installation. This
equipment generates, uses, and can radiate radio frequency energy and, if not installed
and used in accordance with the instructions, may cause harmful interference to radio
communications. However, there is no guarantee that interference will not occur in a
particular installation. If this equipment does cause harmful interference to radio or
television reception, which can be determined by turning the equipment off and on, the
user is encouraged to try to correct the interference by one or more of the following
measures:
— Reorient or relocate the receiving antenna.
— Increase the separation between the equipment and receiver.
— Connect the equipment into an outlet on a circuit different from that to which the
receiver is connected.
— Consult the dealer or an experienced radio/TV technician for help.
Operating near 2.4GHz electrical appliances may cause interference. Move away from
the electrical appliances.
CAUTION:
To comply with FCC RF exposure requirements, the handset should be carried with the
specific belt-clip provided for the handset to ensure compliance. Other non-tested beltclips or similar body-worn accessories may not comply, therefore, should be avoided.
This equipment is hearing aid compatible as defined by the FCC in 47 CFR Section
68.316.
When you hold the phone to your ear, noise might be heard in your Hearing Aid. Some
Hearing Aids are not adequately shielded from external RF (radio frequency) energy. If
noise occurs, use an optional headset accessory or the speakerphone option (if
applicable) when using this phone. Consult with your audiologist or Hearing Aid
manufacturer about the availability of Hearing Aids which provide adequate shielding to
RF energy commonly emitted by digital devices.
Page 6

CAUTION:
To reduce the risk of fire or injury to persons, read and follow these instructions.
1.Use only the battery(ies) specified.
2.Do not dispose of the battery(ies) in a fire. They may explode. Check with local waste
management codes for special disposal instructions.
3.Do not open or mutilate the battery(ies). Released electrolyte is corrosive and may
cause burns or injury to the eyes or skin. The electrolyte may be toxic if swallowed.
4.Exercise care in handling batteries in order not to short the battery to conductive
materials such as rings, bracelets, and keys. The battery and/or conductor may
overheat and cause burns.
5.Charge the battery(ies) provided with or identified for use with this product only in
accordance with the instructions and limitations specified in this manual.
A nickel cadmium battery that is recyclable powers the
product you have purchased. At the end of its useful life,
under various state and local laws, it is illegal to dispose of
this battery into your municipal waste stream. Please call
1-800-8-BATTERY for information on how to recycle this
battery.
WARNING:
TO PREVENT FIRE OR SHOCK HAZARD, DO NOT EXPOSE THIS PRODUCT
TO RAIN OR ANY TYPE OF MOISTURE.
Panasonic World Wide Web address: http://www.panasonic.com
for customers in the USA or Puerto Rico
Panasonic’s e-mail address for customer inquiries:
consumerproducts@panasonic.com
Panasonic Consumer Electronics Company,
Division of Matsushita Electric Corporation of America
One Panasonic Way, Secaucus, New Jersey 07094
Panasonic Sales Company,
Division of Matsushita Electric of Puerto Rico, Inc.
Ave. 65 de Infantería, Km. 9.5, San Gabriel Industrial Park
Carolina, Puerto Rico 00985
– 6 –
If you need assistance with the set-up or operation,
please call 1-800-211-PANA(7262)
Page 7

– (1) – – (2) –
Instalación de la batería
Inserte la batería en la unidad portátil como se muestra ajustando en la
polaridad correcta (#). Presione la batería hacia abajo hasta encajarla en el
compartimiento ($). Cierre la cubierta.
Instalación!
Conexión de la unidad de carga
1
2
•UTILÍCELA SOLAMENTE CON EL ADAPTADOR DE CA KX-TCA1 de Panasonic
(N.° de pedido KX-TCA1-G).
•El adaptador de CA deberá permanecer conectado en todo momento. (Durante la
utilización es normal que se caliente el adaptador.)
Manual de instalación
LEA ESTAS INSTRUCCIONES ANTES DE LA UTILIZACIÓN Y
GUÁRDELAS.
La KX-TGA270S es una unidad portátil opcional para el KX-TG2700/
KX-TG2720/KX-TG2730/KX-TG2740.
Este manual de instalación describe únicamente los pasos necesarios para
iniciar el funcionamiento de la unidad portátil. Lea las instrucciones de
funcionamiento del KX-TG2700/KX-TG2720/KX-TG2730/KX-TG2740 para
obtener más detalles.
Unidad portátil inalámbrica de 2.4 GHz ampliable
Modelo
KX-TGA270S
Unidad de carga.....................................1
Cargador
N.° de pedido PQLV30013ZS
Adaptador de CA N.° de pedido KX-TCA1-G (KX-TCA1)
Cubierta de la unidad portátil .................1
N.° de pedido PQKK10126Z1
Batería ...............................1
N.° de pedido PQPP511SVC (P-P511)
Presilla para el cinturón .....1
N.° de pedido PQKE10340Z1
Accesorios (incluidos)
Para solicitar accesorios extra, llame al
1-800-332-5368.
Tomacorriente
(CA 120 V, 60 Hz)
Adaptador de CA
CHARG
E
GE
Indicador
CHARGE
Contactos
de carga
$
#
%
(MUTE) botón e indicador
O KO K
[-]
Press MUTE on
base unit, then
OK on handset to
register handset
A
B
Page 8

•
Limpie los contactos de carga de la unidad portátil y del cargador con un paño suave
y seco una vez al mes. Limpie más a menudo si la unidad está expuesta a la grasa,
polvo o humedad alta. De lo contrario, la batería tal vez no se cargue correctamente.
Carga de la batería
Ponga la unidad portátil en el cargador y cárguela durante
15
horas
aproximadamente antes de utilizarla por primera vez.
• El indicador CHARGE se encenderá, sonará un
pitido y se visualizará “Charging”.
• Cargue la batería cuando:
– se visualice “
Recharge battery”,
– “” parpadee en la pantalla, o
– la unidad portátil emita pitidos
intermitentemente mientras se utiliza.
•
Si la batería se ha descargado, la unidad portátil visualizará
“Charge for 15HRS” y “” cuando la ponga en el
cargador. La unidad portátil no funcionará. Deje que se cargue.
Operación Tiempo de operación
Mientras se utiliza (HABLAR)
Mientras no se utiliza (Espera)
Mientras se utiliza la función Reception Booster
Hasta 4.5 horas
Hasta 11 días
Hasta 3.5 horas
Información acerca de la batería de la unidad portátil
Después de que su batería Panasonic esté completamente cargada:
Indicador
CHARGE
Contactos
de carga
Montaje en pared!
El cargador puede montarse en una pared. Conecte el adaptador de CA. Instale
los tornillos utilizando la plantilla para pared de abajo. Monte el cargador (#).
Deslícelo hacia abajo ($) y después hacia abajo y hacia la derecha (%) hasta
fijarlo en su sitio.
$
#
%
PLANTILLA
PARA PARED
2.45 cm
(
15
⁄
16
")
Tornillos
A la toma
de corriente
2.45 cm
(
15
⁄
16
")
(MUTE) botón e indicador
O KO K
[-]
Press MUTE on
base unit, then
OK on handset to
register handset
A
B
Page 9

Registro!
Esta unidad portátil deberá ser registrada en la unidad base KX-TG2700/
KX-TG2720/KX-TG2730/KX-TG2740. El número de extensión de la unidad
portátil será asignado al hacer el registro.
Solamente podrá registrarse una unidad portátil cada vez.
Asegúrese de que la unidad base y las otras unidades portátiles no estén
siendo utilizadas. El registro deberá completarse antes de 1 minuto.
(MUTE) botón e indicador
O KO K
[-]
Press MUTE on
base unit, then
OK on handset to
register handset
Tecla blanda ( )
OK
Para cancelar el registro de la unidad portátil, consulte las instrucciones de
funcionamiento del KX-TG2700/KX-TG2720/KX-TG2730/KX-TG2740.
– (3) –
El visualizador de la unidad portátil muestra las
instrucciones como se muestra a la derecha.
1
Unidad base: Presione (MUTE).
•La luz del indicador MUTE parpadeará.
2
Unidad portátil:
#Presione la tecla blanda derecha ( ).
$Espere hasta que suene un pitido largo y el
visualizador muestre el número registrado.
Entonces se habrá completado el registro.
•El número de registro “[1]”a “[8]” se mostrará en la parte superior derecha del
visualizador.
•Podrá parar el registro presionando (OFF) en la unidad portátil y presionando (MUTE) en
la unidad base.
OK
SP
PRIVACY
[-]
Press MUTE on
base unit, then
OK on handset to
register handset
OK
Ej., Número de extensión 2
SP
PRIVACY
[-]
Handset
Registering
SP
PRIVACY
[2]
Handset [2]
Registered
•La ilustración de la unidad base es del KX-TG2730.
A
B
Page 10

Utilización de la presilla para cinturón
Podrá colgar la unidad portátil en su cinturón o bolsillo utilizando la presilla para
cinturón.
Para colocar la presilla para cinturón Para quitar la presilla para cinturón
Mientras presiona la parte superior de
la presilla (A), tire del borde derecho
en el sentido de la flecha (B).
A
B
Auricular opcional!
Enchufando un auricular opcional a la unidad portátil le podrá conversar por
teléfono con las manos libres. Utilice solamente el auricular Panasonic KX-TCA88.
Para hacer el pedido, llame al número de teléfono para accesorios de la página 1.
Conexión del auricular
Abra la tapa de la toma para auricular y conecte el auricular a la toma para
auricular como se muestra.
H
Toma para auricular
– (4) –
 Loading...