

Panasonic KX-TG2501ALS, KX-TG2501NZS User Manual
Getting Started
1
1-A Accessories
1-C Settings
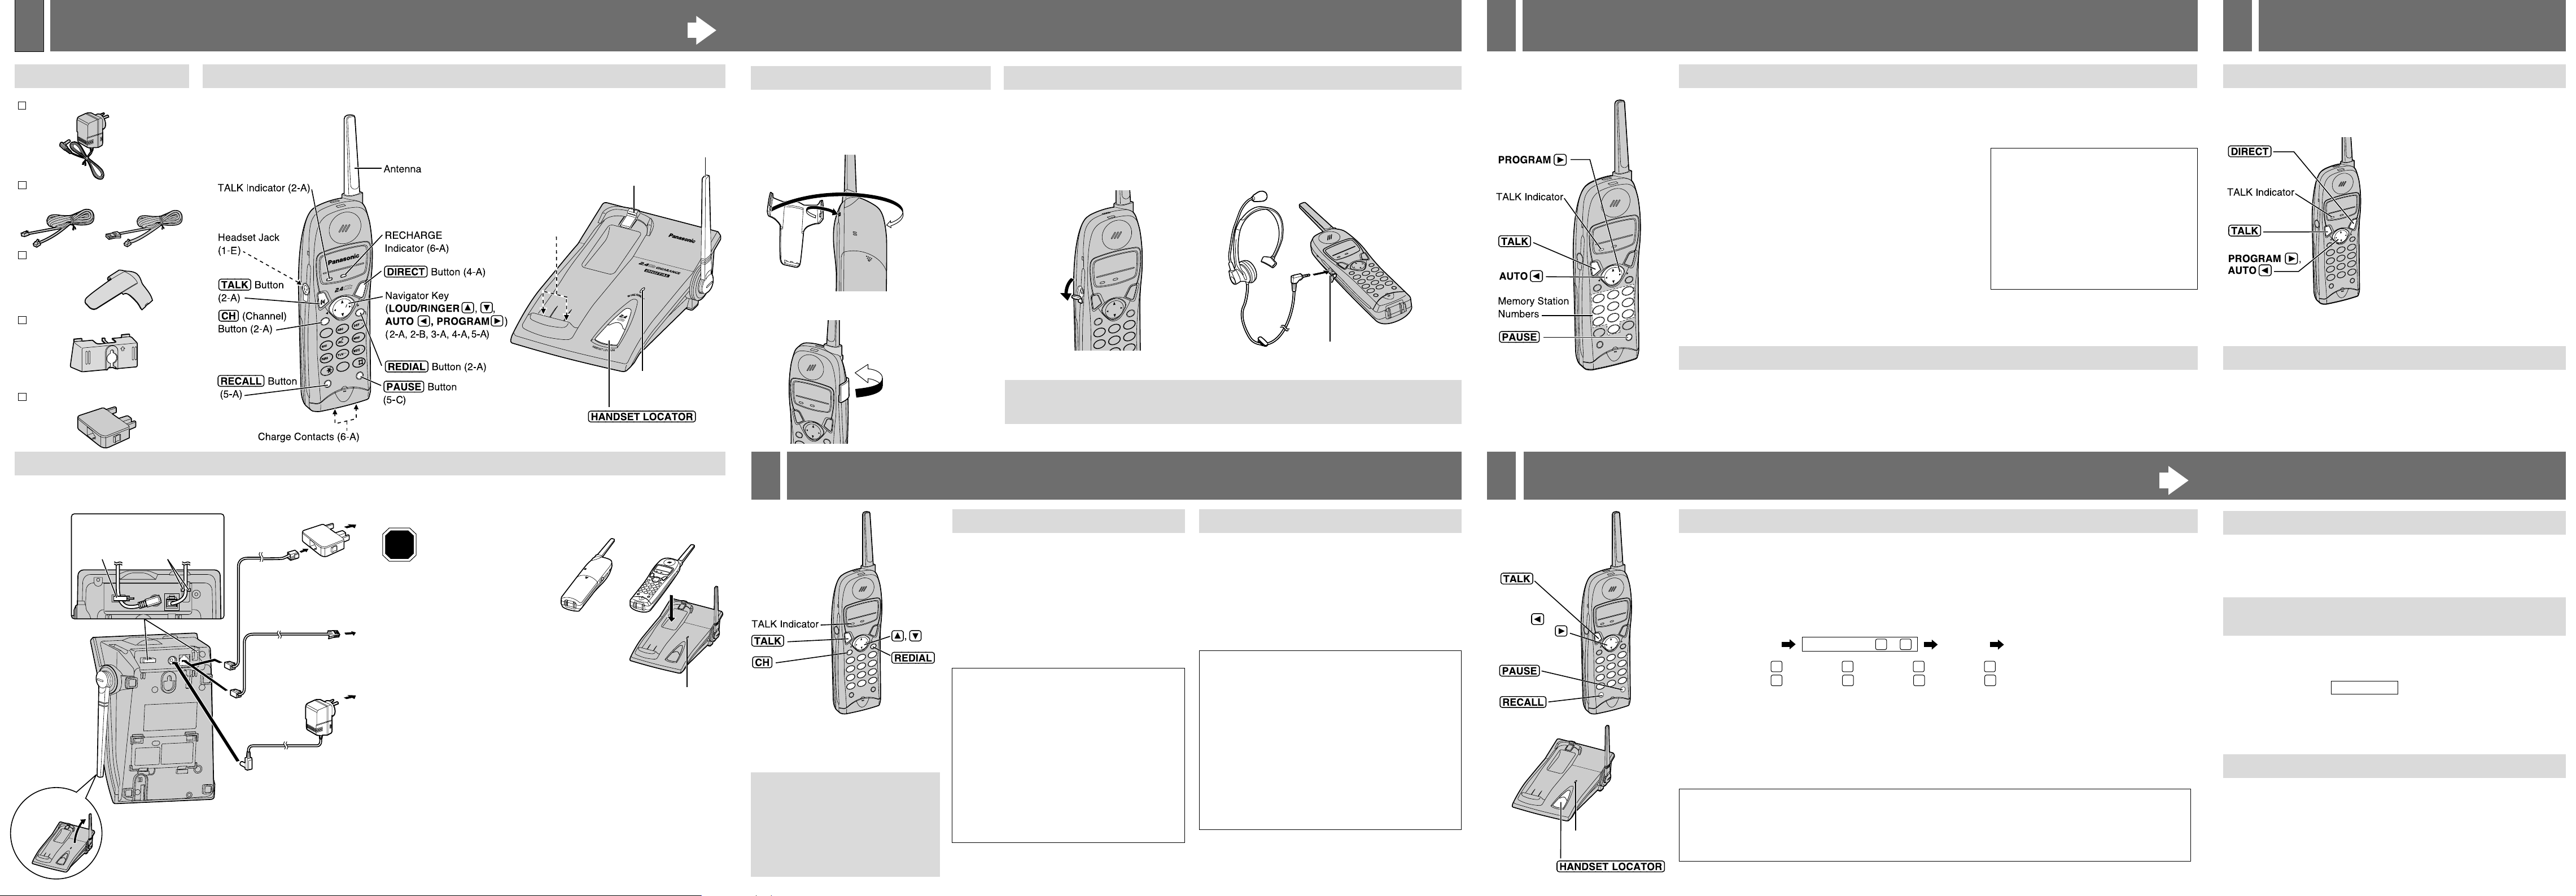
1-B Location of Controls
Handset Base unit
•USE ONLY WITH Panasonic AC ADAPTOR PQLV1AL.
•The AC adaptor must remain connected at all times. (It is normal for the
adaptor to feel warm during use.)
•To connect a standard telephone on the same line, see section 6-D.
•KX-TG2501ALS and KX-TG2501NZS are not designed to be used with
rotary (pulse dialling) services.
2
Raise the antenna.
3
Charge the battery
for 6 hours.
•See section 6-A for more
details.
•The IN USE/CHARGE
indicator lights.
1
Connect as shown.
SPR
E
A
D
SP
E
CTRU
M
Antenna (1-C)
Hook (6-F)
Charge Contacts
(6-A)
IN USE/CHARGE
Indicator (1-C, 5-D)
Button (5-D)
REDIAL
1
2
3
4
5
6
CH
LOUD
RINGER
AUTO
TALK
DIRECT
PROGRAM
ON
OFF
TALK
RECHARGE
REDIAL
1
2
3
4
5
6
CH
LOUD
RINGER
AUTO
TALK
DIRECT
PROGRAM
ON
OFF
TALK
RECHARGE
O
N
OFF
P
A
U
S
E
PAUSE
0
RECALLRECALL
7
8
9
R
E
D
IA
L
REDIAL
1
2
3
4
5
6
CHCH
L
O
U
D
LOUD
R
IN
G
E
R
RINGER
A
U
T
O
AUTO
T
A
LK
TALK
D
IR
E
C
T
DIRECT
PROGRAMPROGRAM
ON
OFF
TAL
K
ALK
REC
H
AR
CHARGE
To Power Outlet
(AC 230 V–240 V,
50/60 Hz)
AC Adaptor
Telephone
Plug
For New Zealand
To Single-Line
Telephone Jack
Telephone Line Cord
To Socket
For Australia
Telephone Line
Cord
STOP
Getting Started
Section 1
Selecting the ringer volume
The TALK indicator light must be off.
•To select HIGH (preset) or LOW,
press Ñ or Ö.
Each time you press
Ñ or Ö, the ringer volume will
change and the selected volume will ring.
•To turn the ringer OFF,
press and hold Ö until 2 beeps sound.
•To turn the ringer ON,
press Ñ.
The ringer will sound at the HIGH level.
•
When you replace the battery, the selected ringer
volume setting will return to the factory set.
To redial the last number dialled
Press (TALK) \ (REDIAL).
To select the receiver volume
3 levels (HIGH, MEDIUM, LOW) are available.
Press
Ñ or Ö while talking.
•Each time you press Ñ or Ö, the volume
level will change.
If noise interferes with the
conversation
Press (CH) to select a clearer channel or move
closer to the base unit.
If the handset is off the base unit,
press
(TALK).
•You can also answer a call by pressing any dialling
button
(0) to (9), (*) or (#) (— Any Key Talk).
OR
If on the base unit, just lift up.
2-B Answering Calls
2-A Making Calls
1
Press (TALK).
•The TALK indicator lights.
•If an alarm tone sounds, see 6-E.
2
Dial a phone number.
3
To hang up, press (TALK) or place
the handset on the base unit.
•The indicator light goes out.
Section 2
Making/Answering Calls
2
Lighted handset keypad
The handset dialling buttons will light
when you press a button or lift the
handset off the base unit, and flash when
a call is received. The lights will go out a
few seconds after pressing a button,
lifting the handset or answering a call.
• For best operating performance, see
section 6-C.
Speed Dialler
Section 3
3
3-A Storing Phone Numbers in Memory
Special Features
5
1
Press PROGRAM á.
•The TALK indicator flashes.
2
Enter a phone number up to 22 digits.
3
Press AUTO Ü.
4
Press a memory station number ((0) to (9)).
•A beep sounds.
•To store other numbers, repeat steps 1 through 4.
3-B Dialling a Stored Number
Press (TALK) \ AUTO Ü \ the memory station number ((0) to (9)).
If you misdial
Press PROGRAM á to end storing. \
\
Start again from step 1.
To erase a stored number
Press PROGRAM á \ AUTO Ü \
\
the memory station number ((0) to (9))
for the phone number to be erased.
•A beep sounds.
•If a pause is required for dialling, press (PAUSE) where needed. Pressing (PAUSE) counts as one digit (5-C).
You can store up to 10 phone numbers in the handset. The dialling buttons ((0)
to (9)) function as memory
stations.
The TALK indicator light must be off before programming.
One-Touch Dialler
4
4-A
Storing a Phone Number in the DIRECT Button
You can store a phone number in the (DIRECT) button. The stored number
is dialled with a one-touch operation.
The TALK indicator light must be off before programming.
4-B
Dialling a Stored Number in the DIRECT Button
Press (TALK) \ (DIRECT).
To erase a stored number: press PROGRAM á \ AUTO Ü \ (DIRECT).
Special Features
•If a pause is required for dialling, press (PAUSE) where needed. Pressing
(PAUSE) counts as one digit (5-C).
Section 5
Section 4
1
Press PROGRAM á.
•The TALK indicator flashes.
2
Enter a phone number up to 22
digits.
•If you misdial, press PROGRAM á,
and start again from step 1.
3
Press (DIRECT).
•A beep sounds.
Raise the
antenna.
Fasten the cords to prevent
them from being disconnected.
Hook
Hooks
OR
IN USE/CHARGE Indicator
AC Adaptor...........................one
Telephone line Cord .............one
Telephone Plug ....................one
Belt Clip ................................one
Wall Mounting Adaptor .........one
For Australia For New Zealand
For Australia only
You can hang the handset on your belt or pocket
using the belt clip.
To attach the belt clip
To remove the belt clip
1-D Belt Clip
Plugging an optional headset into the handset allows a hands-free phone conversation. Please use only
the Panasonic KX-TCA88AL headset.
Connecting the optional headset to the handset
Open the headset jack cover, and connect the optional headset to the headset jack
as shown.
When the optional headset is connected to the handset, make sure to use the headset to talk with the
caller. If you want to have a normal cordless phone conversation, disconnect the headset.
H
1-E Optional Headset
Headset Jack
5-C How to Use the PAUSE Button
(For PBX Line/Long Distance Calls)
We recommend you press (PAUSE) if a pause is required for dialling with
a PBX or to access a long distance service.
Ex: Line access number
(9) (PBX)
(9) \ (PAUSE) \
•Pressing (PAUSE) once creates a 3.5 second pause. This prevents
misdialling when you redial or dial a stored number.
•Pressing (PAUSE) more than once increases the length of the pause
between numbers.
5-D Handset Locator
You can locate the handset or page the handset.
1
Press (HANDSETÒLOCATOR) on the base unit.
•The IN USE/CHARGE indicator flashes and the handset beeps for 1
minute.
2
To stop paging, press (HANDSETÒLOCATOR) again or press (TALK)
twice on the handset.
Phone number
Each time you place the handset on the base unit, the unit automatically
selects one of more than a million security codes. These codes help prevent
the unauthorized use of your telephone line by another cordless telephone
user.
5-B Automatic Security Code Setting
AUTO
PROGRAM
,
IN USE/CHARGE
Indicator
•If a power failure occurs, the setting will return to the factory preset. Reprogram if necessary.
5-A RECALL Button
Pressing (RECALL) allows you to use special features of your host PBX such as call transfer or accessing a
special telephone services (optional), such as call waiting.
Selecting the recall time
The recall time depends on your telephone exchange or host PBX. You can select the following recall times:
“90, 100, 110, 250, 300, 400, 600 or 700 msec (milliseconds)”,
using the handset near the base unit.
KX-TG2501ALS comes from the factory set to “100 msec”. KX-TG2501NZS comes from the factory set to
“600 msec”.
The TALK indicator light must be off before programming.
Press
PROGRAM á AUTO Ü
(RECALL)
.
•If 3 beeps sound after programming, a wrong key was pressed. Start again from the beginning.
•Users in Australia can access Telstra’s “EASY CALL” service by having the recall time set at 100 msec, and then
follow Telstra’s “EASY CALL” instructions to operate this service.
•If the unit is connected via a PBX, PBX functions (transferring a call etc.) might not work correctly. Consult your
PBX supplier for the correct setting.
•When you receive a second call during a conversation, you will hear a signal tone following the call waiting tone
and the conversation will be interrupted for approximately a second. The tones are generated from the telephone
company. This is not fault of the product as these events are normal.
1
: 90 msec
2
: 100 msec3: 110 msec4: 250 msec
5
: 300 msec6: 400 msec7: 600 msec8: 700 msec
1 8
Dialling button ( to )
For Call Waiting Service Users in New Zealand
Adjust the recall time to 600 ms for use with Telecom’s Call Waiting Service. Press (RECALL) if you hear a callwaiting tone while talking.
•The first call is put on hold and you can answer the second call.
•To return to the first caller, press (RECALL) again.

Up to 11 days
While not in use (Standby)
Up to 4.5 hours
While in use
(TALK)
Operation
away from the base unit
near the base unit*
Up to 3.5 hours
Operating time
PLEASE READ BEFORE USE
AND SAVE.
1 Getting Started
2 Making/Answering Calls
3 Speed Dialler
4 One-Touch Dialler
5 Special Features
6 Things You Should Know
Contents by Section
Charge the battery for about
6 hours before initial use.
Things You Should Know
6
6-C Base Unit Location/Noise
Recharge
When the RECHARGE indicator flashes or the
unit beeps intermittently, place the handset on
the base unit to recharge the battery for 6 hours.
•If you DO NOT recharge the handset battery for more than 15
minutes, the RECHARGE indicator will continue to flash.
Note:
While using the handset:
— If you are near a microwave oven which is being used, noise may
be heard at the receiver. Move away from the microwave oven
and closer to the base unit.
— If more than one cordless phone is being used and your handset
is near another cordless phone’s base unit, noise may be heard.
Move away from the other cordless phone’s base unit and closer
to your base unit.
Battery information
After your Panasonic battery is fully charged:
*Within about 3 meters
•The battery operating time may vary depending on usage conditions and
ambient temperature.
•As preventative maintenance, clean the handset and the base unit
charge contacts with a soft dry cloth once a month. Clean more often
if the unit is subject to grease, dust or high humidity.
Otherwise, the
battery may not charge properly.
•If the battery is fully charged, you do not have to place the handset on the
base unit until the RECHARGE indicator flashes. This will maximize the
battery life.
•The battery cannot be overcharged.
6-A Battery
Calls are transmitted between the base unit and the handset using wireless
radio waves.
For maximum distance and noise free operation, the
recommended base unit location is:
RECHARGE
Indicator
In a HIGH and CENTRAL location
with no obstructions such as walls.
Away from electrical appliances
such as a TV, personal computer
or another cordless phone.
Raise
the antenna.
Things You Should Know
6-E Troubleshooting
Problem
The unit does not work.
An alarm tone sounds.
Static, sound cuts in/out,
fades. Interference from
other electrical units.
The unit does not ring.
6-B Battery Replacement
Cause & Remedy
•Check the settings (1-C).
•Charge the battery fully (6-A).
•Clean the charge contacts and charge
again (6-A).
•Install the battery properly (6-B).
•Place the handset on the base unit and
unplug the AC adaptor to reset. Plug in,
and try again.
•Re-install the battery and place the
handset on the base unit. Try again.
•KX-TG2501ALS and KX-TG2501NZS are
not designed to be used with rotary (pulse
dialling) services.
•You are too far from the base unit. Move
closer and try again.
•Place the handset on the base unit and try
again.
•Plug in the AC adaptor.
•Raise the base unit antenna.
•Locate the handset and the base unit away
from other electrical appliances (6-C).
•Move closer to the base unit.
•Raise the base unit antenna.
•Press (CH) to select a clearer channel.
•The ringer volume is set to OFF. Press Ñ
or Ö while the TALK indicator light is off
(2-B).
PQQX13463ZA-BM S0802-0
Red
Lead
Black
Lead
If the RECHARGE indicator flashes after being fully charged, replace the
battery with a new Panasonic N4HKGMB00001 (P-P510) battery.
1
Press the notch on the
battery cover firmly and slide
it as indicated by the arrow.
2
Remove the old battery.
Then install the new one.
•Insert the battery plug into the
connector as shown.
3
Close the cover.
Make sure to charge the new
battery for 6 hours.
This unit will not function during a power failure. To connect a standard
telephone on the same line, use a telephone double adaptor (for Australia)
or a T-adaptor (for New Zealand).
To
Socket
(Optional)
Telephone
Double Adaptor
Standard Telephone
Telephone
Line Cord
Standard
Telephone
Telephone Line Cord
T-Adaptor
(Optional)
To Single-Line
Telephone Jack
For Australia
For New Zealand
Problem
While storing a phone
number, the unit starts to
ring.
You cannot store a phone
number in memory.
Previously programmed
information is erased.
You cannot redial by
pressing
(REDIAL).
(HANDSET!LOCATOR) does
not function.
The RECHARGE indicator
flashes or the unit beeps
intermittently.
You charged the battery
fully, but the RECHARGE
indicator flashes.
The IN USE/CHARGE
indicator light does not
go out while charging.
Cause & Remedy
•To answer the call, press (TALK). The
program will be cancelled. Store the
number again.
•You cannot store a number while the unit
is in the talk mode.
•Do not pause for over 60 seconds while
storing.
•If a power failure occurs, programmed
information may be erased. Reprogram if
necessary.
•If the last number dialled was more than
32 digits long, the number will not be
redialled correctly.
•The handset is too far from the base unit
or is engaged in an outside call.
•Charge the battery fully (6-A).
•Clean the charge contacts and charge
again (6-A).
•Install a new battery (6-B).
•This is normal.
3
Install screws using the
wall template below.
Connect the telephone
line cord.
Mount the unit,
then slide down.
•Raise the antenna.
•Fasten the telephone
line cord to prevent it from
being disconnected.
4
To charge the handset battery:
Fix the charge contacts (#)
and insert the hook to
the handset hole ($
).
•The IN USE/CHARGE
indicator lights.
This unit can be mounted on the wall.
1
Push the hook and turn it around.
Turn the hook until a click
is heard.
2
Connect the AC adaptor.
Tuck the telephone line cord inside
the wall mounting adaptor, then push it
in the direction of the arrow.
•The word “UP”
should face
upward.
6-F Wall Mounting
To Power
Outlet
2
1
Hook
Hole
Hooks
OR
For Australia
To telepnone Plug
connected to Socket
OR
For New Zealand
To Single-line
Telepnone Jack
8.3 cm
Screws
8.3 cm
Wall Template
Section 6
Things You Should Know
For New Zealand Users Only
The grant of a Telepermit for any item of terminal equipment indicates
only that Telecom has accepted that the item complies with minimum
conditions for connection to its network. It indicates no endorsement of
the product by Telecom, nor does it provide any sort of warranty. Above
all, it provides no assurance that any item will work correctly in all
respects with another item of Telepermitted equipment of a different
make or model, nor does it imply that any product is compatible with all
of Telecom’s network services.
WARNING NOTICE:
No “111” or other calls can be made from this device during a mains
power failure.
This equipment shall not be set to make automatic calls to the Telecom
“111” Emergency Service.
•We recommend that a standard phone which can be used in the case
of a power failure be connected to the telephone line at all times.
•This equipment should not be used under any circumstances which
may constitute a nuisance to other Telecom customers.
6-G Safety Instructions
Take special care to follow the safety suggestions listed below.
Safety
1) The unit should be connected to a power supply only of the type
described in the operating instructions or as marked on the unit.
2) When left unused for a long period of time, the base unit should be
unplugged from the household AC outlet.
3) To minimize the possibility of lightning damage when you know that a
thunderstorm is coming, we recommend that you:
a) Unplug the telephone line cord from the phone jack.
b) Unplug the power supply cord from the AC power outlet.
Installations
Environment
1) Do not use this unit near liquids—for example, near a bathtub,
washbowl, sink, etc. Damp environments should also be avoided.
2) The unit should be kept away from heat sources such as radiators,
kitchen range, etc. It also should not be placed in rooms where the
temperature is less than 5°C or greater than 40°C.
3) The AC adaptor is used as the main disconnect device, ensure that the
AC outlet is located/installed near the unit and is easily accessible.
Placement
1) Do not place heavy objects on top of this unit.
2) Care should be taken so that objects do not fall onto, and liquids are not
spilled into, the unit. Do not subject this unit to excessive smoke, dust,
mechanical vibration or shock.
3) Place the unit on a flat surface.
For best performance
1) If noise prevents the conversation from being understood at the handset,
approach the base unit to lessen the noise.
2) The handset should be used at the HIGH volume setting when the
reception audio is difficult to hear.
3) The handset should be fully recharged on the base unit when the
RECHARGE indicator flashes.
4) The handset antenna should not be touched during use because it can
effect the handset’s performance.
5) The maximum calling distance may be shortened when the unit is used
in the following places: Near obstacles such as hills, tunnels,
undergrounds, near metal objects such as wire fences, etc.
WARNING:
TO PREVENT FIRE OR SHOCK HAZARD, DO NOT EXPOSE THIS
PRODUCT TO LIQUID OR ANY TYPE OF MOISTURE.
When a failure occurs which results in the internal parts becoming
accessible, disconnect AC adaptor immediately and return this unit to the
place of purchase or service centre.
If there is any trouble, disconnect the unit from the telephone line and
connect a known working phone. If the known working phone operates
properly, do not reconnect the unit to the telephone line until the fault has
been repaired. If the known working phone does not operate properly,
consult your telephone company.
This equipment has been tested and found to comply with AS/NZS 3548:
1995 limits for electromagnetic interference. Any modifications to any part
of the system or to any peripherals may void the EMC compliance of the
system or the peripherals.
This equipment will be inoperable when mains power fails.
The earcap on the handset is magnetised and may retain metallic objects.
Operating near 2.4GHz electrical appliances may cause interference. Move
away from the electrical appliances and/or press the CH (Channel) button.
Medical
Consult the manufacturer of any personal medical devices, such as
pacemakers, to determine if they are adequately shielded from external RF
(radio frequency) energy. (The unit operates in the frequency range of
2401MHz to 2462MHz, and the power output level can range from 0.001
watts to 0.10 watts.) Do not use the unit in health care facilities if any
regulations posted in the area instruct you not to do so. Hospitals or health
care facilities may be using equipment that could be sensitive to external
RF (radio frequency) energy.
For your future reference
Serial No. Date of purchase
(found on the bottom of the unit)
Name and address of dealer
Attach or keep original receipt to assist with any repair under warranty.
For New Zealand Customers
Panasonic New Zealand operates a toll free Customer
Support Centre.
Please phone 0800 Panasonic (0800 726276) for
assistance.
2.4GHz Cordless Phone
Model No. KX-TG2501ALS
KX-TG2501NZS
Operating Instructions
6-D Adding Another Phone
Kyushu Matsushita Electric Co., Ltd.
1-62, 4-chome, Minoshima, Hakata-ku, Fukuoka 812-8531, Japan
 Loading...