

Page 1
Panasonic
Integrated Telephone System
with Single Micro Cassette
EASA-PHONE
MODEL NO.
KX-T2396BA
ZEBEESI
Matsushita Electric Industrial Co., Ltd.
Central P. O. Box 288, Osaka 530-91, Japan
Printed in Japan
PQQX6594ZA F0492Q0 (XNZ)
Page 2

Table of contents
Table of contents............................................................................... 1-2
Location of controls........................................................................... 3-6
Enclosures............................................................................................ 7
Inserting the tape.................................................................................. 8
Connection ..................................................................................... 9-10
Initial preparation
Selector settings.............................................................. 11-12
Recording an Outgoing Message (OGM)
Checking your recorded OGM
Using your answering machine
..........................................................................
.......................
..............
...........................................
...............................
11-15
13-14
15
15
TELEPHONE
Making and answering calls ......................................................... 17-18
Making calls with the handset
Making calls with the MONITOR button
(on-hook dialling)....................................................... 17
Redialling ............................................................................. 18
Answering calls..................................................................... 18
Automatic Dialling ......................................................................... 19-20
Making calls using the upper memory location
Making calls using the lower memory location ........ 20
Storing the telephone numbers..................................................... 21-24
Storing into the upper memory location
Storing into the lower memory location ................................23
Correcting an error while storing ..........................................24
Confirming a stored number..................................................24
Erasing a stored number ......................................................24
..............................................
....................
...............................
17
19
22
-1 -
Page 3

WARNING:
TO PREVENT FIRE OR SHOCK
HAZARD. DO NOT EXPOSE THIS
PRODUCT TO RAIN OR ANY
TYPE OF MOISTURE.
When a failure occurs which results
in the internal parts becoming
accessible, disconnect the AC
adaptor immediately and return this
unit to authorized service center.
If there is any trouble, disconnect
the unit from the telephone line and
connect a known working phone. If
the known working phone operates
properly, do not reconnect the unit
to the telephone line until the
trouble has been repaired. If the
known working phone does not
operate properly, consult with a
telephone company.
Other operation ............................................................................ 25-27
Recall
..................................................................................
Setting the Timed Recall (Flash)
..........................................
25
26
Hold.......................................................................................27
Pause
...................................................................................
Combination dialling
.............................................................
27
27
ANSWERING MACHINE
Setting up for answering machine
Recording from the beginning of the ICM
part of the tape
Recording after the messages you have heard
................................................
29-30
...........................................................
....................
30
30
Dial the telephone number with a
tone telephone only.
”1
----
Press your code no.
2 times during
playback OGM.
•For Back Space, press your code
no. during playback of the
messages,
•To record the ICM from the
beginning of the tape, press your
code no. alters beeps.
•To save the ICM, hang up after
playback.
•To leave a marker message, speak
after 3 beeps followed by a
10'second pause and 2 beeps.
' N
i The unit
1 will play
j back.
Listening to the recorded messages
.........................................
31 -32
Playing back the tape from the beginning ............................32
Remote operation
........................................................................
33-35
Remote code number ...........................................................33
Playing back alt the messages
.............................................
34
Resetting the tape for future message..................................35
Recording a marker message ..............................................35
Setting the answer mode remotely
Recording a memo message
..............................................................
Recording a conversation (2-way recording)
.......................................
......................................
35
36
37
Monitoring the incoming calls .............................................................38
Troubleshooting guide................................................................... 39-40
Wall mounting
....................................................................................
41
Maintenance ................................................................................. 42-43
Safety instructions
...............................................................................
44
QUICK REFERENCE CARD for tone remote
control can be found on this page.
Page 4
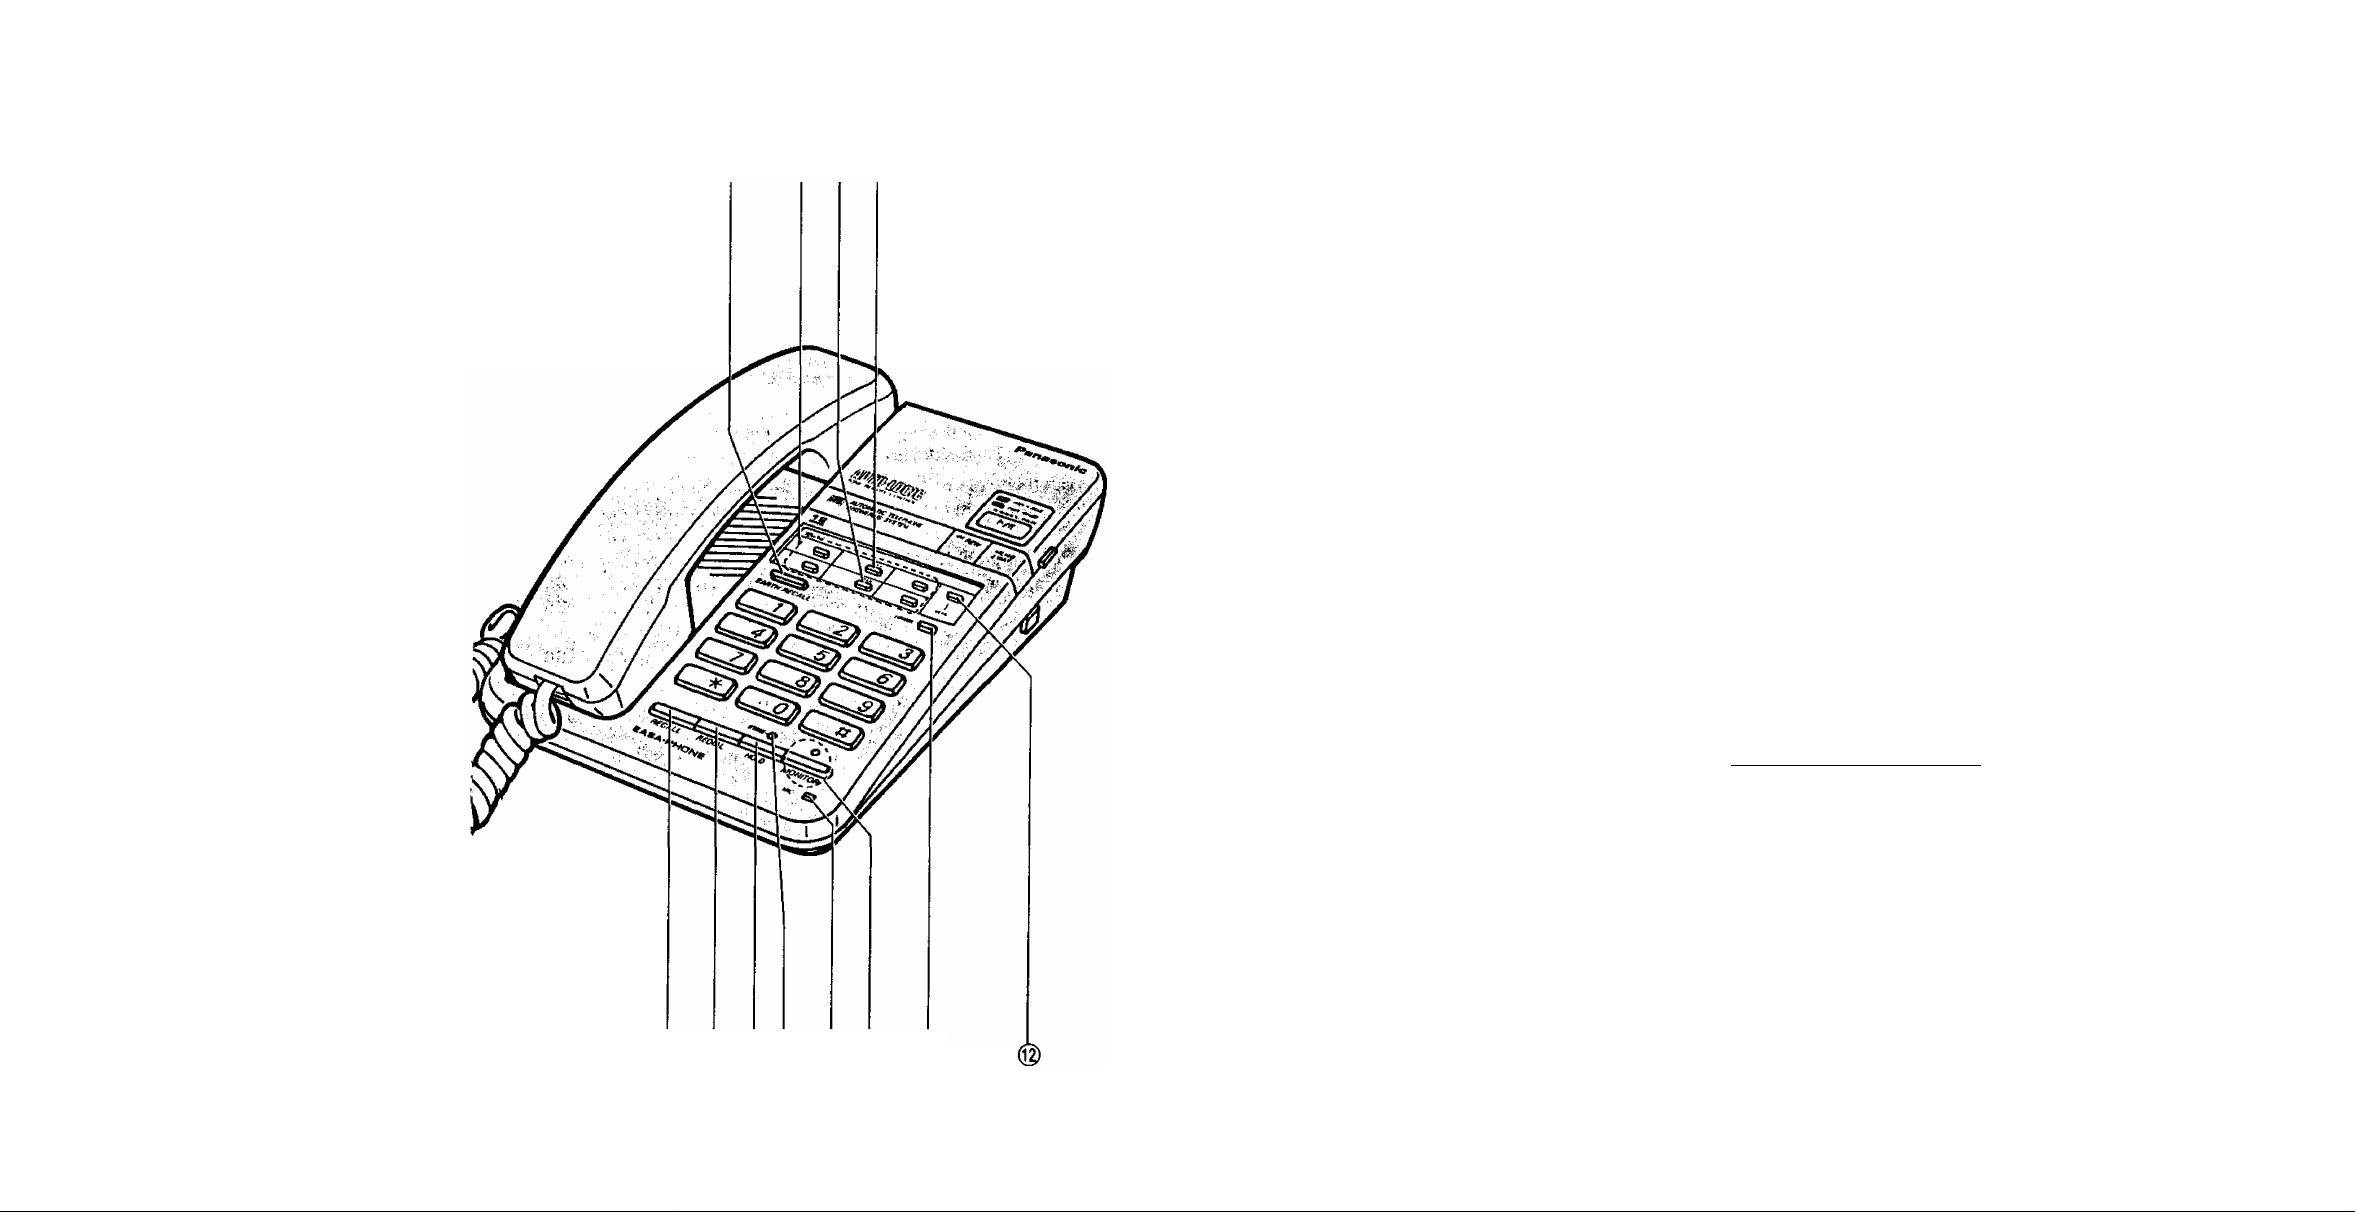
Location of controls
Safety instructions
© ® ® ®
Take special care to follow the
safety suggestions listed below.
Safety
1) Power Source: The unit should
be connected to a power supply
only of the type described in the
operating instructions or as
marked on the unit.
2) Nonuse Periods: When the unit
is not used, turn the power off.
When left unused for a long
period of time, the unit should
be unplugged from the
household AC outlet.
Installations
Environment
1) Water and Moisture: Do not
use this unit near water—for
example, near a bath tub,
washbowl, sink, etc. Damp
basements should also be
avoided.
2) Heat: The unit should be
situated away from heat
sources such as radiators,
kitchen range, etc. It also should
not be placed in rooms where
the temperature less than 5°C
(41 °F) or greater than 40°C
(104T)
Placement
1) Stacking: Do not place heavy
objects on top of this unit.
2) Foreign Material: Care should
be taken so that objects do not
fall into and liquids are not
spilled into the unit. Do not
subject this unit to excessive
smoke, dust, mechanical
vibration, or shock.
3) Surface: Place the uniton a
flat, level surface.
4) Magnetism: The unit should be
situated away from equipment
or devices that generate a
strong magnetic field.
r
KX-T2396BA
QUICK REFERENCE CARD
FOR TONE REMOTE CONTROL
To set the answer mode remotely.
1. Dial the phone number and
waitforlS rings.
•The unit will answer and
play the OGM.
2. Hang up the handset.
•The unit will be ready to
answer the next phone call.
-3-
-44-
When you press any button,
press firmly for 1-2 seconds.
Your remote code no
_____
Page 5
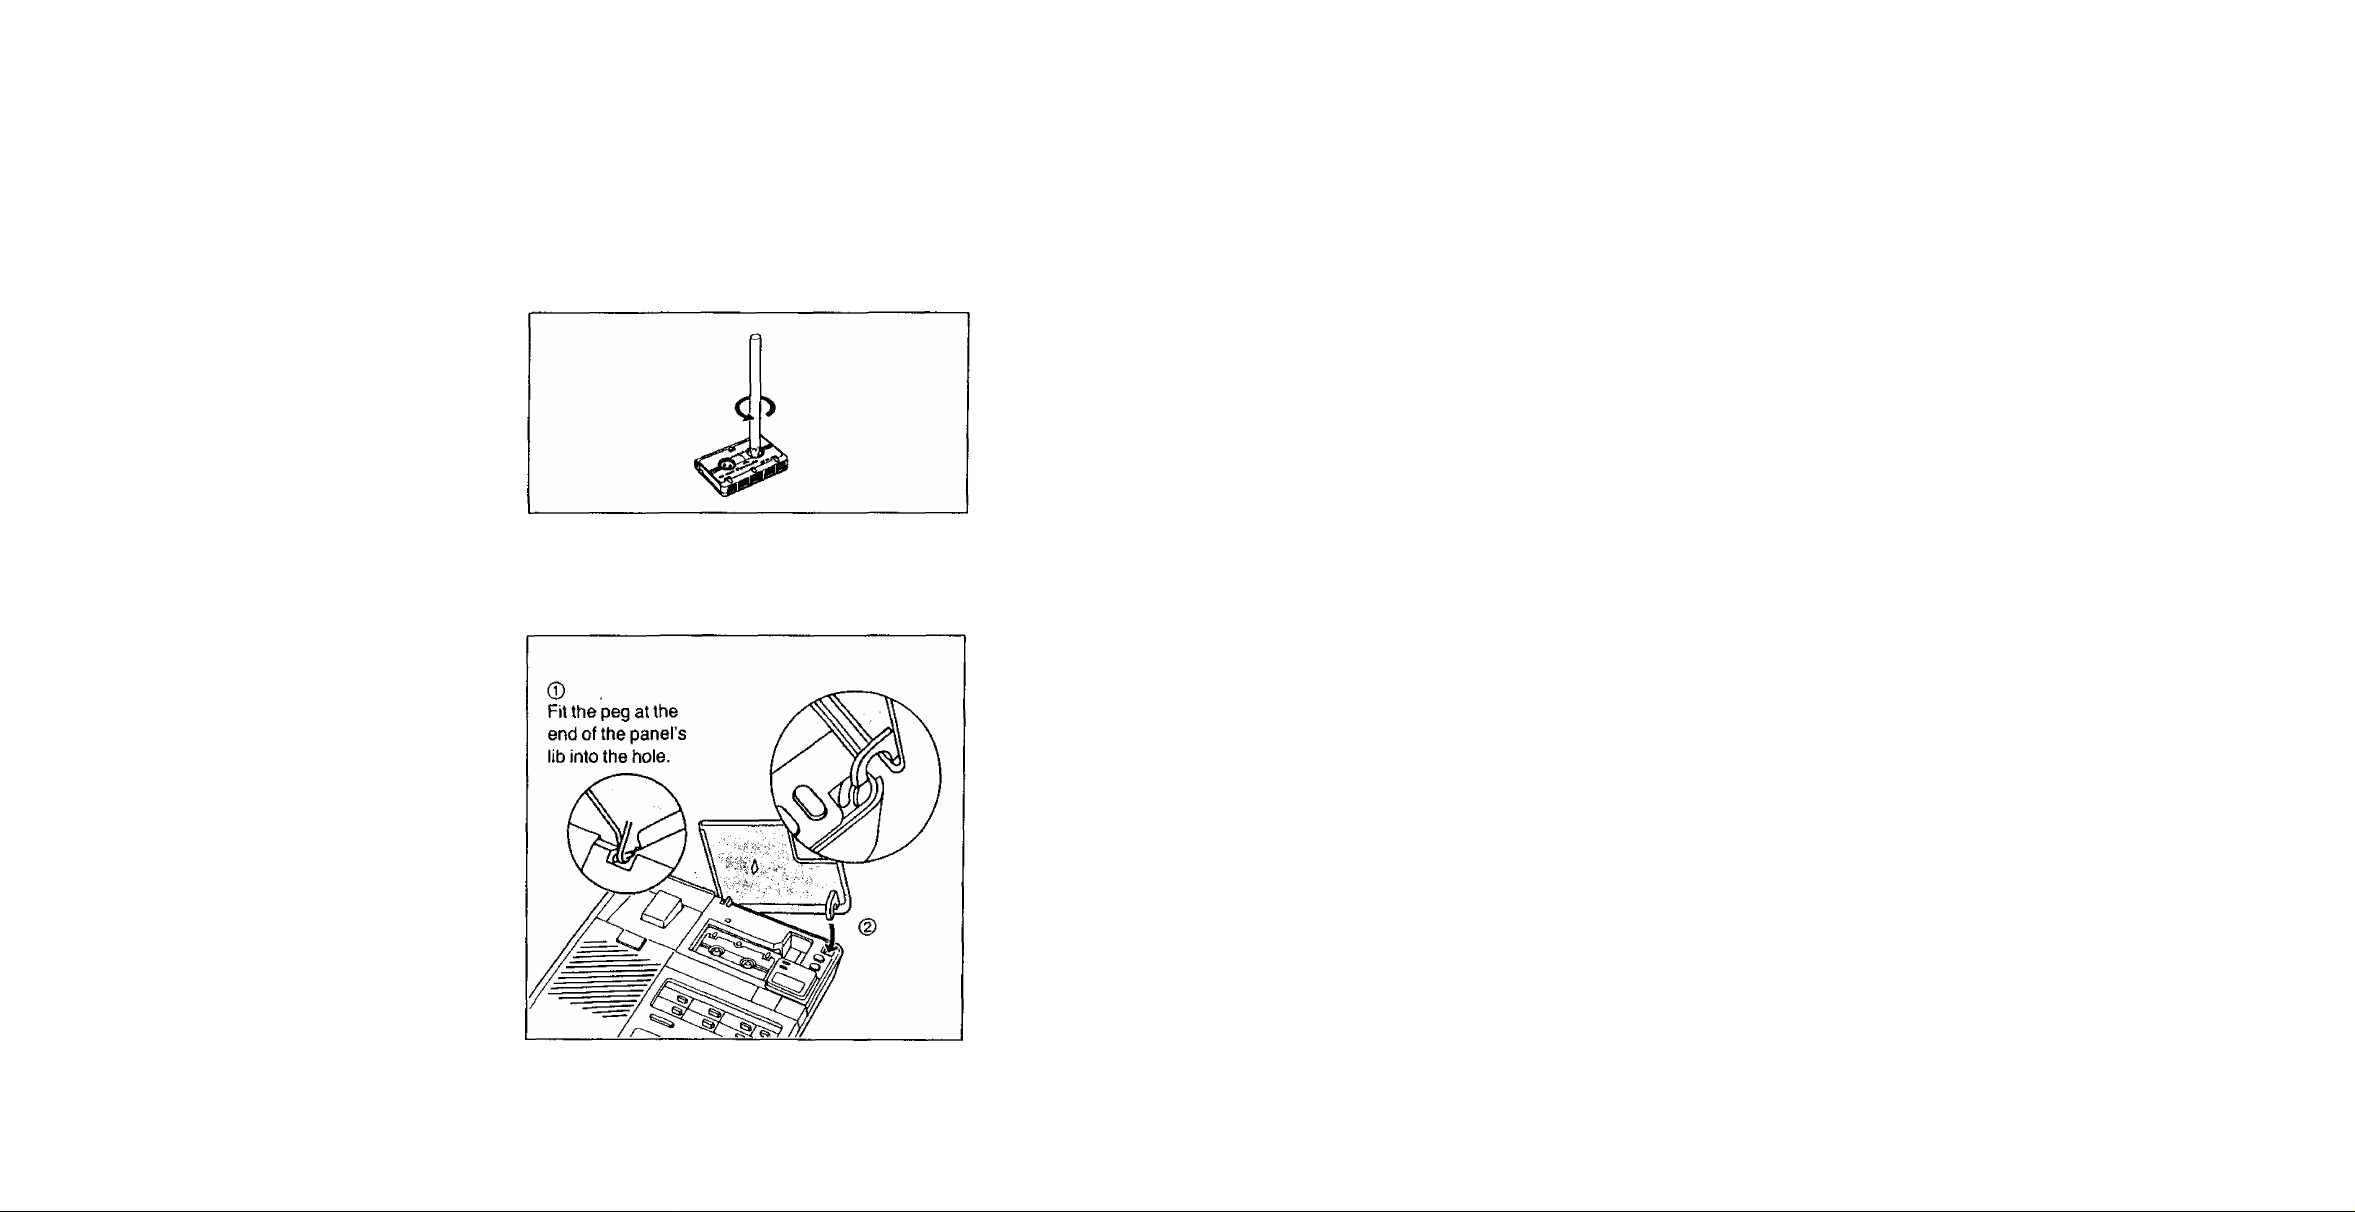
Cassette tape
• For optimum sound quality and performance, we recommend that you
use the opposite side (side-2) after six months and replace the tape
with a new one every year, assuming that the unit answers about ten
calls a day.
• Never place a cassette tape near a magnetic source, such as a magnet
or a TV set, because it may erase or break the recorded message on the
tape.
• Slack in the tape can be tightened by rotating the tape reel with an
instrument like a pencil, as shown.
Cassette panel installation
If the panel comes off, replace it by pushing as shown.
©EARTH RECALL Button
(page 25):
Used to access some feature of
your host PBX which has earth
recall facility.
(©Direct Call Buttons (page 19);
Used to store phone numbers
and to make calls using one
touch dialling.
(©CLEAR Button (page 24):
Used to clear the memory while
storing telephone number.
©PAUSE Button (page 27):
Used to enter a pause in phone
numbers when programming.
(©RECALL (Timed Break Recall)
Button (page 25);
Used to access some of the
feature of your host PBX which
has timed break register recall
facility.
(©REDIAL Button (page 18):
Used to redial the last dialled
phone number.
©HOLD Button (page 27);
Used to put the calling party on
hold during a conversation. It
serves as a store button when
programming phone numbers.
(©STORE (HOLD) Indicator
(page 22);
It lights or flashes when
programming. It also flashes
when holding a call.
©MIC (Microphone) (page 14)
©MONITOR Button and Indicator
(page 17):
Used to dial a phone number or
monitor the caller’s voice while
having conversation without
using the handset.
(©LOWER Button (page 20);
Used to select the lower
memory location.
©PROG (Program) Button
(page 22):
Used to start and complete the
programming procedure.
Page 6
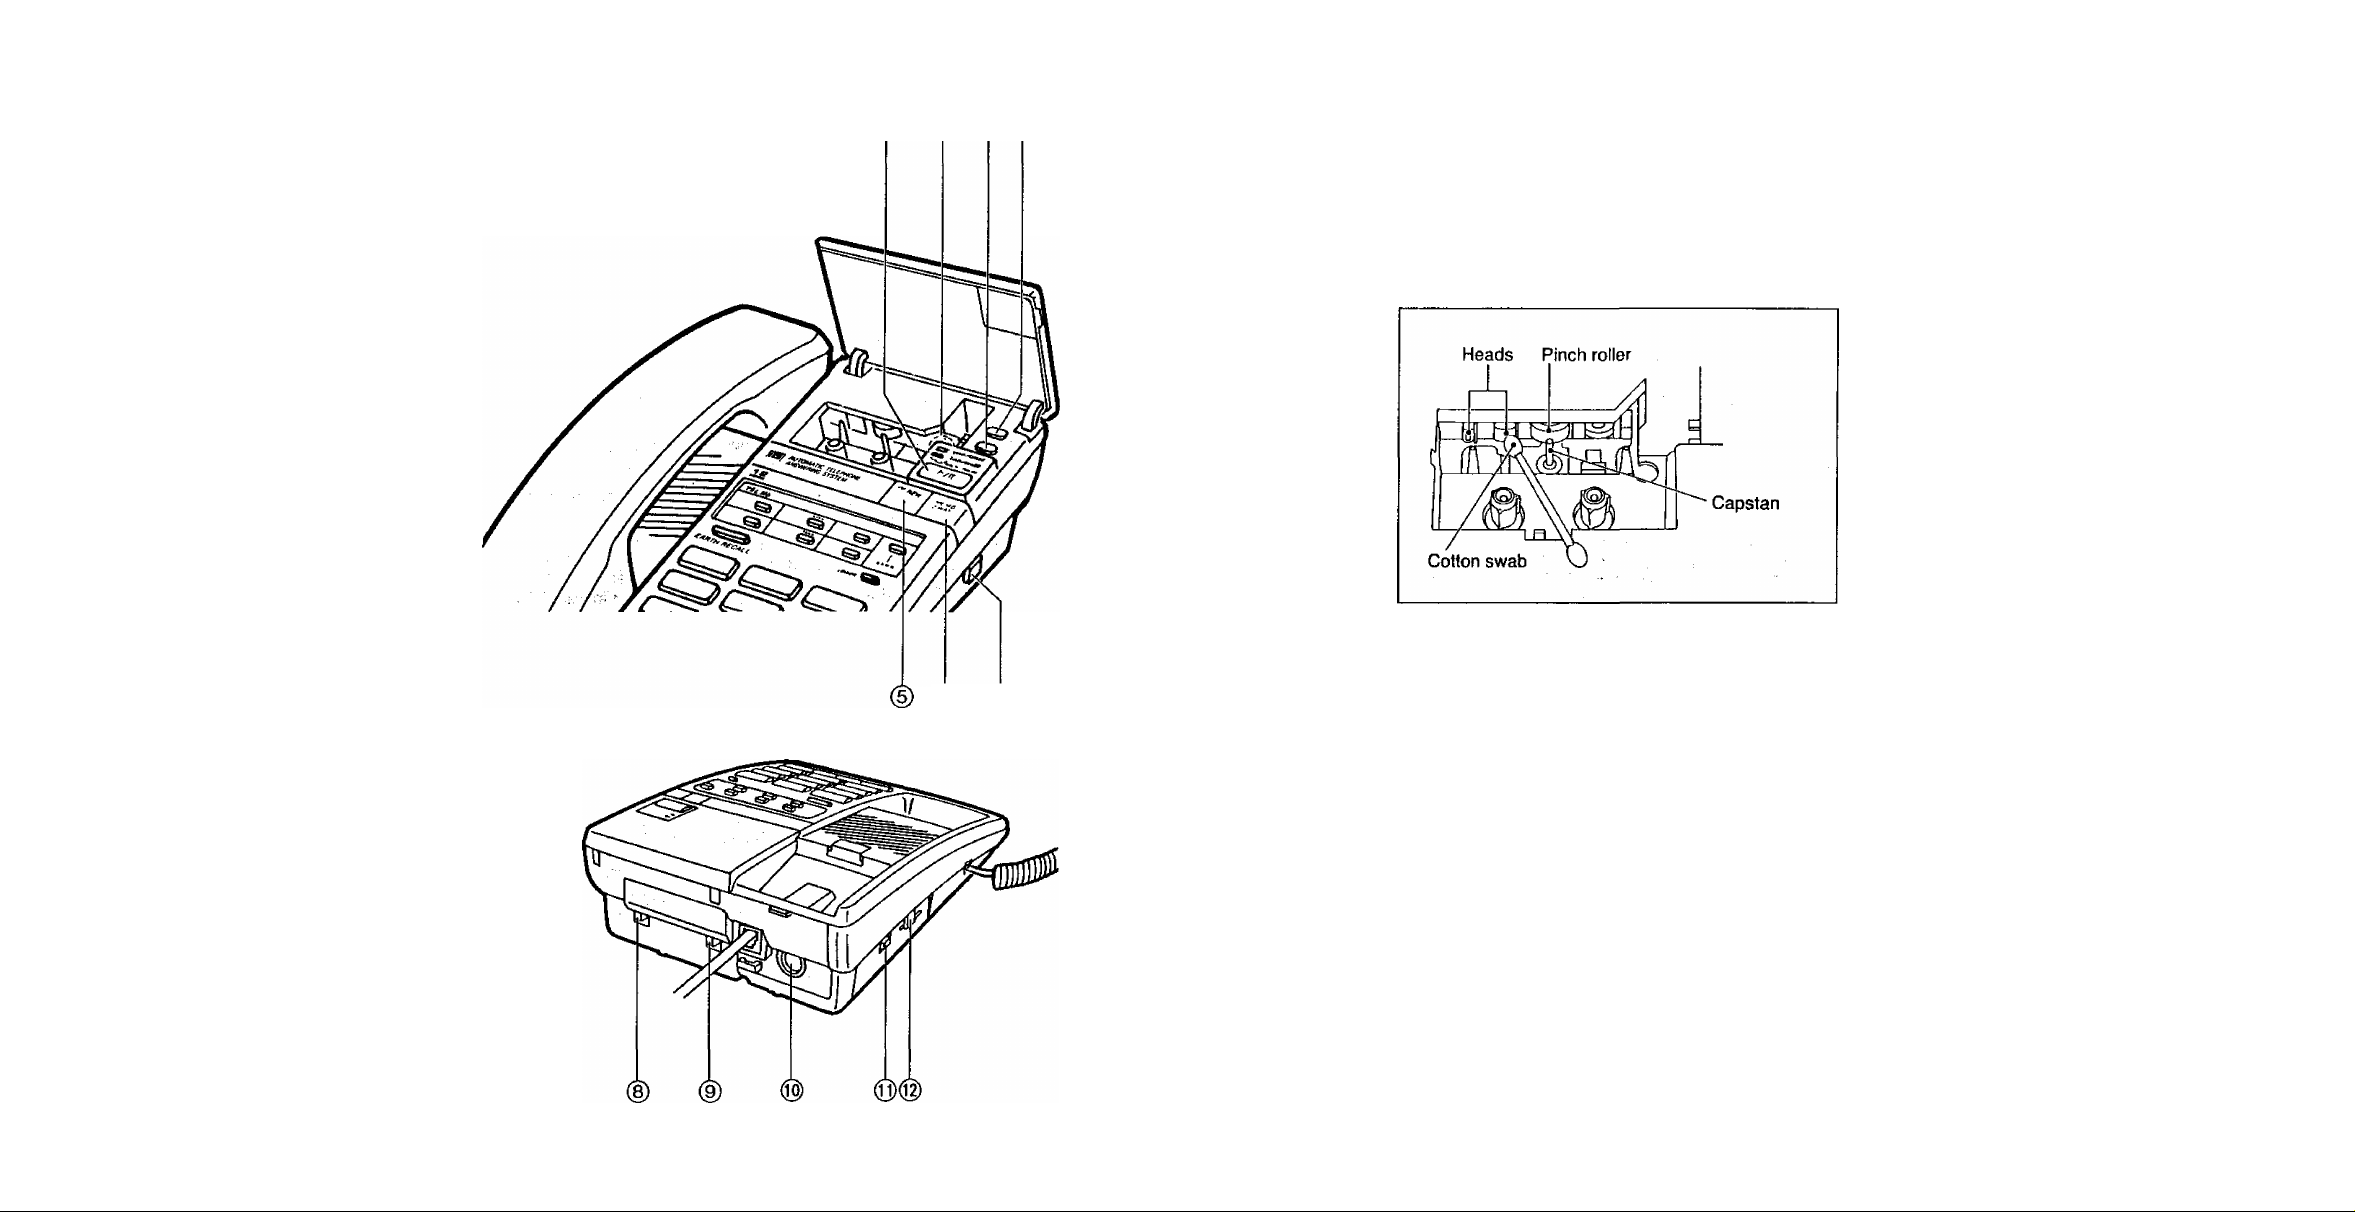
Maintenance
(p (2) (3) @
Because the head and capstan assemblies are in contact with the tape,
dirt and residue from the tape can easily adhere to these parts, causing
distortion. These parts should be cleaned periodically in the manner
described below.
Clean the head surface, pinch roller and capstan with a cotton swab.
If these surfaces are extremely dirty, dampen the cotton swab with alcohol.
► Do not place magnetic or metal objects, such as a screwdriver, near the
head assemblies, as such objects could magnetize the heads.
'Do not oil any part of the unit.
-5- -42-
Page 7
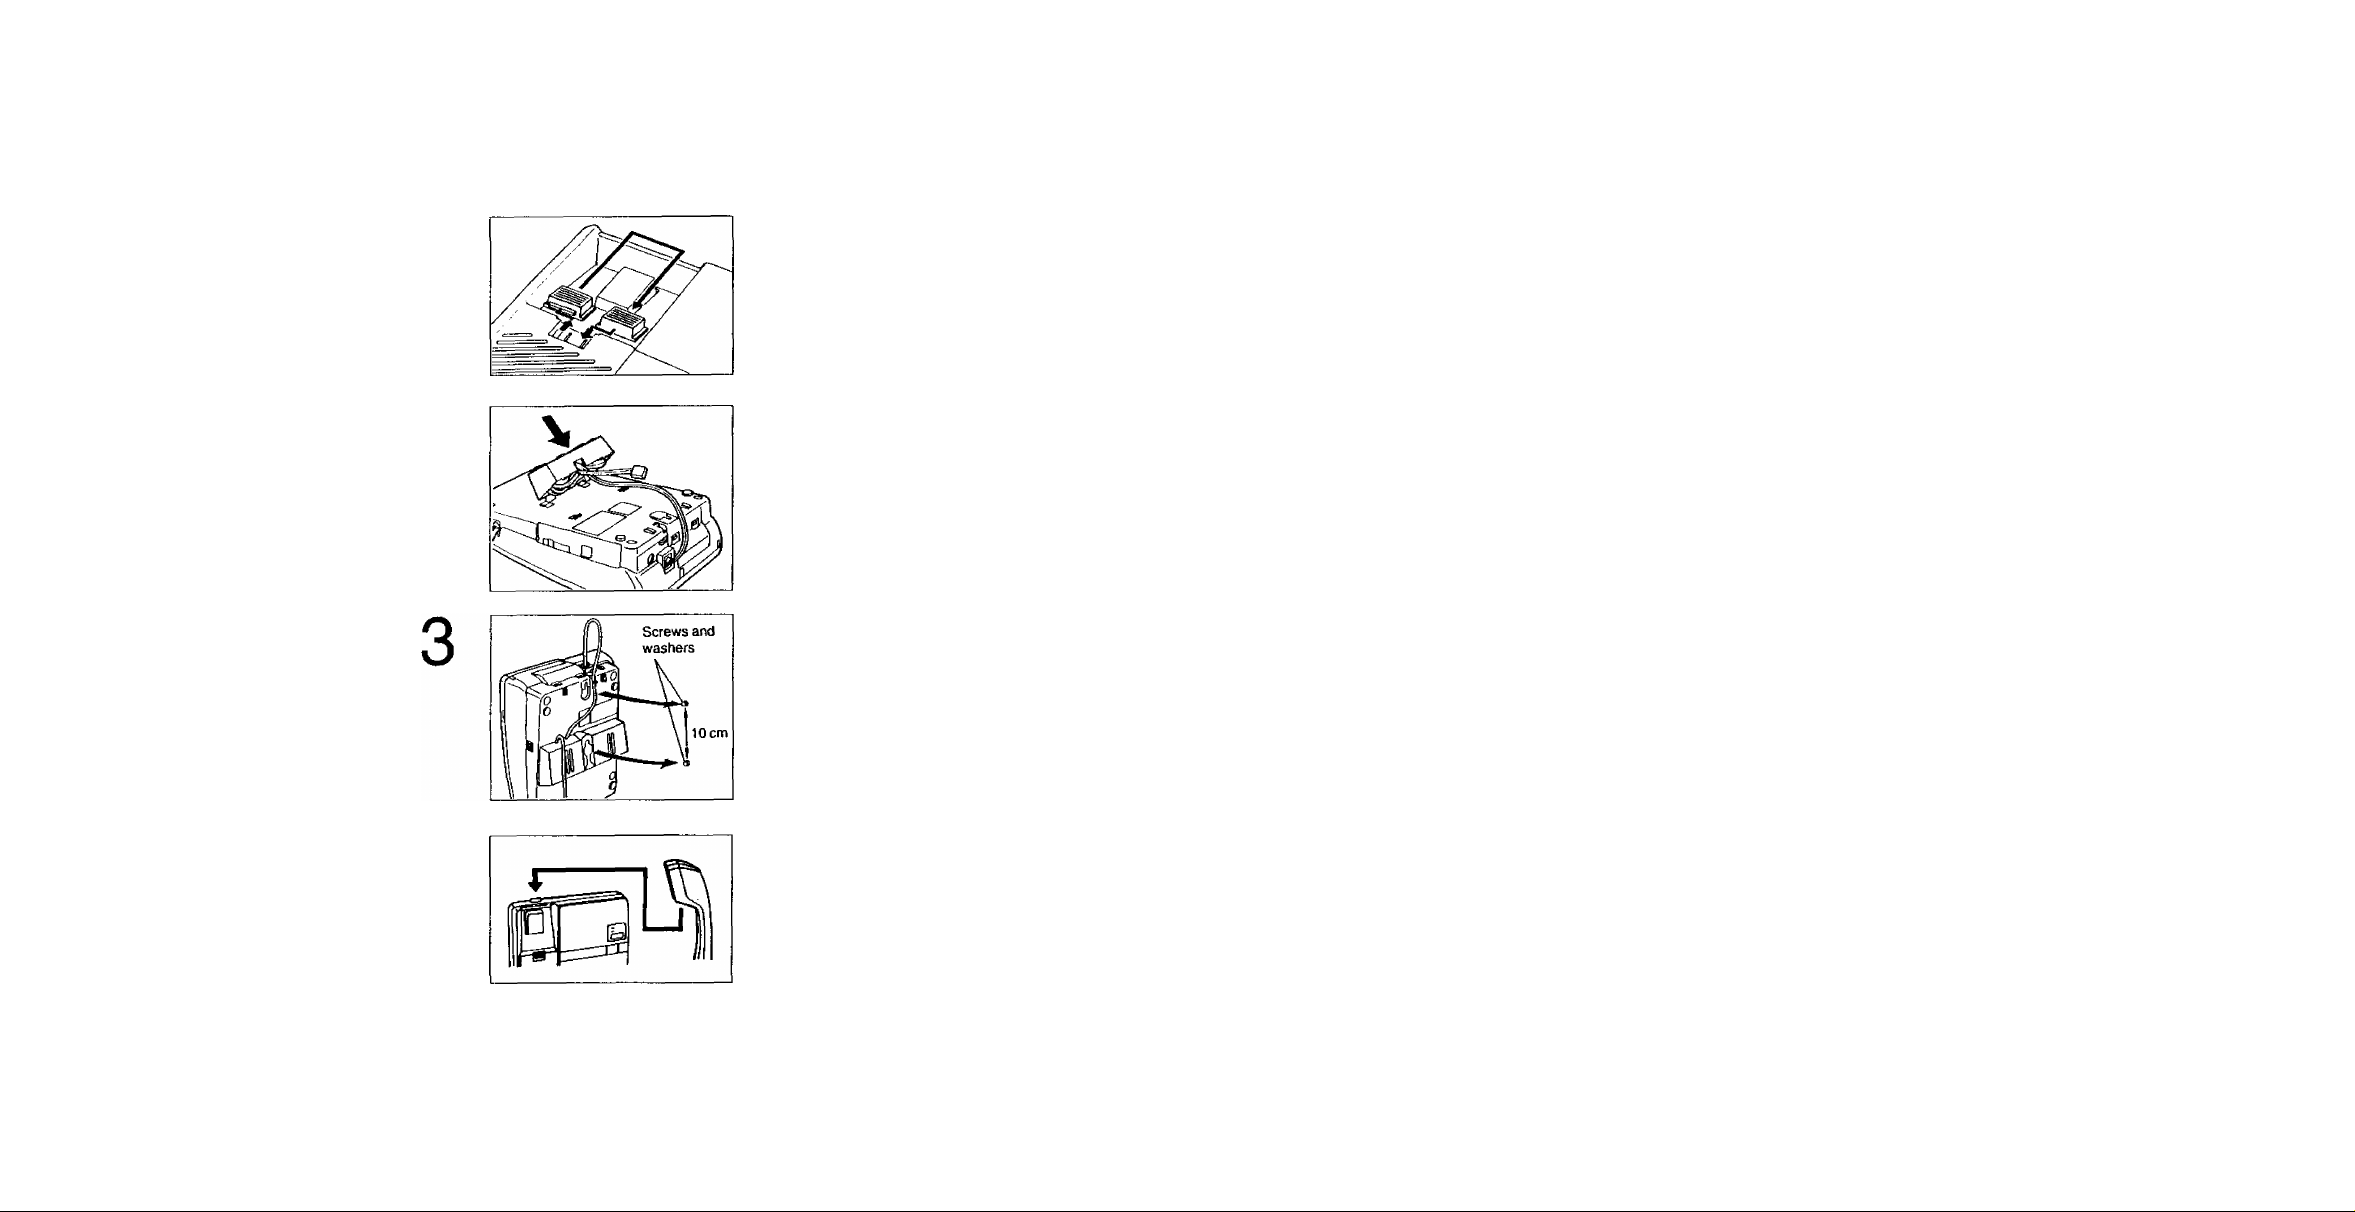
Wall mounting
The unit can be mounted on a wall utilizing the washers and screws
provided.
Turn around the handset hook.
1
Place the wall mount adaptor as
2
shown.
Install the screws and washers
using the wall template indicated
below, then mount the unit eyelets
as shown.
©PLAYBACK/PAUSE Button
(page 30);
Used to play back the recorded
Incoming Messages and to stop
the ICM tape temporarily during
ICM playback.
@PWR/IN USE (Power/ln use)
Indicator (page 14):
It lights when the unit is
powered on, and it flashes while
recording message.
ANS/CALLS (Answer/Calts)
Indicator (page 29):
It lights when the unit is ready
to answer the calls, and it
flashes with indicating the
number of recorded messages
after the message was recorded.
(§)OGM PLAY Button (page 15):
Used to play the recorded
Outgoing Message.
©OGM REG (Record) Button
(page 14):
Used to record the Outgoing
Message.
@ANS SYS (Answer System)
ON/OFF Switch (page 12);
Used to turn on and off the unit.
The PWR/IN USE indicator light
when the unit is turned on.
©RINGS (Ring times) Selector
(page 12);
Used to select the number of
rings that it takes for the unit to
answer.
©VOX SENS (Sensitivity)
Selector (page 12)
(@DC IN Jack (page 9)
©RINGER (Ringer volume)
Selector (page 12):
Used to select the ringer
volume HIGH, LOW or OFF.
(§)VOLUME Control (page 38);
Used to adjust the sound level
for the built-in-speaker.
Wall Template
Drill here
-(t
To temporarily place the handset
down during a conversation, hook
as shown.
10cm
(©REW (Rewind) Button
(page 30):
Used to rewind the cassette
tape.
©MEMO/2 WAY Button
(page 36):
Used to record a memo
message or a telephone
conversation.
Drill here
Page 8

Enclosures
AC adaptor
KX-A11BA
Microcassette tape
(page 8)
Handset
(page 10)
Wall mounting adaptor
(page 41)
one
one Telephone line cord
one Handset cord
one
Screw
.....................................
Washer...................................two
(page 41)
(page 9)
(page 9)
two
one
one
Problems Cause & Remedy
When the cassette tape is played
back, the sound level is low, even
if the VOLUME control is turned up
fully.
I want to record the next Incoming
Messages after the last previously
recorded messages that I have
heard.
The unit does not answer remotely.
I try to operate from a remote
touch tone phone, but the unit
does not respond when I press
any button.
►Clean the heads. (See page 42.)
•Save the old messages. (See
"Recording after the messages
you have heard” on page 30.)
•In case of remote operation, just
hang up.
• If you can hear ring-tone but the
unit fails to answer, this is
because the power of the unit is
turned off. (The unit is not in the
answer mode.) Set the unit to the
answer mode by call your
telephone number and ring for
15 times. (See page 35.)
•Make sure that you are entering
your correct remote code number.
•When you press a button, press
firmly for 1-2 seconds.
• In some areas, a remote touch
tone phone may not function due
to telephone line conditions such
as line noise, echo, etc.
•The unit may not respond if a
remote touch tone phone (such as
mobile telephone, etc.) produces
tones that are too short to activate
the unit. Please change the
telephone.
7-
The ICM tape continues to run
after a caller hangs up.
•Set the VOX SENS selector to
the "L” position.
-40-
Page 9

Troubleshooting guide
Problem
Cause & Remedy
inserting the tape
Cassette tape compartment is covered.
The unit does not work when 1
press any buttons.
The unit does not ring.
i try to store the telephone number
into memory station, but the
storing procedure cannot be done.
The Outgoing Message is
recorded improperly.
When 1 press the OGM REC
button to record my Outgoing
Message, the unit does not start
recording, and a beep sounds
6 times and the ANS/CALLS
indicator flashes.
• Plug in the AC adaptor again.
•The unit is turned off. Press the
ANS SYS ON/OFF switch to turn
on the unit.
•The RINGER selector is set to the
“OFF” position. Set it to the
“HIGH” or “LOW" position.
• Be sure that the AC adaptor is
connected and handset is on the
cradle.
• Record a new Outgoing
Message.
•Clean the heads. (See page 42.)
•The cassette tape might be
broken. Replace it with a new
one.
2
open the cassette panel.
Remove the stopper of the
cassette tape.
Insert the cassette tape.
When 1 record an Outgoing
Message, a beep sounds 6 times
and the unit stops recording.
• Re-record your Outgoing
Message. Speak clearly and
loudly, and do not pause for over
2 seconds while recording.
Page 10
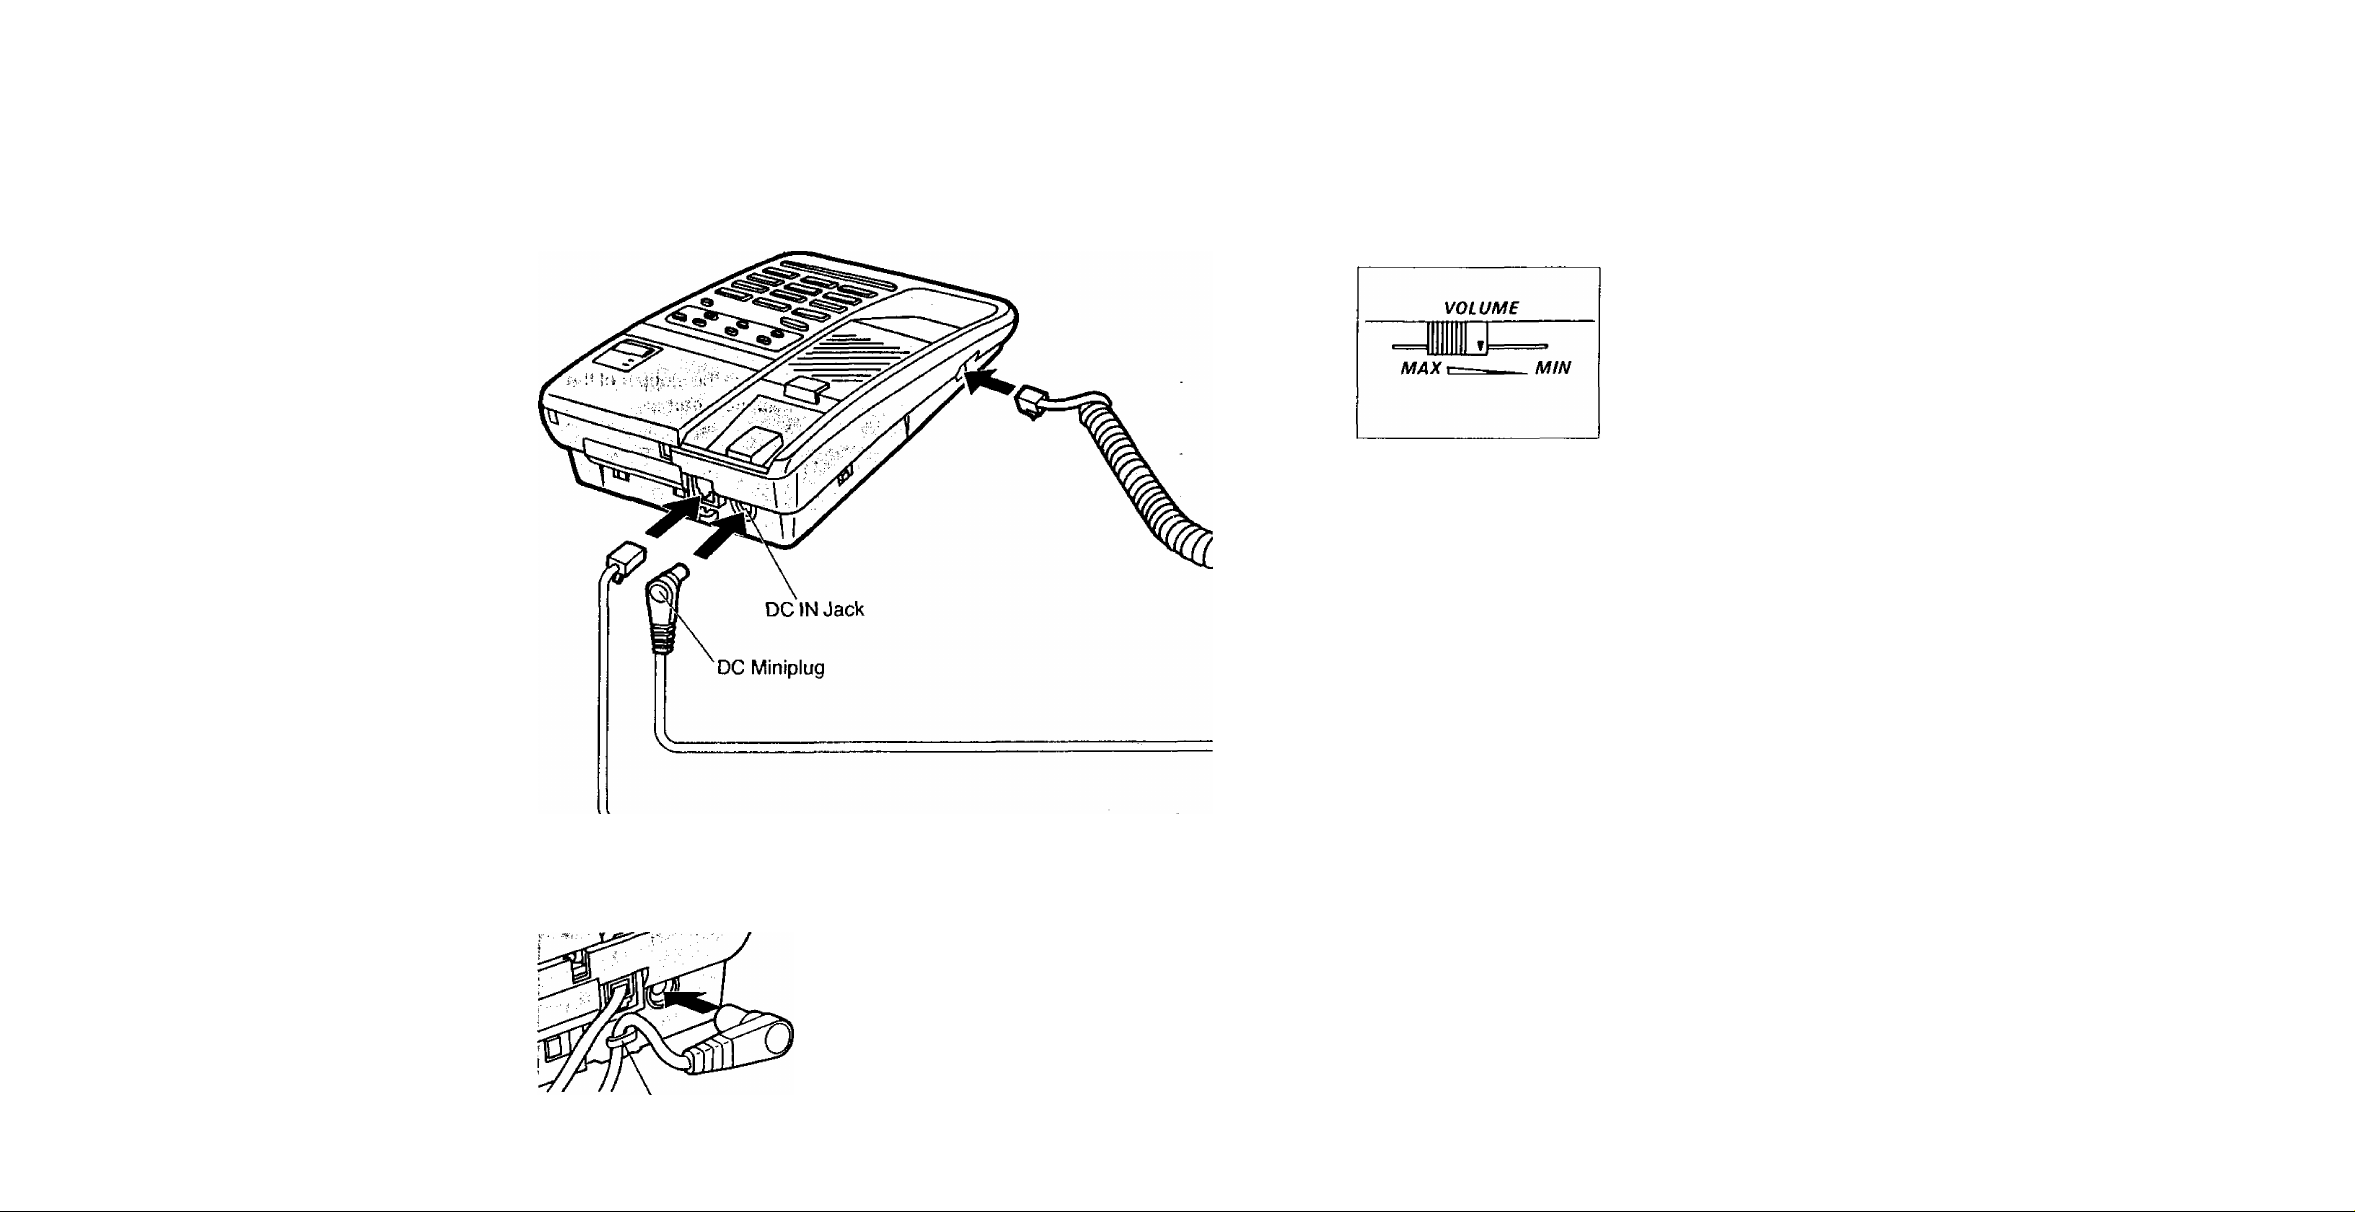
Connection
Monitoring the incoming calis
This unit is designed to be connected as shown.
You may leave the unit in answer mode even when you are around. In this
case, after the unit has answered, you will monitor the caller speaking.
You can interrupt the recording and speak to the caller by simply lifting the
handset. The unit will automatically stop recording.
After hanging up, the unit will be ready to answer the next phone call.
Adjust the VOLUME control if
needed.
Place the cord into the holder.
Holder
Fasten the AC Adaptor cord
to the Holder, to prevent the
DC Miniplug from
disconnecting.
-9-
-38-
Page 11

Recording a conversation
(2-way recording)
You can record a telephone conversation.
1
2
rtArRAC
f
►/11
-----------------------
K
MBMO
2)^VAY
A \
Press the MEMO/2WAY button
until a beep sounds during your
conversation, and continue
speaking.
The PWR/IN USE indicator flashes
and the ANS/CALLS indicator
lights is on.
A beep will be heard every
15 seconds.
Press the MEMO/2WAY button
again when you finish recording.
The PWR/IN USE indicator light is
on and the ANS/CALLS indicator
goes out.
The unit rewinds and resets the
tape, and be ready to answer the
next phone call.
The ANS/CALLS indicator flashes
to show that the conversation was
recorded.
AC adaptor
(KX-A11BA)
To Power outlet
(AC 220-240V, 50 Hz)
The recorded conversation can be played back either manually or
remotely just like any other recorded Incoming Messages.
To Telephone Line
• Be sure to insert the tape before connecting the AC adaptor.
• If a power failure takes place, the unit can be used as a typical telephone.
• Be sure to use the included AC adaptor Panasonic Model KX-A11 BA.
•While you are operating the unit, the case of the AC adaptor may feel
warm. This is a normal condition.
Page 12

Initial preparation
Recording a memo message
Selector settings
ANS SYS ON/OFF Switch
If you want to leave a memo
message for someone, you
can record it on the tape.
It can then be played back
either manually or remotely
just like any other recorded
Incoming Messages.
1
Press the MEMO/2WAY button
until a beep sounds.
A series of short beeps will be
heard followed by a long beep.
Immediately after the long beep,
speak loudly and clearly, about
20 cm away from the microphone.
Function of the AUTO setting (TOLL SAVER)
When you call the unit from an outside phone, the number of rings that it
takes for the unit to answer tells you if there are any new messages.
If the unit answers on the 2nd ring: There is at least one new message.
If the unit answers on the 4th ring: There are no new messages.
Hang up immediately when you hear the 3rd ring. Because the 3rd ring
indicates there are no new messages. This will save you the toll charge for
the call.
-11 -
The PWR/IN USE indicator flashes.
Your recording time is up to
2 minutes 20 seconds.
Press the MEMO/2WAY button
again when you finished recording.
The unit rewind the tape to the
beginning, and is ready to answer
the next phone calis.
The PWR/IN USE indicator light is
on and the ANS/CALLS indicator
flashes to show that your message
was recorded.
-36-
Page 13

Resetting the tape for future message
After listening to the messages, you can reset the tape and record new
messages from the beginning.
Wait for 3 beeps after the last
1
message.
1
ANS SYS
ON/OFF
ANS SYS ON/OFF Switch
Press the switch to turn on the
unit. The PWR/IN USE indicator
light is on, and the unit resets the
cassette tape.
RINGS Selector
Press the code number within
2
10 seconds of hearing 3 beeps.
The unit will rewind the tape to the
beginning. Future messages will
be recorded and the old messages
will be lost.
Recording a marker message
After listening to all your messages, you can leave a message on the
same call. When replay is finished, wait for 3 beeps indicating the end of
the last message. Then wait about 10 seconds for another 2 beeps
indicating that the tape is ready for recording. Leave your message after
the last 2 beeps. Hang up when finished.
3 beeps 2 beeps
Щ
Last
message
----------10
seconds
W
’New message
recording space
2
3
4
Timed Recall (Flash) Setting
The timing of recall signal is preset to “450 msec".
If you set the Timed Recall, refer to “Setting the Timed Recall
(Flash)” on page 26.
RINGER
HIGH • • • OFF
LOW
4: The unit answers on the
4th ring.
AUTO: See “TOLL SAVER” on
page 11.
vox SENS Selector
If either the tape continues to run
after a caller has placed his handset
or there are long pauses between or
after messages, set the selector to
the position “L”.
(Normally the switch is preset to
the position “H".)
RINGER Selector
Set the selector to the “HIGH” or
“LOW" position. When setting to
the “OFF" position, the unit does
not ring.
Setting the answer mode remotely
You can easily set the answer mode from a remote telephone.
1. Call your unit and let the telephone ring 15 times.
2. The unit will answer, and the OGM will be heard, then hang up.
The unit will be ready to answer the next phone call.
Page 14

Recording an Outgoing Message (OGM)
Playing back all the messages
The Outgoing Message is an announcement to tell the caller that you are
out, and asks to leave a message.
OGM REG button
1
2
Cod
To rewind during playback
Call your unit.
Dial your code number {for
example, 1) for 1-2 seconds
2 times while the OGM is being
played.
The unit rewinds the tape and
plays back all the recorded
messages.
After the last message, 3 beeps
will sound and you may hang up.
Messages are automatically saved
after hanging up.
Sample OGM
“Hello, this is Paul Smith. I’m out now, but if you leave a message I’ll call
you back. You will hear a series of short beeps then a long beep will
be heard. Speak after the long beep. You have 2 minutes 20 seconds.
•Please record the bold-faced sentence surely on the OGM.
•Caller’s recording time is up to 2 minutes 20 seconds.
•A series of short beeps lasts while the tape is preparing for recording,
and a long beep means the tape is ready.
-13- 34-
Dial the code number (for
example, 1) for 1 -2 seconds.
The unit rewinds the tape for a few
seconds and starts playback.
Note;
When you press a button, press firmly for 1 -2 seconds.
The unit may not respond if a remote touch tone phone (such as mobile
telephone, etc.) produces tones that are too short to activate the unit.
Page 15

Remote operation
Confirm that the PWR/IN USE indicator light is on.
Your OGM can be up to 30 seconds long.
You can retrieve the recorded Incoming Messages from a remote location
with a touch tone phone by simply dialling your own remote code number.
Remote code number
A remote code number for you is preset and indicated on the bottom of the
unit.
CAUTION:
Do not pause for over 2 seconds during recording.
If 6 beeps sound, start over from step 1 again after the unit stops
rewinding.
Press the OGM REC button, then
1
2
release it.
Immediately after the long beep,
speak clearly and loudly, about
20 cm away from the microphone.
The PWR/IN USE indicator flashes.
Press the OGM REC button again
when you finish recording.
The remote code number is indicated on the label.
The unit rewinds the tape, and will
be ready to answer the calls after
10 seconds.
NOTE:
When there is no room left on the tape to continue recording the caller’s
message, a beep will sound 6 times after the OGM or during the callers’
recording. If you want to inform this to the caller, please record next
sentences additionally in your outgoing message.
*‘lf the beep sounds 6 times, your message will not be recorded.
Should this happen, please call back tomorrow.”
Page 16

Checking your recorded OGM
Piaying back the tape from the beginning
Press the OGM PLAY button.
Press the OGM PLAY button
again if you want to stop the
operation halfway.
The unit will be ready to answer
the calls after 10 seconds.
Using your answering machine
After having done all the preparations for this unit (including connection),
the unit resets the tape, and 10 seconds later, the ANS/CALLS indicator
light is on.
Now your unit is ready to answer the phone call.
(The unit is set to the answer mode.)
Then it will record the callers' messages.
Press the PLAYBACK/PAUSE
button.
The unit rewinds the tape and
plays back your messages.
3 beeps will be heard indicating
the end of the last message.
After 10 seconds, the unit will
rewind the tape, and new
message will be recorded from the
beginning of the ICM part of the
tape.
Adjust volume, if needed.
To pause during playback
Press the PLAYBACK/PAUSE
button during playback to pause
the unit.
The PWR/IN USE indicator flashes
(pause mode).
Press the PLAYBACK/PAUSE
button again to restart playback.
-15-
To rewind during playback
Press the REW button to rewind
the tape to the desired location.
The unit will play back the
message again after you release
the REW button.
If you keep pressing the REW
button until the unit rewinds to the
beginning of the tape, a beep will
be heard. In this case, the unit has
been reset to the answer mode.
-32-
Page 17

Listening to the recorded
messages
When an Incoming Message (ICM) has been recorded, the ANS/CALLS
indicator will flash in groups. The amount of flashes indicates the number
of messages recorded up to 15 times. (Three flashes followed by a pause
means that 3 messages were recorded.)
In case of power interruption, the ANS/CALLS indicator will flash slowly.
PLAYBACK/PAUSE button
TELEPHONE
At the touch of the PLAYBACK/PAUSE button, the unit will automatically
rewinds and play back all the recorded messages. 10 seconds after
playback, the unit will reset the tape and be ready to record incoming calls
automatically.
-
Page 18

Making and answering calls
Recording from the beginning of the ICM part
of the tape
Making calls with the handset
1. Lift the handset, and identify the dial tone.
2. Dial the telephone number.
Making calls with the MONITOR button
(on-hook dialling)
Press the MONITOR button, and
identify the dial tone.
The MONITOR indicator tight is on.
Dial the telephone number.
Press the REW button until the
unit stops rewinding (a beep
sounds), then release it.
OR
After ICM playback, leave the unit
as it is. The unit has been reset to
the answer mode.
New messages are recorded over
the old messages.
Recording after the messages you have heard
When you want to record the next Incoming Messages (ICMs) after the
last recorded message, or after a desired position of the tape, save the
messages you have heard.
Press the PLAYBACK/PAUSE
button to play back the tape to the
end of the message you want to
save.
1
I t
_
f pwf^m liSE
I fiJiyOAOt. F40SE
)
When the other party answers, lift
the handset and speak to the other
party.
Hang up the handset when your
conversation is over.
The MONITOR indicator light is off.
- 17-
2
3
AM'CAnS
1 i PtVniHUSF
Pi AyDACH PAUSE
nAУBAC^PAU¿S
( ]
Press the PLAYBACK/PAUSE
button again to pause the unit.
The PWR/IN USE indicator
)
flashes. (Pause mode)
Press the REW button and the
PLAYBACK/PAUSE button
simultaneously.
The PWR/IN USE and the
ANS/CALLS indicator lights are
on. New calls will be recorded after
the message(s) you have saved.
30-
Page 19

Setting up for answering machine
Press the ANS SYS ON/OFF switch to turn on the unit. The PWR/IN USE
indicator light is on. 10 seconds after, the ANS/CALLS indicator light is on
and the unit is ready to answer the next phone call.
PLAYBACK/PAUSE button
Redialling
The unit can redial the last dialled number automatically. The REDIAL
button will store the last dialled number into memory up to 32 digits.
Lift the handset or press the
MONITOR button, and identify the
dial tone.
Press the REDIAL button.
You can redial once.
You can redial soon after dialling the telephone number by pressing the
REDIAL button without hanging up.
►Answer mode:
When a call is received, the unit answers the call and record the
Incoming Message.
► If you do not want the unit to answer the call, press the ANS SYS
ON/OFF switch to turn off the unit. The PWR/IN USE indicator light will
go out.
►Caller's recording time is limited to 2 minutes 20 seconds.
Answering calls
When the telephone rings, lift the handset and start speaking.
Page 20

Automatic dialling
There are 6 direct call buttons including CLEAR and PAUSE. Each button
consists of 2 memory locations (upper and lower). You can store
12 numbers up to 32 digits.
CAUTION:_____________________________________________________
Do not press any direct call buttons before storing the telephone
number. This is to prevent misoperation of automatic dialling function.
Refer to “Storing the telephone numbers" on pages 21 to 24.
Making calls using the upper memory location
Lift the handset or press the
1
2
r \
CD CO
CD
V
('" ■ )
BARmn€CAL
1 1
CD
T
(
—1
1
f D
MONITOR button, and identify the
dial tone.
Press the direct call button in which
the number that you want to dial is
stored.
J
ANSWERING MACHINE
At first, please record your Outgoing Message
before using your unit as an answering machine.
(For Outgoing Message recording, see page 14.)
-19-
-28-
Page 21

Hold
Pause
Making calls using the iower memory iocation
The HOLD button is used to keep
a call on hold while having a
conversation.
Press the HOLD button while
having a conversation.
The HOLD indicator flashes.
You may place the handset on the
cradle.
Releasing a hold
• If the handset is off-hook;
press the HOLD button again.
•If the handset is on the cradle
(on-hook):
lift the handset or press the
MONITOR button.
•When using another telephone
connected on the same line;
lift the handset of the other
telephone. If the hold is not
released, press the hookswitch
of the other telephone for about
one second.
The PAUSE button is helpful in the
automatic dialling when accessing
an outside line. To use this
function, store “pause” with the
telephone number into the memory
station beforehand.
While storing the telephone number
Into the memory, one pause is
required when waiting for an
outside dial tone.
Example:
P9M PAUSE
l|H
I__I
Line access number
Press once (3.5 seconds pause)
Press twice (7 seconds pause)
Telephone No.
Combination dialling
A telephone number with more
than 32 digits can be stored into
two memory stations. For dialling,
follow the next:
Lift the handset or press the
1
2
CD CD
t
mod
____/
MONITOR button, then identify the
dial tone.
Press the LOWER button, then
press the direct call button in
which the number that you want to
dial is stored.
Ш
-
--------------------------------------------
s
CD
CD
V
___ _ __
MfffflECALL
Memory card
Use a pencil or a bail-point pen to fill in the station directory with station
name. (You can use the reverse side for writing, too)
Remove the cover using an instrument with a pointed end, like a pen.
CD
CD
CD
1
CD
.....
>
iOvrtf* (
If you press the LOWER button by
mistake when you want to use the
upper location, you must hang up
and then dial again.
1. Lift the handset, and identify the
dial tone.
2. Press the direct call button "1”.
3. Press the direct call button “2".
Instead of using two memory
stations, you can store a part of
the telephone number into one
memory station, and the other part
can be dialled manually.
1. Lift the handset, and identify the
dial tone.
2. Press the station key, wait for
dialling to stop, then dial
manually.
- 0*7
Page 22

storing the telephone numbers
Make sure that the handset is on the cradie, the MONITOR indicator is off
and the AC adaptor is connected. When you store a telephone number
into memory, pressing 0 through 9, #, PAUSE, or RECALL button
counts as 1 digit.
Setting the Timed Recall (Flash)
The timing of recall signal must be within the requirement from your Central
Office or Host PBX. Depending on your PBX, you may have to reprogram the
recall signal. 3-digit numbers (100 through 950 msec, every 50 msec) are
available for the recall signal—100,150,200,...950 msec.
The timing of recall signal is preset to “450 msec”.
To program the timing of recall signal
PROG button
1
PAUSE
CD
CIBAH
<ZD
CD
CD
1 OWEn (
Press the PROG button.
The STORE indicator light is on.
Press the RECALL button.
The STORE indicator goes out.
Enter the 3-digit number that your
PBX requires.
(For example, to program 600 msec
for recall signal, enter "600”.)
Press the HOLD button.
The STORE indicator light is on.
-21 -
5
PAUSE
CD CD
CLEAR
CD CD
tOWER (_
Press the PROG button after storing
all the numbers.
The STORE indicator light goes out.
-26-
Page 23

Other operation
Storing into the upper memory location
EARTH RECALL button PAUSE button
RECALL button HOLD button and indicator
Recall
The RECALL and EARTH
RECALL buttons are used to
access special telephone services
such as call waiting service or call
forwarding. Use these buttons
properly depending on the type of
the PBX that your unit is
connected to.
Use the RECALL button for PBX
with Timed Break register recall
facility.
The timing of the recall signal can
be changed by programming, see
page 26.
Example: Call waiting
1. During conversation, another
party calls and you hear a tone.
2. Press the RECALL or EARTH
RECALL button.
The first conversation is placed
on hold and the second call can
be answered.
To speak to the first caller
again (the second caller is
placed on hold), press the
button again.
You may access some features of
your host PBX using the RECALL
button in a dialling operation.
1
5
PAUSE
CD CD
CLEAR
CD
PAUSE
CD
CLEAR
CD
CD
; CD
Press the PROG button.
The STORE indicator light is on.
CD
iOWEH (
Press the direct call button.
The STORE indicator light goes
out.
Dial the telephone number that
you want to store, up to 32 digits.
Press the HOLD button to store
the number into memory.
The STORE indicator light is on.
To store other numbers in
succession, repeat from step 2.
Press the PROG button after
storing all the numbers.
The STORE indicator light goes
out.
LOW£H t
Use the EARTH RECALL button
for PBX with Earth Recall facility.
Page 24

Storing into the lower memory location
Correcting an error while storing
1
PAUSE
CD
CLEAR
CD
CD CD
C3 CD
CD
V
_______
c
£ARTHft£CAU
CD
v^;:7;,,CD
tOWFfl (3
—p
J
4r''
CD
CD CD
Press the PROG button.
The STORE indicator light is on.
Press the LOWER button (the
STORE indicator flashes), then
press the direct call button.
The STORE indicator light goes
out.
cp
Dial the telephone number that
you want to store, up to 32 digits.
If you notice an error before pressing the HOLD button;
TEL W,
PAUSE
CD
CLEAR
CD
V
C ) \
EARTH RECALL
CD
"R
w
Vw“
c
.
Press the CLEAR button.
Repeat from step 2 of the storing
procedure.
Confirming a stored number
Store the same number into the same station. When you press the HOLD
button, you hear a beep once or twice.
•Twice: The number newly stored is the same as that was previously
stored.
• Once; The number newly stored is different from the one that was
previously stored. Reprogram the correct number.
4
5
• I
____
MEDIAL HO^r
iNE \
I 0
\ M0NIT08
A
PAUSE
CD ■ v:^--'cD
CLEAR
■ ■ :>#CD
CD
lOW£R C3I
CZ5
Press the HOLD button.
The STORE indicator light is on.
To store other numbers in
succession, repeat from step 2.
Press the PROG button after
storing all the numbers.
The STORE indicator light goes
out.
-23
Erasing a stored number
1. Press the PROG button.
2. Press the direct call button in which the number that you want to erase
is stored.
3. Press the HOLD button.
4. Press the PROG button.
When you want to erase the number stored into the lower memory
location, press the LOWER button then press the direct call button at
step 2 of the above procedure.
-24-
 Loading...