

Page 1
Panasonic
Integrated Telephone System
EASA>PHONEo
Model No.
KX-T2395/KX-T2395D-W
Pulse-or-tone dialling capability
PLEASE READ BEFORE USE AND SAVE.
La refe<«ncia an aspartol pueda ser
«ncontmda en ias p^naa 36'- 41.
(Spaniah Quick Reference can Pa found
tm pages 35"4i.)
r
ITM
Page 2
Please read IMPORTANT SAFETY INSTRUCTIONS on pages 43-44 before use. Read and understand all instructions.
Features
Thank you for your purchasing the Panasonic integrated
telephone system.
Tone Remote Control System
lets you activate functions from a remote location, via a tone telephone.
TM
fli
automatically rewinds, plays messages, stops at the last message and
resets itself at the touch of one button.
2-Way/Memo Recording
lets you store phone conversations and allows your family or secretary
to leave personal messages on the tape.
Operation
- I -
Page 3
Call Screening
lets you listen to your caller before picking up the receiver.
Built-in Speakerphone
for “hands-free" conversations or conference calls.
One-Touch Automatic Dialing
for up to 12 telephone numbers.
Switchabie Tone/Pulse Settings
for compatibility with tone-actuated computer systems and any phone
line.
One-Touch Tone Switching
lets you temporarily switch to tone from pulse mode by pressing a
button.
-II -
Page 4
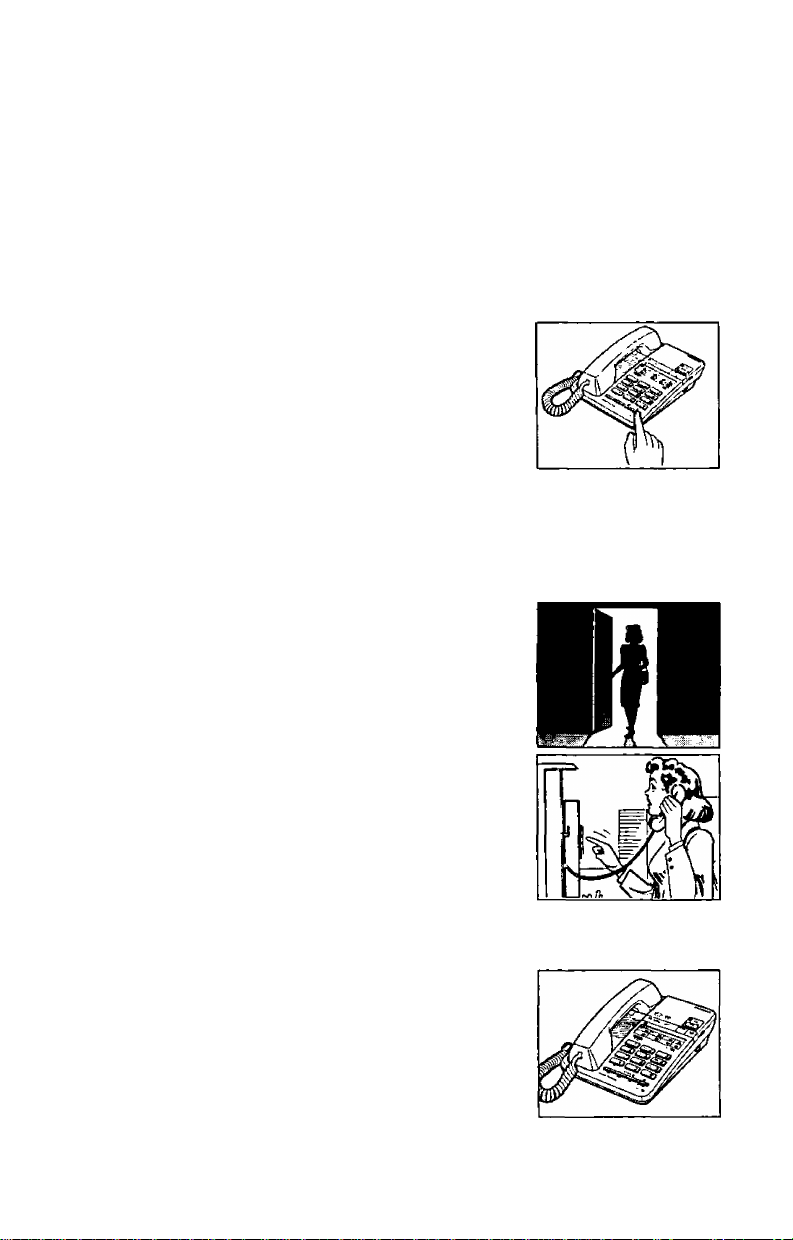
Table of Contents
PREPARATION
TELEPHONE
ANSWERING MACHINE
GENERAL INFORMATION
- Ill -
Page 5

Features.................................................................................................................... I
Table of Contents................................................................................................... Ill
Included Accessories ............................................................................................ V
Location of Controls ........................................................................................... 1
Inserting the Tape .................................................................................................. 5
Connection .............................................................................................................. 6
Initial Settings......................................................................................................... 7
Recording an Outgoing Message (OGM)
Checking your recorded OGM
............................................................
...........................................................
10
9
Making and Answering Calls
Making calls using the handset.......................................................... 11
Making calls using the SP-PHONE button (on-hook dialing) ... 11
Automatic Dialing.................................................................................................. 13
Other Operation .................................................................................................. 17
Setting up for Answering Calls .......................................................................... 19
Listening to Recorded Messages ...................................................................... 21
Remote Operation
Other Features...................................................................................................... 25
Redialing, Answering calls.................................................................. 12
Storing the telephone numbers
Correcting an error while storing
Confirming a stored number............................................................... 16
Erasing a stored number .................................................................... 16
Hold........................................................................................................ 17
Flash, Mute, Tone, Pause, Combination dialing
Recording from the beginning of the ICM part
of the tape ..........................................................................................20
Recording after the messages you want to save ............................. 20
Playing back the tape from the beginning......................................... 22
...............................................................................................
The remote code number..................................................................... 23
Playing back all the messages
Resetting the tape for future message .............................................. 24
Recording a marker message............................................................. 24
Setting answer mode remotely
Recording a memo message
Recording a conversation (2-Way Recording)
Screening incoming calls ................................................................... 26
..............................................................................
..........................................................
.......................................................
...............................
...........................................................
...........................................................
.............................................................
.................................
11
14
16
18
23
23
24
25
26
Troubleshooting Guide
Wall Mounting..................................................................................................... 29
Accessory Order Information ............................................................................. 30
Maintenance.......................................................................................................... 31
Precaution ............................................................................................................ 33
important Information........................................................................................... 34
Referenda Rápida ................................................................................................ 35
Important safety instructions.............................................................................. 43
........................................................................................
27
-IV-
Page 6
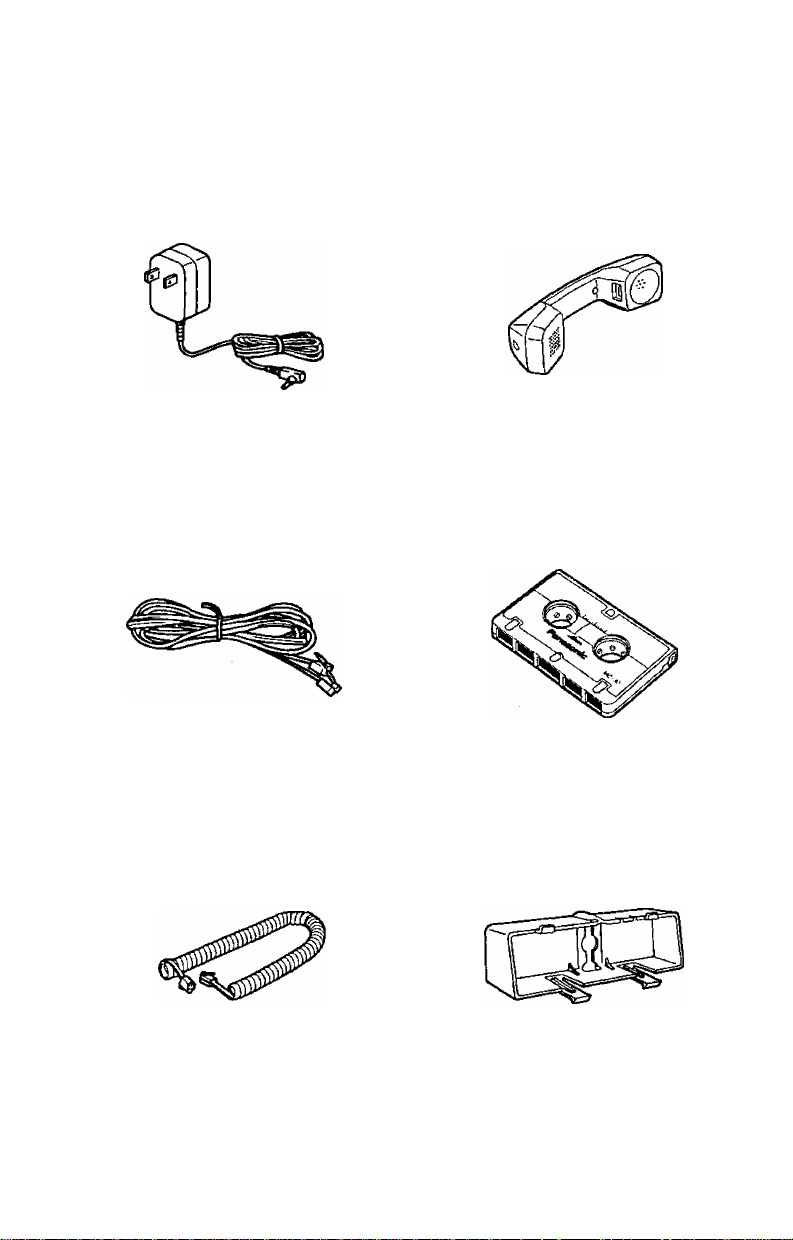
Included Accessories
AC adaptor
KX-A11
Telephone cord
........................
one Handset
one
Microcassette tape
......................................
....................
one
one
Handset cord
.............................
one
Wall mounting adaptor
- V -
..............
one
Page 7
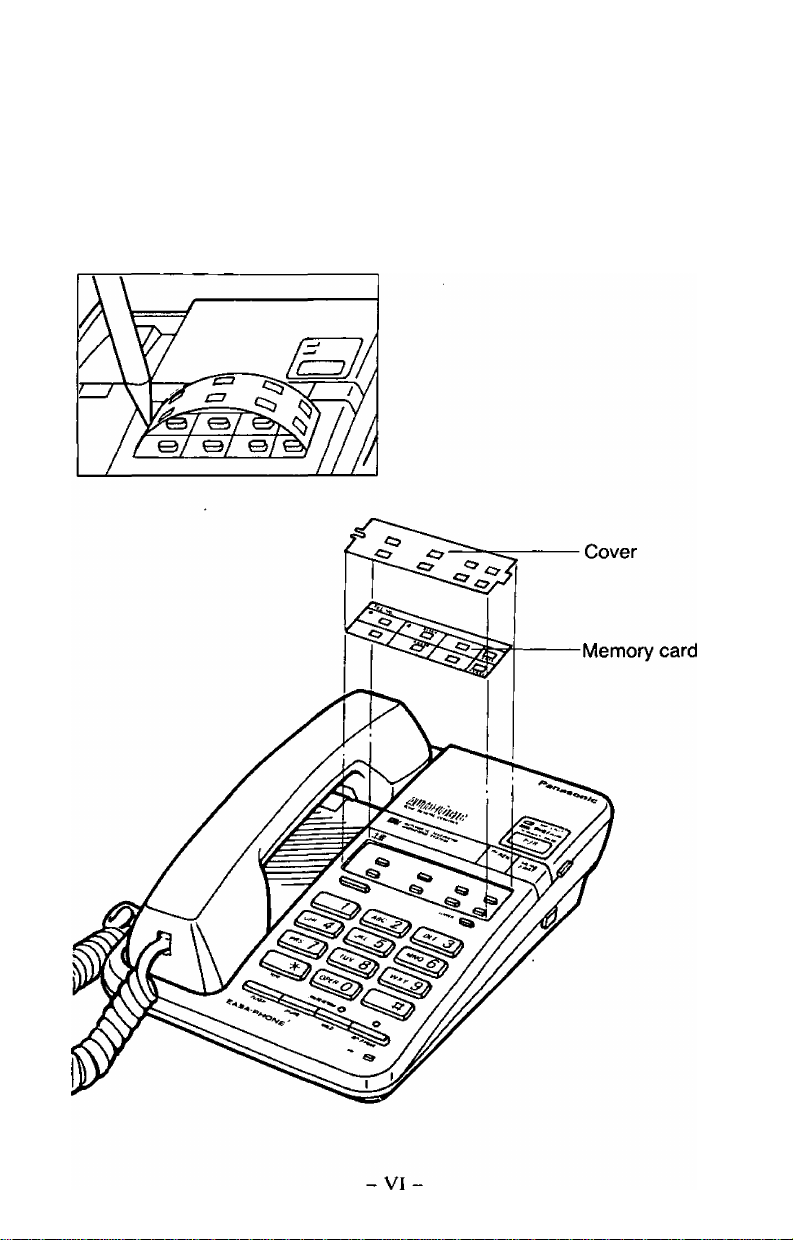
Memory card
Use a pencil or a bait-point pen to fill in the station directory with station
name. (You can use the reverse side for writing, too.)
Remove the cover using an instrument with a pointed end, like a pen.
Page 8
PREPARATION
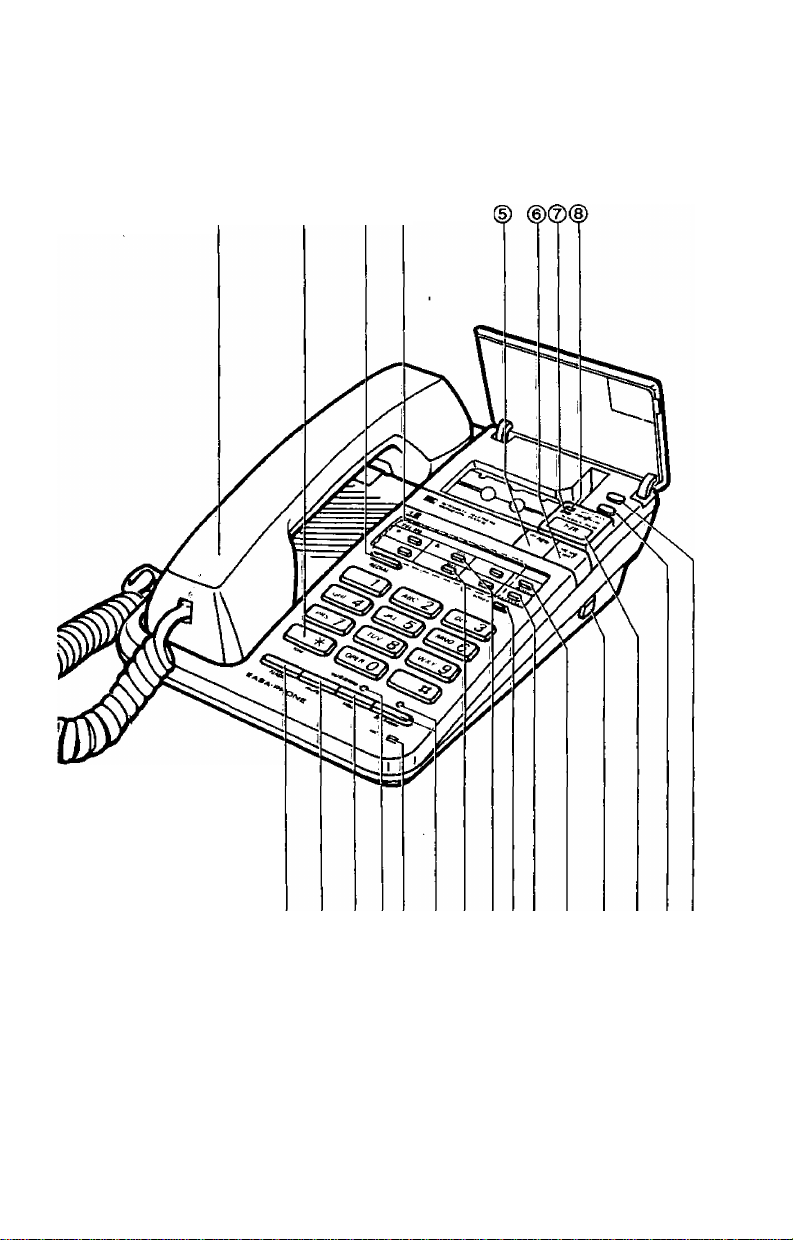
Location of Controls
® ® (3) @
(9) ® ® ® ® @ @
- 1 -
Page 9

PREPARATION
© Handset
©TONE Button:
Used to change the dialing
mode from pulse to tone
during a dialing operation.
@ REDIAL Button;
Used to redial the last dialed
phone number.
0 DIRECT CALL Buttons:
Used to store phone numbers
and to make calls using
one-touch dialing.
® REW (Rewind) Button:
Used to rewind the cassette
tape.
© MEMO/2 WAY Button:
Used to record a memo
message or a telephone
conversation.
© PWR/IN USE (Power/ln use)
Indicator
® ANS/CALLS (Answer/calls)
Indicator
(9) FLASH Button:
Used to access some of the
feature of your host PBX.
® MUTE Button:
Used when you do not want
your voice to be heard by the
other party. The voice of the
calling party will still be heard.
0 HOLD Button and Indicator;
Used to put the calling party
on hold during a conversation.
While holding, the indicator
flashes.
0SP-PHONE (Speakerphone)
Button and Indicator:
Used to make or answer a
phone call without using the
handset.
©CLEAR Button:
Used to clear the memory
while storing telephone
number.
©PAUSE Button;
Used to enter a pause in
phone numbers when
programming.
©LOWER Button:
Used to select the lower
memory location.
©STORE Button:
Used to store phone numbers
into memory.
©PROG (Program) Button:
Used to start and complete the
programming procedures.
® ANS SYS ON/OFF (Answer
System On/Off) Switch:
Used to turn on and off the
unit. The PWR/IN USE
indicator lights when the unit is
turned on.
©PLAYBACK/PAUSE Button:
Used to play back the
recorded Incoming Messages
and to stop the ICM tape
temporarily during ICM
playback.
@OGM PLAY Button:
Used to play the recorded
Outgoing Message.
©MUTE/STORE (HOLD)
Indicator
® MIC (Microphone)
©OGM REC Button:
Used to record the Outgoing
Message.
-2-
Page 10
PREPARATION
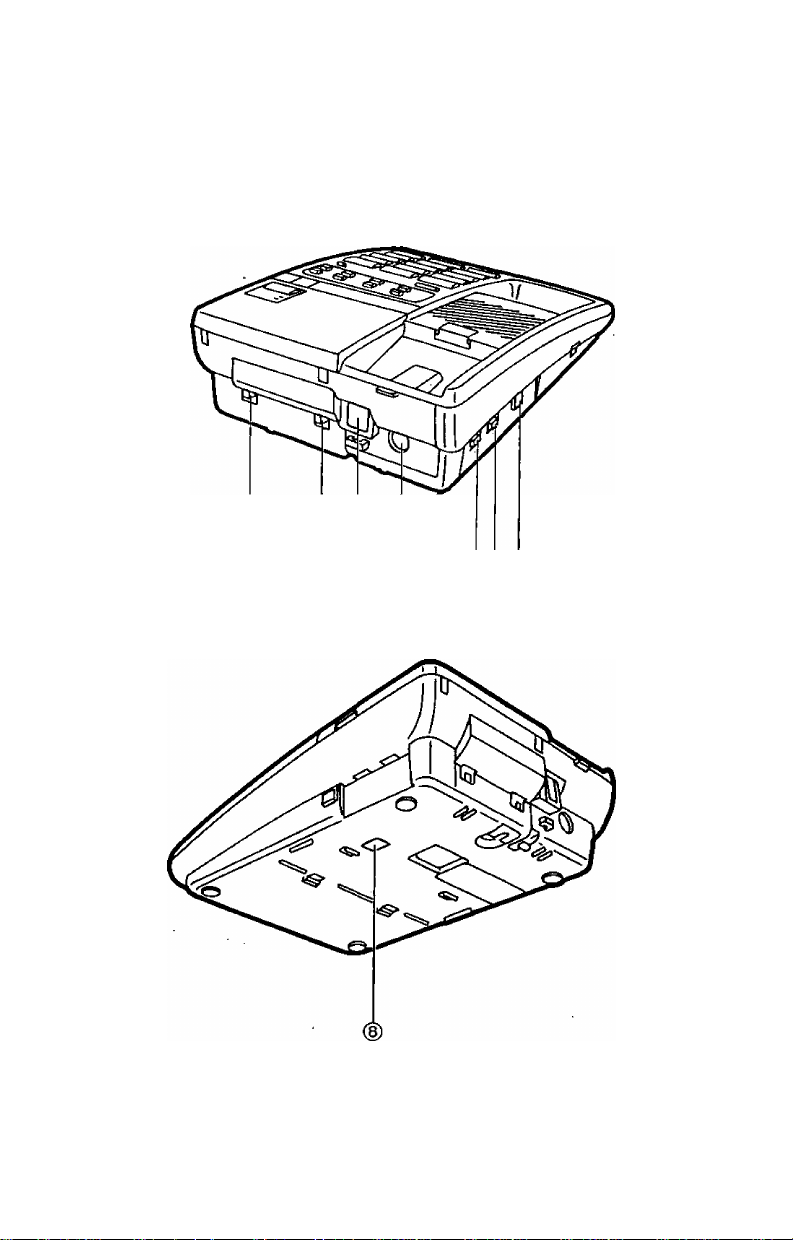
Location of Controls
© @ @ @ (i)@@
-3-
Page 11

© CPC Selector:
Selector for call waiting
service.
© RINGS {Number of Rings)
Selector:
Used to select the number of
rings that it takes for the unit
to answer.
® Telephone Line Jack
@DC IN Jack
® DIALING MODE Selector:
Used to change the dialing
mode TONE or PULSE.
CD RINGER (Ringer volume)
Selector:
Used to select the ringer
volume HIGH. LOW or OFF.
©VOLUME Control:
Used to adjust the sound level
for the built-in-speaker.
PREPARATION
©REMOTE CODE
A remote code number is
indicated on the label.
-4-
Page 12
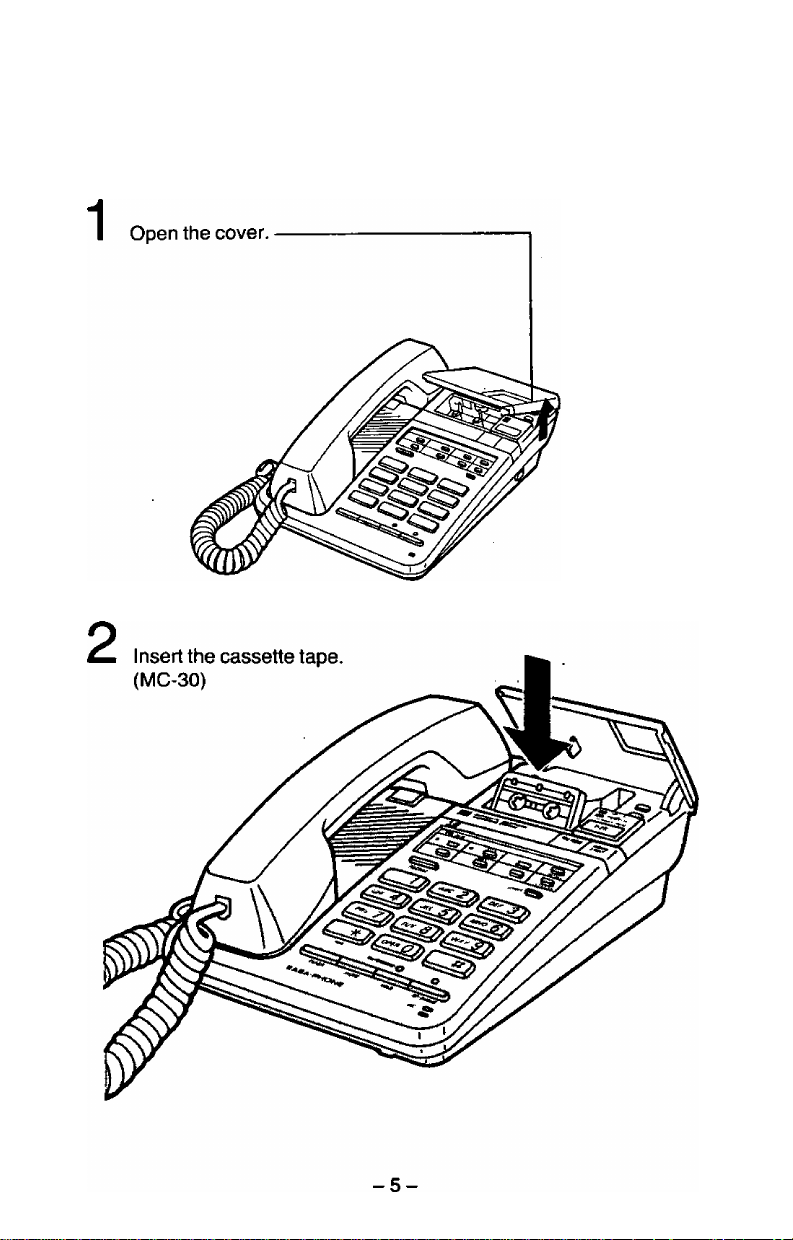
PREPARATION
Inserting the Tape
Page 13
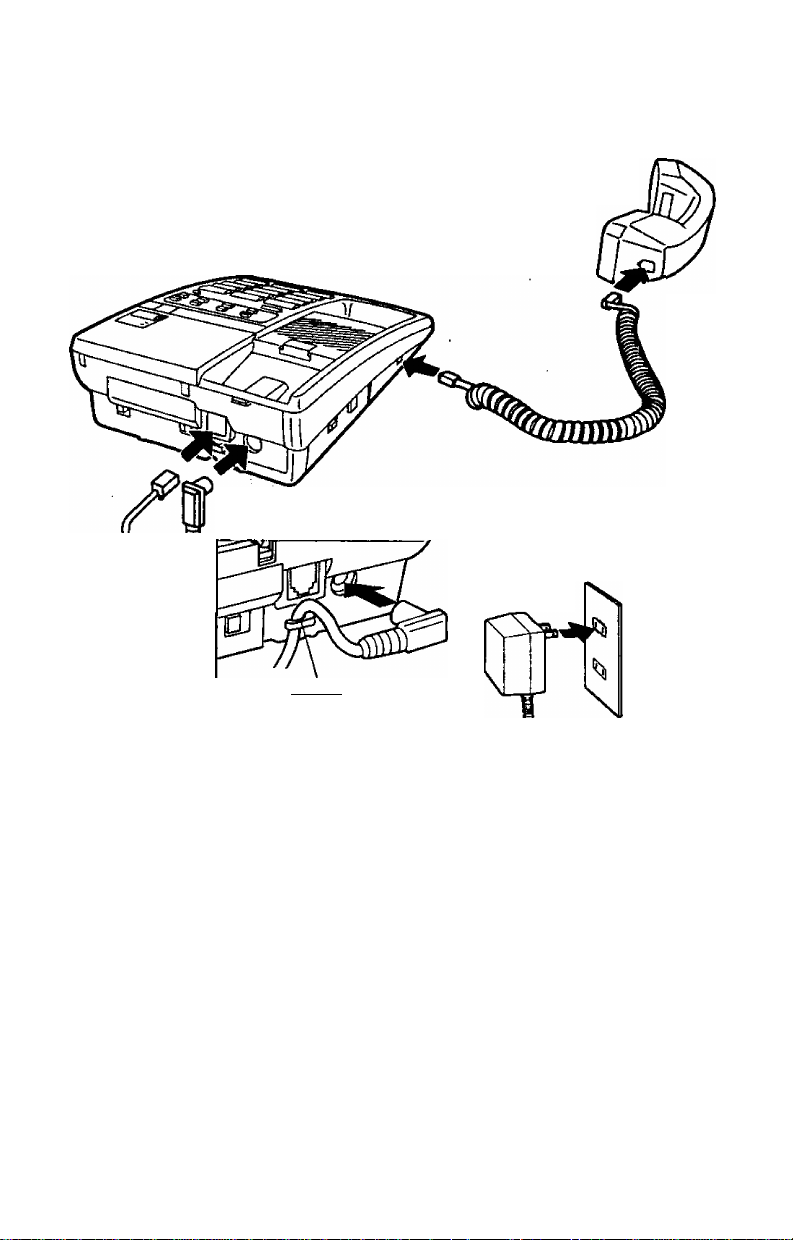
Connection
( Pl^e the cord into the holder.^
PREPARATION
Do not use any handset other
than Panasonic handset for
model KX-T2395/KX-T2395D-W.
AC adaptor
(KX-A11)
\
________
Holder
Power outlet
(AC 120V, 60Hz)
To telephone line single-line \
modular jack ^
Be sure to insert the tape before connecting the AC adaptor.
USE ONLY Panasonic AC ADAPTOR KX-A11. If a power failure
takes place, the unit can be used as a regular telephone.
While operating the unit, the case of the AC adaptor may feel warm.
This is a normal condition.
-6-
Page 14

PREPARATION
Initial Settings
1 2
Function of the AUTO setting (TOLL SAVER)
When you call the unit from an outside phone, the number of rings that
it takes for the unit to answer tells you if there are any new messages.
•If the unit answers on the 3rd ring: There is at least one
new message.
• If the unit answers on the 5th ring: There are no new messages.
Hang up immediately when you hear the 4th ring. Because the 4th ring*
indicates there are no new messages. This will save you the toll charge
for the call.
-7-
3 4
Page 15
AUTO^** 3
5
RINGS
PREPARATION
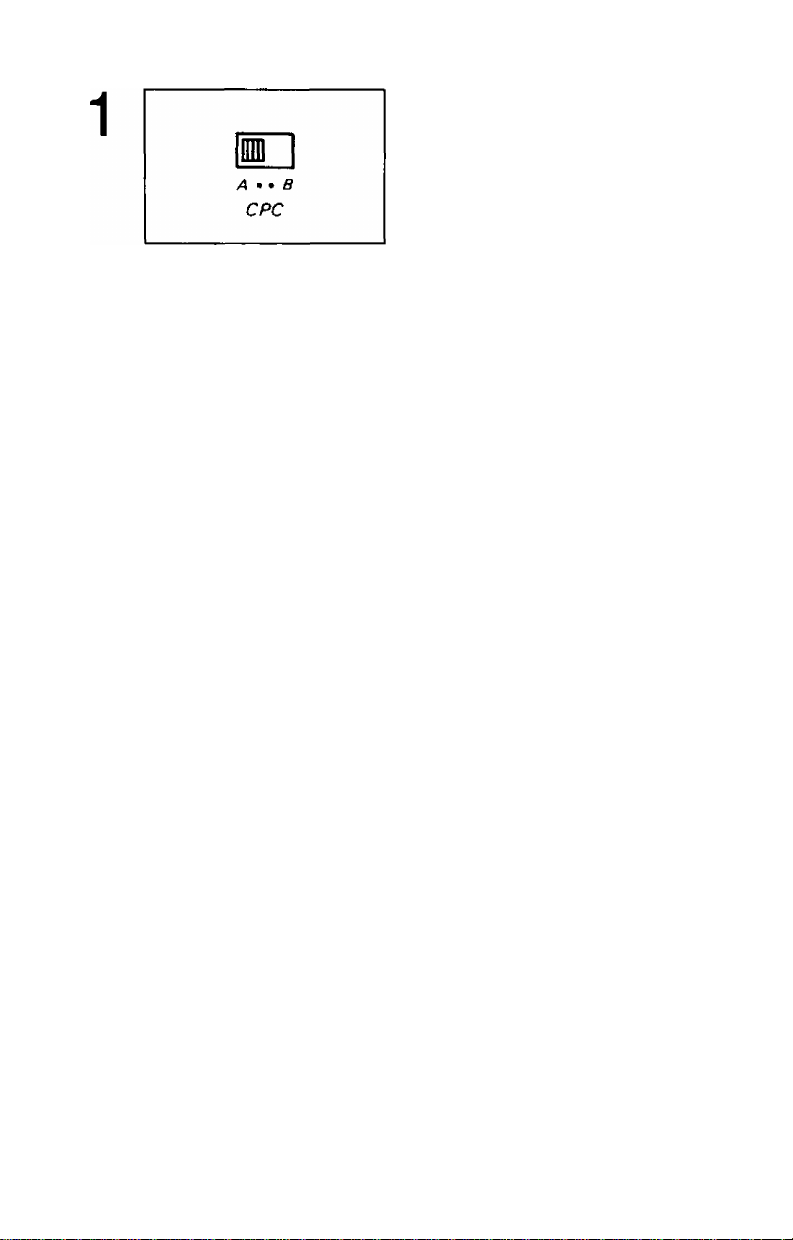
CPC Selector
A: Use this setting if your
telephone line does not have
call waiting service.
B: Use this setting if your
telephone line has call
waiting service.
If some Incoming Messages are
cut off in position A, set to
position B.
RINGS Selector
AUTO: See AUTO setting.
3; The unit answers on the
3rd ring.
5: The unit answers on the
5th ring.
DIALING MODE Selector
DIALING MODE
TONE • . PULSE
RINGER
HIGH • • • OFF
LOW
Set to “TONE”.
Set to “PULSE” when you have
rotary telephone service.
RINGER Selector
HIGH: The ringing sound will
be high.
LOW: The ringing sound will
be low.
OFF: the telephone wilt not
ring.
-8-
Page 16
PREPARATION
Recording an Outgoing Message
(OGM)
The OGM tells the caller that you are out, and asks to leave a message.
When recording your OGM:
•Please record the bold-faced sentence surely on the OGM.
•The caller’s recording time is up to 60 seconds.
•A series of short beeps will be heard while the tape is preparing for
recording, and a long beep means the tape is ready.
Sample OGM
“Hello, this is Dick Smith. I’m out now, but if you leave a message I’ll
call you back. You will hear a series of short beeps then a long
beep will be heard. Speak after the long beep. You have
60 seconds. ”
-9-
Page 17
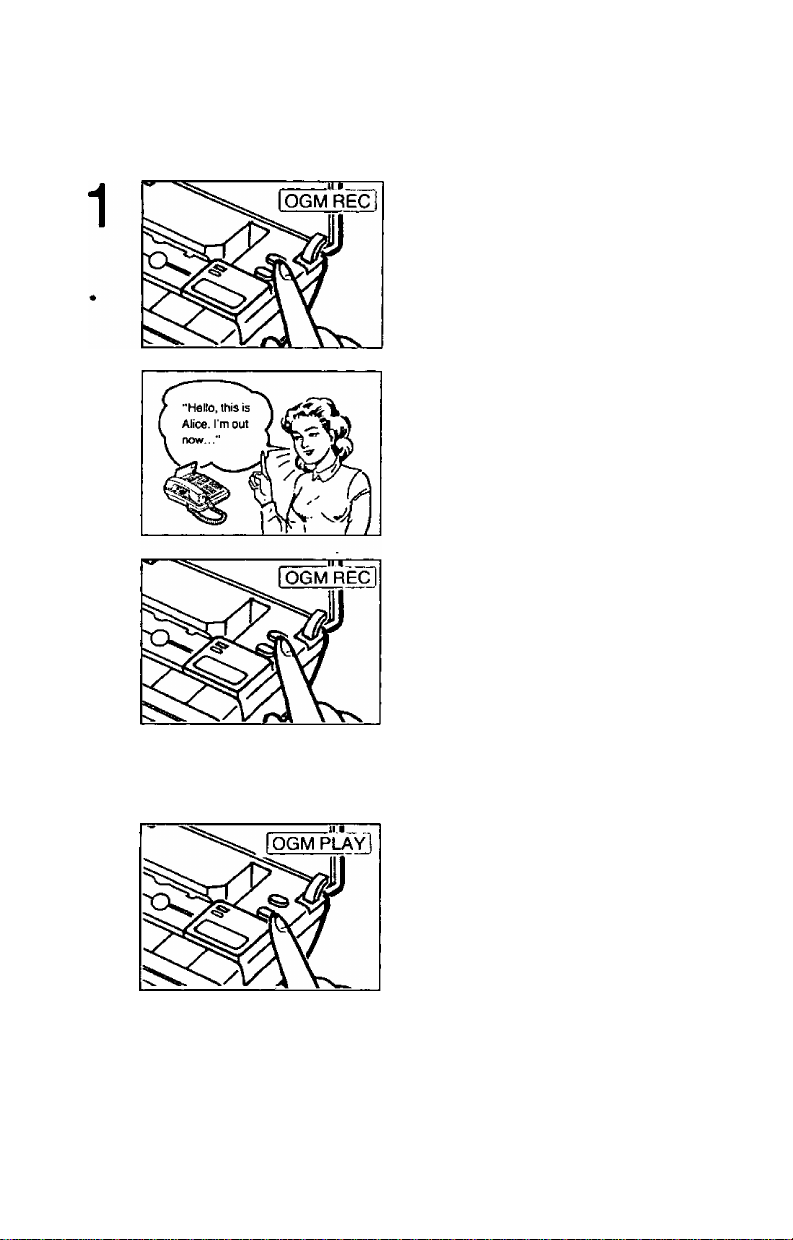
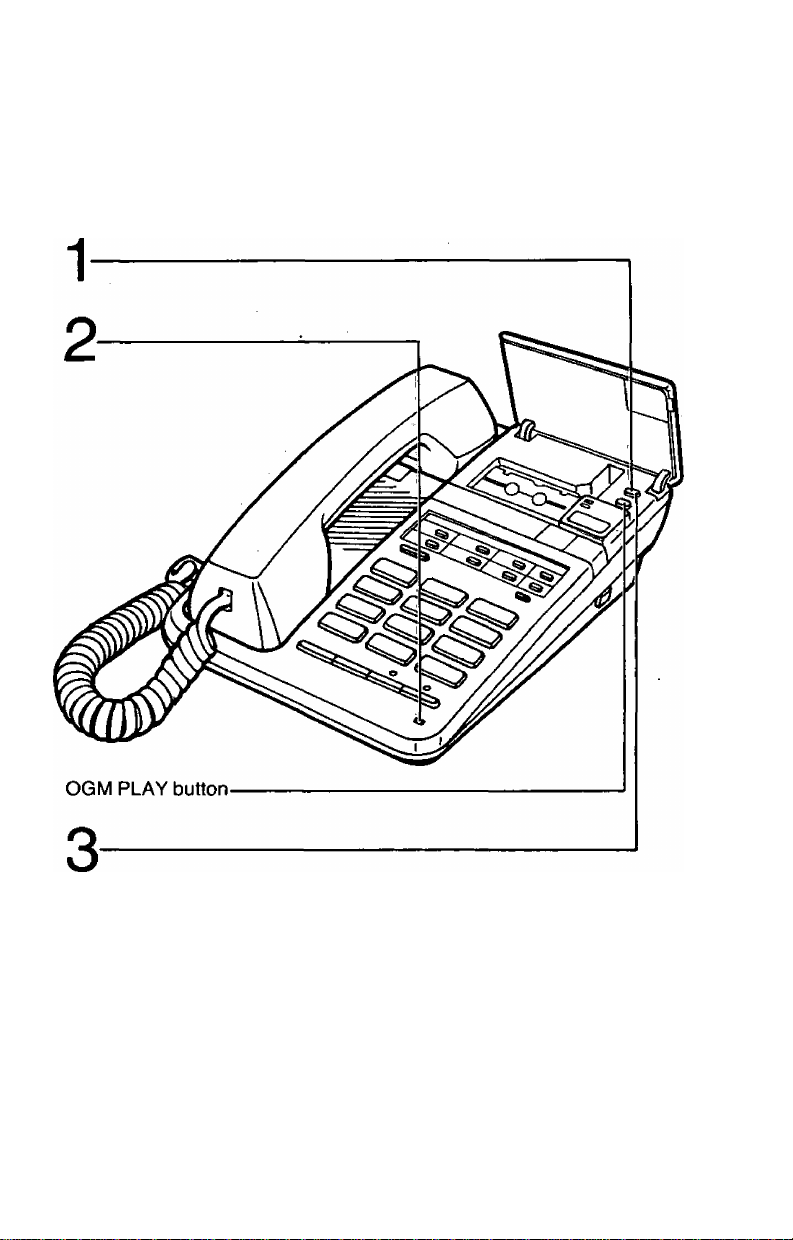
Press the ANS SYS ON/OFF switch to turn on the unit.
(The PWR/IN USE indicator light is on.)
Your OGM can be up to 30 seconds long.
Press the OGM REG button,
then release it.
A series of short beep will be
heard, followed by a long beep
and the PWR/IN USE indicator
flashes.
Speak loudly and clearly right
after the long beep, about 20 cm
(8"0 away from the microphone'
Do not pause for over 2 seconds.
If 6 beeps sound, start over from
step 1 again.
Press the OGM REG button
again when you finish recording.
The tape rewinds, and the unit
will be ready to answer incoming
calls after 10 seconds.
PREPARATION
Checking your recorded OGM
Press the OGM PLAY button to
listen to your recorded OGM.
Press the OGM PLAY button
again if you want to stop the
operation halfway. The unit will
be ready to answer incoming
calls after 10 seconds.
NOTE:
When you use the other side of the tape, please record the Outgoing
Message again.
-10-
Page 18

TELEPHONE
Making and Answering Calis
Making calls using the handset
1. Lift the handset.
2. Dial the telephone number.
You can switch to the speakerphone at any time by pressing the
SP-PHONE button. You can place the handset on the cradle.
Making calls using the SP-PHONE button
(on-hook dialing)
Press the SP-PHONE button,
and dial the telephone number.
The SP-PHONE indicator light
is on.
Speak to the other party through
the microphone.
Press the SP-PHONE button
again when you finish.
The SP-PHONE indicator light
is off.
You can also switch to the
handset at any time by lifting
the handset.
Helpful hints
•When the other party finds it difficult to hear your voice: Lower
the sound level using the speaker volume control or speak louder.
•Absorbing echo: Use in a room which has curtain or carpeting.
•Avoiding iost or broken conversation: If you and the caller speak
at the same time, parts of your conversation will be lost. To avoid this,
speak alternately.
-11 -
Page 19

TELEPHONE
Redialing
Your telephone can redial the last dialed phone number. This number
may be up to 30 digits.
Lift the handset or press the
SP-PHONE button, then press
the REDIAL button.
You can redial once.
Answering calls
When the telephone rings, lift the handset or press the SP-PHONE
button and speak to the calling party.
- 12-
Page 20

TELEPHONE
Automatic Dialing
Before using the automatic dialing feature, store the telephone numbers
into memory. Refer to “Storing the telephone numbers” on pages
14 to 15.
Making calls using the upper memory location:
Lift the handset or press the
1
SP-PHONE button.
Press the direct call button
(one-touch key) in which the .
number you want to dial is stored.
Making calls using the lower memory location:
Lift the handset or press the
1
SP-PHONE button.
Press the LOWER button, then
press the direct call button
(one-touch key) in which the
number you want to dial is stored.
If you press the LOWER button
by mistake when you want to use
the upper location, you must
hang up and then dial again.
-13-
Page 21

TELEPHONE
Storing the telephone numbers
There are 6 direct call buttons. Each button consists of upper and lower
memory locations. Each location (upper and lower) is capable of storing
16 digits. Be sure that the handset is on the cradle, the SP-PHONE
indicator is off and the AC adaptor is connected. When you store a
telephone number into memory, pressing the #, *, PAUSE, or FLASH
button counts as 1 digit.
Into the upper memory location
Press the PROG button.
The STORE indicator light is on.
Press the direct call button
(one-touch key) in which you want
to store the telephone number.
The STORE indicator light
goes out.
Dial the telephone number that
you want to store, up to 16 digits.
Press the STORE button.
The STORE indicator light is on.
To store other numbers in
succession, repeat from step 2.
Press the PROG button after
storing all the numbers.
The STORE indicator light
goes out.
-14-
Page 22

TELEPHONE
Into the lower memory location
1
Press the PROG button.
The STORE indicator light is on.
Press the LOWER button, then
press the direct call button
(one-touch key) in which you want
to store the telephone number.
The STORE indicator light
goes out.
Dial the telephone number that
you want to store, up to 16 digits.
Press the STORE button.
The STORE indicator light is on.
To store other numbers in
succession, repeat from step 2.
Press the PROG button after
storing all the numbers.
the STORE indicator light
goes out.
-15-
Page 23

TELEPHONE
Correcting an error while storing
If you notice an error before pressing the STORE button;
Press the CLEAR button.
1
The new entry wilt be cleared
and previous storage will remain
untouched.
Start over again from step 2 of
the storing procedure.
Confirming a stored number
Repeat storing the same number into the same station. When the
STORE button is pressed, the MEMORY indicator flashes and you hear
a beep.
•Twice: The entry is the same as what was previously stored.
•Once: The entry is different from the one that was previously stored.
Repeat the storing procedure.
NOTE:
In case that the AC adaptor is unplugged for more than 10 minutes, the
stored telephone numbers should be confirmed before dialing.
Erasing a stored number
1. Press the PROG button.
2. Press the direct call button where the telephone number to be erased is
stored.
3. Press the STORE button.
4. Press the PROG button.
-16-
Page 24

TELEPHONE
Other Operation
Hold
The HOLD button is used to place
a call on hold while having a
conversation.
Press the HOLD button while
having a conversation.
The HOLD indicator flashes.
You may place the handset on
the cradle.
Releasing a hold
• If the handset is off-hook,
press the HOLD button again.
•If the handset is on the cradle
(on-hook), lift the handset or
press the SP-PHONE button.
•When using another telephone
connected on the same line;
Lift the handset of the other
telephone. If the hold is not
released, press the hookswitch
of the other telephone for about
one second.
-17-
Page 25

TELEPHONE
Flash
The FLASH button is used to
access special telephone
services such as call waiting
service or call forwarding.
While having a conversation,
another party calls and you hear
a tone, press the FLASH button.
The first conversation is placed on
hold and the second call can be
answered. To speak to the first
caller again, press the FLASH
button again. (The second caller is
placed on hold.)
You may access some of
features of your host PBX using
the FLASH button in a dialing
operation.
Mute
The MUTE button is used when
you do not want your voice to be
heard by the other party. The
other party’s voice can be heard.
Press the MUTE button.
The MUTE/STORE indicator light
is on. To resume the
conversation, press the MUTE
button again.
Tone
Use the TONE button when you
have rotary telephone service.
Pressing it will allow you to
change from pulse to tone mode
during a dialing operation, and
enter special tones and codes to.
operate answering machines,
electronic banking services and
other special services.
Pause
The pause button is helpful in the
automatic dialing when accessing
an outside line. To use this
function, store “PAUSE" with the
telephone number into the
memory station beforehand.
While storing the telephone
number into the memory, one
pause is required when
waiting for an outside diai
tone.
Example:
Press once (3.5-second pause)
Press twice (7-second pause)
Combination diaiing
A telephone number with more
than 30 digits can be stored into
two memory stations. Dialing is
done as follows:
1. Lift the handset.
2. Press the direct call
button “1”.
3. Press the direct call
button “2”.
Instead of using two memory
stations, you can store a part of
the telephone number into one
. memory station, and the other
part can be dialed manually.
1. Lift the handset.
2. Press the station key, wait for
dialing to stop, then dial
manually.
-18-
Page 26

ANSWERING MACHINE
Setting up for Answering Calls
Press the ANS SYS ON/OFF switch to turn on the unit.
The PWR/IN USE indicator light is on. After 10 seconds, the
ANS/CALLS indicator light is on and the unit will be set to answer the
calls. (Answer mode)
Answer mode
When a call is received, the unit answers the call and record the
Incoming Message.
If you do not want the unit to answer the calls, press the ANS SYS
ON/OFF button to turn off the unit. The ANS/CALLS indicator light
goes out.
The caller’s recording time is limited up to 60 seconds.
-19-
Page 27

ANSWERING MACHINE
Recording from the beginning of the ICM part of
the tape
Press the REW button until the unit
stops rewinding (a beep sounds),
then release it
or
after ICM playback, leave the unit
as it is.
The unit has been reset to the
answer mode.
Recording after the messages you want to save
When you want to record the next Incoming Messages (ICMs) after the
last recorded message, or after a desired position of the tape:
Press the PLAYBACK/PAUSE
button to play back the tape to
the end of the message you want
to save.
Press the PLAYBACK/PAUSE
button again to pause the unit.
The PWR/IN USE indicator
flashes, (pause mode)
Press the REW button and the
PLAYBACK/PAUSE button
simultaneously.
The PWR/IN USE indicator and
the ANS/CALLS indicator lights
are on. New calls will be
recorded after the message(s)you have saved.
-20-
Page 28

ANSWERING MACHINE
Listening to Recorded Messages
When an Incoming Message has been recorded, the ANS/CALLS
indicator will flash in groups. The amount of flashes indicates the
number of calls received up to 15 times. (Three flashes followed by a
pause means that 3 messages were received.)
In case of power interruption, the indicator will flash slowly.
automatically rewinds and play back all the recorded messages.
10 seconds after playback, the unit will rewind, reset the tape and record
incoming calls automatically.
21 -
Page 29

ANSWERING MACHINE
Playing back the tape from the beginning
Press the PLAYBACK/PAUSE
1
button to play back the
messages from the beginning.
Adjust volume, if needed.
3 beeps will be heard indicating
the end of the last message.
After 10 seconds, the unit will
rewind the tape and the next
Incoming Message will be
recorded from the beginning of
the ICM part of the tape.
Press the PLAYBACK/PAUSE
button to stop the tape
(pause mode).
The PWR/IN USE indicator
flashes. Press the
PLAYBACK/PAUSE button again
to restart playback.
Press the REW button to rewind
the tape to the desired location.
The unit will play back the
message again after you release
the REW button.
If you keep pressing the REW
button until the unit rewinds to
the beginning of the tape, a beep
will be heard. In this case, the unit
has been reset to the answer
mode.
-22-
Page 30

ANSWERING MACHINE
Remote Operation
You can retrieve the recorded Incoming Messages from a remote
location with a tone phone by simply pressing your own remote code
number.
The remote code number
A remote code number for you is preset and indicated on the bottom of
the unit.
Playing back all the messages
Call your unit.
Dial your code number for
1--2 seconds while the OGM
is playing.
The unit plays back all the
recorded messages.
To rewind during playback, dial
the code number for
1 ~2 seconds. The tape will
rewind for approximately
15 seconds corresponding to the
playback time.
After the last message, 3 beeps will
sound and you may hang up.
Messages are automatically saved
after hanging up.
-23-
Page 31

ANSWERING MACHINE
Resetting the tape for future message
After listening to the messages, you can reset the tape and record new
messages from the beginning of the ICM part of the tape.
Wait for 3 beeps after the last
1
message.
Dial the code number within
10 seconds of hearing 3 beeps.
The unit will rewind the tape to
the beginning. Future messages
will be recorded and the old
messages will be erased.
Recording a marker message
After listening to all your messages, you can record a message on the
same call. When replay is finished, wait for 3 beeps indicating the end
of the last message. Then wait about 10 seconds for another 2 beeps
indicating that the tape is ready for recording. Record your message
after the last 2 beeps.
3 beeps 2 beeps
^ ^
Last
message
Hang up when finished.'
^10 ^
seconds
''New message
recording space
Setting answer mode remotely
You can easily set the unit to answer mode from a remote telephone.
1. Call your unit and let the telephone ring 15 times.
2. The unit will answer, and the OGM will be heard. You may hang up.
The unit wilt be ready to answer the next phone call.
-24-
Page 32

ANSWERING MACHINE
Other Features
Recording a memo message
If you want to leave a memo
message for someone, you
can record it on the tape. It
can then be played back
either manually or remotely
just like any other Incoming
Messages.
1
Press the MEMO/2 WAY button
until a beep sounds.
A series of short beeps will be
heard, followed by a long beep,
and the PWR/IN USE indicator
flashes.
Speak loudly and clearly right
after the tong beep, about 20 cm
(8") away from the microphone.
Press the MEMO/2 WAY button
again when you finish recording.
The PWR/IN USE indicator light,
is on and the ANS/CALLS
indicator flashes to show that
your message was recorded, and
the unit will be ready to answer
incoming calls.
-.25-
Page 33

ANSWERING MACHINE
Recording a conversation (2-Way Recording)
You can record a telephone conversation.
Many states have imposed regulations on the manner in which 2-Way
telephone conversations may be recorded. Consult your local public
utility agency (your telephone company).
Press the MEMO/2 WAY button
1
until a beep sounds, and
continue speaking.
The PWR/IN USE indicator
flashes and the ANS/CALLS
indicator light is on.
A beep will be heard every
15 seconds.
Press the MEMO/2 WAY button
again when you finish recording.
The PWR/IN USE indicator light
is on and the ANS/CALLS
indicator flashes to show that the
conversation was recorded, and
the unit will be ready to answer
incoming calls.
The recorded conversation can
be played back with other
Incoming Messages by pressing
the PLAYBACK/PAUSE button.
Screening incoming calls
You may leave the unit in answer mode even when you are around.
In this case, after the unit has answered, you will screen the caller
speaking. You can interrupt the recording and speak to the caller by
simply lifting the handset or pressing the SP-PHONE button.
The unit will automatically stop recording.
•Adjust the VOLUME control if needed.
•After hanging up, the unit will be ready to answer the next phone call.
-26-
Page 34

GENERAL INFORMATION
Troubleshooting Guide
Problem
The unit does not work when 1
press any buttons.
1 try to store the telephone
number into memory station, but
the storing procedure cannot be
done.
The unit has been set to answer
mode, but no Incoming Messages
are recorded.
The OGM is recorded improperly.
Record a new OGM.The unit
does not function. However a
beep sounds six times and the
ANS /CALLS indicator flashes.
While recording an OGM, a beep
sounds six times.
Cause & Remedy
• Plug in the AC adaptor.
• Press the ANS SYS ON/OFF
switch to turn on the unit.
•Be sure that the AC adaptor is
connected.
•The cassette tape is cut or is not
inserted. Insert the tape or
replace it with a new one.
•The cassette tape might be
broken. Replace it with a new
one.
•Clean the heads.
(See page 31.)
• Re-record your OGM. Speak
clearly and loudly, and do not
pause for over 2 seconds while
recording.
When the cassette tape is played
back, the sound level is low, even
if the VOLUME control is turned
up fully.
1 have played back all the
recorded messages and 1 want to
record the next phone call after
the last previously recorded
messages.
•Clean the heads. (See page 31.)
•Save the recorded messages.
(See page 20.)
• In case of remote operation, just
hang up.
-27-
Page 35

GENERAL INFORMATION
Problem
1 press the button from a remote •Make sure that you are entering
touch tone telephone, but the unit
does not respond.
Some ICMs have not been
recorded up to their end.
The unit does not ring.
Cause & Remedy
your correct remote code
number.
• Record the OGM in a quiet
place.
• In some areas, a remote touch
tone phone may not function
due to telephone line conditions
such as tine noise, echo, etc.
•The unit may not respond if a
touch tone telephone produces
tones that are too short to
activate the unit. When you
press any button, press firmly.
•Set the CPC switch to “B”.
(See page 8.)
• Ringer volume selector is set to
“OFF”. Set to “HIGH” or "LOW”.
-28-
Page 36

GENERAL INFORMATION
Wall Mounting
The unit can be mounted on a wall phone plate. If you do not have a
modular wall phone plate installed, we recommend that you consult with
your telephone company or an installer.
Turn around the handset hook.
Insert the telephone cord as
shown.
Place the wall mount adaptor as
shown.
Mount the unit eyelets as shown.
Page 37

GENERAL INFORMATION
Accessory Order Information
Replacement parts and accessories are available through your local
authorized parts distributor.
For accessory order, call toll free 1 -800-332-5368.
Part No.
RT-MC30
Description Comment
Microcassette
RT-MC60
KX-J07W
Handset Cord .
7 feet
KX-J15W 15 feet
KX-J25W
KX-J66
•
T-adaptor
25 feet
Parallel connection
for single line
QUICK REFERENCE CARD
KX-T2395
FOR TONE REMOTE CONTROL
-30-
■ To set to the answer mode
remotely.
1, Dial the phone number and wait
for 15 rings.
•The unit will set to the answer
mode, and will play the OGM.
2. Hang up the handset.
Page 38

GENERAL INFORMATION
Maintenance
Because the head and capstan assemblies are in contact with the tape,
dirt and residue from the tape can easily adhere to these parts, causing
distortion. These parts should be cleaned periodically in the manner
described below.
Clean the head surface, pinch roller and capstan with a cotton swab.
If these surfaces are extremely dirty,-dampen the cotton swab with
alcohol.
• Do not place magnetic or metal objects, such as a screwdriver, near the
head assemblies, as such objects could magnetize the heads.
• Do not oil any part of the unit.
Dial the telephone number
with a t(we telephone only.
Press your code number; The unit will
during playback OGM. ; play back.
•For Back Space, press your code
number,
•To record the ICM from the beginning
of the tape, press your code number
after 3 t^ps.
•To save the ICM, harrg up after
playback.
•To record a marker message, speak
after hearing 2 beeps.
•Press the button for 1 —2 second.
Your Code No.-
-31 -
Page 39

GENERAL INFORMATION
Cassette tape
•For optimum sound quality and performance, we recommend that you
use side two after six months and replace the tape every year
. assuming that the unit answers about ten calls a day.
• Never place a cassette tape near a magnetic source, such as a magnet
or a TV set, because it may erase the tape.
•Slack in the tape can be tightened by rotating the tape reel with an
instrument like a pencil, as shown.
Cassette panel installation
If the panel comes off, place it back it by pushing as shown.
-32-
Page 40

Precaution
Note:
This equipment has been tested and
found to comply with the limits for a
Class B digital device, pursuant to
Part 15 of the FCC Rules. These
limits are designed to provide
reasonable protection against harmful
interference in a residential
installation. This equipment
generates, uses, and can radiate
radio frequency energy and, if not
installed and used in accordance with
the instructions, may cause harmful
interference to radio communications.
However, there is no guarantee that
interference will not occur in a
particular installation. If this
equipment does cause harmful
interference to radio or television
reception, which can be determined
by turning the equipment off and on,
the user is encouraged to try to
correct the interference by one or
more of the following measures:
—Reorient or relocate the receiving
antenna.
—Increase the separation between
the equipment and receiver.
—Connect the equipment into an
outlet on a circuit different from that
to which the receiver is connected.
—Consult the dealer or an
experienced radioAV technician for
help.
•Environment—do not place the unit
in rooms where the temperature is
less than 5“C {41 °F) or greater than
40°C (104°F). Allow 10 cm (4")
clearatice around the unit for proper
ventilation. Avoid excessive smoke,
dust, mechanical vibration, shock, or
direct sunlight.
• Routine care—wipe the unit with a
soft cloth. Do not use benzine,
thinner, or any abrasive powder.
When you left the unit unused for
long time, unplug the AC adaptor
from the outlet.
•If there is any trouble—disconnect
the unit from the telephone line and
connect a known working phone. If
the known working phone operates
properly, have your unit repaired by
one of the authorized Panasonic
Factory Service Centers. If the
known working phone does not
operate property, consult with your
téléphoné company.
-33-
Page 41

Important Information
If requested by the telephone
company, inform them as follows:
•FCC Registration No.
(found on the bottom of the unit)
•Ringer Equivalence
•The particular telephone line to
which the equipment is connected.
This unit must not be connected to a
coin operated line.
If you are on a party line, check with
your local telephone company.
................
1.08
Ringer Equivalence No. (REN):
The REN is useful in determining the
quantity of devices you may connect
to your telephone line and still have
all of those devices ring when your
telephone number is called. In most,
but not all areas, the sum of the
REN’s of all devices connected to one
line should not exceed five (5.0). To
be certain of the number of devices
you may connect to your line, as
determined by the REN, you should
contact your local telephone company
to determine the maximum REN for
your calling area.
In the event terminal equipment
causes harm to the telephone
network, the telephone company
should notify the customer, if
possible, that service may be
stopped.
However, where prior notice is
impractical, the company may
temporarily cease service providing
that they:
(a) Promptly notify the customer.
(b) Give the customer an opportunity
to correct the problem with their
equipment.
(c) Inform the customer of the right to
bring a complaint to the Federal
Communication Commission
pursuant to procedures set out in
FCC Rules and Regulations
Subpart E of Part 68.
-34
The Telephone Company may make
changes in its communications
facilities, equipment, operations or
procedures, where such action is
reasonably required in the operation
of its business and is not inconsistent
with the rules and regulations in FCC
Part 68.
•
If such changes can be reasonably
expected to render any customer
terminal equipment incompatible with
telephone company communications
facilities, or require modification or
alteration of such terminal equipment,
or otherwise materially affect its use
or performance, the customer shall be
given adequate notice in writing, to
allow the customer an opportunity to
maintain uninterrupted service.
CAUTION:
Any changes or niodifications not
expressly approved by the party
responsible for compliance could void
the user's authority to operate this
device.
When programming emergency
numbers and/or making test calls to
emergency numbers:
1. Remain on the line and briefly
explain to the dispatcher the
reason for the call before hanging
up.
2. Perform such activities in the offpeak hours, such as early morning
hours or late evenings.
WARNING:
TO PREVENT FIRE OR SHOCK
HAZARD. DO NOT EXPOSE THIS
PRODUCT TO RAIN OR ANY TYPE
OF MOISTURE.
This telephone provides
magnetic coupling to hearing
aids.
Page 42

GENERAL INFORMATION
Referencia Rápida
Localización de controles
Botón de Grabación del OGM
(OGM REC)
Botón de Reproducción del OGM
(OGM PLAY)-
Botón de ReproducciónyPausa
(PLAYBACK/PAUSE)
Botón de Memoria/Bídireccional
(MEMO/2 WAY)
Botón de Rebobinado (REW)
Botón de Rediscado
(REDIAL)
Botón de Retención
(HOLD)
Botón del altavoz
(SP-PHOÑE)
Conmutador de SIST. DE
RESPUESTAS
ENCEN DI DO/AP AGADO
(ANS SYS ON/OFF)
Botón de Programa
(PROG)
Botón de Almacenamiento
(STORE)
Botón INFERIOR
(LOWER)
Botón de Pausa
(PAUSE)
^tón de Despeje
(CLEAR) '
-35-
Page 43

Conexión
GENERAL INFORMATION
Introduzca la cinta de casete.
^Cordón de resorte
a sujetador.
Sujetador
Microteléfono
Adaptador de CA
(KX-A11) p.
M.
«i
\l
Tornade fuente
de alimentación
A! teléfono de línea
Toma modular de una
sola línea
Utilice sólo Adaptador de CA KX-A11, Panasonic.
-36-
[\
Page 44

GENERAL INFORMATION
Procedimiento inicial
1. Conmutador de Alimentación (ANS SYS ON/OFF)
Presione el conmutador ANS SYS ON/OFF para encender el aparato.
(El indicador de Alimentación/En Uso se enciende.)
2. Selector CPC (Control del Usuario que Llama)
A: Seleccione esta posición si su teléfono de línea no tiene servicio
de espera de llamadas.
B; Seleccione esta posición si su teléfono de línea tiene servicio de
espera de llamadas.
3. Número de repiques
AUTO: Vea la casilla de “Economizador de llamadas”.
3: Contesta al (tercer) repique.
5: Contesta al (quinto) repique.
4. Selector de Modalidad de Discado
Colocarlo en “TONE”.
Colocarlo en la posición de pulso si su servicio es de teléfono
rotatorio.
5. Selector de Volumen de Timbre
HIGH (ALTO): El volumen del timbre será alto.
LOW (BAJO): El volumen del timbre será bajo.
OFF (APAGADO): El teléfono no sonará.
6. Código Remoto
Está pre-seleccionado un número de código remoto para las
operaciones remotas e impreso en la base del aparato.
Economizador de llamadas
La función de ahorro de llamadas le permite ahorrar en la cuenta de
llamadas cuando Ud. llame a su propio aparato, en el caso de que no
hayan sido grabados mensajes. Coloque el número de llamadas en
“AUTO”.
•respuesta al tercer timbre .... por lo menos un nuevo mensaje ha sido
grabado.
•respuesta al quinto timbre — no ha sido grabado ningún mensaje.
Cuando Ud. llame a su aparato y no haya mensaje grabado, Ud. puede
ahorrar en la cuenta de llamadas telefónicas. Después de escuchar el
cuarto timbre, cuelge inmediatamente. Habrá ahorrado una llamada.
-37-
Page 45

GENERAL INFORMATION
Grabación del OGM (Mensaje de Salida)
El OGM le comunica a la persona que llama que Ud. ha salido y le pide
que deje un mensaje.
Presione el botón de Grabación del
OGM y luego déjelo de presionar.
Se escuchará una serie de “bips"
cortos seguidos de un “bip”
prolongado y el indicador de
Alimentación/En Uso destella.
Hable con voz alta y claramente
inmediatamente después del “bip” a
una distancia aproximada de 20 cm
(8") del micrófono.
No haga pausas de más de
2 segundos durante la grabación. Si
lo hace, sonará un “bip” seis veces.
En este caso, vuelva al paso 1 y repita
el procedimiento de nuevo.
Presione el botón de Grabación del
OGM de nuevo cuando haya
terminado de grabar.
La cinta se rebobinará y el aparato
estará listo para responder las
llamadas de entrada después de
10 segundos.
-38-
Page 46

GENERAL INFORMATION
Lamadas
1. Levante el microteléfono o presione el botón SP-PHONE.
2. Marque el número telefónico.
Contestación de Llama
Cuando el teléfono suene, levante el microteléfono y conteste la llamada.
Rediscado
El botón REDIAL siempre almacena en la memoria el último número
marcado, hasta un máximo de 30 dígitos. Para marcar el mismo número
de nuevo, emplee esta functión.
1. Levante el microteléfono o presione el botón SP-PHONE.
2. Presione el botón REDIAL.
Ud. puede rediscar una vez.
Retención
El botón HOLD es útil para mantener una llamada en retención durante
el transcuro de una converción.
Presione el botón HOLD mientras esté conversando.
Para liberar la retención
•Si el microteléfono está descolgado; presione HOLD y empiece a
hablar.
•Se el microteléfono está colgado; levante el microteléfono y
empiece a hablar.
•Cuando emplee otro teléfono conectado a la misma línea;
Levante el microteléfono del otro teléfono. Si no se libera la retención,
presione el 'conmutador del otro teléfono por un segundo
aproximadamente.
-39-
Page 47

GENERAL INFORMATION
Discado Automático
Discado de un solo toque (12 estaciones de memoria):
Hay 6 botones para llamada directas, cada uno con dos functiones. Son
localizaciones de memoria superior e inferior (hasta 16 dígitos).
Asegúrese de que el microtetéfono esté colgado y de que el botón del
altavoz esté desconectado.
Levante el microteléfono y presione el botón de llamadas directas en la
cual está almacenado el número que desea.
Almacenamiento con discado de un-solo-toque
1. Presione el botón PROG.
El indicador MUTE/STORE se ilumina.
2. Presione el botón de la estación. ,
El indicador MUTE/STORE se apaga.
3. Marque el número teléfonico que desee almacenar.
Hasta un máximo de 16 dígitos.
4. Presione el botón STORE para almacenar el número en la memoria.
El indicador MUTE/STORE se ilumina.
Para almacenar otro número, repita el procedimiento desde el
paso 2.
5. Después de almacenar todos los números, presione el botón
PROG.
El indicador MUTE/STORE se apaga.
Empleo de la localización de la memoria LOWER (INFERIOR)
Otro número telefónico puede ser almacenado en la localización de la
memoria LOWER de la misma estación de llamada directa. En este
caso, Ud. debe modificar el paso 2 del procedimiento anterior.
Presione el botón LOWER, y luego presione el botón de llamada directa.
-40-
Page 48

GENERAL INFORMATION
Reproducción de los mensajes grabados
Cuando el teléfono suene, la unidad reproducirá el mensaje de salida
(OGM) y luego grabará el mensaje de la persona que llama en la cinta.
Presione el botón PLAYBACK/PAUSE.
AUTO-LÓGICO (Función de un solo toque)
Un solo toque del botón PLAYBACK/PAUSE hace posible que la unidad
reproduzca los mensajes y suene 3 pitidos después del último mensaje.
Luego, después de diez segundos, la unidad rebobinará la cinta y estará
lista para grabar nuevoz mensajes desde el comienzo de la sección ICM
de la cinta.
Memorización dei mensaje
Para grabar un mensaje que va a ser oído por alguien usando el control
remoto.
1. Presione el botón MEMO/2 WAY hasta que suene un pitidos.
2. Hable por el MIC.
3. Cuando termine, pulse el botón MEMO/2 WAY.
Para escuchar mensajes desde otro telefono a
distancia
Ud. puede escuchar los mensajes grabados mediante la simple presión
del número de código.
1. Marque el número de su teléfono y presione el número de código por
uno o dos segundos en la modalidad de grabación OGM.
La unidad rebobinará la cinta y Ud. escuchará todos los mensajes en
la cinta.
Se escucharán tres pitidos después del último mensaje.
2. Cuelgue.
Los próximos mensajes de entrada serán grabados después del
último mensaje.
-41 -
Page 49

Anach your purchase receipt here.
For your future reference
Serial No.
(found on the bottom of the unit)
Name and address of dealer
________________
Date of purchase
For product service
• Panasonic Servicenters are listed in the servicenter directory.
•Call 1-800-545-2672 for the location of an authorized servicenter.
When you ship the product
•Carefully pack your unit, preferably in the original carton.
•Attach a letter, detailing the symptom, to the outside of the carton.
Symptom
•Send the unit to an authorized servicenter, prepaid and adequately
insured.
• Do not send your unit to the Matsushita Consumer Electronics
Company listed below or to executive or regional sales offices. These
locations do not repair consumer products.
* •
-42-
Page 50

Important safety instructions
When using this unit, basic safety 10.
precautions should always be
followed to reduce the risk of fire,
electric shock, or personal injury.
1. Read and understand all
instructions. 11.
2. Follow all warnings and
instructions marked on this
unit.
3. Unplug this unit from AC
outlets before cleaning. Do
not use liquid or aerosol
cleaners. Use a damp cloth
for cleaning.
4. Do not use this unit near
water, for example, near a
bath tub, wash bowl, kitchen 12.
sink, or the like.
5. Place this unit securely on a
stable surface. Serious
damage and/or injury may
result if the unit falls.
6. Do not cover slots and
openings on the unit. They
are provided for ventilation
and protection against
overheating. Never place the
unit near radiators, or in a
place where proper ventilation
is not provided.
7. Use only the power source
marked on the unit. If you are
not sure of the type of power
supplied to your home,
consult your dealer or local
power company.
8. Do not place objects on the
power cord. Install the unit
where no one can step or trip
on the cord.
9. Do not overload wall outlets
and extension cords. This can
result in the risk of fire or
electric shock.
-43-
Never push any objects
through slots in this unit. This
may result in the risk of fire or
electric shock. Never spill any
liquid on the unit.
To reduce the risk of electric
shock, do not disassemble
this unit. Take the unit to an
authorized servicenter when
service is required. Opening
or removing covers may
expose you to dangerous
voltages or other risks.
Incorrect reassembly can
cause electric shock when the
unit is subsequently used.
Unplug this unit from the wall
outlet and refer servicing to
an authorized servicenter
when the following conditions
occur:
A. When the power supply
cord or plug is damaged or
frayed.
B. If liquid has been spilled
into the unit.
C. If the unit has been
exposed to rain or water.
D. If the unit does not work
normally by following the
operating instructions.
Adjust only controls
covered by the operating
instructions. Improper
adjustment may require .
extensive work by an
authorized servicenter.
E. If the unit has been
dropped or physically
damaged.
F. If the unit exhibits a distinct
change In performance.
Page 51

13. During thunderstorms, avoid
using telephones except
cordless types. There may be
a remote risk of an electric
shock from lightning..
14. Do not use this unit to report
a gas leak, when in the
vicinity of the leak.
SAVE THESE
INSTRUCTIONS
-44-
Page 52

Matsushita Consumer Electronics Company,
Division of Matsushita Electric Corporation of America
One Panasonic Way, Secaucus, New Jersey 07094
Panasonic Sales Company (“PSC”),
Division of Matsushita Electric of Puerto Rico, Inc.
Ave. 65 de Infantería, Km. 9.5, San Gabriel Industrial Park,
Carolina, Puerto Rico 00985
Printed in Malaysia
PQQX10832YA F0993J2106
Page 53

Servicenter Directory
Panasonic
PRODUCT INFORMA TtON • OPERA TION ASSISTANCE • LITER A TURE
REQUESTS • DEALER LOCATIONS
Customer Satisfaction Center 2F-3, One Panasonic Way, Sacaucus, NJ 07094 (Headquarters)
201-34S-9090 (9:00am-6:00pm Monday-Friday, EST)
ACCESSORY PURCHASES
1-600-332-5368 (Consumer Orders Only)
Matsushita Services Company 20421 64th Avenue South Kent, WA S8032
(6 am to 6 pm Monday-Friday; 6 am to 10:30 am Saturday; PST)
(Visa, Mastercard, Discover card, American Express, Check)
AUTHORIZED SERVICENTERS • PARTS DISTRIBUTOR LOCATIONS
To locate an independent authorized servicenter or parts distributor in your area, within the USA dial toll free
1-600-545-2672, 24 hours a day, 7 days a week.
PRODUCT REPAIRS Factory Servicenters
CALIFORNIA
6550 Katella Avenue
Cypress, CA 90630
Phono (714) 373-7425
Fax (714) 694-8534
8000 Dubuque Avenue
S. San Francisco,
CA 94080
Phone (415) 871-6373
Fax (415)871-6840
20201 Sherman Way
Suite 102
Canoga Park, CA 91306
Phone (818) 709-1775
Fax (818) 709-2165
3878 Ruffin Road Suits A
San Diego, CA 92123
Phone (619) 560-9200
Fax (619) 560-1831
COLORADO
1640 South Abilene Suite D
Aurora, CO 80012
Phone (303) 752-2024
Fax (303) 752-0610
FLORIDA
3700 North 29th Avenue
Suite 102
Hollywood, FL 33020
Phone (954) 925-2880
Fax (954) 925-5224
4710 Eisenhower Boulevard
Suite At Tampa, FL 33634
Phone (813) 884-4746
Fax (813) 886-4564
GEORGIA
8655 Rose we II Road
Suite 100
Atlanta, GA 30350
Phone (770) 518-6301
Fax (770) 518-6306
HAWAII
99-859 Iwaiwa Street
Aiea, Hawaii 96701
Phone (806) 488-1996
Fax (808) 486-4369
ILLINOIS
*1703 North Randall Road
Elgin, IL 60123
‘12:30 to 4:30, Mon-Fri"
Phone (847) 468-5464
Fax (847) 468-5465
9060 Golf Road
Niles, IL 60714
Phone (847) 608-1010
Fax (847) 299-1710
MARYLAND
Sulphur Springs
Business Park
1638 Sulphur Springs Road
Baltimore, MD 21227
Phone (410) 242-2607
Fax (410) 247-3047
MASSACHUSETTS
60 Glacier Drive, Suite G
Westwood. MA 02090
Phone (617) 329-4280
Fax (617) 329-0586
*plck-up/drop-off only
MICHIGAN
37048 Van Dyke Avenue
Sterling Heights, Ml 48312
Phone (310) 939-2060
Fax (310) 939-2638
MINNESOTA
7850-12th Avenue South
Airport Business Center
Bloomington, MN 55425
Phone (612) 854-8624
Fax (512) 854-2089
OHIO
2236 Waycross Road
Cirrcinnati, OH 45240
Phone (513) 851-41BQ
Fax (513) 851-8443
PENNSYLVANIA
2221 Cabot Boulevard
West Suite 8
Langhome, PA 19047
Phora (215) 741-0661
Fax (215)741-0521
Chartiers Valley
Shopping Center
1025 Washington Pike
Bridgeville, PA 15017
Phone (412) 257-4522
Fax (412) 257-4650
TENNESSEE
919-8th Avenue South
Nashville, TN 37203
Phone (615) 244-4434
Fax (615) 244-6713
TEXAS
7482 Harwin Drive
Houston, TX 77036
Phone (713) 781-1528
Fax (713) 781-0643
13615 Welch Road
Suite 101 Farmers Branch,
TX 75244
Phone (214) 385-1975
Fax (214) 960-7626
WASHINGTON
20425-S4th Avenue South
Kent, WA 98032
Phone (206) 872-7922
Fax (206) 872-0918
Service in Puerto Rico
Matsushita Electric
of Puerto Rico, Inc.
Panasonic Sates Company/
Factory Servicenter
Ave, 65 de Intanterfa, Km. 9.5
San Gabriel Industrial Park
Carolina, Puerto Rico 00985
Phone (809) 750-4300
Fax (809) 768-2910
REPAIR INQUIRIES
EAST (PCE)
2221 Cabot Boulevard
West Suite A
Lartghome, PA 19047
Phone (215) 741-0676
Fax (215)750*492
Covers;
CT, DE, ME, MD, MA,
NH, NJ, NY, PA, Rl, VT,
VA. DC, WV
Regional Customer Care Department
EAST (PCE>
1225 Northbrook Parkway
Suite 2-390
Suwanee, GA 30174
Phone (404) 338-6860
Fax (404) 338-6548
Covers:
AL, FL, GA, MS, NC, SC,
TN
CENTRAL (PCC)
1707 North Raoctell Road
Elgin, IL 60123
Phone (847) 468-5530
Fax (847) 468-5528
Covers:
AR, IL, IN, lA, KS, КУ, LA,
Ml. MN, MO, NE, ND, OK,
SD, TX, Wl, OH
WEST (PCW)
6550 Katetia Avenue
Cypress, CA 90630 •
Phone (714) 373-7440
Fax (714) 373-7447
Covers:
AK, AZ, CA, CO, ID, MT,
NV, NM, OR, UT, WA, WY,
HI
(960620)
Page 54

PANASONIC
Telephone Products
Limited Warranty
Matsushita Consumer Electronics Company or Panasonic Sales Company
(collectively referred to as “the warrantor”) will repair this product with new or
refurbished parts, free of charge, in the USA or Puerto Rico for one (1) year from
the date of original purchase in the event of a defect in materials or
workmanship.
This Limited Warranty Excludes both Labor and Parts for: batteries,
antennas, and cosmetic parts (cabinet).
Carry-in or mail-in service in the USA or Puerto Rico can be obtained during the
warranty period by contacting a Matsushita Services Company (MSC) Factory
Servicenter listed in the Servicenter Directory. Or call, loll free, 1-800-545-2672
to locate a MSC authorized Servicenter. Carry-in or mail-in service in Puerto
Rico can be obtained during the warranty period by calling the local telephone
number in the Servicenter Directory.
This warranty is extended only to the original purchaser. A purchase receipt or
other proof of date of original purchase will be required before warranty service
is rendered.
This warranty only covers failures due to defects in materials and workmanship
which occur during normal use. The warranty does not cover damages which
occurred In shipment, or failures which are caused by products not supplied by
the warrantor, or failures which result from accident, misuse, abuse, neglect,
mishandling, faulty installation, misapplication, set-up adjustments, improper
operation or maintenance, alteration, modification, introduction of sand, humidity
or liquids, line power surge, improper voltage supply, lightning damage,*signal
reception problems, commercial use such as hotel, office, restaurant, or other
business or rental use of the product, or serviced by anyone other than a M8C
Factory Servicenter or a MSC authorized Servicenter, or damage that is
attributable to acts of God. ^
LIMITS AND EXCLUSIONS
There are no express warranties except as listed above.
THE WARRANTOR SHALL NOT BE LIABLE FOR INCIDENTAL OR
CONSEQUENTIAL DAMAGES RESULTING FROM THE USE OF THIS
PRODUCT, OR ARISING OUT OF ANY BREACH OF THIS WARRANTY. ALL
EXPRESS AND IMPLIED WARRANTIES, INCLUDING THE WARRANTIES OF
MERCHANTABILITY, AND FITNESS FOR A PARTICULAR PURPOSE, ARE
LIMITED TO THE APPLICABLE WARRANTY PERIOD SET FORTH ABOVE.
Some states do not allow the exclusion or limitation of incidental or
consequential damages, or limitations on how long an implied warranty lasts, so
the above exclusions or limitations may not apply to you.
This warranty gives you specific legal rights and you may also have other rights
which vary from state to state. If a problem with this product develops during or
after the warranty period, you may contact your dealer or Servicenter. If the
problem is not handled to your satisfaction, then write to the Customer
Satisfaction Center at the company address indicated above.
 Loading...