

Page 1
Operating Instructions
MODEL N0.
KX-T2386BA
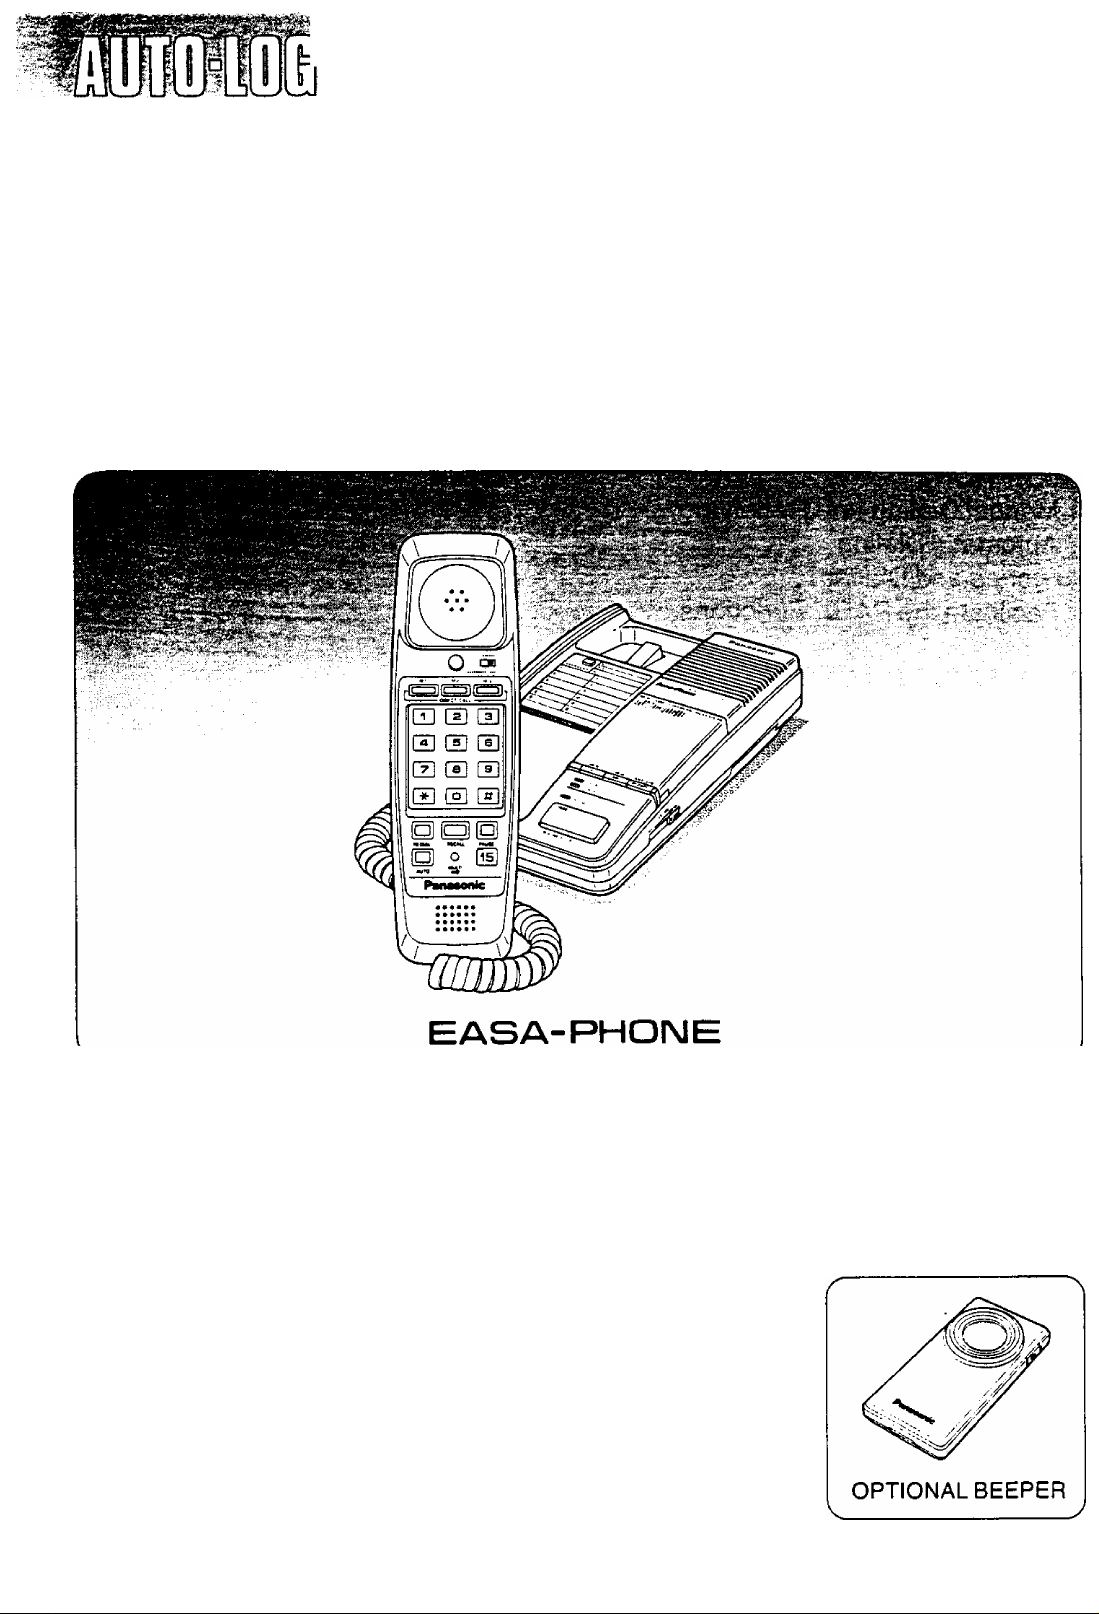
INTEGRATED TELEPHONE SYSTEM
Panasonic
Please read before use.
WITH
A SINGLE MICROCASSETTE
Page 2

Thank you for purchasing the Panasonic Telephone
Answering System.
Contents
Connection................................................................................................ 1
Location of Controls .................................................................................... 3
Preparation.................................................................................................. 4
indicators..................................................................................................... 5
TELEPHONE
Manual Dialing and Receiving
Automatic Dialing .................................................................................... 6
Storing and Dialing................................................................................... 7
Facilitate the PABX Functions
.................................................................
.................................................................
5
8
ANSWERING MACHINE
How to Record Outgoing Message (OGM)
Prior to Leaving ..................................................................................... 10
After Returning Home ........................................................................... 11
How to Operate from Remote Phone
Wall Mounting............................................................................................ 15
Tones Heard from the Unit ....................................................................... 16
Samples of OGM .................................................................................... 16
Troubleshooting Guide.............................................................................. 17
Cassette Tape .......................................................................................... 18
Others ....................................................................................................... 18
Maintenance ............................................................................................. 18
....................................................
...........................................
9
12
_ 1 _
Page 3
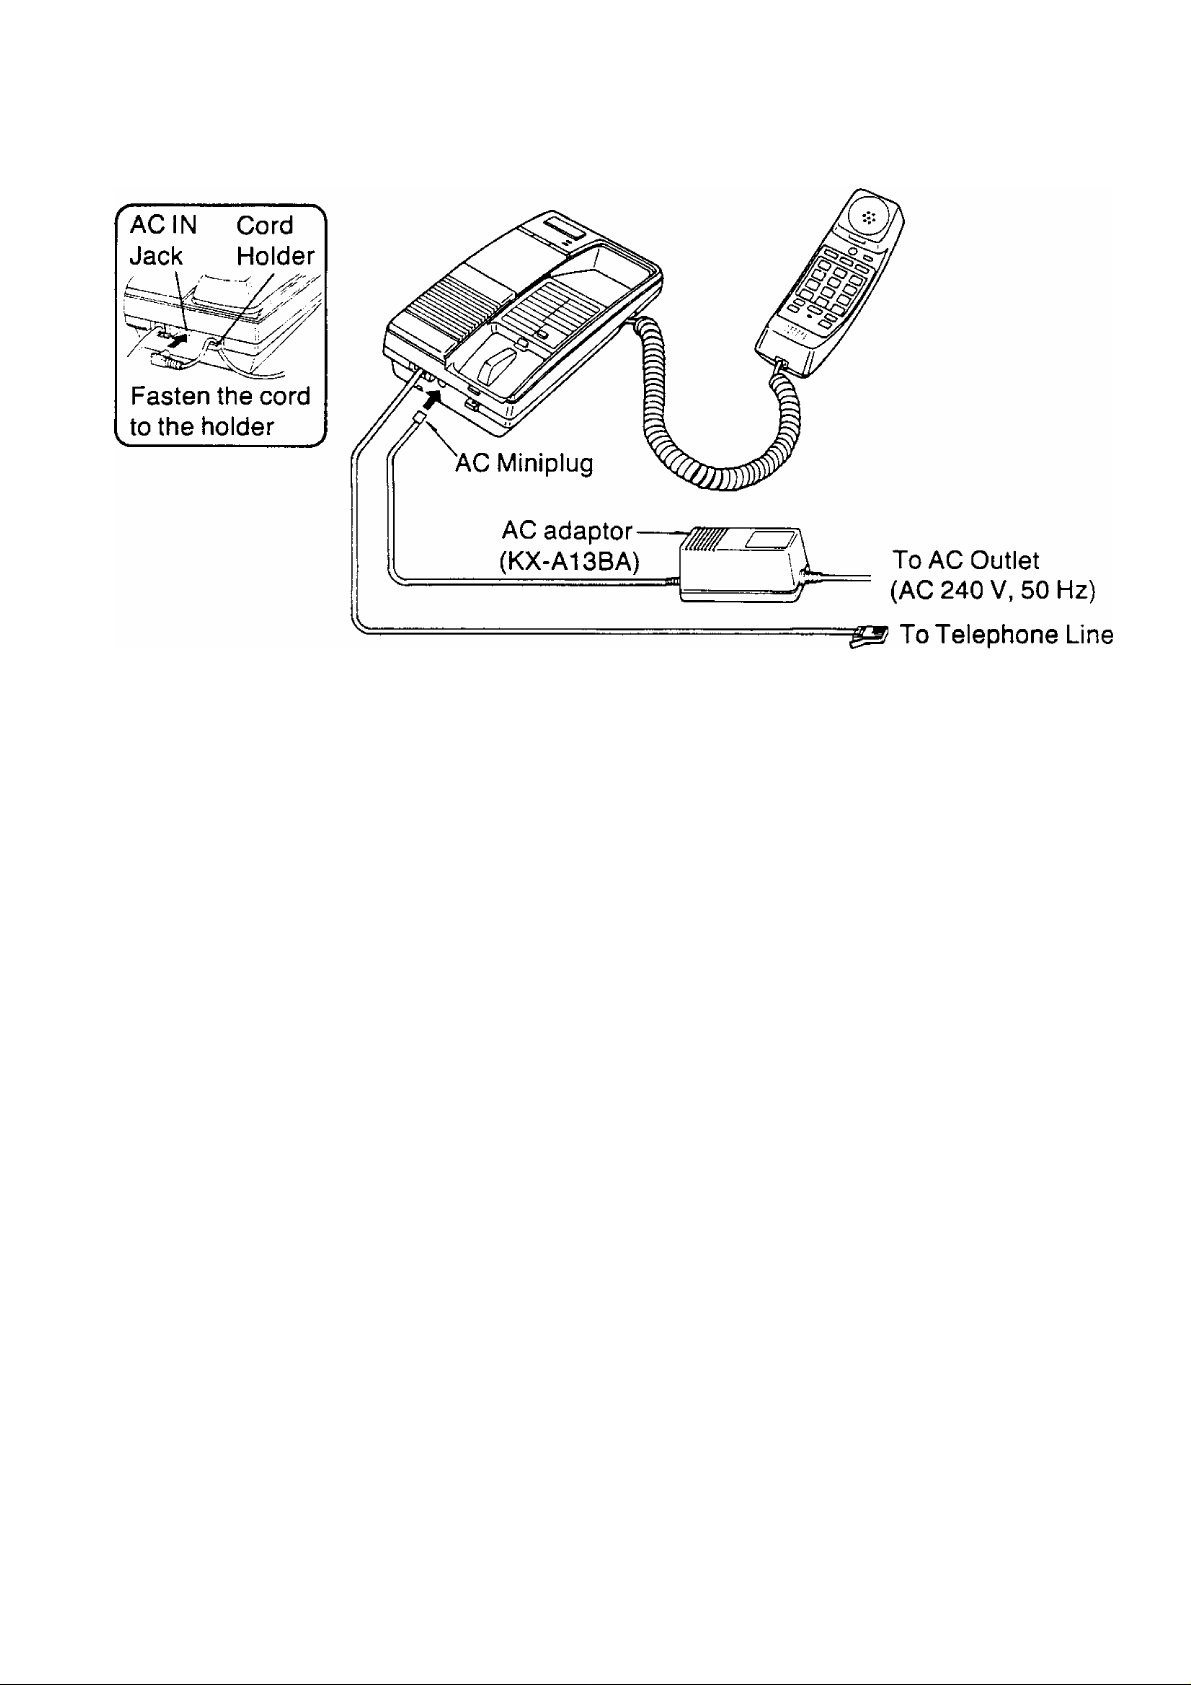
Connection
^ Fasten the AC Adaptor cord to
the Holder, to prevent the AC
Miniplug from disconnecting.
•This unit is designed to be connected as shown above.
•The AC adaptor supplies the unit with operation power.
•Do not use any AC adaptor other than the Panasonic Model
KX-A13BA.
•While operating the unit, the cabinet may feel warm, this Is a
normal conditions.
Be sure to use the AC adaptor. If a power failure takes place, the unit can be used
as a typical telephone.
’WARNING
The users are adviced to immediatery disconnect the equipment should it ever
suffer physical damage which results in the internal parts becoming accessible in
norma! use.
In this instance the users should have the equipment repaired or disposed of.’
- 2 -
Page 4
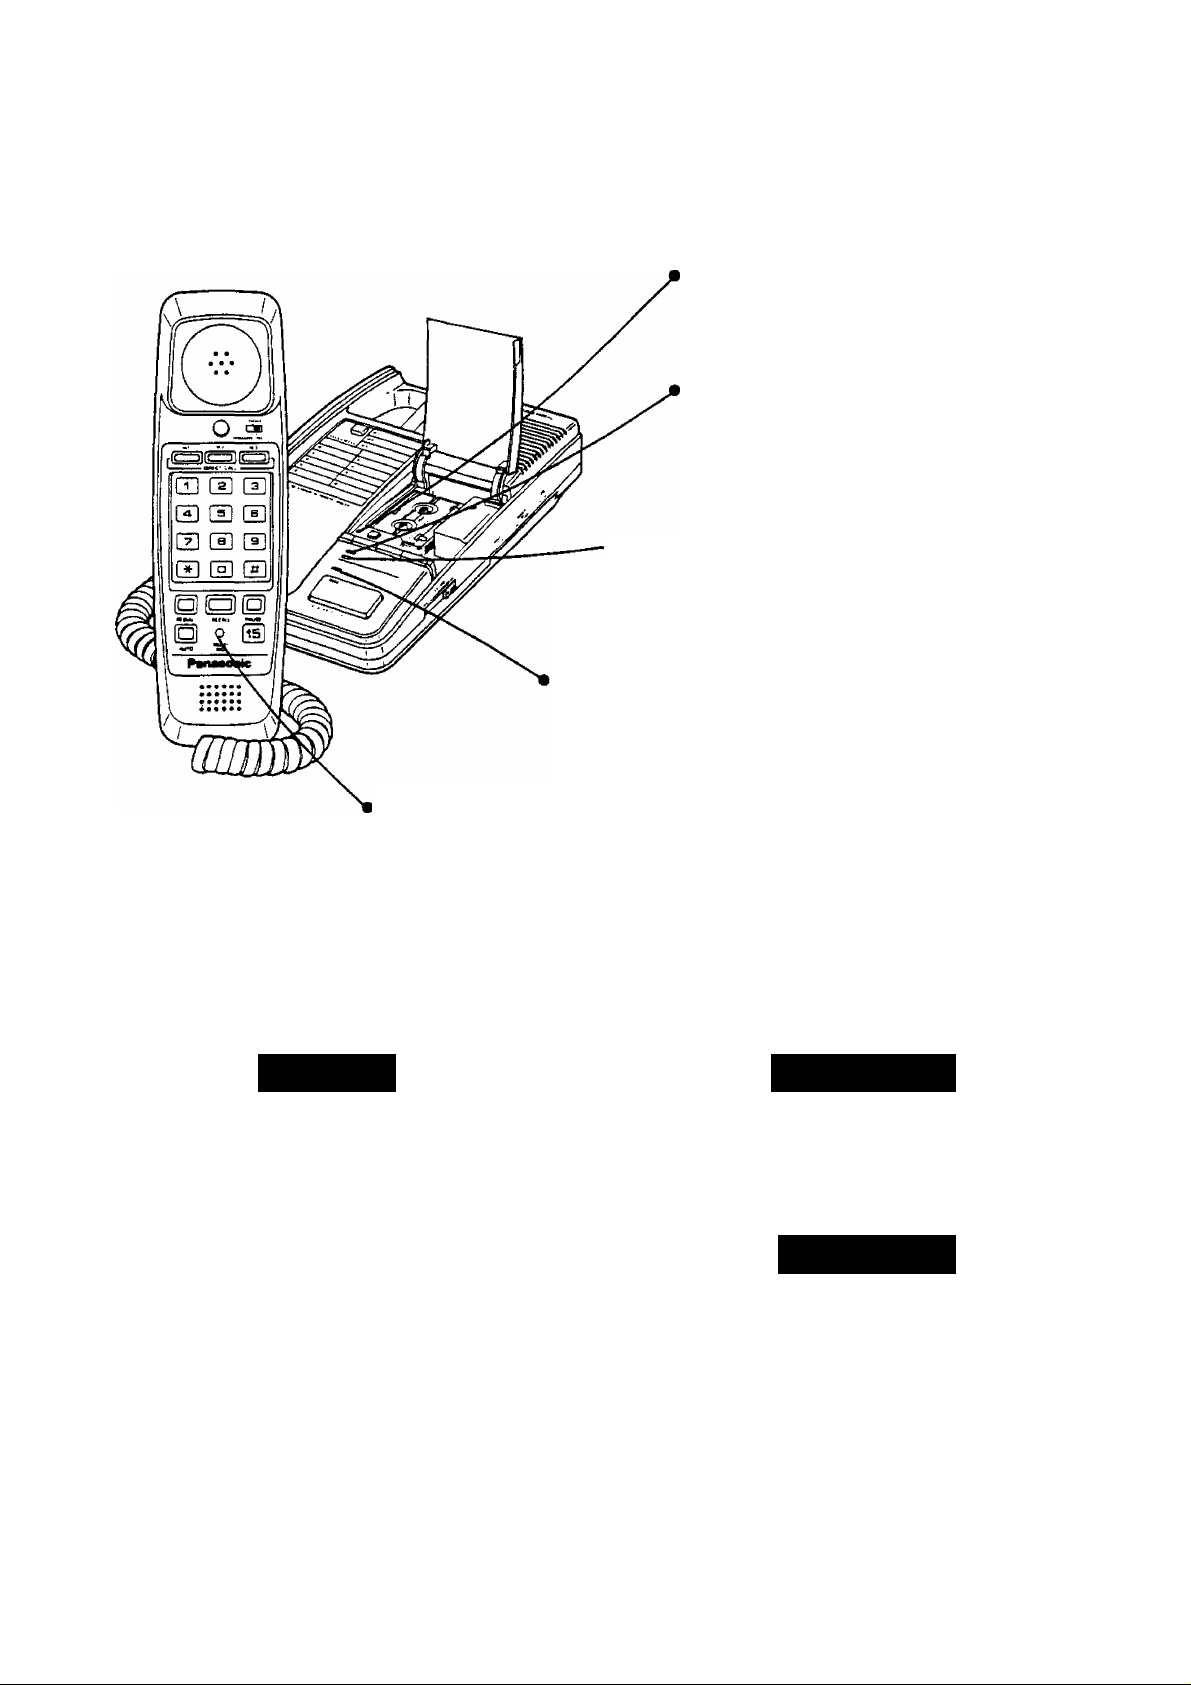
Direct Call
Buttons
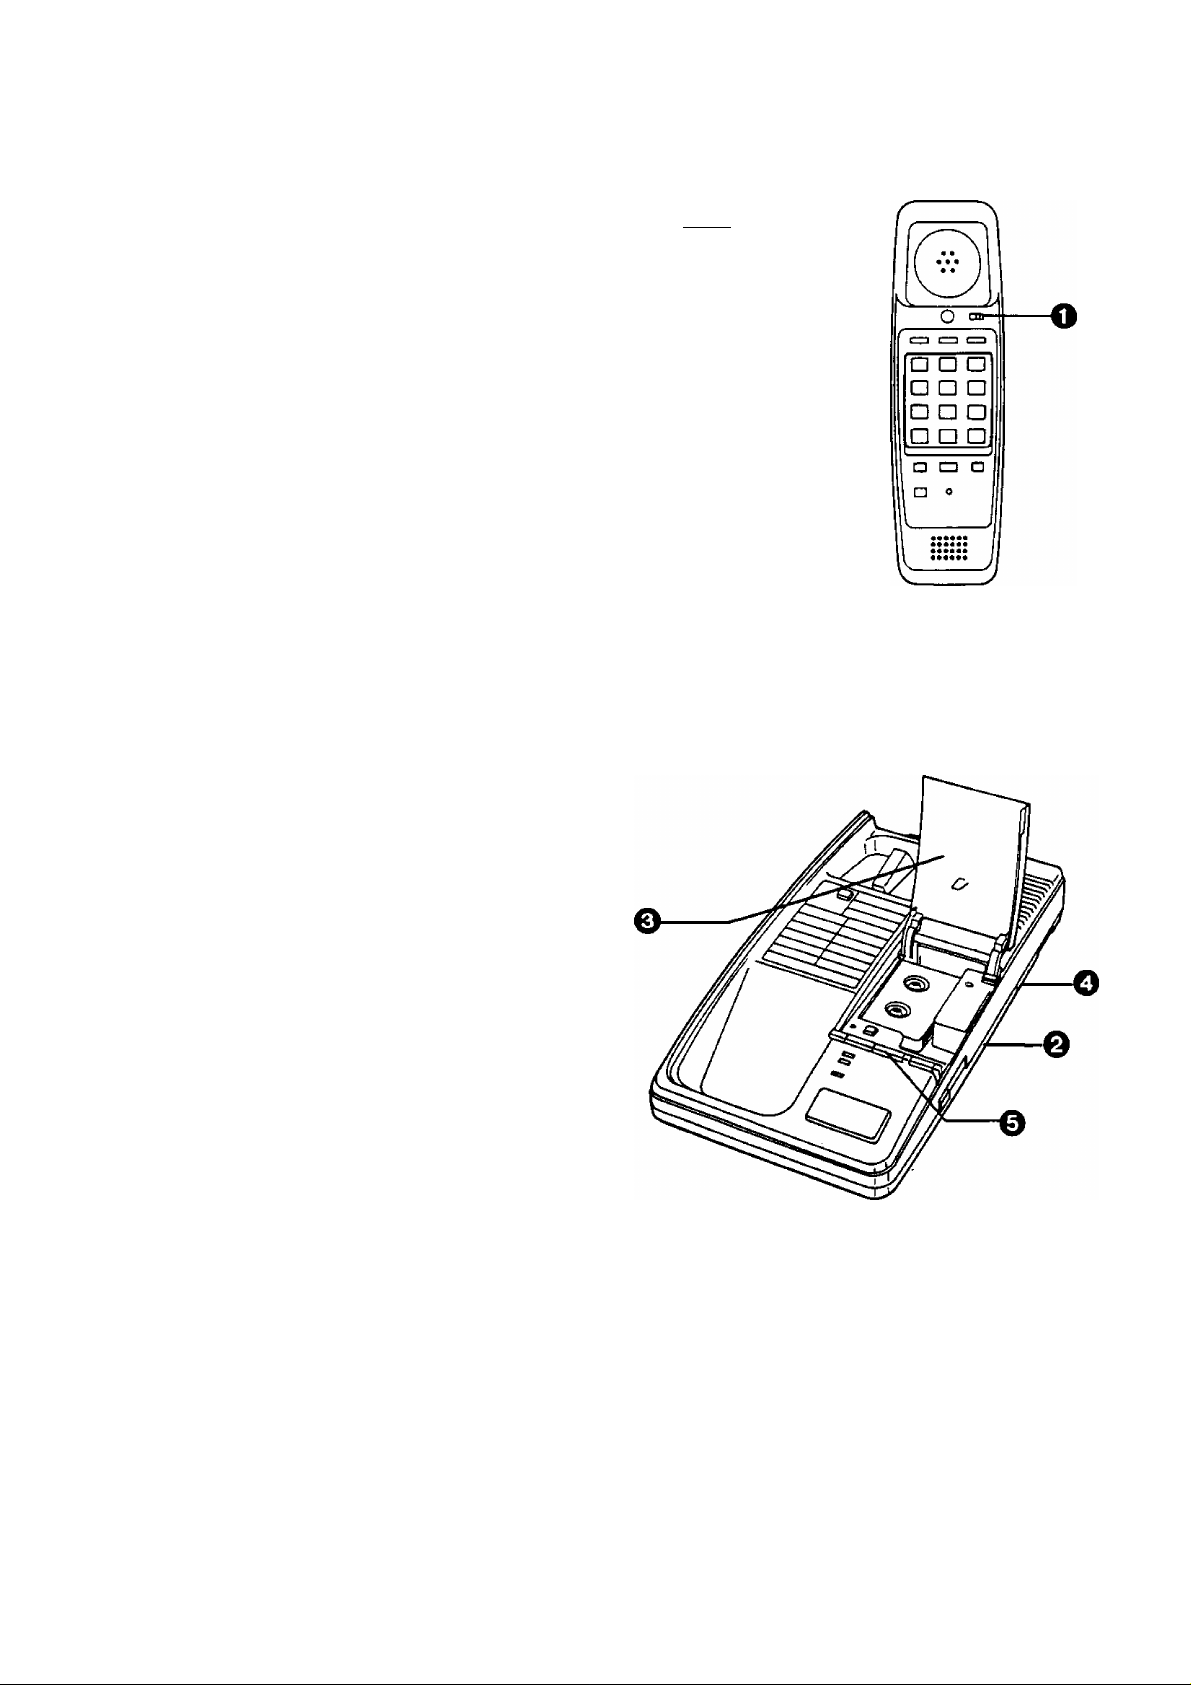
Location of Controls
Earth Recall Button
^Memory Card
rVou can also use the reverse side
for writing. The instructions for
storing numbers into memory
station and automatic dialing are
printed on this card.
Microphone
Redial Button
Auto Button
Time Break
Recall Button
Pause Button
OGM Button
and Indicator
Vox Sensitivity
Switch
Ring Selector
Ringer Selector
Volume Control
Answer System
On/Off Switch
Rewind Button
Memo Button
Playback/
Pause Button
Remote Code
(found on the bottom of the unit)
------
AC Adaptor (KX-A13BA)
Cassette Tape
Hardware
Wall Mounting Adaptor.........................1
Enclosures
.................................
...................................
------------
....................
1
1 pack
^Vox Sensitivity Switch^
If either
A; The tape continues to run after a
caller has replaced his handset:
or
B: There are long pauses between or
1
- 3 -
after messages:
then set the switch to “L”.
(Note: Normally the switch is preset to
the“H” position.)
V
__________________________________________________
_
Page 5
Preparation
O Setto“SEr\
©Setto “HIGH”.
LOW: The ringing sound will be low.
OFF: The telephone will not ring.
© Open the panel.
Insert the micro cassette tape.
For the best results, use MC-30.
O Select the Ring Selector.
3: The unit answers on the third
ring.
5: The unit answers on the fifth
ring.
LONG: When the unit is used on an
extension of PMBX which
uses manual ringing, set to
“LONG”. The unit answers
on the first ring.
MEMORY
PROGRAM SET
RINGER
OFF •••HIGH
LOW
© To reset the tape, push the
Rewind button until In Use
indicator goes out.
For the Easy Operation;
r
If you change the cassette tape, re
record your new OGM then play back
the OGM to confirm that your new
OGM is recorded properly.
OGM should be recorded by the
KX-T2386BA.
Use side 2 of the cassette tape after six
months and replace the tape every year.
See page 18.
J
_ 4 _
Page 6
Indicators
The Indicators inform you of the following functions:
«Power indicator:
In Use indicator:
while the tape moving (steady light)
OGM indicator:
recording mode (light)
Answer/Call indicator:
answer mode
(steady light or flashing)
system on (light)
'Multi indicator:
in the “PROGRAM” mode (steady light)
in the automatic dial mode (steady light)
Manual Dialing and Receiving
Dialing
1 Lift the handset & and identify Lift pSs and talk,
dialing tone.
2 ^ the phone numbers to be
Push dialed.
1
If busy, hang up W-
Receiving
Redialing
3 When you finish the
conversation, hang up
- 5 -
Lift and [J O
2
' REOtA
Push
•The last dialed number can be
redialed once by pushing the
Redial button.
Page 7

Automatic Dialing
■ 12 telephone numbers, up to 30 digits each, can be stored into the memory stations.
■ 3 telephone numbers, up to 30 digits each, can be stored in the Direct Call buttons.
Each Dialing button serves as a memory station.
storage
MEMORY
1
Set to “PROGRAM”.
PROGRAM SET
•The Multi Indicator wilt light.
2 ■ Home Use
Phone No. ^ D .
h station
Push station no.
Use Dialing
/Use DialingX
\ button /
button
• Phone numbers can be stored
into memory stations [T] to @ by
following the same procedure,
^
^ -►IPhone No.l^ □ .
C3IRECT CAl_l_
Push
■ Office Use (PABX)
S m-► [3
Push Station no. Line
' ' '
"^Use Diaiing\ access no.
button
Phone No.
•Or, you may use the instead
ofthestation button
After storing return
to * ^ S ET* ’. PROGRAM SET
Do not press the hook switch or
place the handset back into the
cradle while in the programming
mode. If this happens, return the
Memory Switch to “SET” then
to “PROGRAM”. And
reprogramming must be done.
or
________________
---------
PAUSE
□
AUTO
Ml
N
MEMORY
’'""Ml
Dialing
1 Lift and identify dialing
tone.
DialingN
2 S a -► s
^ AUTO
Push
or
Push
station no.
(ZZ3 •
□IRSCT CAL.I-
Use
button
in
J
Ml
N
3 When you finish, hang up.
Even while storing, you may receive a
call by setting the Memory Switch to
“SET”. Programming is cancelled and
the station must be reprogrammed.
Don’t disconnect AC adaptor and
telephone cords for over 3 minutes, or
the stored phone numbers may be lost
and reprogramming will be required.
- 6 -
Page 8

storing and Dialing
Set the Memory Switch to “PROGRAM”.
Correcting an Error
while Storing
If you notice an error before pressing
the Auto Button.
MEMORY
1 Return to “SET”.
____
PROGRAM SET
2 Repeat from Step 1 of “Storage”
on page 6 to reprogram.
•The previously stored number is
cleared and the new entry is stored.
Erasing a Stored
Number
Example:
To erase the number in the memory
station U].
MEMORY
Changing a Stored
Number
1 Erase the stored number using
the erase procedure.
2 Enter a new phone number using
the storage procedure on page 6.
Pause Usage
Pause usage in a dial sequence is
needed to gain access to an outside
line.
• Especially in manual dialing, a pause is
required for the redialing.
To wait for a dial tone (PABX)
1
Set to “PROGRAM”.
2 S d] ■
■Ji AUTO
Push station no.
/Use DialingX
\ button /
Return to “SET”.
3
PROGRAM SET
MEMORY
PROGRAM SET
One pause is required.
Combination Dialing
Any combination dialing can be done.
•Automatic and manual dialing
• Plural memory stations
- 7 -
Page 9

Facilítate the PABX
When this telephone is used as an extension on a PABX, the Time Break Recall
and Earth Recall buttons act as a hook switch to facilitate the PABX functions
such as transfer, recall and hold.
■ Use either Time Break Recall or Earth Recall button properly depending on
PABX type.
Time Break Recall button...for PABX timed break register recall facility
Earth Recall button...for PABX earth recall facility
■ The memory stations can store a time break recall signal, however it is not
possible to memorize an earth recall signal.
Example; Transferring
The number to which the call is transferred 1234 into the memory station [J.
storage
MEMORY
1 Setto “PROGRAM”.
PROGRAM SET
2 d
Push
a
station no.
/Use Dialing\
[button
J
o
RECAU-
H ••• H
--------V-------
Phone no.
MEMORY
3 Return to “SET”.
PROGRAM SET
T ransfer
1 While having a conversation, aCto CZ]
Push station no.
a
AUTO
2 Hang up after the other party to whom the call is transferred answers.
- 8 -
Page 10

How to Record
Outgoing Message (OGM)
RECORDING (Re-recording)
C3GM
Q
&
Push
until the
indicator lights
Speak into
CONFIRMING
Quickiy ^ □
Push
The purpose of the Outgoing Message is to inform the calling party that you cannot
answer, but want to record the caller’s message.
OGM
Recording
1 Push the OGM Button until the
OGM indicator lights.
•A series of short beeps will sound
followed by a long beep.
Micro-
When finish, Q
I,»)) phone
Microphone
Speak loudly and close to
the MIC, to reduce
background noise.
Confirming
Push the OGM Button quickly.
•if you hold the button too long, the unit
will go into the recording mode.
•The unit will rewind and play back,
•Adjust the Volume Control.
Push
again
2 Speak clearly, loudly and directly
to the microphone for up to
30 seconds.
•While recording, do not pause for
over 2 seconds. If 6 beeps sound,
wait until the In Use indicator goes
out, then start with step 1 again.
Start again at step 1.
•The new message will be recorded and
Re-recording
the previous one will be erased.
OGM
3 Push the OGM Button when you
finish.
•Wait until the tape stops.
Sample of OGM:
Hello, this is (the Panasonic Company).
We can’t answer your call at this
moment. Please leave your name and seconds.
number and we wilt return your call. •A series of short beeps lasts, while
You have up two and a half minutes
to leave your message after the
series of tones.
^Thank you for calling.
•The unit automatically sets itself on Answer mode after 10 seconds from
completing the OGM recording or playback.
•If you record the OGM at a distance, unw^anted noises may be heard. If this happens re
record the OGM by speaking closer to the MIC.
■ More samples of an Outgoing
Message can be found on page 16.
------------------------------------------------------------------------------- ^
•Please record the Bold-faced
sentence in your OGM.
•Caller’s recording time is up to 150
the tape is preparing for the
recording.
•A long beep following the short
beeps means the tape is ready. ^
- 9 -
Page 11

Prior to Leaving
ANSWERING & RECORDING
ANS SYS
&
Push
•The Answer/Call indicator will light after 10 seconds.
. To turn on the power (power light on)
MESSAGE MEMO
Push
Speak into
Automatic Answering
and Recording
One touch on the Answer System
On/Off Switch enables the unit to
answer calls.
•When the telephone rings, the unit wilt
play the outgoing message, then it will
record the caller’s message.
•The Answer/Call indicator will flash
and show the number of recorded
incoming messages. Although, the
flashing is limited up to 15 times in a
group, more messages can be
recorded.
•In case of a power failure, the Answer/
Call indicator will flash slowly after the
power is restored.
Micro
phone
MEMO
Push
to finish
Message Memo
To record a confidential message, any
time at home, on the iCM part of the tape
to be heard by someone using the unit.
1 Confirm that the Answer indicator
lights or flashes.
2 Push the Memo Button until a
beep sounds, followed by a
series of short beeps then a long
beep will be heard.
3 Speak for up to 150 seconds.
4 Push the Memo Button, when
you finish.
•The unit will be ready to answer the
next call.
To Monitor Calls
If you do not want to set the unit to the
Answer mode, turn the Answer
System On/Off Switch off.
Adjust the Volume Control.
To Speak Directly
Lift the handset while answering (or
recording) calls.
•The tape will stop moving.
• If you lift another handset connected to
the KX-T2386BA, the tape will not stop.
-10-
Page 12

After Returning Home
TO LISTEN TO MESSAGES
-</11
Push
•To Stop the tape temporarily (pause),
^/11
Push
•To rewind the tape,
REW
Push
To Listen to Messages
1 Push the Playback/Pause Button.
Auto-Logic
(One Touch Operation)
TO SAVE MESSAGES AFTER
PLAYBACK
-</1!
REW
and i
Push
(simultaneously)
>To record new messages from
the beginning of the ICM part of
the tape during playback, push
the Rewind Button until the In
Use indicator goes out.
•One touch on the playback button
allows the unit to play back and
sound 3 beeps after the last
message. Then 10 seconds later,
the unit will rewind and be ready
to record new messages from
the beginning of the ICM part of
the tape (Reset mode).
•While in the pause mode, the unit
will not automatically change to the
answer mode. To change to the
answer mode, push the Pause Button.
• If you receive a call while playing
back, push the Pause Button then
lift the handset.
•To listen to the message again
during playback, push the Rewind
Button. The unit will start playing
back immediately when you
release the button.
To Save Messages
The previously recorded messages may
be saved.
1 Play back the tape until you hear
the message that you want to
save.
2 Push the Playback/Pause Button
and the Rewind button
simultaneously.
•The unit will rewind the tape after
2 seconds and will be ready to
answer and record future incoming
messages after the message that
you have saved.
-Listening to the ICM after Reset—
1. Push the playback button.
•You hear the 3 beeps.
2. Push the playback button again.
11-
Page 13

How to Operate
from Remote Phone
■ Optional Pickup Remote
Controller (KX-A56A)
You can listen to the recorded
messages and control the unit
from a remote location using a
optional “Pickup Remote
Controller" KX-A56A.
•The Pickup Remote Controller
produces a chirping sound in operation,
and the answering machine responds to
the Controller with a beep.
• Push the buttons on the Controller
continuously, until the beep is heard
through the telephone line from the
answering machine.
Playback Messages
While the Outgoing Message is
playing, place the Controller’s
speaker against the telephone
mouthpiece and push the Play
Back Button. (The beep will be
heard then the outgoing messages
will be stopped.)
•The machine will play back from the
beginning of the recorded
messages.
However, the tape will be stopped
after 2 minutes 40 seconds from
the pushing the Play Back Button,
then 2 beeps will sound.
•To hear further messages, push the
Continue Button within 10 seconds
of this 2 beeps.
•After all the recorded messages have
been played back, 3 beeps will sound
then future incoming messages will be
recorded after the last recorded
message.
12-
Page 14

How to Operate
from Remote Phone (cont.)
How to Record
a Marker Message on
the iCM Tape
3-beep
10-second
After alt the recorded messages have
been played back, 3 beeps will
sound. 10 seconds later, 2 beeps will
sound.
1 Start to talk right after the last
2 beeps.
2 When you finished, hang up.
• If the beep sounds 6 times after all
messages have been played back, you
cannot record a marker message
because the ICM tape has come near to
the end.
2-beep
----------------H
^ marker message
Record date, time, etc.
How to Record Future
Incoming Messages
from the Beginning
of the Tape
8 seconds after all the recorded
messages played back or while
the recorded messages are
playing back.
•The unit will rewind to the beginning
of the tape and then one beep will
sound.
Hang up the telephone.
• Future incoming messages wilt be
recorded from the beginning of the
tape.
If you push the Reset Button by
mistake, push the Review Button
within 8 seconds of one beep to
establish the playback mode.
-13-
Page 15

How to Repeat
Messages
To hear the message again during
above playback, push the Review
Button.
NOTE
• If there is no response from the
answering machine to your remote
controller’s command, the telephone
might be equipped with a carbon
microphone.
For the improvement of the
performance, please shake the
handset to loosen carbon particles.
•The tape will rewind for approximately
15 seconds corresponding to playback
time.
•To rewind further, push and hold the
Review Button.
■ To play back the tape from the
beginning, push the Reset Button,
so the tape will be rewound to the
beginning of the tape and one beep
will sound.
Push the Review Button within
8 seconds of the beep.
►When you use Pickup Remote
Controller, place the Remote
Controller’s speaker against the
telephone mouthpiece leaving about
a quarter inch of clearance and push
the buttons.
-14-
Page 16

Wall Mounting
The unit can be mounted on the wall
utilizing the screws provided.
1 Mark two points on the wall at
S'* Vi6 inches of clearance.
2 Using the washers fix the screws to
the wall.
3 Hook the telephone line cord to the
•To remove the adaptor, pull in the
direction of the arrow © while pushing
the two snap tabs simultaneously in the
direction of the arrow ©, as shown.
5 Mount the unit on the wall then seat
securely by hooking the screw heads
into the slots.
4 Insert the hook of the wall-mounting
;! adaptor into the hole of the unit then
CO place the wall-mounting adaptor by
r
To temporarily place the handset
down during a conversation, hook as
shown.
-15-
Page 17

Tones Heard
Samples of
from the Unit
TYPE
once
WHEN THE TONE
SOUNDS
•When the unit begins to
record an incoming
message on the tape.
•When the unit responds to
the tone from a remote
controller.
•After the tape has been
rewound to the beginning
of the part of the ICM tape.
•Between messages.
OGM
Home
Hello, this is (Smith residence). We
cannot answer your call at this time. If
you leave your name and phone number,
we will return your call as soon as
possible. You have up two and a half
minutes to leave your message. Leave
your message after the short beep tones.
Thank you for calling, here come the
tones.
If the beep sounds 6 times, your
message will not be recorded. Should
this happen please call back
tomorrow.
■ ■ ■
3 times
110 sec.
3 times
twice
6 times
6 times
quickly
After the unit has played
back all the recorded
messages.
When the unit is ready to
record a marker message
on the tape.
•When the tape has
reached the end.
•When the tape is broken
or not inserted.
When the OGM recording
is paused for over 2
seconds.
Note:
When the ICM tape is full, the unit cannot
record any more messages. This is
indicated to the caller by 6 beep tones.
Please record the bold-faced sentence
surely on the OGM tape.
Doctor
This is Doctor ABC’s office. The doctor is
on vacation until August tenth, in his
absence, his calls are being handled by
Doctor Smith, who can be reached at
123-4567. That number again is 123-
4567.
Thank you for calling.
16-
Page 18

Troubleshooting
Guide
Problem
r
The unit does not work when
I push any buttons.
The unit has been set to the
answer mode, but no incoming
message is recorded.
The unit does not function as
an answering machine.
However, a beep sounds
6 times and the call indicator
flashes on and off quickly.
r
While recording an outgoing
message, a beep sounds
6 times.
Cause & Remedy
• Plug in the AC adaptor again.
• Push the Answer System On/Off Switch
on.
•The cassette is broken (cut, worn out or
twisted) or not inserted. Replace the
cassette with a new one.
•The OGM is recorded improperly.
Record a new OGM.
The cassette might be broken. Replace it
with a new one.
Re-record your outgoing message.
Speak clearly, loudly and directly to the
microphone, and do not pause for over
2 seconds while recording.
^ When the tape is played back,
the sound level is low, even if
the Volume Control is turned
up.
I have played back all the
recorded messages and I
want to record the next phone
call after the last recorded
message.
I push the button of a remote
controller, but the unit does
not respond.
The unit does not ring.
Clean the heads. (See “Maintenance" on
page 18.)
• Save all the recorded messages by
using the “Save Messages” operation,
on page 11.
• In case of remote operation, just hang
up.
•Make sure that you are using your own
code number.
•Record the outgoing message in a quiet
place.
Ringer Volume Selector is set to “OFF”.
Set to “HIGH” or “LOW”.
17-
Page 19

Cassette Tape
Others
•For optimum sound quality and
performance, we recommend you to
use side 2 after six months and to
repiace the tape every year and to
re-record the outgoing message
every three months supposing that the
unit answers about ten calls a day.
•Never place a cassette tape near a
magnetic source, such as a magnet or a
TV set, because it may erase the tape.
• insert the cassette tape into the
machine with the tape in front of the
capstan as shown below.
•Slack in the tape can be tightened by
rotating the tape reel with a pencil, as
shown:
• If there is any trouble, disconnect the
unit from the telephone line and connect
a known working phone. If the known
working phone operates properly,
return your unit to your supplier for
repair. If the known working phone does
not operate properly, consult with a
telephone company.
• Do not use benzine, thinner, or similar
solvents. Do not use abrasive powder to
clean the cabinet. Wipe it with a soft
cloth.
• Keep the unit away from heating
appliances and electrical noise
generating devices such as fluorescent
lamps, motors and television. These
noise sources can interfere with the
performance of the EASA-PHONE.
•This unit and the cassette tapes should
be kept free of dust, moisture, high
temperature and vibration, and should
not be exposed to direct sunlight.
• Never attempt to insert wires, pins, etc.
into the vents or other holes of this unit.
Maintenance
Because the head and capstan
assemblies are in contact with the tape,
dirt and residue from the tape can easily
adhere to these parts, causing distortion.
These parts should be cleaned
periodically in the manner described
below.
•Clean the head surfaces, pinch roller
and capstan with a cotton swab.
If these surfaces are extremely dirty,
dampen the cotton swab with alcohol.
Notes:
•Do not bring magnetic or metal objects,
such as a screwdriver, near the head
assemblies, as such objects could
magnetize the heads.
• Do not oil any part of the unit.
Heads Pinch roller
J
-18-
 Loading...