

Page 1

)perating
istructbns
MODEL NO.
INTEGRATED
TELEPHONE SYSTEM
KX-T2365A
EASA-PHONE
Telephone with Automatic Dialer
and Speakerphone
o.
'■'W
o
-o
Panasonic
Please read before use.
Page 2

Contents
Location of Controls .................................................................................................... 2
Preparation .................................................................................................................... 3
Manual Dialing and Receiving ..................................................................................... 4
Automatic Dialing ......................................................................................................... 5
Storing and Dialing ...................................................................................................... 6
Hold ............................................................................................................................... 9
Hands-free .................................................................................................................... 9
Use of Other Features ..................................................................................................10
Adjusting Time .............................................................................................................11
Liquid Crystal Display
...
............................................................................................. 12
Battery Installation ...................................................................................................... 13
Wall Mounting ...............................................................................................................14
Troubleshooting Guide ................................................................................................15
Others
...
...................................................................................................................... 16
Enclosures
AA size batteries
Hardware
...........................................
..........................................
1 pack
3
-1 -
Page 3
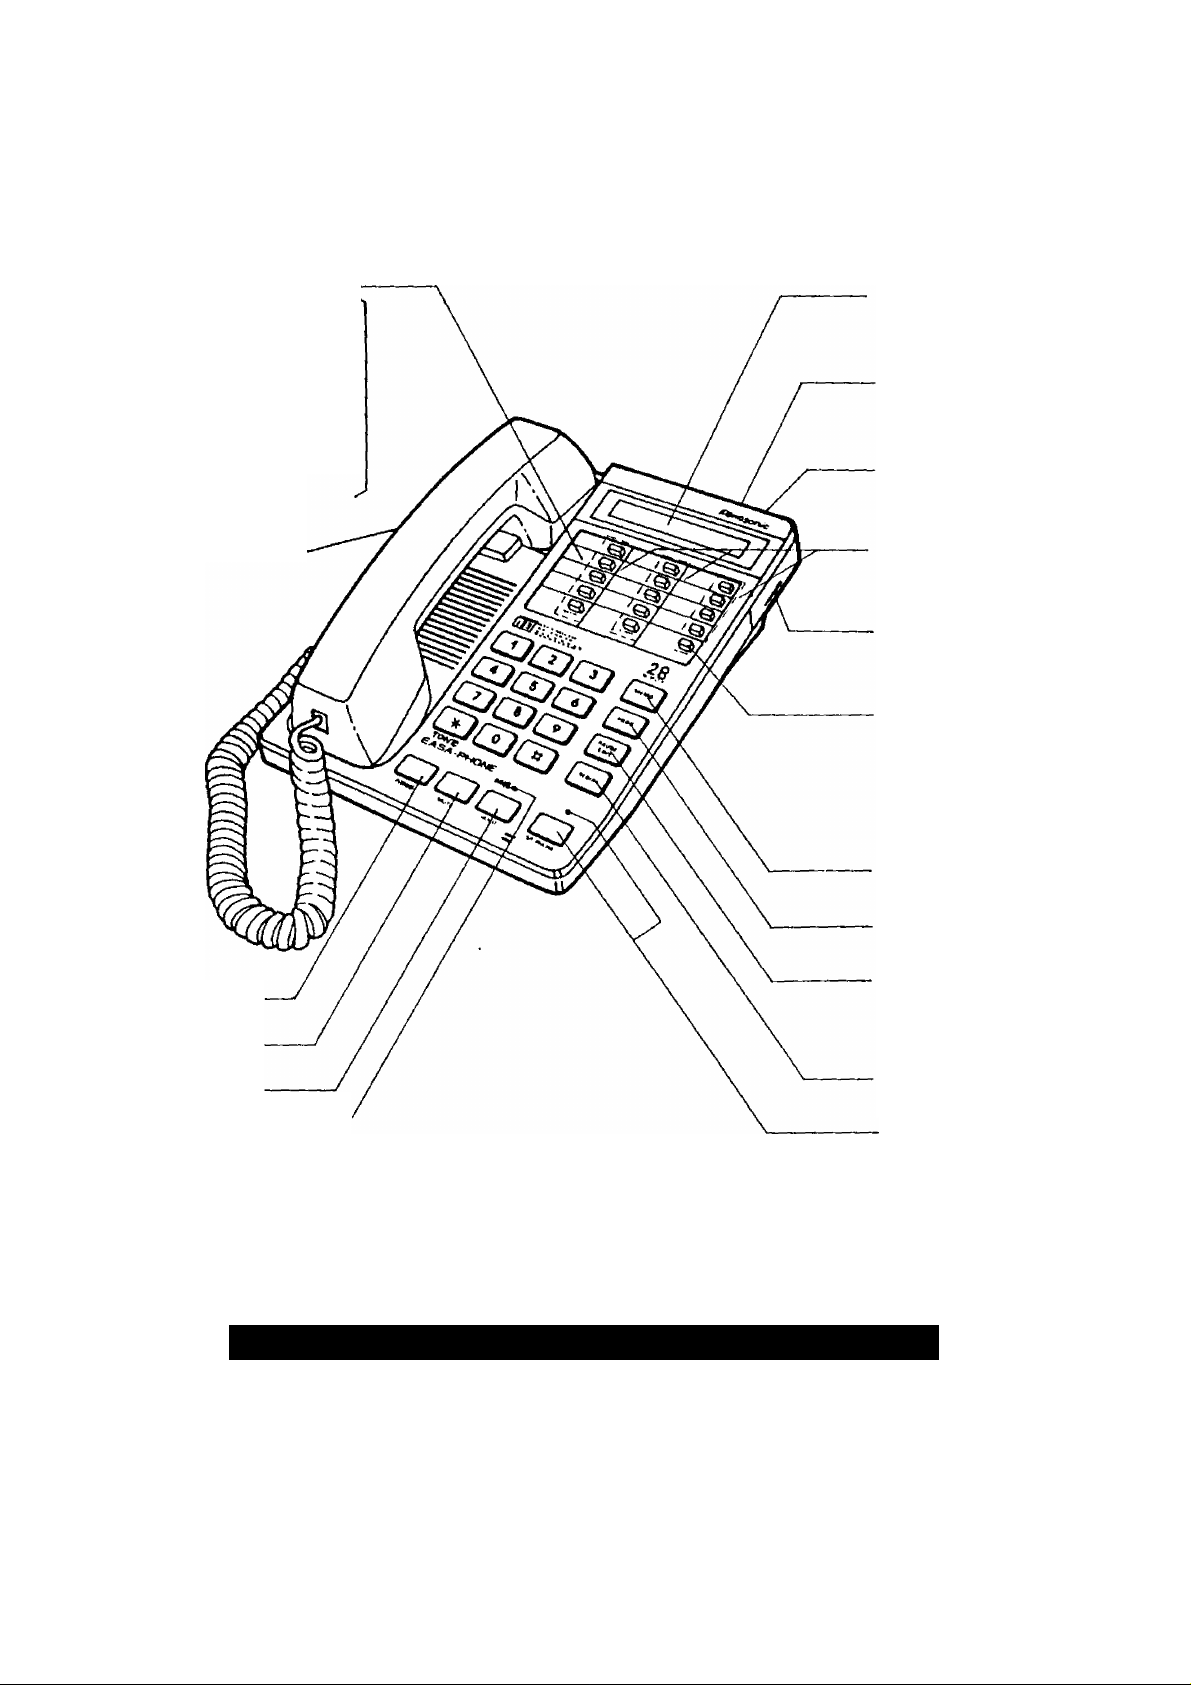
Location of Controls
Memory Card
You can also use the
reverse side tor writing.
The instructions for
storing numbers into
memory are printed on
this card.
Recall Selector
Liquid Crystal
(LC) Display
Ringer Volume
Selector
Dialing mode
Selector
Memory Station
Buttons
Speaker Volume
Control
Lower Station
Button
Recall Button
Mute ButtonHold Button
Mute/Hold Indicator
PROGRAMILOWERIMEMOIREDIAL^^HSAVE
AM I I ^ ZifU fi nz «, Dni
PM t I iji I Zl u
Memo Button
Program Button
Pause/
Save Button
Redial Button
SP-PHONE Button
and Indicator
Liquid Crystal Display
Present
time
This display is different from real display.
2-
Rough length of
time that you speak
Page 4
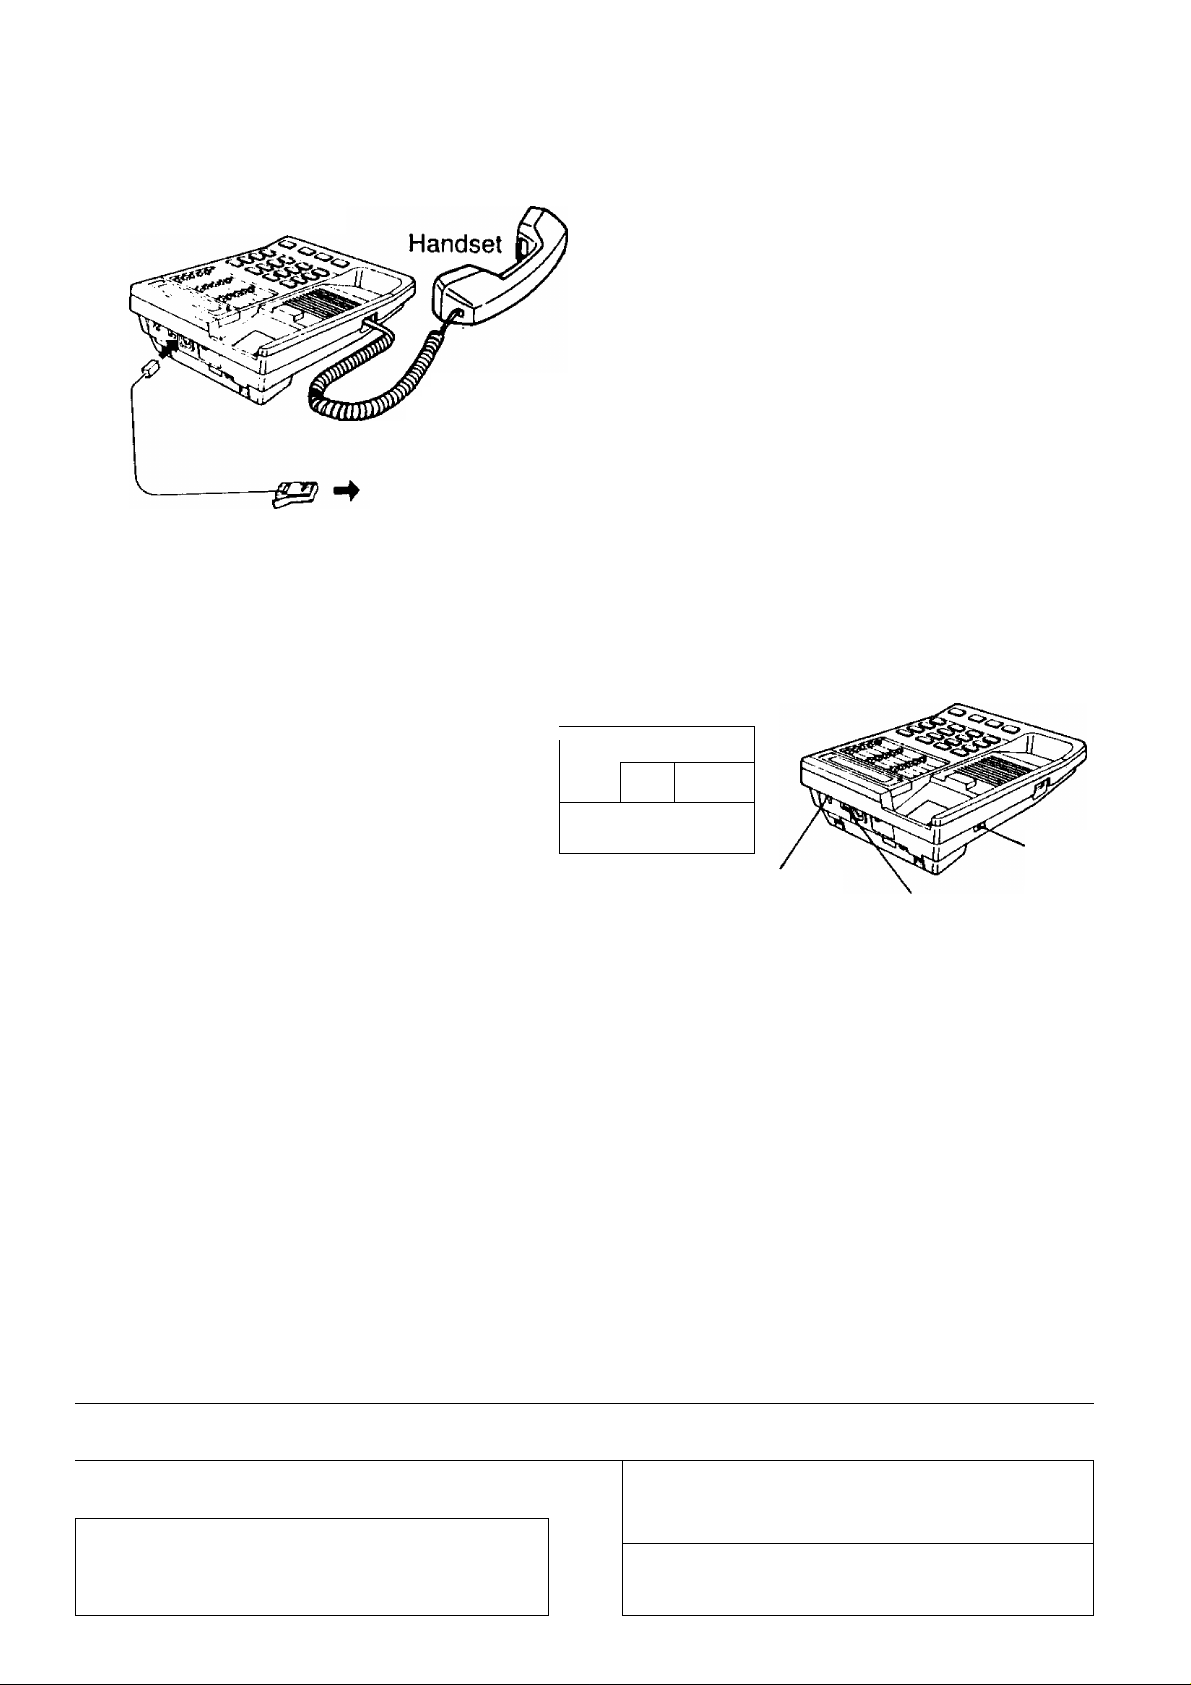
Preparation
Connect as shown.
Handset Cord
To Telephone Line
■ Do not use any handset other than Panasonic handset made for the model KX-T2365A.
O Ringer Volume Selector:
Set to “HIGH”.
LOW: The ringing sound level will be low.
OFF: The telephone will not ring.
O Dialing Mode Selector:
Set to “TONE”.
If dialing cannot be done,
set to "PULSE".
O Recall Selector:
RECALL
Set to “E RE” or
“T BR”.
E RE T BR
V
____ _
RtNGER
OFF • • • HIGH
LOW
DIALING MODE
PULSE • •
-------------
■ ► Œ
TONE
Dialing mode
selector
\
J
Recall
Selector
Ringer Volume
Selector
(depending on PBX type)
E RE ... for PBX earth recall facility
T BR ... for PBX timed break register
recall facility
O Insert the batteries (included) in the
proper order as indicated.
For further details, see page 13.
O Select the LC Displays’ contrast.
I /»«OG I -X.
Push -----------------^
to choose the best display intensity.
[T] : Low intensity
[2] : Middle intensity
[3] : High intensity
Q Adjust the time.
The LC Display will blink when *
first powered on. For further
details, see page 11.
U the batteries are not installed, ^
programming, and speakerphone
operation can not be done. ^
-----------
-----------------
.. f
-------------------
.. àttuofty
5 or [JJ ^ □
• Push the Program Button until the LC
Display shows _
-------------------------------------------------------------^
Replace all the batteries every 10
^months, or misoperation may occur.^
Do not use rechargeable (NickelCadmium) batteries. j
-3-
Page 5

Manual Dialing and Receiving
When the unit is unused, the Liquid Crystal Display will show the present time only.
Using the Handset
Dialing
1 Lift the handset and
identify the dialing tone, then
the phone numbers to be
Push dialed.
• The LC Display will show the phom
number in order of pushing the
Dialing button.
2 When the other party answers,
start talking.
• The LC Display will show the
present time and the length of time
that you speak.
3 When your call is finished, hang
up the
Receiving
HandS'free
Dialing
1 ( ] and identify the
Push sp pH O N e
dialing tone, then ^ the phone
numbers to be dialed.
2 When your call is finished,
da ■
Push sp -p H O N e
Receiving
dr
Push SP P H O N E
The LC Display will show the same as
“Using the Handset”.
and talk.
Lift the and talk.
• The LC Display will show the
present time and the length of time
that you speak.
If busy,
Push
The LC Display will show “
and the redialed number. Also it will
show the present time and the length
of time that you speak.
R fD lA t
REDIAL
If the batteries are not installed,
speakerphone operation cannot be
done.
Rédìaling
When using the handset;
Depressing the Redial button enables
you to redial once.
If the Mute/Hold Indicator lights when speaking, push | j.
-4-
MUTE
Page 6

Automatic Dialing
Each Memory button consists of two functions, they are upper and lower memory
locations. Each location (Upper+Lower) Is capable of storing 16 digits.
storing Phone Numbers
Be sure the handset Is on the cradle,
the SP-PHONE button is off and
batteries are installed (See page 13).
1 ^ 1^''° ] until a beep is heard.
Push
• The LC Display will show
Home Use (into the upper)
„ ^ Station .
button
Office Use (PBX) (into the
lower)
Depressing the Lower Station
button must be done first, then the
LC Display will show “
----------^--------------
Phone no.
LOWER
Dialing
Using the Handset
1 Lift the and identify the
dialing tone.
2 ■ In using the ^ q
upper station, Push S'^tion
^ button
• The LC Display will show the phone
number. _ iow«
■ In using the ^ O^D
lower station, “
• The LC Display will show
LOWER
” and the phone number.
3 When you finish, hang up
theL^ .
Hands-free
button
S a-♦a -»rn-
Station Line
button access no.
-
--------
^ 1 f
------------
^ WMOWr
1 |•••[ 7 ].♦□ ¿a In using-the ^ j—^
Phone no.
The LC Display will show
« Of~f ”
«1*
and the phone number.
3 After storing all the numbers,
S (3-
Push
• The LC Display will show the
present time.
■ To change a Stored Number,
repeat above procedure.
1 ^ I j and identify the dialing
Push SP ‘P H O N£ tone.
upper station, Push Station .
button
In using the rt
lower station, ~ '
Li I—l-^l I
Push
Station
button
3 When you finish, ^ ^ j ,
Push SP-PNOW
■ The LC Display will show the same as
“Using the Handset”
Even while programming numbers, you
can answer a call by simply lifting the
handset. Programming is cancelled
and then reprogramming shall be done.
-5-
Page 7

storing and Dialing
When using the lower station, depressing the Lower Station button must be done first.
Correcting an Error
while Storing
If you notice an error before pushing the Memory button:
I^i шля
s □.
Push
• The new entry is cleared and the
previous storage remains
untouched.
2 Repeat steps 2 of “Storing Phone
Numbers” on page 5.
Paiise Usage
The Pause button function is needed for
an outside line access number or a
computer accessed line.
• Especially in manual dialing, a pause is
required for the redialing.
To wait for a dial tone (PBX)
PAUSE
—I—
One pause is required
- 123...7
Example;
To erase the number stored in the lower
position of the memory station.
1 3[
Push
_
ШВ LCWfR мемояг
2 S a-4D4 a.
Push
3 [ f^ffOG j,
Push
РЯОО
Station
button
Corhbination Dialing
Any combination dialing can be done.
■ Automatic and Manual Dialing
■ Pulse and Tone Dialing
■ Plural Memory Stations
Two pauses are required
Mute Operation
Use when you do not want your voice to
be heard by the other party.
isn.
Push MUTE
• The Mute/Hold Indicator will light.
2 To resume the conversation,
SD
Push MUTE
again.
-6-
Page 8

storing and Dialing (cont.)
V <y i f ^.W>wiyf4. r,v
I jwygf I j-jU:
Saved Number Redial
The last dialed number can be stored
into the Save button before hanging
up (e.g. • during a conversation).
This number will be saved until another
number is stored again, and can be redialed
any time by pushing the Save button.
• This function is useful to store the phone
number which you wish to redial after
dialing another number.
■ Storing
1 G[^ I Phone no.
Push
to dial.
2 When the called line is busy or
while having a conversation,
PAUSf
^ c
Push
sMve
Storing during a
Conversation (Memo Dial)
While having a conversation, another telephone number can be stored into the Memo button.
So you can dial this number by pushing
the Memo button any time you like.
• This function is useful to store a
telephone number, which is given to
you by the other party.
■ Storing
1 While having a conversation,
SB .
Push
2 S [
Push
Phone no.
□
■ Dialing
1 Lift the .
or
In hands-free mode;^[ ]
PAUSE
2^
Push
SAVE
____
Push SP-PHONE
■ Dialing
1 Lilt the P2? orBi 1-
Push sp PH O n e
2 B
Push
If you store the new number into the
Memo button, the previously stored
number will be erased.
-7
Page 9

storing and Dialing (cont.)
The last number manually dialed can be stored Into a memory station.
Example: To store into the upper station.
Be sure the handset is on the cradle, and the SP-PHONE button is off.
■ Redial Memory Transfer
1
S i I
Push
2
В
• The LC Display will show the
__
f--------^ MeiuMY
□ «0«! ^ Q
Station
button
redialed number.
----------------
f '
-------------
•
3 2*
Push ^
-------------
■ Up to 30 digits will be dialed when
using the redial function.
When storing the last dialed number
into memory, the maximum amount of
digits can not exceed 16 digits.
-
Memo Dial Transfer
The Memo dial number can be stored into a memory station. Follow the procedure of
“Redial Memory Transfer" and push the Memo button instead of the Redial button.
Tone, Button Usage
If you want to change from pulse mode
into tone mode during dialing, the Tone
( I ) button can be used instead of
TONE
changing the Dialing Mode selector.
When you hang up, the dialing mode will
be automatically returned to pulse mode.
To access an outside line using the PBX
recall facility, press the Recall Button.
Depending on type of switching
equipment to which Easa-Phone is
connected, various functions, such as
transfer, recall and hold can be initiated.
Reòall Button
-8-
Page 10

Hold
Hands-free
^ ini»** ”'*f ц^g
To Place a Cali on Hold
While having a conversation,
SD^
Push w«-°
• The Hold Indicator will blink slowly.
• You may hang up the
To Release Hold
1 ■ When the handset is being lifted;
^LJ
again.
Switching to Hands
free or Handset during
a Converisatioh
You may choose to use the handsel or
hands-free.
Hands-free Handset
Switch to
Lift the .
• The SP-PHONE Indicator will go out.
Handset Hands-free
Switch to
When the handset is on the cradle;
• In using the handset
Lift the .
or
• In hands-free mode
^CZ]
Push spPHowe
2 Start talking.
1 3 o.
Push SP-PMONE
• The SP-PHONE Indicator will light.
2 Hang up the .
■ Before hanging up, you must push the
SP-PHONE button.
Helpful Hints for Hands-free
If the other party finds it difficult to
hear your voice:
Lower the sound level using the
Volume Control or speak louder.
Absorbing echoes
-9-
Use in a room that has curtains or
carpeting.
Effective Talking
If some part of conversation is lost
while talking, speak alternately.
Page 11

Use of Other Features
W.H miWK'»W*OTe'!>l»*Wg!^IIW№iBCT W|WP»W»W';A-'Kf|WWOTt'.M Wa!!rii'V<PW«^>m>)U')■ iMlJ* № WMWagTOWy l-i. ^‘W g«fw Ml
You may store a secret phone number and Hyphen.
So the secret phone number will not be seen on the LC Display when dialing.
Example:
Phone number 123-4567 into the upper station and 4567 is the secret number.
storage
Be sure the handset is on the cradle
and the SP-PHONE button is off.
1 S (3 •
Push
The LC Display will show
2 B a-»[T][T][T)..a'
Push ^
Station
button
SfCWf r MtMOHY
□-►a .
Automatic Dialing
1 Lift the ^3 or [ ]
SP-PHONE
Push
2 S
D
Push Station
button
' The LC Display will show "
r OOOO
i_ —^ -I
The last four digits will not be shown.
• If you do not store a hyphen, the LC
Display will show
“ i r» r? OOOO “* "
IL. O !_ ■
The LC Display will show
" < o o . f" u c c "
IC J L, lOU (_i ■
• If you need not Hyphen, do not push
HYPHtN
the Q] button at step 2.
The LC Display will show
" i O O i” t” i—t "i"
(!_ Ot- OO »..t ■
3 ^ ] .
Push
• Pushing the HYPHEN button once
counts as 2 digits.
• Pushing the SECRET button once
counts as 2 digits.
10-
Page 12

Adjusting Time
Be sure the handset is on the cradle and the SP-PHONE button is off.
To Adjust
■ Example: To adjust the LC Display
to 8:15 AM
1 & E3
Push
The LC Display will show
____
_
HOLD
_ nn*)
uu u u
2 SCZ]-*(Z)-*[I]-‘S'-
Push Push
• The LC Display will show '"*’08- iS
3 After adjusting the time, push the
“MEMORY” button within 60
seconds from pushing the last
button.
■ other example: To adjust the LC
Display to 9:05 PM
1 B Q CZI I53.
Push Hoto
• The LC Display will show “ »uu-uC”,
The LC Display will show " -GS-GS
When you pusli ( tj ], the “PM" mode
is entered.
If you push once more, the “AM"
mode is entered.
Correcting ah Error while Adjusting
If an error is found during adjustment,
push the Dialing button from the beginning
of the 4-digit to correct the time.
Example:
Time on the LC Display is 10:49 AM but
correct time is 6:30 AM.
Push
The LC Display will show “ - 30 ”
The MEMORY button must be pushed
according to the time signal to set the
seconds.
If your adjusted time is not valid
(Ex. 19-65);
When you push the “MEMORY"
button, the mode will return to
“PROGRAM".
r
The accuracy of the clock will be
approximately ±40 seconds a month
at O^C to 40°C of room temperature.
-11 -
Page 13

Liquid Crystal Display
DISPLAY TYPE WHEN THE DISPLAY SHOWS
n MM ( „ n i"l 1
Id • LIU ” is flashing.
MM ( t ~in
II -U-l
MMiHD _ nin
U U U
U
i~iO - Zi Zi n iC _ “in
f»u -I t-1- u iZi O u
REDIAL
LOWER
SAVE
When you do not adjust the time.
When the unit is not in use.
• “ "■ i /“30 '’indicates the present time.
When you push [ ] ( 1
While you are in conversation.
• " 0 /5 • 30 ” indicates that the length of time that you
speak is about 15 minutes 30 seconds.
When you push .
When you redial a phone number using the redial feature.
ICMTft
When you push .
When you redial a phone number using the Saved Number
Redial feature.
MEMO
AM
PM
o
r OOOO ~I
t- -f
When you push , while having a conversation.
When you dial a phone number using the Memo Dial feature.
When you push ] except for the clock adjusting mode.
When you push ["»] except for the clock adjusting mode.
When you push [~5~]during displaying “PM” while in the clock
adjusting mode.
When you push ] during displaying “AM" while in the clock
adjusting mode.
When you push I I during programming.
When you push .
When you dial a secret phone number.
RECALL
-12-
Page 14

Battery Installation
Three AA size batteries serve as the power source to retain the stored telephone
numbers in memory and to show display on the Liquid Crystal Display.
Replace all the batteries every 10 months
To install the batteries
1. Remove the attaching stand.
or misoperation may occur and Liquid
Crystal Display will not show anything.
To prevent loss of the stored telephone
numbers, replace the batteries within
10 minutes after removing the old ones.
Do not use rechargeable
(nickel-cadmium) batteries.
They are partially different in shape
and performance may and fail to
ensure proper function operation and
may damage the unit.
3. Insert the three AA size batteries
observing the correct polarity.
4. Replace the stand.
Battery Precautions
The batteries should be used correctly,
otherwise, the unit may be damaged
due to battery leakage.
• Do not mix different types
of batteries.
Do not charge, short-circuit,
disassemble, heal or
dispose in fire.
Remove all batteries when
replacing.
Page 15

Wall Mounting
This unit can be mounted on the wall utilizing the
template and screws provided.
1. Turn over the handset guide.
3. Replace the stand,
4. Place the template on the wall.
5. Using the washers fix the screws
to the wall in the positions
indicated.
6. Mount the unit on the wall so that
the screw heads insert into the
slots on the bottom, and then slide
the unit down to hook it securely,
as shown.
Drill here
---------
4)-
To temporarily place the handset
down during a conversation, hook as
shown.
3^^/i6 inches
-14-
Page 16

Redialing operation does not function.
The LC Display does not show
“ ” when the Program button
is pushed. (Program operation does not
function.)
The unit does not keep stored memory.
LT
Batteries have become weak.
Replace all the batteries.
y
The LC Display shows the wrong display
or nothing.
Hands-free operation does not function
after pushing the SP-PHONE button.
-15-
1
Page 17

others
• If there is any trouble, disconnect the
unit from the telephone line and connect
a known working telephone. If the
known working telephone operates
properly, return your unit to your
supplier for repair, if the known working
telephone does not operate properly,
consult with a telephone company.
• When a Station button is pushed and
nothing seems to operate, unplug the
telephone cord then replace the bat
teries.
• Keep the unit away from heating
appliances, and electrical noise genera
ting devices such as fluorescent lamps
and motors.
• The unit should be kept free of dust,
moisture and vibration, and should not
be exposed to direct sunlight.
• Do not use benzine, thinner, or the like,
or any abrasive powder to clean the
cabinet. Wipe it with a soft cloth.
• Do not use any handset other than
Panasonic handset made for the model
KX-T2365A.
WARNING:
TO PREVENT FIRE OR SHOCK
HAZARD, DO NOT EXPOSE THIS PRO
DUCT TO RAIN OR ANY TYPE OF
MOISTURE.
-16-
 Loading...