


Operating Instructions
Home Network System
Access Keypad
Model No. KX-HNK101
Thank you for purchasing a Panasonic product.
This document explains how to operate the access keypad properly.
For details about how to use the system, refer to the User’s Guide
(page 15).
Please read this document before using the unit and save it for future
reference.
For assistance, please contact us at 1-800-272-7033 or visit our Web
site: http://shop.panasonic.com/support for customers in the U.S.A.
Please register your product: http://shop.panasonic.com/support
In order to use this device:
R Download the latest version of the [Home Network] app.
R Update your hub to the latest firmware version
(version 5.50 or later).
For more information, refer to the User’s Guide (page 15).
Printed in China
HNK101_(en_es)_0618_ver.041.pdf 1 2015/06/18 20:12:03
Introduction
Accessory information ...............3
Important Information
About this system ......................4
For your safety ...........................
4
Important safety instructions ......5
For best performance ................5
Other information .......................6
Setup
Part names and functions ..........7
Touchpanel buttons ...................7
LED indicator .............................8
Setup overview ..........................8
Registering the keypad ..............8
Confirming the usage area ........9
Installation ...............................10
Appendix
Using the keypad .....................15
Features available when using the
[Home Network] app ................15
Accessing the User’s Guide ....15
Specifications ..........................16
FCC and other information ......17
Customer services ...................18
Limited Warranty (ONLY FOR
U.S.A.) .....................................19
2
Table of Contents
HNK101_(en_es)_0618_ver.041.pdf 2 2015/06/18 20:12:05
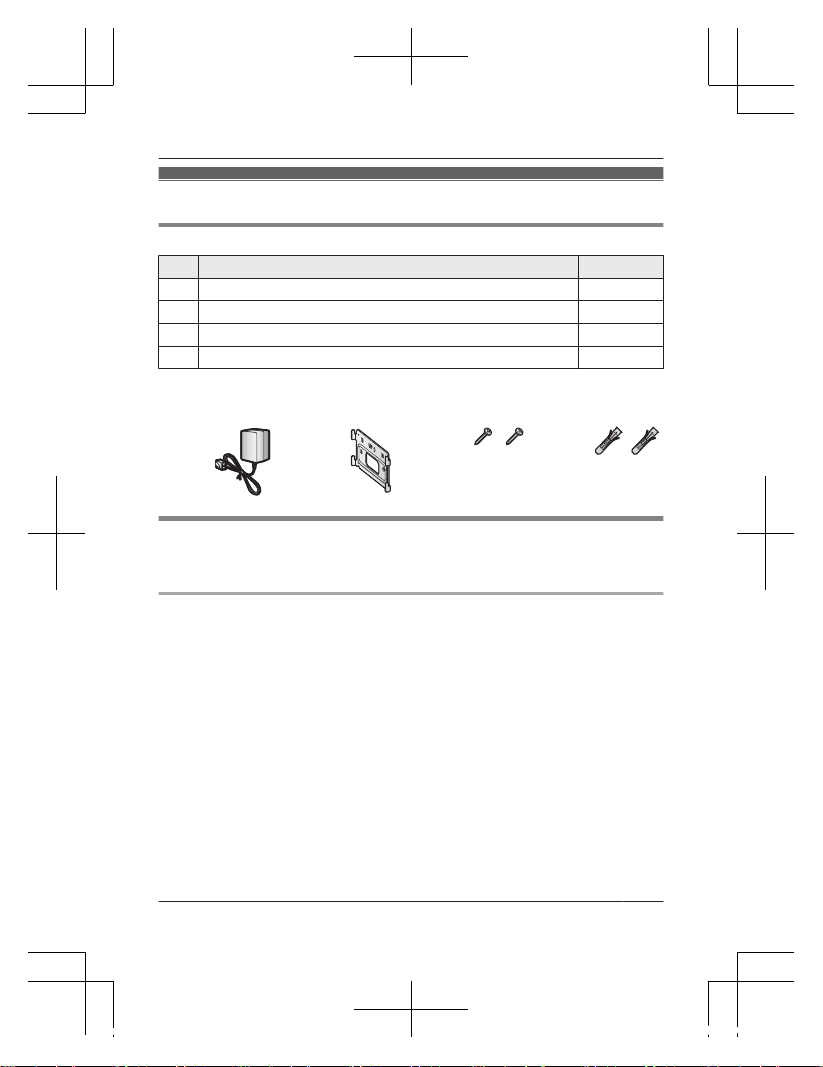
Accessory information
Supplied accessories
No. Accessory item/Part number Quantity
A AC adaptor/PNLV226KZ 1
B
Mounting bracket
*
1
1
C Wall mounting screws (25 mm (1 inch))/XTB4+25AVW 2
D Wall anchors/PNHR2264Z 2
*1 The mounting bracket is attached to the product at the time of shipment.
A
B
*1
C D
Other information
R D
esign and specifications are subject to change without notice.
R The illustrations in these instructions may vary slightly from the actual product.
Trademarks
R i
Phone and iPad are registered trademarks of Apple Inc.
R Android is a trademark of Google Inc.
R Microsoft, Windows, and Internet Explorer are either registered trademarks or
trademarks of Microsoft Corporation in the United States and/or other countries.
R All other trademarks identified herein are the property of their respective owners.
For a
ssistance, please visit http://shop.panasonic.com/support
3
Introduction
HNK101_(en_es)_0618_ver.041.pdf 3 2015/06/18 20:12:05
About this system
R This system is an auxiliary system; it
is not designed to provide complete
protection from property loss.
Panasonic will not be held
responsible in the event that
property loss occurs while this
system is in operation.
R The system’s wireless features are
subject to interference, therefore
functionality in all situations cannot
be guaranteed. Panasonic will not
be held responsible for injury or
damage to property that occurs in
the event of wireless communication
error or failure.
For your safety
T
o prevent severe injury and loss of life/
property, read this section carefully
before using the product to ensure
proper and safe operation of your
product.
WARNING
Power connection
R U
se only the power source marked
on the product.
R Do not overload power outlets and
extension cords. This can result in
the risk of fire or electric shock.
R Completely insert the AC adaptor/
power plug into the power outlet.
Failure to do so may cause electric
shock and/or excessive heat
resulting in a fire.
R Regularly remove any dust, etc.
from the AC adaptor/power plug by
pulling it from the power outlet, then
wiping with a dry cloth. Accumulated
d
ust may cause an insulation defect
from moisture, etc. resulting in a fire.
R Unplug the product from power
outlets if it emits smoke, an
abnormal smell, or makes an
unusual noise. These conditions can
cause fire or electric shock. Confirm
that smoke has stopped emitting
and contact us at http://
shop.panasonic.com/support
R Unplug from power outlets and
never touch the inside of the product
if its casing has been broken open.
Danger of electric shock exists.
R Never touch the plug with wet
hands. Danger of electric shock
exists.
R Do not connect non-specified
devices.
Installation
R T
o prevent the risk of fire or
electrical shock, do not expose the
product to rain or any type of
moisture.
R Do not place or use this product
near automatically controlled
devices such as automatic doors
and fire alarms. Radio waves
emitted from this product may cause
such devices to malfunction
resulting in an accident.
R Do not allow the AC adaptor to be
excessively pulled, bent or placed
under heavy objects.
R Keep small parts (screws, etc.) out
of the reach of children. There is a
risk of swallowing. In the event they
are swallowed, seek medical advice
immediately.
4
For a
ssistance, please visit http://shop.panasonic.com/support
Important Information
HNK101_(en_es)_0618_ver.041.pdf 4 2015/06/18 20:12:05
Operating safeguards
R Unplug the product from power
outlets before cleaning. Do not use
liquid or aerosol cleaners.
R Do not disassemble the product.
R Never put metal objects inside the
product. If metal objects enter the
product, turn off the circuit breaker
and contact an authorized service
center.
Medical
R C
onsult the manufacturer of any
personal medical devices, such as
pacemakers or hearing aids, to
determine if they are adequately
shielded from external RF (radio
frequency) energy. DECT features
operate between 1.92 GHz and
1.93 GHz with a peak transmission
power of 115 mW.
R Do not use the product in health
care facilities if any regulations
posted in the area instruct you not to
do so. Hospitals or health care
facilities may be using equipment
that could be sensitive to external
RF energy.
CAUTION
Installation and location
R N
ever install wiring during a lightning
storm.
R The AC adaptor is used as the main
disconnect device. Ensure that the
AC outlet is installed near the
product and is easily accessible.
Important safety
instructions
When using your product, basic safety
precautions should always be followed
to reduce the risk of fire, electric shock,
and injury to persons, including the
following:
1. Do not use this product near water
for example, near a bathtub,
washbowl, kitchen sink, or laundry
tub, in a wet basement or near a
swimming pool.
2. Use only the power cord indicated
in this document.
SAVE THESE INSTRUCTIONS
For b
est performance
Hub location/avoiding noise
T
he hub and other compatible
Panasonic devices use radio waves to
communicate with each other.
R For maximum coverage and
noise-free communications, place
your hub:
– at a convenient, high, and central
location with no obstructions
between the product and hub in
an indoor environment.
– away from electronic appliances
such as TVs, radios, personal
computers, wireless devices, or
other phones.
– facing away from radio frequency
transmitters, such as external
antennas of mobile phone cell
stations. (Avoid putting the hub
on a bay window or near a
window.)
For a
ssistance, please visit http://shop.panasonic.com/support
5
Important Information
HNK101_(en_es)_0618_ver.041.pdf 5 2015/06/18 20:12:05

R I
f the reception for a hub location is
not satisfactory, move the hub to
another location for better reception.
Environment
R K
eep the product away from
electrical noise generating devices,
such as fluorescent lamps and
motors.
R The product should be kept free
from excessive smoke, dust, high
temperature, and vibration.
R The product should not be exposed
to direct sunlight.
R Do not place heavy objects on top of
the product.
R When you leave the product unused
for a long period of time, unplug the
product from the power outlet.
R The product should be kept away
from heat sources such as heaters,
kitchen stoves, etc. It should not be
placed in rooms where the
temperature is less than 0 °C (32 °F)
or greater than 40 °C (104 °F).
Damp basements should also be
avoided.
R Operating the product near electrical
appliances may cause interference.
Move away from the electrical
appliances.
Other information
Routine care
R W
ipe the outer surface of the
product with a soft moist cloth.
R Remove any dirt from the
touchpanel by wiping it with a soft,
dry cloth. When wiping the
touchpanel, use your fingers to
gently hold it in place, taking care
not to scratch it with your fingernails.
R D
o not use any cleaning products
that contain alcohol, polish powder,
powder soap, benzine, thinner, wax,
petroleum, or boiling water. Also do
not spray the product with
insecticide, glass cleaner, or hair
spray. This may cause a change in
color or quality of the product.
Notice
6
For a
ssistance, please visit http://shop.panasonic.com/support
Important Information
HNK101_(en_es)_0618_ver.041.pdf 6 2015/06/18 20:12:05
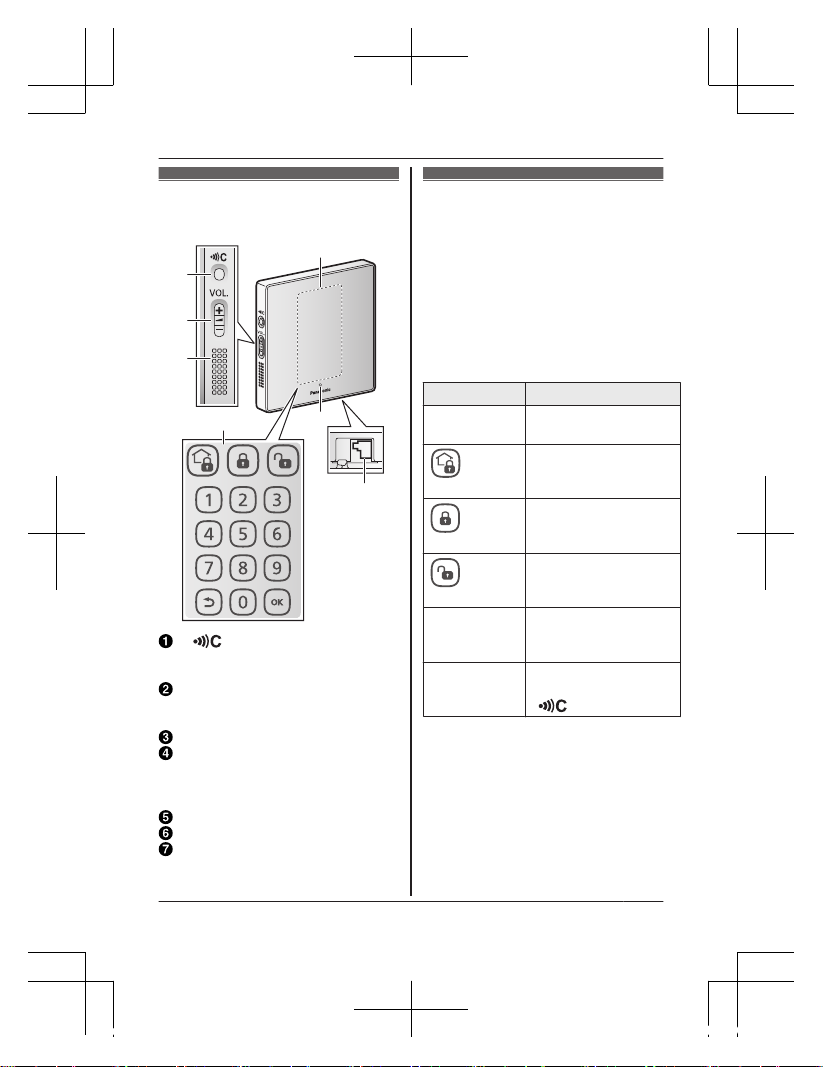
Part names and
functions
D
G
E
F
A
C
B
M N
U
sed when registering the keypad
to the hub.
Volume
U
sed to adjust the volume of the
sounds emitted by the keypad.
Speaker
Touchpanel
When no buttons are displayed
here, touch this area to display the
buttons.
Touchpanel buttons
LED indicator
DC jack
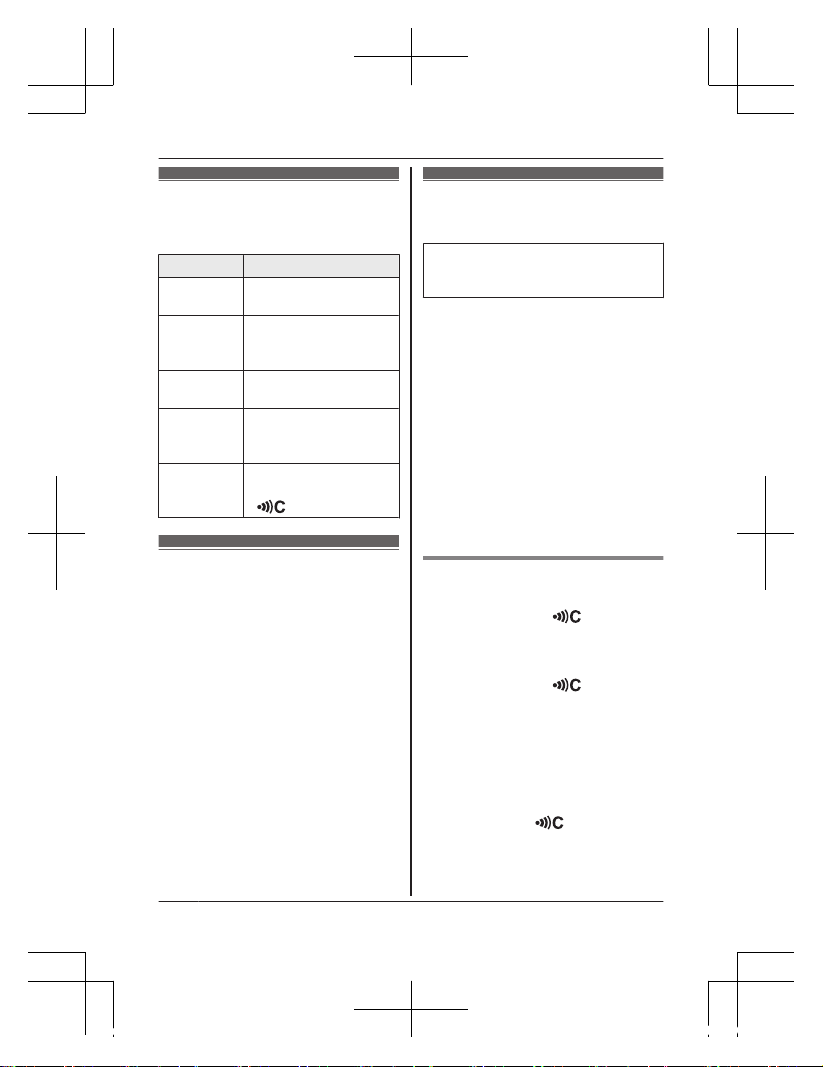
Touchpanel buttons
These buttons allow you to confirm and
change the system’s arm mode. During
normal operation, the button that
corresponds to the current arm mode is
lit by default, and all other buttons are
dimmed. When you tap the touchpanel,
the arm mode buttons light for 10
seconds. During this time, you can tap
an arm mode button to switch to the
corresponding arm mode.
Button Status
None
d
isplayed
No power, or buttons
are turned off*1.
, lit
Normal operation,
[
Arm: At Home] mode
is selected.
, lit
Normal operation,
[
Arm: Away] mode is
selected.
, lit
Normal operation,
[
Disarm] mode is
selected.
Current arm
m
ode button
blinking slowly
Alarm system was
triggered.
All buttons
b
linking slowly
Registration mode
(you pressed and held
M
N)
*1 You can configure the keypad so
that its arm mode buttons do not
light during normal operation. For
more information, refer to the
User’s Guide (page 15).
For a
ssistance, please visit http://shop.panasonic.com/support
7
Setup
HNK101_(en_es)_0618_ver.041.pdf 7 2015/06/18 20:12:05
LED indicator
You can use the LED indicator to
confirm the keypad’s status.
Indicator Status
Off Normal operation, or
n
o power
Red,
b
linking
slowly
Keypad is not
registered to a hub.
Red,
b
linking
Keypad is out of range
of the hub.
Red,
b
linking
quickly
Alarm system was
triggered.
Green,
b
linking
slowly
Registration mode
(You pressed and held
M N)
Setup overview
1 I
nitial setup
Make sure you can access the
system using your mobile device.
For details, refer to the System
Setup Guide included with your
hub.
2 Registration
Required only if the keypad was
purchased separately (i.e., not as
part of a bundle).
3 Confirm the installation area
Read the information in this
document to confirm that the
desired installation area is suitable
to proper operation.
4 Installation
Install the keypad in the desired
location.
Registering the
keypad
This procedure is not required for
d
evices that were included as part of
a bundle.
Before you can use the keypad, it must
be registered to the hub.
If you purchased devices separately
(i.e., not as part of a bundle), you must
register each device to the hub.
You can register each device by using
the registration buttons or the [Home
Network] app.
Note:
R Before registering the keypad, make
sure the AC adaptors of the hub and
keypad are connected and each
device is powered.
Using registration buttons
1 H
ub:
Press and hold M
OTHER
D
EVICEN until the LED indicator
blinks slowly in green.
2 Keypad:
Press and hold M
N until the
LED indicator starts blinking slowly
in green and the touchpanel
buttons start blinking slowly.
R When registration is complete,
the hub sounds one long beep.
Note:
R To cancel without registering the
keypad, press M N
on the hub
and on the keypad again.
R If registration fails, the hub sounds
several short beeps.
8
For a
ssistance, please visit http://shop.panasonic.com/support
Setup
HNK101_(en_es)_0618_ver.041.pdf 8 2015/06/18 20:12:05

Using the app
When you register the keypad by using
the [Home Network] app, you can
assign a name to your devices and
group them by location. For more
information, refer to the User’s Guide
(page 15).
Confirming the
u
sage area
Wireless communication
r
ange
The wireless communication range of
each device in the system from the hub
is approximately 50 m (160 feet)
indoors and approximately 300 m
(1,000 feet) outdoors. Wireless
communication may be unreliable
when the following obstacles are
located between the hub and other
devices.
R Metal doors or screens
R Walls containing aluminum-sheet
insulation
R Walls made of concrete or
corrugated iron
R Double-pane glass windows
R Multiple walls
R When using each device on
separate floors or in different
buildings
Note:
R The keypad’s LED indicator blinks in
red if it is out of range of the hub. In
this case, confirm all connections,
including those of the hub.
Usage area cautions
Using the keypad in the following areas
may cause deformation, malfunction, or
operational failure.
R In direct sunlight
R Areas exposed to grease or steam,
such as kitchens
R Near fire or heating devices
R Near magnetic fields (such as near
microwaves and magnets)
R Areas subject to extreme
temperature changes, such as next
to air conditioners
R Areas with reflective objects, such
as glass, that can interfere with
detection of temperature variation
R Areas where the temperature is
affected by strong illuminating
objects (such as fluorescent lights)
R Near devices that emit strong radio
waves, such as mobile phones
For a
ssistance, please visit http://shop.panasonic.com/support
9
Setup
HNK101_(en_es)_0618_ver.041.pdf 9 2015/06/18 20:12:05
Installation
To mount the keypad flat against the wall, use the mounting bracket.
Note:
R Mount the keypad on the stable location where the keypad can be adequately
supported when mounting.
R Do not mount keypad on a soft material. It may fall down, break, or cause injury.
R Do not mount the keypad on a plywood surface that is less than 25.4 mm
(1 inch) thick.
R The pull-out strength of the installation area must be at least 29.4 N (3 kgf).
Determining the installation location
N
ote:
R Make sure there is at least 20 cm (7 7/8 inches) of space to the left of the
keypad (when mounted) so that the buttons on the side of the keypad can be
accessed.
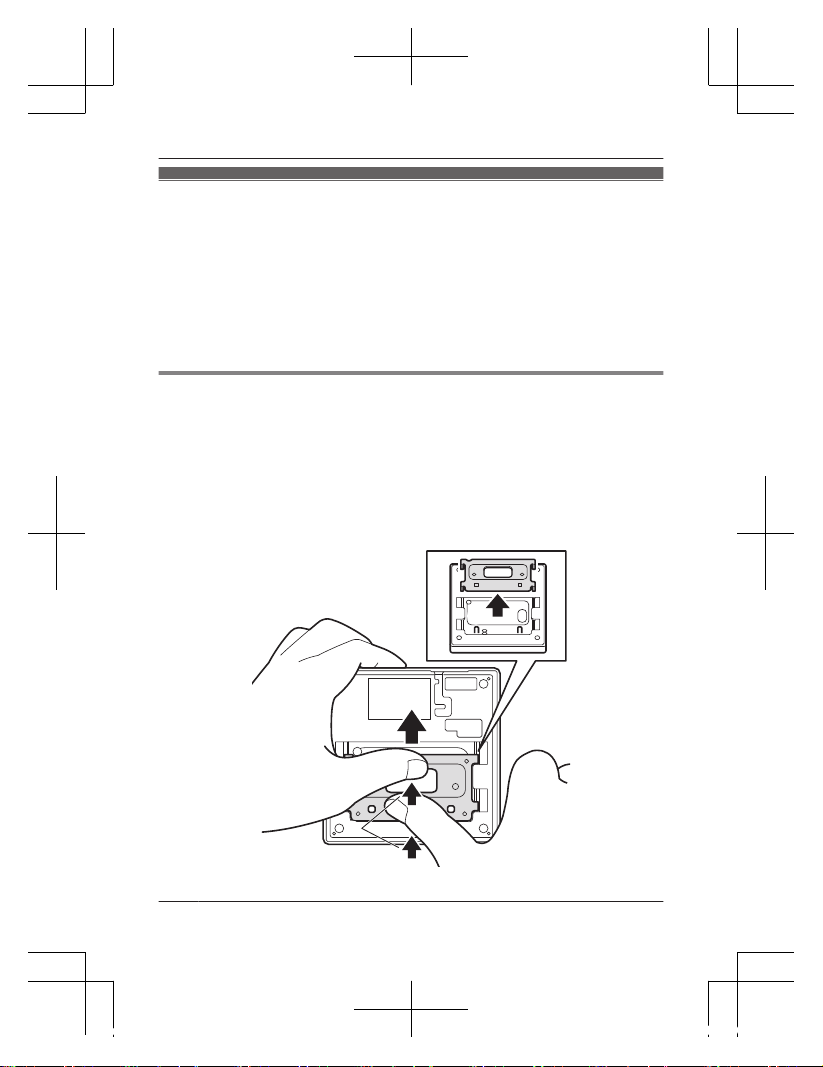
1 Remove the mounting bracket.
R Place the keypad face-down on a flat surface, slide the bracket toward the
bottom of the keypad (A) by pushing it with your thumbs as shown (B),
and then lift the bracket up and away from the keypad (C).
B
A
C
10
For a
ssistance, please visit http://shop.panasonic.com/support
Setup
HNK101_(en_es)_0618_ver.041.pdf 10 2015/06/18 20:12:05
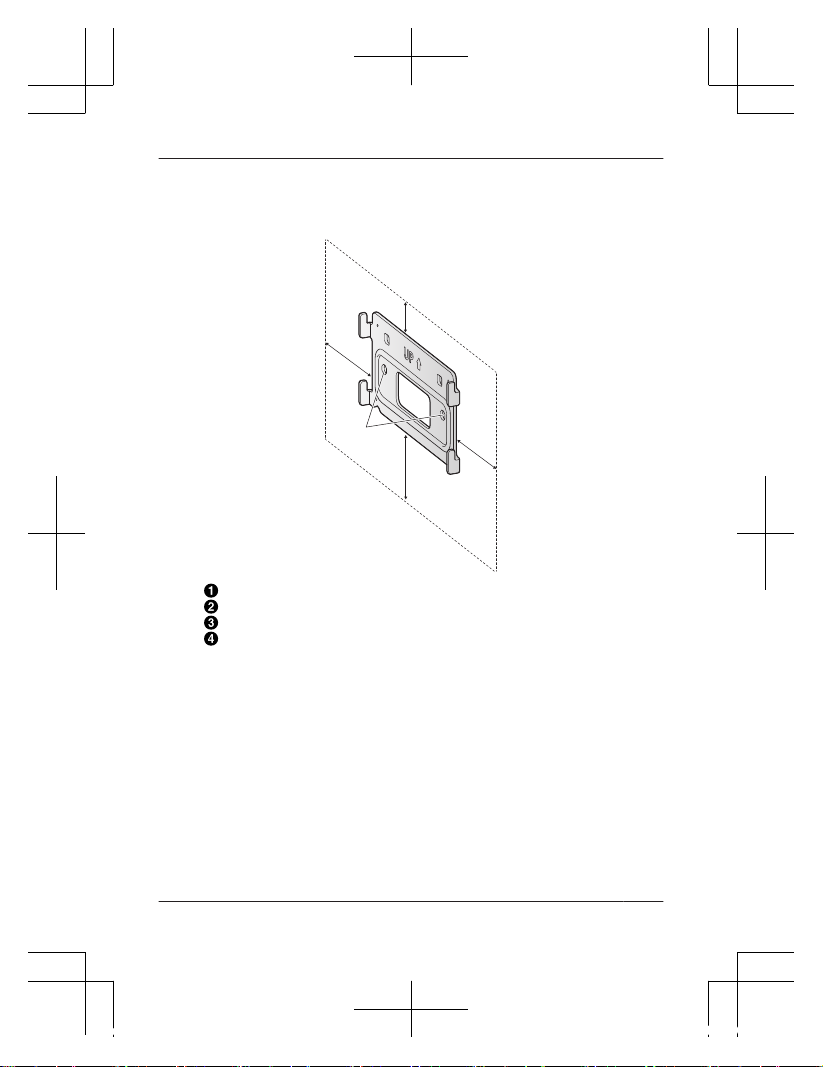
2 P
lace the mounting bracket against the wall and determine where the
mounting bracket will be installed. Mark the screw openings on the wall.
R Refer to the information below. The dotted lines indicate where the edges of
the keypad will be in relation to the mounting bracket.
C
B
D
A
C
16 mm (5/8 inches)
59 mm (2 5/16 inches)
19 mm (3/4 inches)
Screw openings
6
0 mm (2 11/32 inches) apart
3 Drill pilot holes where you marked the screw openings in the previous step.
R The screw openings must be 60 mm (2 11/32 inches) apart.
For a
ssistance, please visit http://shop.panasonic.com/support
11
Setup
HNK101_(en_es)_0618_ver.041.pdf 11 2015/06/18 20:12:05
 Loading...