

Panasonic KX-HGW200 User Manual

Broadband Networking Gateway
Operating Instructions
Model No. KX-HGW200
PLEASE READ BEFORE USE AND SAVE.
Panasonic World Wide Web Address: http://www.panasonic.com
for customers in the USA or Puerto Rico

Before Initial Use
Please read IMPORTANT SAFETY INSTRUCTIONS on
page 62 before use.
Read and understand all instructions.
Thank you for purchasing the Panasonic KX-HGW200.
Attach your purchase receipt here.
For your future reference
Serial No. Date of purchase
(found on the rear side of the unit)
Name and address of dealer
2

FOR OPERATION ASSISTANCE:
—Call
1-800-272-7033
—Refer to
the Panasonic world wide web site
http://www.panasonic.com
—Refer to
the support function of the KX-HGW200 administration
web screen (See p. 44.)
≥NetWare®, Novell®and IPXTMare trademarks or registered trademarks of Novell, Inc.
≥Netscape and Netscape Navigator are registered trademarks of Netscape Communications
Corporation.
≥Ethernet is a registered trademark of Xerox Corporation.
≥Apple®, AppleTalk®, EtherTalk®, LocalTalk®, Macintosh®, Mac®OS, QuickTimeTMand TrueType
are trademarks or registered trademarks of Apple Computer, Inc.
≥Microsoft, MS-DOS, Windows, Windows NT and Netmeeting are either registered trademarks or
trademarks of Microsoft Corporation in the United States and/or other countries.
≥Screen shots reprinted with permission from Microsoft Corporation.
All other brands and product names are trademarks or registered trademarks of their respective
companies.
The operating instructions are subject to change without notice.
© Kyushu Matsushita Electric Co., Ltd. 2000
For assistance, please call: 1-800-272-7033
®
3

Table of Contents
Installation
Overview
Features
System Requirements
Included Accessories
Part Names
Front View
Rear View
The shape of RJ-45 and RJ-11 plug
Indicators
Setup
Diagram of Connections
How the KX-HGW200 Works
Preparation
Connecting the KX-HGW200 to a Cable/xDSL Modem
Connecting the KX-HGW200 to a Home Network
Turning on the Devices
Configuring the Computer
Setup of a Microsoft®Windows®Computer
Setup of a Macintosh®Computer
Confirmation of the Setup
Confirmation of the Home Network Setup
Internet Configuration and Confirmation
. . . . . . . . . . . . . . . . . . . . . . . . . . . . . . . .
. . . . . . . . . . . . . . . . . . . . . . . . . . . . . . . . . . . . . . .
. . . . . . . . . . . . . . . . . . . . . . . . . . . .
. . . . . . . . . . . . . . . . . . . . .
. . . . . . . . . . . . . . . . . . . . . . . . . . . . . .
. . . . . . . . . . . . . . . . . . . . . . . . . . . . . . . . . . . . .
. . . . . . . . . . . . . . . . . . . . . . . . . . . . . . . . . . . . . .
. . . . . . . . . . . . . . . . .
. . . . . . . . . . . . . . . . . . . . . . . . . . . . . . . . . . . . . .
. . . . . . . . . . . . . . . . . . . . . . . . . . . . . . . . . . .
. . . . . . . . . . . . . . . . . . . . . . . . . . .
. . . . . . . . . . . . . . . . . . . . . . .
. . . . . . . . . . . . . . . . . . . . . . . . . . . . . . . . . . . . .
. . . . . . . . . . . . . . . . . . . . . . . . . . .
. . . . . . . . . . . . . . . . . .
. . . . . . . . . . . .
. . . . . . . . . . . . . . . . . . . .
. . . . . . . . . . . . . . . . . .
. . . . . . . . . . . . .
. . . . . . . . . . . . . .
. . .
. . . . . . .
6
6
8
9
10
10
10
11
11
12
12
13
14
14
15
19
20
20
25
27
27
29
Using the
Web Screen
4
About the KX-HGW200 Administration
Web Screen
Setting Up the Parameters
Basic Setup
Additional Setup
Using the Functions
. . . . . . . . . . . . . . . . . . . . . . . . . . . . . . . . . . . . . . . . . .
Ping
Restart
Clear Setting
Change Password
Firmware Upgrade
PPPoE Connection
Status
Usage Data . . . . . . . . . . . . . . . . . . . . . . . . . . . . . . . . . . . . 42
User Registration
Support
Help
. . . . . . . . . . . . . . . . . . . . . . . . . . . . . . . . . . . . . . . .
. . . . . . . . . . . . . . . . . . . . . . . . . . . . . . . . . . . . . . . . .
. . . . . . . . . . . . . . . . . . . . . . . . . . . . . . . . . . . . . . . .
. . . . . . . . . . . . . . . . . . . . . . . . . . . . . . . . . . . . . . . . . .
. . . . . . . . . . . . . . . . . . . . . . . . . . . . .
. . . . . . . . . . . . . . . . .
. . . . . . . . . . . . . . . . . . . . . . . . . . . . . . . . . . . .
. . . . . . . . . . . . . . . . . . . . . . . . . . . . . . . . .
. . . . . . . . . . . . . . . . . . . . . . .
. . . . . . . . . . . . . . . . . . . . . . . . . . . . . . . . . . . .
. . . . . . . . . . . . . . . . . . . . . . . . . . . . . . .
. . . . . . . . . . . . . . . . . . . . . . . . . . . . . . .
. . . . . . . . . . . . . . . . . . . . . . . . . . . . . . .
. . . . . . . . . . . . . . . . . . . . . . . . . . . . . . . .
30
31
31
33
36
36
37
37
38
39
41
42
43
44
45

Useful
Information
Restarting the KX-HGW200
To Initialize the KX-HGW200
To Restart the KX-HGW200
. . . . . . . . . . . . . . . . .
. . . . . . . . . . . . . . . . . . . . . . .
. . . . . . . . . . . . . . . . . . . . . . . .
Web Browser Setting for Proxy Server Use
For Windows
For Macintosh
Setting the Static Network Parameters
Dynamic IP Network (DHCP server function active)
Static IP Network (DHCP server function inactive)
Setup of a Windows Computer
Setup of a Macintosh Computer
Wall Mounting
. . . . . . . . . . . . . . . . . . . . . . . . . . . . . . . . . . .
. . . . . . . . . . . . . . . . . . . . . . . . . . . . . . . . . . .
. . . . . . .
. . . . . .
. . . . . . . . . . . . . . . . . . . . . .
. . . . . . . . . . . . . . . . . . . . .
. . . . . . . . . . . . . . . . . . . . . . . . . . . .
. . . .
. . . . .
46
46
46
47
47
49
51
51
51
52
55
57
Installation
Appendix
Troubleshooting
Specifications
Important Safety Instructions
FCC and Other Information
. . . . . . . . . . . . . . . . . . . . . . . . . .
. . . . . . . . . . . . . . . . . . . . . . . . . . . .
. . . . . . . . . . . . . . .
. . . . . . . . . . . . . . . . .
59
61
62
63
Index . . . . . . . . . . . . . . . . . . . . . . . . . . . . . . . . . . . 65
Web Screen
Using the
Useful Information
For assistance, please call: 1-800-272-7033
Appendix
5
Overview
Features
Networking
The main features of the KX-HGW200 are described as follows:
For Home Network
The KX-HGW200 has three types of network interface: HomePNA 2.0,
10 Base-T Ethernet and wireless.
It supports AppleTalk®network system (EtherTalk®interface network),
TCP/IP and IPXTM(Novell®) protocols simultaneously.
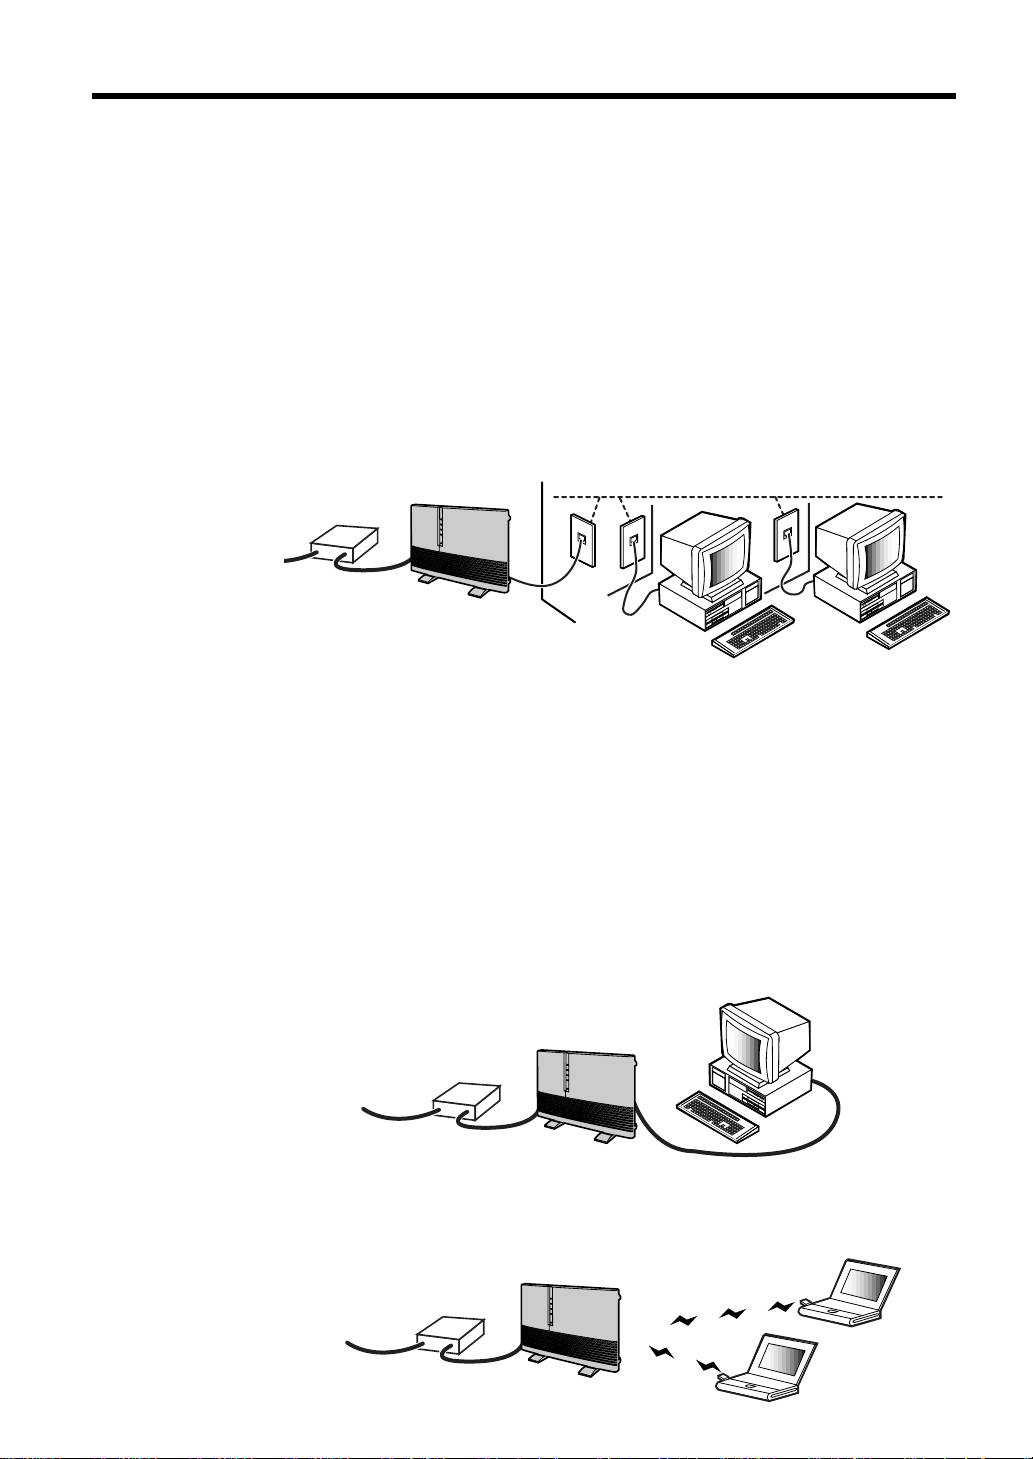
≥ HomePNA 2.0 connection (using existing telephone lines):
Communication speed is a max.10 Mbps.
The HomePNA can transmit and receive data at rates up to 10 Mbps over
any standard home telephone wiring. It links two or more computers by
using your existing phone wiring. While the HomePNA passes information
over your home’s phone wiring, you can use your telephone without
disrupting regular phone service. You will need one HomePNA card and
one modular phone line with standard RJ-11 male phone plugs attached
at each end for each computer that you want to connect to the home
network.
≥ 10 Base-T Ethernet connection (using category 5 straight cable):
Communication speed is a max.10 Mbps.
In order to network more than one computer using Ethernet, an optional
Ethernet hub is required.
≥ Wireless connection (using optional Panasonic wireless cards
KX-HGC200):
Communication speed is a max.11 Mbps.
6

Internet Sharing
The KX-HGW200 has an interface to the Internet (TO MODEM port). This
interface enables you to connect to the Internet via a cable/xDSL modem
with category 5 straight cable. All users can have an Internet access
simultaneously via a single IP (Internet Protocol) address.
DHCP (Dynamic Host Configuration Protocol) Server and Client
DHCP client function
≥ If your ISP (Internet Service Provider) has a DHCP server function, the
KX-HGW200 receives its configuration information automatically from the
ISP.
DHCP server function
≥ The KX-HGW200 can automatically assign a local IP address to each
computer in the home network.
Security
IP Masquerade Function
≥ The KX-HGW200 uses IP masquerade as the default function. This
function translates the local IP address of a computer in the home
network into one global IP address. The IP masquerade function can act
as a firewall for your home network, because the local IP address can
never be known to anyone outside of the home network.
“
Installation
Easy to Administer
Downloadable Firmware
≥ You can download the latest version of the KX-HGW200’s firmware from
Setup via Web Browser
≥ The KX-HGW200 can be set up from a Microsoft®Windows®operating
Password Protection
≥ To access the KX-HGW200 web screen, you have to create and enter a
the Panasonic support web site. See p. 39 for more detailed information.
system or Macintosh®computer using a web browser.
password. The password will prevent accidental or incorrect changes to
the KX-HGW200 setup settings. See p. 27 and 38 for more detailed
information.
For assistance, please call: 1-800-272-7033
7

“
Overview
System Requirements
To set up the KX-HGW200, the computer with which you choose to
configure it must meet the requirements below.
Windows Macintosh
Operating System
Interface*
RAM
Protocol
Web Browser
* HomePNA and wireless connections are not available for Macintosh®computers at this
time.
Microsoft®Windows®95
operating system
Microsoft®Windows®98
operating system
Microsoft®Windows®2000
operating system
Microsoft®Windows®NT
operating system
Ethernet card or HomePNA
1.0/2.0 card with appropriate
interface cable or optional
Panasonic wireless cards,
model KX-HGC200, for your
network connection
16MB or more
TCP/IP network protocol
installed
Internet Explorer 4.0 or later
or Netscape Navigator®4.0
or later
®
Apple®system software
version 7.5.3 or later
Ethernet card with
appropriate interface cable
for your network connection
16MB or more
Open Transport 1.1.2 or Mac
TCP®2.0.6 application
program installed
Internet Explorer 4.0 or later
or Netscape Navigator®4.0
or later
8
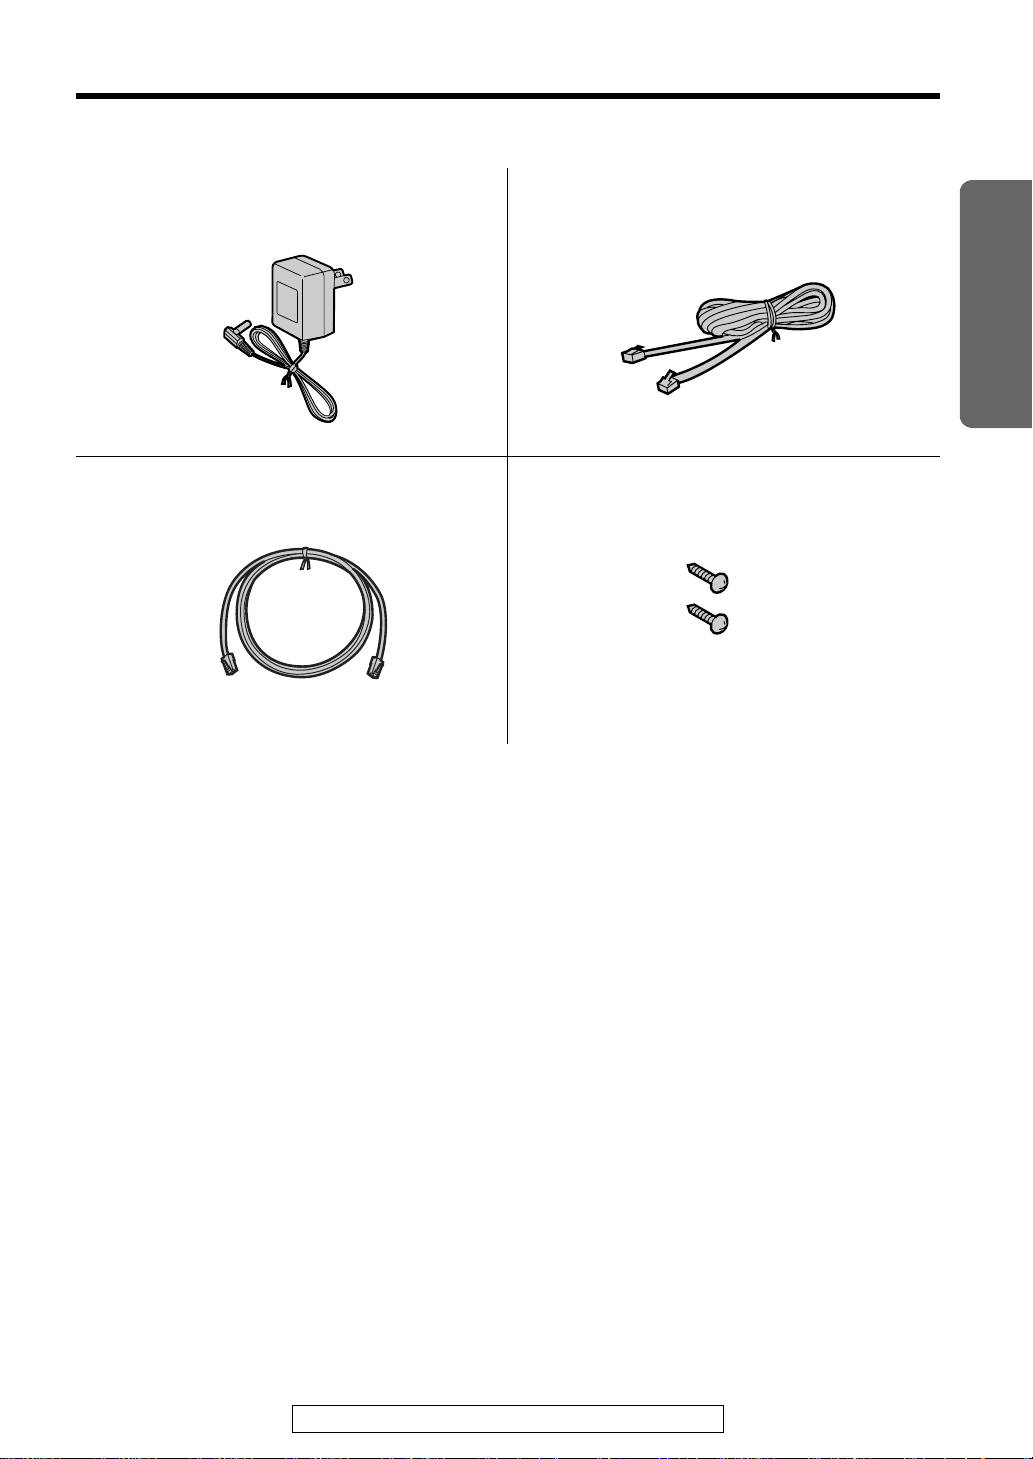
Included Accessories
For extra orders, call 1-800-332-5368.
∏
AC Adaptor (p. 19)
Order No. PQLV12
one one
∏
Category 5 Straight Cable (p. 14, 17, 18)
Order No. PQJA10138Z
one two
∏
Telephone Line Cord (p. 15)
Order No. PQJA10075Z
∏
Screws (p. 57–58)
Order No. PQHE5004Z
Installation
≥If any items are missing or damaged, check with the place of purchase.
≥The order numbers listed above are subject to change without notice.
≥Save the original carton and packing materials for future shipping and transportation of the unit.
For assistance, please call: 1-800-272-7033
9

Part Names
INTERNET
ETHERNET
HomePNA
POWER
KX-HGW200
WIRELESS
Front View
Cover (☞ p. 46)
CLEAR SETTING
button (☞ p. 46)
RESET button
(☞ p. 46)
Arrow mark
Remove the
cover by sliding it
up while pressing
the arrow mark.
INTERNET indicator
(☞ p. 11)
ETHERNET indicator
(☞ p. 11)
HomePNA indicator
(☞ p. 11)
WIRELESS indicator
(☞ p. 11)
POWER indicator
(☞ p. 11)
PC card slot
Use only Panasonic
wireless PC card,
model KX-HGC200.
Rear View
TO MODEM port
(☞ p. 14)
HUB/PC switch
(☞ p. 17, 18)
TO COMPUTER/
ETHERNET HUB port
(☞ p. 17, 18)
PHONE jack
(☞ p. 16)
LINE jack
(☞ p. 15)
Stand (☞ p. 57)
Used for
mounting the
unit on the wall
(☞ p. 58).
10
DC IN jack
(☞ p. 19)
Hook (☞ p. 57)
used for the AC adaptor
while the KX-HGW200 is
wall mounted.
Hook (☞ p. 19)
used for the AC adaptor
while the KX-HGW200 is
utilized with stands.
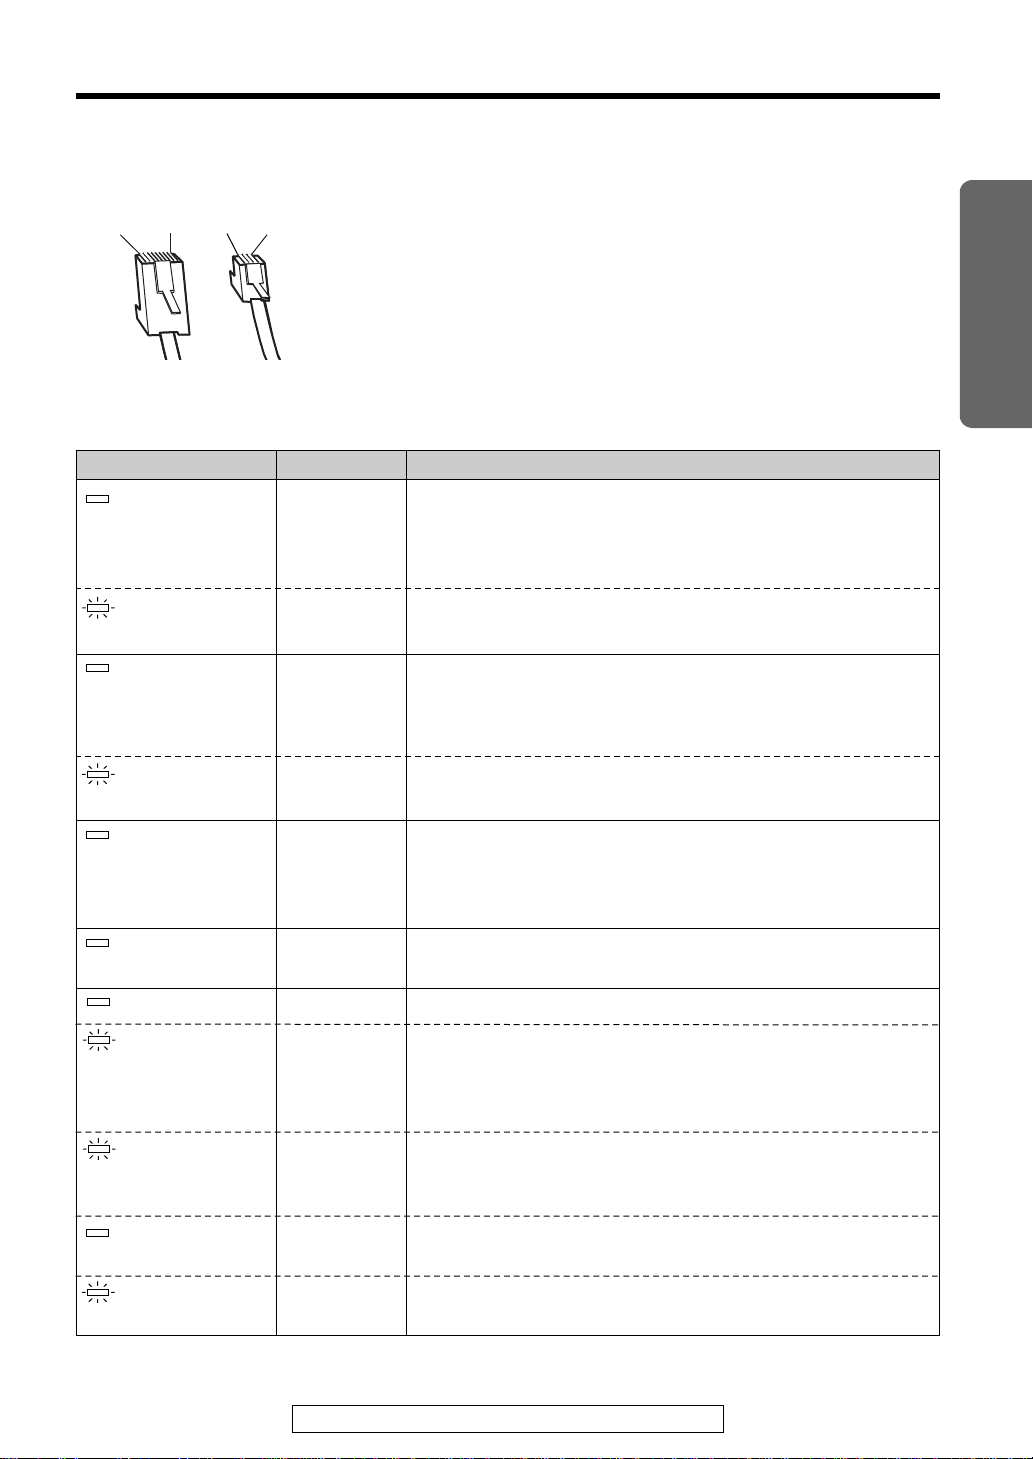
The shape of RJ-45 and RJ-11 plug
Pin 8 Pin 1 Pin 1Pin 4
RJ-45 RJ-11
Indicators
LED
INTERNET
INTERNET
ETHERNET
The shape of RJ-45 plug is different from that of RJ-11 plug. For the
connection of a cable/xDSL modem or Ethernet, use the category 5
straight cable with the RJ-45 plug. For the connection of HomePNA
network, use the telephone line cord with the RJ-11 plug.
Light Color
Green
Green
(Blinking)
Green
The KX-HGW200 is turned on and successfully
connected to a cable/xDSL modem.
The data link is correctly established between the
KX-HGW200 and a cable/xDSL modem.
The KX-HGW200 is sending or receiving data through
this port.
The KX-HGW200 is turned on and successfully
connected to a hub or a computer.
The data link is correctly established between the
KX-HGW200 and a computer.
Indicates
Installation
ETHERNET
HomePNA
WIRELESS
(option)
POWER
POWER
POWER
POWER
POWER
Green
(Blinking)
Green
Green
Green
Green
(Blinking fast)
Green
(Blinking
slowly)
Red
Red
(Blinking)
The KX-HGW200 is sending or receiving data through
this port.
The KX-HGW200 is turned on and successfully
connected to a telephone line.
The data link is correctly established between the
KX-HGW200 and a computer.
The optional wireless card KX-HGC200 is successfully
installed in the KX-HGW200.
The KX-HGW200 is turned on.
The KX-HGW200 software is not working correctly.
Access the KX-HGW200 administration web screen first
and follow the instructions on the Firmware Upgrade
screen.
The KX-HGW200 software is not working correctly. Wait
for a second.
The KX-HGW200 hardware is defective. Press the
RESET button on the KX-HGW200 (see p. 46).
The KX-HGW200 hardware is defective. Press the
RESET button on the KX-HGW200 (see p. 46).
For assistance, please call: 1-800-272-7033
11
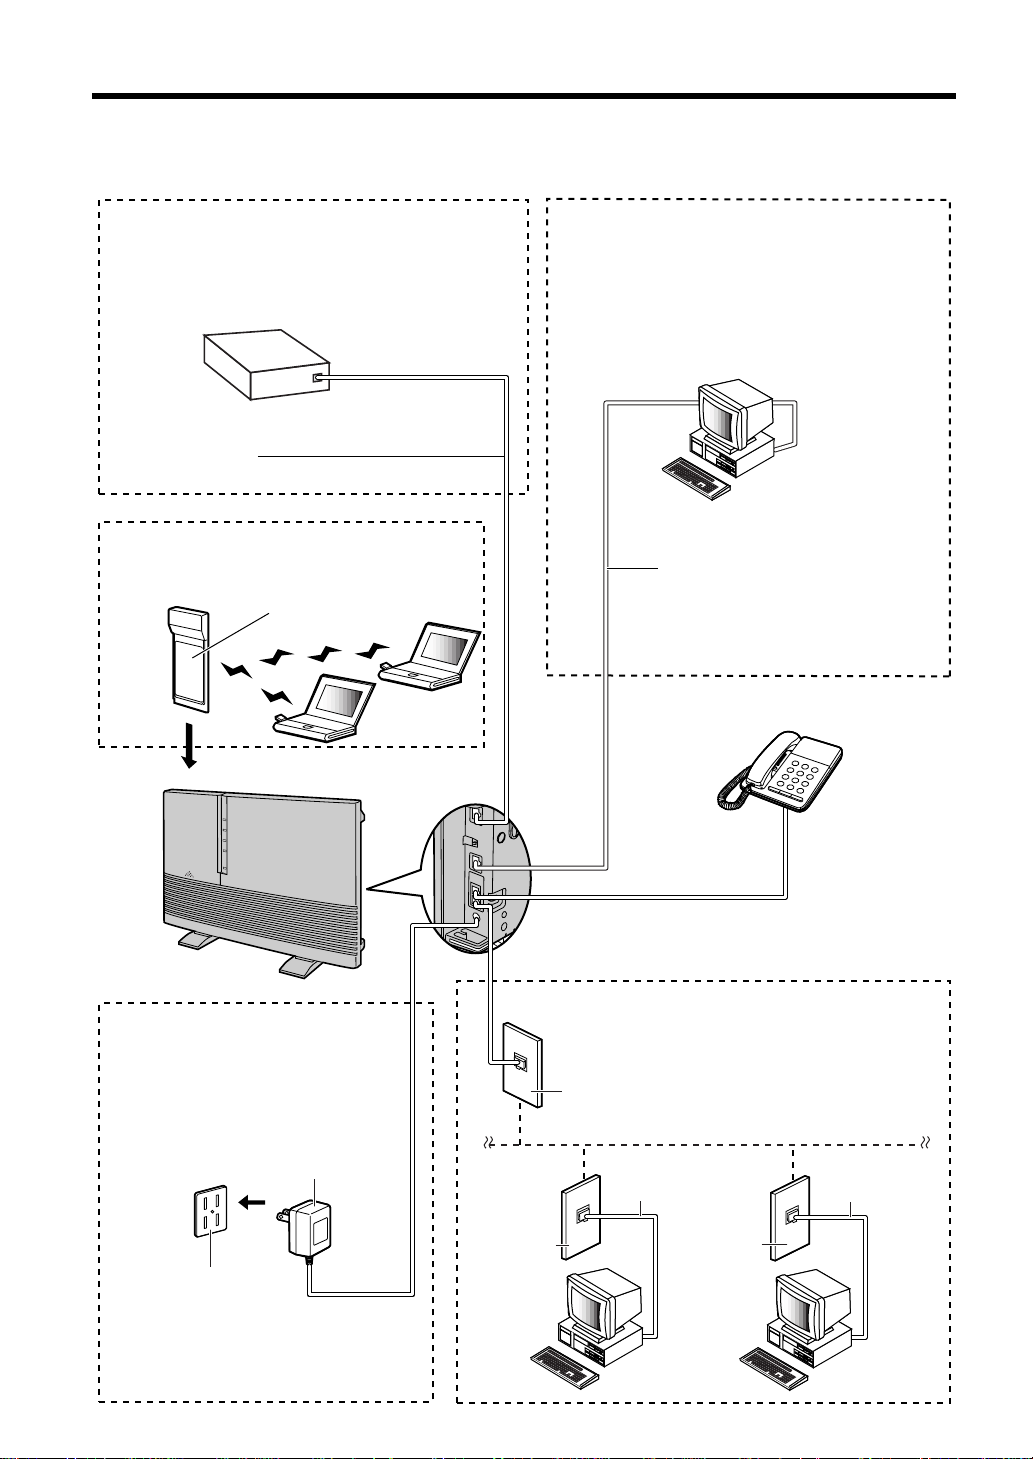
Setup
Cable/xDSL modem
Category 5
straight cable
Telephone
(‘ p. 16)
Telephone
jack
AC adaptor
Telephone line
cord
Power outlet
Cable/xDSL
modem connection
(‘ p. 14)
Power source
(‘ p. 19)
Wireless network
HomePNA phone
line network
(‘ p. 15)
Ethernet connection
(‘ p. 17, 18)
Optional
wireless card
(KX-HGC200)
Telephone
jack
Telephone line
cord
Telephone
jack
Category 5
straight cable
Diagram of Connections
12
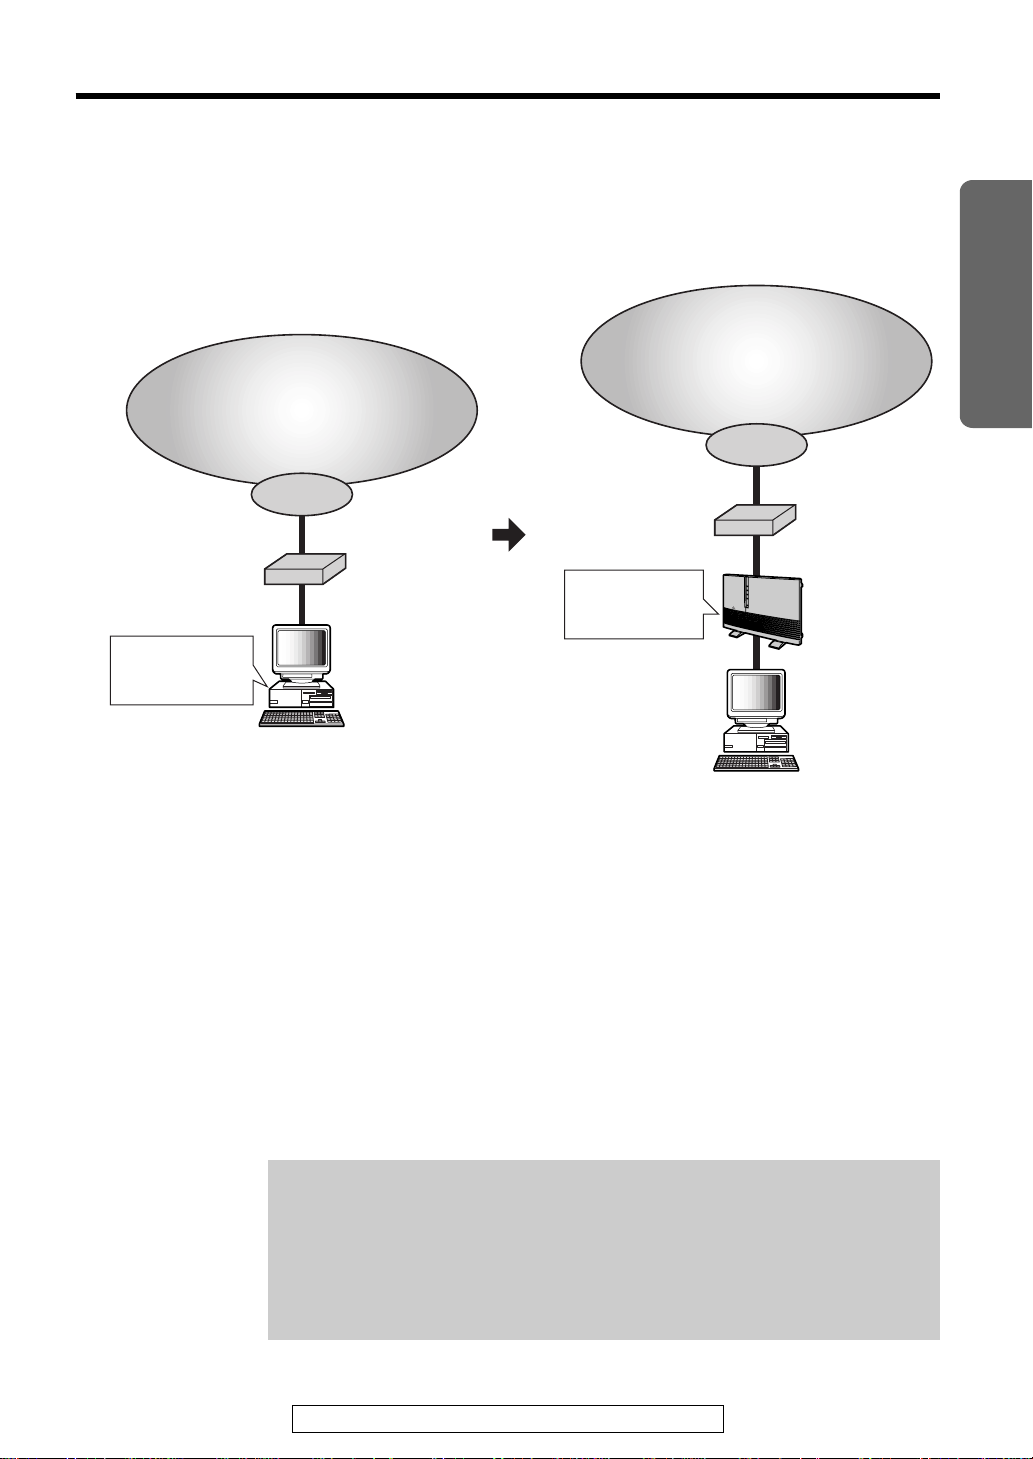
How the KX-HGW200 Works
Computer
ISP
Internet
Cable/xDSL
modem
All the information
to access the ISP
is stored.
Computer
ISP
Internet
Cable/xDSL
modem
KX-HGW200
All the information
to access the ISP
has to be stored.
“
Your current setup
without the KX-HGW200
Internet and home network
with the KX-HGW200
Installation
Before installing the KX-HGW200
≥The computer communicates with your ISP
through cable/xDSL modem.
≥Then the computer sends your account
information to your ISP, and the ISP checks
whether or not you are a member.
That’s why computer stores all the information
for ISP recognition, i.e., login name and
password.
Before you install the KX-HGW200, please confirm that you can
access the Internet with its current connection to a cable/xDSL
modem.
If you can not connect to the Internet from your computer, please set
up your computer to access the Internet according to the instructions
given by your cable/xDSL service provider before installing the
KX-HGW200.
For assistance, please call: 1-800-272-7033
After installing the KX-HGW200
≥The KX-HGW200 communicates with your
ISP instead of your computer. Therefore, the
KX-HGW200 needs to hold the same
account information as your computer
would.
≥If you currently use a cable/xDSL modem
without the KX-HGW200, all the ISP
information that needs to be entered in the
KX-HGW200 is in your computer.
Please see p. 21 for details on how to collect
the information you have to enter in the
KX-HGW200.
13
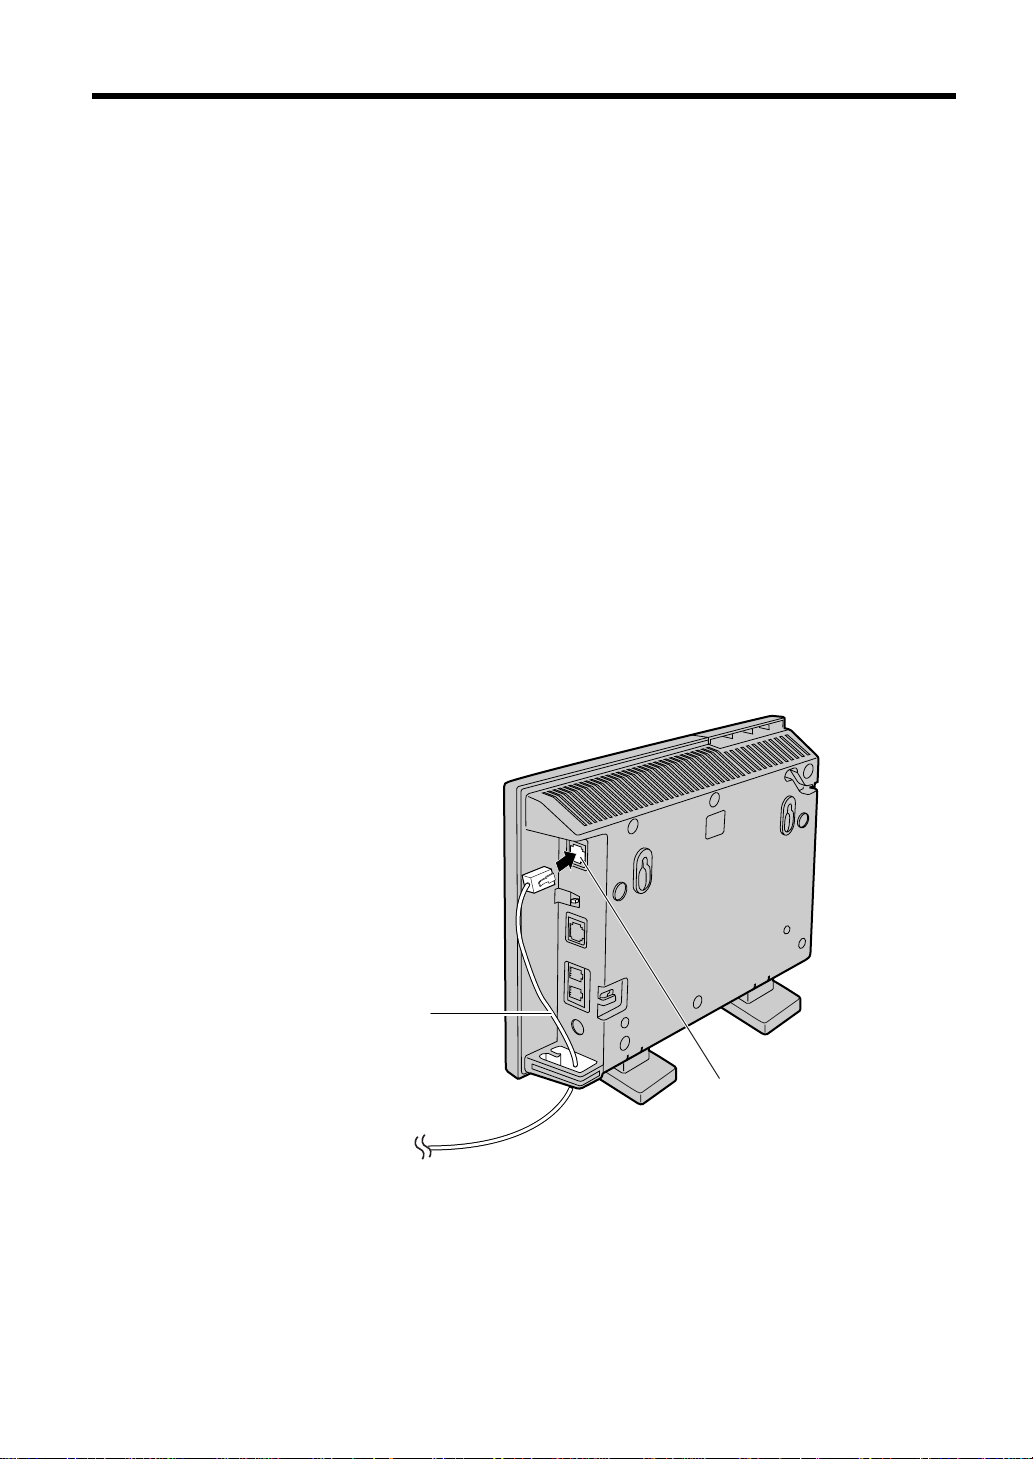
TO MODEM port
To RJ-45 jack
on the Cable/xDSL
modem
Category 5
straight cable
“
Setup
Preparation
Before starting to install the KX-HGW200, make sure that you have
everything below and all the devices are turned off.
≥A Windows or Macintosh computer with web browser software*, a network
card (Ethernet, HomePNA or wireless card) and TCP/IP installed.
≥A cable/xDSL modem with a cable
≥An Internet access account and information provided by the ISP
*See “System Requirements” on p. 8 for recommended browsers.
Connecting the KX-HGW200 to a Cable/xDSL Modem
Make sure the cable/xDSL modem is turned off.
1
Connect the category 5 straight cable (with 8-pin RJ-45 connector) to
2
the RJ-45 jack of the cable/xDSL modem.
Connect the other end of the category 5 straight cable to the
3
TO MODEM port of the KX-HGW200.
14
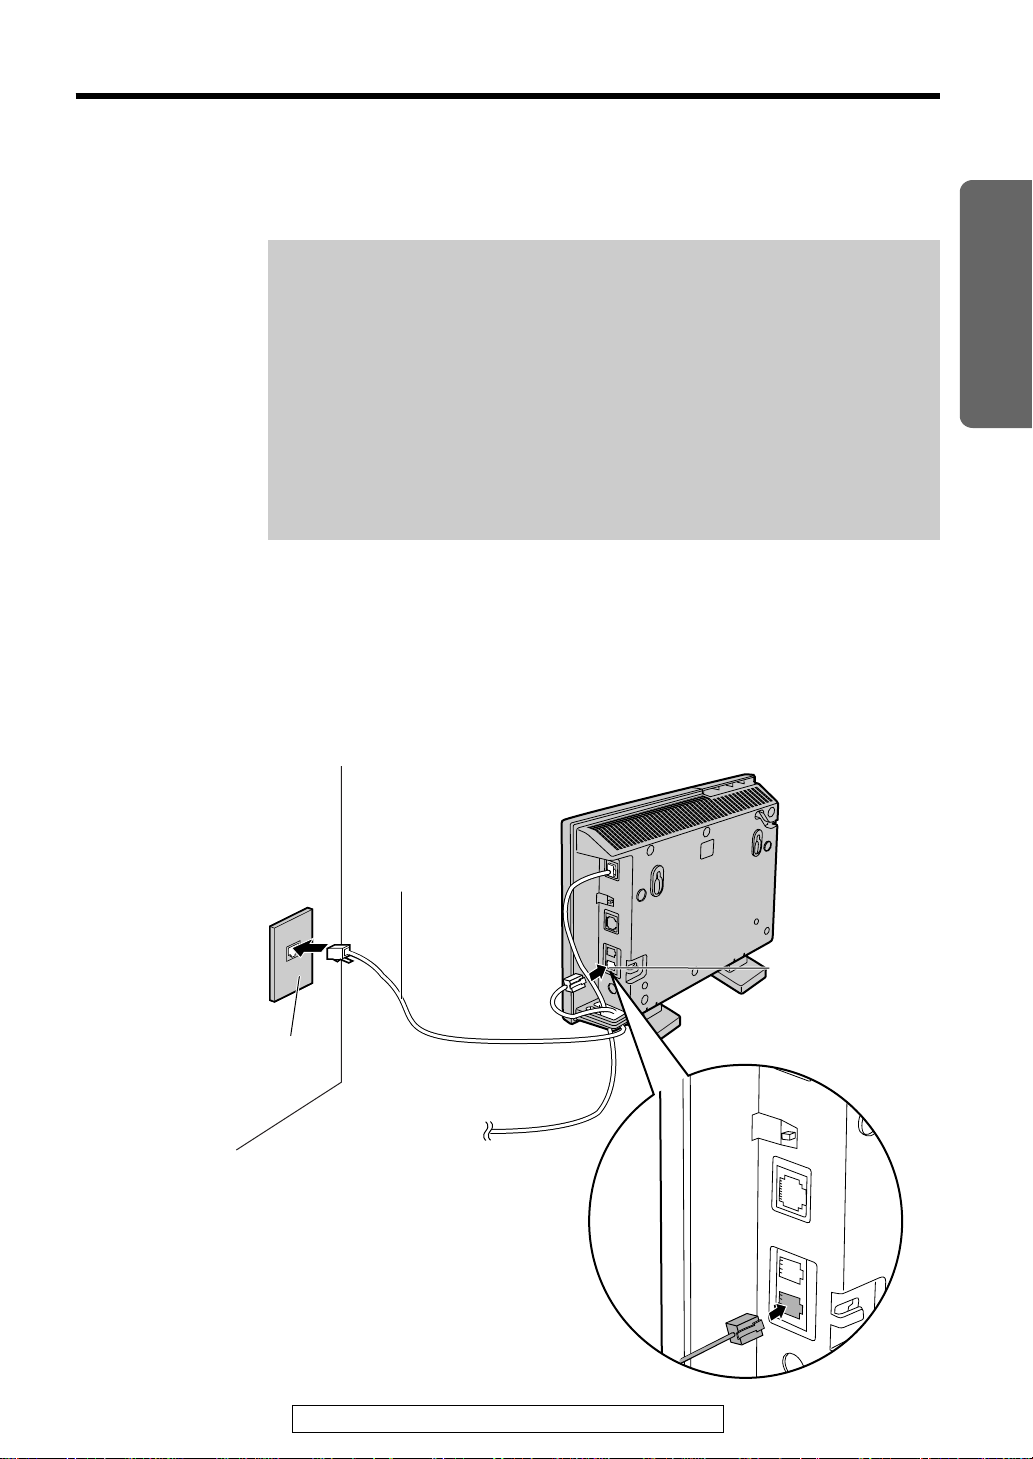
Connecting the KX-HGW200 to a Home Network
Single-line
telephone jack
(RJ11C)
LINE jack
Telephone line
cord
(included accessory)
LINE
To RJ-45 jack
on the cable/xDSL
modem
To connect computers using the HomePNA:
Note:
For using HomePNA:
≥A HomePNA card and software have to be installed properly on the
computer first.
≥To avoid interference with the HomePNA signals, do not use an
ADSL filter, which may have been provided by your phone company,
on the telephone line or on the line that runs in between the
telephone jack and computer. If you have two lines installed and one
of them is dedicated to phone use, you can use the ADSL filter on
that phone line only.
≥Use the telephone line that does not have the ADSL filter for your
HomePNA connection.
Make sure the computer is turned off.
1
Connect the telephone line cord (included accessory) to the LINE jack
2
on the KX-HGW200.
Connect the other end of the telephone line cord to the wall mounted
single-line telephone jack.
“
Installation
For assistance, please call: 1-800-272-7033
(Continued “)
15
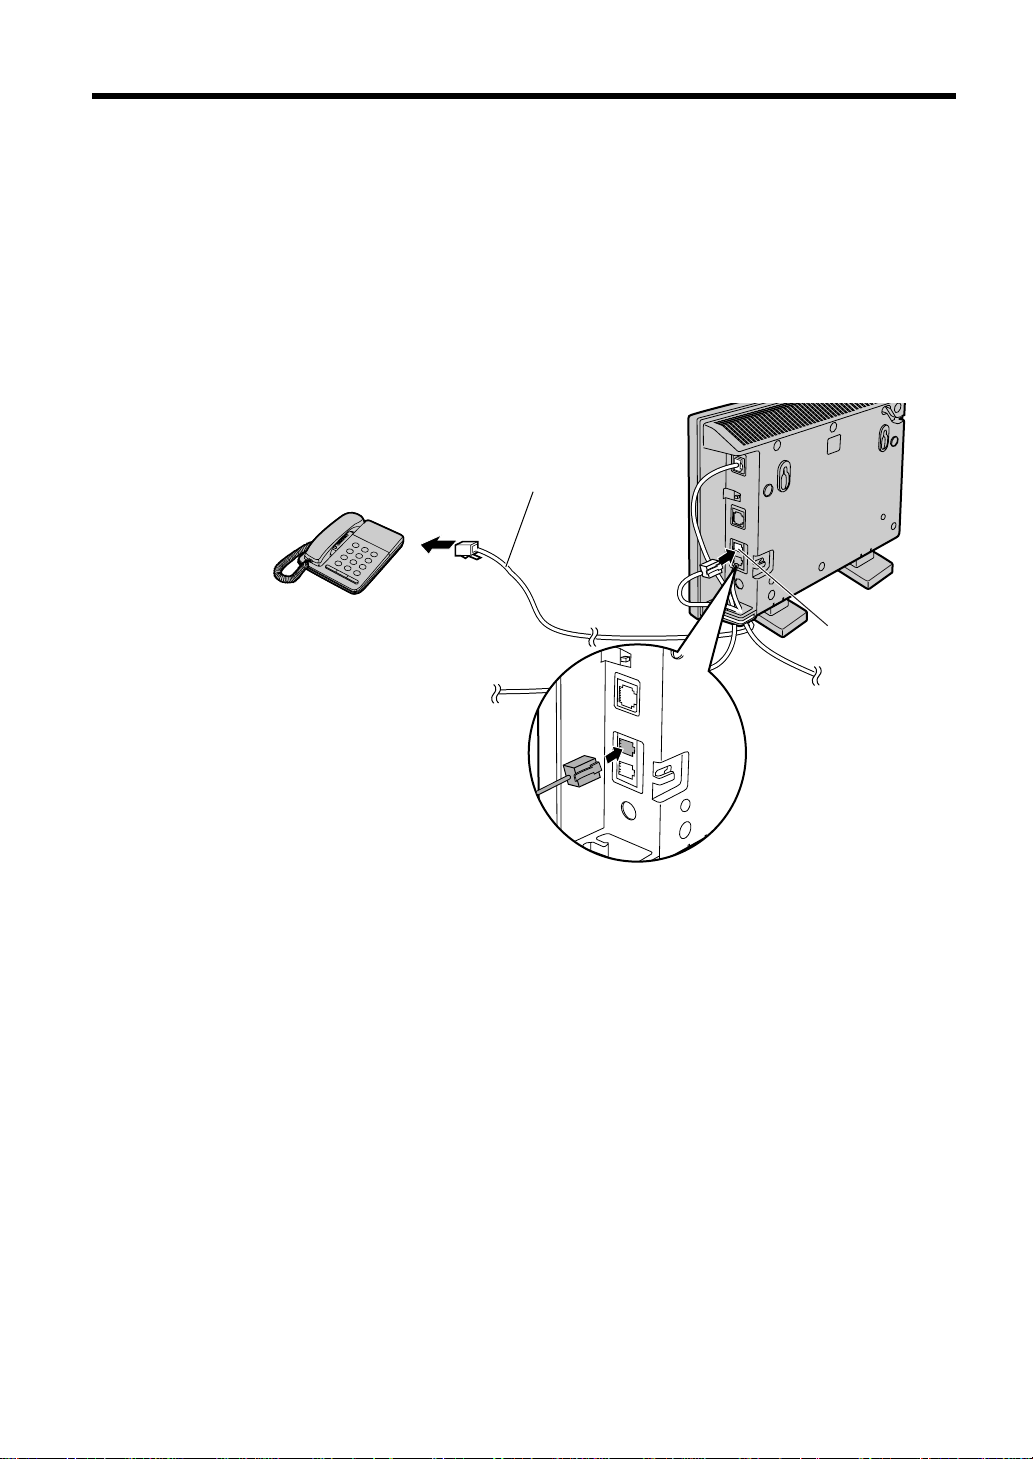
“
Telephone
PHONE jack
Telephone line
cord
PHONE
Setup
Connect the computer to the wall mounted single-line telephone jack.
3
For more detailed information, refer to the HomePNA card manual.
If you are thinking of attaching a telephone to the KX-HGW200, follow
4
the steps below (a, b and c). If not, skip these steps.
a: Connect the end of the telephone line cord to the PHONE jack on
the KX-HGW200.
b: Connect the other end of the telephone line cord to the single-line
telephone jack of the telephone.
c: Make sure a dial tone is heard from the handset of the telephone.
16
To connect computers using optional wireless cards:
An optional Panasonic wireless card, model KX-HGC200, is required for the
KX-HGW200 and for each computer in the network.
≥Before you insert the wireless card into the KX-HGW200, turn off the
KX-HGW200 by removing the AC adaptor.
≥Install a Panasonic wireless card in the wireless card slot of the
KX-HGW200 and in the appropriate PCMCIA slot of the computer(s). The
driver software that comes with the optional wireless card must be
installed in the computer.
≥To install the optional Panasonic wireless card KX-HGC200 and the driver
software in either the KX-HGW200 or a computer, refer to the operating
instructions that come with the wireless card.
The KX-HGW200 is compatible with the optional Panasonic wireless card
KX-HGC200 only. Do not insert any other PCMCIA card into the
KX-HGW200.
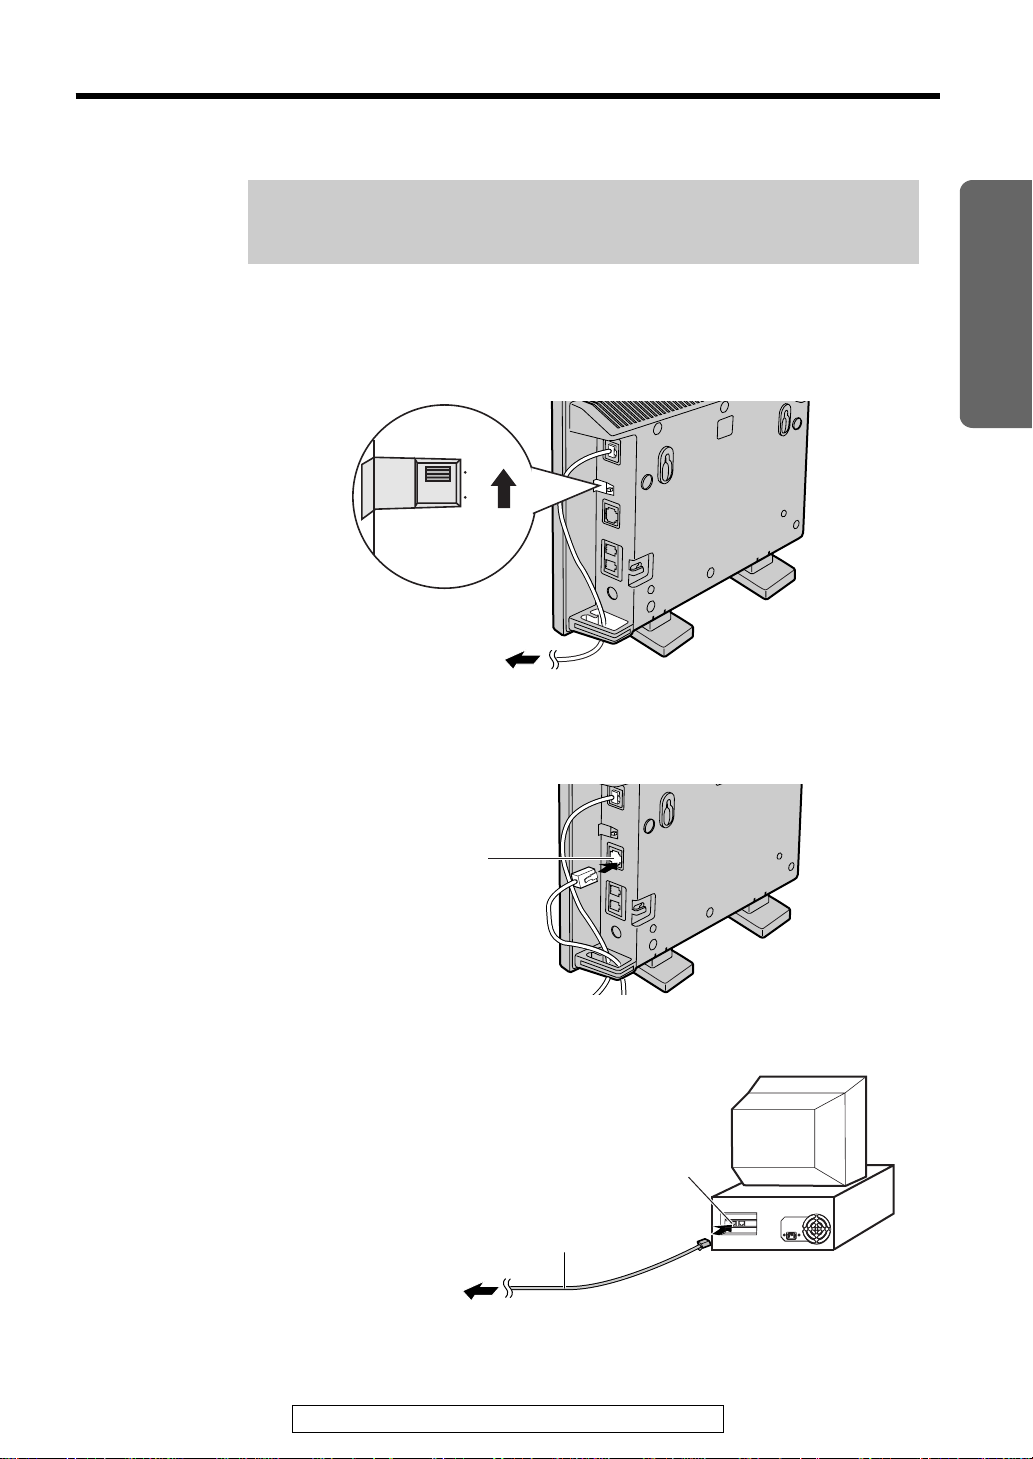
To connect a computer directly to the KX-HGW200:
HUB/PC switch
HUB PC
To RJ-45 jack on
the cable/xDSL
modem
TO COMPUTER/
ETHERNET HUB port
Computer (Rear Side)
Category 5
straight cable
LAN port
To TO COMPUTER/
ETHERNET HUB port
of the KX-HGW200
Note:
If using an Ethernet connection, an Ethernet card and software have
to be installed properly on the computer first.
Make sure the computer is turned off.
1
Set the HUB/PC switch on the KX-HGW200 to PC.
2
“
Installation
Connect the category 5 straight cable to
3
TO COMPUTER/ETHERNET HUB port of the KX-HGW200.
Connect the other end of the category 5 straight cable to the LAN port
4
of the computer.
For assistance, please call: 1-800-272-7033
17
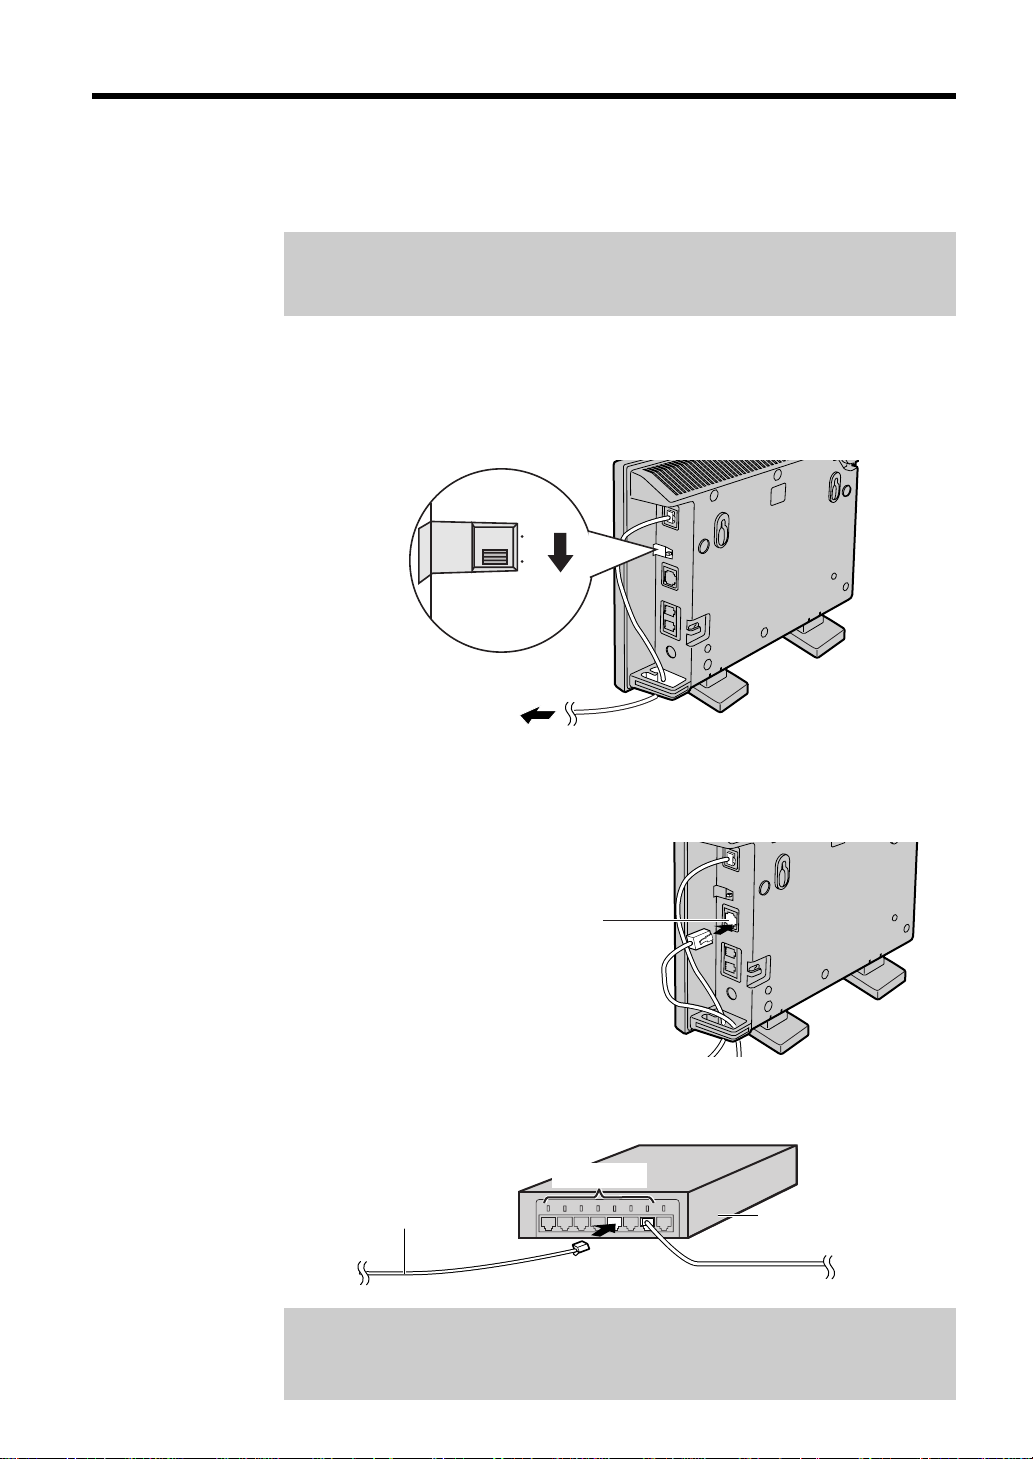
“
HUB/PC switch
HUB PC
To RJ-45 jack
on the cable/
xDSL modem
TO COMPUTER/
ETHERNET HUB port
Category 5
straight cable
Ethernet Hub
LAN port
Setup
To connect an Ethernet Hub to the KX-HGW200:
If you are not currently using an Ethernet hub to network more than one
computer, please skip this page.
Note:
If using an Ethernet connection, an Ethernet card and software have
to be installed properly on the computer first.
Make sure the computers and other devices connected to the Ethernet
1
Hub are turned off.
Set the HUB/PC switch of the KX-HGW200 to HUB.
2
18
3
4
Connect the category 5 straight cable to
TO COMPUTER/ETHERNET HUB port of the KX-HGW200.
Connect the other end of the category 5 straight cable to the LAN port
of the Ethernet Hub.
Note:
Do not connect the category 5 straight cable to the UPLINK port of the
Ethernet Hub.
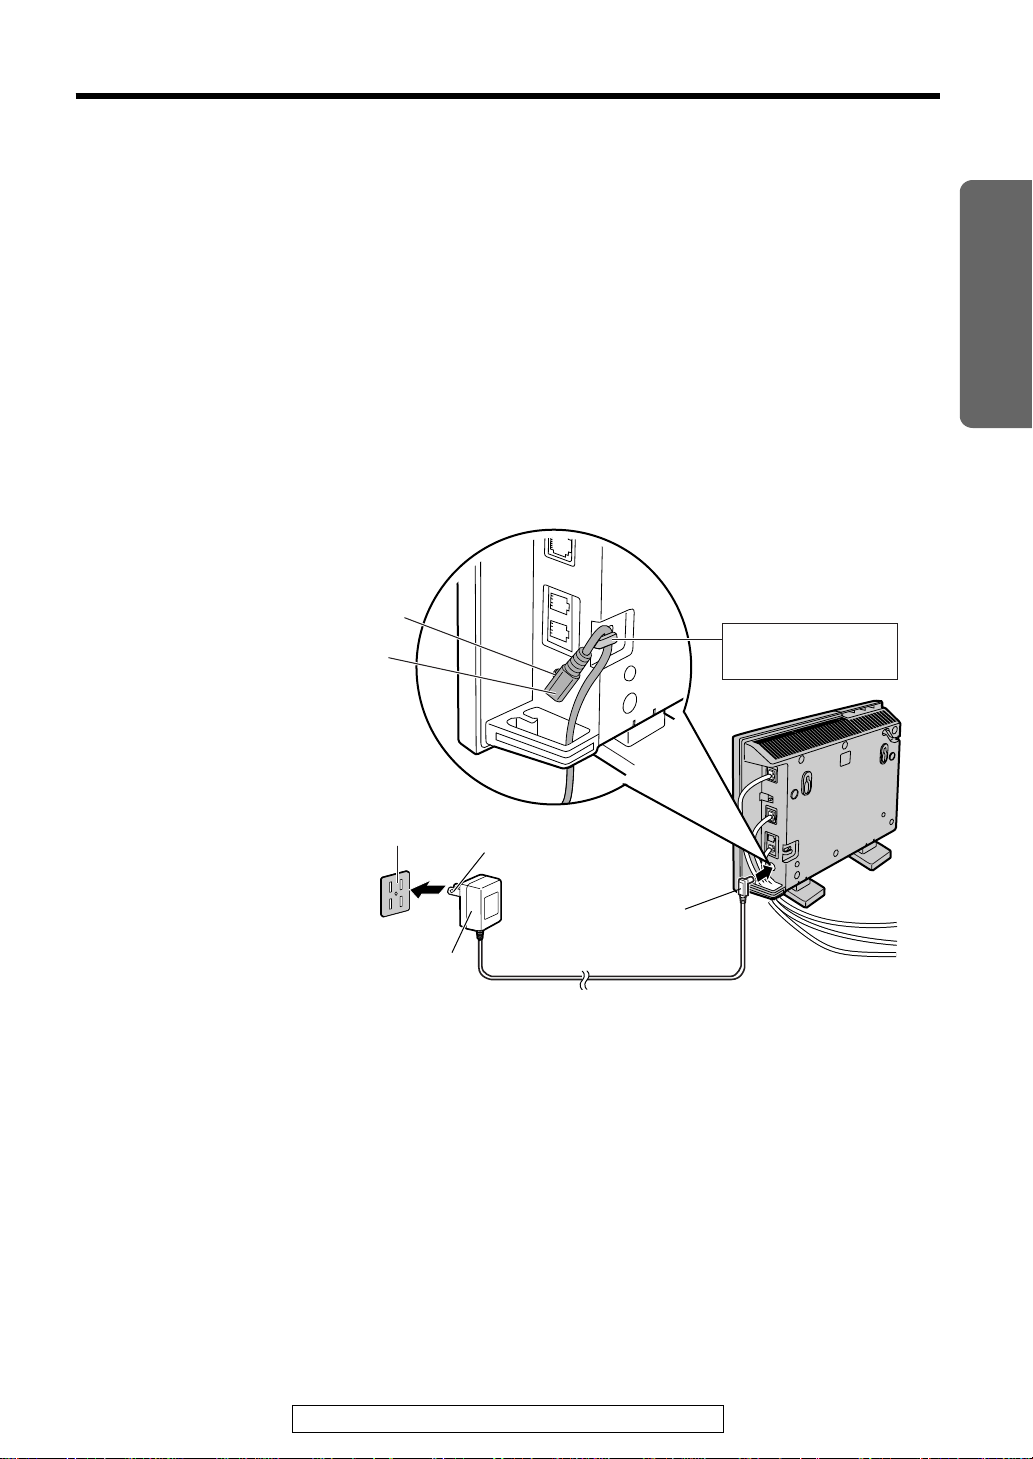
Turning on the Devices
AC adaptor
(included
accessory)
Power Outlet
(AC120 V, 60 Hz)
DC plug
DC IN jack
AC plug
DC plug
Secure the DC plug
using the hook.
After all connections have been made, all the devices should be turned on
following the steps below.
Make sure all the devices in your home network including the modem and
the Ethernet Hub are turned off.
Turn on the cable/xDSL modem.
1
≥After turning it on, leaving the modem idle for few minutes is
recommended.
Connect the DC plug of the AC adaptor to the DC IN jack of
2
the KX-HGW200 and connect the AC plug of the AC adaptor to the
power outlet.
Installation
≥USE ONLY WITH Panasonic AC ADAPTOR (Order No. PQLV12).
≥The AC adaptor must remain connected at all times.
(It is normal for the adaptor to feel warm during use.)
If you use an Ethernet Hub, turn it on.
3
Turn on the computers in the home network.
4
≥After turning on all the devices, see p. 11 and make sure that the
appropriate indicator lights are on.
For assistance, please call: 1-800-272-7033
19
Configuring the Computer
After completing the connections (p. 14–19), to use the DHCP server
function of the KX-HGW200, it is necessary to set up each computer.
Follow the steps below to set up the computers.
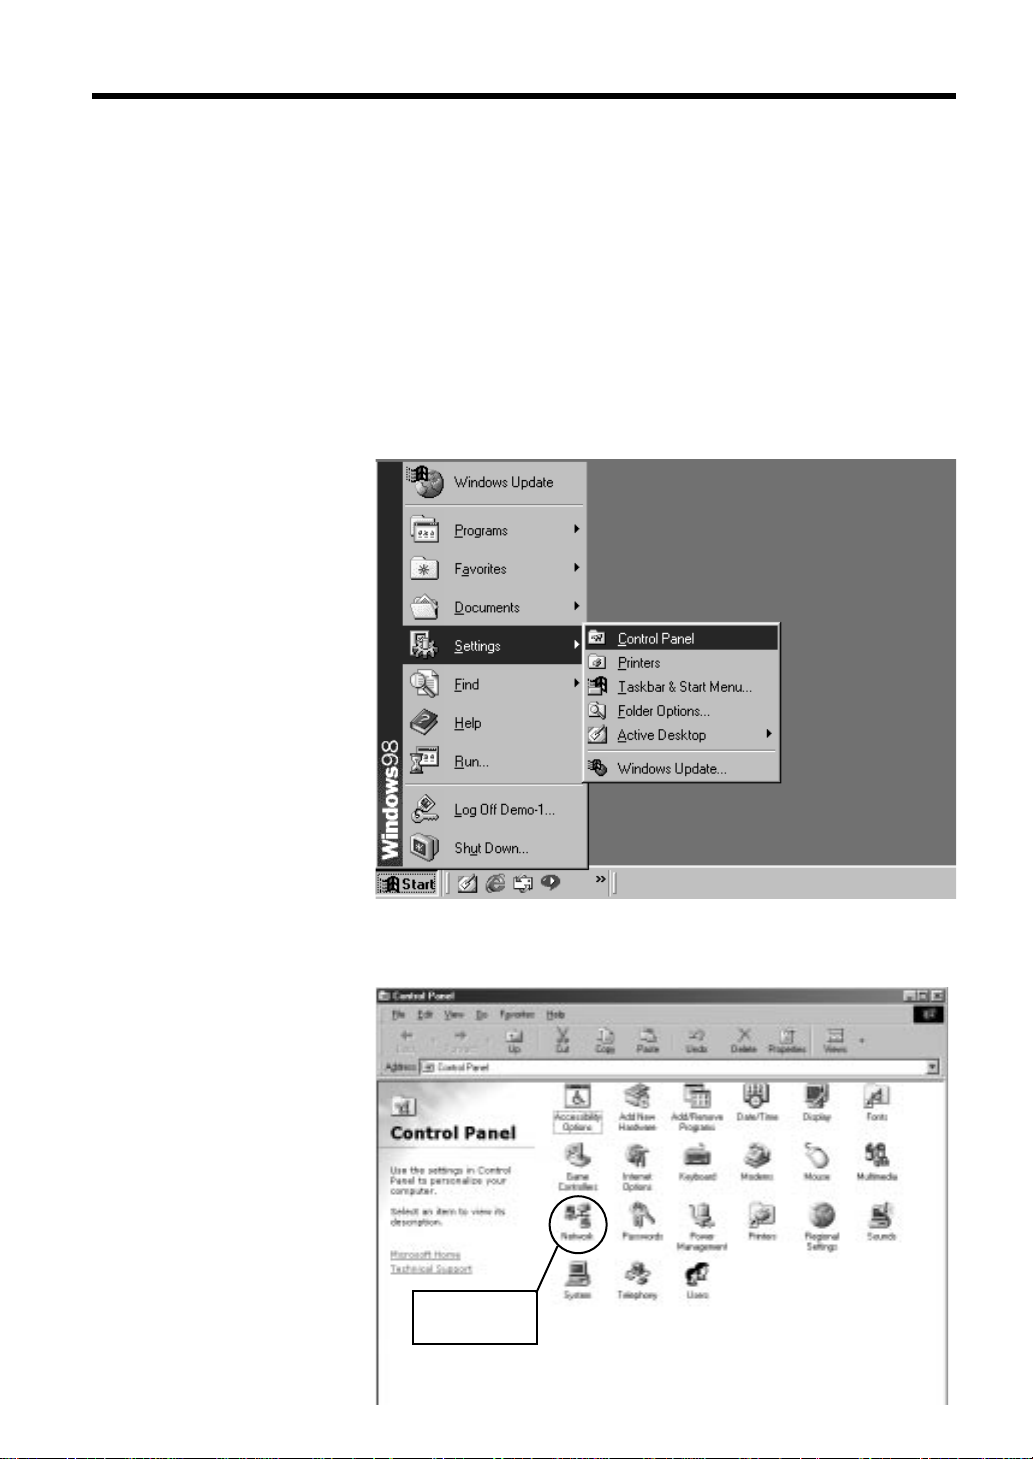
Setup of a Microsoft®Windows®Computer
The steps below are for Windows 98.
Turn on the computer.
1
From the Start menu, select Settings and click Control Panel.
2
20
Double-click the Network icon.
3
Double-click
this icon.
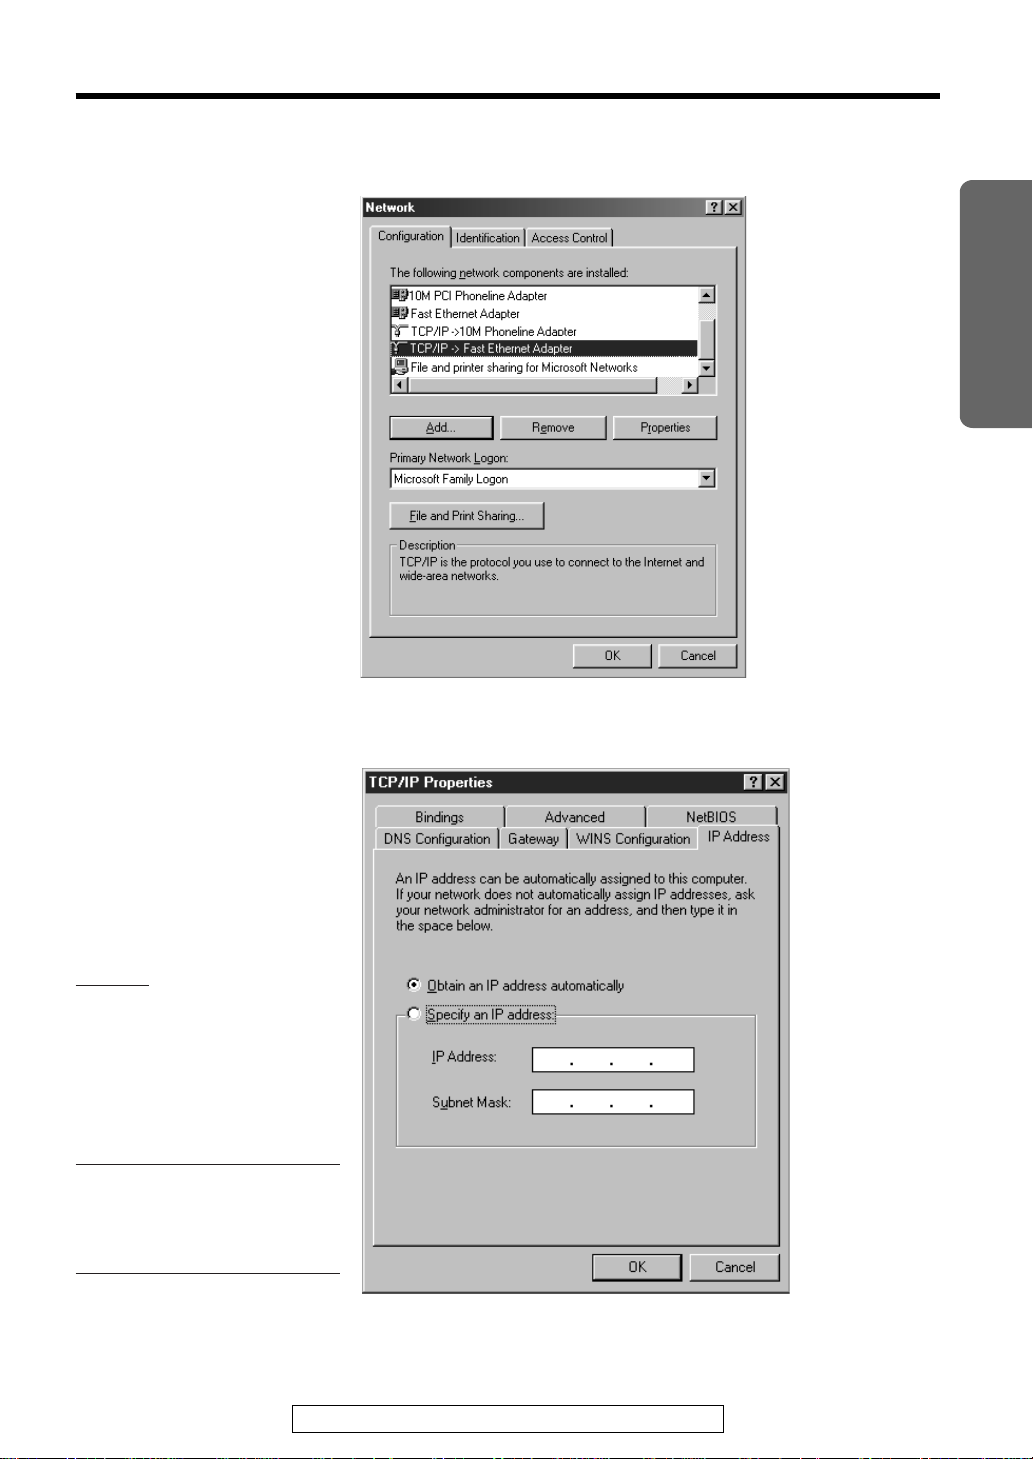
Select TCP/IP that is associated with your network card and click
4
[Properties] in the Network dialog box.
“
Installation
5
Please make note for future
reference
✎Memo
If Obtain an IP address
automatically is selected,
check the DHCP.
∑DHCP
If the data field has already
been filled, record the
parameters first.
✎Memo
Record the IP Address here:
✎Memo
Record the Subnet Mask
here:
1 (See p. 32)
2 (See p. 32)
3 (See p. 32)
Click the IP Address tab in the TCP/IP Properties dialog box.
For assistance, please call: 1-800-272-7033
(Continued “)
21
 Loading...