

Panasonic KX-HGC200 User Manual
11Mbps Wireless LAN PC Card
Panasonic
Panasonic
KX-HGC200
READY
LINK
Operating Instructions
Model No. KX-HGC200
PLEASE READ BEFORE USE AND SAVE.
Panasonic World Wide Web Address:
http://www.panasonic.com
for customers in the USA or Puerto Rico

Before Initial Use
Thank you for purchasing the Panasonic 11 Mbps
Wireless LAN PC Card.
Attach your purchase receipt here.
For your future reference
Serial No. Date of purchase
(found on the rear side of the unit)
Name and address of dealer
FOR OPERATION ASSISTANCE:
–Call
1-800-272-7033
–Refer to
the Panasonic world wide web site
http://www.panasonic.com
≥Microsoft, Windows and Netmeeting are either registered trademarks or
trademarks of Microsoft Corporation in the United States and/or other
countries.
≥Ethernet is a registered trademark of Xerox Corporation.
≥Whitecap™ is a trademark of ShareWave™, Inc.
≥Screen shots reprinted with permission from Microsoft Corporation.
All other brands and product names are trademarks or registered
trademarks of their respective companies.
The operating instructions are subject to change without notice.
The screens of the device driver, Network Manager software and the
Broadband Networking Gateway administration web screens that are
shown in this Operating Instructions manual are subject to change without
notice.
© Kyushu Matsushita Electric Co., Ltd. 2001
2
For Best Performance
KX-HGC200
L
IN
K
ANT.
R
E
A
D
Y
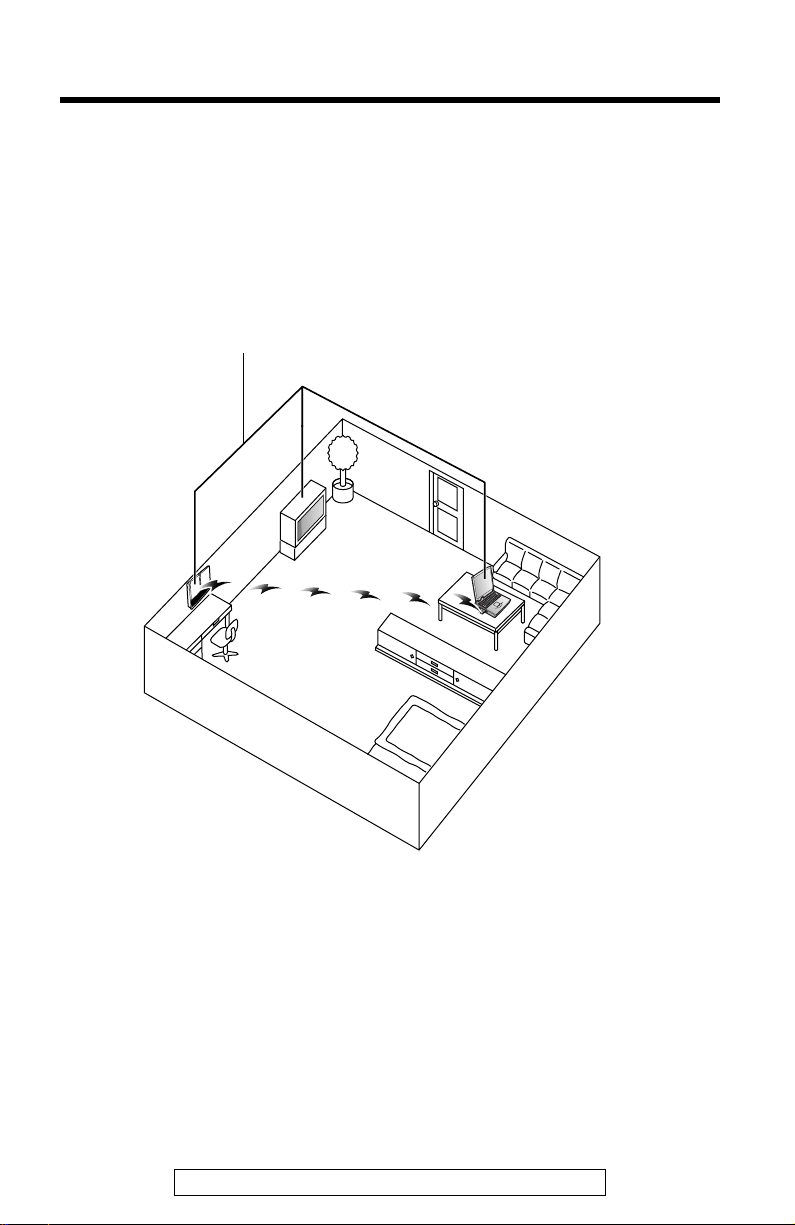
Location of the units
Communications are transmitted between the KX-HGC200s using
wireless radio waves at 11Mbps data speed. For maximum
performance, it is recommended that the KX-HGC200 be operated:
Away from electrical appliances
such as TVs or cordless
telephones.
≥Metal or steel framework, such as refrigerators, can hinder radio
communications. Open areas offer better performance.
≥If the KX-HGC200 is located near a microwave oven which is in use,
communication may be interfered with. For maximum performance,
operate the KX-HGC200 away from microwave ovens.
≥It is recommended that the KX-HGC200s be located no closer than
about 1.6 ft. (50 cm) apart.
For assistance, please call: 1-800-272-7033
3

Table of Contents
Overview. . . . . . . . . . . . . . . . . . . . . . . . . . . . 6
Features. . . . . . . . . . . . . . . . . . . . . . . . . . . . 6
System requirements . . . . . . . . . . . . . . . . . . 6
Included Accessory . . . . . . . . . . . . . . . . . . . . 7
Contents of the CD-ROM . . . . . . . . . . . . . . . 7
Part Names . . . . . . . . . . . . . . . . . . . . . . . . . . 9
Before Start
Installation
Part names. . . . . . . . . . . . . . . . . . . . . . . . . . 9
Indicators . . . . . . . . . . . . . . . . . . . . . . . . . . . 9
Installation Overview. . . . . . . . . . . . . . . . . . 10
4 important parameters to create a
wireless network . . . . . . . . . . . . . . . . . . . . 10
Network with the Broadband Networking
Gateway. . . . . . . . . . . . . . . . . . . . . . . . . . 11
Network consisting only of wireless
computers . . . . . . . . . . . . . . . . . . . . . . . . 12
Installing the KX-HGC200 in
the Broadband Networking Gateway. . . . 13
Confirming the Broadband Networking
Gateway firmware version. . . . . . . . . . . . 13
Inserting the KX-HGC200 in the
Broadband Networking Gateway. . . . . . . 15
Setting up the Broadband Networking
Gateway . . . . . . . . . . . . . . . . . . . . . . . . . . . 17
Setting up from a wired computer. . . . . . . . 17
Setting up from a wireless computer. . . . . . 19
Caution when initializing the Broadband
Networking Gateway. . . . . . . . . . . . . . . . 22
Helpful functions. . . . . . . . . . . . . . . . . . . . . 23
Installing the KX-HGC200 to a Computer. . 25
Before inserting the KX-HGC200 . . . . . . . . 25
Inserting the KX-HGC200 into a computer . 27
Installing the device driver . . . . . . . . . . . . . 29
Installing the Network Manager . . . . . . . . . 38
Confirming the KX-HGC200 setup . . . . . . . 42
4

Installation
Network
Manager
Setting up Your Computer . . . . . . . . . . . . . 44
Confirming the network protocols . . . . . . . . 44
Setting an IP address. . . . . . . . . . . . . . . . . 46
Sharing Files and Printers . . . . . . . . . . . . . 52
Preparing for sharing files and printers . . . . 52
About the Network Manager Software . . . . 54
Using the Network Management Web
Screen . . . . . . . . . . . . . . . . . . . . . . . . . . . . 55
About the Network Management web
screen . . . . . . . . . . . . . . . . . . . . . . . . . . . 55
Using the function menu. . . . . . . . . . . . . . . 56
Using the Device Management
Dialog Box . . . . . . . . . . . . . . . . . . . . . . . . . 59
About the Device Management dialog box . 59
Creating a new wireless network/
Joining another wireless network . . . . . . . 61
Changing the channel (radio frequency) . . . 62
Setting a computer to the Master Node. . . . 62
Forward Error Correction (FEC) . . . . . . . . . 62
Before Start Installation
Network Manager
Appendix
For assistance, please call: 1-800-272-7033
Removing the KX-HGC200 . . . . . . . . . . . . . 63
Appendix
Removing the KX-HGC200 from
a computer . . . . . . . . . . . . . . . . . . . . . . . 63
Removing the KX-HGC200 from
the Broadband Networking Gateway. . . . 64
Updating the KX-HGC200 Firmware . . . . . . 65
Uninstalling the KX-HGC200 Software . . . . 67
Troubleshooting . . . . . . . . . . . . . . . . . . . . . 69
Glossary. . . . . . . . . . . . . . . . . . . . . . . . . . . . 73
Specifications . . . . . . . . . . . . . . . . . . . . . . . 75
FCC and Other Information. . . . . . . . . . . . . 76
Index. . . . . . . . . . . . . . . . . . . . . . . . . . . . . . . 78
5

Overview
Features
No wiring
The KX-HGC200 helps you network without troublesome wiring using
wireless technology and accommodates up to 10 wireless users*.
*Accommodates up to 9 wireless users when used with the Broadband
Networking Gateway.
High data-transmission quality by using the Whitecap™protocol
The features of the Whitecap™ protocol are as follows:
≥Error correction and dynamic TDMA (Time Division Multiple Access) for
higher usable network throughput and range
≥Carries several multimedia (video, voice, audio) data streams
simultaneously
Internet sharing and expandability of the home network (With the
Panasonic Broadband Networking Gateway)
When operated with the Panasonic Broadband Networking Gateway (In
the following pages, Broadband Networking Gateway), the KX-HGC200
allows you to share an Internet connection with the other computers in
your home network at the same time and expand your home network by
using the HomePNA phoneline and Ethernet interfaces of the Broadband
Networking Gateway.
Easy to configure/administrate
The KX-HGC200 setup wizard and Network Manager software lead you
through an easy installation and administration.
System requirements
Operating System
Interface
RAM
Other (for installation)
Protocol
CPU
≥The Network Management web screen (p. 20 –21, 55–58) can be
viewed using Internet Explorer 4.0 or later.
6
Microsoft®Windows®95 operating system
(OSR2.0 or later)
Microsoft®Windows®98 operating system
Microsoft®Windows®Me operating system
PCMCIA Type II PC card slot equipped
32MB or more
CD-ROM drive/Ethernet or HomePNA card
TCP/IP installed
Pentium 133 MHz or faster

Included Accessory
For extra orders, call 1-800-332-5368.
∑ 11Mbps Wireless LAN
Setup CD-ROM
Order No. PQLV50I5AZ
(p. 30, 32, 35)
one
≥If the item is missing or damaged, check with the place of purchase.
≥The order number listed above is subject to change without notice.
≥Save the original carton and packing materials for future shipping and
transportation of the unit.
Contents of the CD-ROM
The CD-ROM contains the following software and files:
The device driver for Windows 95, Windows 98 and Windows Me
–Used while configuring the KX-HGC200. During configuration, the
appropriate driver software is installed depending on the operating
system of your computer.
“
Before Start
The Network Manager software
–Used for administrating the wireless network. For more details, refer to
“About the Network Manager Software” on p. 54.
The firmware update utility software
–Used for updating the KX-HGC200 firmware written in the Flash-ROM.
For more details, refer to “Updating the KX-HGC200 Firmware” on p. 65.
The uninstall software
–Used for uninstalling all the software of the KX-HGC200 that has been
installed to a computer. For more details, refer to “Uninstalling the
KX-HGC200 Software” on p. 67.
The Broadband Networking Gateway firmware for upgrade
–Used for upgrading the Broadband Networking Gateway firmware. For
more details about the firmware, refer to “To obtain and upgrade the
Broadband Networking Gateway firmware” on p. 14.
The Readme.txt
–Contains the latest information about the KX-HGC200.
For assistance, please call: 1-800-272-7033
7
“
♪
♪
Included Accessory
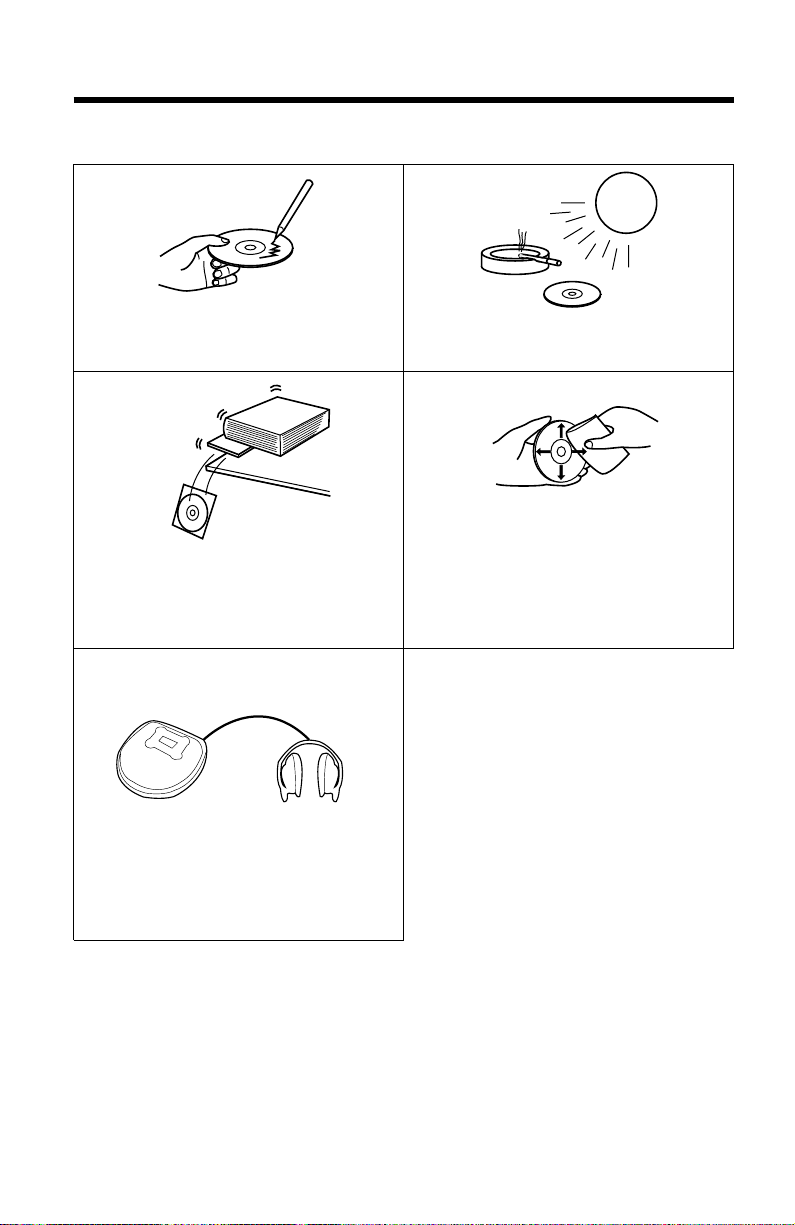
To prevent accidental damage to the CD-ROM:
≥Do not touch or write on the
surface of the disc.
≥Do not place heavy objects on
the disc case or drop the case.
≥Do not play the disc on an audio
CD player.
≥Do not leave the disc in direct
sunlight or near heat sources.
≥To clean the disc, hold the disc
by its edges and wipe it from the
center to the edges with a dry,
soft cloth.
8
Part Names
Panasonic
Panasonic
KX-HGC200
READY
LINK
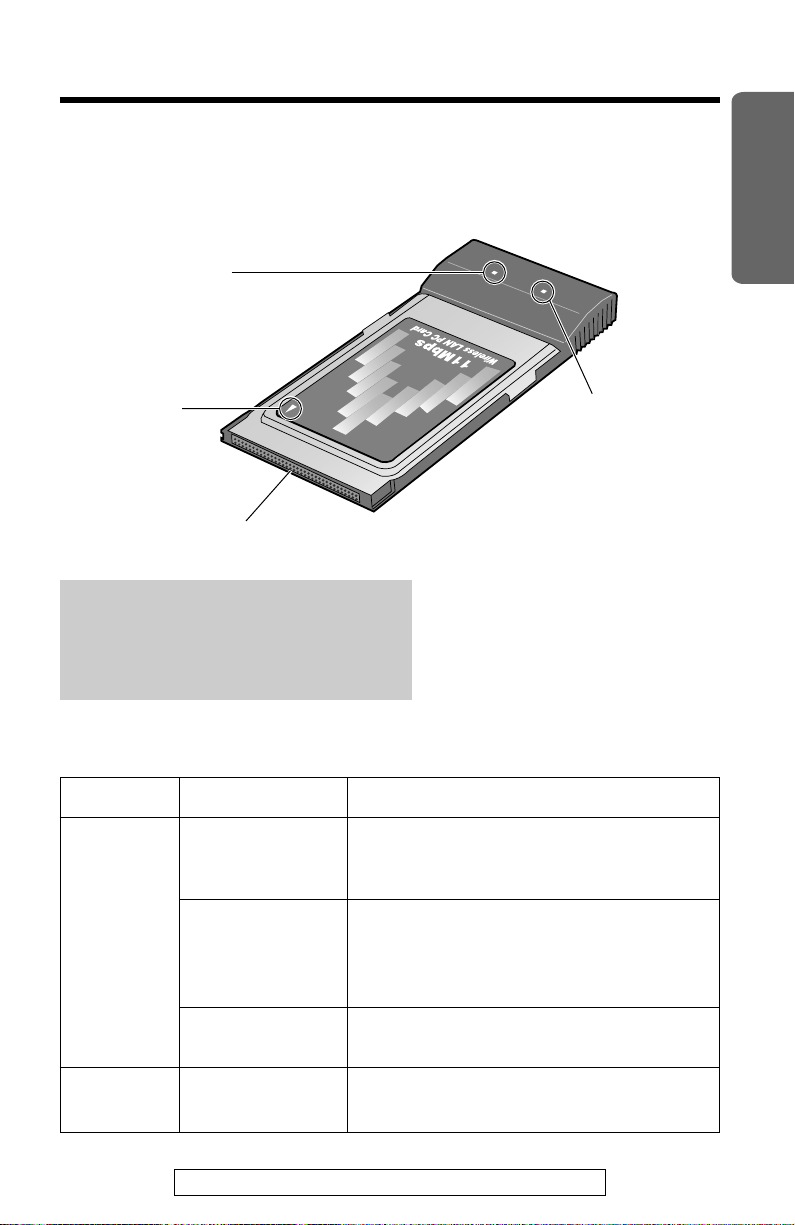
Part names
READY indicator
Before Start
Arrow mark
(p. 15, 27)
PCMCIA Connector
with 68 pins
Note:
≥To prevent the KX-HGC200 from
being damaged, never touch the
PCMCIA connector.
Indicators
LED
LINK
Status
Green
Green
(Blinking)
LINK indicator
Indicates
≥The KX-HGC200 is turned on and
transmitting/receiving data to/from
another KX-HGC200.
≥The KX-HGC200 is turned on and
transmitting/receiving data to/from
another KX-HGC200, but the data
transmission status is not stable.
READY
Off
Green
For assistance, please call: 1-800-272-7033
≥The KX-HGC200 is not connected to
any wireless network.
≥The KX-HGC200 is turned on and
ready for communication.
9

Installation Overview
4 important parameters to create a wireless
network
A wireless network can be created using the 4 parameters below which
are programmed in the Flash-ROM of the KX-HGC200 or in a node*.
Normally, you would only program the Network Name because the other
parameters have been already set. However, for later customization, be
sure to read about the parameters below.
*Node: A device that is connected to the network and can communicate
with other network devices. In this Operating Instructions, we use
this word for the Broadband Networking Gateway or a computer.
Network Name
Name for a wireless network. For security, only the nodes that are
programmed with the same Network Name can communicate. It is
necessary to set a Network Name for all the KX-HGC200 during the
installation of the Network Manager software or on the Broadband
Networking Gateway administration web screen.
Network ID
The ID that is created from the Network Name. Actually, this ID is used for
maintaining a wireless network instead of the Network Name. However,
users do not need to care what Network ID is programmed to each node.
Node Name
Name of each node in your network (wireless or wired) for identification.
The Node Name of the Broadband Networking Gateway is set on its
administration web screen. The Node Name of a computer is set in the
Identification tab in the Network dialog box which can be accessed via the
Control Panel menu on your computer.
Channel Number
Number of the radio frequency channel on which a wireless network
communicates. To prevent the radio frequency interference with other
wireless products, the channels below can be selected depending on the
status of the wireless communications:
Channel 1 (2412 MHz)
Channel 6 (2437 MHz) –default setting of the KX-HGC200
Channel 11 (2462 MHz)
On each channel, data-transmission can be performed on a speed up to
11Mbps. Only the nodes that are programmed with the same channel
number can communicate.
10
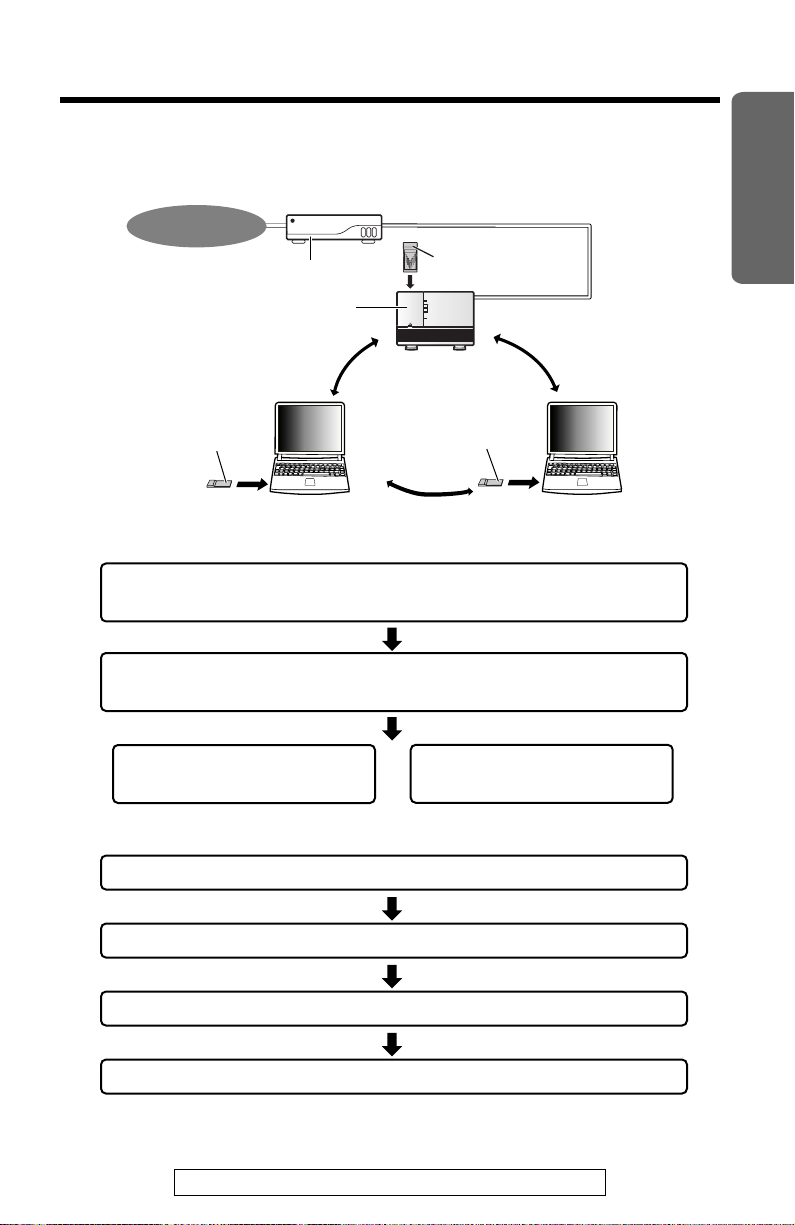
Network with the Broadband Networking
KX-HGW100
HomePNA
WIRELESS
ETHERNET
INTERNET
POWER
Internet
Broadband Networking
Gateway
Cable/xDSL Modem
KX-HGC200
KX-HGC200
KX-HGC200
Gateway
Required setup for the Broadband Networking Gateway
Confirming the Broadband Networking Gateway
firmware version* (p. 13)
“
Before Start
Inserting the KX-HGC200 in
the Broadband Networking Gateway (p. 15)
Setting up from a
wired computer (p. 17)
Setting up from a
wireless computer (p. 19)
Required setup for each computer
Inserting the KX-HGC200 into a computer (p. 27)
*Depending on the Broadband Networking Gateway firmware version,
upgrading may be necessary.
Installing the device driver (p. 29)
Installing the Network Manager (p. 38)
Setting an IP address (p. 46)
For assistance, please call: 1-800-272-7033
11
“
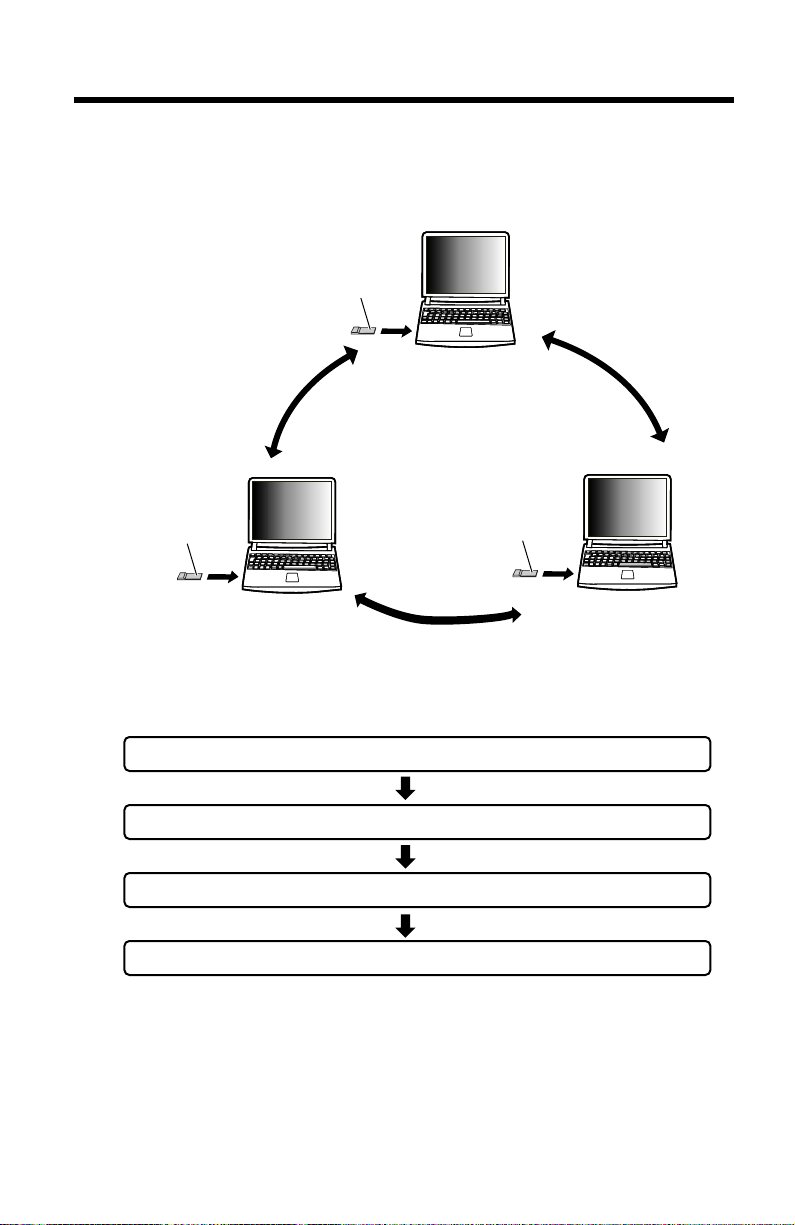
KX-HGC200
KX-HGC200
KX-HGC200
Installation Overview
Network consisting only of wireless
computers
12
Required setup for each computer
Inserting the KX-HGC200 into a computer (p. 27)
Installing the device driver (p. 29)
Installing the Network Manager (p. 38)
Setting an IP address (p. 46)
Installing the KX-HGC200 in the Broadband Networking Gateway
“
Confirming the Broadband Networking
Gateway firmware version
Depending on the firmware version of the Broadband Networking
Gateway, it may not support the KX-HGC200. Before adding the
Broadband Networking Gateway to your wireless network, check your
Broadband Networking Gateway firmware version and, if needed, upgrade
the firmware first.
The steps below are for using the wired computer, not the wireless
computer.
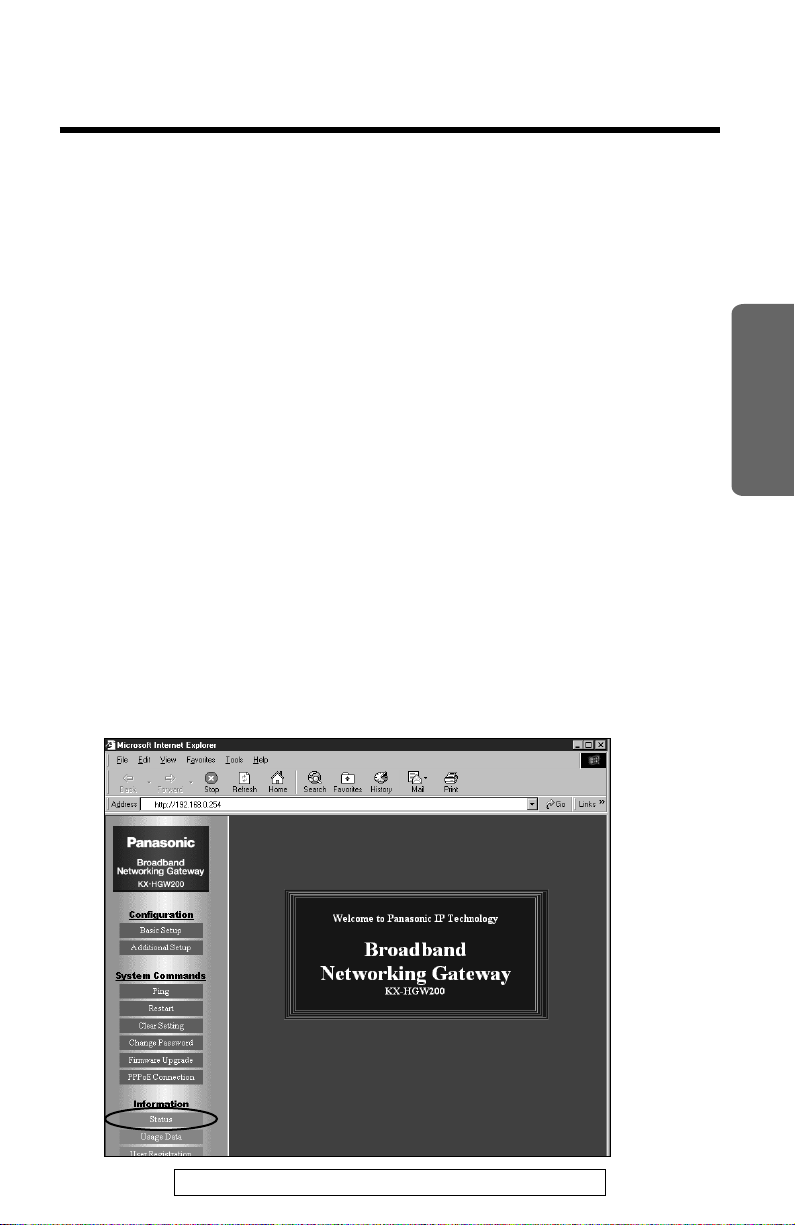
To check the Broadband Networking Gateway firmware
version
Access the Broadband Networking Gateway administration web
1
screen. For more details about accessing the web screen, refer to
the Operating Instructions of the Broadband Networking Gateway.
≥The default local IP address of the Broadband Networking Gateway is
192.168.0.254.
Installation
Click [Status].
2
For assistance, please call: 1-800-272-7033
13

“
Installing the KX-HGC200 in the Broadband
Networking Gateway
In the Firmware section, check the firmware version of your
3
Broadband Networking Gateway.
If the firmware version is 2.00 or later, the firmware supports the
KX-HGC200 use. Then, go to step 4.
If the firmware version is an earlier version than 2.00, upgrade the
Broadband Networking Gateway firmware. For more details about
upgrading the firmware, see below “To obtain and upgrade the
Broadband Networking Gateway firmware.”
Click [Restart] to restart the Broadband Networking Gateway.
4
To obtain and upgrade the Broadband Networking
Gateway firmware
The Broadband Networking Gateway firmware is available as follows:
≥ Included in the below directory of the CD-ROM that came with the
KX-HGC200
\KX-HGW\hgwxxxx_us.bin (depending on the version number of the
firmware)
OR
≥ Downloaded from the Panasonic support web site
http://www.kmelink.net/ipproducts/us/download/index.html
For more detailed information about upgrading the firmware, refer to the
Operating Instructions of the Broadband Networking Gateway.
After upgrading the Broadband Networking Gateway, be sure to
follow the below notes:
≥Restart the computer connected to the Broadband Networking
Gateway.
≥Confirm the Broadband Networking Gateway has been
successfully upgraded referring to the Status screen of the
Broadband Networking Gateway administration web screen.
14
Inserting the KX-HGC200 in the Broadband
INTERNET
ETHERNET
HomePNA
POWER
KX-HGW200
WIRELESS
KX-HGC200
LINK READY
11Mbps
Wireless LAN PC Card
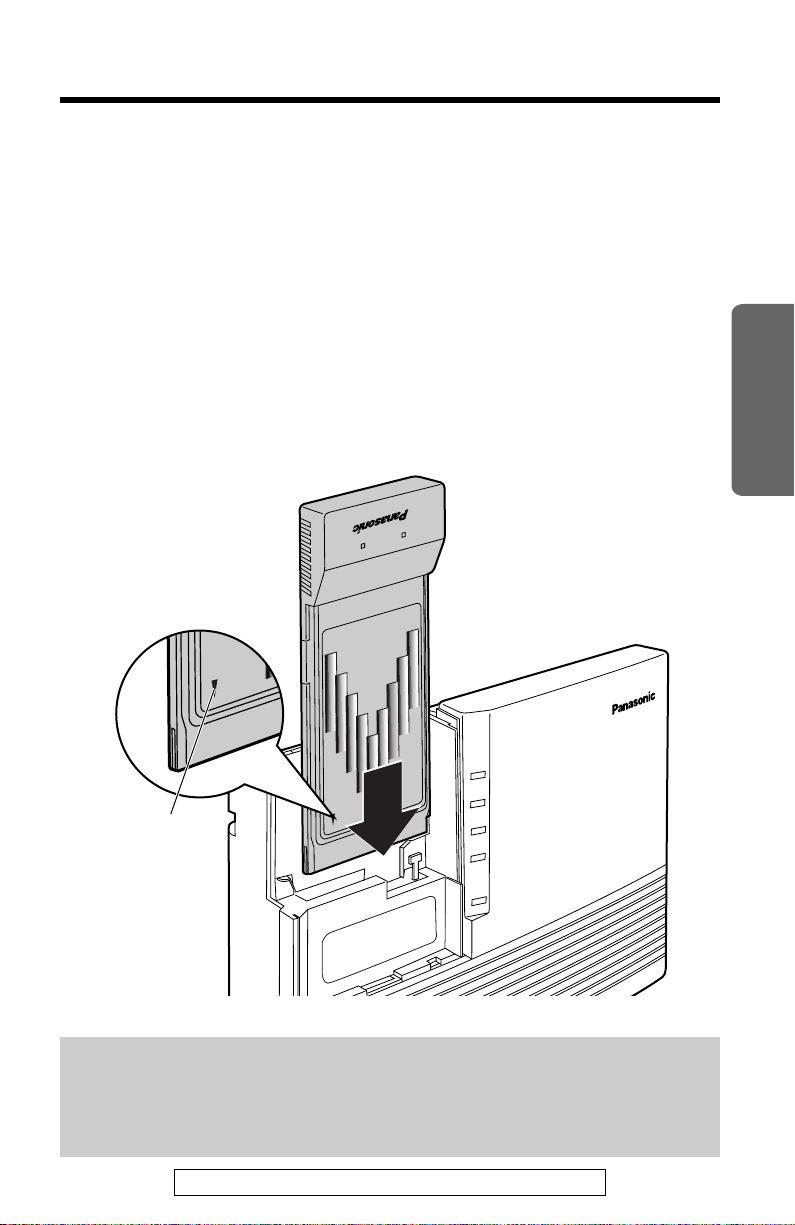
Arrow mark
Networking Gateway
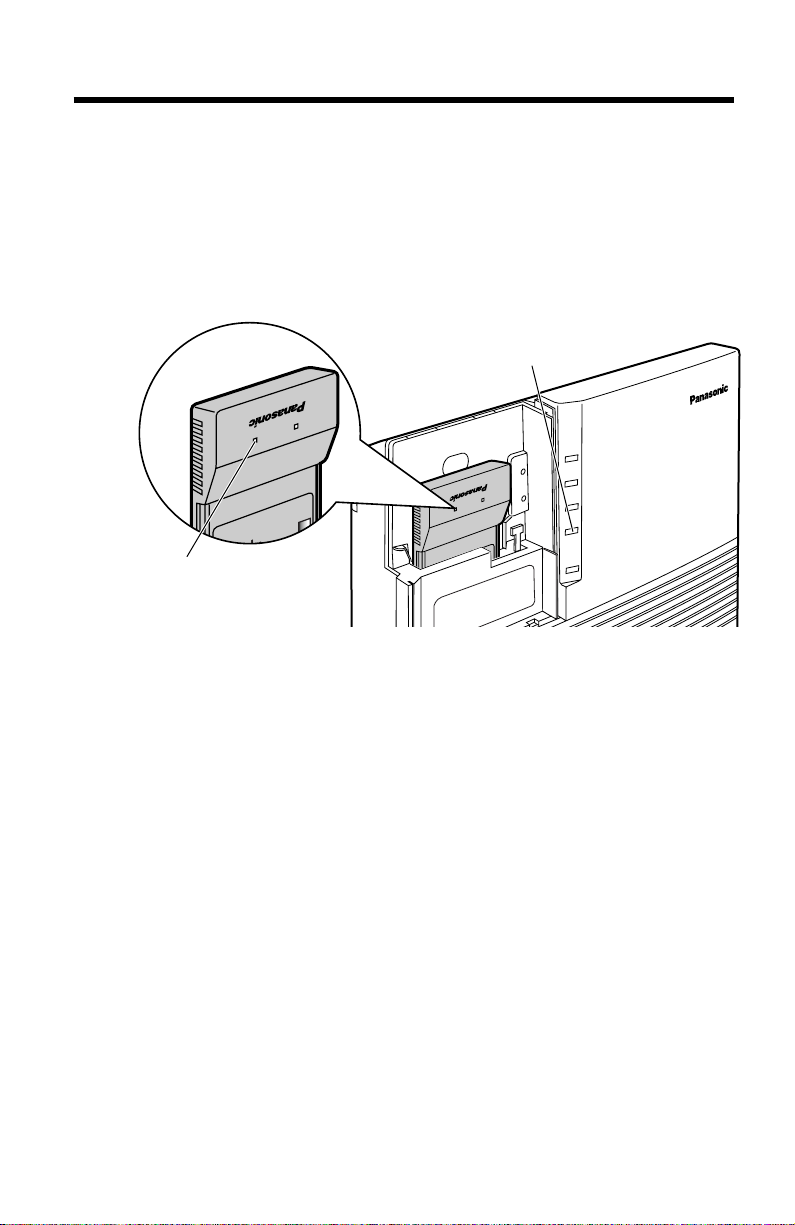
Make sure the Broadband Networking Gateway and other devices
1
connected to it are turned off.
Open the cover on the front side of the Broadband Networking
2
Gateway.
Insert the KX-HGC200 into the PC card slot of the Broadband
3
Networking Gateway making sure that the “Panasonic” side is facing
toward you and the arrow mark on the KX-HGC200 is pointing
toward the slot.
“
Installation
Notes:
≥Be sure to insert the KX-HGC200 firmly until you hear the click.
≥Insert in the proper direction to prevent device from being
damaged.
For assistance, please call: 1-800-272-7033
15
“
INTERNET
ETHERNET
HomePNA
POWER
KX-HGW200
WIRELESS
LINK READY
11M p
Wireless LAN PC Card
KX-HGC200
WIRELESS
indicator
READY
indicator
LINK
READY
11Mbp
Wireless LAN PC Card
KX-HGC200
Installing the KX-HGC200 in the Broadband
Networking Gateway
Turn on the Broadband Networking Gateway and other devices that
4
are being used with it.
≥Make sure the READY indicator of the KX-HGC200 (p. 9) and the
WIRELESS indicator of the Broadband Networking Gateway are lit. If not
lit, refer to p. 13 and confirm the Broadband Networking Gateway firmware
version.
5
16
Close the cover of the Broadband Networking Gateway.
Setting up the Broadband Networking Gateway
After the KX-HGC200 is inserted in the Broadband Networking Gateway,
configuration of the KX-HGC200 is required. The steps for configuration
proceed the Broadband Networking Gateway administration web screen
or Network Management web screen. The KX-HGC200 can be configured
from both a wired computer and wireless computer, but using a wired
computer is convenient.
≥For setting up from a wired computer, follow the steps below.
≥If you can not set up from a wired computer, follow the steps
from p. 19 “Setting up from a wireless computer”.
“
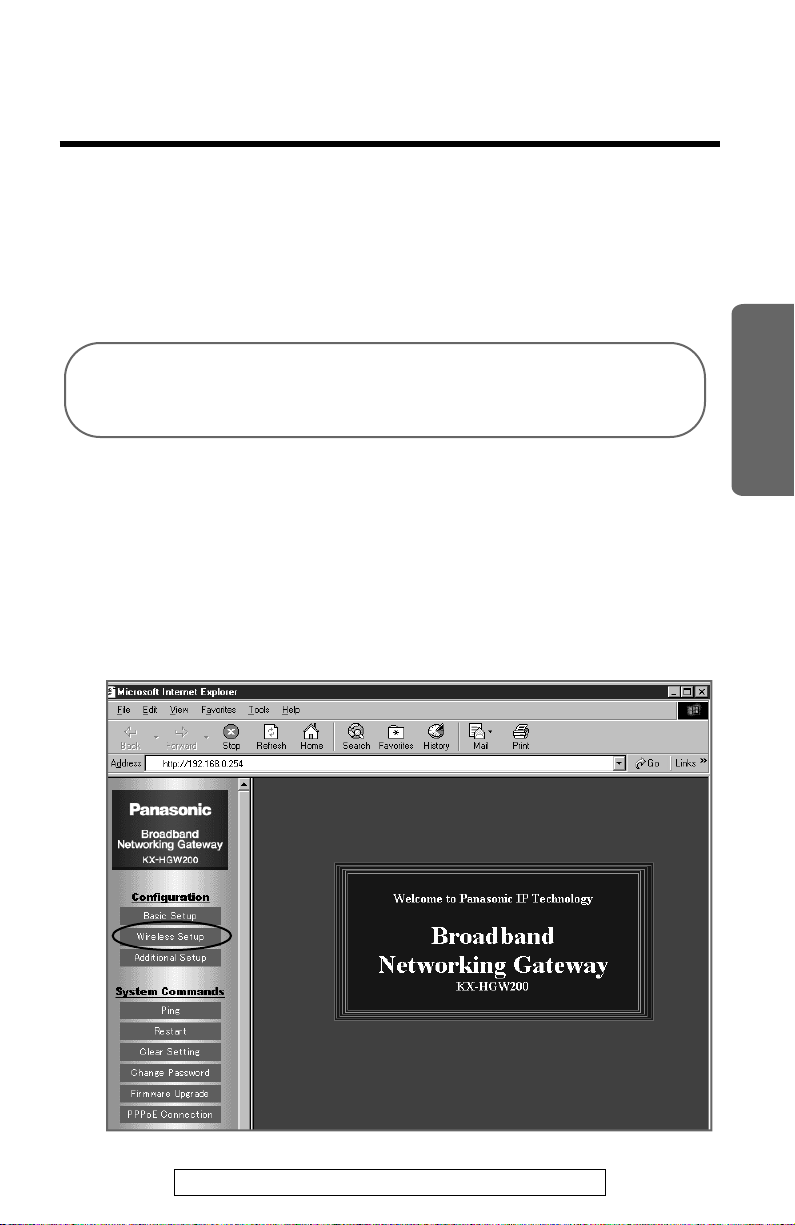
Setting up from a wired computer
Access the Broadband Networking Gateway administration web
1
screen.
≥The default local IP address of the Broadband Networking Gateway is
192.168.0.254.
Click [Wireless Setup].
2
Installation
For assistance, please call: 1-800-272-7033
17

“
Setting up the Broadband Networking Gateway
Enter the Node Name and Network Name in the each field and
3
select the Channel Number from the drop-down list.
Node Name
Channel Number
FEC
Network Name
The name of the Broadband Networking
Gateway for identification in a network.
The KX-HGC200 is preset to communicate
using the radio frequency channel 6
(2437 MHz). This preset channel can be
changed to channel 1 (2412 MHz) or 11
(2462 MHz) by using the Channel Number
pull-down menu. Normally, using the preset
channel is recommended. If the wireless
communication status is not good, changing the
channel may improve the communication status.
To communicate, all the nodes in a wireless
network must be set the same radio
frequency channel.
The FEC (Forward Error Correction) mechanism
of the Whitecap™protocol allows your
KX-HGC200 to correct error packets when data
is transmitted to the other wireless nodes and
contributes to higher throughput.
When you disable this function for one node,
be sure to disable this function for all the
nodes in the wireless network.
To use the KX-HGC200, a network name must
be specified in this entry. For more details, refer
to the next page “About the network name”.
[Uninstall] button
18
Allows you to reset the Network ID of the
KX-HGC200.

About the network name
To communicate with others in a wireless group, the same
Network Name must be programmed into each computer. It is
impossible to communicate with a computer that has a different
Network Name. To join a wireless network, it is necessary to
enter the Network Name that is common to that particular
network. For security, specify a unique Network Name that
others do not guess, using more than 8 digits or characters, for
a wireless network.
Click [Save].
4
≥After the “Success” screen appears, the Broadband Networking Gateway
restarts and you will connect to the administration initial screen.
Restart all the computers that are connected to the Broadband
5
Networking Gateway.
The KX-HGC200 has been successfully set up and is ready to
communicate with others. Refer to pages from 25 and set up each
computer that you want to add to a wireless network.
“
Installation
Setting up from a wireless computer
To set up the Broadband Networking Gateway from a wireless
computer, the wireless computer must have already configured the
KX-HGC200. For more details about how to configure the
KX-HGC200, refer to “
Below steps for configuration are performed on the Network Management
web screen of the wireless computer. All of the computers in the wireless
network can use this function and configure the Broadband Networking
Gateway.
Note:
To set up from a wireless computer, the KX-HGC200 must be set to
use the radio frequency channel 6 and the FEC (p. 62) must be
activated.
Turn on the Broadband Networking Gateway.
Required setup for each computer
” on p. 11.
1
For assistance, please call: 1-800-272-7033
19
“
Setting up the Broadband Networking Gateway
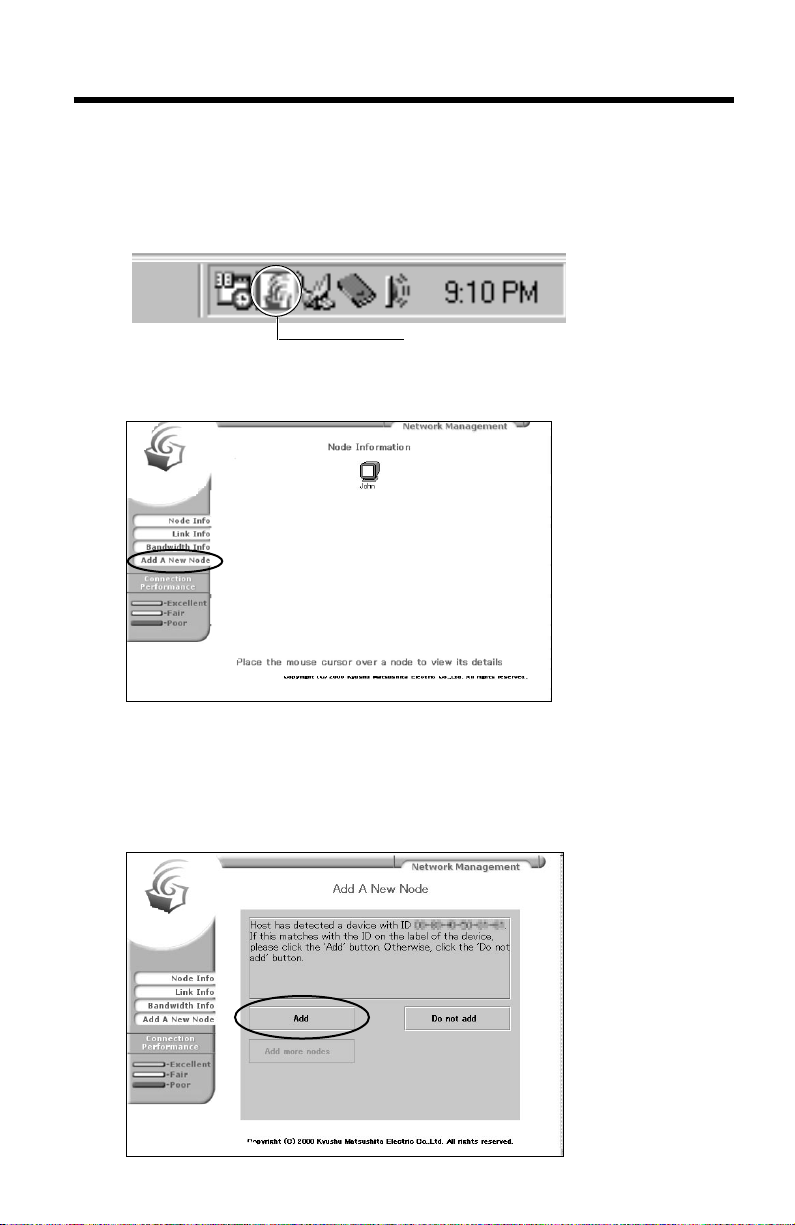
Turn on the wireless computer.
2
On the desktop, double-click the Network Manager icon in the
3
taskbar.
Double-click
Click [Add a New Node] in the Network Management web screen.
4
20
≥This step may take a little time.
≥For the overview of the Network Management web screen, refer to “About
the Network Management web screen” on p. 55.
Click [Add].
5
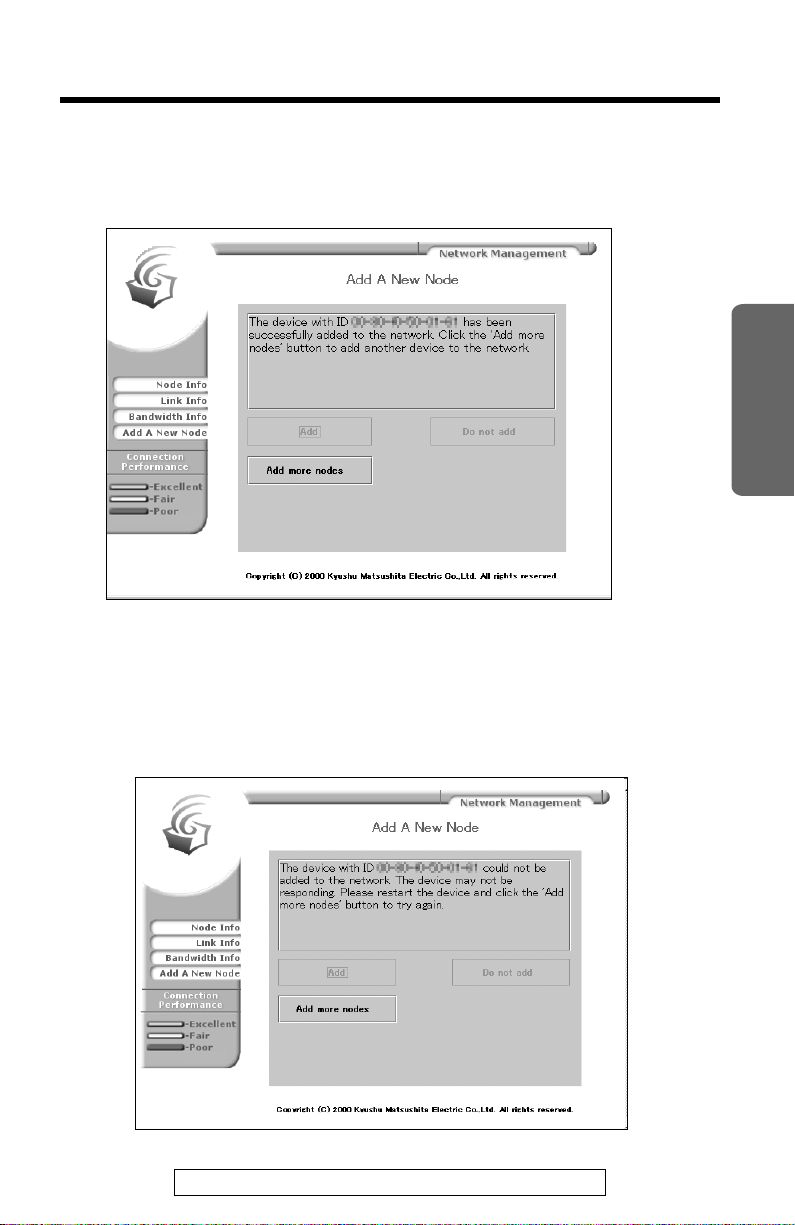
“
The below screen appears and KX-HGC200 has been successfully set up
and is ready to communicate with others. Refer to steps on p. 11
“
Required setup for each computer
want to add to a wireless network.
≥If an error occurs, the screen below appears. Then follow one of the steps
below (A or B).
A: Restart the Broadband Networking Gateway referring to its Operating
Instructions.
B: Close your web browser first, then access the Network Management
web screen again.
” and set up each computer that you
Installation
For assistance, please call: 1-800-272-7033
21

“
Setting up the Broadband Networking Gateway
Caution when initializing the Broadband
Networking Gateway
When the CLEAR SETTING button on the Broadband Networking
Gateway is pressed, all the parameters that have been set to the
Broadband Networking Gateway reset to the default setting. If the
KX-HGC200 is inserted and the WIRELESS indicator of the Broadband
Networking Gateway is turning green at that time, all the parameters
(Node Name, Channel Number, FEC, Network Name and Network ID)
reset to default settings also.
If you want to preserve the parameters set to the KX-HGC200, first
remove the KX-HGC200 from the Broadband Networking Gateway
referring to “Removing the KX-HGC200 from the Broadband Networking
Gateway” on p. 64, then initialize the Broadband Networking Gateway.
Note:
Before initializing, be sure to take notes of the setup parameters of
the Broadband Networking Gateway.
22
“
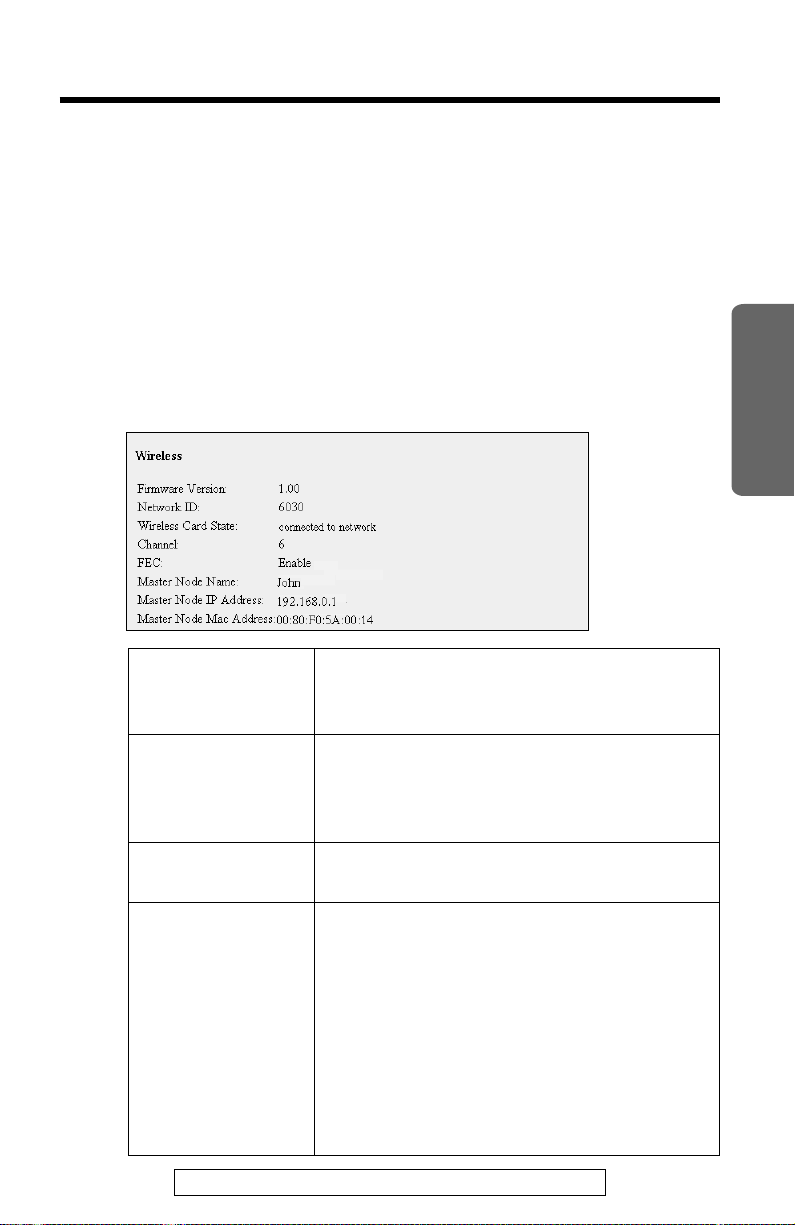
Helpful functions
For checking the setup parameters or data-transmission status of the
KX-HGC200, helpful functions are available on the Broadband Networking
Gateway administration web screen.
Checking the setup parameters
Click [Status] on the Broadband Networking Gateway administration
1
web screen.
Check the Wireless section.
2
Firmware
Version
Network ID
(p. 10)
Master Node IP
Address (p. 73)
Current version of the firmware, written in
the KX-HGC200 Flash-ROM. To update
the firmware, see p. 65.
The Network ID of the wireless network.
This ID works in order to identify a
wireless network to prevent an invalid
access to the wireless network.
The local IP address of the Master Node
in the wireless network.
Installation
Wireless Card
State
For assistance, please call: 1-800-272-7033
connected to network:
The KX-HGC200 is connected to a
wireless network and working properly.
not connected to network:
The KX-HGC200 is not connected to any
wireless network.
TROUBLE:
The KX-HGC200 is not working properly.
The hardware or software is defected.
23
“
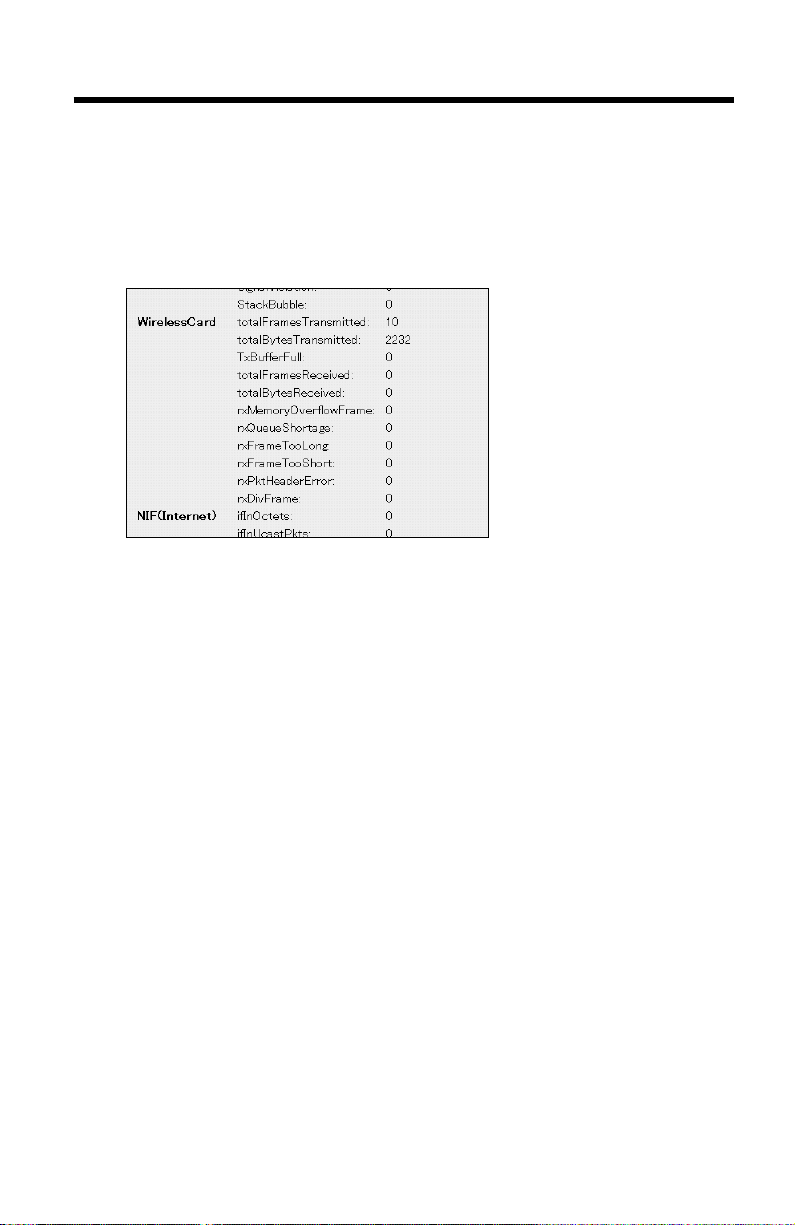
Setting up the Broadband Networking Gateway
Checking data-transmission status
Click [Usage data].
1
Check the WirelessCard section.
2
24
 Loading...