

Page 1
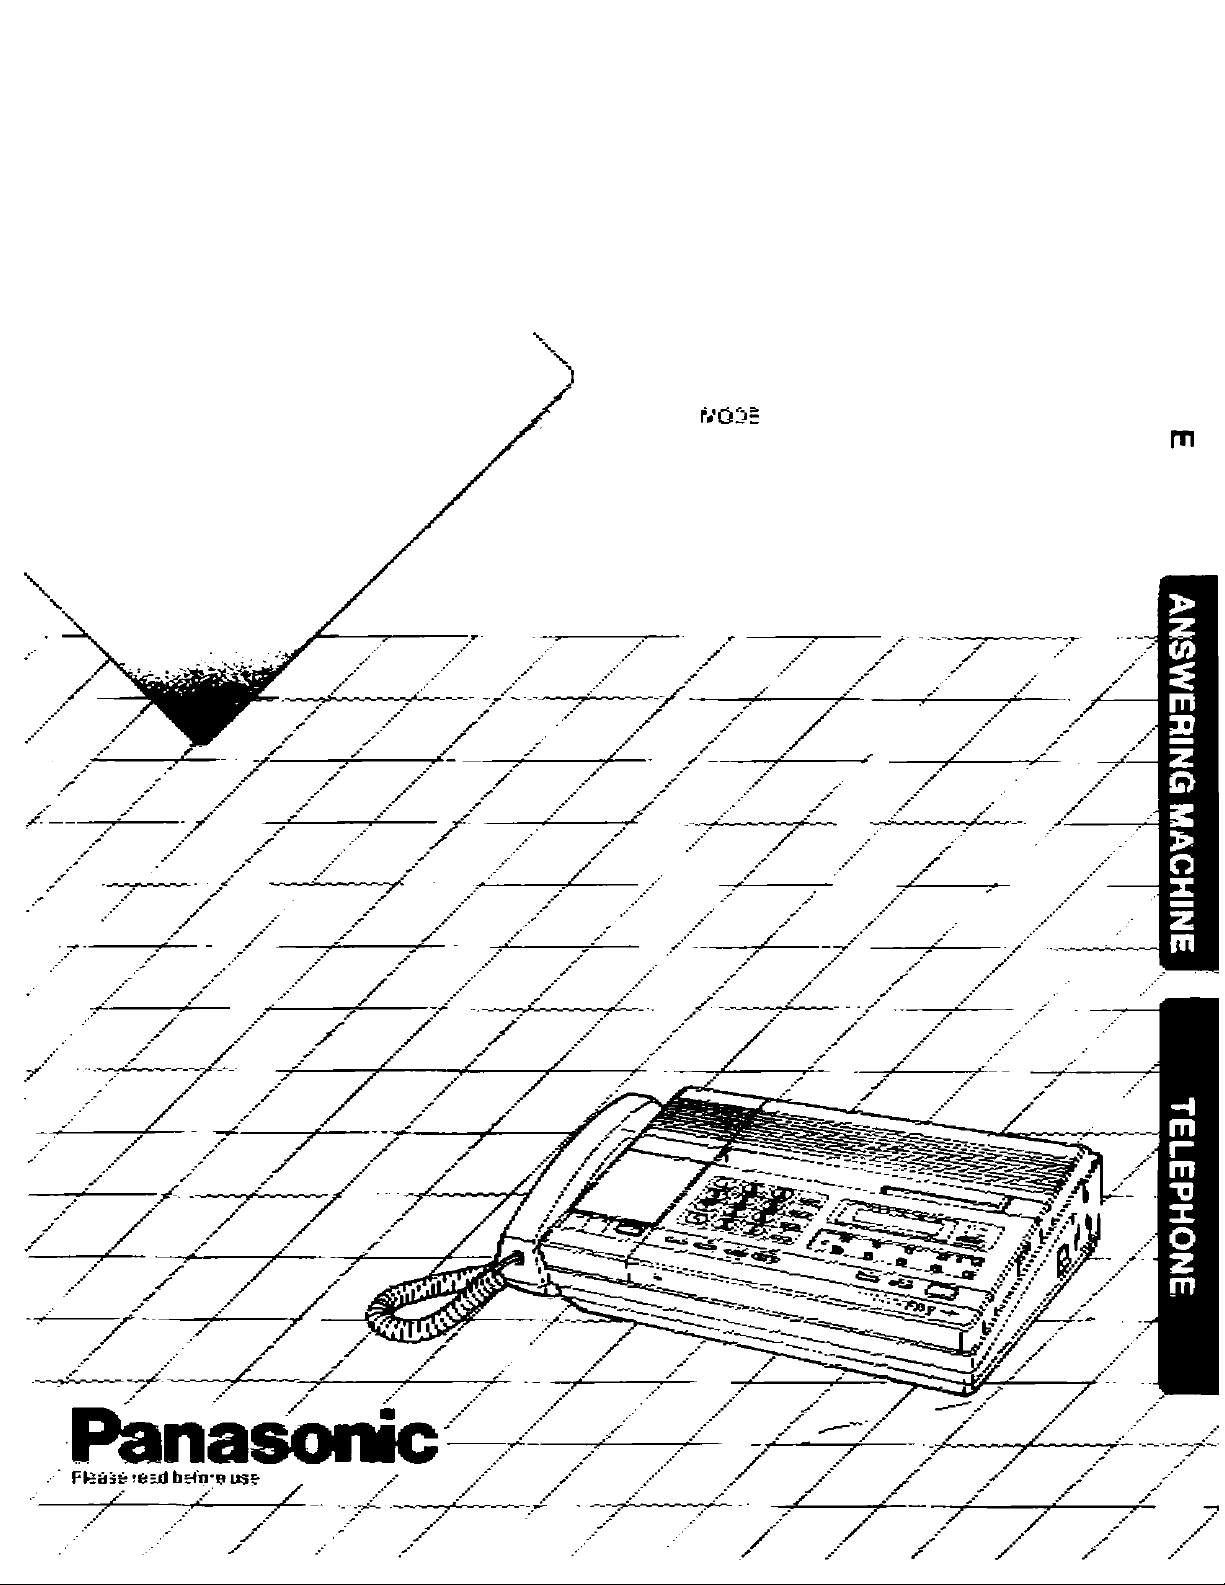
Operating
'7
TELEPHON E-ANSWERIWG
SYSTEM WITH FACSIMILE
>
O
CO
Instructbns
c«KX-F3500 P
Page 2

Thank you for purchasing the Panasonic Telephone-Answering System with Facsimile.
Before reading these Instructions, read the INSTALLATION MANUAL, then install the unit and make the initial settings.
Since this unit functions as a Facsimile, an Answering Machine and a Telephone utilizing one telephone line,
you can receive both voice-messages and documents.
To Speak with the Other Party
and then Transmit/Receive
a Document
With the automatic telephone/facsimile switching feature,
you can switch between telephone and facsimile functions
without redialing. So, if you are in the middle of a
conversation and want to transmit/receive a document,
simply push the START/COPY button and facsimile
transmission/reception will take place automatically.
To Record a Voice-Message and
Receive a Document
The unit will automatically function as an Answering
Machine or a Facsimile depending on the caller’s choice
(voice-message/document).
When a call is received during your absence, the unit will
play your Outgoing Message (OGM) and then be ready to
record a voice-message and/or receive a document
(Automatic Answer Mode).
•In this mode you may speak with the other party and
transmit/receive a document manually.
To Set the Automatic Answer Mode
• Push the AUTO ANSWER button to turn on the
AUTO ANSWER indicator light.
• Record your Outgoing Message.
•Set the AUT0/F/0< selector to “AUTO" position.
Features
Multi-Function System utilizing Single
Telephone Line
allows you to speak with a caller and/or receive a
document.
automatically records a caller's message and/or
receives a document during your absence.
Facsimile
•CCITT GII/Gm communication compatibility
•Automatic document feeder up to five pages at a time
•One-touch transmission with automatic dialer
10 (30 digits) fax numbers for one-touch dialing
•Superb image quality
• 16-step HALF-TONE feature for originals containing
photographs, shaded drawings, etc.
•Up to letter size
I
Answering System
•Auto-logic™ operation
automatically rewinds, play back messages, stops
at the last message and provides for answering the
next call, at the touch of a button.
•Recordable OGM chip
•Beepertess remote control with tone phone
I Integrated Telephone System
• Built-in speakerphone
•One-touch/speed dialing
•Automatic redialing up to 15 times in a hands-free
(speakerphone) operation.
I Copier Function
•Right at yourdesk
•Clear copy
If a caller wishes to transmit a document after
recording a voice-message; advise the caller to “Push
the ASTERISK (*) button after or during the playing of
the Outgoing Message (OGM)’’, the unit will change
from the answering machine mode to the facsimile
mode.
If a caller wishes to record a voice-message after
transmitting a document; advise the caller to “Make a
call reservation following a voice contact procedure on
your facsimile during transmission”.
The unit will start playing the OGM again and then be
able to record a voice-message.
AUTO/FAX Selector
•AUTO position
The unit will automatically switch between
Answering Machine and Facsimile. If the caller’s
voice is not heard within 5 seconds of the end of
the OGM, the unit will automatically switch to the
FAX mode to receive a document. If the caller’s
voice is heard, the unit will function as an
answering machine.
• FAX position
When a call is received, the unit will function as a
facsimile (FAX) machine only.
Page 3
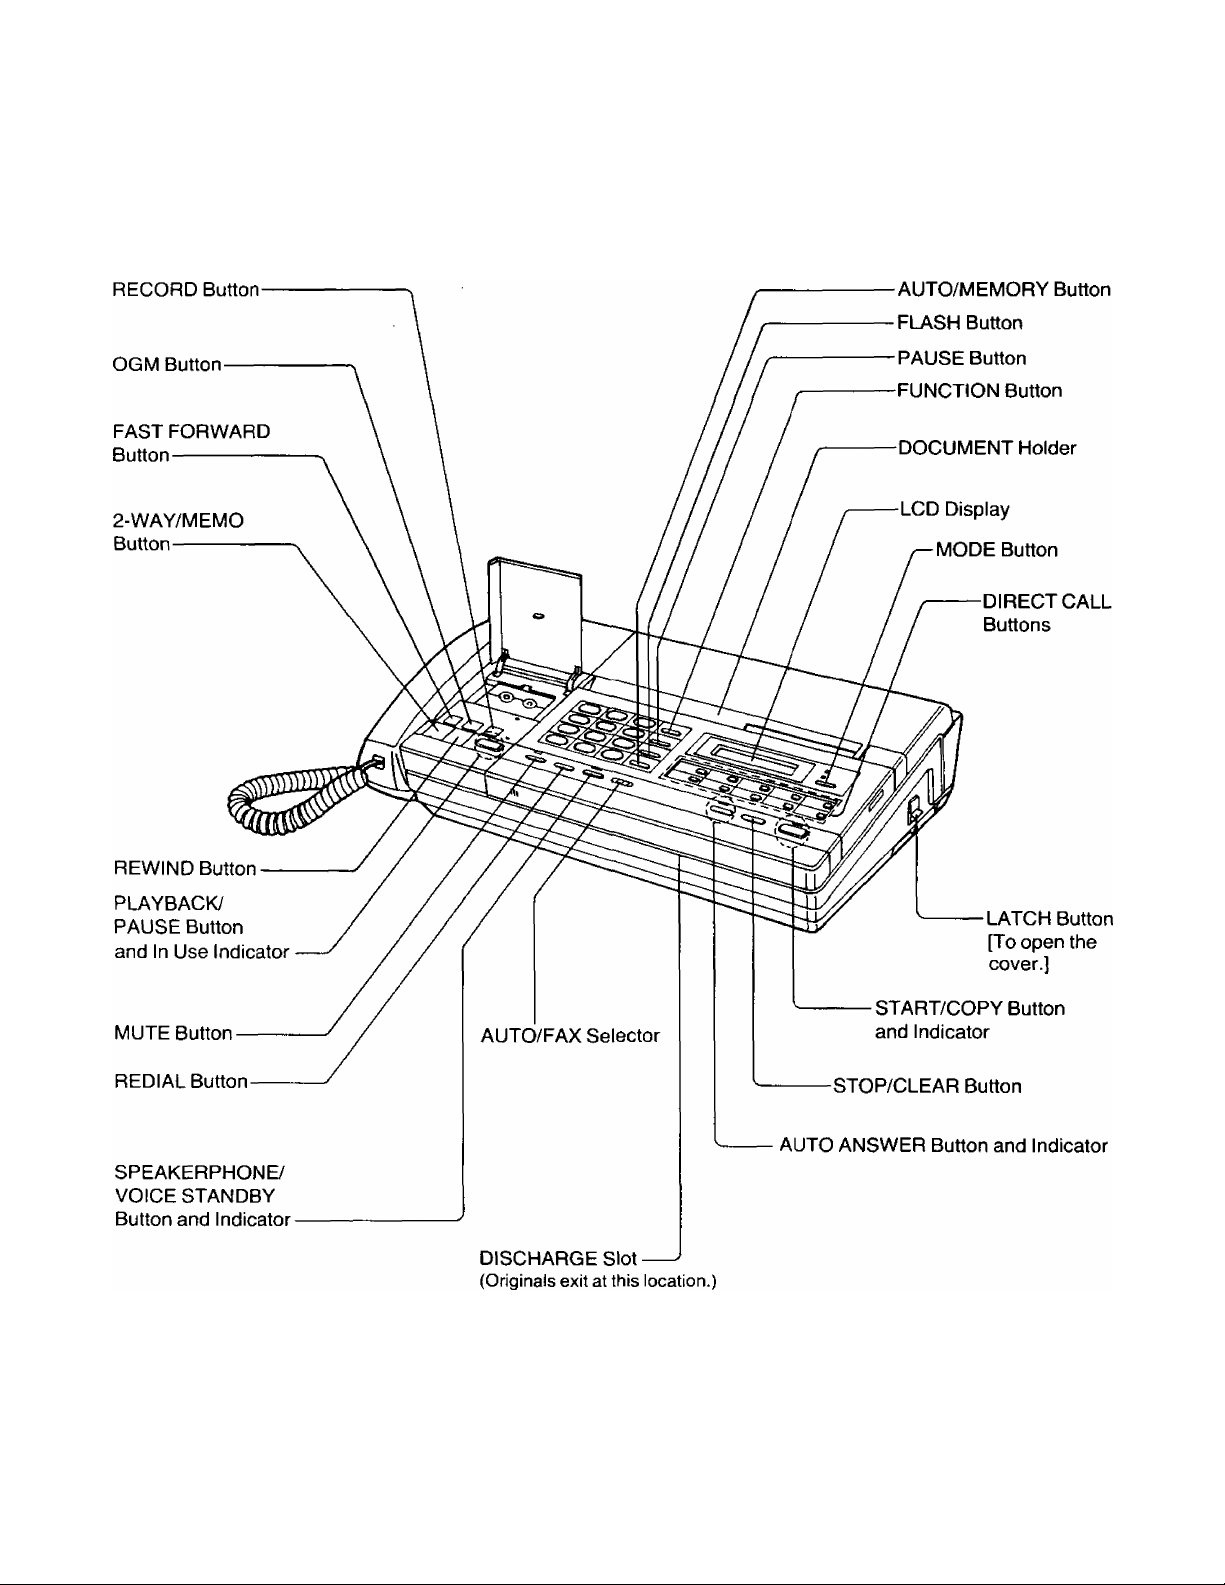
Location of Controls
For your convenience, keep this page open when you read the following instructions.
Page 4
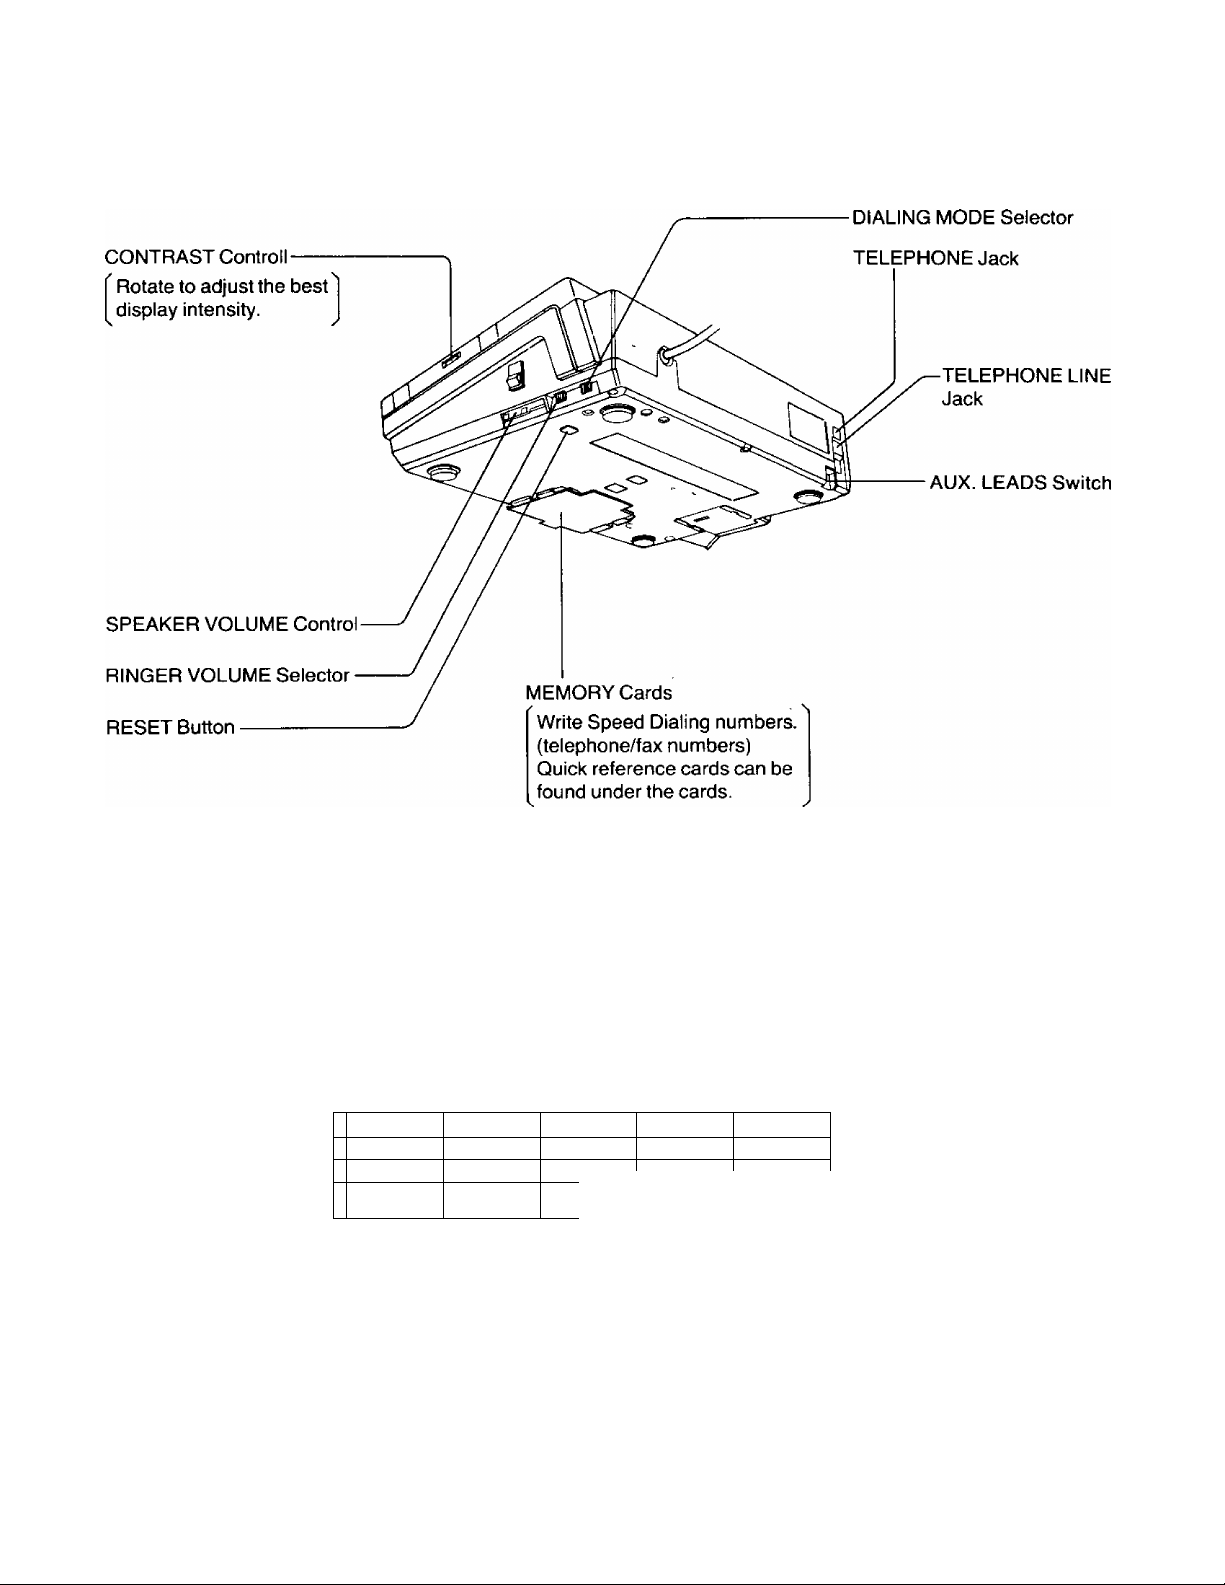
Location of Controls (cont.)
Telephone Line Cord
Incoming Message Tape
Handset...........................
Handset Cord
................
Paper Shaft ....................
Recording Paper
...........
-------------------
MORMAL darker STAMOARO FINE HALF-I ONE PROtiRAM
-
in
1—
II—1
1—1
1
1—1
1
___
____
1
r
Accessories
. 1 Carrier Sheet
. 1 Document Tray ............................................................1
. 1 Document Tray Guide .................................................1
. 1 AA Size Batteries .........................................................4
. 1 Card Holder for Speed Dialing
1
...-l—
1—[ 1—1
1
___
1
-----------
DIRECT CALL Buttons
[Write Name and/or Telephone/FAX numbers.]
-----------------------------------------------------------------
DALARM
MODE
\—[-
1—r
SECRET
hypheM
[3
L_l|
HYPHEN Button
iisSECRET and HYPHEN
buttons are also used as
memory stations.
...............................................................
....................................
POWER Indicator
ALARM Indicator MODE Button
-SECRET Button
1
1
Page 5

Table of Contents
System Setup
......................................................
FACSIMILE
Basic Operation
Manual Transmission and Reception--------- 1-1
•Transmission
• Reception
• Scanning Line Density (Resolution)
•Document Contrast
Transmissible Document .............................. 1-4
•Information on Originals
•How to Use the Carrier Sheet
Automatic Document Reception .................. 1-5
•Preparation
• Setting Up for Automatic Answering
•Receiving a Document
Detailed Operation
How to Transmit a Document
Conveniently ................................................ 1-7
•When Using One-Touch Transmission
•When Using Speed Dialing
Voice Contact ................................................. 1-9
•Initiating Voice Contact
During Transmission or Reception
• Receiving a Request for Contact
How to Operate Your Unit from a Remote
Location
Other Informations
Delayed Transmission..................................1-11
Making a Copy
.......................................................
........................................
...............................................
5
1-10
1-10
1-14
Operating the Answering Machine ...... 2-4
• Playing Back Your Messages
•Call Counter
• Saving Your Messages
• Erasing the ICM
•Monitoring Incoming Calls
•Message Memo
•Recording a 2 Way Conversation
How to Operate from a Remote Phone .. 2-7
•Turning On the Automatic Answer Mode from a
Remote Phone
• Playing Back Messages
•Memory Playback
•Back Space and Skip Forward
• Recording a Marker Message
• Remote Reset
• Skipping OGM for ICM Recording
•Turning On the Speakerphone (Answer Back)
• Changing the OGM
TELEPHONE
Manual Dialing and Reception
•Making a Call
•Receiving a Call
•Redialing
Switching to Hands-free or Handset
Operation during a Conversation
• Handset to Hands-free
•Hands-free to Handset
Speed Dialing and One-Touch Dialing ..
•Programming the Phone Numbers for Speed
Dialing
• Programming the FAX/Phone Numbers for One-
Touch Dialing
• Dialing
........................
.................
3-1
3-2
3-3
Individual Transmission Report
Activity Report (JOURNAL)
Printout Function
..........................................
..................
.........................
UNSWEBiNiQ MACHINE.
Preparing the Answering Machine
• Recording OGM
•Selecting the Caller’s Recording Time
•Selecting the Remote Code No. for Remote
Operation
•Setting Up the Automatic Answer Mode
• Preparing the ICM Tape
_______
1-15
1-16
1-17
2-1
Other Features
• How to Store a Secret Phone Number
• Mute Operation
• Flash Button Usage
•Tone Button Usage
•Combination Dialing
•Outside Line or Computer Accessed Line
(Pause Usage)
....
.............................................. 3-6
GENERAL INFORMATION
Recording Paper Installation
Troubleshooting Guide ..................................... 4-2
Glossary of Terms ............................................. 4-5
............................
4-1
Page 6
System Setup
There are 19 user programable functions in the unit. After entering the Programming Mode by pushing the FUNCTION button,
these functions may be selected or changed by pushing the REDIAL or MUTE button.
No.
Date and Time
01
Logo and Sender’s Identification
02
Delayed Transmission (XMT)
03
04 Time of Delayed XMT
05 FAX No. of Delayed XMT
Remote ID for remote operation
06
07
Caller’s Recording Time
08
CPC (Calling Party Control) Mode
Dial Speed for pulse dialing
09
10 Tone Detect
11
Journal
Transmission (TX) Report
12
Transmission (TX) Speed
13
14
ID Position
FUNCTION LCD DISPLAY
1/ 1/88 12:00AM
SENDER ID “
DELAYED XMT=OFF
SEND AT 12:00AM
SEND TO
REMOTE ID “ 111
REC TIME - VOX
CPC MODE =■ A
DIAL SPEED = 10
TONE DETECT-ON
JOURNAL“AUTO
TX REPORT = OFF
TX SPEED » 9600
ID POSITION“OUT
PAGE
See Example on page 6.
See page 10 in INSTALLATION MANUAL.
See page 1-11.
See page 1-11.
See page 1-12.
See page 2-2.
See page 2-1.
See page 8 in INSTALLATION MANUAL.
See page 8 in INSTALLATION MANUAL.
See page 8 in INSTALLATION MANUAL.
See page 1-16.
See page 1-15.
See page 8 in INSTALLATION MANUAL.
See page 8 in INSTALLATION MANUAL.
15
Motor Test
Printer Test
16
17 System Print
Telephone No. List Print
18
Journal Print
19
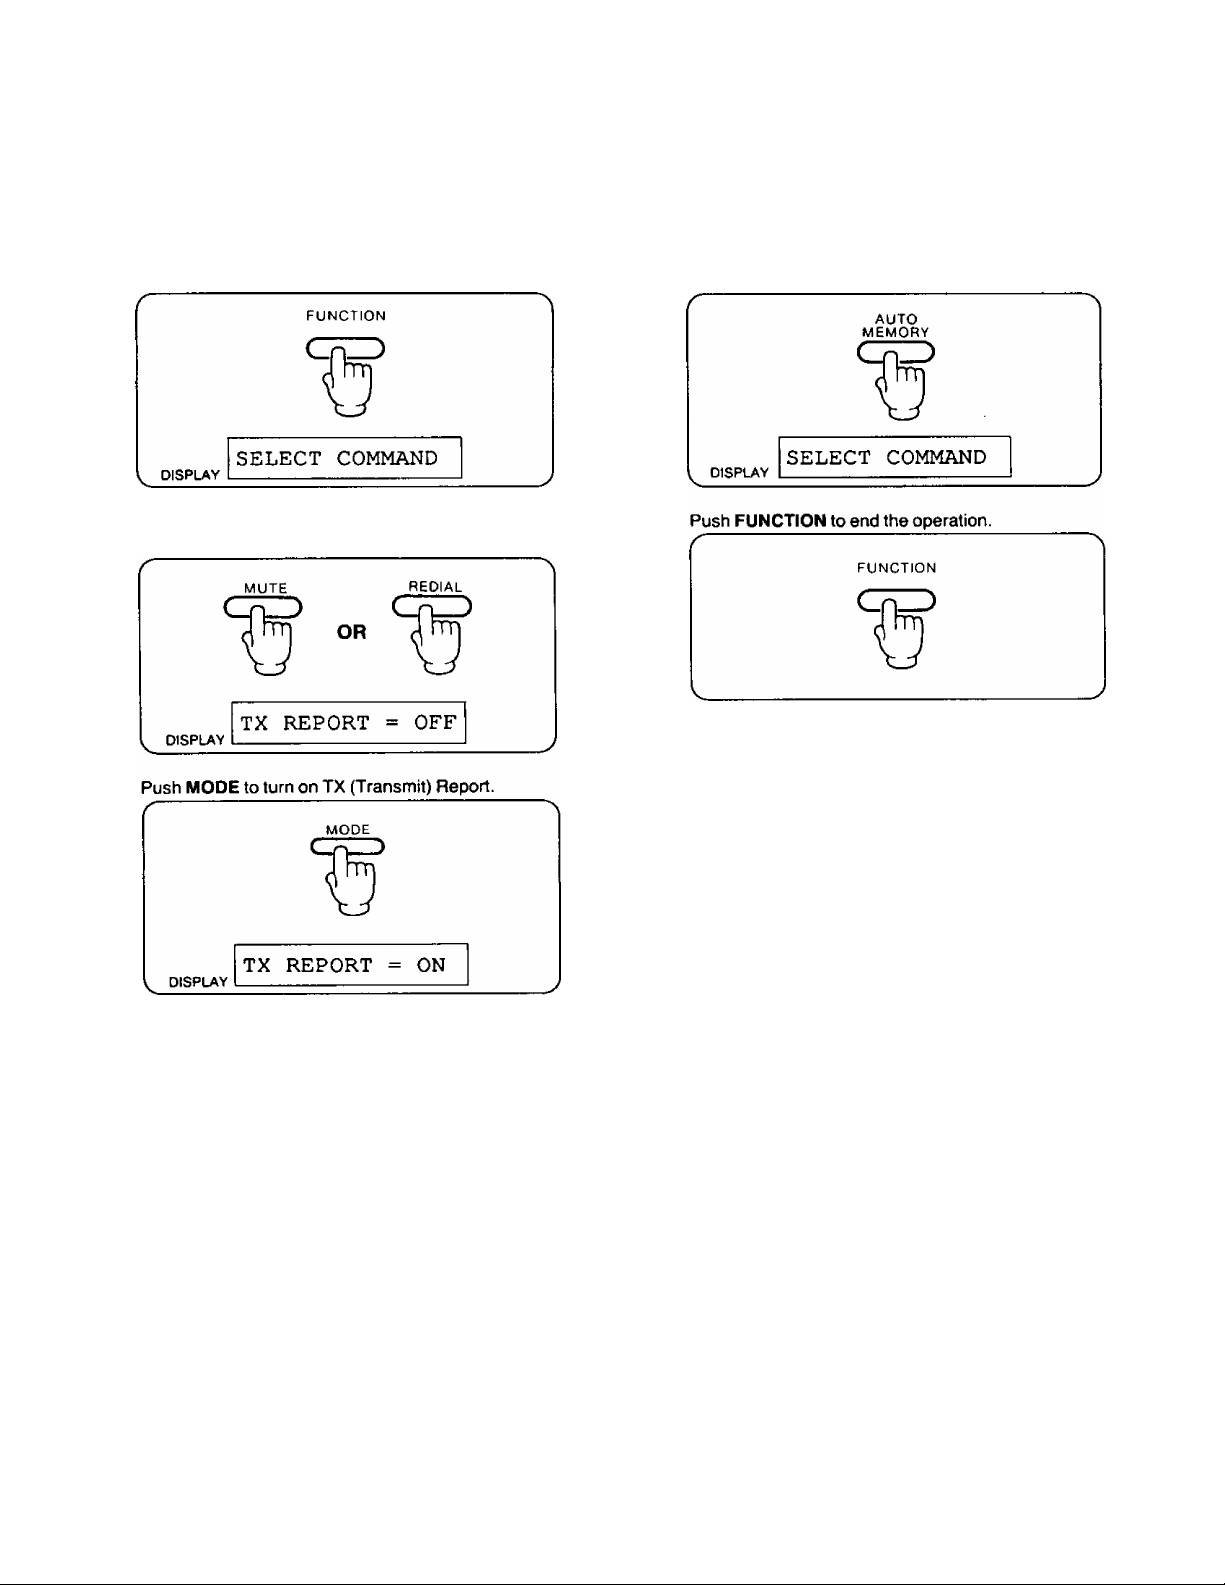
1 Push FUNCTION.
•The following message will be displayed.
SELECT COMMAND
MOTOR TEST
PRINTER TEST
SYSTEM PRINT
TEL LIST PRINT
JOURNAL PRINT
System Setup
See page 16 in INSTALLATION MANUAL.
See page 16 in INSTALLATION MANUAL.
See page 1-17.
See page 1-17.
See page 1-17.
2 Push REDIAL or MUTE until the desired message is
displayed.
•By using the REDIAL button, the function is
selected in the order of No. 01,02,03... 19.
•By using the MUTE button, the function is selected
in the order of No. 19,18,17...01.
3 Proceed to each section.
•Refer to page shown above.
Page 7
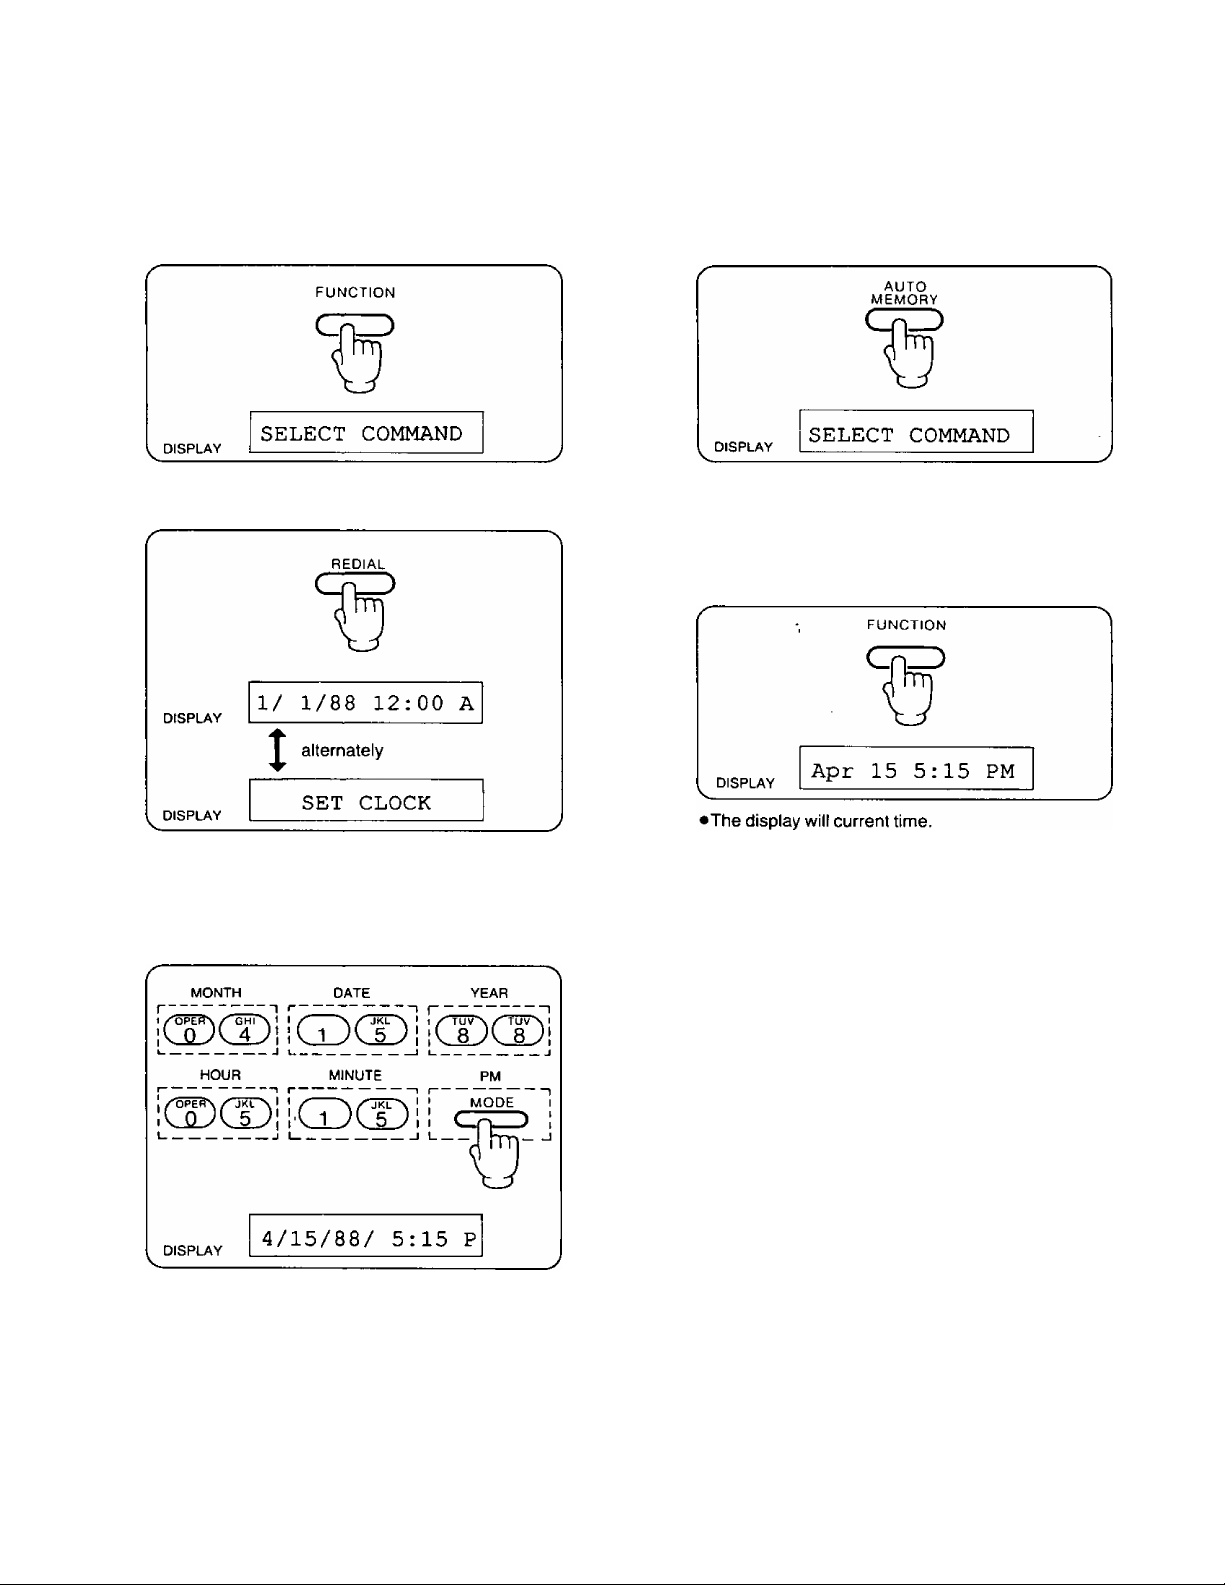
Example: Apr. 15,1988. 5:15 PM
System Setup (cont.)
1 Push FUNCTION.
Push REDIAL.
Push AUTO/MEMORY.
•After pushing the AUTO/MEMORY button, you may
step to the next (or previous) function by pushing
the REDIAL (or MUTE) button.
5 Push FUNCTION to end the operation.
3 Enter the new clock setting in the format MONTH/
DATE/YEAR/HOUR: MINUTE (2 digits each)/PM or
AM.
•Push the MODE button to seiect AM/PM mode.
The display shows A (AM) or P (PM).
•Push or "#” to move the cursor left or right
respectively.
Page 8
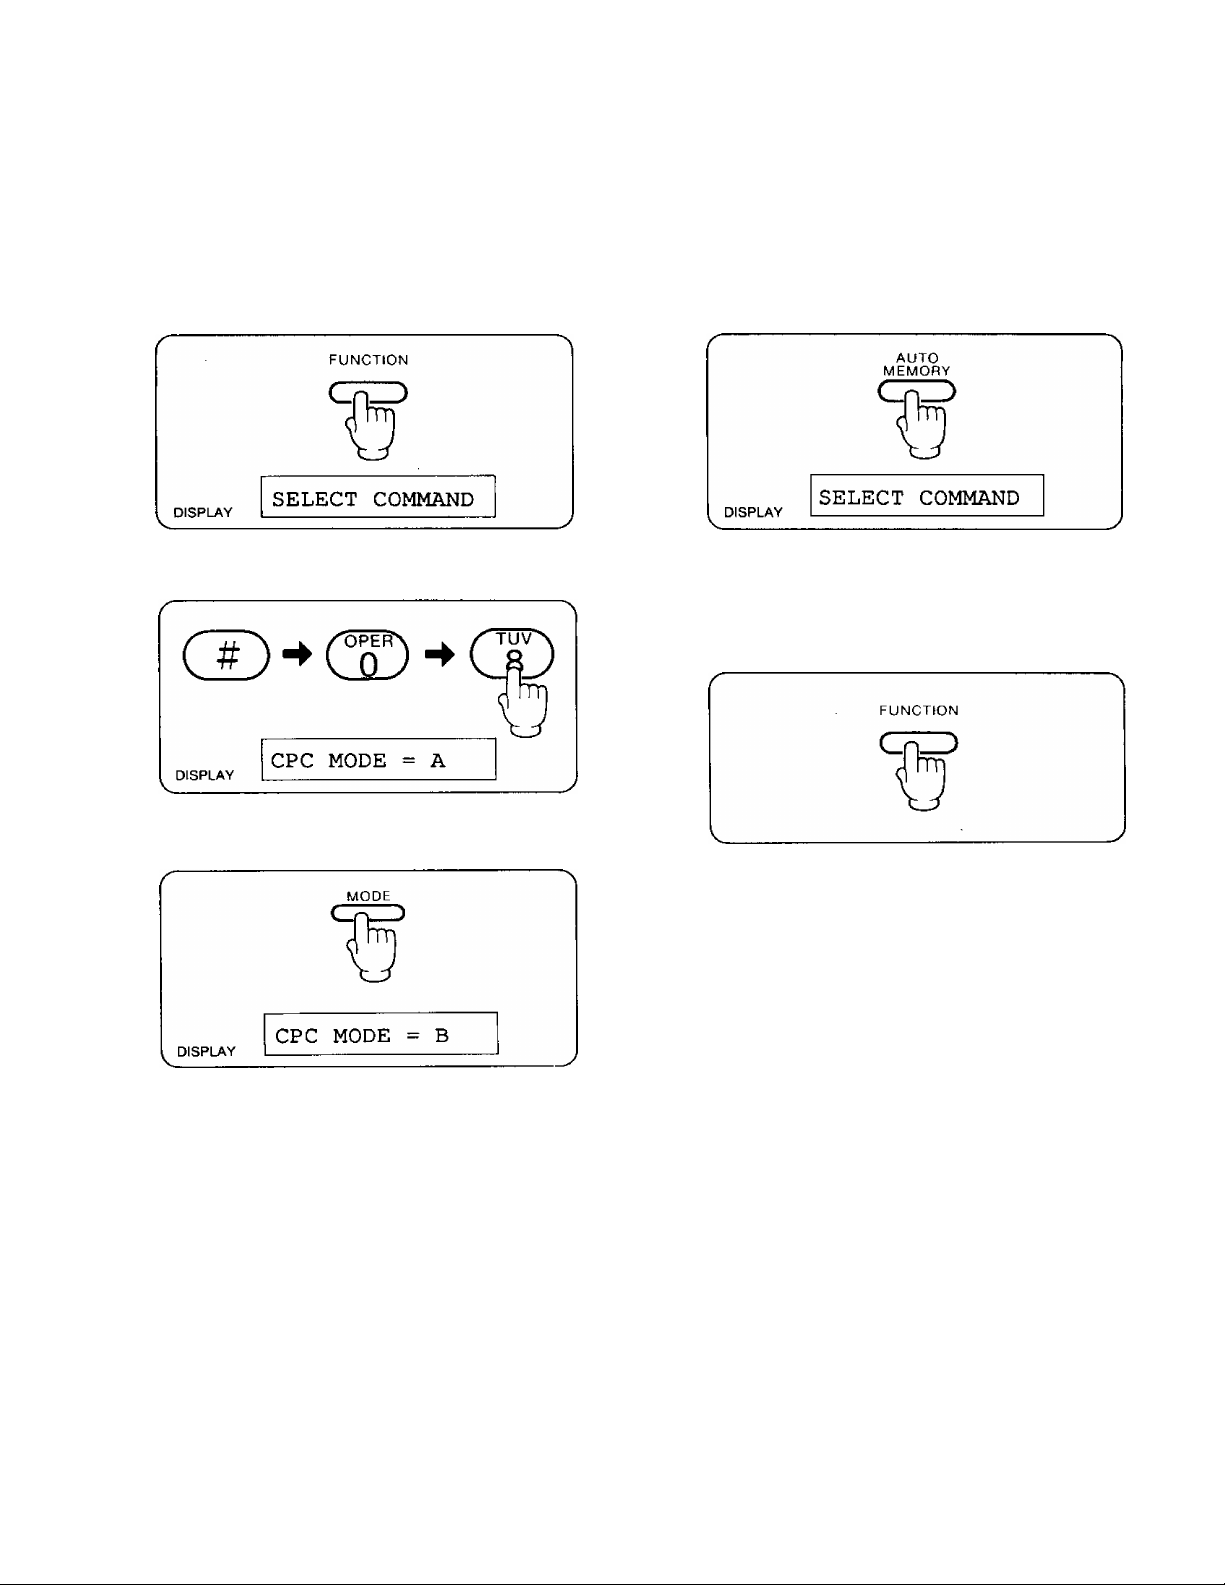
System Setup
You can also select the desired function directly by pushing the “#” and code No. (01 through 19) instead of pushing the REDIAL
or MUTE button.
Example: To select the CPC Mode directly
(cont.)
1 Push FUNCTION.
2 Push “#" and then “08”.
3 Push MODE if you want to change.
Push AUTO/MEMORY.
•After pushing the AUTO/MEMORY button, you may
step to the next (or previous) function by pushing
the REDIAL (or MUTE) button.
5 Push FUNCTION to end the operation.
►“A” and “B” are changed alternately each time you
push the MODE button.
Page 9

How to Operate
a Facsimile Machine
_____________________Table of Contents
Manual Transmission and Reception............................................................... 1-1
Transmission.................................................................................................. 1-1
Reception ...................................................................................................... 1-1
Scanning Line Density (Resolution) ........................................................... 1-2
Document Contrast ...................................................................................... 1-2
Transmissible Document................................................................................... 1-4
Information on Originals .............................................................................. 1-4
How to Use the Carrier Sheet....................................................................... 1-4
Automatic Document Reception ...................................................................... 1-5
Preparation ........................................................
Setting Up for Automatic Answering .......................................................... 1-6
Receiving a Document.................................................................................. 1-6
How to Transmit a Document Conveniently.................................................... 1-7
When Using One-Touch Transmission........................................................ 1-7
When Using Speed Dialing
Voice Contact...................................................................................................... i-9
Initiating Voice Contact During Transmission or Reception
Receiving a Request for Contact ................................................................ 1-9
How to operate Your Unit from a Remote Location
Other Informations .............................................................................
...........................................................................
_______________________
...........................................
...................
........................................
...............
1-5
1-8
1-9
1-10
1-10
Delayed Transmission
Setting Up Delayed Transmission ............................................................... 1-11
Making a Copy ................................................................................................... 1-14
Individual Transmission Report ....................................................................... 1-15
Activity Report (JOURNAL)............................................................................... 1-16
Printout Function................................................................................................ 1-17
......................................................................................
i-i i
Page 10
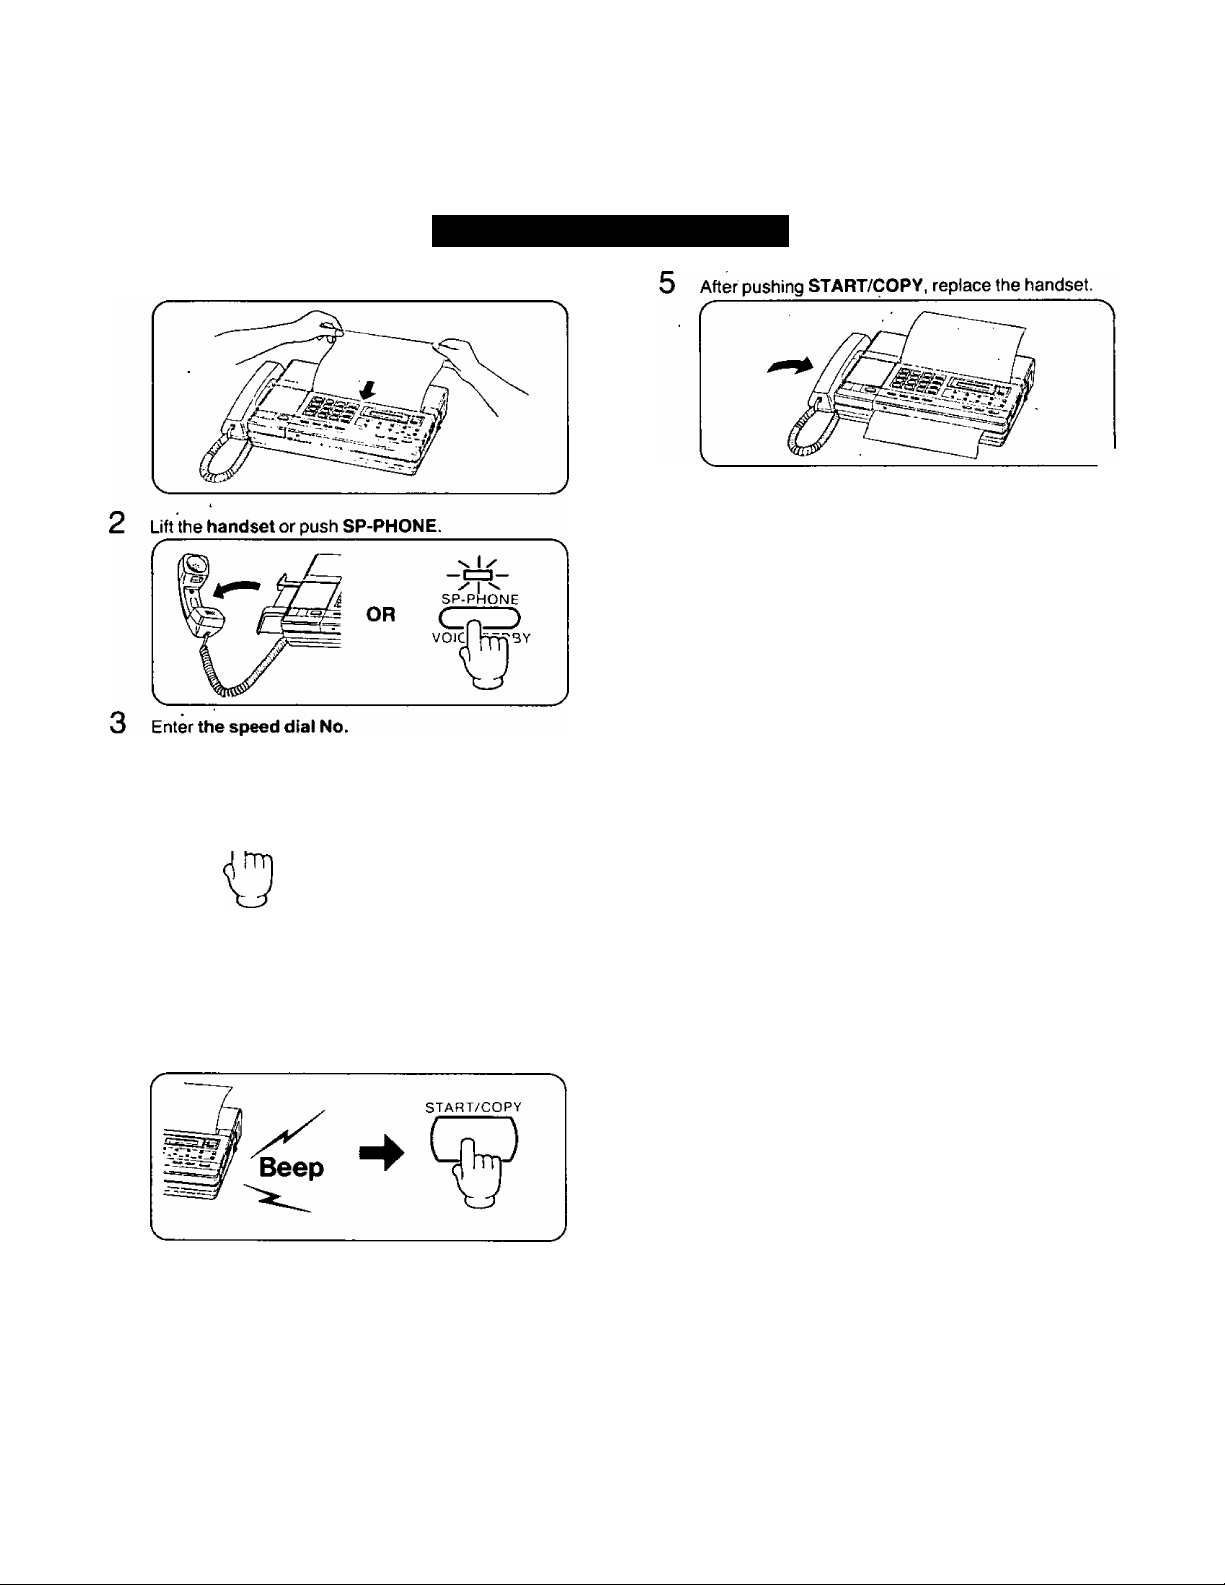
Manual Transmission and Reception
LU
(/)
o
<
Transmission
Place the document face down.
2 Lift the handset or push SP-PHONE, then dial the
FAX NO.
xJZ
SP-PHONE
QtP
void 1ty?3y
(D
Ö
CD
(D CD c
CD
( (D
CD
hTTii)
(
( J
---
r\
---
3
1
3 When the “Beep" (answering carrier tone) is heard,
push START/COPY.
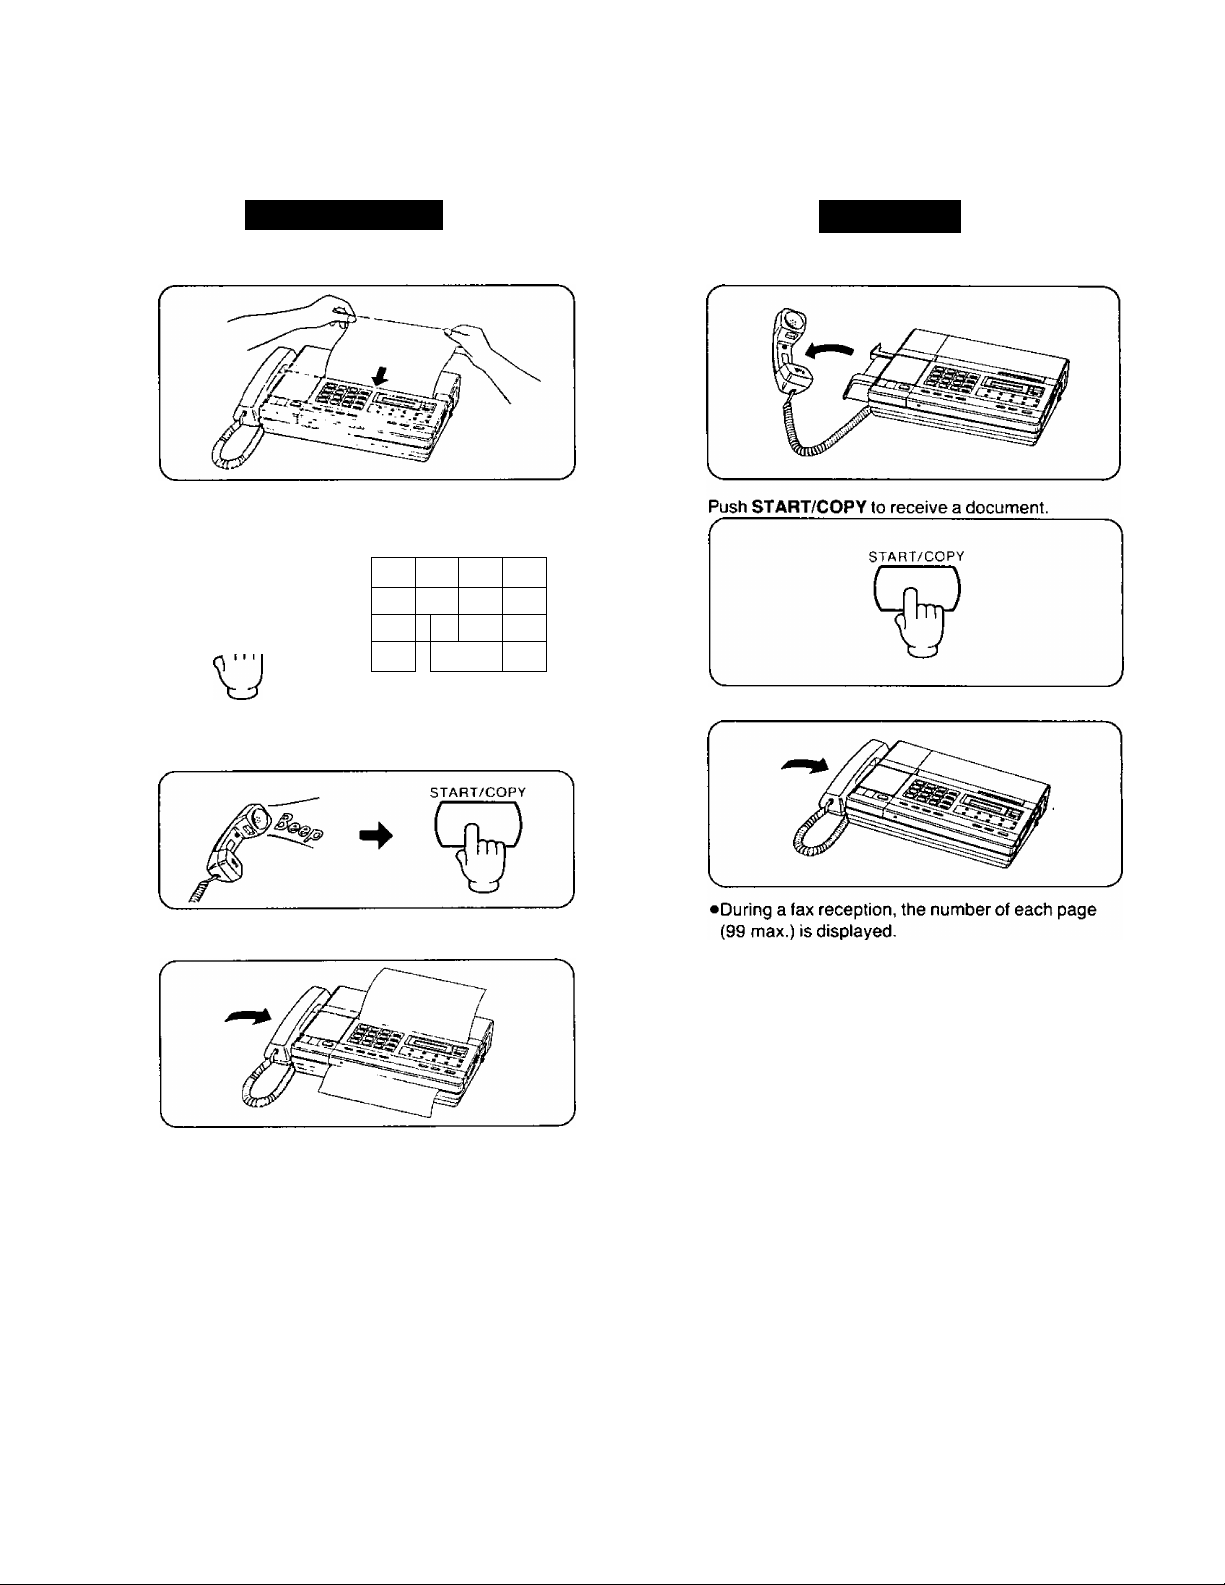
Reception
1 Lift the handset to speak to the caller.
3 After pushing START/COPY, replace the handset.
4 After pushing START/COPY, replace the handset.
•During a fax transmission, the number of each
page (99 max.) is displayed.
(e.g. 5 pages are transmitted.)
DISPLAY
DISPLAY
SENDING
5 PAGES SENT OK
P3
DISPLAY
RECEIVING P5
1-1
Page 11
Manual Transmission and Reception (cont.)
Scanning Line Density
(Resolution)
The resolution (density) of the received image (e.g.
characters, pictures) can be set as shown below;
1
Push MODE.
MODE
• Each mode is indicated by the “ A ” symbol on the
display.
NORMAL DARKER STANDARD FINE HALF-TONE PROGRAM
Jan21 10:45AM
STANDARD is suitable for printed or typewritten
originals with normal size characters.
FINE is suitable for originals written with small
characters.
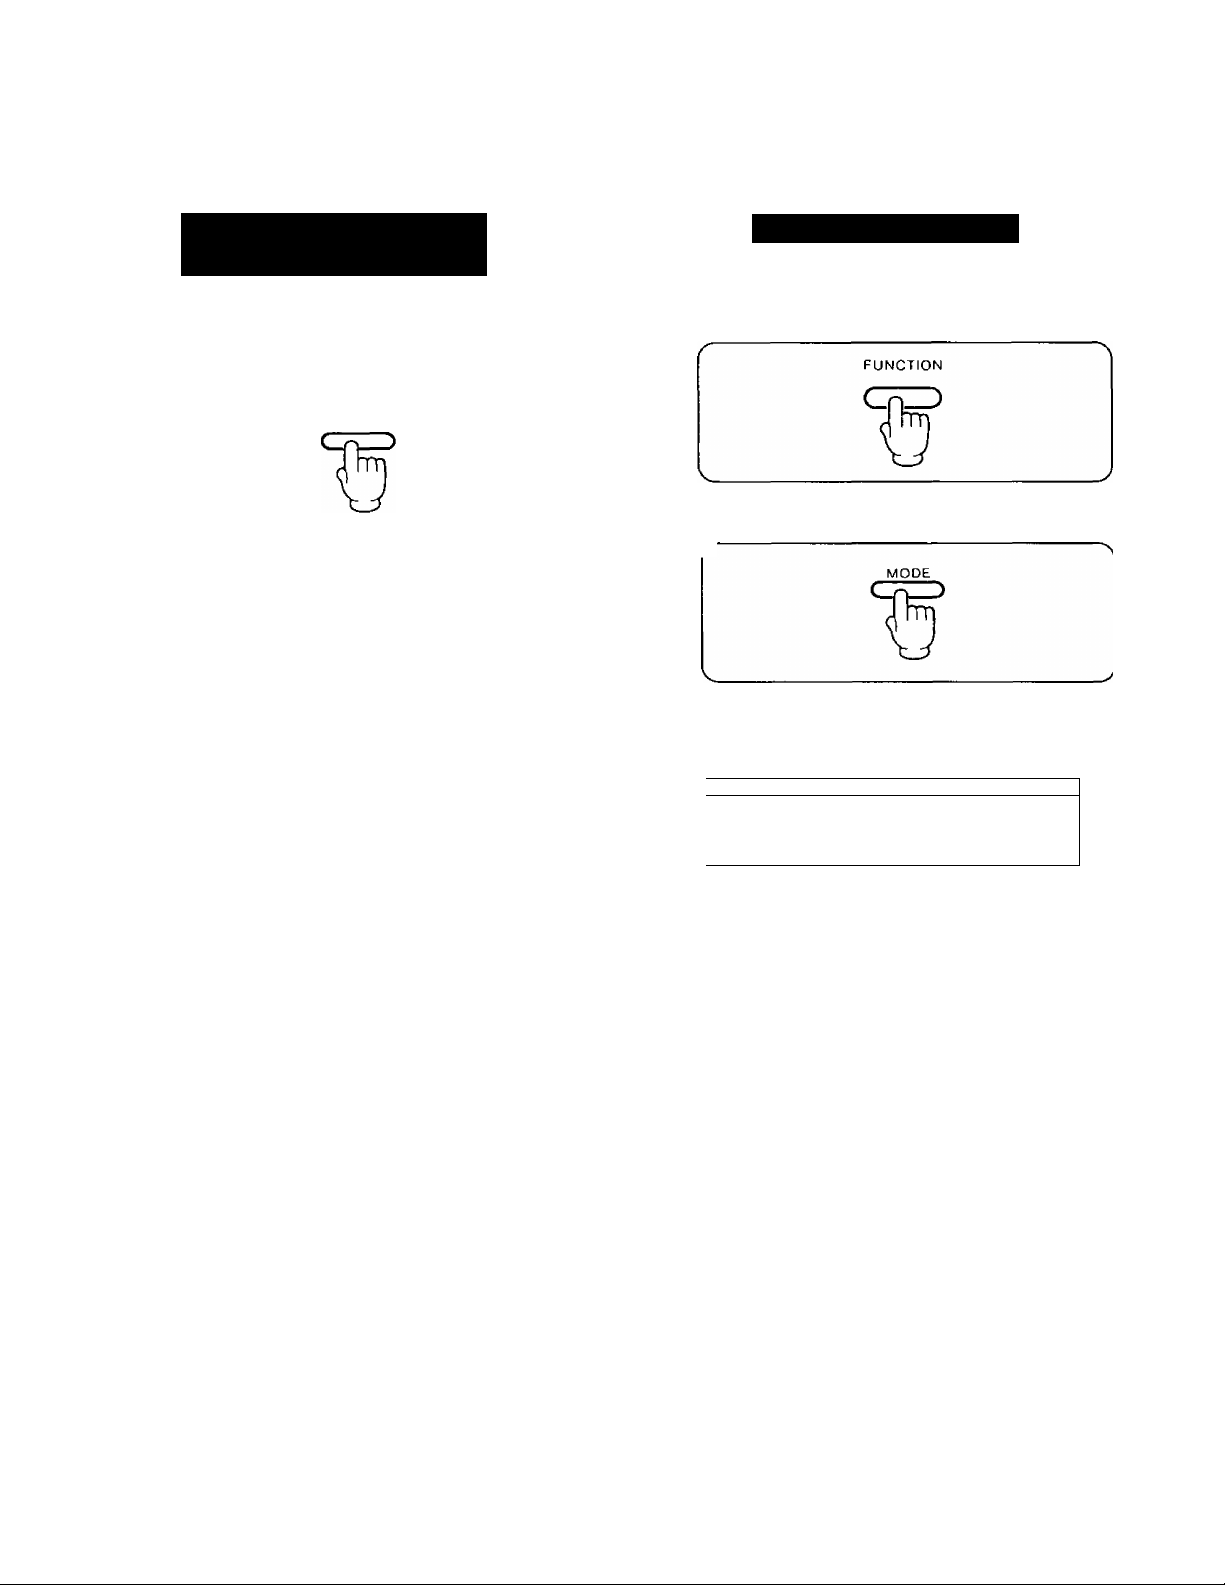
Document Contrast
The document contrast can be set as shown below.
1 Push FUNCTION.
2 Push MODE.
r
• Each mode is indicated by" A ” symbol on the
display.
I NORMAL DARKER
STANDARD FINE HALF-TONE PROGRAM
IA
IJan21
10:45AM
>
o
CO
m
HALF-TONE is suitable for originals containing
photographs, shaded drawings and the like.
Information on Photographs and Drawings:
This unit is equipped with a 16-step HALF-TONE
feature, which should be used when transmitting or
copying originals containing photographs, shaded
drawings, etc.
NOTES:
• START/COPY indicator:
The START/COPY indicator will change from a flashing to a steady light, and the unit will begin transmitting or receiving
the document.
•if you are using the speakerphone, the line will be automatically disconnected after the transmission is completed.
•Begin by transmitting the FAX CORRESPONDENCE leaflet (included) to several of your business associates to confirm
that your unit is functioning correctly, and to inform them of the procedure for transmitting documents and/or recording
voice-messages on your unit.
•If you do not hang up the handset after transmitting, the unit will automatically call the other party.
For further details, see “Voice Contact” on page 1 -9.
NORMAL is suitable for transmitting or copying printed
or typewritten documents.
DARKER is suitable for transmitting or copying
originals written in light pencil.
1-2
Page 12
Manual Transmission and Reception
(cont.)
LU
CO
O
<
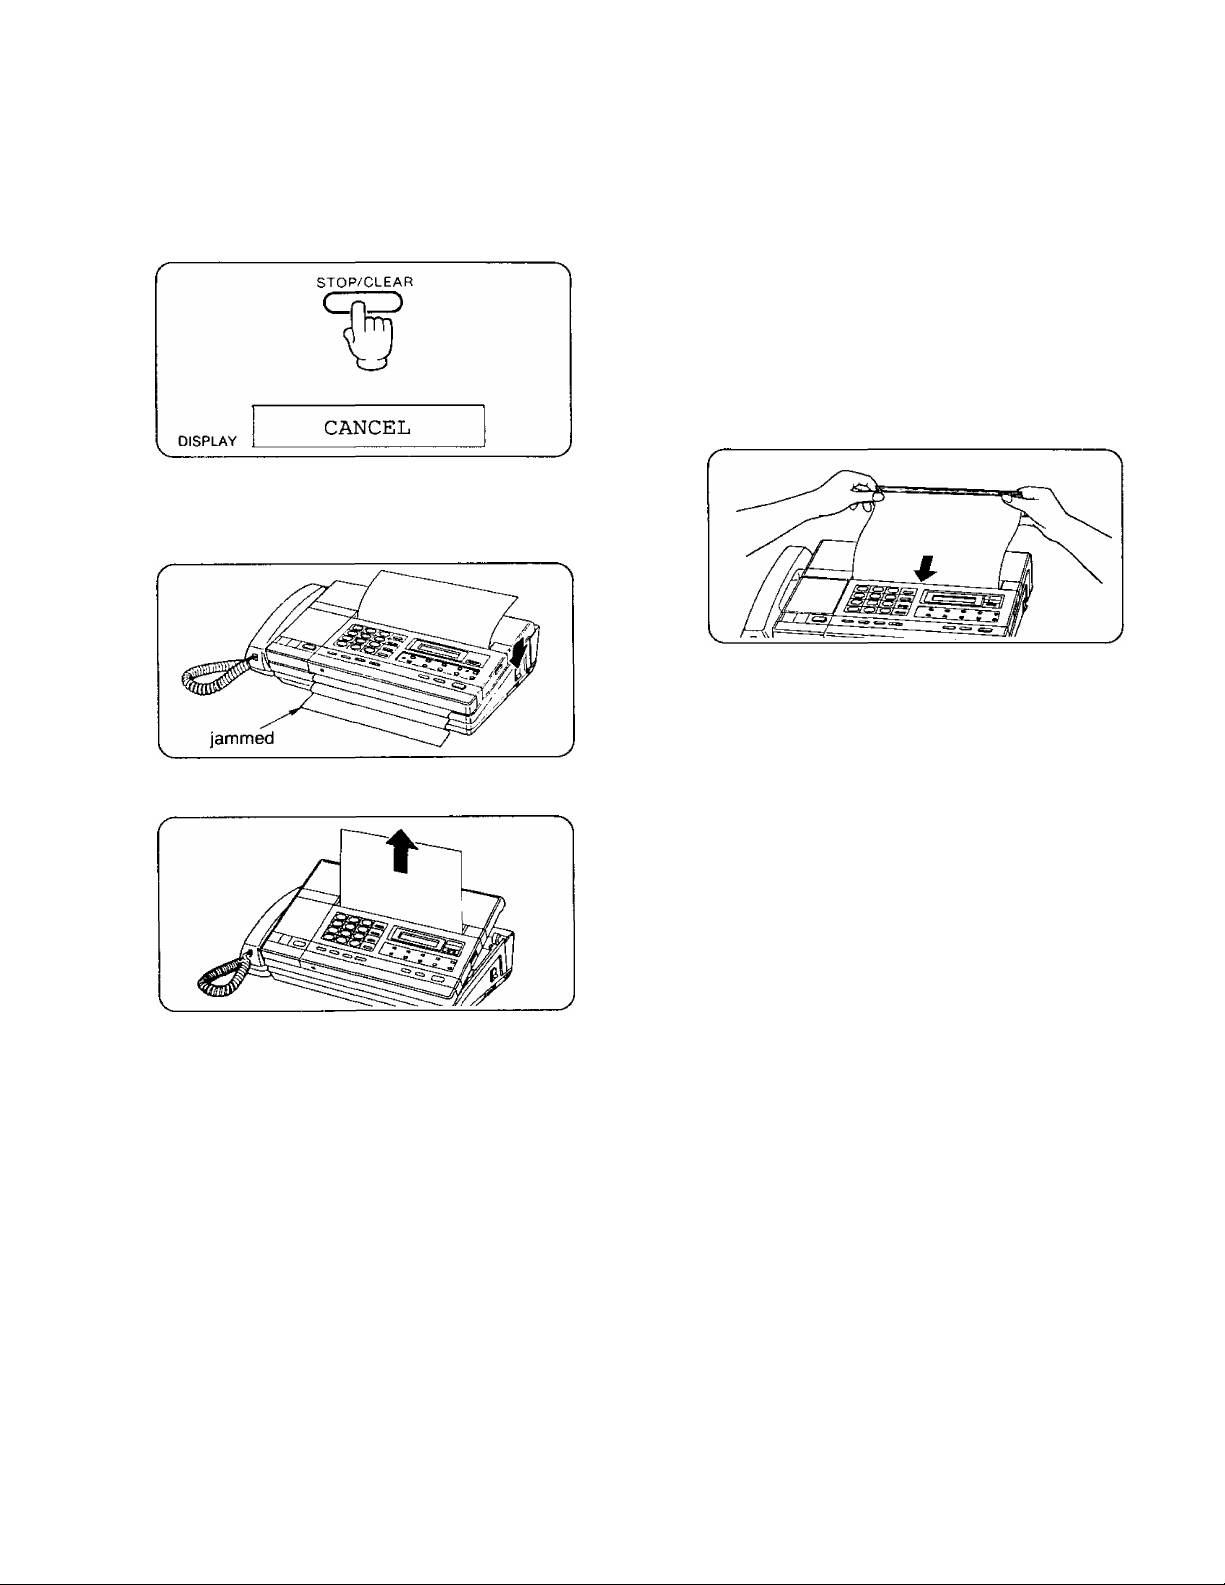
■ To stop transmission:
1 Push down STOP/CLEAR firmily.
■ If a document jams during transmission:
1 Push STOP/CLEAR to stop transmission and then
push LATCH to open the cover.
■ To transmit continuously:
(Weight of document is 16 to 20 pounds.)
1 First insert a maximum of 5 pages.
2 Start the fax transmission.
3 Insert additional pages (5 sheet max.).
•Insert additional pages when the last page
disappears from the top of the DOCUMENT
holder and while the START/COPY indicator is still
lit.
CAUTION:
When you set the documents, a beep will be heard.
After hearing the beep, tight insertion of multiple
documents, may cause simultaneous transmission of
multiple documents.
Pull out the document.
■ To transmit continuously:
(Weight of document is except 16 to 20 pounds.)
1 Transmit a document separately.
2 Insert additional page while hearing 4 beeps’.
’When the unit is ready to transmit a additional page,
4 beeps will be heard.
1-3
Page 13
Transmissible Document
The unit can transmit documents with the following sizes,
weights and textures.
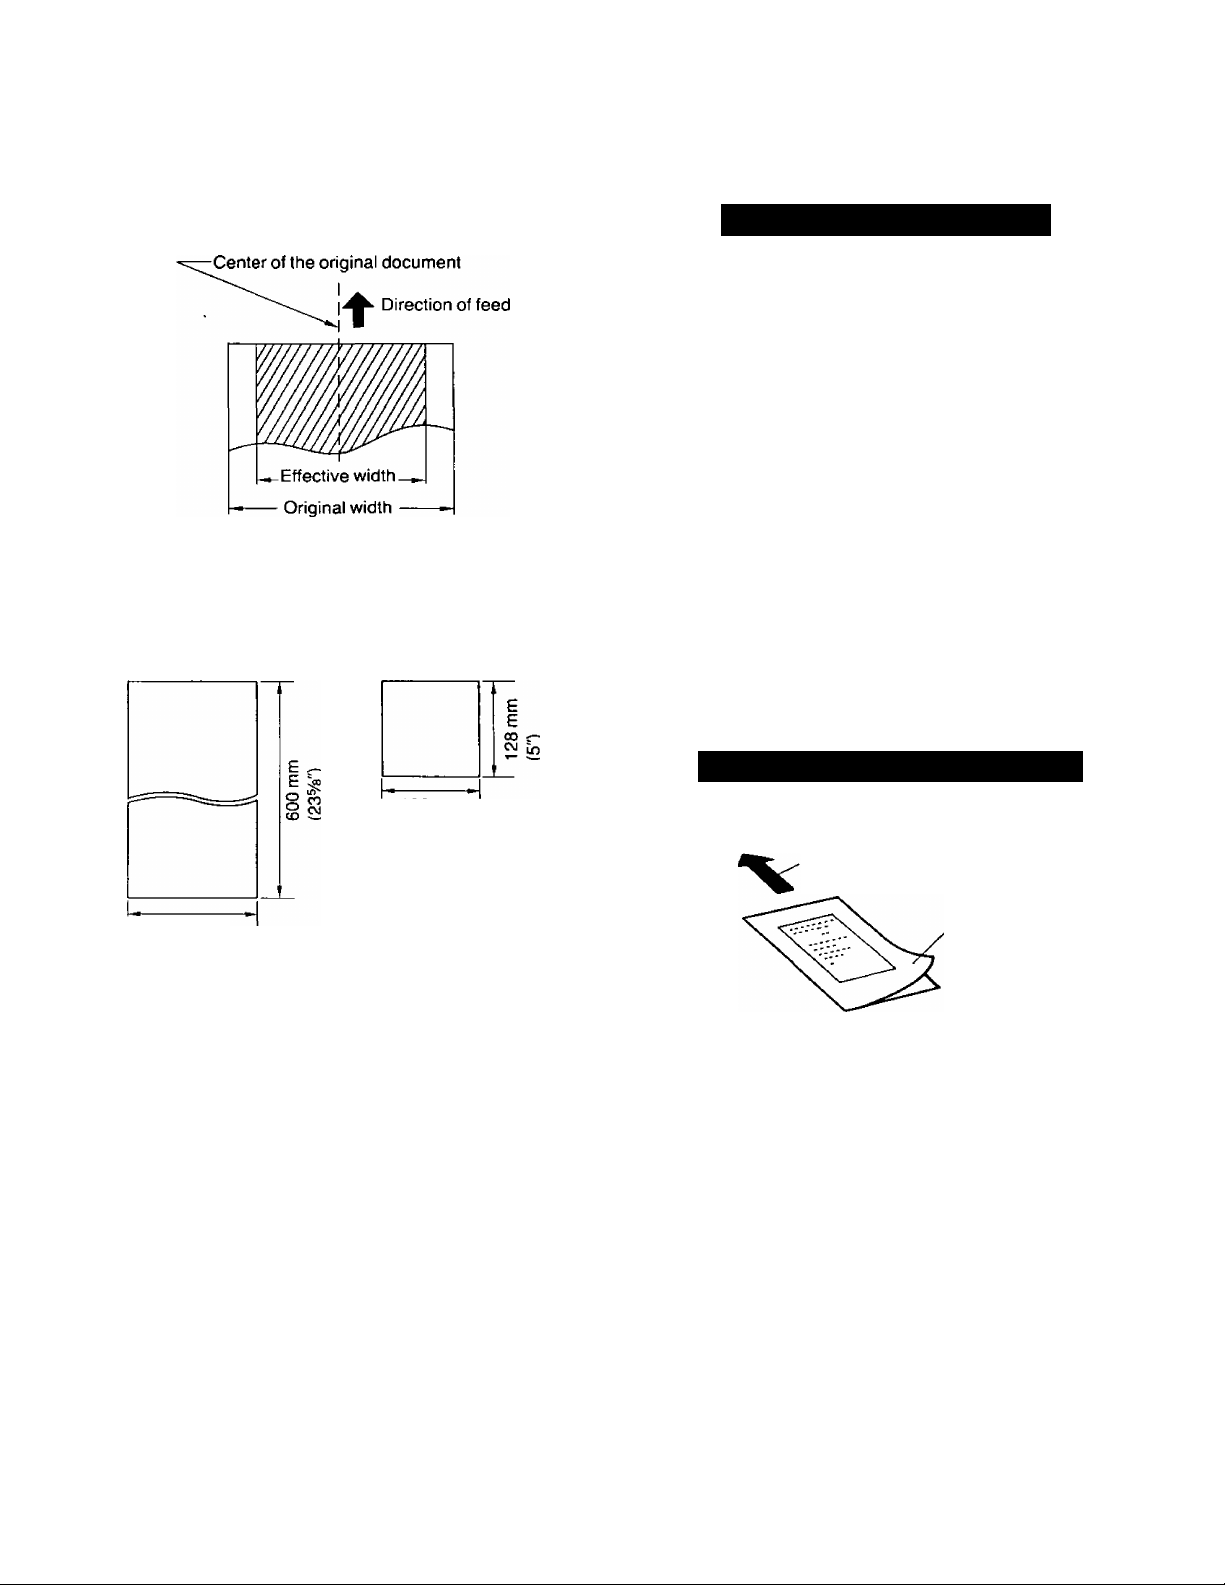
•Original width is 128 mm (5") to 216 mm { 6V 2" ).
• Effective width is up to 208 mm (S^/is").
•Weight of transmissible document is 12 to
24 pounds when sending each page separately.
Maximum size of original
Minimum size of original
Information on Originals
The following documents should first be copied on a
copier machine, and the copy used as the fax
document. Or use the exclusive carrier sheet included
with your unit.
•Paper with chemically treated surfaces such as carbonblacked paper or carbonless duplicating paper
•Heavily curled, creased or torn paper
•Paper with a coated surface
•Small size paper such as a slip or voucher
•Thin paper (less than 12 pounds)
•Wet paper with ink or paste
•Document which has staples or clips
•Make the copy using a copier machine to transmit a
legible document in the following cases:
•Thick paper (over 24 pounds), since a carrier sheet
cannot be used.
•When the contrast between the printed letter and the
background is small.
•When the letters printed on the back side can be seen
from the front of the paper, (e.g. newspaper)
>
o
0)
m
128 mm
(5")
216 mm
(SVs")
Automatic Document Feeder:
•Up to 5 pages at the same time
•Bond paper (16 to 20 pounds)
•Letter size
•Paper with an uncoated surface
•When you are transmitting a narrow document, slide
the right document guide over to support the
document.
NOTES:
•A document which is over 600 mm (23^8") cannot
be transmitted. This will be indicated by the
lighting of the ALARM indicator and the sounding
of the alarm for 1 second.
•If the originals are electrostatically charged, the
automatic document feeder may not function
properly.
• In case of malfunction of the automatic document
feeder, try to send each page separately.
How to Use the Carrier Sheet
Paper feed direction
Transparent
cover
Place the original into the carrier sheet with the print
facing the transparent cover.
Place the transparent cover over the original.
Place the carrier sheet face down against the
DOCUMENT guide and insert it onto the DOCUMENT
holder until it stops.
1-4
Page 14
Automatic Document Reception
In most cases you will be using your unit in the in Auto Receiving mode, so that you can receive documents or messages without
the need for manual operations.
To receive a document automatically, you should first record an Outgoing Message (OGM) and set the unit to the
Automatic Answer mode. (The AUTO ANSWER Indicator will light.)
LU
CO
O
<
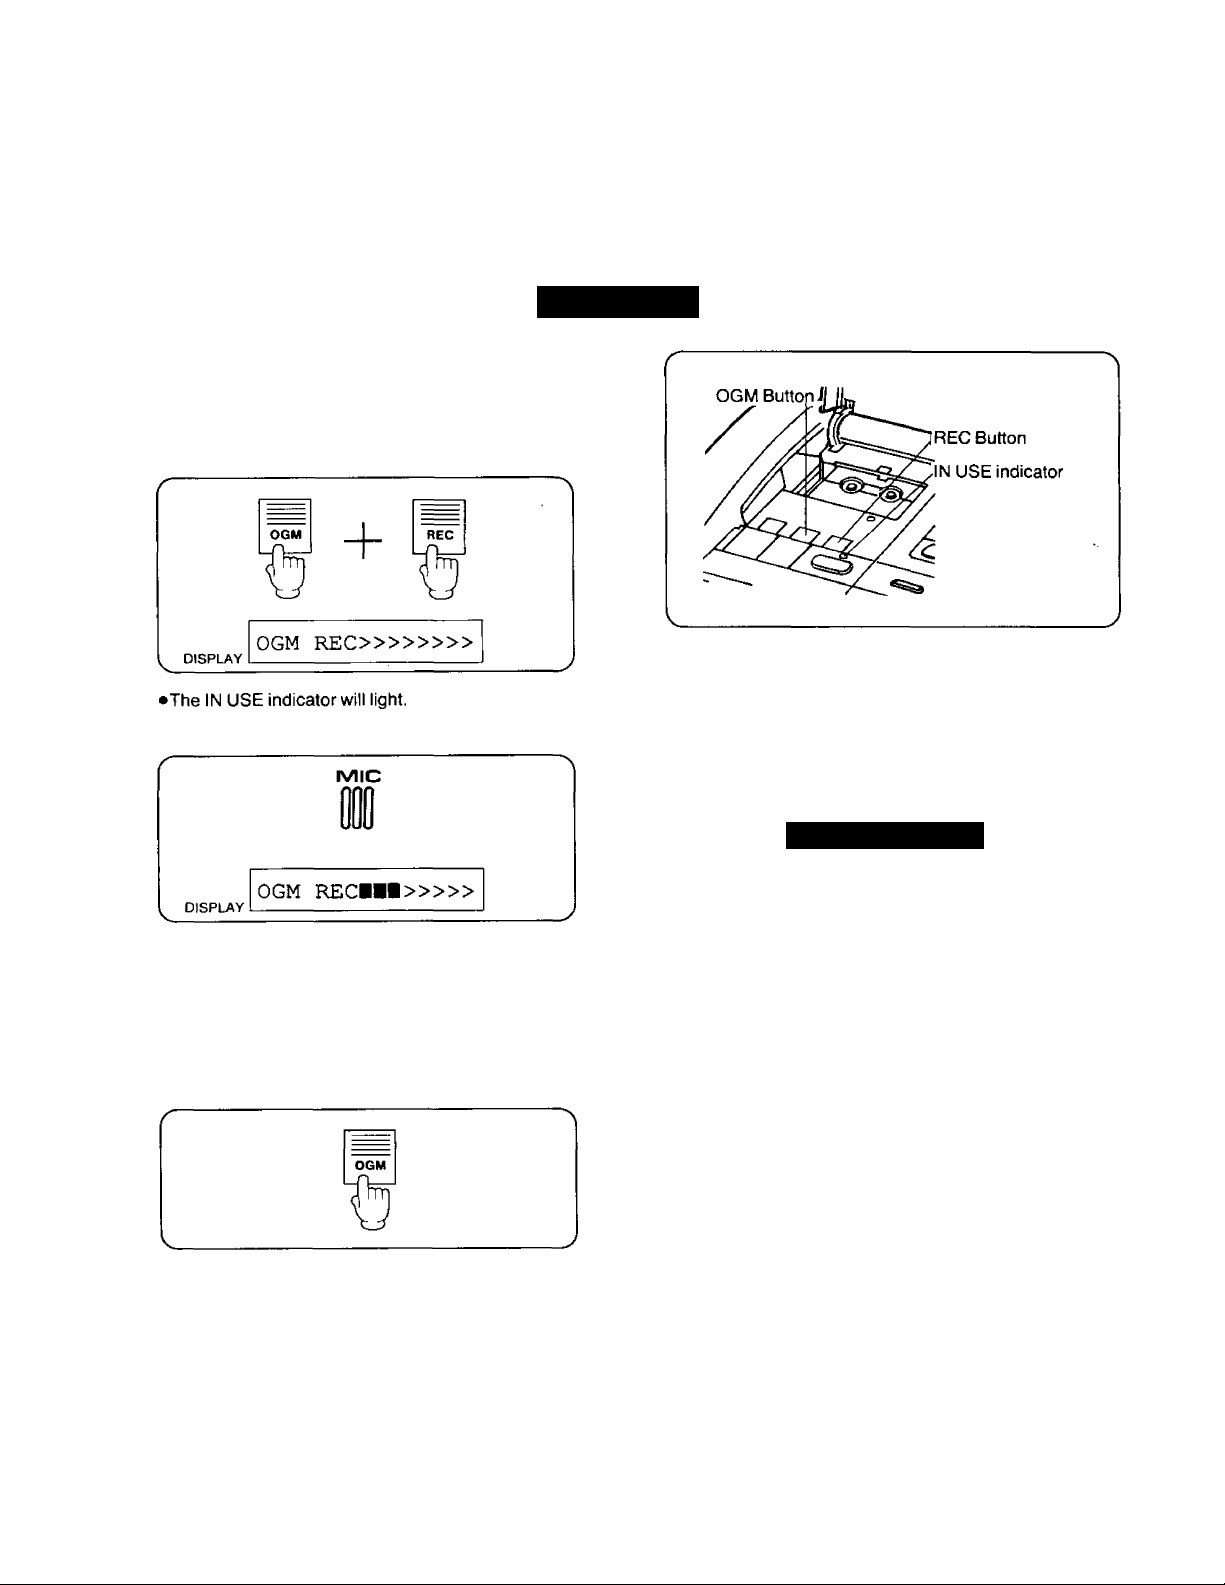
■ OGM Recording:
The purpose of the OGM (Outgoing Message) is to
answer a caller during your absence.
1 Push OGM and REC simultaneously until a beep is
heard.
2 Speak clearly and loudly.
Preparation
Recordable OGM Chip:
•Your Outgoing Message will be recorded on a voice-
recordable microchip.
•Prepare and practice your announcement before you
record it. Your Outgoing Message is limited to
16 seconds.
Samples of OGM
•Recording time is 16 seconds.
•Each on the display represents about
2 seconds.
•Speak about 8 inches away from the MIC.
•For optimum performance, record your OGM
within 12 seconds.
3 When you are finished, push OGM.
• If you want to change your OGM, simply repeat the
above procedure.
Confirming the OGM:
Push the OGM button.
•The LCD display will show;
OGM
■ Set the Recording Time to “VOX*’.
“This is the Panasonic Company. To send a
FAX, push the asterisk (*) button. To leave a
message, speak after the beep”.
■ Set the Recording Time to “1 minute”.
“This is the Panasonic Company. To send a
FAX, push the asterisk (*) button. To leave a
message, speak after the beep, up to 1 minute".
NOTE:
Please record your message using the examples
shown. Remember that the caller will have to push
the asterisk button to begin transmission after
hearing the OGM.
1-5
Page 15
Automatic Document Reception
(cont.)
Setting Up
for Automatic Answering
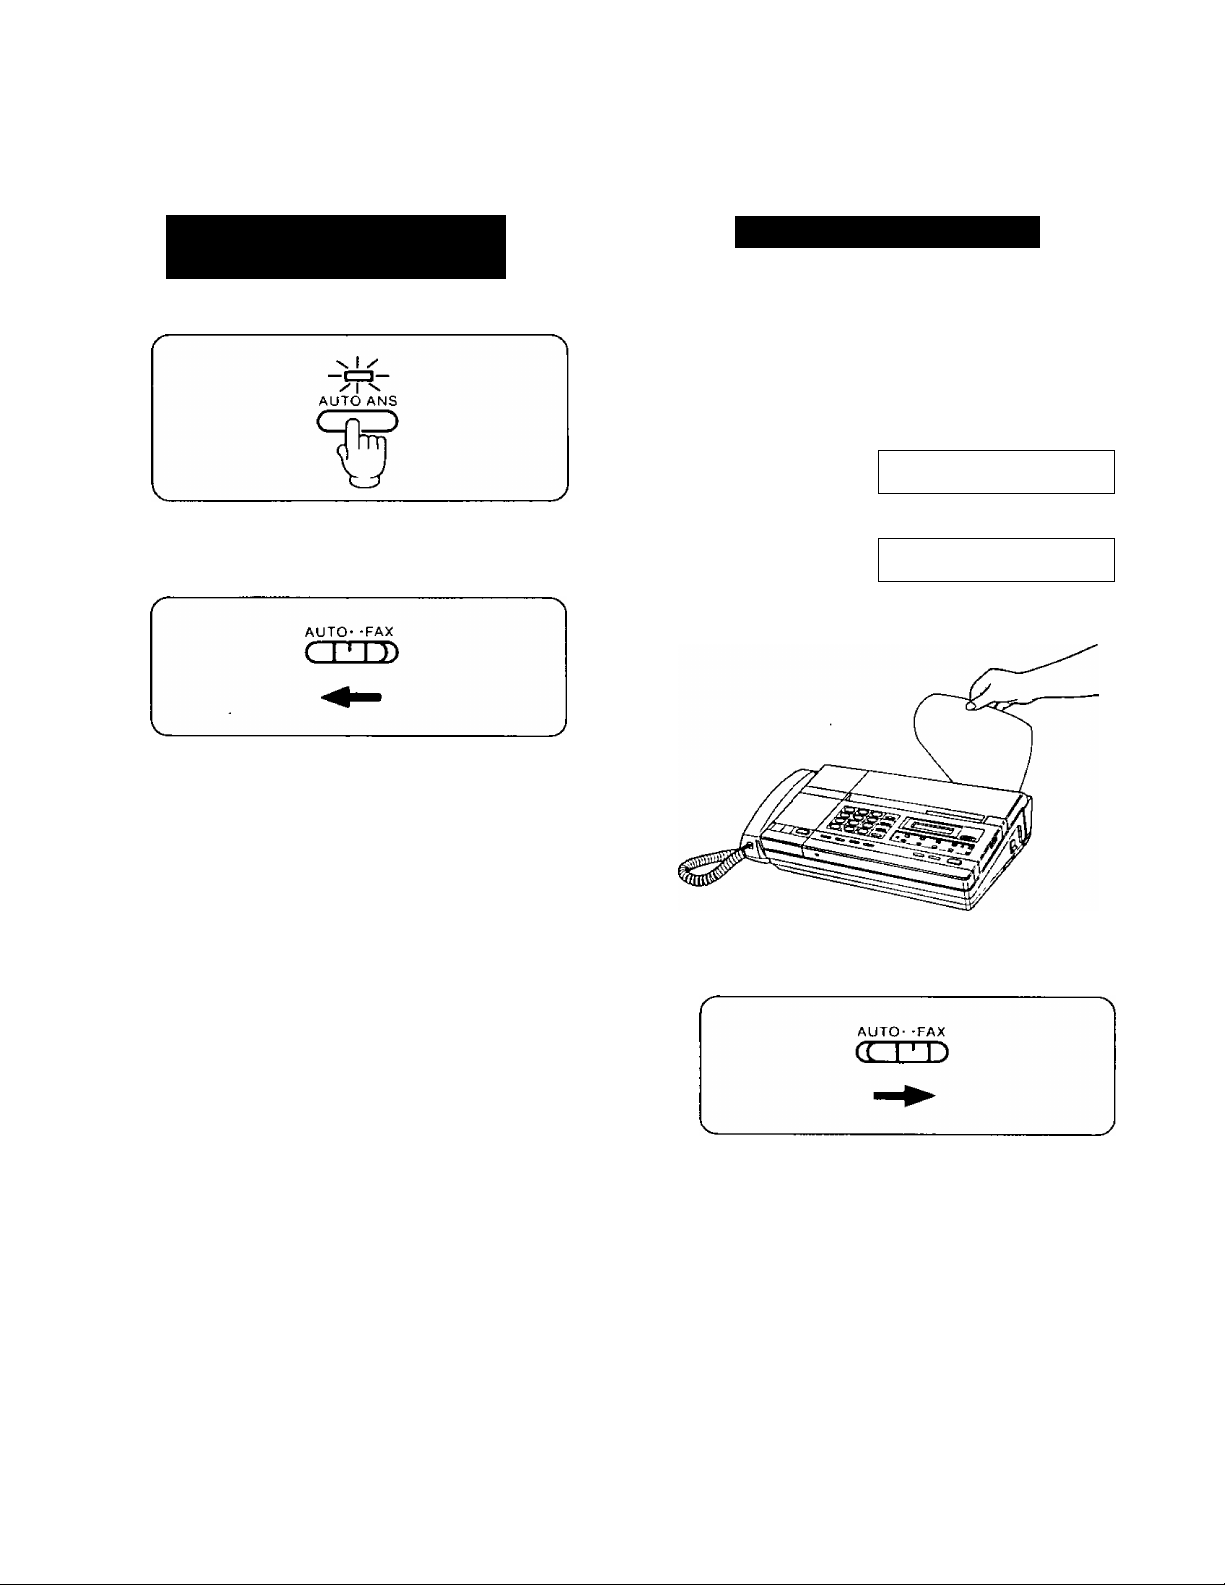
Push AUTO ANSWER to set up.
•The AUTO ANSWER indicator will light.
•The unit will automatically answer all calls.
Set the AUTO/FAX selector to "AUTO”.
AUTO/FAX Selector:
•AUTO position
The unit wilt automatically switch between the
Answering Machine and Facsimile as follows:
If the caller’s voice is not heard within 5 seconds of
the end of the OGM or the caller pushes the asterisk
{*) button, it will automatically switch to the FAX
mode to receive a document.
If a voice is detected, it will function as an Answering
Machine.
• FAX position
When a call is received, the unit will function as a
Facsimile (FAX) machine only.
Receiving a Document
When a call is received, the unit will answer and begin
playing your recorded OGM.
If the caller’s voice is not heard, leave the unit alone.
The unit wilt automatically receive the transmitted
document.
• Display will show the number of pages (99 max.)
received.
RECEIVING PI
:
RECEIVING P4
•Tear off the recorded document as shown.
■ If you want to receive documents only:
1 Set the AUTO/FAX selector to “FAX”.
>
o
cn
m
NOTE:
If someone is unable to transmit a document to you after several tries, we recommend the following.
(i) Shorten your OGM (e.g. ‘To send a FAX, push the asterisk button.”), and ask them to try again.
(ii) Set the AUTO/FAX selector to “FAX" position if transmission cannot be done by using step shown in (i) above.
1-6
Page 16

How to Transmit a Document Conveniently
For convenient transmission, you are allowed to store the FAX number into ten Direct Call buttons (ten FAX memory locations)
for One-Touch Dialing and station number for Speed Dialing.
For more details on how to store the FAX number, refer to "Speed Dialing and One-Touch Dialing” on page 3-3.
Ui
CO
O
<
When Using One-Touch Transmission
It is not necessary to use the handset or SP-PHONE. The unit will automatically dial the number in the FAX memory location and transmit the document.
Be sure that the FAX number is stored in FAX memory location.
1 Place the document face down.
•The FAX memory locations will be automatically
selected.
2 Push the DIRECT CALL button which contains the
FAX number you wish to transmit to.
(e.g. If the Direct station No. is 4.)
Automatic Redialing:
When the line is busy, the unit will automatically redial
the number up to 6 times within a 10-minute period.
•During a redialing, the following message is
displayed.
REDIAL MODE
•To cancel, push the STOP/CLEAR button.
r
NOTE:
•When you push the Direct Call button;
If the document has been placed onto the
DOCUMENT holder, the unit will dial using the
FAX memory location and transmit the document.
If the DOCUMENT holder is empty, the unit will
dial using the telephone memory location.
•"F" indicates FAX memory location and “4” the
station No.
•Facsimile transmission will begin automatically.
1-7
Page 17
How to Transmit a Document
1 Place the document face down.
Conveniently (cont.)
When Using Speed Dialing
>
o
CO
^ m
»Facsimile transmission will begin automatically.
00 to 99 (2 digits)
(e.g. If the station No. is 12)
AUTO
MEMORY
GO
Station No.
DISPLAY
• “A" indicates Auto and “12” the station No.
<A12>
4 When the answering carrier tone is heard, push
START/COPY.
1-8
Page 18

Voice Contact
White you are transmitting or receiving documents, you may wish to speak with the other party.
tf the other party’s unit is equipped with the voice contact feature, you can initiate voice contact as follows.
Initiating Voice Contact During
Ш
S 1 Lift the handset or push SP-PHONE.
(/)
Transmission or Reception
О
<
2 When the other party answers, start speaking.
Receiving a Request for Contact
If the other party tries to contact you during transmission
or reception of a document, the following message will
appear on the LCD Display, and the unit will beep.
During Transmission:
If you initiate voice contact during transmission, you will
be able to speak after all of the documents have
been transmitted.
The other party’s unit will ring or beep depending on the
type of unit, after all of the documents have been
sent.
During Reception:
If you initiate voice contact during receipt of a
document, you will be able to speak after receiving
the current page of the document.
The other party’s unit will ring or beep depending on the
type of the unit after current page has been sent.
NOTES:
•When you are using the handset and wish to speak with the other party immediately after the transmission is completed,
do not replace the handset after pushing the START/COPY button. This will cause your unit to automatically call the other
party.
•If you receive a Request for Voice Contact and you do not pick up the handset or push the SP-PHONE button, the unit will
automatically switch to the Incoming Message recording mode, 10 seconds after the beeps are heard, if the AUTO/FAX
selector is set to "AUTO", and the AUTO ANSWER indicator is lit.
• It may happen that the voice contact cannot be done because of the type of the voice contact provided with the other
party’s unit.
1-9
Page 19

How to Operate
Other
Your Unit from a
Remote Location
To transmit a
document
__
)
Start transmission
To transmita
document after
recording your
message
J
informations
•If a caller hangs up during or immediately after hearing
the OGM, the START/COPY indicator may flash for
about 40 seconds, but nothing is recorded. This may
occur due to differences in Central Office lines and is a
normal condition;
•If you are using a call waiting service, and a call is
received at the same time that a document is being
received, the document may include distored
characters, or reception errors may occur.
•If a telephone connected in parallel with your unit is used
during transmission of a document, the document may
be sent with distored characters.
•If the letters and/or drawing In an original document
are small or intricate, change the Scanning Line
Density (Resolution) to “FÍNE”. When you transmit
the FAX CORRESPONDENCE sheet, we recommend
that you set to "FINE” so that the other party can
receive a clear copy.
•If the condition of the telephone line is poor (noisy) or the
recording paper of the receiving unit is out, the ALARM
indicator wilt flash and a beep will be heard. During these
conditions, transmission is not possible.
"n
>
O
(/)
m
When you use a rotary (pulse) phone, see included
leaflet “FAX CORRESPONDENCE”.
To record a voice message after transmitting a document to another KX-F3500:
1 During transmission, lift the handset or push the
SP-PHONE button.
2 Speak after the long beep following the OGM.
•When you are transmitting a narrow document, slide
the right document guide over to support the
document.
■ WARNINGS:
•When the unit is used in the facsimile mode for a long
time, it may overheat and stop operating. The LCD
display will show "WAIT, OVER HEATED”. At this
time, do not disconnect the AC cord from the power
outlet. Operation will automatically resume as soon
as the unit has cooled.
•If you should experience difficulty transmitting/
receiving a document (particularly international
FAXES) because of poor telephone line conditions,
refer to the INSTALLATION MANUAL.
1-10
Page 20

liJ
C/)
o
<
Delayed Transmission
By programming the unit with a starting time and a FAX number, you can automatically transmit a document anywhere in the
world, and at any time of the day. This operation can be reserved to take place up to 24 hours after setting the timer.
Setting Up Delayed Transmission (On/Off, starting Time and Fax Number)
1 Place the document face down onto the holder.
4 Push MODE to turn on DELAYED TRANSMISSION
(XMT).
•“ON” and "OFF" are changed alternately each
time you push the MODE button.
5 Push AUTO/MEMORY.
3 Push REDIAL or MUTE until the following message
is displayed.
•During the programming mode the "REDIAL” and
“MUTE" buttons are used to step through the
various programming functions.
6 Push REDIAL to step to the programming mode for
the Starting time.
1-11
Page 21

Delayed Transmission (cont)
7 Enter the time (e.g. 8:30 PM) at which the fax is to
be sent.
• Push MODE to select AM/PM mode.
• Push and to move the cursor left and right
respectively.
8 Push AUTO/MEMORY.
•The starting time is now stored into memory,
d Push REDIAL to program the Fax number.
To Use Speed Dialing:
Push AUTO/MEMORY then Station No.
(e.g. If the station No. is 12)
CD
DISPLAY
To Use Manual Dialing;
Dial the number then push AUTO/MEMORY.
(e.g. If the FAX No. is 1234567)
NOTE:
When dialing manually, you must push the AUTO/
MEMORY button after entering the number. This is
not necessary when using One-Touch or Speed
Dialing.
<A12>
>
o
CO
m
10 Enter the FAX number you wish to transmit to.
■ To Use One-Touch Dialing;
Push the DIRECT CALL button.
(e.g. If the Direct station No. is 4.)
DISPLAY
1
1 1
C]
e
2
□
□
7
3
n
n
8
<F4>
O
SECRET
HYPHEN
n
1 1 Push FUNCTION to end the operation.
►Display will show current time and transmission
time alternately and the document will be
transmitted at the time selected.
1-12
Page 22

Delayed Transmission (cont.)
To Change the Parameter after set up:
Push the FUNCTION button then the REDIAL button
until the display shows the parameter to be changed.
Change the parameter using the above procedure.
LU
O
<
Li.
To Cancel the Delayed Transmission:
Change the “DELAYED XMT=ON’’ to "DELAYED
XMT=OFF".
NOTES:
•Automatic and manual reception, transmission and copying function can be performed when Delayed transmission is set,
•To transmit or copy a document, remove the document relating to the Delayed transmission and replace it when you are
done.
•If the line is busy when performing the delayed transmission, the unit will automatically redial the number, up to 6 times
within a 10-minute period.
8:30PM
1-13
Page 23

Making a Copy
The unit may also be used to make single or multiple copies. Any documents which can be transmitted can also be copied.
1
Place the document face down onto the holder.
Push START/COPY.
To abort a copy:
Push STOP/CLEAR firmly.
If the LCD Display shows "OUT OF PAPER”;
Replace the paper. Refer to “Recording Paper
Installation" on page 4-1.
To copy continuously:
Insert additional pages when the last page disappears
from the top of the DOCUMENT holder and while the
START/COPY indicator is still lit.
>
o
cn
m
•The document will be ejected.
•If the document does not feed straight while making a
copy, stop copying, open the cover and pull out the
document.
NOTE:
•The document feeder can handle up to five sheets at a time. The top sheet of the document will be copied first.
•Weight and/or size of usable document are the same as transmissible document.
(Refer to “Transmissible Document" on page 1-4)
1-14
Page 24
Individual Transmission Report
Each time a document is transmitted, this function will cause a record of the transmission to be printed,
Once Individual Transmission Report is set ON, it will remain ON until it is switched OFF.
LU
CO
O
<
Li-
1 Push FUNCTION.
2 Push MUTE or REDIAL until the following message
is displayed.
4 Push AUTO/MEMORY to Store your selection.
>“ON" and “OFF" are changed alternately each
time you push the MODE button.
[INDIVIDUAL TRANSMISSION REPORT Example]
No. OTHER FFtCSIMILE
01 1732526
MODE STPRT TIME USAGE TIME
TXCG3) Jan.01 12:00ftM 00’42
< TX REPORT >
PAGES RESULT
01 OK
1-15
Page 25

Activity Report (JOURNAL)
The JOURNAL is a record of the last 30 transactions (transmission and receptions). It is printed out automatically after
every 30 transactions when the JOURNAL is set to the AUTO mode. It may also be printed out on request.
1
Push FUNCTION.
5 Push FUNCTION to end the operation.
•You can find the JOURNAL Example on page 1-18.
"n
>
O
c/>
m
2 Push MUTE or REDIAL until the following message
is displayed.
•“AUTO” and “MANUAL" are changed alternately
each time you push the MODE button.
Push AUTO/MEMORY to store your selection.
When set to the AUTO mode:
The Activity Report will be automatically printed when
the memory becomes full (30 transactions).
The journal memory will then be cleared.
When set to the MANUAL mode:
The Activity Report will be stored until the memory
becomes full. The oldest line of the report will then be
deleted.
When printing out the report using the MANUAL mode,
refer to "Printout Functions" on page 1-17.
1-16
Page 26

UJ
cn
o
<
li.
Printout Function
A list of Transmissions/Receptions (JOURNAL), Stored Phone Numbers (TEL LIST) and/or User Selections (SYSTEM) can be
printed out on request.
1
Push
FUNCTION.
2 Push MUTE or REDIAL until the following message
is displayed.
3
Push
START/COPY
to start printing.
A- Push FUNCTION to end the operation.
■ List of Transmissions/Receptions (JOURNAL)
This is a report of the last 30 transmissions and
receptions. If there was no activity, no JOURNAL will
be printed.
■ Stored Phone Numbers (TEL LIST)
This is a list of stored phone number for One-Touch ,
and Speed dialing.
[TEL LIST Example]
<< TELEPHONE NO. LIST >>
TEL
NO
T222-2222
01
T2345
02
TSO0-447-4700
03
T205-525-4195
04
05
T333-3333
T123-4567
06
T999
0?
Explanation of TEL LIST
•T.. .When you enter the telephone number with setting
the Dialing Mode Selector to the TONE position.
•R...When you enter the telephone number with setting
the Dialing Mode Selector to the PULSE position.
00 R526-3057
■ User Selections (SYSTEM)
This is a report on all of the User selections and initial
settings.
FftX NO
T123-1234
01
T3434
02
T392-4767
03
04
T3435
05
06
T123456789
T098-765-4321
07
1-17
Page 27

Printout Function (cont.)
[JOURNAL Example]
<<< JOURNAL >>>
(3)
No.
01 1736852 TXCG3) Jul.20 li:39AM
02
03
04 <F2>
05
06
07 <F2> TXCG3) Jul.20 ll:59AM
08 <F2>
09
10 <A11>
OTHER FACSIMILE
<A11>
(4)
INCOMING
INCOMING
INCOMING
INCOMING
(5)
MODE
RXCG3)
TXCG3D Jul.20 ll:46AM
TXCG3)
TXCG3)
TXCG3)
TXCG3)
RXCG3) Jul.20 12:03PM
TXCG3)
(6)
START TIME
Jul.20 ll:41AM
Jul.20 ll:48AM 00’40 01 OK
Jul.20 ll:49AM 00’45 01 OK
Jul.20 11:57AM 00’29 01 OK
Jul.20 12:00PM 00’09 00 02
Jul.20 12:05PM 00’ 16 00 07
(1)
Jul.20. 1988
(7)
USAGE TIME
00'42 01 OK
01’38 01
00’46
00’20 01 02
00’33 00 06
(2)
0i:34 PN
(8)
PAGES
01
RESULT
(9)
04
OK
>
o
CO
m
Explanation of JOURNAL
(1) Date of printout: Month, Day, Year
(2) Time of Printout; Hour. Minute
(3) Communication number (up to 30)
(4) Dial Number
1736852; The other party’s number dialed manually
is 1736852
A11; Station No. 11 for Speed Dialing is used.
F2; Station No. 2 for One-Touch Dialing is used.
INCOMING; Document or telephone call is received.
CODE
01
02
03
[SYSTEM Example]
When the power unit overheats.
When transmission is interrupted by pushing the
STOP/CLEAR button.
When a document is jammed or does not feed into
the unit.
<< SYSTEM
tt01
tt02
«03
«04
«05
«06
«07
«08
«09
«10
«11
«12
«13
«14
DESCRIPTION CODE
SET UP LIST >>
1/ 1/88 12:00AM
SENDER ID =
DELAYED XMT=0FF
SEND AT 12:00AM
SEND TO
REMOTE ID = 111
REC TIME = VOX
CPC MODE = A
DIAL SPEED = 10
TONE DETECTION
JOURNAL=AUTO
TX REPORT = OFF
TX SPEED = 9600
ID POSITION=OUT
(5) Transmissbn/Reception
TX; Transmission
RX; Reception
G3; Communication mode used
(6) Communication start time
(7) Usage time. Minutes; Seconds
(8) Number of pages transmitted or received successfully
(9) Communication result
OK; Successful completion
Numeral: Error code (See Error code below.)
DESCRIPTION
04
05
06 When the unit is out of paper.
07
When transmission/reception error occurs.
When the printhead overheats.
When the cover is opened.
1-18
Page 28

How to Operate
as an Answering Machine
_____________________Table of Contents
Preparing the Answering Machine.................................................................... 2-i
Recording OGM ............................................................................................ 2-1
Selecting the Caller’s Recording Time ....................................................... 2-1
Selecting the Remote Code No. for Remote Operation
Setting Up the Automatic Answer Mode
Preparing the ICM Tape ............................................................................... 2-3
Operating the Answering Machine.................................................................... 2-4
Playing Back Your Messages....................................................................... 2-4
Call Counter .................................................................................................. 2-4
Saving Your Messages
Erasing the ICM............................................................................................. 2-5
Monitoring Incoming Calls
Message Memo.............................................................................................. 2-6
Recording a 2 Way Conversation
How to Operate from a Remote Phone............................................................. 2-7
Turning On the Automatic Answer Mode from a Remote Phone
Playing Back Messages ............................................................................... 2-7
Memory Playback ......................................................................................... 2-8
Back Space and Skip Forward .................................................................... 2-8
Recording a Marker Message....................................................................... 2-8
Remote Reset ................................................................................................ 2-9
Skipping OGM for ICM Recording ............................................................... 2-9
Turning On the Speakerphone (Answer Back)
Changing the OGM ....................................................................................... 2-11
................................................................................
..........................................................................
...............................................................
________________________
............................
....................................................
............
...........................................
2-2
2-3
2-4
2-5
2-6
2-7
2-10
Page 29

Preparing the Answering Machine
To use the unit as an Answering Machine, you should first record an Outgoing Message (OGM).
•The purpose of the OGM is to answer the caller during your absence.
•To have calls answered automatically during your absence, set the unit to the Automatic Answer (AUTO ANS) mode.
•To record voice messages, select the recording time.
Recording OGM
See “Preparation-OGM Recording” on page 1-5.
Selecting the Caller's Recording Time
The Recording Time for Incoming Messages can be set to "VOX” or “1 minute”.
Be sure that the handset is on the cradle and that the SP-PHONE button is off.
The Recording time is preset to "VOX”.
1 Push FUNCTION.
2 Push REDiAL or MUTE until the following message
is displayed.
3 Push MODE if you wish to change.
PushAUTO/MEMORY.
•After pushing the AUTO/MEMORY button, you
may go directly to step 2, “Selecting the Remote
Code No. for Remote Operation" if you wish,
5 Push FUNCTION to end the operation.
VOX:
The unit will record an Incoming Message for as long
as the caller speaks.
•“VOX” and “1 MIN" are changed alternately each
time you push the MODE button.
1 Minute:
The unit will record an Incoming Message (ICM) up to
1 minute.
2-1
Page 30
Preparing the Answering Machine (cent.)
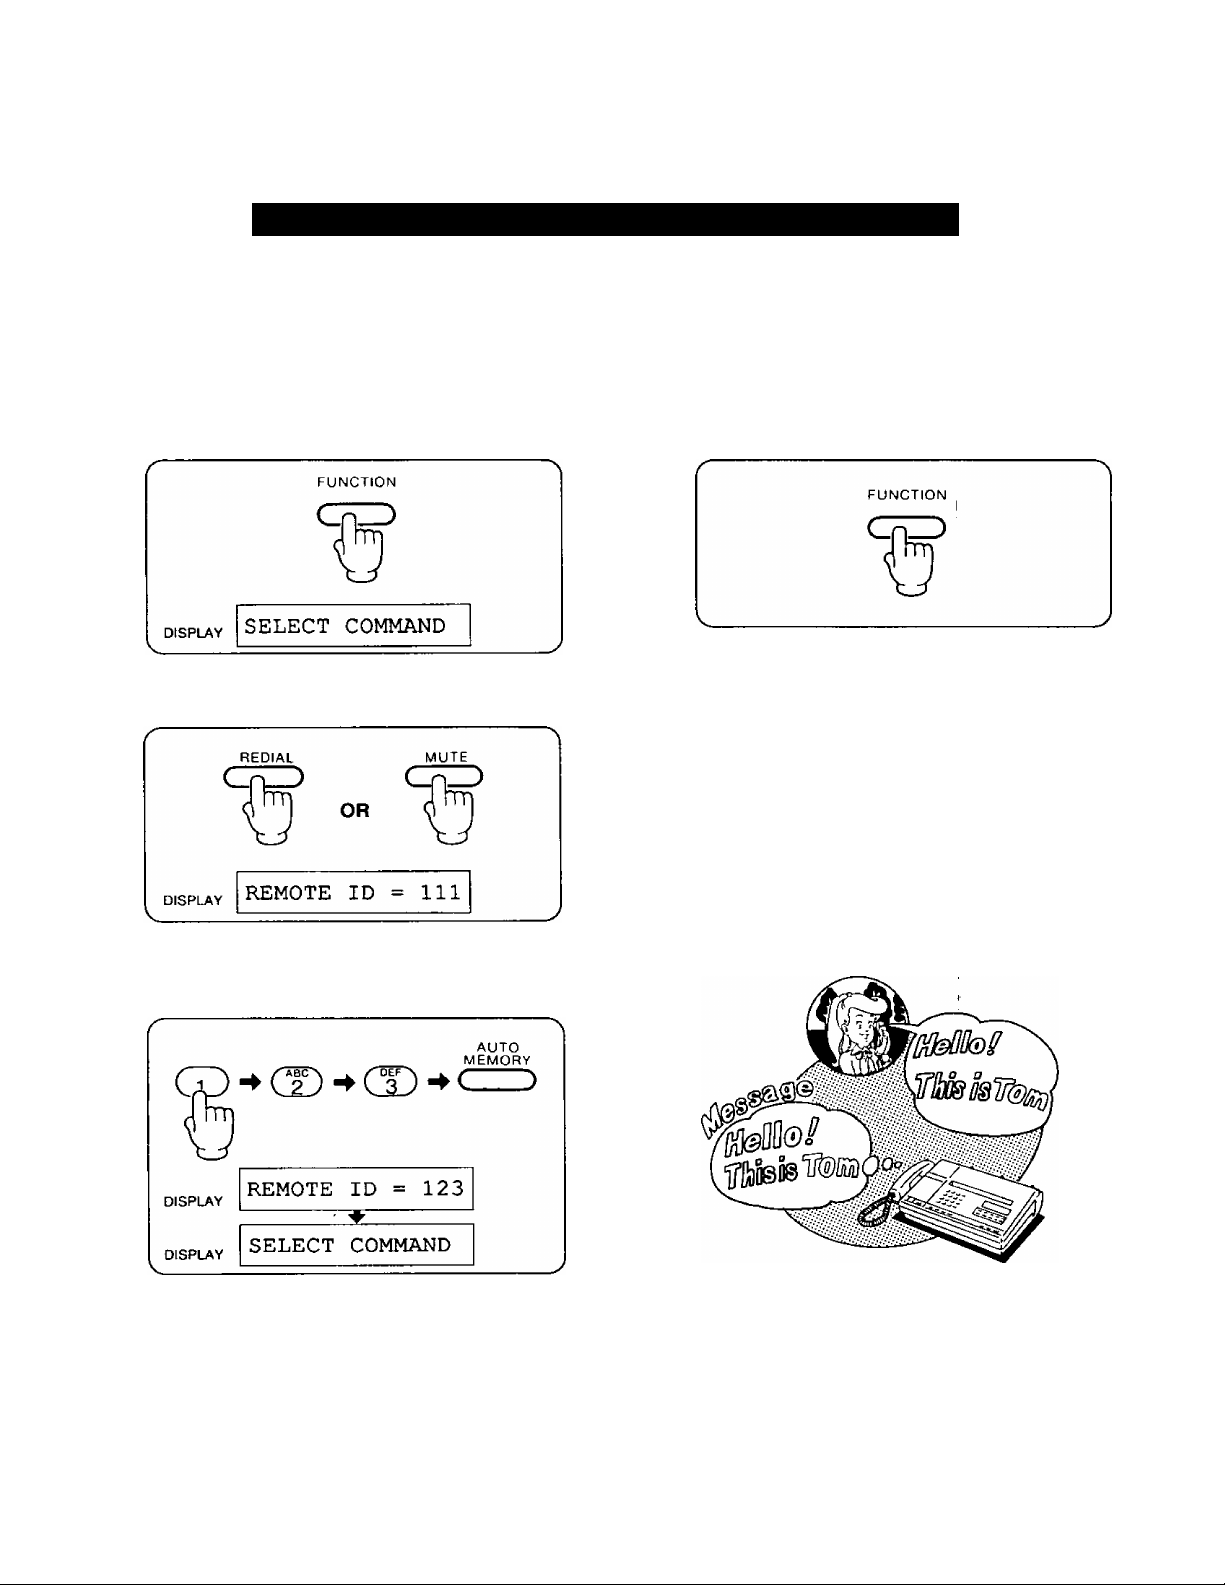
Selecting the Remote Code No. for Remote Operation
A remote code helps to protect from unauthorized persons accessing your unit and retrieving your messages.
The remote code No. has been set to 111 at the factory. However, you may choose another code from within the following
ranges;
Single Digit 1 to 9
Double Digit 11 to 99
Triple Digit 111 to 999
1 Push FUNCTION.
2 Push REDIAL or MUTE until the following message
is displayed.
3 Enter the desired Remote Code and then push
AUTO/MEMORY
(e.g. If the remote code is 123)
4 Push FUNCTION to end the operation.
NOTE:
You cannot use codes which include zero (0). We
recommend that you do not use seven (7) as code
No., since this number is used to control other
remote function.
2-2
Page 31

Preparing the Answering Machine (com)
Setting Up
the Automatic Answer Mode
Push AUTO/ANS.
Set AUTO/FAX selector to AUTO.
Before leaving the office, confirm that the AUTO/ANS
indicator is lit and the AUTO/FAX selector is set to
AUTO or FAX (as needed).
Preparing the ICM Tape
After reviewing the Outgoing or Incoming Messages, the
unit will automatically reset itself to the Automatic Answer
mode and will be ready to answer the next call.
AUTO/FAX Selector
AUTO Position
When a call is received, the unit will answer and
begin playing your OGM. If the caller’s voice is
not heard within 5 seconds of the end of the
OGM or the caller pushes the asterisk (*)
button, the FAX mode will automatically be
selected.
If a voice is detected, the unit will function as an
Answering Machine.
FAX Position
When a call is received, the unit will function as a
Facsimile (FAX) Machine only. No OGM will be
played and no messages can be left on the
answering machine. Remote operation (from
another phone) is also impossible.
To cancel the Automatic Answer mode, push the
AUTO/ANS button..The AUTO/ANS indicator will go
out. The unit will now function as a telephone.
If you use a new ICM tape, push the REW button to
reset the tape.
2-3
Page 32

Operating the Answering Machine
Playing Back Your Messages
Push PLAYBACK/PAUSE.
■ Auto-Logic (One Touch Operation)
At the touch of the PLAYBACK/PAUSE button, the unit
will automatically rewind, playback all the recorded
messages and stop. After 7 seconds, the unit will reset
itself to the Automatic Answer mode. All calls will be
automatically saved.
•Future Incoming Messages will be recorded after the last message.
•To record the future messages from the
beginning of the tape, push the REW button.
■ To stop the tape temporarily:
Call Counter
The unit will show you the number of recorded voice
messages by indicating it on the LCD Display (0—99) and
flashing of the AUTO/ANS indicator.
Jan 21 10:45 AMi3;
The number of recorded voice messages
Saving Your Messages
You can save your messages as follows:
1 Play back the tape to the end of the message you
want to save then push REW and PLAYBACK/
PAUSE simultaneously.
1 Push PLAYBACK/PAUSE.
•To restart, push the PLAYBACK/PAUSE button
again.
•While pausing, the unit does not answer a call
automatically.
To Rewind the Tape:
Push the REW button.
To Fast Forward the Tape:
Push the FF button.
•The unit will go into the Answer mode and future
Incoming Messages will be recorded after the
messages you have saved.
2-4
Page 33

Operating the Answering Machine (com.)
Erasing the ICM Monitoring Incoming Calls
■ To Erase the Recorded Messages:
Wait until the last message has played back and the
tape stops.
1 Push REC and REW simultaneously.
•The messages will be erased while the tape is
rewinding.
While an Incoming Message is being recorded, you can
monitor it through the build-in speaker by adjusting the
SPEAKER VOLUME control.
•The following message will be displayed on the display.
ATAS ANSWERING
■ To speak to the caller directly:
1 Lift the handset or push SP-PHONE and speak.
2-5
Page 34

Operating the Answering Machine (com.)
Message Memo
You can record a confidential message on the Incoming
Message tape (ICM) which can be retrieved by anyone
with your remote code number.
1 Push 2 WAY/MEMO until a beep is heard.
2 Speak into the Microphone to record your message.
Recording
a 2 Way Conversation
While speaking with someone on the telephone, you can
record the conversation, however, many states have
regulations in which 2-Way Telephone Conversations
may be recorded, so you should first consult your public
utility agency before using this feature.
■ To record a 2-Way Conversation:
1 While speaking, push 2 WAY/MEMO until a beep is
heard.
2 Talk with the other party.
3 When you are finish, push 2 WAY/MEMO again.
»The IN USE indicator will go out.
•The unit will return to the Auto Answer mode if the
AUTO ANS indicator is on.
•The until will generate a beep every 15 seconds to
notify the caller that the conversation is being
recorded.
3 When you are finish, push 2 WAY/MEMO again.
2-6
Page 35

How to Operate from a Remote Phone
You can use a tone phone to listen your recorded Incoming Messages, from a remote phone.
Turning On
the Automatic Answer Mode
from a Remote Phone
If you forget to turn your unit to the Automatic Answer
mode before leaving your office, you may turn it on from a
remote location, using any telephone.
1 Call your unit and wait for 15 rings.
15 rings
t
J
•After 15 rings, the unit wiii switch to the Automatic Answer mode.
2 After hearing the OGM or the beep tone, hang up.
r
Playing Back Messages
1 Call your unit.
2 Push your code No. during the OGM.
—
Code No.
•A beep will sound, followed by other (up to 8)
beeps, which represent the number of recorded
messages.
•Another series of short beeps will be heard as the
ICM tape is rewinding and then your message will
be played.
•If the AUTO/FAX selector is set to “AUTO", the unit
will begin to play the OGM.
•If the AUTO/FAX selector is set to “FAX”, you will
hear several “beeps” (answering carrier tone of
your unit).
NOTES:
•If you hear nothing, record the OGM.
•The beep will be heard after the OGM.
1 beep: You may hang up.
6 beeps: The tape is full. Reset the tape. See
“Remote Reset of Tape” on page 2-9.
Listen to messages.
4 Hang up the handset.
r
•Future Incoming Messages will be recorded after
the last message.
2-7
Page 36

How to Operate from a Remote Phone
(cont.)
Memory Playback
If you have already heard your old messages from a
remote phone, you can skip them and only listen to the
newly recorded ones.
1 Call your unit.
2 Push your code No. during the OGM.
3 After hearing the beeps, push “4” immediately.
Back Space and Skip Forward
After listening to the recorded messages or while they are
playing, you can skip forward or back space.
■ Back Space:
1 Push“1”.
■ Skip Forward:
1 Push “2”.
»The beeps indicate the number of recorded
messages.
»During the playback of previously heard messages,
you can also skip them by pushing “4".
The tape will rewind or advance for approximately
15 seconds of playback time, and not to the begining
or end of a message.
Recording a Marker Message
After reviewing all the messages, you can leave your
index message on the tape to be heard by anyone who
has your remote code.
3-beeps ^ 2-beeps
U Last message
II
\
______________
•3 beep tones will be heard after the last message
has been played, followed by a 10-second pause,
and then 2 more beep tones.
Marker message (date, time, etc.) U
---10-sec. pause ^
1 Speak immediately after the last 2 beeps.
f
—
11 ^
J
2-8
When you are finish, hang up.
Page 37

How to Operate from a Remote Phone (cont.)
Remote Reset
To record new Incoming Messages from the beginning of
the tape.
After the recorded messages have been played back or while they are playing back;
1 Push “3" and then hang up.
•The unit will rewind to the beginning of the tape and
reset itself.
■ If you have used the Memory Playback;
1 Push“3”.
r
DBF
3
A
Skipping OGM for ICM Recording
If you would like to leave a message on your unit, but do
not want to listen to your Outgoing Message before doing
so, you can switch directly to the Incoming Message
(Recording) Mode.
1 Call your unit.
\
_____________________
____________________
2 Push “0” during OGM (instead of your Code No.).
►One beep will be heard and the unit will go directly
to the Incoming Messages mode.
J
n
ci^
V
_______________
•The unit wiil rewind to the beginning of the newly
recorded messages and a beep will be heard.
____
2 Push “3” again to advance to the beginning of the
tape.
—
OFF
3
/In
n
V
_________________
*A beep tone will be heard and future Incoming
Messages will be recorded from the beginning of
the tape.
To cancel the Remote Reset;
Push “2" after the tape has been reset (one beep).
/
___
J
I
After hearing a long beep, speak clearly and loudly
to record your message.
i
V_____________________________
__--
____________
)
2-9
Page 38

How to Operate from a Remote Phone
Turning On the Speakerphone (Answer Back)
(cont.)
You may screen the room where the unit is installed for
sound, by turning the speakerphone on remotely. You can
speak with anyone is the room, even if they can not reach
the unit.
1 Call your unit.
M
\
__________________________________
Push your code No. during OGM.
3 After hearing the beeps, push “6” immediately.
_______
)
If you want to talk to the other party in the room:
Ask the other party to pick up the handset or push the
SP-PHONE button, and start the conversation.
•If no one picks up the handset or pushes the
SP-PHONE button, the line will terminate after
30 seconds.
•To use this Answer Back function, position the
SPEAKER VOLUME control for normal use,
otherwise it may be difficult for anyone to hear you
from the speakerphone.
•The beeps indicate the number of recorded
messages.
•The speakerphone of your unit will be turned on.
•You can monitor the room for 30 seconds.
•To monitor further, push “6” again within
10 seconds of the beep.
2-10
Page 39

How to Operate from a Remote Phone (cont.>
Changing the OGM
You can record a new Outgoing Message from a remote
phone.
1 Call your unit.
V
_________________________________
Push your code No. during OGM.
Code No.
3 After hearing the beeps, push “7" immediately.
>1
4 After hearing a long beep, speak clearly and loudly
for up to 16 seconds.
J
5 When you are finished, push "9".
•The new Outgoing Message will be played back.
•The beeps indicate the number of recorded
messages.
NOTES:
•In some areas, a remote tone phone may not function due to telephone line conditions
such as line noise, echo, etc.
•The unit may not respond if tones produced by the telephone are too short.
2-11
QUICK REFERENCE CARD
FOR TONE REMOTE CONTROL
ABC
S
( Back S^ce [ | Skip forward j | Re^t |
GHi
a
\
___
J
Memory Playback | | SP*Phone Turn On |
PRS
7
lOGM-RECI 1 OGM Stop 1
FAX
L.
■ To Mt to tho Automatic Answer mod« remotely
1, Dial the phone number.
2. Wait until 15 rings, and hang up after hearing OGM.
■ To set to the FAX mode after recording
message
1. Push the0 button,
• The "Beep" (answering carrier tone) wilt be heard.
f ■>
JKL
5
TUV
0
f
OPER
■
j 1 OGM Skip 1
fMNo]
WXY
9
___
3
>
Page 40

How to Operate
as a Telephone
Table of Contents
Manual Dialing and Reception .......................................................................... 3*1
Making a Call...................................................................................................... 3-1
Receiving a Cali................................................................................................. 3-1
Redialing ............................................................................................................... 3-1
Switching to Hands-free or Handset Operation
during a Conversation ....................................................................................... 3-2
Handset to Hands-free.......................................................................................... 3-2
Hands-free to Handset.......................................................................................... 3-2
Speed Dialing and One-Touch Dialing ................................................................ 3-3
Programming the Phone Numbers for Speed Dialing
Programming the FAX/Phone Numbers for One-Touch Dialing ...................... 3-4
Dialing..................................................................................................................... 3-5
.......................................
3-3
Dial the telephone
number with a
tone telephone only.
♦
Push your
code number.
c
For Memory
Playback,
push the Q
button.
To turn on the
SP- Phone, push
the Q button.
To change theOGM
1. Push the
B button.
2. Record the new
OGM after a long
beep.
3. When tinishing,
push theB button.
•When you push any bun on. push tirmhy.
ForOGM Skip,
push the Q
button.
The unit will
play back.
•For Back Space,
push the □
button.
• For Skip Fonward,
push the □
button.
•To record the ICM
from the
beginning of the
tape, push the Q
button.
•To save the ICM,
hang up after
playback.
•To record a
marker message,
speak after
hearing 2 beeps.
Other Features ......................................................................................................... 3-6
How to Store a Secret Phone Number
...............................................................
3-6
Mute Operation...................................................................................................... 3-7
Flash Button Usage
.............................................................................................
3-7
Tone Button Usage .............................................................................................. 3-7
Combination Dialing............................................................................................. 3-7
Outside Line or Computer Accessed Line (Pause Usage)................................ 3-7
Page 41

Manual Dialing and Reception
Making a Call
■ Using the Handset
1 Lift the handset and dial the phone number.
2 Speak with the other party.
3 Hang up the handset when finished.
■ On-hook Dialing
1 PushSP-PHONE.
2 Dial the phone number and speak.
Receiving a Call
1 Lift the handset or push SP-PHONE and speak.
Redialing
You can redial the last dialed number by simply pushing
the REDIAL button.
1 Push REDIAL if the line is busy.
•The Display will show the dialed phone number.
3 When finished, push SP-PHONE again.
When using the handset:
Depressing the REDIAL button causes the last number
to be redialed once.
When using the speakerphone:
(Automatic Redialing)
The unit will automatically redial the last number dialed
up to 15 times within a 10-minute period.
•The SP-PHONE indicator will blink slowly.
•During the pause between each redial, the display
will show the following message.
REDIAL MODE
•To cancel the automatic redialing, push the FLASH
button.
3-1
Page 42

Switching to Hands-free or Handset
Operation during a Conversation
You may choose to switch to the handset or the
speakerphone during a conversation.
Handset Hands-free
Switch to
1 Push SP-PHONE and continue speaking.
2 Replace the handset onto the cradle.
•If you replace the handset onto the cradle before
pushing the SP-PHONE button, the conversation
will be cut off.
Hands-free Handset
Switch to
1 Lift the handset while speaking in a Hands-free
Operation.
HELPFUL HINTS FOR HANDS-FREE:
•If it is difficult to hear the other party’s voice when using the speakerphone:
Raise the sound level using the SPEAKER VOLUME control.
•Lower the sound level if the other party has difficulty hearing you.
•Absorbing echoes:
Use this unit in a room which has curtains or carpeting.
•To avoid lost or broken conversations:
If you and the caller speak at the same time, parts of your conversation will be lost. To avoid this, speak alternately.
3-2
Page 43

Speed Dialing and One-Touch Dialing
SPEED DIALING:
The unit allows keys "0” to “9” on the dial pad to be used for an additional 100 memory stations. These stations can then be
accessed by dialing two digits (“00" through “99"). Each station is capable of storing 30 digits.
ONE-TOUCH DIALING:
The unit is also equipped with ten One-Touch dialing stations (using the Direct Call buttons), each of which consists of two
locations: Telephone and FAX Number. Each location (Telephone/FAX No.) is capable of storing 30 digits.
Programming the Phone Numbers for Speed Dialing
•Be sure that the handset is on the cradle and that the
SP-PHONE button is off.
Push FUNCTION.
Enter the Station No. (00 to 99,2 digits).
(e.g. If the Station No. is 46.)
3 Enter the telephone number, then push
AUTO/MEMORY. (e.g. Phone number is 234-5678.)
4 Push FUNCTION to end the operation.
You may also store FAX numbers into the
Speed Dial keys similarly.
Correcting an error white programming:
Push the STOP/CLEAR button instead of pushing the
AUTO/MEMORY button and then re-program the
correct number.
•The new entry will be cleared and the previous
storage will remain untouched.
To print out the stored phone number, see page 1-17.
•The display will show the entered telephone
number.
•To store phone numbers in succession, repeat
steps 2 and 3.
3-3
Page 44

Speed Dialing and One-Touch Dialing
Programming the FAX/Phone Numbers for One-Touch Dialing
•Be sure that the handset is 1 Push FUNCTION,
on the cradle and that the
SP-PHONE button is off.
Storir^^PhbneNo.
FR^teibbhQne number memory location)
№)(
(into the FAX number memory location)
(cont.)
2 Push a DIRECT CALL button,
(e.g. If the Direct station No. is 4.)
3 Enter the telephone number, then push
AUTO/MEMORY. (e.g. Phone number is 123-4567.)
2 Push a DIRECT CALL button, then push MODE to
enter the FAX No. (e.g. If the Direct station No. is 4.)
3 Enter the FAX number, then push AUTO/
MEMORY, (e.g. Phone number is 765-4321.)
•The display will show the entered telephone
number.
•To store telephone numbers in succession, repeat
steps 2 and 3.
•The display will show the entered FAX number.
•To store FAX numbers in succession, repeat
steps 2and3.
•After pushing the Direct Call button, you must push
the MODE button to store a FAX number into the
FAX memory location.
3-4
Page 45

Speed Dialing and One-Touch Dialing (cont.)
4 Push FUNCTION to end the operation.
Correcting an error while programming:
Push the STOP/CLEAR button instead of pushing the
AUTO/MEMORY button and then re-program the
correct number,
•If a number was previously stored at this location, it
would remain intact.
To print out the stored numbers, see page 1-17.
To erase the stored numbers:
Example: To erase the number in memory
station “02".
1 Push FUNCTION.
Dialing
1 Lift the handset or push SP-PHONE.
Push AUTO and then push the Station No.
(e.g. If the Station No. is 12.)
•You can also erase the stored phone/FAX number
for One-Touch Dialing by pushing the DIRECT
CALL button instead of the memory station at
step 2.
Be sure to push the MODE button after pushing
the DIRECT CALL button when you erase the
FAX number of the FAX memory location.
Using One-Touch Dialing;
Push DIRECT CALL.
(e.g. If the Direct station No. is 3.)
•“T" indicates telephone memory location and
‘‘3” the station No.
NOTE:
When you push the DIRECT CALL Button;
•If a document has been placed onto the
DOCUMENT holder, the unit will dial the number
using the FAX memory location.
At this time, the LCD display will show “F”.
•if the DOCUMENT holder is empty, the unit will
dial the number using the telephone memory
location.
3-5
Page 46

other Features
How to Store a Secret Phone Number
This function is useful for keeping a FAX/Phone No.
(or a portion of it) secret, when you print out the list of
phone numbers, using the Printout Function.
(Refer to “Printout Function” on page 1-17.)
Be sure that the handset is on the cradle and that the
SP-PHONE button is off.
Example;
Store the phone No. 123-4567 into the telephone memory
location as a secret No.
1 Push FUNCTION.
2 Push a DIRECT CALL button,
(e.g. If the Direct station No. is 4.)
Enter the telephone number.
Push AUTO/MEMORY.
(TEL LIST Example]
TELEPHONE NO. LIST >>
TEL
NO
T123-456
01
T321-854
02
T[ ^ 1
03
7951-5624
04
05
secret
phone- No
NOTE;
When you print out your list of phone number, the
secret numbers will not be printed.
(Refer to TEL LIST Example as shown below.)
FRX NO
T452-6523
01
T784-6589
02
T126-5468
03
T841-5847
04
05
3-6
Page 47

other Features
(cont.)
Mute Operation
Use this feature when you do not want your voice to be
heard by the other party.
1
Push MUTE.
To resume the conversation;
Push the MUTE button again.
•The MUTE indicator will go out.
Fiash Button Usage
You can access some of the features of your host PBX by
using the FLASH button instead of the Hookswitch. This is
done by pushing the FLASH button lightly when required.
“FLASH” can also be stored in memory the same as
“Storing Phone Numbers" on page 3-3.
Tone Button Usage
If you wish to change from Pulse to Tone white dialing you
may do so by pressing, the “TONE (*)” button instead
of changing the DIALING MODE selector.
When you hang up, the unit will automatically return to the
Pulse mode.
Outside Line or Computer
Accessed Line
(Pause Usage)
Using the PAUSE button function during a dial operation
is helpful when accessing an outside line or a computer
accessed long distance service.
a One pause is required when waiting for an
outside dial tone.
Example (PBX):
Some PBXs require this pause during an automatic
redial.
Two pauses are required when waiting for a
computer tone from long distance service
companies such as MCI, SPRINT, METRO and
others.
Example;
Local access telephone number for the alternate long
distance service company 123-5434,
Authorization no. 563478,
Long distance no. 901-210-9812
1235434
563478
PAUSE
-tone or pulse -
• tone only-
PAUSE
9012109812
Combination Dialing
Any of the following dialing combination is possible.
•Automatic and Manual Dialing
• Pulse and Tone Dialing
•Plural Memory Stations
•The above numbers are used as examples only.
NOTE:
• Pushing the PAUSE button once counts as
1 digit.
•Pushing the TONE button counts as 1 digit.
(Refer to "Tone button Usage”.)
3-7
Page 48

General Information
Table of Contents
Recording Paper Installation........................................................................4-i
Troubleshooting Guide..................................................................................4-2
Glossary of Terms ........................................................................................4-5
Page 49

Recording Paper Installation
Follow the steps below to install the recording paper.
Replace the recording paper roll when the end mark appears on the both sides of the paper (red line). When the roll is
finished, your facsimile will stop receiving and the LCD Display will show;
OUT OF PAPER
1 Push the LATCH button to open the cover.
Insert the paper shaft into the recording paper
(Panasonic KX-A101) and then insert the
recording paper as shown so that it feeds from
the top of the roil and a few inches of paper
extend out of the unit.
•Align the recording paper with two Alignment
marks.
Make sure that the recording paper is correctly
oriented. If it is reversed, no messages will be
recorded.
• To record the messages properly, make sure that
the recording paper is not slackened.
Close the cover carefully by pressing both ends
gently.
• If the LCD Display shows the message below
when you close the cover, close it again carefully.
CHECK COVER
4-1
Page 50

Troubleshooting Guide
Error Messages
CHECK COVER
OUT OF PAPER
POWER FAILED
BATTERY LOW
CHECK OGM/BATT
CHECK MEMORY
SORRY, NO ANSWER
Cause & Remedy
If the message appears, close the cover again carefully.
When the recording paper is finished, replace it.
•When the AC cord is plugged.
• If a power failure occurs,
restored.
If this message appears, the batteries have become weak and should be
replaced.
•The batteries should be replaced, since they are discharged.
•The OGM should be re-recorded and the present time should be
reprogrammed, since they are erased.
If this message appears, Phone/Fax numbers and your selections are
erased, since the built-in lithium battery has become weak. Consult with
specified Panasonic Factory Servicenter.
When the document does not transmit.
Try again.
i, this message will appear after the power is
CHECK DOCUMENT
WAIT, OVERHEATED
CHECK ICM TAPE
•When you transmit a document which is longer than 600 mm, this
message will appear. (The alarm may sound.) Open the cover and
remove the document.
•If a document is jammed during transmission, this message will appear.
Open the cover then remove the jammed document.
When copying or receiving documents for a long time, the unit may
overheat. (The ALARM indicator will light.) In this case, leave the unit
alone and allow the unit to cool.
ICM tape is full. Push the REW button to reset the tape or use 2-side of the
tape.
4-2
Page 51

Troubleshooting Guide
(cont.)
Problem
The ALARM indicator lights during
transmission.
Recordirig image is scratchy and cannot be read
completely.
_________________________________
The document Is not pulled into the unit.
V
________________________
The other party complains that documents are
being received with distorted ietters.
L
________________________
.
r
The unit has been set the automatic Answer
mode, but a document cannot be received
automaticaiiy.
V
Cause & Remedy
FACSIMILE
•Confirm whether the cover is ciosed compietely or not.
•When you transmit a document which is longer than
600 mm, the aiarm may sound. Open the cover and remove
the document.
•If you have call waiting service, it may have been activated
by another teiephone call. Re-connect the unit to a iine that
does not have cali waiting service.
The Sender transmitted a light density document. Have the
other Sender darken the density of a document {e.g. by
copying) then have them transmit it again.
If the document is not properly inserted into the DOCUMENT
holder, it may not be pulled into the feeder. Insert the
document sufficiently until it stops.
_________
•Someone may have used a telephone connected in parallel
with the unit.
•If you have call waiting service, it may have been activated
by another telephone call. Re-connect the unit to a line that
does not have call waiting service.
Confirm whether you have recorded the following OGM-“To
send a FAX, push the asterisk button." or not. See page
1 -5. If you cannot transmit, see page 1 -6.
J
J
>1
J
When using an automatic diaier (One-Touch
Transmission), 1 cannot diai the other party’s FAX
number.
V
r
The START/COPY indicator fiashes for about
40 seconds after your unit receives a cail
automatically but nothing is recorded.
1
f
The unit does not operate properly in telephone
mode, answering machine mode and/or
facsimile mode.
V
f
When 1 receive or copy a document whose
background is very dark or containing photographs,
the unit may produce a high tone.
^ .
Confirm whether the FAX number has been stored into the
FAX memory station or not.
When you place your document into the unit, the unit will
automatically select the FAX memory station.
The caller hang up during or immediately after the playing of
the OGM. This may occur if the disconnect single is not
transmitted from the Central Office, and your unit is in normal
condition.
Push the RESET button, (found on the bottom of the unit)
If the unit does not operate properly even if pushing the RESET
button, unplug the AC cord and then plug it in again after
1 minute.
This is quite normal.
---------------------------------------------------------------------
4-3
\
J
\
J
J
\
)
Page 52

Troubleshooting Guide
(cont.)
Problem
The unit does not work when I push buttons.
I cannot remove the cassette from the unit.
r
The unit has been set to the Automatic Answer
mode, but no Incoming Messages have been
recorded.
When the tape is played back, the sound level is
low, even if the SPEAKER VOLUME control is
turned up fully.
I have played back all the recorded messages
and I want to record the next phone call after the
last previously recorded messages.
Cause & Remedy
ANSWERING MACHINE
Push the RESET button, (found on the bottom of the unit)
If the unit does not operate properly even if pushing the
RESET button, unplug the AC cord and then plug it in again
after 1 minute.
•The microcassette is broken (cut, worn out or twisted) or
not inserted. Replace the cassette with a new one.
•The OGM is recorded improperly. Record a new OGM.
•The AUTO/FAX selector is set to the “FAX” position.
Change the selector to the “AUTO” position.
Clean the heads. (See “Maintenance” on page 17 in
INSTALLATION MANUAL)
When the AUTO ANSWER indicator starts blinking, wait for
7 seconds. When the AUTO ANSWER indicator is off, push
the AUTO ANSWER button. The unit will be ready to record
next phone call.
1 push the buttons of a remote phone, but the
unit does not respond.
r
Some Incoming Messages have not been fully
recorded.
V ______________________ _____________________
f
The unit does not ring.
The caller suddenly cannot hear my voice
during a conversation.
V_______________________________________________________
• Make sure that you are using the correct code number.
•Record the Outgoing Message in a quiet place.
_y
Set the CPC to "B”. (See “Initial Preparation" on page 8 in
INSTALLATION MANUAL.)
J
A
•The RINGER VOLUME selector is set to “OFF”. Should be
set to “HIGH" or "LOW".
J
A
Look at the MUTE indicator. If it is tit, push the MUTE button
to resume the conversation.
J
4-4
Page 53

Glossary of Terms
One-Touch Transmission:
By placing the document onto the DOCUMENT holder and pushing the DIRECT CALL button, the
unit will automatically dial the number in the FAX memory location and transmit the document.
JOURNAL: This is a report of the transmissions and receptions.
TX REPORT:
Individual Transmission Report
Each time a document is transmitted, this function will cause a record of the transmission to be
printed.
OGM: Outgoing Message
ICM: Incoming Message
CPC: Calling Party Control
Calling party control enables the unit to detect when a caller hangs up.
Automatic Answer Mode:
When a call is received, the unit will automatically answer, record voice messages and/or received
documents.
AUTO-LOGIC (One-Touch Operation):
At the touch of the PLAYBACK/PAUSE button, the unit will automatically rewind, playback all the
recorded messages and stop. After 7 seconds, the unit will reset itself to the Automatic Answer
Mode.
VOX: Voice Activated Circuit
The caller can leave a message for any length of time for as long as he/she continues to speak.
FLASH: If you connect your unit to PBX, you may access some features of your PBX by using the FLASH
button instead of the hookswitch.
The following sections can be found in INSTALLATION MANUAL.
•Connection
•Battery Installation
•Recording Paper Installation
•Cassette Tape Installation
•Document Tray Installation
• Installation of the Card for Speed Dialing
• Initial Preparation
•Setting the Day and Time
• Setting the Logo and/or Identification (ID) Number
• Programming the Function
•Serivce Function for Facsimile
• Printerand MotorTest
•Maintenance
•Telephone Line Connection
•Cassette Tape
•Others
• Important Information
•Accessory Order Information
• For Your Future Reference
•Specifications of Facsimile
•Servicenter Directry
•Warranty
4-5
Page 54

Panasonic Company
Division of Matsushita Electric Corporation of America
One Panasonic Way, Secaucus, New Jersey 07094
Panasonic Hawaii, Inc. <“PHi”)
99*859 Iwaiwa Street, Honolulu, Hawaii 96808-0774
Panasonic Sales Company (“PSC”),
Division of Matsushita Electric of Puerto Rico, Inc.
Ave. 65 De Infanteria, KM 9.7 Victoria Industrial Park, Carolina, Puerto Rico 00630
PQQX5713ZA F1088N0
 Loading...