


Panasonic KX-F160 User Manual

Plain Paper FAX
Model No. KX-F1600
Contents
Setting up the Unit for Printing
Using the Unit with Windows
g
Using the Unit with MS-DOSgApplications
Troubleshooting and Routine Care
Specifications
Please read these Operating Instructions before
using the unit and save for future reference.
FOR OPERATION ASSISTANCE,
CALL 1-800-HELP-FAX
OPERATING
INSTRUCTIONS
FOR PRINTER
¡This product is designed for use in the United
States of America, and may not operate in other
countries. (See page 62 for more details.)
¡Este producto ha sido diseñado para su uso en los
Estados Unidos de América, y puede no funcionar
correctamente en otros países. (Consulte la página
62 para tener más detalles.)

2
End-User License Agreement
THIS IS A LEGAL AGREEMENT BETWEEN YOU AND PANASONIC. CAREFULLY READ ALL THE TERMS
AND CONDITIONS OF THIS AGREEMENT PRIOR TO OPENING THE PACKET OF SOFTWARE
PROGRAM. OPENING THE PACKET INDICATES YOUR ACCEPTANCE OF THESE TERMS AND
CONDITIONS. If you do not agree to these terms and conditions, return the unopened packet and the other
components of the Panasonic product to the place of purchase and your money will be refunded. No refunds
will be given for the product that have an opened packet or missing components.
1. COPYRIGHT:
Panasonic has the right to license or has been granted to license the enclosed software program
(“SOFTWARE”), developed and copyrighted by Kyushu Matsushita Electric Co., Ltd. or its licensor
(“Licensor”). You acknowledge that you are receiving only a LIMITED LICENSE TO USE the SOFTWARE
and related documentation, and that you shall obtain no title, ownership nor any other rights in or to the
SOFTWARE and related documentation, all of which title and rights shall remain with Licensor and
Panasonic.
2. LICENSE:
(1) You have the non-exclusive right to use the one copy of the SOFTWARE on a single computer used by
single user. Installation of the SOFTWARE on a network server for the purpose of distribution to one or
more other computers shall not be granted in this Agreement. (2) You may not copy, reproduce, or permit
to be copied or reproduced, the SOFTWARE or related documentation for any purpose, except that you
may either (a) make a reasonable quantity of copies of the SOFTWARE solely for backup or archival
purposes, or (b) transfer the SOFTWARE to a single hard disk, provided that you keep the original solely
for backup or archival purposes. All other copies of the SOFTWARE are in violation of this Agreement. (3)
You may not rent or lease the SOFTWARE, but you may transfer your right under this License Agreement
on a permanent basis, provided that you transfer this Agreement, all copies of the SOFTWARE, all related
documentation and your Panasonic product, and the recipient thereof agrees the terms of this Agreement.
(4) You may not reverse engineer, decompile or disassemble the SOFTWARE, except that in European
Union and European Free Trade Association, you may have the limited right to reverse engineer,
decompile or disassemble the SOFTWARE solely to the extent specifically permitted by the terms and
conditions of Article 6 of the European Community’s Directive for the Legal Protection of Computer
Programs, OJL 122/42 (17 May 1991). (5) You may not use, copy, modify, alter, or transfer the
SOFTWARE, or any copy thereof, in whole or in part, except as expressly provided in this Agreement.
3. TERM:
This license is effective until terminated. You may terminate this Agreement at any time by destroying the
SOFTWARE and related documentation and all copies thereof. This license will also terminate if you fail to
comply with any term or condition of this Agreement. Upon such termination, you agree to destroy all
copies of the SOFTWARE and related documentation.
4. LIMITED WARRANTY:
Within ninety (90) days of your receipt of the SOFTWARE, Panasonic warrants that the storage media on
which the SOFTWARE are furnished is free from defect in materials and workmanship under normal use,
and that it will repair or at its option replace any defective media at no charge to you, provided that such
defective media is returned to Panasonic within such ninety (90) days period.
5. LIMITATION OF LIABILITY:
EXCEPT AS STATED ABOVE, NEITHER PANASONIC NOR PANASONIC’S SUPPLIER MAKES OR
PASSES ON TO YOU OR OTHER THIRD PARTY, ANY WARRANTY OR REPRESENTATION
INCLUDING, BUT NOT LIMITED TO, THE IMPLIED WARRANTY OF MERCHANTABILITY AND FITNESS
FOR A PARTICULAR PURPOSE.
WITHOUT LIMITING THE GENERALITY OF THE FOREGOING, NEITHER PANASONIC NOR
PANASONIC’S SUPPLIER WARRANTS THAT THE SOFTWARE WILL BE ERROR-FREE OR THAT IT
WILL MEET YOUR REQUIREMENTS. NEITHER PANASONIC NOR PANASONIC’S SUPPLIER SHALL
BE LIABLE FOR ANY DAMAGE SUFFERED BY YOU INCLUDING, BUT NOT LIMITED TO,
CONSEQUENTIAL, INCIDENTAL SPECIAL OR PUNITIVE DAMAGES. THE ABOVE LIMITATIONS
SHALL APPLY REGARDLESS OF THE FORM OF ACTION WHETHER IN CONTRACT, TORT

3
(INCLUDING NEGLIGENCE), STRICT PRODUCT LIABILITY OR OTHERWISE, EVEN IF SUCH PARTY HAS
BEEN ADVISED OF THE POSSIBILITY OF SUCH DAMAGES.
Trademarks
Canon and BJ are registered trademarks of Canon Inc.
Centronics is a registered trademark of Centronics Data Computer Corporation.
Epson is a registered trademark of Seiko Epson Corporation.
Epson LQ is a trademark of Epson America, Inc.
IBM is a registered trademark and IBM Proprinter is a trademark of International Business Machines
Corporation.
Microsoftg, Windows and MS-DOS are registered trademarks of Microsoft Corporation in the United States
and/or other countries.
All other trademarks identified herein are the property of their respective owners.
Copyright
This manual is copyrighted by Kyushu Matsushita Electric Co., Ltd. (KME) and its licensee. Under the
copyright laws, this manual may not be reproduced in any form, in whole or part, without the prior written
consent of KME and its licensee.
˛ Kyushu Matsushita Electric Co., Ltd. 1996
Using these operating instructions
This guide contains the following.
Setting up the Unit for Printing
Describes how to set up the unit for printing.
Using the Unit with Windows
Describes how to install the KX-F1600 printer driver for Windows and how to print in a Windows environment.
Using the Unit with MS-DOS Applications
Describes how to print from the MS-DOS applications.
Troubleshooting and Routine Care
Describes how to solve problems which may be encountered when using as a printer.
Specifications
Describes the summary of printer and paper specifications.
Refer to the operating instructions for fax on the following information:
—Important safety instructions
—Limited warranty
—Service center directory
—Maintenance
—Print cartridge guideline

4
Setting up the Unit for Printing
Table of contents
Connecting the unit to a computer RRRRRRRRRRRRRRRRRR 6
Selecting the print cartridge RRRRRRRRRRRRRRRRRRRRR 7
Turning the printer mode on/off RRRRRRRRRRRRRRRRRRR 7
Before loading paper RRRRRRRRRRRRRRRRRRRRRRRR 8
Selecting the print media RRRRRRRRRRRRRRRRRRRRR 8
Setting the paper thickness lever RRRRRRRRRRRRRRRRR 9
Setting the paper selection leverRRRRRRRRRRRRRRRRRR 9
Loading paperRRRRRRRRRRRRRRRRRRRRRRRRRRR 10
Using automatic sheet feed RRRRRRRRRRRRRRRRRRRR 10
Using manual feedRRRRRRRRRRRRRRRRRRRRRRRR 11
Loading envelope RRRRRRRRRRRRRRRRRRRRRRRRR 12
Loading commercial #10 envelopeRRRRRRRRRRRRRRRRR 12
Loading Envelope DL envelopes RRRRRRRRRRRRRRRRR 13
Using the envelope modeRRRRRRRRRRRRRRRRRRRRR 13
Using buttons for printer RRRRRRRRRRRRRRRRRRRRRR 14
Using the Unit with Windows
Installing the printer driver for Windows RRRRRRRRRRRRRRRR 15
Installing the printer driver for Windows 3.1 or 3.11 RRRRRRRRR 15
Installing the printer driver for Windows 95 RRRRRRRRRRRRR 16
Setting as the default printer RRRRRRRRRRRRRRRRRRR 16
Printing documents from Windows applications RRRRRRRRRRRR 17
Printing documents in black and white RRRRRRRRRRRRRRR 17
Printing documents in color RRRRRRRRRRRRRRRRRRRR 18
Setting up the printer driver RRRRRRRRRRRRRRRRRRRRR 19
Selecting printer options in Main dialogRRRRRRRRRRRRRRR 19
Using Settings... dialogRRRRRRRRRRRRRRRRRRRRRR 22
Using Papers... dialog RRRRRRRRRRRRRRRRRRRRRR 25
Printer driver information RRRRRRRRRRRRRRRRRRRRR 26
Changing the default dialog language RRRRRRRRRRRRRRR 27
Removing the printer driver RRRRRRRRRRRRRRRRRRRR 27
Using the Unit with MS-DOS Applications
Selecting a printer driver with MS-DOS applications RRRRRRRRRR 28
Selecting a printer emulation mode RRRRRRRRRRRRRRRRRR 29
Typefaces and print styles in each emulation mode RRRRRRRRR 29
Setting the printer emulation RRRRRRRRRRRRRRRRRRR 30
Customizing settings in each emulation mode RRRRRRRRRRRRR 30
Changing settings for LQ emulation RRRRRRRRRRRRRRRR 31
Changing settings for BJ emulation RRRRRRRRRRRRRRRR 32
Printing a printer setup list and a printer test list RRRRRRRRRRR 34
Selecting print qualityRRRRRRRRRRRRRRRRRRRRRRRR 35
Command summaries in each emulation mode RRRRRRRRRRRR 36
Epson LQ mode command summaries RRRRRRRRRRRRRRR 37
BJ mode command summaries RRRRRRRRRRRRRRRRRR 39
Character sets in each emulation modeRRRRRRRRRRRRRRRR 42
Epson LQ Character Set RRRRRRRRRRRRRRRRRRRRR 42
BJ Character Set RRRRRRRRRRRRRRRRRRRRRRRR 44

5
Troubleshooting and Routine Care
Error messages on the displayRRRRRRRRRRRRRRRRRRRR 50
Before requesting help RRRRRRRRRRRRRRRRRRRRRRR 51
Paper loading problems RRRRRRRRRRRRRRRRRRRRR 51
Print quality problems RRRRRRRRRRRRRRRRRRRRRR 52
Color printing problemsRRRRRRRRRRRRRRRRRRRRRR 52
Problems with Windows applicationsRRRRRRRRRRRRRRRR 53
Problems with non-Windows applicationsRRRRRRRRRRRRRR 54
Other printing problems RRRRRRRRRRRRRRRRRRRRR 54
Replacing the print and ink cartridge RRRRRRRRRRRRRRRRR 55
Replacing the print cartridge RRRRRRRRRRRRRRRRRRR 55
Replacing an ink cartridge in the KX-FA151 color print cartridge RRRR 57
Cleaning the print headRRRRRRRRRRRRRRRRRRRRRR 58
Specifications
Paper specifications RRRRRRRRRRRRRRRRRRRRRRRR 59
Printer specifications RRRRRRRRRRRRRRRRRRRRRRRR 59
IndexRRRRRRRRRRRRRRRRRRRRRRRRRRRRRRR 63
6
3
Turn the unit and the computer on.
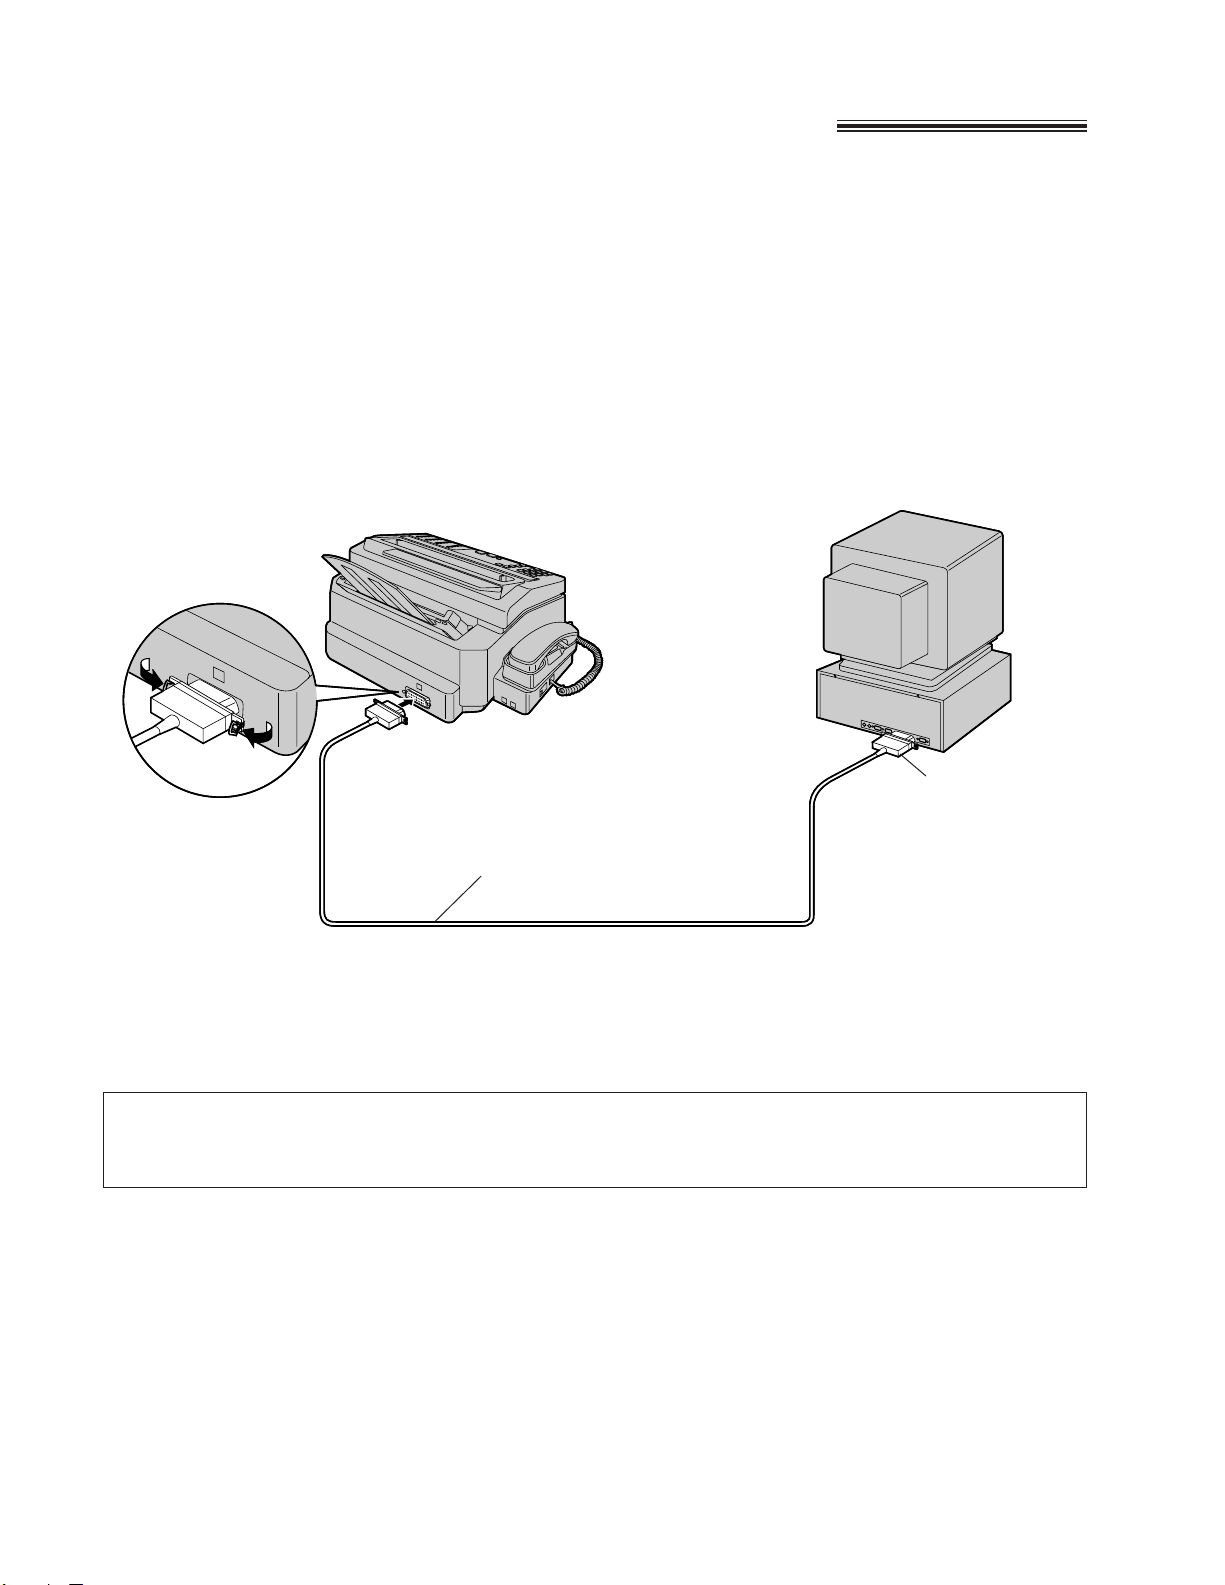
Connecting the unit to a computer
The unit has an 8-bit parallel interface jack, which allows you to use it with IBM PCs and compatible
computers. You need to purchase a Centronics-compatible, parallel interface cable from your dealer.
Note:
¡For reliable data communications and FCC Rules, use a shielded short parallel cable for printing, six feet or
less in length.
1
Turn off the unit by disconnecting the power cord.
Also turn off the computer.
2
Connect the parallel cable.
Parallel cable (not included)
To printer
interface
Your computer
For installing the print cartridge, power cord, stacker, tray, and other accessories, see the
operating instructions for fax.
7
Setting up the Unit
for Printing
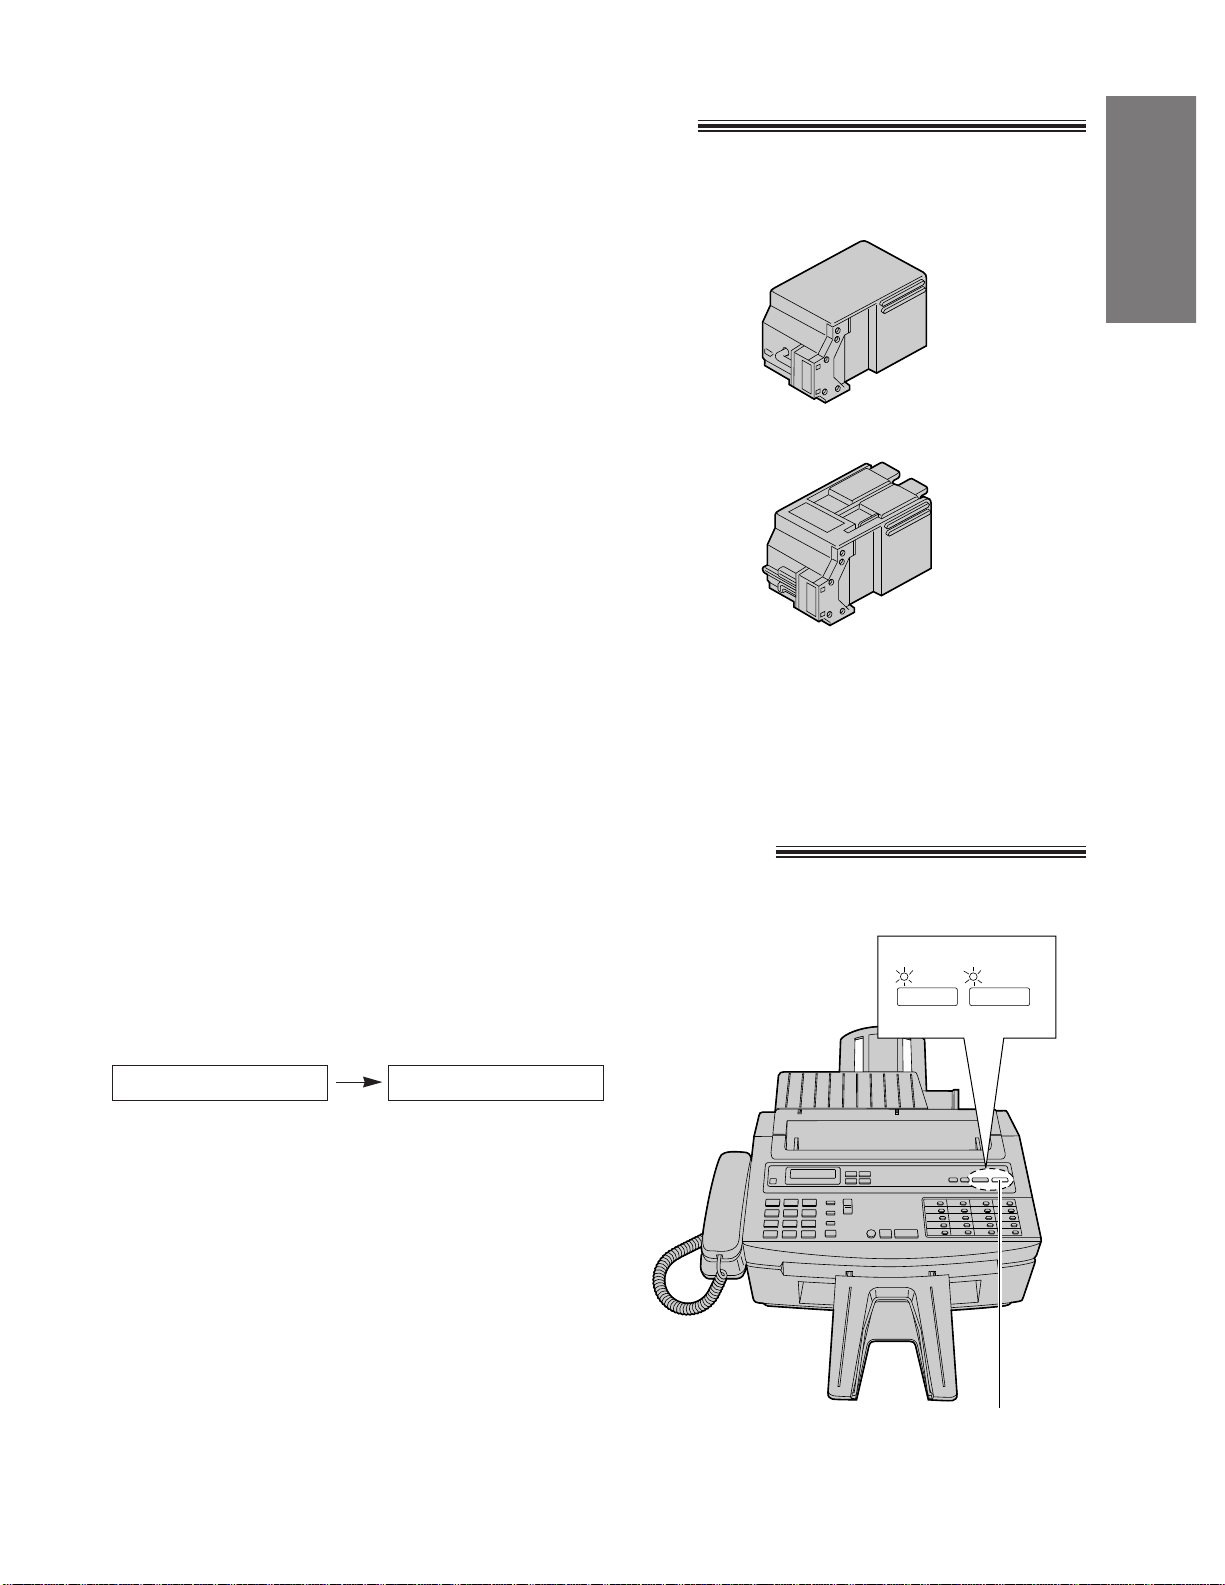
Selecting the print cartridge
The print cartridges that can be used are:
» Included print cartridge or KX-FA150 Print Cartridge
(option) for black and white printing
Use this cartridge for printing draft and monochrome
documents.
With this cartridge installed, your output prints twice as
fast as when the color cartridge is installed and you can
print documents with a higher resolution.
» KX-FA151 Color Print Cartridge (option) for color
printing:
Use this cartridge when you print a document in color.
For instructions on replacing the print cartridge, see page 55.
Note:
¡When changing print cartridges, always store the cartridge you are not using in the print cartridge container.
Turning the printer mode on/off
To use the unit as a printer, turn the printer mode on by
pressing (PRINTER).
¡The PRINTER indicator will light and the display will show
“PLEASE WAIT”.
After about forty seconds, the ON LINE indicator will light
and the printer mode is turned on.
To turn the printer mode off:
Press (PRINTER) again.
¡The PRINTER indicator will go out.
Note:
¡When the printer mode is turned on, the unit stores a
received fax document in memory and displays
“WAITING PRINT”. To print the stored document, turn the
printer mode off.
¡If you do not use the printer function for twenty minutes in
the printer mode, the unit will automatically print the
stored document.
PRINTER ONPLEASE WAIT
(PRINTER)
KX-FA150
KX-FA151
ON LINE
PRINTER

8
Before loading paper
Selecting the print media
You can print on the following print media.
Ink Jet Paper: This paper is specially developed for color printing with ink jet printers. Canon
Bubble Jet Paper LC-301 for BJC-4100 is recommended. Only letter size is
available.
Color Ink Jet Paper: This paper is specially designed for ink jet printers. The unit will produce sharp
and vivid color output on this high-grade matte paper. Canon Coated Paper LC101 for BJC-4100 is recommended. Letter and legal sizes are available.
Plain Paper: You can use regular copier paper, cotton bond papers, and typical letterhead. The
output quality on plain paper can vary depending on the quality of the paper used.
Ink Jet Transparencies: These clear overhead transparencies (also called Over Head Projection or OHP
film) are specially designed for ink jet printers. Other transparencies may cause
problems in your unit by either not feeding correctly or not allowing the ink to dry
properly. Use these transparencies to produce crisp, professional overhead
presentations. Canon Transparencies CF-102 for BJC-4100 is recommended.
Only letter size is available.
Ink Jet Glossy Paper: The paper is specially designed to achieve the highest possible color fidelity and
print quality. Canon Glossy Paper GP-101 for BJC-4100 is recommended. Only
letter size is available.
Resume Paper: These Canon Fabric Sheets FS-101 are specially designed for ink jet printers.
(Fabric Sheets) You can create your own cross stitch designs, pillows, holiday stockings, and
other imaginative craft and sewing projects. Legal size is available.
Ink Jet Back Print Film: This unique glossy paper allows you to print high quality color output such as
photographic images and graphics. These outputs are capable of being viewed
either by rear illumination, such as a light box, or as regular prints. Back print film
is a mylar-based translucent sheet. When viewed by a light box, back print film
provides a sharp, bright, and vivid presentation of special items such as
photographs, portraits, and graphics. Canon Back Print Film BF-102 for BJC-4100
is recommended. Only letter size is available.
Envelope: Commercial number 10 or Envelope DL is recommended.
Note:
¡For more details on paper specifications, see page 59.
9
Setting up the Unit
for Printing
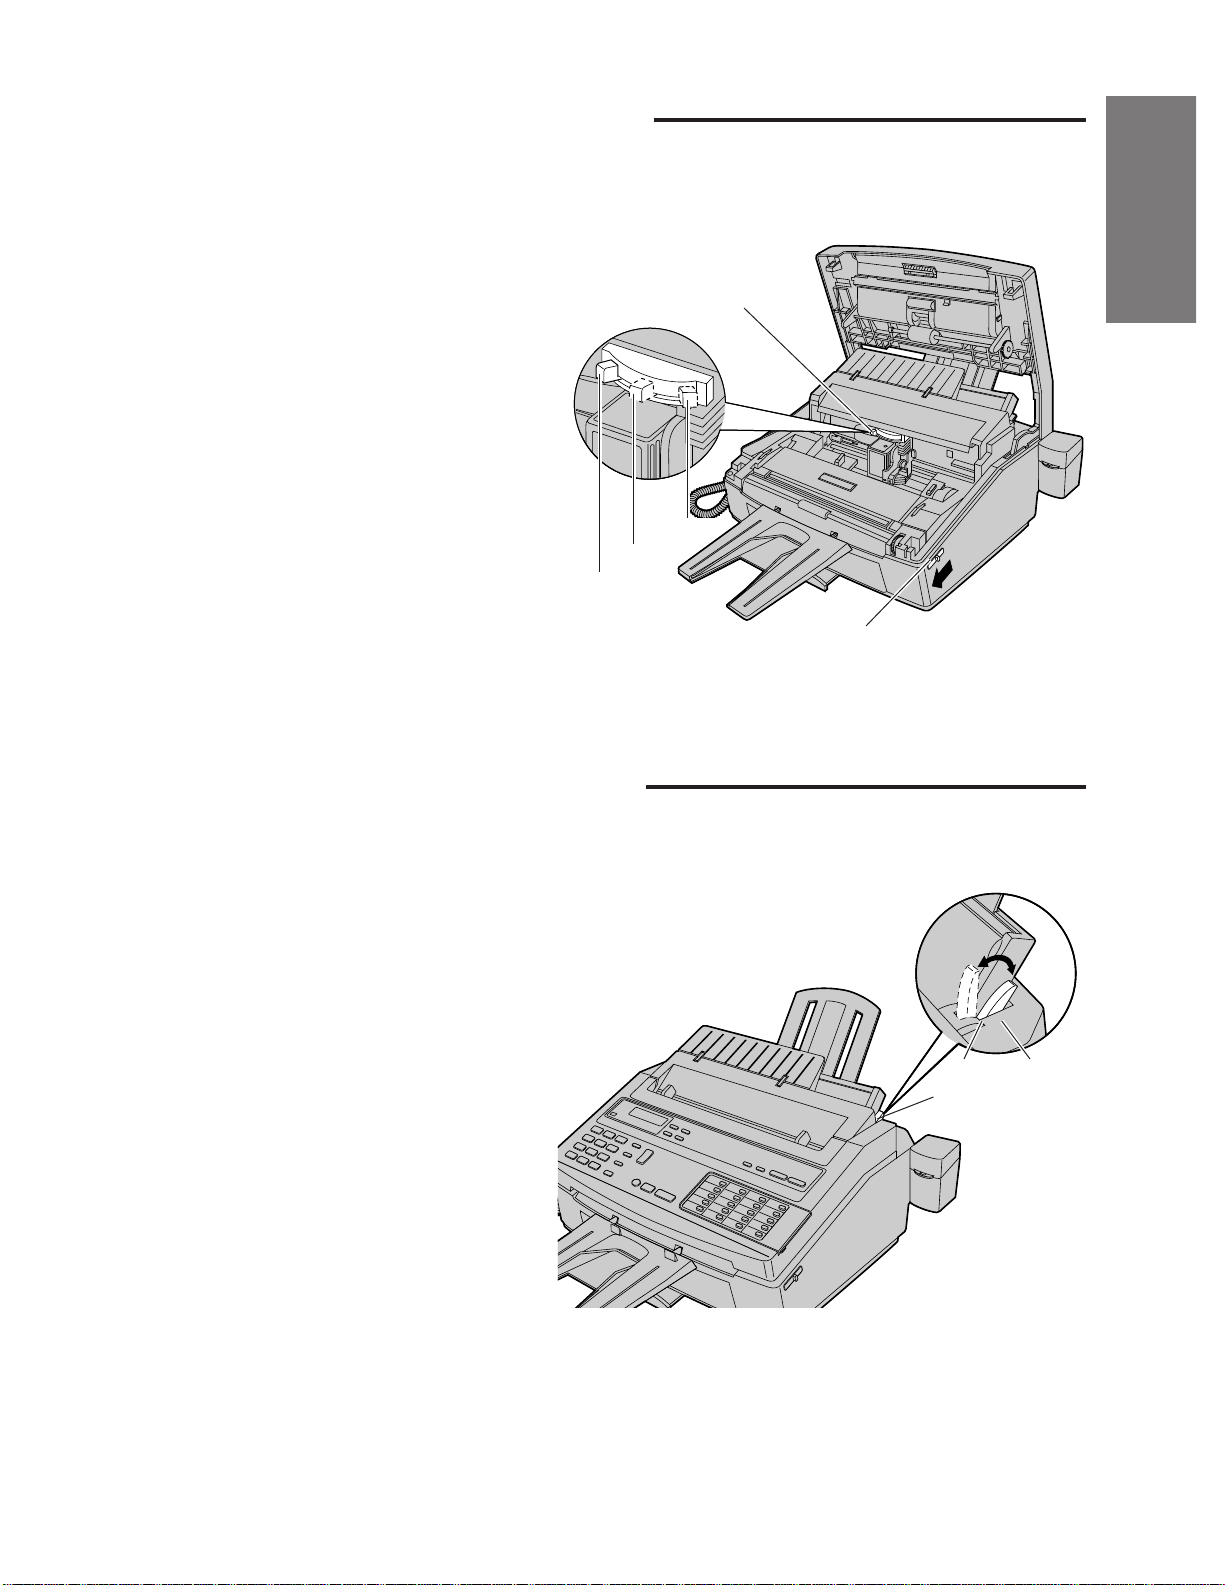
Setting the paper thickness lever
Use the paper thickness lever to adjust the distance between the print head and the paper to accommodate
different paper thicknesses.
1
Slide the front lid open lever towards you to
open the front lid.
2
Set the paper thickness lever to the correct
position.
¡For printing on ink jet paper or plain paper
using a black print cartridge, set to the left
position.
¡For printing on any type of paper using the
color print cartridge, or printing on color ink
jet paper, ink jet glossy paper, ink jet
transparencies, or ink jet back print film, set
to the center position.
¡For printing on thick paper or envelopes, set
to the right position.
Paper thickness lever
Setting the paper selection lever
You must set the paper selection lever according to the paper you use.
Be sure to remove any paper from the paper tray before setting the paper selection lever.
¡For ink jet paper, plain paper, color ink jet
paper, ink jet transparencies, or ink jet back
print films, set this lever to the back position .
¡For envelopes, ink jet glossy paper, thick
paper, and manual feed, set this lever to the
front position.
Note:
¡Do not move this lever after loading paper in the paper tray.
¡This lever is different from a lever on a typewriter or dot matrix printer. You need not pull it forward to load
paper.
Paper selection
lever
Front
Back
Left
Center
Right
Front lid
open lever
10
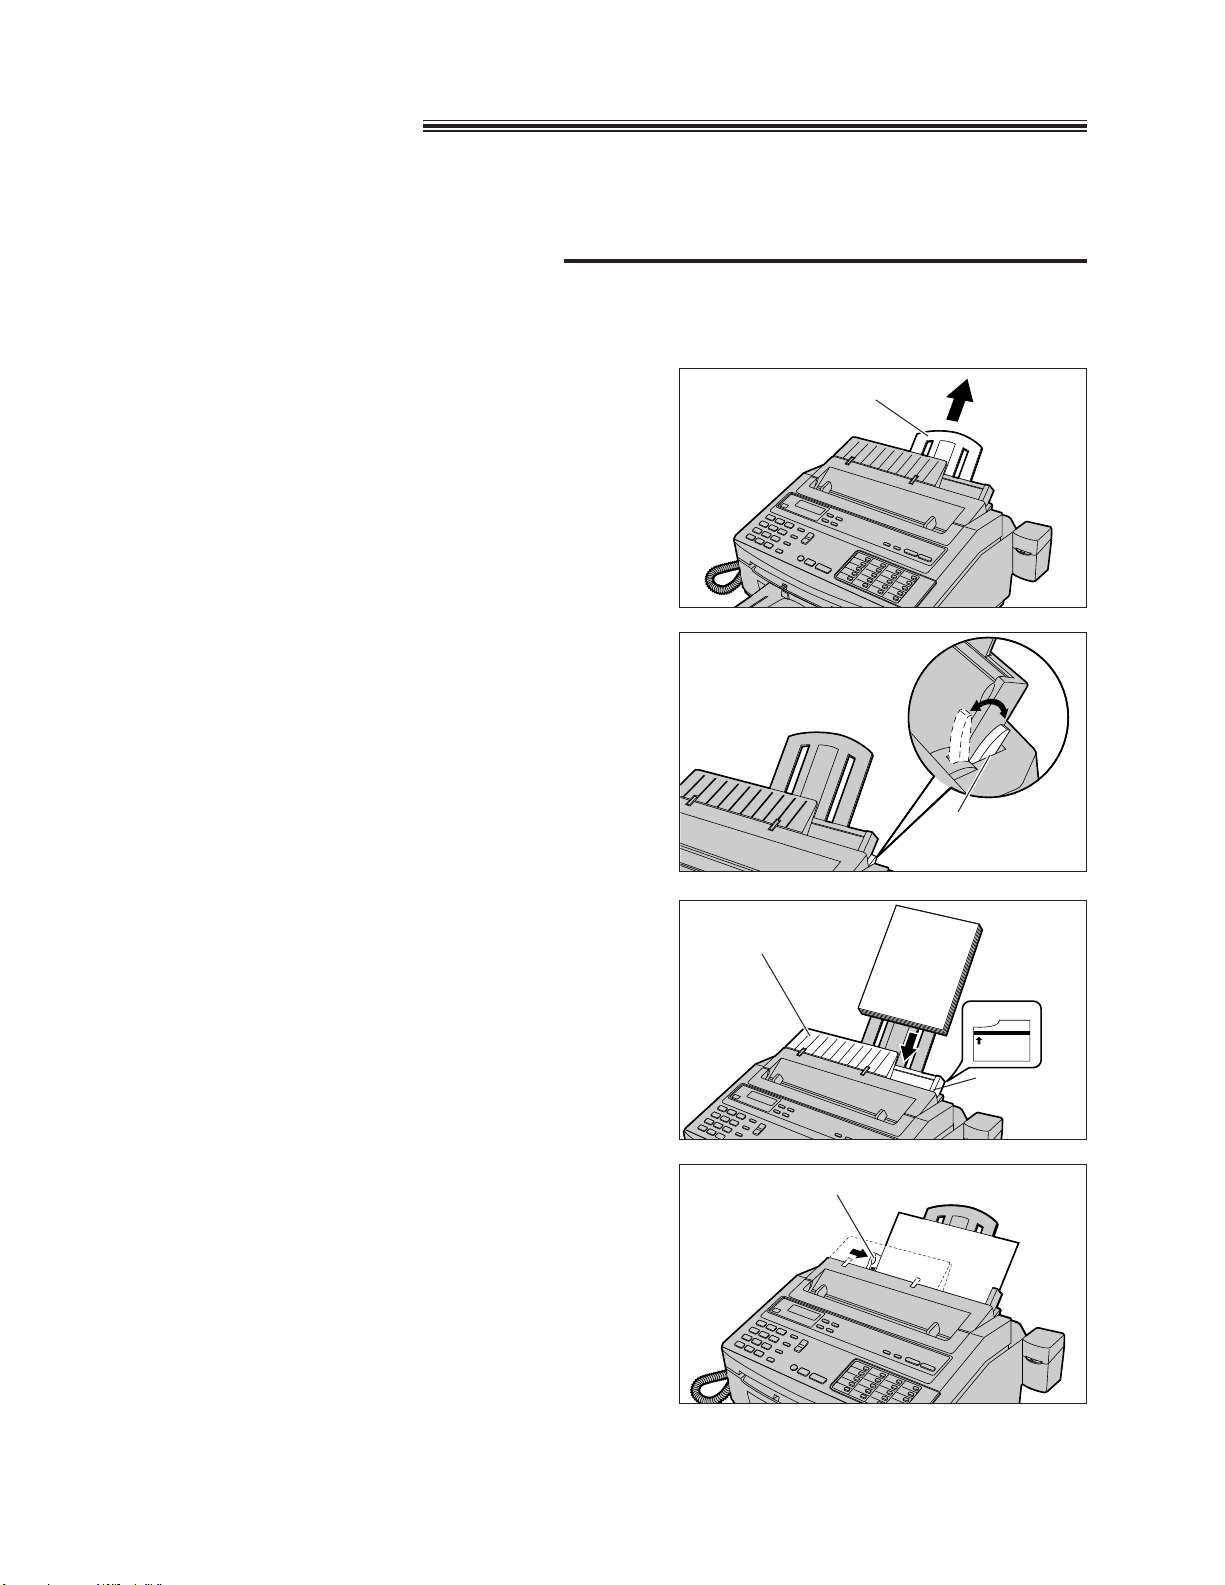
Loading paper
There are two paper feed procedures: automatic sheet feed and manual feed.
Using automatic sheet feed
Use this procedure for ink jet paper, ink jet transparencies and other media other than thick paper or resume
paper. You can stack about 100 sheets of plain paper (20 lb or 95 g/m2) in the paper tray.
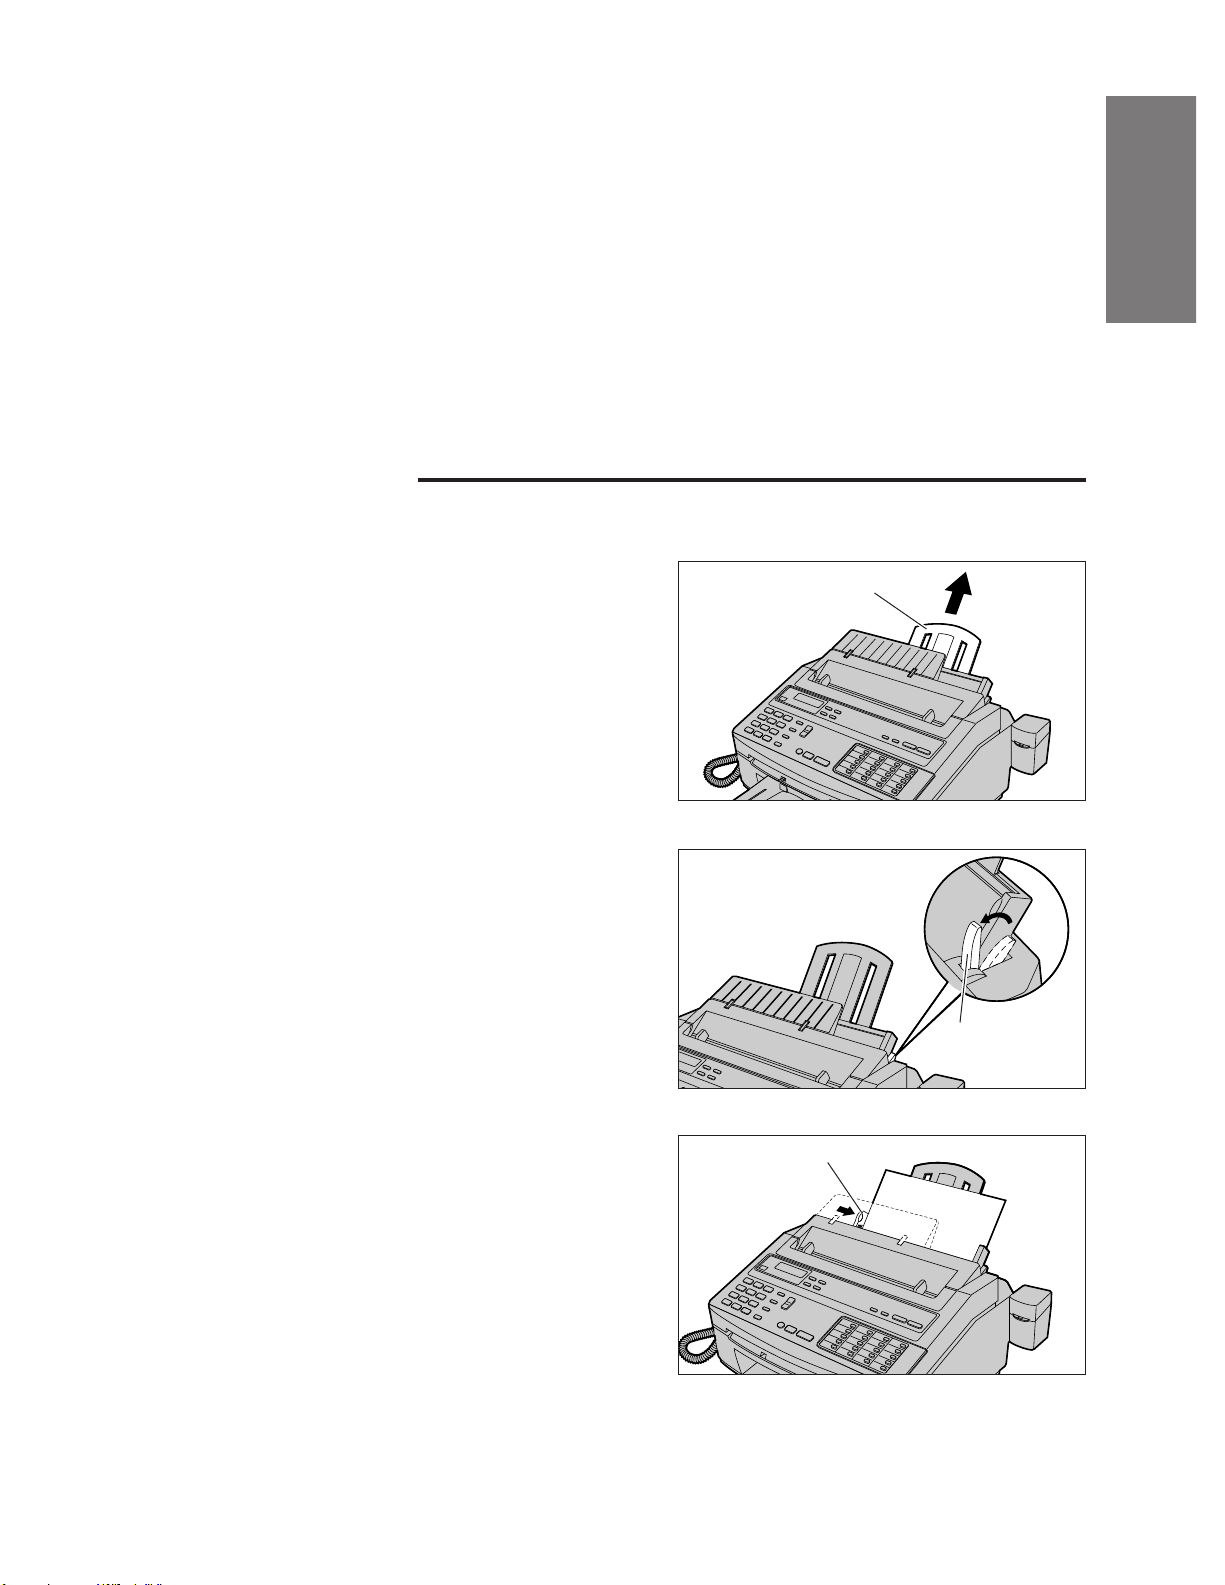
1
Pull the paper rest up until it stops.
¡Unless the paper rest is pulled up, a paper jam or
multiple sheet feeding may occur.
2
Set the paper selection lever to the correct
position.
¡
For ink jet paper, color ink jet paper, plain paper,
ink jet transparencies, or ink jet back print films,
set to the back position.
¡
For ink jet glossy paper, set to the front position.
3
Fan the paper and slide it into the paper tray.
¡Align the edge of the paper with the right edge of
the paper tray.
¡The height of the paper should not exceed the
limit mark on the paper tray.
¡If you have difficulty in sliding the paper, tilt the
document tray towards you then slide the paper
into the paper tray.
4
Adjust the paper guide.
Paper selection
lever
UPPER LIMIT
Limit mark
Paper rest
Paper guide
Paper tray
Document tray
11
Setting up the Unit
for Printing
Using manual feed
Use this procedure for thick paper (24 lb to 28 lb or 91 g/m2to 105 g/m2) or resume paper.
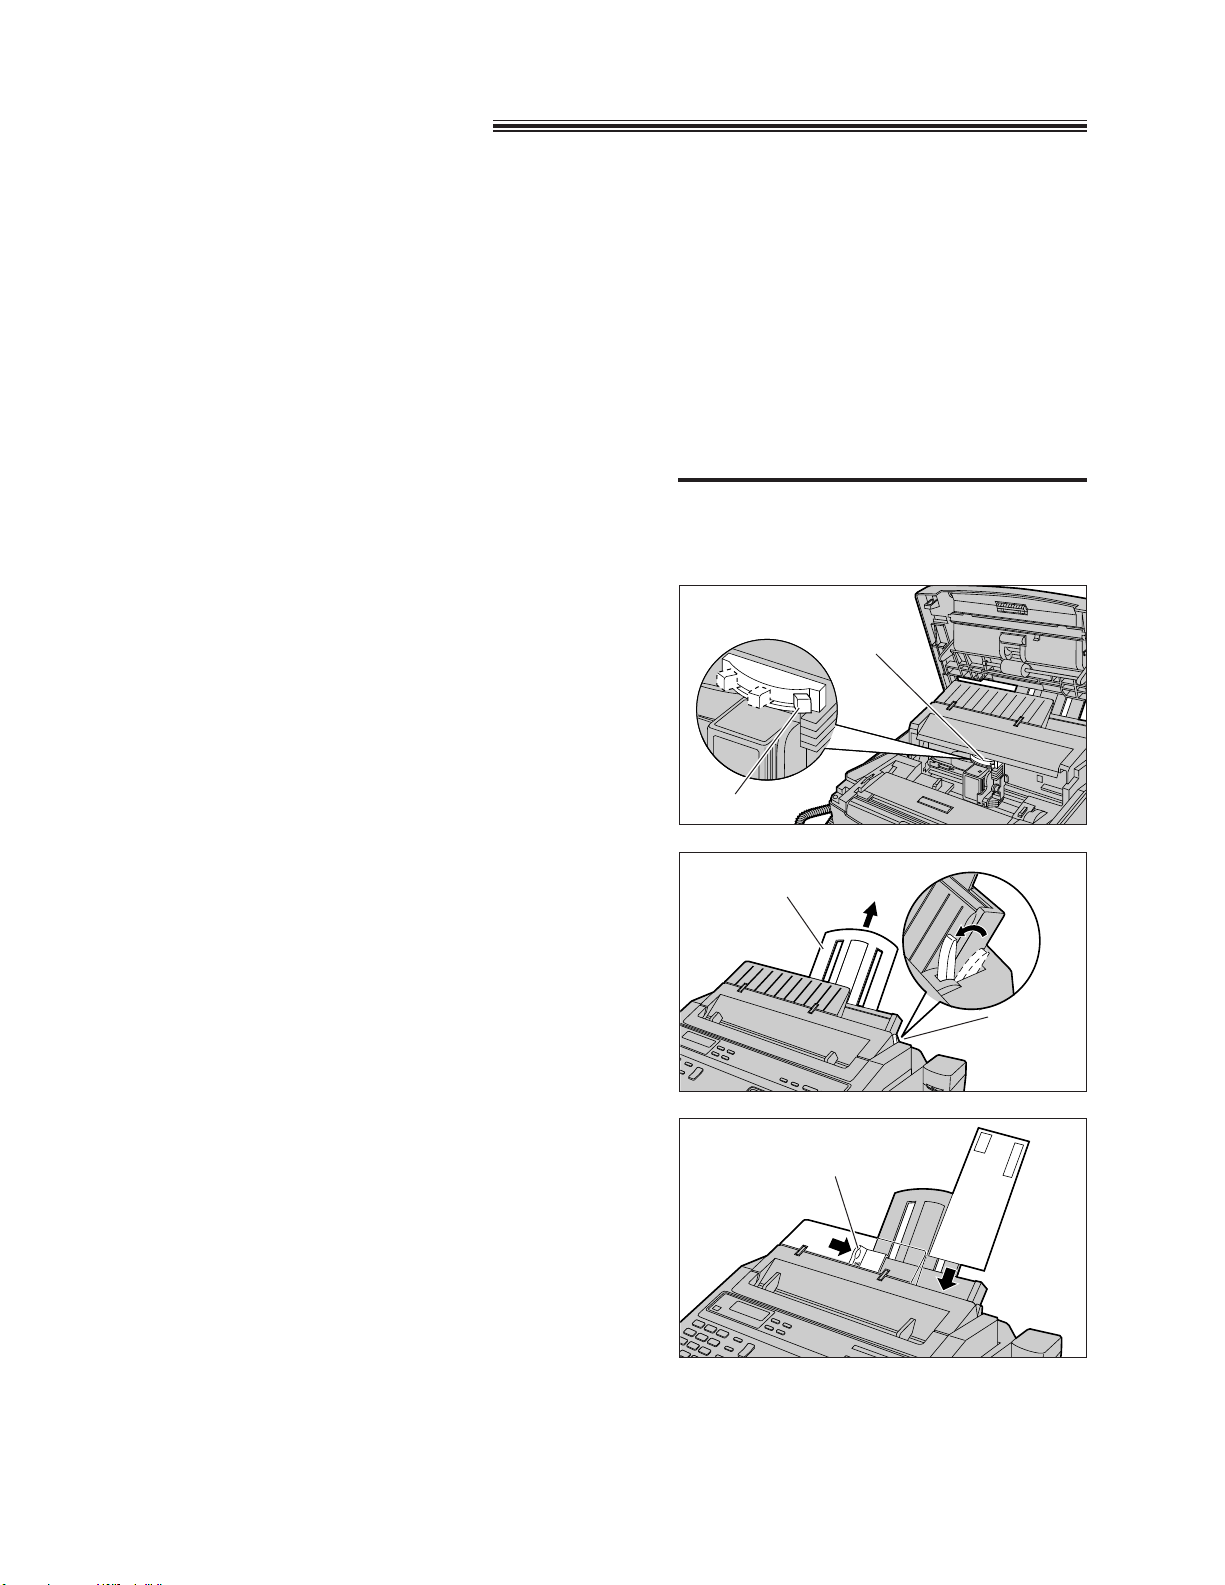
1
Pull the paper rest up until it stops.
2
Set the paper selection lever to the front position.
3
Insert a single sheet of paper into the paper tray.
¡Align the sheet with the right edge of the paper
tray.
¡Adjust the paper guide.
Note:
¡If you print from a Windows application, you must select Manual Feed in the printer driver.
Paper selection
lever
Paper guide
Note:
¡Do not insert paper of different thickness in the paper tray at same time. This may cause a paper jam.
¡Avoid extremely smooth or shiny paper that is highly textured. Also avoid coated, damaged, or wrinkled
paper and paper with a cotton and/or fiber content that is over 20%.
¡Avoid used paper for double-sided printing.
¡Do not use paper printed with this unit for double-sided printing with other copiers or printers, or a paper jam
may occur.
Note for loading transparencies:
¡Do not touch the printing area with your fingers. When you touch the film, the ink will smear.
¡When automatically feeding transparencies, remove each sheet after it is output. Otherwise the sheets may
stick together.
Paper rest
12
Loading envelope
You can stack up to 15 envelopes in the sheet feeder or you can manually feed envelopes one at a time.
U.S. Commercial number 10 envelopes and Envelope DL envelopes are recommended.
Important:
¡The following envelopes are not recommended because they may cause jams or smears, or may damage
your unit.
—Envelopes with windows, holes, perforations, cutouts, and double flaps.
—Envelopes made with special coated paper or deeply embossed paper.
—Envelopes using peel-off sealing strips.
—Envelopes in which letters have been enclosed.
Loading commercial #10 envelope
To load a commercial number 10 or a envelope that is longer than 83⁄4 inch (222 mm) in width, you must use
the manual feed and proceed as follows.
1
Make sure the paper thickness lever is set to the
right.
2
Set the paper selection lever to the front and pull
the paper rest up until it stops.
3
Insert a envelope printing side up.
¡
The envelope must be loaded with the shorter
side first to avoid a paper jam.
¡Adjust the paper guide.
Note:
¡If you are using the KX-F1600 printer driver, make sure the Orientation setting is set to landscape in Main
dialog. For details, see page 19.
Paper
thickness
lever
Right
Paper guide
Paper
selection
lever
Paper rest
AIR MAIL

13
Setting up the Unit
for Printing
Loading Envelope DL envelopes
When you use Envelope DL or envelopes that are shorter than 83⁄4 inch (222 mm) in width, you can load up to
15 envelopes at a time and use the automatic sheet feeding.
1
Set the paper thickness lever to the right.
2
Pull up the paper rest and set the paper selection
lever to the front.
3
Insert the envelopes (up to 15 envelopes) printing
side up.
¡
Align the edge of the envelopes with the right
edge of the paper tray.
¡Adjust the paper guide.
¡The height of the envelopes should not exceed
the limit mark.
AIR MAIL
UPPER LIMIT
Limit mark
Using the envelope mode
If you are not using Windows and your software application
does not have an envelope feature, you can turn on the
unit’s envelope mode using the ENVELOPE button.
1. Make sure the unit is on-line.
2. Open the station key panel and press (ENVELOPE).
The display will show:
3. Press (ON\LINE) to set the unit on-line.
To turn the envelope mode off:
1. Open the station key panel and press (ENVELOPE)
when the unit is on-line.
2. Press (ON\LINE) to set the unit back on-line.
ENVELOPE MODE
(ENVELOPE)
(ON\LINE)
Paper
thickness
lever
Right
Paper
selection
lever
Paper rest
Paper guide
14
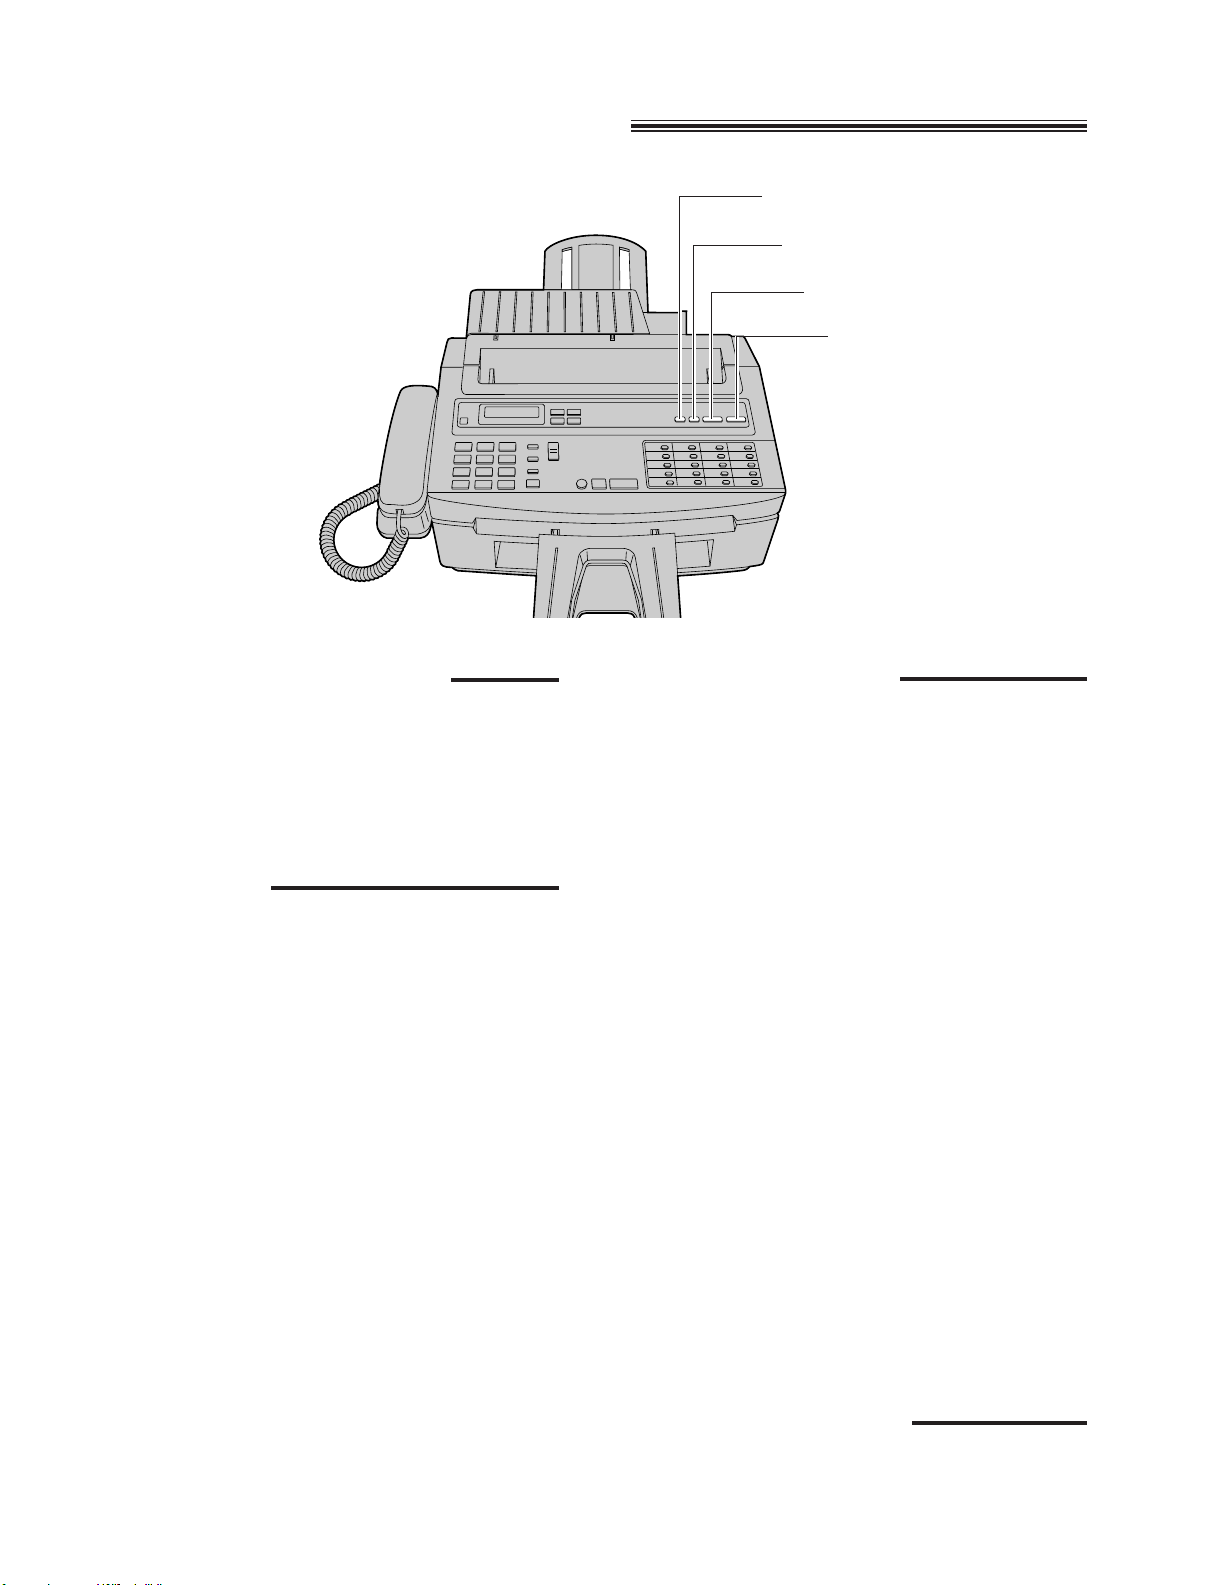
Using buttons for printer
PRINT MODE button
Use this button to select the print mode with MSDOS applications. For details, see page 35.
If you are using Windows, the printer driver
automatically selects the print mode.
FF button
Use this button to load a new sheet of paper or
eject a sheet of paper from the unit.
Form feeding
To load the first sheet of paper to print position,
follow these steps:
1. The unit must be off-line.
2. Stack the paper properly in the sheet feeder.
3. Press (FF) to load the first sheet of paper to its
print position.
Ejecting paper
When you want to eject a sheet of paper, follow
these steps.
1. The unit must be off-line.
2. Press (FF).
ON-LINE button
Use this button to set the unit on and off-line or to
pause a print operation.
Setting the unit on and off-line
1. To set the unit on-line, press (ON\LINE).
¡The ON LINE indicator will light when the unit
is on-line.
2. To set the unit off-line, press (ON\LINE) again.
¡The ON LINE indicator will go out when the
unit is off-line.
Pausing a printer operation
When you are printing a document and you want to
pause the unit:
1. To pause printing, press (ON\LINE).
¡The ON LINE indicator will go out, the unit will
stop printing and go off-line.
2. To start printing again, press (ON\LINE).
3. If data is in the print buffer, the ON LINE
indicator will blink.
¡To print the data, press (ON\LINE) to set the
unit off-line and then press (FF).
PRINTER button
Use this button to turn the printer mode on/off.
For details, see page 7.
PRINT MODE button
FF button
ON-LINE button
PRINTER button
1
Initialize the computer using Windows 3.1 or
3.11.
2
Insert the diskette (provided) into disk drive A
(or B).
3
From the Program Manager, click File. Then
click the Run... option.
4
Type a: (or b:)\install in the Filename field of
the Run dialog, then click OK.
¡
You may have to select the desired
language.
¡
The INSTALLATION dialog box will appear.
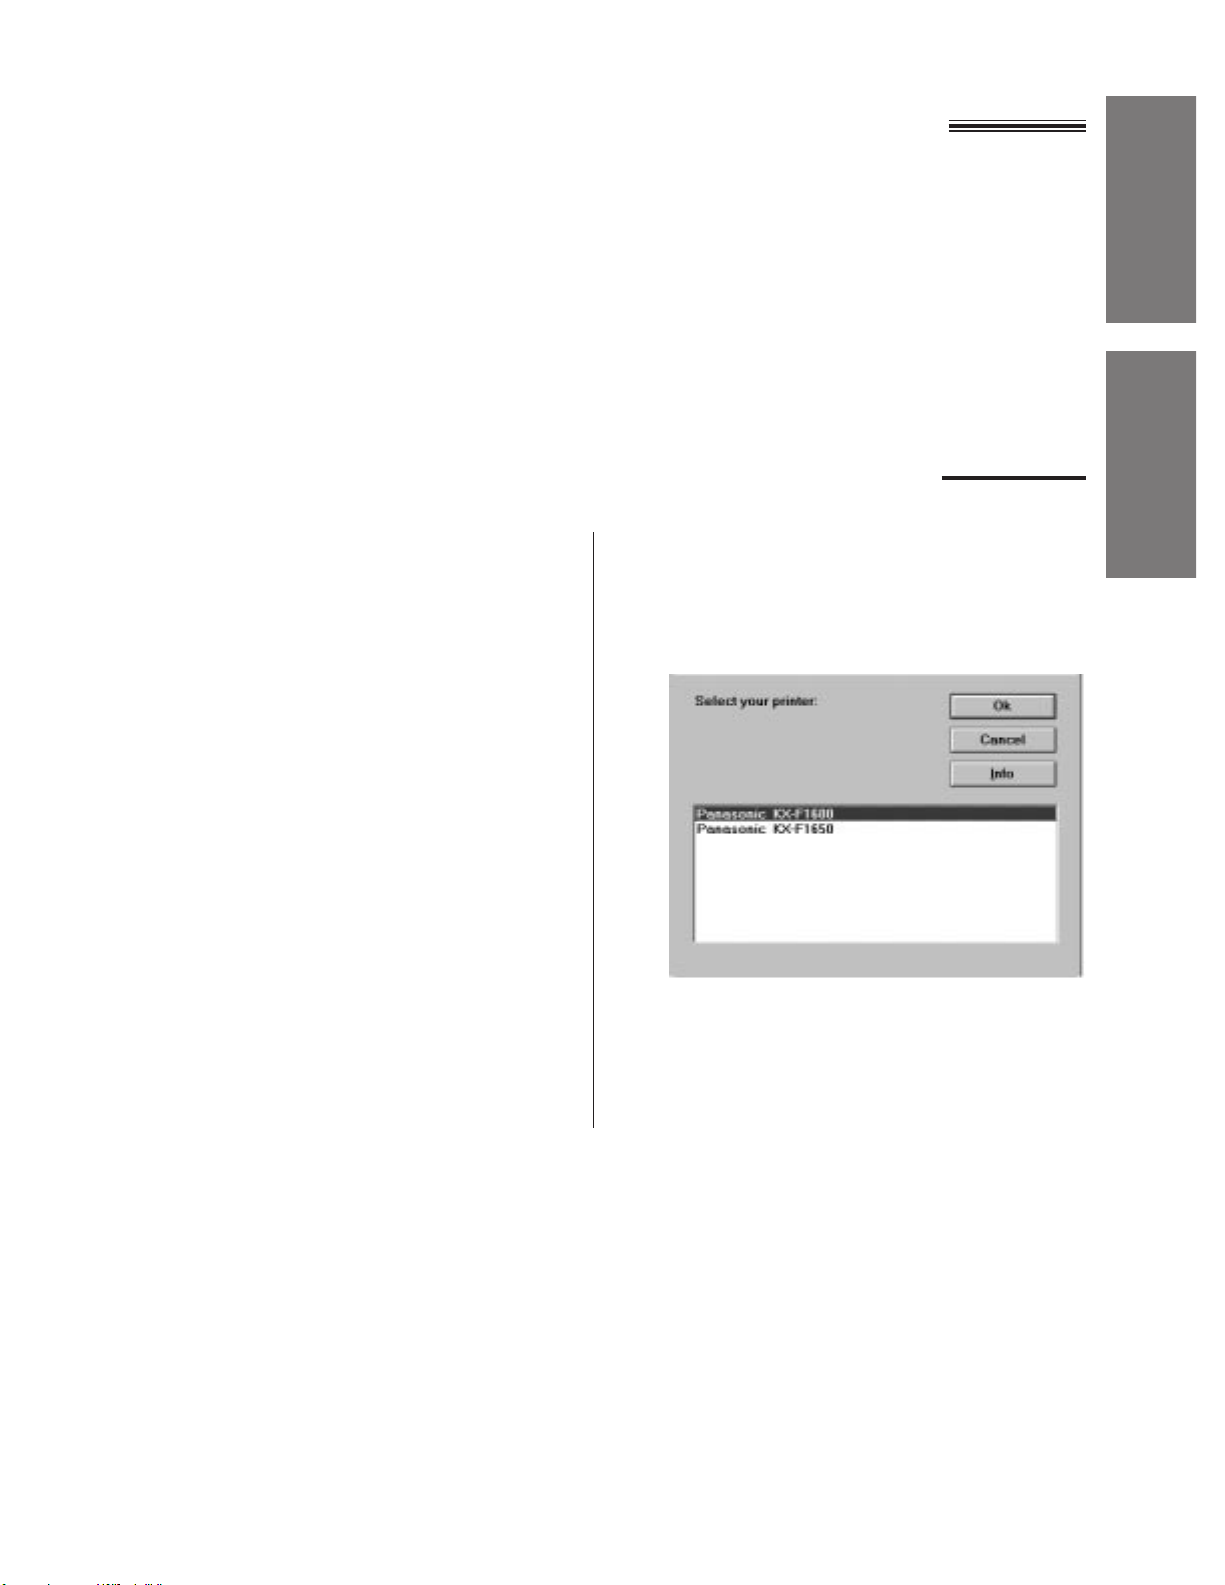
5
Select printer model, then click OK.
6
Follow the instructions on the screen to
complete the installation.
15
Setting up the Unit
for Printing
Using the Unit with
Windows
Installing the printer driver for Windows
Before you can print documents from Windows applications, you must install the appropriate printer driver in
your computer.
The printer driver takes the information from your application program and translates it into a language the unit
can understand.
The driver requires the following operating parameters to be in your computer.
—Minimum 4 MB recommended RAM
—MS-DOS 4.0 and above
—Microsoft Windows 3.1 or 3.11 or Microsoft Windows 95
Installing the printer driver for Windows 3.1 or 3.11
16
Setting as the default printer
After installing the printer driver for Windows 95, set the unit as the default printer by the following procedures.
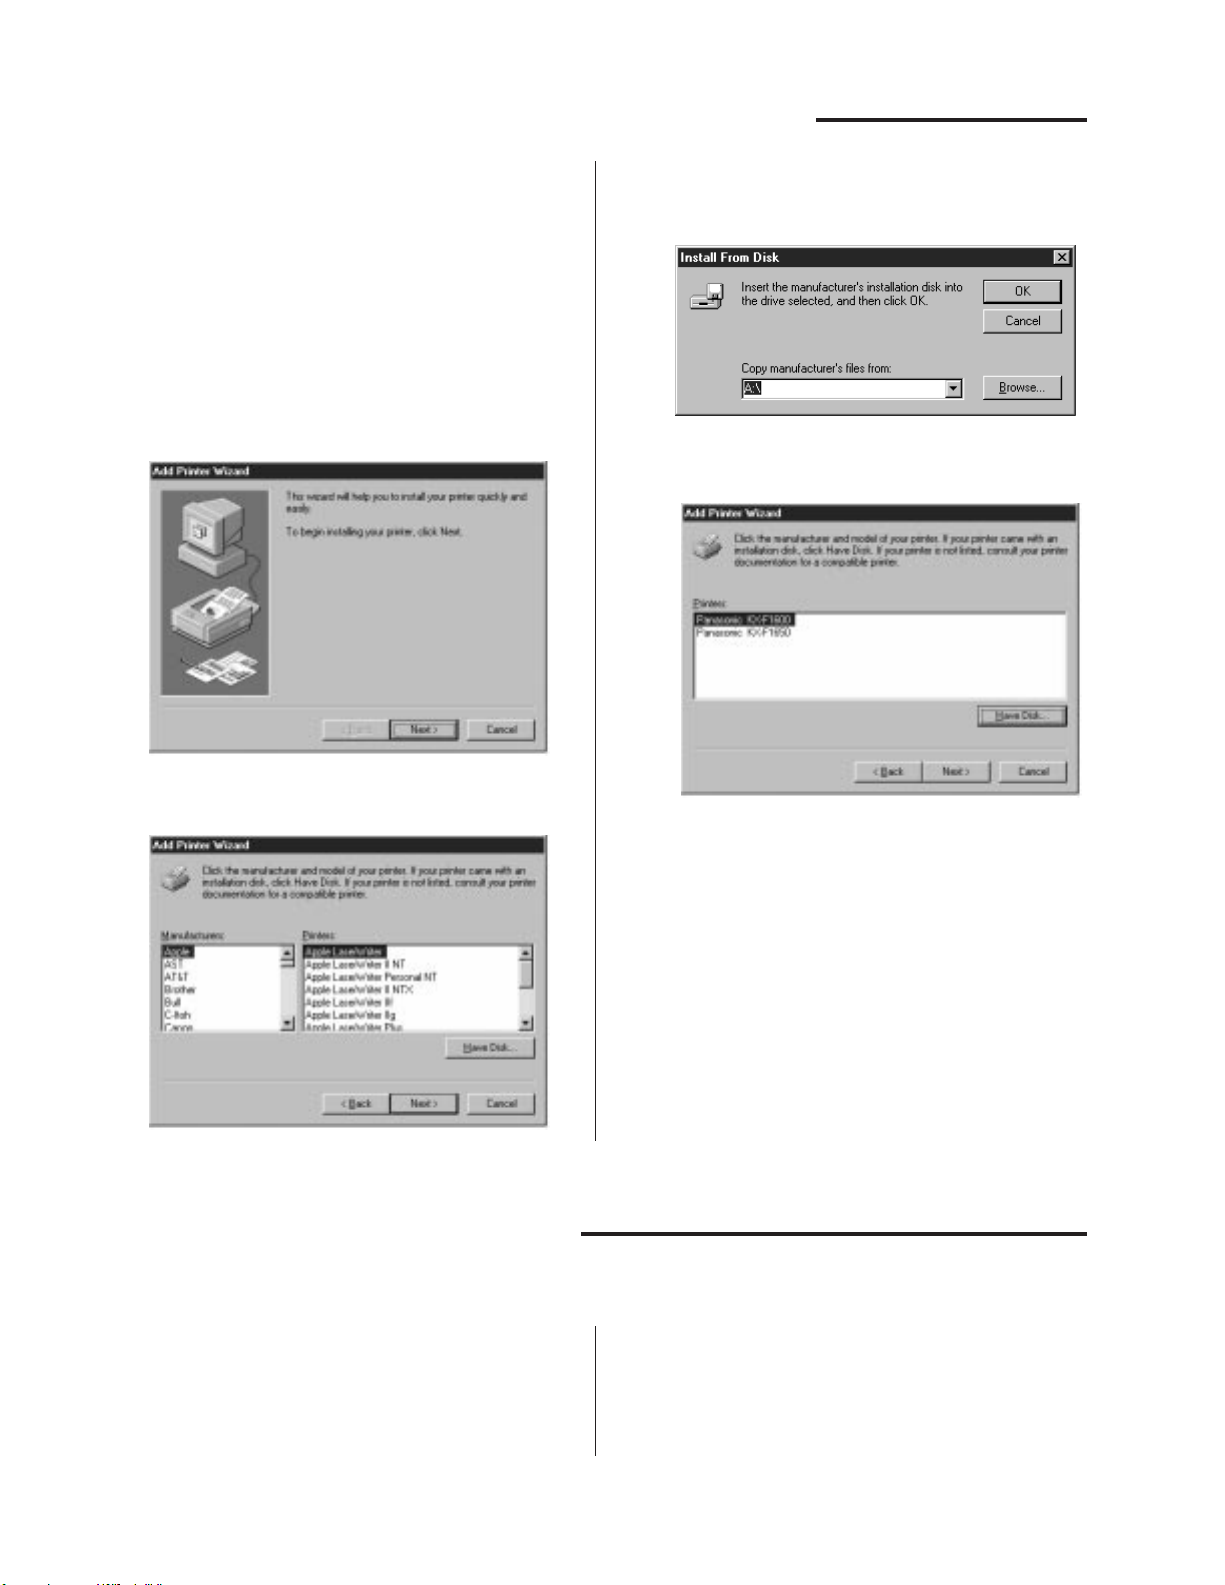
Installing the printer driver for Windows 95
1
Click Start, move the pointer to Settings and
click Printers.
2
Click the “Panasonic KX-F1600” Printer icon.
3
Click File and click Set As Default.
1
Initialize the computer using Windows 95.
2
Insert the diskette (provided) into disk
driver A (or B).
3
Click Start, move the pointer to Settings
and click Printers.
4
Double click the Add Printer icon.
¡
“Add Printer Wizard” window will be
displayed.
5
Click Next>.
6
Click Have Disk...
¡
“Install From Disk” window will be
displayed.
7
Select the disk drive, then click OK.
8
Select printer model, then click Next>.
9
Click Next>.
10
Click Finish.
¡
You may have to select the desired
language.
¡The “Installation” window will appear.
¡Follow the instructions on the screen to
complete the installation.
17
Using the Unit with
Windows
Printing documents from Windows
applications
Printing documents in black and white
When printing a document using Microsoft Word, proceed as follows.
1
Start the application software in the Windows
environment.
2
Open the document you want to print.
3
Click Print... in File menu of the application
software.
4
For Microsoft Word 6.0 with Windows 3.1:
Click Printer..., then click Options...
For Microsoft Word 7.0 with Windows 95:
Click Properties.
¡
Windows will display the printer dialog box.
¡For details on printer options, see pages 19
to 26.
6
After selecting the options you want, click OK
to close the driver dialog box.
7
For Microsoft Word 6.0 with Windows 3.1:
Click Close, click OK to start printing.
For Microsoft Word 7.0 with Windows 95:
Click OK to start printing.
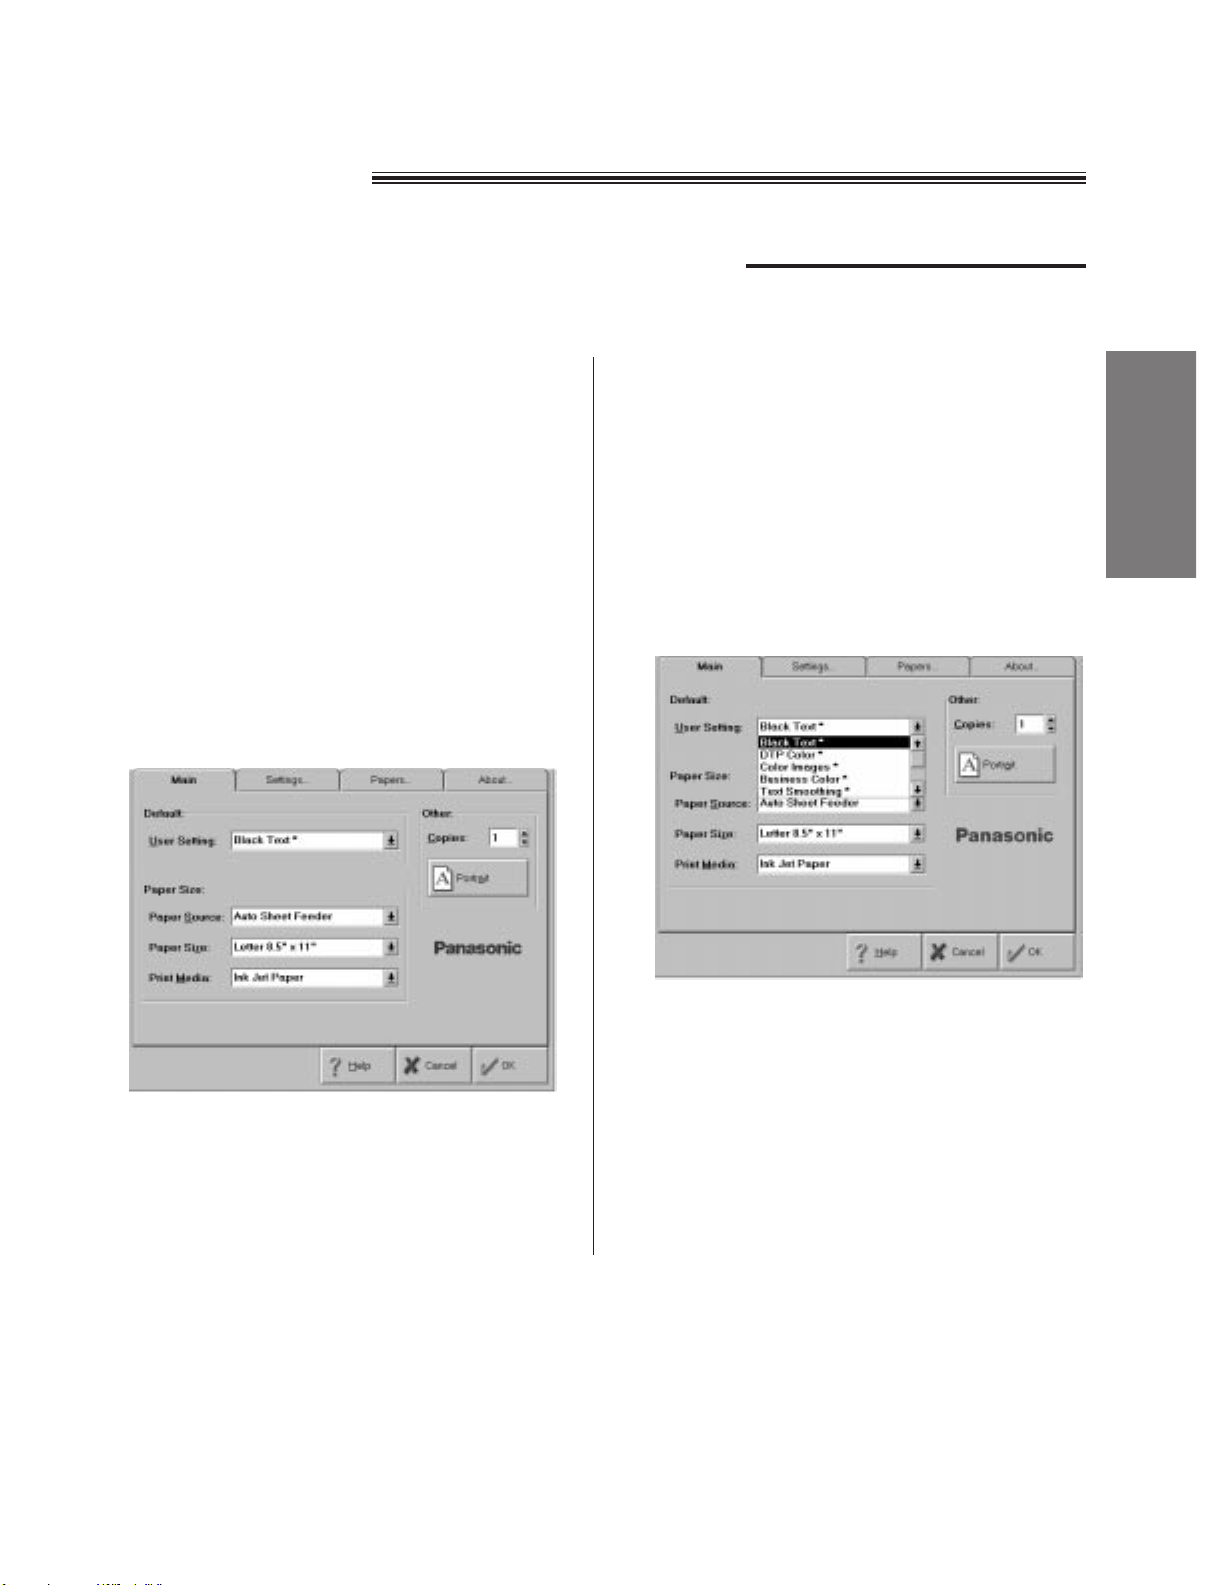
5
From this screen, select printer options.
¡
For black and white printing, click on the
arrow in the User Setting box and select
one of the following from the drop-down list:
¡Black Text: For normal quality
printing.
¡Text Smoothing: For high quality
printing.
¡Grayscale Images: For printing images
like scanned photos or
bitmaps.
Note:
¡The printing procedures are different depending on the software you are using. For details, refer to the
software manual.
¡If the printed document is unclear or blank, the print cartridge may have run out of ink. Clean the print head
at least five times (see page 58). If the output is still blank, replace the print cartridge with a new one (see
page 55).

Printing documents in color
When printing a document using Microsoft Word, proceed as follows.
18
¡For details on printer options, see pages 19
to 26.
7
After selecting the options you want, click OK
to close the driver dialog box.
8
For Microsoft Word 6.0 with Windows 3.1:
Click Close, click OK to start printing.
For Microsoft Word 7.0 with Windows 95:
Click OK to start printing.
1
Make sure the KX-FA151 color print cartridge
is installed and the paper thickness lever is
set to the center.
2
Start the application software in the Windows
environment.
3
Open the document you want to print.
4
Click Print... in File menu of the application
software.
5
For Microsoft Word 6.0 with Windows 3.1:
Click Printer..., then click Options...
For Microsoft Word 7.0 with Windows 95:
Click Properties.
¡
Windows will display the printer dialog box.
6
From this screen select printer options.
¡
For color printing, click on the arrow in the
User Setting box and select one of the
following from the drop-down list:
¡Business Color: For normal quality
printing.
¡DTP Color: For printing colored
images like charts,
diagrams, or graphics.
¡Color Images: For printing colored
images like scanned
photos or bitmaps.
Note:
¡The printing procedures are different depending on the software you are using. For details, refer to the
software manual.
¡If the selected colors do not appear on the output, an ink cartridge may have run out of ink. Clean the print
head at least five times (see page 58). If the output is still unsatisfactory, replace the ink cartridge with a new
one (see page 57).
19
Using the Unit with
Windows
Setting up the printer driver
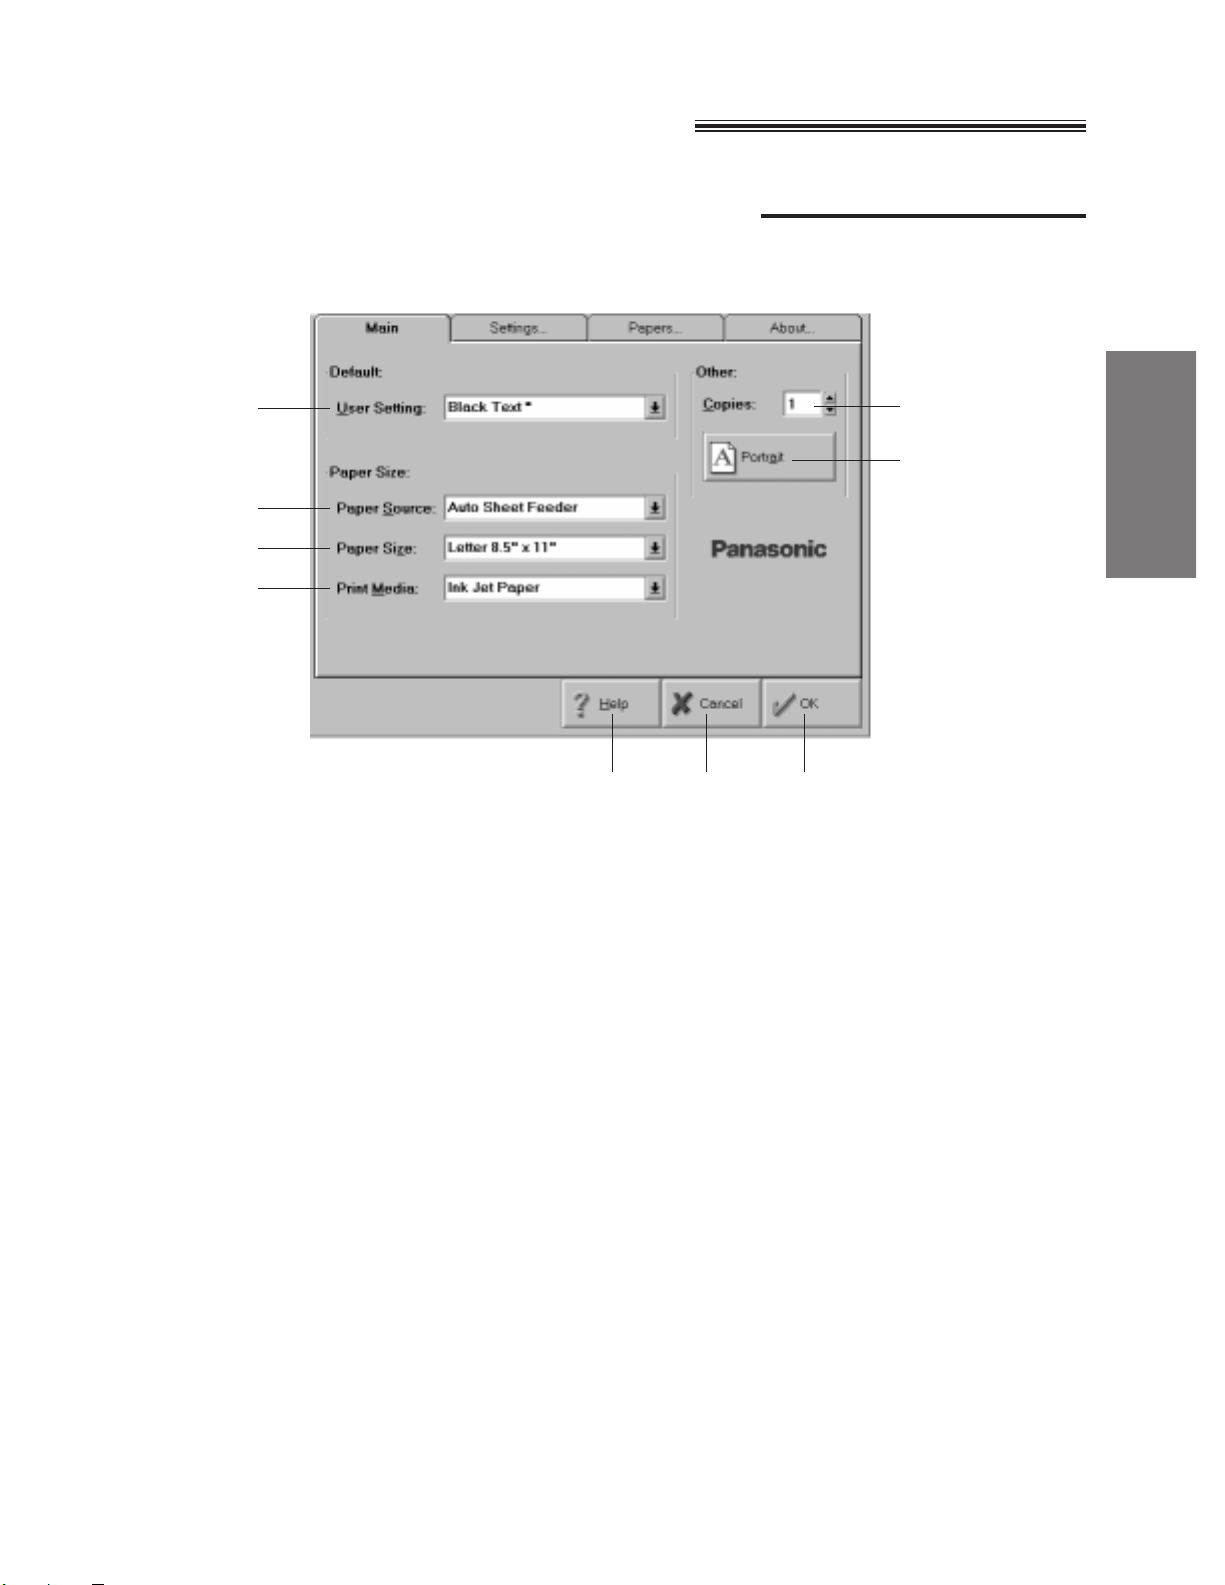
Selecting printer options in Main dialog
The Main dialog contains the most important control for the printer drivers.
A User Setting option
Use this option to select one of the defined processing settings of the driver. In this way, you can restore
a special setting you need just by selecting a User Setting.
Click on the arrow in the User Setting box and select one of the following:
Black Text *: Used for day-to-day printing in monochrome.
This setting uses Normal Quality and Detailed Graphics halftoning.
DTP Color *: Used for images or graphics (like charts or diagrams) in color.
It uses High Quality and Automatic halftoning.
Color Images *: Used for images (like scanned photos or bitmaps) in color.
This setting uses Excellent Quality and Photo halftoning.
Business Color *: Used for day-to-day printing in color.
It uses Normal Quality and Detailed Graphics halftoning.
Text Smoothing *: Used for high quality text in monochrome.
This setting uses High Quality (Smoothing) and Detailed Graphics halftoning.
Grayscale Images *: Used for images (like scanned photos or bitmaps) in monochrome.
This setting uses Excellent Quality and Photo halftoning.
Note:
¡Use the “Settings...” tab to change the possible adjustments in each mode, like Print Quality, Color,
Halftone, or Intensity Control. For details, see page 22.
E
F
A
B
C
D
G H I

20
B Paper Source option
This setting defines how paper (or other print media, such as ink jet transparencies) will be fed into the
unit.
Click on the arrow next to the Paper Source setting and select one of the following:
Auto Sheet Feeder: Used for ink jet paper, envelopes (Envelope DL), ink jet transparencies and
other media other than thick paper or resume paper.
Manual Feed: Used for thick paper, resume paper or envelopes (Commercial #10). The
Manual Feed setting requires that the media is fed into the unit, by hand, one
sheet at a time. The Print Manager icon or caption bar will blink and prompt
you to insert a sheet of paper. The unit beeps, when no paper is inserted. To
solve this error, press (ON\LINE) and insert a sheet of paper into the unit.
C Paper Size option
Specify the size of the paper in the unit.
Click on the arrow next to the Paper Size setting and select one of the following:
A4 210∑∑297 mm
A5 148∑∑210 mm
B5 182∑∑257 mm
Commercial-10
Envelope DL
Legal 8.5
ΩΩ∑∑14ΩΩ
Letter 8.5
ΩΩ∑∑11ΩΩ
Note:
¡If this box does not contain the paper size you want to use, you can define your own using the
‘Papers...’ tab (see page 25).
D Print Media option
This setting is used to define the type of print media that is loaded in the unit. This setting is important for
controlling the quality of the final printed image. Selecting the correct Print Media setting is essential for
producing high-quality printed images.
Click on the arrow next to the Print Media setting and select one of the following:
Ink Jet Paper: Paper selection lever: Set to the back position.
Paper thickness lever: Set to the left position if using the black print cartridge
or to the center position if using the color print
cartridge.
Color Ink Jet Paper: Paper selection lever: Set to the back position.
Paper thickness lever: Set to the center position.
Plain Paper: Compared to the Ink Jet Paper setting, less ink is applied to avoid blurring.
Paper selection lever: Set to the back position.
Paper thickness lever: Set to the left position if using the black print cartridge
or to the center position if using the color print
cartridge.
The output quality on plain paper can vary depending on the quality of
the plain paper used.