

Page 1
Panasonic
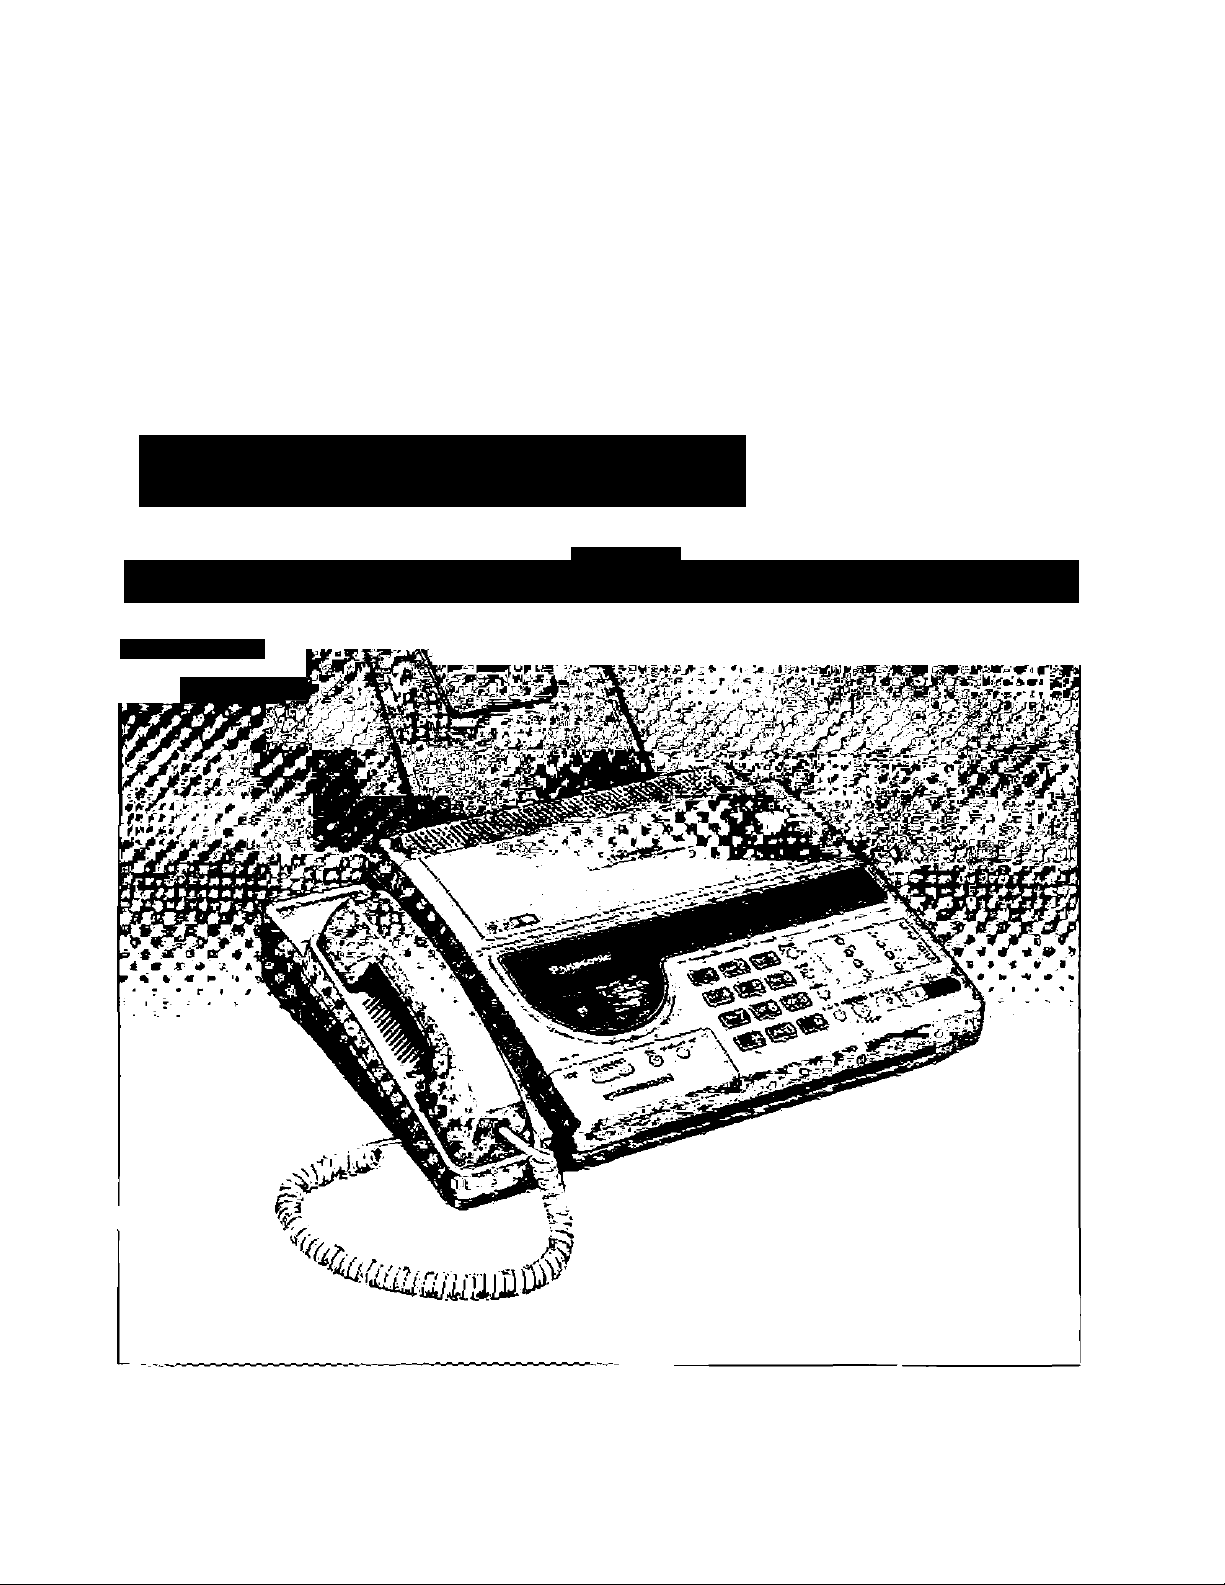
Telephone Answering System
with Facsimile
Operating Instructions
f > IV.*'
' * k' I • » -*• •*,-!*_*
•* .*' u ■> • i
-• F y *
J h
^ C lit ii^e*o ¿■< J ,«111
Model No
KX-F160
• ^
Please read these Operating Instructions before using the product.
Page 2

Thank you for purchasing the Panasonic Telephone Answering System with Facsimile.
Before using the unit, please read these Operating Instructions completely.
You can then easily install, configure and operate the unit properly.
This unit combines multiple functions of Facsimile, Answering Device and Telephone;
you can send and receive voice-messages and documents on a single line.
WARNING:
TO PREVENT FIRE OR SHOCK HAZARD, DO NOT EXPOSE THIS PRODUCT TO RAIN OR ANY TYPE
OF MOISTURE.
GETTING HELP FROM YOUR UNIT:
If you press the HELP button,
—while programming, the unit will print information
about the operation.
—in idle status, the unit will print information about how
to send documents, how to set up, etc.
Page 3

Important information
If required by the telephone company, inform them
of the following.
FCC Registration No.: (found on the rear side of
the unit)
Ringer Equivalence: 0.5B
The particular telephone line to which the
equipment is connected.
This unit must not be connected to a coin operated
line. If you are on a party line, check with your local
telephone company.
Ringer Equivalence Number (REN):
This REN is useful in determining the quantity of
devices you may connect to your telephone line
and still have all of those devices ring when your
telephone number is called. In most but not all
areas, the sum of the REN’s of all devices
connected to one line should not exceed five (5.0).
To be certain of the number of devices you may
connect to your line, as determined by the REN,
you should contact your local telephone company
to determine the maximum REN for your calling
area.
In the event that terminal equipment causes harm
to the telephone network, the telephone company
should notify the customer, if possible, that service
may be stopped. However, where prior notice is
impractical, the company may temporarily cease
service providing that they:
a) Promptly notify the customer.
b) Give the customer an opportunity to correct the
problem with their equipment.
c) Inform the customer of the right to bring a
complaint to the Federal Communication
Commission pursuant to procedures set out in
FCC Rules and Regulations Subpart E of
Part 68.
The Telephone Company may make changes in its
communications facilities, equipment operations, or
procedures where such action is reasonably
required in the operation of its business and is not
inconsistent with the rules and regulations in FCC
Part 68. If such changes can be reasonably
expected to render any customer terminal
equipment incompatible with telephone company
communications facilities, or require modification or
alteration of such terminal equipment, or otherwise
materially affect its use or performance, the
customer shall be given adequate notice in writing,
to allow the customer an opportunity to maintain
uninterrupted service.
CAUTION:
To assure continued compliance with FCC rules,
do not make any unauthorized modifications.
When programming emergency numbers and/or
making test calls to emergency numbers:
1. Remain on the line and briefly explain to the
dispatcher the reason for the call before
hanging up.
2. Perform such activities in the off-peak hours;
such as early morning or late evenings.
This telephone provides magnetic coupling to
hearing aids.
Note:
This equipment has been tested and found to
comply with the limits for a Class B digital device,
pursuant to Part 15 of the FCC Rules. These limits
are designed to provide reasonable protection
against harmful interference in a residential
installation. This equipment generates, uses, and
can radiate radio frequency energy and, if not
installed and used in accordance with the
instructions, may cause harmful interference to
radio communications. However, there is no
guarantee that interference will not occur in a
particular installation. If this equipment does cause
harmful interference to radio or television
reception, which can be determined by turning the
equipment off and on, the user is encouraged to try
to correct the interference by one or more of the
following measures:
—Reorient or relocate the receiving antenna.
—Increase the separation between the equipment
and receiver.
—Connect the equipment into an outlet on a circuit
different from that to which the receiver is
connected.
—Consult the dealer or an experienced radio/TV
technician for help.
CAUTION
The telephone Consumer Protection Act of 1991
makes it unlawful for any person to use a computer
or other electronic device to send any message via
a telephone facsimile machine unless such a
message clearly contains in a margin on the top or
bottom of at least the first sent page the following
information:
1) Date and time of transmission; and,
2) Identification of either business, business entity
or individual sending the message; and,
3) Telephone number of either the sending
machine, business, business entity or individual.
In order to program this information into your
facsimile machine, you must complete the steps on
pages 1-18 to 1-22 in these Operating Instructions.
Page 4

Table of Contents
Introduction.......................................................................................................... viii
Chapter 1 Installation and Initial Preparation
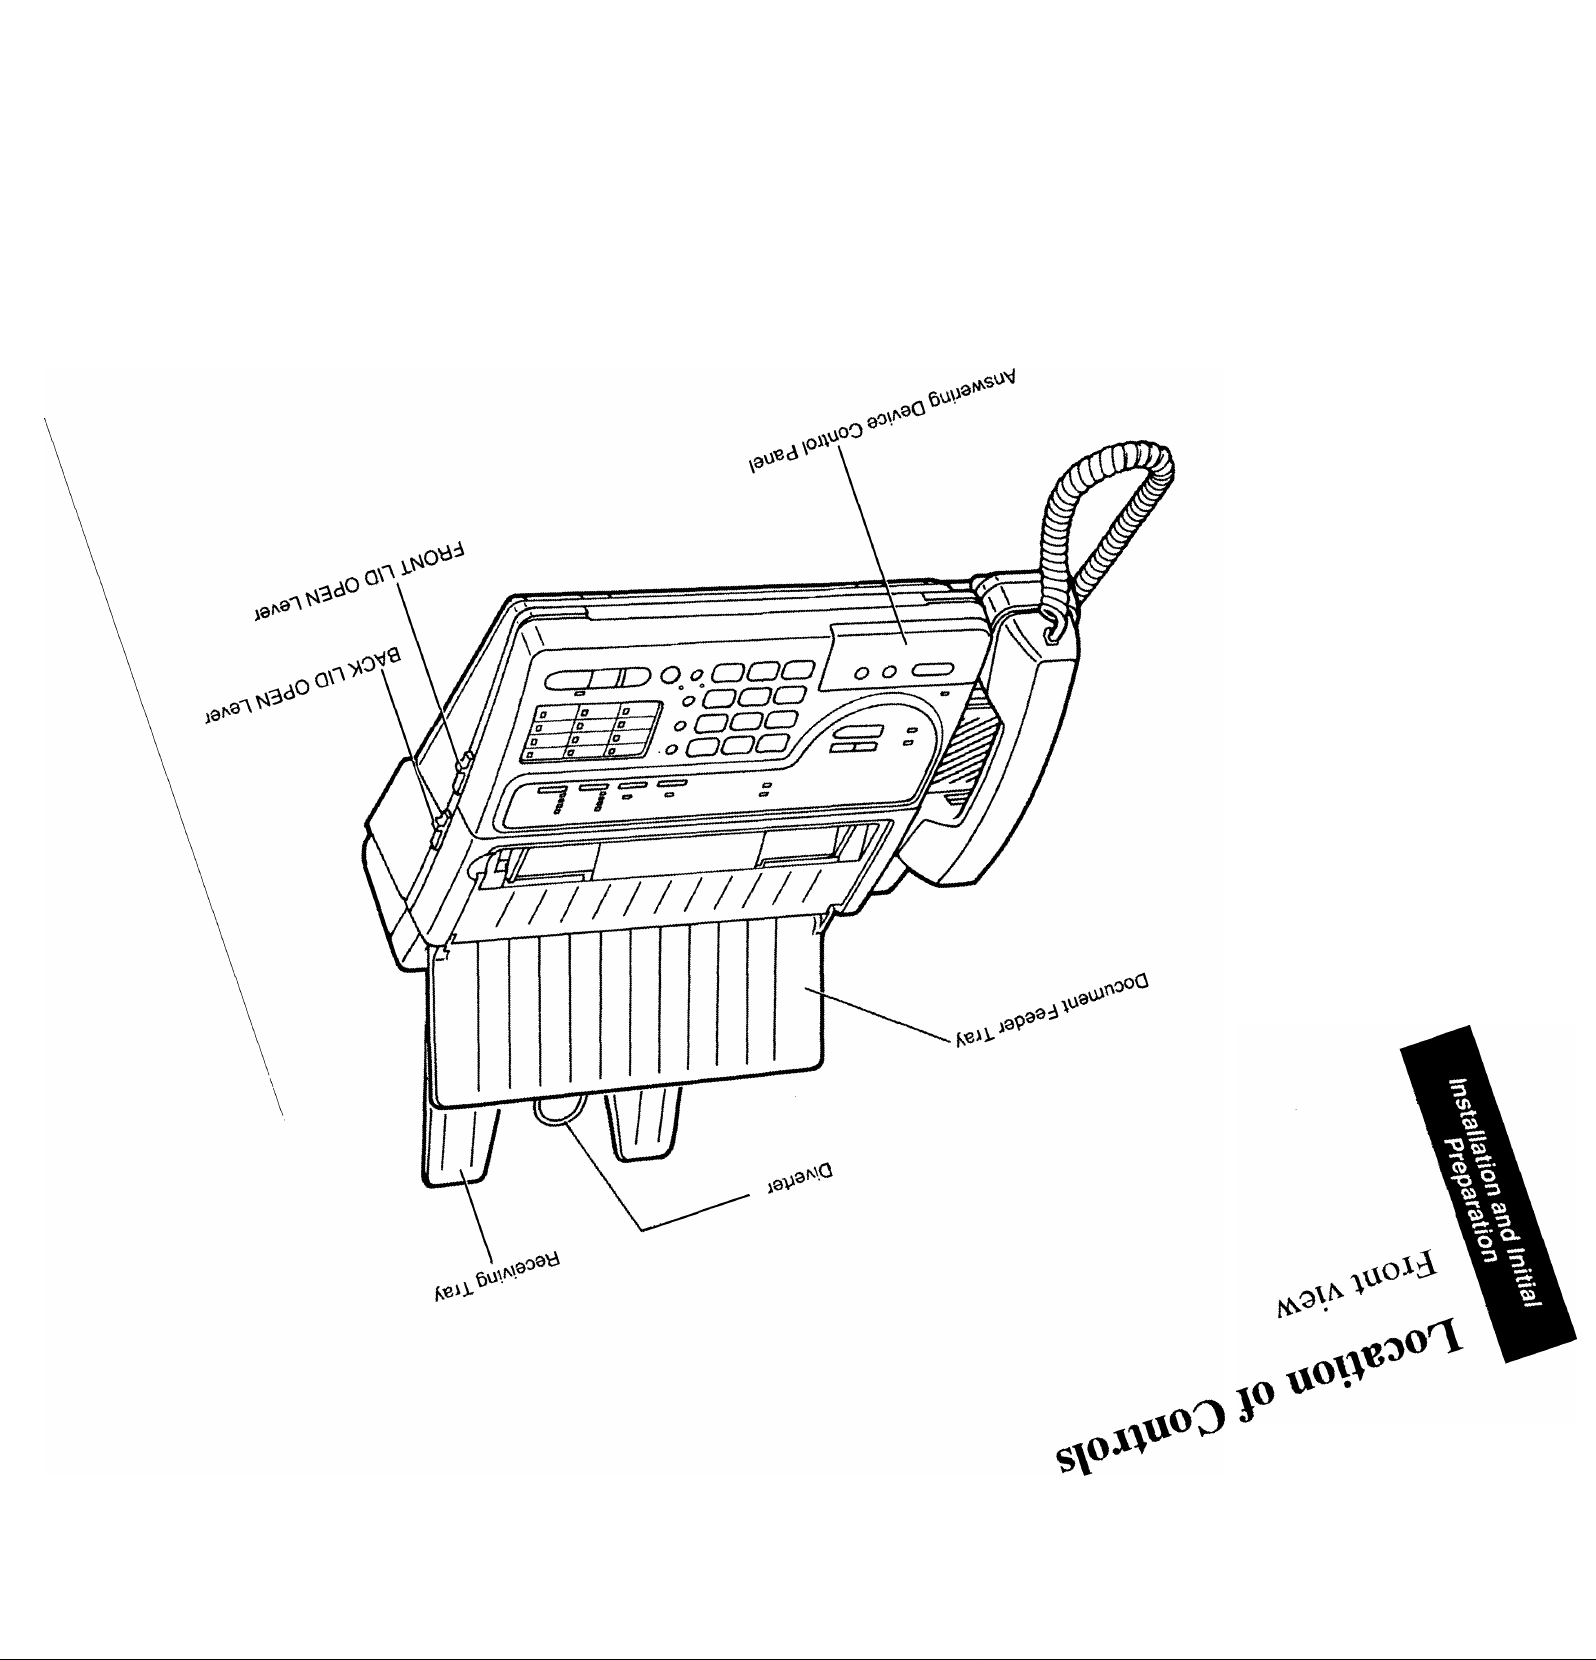
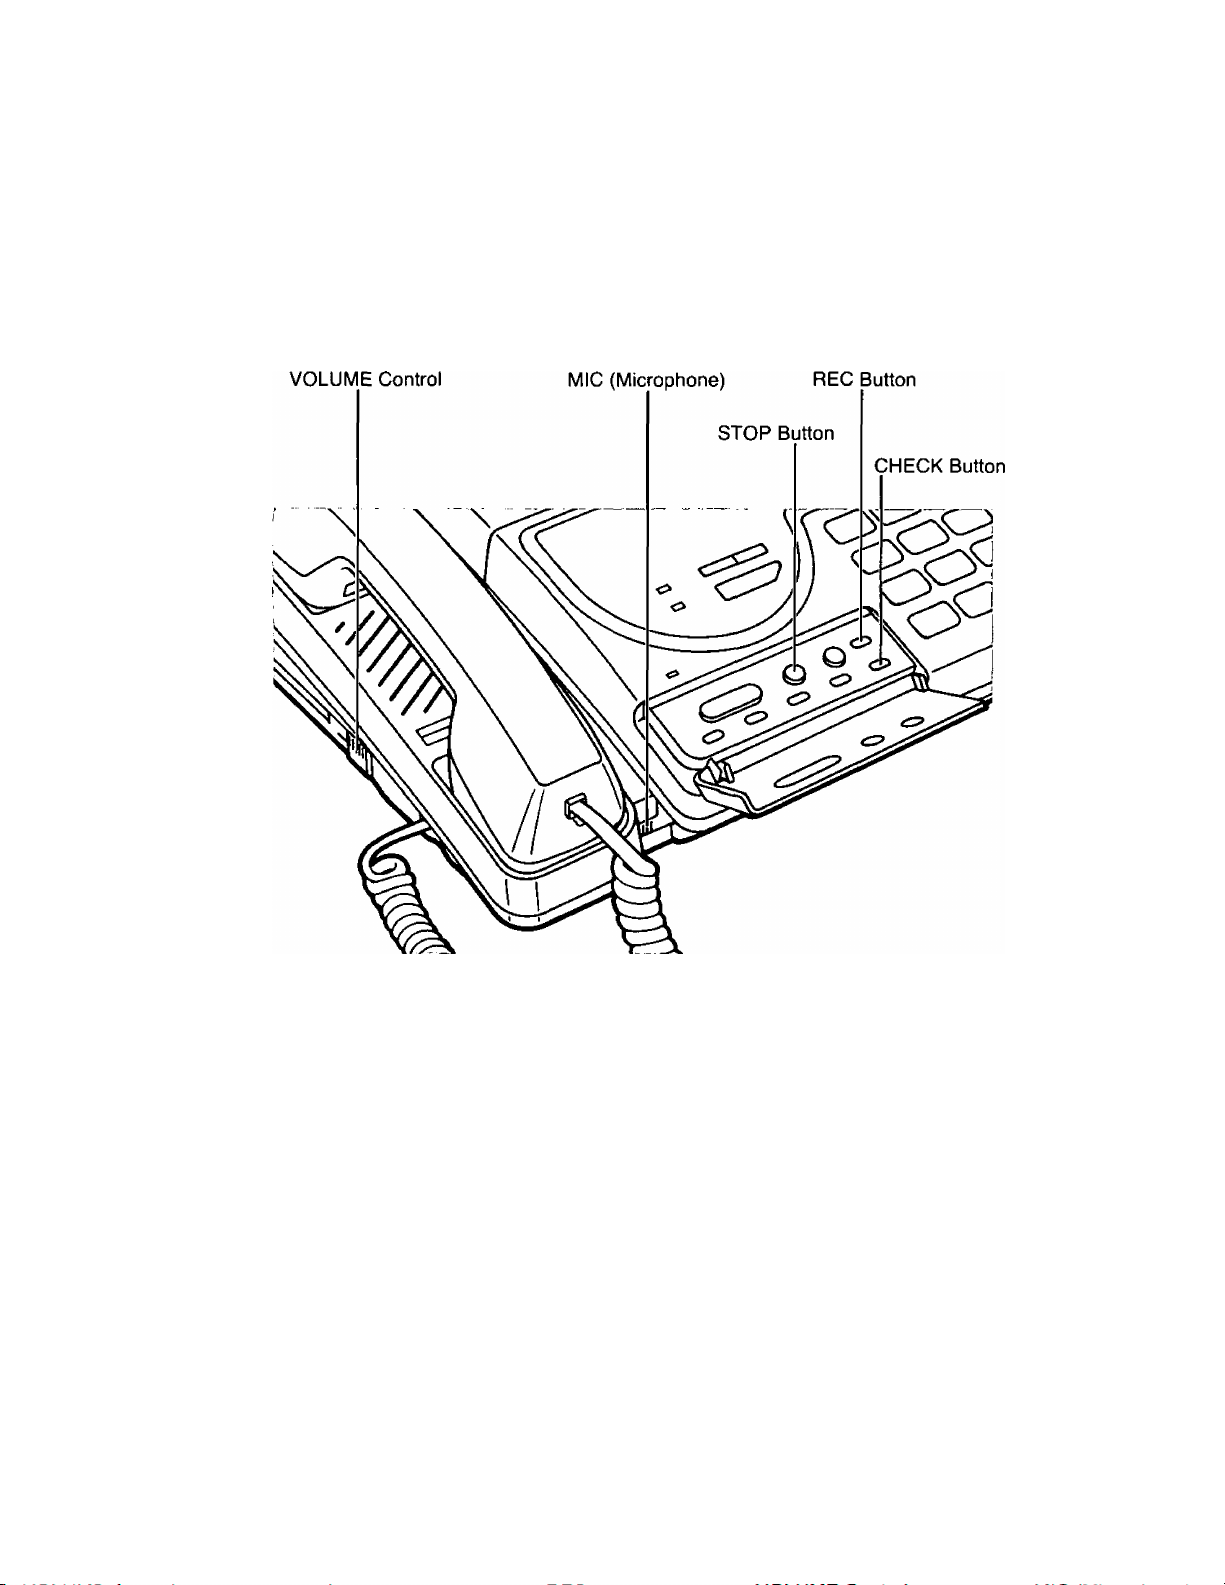
Location of Controls........................................................................................... 1-2
Front view ........................................................................................................... 1-2
Rearview............................................................................................................. 1-3
Side view............................................................................................................. 1-3
Buttons and Indicators........................................................................................ 1-4
Installing Your Unit.............................................................................................. 1-7
Precaution .......................................................................................................... 1-7
Accessories......................................................................................................... 1-8
Installation connections ...................................................................................... 1-9
Installing the receiving tray and the diverter
Installing the microcassette tape ......................................................
Installing the recording paper.............................................................................. 1-12
Setting selectors.................................................................................................... 1-14
Turning the POWER switch on
.......................................................
.................
.............................................................................
1-10
1-11
1-15
Recording Your Greeting Message
Suggested message .......................................................................................... 1-16
Recording a greeting message........................................................................... 1-17
Checking your greeting message........................................................................ 1-17
Programming Your Fax Document Identifiers
Setting date and time............................................................................................ 1-18
Setting your logo .................................................................................................. 1-20
Programming your facsimile telephone number.................................................. 1-22
.................................................................
................................................
1-16
1-18
Selecting the RECEIVE MODE .......................................................................... 1-23
Setting Up Your Facsimile Unit ........................................................................ 1-24
System setup features.......................................................................................... 1-24
How to set up........................................................................................................ 1-26
Individual transmission report setting.................................................................. 1-27
Selecting the number of rings to answer in the ANS/FAX mode......................... 1-29
Selecting the number of rings to answer in the FAX mode
Selecting the caller’s recording time
Setting the remote code (REMOTE ANS ID) for remote operation..................... 1-33
...................................................................
HELP Function—If you have lost your procedures—
Using the HELP button
.......................................................................................
.................................
...................................
1-31
1-32
1-34
1-34
Chapter 2 Basic Instructions
Facsimile and Copier
Before Transmitting Documents
Acceptable documents........................................................................................ 2-2
...................................................................
IV
2-2
Page 5

Documents you cannot send .............................................................................. 2-2
Resolution and contrast
Loading documents ............................................................................................ 2-3
......................................................................................
2-3
Transmitting Documents
Manual transmission .......................................................................................... 2-4
Adding extra pages ............................................................................................. 2-5
Receiving Documents and/or Voice Caiis............................................................... 2-6
Manual reception................................................................................................. 2-6
Automatic reception............................................................................................. 2-7
Receiving in the ANS/FAX mode
Receiving in the TEL/FAX mode
Receiving in the FAX mode ............................................................................ 2-8
Making a Copy........................................................................................................ 2-9
.........................................................................................
...................................................................
.....................................................................
2-4
2-7
2-8
Answering Device
Operating as an Answering Device .......................................................................... 2-10
Setup of voice message and document reception
Listening to newly recorded messages............................................................... 2-11
Listening to all the recorded messages .............................................................. 2-12
Recording after the messages you want to save
Monitoring incoming calls...................................................................................... 2-13
Recording a memo message................................................................................ 2-13
Recording a telephone conversation (2-way recording)
.............................................
...............................................
.......................................
2-11
2-12
2-14
Telephone
Making and Answering Voice Caiis
Making voice calls ................................................................................................ 2-15
Redialing the last dialed number
Answering voice calls............................................................................................ 2-16
..........................................................................
.........................................................................
2-15
2-16
Chapter 3 Intermediate Instructions
Storing Phone Numbers for Automatic Dialing........................................................ 3-2
Listing the directory card .................................................................................... 3-2
Storing phone numbers for one touch dialing
Storing phone numbers for speed dialing
Storing secret phone numbers............................................................................ 3-5
Erasing a stored phone number.......................................................................... 3-6
Facsimile
Transmitting Documents Using Automatic Dialer ................................................... 3-7
Telephone
Making Voice Calls Using Automatic Dialer ........................................................... 3-8
.....................................................
...........................................................
3-3
3-4
Page 6

Chapter 4 Advanced Instructions
Facsimile and Copier
Polling .................................................................................................................... 4-2
Polling another unit manually.............................................................................. 4-2
Polling another unit using automatic dialer
Setting the polling password............................................................................... 4-4
Network Communication ........................................................................................ 4-5
Using a passcode............................................................................................... 4-6
Programming the main passcode....................................................................... 4-7
Turning the TX passcode check on .................................................................... 4-8
Turning the RX passcode check on.................................................................... 4-9
.........................................................
4-3
Remote Fax Receiving Using an Extension Phone
Using an extension phone
Programming a remote fax activation code
Setting the Logo Print Position ............................................................................... 4-12
Setting a Customized Header................................................................................. 4-13
.................................................................................
................................................
.......................................................
4-10
4-10
4-11
A n swering De vice
Operating an Answering Device from a Remote Phone
Summary of remote control functions
Playing back newly recorded messages (Memory playback)
Playing back all messages.................................................................................. 4-16
Back space and skip forward.............................................................................. 4-17
Recording a marker message ............................................................................ 4-17
Resetting the tape for future messages.............................................................. 4-18
Room monitor...................................................................................................... 4-19
Skipping the greeting message for incoming message
recording mode............................................................................................... 4-19
Re-recording a greeting message ...................................................................... 4-20
Call with Privacy Ring............................................................................................. 4-21
Calling with the privacy ring
Programming the PRIVACY RING ID................................................................. 4-22
...............................................................................
.................................................................
.........................................
.............................
4-15
4-15
4-16
4-21
Setting the Message Alert....................................................................................... 4-23
Telephone
Voice Contact.......................................................................................................... 4-24
Initiating voice contact ........................................................................................ 4-24
Receiving a request for voice contact................................................................. 4-24
TONE, FLASH and PAUSE Button Usage ............................................................. 4-25
TONE button (Temporary tone dialing)
FLASH button .................................................................................................... 4-25
PAUSE button .................................................................................................... 4-26
Combination dialing ............................................................................................ 4-26
..............................................................
vi
4-25
Page 7

other Features......................................................................................................... 4-27
Setting Day/Night Mode
Setting the Silent Fax Recognition Ring.............................................................. 4-29
Resetting the setup features .............................................................................. 4-30
......................................................................................
4-27
Chapter 5 Printing Reports and Lists
Activity Report (JOURNAL Report) ........................................................................ 5-2
Setting the JOURNAL AUTO PRINT
Printing a JOURNAL report manually
List of Stored Phone Numbers (TELEPHONE NUMBER LIST).............................. 5-5
Printing a TELEPHONE NUMBER LIST ............................................................ 5-6
Basic Feature List ................................................................................................... 5-7
......
........................................................... 5-3
.................................................................
5-4
Advanced Feature List
...........................................................................................
5-8
Chapter 6 General Information
Troubleshooting ...................................................................................................... 6-2
General corrective measures.............................................................................. 6-2
Clearing a document jam
Clearing a recording paper jam .......................................................................... 6-6
Maintenance............................................................................................................ 6-8
Cleaning the microcassette compartment .......................................................... 6-8
Cleaning the document feeder unit
Cleaning the thermal head.................................................................................. 6-9
Printing a test pattern............................................................................................ 6-10
Accessory Order Information.................................................................................... 6-11
Specifications ......................................................................................................... 6-11
Index........................................................................................................................ 6-12
....................................................................................
.....................................................................
6-5
6-9
VII
Page 8

Introduction
Multi-function system using
one telephone line
General
• Desktop type
•Automatic paper cutter
• Paper Curl Reduction Technology
•Automatic voice/facsimile switching
•Silent ring fax recognition system
• Copier function
• Help function
Facsimile
• 17-second transmission speed*
• Sends/receives 216 mm (8W')x600 mm (23^")
pages at CCITT G3
•Automatic document feeder (up to 10 pages)
• One-touch sending buttons
• 16-level halftones
• Resolution: standard/fine/super fine/halftone
• Network passcode communication
• Polling function
‘Transmission times apply to text data using
CCITT No. 1 test chart, between same machine
models at maximum modem speed. Transmission
times vary in actual usage,
Answering Device
• Recordable greeting message chip
•Auto-Logic operation for one-touch message
playback
The unit automatically plays back all recorded
messages or the new messages at the touch of
the ALL MESSAGES or the NEW MESSAGES
button and stops at the end of the last message,
then resets to answer and record the next call.
• Remote control from touch tone telephone
• Message memo recording
• New message playback
Integrated Telephone System
• 12-station one-touch dialer
• 10-station speed dialer
• One-touch redial
•Call monitor for on-hook dialing
Four types of receiving modes
ANS/FAX mode:
When you wish to use the unit as a telephone
answering device and a facsimile, or when your
machine is unattended, select this mode. When a
call is received during your absence, the unit
records a voice-message and/or receives a
document automatically depending on the caller’s
choice. In this mode, you also are able to speak
with the other party and transmit/receive a
document manually when in your office.
The unit automatically distinguishes between voice
and fax calls.
a) If the unit detects a fax tone white playing the
greeting message, it will automatically activate
the fax function.
b) If the calling party presses the asterisk (*) key
while playing the greeting message or incoming
message recording mode, it will automatically
activate the fax function.
c) If the caller’s voice is heard within 5 seconds
after the beep of the end of the greeting
message, the unit will function as an answering
device. When the unit does not hear a voice
within 5 seconds, the fax function is activated.
TEUFAX mode:
When in the office, you may select this mode.
The unit will automatically distinguish between a
telephone call and a fax call.
a) When the unit receives a fax call, it will
automatically activate the fax function and
initiate fax reception.
b) When the unit receives a telephone call, it will
ring several times until you pick up the handset.
If you do not pick up the handset, the unit will
switch automatically to the fax mode.
FAX mode:
When you wish to use the unit as a facsimile
machine only, select this mode.
If someone calls you when your unit is in the FAX
mode, a fax tone sounds and the person cannot
talk to you. Please inform your callers that this is a
fax only telephone number.
When in the FAX mode, you may still use the fax
telephone to place outgoing voice calls.
TEL (Telephone) mode:
When you wish to use the unit as a standard
telephone, select this mode. If you wish to receive
an incoming fax during a telephone conversation,
press the START button.
vili
Page 9

Installation and Initial Preparation
Table of contents
Chapter 1
Location of Controls
Front view
Rear view
Side view
Buttons and Indicators
Installing Your Unit
Precaution
Accessories
Installation connections
Installing the receiving tray
and the diverter
Installing the microcassette tape
Installing the recording paper
Setting selectors
Turning the POWER switch on
Recording Your Greeting Message
Suggested message
Recording a greeting message
Checking your greeting message
1-2
1-2
1-3
1-3
1-4
1-7
1-7
1-8
1-9
1-10
1-11
1-12
1-14
1-15
1-16
1-16
1-17
1-17
Programming Your Fax Document
Identifiers 1-18
Setting date and time 1-18
Setting your logo 1-20
Programming your facsimile
telephone number 1-22
Selecting the RECEIVE MODE 1-23
Setting Up Your Facsimile Unit 1-24
System setup features 1-24
How to set up 1-26
Individual transmission report setting 1-27
Selecting the number of rings to
answer in the ANS/FAX mode 1-29
Selecting the number of rings to
answer in the FAX mode 1-31
Selecting the caller’s recording time 1-32
Setting the remote code (REMOTE ANS ID)
for remote operation 1 -33
HELP Function
—If you have lost your procedures— 1-34
Using the HELP button 1 -34
1-1
Page 10
Page 11
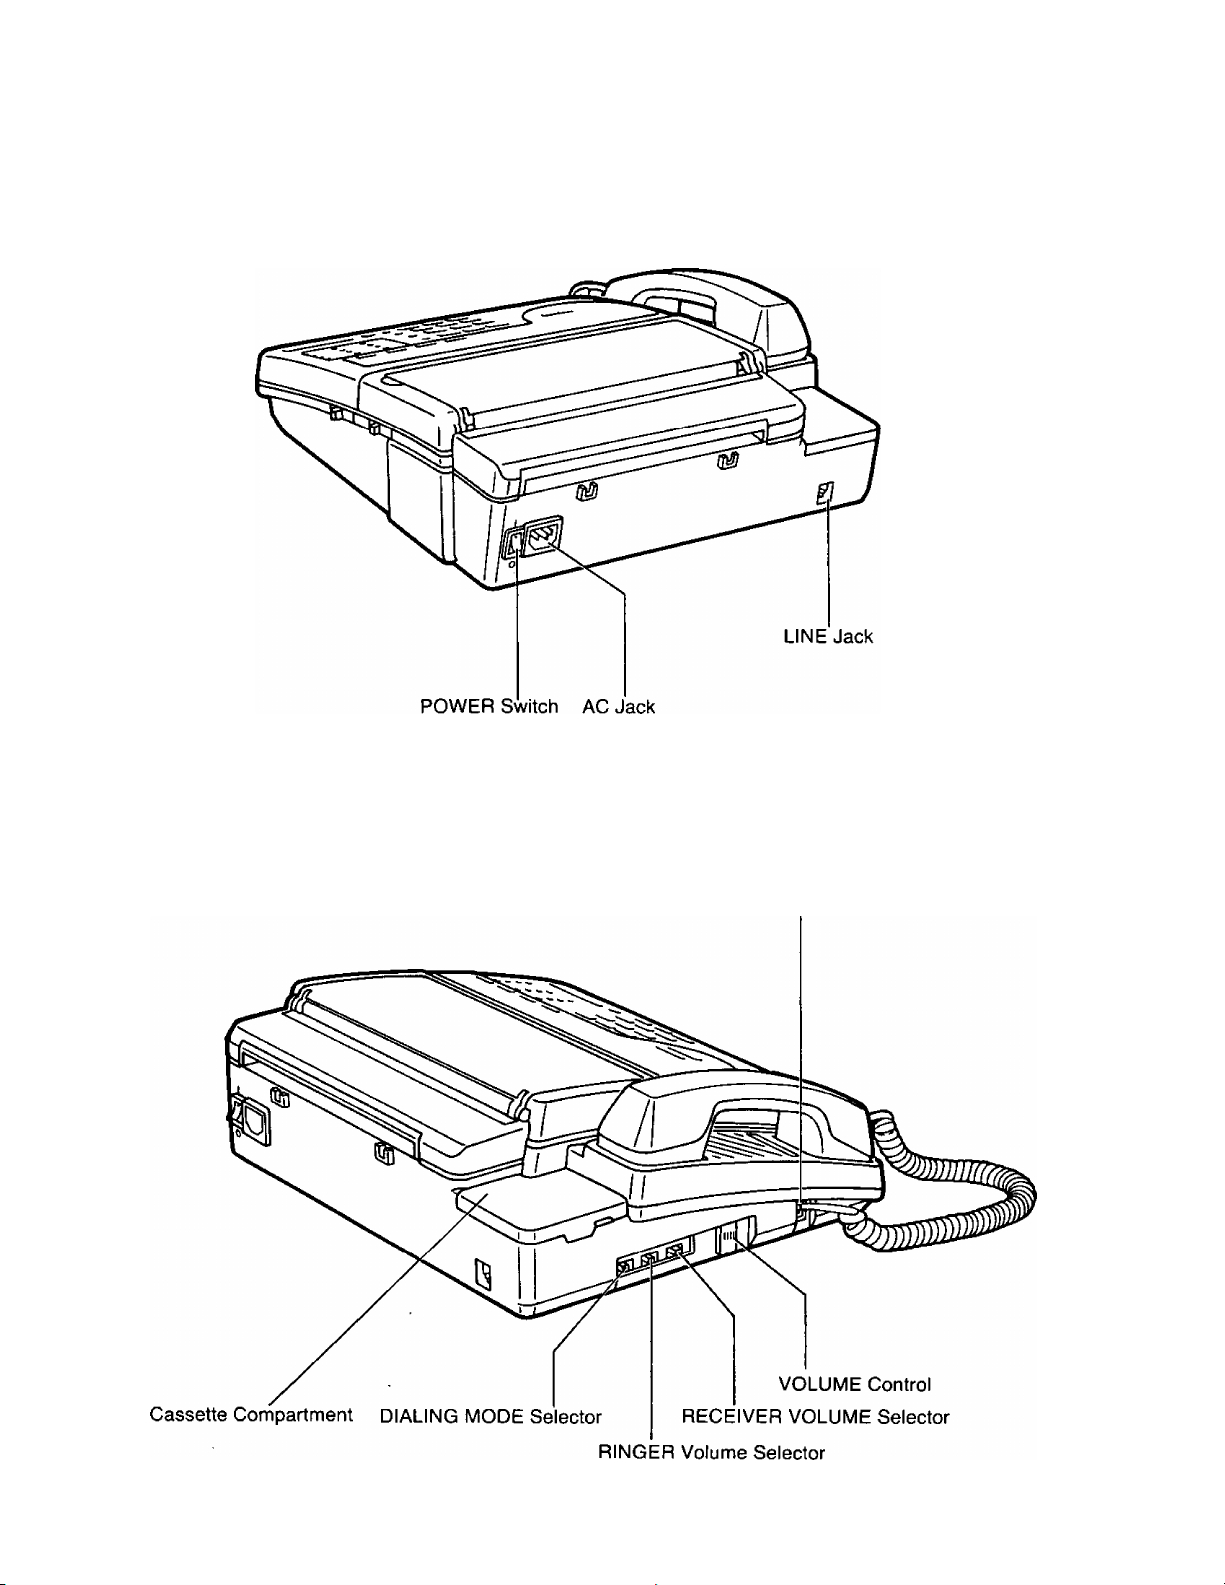
Rear view
Side view
TO HANDSET Jack
1-3
Page 12
Buttons and Indicators
Q O ©
[ 1 ] [abc 2] [pep 3]
[ghI 4j [jKL sj [ MNP 6 j
NEW MESSAGES STOP MEMO^WAY REC
c >) © ©
ANSWERING CONTROL
[pRS 7] fruT^
[ |-^) 0 )
© ©
Q
0 0 0 0 0 0 0
UGHT ORIGINAL I RESOLUTION
) ! (
PAUSE
o
FLASH
o
REDIAL
O.
~&ALlYa5[flJ?irftT:r ISTOP/CLEAR COPY
¡1=1 STANDARD
|c3 FINE
U SUPER FINE
|b half tone
I ANS/FAX
■ TEL/FAX
I FAX
>TEL
□ * □ • □'
' a * □ " 0
’ □ ' □
* D * □
11 SECRET Q
12 HYPHEN Q
oio i(e II □ I » )
¡'OICE STOBl^
I
\
J
NEW MESSAGES STOP MEMO/2VAY REC
c
ALL MESSAGES
cp
\-
REW
0
D 0
FF ICM ERASE
CD CD
GREIITING
Ci) O
1-4
Page 13

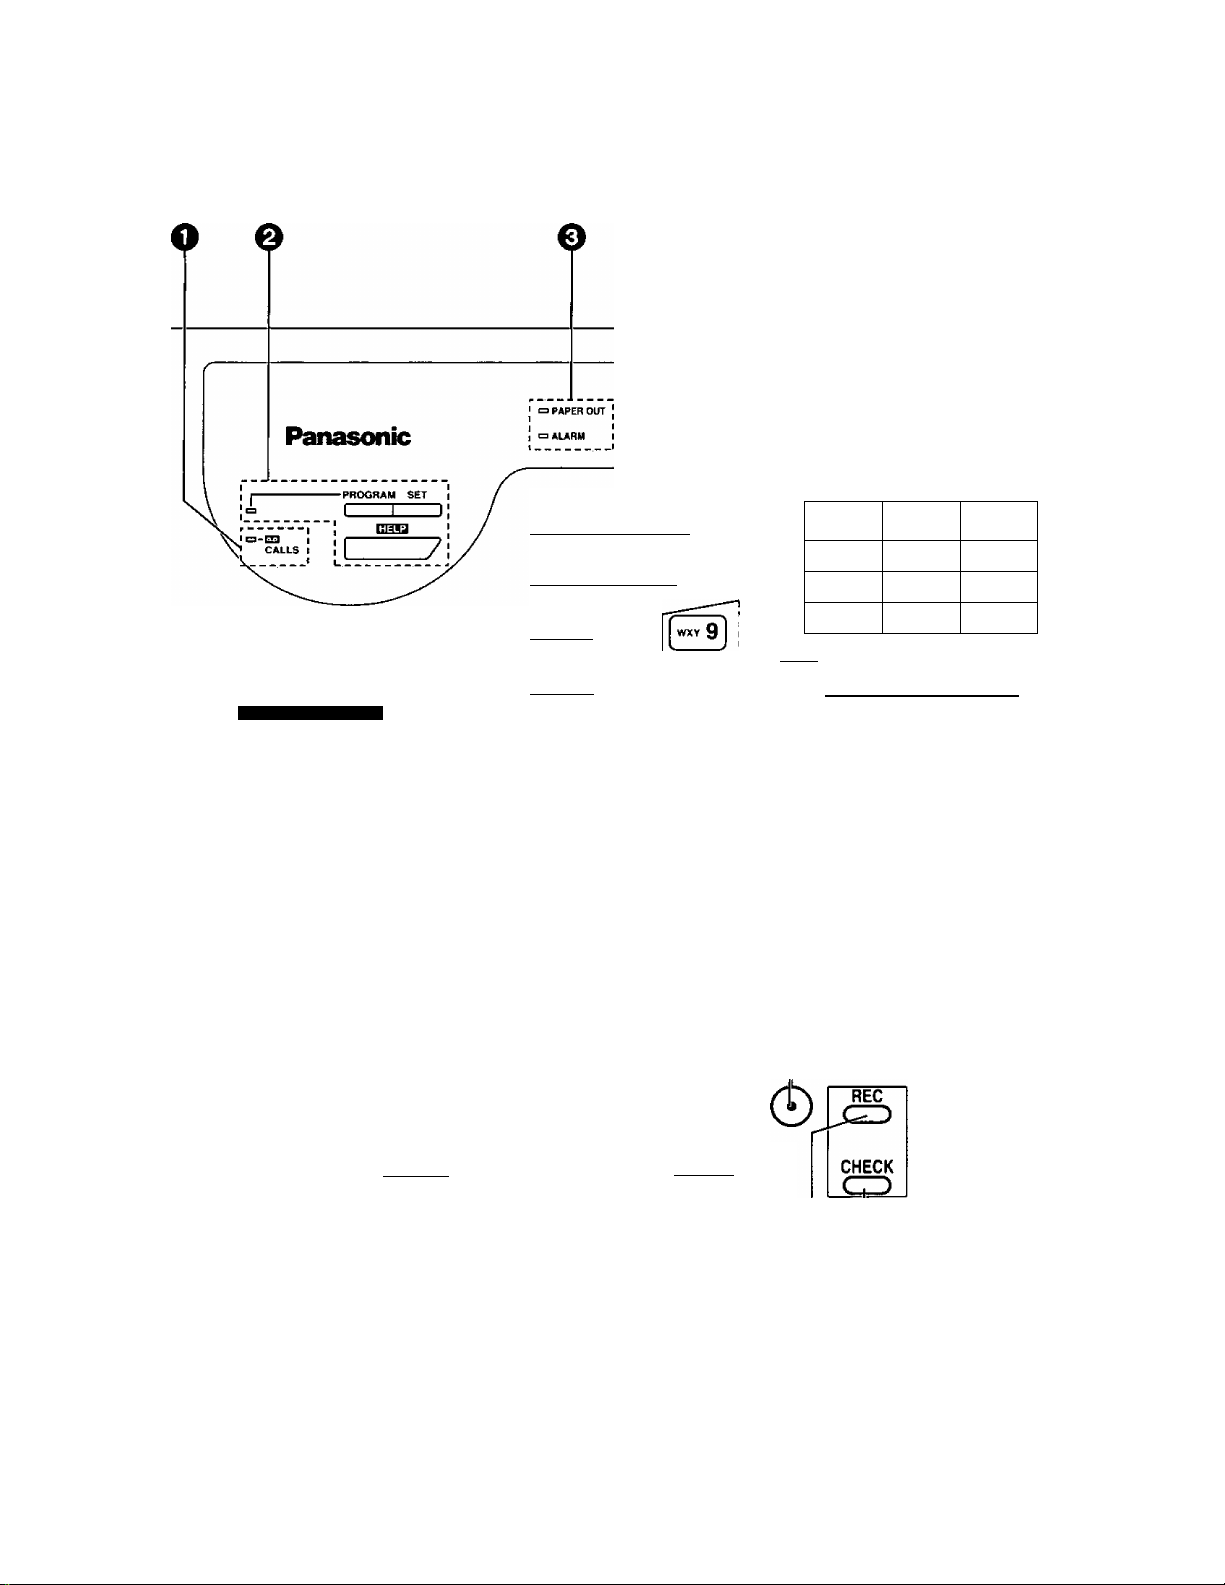
O CALLS Indicator:
Page 2-10
The indicator flashes to show the number of incoming
messages recorded.
0 PROGRAM Button and Indicator:
Page 1-26
SET Button:
Page 1-26
HELP Button;
Pages 1-26 and 1-34
0 PAPER OUT Indicator:
Page 1-13
ALARM Indicator:
Page 1-15
O POLLING Button and Indicator;
Page 4-2
o LIGHT ORIGINAL Button
and Indicator:
Page 2-3
o RESOLUTION Button
and Indicators:
Page 2-3
Used to start or end programming functions.
The indicator lights when this feature is on.
Used to store parameters during programming.
Used to print an easy guide of programming procedures.
The indicator lights when the recording paper roll is
empty.
The indicator lights when any trouble occurs.
Used for polling function. The indicator lights when this
feature is on.
Used to transmit or copy originals with faint writing. The
indicator lights when this feature is on.
Used to adjust scanning line density. The indicators tight
to show which setting you are using.
0
RECEIVE MODE Button
and Indicators:
Pages 1-23 and 2-7
0 IN USE indicator:
Page 2-10
0TONE Button:
Page 4-25
0 PAUSE Button:
Page 4-26
FLASH Button:
Page 4-25
REDIAL Button:
Page 2-16
(D AUTO Button and Indicator:
Pages 3-4 to 3-8
0 MONITOR (VOICE STDBY)
Button and Indicator:
Pages 2-4, 2-15 and 4-24
Used to select the desired receiving mode. The
indicators light to show the mode in which the unit is set.
The indicator lights or flashes when the answering
device is in use.
Used to change the dialing mode from pulse to tone
during a dialing operation.
Used to insert a pause into a phone number during
programming.
Used to access some features of your host PBX.
Used to redial the last dialed number.
Used for speed dialing.
The indicator lights when this feature is on.
Used for on-hook dialing and voice contact features. The
indicator lights when these functions are on.
1-5
Page 14

<E)STOP/CLEAR Button:
Pages 1-26, 2-4 to 2-6
Used to cancel transmission or copying operation. Also
used during programming to clear the previously entered
parameters.
©COPY Button:
Page 2-9
0 START Button and Indicator:
Pages 1 -26 and 2-4
Direct Call Station Keys:
Pages 3-2, 3-3 and 3-7
0 NEW MESSAGES Button:
Page 2-11
© STOP Button:
Page 2-10
© MEMO/2WAY REC Button:
Pages 2-13 and 2-14
© ALL MESSAGES Button:
Page 2-12
© REW (Rewind) Button:
Pages 2-10 and 2-11
© FF (Fast Forward) Button:
Page 2-10
Used to start copy functions.
Used to start transmission or print lists and reports. The
indicator lights when these functions are on.
Used for one touch dialing.
Used to play back only new messages.
Used to stop operations of answering device.
Used to start and stop recording of a memo message or
a telephone conversation.
Used to play back all the recorded messages.
Used to run the tape quickly backward to a desired point.
Used to run the tape quickly forward to a desired point.
©ICM ERASE Button:
Page 2-10
© REC Button:
Page 1-17
©CHECK Button:
Page 1-17
Used to erase recorded incoming messages at high
speed.
Used to start and stop recording of a greeting message.
Used to replay your greeting message.
1-6
Page 15
Installing Your Unit
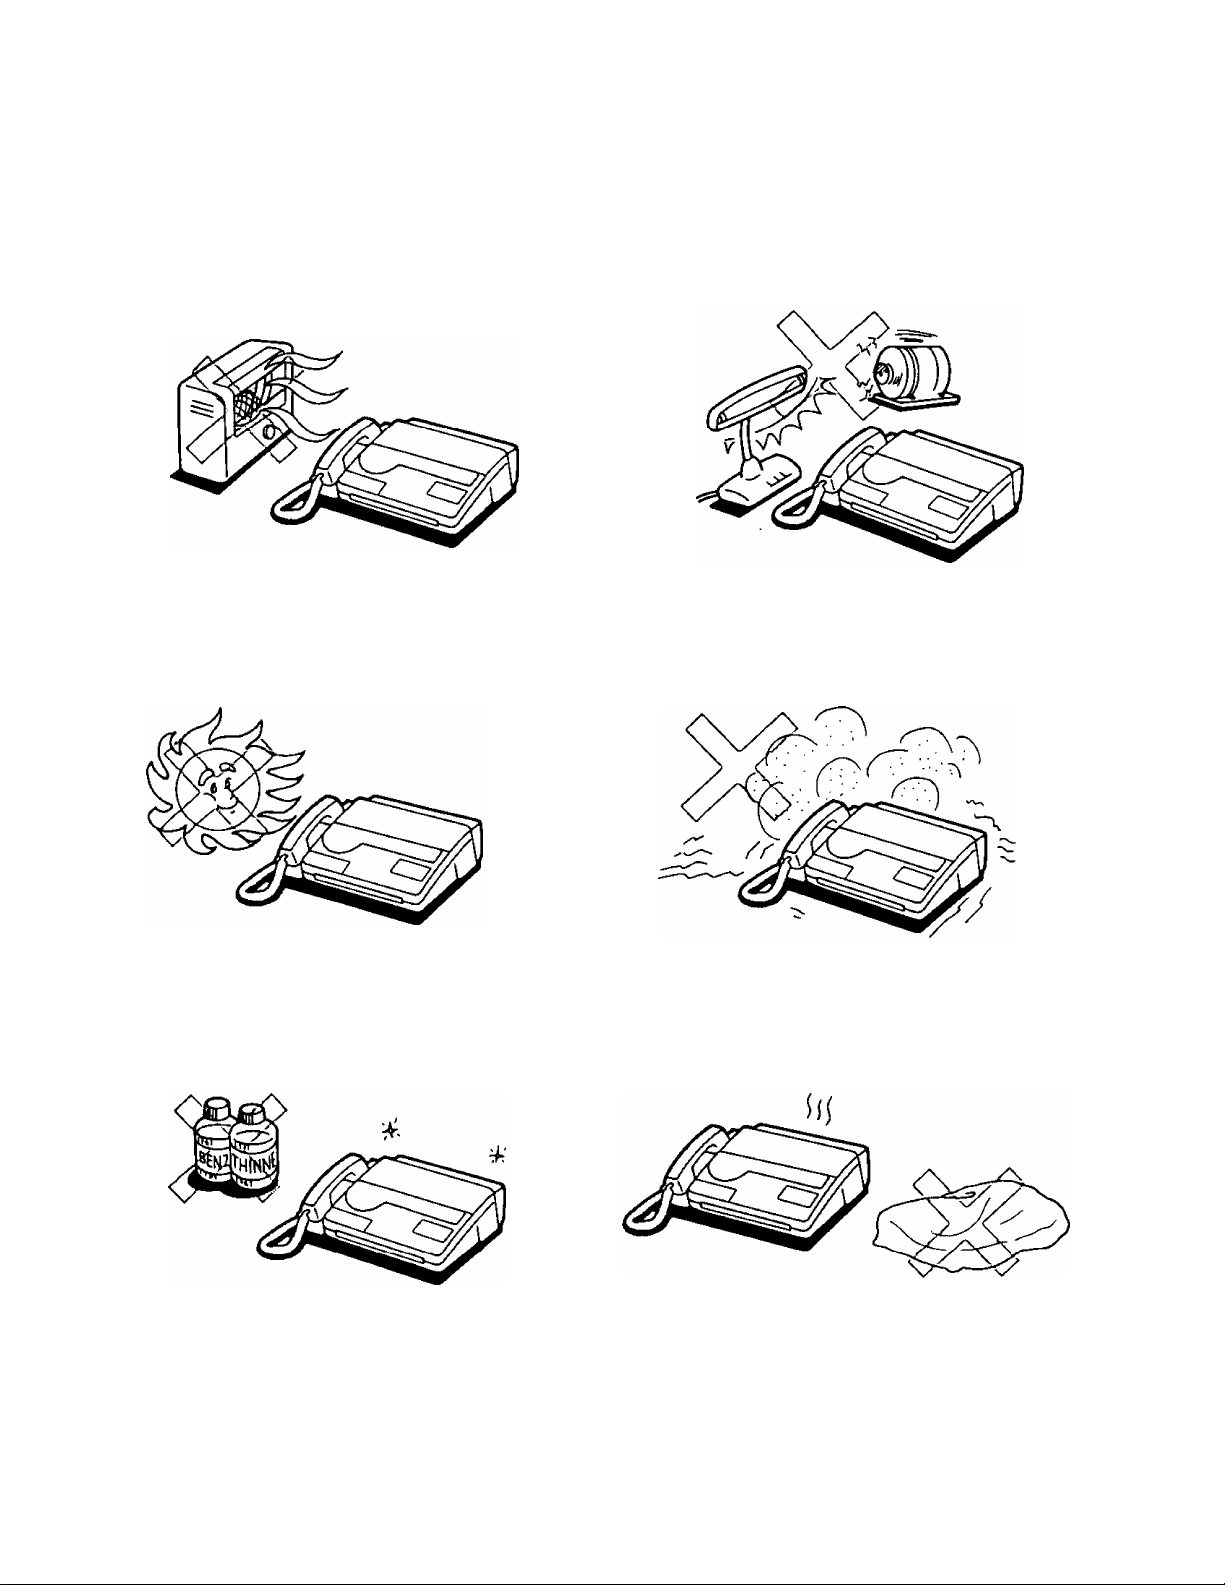
Precaution
Keep the unit away from heating appliances such
as radiators or air conditioning units.
The unit and the cassette tape should not be
exposed to direct sunlight.
Keep the unit away from electrical noise generating
devices such as fluorescent lamps and motors.
The unit and the cassette tape should be kept free
from dust, moisture, high temperature and vibration.
Do not use benzine, thinner, or the like, or any
abrasive powder to clean the cabinet. Wipe it with
a soft cloth.
Do not place any covering over the unit while it is
turned on.
1-7
Page 16
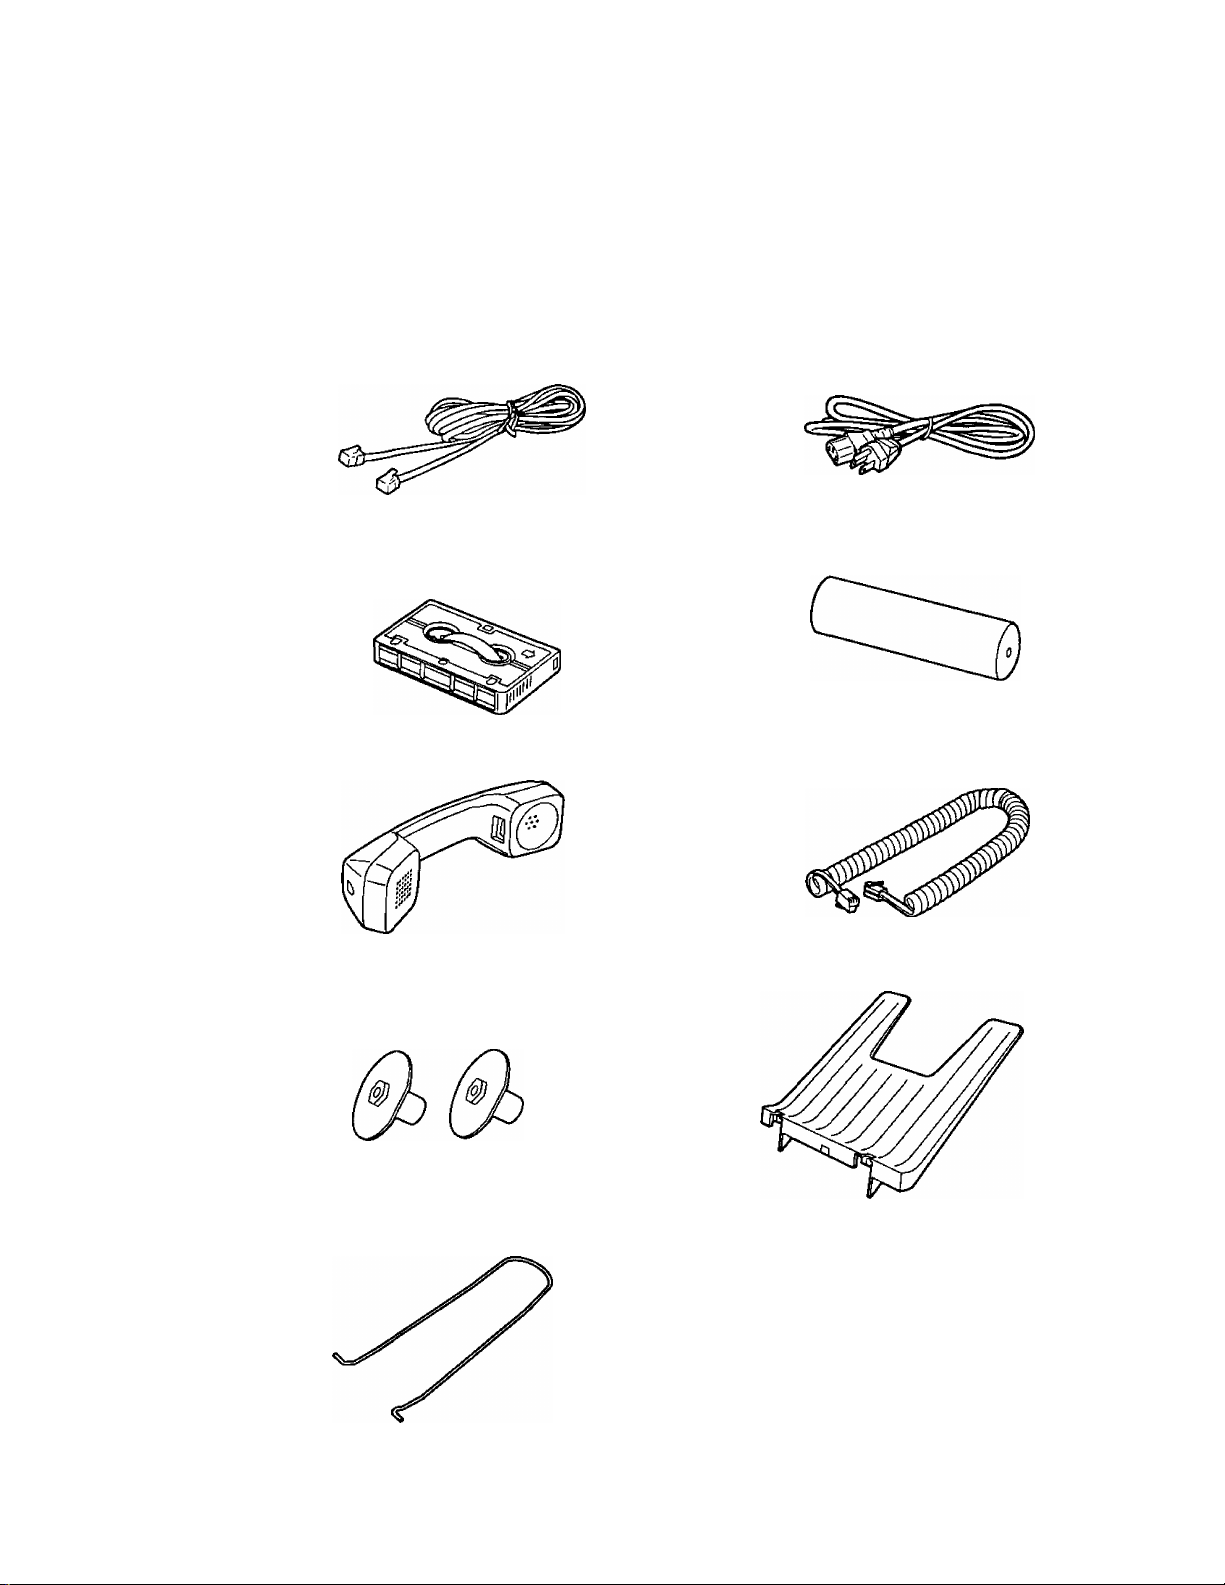
Accessories
1. Carefully remove the unit from the packing carton.
2. Examine the unit for signs of shipping damage.
3. Check that all of the enclosures are included. If you are missing any item, consult your place of
purchase.
Telephone Line Cord AC Power Cord
Microcassette Tape
Handset ............................................................1 Handset Cord
Paper Roll Holders (Green)
(For KX-A101 or the recording paper with
1/^ inch core)
.............................
1 Recording Paper .............................................1
2
Receiving Tray
Diverter
1-8
Page 17
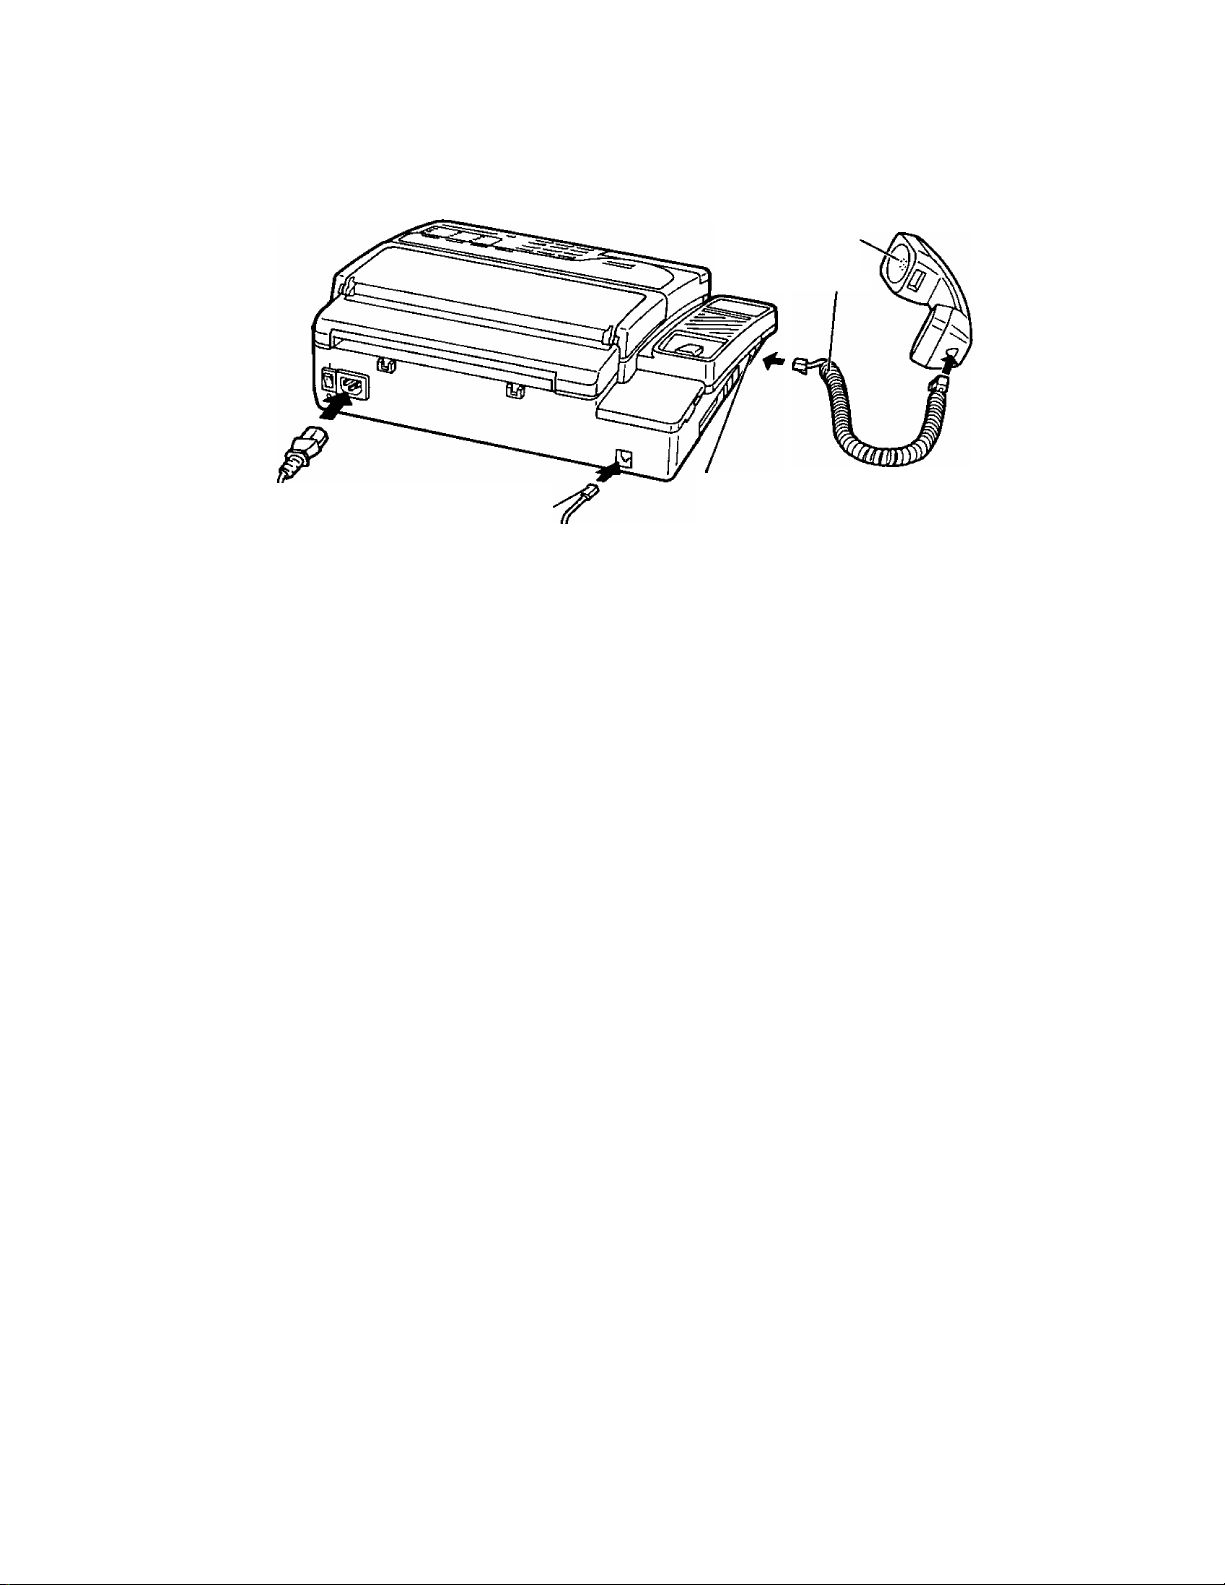
Installation connections
Connect to
“LINE"
Handset
Handset Cord
Connect to
“TO HANDSET”
Modular Jack
for single line (RJ11C)
/C.O. Surge\
^Protector /
a
o
3
o
XL
AC Outlet
(120 V, 60 Hz)
/AC Surge\
\Protector /
NOTES:
•The unit will not function during a power failure or when the power is turned off.
•Connection to integrated answering machines is not recommended.
•This unit is equipped with a 3-wire grounded type plug for safety. If you are unable to insert the
plug into your outlet, contact your electrician to replace your outlet.
•We recommend the use of an exclusive AC outlet to avoid interference from other equipment.
• Place the equipment close to the socket outlet so the socket is easily accessible.
• If your unit is connected to the same line as other extensions, do not use other extensions
during fax transmission and reception. Image quality will be affected.
• For additional equipment protection we recommend the use of a surge protector such as
TELESPIKE BLOK MODEL TSB (TRIPPE MFG. CO.), SPIKE BLOK MODEL SK6-0 (TRIPPE
MFC. CO.), SUPER MAX (PANAMAX) or MP1 (ITW LINX).
1-9
Page 18
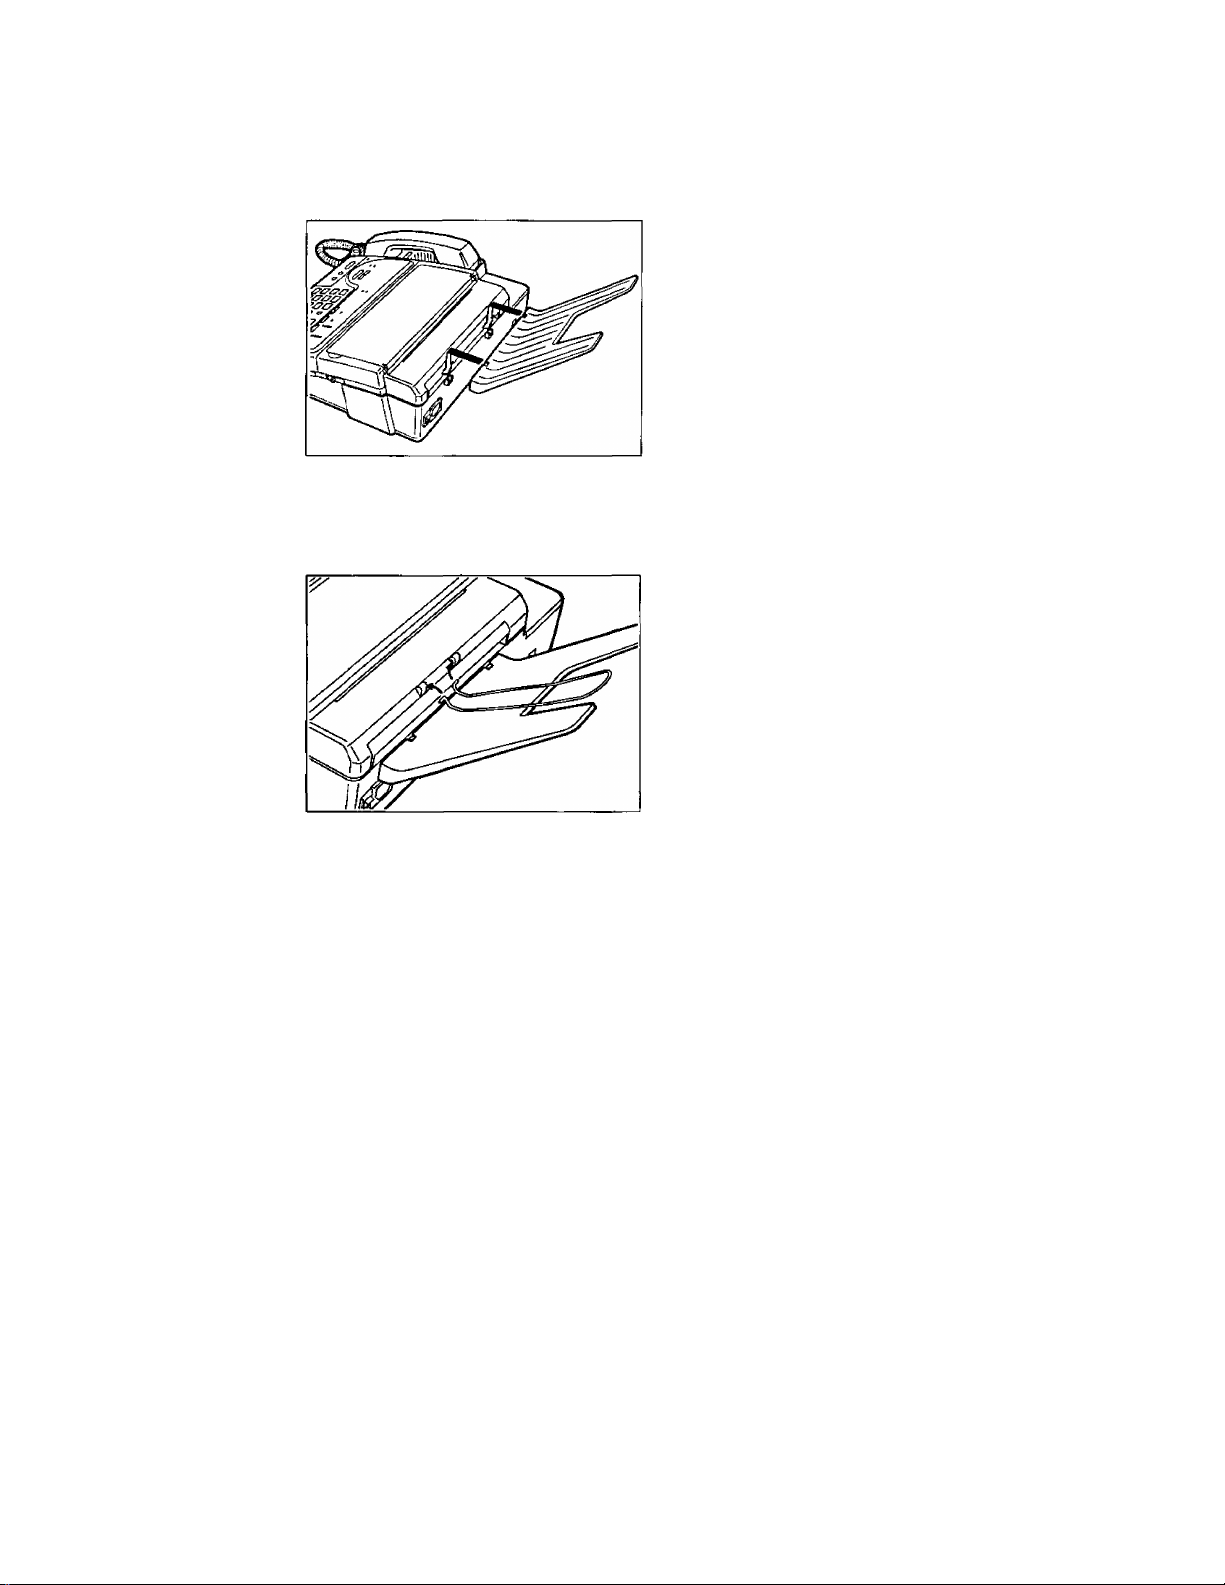
Installing the receiving tray and the diverter
To install the receiving tray:
Insert two fins of the tray into holders on the rear
side of the unit.
To install the diverter:
The diverter will hold the received documents straight and flat.
Insert two hooks of the diverter into holders on
the rear side of the unit.
Make sure that the diverter is placed in proper
direction.
1-10
Page 19
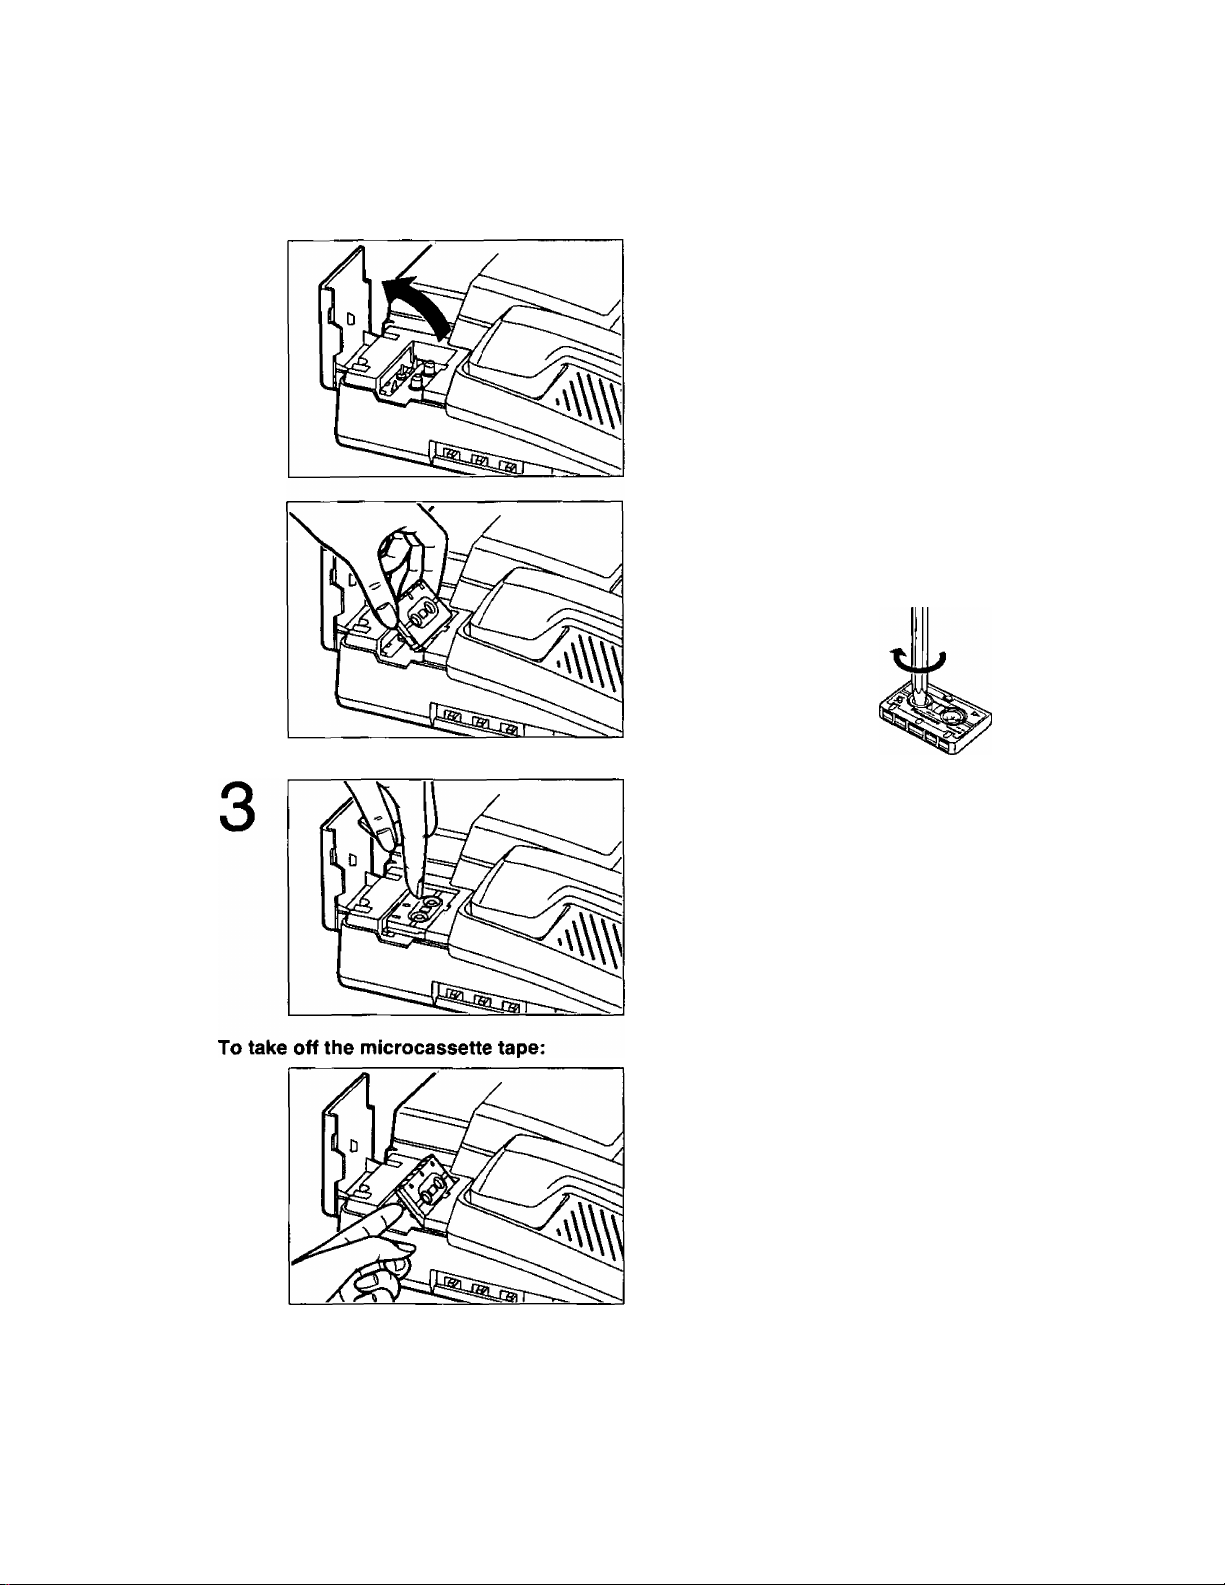
Installing the microcassette tape
The microcassette tape is used to record incoming messages.
To install a microcassette tape:
1
2
Pull up the cassette compartment cover.
Insert the microcassette tape into the
compartment with the full reel to the left.
Make sure that there is no slack in the tape.
Remove any slack by using a pencil and rotating
the tape reel.
Push the microcassette tape down.
Then close the cassette compartment cover.
Lift the microcassette tape as shown, then take
it off.
NOTES:
•For optimum sound quality and performance, use the opposite side (side B) after six months
and replace the tape with a new one every year, assuming that the unit answers about ten calls
a day.
• Never place a cassette tape near a magnetic source such as a magnet or a TV set. It may erase
or interfere with any messages on the tape.
•Should the cassette tape break or become worn, replace it with a new one. We recommend
using the Panasonic cassette tape MC-30 or MC-60.
1-11
Page 20
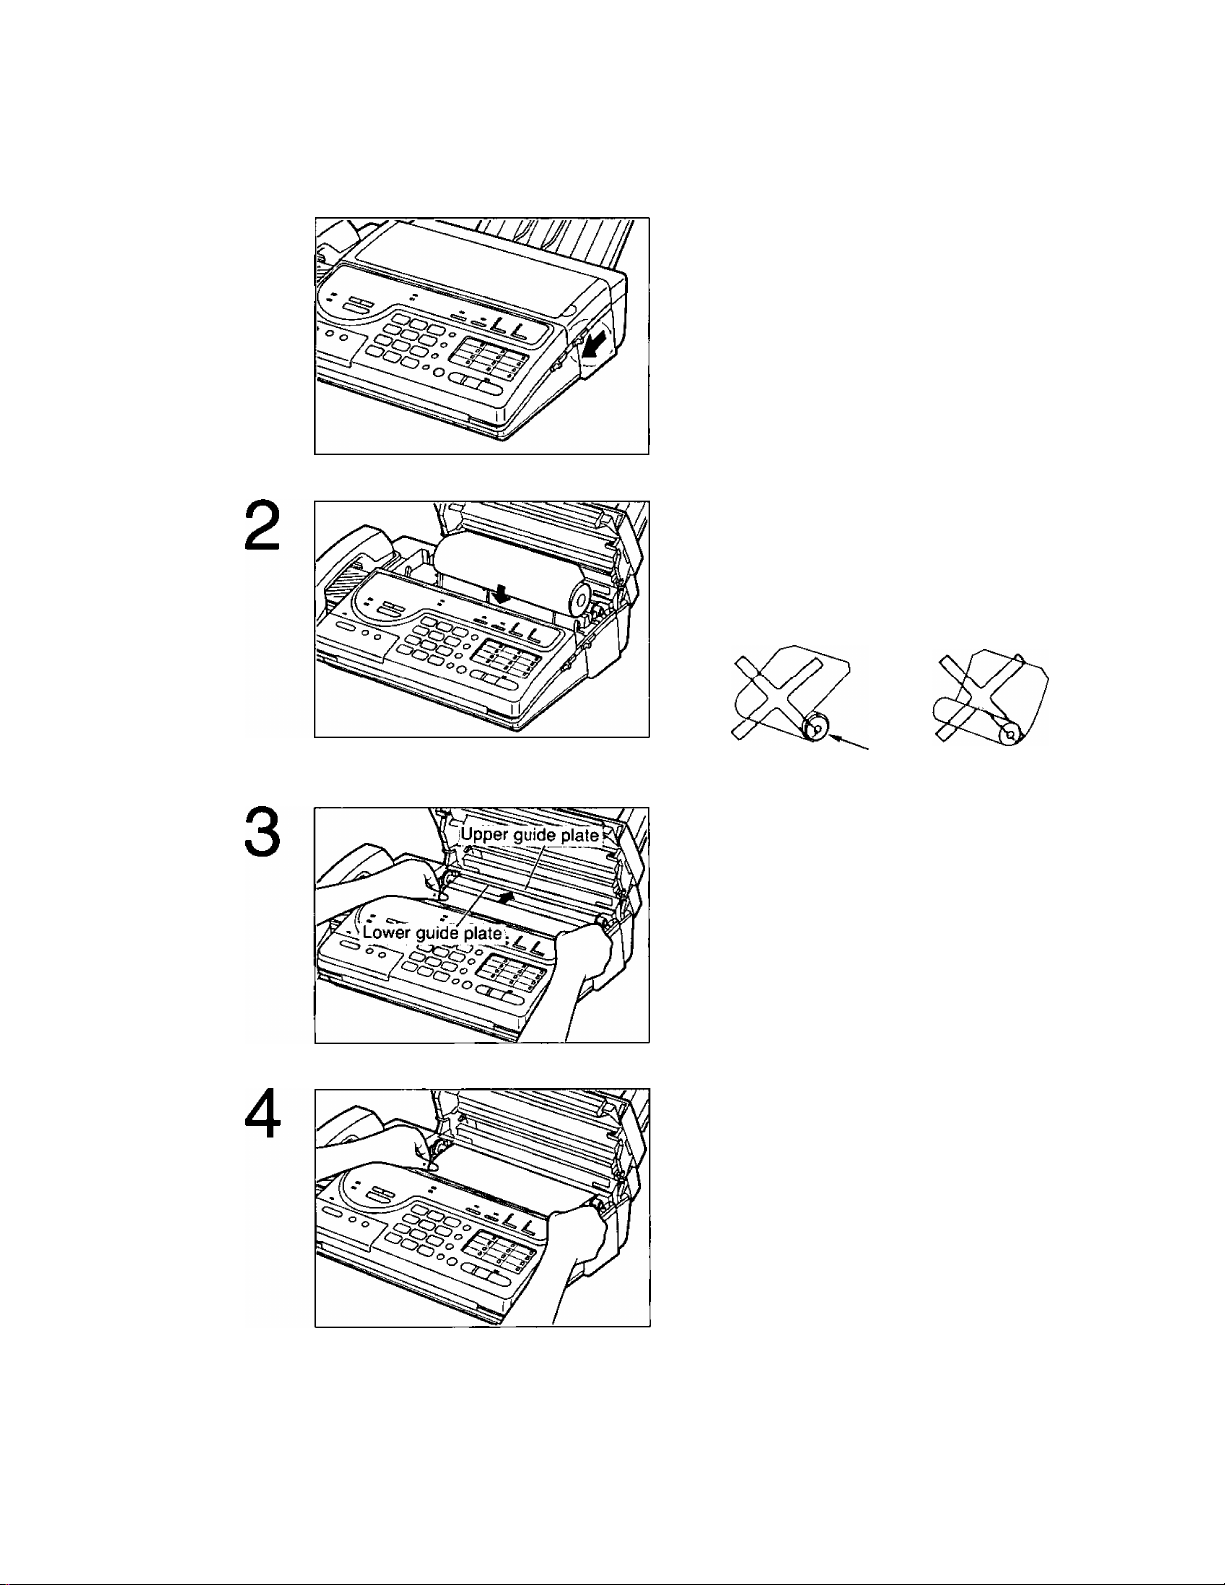
Installing the recording paper
To install a new roll of recording paper:
1
Slide the BACK LID OPEN lever forward to
open the paper compartment cover.
Place a recording paper roll into the paper
compartment.
Make sure that the shiny side of the paper is
facing up and that there is no slack in the paper
roll.
Slack
Insert the leading edge of recording paper
between the upper and the lower guide plates.
Pull the paper a few centimeters (one or two
inches) out of the unit.
1-12
Page 21
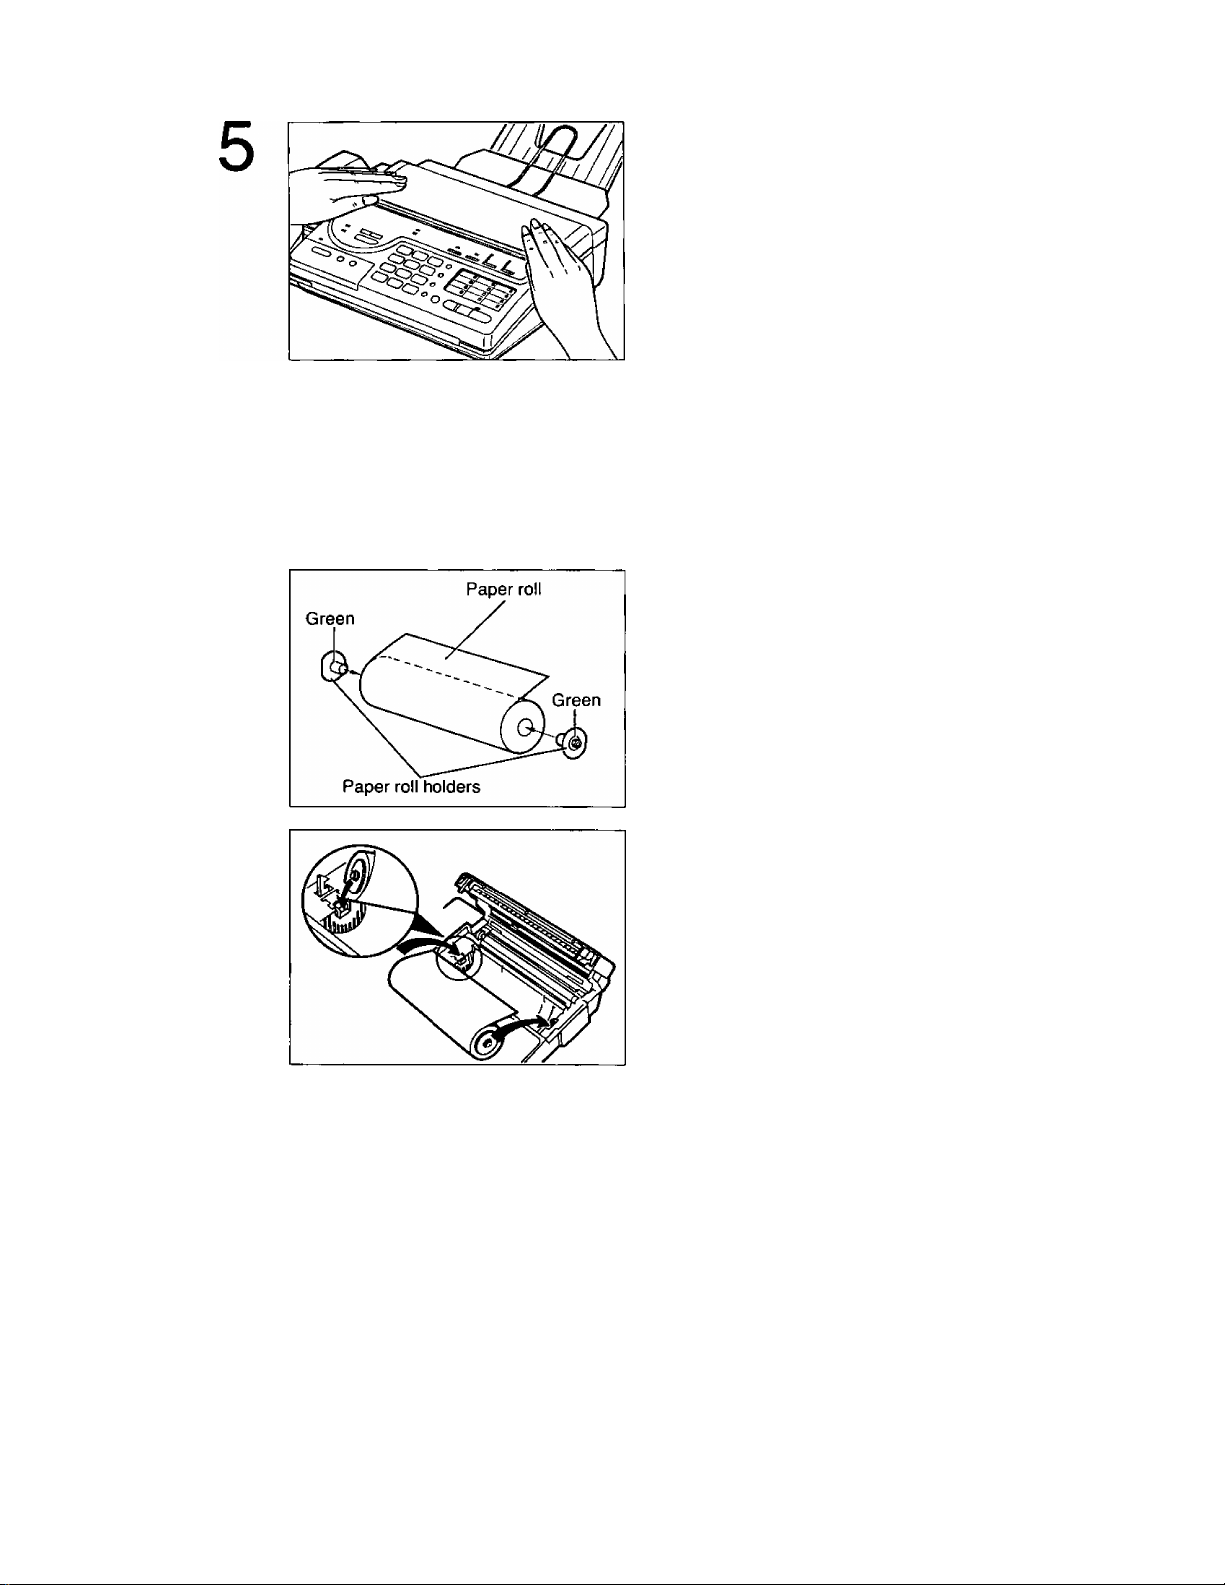
Close the paper compartment cover carefully by
pressing down on both ends gently,
When the unit is on, the recording paper will
project itself slightly and be cut automatically.
NOTES:
• Use only the included roll or specified recording papers (Part No. KX-A101 and KX-A106) for
supplement or else the print quality may be affected or excessive thermal head wear may occur.
•To install the KX-A101 or a recording paper with i/fe inch core, you should use the included
paper roll holders for paper curl reduction system as shown below.
Fix the paper roll holders on both sides of the
recording paper roll.
Insert the left projection of the paper roll holder
into the left groove on the unit then the right
projection into the right groove, while pushing
the paper roll to the left.
Follow the procedures from steps 3 to 5 to finish
installing a KX-A101 or a recording paper with
1/& inch core.
• If the recording paper is heavily curled, the paper curl reduction system may not function
properly.
• Replace the paper roll with a new one;
—when the red lines appear on both sides of the recording paper.
—when the PAPER OUT indicator lights.
1-13
Page 22
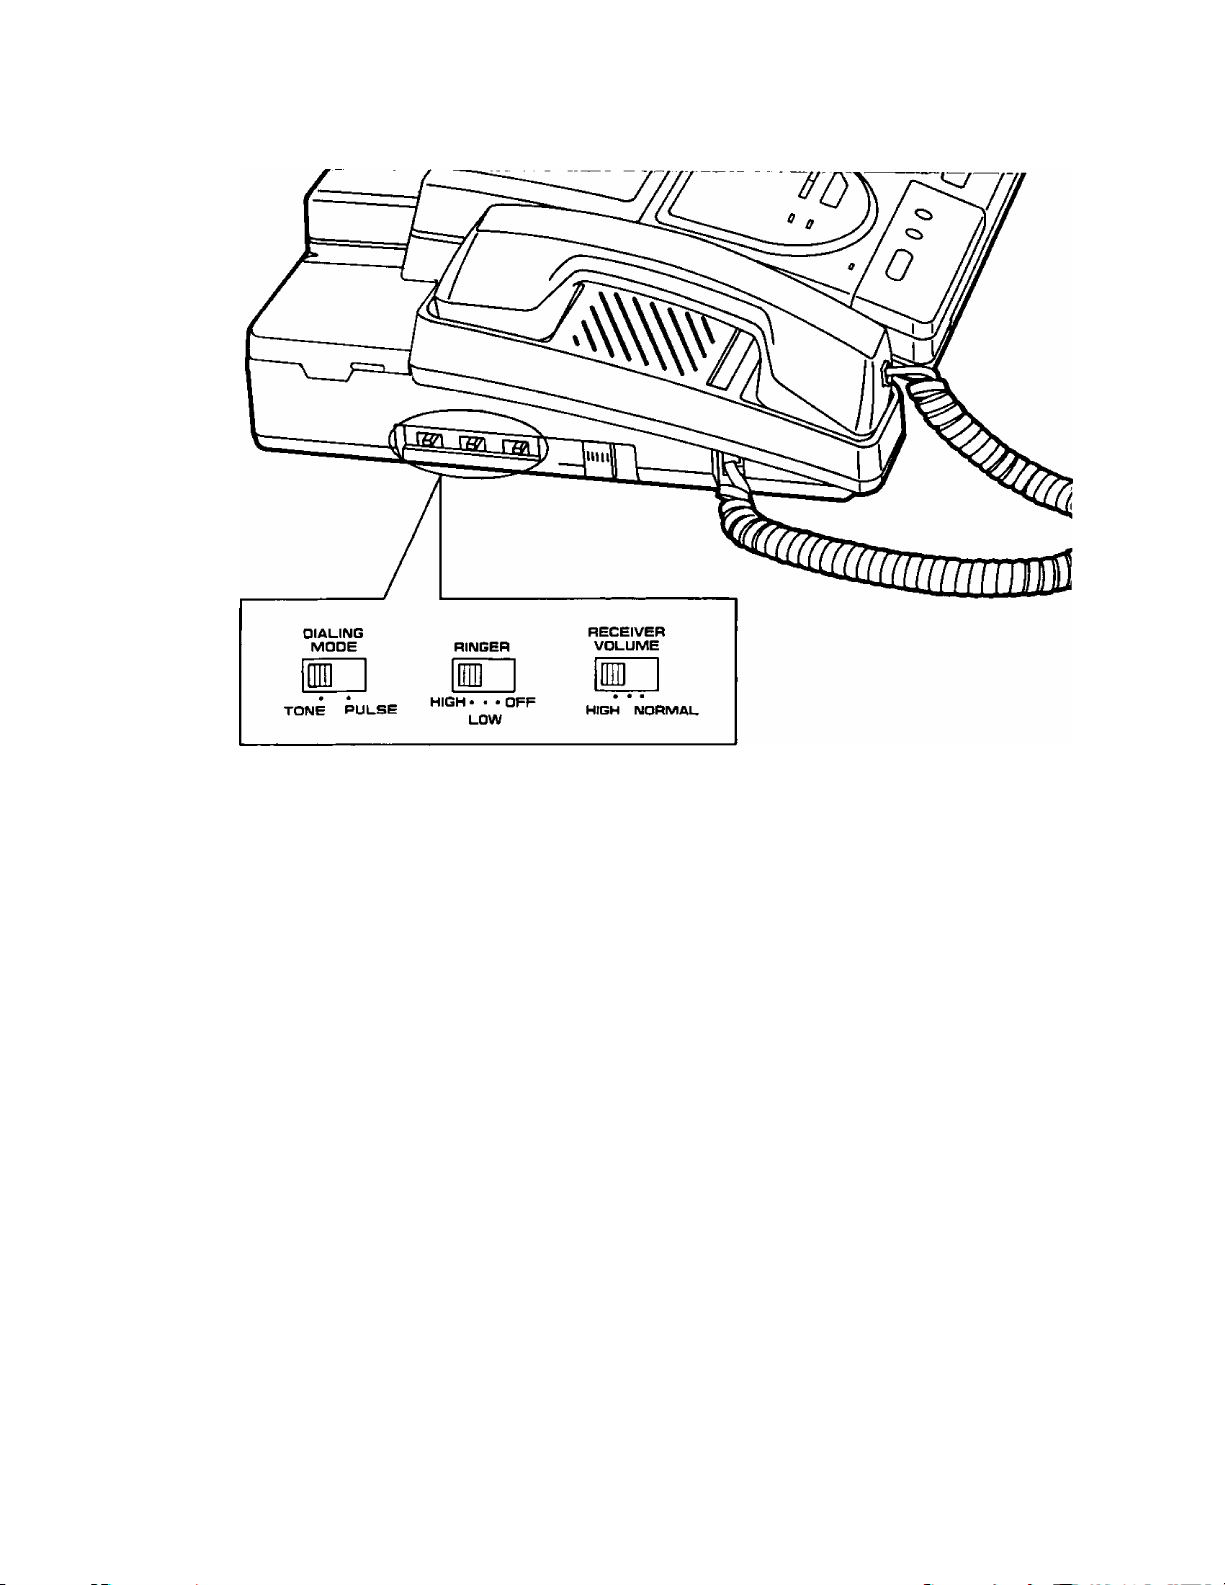
Setting selectors
DIALING MODE Selector:
If your line has,
1. Touch tone service, set the selector to TONE.
2. Rotary pulse dial service, set the selector to PULSE.
RINGER Volume Selector:
HIGH: The ringing sound will be loud.
LOW: The ringing sound will be soft.
OFF: The unit will not ring.
RECEIVER VOLUME Selector:
Adjust the volume level of the handset receiver using the RECEIVER VOLUME selector.
The RECEIVER VOLUME selector can be moved to 3 positions. The center between HIGH and
NORMAL is the middle level of volume.
When the other party's voice is hard to hear, slide the switch to the center or HIGH.
1-14
Page 23

Turning the POWER switch on
Before turning the POWER switch on, confirm the following:
—All connections are completed.
—The cassette tape and the recording paper are installed properly.
—The handset is on the cradle.
1. Turn the POWER switch to the “I” (ON) position.
2. When you turn on the unit for the first time, the ALARM indicator will light.
This shows that the greeting message is not recorded.
To record your greeting message, see pages 1-16 and 1-17.
If the greeting message is not recorded, you cannot use the unit properly as both an
answering device and a facsimile.
NOTES:
• If the ALARM indicator still lights, confirm that the covers are closed firmly.
• If the PAPER OUT indicator lights, install the recording paper property (see pages 1-12 and
1-13).
1-15
Page 24
Recording Your Greeting Message
Record a greeting message before using your machine as an answering machine and facsimile.
The greeting message tells the caller that you are unable to answer, and allows him or her to
leave a voice*message or to send a fax message.
You can store a greeting message up to 16 seconds.
Suggested message
Record your greeting message referring to the examples below.
—When the incoming message recording time is unlimited:
“This is (your name, business and/or telephone number). We are unable to answer right now.
To send a fax, start transmission. To leave a message, speak after the long beep. Thank you."
—When the incoming message recording time is limited to 1 minute:
“This is (your name, business and/or telephone number). We are unable to answer right now.
To send a fax, start transmission. To leave a message, speak for up to 1 minute after the long
beep. Thank you.“
You can choose from two lengths of recording times for incoming messages. When the unit is in
the “VOX” position, the recording time is unlimited, and when in the “1 MIN” position, the
recording time is limited to 1 minute. The two examples above correspond to these two conditions.
The unit is preset to the “VOX” position. To change the recording time, see page 1-32.
1-16
Page 25
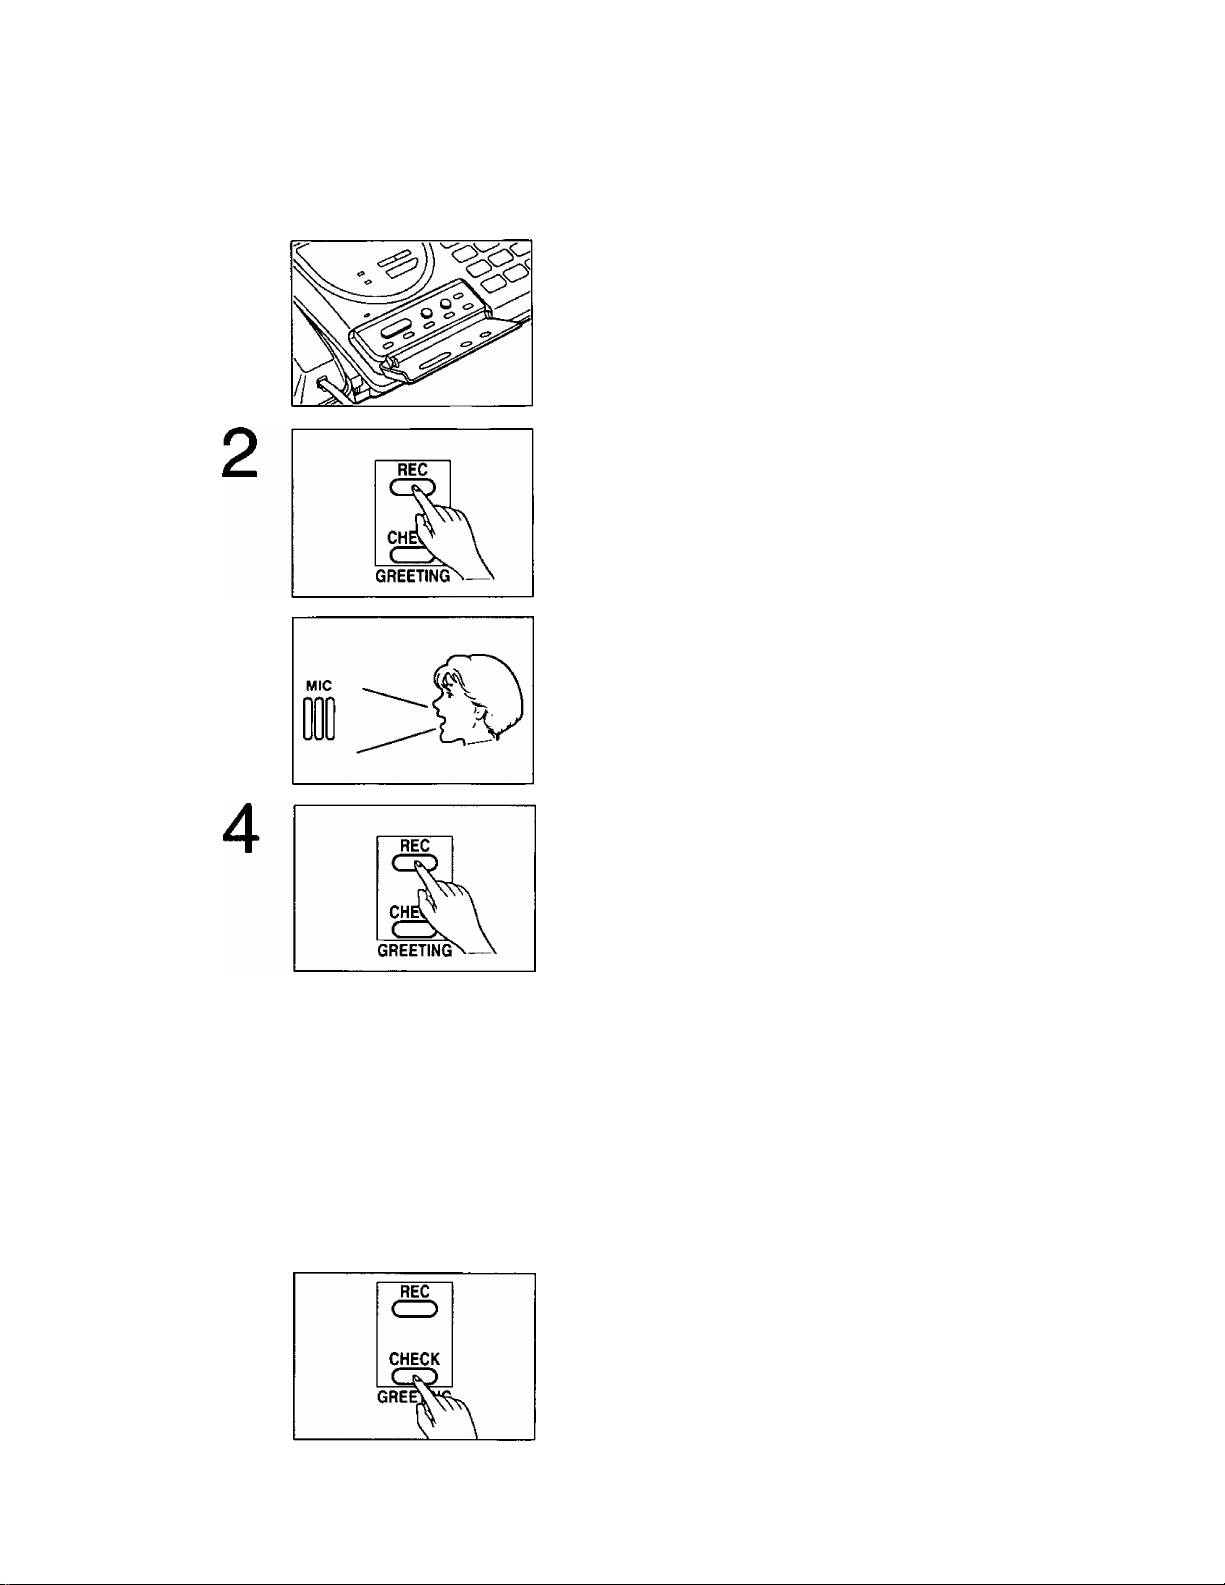
Recording a greeting message
Recording time is limited to 16 seconds. Record your greeting message within 12 seconds for
optimum performance.
1
3
Open the ANSWERING CONTROL panel.
Press the REC button.
A beep is heard.
After the beep, speak immediately, clearly and loudly
toward the microphone from a distance of approximately
20 cm (8 inches).
When finished, press the REC button again or the STOP
button.
The unit plays back your greeting message so that you
5
NOTE:
If you make a mistake while recording, repeat from step 2.
can confirm it.
Adjust the VOLUME control to a suitable level.
Checking your greeting message
Press the CHECK button.
The unit replays your greeting message. If you want to
change your message, perform the operation on this
page again. The previous message will be automatically
erased and a new message will be recorded.
1-17
Page 26
Programming Your Fax Document Identifiers
Your programmed logo and telephone number will be printed on the top of each page transmitted
from your unit, along with the date, time and page number.
This gives the receiving party your name and fax telephone number if they wish to return a fax.
Before using your unit as a facsimile, you should never fail to set this information.
Sample pages sent by your unit
YOUR LOGO
FRON : ABC Company
TO:
FROM:
Setting date and time
YOUR TELEPHONE NUMBER DATE & TIME Number of page
PHONE NO. : +123 4567
Jan. 01 1993 03:05AM P01
FAX CORRESPONDENCE
DATE:
OUR TEL. NO.:
The interna! clock of the unit will print the date and time on the top line of all the documents you
transmit and the fax communication reports such as JOURNAL report and transmission report.
HELPFUL HINT:
When you lose your procedures while programming, press the HELP button.
You will be able to print information about how to set.
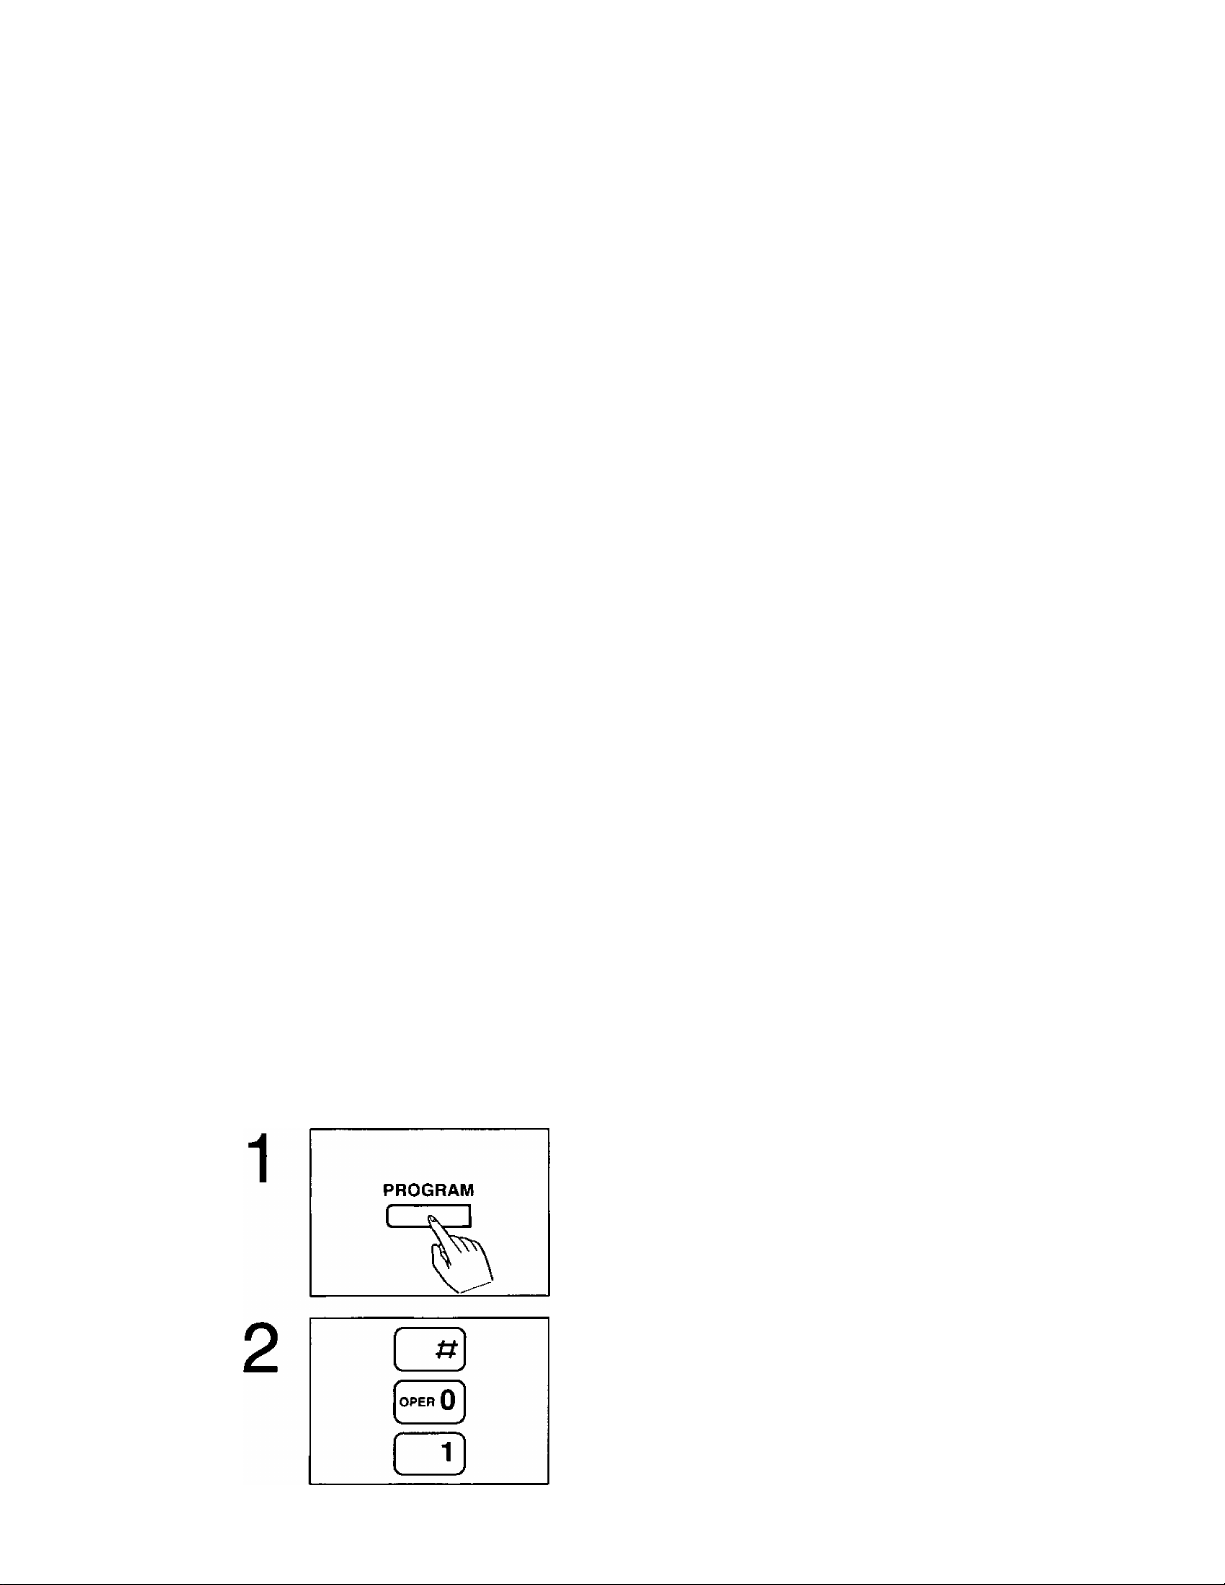
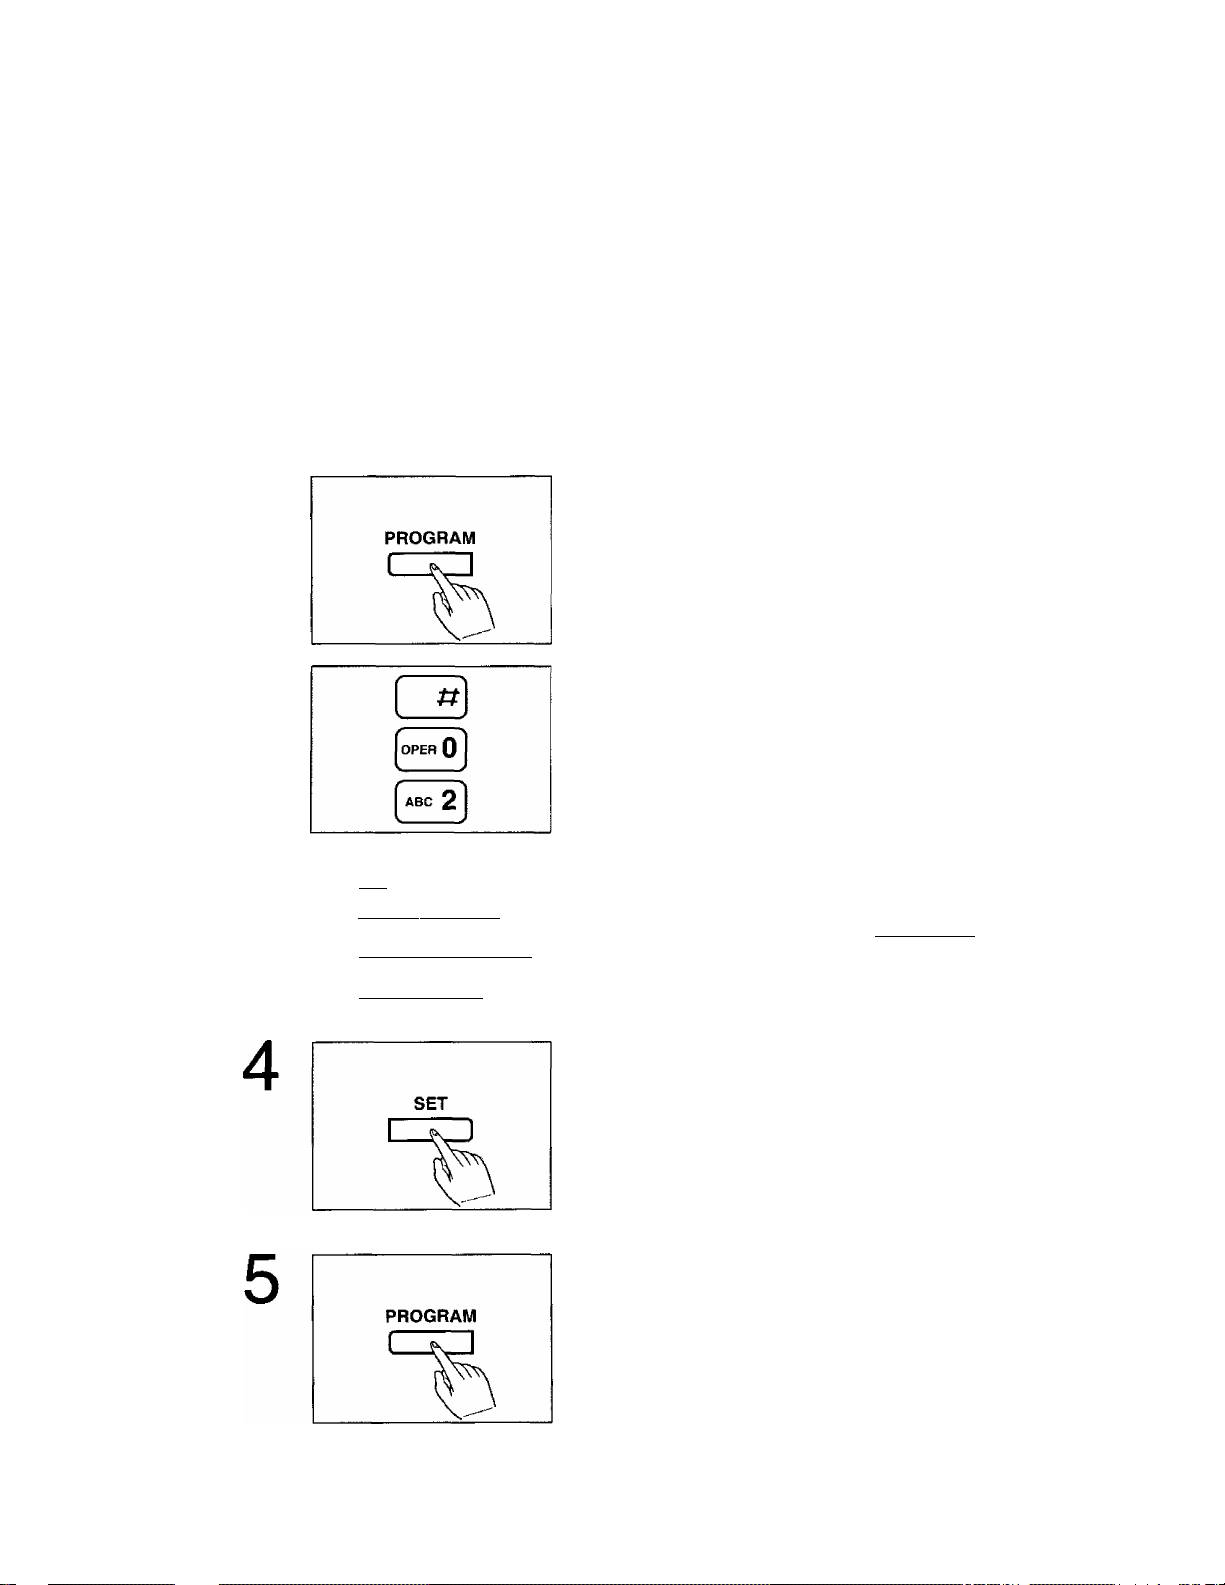
Press the PROGRAM button.
The PROGRAM indicator lights.
Press #, then press 01 for SET DATE setting.
The PROGRAM indicator flashes.
The current setting is printed out automatically for
confirmation.
(continued)
1-18
Page 27
3
[ 1 ] [*BC 2] [°tF 3]
I OHI 4 I I JKL 5 ] HMO 6 ]
[p«» 7] [tw 8] [*»9]
QQQ
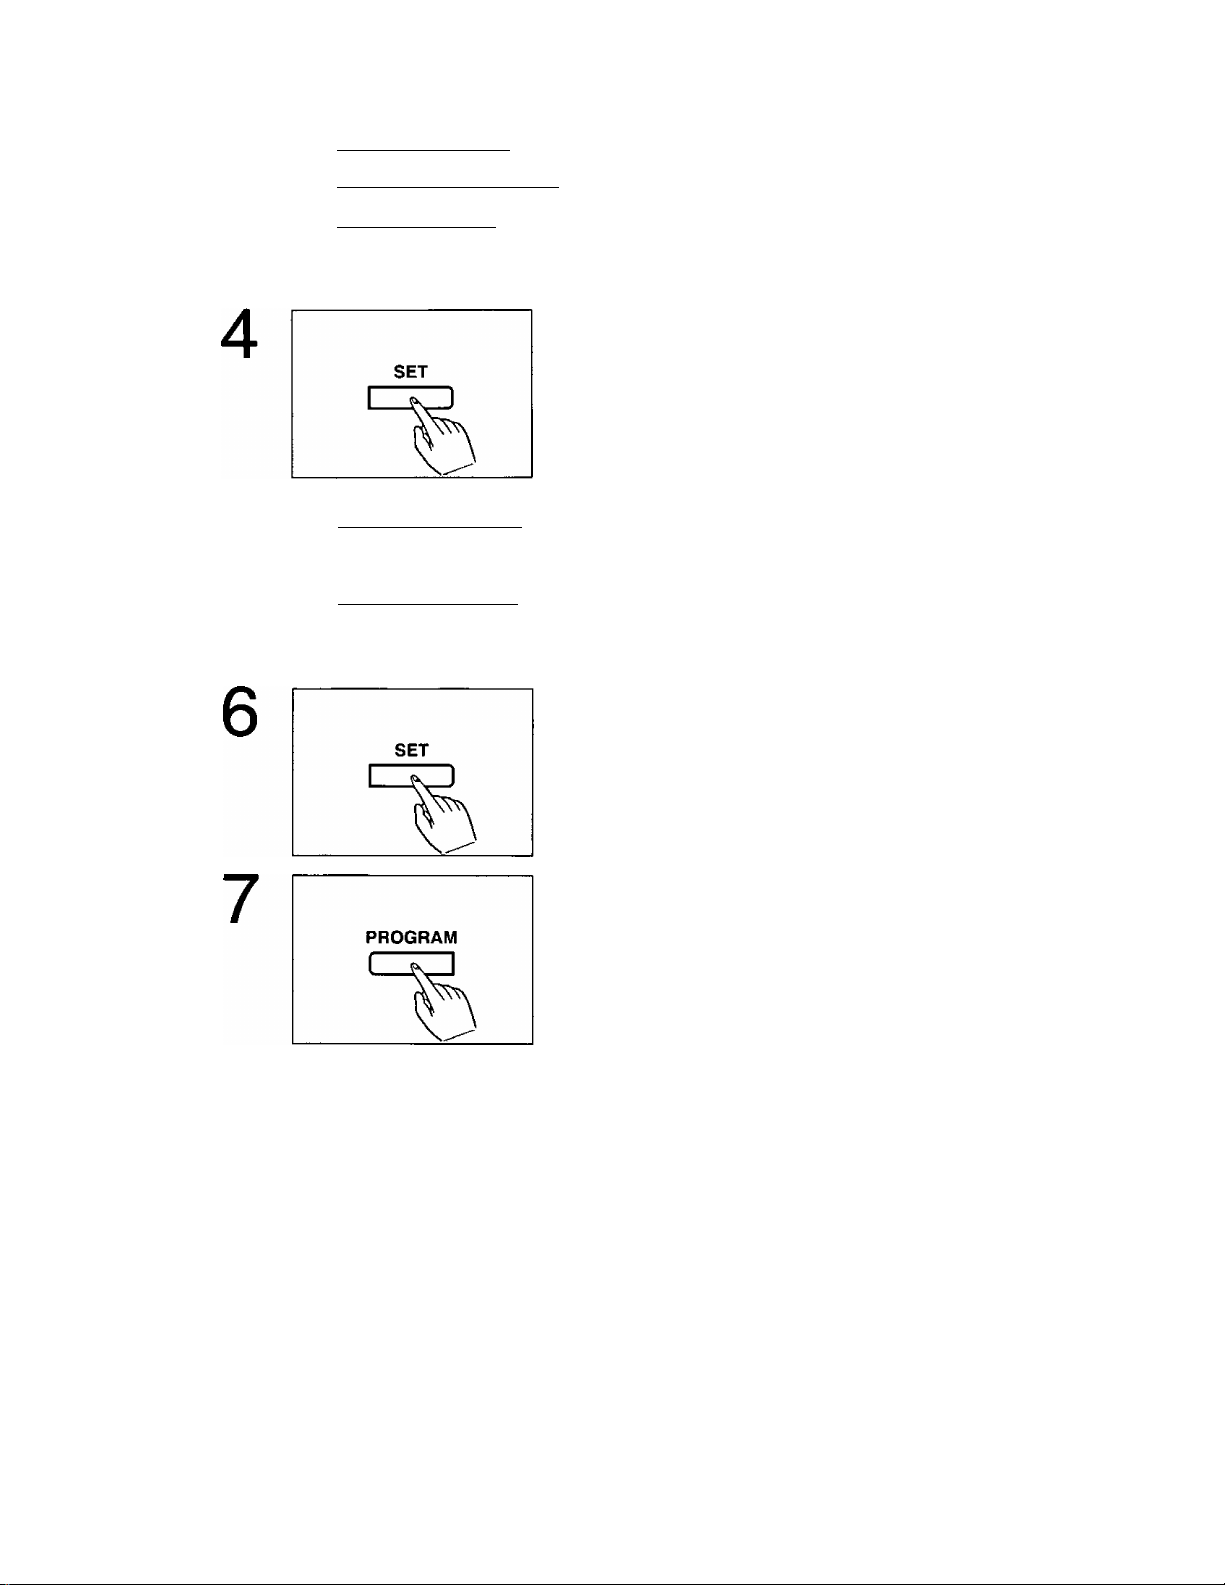
Enter current month/day/year by using the dial keypad.
Example: Aug. 10 1993.
Press 08, 10 then press 1993.
Press the SET button.
The result of your setting is printed out automatically for
confirmation.
If you wish to correct your programming, press the
STOP/CLEAR button then repeat from step 2.
5
[ 1 ] [*BC 2] [oEF 3]
^QHI^^4j I^MNO^Sj
^ 7 ] [fuv sj I mV 9 ]
r~^F^r~^
Enter the current time by using the dial keypad.
Example: 3:45 PM
Press 03 then press 45.
Press # to select PM mode.
(To select AM mode, press *.)
Press the SET button to store the program into memory.
The PROGRAM indicator lights.
The result of your setting is printed out automatically for
confirmation.
If you wish to correct your programming, repeat from
step 2.
Press the PROGRAM button to end the operation.
The PROGRAM indicator goes out.
NOTE:
To correct an error while programming, press the STOP/CLEAR button then repeat from step 2.
1-19
Page 28
Setting your logo
The logo is used to identify fax documents sent by your unit. It may consist of alphanumeric
letters and symbols.
Usually the logo is a company, division or personal name in an abbreviated form. Your
programmed logo will be printed on the top of each page transmitted from your unit.
Your printed logo can be up to 30 digits long. “Panasonic ANS/FAX” is stored in your unit as
default.
To enter each character, select the correct code (2 digits) referring to the character code table
(see page 1-21), then program as follows.
HELPFUL HINT:
When you lose your procedures while programming, press the HELP button.
You will be able to print information about how to set.
Press the PROGRAM button.
1
2
3
r~n ED ED
(GHI 4 j sj ( MM3 6 j
[ PRS 7 ] ['»V 8] [w>'<
[
-X-]
[ tf]
The PROGRAM indicator lights.
Press #, then press 02.
The PROGRAM indicator flashes.
To obtain the character codes, press the HELP button.
Enter your logo by using the dial keypad.
Example; If you want to program the logo as “ABC
Company”, press “30 31 32 01 32 74 72 75
9
]
The logo can be up to 30 characters long.
When finished, press the SET button to store the
program into memory.
60 73 84”-
The PROGRAM indicator lights.
The result of your setting is printed out automatically for
confirmation.
If you wish to correct your programming, try again from
step 2.
Press the PROGRAM button to end the operation.
The PROGRAM indicator goes out.
NOTE:
To correct an error while programming, press the STOP/CLEAR button then repeat from step 2.
1-20
Page 29

Character Code Table
Input Code Input
(*1)
(Space)
!
tt
#
$
%
00
01
02
03
04 05
06
)
+ 12 2
/ 16
Code
& 07
(
08
09
< 19 9 29
Input Code Input Code
U
50 a
V 51 b 61
W 52 c
X
Y 54 e
53
Z 55
=
>
?
@
56
57 h
58 i 68 s
59
d 63
f
g
j
Input Code
10 0
11
1 21
20
22 C
13
14 4
3 23
24 E
15 5 25
6 26 G
17 7
18 8
27 H
28
Input Code
60 k 70
1
62 m
64
65
66
n
0
p
q
72 w 82
73
67 r 77
69 t 79
Input Code
A 30
B
31
32 M
D 33
34
F 35
36 Q
Input Code
K 40
L
41
42
N 43
0
44
P 45
46
37 R 47
1 38 S 48
J 39
Input Code
u 80
T 49
Input Code
-
90
71 V 81 91
92
93
94
95
X 83
74
y
84
75 z 85
76
[
86 (’2) 96
{
1
}
--
¥ 87
78
]
A
88
89
‘1: Enter “00" to erase all of the characters that have been programmed (all clear).
"2: Enter “96” to delete the last character (back space).
■ Check your logo and codes referring to the character code table before programming.
Example: If the logo is ABC Company, fill out the form as follows.
5 10
Input A B c c 0
Code
30
32 01 32 74 72 75 60 73
31
m
P
n
a
y
84
Write your own logo and its code in the form below.
5
10 15
Input
Code
Input
Code
20 25
1-21
15
30
Page 30
Programming your facsimile telephone number
Your facsimile telephone number can be programmed into your unit.
When you transmit a document, your programmed number will be printed on the top of each page
transmitted from your unit.
The unit can hold your phone number up to 20 digits long.
HELPFUL HINT:
When you lose your procedures while programming, press the HELP button.
You will be able to print information about how to set.
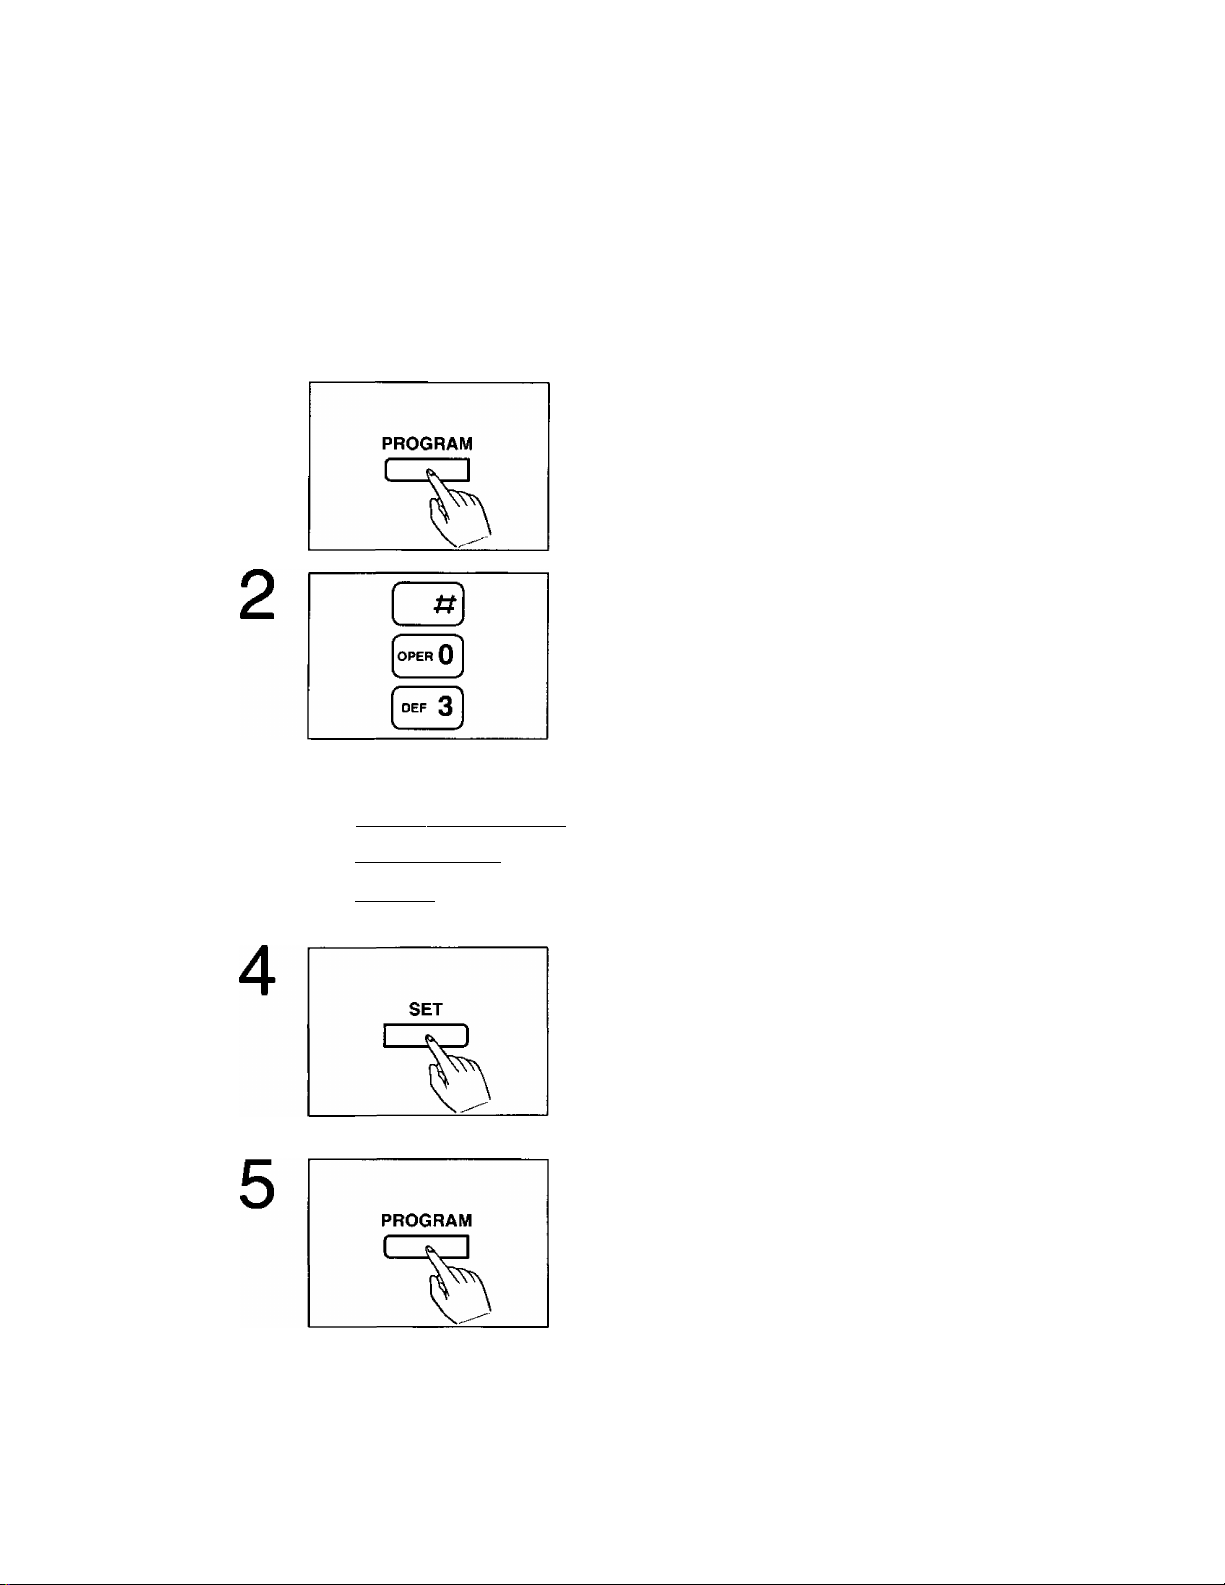
Press the PROGRAM button.
1
The PROGRAM indicator lights.
Press #, then press 03.
The PROGRAM indicator flashes.
3
qeDED
[an* 4] [■'KL 5] [“"0 6]
IPBS 7] [rwf S] [wit 9]
[ #] [oPEB 0 ] [ g]
Enter your telephone number by using the dial keypad
up to 20 digits long.
Example: If the phone number is +123 4567, press
123, #, then press 4567.
When finished, press the SET button to store the
program into memory.
The PROGRAM indicator lights.
The result of your setting is printed out automatically for
confirmation.
If you wish to correct your programming, try again from
step 2.
Press the PROGRAM button to end the operation.
The PROGRAM indicator goes out.
NOTE:
The # button provides a space and the * button provides the mark
1-22
Page 31

Selecting the RECEIVE MODE
The unit has four types of receiving modes:
ANS/FAX mode —When you want to use as a telephone answering device and a facsimile.
TEL/FAX mode —When you want to use telephone and facsimile.
FAX mode —When you want to use facsimile only.
TEL mode —When you want to use as a standard telephone only.
RECEIVE MODE
I ANS/FAX
I TELff^AX
I FAX
I TEL
receiving mode.
HELPFUL HINTS:
■ When you are out of the office—ANS/FAX mode:
The unit will automatically distinguish between a voice and a fax call.
If a fax tone is heard, the unit will automatically activate the fax function. If the caller's voice is
heard within 5 seconds of the beep at the end of the greeting message, the answering device
will receive messages.
You are also able to speak with the other party and transmit or receive documents when in this
mode.
■ When you are in the office—TEL/FAX mode:
The unit will automatically distinguish between a normal telephone call and a fax call.
When the unit receives an automatic fax transmission call, it will switch automatically to fax
function and initiate fax reception.
When the unit receives a voice or manual transmission call, it will ring several times until you
pick up the handset.
—If you do not pick up the handset, the unit will automatically activate the fax function.
—When you pick up the handset and nothing is heard, manual fax reception is required.
Press the START button and hang up to receive the fax.
Press the RECEIVE MODE button to select the desired
■ When you wish to use as a facsimile only—FAX mode:
In this mode you will only be able to receive fax calls. Incoming voice calls will hear the fax
tone. You are still able to make outgoing voice calls.
■ When you wish to use as a standard telephone—TEL mode:
This mode is for use as a standard telephone. You can also receive a fax during a telephone
conversation by pressing the START button.
In this mode, if you do not answer the call until the unit rings 15 times, the unit will automatically
switch to the ANS/FAX mode.
1-23
Page 32

Setting Up Your Facsimile Unit
System setup features
The unit has 9 Basic Features, as listed below, and 16 Advanced Features, as listed on
page 1 -25.
Basic Features are the settings that need to be programmed upon finishing the installation. Most
probable choices have been preselected for you, but some features, such as SET DATE, YOUR
LOGO and YOUR TELEPHONE NUMBER, must be programmed by the user.
Advanced Features should be temporarily programmed as the need arises.
Before using your unit as a facsimile, you should never fail to set the following features.
#01 SET DATE (Pages 1-18, 1-19)
#02 YOUR LOGO (Pages 1-20, 1-21)
#03 YOUR TELEPHONE NUMBER (Page 1 -22)
BASIC FEATURE LIST
The bold-face indicates factory default settings.
Code Functions Descriptions Selections Pages
#01
#02
#03 YOUR TELEPHONE
#04 PRINT
#05 ANS/FAX RING
#06
#07 RECORDING TIME
SET DATE
YOUR LOGO
NUMBER
TRANSMISSION
REPORT
COUNT
FAX RING COUNT
FOR ANS
Sets the current date
and time
Sets your company
name or personal
name
Sets your facsimile
telephone number
Individual
transmission report
setting
Selects the number of
rings to answer in the
ANS/FAX mode, or
sets RINGER to off
Selects the number of
rings to answer in the
FAX mode
Selects the recording
time for incoming
message
(not stored)
up to 30 digits 1-20
up to 20 digits 1-22
ON/ERROR/OFF 1-27
TOLL SAVER
or 1 to 4 rings
or RINGER OFF
1 to 4 rings
VOX (unlimited)
or
1 MIN (1 minute)
1-18
1-19
1-21
1-28
1-29
1-30
1-31
1-32
#08
#99
REMOTE ANS ID Sets the remote
control code for
remote ANS operation
PRINT ADVANCED
FEATURE LIST
Prints the advanced
feature list
1-24
3 digits
(111)
1-33
5-8
Page 33

ADVANCED FEATURE LIST
The bold-face indicates factory default settings.
Code
#10
LOGO POSITION
Functions Descriptions
Sets the LOGO print
position on the
transmitted document
#11
JOURNAL AUTO
PRINT
Prints out the journal
report automatically or
manually
#12 MAIN PASSCODE Sets the passcode for
network communication
#13
TX PASSCODE
CHECK
Turns the transmission
passcode check mode
on
#14 RX PASSCODE
CHECK
Turns the reception
passcode check mode
on
#15
POLLING PASSWORD
Sets the password for
polling
#17 PRIVACY RING ID Sets the PRIVACY
RING ID
Selections Pages
OUT/IN/OFF 4-12
AUTO/MANUAL 5-3
4 digits
4-7
(0000)
ON/OFF 4-8
ON/OFF
4 digits
4-9
4-4
(0000)
3 digits
4-22
(333)
#18
#19
DAY/NIGHT MODE
SILENT FAX
RECOGNITION RING
#20 REMOTE FAX
ACTIVATION CODE
#22 MESSAGE ALERT
#23 CUSTOMIZED
HEADER
#26
PRINT JOURNAL
#27 PRINT TEL LIST
#28
PRINTER TEST
#50 SET DEFAULT
(#10 TO #23)
Turns on the Day/Night
Mode
Sets the silent fax
recognition ring
Sets the remote fax
activation code
Turns on the message
alert
Sets a customized
header
Prints a JOURNAL
report
Prints a telephone
number list
Prints a print test
pattern
Resets the setup
features
ON/OFF 4-27
4-28
3 to 8 rings 4-29
2 to 4 digits
4-11
(**)
ON/OFF
A/B/C/OFF
4-23
4-13
4-14
5-4
5-5
5-6
6-10
4-30
1-25
Page 34

How to set up
To set up your unit, proceed as follows.
HELPFUL HINT:
If you press the HELP button
—while programming, the unit will print information about the operation.
—in idle status, the unit will print information about how to send documents, how to set up, etc.
1. Press the PROGRAM button.
The PROGRAM indicator lights.
2. Press #, then enter the code number you wish to set using the dial keypad.
Refer to the lists on pages 1 -24 and 1 -25.
The PROGRAM indicator flashes.
3. Enter desired choice or data.
4. If you entered “#26", “#27”. “#28”, “#50" and “#99”, press the START button.
Otherwise press the SET button to store your selection.
The PROGRAM indicator lights.
5. Press the PROGRAM button to end the operation.
The PROGRAM indicator goes out.
NOTES:
•When the code number is “#01”, “#02”, “#03" or “#18”, the result of your setting is printed out
automatically after you press the SET button in step 4.
•To correct an error while programming, press the STOP/CLEAR button then repeat from step 2.
•To cancel programming on the way, press the PROGRAM button.
1-26
Page 35

Individual transmission report setting
Each time a document is transmitted, this feature gives you a printed record of the transmission
(XMT REPORT).
The following choices are available;
ON: The report is printed, indicating whether the transmission is successful or not.
ERROR: The report is printed only when transmission fails (default).
OFF: The report is not printed.
Sample of the transmission report:
t«. OTHER FACSIMILE
01 1234567
\
______
Dialed number or
other party’s name
Communication
number
START TIME USAGE TIME MODE PAGES RESULT
Jan. 1 11:29AM 01’0S
Communication
start time
Length of
communication;
Minutes/Seconds
Transaction mode:
TX... Transmission
Print time: Hour/Minute AM/PM
Print date: Month/DayA^ear —
Jan. 01 1993 li:30m
TX
Number of pages
transmitted
successfully
02
OK
Communication
result
CODE
C005 *■
■*
♦
Error code
(for the service
center only)
Explanation of communication result
OK:
PRESSED THE STOP KEY:
Successful communication
The fax communication was interrupted since
the STOP/CLEAR button was pressed.
DOCUMENT JAMMED:
NO DOCUMENT:
PRINTER OVERHEATED:
PAPER OUT:
THE COVER WAS OPENED:
COMMUNICATION ERROR:
PASSCODE FAILED:
NO RESPONSE:
PAPER JAMMED:
A document jammed.
The document was not fed into the unit properly.
Printing head was overheated.
The unit is out of recording paper.
The back lid was opened.
Transmission or reception error.
Passcode communication failed.
Receiving unit is busy or out of recording paper.
The recording paper was jammed.
NOTE:
If the printed time and date on the report are not accurate, reprogram them by following the
instructions on pages 1-18 and 1-19.
1-27
Page 36

To change the individual transmission report setting, proceed as follows.
HELPFUL HINT:
When you lose your procedures while programming, press the HELP button.
You will be able to print information about how to set.
Press the PROGRAM button.
The PROGRAM indicator lights.
Press #, then press 04.
The PROGRAM indicator flashes.
3
4
[ 1 ] [*BC 2] [otF 3]
I OHI 4j I JHL 5 ] I MHO 6 j
[■■m 7] [nw 8] 9 ]
&}
Press the number of the mode you desire.
Setting selections are:
1: ON
2: ERROR
3: OFF
Press the SET button to store your selection into
memory.
The PROGRAM indicator lights.
Press the PROGRAM button to end the operation.
The PROGRAM indicator goes out.
1-28
Page 37

Selecting the number of rings to answer in the ANS/FAX
mode
When in the ANS/FAX mode, the unit will automatically answer on the first ring when receiving a
call.
If you wish to change the number of rings to answer a call, you can choose among the following:
0: Toll Saver {see page 1 -30).
1: The unit answers on the first ring (default).
2: The unit answers on the second ring.
3: The unit answers on the third ring.
4: The unit answers on the fourth ring.
*: The unit will not ring (RINGER OFF).
HELPFUL HINTS:
•When you lose your procedures while programming, press the HELP button.
You will be able to print information about how to set.
• If you wish to have the opportunity to pick up the handset before the call is answered by the unit,
set the number of rings to “3” or “4”.
• If you find there is difficulty in fax receiving from machines that have an automatic transmission
feature, set the number of rings to “1".
•To confirm from the remote phone whether a new incoming message has been recorded or not
(see pages 4-15 to 4-20), select the Toll Saver position. This will save you the toll charge for the
3
CZlEEilEi)
[pBS 7] [tW S] [wXY 9j
Press the PROGRAM button.
The PROGRAM indicator lights.
Press #, then press 05.
The PROGRAM indicator flashes.
Press the number of the selection you desire.
Setting selections are:
0: Toll Saver
1: one ring
2: two rings
3: three rings
4: four rings
*: Ringer Off
Press the SET button to store your selection into
memory.
The PROGRAM indicator lights.
1-29
(continued)
Page 38

Press the PROGRAM button to end the operation.
The PROGRAM indicator goes out.
Toll Saver;
When you call the unit from a remote location, the number of rings tells you if there are any new
voice-messages.
If the unit answers on the first ring, there is at least one new message recorded.
If the unit answers on the third ring, there are no new messages recorded.
Hang up immediately when you hear the second ring. The second ring indicates that there are no
new messages. This will save you the toll charge for the call.
NOTE:
If you set the RINGER OFF through the ANS/FAX RING COUNT function, the extension phone
connected to the unit will ring once when receiving a call.
1-30
Page 39

Selecting the number of rings to answer in the FAX mode
When in the FAX mode, the unit will automatically answer on the first ring when receiving a call.
If you wish to change the number of rings to answer a call, you can choose the number among
“1” (one ring) through “4" (four rings).
HELPFUL HINTS:
•When you lose your procedures while programming, press the HELP button.
You will be able to print information about how to set.
• If you wish to have the opportunity to pick up the handset before the call is answered by the unit,
set the number of rings to “3” or “4".
• If you find there is difficulty in fax receiving from machines that have an automatic transmission
feature, set the number of rings to “1
Press the PROGRAM button.
The PROGRAM indicator lights.
Press #, then press 06.
The PROGRAM indicator flashes.
3
C3(ED Ell
(chi 4 I ( JKL 5 ] [ MHO 6 ]
[■ ■ TO 7] [tuv s] [91
C3@Q
Press the number of the selection you desire.
Setting selections are:
1: one ring
2; two rings
3: three rings
4: four rings
Press the SET button to store your selection into
memory.
The PROGRAM indicator lights.
Press the PROGRAM button to end the operation.
The PROGRAM indicator goes out.
1-31
Page 40

Selecting the caller’s recording time
You can choose from two lengths of recording times for incoming messages.
VOX: The unit records an incoming message as long as a caller speaks (default).
1 MIN: The unit records an incoming message up to 1 minute per message.
To change the recording time, proceed as follows:
HELPFUL HINT:
When you lose your procedures while programming, press the HELP button.
You will be able to print information about how to set.
Press the PROGRAM button.
The PROGRAM indicator lights.
Press #, then press 07.
The PROGRAM indicator flashes.
Press 2 by using the dial keypad.
Setting selections are:
1: VOX (unlimited)
2: 1 MIN (1 minute)
Press the SET button to store your selection into
memory.
The PROGRAM indicator lights.
Press the PROGRAM button to end the operation.
The PROGRAM indicator goes out.
1-32
Page 41

Setting the remote code (REMOTE ANS ID) for remote operation
The REMOTE ANS ID is used to access your answering device from a remote location with a
touch tone phone (see pages 4-15 to 4-20).
Using this code, you can retrieve incoming messages recorded on the microcassette tape from a
remote location.
The REMOTE ANS ID is preset to 111. If you wish to change the number, you can choose any
number from 111 to 999 except numbers including “0”.
For proper operation, make sure that the REMOTE ANS ID number is different from your
PRIVACY RING ID number (see page 4-22).
HELPFUL HINT:
When you lose your procedures while programming, press the HELP button.
You will be able to print information about how to set.
Press the PROGRAM button.
The PROGRAM indicator lights.
Press #, then press 08.
3
CjIEDElI)
j^CHI 4^ j^JKL sj Mwo sj
^PRS 7] s] 9]
EE r~E
The PROGRAM indicator flashes.
Enter the desired REMOTE ANS ID using the dial
keypad.
To correct an error while programming, press the
STOP/CLEAR button then repeat from step 2.
Press the SET button to store your selection into
memory.
The PROGRAM indicator lights.
Press the PROGRAM button to end the operation.
The PROGRAM indicator goes out.
NOTE:
We recommend that you do not use seven (7) as a code number, since this number is used as
the greeting message re-recording command for remote operations.
1-33
Page 42

HELP Function —If you have lost your procedures—
The HELP button is used to print information about how to send documents, how to set up your
unit and how to store phone numbers.
Using the HELP button
■ Press the HELP button when the unit is in the idle status.
The following is printed out.
Sample of the Help Information
:+
:+ REMEMBER TO SET THE DHTE. T'ME. YOUR LOGO RND t
:+ TELEPHONE tJUMBER BEFORE USE. t
:+ PLEASE SEE INSTRUCTIONS BELOU. ^
-+ +.
+ K+:.+ :t i ft+:+M
<<HOU TO SET UP YOUR FhX>>
1. PRESS ‘'PROGRAM".
2. PRESS "tt" THEN THE NUMBER OF THE FEATURE YOU UiSH TO SET USING
THE DIAL KEY-PAD. CSEE LIST OF FEATURES BELOUIi
3. ENTER CHOICE OR DATA.
4. IF YOU ENTERED B99 PRESS "START", OTHERUISE PRESS "SET" TO STORE
YOUR SELECTION.
P.PRESS "PROGRAM" TO END SET UP.
aoi SET DATE = J5n. 01 1993 12:0QhM
«02 YOUR LOGO H.E. CCT-IPANY OR INDIUIDUAL NAMED
'<<PRIOR TO LEhUII^G>>
CONFIRM THAT THE AMS/-FAX INDICATOR IS LIT
«HOU TO PLAYBACK ONLY NEU MESSAGES>>
PRESS "NEU MESSAGES".
<<HOU TO PLAYBACK ALL THE RECORDED MESSAGES>>
PRESS "ALL MESSAGES".
inaSon 1C ANS/FAX
Press the HELP button while programming each feature (#01 through #08, #10, #11 and #18).
Example: When you wish to program the SET DATE (#01),
1. Press the PROGRAM button.
The PROGRAM indicator lights.
2. Press #, then press 01 for SET DATE setting. The PROGRAM indicator flashes.
3. When you wish to know how to continue programming, press the HELP button.
The following is printed out.
<<HOU TO SET THE CLOCK>>
1. ENTER THE MONTH. DAY AND YEAR USING THE DIAL KEY-PAD.
2. PRESS "SET" TO STORE.
3. ENTER THE HOUR AND MINUTE USIhIG THE DIAL KEY-PAD.
PRESS THE KEY TO ENTER AM
aMF) TUg^r. JQ gHTER PM.
4. Resume programming.
1-34
Page 43

Table of Contents
Chapter 2
Basic Instructions
Facsimile and Copier
Before Transmitting Documents
Acceptable documents
Documents you cannot send
Resolution and contrast 2-3 Listening to newly recorded messages
Loading documents
Transmitting Documents 2-4
Manual transmission
Adding extra pages
Receiving Documents and/or Voice Calls
Manual reception 2-6
Automatic reception
Receiving in the ANS/FAX mode
Receiving in the TEL/FAX mode
Receiving in the FAX mode 2-8
Making a Copy
2-2 Operating as an Answering Device 2-10
2-2
2-2
2-3 Listening to all the recorded messages
2-4
2-5 Recording a memo message
2-6
2-7
2-7
2-8
2-9 Answering voice calls
Setup of voice message and
document reception
Recording after the messages you
want to save
Monitoring incoming calls
Recording a telephone conversation
(2-way recording)
Making and Answering Voice Calls 2-15
Making voice calls
Redialing the last dialed number
Answering Device
Telephone
2-11
2-11
2-12
2-12
2-13
2-13
2-14
2-15
2-16
2-16
2-1
Page 44

Before Transmitting Documents
Acceptable documents
The unit can transmit documents that meet the following conditions.
—Documents width should be from 128 mm (5") to 216 mm {8W).
—Maximum document length should not exceed 600 mm (23^").
—Effective scanning width can be up to 208 mm (8^16").
—Number of pages that can be set in the document feeder tray can be up to 10 sheets.
—Document weight:
Single sheet: 45 g/m= to 90 g/m^ (12 pound to 24 pound)
Multiple sheets: 60 g/m^ to 75 g/m^ (16 pound to 20 pound)
Minimum document size
128 mm
(5")
NOTES:
•A document whose length exceeds 600 mm (23W') cannot be transmitted. When you feed such
documents, the unit will stop transmitting and a long beep will be heard. If this happens, press
the STOP/CLEAR button and remove the document.
• If a document is electrostatically charged, the automatic document feeder may not function
properly.
Documents you cannot send
Do not use the following types of documents or they may jam. Make a copy of such documents
and feed the copy into the unit.
—Paper with a chemically treated surface such as carbon paper or carbonless duplicating paper
—Heavily curled, creased or torn paper
—Paper with a coated surface
—Small-sized paper such as a slip or voucher
—Thin paper less than 45 g/m^ (12 pound)
—Thick paper over 90 g/m^ (24 pound)
—Paper with faint contrast between the print and the background
—Paper with printing on the reverse side that can be seen through from the front
(e.g. newspaper)
(QW)
2-2
Page 45

Resolution and contrast
You can set the following functions depending on the quality of an original. Set the functions
before transmission or copying. If you set them during transmission, they will be effective from the
next sheet transmitted.
RESOLUTION:
RESOLUTION
C= STANDARD
CZ3FINE
SUPER FINE
c=a HALF TONE
I J
LIGHT ORIGINAL:
STANDARD is suitable for printed or typewritten
originals with normal-sized characters.
FINE is suitable for originals with small printing.
SUPER FINE doubles the resolution of FINE.
(SUPER FINE only works between other KX-F160s or
other Panasonic compatible machines.)
HALF TONE is useful when sending originals containing
photographs, shaded drawings, etc.
LIGHT ORIGINAL is useful when transmitting or copying
originals with faint writing.
This feature does not work in the HALF TONE resolution.
Loading documents
Remove clips, staples or other similar objects from a document before feeding it into the unit.
Check that all ink, paste or connection fluid on the document is completely dry before feeding it
into the unit.
1
Open the document feeder tray.
Insert the documents FACE DOWN into the document
feeder tray.
The unit can accept up to 10 sheets of paper at a time.
Adjust the document guides to the width of the
document.
4
Set the resolution or contrast setting if needed.
2-3
Page 46

Transmitting Documents
Manual transmission
Insert the documents FACE DOWN.
1
3
[ 1 ] [*BC 2] [oEF 3]
^ 4 j ^ JKL 5 I ^ MHQ ^ j
[pia 7] [tuv S] [wky 9]
[ -X-] [opbbQ] [ tf]
The unit can accept up to 10 sheets of paper at a time.
Press the MONITOR button or lift the handset.
Dial the phone number of the party to which you wish to
send.
If the other party answers, lift the handset and ask them
to press their start or transmit button to start the fax
reception.
Press the START button when a fax tone is heard.
Place the handset on the cradle if using it.
The unit will feed and transmit the documents.
NOTES:
• If you do not replace the handset after pressing the START button, the unit will automatically call
the other party upon finishing the transmission. For further details, see “Voice Contact” on
page 4-24.
•If the line is busy, press the MONITOR button or hang up the handset if using it. Then try again
later by using the REDIAL button in step 3.
•To interrupt transmission, press the STOP/CLEAR button until a beep sounds. Press the
STOP/CLEAR button again to eject the document.
2-4
Page 47

You can also access the other party’s facsimile without using the handset or the MONITOR
button.
This feature enables you to transmit a document with less procedures.
Insert the documents FACE DOWN.
1
[ 1 ] [*»C 2] [otF 3]
2
NOTE:
To interrupt transmission, press the STOP/CLEAR button until a beep sounds. Press the
STOP/CLEAR button again to eject the document.
I CHI 4 ] 5] I MHO sj
[™s 7] [tuv S] [ WXV 9 ]
[35E5C3
Enter the phone number of the party to which you wish
to send.
If you misdialed, press the STOP/CLEAR button then
enter the correct number.
Press the START button.
The unit will dial and transmit the documents.
Automatic redialing feature:
If there is no answer or the line is busy, the unit will
automatically redial the number up to 6 times. To cancel
automatic redialing, press the STOP/CLEAR button.
Adding extra pages
If you want to send 11 or more sheets at a time, insert the first ten pages of the document and
add the extra pages, up to 10 sheets at a time, before the last page is fed into the unit.
2-5
Page 48

Receiving Documents and/or Voice Calls
Manual reception
When in the TEL mode or during a telephone conversation, you can receive fax documents as
follows.
When the phone rings, lift the handset to answer the call.
1
When a voice is heard and document reception is
required, press the START button.
Place the handset on the cradle.
The unit will start receiving a document.
NOTES:
• If you do not replace the handset after pressing START button, the unit will automatically call the
other party. For further details, see “Voice Contact” on page 4-24.
•To interrupt reception, press the STOP/CLEAR button. The unit will stop receiving.
• Replace the paper roll with a new one;
—when the red lines appear on both sides of the recording paper.
—when the PAPER OUT indicator lights.
2-6
Page 49

Automatic reception
Set the RECEIVE MODE to any of the following modes:
—ANS/FAX mode
—TEL/FAX mode
—FAX mode
When receiving a fax call, the unit will automatically activate the fax function, then initiate
reception.
Receiving in the ANS/FAX mode
1
HELPFUL HINTS:
• If the other party wishes to leave you a message and transmit a document on the same call, let
them know the following procedure in advance.
RECEIVE MODE
I ANS/FAX
Ì TEL/FAX
FAX
I
I TEL
Make sure that the unit is in the ANS/FAX mode.
A call comes in.
The unit answers the call after 1 to 4 rings or no rings,
depending on the number of rings after which the unit is
set to answer (see page 1-29).
-When receiving a fax tone, the unit automatically
activates the fax function to receive document.
-When receiving a voice-call, the unit plays your
greeting message.
When the other party’s line has touch tone service:
1. After leaving a message, the other party presses their ^ button.
Your unit will switch to the FAX mode.
2. When a fax tone is heard, they start transmission by pressing their start or transmit button.
When the other party’s line has rotary pulse service:
1. They start transmission by pressing their start or transmit button. Your unit starts reception.
2. They make a call reservation (e.g. ...lift the handset) during transmission of their document.
Your unit plays your greeting message.
3. They leave a message after the long beep following your greeting message.
•Begin by transmitting the FAX CORRESPONDENCE leaflet found on page 6-15 to several of
your associates. In this way you can confirm that your unit is functioning correctly and inform
them of the procedure for transmitting documents and/or recording voice-message on your unit.
NOTE:
If you set the RINGER OFF through the ANS/FAX RING COUNT function, the extension phone
connected to the unit will ring once when receiving a call. See page 1-29 for the RINGER OFF
setting.
2-7
Page 50

Receiving in the TEL/FAX mode
1
NOTES:
•A telephone fee is charged to callers from the first ring.
•When receiving a fax tone, the extension phone connected to the unit will ring once and then the
unit automatically activates the fax function to receive documents.
RECEIVE MODE
I ANS/FAX
I TEL/FAX
I FAX
I TEL
Make sure that the unit is in the TEL7FAX mode.
A call comes in.
—When receiving a fax tone, the unit automatically
activates the fax function to receive documents.
OR
—When receiving a telephone call, the unit rings 3 to
8 times, depending on the setting of the silent fax
recognition ring (see page 4-29).
If a fax reception is required or nothing is heard, press
the START button and hang up to receive a fax.
If someone does not pick up the phone, the unit will
automatically activates the fax function to receive
documents.
Receiving in the FAX mode
1
Make sure that the unit is in the FAX mode.
A call comes in.
The unit answers the call after 1 to 4 rings, depending
on the number of rings after which the unit is set to
answer (see page 1-31).
The unit produces a fax tone, then starts receiving a
document when the other party presses their start or
transmit button.
2-8
Page 51

Making a Copy
The unit can make a copy. Any transmissible documents can be copied.
Before sending a document, you can see how it will look to the receiving party in advance.
When copying, the unit automatically selects the FINE resolution, but you may use SUPER FINE
or HALF TONE resolution.
Insert the documents FACE DOWN.
1
NOTES:
• If you wish to copy 11 or more sheets at a time, insert the first ten pages of the document and
add the extra pages up to 10 sheets at a time, before the last page is fed into the unit.
•You can make or receive voice calls while making a copy.
•To stop making a copy on the way, press the STOP/CLEAR button. The unit stops copy
operation. Press the STOP/CLEAR button again to eject the document.
The unit can accept up to 10 sheets of paper at a time.
Press the COPY button.
The unit starts making a copy.
2-9
Page 52

Operating as an Answering Device
The unit also works as an automatic telephone answering and recording system.
0 CALLS indicator:
The indicator flashes to show the number
of incoming messages recorded up to
15 times. Even if 16 or more calls are
recorded, the indicator will flash up to
15 times.
If the power supply has been interrupted,
the CALLS indicator flashes slowly when
the power is restored.
0 IN USE indicator:
When the answering device is in use, the
indicator lights or flashes.
0 Playing back newly recorded
voice-messages:
Press the NEW MESSAGES button.
See page 2-11.
® Stopping operations of the answering
device:
Press the STOP button.
0 Recording a memo message:
See page 2-13.
0 Playing back all recorded messages:
Press the ALL MESSAGES button.
See page 2-12.
0 Rewinding (Resetting) the tape quickly:
Press the REW (rewind) button.
0 Advancing the tape quickly:
Press the FF (fast forward) button.
0 Erasing recorded voice-messages:
After reviewing messages to you, press
the ICM ERASE button. The messages
are erased while the tape is rewinding.
The tape can be erased at high speed
even if the record-prevention (knock-out)
tabs have been removed.
0 Recording your greeting message:
See page 1-17.
0 Checking your greeting message:
See page 1-17.
Recording a telephone conversation:
See page 2-14.
2-10
Page 53

Setup of voice message and document reception
1
NOTE:
The recording time for incoming messages can be set to VOX (unlimited) or 1 MIN (1 minute). It is
preset to VOX. To change the recording time, see page 1-32.
RECEIVE MODE
I ANS/FAX
I TEL/FAX
I FAX
I TEL
Press the RECEIVE MODE button until the ANS/FAX
indicator tights.
Press the REW button to record messages from the
beginning of the tape.
When a call is received, the unit answers the call and
begins playback of your greeting message. The unit
automatically distinguishes between voice and fax calls,
and then functions as an answering device and/or a
facsimile.
Listening to newly recorded messages
When new incoming messages have been recorded, the CALLS indicator flashes to show the
number of incoming message.
To play back only new messages:
Press the NEW MESSAGES button.
The IN USE indicator lights and then the unit plays back
new messages.
At the end of the last message, 3 beeps sound and the
tape stops automatically.
NOTES:
•The unit is equipped with the message alert feature. When this feature is set to on, the unit lets
you know with a slow beep whether a caller’s message has been recorded in the unit or not.
To set this feature, see page 4-23.
•To interrupt the playback halfway, press the STOP button.
To restart the playback, press the NEW MESSAGES button within one minute after pressing the
STOP button. Or the unit will record over any existing messages.
2-11
Page 54

Listening to all the recorded messages
All the recorded messages will be played back from the beginning of the tape.
Press the ALL MESSAGES button.
The unit plays back all the recorded messages.
At the end of the last message, 3 beeps sound and the
tape stops automatically.
NOTES:
•To interrupt the playback halfway, press the STOP button.
•To restart the playback, press the ALL MESSAGES button within one minute after pressing the
STOP button. Or the unit will record over any existing messages.
Recording after the messages you want to save
New incoming messages will be automatically stored after the last message. If you want to store
incoming messages after your saved messages, proceed as follows.
3
Play back the messages.
You may use the ALL MESSAGES, FF or REW button.
Press the STOP button at the end of the messages you
want to save.
The IN USE indicator goes out.
Press the STOP button again,
or
Leave the unit for one minute.
Future calls will be recorded after the message(s) you
have saved.
2-12
Page 55

Monitoring incoming calls
While an incoming message is being recorded, you can monitor the caller’s voice through the
built-in speaker and answer it if you want.
Adjust the sound level using the VOLUME control.
To answer the call while monitoring, lift the handset. The unit stops recording automatically.
Recording a memo message
If you are going out and want to leave a private message for someone, you can record a voice
memo in the unit. This can then be played back either directly or remotely, exactly like any other
incoming message.
Press the MEMO/2WAY REC button.
1
The IN USE indicator lights and a beep is heard.
Speak toward the microphone from approximately 20 cm
(8 inches) away.
To stop recording, press the STOP button or the
MEMO/2WAY REC button again.
The IN USE indicator goes out.
2-13
Page 56

Recording a telephone conversation (2-way recording)
While speaking with someone on the telephone, you can record your conversation.
During your conversation, press the MEMO/2WAY REC
1
button.
The IN USE indicator lights and a beep is heard.
Continue your conversation.
To stop recording, press the STOP button or the
MEMO/2WAY REC button again.
The IN USE indicator goes out.
NOTE:
Many states have imposed regulations on the manner in which 2-way telephone conversations
may be recorded. So you should inform the other party that the conversation is being recorded.
Consult your local telephone company for further information.
2-14
Page 57

Making and Answering Voice Calls
Making voice calls
Using the handset
1. Lift the handset.
2. Dial the phone number.
Using on-hook dialing
Press the MONITOR button.
The MONITOR indicator lights.
2
[ 1 ] [ 2 ] [oEF 3]
[awi 4] [jui- 5] I WHO 6 ]
EE3E3E3
[ -X-] [opebQ] [ g]
Dial the phone number.
When the other party answers your call, lift the handset
and talk with it.
2-15
Page 58

Redialing the last dialed number
If the line is busy or you wish to redial the last dialed number, you can redial by pressing the
REDIAL button.
Press the REDIAL button.
—When using the handset, the unit redials the last
—When using on-hook dialing, the unit redials the last
Answering voice calls
When the phone rings, lift the handset to answer the call.
dialed number once.
dialed number up to 15 times within 10 minutes if the
line is busy (automatic redialing feature).
2-16
Page 59

Chapter 3
Intermediate Instructions
Table of contents
Storing Phone Numbers for
Automatic Dialing
Listing the directory card
Storing phone numbers for
one touch dialing
Storing phone numbers for
speed dialing
Storing secret phone numbers
Erasing a stored phone number
3-2
3-2
3-3
3-4
3-5
3-6
Facsimile
Transmitting Documents Using
Automatic Dialer
Telephone
Making Voice Calls Using
Automatic Dialer
3-7
3-8
3-1
Page 60

Storing Phone Numbers for Automatic
Dialing
The unit’s memory allows you to use both one touch dialing {up to 12 phone numbers) and speed
dialing (up to 10 phone numbers) for rapid access to your most frequently dialed numbers.
First make sure the DIALING MODE selector is set to TONE or PULSE (rotary) mode, since the
number will be stored in the mode that is set at the time of programming.
HELPFUL HINT:
When you lose your procedures while programming, press the HELP button.
You will be able to print information about how to set.
PROGRAM Button
SET Button
SECRET Key
1. Remove the cover using an instrument with a pointed end, like a pen, as shown below.
2. Remove the directory card.
3. Write in the names associated with the direct call station keys.
4. Re-install the directory card.
Page 61

Storing phone numbers for one touch dialing
This unit is equipped with 12 direct call station keys including SECRET and HYPHEN keys, each
of which can store a telephone number. Each phone number can be programmed up to 30 digits
long.
Press the PROGRAM button.
1
3
C3EEED
I cm 4] [.nc- 5] [
[wa 7] [tuv s] [ 9 ]
QSQ
MHO 6
The PROGRAM indicator lights.
Press one of the direct call station keys where you want
to store the phone number.
The PROGRAM indicator flashes.
Enter the phone number by using the dial keypad.
If you want to insert a hyphen in the number, press the
]
HYPHEN key during programming.
HYPHEN is counted as 2 digits.
Press the SET button to store the program into memory.
The PROGRAM indicator lights.
To store in succession, repeat steps 2 to 4.
After programming all numbers, press the PROGRAM
button to end the operation.
The PROGRAM indicator goes out.
NOTES:
•While storing, pressing the PAUSE or FLASH or TONE button once counts 1 digit.
•To correct an error while programming, press the STOP/CLEAR button then repeat from step 2.
•To cancel the programming halfway, press the PROGRAM button.
•To print out a list of the stored phone numbers, press the PROGRAM button, press #, then
press 27, then press the START button. For further details, see pages 5-5 and 5-6.
3-3
Page 62

Storing phone numbers for speed dialing
The unit is equipped with 10 stations (0 through 9), each of which can store a phone number.
Each phone number can be programmed up to 30 digits long.
Press the PROGRAM button.
1
2
3
OAUTO t—i) E3 E3
^ J"g 7] [niv 8] [9]
C3E5IC5)
[ 1 ] 2] [ pef 3 j
[e« 4) [^KL 5) 1^6]
PRS 7 I ^TUV Oj 9 j
f~^ F^r~^
The PROGRAM indicator lights.
Press the AUTO button.
The AUTO indicator lights.
Enter the 1 -digit number (0 through 9) by using the dial
keypad.
The PROGRAM indicator flashes.
Enter the phone number by using the dial keypad.
To insert a hyphen in the number, press the HYPHEN
key during programming.
HYPHEN is counted as 2 digits.
Press the SET button to store the program into memory.
The AUTO indicator goes out and the PROGRAM
indicator lights.
To store in succession, repeat steps 2 to 4.
After programming all the numbers, press the
PROGRAM button to end the operation.
The PROGRAM indicator goes out.
NOTES:
•To correct an error while programming, press the STOP/CLEAR button then repeat from step 2.
•To cancel the programming halfway, press the PROGRAM button.
•To print out a list of the stored phone numbers, press the PROGRAM button, press #, then
press 27, then press the START button. For further details, see pages 5-5 and 5-6.
3-4
Page 63

Storing secret phone numbers
This function is useful for keeping a whole phone number or a portion of a phone number secret.
When you print out a list of the stored numbers, secret numbers will not be printed.
Press the PROGRAM button.
1
The PROGRAM indicator lights.
Press one of the direct call station keys.
OR
Press the AUTO button.
The AUTO indicator lights.
Then enter the 1 -digit number (0 through 9).
The PROGRAM indicator flashes.
Press the SECRET key.
Then enter the phone number.
Then press the SECRET key again.
Pressing the SECRET key once counts as 2 digits.
Press the SET button to store the program into memory.
The PROGRAM indicator lights.
Press the PROGRAM button to end the operation.
The PROGRAM indicator goes out.
NOTES:
•To correct an error while programming, press the STOP/CLEAR button then repeat from step 2.
•To cancel the programming halfway, press the PROGRAM button.
3-5
Page 64

Erasing a stored phone number
If you wish to erase a stored phone number, proceed as follows.
Press the PROGRAM button.
1
2
OAUTO
O
ra
OR
[cm 4] [j«i- 5] [m»0 6]
EtjeDEI)
( »] [°«°o) I tt]
The PROGRAM indicator lights.
Press one of the direct call station keys.
OR
Press the AUTO button.
The AUTO indicator lights.
Then enter the 1 -digit number (0 through 9).
The PROGRAM indicator flashes.
Press the SET button.
Now the stored phone number has been erased.
The PROGRAM indicator lights.
Press the PROGRAM button to end the operation.
The PROGRAM indicator goes out.
NOTE:
To cancel the programming halfway, press the PROGRAM button.
3-6
Page 65

Transmitting Documents Using Automatic Dialer
You can transmit documents automatically using one touch dialing and speed dialing. Before
using these features, make sure that the desired telephone numbers have been stored into
memory. For storing phone numbers, see pages 3-3 to 3-5.
Insert the documents FACE DOWN.
1
The unit can accept up to 10 sheets of paper at a time.
Using one touch dialing:
Press the desired direct call station key.
The unit dials and transmits the documents
automatically.
OR
Using speed dialing:
Press the AUTO button.
Then enter the desired 1 -digit number (0 through 9) by
using the dial keypad.
The unit dials and transmits the documents
automatically.
Automatic redialing feature:
If there is no answer or the line is busy, the unit will
automatically redial the number up to 6 times. To cancel
automatic redialing, press the STOP/CLEAR button.
NOTE:
To interrupt transmission, press the STOP/CLEAR button until a beep sounds. Press the
STOP/CLEAR button again to eject the document.
3-7
Page 66

Making Voice Calls Using Automatic Dialer
The unit’s memory allows you to use both one touch dialing (up to 12 phone numbers) and speed
dialing (up to 10 phone numbers) for rapid access to your most frequently called numbers.
Before using these features, make sure that the desired telephone numbers have been stored in
memory (see pages 3-3 to 3-5).
Press the MONITOR button or lift the handset.
1
Using one touch dialing:
2
’ □ = □
' □ ‘ □
’ □ □
‘ □ ’ □
’ □
’ □
11 secftCT Q
HVMCN Q
Press the desired direct call station key.
OR
OR
Using speed diaiing:
Press the AUTO button.
Then press the desired station number (0 through 9) by
using the dial keypad.
When the other party answers your call, lift the handset
and talk with it.
3-8
Page 67

Table of contents
Chapter 4
Advanced Instructions
Facsimile and Copier
Polling
Polling another unit manually 4-2
Polling another unit using automatic dialer
Setting the polling password
Network Communication
Using a passcode 4-6
Programming the main passcode 4-7
Turning the TX passcode check on
Turning the RX passcode check on
Remote Fax Receiving Using an
Extension Phone
Using an extension phone
Programming a remote fax activation code 4-11 Initiating voice contact
Setting the Logo Print Position
Setting a Customized Header
Answering Device
Operating an Answering Device from a
Remote Phone
Summary of remote control functions
Playing back newly recorded messages
(Memory playback)
Playing back all messages
Back space and skip forward 4-17 Resetting the setup features
4-2
4-3
4-4
4-5 Call with Privacy Ring
4-8
4-9
4-10
4-10
4-12
4-13
4-15
4-15
4-16 Setting Day/Night Mode
4-16
Recording a marker message 4-17
Resetting the tape for future messages
Room monitor 4-19
Skipping the greeting message for
incoming message recording mode 4-19
Re-recording a greeting message
Calling with the privacy ring 4-21
Programming the PRIVACY RING ID 4-22
Setting the Message Alert
Telephone
Voice Contact 4-24
Receiving a request for voice contact
TONE, FLASH and PAUSE Button Usage
TONE button (Temporary tone dialing)
FLASH button
PAUSE button
Combination dialing
Other Features
Other Features
Setting the Silent Fax Recognition Ring
4-18
4-20
4-21
4-23
4-24
4-24
4-25
4-25
4-25
4-26
4-26
4-27
4-27
4-29
4-30
4-1
Page 68

Polling
Polling means that you call another facsimile machine (we call it “polled machine") to retrieve a
document. The other party must be prepared for your call with a document loaded on their
machine.
This unit can only receive polled documents; it cannot be “polled”.
The unit initiating the call incurs any long distance charges.
Polling another unit manually
The following procedure lets you poll another station.
Make sure that no documents have been fed into the unit and that the polled machine is ready for
your call.
Press the MONITOR button or lift the handset.
Press the POLLING button.
The POLLING indicator lights.
[ 1 ] I «se 2 ] [pEf 3]
3
NOTE:
Cancel polling before reception by pressing the STOP/CLEAR button.
(aw 4 j ( 5 j (mho 6 j
( PH3 7 j (tuv sj ( «»v 9 ]
dlEilQ
Enter the phone number of the unit you wish to poll.
Press the START button when a fax tone is heard.
The unit will start polling.
After reception, the POLLING indicator goes out.
4-2
Page 69

Polling another unit using automatic dialer
Make sure that the desired telephone numbers have been stored into memory (see pages
3-3 through 3-5).
Press the POLLING button.
1
The POLLING indicator lights.
Using one touch dialing:
Press the desired direct call station key.
The unit will dial and receive documents automatically.
When reception ends, the POLLING indicator goes out.
Using speed dialing:
Press the AUTO button.
Enter the desired 1 -digit number (0 through 9) by using
the dial keypad.
The unit will dial and receive documents automatically.
When reception ends, the POLLING indicator goes out.
NOTES:
• If the polled station is busy or there is no answer, the unit will automatically redial the number up
to 6 times.
•Cancel polling before reception by pressing the STOP/CLEAR button.
4-3
Page 70

Setting the polling password
If the document to be retrieved is of a confidential nature and the password is set on the other
machine to prevent unauthorized retrieving, you must set the same password on your unit.
If the passwords in the polling unit and polled unit do not match, no transmission will take place.
NOTES:
• Polling using a password is effective between other Panasonic compatible facsimile machines
{e.g. KX-F60, KX-F90, KX-F110, KX-F5000).
• If the polling password is set to “0000”, the unit does not check the password sent by other
facsimile machines.
Press the PROGRAM button.
The PROGRAM indicator lights.
Press #, then press 15.
The PROGRAM indicator flashes.
3
[ 1 ] [aBC 2] [ OEf 3 I
I Oil 4j sj I MHO s]
[pRS 7] [tw B] [ wi« 9 ]
&}
Enter your polling password of 4 digits by using the dial
keypad.
Press the SET button to store the program into memory.
The PROGRAM indicator lights.
Press the PROGRAM button to end the operation.
The PROGRAM indicator goes out.
4-4
Page 71

Network Communication
The main passcode network communication feature eliminates fax transmission to unauthorized
parties, and helps to prevent reception from an unauthorized station.
This feature is effective to prevent “Junk mail” faxes since only those units with the same
passcode can transmit to your unit.
When the network communication feature is used, the identical main passcode of 4 digits must be
programmed on both sides of the line. The unit checks the passcode before transmitting or
receiving a document.
The unit provides two types of passcode check modes. They are TX (transmission) passcode
check mode and RX (reception) passcode check mode.
■ TX Passcode Check:
Use this feature to restrict document transmission. If the passcode sent from the other
Panasonic compatible machines does not match with the one programmed in your unit,
transmission does not take place (see page 4-8 for TX passcode check setting).
■ RX Passcode Check:
Use this feature to restrict document reception. If the passcode sent from the other Panasonic
compatible machines does not match with the one programmed in your unit, reception does not
take place (see page 4-9 for RX passcode check setting).
NOTES;
•These features are effective only between Panasonic compatible machines that have the same
passcode.
•The password for the polling feature is not related to this network communication feature. They
are independent features.
4-5
Page 72

Using a passcode
Before communication begins, check that your passcode and the other station’s passcode are
identical.
■ When you want to transmit a document to a designated station only:
Set TX PASSCODE CHECK to ON.
Function
TX PASSCODE CHECK
RX PASSCODE CHECK
Your unit transmits a document only when the correct passcode has been received.
When you want to receive a document from a designated station only:
Set RX PASSCODE CHECK to ON.
Function
TX PASSCODE CHECK
RX PASSCODE CHECK
Your unit
ON ON/OFF
OFF ON/OFF
Your unit
OFF
ON ON/OFF
Other Panasonic
compatible machine
Other Panasonic
compatible machine
ON/OFF
Your unit receives a document only when the correct passcode has been received.
When you want to have facsimile communications within a designated group of people:
All the people in the group must set both TX PASSCODE CHECK and RX PASSCODE
CHECK to ON.
Function
TX PASSCODE CHECK
RX PASSCODE CHECK
Only units that share identical passcodes can transmit and receive documents with each other.
Your unit
ON
ON
4-6
Other Panasonic
compatible machine
ON
ON
Page 73

Programming the main passcode
To activate this feature, the identical main passcode must be preprogrammed both on your unit
and the other Panasonic compatible machine(s).
The main passcode may be any 4-digit number except 0000.
Press the PROGRAM button.
The PROGRAM indicator lights.
Press #, then press 12.
The PROGRAM indicator flashes.
3
1
J 2 j 3 j
I JKI- 5 j ^ MWO 6 j
[■•BS 7] [tuv s] [w»T 9]
[ [pbebO] [ g]
Enter the desired passcode of 4 digits using the dial
keypad.
Press the SET button to store the program into memory.
The PROGRAM indicator goes out.
The PROGRAM indicator lights.
Press the PROGRAM button to end the operation.
4-7
Page 74

Turning the TX passcode check on
Press the PROGRAM button.
The PROGRAM indicator lights.
Press #, then press 13.
The PROGRAM indicator flashes.
Press 1 to activate this feature.
Setting selections are:
1: ON (activate this feature)
2: OFF (deactivate this feature)
Press the SET button to store your selection into
memory.
The PROGRAM indicator lights.
Press the PROGRAM button to end the operation.
The PROGRAM indicator goes out.
NOTE:
If the network passcode is set to “0000", this feature does not work properly.
4-8
Page 75

Turning the RX passcode check on
Press the PROGRAM button.
The PROGRAM indicator lights.
Press #, then press 14.
The PROGRAM indicator flashes.
Press 1 to activate this feature.
Setting selections are:
1: ON (activate this feature)
2: OFF (deactivate this feature)
Press the SET button to store your selection into
memory.
The PROGRAM indicator lights.
Press the PROGRAM button to end the operation.
The PROGRAM indicator goes out.
NOTE;
If the network passcode is set to “0000", this feature does not work properly.
4-9
Page 76

Remote Fax Receiving Using an Extension Phone
If you connect an extension to the same line to which your facsimile unit is connected, it is
possible to receive a fax document into your facsimile unit by using the extension telephone near
you.
This saves you the trouble of going to the facsimile unit and pressing the START button.
NOTES:
•This feature is only effective when you receive a call.
•To activate this feature, use a touch tone telephone as an extension phone.
Using an extension phone
A call comes in.
1
Lift the handset of the extension phone.
If a fax tone is heard, or the other party wishes to send
you a fax, press * and * on the extension phone.
Then replace the handset on the cradle.
The unit will switch to the FAX mode, then receive a
document.
NOTE:
Two -)fs can be changed to another 2 to 4-digit number. See page 4-11.
4-10
Page 77

Programming a remote fax activation code
Your code can be from 2 to 4 digits long. The numbers 0 through 9 and characters # and * may
be used. (e.g. 123, 123#)
Press the PROGRAM button.
The PROGRAM indicator lights.
Press #, then press 20.
The PROGRAM indicator flashes.
3
[ 1 ] [*BC 2] [«F 3]
E3 Gil] GEE
|tuv flj I iny 9 ]
QQQ
Enter the new code number using the dial keypad.
Press the SET button to store your program into memory.
The PROGRAM indicator lights.
Press the PROGRAM button to end the operation.
The PROGRAM indicator goes out.
4-11
Page 78

Setting the Logo Print Position
Your logo, telephone number, date, time and page number will be printed on the transmitted
document from your unit in the following condition.
OUT: Outside of the transmitted document’s paper size (default).
IN: Inside of the transmitted document’s paper size.
OFF: Not printed.
To change the logo position:
HELPFUL HINT:
When you lose your procedures while programming, press the HELP button.
You will be able to print information about how to set.
Press the PROGRAM button.
1
3
[ 1 ] [*BC 2] [pEf 3]
[oHI 4j 5] [mno s]
7) [^v a) ¡*»9)
[ •?(■] [ g]
The PROGRAM indicator lights.
Press #, then press 10.
The PROGRAM indicator flashes.
Press the number of the selection you desire.
Setting selections are:
1: OUT
2: IN
3: OFF
Press the SET button to store your selection.
The PROGRAM indicator lights.
Press the PROGRAM button to end the operation.
The PROGRAM indicator goes out.
4-12
Page 79

Setting a Customized Header
A special message that is preprogrammed in your unit can be printed at the top of all pages
transmitted.
You can choose the desired message among the following.
A: CONFIDENTIAL
B: URGENT REPLY REQUEST
Cl URGENT PLEASE READ
3
[<WI 4] [jKL 5] [mho s]
[wtt 7] [niv 8] [w«T gj
QQQ
Press the PROGRAM button.
The PROGRAM indicator lights.
Press #, then press 23.
The PROGRAM indicator flashes.
Select the number of the message you desire.
Setting selections are:
1; “CONFIDENTIAL” is printed.
2: “URGENT REPLY REQUEST” is printed.
3: “URGENT PLEASE READ” is printed.
4: OFF (deactivate this feature)
(continued)
4-13
Page 80

Press the SET button to store your selection into
memory.
The PROGRAM indicator lights.
Press the PROGRAM button to end the operation.
The PROGRAM indicator goes out.
NOTE:
This feature is automatically turned off after each transmission has been finished.
4-14
Page 81

Operating an Answering Device from a Remote Phone
While you are out, you can listen to any recorded incoming messages or re-record your greeting
message using a touch tone telephone.
The following features are available on this unit:
—Playing back newly recorded messages
—Playing back all the recorded messages
—Back space and skip forward
—Recording a marker message
—Resetting the tape for future messages
—Room monitor
—Re-recording the greeting message
—Skipping the greeting message for incoming message recording mode
Before using these features, you must program your unique remote code (REMOTE ANS ID) that
lets you access the answering device of your unit.
The REMOTE ANS ID is preset to “111 ’’ as a default.
If you wish to change the code, see page 1-33.
Summary of remote control functions
Call your unit.
i
Enter your REMOTE ANS ID while the
greeting message is playing.
I
To play back messages:
CHI
New Messages Playback
4
(page 4-16)
JKL
All Messages Playback
5
(page 4-16)
Back Space
(page 4-17)
ABch Skip Forward
(page 4-17)
Resetting Tape
DEF
3
(page 4-18)
Greeting Message Skip
(page 4-19)
Use the following functions as needed:
MNO
Room monitor (page 4-19)
6
Greeting Message
PRS
7
Re-recording (page 4-20)
WXY
Stop Greeting Message
9
Recording (page 4-20)
NOTE:
For your convenience, a quick reference card for remote operation is attached in these operating
instructions (see pages 6-17 and 6-18).
4-15
Page 82

Playing back newly recorded messages (Memory playback)
It is possible to skip over the recorded messages you have already heard and to play back only
new messages.
Call your unit.
1
Dial your REMOTE ANS ID while the greeting message
is playing.
A long beep and a short beep(s) will sound.
Short beep(s) indicate(s) the number of recorded
message(s) up to 8 times. Even if 9 or more calls are
recorded, a short beep sounds 8 times.
Press 4 immediately after hearing the beeps that
indicate the number of recorded messages.
The unit plays back the new messages.
NOTE:
Even during the playback of previously heard messages, you can skip them by pressing 4.
Playing back all messages
You can listen to all the recorded messages from the beginning of the tape.
1
NOTE:
Even if you do not press 5 in step 2, playback of all messages starts automatically.
Call your unit then dial your REMOTE ANS ID while the
greeting message is playing.
Press 5 within 4 seconds after the short beeps.
The unit will rewind the tape and start to play back all
messages.
At the end of the last message, 3 beeps will sound.
After hanging up, all the recorded messages are saved
and the unit is ready to record further messages.
4-16
Page 83

Back space and skip forward
While listening to the recorded messages, you can rewind or advance the tape.
NOTE:
The maximum length of a message that can be rewound or advanced by one press is
approximately 15 seconds. You may have to press 1 or 2 several times to rewind or advance the
tape to the desired position.
To rewind, press 1.
To advance, press 2.
Recording a marker message
After playing back the recorded messages, you can leave an additional message during the same
call.
When playback is finished, wait for 3 beeps indicating the end of the last message. Wait about
10 seconds for another 2 beeps indicating that the tape is ready for recording.
Leave your message after the last 2 beeps.
Hang up when finished. The marker message is
recorded after the last message on the tape.
4-17
Page 84

Resetting the tape for future messages
After listening to the recorded messages, you can reset the tape to record future messages from
the beginning of the tape.
After atl the messages have been played back or even while they are being played;
Press 3, then hang up.
The unit rewinds the tape to the beginning. Future
messages will be recorded and the previously recorded
messages are erased.
If you have used New Messages Playback;
Press 3.
1
If you have reset the tape by mistake;
The unit rewinds the tape to the beginning of the newly
recorded messages, then beeps.
Press 3 again after hearing the beep.
The unit rewinds the tape to the beginning of the
previously recorded messages.
Press 2 after the tape has been reset.
One beep sounds.
The unit advances the tape to the end of the recorded
messages.
4-18
Page 85

Room monitor
You can monitor the sound in the room where the unit is installed for about 30 seconds.
1
NOTE:
To continue monitoring, press 6 again within 10 seconds after hearing one beep.
Call your unit, then dial your REMOTE ANS ID while the
greeting message is playing.
Press 6 after hearing the beeps that indicate the
number of recorded messages.
Skipping the greeting message for incoming message recording mode
Callers can leave a message on your unit without listening to your greeting message.
Call your unit.
1
Press 0 while the greeting message is playing.
After hearing a long beep, speak clearly and loudly to
leave a message.
4-19
Page 86

Re-recording a greeting message
You can change the content of your greeting message from a remote telephone.
Call your unit, then dial your REMOTE ANS ID while the
1
greeting message is playing.
Press 7 to start re-recording after hearing the beeps that
indicate the number of recorded messages.
After hearing a long beep, speak clearly and loudly for
up to 16 seconds.
When finished, press 9.
The new greeting message is played to confirm the
change.
NOTE:
If you pause for over 2 seconds while recording, the unit beeps and stops the greeting message
recording. In this case, repeat from step 2 within 10 seconds.
4-20
Page 87

Call with Privacy Ring
This feature eliminates interruptions caused by unwanted calls. Only callers with a passcode can
activate a distinctive tone during the playing of your greeting message to notify you of a priority
call.
Entering a unique 3-digit code activates this feature. Issue your code to those callers with priority
status. All other calls will be routed to the answering system unless you pick up the handset.
The unit provides PRIVACY RING ID “333” as default setting.
If you wish to change the number, follow the steps on page 4-22.
NOTE:
This feature is effective only in the ANS/FAX mode.
Calling with the privacy ring
Instructions for caller:
Call the unit with a touch tone telephone.
1
Enter the PRIVACY RING ID during the greeting
2
NOTES:
• If nobody answers, press 0 to turn on the incoming message recording mode.
•The unit rings with a distinctive tone for 30 seconds and goes to the incoming message
recording mode if nobody answers. To repeat this process, enter the PRIVACY RING ID code
again during the incoming message recording mode.
message or the incoming message recording mode.
4-21
Page 88

Programming the PRIVACY RING ID
You can choose any number of 3 digits except numbers including “0". You should also use a
number that is different from the REMOTE ANS ID (see page 1-33).
Press the PROGRAM button.
1
3
[ 1 ] [ .BC 2 I [oBF 3 ]
qEDQ
ED ED ED
ED ED ED
The PROGRAM indicator lights.
Press #, then press 17.
The PROGRAM indicator flashes.
Enter the 3-digit number as the new PRIVACY RING ID.
To correct an error, press the STOP/CLEAR button then
repeat from step 2.
Press the SET button to store the program into memory.
The PROGRAM indicator lights.
Press the PROGRAM button to end the operation.
The PROGRAM indicator goes out.
4-22
Page 89

Setting the Message Alert
When this feature is on, the unit will let you know with an alert if a caller’s message has been
recorded or not.
When a new message is recorded in the ANS/FAX mode, a stow beep will sound and the
indicator will blink. When you hear the beep sound, play back the message(s), the beep sound
will stop and the indicator will stop blinking.
To set the message alert:
Press the PROGRAM button.
The PROGRAM indicator lights.
Press #, then press 22.
The PROGRAM indicator flashes.
Press 1 to activate this feature.
Setting selections are:
1: ON (activate this feature)
2; OFF (deactivate this feature)
Press the SET button to store your selection into
memory.
The PROGRAM indicator lights.
Press the PROGRAM button to end the operation.
The PROGRAM indicator goes out
4-23
Page 90

Voice Contact
Initiating voice contact
While transmitting or receiving a document, you may wish to speak to the other party. If the other
party’s unit is equipped with a voice contact feature, you can initiate voice contact and notify the
other party that you wish to speak after the transmission/reception is completed. The other party’s
fax will emit a distinctive ring that indicates that a voice conversation is required. This saves the
extra expense and time of making a subsequent telephone call to discuss information sent over
the fax.
1
Press the MONITOR button or lift the handset while
transmitting or receiving the documents.
When the other party answers, start speaking using the
handset.
—If you initiate voice contact while transmitting
documents, you can speak after all the documents
have been transmitted.
—If you initiate voice contact while receiving
documents, you can speak after receiving the current
page of the documents.
Receiving a request for voice contact
If the other party initiates voice contact during transmission or reception, your unit will emit a
distinctive ring after the fax is completed.
When the unit rings, lift the handset and start speaking.
NOTE:
If you do not answer within 10 seconds after hearing several rings indicating the request for voice
contact, one of the following occurs:
—When the unit is in the ANS/FAX mode, it plays back your greeting message and records the
voice-message on the tape.
—When the unit is in the TEUFAX mode, the line is disconnected.
—When the unit is in the FAX mode, the line is disconnected.
—When the unit is in the TEL mode, the line is disconnected.
4-24
Page 91

TONE, FLASH and PAUSE Button Usage
TONE button (Temporary tone dialing)
This function is only used when your line has a rotary pulse dial service. Pressing the TONE (-)(-)
button allows you to change from pulse to tone mode during a dialing operation and enter special
tones and codes to operate the answering device, electronic banking services, call processing
services and other special services.
Using the TONE button:
Press the TONE (*) button.
When you hang up, the unit automatically returns to
pulse mode.
NOTES:
•Store “TONE” in memory as explained on pages 3-2 to 3-5.
•Pressing the TONE button counts as 1 digit while programming.
FLASH button
The FLASH button is used to access some of the features of your host PABX (private automatic
branch exchange).
For further details, please contact your local telephone company for information about the
availability of these services in your area.
Using the FLASH button:
NOTES:
•Store “FLASH” in memory as explained on pages 3-2 to 3-5.
•Pressing the FLASH button counts as 1 digit while programming.
Press the FLASH button briefly when required.
4-25
Page 92

PAUSE button
The PAUSE button is used in a dial sequence to access an outside line. Pressing the PAUSE
button creates a dialing delay.
Using the PAUSE button:
Example: Line access number 9
NOTES:
• Store “PAUSE" in memory as explained on pages 3-2 to 3-5.
• Pressing the PAUSE button counts as 1 digit while programming.
Combination dialing
The following combination of dialing methods can be used.
—Manual dialing and automatic dialing
—Pulse and Tone dialing
—Plural memory stations
4-26
Page 93

Other Features
Setting Day/Night Mode
You may wish to use the unit as a telephone and facsimile during the business hours and switch
to the answering device during off hours,
With this feature on, the unit automatically switches from the Day mode (TEL7FAX mode) to the
Night mode (ANS/FAX mode) at a preprogrammed time without the operator’s assistance.
HELPFUL HINT:
When you lose your procedures while programming, press the HELP button.
You will be able to print information about how to set.
Press the PROGRAM button.
The PROGRAM indicator lights.
Press #, then press 18.
The PROGRAM indicator flashes.
5
C3G3 ED
[pBS 7] [tUV 8] [wK¥ 9 j
CZ3@(ZH)
Press 1 to turn on the Day/Night Mode.
Setting selections are:
1: ON {activate this feature)
2; OFF (deactivate this feature)
Press the SET button.
The current setting is printed out automatically for
confirmation.
Enter the time at which the Day mode (TEL/FAX mode)
starts.
Example: The TEL/FAX mode start time is 8:00AM.
Press 08 and 00.
Press * to select AM mode.
(To select PM mode, press #.)
(continued)
4-27
Page 94

Press the SET button.
The result of your setting is printed out automatically for
confirmation.
If you wish to correct your programming, press the
STOP/CLEAR button then repeat from step 2.
7
[ 1 ] |*ac 2] [mf 3]
[cw 41 [-WL 5] [ww 6)
[
PflS
7 ] [tuv S] 9]
QSCD
Enter the time at which the unit switches to the Night
mode (ANS/FAX mode).
Example: The ANS/FAX mode start time is 5:00PM.
Press 05 and 00,
Press # to select PM mode.
(To select AM mode, press -H-.)
Press the SET button.
The PROGRAM indicator lights.
The result of your setting is printed out automatically for
confirmation.
If you wish to correct your programming, try again from
step 2.
Press the PROGRAM button to end the operation.
The PROGRAM indicator goes out.
NOTE:
If you select another receiving mode manually while this feature is on, the unit keeps the receiving
mode that you selected until the Day or Night mode starts.
4-28
Page 95

Setting the Silent Fax Recognition Ring
When a voice call is received in the TEL7FAX mode, the unit will ring three times before it
switches automatically to the fax. When an automatic fax transmission is received in the TEL7FAX
mode, the unit will receive the fax without ringing (we call this “Silent Fax Recognition Ring”).
Change the number of rings choosing the number among “3" (three rings) through “8" (eight
rings).
The three rings is preset as default.
NOTES:
•This feature is effective only in the TEL7FAX mode.
•Telephone fees are charged to the calling party from the first ring.
To change the ring count:
Press the PROGRAM button.
The PROGRAM indicator lights.
Press #, then press 19.
3
[ 1 ] [*BC 2] [oEF 3]
Gill E5
I PBS 7 j ^TUV s] ^ w»T 9 ]
(Z3
The PROGRAM indicator flashes.
Enter the desired number from 4 to 8.
Press the SET button to store your selection into
memory.
The PROGRAM indicator lights.
Press the PROGRAM button to end the operation.
The PROGRAM indicator goes out.
4-29
Page 96

Resetting the setup features
Use this operation to return the advanced features of #10 through #23 (see page 1-25) to their
initial default settings.
Press the PROGRAM button.
The PROGRAM indicator lights.
Press #, then press 50.
The PROGRAM indicator flashes.
Press the START button.
The following message will be printed out.
USER PROGRRfTttBLE FUCTICWS RESET OK? YES: PRESS "START"
NO : PRESS "STOP^CLEOR"
Press the START button to return to initial settings.
The following message will be printed out.
USER PROGRfiftlfiBLE FUNCTICNS RESET COMPLETED!
OR
Press the STOP/CLEAR button to cancel.
The PROGRAM indicator lights.
Press the PROGRAM button to end the operation.
The PROGRAM indicator goes out.
4-30
Page 97

Chapter 5
Printing Reports and Lists
Table of contents
Activity Report (JOURNAL Report) 5-2
Setting the JOURNAL AUTO PRINT 5-3
Printing a JOURNAL report manually 5-4
List of Stored Phone Numbers
(TELEPHONE NUMBER LIST) 5-5
Printing a TELEPHONE NUMBER LIST 5-6
Basic Feature List 5-7
Advanced Feature List 5-8
5-1
Page 98

Activity Report (JOURNAL Report)
You can obtain a record of the last 20 transactions (transmissions and receptions) automatically
or manually.
When the JOURNAL AUTO PRINT is set to AUTO, the report prints automatically after every
20 transactions. After each 20 transactions, the report clears and the list begins again. It may also
be printed on request.
When you set this feature to MANUAL, the JOURNAL report data is stored until the memory
becomes full. Once the memory is full, the oldest entry in the memory is deleted when a new
transaction takes place.
This feature has been preset to AUTO as the default.
These reports are useful for keeping records of telephone usage or verifying telephone long
distance charqes.
*
*
♦ NO. OTHER FACSIMILE START TIME USAGE TIME MODE
y Print time: Hour/Minute AM/PM -
Print date: Month/DayA'ear
PAGES RESULT
_______
Jan. 02 1993 10:56AM
^
CODE
1234567
01
02
9998765
03
04
05
06
07
08
09
10
11
12
<<< G3
5556677
+987 1234
<S01>
7776543
4445566
<AQ>
<« G3
661234
<S06>
>>>
>>>
>>>
>K j K >)<: )tsi+. f-+- : ¥ ■ + : f jf. 4- •+• 'k-f-+• + • f K t-. f f4=. ★
Dialed number or
other party’s name
Communication
number (up to 20)
Jan.
1 11
1 11
1 11
1 12
1 12
1 1
2GhM
52hM
2ShM
19PM
Jan.
Jan.
Jan.
Jan.
Jan.
Jan.
Jan.
Jan.
Jan.
Jan.
Jan.
Jan. 2 9:.
Jan. 2 10:26hM
Jan. 2 10:55AM
Communication
start time
31'20
□0’56
00^32
01*48
1
01*45
02*40
1
01*03
or IS
00*35
01*21
02*25
01*02
on
00*58
Length of
communication:
Minutes/Seconds
TX
t:x
RX
TX
r:-;
TX
TX
TX
t;x
pj-:
TX
t:-:
Number of pages
received
or transmitted
successfully
Transaction mode; Communication result
TX...Transmission
RX... Reception
POL.RX...Polling
Explanation of communication result
OK:
PRESSED THE STOP KEY:
Successful communication
The fax communication was interrupted since
the STOP/CLEAR button was pressed.
DOCUMENT JAMMED:
NO DOCUMENT:
PRINTER OVERHEATED;
PAPER OUT:
THE COVER WAS OPENED:
COMMUNICATION ERROR:
PASSCODE FAILED:
NO RESPONSE:
PAPER JAMMED:
A document jammed.
The document was not fed into the unit properly.
Printing head was overheated.
The unit is out of recording paper.
The front lid or back lid was opened.
Transmission or reception error.
Passcode communication failed.
Receiving unit is busy or out of recording paper.
The recording paper was jammed.
OK
□K
□K
OK
OK
OK
OK
OK
PRESSED THE STOP KEY CA23
OK C00)
OK C00J
OK C0S
4.4
.+. > '■ 4:41:4:4:
C005
C00)
C00Ì
C00)
C001
C00D
C00)
C00)
Error code
(lor the service
center only)
NOTE:
If the printed time and date on the report are not accurate, reprogram them by following the
instructions on pages 1-18 and 1-19.
5-2
Page 99

Setting the JOURNAL AUTO PRINT
HELPFUL HINT:
When you lose your procedures white programming, press the HELP button.
You will be able to print information about how to set.
Press the PROGRAM button.
The PROGRAM indicator lights.
Press #, then press 11.
The PROGRAM indicator flashes.
Press the number of the selection you desire.
3
QEDE2)
4] [jKi. 5] [nHO 6]
Setting selections are;
[ww 7] [tw B] [W« 9]
QE3Q
1; AUTO (Prints a report every 20 transactions
automatically.)
2; MANUAL
Press the SET button to store your selection into
memory.
The PROGRAM indicator lights.
Press the PROGRAM button to end the operation.
The PROGRAM indicator goes out.
5-3
Page 100

Printing a JOURNAL report manually
You can print a report of the current JOURNAL upon request. This will not clear the report which
will continue until 20 transactions are completed.
Press the PROGRAM button.
The PROGRAM indicator lights.
Press #, then press 26.
The PROGRAM indicator flashes.
Press the START button to obtain a report.
The unit will start printing.
If there have been no transactions, no JOURNAL is
printed.
When finished, the PROGRAM indicator goes out.
5-4
 Loading...