

PANASONIC HMTA20EP, HMTA2EP User Manual
Operating Instructions
High Definition Mobile Camera
Model No. HM-TA20
HM-TA2
Before use, please read these instructions completely.
Model number suffix “EB” denotes UK model.
VQT3P01-1
1AG6P1P6267-A(S)
Information for Your Safety
HM-TA20
WARNING:
TO REDUCE THE RISK OF FIRE, ELECTRIC SHOCK OR
PRODUCT DAMAGE,
≥ Do not let water or other liquids drip or splash inside the unit.
≥ Do not expose accessories to rain, moisture, dripping or splashing.
≥ Do not place objects filled with liquids, such as vases, on
accessories.
≥ Use only the recommended accessories.
≥ Do not remove covers.
≥ Do not repair this unit by yourself. Refer servicing to qualified
service personnel.
HM-TA2
WARNING:
TO REDUCE THE RISK OF FIRE, ELECTRIC SHOCK OR
PRODUCT DAMAGE,
≥ Do not expose this unit to rain, moisture, dripping or splashing.
≥ Do not place objects filled with liquids, such as vases, on this unit.
≥ Use only the recommended accessories.
≥ Do not remove covers.
≥ Do not repair this unit by yourself. Refer servicing to qualified
service personnel.
2 VQT3P01

CAUTION!
≥ DO NOT INSTALL OR PLACE THIS UNIT IN A BOOKCASE,
BUILT-IN CABINET OR IN ANOTHER CONFINED SPACE.
ENSURE THE UNIT IS WELL VENTILATED. TO PREVENT RISK
OF ELECTRIC SHOCK OR FIRE HAZARD DUE TO
OVERHEATING, ENSURE THAT CURTAINS AND ANY OTHER
MATERIALS DO NOT OBSTRUCT THE VENTILATION VENTS.
≥ DO NOT OBSTRUCT THE UNIT’S VENTILATION OPENINGS
WITH NEWSPAPERS, TABLECLOTHS, CURTAINS, AND
SIMILAR ITEMS.
≥ DO NOT PLACE SOURCES OF NAKED FLAMES, SUCH AS
LIGHTED CANDLES, ON THE UNIT.
≥ DISPOSE OF BATTERIES IN AN ENVIRONMENTALLY
FRIENDLY MANNER.
(EB/EP only)
∫ EMC Electric and magnetic compatibility
This symbol (CE) is located on the rating plate.
Use only the recommended accessories.
≥ Do not use any other USB extension cords except the supplied one.
≥ Keep the Memory Card out of reach of children to prevent swallowing.
Product Identification Marking is located on the bottom of unit.
VQT3P01 3
-If you see this symbol-
Cd
∫ Information for Users on Collection and Disposal of
Old Equipment and used Batteries
These symbols on the products, packaging, and/or
accompanying documents mean that used electrical
and electronic products and batteries should not be
mixed with general household waste.
For proper treatment, recovery and recycling of old
products and used batteries, please take them to
applicable collection points, in accordance with your
and 2006/66/EC.
By disposing of these products and batteries correctly, you will help
to save valuable resources and prevent any potential negative
effects on human health and the environment which could
otherwise arise from inappropriate waste handling.
For more information about collection and recycling of old products
and batteries, please contact your local municipality, your waste
disposal service or the point of sale where you purchased the items.
Penalties may be applicable for incorrect disposal of this waste, in
accordance with national legislation.
outside the European Union]
These symbols are only valid in the European Union. If you wish to
discard these items, please contact your local authorities or dealer
and ask for the correct method of disposal.
national legislation and the Directives 2002/96/EC
For business users in the European Union
If you wish to discard electrical and electronic
equipment, please contact your dealer or supplier
for further information.
[Information on Disposal in other Countries
Note for the battery symbol (bottom two symbol
examples):
This symbol might be used in combination with a
chemical symbol. In this case it complies with the
requirement set by the Directive for the chemical
involved.
4 VQT3P01
∫ Indemnity about recorded content
HM-TA20
HM-TA2
HM-TA20
Panasonic does not accept any responsibility for damages directly or
indirectly due to any type of problems that result in loss of recording or
edited content, and does not guarantee any content if recording or editing
does not work properly. Likewise, the above also applies in a case where
any type of repair is made to the unit.
∫
About recording method and compatibility of this unit
This unit can record detailed high definition images based on the MP4
format (MPEG-4 AVC/H.264 codec).
≥ Since the recording method is different from the AVCHD format, the
data is not compatible.
∫ Cards that you can use with this unit
SD Memory Card, SDHC Memory Card and SDXC Memory Card
≥ 4 GB or more Memory Cards that do not have the SDHC logo or 48 GB
or more Memory Cards that do not have the SDXC logo are not based
on SD Memory Card Specifications.
≥ Refer to page 26 for more details on SD cards.
∫ For the purposes of these operating instructions
≥ SD Memory Card, SDHC Memory Card and SDXC Memory Card are
referred to as the “SD card”.
≥ Pages for reference are indicated by an arrow, for example: l 00
These operating instructions are designed for use with models
the original.
≥ The illustrations used in these operating instructions show model
models.
≥ Depending on the model, some functions are not available.
≥ Features may vary, so please read carefully.
≥ Not all models may be available depending on the region of purchase.
and . Pictures may be slightly different from
, however, parts of the explanation refer to different
VQT3P01 5

Contents
HM-TA20
Please be sure to read “(Important) About the Waterproof/
Dustproof and Anti-shock Performance of this unit
[HM-TA20]” (l 8) before using this unit underwater to prevent the
unit from being mishandled, which may cause water to seep in.
Information for Your Safety........2
(Important)
About the Waterproof/Dustproof
and Anti-shock Performance of
this unit [HM-TA20] .................... 8
Check before using
underwater .............................. 10
Using this unit underwater....... 12
Caring of this unit after using it
underwater .............................. 13
Accessories.............................. 16
Optional accessories ............... 16
Preparation
Parts identification and
handling .................................... 17
Charging the battery................ 21
Charging and motion pictures
recording time ......................... 24
Approximate operating time
and number of recordable
still pictures ............................. 24
Charging and voices recording
time ......................................... 25
Preparing the card ................... 26
Cards that you can use with
this unit .................................... 26
Inserting/removing
an SD card .............................. 28
Turning the unit on/off ............. 30
How to use the touch
screen ....................................... 31
Setting date and time............... 32
Recording/Playback
Recording ................................. 34
Selecting a mode .................... 34
Recording motion pictures ...... 35
Recording still pictures............ 36
Recording voices .................... 37
Intelligent Auto Mode .............. 38
Digital zoom in/out function..... 39
Recording with the LED light... 39
Night view mode ..................... 40
Effect function
(applying special effects) ........ 40
For underwater recording
[HM-TA20]............................... 41
Playback ................................... 42
Playing back the slide show/
continuous playback ............... 47
Zooming in on a still picture
during playback
(Playback zoom) ..................... 48
Deleting scenes, still pictures
or voices.................................. 49
Creating still picture from
motion picture ......................... 51
To delete unwanted parts of
a motion picture ...................... 52
Setting of online sharing of
motion pictures........................ 53
Using the Setup menu
screen ....................................... 54
Menu list.................................. 54
Watching Motion/Still Pictures
on your TV ................................ 59
6 VQT3P01

With a PC
What you can do with a PC..... 61
Operating environment ........... 63
Installation ................................ 66
Connecting to a PC.................. 68
About the PC display............... 70
Starting HD Writer PE 2.0 ........ 71
Reading the operating
instructions of the software
applications ............................. 71
If using Mac .............................. 72
To use as a camera
for Skype .................................. 73
How to connect ....................... 75
Others
Indications ................................ 76
Messages/Troubleshooting..... 79
Cautions for use....................... 83
Requests when disposing of
this unit ..................................... 88
About copyright ....................... 91
Recording modes/
approximate recordable time
(motion pictures).......................92
Approximate number of
recordable pictures ................. 93
Recording modes/approximate
recordable time (voices).......... 93
Specifications........................... 94
Index ......................................... 99
VQT3P01 7

(Important)
About the Waterproof/Dustproof
and Anti-shock Performance of this
unit [HM-TA20]
Waterproof/Dustproof Performance
This unit’s waterproof/dustproof rating complies with the
“IP58” rating. Provided the care and maintenance guidelines
described in this document are strictly followed, this unit can
operate underwater, to a depth not exceeding 3 m for a time
not exceeding 60 minutes. (*1)
Anti-shock Performance
This unit also complies with “MIL-STD 810F Method 516.5Shock”. This unit has cleared a drop test from a height of
1.5 m onto 3 cm thick plywood. In most cases this unit should
not sustain any damage if dropped from a height not
exceeding 1.5 m. (*2)
This does not guarantee no destruction, no malfunction, or
waterproofing in all conditions.
*1 This means that this unit can be used underwater for specified time
in specified pressure in accordance with the handling method
established by Panasonic.
*2 “MIL-STD 810F Method 516.5-Shock” is the test method standard of
the U.S. Defense Department, which specifies performing drop tests
from a height of 122 cm, at 26 orientations (8 corners, 12 ridges,
6 faces) using 5 sets of devices, and passing the 26 orientation
drops within 5 devices. (If failure occurs during the test, a new set is
used to pass the drop orientation test within a total of 5 devices.)
Panasonic’s test method is based on the above “MIL-STD 810F
Method 516.5-Shock”. However, the drop height was changed from
122 cm to 150 cm dropping onto 3 cm thick plyboard. This drop test
was passed.
(Disregarding appearance change such as loss of paint or distortion
of the part where drop impact is applied.)
8 VQT3P01

∫ Handling of this unit
≥ Waterproofing is not guaranteed if the unit is subject to an impact as a
result of being hit or dropped etc. If an impact to this unit occurs, it
should be inspected (subject to a fee) by a Panasonic’s Service Center
to verify that the waterproofing is still effective.
≥ The waterproof performance may be degraded due to the strong water
pressure when this unit is used deeper than 3 m underwater.
≥ When this unit is splashed with detergent, soap, hot spring, bath
additive, sun oil, sun screen, chemical, etc., wipe it off immediately.
≥ Waterproof function of this unit is for sea water and fresh water only.
≥ Any malfunction caused by customer misuse, or mishandling will not
be covered by the warranty.
≥ The inside of this unit is not waterproof. Water leakage will cause
malfunction.
≥ Supplied accessories are not waterproof.
≥ Cards are not waterproof. Do not handle with a wet hand. Also, do not
insert wet card into this unit.
≥ Do not leave this unit for a long period of time in places where
temperature is very low (at ski resorts or at high altitude etc.) or very
high [above 35 oC], inside a car under strong sunlight, close to a
heater, on the beach, etc. Waterproof performance may be degraded.
≥ Foreign objects may adhere to the inner side of the door/cover
(around the rubber seal or connecting terminals) when the door/
cover is opened or closed in places with sand or dust etc. This
may result in the impairment of the waterproof performance if the
door/cover is closed with foreign objects adhered. Be extremely
careful since it may result in malfunction etc.
≥ If any foreign object is adhered to the inner side of the door/cover,
remove with the lint-free cloth.
≥ If any liquid such as water droplets is adhered to this unit or inner
side of the door/cover, wipe off with a soft dry cloth. Do not open
or close the door/cover near the water, when underwater, using
wet hands, or when this unit is wet. It may cause water leakage.
VQT3P01 9

∫ When inner side of the lens is fogged (condensation)
It is not a malfunction or failure of this unit. It may be caused by the
environment in which this unit is used.
What to do when inner side of the lens is fogged
≥ Turn off the unit and open the door/cover in a place with constant
ambient temperature, away from high temperatures, humidity, sand
and dust. The fog will disappear naturally in 10 minutes to 2 hours with
the door/cover open when the temperature of this unit gets close to the
ambient temperature.
≥ Contact Panasonic’s Service Center if the fogging does not disappear.
Conditions in which inner side of the lens may be fogged
Condensation may occur and the inner side of the lens may be fogged when this
unit is used in areas that undergo a significant change in temperature or in high
humidity, such as the following:
≥ When this unit is used underwater suddenly after being on a hot
beach etc.
≥ When this unit is moved to a warm area from a cold area, such as
at a ski resort or at high altitude
≥ When the door/cover is opened in a high-humidity environment
Check before using underwater
Do not open or close the door/cover in places with sand and
dust, close to water, or with wet hands. Sand or dust adhering
may cause water leaks.
1 Check that there are no foreign objects on the inner
side of the door/cover.
≥ If there is any foreign object, such as lint, hair, sand, etc., on the
surrounding area, water will leak within a few seconds causing
malfunction.
≥ Wipe it off with a dry soft cloth if there is any liquid.
It may cause water leaks and malfunction if you use this unit with
liquid adhered.
≥ If there is any foreign material, remove with the lint-free cloth.
≥ Be extremely careful to remove the small sand etc. that may
adhere to the sides and corners of the rubber seal.
10 VQT3P01
2 Check for cracks and deformation of the rubber seal
on the door/cover.
≥ The integrity of the rubber seals may decrease after about 1 year,
with use and age. To avoid permanently damaging this unit the
seals should be replaced once each year. Please contact
Panasonic’s Service Center for related costs and other
information.
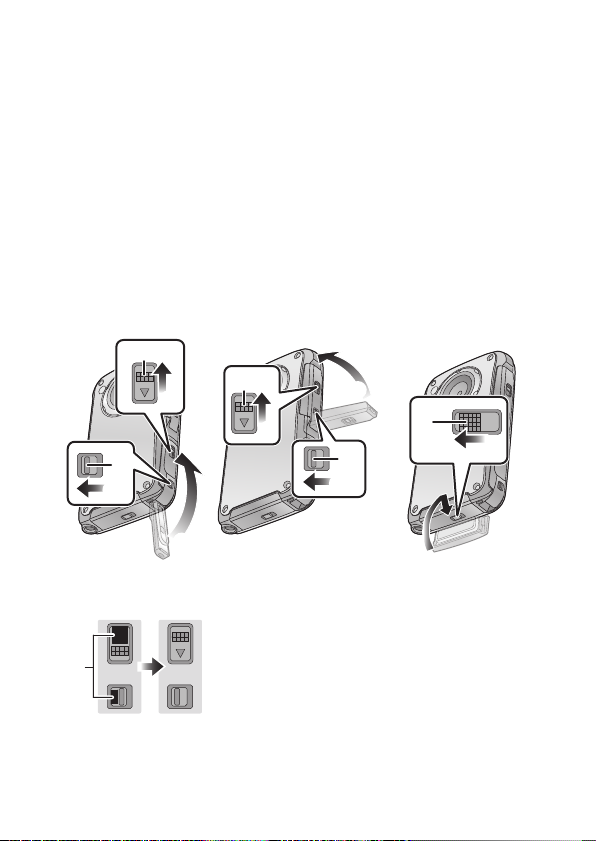
3 Close the door/cover securely.
≥ Lock the LOCK lever securely until the red part is no longer visible.
≥ To prevent water seeping into this unit, be careful not to trap
foreign objects such as liquids, sand, hair or dust etc.
USB terminal cover
HDMI/Headphone
cover
SD card door
A LOCK lever
B Open/close lever
C Released state
D Locked state
E Red part
VQT3P01 11

Using this unit underwater
≥ Use this unit underwater at a depth of up to 3 m with the water
temperature between 0 oC and 35 oC.
≥ Do not use this unit at a depth of over 3 m.
≥ Do not use it in the hot water over 35 oC (in the bath or hot spring).
≥ Do not use this unit underwater not longer than 60 minutes
continuously.
≥ Do not open or close the door/cover.
≥ Do not apply shock to this unit underwater. (Waterproof performance
may not be maintained, and there is a chance of water leak.)
≥ Do not dive into the water holding this unit. Do not use this unit in a
location where the water will splash strongly, such as rapid flow or
waterfall. (Strong water pressure may be applied, and it may cause
malfunction.)
≥ This unit will sink in the water. Take care not to drop this unit and lose it
underwater by securely placing the strap around your wrist or similar
measure.
≥ Attaching a tripod with a 5.5 mm screw or larger may open a hole in
this unit through which water will leak.
≥ The touch screen will not work underwater. It will malfunction, so make
sure to press the screen lock button. (l 41)
12 VQT3P01
Caring of this unit after using it underwater
Do not open or close the door/cover until the sand and dust is
removed by rinsing this unit with water.
Make sure to clean this unit after using it.
≥ Thoroughly wipe off any water droplets, sand, and saline matter on
your hands, body, hair, etc.
≥ It is recommended to clean this unit indoors, avoiding places where
water spray or sand may fall.
Do not leave this unit uncared for more than 60 minutes after
using it underwater.
≥ Leaving this unit with foreign objects or saline matter on it may
cause damage, discolouration, corrosion, unusual odour, or
deterioration of the waterproof performance.
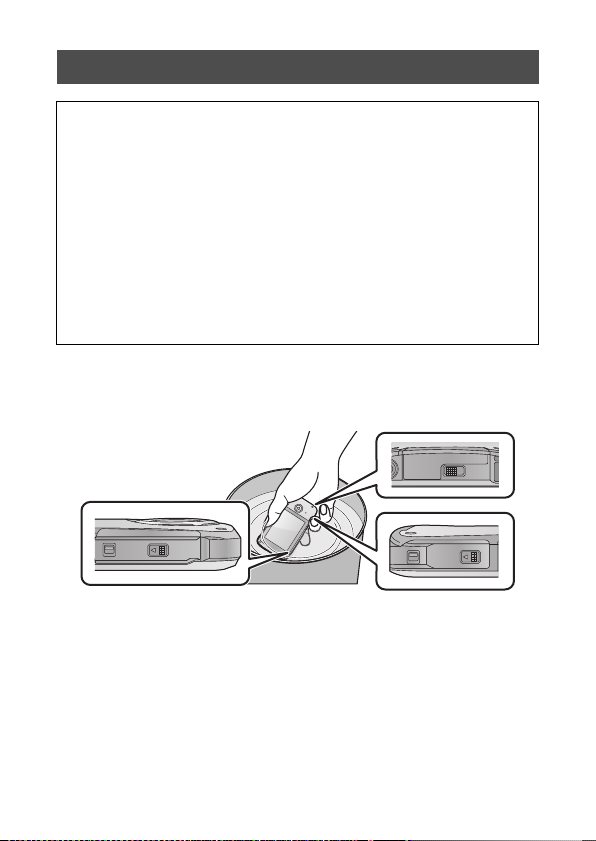
1 Rinse with water with the door/cover closed.
≥ After use at the seaside or underwater, soak the unit in fresh water
pooled in a shallow container for 10 minutes or less.
VQT3P01 13
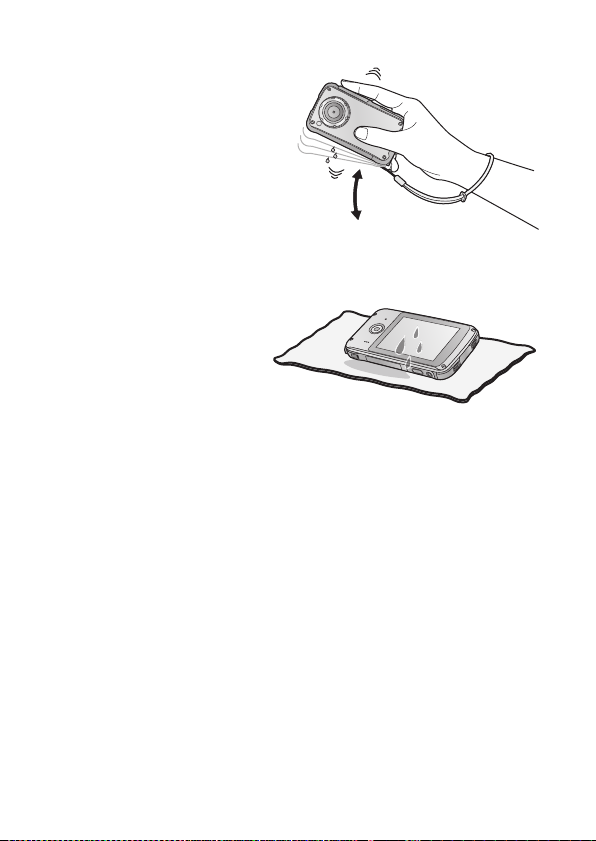
2 Drain water by holding
this unit upside down
and shaking it lightly a
few times.
≥ After using this unit at the
seaside or underwater, or
after washing it, water will
remain at the speaker site
of this unit for a while and it
may cause lower sound or
sound distortion.
≥ Fasten the strap firmly to prevent this unit from dropping.
3 Wipe off water
drops on this unit
with a dry soft cloth
and dry this unit in a
shaded area which
is well ventilated.
≥ Dry this unit by standing it on a dry cloth.
≥ Do not dry this unit with hot air from dryer or similar. Waterproof
performance will deteriorate due to deformation.
≥ Do not use chemicals such as benzine, thinner, alcohol, or
cleanser, or soap or detergents.
4 Confirm that there are no water droplets, open the
door/cover, and wipe off any water droplets or sand
left inside using a soft dry cloth.
≥ Water droplets may adhere to the card when the door/cover is
opened without thoroughly drying. Also, water may accumulate in
the gap around the card compartment or the terminal connector.
Be sure to wipe any water off with a soft dry cloth.
≥ The water droplets may seep into this unit when the door/cover is
closed while it is still wet, causing condensation or failure.
14 VQT3P01

For the United Kingdom and Ireland customers
∫ Sales and Support Information
Customer Care Centre
≥ For customers within the UK: 0844 844 3852
≥ For customers within lreland: 01 289 8333
≥ Visit our website for product information
www.panasonic.co.uk
≥ E-mail: customer.care@panasonic.co.uk
Technical Support for AV Software
≥ For customers within the UK: 0844 844 3869
≥ For customers within Ireland: 01 289 8333
Direct Sales at Panasonic UK
≥ For customers: 0844 844 3856
≥ Order accessory and consumable items for your product with ease and
confidence by phoning our Customer Care Centre Monday–Thursday
9.00 a.m.–5.30 p.m., Friday 9.30 a.m.– 5.30 p.m. (Excluding public
holidays)
≥ Or go on line through our Internet Accessory ordering application at
www.pas-europe.com
≥ Most major credit and debit cards accepted.
≥ All enquiries transactions and distribution facilities are provided directly
by Panasonic UK.
≥ It couldn’t be simpler!
≥ Also available through our Internet is direct shopping for a wide range
of finished products, take a browse on our website for further details.
.
VQT3P01 15
Accessories
Check the accessories before using this unit.
Keep the accessories out of reach of children to prevent swallowing.
Product numbers correct as of April 2011. These may be subject to change.
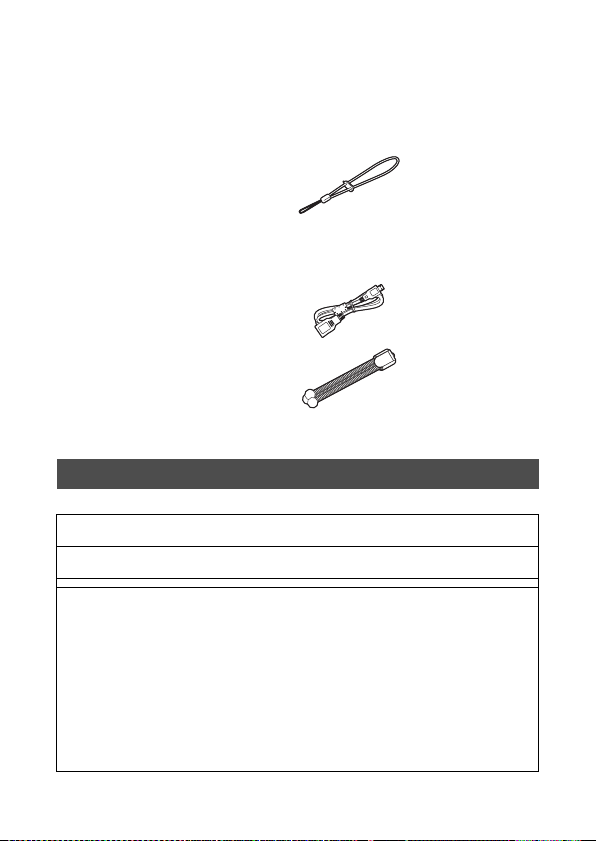
Hand strap with stylus pen
VFC4708
≥ The stylus pen is used for operations that are hard
to operate with your fingers or performing detailed
operations with the touch screen operation. (l 31)
USB extension cord
VFA0545
Trip od
VFC4709
≥
The unit comes with built-in HD Writer PE 2.0 video editing software.
≥ Supplied accessories are not waterproof.
Optional accessories
Some optional accessories may not be available in some countries.
HDMI mini cable (RP-CDHM15, RP-CDHM30)
SD/SDHC/SDXC Memory Card (Refer to page 26)
AC adaptor (VSK0746)*
Order number:
(EB) VSK0752*
(EP) VSK0751*
(GC) AVSK0752*/BVSK0751*
A
Hong Kong Special Administrative Region of China and Saudi Arabia
B Areas Other than Hong Kong Special Administrative Region of
China, Saudi Arabia
(GN) VSK0753*
* AC adaptor (VSK0746/VSK0751/VSK0752/VSK0753) is only for charging.
16 VQT3P01
Preparation
HM-TA20
HM-TA2
1
8
2
3
4
6
7
5
1
2
3
4
6
7
5
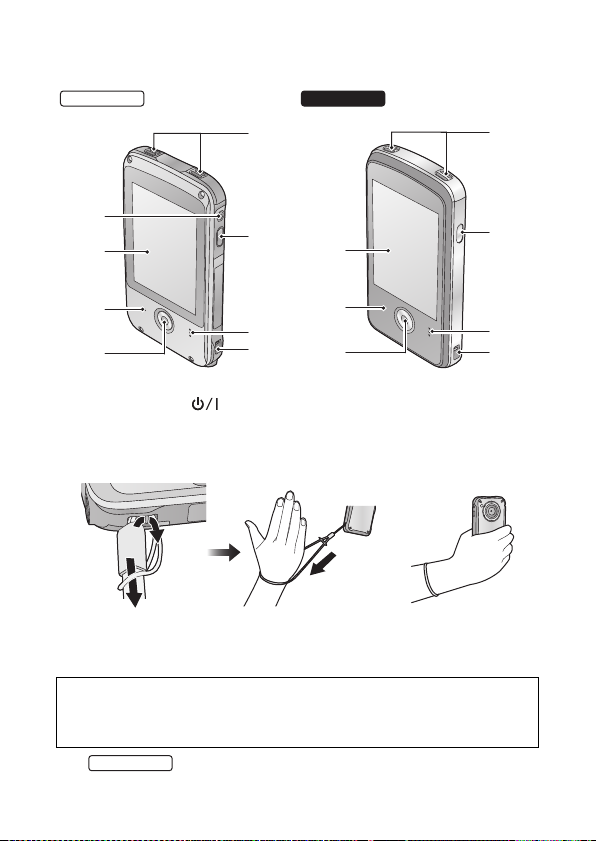
HM-TA20
Parts identification and handling
1 Internal microphones
2 Power button [ ] (l 30)
3 Speaker
4 Hand strap fixture
≥
Attach the hand strap to this unit and adjust its length using the stylus pen.
5 Recording button (l 35)
6 Status indicator (l 21, 28, 30, 59)
7 LCD monitor (Touch screen) (l 31)
Due to limitations in LCD production technology, there may be some
tiny bright or dark spots on the LCD monitor screen. However, this is
not a malfunction and does not affect the recorded picture.
8
Screen lock button (l 41)
VQT3P01 17
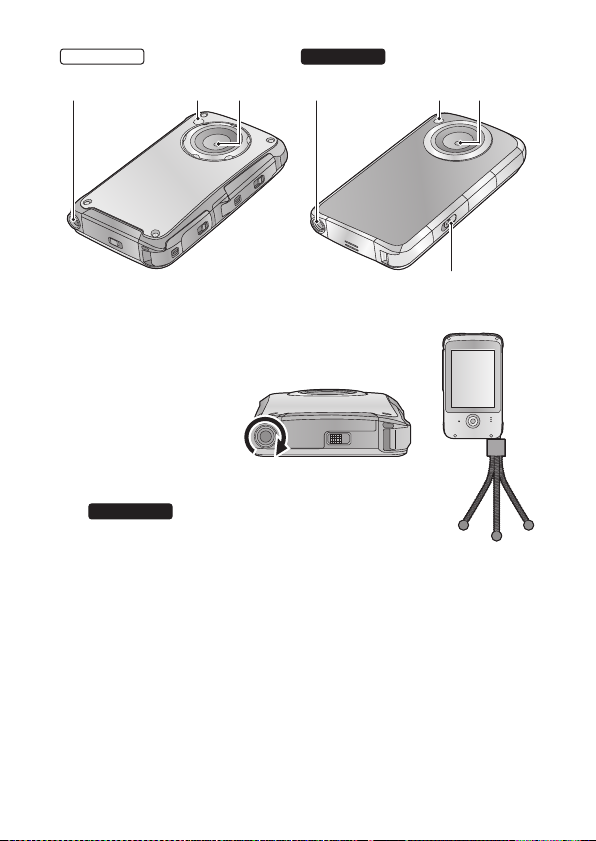
9 Tripod receptacle
HM-TA20
HM-TA2
91011
910
12
11
HM-TA2
≥ If you attach a tripod
which has 5.5 mm
screw or larger, it may
damage this unit.
10 LED light (l 39)
11 Lens
12
USB Latch (l 21)
18 VQT3P01
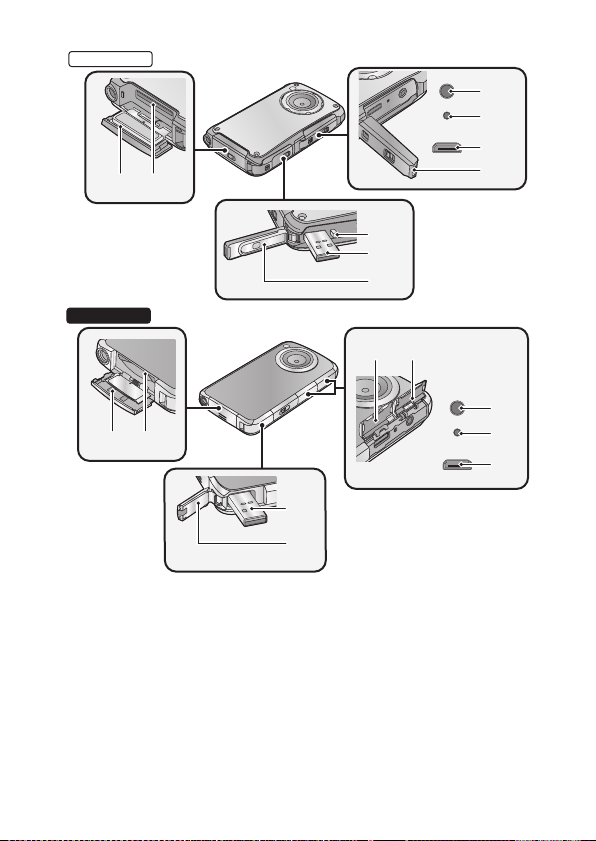
HM-TA20
15
16
RESET
17
13 14
18
19
20
21
HM-TA2
22 23
13 14
RESET
20
21
13 SD card door (l 28)
14 Card slot (l 28)
15 Headphone terminal [Ë]
≥ Recommended additional earphones: Panasonic RP-HV154,
RP-HJE130 (the product number is correct as of April 2011.)
jMax. output voltage of unit at earphone terminal:
150 mV or less
jWide band characteristic voltage of headphone or earphone:
75 mV or larger
≥ Excessive sound pressure from earphones and headphones can
cause hearing loss.
≥
Listening at full volume for long periods may damage the user’s ears.
Be sure to use the supplied or recommended headphones or earphones.
VQT3P01 19
15
16
17
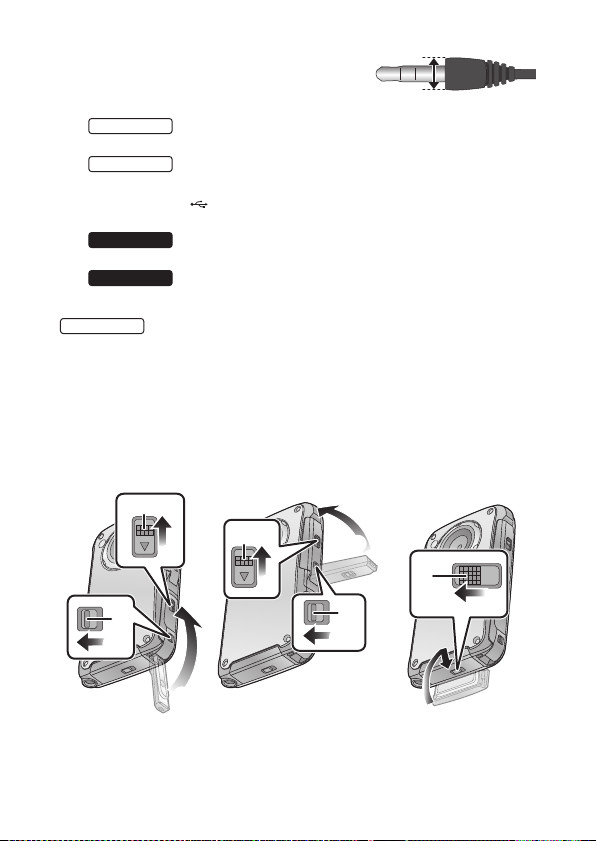
≥ Use the earphone/headphone with a A
HM-TA2
HM-TA20
part width ‰ 11 mm or smaller.
16 Reset button [RESET] (l 82)
17 HDMI mini connector (l 59)
HM-TA20
18
HDMI/Headphone cover
HM-TA20
19
USB Latch (l 21)
20 USB terminal [ ] (l 21, 66, 68, 75)
21 USB terminal cover (l 21)
HM-TA2
22
HDMI cover
23
Headphone terminal cover
About locks for USB terminal cover, HDMI/Headphone cover and
SD card door
Each door/cover is equipped with a LOCK lever to lock the open/close
lever. When opening and closing the door/cover, slide the LOCK lever
and then slide the open/close lever.
USB terminal cover
HDMI/Headphone
cover
SD card door
A LOCK lever
B Open/close lever
20 VQT3P01
Preparation
HM-TA20
HM-TA2
Charging the battery
When this unit is purchased, the battery is not charged. Charge
the battery fully before using this unit for the first time.
Important:
≥ This unit has a built-in rechargeable lithium-ion battery. Do not
remove except when disposing of this unit.
≥ The battery will not be charged if the unit is turned on.
≥ The battery can also be charged using the AC adaptor (optional).
(l 16, 22)
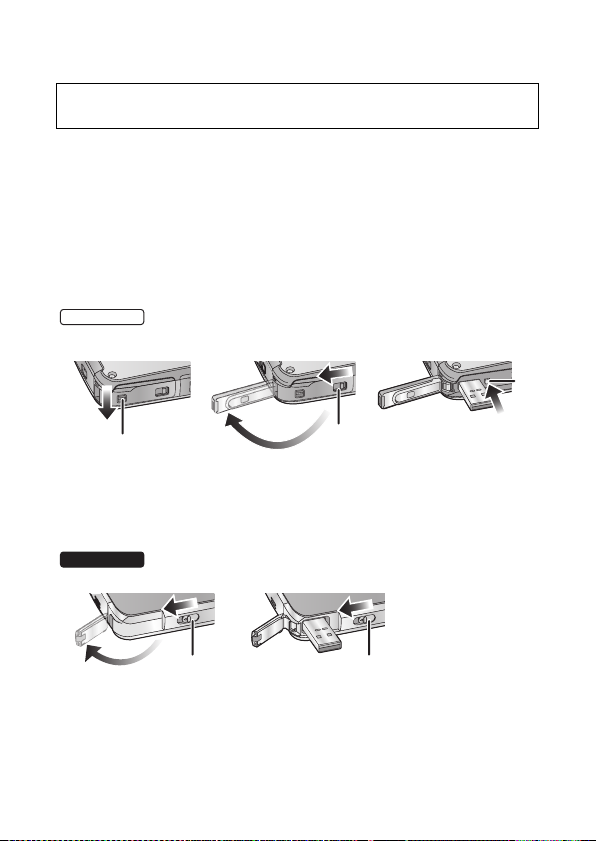
1 Take out the USB terminal.
≥ Be careful as the USB terminal will jump out.
1 Slide the LOCK lever for the USB terminal cover A to release the
lock on the open/close lever for the USB terminal cover B.
2 Open the USB terminal cover while sliding the open/close lever for
the USB terminal cover B in the direction indicated by the arrow.
3 Press the USB Latch C until the USB terminal comes out.
1 Slide the USB Latch A until the USB terminal cover opens.
2 Slide the USB Latch A again until the USB terminal comes out.
VQT3P01 21

2 Connect USB terminal of this unit to a PC with a USB
extension cord.
≥ Be sure to connect USB terminal of this unit to a PC with a USB
extension cord when charging the battery.
≥ Connect the USB extension cord by inserting it securely all the
way without forcing.
A USB extension cord (supplied)
B AC adaptor (optional)
≥ Do not use any other USB extension cords except the supplied one.
(Operation is not guaranteed with any other USB extension cords.)
≥
Insert the USB extension cord securely all the way. (Insert to the line C.)
It will not operate properly if it is not inserted all the way.
≥
(EB) Always use a genuine Panasonic AC adaptor (VSK0752; optional).
(EP) Always use a genuine Panasonic AC adaptor (VSK0751; optional).
(GC) Always use a genuine Panasonic AC adaptor
(
A
VSK0752/BVSK0751; optional).
A
Hong Kong Special Administrative Region of China and Saudi Arabia
B
Areas Other than Hong Kong Special Administrative Region of China,
Saudi Arabia
(GN) Always use a genuine Panasonic AC adaptor (VSK0753; optional).
THE SOCKET OUTLET SHALL BE INSTALLED NEAR THE
EQUIPMENT AND SHALL BE EASILY ACCESSIBLE.
The unit is in the standby condition when the AC adaptor is connected.
The primary circuit is always “live” as long as the AC adaptor is
connected to an electrical outlet.
≥ The status indicator will flash red at an interval of 2 seconds, indicating
that charging has begun.
≥ During charging, the status indicator flashes. When charging is
finished, the status indicator turns off.
22 VQT3P01
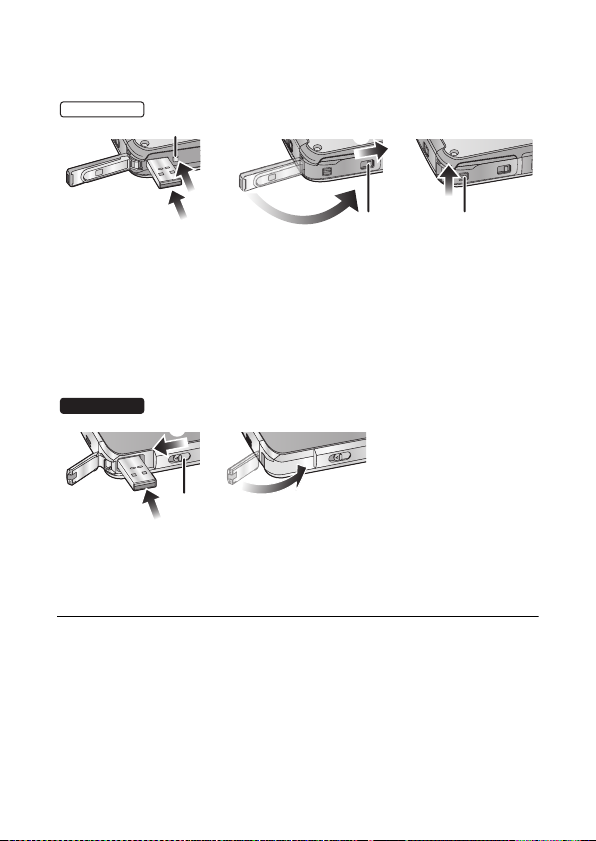
∫ To return the USB terminal to its original position
HM-TA20
HM-TA2
≥
When pressing the USB terminal with your fingers, press slowly and carefully.
1 Press the USB Latch C.
2 While pressing on the USB Latch C, press the USB terminal with
your finger.
≥ Release your finger from the USB Latch C, and push in the USB
terminal until it is locked.
3 Close the USB terminal cover.
4 While the USB terminal cover is closed, slide the open/close lever for
the USB terminal cover B toward the direction of the arrow.
5 Slide the LOCK lever for the USB terminal cover A to lock the open/
close lever for the USB terminal cover B.
Slide the USB Latch A.
1
2
While the USB Latch A is slid, press the USB terminal with your finger.
≥ Release your finger from the USB Latch A, and push in the USB
terminal until it is locked.
3 Close the USB terminal cover.
≥ Please refer to page 84 if the status indicator flashes quickly.
≥ Do not heat or expose to flame.
≥ Do not leave unit in an automobile exposed to direct sunlight for a long
period time with doors and windows closed.
≥ If the operating time is still too short even after the battery is fully
charged, the battery has worn out and needs to be replaced. Consult
the dealer who you purchased this unit from.
Operation is not guaranteed for all devices equipped with a USB terminal.
≥
VQT3P01 23

Charging and motion pictures recording time
∫ Charging/Recording time
≥ Temperature: 25 oC/humidity: 60%RH
Maximum
Charging time
4h20min
* Maximum continuous recordable time for one scene:
j
If [Video Rec Mode] is set to //:
29min59sec
jIf [Video Rec Mode] is set to :
Approx. 20 min (up to 4 GB recording capacity)
≥ These times are approximations.
≥
The indicated charging time is for when the battery has been
discharged completely. Charging time and recordable time vary
depending on the usage conditions such as high/low temperature.
≥
The actual recordable time refers to the recordable time when repeatedly
starting/stopping recording, turning the unit on/off, adjusting the zoom etc.
≥
This unit becomes warm after use or charging. This is not a malfunction.
Recording mode
/ 1h30min 55min
continuous
recordable time
1h25min 50min
1h45min 1h
*
Actual
recordable
time
Approximate operating time and number of
recordable still pictures
Number of recordable
pictures
Recording time
Playback time Approx. 210 min
Recording conditions by CIPA standard
≥ CIPA is an abbreviation of Camera & Imaging Products Association.
≥ Using a Panasonic SD Memory Card (2 GB)
Approx.
230 pictures
Approx. 115 min
By CIPA standard
24 VQT3P01
Charging and voices recording time
PCM
128Low
AAC
∫ Charging/Recording time
≥ Temperature: 25 oC/humidity: 60%RH
Charging time
Recording mode
Maximum continuous
recordable time
4h30min
256
AAC
AAC
128
/ 4h30min
4h30min
4h20min
* Maximum continuous recordable time for one voice:
Approx. 5 h (up to 4 GB recording capacity)
≥ These times are approximations.
The indicated charging time is for when the battery has been
≥
discharged completely. Charging time and recordable time vary
depending on the usage conditions such as high/low temperature.
≥ This unit becomes warm after use or charging. This is not a
malfunction.
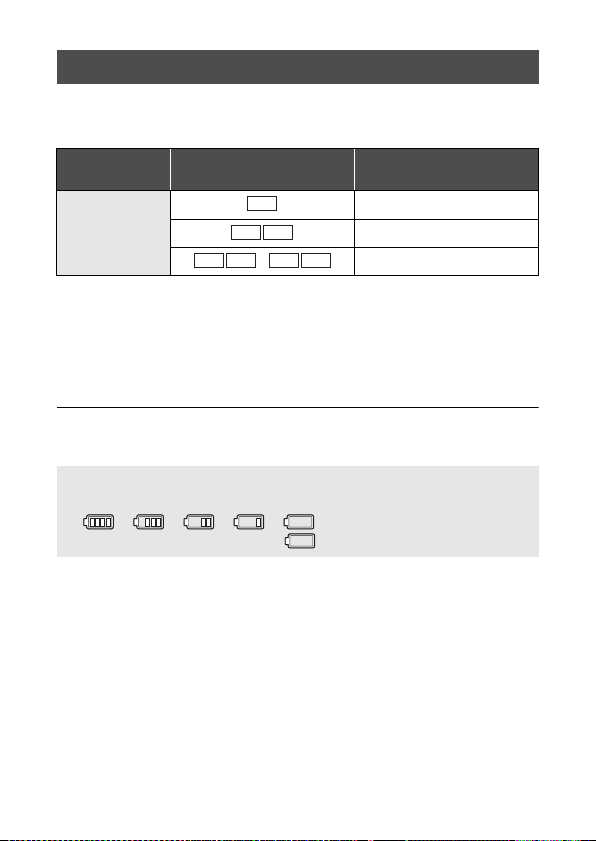
Battery capacity indication
≥ The display changes as the battery capacity reduces.
####
If the battery discharges, then will become red.
*
VQT3P01 25
Preparation
Preparing the card
The following operations can be performed using this unit.
≥ When a card has not been inserted: Scenes, still pictures and
voices can be recorded on the built-in memory and played back.
( appears.)
≥ When a card has been inserted: Scenes, still pictures and voices
can be recorded on the card and played back.
Normally, insert the card to use.
Cards that you can use with this unit
This unit (an SDXC compatible device) is compatible with SD Memory Cards,
SDHC Memory Cards and SDXC Memory Cards. When using an SDHC
memory card/SDXC memory card with other equipment, check the equipment
is compatible with these memory cards.
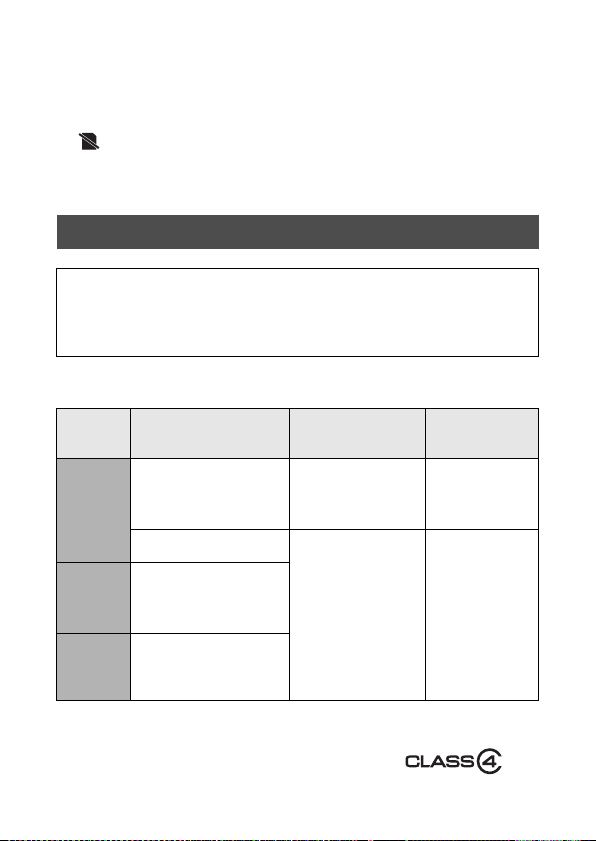
Use SD cards conforming to Class 4 or higher of the SD Speed
Class Rating* for motion picture recording.
Card
type
SD
Memory
Card
SDHC
Memory
Card
SDXC
Memory
Card
* SD Speed Class Rating is the speed
standard regarding continuous writing.
Check via the label on the card, etc.
Capacity
8MB/
16 MB/32 MB/64 MB/
128 MB/256 MB
512MB/1GB/2GB
4 GB/6 GB/8 GB/
12 GB/16 GB/24 GB/
32 GB
48 GB/64 GB
Cannot be
guaranteed in
operation.
Can be used. Can be used.
26 VQT3P01
Motion picture/
Voice recording
e.g.:
Still picture
recording
Cannot be
guaranteed in
operation.
≥ Please confirm the latest information about SD Memory Cards/
32
SDHC Memory Cards/SDXC Memory Cards that can be used for
motion picture recording on the following website.
http://panasonic.jp/support/global/cs/e_cam
(This website is in English only.)
≥ 4 GB or more Memory Cards that do not have the SDHC logo or 48 GB
or more Memory Cards that do not have the SDXC logo are not based
on SD Memory Card Specifications.
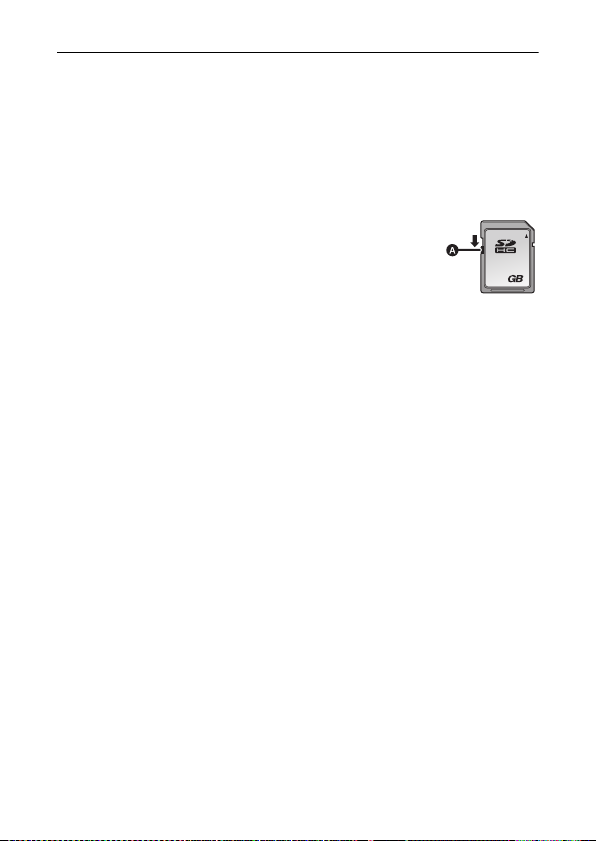
≥ When the write-protect switch A on SD card is locked,
no recording, deletion or editing will be possible on the
card.
≥ Keep the Memory Card out of reach of children to
prevent swallowing.
∫ About Built-in Memory
≥ Recordable Memory size: Approx. 10 MB
≥ You can not copy the recorded pictures to a card.
≥ The built-in memory can be used as a temporary storage device.
≥ The access time for the built-in memory may be longer than the access
time for a card.
VQT3P01 27
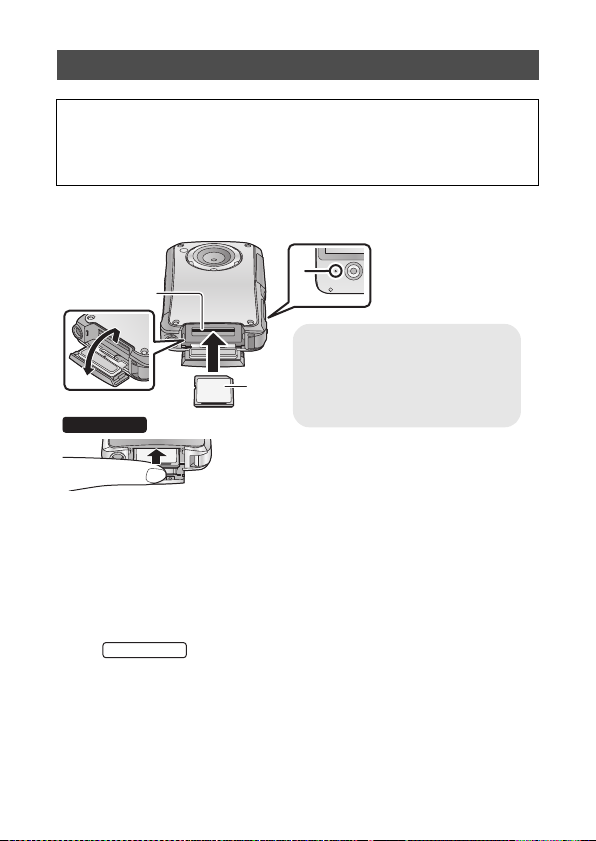
Inserting/removing an SD card
HM-TA2
Status indicator A
≥ When this unit is accessing
the SD card, the status
indicator lights up.
≥ Insert SD card as shown in the figure.
HM-TA20
When using an SD card not from Panasonic, or one previously used on other
equipment, for the first time on this unit, format the SD card. (
SD card is formatted, all of the recorded data is deleted. Once the data is
deleted, it cannot be restored.
Caution:
Check that the status indicator has gone off.
l
58) When the
1 Open the SD card door and insert (remove) the SD
card into (from) the card slot B.
≥ Face the label side C in the direction shown in the illustration and
press it straight in as far as it will go.
≥ Press the centre of the SD card and then pull it straight out.
≥
Open the SD card door after releasing the lock with the LOCK
lever for the SD card door.
2 Securely close the SD card door.
28 VQT3P01

≥ Do not touch the terminals on the back of the SD card.
≥ Do not apply strong shocks, bend, or drop the SD card.
≥ Electrical noise, static electricity or the failure of this unit or the SD card
may damage or erase the data stored on the SD card.
≥ When the status indicator is lit, do not:
jRemove the SD card
jTurn the unit off
jInsert and remove the USB terminal
jExpose the unit to vibrations or shock
Performing the above while the status indicator is on may result in
damage to data/SD card or this unit.
≥ Do not expose the terminals of the SD card to water, dirt or dust.
≥ Do not place SD cards in the following areas:
jIn direct sunlight
jIn very dusty or humid areas
jNear a heater
jLocations susceptible to significant difference in temperature
(condensation can occur.)
jWhere static electricity or electromagnetic waves occur
≥ To protect SD cards, return them to their cases when you are not using
them.
≥ About disposing of or giving away the SD card. (l 87)
VQT3P01 29
Preparation
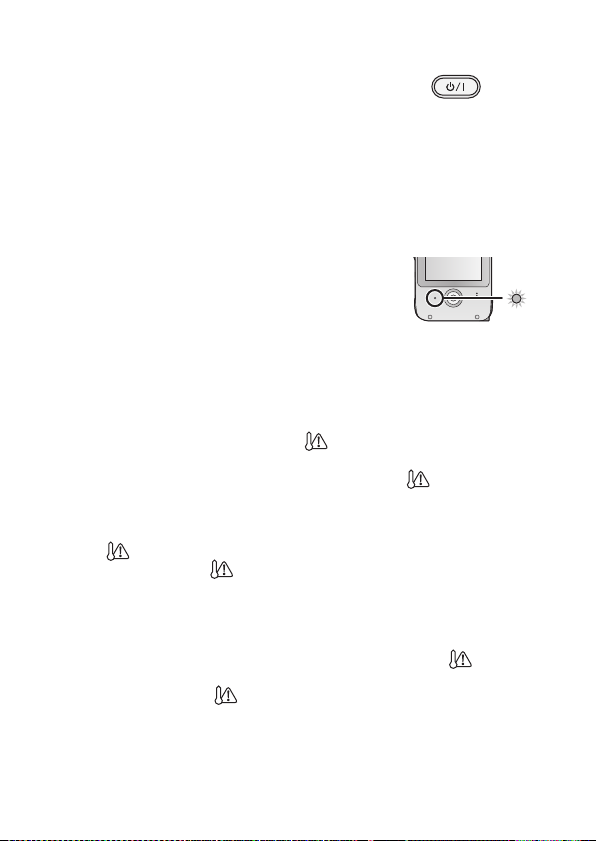
Turning the unit on/off
Press the power button to turn on the unit.
≥ The LCD monitor lights on.
To turn off the unit
Continue pressing the power button until the LCD monitor goes off.
∫ About the screen display
Please refer to page 76 for details of the icons displayed on the screen.
∫ About the power save function
To prevent battery consumption, it will turn off the
screen and go into idle mode after approx. 2 minutes of
no operation. (The status indicator
The unit will be turned off automatically if no operation
is performed for a further 5 minutes (approx.) while in
idle mode.
≥ Idle mode is cancelled by pressing the Power button or Recording
button.
∫ About the high temperature warning icon
When the high temperature warning icon is displayed, the temperature of
the unit is high.
≥ It is possible to continue recording/playback when is displayed,
but it is recommended to stop operations and turn off the unit as soon
as possible.
≥ If the temperature rises further, the unit will be turned off automatically
after flashes. You will not be able to turn on the unit again until the
temperature lowers ( will flash.), so wait until the temperature
lowers before using again.
≥ A countdown until the recording is stopped will start from approx.
15 seconds during motion picture recording, and the recording will stop
when the display reaches 0 seconds.
≥ When you turn off the unit while the temperature is high ( is
displayed.), you will not be able to turn on the unit again until the
temperature lowers. ( will flash.)
A
flashes.)
30 VQT3P01
 Loading...