

PANASONIC H-FSA45200E User Manual

1
2
3
ENGLISH
DEUTSCH
Operating Instructions/
Panasonic Corporation
Web Site: http://www.panasonic.com
Panasonic Corporation 2017
Manufactured by: Panasonic Corporation
Kadoma, Osaka, Japan
Importer for Europe: Panasonic Marketing
Europe GmbH
Panasonic Testing Centre
Winsbergring 15, 22525
Hamburg, Germany
12
3 4
5 67
E
Bedienungsanleitung/
Manuel d’utilisation/
Instrucciones de
funcionamiento
INTERCHANGEABLE LENS FOR
DIGITAL CAMERA
WECHSELOBJEKTIV FÜR
DIGITAL-KAMERA
OBJECTIF INTERCHANGEABLE
POUR APPAREIL PHOTO NUMÉRIQUE
ÓPTICA INTERCAMBIABLE
PARA CÁMARA DIGITAL
Model No./Model Nr./Modèle/Modelo N.
H-FSA45200
DVQX1179ZA
F1216KD0
1
VFC4358
3 4
2
VYF3201
VYC0986VFC4315
Please read these instructions carefully before using this
product, and save this manual for future use.
-If you see this symbol-
Disposal of Old Equipment
Only for European Union and countries with
recycling systems
This symbol on the products, packaging,
and/or accompanying documents means
that used electrical and electronic products
must not be mixed with general household
waste.
of old products, please take them to applicable collection
points in accordance with your national legislation.
By disposing of them correctly, you will help to save
valuable resources and prevent any potential negative
effects on human health and the environment.
For more information about collection and recycling,
please contact your local municipality.
Penalties may be applicable for incorrect disposal of this
waste, in accordance with national legislation.
For proper treatment, recovery and recycling
Information for Your Safety
Keep the unit as far away as possible from electromagnetic
equipment (such as microwave ovens, TVs, video games,
radio transmitters, high-voltage lines etc.).
• Do not use the camera near cell phones because doing
so may result in noise adversely affecting the pictures
and sound.
• If the camera is adversely affected by electromagnetic
equipment and stops functioning properly, turn the
camera off and remove the battery and/or the connected
AC adaptor. Then reinsert the battery and/or reconnect
the AC adaptor and turn the camera on.
The lens can be used with a digital camera compatible with the
lens mount standard for the “Micro Four Thirds
• It cannot be mounted on the Four Thirds
specification camera.
• The appearance and specifications of products described
in this manual may differ from the actual products you
have purchased due to later enhancements.
• Micro Four ThirdsTM and Micro Four Thirds Logo marks
are trademarks or registered trademarks of Olympus
Imaging Corporation, in Japan, the United States, the
European Union and other countries.
•Four ThirdsTM and Four Thirds Logo marks are
trademarks or registered trademarks of Olympus
Imaging Corporation, in Japan, the United States, the
European Union and other countries.
• G MICRO SYSTEM is an interchangeable lens type
digital camera system of LUMIX based on a Micro Four
Thirds System standard.
• Other names of systems and products mentioned in
these instructions are usually the registered trademarks
or trademarks of the manufacturers who developed the
system or product concerned.
TM
TM
mount
System”.
Precautions
∫ Lens Care
• This lens has a dust-proof and splash-proof
construction. When using it, please be careful of the
following. If the lens is not working properly, consult the
dealer or your nearest Service Centre.
– Please attach the lens to a dust-proof and splash-
proof digital camera.
– When detaching the lens from the digital camera, take
care to ensure that sand, dust, splashes of water etc.,
do not get into the lens or the terminals.
– This lens is not waterproof and cannot be used to record
underwater. For splash-proofing, the lens is constructed
to resist the entry of water. If splashes of water etc. do
adhere to the lens, wipe after use with a soft dry cloth.
• To improve the dust-proofing and splash-proofing of this
lens, a lens mount rubber is used in the mounting
portion. After changing the lens a number of times, you
may find that the lens mount rubber has marked the
mount portion of the digital camera body, which does not
affect its performance. For information on changing the
lens mount rubber, contact your nearest Service Centre.
• Do not press the lens with excessive force.
• When there is dirt (water, oil, and fingerprints, etc.) on
the surface of the lens, the picture may be affected.
Lightly wipe the surface of the lens with a soft, dry cloth
before and after taking pictures.
• To prevent dust and other particles from accumulating
on or entering the lens, attach the lens rear cap when
the lens is not in use.
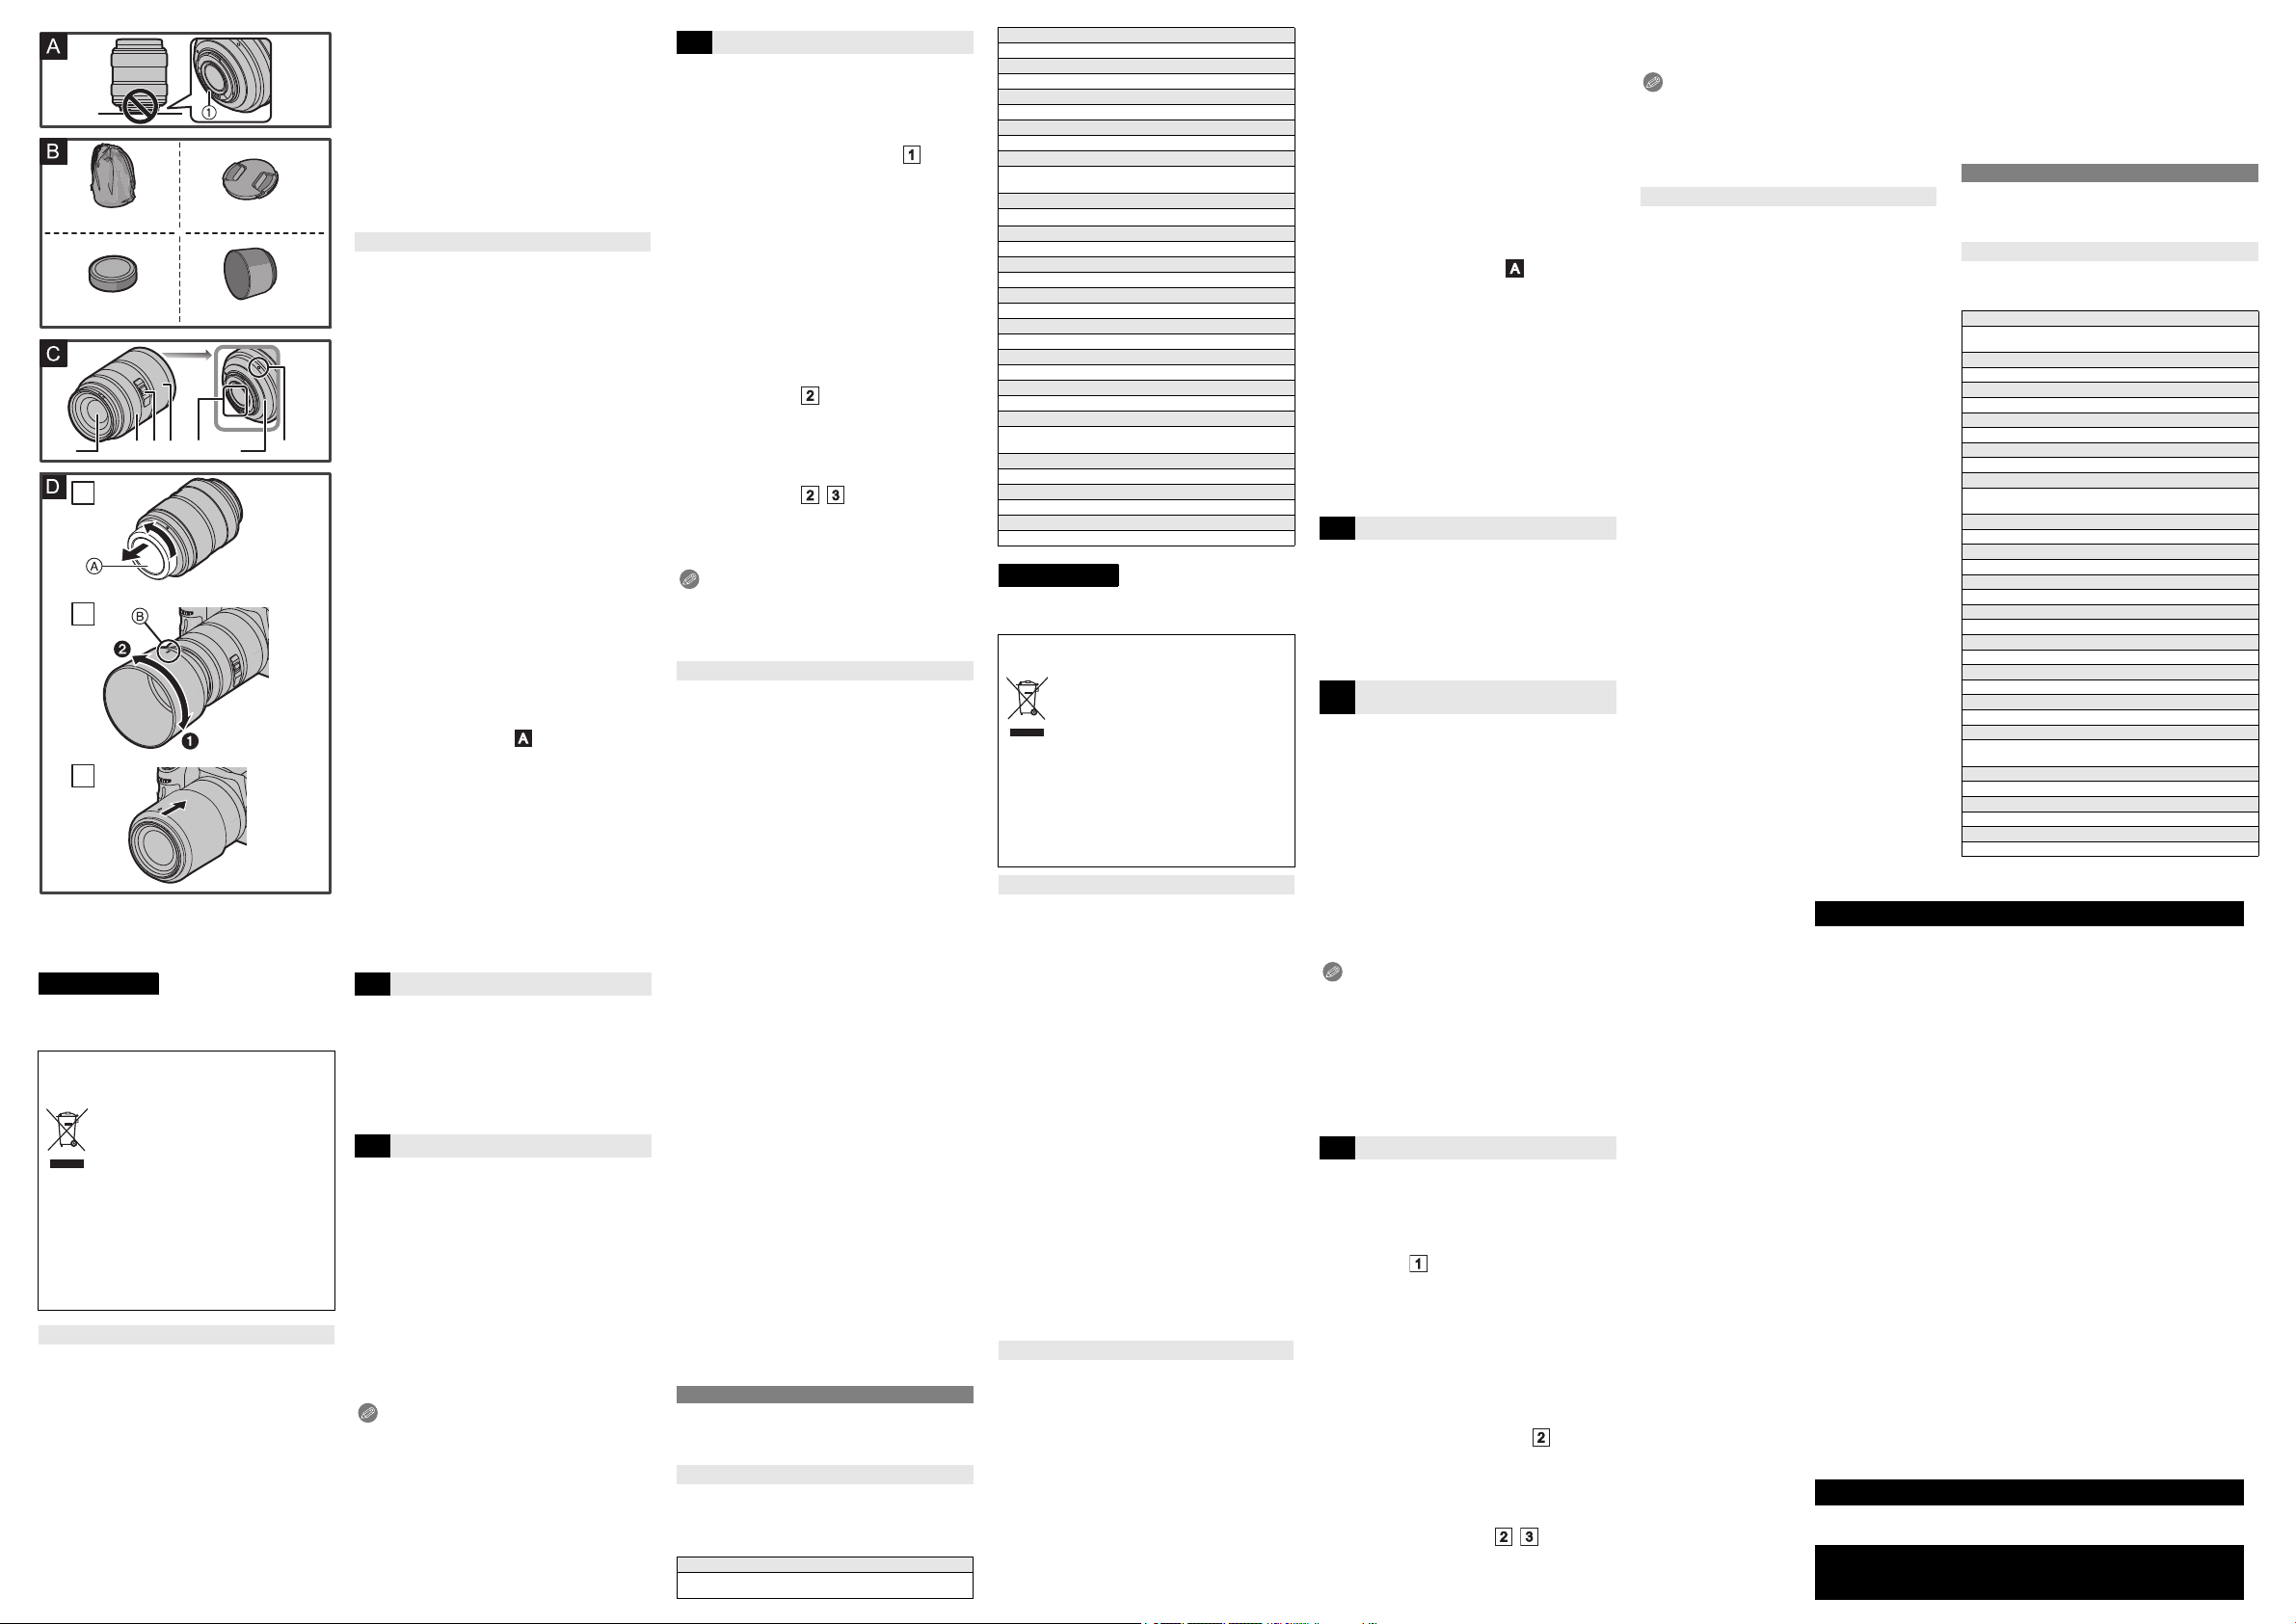
• To protect the lens contact points 1, do not place the
lens with its mount surface facing down. In addition, do
not allow the lens contact points to become dirty. (See
illustration )
∫ About Condensation (Fogging of the Lens)
• Condensation occurs when there are differences in
temperature and humidity as described below.
Condensation can cause the lens to become dirty and
lead to mold and malfunctioning, so exercise caution in
the following situations:
– When the camera is brought indoors from outside
during cold weather
– When the camera is brought into an air-conditioned car
– When cold air from an air conditioner is directly blown
onto the lens
– In humid places
• If condensation occurs, turn the power off and leave it for
about two hours. Once the camera acclimatizes to the
surrounding temperature the condensation will go away
naturally.
Supplied Accessories
B
Product numbers correct as of January 2017. These may
be subject to change.
1 Lens Pouch
2 Lens Cap
3 Lens Rear Cap
4 Lens Hood
• The lens rear cap and lens cap are attached to the
interchangeable lens at the time of purchase.
Names and Functions of Components
C
1 Lens surface
2 Focus ring
Rotate to focus when taking pictures with manual
focus (MF).
3 [O.I.S.] switch
When the lens is attached to the camera the stabilizer
function is set to activate if the O.I.S. switch is set to
[ON].
• We recommend setting the O.I.S. switch to [OFF]
when using a tripod.
4 Zoom ring
Rotate the zoom ring when you wish to take large
(tele) or wide (wide angle) pictures.
5 Contact points
6 Lens mount rubber
7 Lens fitting mark
Note
• If you zoom after focusing, focusing errors may occur.
After zooming, please perform the focusing again.
• In very quiet situations Auto Focus operating sounds
may be recorded during motion picture recording. This is
not a malfunction. In such situations, switching to
Manual Focus will improve the situation.
• If you set the O.I.S. to [ON] when recording a motion
picture, operating sounds may be recorded. If they
become bothersome, we recommend setting the O.I.S.
switch to [OFF] and mounting the camera on a tripod.
Attaching/Detaching the Lens
D
For information on how to attach and remove the lens,
refer to the operating instructions for your digital
camera.
• Before attaching or detaching the lens, check that
the digital camera is turned off.
• Before attaching the lens to the digital camera, remove
the lens rear cap A by rotating it in the direction of the
arrow. (See illustration )
• To prevent dust and other particles from accumulating on
or entering the lens, be sure to attach the lens cap/lens
rear cap after detaching the lens from the digital camera.
∫ Attaching Filters
• Vignetting may occur if using 2 or more filters at the
same time.
• It is possible to attach the lens cap with the filter already
attached.
• When using the lens hood and a filter at the same time,
attach the filter first.
• You cannot attach a conversion lens or adaptor to this
lens. A filter may be used, but attaching any other
element may cause damage to the lens.
∫
Attaching the Lens Hood (Supplied Accessory)
(See illustration )
Insert the lens hood into the lens, and turn in
the direction of the arrow (
B
: Fit to the mark
1
) until it stops.
∫ Temporarily Storing the Lens Hood
(See illustration / )
1 Turn the lens hood in the direction of the
arrow (2) to detach it.
2 Reverse the lens hood and then attach it in
the same way as shown previously.
Note
• When taking pictures with the flash with the lens hood
attached, the lower portion of the screen may turn dark
(vignetting effect) and the control of the flash may be
disabled because the photo flash may be obscured by
the lens hood. We recommend detaching the lens hood.
Cautions for Use
Take care not to drop or knock the lens. Also take care
not to put a lot of pressure on the lens.
• Take care not to drop the bag that you inserted the lens
in as it may strongly shock the lens. The camera may
stop operating normally and pictures may no longer be
recorded. Also, the lens may be damaged.
• When carrying the digital camera with the lens attached,
hold both the digital camera and the lens.
When using pesticides and other volatile substances
around the camera make sure that they do not get
onto the lens.
• If such substances get onto the lens they can damage
the exterior case or cause the paint to peel.
Do not point the lens at the sun or other strong light
sources.
• This could cause the lens to collect an excessive amount
of light, resulting in fire and malfunction.
• Under no circumstances should the unit be stored in any
of the following locations since doing so may cause
problems in operation or malfunctioning.
– In direct sunlight or on a beach in summer
– In locations with high temperatures and humidity
levels or where the changes in temperature and
humidity are acute
– In locations with high concentrations of sand, dust or dirt
– Where there is fire
– Near heaters, air conditioners or humidifiers
– Where water may make the unit wet
– Where there is vibration
– Inside a vehicle
• Refer also to the operating instructions of the digital
camera.
• When the unit is not going to be used for a prolonged
period, we recommend storing with a desiccant (silica
gel). Failure to do so may result in performance failure
caused by mold, etc. It is recommended that you check
the unit’s operation prior to use.
• Do not leave the lens in contact with rubber or plastic
products for extended periods of time.
• Do not touch the lens contact point. Doing so can cause
failure of the unit.
• Do not disassemble or alter the unit.
Do not use benzine, thinner, alcohol or other similar
cleaning agents to clean the lens glass or exterior cabinet.
• Using solvents can damage the lens or cause the paint
to peel.
• Wipe off any dust or fingerprints with a soft, dry cloth.
• Use a dry, dust cloth to remove dirt and dust on the lens
mount rubber, zoom ring, or focus ring.
• Do not use a household detergent or a chemically
treated cloth.
Troubleshooting
A sound is heard when the camera is turned on or off.
• This is the sound of lens or aperture movement and is
not a malfunction.
Specifications
Specifications are subject to change without notice.
INTERCHANGEABLE LENS FOR DIGITAL CAMERA
“LUMIX G VARIO 45-200 mm/F4.0-5.6 II /POWER O.I.S.”
Focal length
f=45 mm to 200 mm
(35 mm film camera equivalent: 90 mm to 400 mm)
Aperture type
7 diaphragm blades/circular aperture diaphragm
Maximum aperture
F4.0 (Wide) to F5.6 (Tele)
Minimum aperture value
F22
Lens construction
16 elements in 13 groups (3 ED lenses)
In focus distance
1.0 m (3.3 feet) to 
(from the focus distance reference line)
Maximum image magnification
0.19k (35 mm film camera equivalent: 0.38k)
Optical image stabiliser
Available
[O.I.S.] switch
Available (Switching ON/OFF)
Mount
“Micro Four Thirds Mount”
Angle of view
27x (Wide) to 6.2x (Tele)
Filter diameter
52 mm
Max. diameter
Approx. 70 mm (2.8 inch)
Overall length
Approx. 100 mm (3.9 inch) (from the tip of the lens to
the base side of the lens mount)
Mass
Approx. 370 g (0.81 lb)
Operating temperature
0 oC to 40 oC (32 oF to 104 oF)
Dust-proof and splash-proof
Available
Bitte lesen Sie diese Anleitung vor der Inbetriebnahme
dieses Produkts aufmerksam durch, und bewahren Sie
dieses Handbuch für spätere Bezugnahme griffbereit auf.
-Bedeutung des nachstehend abgebildeten Symbols-
Entsorgung von Altgeräten
Nur für die Europäische Union und Länder mit
Recyclingsystemen
Behandlung, Aufarbeitung bzw. zum Recycling gemäß
den gesetzlichen Bestimmungen den zuständigen
Sammelpunkten zu.
Indem Sie diese Produkte ordnungsgemäß entsorgen,
helfen Sie dabei, wertvolle Ressourcen zu schützen und
eventuelle negative Auswirkungen auf die menschliche
Gesundheit und die Umwelt zu vermeiden.
Für mehr Informationen zu Sammlung und Recycling, wenden
Sie sich bitte an Ihren örtlichen Abfallentsorgungsdienstleister.
Gemäß Landesvorschriften können wegen nicht
ordnungsgemäßer Entsorgung dieses Abfalls
Strafgelder verhängt werden.
Dieses Symbol, auf den Produkten, der
Verpackung und/oder den
Begleitdokumenten, bedeutet, dass
gebrauchte elektrische und elektronische
Produkte nicht in den allgemeinen Hausmüll
gegeben werden dürfen.
Bitte führen Sie alte Produkte zur
Informationen für Ihre Sicherheit
Halten Sie das Gerät so weit wie möglich von Geräten
und Einrichtungen fern, die elektromagnetische
Felder erzeugen (wie Mikrowellengeräte,
Fernsehgeräte, Videospielgeräte, Funksender,
Hochspannungsleitungen usw.).
• Verwenden Sie die Kamera nicht in der Nähe von
Mobiltelefonen. Es könnten sonst Bild- und
Tonstörungen auftreten.
• Wenn die Kamera durch elektromagnetische Felder
anderer Geräte gestört wird und Fehlfunktionen
auftreten, schalten Sie die Kamera aus. Nehmen Sie
den Akku heraus und/oder trennen Sie das Netzadapter
ab. Setzen Sie den Akku dann wieder ein und/oder
stecken Sie das Netzadapter wieder ein und schalten
Sie die Kamera ein.
Das Objektiv kann mit Digitalkameras verwendet werden,
deren Objektivfassung mit dem “Micro Four Thirds
System”-Standard kompatibel ist.
• Objektive dieser Ausführung lassen sich nicht auf
Kameras mit Four-Thirds
• Ausstattung und technische Daten der von Ihnen
erworbenen Produkte können aufgrund technischer
Weiterentwicklungen von der Ausstattung und den
technischen Daten der in diesem Handbuch
beschriebenen Produkte abweichen.
• Micro Four ThirdsTM und die für Micro Four Thirds
verwendeten Logos sind Markenzeichen oder eingetragene
Markenzeichen der Olympus Imaging Corporation in Japan,
den USA, der EU und anderen Ländern.
•Four ThirdsTM und die für Four Thirds verwendeten
Logos sind Markenzeichen oder eingetragene
Markenzeichen der Olympus Imaging Corporation in
Japan, den USA, der EU und anderen Ländern.
• Das G MICRO SYSTEM ist ein Digitalkamerasystem
aus der LUMIX-Reihe mit Wechselobjektiven auf
Grundlage des Micro-Four-Thirds-Standards.
• Andere Namen von Systemen oder Produkten welche in
dieser Bedienungsanleitung genannt werden, sind
normalerweise Warenzeichen oder eingetragene
Warenzeichen der Hersteller dieser Produkte oder Systeme.
TM
-Bajonett aufsetzen.
TM
Vermeidung von Störungen
∫ Objektivpflege
• Dieses Objektiv verfügt über eine staub- und
spritzwasserdichte Konstruktion. Bitte achten Sie bei der
Verwendung des Objektivs auf folgende Punkte.
Wenn das Objektiv nicht richtig funktioniert, wenden Sie
sich an Ihren Händler oder Ihr nächstgelegenes ServiceCenter.
– Bitte bringen Sie das Objektiv an einer staub- und
spritzwasserdichten Digital-Kamera an.
– Achten Sie beim Abnehmen des Objektivs von der
Digital-Kamera darauf, dass kein Sand, Staub, keine
Spritzer oder Wasser, etc. in das Objektiv oder die
Anschlüsse gelangen.
– Dieses Objektiv ist nicht wasserdicht und kann nicht
für Aufnahmen unter Wasser verwendet werden. Zum
Spritzwasserschutz ist das Objektiv so konstruiert,
dass es dem Eindringen von Wasser standhält. Wenn
sich Wasserspritzer, etc. am Objektiv festsetzen,
trocknen Sie das Objektiv nach der Verwendung mit
einem weichen, trockenen Tuch ab.
• Zur Verbesserung des Staub- und Spritzschutzes des
Objektivs wird ein Objektivfassungsgummi an der
Anschlussposition verwendet. Nachdem das Objektiv
einige Male gewechselt wurde, kann ein Abdruck des
Objektivfassungsgummis am Anschlussbereich der
Digitalkamera zu sehen sein. Dies beeinträchtigt nicht
die Leistung. Kontaktieren Sie für Informationen zum
Wechseln des Objektivfassungsgummis Ihr
nächstgelegenes Service-Center.
• Üben Sie keinen zu starken Druck auf das Objektiv aus.
• Schmutz auf dem Objektiv (Wasser, Öl, Fingerabdrücke
usw.) kann zu schlechteren Bildern führen. Wischen Sie
die Objektivoberfläche vor und nach dem Fotografieren
vorsichtig mit einem weichen, trockenen Tuch ab.
• Bringen Sie den hinteren Objektivdeckel an, wenn das
Objektiv nicht verwendet wird, damit keine Staub- oder
anderen Partikel auf die Linse oder in das Objektiv geraten.
• Platzieren Sie das Objektiv nicht mit der
Befestigungsseite nach unten, damit die Kontaktpunkte
1 des Objektivs nicht beschädigt werden. Achten Sie
außerdem darauf, dass die Kontaktpunkte des Objektivs
nicht verschmutzen. (Siehe Abbildung )
∫ Hinweise zu Kondensation
(Beschlagen des Objektivs)
• Kondensation entsteht, wenn sich
Umgebungstemperatur oder Luftfeuchte wie unten
beschrieben ändern. Da Kondensation zu Flecken auf
dem Objektiv, Pilzbefall und Fehlfunktionen führen kann,
müssen Sie in folgenden Fällen auf Anzeichen von
Kondensation achten:
– Die Kamera wird bei kaltem Wetter von draußen nach
drinnen gebracht
– Die Kamera wird in ein klimatisiertes Auto gebracht
– Eine Klimaanlage bläst kalte Luft direkt auf das Objektiv
– Die Kamera wird bei hoher Luftfeuchte verwendet
• Wenn sich Kondensation bildet, schalten Sie die Kamera
aus und lassen Sie sie für etwa zwei Stunden
ausgeschaltet. Die Kondensation baut sich während der
Anpassung der Kamera an die Umgebung auf
natürlichem Wege ab.
Beiliegendes Zubehör
B
Die Produktnummern beziehen sich auf den Stand von
Januar 2017. Änderungen sind vorbehalten.
1 Objektivbeutel
2 Objektivdeckel
3 Hinterer Objektivdeckel
4 Gegenlichtblende
• Beim Kauf sind der hintere Objektivdeckel und der
Objektivdeckel auf das Wechselobjektiv aufgesetzt.
Bezeichnungen und Funktionen der
C
einzelnen Kamerateile
1 Linsenfläche
2 Schärfenring
Drehen Sie auf Fokus, wenn Sie Bilder mit dem
manuellen Fokus (MF) aufnehmen.
3 [O.I.S.]-Schalter
Wenn der O.I.S.-Schalter bei aufgesetztem Objektiv auf
[ON] gestellt ist, wird die Bildstabilisatorfunktion aktiviert.
• Es empfiehlt sich, den O.I.S.-Schalter auf [OFF] zu
stellen, wenn Sie ein Stativ verwenden.
4 Zoomring
• Drehen Sie am Zoomring, wenn Sie Aufnahmen mit
Tele oder Aufnahmen mit Weitwinkel machen möchten.
5 Kontaktpunkt
6 Objektivfassungsgummi
7 Markierung zum Ansetzen des Objektivs
Hinweis
• Wenn Sie nach dem Fokussieren den Zoom verwenden,
kann es zu Fokussierungsproblemen kommen. Bitte
stellen Sie nach dem Zoomvorgang erneut scharf.
• In sehr stillen Situationen können die Auto-FokusBetriebsgeräusche während der Videoaufnahme
aufgezeichnet werden. Dabei handelt es sich nicht um
eine Fehlfunktion. Solche Situationen lassen sich durch
das Wechseln zum Manuellen Fokus verbessern.
• Wenn Sie während der Aufnahme eines Videos den
O.I.S. auf [ON] stellen, können Betriebsgeräusche
aufgezeichnet werden. Wenn diese stören, empfehlen
wir, den O.I.S.
Kamera auf ein Stativ zu montieren.
D
Informationen zum Aufsetzen und Abnehmen des
Objektivs finden Sie in der Bedienungsanleitung Ihrer
Digital-Kamera.
• Vergewissern Sie sich, bevor Sie das Objektiv
aufsetzen oder abnehmen, dass die Digital-Kamera
ausgeschaltet ist.
• Bevor Sie das Objektiv auf die Digital-Kamera
aufsetzen, nehmen Sie den hinteren Objektivdeckel A
ab, indem Sie ihn in Pfeilrichtung drehen.
(Siehe Abbildung )
• Bringen Sie den Objektivdeckel/hinteren Objektivdeckel
an, wenn Sie das Objektiv von der Digital-Kamera
abnehmen, damit keine Staub- oder anderen Partikel auf
die Linse oder in das Objektiv geraten.
∫ Filter aufsetzen
• Ein Vignettierungseffekt kann auftreten, wenn 2 oder
mehr Filter gleichzeitig verwendet werden.
• Der Objektivdeckel kann auch aufgesetzt werden, wenn
der Filter bereits angebracht ist.
• Wenn Sie die Gegenlichtblende und einen Filter zugleich
verwenden, bringen Sie zuerst den Filter an.
• Auf dieses Objektiv lassen sich weder Vorsatzlinsen
noch Adapter aufsetzen. Die Verwendung von Filtern ist
möglich, das Aufsetzen anderer Komponenten dagegen
kann zu einer Beschädigung des Objektivs führen.
Gegenlichtblende aufsetzen
∫
Zubehör) (Siehe Abbildung )
Setzen Sie die Gegenlichtblende in das
Objektiv ein und drehen Sie sie so weit wie
möglich in Pfeilrichtung (1).
B: Ausrichten der Markierungen
∫ Gegenlichtblende auf dem Objektiv
aufbewahren (Siehe Abbildung / )
1 Drehen Sie die Gegenlichtblende in
Pfeilrichtung (2), um sie zu entfernen.
2 Drehen Sie die Gegenlichtblende um und
setzen Sie sie wie oben beschrieben wieder
auf.
• Wenn Sie bei aufgesetzter Gegenlichtblende Aufnahmen
mit Blitz machen, kann der untere Teil des Bildes dunkel
erscheinen (Vignettierungseffekt/Randabschattung).
Außerdem funktioniert unter Umständen die
Blitzsteuerung nicht, weil das Blitzlicht durch die
Gegenlichtblende verdeckt wird. Wir empfehlen, bei
Blitzaufnahmen die Gegenlichtblende abzunehmen.
-
Schalter auf [OFF] zu stellen und die
Objektiv ansetzen/abnehmen
Hinweis
(Mitgeliefertes
Vorsichtsmaßnahmen
Achten Sie darauf, das Objektiv nicht fallen zu lassen
und keinen starken Stößen auszusetzen. Üben Sie
keinesfalls zu starken Druck auf das Objektiv aus.
• Achten Sie auch darauf, dass die Tasche, in der Sie das
Objektiv aufbewahren, nicht herunterfällt, denn das
Objektiv könnte sonst schwer beschädigt werden. Unter
Umständen funktioniert dann auch die Kamera nicht
mehr und kann keine Bilder mehr aufzeichnen.
• Wenn Sie die Digitalkamera mit angebrachtem Objektiv
tragen, halten Sie sowohl die Digitalkamera als auch das
Objektiv.
Wenn in der Umgebung der Kamera Pestizide oder
andere flüchtige Substanzen verwendet werden,
müssen Sie dafür sorgen, dass diese Stoffe nicht in
Kontakt mit der Obektivoberfläche kommen.
• Falls solche Substanzen auf das Objektiv gelangen,
könnten sie zur Beschädigung des Objektivs oder zum
Abblättern der Farbe führen.
Richten Sie das Objektiv nicht gegen die Sonne oder
andere starke Lichtquellen.
• Das Objektiv könnte zu viel Licht aufnehmen, was zu
Bränden oder Fehlfunktionen führen kann.
• Keinesfalls darf das Gerät unter den folgenden
Bedingungen benutzt oder aufbewahrt werden, da dies
zu Defekten oder Funktionsstörungen führen kann.
– Bei direktem Sonnenlicht oder im Sommer an der
Küste
– An Orten mit hohen Temperaturen und hoher
Feuchtigkeit, bzw. wo starke Änderungen bei
Temperatur und Feuchtigkeit erfolgen
– An Orten mit hoher Konzentration von Sand, Staub
oder Schmutz
– Bei einem Brand
– In der Nähe von Heizkörpern, Klimaanlagen oder
Luftbefeuchtern
– Wo Wasser das Gerät benässen kann
– Wo Erschütterungen vorhanden sind
– In einem Fahrzeug
• Weiter Informationen finden Sie auch in der
Bedienungsanleitung der Kamera.
• Wenn für längere Zeit kein Einsatz erfolgt, lagern Sie
das Objektiv gemeinsam mit einem Trocknungsmittel
(Silica-Gel). Ohne ausreichende Trocknung kann die
Einsatzfähigkeit des Objektivs durch Schimmel usw.
beeinträchtigt oder der Einsatz völlig unmöglich werden.
Es wird empfohlen, die Funktionsfähigkeit des Gerätes
vor dem Gebrauch zu prüfen.
• Stellen Sie sicher, dass das Objektiv nicht über einen
längeren Zeitraum in Kontakt mit Gummi- oder
Plastikprodukten kommt.
• Berühren Sie nicht die elektrischen Kontakte des
Gerätes. Dadurch kann es zu einem Defekt am Gerät
kommen.
• Nehmen Sie das Gerät nicht auseinander und nehmen
Sie keine Veränderungen daran vor.
Verwenden Sie zur Reinigung der Geräte kein
Waschbenzin, Alkohol oder ähnliche
Reinigungsmittel.
• Lösungsmittel können zur Beschädigung des Objektivs
oder zum Abblättern der Farbe führen.
• Staub und Fingerabdrücke lassen sich mit einem
weichen, trockenen Tuch entfernen.
• Verwenden Sie ein trockenes Staubtuch, um Schmutz
und Staub von Objektivfassungsgummi, Zoom-Ring oder
Fokusring zu entfernen.
• Verwenden Sie keine Küchenspülmittel oder mit
Chemikalien getränkte Tücher.
Fehlerbehebung
Beim Ein- und Ausschalten ist ein Geräusch zu hören.
• Dieses Geräusch wird durch die Blenden- oder
Objektivbewegung verursacht; es ist keine Fehlfunktion.
Spezifikationen
Die Spezifikationen können ohne Ankündigung geändert
werden.
WECHSELOBJEKTIV FÜR DIGITAL-KAMERA
“LUMIX G VARIO 45-200 mm/F4.0-5.6 II /POWER O.I.S.”
Brennweite
f=45 mm bis 200 mm
(Kleinbild-Äquivalent: 90 mm bis 400 mm)
Blende
7 Blendenlamellen/runde Öffnungsblende
Maximale Blendenöffnung
F4.0 (Weitwinkel) bis F5.6 (Tele)
Minimale Blende
F22
Objektivaufbau
16 Elemente in 13 Gruppen (3 ED-Linsen)
Schärfebereich
1,0 m bis ¶ (von der Bezugslinie für Fokusentfernung)
Maximale Vergrößerung
0,19k (Kleinbild-Äquivalent: 0,38k)
Optischer bildstabilisator
Ver fügb ar
[O.I.S.]-Schalter
Verfügbar (Umschalten ON/OFF)
Objektivbajonett
“Micro Four Thirds Mount”
Bildwinkel
27x (Weitwinkel) bis 6,2x (Tele)
Filterdurchmesser
52 mm
Max. Durchmesser
Ca.
70 mm
Gesamtlänge
Ca. 100 mm (vom vorderen Ende des Objektivs bis zum
Ende des Objektivbajonetts)
Gewicht
Ca. 370 g
Betriebstemperatur
0 oC bis 40 oC
Staub- und spritzwasserdicht
Ja
FRANÇAIS
1
1
2
3
ESPAÑOL
Limited Warranty (ONLY FOR AUSTRALIA)
VFC4358
2
VYF3201
3 4
VYC0986VFC4315
12
Veuillez lire attentivement les présentes instructions avant d’utiliser
ce produit, et conserver ce manuel pour utilisation ultérieure.
-Si vous voyez ce symboleL’élimination des équipements usagés
Applicable uniquement dans les pays membres de
l’Union européenne et les pays disposant de
systèmes de recyclage
les porter à l’un des points de collecte prévus, conformément à
la législation nationale en vigueur.
En les éliminant conformément à la réglementation en vigueur,
vous contribuez à éviter le gaspillage de ressources précieuses
ainsi qu’à protéger la santé humaine et l’environnement.
Pour de plus amples renseignements sur la collecte et le
recyclage, veuillez vous renseigner auprès des collectivités
locales.
Le non-respect de la réglementation relative à l’élimination des
déchets est passible d’une peine d’amende.
Évitez d’approcher l’élément de tout équipement
magnétisé (four à micro-ondes, téléviseur, équipement
de jeux vidéo, émetteur radio, ligne à haute tension, etc.).
• N’utilisez pas l’appareil photo à proximité d’un téléphone
• Advenant le cas où le fonctionnement de l’appareil serait
L’objectif peut être utilisé de pair avec un appareil photo
numérique compatible avec le système de monture
normalisé “Micro Four ThirdsTM System” (Micro Quatre Tiers).
• Il ne peut pas être monté sur les appareils à monture
• L’apparence et les spécifications des produits décrits dans
Apposé sur le produit lui-même, sur son
emballage, ou figurant dans la documentation qui
l’accompagne, ce pictogramme indique que
appareils électriques et électroniques usagés,
doivent être séparées des ordures ménagères.
Afin de permettre le traitement, la valorisation et le
recyclage adéquats des appareils usagés, veuillez
Précautions à prendre
cellulaire; cela pourrait entraîner un bruit nuisible à
l’image et au son.
dérangé par un champ magnétique, coupez le contact,
retirez la batterie ou débranchez l’adaptateur secteur
pour ensuite soit remettre la batterie en place, soit
rebrancher l’adaptateur. Remettez l’appareil en marche.
Four ThirdsTM (Quatre Tiers).
le présent manuel peuvent différer des produits que vous
avez achetés en raison de bonifications ultérieures.
5 67
3 4
• Micro Four ThirdsTM (Micro Quatre Tiers) et le logo Micro
Four Thirds sont des marques de commerce ou des
marques déposées d’Olympus Imaging Corporation au
Japon, aux États-Unis, en Union européenne et dans
d’autres pays.
•Four ThirdsTM (Quatre Tiers) et le logo Four Thirds sont
des marques de commerce ou des marques déposées
d’Olympus Imaging Corporation au Japon, aux ÉtatsUnis, en Union européenne et dans d’autres pays.
• G MICRO SYSTEM est un système d’appareil photo
numérique à objectif interchangeable de LUMIX basé sur la
norme du système Micro Four ThirdsTM (Micro Quatre Tiers).
• Les autres noms de systèmes et produits mentionnés dans
ce manuel d’utilisation sont habituellement des marques
déposées ou des marques de commerce des fabricants qui
ont développé le système ou le produit intéressé.
Précautions
∫ Entretien de l’objectif
• Cet objectif possède un dispositif anti-poussière et antiéclaboussure. Lorsque vous l’utilisez, soyez attentif aux
points suivants.
Si l’objectif ne fonctionne pas correctement, consultez le
revendeur ou votre centre d’assistance le plus proche.
– Veuillez installer l’objectif sur un appareil photo
numérique anti-poussière et anti-éclaboussure.
– Lorsque vous détachez l’objectif de l’appareil photo
numérique, veillez à ce que le sable, la poussière, les
gouttes d’eau, etc., n’entrent pas en contact avec
l’objectif ou les bornes.
– Cet objectif n’est pas étanche et ne doit pas être utilisé
pour enregistrer sous l’eau. Concernant le dispositif antiéclaboussure, l’objectif est construit pour résister à l’entrée
de l’eau. Si des projections d’eau, etc., adhèrent à l’objectif,
essuyez après utilisation avec un chiffon doux et sec.
• Pour améliorer la performance anti-poussière et antiéclaboussure de cet objectif, une garniture en caoutchouc
est utilisée dans la partie de montage. Après avoir changé
l’objectif un certain nombre de fois, vous pouvez constater
que la garniture en caoutchouc de l’objectif a marqué la
partie de montage du boîtier de l’appareil photo numérique,
ce qui n’affecte pas ses performances.
Pour plus d’informations sur la garniture en caoutchouc de
l’objectif, contactez votre service d’assistance.
• N’appuyez pas avec force sur l’objectif.
• Lorsqu’il a des salissures (eau, huile, traces de doigts, etc.)
sur la surface de l’objectif, cela peut avoir une incidence sur
l’image. Essuyez légèrement la surface de l’objectif avec un
chiffon sec et doux avant et après la prise de photos.
• Pour éviter que la poussière et d'autres corps étrangers
s'accumulent ou pénètrent à l'intérieur de l'objectif, fixez le
capuchon d’objectif arrière lorsque l'objectif n'est pas utilisé.
• Pour protéger les points de contact de l'objectif 1, ne
posez pas l'objectif sur le côté de sa surface de montage.
Faites en sorte, également, que les points de contact ne se
salissent pas. (Voir illustration )
∫
À propos de la condensation (Objectif embué)
• Il y a formation de condensation lorsque la température et
l’humidité changent comme suit. La condensation peut
salir l’objectif, entraîner de la moisissure et des problèmes
de fonctionnement. Aussi, est-il important de prendre des
précautions dans les circonstances suivantes :
– Lorsque l’appareil est transporté de l’extérieur à
l’intérieur par temps froid
– Lorsque l’appareil est placé dans un véhicule climatisé
– Lorsque l’air frais d’un climatiseur arrive directement
sur l’objectif
– Lorsque l’appareil est utilisé ou placé dans un endroit
humide
• En cas de condensation, mettez l’appareil photo hors
marche et laissez-le ainsi pendant environ 2 heures.
Lorsque la température de l’appareil photo se rapproche
de celle ambiante, la buée disparaît naturellement.
Accessoires fournis
B
Les codes du produit sont corrects à compter de janvier
2017. Ceux-ci sont susceptibles d’être modifiés.
1 Étui pour objectif
2 Capuchon d’objectif
3 Capuchon arrière d’objectif
4 Parasoleil
• Le capuchon arrière d’objectif et le capuchon d’objectif sont
fixés à l’objectif interchangeable au moment de l’achat.
Noms et fonctions des composants
C
1 Surface de l’objectif
2 Bague de mise au point
Faites tourner afin de mettre au point lors de la prise
de photos en mise au point manuelle (MPM).
3 Commutateur [O.I.S.] (S.O.I.)
Lorsque l’objectif est fixé à l’appareil photo, la fonction
de stabilisation optique de l’image est activée si le
commutateur O.I.S. (S.O.I.) est réglé sur [ON] (OUI).
• Nous vous conseillons de régler le commutateur O.I.S.
(S.O.I.) sur [OFF] (NON) lorsque vous utilisez un trépied.
4 Bague de zoom
Tournez la bague de réglage du zoom pour une prise
de vue rapprochée (téléobjectif) ou à grand-angle.
5 Points de contact
6 Garniture en caoutchouc de l’objectif
7 Repère pour la mise en place de l’objectif
Note
• Si vous zoomez après avoir fait la mise au point, une
erreur de mise au point peut survenir. Après avoir
zoomé, veuillez refaire la mise au point.
• Dans un endroit très silencieux les sons du
fonctionnement de la mise au point automatique peuvent
être enregistrés en même temps que le film. Il ne s’agit
pas d’un dysfonctionnement. Dans de tels cas, passer
en mise au point manuelle peut améliorer la situation.
• Si vous paramétrez le commutateur O.I.S. (S.O.I.) sur
[ON] (OUI) pour enregistrer un film, les sons de
fonctionnement peuvent être enregistrés. S'ils
deviennent gênants, nous vous conseillons de
paramétrer le commutateur O.I.S. (S.O.I.) sur [OFF]
(NON) et de monter l'appareil photo sur un trépied.
Fixation/Retrait de l’objectif
D
Pour de plus amples informations sur la manière
d’installer et de retirer l’objectif, consultez le manuel
d'utilisation de l’appareil photo numérique.
• Avant d’installer ou de retirer l’objectif, vérifiez que
l’appareil photo numérique est hors marche.
• Avant d’installer l’objectif sur l’appareil photo numérique,
retirez le capuchon d’objectif arrière A en le tournant
dans le sens de la flèche. (Voir illustration )
• Pour éviter que la poussière et d'autres corps étrangers
s'accumulent ou pénètrent à l'intérieur de l'objectif,
assurez-vous de fixer le capuchon d’objectif/capuchon
d’objectif arrière une fois que l'objectif a été retiré de
l'appareil photo numérique.
∫ Fixation de filtres
• Un effet de vignettage peut survenir si 2 filtres ou plus
sont présents en même temps.
• Il est possible d’installer le capuchon d’objectif fourni
avec le filtre déjà en place.
• Pour utiliser le parasoleil et un filtre en même temps,
installez d'abord le filtre.
• Vous ne pouvez pas installer de lentilles d’objectif ou
d’adaptateur sur cet objectif. Un filtre peut être utilisé,
mais installer un autre élément peut causer des
dommages à l’objectif.
∫ Fixation du parasoleil (Fourni)
(Voir illustration )
Insérez le parasoleil dans l'objectif et
tournez-le dans le sens de la flèche (1)
jusqu'à ce qu'il s'arrête.
B : Alignement avec le repère
∫ Rangement temporaire du parasoleil
(Voir illustration / )
1 Tournez le parasoleil dans le sens de la
flèche (2) pour le retirer.
2
Retournez le parasoleil, puis fixez-le de la
même façon, tel qu’illustré ci-contre.
Note
• Lorsque vous prenez des photos avec le flash et que le
parasoleil est monté, la partie inférieure de l’écran peut
s’assombrir (effet de vignetage) et le contrôle du flash peut
être empêché car l’éclair du flash peut être obscurci par le
parasoleil. Nous vous recommandons de retirer le parasoleil.
Précautions d’utilisation
Prenez soin de ne pas faire tomber ni de cogner l’objectif.
De plus, ne mettez pas trop de pression dessus.
• Attention à ne pas faire tomber le sac où se trouve
l’objectif, car celui-ci pourrait être endommagé.
L’appareil photo pourrait ne plus marcher normalement
et les images ne seraient plus enregistrées.
• Lorsque vous transportez l'appareil photo numérique
avec l'objectif fixé, tenez-les tous les deux.
Si des pesticides ou toute autre substance volatile
sont utilisés près de l’appareil, veuillez protéger
l’objectif contre toute éclaboussure ou vaporisation.
• Si de telles substances atteignent l’objectif, celui-ci pourrait
être endommagé, ou la peinture pourrait s’écailler.
Ne pointez pas l'objectif vers le soleil ou d'autres
sources intenses de lumière.
• L'objectif pourrait recueillir une quantité excessive de
lumière, causant un embrasement et un dysfonctionnement.
• En aucunes circonstances vous ne devez ranger
l’objectif dans les endroits indiqués ci-dessous car cela
pourrait causer des problèmes d’utilisation ou de
mauvais fonctionnement.
– À la lumière directe du soleil ou sur la plage en été
– Dans des endroits ayant des niveaux de température
et d’humidité élevés ou dans des endroits où les
changements de température et d’humidité sont
prononcés
– Dans des endroits ayant une forte concentration de
sable, de poussière ou de saleté
– Où il y a du feu
– Près de radiateurs, climatiseurs, humidificateurs
– Où l’eau pourrait mouiller l’objectif
– Où il y a des vibrations
– À l’intérieur d’un véhicule
• Reportez-vous également au manuel d’utilisation de
l’appareil photo.
• Si l’appareil ne doit plus être utilisé pendant une période
prolongée, nous vous conseillons de le ranger avec un
produit déshydratant (gel de silice). Tout manquement à
cela pourrait provoquer une panne causée par la
moisissure etc. Nous vous conseillons de vérifier le
fonctionnement de l’objectif avant de l’utiliser.
• Évitez que l’objectif ne soit en contact avec des produits en
plastique ou en caoutchouc pendant une longue période.
• Ne touchez pas les points de contact de l’objectif. Ceci
pourrait causer un mauvais fonctionnement de l’objectif.
• Ne désassemblez ni ne tentez de modifier l’objectif.
N’utilisez pas de benzène, d’alcool ni aucun autre
produit nettoyant similaire pour nettoyer l’appareil.
• L’emploi de solvants peut endommager l’objectif ou faire
s’écailler la peinture.
• Essuyez toute poussière ou traces de doigts avec un
chiffon doux et sec.
• Utilisez un chiffon à poussière sec pour retirer les salissures
et la poussière sur la garniture en caoutchouc de l'objectif,
la bague du zoom ou la bague de mise au point.
• N’utilisez pas de détergent de cuisine ou de linge chimique.
Dépannage
Un bruit se fait entendre à la mise en marche et hors
marche de l’appareil photo.
• Il s’agit du bruit de l’objectif ou du mouvement de
l’ouverture et ce n’est pas un défaut de fonctionnement.
Spécifications
Ces caractéristiques peuvent subir des changements
sans avis préalable.
OBJECTIF INTERCHANGEABLE POUR APPAREIL
PHOTO NUMÉRIQUE
“LUMIX G VARIO 45-200 mm/F4.0-5.6 II /POWER O.I.S.”
Distance focale
f=45 mm à 200 mm
(Équivalent à un film de 35 mm : 90 mm à 400 mm)
Type d’ouverture
7 lamelles de diaphragme/diaphragme à ouverture ronde
Ouverture maximale
F4.0 (Grand-angle) à F5.6 (Téléobjectif)
Valeur d’ouverture minimum
F22
Composition de l’objectif
16 éléments en 13 groupes (3 lentilles ED)
Distance de mise au point
1,0 m (3,3 pi) à ¶ (à partir de la ligne de référence de la
distance de mise au point)
Grossissement maximum de l’image
0,19k (Équivalent à un film de 35 mm : 0,38k)
Stabilisateur optique de l’image
Disponible
Commutateur [O.I.S.] (S.O.I.)
Disponible (Commutation ON/OFF)
Monture
“Micro Quatre Tiers” (Micro Four Thirds Mount)
Angle de vue
27x (Grand-angle) à 6,2x (Téléobjectif)
Diamètre de filtre
52 mm
Diamètre maximum
Environ 70 mm (2,8 pouces)
Longueur totale
Environ 100 mm (3,9 pouces) (du bout de l’objectif à la
base de montage de l’objectif)
Poids
Environ 370 g (0,81 lb)
Température de service
0 oC à 40 oC (32 oF à 104 oF)
Anti-poussière et anti-éclaboussure
Oui
Lea cuidadosamente estas instrucciones antes de usar este
producto, y guarde este manual para usarlo en el futuro.
-Si ve este símboloEliminación de Aparatos Viejos
Solamente para la Unión Europea y países con
sistemas de reciclado
Este símbolo en los productos, su embalaje
o en los documentos que los acompañen
significa que los productos eléctricos y
electrónicos usadas no deben mezclarse
con los residuos domésticos.
Para el adecuado tratamiento, recuperación
los puntos de recogida de acuerdo con su legislación
nacional.
Si los elimina correctamente ayudará a preservar valuosos
recursos y evitará potenciales efectos negativos sobre la
salud de las personas y sobre el medio ambiente.
Para más información sobre la recogida u reciclaje, por
favor contacte con su ayuntamiento.
Puede haber sanciones por una incorrecta eliminación
de este residuo, de acuerdo con la legislación nacional.
y reciclaje de los productos viejos llévelos a
Información para su seguridad
Mantenga la unidad lo más lejos que sea posible de
equipos electromagnéticos (como hornos de
microondas, televisores, vídeo juegos, trasmisores
radio, líneas de alto voltaje, etc.).
• No utilice la cámara cerca de teléfonos móviles, ya que
lo de hacerlo puede producir ruido que afectará
negativamente a las imágenes y el sonido.
• Si la cámara queda afectada negativamente por un
equipo electromagnético y deja de funcionar
correctamente, apague la cámara y quite la batería y/o
el adaptador de CA conectado. Luego vuelva a insertar
la batería y/o vuelva a conectar el adaptador de CA y
encienda la cámara.
El objetivo puede usarse con una cámara digital
compatible con el estándar de montaje de objetivos del
“Micro Four ThirdsTM System”.
• No se puede montar en una cámara con estándar de
soporte Four ThirdsTM.
• E aspecto y las especificaciones de los productos descritos
en este manual pueden diferir de los productos reales que
usted ha comprado debido a aumentos sucesivos.
• El logotipo Micro Four ThirdsTM y Micro Four Thirds son
marcas comerciales o marcas comerciales registradas
de Olympus Imaging Corporation, en Japón, Estados
Unidos, la Unión Europea y otros países.
• El logotipo Four ThirdsTM y Four Thirds son marcas
comerciales o marcas comerciales registradas de
Olympus Imaging Corporation, en Japón, Estados
Unidos, la Unión Europea y otros países.
• G MICRO SYSTEM es un sistema de cámara digital con
objetivo intercambiable de LUMIX basado en el estándar
Micro Four Thirds System.
• Los nombres de los sistemas y productos que se
mencionan en estas instrucciones generalmente son
marcas comerciales registradas o marcas comerciales
de los fabricantes que desarrollaron el sistema o
producto en cuestión.
Prevención contra las averías
∫ Atención del objetivo
• Esta lente tiene una construcción con resistencia al polvo y
las salpicaduras. Al usarla, tenga cuidado con lo siguiente.
Si la lente no está funcionando correctamente, consulte a
su distribuidor o a su centro de servicio más cercano.
– Coloque la lente en una cámara digital con resistencia
al polvo y las salpicaduras.
– Al retirar la lente de la cámara digital, tenga cuidado y
asegúrese de que la arena, polvo, salpicaduras de
agua, etc. no entren en la lente o los terminales.
– Esta lente no es impermeable y no se puede usar para
grabar abajo del agua. Para la resistencia a
salpicaduras, la lente está construida para resistir la
entrada de agua. Si las salpicaduras de agua, etc. no
se adhieren a la lente, límpiela después de usarla con
un paño suave y seco.
• Para mejorar la función de resistencia al polvo y la
salpicadura de esta lente, se usa una goma de montaje de
la lente en la parte de montaje. Luego de cambiar la lente
varias veces, puede encontrar que la goma de montaje de
la lente haya marcado la parte de montaje del cuerpo de la
cámara digital, lo que no afecta su rendimiento.
Para obtener información sobre cómo cambiar la goma de
montaje de la lente, comuníquese con el centro de servicio
más cercano.
• No ejerce demasiada presión en el objetivo.
• Cuando hay suciedad (agua, aceite, huellas dactilares,
etc.) en la superficie del objetivo, la imagen puede salir
afectada. Limpie ligeramente con un paño blando y seco
antes y después de tomar las imágenes.
• Para evitar que se introduzcan o acumulen polvo y otras
partículas en la lente, instale la tapa trasera de esta
cuando no la utilice.
• Para proteger los puntos de contacto de la lente 1, no la
coloque con la superficie de montaje orientada hacia
abajo. Evite además que los puntos de contacto de la
lente se ensucien. (Ver ilustración )
∫ Acerca de la condensación
(Empañamiento del objetivo)
• La condensación ocurre cuando se encuentra una
diferencia en la temperatura y humedad como se describe
abajo. La condensación puede hacer ensuciar el objetivo y
producir hongos y un funcionamiento defectuoso, por lo
tanto ponga cuidado en las situaciones a continuación:
– Cuando lleva la cámara en casa desde el aire libre
durante un tiempo frío
– Cuando lleva la cámara dentro de un coche con aire
acondicionado
– Cuando sopla en el objetivo aire frío desde un
acondicionador de aire
– En lugares húmedos
• Para impedir la condensación, meta la cámara en una
bolsa de plástico para que se aclimate a la temperatura
ambiente. Si ocurre condensación, apague la
alimentación y la deje así durante dos horas. Una vez de
que la cámara se haya aclimatado a la temperatura
ambiente en empañamiento desaparece naturalmente.
Accesorios suministrados
B
Números de productos correctos a partir de enero de 2017.
Pueden estar sujetos a cambio.
1 Estuche de la lente
2 Tapa del objetivo
3 Tapa trasera del objetivo
4 Visera del objetivo
• La tapa trasera del objetivo y
intercambiable al momento de la compra.
Nombres y funciones de los
C
componentes
la tapa del objetivo
1 Superficie del objetivo
2 Anillo del enfoque
Gire para enfocar cuando tome fotografías con el
enfoque manual (MF).
3 Interruptor [O.I.S.]
Cuando a la cámara está unido el objetivo, está
ajustada la función estabilizadora para ver si el
interruptor O.I.S. está ajustado en [ON].
• Le recomendamos que ajuste el interruptor O.I.S. a
[OFF] cuando usa un trípode.
4 Anillo del zoom
Gire el anillo del zoom cuando quiere tomar
imágenes grandes (teleobjetivo) o anchas
(granangular).
5 Punto de contacto
6 Goma de montaje de la lente
7 Marca para ajustar el objetivo
Nota
• Si hace zoom después de hacer enfoque, pueden ocurrir
errores de enfoque. Luego de hacer zoom, realice de
nuevo el enfoque.
• En situaciones muy tranquilas es posible que se grabe
el sonido de funcionamiento del enfoque automático
durante la grabación de una película. Esto no significa
un mal funcionamiento. En tales situaciones, si cambia a
enfoque manual mejorará la situación.
• Si establece O.I.S. a [ON] cuando graba una película, es
posible que se grabe el ruido de funcionamiento. Si le
molesta, le recomendamos que establezca el interruptor
O.I.S. a [OFF] e instale la cámara en un trípode.
Unir y quitar el objetivo
D
Para obtener información sobre cómo colocar y
retirar la lente, consulte las instrucciones de
funcionamiento de su cámara digital.
• Antes de colocar o quitar la lente, compruebe que la
cámara digital está apagada.
• Antes de colocar la lente en la cámara digital, quite la
tapa trasera de la lente A girándola en el sentido de la
flecha.
(Ver ilustración )
• Para evitar que se introduzcan o acumulen polvo y otras
partículas en la lente, no olvide instalar la tapa trasera de
la lente una vez que la haya retirado de la cámara digital.
∫ Unión de los filtros
• Se podrían generar viñetas si se usan 2 o más filtros a la vez.
• Se puede colocar la tapa del objetivo con el filtro ya colocado.
• Si utiliza la visera de la lente y un filtro al mismo tiempo,
instale el filtro en primer lugar.
• No consigue acoplar un objetivo de conversión o
adaptador a este objetivo. Puede usarse un filtro, pero
acoplar cualquier otro elemento puede dañar el objetivo.
∫ Unión de la visera del objetivo (Accesorio
suministrado) (Ver ilustración )
Introduzca la visera de la lente en la lente y
gírela en el sentido de la flecha (1) hasta
que se detenga.
B: Ajustando hacia la marca
∫ Almacenamiento temporal de la visera del
objetivo (Ver ilustración / )
1 Gire la visera de la lente en el sentido de la
flecha (2) para retirarla.
2 Vuelque la visera del objetivo y, luego,
únala de la misma manera que la mostrada
anteriormente.
Nota
• Cuando toma las imágenes con el flash y tiene unida la
visera del objetivo, la porción inferior de la pantalla
podría ponerse oscura (efecto de viñeteado) y el control
del flash podría inhabilitarse debido a que éste podría
ser oscurecido por la misma visera. Le recomendamos
que quite dicha visera.
Precauciones para el uso
Tenga cuidado de no hacer caer el objetivo ni le
choque contra. Asimismo tenga cuidado de no
presionarlo demasiado.
• Tenga cuidado de no hacer caer la bolsa en la que cabe
el objetivo. Éste podría dañarse, la cámara podría dejar
de funcionar normalmente y las imágenes ya p odrían no
grabarse.
• Cuando lleve la cámara digital con el objetivo montado,
sostenga la cámara digital y la lente a la vez.
Cuando usa pesticidas y otras substancias volátiles
alrededor de la cámara tenga cuidado de que no entre
en el objetivo.
• Si dichas substancias caen en el objetivo, éstas pueden
dañarlo o hacer desconchar su barniz.
No apunte con el objetivo al sol u otras fuentes de luz
intensa.
• Esto podría hacer que el objetivo recogiera demasiada
luz, lo que podría provocar un incendio y una avería.
• De ninguna manera la unidad debe ser usada o
almacenada en uno de los siguientes lugares ya que lo
de hacerlo podría perjudicarla o producir un
funcionamiento defectuoso.
– Bajo la luz directa del sol o bien a lo largo de la costa
durante el verano
– En lugares donde haya altas temperaturas o altos
niveles de humedad o bien donde sean repentinos los
cambios de temperatura y humedad
– En lugares donde haya altas concentraciones de
arena, polvo o suciedad
– Donde haya llamas
– Cerca de calefactores, acondicionadores de aire o
humedecedores
– Donde el agua puede hacer mojar la unidad
– Donde haya vibraciones
– Dentro de un vehículo
• Se refiera también a las instrucciones de funcionamiento
de la cámara digital.
• Cuando no ha de ser usada la unidad por un período
prolongado, le recomendamos guardar con un
desecante (silicagel). El hecho de no hacerlo podría
ocasionar una avería causada por el moho etc. Se
recomienda que compruebe el funcionamiento de la
unidad antes de usarla.
• No deje el objetivo en contacto con productos de
plástico durante largos períodos de tiempo.
• No toque los contactos eléctricos de la unidad. Lo de
hacerlo puede causar avería en la unidad.
• No desmonte ni modifique la unidad.
1. The product is warranted for 12 months from the date of purchase. Subject to the conditions of this warranty
Panasonic or its Authorised Service Centre will perform necessary service on the product without charge for
parts or labour, if in the opinion of Panasonic, the product is found to be faulty within the warranty period.
2. This warranty only applies to Panasonic products purchased in Australia and sold by Panasonic Australia or
its Authorised Distributors or Dealers and only where the products are used and serviced within Australia or
it's territories. Warranty cover only applies to service carried out by a Panasonic Authorised Service Centre
and only if valid proof of purchase is presented when warranty service is requested.
3. This warranty only applies if the product has been installed and used in accordance with the manufacturer’s
recommendations (as noted in the operating instructions) under normal use and reasonable care (in the
opinion of Panasonic). The warranty covers normal domestic use only and does not cover damage,
malfunction or failure resulting from use of incorrect voltages, incorrect installation, accident, misuse, neglect,
build-up of dirt or dust, abuse, maladjustment of customer controls, mains supply problems, thunderstorm
activity, infestation by insects or vermin, tampering or repair by unauthorised persons (including unauthorised
alterations), introduction of sand, humidity or liquids, commercial use such as hotel, offi ce, restaurant, or other
business or rental use of the product, exposure to abnormally corrosive conditions or any foreign object or
matter having entered the product.
4. This warranty does not cover the following items unless the fault or defect existed at the time of purchase:
(a) Cabinet Part(s) (e) DVD, Blu-ray or Recordable Discs
(b) Video or Audio Tapes (f) Video / Audio Heads from wear and tear in normal use
(c) SD cards or USB devices (g) Information stored on Hard Disk Drive, USB stick or SD card
(d) User replaceable Batteries (h) DTV reception issues caused by TV Aerial / Cabling / Wall socket(s)
etc
5. Some products may be supplied with Ethernet connection hardware. The warranty is limited on such products
and will not cover
(a) Internet and or DLNA connection / setup related problems
(b) Access fees and or charges incurred for internet connection
(c) The use of incompatible software or software not specifi cally stipulated in the product operations manual;
and
(d) Any indirect or consequential costs associated with the incorrect use or misuse of the hardware, its
connection to the internet or any other device.
6. To claim warranty service, when required, you should:
• Telephone Panasonic’s Customer Care Centre on 132600 or visit our website referred to below and use
the Service Centre Locator for the name/address of the nearest Authorised Service Centre.
• Send or take the product to a Panasonic Authorised Service Centre together with your proof of purchase
receipt as a proof of purchase date. Please note that freight and insurance to and / or from your nearest
Authorised Service Centre must be arranged by you.
• Note that home or pick-up/delivery service is available for the following products in the major metropolitan
areas of Australia or the normal operating areas of the nearest Authorised Service Centres:
- Plasma/LCD televisions / displays (screen size greater than 103 cm)
7. The warranties hereby conferred do not extend to, and exclude, any costs associated with the installation, deinstallation or re-installation of a product, including costs related to the mounting, de-mounting or remounting
of any screen, (and any other ancillary activities), delivery, handling, freighting, transportation or insurance of
the product or any part thereof or replacement of and do not extend to, and exclude, any damage or loss
occurring by reason of, during, associated with, or related to such installation, de-installation, re-installation or
transit.
Panasonic Authorised Service Centres are located in major metropolitan areas and most regional centres of
Australia, however, coverage will vary dependant on product. For advice on exact Authorised Service Centre
locations for your product, please telephone our Customer Care Centre on 132600 or visit our website and use
the Service Centre Locator.
In addition to your rights under this warranty, Panasonic products come with consumer guarantees that cannot be
excluded under the Australian Consumer Law. If there is a major failure with the product, you can reject the
product and elect to have a refund or to have the product replaced or if you wish you may elect to keep the goods
and be compensated for the drop in value of the goods. You are also entitled to have the product repaired or
replaced if the product fails to be of acceptable quality and the failure does not amount to a major failure.
If there is a major failure in regard to the product which cannot be remedied then you must notify us within a
reasonable period by contacting the Panasonic Customer Care Centre. If the failure in the product is not a major
failure then Panasonic may choose to repair or replace the product and will do so in a reasonable period of time
from receiving notice from you.
THIS WARRANTY CARD AND THE PURCHASE DOCKET (OR SIMILAR PROOF OF PURCHASE)
If you require assistance regarding warranty conditions or any other enquiries, please visit the
Panasonic Australia website
If phoning in, please ensure you have your operating instructions available.
SHOULD BE RETAINED BY THE CUSTOMER AT ALL TIMES
Panasonic Australia Pty. Limited
PRO-031-F11 Issue: 4.0 01-01-2011
No utilice gasolina, diluyente, alcohol u otros agentes
de limpieza parecidos para limpiar la unidad.
• El hecho de usar disolventes puede dañar el objetivo y
hacer desconchar su barniz.
• Quite cualquier indicio de polvo o huellas dactilares con
un paño blando y seco.
• Use un paño seco para sacar la suciedad y el polvo de
la goma de montaje de la lente, el anillo de zoom y el
anillo de enfoque.
•
No use detergentes para cocina o un paño tratado
químicamente
.
Búsqueda de averías
Se oye un sonido cuando se enciende o se apaga la
cámara.
• Éste es el sonido del objetivo o el movimiento de
abertura y no es un funcionamiento defectuoso.
Especificaciones
Las especificaciones están sujetas a cambio sin previo aviso.
ÓPTICA INTERCAMBIABLE PARA CÁMARA DIGITAL
“LUMIX G VARIO 45-200 mm/F4.0-5.6 II /POWER O.I.S.”
Longitud focal
f=45 mm a 200 mm (Igual a una cámara de película de
35 mm: de 90 mm a 400 mm)
Tipo de abertura
7 aspas de diafragma/Diafragma de apertura circular
Apertura máxima
F4.0 (Granangular) a F5.6 (Teleobjetivo)
Valor de abertura mínimo
F22
Estructura del objetivo
16 elementos en 13 grupos (3 lentes ED)
En la distancia del enfoque
1,0m (3,3pies) a ¶ (desde la línea de referencia de la
distancia de enfoque)
Máxima ampliación de la imagen
0,19k (Igual a una cámara de película de 35 mm: 0,38k)
Estabilizador óptico de la imagen
Disponible
Interruptor [O.I.S.]
Disponible (ENCENDER/APAGAR)
Soporte
“Micro Four Thirds Mount”
Ángulo visual
27x (Granangular) a 6,2x (Teleobjetivo)
Diámetro del filtro
52 mm
Diámetro máx.
Aprox. 70 mm (2,8 pulgadas)
Longitud total
Aprox. 100 mm (3,9 pulgadas) (desde la punta del
objetivo hasta la base lateral de la montura del objetivo)
Peso
Aprox. 370 g (0,81 lb)
Temperatura de funcionamiento
0 oC a 40 oC (32 oF a 104 oF)
Resistencia al polvo y a las salpicaduras
Sí
Panasonic Warranty
www.panasonic.com.au
ACN 001 592 187 ABN 83 001 592 187
1 Innovation Road, Macquarie Park NSW 2113
or contact by phone on
132 600
 Loading...