

Page 1

INTERCHANGEABLE LENS FOR DIGITAL CAMERA
Before use, please read these instructions completely.
E
Operating Instructions
Model No. H-ES045
VQT2H16-2
Page 2

Contents
Information for Your Safety..................................... 2
Precautions........................................................... 5
Supplied Accessories .............................................6
Attaching/Detaching the Lens................................. 6
Names and Functions of Components ...................8
Cautions for Use..................................................... 9
Troubleshooting ..................................................10
Specifications........................................................11
2
VQT2H16
Information for Your Safety
Keep the unit as far away as possible from
electromagnetic equipment (such as microwave
ovens, TVs, video games, radio transmitters,
high-voltage lines etc.).
≥ Do not use the camera near cell phones because
doing so may result in noise adversely affecting
the pictures and sound.
≥ If the camera is adversely affected by
electromagnetic equipment and stops functioning
properly, turn the camera off and remove the
battery and/or the connected AC adaptor. Then
reinsert the battery and/or reconnect the AC
adaptor and turn the camera on.
Page 3

The lens can be used with a digital camera
compatible with the lens mount standard for the
“Micro Four Thirds
≥ It cannot be mounted on the Four Thirds
TM
System”.
TM
mount
specification camera.
≥ The digital camera illustrations in these operating
instructions show DMC-GF1 as an example.
≥ The appearance and specifications of products
described in this manual may differ from the actual
products you have purchased due to later
enhancements.
≥ Four Thirds
TM
and Four Thirds Logo marks are
trademarks or registered trademarks of Olympus
Imaging Corporation, in Japan, the United States,
the European Union and other countries.
≥ Micro Four Thirds
TM
and Micro Four Thirds Logo
marks are trademarks or registered trademarks of
Olympus Imaging Corporation, in Japan, the
United States, the European Union and other
countries.
≥ G MICRO SYSTEM is a lens exchange type
digital camera system of LUMIX based on a Micro
Four Thirds System standard.
≥ LEICA is a registered trademark of Leica
ENGLISH
Microsystems IR GmbH. ELMARIT is a registered
trademark of Leica Camera AG. The LEICA DG
lenses are manufactured using measurement
instruments and quality assurance systems that
have been certified by Leica Camera AG based
on the company’s quality standards.
≥ Other names, company names, and product
names printed in these instructions are
trademarks or registered trademarks of the
companies concerned.
VQT2H16
3
Page 4

-If you see this symbol-
Information on Disposal for Users of Waste Electrical & Electronic Equipment (private
households)
This symbol on the products and/or accompanying documents means that used
electrical and electronic products should not be mixed with general household waste.
For proper treatment, recovery and recycling, please take these products to
designated collection points, where they will be accepted on a free of charge basis.
Alternatively, in some countries you may be able to return your products to your local
retailer upon the purchase of an equivalent new product.
Disposing of this product correctly will help to save valuable resources and prevent
any potential negative effects on human health and the environment which could
otherwise arise from inappropriate waste handling. Please contact your local authority
for further details of your nearest designated collection point.
Penalties may be applicable for incorrect disposal of this waste, in accordance with national legislation.
For business users in the European Union
If you wish to discard electrical and electronic equipment, please contact your dealer or supplier for
further information.
Information on Disposal in other Countries outside the European Union
This symbol is only valid in the European Union.
If you wish to discard this product, please contact your local authorities or dealer and ask for the correct
method of disposal.
4
VQT2H16
Page 5
Precautions
∫ Lens Care
≥ Sand and dust can damage the lens. Make
sure that no sand or dust gets inside the lens
or the terminals when using the lens on a
beach, etc.
≥ This lens is not waterproof. If drops of water
get onto the lens, wipe the lens with a dry
cloth.
≥ Do not press the lens with excessive force.
≥ When there is dirt (water, oil, and fingerprints, etc.)
on the surface of the lens, the picture may be
affected. Lightly wipe the surface of the lens with a
soft, dry cloth before and after taking pictures.
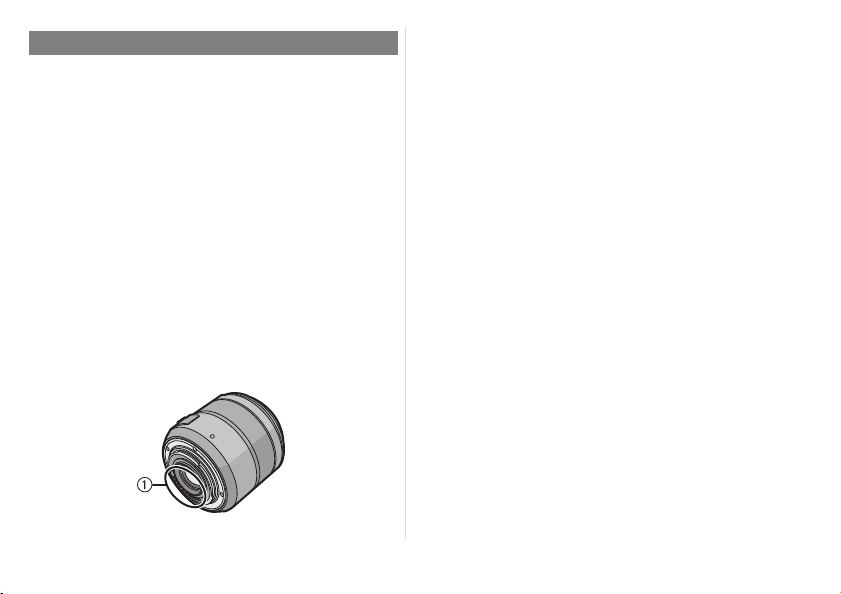
≥ Do not place the lens mount facing downwards.
Do not allow the lens contact point 1 to become
dirty.
∫ About Condensation (Fogging of the
Lens)
≥ Condensation occurs when there are differences
in temperature and humidity as described below.
Condensation can cause the lens to become dirty
and lead to mold and malfunctioning, so exercise
caution in the following situations:
– When the camera is brought indoors from outside
during cold weather
– When the camera is brought into an air-
conditioned car
– When cold air from an air conditioner is directly
blown onto the lens
– In humid places
≥ Put the camera into a plastic bag to allow it to
acclimatise to the surrounding temperature in
order to prevent condensation. If condensation
occurs, turn the power off and leave it for about
two hours. Once the camera acclimatises to the
surrounding temperature the condensation will go
away naturally.
VQT2H16
5
Page 6

Supplied Accessories
VFC4456 VYC1005 VYF3284 VFC4315
312 4
Attaching/Detaching the Lens
[Inspection to be performed when you unpack the unit]
When removing the unit from its packing box, check
that the main unit and the supplied accessories are
there and also check their external appearance and
functions to verify that they have not sustained any
damage during distribution and transportation.
If you discover any trouble, contact your vendor
before using the product.
Product numbers correct as of September 2009.
These may be subject to change.
1 Lens Storage Bag
2 Lens Hood
3 Lens Cap
4 Lens Rear Cap
(The lens cap and lens rear cap are attached to
the interchangeable lens at the time of purchase.)
6
VQT2H16
≥ Refer also to the camera’s operating instructions
for attaching and detaching the lens.
∫ Attaching the Lens
≥ Check that the camera is turned off.
1 Turn the lens rear cap
to detach it.
A: Lens Rear Cap
2 Align the lens fitting
marks B (red marks) on
the camera body and the
lens and then rotate the
lens in the direction of
the arrow until it clicks.
• Do not press the lens release button when you
attach a lens.
• Do not try to attach the lens when holding it at an
angle to the camera body as the lens mount may
get scratched.
• Check that the lens is attached correctly.
Page 7
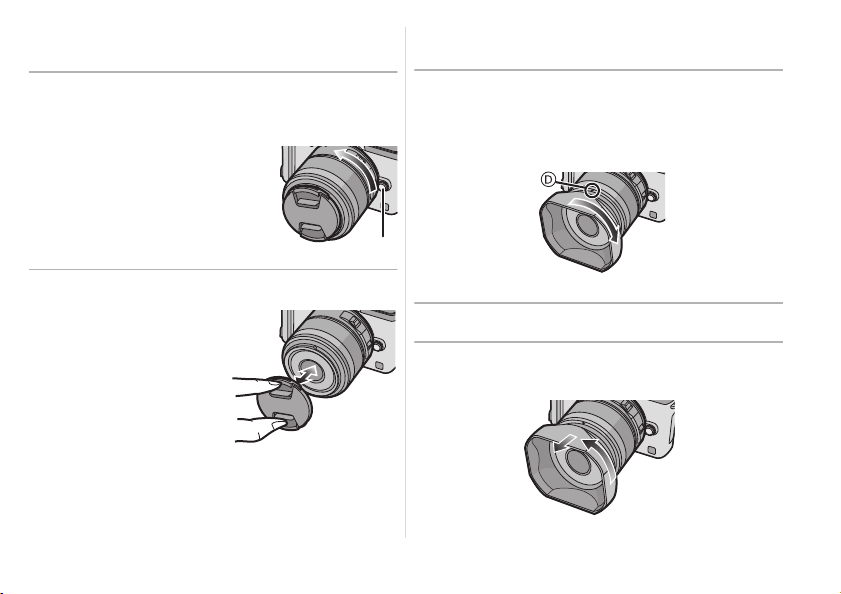
∫ Detaching the Lens
≥ Check that the camera is turned off.
Press the lens release button C while
turning the lens as far as possible in the
direction of the arrow to detach it.
• Attach the lens rear cap so
that the lens contact point
does not get scratched.
• Attach the body cap to the
camera so no dirt or dust will
get inside the main unit.
∫ Attaching the Lens Hood
(Supplied Accessory)
Insert the lens hood into the lens with the
short sides at the top and bottom, and
turn in the direction of the arrow until it
stops.
∫ Attaching and Detaching the Lens Cap
≥ Be careful not to lose
the lens cap.
D: Fit to the mark
∫ Removing the Lens Hood
Turn the lens hood in the direction of the
arrow to detach it.
VQT2H16
7
Page 8

≥ When taking pictures with the flash with the lens
hood attached, the lower portion of the screen
may turn dark (vignetting effect) and the control of
the flash may be disabled because the photo flash
may be obscured by the lens hood. We
recommend detaching the lens hood.
≥ When using the AF assist lamp in the dark, detach
the lens hood.
∫ Attaching Filters
≥ Vignetting may occur if using 2 or more
MC protectors (optional:DMW-LMC46),
PL filters (optional:DMW-LPL46) or ND filters
(optional:DMW-LND46), or if using thick
protectors and/or filters.
≥ The filter may become impossible to remove if
excessively tightened, so please refrain from
tightening it too strongly.
≥ It is possible to attach the lens cap with the filter
already attached.
≥ You cannot attach a conversion lens or adaptor to
this lens. A filter may be used, but attaching any
other element may cause damage to the lens.
8
VQT2H16
Names and Functions of
Components
∫ Lens
1 5
1 Lens surface
2 Focus ring
Rotate to focus when taking pictures with manual focus.
3 [O.I.S.] switch
When the lens is attached to the camera the
stabilizer function is set to activate if the [O.I.S.]
switch is set to [ON].
2 3 4
6
Page 9

≥ We recommend setting the [O.I.S.] switch to [OFF]
when using a tripod.
≥ The stabilizer function may not be effective in the
following cases.
– When there is a lot of jitter.
– When using the digital zoom.
– When taking pictures while following a moving subject.
– When the shutter speed becomes slower to take
pictures indoors or in dark places.
– When taking close-up pictures.
4 [FOCUS] switch
[FULL]: It can focus between the ranges of 0.15 m
(0.5 feet) to ¶. Use in [FULL] position to
take pictures using the macro function.
[LIMIT]: It can focus between the ranges of 0.5 m
(1.64 feet) to ¶. The speed of focusing with
auto focus will be faster.
5 Contact point
6 Lens fitting mark
Note
≥ When flash recording with a close subject, the
light of the flash will be blocked by the lens and
part of the picture may be dark. Check the
distance from the subject when recording.
≥ This lens has the following characteristics due to
its macro specifications.
– It takes time to focus.
– The range of focus is fairly small.
Cautions for Use
∫ About the Lens
Take care not to drop or knock the lens. Also
take care not to put a lot of pressure on the lens.
≥ Take care not to drop the bag that you inserted the
lens in as it may strongly shock the lens. The
camera may stop operating normally and pictures
may no longer be recorded. Also, the lens may be
damaged.
When using pesticides and other volatile
substances around the camera make sure that
they do not get onto the lens.
≥ If such substances get onto the lens they can
damage the exterior case or cause the paint to
peel.
Do not carry the unit when it is still attached to
the camera body.
≥ Under no circumstances should the unit be stored
in any of the following locations since doing so
may cause problems in operation or
malfunctioning.
– In direct sunlight or on a beach in summer
VQT2H16
9
Page 10

– In locations with high temperatures and humidity
levels or where the changes in temperature and
humidity are acute
– In locations with high concentrations of sand,
dust or dirt
– Where there is fire
– Near heaters, air conditioners or humidifiers
– Where water may make the unit wet
– Where there is vibration
– Inside a vehicle
≥ Refer also to the operating instructions of the
digital camera.
≥ When the unit is not going to be used for a
prolonged period, we recommend storing with a
desiccant (silica gel). Failure to do so may result in
performance failure caused by mold, etc. It is
recommended that you check the unit’s operation
prior to use.
Do not leave the lens in contact with rubber or
≥
plastic products for extended periods of time.
≥ Do not touch the lens contact point. Doing so can
cause failure of the unit.
≥ Do not disassemble or alter the unit.
10
VQT2H16
Do not use benzine, thinner, alcohol or other
similar cleaning agents to clean the lens glass or
exterior cabinet.
≥ Using solvents can damage the lens or cause the
paint to peel.
≥ Wipe off any dust or fingerprints with a soft, dry
cloth.
≥ Use a dry, dust cloth to remove dirt and dust on
the focus ring.
≥ Do not use a household detergent or a chemically
treated cloth.
Troubleshooting
A sound is heard when the camera is turned on
or off.
≥ This is the sound of lens or aperture movement
and is not a malfunction.
A sound is heard when the lens is shaken.
≥ The OIS system in this lens will create some
rattling noise when the camera is moved while
switched OFF, this is not a malfunction. The noise
will disappear when the camera is switched ON
and the OIS is engaged.
Page 11

Specifications
INTERCHANGEABLE LENS FOR DIGITAL CAMERA
“LEICA DG MACRO– ELMARIT 45 mm/F2.8 ASPH./MEGA O.I.S.”
Focal length f=45 mm (35 mm film camera equivalent: 90 mm)
Aperture type 7 leaf shutters/iris diaphragm/circular diaphragm
Aperture range F2.8
Minimum aperture value F22
Lens construction 14 elements in 10 groups (1 aspherical lens, 1 ED lens)
In focus distance [FULL]: 0.15 m (0.5 feet)
Maximum image magnification 1.0k (35 mm film camera equivalent: 2.0k )
Optical image stabilizer Available
Mount “Micro Four Thirds Mount”
Angle of view 27x
Filter diameter 46 mm
Max. diameter Approx. 63 mm
Overall length Approx. 62.5 mm (2.46 inch)
Mass Approx. 225 g
(from the focus distance reference line)
(1.81 inch)
(2.48 inch)
(from the tip of the lens to the base side of the lens mount)
(7.94 oz)
to ¶ / [LIMIT]: 0.5 m (1.64 feet) to 
11
VQT2H16
Page 12

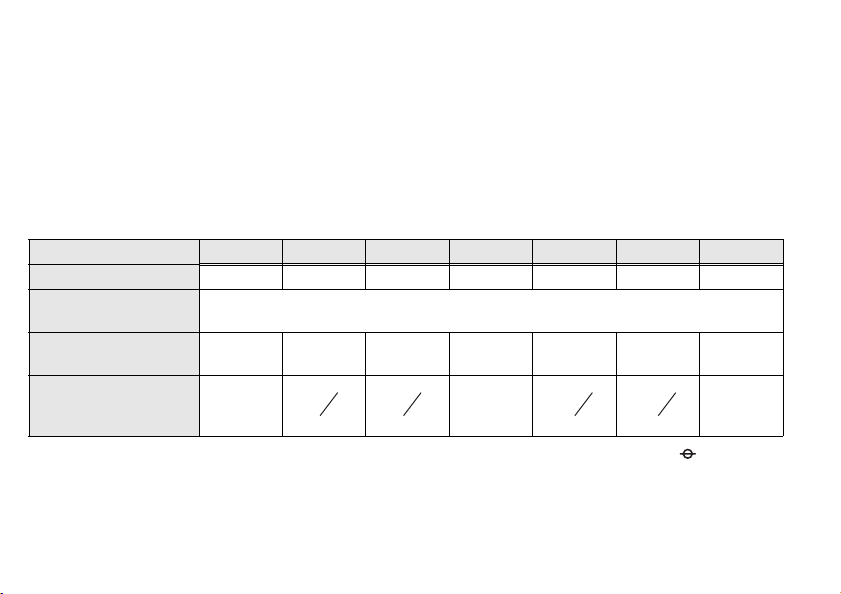
∫ About the Exposure
2
3
The difference between the nominal F value (aperture value displayed on the camera) and the effective F
value (actual aperture value) will be greater when taking pictures using the macro function, which allows
you to take pictures of close-up subjects enlarged. When using a commercially available stand-alone
exposure meter, it is necessary to correct the value depending on the magnification and distance from the
subject. Refer to following table for the exposure correction (exposure factor).
It is not necessary to correct the difference between the nominal F value and the effective F value with the
automatic exposure of the camera, since it will determine the exposure by measuring the light coming in
through the lens.
Guide for exposure correction when using a stand-alone exposure meter
Magnification 1/¶ 1/8 1/4 1/3 1/2 1/1.5 1/1
Distance 
Nominal F value F2.8
Effective F value F2.8 F3.2 F3.5 F4.0 F4.5 F5.0 F5.6
Exposure correction
(Exposure factor)
(In steps of 1/3)
≥ Distance is the actual distance between the recording plane ([ ] marked on the body of the digital
camera) to the subject.
Magnification represents the (size of the image of the subject at the recording plane) / (actual size of the subject).
≥
12
VQT2H16
n0+ + +1+1 +1 +2
0.47 m
(1.54 feet)
1
3
0.28 m
(0.92 feet)
0.23 m
(0.75 feet)
0.19 m
(0.62 feet)
1
3
0.17 m
(0.56 feet)
0.15 m
(0.5 feet)
2
3
Page 13

Inhalt
Informationen für Ihre Sicherheit ................................13
Vermeidung von Störungen......................................16
Beiliegendes Zubehör.................................................17
Objektiv ansetzen/abnehmen .....................................17
Bezeichnungen und Funktionen der
einzelnen Kamerateile ................................................19
Vorsichtsmaßnahmen.................................................20
Fehlerbehebung .......................................................21
Spezifikationen ...........................................................22
DEUTSCH
Informationen für Ihre
Sicherheit
Halten Sie das Gerät so weit wie möglich von
Geräten und Einrichtungen fern, die
elektromagnetische Felder erzeugen (wie
Mikrowellengeräte, Fernsehgeräte,
Videospielgeräte, Funksender,
Hochspannungsleitungen usw.).
≥ Verwenden Sie die Kamera nicht in der Nähe von
Mobiltelefonen. Es könnten sonst Bild- und
Tonstörungen auftreten.
≥ Wenn die Kamera durch elektromagnetische
Felder anderer Geräte gestört wird und
Fehlfunktionen auftreten, schalten Sie die Kamera
aus. Nehmen Sie den Akku heraus und/oder
trennen Sie das Netzteil ab. Setzen Sie den Akku
dann wieder ein und/oder stecken Sie das Netzteil
wieder ein und schalten Sie die Kamera ein.
13
VQT2H16
Page 14

Das Objektiv kann mit Digitalkameras verwendet
werden, deren Objektivfassung mit dem “Micro Four
™ System”-Standard kompatibel ist.
Thirds
≥ Objektive dieser Ausführung lassen sich nicht auf
Kameras mit
Four-Thirds™-Bajonett aufsetzen.
≥ Die Erläuterungen zur Digitalkamera in dieser
Bedienungsanleitung beziehen sich als ein
Beispiel auf DMC-GF1.
≥ Ausstattung und technische Daten der von Ihnen
erworbenen Produkte können aufgrund
technischer Weiterentwicklungen von der
Ausstattung und den technischen Daten der in
diesem Handbuch beschriebenen Produkte
abweichen.
≥ Four Thirds
TM
und die für Four Thirds
verwendeten Logos sind Markenzeichen oder
eingetragene Markenzeichen der Olympus
Imaging Corporation in Japan, den USA, der EU
und anderen Ländern.
≥ Micro Four Thirds
TM
und die für Micro Four Thirds
verwendeten Logos sind Markenzeichen oder
eingetragene Markenzeichen der Olympus
Imaging Corporation in Japan, den USA, der EU
und anderen Ländern.
14
VQT2H16
≥ Das G MICRO SYSTEM ist ein
Digitalkamerasystem aus der LUMIX-Reihe mit
Wechselobjektiven auf Grundlage des Micro-FourThirds-Standards.
≥ LEICA ist ein eingetragenes Markenzeichen der
Leica Microsystems IR GmbH. ELMARIT ist ein
eingetragenes Markenzeichen der Leica Camera
AG. Die Herstellung der LEICA DG-Objektive
erfolgt unter Verwendung von Messinstrumenten
und Qualitätssicherungssystemen, die von der
Leica Camera AG auf Grundlage der
Qualitätsstandards des Unternehmens zertifiziert
wurden.
≥ Alle anderen Namen, Firmen- und Produktnamen
in dieser Bedienungsanleitung sind Warenzeichen
oder eingetragene Warenzeichen der jeweiligen
Unternehmen.
Page 15

-Bedeutung des nachstehend abgebildeten Symbols-
Benutzerinformationen zur Entsorgung von elektrischen und elektronischen Geräten (private
Haushalte)
Entsprechend der grundlegenden Firmengrundsätzen der Panasonic-Gruppe wurde
ihr Produkt aus hochwertigen Materialien und Komponenten entwickelt und
hergestellt, die recycelbar und wieder verwendbar sind.
Dieses Symbol auf Produkten und/oder begleitenden Dokumenten bedeutet, dass
elektrische und elektronische Produkte am Ende ihrer Lebensdauer vom Hausmüll
getrennt entsorgt werden müssen.
Bringen Sie bitte diese Produkte für die Behandlung, Rohstoffrückgewinnung und
Recycling zu den eingerichteten kommunalen Sammelstellen bzw.
Wertstoffsammelhöfen, die diese Geräte kostenlos entgegennehmen.
Die ordnungsgemäße Entsorgung dieses Produkts dient dem Umweltschutz und
verhindert mögliche schädliche Auswirkungen auf Mensch und Umwelt, die sich aus
einer unsachgemäßen Handhabung der Geräte am Ende Ihrer Lebensdauer ergeben
könnten.
Genauere Informationen zur nächstgelegenen Sammelstelle bzw. Recyclinghof
erhalten Sie bei Ihrer Gemeindeverwaltung.
Für Geschäftskunden in der Europäischen Union
Bitte treten Sie mit Ihrem Händler oder Lieferanten in Kontakt, wenn Sie elektrische und elektronische
Geräte entsorgen möchten. Er hält weitere Informationen für sie bereit.
Informationen zur Entsorgung in Ländern außerhalb der Europäischen Union
Dieses Symbol ist nur in der Europäischen Union gültig.
VQT2H16
15
Page 16

Vermeidung von Störungen
∫ Objektivpflege
≥ Sand und Staub können das Objektiv
beschädigen. Achten Sie darauf, dass kein
Sand oder Staub auf Objektiv oder Anschlüsse
gelangt, wenn Sie die Kamera im Freien, z.B.
am Strand, verwenden.
≥ Dieses Objektiv ist nicht wasserdicht. Wenn
Regenwasser oder anderes Wasser auf das
Objektiv spritzt, wischen Sie es mit einem
trockenen Tuch ab.
≥
Üben Sie keinen zu starken Druck auf das Objektiv aus.
≥
Schmutz auf dem Objektiv (Wasser, Öl,
Fingerabdrücke usw.) kann zu schlechteren Bildern
führen. Wischen Sie die Objektivoberfläche vor und
nach dem Fotografieren vorsichtig mit einem
weichen, trockenen Tuch ab.
≥ Richten Sie die Objektivfassung nicht nach unten.
Achten Sie darauf, dass der Kontaktpunkt der
Objektivfassung 1 nicht verschmutzen.
16
VQT2H16
∫ Hinweise zu Kondensation (Beschlagen
des Objektivs)
≥ Kondensation entsteht, wenn sich
Umgebungstemperatur oder Luftfeuchte wie unten
beschrieben ändern. Da Kondensation zu Flecken
auf dem Objektiv, Pilzbefall und Fehlfunktionen
führen kann, müssen Sie in folgenden Fällen auf
Anzeichen von Kondensation achten:
– Die Kamera wird bei kaltem Wetter von draußen
nach drinnen gebracht
– Die Kamera wird in ein klimatisiertes Auto
gebracht
– Eine Klimaanlage bläst kalte Luft direkt auf das
Objektiv
– Die Kamera wird bei hoher Luftfeuchte verwendet
≥ Sie vermeiden Kondensation, wenn Sie die
Kamera in einer geschlossenen Plastiktüte
transportieren und diese erst dann öffnen, wenn
sich die Kamera an die Umgebungstemperatur
angepasst hat. Wenn sich Kondensation bildet,
schalten Sie die Kamera aus und lassen Sie sie
für etwa zwei Stunden ausgeschaltet. Die
Kondensation baut sich während der Anpassung
der Kamera an die Umgebung auf natürlichem
Wege ab.
Page 17

Beiliegendes Zubehör
VFC4456 VYC1005 VYF3284 VFC4315
312 4
Objektiv ansetzen/abnehmen
[Kontrollen, die beim Entfernen der Verpackung
des Geräts vorzunehmen sind]
Prüfen Sie beim Entnehmen des Gerätes aus seinem
Karton, ob das Hauptgerät und sein beiliegendes
Zubehör vorhanden sind. Kontrollieren Sie deren
äußeres Aussehen und ihre Funktionsweise, um zu
prüfen, dass es während des Vertriebs und
Transports nicht zu Beschädigungen gekommen ist.
Setzen Sie sich, sollten Sie Störungen feststellen, vor dem
Gebrauch des Gerätes mit Ihrem Händler in Verbindung.
Die Produktnummern entsprechen dem Stand von
September 2009. Änderungen bleiben vorbehalten.
1 Objektivtasche
2 Gegenlichtblende
3 Objektivdeckel
4 Hinterer Objektivdeckel
(Beim Kauf sind der Objektivdeckel und der hintere
Objektivdeckel auf das Wechselobjektiv aufgesetzt.)
≥ Informationen zum Aufsetzen und Abnehmen des
Objektivs finden Sie auch in der
Bedienungsanleitung der Kamera.
∫ Das Objektiv aufsetzen
≥
Stellen Sie sicher, dass die Kamera ausgeschaltet ist.
1
Drehen Sie den hinteren
Objektivdeckel, um ihn
abzunehmen
A: Hinterer Objektivdeckel
2
Richten Sie die roten
Markierungen
.
B
zum
Ansetzen des Objektivs auf
Kameragehäuse und
Objektiv aneinander aus
und drehen Sie das Objektiv
in Pfeilrichtung, bis es hörbar einrastet.
• Drücken Sie nicht auf die Objektiventriegelung,
während Sie das Objektiv ansetzen.
• Versuchen Sie niemals, das Objektiv schräg
zum Gehäuse anzusetzen, da die
Objektivfassung beschädigt werden könnte.
• Überprüfen Sie, ob das Objektiv richtig aufgesetzt ist.
17
VQT2H16
Page 18

∫ Das Objektiv abnehmen
≥
Stellen Sie sicher, dass die Kamera ausgeschaltet ist.
Halten Sie die Objektiventriegelung
gedrückt C und drehen Sie das Objektiv
so weit wie möglich in Pfeilrichtung, bis
Sie es abnehmen können.
• Setzen Sie den hinteren
Objektivdeckel auf, um die
Kontakte der Objektivfassung
nicht zu beschädigen.
• Setzen Sie den
Gehäusedeckel der Kamera
auf, damit kein Schmutz oder
Staub ins Kamerainnere gelangen kann.
∫ Objektivdeckel aufsetzen und abnehmen
≥ Verlieren Sie den
Objektivdeckel nicht.
18
VQT2H16
∫ Gegenlichtblende aufsetzen
(Mitgeliefertes Zubehör)
Setzen Sie die Gegenlichtblende so in
das Objektiv ein, dass die kürzeren
Vorsprünge oben und unten sitzen, und
drehen Sie die Gegenlichtblende in
Pfeilrichtung bis zum Anschlag.
D: Ausrichten der Markierungen
∫ Gegenlichtblende abnehmen
Drehen Sie die Gegenlichtblende in
Pfeilrichtung, um sie abzunehmen.
Page 19

≥
2 3 4
1 5
6
Wenn Sie bei aufgesetzter Gegenlichtblende
Aufnahmen mit Blitz machen, kann der untere Teil
des Bildes dunkel erscheinen (Vignettierungseffekt/
Randabschattung). Außerdem funktioniert unter
Umständen die Blitzsteuerung nicht, weil das
Blitzlicht durch die Gegenlichtblende verdeckt wird.
Wir empfehlen, bei Blitzaufnahmen die
Gegenlichtblende abzunehmen.
≥ Nehmen Sie die Gegenlichtblende ab, wenn Sie
bei wenig Licht mit der AF-Hilfslampe arbeiten.
∫ Filter aufsetzen
≥ Falls zwei oder mehr Aufsätze, also
MC-Schutzfilter (Sonderzubehör:DMW-LMC46),
PL-Filter (Sonderzubehör:DMW-LPL46) oder
ND-Filter (Sonderzubehör:DMW-LND46),
verwendet werden oder falls der verwendete
Objektivschutz bzw. Filter besonders dick ist, kann
ein Vignettierungseffekt auftreten.
≥ Der Filter lässt sich eventuell nicht mehr
abnehmen, wenn er zu fest angezogen wird.
Gehen Sie daher vorsichtig vor.
≥ Der Objektivdeckel kann auch aufgesetzt werden,
wenn der Filter bereits angebracht ist.
≥ Auf dieses Objektiv lassen sich weder
Vorsatzlinsen noch Adapter aufsetzen. Die
Verwendung von Filtern ist möglich, das
Aufsetzen anderer Komponenten dagegen kann
zu einer Beschädigung des Objektivs führen.
Bezeichnungen und Funktionen
der einzelnen Kamerateile
∫ Objektiv
1 Linsenfläche
2 Schärfenring
Drehen Sie zum Scharfstellen am Schärfenring,
wenn Sie Aufnahmen mit der manuellen
Scharfeinstellung machen.
3 [O.I.S.]-Schalter
Wenn der [O.I.S.] Schalter bei aufgesetztem Objektiv auf
[ON] gestellt ist, wird die Bildstabilisatorfunktion aktiviert.
19
VQT2H16
Page 20

≥ Es empfiehlt sich, den [O.I.S.]-Schalter auf [OFF]
zu stellen, wenn Sie ein Stativ verwenden.
≥ In folgenden Fällen ist die Stabilisatorfunktion
unter Umständen nicht wirksam.
– Bei exzessivem Verwackeln der Kamera.
– Bei Verwendung des Digitalzooms.
– Bei Aufnahmen während der Verfolgung eines
sich bewegenden Motivs.
– Bei einer Verlängerung der Verschlusszeit für
Aufnahmen in Innenräumen oder Umgebungen
mit wenig Licht.
– Bei Nahaufnahmen.
4 Schalter [FOCUS]
[FULL]: Scharfstellung im Bereich von 0,15 m bis ¶.
Um Aufnahmen mit der Makro-Funktion zu
machen, wählen Sie die Einstellung [FULL].
[LIMIT]: Scharfstellung im Bereich von 0,5 m bis ¶.
In dieser Einstellung ist die Scharfstellung
im Autofokus schneller.
5 Kontaktpunkt
6 Markierung zum Ansetzen des Objektivs
Hinweis
≥ Wenn Sie ein Motiv nah an der Kamera mit Blitz
aufnehmen, blockiert das Objektiv das Licht vom
Blitz, so dass Teile des Bildes dunkel werden
können. Achten Sie bei diesen Aufnahmen daher
auf ausreichenden Abstand zum Motiv.
Dieses Objektiv besitzt aufgrund seiner
≥
Makrospezifikationen die folgenden Eigenschaften.
– Die Scharfeinstellung dauert.
– Der Fokussierbereich ist ziemlich klein.
20
VQT2H16
Vorsichtsmaßnahmen
∫ Hinweise zum Objektiv
Achten Sie darauf, das Objektiv nicht fallen zu
lassen und keinen starken Stößen auszusetzen.
Üben Sie keinesfalls zu starken Druck auf das
Objektiv aus.
≥
Achten Sie auch darauf, dass die Tasche, in der Sie
das Objektiv aufbewahren, nicht herunterfällt, denn
das Objektiv könnte sonst schwer beschädigt
werden. Unter Umständen funktioniert dann auch die
Kamera nicht mehr und kann keine Bilder mehr
aufzeichnen.
Wenn in der Umgebung der Kamera Pestizide
oder andere flüchtige Substanzen verwendet
werden, müssen Sie dafür sorgen, dass diese
Stoffe nicht in Kontakt mit der
Obektivoberfläche kommen.
≥
Falls solche Substanzen auf das Objektiv gelangen,
könnten sie zur Beschädigung des Objektivs oder
zum Abblättern der Farbe führen.
Tragen Sie das Gerät nicht, während es noch an
der Kamera angebracht ist.
≥ Keinesfalls darf das Gerät unter den folgenden
Bedingungen benutzt oder aufbewahrt werden, da
dies zu Defekten oder Funktionsstörungen führen
kann.
Page 21

– Bei direktem Sonnenlicht oder im Sommer an der
Küste
– An Orten mit hohen Temperaturen und hoher
Feuchtigkeit, bzw. wo starke Änderungen bei
Temperatur und Feuchtigkeit erfolgen
– An Orten mit hoher Konzentration von Sand,
Staub oder Schmutz
– Bei einem Brand
– In der Nähe von Heizkörpern, Klimaanlagen oder
Luftbefeuchtern
– Wo Wasser das Gerät benässen kann
– Wo Erschütterungen vorhanden sind
– In einem Fahrzeug
≥ Weiter Informationen finden Sie auch in der
Bedienungsanleitung der Kamera.
≥ Wenn für längere Zeit kein Einsatz erfolgt, lagern
Sie das Objektiv gemeinsam mit einem
Trocknungsmittel (Silica-Gel). Ohne ausreichende
Trocknung kann die Einsatzfähigkeit des
Objektivs durch Schimmel usw. beeinträchtigt
oder der Einsatz völlig unmöglich werden. Es wird
empfohlen, die Funktionsfähigkeit des Gerätes vor
dem Gebrauch zu prüfen.
≥ Stellen Sie sicher, dass das Objektiv nicht über
einen längeren Zeitraum in Kontakt mit Gummioder Plastikprodukten kommt.
≥ Berühren Sie nicht die elektrischen Kontakte des
Gerätes. Dadurch kann es zu einem Defekt am
Gerät kommen.
≥ Nehmen Sie das Gerät nicht auseinander und
nehmen Sie keine Veränderungen daran vor.
Verwenden Sie zur Reinigung der Geräte kein
Waschbenzin, Alkohol oder ähnliche
Reinigungsmittel.
≥ Lösungsmittel können zur Beschädigung des
Objektivs oder zum Abblättern der Farbe führen.
≥ Staub und Fingerabdrücke lassen sich mit einem
weichen, trockenen Tuch entfernen.
≥ Verwenden Sie ein trockenes Staubtuch, um
Schmutz und Staub vom Schärfering zu entfernen.
≥ Verwenden Sie keine Küchenspülmittel oder mit
Chemikalien getränkte Tücher.
Fehlerbehebung
Beim Ein- und Ausschalten ist ein Geräusch zu
hören.
≥ Dieses Geräusch wird durch die Blenden- oder
Objektivbewegung verursacht; es ist keine
Fehlfunktion.
Bei stärkeren Objektivbewegungen ist ein
Geräusch zu hören.
≥ Dieses Geräusch entsteht durch die Bewegung
der Linse zur optischen Bildstabilisierung im
Objektiv und ist daher keine Fehlfunktion.
21
VQT2H16
Page 22

Spezifikationen
WECHSELOBJEKTIV FÜR DIGITALE KAMERA
“LEICA DG MACRO– ELMARIT 45 mm/F2.8 ASPH./MEGA O.I.S.”
Brennweite f=45 mm (Kleinbild-Äquivalent: 90 mm)
Blende Zentralverschluss mit sieben Lamellen/Irisblende/Rundblende
Blendenwerte F2.8
Minimale Blende F22
Objektivaufbau 14 Elemente in 10 Gruppen
Schärfebereich [FULL]: 0,15 m bis ¶ / [LIMIT]: 0,5 m bis 
Maximale Vergrößerung 1,0k (Kleinbild-Äquivalent: 2,0k)
Optischer bildstabilisator Verfügbar
Objektivbajonett “Micro Four Thirds Mount”
Bildwinkel 27x
Filterdurchmesser 46 mm
Max. Durchmesser Ca. 63 mm
Gesamtlänge Ca. 62,5 mm
Gewicht Ca. 225 g
22
VQT2H16
(von der Referenzlinie für die Brennweite)
(vom Objektivende bis zu der Seite, an der das Objektiv aufgesetzt wird)
(1 asphärische Linse, 1 ED-Linse)
Page 23
∫ Hinweise zur Belichtung
132
3
2
3
Die Abweichung zwischen dem nominalen Blendenwert (auf der Kamera angezeigte Blendenzahl F) und
dem effektiven Blendenwert (tatsächliche Blendenzahl F) ist bei Aufnahmen mit der Makro-Funktion größer,
in der Sie vergrößerte Nahaufnahmen des Motivs machen können. Wenn Sie einen handelsüblichen
separaten Belichtungsmesser verwenden, müssen Sie den Wert je nach der Vergrößerung und dem
Abstand zum Motiv korrigieren. Die jeweilige Belichtungskorrektur (Korrekturfaktor) können Sie der
folgenden Tabelle entnehmen.
Bei der automatischen Belichtung der Kamera muss die Abweichung zwischen dem nominalen
Blendenwert und dem effektiven Blendenwert nicht korrigiert werden, da die Kamera die erforderliche
Belichtung anhand einer Messung der Lichtmenge bestimmt, die durch das Objektiv einfällt.
Leitfaden für die Belichtungskorrektur bei Verwendung eines separaten Belichtungsmessers
Vergrößerung 1/¶ 1/8 1/4 1/3 1/2 1/1,5 1/1
Abstand ¶ 0,47 m 0,28 m 0,23 m 0,19 m 0,17 m 0,15 m
Nominaler
Blendenwert F
Effektiver
Blendenwert F
Belichtungskorrektur
(Korrekturfaktor)
(in Schritten von 1/3)
≥ Mit dem Abstand wird der tatsächliche Abstand zwischen der Bildebene (Kennzeichnung [ ] auf dem
Kameragehäuse) und dem Motiv bezeichnet.
≥ Mit der Vergrößerung wird das Verhältnis (Größe der Abbildung des Motivs auf der Bildebene) /
(tatsächliche Größe des Motivs) bezeichnet.
F2.8 F3.2 F3.5 F4.0 F4.5 F5.0 F5.6
n0+ + +1+1 +1 +2
F2.8
1
3
23
VQT2H16
Page 24

Table des matières
Précautions à prendre ......................................... 24
Précautions ........................................................26
Accessoires fournis .............................................. 27
Fixation/Retrait de l’objectif .................................. 27
Noms et fonctions des composants......................30
Précautions d’utilisation........................................31
Dépannage ......................................................... 32
Spécifications........................................................33
Précautions à prendre
Évitez d’approcher l’élément de tout équipement
magnétisé (four à micro-ondes, téléviseur,
équipement de jeux vidéo, émetteur radio, ligne
à haute tension, etc.).
≥ N’utilisez pas l’appareil photo à proximité d’un
téléphone cellulaire; cela pourrait entraîner un
bruit nuisible à l’image et au son.
≥ Advenant le cas où le fonctionnement de l’appareil
serait dérangé par un champ magnétique, coupez
le contact, retirez la batterie ou débranchez
l’adaptateur secteur pour ensuite soit remettre la
batterie en place, soit rebrancher l’adaptateur.
Remettez l’appareil en marche.
L’objectif peut être utilisé de pair avec un appareil
photo numérique compatible avec la monture
d’objectif standard prise en charge par le système
“Micro Four Thirds
24
VQT2H16
TM
System”.
≥ Il ne peut pas être monté sur les appareils à
monture Four Thirds
≥
Les illustrations de l’appareil photo numérique de ce manuel
d’utilisation prennent le DMC-GF1 comme exemple.
≥ L’apparence et les spécifications des produits
décrits dans le présent manuel peuvent différer
des produits que vous avez achetés en raison de
bonifications ultérieures.
≥
Four ThirdsTM et le logo Four Thirds sont des marques
commerciales ou des marques déposées d’Olympus
Imaging Corporation, au Japon, aux États-Unis, en
Union européenne et dans les autres pays.
≥ Micro Four ThirdsTM et le logo Micro Four Thirds
sont des marques commerciales ou des marques
déposées d’Olympus Imaging Corporation, au
Japon, aux États-Unis, en Union européenne et
dans les autres pays.
≥ G MICRO SYSTEM est un système appareil
photo numérique du type à échange d’objectif de
LUMIX basé sur un standard Micro Four Thirds.
LEICA est une marque déposée de Leica
≥
Microsystems IR GmbH. ELMARIT est une marque
déposée de Leica Camera AG. Les objectifs LEICA
DG sont fabriqués en utilisant des instruments de
mesure et des systèmes d’assurance qualité qui
ont été certifiés par Leica Camera AG basés sur
les standards de qualité de la société.
≥ Les autres noms, raisons sociales et appellations
de produits cités dans ce manuel sont des
marques de commerce ou des marques déposées
de leurs détenteurs respectifs.
TM
.
Page 25

-Si vous voyez ce symbole-
FRANÇAIS
Informations relatives à l’évacuation des déchets, destinées aux utilisateurs d’appareils
électriques et électroniques (appareils ménagers domestiques)
Lorsque ce symbole figure sur les produits et/ou les documents qui les accompagnent,
cela signifie que les appareils électriques et électroniques ne doivent pas être jetés
avec les ordures ménagères.
Pour que ces produits subissent un traitement, une récupération et un recyclage
appropriés, envoyez-les dans les points de collecte désignés, où ils peuvent être
déposés gratuitement. Dans certains pays, il est possible de renvoyer les produits au
revendeur local en cas d’achat d’un produit équivalent.
En éliminant correctement ce produit, vous contribuerez à la conservation des
ressources vitales et à la prévention des éventuels effets négatifs sur l’environnement
et la santé humaine qui pourraient survenir dans le cas contraire.
Afin de connaître le point de collecte le plus proche, veuillez contacter vos autorités locales.
Des sanctions peuvent être appliquées en cas d’élimination incorrecte de ces déchets, conformément à
la législation nationale.
Utilisateurs professionnels de l’Union européenne
Pour en savoir plus sur l’élimination des appareils électriques et électroniques, contactez votre revendeur
ou fournisseur.
Informations sur l’évacuation des déchets dans les pays ne faisant pas partie de l’Union
européenne
Ce symbole n’est reconnu que dans l’Union européenne.
Pour vous débarrasser de ce produit, veuillez contacter les autorités locales ou votre revendeur afin de
connaître la procédure d’élimination à suivre.
VQT2H16
25
Page 26

Précautions
∫ Entretien de l’objectif
≥ Le sable et la poussière peuvent endommager
l’objectif. Aussi, convient-il de protéger et
l’objectif et les contacts de la monture contre
toute infiltration de sable et de poussière
lorsque l’appareil est utilisé à la plage, etc.
≥ Cet objectif n’est pas étanche à l’eau. Si des
gouttes d’eau l’éclaboussaient, essuyez
l’objectif avec un linge sec.
≥ N’appuyez pas avec force sur l’objectif.
≥ Lorsqu’il a des salissures (eau, huile, traces de
doigts, etc.) sur la surface de l’objectif, cela peut
avoir une incidence sur l’image. Essuyez
légèrement la surface de l’objectif avec un chiffon
sec et doux avant et après la prise de photos.
≥ Ne posez pas l’objectif côté monture vers le bas.
Point de contact 1 de la monture de l’objectif
restent toujours propres.
26
VQT2H16
∫ À propos de la condensation (Objectif
embué)
≥ Il y a formation de condensation lorsque la
température et l’humidité changent comme suit.
La condensation peut salir l’objectif, entraîner de
la moisissure et des problèmes de
fonctionnement. Aussi, est-il important de prendre
des précautions dans les circonstances suivantes:
– Lorsque l’appareil est transporté de l’extérieur à
l’intérieur par temps froid
– Lorsque l’appareil est placé dans un véhicule
climatisé
– Lorsque l’air frais d’un climatiseur arrive
directement sur l’objectif
– Lorsque l’appareil est utilisé ou placé dans un
endroit humide
≥ Gardez l’appareil photo à l’intérieur d’un sac en
plastique jusqu’à ce que la température de
celui-ci soit la plus près possible de celle de la
température ambiante afin d’éviter la
condensation. En cas de condensation, éteignez
l’appareil photo et laissez-le ainsi pendant environ
2 heures. Lorsque la température de l’appareil
photo se rapproche de celle ambiante, la buée
disparaît naturellement.
Page 27

Accessoires fournis
Fixation/Retrait de l’objectif
[La vérification doit être effectuée lorsque vous
sortez l’appareil de l’emballage]
En retirant l’appareil de son emballage, vérifiez la
présence de l’appareil principal et de tous ses
accessoires, et vérifiez également l’apparence externe
ainsi que leur fonction afin de vous assurer qu’ils n’ont
subi aucun dommage lors du transport ou de la livraison.
Si vous découvrez un problème, contactez votre
vendeur avant d’utiliser le produit.
Les codes des produits sont corrects jusqu'à septembre
2009. Ceux-ci sont susceptibles d’être modifiés.
312 4
VFC4456 VYC1005 VYF3284 VFC4315
1 Sac de rangement pour l’objectif
2 Parasoleil
3 Protège-objectif
4 Capuchon arrière de l’objectif
(Le protège-objectif et le capuchon arrière sont montés
sur l’objectif interchangeable au moment de l’achat.)
≥ Pour les instructions sur la mise en place et le
retrait de l’objectif, reportez-vous au manuel
d’utilisateur de l’appareil photo.
∫ Mise en place de l’objectif
≥ Vérifiez que l’appareil photo est éteint.
1 Tournez le capuchon
arrière de l’objectif
pour le retirer.
A: Capuchon arrière de
l’objectif
2
Alignez les repères pour la
mise en place de l’objectif
B
(marques rouges) sur le
boîtier de l’appareil photo et
sur l’objectif, puis tournez
l’objectif dans le sens de la
flèche jusqu’à ce que vous entendiez un déclic.
• N’appuyez pas sur la touche de déverrouillage
de l’objectif lorsque vous fixez un objectif.
• N’essayez pas de fixer l’objectif lorsque vous le
tenez en angle par rapport au boîtier, car la
monture de l’objectif risquerait d’être éraflée.
• Vérifiez que l’objectif est fixé correctement.
VQT2H16
27
Page 28

∫ Retrait de l’objectif
≥ Vérifiez que l’appareil photo est éteint.
Appuyez sur la touche de
déverrouillage de
l’objectif C tout en
tournant l’objectif aussi
loin que possible dans le
sens de la flèche pour le
retirer.
• Fixez le capuchon arrière de l’objectif afin que
les contacts de la monture de l’objectif ne soient
pas rayés.
• Fixez le capuchon sur la monture d’objectif de
manière à prévenir toute infiltration de poussière
dans l’appareil.
∫ Fixation et retrait du protège-objectif
≥ Attention à ne pas
perdre le capuchon
d’objectif.
28
VQT2H16
∫ Fixation du parasoleil (Fourni)
Insérez le parasoleil dans l’objectif avec
les côtés courts en haut et en bas, et
tournez dans le sens de flèche jusqu’à ce
qu’il s’arrête.
D: Alignement avec le repère
Page 29

∫ Enlever le Parasoleil
Tournez le parasoleil dans le sens de la
flèche pour le retirer.
≥
Lorsque vous prenez des photos avec le flash et
que le parasoleil est monté, la partie inférieure de
l’écran peut s’assombrir (effet de vignetage) et le
contrôle du flash peut être empêché car l’éclair du
flash peut être obscurci par le parasoleil. Nous
vous recommandons de retirer le parasoleil.
≥ Lorsque vous utilisez la lampe d’assistance de
mise au point automatique dans l’obscurité, retirez
le parasoleil.
∫ Fixation de filtres
≥ Un effet de vignetage peut survenir en utilisant 2
ou plus protecteurs MC (en option:DMW-LMC46),
filtres PL (en option:DMW-LPL46) ou filtres ND
(en option:DMW-LND46), ou en utilisant des
protecteurs et/ou des filtres épais.
≥ Le filtre peut être impossible à retirer s’il est trop
serré, veuillez donc éviter de le faire.
≥ Il est possible de fixer le capuchon d’objectif avec
le filtre déjà en place.
≥ Vous ne pouvez pas installer de convertisseur
d’objectif ou d’adaptateur sur cet objectif. Un filtre
peut être utilisé, mais installer un autre élément
peut causer des dommages à l’objectif.
29
VQT2H16
Page 30

Noms et fonctions des
2 3 4
1 5
6
composants
∫ Objectif
1 Surface de l’objectif
2 Bague de mise au point
Tournez pour effectuer la mise au point lors de
prises de vues avec mise au point manuelle.
30
VQT2H16
3 Commutateur [O.I.S.] (S.O.I.)
Lorsque l’objectif est fixé à l’appareil photo, la
fonction de stabilisation optique de l’image est
activée si le commutateur [O.I.S.] (S.O.I.) est réglé
sur [ON] (en marche).
≥ Nous vous conseillons de régler le commutateur
[O.I.S.] (S.O.I.) sur [OFF] (NON) lorsque vous
utilisez un trépied.
≥ La fonction de stabilisateur peut ne pas être
efficace dans les cas suivants.
– Lorsqu’il y a beaucoup de vacillements.
– Lorsque vous utilisez le zoom numérique.
– Lorsque vous prenez des photos tout en suivant
un objet en mouvement.
– Lorsque la vitesse d’obturation devient plus lente
pour prendre des photos à l’intérieur ou dans des
endroits sombres.
– Pour prendre des photos en gros plan.
4 Interrupteur [FOCUS]
[FULL]: Il peut mettre au point dans une plage allant
de 0,15 m à ¶. Utilisation en position [FULL]
pour des prises de vue en utilisant la
fonction macro.
Il peut mettre au point dans une plage allant
[LIMIT]:
de 0,5 m à
avec la mise au point automatique sera plus
rapide.
. La vitesse de mise au point
Page 31

5 Point de contact
6 Repère pour la mise en place de l’objectif
Note
≥ En enregistrant un sujet proche avec le flash, la
lumière du flash peut être bloquée par l’objectif et
une partie de la photo peut être sombre. Vérifiez
la distance du sujet en enregistrant.
≥ Cet objectif possède les caractéristiques
suivantes à cause des spécifications de sa macro.
– Il met du temps à faire la mise au point.
– La plage de mise au point est assez petite.
Précautions d’utilisation
∫ À propos de l’objectif
Prenez soin de ne pas faire tomber ni de cogner
l’objectif. De plus ne mettez pas trop de pression
dessus.
≥
Attention à ne pas faire tomber le sac où se trouve
l’objectif, car celui-ci pourrait être endommagé.
L’appareil photo pourrait ne plus marcher normalement
et les images ne seraient plus enregistrées.
Si des pesticides ou toute autre substance
volatile sont utilisés près de l’appareil, veuillez
protéger l’objectif contre toute éclaboussure ou
vaporisation.
≥
Si de telles substances atteignent l’objectif, celui-ci
pourrait être endommagé, ou la peinture pourrait
s’écailler.
Ne transportez pas l’objectif s’il est encore fixé
sur l’appareil photo.
≥ En aucunes circonstances vous ne devez ranger
l’objectif dans les endroits indiqués ci-dessous car
cela pourrait causer des problèmes d’utilisation ou
de mauvais fonctionnement.
– À la lumière directe du soleil ou sur la plage en été
– Dans des endroits ayant des niveaux de
température et d’humidité élevés ou dans des
endroits où les changements de température et
d’humidité sont prononcés
– Dans des endroits ayant une forte concentration
de sable, de poussière ou de saleté
– Où il y a du feu
– Près de radiateurs, climatiseurs, humidificateurs
– Où l’eau pourrait mouiller l’objectif
– Où il y a des vibrations
– À l’intérieur d’un véhicule
≥ Reportez-vous également au manuel d’utilisation
de l’appareil photo.
31
VQT2H16
Page 32

≥ Si l’appareil ne doit plus être utilisé pendant une
période prolongée, nous vous conseillons de le
ranger avec un produit déshydratant (gel de
silice). Tout manquement à cela pourrait
provoquer une panne causée par la moisissure
etc. Nous vous conseillons de vérifier le
fonctionnement de l’objectif avant de l’utiliser.
≥ Évitez que l’objectif ne soit en contact avec des
produits en plastique ou en caoutchouc pendant
une longue période.
≥ Ne touchez pas les contacts électriques de
l’objectif. Ceci pourrait causer un mauvais
fonctionnement de l’objectif.
≥ Ne désassemblez ni ne tentez de modifier
l’objectif.
N’utilisez pas de benzène, d’alcool ni aucun
autre produit nettoyant similaire pour nettoyer
l’appareil.
≥ L’emploi de solvants peut endommager l’objectif
ou faire s’écailler la peinture.
≥ Essuyez toute poussière ou traces de doigts avec
un chiffon doux et sec.
≥ Utilisez un chiffon sec pour retirer la saleté et la
poussière de la bague de mise au point.
≥ N’utilisez pas de détergent de cuisine ou de linge
chimique.
32
VQT2H16
Dépannage
Un bruit se fait entendre à la mise en marche et
hors marche de l’appareil photo.
≥ Il s’agit du bruit de l’objectif ou du mouvement de
l’ouverture et ce n’est pas un défaut de
fonctionnement.
Un bruit se fait entendre lorsque l’appareil est
secoué.
≥ Il s’agit du son de fonctionnement du stabilisateur
dans l’objectif et il ne s’agit pas d’un mauvais
fonctionnement.
Page 33

Spécifications
OBJECTIF INTERCHANGEABLE POUR APPAREIL PHOTO NUMÉRIQUE
“LEICA DG MACRO– ELMARIT 45 mm/F2.8 ASPH./MEGA O.I.S.”
Distance focale f=45 mm (Équivalent à un film de 35 mm: 90 mm)
Type d’ouverture Obturateurs à 7 lamelles/diaphragme à iris/diaphragme circulaire
Plage d’ouverture F2.8
Valeur d’ouverture minimum F22
Composition de l’objectif 14 éléments en 10 groupes (1 objectif asphérique, 1 objectif ED)
Distance de mise au point [FULL]: 0,15 m à ¶ / [LIMIT]: 0,5 m à 
Grossissement maximum de l’image
Stabilisateur optique de l’image Disponible
Monture “Micro Four Thirds Mount”
Angle de vue 27x
Diamètre de filtre
Diamètre maximum Environ
Longueur totale Environ
Poids Environ
(à partir de la ligne de référence de mise au point)
1,0k (Équivalent à un film de 35 mm: 2,0k)
46 mm
63 mm
62,5 mm (à partir du bout de l’objectif jusqu’au côté support
de la monture de l’objectif)
225 g
33
VQT2H16
Page 34

∫ À propos de l’Exposition
1323132
3
La différence entre la valeur nominale F (valeur d’ouverture affichée sur l’appareil photo) et la valeur
effective F (valeur d’ouverture effective) sera plus importante lorsqu’on effectue des prises de vue en
utilisant la fonction macro, qui vous permet d’effectuer des prises de vue agrandies de sujets proches.
Lorsqu’on utilise un photomètre autonome disponible en commerce, il faut corriger la valeur selon
l’agrandissement et la distance du sujet. Référez-vous au tableau suivant pour la correction de l’exposition
(facteur d’exposition).
Il n’est pas nécessaire de corriger la différence entre la valeur nominale F et la valeur effective F avec
l’exposition automatique de l’appareil photo, puisque celle-ci déterminera l’exposition en mesurant la
lumière qui pénètre à travers l’objectif.
Guide pour la correction de l’exposition lors de l’utilisation d’un photomètre autonome
Agrandissement 1/¶ 1/8 1/4 1/3 1/2 1/1,5 1/1
Distance ¶ 0,47 m 0,28 m 0,23 m 0,19 m 0,17 m 0,15 m
Valeur nominale F F2.8
Valeur effective F F2.8 F3.2 F3.5 F4.0 F4.5 F5.0 F5.6
Correction
d’exposition
(Facteur d’exposition)
(à intervalles de 1/3)
≥ La distance est la distance effective entre le plan d’enregistrement ([ ] marqué sur le corps de l’appareil
photo numérique) et le sujet.
≥ L’agrandissement représente (la dimension de l’image du sujet au plan d’enregistrement) / (dimension
effective du sujet).
34
VQT2H16
n0+ + +1+1 +1 +2
Page 35

Indice
Información para su seguridad..............................35
Prevención contra las averías.............................38
Accesorios suministrados .....................................39
Unir y quitar el objetivo..........................................39
Nombres y funciones de los componentes ...........41
Precauciones para el uso......................................42
Búsqueda de averías ..........................................43
Especificaciones ...................................................44
ESPAÑOL
Información para su
seguridad
Mantenga la unidad lo más lejos que sea posible
de equipos electromagnéticos (como hornos de
microondas, televisores, vídeo juegos,
trasmisores radio, líneas de alto voltaje, etc.).
≥ No utilice la cámara cerca de teléfonos móviles,
ya que lo de hacerlo puede producir ruido que
afectará negativamente a las imágenes y el
sonido.
≥ Si la cámara queda afectada negativamente por
un equipo electromagnético y deja de funcionar
correctamente, apague la cámara y quite la
batería y/o el adaptador de CA conectado. Luego
vuelva a insertar la batería y/o vuelva a conectar
el adaptador de CA y encienda la cámara.
35
VQT2H16
Page 36

El objetivo puede usarse con una cámara digital
compatible con el estándar de montaje de objetivos
del “Micro Four Thirds
≥ No se puede montar en una cámara con estándar
de soporte Four Thirds
TM
System”.
TM
.
≥ Las figuras de la cámara digital en estas
instrucciones de funcionamiento muestran la
DMC-GF1 en concepto de ejemplo.
≥ E aspecto y las especificaciones de los productos
descritos en este manual pueden diferir de los
productos reales que usted ha comprado debido a
aumentos sucesivos.
≥ El logotipo Four Thirds
TM
y Four Thirds son
marcas comerciales o marcas comerciales
registradas de Olympus Imaging Corporation, en
Japón, los Estados Unidos, la Unión Europea y
otros países.
≥ El logotipo Micro Four Thirds
TM
y Micro Four
Thirds son marcas comerciales o marcas
comerciales registradas de Olympus Imaging
Corporation, en Japón, los Estados Unidos, la
Unión Europea y otros países.
≥ G MICRO SYSTEM es un sistema de cámara
digital con objetivo intercambiable de LUMIX
basado en el estándar Micro Four Thirds System.
36
VQT2H16
≥ LEICA es una marca registrada de Leica
Microsystems IR GmbH. ELMARIT es una marca
registrada de Leica Camera AG. Los objetivos
LEICA DG se fabrican usando instrumentos de
medida y sistemas de garantía de calidad
certificados por Leica Camera AG en base a los
estándares de calidad de la compañía.
≥ Los demás nombres, nombres de sociedades y
nombres de productos citados en estas
instrucciones son marcas de fábrica o marcas
registradas.
Page 37

-Si ve este símbolo-
Información sobre la eliminación para los usuarios de equipos eléctricos y electrónicos usados
(particulares)
La aparición de este símbolo en un producto y/o en la documentación adjunta indica
que los productos eléctricos y electrónicos usados no deben mezclarse con la basura
doméstica general.
Para que estos productos se sometan a un proceso adecuado de tratamiento,
recuperación y reciclaje, llévelos a los puntos de recogida designados, donde los
admitirán sin coste alguno. En algunos países existe también la posibilidad de
devolver los productos a su minorista local al comprar un producto nuevo equivalente.
Si desecha el producto correctamente, estará contribuyendo a preservar valiosos
recursos y a evitar cualquier posible efecto negativo en la salud de las personas y en
el medio ambiente que pudiera producirse debido al tratamiento inadecuado de
desechos. Póngase en contacto con su autoridad local para que le informen
detalladamente sobre el punto de recogida designado más cercano.
De acuerdo con la legislación nacional, podrían aplicarse multas por la eliminación incorrecta de estos
desechos.
Para empresas de la Unión Europea
Si desea desechar equipos eléctricos y electrónicos, póngase en contacto con su distribuidor o
proveedor para que le informe detalladamente.
Información sobre la eliminación en otros países no pertenecientes a la Unión Europea
Este símbolo sólo es válido en la Unión Europea.
Si desea desechar este producto, póngase en contacto con las autoridades locales o con su distribuidor
para que le informen sobre el método correcto de eliminación.
VQT2H16
37
Page 38

Prevención contra las averías
∫ Atención del objetivo
≥ La arena y el polvo pueden dañar el objetivo.
Cuando usa el objetivo en una playa, tenga
cuidado de que ni arena ni polvo entren en el
interior del objetivo o los terminales, etc.
≥ Este objetivo no es impermeable. Si caen
gotas de agua en el objetivo, límpielo con un
paño seco.
≥ No ejerce demasiada presión en el objetivo.
≥ Cuando hay suciedad (agua, aceite, huellas
dactilares, etc.) en la superficie del objetivo, la
imagen puede salir afectada. Limpie ligeramente
con un paño blando y seco antes y después de
tomar las imágenes.
≥ No meta el soporte del objetivo mirando hacia
abajo. No deje que se ensucien los punto de
contacto 1.
38
VQT2H16
∫ Acerca de la condensación
(Empañamiento del objetivo)
≥ La condensación ocurre cuando se encuentra una
diferencia en la temperatura y humedad como se
describe abajo. La condensación puede hacer
ensuciar el objetivo y producir hongos y un
funcionamiento defectuoso, por lo tanto ponga
cuidado en las situaciones a continuación:
– Cuando lleva la cámara en casa desde el aire
libre durante un tiempo frío
– Cuando lleva la cámara dentro de un coche con
aire acondicionado
– Cuando sopla en el objetivo aire frío desde un
acondicionador de aire
– En lugares húmedos
≥ Para impedir la condensación, meta la cámara en
una bolsa de plástico para que se aclimate a la
temperatura ambiente. Si ocurre condensación,
apague la alimentación y la deje así durante dos
horas. Una vez de que la cámara se haya
aclimatado a la temperatura ambiente en
empañamiento desaparece naturalmente.
Page 39

Accesorios suministrados
VFC4456 VYC1005 VYF3284 VFC4315
312 4
Unir y quitar el objetivo
[Controles a realizar cuando va a desembalar la unidad]
Al quitar la unidad de su embalaje, compruebe que se
encuentren la unidad principal y los accesorios
suministrados. Además compruebe el aspecto externo
y las funciones para verificar que no hayan padecidos
daños durante la distribución y el transporte.
Por si encuentra un cualquier problema, antes de
usar el producto llame a su comerciante.
Los números de producto se aplican desde septiembre
de 2009. Estos pueden estar sujetos a modificaciones.
1 Bolsa de almacenamiento del objetivo
2 Visera del objetivo
3 Tapa del objetivo
4 Tapa trasera del objetivo
(Al momento de la compra la tapa del objetivo y la tapa
trasera del mismo están unidas al objetivo intercambiable.)
≥
Se refiera también a las instrucciones de funcionamiento
de la cámara para unir y separar el objetivo.
∫ Unión del objetivo
≥ Compruebe que la cámara esté apagada.
1
Gire la tapa trasera del
objetivo para separarla
A: Tapa trasera del objetivo
2
Alinee las marcas para
ajustar el objetivo
(marcas rojas)
ubicadas en
B
.
el cuerpo de la cámara y el
mismo objetivo, luego gire
éste en la dirección de la
flecha hasta que dispare.
• No pulse el botón de desenganche del objetivo
cuando va a unir un objetivo.
• Como el soporte del objetivo podría salir rayado,
no trate de unir el objetivo a la cámara
manteniéndolo de ángulo.
• Compruebe que el objetivo esté unido
correctamente.
VQT2H16
39
Page 40

∫ Separación del objetivo
≥ Compruebe que la cámara esté apagada.
Pulse el botón de
desenganche del
objetivo C mientras gira
hasta que sea posible el
objetivo en la dirección
de la flecha para quitarlo.
• Una la tapa trasera de manera que el punto de
contacto del objetivo no salga rayado.
• Una la tapa del cuerpo a la cámara para que ni
suciedad ni polvo entren dentro de la unidad
principal.
∫ Unión y separación de la tapa del
objetivo
≥ Ponga cuidado en no
perder la tapa del
objetivo.
40
VQT2H16
∫ Unión de la visera del objetivo
(Accesorio suministrado)
Inserte la visera del objetivo con las partes
cortas arriba y abajo, luego gírela en la
dirección de la flecha hasta que dispare.
D: Ajustando hacia la marca
∫ Quitar la visera del objetivo
Gire la visera del objetivo en la dirección
de la flecha para quitarla.
Page 41

≥ Cuando toma las imágenes con el flash y tiene
2 3 4
1 5
6
unida la visera del objetivo, la porción inferior de
la pantalla podría ponerse oscura (efecto de
viñeteado) y el control del flash podría
inhabilitarse debido a que éste podría ser
oscurecido por la misma visera. Le
recomendamos que quite dicha visera.
≥ Cuando usa la lámpara de ayuda AF en la
oscuridad, quite la visera del objetivo.
∫ Unión de los filtros
≥ Puede tener lugar viñeteado si usa 2 o más
protectores MC (opcionales:DMW-LMC46), filtros
PL (opcionales:DMW-LPL46) o filtros ND
(opcionales:DMW-LND46), o bien si usa
protectores y/o filtros espesos.
≥ Tal vez sea imposible de retirar el filtro si está
demasiado apretado, por lo que no debe apretarlo
demasiado fuerte.
≥ Se puede colocar la tapa del objetivo con el filtro
ya colocado.
≥ No consigue acoplar un objetivo de conversión o
adaptador a este objetivo. Puede usarse un filtro,
pero acoplar cualquier otro elemento puede dañar
el objetivo.
Nombres y funciones de
los componentes
∫ Objetivo
1 Superficie del objetivo
2 Anillo del enfoque
Ruotare per mettere a fuoco quando si scattano
fotografie utilizzando la messa a fuoco manuale.
VQT2H16
41
Page 42

3 Interruptor [O.I.S.]
Cuando a la cámara está unido el objetivo, está
ajustada la función estabilizadora para ver si el
interruptor [O.I.S.] está ajustado en [ON].
≥ Le recomendamos que ajuste el interruptor
[O.I.S.] a [OFF] cuando usa un trípode.
≥ La función estabilizadora podría no funcionar
suficientemente en los casos a continuación.
– Cuando hay demasiada trepidación.
– Cuando usa el zoom digital.
– Cuando toma imágenes mientras sigue sujetos
en movimiento.
– Cuando se reduce la velocidad de obturación
para tomar imágenes en casa o en lugares
oscuros.
– Al tomar imágenes en primer plano.
4 Interruptor [FOCUS]
[FULL]: Puede enfocar entre los rangos de 0,15 m a
¶. Úselo en posición [FULL] si desea captar
imágenes utilizando la función macro.
[LIMIT]: Puede enfocar entre los rangos de 0,5 m a
¶. Con el enfoque automático, la velocidad
de enfoque aumentará.
5 Punto de contacto
6 Marca para ajustar el objetivo
42
VQT2H16
Nota
≥
Cuando graba usando el flash estando cerca del
sujeto, la luz del flash será bloqueada por el objetivo y
parte de la imagen puede quedar oscura. Compruebe
la distancia desde el sujeto cuando graba.
≥ Este objetivo tiene las siguientes características
debidas a su especificaciones macro.
– Lleva tiempo para enfocar
– El rango del enfoque es bastante pequeño.
Precauciones para el uso
∫ Acerca del objetivo
Tenga cuidado de no hacer caer el objetivo ni le
choque contra. Asimismo tenga cuidado de no
presionarlo demasiado.
≥
Tenga cuidado de no hacer caer la bolsa en la que
cabe el objetivo. Éste podría dañarse, la cámara
podría dejar de funcionar normalmente y las
imágenes ya podrían no grabarse.
Cuando usa pesticidas y otras substancias
volátiles alrededor de la cámara tenga cuidado
de que no entre en el objetivo.
≥
Si dichas substancias caen en el objetivo, éstas
pueden dañarlo o hacer desconchar su barniz.
No transporte la unidad si ésta está todavía
unida al cuerpo de la cámara.
Page 43

≥ De ninguna manera la unidad debe ser usada o
almacenada en uno de los siguientes lugares ya
que lo de hacerlo podría perjudicarla o producir un
funcionamiento defectuoso.
– Bajo la luz directa del sol o bien a lo largo de la
costa durante el verano
– En lugares donde haya altas temperaturas o altos
niveles de humedad o bien donde sean repentinos
los cambios de temperatura y humedad
– En lugares donde haya altas concentraciones de
arena, polvo o suciedad
– Donde haya llamas
– Cerca de calefactores, acondicionadores de aire
o humedecedores
– Donde el agua puede hacer mojar la unidad
– Donde haya vibraciones
– Dentro de un vehículo
≥ Se refiera también a las instrucciones de
funcionamiento de la cámara digital.
≥ Cuando no ha de ser usada la unidad por un
período prolongado, le recomendamos guardar
con un desecante (silicagel). El hecho de no
hacerlo podría ocasionar una avería causada por
el moho etc.
funcionamiento de la unidad antes de usarla
≥ No deje el objetivo en contacto con productos de
plástico durante largos períodos de tiempo.
Se recomienda que compruebe el
.
≥ No toque los contactos eléctricos de la unidad. Lo
de hacerlo puede causar avería en la unidad.
≥ No desmonte ni modifique la unidad.
No utilice gasolina, diluyente, alcohol u otros
agentes de limpieza parecidos para limpiar la
unidad.
≥ El hecho de usar disolventes puede dañar el
objetivo y hacer desconchar su barniz.
≥ Quite cualquier indicio de polvo o huellas
dactilares con un paño blando y seco.
≥ Use un paño suave y seco para eliminar suciedad
y polvo de la anilla de enfoque.
≥ No use detergentes para cocina o un paño tratado
químicamente.
Búsqueda de averías
Se oye un sonido cuando se enciende o se
apaga la cámara.
≥ Éste es el sonido del objetivo o el movimiento de
abertura y no es un funcionamiento defectuoso.
Se oye un sonido al sacudir el objetivo.
≥ Es el sonido del funcionamiento del estabilizador
del objetivo y no constituye un problema de
funcionamiento.
43
VQT2H16
Page 44

Especificaciones
ÓPTICA INTERCAMBIABLE PARA CÁMARA DIGITAL
“LEICA DG MACRO– ELMARIT 45 mm/F2.8 ASPH./MEGA O.I.S.”
Longitud focal f=45 mm (Igual a una cámara de película de 35 mm: de 90 mm)
Tipo de abertura 7 obturaciones de hoja/diafragma iris/diafragma circular
Gama de abertura F2.8
Valor de abertura mínimo F22
Estructura del objetivo
En la distancia del enfoque [FULL]: 0,15 m a ¶ / [LIMIT]: 0,5 m a 
Máxima ampliación de la imagen 1,0k (Igual a una cámara de película de 35 mm: 2,0k)
Estabilizador óptico de la imagen Disponible
Soporte “Micro Four Thirds Mount”
Ángulo visual 27x
Diámetro del filtro
Diámetro máx. Aprox.
Longitud total Aprox.
Peso Aprox.
44
VQT2H16
14 elementos en 10 grupos (1 objetivo esférico, 1 objetivo ED)
(desde la línea de referencia de la distancia del enfoque)
46 mm
63 mm
62,5 mm (desde la punta del objetivo al lado de la base del
soporte del objetivo)
225 g
Page 45

∫ Acerca de la exposición
132
3
2
3
La diferencia entre el valor F nominal (valor de apertura visualizado en la cámara) y el valor F efectivo
(valor de apertura real) será mayor cuando se captan imágenes usando la función macro, lo cual le permite
captar imágenes ampliadas de sujetos en primer plano. Cuando use un medidor de exposición autónomo
disponible en el mercado, es necesario corregir el valor dependiendo de la amplificación y distancia desde
el sujeto. Consulte la tabla siguiente en lo relativo a la corrección de la exposición (factor de exposición).
Hay que corregir la diferencia entre el valor F nominal y el valor F efectivo con la exposición automática de
la cámara, ya que determinará la exposición cuantificando la luz que entra a través del objetivo.
Guía para corregir la exposición al usar un medidor de exposición autónomo
Ampliación 1/¶ 1/8 1/4 1/3 1/2 1/1,5 1/1
Distancia ¶ 0,47 m 0,28 m 0,23 m 0,19 m 0,17 m 0,15 m
Valor F nominal F2.8
Valor F efectivo F2.8 F3.2 F3.5 F4.0 F4.5 F5.0 F5.6
Corrección de la
exposición
(Factor de exposición)
(En intervalos de 1/3)
≥ Distancia es la distancia real entre el plano de grabación ([ ] marcado en el cuerpo de la cámara digital)
al sujeto.
≥ La amplificación representa el (tamaño de la imagen del sujeto en el plano de grabación) / (tamaño real
del sujeto).
n0+ + +1+1 +1 +2
1
3
45
VQT2H16
Page 46

Indice
Informazioni per la sua sicurezza .........................46
Prevenzione guasti ............................................. 49
Accessori in dotazione.......................................... 50
Installazione/Rimozione dell’obiettivo................... 50
Nomi e funzioni dei componenti............................ 52
Precauzioni per l’uso ............................................53
Ricerca guasti ..................................................... 54
Specifiche.............................................................55
46
VQT2H16
Informazioni per la sua
sicurezza
Tenere l’unità il più possibile lontana da
apparecchi elettromagnetici (come forni a
microonde, TV, videogiochi, radiotrasmittenti,
linee dell’alta tensione, ecc.).
≥ Non utilizzare la fotocamera vicino a telefoni
cellulari, perché ciò può causare disturbi che
influenzano negativamente immagini e suoni.
≥ Se il funzionamento della fotocamera digitale è
disturbato da apparecchi elettromagnetici,
spegnere la fotocamera e rimuovere la batteria e/
o l’adattatore CA collegato. Quindi inserire
nuovamente la batteria e/o ricollegare l’adattatore
CA. Infine, riaccendere la fotocamera.
Page 47

L’obiettivo può essere utilizzato con una fotocamera
digitale dotata di un supporto dell’obiettivo
compatibile con lo standard “Micro Four Thirds
TM
System”.
Non montabile su una fotocamera con specifiche sul
≥
supporto
Four Thirds
TM
.
≥ Le illustrazioni della fotocamera digitale presenti
in queste istruzioni operative mostrano il modello
DMC-GF1 come esempio.
≥ L’aspetto e le specifiche dei prodotti descritti in
questo manuale possono differire da quelli dei
prodotti acquistati a causa di miglioramenti
introdotti in tempi successivi alla stampa del
manuale.
≥ Four Thirds
TM
e il logo Four Thirds sono marchi o
marchi registrati di Olympus Imaging Corporation,
in Giappone, negli Stati Uniti, nell’Unione Europea
e in altri paesi.
≥ Micro Four Thirds
TM
e il logo Micro Four Thirds
sono marchi o marchi registrati di Olympus
Imaging Corporation, in Giappone, negli Stati
Uniti, nell’Unione Europea e in altri paesi.
≥ G MICRO SYSTEM è un sistema di fotocamera
digitale LUMIX del tipo a più obiettivi basato sullo
standard Micro Four Thirds System.
≥ LEICA è un marchio registrato di Leica
ITALIANO
Microsystems IR GmbH. ELMARIT è un marchio
registrato di Leica Camera AG. Gli obiettivi LEICA
DG sono prodotti utilizzando strumenti di
misurazione e sistemi di garanzia della qualità
certificati da Leica Camera AG in base agli
standard di qualità dell’azienda.
≥ Altri nomi, nomi di società e nomi di prodotti
contenuti in queste istruzioni sono marchi o
marchi registrati delle relative società.
VQT2H16
47
Page 48

-Se vedete questo simboloInformazioni per gli utenti sullo smaltimento di apparecchiature elettriche ed elettroniche obsolete
(per i nuclei familiari privati)
Per gli utenti aziendali nell'Unione Europea
Qualora si desideri smaltire apparecchiature elettriche ed elettroniche, contattare il rivenditore o il fornitore
per ulteriori informazioni.
Informazioni sullo smaltimento in nazioni al di fuori dell'Unione Europea
Questo simbolo è valido solo nell'Unione Europea.
Qualora si desideri smaltire questo prodotto, contattare le autorità locali o il rivenditore e chiedere
informazioni sul metodo corretto di smaltimento.
48
VQT2H16
Questo simbolo sui prodotti e/o sulla documentazione di accompagnamento significa
che i prodotti elettrici ed elettronici usati non devono essere mescolati con i rifiuti
domestici generici.
Per un corretto trattamento, recupero e riciclaggio, portare questi prodotti ai punti di
raccolta designati, dove verranno accettati gratuitamente. In alternativa, in alcune
nazioni potrebbe essere possibile restituire i prodotti al rivenditore locale, al momento
dell'acquisto di un nuovo prodotto equivalente.
Uno smaltimento corretto di questo prodotto contribuirà a far risparmiare preziose
risorse ed evitare potenziali effetti negativi sulla salute umana e sull'ambiente, che
potrebbero derivare, altrimenti, da uno smaltimento inappropriato. Per ulteriori dettagli,
contattare la propria autorità locale o il punto di raccolta designato più vicino.
In caso di smaltimento errato di questo materiale di scarto, potrebbero venire applicate
delle penali, in base alle leggi nazionali.
Page 49

Prevenzione guasti
∫ Custodia dell’obiettivo
≥ Sabbia e polvere possono danneggiare
l’obiettivo. Evitare che sabbia o polvere
penetrino all’interno dell’obiettivo o dei
terminali quando si utilizza l’obiettivo su una
spiaggia, ecc.
≥ Questo obiettivo non è impermeabile. Se delle
gocce d’acqua dovessero cadere
sull’obiettivo, pulirlo con un panno asciutto.
≥ Non premere con troppa forza l’obiettivo.
≥ Quando la superficie della lente è sporca (acqua,
olio, impronte, ecc.), l’immagine può risultare
deteriorata. Pulire leggermente la superficie della
lente con un panno asciutto e morbido prima e
dopo aver ripreso delle immagini.
≥ Non tenere il supporto dell’obiettivo rivolto verso il
basso. Evitare che i Contatto del supporto
dell’obiettivo 1 si sporchino.
∫ Informazioni sulla condensa
(Appannamento dell’obiettivo)
≥ La condensa si forma quando si verificano
differenze di temperatura e umidità come quelle
descritte sotto. La condensa può causare
l’appannamento dell’obiettivo e portare alla
formazione di muffe e a malfunzionamenti, per cui
è necessario fare attenzione nelle seguenti
situazioni:
– Quando si porta la fotocamera da un ambiente
esterno freddo a uno interno
– Quando si porta la fotocamera in un’auto con il
condizionatore in funzione
– Quando l’aria fredda di un condizionatore
colpisce direttamente l’obiettivo
– In luoghi umidi
≥ Per evitare la formazione di condensa, inserire la
fotocamera in una busta di plastica per consentirle
di adattarsi alla temperatura circostante. Se si
forma della condensa, spegnere la fotocamera e
non toccarla per un paio due ore. Una volta che la
temperatura della fotocamera ritorna ai valori
dell’ambiente circostante l’appannamento
scomparirà naturalmente.
49
VQT2H16
Page 50

Accessori in dotazione
VFC4456 VYC1005 VYF3284 VFC4315
312 4
Installazione/Rimozione dell’obiettivo
[Controlli da effettuare quando si disimballa l’unità]
Quando si estrae il flash dalla confezione, controllare
che siano presenti l’unità principale e gli accessori in
dotazione. Controllarne inoltre l’aspetto esterno e il
funzionamento, per verificare che non abbiano
subito danni durante la distribuzione e il trasporto.
Se si riscontra qualche problema, contattare il
rivenditore prima di utilizzare il prodotto.
I numeri dei prodotti sono aggiornati a settembre
2009. È possibile che subiscano delle modifiche.
1 Sacca portaobiettivo
2 Paraluce
3 Copriobiettivo
4 Copriobiettivo posteriore
(Il copriobiettivo anteriore e quello posteriore
sono installati sull’obiettivo intercambiabile al
momento dell’acquisto.)
50
VQT2H16
≥ Consultare anche le istruzioni per l’uso della
fotocamera per informazioni sulla procedura di
installazione e disinstallazione della fotocamera.
∫ Installazione dell’obiettivo
≥ Controllare che la fotocamera sia spenta.
1 Ruotare il
copriobiettivo
posteriore per
disinstallarlo.
A:
Copriobiettivo posteriore
2
Allineare i segni per
l’installazione dell’obiettivo B
(segni rossi) sul corpo della
fotocamera e sull’obiettivo,
quindi ruotare l’obiettivo nella
direzione indicata dalla
freccia finché non scatta.
• Non premere il pulsante di sblocco dell’obiettivo
quando si installa un obiettivo.
• Non tentare di installare l’obiettivo tenendolo
diagonalmente rispetto al corpo della fotocamera,
per evitare di graffiare il supporto dell’obiettivo.
• Controllare che l’obiettivo sia installato correttamente.
Page 51

∫ Disinstallazione dell’obiettivo
≥ Controllare che la fotocamera sia spenta.
Premere il pulsante di sblocco
dell’obiettivo C e nel contempo ruotare
fino in fondo l’obiettivo nella direzione
indicata dalla freccia per rimuoverlo.
• Installare il copriobiettivo
posteriore per evitare di
graffiare il punto di contatto.
• Installare il copriobiettivo
posteriore sulla fotocamera
per evitare che sporcizia o
polvere penetrino all’interno
dell’unità principale.
∫
Installazione e rimozione del copriobiettivo
≥ Fare attenzione a non
perdere il
copriobiettivo.
∫ Installazione del paraluce
(Accessorio in dotazione)
Inserire il paraluce sull’obiettivo con i lati
corti nella parte superiore e inferiore,
quindi ruotarlo nella direzione indicata
dalla freccia finché non si sente uno
scatto.
D: Allineamento al segno
∫ Rimozione del Paraluce
Ruotare il paraluce nella direzione
indicata dalla freccia per rimuoverlo.
VQT2H16
51
Page 52

≥ Quando si riprendono immagini con il flash e il
paraluce è installato, la parte inferiore dello
schermo può risultare scura (effetto vignetta) e il
controllo del flash può essere disabilitato, poiché il
flash fotografico può essere oscurato dal
paraluce. Si consiglia di scollegare il paraluce.
≥ Quando si utilizza la lampada di aiuto AF in
condizioni di oscurità, scollegare il paraluce.
∫ Installazione dei filtri
≥ È possibile che si verifichi un effetto vignetta se si
utilizzano 2 o più protezioni MC (opzionali:
DMW-LMC46), filtri PL (opzionali:DMW-LPL46) o
filtri ND (opzionali:DMW-LND46), oppure se si
utilizzano protezioni e/o filtri spessi.
≥ Se il filtro viene stretto eccessivamente, può
diventare impossibile rimuoverlo. Evitare quindi di
stringerlo troppo.
≥ È possibile installare il copriobiettivo con il filtro
già installato.
≥ Su questo obiettivo non è possibile installare una
lente o adattatore di conversione. È possibile
utilizzare un filtro, ma collegare qualsiasi altro
elemento può danneggiare l’obiettivo.
52
VQT2H16
Nomi e funzioni dei componenti
∫ Obiettivo
1 5
1 Superficie dell’obiettivo
2 Ghiera di messa a fuoco
Ruotare per mettere a fuoco quando si scattano
fotografie utilizzando la messa a fuoco manuale.
3 Interruttore [O.I.S.]
Quando l’obiettivo è installato sulla fotocamera la
funzione di stabilizzazione è attivata se l’interruttore
[O.I.S.] è posizionato su [ON].
≥ Si consiglia di posizionare l’interruttore [O.I.S.] su
[OFF] quando si utilizza un treppiede.
2 3 4
6
Page 53

≥ Nei seguenti casi la funzione di stabilizzazione
può rivelarsi inefficace.
– Quando le oscillazioni sono forti.
– Quando si utilizza lo zoom digitale.
– Quando si riprendono immagini seguendo un
soggetto in movimento.
– Quando la velocità dell’otturatore viene ridotta
per la ripresa di immagini in interni o in condizioni
di scarsa illuminazione.
– Quando si riprendono immagini ravvicinate.
4 Interruttore [FOCUS]
[FULL]: La distanza utile di messa a fuoco è di
0,15 m a
riprendere immagini con la funzione Macro.
[LIMIT]: La distanza utile di messa a fuoco è di
0,5 m a ¶. La messa a fuoco automatica
sarà più rapida.
. Utilizzare la posizione [FULL] per
5 Punto di contatto
6 Segno per l’installazione dell’obiettivo
Nota
Quando si riprende un soggetto da distanza
≥
ravvicinata utilizzando il flash, la luce del flash verrà
bloccata dall’obiettivo e una parte dell’immagine
potrà risultare scura. Controllare la distanza dal
soggetto quando si riprende un’immagine.
≥ A causa delle sue specifiche macro, questo
obiettivo ha le seguenti caratteristiche.
– La messa a fuoco richiede tempo.
– La distanza utile di messa a fuoco è abbastanza
piccola.
Precauzioni per l’uso
∫ L’obiettivo
Fare attenzione a non lasciar cadere o a non
urtare l’obiettivo. Evitare inoltre di esercitare una
forte pressione sull’obiettivo.
Fare attenzione a non far cadere la custodia in cui è
≥
stato inserito l’obiettivo in quanto questo può
danneggiarsi. La fotocamera può smettere di
funzionare e potrebbe non essere più possibile
registrare delle immagini.
Quando si utilizzano pesticidi e altre sostanze
volatili nelle vicinanze della fotocamera fare
attenzione che non vengano a contatto con
l’obiettivo.
≥ Se tali sostanze vengono a contatto con l’obiettivo
possono danneggiarlo o provocare il distacco di
vernice.
Non lasciare l’unità installata sulla fotocamera
mentre la si trasporta.
≥ Non utilizzare e non lasciare mai l’unità nelle
seguenti condizioni, per evitare problemi di
funzionamento.
– Esposta alla luce del sole, o in spiaggia d’estate
53
VQT2H16
Page 54

– Temperatura e umidità elevate o soggette a
grossi sbalzi
– Elevate concentrazioni di sabbia, polvere o sporco
– Dove sono presenti fiamme
– Vicino a caloriferi, condizionatori o umidificatori
– Dove l’unità può venire a contatto con l’acqua
– Dove sono presenti vibrazioni
– All’interno di un’auto
≥ Vedere anche le istruzioni per l’uso della
fotocamera digitale.
≥ Quando si prevede di non utilizzare l’unità per un
periodo prolungato, si consiglia di porvi accanto
un disseccante (silica gel). In caso contrario
potrebbero verificarsi dei malfunzionamenti dovuti
alla presenza di muffe ecc. Si consiglia di
controllare il funzionamento dell’unità prima
dell’uso.
≥ Non lasciare l’obiettivo a contatto per lungo tempo
con prodotti in gomma o in plastica.
≥ Non toccare i contatti elettrici dell’unità. In caso
contrario l’unità può guastarsi.
≥ Non smontare o alterare l’unità.
Non utilizzare benzina, diluenti, alcol o prodotti
simili per pulire l’unità.
54
VQT2H16
≥ L’utilizzo di solventi può danneggiare l’obiettivo o
provocare il distacco di vernice.
≥ Rimuovere la polvere o le impronte digitali
eventualmente presenti con un panno morbido e
asciutto.
≥ Usare un panno asciutto per rimuovere lo sporco
e la polvere dalla ghiera della messa a fuoco.
≥ Non utilizzare un detergente da cucina o un panno
chimico.
Ricerca guasti
Quando la fotocamera viene accesa o spenta, si
sente un suono.
≥ È il suono provocato dal movimento dell’obiettivo
o dell’apertura, e non si tratta di un
malfunzionamento.
Si sente un rumore quando l’obiettivo viene
scosso.
≥ È il rumore generato dal funzionamento dello
stabilizzatore dell’obiettivo e non si tratta di un
malfunzionamento.
Page 55

Specifiche
LENTI INTERCAMBIABILI PER FOTOCAMERA DIGITALE
“LEICA DG MACRO– ELMARIT 45 mm/F2.8 ASPH./MEGA O.I.S.”
Lunghezza focale f=45 mm (equivalente per fotocamera con pellicola da 35 mm: 90 mm)
Tipo di apertura 7 otturatori a lamelle/diaframma a iride/diaframma circolare
Gamma dell’apertura F2.8
Valore minimo dell’apertura F22
Costruzione dell’obiettivo 14 elementi in 10 gruppi
Distanza di messa a fuoco [FULL]: 0,15 m a ¶ / [LIMIT]: 0,5 m a 
(dalla riga di riferimento della distanza di messa a fuoco)
Ingrandimento massimo
dell’immagine 1,0k (equivalente per fotocamera con pellicola da 35 mm: 2,0k)
Stabilizzatore ottico di immagine Disponibile
Supporto “Micro Four Thirds Mount”
Profondità di campo 27x
Diametro del filtro 46 mm
Diametro massimo Circa 63 mm
Lunghezza complessiva Circa 62,5 mm
(dall’estremità dell’obiettivo alla base del supporto dell’obiettivo)
Massa Circa 225 g
(1 lente asferica, 1 lente ED)
55
VQT2H16
Page 56

∫ L’Esposizione
1323132
3
La differenza tra il valore F nominale (valore dell’apertura visualizzato sulla fotocamera) e il valore F
effettivo (valore effettivo dell’apertura) sarà maggiore quando si riprendono delle immagini utilizzando la
funzione macro, che consente riprese ravvicinate ingrandite. Quando si utilizza un esposimetro autonomo
normalmente disponibile in commercio, è necessario correggere il valore in base all’ingrandimento e alla
distanza dal soggetto. Per quanto riguarda la correzione dell’esposizione (fattore di esposizione) consultare
la tabella seguente.
La correzione della differenza tra il valore F nominale e quello effettivo non è necessaria quando si utilizza
la funzione di esposizione automatica della fotocamera, poiché in tal caso l’esposizione viene determinata
misurando la luce che attraversa l’obiettivo.
Guida per la correzione dell’esposizione quando si utilizza un esposimetro autonomo
Ingrandimento 1/¶ 1/8 1/4 1/3 1/2 1/1,5 1/1
Distanza ¶ 0,47 m 0,28 m 0,23 m 0,19 m 0,17 m 0,15 m
Valore F nominale F2.8
Valore F effettivo F2.8 F3.2 F3.5 F4.0 F4.5 F5.0 F5.6
Correzione
dell’esposizione
(Fattore di
esposizione)
(In intervalli di 1/3)
≥ La distanza è la distanza effettiva tra il piano di ripresa (segno [ ] sul corpo della fotocamera digitale) e
il soggetto.
≥ L’ingrandimento rappresenta il rapporto tra (dimensioni dell’immagine del soggetto a livello del piano di
ripresa) / (dimensioni effettive del soggetto).
56
VQT2H16
n0+ + +1+1 +1 +2
Page 57

目錄
安全注意事項.................................. 57
故障預防..................................... 59
提供的附件.................................... 60
/ 取下鏡頭 ................................ 61
安裝
元件的名稱及功能.............................. 64
使用時的注意事項.............................. 65
故障排除..................................... 65
規格.......................................... 66
安全注意事項
使本產品遠離磁性設備(如微波爐、電視、視訊遊戲設
備、無線電發射機、高壓線等)。
≥ 請勿在移動電話附近使用相機,否則會影響圖片和
聲音質量。
≥ 如果相機由於受帶磁設備影響而不能正常工作,請
先將其關閉,取出電池和 / 或斷開連接的 AC 適配
器, 然後重新插入電池和 / 或連接 AC 適配器。隨
後,開啟相機。
此鏡頭可用於與鏡頭座標準
中 文
“Micro Four Thirds
無法安裝到 4/3™(Four Thirds™) 接口規格的相機上。
≥
™ System”兼 容 的 數 位 相 機。
≥ 本使用說明書中的數位相機圖例以DMC-GF1 為例
進行說明。
≥ 由於產品的不斷改進,本說明書中所描述的產品外
觀和規格可能與實際所購買的產品有所不同。
≥ Four Thirds
TM
和 Four Thirds 標誌是 Olympus
Imaging Corporation 在日本、美國、歐盟和其他
國家的商標或註冊商標。
≥ Micro Four Thirds
TM
和 Micro Four Thirds 標誌是
Olympus Imaging Corporation 在日本、美國、歐
盟和其他國家的商標或註冊商標。
≥ G MICRO SYSTEM是 LUMIX 的鏡頭互換式數位相
機系統,基於微型 4/3 系統 (Micro Four Thirds
System) 標準。
≥ LEICA 是 Leica Microsystems IR GmbH 的註冊商
標。 ELMARIT 是 Leica Camera AG 的註冊商標。
LEICA DG 鏡頭是採用 Leica Camera AG 品質標
準認可的測試儀器和品質保證體系生產的產品。
≥ 說明書中列印的其他名稱、公司名稱和產品名稱都
是有關公司的商標或註冊商標。
VQT2H16
57
Page 58

- 如果看到此符號的話 -
歐盟以外國家的棄置資訊
本符號只適用於歐盟國家。
如欲丟棄本產品,請聯絡當地
政府單位或經銷商,洽詢正確
的棄置方法。
進口廠商 : 台松電器販賣股份有限公司
地址 : 新北市中和區員山路 579 號
電話 :(02)2223-5121
58
VQT2H16
Page 59

故障預防
∫ 鏡頭保養
≥ 沙子及塵土會損壞鏡頭。 在沙灘等地方使用鏡頭
時,請勿讓沙子或塵土進入到鏡頭或端子中。
≥ 此鏡頭不防水。 如果水滴濺到鏡頭上,請用乾布擦
拭鏡頭。
≥ 請勿用力按壓鏡頭。
≥ 當鏡頭表面有污垢(水、油和手印等)時,相片
可能會受到影響。 拍攝前後,請用一塊軟乾布輕輕
擦拭鏡頭表面。
≥ 請勿將鏡頭支座朝下放置。 請勿使鏡頭支座接觸點
1 變髒。
∫ 關於水汽凝結(鏡頭的霧化)
≥ 當周圍環境溫度和濕度如下變化時,會發生水汽凝
結。 水汽凝結可能會使鏡頭變髒,產生霉菌及發生
故障,因此在下列情況時請注意:
– 在寒冷的天氣裡將相機從室外帶到室內時
– 將相機帶到開著空調的車內時
– 空調等設備的冷風直接吹向鏡頭時
– 在潮濕的地方
≥ 要防止水汽凝結,請將相機放在塑膠袋中,直到相
機溫度接近周圍環境溫度。 如果發生了水汽凝結,
請關閉電源,然後將其擱置約2 小時。 當相機溫度
接近周圍環境溫度時,霧化將自然消失。
59
VQT2H16
Page 60

提供的附件
VFC4456 VYC1005 VYF3284 VFC4315
312 4
[ 請在打開包裝取出本裝置時進行檢查 ]
當從其包裝盒中取出本裝置時,請檢查是否包含主機
及其提供的附件,還要檢查它們的外觀和功能,以確保
它們在配送和運輸過程中沒有損壞。
如果發現有問題,請在使用本產品前連繫您的銷售商。
產品號碼截至 2009 年 9 月為準。此後可能會有變更。
1 鏡頭儲藏袋
2 鏡頭遮光罩
3 鏡頭蓋
4 鏡頭後蓋
(購買時,可互換鏡頭上安有鏡頭蓋和鏡頭後
蓋。)
60
VQT2H16
Page 61

安裝 / 取下鏡頭
≥ 安裝及取下鏡頭的方法也請參閱相機的使用說明
書。
∫ 安裝鏡頭
≥ 檢查相機是否關閉。
1 轉動鏡頭後蓋將其取
下。
A: 鏡頭後蓋
2 將鏡頭對準機身上的鏡
頭安裝標記 B (紅色標
記),然後朝箭頭方向轉動
鏡頭直到發出喀噠聲為止。
• 安裝鏡頭時,請勿按鏡頭釋放
按鈕。
• 請勿將鏡頭以傾斜的狀態安裝到相機上,否則,鏡
頭接座會被劃傷。
• 檢查鏡頭是否安裝正確。
∫ 取下鏡頭
≥ 檢查相機是否關閉。
在按下 C 鏡頭釋放按鈕的
同時,盡可能朝箭頭方向轉
動鏡頭以將其取下。
• 請蓋上鏡頭後蓋,這樣就不會
劃傷鏡頭支座觸點。
• 將機身蓋安裝到相機上,以防
止污物或灰塵進入機身內部。
∫ 安裝 / 取下鏡頭蓋
≥ 小心不要把鏡頭蓋弄丟
了。
61
VQT2H16
Page 62

∫ 安裝鏡頭遮光罩(提供的附件)
將鏡頭遮光罩的短的部分位於上下插入鏡頭,
朝箭頭指示的方向轉動直到停止為止。
∫ 取下鏡頭遮光罩
朝著箭頭方向轉動鏡頭遮光罩以卸下。
D: 對準標記
62
VQT2H16
≥ 在安裝了鏡頭遮光罩的情況下用閃光燈拍攝時,由
於鏡頭遮光罩可能使照片閃光燈變暗,因此螢幕的
下面部分可能會變暗 (暈影效果),並且閃光燈的
控制可能會失效。
≥ 當在暗處使用 AF 輔助燈時,請取下鏡頭遮光罩。
Page 63

∫ 安裝濾鏡
≥ 如果使用 2 個以上的 MC 保護鏡
(另購件 :DMW-LMC46)、 PL 偏光鏡
(另購件 :DMW-LPL46)或ND 濾鏡
(另購件 :DMW-LND46),或者使用厚的保護鏡
和/ 或濾鏡,則可能會出現暈影。
≥ 如果擰得過緊,可能無法取下濾鏡。因此,請不要
太用力地擰它。
≥ 安裝了濾鏡時,可以安裝鏡頭蓋。
≥ 不能將轉換鏡頭或轉接器安裝到該鏡頭上。 可以使
用濾鏡,但安裝其他任何元件可能會對鏡頭造成損
壞。
63
VQT2H16
Page 64

元件的名稱及功能
2 3 4
1 5
6
∫ 鏡頭
1 鏡頭表面
2 對焦環
用手動對焦拍攝時,轉動進行對焦。
64
VQT2H16
3 [O.I.S.] 開關
將鏡頭安裝到相機上時,如果 [O.I.S.] 開關設定為
[ON],則將啟動穩定器功能。
≥ 建議在使用三腳架時將 [O.I.S.] 開關設定到 [OFF]。
≥ 在下列情況下,穩定器功能可能無效。
– 當不斷抖動時。
– 當使用數位變焦時。
– 當追蹤移動物體拍攝圖片時。
– 當快門速度變慢在室內或暗處拍攝時。
– 拍攝特寫圖片時。
4 [FOCUS] 開關
[FULL]:可 以 在 0.15 m 至 ¶ 的範圍內對焦。 要使用
微距功能拍攝,請在 [FULL] 位置使用。
[LIMIT]:可 以 在 0.5 m 至 ¶ 的範圍內對焦。 自動對焦
的對焦速度將會變快。
5 接觸點
6 鏡頭安裝標記
注意
≥ 使用閃光燈拍攝近距離的被攝物體時,閃光燈發出
的光會被鏡頭遮擋住,圖片的一部分可能會變暗。
拍攝時,請確認到被攝物體的距離。
≥ 由於本鏡頭是微距規格,因此具有以下特徵。
– 對焦需要花費一些時間。
– 對焦範圍相當小。
Page 65

使用時的注意事項
∫ 關於鏡頭
請務必小心,切勿跌落或撞擊鏡頭。還要務必小心,切
勿在鏡頭上施加過多壓力。
請注意不要讓裝有鏡頭的包跌落,因為這樣可能會損
≥
壞鏡頭。相機可能會停止正常操作,可能無法繼續拍
攝圖片。
在相機周圍使用殺蟲劑或其他揮發性的物質時,請勿
使其接觸到鏡頭。
≥ 如果此類化學藥品接觸到鏡頭,可能會損壞鏡頭,
表面漆可能也會剝落。
請勿在本裝置還安裝在相機機身時攜帶本裝置。
≥ 任何情況下都不要在以下地方使用或存放本裝置,
因為這樣做可能導致操作時出現問題或產生故障。
– 太陽直射的地方或夏天的海邊
– 溫度和濕度較高或者溫度和濕度變化劇烈的地方
– 沙子、灰塵或污垢比較集中的地方
– 有火的地方
– 靠近加熱器、空調或加濕器的地方
– 水可能打濕本裝置的地方
– 受到震動的地方
– 車內
≥ 也請參閱數位相機的使用說明書。
≥ 準備長時間不使用本裝置時,建議在存放時放入一
些乾燥劑 (矽膠)。 否則,可能會由於發霉等原因
而導致性能出現故障。 建議在使用前先檢查本裝置
是否能夠正常運行。
≥ 請勿讓鏡頭與橡膠或塑料製品長時間接觸。
≥ 請勿觸摸本裝置的電觸點。 這樣做可能會導致本裝
置發生故障。
≥ 請勿拆卸或改裝本裝置。
請勿使用汽油、稀釋劑、酒精或其他類似的清潔劑清潔
本裝置。
≥ 使用溶劑會損壞鏡頭或導致表面漆剝落。
≥ 請用一塊乾軟布擦袪灰塵或手印。
≥ 請用乾的除塵布擦去對焦環上的污垢和灰塵。
≥ 請勿使用廚房清潔劑或經化學方法處理過的抹布。
故障排除
當相機開啟或關閉時聽到機械音。
≥ 這是鏡頭或光圈運動的聲音,不是故障。
晃動鏡頭時聽到聲音。
≥ 這是鏡頭內部的防手震鏡頭的工作音,而並非故
障。
65
VQT2H16
Page 66

規格
數位相機用可替換鏡頭
“LEICA DG MACRO– ELMARIT 45 mm/F2.8 ASPH./MEGA O.I.S.”
焦距
光圈類型
光圈範圍
最小光圈值
鏡頭結構 14 件 10 組(1 片非球面鏡片、 1 片 ED 鏡片)
In focus(焦點對準)距離
最大影像放大率
光學影像穩定器 可用
裝配 “Micro Four Thirds 接口 ”
視角
濾鏡直徑
最大直徑
全長
重量
66
VQT2H16
f=45 mm(相當於 35 mm 菲林相機: 90 mm)
7 葉片快門 / 虹膜光圈 / 園形光圈
F2.8
F22
[FULL] : 0.15 m 至 ¶ / [LIMIT] : 0.5 m 至 ¶(從焦距參考線)
1.0k(相當於 35 mm 菲林相機: 2.0k)
27x
46 mm
約 63 mm
約 62.5 mm (從鏡頭的頂部到鏡頭座的底部)
約 225 g
Page 67

∫ 關於曝光
132
3
2
3
使用可以將近處的被攝物體放大拍攝的微距功能拍攝時,標稱 F 值(相機上顯示的光圈值)和有效 F 值(實際
光圈值)之間的差值會較大。 使用市售的獨立的曝光表時,根據倍率和到被攝物體的距離,需要修正該值。 有
關曝光補正(曝光係數),請 參 閱 下 表。
用相機的自動曝光,無需修正標稱 F 值和有效 F 值之間的差值,因為相機會通過測量從鏡頭進入的光來確定
曝光。
使用獨立的曝光表時的曝光補正指南
倍率
距離
標稱 F 值
有效 F 值
曝光補正
(曝光係數)
(以 1/3 級增減)
≥ 距離是指攝影面(數位相機機身上標記的 [])到被攝物體之間的實際距離。
≥ 倍率表示 (在攝影面的被攝物體的影像大小)/ (被攝物體的實際大小)。
1/¶ 1/8 1/4 1/3 1/2 1/1.5 1/1
¶ 0.47 m 0.28 m 0.23 m 0.19 m 0.17 m 0.15 m
F2.8
F2.8 F3.2 F3.5 F4.0 F4.5 F5.0 F5.6
n0+ + +1+1 +1 +2
1
3
67
VQT2H16
Page 68

Содержание
Информация для вашей безопасности ...................68
Правила эксплуатации............................................69
Принадлежности, входящие в комплект .................70
Уст а нов к а /Снятие объектива ...................................71
Названия и функции составных частей ...................74
Предосторожности при использовании
фотокамеры...............................................................75
Уст ра нен ие неисправностей ..................................76
Технические характеристики ....................................77
-Если Вы увидите такой символ-
Информация по обращению с отходами для
стран, не входящих в Европейский Союз
68
VQT2H16
Действие этого символа
распространяется только на
Европейский Союз.
Если Вы собираетесь
выбросить данный продукт,
узнайте в местных органах
власти или у дилера, как
следует поступать с
отходами такого типа.
Информация для вашей
безопасности
Храните прибор вдали от источников
электромагнитного излучения (например,
микроволновых печей, телевизоров,
оборудования для видеоигр, радиопередатчиков,
высоковольтных линий и т.д.).
≥ Не пользуйтесь фотокамерой вблизи сотовых
телефонов, так как телефоны могут вызвать
помехи, отрицательно сказывающиеся на
качестве снимков и звука.
Если камера подвергается негативному влиянию
≥
электромагнитного излучения и перестает
работать нормально, выключите камеру,
извлеките батарею и/или подключенный сетевой
адаптер переменного тока. Затем снова вставьте
батарею и/или снова подключите сетевой
адаптер переменного тока и включите камеру.
Объектив может использоваться с цифровой
камерой, совместимой со стандартом крепления
объективов “Micro Four Thirds
Не предусмотрена его установка на фотокамеры
≥
со спецификацией крепления Four Thirds
TM
System”.
TM
.
Page 69

≥ На иллюстрациях цифровой камеры в данных
инструкциях по эксплуатации в качестве
примера показан DMC-GF1.
≥ Внешний вид и спецификации продуктов,
описанные в данном руководстве, могут
отличаться от фактических приобретенных
продуктов ввиду более поздних улучшений.
≥ Four Thirds
TM
и знаки логотипа Four Thirds
являются товарными знаками или
зарегистрированными товарными знаками
Olympus Imaging Corporation в Японии,
Соединенных Штатах, Европейском Союзе и
других странах.
≥ Micro Four Thirds
TM
и знаки логотипа Micro Four
Thirds являются товарными знаками или
зарегистрированными товарными знаками
Olympus Imaging Corporation в Японии,
Соединенных Штатах, Европейском Союзе и
других странах.
≥ G MICRO SYSTEM является системой
объективов сменного типа для цифровых
камер LUMIX, разработанной на основе
стандарта Micro Four Thirds System.
LEICA является зарегистрированным товарным
≥
РУССКИЙ ЯЗЫК
знаком Leica Microsystems IR GmbH. ELMARIT
является зарегистрированным товарным знаком
Leica Camera AG. Объективы LEICA DG
производятся с использованием измерительных
приборов и систем контроля качества,
сертифицированных Leica Camera AG на основе
корпоративных требований к качеству.
≥
Другие названия, названия фирм и изделий,
отмеченные в этой инструкции, являются
торговыми знаками или зарегистрированными
товарными знаками соответствующих компаний.
Правила эксплуатации
∫ Уход за объективом
≥
Песок и пыль могут привести к повреждению
объектива. При использовании объектива на
пляже и т.п. убедитесь, что внутри объектива
и гнезд нет песка и пыли.
≥
Данный объектив не является
водонепроницаемым. Если на объектив попали
капли воды, вытрите объектив сухой тканью.
≥ Нельзя сильно нажимать на объектив.
≥ В случае попадания на поверхность объектива
грязи (воды, масла, отпечатков пальцев и т. д.)
качество снимка может ухудшиться. Следует
осторожно вытереть поверхность объектива
мягкой сухой тканью перед съемкой.
69
VQT2H16
Page 70

≥ Не ставьте объектив монтажной поверхностью
вниз. Не допускайте попадание загрязнений на
монтажные поверхности 1 объектива.
≥ Для предотвращения конденсации поместите
камеру в пластиковый пакет, чтобы ее
температура сравнялась с температурой
окружающего воздуха. При возникновении
конденсации выключите камеру и оставьте ее
примерно на два часа. Когда температура
камеры сравняется с температурой
окружающего воздуха, запотевание исчезнет
естественным образом.
∫ О конденсации (Запотевании
объектива)
≥ Конденсация происходит при разнице в
температуре и влажности, как описано ниже.
Конденсация может привести к загрязнению
объектива, появлению плесени и
неисправностей, поэтому необходимо
соблюдать осторожность в следующих
ситуациях:
– при внесении камеры в помещение с улицы в
холодную погоду
– при внесении камеры в салон автомобиля, где
работает кондиционер
– если поток холодного в
кондиционера направлен прямо на объектив
– во влажных местах
70
VQT2H16
оздуха из
Принадлежности,
входящие в комплект
[Комплектность необходимо проверять при
распаковке устройства]
При изъятии устройства из оригинальной упаковки
проверьте наличие основного устройства и его
комплектующих, а также осмотрите устройство
снаружи и проверьте его функциональность,
чтобы убедиться в отсутствии каких-либо
повреждений в результате транспортировки.
Если вы обнаружите какое-либо несоответствие,
свяжитесь с вашим поставщиком,
воздержавшись от эксплуатации изделия.
Page 71

Номера изделий правильны по состоянию на
VFC4456 VYC1005 VYF3284 VFC4315
312 4
сентябрь 2009 г. Они могут изменяться.
∫ Установка объектива
≥ Убедитесь, что камера выключена.
1 Поверните заднюю
крышку объектива и
снимите ее.
A: Крышка задней части
объектива
1 Сумка для объектива
2 Бленда
3 Крышка объектива
4 Крышка задней части объектива
(Во время покупки крышка объектива и
задняя крышка объектива прикреплены к
сменному объективу.)
Установка/Снятие
объектива
≥ Информацию об установке и снятии объектива
см. также в инструкциях по эксплуатации
камеры.
2 Совместите
установочную метку
объектива B (красная
метка) на корпусе
фотокамеры с меткой
на объективе и затем
поверните объектив в направлении
стрелки до щелчка.
• Не нажимайте кнопку открытия объектива в
процессе установки объектива.
• Не пытайтесь установить объектив под углом
к корпусу камеры, поскольку это может
привести к повреждению крепления
объектива.
• Убедитесь, что объектив установлен
правильно.
VQT2H16
71
Page 72

∫ Снятие объектива
≥ Убедитесь, что камера выключена.
Чтобы снять объектив,
нажмите кнопку
открытия объектива C
и одновременно
поверните объектив до
упора в направлении
стрелки.
• Прикрепите заднюю крышку объектива,
чтобы избежать царапин монтажной
поверхности объектива.
• Прикрепите к камере крышку корпуса во
избежание попадания грязи и пыли внутрь
основного устройства.
∫ Установка и снятие крышки объектива
≥ Будьте осторожны
чтобы не потерять
крышку объектива.
72
VQT2H16
∫ Присоединение бленды объектива
(Принадлежность в комплекте)
Вставьте бленду в объектив короткой
стороной в верхней и в нижней части,
затем поворачивайте ее по
направлению стрелки до блокировки.
D: Отрегулируйте до совпадения с отметкой
Page 73

∫ Снятие бленды объектива
Чтобы снять бленду, поверните ее в
направлении стрелки.
≥ При съемке со вспышкой с использованием
бленды нижняя часть снимка может быть
затененной (эффект виньетирования), а
управление вспышкой может быть отключено,
поскольку бле нд а может затенять вспышку.
Рекомендуется отсоединить бленду.
≥ При использовании в темноте вспомогательной
лампы автоматической фокусировки
отсоедините бленду объектива.
∫ Установка фильтров
≥ Виньетирование может возникать при
использовании 2 или более защитных
устройств MC (поставляются отдельно:
DMW-LMC46), фильтров PL (поставляются
отдельно:DMW-LPL46) или фильтров ND
(поставляются отдельно:DMW-LND46) либо
при использовании толстых защитных
устройств и/или фильтров.
≥ Если фильтр будет чрезмерно затянут, снять
его может быть невозможно, поэтому не
затягивайте его слишком сильно.
≥ Крышку объектива можно прикреплять и в то
случае, если уже прикреплен фильтр.
≥ К данному объективу нельзя прикрепить
преобразовательный объектив или
переходник. Можно использовать фильтр, но
прикрепление любого другого элемента может
привести к повреждению объектива.
VQT2H16
м
73
Page 74

Названия и функции
2 3 4
1 5
6
составных частей
∫ Объектив
1 Поверхность линзы
2 Кольцо фокусировки
Вращайте для наведения на резкость при
съемке в режиме с ручной наводкой на резкость.
74
VQT2H16
3 Переключатель [O.I.S.]
Если объектив прикреплен к камере, функция
стабилизатора установлена на активацию, если
переключатель [O.I.S.] установлен на [ON].
≥ При использовании штатива рекомендуется
устанавливать переключатель [O.I.S.] в
положение [OFF].
≥ Функция стабилизатора может работать
неэффективно в следующих случаях.
– Если увеличение слишком большое.
– При исползовании цифрового увеличения.
– При съемке со слежением за двигающимися
объектами.
– При слишком низкой ск
время съемки внутри помещения или в
темном месте.
– Съемка крупным планом.
орости затвора, во
4 Переключатель [FOCUS]
[FULL]: Возможность фокусировки в диапазоне
от 0,15 м до ¶. Используйте положение
[FULL] для выполнения снимков с
применением функции макро.
[LIMIT]: Возможность фокусировки в диапазоне
от 0,5 м до ¶. Скорость фокусировки с
использованием автофокусировки
увеличивается.
Page 75

5 Метка установки объектива
6 Монтажная поверхность
Примечание
≥ При съемке со вспышкой бл из ко
расположенного объекта свет вспышки может
блокироваться объективом, и часть снимка
может быть затемнена. Проверяйте
расстояние до объекта при съемке.
≥ Данный объектив имеет следующие
характеристики, обусловленные
особенностями макросъемки.
– Для фокусировки требуется некоторое время.
– Диапазон фокусировки достаточно мал.
Предосторожности при
использовании
фотокамеры
∫ Об объективе
Старайтесь не ронять и не ударять объектив.
Также старайтесь не подвергать объектив
чрезмерному давлению.
≥ Следите за тем, чтобы не уронить в сумку, в
которую вы положили объектив, поскольку это
может привести к повреждению объектива.
Камера может перестать нормально работать,
и дальнейшая запись снимков может оказаться
невозможной.
При использовании пестицидов и других
учих веществ вблизи камеры убедитесь,
лет
что они не попадают на объектив.
≥ При попадании на объектив такие вещества
могут повредить объектив или привести к
отслаиванию краски.
Не носите устройство присоединенным к
корпусу фотокамеры.
≥ Категорически запрещается пользоваться
фотовспышкой или хранить ее в следующих
условиях, так как это может привести к сбоям в
рабо
те или неправильной работе.
75
VQT2H16
Page 76

– Под воздействием прямых солнечных лучей
или на пляже летом
– В местностях с высокой влажностью воздуха и
высокими температ урами, или с резкими
перепадами температуры и влажности
– В местностях с высокими концентрациями
песка, пыли или грязи
– При срабатывании вспышки
– Возле обогревателей, кондиционеров или
увлажнителей
– Где возможно намокание устройства
– Где присутствует вибрация
– В автомобиле
≥ См. та
≥
≥ Не оставляйте объектив в контакте с
≥
76
VQT2H16
кже инструкции по эксплуатации
цифровой камеры.
Если камера не будет использоваться в
течение длительного времени, рекомендуется
хранить ее вместе с влагопоглотителем
(силикагелем). Невыполнение данной
рекомендации может привести к нарушению
технических характеристик ввиду образования
плесени и т. д. Прежде чем использовать,
рекомендуется проверять работоспособность
устройства после такого длительного хранения.
резиновыми или пластиковым продуктами на
продолжительный период времени.
Не прикасайтесь к электрическим контактам
устройства. Это может вызвать сбой в его работе.
≥ Запрещается разбирать или вносить
изменения в аппарат.
Не используйте бензин, растворитель, спирт
и другие подобные моющие средства для
очистки аппарата.
≥ Использование растворителей может
повредить объектив или привести к
отслаиванию краски.
≥ Вытирайте пыль и следы пальцев мягкой сухой
тканью.
≥ Вытирайте грязь и пыль с фокусировочного
кольца сухой тканью для удаления пыли.
прещается использовать моющие средства
≥ За
или химически обработанную ткань.
Устранение неисправностей
При включении и выключении камеры
слышен звук.
≥ Звук возникает в результате движения
диафрагмы объектива и не является
неисправностью.
При сотрясении объектива слышен звук.
≥ Это рабочий звук линзы стабилизатора в
объективе, он не является признаком
неисправности.
Page 77

Технические характеристики
СМЕННЫЙ ОБЪЕКТИВ ДЛЯ ЦИФРОВОЙ ФОТОKAMEРЫ
“LEICA DG MACRO– ELMARIT 45 mm/F2.8 ASPH./MEGA O.I.S.”
Фокусное расстояние f=45 мм (Эквивалент 35 мм пленочной камеры: от 90 мм)
Тип диафрагмы 7 лепестковый затвор/ирисовая диафрагма/круговая диафрагма
Диапазон диафрагм F2.8
Минимальное значение
показателя диафрагмы F22
Конструкция объектива 14 элементов в 10 группах (1 асферическая линза, 1 линза ED)
Фокусное расстояние от [FULL]: от 0,15 м до ¶ / [LIMIT]: от 0,5 м до 
(от линии отсчета расс
Максимальное увеличение
изображения 1,0k (Эквивалент 35 мм пленочной камеры: 2,0k)
Оптический стабилизатор
изображения Имеется
Крепление “Micro Four Thirds Mount”
Угол обзора 27x
Диаметр фильтра 46 мм
Максимальный диаметр Прибл. 63 мм
Полная длина Прибл. 62,5 мм (от конца объектива до нижней стороны монтажной
поверхности объектива)
Масса Прибл. 225 г
тояния до объекта съемки)
VQT2H16
77
Page 78

∫ Об экспозиции
2
3
Разница между номинальным значением F (значение диафрагмы, отображенное на камере) и
действительным значением F (фактическое значение диафрагмы) будет большей при выполнении
снимков с помощью функции макро, позволяющей выполнять снимки увеличенных объектов
крупным планом. При использовании имеющихся в продаже отдельных экспонометров необходимо
корректировать значение, в зависимости от увеличения и расстояния до объекта. В следующей
та
блице приведены сведения о коррекции экспозиции (коэффициенте экспозиции).
Необязательно исправлять разницу между номинальным значением F и действительным значением
F с помощью автоматической экспозиции камер, поскольку экспозиция определяется таким образом
с помощью измерения света, проходящего через объектив.
Руководство по коррекции экспозиции при использовании отдельного экспонометра
Увеличение 1/¶ 1/8 1/4 1/3 1/2 1/1,5 1/1
Расстояние ¶ 0,47 м 0,28 м 0,23 м 0,19 м 0,17 м 0,15 м
Номинальное
значение F
Действительное
значение F
Коррекция экспозиции
(Коэффициент
экспозиции)
(С шагом 1/3)
≥ Расстояние — это фактическое расстояние от плоскости съемки (обозначена ме
корпусе цифровой камеры) до объекта.
≥ Увеличение представляет собой соотношение (размер изображения объекта на плоскости
съемки)/ (фактический размер объекта).
78
VQT2H16
F2.8 F3.2 F3.5 F4.0 F4.5 F5.0 F5.6
n0+ + +1+1 +1 +2
1
3
F2.8
1
3
ткой [] на
2
3
Page 79

Установленный производителем в порядке п. 2 ст. 5 федерального закона РФ “О защите прав
потребителей” срок службы данного изделия равен 7 годам с даты производства при условии,
что изделие используется в строгом соответствии с настоящей инструкцией по эксплуатации и
применимыми техническими стандартами.
VQT2H16
79
Page 80

E
VQT2H16-2
F0909HN2061 ( 1260 )
Panasonic Corporation
Web Site: http://panasonic.net
EU
Pursuant to at the directive 2004/108/EC, article 9(2)
Panasonic Testing Centre
Panasonic Marketing Europe GmbH
Winsbergring 15, 22525 Hamburg, Germany
Panasonic Corporation 2009
 Loading...