

Page 1
INTERCHANGEABLE LENS FOR DIGITAL CAMERA
For USA and Puerto Rico assistance, please call: 1-800-211-PANA(7262) or, contact us via the web at: http://www.panasonic.com/contactinfo
For Canadian assistance, please call: 1-800-99-LUMIX (1-800-995-8649) or
send e-mail to: lumixconcierge@ca.panasonic.com
Before connecting, operating or adjusting this
product, please read the instructions completely.
Operating Instructions
Model No. H-ES045
PP
VQT2H15-1
Page 2

Contents
Information for Your Sa fety.....................................2
Precautions...........................................................5
Supplied Accessories .............................................6
Attaching/Detaching the Lens................................. 6
Names and Functions of Components ................... 9
Cautions for Use...................... .............................10
Troubleshooting..................................................11
Specifications........................................................12
Limited Warranty. ............... .............. .....................14
-If you see this symbol-
Information on Disposal in other Countries
outside the European Uni on
2
VQT2H15
This symbol is only valid in the
European Union.
If you wish to discard this
product, please contact your
local authorities or dealer and
ask for the correct method of
disposal.
THE FOLLOWING APPLIES ONLY IN CANADA.
This Class B digital apparatus complies with
Canadian ICES-003.
Information for Your Safety
Keep the unit as far away as possible from
electromagnetic equipment (such as microwave
ovens, TVs, video games, radio transmitters,
high-voltage lines etc.).
≥ Do not use the camera near cell phones because
doing so may result in noise adversely affecting
the pictures and sound.
If the cam era i s ad ve rse ly a f fect ed b y e lect rom agne ti c
≥
equipment and stops functioning properly, turn the
camera off and remove the battery and/or the
connected AC adaptor. Then reinsert the battery and/
or reconnect the AC adaptor and turn the camera on.
The lens can be used with a digital camera
compatible with the lens mount standard for the
“Micro Four Thirds
It cannot be mounted on the Four ThirdsTM mount
≥
specification camera.
TM
System”.
Page 3

≥ The digital camera illustrations in these operating
instructions show DMC-GF1 as an example.
≥ The appearance and specifications of products
described in this manual may differ from the actual
products you have purchased due to later
enhancements.
≥ Four Thirds
TM
and Four Thirds Logo marks are
trademarks or registered trademarks of Olympus
Imaging Corporation, in Japan, the United States,
the European Union and other countries.
≥ Micro Four Thirds
TM
and Micro Four Thirds Logo
marks are trademarks or registered trademarks of
Olympus Imaging Corporation, in Japan, the
United States, the European Union and other
countries.
≥ G MICRO SYSTEM is a lens exchange type
digital camera system of LUMIX based on a Micro
Four Thirds System standard.
≥ LEICA is a registered trademark of Leica
Microsystems IR GmbH. ELMARIT is a registered
trademark of Leica Camera AG. The LEICA DG
lenses are manufactured using measurement
instruments and quality assurance systems that
have been certified by Leica Camera AG based
on the company’s quality standards.
≥ Other names, company names, and product
ENGLISH
names printed in these instructions are
trademarks or registered trademarks of the
companies concerned.
VQT2H15
3
Page 4

THE FOLLOWING APPLIES ONLY IN THE U.S.A.
FCC Note:
This equipment has been tested and found to comply with the limits for a Class B digital device, pursuant to Part 15 of
the FCC Rules.
These limits are designed to provide reasonable protection against harmful interference in a residential installation.
This equipment generates, uses and can radiate radio frequency energy and, if not installed and used in accordance
with the instructions, may cause harmful interference to radio communications. However, there is no guarantee that
interference will not occur in a particular installation. If this equipment does cause harmful interference to radio or
television reception, which can be determined by turning the equipment off and on, the user is encouraged to try to
correct the interference by one or more of the following measures:
● Reorient or relocate the receiving antenna.
● Increase the separation between the equipment and receiver.
● Connect the equipment into an outlet on a circuit different from that to which the receiver is connected.
● Consult the dealer or an experienced radio/TV technician for help.
Any unauthorized changes or modifications to this equipment would void the user’s authority to operate this device.
This device complies with Part 15 of the FCC Rules. Operation is subject to the following two conditions: (1) This
device may not cause harmful interference, and (2) this device must accept any interference received, including
interference that may cause undesired operation.
Responsible Party:
Panasonic Corporation of North Amer ica
One Panasonic Way
Secaucus, NJ 07094
Support Contact:
Panasonic Consumer Electronics Company
Telephone No.: 1-800-211-PANA (7262)
4
VQT2H15
Page 5
Precautions
∫ Lens Care
≥ Sand and dust can damage the lens. Make
sure that no sand or dust gets inside the lens
or the terminals when usi ng the lens on a
beach, etc.
≥ This lens is not waterproof. If drops of water
get onto the lens, wipe the lens with a dry
cloth.
≥ Do not press the lens with excessive force.
≥ When there is dirt (water, oil, and fingerprints, etc.)
on the surface of the lens, the picture may be
affected. Lightly wipe the surface of the lens with a
soft, dry cloth before and after taking pictures.
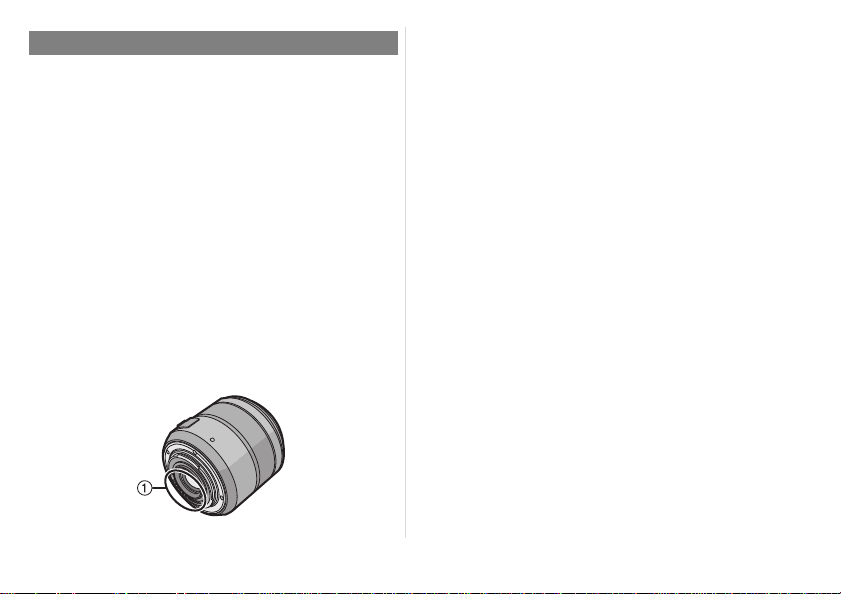
≥ Do not place the lens mount facing downwards.
Do not allow the lens contact point 1 to become
dirty.
∫ About Condensation (Fogging of the
Lens)
≥ Condensation occurs when there are differences
in temperature and humidity as described below.
Condensation can cause the lens to become dirty
and lead to mold and malfunctioning, so exercise
caution in the following situations:
–When the camera is brought indoors from outside
during cold weather
–When the camera is brought into an air-
conditioned car
–When cold air from an air conditioner is directly
blown onto the lens
–In humid places
≥ Put the camera into a plastic bag to allow it to
acclimatize to the surrounding temperature in
order to prevent condensation. If condensation
occurs, turn the power off and leave it for about
two hours. Once the camera acclimatizes to the
surrounding temperature the condensation will go
away naturally.
VQT2H15
5
Page 6
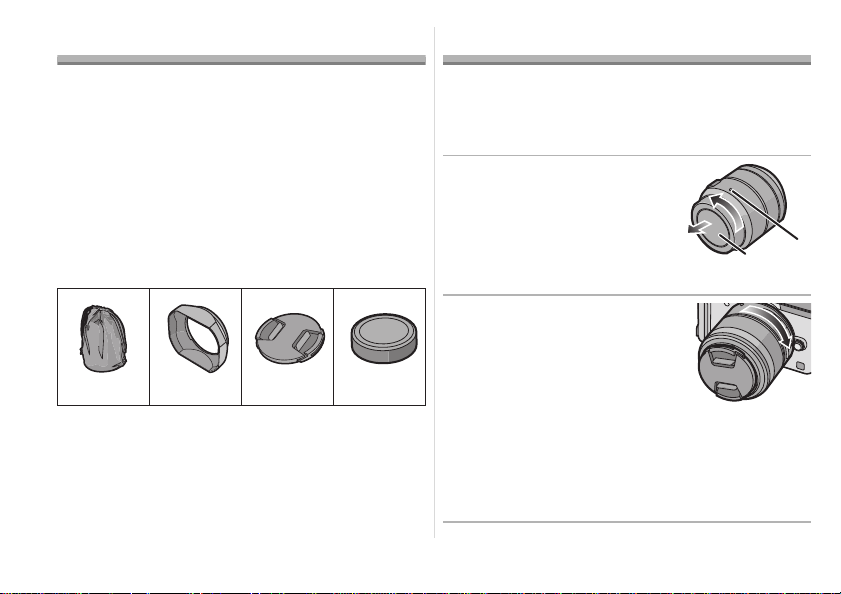
Supplied Accessories
VFC4456 VYC1005 VYF3284 VFC4315
312 4
Attaching/Detaching the Lens
[Inspection to be performed when you unpack the unit]
When removing the unit from its packing box, check
that the main unit and the supplied accessories are
there and also check their external appearance and
functions to verify that they have not sustained any
damage during distribution and transportation.
If you discover any trouble, contact your vendor
before using the product.
Product numbers correct as of September 2009.
These may be subject to change.
1 Lens Storage Bag
2 Lens Hood
3 Lens Cap
4 Lens Rear Cap
(The lens cap and lens rear cap are attached to
the interchangeable lens at the time of purchase.)
6
VQT2H15
≥ Refer also to the camera’s operating instructions
for attaching and detaching the lens.
∫ Attaching the Lens
≥ Check that the camera is turned off.
1 Turn the lens rear
cap to detach it.
A: Lens Rear Cap
2 Align the lens fitting
marks B (red marks) on
the camera body and the
lens and then rotate the
lens in the direction of
the arrow until it clicks.
•Do not press the lens release
button when you attach a lens.
•Do not try to attach the lens when holding it at an
angle to the camera body as the lens mount may
get scratched.
•Check that the lens is attached correctly.
Page 7
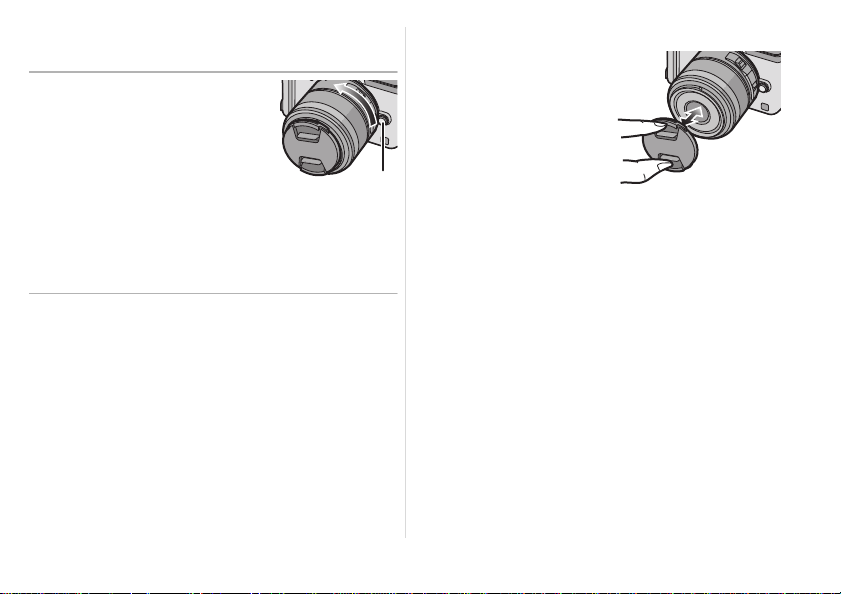
∫ Detaching the Lens
≥ Check that the camera is turned off.
Press the lens release
button C while turning
the lens as far as
possible in the direction
of the arrow to detach it.
•Attach the lens rear cap so
that the lens contact point does not get
scratched.
•Attach the body cap to the camera so no dirt or
dust will get inside the main unit.
∫ Attaching and Detaching the Lens Cap
≥ Be careful not to lose
the lens cap.
VQT2H15
7
Page 8
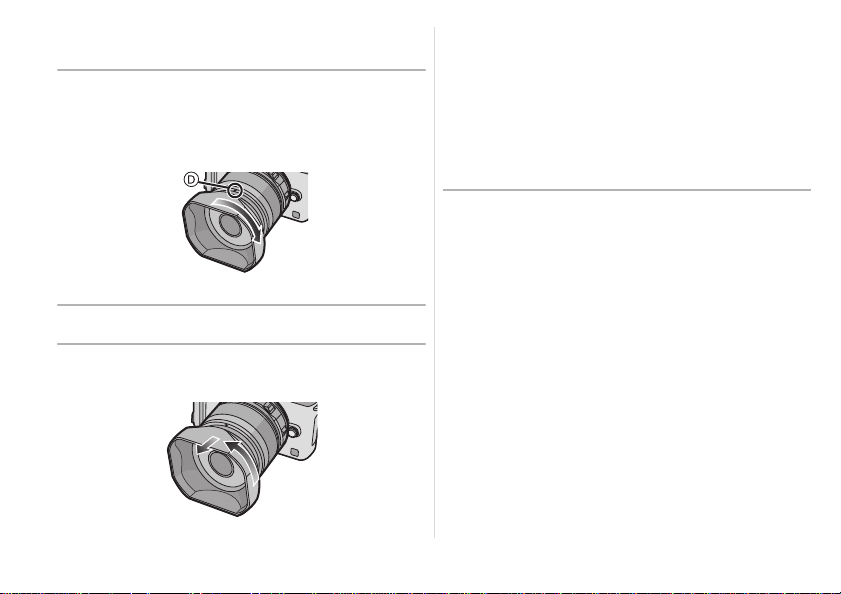
∫ Attaching the Lens Hood
(Supplied Accessory)
Insert the lens hood into the len s with the
short sides at the top and bottom, and
turn in the direction of the arrow until it
stops.
D: Fit to the mark
∫ Removing the Lens Hood
T urn th e len s hoo d in th e dire ction of the
arrow to detach it.
8
VQT2H15
•When taking pictures with the flash with the lens
hood attached, the lower portion of the screen
may turn dark (vignetting effect) and the control
of the flash may be disabled because the photo
flash may be obscured by the lens hood. We
recommend detaching the lens hood.
•When using the AF assist lamp in the dark,
detach the lens hood.
∫ Attaching Filters
≥ Vignetting may occur if using 2 or more
MC protectors (optional:DMW-LMC46),
PL filters (optional:DMW-LPL46) or ND filters
(optional:DMW-LND46), or if using thick
protectors and/or filters.
≥ The filter may become impossible to remove if
excessively tightened, so please refrain from
tightening it too strongly.
≥ It is possible to attach the lens cap with the filter
already attached.
≥ You cannot attach a conversion lens or adaptor to
this lens. A filter may be used, but attaching any
other element may cause damage to the lens.
Page 9
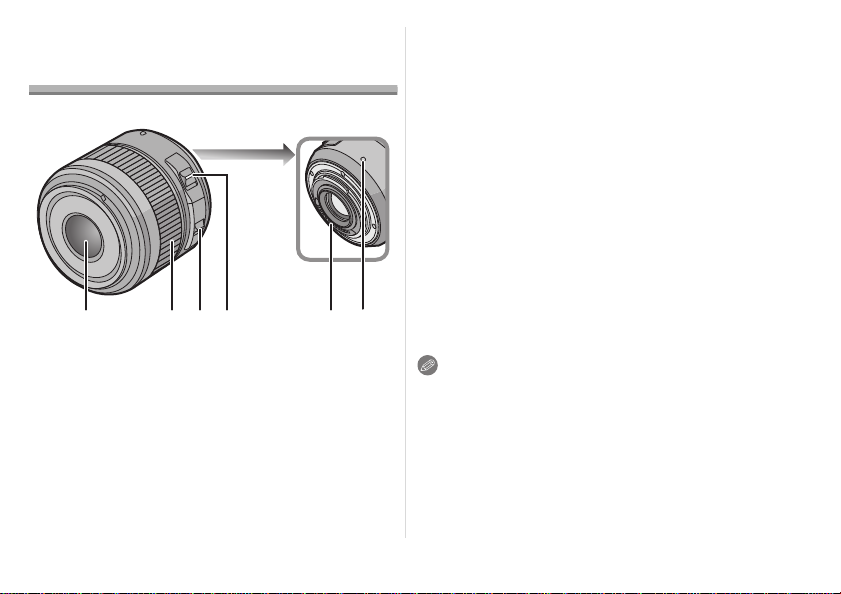
Names and Functions of
2 3 4
1 5
6
Components
∫ Lens
1 Lens surface
2 Focus ring
Rotate to focus when taking pictures with manual
focus.
3 [O.I.S.] switch
When the lens is attached to the camera the
stabilizer function is set to activate if the [O.I.S.]
switch is set to [ON].
≥ We recommend setting the [O.I.S.] switch to [OFF]
when using a tripod.
≥ The stabilizer function may not be effective in the
following cases.
–When there is a lot of jitter.
–When using the digital zoom.
– When taking pictures while following a moving subject.
–When the shutter speed becomes slower to take
pictures indoors or in dark places.
–When taking close-up pictures.
4 [FOCUS] switch
[FULL]: It can focus between the ranges of 0.15 m
(0.5 feet) to ¶. Use in [FULL] position to
take pictures using the macro function.
[LIMIT]:It can focus between the ranges of 0.5 m
(1.64 feet) to ¶. The speed of focusing with
auto focus will be faster.
5 Contact point
6 Lens fitting mark
Note
≥ When flash recording with a close subject, the
light of the flash will be blocked by the lens and
part of the picture may be dark. Check the
distance from the subject when recording.
≥ This lens has the following characteristics due to
its macro specifications.
–It takes time to focus.
–The range of focus is fairly small.
VQT2H15
9
Page 10

Cautions for Use
∫ About the Lens
Take care not to drop or knock the lens. Also
take care not to put a lot of pressure on the lens.
Take care not to drop the bag that you inserted the
≥
lens in as it may damage the lens. The camera may
stop operating normally and pictures may no longer
be recorded.
When using pesticides and other volatile
substances around the camera make sure that
they do not get onto the lens.
If such substances get onto the lens they can
≥
damage the exterior case or cause the paint to peel.
Do not carry the unit when it is still attached to
the camera body.
Under no circumstance s should the u nit be stored
≥
in any of the following locations since doing so may
cause problems in operation or malfunctioning.
–In direct sunlight or on a beach in summer
–In locations with high temperatures and humidity
levels or where the changes in temperature and
humidity are acute
–In locations with high concentrations of sand,
dust or dirt
–Where there is fire
10
VQT2H15
–Near heaters, air conditioners or humidifiers
–Where water may make the unit wet
–Where there is vibration
–Inside a vehicle
≥ Refer also to the operating instructions of the
digital camera.
≥ When the unit is not going to be used for a
prolonged period, we recommend storing with a
desiccant (silica gel). Failure to do so may result in
performance failure caused by mold, etc. It is
recommended that you check the unit’s operation
prior to use.
≥ Do not leave the lens in contact with rubber or
plastic products for extended periods of time.
≥ Do not touch the lens contact point. Doing so can
cause failure of the unit.
≥ Do not disassemble or alter the unit.
Do not use benzine, thinner, alcohol or other
similar cleaning agents to clean the lens glass or
exterior cabinet.
≥ Using solvents can damage the lens or cause the
paint to peel.
≥ Wipe off any dust or fingerprints with a soft, dry
cloth.
≥ Use a dry, dust cloth to remove dirt and dust on
the focus ring.
≥ Do not use a household detergent or a chemically
treated cloth.
Page 11

Troubleshooting
A sound is heard when the camera is turned on
or off.
≥ This is the sound of lens or aperture movement
and is not a malfunction.
A sound is heard when the lens is shaken.
≥ This is the sound of the operation of the stabilizer
lens in the lens and is not a malfunction.
11
VQT2H15
Page 12

Specifications
INTERCHANGEABLE LENS FOR DIGITAL CAMERA
“LEICA DG MACRO–ELMALIT 45 mm/F2.8 ASPH./MEGA O.I.S.”
Focal length f=45 mm (35 mm film camera equivalent: 90 mm)
Aperture type 7 leaf shutters/iris diaphragm/circular diaphragm
Aperture range F2.8
Minimum aperture value F22
Lens construction 14 elements in 10 groups (1 aspherical lens, 1 ED lens)
In focus distance [FULL]: 0.15 m (0.5 feet) to ¶ / [LIMIT]: 0.5 m (1 .6 4 feet) to 
Maximum image magnification 1.0k (35 mm film camera equivalent: 2.0k)
Optical image stabilizer Available
Mount “Micro Four Thirds Mount”
Angle of view 27x
Filter diameter 46 mm (1.81 inch)
Max. diameter Approx. 63 mm (2.48 inch)
Overall length Approx. 62.5 mm (2.46 inch)
Mass (Weight) Approx. 225 g (7.94 oz)
12
VQT2H15
(from the focus distance reference line)
(from the tip of the lens to the base side of the lens mount)
Page 13

∫ About the Exposure
132
3
2
3
The difference between the nominal F value (aperture value displayed on the camera) and the effective F
value (actual aperture value) will be greater when taking pictures using the macro function, which allows
you to take pictures of close-up subjects enlarged. When using a commercially available stand-alone
exposure meter, it is necessary to correct the value depending on the magnification and distance from the
subject. Refer to following table for the exposure correction (exposure factor).
It is not necessary to correct the difference between the nominal F value and the effective F value with the
automatic exposure of the camera, since it will determine the exposure by measuring the light coming in
through the lens.
Guide for exposure correction when using a stand-alone exposure meter
Magnification 1/¶ 1/8 1/4 1/3 1/2 1/1.5 1/1
Distance 
Nominal F value F2.8
Effective F value F2.8 F3.2 F3.5 F4.0 F4.5 F5.0 F5.6
Exposure correction
(Exposure factor)
(In steps of 1/3)
≥ Distance is the actual distance between the recording plane ([ ] marked on the body of the digital
camera) to th e subject.
Magnification represents the (size of the image of the subject at the recording plane) / (actual size of the subject).
≥
n0+ + +1+1 +1 +2
0.47 m
(1.54 feet)
0.28 m
(0.92 feet)
0.23 m
(0.75 feet)
0.19 m
(0.62 feet)
1
3
0.17 m
(0.56 feet)
0.15 m
(0.5 feet)
VQT2H15
13
Page 14

Limited Warranty
FOR U.S.A. and Puerto Rico
PANASONIC CONSUMER ELECTRONICS COMPANY,
DIVISION OF PANASONIC CORPORATION OF NORTH AMERICA
One Panasonic Way,
Secaucus, New Jersey 07094
Digital Still Camera ACCESSORIES LIMITED WARRANTY
Limited Warranty Coverage
If your product does not work properly because of a defect in materials or workmanship, Panasonic
Consumer Electronics Company (referred to as “the warrantor”) will, for the length of the period indicated
on the chart below, which starts with the date of original purchase (“warranty period”), at its option either (a)
repair your product with new or refurbished parts, or (b) replace it with a new or a refurbished product. The
decision to repair or replace will be made by the warrantor.
PRODUCT OR PART NAME PARTS LABOR
Interchangeable Lens for Digital Camera 1 (ONE) YEAR 1 (ONE) YEAR
Y ou must Mail-In your product during the warranty period. This warranty only applies to products purchased
and serviced in the United St ates or Puerto Rico. T his warranty is extended only to t he original purchaser of
a new product which was not sold “as is”.
Mail-In Service
For assistance in obtaining service in the United States and Puerto Rico please contact:
Panasonic Camera and Digital Service Center
1590 Touhy Ave.
Elk Grove Village, IL 60007
14
VQT2H15
Page 15

If repair is needed during the warranty period the purchaser will be required to furnish a sales receipt/proof
of purchase indicating date of purchase.
Also, purchaser will be responsible for shipping the unit to the above address.
Limited Warr a nty Limits And Exclusions
This warranty ONLY COVERS failures due to defects in materials or workmanship, and DOES NOT
COVER normal wear and tear or cosmetic damage. The warranty ALSO DOES NOT COVER damages
which occurred in shipment, or failures which are caused by products not supplied by the warrantor, or
failures which result from accidents, misuse, abuse, neglect, mishandling, misapplication, alteration, faulty
installation, set-up adjustments, misadjustment of consumer controls, improper maintenance, power line
surge, lightning damage, modification, or commercial use (such as in a hotel, office, restaurant, or other
business), rental use of the product, service by anyone other than a Factory Service Center or other
Authorized Servicer, or damage that is attributable to acts of God.
THERE ARE NO EXPRESS WARRANTIES EXCEPT AS LISTED UNDER “LIMITED WARRANTY
COVERAGE”. THE WARRANTOR IS NOT LIABLE FOR INCIDENTAL OR CONSEQUENTIAL
DAMAGES RESUL TING FROM THE USE OF THIS PRODUCT, OR ARISING OUT OF ANY BREACH OF
THIS WARRANTY.
(As examples, this excludes damages for lost time, travel to and from the servicer, or loss of, or
failure to obtain, images, data or other camera memory content. The items listed are not exclusive,
but are for illustration only.) ALL EXPRESS AND IMPLIED WARRANTIES, INCLUDING THE
WARRANTY OF MERCHANTABILITY, ARE LIMITED TO THE PERIOD OF THE LIMITED WARRANTY.
Some states do not allow the exclusion or limitation of incidental or consequential damages, or limitations
on how long an implied warranty lasts, so the exclusions may not apply to you.
This warranty gives you specific legal rights and you may also have others rights which vary from state to
state. If a problem with this product develops during or after the warranty period, you may contact your
dealer or Service Center. If the problem is not handled to your satisfaction, then write to the warrantor’s
Consumer Affairs Department at the addresses listed for the warrantor.
PAR TS AND SERVICE WHICH ARE NOT COVERED BY THIS LIMITED WARRANTY ARE YOUR
RESPONSIBILITY.
15
VQT2H15
Page 16

FOR CANADA
Panasonic Canada Inc.
5770 Ambler Drive, Mississaug a, On tario L4W 2T3
PANASONIC PRODUCT – LIMITED WARRANTY
Panasonic Canada Inc. warrants this product to be free from defects in material and workmanship and
agrees to remedy any such defect for a period as stated below from the date of original purchase.
Digital Camera One (1) year, parts and labour
Digital Photo Per ipherals One (1) year, parts and labour
Digital Camera Accessories Ninety (90) days, parts and labour
LIMITATIONS AND EXCLUSIONS
This warranty does not apply to products purchased outside Canada or to any product which has been
improperly installed, subjected to usage for which the product was not designed, misused or abused,
damaged during shipping, or which has been altered or repaired in any way that affects the reliability or
detracts from the performance, nor does it cover any product which is used commercially. Dry cell batteries,
printer ink cartridge and paper are also excluded from coverage under this warranty.
This warranty is extended to the original end user purchaser only. A purchase receipt or other proof of date
of original purchase is required before warranty service is performed.
THIS EXPRESS, LIMITED WARRANTY IS IN LIEU OF ALL OTHER WARRANTIES, EXPRESS OR
IMPLIED, INCLUDING ANY IMPLIED WARRANTIES OF MERCHANTABILITY AND FITNESS FOR A
PARTICULAR PURPOSE.
16
VQT2H15
Page 17

IN NO EVENT WILL PANASONIC CANADA INC. BE LIABLE FOR ANY SPECIAL, INDIRECT OR
CONSEQUENTIAL DAMAGES.
In certain instances, some jurisdictions do not allow the exclusion or limitation of incidental or consequential
damages, or the exclusion of implied warranties, so the above limitations and exclusions may not be
applicable.
WARRANTY SERVICE/PRODUCT REPAIRS
For product operation repairs and information assistance, please contact:
Our Customer Care Centre:1-800 #: 1-800-99-LUMIX (1-800-995-8649)
Fax #: (905) 238-2360
Lumix Email link: lumixconcierge@ca.panasonic.com
Email link: “Customer support” on www.panasonic.ca
17
VQT2H15
Page 18

Indice
Información para su seguridad .............................18
Prevención contra las averías............................21
Accesorios suministrados.....................................22
Unir y quitar el objetivo.........................................22
Nombres y funciones de los componentes........... 24
Precauciones para el uso .....................................26
Búsqueda de averías..........................................27
Especificaciones...................................................28
-Si ve este símboloInformación sobre la eliminación en otros
países no pertenecientes a la Unión Europea
Este símbolo sólo es válido en
la Unión Europea.
Si desea desechar este
producto, póngase en
contacto con las autoridades
locales o con su distribuidor
para que le informen sobre el
método correcto de
eliminación.
18
VQT2H15
LO SIGUIENTE SÓLO INTERESA A CANADÁ.
Este aparato digital de la clase B cumple con
ICES-003 canadiense.
Información para su seguridad
Mantenga la unidad lo más lejos que sea posible
de equipos electromagnéticos (como hornos de
microondas, televisores, vídeo juegos,
trasmisores radio, líneas de alto voltaje, etc.).
≥ No utilice la cámara cerca de teléfonos móviles,
ya que lo de hacerlo puede producir ruido que
afectará negativamente a las imágenes y el
sonido.
≥ Si la cámara queda afectada negativamente por
un equipo electromagnético y deja de funcionar
correctamente, apague la cámara y quite la
batería y/o el adaptador de CA conectado. Luego
vuelva a insertar la batería y/o vuelva a conectar
el adaptador de CA y encienda la cámara.
Page 19

El objetivo puede usarse con una cámara digital
compatible con el estándar de montaje de objetivos
del “Micro Four Thirds
≥ No se puede montar en una cámara con estándar
de soporte Four Thirds
TM
System”.
TM
.
≥ Las figuras de la cámara digital en estas
instrucciones de funcionamiento muestran la
DMC-GF1 en concepto de ejemplo.
≥ E aspecto y las especificaciones de los productos
descritos en este manual pueden diferir de los
productos reales que usted ha comprado debido a
aumentos sucesivos.
≥ El logotipo Four Thirds
TM
y Four Thirds son
marcas comerciales o marcas comerciales
registradas de Olympus Imaging Corporation, en
Japón, los Estados Unidos, la Unión Europea y
otros países.
≥ El logotipo Micro Four Thirds
TM
y Micro Four
Thirds son marcas comerciales o marcas
comerciales registradas de Olympus Imaging
Corporation, en Japón, los Estados Unidos, la
Unión Europea y otros países.
≥ G MICRO SYSTEM es un sistema de cámara
digital con objetivo intercambiable de LUMIX
basado en el estándar Micro Four Thirds System.
≥ LEICA es una marca registrada de Leica
ESPAÑOL
Microsystems IR GmbH. ELMARIT es una marca
registrada de Leica Camera AG. Los objetivos
LEICA DG se fabrican usando instrumentos de
medida y sistemas de garantía de calidad
certificados por Leica Camera AG en base a los
estándares de calidad de la compañía.
≥ Los demás nombres, nombres de sociedades y
nombres de productos citados en estas
instrucciones son marcas de fábrica o marcas
registradas.
VQT2H15
19
Page 20

LO SIGUIENTE SÓLO SE APLICA EN LOS EE. UU.
Notas FCC:
Se ensayó este equipo y se comprobó que está de conformidad con los límites de un dispositivo digital de la clase B,
de acuerdo con la Parte 15 de las Reglas FCC.
Estos límites se han ideado para proporcionar una razonable protección contra las interferencias dañinas en una
instalación residencial. Este equipo genera, utiliza y puede radiar energía de frecuencia radio y, por si no se instala y
se utiliza de acuerdo con las instrucciones, puede ocasionar interferencia dañina a las comunicaciones radio. Aunque
no hay garantía de que no pueda tener lugar interferencia en especiales instalaciones. Si este equipo causa
interferencia a la recepción de radio o televisión que pueden determinarse apagando y encendiendo el equipo, se
anima al usuario intentar corregir la interferencia tomando una de las medidas a continuación:
● Vuelva a orientar o a colocar la antena receptora.
● Aumente la separación entre el equipo y el receptor.
● Conecte el equipo a una toma de un circuito diferente del que está conectado el receptor.
● Llame al concesionario o un técnico experto de radio y televisión para ayud a.
Todo cambio o modificación a este equipo sin autorizar invalidará el título del usuario para hacer funcionar este
dispositivo.
Este dispositivo cumple con la Parte 15 de las Reglas FCC. El funcionamiento está sujeto a las dos condiciones a
continuación: (1) Este dispositivo podría no causar interferencia dañina y (2) este dispositivo tiene que aceptar toda la
interferencia recibida, incluyendo la que puede causar un funcionamiento no deseado.
Parte responsable:
Panasonic Corporation of North Amer ica
One Panasonic Way
Secaucus, NJ 07094
Contacto de asistencia:
Panasonic Consumer Electronics Company
Teléfono: 1-800-211-PANA (7262)
20
VQT2H15
Page 21

Prevención contra las averías
∫ Atención del objetivo
≥ La arena y el polvo pueden dañar el objetivo.
Cuando usa el objetivo en una playa, tenga
cuidado de que ni arena ni polvo entren en el
interior del objetivo o los terminales, etc.
≥ Este objetivo no es impermeable. Si caen
gotas de agua en el objetivo, límpielo con un
paño seco.
≥ No ejerce demasiada presión en el objetivo.
≥ Cuando hay suciedad (agua, aceite, huellas
dactilares, etc.) en la superficie del objetivo, la
imagen puede salir afectada. Limpie ligeramente
con un paño blando y seco antes y después de
tomar las imágenes.
≥ No meta el soporte del objetivo mirando hacia
abajo. No deje que se ensucien los punto de
contacto 1.
∫ Acerca de la condensación
(Empañamiento del objetivo)
≥ La condensación ocurre cuando se encuentra una
diferencia en la temperatura y humedad como se
describe abajo. La condensación puede hacer
ensuciar el objetivo y producir hongos y un
funcionamiento defectuoso, por lo tanto ponga
cuidado en las situaciones a continuación:
–Cuando lleva la cámara en casa desde el aire
libre durante un tiempo frío
–Cuando lleva la cámara dentro de un coche con
aire acondicionado
–Cuando sopla en el objetivo aire frío desde un
acondicionador de aire
–En lugares húmedos
≥ Para impedir la condensación, meta la cámara en
una bolsa de plástico para que se aclimate a la
temperatura ambiente. Si ocurre condensación,
apague la alimentación y la deje así durante dos
horas. Una vez de que la cámara se haya
aclimatado a la temperatura ambiente en
empañamiento desaparece naturalmente.
21
VQT2H15
Page 22

Accesorios suministrados
VFC4456 VYC1005 VYF3284 VFC4315
312 4
Unir y quitar el objetivo
[Controles a realizar cuando va a desembalar la unidad]
Al quitar la unidad de su embalaje, compruebe que se
encuentren la unidad principal y los accesorios
suministra dos. Además compru ebe el as pecto e xterno
y las funcion es para verific ar que no hayan pad ecidos
daños durante la distribución y el transporte.
Por si encuentra un cualquier problema, antes de
usar el producto llame a su comerciante.
Los números de producto se aplican desde septiembre
de 2009. Estos pueden estar sujetos a modificaciones.
1 Bolsa de almacenamiento del objetivo
2 Visera del objetivo
3 Tapa del objetivo
4 Tapa trasera del objetivo
(Al momento de la compra la tapa del objetivo y
la tapa trasera del mismo están unidas al
objetivo intercambiable.)
22
VQT2H15
≥ Se refiera también a las instrucciones de
funcionamiento de la cámara para unir y separar
el objetivo.
∫ Unión del objetivo
≥ Compruebe que la cámara esté apagada.
1
Gire la tapa trasera del
objetivo para separarla
A:
Tapa trasera del objetivo
2
Alinee las marcas para
ajustar el objetivo
.
B
(marcas rojas ) ubicadas en
el cuerpo de la cá mara y e l
mismo objetivo , lu eg o gire
éste en la dirección de la
flecha hasta que dispare.
•No pulse el botón de desenganche del objetivo
cuando va a unir un objetivo.
•Como el soporte del objetivo podría salir rayado,
no trate de unir el objetivo a la cámara
manteniéndolo de ángulo.
•Compruebe que el objetivo esté unido
correctamente.
Page 23

∫ Separación del objetivo
≥ Compruebe que la cámara esté apagada.
Pulse el botón de
desenganche del
objetivo C mientras gira
hasta que sea posible el
objetivo en la dirección
de la flecha para quitarlo.
•Una la tapa trasera de manera que el punto de
contacto del objetivo no salga rayado.
•Una la tapa del cuerpo a la cámara para que ni
suciedad ni polvo entren dentro de la unidad
principal.
∫ Unión y separación de la tapa del
objetivo
≥ Ponga cuidado en no
perder la tapa del
objetivo.
∫ Unión de la visera del objetivo
(Accesorio suministrado)
Inserte la visera del objetivo con las partes
cortas arriba y abajo, luego gírela en la
dirección de la flecha hasta que dispare.
D: Ajustando hacia la marca
∫ Quitar la visera del objetivo
Gire la visera del objetivo en la dirección
de la flecha para quitarla.
23
VQT2H15
Page 24

•Cuando toma las imágenes con el flash y tiene
2 3 4
1 5
6
unida la visera del objetivo, la porción inferior de
la pantalla podría ponerse oscura (efecto de
viñeteado) y el control del flash podría
inhabilitarse debido a que éste podría ser
oscurecido por la misma visera. Le
recomendamos que quite dicha visera.
•Cuando usa la lámpara de ayuda AF en la
oscuridad, quite la visera del objetivo.
∫ Unión de los filtros
≥ Puede tener lugar viñeteado si usa 2 o más
protectores MC (opcionales:DMW-LMC46), filtros
PL (opcionales:DMW-LPL46) o filtros ND
(opcionales:DMW-LND46), o bien si usa
protectores y/o filtros espesos.
≥ Tal vez sea imposible de retirar el filtro si está
demasiado apretado, por lo que no debe apretarlo
demasiado fuerte.
≥ Se puede colocar la tapa del objetivo con el filtro
ya colocado.
≥ No consigue acoplar un objetivo de conversión o
adaptador a este objetivo. Puede usarse un filtro,
pero acoplar cualquier otro elemento puede dañar
el objetivo.
24
VQT2H15
Nombres y funciones de los componentes
∫ Objetivo
1 Superficie del objetivo
2 Anillo del enfoque
Ruotare per mettere a fuoco quando si scattano
fotografie utilizzando la messa a fuoco manuale.
Page 25

3 Interruptor [O.I.S.]
Cuando a la cámara está unido el objetivo, está
ajustada la función estabilizadora para ver si el
interruptor [O.I.S.] está ajustado en [ON].
≥ Le recomendamos que ajuste el interruptor
[O.I.S.] a [OFF] cuando usa un trípode.
≥ La función estabilizadora podría no funcionar
suficientemente en los casos a continuación.
–Cuando hay demasiada trepidación.
–Cuando usa el zoom digital.
–Cuando toma imágenes mientras sigue sujetos
en movimiento.
– Cuando se reduce la velocidad de obturación para
tomar imágenes en casa o en lugares oscuros.
–Al tomar imágenes en primer plano.
4 Interruptor [FOCUS]
[FULL]: Puede enfocar entre los rangos de 0,15 m
(0,5 pies) a ¶. Úselo en posición [FULL] si
desea captar imágenes utilizando la función
macro.
[LIMIT]:Puede enfocar entre los rangos de 0,5 m
(1,64 pies) a ¶. Con el enfoque automático,
la velocidad de enfoque aumentará.
5 Punto de contacto
6 Marca para ajustar el objetivo
Nota
≥ Cuando graba usando el flash estando cerca del
sujeto, la luz del flash será bloqueada por el
objetivo y parte de la imagen puede quedar
oscura. Compruebe la distancia desde el sujeto
cuando graba.
≥ Este objetivo tiene las siguientes características
debidas a su especificaciones macro.
–Lleva tiempo para enfocar.
–El rango del enfoque es bastante pequeño.
25
VQT2H15
Page 26

Precauciones para el uso
∫ Acerca del objetivo
Tenga cuidado de no hacer caer el objetivo ni le
choque contra. Asimismo tenga cuidado de no
presionarlo demas ia do.
≥
Tenga cuidado de no hacer caer la bolsa en la que
cabe el objetivo. Éste podría dañarse, la cámara
podría dejar de funcionar normalmente y las
imágenes ya podrían no grabarse.
Cuando usa pesticidas y otras substancias
volátiles alrededor de la cámara tenga cuidado
de que no entre en el objetivo.
≥
Si dichas substancias caen en el objetivo, éstas
pueden dañarlo o hacer desconchar su barniz.
No transporte la unidad s i ésta está todavía
unida al cuerpo de la cámara.
≥ De ninguna manera la unidad debe ser usada o
almacenada en uno de los siguientes lugares ya
que lo de hacerlo podría perjudicarla o producir un
funcionamiento defectuoso.
–Bajo la luz directa del sol o bien a lo largo de la
costa durante el verano
– En lugares donde haya altas temperaturas o altos
niveles de humedad o bien donde sean repentinos
los cambios de temperatura y humedad
–En lugares donde haya altas concentraciones de
arena, polvo o suciedad
26
VQT2H15
–Donde haya llamas
–Cerca de calefactores, acondicionadores de aire
o humedecedores
–Donde el agua puede hacer mojar la unidad
–Donde haya vibraciones
–Dentro de un vehículo
≥ Se refiera también a las instrucciones de
funcionamiento de la cámara digital.
≥ Cuando no ha de ser usada la unidad por un
período prolongado, le recomendamos guardar
con un desecante (silicagel). El hecho de no
hacerlo podría ocasionar una avería causada por
el moho etc.
funcionamiento de la unidad antes de usarla
≥ No deje el objetivo en contacto con productos de
plástico durante largos períodos de tiempo.
≥ No toque los contactos eléctricos de la unidad. Lo
de hacerlo puede causar avería en la unidad.
≥ No desmonte ni modifique la unidad.
No utilice
agentes de limpieza parecidos para limpiar la unidad.
≥ El hecho de usar disolventes puede dañar el
objetivo y hacer desconchar su barniz.
≥ Quite cualquier indicio de polvo o huellas
dactilares con un paño blando y seco.
≥ Use un paño suave y seco para eliminar suciedad
y polvo de la anilla de enfoque.
≥ No use detergentes para cocina o un paño tratado
químicamente.
Se recomienda que compruebe el
gasolina
, diluyente, alcohol u otros
.
Page 27

Búsqueda de averías
Se oye un sonido cuando se enciende o se
apaga la cámara.
≥ Éste es el sonido del objetivo o el movimiento de
abertura y no es un funcionamiento defectuoso.
Se oye un sonido al sacudir el obje tivo.
≥ Es el sonido del funcionamiento del estabilizador
del objetivo y no constituye un problema de
funcionamiento.
27
VQT2H15
Page 28

Especificaciones
ÓPTICA INTERCAMBIABLE PARA CÁMARA DIGITAL
“LEICA DG MACRO–ELMALIT 45 mm/F2.8 ASPH./MEGA O.I.S.”
Longitud focal f=45 mm (Igual a una cámara de película de 35mm: de 90 mm)
Tipo de abertura 7 obturaciones de hoja/diafragma iris/diafragma circular
Gama de abertura F2.8
Valor de abertura mínimo F22
Estructura del objetivo 14 elementos en 10 grupos
En la distancia del enfoque [FULL]: 0,15 m (0,5 pies) a ¶ / [LIMIT]: 0,5 m (1,64 pies) a 
Máxima ampliación de la imagen 1,0k (Igual a una cámara de película de 35mm: 2,0k)
Estabilizador óptico de la imagen Disponible
Soporte “Micro Four Thirds Mount”
Ángulo visual
Diámetro del filtro 46 mm (1,81 pulgadas)
Diámetro máx. Aprox. 63 mm (2,48 pulgadas)
Longitud total Aprox. 62,5 mm (2,46 pulgadas) (desde la punta del objetivo al lado de
Peso Aprox. 225 g (7,94 onzas)
28
VQT2H15
(desde la línea de referencia de la distancia del enfoque)
27x
la base del soporte del objetivo)
(1 objetivo esférico, 1 objetivo ED)
Page 29

∫ Acerca de la exposición
132
3
2
3
La diferencia entre el valor F nominal (valor de apertura visualizado en la cámara) y el valor F efectivo
(valor de apertura real) será mayor cuando se captan imágenes usando la función macro, lo cual le permite
captar imágenes ampliadas de sujetos en primer plano. Cuando use un medidor de exposición autónomo
disponible en el mercado, es necesario corregir el valor dependiendo de la amplificación y distancia desde
el sujeto. Consulte la tabla siguiente en lo relativo a la corrección de la exposición (factor de exposición).
Hay que corregir la diferencia entre el valor F nominal y el valor F efectivo con la exposición automática de
la cámara, ya que determinará la exposición cuantificando la luz que entra a través del objetivo.
Guía para corregir la exposición al usar un medidor de exposición autónomo
Ampliación 1/¶ 1/8 1/4 1/3 1/2 1/1,5 1/1
Distancia 
Valor F nominal F2.8
Valor F efectivo F2.8 F3.2 F3.5 F4.0 F4.5 F5.0 F5.6
Corrección de la
exposición
(Factor de exposición)
(En intervalos de 1/3)
≥ Distancia es la dist an cia real ent re el plano de grabación ([ ] marcado en el cuerpo de la cámara digital)
al sujeto.
≥ La amplificación representa el (tamaño de la imagen del sujeto en el plano de grabación) / (tamaño real
del sujeto).
n0+ + +1+1 +1 +2
0,47 m
(1,54 pies)
0,28 m
(0,92 pies)
0,23 m
(0,75 pies)
0,19 m
(0,62 pies)
1
3
0,17 m
(0,56 pies)
0,15 m
(0,5 pies)
VQT2H15
29
Page 30

Panasonic Consumer Electronics Company,
Division of Panasonic Corporation of North America
One Panasonic Way, Secaucus, NJ 07094
Panasonic Canada Inc.
5770 Ambler Drive, Mississauga, Ontario, L4W 2T3
Panasonic Corporation 2009
P
Printed in Japan
 Loading...