

Page 1
OPERATING INSTRUCTIONS
Basic Guide
Tablet Computer
Model No.
FZ-A2
series
Contents
Getting Started
Introduction ...................................................... 2
Description of Parts .........................................4
First-time Operation ......................................... 7
Turning On/Off and Sleeping/Waking Up ..............10
Input Operation ..............................................11
Useful Information
Handling and Maintenance ............................ 14
Troubleshooting
Troubleshooting (Basic) .................................20
Getting Started
Useful Information
Appendix
Specications ................................................23
LIMITED WARRANTY ................................... 25
Standard Limited Warranty ............................35
Please read these instructions carefully before using this product, and save this manual for future use.
Troubleshooting
Appendix
Page 2

Introduction
Thank you for purchasing this Panasonic product. For optimum performance and safety, please
read these instructions carefully.
Terms and illustrations in these instructions
n
CAUTION
NOTE
: Page in these Operating Instructions - Reference Manual.
è
: Reference to the on-screen manuals.
Some illustrations are simplified to help your understanding and may look different from the
l
actual unit.
If you do not log on as an owner, you cannot use some functions or cannot display some
l
screens.
Refer for the latest information about optional products to the catalogs, etc.
l
Screen messages are explained in [English (United States)].
l
(Depending on the language preference, some screen messages in these instructions are
different from the actual screen messages. For example, [Aeroplane mode] may be displayed
instead of [Airplane mode] in some language preference.)
: Conditions that may result in minor or moderate injury.
: Useful and helpful information.
Getting Started
Disclaimer
n
Computer specifications and manuals are subject to change without notice.
Panasonic Corporation assumes no liability for damage incurred directly or indirectly from errors,
omissions or discrepancies between the computer and the manuals.
Trademarks
n
Intel is a registered trademark or trademark of Intel Corporation.
microSDHC Logo is a trademark of SD-3C, LLC.
Adobe, the Adobe logo and Adobe Reader are either registered trademarks or trademarks of
Adobe Systems Incorporated in the United States and/or other countries.
Bluetooth® is a registered trademark owned by Bluetooth SIG, Inc., U.S.A. and licensed to Panasonic Corporation.
HDMI, the HDMI Logo and High-Denition Multimedia Interface are trademarks or registered
trademarks of HDMI Licensing LLC in the United States and other countries.
Names of products, brands, etc., appearing in this manual are trademarks or registered trademarks of their respective own companies.
This product is licensed under the AVC Patent Portfolio License, VC-1 Patent Portfolio License
and MPEG-4 Visual Patent Portfolio License for the personal use of a consumer or other uses in
which it does not receive remuneration to
(i) encode video in compliance with the AVC Standard, VC-1 Standard and MPEG-4 Visual Stan-
dard (“AVC/VC-1/MPEG-4 Video”) and/or
(ii) decode AVC/VC-1/MPEG-4 Video that was encoded by a consumer engaged in a personal
activity and/or was obtained from a video provider licensed to provide AVC/VC-1/MPEG-4
Video. No license is granted or shall be implied for any other use. Additional information may
be obtained from MPEG LA, LLC. See http://www.mpegla.com.
2
Page 3

On-screen Manual
n
For further information about the computer, you can refer to the on-screen manual by performing
the following steps.
Touch
A
When more than one on-screen manuals are prepared, name of those manuals are listed in
above step. Touch a manual to access from the list.
For U.S.A.
n
This computer contains:
Model : WL15B
FCC ID : ACJ9TGWL15B
- [ OnlineManual].
Getting Started
3
Page 4
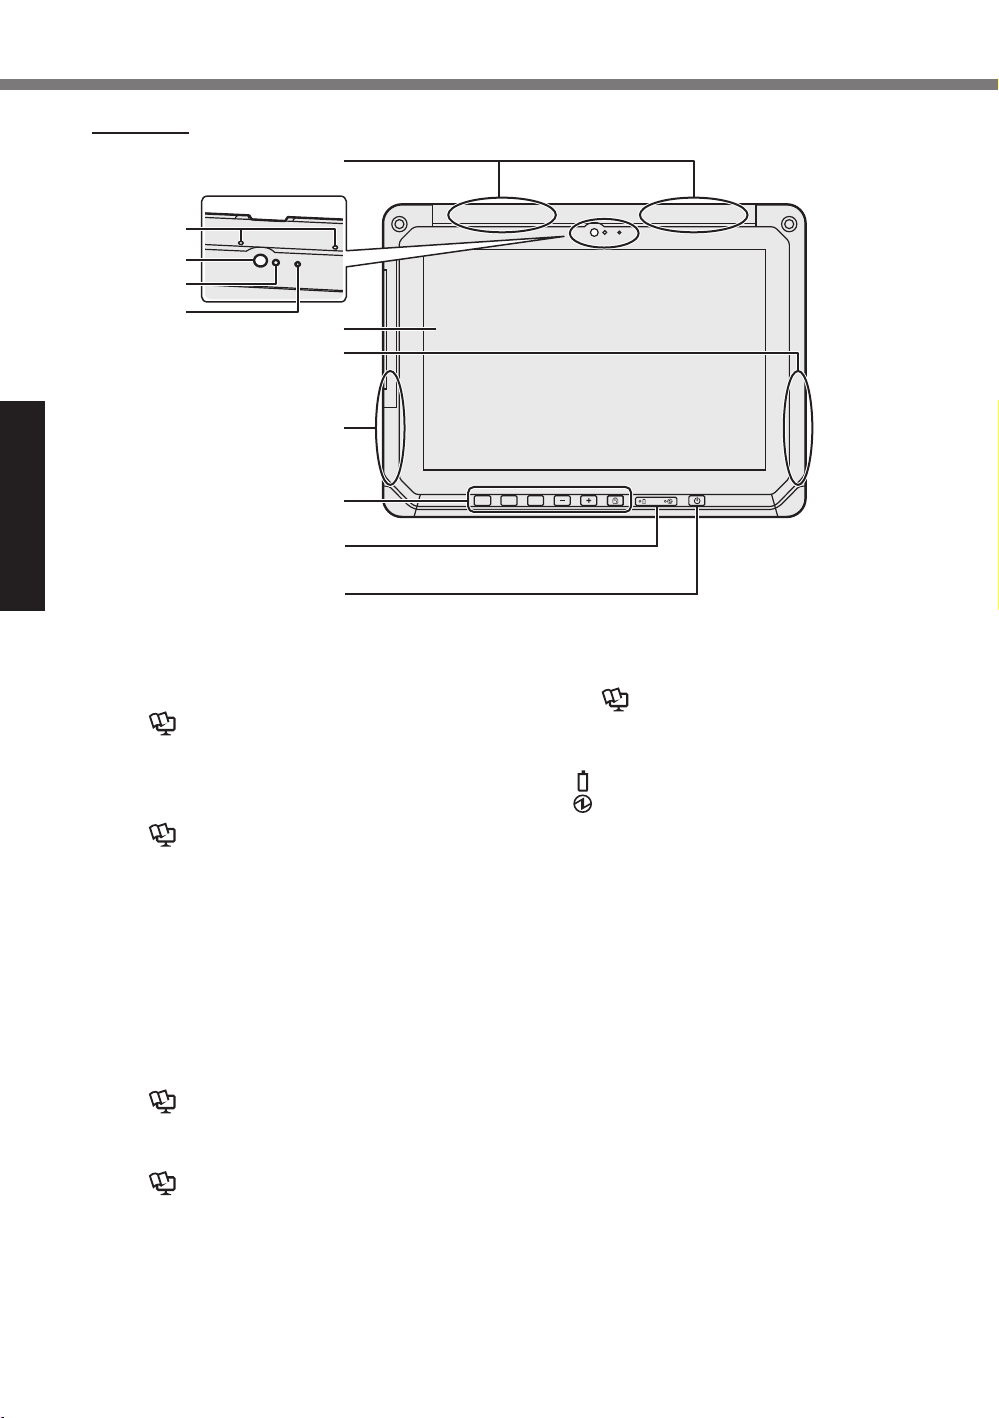
Description of Parts
Front side
A
B
C
D
E
F
G
H
Getting Started
A: Wireless WAN Antenna
<Only for model with wireless WAN>
Operating Instructions - Reference
è
Manual “Wireless WAN”, “GPS”
B: Microphone
C: Front Camera / Lens
Operating Instructions - Reference
è
Manual “Camera”
D: Ambient Sensor
The ambient light sensor is equipped
with an automatic brightness adjustment
function that adjusts the display screen.
(è page 15)
E: Camera Indicator
F: LCD
G: Wi-Fi / Bluetooth Antenna
Operating Instructions - Reference
è
Manual “Wi-Fi”, “Bluetooth”
H: Wi-Fi Antenna
Operating Instructions - Reference
è
Manual “Wi-Fi”
I
J
K
A1 A2 A3
I: Tablet Buttons
Operating Instructions - Reference
è
Manual “Tablet Buttons”
J: LED Indicators
: Battery status
: Power Indicator
Off: Power off, Green: Power on,
Blinking green: Sleep (Depending on
the running state of software, the indicator may be green (not blinking)).
K: Power Switch
4
Page 5
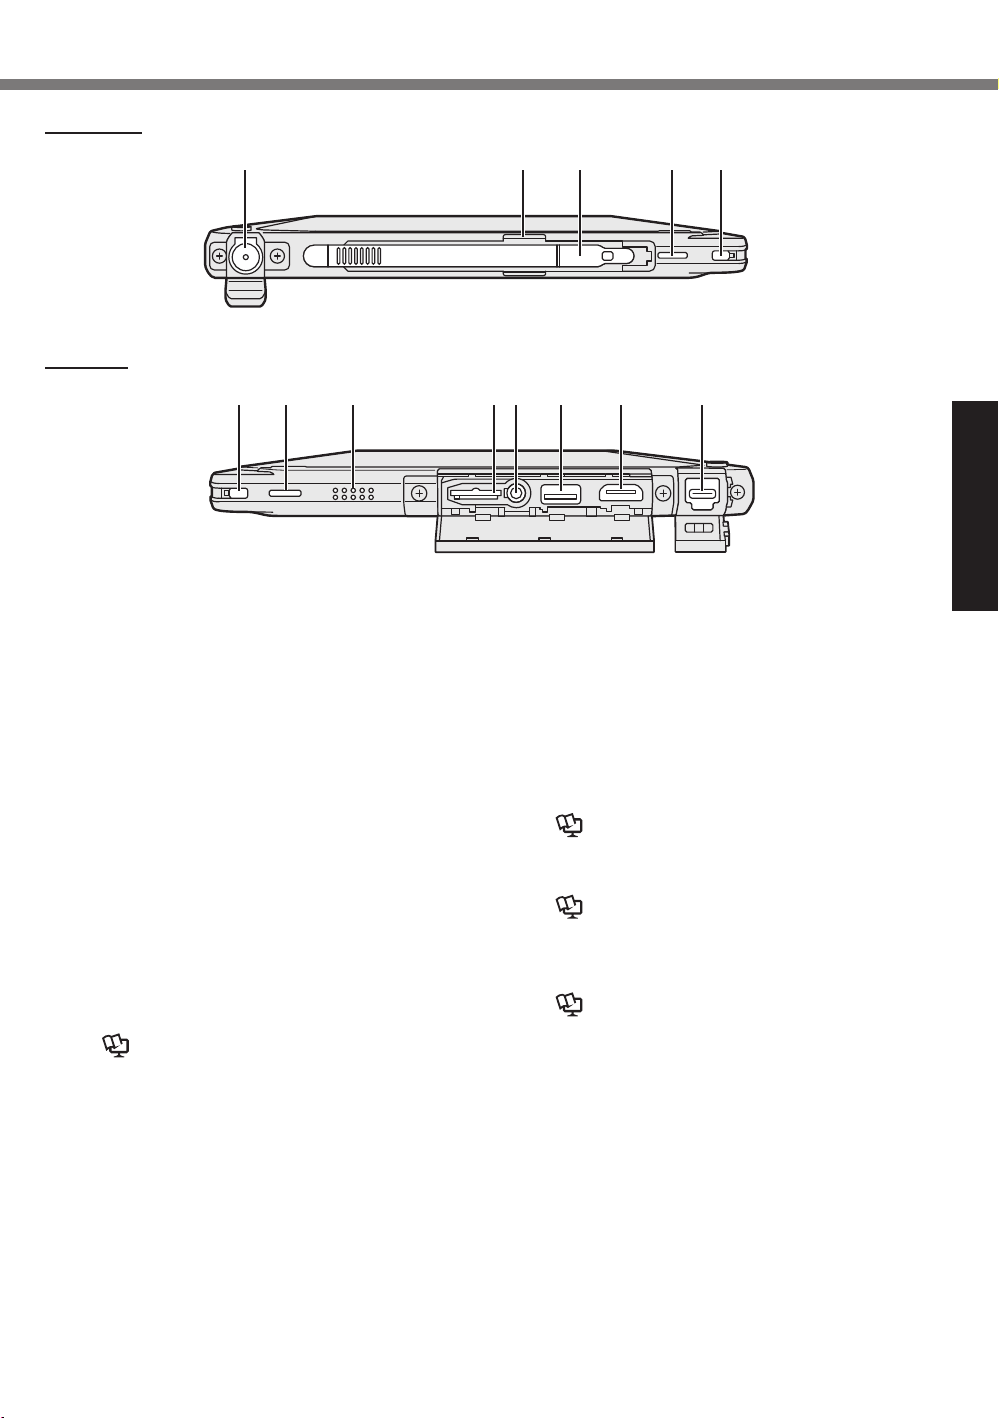
Right side
A B C D
Left side
DE F G H I J K
A: DC-IN Jack
Only the main unit can be charged.
B: Pen Holder
C: Pen
D: Tether Hole
E: Security Lock
F: Speaker
The speaker contains a magnet and magnetic products. Avoid leaving metallic
object or magnetic media in contact with
these areas.
G: microSD Memory Card Slot
Keep microSD Memory Cards away from
infants and small children.
Operating Instructions - Reference
è
Manual “MicroSD Memory Card”
E
H: Headset Jack
A headset or headphone can be connected.
I: Type-A USB 3.0 Port
Do not insert any foreign object in the USB
port.
Operating Instructions - Reference
è
Manual “USB Devices”
J: HDMI Output Port
Operating Instructions - Reference
è
Manual “External display”
K: Type-C USB 3.1 Port
Operating Instructions - Reference
è
Manual “USB Devices”
Getting Started
5
Page 6
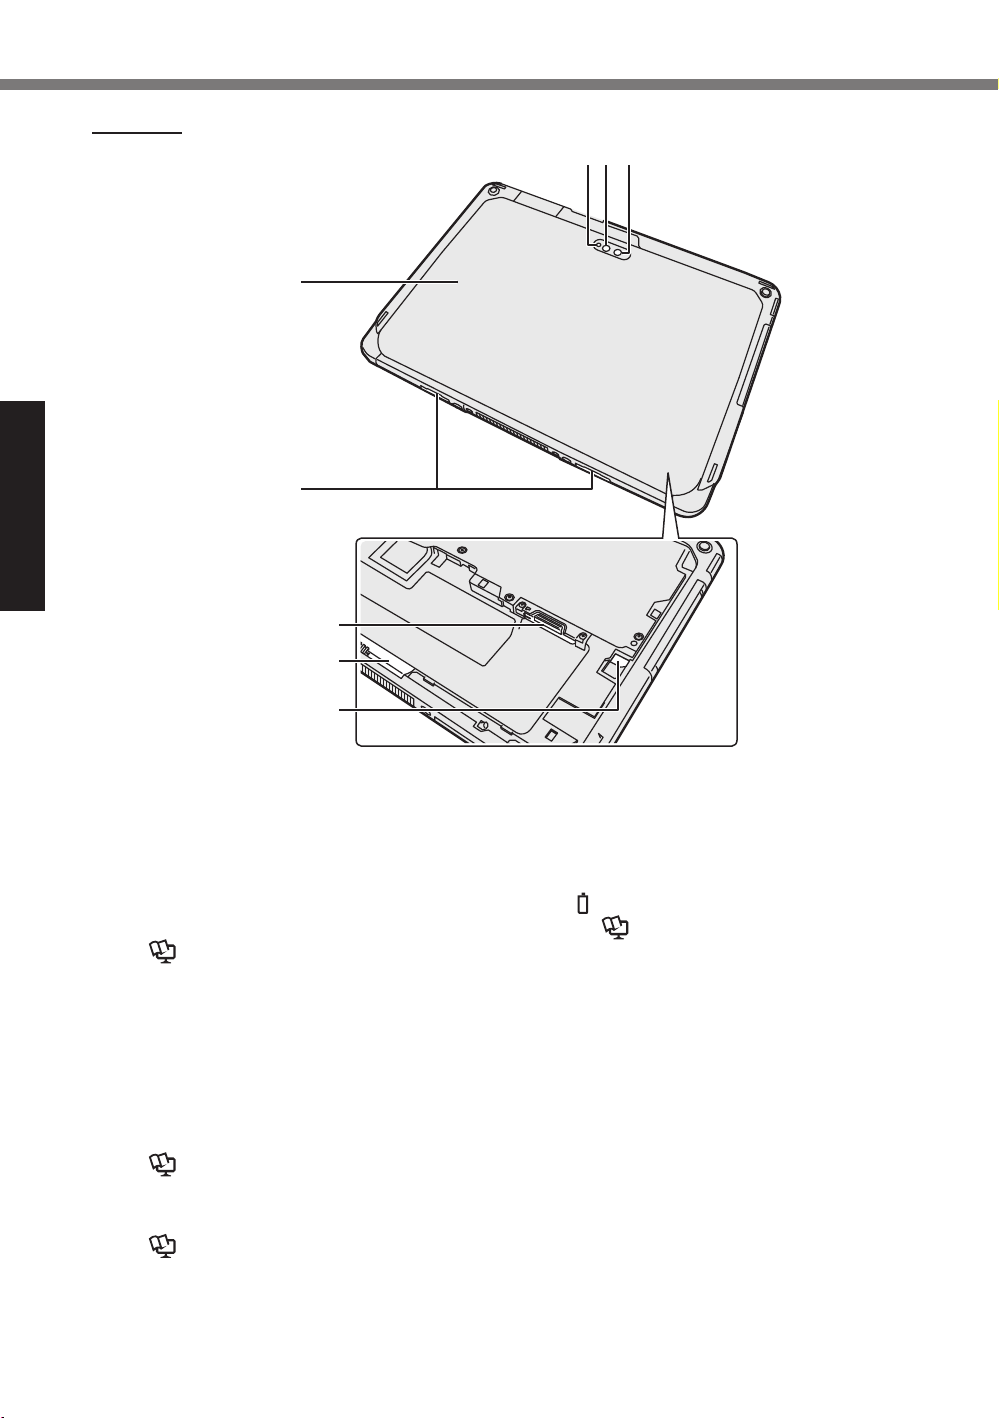
Description of Parts
Rear side
Getting Started
A CB
D
E
F
G
H
Rear Camera
<Only for model with Rear Camera>
A: Camera Indicator
B: Camera Light
C: Camera Lens
Operating Instructions - Reference
è
Manual “Camera”
D: Back Cover
The shape of this may vary depending on
the model.
E: Release Latch
F: microSIM Card Slot
<Only for model with wireless WAN>
Operating Instructions - Reference
è
Manual “Wireless WAN”
G: Battery Pack Latch
Operating Instructions - Reference
è
Manual “Battery Power”
H: LED Indicator
<Only for model with built-in bridge battery>
: Battery Status
Operating Instructions - Reference
è
Manual “Battery Power”
6
Page 7
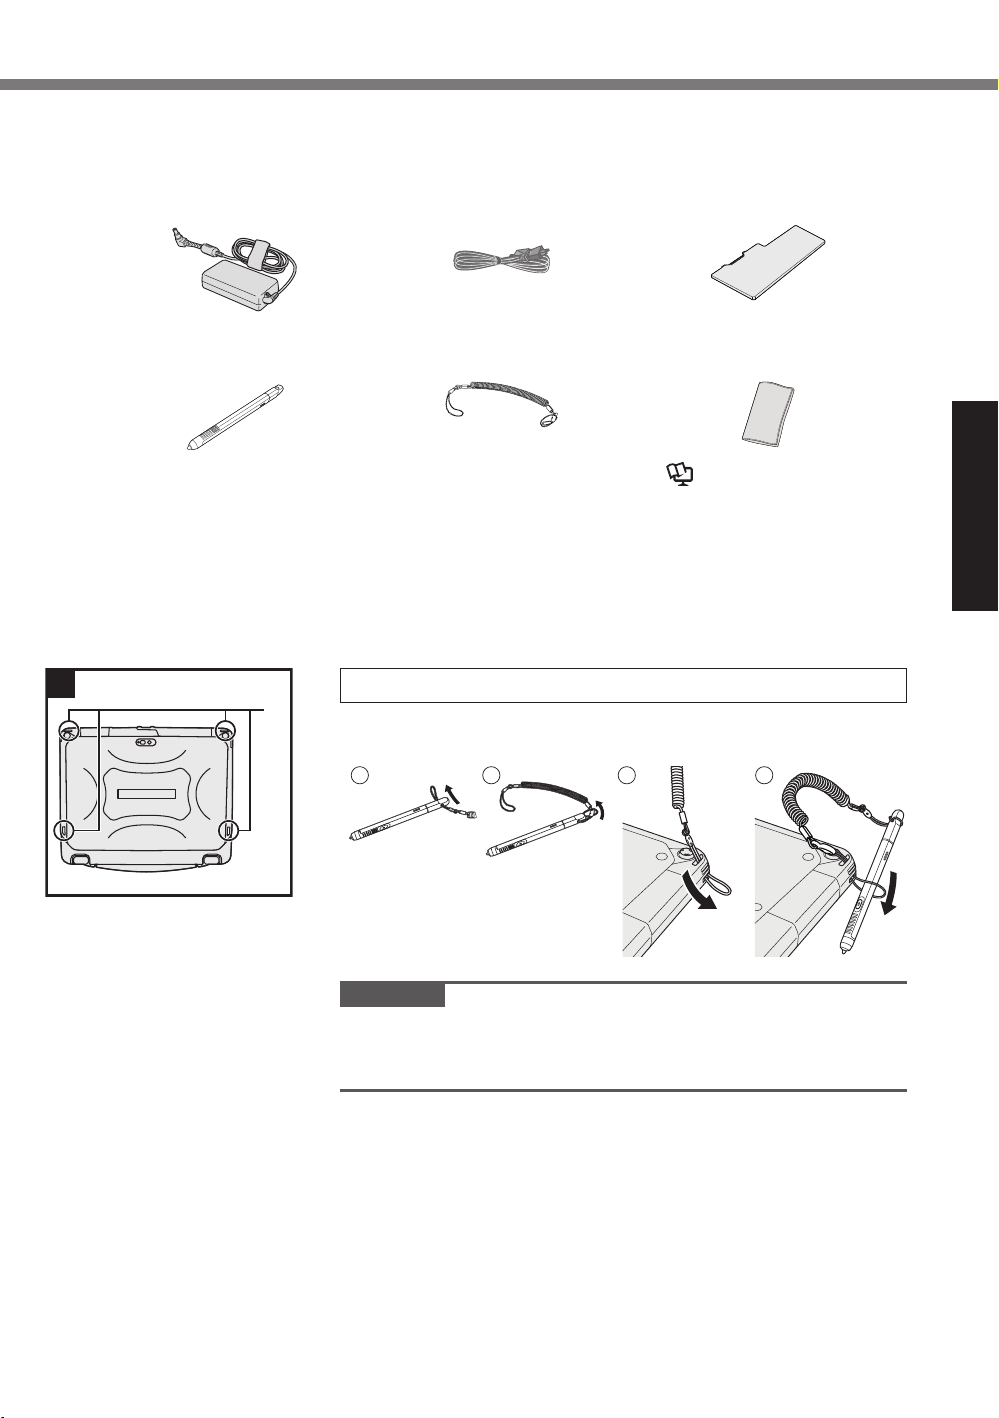
First-time Operation
Preparation
n
Check and identify the supplied accessories.
A
If you do not find the described accessories, contact Panasonic Technical Support.
AC Adaptor .....1
y
AC Cord ........1
y
Battery Pack ....1
y
*1
Model No: CF-AA6413C
Stylus ..........1
y
• OPERATING INSTRUCTIONS - Read Me First ...............1
*1
Stored in the main unit at the time of packing.
1
A
Tether ..........1
y
1 Attaching the stylus to the computer.
Use the tether to attach the stylus to the computer so you will
not lose it. There are holes (A) to attach it.
1 2 3 4
Model No: CF-VZSU0QW
Soft Cloth .......1
y
Operating Instructions
è
- Reference Manual “Input
Operation”
Getting Started
CAUTION
Do not pull the tether with excessive force. The stylus may
l
hit the computer, person’s body or other objects when released.
7
Page 8
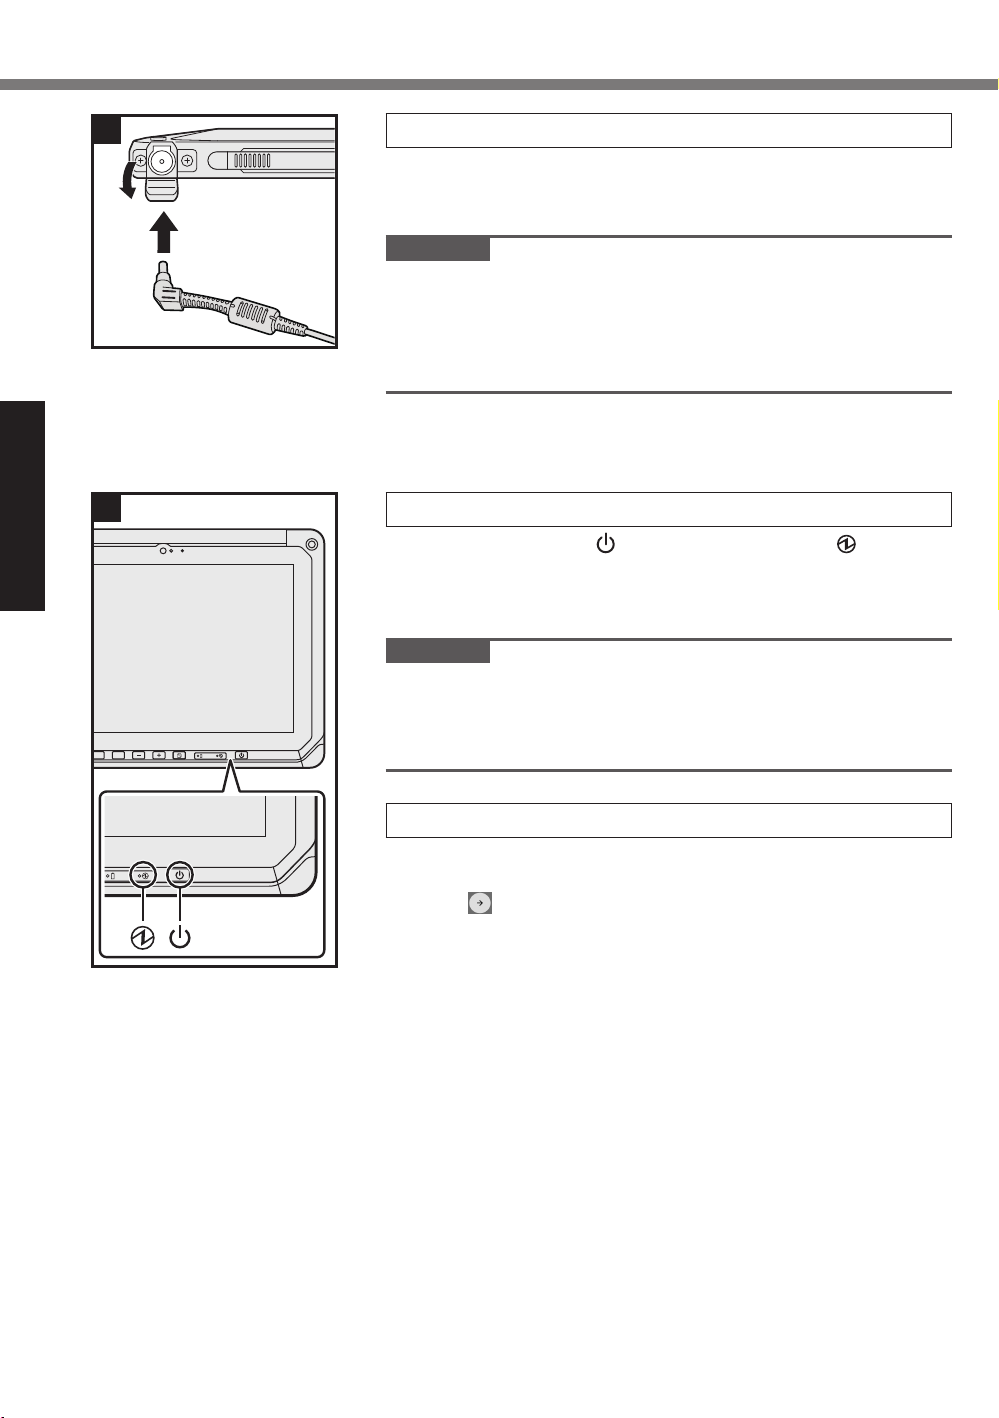
First-time Operation
2
①
②
3
Getting Started
A2A2 A3
2 Connect your computer to a power outlet.
Open the cover.
A
Connect your computer to a power outlet.
B
The battery charging starts automatically.
CAUTION
Do not disconnect the AC adaptor until the first-time opera-
l
tion procedure is completed.
When using the computer for the first time, do not connect
l
any peripheral device except the battery pack and AC adaptor.
3 Turn on the computer.
Press the power switch until the power indicator lights.
When turning on the computer for the first time after purchase,
it may take about 5 minutes for the “Welcome” screen described
in step 4 to appear.
CAUTION
Do not press the power switch repeatedly or do not hold the
l
power switch for 10 seconds or longer.
The default settings of the Setup Utility cannot be changed
l
until the first-time operation settings are configured.
4 Initializing the computer.
When “Welcome” is displayed, touch the language name and
A
scroll the language list, then touch the language you use and
touch
<Only for model with wireless WAN
B
When “Insert SIM card” screen is displayed, touch [SKIP].
When “Select Wi-Fi network” screen is displayed, perform
C
one of the following operations.
- If you want to set up wi-fi, set up wi-fi by following the onscreen instructions.
- If you do not want to set up wi-fi, touch [SKIP], then
when the confirmation message is displayed touch
[SKIP ANYWAY].
When “Date & time” screen is displayed, confirm the settings
D
and touch [NEXT].
When “Name” screen is displayed, input your name, then
E
touch [NEXT].
.
>
You will proceed to step E after the settings are complete.
8
Page 9
When “Protect your phone” screen is displayed, touch the
F
item to select setting, then touch [NEXT].
• If add the check mark to “Protect this device and ...”,
“Choose screen lock” screen will be displayed. Set the
screen lock method by following the on-screen instructions
and touch [NEXT].
• If remove the check mark from “Protect this device and ...”,
touch [SKIP] and [SKIP ANYWAY].
When “Google
G
message and touch the items to select settings, then touch
[NEXT].
When “Welcome” screen is displayed, touch [GOT IT].
H
If you did not set up Wi-Fi in step C, connect to the internet
I
via Wi-Fi or wireless WAN. (è Operating Instructions Reference Manual “Wireless Communication”)
To connect to internet via wireless WAN, inserting the microSIM card is necessary. (è Operating Instructions - Ref-
erence Manual “Wireless WAN”)
Touch
J
- [Download].
Follow the on-screen instructions.
CAUTION
If the location info setup confirmation screen appears, follow
l
the instructions on the screen to perform setup.
<Only for model with wireless WAN>
l
Do not afx labels on microSIM cards as doing so may result
in malfunction.
TM
services” screen is displayed, confirm the
- [ Settings] - [ About tablet] - [System updates]
Getting Started
9
Page 10

Turning On/Off and Sleeping/Waking Up
Turning On
Press
A
Release the lock using the method configured in the “Protect your phone” screen
B
(è page 9).
CAUTION
Do not press the power switch repeatedly.
l
Once you turn off the computer, wait for ten seconds or more before you turn on the computer
l
again.
Do not perform the following operation until the drive indicator turns off.
l
• Connecting or disconnecting the AC adaptor
• Pressing the power switch
• Touching buttons, screen or external mouse
NOTE
Lock type can be changed by touching
l
Getting Started
Turning Off
Press and hold
A
Touch [
B
Sleeping
At the time of purchase, the screen turns off automatically after 1 minute with no operation. To
turn off the screen manually, perform the following operation.
Press
A
The screen turns off.
(power switch) until (power indicator) lights.
- [ Settings] - [ Security] - [Screen lock].
(Power switch) until “Power off” screen is displayed.
Power off].
(Power switch).
NOTE
l
Waking Up
A
B
10
The screen turns off automatically after 1 minute. You can change time to turn the screen off
by touching
Press
Release the lock using the method configured in the “Protect your phone” screen
(è page 9).
- [ Settings] - [ Display] - [Sleep].
(power switch) until (power indicator) lights.
Page 11
Input Operation
Screen Input Operation
Touch Select items or options.
Touch and hold Open special options.
Swipe Scroll the screen.
Flick Scroll the screen quickly.
Drag and drop Move an item.
Pinch
Zoom in or out the screen.
Depending on the applications, you can also zoom in or
out by double-touching the screen.
Getting Started
Tablet Buttons
A1
A2
A3
A1 button
Starts the dashboard (under factory default conditions).
When [Concealed Mode] is set to [Enabled], this enables/disables concealed mode.
A2 button
<Only for models with barcode readers>
Scans barcodes (under factory default conditions).
You can change the function assigned to this button using User Button Manager.
Operating Instructions - Reference Manual “Tablet Buttons”
A3 button
Enables security mode (under factory default conditions).
You can change the function assigned to this button using User Button Manager.
Operating Instructions - Reference Manual “Tablet Buttons”
Down button
Decreases the volume.
While using the BIOS Setup Utility, this button functions identically to the ↓ key on a
keyboard. You can also change the function assignment of the button to increasing/
decreasing the brightness or disable the button.
Up button
Increases the volume.
While using the BIOS Setup Utility, this button functions identically to the → key on
a keyboard. You can also change the function assignment of the button to increasing/decreasing the brightness or disable the button.
Rotation lock button
Enables/disables automatic screen rotation.
Automatic screen rotation is enabled under factory default conditions.
11
Page 12
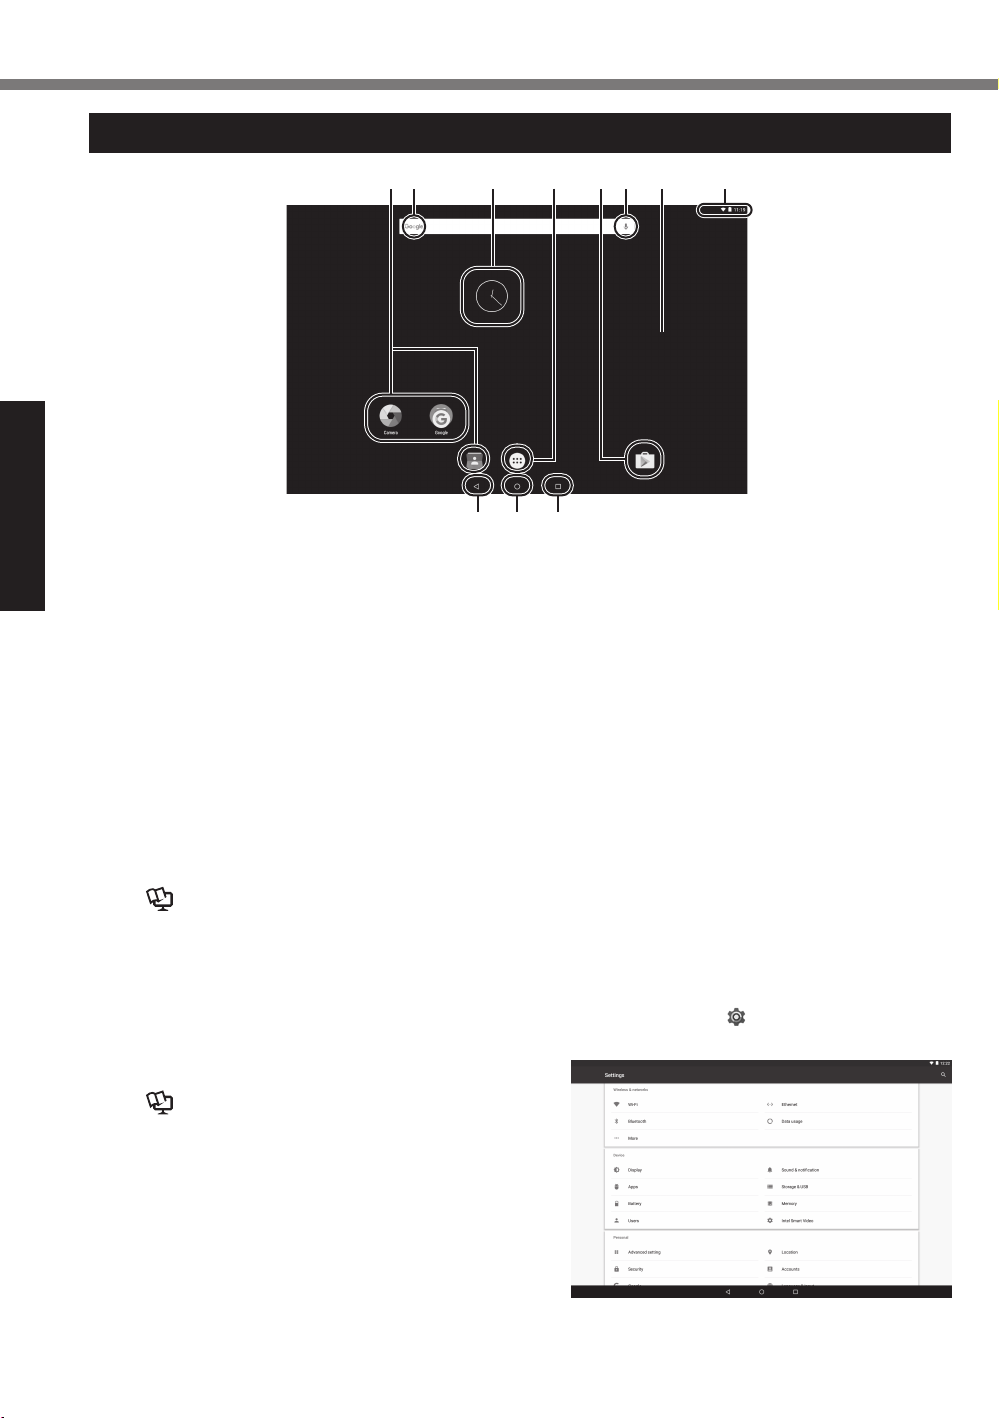
Input Operation
BAC D EF G
C
Home Screen
H I J
A: Search
Getting Started
Search the internet and this computer
using Google search. You can input the
search terms by using on-screen keyboard.
B: Voice search
Search the internet and this computer
using Google search. You can input the
search terms by speaking.
C: Application shortcuts
Open an application. You can add/remove
applications shortcuts to/from the home
screen.
Operating Instructions - Refer-
è
ence Manual “Customizing the Home
Screen”
D: Widgets
The small applications on the home
screen. Some widgets display the latest information (clock, calendar, weather, email,
etc.) on the home screen.
Operating Instructions - Refer-
è
ence Manual “Customizing the Home
Screen”
E: Home screen
The starting point for this computer. You
can place shortcuts, widgets and other
items to the home screen.
You can add, delete, and sort items on the
home screen.
F: Apps
Display all applications and widgets. Touch
an application/widget to open from the list.
G: Status detail
The status detail (remaining battery
charge, network status, etc.) and clock are
displayed. Swipe down from the top edge
of the screen, and touch the header in the
notification shade to display the quick settings. The quick settings display network
status, remaining battery charge and other
details.
When you touch [
plication is opened.
Settings], Settings ap-
12
Page 13

H: Back
Return to the previous screen.
I: Home
Return to the home screen.
J: Recent apps
Display the recent applications. Touch an
application to open from the application
list.
To remove an application from the list, flick
the application left or right, or touch the
[×] icon at the top right of the application
window.
Getting Started
13
Page 14

Handling and Maintenance
Operation environment
Place the computer on a flat stable surface not subject to shock, vibration, and danger of drop-
l
ping. Do not place the computer upright or turn it over. If the computer is exposed to an extremely strong impact, it may become damaged.
Operating environment
l
Temperature: Operation : -10
Storage : -20 °C to 60 °C {-4 °F to 140 °F}
Humidity: Operation : 30% to 80% RH (No condensation)
Storage : 30% to 90% RH (No condensation)
Even within the above temperature/humidity ranges, operation for a long time in extreme environments, smoking nearby, or operation in places where oil is used or where there is a lot of
dust will result in the product deterioration and will shorten the product life.
*1
Do not expose the skin to this product when using the product in a hot or cold environment.
If the computer is wet in temperatures of 0 °C {32 °F} or below, freeze damage may occur.
Make sure to dry off the computer in such temperatures.
Do not place the computer in the following areas, otherwise the computer may be damaged.
l
• Near electronic equipment. Image distortion or noise may occur.
• In extremely high or low temperature.
As the computer can become hot during operation, keep it away from items that are sensitive
l
to heat.
to 50 °C {14 °F to 122 °F} (IEC60068-2-1, 2)*1
°C
Handling cautions
This computer is designed to minimize shock to parts such as the LCD and the ash memory
drive, but no warranty is provided against any trouble caused by shock. Be extremely careful
when handling the computer.
When carrying the computer:
l
Useful Information
• Turn off the computer.
• Remove all external devices, cables, Smart Cards and other protruding objects.
• Do not drop or hit the computer against solid objects.
• Do not grip the display part.
When you board an airplane, take the computer with you and never put it in your checked lug-
l
gage. When using the computer on airplane, follow the airline’s instructions.
When carrying a spare battery, put it in a plastic bag to protect its terminals.
l
The touchscreen is designed to be used by a finger tip. Do not place any object on its surface
l
and do not press down strongly with sharp-pointed or hard objects that may leave marks (e.g.,
nails, pencils and ball point pens).
Avoid any harmful substances such as oil from getting into the touchscreen. The pointer may
l
not work correctly.
Be careful not to get injured by dropping or getting hit when carrying the computer.
l
Use only the dedicated stylus to touch the screen. Do not place any object on its surface and
l
do not press down strongly with sharp-pointed or hard objects that may leave marks (e.g.,
nails, pencils and ball point pens).
Do not use the screen when dust or dirt (e.g., oil) is on the screen. Otherwise foreign particles
l
on the screen/dedicated stylus can scratch the screen surface or obstruct the dedicated stylus
operation.
Use the dedicated stylus only for touching the screen. Using it for any other purpose may
l
damage the dedicated stylus and result in scratches on the screen.
14
Page 15

When the battery indicator does not light on
n
The battery indicator may not light on even if the AC adaptor and the battery pack are correctly
connected to the computer, due to the following reasons.
The AC adaptor’s protection function may be working. In this case, pull out the AC cord and
l
wait for more than 1 minute before reconnecting the AC cord.
When using peripheral devices
n
Follow these instructions and the Operating Instructions - Reference Manual to avoid any damage to the devices. Carefully read the instruction manuals of the peripheral devices.
Use the peripheral devices conforming to the computer’s specifications.
l
Connect to the connectors in the correct direction.
l
If it is hard to insert, do not try forcibly but check the connector’s shape, direction, alignment of
l
pins, etc.
If screws are included, fasten them securely.
l
Remove the cables when you carry the computer. Do not pull the cables forcibly.
l
Preventing your computer from unauthorized use via Wi-Fi/Bluetooth/Wireless WAN
n
Before using Wi-Fi/Bluetooth/Wireless WAN, make the appropriate security settings such as
l
data encryption.
Sensors
n
This computer is equipped with four sensors (acceleration sensor, gyro sensor, magnetic sensor,
ambient light sensor), and you can use these sensors with any software that is compatible.
As the accuracy of each sensor output is dependent on the operating environment and other conditions, the results should only be used as a reference.
The acceleration sensor, gyro sensor, and magnetic sensor are located at the bottom center of
the LCD. The detection results of each sensor may vary depending on the display mode, how you
are holding the computer, the application software you are using, and other factors.
Automatic brightness adjustment
l
The computer is equipped with an automatic brightness adjustment function that adjusts the
display screen based on the ambient light sensor. You can configure the automatic adjustment
function as follows.
Touch
A
Touch [
B
The ambient light sensor is located at the top of the LCD and to the left of the camera.
(è page 4 “Description of Parts”)
The ambient light cannot be detected properly if this area is obstructed or dirty.
- [ Settings] - [ Display].
] for [Brightness level] and turn it on.
Useful Information
15
Page 16

Handling and Maintenance
Magnetic sensor
l
The magnetic sensor on the computer operates by detecting geomagnetism. Therefore, the
magnetic sensor may not function properly and it readings may be inaccurate, especially in
the following environments.
• Inside or near steel structures such as buildings or bridges
• Inside or near automobiles, or near train power lines
• Near metallic furniture or appliances
• When the AC adaptor or other peripheral devices are brought closer to the computer
• Near magnets, speakers, or other objects with strong magnetic fields
The magnetic directions indicated by the magnetic sensor may not be accurate immediately
after purchase or in environments with poor magnetic fields.
In such cases, turn on the computer and move it as follows.
Hold the computer so that its display side is facing the ground and level.
A
While keeping the computer level, rotate it 90 degrees or more clockwise.
B
Return the computer to position A, and rotate it 90 degrees or more counterclockwise.
C
Return the computer to position A.
D
Tilt the computer 90 degrees or more to the left so that the left side of the computer tilts
E
down.
Return the computer to position A, and tilt it 90 degrees or more to the right so that the
F
right side of the computer tilts down.
CAUTION
Hold the computer firmly when moving it. Strong shocks from dropping the computer may
l
result in damage.
Useful Information
16
Page 17

Maintenance
If drops of water or other stains get on the surface of the LCD panel, wipe them off immediately.
Failure to do so may result in staining.
To clean the LCD panel
Use the soft cloth. (For further information, refer to “Suggestions About Cleaning the LCD Surface” è
screen”.)
To clean areas other than the LCD panel
Wipe with a soft dry cloth such as gauze. When using detergent, dip a soft cloth in water-diluted
detergent and wring it thoroughly.
CAUTION
Do not use benzene, thinner, or rubbing alcohol since it may adversely affect the surface
l
causing discoloration, etc. Do not use commercially-available household cleaners and cosmetics, as they may contain components harmful to the surface.
Do not apply water or detergent directly to the computer, since liquid may enter inside of the
l
computer and cause malfunction or damage.
Use a soft, dry cloth to wipe droplets of water from the surface of the unit. Do not use a micro-
l
wave to dry the unit. Doing so will result in malfunction or damage.
Operating Instructions - Reference Manual “Maintaining the performance of the
Power-Saving Function
When the computer is not operated or accessed for a specified period, the power-saving function
activates and the computer enters sleep mode. This function allows you to reduce power consumption when the computer is not being used while it is turned on.
The power-saving function is enabled under factory default settings. (è Operating Instruc-
tions - Reference Manual “Important Battery Tips”)
To exit sleep mode, press the
l
(power switch).
Dispose of Computer
Preparation
n
Remove all peripherals (microSD memory card, etc.).
l
Perform “Factory data reset” to erase the stored data.
l
<Only for model with Built-in Bridge Battery>
<For Europe and U.S.A./Canada>
Attention Customers
Don't remove the battery by yourself. The battery must be removed by qualified professionals.
When disposing of this product, be sure to contact qualified professionals to remove the battery.
Useful Information
17
Page 18

Handling and Maintenance
Attention Qualied professionals to remove the battery
Dispose of this product correctly in accordance with the local regulations after removing the
battery as shown in the following procedure.
CAUTION
Never disassemble the computer except before disposal.
l
Refer to “Safety Precautions” in OPERATING INSTRUCTIONS - Read Me First for precau-
l
tions when disposing of the computer.
Turn off the computer, and disconnect the AC adaptor.
A
Slide both latches (A) to the arrow direction, and then remove the cover.
B
Depending on the models, the shape of cover may differ.
A
Slide both latches (B) to the arrow direction, and then remove the battery pack, and wait for
C
about 3 minutes.
Useful Information
B
18
Page 19

Remove the screws (10) and lift the cover.
D
Pull out the built-in bridge battery in the sheet cover, and then remove the connector of the
E
built-in bridge battery.
Insulate the connectors of the built-in bridge battery by covering them with plastic tape, for
F
example.
Dispose of the battery with the cover attached correctly in accordance with the local regula-
G
tion.
Useful Information
19
Page 20

Troubleshooting (Basic)
Follow the instructions below when a problem has occurred. There is also an advanced troubleshooting guide in the “Reference Manual”. For a software problem, refer to the software’s instruction manual. If the problem persists, contact Panasonic Technical Support
can also use the “Hardware Diagnostic” to determine whether or not there is a problem (è
Operating Instructions - Reference Manual “Hardware Diagnostics”).
Starting Up
n
(è page 25)
. You
Cannot start up.
The power indicator or
battery indicator is not lit.
Cannot turn on the computer.
The computer does not
wake up from sleep.
Starting up and operation
is slow.
The date and time are
incorrect.
Cannot wake up from
sleep.
Unknown password required at startup.
Other startup problems.
Connect the AC adaptor.
l
Insert a fully charged battery.
l
Remove the battery pack and the AC adaptor, then connect them
l
again.
If a device is connected to the USB port, disconnect the device.
l
Turn off the computer and leave it in an environment of 5
l
higher temperature for about an hour, then turn on the power again.
The ambient temperature may be higher. Move this computer to the
l
cooler place.
Make the correct settings.
l
Touch
A
If the problem persists, the internal clock battery may need to be re-
l
placed. Contact Panasonic Technical Support (è page 25).
When the computer is connected to network, check the date and time
l
of the server.
The 2038 A.D. or later year will not be correctly recognized on this
l
computer.
In sleep mode, the AC adaptor may be disconnected. If the AC adap-
l
tor was disconnected and the battery pack was discharged in sleep
mode, data not saved will be lost and the computer will not wake up.
When a password is configured for DeviceManagement, the same
l
password is configured as the BIOS supervisor password. Contact the
system administrator that configured the DeviceManagement password.
If you forgot the password, contact the system administrator or Pana-
l
sonic Technical Support.
Remove all peripheral devices.
l
- [ Settings] - [ Date & time], and set date and time.
{41 °F} or
°C
Shutting down
Troubleshooting
n
Computer does not shut
down.
20
Remove the peripheral devices.
l
Wait one or two minutes. It is not a malfunction.
l
Press and hold
l
computer off forcibly.
(Power switch) for 10 seconds or longer to turn the
Page 21

n
Display
No display.
The screen is dark.
There are red, green, or
blue dots on the screen,
or there is unevenness in
colors and brightness on
the screen.
Screen Input Operation
n
The pointer does not
work.
Cannot operate the
touchscreen.
Battery Status Indicator
n
Blinking orange.
Lighting red.
The computer entered sleep mode by the power-saving function. To
l
resume, press the power switch.
If the brightness setting of this computer is set to automatic brightness
l
mode, the screen brightness automatically changes depending on the
ambient brightness.
Disable automatic brightness mode and change the brightness of the
l
screen.
The following are not malfunctions.
Although advanced high-precision technologies are used in the pro-
l
duction of color LCD screens, 0.002% or less of the picture elements
may be dark or remain constantly lit (more than 99.998% of elements
function properly).
Due to the natural characteristics of LCD screens, you may notice
l
unevenness in colors and brightness depending on your angle of view.
Hues may also vary by product.
When using the external mouse, connect it correctly.
l
Press
l
switch) to wake up.
The battery cannot be charged temporarily. Remove the AC adaptor,
l
then connect it again.
The remaining battery charge is approximately 9 % or less. Charge the
l
battery pack.
(Power switch) to enter to sleep mode, then press (Power
Others
n
No response.
Press and hold
l
and touch [OK], then press
If the application does not work normally, uninstall and reinstall the ap-
l
plication. To uninstall :
Touch
A
Touch the application you want to uninstall, and touch [Uninstall].
B
Uninstall the application by following the on-screen instructions.
C
(Power switch) until “Power off” screen is displayed
(Power switch) to turn it on.
- [ Settings] - [ Apps].
Troubleshooting
21
Page 22

Troubleshooting (Basic)
Factory Data Reset
If you need to reset the storage to the default condition, perform “Factory data reset”.
CAUTION
Factory data reset function will return this computer to the default condition. When you reset
l
this computer, the stored data will be erased.
Back up important data to other media before reset.
Touch
A
All the data in /mnt/sdcard folder will be erased. The data in microSD memory card inserted
into microSD memory card slot will not be erased.
Touch [Reset tablet].
B
Follow the on-screen instructions.
C
- [ Settings] - [ Backup & reset] - [Factory data reset].
Troubleshooting
22
Page 23

Specications
This page provides the specifications for the basic model.
The specification is different according to the model number.
Main Specications
n
®
CPU Intel
Atom™ x5-Z8550 Processor (2
GHz
2.4
)
Video controller SoC embedded
*1
Memory 4
Storage Flash memory drive (eMMC) : 32
GB
GB
Display Method 10.1 WUXGA type
Touchscreen 10 Finger touch (Capacitive)
®
Wi-Fi Intel
Bluetooth
Card Slot microSD Memory
*3
Card Slot
*4
Interface Type-A USB port 3.0 × 1
Dual Band Wireless-AC 8260
Version 4.2
microSDHC compatible
*5
, Type-C USB port 3.1 x 1*5,
HDMI output port x 1*6, Expansion Bus Connector, Headset
Jack (Miniature jack M3, CTIA standard / Audio output: 32
Ω
, Output Power 4
mW
× 2, Stereo / Microphone: Monaural
Input) x 1, Expansion bus connector (24 pin) x 1
Camera Front 1920 × 1080 dots, 30 fps (Video) / 1920 × 1080 dots (Still),
Array Microphone
Rear 1920 × 1080 dots, 30 fps (Video) / 3264 × 2448 dots (Still),
With camera light
Sensor Ambient light sensor, Magnetic sensor, Gyro sensor, Accel-
eration sensor
Power Supply AC adaptor or Battery pack
AC Adaptor
*7
Input: 100 V to 240 V AC, 50
Hz
/60
4.06 A
Battery Pack Li-ion 11.4 V, Minimum 2600
mAh
(with CF-VZSU0QW)
Operating Time
*8
Approx. 9 hours (models without wireless WAN), approx..
7.5 hours (models with wireless WAN)
Charging Time
*9
Physical Dimensions (W × D × H)
Approx. 2.5 hours
272
mm
× 196
mm
× 16.4
mm
{10.71” × 7.72” × 0.65”}
(excluding projecting parts)
Weight Approx. 880 g {Approx. 1.95
lb.
} (with CF-VZSU0QW, ex-
cluding the optional devices)
Environment
Operating Temperature -10 °C to 50 °C {14 °F to 122 °F} (IEC60068-2-1, 2)
Humidity 30% to 80% RH (No condensation)
Storage Temperature -20 °C to 60 °C {-4 °F to 140 °F}
Humidity 30% to 90% RH (No condensation)
OS
*11
Android 6.0
*1
MB
Cache, up to
*2
Hz
, Output: 16 V DC,
*10
Appendix
23
Page 24

Specications
Main Specications
n
Pre-installed Software Adobe Acrobat DC - PDF Reader, Dashboard, DeviceMan-
agement, User Button Manager, Hardware Diagnostics,
Google applications
Optional Devices
n
Wireless WAN LTE compatible
GPS GPS, Glonass, SBAS
Type-A USB 2.0 Part x 1
Magnetic Stripe Card Reader x 1
Smart Card Slot x 1
MicroSIM Card Slot x 1
Barcode Reader x 1
Built-in bridge battery (not replaceable) For hot swap
W
Approx. 0.5
l
when the battery pack is fully charged (or not being charged) and the computer
is OFF.
<When using with 115 V AC>
Even when the AC adaptor is not connected to the computer, power is consumed (Max. 0.3 W)
simply by having the AC adaptor plugged into an AC outlet.
*12
*13
*1
MB
1
*2
MB
1
ware will report as fewer
*3
Does not guarantee operation of all Bluetooth peripherals.
*4
Operation has been tested and confirmed using Panasonic microSD Memory Card with a capacity of up
to 2
Operation on other microSD equipment is not guaranteed.
*5
Does not guarantee operation of all USB-compatible peripherals.
*6
Compatibility with all external displays that support HDMI is not guaranteed.
*7
<Only for North America>
The AC adaptor is compatible with power sources up to 240 V AC adaptor.
This computer is supplied with a 125 V AC compatible AC cord.
*8
Measurement results are based on Panasonic testing methods. Measured at LCD brightness: 150
browsing web site via wi-fi every 20 seconds.
Varies depending on the usage conditions, or when an optional device is attached.
*9
Varies depending on the usage conditions. When charging completely discharged battery pack, it may
take a log time.
*10
Do not expose the skin to this product when using the product in a hot or cold environment.
(è OPERATING INSTRUCTIONS - Read Me First)
When using in hot or cold environment, some peripherals and battery pack may fail to work properly.
Check the operation environment of the peripherals.
Using this product continuously in a hot environment will shorten the product life. Avoid use in these types
of environments.
*11
An OS that has been installed at the time of purchase can be supported.
*12
Appendix
Depending on the model, some Google applications may be installed.
*13
Only for model with GPS.
= 1,048,576 bytes / 1
= 1,000,000 bytes / 1
GB
and Panasonic microSDHC Memory Card with a capacity of up to 32
GB
= 1,073,741,824 bytes
GB
= 1,000,000,000 bytes. Your operating system or some application soft-
GB
.
GB
.
20-M-1-1
2
cd/m
,
24
Page 25

LIMITED WARRANTY
For U.S.A.
Panasonic System Communications Company of North America (PSCNA)
Computer Products - Worldwide Warranties
Section 1: Limited Warranty - Hardware
PSCNA, referred hereafter as “Panasonic” will repair the products listed below with new or rebuilt parts, free
of charge in a Global Panasonic designated service location for the period specified below from the date of
original purchase in the event of a defect in materials or workmanship. These warranties are extended solely
to the original purchaser. A purchase receipt or other proof of date of original purchase will be required
before warranty performance is rendered.
• Laptop PC (CF-##) – 3 Years
• Tablet PC (FZ-##) – 3 Years
• Ultra-Mobile (CF-U#/CF-H# Series) – 3 Years
• PDRC - LCD & Keyboard Assembly – 3 Years
Battery Warranty
Batteries supplied with the product are covered under the warranty for one (1) year from date of purchase,
except as excluded in Section 3. Batteries purchased separately are covered under the warranty for one (1)
year from the date of purchase. A replacement battery furnished under the product warranty is covered for
the remaining period of the one year warranty on the original or purchased battery.
Optional: Panasonic “Protection Plus” Warranty
Any unit for which the Panasonic “Protection Plus” warranty has been purchased will receive additional
coverage for any failure that occurs due to accidental damage. All other terms and conditions of the
standard warranty apply and this additional coverage will exist for the duration of the standard warranty
period of the unit. If an extended Protection Plus warranty program is purchased, coverage is extended to
the end of the last year of extended coverage purchased.
This warranty does not cover failures or defects that are caused by fire, intentional acts, loss, theft, improper
maintenance, modification or service by anyone other than the Panasonic National Service Center or a
Panasonic Authorized Service Provider, or damage that is attributable to acts of God. Cosmetic damage
that does not affect functionality is not covered. Cosmetic damage on units with hardware failures will be
repaired in accordance with the warranty terms. This warranty is extended solely to the original purchaser
on the unit serial number for which it was purchased. Complete unit replacement fulfills the full obligation
and is at the discretion of Panasonic and is limited to once during the coverage term. Maximum benefit is
limited to one replacement per coverage year of the Motherboard, LCD, Storage Drive, and Keyboard.
25
Appendix
Page 26

LIMITED WARRANTY
Wireless Module Warranty
Panasonic approved wireless modems installed in Panasonic brand computers and integrated by Panasonic
or an Authorized Panasonic Wireless Integrator are covered under the warranty for the remaining warranty
period of the device in which the modem is installed. For devices with less than three (3) months remaining
on the unit warranty, the wireless modem will be covered for a period of three (3) months from the date of
installation of the modem, covering only modem replacement or modem installation related issues.
All modems must be approved by the wireless carrier prior to use. Any use or attempted use of a wireless
modem not approved and activated by the carrier for use on their network is strictly prohibited and is not
sanctioned or warranted by Panasonic and may result in legal action. In addition, all modems must be
approved by Panasonic as compatible with the device hardware before installation or use.
Panasonic’s sole responsibility for the warranty or technical support of the software required to install or
operate the modem is defined in Section 2 (Limited Software Warranty). Any attempted software installation
by anyone other than a Panasonic Authorized Wireless Integrator is not covered under warranty and may
result in service charges to re-image or replace the hard drive.
Installation or attempted installation by any party other than Panasonic or an Authorized Panasonic Wireless
Integrator is strictly not covered under the warranty and may void the computer warranty if damage results.
Options and Accessories Warranties
The below listed Panasonic brand or supplied options and accessories are covered under this limited
warranty for the period specified from the date of purchase or as specifically stated:
• AC Adaptor / Power Cord – 3 Years
• Memory Expansion Card (Panasonic Brand) – 3 Years
• Car Mount - Docking Station PCB or Vehicle Docking Station – 3 Years
• Desktop Port Replicator, I-O Box, Docking Cradle (like CF-U1) – 3 Years
• Antenna Pass-through Cable – 3 Years
• Backlit or Full-sized keyboard – 3 Years or assumes warranty of the unit in which it is installed
• Integrated Panasonic supplied options and kits including, but not limited to Wireless Modems, Media
Bay Drives (Floppy, CD, DVD, Combo), Camera, GPS, Bluetooth, Smartcard Reader, Magnetic Card
Reader, Barcode Scanner, and Fingerprint Reader - 3 Years or assumes warranty period of the unit in
which it is installed provided the integration was performed by Panasonic or an Authorized Integrator.
• Hard Drive / Solid State Drive (Internal) – 3 Years
• Separately purchased 2nd Hard Drive – 1 Year
• External USB Drives (CD / DVD / Floppy / Hard Drive) – 1 Year
• Optional Battery – 1 Year
• Battery Charger / Multi-Bay Battery Charger – 1 Year
• Stylus Pens, Digitizer & Standard – 90 Days (physical damage excluded)
Appendix
26
Page 27

Section 2 - Limited Warranty - Software
Panasonic warrants to you only that the disk(s) or other media on which the Programs are furnished will
be free from defects in material and workmanship under normal use for a period of sixty (60) days from the
date of delivery thereof to you, as evidenced by your purchase receipt.
This is the only warranty Panasonic makes to you. Panasonic does not warrant that the functions contained
in the Programs will meet your requirements or that the operation of the Programs will be uninterrupted
or error free. Panasonic shall have no obligation for any defects in the disk(s) or other media on which
the Programs are furnished resulting from your storage thereof, or for defects that have been caused by
operation of the disk(s) or other media
Panasonic’s entire liability and your exclusive remedy under this warranty shall be limited to the
replacement, in the United States or other Panasonic designated location, of any defective disk or other
media which is returned to Panasonic’s Authorized Service Center, together with a copy of the purchase
receipt, within the aforesaid warranty period.
Section 3 - Limited Warranty Exclusions - Specifically excluded from the warranty are:
• All consumable items; such as screen protection films, logo badges, labels, cleaning cloths, carry
cases, manuals, cables, straps, belts, holsters, tethers, and harnesses and any other options and
accessories not listed above or covered under a separate warranty.
• Failures related to the product operating system, hard drive or solid state drive image, software setup,
software program, virus, other program(s) or file(s) on any drive or in any computer memory location.
• Failures due to BIOS settings or changes, as well as any cosmetic or physical damage to the unit.
• Any unit or device with a missing or altered model number or serial number label
• Cosmetic damage or any damage which occurs in shipment
• Failures which are caused by products not supplied by Panasonic
• Failures which result from alteration, accident, misuse, introduction of liquid or other foreign matter into
the unit, abuse, neglect, installation, maladjustment of consumer controls, improper maintenance or
modification, use not in accordance with product use instructions
• Failures due to service by anyone other than a Panasonic Authorized Service Provider
• Failures caused by improper installation of options or accessories or due to integration by any
company other than Panasonic or a Panasonic Authorized Integrator
• Damage, failure, or loss due to the unit being stolen, lost, misplaced, or used by anyone other than the
original purchaser
• Damage that is attributable to acts of God
27
Appendix
Page 28

LIMITED WARRANTY
This limited warranty only covers failures due to defects in materials or workmanship which occur during
normal use. If a unit is sent to a Panasonic Authorized Service Center and no hardware failure is found,
the customer will be billed for labor to correct a software issue or reimage the hard drive plus shipping and
applicable administrative fees at the current rates set by the service provider.
THIS PRODUCT IS NOT INTENDED FOR USE AS OR PART OF NUCLEAR EQUIPMENT/SYSTEMS,
AIR TRAFFIC CONTROL EQUIPMENT/SYSTEMS, OR AIRCRAFT COCKPIT EQUIPMENT/SYSTEMS
PANASONIC WILL NOT BE RESPONSIBLE FOR ANY LIABILITY RESULTING FROM THE USE OF THIS
PRODUCT ARISING OUT OF THE FOREGOING USES.
1
*
AIRCRAFT COCKPIT EQUIPMENT/SYSTEMS include class 2 Electronic Flight Bag (EFB) Systems and
Class 1 EFB Systems when used during critical phases of flight (e.g., during take-off and landing) and/or
mounted onto the aircraft. Class 1 EFB Systems and 2 EFB Systems are defined by FAA: AC (Advisory
Circular) 120-76A or JAA: JAA TGL (Temporary Guidance Leaflets) No. 36.
Other Limits and Exclusions: There are no other express warranties except as listed above.
PANASONIC SHALL NOT BE LIABLE FOR LOSS OF DATA OR OTHER INCIDENTAL OR
CONSEQUENTIAL DAMAGES RESULTING FROM THE USE OF THIS PRODUCT, OR ARISING OUT OF
ANY BREACH OF THIS WARRANTY. ALL EXPRESS AND IMPLIED WARRANTIES, INCLUDING THE
WARRANTIES OF MERCHANTABILITY AND FITNESS FOR A PARTICULAR PURPOSE ARE LIMITED TO
THE APPLICABLE WARRANTY PERIOD SET FORTH ABOVE. Some states do not allow the exclusion or
limitation of incidental or consequential damages, or limitations on how long an implied warranty lasts, so
the above limitations or exclusions may not apply to you.
This limited warranty gives you specific legal rights, and you may also have other rights which vary from
state to state.
For technical support or to arrange for service on your Panasonic computer product, call our toll-free hotline
at 1-855-PSC-TECH (855-772-8324).
DIAL TOLL FREE: 1-855-PSC-TECH (855-772-8324)
Web Site : www.panasonic.com/toughbook
*1
.
Appendix
28
Page 29

For Canada
PANASONIC COMPUTER AND PERIPHERALS LIMITED WARRANTY
Coverage – Panasonic Canada Inc. (“PCI”) warrants to you, the rst end user customer, this computer prod-
uct (excluding software media), when purchased from PCI or from a PCI authorized reseller, to be free from
defects in materials and workmanship under normal use, subject to the terms set forth below, during the
period of warranty coverage specied.
Scope of Coverage Period of Coverage Type of Failure Coverage
•
Laptop Computers (except Battery) and
AC Adaptor
•
Factory/PCI installed options including
Wireless WAN, GPS, Bluetooth, Finger
print reader, Backlit keyboard, Memory
Card and Media Bay Drives (Floppy, CD/
DVD)
•
Mobile Wireless Display
•
PDRC – LCD and Keyboard Assemblies
•
Port Replicator
•
Hand-held Computers
•
Battery
•
Battery charger
•
Auto Adaptor
•
External USB Drives
•
Digitizer pen or stylus Ninety (90) Days from Date of
•
All consumable items including protec-
tion lm, cleaning cloth, carry case,
tether and harness
Remedy – In the event of a warranty claim, contact PCI’s representatives within the applicable warranty
period, identifying the nature of the defect claimed, at 1-800-668-8386 between 9:00 A.M. and 5:00 P.M.,
Eastern Time Zone, Mon. – Fri. (excluding holidays) for instructions on how to obtain service. A purchase
receipt or other proof of date of original purchase is required before warranty service is performed. Defective
parts covered by this Limited Warranty will be repaired or replaced with new or comparable rebuilt parts on
an exchange basis. Warranty replacement or repair is subject to the terms of this Limited Warranty for the
balance of the original period of warranty coverage.
No Coverage – This Limited Warranty does not cover products purchased outside Canada. Neither does
it cover damage to, failure of, or defects in a product or accessory through mishandling, improper installation, abnormal use, misuse, neglect, accident, introduction of liquid or other foreign matter into the product,
alteration or servicing by anyone not authorized by PCI, or act of God.
THIS PRODUCT IS NOT INTENDED FOR USE AS, OR AS PART OF, NUCLEAR EQUIPMENT/SYSTEMS,
AIR TRAFFIC CONTROL EQUIPMENT/SYSTEMS, OR AIRCRAFT COCKPIT EQUIPMENT/SYSTEMS
PANASONIC WILL NOT BE RESPONSIBLE FOR ANY LIABILITY RESULTING FROM THE USE OF THIS
PRODUCT ARISING OUT OF THE FOREGOING USES.
*2
AIRCRAFT COCKPIT EQUIPMENT/SYSTEMS include Class2 Electrical Flight Bag (EFB) Systems and
Class1 EFB Systems when used during critical phases of ight (e.g., during take-off and landing) and/or
mounted on to the aircraft. Class1 EFB Systems and 2 EFB Systems are dened by FAA: AC (Advisory
Circular) 120-76A or JAA: JAA TGL (Temporary Guidance Leaets) No.36
IF YOU SHIP THE PRODUCT FOR WARRANTY SERVICE
Carefully pack the product, preferably in the original carton. Include details of defect claimed and proof of
date of original purchase. No liability is assumed for loss or damage to the product while in transit, if you
chose your own transportation carrier.
Three (3) Years from Date of
Original End User Customer
Purchase
One (1) Year from Date of
Original End User Customer
Purchase
Original End User Customer
Purchase
No Coverage
Defective Materials or Workmanship
Defective Materials or Workmanship
Defective Materials or Workmanship
*2
.
29
Appendix
Page 30

LIMITED WARRANTY
SOFTWARE MEDIA LIMITED WARRANTY
Coverage – PCI warrants to you, the rst end user customer, that the disk(s) or other media on which soft-
ware program(s) is/are supplied will be free from defects in materials and workmanship under normal use in
Canada for a period of sixty (60) days from date of receipt as evidenced by your purchase receipt for your
Panasonic Computer product.
THIS IS THE ONLY WARRANTY THAT PCI MAKES RESPECTING THE SOFTWARE MEDIA. PCI does not
warrant the software. Please refer to the software licensor’s written warranty (accompanying the copy of the
software) for any software warranty claim.
Claim Procedure – In the event of a defect in material or workmanship in the media during
the sixty (60) day warranty period, and you return it, transportation costs prepaid, to Panasonic Canada Inc.,
Computer Products Marketing, 5770 Ambler Drive, Mississauga, Ontario L4W 2T3, within the warranty period,
together with a copy of your purchase receipt, and an explanation of the suspected defect, PCI will replace in
Canada the defective disk(s) or other media.
Remedy – PCI’s entire liability, and your only remedy for any breach of this software media warranty is limited to replacement of the media only. It does not cover any other damages, including, but not limited to, loss
of use or prot loss, or special, indirect or consequential damages, or other claims, whether or not of similar
character.
No Coverage – This limited warranty does not apply if the disk(s) or other media has been used in other
than a Panasonic product, or in environmental conditions other than those specied by PCI or the manufacturer, or if subjected to misuse, neglect, mishandling, modication or attempted modication of the program,
or if damaged by accident or act of God. PCI is not responsible for damage to or loss of any program, data
or removable storage media.
GENERAL
NO OTHER WARRANTIES – PCI DISCLAIMS ALL OTHER WARRANTIES, EITHER EXPRESS OR IMPLIED, INCLUDING, BUT NOT LIMITED TO, IMPLIED WARRANTIES OF MERCHANTABILITY AND
FITNESS FOR A PARTICULAR PURPOSE, WITH RESPECT TO THE SOFTWARE, SOFTWARE MEDIA,
COMPUTER PRODUCT, OPTIONS AND ACCESSORIES.
NO LIABILITY FOR CONSEQUENTIAL DAMAGES – IN NO EVENT SHALL PCI BE LIABLE FOR ANY
SPECIAL, INDIRECT OR CONSEQUENTIAL DAMAGES ARISING FROM ANY BREACH OF THE LIMITED
WARRANTIES SET OUT IN THIS DOCUMENT, OR FROM THE USE OF THE COMPUTER PRODUCT,
INCLUDING, WITHOUT LIMITATION, LOSS OF DATA, BUSINESS, PROFIT OR GOODWILL.
IN ANY EVENT, PCI’S MAXIMUM LIABILITY FOR ANY BREACH SHALL NOT EXCEED THE AMOUNT
ACTUALLY PAID BY YOU FOR THE COMPUTER PRODUCT.
NO ACTION, REGARDLESS OF ITS BASIS, MAY BE BEGUN AGAINST PCI MORE THAN TWO (2)
YEARS AFTER THE CAUSE OF ACTION AROSE.
Statutory Warranties – Some jurisdictions do not allow these limitations or exclusions, so they may not apply to you.
Appendix
30
Page 31

LIMITED WARRANTY (GARANTIE LIMITÉE)
Pour le Canada
GARANTIE LIMITÉE – ORDINATEURS ET PÉRIPHÉRIQUES PANASONIC
Couverture –
l’exclusion des supports des logiciels) est, au moment de sa vente par PCI ou d’un revendeur agréé par PCI,
exempt de défauts de pièces et de fabrication dans les conditions normales d’utilisation, et ce, pendant la période de couverture de la garantie, sous réserve des modalités décrites ci-dessous.
Éléments couverts Durée de couverture Type de couverture
•
Ordinateurs blocs-notes (sauf batteries)
et adaptateur secteur
•
Options installées en usine/par PCI
incluant : WAN sans l, GPS, Bluetooth,
lecteur d’empreintes digitales, clavier
rétroéclairé, carte mémoire et lecteurs
(disquettes, CD/DVD)
•
Écran mobile sans l
•
Ensembles PDRC – ACL et clavier
•
Duplicateur de port
•
Ordinateurs de poche
•
Batterie
•
Chargeur de batterie
•
Adaptateur pour voiture
•
Périphériques USB
•
Stylo pointeur standard ou pour numé-
riseur graphique
•
Tous les articles consommables incluant
les pellicules protectrices, chiffons de
nettoyage, étuis de transport, longes et
sangles
Recours –
garantie deviendrait nécessaire, communiquez par téléphone avec un représentant de PCI au 1-800-668-8386,
entre 9h00 et 17h00 (heure de l’Est) du lundi au vendredi (sauf les jours fériés), avant l’échéance de la garantie
applicable, en prenant soin d’identier la nature de la défaillance.
Un reçu ou toute autre pièce justicative de la date d’achat original sera exigé avant toute réparation. Toute
pièce défectueuse couverte par la présente garantie limitée sera réparée ou remplacée par une pièce neuve ou
remise à neuf. Le remplacement ou la réparation sera fait conformément aux modalités de la présente garantie
limitée pendant la durée restante de la période originale de la garantie.
Produits non couverts – La présente garantie limitée ne couvre pas les produits achetés à l’extérieur
du Canada. Elle ne couvre pas non plus les dommages, la défaillance ou les défauts attribuables à une
manutention inadéquate, une mauvaise installation, une utilisation anormale ou abusive, de la négligence,
un accident, un déversement ou la pénétration d’un objet étranger, une modication, un cas fortuit ou une
réparation effectuée par une personne non agréée par PCI.
CE PRODUIT N’EST PAS DESTINÉ À ÊTRE UTILISÉ, EN TOUT OU EN PARTIE, COMME SYSTÈME/ÉQUIPEMENT
NUCLÉAIRE, SYSTÈME/ ÉQUIPEMENT DE CONTRÔLE DU TRAFFIC AÉRIEN OU SYSTÈME/ÉQUIPEMENT DE
POSTE DE PILOTAGE D’AVION*3. PANASONIC DÉCLINE TOUTE RESPONSABILITÉ CONCERNANT L’UTILISATION
DE CE PRODUIT DANS LES CAS SUSMENTIONNÉS.
*3
Les SYSTÈMES/ÉQUIPEMENTS DE POSTE DE PILOTAGE D’AVION sont dotés de systèmes OEPP
(organiseur électronique de poste de pilotage) de classe 2 et de classe 1 utilisés pendant des phases
critiques de vol (par exemple, pendant le décollage et l’atterrissage) et(ou) montés sur l’avion. Les
systèmes OEPP de classe 1 et de classe 2 sont dénis par le circulaire d’information FAA: AC (Advisory
Circular) 120-76A ou le feuilet n° 36 JAA: JAA TGL (Temporary Guidance Leaets) No 36.
Panasonic Canada Inc. (« PCI ») garantit à l’acheteur original que ce produit informatique (à
Trois (3) ans à partir de la date
d’achat original.
Un (1) an à partir de la date
d’achat original.
Quatre-vingt-dix (90) jours à
partir de la date d’achat original.
Aucune couverture
Pour obtenir des informations sur la marche à suivre dans le cas où une réclamation en vertu de la
Défauts de pièces et de fabrication
Défauts de pièces et de fabrication
Défauts de pièces et de fabrication
EXPÉDITION DU PRODUIT POUR SERVICE SOUS GARANTIE
Emballez soigneusement le produit, de préférence dans son emballage d’origine. Joignez une description
de la défaillance de même qu’une pièce justicative de la date d’achat. Panasonic Canada Inc. ne peut
être tenue responsable pour tout dommage ou perte subi pendant le transport si vous avez choisi le transporteur.
Appendix
31
Page 32

LIMITED WARRANTY (GARANTIE LIMITÉE)
GARANTIE LIMITÉE – SUPPORTS DES LOGICIELS
Couverture – Panasonic Canada Inc. (« PCI ») garantit à l’acheteur original que la ou les disquettes ou tout
autre support sur lequel le ou les programmes sont fournis sont exempts de défauts de pièces et de fabrication dans des conditions normales d’utilisation au Canada, et ce, pour une période de soixante (60) jours
suivant la date de réception indiquée sur la preuve d’achat.
LA PRÉSENTE GARANTIE EST LA SEULE OFFERTE PAR PCI COUVRANT LES SUPPORTS DE LOGICIELS. PCI ne garantit pas les logiciels. Reportez-vous à la garantie écrite du concédant de licence d’utilisation du logiciel (qui accompagne la copie du logiciel) pour toute réclamation en vertu de la garantie.
Réclamation – marche à suivre –
si l’article en question est retourné, port payé, à son service de Marketing – produits informatiques, 5770 Ambler
Drive, Mississauga (Ontario) L4W 2T3, dans les soixante (60) jours suivant la date d’achat original. Joignez à votre
envoi une pièce justicative de votre achat et une description du problème.
Recours –
garantie sur ce support de logiciel est limitée au seul remplacement du support. Elle ne couvre aucun autre
dommage, y compris, mais non exclusivement, la perte
d’usage ou de prots, ni aucun dommage spécial, indirect ou consécutif, ni aucune autre réclamation de nature
similaire ou autre.
Produits non couverts –
ont été utilisés dans un produit d’une marque autre que Panasonic ou dans des conditions environnementales
autres que celles spéciées par PCI ou le fabricant, ou soumis à une mauvaise utilisation, à la négligence, à une
manutention inadéquate ou encore si le programme a été modié ou subi une tentative de modication ou des
dommages attribuables à un accident ou à un cas fortuit. De plus, PCI n’assume aucune responsabilité pour toute
perte de, ou tout dommage à, un programme, des données ou un support de sauvegarde amovible.
PCI NE RECONNAÎT AUCUNE AUTRE GARANTIE, EXPLICITE OU IMPLICITE, Y COMPRIS, MAIS NON
EXCLUSIVEMENT, LES GARANTIES IMPLICITES DE VALEUR COMMERCIALE ET D’UTILITÉ À UNE FIN
QUELCONQUE, À L’ÉGARD DU LOGICIEL, SUPPORTS DE LOGICIELS, PRODUITS INFORMATIQUES,
PÉRIPHÉRIQUES ET ACCESSOIRES.
SOUS AUCUNE CIRCONSTANCE PCI NE POURRA ÊTRE TENUE RESPONSABLE DES DOMMAGES
SPÉCIAUX, INDIRECTS OU CONSÉCUTIFS ATTRIBUABLES À UN MANQUEMENT AUX GARANTIES
LIMITÉES DÉCRITES DANS LE PRÉSENT DOCUMENT OU À L’UTILISATION DU PRODUIT INFORMATIQUE, Y COMPRIS, SANS RESTRICTION, LA PERTE DE DONNÉES, D’AFFAIRES, D’ACHALANDAGE
OU DE PROFIT.
DANS TOUS LES CAS, LA RESPONSABILITÉ MAXIMALE DE PCI POUR TOUT MANQUEMENT NE
POURRA EXCÉDER LE PRIX DE VENTE DU PRODUIT INFORMATIQUE.
AUCUNE RÉCLAMATION, SANS ÉGARD À SES MOTIFS, NE POURRA ÊTRE FAITE AUPRÈS DE PCI
PLUS DE DEUX (2) ANS APRÈS LES FAITS INVOQUÉS À LA BASE D’UNE TELLE RÉCLAMATION.
Garantie statutaires –
elles ne pas s’appliquer
La responsabilité de PCI - et votre seul recours - dans le cas de toute défaillance couverte par la
La présente garantie limitée ne s’applique pas si la ou les disquettes ou autre support
Certaines juridictions interdisent de telles limitations ou exclusions; aussi, pourraient-
.
Panasonic Canada Inc. remplacera toute disquette ou support défectueux
GÉNÉRALITÉS
Appendix
32
Page 33

For Australia
Personal / Notebook Computers - 36 Month Warranty from Date of Purchase
1. Subject to the conditions of this warranty Panasonic or its Authorised Service Centre will perform
necessary service on the product without charge for parts or labour, if in the opinion of Panasonic, the
product is found to be faulty within the warranty period.
2. This warranty only applies to Panasonic products purchased in Australia and sold by Panasonic
Australia or its Authorised Distributors or Dealers and only where the products are used and serviced
within Australia or it’s territories. Warranty cover only applies to service carried out by a Panasonic
Authorised Service Centre and only if valid proof of purchase is presented when warranty service is
requested.
3. This warranty only applies if the product has been installed and used in accordance with the
manufacturer’s recommendations (as noted in the operating instructions) under normal use and
reasonable care (in the opinion of Panasonic). The warranty covers normal use only.
4. Toughbook/Toughpad accessories as packed in the original box such as (stylus, pens, AC charger,
combo drive, etc) are covered in warranty for 12 months from the date of purchase.
5. Batteries as packed in the original box are covered in warranty for 6 months from the date of purchase.
A battery is considered good if it maintains 50% of its charge capacity during the warranty period.
6. Additional Accessories sold separate to the main Toughbook/Toughpad box are covered in warranty for
12 months.
7. Consumables sold separate to the main Toughbook/Toughpad box are covered in warranty for 6
months.
8. This warranty does not cover any of the following:
• No Fault Found (NFF); any costs incurred where it is found that the Toughbook/Toughpad is
functioning normally (“No Fault Found”). Panasonic reserves the right to charge the logistics cost and
inspection fee for every NFF case directly to the customer.
• Negligence, abuse, misuse; Abuse or misuse in respect of the Toughbook/Toughpad including
but not limited to: damage, malfunction or failure resulting from use of incorrect voltages, incorrect
installation, accident, misuse, neglect, buildup of dirt or dust, abuse, maladjustment of customer
controls, mains supply problems, thunderstorm activity, infestation by insects or vermin, tampering or
repair by unauthorised persons (including unauthorised alterations), exposure to abnormally corrosive
conditions or any foreign object or matter having entered the product.
• Tolerance on LCD defect; The Warranty excludes 3 or less faulty pixels on screen.
• Wear and Tear; The cost of remedying or making good solely due to:
Wear and Tear, gradual deterioration or oxidisation, gradually developing defects, cracks, aws or
○
fractures;
Scratching or chipping of any surfaces.
○
• Data:
Loss of or damage to Internal Data. It is the customer’s responsibility to backup all data from the
○
hard disk drive before sending equipment for repair. If a problem is related to the HDD or SSD, or
the HDD or SSD has to be replaced, Panasonic will only reload the factory pre-installed software for
the product onto the replacement drive.
Loss of or damage to External Data carrying material and the value to you of data stored on your
○
Toughbook or Toughpad device. External data carrying materials and any computer program or
data information recorded thereon unless stated above.
Software and Settings; the costs of rectifying programming errors or design defects in software. The
○
maladjustment of consumer controls such as function settings.
9. This warranty does not cover the following items unless the fault or defect existed at the time of
purchase: Software.
10. To claim warranty service, when required, you should: Check the Panasonic web site for latest warranty
contact. Prepare purchase receipt as proof of purchase date and system serial number which will be
required by the Authorised Service Centre.
11. The Warranty includes the repair or exchange of faulty parts within the product with items that are
functionally equivalent to that as originally supplied or better – including new or refurbished parts or
units – solely at Panasonic’s discretion.
12. Panasonic will arrange free pick up and return for approved warranty repairs within 50km of capital city
locations. Please ensure your unit is properly packed for return to the service location.
Appendix
33
Page 34

LIMITED WARRANTY (GARANTIE LIMITÉE)
13. The warranties hereby conferred do not extend to, and exclude, any costs associated with the
installation, de-installation or re-installation of a product, including costs related to the mounting, demounting or remounting of any screen, (and any other ancillary activities), delivery, handling, freighting,
transportation or insurance of the product or any part thereof or replacement of and do not extend to,
and exclude, any damage or loss occurring by reason of, during, associated with, or related to such
installation, de-installation, re-installation or transit.
In addition to your rights under this warranty, Panasonic products come with consumer guarantees that
cannot be excluded under the Australian Consumer Law. If there is a major failure with the product, you can
reject the product and elect to have a refund or to have the product replaced or if you wish you may elect
to keep the goods and be compensated for the drop in value of the goods. You are also entitled to have the
product repaired or replaced if the product fails to be of acceptable quality and the failure does not amount
to a major failure.
If there is a major failure in regard to the product which cannot be remedied then you must notify us within
a reasonable period by contacting the Panasonic Customer Care Centre. If the failure in the product is not
a major failure then Panasonic may choose to repair or replace the product and will do so in a reasonable
period of time from receiving notice from you.
THIS PRODUCT IS NOT INTENDED FOR USE AS, OR AS PART OF, NUCLEAR EQUIPMENT/SYSTEMS,
AIR TRAFFIC CONTROL EQUIPMENT/SYSTEMS, OR AIRCRAFT COCKPIT EQUIPMENT/SYSTEMS
PANASONIC WILL NOT BE RESPONSIBLE FOR ANY LIABILITY RESULTING FROM THE USE OF THIS
PRODUCT ARISING OUT OF THE FOREGOING USES.
*4
AIRCRAFT COCKPIT EQUIPMENT/SYSTEMS include class 2 Electronic Flight Bag (EFB) Systems and
Class 1 EFB Systems when used during critical phases of ight (e.g., during take-off and landing) and/or
mounted onto the aircraft. Class 1 EFB Systems and 2 EFB Systems are dened by FAA: AC (Advisory
Circular) 120-76A or JAA: JAA TGL (Temporary Guidance Leaets) No. 36.
THIS WARRANTY CARD AND THE PURCHASE DOCKET
(OR SIMILAR PROOF OF PURCHASE)
SHOULD BE RETAINED BY THE CUSTOMER AT ALL TIMES
*4
.
Appendix
If you require assistance regarding warranty conditions or any other enquiries, please visit the
Panasonic Australia website http://www.panasonic.com/au/support.html or
contact by phone on 1300 132 463
Panasonic Australia Pty. Limited
ACN 001 592 187 ABN 83 001 592 187
Innovation Road, Macquarie Park NSW 2113
www.panasonic.com.au
PRO-031-F37 Issue: 4.0 01-06-2015
34
Page 35

Standard Limited Warranty
For Europe
Panasonic System Communications Company Europe
Panasonic System Communications Company Europe (referred to as “Panasonic”) will repair this
product (other than software, which is treated in a different section of this warranty) with new or
refurbished parts, from the date of original purchase in the event of a defect in materials or workmanship. This warranty only applies to new Panasonic Toughbooks purchased in the EEA and
Switzerland and Turkey.
Panasonic (or its authorised Service Provider) target to repair your equipment within 48 hours
from its receipt in our service centre.
Additional charges may apply for shipment to countries outside of the European Union. Panasonic will use all reasonable endeavours to ensure this service.
This warranty only covers failures due to defects in materials or workmanship which occur during
normal use for the applicable Service Agreement Period listed below. In the event that any product (or part thereof) is replaced, Panasonic shall transfer ownership of the replacement product (or
part) to the customer and the customer shall transfer ownership of the replaced product (or part)
to Panasonic.
Service Agreement Period - from original date of purchase
• Toughbooks (and every accessory included in the original packaging except the battery) - 3
years
• Toughpads (and every accessory included in the original packaging except the battery) - 3
years
• Accessories included in the original package - 3 years
• Additional peripherals manufactured by Panasonic (including media bay devices such as
CD-Rom drives) - 1 year
• Batteries - 6 months. Panasonic Warranty covers the battery for six months. A battery is
considered good if it maintains 50 % of its charge capacity during the warranty period. If a
battery is returned under this contract and testing determines that it has charge capacity
greater than 50 %, the battery will be returned with an invoice for the retail purchase price of
a new battery.
This warranty is extended solely to the original purchaser. A purchase receipt or other proof of
date of original purchase will be required before warranty performance is rendered.
Appendix
35
Page 36

Standard Limited Warranty
Limits and Exclusions:
This warranty does not cover and shall be void for:
• Broken or cracked LCD screen.
• Defective pixel in notebook displays and LCD screens within 0.002
• Damage that is attributable to fire, theft or acts of God.
• Damage caused by environmental influences (electrical storms, magnetic fields etc.).
• Damage which has not been caused during normal operation
• Repair of damage that is cosmetic only or does not affect product functionality such as wear
and tear, scratches and dents.
• Failures caused by products not supplied by Panasonic.
• Failures resulting from alteration, accidental damage, casualty, misuse, abuse or neglect.
• Introduction of liquid or other foreign matter into the unit.
• Improper installation, operation or maintenance.
• Improper connections with peripherals.
• Maladjustment of consumer controls such as function settings.
• Modification or service by anyone other than Panasonic or its approved Service Providers.
• Products used as short term rental or leased equipment.
• Products whose serial number has been removed making the unit warranty condition impos-
sible to clearly determine.
THIS PRODUCT IS NOT INTENDED FOR USE AS, OR AS PART OF, NUCLEAR EQUIPMENT/
SYSTEMS, AIR TRAFFIC CONTROL EQUIPMENT/SYSTEMS, OR AIRCRAFT COCKPIT
EQUIPMENT/SYSTEMS. PANASONIC WILL NOT BE RESPONSIBLE FOR ANY LIABILITY RESULTING FROM THE USE OF THIS PRODUCT ARISING OUT OF THE FOREGOING USES.
There are no other express warranties except as listed above.
We strongly recommend that customers backup their data before sending back their unit to an
Authorised Service Provider.
Panasonic shall not be liable for loss of data or other incidental or consequential damages re-
sulting from the use of this product, or arising out of any breach of this warranty. All express and
implied warranties, including the warranties of satisfactory quality and tness for a particular purpose are limited to the applicable warranty period set forth above. Panasonic shall not be liable
for any indirect, special or consequential loss or damage (including without limitation any loss of
prots) arising from the use of this product or for any breach of this warranty.
This limited warranty gives you specic legal rights, and you may have other rights that vary from
country to country. You must consult the applicable country laws for a full determination of your
rights. This limited warranty is in addition to, and does not affect any rights arising out of any contract of sale or by statute.
%
Appendix
36
Page 37

Panasonic System Communications Company Europe
Data Storage Media
Data Storage Media is the media on which the Operating System, drivers and programs originally
installed by Panasonic on the main unit are stored. This media is originally provided with the unit.
Panasonic warrants to you only that the disc(s) or other media on which the Programs are furnished will be free from defects in material and workmanship under normal use for a period of
sixty (60) days from the date of delivery thereof to you, as evidenced by your purchase receipt.
This is the only warranty Panasonic makes to you. Panasonic does not warrant that the functions
contained in the Programs will meet your requirements or that the operation of the Programs will
be uninterrupted or error free.
Panasonic’s entire liability and your exclusive remedy under this warranty shall be limited to the
replacement of any defective disk or other media which is returned to Panasonic’s authorized
Service Centre, together with a copy of the purchase receipt, within the aforesaid warranty period.
Panasonic shall have no obligation for any defects in the disk(s) or other media on which the Programs are furnished resulting from your storage thereof, or for defects that have been caused by
operation of the disk(s) or other media otherwise than on the Product or in the environment con-
ditions other than those specied by Panasonic by alteration, accident, misuse, abuse, neglect,
mishandling, misapplication, installation, maladjustment of consumer controls, improper main-
tenance, modication or damage that is attributable to acts of God. In addition, Panasonic shall
have no obligation for any defects in the disk(s) or other media if you have modied, or attempted
to modify any Program.
Duration of implied warranties, if any is limited to sixty (60) days.
Pre-installed software
Pre-installed software means the software shipped pre-loaded by Panasonic, not that loaded by
any third party or selling agent.
Panasonic and its suppliers makes no warranty, either express, implied or statutory, with respect
to software provided with the Product and licensed to Purchaser, its quality, performance, mer-
chantability, or tness for a particular purpose.
Panasonic does not warrant that the functions contained in the software will be uninterrupted or
error free. Panasonic assumes no risk of and shall not in any case be liable for any damages,
including, without limitation, any special, incidental, consequential, or punitive damages arising
from breach of warranty or contract, negligence or any other legal theory, including, without limitation loss of goodwill, prots or revenue, loss of use of the Programs or Products or any associated equipment, cost of capital, cost of any substitute equipment, facilities, or services, downtime
costs, or claims of any party dealing with such damages.
Some countries do not allow the exclusion or limitation of incidental or consequential damages, or
limitations on how long an implied warranty lasts, so the above limitations or exclusions may not
apply to you.
This limited warranty gives you specic legal rights and you may also have other rights that vary
from country to country. You must consult applicable country laws for a full determination of your
rights.
Appendix
37
Page 38

Standard Limited Warranty
Contacts
Address
Web page
Helpdesk
English speaking service +44 (0) 800 0884324
French speaking service +33 (0) 80 5636449
German speaking service +49 (0) 800 7235211
Italian speaking service +39 800 986915
Spanish speaking service +34 (0) 901 101 157
Austria +43 (0) 800 006493
Switzerland (German) +41 (0) 800 002429
Switzerland (French) +41 (0) 800 588017
E-mail address toughbooksupport@eu.panasonic.com
Czech speaking service +420 (0) 800 143234
Hungarian speaking service +36 (0) 6800 163 67
Polish speaking service +48 (0) 800 4911558
Romanian speaking service +40 (0) 800 894 743
Slovakian speaking service +421 (0) 800 42672627
E-mail address toughbooksupport@csg.de
Panasonic System Communications Company Europe
Panasonic Manufacturing U.K. Ltd.
Service Centre Building B4,
Wharfedale Road, Pentwyn Industrial Estate, Cardiff,
United Kingdom
CF23 7XB
http://business.panasonic.co.uk/computer-product/
Payments toughbookservicepayments.cardiff@eu.panasonic.com
Appendix
38
Page 39

Panasonic Corporation
Osaka, Japan
Panasonic System Communications Company of North America
Two Riverfront Plaza,
Newark NJ 07102
Panasonic Canada Inc.
5770 Ambler Drive, Mississauga,
Ontario L4W 2T3
Panasonic Australia Pty. Limited
ACN 001 592 187 ABN 83 001 592 187
1 Innovation Road, Macquarie Park NSW 2113
Importer’s name & address pursuant to the EU legislation
Panasonic System Communications Company Europe, Panasonic Marketing
Europe GmbH
Hagenauer Straße 43
65203 Wiesbaden
Germany
Web Site : http://panasonic.net/avc/pc/
© Panasonic Corporation 2016
PS0916-0
20160228ZAD
 Loading...