

Page 1

Panasonic
Page 2

Table Of Contents
• Comparison Between Models……..………………………
• Inputs/Outputs Overview………………………………..…
• Run Screen………………………………………………....…
• Main Menu……………………………………….……….……
• Tools…………………………………………………………...
– Learn/Learn Open
– Replace/Edit/Forget (Unlearn)
• Programming Modes…………………………………….….
– Parameter Mode
– Group Mode
– Job Mode
• History………………………………………………………….
• Events………………………………………………………….
• Qualifier Settings…………………………………………….
• Protocols/Network Settings………………………………..
• Inputs/Outputs……………………………….……………….
• Update Firmware…………………………….……………….
Page 3
Page 4
Page 5
Page 6
Page 7
Page 9
Page 16
Page 17
Page 18
Page 19
Page 20
Page 21
• Check Firmware……………………………..……………….
• Assembly Manager………………………….........…………
– Connecting A PC
• Data Collection……………………………………………….
– Download Data To USB / Configuration To USB
– Upload Configuration From USB
– Create A .CSV File
Page 22
Page 23
Page 27
Page 3
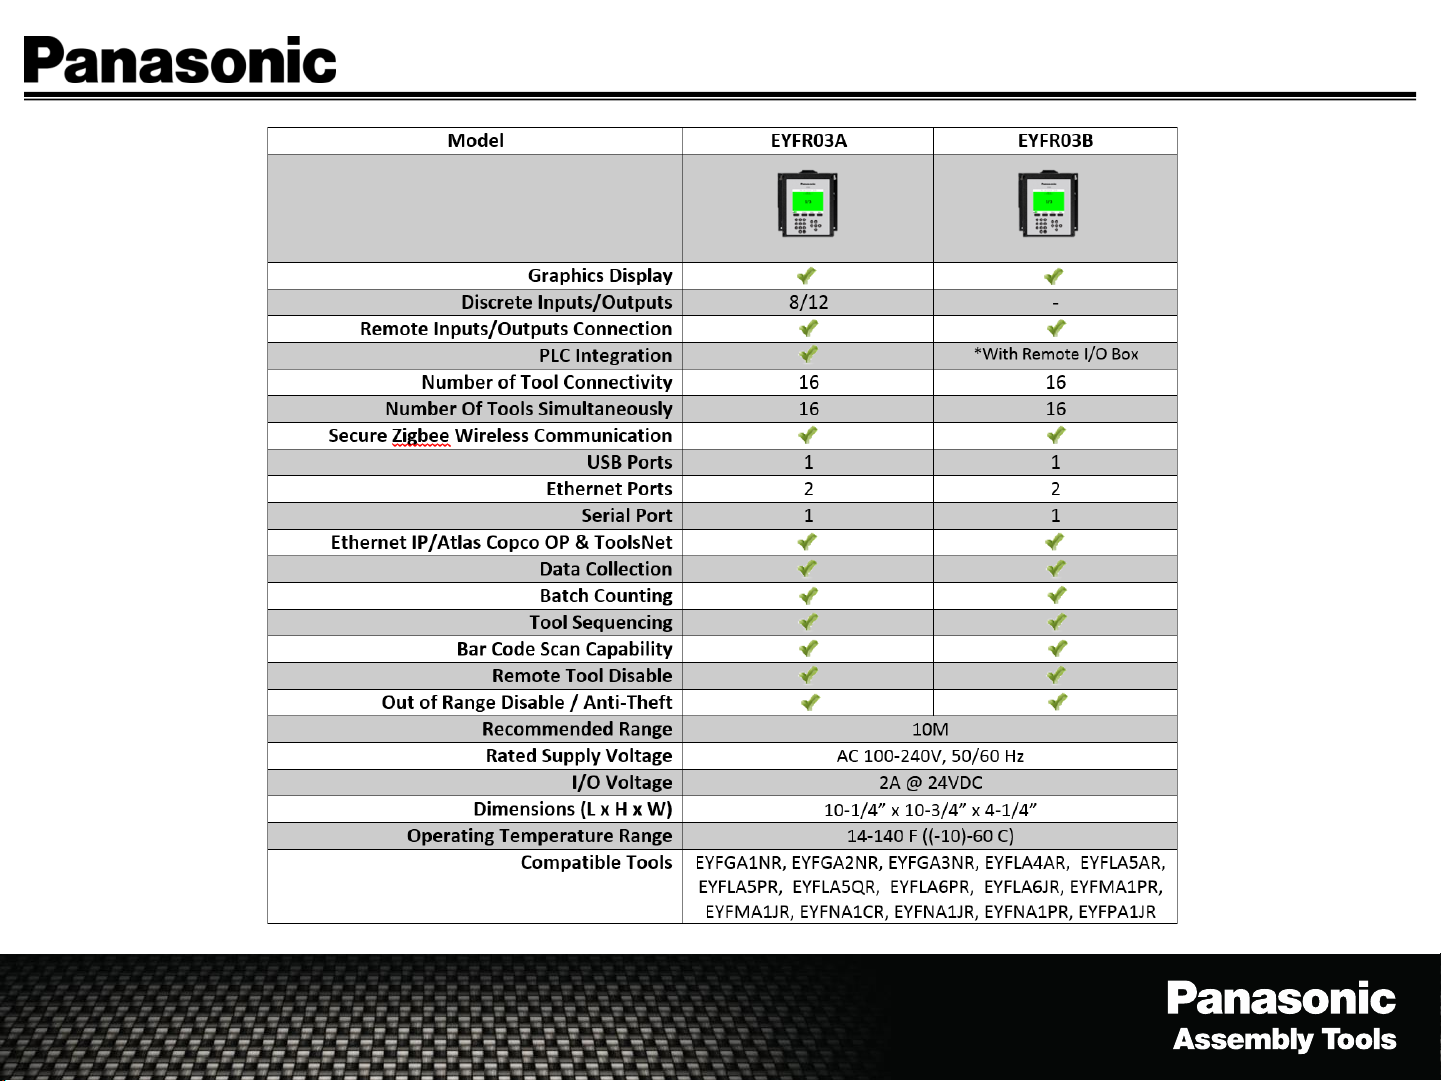
EYFR03 Model Comparison
Page 3
Page 4
PLC
AND/
OR
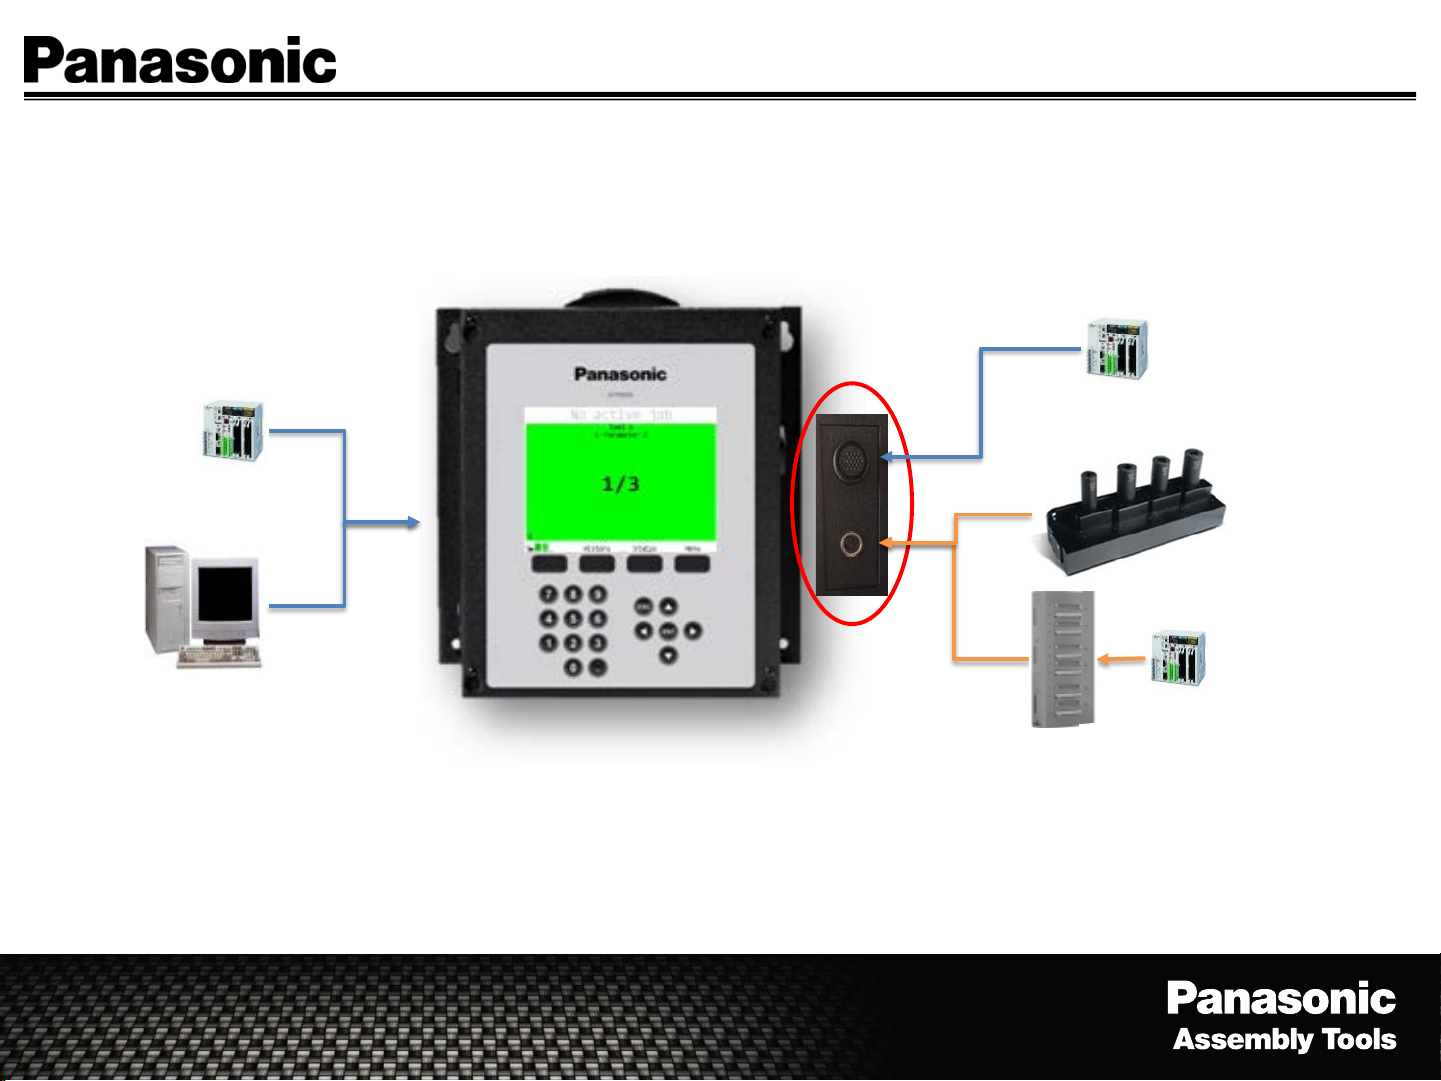
EYFR03 Inputs/Outputs Overview
Discrete I/O (24 Pin Connector)
Used to connect directly to the assembly
line or a PLC.
8 Inputs/12 Outputs
(Used in EYFR03A)
OR
Page 4
PLC
Socket
Tray
PC
Ethernet Connection (RJ45 Qty. 2)
Ethernet IP, Open Protocol, ToolsNet
(EYFR03A/B)
PLC
I/O Module
Remote I/O (5 Pin Connector)
(For Future Use)–I/O Module
(Used in EYFR03A/B)
Page 5
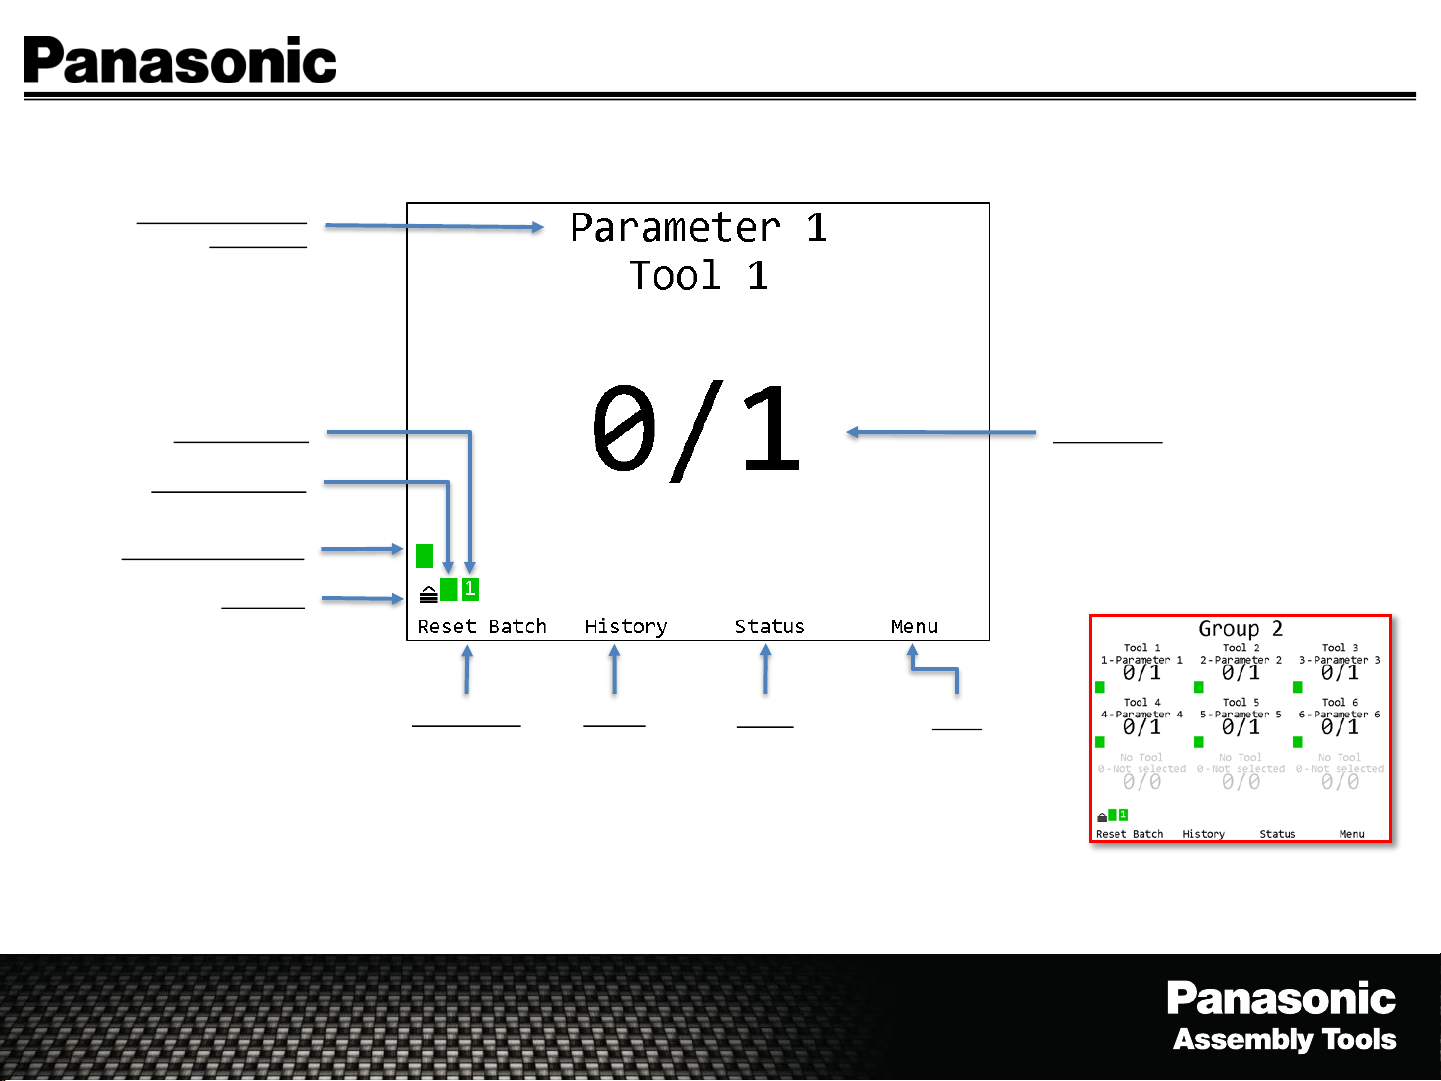
Parameter Name &
Tool Name
EYFR03 Run Screen
Page 5
Network Status
Unit Radio Status
Tool Status Indicator
Unit Lock
Reset Batch
History
Status
Current
configurations
Batch Count
Menu
Access to setting
up the Qualifier
Password - 1011
Group View Screen Shot
Page 6
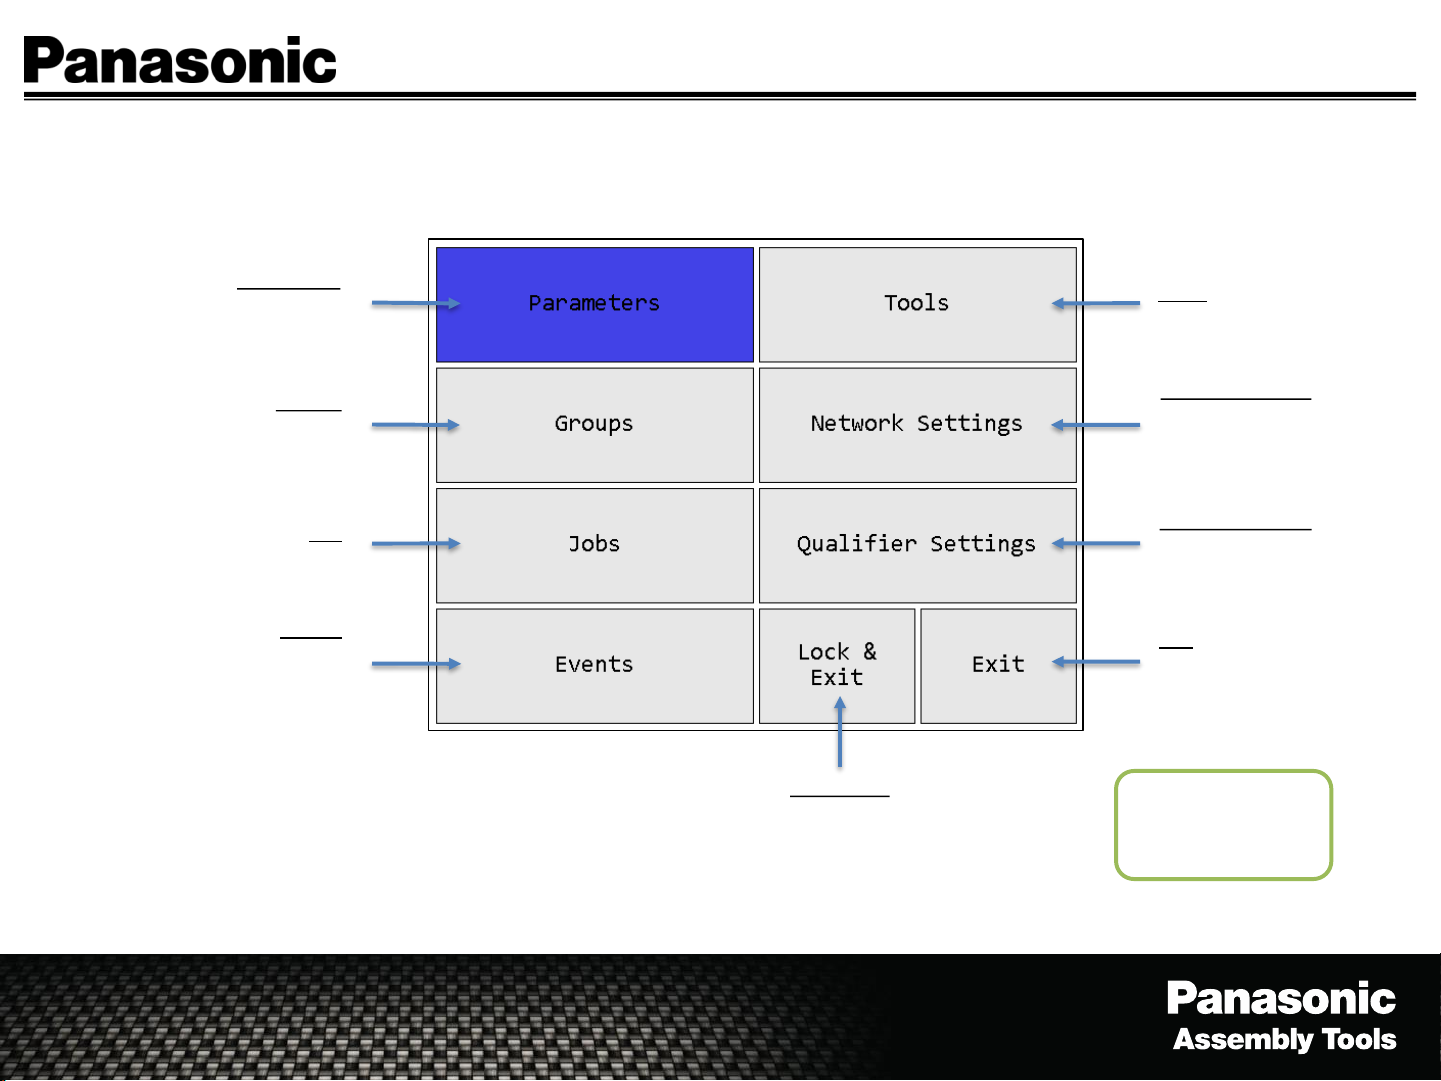
EYFR03 Menu Navigation
Page 6
Parameters
Select, View and Edit
Parameters
Groups
Select, View and Edit
Groups
Job
Select, View and Edit Jobs
Events
View non-tightening events
such as programming and tool
changes, power ups, etc...
Lock & Exit
Exit and Lock Out Menu /
Returns to Run Screen
Tools
Learn and Edit Tools
Network Settings
View and Edit General,
ACOP, ToolsNet and
EIP Network Settings
Qualifier Settings
View and Edit Global
Qualifier Settings
Exit
Exit Menu /
Returns to Run Screen
New
Menu Password
1011
Page 7
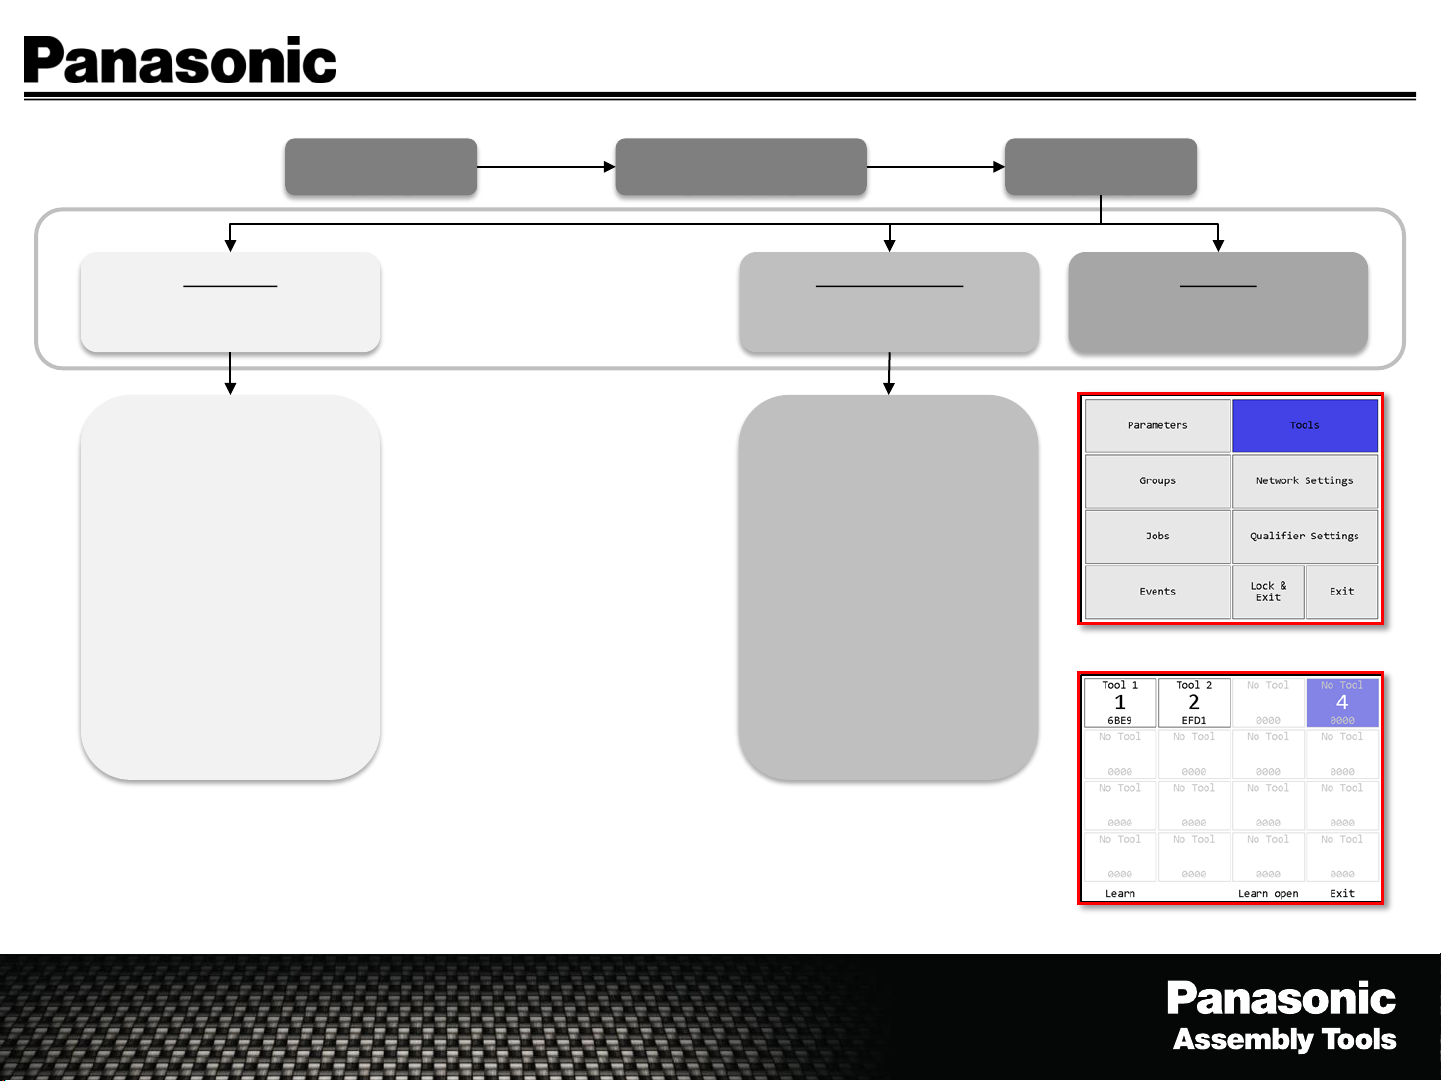
Tools - Learn/Learn Open
Page 7
Learn Tool
(Starts the learn sequence
for the highlighted tool slot)
1. Remove/Replace
Battery, Pull tool
trigger for 2 seconds
2. Successful Learn - the
screen will
automatically returns
to the tool menu and
the box will turn green
3. To learn additional
tools return to the
Learn step above.
4. Exit (Returns to the
Main Menu)
Menu
(Enter)
Password
(1011 Enter)
(Starts the learn sequence
for the first empty tool slot)
1. Remove/Replace
2. Successful Learn - the
3. To learn additional
4. Exit (Returns to the
Learn Open Tool
Battery, Pull tool
trigger for 2 seconds
screen will
automatically returns
to the tool menu and
the box will turn green
tools return to the
Learn step above.
Main Menu)
Tools
(Enter)
Exit Tool
(Returns to the Main Menu)
Main menu - Tools
*In the case a tool can not be learned to a Qualifier, try these steps.
1. Check to see that the tools model or serial number contains an “R” which states it has a wireless card included.
2. Make sure to follow the directions on the screen – remove & replace battery then pull tool trigger and release.
3. Check the serial number to see if the tool was built on or after 15=2015/01=Jan (Ser# XXXXXXX1501XXXX),
if yes the wireless card may be disabled. To re-enable the wireless card, pull the tools trigger “7” times, each
trigger pull should show a bad fastenings (red light turns on). The tool should learn to the Qualifier.
Learn Tool Menu
Page 8
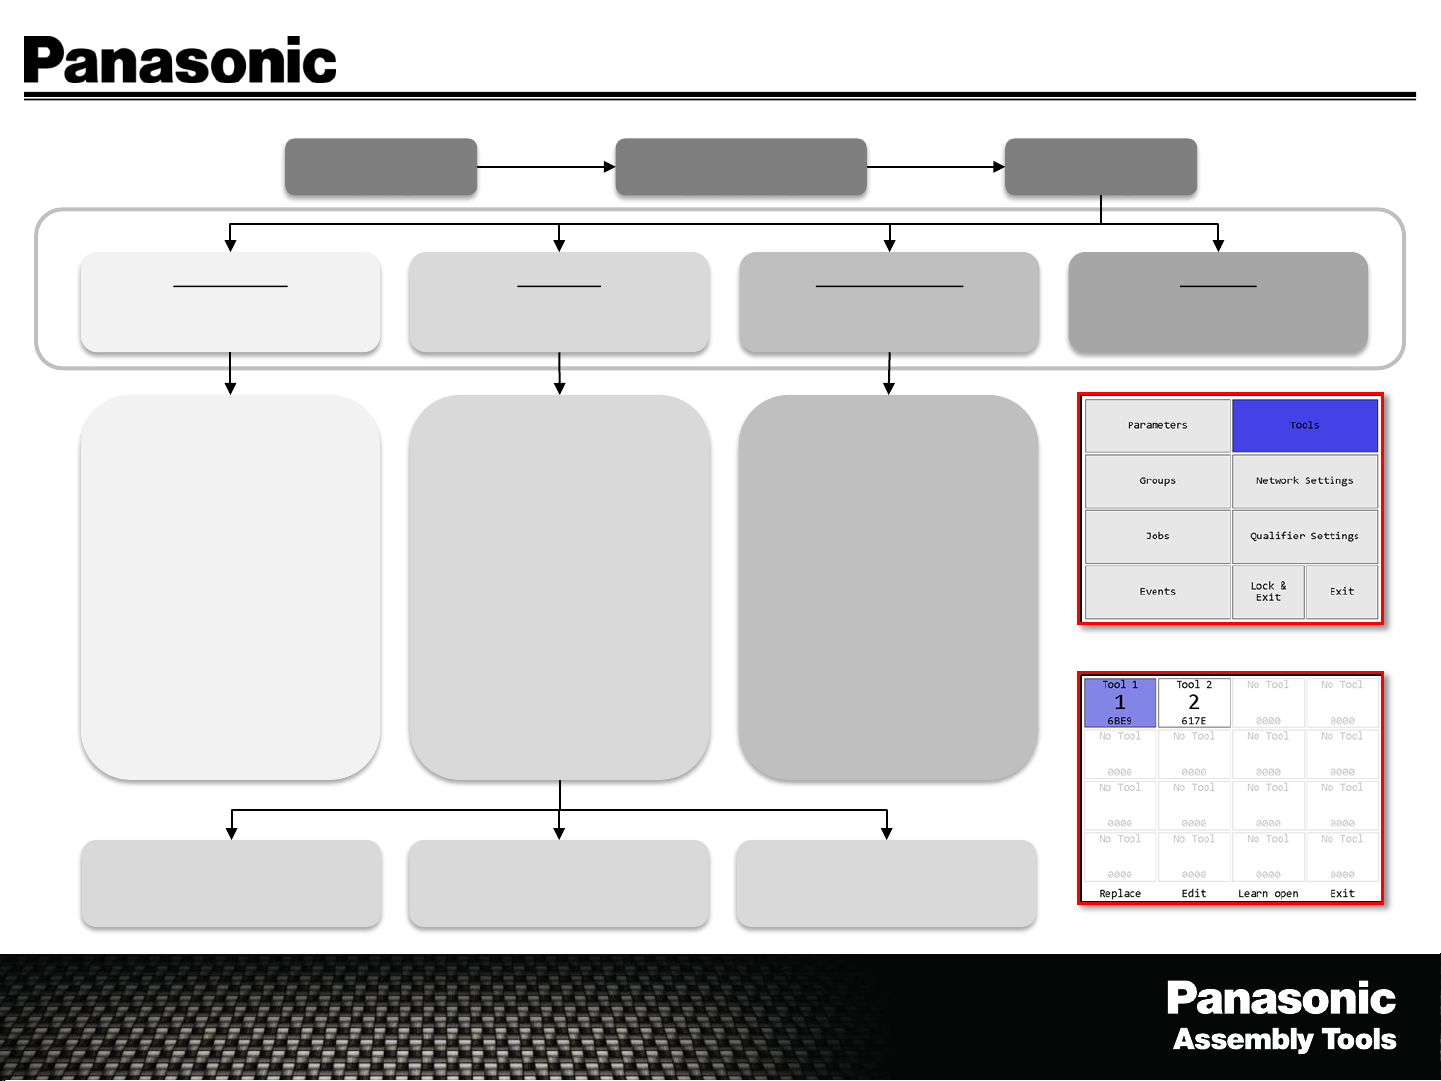
Tools - Replace/Edit/Forget (Unlearn)
Page 8
Replace Tool
(Starts the learn sequence
for the highlighted tool slot)
1. Remove/Replace
Battery, Pull tool
trigger for 2 seconds
2. Successful Learn - the
screen will
automatically returns
to the tool menu and
the box will turn green
3. To learn additional
tools return to the
Learn step above.
4. Exit (Returns to the
Main Menu)
Menu
(Enter)
Edit Tool
(Edit the highlighted tool)
1. Editable Fields
a. Tool Name
b. Serial Number
c. Last Calibration
d. Next Calibration
e. Last PM
f. Cycles before PM
2. Not Editable Fields
a. Radio Info
b. Cycles
Password
(1011 Enter)
(Starts the learn sequence
for the first empty tool slot)
1. Remove/Replace
2. Successful Learn - the
3. To learn additional
4. Exit (Returns to the
Learn Open Tool
Battery, Pull tool
trigger for 2 seconds
screen will
automatically returns
to the tool menu and
the box will turn green
tools return to the
Learn step above.
Main Menu)
Tools
(Enter)
Exit Tool
(Returns to the Main Menu)
Main menu - Tools
Forget (Removes tool from
Qualifier)
Save (Saves changes and
returns to the Tool Menu)
Cancel (Cancels changes and
returns to the Tool Menu)
Learn Tool Menu
Page 9

EYFR03 Programming Modes
Parameter Mode – Select a single tool, from the learned tools, to run on an application.
• Use - When a single tool is required.
• Not to use - When a group or a sequence is required.
• Reports – Signals batch complete for each tool individually.
Group Mode – Selec t a group of tools, up to 16 tools, to run in any order or
simultaneously.
• Uses - When a group of tools are required with a group batch complete.
• Not to use - When a sequence is required.
• Reports - Signals batch complete once the group all fasteners are completed for each tool.
Free Run Mode – Each tool can run independently and report an independent batch complete for each tool.
• Uses - When a group of tools are required with individual tool batch complete.
• Not to use - When a sequence is required.
• Reports - Signals batch complete for each tool independently.
Page 9
Job Mode – Select up to 16 tools and/or a group of tools to run in a sequence.
• Uses – When a specific sequence is required.
• Not to use – When a basic rundown is needed (such as parameter mode).
• Reports – Signals batch complete when all of the tools have completed their individual steps.
Page 10
EYFR03 Create And Run A Parameter
Page 10
Menu
(Enter)
Edit the
Parameter as
necessary.
Password
(1011 Enter)
Press “Save” and the
Qualifier returns to the
Choose Parameter Screen
Parameters
(Enter)
Arrow over to the
Parameter to run,
Press “Select”
Select Parameter
(Arrow over to a Parameter to
Create/Edit (Enter))
The Run Screen should be
showing and is now ready
to run a Parameter
*When a tool is learned into the
Qualifier, a parameter is
automatically created and the tool
is automatically connected to the
corresponding parameter.
(ie. Tool1=Parameter1,
Tool2=Parameter2, …,
Tool16=Parameter16)
Main menu - Parameters
Parameter Edit Screen
Page 11

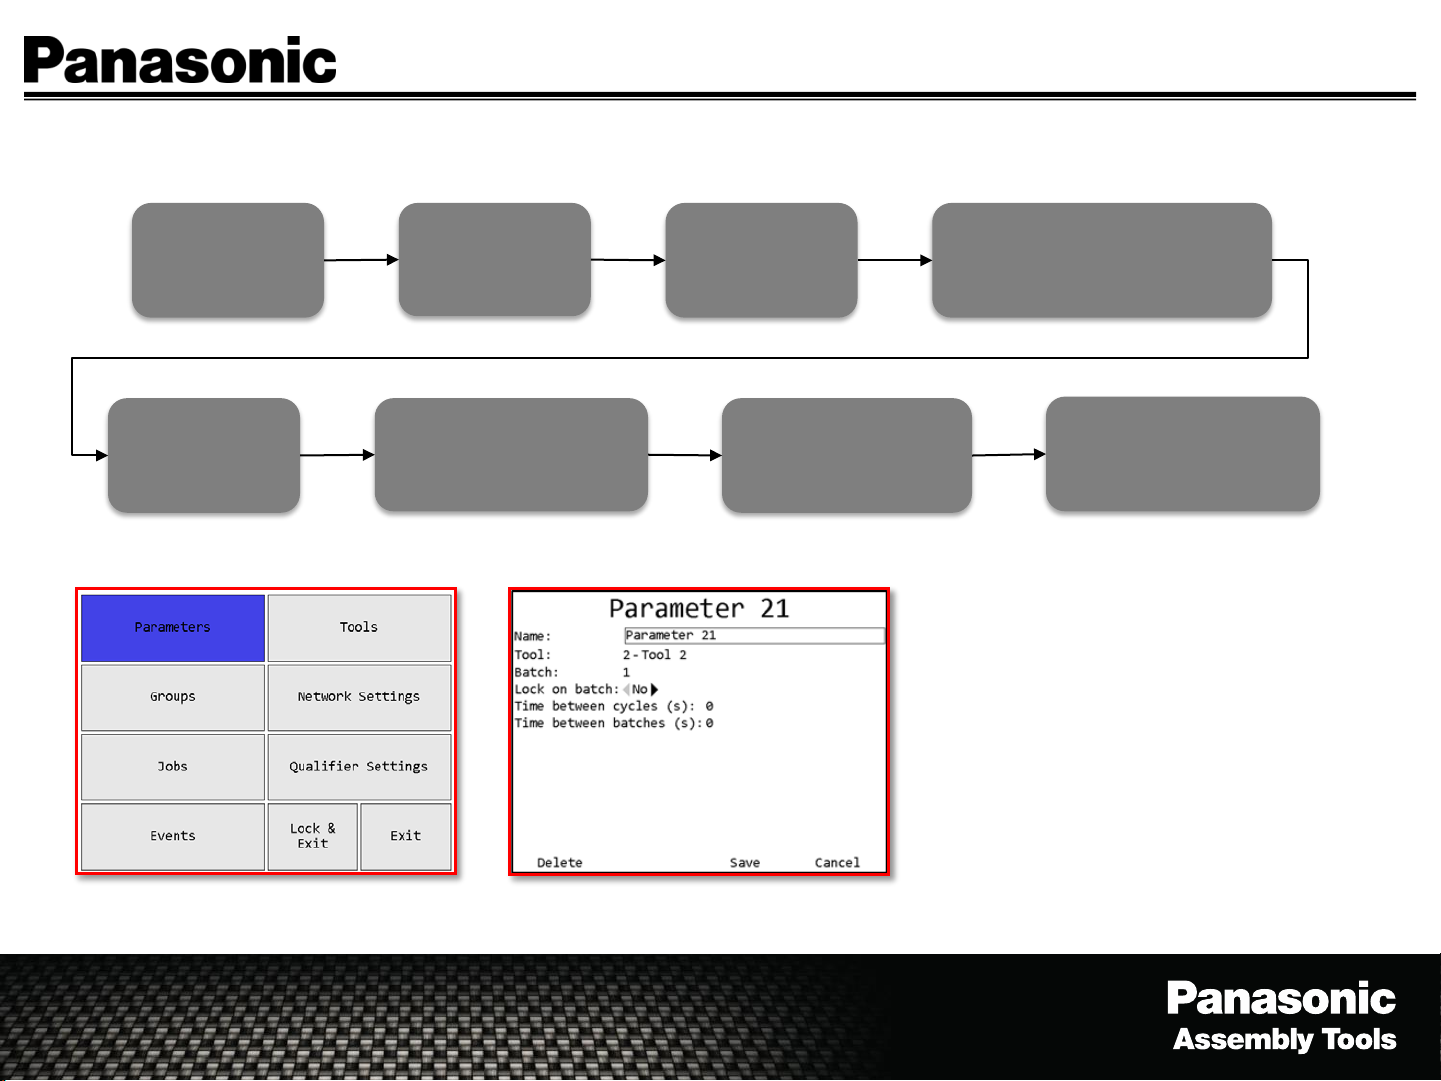
Parameter - Select/Edit/Copy
Page 11
Select Parameter
(Select the highlighted
parameter to run)
Parameter Edit Screen
Menu
(Enter)
Edit Parameter
(Edit the highlighted
parameter)
1. Editable Fields
a. Parameter Name
b. Batch Count
c. Lock On Batch
d. Time Between Cycles
(Seconds)
e. Time Between
Batches (Seconds)
2. Not Editable Fields
a. Tool Name
Password
(1011 Enter)
Paste (Paste copied
parameter into highlighted
cell (Paste can only be used
on parameters 17-100)
Copy Parameter
(Copy the highlighted
parameter to another
location)
Parameters
(Enter)
Exit Parameter
(Returns to the Main Menu)
Exit (Enter – Returns to the
Main Menu)
Delete (Deletes all
information in the parameter
returns to parameter menu)
Save (Saves changes and
returns to the parameter
menu)
Cancel (Cancels changes and
returns to the parameter
menu)
Page 12

EYFR03 Create And Run A Group
Page 12
Menu
(Enter)
Edit the Group
as necessary.
Password
(1011 Enter)
Press “Parameter”
add/edit the tools
attached to the Group
Press “Save” and the
Qualifier returns to the
Choose Group Screen
Groups
(Enter)
Choose the different
tools to be attached
to the Group
Arrow over to the
Group to run, Press
“Select”
Select Group
(Arrow over to a Group to
Create/Edit (Enter))
Press “Exit” and the
Qualifier returns to the
Group edit screen
The Run Screen should be
showing and is now ready
to run the Group
Page 13

Group - Select/Edit/Copy
Menu (Enter) Password (1011 Enter) Group (Enter)
Page 13
Select Group
(Select the highlighted group
to run)
Group Edit Screen
Delete (Deletes all
information in the group
returns to group menu)
Edit Group
(Create and/or Edit the
highlighted group)
1. Editable Fields
a. Group Name
b. Lock On Done
1. No
2. Yes
c. Batch Beep On
1. Group
2. Parameter
d. Free Run Mode
1. No
2. Yes
Parameters (Goes to the
parameter selection)
Copy Group
(Copy the highlighted group
to another location)
Paste (Paste copied group
into highlighted cell
Save (Saves changes and
returns to the parameter
menu)
Exit Group
(Returns to the Main Menu)
Exit (Enter – Returns to the
Main Menu)
Cancel (Cancels changes and
returns to the group menu)
1-8 (Shows parameter slots
1-8 of the group)
9-16 (Shows parameter slots
1-8 of the group)
Exit (Returns to the group
edit screen)
Page 14

EYFR03 Create And Run A Job
Page 14
Menu
(Enter)
Edit the Job as
necessary.
Password
(1011 Enter)
Press “Steps”
add/edit the tools
attached to the Job
Press “Save” and the
Qualifier returns to the
Choose Job Screen
Jobs
(Enter)
Choose the different
Parameters/Groups to
be attached to the Job
Arrow over to the Job
to run, Press “Select”
Select Job
(Arrow over to a Job to
Create/Edit (Enter))
Press “Exit” and the
Qualifier returns to the
Job edit screen
The Run Screen should be
showing and is now ready
to run the Job
Page 15

Job - Select/Edit/Copy
Menu (Enter) Password (1011 Enter) Job (Enter)
Page 15
Select Job
(Select the highlighted job to
run)
Job Edit Screen
Delete (Deletes all
information in the job and
returns to job menu)
Edit Job
(Edit the highlighted job)
1. Editable Fields
a. Job Name
b. Lock On Done
1. No
2. Yes
c. Batch Beep On
1. Job
2. Parameter
2. Not Editable Fields
a. Number of Steps
Steps (Goes to the
parameter and/or group
selection)
Copy Job
(Copy the highlighted job to
another location)
Paste (Paste copied group
into highlighted cell
Save (Saves the changes and
returns to the job menu)
Exit Job
(Returns to the Main Menu)
Exit (Enter – Returns to the
Main Menu)
Cancel (Cancels changes and
returns to the job menu)
11-20 (Shows steps 11-20)
Parameter (Allows the
parameter to be the selected
step)
Group (Allows the group to
be the selected step)
Exit (Returns to the group
edit screen)
Page 16

History - View
The History screen shows some
information about the tightenings
stored in unit memory.
More information about the
tightenings is not shown but is
available via the network protocols.
Page 16
Main menu - Events
Previous
(Steps back a page of
history)
Run Screen
Next
(Steps to the next page of
history)
History
(Soft Key)
Exit History
(Returns to the Run Screen)
Page 17

The Events screen shows the
log of non-tightening events
that have occurred.
Events - View
Main menu - Events Events Screen
Page 17
Menu
(Enter)
Password
(1011 Enter)
(Steps to the next page of
Next
events)
Events
(Enter)
Exit Events
(Returns to the Main Menu)
Page 18

Qualifier Settings – View/Edit
Page 18
Menu
(Enter)
Edit Setting
(Edit the highlighted setting)
1. Editable Fields
a. Qualifier Name
b. Password
c. XBEE Channel
d. Bar Code Baud Rate
e. Beep On Reject
f. Beep On Batch
g. Beep On Cycle
h. Volume
i. Reject Timeout
j. Batch Timeout
k. Cycle Timeout
l. Require VIN To Run
m. Clear VIN On Batch
n. NOK’s
o. Time
(1011 Enter)
Restore Defaults
(Restores to factory defaults)
Select Items To Reset
1. Editable Fields
a. Tools
b. Parameters
c. Groups
d. Jobs
e. Qualifier Settings
f. Network Settings
g. Tightenings
h. Events
Reset All
(Resets All The Changes)
Password
Save Settings
(Saves changes made to the
qualifier settings)
Reset
(Resets only the selected
changes)
Qualifier Settings
(Enter)
Cancel Settings
(Cancels changes made to
the qualifier settings)
Main menu – Qualifier Settings
Cancel
(Cancels changes and returns
to the qualifier settings)
Reset All Confirmation Reset All Confirmation
Page 19

EYFR03 Protocol Types
General – Configure standard network settings (DHCP
Capable)
ACOP (Open Protocol) – Configure ACOP settings
• Use – select parameters/grou p s /j obs from a remote system (PC).
ToolsNet – Configure ToolsNet settings
• Use – data collection purposes only.
EtherNet/IP – Configure general network settings
• Use – select parameters/groups/jobs, change qualifier settings and
data collection from a remote system (PC or PLC).
Page 19
Page 20

EYFR03 Inputs/Outputs Overview
Discrete I/O (24 Pin Connector)
Used to connect directly to the assembly line or a P LC.
(Applies to EYFR03A)
Inputs (8) – The inputs can be configured to meet the needs of the customer.
• Select Parameter, Group or Job
• Stop Operation
• Suspend Qualifier
• Batch Reset
• Operation Reset
• Clear VIN
• Clear ID
• Bypass VIN
Outputs (12) – The outputs can be configured to meet the needs of the customer.
• Active Parameter, Group or Job
• Tool # Cycle Accept
• Tool # Cycle Reject
• Tool # Batch Complete
• Qualifier Suspended
Page 20
I/O Schematic
*Located in the User Manual or available upon request.
Remote I/O (5 Pin Connector) (For Future Use)
Used for an expanded I/O Module
(Applies to EYFR03A/B)
*Assembly Manager Software is required
for the initial setup and for making changes
to the Input and Outputs.
Page 21

EYFR03 Updating Firmware
Page 21
Put firmware on
a USB drive in
the root folder
Turn Qualifier
Select “Upload
USB File to
Device” (Enter)
The Qualifier will
automatically update
then reboot itself.
On
Insert USB into
Select Items To
Upload
Firmware = “Yes”
Select “Exit”
Qualifier
Wait for
Qualifier to
detect USB Drive
Press “Upload”
Button
Remove USB
from Qualifier
Page 22

EYFR03 Checking Firmware Version
Firmware
Run Screen
Click “Status”
Version is Listed
at the Top
Page 22
Page 23

EYFR03 Assembly Manager Software
View/Download History – Data Collection
Setup Inputs/Outputs – Not available through
the Qualifier keypad/screen
Backup/Restore Settings
Program Parameters/Groups/Jobs
View Qualifier Events
Connect Via Ethernet Cable Directly/Network
Standard or Crossover Ethernet Cable
*Learning a tool has to be done at the Qualifier
through the keypad/screen.
Page 23
To obtain a copy of the software, please find the
link in the owners manual or visit our website at
www.panasonic.com/assemblytools
Page 24

Installing EYFR03 Assembly Manager
EYFR03 Assembly Manager
Install file name “EYFR03 Assembly Manager
1_0 setup.exe.
Follow the prompts
1. Click “Next” to continue install.
2. Select Destination Location, Click “Next”
3. Select Start Menu Folder, Click “Next”
4. Select Additional Tasks (Desktop Icon), Click
“Next”
Page 24
5. Ready to Install, Click “Install”
6. Finished, Click “Finish”
Page 25

Connecting A PC To A EYFR03 Qualifier
Items Needed – PC, Ethernet Cable, Assembly Manager Installed
1. Connect the Ethernet cable into both the PC & Qualifier.
2. Configure the Qualifier Network Settings
1. Go to “Menu” / “Network Setting” / “General”
1. Configure General Menu with the following
1. IP Address – 192.168.1.68
2. Subnet – 255.255.255.0
3. Gateway – 192.168.1.1
4. DHCP - No
2. Cycle power of the Qualifier after changing the IP
address.
3. Configure the PC Network Settings
1. Configure the PC’s network address to the following
1. IP Address – 192.168.1.5
2. Subnet – 255.255.255.0
3. Gateway – 192.168.1.1
Page 25
Page 26

Connecting EYFR03 Assembly Manager
1. Enter the IP address of the Qualifier, click “Connect”
2. Choose what you would like to read from the Qualifier and click “Read”.
3. If the PC connects correctly to the Qualifier, this screen will appear.
Page 26
4. Final screen after connection has been established.
Page 27

EYFR03 Assembly Manager Software – Data Collection
TID Job Seq # Time J# P# P Name Last Write Time Tool SN OK Torque Status Angle Status Count Batch Batch Status Torque Unit Torque Min Torque Max Torque Angle Min Angl e Max An gle Torque Dir Torque Mode T # VIN
1 1 12/8/2014 16: 25 45 1 P arameter 1 12/6/2014 13: 15 FALSE 0 0 0 1 0 0 0 0 0 0 0 0 0 0 1
2 1 12/8/2014 16: 25 45 1 P arameter 1 12/6/2014 13: 15 FALSE 0 0 0 1 0 0 0 0 0 0 0 0 0 0 1
3 1 12/8/2014 16: 25 45 1 P arameter 1 12/6/2014 13: 15 TRUE 35 0 1 1 0 0 0 0 0 0 0 0 0 0 1
4 2 12/8/2014 16: 27 45 1 P arameter 1 12/6/2014 13: 15 TRUE 35 0 1 1 0 0 0 0 0 0 0 0 0 0 1
5 2 12/15/2014 14: 34 45 1 Parameter 1 12/6/2014 13: 15 FALSE 0 0 0 1 0 0 0 0 0 0 0 0 0 0 1
6 2 12/15/2014 14: 34 45 1 Parameter 1 12/6/2014 13: 15 FALSE 0 0 0 1 0 0 0 0 0 0 0 0 0 0 1
7 2 12/15/2014 14: 34 45 1 Parameter 1 12/6/2014 13: 15 FALSE 0 0 0 1 0 0 0 0 0 0 0 0 0 0 1
8 2 12/15/2014 14: 34 45 1 Parameter 1 12/6/2014 13: 15 FALSE 0 0 0 1 0 0 0 0 0 0 0 0 0 0 1
9 2 12/15/2014 14: 34 45 1 Parameter 1 12/6/2014 13: 15 FALSE 0 0 0 1 0 0 0 0 0 0 0 0 0 0 1
10 2 12/15/ 2014 14:34 45 1 Paramete r 1 12/6/ 2014 13:15 FALSE 0 0 0 1 0 0 0 0 0 0 0 0 0 0 1
11 2 12/15/ 2014 14:34 45 1 Paramete r 1 12/6/ 2014 13:15 FALSE 0 0 0 1 0 0 0 0 0 0 0 0 0 0 1
12 3 12/15/ 2014 14:34 45 1 Paramete r 1 12/6/ 2014 13:15 FALSE 0 0 0 1 0 0 0 0 0 0 0 0 0 0 1
13 3 12/15/ 2014 14:34 45 1 Paramete r 1 12/6/ 2014 13:15 FALSE 0 0 0 1 0 0 0 0 0 0 0 0 0 0 1
14 3 12/15/ 2014 14:34 45 1 Paramete r 1 12/6/ 2014 13:15 FALSE 0 0 0 1 0 0 0 0 0 0 0 0 0 0 1
15 3 12/15/ 2014 14:34 45 1 Paramete r 1 12/6/ 2014 13:15 FALSE 0 0 0 1 0 0 0 0 0 0 0 0 0 0 1
16 3 12/15/ 2014 14:35 45 1 Paramete r 1 12/6/ 2014 13:15 FALSE 35 0 1 1 0 0 0 0 0 0 0 0 0 0 1
17 4 12/17/ 2014 11:37 0 1 Pa rameter 1 12/6/2014 13: 15
FALSE 0 0 1 1 0 0 0 0 0 0 0 0 0 0 1
18 4 12/17/ 2014 11:37 0 1 Pa rameter 1 12/6/2014 13: 15 T RUE 0 0 1 1 0 0 0 0 0 0 0 0 0 0 1
19 4 12/17/ 2014 11:37 0 1 Pa rameter 1 12/6/2014 13: 15 T RUE 0 0 1 1 0 0 0 0 0 0 0 0 0 0 1
20 6 12/17/ 2014 11:39 45 1 Paramete r 1 12/6/ 2014 13:15 TRUE 35 0 1 1 0 0 0 0 0 0 0 0 0 0 1
21 6 12/17/ 2014 11:39 45 2 Paramete r 2 12/6/ 2014 13:15 FALSE 0 0 1 2 0 0 0 0 0 0 0 0 0 0 2
22 6 12/17/ 2014 11:39 45 2 Paramete r 2 12/6/ 2014 13:15 FALSE 35 0 2 2 0 0 0 0 0 0 0 0 0 0 2
23 7 12/17/ 2014 11:40 45 2 Paramete r 2 12/6/ 2014 13:15 FALSE 0 0 0 2 0 0 0 0 0 0 0 0 0 0 2
24 7 12/17/ 2014 11:40 45 2 Paramete r 2 12/6/ 2014 13:15 FALSE 0 0 0 2 0 0 0 0 0 0 0 0 0 0 2
25 7 12/17/ 2014 11:40 45 2 Paramete r 2 12/6/ 2014 13:15 FALSE 0 0 0 2 0 0 0 0 0 0 0 0 0 0 2
26 7 12/17/ 2014 11:40 45 2 Paramete r 2 12/6/ 2014 13:15 TRUE 0 0 1 2 0 0 0 0 0 0 0 0 0 0 2
27 7 12/17/ 2014 11:40 45 2 Paramete r 2 12/6/ 2014 13:15 TRUE 35 0 2 2 0 0 0 0 0 0 0 0 0 0 2
28 8 12/17/ 2014 11:41 45 2 Paramete r 2 12/6/ 2014 13:15 FALSE 0 0 0 2 0 0 0 0 0 0 0 0 0 0 2
29 8 12/17/ 2014 11:41 45 2 Paramete r 2 12/6/ 2014 13:15 FALSE 0 0 0 2 0 0 0 0 0 0 0 0 0 0 2
30 8 12/17/ 2014 11:42 45 2 Paramete r 2 12/6/ 2014 13:15 TRUE 0 0 1 2 0 0 0 0 0 0 0 0 0 0 2
31 8 12/17/ 2014 11:42 45 2 Paramete r 2 12/6/ 2014 13:15 TRUE 35 0 2 2 0 0 0 0 0 0 0 0 0 0 2
32 8 12/17/ 2014 11:43 45 1 Paramete r 1 12/6/ 2014 13:15 TRUE 35 0 1 1 0 0 0 0 0 0 0 0 0 0 1
33 9 12/17/ 2014 11:43 1 1 Pa rameter 1 12/6/2014 13: 15 T RUE 35 0 1 1 0 0 0 0 0 0 0 0 0 0 1
34 9 12/17/ 2014 11:44 1 2 Pa rameter 2 12/6/2014 13: 15 T RUE 35 0 1 1 0 0 0 0
0 0 0 0 0 0 2
35 9 12/17/ 2014 11:44 1 1 Pa rameter 1 12/6/2014 13: 15 T RUE 35 0 1 1 0 0 0 0 0 0 0 0 0 0 1
36 10 12/ 17/2014 12:41 45 2 P arameter 2 12/6/2014 13: 15 FALSE 0 0 0 2 0 0 0 0 0 0 0 0 0 0 2
37 10 12/ 17/2014 12:48 45 1 P arameter 1 12/6/2014 13: 15 FALSE 0 0 0 1 0 0 0 0 0 0 0 0 0 0 1
38 11 12/ 18/2014 17:28 0 1 Paramete r 1 12/6/ 2014 13:15 FALSE 0 0 0 1 0 0 0 0 0 0 0 0 0 0 1
39 11 12/ 18/2014 17:28 0 1 Paramete r 1 12/6/ 2014 13:15 TRUE 0 0 1 1 0 0 0 0 0 0 0 0 0 0 1
40 11 12/ 18/2014 17:34 0 1 Paramete r 1 12/6/ 2014 13:15 TRUE 0 0 1 1 0 0 0 0 0 0 0 0 0 0 1
Page 27
Collect Data Via
• Assembly Manager Software
• ACOP/ToolsNet
• EtherNet/IP – USB Flash Drive
View Data Collection
• At the Qualifier - Live
• Assembly Manager Software - Download
• ACOP/ToolsNet – Live
• EtherNet/IP – Live
• USB Flash Drive
Page 28

EYFR03 Download Data To USB Drive
Page 28
Turn Qualifier
On
Select
“Download
Device Data To
USB” (Enter)
The Qualifier will
automatically
download the file.
Insert USB into
Qualifier
Select Items To
Upload
Results = “Yes”
Press
“Cancel”
Button
Wait for
Qualifier to
detect USB Drive
Press
“Download”
Button
Select “Exit”
(Enter)
Remove USB
from Qualifier
Page 29

EYFR03 Save The Configuration To US B Dr i ve
Page 29
Turn Qualifier
Select
“Download
Device Data To
USB” (Enter)
The Qualifier will
automatically
download the file.
On
Insert USB into
Qualifier
Select Items To
Upload
Configuration = “Yes”
Press
“Cancel”
Button
“Download”
Select “Exit”
(Enter)
Wait for
Qualifier to
detect USB Drive
Press
Button
Remove USB
from Qualifier
Page 30

EYFR03 Upload Configuration From USB Drive
Page 30
Put the
configuration file on
a USB drive in the
root folder
Turn Qualifier
Select “Upload
USB File To
Device” (Enter)
The Qualifier will
automatically upload
the file.
On
Insert USB into
Qualifier
Select Items To
Upload
Configuration = “Yes”
Press
“Cancel”
Button
Press “Upload”
Select “Exit”
(Enter)
Wait for
Qualifier to
detect USB Drive
Button
Remove USB
from Qualifier
Page 31

EYFR03 Assembly Manager Software – Create CSV Data File
Page 31
Connect PC To
Qualifier Via
Ethernet Cable
Connection Window
Type in Qualifier IP
Address, Click Connect
View/Save
Tightening Results
Configure PC
IP Address
Sync with Device
Select what to
sync, click “Read”
To Save
Click “Save” and save
the csv file to the PC
Configure Qualifier
IP Address
Upload tightenings
to the PC
Click the X at the
top right to close
the window.
Start Up “EYFR03
Assembly
Manager”
Top Menu
click the “Upload
tightening results”
Open .CSV file in
Excel for best
viewing
 Loading...