


Operating Instructions
Bedienungsanleitung
Instructions d’utilisation
Istruzioni per l’uso
Gebruiksaanwijzing
Manual de instrucciones
Brugsvejledning
Driftsföreskrifter
Bruksanvisning
Käyttöohjeet
Cordless Drill & Driver
Akku-Bohrschrauber
Perceuse et tournevis sur batterie
Trapano e cacciavite senza lo
Draadloze boor en schroevendraaier
Taladro y destornillador sin cable eléctrico
Ledningsfri bor og skrutrækker
Laddningsbar borr/skruvdragare
Oppladbar drill og skrutrekker
Ladattava porakone/ruuvinväännin
Model No: EY7410
Before operating this unit, please read these instructions completely and save this manual for future use.
Vor Inbetriebnahme des Gerätes die Betriebsanleitung bitte gründlich durchlesen und diese Broschüre zum späteren Nachschlagen sorgfältig aufbewahren.
Lire entièrement les instructions suivantes avant de faire fonctionner l’appareil et conserver ce mode d’emploi à des fins de consultation ultérieure.
Prima di usare questa unità, leggere completamente queste istruzioni e conservare il manuale per usi futuri.
Lees deze gebruiksaanwijzing aandachtig door voor u het apparaat in gebruik neemt en bewaar de gebruiksaanwijzing voor eventuele naslag.
Antes de usar este aparato por primera vez, lea todas las instrucciones de este manual y guarde el manual para poderlo consultar en el futuro.
Gennemlæs denne betjeningsvejledning før brugen og gem den til fremtidig brug.
Läs igenom hela bruksanvisningen innan verktyget tas i bruk. Spara bruksanvisningen för senare användning.
Før enheten tas i bruk, vennligst les disse alle anvisningene og oppbevar deretter bruksanvisningen for senere bruk.
Lue ohjeet huolella ennen laitteen käyttöönottoa ja säilytä tämä käyttöohje tallessa tulevaa tarvetta varten.

Index/Index/Index/Indice/Index/Indice/Indeks/Index/Indeks/Hakemisto
English: Page 5 Español: Página 50
Deutsch: Seite 14 Dansk: Side 59
Français: Page 23 Svenska: Sid 68
Italiano: Pagina 32 Norsk: Side 76
Nederlands: Bladzijde 41 Suomi: Sivu 84
FUNCTIONAL DESCRIPTION
FUNKTIONSBESCHREIBUNG
DESCRIPTION DES FONCTIONS
DESCRIZIONE DELLE FUNZIONI
FUNCTIEBESCHRIJVING
DESCRIPCIÓN FUNCIONAL
FUNKTIONSBESKRIVELSE
FUNKTIONSBESKRIVNING
FUNKSJONSBESKRIVELSE
TOIMINTAKUVAUS
(H)
(G)
(F)
(A)
(E)
-
2 -
(B)
(M)
(N)
(L)
(I)
(C)
(J)
(D)
(K)

Speed selector switch
Bereichsschalter
Sélecteur de vitesse de rotation
Selettore di velocità
Snelheidskeuzeschakelaar
(A)
Conmutador selector de velocidad
Hastighedsvælgeromskifter
Varvtalsomkopplare
Hastighetsvelger
Nopeusalueen valitsin
Main switch lock
Hauptschaltersperre
Verrou de l’interrupteur principal
Blocco interruttore principale
Hoofdschakelaarvergrendeling
(B)
Bloqueo de interruptor principal
Hoverafbryderlås
Strömbrytarspärr
Hovedbryterlås
Pääkytkimen lukko
Main switch
Hauptschalter
Interrupteur principal
Interruttore principale
Hoofdschakelaar
(C)
Interruptor principal
Hoverafbryder
Strömbrytare
Hovedbryter
Pääkytkin
LED light
LED-Leuchte
Lumière DEL
Luce LED
LED-lampje
(E)
Luz indicadora
LED-lys
LED-ljus
LED-lys
LED-valo
Hexagonal bit chuck
Sechskantbitfutter
Mandrin de mèche hexagonal
Mandrino esagonale per punte
Zeskantboorkop
(G)
Portador de broca hexagonal
Sekskantet borepatron
Chuck för sexkantsbits
Sekskantet borchuck
Kuusioterän kiinnityslaite
Battery pack
Akku
Batterie autonome
Pacco batteria
Accu
(D)
Batería
Batteripakning
Batteri
Batteri-pakke
Akku
Clutch handle
Kupplungsring
Poignée de l’embrayage
Impugnatura frizione
Koppelingshandgreep
(F)
Mango de embrague
Koblingshåndtag
Kopplingshandtag
Clutchhåndtak
Kytkimen kahva
Battery low warning lamp
Akkuladungs-Warnlampe
Témoin d’avertissement de batterie basse
Spia avvertenza batteria scarica
Waarschuwingslampje voor lage accuspanning
(H)
Luz de aviso de baja carga de batería
Advarselslampes batterieffekt lav
Varningslampa för svagt batteri
Varsellampe for at batteriet er for lavt
Alhaisen akkujännitteen varoituslamppu
-
3 -

LED light ON/OFF button
LED-Leuchten-EIN/AUS-Taste
Bouton Marche/Arrêt de la lumière DEL
Tasto di accensione e spegnimento della luce LED
Aan/uit-toets (ON/OFF) voor LED-lampje
(I)
Botón ON/OFF de luz LED
TÆND/SLUK-knap til LED-lys
Strömbrytare för LED-ljus
PÅ/AV-knapp for LED-lys
LED-valon kytkin/katkaisupainike
Bit set
Bitsatz
Jeu de mèches
Inserimento punta
Bitset
(J)
Juego de brocas
Bit
Bitsuppsättning
Bitsett
Teräsarja
Battery charger
Ladegerät
Chargeur de batterie
Caricabatterie
Acculader
(K)
Cargador de la batería
Batterioplader
Batteriladdare
Batterilader
Akkulaturi
Battery dock cover
Ladeschachtabdeckung
Couvercle du poste d’accueil de la batterie
Coperchio vano batteria
Deksel van accuhouder
(M)
Cubierta de enchufe de carga de batería
Batteridokdæksel
Batteridockningslucka
Batteridokkdeksel
Akkuliittimen kansi
Ni-Cd battery pack dock
Ni-Cd-Akkuladeschacht
Poste d’accueil de la batterie autonome Ni-Cd
Spazio raccordo pacco batteria Ni-Cd
Ni-Cd accuhouder
(L)
Enchufe de carga de batería Ni-Cd
Ni-Cd batteripakningsdok
Docka för NiCd-batteri
Dokk for Ni-Cd-batteripakke
Ni-Cd akun liitin
Li-ion battery pack dock
Li-Ion-Akkuladeschacht
Poste d’accueil de la batterie autonome Li-ion
Spazio raccordo pacco batteria Li-ion
Li-ion accuhouder
(N)
Enchufe de carga de batería Li-ión
Li-ion batteripakningsdok
Docka för litiumjonbatteri
Dokk for Li-ion-batteripakke
Li-ioniakun liitin
-
4 -

Original instructions: English
Translation of the original instructions:
Other languages
Read the Safety Instructions booklet and
the following before using.
To reduce the risk of
injury, user must read and
understand instruction
manual.
For indoor use only.
I
. ADDITIONAL
SAFETY RULES
1) Wear ear protectors when using
the tool for extended periods.
Prolonged exposure to high inten
sity noise can cause hearing loss.
2) Be aware that this tool is always in
an operating condition, since it does
not have to be plugged into an electrical outlet.
3) When drilling into walls, floors, etc.,
“live” electrical wires may be encountered. DO NOT TOUCH THE CHUCK
OR ANY FRONT METAL PARTS OF
THE TOOL! Hold the tool only by the
plastic handle to prevent electric shock
in case you drill into a “live” wire.
4) If the bit becomes jammed, immedi
ately turn the main switch off to prevent an overload which can damage
the battery pack or motor.
Use reverse motion to loosen jammed
bits.
5) During charging, the charger may
become slightly warm. This is normal. Do not leave the battery in
the charger for more than 24 hours
after charging is completed.
Symbol Meaning
V
Volts
Direct current
WARNING:
• Do not use other than the Panasonic
battery packs that are designed for
-
-
use with this rechargeable tool.
•
Panasonic is not responsible for any
damage or accident caused by the
use of the recycled battery pack and
the counterfeit battery pack.
•
Do not dispose of the battery pack in
a fire, or expose it to excessive heat.
•
Do not drive the likes of nails into the
battery pack, subject it to shocks, dismantle it, or attempt to modify it.
• Do not allow metal objects to touch
the battery pack terminals.
•
Do not carry or store the battery pack
in the same container as nails or
similar metal objects.
•
Do not charge the battery pack in
a high-temperature location, such
as next to a fire or in direct sunlight.
Otherwise, the battery may overheat,
catch fire, or explode.
•
Never use other than the dedicated
charger to charge the battery pack.
Otherwise, the battery may leak,
overheat, or explode.
•
When the Battery Pack Has Deteriorated,
Replace It with a New One.
Continued use of a damaged battery
pack may result in heat generation,
ignition or battery rupture.
n
0
… min
Ah
No load speed
Revolutions or reciprocations
-1
per minutes
Electrical capacity of battery
pack
Rotation only
II
. ASSEMBLY &
OPERATION
Hexagonal Bit Chuck
Attaching the bits
NOTE:
When attaching or removing drill
bits, disconnect the battery pack
-
5 -

from the tool and switch the lock
<Battery low warning lamp>
Off
(normal
operation)
Flashing
(No charge)
Battery
protection
feature active
button into the lock position.
1. Hold the collar of the chuck and pull it
out from the driver.
2. Insert the bit into the chuck. Release
the collar.
3. The collar will return to its original
position when it is released.
4. Pull the bit to make sure it does not
come out.
5. To remove the bit, pull out the collar in
the same way.
Bit
Hexagonal bit chuck
Approx: 4.4 N·m
(45.0 kgf-cm or 39.0 in-lbs)
For powerful driving
screws and
drilling
● When using at high speeds, set the
clutch at 10 or below. (Operation
stops at the maximum torque of 1.5
N·m (15 kgf-cm) when the scale is
higher.)
● The auto shut-off function may
become inoperable at high clutch
settings when battery power drops.
Recharge the battery in that case.
NOTE:
The chart is only a reference. The
torque settings may differ by materials, types of screws, etc. Please test
it at your own conditions before use.
9.5 mm (3/8") - 13 mm (33/64") 6.35 mm (1/4")
Clutch Handle
(Clutch Torque Setting)
Adjust the torque to one of the 21 possible settings to the job. There is an
interval of about 0.13 N·m (1.3 k f-cm
or 1.1 in-lbs) between steps.
CAUTION:
Test the setting before actual operation.
Set the scale at this mark.
Reference for Adjusting Torque
Setting
1
5
9
13
17
21
Torque Use
Approx: 0.29 N·m
(3.0 kgf-cm or 2.6 in-lbs)
Approx: 0.82 N·m
(8.4 kgf-cm or 7.3 in-lbs)
Approx: 1.35 N·m
(13.8 kgf-cm or 12.0 in-lbs)
Approx: 1.88 N·m
(19.2 kgf-cm or 16.6 in-lbs)
Approx: 2.41 N·m
(24.6 kgf-cm or 21.3 in-lbs)
Approx: 2.94 N·m
(30.0 kgf-cm or 26.0 in-lbs)
For driving
screws
Battery Low Warning Lamp
Excessive (complete) discharging of
Li-ion batteries shortens their service
life dramatically. The driver includes a
battery protection feature designed to
prevent excessive discharging of the
battery pack.
●The battery protection feature acti
vates immediately before the battery loses its charge, causing the
battery low warning lamp to flash.
●If you noticethe battery low warn
ing lamp flashing, charge the battery pack immediately.
Using the LED Light
Before the use of LED light, always
pull the power switch once.
Press the LED light on button.
The light illuminates with very low cur-
rent, and it does not adversely affect
-
6 -
-
-

the performance of the tool during
use or its battery capacity.
CAUTION:
• The built-in LED light is designed
to illuminate the small work area
temporarily.
• Do not use it as a substitute for a
regularashlight,sinceitdoesnot
have enough brightness.
• LED light turns off when the tool
has not been used for 5 minutes.
Caution : DO NOT STARE INTO BEAM.
Use of controls or adjustments or performance
ofproceduresotherthanthosespeciedherein
may result in hazardous radiation exposure.
Bit-locking Function
With the switch at off and the bit locked in place, the tool can be used as a
manual screw-driver - up to 14.7 N·m
(150 kgf-cm, 130 in-lbs).
There will be a little play in the driving
shaft, but this is not a malfunction.
forward rotation, or the lower half for
reverse rotation.
Forward
Forward
Reverse
Reverse
Speed Selector Switch
To suit the application of this tool, two
different rotational speeds are available. Depending upon use, either the
high or low speed should be selected.
HIGH
Speed selection Torque
LOW 200 min-1 (rpm) High
HIGH 600 min-1 (rpm) Low
LOW
CAUTION:
• Check speed selector switch before
use.
• Do not operate the speed selector
switch while the main switch is on
(switch is in the ON position).
Main Switch Lock
After use, set the main switch lock at
the lock position to prevent accidental
operation.
Main switch lock
Lock
Main Switch (ON/OFF)
Push the upper half of the switch for
Battery Pack
CAUTION:
1. Remove the battery pack away from
the tool.
-
7 -

2. Charge the battery pack using the
battery charger.
3. After charging has been completed,
remove the battery pack from the
charger and connect it to the tool.
Disconnect the charger from the
power source when not in use.
Battery Pack Life
The rechargeable batteries have
a limited life. If the operation time
becomes extrem e l y sh o r t after
recharging, replace the battery pack
with a new one.
Battery Recycling
ATTENTION:
For environmental protection and
recycling of materials, be sure
that it is disposed of at an officially
assigned location, if there is one in
your country.
NOTE:
Use under extremely hot or cold
conditions will reduce operating
capacity per charge.
[Battery Pack]
For Appropriate Use of Bat-
tery pack
Li-ion Battery pack
• For optimum battery life, store the Liion battery pack following use without
charging it.
•
The ambient temperature range is
between 0°C (32°F) and 40°C (104°F).
If the battery pack is used when the
battery temperature is below 0°C
(32°F), the tool may fail to function
properly.
• When battery pack is not in use,
keep it away from other metal objects
like: paper clips, coins, keys, nails,
screws, or other small metal objects
that can make a connection from one
terminal to another.
Shorting the battery terminals togeth
er may cause sparks, burns or a fire.
•
When operating the battery pack,
make sure the work place is well ventilated.
[Battery Charger]
Charging
Common Cautions for the Liion/Ni-Cd Battery Pack
NOTE:
• When a cold battery (of about 0°C
or less) is to be charged in a warm
room, leave the battery in the room
for at least one hour and charge
it when it has warmed up to room
temperature. (Failing to do so may
result in less than a full charge.)
Cool down the charger when charging
•
more than two battery packs consecutively.
• Do not insert your fingers into contact hole, when holding charger or
any other occasions.
CAUTION:
To prevent the risk of fire or damage
to the battery charger.
• Do not use power source from an
engine generator.
• Do not cover vent holes on the
-
charger and the battery pack.
• Unplug the charger when not in
use.
Li-ion Battery Pack
NOTE:
Your battery pack is not fully charged at the time of purchase. Be sure
to charge the battery before use.
-
8 -

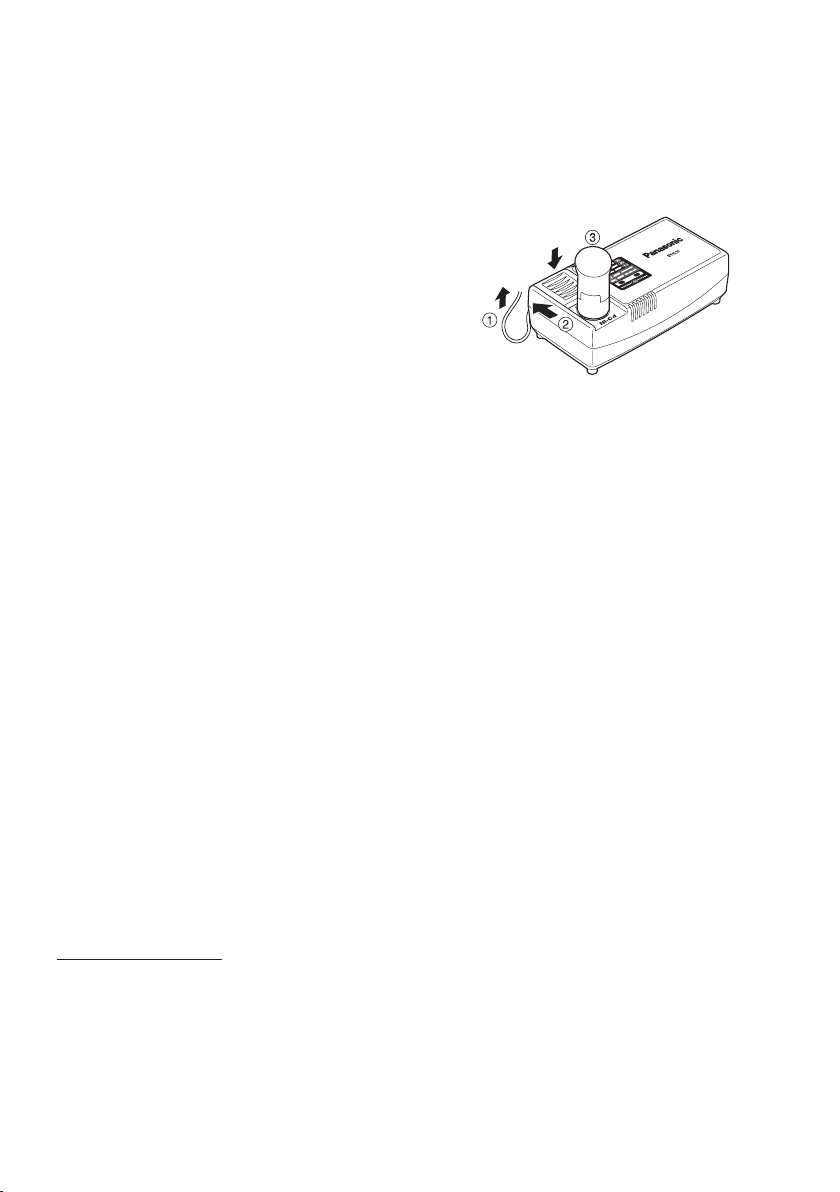
Battery charger
1. Plug the charger into the AC outlet.
NOTE:
Sparks may be produced when the
plug is inserted into the AC power
supply, but this is not a problem in
terms of safety.
2. Slide the battery dock cover back to
allow insertion of the Li-ion battery
pack.
●Verify thatthe cover is locked se
curely in place.
3. Insert the battery pack firmly into the
charger.
To AC
outlet
4. During charging, the charging lamp
will be lit.
When charging is completed, an internal electronic switch will automatically
be triggered to prevent overcharging.
• Charging will not start if the battery
pack is warm (for example, immediately after heavy-duty operation).
The orange standby lamp will be
flashing until the battery cools down.
Charging will then begin automati
cally.
5.
The charge lamp (green) will flash
slowly once the battery is approximately 80% charged.
6.
When charging is complete d, the
charging lamp will start flashing quickly
in green color.
7. If the temperature of the battery pack
is 0°C or less, charging takes longer to
fully charge the battery pack than the
standard charging time. Even when
the battery is fully charged, it will have
approximately 50% of the power of a
fully charged battery at normal operating temperature.
8. If the power lamp does not light immediately after the charger is plugged
in, or if after the standard charging
time the charging lamp does not flash
quickly in green, consult an authorized
dealer.
9. If a fully charged battery pack is inserted into the charger again, the
charging lamp lights up. After several
minutes, the charging lamp may flash
quickly to indicate the charging is
completed.
Ni-Cd Battery Pack
NOTE:
When you charge the battery pack
for the first time, or after prolonged
storage, charge it for a bout 24
hours to bring the battery up to full
capacity.
Battery charger
1. Plug the charger into the AC outlet.
NOTE:
Sparks may be produced when the
plug is inserted into the AC power
supply, but this is not a problem in
terms of safety.
2. Slide the battery dock cover back to
allow insertion of the Ni-Cd battery
pack.
●Verifythatthecoverislockedsecurely
in place.
3. Insert the battery pack firmly into the
-
charger.
To AC
outlet
4.
During charging, the charging lamp will
be lit.
When charging is completed, an internal electronic switch will automatically
be triggered to prevent overcharging.
• Charging will not start if the battery
pack is warm (for example, immediately after heavy-duty operation).
-
9 -
The orange standby lamp will be
flashing until the battery cools down.
Charging will then begin automatically.
5.
When charging is completed, the
charging
lamp will start flashing quick-
ly in green color.
6. If the power lamp does not light im
mediately after the charger is plugged in, or if after the standard charging time the charging lamp does not
flash quickly in green, consult an authorized dealer.
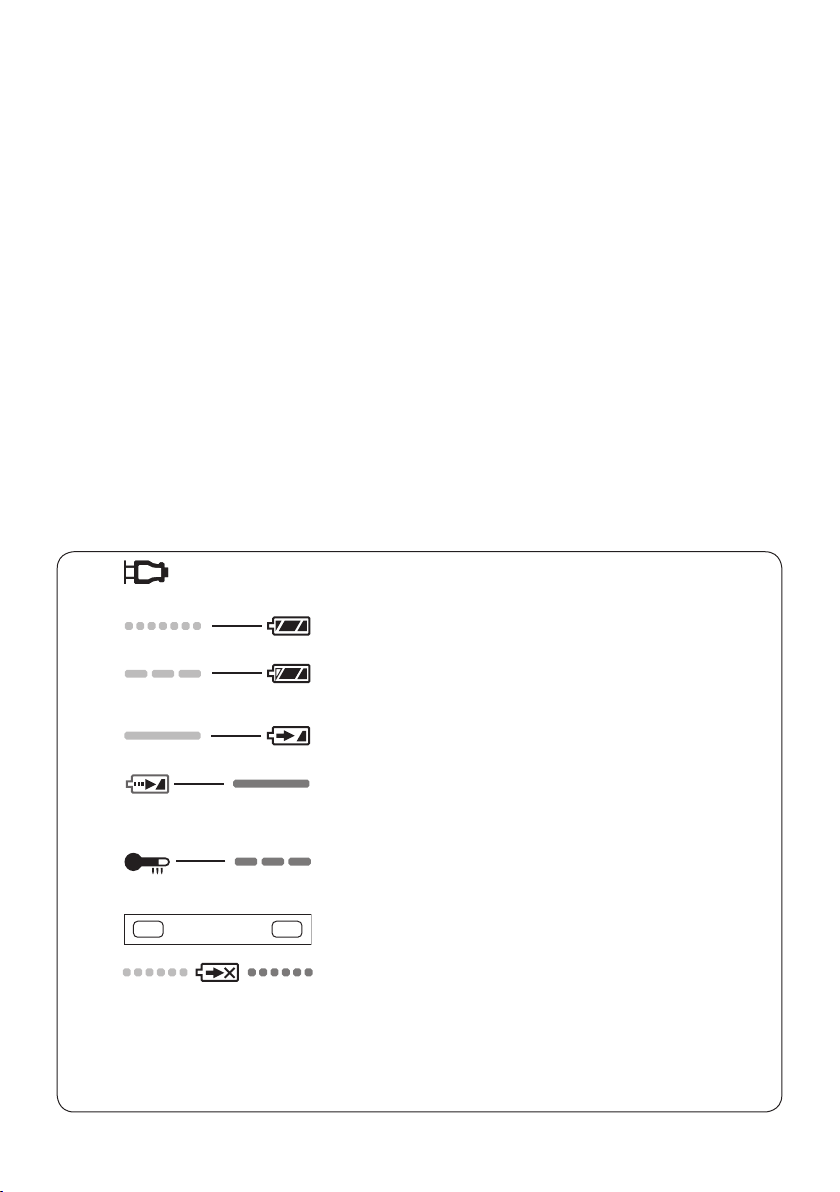
LAMP INDICATIONS
Green Lit
Charger is plugged into the AC outlet.
Ready to charge.
Green Flashing Quickly
Charging is completed. (Full charge.)
Green Flashing
Battery is approximately 80% charged. (Usable charge.
Li-ion only)
Green Lit
Now charging.
Orange Lit
Battery pack is cool.
The battery pack is being charged slowly to reduce the
load on the battery. (Li-ion only)
Orange Flashing
Battery pack is warm. Charging will begin when temperature of battery pack drops.
Charging Status Lamp
Left: green Right: orange will be displayed.
Both Orange and Green Flashing Quickly
Charging is not possible. Clogged with dust or malfunction of the battery pack.
If the temperature of the battery pack is –10°C or less,
thechargingstatuslamp(orange)willalsostartashing.
Charging will begin when the temperature of the battery
pack goes up (Li-ion only)
7. If a fully charged battery pack is inserted into the charger again, the
charging lamp lights up. After several
minutes, the charging lamp may flash
quickly to indicate the charging is
completed.
-
-
10 -

Information for Users on Collection and Disposal of Old Equipment and used Batteries
These symbols on the products, packaging, and/or accompanying documents mean that used electrical and electronic products and batteries
should not be mixed with general household waste.
For proper treatment, recovery and recycling of old products and used batteries, please take them to applicable collection points, in accordance with
your national legislation and the Directives 2002/96/EC and 2006/66/EC.
By disposing of these products and batteries correctly, you will help to save
valuable resources and prevent any potential negative effects on human
health and the environment which could otherwise arise from inappropriate
waste handling.
For more information about collection and recycling of old products and batteries, please contact your local municipality, your waste disposal service or
the point of sale where you purchased the items.
Penalties may be applicable for incorrect disposal of this waste, in accordance with national legislation.
For business users in the European Union
If you wish to discard electrical and electronic equipment, please contact your
dealer or supplier for further information.
[Information on Disposal in other Countries outside the European
Union]
These symbols are only valid in the European Union. If you wish to discard these
items, please contact your local authorities or dealer and ask for the correct method
of disposal.
Note for the battery symbol (bottom two symbol examples):
This symbol might be used in combination with a chemical symbol. In this case it
complies with the requirement set by the Directive for the chemical involved.
III
. MAINTENANCE
Use only a dry, soft cloth for wiping the unit. Do not use a damp cloth, thinner, benzine, or other volatile solvents for cleaning.
IV
. ACCESSORIES
Use only bits suitable for size of drill’s
chuck.
-
11 -
9.5 mm (3/8") -
13 mm (33/64")
6.35 mm
(1/4")

V
. SPECIFICATIONS
MAIN UNIT
Model EY7410
Capacity
Motor 3.6 V DC
No load speed
Maximum torque
Maximum clutch torque 3.0 N·m (30 kgf-cm, 26 in-lbs)
Overall length 276 mm (10-55/64")
Weight (with battery pack) 0.5 kg (1.1 lbs)
Screw driving
Drilling For metal ø 5 mm (13/64") spc t = 1.6 mm
Machine screw M2.5 – M5
Wood screw ø 3.8 x 38 mm (5/32" x 1-29/64")
-1
LOW: 200 min
HIGH: 600 min-1 (rpm)
LOW: 4.4 N·m (45 kgf-cm, 39 in-lbs)
HIGH: 1.5 N·m (15 kgf-cm, 13 in-lbs)
(rpm)
BATTERY PACK
Model EY9L10
Storage battery Li-ion Battery
Battery voltage 3.6 V DC (3.6 V x 1 cell)
BATTERY CHARGER
Model EY0L10
Weight 0.6 kg (1.3 lbs)
Electrical rating See the rating plate on the bottom of the charger.
2.4 V
EY9021
15 min.
Charging time
3.6 V
EY9025
15 min.
EY9L10
Usable: 15 min.
Full: 30 min.
NOTE:
• For applicable battery packs to this charger, see the label on the charger or the
latest general catalog.
The instruction label on the battery packs also shows the applicable charger.
-
12 -

ONLY FOR U. K.
VI
.
ELECTRICAL PLUG
INFORMATION
FOR YOUR SAFETY PLEASE READ
THE FOLLOWING TEXT CAREFULLY
This appliance is supplied with a moulded
three pin mains plug for your safety and
convenience.
A5ampfuseisttedinthisplug.
Should the fuse need to be replaced please
ensure that the replacement fuse has a
rating of 5 amp and that it is approved by
ASTA or BSI to BS1362.
Check for the ASTA mark or the BSI
mark on the body of the fuse.
If the plug contains a removable fuse cover
youmustensurethatitisrettedwhenthe
fuse is replaced.
If you lose the fuse cover the plug must
not be used until a replacement cover is
obtained.
A r eplac e m e nt f u s e co v e r c a n be
pu rchased from your local Panasoni c
Dealer.
IF THE F ITT ED MOU LDE D PLUG I S
UNSUITABLE FOR THE SOCKET OUTLET
IN YO U R HO M E TH EN TH E FUS E
SHOULD BE REMOVED AND THE PLUG
CUT OFF AND DISPOSED OF SAFELY.
THERE IS A DAN G ER OF S EVERE
ELECTRICAL SHOCK IF THE CUT OFF
PLUG IS INSERTED INTO ANY 13 AMP
SOCKET.
Ifanewplugistobettedpleaseobserve
the wiring code as shown below.
If in any doubt please consult a qualified
electrician.
IMPORTANT:
The wires in this mains lead are
colour ed in accordan ce with the
following code:
Blue: Neutral
Brown: Live
As the colours of the wire in the mains
lead of this appliance may not correspond
with the coloured markings identifying the
terminals in your plug, proceed as follows.
The wire which is coloured BLUE must be
connected to the terminal in the plug which
is marked with the letter N or coloured
BLACK.
The wire which is coloured BROWN must
be connected to the terminal in the plug
which is marked with the letter L or coloured
RED.
Under no circumstances should either
of these wires be connected to the earth
terminal of the three pin plug, marked with
the letter E or the Earth Symbol .
How to replace the fuse: Open the fuse
compar tme nt wit h a s cre wdriver a nd
replace the fuse and fuse cover if it is
removable.
Fuse Cover
This apparatus was produced to BS800.
-
13 -

Original-Anleitung: Englisch
Übersetzung der Original-Anleitung: Andere
Sprachen
Lesen Sie bitte vor der ersten Inbetriebnahme dieses Gerätes das separate Handbuch „Sicherheitsmaßregeln“ sorgfältig
durch.
I
.
WEITERE WICHTIGE
SICHERHEITSREGELN
1) Geeigneten Gehörschutz tragen,
wenn das Werkzeug längere Zeit
im Betrieb ist!
Lange Einwirkung von starkem
Lärm kann zu Gehörverlust führen.
2) Denken Sie daran, dass das Werkzeug ständig betriebsbereit ist, da
es nicht an die Steckdose angeschlossen werden muss.
3)
Beim Bohren oder Schrauben in
Wände, Fußböden usw. können
stromführende Kabel berührt werden. DAHER NIE DAS SECHSKANTSCHNELLSPANNFUTTER
O D ER AN D ER E V O RD E RE
METALLTEILE BERÜHREN! Das
Werkzeug beim Schrauben nur am
Kunststoffgriff halten, um in solchen
Fällen vor elektrischen Schlägen geschützt zu sein.
4) Falls der Bit stecken bleibt, lassen
Sie sofort den Elektronikschalter
los, um eine Überlastung zu verhüten, die den Akku oder Motor beschädigen kann.
Verwenden Sie die Rückwärtsdre-
hung, um klemmende Bits zu lösen.
5) Beim Aufladen kann sich das Ladegerät etwas erhitzen. Dies ist normal. Lassen Sie den Akku nach
Absc h l uss des Ladev o r gangs
nicht länger als 24 Stunden im La
degerät.
Symbol Bedeutung
V
n
0
… min
Ah
Drehzahl oder Hubzahl pro
-1
Akkukapazitat in Ampere
Zur Verminderung der
Verletzungsgefahr muss
die Bedienungsanleitung
gründlich gelesen werden.
Nur für Inneneinsatz.
Volt
Gleichstrom
Leerlaufdrehzahl
Minute
Stunden
Bohren
WARNUNG:
• Verwenden Sie nur die PanasonicAkkus, die für den Einsatz mit dieser
Akku-Maschine ausgelegt sind.
• P a n a s on i c ü b er n i mm t k e i ne
Verantwortung für etwaige Schäden
oder Unfälle, die durch den Gebrauch
von recycelten und gefälschten Akkus
verursacht werden.
• Werfen Sie den Akku nicht ins Feuer,
und setzen Sie ihn auch keiner übermäßigen Wärme aus.
• Unterlassen Sie das Einschlagen von
Nägeln in den Akku sowie Erschüttern,
Zerlegen oder Abändern des Akkus.
• Achten Si e da r a u f , da s s keine
Metallgegenstände mit den Kontakten
des Akkus in Berührung kommen.
• Unterlassen Sie das Tragen oder
Aufbew ahren des Akkus zusam-
-
men mit Näge ln od er ähnli chen
Metallgegen s t ä n d e n im selben
Behälter.
• Laden Sie den Akku nicht an einem
heißen Ort, wie z. B. in der Nähe eines
Feuers oder in direktem Sonnenlicht.
Anderenfalls kann der Akku überhitzen,
Feuer fangen oder explodieren.
-
14 -

•
Verwenden Sie nur das zugehörige
Ladegerät zum Laden des Akkus.
Anderenfalls kann der Akku auslaufen, überhitzen oder explodieren.
•
Wenn der Akku schwach geworden
ist, ersetzen Sie ihn dur ch einen
neuen.
Fo r t g e s e t z t er Gebr a u ch eine s
b e sc h ä d ig t en A k ku s k an n z u
Wärmeerzeugung, Entzündung oder
Bruch führen.
II
.
MONTAGE & BETRIEB
Sechskantbitfutter
1. Anbringen von Bits
HINWEIS:
Wenn Sie Bohrerbits anbringen
oder abnehmen, trennen Sie den
Akku vom Werkzeug, und stellen
Sie den Sperrknopf auf die Sperrstellung.
1. Die Hülse des Schnellspannfutters halten und vom Schrauber herausziehen
2. Den Bit in das Bohrfutter einsetzen.
Die Hülse loslassen.
3. Der Ring springt in seine Ausgangsposition zurück, wenn er losgelassen
wird.
4.
An dem Bit ziehen, um sicherzustellen,
dass er nicht abgezogen werden kann
5.
Zum Entfernen des Bits die Hülse auf
die gleiche Weise herausziehen.
Bit
9,5 mm (3/8") - 13 mm (33/64") 6,35 mm (1/4")
Sechskantbitfutter
VORSICHT:
Testen Sie die Einstellung vor der
eigentlichen Arbeit.
Die Skala auf dieses Zeichen ( ) einstellen.
Referenz für die Drehmoment-Einstellung
Position
1
5
9
13
17
21
.
Drehmoment
Ca. 0,29 N·m
(3,0 kgf-cm)
Ca. 0,82 N·m
(8,4 kgf-cm)
Ca. 1,35 N·m
(13,8 kgf-cm)
Ca. 1,88 N·m
(19,2 kgf-cm)
Ca. 2,41 N·m
(24,6 kgf-cm)
Ca. 2,94 N·m
(30,0 kgf-cm)
Ca. 4,4 N·m
(45,0 kgf-cm)
Anwendung
Für
normales
Schrauben
Für
kraftvolles
Schrauben
und Bohren
● Stellen Sie die Kupplung bei hohen
Drehzahlen auf 10 oder niedriger.
(Bei höherem Skalenwert stoppt
der Betrieb beim maximalen Drehmoment von 1,5 N·m (15 kgf-cm).)
● Die automatische Abschaltung kann
.
bei höheren Kupplungseinstellungen
funktionsunfähig werden, wenn die
Akkuleistung nachlässt. Laden Sie in
diesem Fall den Akku auf.
HINWEIS:
Die Tabelle ist nur ein Anhaltspunkt.
Die Drehmoment-Einstellung kann
je nach Material, Schraubentyp usw.
unterschiedlich sein. Bitte testen
Sie die Einstellung für Ihre eigenen
Bedingungen vor der Benutzung.
Kupplungsring (Einstellung
des Kupplungsdrehmoments
Stellen Sie das Drehmoment für die
jeweilige Arbeit auf eine der 21 mögli
chen Einstellungen ein. Ein Intervall
von etwa 0,13 N·m (1,3 kgf·cm) besteht
zwischen den Stufen.
)
-
-
15 -

Akkuladungs-Warnlampe
<Akkuladungs-Warnlampe>
Aus
(normaler
Betrieb)
Blinken
(Keine Ladung)
Akkuschutzfunktion aktiv
Übermäßiges (vollständiges) Entladen von Li-Ion-Akkus führt zu einer
erheblichen Verkürzung ihrer Lebensdauer. Der Schrauber ist mit einer Akkuschutzfunktion ausgestattet, die übermäßiges Entladen des Akkus verhindert.
●Die Akkuschutzfunktion wird unmittelbar vor der Erschöpfung des Akkus
aktiviert und bewirkt Blinken der
Akkuladungs-Warnlampe.
●Wenn dieAkkuladungsWarnlampe
blinkt, laden Sie den Akku unverzuglich auf.
VORSICHT:
• Die eingebaute LED dient zur vorüberge henden Beleuchtung des
kleinen Arbeitsbereichs.
• Benutzen Sie sie nicht als Ersatz für
eine reguläre Taschenlampe, weil sie
nicht hell genug ist.
• Die LED-Leuchte schaltet sich aus,
wenn die Maschine 5 Minuten lang
nicht benutzt wird.
Vorsicht:
Di e Verwen dung von Bedi eneleme nten,
Einstellungen oder Vorgängen außer den
hier beschriebenen kann zur Freisetzung
gefährlicher Strahlung führen.
SEHEN SIE NICHT IN DEN
STRAHL.
Verwendung der LED-Leuchte
Betätigen Sie vor der Benutzung der
LED-Leuchte einmal den Ein-AusSchalter.
Drü cken Sie die L ED-Le ucht enEinschalttaste .
Die Leuchte benötigt nur sehr wenig
Strom und beeinträchtigt nicht die
Lei stun g der Masch ine oder die
Akkukapazität während der Benutzung.
Bitverriegelungsfunktion
Bei ausgeschaltetem Schalter und
verriegeltem Bit kann das Werkzeug
wie ein manueller Schraubendreher
verwendet werden — bis zu 14,7 N·m
(150 kgf-cm).
Die Antriebswelle kann etwas Spiel
aufweisen, was jedoch keine Funktionsstörung ist.
Hauptschalter (EIN/AUS)
Drücken Sie die obere Hälfte des
Schalters für Vorwärtsdrehung, und die
untere Hälfte für Rückwärtsdrehung.
-
16 -

Rechts
Rechts
Links
Links
Drehzahl-Wahlschalter
Um das Werkzeug der jeweiligen
Anwendung anzupassen, sind zwei
verschiedene Drehzahlen verfügbar.
Wählen Sie je nach der Anwendung
entweder die hohe oder die niedrige
Drehzahl.
HOCH
NIEDRIG
2. Laden Sie den Akku mit dem Lade
gerät.
3. Nehmen Sie den Akku nach Ab
schluss des Ladevorgangs vom Ladegerät ab, und bringen Sie ihn am
Werkzeug an.
Trennen Sie das Ladegerät von der
Stromquelle, wenn es nicht benutzt
wird.
HINWEIS:
D i e Verw e n d u n g un t e r seh r
heißen oder kalten Bedingungen
führt zu einer Verringerung der
Betriebskapazität pro Ladung.
-
-
Wahl der Drehzahl
NIEDRIG 200 min-1 (U/min) Hoch
HOCH 600 min-1 (U/min) Niedrig
Drehmoment
VORSICHT:
• Überprüfen Sie den Drehzahl-Wahlschalter vor Gebrauch.
• Betätigen Sie den Drehzahl-Wahlschalter nicht, während der Hauptschalter eingeschaltet ist (in der EINStellung).
Hauptschaltersperre
Stellen Sie die Hauptschaltersperre
nach dem Gebrauch auf die Sperrposition, um versehentliche Betätigung
zu vermeiden.
Hauptschaltersperre
Verriegeln
Akku
VORSICHT:
1. Nehmen Sie den Akku vom Werkzeug ab.
[Akku]
Für richtigen Gebrauch des
Akkus
Li-Ion-Akku
• Um eine möglichst lange Lebensdauer des Li-Ion-Akkus zu erzielen, lagern
Sie ihn nach dem Gebrauch, ohne ihn
aufzuladen.
•
Der Umgebungstemperaturbereich
liegt zwischen 0°C (32°F) und 40°C
(104°F).
Wenn das Akkupack bei einer Akku-
temperatur unter 0°C (32°F) benutzt
wird, funktioniert das Werkzeug möglicherweise nicht einwandfrei.
• Wenn Sie den Akku nicht benutzen,
halten Sie ihn von Metallgegenständen fern: Büroklammern, Münzen,
Schlüssel, Nägel, Schrauben oder
andere kleine Metallgegenstände,
welche die Kontakte kurzschließen
können.
Das Kurzschließen der Akkukontak-
te kann Funken, Verbrennungen oder
einen Brand verursachen.
•
Sorgen Sie bei Benutzung des Akkus
für ausreichende Belüftung des Arbeitsplatzes.
17 -
-

Lebensdauer des Akkus
Das Akku hat nur eine begrenzte Lebensdauer. Wenn auch nach einer
ordnun g s g e m ä ß e n Ladung die
Betriebszeit extrem kurz ist, muss der
Akku erneuert werden.
Batterie-Recycling
ACHTUNG:
Um Umweltschutz und MaterialRecycling zu gewährleisten, müssen Sie die Batterie zur örtlichen
Entsorgungsstelle bringen, falls
eine solche in Ihrem Land vorhanden ist.
[Ladegerät]
Laden
Allgemeine Vorsichtsmaßnahmen
für Li-Ion/Ni-Cd-Akkus
HINWEIS:
• Wenn ein kalter Akku (von etwa
0°C (32°F) oder weniger) in einem
warmen Raum aufgeladen werden
soll, lassen Sie den Akku für mindestens eine Stunde in dem Raum
und laden Sie ihn auf, wenn er sich
auf Raumtemperatur erwärmt hat.
Anderenfalls wird der Akku möglicherweise nicht voll aufgeladen.
Den Akku abkühlen lassen, wenn
•
mehr als zwei Akku-Sätze hintereinander aufgeladen werden.
• Stecken Sie Ihre Finger nicht in
die Kon taktö ffnu ng, wenn da s
Ladegerät festgehalten wird oder
bei anderen Gelegenheiten.
VORSICHT:
Um die Gefahr eines Brandes oder
Sc hadens am Ladegerät zu verhindern.
• Keinen Motorgenerator als Spannungsquelle benutzen.
• Decken Sie die Entlüftungsöffnungen des Ladegerätes und den Akku
nicht ab.
Trennen Sie das Ladegerät vom
•
Stromnetz, wenn es nicht benutzt
wird.
Li-Ion-Akku
HINWEIS:
Beim Kauf ist Ihr Akku nicht voll aufgeladen. Laden Sie daher den Akku
vor Gebrauch auf.
Ladegerät
1. Ladegerät an Wandsteckdose anschließen.
HINWEIS:
Beim Einführen des Steckers in
eine Netzsteckdose können Funken
erzeugt werden, was jedoch in Bezug
auf die Sicherheit kein Problem
darstellt.
2. Schieben Sie die Ladeschachtabdeckung zurück, um den Li-Ion-Akku
einzuschieben.
●Achten Sie darauf, dass die Abdeck-
ung einwandfrei eingerastet ist.
3. Akku fest in das Ladegerät schieben.
An Netzsteckdose
4.
Während des Ladens leuchtet die Ladekontrolllampe.
Mit Erreichen der vollen Ladung spricht
automatisch eine interne, elektronische
Schaltung an, die ein Überladen verhindert.
Das Laden beginnt nicht, solange der
•
Akku noch heiß ist (wie z.B. unmittelbar nach intensivem Gebrauch).
Die Bereitschaftslampe blinkt in
Orange, bis der Akku abgekühlt ist.
Das Laden beginnt dann automa-
tisch.
5.
Die Ladekontrolllampe (grün) blinkt
langsam, wenn der Akku zu etwa
80% aufgeladen ist.
6.
Wenn der Ladevorgang beendet ist,
beginnt die Ladekontrolllampe schnell
in Grün zu blinken.
-
18 -

7. Falls die Akkutemperatur 0°C oder
weniger beträgt, dauert der Ladevorgang bis zur vollen Aufladung des
Akkus länger als die normale Ladezeit.
Selbst wenn der Akku voll aufgeladen
ist, hat er nur etwa 50% der Leistung
eines voll aufgeladenen Akkus bei
normaler Betriebstemperatur.
8.
Falls die Betriebslampe nicht unmittelbar nach dem Anschluss des Ladegeräts aufleuchtet oder die Ladekontrolllampe nach Ablauf der normalen Ladezeit nicht schnell in Grün blinkt, konsultieren Sie einen Vertragshändler.
9. Wird ein voll aufge ladener A kku
erneut in das Ladegerät eingesetzt,
leuchtet die Ladekontrolllampe auf.
Nach einigen Minuten beginnt die
Ladekontrolllampe rascher zu blinken
und zeigt an, dass der Ladevorgang
abgeschlossen ist.
Ni-Cd-Akku
HINWEIS:
Beim ersten Aufladen der Akkus
oder beim Aufla d en nac h l ängerer Ruhezeit die Akkus etwa 24
Stunden lang aufladen , um die
volle Kapazität zu erreichen.
Ladegerät
1. Ladegerät an Wandsteckdose anschließen.
HINWEIS:
Beim Einführen des Steckers in
eine Netzsteckdose können Funken
erzeugt werden, was jedoch in Bezug
auf die Sicherheit kein Problem
darstellt.
2. Schieben Sie die Akkuladeschachtabdeckung zurück, um den Ni-Cd-Akku einzuschieben.
●AchtenSiedarauf, dass dieAbdeck-
ung einwandfrei eingerastet ist.
3. Akku fest in das Ladegerät schieben.
4.
Während des Ladens leuchtet die Ladekontrolllampe.
Mit Erreichen der vollen Ladung spricht
automatisch eine interne, elektronische
Schaltung an, die ein Überladen verhindert.
• Das Laden beginnt nicht, solange
der Akku noch heiß ist (wie z.B. unmittelbar nach intensivem Gebrauch).
Die Bereitschaftslampe blinkt in
Orange, bis der Akku abgekühlt ist.
Das Laden beginnt dann automatisch.
5.
Wenn der Ladevorgang beendet ist,
beginnt die Ladekontrolllampe schnell
in Grün zu blinken.
6. Wenn die Ladekontrolllampe nicht unmittelbar nach dem Anschließen des
Netzkabels aufleuchtet oder nach Ablauf der normalen Ladezeit nicht erlischt, wenden Sie sich bitte an einen
autorisierten Fachhändler.
7. Wird ein voll aufgeladener Akku erneut in das Ladegerät eingesetzt,
leuchtet die Ladekontrolllampe auf.
Nach einigen Minuten beginnt die
Ladekontrolllampe rascher zu blinken
und zeigt an, dass der Ladevorgang
abgeschlossen ist.
An Netzsteckdose
-
19 -

ANZEIGELAMPEN
Leuchten in Grün
Das Ladegerät ist an eine Netzsteckdose angeschlossen.
Ladebereitschaft hergestellt.
Schnelles Blinken in Grün
Ladevorgang ist abgeschlossen. (Volle Ladung)
Blinken in Grün
Der Akku ist zu etw a 80 % aufgeladen. (Nutzbare
Ladung. Nur Li-Ion)
Leuchten in Grün
Ladevorgang läuft.
Leuchten in Orange
Akku ist kalt.
Der Akku wird langsam geladen, um seine Belastung zu
reduzieren. (Nur Li-Ion)
Blinken in Orange
Der Akku ist warm geworden. Der Ladevorgang beginnt
wieder, wenn dieTemperatur des Akku gefallen ist.
Ladezustandslampe
Links: Grün Rechts: Orange wird angezeigt
Schnelles Blinken in Orange und Grün
Keine Ladung möglich.Verstaubt oder Defekt des Akkus.
Beträgt die Temperatur des Akkus –10°C oder weniger,
beginnt die Ladekontrolllampe (orange) ebenfalls zu blinken. Der Ladevorgang beginnt, wenn die Temperatur des
Akkus steigt (nur Li-Ion)
Benutzerinformation zur Sammlung und Entsorgung von veralteten
Geräten und benutzten Batterien
Diese Symbole auf den Produkten, Verpackungen und/oder Begleitdokumenten bedeuten, dass benutzte elektrische und elektronische Produkte
und Batterien nicht in den allgemeinen Hausmüll gegeben werden sollen.
Bitte bringen Sie diese alten Produkte und Batterien zur Behandlung, Aufarbeitung bzw. zum Recycling gemäß Ihrer Landesgesetzgebung und den
Richtlinien 2002/96/EG und 2006/66/EG zu Ihren zuständigen Sammelpunkten.
Indem Sie diese Produkte und Batterien ordnungsgemäß entsorgen, helfen
Sie dabei, wertvolle Ressourcen zu schützen und eventuelle negative Auswirkungen auf die menschliche Gesundheit und die Umwelt zu vermeiden, die
anderenfalls durch eine unsachgemäße Abfallbehandlung auftreten können.
Wenn Sie ausführlichere Informationen zur Sammlung und zum Recycling
alter Produkte und Batterien wünschen, wenden Sie sich bitte an Ihre
örtlichen Verwaltungsbehörden, Ihren Abfallentsorgungsdienstleister oder
an die Verkaufseinrichtung, in der Sie die Gegenstände gekauft haben.
Gemäß Landesvorschriften können wegen nicht ordnungsgemäßer Entsorgung dieses Abfalls Strafgelder verhängt werden.
Für geschäftliche Nutzer in der Europäischen Union
Wenn Sie elektrische oder elektronische Geräte entsorgen möchten, wenden Sie
sich wegen genauerer Informationen bitte an Ihren Händler oder Lieferanten.
-
20 -

[Informationen zur Entsorgung in Ländern außerhalb der Europäischen Union]
Diese Symbole gelten nur innerhalb der Europäischen Union. Wenn Sie solche
Gegenstände entsorgen möchten, erfragen Sie bitte bei den örtlichen Behörden
oder Ihrem Händler, welches die ordnungsgemäße Entsorgungsmethode ist.
Hinweis zum Batteriesymbol (unten zwei Symbolbeispiele):
Dieses Symbol kann in Kombination mit einem chemischen Symbol verwendet
werden. In diesem Fall erfüllt es die Anforderungen derjenigen Richtlinie, die für die
betreffende Chemikalie erlassen wurde.
III
. WARTUNG
Das Gerät nur mit einem trockenen, weichen Lappen abwischen. Verwenden
Sie zum Reinigen keine feuchten Lappen oder flüchtige Lösungsmittel wie
Farbverdünner oder Benzin.
IV
. ZUBEHÖR
Verwenden Sie nur für die Futtergröße
passende Bits.
V
. TECHNISCHE DATEN
9,5 mm (3/8") -
13 mm (33/64")
HAUPTGERÄT
Modell EY7410
Kapazität
Motor 3,6 V DC
Drehzahl ohne Last
Maximales Drehmoment
Maximales Kupplungsdrehmoment
Gesamtlänge 276 mm (10-55/64")
Gewicht (mit Akku) 0,5 kg (1,1 lbs)
Schrauben
Bohren Für Metall ø 5 mm (13/64") spc t = 1,6 mm
Maschinenschraube M2,5 – M5
Holzschraube ø 3,8 x 38 mm (5/32" x 1-29/64")
-1
NIEDRIG: 200 min
HOCH: 600 min-1 (U/min)
NIEDRIG: 4,4 N·m (45 kgf-cm, 39 in-lbs)
HOCH: 1,5 N·m (15 kgf-cm, 13 in-lbs)
3,0 N·m (30 kgf-cm. 26 in-lbs)
(U/min)
AKKU
Modell EY9L10
Akku Li-Ion-Akku
Akkuspannung 3,6 V DC (3,6 V x 1 Zellen)
6,35 mm
(1/4")
-
21 -

AKKU-LADEGERÄT
Modell EY0L10
Gewicht 0,6 kg (1,3 lbs)
Nennleistung Siehe Typenschild auf der Unterseite des Ladegerätes.
2,4 V
EY9021
15
Ladezeit
Min.
HINWEIS:
• Die für dieses Ladegerät geeigneten Akkus sind auf dem Aufkleber am Ladegerät
oder im neusten Generalkatalog angegeben.
Der Anweisungsaufkleber auf dem Akku gibt ebenfalls das geeignete Ladegerät an.
3,6 V
EY9025
15 Min.
EY9L10
Nutzbar: 15 Min.
: 30 Min.
Voll
-
22 -

Instructions originales: anglais
Traduction des instructions originales:
Autres langues
Veuillez lire la brochure “Instructions de
sécurité” et ce qui suit avant d’utiliser
l’appareil.
I
.
REGLES DE SECURITE
COMPLEMENTAIRES
1) Portez des lunettes lorsque vous
utilisez l’outil pendant de longues
périodes.
L’exposition prolongée à du bruit
de haute densité peut entraîner la
perte de l’ouïe.
2) N’oubliez pas que cet outil est tou
jours en état de fonctionner puisqu’il
est alimenté par batterie.
3) Lors du perçage ou du vissage dans
des murs, des planchers, etc., des
câbles électriques sous tension peuvent être rencontrés. NE TOUCHEZ
NI AU MANDRIN HEXAGONAL
RAPIDE NI AUX PARTIES METALLIQUES DE L’OUTIL! Tenez l’outil
au moyen de la poignée en matière
plastique afin d’éviter toute secousse
électrique si la mèche venait en contact avec un fil électrique.
4) Si la mèche est coincée, mettez im
médiatement le commutateur de la
gâchette hors tension afin de prévenir une surcharge pouvant endommager la batterie autonome ou le
moteur.
Dégagez la mèche en inversant le
sens de rotation.
5) La température du chargeur peut
s’élever en cours d’utilisation. Ce
n’est pas là le signe d’une anomalie
de fonctionnement. Ne laissez pas
la batterie dans le chargeur pendant
plus de 24 heures après avoir ter
miné la charge.
Symbole
V
Signication
Volts
Courant continu
n
0
… min
Ah
-1
Vitesse sans charge
Révolutions ou alternances
par minute
Capacité électrique de la bat-
terie autonome
Rotation seulement
Pour réduire les risques de
blessures, l'utilisateur doit lire et
comprendre le mode d'emploi.
Pour l’utilisation à l’intérieur
seulement.
-
-
-
AVERTISSEMENT:
• N’utilisez que la batterie autonome
Panasonic conçue pour l’utilisation
avec cet outil rechargeable.
•
Panasonic décline toute responsabilité
en cas de dommage ou d’accident
causé par l’utilisation d’une batterie
autonome recyclée et d’une batterie
autonome de contrefaçon.
•
Ne mettez pas la batterie autonome au
rebut dans un feu ou ne l’exposez pas
à une chaleur excessive.
•
N’enfoncez pas de clous ou autres
dans la batterie autonome, ne la soumettez pas à des chocs, ne la démontez pas ou n’essayez pas de la modifier.
•
Ne laissez pas d’objets métalliques
entrer en contact avec les bornes de
la batterie autonome.
•
Ne transportez pas ou ne rangez pas
la batterie autonome dans un récipient contenant des clous ou tout autre
objet métallique.
•
Ne chargez pas la batterie autonome
dans un endroit où la température est
élevée comme à proximité d’un feu ou
à la lumière directe du soleil. Sinon la
batterie peut surchauffer, prendre feu
ou exploser.
•
N’utilisez que le chargeur dédié pour
charger la batterie autonome. Sinon,
la batterie peut fuir, surchauffer ou
exploser.
-
23 -

-
24 -
•
Si la batterie autonome s’est détériorée,
la remplacer par une batterie neuve.
L’utilisation prolongée d’une batterie auto-
nome endommagée peut provoquer des
dégagements de chaleur, un départ de
feu ou l’explosion de la batterie.
II
.
ASSEMBLAGE &
FONCTIONNEMENT
Mandrin de mèche hexagonal
Fixation des mèches
REMARQUE:
Lors de la fixation ou de l’enlèvement de mèches de perceuse, débranchez la batterie autonome de
l’outil et mettez le bouton de verrouillage dans la position verrouillée.
1. Maintenez le collier du mandrin de
connexion rapide et retirez-le de la
perceuse.
2. Insérez la mèche dans le mandrin.
Relâchez le collier.
3. Le collier reviendra dans sa position
d’origine lorsqu’il sera relâché.
4. Tirez sur la mèche pour vérifier qu’elle
ne ressort pas.
5. Pour retirer la mèche, tirez le collier
vers l’extérieur de la même manière.
Mèche
9,5 mm (3/8") - 13 mm (33/64") 6,35 mm (1/4")
Poignée de l’embrayage
(Réglage du couple de ser-
rage de l’embrayage)
Ajustez le couple de serrage sur l’un
des 21 réglages possibles pour le tra
vail. Il y a un intervalle d’environ 0,13
N·m (1,3 kgf/cm ou 1,1 po-lbs) entre
chaque étape.
Mandrin de mèche hexagonal
MISE EN GARDE:
Essayez le réglage avant l’utilisation effective.
Réglez l’échelle sur cette marque.
Références pour l’ajustement du
couple de serrage
Réglage
Couple de serrage Utilisation
Environ 0,29 N·m
1
kgf/cm ou 2,6 po-lbs)
Environ 0,82 N·m (8,4
5
kgf/cm ou
Environ 1,35 N·m
9
kgf/cm ou 12,0 po-lbs)
Environ 1,88 N·m
13
kgf/cm ou 16,6 po-lbs)
Environ 2,41 N·m
17
kgf/cm ou 21,3 po-lbs)
Environ 2,94 N·m
21
kgf/cm ou 26,0 po-lbs)
Environ 4,4 N·m (45,0
kgf/cm ou
7,3
39,0
po-lbs
po-lbs
(3,0
)
(13,8
(19,2
(24,6
(30,0
)
Pour visser
des vis
Pour un
vissage et
un perçage
puissants
● Lors de l’utilisation à hautes vitesses,
réglez l’embrayage sur 10 ou plus
bas. (Le fonctionnement s’arrête au
couple de serrage maximum de 1,5
N·m (15 kgf/cm) lorsque l’échelle est
plus élevée.)
● La fonction d’arrêt automatique
peut ne pas fonctionner à des réglages de l’embrayage plus élevés
lorsque la puissance de la batterie
diminue. Dans ce cas, rechargez la
batterie.
REMARQUE:
Le tableau n’est qu’une référence.
Le réglage du couple de serrage
peut différer selon les matériaux, le
type des vis, etc. Veuillez effectuer
des essais de vos conditions particulières avant l’utilisation.
-

Témoin d’avertissement de
<Témoin d’avertissement de batterie basse>
Arrêt
(fonctionnement
normal)
Clignotant
(Pas de charge)
Caractéristique de
protection de la
batterie active.
batterie basse
Une décharge excessive (totale) des
batteries aux ions de lithium réduit
leur durée de vie de façon notable.
L’outil comprend une caractéristique
de protection de la batterie conçue
pour empêcher une décharge excessive de la batterie autonome.
●La caractéristique de protection de
la batterie s’active automatiquement avant que la batterie ne perde
sa charge, entraînant le clignotement du témoin d’avertissement de
batterie basse.
●Dès que vous remarquez le clignotement du témoin d’avertissement de
batterie basse, rechargez immédiatement la batterie autonome.
Utilisation de la lumière DEL
Avant d’utiliser l’éclairage DEL, tirez
toujour sune fois l’interrupteur d’alimentation.
Appuyez sur le bouton d’allumage de l’éclairage DEL.
La lumière éclaire avec un courant
de très faible intensité qui n’affecte
pas négativement la performance du
tournevis ou la capacité de la batterie
pendant son utilisation.
MISE EN GARDE:
• La lumière DEL incorporée est conçue pour éclairer temporairement la
petite zone de travail.
•Ne l’utilisez pas comme remplacement d’une torche normale, elle n’
est pas assez lumineuse.
• L’éclairage DEL s’éteint après que
l’outil n’ait pas été utilisé pendant 5
minutes.
Mise en garde
L’utilisation de commandes ou de réglages ou
l’exécution de procédures autres que ceux spéci-
ésdanscemanuelpeutentraînerl’expositionà
de dangereuses radiations.
: NE REGARDEZ PAS DIRECTE-
MENT LE FAISCEAU.
Fonction de verrouillage de
la mèche
Avec le commutateur sur la position
d’arrêt et la mèche verrouillée en place,
l’outil peut être utilisé comme un tournevis manuel - jusqu’à 14,7 N·m (150
kgf/cm, 130 po-lbs).
L’arbre d’entraînement présentera un
peu de jeu, mais cela n’est pas un
mauvais fonctionnement.
Interrupteur principal (ON/
OFF)
Poussez la moitié supérieure de l’interrupteur pour une rotation vers l’avant
ou la moitié inférieure pour une rotation en arrière.
25 -
-

-
26 -
Vers l’avant
Vers l’avant
Vers l’arrière
Vers l’arrière
Commutateur du sélecteur
de vitesse
Pour adapter l’application de cet outil,
deux vitesses de rotation différentes sont disponibles. En fonction de
l’utilisation, sélectionnez soit la haute
vitesse, soit la basse vitesse.
HAUT
Sélection de la vitesse
BAS
HAUT
min
200
600 min-1 (t/mn)
-1
(t/mn)
BAS
Couple de
serrage
Haut
Bas
MISE EN GARDE:
• Vérifiez le commutateur du sélecteur de vitesse avant l’utilisation.
• Ne faites pas fonctionner le commu
tateur du sélecteur de vitesse alors
que l’interrupteur principal est sur la
position de marche (le commutateur
est sur la position ON).
Verrou de l’interrupteur prin-
cipal
Après l’utilisation, mettez l’i nterrupteur principal sur la position verrouillée pour empêcher tout fonctionnement accidentel.
Verrou de l’interrupteur principal
Verrou
Batterie autonome
MISE EN GARDE:
1. Retirez la batterie autonome de
l’outil.
2. Chargez la batterie autonome en
utilisant le chargeur de batterie.
3. Lorsque la charge est terminée,
retirez la batterie autonome du
chargeur et connectez-la à l’outil.
Déconnectez le chargeur de la
source d’alimentation lorsqu’il n’est
pas utilisé.
REMARQUE:
L’utilisation dans des conditions
extrêmes de chaleur ou de froid
réduit la capacité de fonctionnement
par charge.
[Batterie autonome]
Pour une utilisation correcte
de la batterie autonome
-
Batterie autonome Li-ion
• Pour une longévité optimale de la batterie, rangez la batterie autonome
Li-ion sans la charger après l’avoir utilisée.
•
Le niveau de température ambiante
moyenne se situe entre 0°C (32°F) et
40°C (104°F).
Si la batterie autonome est utilisée
alors que sa température est inférieure
à 0°C (32°F), l’outil pourrait ne pas
fonctionner correctement.
•
Lorsque vous n’utilisez pas la batterie autonome, éloignez-la d’autres
objets métalliques tels que: trombones,
pièces de monnaie, clés, clous, vis et
autres petits objets métalliques susceptibles de connecter les bornes entre
elles.

Si vous court-circuitez les bornes de
la batterie, vous risquez de causer
des étincelles, de vous brûler ou de
provoquer un incendie.
•
Lors de l’utilisation de la batterie autonome, assurez-vous de la bonne ventilation du lieu de travail.
Longévité des batteries autonomes
Les batteries rechargeables ont une
longévité limitée. Si le temps de fonctionnement devient très court après
la recharge, remplacez la batterie
autonome par une neuve.
Recyclage de la batterie autonome
ATTENTION:
Pour la protection de l'environnement naturel et le recyclage des
matériaux, veillez à mettre la batterie au rebut à un endroit prévu
officiellement à cet effet, s’il y en a
un dans votre pays.
[Chargeur de batterie]
Recharge
Mises en garde communes pour
la batterie autonome Li-ion/Ni-Cd
REMARQUE:
• Lo rsqu ’une bat terie auton ome
froide (en-dessous de 0°C) doit être
rechargée dans une pièce chaude,
laissez la batterie autonome dans la
pièce pendant une heure au moins
et rechargez-la quand elle a atteint la
température ambiante. (Sinon, il est
possible que la batterie autonome ne
soit pas complètement chargée.)
•
Laissez refroidir le chargeur quand
vous rechargez plus de deux batteries
autonomes à la suite.
• Ne mettez pas vos doigts dans les
trous des connecteurs lorsque vous
prenez les chargeurs ou à n’importe
quelle occasion.
MISE EN GARDE:
Pour éviter les risques d’incendie ou
d’endommagement du chargeur de
batterie.
• N’utilisez pas de source d’alimentation provenant d’un générateur de
moteur.
Ne bouchez pas les trous d’aéra-
•
tion du chargeur et de la batterie
autonome.
Débranchez le chargeur lorsque
•
vous ne l’utilisez pas.
Batterie autonome Li-ion
REMARQUE:
Votre batterie autonome n’est pas
complètement chargée au moment
de l’achat. Veillez à bien charger
complètement la batterie avant son
utilisation.
Chargeur de batterie
1. Branchez le cordon d’alimentation du
chargeur dans une prise secteur.
REMARQUE:
Des étincelles peuvent être produites lorsque la fiche est introduite
dans la prise d’alimentation secteur;
toutefois, ceci ne pose aucun problème de sécurité.
2. Faites glisser le couvercle du poste
d’accueil de la batterie vers l’arrière
pour permettre l’insertion de la batterie autonome Li-ion.
●Assurezvousque le couvercle est
bien verrouillé en place.
3.
Introduisez soigneusement la batterie
autonome dans le chargeur.
Vers la prise
CA
4. Pendant la charge, le témoin s’allume.
Lorsque la charge est terminée, un
interrupteur électronique s’actionne
pour protéger la batterie.
La charge ne peut pas être réalisée
•
si la batterie autonome est chaude
(par exemple, à la suite d’un long
travail de perçage).
-
27 -
-
28 -
Le témoin d’attente orange clignote
jusqu’à ce que la batterie se soit
refroidie.
La charge commence alors auto-
matiquement.
Le témoin de charge (vert) clignote
5.
lentement dès que la batterie est
chargée à environ 80%.
6.
Lorsque la charge est terminée, le
témoin de charge se met à clignoter
rapidement en vert.
7. Lorsque la température de la batterie
autonome est de 0ºC ou moins, la batterie autonome prend plus longtemps
à charger que la durée standard.
Même lorsque la batterie est complètement chargée, elle n’aura qu’environ
50% de la puissance d’une batterie
complètement chargée à une température de fonctionnement normale.
8.
Lorsque le témoin d’alimentation ne
s’allume pas immédiatement après
avoir branché le chargeur, ou si après
la durée de charge standard, le témoin
de charge ne clignote pas rapidement
en vert, consultez un concessionnaire
autorisé.
9. Si une batterie complètement chargée
est à nouveau insérée dans le
chargeur, le témoin de charge s’allume.
Après quelques minutes, le voyant de
charge risque de clignoter rapidement
pour i ndiqu e r que la c harge est
terminée.
Batterie autonome Ni-Cd
REMARQUE:
Chargez une nouvelle batterie autonome, ou une batterie autonome
qui n’a pas été utilisée pendant
une période prolongée, pendant 24
heures pour lui redonner sa pleine
capacité.
Chargeur de batterie
1. Branchez le cordon d’alimentation du
chargeur dans une prise secteur.
REMARQUE:
Des étincelles peuvent être produites lorsque la fiche est introduite
dans la prise d’alimentation secteur;
toutefois, ceci ne pose aucun problème de sécurité.
2. Faites glisser le couvercle du poste
d’accueil de la batterie vers l’arrière
pour permettre l’insertion de la batterie autonome Ni-Cd.
●Assurezvous que le couvercle est
bien verrouillé en place.
3. Introduisez soigneusement la batterie
autonome dans le chargeur.
Vers la prise
CA
4. Pendant la charge, le témoin s’allume.
Lorsque la charge est terminée, un
interrupteur électronique s’actionne
pour protéger la batterie.
La charge ne peut pas être réalisée
•
si la batterie autonome est chaude
(par exemple, à la suite d’un long travail de perçage).
Le témoin d’attente orange clignote
jusqu’à ce que la batterie se soit
refroidie. La charge commence alors
automatiquement.
5.
Lorsque la charge est terminée, le
témoin de charge se met à clignoter
rapidement en vert.
6. Si le voyant de charge ne s’allume
pas immédiatement après le brancheme nt du chargeur ou, si après la
durée de charge standard, le voyant
ne s’éteint pas, consultez un revendeur agréé pour de l’assistance technique.
7. Si une batterie complètement chargée
est à nouveau insérée dans le chargeur, le témoin de charge s’allume.
Après quelques minutes, le voyant de
charge risque de clignoter rapidement
pour i ndiqu e r que la c harge est
terminée.
 Loading...