

Page 1
Panasonic"
Operating Instructions
Instrucciones de Uso
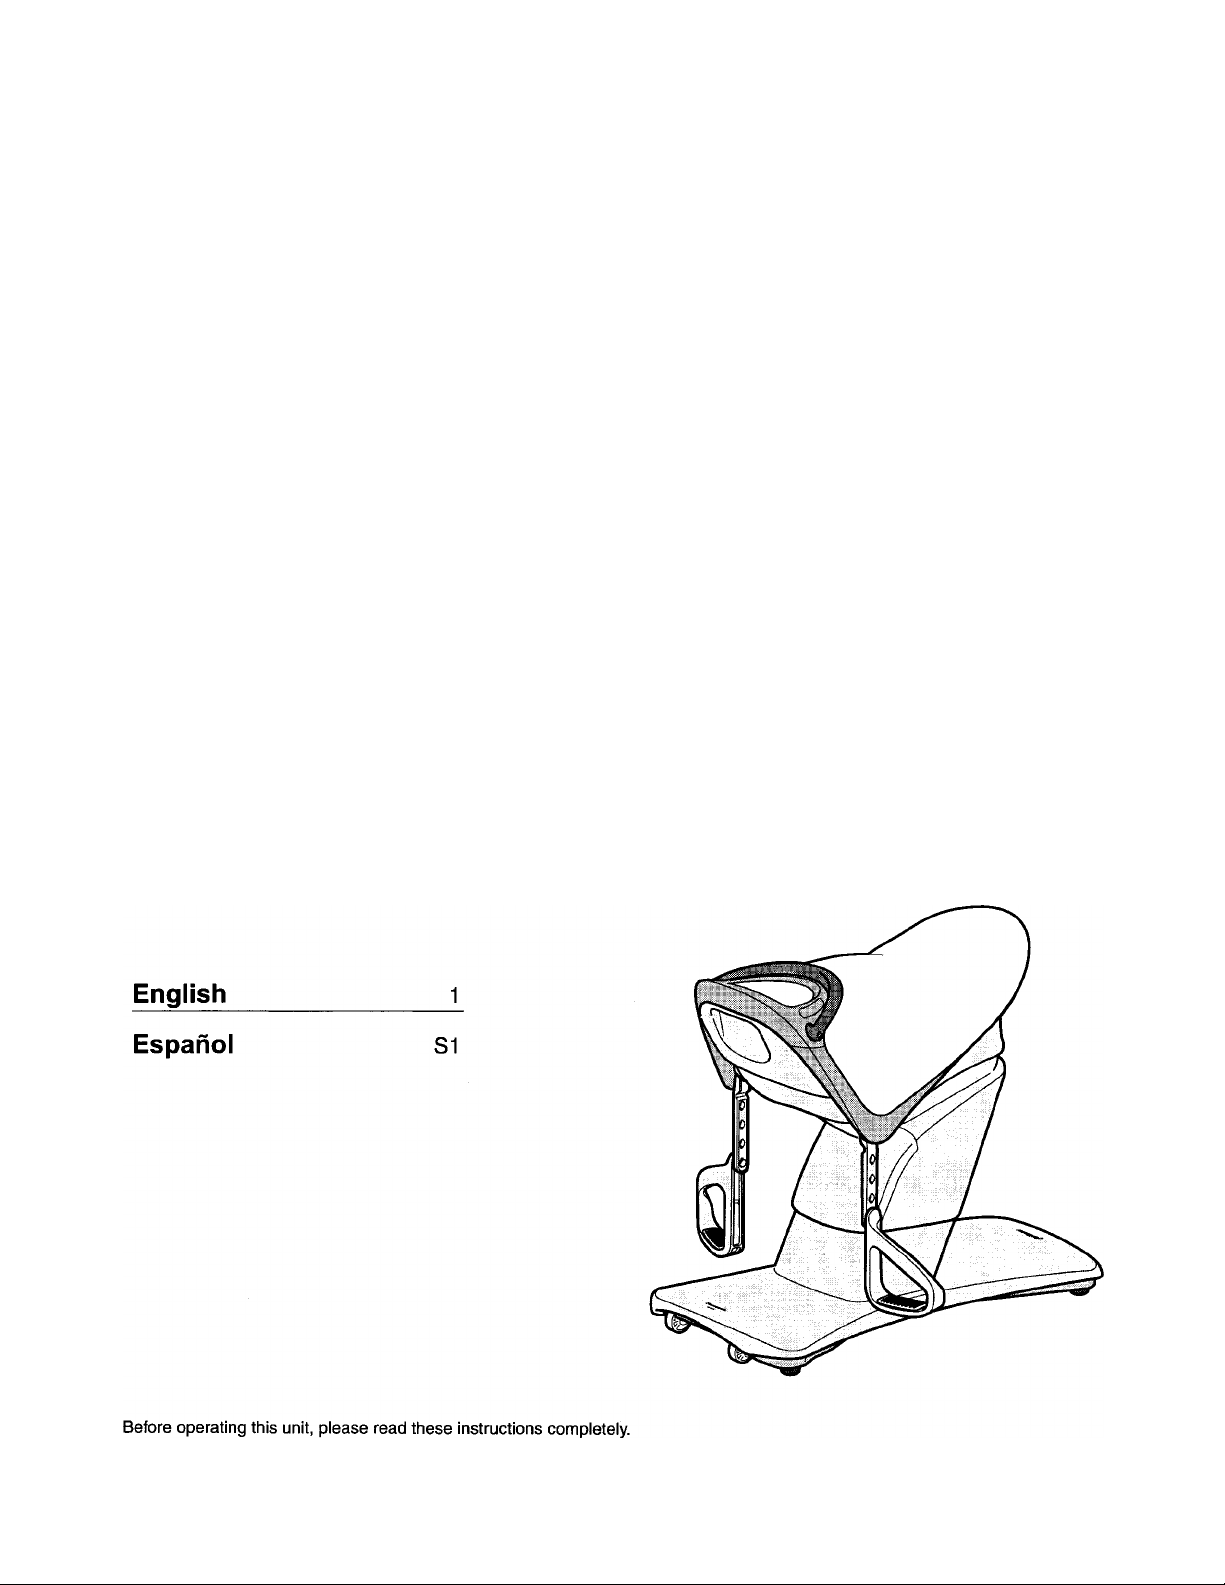
Core Trainer Exercise Equipment
Equipo de Ejercicios Entrenador Básico
Model No7№ de Modelo EU7805
Antes de utilizar esta unidad, lea compleatamente estas instrucciones y
guárdelas para referencia futura.
WEU7805L8788
Page 2

Thank you for purchasing the Panasonic Core Trainer Exercise Equipment EU7805. Please read this manual
carefully to ensure optimum performance and safety
in
3
(Q
I IMPORTANT SAFETY INSTRUCTIONS
Basic precautions should always be followed when using an electrical unit, Including the following.
Read all instructions before using the unit.
DANGER • To reduce the risk of electric shock:
1. Always unplug the unit immediately after use.
2. Always unplug the unit before cleaning
WARNING
1. Always insert the power plug all the way into the outlet to reduce the risk of short-circuit and fire.
2. The unit should never be left unattended when plugged in. Always unplug the unit when not in use.
3. Close supervision is necessary when this appliance is used by, on, or near children, invalids, or disabled
persons.
4. Only use the unit for the purpose described in these instructions.
5. Do not stand on the unit.
6. Do not use any accessories other than those recommended by the manufacturer.
7. This unit should not be used by children. Keep children away from the unit.
8. Never operate the unit if it has a damaged power cord or plug. Return the unit to the nearest authorized service
center if it is not working properly, if it has been dropped or damaged, or if it has been immersed or exposed in
water.
9. Keep the power cord away from heated surfaces. Do not pull the appliance by the power cord.
10. Do not use the unit on top of heating appliances, such as electric carpets, etc.
11. Do not use the unit in bathrooms or other damp or humid places as this may cause electric shock or cause the
unit to malfunction. Do not spill water, etc. onto the control panel.
12. Do not use the unit outdoors.
13. Do not use the unit in places where aerosol spray products are in use or where oxygen is being administered.
14. When unplugging the unit, turn off all controls before removing the plug from power outlet. Do not use the unit
with a transformer as this may lead to malfunction or electric shock.
15. Connect this unit to a properly grounded outlet only. See Grounding Instructions.
16. To avoid electric shock or injury, do not attempt to open or disassemble any part of the unit as it contains no
user-serviceable parts.
17. Never drop or insert any object into any opening.
-To reduce the risk of burns, fire, electric shock, or injury to persons:
SAVE THESE INSTRUCTIONS
Page 3

I SAFETY PRECAUTIONS
WARNING: To avoid the risk of injury:
Before using the Core Trainer Exercise Equipment, please read the following instructions carefully. They contain
important safety information and instructions on the proper use and maintenance of the equipment.
1. Before beginning any exercise program, consult your physician for a complete physical examination and
suggested exercise program specific for your condition. Base your program of exercise on the advice given by
your doctor. Incorrect or excessive exercise may damage your health or aggravate any pre-existing medical
condition.
2. Warm up prior to beginning any exercise program by proper stretching to prepare muscles and joints for
exercise and help avoid possible injury.
3. Immediately discontinue use if you should feel faint, dizzy, nauseous or experience discomfort or other
abnormal symptoms.
4. Do not wear loose clothing which could become caught in moving parts.
5. Do not stand or kneel on seat. Always sit squarely centered. Sit straight up, hold seat firmly between your legs
and hold onto the handle. (See page 10.)
6. Do not use footrests to mount or dismount Core Trainer seat. Footrests are for balance and support when riding
and are not for mounting or dismounting. Use of footrests for mounting or dismounting may result in breaking
and possible injury.
7. Place the unit on a level area with sufficient room for exercise movements.
O)
c
lU
8. This Core Trainer Exercise Equipment is designed for adult use. The unit is not for use by children. Keep
children away from unit to prevent injury.
9. This equipment is to be used only for its intended purpose; physical exercise by adult persons. This equipment
is not to be used or operated in a manner that allows it to lift from the floor.
10. Check components periodically to insure the equipment is in good condition, particularly the handle, footrests,
fabric and the power cord. Disconnect unit and replace worn parts or send the unit in for service.
11. Do not touch the cover while operating the unit.
12. Do not jump on or off the unit while it is moving.
13. Do not handle the power plug with wet hands.
RISK OF ELECTRIC SHOCK
Do not use the unit in a location of high humidity. Do not operate the unit if the fabric has been torn as this may also
result in shock.
Page 4

I OPERATING PRECAUTIONS
m
3
WARNING: To avoid damaging the unit or risk of personal injury, follow these
(O
precautions:
W
3‘
1. Do not use or store the unit in a iocation that is exposed to direct sunlight or in a hot location, such as near a
heater, or on heating equipment, such as an electric carpet.
2. Do not damage, excessively bend, pull, or twist the power cord. Do not allow the cord to hang (drape) or route
where it can cause a tripping hazard.
3. Do not disassembie, repair, or modify the unit.
4. Do not spill water or liquids on the unit or control panel.
5. When using the unit for the first time, start with the “Easy” course to familiarize yourself with the movement.
6. If you are concerned about your level of physical fitness for any reason, start with “Slow” and then gradually
increase the speed.
7. Persons who usually do not exercise should not exercise vigorously in the beginning.
8. The unit is designed for home use.
Page 5
I GROUNDING INSTRUCTIONS
This product must be grounded. If it should malfunction or break down, grounding provides a path of least
resistance for electric current to reduce the risk of electric shock. This product is equipped with a cord having an
equipment-grounding conductor and a grounding plug. The plug must be plugged into an appropriate outlet that is
properly installed and grounded in accordance with all local codes and ordinances.
DANGER
Improper connection of the equipment-grounding conductor can result in a risk of electric shock. Check with a
qualified electrician or serviceman if you are in doubt as to whether the product is properly grounded. Do not modify
the plug provided with the product - if it will not fit the outlet, have a proper outlet installed by a qualified electrician.
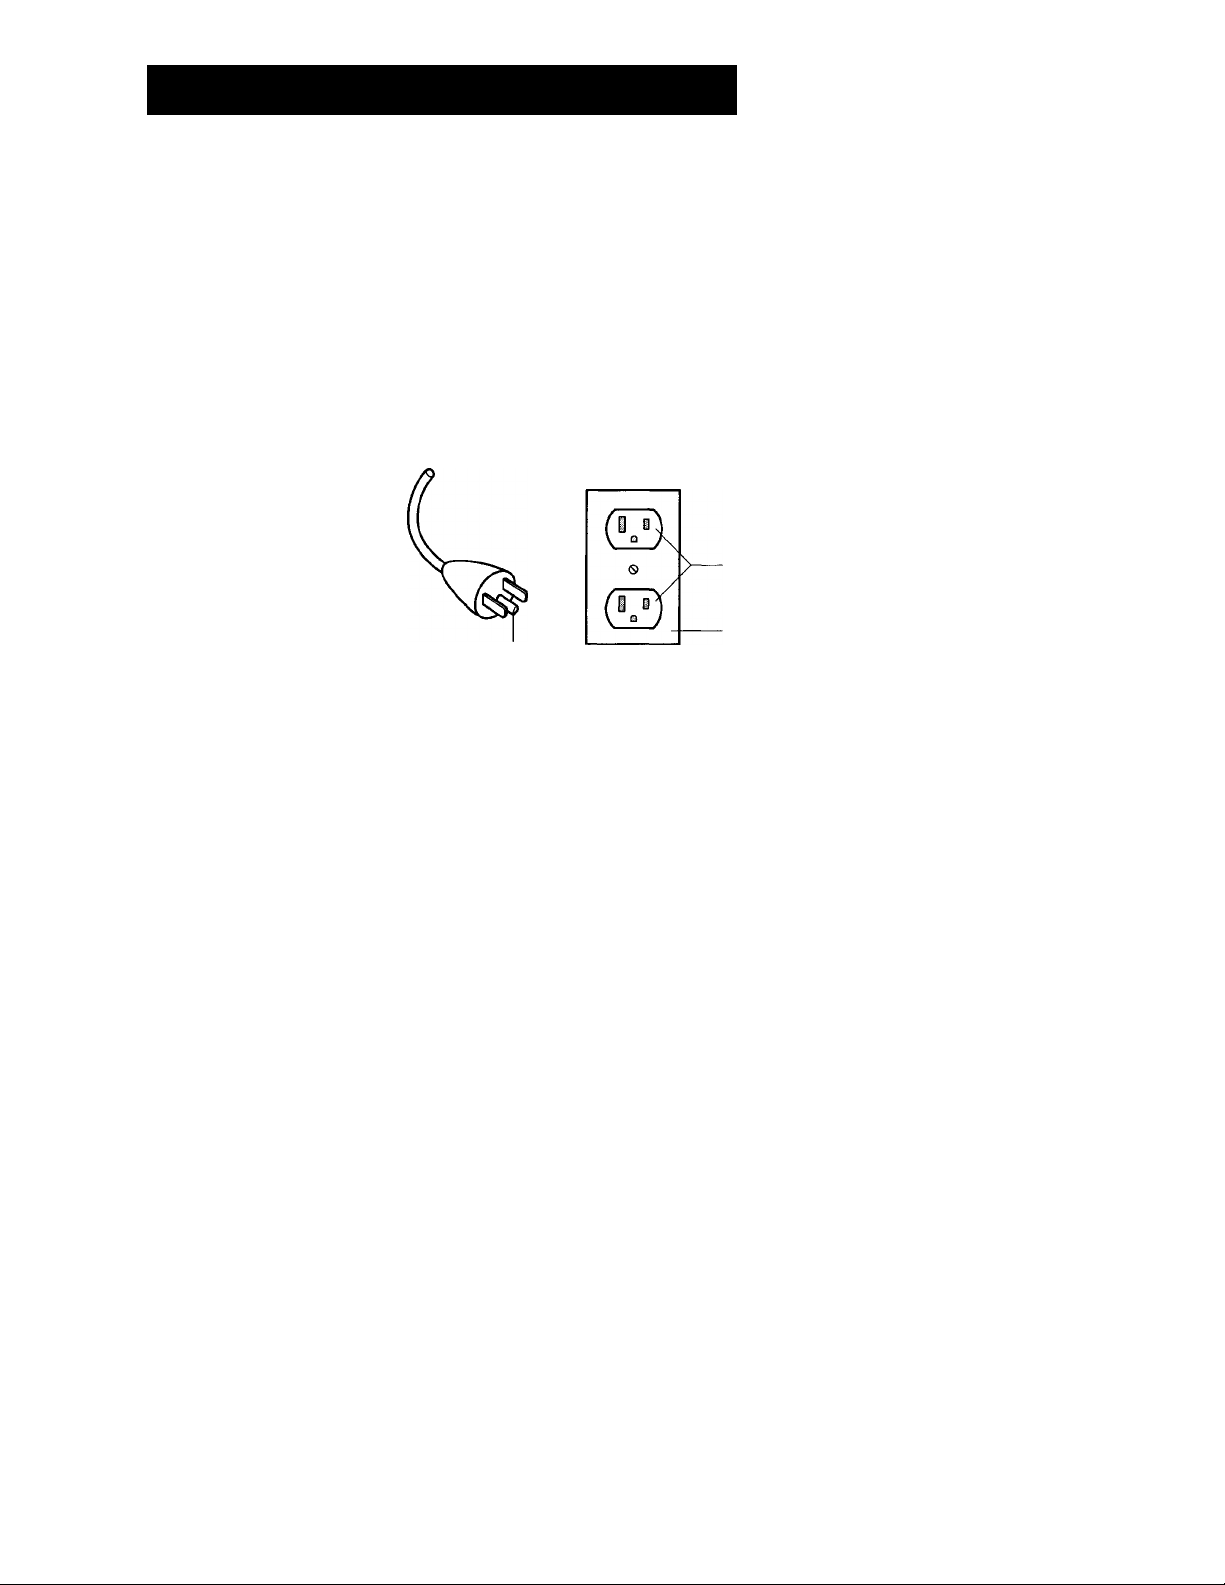
This product is for use on a nominal 120-volt circuit and has a grounding plug that looks like the plug illustrated in
Figure A. Make sure that the product is connected to an outlet having the same configuration as the plug. No
adapter should be used with this product.
Figure A
GROUNDED
OUTLET
GROUNDED
GROUNDING PIN
OUTLET BOX
O)
C
lU
Page 6
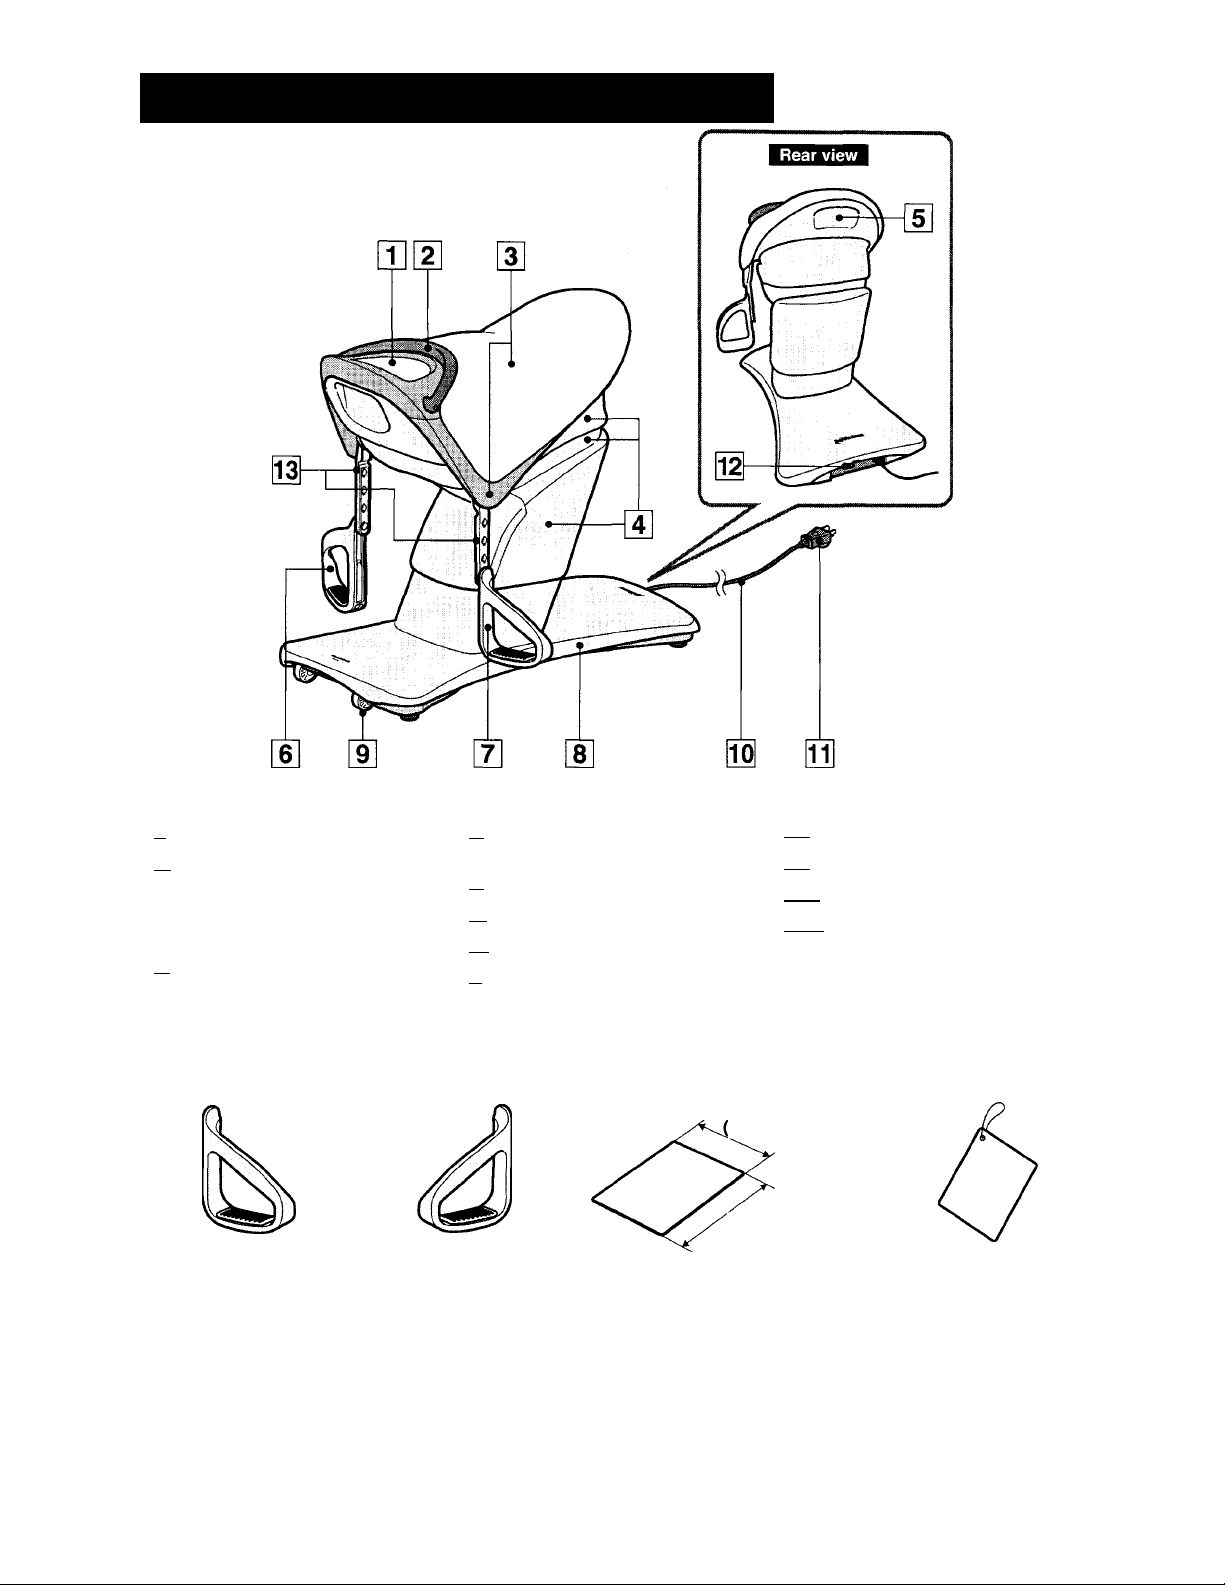
I PART NAMES AND FUNCTIONS
m
3
^ Main unit
(Q
m Control panel (See page 6.)
[2I Handle
• Hold during exercise (until you are
familiar with the movement).
[^Seat
[Tl Cover
• The motor is enclosed.
«Left footrest
[sl Cavity
• To hold during transportation.
fel Right footrest
[Y] Left footrest
[¥1 Stand
fil Wheels (See page 7.)
Accessories
> Right footrest •Mat
[To| Power cord
[TT| Power plug
[T2I Power switch (See page 9.)
[T3I Footrest bracket
'This cannot be removed from the
main unit.
> Quick start sheet
Approx. 19.7"
50 cm)
Approx. 36.6"
(93 cm)
Page 7
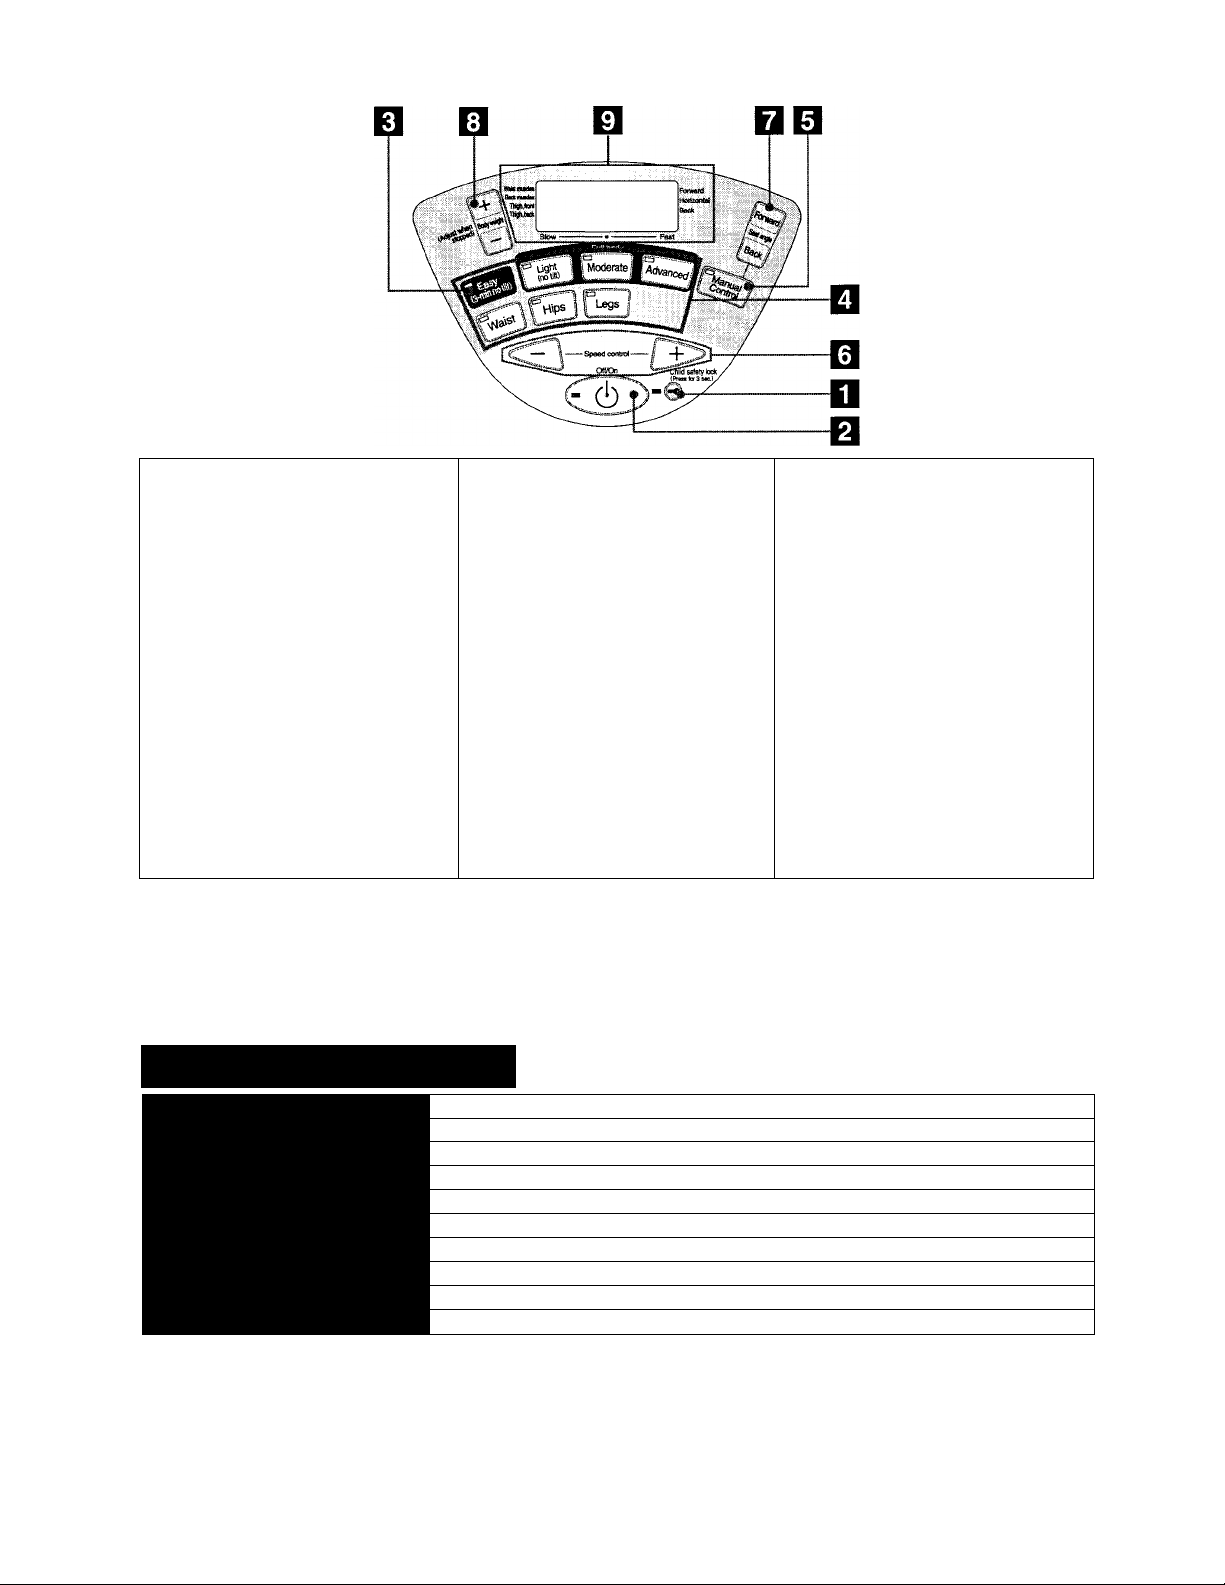
Control panel
—
n Child lock
• This locks the control panel to
prevent inadvertent changes or
malfunctions.
• Press this for about 3 seconds
continuously to lock or unlock.
(See pages 11 and 18.)
Qj OFF/ON button
K1 Easy button
• For use by the beginners and
those who might be less confident
of their physical fitness.
Q Pre-Set Programs buttons
• For programmed exercises (the
speed is adjustable).
*ln Easy mode, the speed Is not
adjustable.
d Manual Control button
• Exercise after adjusting the
desired speed and seat angle
(forward/backward).
d Speed Control buttons
•The exercise speed is adjustable
according to your level of physical
fitness. (Speed level indication:
See page 16.)
Q Seat Angle Adjustment button
• Adjust the seat angle (fon/vard/
backward). (This is enabled in
manual control mode.)
d Weight Setting button
• To set the weight. (See page 11.)
d LCD Display
The following are indicated;
• Speed level
• Seat angle level
• Remaining time
• Weight
• Consumed calories (estimate)
• Exercising part
UJ
Ui
c
*Lamp indications on the control panel
For this instruction, the lamp status on the control
[Lamp Off] [Lamp On]
panel is expressed as shown on the right.
■ SPECIFICATIONS
Model number:
Power supply: AC 120 V 60 Hz
Rated current:
Weight: Approx. 77 lbs (35 kg)
Applicable height;
Maximum user weight:
Dimensions (H x W x D); 29.1 in. X 18.1 in. X 35.0 in. (74 cm x 46 cm x 89 cm)
Pre-set programs;
Speed adjustment:
Accessories;
EU7805
2.7 A
4.6 ft.-6.1 ft. (140 cm-185 cm)
264 lbs (120 kg)
7 types (easy, light, moderate, advanced, waist, hips, legs)
Manual 9 steps
Footrest (x2). Mat, Quick start sheet
[Flashing]
Page 8

I SETTING UP
<1 ^ Lift up the back of unit and move by roiling it on its wheels.
Notes
• Do not move the unit with the handle.
Failure to heed this warning may result in an accident
or personal Injury.
• Do not step on the power plug while moving the unit.
• Slowly lift and move the unit while taking care not to
injure your lower back.
• Slowly move the unit after setting a mat on the floor to
avoid damage to the floor.
• When moving the unit, watch your feet while slowly
lowering the unit.
Cavity
Move the unit slowiy.
Mat Wheels
2 Lay out the supplied mat and
place the unit on it.
*Lay out the mat so that the rubber surface faces
down.
• When laying out the mat, a space of 31.5 in.
(80 cm) to the left and to the right and 23.6 in.
(60 cm) to the front and to the rear of the mat is
required (see illustration).
Notes
• When using the unit on carpet, marks may remain on
the carpet even if the unit was first placed on the mat.
• If there is concern about vibration or noise downstairs,
lay out a thick mat that is commercially available.
• Avoid using the unit on a cork floor; doing so may
damage the floor.
• Avoid using the unit when the mat under the unit is
bent or the unit protrudes off the mat.
• Be sure to place the unit on the mat before use.
- Using the unit without the mat may result in scratches
on the floor.
Plug the power plug into the power outlet.
• Do not allow the cord to hang (drape) or route cord where it can cause a tripping
hazard.
Page 9

4 Attach the supplied footrest to the footrest bracket.
Attach the footrest at a 90° horizontal angle and turn down.
(see the footrest positioning guide below)
There are two footrests, one for each foot.
Attach so that the “L!’ and “R” letters are facing in.
• Footrest positioning guide
(The footrest can be adjusted to 4 different
heights.)
'Attach the left footrest and the right footrest
at the same positions.
Body height
Approx. -5.1 ft. (-155 cm)
a)
c
lU
Approx. 5.1 ft.-5.4 ft. (155 cm-165 cm)
Approx. 5.4 ft.-6.1 ft. (165 cm-185 cm)
Page 10

I Preparation before exercise
2 Sit on the seat and confirm the iength of the footrests.
• Slightly bend your knees and adjust the footrests to a length at which your feet are firmly held.
• Place your feet in the footrests. If they feel too tight or too loose, get off the unit and again adjust the footrest height.
(See page 8.)
Notes
• Do not wear pants made of thin material, shorts, or similar
clothing that will allow your skin to come into direct contact
with the seat and footrest.
Failure to heed this warning may result in personal injury
from abrasions.
• Wear socks and shoes while exercising.
• Do not touch the control panel when getting on the unit.
• Do not use footrests to mount or dismount Core Trainer
seat. Place your foot in the footrest after getting on the unit.
• Seek assistance if you are concerned about losing your
balance and falling when getting on and off the unit or
exercising.
, Stretch your muscles.
• stretching is recommended before using the unit.
Page 11

Basic posture while exercising
(For effective exercise)
Sit up straight on the seat Move your head as
and draw in your chin. iittle as possibie.
Keep your back Sit in a reiaxed
straight position
Hold the handle
lightly
2
c
UJ
Keep your hips in the
center of the seat.
Step on the footrests with
the baiis of your feet.
Do not exercise in the following postures.
Your thighs are
loose.
Hold the seat firmly with
your thighs.
(Keep your hips on the
center of the seat.)
Sit on the center to maintain right and ieft balance.
XX
Step with the
arch of the foot.
Round shoulders Excessively
leaning to the rear
( Posture during forward tilt of the seat ) ( Posture during backward tilt of the seat )
*Suitable for exercising the waist, body, and legs. ‘Suitable for exercising the back and hips.
10
Page 12

I STARTING THE EXERCISE
m
‘Exercising daily is recommended.
3
(Û
■| -1 Press the OFF/ON button.
• After pressing OFF/ON button, the lamps turn on and then the
lamps for the Pre-set Programs and the Manual Control flash.
(Operate the buttons within 1 minute after pressing OFF/ON button,
otherwise the power turns off automatically.)
Note
• If the unit is used for medical purposes, such as rehabilitation, follow the
instructions of medical specialists or physical therapists.
Unlock the child lock if it is locked.
1-2
(Press this button for about 3 seconds or more continuously.)
(If the child lock is on, the child lock lamp flashes whenever the Seat
Angle Adjustment button and the OFF/ON button is pressed; the lamp
then turns off automatically. Once the child lock is turned off, the
lamps for the Pre-set Programs and the Manual Control flash.)
*The child lock is unlocked at the time of delivery.
Off/On safety lock
(Press for 3 sec.).
Flashes
2 Set your weight with I + | and
(After exercising, the amount of exercise, an estimate of the consumed calories, is calculated on the basis of the weight set
previously and displayed.)
• If you do not set the current weight, the weight value set during the previous exercise is retained.
[The default value at the time of delivery is 130 lbs (60 kg).]
• The weight can be set within the range of 65 lbs to
265 lbs (30 kg to 120 kg).
• Press the button once to shift the weight by 1 lbs
(0.45 kg). Press the button continuously to shift the
weight by 5 lbs (2.3 kg).
Waist musdes
i: Back itiuscles
TOgh,back
Forward
Horizontal
Back
11
Page 13

3 Exercise by pressing either the Pre-Set Programs buttons or Manual Control
button. (For details of the respective courses, see page 13.)
Starting the exercise
• Use the “Easy” course until you are familiar with the movement,
(In the Easy course, the speed level is set to “Slow” the seat position is set to horizontal, and the exercise time is set to about 3
minutes.)
• Hold the seat firmly with your thighs while exercising.
Before using the programs where the seat tilts forward or backward
• The operation stops automatically after 15 minutes; however, if the unit is used again continuously, the operation may stop
when the protective safety device activated. (The lamps on the control panel flash and operation stops. See page 20.)
In that case, turn the power switch off for about 30 minutes before turning the power switch back on so that the protective
device is restored and the unit can be used.
• Exceeding the recommended maximum weight of 264 lbs (120 kg) may stop the operation for safety.
(The lamps on the control panel flash and operation stops. See page 20.)
In that case, turn the power switch off for about 30 minutes before turning the power switch back on and try the unit again.
•Avoid sitting on the unit during operation while shifting your body weight to one side of the unit or rocking left and right.
- Doing so will slow down the operation of the unit and may cause a malfunction.
<2
O)
c
lU
4 The operation automatically shuts off
approximately 15 minutes after the OFF/ON
button was pressed at the start of the exercise.
(The Easy course finishes after about 3 minutes)
*To stop the operation midway, press the OFF/ON button.
'Depending on the stopping position, the seat may be tilted right or left or
the seat may move when applying force to the seat or the control panel.
This is considered normal.
The unit may tilt to the left or right in the
stop position.
'(If titled to the left)
I
The center of the seat
12
Page 14

The respective Pre-set Programs
m
3
(û
«’
sr
Light
(no tilt)
■a
Use the Easy course to become familiar with the
movement of the unit.
Use this course to become familiar with the
speed and the exercises for basic physical
fitness before using the course where the seat
tilts automatically for vigorous exercise.
This course is for vigorous exercise and is
suitable for burning fat.
Moderate
This course burns the most calories and is
Advanced
Inaisi
suitable for burning fat.
This course exercises the abdominal muscles
and is suitable for shaping up the waist.
This course exercises the back and hips and is
suitable for shaping up the hips.
Hips
This course exercises the thighs and is suitable
Legs
*You cannot change the course from the Easy course to another course while the Easy course is functioning.
To change the course, press OFF/ON button to stop operation. Press OFF/ON button again after turning off the lamp, and then
select the desired course.
for improving leg strength.
Operational features
Operational specifications
Speed: Slow
Seat Angle; horizontal
Time: Approx. 3 min.
Speed: From “Slow” to “Fast”
(The speed range is selectable in 5 steps.)
Seat Angle: horizontal
Time: Approx. 15 min.
Speed: From “Slow” to “Fast”
(The speed range is selectable in 5 steps.)
Seat Angle: tilted fonward, horizontal, tilted to the
rear
Time: Approx. 15 min.
Speed: From “Slow” to “Fast”
(The speed range is selectable in 5 steps.)
Seat Angle: tilted fon/vard, tilted to the rear
Time: Approx. 15 min.
Speed: From “Slow” to “Fast”
(The speed range is selectable in 5 steps.)
Seat Angle: mainly tilted forward, horizontal, tilted to
the rear
Time: Approx. 15 min.
Speed: From “Slow” to “Fast"
(The speed range is selectable in 5 steps.)
Seat Angle: mainly tilted to the rear, horizontal,
tilted forward
Time: Approx. 15 min.
Speed: From “Slow” to “Fast”
(The speed range is selectable in 5 steps.)
Seat Angle: tilted fon/vard, horizontal
Time: Approx. 15 min.
Manual operation
When the Manual Control button is pressed, the corresponding lamp illuminates and the
unit runs at a fixed speed.
The exercise can be adjusted to the desired speed level and seat tilt with the Speed Control and Seat Angle Adjustment
buttons. (See pages 16 and 17.)
• When 's pressed, the speed increases.
• When is pressed, the speed decreases.
Speed indicator: The selected speed level lights.
13
• When iFofwaidl
• When |tockj is held down, the seat tilts backward.
The lamp will flash when the maximum tilt.
is held down, the seat tilts forward.
Page 15

Changes in seat reclining in pre-set programs
iC3
Light
(no tilt)
1
Seat operates horizontally with no tilt in these program settings.
About 3 minutes only for
^ ^
I
The seat tiits forward, and returns to the horizontal position and then tiits backward
repeatedly to exercise the entire body.
Approx. 40 seconds
tilted forward
Approx. 20 seconds
horizontal
Horizontal only
P ]
I Moderate |
Approx. 40 seconds
tilted to the rear
Approx. 20 seconds
horizontal
Ui
c
UJ
f=i
j Advanced]
Ln=
...
The seat tiits forward and backward repeatedly to exercise the entire body.
Approx. 60 seconds
tilted forward
Approx. 60 seconds
tilted to the rear
14
Page 16

m
3
(Q
Horizontal and back are repeated with the seat mainly tilted forward to exercise mainly
the waist and abdominals.
Approx. 60 seconds
tilted forward
Horizontal and forward are repeated with the seat mainly tilted to the back to exercise mainly the hips.
Approx. 60 seconds
tilted to the rear
Approx. 15 seconds
horizontal
Approx. 15 seconds
horizontal
Approx. 30 seconds
tilted to the rear
Approx. 30 seconds
tilted forward
Approx. 15 seconds
horizontal
Approx. 15 seconds
horizontal
V________________________________________________________________________________________________________________________________________________________________________________________________________________/
ugs |c:rp:;p::-:r=x5
The seat tilts forward and returns to the horizontal position repeatedly to exercise the thighs.
Approx. 75 seconds
horizontal
15
Approx. 45 seconds
tilted forward
Page 17

Speed level adjustment
Press O'" ¿.jt^ adjust the speed.
^ to increase the speed, and pressPress to decrease the speed.
> In the Manual Operation, press or speed level by one step.
• In the Easy course, the speed level cannot be adjusted.
(The speed level Is fixed in the program.)
• In other Pre-set Programs, press or > to shift the speed level as follows.
The speed level can be selected among 5 steps; Slow, Slightly slow, Regular, Slightly fast. Fast.
For the ranges of the respective speed levels, refer to the following table.
n
£
.(0
lU
O)
c
gpééd livélé and Indicator
The speed level Indicator lamps showing the speed range illuminate and the lamp showing the current speed flashes.
Slow
\ I /
Slow
/ I N
Slightly slow
Regular
Slightly fast
I I
III
/ I \
\ I /
/ I \
\ I /
f I \
Fast
Each time I is pressed, the range changes to the
slower speed levels.
Note
• If you are concerned about your level of physical fitness for any reason, start with “Slow” and then gradually increase the
speed.
Failure to heed this warning may result in experiencing an excessive load, which may result in injury.
Each time is pressed, the range changes to the
faster speed levels.
Fast
Slow
Slightly slow
Regular
Slightly fast
\ I /
Fast
/ I \
16
Page 18

Seat angle adjustment
*The seat angle is adjustable only in Manual Operation.
m
3
to
In the Pre-set Programs, the seat angle cannot be adjusted while exercising. If the seat angle (forwardAiackward) is
adjusted while stopping the operation, and then the exercise course button is pressed, the seat returns to the
horizontal position once.
Press |ForviaK)| or Isackj tO adjUSt ths seat angle. *The lamp win flash when the maximum tiit.
When
FonramJi
is held down, the seat tilts forward. When {Back: is held down, the seat tilts backward.
Switching the exercise course selection
The exercise course can be changed while exercising by pressing the button for the desired exercise course.
»It is impossible to switch directly from the Easy course to another course.
To switch to another course from the Easy course, press OFF/ON button to stop the operation. After turning off the lamp, press
OFF/ON button again and then select the desired course.
• When the exercise course is changed, the seat returns to the horizontal position and the speed drops to the slowest level.
Pausing during exercise
Exercise can be paused by pressing either the Manual Control or Pre-Set Programs
buttons that are lit up.
This can be toggled back on by pressing again.
• When paused, the unit will turn off after one minute automatically.
Remaining time indicator
• The remaining time for the exercise is indicated on the control
panel.
Wa'sKnuscles
.. .Ssek. tpiisclss
TWgh,front
Thigh,back
Slow
Exercise level
• The exercise levels for the
respective body parts are
indicated while exercising.
The level meter with 5 steps
indicates the action of the
muscles for the respective body
parts.
Waist musclas
Backrraiscles
Thigh,front
Thigh,back
--------
«■ I.
Slow -
"gm I Imîn."
_ _ _
Ir
Fast
Forward
Hofi
Back
Exercise level chart (5 steps)^
Soft
Fast
Medium Hard
17
Page 19

Amount of exercise (estimate of consumed caiories)
•The amount of exercise (estimate of consumed calories) is
indicated after finishing.
(The indication automatically turns off after 10 seconds.)
• If the weight was not set previously, the amount is calculated
using the default value of 132 lbs (60 kg).
Slow
I AFTER EXERCISE IS COMPLETE
^ Lock the Chiid iock. (Press (^1^) about 3 seconds or more.)
• Lock the child lock while stopping operSion.
(When the child lock is locked, the lamp flashes and then is turned off automatically.)
Note
• After using the unit, lock the child lock and turn the power switch OFF.
Failure to heed this warning may result in accidents or personal injuries to children.
1
Fast
O)
c
lU
2 Turn OFF the power switch.
3 Remove the power plug from the
outlet.
Note
• Be sure to hold the power plug and not the power cord
when removing it from the outlet.
Failure to heed this warning may result in electric
shock, short circuits, or fire.
4 Stretch your muscles.
Note
• Be sure to stretch after using the unit to relax your
exercised muscles and eliminate fatigue.
18
Page 20

■ CLEANING AND MAINTENANCE
m
Notes
3
<Q
• Do not handle the power plug with wet hands.
W
Failure to heed this warning may result in electric shock or personal injury.
3*
•Always unplug the unit before cleaning.
Failure to heed this warning may result in electric shock.
Synthetic leather part
Wipe seat with a soft, dry cloth.
• Do not use any leather maintenance tools that are
commercially available (chemical cloth or chemicals).
This can cause discoloration or hardening of the synthetic
leather.
• If the synthetic leather is particularly dirty, wipe it in the
following manner.
1. Soak a soft cloth in water or a 3% to 5% solution of mild
detergent and wring it out thoroughly.
2. Dab the surface with the moistened cloth.
3. Rinse the cloth in water, wring it out thoroughly, and then
wipe any remaining detergent from the surface.
4. Wipe the surfaces with a soft, dry cloth.
5. Allow to dry naturally.
• If it is difficult to remove dirt, soak a commercially available
Melamine foam sponge in mild detergent and wipe the unit
with it.
• Do not use a hair dryer to dry the surface more quickly.
• Since colors may transfer from clothing to the synthetic
leather surface, be careful when using the unit with clothing
such as leans or colored clothes.
• Do not allow these areas to come in contact with plastic for
extended periods of time as this may lead to discoloration.
• Do not use a metal scrubber or a sponge with abrasives.
• Do not use thinners, benzine, or alcohol.
Plastic parts
1. Wipe the unit with a cloth moistened with mild detergent
and thoroughly wrung out.
• Do not use a metal scrubber or a sponge with abrasives.
• Do not use thinners, benzine, or alcohol.
2. Wipe the unit with a cloth moistened with plain water and
thoroughly wrung out.
• Be sure you thoroughly wring out the cloth first when
cleaning the control panel.
3. Allow the unit to dry naturally.
19
Page 21

■ TROUBLESHOOTING
Problem
^ Cause and Remedy
Does not start even after pressing the OFF/ON button.
The unit will not operate at all.
^ «The power plug is not securely inserted into the outlet.
In this case, securely Insert the power plug into the outlet.
•The power switch is off. In this case, turn the power switch on.
•The child lock is engaged. Unlock the child lock.
The unit stopped operation and all the lamps on the control panel flashed.
► An extremely heavy load was applied. Reset the flashing lights by pressing the OFF/ON button.
Operation of the unit moves fast then slow.
► Your body weight shifted to one side of the unit. Refer to the basic posture and sit properly.
The tilting of the seat (left and right) is not even.
^ Your body weight shifted to one side of the unit or you were not sitting in the center of the seat.
Refer to the basic posture and sit properly.
Refer to this item for the following difference in the tilt angles in the right and left direction that you feel during exercise.
__________________ _________________________________________________________ _________________
Seat reclines during stop.
► This occurs since the seat is designed to move in a figure eight pattern and is not an indication of a problem.
Noise Is heard during operation.
^ This occurs due to the design and is not an indication of a problem.
Refer to this item for the following “Noises generated while operating the unit”.
Unusual or periodic noise is heard during operation.
► Immediately stop using the unit.
The hips hurt.
^ Confirm the basic posture (see page 10) and use the unit in the horizontal position at a slow speed level according to your
level of physical fitness until you become familiar with the movement.
If you experience acute pain, stop using the unit.________________________________________________________________
Symptoms of motion sickness developed.
► Confirm the basic posture (see page 10) and use the unit at a slow speed and shorten the exercise time.
When the unit stops and the indication on the LCD display is “FI 7"
► The unit may stop due to equipment failure. Immediately stop using the unit.
When the unit stops and the Indication on the LCD display is “F10” to “FI 6".
^ The unit may have stopped due to improper operation (for instance, excessive loads on the unit, or the unit is used for
15 minutes or more continuously).________________________________________________________________________
When the unit stops and the indication on the LCD display is “F18”
^ The unit may be influenced by a power failure or vibration.
Turn off the power switch once. Turn ON the power switch again after about 30 minutes.
Notes
• If the problem is not solved by the above remedies, immediately stop using the unit.
• Do not disassemble, repair, or modify the unit.
Failure to heed this warning may result in personal injury due to combustion or malfunctions.
____________________________
______________
(See page 7.)
(See page 9.)
(See page 11.)
(See page 6.)
(See page 10.)
(See page 10.)
O)
c
lU
Noise generated while operating the unit
The following noise may be qenerated while operating the
unit. These noises are mechanical and are considered
normal.
• Operating noise generated at the forward and the backward
positions during eight-figure operation in four directions
(forward-backward and left-right) (knocking sounds).
• Operating noises generated when tilted operation of the
seat. (Locking sounds)
• Noises while sitting on the seat or operating the unit.
(Squeezing sounds)
Difference in the tilt angles in the right and left direction that you feel during exercise
You may feel the tilt in the right and left direction during the
exercise. There is no difference in the tilt angles to the right
and left, but you may experience a difference due to
difference in muscle strength between the right and left. You
may feel it when the unit moves faster than the optimum
speed level for your level of physical fitness.
Use that unit without experiencing discomfort by decreasing
the speed level.
20
Page 22

I FREQUENTLY ASKED QUESTIONS
m
<ú
3
Q1
A1
Q2 How many times can I use the unit each day?
AO Twice a day is the standard frequency of use. A single exercise should be within 15 minutes.
Are there any suggestions for using the unit for the first time?
Ride on the unit in the basic posture described on page 10. Start the exercise with the “Easy” course to accustom
your body to the movement. Once you grow accustomed to the movement, we recommend exercising with the
“Light” course.
We recommend exercising once in the morning and once in the evening.
* Over exercise may subject your body to excessive strain.
Q3
A3
fkA The pain is probably due to abrasions during exercise. Stop using the unit until the pain disappears. When using the
Q5
A5
Q6
A6
What kind of dress is recommended when exercising?
Dress in a sporty style where it is easy to move. However, wearing pants of thin fabrics or breeches may result in
abrasions to your skin from rubbing on the unit. Choose pants with thick fabric.
A I feel a pain in the buttocks or the area around the coccyx due to abrasions, is there any good method of
preventing the pain?
unit again after the pain disappears, hold the seat firmly with your thighs so that vour buttocks do not move during
the exercise. Wear pants with thick fabric, and exercise with reasonable intensity.
If there is abrasion still, try the following methods;
(1) Use the unit at iow speed until you grow accustomed to the movement and you don’t feel any pain in the
buttocks, and then graduaiiy increase the speed.
(2) Cover the seat with a cushion to reduce the stimulation of your buttocks. (Since using the cushion makes you
slightly unstable when using the unit, hold the reins lightly during the exercise.)
l am an elder and have no confidence in my level of physical fitness. How can I use the unit?
For elderly persons or persons not confident in their level of physical fitness, we recommend starting the exercise
with the “Easy” course to accustom your body to the movement. Once you grow accustomed to the movement in the
“Easy” course, gradually increase the speed in the “Light” course to improve your level of physical fitness.
Never over do the exercise—and always gradually increase the intensity of the exercise.
I have been using the unit for a period of time, but I did not lose any weight.
Use the unit in the proper basic position.
Do you eat meals regularly? Don’t eat or drink too much and don’t eat between meals. The diet effects depend on a
balance between calories intake and calories consumed.
Do exercise with the unit regularly and pay attention to your eating habits.
21
Q7
A7
Will the exercise with the unit result in building muscle?
The intensity of the exercise on the unit is not vigorous enough to make you muscular. A load of about 70% of the
maximal myodynamics must be applied to obtain the muscular hypertrophy effect (to grow muscular).
Page 23

Matsushita Electric Works, Ltd
Osaka, Japan
U92207805231
S0508-0
 Loading...