

Page 1
Operating Instructions
Instrucciones de Uso
Mode d’emploi
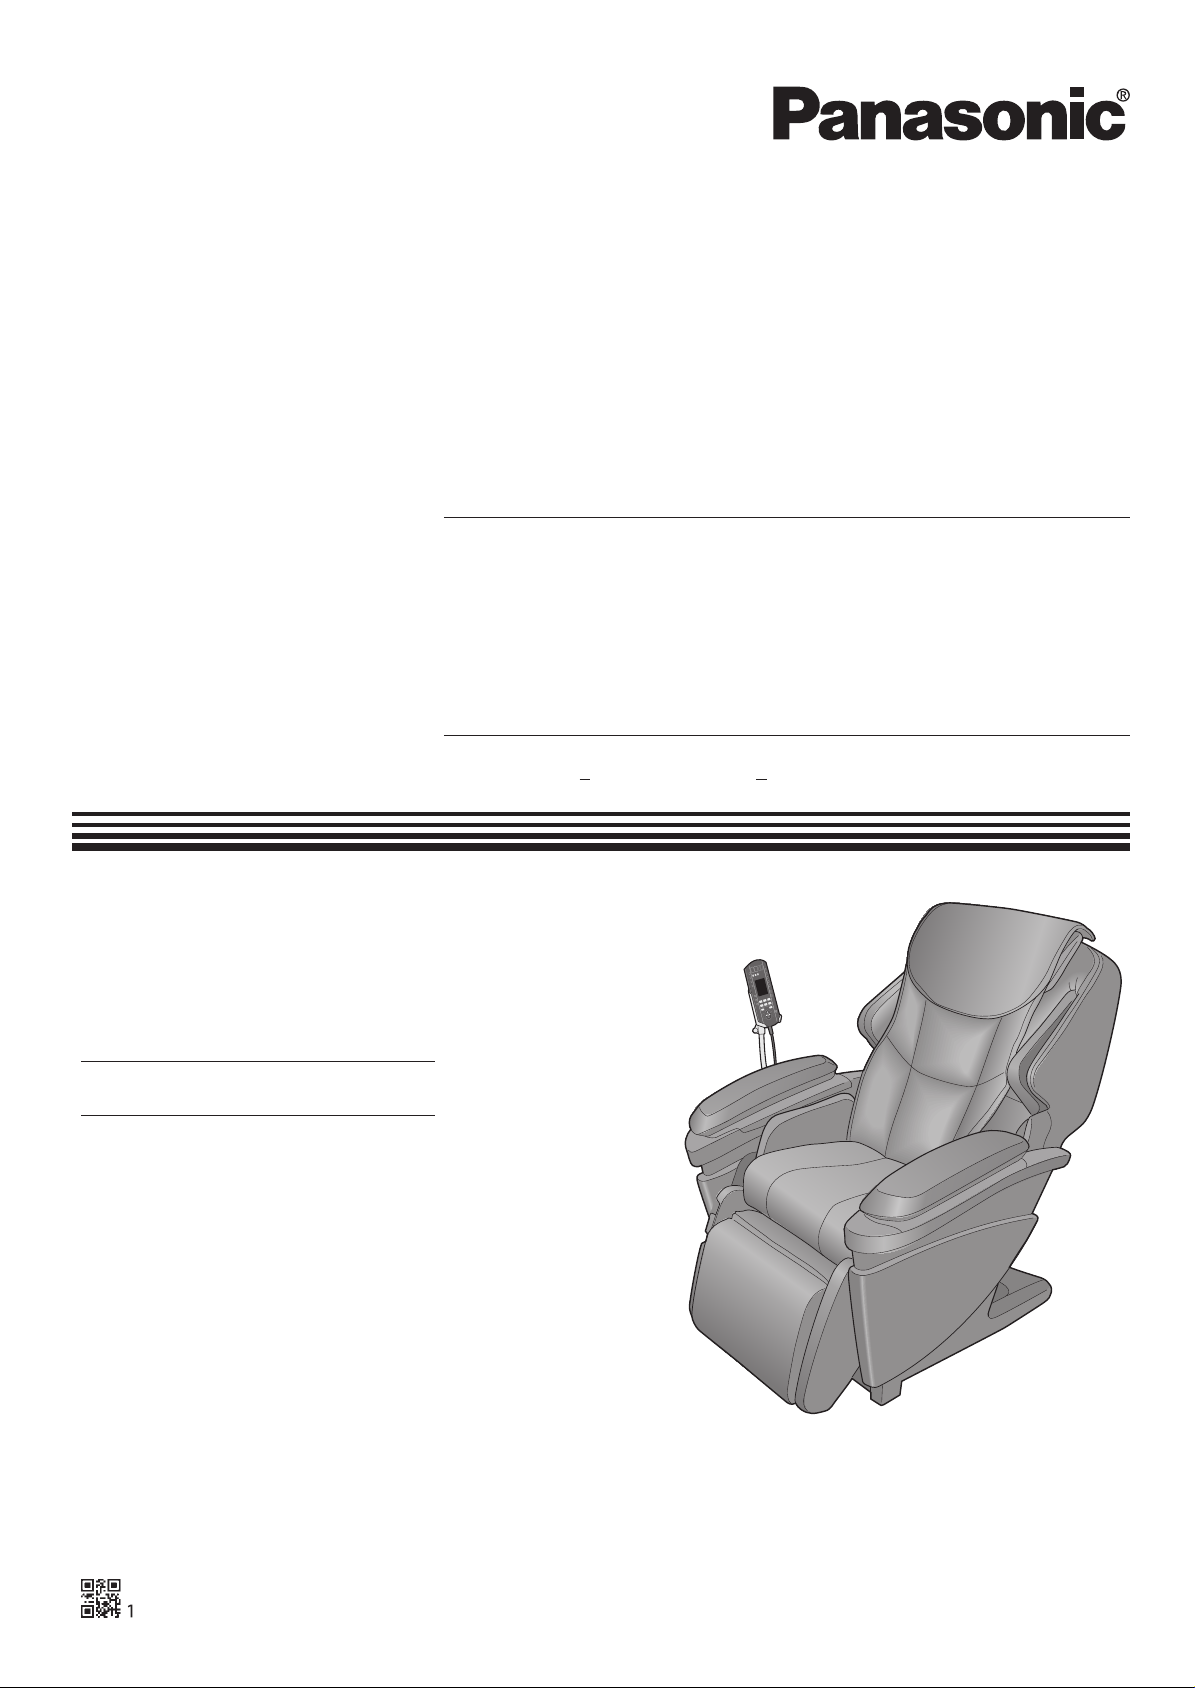
Household Massage Lounger
Sillón de Masaje Doméstico
Fauteuil vibromasseur
English EN3
Español SP3
Français FR3
Model No./Nº de Modelo/N
º
de modèle EP-MA73
Before operating this unit, please read these instructions completely.
Antes de utilizar esta unidad, lea compleatamente estas instrucciones y guárdelas para referencia futura.
Avant d’utiliser cet appareil, nous vous recommandons de lire l’ensemble de ces instructions et de les ranger dans un
endroit accessible pour une consultation ultérieure.
Page 2

Contents
Before Use
How to Use
Automatic
course
IMPORTANT SAFETY INSTRUCTIONS . . . . . . . . . . . . . EN4
●
●
SAFETY PRECAUTIONS . . . . . . . . . . . . . . . . . . . . . . . . . . . . . . EN5-6
●
OPERATING PRECAUTIONS . . . . . . . . . . . . . . . . . . . . . . . . . . . . . .EN6
●
GROUNDING INSTRUCTIONS . . . . . . . . . . . . . . . . . . . . . . . . . . . . .EN6
●
Specifi cations . . . . . . . . . . . . . . . . . . . . . . . . . . . . . . . . . . . . . . . . EN8-9
●
Part names and functions . . . . . . . . . . . . . . . . . . . . . . . . . . . EN10-13
●
Setting up the massage lounger . . . . . . . . . . . . . . . . . . . . . . EN14-15
●
Assembly . . . . . . . . . . . . . . . . . . . . . . . . . . . . . . . . . . . . . . . . EN16-19
●
Before sitting down . . . . . . . . . . . . . . . . . . . . . . . . . . . . . . . . EN20-23
●
Simple use . . . . . . . . . . . . . . . . . . . . . . . . . . . . . . . . . . . . . . . EN24-25
●
When you want a complete massage . . . . . . . . . . . . . . . . . . EN26-29
・Starting automatic course
・Adjusting the intensity of neck, shoulder, back and lower back massages
・Turning air massage or stretch On/Off
●
To register your preferences . . . . . . . . . . . . . . . . . . . . . . . . . EN30-31
・Registering favorite settings
・Starting with registered settings
●
About the Heat massage heads/Foot Heat . . . . . . . . . . EN32-33
●
When you want a concentrated massage of a particular body part with your favorite
Manual
operation
Air action
Stretch
action
action, such as Kneading on the neck or Tapping on the shoulder
・Starting manual operation
・Adjusting the intensity and position
●
To perform air massage for shoulder / hand/arm / lower back /
leg/foot, or stretch for neck / chest / hip / leg . . . . . . . . . . . EN38-42
・Starting air massage/stretch
・Adjusting the intensity
・Smart uses of the leg/foot air massage/stretch
●
When you want to adjust the reclining angle and/or leg rest
●
After completing the massage . . . . . . . . . . . . . . . . . . . . . . . EN44-45
Maintenance
●
Cleaning and maintenance . . . . . . . . . . . . . . . . . . . . . . . . . . EN46-47
●
Moving the unit . . . . . . . . . . . . . . . . . . . . . . . . . . . . . . . . . . . . EN48-49
Q&A/Important Notes
. . . EN34-37
. . . EN43
●
About the automatic course/action/voice guidance function
●
Q&A . . . . . . . . . . . . . . . . . . . . . . . . . . . . . . . . . . . . . . . . . . . . . EN52-56
●
Troubleshooting . . . . . . . . . . . . . . . . . . . . . . . . . . . . . . . . . . . EN57-59
・Sounds and sensations of the unit . . . . . . . . . . . . . . . . . . . . . . . . . . . .EN58
・Error display . . . . . . . . . . . . . . . . . . . . . . . . . . . . . . . . . . . . . . . . . . . . .EN59
. . . EN50-51
EN3
Page 3

IMPORTANT SAFETY INSTRU
Basic precautions should always be followed when using an electrical unit, including the following.
Please ensure that you read all instructions before using the Household Massage Lounger.
CTIONS
DANGER – To reduce the risk of electric shock:
1. Always unplug this unit from the electrical outlet immediately after using and before cleaning.
WARNING – To reduce the risk of burns, fire, electric shock, or injury to persons:
1. Fully insert the power plug to reduce the risk of short-circuit and fire.
2. The unit should never be left unattended when plugged in. Always unplug the unit when not in use.
3. The unit is not to be used by people who cannot move or communicate on their own.
4. Only use the unit for the purpose described in these instructions.
5. Do not stand on the unit.
6. Do not use any accessories other than those recommended by the manufacturer.
7. Always return the seat to the upright position and make sure the leg rest is completely retracted. Be careful that
nothing is obstructing the leg rest while retracting. Keep children away from the leg rest.
8. Never operate the unit if it has a damaged power cord or plug. Return the unit to the nearest authorized service
center if it is not working properly, if it has been dropped or damaged, or if it has been immersed in water.
9. Keep power cords away from heated surfaces. Do not carry the unit by the power cord.
10. Never block the air openings during operation and make sure that all air openings are kept free of lint and hair,
etc. Do not drop or insert anything into any of the openings of the unit.
11. Do not use the unit on top of heating appliances, such as electric carpets, etc. Do not operate the unit under
blanket or pillow. Excessive heating can occur and cause fire, electric shock, or injury to persons.
12. Do not use the unit in bathrooms or other damp or humid places as this may cause electric shock or cause the
unit to malfunction. Do not spill water, etc. onto the controller.
13. Do not use the unit outdoors.
14. Do not use or operate where aerosol spray products are being used or where oxygen is being administered.
15. When unplugging the unit, turn off all controls before removing the plug from power outlet. Do not use the unit
with a transformer as this may lead to malfunction or electric shock.
16. Connect this unit to a properly grounded outlet only. See Grounding instructions.
17. Use heated surfaces carefully. May cause serious burns. Do not use over insensitive skin areas or in the
presence of poor circulation. The unattended use of heat by children or incapacitated persons may be
dangerous.
18. Always raise the comfort cushion to check that the fabric covering the movement area of the massage heads in
the backrest has not been ripped before using the unit. Please also check other areas to ensure that the fabric
has not been ripped. No matter how small the rip, if you find one then immediately stop using the unit, unplug
the power cord and have the unit repaired at an authorized service center.
19. Do not push hands, elbows, arms, feet or legs into the fabric covering the movement area of the massage
heads in the backrest while using the unit.
20. Do not use the unit in close proximity to loose clothing or jewelry.
21. Keep long hair away from the unit while in use.
22. Always use sockets and wiring devices at the correct rated value. Use at the specified power supply 120 V, AC.
Failure to do so may result in electric shock or fire due to overheating.
23. When Heat massage heads are used, do not let the massage heads touch the same place for a long time. Do
not use the Foot Heat massage for a long time. Low-temperature burn may occur
24. Do not damage the Heat (heater) section. (See page EN11.) Do not stick pins or needles into the unit. Do not
damage with a sharp object. Doing so may damage the internal heater, causing fire or electric shock.
25. Sit on the unit after confirming there is no foreign matter between the parts of the unit. (Confirm that there are
no foreign objects stuck in the comfort cushion, leg rest or hand & arm massage section.) Sit down and ensure
that the leg rest is properly locked in place. Failure to observe this precaution may result in accident or injury.
26. Periodically remove dust, etc. from the power plug. Failure to do so may result in insulation failure due to
humidity, etc., which may cause fire. (Remove dust using a dry cloth.)
27. Do not insert or unplug the power plug with wet hands. Doing so may cause electric shock.
28. Do not massage any one point for more than 5 minutes at a time. Excessive massaging can overstimulate the
muscles and nerves and result in an adverse effect.
29. After each massage, slide the power switch, which is located on the right side of the chair, to the off position
and turn its lock switch to the lock position and remove the key and power plug.
30. Do not attempt to open or disassemble any part of the unit. Only use an authorized Panasonic servicer to fix
your unit.
31. If the massager functions abnormally, immediately turn off the power and have the massager checked by an
authorized service center.
EN4
SAVE THESE INSTRUCTIONS
Page 4

SAFETY PRECAUTIONS
CAUTION: To avoid the risk of injury:
1. Persons with any of the conditions listed below or who are undergoing medical treatment or suffer from medical
conditions should consult with their physicians before using the unit:
a) Pregnant women, people who are ill, in poor physical shape.
b) People suffering from back, neck, shoulder, or hip pain.
c) People who have a pacemaker, defibrillator, or other personal medical devices prone to electronic
interference.
d) People suffering from heart disease.
e) People who are prohibited from receiving massage by a physician due to thrombosis or aneurism, acute
varicose veins, or other circulatory disorders.
f) People with irregular curvatures of the spine.
g) People who have a loss of heat sensation.
2. This unit should not be used by children. Remove the key
3. Do not insert your hands, fingers, feet or head into the spaces following spaces:
(1) Between the backrest and seat or armrest
(2) Between the leg rest and seat or armrest
(3) Between the seat and armrest
(4) Between the back cover and leg cover
(5) Back of the leg rest
4. Do not use the unit against bare skin. While thin clothing may increase ef
to the massager may irritate the skin.
Do not use the unit while wearing anything hard on your head like a hair accessory, etc. Do not use the unit for
massaging the head, abdomen, front neck, elbows or knees.
Do not use excessively strong massage action on the back of the neck.
5. When using the body scanning function, always ensure that the shoulder position is correct.
position is not correct, use the POSITION button to adjust it properly. Or stop the massage function and re-try
the body scanning function. You can adjust the shoulder position in this way in the automatic course and manual
operation. Failure to align the shoulder position correctly can lead to injury.
6. Do not stretch the back muscles for more than approximately 16 minu
muscles which may result in discomfort, do not use the unit for more than 5 minutes when first using it. You can
gradually increase the duration and strength of the massage as you become used to it.
To prevent excessive massaging, do not use the massager for more than a total of 16 minutes each session.
After approximately 16 minutes, the massage heads will be retracted and stop moving.
The comfort cushion can be removed if you want to experience a stronger back massage. Exercise extreme
care when you use this mode in order to avoid back pain or injury. Use only for short periods of time (no more
than 16 minutes). Reinstall the comfort cushion if you want to restore to normal massage intensity.
7. While using the massager, if you start feeling sick
While using the massager, if the pressure seems too strong, the movement of the massage heads can be
stopped at any time by pressing the Quick stop button.
8. Do not go to sleep while using the unit. Do not use the unit after drinking alcohol.
9. When the seat back is in a reclined position, do not sit on it or sit with your legs
Do not sit on the leg rest as the unit may fall over.
10. Do not allow children or pets to play on or around the unit, especially during operation.
11. Do not unplug the unit or turn it off during operation. Unplug the unit immediately if there is a power outage.
12. Be sure to start on the gentle massage program if using the massager for the first time. The shiatsu massage
s
tronger and should be enjoyed after one has gotten accustomed to the chair.
13. Do not allow children to play on this mechanized furniture or operate the mechanism. Leg rest folds down on
closing so that a child could possibly be injured. Always leave in an upright and closed position. Keep hands
and feet clear of mechanism. Only the occupant should operate it.
14. Remove hard objects, such as
Empty pockets of hard objects when massaging the area of the seat or thighs.
15. People with any of the conditions listed below should not use the Hip stretch:
1) People suffering from acute lumbago, spinal disc herniation, or misalignment of the vertebrae
2) People with hip joint problems such as hip osteoarthritis
3) People with osteoporosis
4
) People who felt numbness or listlessness in the legs
It may worsen the symptoms.
16. Always return the leg rest to its original position before moving the unit.
Failure to observe this precaution may result in injury due to the leg rest returning to its original position when
the unit is being moved.
17. Store the attachment screws out of reach of children.
Accidental ingestion may oc
8. Do not stand, jump on, or place objects on the seat until the air is completely extracted for the air massage.
1
19. Do not hold the sole massage section when moving the unit.
Doing so may result in the section sliding as you move the unit, causing injuries.
20. Do not drag or push the unit in an installed state.
Protect your floor (place a mat or similar) when moving the unit on its castor
false fingernails, wristwatches or rings, when massaging hands or arms.
cur.
or if the massage seems painful, stop using it immediately.
when not in use and store out of reach of children.
ctiveness, exposing the skin directly
fe
If the shoulder
tes at a time. To avoid overstretching the
resting on the headrest.
s to avo
id damage to your floor.
is
Before Use
EN5
Page 5
SAFETY PRECAUTIONS
21. If you have not used the unit for a while, carefully read this operating instructions again and check that the unit
is operating normally before use.
Failure to do so may result in accident or injury.
22. Do not use at the same time as another medical device. Doing so may cause an accident or deteriorated health.
23. Do not allow children to use the controller holder fixing screw.
Failure to do
so may result in an accident or the child accidentally swallowing the key or screw.
OPERATING PRECAUTIONS
CAUTION: To avoid damaging the chair, follow these precautions:
1. The chair is designed for a maximum user weight of 120 kg (264 lbs). Exceeding the maximum weight may
cause permanent damage to the massage mechanism and/or other components of the unit. Any such damage
is deemed to be user abuse and is not covered under the Limited Warranty.
2. Do not sit on or drop the controller. Do not pull the controller cord or the powe
cord of the controller between the armrest and the chair back.
3. Do not treat the chair roughly, such as turning the chair on its side, turning the chair over or standing on it.
4. Do not treat the covering roughly.
Keep sharp or pointed objects away from the covering of the chair. Be careful not to drop lit ashes, lit cigarettes •
or matc
E
5. Do not repeatedly operate any switch at short intervals. Such action may cause the switch to malfunction.
6. Some noise may be heard coming from the massager while in use. This is due to the structure of the massager
and is normal.
7. Make sure there are no obstacles behind the chair before reclini
angle of 170˚. If the back hits a wall or pillar, the chair may malfunction. Be sure to have ample space behind
the chair. Recline the chair slowly in order to avoid contact with an obstacle.
8. When excessive pressure is applied to the massage heads, they may stop moving for safety. When moving the
heads up from the lowered position, ones body weight may
raise your body and allow the massage heads to move up.
9. Do not sit on the chair with wet body or hair.
10. The unit must not be used in wet rooms (sauna, swimming pool) or outdoors.
11. Always hold the power plug, not the power cord, when unplugging it from a socket.
Failure to observe this precaution may result in electric shock or short-c
hes on the chair.
xposure to direct sunlight can cause fading or a change in color of the covering.•
ng it. T
stop the heads movement. In such a case, slightly
r cord. Be careful not to catch the
he chair can be reclined to a maximum
ircuit.
EN6
GROUNDING INSTRUCTIONS
This product must be grounded. If it should malfunction or break down, grounding provides a path of least resistance for electric
current to reduce the risk of electric shock. This product is equipped with a cord having an equipment-grounding conductor and
a grounding plug. The plug must be plugged into an appropriate outlet that is properly installed and grounded in accordance with
a
ll local codes and ordinances.
DANGER
Improper connection of the equipment-grounding conductor can result in a risk of electric shock. Check with a qualified
electrician or serviceman if you are in doubt as to whether the product is properly grounded. Do not modify the plug provided
with the product – if it will not fit the outlet, have a proper outlet installed by a qualified electrician.
This product is for use on a nominal 120-vo
Make sure that the product is connected to an outlet having the same configuration as the plug.
No adapter should be used with this product.
GROUNDING PIN
lt circuit and has a gr
ounding plug that looks like the plug illustrated in Figure A.
Figure A
GROUNDED
OUTLET
GROUNDED
OUTLET BOX
Page 6
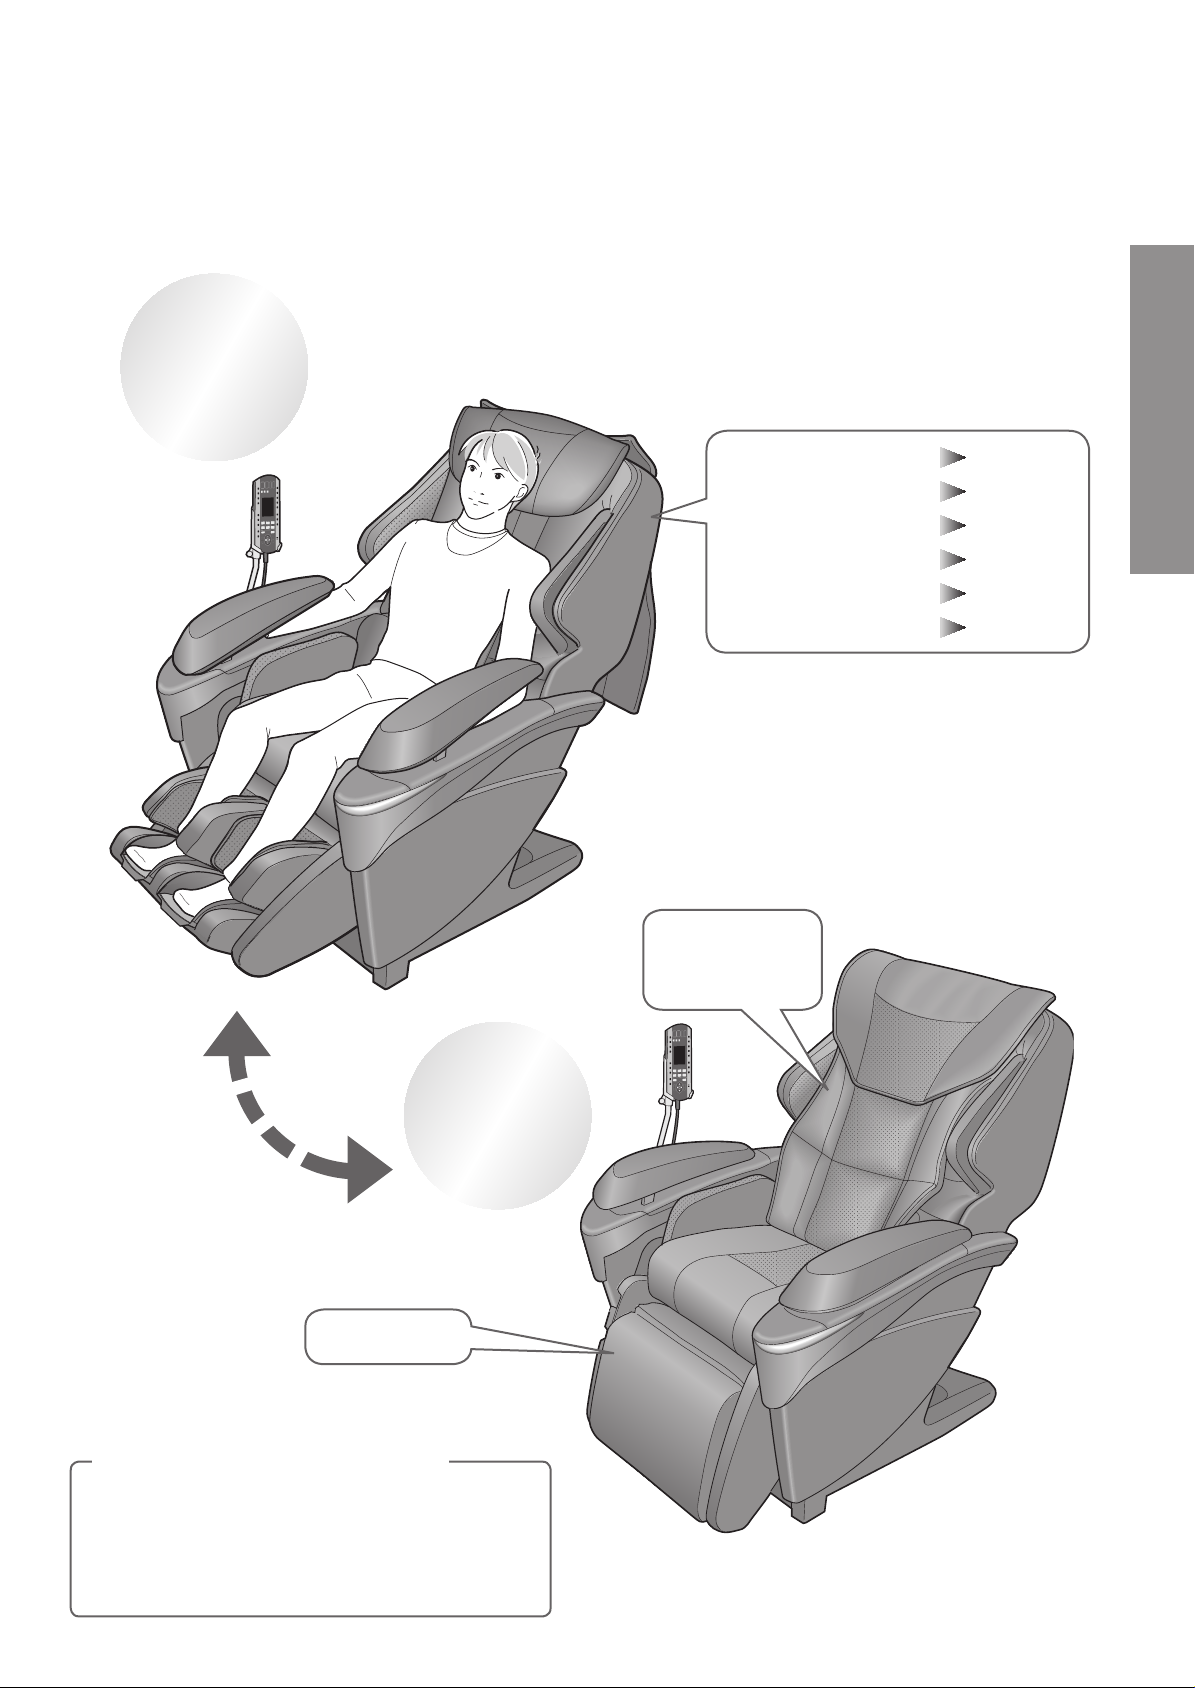
Use your chair in a wide variety of
situations, with or without the massage
function
To use the
massage
function
Main functions
・Automatic course Page EN26
・
Heat massage heads
・Foot Heat
・Manual operation
・Air action
・Stretch action
● Raise the comfort cushion for use.
Page EN32
Page EN32
Page EN34
Page EN38
Page EN38
Before Use
When not
using the
massage
function
● You can use this unit as a normal
reclining chair.
Smart storage
Intended use, effects and benefits of the
massage chair
Massage, massage substitute
Helps recovery
from fatigue
Promotes blood
circulation
Relieves muscle
tiredness
Relaxes stiff muscles
Relieves nerve and
muscle pain
Comfort
cushion for
extra comfort!
● See page EN52 for details on
how to massage legs or upper
body only.
EN7
Page 7

Specifications
Power supply AC 120 V 60 Hz
Rated Current 3.2 A
Massage area
(Up-Down)
Upper body massage
Massage area
(Left-Right)
Massage area
(Forward-Back)
Massage
speed
Air massage
Air pressure
(Calf)
Reclining angle
Automatic
shut-off
Dimensions
When not reclined
(H × W × D)
Approx. 78 cm (30.7 in.) (The massage heads move a total of approx. 62 cm (24.4 in.))
Distance between massage heads during operation (including width of massage heads)
Neck, shoulder, back, lower back: Approx. 5 cm - 21 cm (2.0 in.- 8.3 in.)
Distance between massage heads (including width o
up-and-down movement: Approx. 5 cm - 17 cm (2.0 in.- 6.7 in.)
Projected amount of massage head (Intensity adjustable)
Approx. 10 cm (3.9 in.)
Knead: From approx. 4 times/min – approx. 73 times/min
Tap: From approx. 190 times/min – approx. 520 times/min (one side)
Moving speed: From approx. 1 cm/s – approx. 5 cm/s
3: Approx. 32 kPa
2: Approx. 29 kPa
1: Approx. 17 kPa
(It may vary with the area slightly.)
Backrest … Approx. 120° – 170°
Leg rest (Leg & sole massage section) … Approx. 5° – 85°
Leg rest (Flat section) … Approx. 15° – 95°
Around 16 minutes (automatically ends)
Approx. 115 cm × 90 cm × 122 cm (45.3 in. × 35.4 in. × 48 in.)
f massage heads) during back roll and
When reclined
(H × W × D)
Weight of unit Approx. 85 kg (187.2 lbs)
Dimensions of box
(H × W × D)
Weight in box Approx. 100 kg (220.3 lbs)
Maximum user weight
For those who weigh 100 kg (220.3 lbs) or more, the product operations may make more noise and the fabric cover
may wear faster.
66 cm × 90 cm × 202 cm (26 in. × 35.4 in. × 79.5 in.)
Approx. 75 cm × 74 cm × 160 cm (29.5 in. × 29.1 in. × 63 in.)
Approx. 120 kg (264.3 lbs)
EN8
Page 8
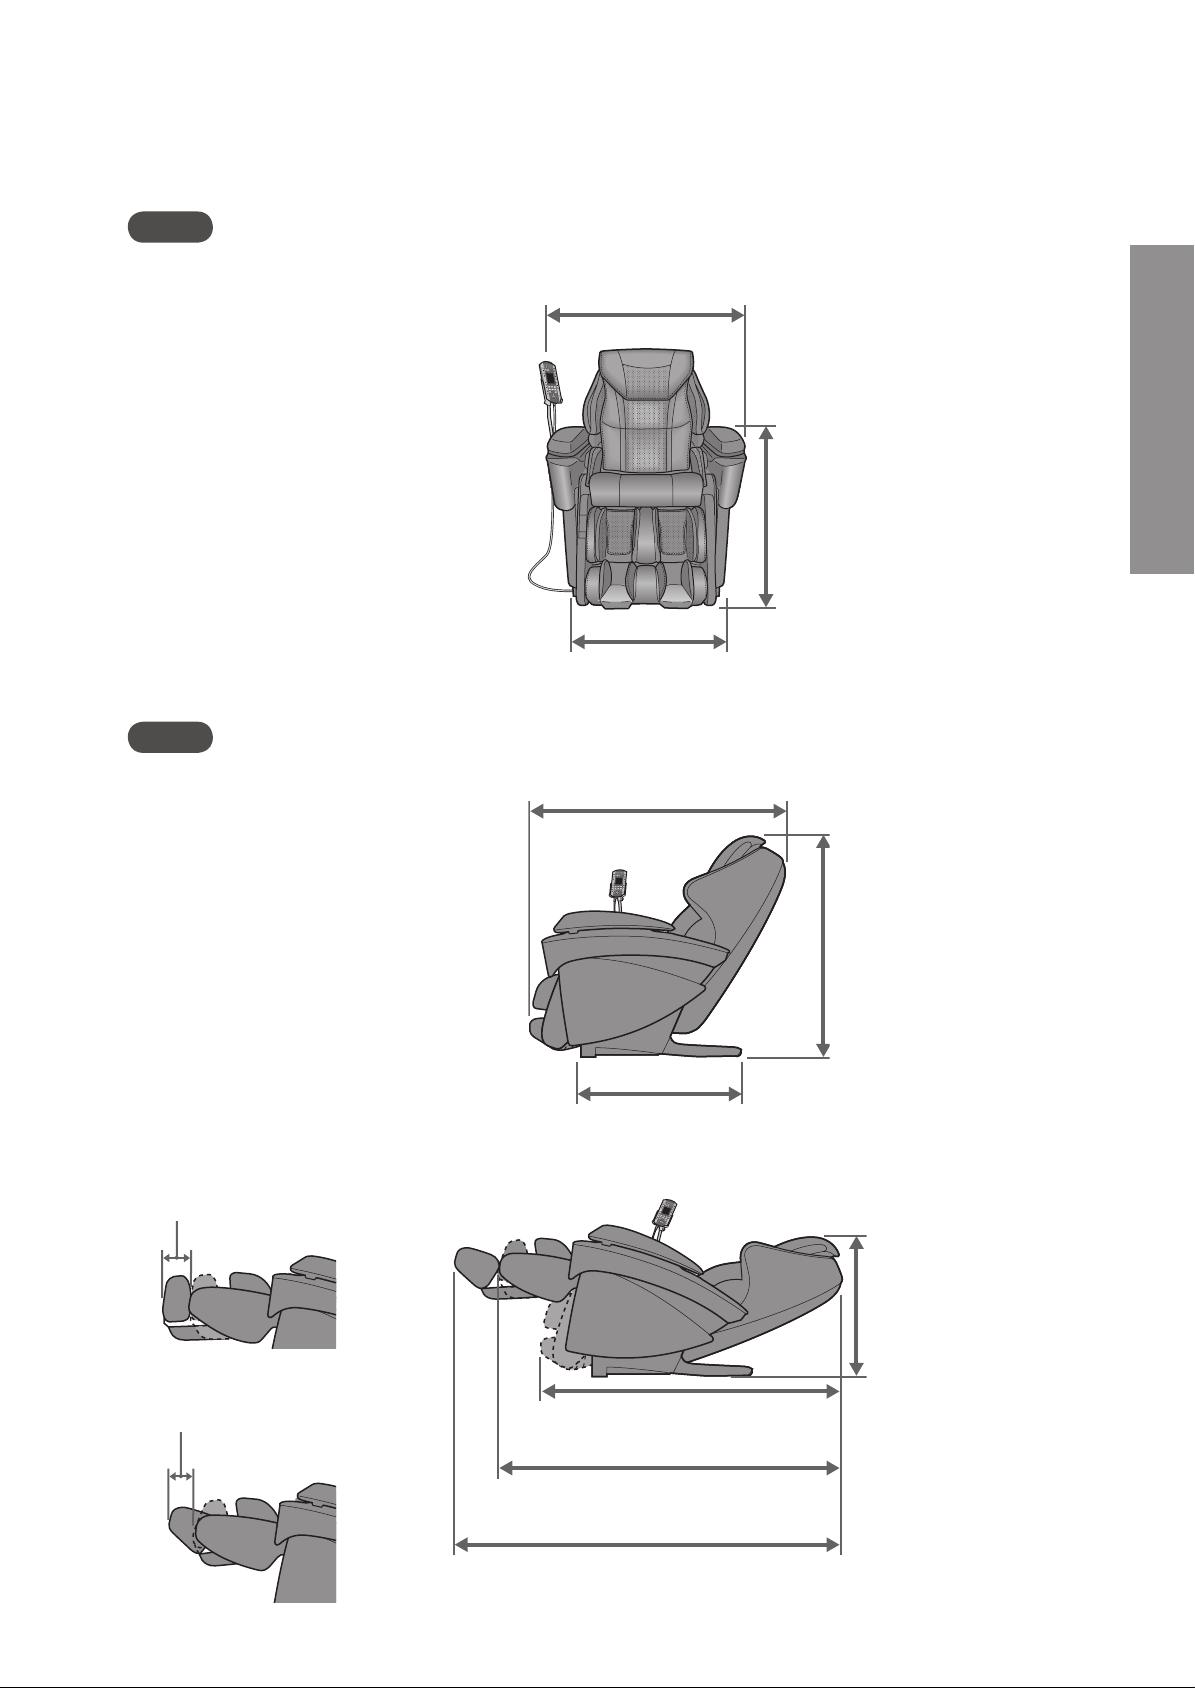
Unit dimensions
Front
Side
Maximum Width
Approx. 90 cm (35.4 in.)
Width of floor section
Approx. 64 cm (25.2 in.)
Length
Approx. 122 cm (48 in.)
With controller stand removed
Approx. 85 cm (33.5 in.)
With controller stand and armrest
(
Approx. 68 cm (26.8 in.)
Armrest height
Approx. 73 cm (28.7 in.)
removed
)
Before Use
Amount of slide of sole
massage section
Approx. 18 cm (7.1 in.)
unt of recline of leg
Amo
section
Approx. 11 cm (4.3 in.)
Backrest height
Approx. 115 cm (45.3 in.)
Length of floor section
Approx. 79 cm (31.1 in.)
Height
(With pillow attached)
Approx. 66 cm (26 in.)
Length (with leg rest folded down)
Approx. 153 cm (60.2 in.)
Length (with leg rest extended)
Approx. 173 cm (68.1 in.)
Maximum length
Approx. 202 cm (79.5 in.)
EN9
Page 9
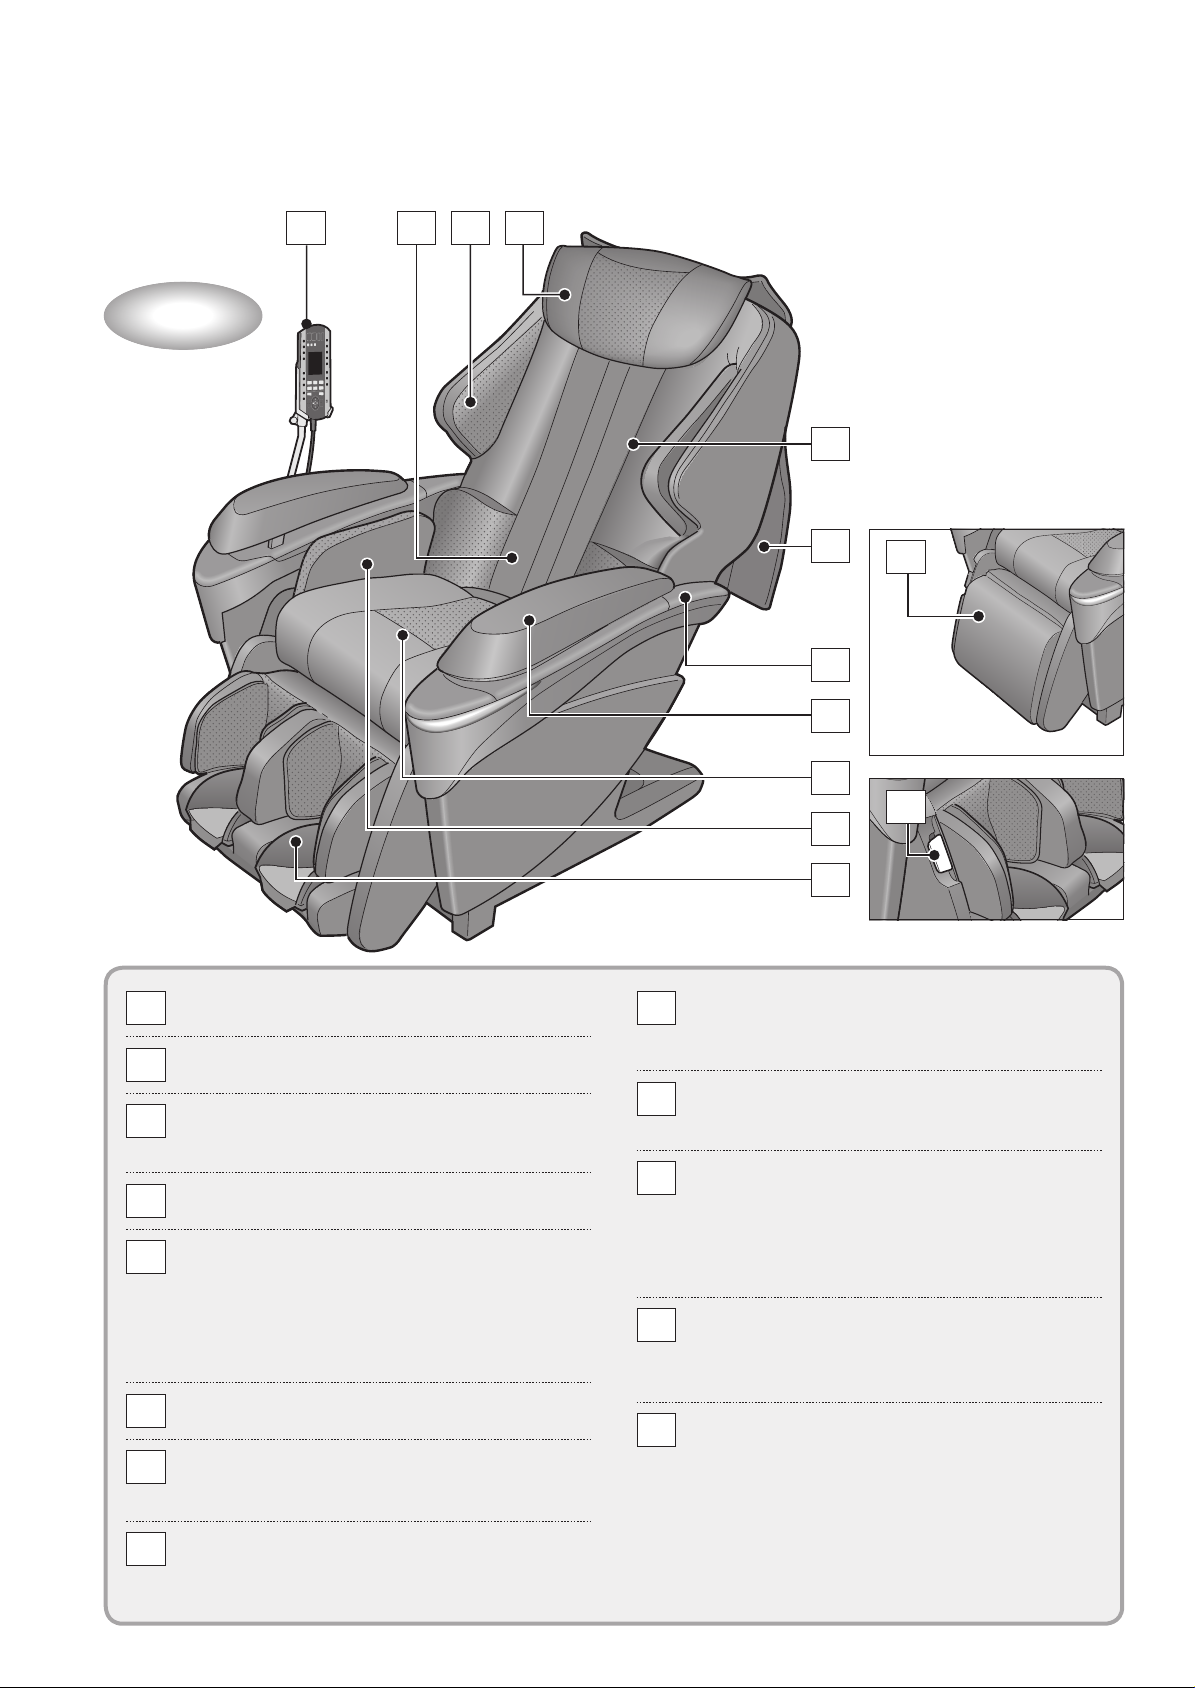
Part names and functions
Main unit
Front
4321
5
6
12
7
8
9
13
10
Controller
1
Retracted position of massage heads
2
Shoulder side massage section
3
Includes integrated air massage function.
●
Pillow
4
Backrest
5
● Massage heads:
→Includes the massage mechanism.
→Includes “Heat” massage heads.
● Air bag for lower back massage is built in.
Comfort cushion
6
Armrest
7
● Moves with the backrest.
See pages EN12-13
11
Seat
9
● Air bag for seat/thigh massage is built in.
Seat & thigh side massage section
10
● Includes integrated air massage function.
Leg rest-Leg & sole massage section
11
● Includes air massage function.
● Position can be adjusted by sliding sole
massage section.
● Includes built-in “Heat” (hea
Leg rest-Flat section
12
●
Use the unit as a comfort chair by rotating
and storing when not using for massaging.
Leg rest rotation lock release lever
13
● Rotate the leg rest manually while pulling the
lever.
(Flat section ⇔ Leg & sole massage section)
ter) section.
EN10
Hand & arm massage section
8
● Includes integrated air massage function.
Page 10
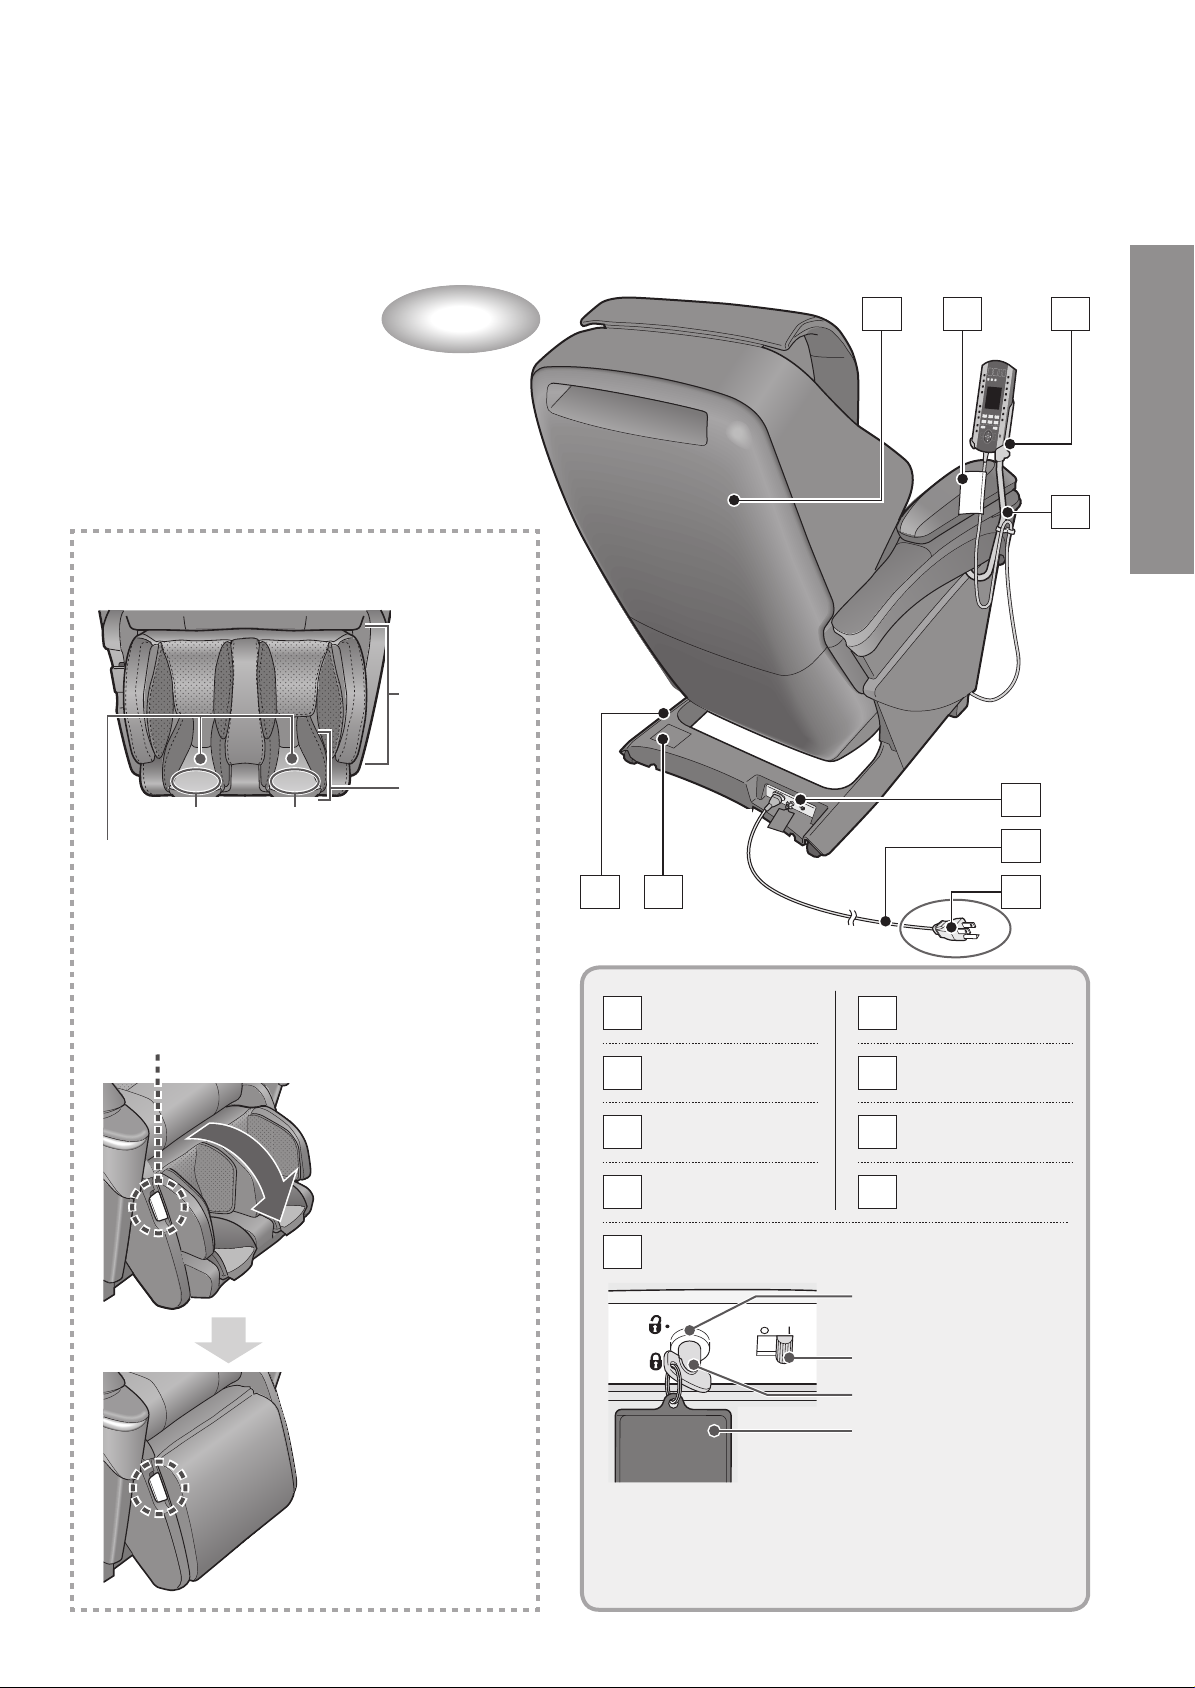
lock switch
onoff
lock
open
power
Back
Leg rest-Leg & sole massage section
Leg massage
section
14 15 16
Before Use
17
Sole massage
“Heat” (heater) section
● Sole covers
(can be removed for washing▶See page
EN47.)
section
Can be stored when not using for
massage
Leg rest is rotated manually while pulling on the
leg rest rotation lock release lever.
Leg & sole massage section
2122
Back cover
14
Caution sticker
15
Controller
16
holder
Controller
17
stand
Power switch section
18
Power cord
19
Power plug
20
Rating sticker
21
Leg cover
22
Lock switch
Power switch
18
19
20
Lock switch key
Flat section
● Lock switch is set to “open” and power switch
is set to “on” prior to leaving the factory.
Lock switch key tag
● For preventing
children from
swallowing it by
accident.
▶Continued on the next page
EN11
Page 11
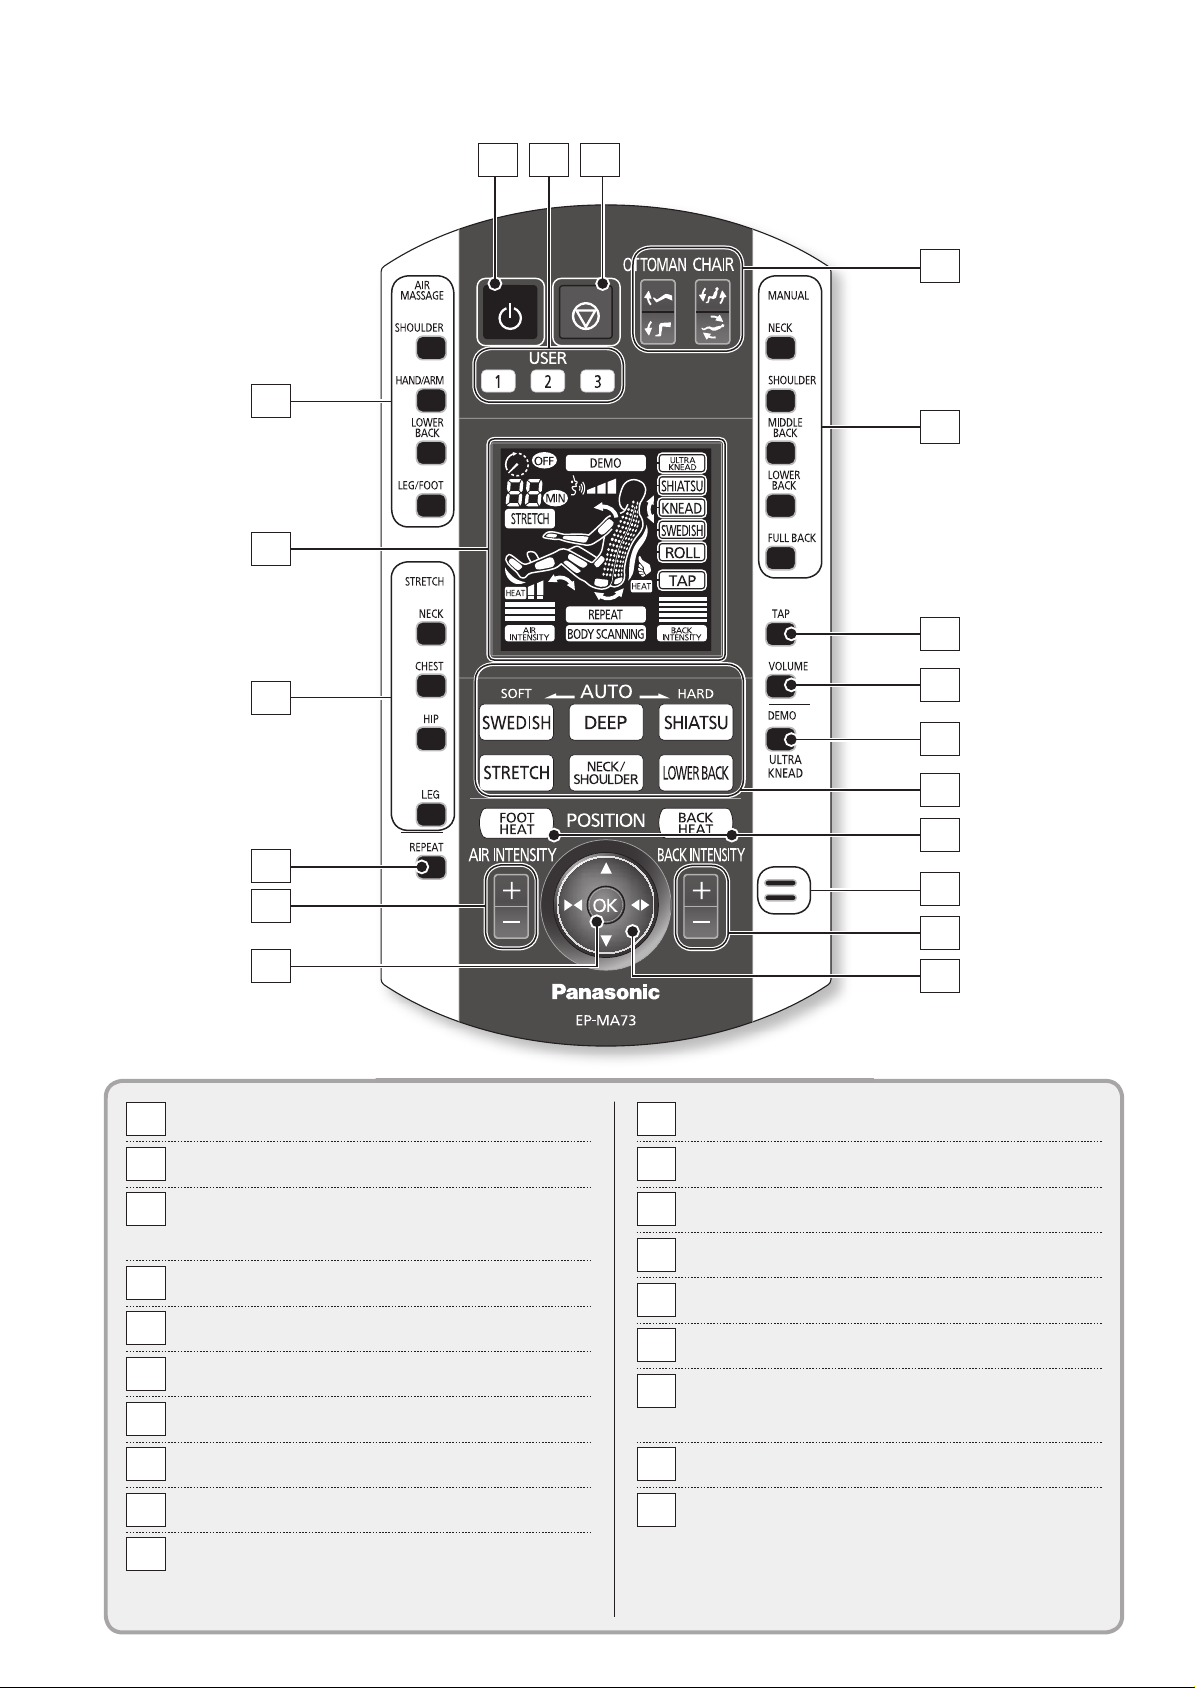
Part names and functions
(Continued)
Controller
19
18
17
1 32
4
5
6
7
8
16
15
14
On/Off button Speaker
1
USER buttons See pages EN30-31
2
Quick stop button
3
●
Press this button to stop the massage immediately.
OTTOMAN/CHAIR controllers
4
MANUAL selection button
5
TAP button See page EN37
6
Voice guidance volume controller
7
See page EN43
See page EN34
See page EN51
11
Back massage intensity controller
12
POSITION button See page EN27
13
OK button
14
Air massage intensity controller
15
REPEAT button See page EN28
16
STRETCH selection On/Off buttons
17
● “Neck”, “chest”, “hip”, “leg” stretch.
9
10
11
12
13
●
This illustration is when all lamps are illuminated.
See page EN25
See page EN25
See page EN38
EN12
DEMO button See page EN26
8
AUTO selection buttons
9
BACK HEAT (Heat massage heads)
10
On/Off button
Foot Heat On/Off button
See page EN26
See page EN32
See page EN32
Display See page EN13
18
AIR MASSAGE selection On/Off buttons
19
● “Shoulder”, “arm”, “lower back”, “leg/foot”
air.
See page EN38
Page 12
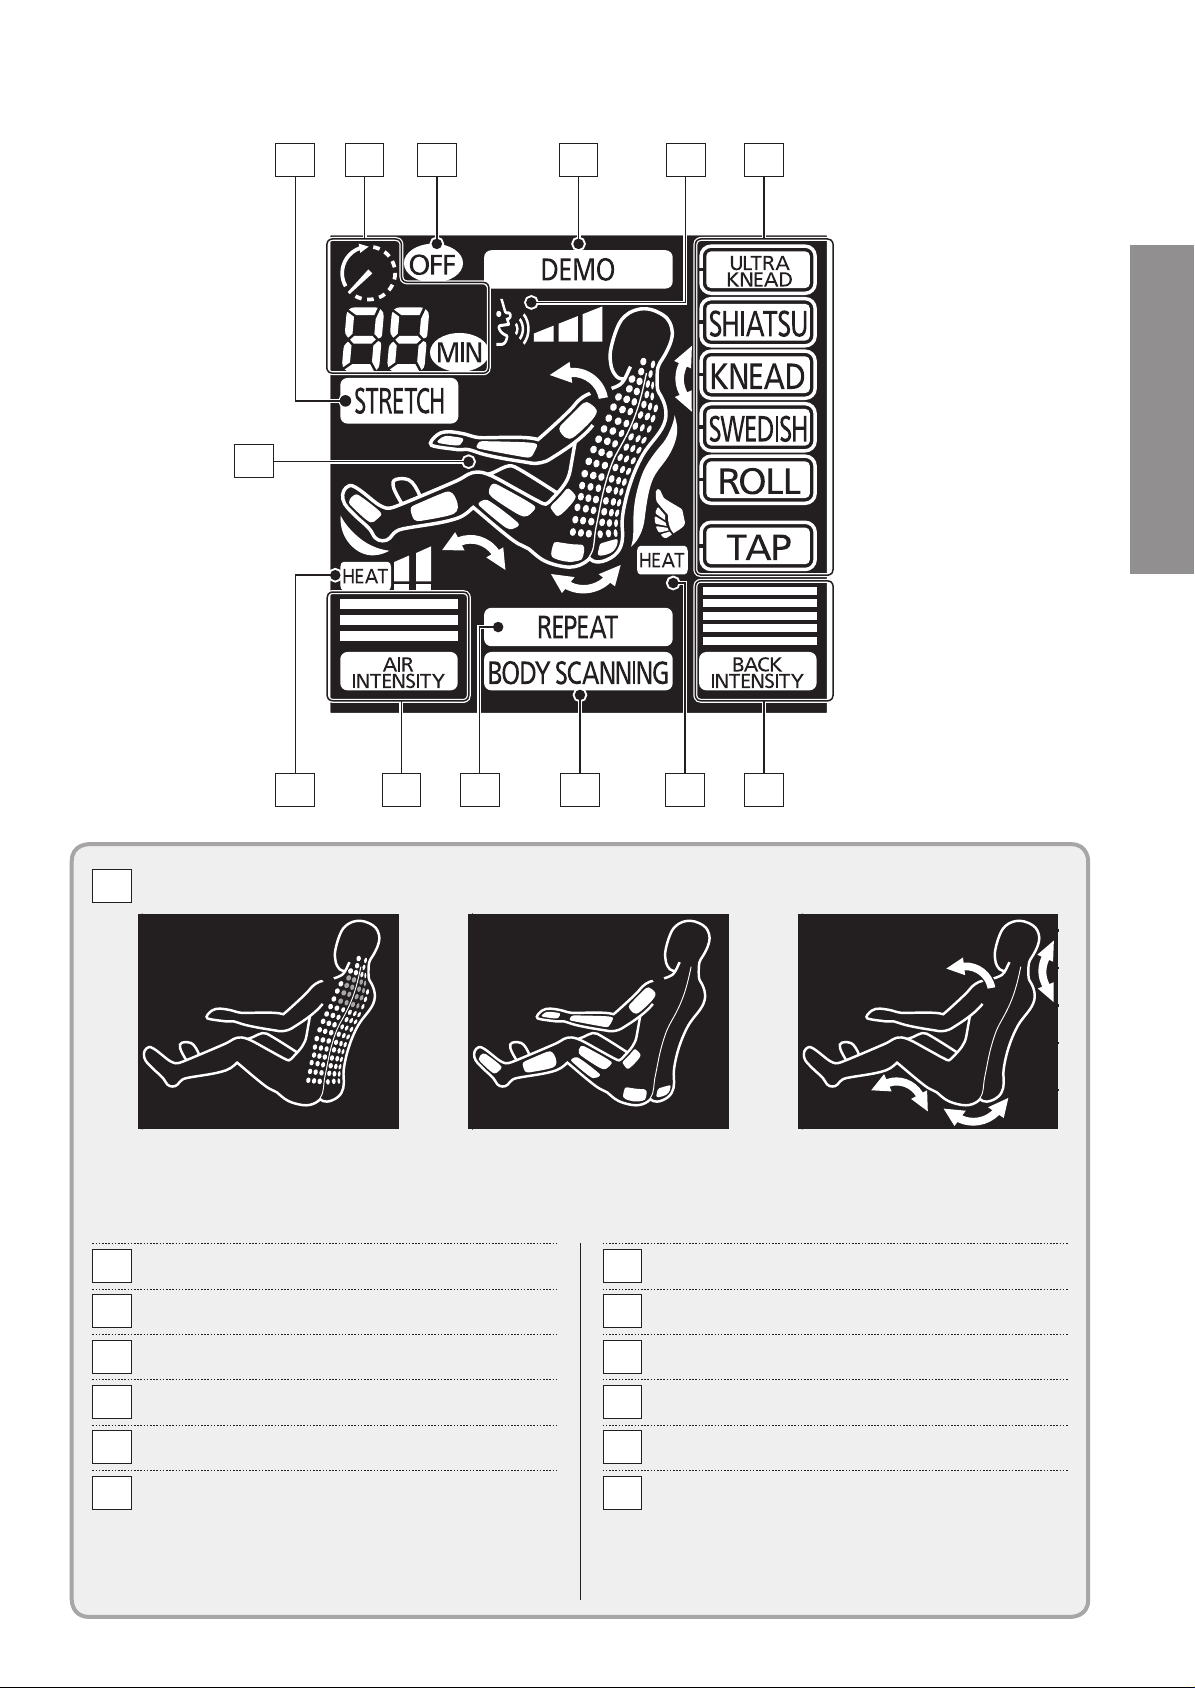
Display
2
3 76
4 5
Before Use
1
13 9
Massage area display
1
Current approximate
massage position flashes.
Stretch action display
2
Remaining time display
3
Massage ending display
4
12 11 810
Currently selected air
massage parts light up.
Current air massage position
flashes.
See page EN38
●
This illustration is when all lamps are illuminated.
Currently selected stretch
parts light up.
Current stretch position
flashes.
Back intensity display
8
Heat massage heads display
9
Body scanning display
10
See page EN29
See page EN29
See page EN26
5
Demo course (ULTRA KNEAD) display
Voice guidance volume display
6
See page EN51
7
● Currently performing massage actions light
up while massaging.
● Currently selected action’s frame is flashed
when manual operation is selected.
Repeat display See page EN28
11
Air intensity display
12
Foot Heat display See page EN29Operation display
13
See page EN28
EN13
Page 13
Setting up the massage lounger
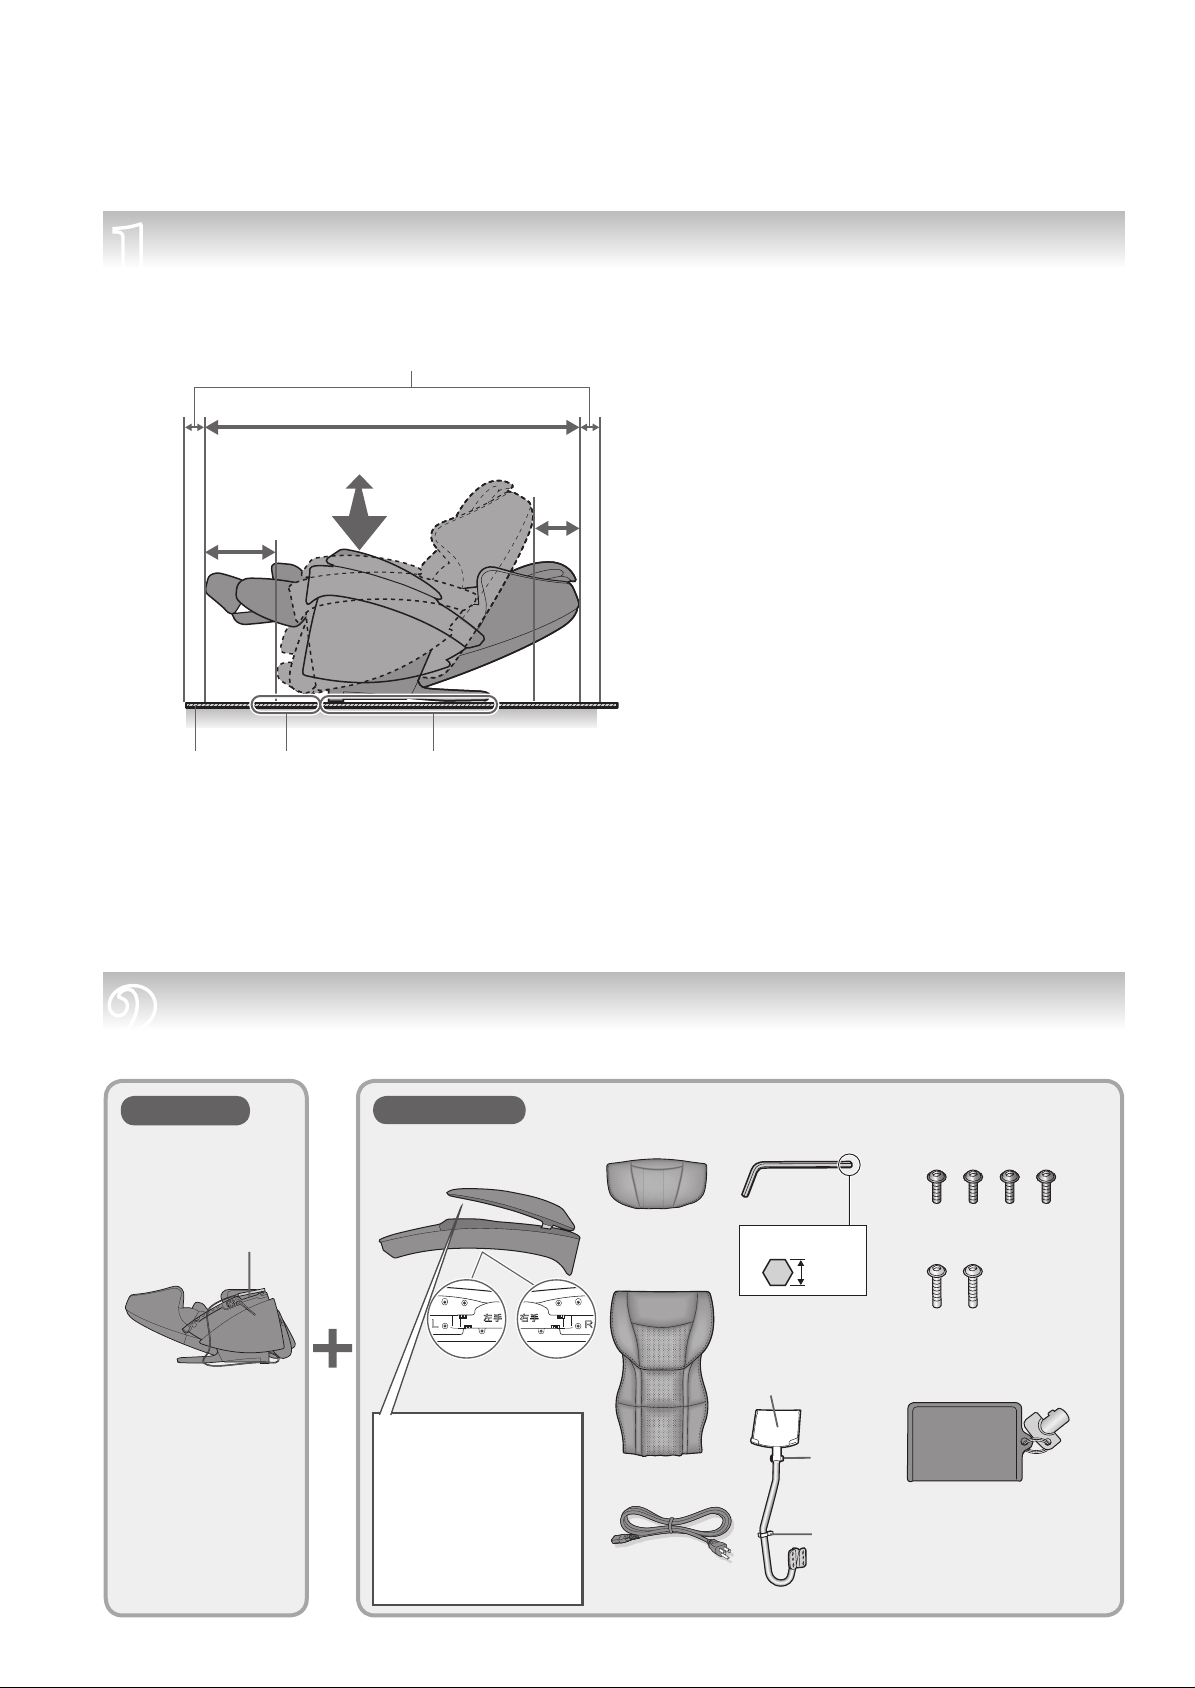
Where to use the unit
1
● Ensure there is adequate space to recline.
Keep at least 10 cm (3.9 in.) away from the wall.
Approx. 202 cm (7
Width approx.
90 cm (35.4 in.)
Approx. 49 cm
(19.3 in.)
Area where leg rest
Mat
could touch the floor
● Do not expose the massage lounger to direct sunlight or high temperatures, such as in front of
heating sources, because this can cause discoloration or hardening of the synthetic leather.
● Place the unit on a mat to prevent floor damage. When placing a mat under the unit, the size of
the mat should be sufficient (at least 120 c
where the unit touches and where the leg rest could touch the floor, as shown in the diagram
on the above.
● Install the unit near a power outlet.
9.5 in.)
A
pprox. 30 cm
(11.8 in.)
Area where unit
touches the floor
● For details on the dimensions of the unit, see
page EN9.
m × 70 cm (47.2 in.
× 27.6 in.)) to cover the areas
Confirm that the main unit and the accessories are in the box.
2
Main unit
Controller
Accessories
●
Armrests (Right/Left)
Right/Left indication
(Back of the armrest)
The holes in the fabric
at the back of the
hand & arm massage
section are due to
the manufacturing
process and are not a
fault.
●Pillow
●Comfort
cushion
●Power cord
●Allen key — 1
●Attachment screws
(Cross-section)
4 mm
●Controller stand
Controller
holder
Controller
holder fixing
screw
Clip
●Lock switch key
(M6 × 13) — Black
(M6 × 20) — Silver
(2 pcs.)
This is initially inserted
in the lock switch of the
power switch section
prior to leaving the
factory.
(4 pcs.)
EN14
Page 14
3
Hold onto
the sides.
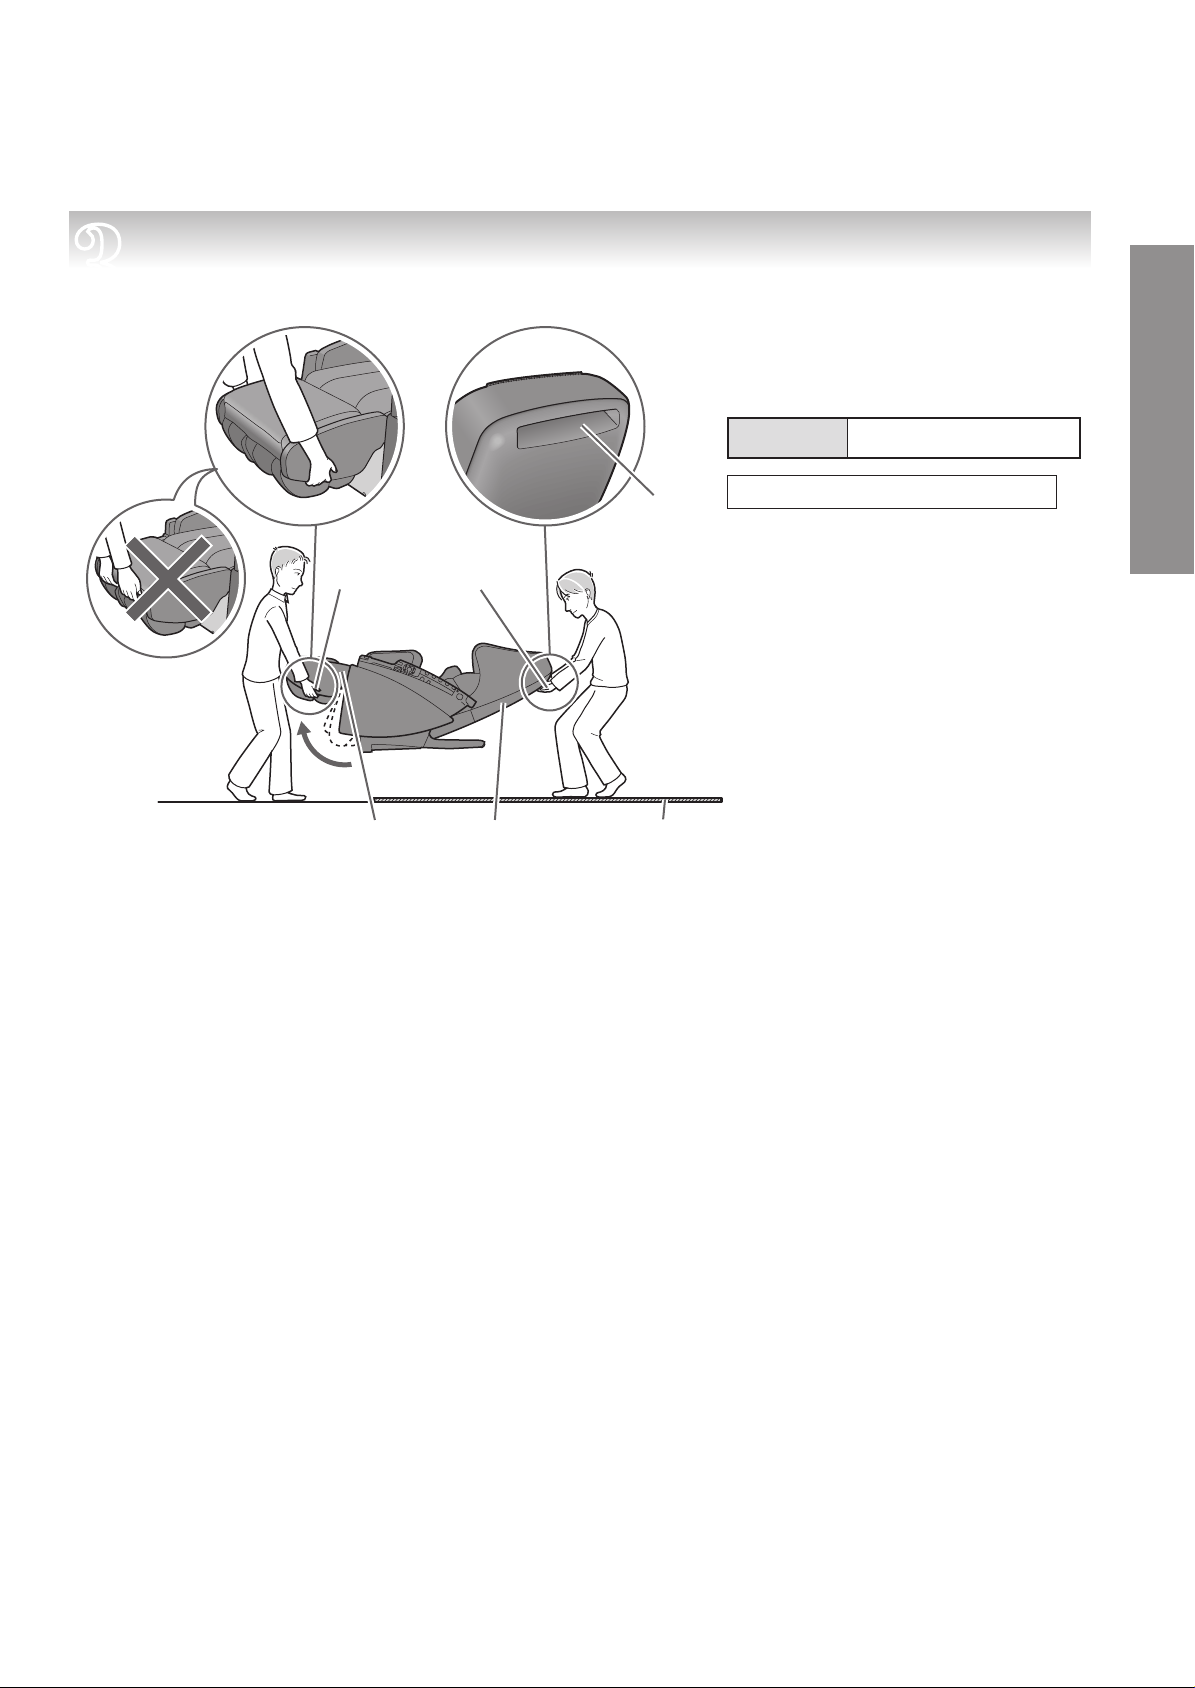
Removing everything from the box and installing the unit
●
Since the unit is very heavy , be careful
to avoid back injuries. (The unit must
be carried by two or more persons.)
Unit weight Approx. 85 (187.2 lbs)
Before Use
Do not hold onto
the front side.
The sole massage
section might slide,
and injuries may
occur.
Hold onto
the sides of
the leg rest.
Leg rest Back cover Mat
Place your
fingers in
the groove
Groove
To put the unit down on the floor
● Put the unit down slowly watching
your step carefully.
● Put down the leg rest by holding it
with your hands until it has been
set on the floor completely. If you
release your hands before the leg
rest is fully extended, the leg rest
will forcefu
position.
● The floor may get damaged, so it
is recommended to place a mat
etc. on the floor.
lly return
to the initial
EN15
Page 15
Assembly
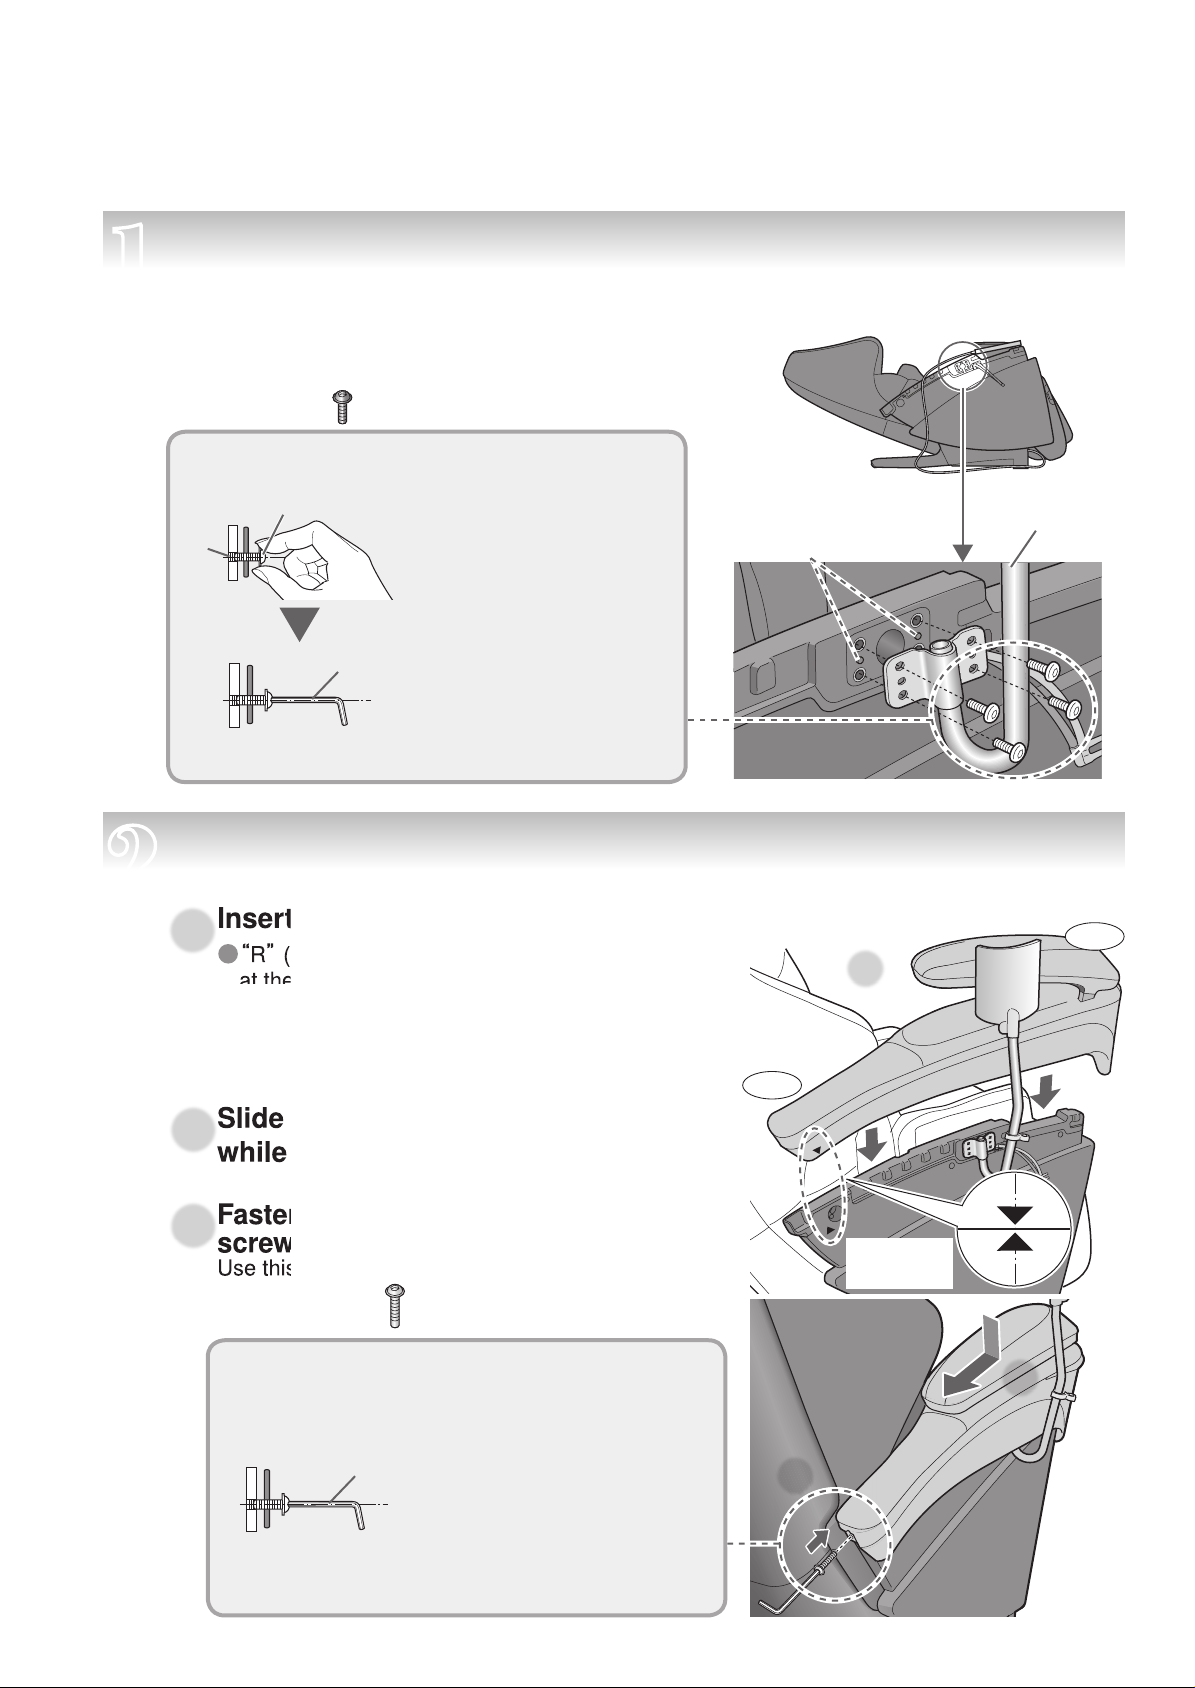
Attaching the controller stand to the right or left side panel of this unit
1
Fasten the controller stand with the
<When attaching on the right side panel>
attachment screws. (4 positions)
Use this screw … Attachment screws (M6 × 13)
× 4 pcs. (Black)
How to tighten the screws
Align the 2 prongs of the
●
side panel with the holes
of the controller stand.
Hole
Attachment screw
Allen key
● Tighten the 4 screws
lightly using your fingers.
(Make the screws level
with the holes.)
●
Tighten firmly with the allen key.
●
Screw may be damaged if
you tighten the screw inserted
into the hole crookedly using
an allen key.
Fasten the armrest with the attachment screws.
Controller
Stand
(On both the right and left sides)
2
Insert the armrest into the unit.
●❶
● “R” (right side) and “L” (left side) are indicated
at the bottom of the armrest.
Insert the armrest from the top aligning the ▲
●
marks on the side of the armrest.
●
Be careful to avoid pinching your fingers and air plugs.
Slide the armrest toward the back
●❷
while pushing it downward.
Fasten the armrest with the attachment
●❸
screws. (One position for each side)
Use this screw … Attachment screws (M6 × 20)
× 2 pcs. (Silver)
How to tighten the screws
● Put an attachment screw
on the edge of the allen
Allen key
key and tighten the screw
horizontally to the hole.
● Screw may be damaged
if you tighten the screw
inserted into the hole
crooked
ly using an allen key.
<When attaching the right armrest>
Front
●❶
Back
Align the ▲
marks.
●❷
●❸
EN16
Page 16

3
Connect the air plugs
① Press air plugs into the air plug sockets below the armrest until you hear a click.
View from bottom
Before Use
Air plug jack
4
Front
Press until the protrusion clicks
into place.
・Arm massage will not operate unless the air plugs are inserted securely.
②Follow the same step when connecting to the armrest on the left side.
Connect the power cord to the unit
Check for dirt and damage on
Appliance inlet
Connector
●❶
appliance inlet of the power switch
section and the connector of the
power cord.
Air plug
Protrusion
Insert the connector into the
●❷
appliance inlet.
Power cord
Power switch section
GROUNDING INSTRUCTIONS
● The unit must be properly grounded. If it should malfunction or break down, grounding
provides a path of least resistance for electric current in order to reduce the risk of electric
shock.
● This unit is equipped with a cord with an equipment-grounding conductor and a grounding
plug. The plug must be plugged into an appropriate outlet that has been properly installed in
ordance with all local codes and ordinances.
acc
Be sure to push the connector in all
●❸
the way.
▶Continued on the next page
EN17
Page 17
Assembly
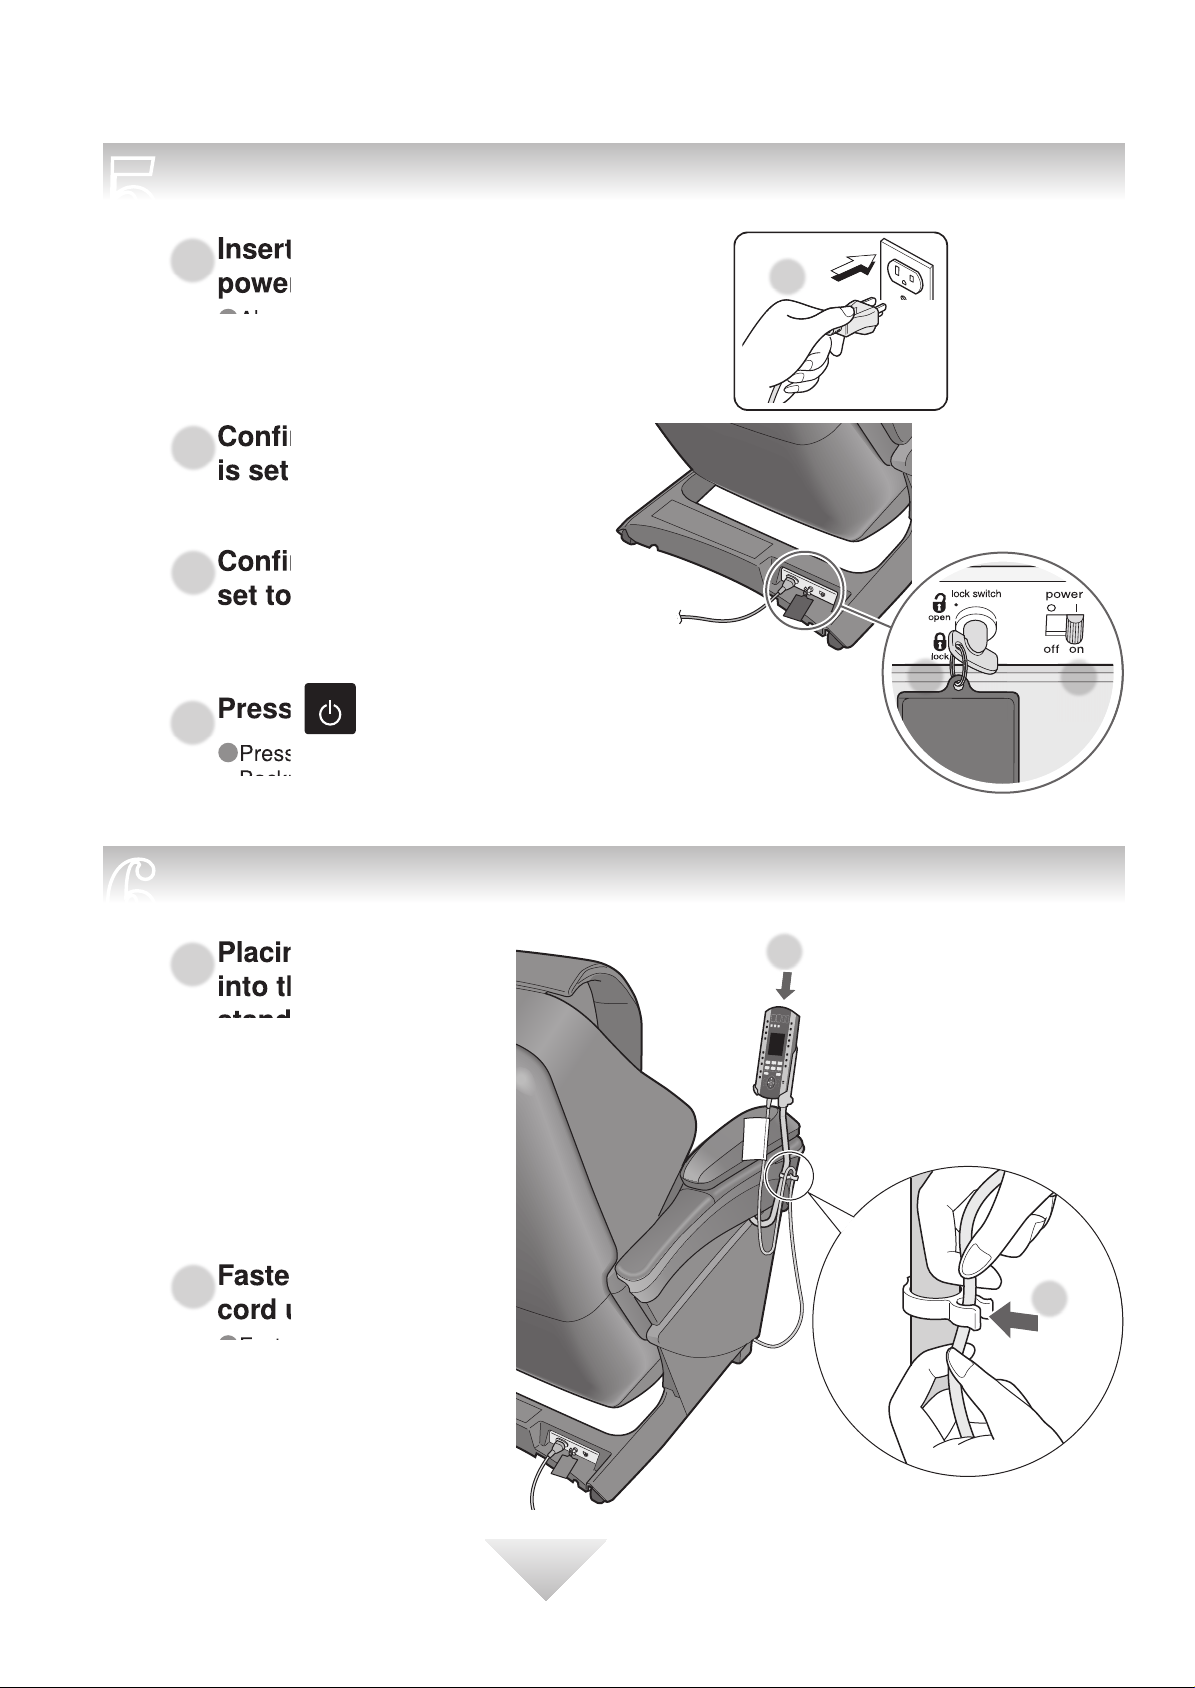
Turn on the power and raise the backrest to the upright position.
5
Insert the power plug into the
●❶
power outlet.
● Always be sure to insert into an AC
120 V plug.
Confirm the lock switch key
●❷
is set to the open position.
Confirm the power switch is
●❸
set to the on position.
(Continued)
●❶
6
Press
on the controller twice.
●❹
● Press once, and then press again approx. 1 second later.
Backrest will rise automatically.
Placing the controller
Placing the controller
●❶
into the contro
stand.
ller
●❶
●❷
●❸
EN18
Fasten the controller
●❷
cord using the clip.
● Fasten so the cable under
the clip will not sag too
much with the backrest
raised.
(Because there is a
chance of the cord
becoming tangled with
your feet, etc.)
●❷
Page 18
When the controller stand is attached on the left side
●Run the controller cord to the left.
①
Press
②
Press on the controller and hold until the leg rest has
risen as far as it will go.
・
Continue pressing until a “beep-beep-beep” sound is heard.
③ Disconnect the controller cord.
・ Hook is released by pressing on the tab on the fastening
band with your fingers.
Move the controller cord under the leg rest to the left side.
④
Fasten the controller cord.
⑤
・ Press down from the edge if it does not fit in easily.
nsert the tip of the fastening band into the hole.
⑥
I
● The controller cord is fastened to the right side prior to
leaving the factory.
Fastening band
③
on the controller to turn on the power.
Fasten to the right side
③
Tab
Controller cord
④
Leg rest
View from
front
②
Cord-holder groove
●⑥
Controller cord
Before Use
●⑤
7
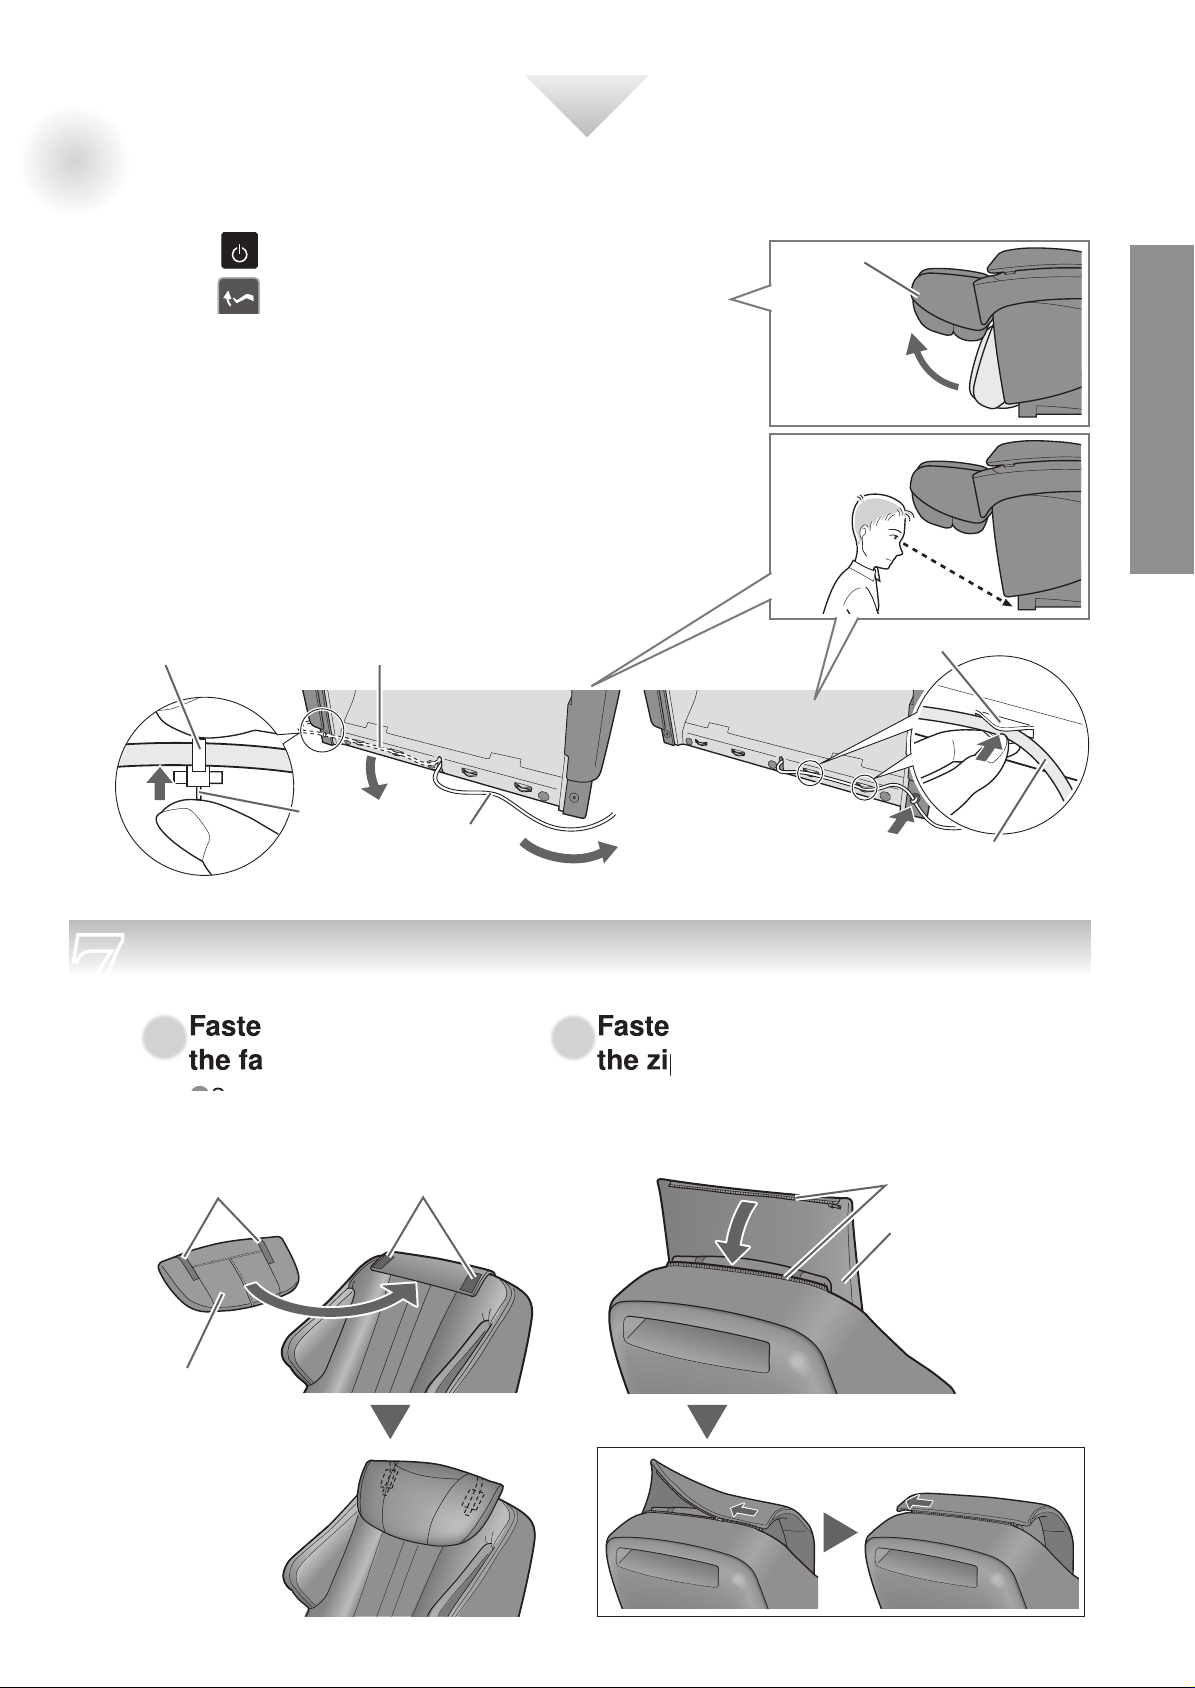
Fasten the pillow and the comfort cushion.
Fasten the pillow using
●❶●❷
the fasteners.
● See page EN23 for guidelines
on positioning the pillow
during the massage.
Fasteners Fasteners Zipper
Pillow
Fasten the comfort cushion using
the zipper.
Comfort cushion
EN19
Page 19

Before sitting down
Check the surrounding area.
1
Make sure there are no
objects, people, or pets in
the vicinity of the unit.
Flip up the comfort cushion and deploy the leg & sole
2
massage section.
● Do not massage with the
comfort cushion still on the
backrest.
Comfort cushion
How to deploy the leg & sole massage section
●① While raising the
leg rest rotation lock
release lever in the
direction of the arrow.
●●② Rotate from bottom.
●③ Rotate until it stops
rotating.
●④ Let go of the leg rest
rotation lock release
lever.
●⑤ Check that the leg rest
does not rotate.
●①
●④
Let go. Let go.
●②
●③
Press
firmly.
EN20
WARNING
Sit on the unit after confirming there is no foreign matter between the parts of the unit. (Confirm
that there are no foreign objects stuck in the comfort cushion, leg rest or hand & arm massage
section.) Sit down and ensure that the leg rest is properly locked in place.
Failure to observe this precaution may result in accident or injury.
Page 20

3
Check the power cord and the power plug.
WARNING
Periodically remove dust, etc. from the power plug.
Failure to do so may result in insulation failure due to
humidity, etc., which may cause fire. (Remove dust
using a dry cloth.)
Never operate the unit if it has a damaged
power cord or plug. Return the unit to the
nearest authorized service center if it is not
working properly, if it has been dropped or
damaged, or if it has been immersed in wate
Keep power cords away from heated surfaces.
Do not carry the unit by the power cord.
r.
Be sure to push the connector all
the way into the appliance inlet.
Before Use
Be careful not to trip
over the power cord.
4
Switching on the power supply
Insert the power plug into an electrical outlet.
●❶
Turn the lock switch key to the open position.
●❷
Slide the power switch to the on position.
●❸
WARNING
Fully insert the power plug to reduce the risk
of short-circuit and fire.
Always use sockets and wiring devices at the
correct rated value.
Use at the specified power supply 120 V, AC.
Failure to do so may result in electric shock or fire
due to overheating.
Do not insert or unplug the power plug with
wet hands.
Doing so may cause electric shock.
●❷
open
lock
●❶
lock switch
power
onoff
●❸
▶Continued on the next page
EN21
Page 21

Before sitting down
Check the unit.
(Continued)
5
Make sure there are no tears or rips in the fabric.
●❶
WARNING
Always raise the comfort cushion to check that
the fabric covering the movement area of the
massage heads in the backrest has not been
ripped before using the unit. Please also check
other areas to ensure that the fabric has not been
ripped. No matter how small the rip, if you find
one then immediately stop using the unit, unplug
the power cord and have the unit repaired at an
authorized service
Make sure there is no foreign matter between the unit.
●❷
center.
When the massage heads are
not in the retracted position
Press twice to return the massage
Fabric covering
the movement
area of the
massage heads
in the backrest
Backrest
Comfort
cushion
Make sure the massage heads are in
●❸
the retracted position.
Make sure the leg rest is in the
●❹
fully lowered position.
heads to the retracted position.
Check the retracted position
of the massage heads
Leg rest
Check
Hand & arm
massage section
EN22
Check that the leg rest does not
●❺
rotate.
When the leg rest is not
fully lowered
The leg rest will lower by
pressing on
twice.
Page 22

6
Adjust the pillow position.
7
Remove the pillow.
1
Pillow
Slide the sole massage section to your preferred position.
It will slide up to
Adjust the height of the pillow so
2
that the bottom edge is at ear level.
● If positioned too low, the pillow may interfere with a
massage of the area around the neck.
● When the reclining angle changes, the position of
shift. In that case, adjust the position
the pillow
again.
may
Lower edge of the pillow
Ear level
Before Use
about 18 cm (7.1 in.).
Push with the soles of your feet to slide the sole massage section out.
Lift your soles slightly and the sole massage section returns.
Adjust the controller stand.
8
Horizontal orientation can be adjusted.
Left and right
EN23
Page 23

Simple use
◦❶
Press to turn
the power on.
(The power switches off
automatically after 3 minutes if the
controls are not operated when the
unit is not massaging.)
Select a function (massage).
◦❷
Automatic Course
Select one
from
Manual Operation
Select the body
1
part and press
the button.
● Manual operations
and air actions can
be used at the same
time.
● For details, see pages
EN26 to EN29.
● For details, see pages
EN34 to EN37.
Body
part
Air Action
Select the body
1
part and press the
button.
● You can select multiple
body parts.
Stretch Action
Select the body
1
part and press
the button.
Action
● For details, see pages
EN38 to EN42.
● For details, see pages
EN38 to EN42.
EN24
● You can select
multiple body parts.
Page 24

To adjust to your preferences
To adjust the intensity of automatic courses
● Press the buttons to adjust the massage intensity.
To adjust to your preferences
Choose your favorite
23
action.
Press
and the action
starts.
● You can also select by repeatedly pressing the
button of your favo
● If you want to select tap, press
rite body part.
.
To adjust to your preferences
To adjust the air massage intensity
● Press the buttons to adjust the air massage intensity.
(Displayed in 3 steps)
To adjust the intensity
●
Press the buttons to adjust the intensity.
● The number of intensity levels that
you can adjust differs depending on
the action.
How to Use
Recline the backrest.
2
Press
● See page EN43 for description
on how to adjust the reclining
angle and the leg rest.
T
o adjust to your preferences
To adjust the intensity
●Press the buttons to adjust the
intensity for each of the air and back.
EN25
Page 25

Automatic course
When you want a complete massage
◦❶
Press to turn on the power.
( When not massaging, the power is turned
off automatically if 3 minutes or more pass
without operation.)
Press one of the buttons
◦❷
(
to select the program.
Characteristics of automatic course (upper body)
SWEDISH ……
DEEP …………
SHIATSU ……
STRETCH ……
NECK/SHOULDER
LOWER BACK
DEMO (ULTRA KNEAD)
Gentle relaxation course based on
Swedish and kneading actions.
Standard course for thorough relaxation
based on the kneading and ultra actions.
This is a course to strongly loosen points
of muscle tightness mainly by shiatsu.
Stretching course in which four
stretching actions are repeated.
elaxation course that focuses on
R
…
the muscles around the cervical
vertebrae (neck and shoulders).
This is a course to relax the muscles
…
around your lower to middle back.
This course lets you experience the ultra
…
knead action on the upper body, and air
ultra knead action on the soles and palms.
)
EN26
●
Overview of the respective programs ▶See page EN50.
Body scanning will commence when the program is selected. ( will flash.)
● The body scanning will properly detect height ranges between approximately 140 cm (55.1 in.)
and 185 cm (72.8 in.).
Sit as far back in the seat as possible
with your head on the pillow.
A: Head
B: Shoulder
A
B
C
D
Adjust the pillow height so
that the bottom edge of
the pillow is at ear level.
▲
C: Back
D: Lower back
See page EN23.
The unit will automatically recline to the correct
massage position.
Correct
massage
position
Raised
approx. 60°
●
If the massage lounger is reclined further than the correct massage position
angle, it will not automatically recline to the correct massage position.
Reclined
approx. 20°
Page 26

Approximately 30 seconds after the body scanning starts, the
massage heads slowly lower to the shoulder position, and a
soft tapping action begins to determine your shoulder position.
Massage
head
Tapping
action
● Keep your head on the pillow until
the soft tapping action begins. Lifting
● Air in the seat will operate so the body will not
shift during the body scanning.
your head from the pillow will result in
incorrect determination of the shoulder
position.
How to Use
To adjust the shoulder position during the tapping action
● When the shoulder position is incorrect, adjust then shoulder position while the soft tapping
action is in progress (for approximately 12 seconds), and use the POSITION button to move
the massage heads up or down and then press
A single press of the
button will raise or lower
the massage heads
approximately 1.2 cm
(0.5 in.).
.
Too high
Correct position of the
massage head
(The point where the
tapping action should
be felt.)
Too low
Body scanning is completed when the tapping action finishes.
● If you press
massage will start.
while the tapping action is still going on, it will end the body scanning and the
● The leg rest may adjust automatically so that the soles of the feet touch the sole massage
section according to your estimated height based on the shoulder position.
● If the shoulder position is off drastically, turn the power off once, and repeat from step
shoulder firmly pressed against the back
rest.
▶Continued on the next page
❶ with
EN27
Page 27

When you want a complete massage
(Continued)
To adjust to your preference
Depending on what you are adjusting, a course in
progress may be shut off by the timer function.
Setting the on/off of the air massage or
the stretch massage
Memory
Memory
Operation can be turned on/off by
pressing buttons on the left.
NeckChestShoulderHand/
Arm
On/off for the air massage
or stretch can be
confirmed on the display.
(Lit: On, Off: Off)
Leg/Foot
Hip
Lower
back
To repeat the current massage
Contents of current massage action will be
repeated by pressing
● “REPEAT” command may not be accepted when
the action is switching.
●
will flash while massage is repeating.
.
Changing the intensity of the air massage
Memory
When performing a massage on shoulder,
hand/arm, lower back or leg/foot,
Adjust by pressing
.
Memory
Fine adjustment of the position
(Number of adjustments possible)
3 times
● Adjustment may
3 times 3 times
3 times
not be possible
depending on
the position.
EN28
● See pages EN38 to EN42
for effective method for
using and operations of the
air massage and stretch.
Caution
You may not feel the difference in intensity
for massage or stretch even if the back
(Intensity) adjustment or air (Intensity)
adjustment button is pressed.
● When the intensity was increased right
when the operation has changed.
● The feeling is different depending on
the person or the position.
Page 28

Adjusting the reclining angle and leg rest to massage in relaxing
position
To adjust the reclining angle and the leg
rest angle:
Adjust by pressing
For a person with small body dimensions:
When there is not enough stimulation on your soles
When stimulation of your hands/arms is too gentle
For a person with large body dimensions:
When your knees are raised
●See page EN43 for description on how to adjust the reclining angle and the leg rest.
.
See “Effective method
for
massage or stretch”
on page EN39.
To adjust the amount
of sliding of the sole
massage section:
using the leg/foot air
Push with the soles
of your feet to slide
the sole massage
section out.
Lift your soles slightly and sole massage section returns.
To turn Heat massage heads and Foot Heat On and Off
You can turn on/off the Heat massage
heads by pressing
Lit: “Heat” massage heads On.
Off: “Heat” massage heads Off.
● Temperature cannot be adjusted.
● For details, see page EN33.
● Sense of warmth differs depending on your body shape, the massage body part, massage action,
clothing, and room temperature.
.
You can turn on/off the Foot Heat by
pressing .
Lit: “Foot Heat” On
Off: “Foot Heat” Off
High
● Temperature can be adjusted
between two levels.
● For details, see page EN33.
Low
Memory
Memory
How to Use
To adjust the back intensity
Back intensity can be adjusted by pressing on the + or – of the BACK INTENSITY.
● Current position that is getting massaged can be checked on the display.
● There are 3 levels of intensity for the automatic courses. (Three back intensity
levels, 1, 3 and 5)
● Intensity will not change further even if you keep pressing the button when the
intensity is set to maximum or
Caution
Intensity might increase drastically when the intensity is increased in multiple steps.
Always increase the intensity one step at a time, checking how it feels.
●For safety reasons, it is designed not to increase the intensity drastically.
● If you do not feel enough intensity even if it is set to maximum, or if you feel too
much intensity even if it is set to minimum, see page EN54.
Memory
Memory
Items that have this mark can be registered and used with your favorite settings.
(See page EN30.)
minimu
m.
Memory
Memory
EN29
Page 29

Automatic course
To register your preferences
You can register your preferred settings set during the automatic course, and have them reproduced next
time you are massaging.
Contents that can be registered
・Air intensity and back intensity settings
・Air and stretch on/off settings
・
Heat massage heads on/off setting
・
Foot Heat on/off setting and temperature settings
・Voice guidance volume setting
( See page EN28 to EN29 for details on how to configure
settings and page EN51 for details on volume settings.)
You can register settings for each automatic course
in each USER button.
}
For example, you can register th
settings in USER
High air intensity for SHIATSU
Low air intensity for STRETCH.
This mark is
the indicator
llowing different
e fo
:
The last setting registered for the USER button is
applied regardless of which automatic course is
}
used.
After the automatic course has finished,
◦❶
or when the massage is completed by
pressing
Your preferred settings (pages EN28–29, EN51
(volume)) are displayed and the USER buttons will flash.
during the course
Memory
Memory
If there is another setting already
registered, Other settings are already
registered. will be announced.*
■ To update to contents of new setting*
Press the same button again.
Press.
This will also be announced when you try
*
to register to a separate automatic course
or same automatic course contents that
are the same as those already registered.
■ If you do not want to delete the setting
already registered
ress other USER button.
P
Select and press one button from
◦❷
that you would
like to register while the buttons
are flashing (approx. 15 seconds).
● Selected button will light. (Example: )
When the registration is completed
Pressed button will turn off, and the power will be
●
turned off automatically in approximately 3 seconds.
● Be careful since registered contents will not be
saved when the power switch is turned “Off” or the
power cord is disconnected during the massage.
EN30
Press.
Page 30

To start the registered program
◦❶
◦❷
◦❸
Press to turn on the
power.
( When not massaging, the power is turned off automatically
if 3 minutes or more pass without operation.)
Select one of the USER
buttons that is registered.
●
Registered USER button will light. (Example: )
Press.
Select and press one of the
automatic courses that is
registered using the USER
button.
(Example: “SWEDISH”)
How to Use
Massage with registered setting will start after the body scanning.
● When an unregistered course is selected, the standard automatic course massage is applied.
However, the “Heat” massage heads on/off settings, “Foot Heat” on/off settings, temperature settings
and volume settings registered to the USER button are applied. (See page EN30.)
To delete the registered settings
Press to turn on
●❶●❸●❷
the power. Press the
button you want to
delete.
Press.
Press again and
hold for more than
3 seconds until the
button changes to
flashing.
Press and hold for
more than 3 seconds.
(Example:
)
Press again
during the button
flashes (about
10 seconds).
Press.
Delete is completed
once the flashing stops.
EN31
Page 31

Automatic course
About the Heat massage heads/Foot Heat
WARNING
When Heat massage heads are used, do not let the massage heads touch the same place for a long time.
Do not use theFoot Heat massage for a long time.
Low-temperature burn may occur.
Press to turn on the
◦❶
power.
( When not massaging, the power is turned
off automatically if 3 minutes or more pass
without operation.)
Press the automatic course
◦❷
button and start the massage.
To turn Heat massage heads On
Lit: “Heat” massage heads On
Lit (On)
To turn Heat massage heads Off
Press to turn off.
● Button will turn off.
● Temperature cannot be
adjusted.
To turn Foot Heat On
Lit (On)
Lit: “High” On
EN32
● Sense of warmth differs depending on
your body shape, the massage body
part, massage action, clothing, and room
temperature.
Off: “Foot Heat” Off
● Button also turns off.
Lit: “Low” On
Page 32

To turn Heat massage heads/Foot Heat off each time
●
Register “Heat” massage heads/“Foot Heat” as off in the memory. (See page EN30.)
The warm section of the Heat massage heads warm up the
cloth of the massage location.
“Heat” massage
heads rubber
section
“Heat” massage
heads warm
section
“Heat”
massage
heads warm
section
The Foot Heat uses a built-in Heat (heater) section
in the sole section to warm the toe portion of the cloth.
Warms the toe portion of the cloth
Place feet so that they are firmly pressed against the “Heat” (heater) section.
ur feet touch this section to feel
Raise the sole massage section during use so that soles of
the heat from the heater section. You can also place a blanket over your knees and lower legs
to feel even warmer.
yo
Shiatsu points
How to Use
“Heat” heater section (Warms the toe portion of the cloth)
● Heat function cannot be used alone.
●Warmth may vary according to room temperature, clothing and physical build.
●Warmth will vary between “Heat” massage heads and “Foot Heat”.
●If the “Foot Heat” controller is set at a low temperature, try adjusting it higher.
EN33
Page 33

Manual operation
When you want a concentrated massage of a particular body part with your
favorite action, such as Kneading on the neck or Tapping on the shoulder
WARNING
Do not massage any one point for more than 5 minutes at a time. Excessive massaging can
overstimulate the muscles and nerves and result in an adverse effect.
◦❶
◦❷
Press to turn on the
power.
( When not massaging, the power is turned off automatically
if 3 minutes or more pass without operation.)
Select the body part you
want to massage.
● List of manual massage
options is displayed.
(Example)
When “NECK” is selected
EN34
◦❹
◦❸
Select action you prefer.
The currently selected
action flashes
Action can also be selected
●
by repeatedly pressing the
❷
area selected in step
●
When is selected, “ROLL” or a
combination of “ROLL” and another action
can be selected.
.
Page 34

◦❹
Press
● The massage heads will move to selected position automatically to start the massage after
the body scanning is completed. See page EN26 about body scanning.
● See pages EN36-37 for setting the massage in accordance with your preferences.
● When a massage to the same location has continued for 5 minutes, it will automatically move
up approximately 3 cm
to start the action.
(1.2 in.).
Body scanning for manual operation
NECK/SHOULDER/FULL BACK
MIDDLE BACK/LOWER BACK …
Normal body scanning.
…
Simple body scanning. (The massage heads will not
come up to the shoulder position.)
To change an action in the middle of a massage
Select your favorite one again in steps
●
Press within approximately 40 seconds after reselecting an action in step ❷, otherwise the
reselection will be cancelled automatically.
❷ to ❹.
If you want to massage with tapping action only
① Press to turn on the power.
Select
②
.
How to Use
③
Start the tapping action by pressing
・Body scanning will not be performed.
・ To change the action, select with steps
.
❷ – ❹ on the previous page.
▶Continued on the next page
EN35
Page 35

When you want a concentrated massage of a particular body part with your favorite
action, such as Kneading on the neck or Tapping on the shoulder
(Continued)
To adjust to your preference
Using air massage together
Operation can be turned on/off by
pressing buttons on the left.
ShoulderHand/Arm
On/off for the air
massage can be
confirmed on the
display.
(Lit: On, Off: Off)
Leg/Foot
Lower
back
Changing the intensity of the air massage
When performing an air massage,
Adjust by pressing
●Intensity is displayed in 3 levels.
.
Fine adjustment of the position
It can be adjusted with .
When you keep on pressing the button up or down,
●
the position will move continuously until you release
the button.
EN36
Caution
The stretch action will not be performed simultaneously.
The manual operation is cleared when any STRETCH
button is pressed.
Page 36

Adjusting the reclining angle and leg rest to massage in relaxing
position
To adjust the reclining angle and
the leg rest angle:
Adjust by pressing
●See page EN43 for description on how to adjust the reclining angle and the leg rest.
.
To adjust the amount
of sliding of the sole
massage section:
Push with the soles of
your feet to slide the sole
massage section out.
Lift your soles slightly and the sole massage section returns.
Adding tapping actions to the current operation
Press .
● You can select tap on/off every time it is pressed.
You cannot select on/off when you are massaging only with the tapping action.
Turning the Heat massage head and Foot Heat On and Off
How to Use
Your can turn the Heat massage heads
on/off by pressing
Lit: “Heat” massage heads On.
Off: “Heat” massage heads Off.
● Temperature cannot be adjusted.
● For details, see page EN33.
● Sense of warmth differs depending on your body shape, the massage body part, massage action,
clothing, and room temperature.
.
You can turn on/off the Foot Heat by
pressing
Lit: “Foot Heat” On
Off: “Foot Heat” Off
High
● Temperature can be adjusted
between two levels.
● For details, see page EN33.
Low
.
Adjusting the back intensity
Back intensity can be adjusted by pressing on the + or – of the BACK INTENSITY.
●The intensity of manual operation is displayed.
●Level of intensity that can be adjusted differs depends on the action.
Caution
Intensity might increase drastically when the intensity is increased in multiple steps.
Always increase the intensity one step at a time, checking how it feels.
●For safety reasons, it is designed not to increase the intensity drastically.
EN37
Page 37

Air action Stretch action
To perform air massage for shoulder / hand/arm / lower back / leg/foot, or stretch for neck / chest / hip / leg
Press to turn on the
◦❶
◦❷
power.
( When not massaging, the power is turned off automatically
if 3 minutes or more pass without operation.)
Select the body
part you want to
massage.
On/off for the air massage or stretch can
be confirmed on the display.
・Lit: On
・Off: Off
Hand/
Arm
NeckChestShoulder
To adjust the air intensity
Adjust by pressing .
● Intensity is displayed in 3 levels.
To adjust the back intensity
(only for stretch)
Adjust by pressing .
Lower
back
Leg/Foot
●
See page EN41 about the action of the air massage.
●
See page EN42 about the action of the stretch.
●
For the stretch action, the massage heads will
automatically move to the area to stretch after the
body scanning, and perform stretch preparation action.
Hip
Turrning Heat massage heads
On and Off (only for stretch)
Press
● See page EN32 for details.
to turn this on and off.
Turning Foot Heat On and Off
Press
to turn this on and off.
EN38
● Intensity is displayed in 3 levels.
● See page EN32 for details.
Page 38

Center of the armrest
Effective method for using the
leg/foot air massage or stretch
How to use the hand & arm massage
Adjust the leg rest so that your sole fits
on sole massage section completely.
● Place your feet so that the arch of your feet are
touching the shiatsu points.
For a person with small body dimensions
● If the leg rest is raised, it is easier to fit your
sole on it.
Press the
button.
For a person with large body dimensions
● If the slide of the sole
massage section is
adjusted, your knees
will not be lifted as
much.
Push with the soles of
your feet to slide the sole
massage section out.
Lift the hand & arm
1
massage section up.
Insert the hand with
2
fingers extended.
Effective method for using the hand & arm massage
Position the forearm and hand
at the center of the armrest.
How to Use
Lift your soles slightly and the sole massage section returns.
Knees will not be lifted as
●
much also by lowering the
leg rest.
Press the
button.
It is possible to massage your
leg completely by laying the sole
massage
section flat.
Sole massage section
Insert the hand all
the way inside.
● Raise the backrest if there is any difficulty
when positioning the hand and forearm.
▶Continued on the next page
EN39
Page 39

To perform air massage for shoulder / hand/arm / lower back / leg/
foot, or stretch for neck / chest / hip / leg
(Continued)
Operation of the HAND / ARM (Ultra knead on palms) massage
:
Palms to arms
● The arm massage simultaneously massages the left and right hands, with a different intensity for
either hand. (Only one hand at a time is strongly massaged so that the massage can be immediately
stopped in the event of an abnormality or danger.)
<Right hand:
The two large and small airbags work together to firmly massage your palms.
Strong
>
<Left hand:
Gentle
>
<Right hand:
Gentle
Alternates
>
>
Adjust the position according to arm length.
<Left hand:
Strong
EN40
Ultra knead on
palms
Long arms
Short arms
Page 40

Operation of the SHOULDER massage
Pressure is applied to clamp from your shoulders to your arms from the sides.
Operation of the LOWER BACK massage
Pressure is applied to clamp your lower back
through tights from the sides.
3 airbags in the seat gives stimulation to your
The
posterior through hamstring.
Operation of the SOLE (Ultra knead on soles) and LEG / FOOT massage
: Example below.
Sole
● Place your feet so that the arch of your feet are touching the shiatsu
points.
Press soles down from
above so that they are
enclosed.
: Calves will be
Leg
compressed by
pressing against
from both sides.
The sole airbags inflate
from below and the points
press the sole. The left
and right airbags inflate
alternately.
Ultra
knead on
soles
The sole is moved from
side to side and firmly
massaged.
How to Use
▶Continued on the next page
EN41
Page 41

To perform air massage for shoulder / hand/arm / lower back / leg/
foot, or stretch for neck / chest / hip / leg
Operation of the NECK stretch
The massage heads secure the neck and the
base of the head while air is slowly discharged
o ex
from the inflated backrest airbags t
neck muscles.
② The secured
massage heads
stretch the neck.
tend the
Operation of the CHEST stretch
Muscles in the region from your shoulder
blades to your chest are stretched by holding
your shoulders with the shoulder side massage
section and pressing your back with the massage
heads.
(Continued)
① Air is discharged from the
inflated airbags.
Operation of the HIP stretch
Muscles are loosened by widely twisting and
swaying around your pelvis.
Operations of the LEG stretch
Legs are stretched by clamping on the sides of
your thighs and legs/soles and lowering the leg
rest.
EN42
● Sole massage section might hit the floor etc.
when the LEG stretch is performed with the
sole massage section having been slid out
to extend.
Page 42

When you want to adjust the reclining angle and/or leg rest
Press to turn on the power.
1
(When not massaging, the power is turned off automatically if 3 minutes or more pass without operation.)
Press to adjust the angle.
2
●Movement will continue until a “beep-beep-beep” sound is heard if the buttons are held down.
●The movement of the leg rest may be delayed slightly.
●Armrest will move in accordance with the reclining of the backrest.
Approx. 120°
Approx.
95°
Approx. 85°
How to Use
Approx. 5°
Approx. 170°
Approx. 15°
● Do not raise or lower the backrest and/or leg rest repeatedly for any purpose other than adjusting to
your preferred positions.
EN43
Page 43

After completing the massage
Returning to normal chair position
Hang the comfort cushion on
1
the backrest.
Store the leg rest.
2
① While raising the leg rest rotation lock release lever in the
direction of the arrow.
② Rotate from top.
Rotate until it stops rotating.
③
④ Let go of the leg rest rotation lock release lever.
⑤ Check that the leg rest does not rotate.
●①
WARNING
Sit on the unit after confirming there is no foreign matter between
the parts of the unit. (Confirm that there are no foreign objects
stuck in the comfort cushion, leg rest or hand & arm massage
section.) Sit down and ensure that the leg rest is properly locked in
place.
Failure to observe this precaution may result in accident or injury.
Disconnecting the power
Slide the power switch to the off position.
1
Turn the lock switch key to the
2
lock position and remove it.
WARNING
After each massage, slide the power switch,
which is located on the right side of the chair,
to the off position and turn its lock switch
to the lock position and remove the key and
power plug.
3
4
●④
Let go.
Let go.
lock switch
2
open
lock
Power switch
section
Remove the power plug
from the electrical outlet.
The lock switch key
must be stored out of
the reach of children.
●②
●③
Press firmly.
power
off
on
1
EN44
Page 44

Timer function
The massage will complete automatically approximately
16 minutes after the starting the operation.
● Sole massage section will retract, and the leg rest will
be lowered automatically so you can stand up safely.
Sole massage section will not retract all the way
when the sole massage section is extended out,
since it will hit the floor.
Raise your legs to retract all the way.
● Backrest will not rise automatically.
● The massage heads move to the retracted position.
Backrest will rise by pressing
twice.
Interrupting the massage
Return the sole massage section to the original
position and then press
●The massage heads move to the retracted position.
● The leg rest lowers and the backrest raises
automatically. (The backrest will move after
the massage heads retract.)
.
Lift your soles slightly and the
sole massage section returns.
If you experience any problems
Press .
●All operations will stop immediately.
●Get off the unit carefully
not to fa
ll.
How to Use
EN45
Page 45

Cleaning and maintenance
Areas covered with synthetic leather
Wipe these areas with a soft, dry cloth.
● Never use chemicals such as thinner, benzine,
alcohol, etc.
● When using the commercially available leather-care
products (wipes), follow its instructions.
● If the synthetic leather is particularly dirty, wipe it in
the following manner.
Soak a soft cloth in water or a 3% to 5% solution of
mild detergent (such as dish detergent) and wring it
out thoroughly
Dab the surface with the moistened cloth.
Rinse the cloth in water, wring it out thoroughly, and
then wipe any remaining detergent from the surface.
Wipe the surfaces with a soft, dry cloth.
Allow to dry naturally.
● If it is difficult to remove dirt, soak a commercially
available Melamine foam sponge in mild detergent
(such as dish detergent) and wipe the unit with it.
● Do not use a hair dry
quickly.
● Since colors may transfer from clothing to the
synthetic leather surface, be careful when using the
unit with clothing such as jeans or colored clothes.
● Do not allow these areas to come in contact with
plastic for extended periods of time as this may lead
to discoloration. Also, if you use any kind of lotion,
gel or cream for your hair, place a towel or some
o
ther cov
.
er to dry
er over the area of contact.
the surface more
water
mild detergent
Wipe the unit with a cloth
1
moistened with mild detergent
(such as dish detergent) and
thoroughly wring out the cloth.
● Never use chemicals such as thinner,
benzine, alcohol, etc.
Wipe the unit with a cloth
2
moistened with plain water
and thoroughly wring out.
● Make sure to wring tightly before wiping
the controller.
Allow the unit to dry naturally.
3
Plastic area
mild detergent
water
thinner
benzine
alcohol
EN46
Page 46

Seat fabric
Wipe the unit with a cloth moistened with
1
mild detergent and thoroughly wring out.
●
Never use chemicals such as thinner, benzine, alcohol, etc.
Use water or a mild detergent and brush on
2
areas where the seat fabric is particularly soiled.
●
Be careful not to brush the fabric too much to avoid damage.
Wipe the unit with a cloth moistened with
3
plain water and thoroughly wring out.
Allow the unit to dry naturally.
4
● Since color may transfer from clothing to the seat fabric, be careful when using the unit with
clothing such as jeans or colored clothes.
water
Sole covers: can be removed and washed.
How to remove
Remove the
front fastener.
Lift out the
covers on either
side from the
front.
Hold the back
and pull out.
Precautions when washing
(Laundering
information)
Sole covers
How to attach
Attach the back
to the catch.
Attach the
covers on either
side.
Fasten the front
fastener.
Gently smooth out any wrinkles and hang up
❹
to dry.
■
Hand washing
(please do not use a washing machine)
Use a net when washing.
Soak in water cooler than
❶
30 °C and wash by gently pressing.
Caution
・ Never rub or wring while washing.
・ Never use detergents with bleaching agents, as
these cause the color to fade.
・ Wash separately from other items, as the color
leaches easily.
Rinse thoroughly.
❷
Remove excess water by pressing gently.
❸
Caution
・Never wring, as this damages the fabric and
breaks the fibers.
Caution
・ Never dry in the sun, as this causes the fabric to
shri
nk or fade.
・
Hang up to dry immediately, as the color bleeds onto
other items easily.
Remove any wrinkles by ironing after washing.
(Precautions for ironing)
Place a cloth over the top and iron at a medium
heat no higher than 160 °C.
■Dry cleaning
Ask your dry cleaner to take the following precautions
during (oil type) dry cleaning to prevent damage to the
fabric.
● Be sure to use a net.
● Perform soft washing and do not use a tumble
dryer.
Maintenance
EN47
Page 47

Moving the unit
Moving by lifting it with 2 or more persons
Move the unit with 2 or more people in front and back of the unit holding on the
side of the leg rest and the groove on the back cover of the backrest.
Hold onto the sides.
Groove
Hold onto the sides
of the leg rest.
Do not hold onto
the front side.
The sole massage
section might
slide, and injuries
may occur.
Place the controller and
power cord on the seat.
Leg rest Back cover
* You may damage the floor by dropping the unit if you do not hold it correctly.
ver carry
Ne
To put the unit down on the floor
●Put the unit down slowly and carefully watch your step.
● Put down the leg rest by holding it with your hands until it has been set on the floor completely.
If you release your hands before the leg rest is fully extended, the leg rest will forcefully return to the
initial position.
by the armrest, because it may get damaged.
Place your fingers
in the groove.
Mat
EN48
Page 48

Using the castors to move the unit
Move the unit by holding onto the side of the leg rest and using the castors.
Hold onto the sides.
Do not hold onto the front side.
The sole massage section
might slide, and injuries may
occur.
Hold onto the sides of the leg rest.
Lift it no higher
than waist height
The floor may get damaged, so it is
recommended to place a mat etc. on the floor.
To put the unit down on the floor
●Put the unit down slowly and carefully watch your step.
● Put down the leg rest by holding it with your hands until it has been set on the floor completely.
If you release your hands before the leg rest is fully extended, the leg rest will forcefully return to the
initial position.
Roll the uni
t slow
Castors
ly
Place the controller and
power cord on the seat.
How to remove the armrest
It is easier to move with the armrest removed.
Remove the air plugs.
1
(See step 3 on page EN17.)
Remove the attachment screws.
2
(See step 2-
Slide the armrest forward and pull up with
3
both hands.
❸ on page EN16.)
Maintenance
EN49
Page 49

Roll on neck,
Neck stretchSwedish on
Swedish on
Knead on
Pelvis stretch
Swedish on
Finishing
Chest stretch
About the automatic course/action/voice guidance function
Overview of the automatic course
Knead, Swedish
SWEDISH STRETCHDEEP
Roll on neck,
Roll on neck,
Ultra knead, Knead
Ultra knead, Knead
Roll on neck,
Shiatsu
SHIATSU LOWER BACK
shoulders,
shoulders,
Knead, Ultra knead
Knead, Ultra knead
Knead on
Knead on
shoulders,
shoulders
Ultra knead
Ultra knead
Knead on
shoulders,
shoulders,
Shiatsu, Ultra knead
Shiatsu, Ultra knead
Neck stretch
Neck stretch Knead on
* Time spent on “Finishing Touches” differs depending on your
height and intensity setting.
lower back,
Swedish
Knead on
Knead on
lower back,
lower back
Ultra knead, Roll
Ultra knead, Roll
Shiatsu on
Shiatsu on
lower back,
lower back,
Knead, Ultra knead
Knead, Ultra knead
Leg stretch
Hip stretch
Leg stretch
Hip stretch
Leg stretch
back
Ultra knead
Ultra knead
on back,
on back,
Roll on neck
Roll on neck
Knead on back
Chest stretch
Chest stretch
Ultra knead
Ultra knead
on shoulders
on shoulders
touches
*
Finishing
touches
*
Finishing
touches
*
Neck stretch
Roll on neck
NECK/SHOULEDR
Roll on neck,
Roll on neck,
Shiatsu, Knead,
Shiatsu, Knead,
Ultra knead
Ultra knead
Roll on lower
Roll on lower
back, Knead,
back, Knead,
Ultra knead
Ultra knead
About the DEMO course
Neck/Shoulder/
Neck/Shoulder/
ULTRA KNEAD
Back Ultra
Back Ultra
knead
knead
Chest stretch
Neck stretch
Knead on
Knead on
back,
back,
Ultra knead
Ultra knead
Ultra knead
Ultra knead
on lower
on lower
back
back
Hip stretch
Leg stretch
Ultra knead
Ultra knead
on shoulders,
on shoulders,
Knead, Roll
Knead, Roll
Hip Stretch
Leg Stretch
Back/Chest
Ultra knead
Neck stretch
Roll on neck
Chest stretch
Knead on
Knead on
lower back,
lower back
Shiatsu,
Shiatsu,
Ultra knead
Ultra knead
Neck/Shoulder
Ultra knead
Chest stretch
Swedish on back
Ultra knead
Ultra knead
on shoulders,
on shoulders,
Knead, Shiatsu
Knead, Shiatsu
Finishing
touches
Neck stretch
Neck/Shoulder
Neck/Shoulder
Knead, Ultra knead
Knead, Ultra knead
*
Hip stretch
Leg stretch
Shoulder to
Shoulder to
back Ultra
back Ultra
knead
knead
Neck stretch
Chest stretch
Neck stretch
Finishing touches
Chest/Hip/
Leg Stretch
Neck/HipStretch
Finishing touches
Hip stretch
Leg stretch
*
*
EN50
This course lets you experience the ultra knead operation on the upper body,
and air ultra knead operation on the soles and palms.
▶Continued on the next page
Page 50

About the action
(The figures are images of the respective operations.)
ULTRA KNEAD
Kneading action at
small points.
ROLL
Action to stretch an
area.
SHIATSU
Action compressing
muscle knots vertically.
TAP
Tapping action for right
and left alternately.
About the voice guidance function
KNEAD
Deep kneading action.
FULL BACK ROLL
Action stretching the
body along the backbone.
This is a function which briefly explains the operation
procedures and contents of the action.
SWEDISH
Action of rubbing gently
across a wide area.
● The respective actions
are suitable for
specific body parts.
Actions of Shiatsu
for the “NECK” are
different from of
the actions for the
“SHOULDER”.
Adjusting the voice guidance volume
Press
Display
Volume
to shift the volume level by one up/down.
OffSoft
Seat yourself deeply in the
chair, and adjust the position
of the pillow.
Press the OK button if the
position is OK.
Medium
(Default setting)
Loud
Q&A/Important
Notes
The single beep (when a button is pressed) and the triple beep
(when the adjustable setting limit is reached) will always be audible.
Memory
Memory
This can be used with the volume registered
●
▶
during the automatic course.
See page EN30.
EN51
Page 51

Q&A
Usage situation
Can I use the unit if I have an
Q
illness that requires regular
medical attention?
Consult your doctor before using this
A
unit.
Massage is a form of stimulation by tactile
pressure in which pressure is applied to
the muscles to relax them and improve
circulation. This may exacerbate some
illnesses. Be sure to consult a doctor if you
have an illness.
(See pages EN5-6.)
Usage method
Is it possible to massage only the
Q
upper body or legs?
Yes.
A
Massaging only the upper body
Store the leg rest and raise the comfort
cushion to expose the backrest and pillow.
Massaging only the legs
Use the leg & sole massage section with the
comfort cushion on the backrest.
(For details on opening the leg & sole
massage section, see page EN20.)
EN52
Page 52

,
Body scanning
How does body scanning work?
Q
The shoulder position is detected by
A
the following mechanism.
① The massage heads rise up the back to
the base of the neck, making a series of
short beeps.
② The massage heads protrude.
(If the shoulder position is wrong, the
massage heads move further up and
repeat this step until they find the
shoulders.)
③ The massage heads slowly lower to the
shoulder position.
④ A tapping action is performed in the
shoulder position for around 12 seconds.
◦ Press
and start the massage, even during this
tapping action.
to complete body scanning
<If shorter than 140 cm>
Place a cushion on the
seat and sit firmly.
During body scanning or a massage,
Q
the buttons flashed, five short beeps
sounded (
<If taller than 185 cm>
Recline the backrest
and slide your body
down.
was displayed)
and the operation stopped. What
happened?
Body scanning and the massages
A
stop for safety reasons if the body
cannot be detected for one of the
following reasons:
① The user is not sitting.
② The head and/or back is not touching the
backrest.
③ A cushion is placed against the backrest
or the user is wearing thick clothing.
* Body scanning = action of measuring the
body.
Body scanning can be performed correctly for
◦
heights between approx. 140 cm (55.1 in.) and
185 cm (72.8 in.).
Can people shorter than 140 cm or
Q
taller than 185 cm still use it?
Yes.
A
The following methods are recommended,
as the correct shoulder position may not be
found during body scanning.
Sit firmly, lean gently back so that your
low,
head touches the pil
then press
④ The comfort cushion is not raised.
to start again.
press
The correct shoulder position
Q
cannot be found during body
scanning. (The wrong position is
used every time.)
Correct body scanning may not be
A
possible for some sitting positions
(such as leaning forward.)
Adjust the shoulder position using the
POSITION button. (See page EN27.)
For more correct scanning, sit firmly in the
unit and lean back gently so that yo
is touching the pillow (backrest).
and
ur head
Q&A/Important
Notes
▶Continued on the next page
EN53
Page 53

Q&A
Continued
Upper body massage
The automatic course is not strong
Q
enough even at the strongest
setting or are too strong even at
the weakest setting.
Try the following methods.
A
<If the automatic course is not strong
enough even at the strongest setting>
Recline the backrest. The extra body weight
adds intensity to the massage.
<If the automatic course is too strong
even at the weakest setting>
Place a piece of fabric or blanket between you
and the backrest to decrease the sensation of
the massage heads.
If you feel too strong at your lower back, you
can also push the lower b
discharge some of the air in the lower back
area. This decreases the sensation.
There is a delay in movement when
Q
adjusting the position.
The chair may not move immediately
A
depending on when the POSITION
button is pushed.
(There may be a small time lag. This
is not an abnormality.)
If long beeps sound when the button is
pushed, this means that it is at the furthest
position and
cannot move any further.
ack air button to
Hand & arm massages
The intensity in the left hand & arm
Q
differs from that in the right.
Only one hand at a time is strongly
A
massaged so that the massage can be
immediately stopped using the other
hand in the event of an abnormality or
danger.
Red marks are left on the underside
Q
of my hands/arms after a hand &
arm massage.
Marks may remain on the hands and
A
arms after use. These eventually
and are not a problem.
Arm air pressure is applied more
Q
times on one side than on the other
during the automatic courses.
Changing settings such as intensity
A
(back or air) or position can cause air
pressure to be applied on one side
more than on the other. This is not an
abnormality.
◦ The air action works in connection with the
back massage, so changing the settings
can change the
air action.
fade
The height (intensity) on the left
Q
feels different to that on the right.
Is this OK?
It is designed to differ in some cases.
A
An alternating tapping mechanism is used
to create a more natural sensation. The
massage heads therefore do not move in
unison in some massages.
The height (intensity) on the left differs from
that on the right in these massages. This is
not a malfun
ction.
Operating sounds during air
massage
A rattling sound occurs under the
Q
seat during the air massage. Is this
a malfunction?
This is an operating sound that
A
is designed to occur during air
massages. It is not a malfunction.
EN54
Page 54

Reclining
Leg rest
The angle of the backrest, leg rest
Q
or armrest automatically changes at
times.
The angle automatically changes in
A
the following cases.
① When automatic course, stretch action or
manual operation are started.
The chair automatically reclines to the
massage position.
The angle does not change if the chair is
already reclined to the massage position
or further.
Raises
around 60°
Reclines
around
20°
When storing the leg rest, the leg
Q
rests stop rotating when the leg
rest rotation lock release lever is
released while they are rotating.
The leg rests are designed to stop
A
partway for safety reasons.
◦ If this happens, rotate them to the correct
position.
②
When is pressed to end the massage.
The chair automatically returns to the
upright position.
◦Only the leg rest returns to the original
position if the massage is completed
according to the 16-minute timer.
is pressed to end the massage,
If
◦
all operations immediately stop and the
angle does not automatically change.
Controller
The controller holder is unsteady.
Q
Tighten the controller holder fixing
A
screw.
If the controller holder comes off, loosen
the controller holder fixing screw, place the
holder in and tighten the fixing screw again.
Controller holder
Controller holder
ixing screw
f
▶Continued on the next page
Q&A/Important
Notes
EN55
Page 55

Q&A
(Continued)
Other
The noise grows louder after using
Q
the chair for a long time.
This may be a malfunction. Contact the
A
nearest authorized service center for
an inspection and repair.
Is there a timer function?
Q
Yes.
A
To prevent overuse, the massage
automatically ends around 16 minutes after
starting. When the timer ends, the leg rest
automatically lowers and the massage heads
are stored.
Press to use again.
◦ Take a break of around 10 minutes after
using for 16 minutes.
◦
Do not use more than twice (30 minutes)
per day.
The leg & sole massage section
Q
doesn’t get warm.
What precautions should I take to
Q
transport the unit when moving?
Take the following precautions:
A
◦Recline the backrest and raise the
massage heads to around the center of
the backrest. This moves the center of
gravity to the center of the unit and makes
it easier to move.
Do not move the chair while a person is
◦
sitting in it.
① Press
② Press
Hold down the
two but
ntil long
u
beeps sound.
③ Select an automatic course when the
power is on.
The massage heads move. An error
◦
occurs and the movement stops when
they reach the center of the backrest.
to turn the power on.
to recline the backrest.
tons
EN56
The Foot Heat warms the toe portion
A
of the cloth. Place feet so that they
are firmly pressed against the Heat
(heater) section.
Raise the leg & sole massage section
during use so that soles of your feet
touch this sec
the heater section.
You can also place a blanket over your knees
and lower legs to feel even warmer.
tion to fe
el the heat from
Massage
heads
④ Press to turn the power off.
◦ Be sure to press
automatically raises the backrest.
⑤Turn the power switch “off” and remove
the power plug (see page EN45.)
If you need to move the chair with the
backrest upright, follow the steps below.
(1) Follow steps ①→③→④ above and raise
the massage heads to the center.
(2) Turn the controller power on again, raise
the backrest and press
power.
◦ Handle the chair with care. If you do
not have the original box, use packing
materials to prevent damage or vibration.
◦ When packing, check that the power
cord and controller cord are not wrapped
around the main unit and take measures
such as placing them on the seat with
the controller to ensure that they do not
scrape against the ground while moving.
, as
to turn off the
Page 56

Troubleshooting
Investigate the Problem and follow appropriate the Cause and Remedy below.
If the problem still exists after following the remedy, contact an authorized service center.
Problem Cause and Remedy
For safety purposes, operation may stop when
The unit stops during
operation.
excessive force is applied to the unit.
Turn off the power switch, wait 10 seconds and then switch it back
on for operation.
It is not possible to recline the unit.
The leg rest cannot be raised or
lowered.
( All the displays and buttons on the
controller will flash and then turn off.)
The massage heads do not
come up to the shoulder or
neck.
The height of the left and right
massage heads is different.
Heat massage heads do
not get warm.
The Foot Heat does not
get warm.
If the unit encounters an obstacle or if excessive force is exerted on it
during operation, in the interests of safety the unit will come to a stop.
When all displays and buttons are flashing and the backrest or the leg
rest has stopped, turn off the power of the unit once, turn on the
power again after approximately 10 seconds, and then operate the unit.
If your head does not contact the pillow or your back does not contact the backrest,
the shoulder position may be detected as lower than the actual position during the
body scanning. Sit on the seat in the deepest position and put your head on the
pillow, and then repeat the operations again from the start.
An alternating tapping method is employed, which means that this phenomenon
will naturally occur. There is nothing wrong with the unit.
● is set to Off.
Sense of warmth from the massage heads differs depending on your body
●
shape, the massage body part, massage action, clothing, and room temperature.
● is set to Off.
● The Foot Heat warms the toe portion of the cloth.
Sense of warmth from the Heat (heater) section differs depending on
your body shape, the massage body part, massage action, clothing, and
room temperature.
Raise the leg/sole massage section during use so that soles of your feet
touch this section to feel the heat from the heater section. You can also
place a blanket over your
knees and lower legs to feel even warmer.
See page EN26.
See page EN54.
The Heat massage heads or
Foot Heat do not cool down
even after being turned off.
Reclining does not take place even though
a massage is started in automatic course.
(The seat does not automatically recline.)
The backrest does not
return to the upright
position.
●
Because of the structure of the heater, the Heat massage heads
will feel warm for a while after heating due to the residual heat.
●
Continuing to massage the same area even after turning off the Heat
massage heads and the Foot Heat switch may increase the temperature felt.
Automatic reclining will not activate when the backrest is reclined
to flat position more than massage position and leg rest is in upper
position. See page EN55.
If the unit is stopped by automatic shut-off or by pressing , it will not return automatically.
(To return from the reclined position to the original position, press
twice.)
Q&A/Important
Notes
EN57
Page 57

Troubleshooting
Problem Cause and Remedy
(Continued)
The unit will not operate at all.
●
Upper body (neck to lower back) massage
●Lower body massage
●Hands and arms massage
It is not possible to
massage hands and arms.
Sometimes the power wont turn
on when
is pressed again
when a massage has finished.
The unit has been damaged.
● The power plug has been disconnected. See page EN21.
● The power switch on the unit has not been turned on.
● An automatic courses button or manual operation button hasnt
been pressed after pressing
The air plug on the armrest is disconnected. See page EN17.
Approximately 5 seconds are required for program termination after
a massage finishes. Wait at least 5 seconds once all movement
has stopped before pressing
To prevent accidents, be sure to contact an authorized service
center.
.
.
The power cord or power plug is abnormally hot.
Sounds and sensations of the unit
The following sounds and sensations occur while using the unit. However, they occur due to the
construction of the unit and are perfectly normal.
● Sounds and feels like the massage heads are
straining to get over wrinkles in the cloth
●
Operating sounds of the kneading or tapping actions
● Creaking sound when the massage heads are in
operation
● Operating sounds when the massage heads move
up or down
● Sounds of the belt rotating
● Motor sounds
● Sounds when the massage heads change from
push to pull
● Sound when sitting down
If these sounds have grown louder, there may be a malfunction.
●Contact the nearest authorized service center for inspection and repair.
● Sound of the comfort cushion moving over the
armrest when the seat is reclining
● Rubbing sound of the massage heads on the seat
fabric
● Sound of discharging air
● Sounds when air pressure is applied
● Rattling sound of the leg rest
● Sounds of the pump beneath the seat
● Sounds of the valve beneath the seat
● Clunking sound during leg stretch or operation
● Sounds of air moving
● Sounds of the foot massager sliding
WARNING
Do not attempt to open or disassemble any
part of the unit. Only use an authorized
Panasonic servicer to fix your unit.
Never operate the unit if it has a damaged
power cord or plug. Return the unit to the
nearest authorized service center if it is not
working properly, if it has been dropped or
damaged, or if it has been immersed in water.
If the massager functions abnormally,
immediately turn off the power and have the
massager checked by an authorized service
center.
WARNING
EN58
Page 58

,
Error display
Contents of the error will be displayed in the remaining time display area
when an error occurs during the operation.
Remaining time
display
<Example of error display>
● For the error “U10”
Error display Contents
For safety reasons, operation will terminate automatically
when it cannot detect if someone is seated. If this error occurs
even if you are seated, press
backrest, and operate from the start again.
Operation is terminated because there is a problem with
internal communication.
will flash alternately.
, sit back all the way to the
Operation is terminated because there is a problem with
the massage mechanism.
Operation except for the massage mechanism is terminated
because there is a problem with the reclining mechanism
or the raise/lowering mechanism of the leg rest.
Please contact an authorized service center. (See the warranty card for the contact number.*)
Service and maintenance will be carried out smoother if the error number is communicated
when contacting.
Q&A/Important
Notes
* Only for USA and Puerto Rico
EN59
Page 59

Panasonic Corporation of North America
Two Riverfront Plaza, Newark, NJ 07102-5490
1-800-338-0552 (USA only) for questions and comments
1-877-PANAFIX (USA only) for massage chairs customer service
http://www.panasonic.com/massage
Panasonic Canada Inc.
5770 Ambler Drive
Mississauga, ON L4W 2T3
1-800-561-5505
http://www.panasonic.com
© Panasonic Corporation 2014
Fecha de publicación: 2014-04-01
Printed in China
Impreso en China
No. 1 EN, SP, FR Imprimé en Chine
Issued date: 2014-04-01
Date de parution : 2014-04-01
P9310MA73201
 Loading...