

Page 1
No. 1 EN, SP Printed in China
P93101285231 Impreso en China
Panasonic Consumer
Electronics Company
One Panasonic Way 1H-1
Secaucus, New Jersey 07094
1-800-338-0552 for questions and comments.
www.panasonic.com/massage
19 2008/08/28 13:17:49
English 1
Español S1
Operating Instructions
Instrucciones de Uso
Sillón de Masaje Doméstico
Household Massage Lounger
Model No./Nº de Modelo
EP1285
Before operating this unit, please read these instructions completely.
Antes de utilizar esta unidad, lea compleatamente estas instrucciones y
guárdelas para referencia futura.
1 2008/08/28 13:17:32
Page 2

1
English
2
English
IMPORTANT SAFETY INSTRUCTIONS
Basic precautions should always be followed when using an electrical unit, including the following.
Please ensure that you read all instructions before using the Household Massage Lounger.
DANGER – To reduce the risk of electric shock:
1. Always unplug this unit from the electrical outlet immediately after using and before cleaning.
WARNING – To reduce the risk of burns, fire, electric shock, or injury to persons:
1. Always insert the power plug all the way into the outlet to reduce the risk of short-circuit and fire.
2. The unit should never be left unattended when plugged in. Always unplug the unit when not in use.
3. The unit is not to be used by people who cannot move or communicate on their own.
4. Only use the unit for the purpose described in these instructions.
5. Do not stand on the unit.
6. Do not use any accessories other than those recommended by the manufacturer.
7. Always return the seat to the upright position. Keep children away from the unit.
8. Never operate the unit if it has a damaged power cord or plug. Return the unit to the nearest authorized service
center if it is not working properly, if it has been dropped or damaged, or if it has been immersed in water.
9. Keep power cords away from heated surfaces. Do not carry the unit by the power cord.
10. Never block the air openings during operation and make sure that all air openings are kept free of lint and hair,
etc. Do not drop or insert anything into any of the openings of the unit.
11. Do not use the unit on top of heating appliances, such as electric carpets, etc. Do not operate the unit under
blanket or pillow. Excessive heating can occur and cause fire, electric shock, or injury to persons.
12. Do not use the unit in bathrooms or other damp or humid places as this may cause electric shock or cause the
unit to malfunction. Do not spill water, etc. onto the controller.
13. Do not use the unit outdoors.
14. Do not use or operate where aerosol spray products are being used or where oxygen is being administered.
15. When unplugging the unit, turn off all controls before removing the plug from power outlet. Do not use the unit
with a transformer as this may lead to malfunction or electric shock.
16. Connect this unit to a properly grounded outlet only. See Grounding Instructions.
SAVE THESE INSTRUCTIONS
SAFETY PRECAUTIONS
WARNING: To avoid the risk of injury:
1. Persons with any of the conditions listed below or who are undergoing medical treatment or suffer from medical
conditions should consult with their physicians before using the unit:
a) Pregnant women, people who are ill, in poor physical shape.
b) People suffering from back, neck, shoulder, or hip pain.
c) People who have a pacemaker, defibrillator, or other personal medical devices prone to electronic
interference.
d) People suffering from heart disease.
e) People who are prohibited from receiving massage by a physician due to thrombosis or aneurism, acute
varicose veins, or other circulatory disorders.
f) People with irregular curvatures of the spine.
2. This unit should not be used by children. Remove the key when not in use and store out of reach of children.
3. Sit down slowly after checking the position of the massage heads. Never put any part of your body between the
massage heads as the squeezing action of the massage heads may cause injury. Never put your fingers or feet
in the gap between the backrest and seat, the backrest and the armrest, or the seat and cover under the
armrest.
4. Do not use the unit against bare skin. While thin clothing may increase effectiveness, exposing the skin directly
to the massager may irritate the skin.
Do not use the unit while wearing anything hard on your head like a hair accessory, etc. Do not use the unit for
massaging the head, abdomen, front neck, elbows or knees.
Do not use excessively strong massage action on the back of the neck.
5. When using the massager, use the Neck Roller Position button to adjust the massage heads to the correct
position. You can adjust the shoulder position in this way in the pre-programs and Rolling in the manual
operation.
Failure to align the shoulder position correctly can lead to injury.
6. Do not stretch the back muscles for more than approximately 15 minutes at a time. To avoid overstretching the
muscles which may result in discomfort, do not use the unit for more than 5 minutes when first using it. You can
gradually increase the duration and strength of the massage as you become used to it.
Do not massage any one point for more than 5 minutes at a time.
Excessive massaging can overstimulate the muscles and nerves and result in an adverse effect.
To prevent excessive massaging, do not use the massager for more than a total of 15 minutes each session.
After approximately 15 minutes, the massage heads will be retracted and stop moving.
The back cushion can be removed if you want to experience a stronger back massage. Exercise extreme care
when you use this mode in order to avoid back pain or injury. Use only for short periods of time (no more than
15 minutes). Reinstall the back cushion if you want to restore to normal massage intensity.
7. While using the massager, if you start feeling sick or if the massage seems painful, stop using it immediately.
While using the massager, if the pressure seems too strong, the movement of the massage heads can be
stopped at any time by pressing the Quick Stop button.
8. Do not go to sleep while using the unit. Do not use the unit after drinking alcohol.
9. When the seat back is in a reclined position, do not sit on it or sit with your legs resting on the headrest.
10. Do not allow children or pets to play on or around the unit, especially during operation.
11. Do not unplug the unit or turn it off during operation. Unplug the unit immediately if there is a power outage.
12. Be sure to start on the gentle massage program if using the massager for the first time. The shiatsu massage is
stronger and should be enjoyed after one has gotten accustomed to the chair.
13. Do not allow children to play on this mechanized furniture or operate the mechanism. Always leave in an upright
and closed position. Keep hands and feet clear of mechanism. Only the occupant should operate it.
14. Always raise the back cushion to check that the fabric of the unit itself has not been ripped before using the unit.
Please also check other areas to ensure that the fabric has not been ripped. No matter how small the rip, if you
find one then immediately stop using the unit, unplug the power cord and have the unit repaired at an
authorized service center.
1-2 2008/08/28 13:17:32
Page 3
3
English
4
English
OPERATING PRECAUTIONS
WARNING: To avoid damaging the chair, follow these precautions:
1. The chair is designed for a maximum user weight of 264 lbs (120 kg). Exceeding the maximum weight may
cause permanent damage to the massage mechanism and/or other components of the unit. Any such damage
is deemed to be user abuse and is not covered under the Limited Warranty.
2. Do not sit on or drop the controller. Do not pull the controller cord or the power cord. Be careful not to catch the
cord of the controller between the armrest and the chair back.
3. Do not treat the chair roughly, turn the chair on its side, turn the chair over or stand on it.
4. Do not treat the covering roughly.
Keep sharp or pointed objects away from the covering of the chair. Be careful not to drop lit ashes, lit cigarettes
or matches on the chair.
Exposure to direct sunlight can cause fading or a change in color of the covering.
5. If the massager functions abnormally, immediately turn off the power and have the massager checked by an
authorized service center.
6. Do not repeatedly operate any switch at short intervals. Such action may cause the switch to malfunction.
7. Some noise may be heard coming from the massager while in use. This is due to the structure of the massager
and is normal.
8. Make sure there are no obstacles behind the chair before reclining it. The chair can be reclined to a maximum
angle of 170˚. If the back hits a wall or pillar, the chair may malfunction. Be sure to have ample space behind
the chair. Recline the chair slowly in order to avoid contact with an obstacle.
9. When excessive pressure is applied to the massage heads, they may stop moving for safety. When moving the
heads up from the lowered position, one’s body weight may stop the heads’ movement. In such a case, slightly
raise your body and allow the massage heads to move up.
10. After each massage, slide the power switch, which is located on the right side of the chair, to the “off” position
and turn its lock switch to the “lock” position.
11. Do not sit on the chair with wet body or hair.
12. The unit must not be used in “wet rooms” (sauna, swimming pool) or outdoors.
13. Do not attempt to open or disassemble any part of the unit. Only use an authorized Panasonic servicer to fix
your unit.
•
•
GROUNDING INSTRUCTIONS
This product must be grounded. If it should malfunction or break down, grounding provides a path of least
resistance for electric current to reduce the risk of electric shock. This product is equipped with a cord having an
equipment-grounding conductor and a grounding plug. The plug must be plugged into an appropriate outlet that is
properly installed and grounded in accordance with all local codes and ordinances.
DANGER
Improper connection of the equipment-grounding conductor can result in a risk of electric shock. Check with
a qualified electrician or serviceman if you are in doubt as to whether the product is properly grounded. Do not
modify the plug provided with the product – if it will not fit the outlet, have a proper outlet installed by a qualified
electrician.
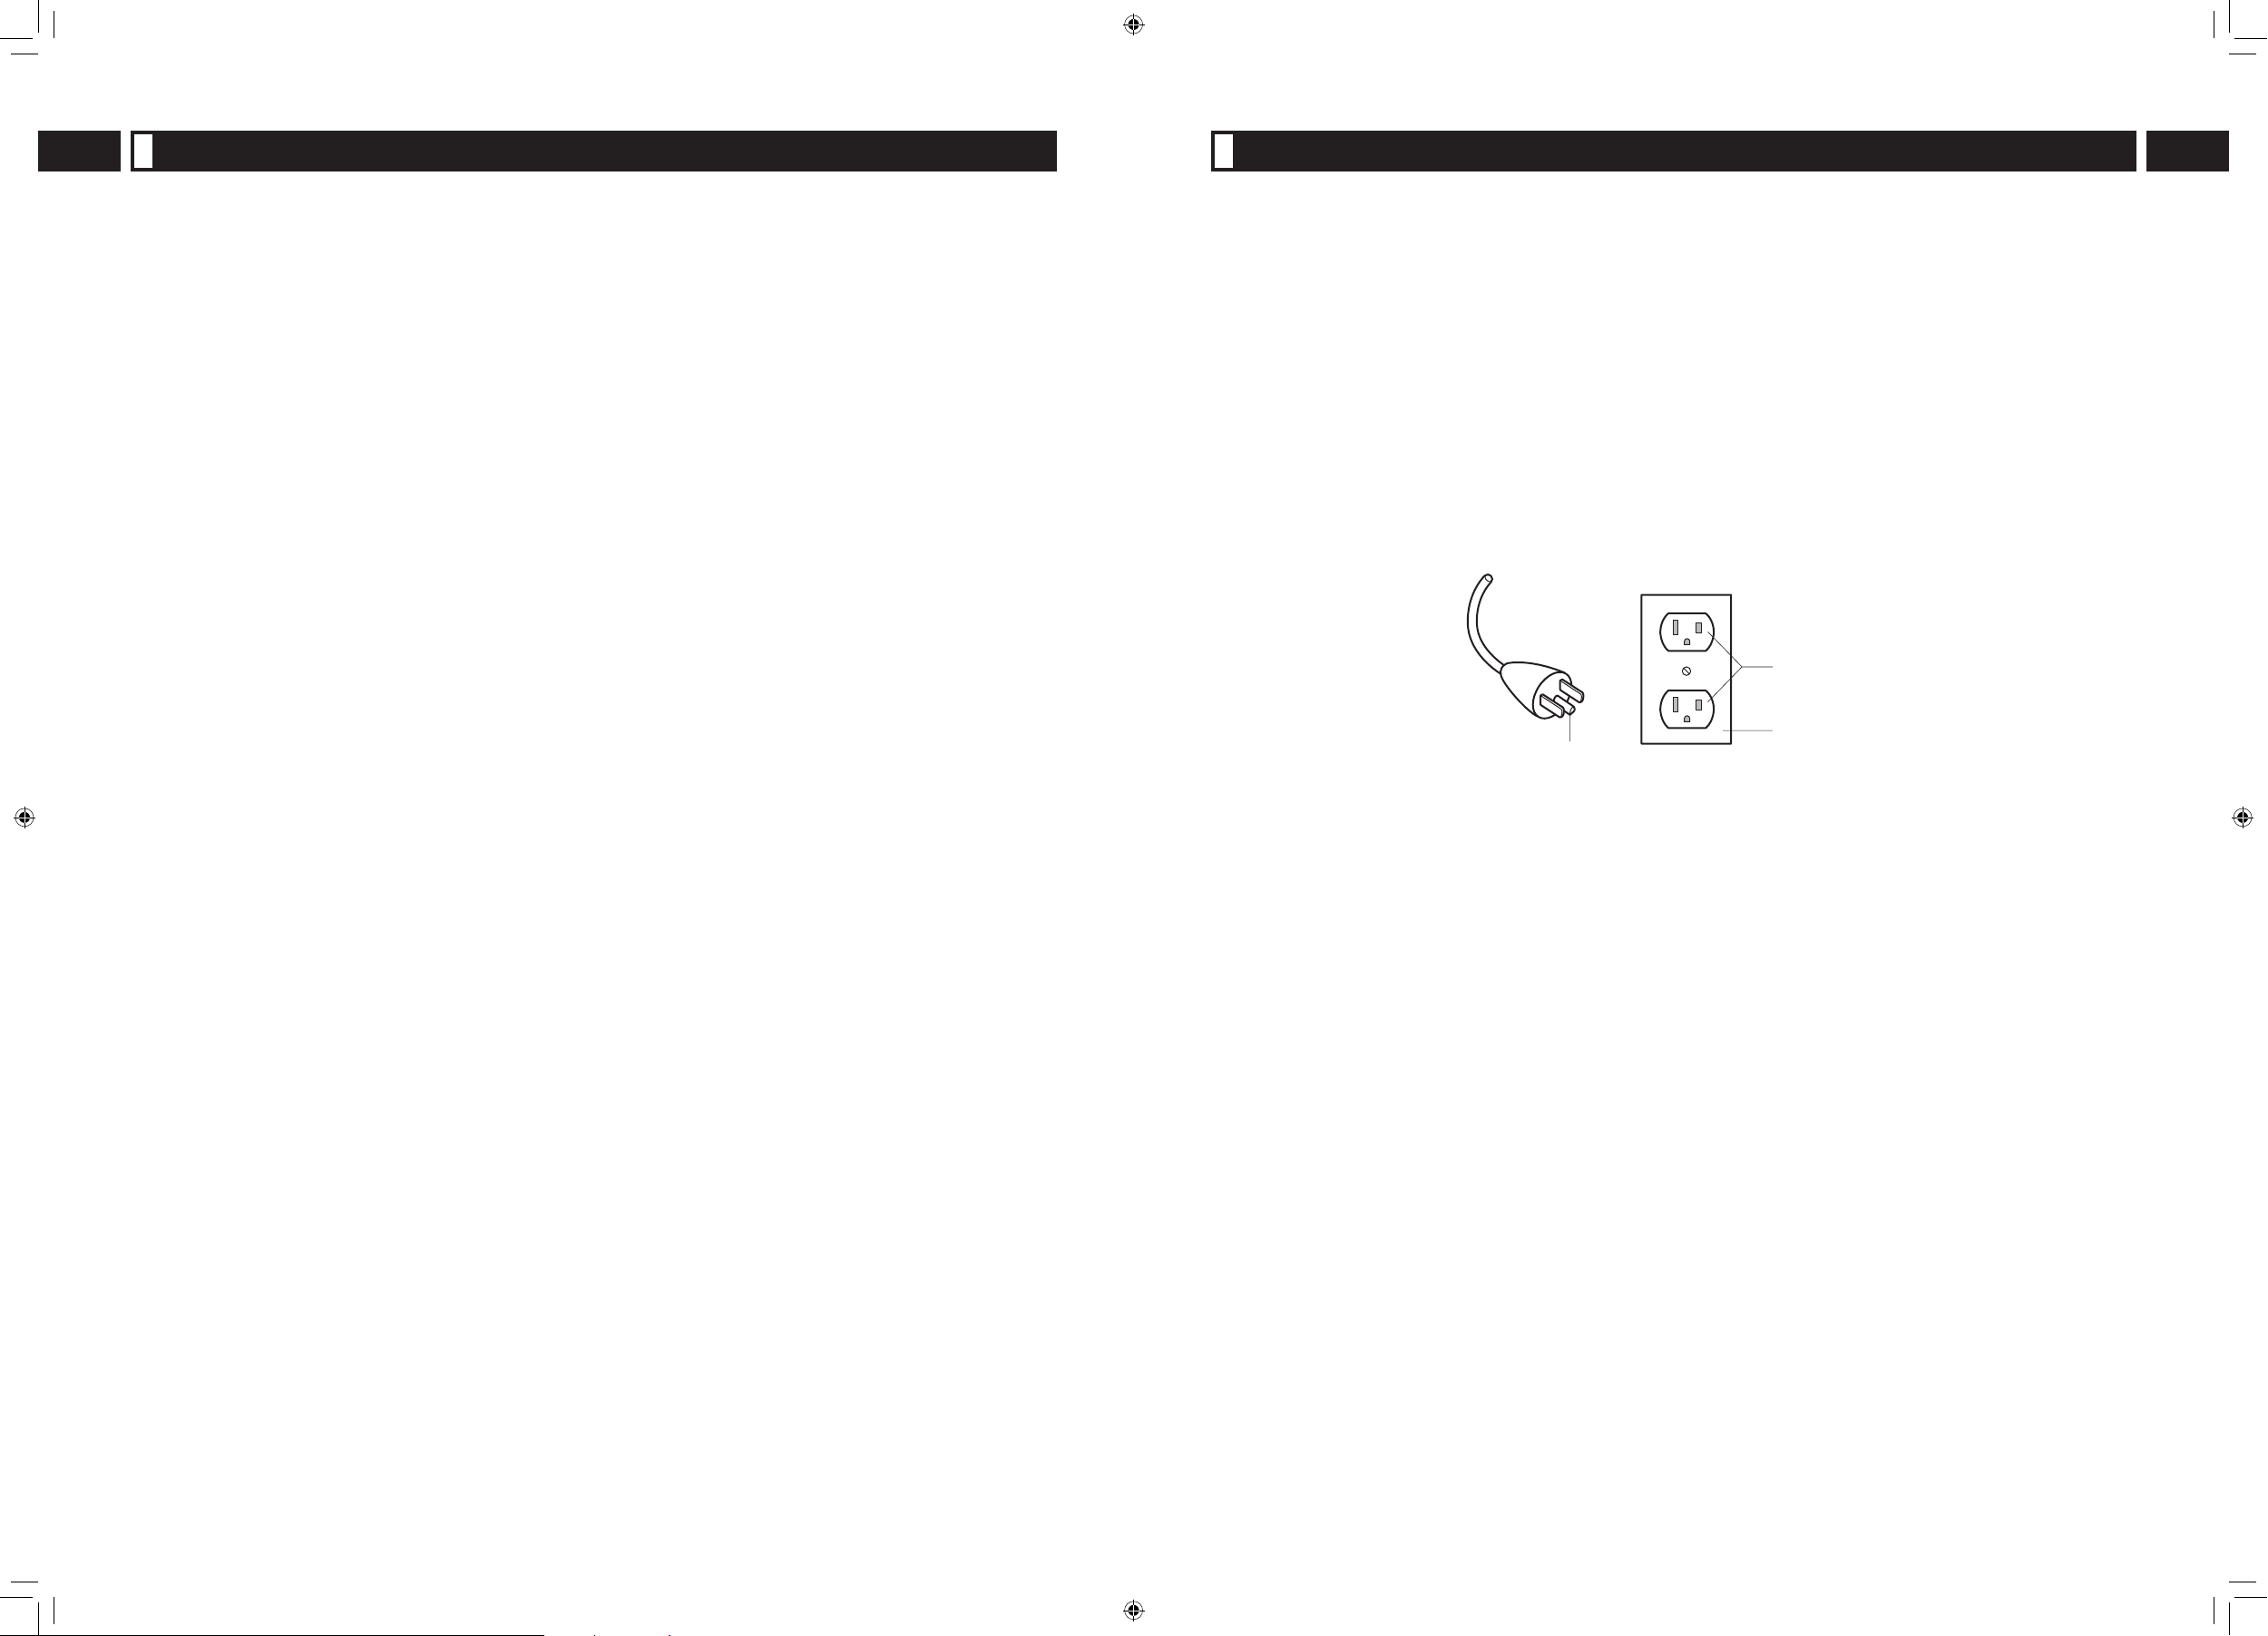
This product is for use on a nominal 120-volt circuit and has a grounding plug that looks like the plug illustrated in
Figure A. Make sure that the product is connected to an outlet having the same configuration as the plug.
No adapter should be used with this product.
Figure A
GROUNDED
OUTLET
GROUNDED
OUTLET BOX
GROUNDING PIN
3-4 2008/08/28 13:17:32
Page 4
5
English
6
English
22
21
20
23
1
2
3
5
4
6
7
8
9
11
10
12
13
14
16
17
18
19
24
15
14
Back Cover
15
Backrest Latch
16
Safety Precaution Label
17
Specification Label
18
Power Cord
19
Power Plug
20
Power Switch
21
Lock Switch
22
Lock Switch Key
23
Lock Switch Key Tag
To prevent children from
accidentally swallowing the lock
switch key.
24
Wheels
•
1 Pillow Velcroes
2
Armrest
3
Controller Holder
On both the left and right side.
4
Legrest Slide Lever
Extendable length to approx. 5 in.
(12 cm)
5
Legrest
6
Leg/Sole massage section
Includes an air massage function.
7
Pillow
For use when watching TV or just
relaxing.
The pillow has a height
adjustment. (See Page 10)
The pillow is detachable, and can
also be flipped over.
•
•
•
•
•
•
8 Back Cushion
9 Retracted Position of Massage
Heads
The massage heads are normally
retracted to the left and right in
the upper part of the backrest.
10
Velcro for securing the controller
cord
11
Sole Shiatsu Sheet
“Stopper” is provided on the back
side.
Fine adjustment of position is
possible.
The sole shiatsu sheet is
detachable.
12
Back Cushion Zipper
The back cushion is detachable.
13
Handle
•
•
•
•
•
SPECIFICATIONS
Power Supply:
AC 120 V 60 Hz
Rated current:
2.0 A
Upper Body Massage
Massage Area (Up-Down): Approx. 26.6 in. (67.5 cm)
Massage Area (Left-Right): Distance between Massage Heads during Operation
Approx. 2.4 in. – 7.1 in. (6.0 cm – 18.0 cm)
Up-Down Movement Speed: Approx. 20 – 35 sec. return.
Massage Speed: Knead: Approx. 20 cycles/min. – 30 cycles/min.
Swedish: Approx. 30 cycles/min. – 50 cycles/min.
Compression: Approx. 20 cycles/min. – 30 cycles/min.
Hawaiian: Approx. 30 cycles/min. – 50 cycles/min.
Soft Shiatsu: Approx. 150 cycles/min. – 210 cycles/min.
Tap: Approx. 230 cycles/min. – 350 cycles/min.
Full Roll: Approx. 20 sec./cycle – 35 sec./cycle
[Movement range: Approx. 21.1 in. (53.5 cm)]
Regional Roll: Approx. 7 sec./cycle – 9 sec./cycle
[Movement range: Approx. 4.7 in. (12 cm)]
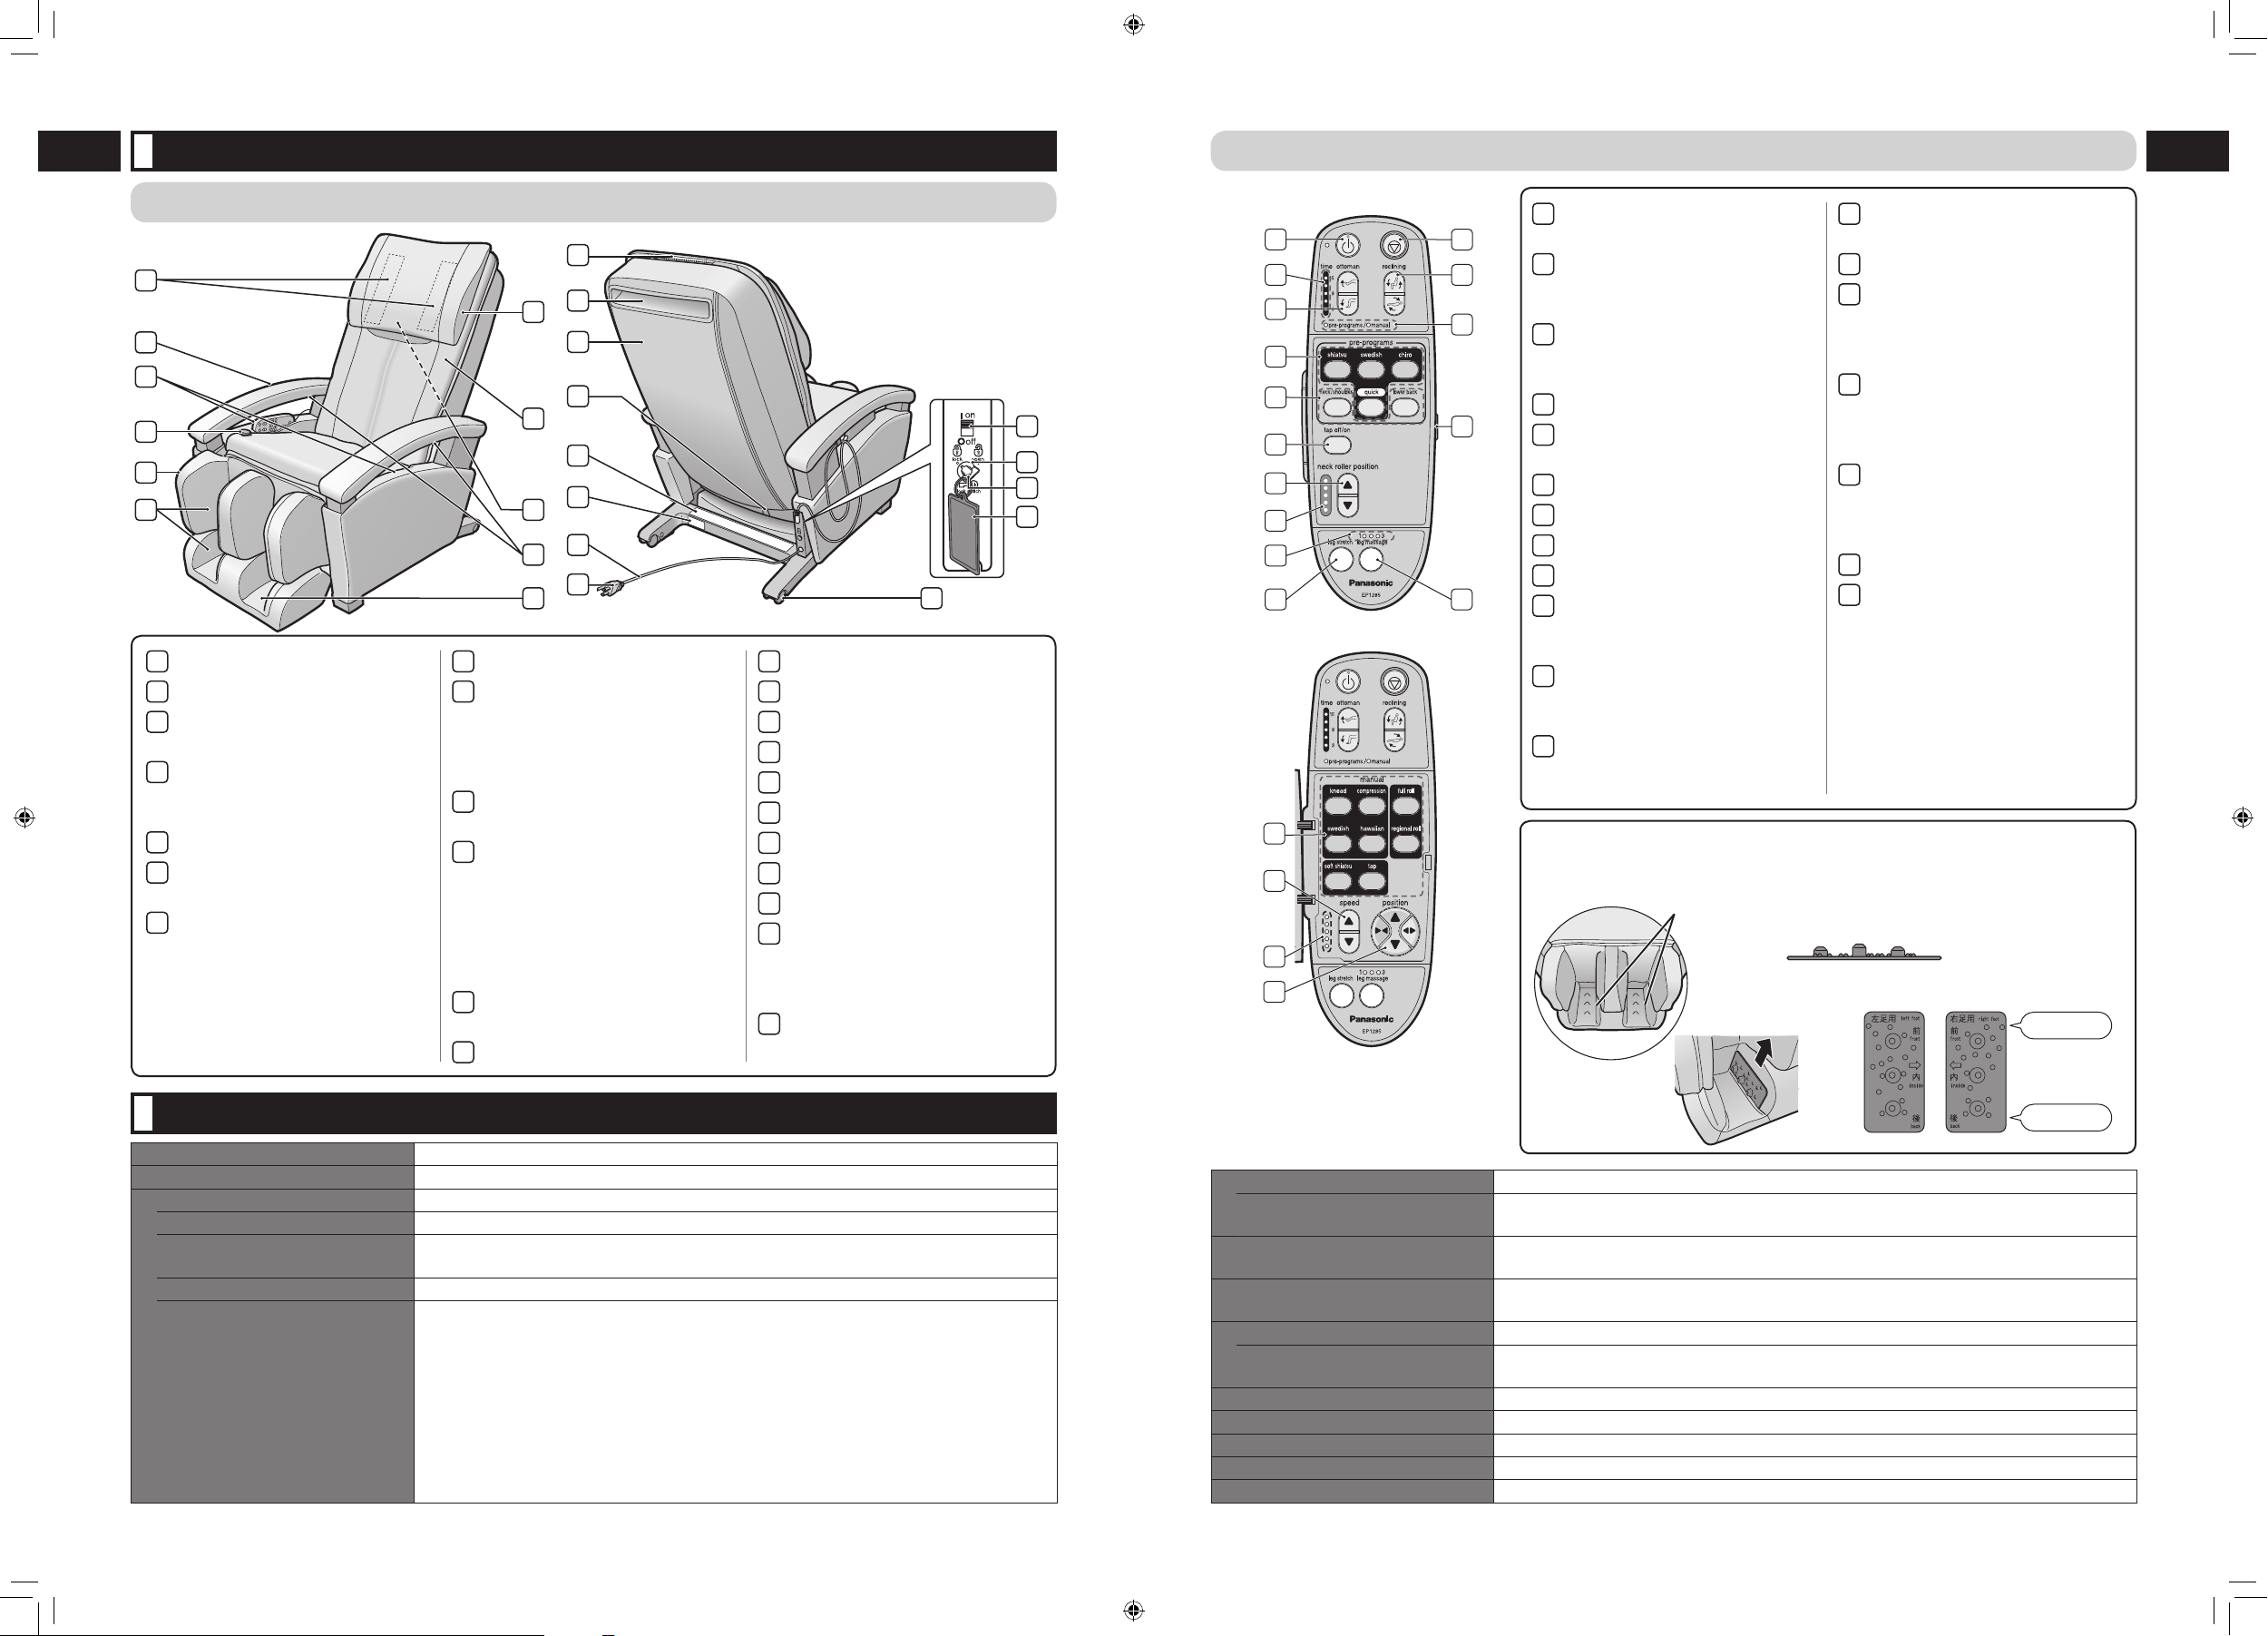
PART NAMES AND FUNCTIONS
MASSAGE LOUNGER
The sole shiatsu sheet is
detachable.
Opening
To attach the sole shiatsu sheet
Projections are on
the upper side.
Toe
Heel
For the right footFor the left foot
Lower Body Massage
Air Pressure: Strong: Approx. 27.0 kPa
Medium: Approx. 20.0 kPa
Weak: Approx. 11.0 kPa
Reclining Angle:
Backrest: Approx. 120° – 170°
Legrest: Approx. 0° – 75°
Automatic Shut-Off:
Approx. 15 min. for both upper and lower body
(Approx. 5 minutes for the quick massage)
Dimensions
When not reclined. (H × W × D):
When reclined. (H × W × D):
Approx. 43.3 in. × 29.1 in. × 47.2 in. (110 cm × 74 cm × 120 cm)
Approx. 24.0 in. × 29.1 in. × 66.1 in. (61 cm × 74 cm × 168 cm)
Weight of Unit:
Approx. 139 lbs (63 kg)
Dimensions of Box (H × W × D):
Approx. 30.7 in. × 30.3 in. × 47.6 in. (78 cm × 77 cm × 121 cm)
Weight in Box:
Approx. 172 lbs (78 kg)
Maximum User Weight:
Approx. 264 lbs (120 kg)
Minimum Distance from Wall:
15.7 in. (40 cm)
37
Operation Indicator
Displays operational status.
38
Cover
39
Leg Massage button
Turns airbags on and off and
adjusts intensity of leg massage
in 3 steps.
40
Manual Operation buttons
This allows you to select the
massage action you desire.
(See Page 14)
41
Speed Adjustment button
Adjusts speed of upper body
massage in 5 steps during
manual operation.
42
Speed Indicator
43
Massage Position Adjustment
button
Adjusts position of massage
heads during manual operation.
(See Page 14)
•
•
•
•
•
25
OFF/ON button
Switches the controller on and off.
26
Time Indicator
Displays time remaining before
end of massage.
27
Ottoman button
Use this button to adjust the angle
of the legrest.
28
Pre-Programs buttons
29
Massage Focus buttons
Used to select focus of massage.
30
Tapping OFF/ON button
31
Neck Roller Position button
32
Neck Roller Position Indicator
33
Leg Massage Intensity Indicator
34
Leg Stretch button
Used for turning leg stretch on
and off.
35
Quick Stop button
Used to stop the massage
immediately.
36
Reclining button
Use this button to adjust the angle
of the backrest and legrest.
•
•
•
•
•
•
•
26
25
27
28
29
30
31
32
33
34
35
36
37
38
39
40
41
42
43
Cover Closed
Cover Opened
SOLE SHIATSU SHEET
Be sure of the proper direction and sides of the
sole shiatsu sheet and insert it into the opening.
CONTROLLER
5-6 2008/08/28 13:17:33
Page 5
7
English
8
English
SETTING UP THE UNIT
WHERE TO USE THE UNIT
Keep at least 3.9 (10 cm) away from the wall.
Approx. 76.8
(195 cm)
Approx. 13.8
(35 cm)
Width approx.
27.5 (70 cm)
Approx. 11.8
(30 cm)
Mat
Area where legrest
could touch the floor
Area where unit
touches the floor
Avoid places where the unit will be exposed to direct sunlight
for long periods of time or places where it will be exposed to
high temperatures, such as in front of a heater, etc., as this
can cause discoloration or hardening of the leather.
Placing a mat or cloth under the unit is recommended to
prevent floor damage. The size of the mat should be sufficient
[at least 47.2 in. × 27.5 in. (120 cm × 70 cm)] to cover the
areas where the unit touches and where the legrest could
touch the floor.
Set the unit near the outlet.
See Warning No. 11 and 12 on page 1.
•
•
•
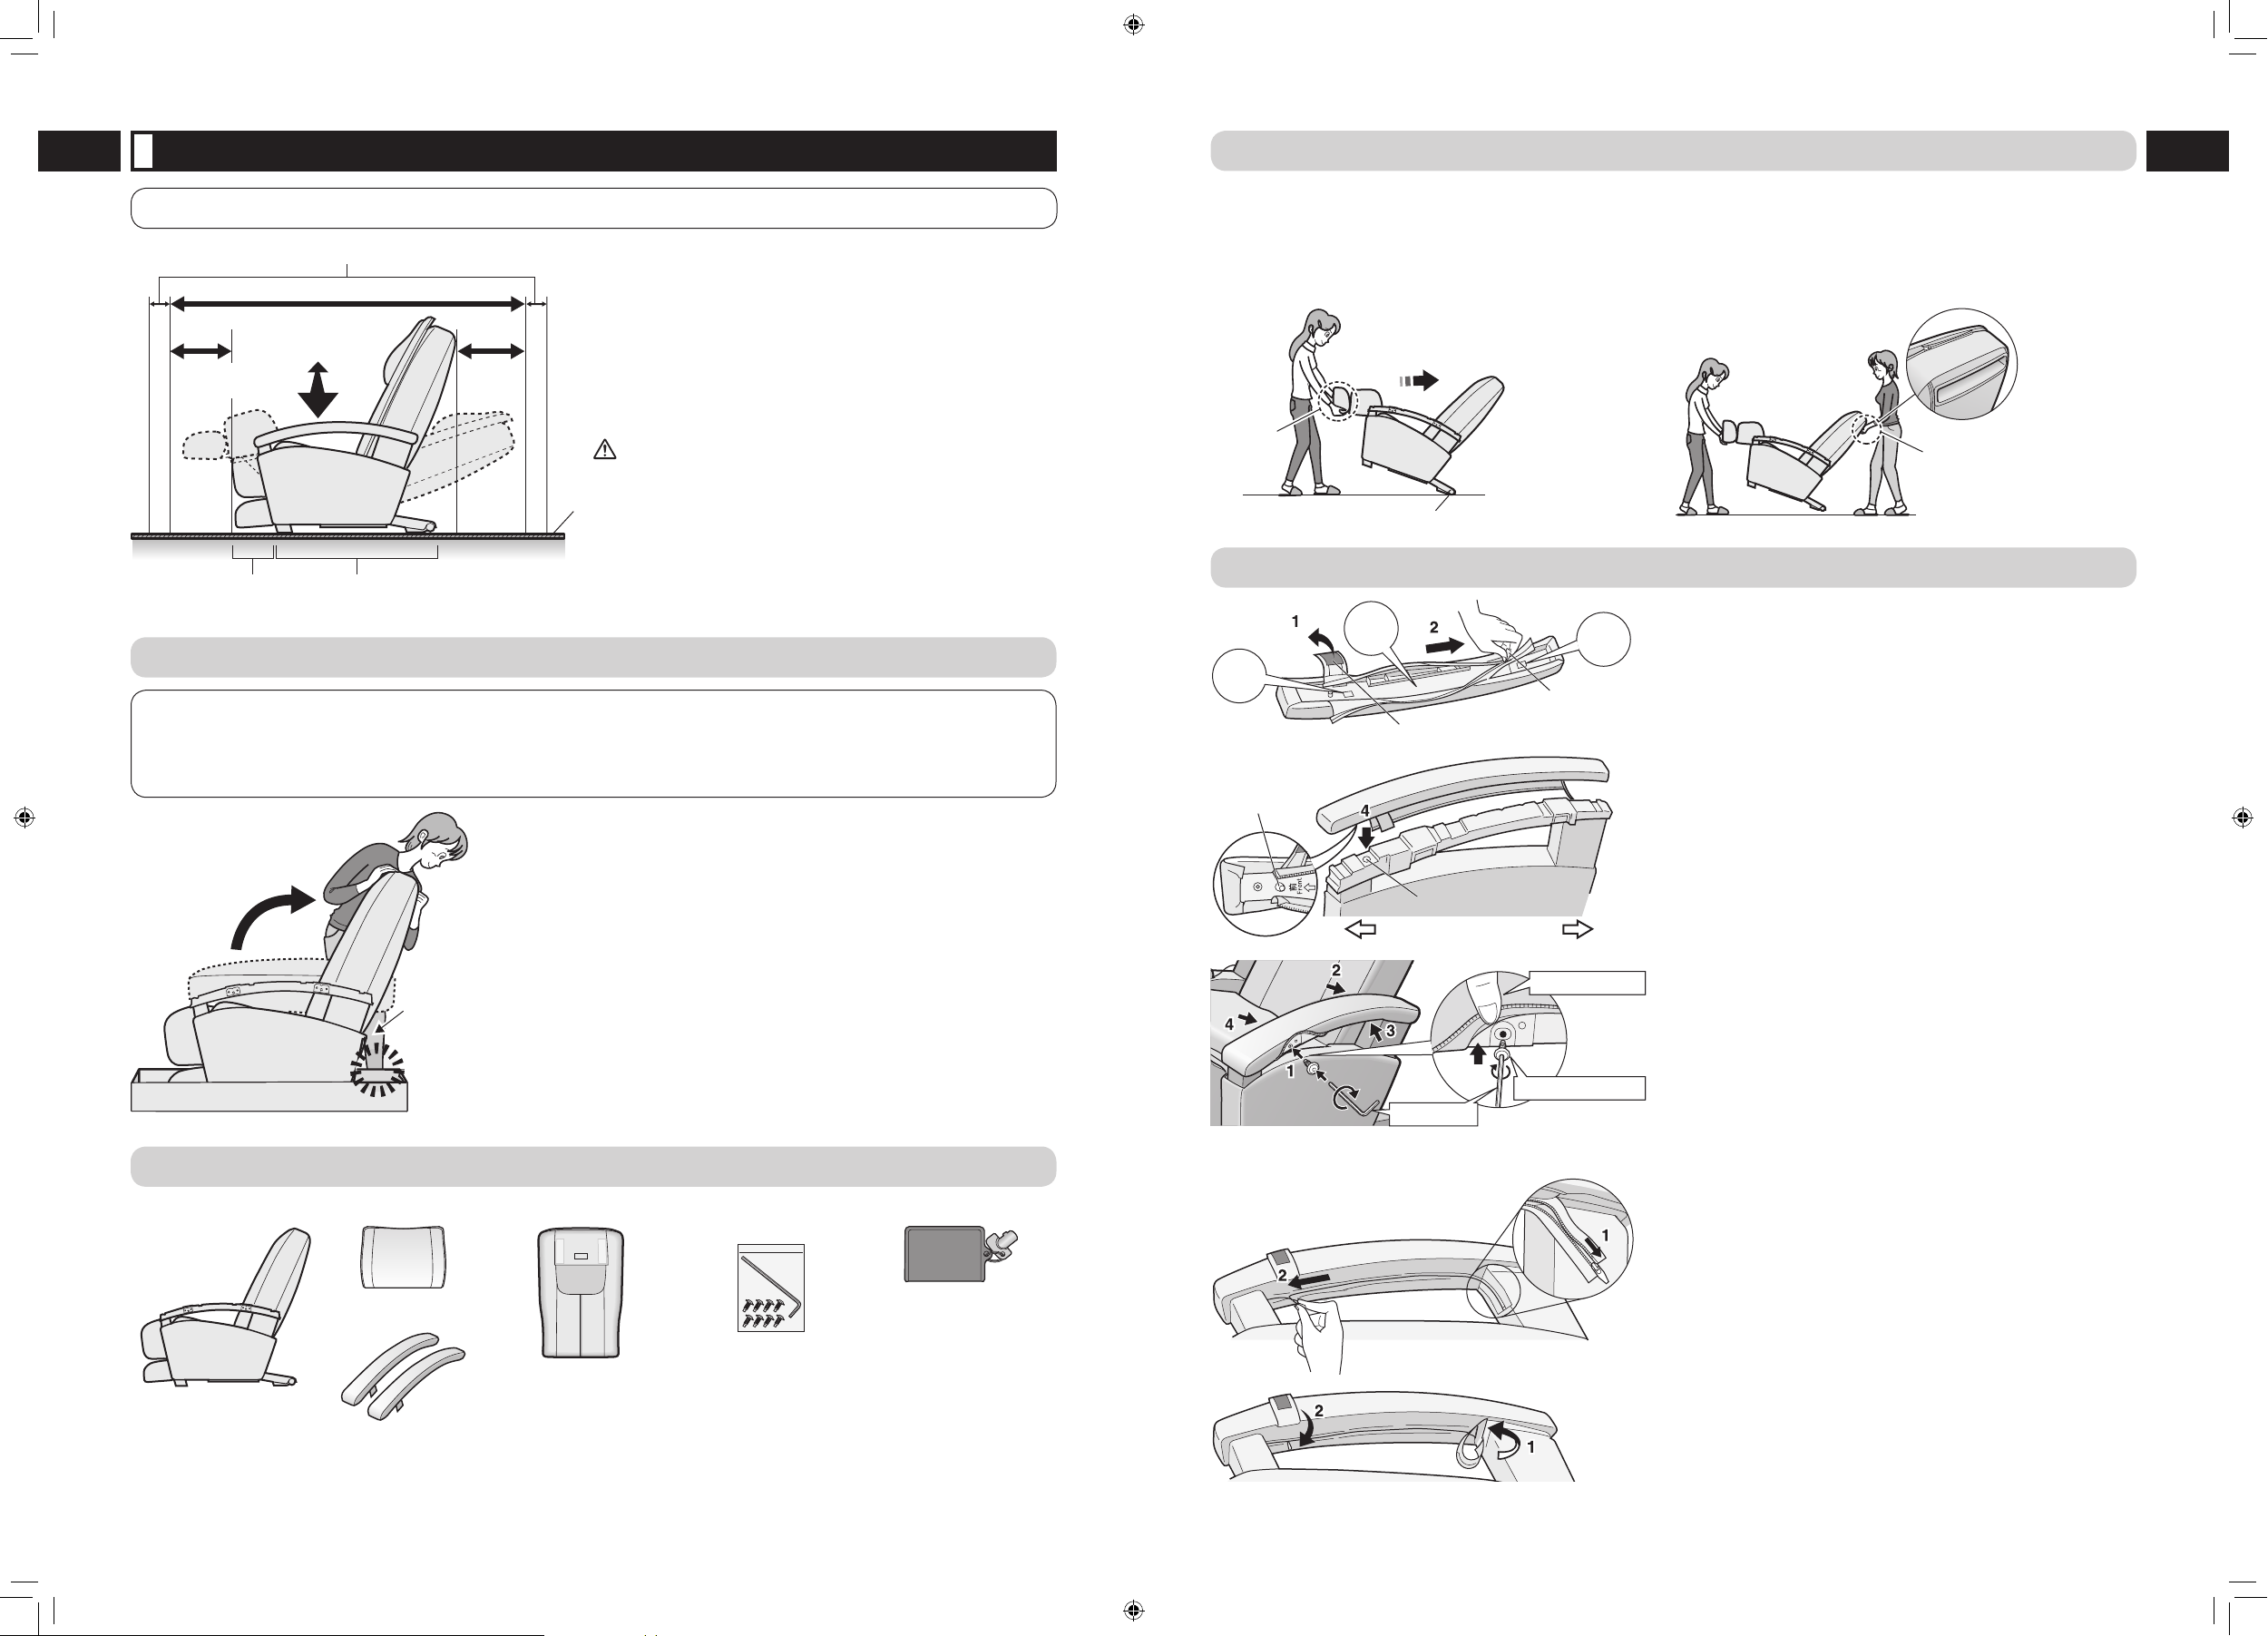
1 UNPACK THE UNIT AND RAISE THE BACKREST
CAUTION
When raising the backrest, be careful not to cause hands or feet to become caught between the backrest and the
backrest latch or the backrest and the armrests.
Failure to follow this precaution may result in injury.
•
Check that there
is nothing
around the unit.
Backrest latch
1
Remove the top of the shipping container.
When packed for shipping the backrest is folded forward.
2
Remove the packing and cushioning
materials and take out all accessories.
3
Raise the backrest.
Do not connect the power cord to an electrical outlet during setup.
Hold the backrest with both hands and lift in the direction of the
arrow until it comes to a stop.
Be careful the power cord and controller are not caught in the
backrest.
•
•
•
•
2 INSPECT CONTENTS OF SHIPPING CONTAINER
Massage Lounger Pillow Back Cushion Allen Key — 1
Attachment Screws — 8
Lock Switch Key — 1
The lock switch key has
been inserted in the
lock switch prior to
leaving the factory.
•
Armrests — 2
3 HOW TO MOVE THE UNIT
Using the wheels to move the unit
Grasp the legrest to move the unit when using the wheels.
It is easier to move the unit with the massage heads
retracted and the backrest in the upright position.
* Place a mat or cloth on the floor and move the unit slowly
to prevent floor damage.
•
•
Lifting the Unit
Move the unit by having one person hold the legrest and
another person use the handles on the back.
* Please hold the handles and legrest securely to avoid
dropping the unit as it may damage your floor.
•
Move it slowly
Legrest
Wheels
Place your
fingers inside
the handle
4 INSTALL THE ARMRESTS ON THE UNIT
Front
Back
Left
Velcro
Zipper
Convex
Front Rear
Round hole
1
Install the armrests.
(Be careful to avoid damaging the coated fabric.)
1 Unfasten the velcro.
2 Unfasten the zipper of the armrest completely.
3 Check the side (right or left) of the armrest. Check
the direction (front or back) of the armrest as well.
The illustration shows the left armrest. The right armrest
is stamped “Front”, “Right” and “Back”.
* The left armrest must be installed on the left hand side of
the unit.
4 Align the convex portion of the armrest with the
round hole on the unit, and embed the armrest on
the unit. Avoid catching the coated fabric between
them.
If it is caught, pull it out without damaging the fabric.
Lift up
Secure with screws
Allen key
2
Secure the armrests with attachment
screws.
(Total of 4 positions for a single armrest)
Lift the coated fabric on the side of the armrest and
insert the attachment screw onto the end of the Allen
key, and then tighten.
(Tighten the screws in the 4 positions lightly at first, and
then tighten all screws firmly.)
* If the screw does not enter into the hole, tighten the screw
by pushing the armrest from the top.
3
Close the zipper at the bottom side of
the armrests.
When closing the zipper, be careful not to twist the end of
the zipper.
1 Set the zipper.
2 Fasten the zipper.
4
Put both ends of the zipper into the
inside.
1 Turn in the edge of the zipper.
2 Fix the sliding tab of the zipper with the velcro.
7-8 2008/08/28 13:17:35
Page 6
9
English
10
English
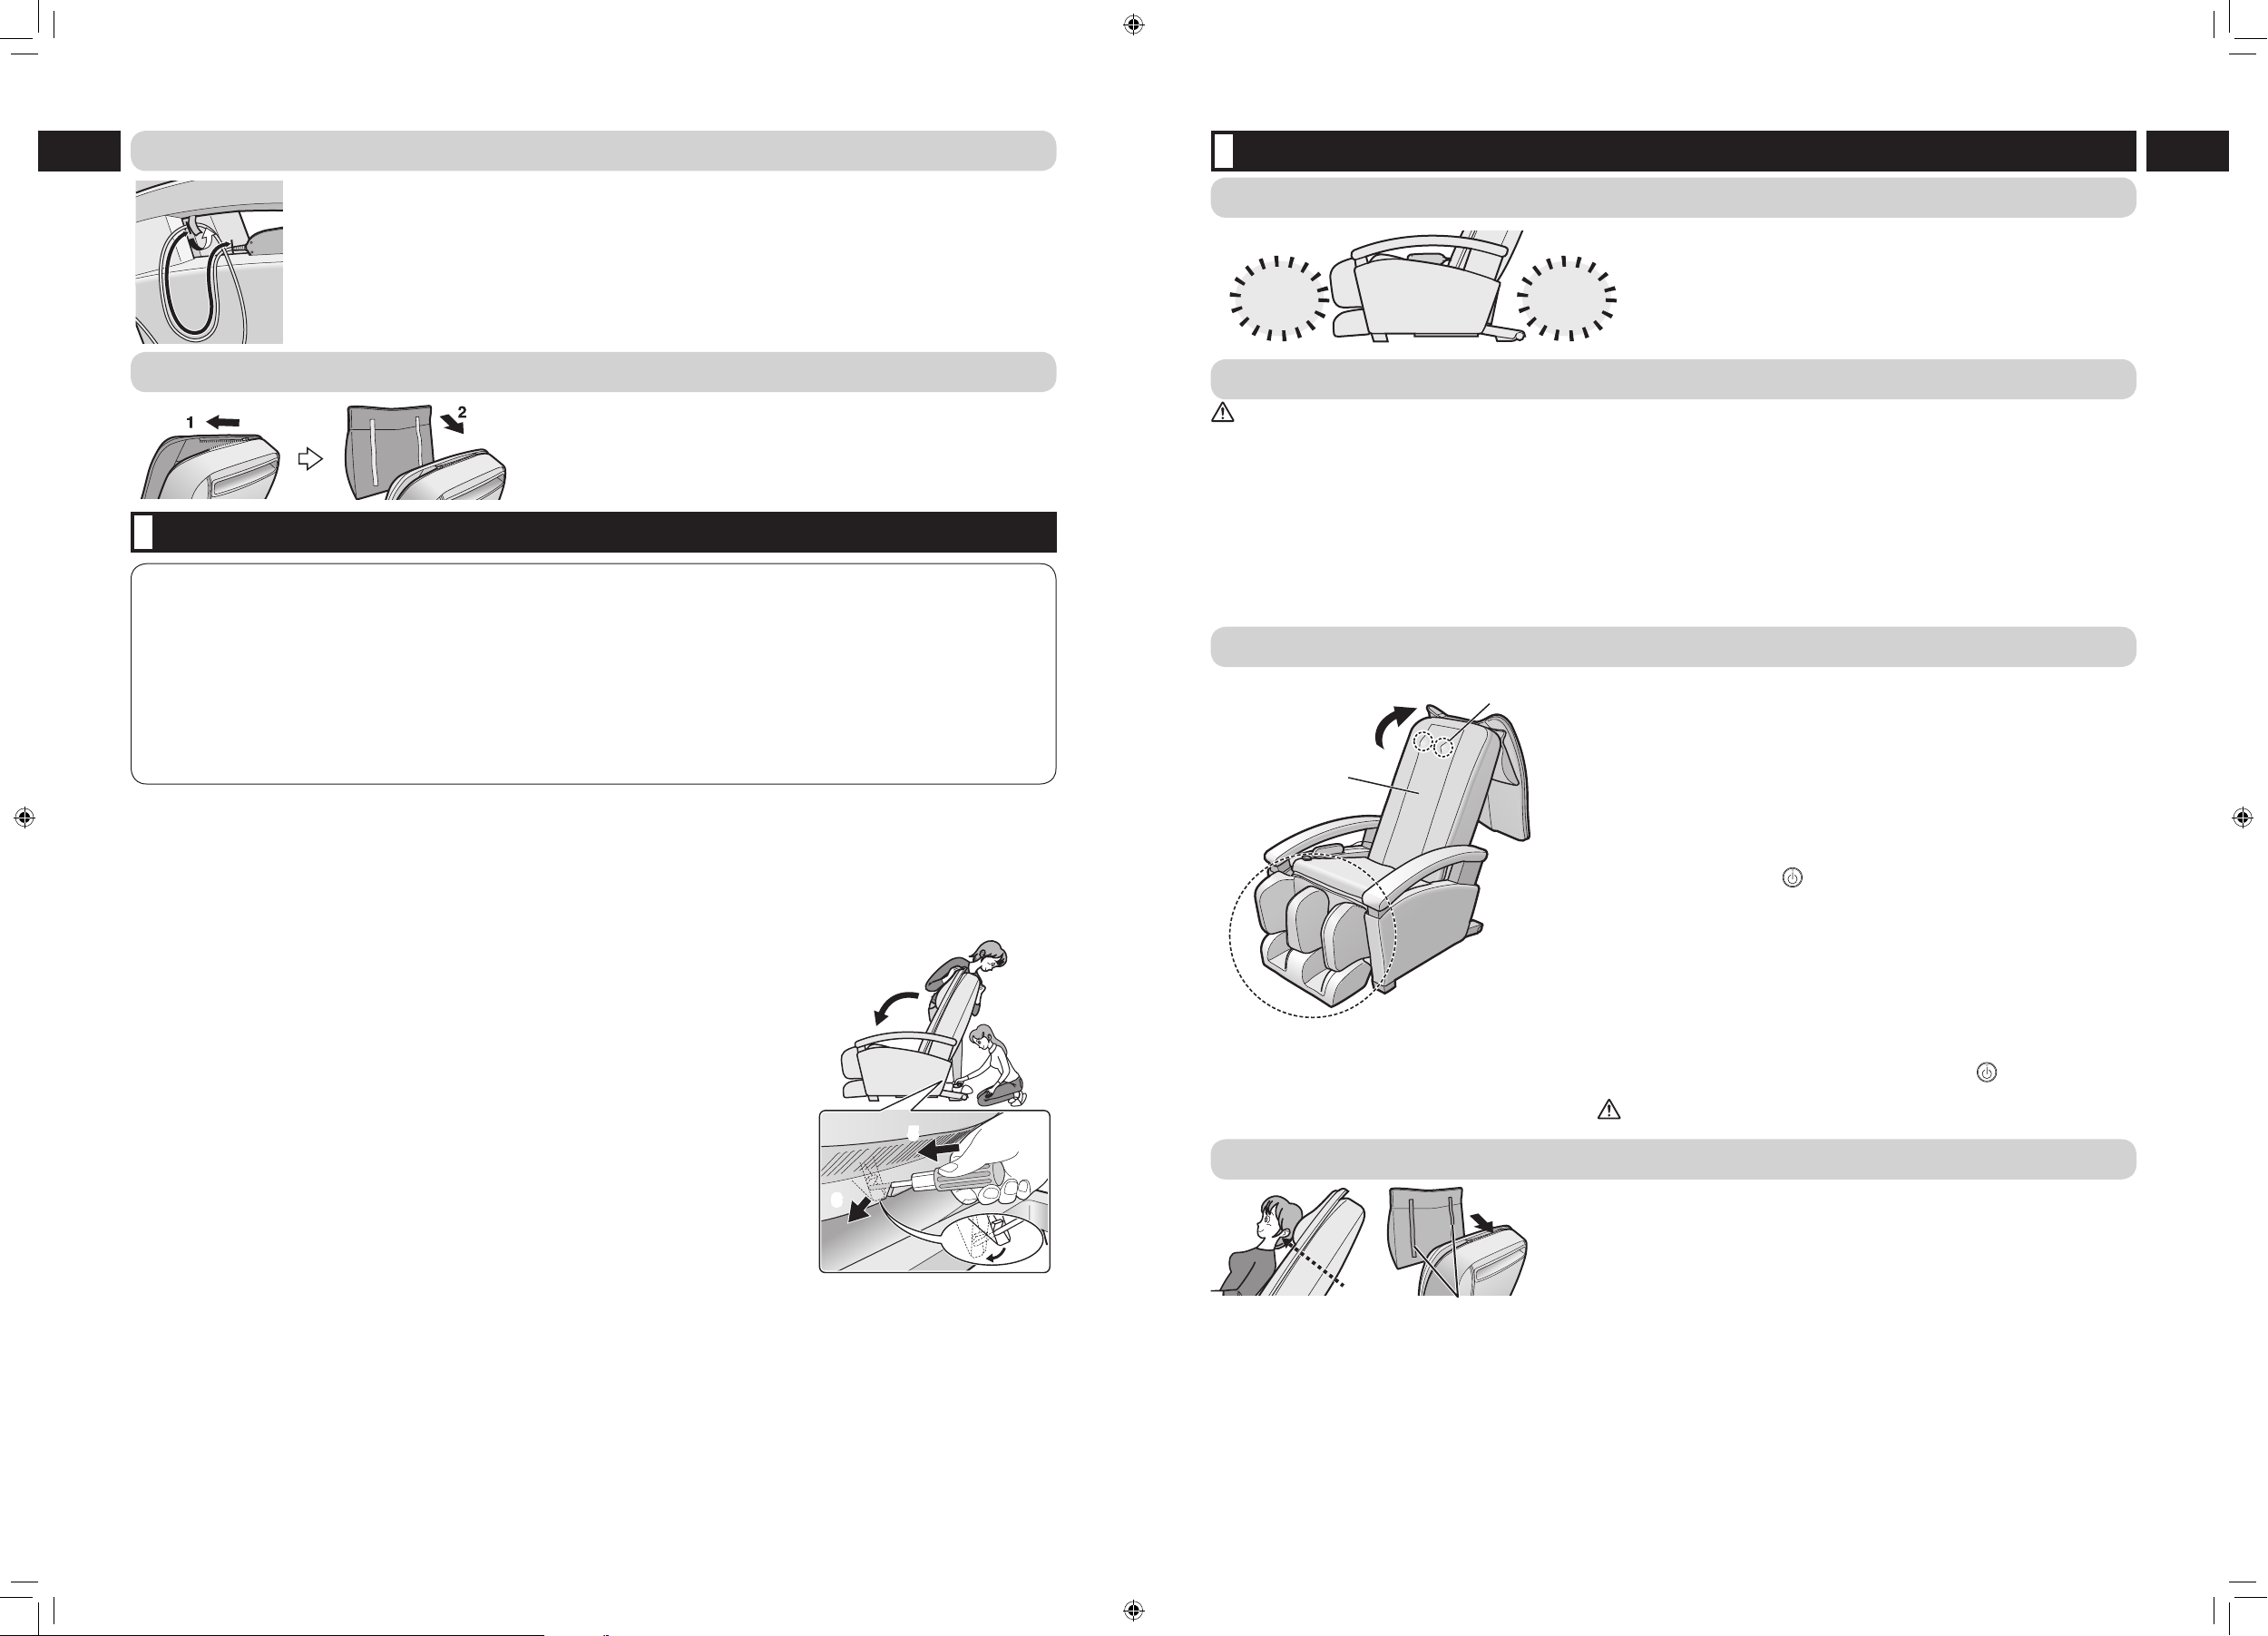
6 ATTACHING THE BACK CUSHION AND PILLOW
1
Attach the back cushion using the zipper.
2
Attach the pillow using the velcroes.
5 FIX THE CONTROLLER CORD
Approx. 18 (45 cm)
Use the controller cord velcroes to secure the cord, leaving approximately 18 in.
(45 cm) of free wire.
* Confirm that there is a margin for the controller cord length when the backrest is reclined.
(The illustration shows that the cord is attached to the right armrest.)
FOLDING THE BACKREST FORWARD (REPACKING)
CAUTION
Keep hands, feet, children, objects, etc., clear of openings on the unit, including seat, armrests and legrest; gaps
between the unit and the floor; and the backrest’s range of movement when being folded forward.
Failure to do so could result in injury.
The unit should not be turned on and the controls should not be operated on when the backrest is folded forward.
Failure to follow these instructions could result in injury.
The unit should not be climbed on and objects should not be placed on the unit when the backrest is folded
forward.
Failure to follow these instructions could result in damage to the unit.
In the interests of safety, the backrest should always be folded forward by two persons.
•
•
•
•
1
Press the OFF/ON button to switch off the power.
2
Slide the power switch to the “off” position, lock it, and then unplug the power
cord.
3
Remove the back cushion and the pillow from the unit.
4
Remove the armrest from the unit.
Refer to “INSTALL THE ARMRESTS ON THE UNIT” on page 8 and remove them in
reverse order.
5
Insert a screwdriver into the opening for the backrest latch
approx. 1.6 in. (4 cm) from the upper edge of the opening
(until the screwdriver contacts the backrest latch).
6
Push tip of screwdriver downward approx. 1 in. (2.5 cm) to
release backrest latch.
7
Pull out screwdriver when pushing of backrest toward
seat begins.
*Be careful to avoid catching the controller or the cord between the backrest and the seat.
* It is recommended that you move the unit before folding the backrest (upright
position). When the backrest is folded, it is not fixed and is unstable.
55
66
77
BEFORE USING THE UNIT
1 CHECK THE SURROUNDING AREA
Check that there is nothing around the
unit.
2 POWERING UP THE UNIT
See Warning No. 8 on page 1.
1
Make sure the power plug is functional.
Make sure the power plug is undamaged. Make sure the power plug is free of foreign matter and debris.
2
Plug the power plug into an electrical outlet.
3
Verify that the lock switch key is turned to the “open” position.
If in “lock” position, turn the lock switch key to “open”.
4
Slide the power switch to the “on” position.
3 CHECK THE UNIT
1
3
4
1
Make sure the covering is free of rips or tears.
2
Make sure there are no obstacles between
the parts of the unit.
3
Make sure the massage heads are in the
retracted position, i.e. they are parked to the
left and right in the upper part of the backrest.
If not retracted, press twice to return the massage heads to the
retracted position.
4
Make sure the legrest is lowered.
Do not sit on the legrest when it is raised. Doing so may cause it to
collapse down or bend the legrest. The legrest is not meant to
support full body weight.
To lower the legrest
Make sure the legrest has fully returned to the original position by
pulling the legrest slide lever, and then press the button twice.
See Warning No. 14 on page 2.
•
4 ADJUSTING FOR CORRECT PILLOW HEIGHT
Velcroes
Adjust the pillow height so that the bottom edge
of the pillow is at ear level.
If positioned too low, the pillow can lessen the effect of massage around the
neck area.
•
•
•
9-10 2008/08/28 13:17:37
Page 7

11
English
12
English
5 ADJUSTING THE RECLINING ANGLE
Press
and to adjust the angle of the backrest and legrest.
With the button held down, movement will continue until a “beep-beep-beep” sound indicates the backrest has been raised or
lowered as far as possible.
The legrest will start to move shortly after the backrest.
Approx. 75˚
Approx. 0˚
Approx. 120˚
Approx. 170˚
* The reclining operation is a function that adjusts the angle of the backrest and legrest. Avoid using it for any other purposes,
such as continuous up/down operation etc.
6 ADJUSTING THE LEGREST LENGTH
Push the legrest out by pulling back on the legrest slide lever.
Pull the legrest slide lever.
Push with the soles
of your feet to slide
the legrest out.
Raise the legs slightly
and the legrest returns.
•
•
Pre-Program and Quick Massage Characteristics
Shiatsu
Uses mainly Soft Shiatsu,
Tap and Knead actions to
comfortably loosen and
provide relief from tension
held at pressure points.
Recommended for those
with severe stiffness or
who prefer a stimulating
massage.
Swedish
Uses mainly Swedish,
Hawaiian and Knead actions
to evenly apply musclerelaxing strokes all over.
Recommended for those
who want a gentle relaxing
massage.
Chiro
Uses Full Roll and
Compression to stretch all
your muscles. A kneading
action is applied to a stiff
back and joints to refresh the
posture and strengthen you
against fatigue.
Recommended for those
who want a fairly strong
massage due to stiff
muscles.
Quick
Covers all areas using a
variety of massage actions,
all in a span of just five
minutes.
Recommended for those
who want a quick, relaxing
massage.
1
2
4
1
Press the OFF/ON button.
The OFF/ON indicator will come on.
2
Select the pre-program you want.
Please press one of the flashing buttons.
If you press another Pre-Program button or a manual operation button during
your selected pre-program massage, the massage will switch to the newly
selected massage.
In pre-programs, the leg massage begins at the same time.
It is possible to stop or change the intensity of the leg massage during the
program. (See Page 16)
Pressing a Pre-Program button automatically moves the backrest and legrest
into massage position.
3
Sit as far back in the seat as possible with your head
centered on the pillow.
4
Adjusting shoulder position
When the shoulder position indicator is flashing, adjust the position of the
massage heads (upper heads) so that they lightly touch the shoulders.
Too high
Correct position
Too low
Lightly touching the
shoulder.
•
Up Down
Press
Press
Approximate Height
6.0 ft. (185 cm)
5.2 ft. (160 cm)
4.5 ft. (140 cm)
5-Stage adjustment [up and down approx. 3.9 in. (10 cm)]
It is possible to change the position of the massage heads during the massage.
When it is not possible to correctly adjust the shoulder position, you may have to
slide your body and adjust it again.
•
•
•
•
•
•
•
•
•
About the Time Indicator
Time Remaining
Approx. 15 min.
Approx. 9 min.
Approx. 3 min.
Displays remaining massage time via flashing LED.
Starts counting down from 15 minutes in increments of approximately 3 minutes.
Flashing speeds up one minute before end of massage.
•
•
•
USING PRE-PROGRAMS AND QUICK MASSAGE
11-12 2008/08/28 13:17:38
Page 8

13
English
14
English
Persons whose height is less than 4.5 ft. (140 cm) or more than 6.0 ft. (185 cm) are recommended to use the unit in the
manner described below when the massage heads do not touch their shoulders.
Height is around 4.5 ft. (140 cm) or less Height is around 6.0 ft. (185 cm) or more
Use by placing
a cushion on the
seat and sitting
as far back as
possible.
Use by reclining
the backrest
and sliding your
body downward.
5
Customize
A Selecting an area for a focused massage
Massaging the Neck and Shoulders Massaging the Lower Back
Press
The upper and lower back
will also be massaged
slightly.
•
Press
The neck and shoulders
will also be massaged
slightly.
•
*Press the button again to toggle it off.
B Removing tapping from pre-programs
Press
*Press the button again to restore tapping to the program.
C Adjusting leg massage
Press
Please see page 16 for details regarding leg massage.•
Adjust the legrest so your sole fits on it.
Switch off the leg stretch function to stop the legrest from returning to the original position.
•
For a person with small
body dimensions
If the legrest is raised, it is
easier to fit your sole on it.
•
Press
For a person with large
body dimensions
You can relax by lowering
the legrest.
•
Press
It is possible to massage your leg completely by rotating the sole section.•
6
Auto shut-off in pre-programs
The massage will end after approximately 15 minutes and the unit will automatically shut off.
The massage heads will move to the retracted position and stop.
The legrest will automatically lower.
The OFF/ON indicator will flash until the heads have stopped moving.
If you want to continue using the unit, press the OFF/ON button. Please rest at least 10 minutes between massages.
•
•
•
•
•
Stopping a pre-program Immediately stopping the massage
Press
Press the OFF/ON button.
The massage heads will move to the
retracted position, and the backrest and
legrest will automatically return to their
original position.
•
•
Press
Press the Quick Stop button.
All movement will stop immediately.
•
•
2
3
1
Open the cover of the controller.
2
Press the OFF/ON button.
The OFF/ON indicator will come on.
All of the Manual Operation buttons will start to flash.
3
Select the massage type you want.
Press the button of the massage you require.
The button will light up and the massage will begin (See Page 15).
The unit will automatically recline to the massage position. See Page 11 for
a fine adjustment.
4
Customized adjustments
You can adjust the position or speed of the massage heads, and you will hear
a “beep-beep-beep” sound when it reaches its limit.
A Adjusting the Vertical Position of the Massage Heads
Up
Down
Press the button once to move the position
slightly [approx. 0.6 in. (15 mm)]. Press and
hold the button to move the position
continuously; release the button to stop the
movement.
•
B Adjusting the Width between Massage Heads
Increasing
Decreasing
Tap, Soft Shiatsu, Full Roll, and Regional Roll
can be adjusted in 3 steps.
•
C Adjusting Massage Speed
Increasing
Decreasing
Massage speed is adjustable in 5 steps.•
5
Auto shut-off in manual operation
The massage will end after approximately 15 minutes and the unit will
automatically shut off.
The massage heads will move to the retracted position and stop.
The legrest will automatically lower.
The OFF/ON indicator will flash until the heads have stopped moving.
If you want to continue using the unit, please press the OFF/ON button. Please
rest at least 10 minutes between massages.
•
•
•
•
•
•
•
•
•
MANUAL OPERATION FOR THE UPPER BODY
Massage Actions
Knead
Feels like the fingers and
thumbs of two hands
squeezing in unison as they
carefully work their way
upwards to loosen stiffness.
Recommended for the area
of the neck and shoulders.
Swedish
Feels like a two palms gliding
over the skin as they
rhythmically knead the
muscles beneath.
Recommended for
loosening up large areas
of the back.
Soft Shiatsu
Feels like a pair of thumbs
carefully alternating between
the right and left sides as
they zero in on their target.
Recommended for
loosening up knots of
tension.
Full Roll
From lower back to neck, you
can feel it move 26.6 in.
(67.5 cm) up and down the
whole of the upper body.
Recommended for overall
stretching of the back
muscles.
Compression
Applies fluent alternating
strokes to the left and right
sides as if drawing stiffness
to the outside.
Recommended for
relaxation of the whole
body.
Hawaiian
Feels like two hands moving
rhythmically in a circular
pattern to relax and refresh
the back.
Recommended for
relieving tension in the
lower back.
Tap
Feels like the edges of two
hands rhythmically tapping to
penetrate into the body and
relax muscles.
Recommended for use on
the fine muscles of the
neck or as a finishing
massage.
Regional Roll
You can feel it travel up and
down working on 3.9 in.
(10 cm) localized areas of
the back.
Recommended for focused
rolling out of back
muscles.
13-14 2008/08/28 13:17:40
Page 9

15
English
16
English
NOTE:
A built-in timer prevents overuse of the unit.
When using manual operation, the timer automatically stops operation after 15 minutes.
*If you want to continue to use the unit, we recommend that you have a break of at least 10 minutes between massages to allow
your body to rest.
•
•
Combining Massages
It is possible to combine massage types.
It is not possible to combine massage types in the same
category.
•
•
E.g. 1 Adding Tap when Knead is selected.
E.g. 2 Adding Full Roll to the selection.
E.g. 3 Deselecting Full Roll.
Changing Massage Types
E.g. 1 Changing massage types in the same category.
(Changing to Hawaiian when Knead is selected.)
E.g. 2 Changing to a massage type outside the category.
(Changing to Tap when Knead is selected.)
• When Knead is combined with Tap, deselecting
Knead will leave only Tap.
Stopping mid-way through a massage Immediately stopping the massage
Press
Press the OFF/ON button.
The massage heads will move to the
retracted position, and the backrest and
legrest will automatically return to their
original position.
•
•
Press
Press the Quick Stop button.
All movement will stop immediately.
•
•
Description of Leg Massage/Stretch
Leg massage
A bottom-to-top squeezing action slowly relaxes and softens to comfortably alleviate tired, swollen legs.
Leg stretch
Lowered to
approx. 15˚
Lowered to
approx. 20˚
Raised to
approx. 70˚
After the legs have been grasped by
the airbags, they are slowly stretched
as the legrest lowers to a 15° angle
from the massage position.
The legrest then rises to a 70° angle,
after which it lowers once again to
a 20° angle for a deep stretch.
The legrest rises again and returns to
a 70° angle.
1
2
1
Press the OFF/ON button.
The OFF/ON indicator will come on.
2
Press the Leg Massage button.
The air massage will begin.
Leg massage intensity is displayed by the indicator.
3
Customize
A Adjusting the massage intensity
The intensity is adjustable in 3 steps.
The intensity will move 1 step each time the button is
pushed, moving in order of medium, strong, off and
weak.
Default is level 2.
* If only the Leg Massage is used, OFF is omitted.
•
•
•
1 2 3 off*
weak
medium
strong
B Press the Leg Stretch button.
Press again to stop the leg stretch.•
4
Auto shut-off in leg massage/stretch
The massage will end after approximately 15 minutes and the unit will
automatically shut off.
The legrest will automatically lower.
If you want to continue using the unit press the OFF/ON button.
•
•
•
•
•
•
Stopping mid-way through a massage Immediately stopping the massage
Press
Press the OFF/ON button.
It will take some time before the air is
completely evacuated. (The sound of
air escaping may be audible after
pressing the OFF/ON button.)
•
•
Press
Press the Quick Stop button.
All movement will stop immediately.
•
•
MANUAL OPERATION FOR THE LEG
Adjust the angle and length of the legrest before starting a massage. (See Page 11)
15-16 2008/08/28 13:17:41
Page 10

17
English
18
English
AFTER COMPLETING THE MASSAGE
RETURN THE SEAT TO THE ORIGINAL POSITION
1
Check that there is nothing in the vicinity
of the backrest or the legrest.
2
Return the legrest to the original position.
Pull the legrest slide lever back.
3
Press the OFF/ON button twice.
The backrest and legrest will automatically return to their original
positions.
The backrest and the legrest can be returned with the reclining
button. (See Page 11)
4
Place the controller in its holder.
5
Return the pillow and the back cushion to
their original positions.
•
•
Pull the legrest
slide lever back.
Raise the legs slightly
and the legrest returns.
DISCONNECT THE POWER
See Warning No. 2 on page 1, No. 2 on page 2, and No. 10 on page 3.
1
Slide the power switch to the “off” position.
2
Turn the lock switch key to the “lock” position.
3
Unplug the power cord.
4
The lock switch key must be stored out of the reach of children.
CLEANING AND MAINTENANCE
See Danger No. 1 on page 1.
LEATHER COVERING ON THE PILLOW, THE BACK CUSHION AND THE UNIT
Wipe these areas with a soft, dry cloth.
(Do NOT use cloths containing any kind of chemical, etc.)
If the leather is particularly dirty, dampen with liquid soap and brush the surface. Wipe with a cloth dampened with water. Allow
to dry naturally.
(Do NOT use a hair dryer to try to dry the surfaces more quickly.)
Wearing of denim, colored, patterned or other clothing with a tendency to fade should be avoided during use, as it could lead to
discoloration of the leather.
Please do NOT use thinners, benzine or alcohol.
PIPE AND PLASTIC AREAS
1 Wipe the unit with a cloth that has been soaked in a mild detergent and then thoroughly wring out.
2 Next wipe the unit with a cloth that has been moistened with just water and thoroughly wring out.
*Make sure you thoroughly wring out the cloth first when cleaning the controller.
3 Allow the unit to dry naturally.
Please do NOT use thinners, benzine or alcohol.
COATED FABRIC
1 Wipe the seat fabric with a cloth that has been soaked in a mild detergent solution and then thoroughly wring out.
2 Use a brush to apply a mild detergent to areas where the coated fabric has become particularly soiled. Be careful not to brush
the fabric too much as this may damage it.
3 Next wipe the fabric with a cloth that has been moistened with just water and then thoroughly wring out.
4 Allow the fabric to dry naturally.
Please do NOT use thinners, benzine or alcohol.
•
•
•
•
•
•
TROUBLESHOOTING
Problem
Cause and Remedy
Motor Noises
It sounds and feels like the massage heads are straining to get over wrinkles in the cloth.
The motor groans when it comes under load.
There is excessive noise during Tapping. (The noise is greater at the top of the unit.)
There is a creaking noise when the massage heads are in operation.
There is a rattling sound when the massage heads move up or down.
The belt can be heard rotating.
There is a rubbing sound produced by the massage heads rubbing on the seat fabric.
There is a noise when the backrest cushion moves over the armrest when the seat is reclining.
There is a noise when I sit down.
There is a strange sound when the massage heads move in and out.
When the power switch is turned on there is a humming sound.
Air massage-related sounds. There is a hissing sound of air escaping. There is a humming sound from the pump.
The legrest rattles.
There is operational noise of valves under the seat.
There is an unstable sound when air escapes during the leg stretch.
•
•
•
•
•
•
•
•
•
•
•
•
•
•
•
These sounds are perfectly normal and will not have any effect on the operation of the unit.
The massage heads stop during operation.
When excessive force is applied to the massage heads during operation, in the interests of safety the massage heads may
stop moving.
If all markings and buttons on the controller start to flash, which is extremely unusual, turn off the power switch, wait for
approximately 10 seconds and then turn the power switch on again. If the massage heads stop again, position yourself so
that your back is not completely in contact with the backrest.
The massage heads do not come up to the shoulder or neck.
The position of the massage heads is incorrect. (See Page 12)
The height of the left and right massage heads is different.
An alternating tapping method is employed, which means that this phenomenon will naturally occur.
There is nothing wrong with the unit.
It is not possible to recline the unit.
The legrest cannot be raised or lowered.
If the unit encounters an obstacle or if excessive force is exerted on it during operation, in the interests of safety the unit will
come to a stop.
If all markings and buttons on the controller start to flash, which is extremely unusual, turn off the power switch, wait for
approximately 10 seconds and then turn the power switch on again.
Reclining does not take place even though a massage is started in pre-programs.
(The seat does not automatically recline.)
In some cases the seat may not automatically recline depending on the position (angle) of the backrest or the legrest.
Automatic reclining will not activate when the backrest is reclined to flat position more than massage position and legrest is
in upper position.
When you use the manual operation only for legs, automatic reclining will not activate.
The backrest does not return to the upright position.
The backrest will not return to the upright position if the timer is activated or the button is pressed.
(Pressing twice will return the backrest to its original position.) (See Page 17)
It is not possible to switch from Swedish and Knead to Hawaiian and Compression.
Switching can be hindered when the user’s body weight is not resting on the massage heads. Shift your weight so that your
body is contact with the massage heads.
The legrest will not return to its original position.
If the length of the legrest has been extended, the legrest will strike the floor, preventing from returning to its original
position. Try again after retracting it to its original length.
The unit will not operate at all.
The power cord has been disconnected. (See Page 10)
The power switch on the unit has not been turned on. (See Page 10)
A Pre-Program button or Manual Operation button hasn’t been pressed after pressing . (See Pages 12, 14)
•
•
•
The unit has been damaged.
Stop using the unit immediately.
The power cord or power plug is abnormally hot.
Stop using the unit immediately.
See Warning No. 5 and 13 on page 3.
If service is needed please contact your local dealer or all 1-877 Panafix (723-2349).
17-18 2008/08/28 13:17:42
Page 11

S1
Español
S2
Español
INSTRUCCIONES DE SEGURIDAD IMPORTANTES
Se deberán observar siempre las precauciones básicas durante el uso de instrumentos eléctricos, incluyendo las
siguientes.
Por favor asegúrese de leer todas las instrucciones antes de utilizar el Sillón de Masaje Doméstico.
PELIGRO – Para reducir el riesgo de descargas eléctricas:
1. Siempre desenchufe esta unidad de la toma de corriente inmediatamente después de usarla y antes de
limpiarla.
ADVERTENCIA – Para reducir el riesgo de quemaduras, incendio, descarga eléctrica, o herida a personas:
1. Inserte el enchufe completamente en la toma de corriente a fin de reducir el riesgo de cortocircuitos e incendio.
2. No descuide la unidad durante el tiempo que esté conectada. Desconéctela siempre que no esté siendo usada.
3. La unidad no debe ser usada por personas que no puedan moverse o comunicarse por si mismas.
4. Use la unidad únicamente para el propósito descrito en estas instrucciones.
5. No se pare sobre la unidad.
6. No utilice otros accesorios distintos a los recomendados por el fabricante.
7. Siempre regrese el asiento a la posición vertical. Mantenga a los niños alejados de la unidad.
8. Nunca ponga la unidad en funcionamiento si tuviera un cable o un enchufe dañado. Devuelva la unidad al
centro de servicio autorizado más cercano si no funciona correctamente, si la ha dejado caer o dañado, o si ha
sido sumergida en agua.
9. Mantenga los cables de alimentación alejados de superficies expuestas al calor. No transporte la unidad
tomándola por el cable de alimentación.
10. Nunca bloquee las aberturas de aireación durante el funcionamiento y asegúrese de que todas las aberturas
de aireación estén libres de pelusa y pelo, etc. No deje caer ni inserte nada en cualquiera de las aberturas de
la unidad.
11. No use la unidad encima de aparatos de calefacción, tales como alfombras eléctricas, etc. No lo haga funcionar
bajo una cubierta o almohada. Puede ocurrir calor excesivo y causar incendio, choque eléctrico o herida a
personas.
12. No use la unidad en baños u otros lugares mojados o húmedos ya que esto puede causar choque eléctrico o
hacer que la unidad falle. No derrame agua, etc. sobre el controlador.
13. No use la unidad a la intemperie.
14. No lo use u opere donde se utilicen productos de aerosol o donde se esté administrando oxígeno.
15. Cuando desenchufe la unidad, apague primero todos los controles antes de extraer el enchufe de la toma de
alimentación. No utilice transformadores con la unidad ya que ésto podría originar fallos en el funcionamiento o
descargas eléctricas.
16. Conecte esta unidad sólo a una toma de alimentación correctamente puesta a tierra. Vea las Instrucciones de
Puesta a Tierra.
CONSERVE ESTAS INSTRUCCIONES
PRECAUCIONES DE SEGURIDAD
ADVERTENCIA: Para evitar el riesgo de herida:
1. Las personas con alguna de las condiciones listadas abajo o bajo tratamiento médico o que sufran de
condiciones médicas deberán consultar a su médico antes de usar la unidad:
a) Mujeres embarazadas, gente que está enferma, en forma física pobre.
b) Gente que sufre de dolor en la espalda, el cuello, el hombro o la cadera.
c) Gente que tiene un marcapasos, desfibrilador u otros dispositivos médicos personales con tendencia a la
interferencia electrónica.
d) Gente que sufre de enfermedades cardiacas.
e) Gente a quienes su médico les ha prohibido el recibir masaje debido a una trombosis o aneurisma, venas
varicosas agudas u otros problemas de circulación.
f) Gente con curvaturas irregulares de la columna.
2. Esta unidad no debe ser usada por niños. Retire la llave cuando no la use y almacénela en algún lugar fuera
del alcance de los niños.
3. Siéntese lentamente después de comprobar la posición de las cabezas de masaje. No ponga nunca ninguna
parte de su cuerpo entre las cabezas de masaje ya que la acción de aprisionamiento de las mismas podría
causarle lesiones. No ponga nunca sus dedos o sus pies en la separación entre el respaldo y el asiento, el
respaldo y los apoyabrazos, el asiento y la cubierta bajo los apoyabrazos.
4. No utilice la unidad en la piel desnuda. Mientras que los tejidos finos aumentan la efectividad, la exposición
directa de la piel al sillón de masaje podría irritar la piel.
No use la unidad mientras que tiene puesto algún objeto duro en la cabeza tal como un accesorio para el pelo,
etc.
No use la unidad para masajear la cabeza, el abdomen, la parte frontal del cuello, los codos o las rodillas. No
use una acción de masaje excesivamente fuerte en la parte posterior del cuello.
5. Al usar el masajeador, use el botón de posición de rodillo de cuello para ajustar las cabezas de masaje en la
posición correcta. Puede ajustar la posición del hombro de esta forma en los modos de preprograma y rodillo
en el funcionamiento manual.
El no alinear la posición del hombro correctamente puede llevar a heridas.
6. No exceda los 15 minutos en cada sesión de masaje de espalda. Para evitar el estirar los músculos demasiado,
que puede resultar en incomodidad, no use la unidad durante más de 5 minutos la primerta vez que la use.
Podrá aumentar gradualmente la duración y la potencia del masaje según se vaya acostumbrando.
No masajee una zona durante más de 5 minutos seguidos.
Un masaje excesivo puede sobreestimular los músculos y nervios y resultar en un efecto adverso.
Para prevenir el exceso de masaje, no use el sillón de masaje durante más de 15 minutos en cada sesión.
Después de aproximadamente 15 minutos, las cabezas de masaje se retraerán y se detendrán.
El cojín del respaldo puede ser retirado si desea experimentar un masaje de espalda más fuerte. Tenga mucho
cuidado cuando use este modo a fin de evitar dolor o herida en su espalda. Úselo sólo por periodos cortos de
tiempo (no más de 15 minutos). Reinstale el cojín del respaldo si desea restaurar a una intensidad de masaje
normal.
7. Al usar el sillón de masaje, si se siente mal o si el masaje resulta doloroso, deje de usarlo inmediatamente. Al
usar el sillón de masaje, si la presión parece demasiado fuerte, se puede detener el movimiento de las
cabezas de masaje en cualquier momento oprimiendo el Botón de Parada Rápida.
8. No se quede dormido al usar la unidad. No use la unidad después de beber alcohol.
9. Cuando el respaldo esté en una posición reclinada, no se siente en él, ni se siente con sus piernas
descansando en el reposacabeza.
10. No permita a los niños o animales domésticos jugar alrededor de la unidad, especialmente durante su
funcionamiento.
11. No desenchufe la unidad durante su funcionamiento. Desenchúfela inmediatamente si se produce un corte en
la alimentación eléctrica.
12. Si usa el masajeador por primera vez, asegúrese de comenzar en el programa de masaje suave. El masaje
shiatsu es más fuerte y deberá ser disfrutado cuando uno se haya acostumbrado a la silla.
13. No permita que los niños jueguen en este mueble mecanizado ni que operen el mecanismo. Déjelo siempre en
una posición vertical y cerrada. Mantenga las manos y los pies lejos del mecanismo. Sólo el ocupante deberá
hacerlo funcionar.
14. Levante siempre el cojín posterior para comprobar que el tapizado de la unidad no ha sufrido rasgaduras antes
de su uso. Además revise también otras áreas para asegurarse de que el tapizado no haya sido rasgado. Sin
importar cuán pequeña fuera la rasgadura, si encuentra una, deje de usar la unidad inmediatamente,
desenchufe el cable de alimentación y haga que reparen la unidad en un centro de servicio autorizado.
1-2 2008/08/28 13:17:42
Page 12

S3
Español
S4
Español
PRECAUCIONES PARA EL FUNCIONAMIENTO
ADVERTENCIA: Para evitar dañar el sillón, observe estas precauciones:
1. El asiento está deseñado para soportar un peso máximo de 264 libras (120 kgs.). Exceder el peso máximo
puede causar daño permanente al mecanismo de masaje y/o a los otros componentes de la unidad. Un daño
tal es considerado como abuso del usuario y no está cubierto bajo la Garantía Limitada.
2. No se siente encima ni deje caer el controlador. No jale del cable del controlador o el cable de alimentación.
Tenga cuidado para que el cable del controlador no quede atrapado entre el reposabrazos y el respaldo de la
silla.
3. No trate el asiento con brusquedad, volcándolo de lado, girándolo boca arriba o parándose en él.
4. No trate al tapizado con brusquedad.
Mantenga objetos afilados o punzantes lejos del tapizado del asiento. Tenga cuidado de no dejar caer cenizas
encendidas, cigarrillos encendidos o fósforos sobre el asiento.
La exposición a la luz solar directa puede causar desteñido o cambios en el color del tapizado.
5. Si el sillón de masaje funciona anormalmente, apáguelo inmediatamente y llévelo a un centro de servicio
autorizado para que sea revisado.
6. No accione ningún interruptor a intervalos cortos. Tal acción puede hacer que falle el interruptor.
7. Puede que se escuche algo de ruido proveniente del sillón de masaje mientras que está en uso. Esto es debido
a su estructura y es normal.
8. Asegúrese de que no haya ningún obstáculo detrás del asiento antes de reclinarlo. El asiento se puede reclinar
hasta un ángulo máximo de 170°. Si el respaldo golpea una pared o una columna, puede fallar. Asegúrese de
dejar siempre un espacio amplio detrás del sillón. Reclínelo lentamente para evitar que entre en contacto con
un obstáculo.
9. Cuando se aplique una presión excesiva a las cabezas de masaje, puede que éstas se detengan por
seguridad. Al mover las cabezas hacia arriba de una posición inferior, el peso del cuerpo de uno puede que
detenga el movimiento de las cabezas. En tal caso, levántese ligeramente para permitir que las cabezas de
masaje suban.
10. Después de cada masaje, deslice el interruptor de alimentación, que se encuentra situado en el lado derecho
del asiento, a la posición “off” (apagado) y haga girar su interruptor de bloqueo a la posición “lock” (bloqueado).
11. No se siente con el cuerpo o el cabello mojados.
12. La unidad no debe ser usada en locales húmedos (sauna, piscina) o al aire libre.
13. No intente abrir o desensamblar cualquier parte de la unidad. Solamente un técnico de Panasonic deberá
arreglar su unidad.
•
•
INSTRUCCIONES DE CONEXIÓN A TIERRA
El producto debe ser conectado a tierra. Si funcionara mal o se descompusiera, la conexión a tierra proporciona el
camino de menos resistencia a la corriente eléctrica para reducir el riesgo de choque eléctrico. Este producto está
equipado con un cordón que dispone de un conductor y una clavija para conexión a tierra. La clavija debe
conectarse en la toma de corriente apropiada que disponga de una conexión a tierra según todos los códigos y
ordenanzas locales.
PELIGRO
Una conexión mal hecha del conductor de conexión a tierra del equipo puede resultar en un riesgo de choque
eléctrico.
Póngase en contacto con un electricista calificado si tiene alguna duda sobre si el producto está puesto a tierra
adecuadamente.
No modifique la clavija suministrada con el producto — si no entrara en la toma de corriente, haga que una toma
de corriente apropiada sea instalada por un electricista calificado.
Este producto ha sido diseñado para ser usado en un circuito nominal de 120 voltios y tiene una clavija de
conexión a tierra como la mostrada en la Figura A. Asegúrese de que el producto esté conectado a una toma de
corriente que tenga la misma configuración que la clavija. Ningún adaptador deberá usarse con este producto.
Figura A
TOMA DE CORRIENTE CON
CONEXIÓN A TIERRA
CAJA DE TOMA DE CORRIENTE
CON CONEXIÓN A TIERRA
PATILLA DE
CONEXIÓN A TIERRA
3-4 2008/08/28 13:17:42
Page 13

S5
Español
S6
Español
22
21
20
23
1
2
3
5
4
6
7
8
9
11
10
12
13
14
16
17
18
19
24
15
15
Pestillo del Respaldo
16 Etiqueta de Precaución de Seguridad
17
Etiqueta de especificaciones
18
Cable de Alimentación
19
Clavija de Alimentación
20
Interruptor de Alimentación
21
Interruptor de Bloqueo
22
Llave del Interruptor de Bloqueo
23
Etiqueta de la llave del interruptor
de bloqueo
Para prevenir que los niños
ingieran accidentalmente la llave
del interruptor de bloqueo.
24
Ruedas
•
1 Velcro de Almohada
2
Reposabrazos
3
Funda del Controlador
En ambos lados izquierdo y derecho.
4
Palanca de deslizamiento del
reposapiernas
Extensible hasta una longitud de
aprox. 5 pulg. (12 cm)
5
Reposapiernas
6
Sección de masaje de piernas/
plantas de los pies
Incluye función de masaje con aire.
7
Almohada
Para usar cuando vea televisión o
simplemente se relaje.
La almohada tiene un ajuste de
altura. (Ver Página S10)
La almohada es desmontable, y puede
también ser echada hacia atrás.
•
•
•
•
•
•
8 Cojín de Espalda
9 Posición Retraida de las Cabezas
de Masaje
Las cabezas de masaje están
normalmente retraidas a la izquierda y
derecha en la parte superior del respaldo.
10
Velcro para asegurar el cable del
controlador
11 Placa Shiatsu para plantas de los pies
Se provee un “tope” en la parte
posterior.
Es posible realizar un ajuste fino de
la posición.
La placa shiatsu para las plantas
de los pies es desmontable.
12
Cierre del Cojín de Espalda
El cojín de espalda es desmontable.
13
Tirador
14
Cubierta Trasera
•
•
•
•
•
ESPECIFICACIONES
Alimentación:
CA 120 V 60 Hz
Corriente nominal:
2,0 A
Masaje de la Parte Superior del cuerpo
Área de Masaje (Arriba-Abajo): Aprox. 26,6 pulg. (67,5 cm)
Área de Masaje (Izquierda-
Derecha):
Distancia entre las Cabezas de Masaje durante el Funcionamiento
Aprox. 2,4 pulg. – 7,1 pulg. (6,0 cm – 18,0 cm)
Superficie de Masaje Total Máxima:
Aprox. 20 – 35 seg. ida y vuelta
Velocidad de Masaje: Knead (Amasar): Aprox. 20 ciclos/min. – 30 ciclos/min.
Swedish (Sueco): Aprox. 30 ciclos/min. – 50 ciclos/min.
Compression (Compresión): Aprox. 20 ciclos/min. – 30 ciclos/min.
Hawaiian (Hawaiano): Aprox. 30 ciclos/min. – 50 ciclos/min.
Soft Shiatsu (Shiatsu Suave): Aprox. 150 ciclos/min. – 210 ciclos/min.
Tap (Golpeteo): Aprox. 230 ciclos/min. – 350 ciclos/min.
Full Roll (Rodamiento Completo): Aprox. 20 seg./ciclo – 35 seg./ciclo
[Gama de movimiento: Aprox. 21,1 pulg. (53,5 cm)]
Regional Roll (Rodamiento Regional): Aprox. 7 seg./ciclo – 9 seg./ciclo
[Gama de movimiento: Aprox. 4,7 pulg. (12 cm)]
NOMBRES DE PARTES Y FUNCIONES
SILLÓN DE MASAJE
La placa shiatsu para las plantas
de los pies es desmontable.
Abertura
Para montar la placa shiatsu para las plantas de los pies
Los salientes se encuentra
en el lado superior.
Dedo del pie
Talón
Para el pie derechoPara el pie izquierdo
Masaje de la Parte Inferior del cuerpo
Presión de aire: Fuerte: Aprox. 27,0 kPa
Media: Aprox. 20,0 kPa
Débil: Aprox. 11,0 kPa
Ángulo de Reclinación:
Respaldo: Aprox. 120° – 170°
Reposapiernas: Aprox. 0° – 75°
Apague Automático:
Aprox. 15 min. para ambas la parte superior e inferior del cuerpo
(Aprox. 5 minutos en caso de masaje rápido)
Dimensiones
No reclinado. (Al×An×Prof):
Reclinado. (Al×An×Prof):
Aprox. 43,3 pulg. × 29,1 pulg. × 47,2 pulg. (110 cm × 74 cm × 120 cm)
Aprox. 24,0 pulg. × 29,1 pulg. × 66,1 pulg. (61 cm × 74 cm × 168 cm)
Peso de la Unidad:
Aprox. 139 libras (63 kgs.)
Dimensiones de la Caja (Al×An×Prof):
Aprox. 30,7 pulg. × 30,3 pulg. × 47,6 pulg. (78 cm × 77 cm × 121 cm)
Peso en Caja:
Aprox. 172 libras (78 kgs.)
Máximo Peso de Usuario:
Aprox. 264 libras (120 kgs.)
Distancia Mínima desde la Pared:
15,7 pulg. (40 cm)
36
Botón de Reclinar
Use este botón para ajustar el
ángulo del respaldo y del
reposapiernas.
37
Indicador de Funcionamiento
Muestra el estatus operacional.
38
Cubierta
39
Botón de Masaje de Piernas
Enciende y apaga las bolsas de
aire y ajusta la intensidad del
masaje de piernas en 3 pasos.
40
Botones de Operación Manual
Esto le permite seleccionar la
acción de masaje que desea.
(Ver Página S14)
41
Botón de Ajuste de Velocidad
Ajusta la velocidad del masaje del
cuerpo superior en 5 pasos
durante la operación manual.
42
Indicador de Velocidad
43
Botón de Ajuste de Posición de
Masaje
Ajusta la posición de las cabezas
de masaje durante la operación
manual. (Ver Página S14)
•
•
•
•
•
•
25
Botón de APAGAR/ ENCENDER
(OFF/ON)
Enciende y apaga el controlador.
26
Indicador de Tiempo
Muestra el tiempo remanente
antes del fin del masaje.
27
Botón de Otomana
Use este botón para ajustar el
ángulo del reposapiernas.
28
Botones de Pre-programas
29
Botones de Foco de Masaje
Usados para seleccionar el foco
del masaje.
30
Botón de APAGAR/ ENCENDER
Golpeteo
31
Botón de Posición de Rodillo de
Cuello
32
Indicador de Posición de Rodillo
de Cuello
33
Indicador de Intensidad de
Masaje de Piernas
34
Botón de Estirar Piernas
Usado para encender y apagar el
estiramiento de piernas.
35
Botón de Parada Rápida
Usado para detener el mensaje
inmediatamente.
•
•
•
•
•
•
26
25
27
28
29
30
31
32
33
34
35
36
37
38
39
40
41
42
43
Cubierta Cerrada
Cubierta Abierta
PLACA SHIATSU PARA PLANTAS DE LOS PIES
Asegúrese de que la placa shiatsu para las
plantas de los pies esté del lado correcto y bien
orientada e insértela en la abertura.
CONTROLADOR
5-6 2008/08/28 13:17:43
Page 14

S7
Español
S8
Español
ARMANDO LA UNIDAD
DÓNDE USAR LA UNIDAD
Mantener una distancia de al menos
3,9 (10 cm) de la pared.
Aprox. 76,8
(195 cm)
Aprox. 13,8
(35 cm)
Anchura aproximada
27,5 (70 cm)
Aprox. 11,8
(30 cm)
Estera
Zona en que el
reposapiernas podría
tocar el suelo
Zona en que el
sillón toca el suelo
Evite los lugares en donde la unidad estará expuesta a la luz
directa del sol durante largos periodos de tiempo o lugares en
donde estará expuesta a altas temperaturas, tales como
delante de un calentador, etc., ya que esto puede causar
descoloración o endurecimiento de la piel.
Se recomienda colocar una estera o un paño por debajo de la
unidad para prevenir que se dañe el piso. El tamaño de la
estera deberá ser tal [al menos 47,2 pulg. × 27,5 pulg. (120
cm × 70 cm)] que cubra las áreas donde la unidad se apoya y
donde el reposapiernas puede tocar el suelo.
Coloque la unidad cerca de la toma de corriente.
Consulte la Advertencia No. 11 y 12 en la página S1.
•
•
•
1 DESEMPAQUE LA UNIDAD Y ELEVE EL RESPALDO
CUIDADO
Al alzar el respaldo, tenga cuidado de no provocar que las manos o los pies queden atrapados entre el respaldo y
el pestillo del respaldo o el respaldo y el reposabrazos.
El no observar esta precaución puede resultar en lesiones.
•
Pestillo del
Respaldo
Compruebe que
no haya nada
alrededor de la
unidad.
1
Saque la parte superior del contenedor de
envio.
Al ser empaquetado para el envio el respaldo es doblado hacia
adelante.
2
Retire los materiales de embalaje y
amortiguamiento y saque todos los
accesorios.
3
Eleve el respaldo.
No conecte el cordón de alimentación a una toma de corriente
durante el armado.
Sostenga el respaldo con ambas manos y levántelo en la
dirección de la fecha hasta que se detenga.
Tenga cuidado de que el cable de alimentación y el controlador
no queden atrapados en el respaldo.
•
•
•
•
2 INSPECCIONE EL CONTENIDO DEL CONTENEDOR DE ENVIO
Silóna de Masaje Almohada Cojín de Espalda Llave Allen — 1
Tornillos de fijación — 8
Llaves del interruptor
de bloqueo — 1
La llave del interruptor
de bloqueo se inserta
en el interruptor de
bloqueo antes de que el
sillón salga de la
fábrica.
•
Reposabrazos — 2
3 CÓMO MOVER LA UNIDAD
Usando las ruedas para mover la unidad
Sujete el reposapiernas para mover la unidad cuando use las
ruedas.
Es más fácil mover la unidad con las cabezas de masaje
retraidas y el respaldo en la posición erecta.
* Coloque una alfombra o un paño en el piso y mueva la unidad
lentamente para prevenir daño al piso.
•
•
Levantando la unidad
Mueva el sillón haciendo que una persona sostenga el
reposapiernas y otra persona use los tiradores en la parte de
atrás.
* Por favor sostenga los tiradores y el reposapiernas con
seguridad para evitar dejar caer la unidad ya que puede dañar
su piso.
•
Muévalo lentamente
Reposapiernas
Ruedas
Coloque los
dedos dentro
del tirador
4 INSTALACIÓN DE LOS REPOSABRAZOS EN LA UNIDAD
Delantero
Trasero
Izquierdo
Velcro
Cierre
Convexo
Delantero Posterior
Orificio redondo
1
Instale los reposabrazos.
(Evite cuidadosamente dañar el entelado.)
1 Quite el velcro.
2 Abra el cierre del reposabrazos completamente.
3 Confirme la posición lateral (derecha o izquierda) del
reposabrazos. También confirme la dirección
(delantera o trasera) del reposabrazos.
La ilustración muestra el reposabrazos izquierdo. El
reposabrazos derecho se encuentra estampado con
“Front” (Delantero), “Right” (Derecho) y “Back” (Trasero).
* El reposabrazos izquierdo se debe instalar en el lado de la
mano izquierda de la unidad.
4
Alinee la parte convexa del reposabrazos con el orificio
redondo de la unidad, e inserte el reposabrazos en la
unidad. Evite atrapar el entelado entre ellos.
Si así sucediera, retírelo sin dañar la tela.
Levantar
Asegure con tornillos
Llave Allen
2
Asegure los reposabrazos con los
tornillos de fijación.
(4 posiciones en total para un solo reposabrazos)
Levante el entelado en el lado del reposabrazos e
inserte el tornillo de fijación en el extremo de la llave
Allen y después apriete.
(Apriete los tornillos en las 4 posiciones primero ligeramente y
después apriete todos los tornillos firmemente.)
* Si el tornillo no entra en el orificio, apriete el tornillo
empujando el reposabrazos desde la parte superior.
3
Cierre el cierre en el lado inferior de
los reposabrazos.
Al cerrar el cierre, tenga cuidado de no doblar el extremo
del cierre.
1 Coloque el cierre.
2 Sujete el cierre.
4
Coloque ambos extremos del cierre
por dentro.
1 Gire el borde del cierre.
2 Fije la lengüeta deslizante del cierre con el velcro.
7-8 2008/08/28 13:17:44
Page 15

S9
Español
S10
Español
6 INSERCIÓN DEL COJÍN DE ESPALDA Y ALMOHADA
1
Adose el cojín de espalda usando el cierre.
2
Adose la almohada usando los velcros.
5 FIJE EL CABLE DEL CONTROLADOR
Aprox. 18
(45 cm)
Utilice los velcros del cable del controlador para asegurar el cable, dejando
aproximadamente 18 pulg. (45 cm) de cable libre.
* Confirme que existe un margen para la longitud del cable del controlador al reclinar el
respaldo.
(La ilustración muestra que el cable se inserta en el reposabrazos derecho.)
DOBLANDO EL RESPALDO HACIA ADELANTE (REEMPACADO)
CUIDADO
Mantenga las manos, los pies, los niños, objetos, etc., lejos de las aberturas de la unidad, incluyendo el asiento,
los reposabrazos y el reposapiernas; espacios entre la unidad y el piso; y el espacio en que se mueve el respaldo
cuando es doblado hacia adelante.
El no hacerlo así podría resultar en lesiones.
No deberá encender la unidad ni operar los controles al reclinar el respaldo hacia adelante.
Si no sigue estas instrucciones podría resultar en lesiones.
No debe subirse sobre la unidad y no debe colocar objetos sobre la unidad al reclinar el respaldo hacia adelante.
Si no sigue estas instrucciones podría resultar en daños a la unidad.
Por razones de seguridad, el respaldo deberá ser siempre doblado hacia adelante por dos personas.
•
•
•
•
1
Oprima el botón APAGAR/ENCENDER (OFF/ON) para apagar la alimentación.
2
Deslice el interruptor de corriente a la posición “off” (bloquéelo), y luego
desenchufe el cable de corriente.
3
Saque el cojín de espalda y la almohada de la unidad.
4
Quite el reposabrazos de la unidad.
Consulte “INSTALACIÓN DE LOS REPOSABRAZOS EN LA UNIDAD” en la página S8 y
quítelos en orden inverso.
5
Inserte un desatornillador en la apertura para el pestillo
del respaldo aprox. 1,6 pulg. (4 cm) desde el borde
superior de la apertura (hasta que el desatornillador entre
en contacto con el pestillo del respaldo).
6
Empuje la punta del destornillador hacia abajo aprox.
1 pulg. (2,5 cm) para soltar el pestillo del respaldo.
7
Saque el destornillador cuando empiece a empujar el
respaldo hacia adelante.
*Tenga cuidado para evitar atrapar el controlador o el cable entre el respaldo y el asiento.
* Se recomienda que mueva la unidad antes de reclinar el respaldo (posición
vertical). Al reclinar el respaldo, no se encuentra fijo y es inestable.
55
66
77
ANTES DEL USO DE LA UNIDAD
1 COMPRUEBE EL ÁREA CIRCUNDANTE
Compruebe que no haya nada alrededor
de la unidad.
2 ENCENDIENDO LA UNIDAD
Consulte la Advertencia No. 8 en la página S1.
1
Asegúrese de que el tomacorriente esté en condición de funcionar.
Asegúrese de que el tomacorriente no esté dañado. Asegúrese de que el tomacorriente este libre de objetos extraños y
basura.
2
Enchufe el tomacorriente en una toma de corriente.
3
Compruebe que la llave del interruptor de bloqueo esté puesta en la posición
“open” (abierto).
Si está en la posición “lock” (bloqueado), haga girar la llave del interruptor de bloqueo a la posición “open” (abierto).
4
Haga deslizar el interruptor de corriente a la posición “on” (encendido).
3 COMPRUEBE LA UNIDAD
1
3
4
1
Asegúrese de que la cobertura del sillón esté
libre de rasgones o roturas.
2
Asegúrese de que no existan obstáculos
entre las piezas de la unidad.
3
Asegúrese de que las cabezas de masaje
estén en la posición retraida, esto es, estén
estacionadas a la izquierda y derecha en la
parte superior del respaldo.
Si no están retraidas, oprima dos veces para regresar las cabezas
de masaje a la posición retraida.
4
Asegúrese de que el reposapiernas esté
bajado.
No se siente en el reposapiernas cuando esté levantado. El hacerlo
así puede hacerlo desplomarse o doblarse. El reposapiernas no está
diseñado para soportar todo el peso del cuerpo.
Para bajar el reposapiernas
Asegúrese de devolver el reposapiernas completamente a su posición
original tirando de la palanca de deslizamiento del reposapiernas y, a
continuación, pulse el botón dos veces.
Consulte la Advertencia No. 14 en la página S2.
•
4 AJUSTANDO PARA UNA ALTURA CORRECTA DE LA ALMOHADA
Velcros
Ajuste la altura de la almohada de modo que el
filo de abajo esté al nivel de la oreja.
Si es colocada demasiado bajo, la almohada puede reducir el efecto del
masaje alrededor del área del cuello.
•
•
•
9-10 2008/08/28 13:17:45
Page 16

S11
Español
S12
Español
5 AJUSTANDO EL ÁNGULO DE RECLINAMIENTO
Oprima
y para ajustar el ángulo del respaldo y del reposapiernas.
Con el botón oprimido, el movimiento continuará hasta que un sonido “pi-pi-pi” indique que el respaldo ha sido elevado o
bajado tanto como es posible.
El reposapiernas empezará a moverse un corto tiempo después que el respaldo.
Aprox. 75˚
Aprox. 0˚
Aprox. 120˚
Aprox. 170˚
* La operación de reclinación es una función que ajusta el ángulo del respaldo y del reposapiernas. Evite usarla para otros
propósitos, tales como una operación continua hacia arriba/abajo etc.
6 Ajuste de la longitud del reposapiernas
Empuje el reposapiernas hacia afuera tirando de la palanca del reposapiernas
hacia atrás.
Tire de la palanca
de deslizamiento
del reposapiernas.
Empuje con las
plantas de los pies
para deslizar el
reposapiernas hacia
fuera.
Levante ligeramente las
piernas para hacer que
el reposapiernas se
retraiga.
•
•
Características del Pre-Programa y del Masaje Rápido
Shiatsu (Shiatsu)
Usa principalmente acciones
de Shiatsu Suave, Golpeteo y
Amasar para aflojar
cómodamente y proveer
alivio de la tensión mantenida
en los puntos de presión.
Recomendado para
aquellos con rigidez severa
o que prefieren un masaje
estimulante.
Swedish (Sueco)
Usa principalmente acciones
Suecas, Hawaianas y de
Amasar para aplicar
parejamente golpes
relajadores de músculos por
todas partes.
Recomendado para
aquellos que desean un
masaje suave de relajación.
Chiro (Giro)
Usa Rodamiento Completo y
Compresión para estirar todos sus
músculos. Se aplica una acción de
amasamiento para un estiramiento y
articulaciones para refrescar la
postura y fortalecerlo contra la fatiga.
Recomendado para aquellos
que desean un masaje
ligeramente fuerte debido a
que los músculos se
encuentran agarrotados.
Quick (Rápido)
Cubre todas las áreas
usando una variedad de
acciones de masaje, todo
en el espacio de sólo
cinco minutos.
Recomendado para
aquellos que desean un
masaje rápido y
relajante.
1
2
4
1
Oprima el botón de APAGAR/ENCENDER (OFF/ON).
El indicador APAGAR/ENCENDER (OFF/ON) se encenderá.
2
Seleccione el pre-programa que desea.
Por favor oprima uno de los botones que están destellando.
Si oprime otro botón de Pre-Programa o un botón de funcionamiento manual
durante su masaje de preprograma seleccionado, el masaje se cambiará al
nuevo masaje seleccionado.
En los pre-programas, el masaje de piernas comienza al mismo tiempo.
Es posible detener o cambiar la intensidad del masaje de piernas durante el
programa. (Ver Página S16)
Oprimiendo un botón de Pre-programa mueve automáticamente el respaldo y el
reposapiernas hacia la posición de masaje.
3
Siéntese lo más atrás posible en el asiento con su
cabeza centrada en la almohada.
4
Ajustando la posición del hombro
Cuando el indicador de posición de hombro está destellando, ajuste la posición
de las cabezas de masaje (cabezas superiores) de modo que toquen
suavemente los hombros.
Demasiado alto
Posición correcta
Demasiado bajo
Tocando ligeramente el
hombro.
•
Arriba Abajo
Oprima
Oprima
Altura Aproximada
6,0 pies (185 cm)
5,2 pies (160 cm)
4,5 pies (140 cm)
Ajuste de 5 etapas arriba/abajo [arriba y abajo aprox. 3,9 pulg. (10 cm)]
Es posible cambiar la posición de las cabezas de masaje durante el masaje.
Cuando no sea posible ajustar correctamente la posición de hombros, puede
que Ud. tenga que deslizar su cuerpo y ajustarlo otra vez.
•
•
•
•
•
•
•
•
•
Acerca del Indicador del Tiempo
Tiempo que Queda
Aprox. 15 mins.
Aprox. 9 mins.
Aprox. 3 mins.
Muestra el tiempo de masaje que queda por medio de un LED destellando.
Comienza la cuenta regresiva desde los 15 minutos en incrementos de aproximadamente
3 minutos.
El destello se acelera un minuto antes del fin del masaje.
•
•
•
USANDO PRE-PROGRAMAS Y MASAJE RÁPIDO
11-12 2008/08/28 13:17:46
Page 17

S13
Español
S14
Español
Se recomienda a las personas cuya estatura es de menos de 4,5 pies (140 cm) o más de 6,0 pies (185 cm) que usen la
unidad de la manera descrita más abajo cuando las cabezas de masaje no toquen sus hombros.
Cuando la estatura es de unos 4,5 pies (140 cm) o menos
Cuando la estatura es de unos 6,0 pies (185 cm) o más
Uselo colocando un
cojín en el asiento y
sentándose tan atrás
como sea posible.
Uselo reclinando el
respaldo y deslizando
su cuerpo hacia
abajo.
5
Personalizado
A Seleccionando un área para un masaje enfocado
Masajeando el Cuello y los Hombros Masajeando la Espalda Inferior
Oprima
La espalda superior e
inferior también serán
masajeadas ligeramente.
•
Oprima
El cuello y los hombros
también serán
masajeados ligeramente.
•
*Oprima otra vez el botón para conmutarlo a apagado.
B Sacando el golpeteo de los pre-programas
Oprima
*Oprima otra vez el botón para restaurar el golpeteo al programa.
C Ajuste del masaje para piernas
Oprima
Consulte los detalles relativos al masaje de piernas en la página S16.•
Ajuste el reposapiernas de tal modo que sus plantas calcen bien.
Apague la función de estirar piernas para que el reposapiernas no regrese a su posición
original.
•
Para una persona de
contextura pequeña
Si el reposapiernas está
elevado, sus plantas calzan
mejor.
•
Oprima
Para una persona de
contextura grande
Puede relajarse bajando el
reposapiernas.
•
Oprima
Es posible masajear la pierna por completo girando la sección para plantas.•
6
Apague automático en los pre-programas
El masaje terminará después de aproximadamente 15 minutos y la unidad se apagará automáticamente.
Las cabezas de masaje se moverán a la posición retraida y se detendrán.
El reposapiernas descenderá automáticamente.
El indicador APAGAR/ENCENDER (OFF/ON) destellará hasta que las cabezas hayan dejado de moverse.
Si desea continuar usando la unidad, oprima el botón APAGAR/ENCENDER (OFF/ON). Por favor descanse por lo menos
10 minutos entre masajes.
•
•
•
•
•
Deteniendo un pre-programa Deteniendo inmediatamente el masaje
Oprima
Oprima el botón APAGAR/ENCENDER (OFF/ON).
Las cabezas de masajes se moverán a la posición
retraída, y el respaldo y el reposapiernas
regresarán automáticamente a su posición original.
•
•
Oprima
Oprima el botón Parada Rápida.
Todo movimiento se detendrá
inmediatamente.
•
•
2
3
1
Abra la cubierta del controlador.
2
Oprima el botón APAGAR/ENCENDER (OFF/ON).
El indicador APAGAR/ENCENDER (OFF/ON) se encenderá.
Todos los botones de Operación Manual comenzarán a destellar.
3
Seleccione el tipo de masaje que desea.
Oprima el botón del masaje que requiere.
El botón se iluminará y el masaje comenzará. (Ver Página S15)
La unidad se reclinará automáticamente a la posición de masaje. Consulte la
Página S11 para un ajuste fino.
4
Ajustes personalizados
Puede ajustar la posición o la velocidad de las cabezas de masaje y escuchará
un “pi-pi-pi” cuando llegue a su límite.
A Ajustando la Posición Vertical de las Cabezas de Masaje
Arriba
Abajo
Oprima el botón una vez para mover la posición
ligeramente [aprox. 0,6 pulg. (15 mm)]. Oprima
y sostenga el botón para mover la posición
continuamente; suelte el botón para detener el
movimiento.
•
B Ajustando el Ancho entre las Cabezas de Masaje
Incrementando
Reduciendo
Golpeteo, Shiatsu Suave, Rodamiento
Completo, y Rodamiento Regional pueden ser
ajustados en 3 pasos.
•
C Ajustando la Velocidad de Masaje
Incrementando
Reduciendo
La velocidad de masaje es ajustable en
5 pasos.
•
5
Apague automático en la operación manual
El masaje terminará aproximadamente después de 15 minutos y la unidad se
apagará automáticamente.
Las cabezas de masaje se moverán a la posicion retraida y se detendrán.
El reposapiernas descenderá automáticamente.
El indicador APAGAR/ENCENDER (OFF/ON) destellará hasta que las cabezas
hayan dejado de moverse.
Si desea continuar usando la unidad, por favor oprima el botón APAGAR/
ENCENDER (OFF/ON). Por favor descanse por lo menos 10 minutos entre masajes.
•
•
•
•
•
•
•
•
•
OPERACIÓN MANUAL PARA EL CUERPO SUPERIOR
Acciones de Masaje
Knead (Amasar)
Se siente como los dedos y
pulgares de dos manos
pellizcando al unísono a
medida que siguen su
camino hacia arriba para
aflojar la rigidez.
Recomendado para el área
del cuello y los hombros.
Swedish (Sueco)
Se siente como dos palmas
deslizándose sobre la piel a
medida que amasan
rítmicamente los músculos
debajo.
Recomendado para aflojar
áreas grandes de la
espalda.
Soft Shiatsu (Shiatsu Suave)
Se siente como un par de
pulgares que se alternan
cuidadosamente entre los
lados derecho e izquierdo a
medida que se centran en su
objetivo.
Recomendado para aflojar
nudos de tensión.
Full Roll (Rodamiento Completo
)
Desde la espalda inferior
hasta el cuello, puede sentirlo
moverse 26,6 pulg. (67,5 cm)
hacia arriba y abajo por todo
el cuerpo superior.
Recomendado para un
estirado general de los
músculos de la espalda.
Compression (Compresión)
Aplica golpes alternados
sueltos a los lados izquierdo
y derecho como si se sacara
la rigidez hacia afuera.
Recomendado para la
relajación de todo el
cuerpo.
Hawaiian (Hawaiano)
Se siente como dos manos
moviéndose rítmicamente en
un patrón circular para
relajar y refrescar la espalda.
Recomendado para aliviar
la tensión en la espalda
inferior.
Tap (Golpeteo)
Se siente como si los filos de
las manos golpearan
rítmicamente para penetrar en
el cuerpo y relajar los músculos.
Recomendado para usarse en
los finos músculos del cuello o
como un masaje de acabado.
Regional Roll (Rodamiento Regional)
Puede sentirlo viajar hacia
arriba y abajo trabajando
3,9 pulg. (10 cm) en áreas
localizadas de la espalda.
Recomendado para un
rodamiento enfocado desde
los músculos de la espalda.
13-14 2008/08/28 13:17:48
Page 18

S15
Español
S16
Español
NOTA:
Un temporizador incorporado previene el sobreuso de la unidad.
Cuando se usa la operación manual, el temporizador detiene automáticamente la operación después de 15 minutos.
*Si desea continuar usando la unidad, le recomendamos que tenga un descanso de por lo menos 10 minutos entre masajes
para permitir a su cuerpo que descanse.
•
•
Combinando Masajes
Es posible combinar tipos de masajes.
No es posible combinar tipos de masajes en la misma
categoría.
•
•
P.ej. 1 Añadiendo Golpeteo cuando Amasar está
seleccionado.
P.ej. 2 Añadiendo Rodamiento Completo a la selección.
P.ej. 3 Deseleccionando Rodamiento Completo.
Cambiando Tipos de Masajes
P.ej. 1 Cambiando tipos de masajes en la misma
categoría. (Cambiando a Hawaiano cuando
Amasar está seleccionado.)
P.ej. 2 Cambiando a un tipo de masaje fuera de la
categoría. (Cambiando a Golpeteo cuando Amasar
está seleccionado.)
• Cuando Amasar es combinado con Golpeteo, el
deseleccionar Amasar dejará sólo Golpeteo.
Deteniéndose a mitad de camino de un
masaje
Deteniendo inmediatamente el masaje
Oprima
Oprima el botón APAGAR/ENCENDER
(OFF/ON).
Las cabezas de masajes se moverán a
la posición retraída, y el respaldo y el
reposapiernas regresarán
automáticamente a su posición original.
•
•
Oprima
Oprima el botón Parada Rápida.
Todo movimiento se detendrá
inmediatamente.
•
•
Descripción del Masaje de Piernas/Estirado
Masaje de piernas
Una acción de pellizque de abajo hacia arriba lentamente relaja y afloja para aliviar cómodamente las piernas cansadas e
hinchadas.
Estiramiento de piernas
Bajado a
aprox. 15˚
Bajado a
aprox. 20˚
Subido a
aprox. 70˚
Después de que las piernas hayan sido
tomadas por las bolsas de aire, son
estiradas lentamente a medida que el
reposapiernas desciende a un ángulo
de 15° con respecto de la posición de
masaje.
El reposapiernas luego se eleva a un
ángulo de 70°, después de lo cual se
baja otra vez a un ángulo de 20° para un
estiramiento profundo.
El reposapiernas se eleva nuevamente
y regresa a un ángulo de 70º.
1
2
1
Oprima el botón APAGAR/ENCENDER (OFF/ON).
El indicador APAGAR/ENCENDER (OFF/ON) se encenderá.
2
Oprima el botón de Masaje de Piernas.
El masaje con aire comenzará.
La intensidad del masaje de piernas es mostrada en el indicador.
3
Personalizado
A Ajustando la intensidad del masaje
La intensidad es ajustable en 3 pasos.
La intensidad se moverá 1 paso cada vez que el botón
es oprimido, moviéndose en el orden de media, fuerte,
apagado y débil.
El nivel por defecto es 2.
* Se omite OFF (APAGADO) si se utiliza únicamente el
masaje para las piernas.
•
•
•
1 2 3 off*
débil
media
fuerte
B Oprima el botón de Estiramiento de Piernas.
Oprima otra vez para detener el estiramiento de piernas.•
4
Apague automático en masaje de piernas/estirar
El masaje terminará aproximadamente después de 15 minutos y la unidad se
apagará automáticamente.
El reposapiernas descenderá automáticamente.
Si desea continuar usando la unidad, por favor oprima el botón APAGAR/
ENCENDER (OFF/ON).
•
•
•
•
•
•
Deteniendo un pre-programa Deteniendo inmediatamente el masaje
Oprima
Oprima el botón APAGAR/ENCENDER
(OFF/ON).
Tomará algo de tiempo antes de que el
aire sea evacuado completamente. (El
sonido del aire escapando puede ser
audible después de oprimir el botón
APAGAR/ENCENDER (OFF/ON).)
•
•
Oprima
Oprima el botón Parada Rápida.
Todo movimiento se detendrá
inmediatamente.
•
•
OPERACIÓN MANUAL PARA LAS PIERNAS
Ajuste el ángulo y la longitud del reposapiernas antes de comenzar un masaje. (Ver Página S11)
15-16 2008/08/28 13:17:49
Page 19

S17
Español
S18
Español
DESPUÉS DE COMPLETAR EL MASAJE
REGRESE EL ASIENTO A LA POSICIÓN ORIGINAL
1
Compruebe que no haya nada en la
vecindad del respaldo o del reposapiernas.
2
Devuelva el reposapiernas a su posición
original.
Tire de la palanca de deslizamiento del reposapiernas hacia atrás.
3
Oprima el botón APAGAR/ENCENDER
(OFF/ON) dos veces.
El respaldo y el reposapiernas regresarán automáticamente a
sus posiciones originales.
El respaldo y el reposapiernas pueden regresar pulsando el
botón de reclinación. (Ver Página S11)
4
Coloque el controlador en su funda.
5
Regrese la almohada y el cojín de espalda
a sus posiciones originales.
•
•
Tire de la palanca
de deslizamiento
del reposapiernas
hacia atrás.
Levante ligeramente las
piernas para hacer que
el reposapiernas se
retraiga.
DESCONECTE LA CORRIENTE
Consulte la Advertencia No. 2 en la página S1, No. 2 en la página S2 y No. 10 en la página S3.
1
Deslice el interruptor de corriente a la posición “off” (apagado).
2
Haga girar la llave del interruptor de bloqueo a la posición “lock” (bloqueado).
3
Desenchufe el cordón de alimentación.
4
La llave del interruptor de bloqueo debe almacenarse fuera del alcance de los niños.
LIMPIEZA Y MANTENIMIENTO
Consulte Peligro No. 1 en la página S1.
CUBIERTA DE CUERO EN LA ALMOHADA, EL COJÍN DE ESPALDA Y LA UNIDAD
Limpie estas áreas con un paño suave y seco.
(NO use paños que contengan algún tipo de químico, etc.)
Si el cuero está particularmente sucio, mójelo con jabón líquido y cepille la superficie. Limpie con un paño humedecido con
agua. Déjelo secar naturalmente.
(NO use un secador de cabello para tratar de secar las superficies más rápidamente.)
Deberá evitarse el uso de prendas de mezclilla, coloreadas, estampadas o cualquier otro tipo de prenda con tendencia a
desteñirse durante el uso, ya que podría ocasionar la decoloración de la piel.
Por favor NO use disolventes, benzina o alcohol.
TUBOS Y ÁREAS DE PLÁSTICO
1 Pase sobre la unidad un paño que haya sido remojado en detergente suave y que haya sido exprimido completamente.
2 Luego pase un paño que haya sido mojado sólo con agua y haya sido exprimido completamente.
*Asegúrese de escurrir completamente el paño primero cuando limpie el controlador.
3 Deje que la unidad se seque naturalmente.
Por favor NO use disolventes, benzina o alcohol.
ENTELADO
1 Limpie la tela del asiento con un paño que haya sido remojado en una solución suave de detergente y luego haya sido
completamente exprimido.
2 Use una brocha para aplicar detergente suave en áreas en donde la tela se ha ensuciado especialmente. Tenga cuidado de
no pasar la brocha demasiado en la tela ya que esto puede dañarla.
3 Luego pase sobre la tela un paño que haya sido mojado sólo con agua y después haya sido bien exprimido.
4 Deje que la tela se seque naturalmente.
Por favor NO use disolventes, benzina o alcohol.
•
•
•
•
•
•
REMEDIO DE PROBLEMAS
Problema
Causa y Remedio
Ruidos de Motor
Suena y se siente como que las cabezas de masaje están esforzándose para pasar sobre las arrugas en la tela.
El motor retumba cuando está bajo carga.
Existe ruido excesivo durante Golpeteo. (El ruido es mayor en la parte superior de la unidad.)
Hay un sonido de chirrido cuando las cabezas de masaje están en operación.
Hay un sonido de cascabeleo cuando las cabezas de masaje se mueven hacia arriba y abajo.
La correa se oye al girar.
Hay un sonido de frotamiento producido por las cabezas de masaje frotando la tela del asiento.
Hay un ruido cuando el cojín del respaldo se mueve sobre el reposabrazos al reclinarse el asiento.
Hay un ruido cuando me siento.
Hay un ruido extraño cuando las cabezas de masaje se mueven hacia adentro y hacia afuera.
Cuando el interruptor de alimentación es encendido hay un sonido como un zumbido.
Sonidos relacionados con el masaje con aire. Hay un siseo del aire que se escapa. Hay un zumbido de la bomba.
El reposapiernas traquetea.
Hay un ruido de operación de válvulas debajo del asiento.
Hay un sonido inestable cuando el aire se escapa durante el estiramiento de piernas.
•
•
•
•
•
•
•
•
•
•
•
•
•
•
•
Estos sonidos son perfectamente normales y no tendrán ningún efecto en el funcionamiento de la unidad.
Las cabezas de masaje se detienen durante el funcionamiento.
Si se aplica fuerza excesiva a las cabezas de masaje durante el funcionamiento, por motivos de seguridad pueda que las
cabezas de masaje se detengan.
Si todas las marcas y botones en el controlador comienzan a destellar, lo que es extremadamente inusual, apague el interruptor
de corriente, espere aproximadamente 10 segundos y luego encienda el interruptor de corriente otra vez. Si las cabezas de
masaje se detienen otra vez, colóquese de modo que su espalda no esté completamente en contacto con el respaldo.
Las cabezas de masaje no suben hasta los hombros o el cuello.
La posición de las cabezas de masaje es incorrecta. (Ver Página S12)
La altura de las cabezas de masaje izquierdas y derechas es diferente.
Un método de golpeteo alternado es empleado, lo que significa que este fenómeno ocurrirá normalmente.
No hay ningún problema con la unidad.
No es posible reclinar la unidad.
El reposapiernas no puede ser levantado o bajado.
Si la unidad encuentra un obstáculo o si se ejerce fuerza excesiva en ella durante el funcionamiento, por motivos de
seguridad la unidad se detendrá.
Si todas las marcas y botones en el controlador comienzan a destellar, lo que es extremadamente inusual, apague el
interruptor de corriente, espere aproximadamente 10 segundos y luego encienda el interruptor de corriente otra vez.
El reclinamiento no tiene lugar aun cuando un masaje es comenzado en pre-programas.
(El asiento no se reclina automáticamente.)
En algunos casos puede que el asiento no se recline automáticamente dependiendo de la posición (ángulo) del respaldo
o del reposapiernas.
El reclinado automático no se activará cuando el respaldo esté más horizontal que la posición de masaje y el
reposapiernas esté levantado.
Cuando utilice la operación manual solo para las piernas, no se activará el reclinado automático.
El respaldo no regresa a la posición vertical.
El respaldo no regresará a la posición vertical si el temporizador es activado o si el botón es oprimido.
(Oprimiendo dos veces regresará el respaldo a su posición original.) (Ver Página S17)
No es posible cambiar de Sueco y Amasar a Hawaiano y Compresión.
El cambio puede ser perturbado cuando el peso del cuerpo del usuario no está descansando sobre las cabezas de
masaje. Cambie su peso de modo que su cuerpo esté en contacto con las cabezas de masaje.
El reposapiernas no regresa a su posición original.
Si la longitud del reposapiernas ha sido extendida, el reposapiernas golpeará el piso, previniendo que regrese a su
posición original. Pruebe otra vez después de retraerlo a su longitud original.
La unidad no funciona en absoluto.
El cable de alimentación ha sido desconectado. (Ver Página S10)
El interruptor de alimentación en la unidad no ha sido encendido. (Ver Página S10)
Un botón de Pre-Programa o un botón de Operación Manual no ha sido oprimido después de oprimir . (Ver Páginas S12, S14)
•
•
•
La unidad ha sido dañada.
Deje de usar la unidad inmediatamente.
El cable de alimentación o el tomacorrriente está anormalmente caliente.
Deje de usar la unidad inmediatamente.
Consulte la Advertencia No. 5 y 13 en la página S3.
Si requiere de servicio póngase en contacto con su distribuidor local o llame al 1-877 Panafix (723-2349).
17-18 2008/08/28 13:17:49
 Loading...