

Page 1
®
Operating Instructions
Instrucciones de Uso
Mode d’emploi
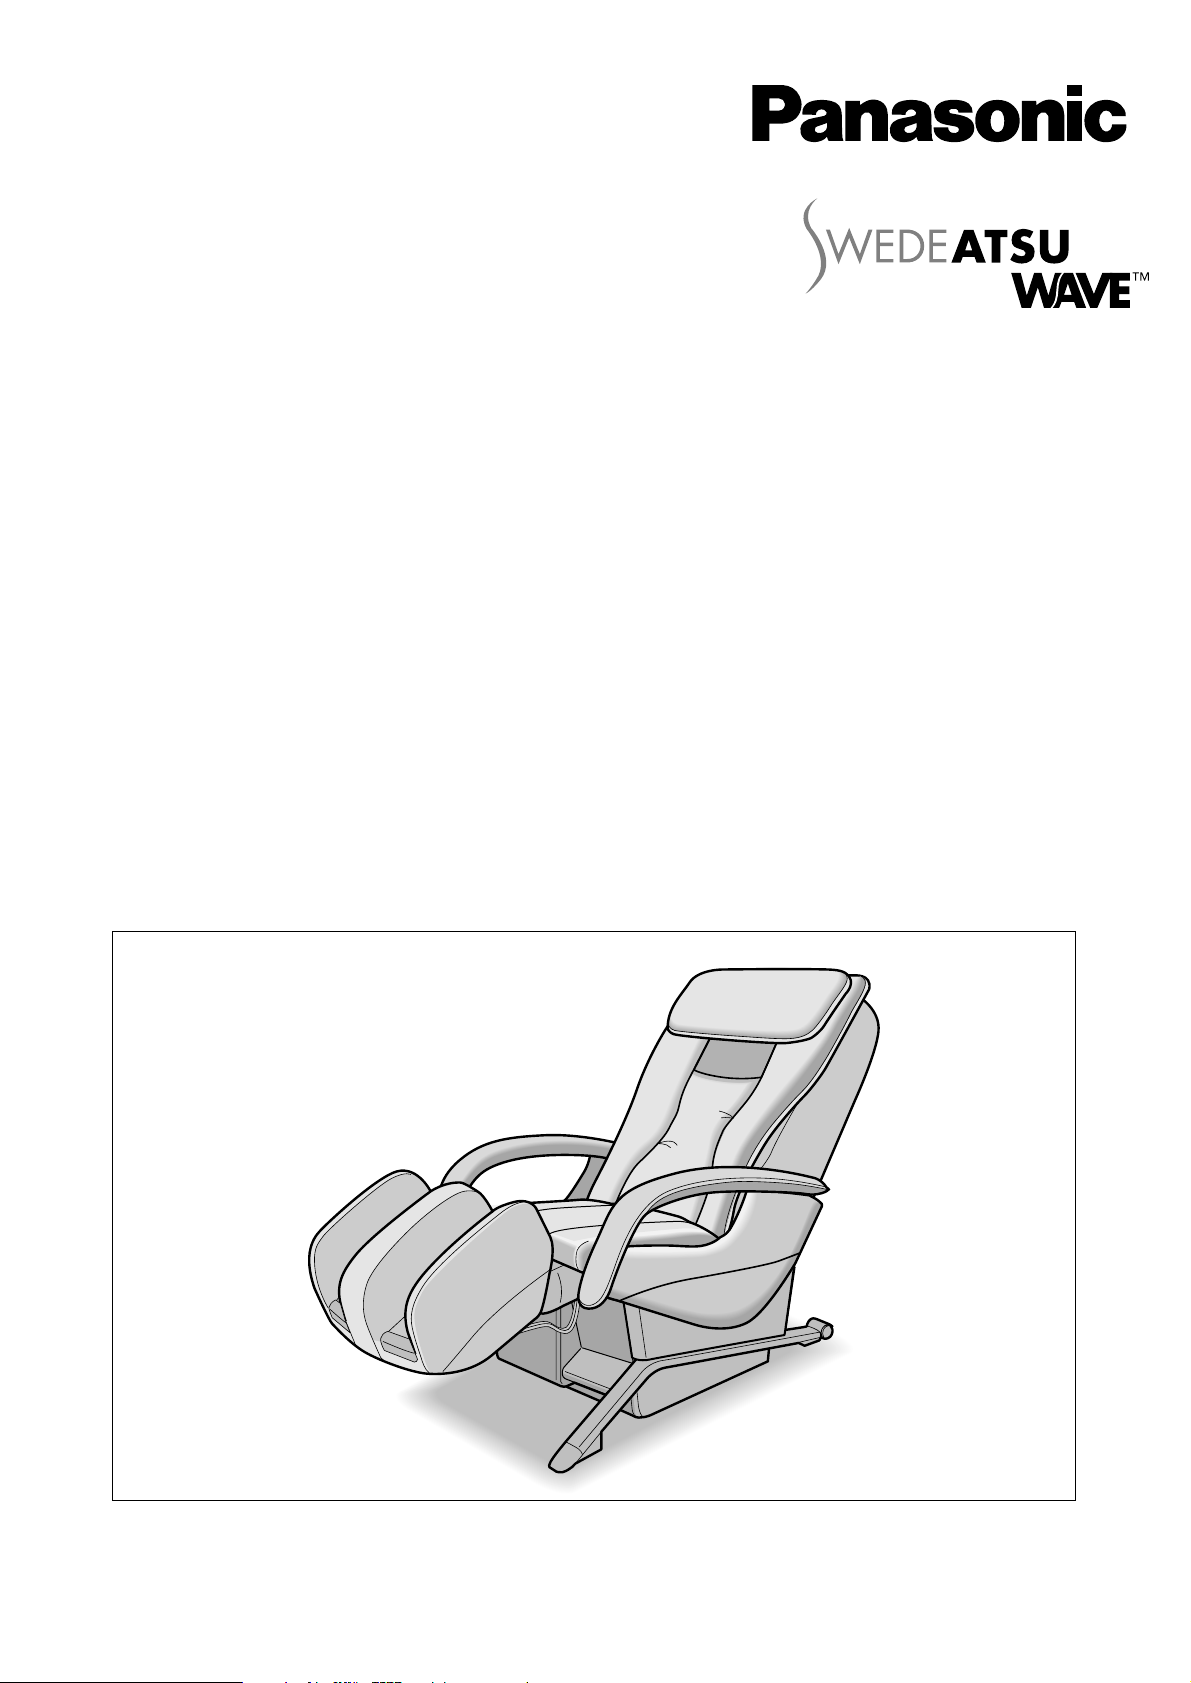
Household
Massage Lounger
Sillón de Masaje Doméstico
Fauteuil vibromasseur
Before operating this unit, please read these instructions completely, and save for future reference.
Antes de utilizar esta unidad, lea completamente estas instrucciones y guárdelas para referencia futura.
Avant d’utiliser cet appareil, nous vous recommandons de lire l’ensemble de ces instructions et de les ranger dans
un endroit accessible pour une consultation ultérieure.
Model/Modelo/Modéle No. EP1272
Page 2

See pages 1-24
Ver página S1-S24
INDICE
Español
Reportez-vous à la page F1-F24
INDEX
Français
INDEX
English
Page 3

IMPORTANT SAFETY INSTRUCTIONS
Basic precautions should always be followed when using an electrical unit, including the following.
Please ensure that you read all instructions before using the Household Massage Lounger.
DANGER – To reduce the risk of electric shock:
1. Always unplug the unit immediately after use.
2. Always unplug the unit before cleaning.
WARNING – To reduce the risk of burns, fire, electric shock, or injury to persons:
1. Always insert the power plug all the way into the outlet to reduce the risk of short-circuit and fire.
2. The unit should never be left unattended when plugged in. Always unplug the unit when not in use.
3. Close and continuous supervision is necessary when the unit is used by people who are limited in their ability to
move or communicate.
4. Only use the unit for the purpose described in these instructions.
5. Do not stand on the unit.
6. Do not use any accessories other than those recommended by the manufacturer.
7. This unit should not be used by children. Keep children away from the unit. Always return the seat to the upright
position and retract the legrest completely to avoid possible injury. Make sure that nothing is in the way when
retracting the legrest. Remove key when not in use and store out of reach of children.
8. Never operate the unit if it has a damaged power cord or plug. Return the unit to the nearest authorized service
center if it is not working properly, if it has been dropped or damaged, or if it has been immersed in water.
9. Always raise the back cushion to check that the fabric of the unit itself has not been ripped before using the
unit. Please also check other areas to ensure that the fabric has not been ripped. No matter how small the rip,
if you find one then immediately stop using the unit, unplug the power cord and have the unit repaired at an
authorized service center.
10. Keep power cords away from heated surfaces. Do not carry the unit by the power cord. Do not allow pins,
rubbish or moisture to come into contact with the plug.
11. Do not use the unit on top of heating appliances, such as electric carpets, etc. Do not operate the unit under
blanket or pillow. Excessive heating can occur and cause fire, electric shock, or injury to persons.
12. Never block the air openings during operation and make sure that all air openings are kept free of lint and hair, etc.
Do not drop or insert anything into any of the openings of the unit.
13. Do not use the unit in bathrooms or other damp or humid places as this may cause electric shock or cause the
unit to malfunction. Do not spill water, etc. onto the controller.
14. Do not use the unit outdoors.
15. Do not use the unit in places where aerosol spray products are in use or where oxygen is being used.
16. When unplugging the unit, turn off all controls before removing the plug from power outlet. Do not use the unit
with a transformer as this may lead to malfunction or electric shock.
17. Connect this unit to a properly grounded outlet only. See Grounding Instructions.
18. To avoid electric shock or injury, do not attempt to open or disassemble any part of the unit as it contains no
user-serviceable parts.
SAVE THESE INSTRUCTIONS
1
Page 4

SAFETY PRECAUTIONS
WARNING: To avoid the risk of injury:
1. Persons with any of the conditions listed below or who are undergoing medical treatment should consult with
their physicians before using the unit:
a) Pregnant women, people who are ill, in poor physical shape.
b) People suffering from back, neck, shoulder, or hip pain.
c) People who have a pacemaker, defibrillator, or other personal medical devices prone to electronic
interference.
d) People suffering from heart disease.
e) People who are prohibited from receiving massage by a physician due to thrombosis or aneurism, acute
varicose veins, or other circulatory disorders.
f) People with irregular curvatures of the spine.
2. Sit down slowly after checking the position of the massage heads. Never put any part of your body between the
massage heads as the squeezing action of the massage heads may cause injury. Never put your fingers or feet
in the gap between the backrest and seat, the backrest and the armrest, the seat and cover under the armrest,
or the gap between the legrest and the footrest. Do not place your fingers or any part of your body in the
mechanism below the legrest, or between the legrest and footrest.
3. Do not use the unit against bare skin. While thin clothing may increase effectiveness, exposing the skin directly
to the massager may irritate the skin.
Do not use the unit while wearing anything hard on your head like a hair accessory, etc. Do not use the unit for
massaging the head, abdomen, front neck, elbows or knees.
Do not use excessively strong massage action on the back of the neck.
4. When using the massager, use the Neck Roller Position button to adjust the massage heads to the correct
position. You can adjust the shoulder position in this way in the pre-programs and Rolling in the manual
operation.
Failure to align the shoulder position correctly can lead to injury.
5. Do not stretch the back muscles for more than approximately 15 minutes at a time. To avoid overstretching the
muscles which may result in discomfort, do not use the unit for more than 5 minutes when first using it. You can
gradually increase the duration and strength of the massage as you become used to it.
Do not massage any one point for more than 5 minutes at a time.
Excessive massaging can overstimulate the muscles and nerves and result in an adverse effect.
To prevent excessive massaging, do not use the massager for more than a total of 15 minutes each session.
After approximately 15 minutes, the massage heads will be retracted and stop moving.
The back cushion can be removed if you want to experience a stronger back massage. Exercise extreme care
when you use this mode in order to avoid back pain or injury. Use only for short periods of time (no more than
15 minutes). Reinstall the back cushion if you want to restore to normal massage intensity.
6. While using the massager, if you start feeling sick or if the massage seems painful, stop using it immediately.
While using the massager, if the pressure seems too strong, the movement of the massage heads can be
stopped at any time by pressing the Quick Stop button.
7. Do not go to sleep while using the unit. Do not use the unit after drinking alcohol.
8. When the seat back is in a reclined position, do not sit on it or sit with your legs resting on the headrest.
Do not sit on the legrest as the unit may fall over.
9. Do not allow children or pets to play on or around the unit, especially during operation.
10. Do not unplug the unit or turn it off during operation. Unplug the unit immediately if there is a power outage.
11. Be sure to start on the gentle massage program if using the massager for the first time. The shiatsu massage is
stronger and should be enjoyed after one has gotten accustomed to the chair.
12. Do not allow children to play on this mechanized furniture or operate the mechanism. Legrest folds down on
closing so that a child could possibly be injured. Always leave in an upright and closed position. Keep hands
and feet clear of mechanism. Only the occupant should operate it.
2
Page 5

OPERATING PRECAUTIONS
WARNING: To avoid damaging the chair, follow these precautions:
1. The chair is designed for a maximum user weight of 264 lbs (120 kg). Exceeding the maximum weight may
cause permanent damage to the massage mechanism and/or other components of the unit. Any such damage
is deemed to be user abuse and is not covered under the Limited Warranty.
2. Do not sit on or drop the controller. Do not pull the controller cord or the power cord. Be careful not to catch the
cord of the controller between the armrest and the chair back.
3. Do not treat the chair roughly, such as turning the chair on its side, turning the chair over or standing on it.
4. Do not treat the covering roughly.
• Keep sharp or pointed objects away from the covering of the chair. Be careful not to drop lit ashes, lit
cigarettes or matches on the chair.
• Exposure to direct sunlight can cause fading or a change in color of the covering.
5. If the massager functions abnormally, immediately turn off the power and have the massager checked by an
authorized service center.
6. Do not attempt to repair the massager yourself.
7. Do not repeatedly operate any switch at short intervals. Such action may cause the switch to malfunction.
8. Some noise may be heard coming from the massager while in use. This is due to the structure of the massager
and is normal.
9. Make sure there are no obstacles behind the chair before reclining it. The chair can be reclined to a maximum
angle of 170°. If the back hits a wall or pillar, the chair may malfunction. Be sure to have ample space behind
the chair. Recline the chair slowly in order to avoid contact with an obstacle.
10. When excessive pressure is applied to the massage heads, they may stop moving for safety. When moving the
heads up from the lowered position, one’s body weight may stop the heads’ movement. In such case, slightly
raise your body and allow the massage heads to move up.
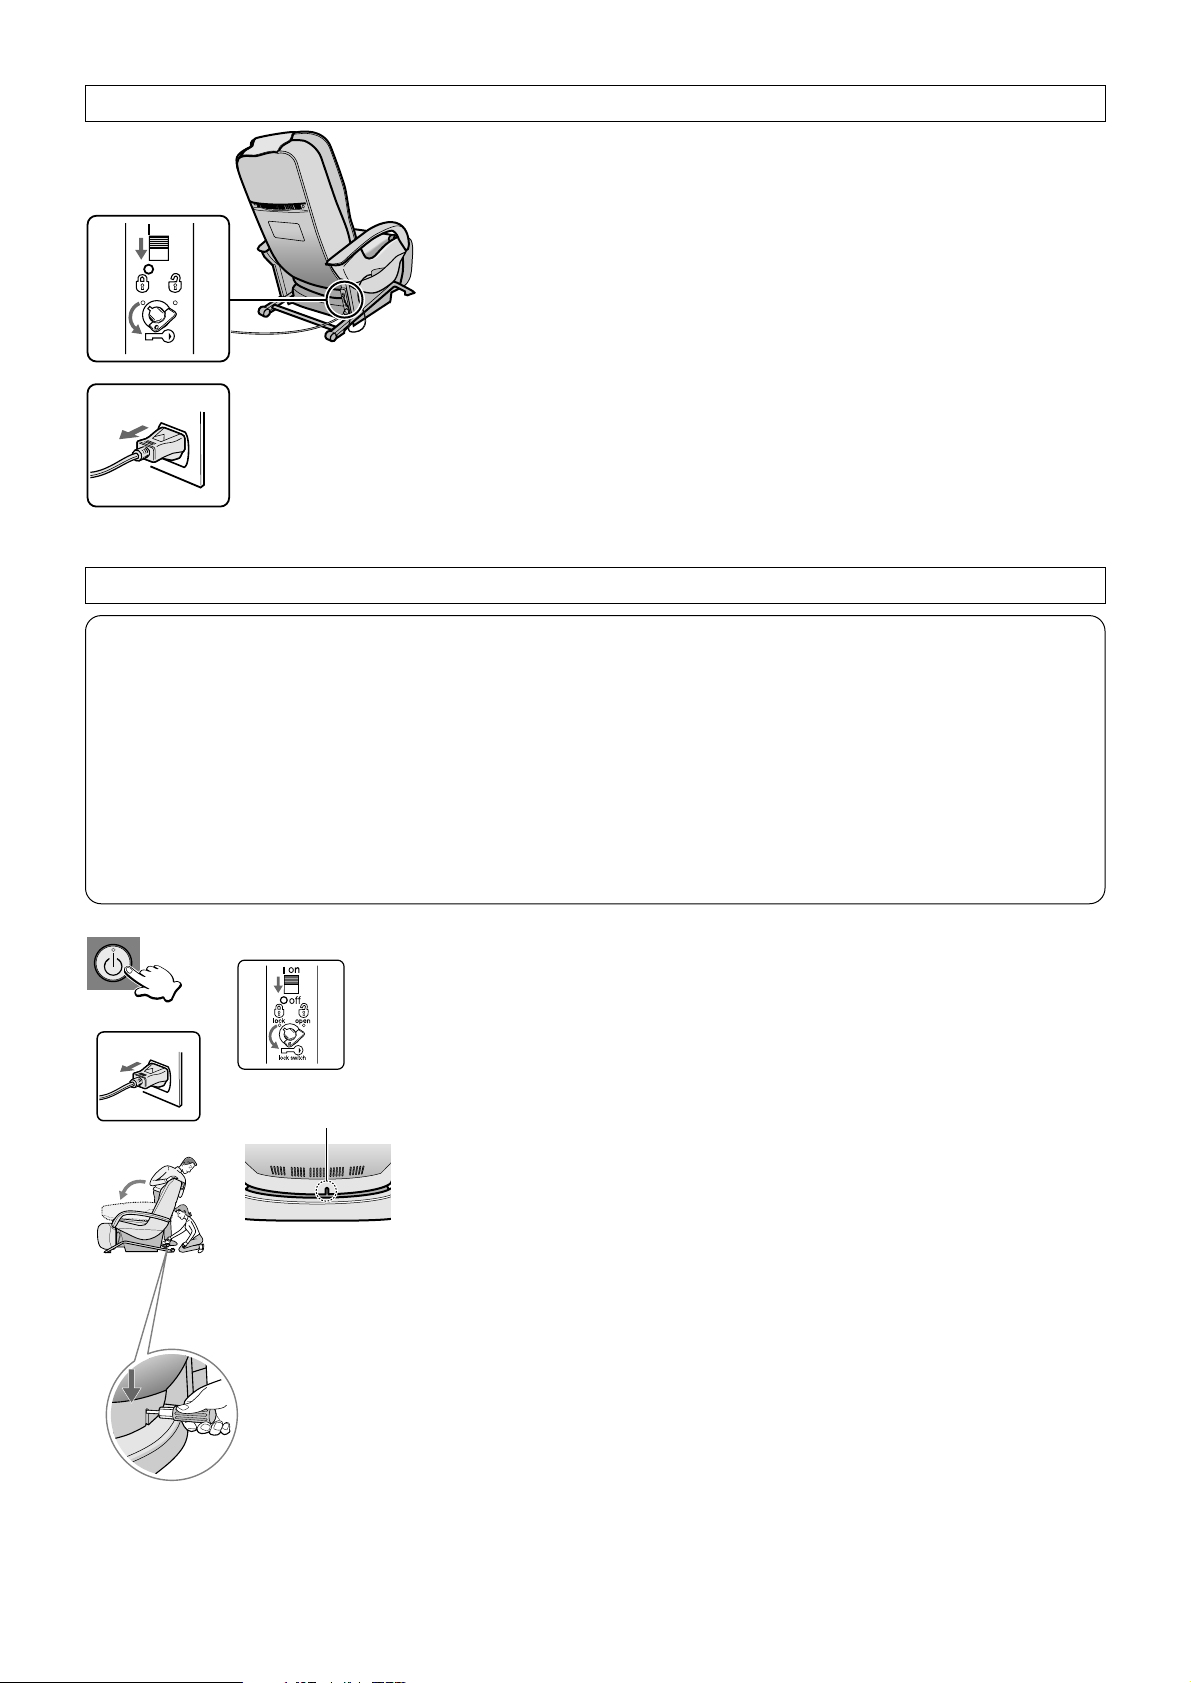
11. After each massage, slide the power switch, which is located on the right side of the chair, to the “off” position
and turn its lock switch to the “lock” position.
12. Do not sit on the chair with wet body or hair.
13. The unit must not be used in “wet rooms” (sauna, swimming pool) or outdoors.
3
Page 6
4
GROUNDING INSTRUCTIONS
The product must be grounded. If it should malfunction or break down, grounding provides a path of least
resistance for electric current to reduce the risk of electric shock. This product is equipped with a cord having an
equipment-grounding conductor and a grounding plug. The plug must be plugged into an appropriate outlet that is
properly installed and grounded in accordance with all local codes and ordinances.
DANGER
Improper connection of the equipment-grounding conductor can result in a risk of electric shock. Check with a
qualified electrician or serviceman if you are in doubt as to whether the product is properly grounded. Do not modify
the plug provided with the product — if it will not fit the outlet, have a proper outlet installed by a qualified electrician.
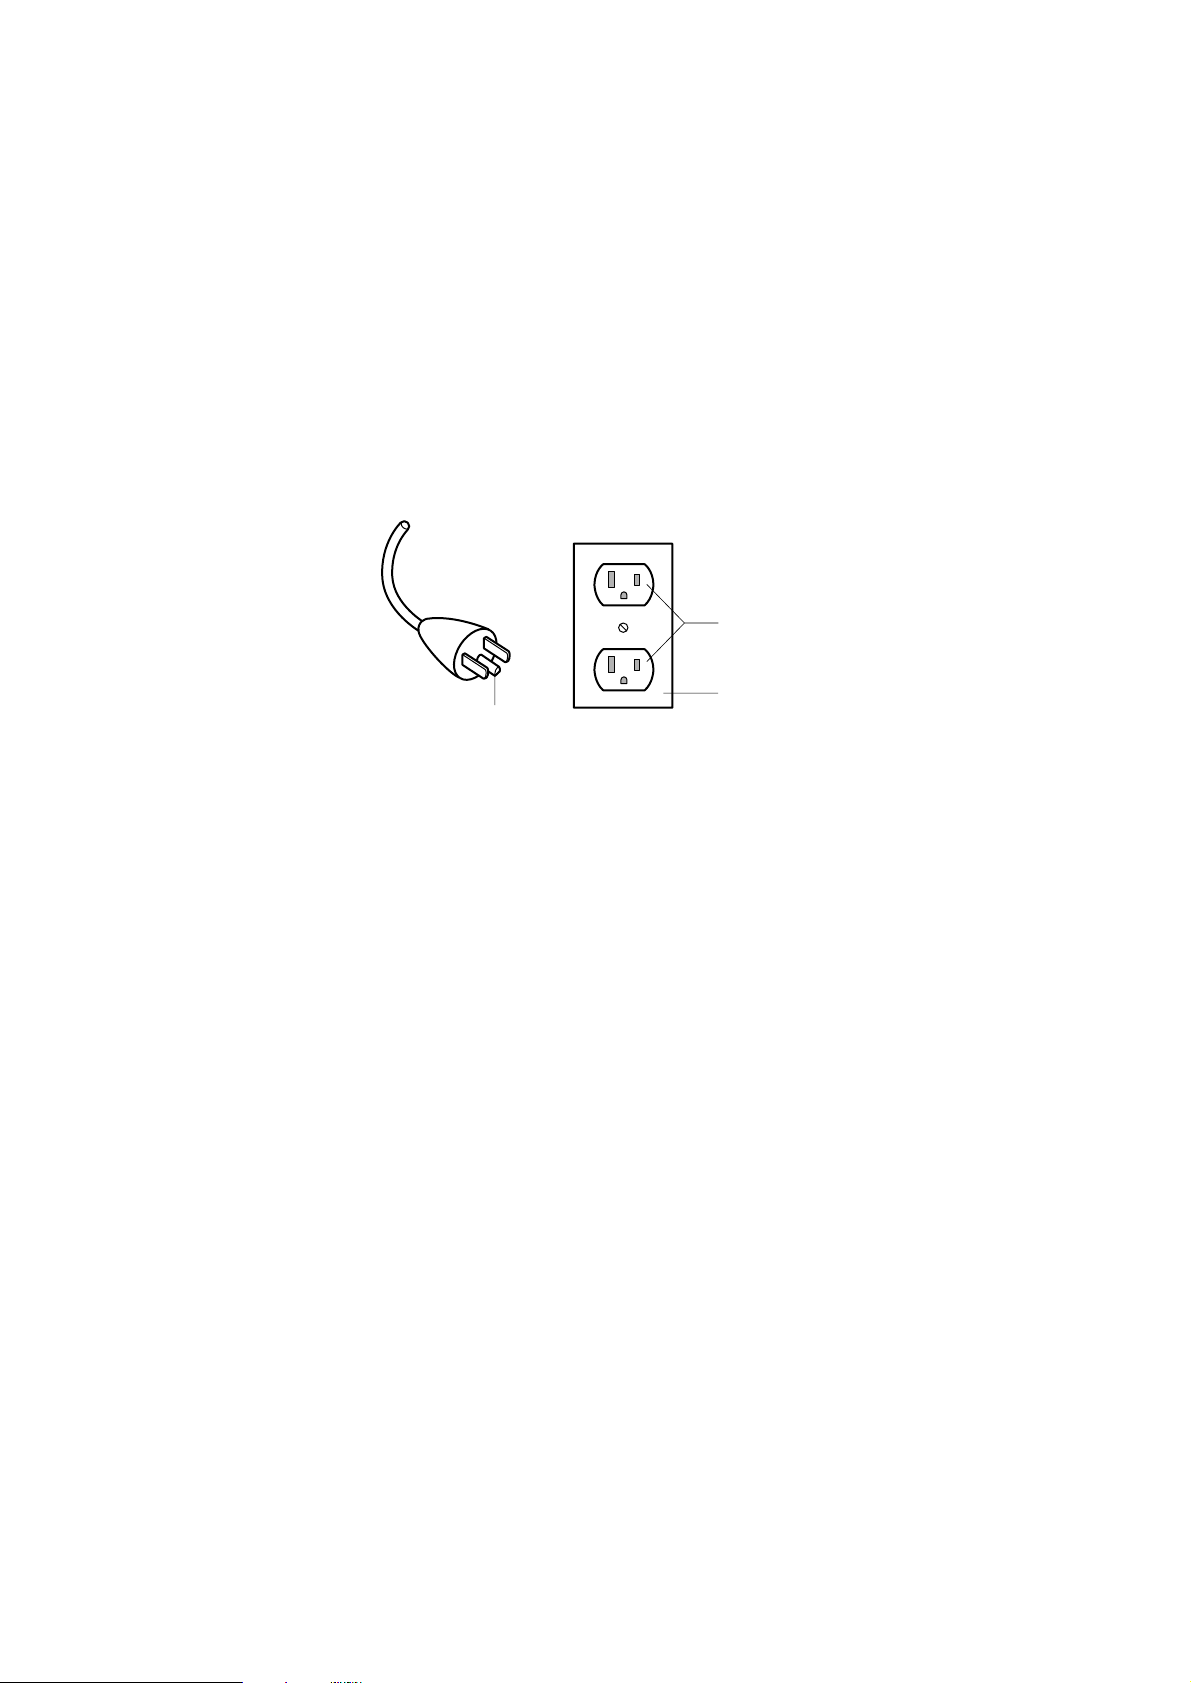
This product is for use on a nominal 120-volt circuit and has a grounding plug that looks like the plug illustrated in
Figure A. Make sure that the product is connected to an outlet having the same configuration as the plug.
No adaptor should be used with this product.
GROUNDED
OUTLET
GROUNDED
OUTLET BOX
GROUNDING PIN
Figure A
Page 7
5
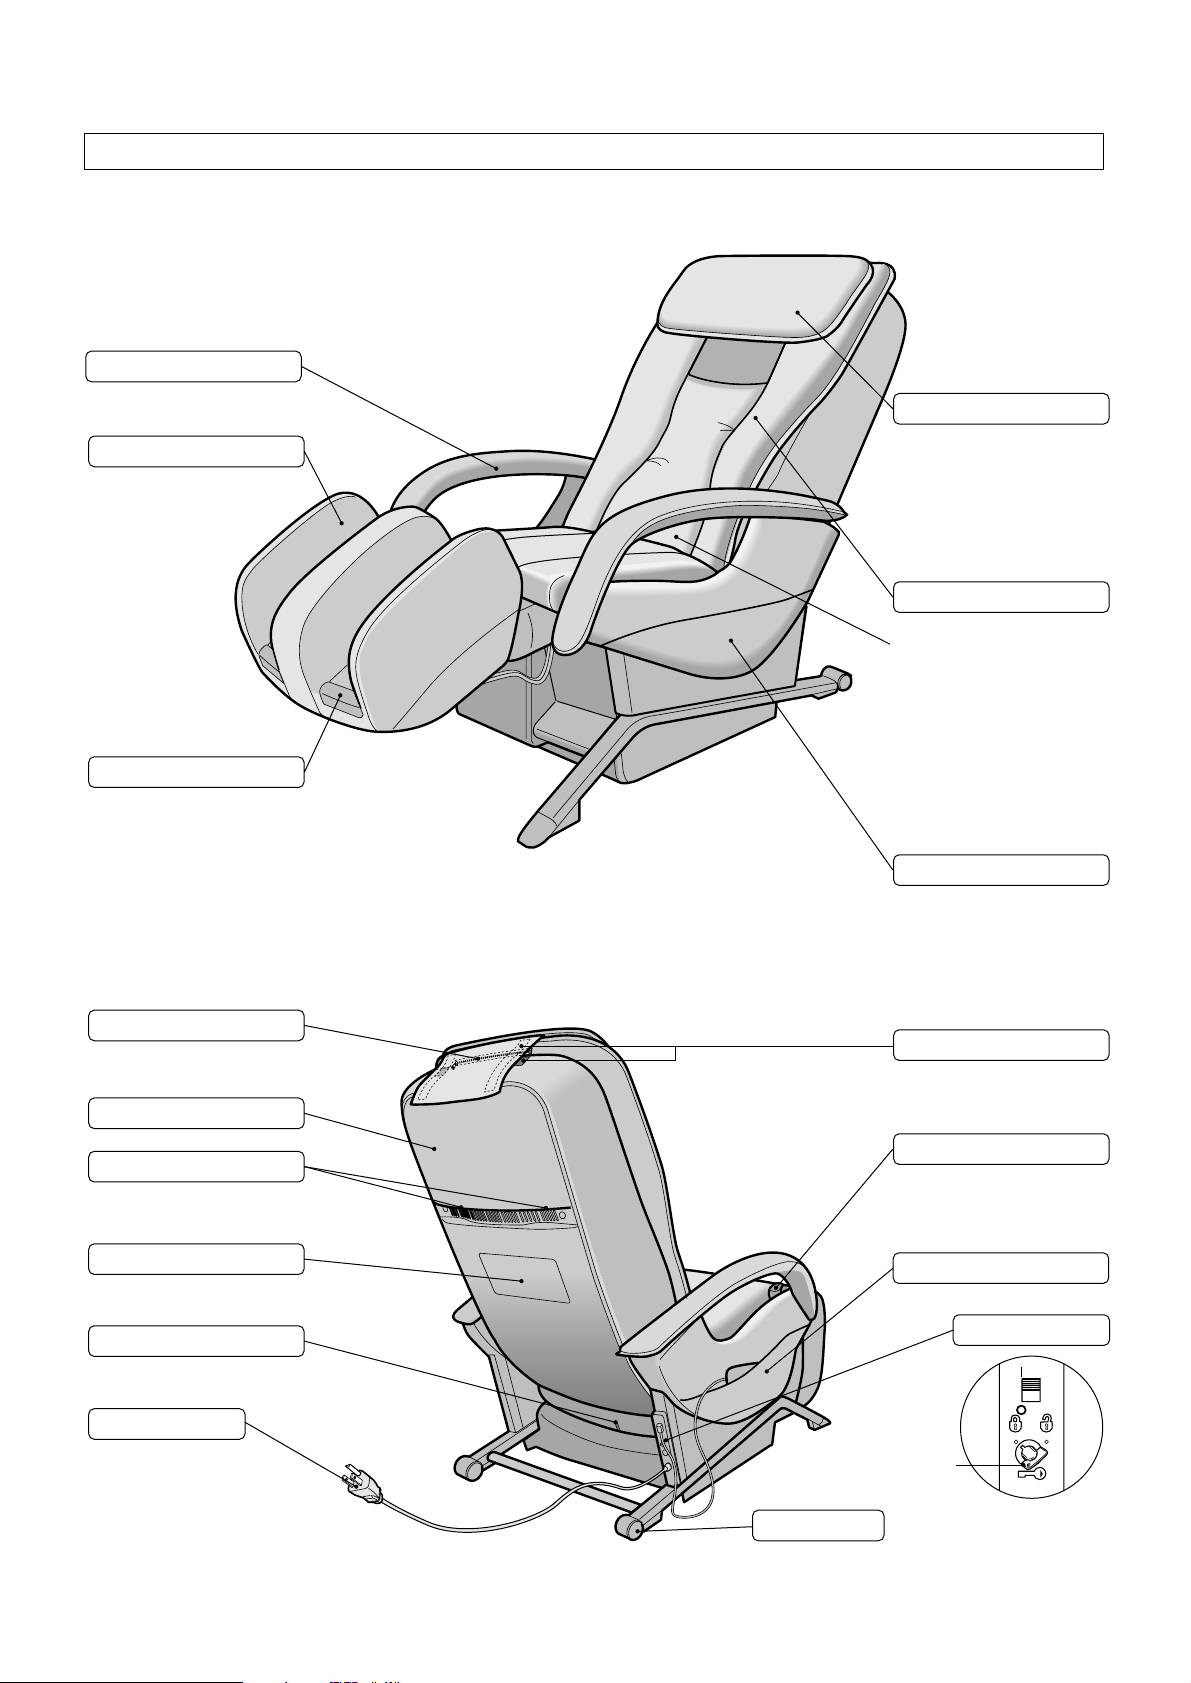
PART NAMES AND FUNCTIONS
MASSAGE LOUNGER
n
Front
Armrest
Legrest
• Includes an air massage
function.
Legrest Slide Projections
• Use these to extend the
legrest length by pushing
with your heels.
Pillow
For use when watching TV
•
or just relaxing.
•
The pillow has a height
adjustment. (See Page 10)
•
The pillow is detachable,
and can also be flipped
over.
Back Cushion
Retracted Position of
Massage Heads
The massage heads are
*
normally retracted to the left
and right in the upper part of
the backrest. (However, if the
Quick Stop button is pushed
to stop the massage then the
massage heads will not retur
to the retracted position.)
Side Pocket
Back Cushion Zipper
• The back cushion is
detachable.
Back Cover
Handle
Safety Precaution Label
Backrest Latch
Power Cord
Back
Lock Switch Key
Wheels
Pillow Fasteners
Legrest Slide Lever
• Pull this lever when you
want to extend the length
of the legrest.
Controller Holder
Power Switch
on
off
lock
open
lock switch
Page 8
6
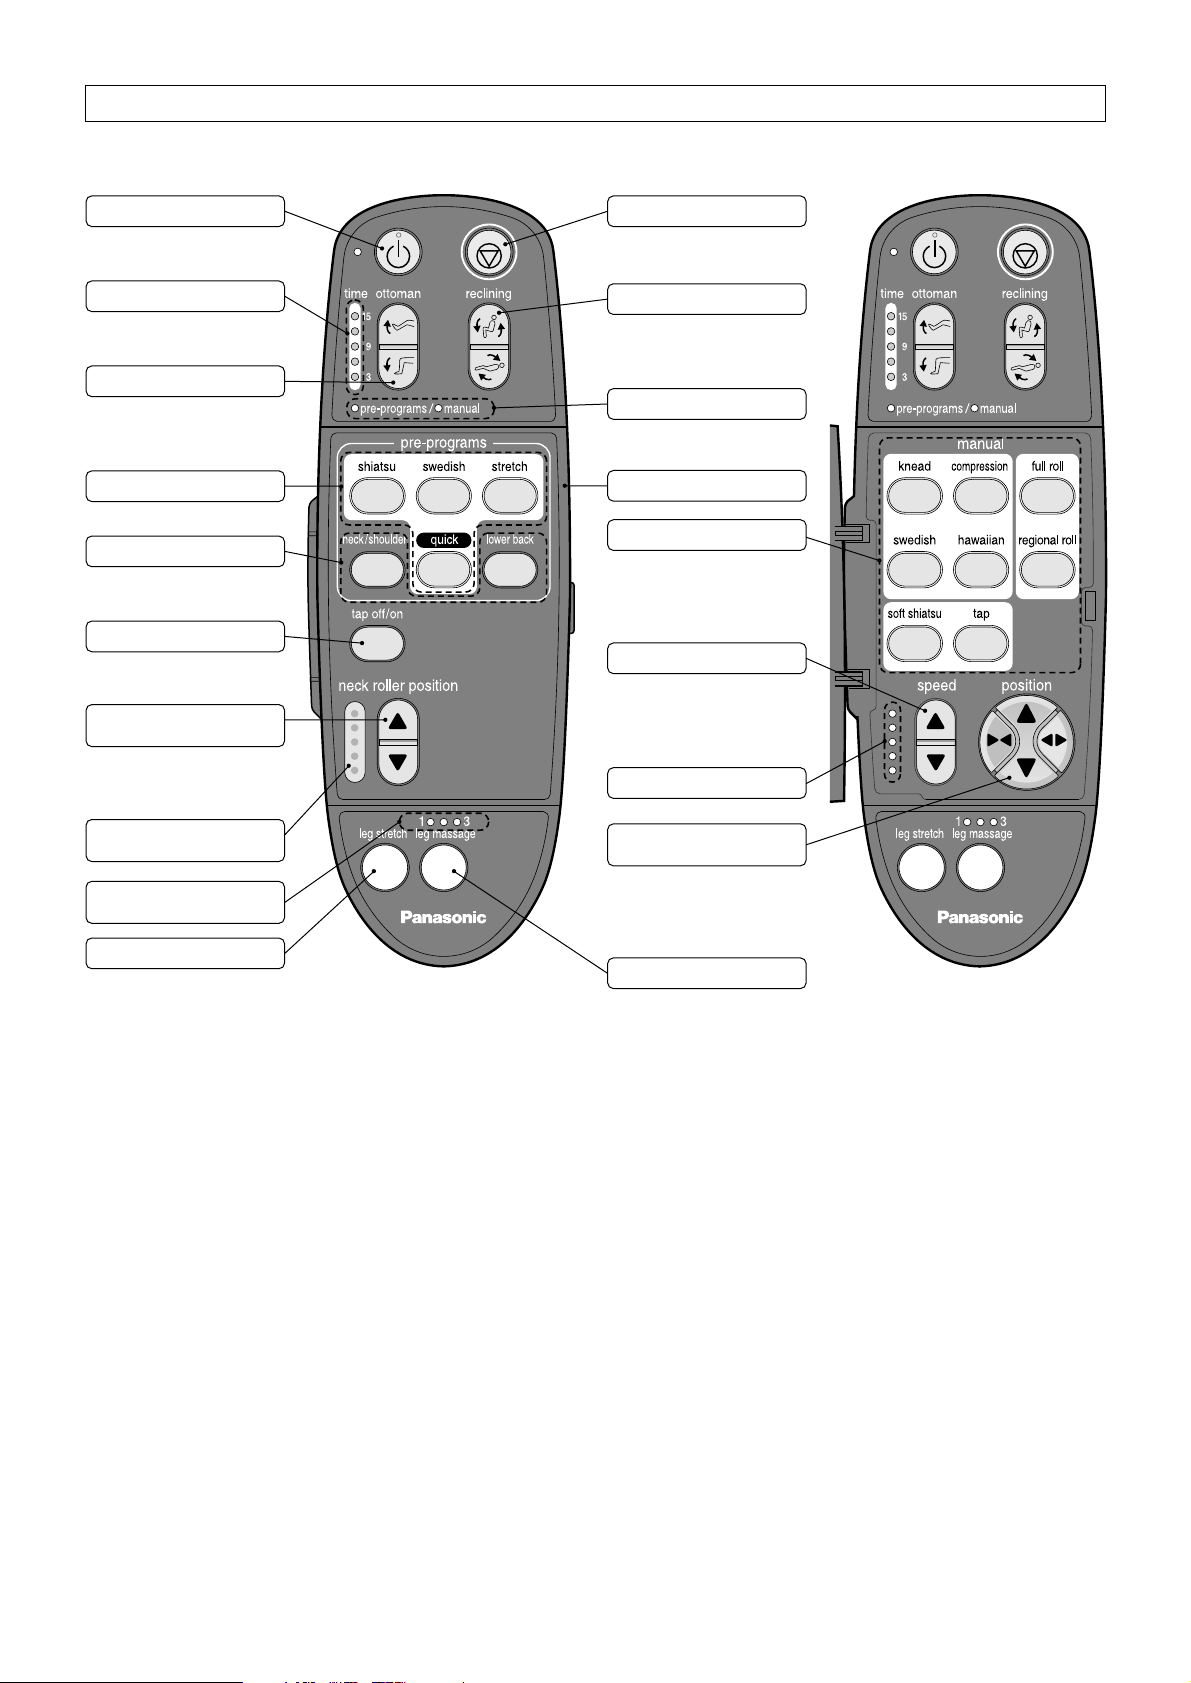
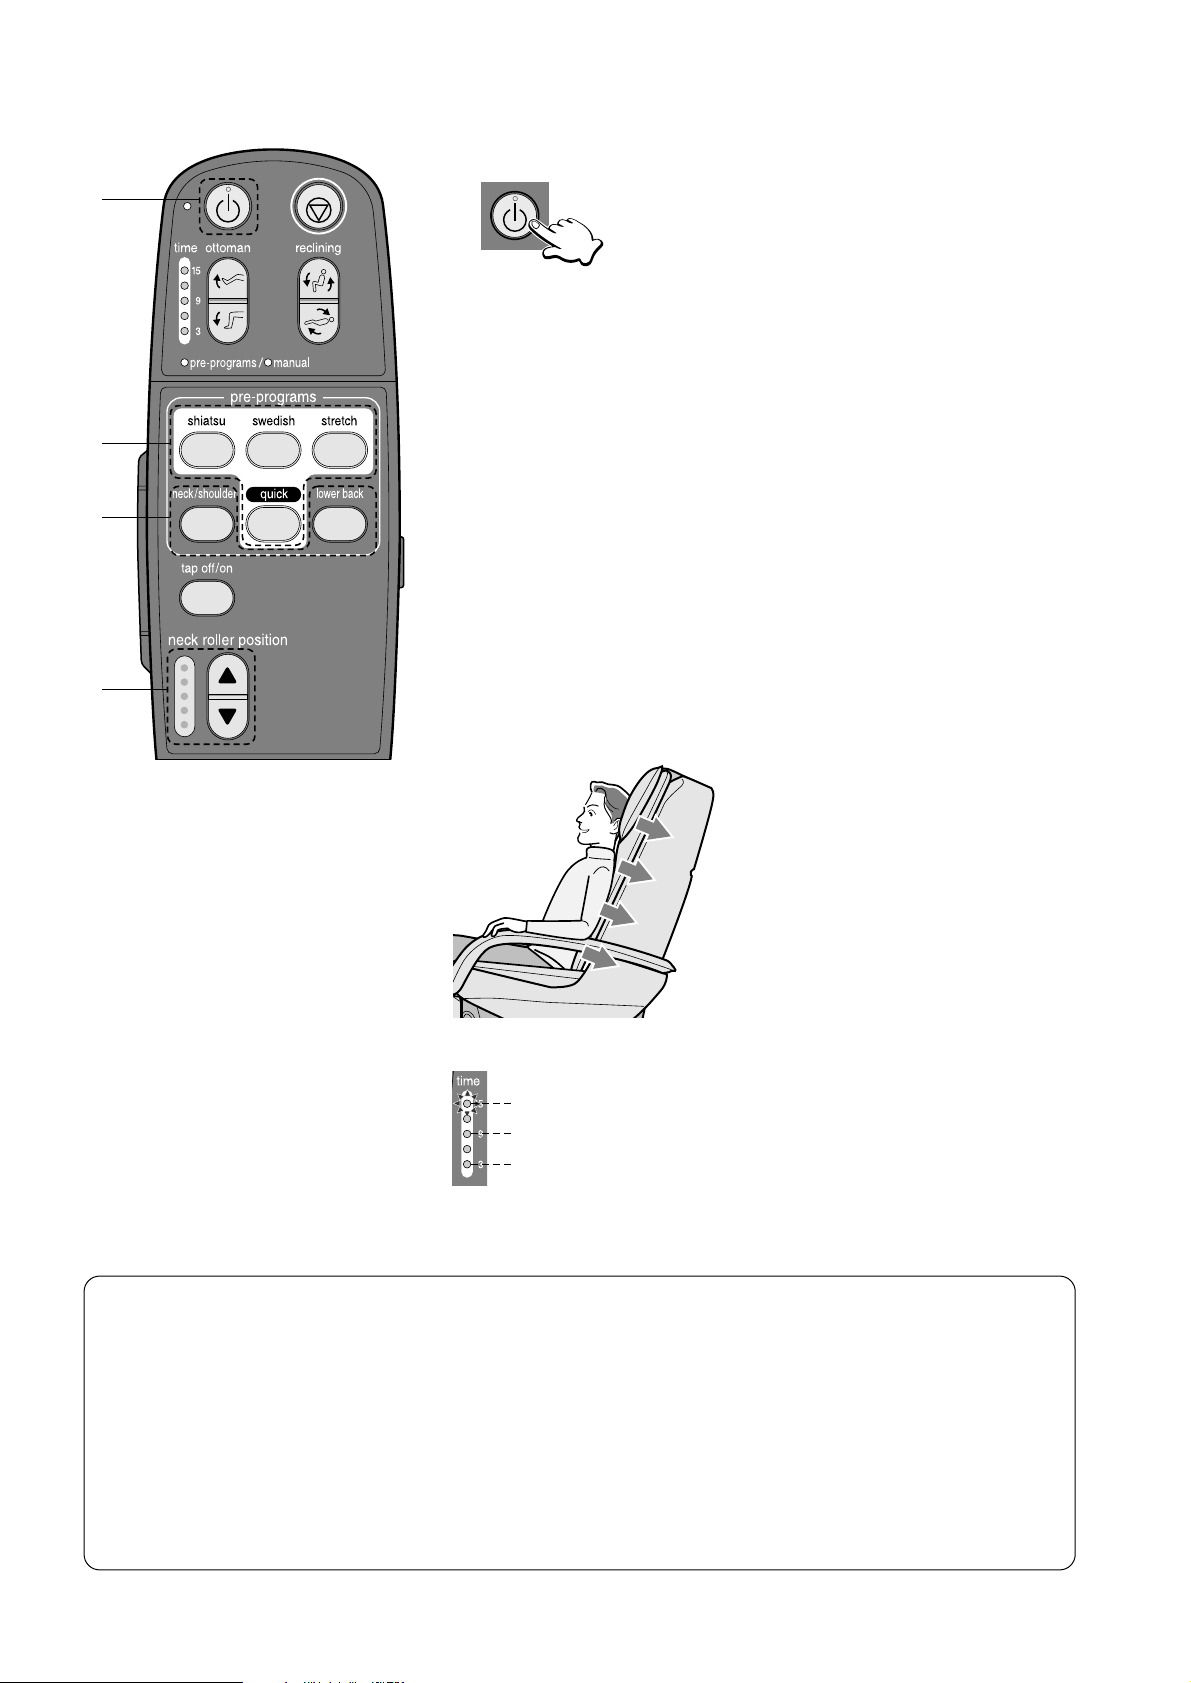
CONTROLLER
Cover Closed Cover Opened
OFF/ON button
• Switches the controller
on and off.
Time Indicator
• Displays time remaining
before end of massage.
Ottoman button
• Use this button to
adjust the angle of the
legrest.
Pre-Programs buttons
Massage Focus buttons
• Used to select focus of
massage.
Tapping OFF/ON button
• For use during
pre-programs.
Neck Roller Position
button
• Used for positioning
massage heads at
shoulder level.
Neck Roller Position
Indicator
Leg Massage
Intensity Indicator
Leg Stretch button
• Used for turning leg
stretch on and off.
Quick Stop button
• Used to stop the
massage immediately.
Reclining button
• Use this button to
adjust the angle of the
backrest and legrest.
Operation Indicator
• Displays operational
status.
Cover
Manual Operation buttons
• This allows you to
select the massage
action you desire.
(See Page 14)
Speed Adjustment button
• Adjusts speed of upper
body massage in 5
steps during manual
operation.
Speed Indicator
Massage Position
Adjustment button
• Adjusts position of
massage heads during
manual operation.
(See Page 15)
Leg Massage button
•
Tu r ns airbags on and off
and adjusts intensity of
leg massage in 3 steps.
Page 9
7
CAUTION
• When raising the backrest, do not allow hands or feet to
become caught between the backrest and the backrest
latch or the backrest and the armrests. Failure to follow
this precaution may result in pinching, which may lead to
injury.
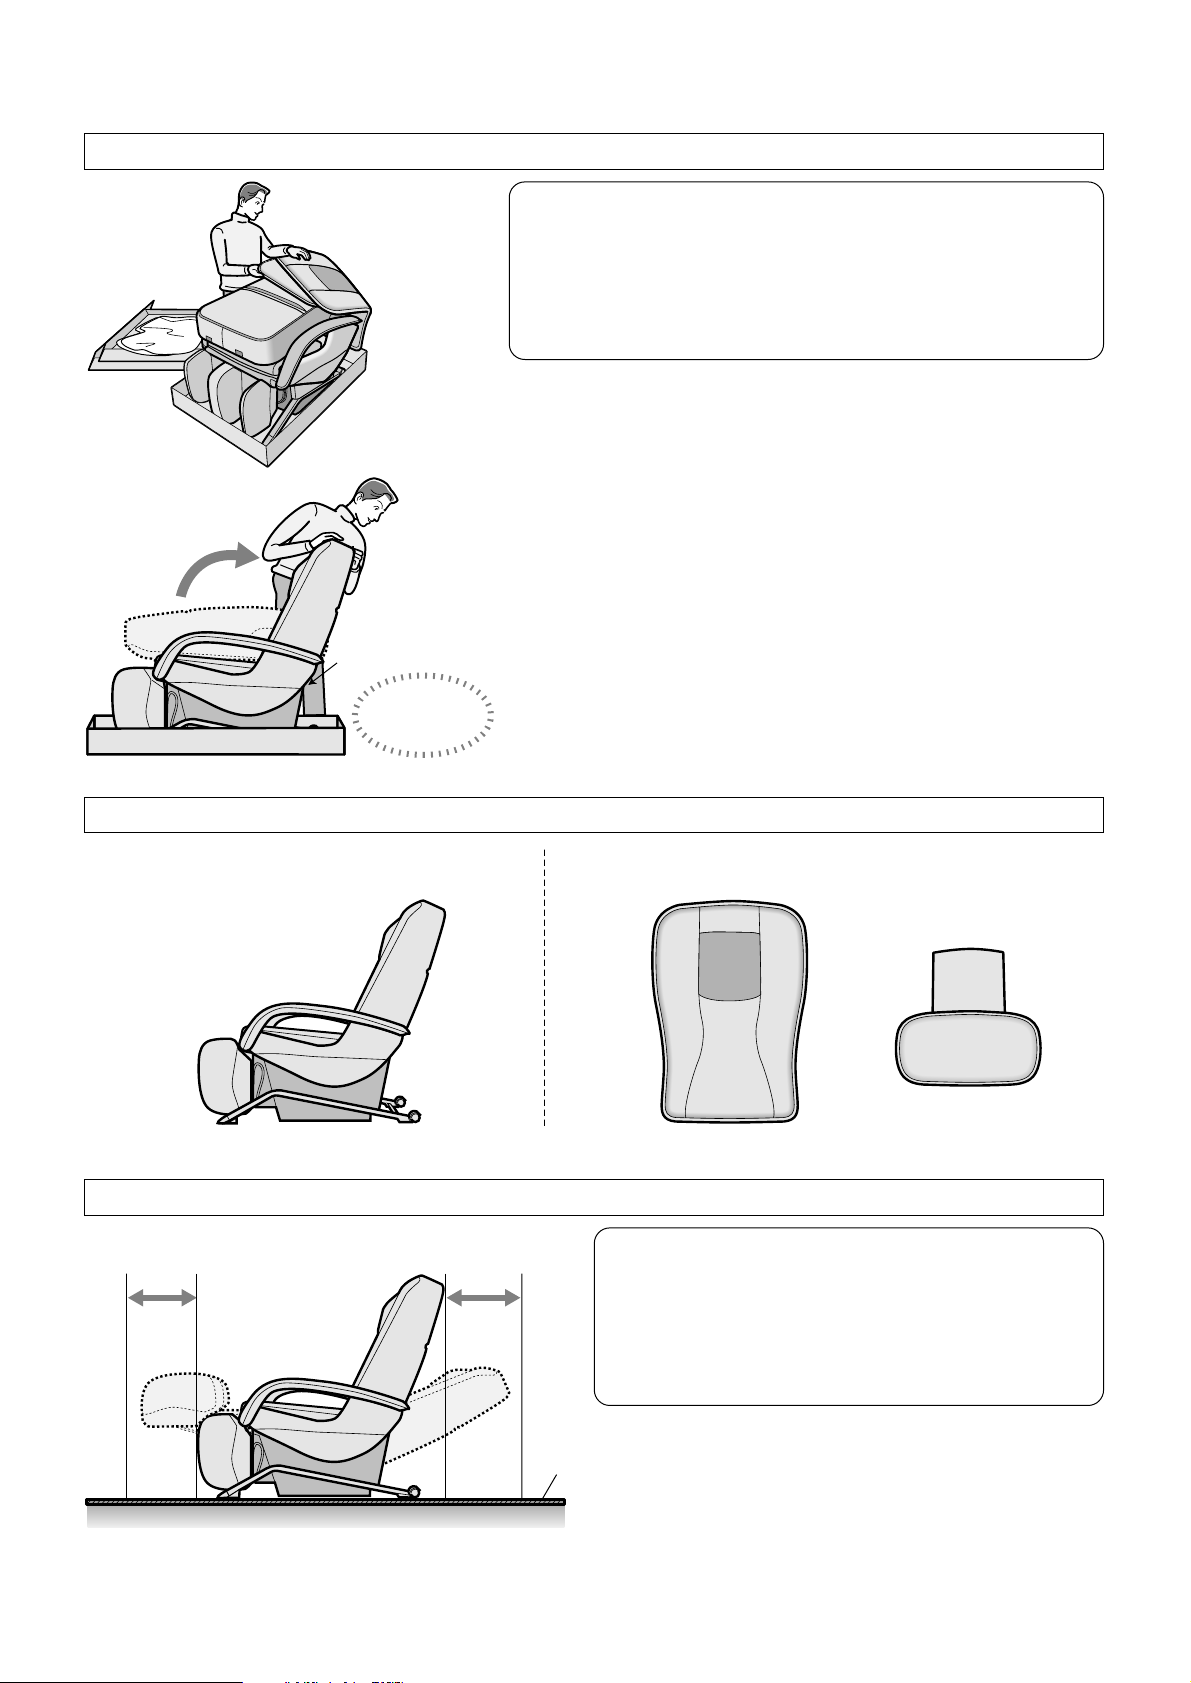
UNPACK THE UNIT AND RAISE THE BACKREST
• Avoid places where the unit will be exposed to direct
sunlight for long periods of time or places where it will
be exposed to high temperatures, such as in front of a
heater, etc., as this can cause discoloration or
hardening of the synthetic leather.
• Placing a mat or cloth under the unit is recommended to
prevent floor damage.
WHERE TO USE THE UNIT
INSPECT CONTENTS OF SHIPPING CONTAINER
SETTING UP THE UNIT
Backrest Latch
Keep hands, feet,
children and objects
clear of area.
At Least
15.7"
(40 cm)
At Least
15.7"
(40 cm)
Mat
Select a place where the unit can be reclined.
1. Remove the top of the shipping container.
• When packed for shipping the backrest is folded forward.
2. Remove the packing and cushioning materials
and take out the accessories.
3. Raise the backrest.
• Do not connect the power cord to an electrical outlet during
setup.
• Hold the backrest with both hands and lift in the direction of
the arrow until it comes to a stop.
Back Cushion
Pillow
AccessoriesMassage Lounger
CAUTION
• Do not use the unit in areas with high humidity,
such as the bathroom, etc. as this can lead to
electric shock or other accidents.
• Place the unit on a totally flat surface. Failure to
do so may result in the seat tipping over.
Page 10
8
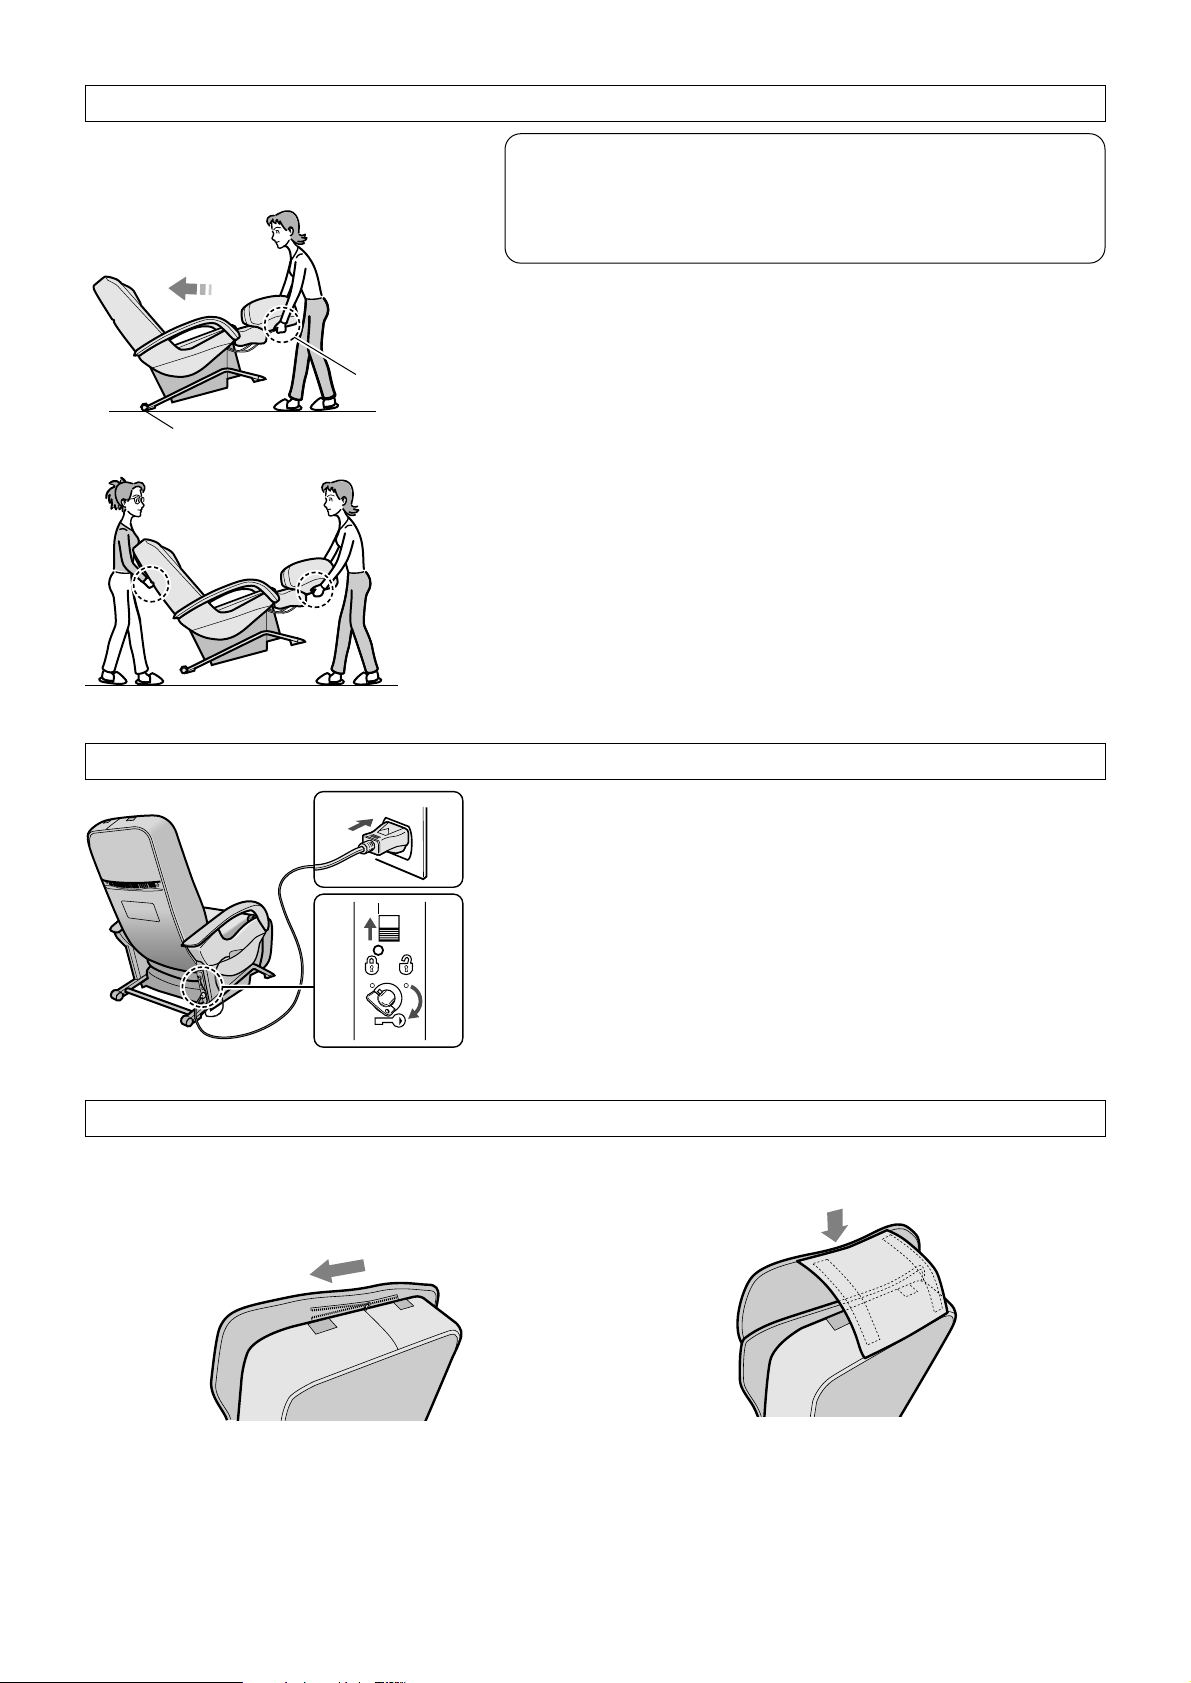
CAUTION
• Do not move the unit while someone is seated on it.
Failure to do so may cause the unit to tip over, which may lead
to damage or injury.
HOW TO MOVE THE UNIT
1. Plug the power plug into an electrical outlet.
2. Verify that the lock switch key is turned to the
“open” position.
• If in “lock” position, turn the lock switch key to “open”.
3. Slide the power switch to the “on” position.
POWERING UP THE UNIT
1. Attach the back cushion using the
zipper.
2. Attach the pillow using the fasteners.
ATTACHING THE BACK CUSHION AND PILLOW
Using the wheels to move the unit
• Grasp the legrest to move the unit when using the wheels.
• It is easier to move the unit with the massage heads retracted and
the backrest in the upright position.
* Place a mat or cloth on the floor and move the unit slowly to
prevent floor damage.
Lifting the Unit
• Move the chair by having one person hold the legrest and another
person use the handles on the back.
* Please hold the handles and legrest securely to avoid dropping
the unit as it may damage your floor.
off
lock
lock switch
open
on
3
2
1
Move it slowly
Hold
the legrest.
Wheels
Page 11
9
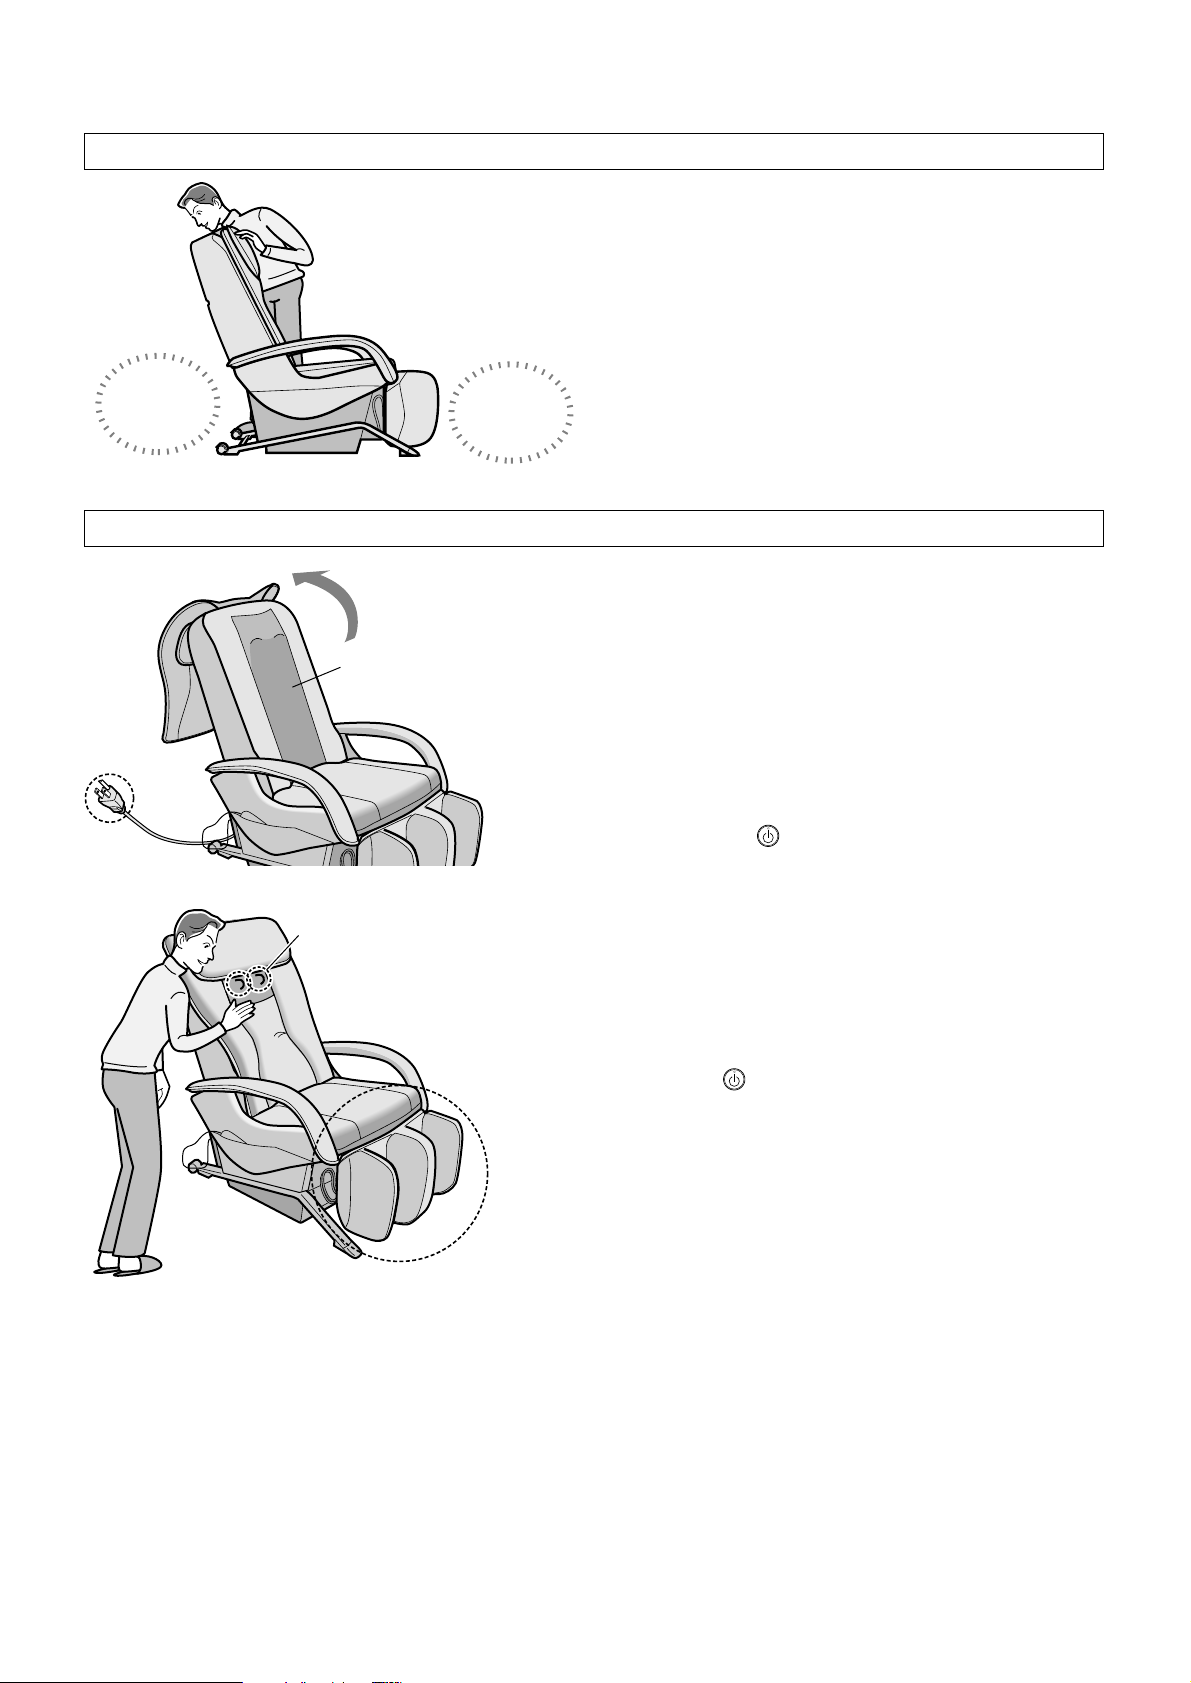
Check that there is nothing around the unit.
1. Make sure the covering is free of rips or tears.
2. Make sure the power plug is functional.
• Make sure the power plug is undamaged.
• Make sure the power plug is free of foreign matter and
debris.
3. Make sure the massage heads are in the
retracted position, i.e. they are parked to the
left and right in the upper part of the backrest.
If not retracted, press twice to return the massage heads
to the retracted position.
4. Make sure the legrest is lowered.
• Do not sit on the legrest when it is raised. Doing so may
cause it to collapse down or bend the legrest. The legrest is
not meant to support full body weight.
Lowering the Legrest
Pull the legrest slide lever, make sure the legrest is fully
retracted, then press twice to return the legrest to its lowest
position.
CHECK THE SURROUNDING AREA
CHECK THE UNIT
BEFORE USING THE UNIT
Keep hands,
feet, children and
objects clear
of area.
Keep hands,
feet, children and
objects clear
of area.
1
Check covering.
2
Check
3
Check retracted
position.
4
Check the legrest.
Page 12
10
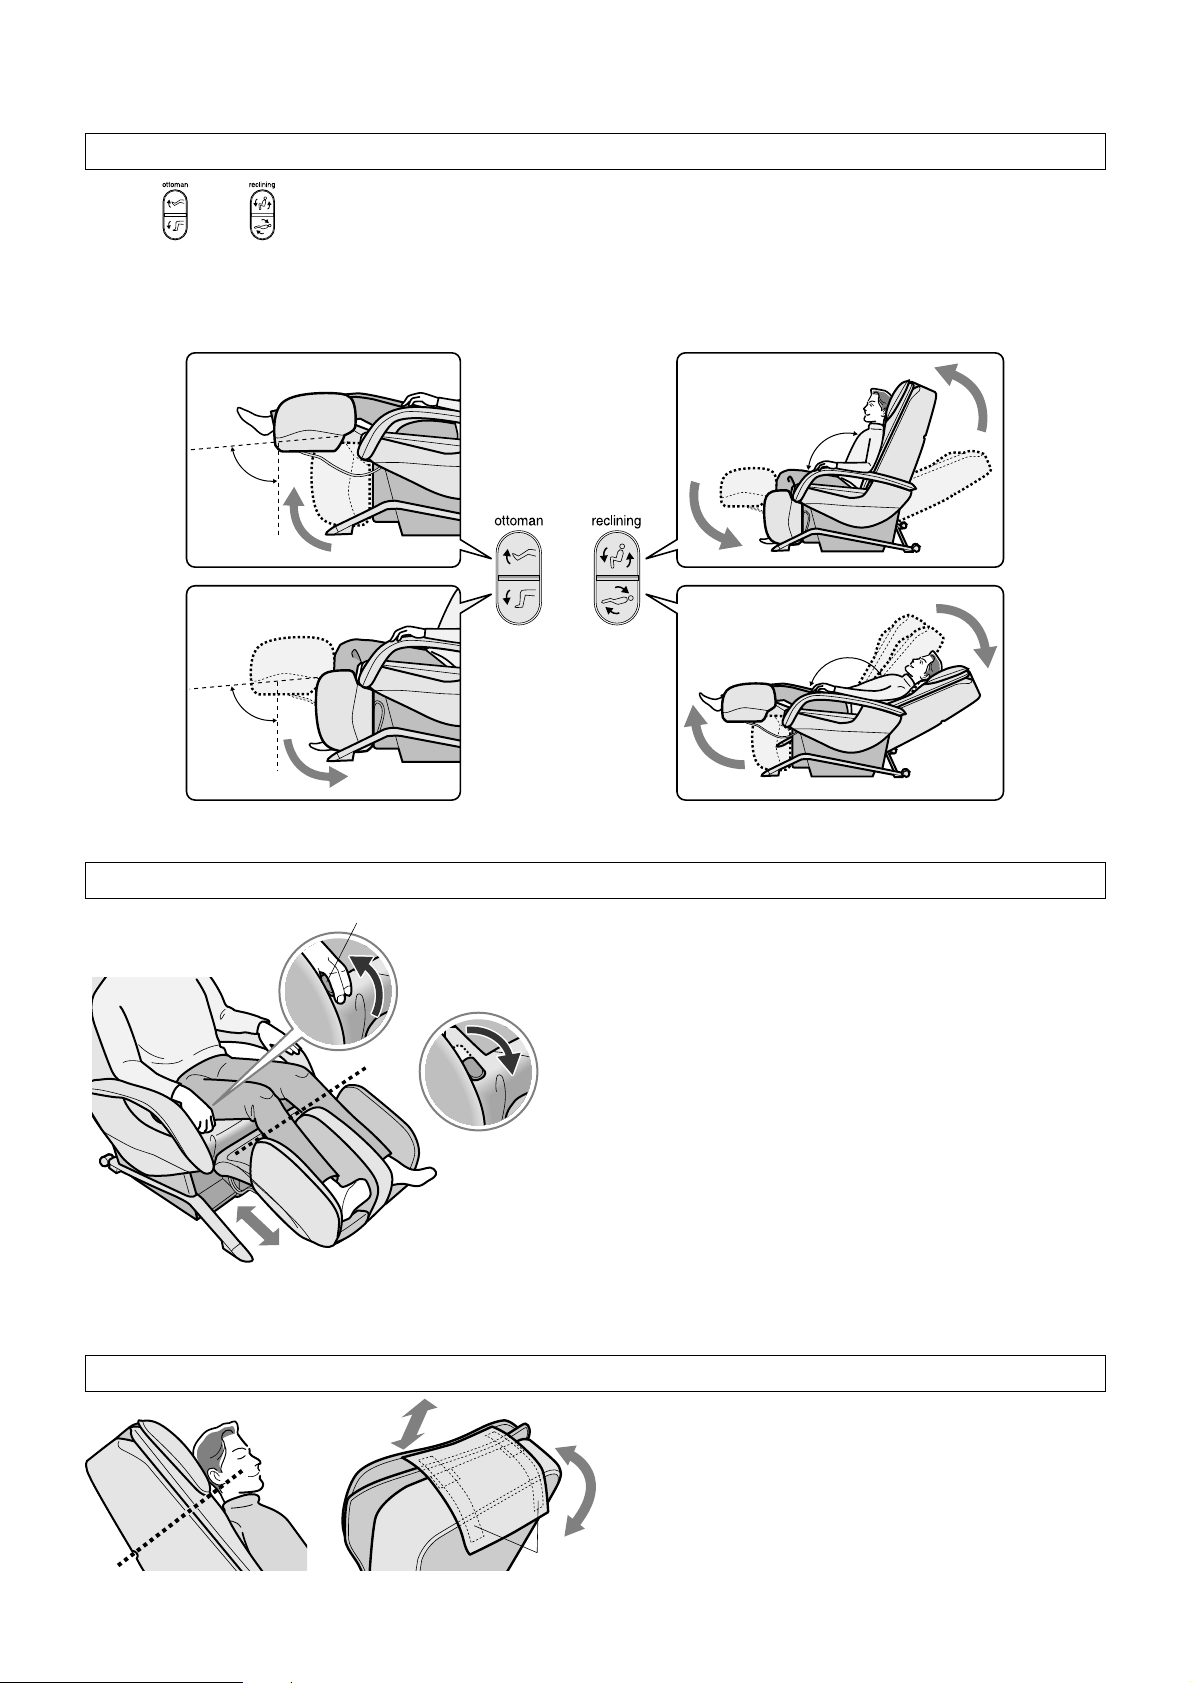
ADJUSTING THE RECLINING ANGLE
1. Pull on the legrest slide lever and
extend the legrest to desired length.
(maximum approx. 6 in. (15 cm)).
2. Release the legrest slide lever.
EXTENDING THE LEGREST LENGTH
ADJUSTING THE SEAT
Press and to adjust the angle of the backrest and legrest.
• With either button held down, movement will continue until a “beep-beep-beep” sound indicates the legrest or
backrest has been raised or lowered as far as possible.
• The legrest will start to move shortly after the backrest.
Approx.
85°
Approx. 120°
Approx. 170°
Approx.
85°
Adjust the pillow height so that the
bottom edge of the pillow is at ear level.
• If positioned too low, the pillow can lessen the effect
of massage around the neck area.
ADJUSTING FOR CORRECT PILLOW HEIGHT
Legrest Slide Lever
Pull back.
Release
the lever.
• Extend legrest length by pushing legrest slide projection with heel.
• Raise legs slightly and legrest returns.
• Extend until the end of the legrest is lower than the knees.
Fasteners
Page 13
11
USING PRE-PROGRAMS AND QUICK MASSAGE
1
2
5
4
1. Press the OFF/ON button.
2. Select the pre-program you want.
• Please press one of the flashing buttons.
• For a general explanation of pre-program characteristics, please
refer to the bottom of this page.
• For an outline of each pre-program, please refer to the information
on page 18.
• If you press another Pre-Program button during your selected preprogram massage, the massage will switch to the newly selected
pre-program.
The Selected Program will Start
• It is possible to change the pre-program selected or to change to
manual operation mid-way through a massage.
• In pre-programs, the leg massage begins at the same time.
It is possible to stop or change the intensity of the leg massage
during the program. (See Page 17)
3. Sit as far back in the seat as possible with your
head on the pillow.
About the Time Indicator
Head rests
on pillow.
Approx. 15 min.
Approx. 9 min.
Approx. 3 min.
Time Remaining
Press
• The OFF/ON indicator will come on.
•
You can now select one of the pre-programs or one of
the manual settings.
• Pressing a Pre-Program button
automatically moves the backrest and
legrest into massage position.
• If the massage lounger is reclined
further than this angle then it will not
automatically recline.
• Displays remaining massage time via flashing
LED.
• Starts counting down from 15 minutes in
increments of approximately 3 minutes.
• Flashing speeds up one minute before end of
massage.
Shiatsu: Uses mainly Soft Shiatsu, Tap and Knead actions to comfortably loosen and provide relief from
tension held at pressure points. Recommended for those with severe stiffness or who prefer a stimulating
massage.
Swedish: Uses mainly Swedish, Hawaiian and Knead actions to evenly apply muscle-relaxing strokes all
over. Recommended for those who are just starting out or prefer a gentle massage.
Stretch: Uses mainly Full Roll, Soft Shiatsu, Compression, Knead and Leg Stretch actions to stretch out and
loosen up back and leg muscles. Recommended for those who are physically inactive or troubled by tired legs.
Quick: Covers all areas using a variety of massage actions, all in a span of just five minutes.
Recommended for those who want to relax quickly.
Pre-Program and Quick Massage Characteristics
Page 14
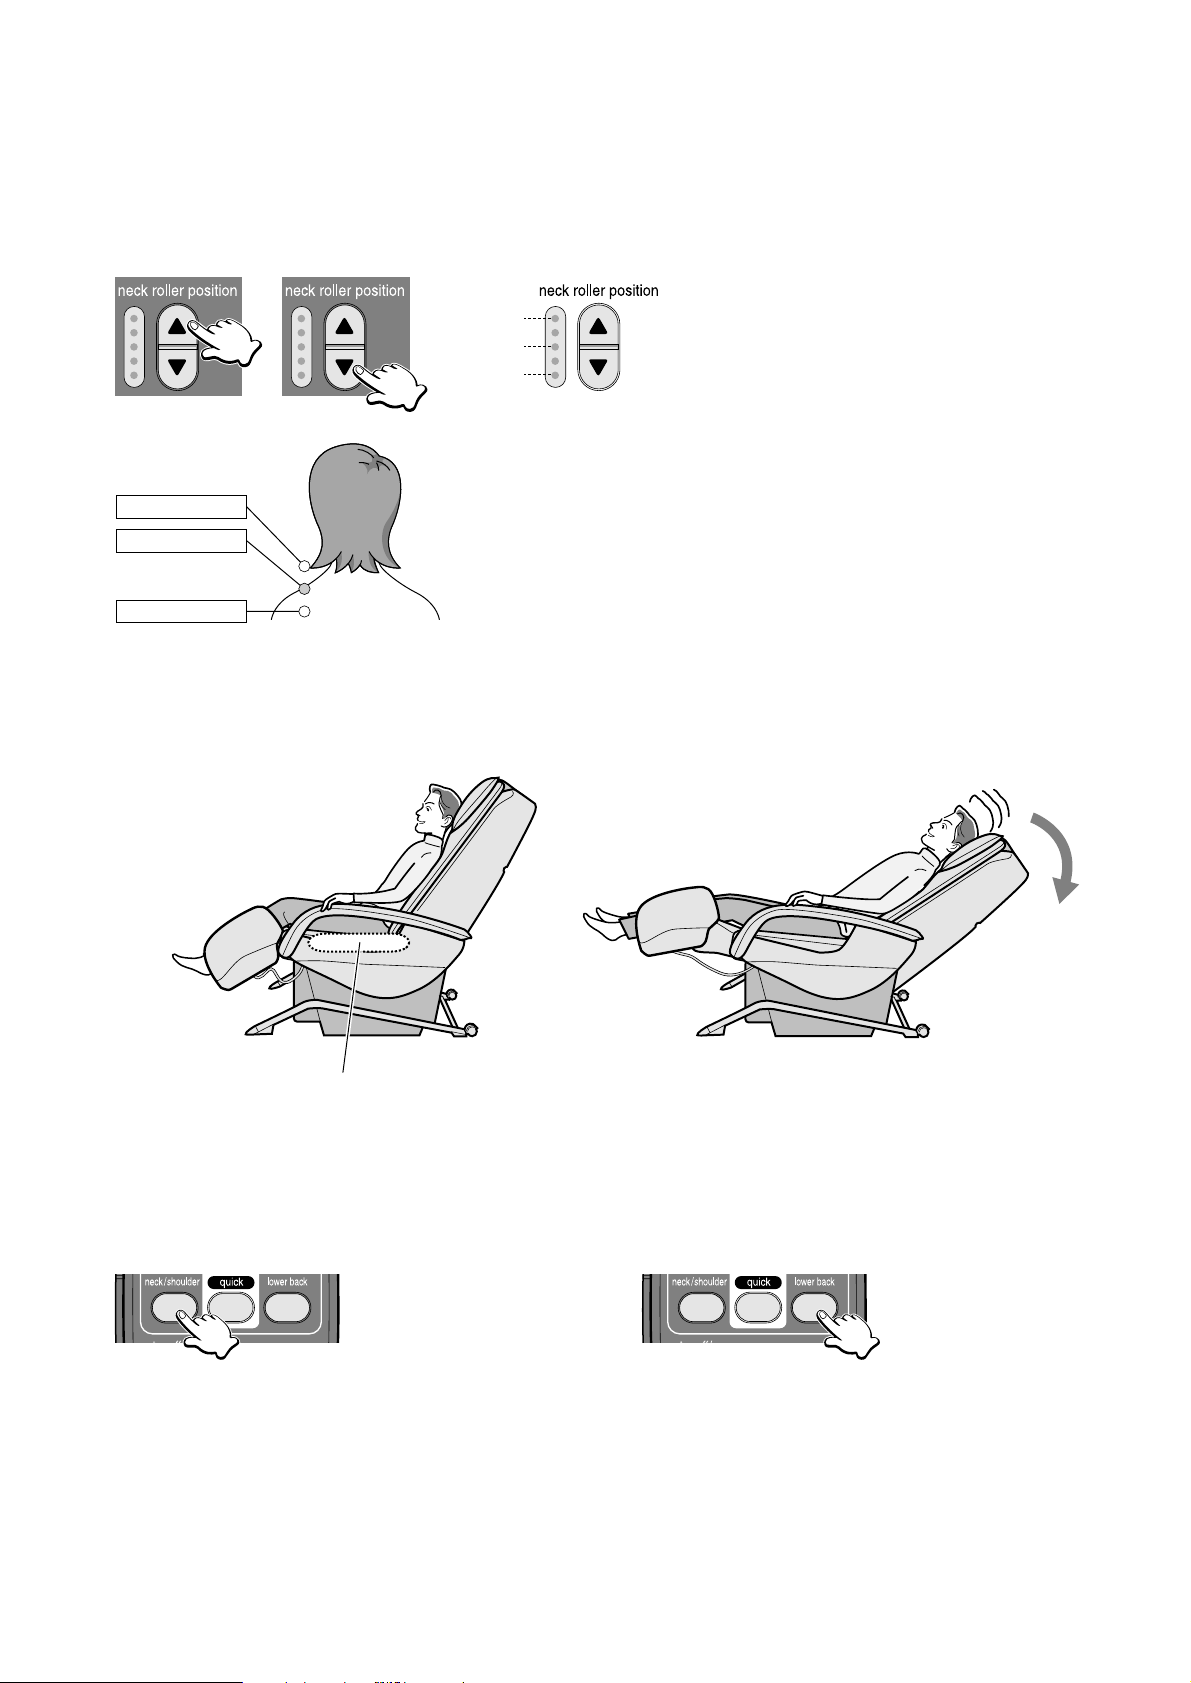
• When the shoulder position indicator is flashing, adjust the position of
the massage heads (upper heads) so that they lightly touch the
shoulders.
• The shoulder position can be adjusted up and down 4 in. (10 cm).
• When it is not possible to correctly adjust the shoulder position, you
may have to slide your body and adjust it again.
12
4. Adjusting shoulder position
• When a pre-program begins, the backrest and legrest automatically move the massage position where the
massage heads carry out a Soft Shiatsu massage in the area around the shoulders. During the time that the
shoulder position indicator is flashing (approx. 7 seconds), use the Neck Roller Position button to align the
position of the massage heads to your shoulder height.
Approximate positions for adjusting the position of the heads are shown below.
• Persons whose height is less than 4.6 ft. (140 cm) or more than 6.1 ft. (185 cm) are recommended to use the
chair in the manner described below when the massage heads do not touch their shoulders.
• 5-stage adjustment
Up Down Approximate Height
Press
Press
6'1" (185 cm)
5'2" (160 cm)
4'6" (140 cm)
When height is around 4.6 ft. (140 cm) or less When height is around 6.1 ft. (185 cm) or more
Use by placing a cushion on the seat and
sitting as far back as possible.
Use by reclining the backrest and
sliding your body downward.
• Lightly touching
the shoulder.
Too high
Correct position
Too low
• It is possible to change the position of
the massage heads during the massage.
Helpful Tips
5. Selecting an area for a focused massage
• Please see pages 14–17 for details regarding manual operation.
Massaging the Lower Back
• Press this button to focus the program on the lower
back. (The neck and shoulders will also be
massaged slightly.)
• Press the button again to toggle it off.
Massaging the Neck and Shoulders
• Press this button to focus the massage on the neck
and shoulders. (The upper and lower back will also
be massaged slightly.)
• Press the button again to toggle it off.
Press Press
Page 15
13
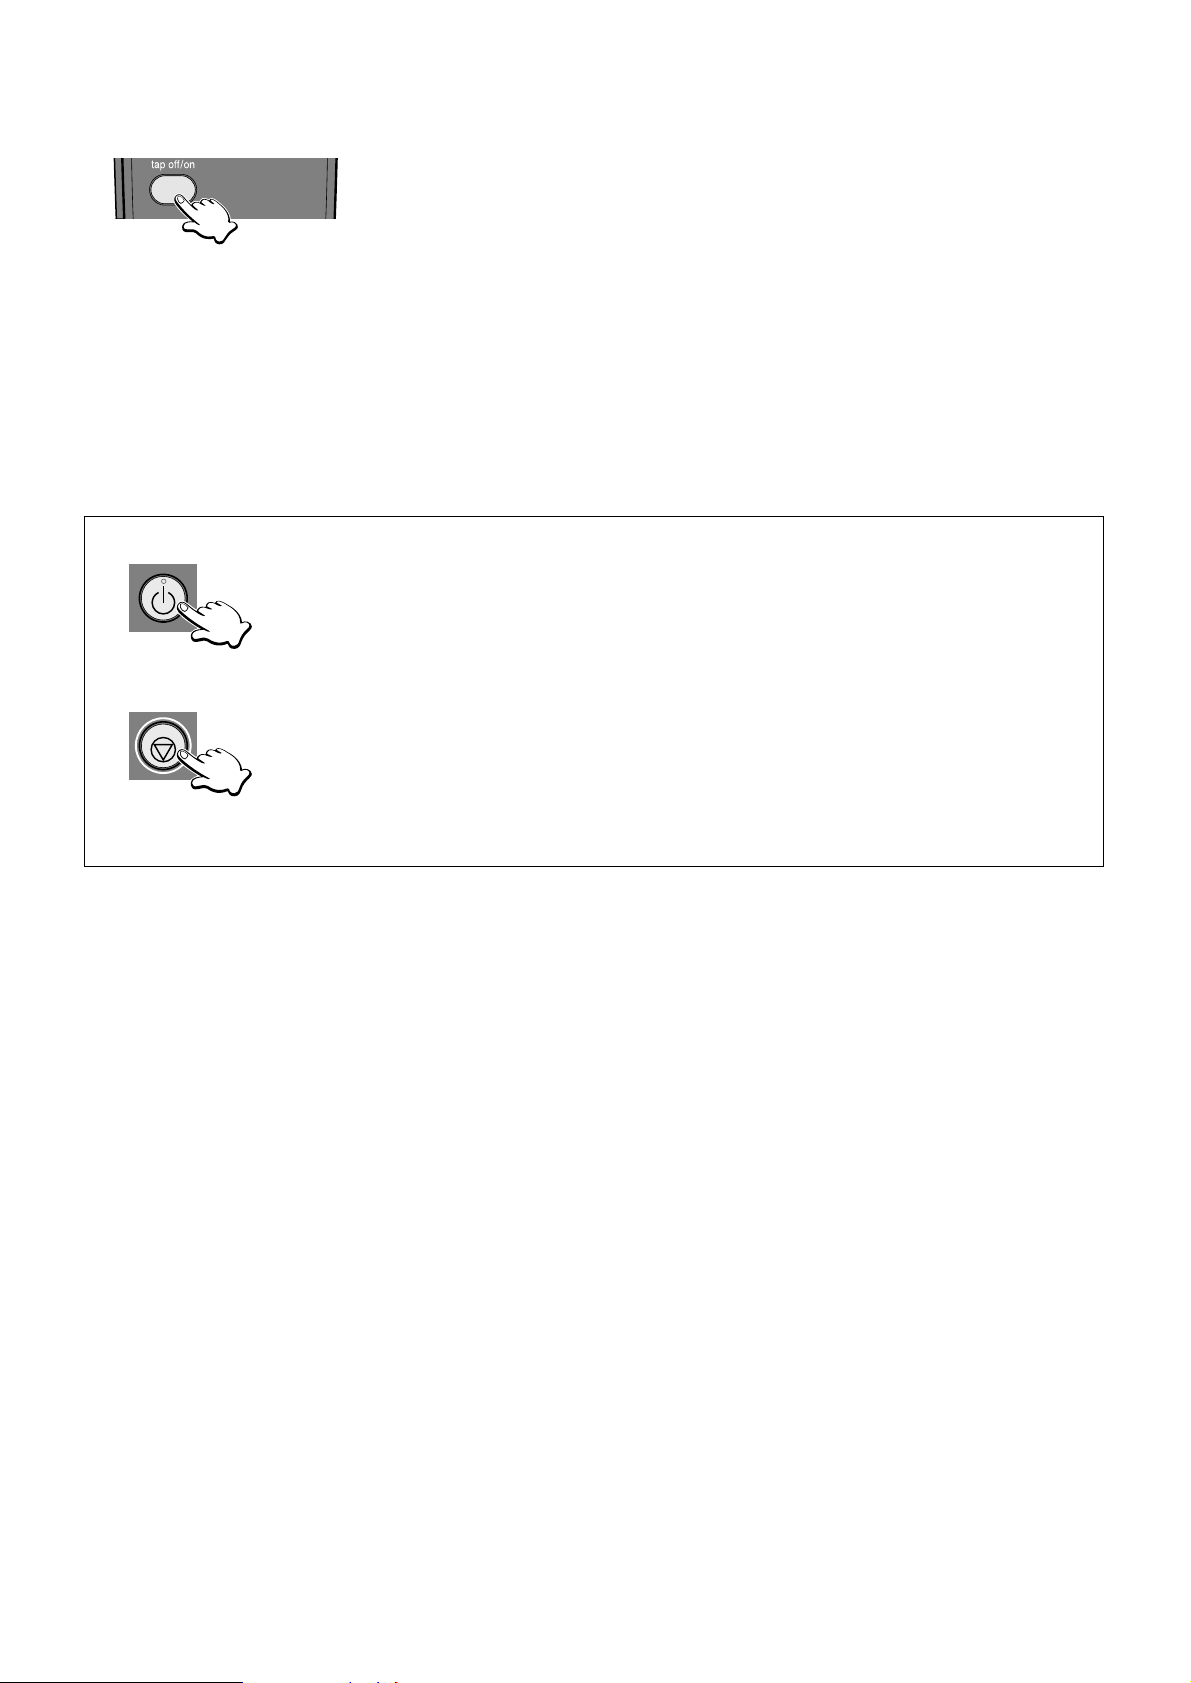
Stopping a pre-program
Immediately stopping the massage
Press
6. Removing tapping from pre-programs
7. Auto shut-off in pre-programs
• The massage will end after approximately 15 minutes and the unit will automatically shut off.
• The massage heads will move to the retracted position and stop.
• The OFF/ON indicator will flash until the heads have stopped moving.
• If you want to continue using the massage lounger, press the OFF/ON button. Please rest at least 10 minutes
between massages.
Removing Tapping Action
• Press this button to remove tapping in pre-programs. (The tapping will change to a
kneading massage.)
* Press the button again to restore tapping to the program.
Press
• Press the OFF/ON button.
• The OFF/ON indicator will continue to flash until the massage heads have returned to the
retracted position and the unit shuts off.
Press
• Press the Quick Stop button.
• All movement will stop immediately.
• The massage heads will not return to the retracted position, which may make sitting in
the seat somewhat uncomfortable.
• Please press the OFF/ON button twice to return the massage heads to the retracted
position.
Page 16
14
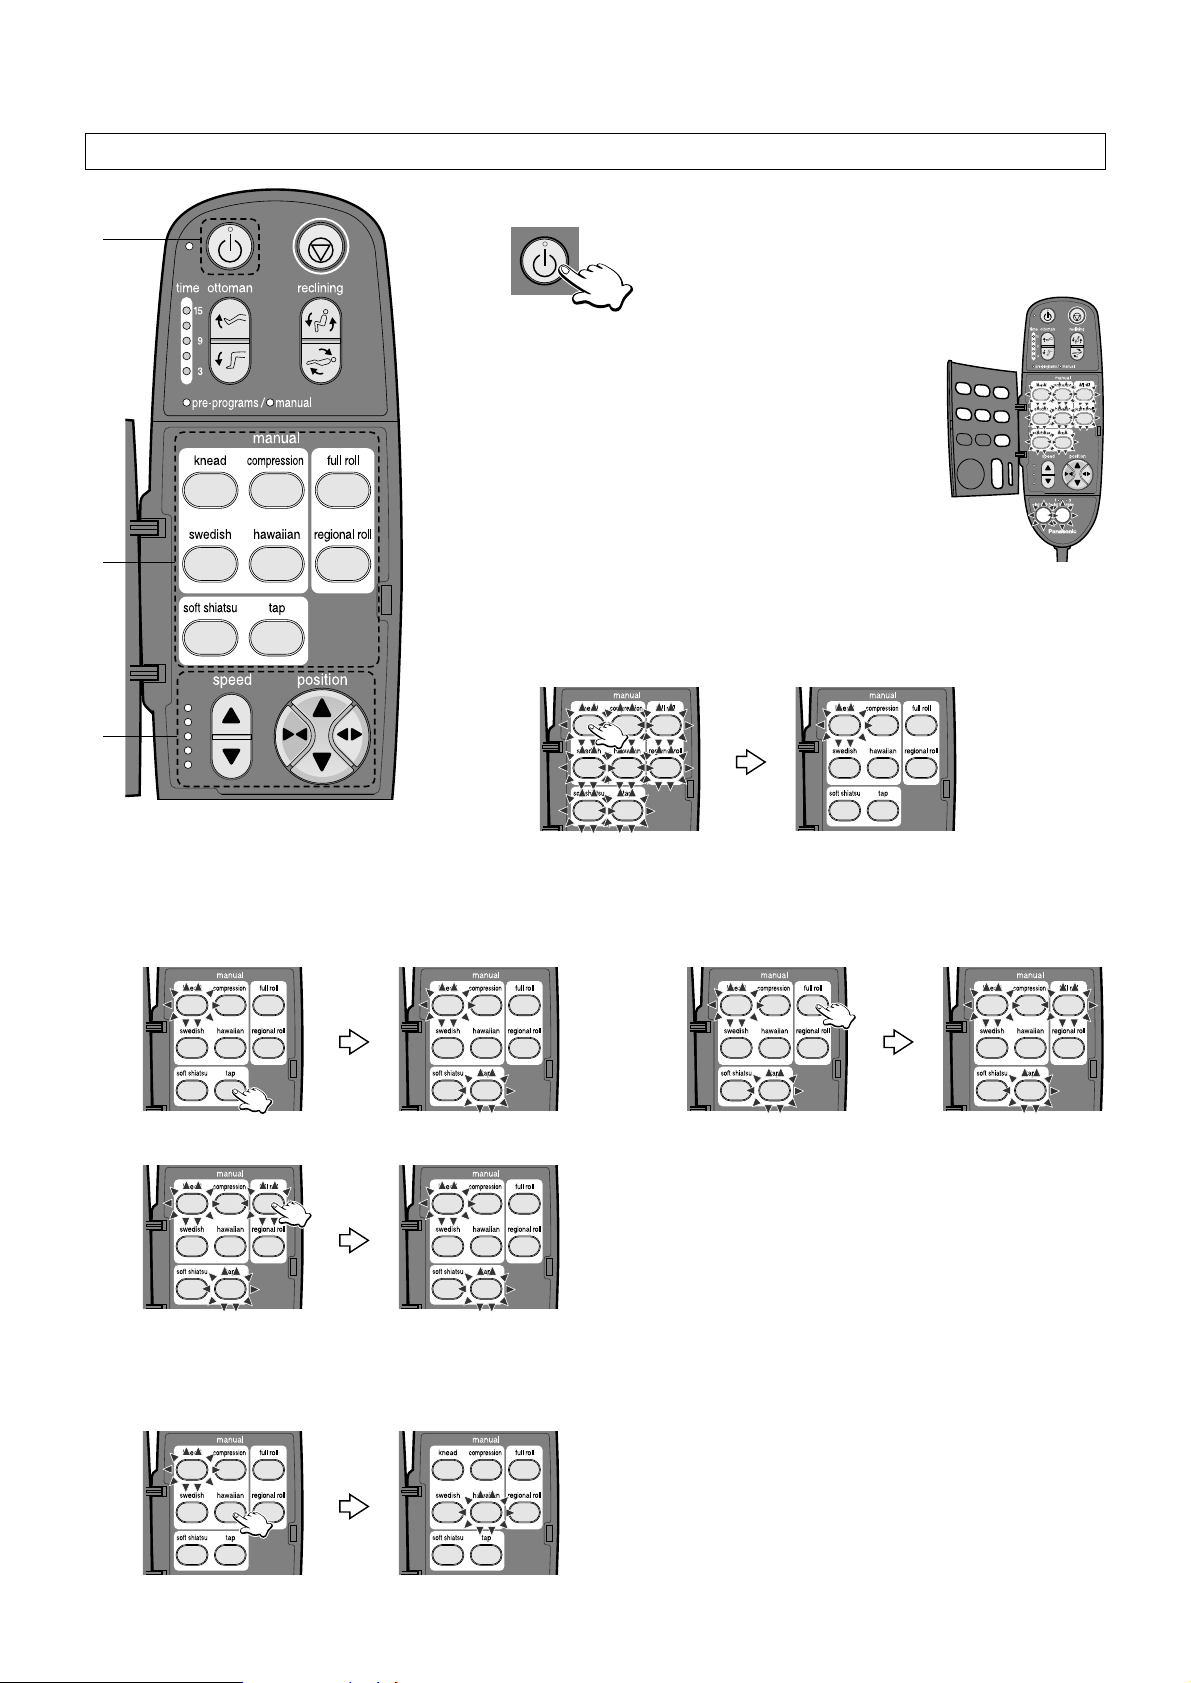
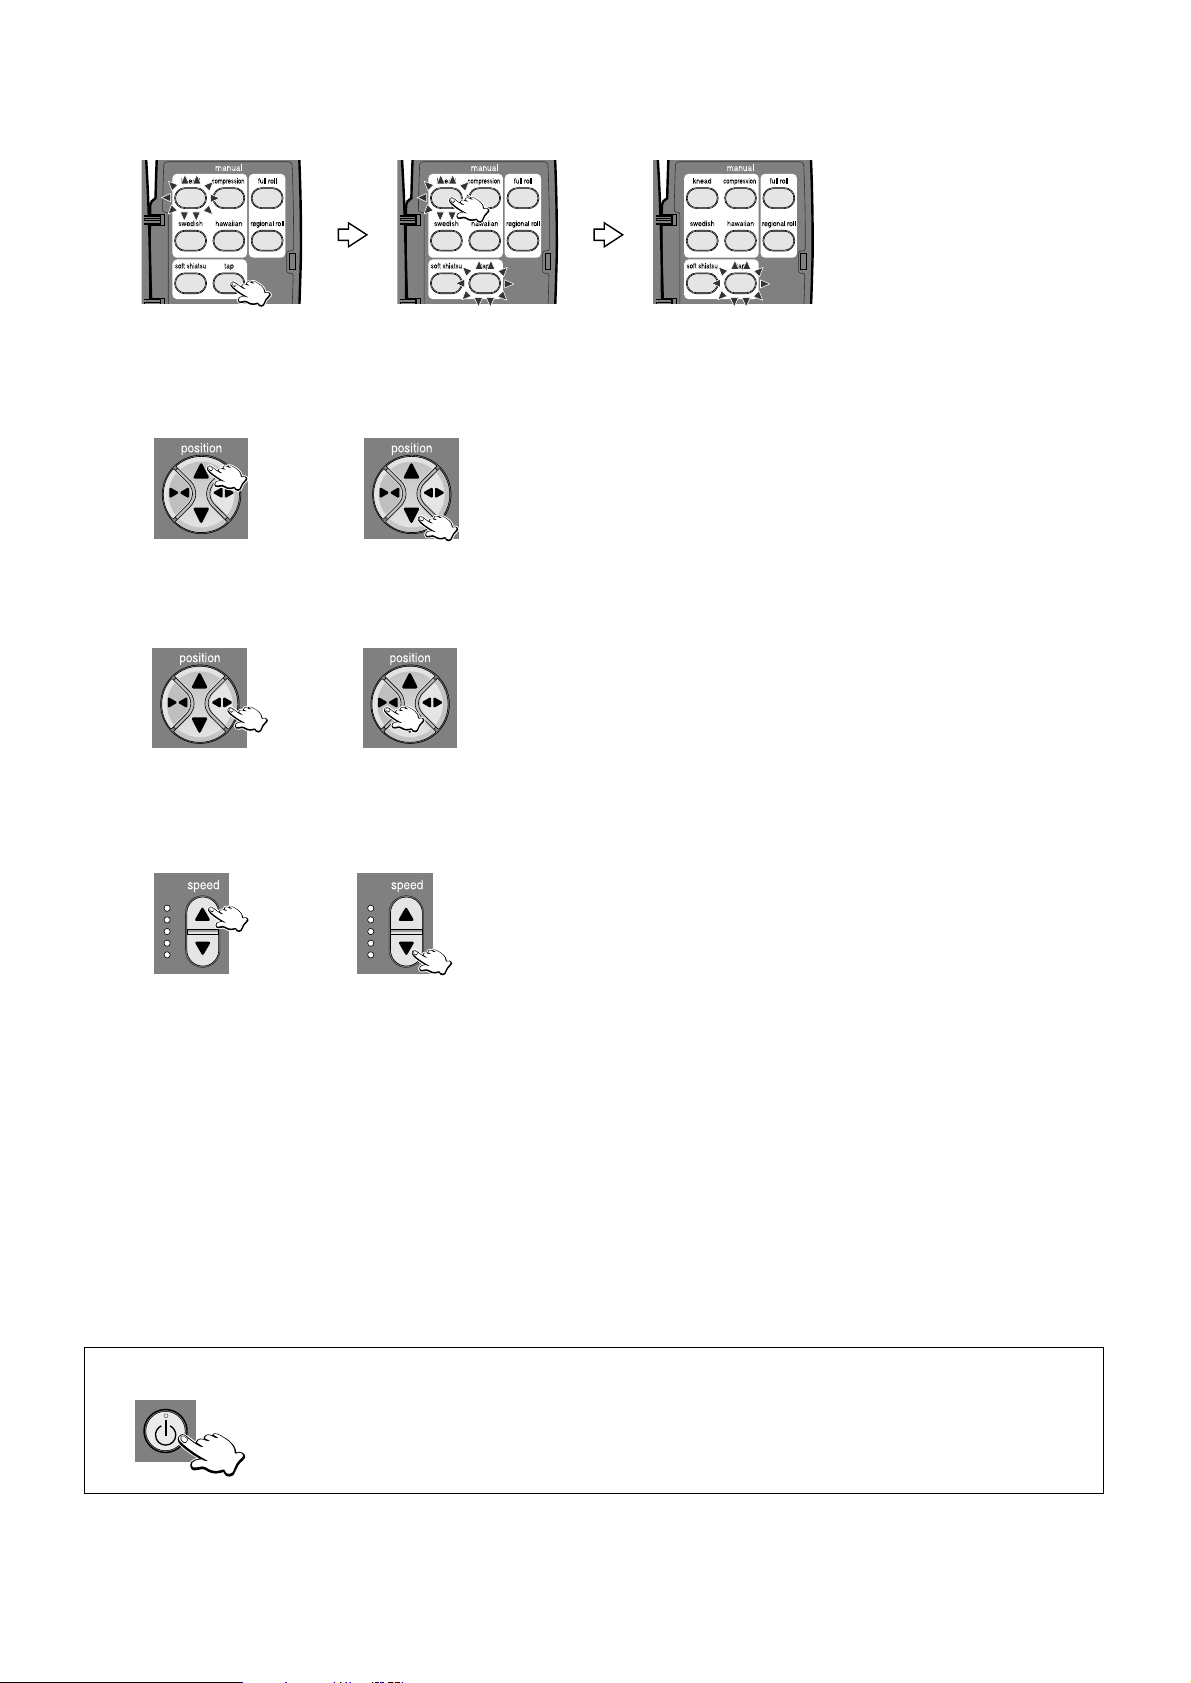
USING MANUAL SETTINGS
1
3
4
1. Press the OFF/ON button.
2. Open the cover of the controller.
• All of the Manual Operation buttons will start
to flash.
3. Select the massage type you want.
• Press the button of the massage you require.
The button will light up and the massage will begin.
• The unit will automatically recline to the massage position.
E.g. Selecting Knead
MANUAL OPERATION FOR THE UPPER BODY
Combining Massages
• It is possible to combine massage types.
• It is not possible to combine massage types in the same category.
E.g. 1 Adding Tap when Knead is selected.
Press
E.g. 3 Deselecting Full Roll.
Press
E.g. 2 Adding Full Roll to the selection.
Press
Changing Massage Types
E.g. 1 Changing massage types in the same category.
(Changing to Hawaiian when Knead is selected.)
Press
Press
• The OFF/ON indicator will come on.
• You can now select one of the pre-programs or
one of the manual settings.
Press
Page 17
15
4. Adjusting manual massage settings
Adjusting the Vertical Position of the Massage Heads
Adjusting the Width between Massage Heads
Adjusting Massage Speed
E.g. 2 Changing to a massage type outside the category.
(Changing to Tap when Knead is selected.)
• When Knead is combined with Tap, deselecting Knead will leave only Tap.
Press
Press
Massage heads up Massage heads down
Increasing the width Decreasing the width
Increasing
massage speed
Decreasing
massage speed
5. Auto shut-off in manual operation
• The massage will end after approximately 15 minutes and the unit will automatically shut off.
• The massage heads will move to the retracted position and stop.
• The OFF/ON indicator will flash until the heads have stopped moving.
• If you want to continue using the massage lounger, please press the OFF/ON button. Please rest at least 10
minutes between massages.
NOTE:
•A built-in timer prevents overuse of the unit.
• When using manual operation, the timer automatically stops operation after 15 minutes.
* If you want to continue to use the unit, we recommend that you have a break of at least 10 minutes between
massages to allow your body to rest.
• The massage heads will move a little each time the button is
pressed. If you hold down the button, the massage heads will
continue to move until you release the button. When the
massage heads reach their limit you will hear a “beep-beepbeep” sound.
• Tap, Soft Shiatsu, Full Roll, and Regional Roll can be
adjusted in 3 steps.
• The massage heads will move a little each time the button is
pressed. If you hold down the button, the massage heads will
continue to move until you release the button.
• When the massage heads reach their limit you will hear a
“beep-beep-beep” sound.
• Massage speed is adjustable in 5 steps.
• When the massage speed reaches its maximum or minimum
limit you will hear a “beep-beep-beep” sound.
Stopping mid-way through a massage
• Press the OFF/ON button.
• The massage heads will return to the retracted position and stop.
Press
Press
Page 18
16
MASSAGE ACTIONS
Feels like the fingers and thumbs of two
hands squeezing in unison as they
carefully work their way upwards to loosen
stiffness.
Recommended for the area of the neck
and shoulders.
Knead Compression
Applies fluent alternating strokes to the
left and right sides as if drawing
stiffness to the outside.
Recommended for relaxation of the
whole body.
Feels like a two palms gliding over the
skin as they rhythmically knead the
muscles beneath.
Recommended for loosening up large
areas of the back.
Swedish Hawaiian
Feels like two hands moving rhythmically in
a circular pattern to relax and refresh the
back.
Recommended for relieving tension in the
lower back.
Tap
Feels like the edges of two hands
rhythmically tapping to penetrate into the
body and relax muscles. Recommended
for use on the fine muscles of the neck or
as a finishing massage.
Soft Shiatsu
Feels like a pair of thumbs carefully
alternating between the right and left sides
as they zero in on their target.
Recommended for loosening up knots of
tension.
Regional Roll
You can feel it travel up and down working
on 4 in. (10 cm) localized areas of the
back.
Recommended for focused rolling out of
back muscles.
Full Roll
From lower back to neck, you can feel it
move 27 in. (67.5 cm) up and down the
whole of the upper body.
Recommended for overall stretching of the
back muscles.
Page 19
17
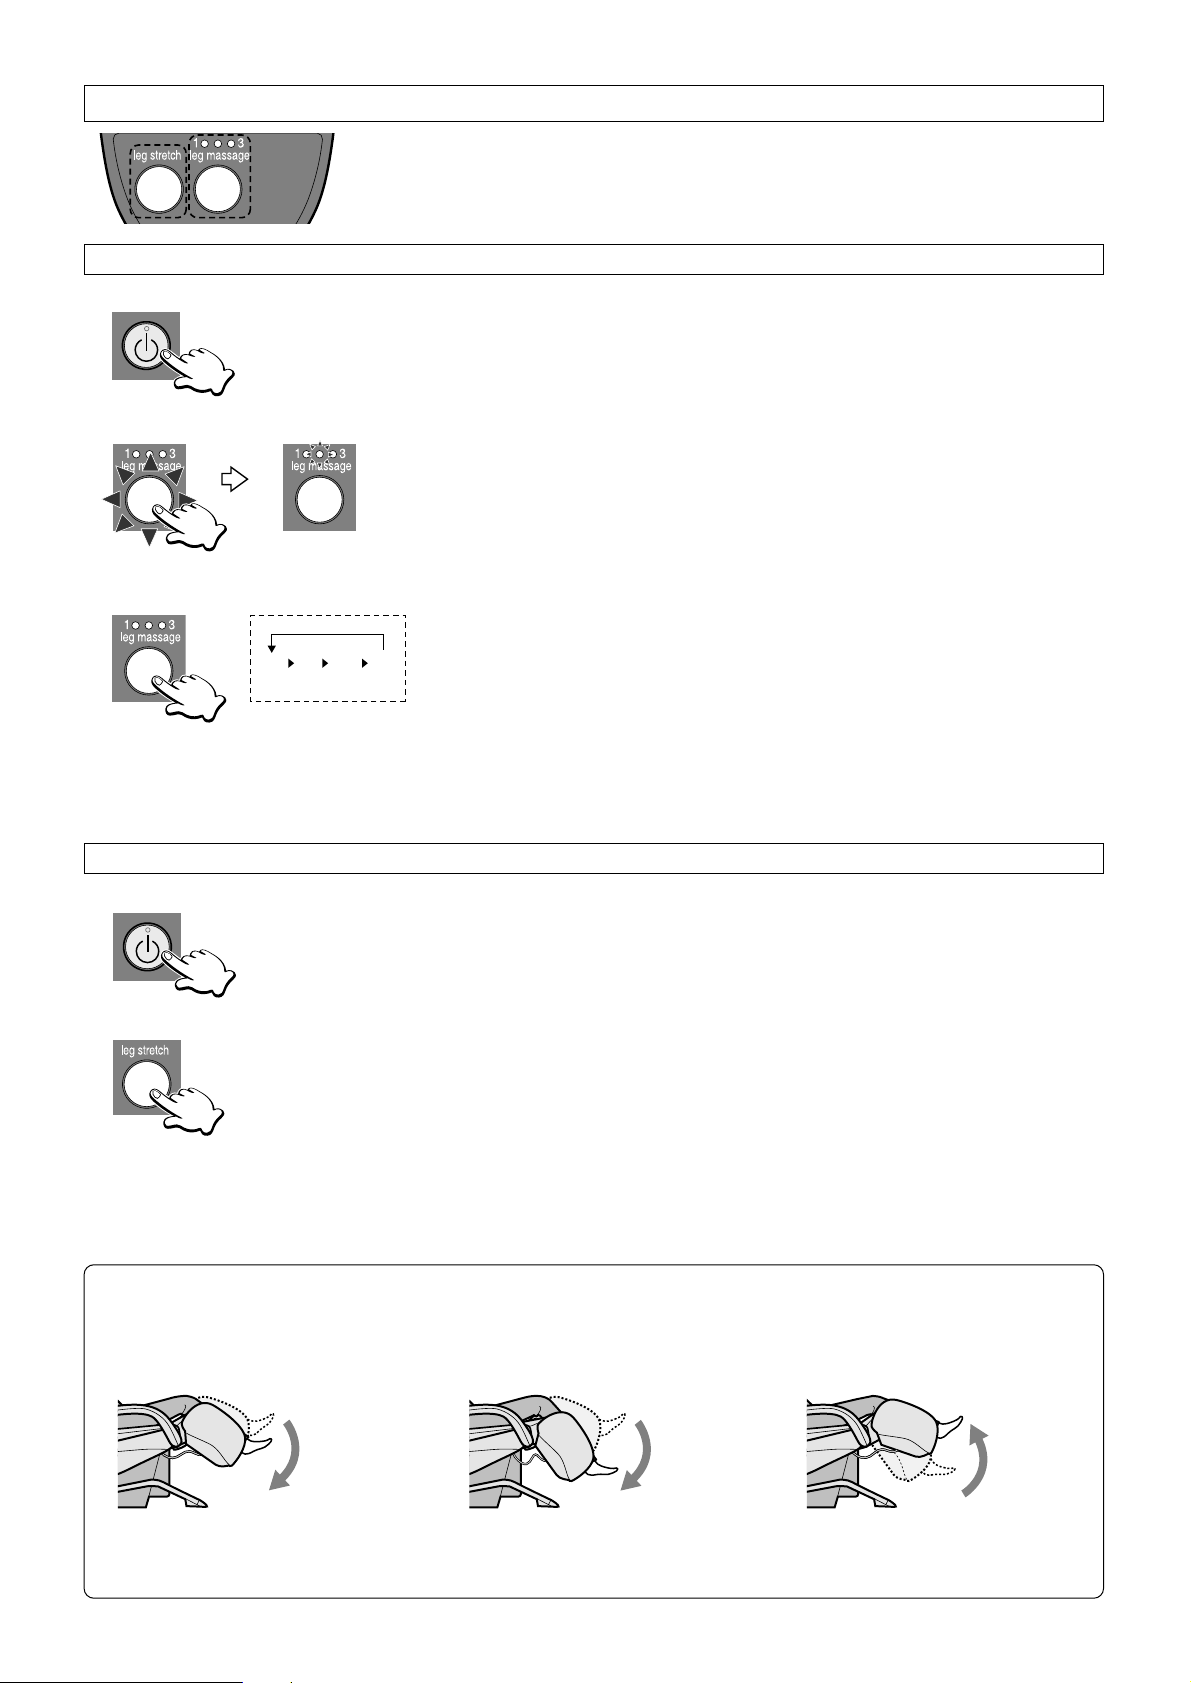
Adjust the angle and length of the legrest before starting a massage.
(See Page 10)
1. Press the OFF/ON button.
2. Press the Leg Massage button.
3. Adjusting the massage intensity
4. Auto shut-off in leg massage/stretch
• The massage will end after approximately 15 minutes and the unit will automatically shut off.
• If you want to continue using the massage lounger press the OFF/ON button.
• The Pre-Programs and Leg Massage buttons will begin to flash.
• The air massage will begin.
• Leg massage intensity is displayed by the indicator.
• The reclining angle can be adjusted during the massage. The airbags will
deflate while the Reclining button is held down so that you can reposition
your legs.
• The intensity is adjustable in 3 steps.
• The intensity will move 1 step each time the button is pushed, moving in
order of medium, strong, off and weak.
• Default is level 2.
MANUAL OPERATION FOR THE LOWER BODY
Description of Leg Massage/Stretch
Leg massage
A hand-like grasping action loosens calf muscles in three stages while a bottom-to-top squeezing action slowly relaxes and
softens to comfortably alleviate tired, swollen legs.
Leg stretch
Using the leg air massage
1. Press the OFF/ON button.
2. Press the Leg Stretch button.
3. Auto shut-off in leg massage/stretch
• The massage will end after approximately 15 minutes and the unit will automatically shut off.
• If you want to continue using the massage lounger press the OFF/ON button.
• The Pre-Program and Leg Massage buttons will begin to flash.
• Press again to stop the leg stretch.
Using the leg stretch
After the legs have been grasped by
the airbags, they are slowly stretched
as the legrest lowers to a 15° angle.
The legrest then rises to an 70° angle,
after which it lowers once again to a
20° angle for a deep stretch.
The legrest rises again and
returns to its original angle.
Press
Press
Press
Press
Press
1 2 3 off
weak medium strong
Lowered to
approx. 15°
Lowered to
approx. 20°
Raised to
approx. 70°
Page 20
18
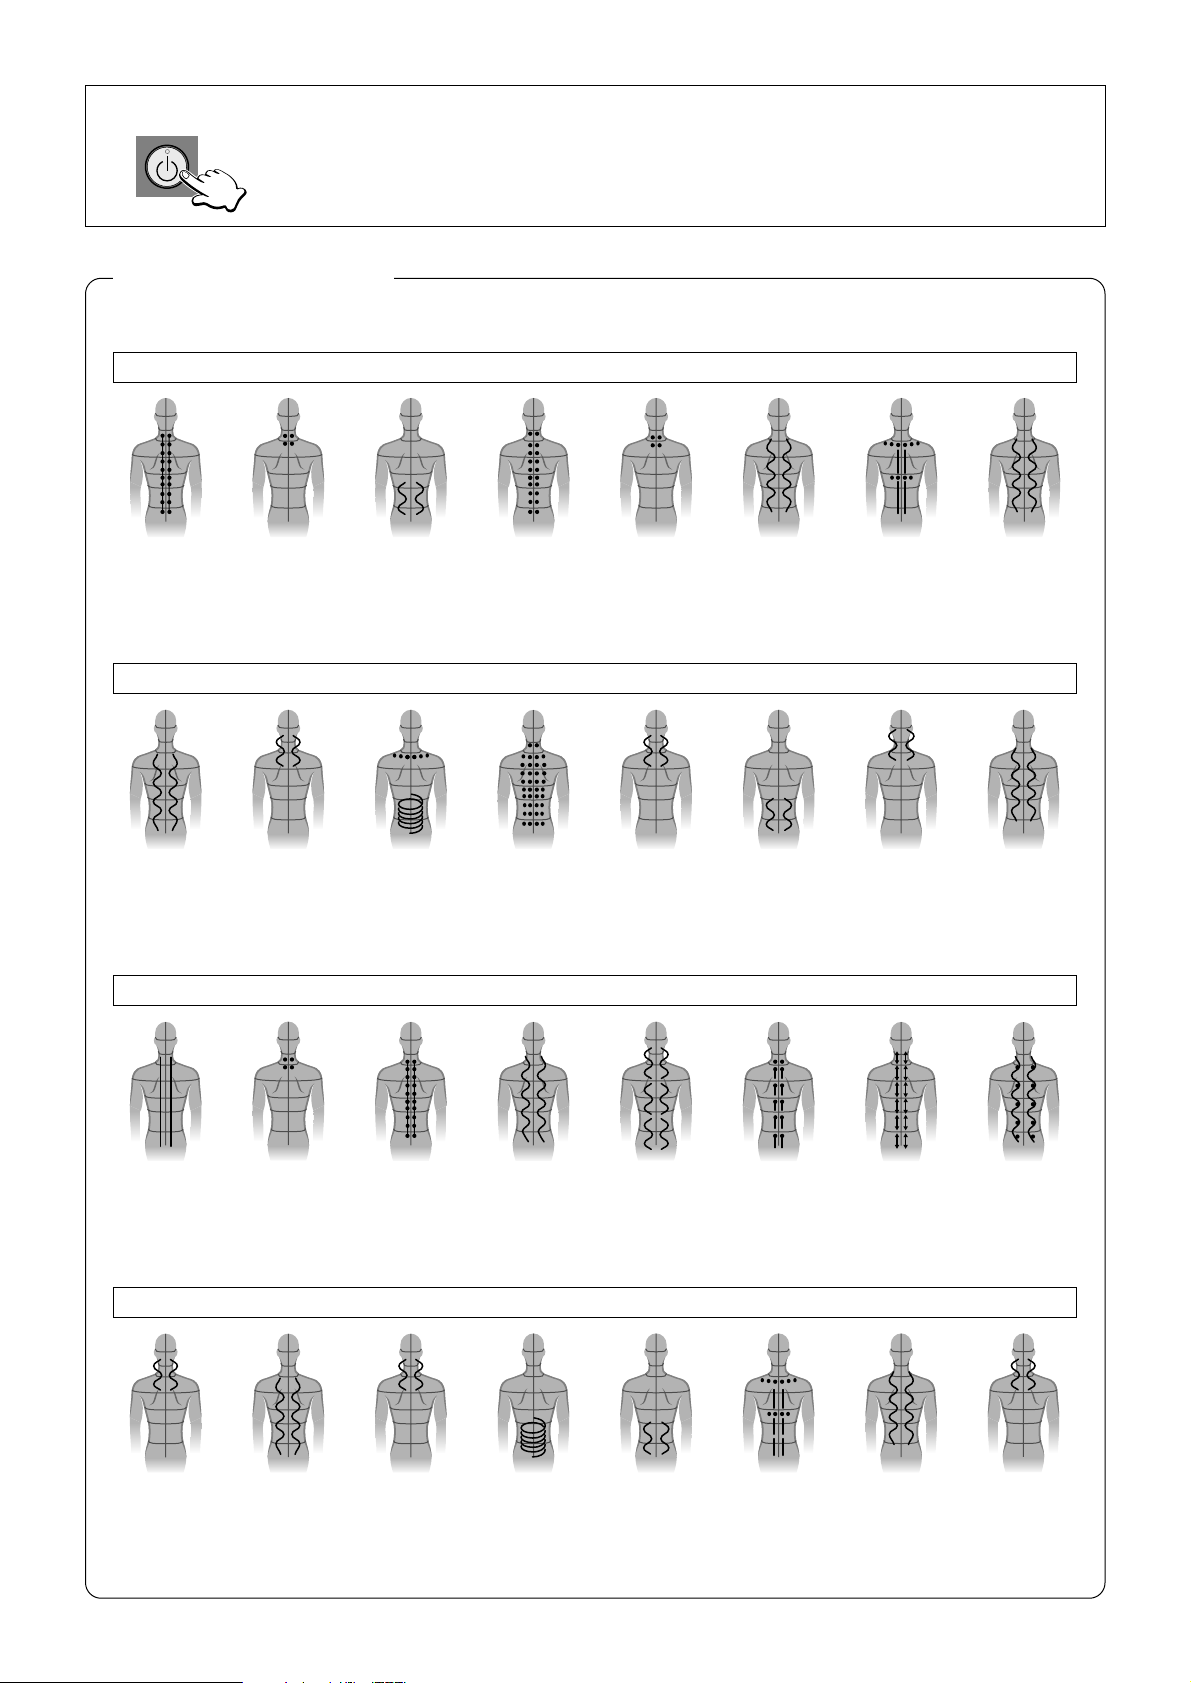
Overall
stimulation with
soft shiatsu
from neck to
lower back.
Carefully
stimulates area
of neck and
shoulders with
soft shiatsu.
Focuses on
area of lower
back using a
deep rubbingtype action.
Carefully
stimulates with
tapping at
points from neck
to lower back.
Carefully
stimulates using
soft shiatsu on
area at base of
neck.
Relaxes by
carefully
kneading and
tapping from neck
to lower back.
Percussively
strokes at points
on shoulders,
shoulder blades
and spine.
Finishes with
overall massage
to loosen and
relax.
Overall loosening
with wide
rubbing strokes
from neck to
lower back.
Thoroughly
massages to
gradually loosen
area of neck
and shoulders.
Focuses on area
of lower back
with rubbing
action in circular
pattern.
Loosens in
stages with
massage from
neck to lower
back.
Thoroughly
massages with
rhythmic action
on neck and
shoulders.
Rhythmically
massages with
squeezing
action on upper
and lower back.
Thoroughly
massages to
gradually loosen
area of neck
and shoulders.
Finishes with
broad strokes
for overall
massage.
Stretches back
muscles by
gradually moving
from neck to
lower back.
Gradual
pressing action
that works on
area at base of
neck.
Uses shiatsu on
back muscles
working from
neck to lower
back.
Pressing-type
action alternates
as it moves from
neck to lower
back.
Kneads area of
back working
upwards from
lower back to
neck.
Uses shiatsu on
back muscles
working up from
lower back to
neck.
Applies
meticulous
kneading action
up and down
back muscles.
Uses alternating
compression and
shiatsu moving
from neck to
lower back.
Gradually
loosens area of
neck and
shoulders.
Rhythmical
loosening action
works along
length of body.
Rhythmical
action thoroughly
loosens area of
neck and
shoulders.
Focuses on area
of lower back
with rubbing
action in circular
pattern.
Focuses on
lower back with
squeezing-type
massage action.
Loosens
shoulders,
shoulder blades
and spine with
tapping action.
Loosening over
wide area along
length of body
with rhythmical
tapping.
Carefully
loosens area at
base of neck.
Additional Information
Overview of Pre-Program and Quick Massages
Shiatsu
Swedish
Stretch
Quick
Stopping mid-way through a massage
• Press the OFF/ON button.
• It will take some time before the air is completely evacuated.
(The sound of air escaping may be audible after pressing the OFF/ON button.)
Press
Press
Page 21

19
1. Check that there is nothing in the vicinity of
the backrest or the legrest.
2. Always retract the legrest after use if you
have extended it.
RETURN THE SEAT TO THE ORIGINAL POSITION
AFTER COMPLETING THE MASSAGE
• Raise legs slightly and legrest returns.
Legrest
Slide Lever
Pull back.
Keep hands,
feet, children and
objects clear
of area.
Keep
hands, feet,
children and
objects clear
of area.
3. Press the OFF/ON button twice.
• The backrest and legrest will automatically return to their
original positions.
Press
4. Place the controller in its holder.
5. Return the pillow and the back cushion to
their original positions.
Page 22
20
1. Slide the power switch to the “off” position.
2. Turn the lock switch key to the “lock” position.
* Remove key and store out of reach of children.
3. Unplug the power cord.
DISCONNECT THE POWER
1. Press the OFF/ON button to switch off the
power. (The massage heads should return to
their retracted position in upper part of the
backrest.)
2. Slide the power switch to the “off” position,
lock it, and then unplug the power cord.
3. Remove the back cushion and pillow from the
chair.
4. Insert a screwdriver or similar tool into the
opening at the bottom of the back cover. The
tool should be angled slightly up rest on the
top of the latch. Push down on the latch so
that it detaches. A second person should
hold the backrest with both hands and slowly
push it forward, folding it down onto the seat.
5. Moving the chair with the backrest in the up
position is advisable. If moving with the
backrest folded down, two people should
move the chair by grasping the undersides of
the armrests. Care should be given to not
letting the chair tip, or allowing the backrest
to come up, especially on inclines.
FOLDING THE BACKREST FORWARD (REPACKING)
CAUTION
• Keep hands, feet, children, objects, etc., clear of openings on the unit, including seat, armrests and
legrest; gaps between the unit and the floor; and the backrest’s range of movement when being
folded forward.
Failure to do so could result in injury due to pinching.
• Do not turn on power or operate controls with backrest folded forward.
Doing so could result in injury due to pinching.
• Do not climb on or place objects on top of back cover with backrest folded forward.
Doing so could result in damage to the unit.
•In the interests of safety, the backrest should always be folded forward by two persons.
on
1
off
lock
open
2
lock switch
3
Press
Backrest
Latch Opening
4-1. With tip touching upper edge
of opening, angle screwdriver
slightly upward and insert
approx. 1.6 in. (4 cm).
4-2. Push tip of screwdriver downward
approx. 1 in. (2.5 cm) to release
backrest latch.
4-3. Pull out screwdriver when pushing of
backrest toward seat begins.
Page 23
21
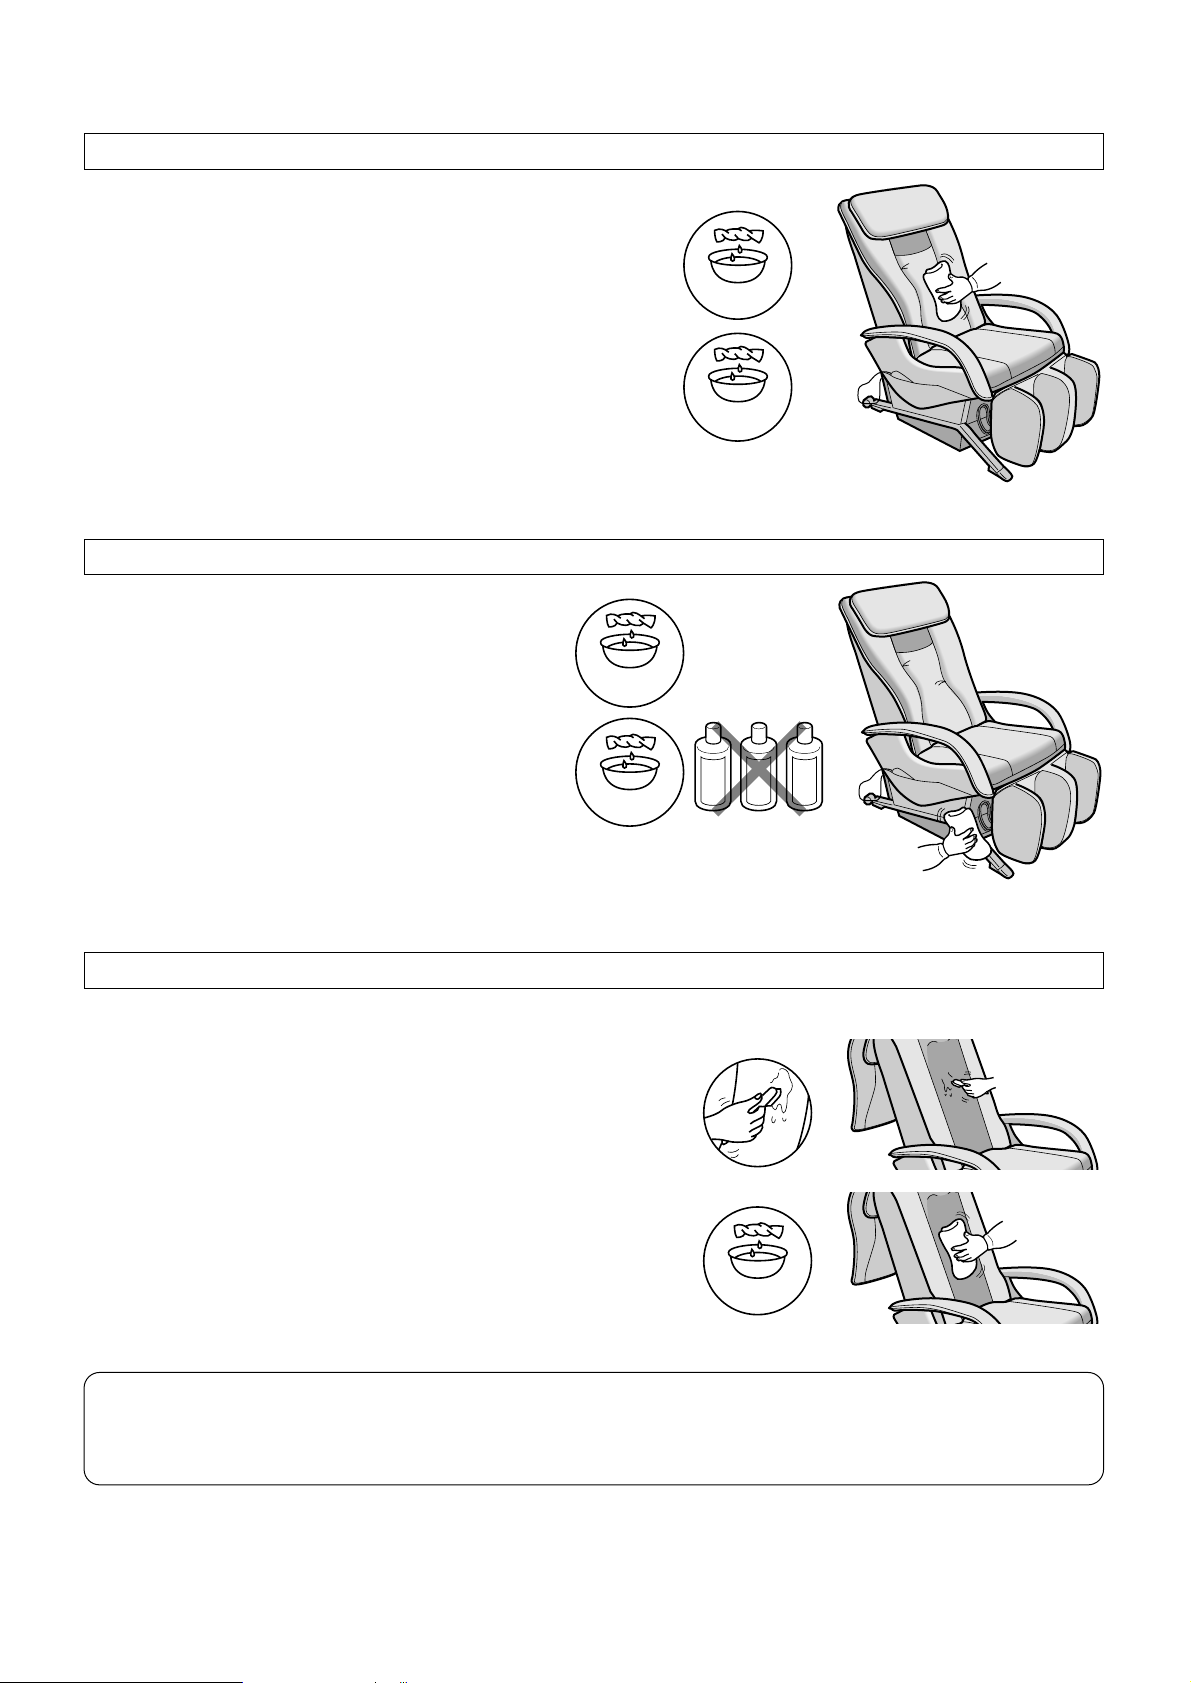
• Wipe these areas with a soft, dry cloth.
(Do NOT use cloths containing any kind of chemical, etc.)
• If the leather is particularly dirty, dampen with liquid soap
and brush the surface. Wipe with a cloth dampened with
water. Allow to dry naturally.
(Do NOT use a hair dryer to try to dry the surfaces more
quickly.)
• Do not allow these areas to come in contact with plastic for
extended periods of time as this may lead to discoloration.
• Please do NOT use thinners, benzine or alcohol.
LEATHER COVERING ON THE PILLOW, THE BACK CUSHION AND THE UNIT
CLEANING AND MAINTENANCE
Mild Detergent
Water
z Wipe the unit with a cloth that has been soaked
in a mild detergent and then thoroughly wrung
out.
x Next wipe the unit with a cloth that has been
moistened with just water and thoroughly wrung
out.
* Make sure you thoroughly wring out the cloth
first when cleaning the controller.
c Allow the unit to dry naturally.
• Please do NOT use thinners, benzine or alcohol.
Mild Detergent
Water
Thinners
Benzine
Alcohol
PIPE AND PLASTIC AREAS
z Wipe the seat fabric with a cloth that has been soaked in a
mild detergent solution and then thoroughly wrung out.
x Use a brush to apply a mild detergent to areas where the
coated fabric has become particularly soiled. Be careful not
to brush the fabric too much as this may damage it.
c Next wipe the fabric with a cloth that has been moistened
with just water and then thoroughly wrung out.
v Allow the fabric to dry naturally.
• Please do NOT use thinners, benzine or alcohol.
Water
COATED FABRIC ON THE BACK CUSHION
CAUTION
•Always unplug the unit before cleaning it. Never touch a power plug with wet hands.
Failure to follow these instructions may lead to electrocution or burns.
Page 24

22
Problem Cause and Remedy
Motor Noises
• It sounds and feels like the massage heads are
straining to get over wrinkles in the cloth.
• The motor groans when it comes under load.
• There is excessive noise during Tapping. (The noise
is greater at the top of the massage lounger.)
• There is a creaking noise when the massage heads
are in operation.
• There is a rattling sound when the massage heads
move up or down.
• The belt can be heard rotating.
• There is a rubbing sound produced by the massage
heads rubbing on the seat fabric.
• There is a noise when the backrest cushion moves
over the armrest when the seat is reclining.
• There is a noise when I sit down.
• There is a strange sound when the massage heads
move in and out.
• When the power switch is turned on there is a
humming sound.
• Air massage-related sounds.
There is a hissing sound of air escaping.
There is a humming sound from the pump.
• The legrest rattles.
• There is an unstable sound when air escapes during
the leg stretch.
PROBLEM
TROUBLESHOOTING
These sounds are perfectly normal and will not have
any effect on the operation of the unit.
H
The massage heads stop during operation.
When excessive force is applied to the massage
heads during operation, in the interests of safety the
massage heads may stop moving.
If all markings and buttons on the controller start to
flash, which is extremely unusual, turn off the power
switch, wait for approximately 10 seconds and then
turn the power switch on again. If the massage
heads stop again, position yourself so that your back
is not completely in contact with the backrest.
H
The height of the left and right massage
heads is different.
An alternating tapping method is employed, which
means that this phenomenon will naturally occur.
There is nothing wrong with the unit.
H
The massage heads do not come up to the
shoulder or neck.
The position of the massage heads is incorrect.
(See Page 12)
H
It is not possible to recline the unit.
The legrest cannot be raised or lowered.
If the unit encounters an obstacle or if excessive
force is exerted on it during operation, in the interests
of safety the unit will come to a stop.
If all markings and buttons on the controller start to
flash, which is extremely unusual, turn off the power
switch, wait for approximately 10 seconds and then
turn the power switch on again.
H
Page 25

23
Problem Cause and Remedy
The backrest does not return to the upright
position.
The backrest will not return to the upright position if
the timer is activated or the button is pressed.
(Pressing twice will return the backrest to its
original position.)
(See Page 19)
H
Reclining does not take place even though a
massage is started in pre-programs.
(The seat does not automatically recline.)
In some cases the seat may not automatically recline
depending on the position (angle) of the backrest or
the legrest. (See Page 11)
H
The unit will not operate at all.
• The power cord has been disconnected.
(See Page 8)
• The power switch on the unit has not been turned on.
(See Page 8)
•A Pre-Program button or Manual Operation button
hasn’t been pressed after pressing .
(See Pages 11, 14)
H
The unit has been damaged.
Stop using the unit immediately.
H
The power cord or power plug is abnormally
hot.
Stop using the unit immediately.
H
It is not possible to switch from Swedish and
Knead to Hawaiian and Compression.
Switching can be hindered when the user’s body
weight is not resting on the massage heads. Shift
your weight so that your body is contact with the
massage heads.
H
The legrest will not return to its original
position.
If the length of the legrest has been extended, the
legrest will strike the floor, preventing from returning
to its original position. Try again after retracting it to
its original length.
H
Page 26

24
Power Supply: AC120V 60 Hz
Power Consumption: 220 W
Upper Body Massage
Massage Area (Up-Down): Approx. 27 in. (67.5 cm)
Massage Area (Left-Right): Distance between Massage Heads during Operation
Approx. 2 – 7 in. (6.0 – 18.0 cm)
Up-Down Movement Speed: Approx. 20 – 35 sec. return.
Massage Speed: Knead: Approx. 20 – 30 cycles/min.
Swedish: Approx. 30 – 50 cycles/min.
Compression: Approx. 20 – 30 cycles/min.
Hawaiian: Approx. 30 – 50 cycles/min.
Soft Shiatsu: Approx. 120 – 200 cycles/min.
Tap: Approx. 300 – 700 cycles/min.
Full Roll: Approx. 20 – 35 sec./cycle
(Movement range: Approx. 21.1 in. (53.5 cm))
Regional Roll: Approx. 7 – 9 sec./cycle
(Movement range: Approx. 4.7 in. (12 cm))
Lower Body Massage
Air Pressure Strong: Approx. 24.0 kPa
Medium: Approx. 14.5 kPa
Weak: Approx. 8.0 kPa
Reclining Angle: Backrest: Approx. 120° – 170°
Legrest: Approx. 0° – 85°
Automatic Shut-Off: Approx. 15 min. for both upper and lower body
Dimensions:
When not reclined. (H#W#D) 42.9#26.8#47.2 in. (109#68#120 cm)
When reclined. (H#W#D) 24.0#26.8#66.1 in. (61#68#168 cm)
Weight of Unit: Approx. 133 lbs (60 kg)
Dimensions of Box (H#W#D): 30.7#30.3#47.6 in. (78#77#121 cm)
Weight in Box: Approx. 161 lbs (73 kg)
Maximum User Weight: Approx. 264 lbs (120 kg)
Minimum Distance from Wall: 15.7 in. (40 cm)
SPECIFICATIONS
Page 27

INSTRUCCIONES DE SEGURIDAD IMPORTANTES
Se deberán observar siempre las precauciones básicas durante el uso de instrumentos eléctricos, incluyendo las
siguientes.
Por favor asegúrese de leer todas las instrucciones antes de utilizar el Sillón de Masaje Doméstico.
PELIGRO – Para reducir el riesgo de descargas eléctricas:
1. Desconecte siempre la unidad inmediatamente después de su uso.
2. Desconecte siempre la unidad antes de su limpieza.
ADVERTENCIAS
1. Inserte el enchufe completamente en la toma a fin de reducir el riesgo de cortocircuitos e incendio.
2. No descuide la unidad durante el tiempo que esté conectada. Desconéctela siempre que no esté siendo
usada.
3. La supervisión cercana y continua se hará necesaria siempre que usen la unidad personas limitadas en su
capacidad de movimiento o comunicación.
4. Use la unidad únicamente para el propósito descrito en estas instrucciones.
5. No se pare sobre la unidad.
6. No utilice otros accesorios distintos a los recomendados por el fabricante.
7. Esta unidad no debe ser utilizada por niños. Mantenga a los niños alejados de la unidad. Coloque siempre el
respaldo del sillón de nuevo en posición vertical y retraiga por completo el reposapiernas a fin de evitar
posibles heridas. Asegúrese de que no haya nada que pudiera obstaculizar la retracción del reposapiernas.
Saque la llave cuando no esté en uso y almacénela fuera del alcance de los niños.
8. Nunca ponga la unidad en funcionamiento si tuviera un cable o un enchufe dañado. Devuelva la unidad al
centro de servicio autorizado más cercano si no funciona correctamente, si la ha dejado caer o dañado, o si ha
sido sumergida en agua.
9. Levante siempre el cojín posterior para comprobar que el tapizado de la unidad no ha sufrido rasgaduras antes
de su uso. Además revise también otras áreas para asegurarse de que el tapizado no haya sido rasgado. Sin
importar cuán pequeña fuera la rasgadura, si encuentra una, deje de usar la unidad inmediatamente,
desenchufe el cable de alimentación y haga que reparen la unidad en un centro de servicio autorizado.
10. Mantenga los cables de alimentación alejados de superficies expuestas al calor. No transporte la unidad
tomándola por el cable de alimentación. No permita que alfileres, basura o humedad se pongan en contacto
con el enchufe.
11. No use la unidad encima de aparatos de calefacción, tales como alfombras eléctricas, etc.
No lo haga funcionar bajo una cubierta o almohada. Puede ocurrir calor excesivo y causar incendio, choque
eléctrico o herida a personas.
12. Nunca bloquee las aberturas de aireación durante el funcionamiento y asegúrese de que todas las aberturas
de aireación estén libres de pelusa y pelo, etc. No deje caer ni inserte nada en cualquiera de las aberturas de
la unidad.
13. No use la unidad en cuartos de baño u otros espacios húmedos ya que esto puede causar un choque eléctrico
o hacer que la unidad funcione mal. No derrame agua, etc sobre el controlador.
14. No use la unidad a la intemperie.
15. No use la unidad en lugares donde se usen productos que contengan aerosoles o en donde se utilice oxígeno.
16. Cuando desenchufe la unidad, apague primero todos los controles antes de extraer el enchufe de la toma de
alimentación. No utilice transformadores con la unidad ya que ésto podría originar fallos en el funcionamiento o
descargas eléctricas.
17. Conecte esta unidad sólo a una toma de alimentación correctamente puesta a tierra. Vea las Instrucciones de
Puesta a Tierra.
18. Con el fin de evitar descargas eléctricas o heridas, no intente abrir ni desmontar cualquier parte de la unidad
ya que no contiene piezas a las que el usuario pueda dar servicio.
CONSERVE ESTAS INSTRUCCIONES
S1
– Para reducir el riesgo de quemaduras, incendio, descarga eléctrica, o
herida a personas:
Page 28

PRECAUCIONES DE SEGURIDAD
ADVERTENCIA: Para evitar el riesgo de herida:
1. Las personas con alguna de las dolencias enumeradas más abajo o que están bajo tratamiento médico deberán
consultar con sus médicos antes de usar la unidad:
a) Mujeres embarazadas, gente que está enferma, en forma física pobre.
b) Gente que sufre de dolor en la espalda, el cuello, el hombro o la cadera.
c) Gente que tiene un marcapasos, desfibrilador u otros dispositivos médicos personales con tendencia a la
interferencia electrónica.
d) Gente que sufre de enfermedades cardiacas.
e) Gente a quienes su médico les ha prohibido el recibir masaje debido a una trombosis o aneurisma, venas varicosas
agudas u otros problemas de circulación.
f) Gente con curvaturas irregulares de la columna.
2. Siéntese lentamente después de comprobar la posición de las cabezas de masaje. No ponga nunca ninguna parte de
su cuerpo entre las cabezas de masaje ya que la acción de aprisionamiento de las mismas podría causarle lesiones.
No ponga nunca sus dedos o sus pies en la separación entre el respaldo y el asiento, el respaldo y los apoyabrazos, el
asiento y la cubierta bajo los apoyabrazos, o la separación entre el reposapiernas y el reposapies. No ponga sus dedos
ni niguna parte de su cuerpo en el mecanismo debajo del reposapiernas, o entre el reposapiernas y el reposapies.
3.
No utilice la unidad en la piel desnuda. Mientras que los tejidos finos aumentan la efectividad, la exposición directa de la piel al
sillón de masaje podría irritar la piel.
No use la unidad mientras que tiene puesto algún objeto duro en la cabeza tal como un accesorio para el pelo, etc.
No use la unidad para masajear la cabeza, el abdomen, la parte frontal del cuello, los codos o las rodillas. No use una acción
de masaje excesivamente fuerte en la parte posterior del cuello.
4. Cuando use el masajeador, use el botón de Posición de Rodillo de Cuello para ajustar las cabezas de masaje en su posición
correcta. Se puede ajustar la posición del hombro de este modo en los pre-programas, el Auto Programa y el Rodamiento en
la operación manual.
El no alinear la posición de rodillo de cuello correctamente puede llevar a herida.
5. No exceda los 15 minutos en cada sesión de masaje de espalda. Para evitar el estirar los músculos demasiado, que puede
resultar en incomodidad, no use la unidad durante más de 5 minutos la primerta vez que la use. Podrá aumentar
gradualmente la duración y la potencia del masaje según se vaya acostumbrando.
No masajee una zona durante más de 5 minutos seguidos.
Un masaje excesivo puede sobreestimular los músculos y nervios y resultar en un efecto adverso.
Para prevenir el exceso de masaje, no use el sillón de masaje durante más de 15 minutos en cada sesión.
Después de aproximadamente 15 minutos, las cabezas de masaje se retraerán y se detendrán.
El cojín del respaldo puede ser retirado si desea experimentar un masaje de espalda más fuerte. Tenga mucho cuidado
cuando use este modo a fin de evitar dolor o herida en su espalda. Úselo sólo por periodos cortos de tiempo (no más de 15
minutos). Reinstale el cojín del respaldo si desea restaurar a una intensidad de masaje normal.
6. Al usar el sillón de masaje, si se siente mal o si el masaje resulta doloroso, deje de usarlo inmediatamente.
Al usar el sillón de masaje, si la presión parece demasiado fuerte, se puede detener el movimiento de las cabezas de masaje
en cualquier momento oprimiendo el Botón de Parada Rápida.
7. No se quede dormido al usar la unidad. No use la unidad después de beber alcohol.
8. Cuando el respaldo esté en una posición reclinada, no se siente en él, ni se siente con sus piernas descansando en el
reposacabeza. No se siente en el reposapiernas, ya que la unidad podría caerse.
9. No permita a los niños o animales domésticos jugar alrededor de la unidad, especialmente durante su funcionamiento.
10. No desenchufe la unidad durante su funcionamiento. Desenchúfela inmediatamente si se produce un corte en la
alimentación eléctrica.
11. Asegúrese de comenzar por el programa de masaje suave si usa el sillón de masaje por primera vez. El masaje shiatsu es
más fuerte y deberá ser disfrutado cuando uno se haya acostumbrado a la silla.
12. No deje que los niños jueguen en este mueble mecanizado ni que hagan funcionar el mecanismo. El reposapiernas se dobla
al cerrarse así que un niño podría herirse. Deje siempre la unidad en posición erecta y cerrada. Mantenga sus manos y pies
lejos del mecanismo. Sólo el ocupante deberá hacerlo funcionar.
S2
Page 29

PRECAUCIONES PARA EL FUNCIONAMIENTO
ADVERTENCIA: Para evitar dañar el sillón, observe estas precauciones:
1. El asiento está deseñado para soportar un peso máximo de 264 libras (120 kgs.). Exceder el peso máximo
puede causar daño permanente al mecanismo de masaje y/o a los otros componentes de la unidad. Un daño
tal es considerado como abuso del usuario y no está cubierto bajo la Garantía Limitada.
2. No se siente encima ni deje caer el controlador. No jale el cordón del controlador ni el cordón de alimentación.
Tenga cuidado de que el cordón del controlador no sea atrapado entre el reposabrazos y el respaldo del sillón.
3. No trate al asiento con brusquedad, como volcándolo de lado, poniéndolo boca arriba o parándose en él.
4. No trate al tapizado con brusquedad.
• Mantenga objetos afilados o punzantes lejos del tapizado del asiento. Tenga cuidado de no dejar caer
cenizas encendidas, cigarrillos encendidos o fósforos sobre el asiento.
• La exposición a la luz solar directa puede causar desteñido o cambios en el color del tapizado.
5. Si el sillón de masaje funciona anormalmente, apáguelo inmediatamente y llévelo a un centro de servicio
autorizado para que sea revisado.
6. No intente reparar el sillón de masaje Ud. mismo.
7. No accione ningún interruptor a intervalos cortos. Tal acción puede hacer que falle el interruptor.
8. Puede que se escuche algo de ruido proveniente del sillón de masaje mientras que está en uso. Esto es
debido a su estructura y es normal.
9. Asegúrese de que no haya ningún obstáculo detrás del asiento antes de reclinarlo. El asiento se puede reclinar
hasta un ángulo máximo de 170°. Si el respaldo golpea una pared o una columna, puede fallar. Asegúrese de
dejar siempre un espacio amplio detrás del sillón. Reclínelo lentamente para evitar que entre en contacto con
un obstáculo.
10. Cuando se aplique una presión excesiva a las cabezas de masaje, puede que éstas se detengan por
seguridad. Al mover las cabezas hacia arriba de una posición inferior, el peso del cuerpo de uno puede que
detenga el movimiento de las cabezas. En tal caso, levántese ligeramente para permitir que las cabezas de
masaje suban.
11. Después de cada masaje, deslice el interruptor de alimentación, que se encuentra situado en el lado derecho
del asiento, a la posición “off” y haga girar su interruptor de bloqueo a la posición “lock”.
12. No se siente con el cuerpo o el cabello mojados.
13. La unidad no debe ser usada en locales húmedos (sauna, piscina) o al aire libre.
S3
Page 30

S4
INSTRUCCIONES DE CONEXIÓN A TIERRA
El producto debe ser conectado a tierra. Si funcionara mal o se descompusiera, la conexión a tierra proporciona el
camino de menos resistencia a la corriente eléctrica para reducir el riesgo de choque eléctrico. Este producto está
equipado con un cordón que dispone de un conductor y una clavija para conexión a tierra. La clavija debe
conectarse en la toma de corriente apropiada que disponga de una conexión a tierra según todos los códigos y
ordenanzas locales.
PELIGRO
Una conexión mal hecha del conductor de conexión a tierra del equipo puede resultar en un riesgo de choque
eléctrico. Póngase en contacto con un electricista calificado si tiene alguna duda sobre si el producto está puesto a
tierra adecuadamente. No modifique la clavija suministrada con el producto — si no entrara en la toma de
corriente, haga que una toma de corriente apropiada sea instalada por un electricista calificado.
Este producto ha sido diseñado para ser usado en un circuito nominal de 120 voltios y tiene una clavija de
conexión a tierra como la mostrada en la Figura A. Asegúrese de que el producto esté conectado a una toma de
corriente que tenga la misma configuración que la clavija. Ningún adaptador deberá usarse con este producto.
GROUNDED
OUTLET
GROUNDED
OUTLET BOX
GROUNDING PIN
Figure A
PATILLA DE
CONEXIÓN A TIERRA
CAJA DE TOMA DE
CORRIENTE CON
CONEXIÓN A TIERRA
TOMA DE CORRIENTE
CON CONEXIÓN A TIERRA
Figura A
Page 31

S5
NOMBRES DE PARTES Y FUNCIONES
SILLÓN DE MASAJE
a
n
e
Frente
Reposabrazos
Reposapiernas
•
Incluye una función
de masaje con aire.
Proyecciones Deslizantes
del Reposapiernas
•
Use estas para extender la
longitud del reposapiernas
empujando con sus talones.
Almohada
•
Para usar cuando vea televisió
o simplemente se relaje.
•
La almohada tiene un ajuste d
altura. (Ver Página S10)
•
La almohada es desmontable,
y y puede también ser echada
hacia atrás.
Cojín de Espalda
Posición Retraida de
las Cabezas de Masaje
Las cabezas de masaje están
*
normalmente retraidas a la
izquierda y derecha en la parte
superior del respaldo.
(Sin embargo, si el botón de
Parada Rápida es oprimido par
detener el masaje, entonces las
cabezas de masaje no regresarán a la posición retraida.)
Bolsillo Lateral
Cierre del Cojín
de Espalda
•
El cojín de espalda es
desmontable.
Cubierta Trasera
Tirador
Etiqueta de Precaución
de Seguridad
Pestillo del Respaldo
Cable de Alimentación
Posterior
Sujetador de Almohada
Palanca de Deslizar
el Reposapiernas
•
Jale esta palanca cuando
desee extender la longitud
del reposapiernas.
Funda del Controlador
Llave del Interruptor
de Bloqueo
Interruptor de
Alimentación
on
off
lock
open
lock switch
Ruedas
Page 32

S6
CONTROLADOR
Cubierta Cerrada Cubierta Abierta
Botón de APAGAR/
ENCENDER (OFF/ON)
• Enciende y apaga el
controlador.
Indicador de Tiempo
• Muestra el tiempo
remanente antes del fin del
masaje.
Botón de Otomana
• Use este botón para ajustar
el ángulo del reposapiernas.
Botones de
Pre-programas
Botones de Foco
de Masaje
• Usados para seleccionar el
foco del masaje.
Botón de APAGAR/
ENCENDER Golpeteo
• Para uso durante los
pre-programas.
Botón de Posición de
Rodillo de Cuello
• Usado para posicionar las
cabezas de masaje al nivel
del hombro.
Indicador de Posición
de Rodillo de Cuello
Indicador de Intensidad
de Masaje de Piernas
Botón de Estirar Piernas
• Usado para encender y
apagar el estiramiento de
piernas.
Botón de Parada Rápida
• Usado para detener el
mensaje inmediatamente.
Botón de Reclinar
• Use este botón para ajustar
el ángulo del respaldar y
del reposapiernas.
Indicador de
Funcionamiento
• Muestra el estatus
operacional.
Cubierta
Botones de
Operación Manual
• Esto le permite seleccionar
la acción de masaje que
desea. (Ver Página S14)
Botón de Ajuste
de Velocidad
• Ajusta la velocidad del
masaje del cuerpo superior
en 5 pasos durante la
operación manual.
Indicador de Velocidad
Botón de Ajuste de
Posición de Masaje
• Ajusta la posición de las
cabezas de masaje durante
la operación manual.
(Ver Página S15)
Botón de Masaje
de Piernas
• Enciende y apaga las
bolsas de aire y ajusta la
intensidad del masaje de
piernas en 3 pasos.
Page 33

S7
CUIDADO
• Al alzar el respaldo, no permita que las manos o pies
queden atrapados entre el respaldo y el pestillo del
respaldo o entre el respaldo y los reposabrazos. El no
observar esta precaución puede resultar en apretones, lo
que puede llevar a herida.
DESEMPAQUE LA UNIDAD Y ELEVE EL RESPALDO
• Evite los lugares en donde la unidad estará expuesta a la luz
directa del sol durante largos periodos de tiempo o lugares en
donde estará expuesta a altas temperaturas, tales como
delante de un calentador, etc., ya que esto puede causar
descoloración o endurecimiento del cuero sintético.
• Se recomienda colocar una alfombra o un paño debajo de la
unidad para prevenir daño al piso.
DÓNDE USAR LA UNIDAD
INSPECCIONE EL CONTENIDO DEL CONTENEDOR DE ENVIO
ARMANDO LA UNIDAD
Mantenga lejos
del área las manos,
los pies, niños y
objetos.
Pestillo del
Respaldo
1. Saque la parte superior del contenedor de
envio.
• Al ser empaquetado para el envio el respaldo es doblado
hacia adelante.
2. Retire los materiales de embalaje y
amortiguamiento y saque los accesorios.
3. Eleve el respaldo.
• No conecte el cordón de alimentación a una toma de corriente
durante el armado.
• Sostenga el respaldo con ambas manos y levántelo en la
dirección de la fecha hasta que se detenga.
CUIDADO
• No use la unidad en áreas de alta humedad, tales
como el baño, etc., ya que esto puede ocasionar
choque eléctico u otros accidentes.
• Coloque la unidad en una superficie completamente
plana. De no hacerlo, el asiento podría volcarse.
Por lo Menos
15.7 pulg.
(40 cm)
Por lo Menos
15.7 pulg.
(40 cm)
Por lo Menos
15.7 pulg.
(40 cm)
Por lo Menos
15.7 pulg.
(40 cm)
Seleccione un lugar en donde la unidad pueda ser reclinada.
AlfombraAlfombra
Back Cushion
Pillow
AccessoriesMassage Lounger
Silón de Masaje Accesorios
Cojín de Espalda
Almohada
Page 34

S8
CUIDADO
•
No mueva la unidad mientras que alguien esté sentado en ella.
El dejar de hacer esto puede hacer que la unidad se voltee, lo
que puede llevar a daño o herida.
CÓMO MOVER LA UNIDAD
1.
Enchufe el tomacorriente en una toma de
corriente.
2.
Compruebe que la llave del interruptor de bloqueo
esté puesta en la posición “open” (abierto).
• Si está en la posición “lock” (bloqueado), haga girar la llave del
interruptor de bloqueo a la posición “on” (encendido).
3.
Haga deslizar el interruptor de corriente a la
posición “on” (encendido).
ENCENDIENDO LA UNIDAD
ADOSANDO EL COJÍN DE ESPALDA Y LA ALMOHADA
Usando las ruedas para mover la unidad
• Sujete el reposapiernas para mover la unidad cuando use las
ruedas.
• Es más fácil mover la unidad con las cabezas de masaje retraidas
y el respaldo en la posición erecta.
* Coloque una alfombra o un paño en el piso y mueva la unidad
lentamente para prevenir daño al piso.
Levantando la unidad
• Mueva el sillón haciendo que una persona sostenga el
reposapiernas y otra persona use los tiradores en la parte de atrás.
* Por favor sostenga los tiradores y el reposapiernas con seguridad
para evitar dejar caer la unidad ya que puede dañar su piso.
off
lock
lock switch
open
on
3
2
1
Wheels
Hold
the legrest.
Move it slowly
Sostenga
el reposapiernas
Ruedas
Muévalo lentamente
1. Adose el cojín de espalda usando
el cierre.
2. Adose la almohada usando los
sujetadores.
Page 35

S9
Compruebe que no haya nada alrededor de
la unidad.
1. Asegúrese de que la cobertura esté libre de
rasgones o roturas.
2. Asegúrese de que el tomacorriente esté en
condición de funcionar.
• Asegúrese de que el tomacorriente no esté dañado.
• Asegúrese de que el tomacorriente este libre de objetos
extraños y basura.
3. Asegúrese de que las cabezas de masaje
estén en la posición retraida, esto es, estén
estacionadas a la izquierda y derecha en la
parte superior del respaldo.
Si no están retraidas, oprima dos veces para regresar las
cabezas de masaje a la posición retraida.
4. Asegúrese de que el reposapiernas esté
bajado.
• No se siente en el reposapiernas cuando esté levantado. El
hacerlo así puede hacerlo desplomarse o doblarse. El
reposapiernas no está diseñado para soportar todo el peso
del cuerpo.
Bajando el Reposapiernas
Jale la palanca de deslizar el reposapiernas, asegúrese de que el
reposapiernas esté completamente retraido, luego oprima dos
veces para regresar el reposapiernas a su posición más baja.
COMPRUEBE EL ÁREA CIRCUNDANTE
COMPRUEBE LA UNIDAD
ANTES DEL USO DE LA UNIDAD
Mantenga lejos
del área las manos,
los pies, niños y
objetos.
Mantenga lejos
del área las manos,
los pies, niños y
objetos.
1
Compruebe
la cubierta.
2
CompruebeCompruebe
3
Compruebe
la posición retraida.
4
Compruebe el reposapiernas.
Page 36

S10
AJUSTANDO EL ÁNGULO DE RECLINAMIENTO
1. Jale de la palanca de deslizar
reposapiernas y extienda el
reposapiernas a la longitud deseada.
(máximo aprox. 6 pulg. (15 cm)).
2. Suelte la palanca de deslizar
reposapiernas.
EXTENDIENDO LA LONGITUD DEL REPOSAPIERNAS
AJUSTANDO EL ASIENTO
Oprima y para ajustar el ángulo del respaldo y del reposapiernas.
• Con ambos botones oprimidos, el movimiento continuará hasta que un sonido “pi-pi-pi” indique que el
reposapiernas o el respaldo ha sido elevado o bajado tanto como es posible.
• El reposapiernas empezará a moverse un corto tiempo después que el respaldo.
Ajuste la altura de la almohada de modo
que el filo de abajo esté al nivel de la
oreja.
•
Si es colocada demasiado bajo, la almohada puede
reducir el efecto del masaje alrededor del área del cuello.
AJUSTANDO PARA UNA ALTURA CORRECTA DE LA ALMOHADA
Aprox.
85°
Aprox.
85°
Aprox. 120°
Aprox. 170°
Fasteners
Sujetadores
Approx. 120°
Approx.
85°
Approx. 170°
Approx.
85°
Palanca de Deslizar
el Reposapiernas
Jale hacia atrás.
Suelte
la palanca.
• Extienda la longitud del reposapiernas empujando con el
talón la proyección de deslizar el reposapiernas.
• Eleve las piernas ligeramente y el reposapiernas regresa.
• Extienda hasta que el extremo del reposapiernas esté
más bajo que las rodillas para evitar incomodidad.
Page 37

S11
USANDO PRE-PROGRAMAS Y MASAJE RÁPIDO
1
2
5
4
1. Oprima el botón de APAGAR/ENCENDER (OFF/ON).
2. Seleccione el pre-programa que desea.
• Por favor oprima uno de los botones que están destellando.
• Para una explicación general de las características del preprograma, por favor refiérase a la parte inferior de esta página.
• Para un esquema de cada pre-programa, por favor refiérase a la
información en la página S18.
• Si oprime otro botón de Pre-Programa durante su masaje de preprograma seleccionado, el masaje se cambiará al nuevo preprograma seleccionado.
El Programa Seleccionado Comenzará
• Es posible cambiar el pre-programa seleecionado o cambiar a la
operación manual a mitad de camino de un masaje.
• En los pre-programas, el masaje de piernas comienza al mismo
tiempo. Es posible detener o cambiar la intensidad del masaje d
piernas durante el programa. (Ver Página S17)
3. Siéntese lo más atrás posible en el asiento con su
cabeza en la almohada.
• El indicador APAGAR/ENCENDER (OFF/ON) se
encenderá.
• Ahora puede seleccionar uno de los pre-programas
o uno de los ajustes manuales.
• Oprimiendo un botón de Pre-programa
mueve automáticamente el respaldo y
el reposapiernas hacia la posición de
masaje.
• Si el sillón de masaje es reclinado más
allá de este ángulo entonces no se
reclinará automáticamente.
Press
Oprimir
Head rests
on pillow.
La cabeza
descansa en
la almohada.
Acerca del Indicador del Tiempo
Approx. 15 m
Approx. 9 min
Approx. 3 min
Time Remainin
• Muestra el tiempo de masaje que queda por
medio de un LED destellando.
• Comienza la cuenta regresiva desde los
15 minutos en incrementos de aproximadamente
3 minutos.
• El destello se acelera un minuto antes del fin del
masaje.
Aprox. 15 mins.
Aprox. 9 mins.
Aprox. 3 mins.
Tiempo que Queda
Shiatsu: Usa principalmente acciones de Shiatsu Suave, Golpeteo y Amasar para aflojar cómodamente y
proveer alivio de la tensión mantenida en los puntos de presión. Recomendado para aquellos con rigidez
severa o que prefieren un masaje estimulante.
Sueco: Usa principalmente acciones Suecas, Hawaianas y de Amasar para aplicar parejamente golpes
relajadores de músculos por todas partes. Recomendado para aquellos que acaban de comenzar o que
prefieren un masaje suave.
Estiramiento: Usa principalmente acciones de Rodamiento Completo, Shiatsu Suave, Compresión,
Amasar y Estiramiento de Piernas para estirar y aflojar la espalda y los músculos de las piernas.
Recomendado para aquellos que son fisícamente inactivos o afligidos por piernas cansadas.
Rápido: Cubre todas las áreas usando una variedad de acciones de masaje, todo en el espacio de sólo
cinco minutos. Recomendado para aquellos que desean relajarse rápidamente.
Características del Pre-Programa y del Masaje Rápido
Page 38

• Cuando el indicador de posición de hombro está destellando, ajuste la
posición de las cabezas de masaje (cabezas superiores) de modo que
toquen suavemente los hombros.
• La posición de hombros puede ser ajustada arriba y abajo 4 pulg.
(10 cm).
• Cuando no sea posible ajustar correctamente la posición de hombros,
puede que Ud. tenga que deslizar su cuerpo y ajustarlo otra vez.
S12
4. Ajustando la posición del hombro
• Cuando un pre-programa comienza, el respaldo y el reposapiernas se mueven automáticamente a la posición de
masaje en donde las cabezas de masaje llevan a cabo un masaje Shiatsu Suave en el área alrededor de los
hombros. Durante el tiempo que el indicador de posición de hombros está destellando (aprox. 7 segundos), use el
botón de Posición de Rodillo del Cuello para alinear la posición de las cabezas de masaje con su altura de hombros.
Más abajo se muestran posiciones aproximadas para ajustar la posición de las cabezas.
• Ajuste de 5 etapas arriba/abajo.
Arriba Abajo Altura Aproximada
Oprimir
Oprimir
6'1" (185 cm)
5'2" (160 cm)
4'6" (140 cm)
• Tocando ligeramente
el hombro.
Demasiado alto
Posición correcta
Demasiado bajo
• Es posible cambiar la posición de
las cabezas de masaje durante
el masaje.
Consejos Utiles
• Se recomienda a las personas cuya estatura es de menos de 4.6 pies (140 cm) o más de 6.1 pies (185 cm)
que usen el sillón de la manera descrita más abajo cuando las cabezas de masaje no toquen sus hombros.
When height is around 4.6 ft. (140 cm) or less When height is around 6.1 ft. (185 cm) or more
Use by placing a cushion on the seat and
sitting as far back as possible.
Use by reclining the backrest and
sliding your body downward.
Cuando la estatura es de unos
4.6 pies (140 cm) o menos
Cuando la estatura es de unos
6.1 pies (185 cm) o más
Uselo colocando un cojín en el asiento y
sentándose tan atrás como sea posible.
Uselo reclinando el respaldo y deslizando
su cuerpo hacia abajo.
5. Seleccionando un área para un masaje enfocado
• Por favor vea las páginas S14-S17 para detalles concernientes con la operación manual.
Masajeando la Espalda Inferior
• Oprima este botón para enfocar el programa en la
espalda inferior. (El cuello y los hombros también
serán masajeados ligeramente.)
• Oprima otra vez el botón para conmutarlo a apagado.
Masajeando el Cuello y los Hombros
• Oprima este botón para enfocar el masaje en el
cuello y los hombros. (La espalda superior e inferior
también serán masajeadas ligeramente.)
• Oprima otra vez el botón para conmutarlo a apagado.
Oprima Oprima
Page 39

S13
Deteniendo un pre-programa
Deteniendo inmediatamente el masaje
6. Sacando el golpeteo de los pre-programas
7. Apague automático en los pre-programas
• El masaje terminará después de aproximadamente 15 minutos y la unidad se apagará automáticamente.
• Las cabezas de masaje se moverán a la posición retraida y se detendrán.
• El indicador APAGAR/ENCENDER (OFF/ON) destellará hasta que las cabezas hayan dejado de moverse.
• Si desea continuar usando el sillón de masaje, oprima el botón APAGAR/ENCENDER (OFF/ON). Por favor
descanse por lo menos 10 minutos entre masajes.
Sacando la Acción de Golpeteo
• Oprima este botón para sacar el golpeteo en los pre-programas. (El golpeteo
cambiará a un masaje de amasar.)
• Oprima otra vez el botón para restaurar el golpeteo al programa.
Oprima
• Oprima el botón APAGAR/ENCENDER (OFF/ON).
• El indicador APAGAR/ENCENDER (OFF/ON) continuará destellando hasta que las
cabezas de masaje hayan regresado a la posición retraida y la unidad se apague.
• Oprima el botón Parada Rápida.
• Todo movimiento se detendrá inmediatamente.
• Las cabezas de masaje no regresarán a la posición retraida, lo que puede que haga el
estar sentado en el asiento algo incómodo.
• Por favor oprima el botón APAGAR/ENCENDER (OFF/ON) dos veces para regresar las
cabezas de masaje a la posición retraida.
Press
Oprima
Press
Oprima
Page 40

S14
USANDO LOS AJUSTES MANUALES
1
3
4
1. Oprima el botón APAGAR/ENCENDER (OFF/ON).
2. Abra la cubierta del controlador.
• Todos los botones de Operación Manual
comenzarán a destellar.
3. Seleccione el tipo de masaje que desea.
• Oprima el botón del masaje que requiere.
El botón se iluminará y el masaje comenzará.
• La unidad se reclinará automáticamente a la posición de masaje.
p.ej. Seleccionando Amasar
OPERACIÓN MANUAL PARA EL CUERPO SUPERIOR
Combinando Masajes
• Es posible combinar tipos de masajes.
• No es posible combinar tipos de masajes en la misma categoría.
P.ej. 1 Añadiendo Golpeteo cuando Amasar está seleccionado.
P.ej. 3 Deseleccionando Rodamiento Completo.
P.ej. 2 Añadiendo Rodamiento Completo a la selección.
Cambiando Tipos de Masajes
P.ej. 1 Cambiando tipos de masajes en la misma categoría.
(Cambiando a Hawaiano cuando Amasar está seleccionado.)
• El indicador APAGAR/ENCENDER (OFF/ON)
se encenderá.
• Ahora puede seleccionar uno de
los pre-programas o uno de
los ajustes manuales.
Press
Oprima
Press
Oprima
Press
Press
Press
Press
Oprima
Oprima
Oprima
Oprima
Page 41

S15
4. Configurando los ajustes de masaje manual
Ajustando la Posición Vertical de las Cabezas de Masaje
Ajustando el Ancho entre las Cabezas de Masaje
Ajustando la Velocidad de Masaje
P.ej. 2 Cambiando a un tipo de masaje fuera de la categoría.
(Cambiando a Golpeteo cuando Amasar está seleccionado.)
• Cuando Amasar es combinado con Golpeteo, el deseleccionar Amasar dejará sólo Golpeteo.
5. Apague automático en la operación manual
• El masaje terminará aproximadamente después de 15 minutos y la unidad se apagará automáticamente.
• Las cabezas de masaje se moverán a la posicion retraida y se detendrán.
• El indicador APAGAR/ENCENDER (OFF/ON) destellará hasta que las cabezas hayan dejado de moverse.
• Si desea continuar usando el sillón de masaje, por favor oprima el botón APAGAR/ENCENDER (OFF/ON).
Por favor descanse por lo menos 10 minutos entre masajes.
NOTA:
• Un temporizador incorporado previene el sobreuso de la unidad.
• Cuando se usa la operación manual, el temporizador detiene automáticamente la operación después de
15 minutos.
* Si desea continuar usando la unidad, le recomendamos que tenga un descanso de por lo menos 10 minutos
entre masajes para permitir a su cuerpo que descanse.
• Las cabezas de masaje se moverán un poco cada vez que el
botón sea oprimido. Si lo mantiene oprimido, las cabeza de
masaje continuarán moviéndose hasta que Ud. Suelte el
botón. Cuando las cabezas de masaje lleguen a su límite se
escuchará un sonido “pi-pi-pi”.
• Golpeteo, Shiatsu Suave, Rodamiento Completo, y
Rodamiento Regional pueden ser ajustados en 3 pasos.
• Las cabezas de masaje se moverán un poco cada vez que el
botón sea oprimido. Si lo mantiene oprimido, las cabeza de
masaje continuarán moviéndose hasta que Ud. Suelte el botón.
• Cuando las cabezas de masaje lleguen a su límite se
escuchará un sonido “pi-pi-pi”.
• La velocidad de masaje es ajustable en 5 pasos.
• Cuando la velocidad de masaje llega a su máximo o a su
mínimo se escuchará un sonido “pi-pi-pi”.
Deteniéndose a mitad de camino de un masaje
• Oprima el botón APAGAR/ENCENDER (OFF/ON).
• Las cabezas de masaje regresarán a la posición retraida y se detendrán.
Press
Press
Oprima
Oprima
Massage heads up Massage heads down
Cabezas de
masaje arriba
Cabezas de
masaje abajo
Increasing the width Decreasing the width
Incrementando el ancho Reduciendo el ancho
Increasing
massage speed
Decreasing
massage speed
Incrementando la
velocidad de masaje
Reduciendo la
velocidad de masaje
Press
Oprima
Page 42

S16
ACCIONES DE MASAJE
Se siente como los dedos y pulgares de
dos manos pellizcando al unísono a
medida que siguen su camino hacia arriba
para aflojar la rigidez.
Recomendado para el área del cuello y los
hombros.
Amasar Compresión
Aplica golpes alternados sueltos a los
lados izquierdo y derecho como si se
sacara la rigidez hacia afuera.
Recomendado para la relajación de
todo el cuerpo.
Se siente como dos palmas
deslizándose sobre la piel a medida
que amasan rítmicamente los músculos
debajo.
Recomendado para aflojar áreas
grandes de la espalda.
Sueco Hawaiano
Se siente como dos manos moviéndose
rítmicamente en un patrón circular para
relajar y refrescar la espalda.
Recomendado para aliviar la tensión en la
espalda inferior.
Golpeteo
Se siente como si los filos de las manos
golpearan rítmicamente para penetrar en el
cuerpo y relajar los músculos.
Recomendado para usarse en los finos
músculos del cuello o como un masaje de
acabado.
Shiatsu Suave
Se siente como un par de pulgares que se
alternan cuidadosamente entre los lados
derecho e izquierdo a medida que se
centran en su objetivo.
Recomendado para aflojar nudos de
tensión.
Rodamiento Regional
Puede sentirlo viajar hacia arriba y abajo
trabajando 4 pulg. (10 cm) en áreas
localizadas de la espalda.
Recomendado para un rodamiento
enfocado desde los músculos de la espalda.
Rodamiento Completo
Desde la espalda inferior hasta el cuello,
puede sentirlo moverse 27 pulg. (67.5 cm)
hacia arriba y abajo por todo el cuerpo
superior.
Recomendado para un estirado general de
los músculos de la espalda.
Page 43

S17
Ajuste el ángulo y la longitud del reposapiernas antes de comenzar un
masaje. (Ver Página S10)
1. Oprima el botón APAGAR/ENCENDER (OFF/ON).
2. Oprima el botón de Masaje de Piernas.
3. Ajustando la intensidad del masaje
4. Apague automático en masaje de piernas/estirar
• El masaje terminará después de 15 minutos y la unidad se apagará automáticamente.
• Si desea continuar usando el sillón de masaje oprima el botón APAGAR/ENCENDER (OFF/ON).
• Los Pre-Programas y los botones de Masaje de Piernas comenzarán a
destellar.
• El masaje con aire comenzará.
• La intensidad del masaje de piernas es mostrada en el indicador.
• El ángulo de reclinación puede ser ajustado durante el masaje. Las bolsas
de aire se desinflarán mientras que el botón de Reclinar sea mantenido
oprimido de modo que Ud. pueda volver a colocar sus piernas.
• La intensidad es ajustable en 3 pasos.
• La intensidad se moverá 1 paso cada vez que el botón es oprimido,
moviéndose en el orden de media, fuerte, apagado y débil.
• El nivel por defecto es 2.
OPERACIÓN MANUAL PARA EL CUERPO INFERIOR
Descripción del Masaje de Piernas/Estirado
Masaje de piernas
Una acción de cogida como con una mano afloja los músculos en tres etapas mientras que una acción de pellizque de
abajo hacia arriba lentamente relaja y suaviza para aliviar cómodamente las piernas cansadas e hinchadas.
Estiramiento de piernas
Usando el masaje con aire de piernas
1. Oprima el botón APAGAR/ENCENDER (OFF/ON).
2. Oprima el botón de Estiramiento de Piernas.
3. Apague automático en el masaje/estiramiento de piernas
• El masaje terminará después de 15 minutos y la unidad se apagará automáticamente.
• Si desea continuar usando el sillón de masaje oprima el botón APAGAR/ENCENDER (OFF/ON).
• Los botones de Pre-Programa y Masaje de Piernas comenzarán a destellar.
• Oprima otra vez para detener el estiramiento de piernas.
Usando el estirado de piernas
Después que las piernas han sido cogidas por las
bolsas de aire, son estiradas lentamente a medida
que el reposapiernas se baja a un ángulo de 15°.
El reposapiernas luego se eleva a un ángulo de
70°, después de lo cual se baja otra vez a un
ángulo de 20° para un estiramiento profundo.
El reposapiernas se levanta
otra vez y regresa a su ángulo
original.
Press
Press
weak medium strong
1 2 3 off
Press
Oprima
Oprima
Oprima
débil media fuerte
Press
Press
Oprima
Oprima
Lowered to
approx. 15°
Lowered to
approx. 20°
Raised to
approx. 70°
Bajado a
aprox. 15°
Bajado a
aprox. 20°
Subido a
aprox. 70°
Page 44

S18
Estimulación
general con shiatsu
suave desde el
cuello hasta la
espalda inferior.
Estimula cuidadosamente el área
del cuello y los
hombros con
shiatsu suave.
Enfoca el área de la
espalda inferior
usando una acción
del tipo frotamiento
profundo.
Estimula cuidadosamente con golpeteo en puntos desde el cuello hasta la
espalda inferior.
Estimula cuidadosamente usando
shiatsu suave en el
área de la base del
cuello.
Relaja amasando
cuidadosamente y
golpeteando desde
el cuello hasta la
espalda inferior.
Golpea en forma
percusiva en puntos de los hombros,
omoplatos y
columna.
Termina con un
masaje general
para aflojar y
relajar.
Afloje general con
golpes de frotamiento amplios
desde el cuello hasta la espalda inferior.
Masajea por completo para aflojar
gradualmente el
área del cuello y
los hombros.
Enfoca en un área
de la espalda inferios con una acción
de frotamiento en
un patrón circular.
Afloja en etapas
con masaje desde
el cuello hasta la
espalda inferior.
Masajea por completo con acción
rítmica en el cuello
y los hombros.
Masajea rítmicamente con una
acción de pellizco
en la espalda
superior e inferior.
Masajea por completo para aflojar
gradualmente el
área del cuello y
los hombros.
Termina con
golpes amplios
para un masaje
general.
Estira los músculos
de la espalda moviéndose gradualmente
desde el cuello hasta
la espalda inferior.
Una acción de
oprimir gradual
que trabaja en el
área de la base del
cuello.
Usa shiatsu en los
músculos de la espalda trabajando
desde el cuello hasta
la espalda inferior.
Una acción del tipo de
oprimir se alterna a
medida que se mueve
desde el cuello hasta
la espalda inferior.
Amasa el área de la
espalda trabajando
hacia arriba desde
la espalda inferior
hasta el cuello.
Usa shiatsu en los
músculos de la espalda trabajando hacia arriba desde la espalda
inferior hasta el cuello.
Aplica una acción de
amasar meticulosa
hacia arriba y abajo
de los músculos de
la espalda.
Usa compresión
alterna y shiatsu
moviéndose desde
el cuello hasta la
espalda inferior.
Afloja gradualmente el área del
cuello y los hombros.
Acción de afloje
rítmica trabaja a lo
largo de la longitud del cuerpo.
Acción rítmica
afloja completamente el área del
cuello y los hombros.
Enfoca en un área
de la espalda inferior con una acción
de frotamiento en
un patrón circular.
Enfoca en la espalda inferior con una
acción de masaje
del tipo pellizco.
Afloja los hombros, los omoplatos y la columna
con una acción de
golpeteo.
Aflojamiento sobre
un área amplia a lo
largo del cuerpo
con un golpeteo
rítmico.
Cuidadosamente
afloja el área en la
base del cuello.
Información Adicional
Vista General de Masajes Pre-Programas y Rápidos
Shiatsu
Sueco
Estiramiento
Rápido
Deteniéndose a mitad de camino de un masaje
• Oprima el botón APAGAR/ENCENDER (OFF/ON).
• Tomará algo de tiempo antes de que el aire sea evacuado completamente. (El sonido del aire
escapando puede ser audible después de oprimir el botón APAGAR/ENCENDER (OFF/ON).)
Press
Oprima
Page 45

S19
1. Compruebe que no haya nada en la
vecindad del respaldo o del
reposapiernas.
2. Siempre retraiga el reposapiernas
después del uso si lo ha extendido.
REGRESE EL ASIENTO A LA POSICIÓN ORIGINAL
DESPUÉS DE COMPLETAR EL MASAJE
• Eleve las piernas ligeramente y el reposapiernas regresa.
Jale hacia atrás.
Palanca de Deslizar
el Reposapiernas
Mantenga lejos
del área las manos,
los pies, niños
y objetos.
Mantenga
lejos del área
las manos, los pies,
niños yobjetos.
3. Oprima el botón APAGAR/ENCENDER
(OFF/ON) dos veces.
• El respaldo y el reposapiernas regresarán
automáticamente a sus posiciones originales.
Press
4. Coloque el controlador en su funda.
5. Regrese la almohada y el cojín de espalda
a sus posiciones originales.
Oprima
Page 46

S20
1. Deslice el interruptor de corriente a la posición
“off” (apagado).
2. Haga girar la llave del interruptor de bloqueo a
la posición “lock” (bloqueado).
* Saque la llave y almacénela fuera del alcance de los niños.
3. Desenchufe el cordón de alimentación.
DESCONECTE LA CORRIENTE
1. Oprima el botón APAGAR/ENCENDER (OFF/ON)
para apagar la alimentación. (Las cabezas de
masaje deberán regresar a su posición retraida en
la parte superior del respaldo.)
2. Deslice el interruptor de corriente a la posición
“off” (bloquéelo), y luego desenchufe el cable de
corriente.
3. Saque el cojín de espalda y la almohada de la silla.
4. Inserte un destornillador o un objeto similar en el
agujero en el fondo de la cubierta posterior. El
instrumento deberá ser puesto en ángulo
ligeramente hacia arriba y descansar en la parte
superior del pestillo. Empuje el pestillo hacia
abajo de modo que se desenganche. Una segunda
persona deberá sostener el respaldo con ambas
manos y empujarlo lentamente hacia adelante,
doblándolo sobre el asiento.
5. Se aconseja mover la silla con el respaldo en la
posición vertical. Si se mueve con el respaldo
doblado hacia abajo, dos personas deberán
mover la silla cogiendo las partes inferiores de los
reposabrazos. Se deberá tener cuidado de no
dejar que la silla se voltee, ni dejar que el respaldo
se levante, especialmente en pendientes.
DOBLANDO EL RESPALDO HACIA ADELANTE (REEMPACADO)
CUIDADO
• Mantenga las manos, los pies, los niños, objetos, etc., lejos de las aberturas de la unidad, incluyendo
el asiento, los reposabrazos y el reposapiernas; espacios entre la unidad y el piso; y el espacio en
que se mueve el respaldo cuando es doblado hacia adelante.
El no hacerlo así podría resultar en herida o atrapamiento.
• No encienda la alimentación ni opere los controles con el respaldo doblado hacia adelante.
El hacerlo así podría resultar en herida debido a atrapamiento.
• No se suba a/ni coloque objetos en la parte superior de la cubierta posterior con el respaldo doblado
hacia adelante.
El hacerlo así podría resultar en daño a la unidad.
• Por razones de seguridad, el respaldo deberá ser siempre doblado hacia adelante por dos personas.
on
1
off
lock
open
2
lock switch
3
Oprimir
Abertura del Pestillo
del Respaldo
4-1. Con la punta tocando el extremo
superior de la abertura, ponga
el destornillador ligeramente en
ángulo hacia arriba e insértelo
aprox. 1.6 pulg. (4 cm)
4-2. Empuje la punta del destornillador hacia
abajo aprox. 1 pulg. (2.5 cm)
para soltar el pestillo del respaldo.
4-3. Saque el destornillador cuando empiece a
empujar el respaldo hacia adelante.
Page 47

S21
• Limpie estas áreas con un paño suave y seco. (NO use
paños que contengan algún tipo de químico, etc.)
• Si el cuero está particularmente sucio, mójelo con jabón
líquido y cepille la superficie. Limpie con un paño
humedecido con agua. Déjelo secar naturalmente. (NO use
un secador de cabello para tratar de secar las superficies
más rápidamente.)
• Ne permita que la unidad entre en contacto con estas áreas
durante periodos largos ya que esto puede ocasionar
descoloración.
• Por favor NO use disolventes, benzina o alcohol.
CUBIERTA DE CUERO EN LA ALMOHADA, EL COJÍN DE ESPALDA Y LA UNIDAD
LIMPIEZA Y MANTENIMIENTO
Detergente
Suave
Agua
z Pase sobre la unidad un paño que ha sido
remojado en detergente suave y luego bien
exprimido.
x Luego pase un paño que ha sido mojado con
sólo agua y bien exprimido.
* Asegúrese de escurrir completamente el paño
primero cuando limpie el controlador.
c Deje que la unidad se seque naturalmente.
• Por favor NO use disolventes, benzina o alcohol.
Detergente
Suave
Agua
Disolventes
Benzina
Alcohol
TUBOS Y ÁREAS DE PLÁSTICO
z Limpie la tela del asiento con un paño que ha sido
remojado en una solución suave de detergente y luego
completamente escurrido.
x Use una brocha para aplicar detergente suave en áreas en
donde la tela se ha ensuciado especialmente. Tenga
cuidado de no pasar la brocha demasiado en la tela ya que
esto puede dañarla.
c Luego pase sobre la tela un paño que ha sido mojado sólo
con agua y bien exprimido.
v Deje que la tela se seque naturalmente.
• Por favor NO use disolventes, benzina o alcohol.
Water
ENTELADO EN EL COJÍN DE ESPALDA
CUIDADO
• Siempre desconecte la unidad antes de limpiarla. Nunca toque un tomacorriente con las manos mojadas.
El no seguir estas instrucciones puede llevar a electrocución o quemaduras.
Agua
Page 48

S22
Problema Causa y Remedio
PROBLEMA
REMEDIO DE PROBLEMAS
Ruidos de Motor
• Suena y se siente como que las cabezas de masaje
están esforzándose para pasar sobre las arrugas en
la tela.
• El motor retumba cuando está bajo carga.
• Hay ruido excesivo durante el Golpeteo. (El ruido es
más grande en la parte superior del sillón de
masaje.)
• Hay un sonido de chirrido cuando las cabezas de
masaje están en operación.
• Hay un sonido de cascabeleo cuando las cabezas
de masaje se mueven hacia arriba y abajo.
• La correa se oye al girar.
• Hay un sonido de frotamiento producido por las
cabezas de masaje frotando la tela del asiento.
• Hay un ruido cuando el cojín del respaldo se mueve
sobre el reposabrazos al reclinarse el asiento.
• Hay un ruido cuando me siento.
• Hay un ruido extraño cuando las cabezas de
masaje se mueven hacia adentro y hacia afuera.
• Cuando el interruptor de alimentación es encendido
hay un sonido como un zumbido.
• Sonidos relacionados con el masaje con aire.
Hay un siseo del aire que se escapa.
Hay un zumbido de la bomba.
• El reposapiernas traquetea.
• Hay un sonido inestable cuando el aire se escapa
durante el estiramiento de piernas.
Estos sonidos son perfectamente normales y no
tendrán ningún efecto en el funcionamiento de
la unidad.
H
Las cabezas de masaje se detienen durante
el funcionamiento.
Si se aplica fuerza excesiva a las cabezas de
masaje durante el funcionamiento, por motivos de
seguridad pueda que las cabezas de masaje se
detengan.
Si todas las marcas y botones en el controlador
comienzan a destellar, lo que es extremadamente
inusual, apague el interruptor de corriente, espere
aproximadamente 10 segundos y luego encienda el
interruptor de corriente otra vez. Si las cabezas de
masaje se detienen otra vez, colóquese de modo
que su espalda no esté completamente en contacto
con el respaldo.
H
La altura de las cabezas de masaje
izquierdas y derechas es diferente.
Un método de golpeteo alternado es empleado, lo
que significa que este fenómeno ocurrirá
normalmente.
No hay ningún problema con la unidad.
H
Las cabezas de masaje no suben hasta
los hombros o el cuello.
La posición de las cabezas de masaje es incorrecta.
(Ver Página S12)
H
No es posible reclinar la unidad.
El reposapiernas no puede ser levantado o
bajado.
Si la unidad encuentra un obstáculo o si se ejerce
fuerza excesiva en ella durante el funcionamiento,
por motivos de seguridad la unidad se detendrá.
Si todas las marcas y botones en el controlador
comienzan a destellar, lo que es extremadamente
inusual, apague el interruptor de corriente, espere
aproximadamente 10 segundos y luego encienda el
interruptor de corriente otra vez.
H
Page 49

S23
Problema Causa y Remedio
El respaldo no regresa a la posición vertical.
El respaldo no regresará a la posición vertical si el
temporizador es activado o si el botón es
oprimido. (Oprimiendo dos veces
regresará el respaldo a su posición original.)
(Ver Página S19)
H
El reclinamiento no tiene lugar aun cuando
un masaje es comenzado en
pre-programas.
(El asiento no se reclina automáticamente.)
En algunos casos puede que el asiento no se recline
automáticamente dependiendo de la posición
(ángulo) del respaldo o del reposapiernas.
(Ver Página S11)
H
La unidad no funciona en absoluto.
• El cable de alimentación ha sido desconectado.
(Ver Página S8)
• El interruptor de alimentación en la unidad no ha sido
encendido. (Ver Página S8)
• Un botón de Pre-Programa o un botón de
Operación Manual no ha sido oprimido después de
oprimir .
(Ver Páginas S11, S14)
H
La unidad ha sido dañada.
Deje de usar la unidad inmediatamente.
H
El cable de alimentación o el tomacorrriente
está anormalmente caliente.
Deje de usar la unidad inmediatamente.
H
No es posible cambiar de Sueco y Amasar a
Hawaiano y Compresión.
El cambio puede ser perturbado cuando el peso del
cuerpo del usuario no está descansando sobre las
cabezas de masaje. Cambie su peso de modo que su
cuerpo esté en contacto con las cabezas de masaje.
H
El reposapiernas no regresa a su posición
original.
Si la longitud del reposapiernas ha sido extendida, el
reposapiernas golpeará el piso, previniendo que
regrese a su posición original. Pruebe otra vez
después de retraerlo a su longitud original.
H
Page 50

S24
Alimentación: CA120V 60Hz
Consumo de energía: 220W
Masaje de la Parte Superior del cuerpo
Área de Masaje (Arriba-Abajo): Aprox. 27 pulg. (67.5 cm)
Área de Masaje (Izquierda-Derecha): Distancia entre las Cabezas de Masaje durante el Funcionamiento
Aprox. 2 – 7 pulg. (6.0 – 18.0 cm)
Superficie de Masaje Total Máxima: 135 pulg. cuadr. (810 cm2)
Velocidad de Movimiento Arriba-Abajo: Aprox. 20 – 35 seg. ida y vuelta
Velocidad de Masaje: Amasar: Aprox. 20 – 30 ciclos/min.
Sueco: Aprox. 30 – 50 ciclos/min.
Compresión: Aprox. 20 – 30 ciclos/min.
Hawaiano: Aprox. 30 – 50 ciclos/min.
Shiatsu Suave: Aprox. 120 – 200 ciclos/min.
Golpeteo: Aprox. 300 – 700 ciclos/min.
Rodamiento Completo: Aprox. 20 – 35 ciclos/min.
(
Gama de movimiento: Aprox. 21.1 pulg. (53.5 cm))
Rodamiento Regional: Aprox. 7 – 9 ciclos/min.
(Gama de movimiento: Aprox 4.7 pulg. (12.0 cm))
Masaje de la Parte Inferior del cuerpo
Presión de Aire: Fuerte: Aprox. 24.0 kPa
Media: Aprox. 14.5 kPa
Débil: Aprox. 8.0 kPa
Ángulo de Reclinación: Respaldo: Aprox. 120° – 170°
Reposapiernas: Aprox. 0° – 85°
Apague Automático: Aprox. 15 min. para ambas la parte superior e inferior del cuerpo
Dimensiones:
No reclinado. (Al#An#Prof) 42.9#30.3#47.2 pulg. (109#77#120 cm)
Reclinado. (Al#An#Prof) 24.0#30.3#66.1 pulg. (61#77#168 cm)
Peso de la Unidad: Aprox. 155 libras (70 kgs.)
Dimensiones de la Caja (Al#An#Prof):
30.7#32.7#52.0 pulg. (78#83#132 cm)
Peso en Caja: Aprox. 183 libras (83 kgs.)
Máximo Peso de Usuario: Aprox. 264 libras (120 kgs.)
Distancia Mínima desde la Pared: 15.7 pulg. (40 cm)
ESPECIFICACIONES
Page 51

CONSIGNES IMPORTANTES DE SÉCURITÉ
L’utilisation de tout appareil électrique, y compris celui-ci, exige le respect des précautions de base, y compris des
suivantes.
Veuillez lire toutes les instructions avant d’utiliser le fauteuil vibromasseur.
DANGER – Pour réduire le risque de choc électrique:
1. Débranchez toujours l’appareil immédiatement après l’avoir utilisé.
2. Débranchez toujours l’appareil avant de le nettoyer.
ATTENTION
1. Enfoncez toujours la fiche d’alimentation à fond dans la prise afin de réduire les risques de court-circuit ou
d’incendie.
2. Ne laissez jamais l’appareil sans surveillance lorsqu’il est branché. Débranchez toujours l’appareil lorsqu’il n’est
pas utilisé.
3. Une surveillance acrcrue et rapprochée s’impose lorsque l’appareil est utilisé par des personnes présentant
une mobilité ou des capacités de communication réduites.
4. Utilisez cet appareil exclusivement aux fins décrites dans le présent manuel.
5. Ne vous tenez pas debout sur l’appareil.
6. N’utilisez aucun accessoire autre que les accessoires recommandés par le fabricant.
7. Cet appareil ne doit pas être utilisé par des enfants. Gardez les enfants éloignés de l’appareil. Ramenez
toujours le siège en position verticale et rétractez complètement le repose-jambes pour éviter d’éventuels
accidents. Veillez à ne rien heurter lorsque vous rétractez le repose-jambes. Lorsqu’elle n’est pas utilisée,
retirez la clé et rangez-la hors de la portée des enfants.
8. Ne mettez jamais l’appareil en marche lorsque la fiche ou le cordon d’alimentation est endommagé. Renvoyez
l’appareil au centre de service agréé le plus proche s’il ne fonctionne pas correctement, s’il est tombé ou s’il a
été endommagé ou encore s’il a été immergé dans de l’eau.
9. Avant d’utiliser l’appareil, soulevez toujours le coussin dorsal pour vérifier que la housse de l’appareil n’est pas
déchirée. Veuillez également vérifier que la housse n’est pas déchirée en d’autres endroits. Si vous constatez
la moindre déchirure, arrêtez immédiatement d’utiliser l’appareil, débranchez le cordon d’alimentation et faites
réparer l’appareil dans un centre de service agréé.
10. Tenez les cordons d’alimentation à l’écart des surfaces chauffées. Ne transportez pas l’appareil par le du
cordon d’alimentation. Ne laissez ni pointes, ni débris, ni humidité entrer en contact avec la fiche.
11. N’utilisez pas l’appareil sur des appareils de chauffage comme des tapis chauffants, etc. Ne faites pas
fonctionner le fauteuil lorsque vous êtes sous une couverture ou un oreiller. Cela peut produire une chaleur
excessive pouvant entraîner un incendie, une électrocution ou des blessures personnelles.
12. N’obstruez jamais les ouvertures d’aération pendant le fonctionnement et assurez-vous qu’aucune des
ouvertures d’aération n’est obstruée par des peluches, des cheveux, etc. Ne laissez rien tomber ou
n’introduisez rien dans aucune des ouvertures de l’appareil.
13. N’utilisez pas l’appareil dans des salles de bain ou dans toute autre pièce humide, sachant que cela peut
provoquer une électrocution ou un mauvais fonctionnement de l’appareil. Ne renversez pas d’eau, etc. sur le
contrôleur.
14. N’utilisez pas l’appareil à l’extérieur.
15. N’utilisez pas l’appareil dans des endroits où des bombes aérosol sout utilisées, ni dans des endroits où l’on
manipule de l’oxygène.
16. Au moment de débrancher l’appareil, mettez tous les boutons de commande en position d’arrêt avant de retirer
la fiche de la prise de courant. N’utilisez pas l’appareil avec à un transformateur, car cela peut entraîner des
dysfonctionnements ou des chocs électriques.
17. Ne branchez cet appareil que sur une prise de courant reliée à la terre. Reportez-vous aux consignes de mise
à la terre.
18. Afin d’éviter d’éventuelles blessures ou chocs électriques, aucun élément de cet appareil ne doit être ouvert ou
démonté par l’utilisateur. Cet appareil ne contient aucune pièce pouvant être remplacée par l’utilisateur.
CONSERVEZ CE MODE D’EMPLOI
F1
– Pour réduire les risques de brûlure, d’incendie ou de choc électrique et pour éviter
de blesser quiconque:
Page 52

CONSIGNES DE SÉCURITÉ
ATTENTION: Afin d’éviter tout risque de blessure, prenez les précautions suivantes.
1. Les personnes présentant l’une des conditions listées ci-dessous ou qui sont sous traitement médical doivent consulter leur
médecin avant d’utiliser l’appareil.
a) Les femmes enceintes, les personnes malades ou en mauvaise condition physique.
b) Les personnes souffrant du dos, de la nuque, des épaules ou des hanches.
c) Les personnes qui portent un stimulateur cardiaque, un défibrillateur ou tout autre appareil médical sensible aux interférences
électroniques.
d) Les personnes souffrant d’une maladie de cœur.
e) Les personnes dont le médecin leur a interdit les massages à la suite d’une thrombose ou d’un anévrisme, de varices aiguës ou
de tout autre désordre de la circulation.
f) Les personnes dont la colonne vertébrale est anormalement courbée.
2. Asseyez-vous en douceur après avoir vérifié la position des têtes de massage. Aucune partie de votre corps ne doit se trouver
prise entre les têtes de massage car leur action comprimante pourrait entraîner des blessures. Ne glissez jamais vos doigts ou vos
pieds dans l’espace situé entre le siège et le dossier, entre le dossier et les accoudoirs, entre le siège et la housse en dessous des
accoudoirs ou encore dans l’espace situé entre le repose-jambes et le repose-pieds. Ne mettez pas vos doigts ni aucune partie de
votre corps dans le bloc mécanique en dessous du repose-jambes ou entre le repose-jambes et le repose-pieds.
3. N’utilisez pas l’appareil à même la peau. S’il est préférable de porter un vêtement léger pour renforcer l’efficacité du massage, un
contact direct avec la peau peut en revanche provoquer des irritations.
Ne portez aucun objet dur sur la tête, tel que des accessoires de coiffure, lorsque vous utilisez l’appareil.
L’appareil ne doit pas être utilisé pour des massages de la tête, de l’abdomen, du cou, des coudes ou des genoux.
N’utilisez pas de massage trop fort sur le dos et la nuque.
4. Lors de l’utilisation du fauteuil vibromasseur, utilisez le bouton de position du rouleau de nuque pour ajuster les têtes de massage
à la position correcte. Vous pouvez ajuster la position des épaules de cette façon dans les préprogrammes et dans le roulement
dans le fonctionnement manuel. Si la position des épaules n’est pas correctement alignée, cela peut entraîner des blessures.
5. Les muscles du dos ne doivent pas être soumis à des étirements pendant plus d’une quinzaine de minutes d’affilée. Afin d’éviter
un étirement excessif des muscles qui peut se traduire par un malaise, n’utilisez pas l’appareil pendant plus de 5 minutes lors de la
première séance. Vous pouvez augmenter progressivement la durée et l’intensité du massage à mesure que vous vous y habituez.
Le massage ne doit pas être focalisé sur un même point pendant plus de 5 minutes d’affilée.
Un massage excessif peut trop stimuler les muscles et les nerfs et entraîner un résultat contraire.
Pour éviter les effets d’un massage excessif, chaque séance d’utilisation du fauteuil vibromasseur ne doit pas se prolonger au-delà
de 15 minutes en tout.
Après environ 15 minutes, les têtes de massage se placent en position rétractées et s’arrêtent.
Retirez le coussin dorsal pour obtenir un massage du dos plus vigoureux. Faites très attention afin d’éviter des douleurs au dos ou
des blessures lorsque vous utilisez ce mode. Ne l’utilisez que pendant de courtes périodes (pas plus de 15 minutes). Réinstallez le
coussin dorsal si vous désirez restaurer l’intensité normale des massages.
6. Si vous commencez à vous sentir mal ou si le massage vous semble douloureux alors que vous êtes en train d’utiliser l’appareil,
interrompez immédiatement le massage.
Si, alors que vous êtes en train d’utiliser le fauteuil vibromasseur, la pression vous paraît trop forte, vous pouvez à tout moment,
interrompre le mouvement des têtes de massage en appuyant sur le bouton d’arrêt rapide.
7. Ne vous endormez pas pendant que vous utilisez l’appareil. N’utilisez pas l’appareil après avoir consommé de l’alcool.
8. Ne vous asseyez par sur le dossier lorsque le siège est en position inclinée et ne vous asseyez pas non plus en faisant reposer
vos jambes sur l’appuie tête.
Ne vous asseyez pas sur le repose-jambes car l’appareil pourrait se renverser.
9. Ne laissez pas les enfants ni les animaux jouer sur ou autour de l’appareil, notamment s’il est en marche.
10. Ne débranchez pas ou ne mettez pas l’appareil hors tension pendant son fonctionnement. Débranchez immédiatement l’appareil
lors d’une panne de courant.
11. Veillez à commencer par le programme de massage léger si vous utilisez le vibromasseur pour la première fois. Le massage
shiatsu est fort et doit être utilisé uniquement après s’être habitué au fauteuil.
12. Ne laissez pas les enfants jour sur ce meuble mécanique ou faire fonctionner le mécanisme. Le repose-jambes se replie à la
fermeture, risquant de blesser un enfant. Laissez-le toujours en position droite et fermée. Gardez les mains et les pieds éloignés
du mécanisme. Seul l’occupant doit le faire fonctionner.
F2
Page 53

PRÉCAUTIONS D’EMPLOI
ATTENTION: Pour éviter d’endommager l’appareil, prenez les précautions suivantes:
1. Le siège est conçu pour supporter un poids maximum de 120 kg (264 lb). Un poids supérieur à ce maximum
peut entraîner une détérioration permanente du mécanisme de massage et (ou) d’autres composants de
l’appareil.
Toute détérioration de ce genre est considérée comme un abus de la part de l’utilisateur et, en tant que telle,
ne sera pas couverte par la garantie.
2. Ne vous asseyez pas sur le contrôleur ou ne le laissez pas tomber. Ne tirez pas sur le cordon du contrôleur ou
sur le cordon d’alimentation. Veillez à ne pas coincer le cordon du contrôleur entre l’accoudoir et le dossier du
fauteuil.
3. N’infligez pas de traitement brutal à l’appareil, par exemple, en le renversant sur le côté ou en le mettant à
l’envers et en montant dessus.
4. N’infligez pas de traitement abusif à la housse.
• Tenir tout objet pointu et acéré éloigné de la housse. Veillez à ne pas laisser tomber de cendres vives, de
cigarettes ou d’allumettes allumées sur le fauteuil.
• La couleur de la housse peut passer ou changer si elle est exposée à la lumière directe du soleil.
5. Si le vibromasseur fonctionne anormalement, coupez immédiatement l’alimentation et contactez le service
après-vente pour une vérification complète.
6. N’essayez pas de réparer vous-même l’appareil.
7. Ne jouez pas avec les interrupteurs en leur infligeant d’incessants va-et vient car un dysfonctionnement à leur
niveau pourrait s’ensuivre.
8. Vous entendrez peut-être des bruits provenant de l’appareil au cours de son utilisation. Ces bruits sont dus à la
structure du fauteuil et n’ont absolument rien d’anormal.
9. Avant d’incliner le siège, vérifiez qu’aucun obstacle ne se trouve derrière. Le siège peut être incliné jusqu’à un
maximum de 170°, mais il peut ne pas fonctionner correctement si le dossier touche un mur ou tout autre
obstacle.Veillez à ce que l’espace derrière le siège soit toujours amplement dégagé et inclinez le fauteuil
lentement dans l’éventualité d’un contact avec un obstacle.
10. En cas de pression excessive sur les têtes de massage, un processus de sécurité peut se déclencher et
interrompre ainsi leur mouvement. Lors du redressement des têtes depuis leur position rétractée, le poids du
corps peut entraîner leur immobilisation. Dans ce cas, soulevez légèrement le corps et attendez que les têtes
de massage remontent jusqu’à la position voulue.
11. Après chaque séance de massage, ramenez l’interrupteur d’alimentation, situé au dos du siège, en position
“off” (arrêt) et l’interrupteur de verrouillage en position “lock” (verrouillé).
12. Ne vous asseyez pas sur le fauteuil vibromasseur avec le corps ou les cheveux mouillés.
13. N’utilisez pas l’appareil dans des “locaux humides” (sauna, piscine) ou à l’extérieur.
F3
Page 54

F4
CONSIGNES DE MISE À LA TERRE
Le produit doit être relié à la terre. Si un mauvais fonctionnement se produit ou s’il tombe en panne, la mise à la
terre procure une voie de moindre résistance au courant électrique et réduit ainsi les risques d’électrocution. Ce
produit est équipé d’un cordon muni d’un conducteur de mise à la terre de l’appareillage et d’une fiche de mise à la
terre. La fiche doit être branchée dans une prise secteur appropriée correctement installée et mise à la terre
conformément à l’ensemble des codes et décrets locaux.
DANGER
Une mauvaise connexion du conducteur de mise à la terre de l’appareillage peut entraîner un risque
d’électrocution. Consulter un électricien ou un agent de service qualifié en cas de doute concernant la mise à la
terre du produit. Ne modifiez pas la fiche fournie avec le produit. Si elle ne s’adapte pas à la prise secteur,
demandez à un électricien qualifié d’installer une prise secteur adaptée.
Ce produit est conçu pour être utilisé sur un circuit nominal d’une tension de 120 volts et est équipé d’une fiche de
mise à la terre qui ressemble à la fiche illustrée dans la Figure A. Assurez-vous que le produit est connecté à une
prise secteur ayant la même configuration que la fiche.
N’utilisez pas d’adaptateur avec ce produit.
GROUNDED
OUTLET
GROUNDED
OUTLET BOX
GROUNDING PIN
Figure A
FICHE DE MISE
À LA TERRE
BOÎTIER DE PRISE SECTEUR
MISE À LA TERRE
PRISE SECTEUR DE
MISE À LA TERRE
Figure A
Page 55

F5
DÉSIGNATION ET FONCTION DES DIFFÉRENTES PIÈCES
FAUTEUIL VIBROMASSEUR
Avant
Accoudoir
Oreiller
Repose-jambes
• Comprend une fonction
de massage par air.
Saillies de la coulisse
du repose-jambes
• Utilisez ces dernières pour
augmenter la longueur du
repose-jambes en les
repoussant avec les talons.
• Pour regarder la télévision ou
simplement pour se détendre.
• La hauteur de l’oreiller peut
être ajustée. (Reportez-vous
à la page F10)
• L’oreiller est amovible et peut
également être basculé.
Coussin dorsal
Position rétractée des têtes
de massage
* Les têtes de massages sont
normalement rétractées vers
la gauche et vers la droite de la
partie supérieure du coussin
dorsal. (Cependant, si le bouton
d'arrêt rapide est appuyé pour
arrêter le massage, les têtes de
massage ne retournent pas
à leur position rétractée.)
Poche latérale
Fermeture éclair
du coussin dorsal
• Le coussin dorsal est
amovible.
Housse arrière
Poignée
Étiquette des précautions
de sécurité
Verrou du dossier
Cordon d’alimentation
Arrière
• Tirez ce levier pour allonger
le repose-jambes.
Interrupteur d’alimentation
Clé de l’interrupteur
de verrouillage
Roulettes
Attaches de l’oreiller
Levier de la coulisse
du repose-jambes
Porte-contrôleur
on
off
lock
open
lock switch
Page 56

F6
CONTRÔLEUR
Couvercle fermé Couvercle ouvert
Bouton d’arrêt/marche
• Utilisez ce bouton pour
allumer et éteindre le
contrôleur.
Témoin de durée
• Affiche la durée restante
avant la fin du massage.
Bouton Ottomane
• Utilisez ce bouton pour
ajuster l’angle du reposejambes.
Boutons de
préprogrammes
Boutons de focalisation
des massages
• Utilisez ces boutons pour
focaliser les massages.
Bouton d’arrêt/marche
du tapotement
• Utilisez ce bouton pendant
les préprogrammes.
Bouton de positionnement
du rouleau de nuque
• Utilisez ce bouton pour
positionner les têtes de
massage au niveau des
épaules.
Bouton d’arrêt rapide
• Utilisez ce bouton pour
arrêter immédiatement le
massage
Bouton d’inclinaison
• Utilisez ce bouton pour
ajuster l’angle du dossier
et du repose-jambes.
Témoin de
fonctionnement
• Affiche l’état du
fonctionnement.
Couvercle
Boutons de
fonctionnement manuel
• Ces boutons permettent
de sélectionner l’action de
massage désirée.
(Reportez-vous à la page F14)
Bouton de réglage
de la vitesse
• Ce bouton permet de régler
la vitesse du massage de la
partie supérieure du corps
en 5 étapes pendant le
fonctionnement manuel.
Témoin de vitesse
Témoin de la position
du rouleau de nuque
Témoin de l’intensité
du massage des jambes
Bouton d’étirement
des jambes
• Utilisez ce bouton pour
activer et désactiver
l’étirement des jambes
Bouton d’ajustement de
la position du massage
• Ce bouton permet d’ajuster
la position des têtes de
massage pendant le
fonctionnement manuel.
(Reportez-vous à la page F15)
Bouton de massage
des jambes
• Ce bouton active et
désactive les sacs d’air et
ajuste l’intensité du
massage des jambes en
3 étapes.
Page 57

F7
ATTENTION
• Lorsque vous relevez le dossier, ne laissez pas vos mains
ou vos pieds se faire prendre entre le dossier et le verrou
du dossier ou entre le dossier et les accoudoirs. Si cette
précaution n’est pas respectée, cela peut provoquer un
pincement pouvant entraîner des blessures.
DÉBALLEZ L’APPAREIL ET RELEVEZ LE DOSSIER
• Évitez les endroits où l’appareil serait exposé à la lumière
directe du soleil pendant de longues périodes ou les endroits
où il serait exposé à des températures élevées comme devant
un appareil de chauffage, etc. Cela peut entraîner la
décoloration ou le durcissement du cuir synthétique.
• Il est recommandé de placer un tapis ou un tissu au-dessous
de l’appareil afin d’éviter d’endommager le sol.
EMPLACEMENT DE L’APPAREIL
INSPECTEZ LE CONTENU DE LA CAISSE D’EXPÉDITION
INSTALLATION DE L’APPAREIL
Gardez les mains,
les pieds, les enfants
et objets éloignés
de la zone.
Verrou du dossier
Au moins
40 cm
(15,7 po)
Au moins
40 cm
(15,7 po)
Au moins
40 cm
(15,7 po)
Au moins
40 cm
(15,7 po)
Tapis
Sélectionnez un endroit où l’appareil peut être incliné.
1. Retirez le dessus de la caisse d’expédition.
• Lors de l’emballage pour l’expédition, le dossier est plié vers
l’avant.
2. Enlevez les matériaux d’emballage et de
matelassage et retirez les accessoires.
3. Relevez le dossier.
• Ne connectez pas le cordon d’alimentation à une prise secteur
pendant l’installation.
• Tenez le dossier à deux mains et soulevez-le dans le sens de
la flèche jusqu’à ce qu’il s’arrête.
Back Cushion
Pillow
AccessoriesMassage Lounger
ATTENTION
•N’utilisez pas l’appareil dans des endroits où l’humidité
est élevée comme une salle de bain, etc. Cela peut
entraîner une électrocution ou autres accidents.
• Placez l’appareil sur une surface totalement plate,
sinon, le fauteuil peut se renverser.
Fauteuil vibromasseur Accessoires
Coussin dorsal
Oreiller
Page 58

F8
ATTENTION
•
Ne déplacez pas l’appareil tant que quelqu’un est assis dessus.
Si cette précaution n’est pas respectée, cela peut provoquer le
renversement de l’appareil, entraînant de dégâts ou des blessures.
COMMENT DÉPLACER L’APPAREIL
1. Branchez la fiche d’alimentation dans une prise
secteur.
2. Assurez-vous que la clé de l’interrupteur de
verrouillage se trouve sur la position “open” (ouvert).
• Si elle est sur la position “lock” (verrouillé), mettez la clé de
l’interrupteur de verrouillage sur “open" (ouvert).
3. Faites glisser l’interrupteur d’alimentation sur
la position “on” (marche).
MISE EN MARCHE DE L’APPAREIL
1. Fixez le coussin dorsal à l’aide de
la fermeture éclair.
2. Fixez l’oreiller à l’aide des attaches.
FIXATION DU COUSSIN DORSAL ET DE L’OREILLER
Utilisation des roulettes pour déplacer l’appareil
• Saisissez le repose-jambes pour déplacer l’appareil en utilisant les
roulettes.
• Il est plus facile de déplacer l’appareil avec les têtes de massage
rétractées et le dossier en position verticale.
* Placez un tapis ou un tissu sur le sol et déplacez l’appareil
lentement pour empêcher d’endommager le sol.
Soulèvement de l’appareil
• Déplacez le fauteuil avec une personne tenant le repose-jambes
et une autre personne tenant les poignées à l’arrière.
* Veuillez bien tenir fermement le repose-jambes et les poignées pour
éviter de laisser tomber l’appareil, cela peut endommager le sol.
off
lock
lock switch
open
on
3
2
1
Tenir le
repose-jambes
Roulettes
Le déplacer lentement
Move it slowly
Wheels
Hold
the legrest.
Page 59

F9
Assurez-vous qu’il n’y a rien autour de
l’appareil.
1. Assurez-vous que la housse ne présente pas
de déchirure.
2. Assurez-vous que la fiche d’alimentation est
prête à fonctionner.
• Assurez-vous que la fiche d’alimentation ne présente pas
de dégât.
• Assurez-vous que la fiche d’alimentation est libre de tout
corps étranger ou débris.
3. Assurez-vous que les têtes de massage se
trouvent dans la position rétractée, c’est-àdire qu’elles sont rangées à droite et à
gauche de la partie supérieure du dossier.
Si elles ne sont pas rétractées, appuyez deux fois sur
pour faire revenir les têtes de massage à leur position
rétractée.
4. Assurez-vous que le repose-jambes est
abaissé.
• Ne vous asseyez pas sur le repose-jambes lorsqu’il est
relevé. Cela peut le faire s’effondrer ou le plier. Le reposejambes n’est pas conçu pour supporter le plein poids du
corps.
Abaissement du repose-jambes
Tirez sur le levier de la coulisse du repose-jambes, assurezvous que le repose-jambes est complètement rétracté, puis
appuyez deux fois sur pour faire revenir le repose-jambes à
sa position la plus basse.
VÉRIFIEZ LA ZONE ENVIRONNANTE
VÉRIFIEZ L’APPAREIL
AVANT D’UTILISER L’APPAREIL
Gardez les
mains, les pieds,
les enfants et
objets éloignés
de la zone.
Gardez les
mains, les pieds,
les enfants et
objets éloignés
de la zone.
1
Check covering.
2
Check
3
Check retracted
position.
4
Check the legrest.
Vérifier la housse
Vérifier la position
rétractée
Vérifier le repose-jambes
Vérifier
Page 60

F10
AJUSTEMENT DE L’ANGLE D’INCLINAISON
1. Repoussez le levier de la coulisse du
repose-jambes et allongez le reposejambes à la longueur désirée.
(environ 15 cm (6 po) maximum).
2. Relâchez le levier de la coulisse du
repose-jambes.
POUR ALLONGER LA LONGUEUR DU REPOSE-JAMBES
RÉGLAGE DU SIÈGE
Appuyez sur le bouton et sur le bouton pour ajuster l’angle d’inclinaison du
dossier et du repose-jambes.
• Si vous maintenez l’un des boutons enfoncé, le mouvement continue jusqu’à ce qu’un "bip-bip-bip" retentisse
pour signaler que le repose-jambes ou le dossier ont été relevés ou abaissés le plus loin possible.
• Le repose-jambes se met en mouvement peu après le dossier.
Approx.
85°
Approx. 120°
Approx. 170°
Approx.
85°
Ajustez la hauteur de l’oreiller de façon
à ce que le bord inférieur de l’oreiller
soit au niveau des oreilles.
• Si l’oreiller est positionné trop bas, cela peut diminuer
l’effet du massage autour de la zone de la nuque.
AJUSTEMENT DE L’OREILLER À LA HAUTEUR CORRECTE
Environ
85°
Environ
85°
Environ 120°
Environ 170°
Attaches
Levier de la coulisse
du repose-jambes.
Tirer vers l’arrière.
Relâcher
le levier.
• Allongez le repose-jambes en repoussant la saillie de la coulisse du
repose-jambes avec le talon.
• Relevez légèrement les jambes pour faire revenir le repose-jambes.
• Allongez jusqu’à ce que le repose-jambes soit plus bas que les
genoux afin d’éviter tout inconfort.
Fasteners
Page 61

F11
UTILISATION DES MASSAGES PRÉPROGRAMMÉS ET RAPIDE
1
2
5
4
1. Appuyez sur le bouton d’arrêt/marche
2. Sélectionnez le préprogramme que vous désirez.
• Veuillez appuyer sur l’un des boutons clignotant.
• Pour une explication générale des caractéristiques du préprogramme,
veuillez vous reporter au bas de cette page.
• Pour une vue générale de chaque préprogramme, veuillez vous reporter
aux informations de la page F18.
• Si vous appuyez sur le bouton d’un autre préprogramme pendant
l’exécution du massage de votre préprogramme sélectionné, le massage
passe à l’exécution du préprogramme nouvellement sélectionné.
Le programme sélectionné commence
• Il est possible de changer le préprogramme sélectionné ou de passer au
fonctionnement manuel au milieu d’un massage.
• Dans les préprogrammes, le massage des jambes commence en même
temps. Il est possible d’arrêter ou de changer l’intensité du massage des
jambes pendant l’exécution du programme. (Reportez-vous à la page F17)
3. Asseyez-vous le plus en arrière possible dans
le siège avec votre tête sur l’oreiller.
À propos du témoin de durée
Head rests
on pillow.
Approx. 15 m
Approx. 9 min
Approx. 3 min
Time Remainin
Press
• Le témoin d’arrêt/marche s’allume
• Vous pouvez maintenant sélectionner l’un des
préprogrammes ou l’un des réglages manuels.
• Appuyez sur un bouton de préprogramme
pour placer automatiquement le dossier et
le repose-jambes en position de massage.
• Si le fauteuil vibromasseur est incliné audelà de cet angle, il ne peut pas s’incliner
automatiquement.
• Affiche la durée de massage restante au moyen
d’un DEL clignotant.
• Commence le compte à rebours de 15 minutes
par incréments d’environ 3 minutes.
• Le clignotement s’accélère une minute avant la fin
du massage.
Appuyez
La tête se repose
sur l’oreiller.
Environ 15 minutes
Environ 9 minutes
Environ 3 minutes
Durée restante
Shiatsu: ce massage utilise principalement le massage Shiatsu doux, les actions de Tapotement et de
Pétrissage pour décontracter confortablement et offre un soulagement de la tension des points de pression.
Recommandé pour ceux qui souffrent de raideurs sévères ou qui préfèrent un massage stimulant.
Suédois: ce massage utilise principalement les actions des massages Suédois, Hawaïen et Pétrissage
pour appliquer des mouvements réguliers sur tout le corps pour détendre les muscles. Recommandé pour
les débutants ou pour ceux qui préfèrent un massage doux.
Étirement: ce massage utilise principalement les actions de Rouleau plein, de Shiatsu doux, de
Compression, de Pétrissage et d’Étirement des jambes pour étirer et décontracter les muscles du dos et
des jambes. Recommandé pour ceux qui sont physiquement inactifs ou gênés par des jambes fatiguées.
Rapide: ce massage couvre toutes les zones en utilisant une variété d’actions de massage, le tout en cinq
minutes. Recommandé pour ceux qui veulent se décontracter rapidement.
Caractéristiques des massages préprogrammés et rapide
Page 62

5. Sélection d’une zone pour un massage focalisé
• Pour plus de détails concernant le fonctionnement manuel, veuillez vous reporter aux pages F14-F17.
Massage du bas du dos
• Appuyez sur ce bouton pour focaliser le programme sur le
bas du dos. (La nuque et les épaules sont également
légèrement massés.)
• Appuyez de nouveau sur le bouton pour le désactiver.
• Lorsque le témoin de position des épaules clignote, ajustez la position
des têtes de massage (têtes supérieures) de façon à ce qu’elles
soient légèrement en contact avec les épaules.
• La position des épaules peut être ajustée de 10 cm (4 po) vers le haut
et vers le bas.
• Lorsqu’il n’est pas possible d’ajuster correctement la position des
épaules, déplacez votre corps et ajustez-la de nouveau.
Massage de la nuque et des épaules
• Appuyez sur ce bouton pour focaliser le massage sur la
nuque et sur les épaules. (Le haut et le bas du dos sont
également légèrement massés.)
• Appuyez de nouveau sur le bouton pour le désactiver.
Appuyez
Appuyez
F12
4. Réglage de la position des épaules
• Lorsqu’un préprogramme commence, le dossier et le repose-jambes se placent automatiquement en position
de massage là où les têtes de massage exécutent un massage Shiatsu doux dans la zone entourant les
épaules. Pendant que le témoin de la position des épaules clignote, (environ 7 secondes), utilisez le bouton de
position du rouleau de nuque pour aligner la position des têtes de massage à la hauteur de vos épaules.
Les emplacements approximatifs d’ajustement de la position des têtes de massage sont montrés ci-dessous.
• Ajustement haut/bas en 5 étapes
Vers le haut Vers le bas Hauteur approximative
Appuyez
Appuyez
185 cm (6'1")
160 cm (5'6")
140 cm (4'6")
•
Légèrement en contact
avec les épaules
Trop haut
Position correcte
Trop bas
• Il est possible de changer la position
des têtes de massage pendant
l’exécution d’un massage
Conseils pratiques
• Il est recommandé aux personnes dont la taille est inférieure à 140 cm (4,6 pieds) ou supérieure à 185 cm (6,1
pieds) d’utiliser le fauteuil de la manière décrite ci-dessous lorsque les têtes de massage ne sont pas en
contact avec leurs épaules.
When height is around 4.6 ft. (140 cm) or less When height is around 6.1 ft. (185 cm) or more
Use by placing a cushion on the seat and
sitting as far back as possible.
Use by reclining the backrest and
sliding your body downward.
Lorsque la taille est d’environ
140 cm (4,6 pieds) ou moins
Lorsque la taille est d’environ
185 cm (6,1 pieds) ou plus
Placez un coussin sur le siège et
asseyez-vous le plus loin possible en arrière.
Inclinez le dossier et faites glisser
votre corps vers le bas.
Page 63

F13
Pour arrêter un préprogramme
Pour arrêter immédiatement le massage
Press
6. Pour supprimer le tapotement des préprogrammes
7. Arrêt automatique des préprogrammes
• Le massage se termine après environ 15 minutes et l’appareil s’éteint automatiquement.
• Les têtes de massage se placent dans la position rétractée et s’arrêtent.
• Le témoin d’arrêt/marche clignote jusqu’à ce que les têtes de massage s’arrêtent.
• Si vous désirez continuer à utiliser le fauteuil vibromasseur, appuyez sur le bouton d’arrêt/marche. Veuillez
laisser au moins 10 minutes entre les massages.
Pour supprimer l’action de tapotement
• Appuyez sur ce bouton pour supprimer le tapotement des préprogrammes. (Le
tapotement change pour un massage de pétrissage.)
* Appuyez de nouveau sur le bouton pour rétablir le programme de tapotement.
Appuyez
Appuyez
• Appuyez sur le bouton d’arrêt/marche.
• Le témoin d’arrêt/marche clignote jusqu’à ce que les têtes de massage soient revenues
à la position rétractée et l’appareil s’éteint.
Press
• Appuyez sur le bouton d’arrêt rapide.
• Tout mouvement s’arrête immédiatement.
• Les têtes de massage ne retournent pas à leur position rétractée, ce qui fait que rester
assis sur le fauteuil est plutôt inconfortable.
• Veuillez appuyer deux fois sur le bouton d’arrêt/marche pour faire retourner les têtes de
massage à la position rétractée.
Appuyez
Page 64

F14
UTILISATION DES RÉGLAGES MANUELS
1
3
4
1. Appuyez sur le bouton d’arrêt/marche.
2. Ouvrez le couvercle du contrôleur.
• Tous les boutons du fonctionnement manuel
se mettent à clignoter.
3. Sélectionnez le type de massage
que vous désirez.
• Appuyez sur le bouton du massage désiré.
Le bouton s’allume et le massage commence.
• L’appareil s’incline automatiquement à la position nécessaire pour
le massage.
Exemple: sélection de Pétrissage
FONCTIONNEMENT MANUEL POUR LE HAUT DU CORPS
Pour combiner des massages
• Il est possible de combiner des types de massages.
• Il n’est pas possible de combiner des types de massages dans la même catégorie.
Exemple 1: ajouter Tapotement lorsque Pétrissage est sélectionné.
Press
Exemple 3: désélectionner Roulement plein.
Press
Exemple 2: ajouter Roulement plein à la sélection.
Press
Pour changer de type de massage.
Exemple 1: pour changer de massage dans la même catégorie.
(Pour changer à Hawaïen lorsque Pétrissage est sélectionné.)
Press
Press
• Le témoin d’arrêt/marche s’allume.
• Vous pouvez maintenant sélectionner l’un des
préprogrammes ou l’un des réglages manuels.
Appuyez
Appuyez
Appuyez
Appuyez
Appuyez
Appuyez
Press
Page 65

F15
4. Ajustement des réglages des massages manuels
Ajustement de la position verticale des têtes de massage
Ajustement de la largeur entre les têtes de massage
Ajustement de la vitesse du massage
Exemple 2: pour changer à un massage d’une autre catégorie.
(Changer à Tapotement lorsque Pétrissage est sélectionné.)
• Lorsque Pétrissage est combiné avec Tapotement, désélectionnez Pétrissage pour ne
garder que Tapotement.
Press
Press
Massage heads up Massage heads down
Increasing the width Decreasing the width
Increasing
massage speed
Decreasing
massage speed
5. Arrêt automatique en mode manuel
• Le massage se termine au bout d’environ 15 minutes et l’appareil se met automatiquement hors circuit.
• Les têtes de massage se placent automatiquement à la position rétractée et s’arrêtent.
• Le témoin d’arrêt/marche clignote jusqu’à ce que les têtes de massage aient cessé de se déplacer.
• Si vous désirez continuer à utiliser le fauteuil vibromasseur, veuillez appuyer sur le bouton d’arrêt/marche.
Veuillez vous reposer au moins 10 minutes entre les massages.
REMARQUES:
• Une minuterie incorporée empêche l’appareil d’être trop utilisé.
• Lors de l’utilisation du mode manuel, la minuterie arrête automatiquement le fonctionnement au bout de 15 minutes.
* Si vous désirez continuer à utiliser l’appareil, nous vous recommandons d’observer un temps d’arrêt d’au moins
10 minutes entre les massages pour permettre à votre corps de se reposer.
• Les têtes de massage se déplacent un petit peu à chaque
pression sur le bouton. Si vous maintenez le bouton enfoncé,
les têtes de massage continuent de se déplacer jusqu’à ce
que vous relâchiez le bouton. Lorsque les têtes de massage
ont atteint leur limite, un “bip-bip-bip” se fait entendre.
• Le Tapotement, le Shiatsu doux, le Roulement plein et le
Roulement local peuvent être ajustés en 3 étapes.
• Les têtes de massage se déplacent un petit peu à chaque
pression sur le bouton. Si vous maintenez le bouton enfoncé,
les têtes de massage continuent de se déplacer jusqu’à ce
que vous ayez relâché le bouton.
• Lorsque les têtes de massage ont atteint leur limite, un “bipbip-bip” se fait entendre.
• La vitesse du massage peut être ajustée en 5 étapes.
• Lorsque la vitesse du massage atteint sa limite maximum ou
minimum, un “bip-bip-bip” se fait entendre.
Pour arrêter au milieu d’un massage
• Appuyez sur le bouton d’arrêt/marche.
• Les têtes de massage retournent à la position rétractée et s’arrêtent.
Appuyez
Appuyez
Têtes de massage
relevées
Têtes de massage
abaissées
Pour augmenter
la largeur
Pour diminuer
la largeur
Pour augmenter
la vitesse du massage
Pour diminuer la vitesse
du massage
Press
Appuyez
Page 66

F16
ACTIONS DE MASSAGE
Donne l’impression des doigts et du pouce
des deux mains pétrissant ensemble tout
en remontant pour détendre toute raideur.
Recommandé pour les zones de la nuque
et des épaules.
Pétrissage Compression
Appliquez des passages de mains
réguliers alternatifs vers la gauche et
vers la droite comme pour faire
disparaître toute raideur vers l’extérieur.
Recommandé pour la détente de tout
le corps.
Donne l’impression des paumes des
deux mains glissant au-dessus de la
peau alors qu’elles pétrissent en
cadence les muscles en-dessous.
Recommandé pour détendre les larges
zones du dos.
Suédois Hawaïen
Donne l’impression de deux mains se
déplaçant en cadence selon un motif
circulaire pour décontracter et rafraîchir le
dos.
Recommandé pour soulager la tension du
bas du dos.
Tapotement
Donne l’impression du tranchant des deux
mains tapotant en cadence pour pénétrer
le corps et détendre les muscles.
Recommandé pour l’utilisation sur les
muscles fins de la nuque ou comme
massage final.
Shiatsu doux
Donne l’impression de deux pouces
alternant soigneusement entre la droite et
la gauche alors qu’ils se rapprochent du
centre.
Recommandé pour détendre les nœuds de
tension.
Roulement local
Vous pouvez le sentir se déplacer du haut
en bas, passant sur 10 cm (4 po) des
zones localisées du dos.
Recommandé pour le roulement focalisé
des muscles du dos.
Roulement plein
Du bas du dos jusqu’à la nuque, vous
pouvez le sentir se déplacer de 67,5 cm
(27 po) du haut en bas de la partie
supérieure du corps.
Recommandé pour l’étirement général des
muscles du dos.
Page 67

F17
Ajustez l’angle et la longueur du repose-jambes avant de commencer
un massage. (Reportez-vous à la page F10)
1. Appuyez sur le bouton d’arrêt/marche.
2. Appuyer sur le bouton de massage des jambes
3. Ajustement de la densité du massage
4. Arrêt automatique pendant le massage/étirement des jambes
• Le massage se termine au bout d’environ 15 minutes et l’appareil se met automatiquement hors circuit.
• Si vous désirez continuer à utiliser le fauteuil vibromasseur, appuyez sur le bouton d’arrêt/marche.
• Les boutons des préprogrammes et du massage des jambes se mettent à
clignoter.
• Le massage à l’air commence.
• Le témoin affiche l’intensité du massage des jambes.
• L’angle d’inclinaison peut être ajusté pendant le massage. Les sacs d’air
se dégonflent pendant que le bouton d’inclinaison est maintenu enfoncé,
vous permettant de changer la position de vos jambes.
• L’intensité peut être ajustée en 3 étapes.
• L’intensité se déplace d’une étape à chaque pression sur le bouton dans
l’ordre moyen, fort, arrêt et faible.
•2 est le niveau par défaut.
MODE MANUEL POUR LE BAS DU CORPS
Description du massage/étirement des jambes
Massage des jambes
Une action semblable à une main saisit et relâche les muscles des mollets en trois étapes tandis qu’une action de pression
de bas en haut détend et assouplit les jambes fatiguées, enflées, pour les soulager confortablement.
Étirement des jambes
Utilisation de l’air pour le massage des jambes
1. Appuyez sur le bouton d’arrêt/marche.
2. Appuyez sur le bouton Étirement des jambes.
3. Arrêt automatique du massage/étirement des jambes
• Le massage se termine au bout d’environ 15 minutes et l’appareil se met automatiquement hors circuit.
• Si vous désirez continuer à utiliser le fauteuil vibromasseur, appuyez sur le bouton d’arrêt/marche.
• Les boutons Préprogramme et Massage des jambes se mettent à clignoter.
• Appuyez de nouveau pour pour arrêter l’étirement des jambes
Utilisation de l’étirement des jambes
°
Après que les jambes aient été saisies par les
sacs d’air, elles sont lentement étirées alors que
le repose-jambes s’abaisse à un angle de 15°.
Puis le repose-jambes s’élève à un angle de
70° pour se rabaisser une fois de plus à un
angle de 20° pour un étirement profond.
Le repose-jambes se relève de nouveau
et retourne à son angle original.
Press
Press
Press
Appuyez
Appuyez
Appuyez
Appuyez
Appuyez
Abaissé
d’environ 15°
Abaissé
d’environ 20°
Abaissé
d’environ 70°
faibe moyen fort
Press
Press
1 2 3 off
weak medium strong
Lowered to
approx. 15°
Lowered to
approx. 20°
Raised to
approx. 70
Page 68

F18
Simulation
générale à l’aide
d’un shiatsu doux
de la nuque au
bas du dos.
Précautionneuse
simulation des zones
de la nuque et des
épaules à l’aide d’un
shiatsu doux.
Focalise sur les
zones du bas du
dos à l’aide d’une
action de type
frottement profond.
Précautionneuse
simulation à l’aide
d’un tapotement à
des points allant de la
nuque au bas du dos.
Précautionneuse
simulation de la
zone de la base de
la nuque à l’aide
d’un shiatsu doux.
Détend à l’aide d’un
pétrissage précautionneux et d’un
tapotement de la
nuque au bas du dos.
Mouvements de percussion à des points
situés sur les épaules,
les omoplates et la
colonne vertébrale.
Te r mine par un
massage général
destiné à détendre
et à décontracter.
Relâchement général avec d’amples
mouvements de
frottement de la nuque au bas du dos.
Massage complet
pour détendre
graduellement la
zone de la nuque
et des épaules.
Focalise sur la zone
du bas du dos avec
une action de
frottement selon un
motif circulaire.
Relâchement par
étapes avec un
massage de la
nuque au bas du
dos.
Massage complet
avec une action
cadencée sur la
nuque et les
épaules.
Massage cadencé
avec une action
de pincement sur
le haut et le bas
du dos.
Massage complet
pour détendre
graduellement la
zone de la nuque
et des épaules.
Te r mine par un
massage général
avec d’amples
mouvements.
Étire les muscles
du dos en se déplaçant lentement
de la nuque au
bas du dos.
Action de pression
graduelle
appliquée à la
zone de la base
de la nuque.
Utilise le shiatsu
appliqué sur les
muscles du dos
de la nuque au
bas du dos.
Une action de type
pression qui alterne alors qu’elle
passe de la nuque
au bas du dos.
Pétrie la zone du
dos en allant vers
le haut du bas du
dos à la nuque.
Utilise le shiatsu
appliqué sur les
muscles du dos,
du bas du dos
jusqu’à la nuque.
Applique une action de pétrissage
méticuleux du
haut au bas des
muscles du dos.
Utilise tour à tour
la compression et
le shiatsu en passant de la nuque
au bas du dos.
Détend
graduellement la
zone de la nuque
et des épaules.
Action de détente
cadencée se
déplaçant tout au
long du corps.
Action cadencée
qui détend
complètement la
zone de la nuque
et des épaules.
Focalise sur la
zone du bas du dos
avec une action de
frottement selon un
motif circulaire.
Focalise sur le
bas du dos avec
une action de
massage de type
pincement.
Détend les épaules,
les omoplates et la
colonne vertébrale
avec une action de
tapotement.
Détente sur une
large zone sur la
longueur du corps
avec un tapotement
cadencé.
Détend
soigneusement la
zone de la base
de la nuque.
Informations supplémentaires
Vue générale des massages préprogrammés et rapide
Shiatsu
Suédois
Étirement
Rapide
Pour arrêter au milieu d’un massage
• Appuyez sur le bouton d’arrêt/marche.
• L’air prend un certain temps pour s’évacuer complètement. (Le son de l’air s’échappant
peut se faire entendre après avoir appuyé sur le bouton d’arrêt/marche.)
Press
Appuyez
Page 69

•
Relevez légèrement les jambes pour faire revenir le repose-jambes.
Levier de la coulisse
du repose-jambes
Tirez vers
l’arrière.
Gardez les
mains, les pieds,
les enfants et
objets éloignés
de la zone.
Gardez les mains,
les pieds, les enfants et
objets éloignés de
la zone.
F19
1. Assurez-vous que rien ne se trouve dans
l’environnement du dossier et du reposejambes.
2. Rétractez toujours le repose-jambes après
l’utilisation si vous l’avez allongé.
FAITES REVENIR LE SIÈGE À SA POSITION ORIGINALE
LORSQUE LE MASSAGE EST TERMINÉ
3. Appuyez deux fois sur le bouton
d’arrêt/marche.
• Le dossier et le repose-jambes retournent
automatiquement à leur position originale.
Press
4. Replacez le contrôleur dans son portecontrôleur.
5. Retournez l’oreiller et le coussin dorsal à
leur position originale.
Appuyez
Page 70

F20
1. Faites coulisser l’interrupteur d’alimentation à
la position “off” (arrêt).
2. Faites tourner la clé de l’interrupteur de
verrouillage à la position “lock” (verrouillé).
* Retirez la clé et rangez-la hors de la portée des enfants.
3. Débranchez le cordon d’alimentation.
DÉCONNECTEZ L’ALIMENTATION
1. Appuyez sur le bouton d’arrêt/marche pour
mettre l’alimentation hors tension. (Les têtes de
massage doivent retourner à leur position
rétractée dans la partie supérieure du dossier.)
2. Faites glisser l’interrupteur d’alimentation à la
position “off” (arrêt), verrouillez-le, puis
débranchez le cordon d’alimentation.
3. Retirez le coussin dorsal et l’oreiller du fauteuil.
4. Insérez un tournevis ou tout autre outil de
forme semblable dans l’orifice au bas de la
housse arrière. Inclinez l’outil légèrement vers
le haut et reposez-le sur le haut du verrou.
Repoussez le verrou vers le bas pour qu’il se
détache. Une seconde personne doit tenir le
dossier à deux mains et le repousser lentement
vers l’avant pour le replier sur le siège.
5. Il est recommandé de déplacer le fauteuil avec
le dossier dans la position relevée. Si le fauteuil
est déplacé avec le dossier dans la position
repliée, deux personnes doivent déplacer le
fauteuil en le saisissant par le dessous des
accoudoirs. Veillez à ce que le fauteuil ne se
renverse pas ou à ce que le dossier ne se relève
pas, particulièrement sur les plans inclinés.
REPLIAGE DU DOSSIER VERS L’AVANT (REMBALLAGE)
ATTENTION
• Gardez les mains, les pieds, les enfants, tout objet, etc. éloignés des ouvertures de l’appareil, y
compris du siège, des accoudoirs et du repose-jambes; des espaces entre l’appareil et le sol; et de la
portée du mouvement du dossier lorsqu’il est replié vers l’avant.
Cela peut entraîner des blessures dues à des pincements.
• Ne mettez pas l’alimentation sous tension et ne faites pas fonctionner les commandes alors que le
dossier est replié vers l’avant.
Cela peut entraîner des blessures dues à des pincements.
• Ne grimpez pas ou ne placez pas d’objets sur la housse arrière avec le dossier replié vers l’avant.
Cela peut endommager l’appareil.
• Pour des raisons de sécurité, le dossier doit toujours être replié vers l’avant par deux personnes.
on
1
off
lock
open
2
lock switch
3
Appuyez
Ouverture du
verrou du dossier
4-1. Avec son extrémité touchant le
bord supérieur de l’ouverture,
inclinez le tournevis légèrement
vers le haut et insérez-le
d’environ 4 cm (1,6 po).
4-2. Repoussez l’extrémité du tournevis vers le
bas d’environ 2,5 cm (1 po) pour relâcher
le verrou du dossier.
4-3. Retirez le tournevis lorsque la poussée du
dossier vers le siège commence.
Page 71

F21
• Essuyez ces zones à l’aide d’un chiffon doux et sec.
(N’utilisez PAS de chiffon imbibé d’un quelconque produit
chimique, etc.)
• Si le cuir est particulièrement sale, humectez-le avec du
savon liquide et brossez la surface. Essuyez avec un chiffon
humecté d’eau. Laissez sécher naturellement. (N’utilisez
PAS de sèche-cheveux pour essayer de sécher la surface
plus rapidement.)
• Ne laissez pas l’appareil en contact avec ces zones pendant
de longues périodes, cela peut entraîner leur décoloration.
• Veuillez NE PAS utiliser de solvant, de benzine ou d’alcool.
DU CUIR RECOUVRANT L’OREILLER, LE COUSSIN DORSAL ET L’APPAREIL
NETTOYAGE ET ENTRETIEN
Détergent
doux
Eau
z Essuyez l’appareil avec un chiffon trempé dans
un détergent doux et bien essoré.
x Essuyez ensuite l’appareil avec un chiffon
humecté d’eau seulement et bien essoré.
* Veillez à d’abord complètement essorer le
chiffon avant de nettoyer le contrôleur.
c Laissez sécher l’appareil.
• Veuillez NE PAS utiliser de solvant, de benzine ou
d’alcool.
Détergent
doux
Eau
Solvant
Benzine
Alcool
ZONE DES TUYAUX ET EN PLASTIQUE
z Essuyez le tissu du siège avec un chiffon humecté d’une
solution de détergent doux et bien essoré.
x Utilisez une brosse pour appliquer un détergent doux sur
les zones où le tissu enduit est particulièrement taché.
Veillez à ne pas trop brosser le tissu, cela peut
l’endommager.
c Essuyez ensuite la housse à l’aide d’un chiffon humecté
d’eau et bien essoré.
v Laissez la housse sécher.
• Veuillez NE PAS utiliser de solvant, de benzine ou d’alcool.
Water
TISSU ENDUIT SUR LE COUSSIN DORSAL
ATTENTION
• Débranchez toujours l’appareil avant de le nettoyer. Ne touchez jamais une fiche d’alimentation avec
les mains mouillées.
Si ces instructions ne sont pas observées, cela peut entraîner des chocs électriques ou des brûlures.
Eau
Page 72

F22
Problème Cause et remède
Bruits de moteur
• Bruit et sensation comme si les têtes de massage
faisaient des efforts pour passer au-dessus des plis
du tissu.
• Sous une charge, le moteur grince.
• Le mode Tapotement fait trop de bruit. (Il y a plus de
bruit au sommet du fauteuil vibromasseur.)
• Un grincement est produit lorsque les têtes de
massage fonctionnent.
• Un cliquetis est produit lorsque les têtes de massage
montent ou descendent.
• On entend la courroie tourner.
• Un bruit de frottement est produit par les têtes de
massage frottant sur la housse.
• Un bruit est produit lorsque le coussin dorsal se
déplace au-dessus des accoudoirs lorsque le fauteuil
s’incline.
• Un bruit est produit lorsque je m’assied.
• Un bruit bizarre est produit lorsque les têtes de
massage entrent et ressortent.
• Un bourdonnement est produit lorsqu’on enclenche
l’interrupteur d’alimentation.
• Bruits reliés au massage par air.
Un sifflement d’air s’échappant est produit.
Un bourdonnement est produit par la pompe.
• Le repose-jambes cliquète.
• Un son irrégulier est émis lorsque l’air s’échappe
pendant l’étirement des jambes.
PROBLÈME
DÉPANNAGE
Ces bruits n’ont absolument rien d’anormal et n’ont
aucun effet sur le fonctionnement de l’appareil.
H
Les têtes de massage s’arrêtent en cours de
fonctionnement.
Si, au cours d’une séance de massage, une trop forte
pression s’exerce sur les têtes de massage, il peut
arriver qu’elles s’immobilisent pour des raisons de
sécurité.
Dans le cas extrêmement inhabituel où tous les
boutons et voyants du contrôleur se mettent à clignoter,
éteignez l’appareil à l’aide de l’interrupteur
d’alimentation, patientez une dizaine de secondes, puis
rallumez-le au moyen de l’interrupteur d’alimentation. Si
les têtes de massage s’arrêtent de nouveau,
positionnez votre corps de façon à ce que votre dos ne
soit pas complètement en contact avec le dossier.
H
La hauteur des têtes de massage droite et
gauche est différente.
Une méthode de tapotement alternative est utilisée,
signifiant que ce phénomène se produit normalement.
L’appareil ne présente aucun problème.
H
Les têtes de massage ne remontent pas
jusqu’aux épaules ou jusqu’à la nuque.
La position des têtes de massage est incorrecte.
(Reportez-vous à la page F12)
H
Il est impossible d’incliner l’appareil.
Il est impossible de relever ou d’abaisser
le repose-jambes.
Si l’appareil rencontre un obstacle ou si une force
excessive est appliquée pendant le fonctionnement,
l’appareil s’arrête pour des raisons de sécurité.
Dans le cas extrêmement inhabituel où tous les
boutons et voyants du contrôleur se mettent à clignoter,
éteignez l’appareil à l’aide de l’interrupteur
d’alimentation, patientez une dizaine de secondes, puis
rallumez-le au moyen de l’interrupteur d’alimentation.
H
Page 73

F23
Problème Cause et remède
Le dossier ne retourne pas à la position
verticale.
Le dossier ne retourne pas à la position verticale
lorsque la minuterie est activée ou lorsque le bouton
est pressé. (Appuyez deux fois sur pour faire
revenir le dossier à sa position originale.)
(Reportez-vous à la page F19)
H
Le siège ne s’incline pas, même lorsqu’une
séance de massage est démarrée dans un des
préprogrammes.
(Le siège ne s’incline pas automatiquement.)
Dans certains cas, le siège peut ne pas s’incliner
automatiquement en fonction de la position (de l’angle)
du dossier ou du repose-jambes.
(Reportez-vous à la page F11)
H
L’appareil ne fonctionne pas du tout.
• Le cordon d’alimentation est débranché.
(Reportez-vous à la page F8)
• L’interrupteur d’alimentation de l’appareil n’est pas
enclenché. (Reportez-vous à la page F8)
• Un bouton de préprogramme ou un bouton de
fonctionnement manuel n’a pas été appuyé après
avoir appuyé sur .
(Reportez-vous aux pages F11, F14)
H
L’appareil a été endommagé.
Arrêtez immédiatement d’utiliser l’appareil.
H
Le cordon d’alimentation ou la fiche
d’alimentation sont anormalement chauds.
Arrêtez immédiatement d’utiliser l’appareil.
H
Impossible de passer de Suédois et Pétrissage
à Hawaïen et Compression.
La commutation peut être empêchée lorsque le poids
du corps de l’utilisateur ne repose pas sur les têtes de
massage. Déplacez votre poids de façon à ce que votre
corps soit en contact avec les têtes de massage.
H
Le repose-jambes ne retourne pas à sa
position originale.
Si la longueur du repose-jambes a été allongée, le
repose-jambes touche le sol, l’empêchant de revenir à
sa position originale. Essayez de nouveau après l’avoir
rétracté à sa longueur originale.
H
Page 74

F24
Alimentation: 120 V c.a., 60 Hz
Consommation de courant: 220 W
Massage du haut du corps
Zone de massage (Haut-bas): Environ 67,5 cm (27 po)
Zone de massage (Gauche-droite): Écartement des têtes de massage en cours de fonctionnement
Environ 6,0 – 18,0 cm (2 – 7 po)
Vitesse du mouvement Haut-bas: Environ 20-35 secondes retour.
Vitesse du massage: Pétrissage: Environ 20 – 30 cycles/min.
Suédois: Environ 30 – 50 cycles/min.
Compression: Environ 20 – 30 cycles/min.
Hawaïen: Environ 30 – 50 cycles/min.
Shiatsu doux: Environ 120 – 200 cycles/min.
Tapotement: Environ 300 – 700 cycles/min.
Roulement plein: Environ 20 – 35 sec./cycle
(Amplitude du mouvement: Environ 53,5 cm (21,1 po))
Roulement local: Environ 7 – 9 sec./cycle
(Amplitude du mouvement: Environ 12 cm (4,7 po))
Massage du bas du corps
Pression de l’air Forte: Environ 24,0 kPa
Moyenne: Environ 14,5 kPa
Faible: Environ 8,0 kPa
Angle d’inclinaison: Dossier: Environ 120° – 170°
Repose-jambes: Environ 0° – 85°
Arrêt automatique: Environ 15 minutes pour le haut du corps et le bas du corps
Dimensions:
Non incliné (H#L#P) 109#68#120 cm (42,9#26,8#47,2 po)
Incliné (H#L#P) 61#68#168 cm (24,0#26,8#66,1 po)
Poids de l’appareil: Environ 60 kg (133 lb)
Dimensions de la boîte (H#L#P): 78#77#121 cm (30,7#30,3#47,6 po)
Poids dans la boîte: Environ 73 kg (161 lb)
Poids maximal de l’utilisateur: Environ 120 kg (264 lb)
Distance au mur minimale: 40 cm (15,7 po)
CARACTÉRISTIQUES
Page 75

Page 76

No.1 EN, SP, FR Printed in China
Impreso en China
Imprimé en Chine
P93101272231
Panasonic Consumer
Electronics Company
One Panasonic Way 4A-3
Secaucus, New Jersey 07094
1-800-338-0552 for questions and comments.
www.panasonic.com/massage
Panasonic Canada Inc.
5770 Ambler Drive
Mississauga, ON L4W 2T3
905-624-5010
www.panasonic.ca
 Loading...