

Panasonic EP-1260A3, EP-1060G2, EP-1260W7 User Manual
30
MASSAGE LOUNGER
EP1060/EP1260
Instruction Manual
EP1060
EP1260
33
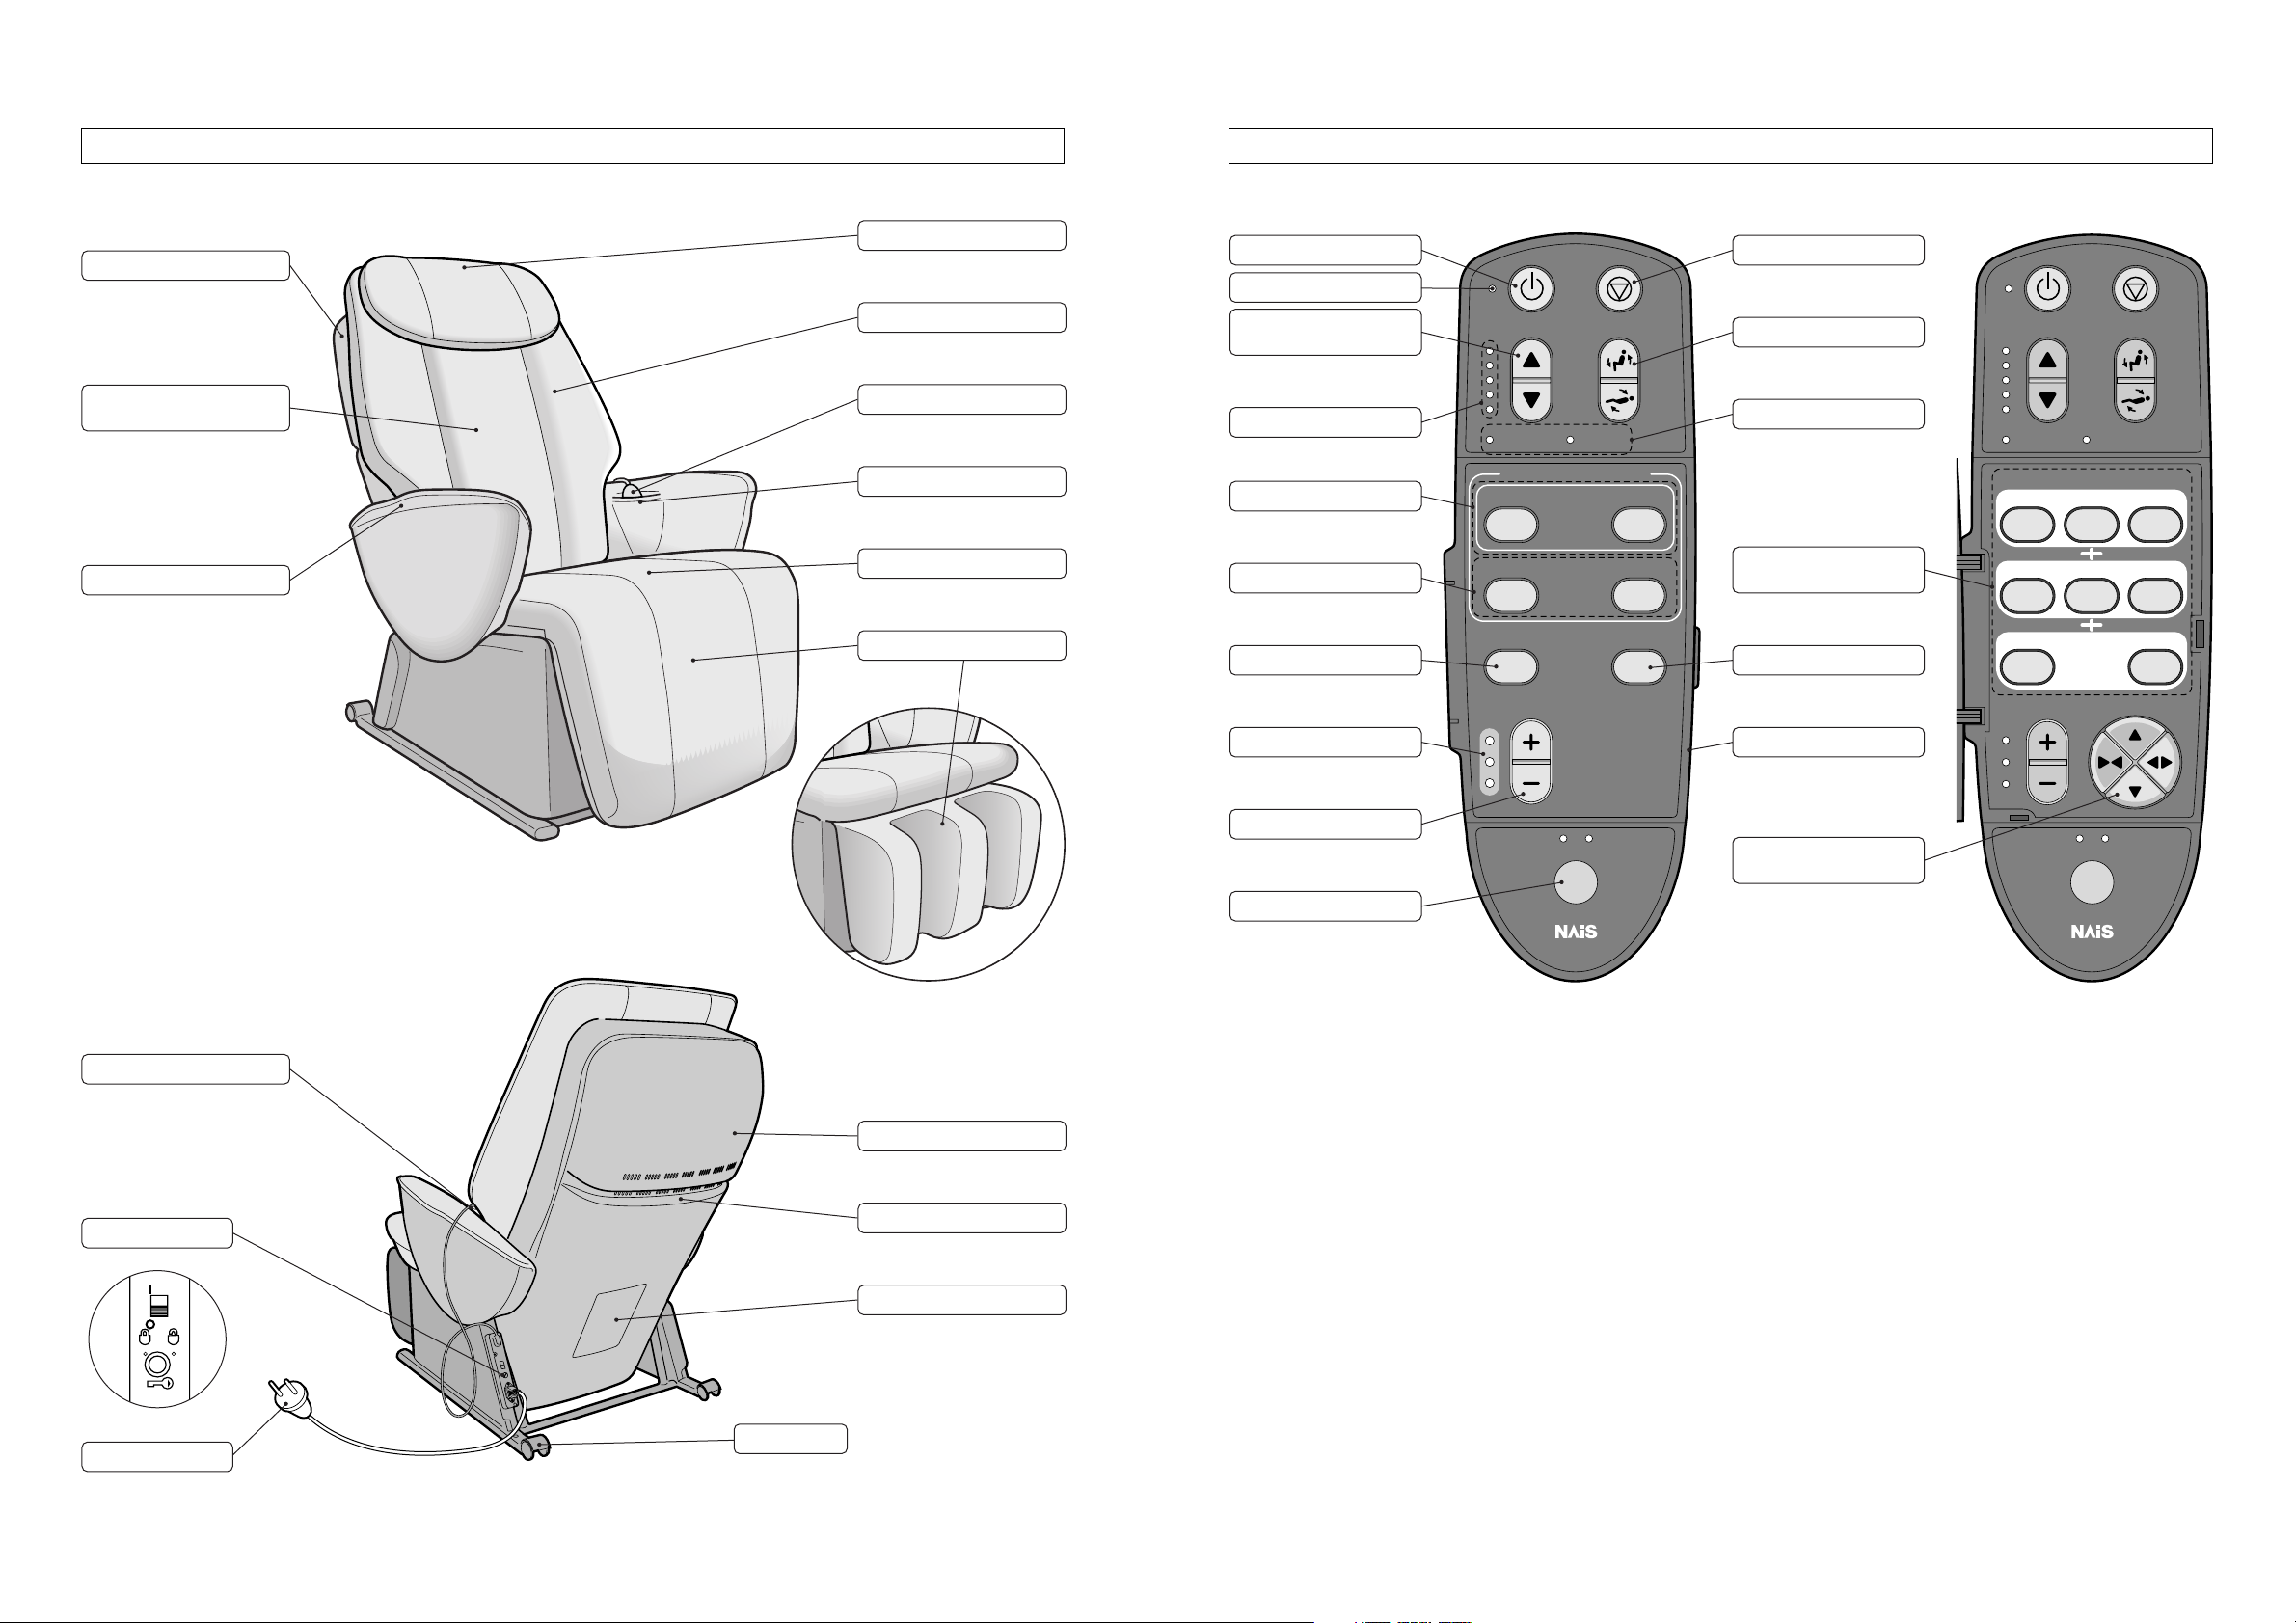
CONTROLLER
PART NAMES AND FUNCTIONS
programmed operation
whole back
gentlestrong
neck roller position
reclining
programmed
operation
/
manual
operation
lower backneck, shoulder
tap on/offvibration on/off
gentle strong
intensity
leg massage
neck roller position
reclining
programmed
operation
/
manual
operation
intensity
roll
manual operation
whole back
regional
tap Avibration tap B
swedishshiatsu knead
position
gentle strong
leg massage
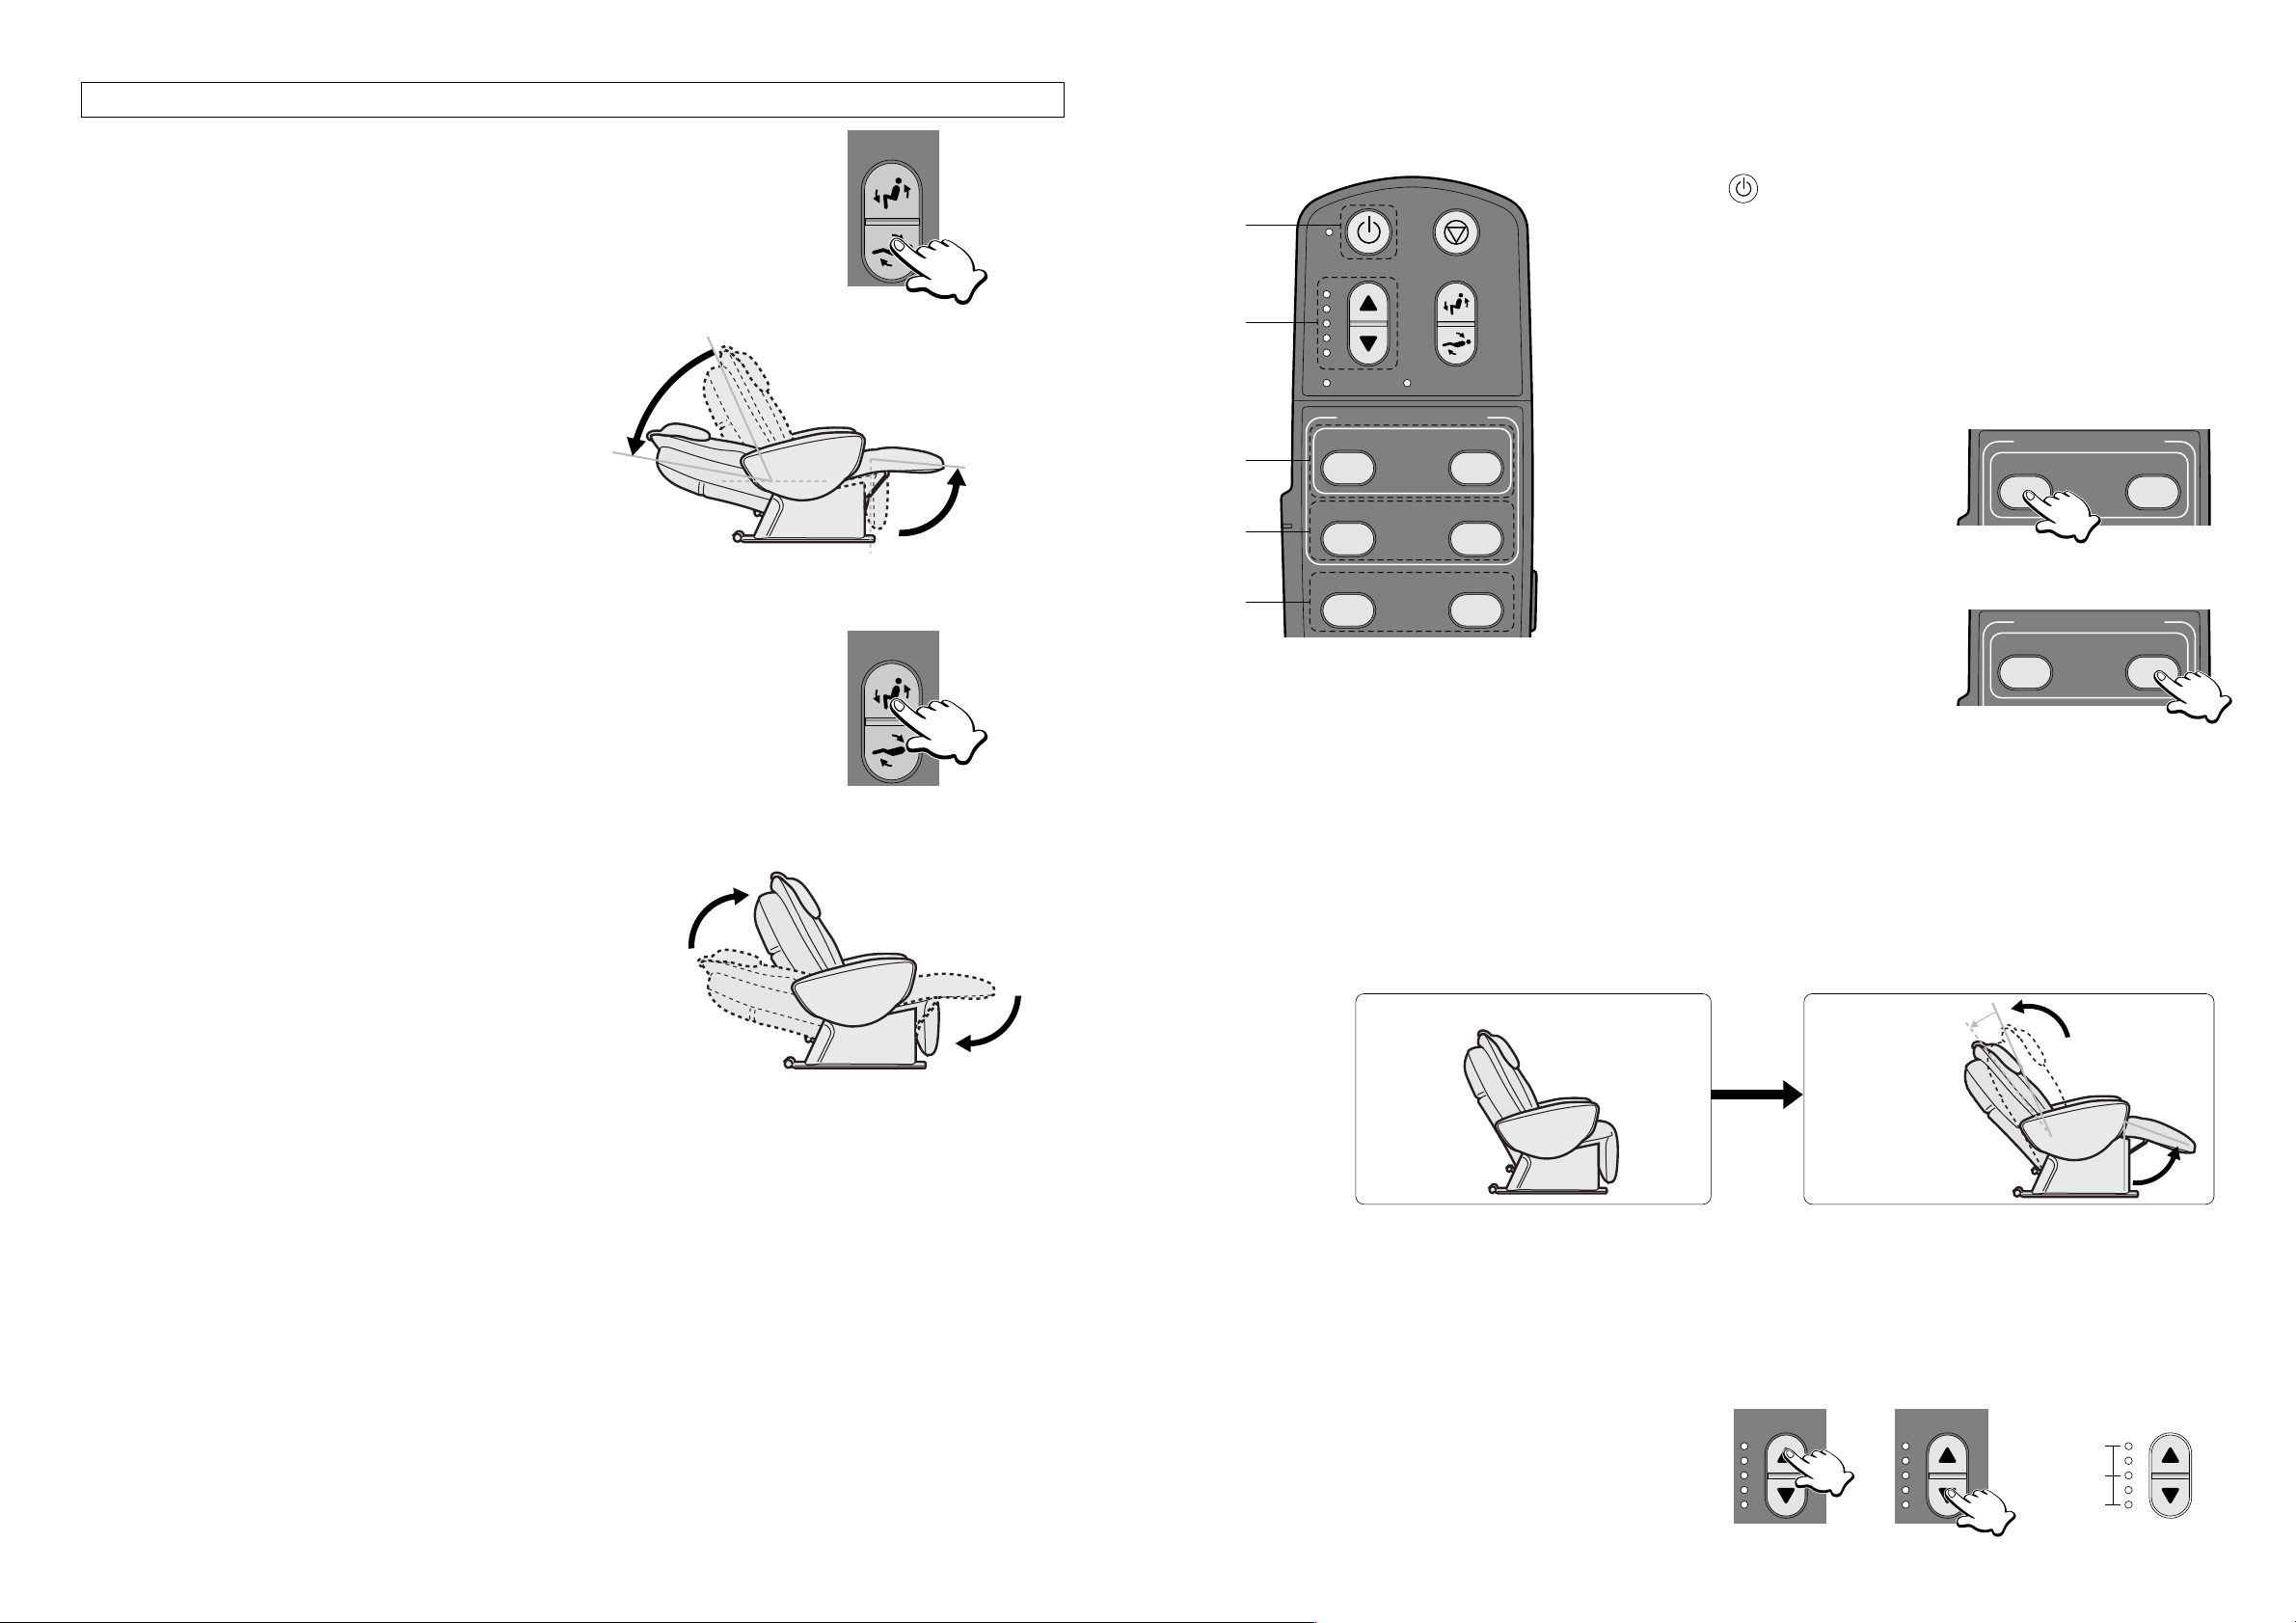
ON/OFF Button
ON/OFF Lamp
Cover Closed Cover Open
• Used to stop the massage
immediately.
Stop Button
• Used to adjust the angle of
the backrest and legrest.
Reclining Button
• Displays operational mode.
Movement Indicator
Manual Operation
Selection Buttons
• Used in Programmed
Operation.
Tapping ON/OFF Button
Cover
Massage Head
Adjustment Buttons
• Used to adjust the shoulder
position.
Shoulder Position
Adjustment Button
Shoulder Position Indicator
Programmed Operation Buttons
• Used for selecting the area to
for concentrated massage.
Concentrated Area Buttons
• Used in Programmed
Operation.
Vibration ON/OFF Button
Intensity Indicator
• Used to adjust the intensity of
the massage (3-stage).
Intensity Adjustment Button
• Used to turn on/off and adjust
the leg vibration massage
unit.
Leg Massage Button
32
PART NAMES AND FUNCTIONS
SEAT
off
lock
lock switch
open
on
Backrest
Center Cushion with
Integrated Pillow
• Push up the center cushion for a
stronger massage if the massage
feels too weak.
Armrest
Back Cushion Zip
Back Cushion
Controller
Controller Pocket
Seat
Legrest
Controller
Power Switch
EP1060
EP1260
Back Cover
Back Cover Handles
Safety Precaution Label
Power Cord
Wheels
35
1. After Carrying Out Safety Checks, Turn the Unit On (See Page 36)
z Plug the power plug into the power socket.
x Turn the lock switch to the “open” position.
c Turn on the power switch on the back of the unit.
• Please always check for the following before using the unit.
- Check that there are no person, pets, or obstacles around the unit.
- Check that there are no rips in the fabric.
2. Press the button.
• When you press the button, the Programmed Operation and Leg Massage
Buttons will flash. If the cover of the controller is open, then the Manual Operation Selection Buttons will flash.
3. Select the Desired Program or the Desired Movement on the Manual Operation
Programmed Operation
• Ideal for people who feel tired all over.
• Ideal for people who want to operate the massage lounger simply.
z Select the required program.
x Press the Neck/Shoulder or Lower Back Buttons if you want to focus on a particular area.
c The chair will recline to the optimum angle for the massage. The massage will then begin
and continue until the end of the selected program is reached, at which time the massage
will automatically stop.
Manual Operation
• Used for selecting a particular massage movement or area to be massaged.
• Ideal for people who want to adjust movement and location during the course of a massage.
• Ideal for people who want just a little more on the shoulders at the end of their massage.
z Open the cover of the controller and select the massage required.
x The seat will automatically recline to the optimum massage position.
c Adjust the position and intensity of the massage rollers.
v Press the
button to complete the massage.
4. Adjust the Angle of the Backrest and Legrest (See Page 38)
•
Adjust the angle of the backrest and legrest to the most comfortable position.
• When retracting the backrest, as the massage heads must be retracted in the interests
of safety, there may be a slight delay before the backrest actually starts to retract.
Please continue to hold down the Reclining Button until the backrest is fully retracted.
5. Turn the Power Off to Finish the Massage
(See Page 45)
z Turn the power switch to the “off” position.
x Turn the lock switch the “lock” position.
c Unplug the power cord.
• Here you will find an overview of how to use the massage lounger. Please refer to the pages shown for further details.
HOW TO USE THE MASSAGE LOUNGER — INTRODUCTION
off
lock
lock switch
open
on
2
3
off
lock
lock switch
open
on
1
2
If excessive pressure is applied to the massage heads during upper body massage, in the interests
of safety the massage heads may stop moving. If this occurs, raise your body slightly before
restarting it. (This may happen more frequently for people who weigh 100kg or more.)
If the massage mechanism stops (or if all markings and buttons on the controller start to flash), turn
off the power switch, wait for approximately 10 seconds, and then turn the power switch on again.
34
Mat
Flat Surface
CAUTION
• Do not use the unit in areas with high humidity, such
as the bathroom, etc. as this can lead to electric
shock or other accidents.
• Place the unit on a totally flat surface. Failure to do
so may result in the seat tipping over.
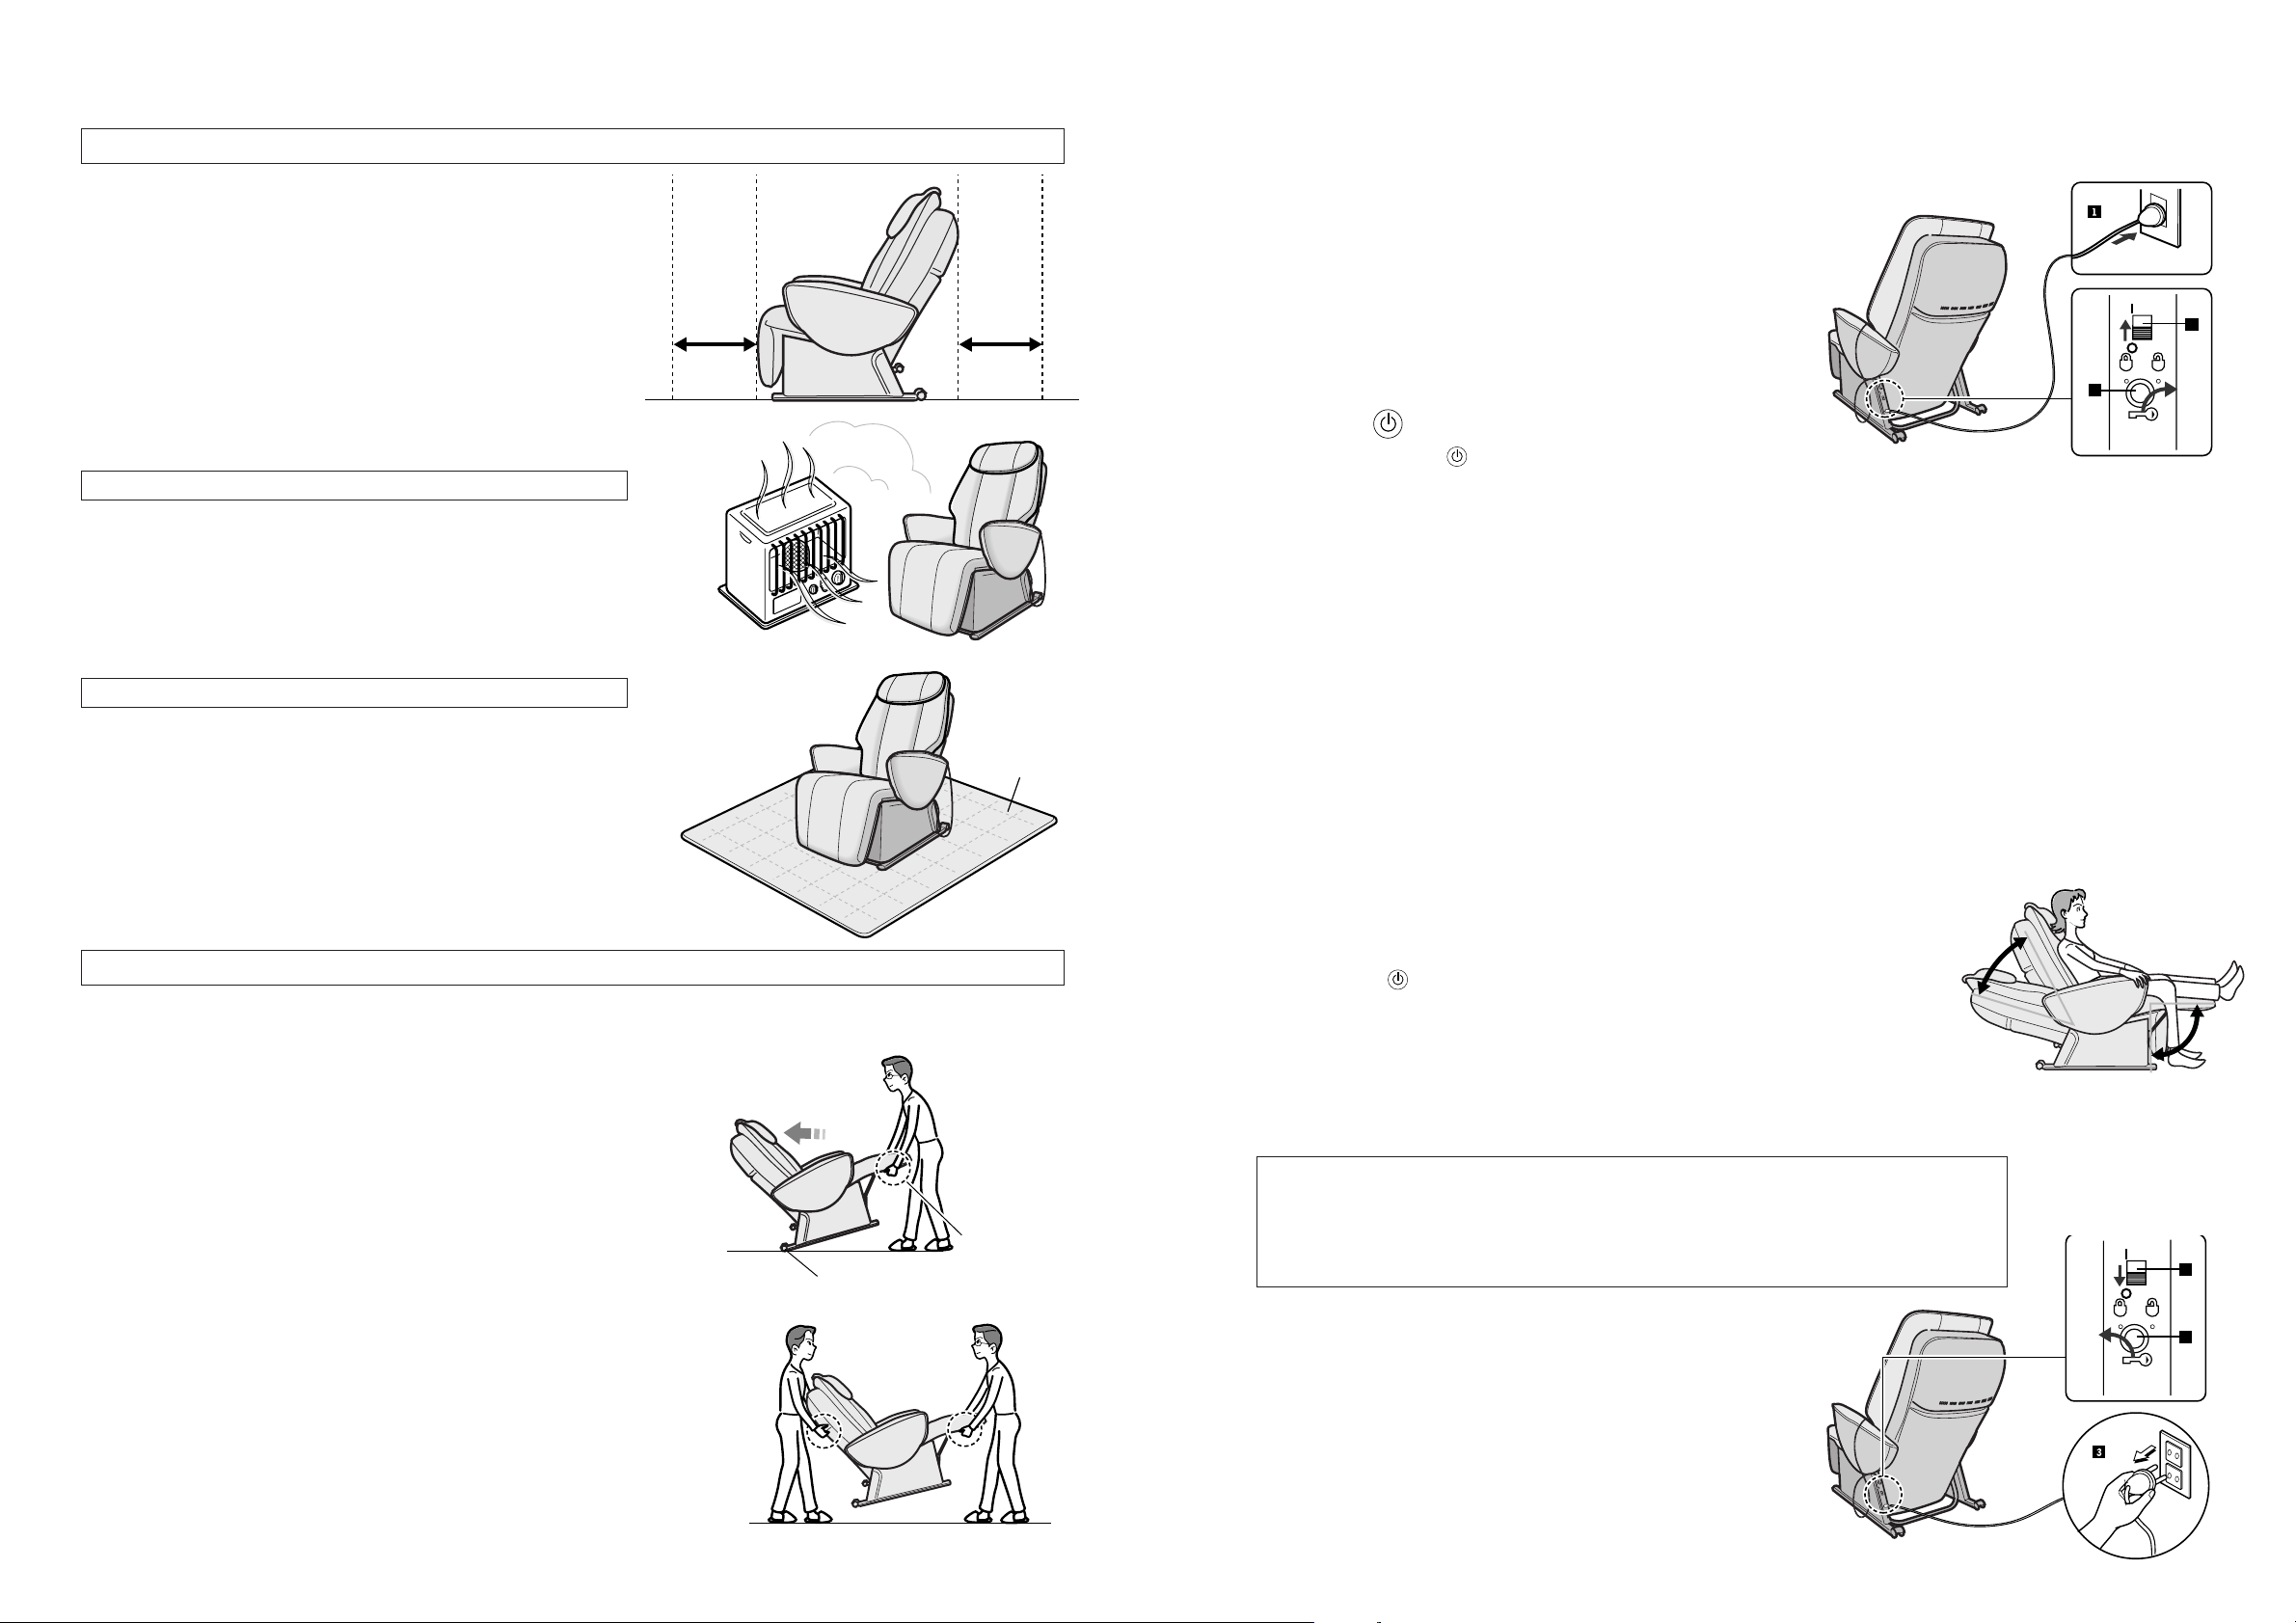
WHERE TO USE THE UNIT
CAUTION
• Do not move the unit when someone is sitting in it as it may tip over.
MOVING THE SEAT
SETTING UP THE MASSAGE LOUNGER
30cm40cm 40cm
Wheels
Move it slowly
Hold the pipes
on both sides of
the legrest
Ensure there is Adequate Space for Reclining
• Ensure that there is approximately 40cm behind and at least
40cm in front of the unit.
Places to Avoid
• Do not use the unit in direct sunlight or in places where it will
be exposed to high temperatures, such as in front of a heater,
etc., as this can cause discoloration or hardening of the
synthetic leather.
Avoid Damaging Your Floor
• As there is the possibility that the unit may damage your floor,
we suggest that you place it on a mat, etc., which will also help
to reduce overall operating noise.
Moving the unit Using the Wheels
• Tilt the seat back by holding the pipes on both sides of the legrest and
allow the unit to roll on the wheels located at the back.
• Returning the massage heads to the retracted position and the seat
back to the upright position makes it easier to move the unit.
* As the unit may mark the floor when moved, please place a mat, etc.,
on the floor and move it slowly.
* Do not move the unit when someone is sitting in it.
Carrying the unit
• When carrying the unit, have one person hold the pipes on both sides
of the legrest and the other person lift the chair using the back cover
handles located on the back of the unit.
* As the unit may mark the floor if dropped, please ensure that you hold
the legrest and handles securely.
37
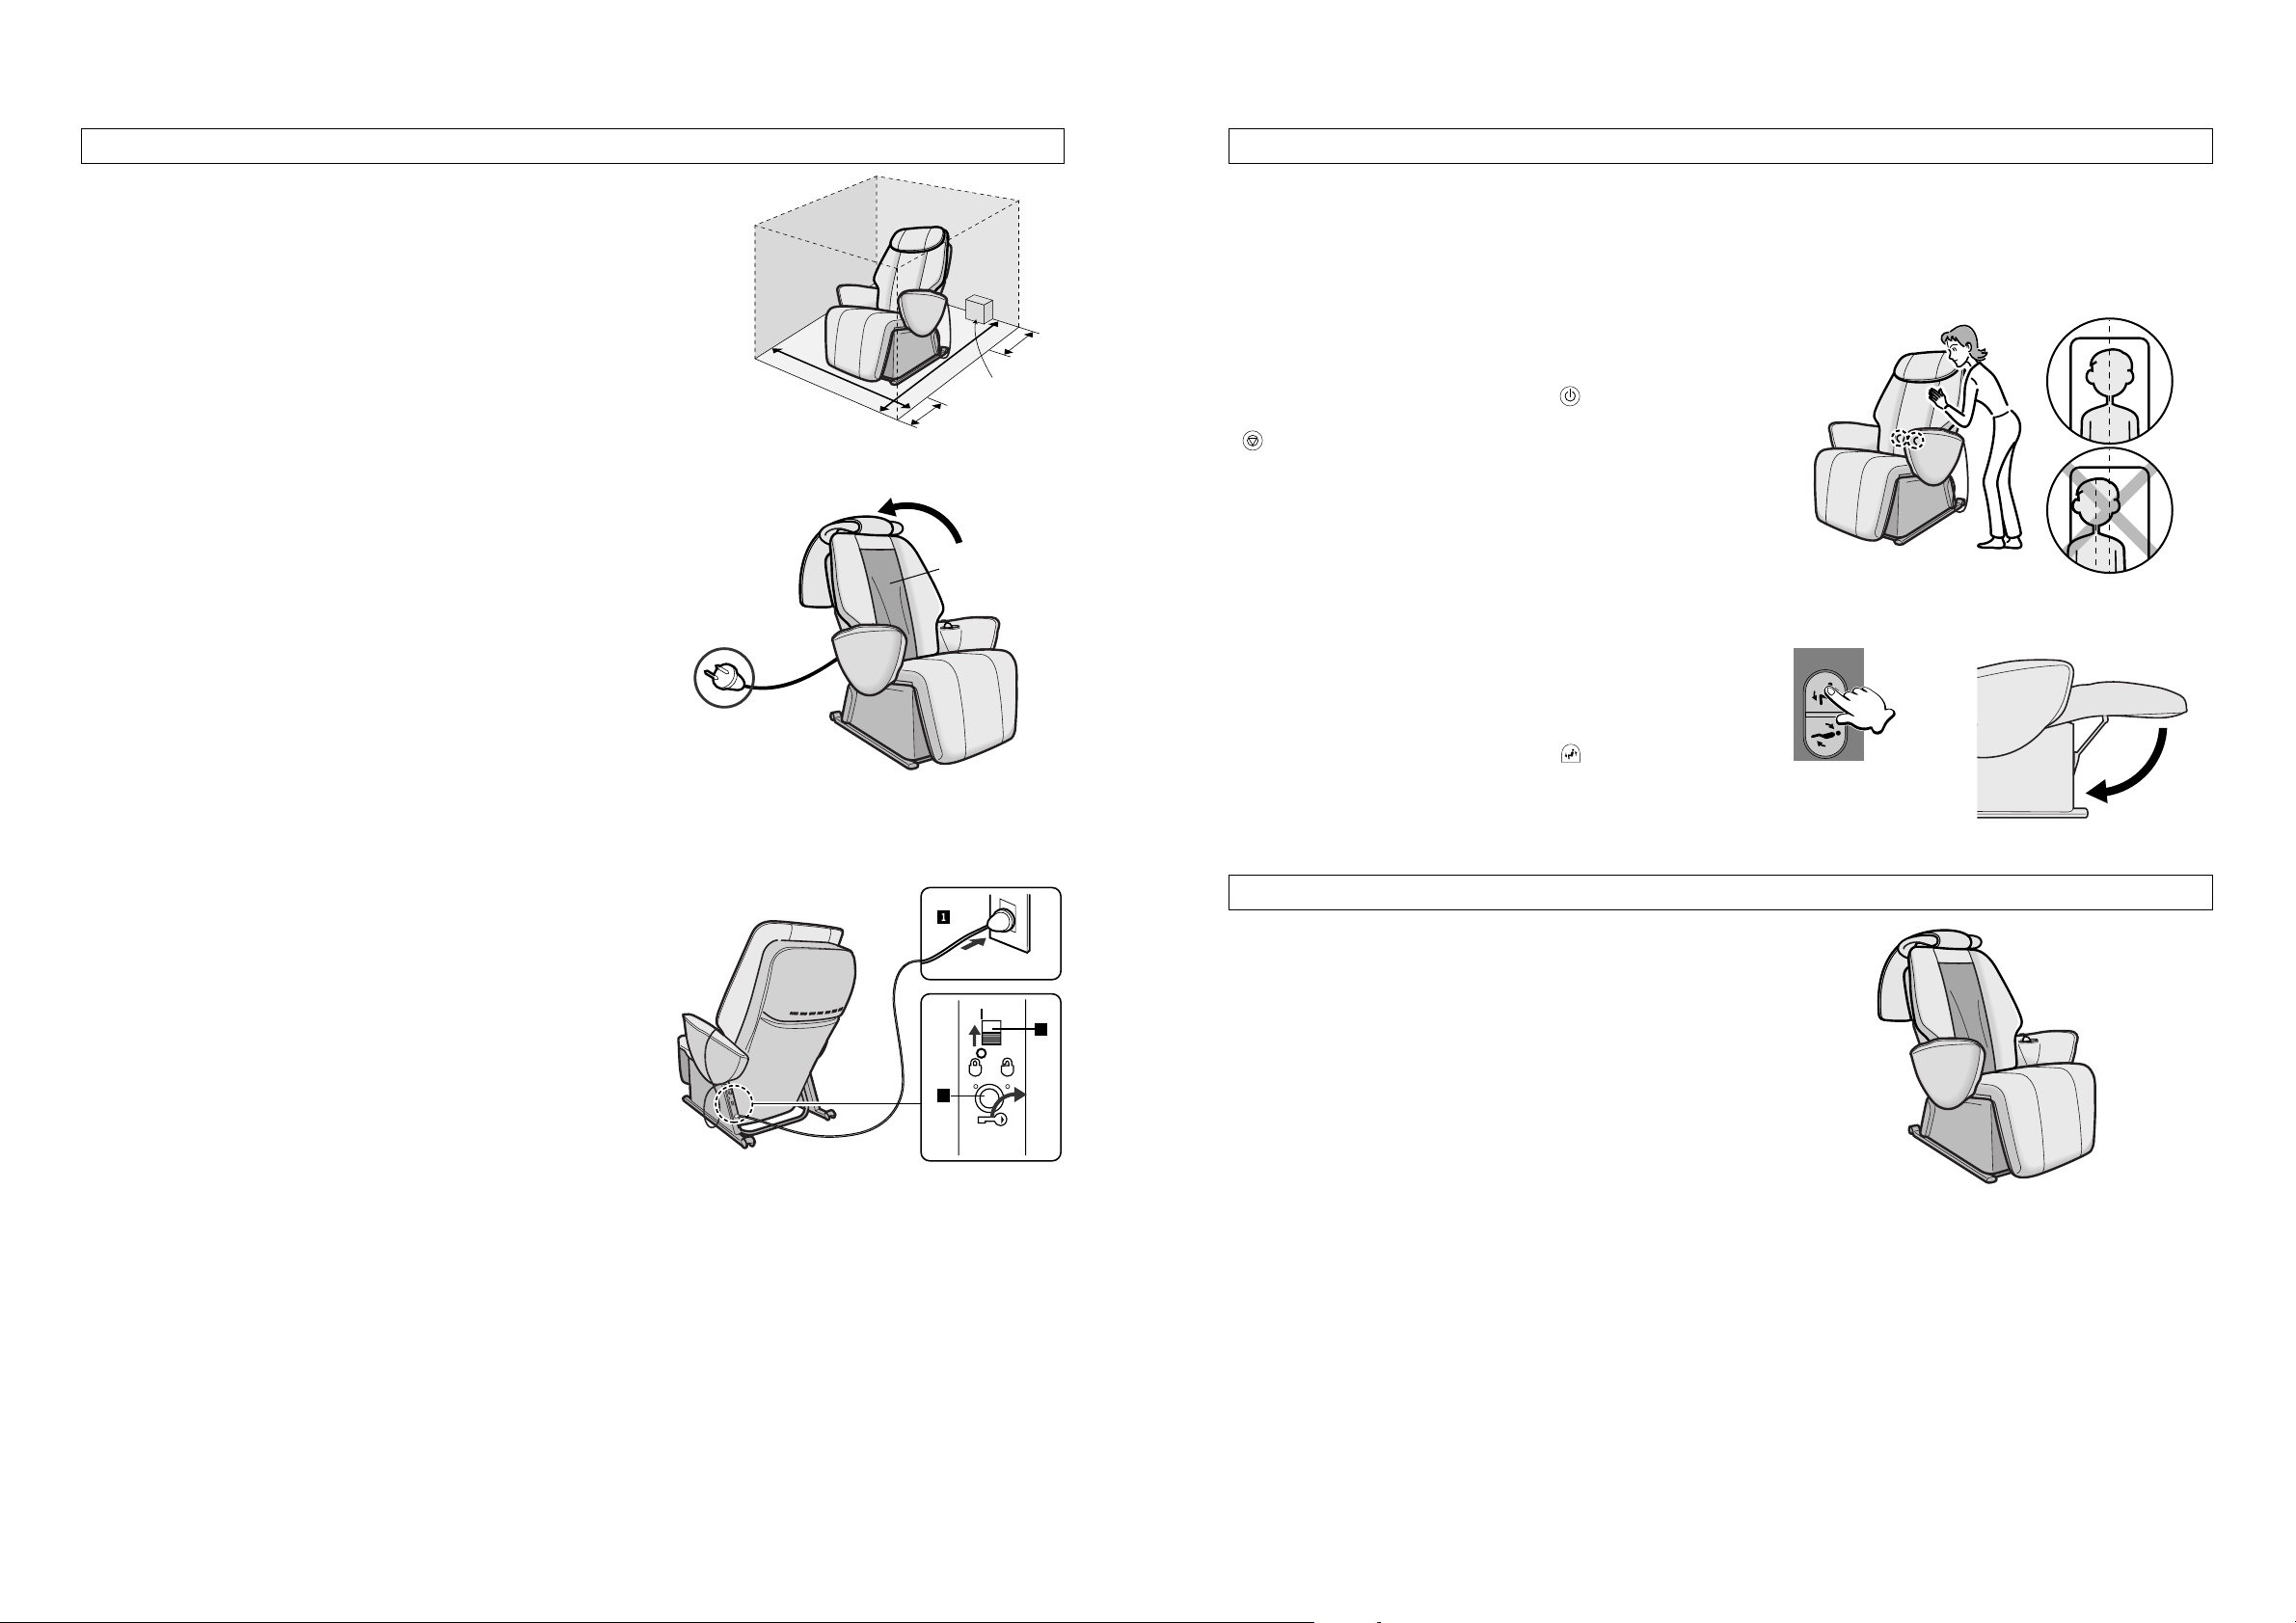
CAUTION
• Slowly sit down after checking the position of the massage heads.
If you do not check the position of the massage heads, you may be injured or the unit may be damaged.
BEFORE SITTING DOWN
• When the massage does not feel strong enough, lift up the
pillow and carry out the massage again.
ADJUSTING THE PILLOW
ADJUSTING THE SEAT
• The massage heads are normally in the retracted position
(to the left and right at the lower part of the backrest).
• Do not sit down if the massage heads are not in the
retracted position. Instead, push the button twice to
retract the massage heads to the proper position. (If the
button is pushed during the massage, then the
massage heads will not be retracted.)
• Please do not sit on the controller as the reclining button
may be pressed causing the seat to automatically recline.
Sit Down Only When the Legrest is Lowered
• If you sit on the unit when the legrest is raised, the verb
“may” itself means that the possibility exists, there is no
need to repeat this. It may fall over and you may be injured.
• When the legrest is raised, press the button to lower the
legrest before sitting down.
reclining
Press
36
1. Check the Surrounding Area
z Check that there is nothing behind the unit.
x Check that there is enough room to recline the unit.
• In the interests of safety, the unit may stop moving if it hits
something while reclining.
2. Check the Unit
z Lift up the pillow and the center cushion to check
that there are no rips in the fabric of the back
cushion, etc.
x Check that the power plug has not been damaged
or has pins or dust sticking to it.
AFTER CHECKING THE SURROUNDING AREA, TURN ON THE POWER
BEFORE USING THE UNIT
Do not leave
anything here.
40cm
40cm
Check
Main Cushion Fabric
3. Turn the Power On
z Plug the power plug into the power socket.
x Turn the lock switch to the “open” position.
c Turn on the power switch on the back of the unit.
When plugging the unit in, make sure that there are at least
10cm of slack in the power cord.
(Take care to ensure that the power cord is not caught by the
unit when it reclines.)
off
lock
lock switch
open
on
2
3
39
The Selected Program will Start
• It is possible to change the program selected and the desired movement mid-way through a massage.
• In Programmed Operation, the leg massage begins at the same time.
It is possible to stop or change the intensity of the leg massage during the program. (Please see Page 43.)
• When retracting the backrest, as the massage heads must be retracted in the interests of safety, there may be
a slight delay before the backrest actually starts to retract. Please continue to hold down the Reclining Button
until the backrest is fully retracted.
The Seat Automatically Reclines to the Massage Position
• If the seat is already reclined further than the massage position, It will not be automatically reclined.
PROGRAMMED OPERATION
• Please check that there are no children or pets in the vicinity of the unit before use.
programmed operation
whole back
gentlestorong
neck roller position
reclining
programmed
operation
/
manual
operation
lower backneck, shoulder
tap on/offvibration on/off
1
2
3
4
5
1. Press the button
• The ON/OFF lamp will come on.
•
You can now select either strong or gentle or one of the manual settings
that can be accessed by opening the cover of the controller.
2. Select the Program You Want
• See Page 46 for details regarding the content of each of these
programs.
Vigorously Massage the Whole Back
• Strong uses mainly a kneading
massage and Shiatsu massage to
relax stiff muscles.
• This type of massage is ideal for
people with stiff muscles
throughout their entire back.
Gently Massage the Whole Back
• Gentle uses a softer massage to help
a tired body to recover.
• This type of massage is ideal for
people who are feeling tired or
weary.
Normal Position
Massage Position
Approx. 60°
Raised
Approx. 14° Reclined
Reclining
In this comfortable
position it is possible to
massage from the neck
to the soles of the feet.
programmed operation
whole back
gentlestrong
programmed operation
whole back
gentlestrong
Press
Press
3. Adjusting the Shoulder Position
• When programmed operation begins, the seat automatically reclines to the massage position where the
massage heads carry out a Shiatsu massage in the area around the shoulders. During the time that the
Shoulder Position Indicator is flashing (approx. 20 seconds), use the Shoulder Position Adjustment Button to
adjust the position of the massage heads.
Approximate positions for adjusting the position of the rollers are shown below.
• It is possible to change the position of the rollers
during the massage.
• As the position of the shoulders will change when
the reclining angle is changed during a massage,
please readjust the shoulder position every time
you change the reclining angle.
• 5-stage (up-down approx. 10cm) adjustment.
neck roller positionneck roller positionneck roller position
185 cm
160 cm
140 cm
Up Down Approximate Height
Press
Press
38
1. Reclining The Seat
• Hold down the Reclining Button to recline the seat and raise the legrest.
• When both the backrest and legrest have been extended as far as possible
you will hear a “peep, peep, peep” sound.
• When first using the unit, please do not fully recline the seat.
2. Retracting The Seat
• Check that there is nothing behind the seat or under the legrest.
• Hold down the Reclining Button to retract the backrest and lower the legrest.
• When both the backrest and legrest have been retracted as far as possible
you will hear a “peep, peep, peep” sound.
• When retracting the backrest, as the massage heads must be retracted in
the interests of safety, there may be a slight delay before the backrest
actually starts to retract. Please continue to hold down the Reclining Button
until the backrest is fully retracted.
RECLINING THE SEAT
Press
Press
reclining
Angle
Reclined
Approx. 170°
Approx. 120°
Approx. 0°
reclining
Approx. 85°
Angle
Raised
Angle
Raised
Angle
Reclined
 Loading...