

Page 1
EP1061/EP1060
EP1061/EP1060
EP1060EP1061
Before operating this unit, please read these instructions completely, and save for future reference.
Antes de utilizar esta unidad, lea completamente estas instrucciones y gurdelas por si necesita consultarlas en el futuro.
Sillón de masaje
Instrucciones de uso
Modelo No.
Page 2

English See page 3-28
Español Ver págs 29-54
INDEX / íNDICE
Page 3

Thank you for purchasing the Panasonic Swede-AtsuTMMassage Lounger EP1061/EP1060. Please read this
manual carefully to ensure optimum performance and safety.
IMPORTANT SAFETY INSTRUCTIONS
Basic precautions should always be followed when using an electrical unit, including the following.
Please ensure that you read all instructions before using the Household Massage Lounger.
DANGER – To reduce the risk of electric shock:
1. Always unplug the unit immediately after use.
2. Always unplug the unit before cleaning.
W ARNING – To reduce the risk of burns, fire, electric shock, or injury to persons:
1. Always insert the power plug all the way into the socket to reduce the risk of short-circuit and fire.
2. The unit should never be left unattended when plugged in. Always unplug the unit when not in use.
3. Close and continuous supervision are necessary when the unit is used by people who are limited in their ability
to move or communicate.
4. Only use the unit for the purpose described in these instructions.
5. Do not stand on the unit.
6. Do not use any accessories other than those recommended by the manufacturer.
7. This unit should not be used by children. Keep children away from the unit. Always return the seat to the
upright position and retract the legrest completely to avoid possible injury. Make sure that nothing is in the way
when retracting the legrest.
8. Never operate the unit if it has a damaged power cord or plug. Return the unit to the nearest authorized service
center if it is not working properly, if it has been dropped or damaged, or if it has been immersed in water.
9. Always raise the center cushion to check that the fabric of the unit itself has not been ripped before using the
unit. Please also check other areas to ensure that the fabric has not been ripped. No matter how small the rip,
if you find one then immediately stop using the unit, unplug the power cord and have the unit repaired at an
authorized service center.
10. Keep power cords away from heated surfaces. Do not allow pins, rubbish or moisture to come into contact with
the plug. Do not use the unit on top of heating appliances, such as electric carpets, etc.
11. Never block the air openings during operation and make sure that all air openings are kept free of lint and hair, etc.
12. Do not drop or insert anything into any of the openings of the unit.
13. Do not use the unit in bathrooms or other damp or humid places as this may cause electric shock or cause the
unit to malfunction. Do not spill water, etc. onto the controller.
14. Do not use the unit outdoors.
15. Do not use the unit in places where aerosol spray products are in use or where oxygen is handled.
16. When unplugging the unit, turn off all controls before removing the plug from power socket. Do not use the unit
with a transformer as this may lead to malfunction or electric shock.
17. Connect this unit to a properly grounded outlet only. See Grounding Instructions.
18. To avoid electric shock or injury, do not attempt to open or disassemble any part of the unit as it contains no
user-serviceable parts.
SAVE THESE INSTRUCTIONS
3
Page 4

SAFETY PRECAUTIONS
W ARNING: To avoid the risk of injury, follow these precautions:
1. Pregnant women, people who are ill, in poor physical shape or undergoing medical treatment, and people
suffering from back, neck, shoulder or hip pain should consult their doctor before using the unit. If you have a
pacemaker, defibrillator, or other personal medical device, consult with the manufacturer of your device before
using the unit. Your physician may be able to assist you in obtaining this information.
2. Sit down slowly after checking the position of the massage heads. Never put any part of your body between
the massage heads as the squeezing action of the massage heads may cause injury. Never put your fingers or
feet in the gap between the backrest and seat, the backrest and the armrest, the seat and cover under the
armrest, or the gap between the legrest and the footrest. Do not place your fingers or any part of your body in
the mechanical section of the legrest located under the seat.
3. Do not use the unit against bare skin. While thin clothing may increase effectiveness, exposing the skin directly
to the massager may irritate the skin.
Do not use the unit while wearing anything hard on your head like a hair accessory, etc.
4. Do not use the unit for massaging the head, abdomen, elbows or knees.
5. Always check that the shoulder position is correct. If it is not correct, use the Neck Roller Position Adjustment
Button to adjust it properly (In programmed operation).
6. Do not stretch the back muscles for more than approximately 15 minutes at a time. To avoid overstretching the
muscles which may result in discomfort, do not use the unit for more than 5 minutes when first using it. You
can gradually increase the duration and intensity of the massage as you become used to it.
Do not massage any one point for more than 5 minutes at a time.
To prevent excessive massaging, do not use the massager for more than a total of 15 minutes each session.
After approximately 15 minutes, the massage heads will be retracted and stop moving.
7. While using the unit, if you start feeling sick or if the massage seems painful, stop using it immediately.
While using the massager, if the pressure seems too strong, the movement of the massage heads can be
stopped at any time by pressing the Stop Button.
8. Do not go to sleep while using the unit. Do not use the unit after drinking alcohol.
9. When the seat back is in a reclined position, do not sit on it or sit with your legs resting on the headrest.
Do not sit on the legrest as the unit may fall over.
10. Do not allow children or pets to play on or around the unit, especially during operation.
11. Do not unplug the unit or turn it off during operation. Unplug the unit immediately if there is a power
interruption.
12. For those who are trying the massage for the first time, it is recommended to start on the gentle massage
program. The shiatsu massage is stronger and should be enjoyed after one has gotten accustomed to the
chair.
4 5
Page 5

OPERATING PRECAUTIONS
W ARNING: To avoid damaging to the chair, follow these precautions:
1. The chair is designed for a maximum user weight of 264lbs (120kg). Exceeding the maximum weight may
cause permanent damage to the massage mechanism and/or other components of the chair. Any such
damage is deemed to be user abuse and is not covered under the Limited Warranty.
2. Do not sit on or drop the controller. Do not pull the controller cord or the power cord. Be careful not to catch
the cord of the controller between the armrest and the chair back.
3. Do not treat the chair roughly, such as turning the chair on its side, turning the chair over or standing on it.
4. Do not treat the covering roughly.
• Keep sharp or pointed objects away from the covering of the chair. Be careful not to drop lit ashes, lit cigarette
or matches on the chair.
• Exposure to direct sunlight can cause fading or a change in color of the covering.
5. If the massager functions abnormally, immediately turn off the power and have the massager checked by an
authorized service center.
6. Do not attempt to repair the massager yourself.
7. Do not repeatedly operate any switch at short intervals. Such action may cause the switch to malfunction.
8. Some noise may be heard coming from the massager while in use. This is due to the structure of the
massager and is normal.
9. Make sure there are no obstacles behind the chair before reclining it. The chair can be reclined to a maximum
angle of 170°. If the back hits a wall or pillar, the chair may malfunction. Be sure to have ample space behind
the chair. Recline the chair slowly in order to avoid contact with an obstacle.
10. When excessive pressure is applied to the massage heads, they may stop moving for safety. When moving the
heads up from the lowered position, one’s body weight may stop the heads’ movement. In such case, slightly
raise the body and allow the massage heads to move up.
11. After each massage, slide the power switch, which is located on the back of the chair, to the “off” position and
turn its lock switch to the “lock” position.
12. Do not sit on massage chair with wet body or hair.
13. The massage Lounger must not be used in “wet rooms” (sauna, swimming pool) or out of doors.
CARING FOR THE MASSAGER
• Always unplug the chair before cleaning.
• If the covering becomes soiled, dampen with liquid soap and brush the surface. Wipe with a cloth dampened with
water. Allow to dry naturally. If the plastic portions become soiled use lukewarm water, with liquid soap on a soft
cloth, to clean the surface.
• Do not use thinner, benzene or other solvent-type cleaners. Chemicals can discolor or damage the materials.
Page 6
GROUNDING INSTRUCTIONS
• The product must be grounded. If it should malfunction, grounding provides the path of least resistance for
electric current to reduce the risk of electric shock.
• This product is equipped with a cord having an equipment-grounding conductor and a grounding plug. The plug
must be plugged into an appropriate outlet that is properly installed and grounded in accordance with all local
codes and ordinances.
DANGER
• Improper connection of the equipment-grounding conductor can result in a risk of electric shock. Check with a
qualified electrician if you are in doubt as to whether the product is properly grounded. Do not modify the plug
provided with the product even if it does not fit the outlet. Have a proper outlet installed by a qualified electrician.
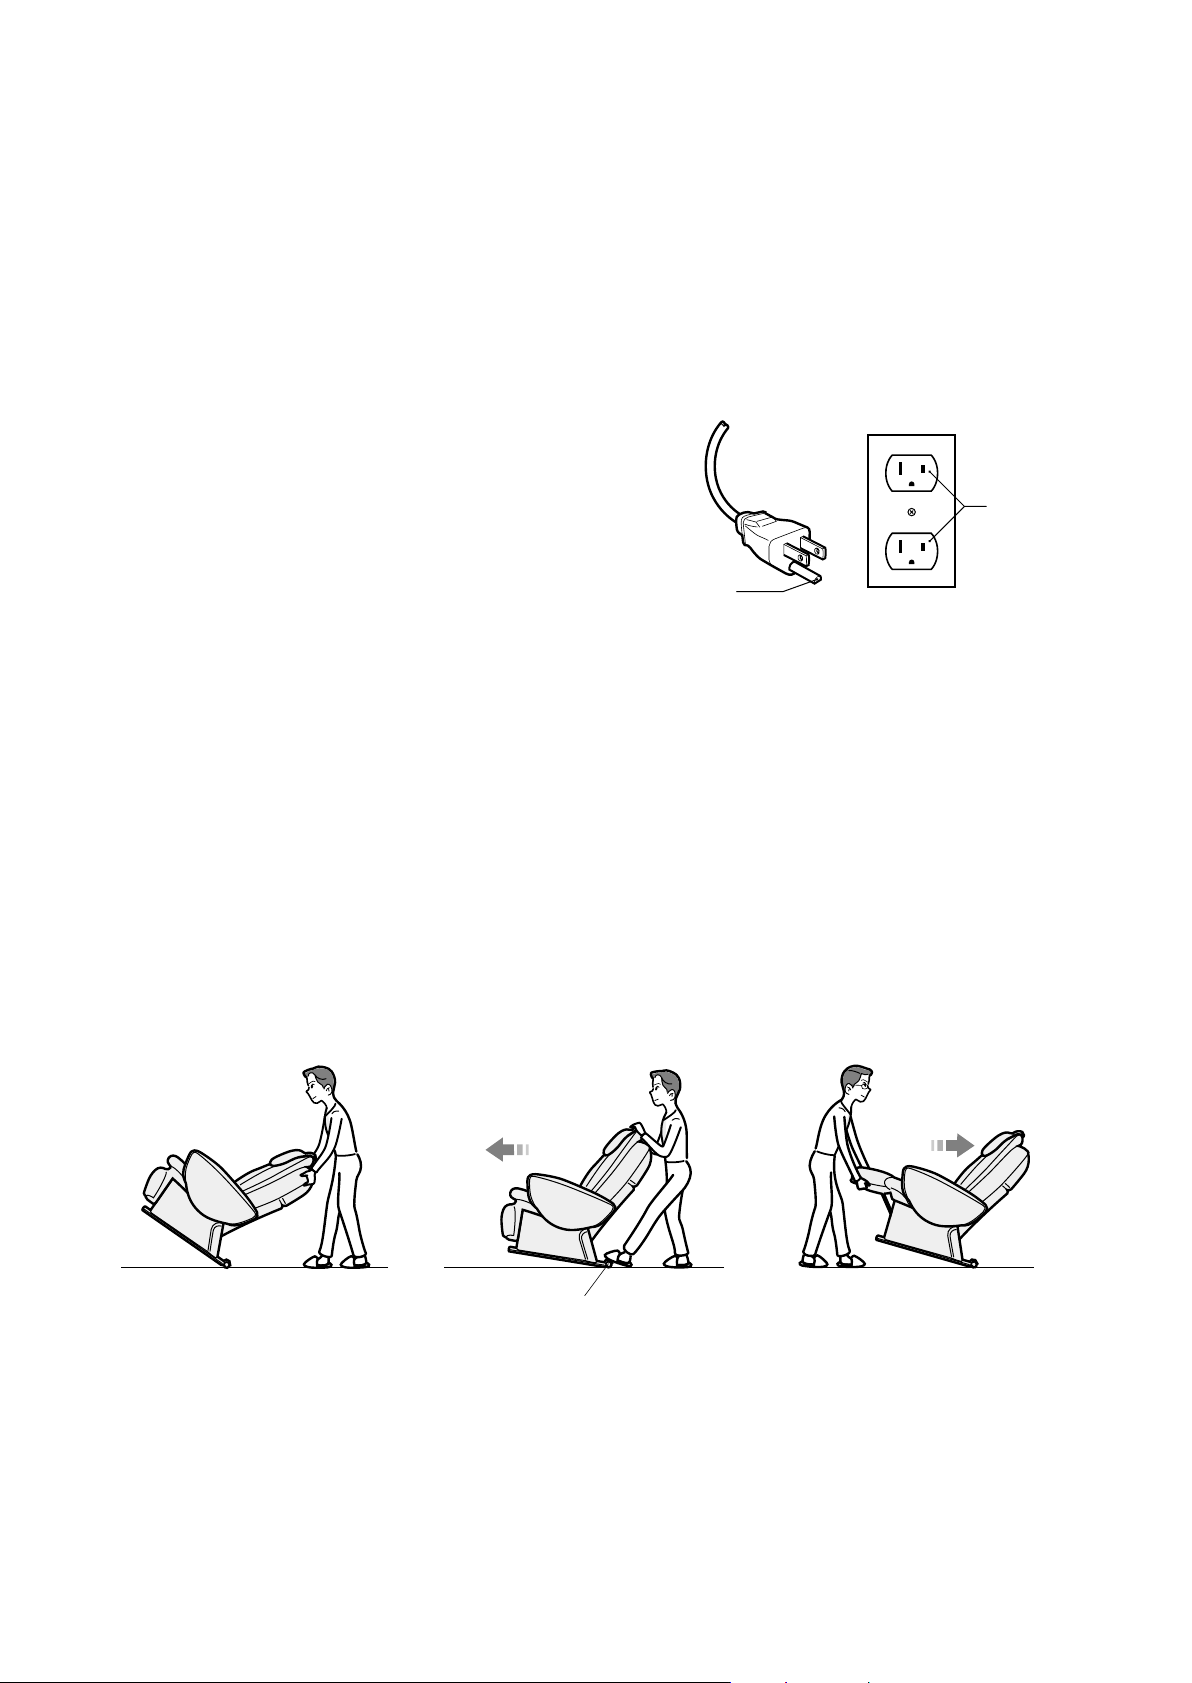
• This product is for use on a nominal 120-volt circuit and has
a grounding plug that looks like the plug shown in Figure A.
Make sure that the product is connected to an outlet having
the same configuration as the plug. No adaptor should be
used with this product.
HOW TO MOVE THE CHAIR
CAUTION
Do not move the chair while someone is sitting in it.
Failure to observe this point may cause the chair to tip over, possibly resulting in personal injury.
Use the casters to move the chair.
• Do not attempt to move the chair by lifting from the front (right illustration). The correct way to move the chair is by
putting your foot on the caster and pushing down from behind the chair (left illustration).
• It is easier to move the chair if the massage heads have been moved to their resting positions and the backrest
reclined.
• Moving the chair may damage easily marked floor surfaces, therefore, place a mat or cloth on the floor and move
the chair slowly.
• Before pushing down the chair, prepare yourself for its weight and exercise caution when moving it.
Figure A
GROUNDING
PIN
GROUNDED
OUTLET
CORRECT WRONG
Caster
Page 7
76
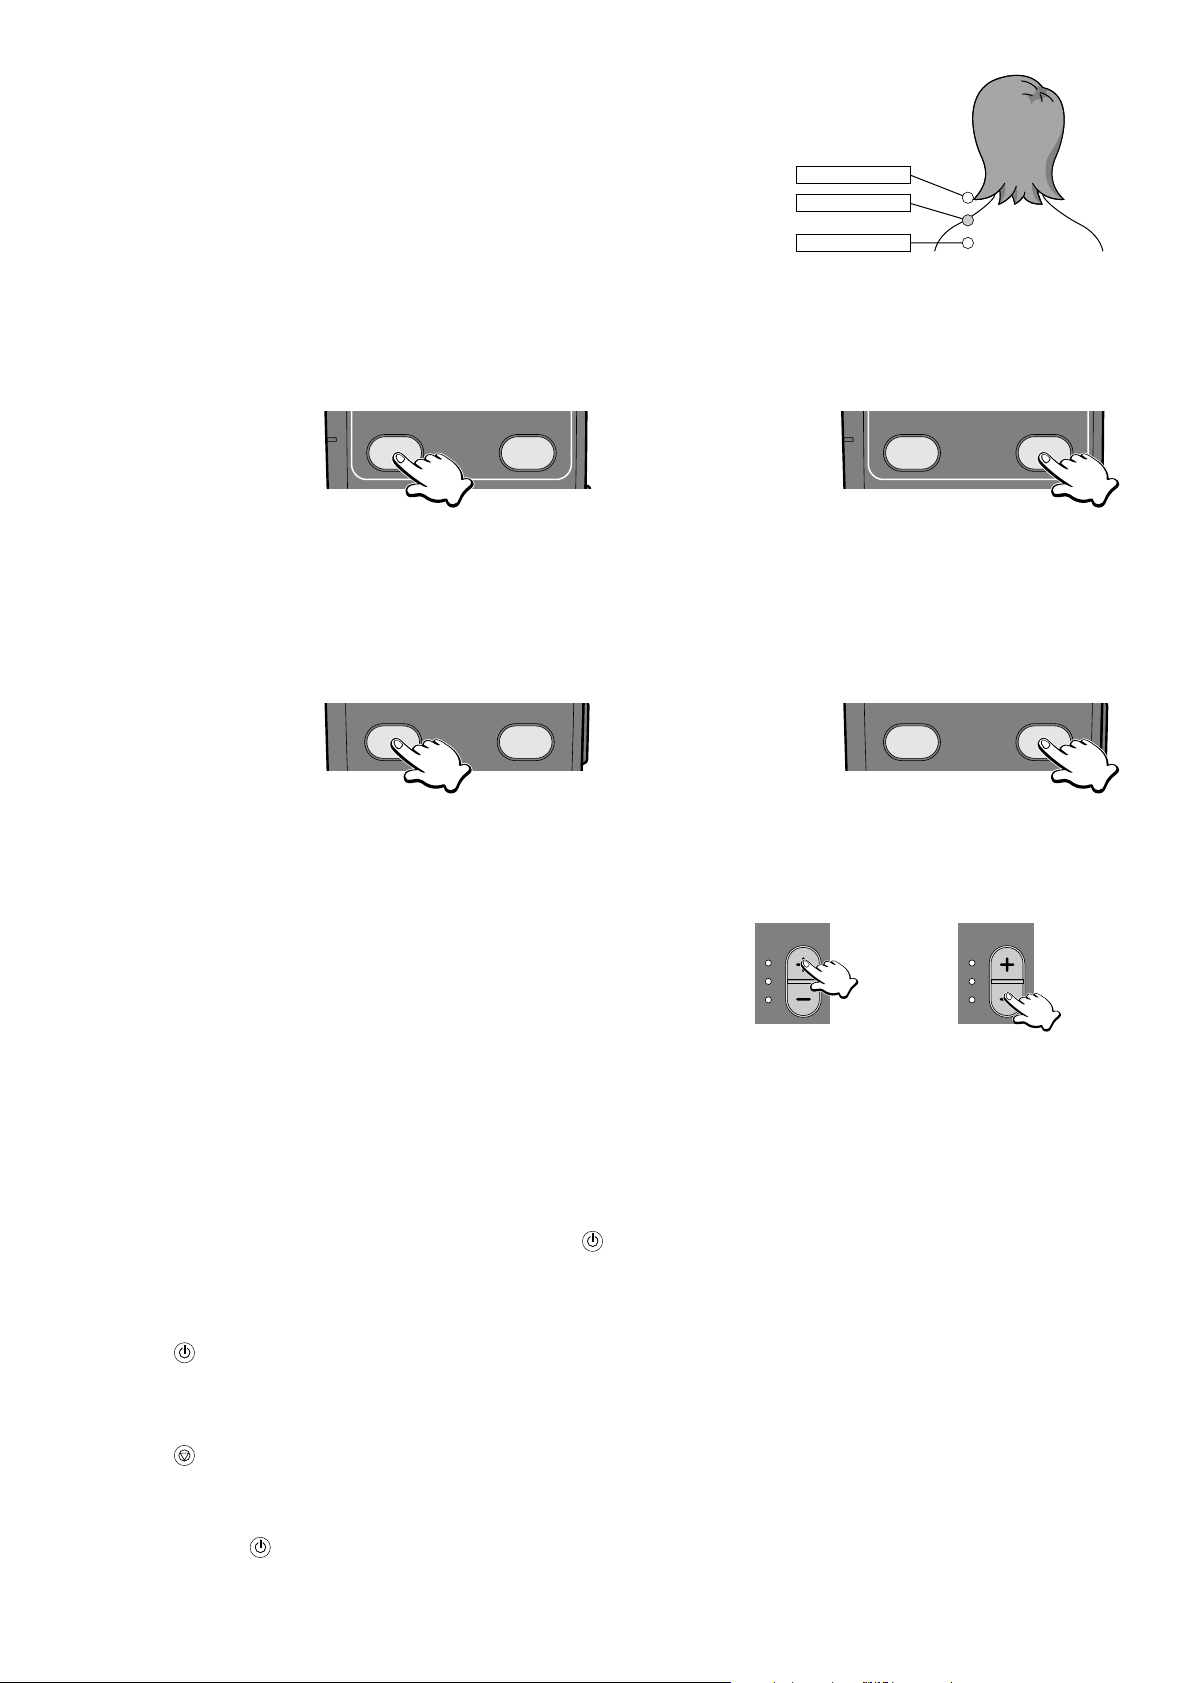
PART NAMES AND FUNCTIONS
SEAT
Backrest
Back Cushion Zip
Back Cushion
Center Cushion with
Integrated Pillow
• Push up the center cushion for a
stronger massage if the massage
feels too weak.
Armrest
2 way roller massage
Soles of feet Calves
Controller
Controller Pocket
Seat
Legrest
EP1061
Power Switch
Lock Switch
EP1060
Controller
Back Cover
Back Cover Handles
on
Safety Precaution Label
off
lock open
lock switch
Wheels
Page 8
16in.
40cm
16in.
40cm
8
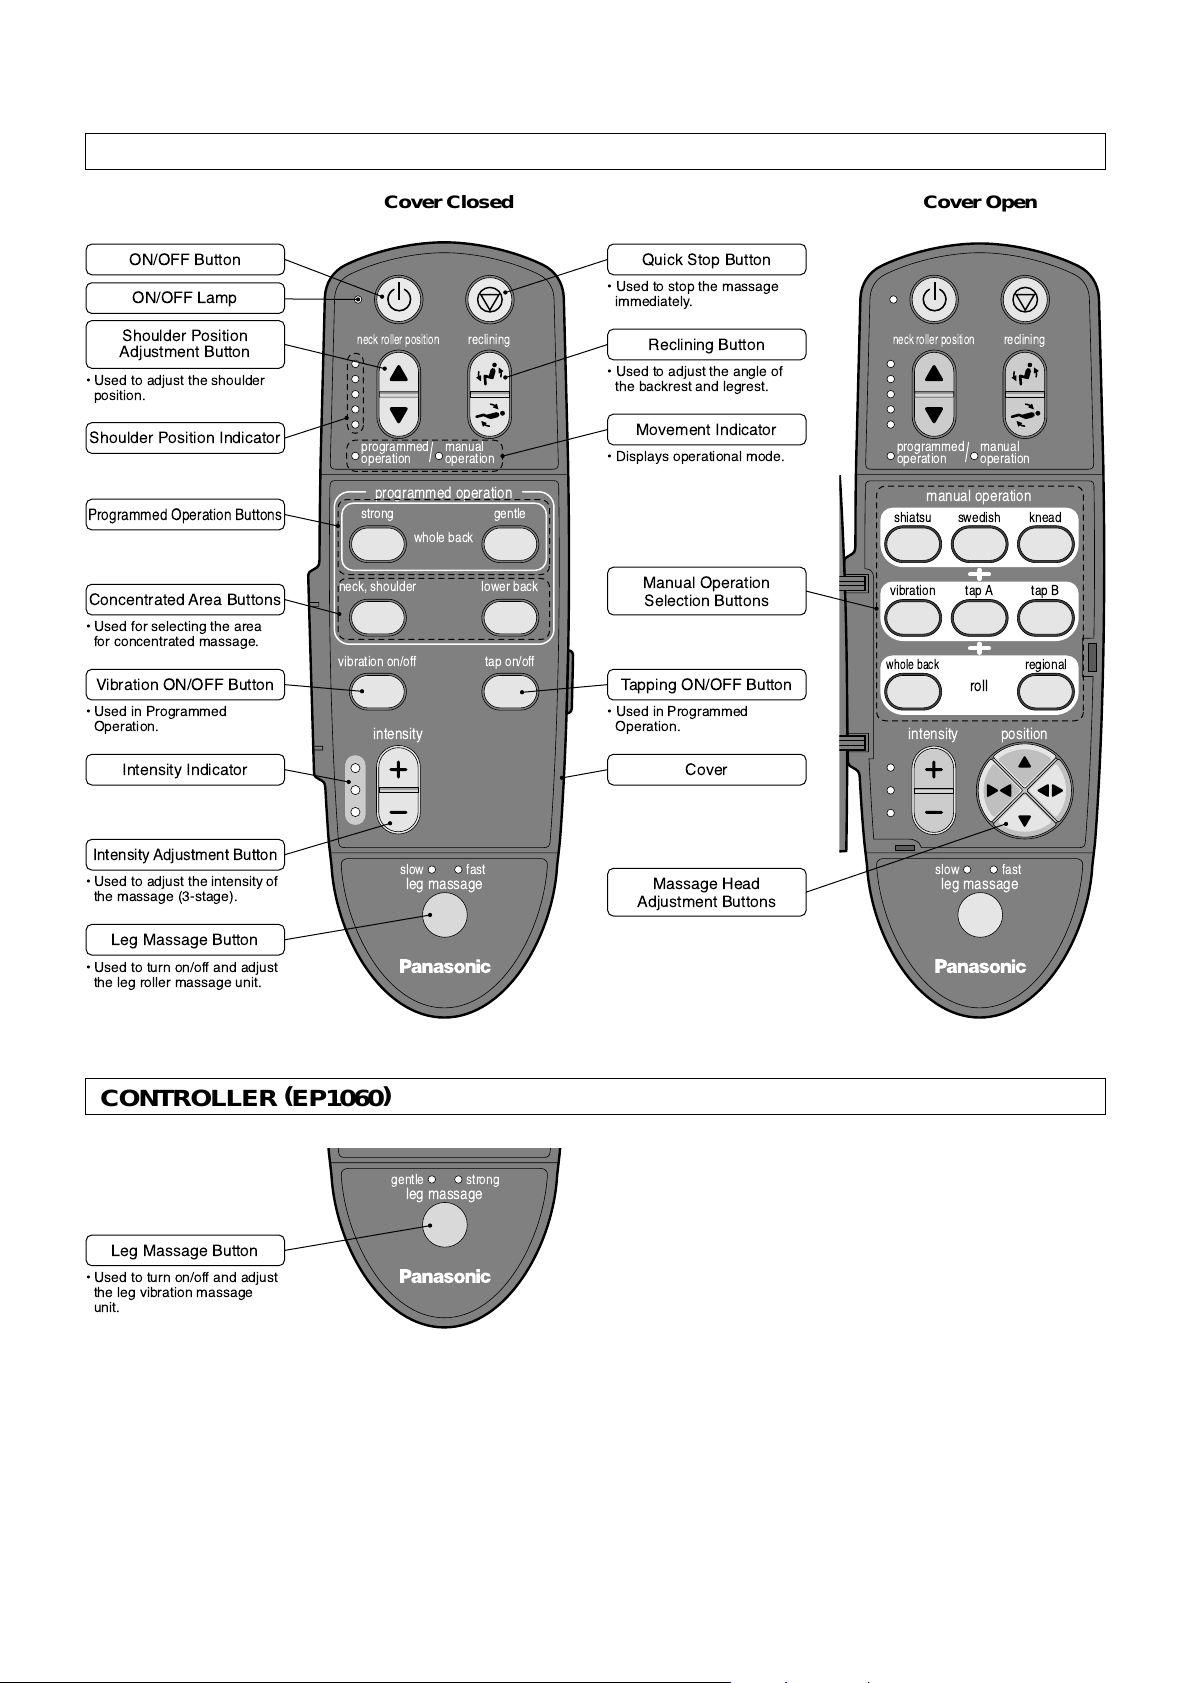
CONTROLLER (EP1061
)
PART NAMES AND FUNCTIONS
programmed operation
whole back
gentlestrong
neck roller position
reclining
programmed
operation
/
manual
operation
lower backneck, shoulder
tap on/offvibration on/off
slow fast
intensity
leg massage
neck roller position
reclining
programmed
operation
/
manual
operation
intensity
roll
manual operation
whole back
regional
tap Avibration tap B
swedishshiatsu knead
position
slow fast
leg massage
ON/OFF Button
ON/OFF Lamp
Cover Closed Cover Open
¥ Used to stop the massage
immediately.
Quick Stop Button
¥ Used to adjust the angle of
the backrest and legrest.
Reclining Button
¥ Displays operational mode.
Movement Indicator
Manual Operation
Selection Buttons
¥ Used in Programmed
Operation.
Tapping ON/OFF Button
Cover
Massage Head
Adjustment Buttons
¥ Used to adjust the shoulder
position.
Shoulder Position
Adjustment Button
Shoulder Position Indicator
Programmed Operation Buttons
¥ Used for selecting the area
for concentrated massage.
Concentrated Area Buttons
¥ Used in Programmed
Operation.
Vibration ON/OFF Button
Intensity Indicator
¥ Used to adjust the intensity of
the massage (3-stage).
Intensity Adjustment Button
¥ Used to turn on/off and adjust
the leg roller massage unit.
Leg Massage Button
¥ Used to turn on/off and adjust
the leg vibration massage
unit.
Leg Massage Button
CONTROLLER (EP1060
)
gentle strong
leg massage
Page 9

9
CAUTION
• Do not use the unit in areas with high humidity, such
as the bathroom, etc. as this can lead to electric
shock or other accidents.
• Place the unit on a totally flat surface. Failure to do
so may result in the seat tipping over.
WHERE TO USE THE UNIT
SETTING UP THE MASSAGE LOUNGER
16in.
40cm
16in.
40cm
Ensure there is Adequate Space for Reclining
• Ensure that there is approximately 16in. (40cm) behind and at
least 16in. (40cm) in front of the unit.
Places to Avoid
• Do not use the unit in direct sunlight or in places where it will
be exposed to high temperatures, such as in front of a heater,
etc. as this can cause discoloration or hardening of the
synthetic leather.
Page 10
Do not leave
anything here.
16in.
(40cm)
16in.
(40cm)
Main Cushion Fabric
Check
2
3
1
on
off
lock open
lock switch
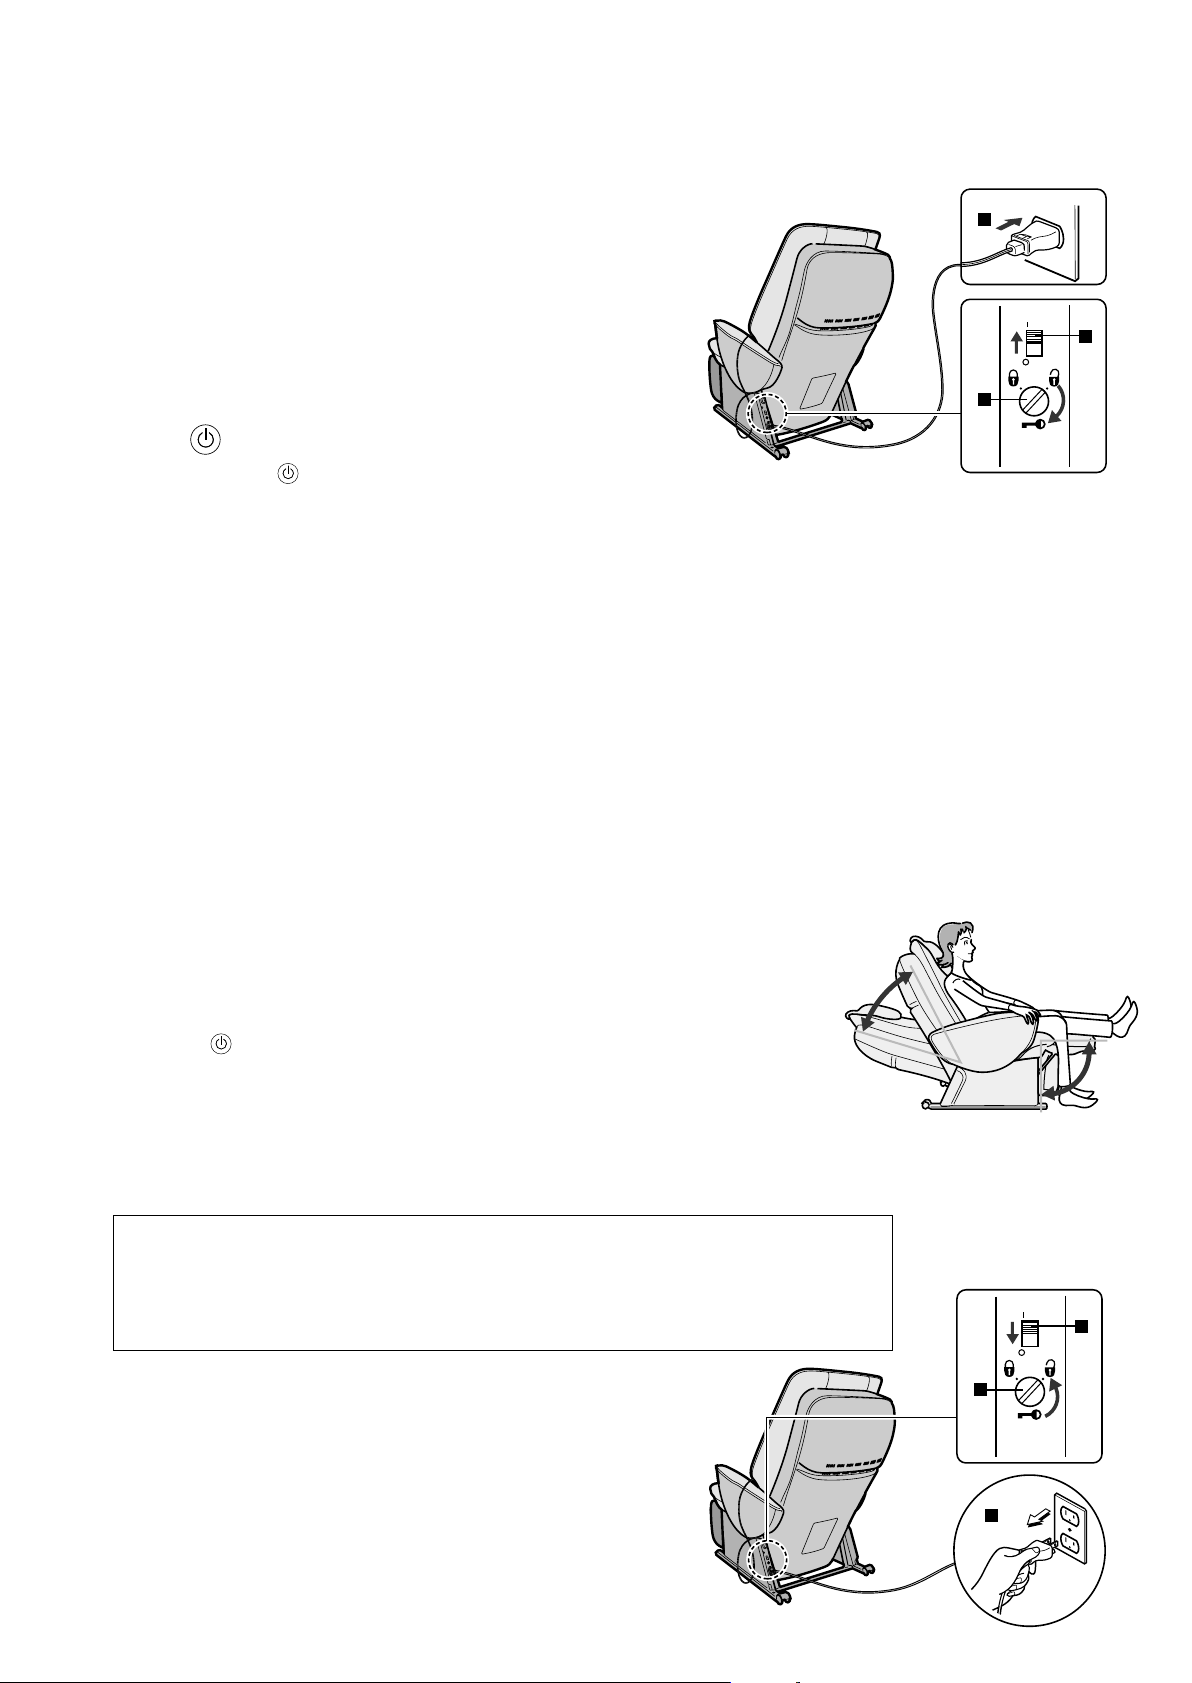
1. After Carrying Out Safety Checks, Turn the Unit On (See Page 1 1)
z Plug the power plug into the power socket.
x Turn the lock switch to the “open” position.
c Turn on the power switch on the back of the unit.
• Please always check for the following before using the unit.
- Check that there is no person, pets, or obstacles around the unit.
- Check that there are no rips in the fabric.
2. Press button.
• When you press button, the Programmed Operation and Leg Massage
Buttons will flash. If the cover of the controller is open, then the Manual Operation Selection Buttons will flash.
3. Select the Desired Program or the Desired Movement on the Manual Operation
(See details on page 14)
Programmed Operation
• Ideal for people who feel tired all over.
• Ideal for people who want to operate the massage lounger simply.
z Select the required program.
x Press the Neck/Shoulder or Lower Back Buttons if you want to focus on a particular area.
c The chair will recline to the optimum angle for the massage. The massage will then begin
and continue until the end of the selected program is reached, at which time the massage
will automatically stop. An average program massage is 15-17 minutes.
Manual Operation
• Used for selecting a particular massage movement or area to be massaged.
• Ideal for people who want to adjust movement and location during the course of a massage.
• Ideal for people who want just a little more on the shoulders at the end of their massage.
z Open the cover of the controller and select the massage required.
x The seat will automatically recline to the optimum massage position.
c Adjust the position and intensity of the massage rollers.
v Press
button to complete the massage.
4. Adjust the Angle of the Backrest and Legrest (See Page 13)
•
Adjust the angle of the backrest and legrest to the most comfortable position.
• When retracting the backrest, as the massage heads must be retracted in the interests
of safety there may be a slight delay before the backrest actually starts to retract.
Please continue to hold down the Reclining Button until the backrest is fully retracted.
5. Turn the Power Off to Finish the Massage
(See Page 20)
z Turn the power switch to the “off” position.
x Turn the lock switch the “lock” position.
c Unplug the power cord.
• Here you will find an overview of how to use the massage lounger. Please refer to the pages shown for further details.
HOW TO USE THE MASSAGE LOUNGER — INTRODUCTION
2
3
1
on
off
lock open
lock switch
3
2
1
on
off
lock open
lock switch
If excessive pressure is applied to the massage heads during upper body massage, in the interests
of safety the massage heads may stop moving. If this occurs, raise your body slightly before
restarting it. (This may happen more frequently for people with a weight of 220 lbs. or more.)
If the massage mechanism stops (or if all markings and buttons on the controller start to flash), turn
off the power switch, wait for approximately 10 seconds, and then turn the power switch on again.
Page 11
1110
1. Check the Surrounding Area
z Check that there is nothing behind the unit.
x Check that there is enough room to recline the unit.
• In the interests of safety, the unit may stop moving if it hits
something while reclining.
2. Check the Unit
z Lift up the pillow and the center cushion to check
that there are no rips in the fabric of the back
cushion, etc.
x Check that the power plug has not been damaged
or has pins or dust sticking to it.
AFTER CHECKING THE SURROUNDING AREA, TURN ON THE POWER
BEFORE USING THE UNIT
Do not leave
anything here.
16in.
(40cm)
16in.
(40cm)
Main Cushion Fabric
Check
3. Turn the Power On
z Plug the power plug into the power socket.
x Turn the lock switch to the “open” position.
c Turn on the power switch on the back of the unit.
When plugging the unit in, make sure that there is at least 4in.
(10cm) slack in the power cord.
(Take care to ensure that the power cord is not caught by the
unit when it reclines.)
2
3
1
on
off
lock open
lock switch
After each use
• Be sure to tum the power switch to “off”.
• To prevent children from using this unit, lock the power switch by moving the
operating lock switch to the “lock” position.
• As a further precaution, unplug the power cord from the outlet after each use.
NOTE:
Be careful not to pinch the cord under the leg frames of the chair or any other objects.
NOTE:
The operating lock
switch prevents the unit
from being turned on
when switch is in the
“lock” position.
Page 12

CAUTION
• Slowly sit down after checking the position of the massage heads.
Do not exceed the maximum user weight of 264 lbs. (120kg). Before sitting down, you must first check the
position of the massage heads with your hands. If you do not check the position of the massage heads then this
can lead to injury or the cause of the unit to malfunction.
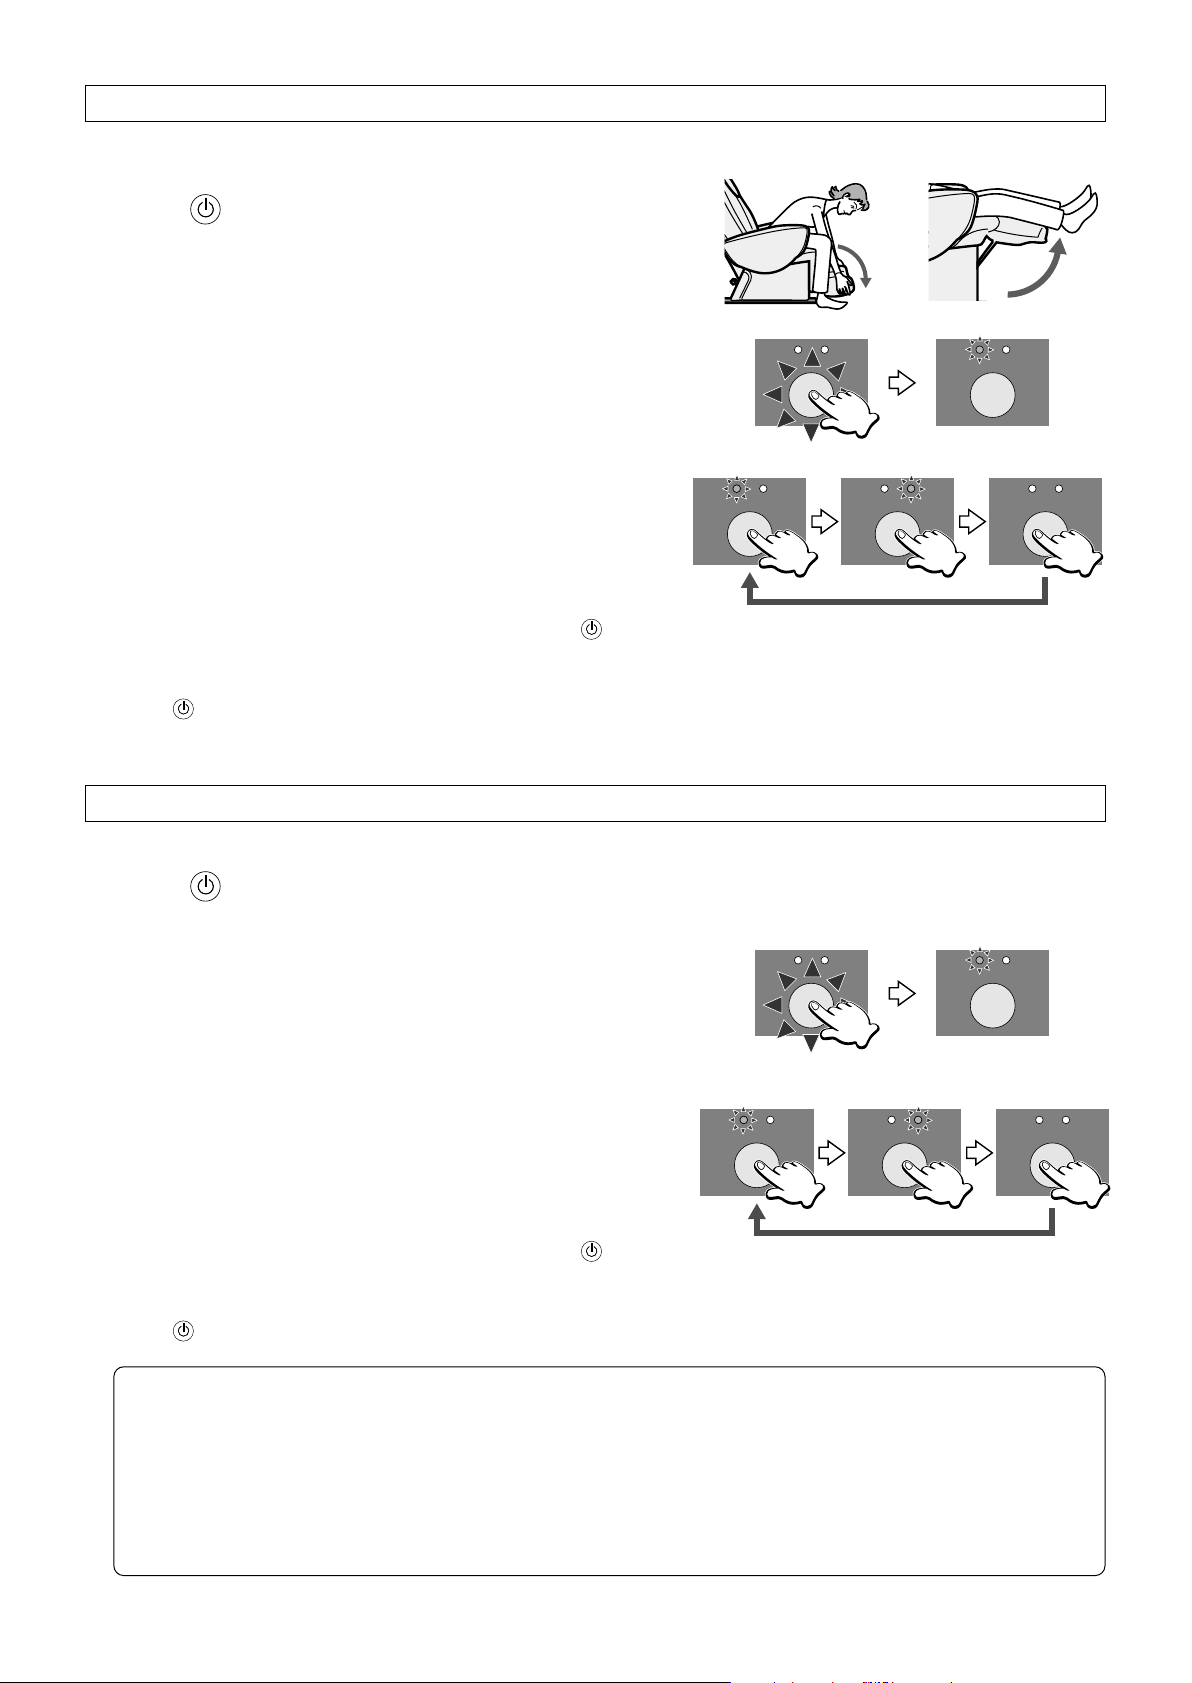
BEFORE SITTING DOWN
• When the massage does not feel strong enough, lift up the
pillow and carry out the massage again.
• To make the massage even stronger, the center cushion
with integrated pillow can also be flipped up after unclipping
it at the bottom.
ADJUSTING THE PILLOW
ADJUSTING THE SEAT
• The massage heads are normally in the retracted position
(to the left and right at the lower part of the backrest).
• Do not sit down if the massage heads are not in the
retracted position. Instead, push button twice to retract
the massage heads to the proper position. (If button is
pushed during the massage, then the massage heads will
not be retracted.)
• Please do not sit on the controller as the reclining button
may be pressed causing the seat to automatically recline.
Sit Down Only When the Legrest is Lowered
• If you sit on the unit when the legrest is raised, there is the
possibility that it may fall over and you may be injured.
• When the legrest is raised, press button to lower the
legrest before sitting down.
W ARNING:
To avoid the risk of personal injury, do not put your fingers or
any part of your body in the mechanical section of the
legrest.
reclining
reclining
Approx. 170°
Angle
Reclined
Approx. 120°
Approx. 85°
Angle
Raised
Approx. 0°
Angle
Reclined
Angle
Raised
reclining
Press
• To open the leg massager for a soles feet massage, grab the top of part of the ottoman on both sides and fold
out and away from you.
NOTE:
• DO not sit on or get off the lounger by standing on the legrest while it is folded down.
Always remove your feet from the massager prior to standing.
• DO not open or close leg massager while reclining.
MASSAGE FOR SOLES OF FEET
Page 13
1312
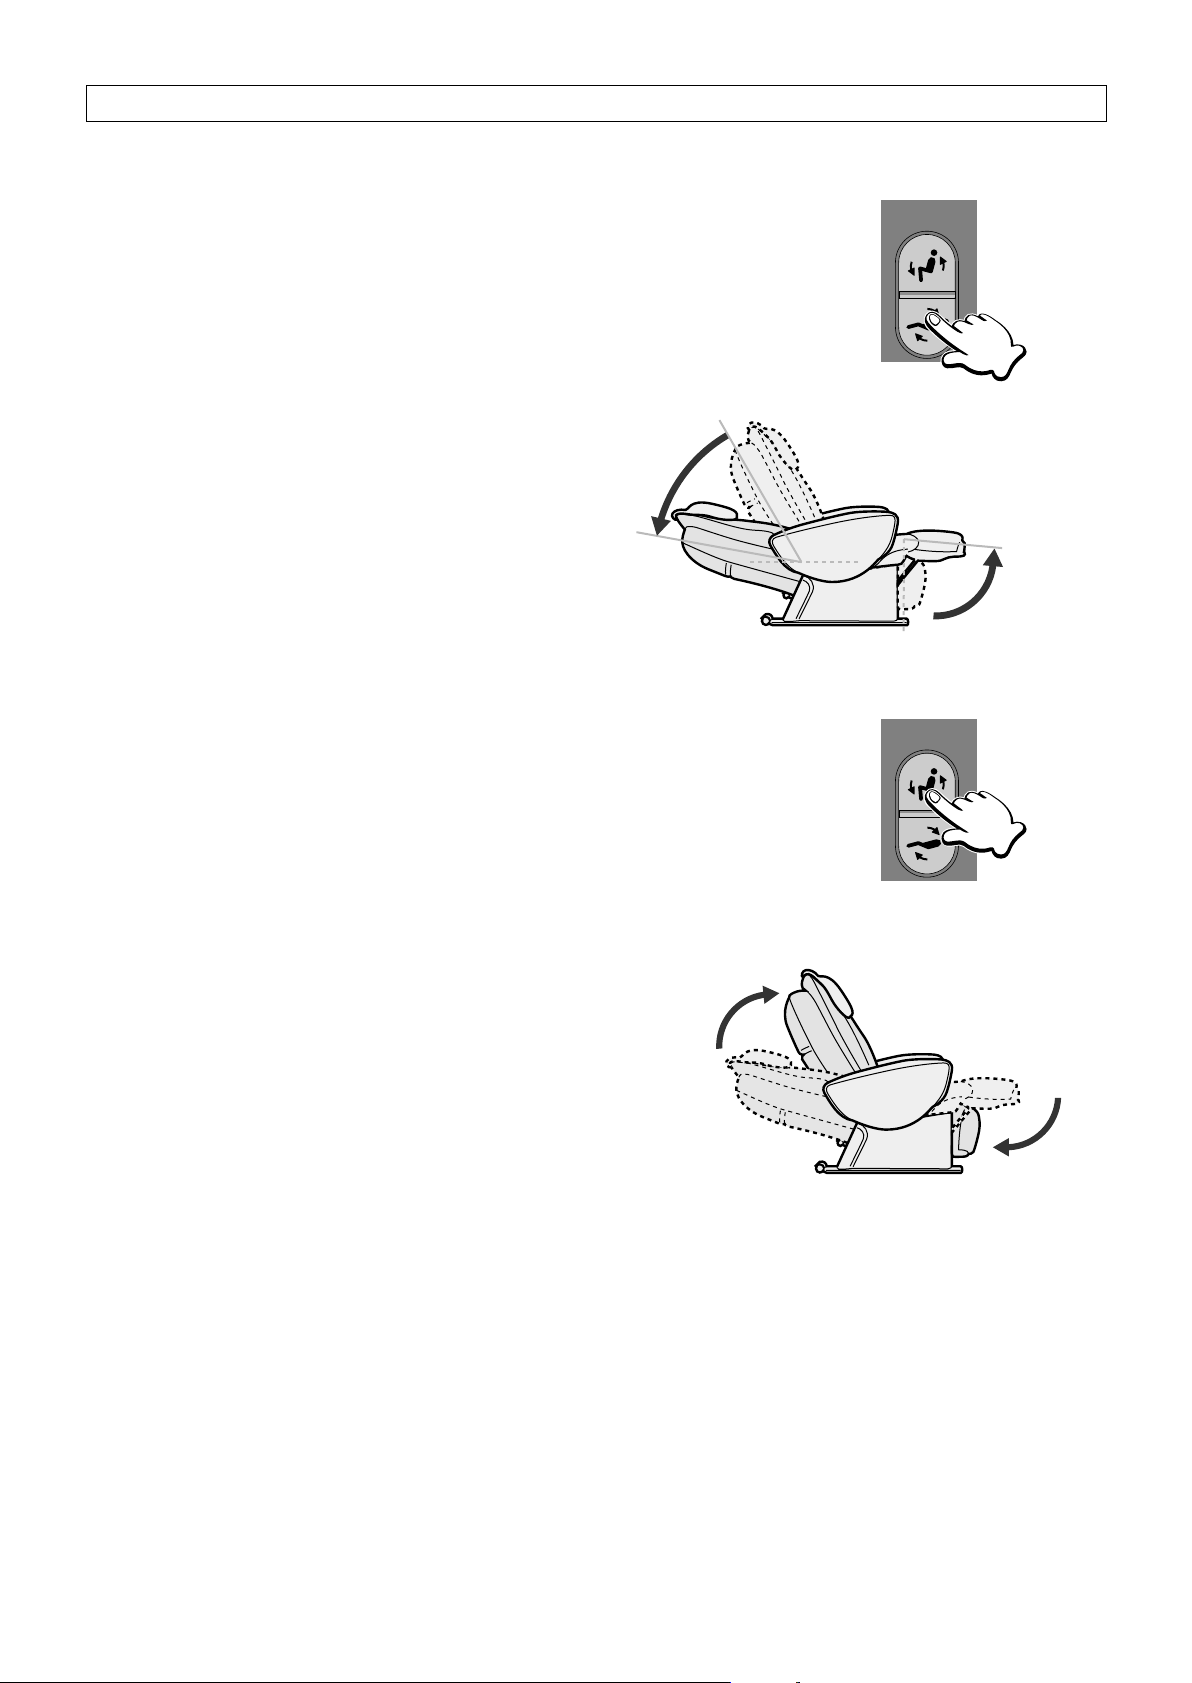
1. Reclining The Seat
• Hold down the Reclining Button to recline the seat and raise the legrest.
• When both the backrest and legrest have been extended as far as possible
you will hear a “peep, peep, peep” sound.
• When first using the unit, please do not fully recline the seat.
2. Retracting The Seat
• Check that there is nothing behind the seat or under the legrest.
• Hold down the Reclining Button to retract the backrest and lower the legrest.
• When both the backrest and legrest have been retracted as far as possible
you will hear a “peep, peep, peep” sound.
• When retracting the backrest, as the massage heads must be retracted in
the interests of safety there may be a slight delay before the backrest
actually starts to retract. Please continue to hold down the Reclining Button
until the backrest is fully retracted.
RECLINING THE SEAT
reclining
Approx. 170°
Angle
Reclined
Approx. 120°
Approx. 85°
Angle
Raised
Approx. 0°
Angle
Reclined
Angle
Raised
reclining
Press
Press
NOTE:
Position the chair at least 16 in. (40cm) away from any wall or other obstacle to ensure adequate reclining space.
CAUTION
To avoid personal injury, after use, always be sure to return the legrest and backrest to their resting positions
(legrest lowered and backrest raised).
Be sure that there is no person or pet under the legrest before lowering the legrest to its resting position.
W ARNING:
To avoid the risk of personal injury, do not put your fingers or any part of your body in the mechanical section of
the legrest.
Page 14
The Selected Program will Start
• It is possible to change the program
selected and the desired movement
mid-way through a massage.
• In Programmed Operation, the leg massage begins at the same time.
It is possible to stop or change the intensity of the leg massage during the program. (Please see Page 18.)
• When retracting the backrest, as the massage heads must be retracted in the interests of safety there may be
a slight delay before the backrest actually starts to retract. Please continue to hold down the Reclining Button
until the backrest is fully retracted.
The Seat Automatically Reclines to the Massage Position
• Initial position if auto recline is for both back and open ottoman operation. (for soles and feet.)
• To recline further, please use the recline button, but it is not recommended to keep the ottoman open.
PROGRAMMED OPERATION
• Please check that there are no children or pets in the vicinity of the unit before use.
programmed operation
whole back
gentlestorong
neck roller position
reclining
programmed
operation
/
manual
operation
lower backneck, shoulder
tap on/offvibration on/off
1
2
3
4
5
1. Press button
• The ON/OFF lamp will come on.
•
You can now select either strong or gentle or one of the manual settings
that can be accessed by opening the cover of the controller.
2. Select the Program You W ant
• See Page 21 for details regarding the content of each of these
programs.
Vigorously Massage the Whole Back
• Strong uses mainly a kneading massage and Shiatsu massage to
relax stiff muscles.
• This type of massage is ideal for
people with stiff muscles
throughout their entire back.
• Massage starts out predominantly in
the upper back.
Gently Massage the Whole Back
• This type of massage is ideal for
people who are feeling tired or weary.
• It is gentler than shiatsu massage more like a sewedish palm massage.
Normal Position
(EP1061)
Massage Position
Approx. 14°
Raised
Approx. 3° Reclined
Reclining
In this comfortable
position it is possible to
massage from the neck
to the soles of the feet.
Normal Position
(EP1060)
Massage Position
Approx. 60°
Raised
Approx. 14° Reclined
Reclining
In this comfortable
position it is possible to
massage from the neck
to the soles of the feet.
programmed operation
whole back
gentlestrong
programmed operation
whole back
gentlestrong
Press
Press
• Lightly touching the shoulder.
Too high
Correct position
Too low
lower backneck, shoulder
lower backneck, shoulder
tap on/offvibration on/off
tap on/offvibration on/off
3. Adjusting Shoulder Position
• When programmed operation begins, the seat automatically reclines to the massage position where the
massage heads carry out a Shiatsu massage in the area around the shoulders. During the time that the
Shoulder Position Indicator is flashing (approx. 20 seconds), use the Shoulder Position Adjustment Button to
adjust the position of the massage heads, limiting how high they will go.
Approximate positions for adjusting the position of the rollers are shown below.
• It is possible to change the position of the rollers
during the massage.
• As the position of the shoulders will change when
the reclining angle is changed during a massage,
please readjust the shoulder position every time
you change the reclining angle.
• 5-stage (up-down approx. 4in.) adjustment.
neck roller positionneck roller positionneck roller position
6.1ft
5.2ft
4.6ft
Up Down Approximate Body Height
Press
Press
intensityintensity
Increasing massage intensity Decreasing massage intensity
Page 15
4. Selecting an Area for Concentrated Massage
• Please see Page 21–23 for details regarding the programs.
7. Auto Stop in Programmed Operation
When the selected program has been completed, the unit will automatically come to a stop.
(Although programmed operation lasts for approximately 15 minutes (12–17 minutes), this will vary according to
the shoulder position and program selected, whether or not tapping is on or off, and the weight of the person
using the unit.)
• The massage heads will move to the retracted position and stop.
• The ON/OFF lamp will flash until the heads have stopped moving.
• If you want to start another massage, please press button.
• Please rest at least 10 minutes between massages.
8. Stopping Programmed Operation
Press button to stop programmed operation.
• The ON/OFF lamp will continue to flash until the massage heads have returned to the retracted position.
9. Stopping the Massage Immediately
Press button to stop programmed operation immediately.
• All movement will stop immediately.
• The massage heads will not return to the retracted position, which may make sitting in the seat somewhat
uncomfortable.
• Please press button twice in order to return the massage heads to the retracted position.
Massaging the Lower Back
• Press this button to focus the program on the lower
back.
(The neck and
shoulders will also be
massaged slightly.)
• Press the button
again to toggle off.
1514
• When the Shoulder Position Indicator is flashing, adjust the position of
the massage heads (upper roller) so that they lightly touch the shoulder.
• The shoulder position can be adjusted up and down 4in. (10cm).
• When it is not possible to correctly adjust the shoulder position, slide
your body down and try adjusting it again.
• Lightly touching the shoulder.
Too high
Correct position
Too low
Massaging the Neck and Shoulders
• Press this button to focus the program on the neck
and shoulders.
(The upper and lower
back will also be
massaged slightly.)
• Press the button
again to toggle off.
lower backneck, shoulder
lower backneck, shoulder
5. Removing Vibration and Tapping from Programs
Removing Tapping from Programmed Operation
• Press this button to remove tapping in
programmed operation. (The tapping will change
to a kneading massage.)
*Press the button
again to restore
tapping to the
program.
Removing Vibration from Programmed Operation
• Press this button to remove vibration in programmed
operation. (The vibration will change to a kneading
massage.)
*Press the button
again to restore
vibration to the
program.
tap on/offvibration on/off
tap on/offvibration on/off
Press Press
Press Press
• For Tapping B, and Vibration, unless the massage heads are actually touching the body then you may not feel
anything.
6. Adjusting Massage Intensity
• Massage intensity can be adjusted up to 3 levels.
• When the massage heads reach their limit you will hear a “peep,
peep, peep” sound.
intensityintensity
Increasing massage intensity Decreasing massage intensity
Press
Press
Page 16
MANUAL OPERATION
neck roller position
reclining
programmed
operation
/
manual
operation
intensity
roll
manual operation
whole back
regional
tap Avibration tap B
swedishshiatsu knead
position
1
3
4
1. Press button
• The ON/OFF lamp will come on.
• You can now select either Strong or Gentle or one of the manual
settings that can be accessed by opening the cover of the
controller.
2. Open the Cover of the Controller
• All of the manual operation buttons will start
to flash.
3. Selecting the Massage Type Required
• Press the button of the massage you require.
The button will be lit.
• The seat will automatically recline to the massage position.
E.g. Selecting Knead.
MANUAL OPERATION FOR THE UPPER BODY
Combining Massages
• It is possible to combine massage types.
• It is not possible to combine massage types in the same category.
E.g.1 Adding Tap B when Knead is selected.
E.g.3 Toggling off Roll pressing it again.
E.g.2 Adding Roll to the selection.
Press
Press
Press
Press
positionposition
Raising the massage heads Lowering the massage heads
positionposition
Increasing the width Decreasing the width
Changing Massage Types
E.g.1 Changing massage types in the same category.
(Changing to Shiatsu when Knead is selected.)
Press
intensityintensity
Increasing massage intensity Decreasing massage intensity
manual operation
swedishshiatsu knead
tap Avibration tap B
manual operation
swedishshiatsu knead
tap Avibration tap B
neck roller position
programmed
operation
manual operation
whole back
intensity
slow fast
leg massage
reclining
manual
/
operation
swedishshiatsu knead
tap Avibration tap B
roll
position
regional
manual operation
swedishshiatsu knead
tap Avibration tap B
whole back
regional
roll
manual operation
swedishshiatsu knead
tap Avibration tap B
whole back
regional
roll
manual operation
whole back
swedishshiatsu knead
tap Avibration tap B
roll
regional
manual operation
whole back
manual operation
whole back
manual operation
whole back
swedishshiatsu knead
tap Avibration tap B
regional
roll
swedishshiatsu knead
tap Avibration tap B
regional
roll
swedishshiatsu knead
tap Avibration tap B
regional
roll
whole back
regional
roll
whole back
manual operation
swedishshiatsu knead
tap Avibration tap B
whole back
regional
roll
regional
roll
manual operation
swedishshiatsu knead
tap Avibration tap B
whole back
regional
roll
Page 17
1716
4. Adjusting Manual Massage Settings
Adjusting the Vertical Position of the Massage Heads
• The massage heads will move a little each time the button is
pressed. If you hold down the button, the massage heads will
continue to move until you release the button. When the
massage heads reach their limit you will hear a “peep, peep,
peep” sound.
Adjusting the Width between Massage Heads
• Vibration, Tap, Shiatsu Whole Back Roll, and Regional Roll
can be adjusted in 5-stages while Swedish (gentle) can be
adjusted in 3-stages.
• As Swedish covers the entire width of the back, it is not
possible to adjust width settings.
• The massage heads will move a little each time the button is
pressed. If you hold down the button, the massage heads will
continue to move until you release the button.
• When the massage heads reach their limit you will hear a
“peep, peep, peep” sound.
• As Roll or combining Roll with other massages sometimes
produce an especially strong massage, adjustment is limited
to medium or weak.
E.g.2 Changing to a massage type outside the category.
(Changing to Tap B when Knead is selected.)
• When Knead is combined with Tap B, deselecting Knead will leave only Tap.
Press
Press
positionposition
Raising the massage heads Lowering the massage heads
Press
Press
positionposition
Increasing the width Decreasing the width
Press
Press
Roll, Roll + (Shiatsu, Tap B, Tap A, Vibration) Combination..................................Weak/Medium only
Roll + (Knead, Swedish Combination)...................................................................Weak only
• For Tap B, Swedish, and Vibration, unless the massage heads are actually touching the body then you may
not feel the movement.
5. Auto Stop in Manual Operation
• A timer will automatically stop the unit approximately 15 minutes (15–17 minutes) after the massage started.
(This is to prevent overuse in the interests of safety.)
• The massage heads will move to the retracted position and stop.
• The ON/OFF lamp will flash until the heads have stopped moving.
• If you want to start another massage, please press button.
• Please rest at least 10 minutes between massages.
6. Stopping Manual Operation
Press button to stop manual operation.
• The ON/OFF lamp will continue to flash until the massage heads have returned to the retracted position.
Adjusting Massage Intensity
• Massage intensity can be adjusted up to 3 levels.
• When the massage heads reach their limit you will hear a “peep,
peep, peep” sound.
intensityintensity
Increasing massage intensity Decreasing massage intensity
Press
Press
manual operation
swedishshiatsu knead
tap Avibration tap B
manual operation
swedishshiatsu knead
tap Avibration tap B
manual operation
swedishshiatsu knead
tap Avibration tap B
whole back
roll
regional
whole back
regional
roll
whole back
regional
roll
Page 18
Check that
there is nothing
here
Check that
there is nothing
here
reclining
Closing the leg
massager
• The leg massager has two functions.
The massager can also massage the soles of the feet.
1. Press button
• The programmed operation and leg massage button will flash.
2. Press the Leg Massage button
• The leg massage will start.
• The speed of the massage will be displayed.
• It is possible to adjust the reclining angle during the massage.
3. Adjusting Massage Speed
• Leg massage intensity can be adjusted in 2-stages.
4. Leg Massage Auto Stop
• A timer will automatically stop the unit approximately 15
minutes (15–17 minutes) after the massage started.
• If you want to start another massage, please press button.
5. STOPPING MANUAL OPERATION
Press button to stop the leg massage.
18
LEG MASSAGE IN MANUAL OPERA TION (EP1061
)
Press
Press Press Press
Soles of feet Calves
• If your calves are not in the correct position in the legrest, please adjust your legs so that they are.
1. Press button
• The programmed operation and leg massage button will flash.
2. Press the Leg Massage button
• The vibration massage will start.
• The strength of the massage will be displayed.
• It is possible to adjust the reclining angle during the massage.
3. Adjusting Massage Intensity
• Leg massage intensity can be adjusted in 2-stages.
4. Leg Massage Auto Stop
• A timer will automatically stop the unit approximately 15
minutes (15–17 minutes) after the massage started.
• If you want to start another massage, please press button.
5. STOPPING MANUAL OPERATION
Press button to stop the leg massage.
LEG MASSAGE IN MANUAL OPERA TION (EP1060
)
Press
gentle strong
leg massage
gentle strong
leg massage
gentle strong
leg massage
Gentle Strong Off
Press Press Press
NOTE:
(EP1061) DO NOT sit on or get off the lounger by standing on the legrest while it is folded down. Always
remove your feet from the massager prior to standing.
(EP1060/EP1061) Integrated Timer to Prevent Overuse
• An integrated timer prevents overuse of the unit.
• When using manual operation, the timer automatically stops operation after 15 minutes (15–17 minutes).
*If you want to continue to use the unit, please ensure that you have a break of at least 10 minutes
between massages to allow your body to rest.
slow fast
leg massage
slow fast Off
slow fast
leg massage
slow fast
leg massage
slow fast
leg massage
slow fast
leg massage
gentle strong
leg massage
gentle strong
leg massage
Page 19

19
1. Check that there is Nothing Under the
Backrest or the Legrest.
RETURN THE SEAT TO THE ORIGINAL POSITION
AFTER COMPLETING THE MASSAGE
Check that
there is nothing
here
Check that
there is nothing
here
2. Return the Seat to the Upright Position.
• When returning the seat to the upright position, as it may
take some time for the massage heads to return to the
retracted position, please continue to press the Reclining
Button until the seat is fully upright.
reclining
Closing the leg
massager
3. Place the Controller in its Pocket
• Using the controller pocket as a grip to help you stand up
can place excessive force on the pocket, which can cause
it to rip. Please refrain from doing so.
4. Return the Center Cushion to its Original
Position.
Press
Page 20

1
Roll, Shiatsu and
Knead/Roll
Knead, Roll
and Shiatsu/Vibration
Swedish, Tap B/
Roll and Shiatsu
Shiatsu and
Tap B/Roll
Knead/Tap B
and Roll
Tap B/Roll,
Tap B and Knead
Knead/Roll, Tap B
and Knead/Tap B/Roll
Knead and
Shiatsu
Tap B, Tap B/
Roll and Shiatsu
2 3
6
54
7 8 9
Shiatsu, Tap A
and Roll
10
1
Roll, Knead and
Swedish/Tap A/Roll
Swedish and
Swedish/Tap A/Roll
Swedish, Shiatsu and
Swedish/Tap A/Roll
Swedish/Roll and
Swedish/Tap A/Roll
Shiatsu, Vibration/Roll
and Shiatsu/Vibration
Tap A, Swedish/Roll
and Swedish/Tap A/Roll
Swedish/Roll, Swedish/
Tap A/Roll and Swedish/
Vibration/Roll
Swedish/Vibration
Swedish/Vibration and
Swedish/Tap A/Roll
2 3
6
54
7 8 9
Swedish/Tap A/Roll,
Swedish and Roll
10
20
1. Turn Off the Power
z Turn the power switch to the “off” position.
x Turn the lock switch to the “lock” position.
DISCONNECT THE POWER
• Always turn the power switch to the “off” position and the lock switch to the “lock” position.
Failure to do so may lead to accidents if children play with the unit.
• Do not pull on the power cord when unplugging the unit from the power supply. Always hold the power plug itself.
Failure to do so may lead to electric shock or short-circuits.
• Always unplug the unit from the power supply when not in use.
Failure to do so may lead to insulation deterioration due to dust or moisture, which may in turn lead to shortcircuits or fire.
CAUTION
2. Unplug the Power Cord
on
off
lock open
lock switch
Page 21

21
• The movements below are shown in simplified form for the sake of illustration.
• When the programs have finished the unit will automatically stop. (Although programmed operation lasts for
approximately 15 minutes (12–17 minutes), this will vary according to the shoulder position and program selected,
whether or not tapping is on or off, and the weight of the person using the unit.)
STRONG
GENTLE
DETAILS REGARDING PROGRAMMED OPERATION
1
Roll, Shiatsu and
Knead/Roll
Knead, Roll
and Shiatsu/Vibration
Swedish, Tap B/
Roll and Shiatsu
Shiatsu and
Tap B/Roll
Knead/Tap B
and Roll
Tap B/Roll,
Tap B and Knead
Knead/Roll, Tap B
and Knead/Tap B/Roll
Knead and
Shiatsu
Tap B, Tap B/
Roll and Shiatsu
2 3
6
54
7 8 9
Shiatsu, Tap A
and Roll
10
1
Roll, Knead and
Swedish/Tap A/Roll
Swedish and
Swedish/Tap A/Roll
Swedish, Shiatsu and
Swedish/Tap A/Roll
Swedish/Roll and
Swedish/Tap A/Roll
Shiatsu, Vibration/Roll
and Shiatsu/Vibration
Tap A, Swedish/Roll
and Swedish/Tap A/Roll
Swedish/Roll, Swedish/
Tap A/Roll and Swedish/
Vibration/Roll
Swedish/Vibration
Swedish/Vibration and
Swedish/Tap A/Roll
2 3
6
54
7 8 9
Swedish/Tap A/Roll,
Swedish and Roll
10
Page 22

• The movements below are shown in simplified form for the sake of illustration.
• When the programs have finished the unit will automatically stop. (Although programmed operation lasts for
approximately 15 minutes (12–17 minutes), this will vary according to the shoulder position and program selected,
whether or not tapping is on or off, and the weight of the person using the unit.)
22
STRONG/NECK & SHOULDER COMBINA TION
STRONG/LOWER BACK COMBINATION
1
Roll, Shiatsu and
Knead/Roll
Tap B/Roll,
2 3
Tap B and Knead
Knead and Shiatsu Tap B, Tap B/
Roll and Shiatsu
Tap B/Roll and
54
Knead/Tap B/Roll
Tap B, Knead
6
and Tap B/Roll
7 8 9
Knead and Shiatsu Tap B, Tap B/
1
Knead/Roll, Swedish/
Tap B and Tap B/Roll
Roll and
2 3
Shiatsu/Vibration
Roll and Shiatsu
Swedish, Tap B/
Roll and Shiatsu
Knead/Tap B/Roll
Shiatsu and
Tap B/Roll
10
Shiatsu, Swedish
and Roll
Tap B/Roll,
54
Knead/Roll and
Swedish/Tap B
6
Roll and
Shiatsu/Vibration
7 8 9
Swedish, Tap B/
Roll and Shiatsu
Shiatsu and Tap B/
Roll
Knead/Roll and
Vibration/Roll
10
Shiatsu and
Swedish
Page 23

23
GENTLE/NECK & SHOULDER COMBINA TION
GENTLE/LOWER BACK COMBINA TION
• The movements below are shown in simplified form for the sake of illustration.
• When the programs have finished the unit will automatically stop. (Although programmed operation lasts for
approximately 15 minutes (12–17 minutes), this will vary according to the shoulder position and program selected,
whether or not tapping is on or off, and the weight of the person using the unit.)
1
Roll, Knead and
Swedish/Tap A/Roll
Tap A, Swedish/Roll
2 3
and Swedish/Tap A/Roll
Swedish, Swedish/Vibration
and Swedish/Tap A/Roll
Swedish and
Swedish/Tap A/Roll
Tap A, Swedish/
54
Roll and Swedish/
Tap A/Roll
Swedish, Swedish/
6
Vibration and Swedish/
Tap A/Vibration
7 8 9
Swedish and Swedish/
Tap A/Roll
1
Roll, Knead and
Swedish/Tap A/Roll
Swedish/Tap A/Roll,
2 3
Swedish/Vibration/Roll
and Swedish
Tap A, Swedish/Roll
and Swedish/Tap A/Roll
Swedish, Shiatsu and
Swedish/Tap A/Roll
Swedish, Swedish/Vibration
and Swedish/Tap A/Roll
Shiatsu, Vibration/Roll
and Shiatsu/Vibration
10
Swedish/Tap A/Roll,
Swedish and Roll
Swedish/Roll and
54
Swedish/Tap A/Roll
Swedish/Tap A/Roll,
6
Swedish/Vibration/Roll
and Swedish
7 8 9
Swedish, Shiatsu and
Swedish/Tap A/Roll
Shiatsu, Vibration/Roll
and Shiatsu/Vibration
Swedish/Tap A/
Roll and Swedish
10
Swedish
Page 24

Mild
Detergent
Water
Water
Mild
Detergent
Thinners
Benzene
Alcohol
Water
24
This feels as though the thumbs of both
hands are being used to work on the
acupressure points. The initial strong
push is followed by a short pause to give
the impression of a professional shiatsu
masseur. This type of massage is ideal
for people with tight muscles and pain
who want a point massage.
Shiatsu Tap A
This motion resembles the outer edge of
the fingers being used to tap in a rhythmic
motion that is designed to penetrate into
the body and relax the muscles. It is ideal
to use on the fine muscles of the neck or
as a finishing massage.
This motion is like the palms of both
hands being used to press and rub
over a wide area from both sides of
the body. This type of massage is
ideal for someone wanting a broad
massage on the back or lower back.
Swedish Tap B
This motion is like a fist used in a rhythmic
pattern to provide a solid tapping that is
designed to eliminate stubborn stiffness
and tiredness. This kind of massage is
ideal for thick muscles such as those found
in the shoulders.
Whole Back Roll
The massage heads become rollers that
roll over the back up and down from the
neck to the lower back to stretch the back
muscles and relieve tension. It is ideal to
use at the beginning of a massage as it is
relatively soft.
Knead
With this massage, a strong push is
followed by a quick release in a rhythm
that is designed to relax stiff muscles. It
is ideal for loosening stiff muscles in the
neck and shoulders.
Regional Roll
The massage heads become rollers that
roll over the back muscles, but this time in
a specified location. It is ideal for
combining with Knead, Tap B and
Vibration.
Vibration
The minute vibrations are designed to
relax even the tensest body. Combined
with a rolling massage, etc., this type of
massage is ideal for the whole back.
DETAILS REGARDING MANUAL OPERATION
Page 25

25
• Rub the covers lightly using a soft and dry cloth for normal
cleaning.
(Please do not use a cloth containing any kind of chemicals.)
• If the covers becomes dirty, apply a 3–5% solution of a mild
detergent in warm water using a soft cloth, tapping the
surface to remove it. Afterwards, thoroughly rinse the cloth
and use it to remove the detergent, wipe it gently with a dry
cloth, and then leave it to dry naturally.
(Please do not use a hair dryer in an attempt to dry the
covers more quickly.)
• If the covers is allowed to come into contact with vinyl for an
extended period of time, this may cause it to become
discolored.
PILLOW , BACK CUSHION, SEAT AND ARMREST COVERS
CLEANING AND MAINTENANCE
Mild
Detergent
Water
z Wipe the unit with a cloth that has been
soaked in a mild detergent and then
thoroughly wrung out.
x Next wipe the unit with a cloth that has been
dampened with just water.
*Make sure you thoroughly wring out the
cloth first when cleaning the controller.
c Allow the unit to dry naturally.
• Never use benzene, thinners or alcohol.
Water
Mild
Detergent
Thinners
Benzene
Alcohol
PIPES AND PLASTIC AREAS
z Wipe the seat fabric with a cloth that has been soaked in a
weak mild detergent solution and then thoroughly wrung out.
x Use a weak mild detergent to brush on to areas where the
seat fabric has become particularly soiled. Be careful not
to brush the fabric too much as this may cause damage.
c Next wipe the fabric with a cloth that has been dampened
with just water.
v Allow the fabric to dry naturally.
Water
SEAT F ABRIC
• Always remove the power plug from the power socket when cleaning the unit. Take care to dry your hands
thoroughly before attempting to plug the power plug back into the power socket when you have finished. Failure
to do so may lead to electric shock or burns.
CAUTION
Page 26

26
Problem Cause and Remedy
Motor Noises
• The motor gets louder when it comes under load.
• There is excessive noise during Tapping.
(The noise is louder at the top of the unit.)
• The motor sounds louder when adjusting massage
intensity and width.
• There is a rubbing sound produced by the massage
heads rubbing on the seat fabric.
• There is a rubbing sound produced by fabric rubbing
on fabric.
TROUBLESHOOTING
These sounds are perfectly normal and will not have
any effect on the operation of the unit.
H
The massage heads stop during operation.
When the massage heads are raised or lowered, if
they come into contact with a wall or other obstruction,
in the interests of safety the massage heads may
stop moving. In such a situation, move the chair or
remove the obstruction and start the massage again.
If all markings and buttons on the controller start to
flash, which is extremely unusual, turn off the power
switch, wait for approximately 10 seconds and then
turn the power switch on again.
If excessive force is applied to the massage heads
during operation, in the interests of safety the
massage heads may stop moving. If this occurs,
raise your body slightly before restarting it.
If all markings and buttons on the controller start to
flash, which is extremely unusual, turn off the power
switch, wait for approximately 10 seconds and then
turn the power switch on again.
H
Nothing can be felt when using Tap A, Tap B
or Vibration.
If the massage heads are not touching your body
then you will, of course, feel nothing. Therefore,
please make sure that your body comes into close
contact with the massage heads.
H
The massage heads do not come up to the
shoulder or neck.
The position of the shoulders is incorrect.
(See Page 14)
H
H
Before requesting service for this unit, check the table below for the possible cause of the problem. Some simple
checks or minor adjustment on your part may eliminate the problem and restore proper operation. If you are in
doubt about some of the check points, or if the remedies indicated in the chart do not solve the problem, call us at
1-800-338-0552 to locate the servicer near to you.
Page 27

27
Problem Cause and Remedy
Even though I press the reclining button
nothing appears to happen.
When retracting the backrest, in the interests of
safety, the massage heads move to the retracted
position before the backrest starts to retract.
Please hold down the button until the backrest is fully
reclined.
H
The controller becomes warm.
If the unit is used continuously for an extended
period of time it will naturally become warm.
If the controller becomes too hot, immediately stop
using the unit and return it for inspection or repair to
the place that you bought it.
H
The unit will not operate at all.
• Upper body (neck to lower back) massage.
• Leg massage.
• The power cord has been disconnected.
(See Page 11)
• The power switch on the unit has not been turned on.
(See Page 11)
• After pressing button, the program button or the
manual operation selection button has not been
pushed. (See Pages 14–17)
The power cord has been disconnected.
H
The unit has been damaged.
Unplug AC cord from outlet immediately and have
massage lounger serviced.
H
The power cord or power plug is abnormally
hot.
Unplug AC cord from outlet immediately and have
massage lounger serviced.
H
H
The length of the programs selected in
programmed operation varies.
• When using the massage lounger in programmed
operation, when the program is finished movement
automatically stops. (Although programmed
operation lasts for approximately 15 minutes
(12–17 minutes), this will vary according to the
shoulder position and program selected, whether or
not tapping is on or off, and the weight of the
person using the unit.)
H
It is not possible to recline the unit.
The legrest cannot be raised or lowered.
If the unit encounters an obstacle or if excessive
force is exerted on it during operation, in the
interests of safety the unit will come to a stop.
If all markings and buttons on the controller start to
flash, which is extremely unusual, turn off the power
switch, wait for approximately 10 seconds and then
turn the power switch on again.
H
Page 28

28
Power Supply: 120V AC, 60Hz
Power Consumption: 160W (Approx. 5W in Standby mode with the controller turned off or when the
unit is turned off.)
Upper Body Massage
Massage Area (Up-Down): Approx. 27.6in. (70cm)
Massage Area (Left-Right): Distance between Massage Heads during Operation
Approx. 2.4 – 5.9in. (6 – 15cm)
Massage Area (Forward-Back): 2.2in. (5.5cm)
Massage Cycle: Shiatsu: Approx. 12 cycles/min.
Swedish: Approx. 11 cycles/min.
Knead: Approx. 12 cycles/min.
Vibration: Approx. 3,000 – 3,600 cycles/min.
Tap A: Approx. 50 – 3,600 cycles/min.
Tap B: Approx. 200 – 300 cycles/min.
Whole Body Roll: Approx. 2 cycles/min.
(Approx. 35 sec./cycle)
Regional Roll: Approx. 6 – 10 cycles/min.
(Approx. 6 – 10 sec./cycle)
Leg Massage
Roller speed: Fast: Approx. 60 cycles/min.
Slow: Approx. 50 cycles/min.
Reclining Angle: Backrest: Approx. 120°–170°
Legrest: Approx. 0°–85°
Automatic Shut-Off: Approx. 15 min. for both upper body and legs (15 – 17min.)
Dimensions:
When not reclined. (H#W#D) 41.3#31.5#41.3in. (105#80#105cm)
When reclined. (H#W#D) 23.6#31.5#65in. (60#80#165cm)
Weight: 128 lbs. (58kg)
Maximum user weight: 264 lbs. (120kg)
SPECIFICATIONS (EP1061)
Power Supply: 120V AC, 60Hz
Power Consumption: 135W (Approx. 5W in Standby mode with the controller turned off or when the
unit is turned off.)
Upper Body Massage
Massage Area (Up-Down): Approx. 27.6in. (70cm)
Massage Area (Left-Right): Distance between Massage Heads during Operation
Approx. 2.4 – 5.9in. (6 – 15cm)
Massage Area (Forward-Back): 2.2in. (5.5cm)
Massage Cycle: Shiatsu: Approx. 12 cycles/min.
Swedish: Approx. 11 cycles/min.
Knead: Approx. 12 cycles/min.
Vibration: Approx. 3,000 – 3,600 cycles/min.
Tap A: Approx. 50 – 3,600 cycles/min.
Tap B: Approx. 200 – 300 cycles/min.
Whole Body Roll: Approx. 2 cycles/min.
(Approx. 35 sec./cycle)
Regional Roll: Approx. 6 – 10 cycles/min.
(Approx. 6 – 10 sec./cycle)
Leg Massage
Vibration: Strong: Approx. 3,000 cycles/min.
Weak: Approx. 2,500 cycles/min.
Reclining Angle: Backrest: Approx. 120°–170°
Legrest: Approx. 0°–85°
Automatic Shut-Off: Approx. 15 min. for both upper body and legs (15 – 17min.)
Dimensions:
When not reclined. (H#W#D) 41.3#31.5#41.3in. (105#80#105cm)
When reclined. (H#W#D) 23.6#31.5#67in. (60#80#170cm)
Weight: 117 lbs. (53kg)
Maximum user weight: 264 lbs. (120kg)
SPECIFICATIONS (EP1060)
Page 29

29
Gracias por haber adquirido el sillón de masaje Swede-AtsuTMPanasonic modelo EP1060/EP1061. Lea atentamente
este manual para obtener un rendimiento y una seguridad óptimos.
INSTRUCCIONES DE SEGURIDAD
Es muy importante observar siempre las precauciones básicas durante el uso de instrumentos eléctricos, entre las
cuales se incluyen las siguientes.
Asegúrese de leer todas las instrucciones antes de utilizar el sillón de masaje doméstico.
PELIGRO – Riesgo de descargas eléctricas:
1. Desconecte siempre la unidad inmediatamente después de su uso.
2. Desconecte siempre la unidad antes de su limpieza.
ADVERTENCIAS –
Riesgo de quemaduras, incendios, descargas eléctricas o daños a otras personas:
1. Inserte el enchufe completamente en la toma a fin de reducir el riesgo de cortocircuitos o incendios.
2. No descuide la unidad durante el tiempo que esté conectada. Desconéctela siempre una vez finalice su uso.
3. La supervisión cercana y continua se hará necesaria siempre que usen la unidad personas limitadas en su
capacidad de movimiento o comunicación.
4. Use el sillón únicamente para el propósito descrito en estas instrucciones.
5. No ponerse de pie sobre la unidad.
6. No utilice otros accesorios distintos a los recomendados por el fabricante.
7. Esta unidad no debe ser utilizada por los niños. Mantenga a los niños alejados del sillón. Coloque siempre el
respaldo del sillón de nuevo en posición vertical y plegar por completo el reposapiernas a fin de evitar
accidentes. Asegúrese de que la zona se encuentra despejada al plegar el reposapiernas.
8. Nunca ponga la unidad en funcionamiento si hay un cable o enchufe eléctrico defectuosos. Si la unidad no
funciona correctamente, se ha caído, dañado o sumergido en agua, llévela al centro de asistencia autorizado
más próximo.
9. Levante siempre el cojín central para comprobar que el tapizado de la unidad no ha sufrido rasgaduras antes
de su uso. Inspeccione además otras áreas para asegurarse de que el tapizado se encuentra en perfecto
estado. En caso de descubrir cualquier rasgadura, independientemente de su tamaño, deberá interrumpir el
uso del sillón, desconectarlo y llevarlo a un centro de asistencia autorizado para su reparación.
10. Mantenga los cables de alimentación alejados de superficies expuestas al calor. Evite cualquier tipo de
suciedad o humedad en el enchufe. No coloque la unidad sobre utensilios de calefacción como por ejemplo
alfombras eléctricas, etc.
11. Nunca cubra las salidas de ventilación durante el funcionamiento y asegúrese de que estén libres de pelusa o
suciedad.
12. No vierta o inserte nada en las aberturas de la unidad.
13. No use la unidad en cuartos de baño u otros espacios húmedos ya que existe posibilidad de descargas
eléctricas o mal funcionamiento de la unidad. Evite derramar agua u otro líquido sobre el mando de control.
14. No utilice la unidad a la intemperie.
15. No use la unidad en lugares donde se usen productos que contengan aerosoles o donde se utilice oxígeno.
16. Cuando desenchufe la unidad, apague primero todos los controles antes de extraer el enchufe de la toma de
alimentación. No utilice transformadores con la unidad ya que podría originar fallos en el funcionamiento o
descargas eléctricas.
17. Conecte esta unidad a una toma de alimentación que garantice la puesta a tierra adecuadamente. Consulte las
instrucciones referentes a la puesta a tierra.
18. Con el fin de evitar descargas eléctricas o cualquier tipo de daños, no abra o desmonte la unidad ya que
contiene piezas delicadas.
CONSERVE ESTAS INSTRUCCIONES
Page 30

30 31
PRECAUCIONES DE SEGURIDAD
ADVERTENCIA: Para evitar el riesgo de lesionarse, siga estas precauciones.
1. Las mujeres embarazadas, personas enfermas, en baja forma física o bajo tratamiento médico y las personas
que sufran dolores de espalda, cuello, hombros o de cadera deberán consultar a su médico antes de usar la
unidad. Si lleva un marcapasos, desfibrilador u otro tipo de dispositivo médico, consulte con el fabricante del
dispositivo antes del uso de esta unidad. Su traumatólogo puede ayudarle a obtener este tipo de información.
2. Siéntese lentamente después de comprobar la posición de las cabezas de masaje. No ponga nunca ninguna
parte de su cuerpo entre las cabezas de masaje ya que la acción de aprisionamiento de las mismas podría
provocarle lesiones. No ponga nunca sus dedos o sus pies en la separación entre el respaldo y el asiento, el
respaldo y los apoyabrazos, el asiento y la cubierta bajo los apoyabrazos, o la separación entre el
reposapiernas y el reposapiés. No ponga sus dedos ni ninguna parte de su cuerpo en la sección mecánica del
reposapiernas situado debajo del asiento.
3. No utilice la unidad sobre la piel desnuda. Mientras los tejidos finos incrementan la efectividad, la exposición
directa sobre la piel desnuda podría originar irritaciones.
No utilice ningún accesorio duro sobre la cabeza, como por ejemplo accesorios para el pelo o similares,
durante el uso de la unidad.
4. No use la unidad para masajear la cabeza, abdomen, codos o rodillas.
5. Verifique siempre que la posición de los hombros sea la adecuada. Si no es la correcta, utilice el botón de
ajuste de la posición del rodillo para el cuello para ajustarla correctamente (en la posición programada).
6. No exceda los 15 minutos en cada sesión de masaje de espalda. El exceso de masajeo de los músculos
puede resultar molesto; no utilice la unidad durante más de 5 minutos la primera vez. Podrá aumentar
gradualmente la duración y la extensión del masaje según se vaya acostumbrando.
No masajee una zona durante más de 5 minutos seguidos.
Para evitar el exceso en el masaje, no sobrepase los 15 minutos en cada sesión.
Después de 15 minutos aproximadamente, los rodillos de masaje se recogen deteniendo su movimiento.
7. Si comenzara a sentirse mal o a resultarle dolorosos los movimientos durante la sesión, interrumpa
inmediatamente el masaje.
Si la presión del masaje resulta demasiado fuerte durante la sesión, es posible detener los rodillos de masaje
en cualquier momento simplemente pulsando el botón de parada.
8. Nunca se quede dormido durante la sesión. No use el sillón de masaje después de tomar bebidas alcohólicas.
9. Nunca se siente sobre el respaldo reclinado, ni al revés con las piernas sobre el reposacabezas.
No se siente sobre el reposapiernas, de lo contrario la unidad podría volcar.
10. No permita a los niños o animales domésticos jugar alrededor de la unidad, especialmente durante su
funcionamiento.
11. No desenchufe ni apague la unidad durante su funcionamiento. Desenchufe inmediatamente la unidad si se
produce un corte en la alimentación eléctrica.
12. A las personas que intentan darse un masaje por primera vez se les recomienda empezar un programa de
masaje suave. El masaje “shiatsu” es muy fuerte, por lo que deberá ser disfrutado cuando uno se hay
acostumbrado a la silla.
Page 31

PRECAUCIONES PARA EL FUNCIONAMIENTO
ADVERTENCIA: Para evitar dañar el asiento, siga estas precauciones:
1. El asiento está diseñado para soportar un peso máximo de 264lbs (120kg). Exceder el peso máximo puede
causar el daño permanente del mecanismo de masaje y/o de otros componentes de la unidad.
El fabricante no se responsabiliza de los daños originados por un mal uso y por tanto no quedan cubiertos por
la garantía.
2. No se siente nunca sobre el mando de control ni permita que éste se caiga. No tire del cable del mando de
control ni del cable de la red. Tenga cuidado para que el cable del mando de control no quede atrapado entre
el apoyabrazos y el respaldo del asiento.
3. No trate el asiento con brusquedad, evitando volcarlo de lado, dándolo la vuelta o subiéndose encima de él.
4. Trate el tapizado con delicadeza.
• Mantenga cualquier objeto afilado o punzante lejos del tapizado del asiento. Evite la caída de cenizas y de
cigarrillos o cerillas encendidos sobre el asiento.
• La exposición a la luz solar directa puede desteñir o causar cambios en el color del tapizado.
5. Si el sillón de masaje funciona mal, apáguelo inmediatamente y llévelo a un centro de servicio autorizado para
que se lo revisen.
6. No intente reparar el sillón de masaje por su propia cuenta.
7. No accione ningún interruptor con insistencia. Tal acción puede ser la causa de que el interruptor funcione mal.
8. El sillón de masaje emite algunos ruidos durante el funcionamiento. Esto se debe a su estructura y es
completamente normal.
9. Asegúrese de que no haya ningún obstáculo detrás del asiento antes de reclinarlo. El asiento se puede reclinar
con un ángulo máximo de 170°. Si el respaldo golpea contra una pared o una columna, el sillón podrá
funcionar mal. Asegúrese de dejar siempre un espacio amplio detrás del sillón. Reclínelo lentamente para
evitar que entre en contacto con un obstáculo.
10. Cuando se aplique una presión excesiva a las cabezas de masaje, éstas podrán detenerse con fines de
seguridad. Cuando las cabezas se desplazan hacia arriba, el peso del cuerpo puede detener su movimiento.
En este caso, levántese ligeramente para permitir que suban las cabezas de masaje.
11. Después de cada masaje, deslice el interruptor de la alimentación, que se encuentra situado en la parte
posterior del asiento, hacia la posición “off”, y ponga el interruptor de bloqueo en la posición “lock
12. No utilice of sillón con alguna parte del cuerpo mojada.
13. No utilice el sillón de masaje en locales húmedos (sauna, piscina) o al aire libre.
CUIDADO DEL SILLóN DE MASAJE
• Desenchufe siempre el sillón antes de limpiar.
• Si está sucio el tapizado, humedézcalo con jabón líquido y cepille la superficie. Frote luego con un paño
humedecido en agua. Deje que el tapizado se seque naturalmente. Si se ensucian las partes de plástico, utilice
agua templada con jabón líquido en un paño blando para limpiar la superficie.
• No utilice diluyente, bencina u otros productos de limpieza tipo disolvente. Los productos químicos pueden
desteñir o estropear los materiales.
Page 32

on
off
lock open
lock switch
EP1060
Interruptor de
alimentación
Interruptor de
bloqueo
Plantas de los pies Pantorrillas
Masaje de rodillos de 2 formas
EP1061
Respaldo
Reposabrazos
• Levante el cojín central si el
masaje no le resulta lo
suficientemente fuerte.
Cojín central con almohada
incorporada
Cremallera trasera del cojín
Cojín lateral
Mando de control
Bolsillo para el mando
Asiento
Reposapiernas
Mando de control
Cubierta trasera
Tirador de la cubierta trasera
Etiqueta de seguridad
Ruedas
CONEXIÓN A T OMA DE TIERRA
• El producto debe ser conectado a tierra. Si funciona mal, la conexión a tierra proporciona el camino de menos
resistencia a la corriente eléctrica, reduciéndose así el riesgo de poder recibir una descarga eléctrica.
• Este producto está equipado con un cable que dispone de un conductor y una clavija con conexión a tierra. La
clavija debe conectarse en la toma de corriente apropiada que disponga de una conexión a tierra según todos los
códigos y ordenanzas locales.
PELIGRO
• Una conexión mal hecha del conductor de conexión a tierra puede dar origen a descargas eléctricas. Póngase en
contacto con un electricista cualificado si tiene alguna durante acerca de la conexión a tierra del producto. No
modifique la clavija suministrada con el producto aunque ésta no pueda conectarse en la toma de corriente. Pida
a un electricista cualificado que le instale una toma de
corriente apropiada.
• Este producto ha sido diseñado para funcionar con una
corriente nominal de 120 voltios, y tiene una clavija de
conexión a tierra como la mostrada en la figura A.
Asegúrese de que el producto esté conectado a una
toma de corriente que tenga la misma configuración
que la clavija. Con este producto no deberá utilizarse
ningún adaptador.
CÓMO MOVER EL ASIENTO
PRECAUCIÓN
No mueva el asiento mientras hay alguien sentado en él.
Si no sigue este consejo, el asiento podrá volcarse y la persona podría lesionarse.
Utilice las ruedecitas para mover el asiento.
• No intente mover el asiento levantándolo desde la parte delantera (ilustración derecha). La forma correcta de
mover el asiento consiste en poner un pie sobre una ruedecita y empujar hacia abajo por detrás del asiento
(ilustración izquierda).
• Resulta más fácil mover el asiento si las cabezas de masaje han sido desplazadas hacia las posiciones de apoyo
y el respaldo está inclinado.
• Mover el asiento puede marcar fácilmente las superficies de los suelos, por lo tanto, ponga una estera o trapo en
el suelo y desplace el asiento lentamente.
• Antes de empujar el asiento hacia abajo, prepárese para manejar su peso y tenga mucho cuidado al desplazarlo.
Figura A
PATILLA DE
CONEXIóN A TIERRA
TOMA DE
CORRIENTE CON
CONEXIóN A
TIERRA
BIEN MAL
Ruedecita
Page 33

3332
on
off
lock open
lock switch
EP1060
Interruptor de
alimentación
Interruptor de
bloqueo
Plantas de los pies Pantorrillas
Masaje de rodillos de 2 formas
EP1061
Respaldo
Reposabrazos
• Levante el cojín central si el
masaje no le resulta lo
suficientemente fuerte.
Cojín central con almohada
incorporada
Cremallera trasera del cojín
Cojín lateral
Mando de control
Bolsillo para el mando
Asiento
Reposapiernas
Mando de control
Cubierta trasera
Tirador de la cubierta trasera
Etiqueta de seguridad
Ruedas
PARTES DE LA UNIDAD Y SUS FUNCIONES
ASIENTO
Page 34

16in.
40cm
16in.
40cm
34
MANDO DE CONTROL (EP1061
)
PARTES DE LA UNIDAD Y SUS FUNCIONES
programmed operation
whole back
gentlestrong
neck roller position
reclining
programmed
operation
/
manual
operation
lower backneck, shoulder
tap on/offvibration on/off
slow fast
intensity
leg massage
neck roller position
reclining
programmed
operation
/
manual
operation
intensity
roll
manual operation
whole back
regional
tap Avibration tap B
swedishshiatsu knead
position
slow fast
leg massage
• Se utiliza para el encendido,
apagado y ajuste de la unidad
de masaje de piernas.
Botón del masaje de piernas
Botón de encendido/apagado
Indicador de encendido/apagado
Tapa cerrada Tapa abierta
• Sirve para detener el masaje
de inmediato.
Botón de parada
• Sirve para ajustar el ángulo
de inclinación del respaldo y
reposapiernas.
Botón de reclinado
• Indica el modo de operación
(manual o programado).
Indicador de modo
Botones de selección
del programa manual
• Se usa en el modo
programado.
Botón de encendido/
apagado de percusión
Tapa
Botones de ajuste de
los rodillos de masaje
• Sirve para acomodar la
posición de los hombros.
Botón de ajuste de
posición de hombros
Indicadores de posición
de hombros
Botones modo
programado
• Sirven para seleccionar la
zona donde debe
concentrarse el masaje.
Botones para zonas localizadas
• Se usa en el modo
programado.
Botón de encendido/
apagado de vibración
Indicador de intensidad
•
Sirve para seleccionar la intensidad
del masaje (3 niveles).
Botón selector de
intensidad
• Se utiliza para encender/apagar
y ajustar la unidad de masaje
por rodillo de las piernas.
Botón del masaje de piernas
MANDO DE CONTROL (EP1060
)
gentle strong
leg massage
Page 35

35
16in.
40cm
16in.
40cm
PRECAUCIONES
• No utilice la unidad en lugares con humedad como
por ejemplo el cuarto de baño, etc. para prevenir las
descargas eléctricas u otros accidentes.
• Coloque la unidad en una superficie completamente
plana. De lo contrario el sillón podría volcar.
EMPLAZAMIENTO DE LA UNIDAD
MONTAJE DEL SILLÓN DE MASAJE
Garantice espacio suficiente para abatir el asiento
• Serán necesarios unos 16in. (40 cm) aproximadamente por
detrás y al menos 16in. (40 cm) por delante de la unidad.
Lugares que deben evitarse
• No exponga la unidad a la luz solar o en lugares expuestos a
altas temperaturas, por ej., frente a la calefacción ya que
podría causar decoloración o endurecimiento de la piel
sintética.
Page 36

1. T ras realizar las comprobaciones de seguridad, encienda la unidad (ver pág. 37)
z Conecte el enchufe de alimentación a la toma de corriente.
x
Gire el interruptor de bloqueo a su posición desbloqueada (Open).
c Encienda el interruptor de alimentación situado en la
parte posterior de la unidad.
•
Realice siempre las siguientes comprobaciones antes de usar la
unidad.
- Compruebe que no hay personas, animales u obstáculos
alrededor de la unidad.
- Compruebe que no existen rasgaduras en el tejido.
2. Pulse el botón
• Al pulsar el botón , parpadearán los botones del modo
programado y de masaje de piernas. Si la tapa del mando está abierta, también parpadearán los botones de
selección del modo manual.
3. Seleccione el programa o movimiento deseado en el modo manual (ver pág. 40)
Modo programado
• Ideal para personas que sienten la fatiga en todo el cuerpo.
• Ideal para personas que simplemente desean probar el sillón de masajes.
z Seleccione el programa deseado.
x Pulse los botones Cuello/Hombros o Zona lumbar si desea localizar el masaje sobre una
zona en particular.
c El sillón se reclinará hasta el ángulo óptimo para realizar el masaje. La sesión comenzará y
continuará hasta alcanzar el final del programa seleccionado, en cuyo momento se
detendrá automáticamente el masaje.
Modo manual
• Sirve para seleccionar un movimiento de masaje o una zona en particular.
• Ideal para aquellas personas que deseen ajustar el movimiento y la zona durante el curso del masaje.
• Ideal para aquellas personas que deseen un masaje más prolongado en los hombros al final del programa.
z Abra la tapa del mando de control y seleccione el masaje deseado.
x El asiento se reclinará automáticamente a la posición óptima de masaje.
c Ajuste la posición e intensidad de los rodillos de masajes.
v Pulse el botón para realizar el masaje.
4.
Ajuste el ángulo del respaldo y del reposapiernas (ver pág. 39)
•
Ajuste el ángulo del respaldo y del reposapiernas hasta la posición
más confortable.
•
Al levantar el respaldo, los rodillos de masaje se recogen por motivos de seguridad, lo cual
produce una pequeña demora hasta que el respaldo comienza realmente a levantarse.
Por lo tanto, mantenga pulsado el botón de reclinado mientras el respaldo alcanza la posición vertical.
5. Apague la unidad tras finalizar el masaje
(ver página 46)
z
Apague el interruptor de alimentación (posición Off).
x Gire el interruptor de bloqueo a su posición
bloqueada (lock).
c Desenchufe el cable de alimentación eléctrica.
• A continuación describimos el modo de uso general del sillón de masaje. Para obtener mayor detalle, consulte las
páginas indicadas.
USO DEL SILLÓN DE MASAJES — INTRODUCCIÓN
Si se aplica una presión excesiva sobre los rodillos de masaje durante el masaje de la parte superior del cuerpo, por
motivos de seguridad los rodillos detendrán su movimiento. Si se da el caso, incorpórese ligeramente antes de volver
a iniciar el masaje. (Esto ocurrirá con mayor probabilidad con aquellas personas cuyo peso exceda los 220 Ib.)
Si el mecanismo de masaje se detiene (o si todos los indicadores y botones del mando de control comienzan a
parpadear), apague el interruptor de alimentación, espere aprox. 10 segundos y enciéndalo de nuevo.
16in.
(40cm)
16in.
(40cm)
Aquí no debe
haber obstáculos.
Compruebe
el enchufe
Tejido del
cojín central
2
3
1
on
off
lock open
lock switch
2
3
1
on
off
lock open
lock switch
3
2
1
on
off
lock open
lock switch
Page 37

3736
16in.
(40cm)
16in.
(40cm)
Aquí no debe
haber obstáculos.
Compruebe
el enchufe
Tejido del
cojín central
2
3
1
on
off
lock open
lock switch
1. Compruebe el área que rodea al sillón
z Verifique que no hay nada detrás de la unidad.
x Compruebe que hay suficiente espacio para
reclinar la unidad.
• Por motivos de seguridad, la unidad se detendrá si tropieza
con algo al reclinarse.
TRAS COMPROBAR EL ÁREA CIRCUNDANTE, ENCIENDA LA UNIDAD
ANTES DEL USO DE LA UNIDAD
2. Compruebe la unidad
z Levante la almohada y el cojín central para verificar
que no existe ninguna rasgadura en la funda del
cojín, etc.
x Compruebe que el enchufe no ha resultado dañado
ni tiene suciedad.
3. Encienda la unidad
z Conecte el enchufe de alimentación a la toma de
corriente.
x Gire el interruptor de bloqueo a su posición
desbloqueada (Open).
c Encienda el interruptor de alimentación situado en
la parte posterior de la unidad.
Cuando enchufe la unidad, asegúrese de que el cable de
alimentación pueda moverse un mínimo de 4in. (10 cm), es
decir, que no quede completamente tirante.
Después de cada uso
• Asegúrese de poner el interruptor de la alimentación en "off".
• Para impedir que los niños utilicen esta unidad, bloquee el interruptor de la
alimentación moviendo el interruptor de bloqueo del funcionamiento a la
posición "lock".
• Como medida de precaución adicional, desenchufe el cable de la
alimentación de la toma de corriente después de cada uso del sillón de
masaje.
NOTA:
Tenga cuidado para no pellizcar el cable debajo de los bastidores para las piernas
del asiento o con ningún otro objeto.
NOTA:
El interruptor de bloqueo
del funcionamiento
impide que la unidad
sea encendida cuando
está situado en la
posición “lock”.
Page 38

PRECAUCIONES
• Siéntese despacio tras comprobar la posición de los rodillos de masaje.
No sobrepase el peso máximo del usuario de 264lbs.(120 kg.) Antes de sentarse, deberá comprobar primero la
posición de las cabezas de masaje con sus manos porque, si no lo hace, las cabezas de masaje podrán causar
lesiones o que la unidad funcione mal.
ANTES DE SENTARSE
AJUSTE DEL ASIENTO
• Los rodillos de masaje se encuentran normalmente
recogidos (a la izquierda y a la derecha de la parte inferior
del respaldo).
• No se siente si los rodillos de masaje no se encuentran
recogidos. En ese caso, pulse el botón dos veces para
recoger los rodillos de masaje a la posición adecuada. (Si
se había pulsado el botón de parada durante el masaje,
los rodillos de masaje no se encontrarán regidos.)
• No se siente sobre el mando de control ya que podría
presionar el botón de reclinación provocando que el
asiento se recline automáticamente.
Siéntese siempre con el reposapiernas bajado.
• Si se sienta con el reposapiernas elevado, podría plegarse
inesperadamente y causarle lesiones.
• Si el reposapiernas está levantado, pulse el botón para
descenderlo antes de sentarse.
ADVERTENCIA:
Para evitar el peligro de lesionarse, no ponga sus dedos o
ninguna parte de su cuerpo en la sección mecánica del
reposapiernas.
reclining
reclining
170° aprox.
Ángulo de inclinación
120° aprox.
85° aprox.
Ángulo de
elevación
0° aprox.
Ángulo de
inclinación
Ángulo de
elevación
reclining
Pulsar
• Para abrir el dispositivo de masaje de las piernas y dar un masaje en las plantas de los pies, sujete la parte
superior de la otomana por ambos lados y sáquela alejándola de usted.
NOTA:
• NO se siente en el sillón de masaje ni se levante del mismo pisando el reposapiernas mientras éste está
plegado hacia abajo. Quite siempre sus pies del sillón de masaje antes de
levantarse.
• NO abra ni cierre el dispositivo de masaje de las piernas mientras reclina el
asiento.
MASAJE EN LAS PLANTAS DE LOS PIES
• Cuando el masaje no resulta lo suficientemente fuerte,
levante el cojín y comience un nuevo masaje.
COLOCACIÓN DEL COJÍN
Page 39

3938
2. Levantar el respaldo
• Verifique que no hay ningún obstáculo detrás del asiento o bajo el
reposapiernas.
• Mantenga pulsado el botón de reclinado para levantar el respaldo y bajar el
reposapiernas.
• Cuando tanto el respaldo como el reposapiernas han alcanzado la posición
inicial, se oyen tres pitidos.
• Al levantar el respaldo, los rodillos de masaje se recogen por motivos de
seguridad, lo cual produce una pequeña demora hasta que el respaldo
comienza realmente a levantarse. Por lo tanto, mantenga pulsado el botón
de reclinado mientras el respaldo alcanza la posición vertical.
reclining
170° aprox.
Ángulo de inclinación
120° aprox.
85° aprox.
Ángulo de
elevación
0° aprox.
Ángulo de
inclinación
Ángulo de
elevación
reclining
Pulsar
Premere
PRECAUCIÓN:
Para evitar lesiones, después de la utilización, coloque siempre el reposapiernas y el respaldo en sus
posiciones de apoyo (reposapiernas bajado y respaldo subido).
Asegúrese de que no haya ninguna persona o animal doméstico debajo del reposapiernas antes de bajarlo a su
posición de apoyo.
ADVERTENCIA:
Para evitar el peligro de lesionarse, no ponga sus dedos o ninguna parte de su cuerpo en la sección mecánica
del reposapiernas.
1. Reclinar el asiento
• Mantenga pulsado el botón de reclinación para abatir el asiento y elevar el
reposapiernas.
• Una vez extendidos tanto el respaldo como el reposapiernas hasta su
límite, se oyen tres pitidos.
• Si se usa la unidad por primera vez, no recline el asiento completamente.
RECLINAR EL ASIENTO
NOTE:
Coloque el asiento a unos 16 in. (40 cm) de cualquier pared u obstáculo para dejar un espacio de reclinación
adecuado.
Page 40

El programa seleccionado empezará
• Es posible cambiar el programa seleccionado y el movimiento deseado en mitad de la sesión.
• Con el modo programado, el masaje de piernas comienza al mismo tiempo.
Es posible detener el masaje de piernas o modificar su intensidad durante el curso del programa. (Consulte la
página 44.)
• Al levantar el respaldo, los rodillos de masaje se recogen por motivos de seguridad, lo cual produce una
pequeña demora hasta que el respaldo comienza realmente a levantarse. Por lo tanto, mantenga pulsado el
botón de reclinado mientras el respaldo alcanza la posición vertical.
El asiento se reclinará automáticamente a la posición de masaje
• Si el asiento ha excedido el ángulo de reclinado, se detendrá automáticamente.
MODO PROGRAMADO
• Verifique que no se encuentra ningún niño o animal alrededor de la unidad antes de su uso.
programmed operation
whole back
gentlestorong
neck roller position
reclining
programmed
operation
/
manual
operation
lower backneck, shoulder
tap on/offvibration on/off
1
2
3
4
5
1. Pulse el botón
• El indicador de encendido/apagado se encenderá.
• Entonces puede seleccionar tanto la intensidad (fuerte o suave) del
masaje o uno de los modos manuales seleccionables abriendo la
tapa del mando de control.
2. Seleccione el programa deseado
•
Consulte la página 47 para obtener más detalles acerca de estos
programas.
Masaje intenso en toda la espalda
•
La opción fuerte reproduce un masaje
con movimientos similares al de amasar
y un masaje Shiatsu destinado a relajar
los músculos entumecidos.
•
Este tipo de masaje resulta ideal para
gente con los músculos de toda la
espalda agarrotados.
Masaje suave en toda la espalda
• La opción suave proporciona un masaje
suave para ayudar al cuerpo a
recuperase.
• Este tipo de masaje resulta ideal para
personas que se sienten agotadas.
Posición inicial
(EP1061)
Posición de
masaje
Levantado
aprox. 14°
Reclinado aprox. 3°
Reclinando
En esta confortable
posición es posible
masajear desde el
cuello hasta la planta de
los pies.
Posición inicial
(EP1060)
Posición de
masaje
Levantado
aprox. 60°
Reclinado aprox. 14°
Reclinando
En esta confortable
posición es posible
masajear desde el
cuello hasta la planta de
los pies.
programmed operation
whole back
gentlestrong
programmed operation
whole back
gentlestrong
Pulsar
Pulsar
3. Ajuste la posición de los hombros
• Al comenzar el modo programado, el asiento se reclina automáticamente a la posición de masaje y los rodillos
inician un masaje Shiatsu en la zona alrededor de los hombros. Mientras el indicador de posición de hombros
está parpadeando (aprox. 20 segundos), use el botón de ajuste de posición de hombros a fin de posicionar los
rodillos de masaje.
En la ilustración inferior se muestran las diferentes posiciones de ajuste de los rodillos.
• Es posible modificar la posición de los rodillos
durante el masaje.
• Puesto que la posición de los hombros cambia al
modificar el ángulo de inclinación durante el
masaje, reajuste la posición de sus hombros
siempre que modifique el ángulo de inclinación.
• 5 niveles de ajuste (aprox. 4in. de margen).
6.1ft
5.2ft
4.6ft
neck roller position
Up Down Arriba Abajo Altura aproximada
Pulsar
Pulsar
neck roller positionneck roller position
•
Ligero contacto con los
hombros.
Demasiado alto
Posición correcta
Demasiado bajo
lower backneck, shoulder
lower backneck, shoulder
tap on/offvibration on/off
tap on/offvibration on/off
Aumentando la
intensidad del masaje
Disminuyendo la
intensidad del masaje
intensityintensity
Page 41

4140
4. Seleccione una zona para el masaje localizado
• Consulte las páginas 47–49 para obtener más detalles con respecto a los programas.
7. Parada automática con el modo programado
Una vez finalizado el programa seleccionado, la unidad se detendrá automáticamente.
(Aunque la duración del modo programado es de 15 minutos aprox. (entre 12 y 17), esto variará de acuerdo
con la posición de los hombros, del programa seleccionado, independientemente de si la percusión está
activada, y del peso de la persona que está usando la unidad.)
• Los rodillos de masaje se desplazarán a la posición recogida y se detendrán.
• El indicador de encendido/apagado parpadeará aunque los rodillos se hayan detenido.
• Si desea iniciar otra sesión de masaje, pulse el botón .
• Es recomendable hacer una pausa de 10 minutos entre sesiones de masajes para permitir que el cuerpo
descanse.
8. Detener el modo programado
Pulsar el botón para detener el modo programado.
• El indicador de encendido/apagado continuará parpadeando hasta que los rodillos de masaje vuelvan a la
posición recogida.
9. Detener el masaje de inmediato
Pulsar el botón para detener de inmediato el funcionamiento programado.
• Inmediatamente se detendrán todos los movimientos.
• Los rodillos de masaje no se retirarán a la posición inicial, lo cual resulta incómodo y poco confortable.
• Pulse el botón dos veces a fin de devolver los rodillos de masaje a la posición recogida.
Masajear la zona lumbar
• Pulse este botón para concentrar el masaje en la
zona lumbar. (El cuello y los hombros también
recibirán un suave masaje.)
• Para cancelar el
proceso, pulse de
nuevo el botón.
• Cuando el indicador de posición de hombros parpadea, ajuste la
posición de los rodillos de masaje (rodillo superior) de modo que toquen
suavemente los hombros.
•
La posición de los hombros se puede ajustar en un margen de 4in. (10 cm).
• Si no resulta posible corregir el ajuste de la posición de hombros,
deslice su cuerpo hacia abajo e intente ajustar otra vez.
•
Ligero contacto con los
hombros.
Demasiado alto
Posición correcta
Demasiado bajo
Masajear cuello y hombros
• Pulse este botón para concentrar el masaje en
cuello y hombros. (La zona lumbar y superior de la
espalda también recibirán un suave masaje.)
• Para cancelar el
proceso, pulse de
nuevo el botón.
lower backneck, shoulder
lower backneck, shoulder
5. Quitar la vibración y percusión de los programas
Quitar la percusión del modo programado
• Pulse este botón para quitar la percusión del modo
programado. (La percusión se sustituirá por un
movimiento de amasamiento.)
*Volver a pulsar el botón para reestablecer la
percusión en el
programa.
Quitar la vibración del modo programado
• Pulse este botón para quitar la vibración del modo
programado. (La vibración se sustituirá por un
movimiento de amasamiento.)
*Volver a pulsar el botón para reestablecer la
vibración en el
programa.
tap on/offvibration on/off
tap on/offvibration on/off
Pulsar Pulsar
Pulsar
• Con las funciones de percusión B y vibración, los rodillos de masaje deben de estar en contacto con el
cuerpo, de lo contrario no notará nada.
Antes de sentarse verifique siempre que la unidad no se encuentra en funcionamiento.
Pulsar
6. Ajustar la intensidad del masaje
• La intensidad del masaje se puede ajustar entre 3 niveles.
• Cuando los rodillos de masaje alcanzan su límite, se
escuchará un pitido triple.
Aumentando la
intensidad del masaje
Disminuyendo la
intensidad del masaje
intensityintensity
Pulsar
Pulsar
Page 42

MODO MANUAL
neck roller position
reclining
programmed
operation
/
manual
operation
intensity
roll
manual operation
whole back
regional
tap Avibration tap B
swedishshiatsu knead
position
1
3
4
1. Pulse el botón
• El indicador de encendido/apagado se encenderá.
• Entonces se puede seleccionar tanto la intensidad (fuerte o
suave) del masaje como uno de los ajustes manuales
seleccionables abriendo la tapa del mando de control.
2. Abra la tapa del mando de control
• Todos los botones del funcionamiento manual
comenzarán a parpadear.
3. Seleccione el tipo de masaje deseado
• Pulse el botón del masaje que desea.
El botón se enciende.
• El asiento se reclina automáticamente a la posición óptima para el
masaje.
Por ej. al seleccionar amasar.
MODO MANUAL EN LA PARTE SUPERIOR DEL CUERPO
Combinación de masajes
• Es posible combinar los tipos de masajes.
• Sin embargo no resulta posible combinar los tipos de masaje dentro de la misma categoría.
Por ej. añadir Percusión B cuando Amasar está seleccionado.
Ej. 3: Deseleccionar Rodamientos.
Ej. 2: Añadir Rodamientos a la selección.
Pulsar
Pulsar
Pulsar
Pulsar
Cambiar de tipo de masaje
Ej. 1: Cambiar de tipo de masaje dentro de la misma categoría.
(Cambiar a Shiatsu cuando está seleccionado Amasar.)
Pulsar
• Verifique que no se encuentra ningún niño o animal alrededor de la unidad antes de su uso.
Elevando los rodillos
de masaje
Descendiendo los
rodillos de masaje
positionposition
Aumentando la separación Disminuyendo la separación
positionposition
Aumentando la
intensidad del masaje
Disminuyendo la
intensidad del masaje
intensityintensity
neck roller position
programmed
operation
manual operation
whole back
intensity
slow fast
leg massage
reclining
manual
/
operation
swedishshiatsu knead
tap Avibration tap B
roll
position
regional
manual operation
whole back
swedishshiatsu knead
tap Avibration tap B
regional
roll
manual operation
whole back
swedishshiatsu knead
tap Avibration tap B
regional
roll
manual operation
swedishshiatsu knead
tap Avibration tap B
whole back
roll
regional
manual operation
whole back
swedishshiatsu knead
tap Avibration tap B
regional
roll
whole back
manual operation
swedishshiatsu knead
tap Avibration tap B
roll
regional
manual operation
whole back
swedishshiatsu knead
tap Avibration tap B
regional
roll
manual operation
whole back
swedishshiatsu knead
tap Avibration tap B
regional
roll
manual operation
whole back
swedishshiatsu knead
tap Avibration tap B
regional
roll
manual operation
swedishshiatsu knead
tap Avibration tap B
whole back
regional
roll
manual operation
whole back
swedishshiatsu knead
tap Avibration tap B
regional
roll
Page 43

4342
4. Ajuste las configuraciones de masaje manual
Ajustar la posición vertical de los rodillos de masaje
• Los rodillos de masaje se mueven ligeramente cada vez que
se pulsa el botón. Si mantiene pulsado el botón, los rodillos de
masaje continuarán moviéndose hasta soltar el botón. Cuando
los rodillos de masaje alcanzan su límite, se oye un pitido
triple.
Ajustar la separación entre los rodillos de masaje
• Las opciones Vibración, Percusión, Shiatsu, Rodamientos de
espalda completa y Rodamientos locales se pueden ajustar
en 5 niveles mientras que la opción Sueco sólo tiene 3
niveles.
• El masaje sueco abarca toda la espalda, por lo tanto no es
posible regular la separación de los rodillos.
• Los rodillos de masaje se mueven ligeramente cada vez que
se pulsa el botón. Si mantiene pulsado el botón, los rodillos de
masaje continuarán moviéndose hasta soltar el botón.
• Cuando los rodillos de masaje alcanzan su límite, se
escuchará un pitido triple.
• La opción Rodamientos o la combinación de Rodamientos con
otros masajes son de intensidad fuerte, por este motivo su
ajuste se limita a los niveles medio y suave.
Ej. 2: Cambiar el tipo de masaje dentro de otra categoría.
(Cambiar a Percusión B cuando está seleccionado Amasar.)
• Cuando Amasar está combinado con Percusión B, al deseleccionar Amasar, sólo continúa con
Percusión.
Pulsar
Pulsar
Elevando los rodillos
de masaje
Descendiendo los
rodillos de masaje
positionposition
Pulsar
Pulsar
Aumentando la separación Disminuyendo la separación
positionposition
Pulsar
Pulsar
Rodamientos, Rodamientos + (Shiatsu, Percusión B, Percusión A, Vibración) Combinación...Suave/Medio
Rodamientos + (Combinación Amasar, Sueco).........................................................................Suave
• Para Percusión B, Sueco y Vibración, los rodillos de masaje deben estar en contacto con el cuerpo, de lo
contrario no notará el movimiento.
5. Parada automática con el modo manual
• Un temporizador detendrá automáticamente la unidad aproximadamente 15 minutos (entre 15 y 17) después
del comienzo de la sesión.
(Esto obedece a un motivo de seguridad que pretende evitar el uso excesivo.)
• Los rodillos de masaje se desplazarán a la posición recogida y se detendrán.
• El indicador de encendido/apagado parpadeará aunque los rodillos se hayan detenido.
• Si desea iniciar otra sesión de masaje, pulse el botón .
• Es recomendable hacer una pausa de 10 minutos entre sesiones de masajes para permitir que el cuerpo
descanse.
6. Detener el modo manual
Pulse el botón para detener el modo manual.
• El indicador de encendido/apagado continuará parpadeando hasta que los rodillos de masaje vuelvan a la
posición recogida.
Ajustar la intensidad del masaje
• La intensidad del masaje se puede ajustar entre 3 niveles.
• Cuando los rodillos de masaje alcanzan su límite, se
escuchará un pitido triple.
Aumentando la
intensidad del masaje
Disminuyendo la
intensidad del masaje
intensityintensity
Pulsar
Pulsar
manual operation
swedishshiatsu knead
tap Avibration tap B
manual operation
swedishshiatsu knead
tap Avibration tap B
manual operation
swedishshiatsu knead
tap Avibration tap B
whole back
roll
regional
whole back
regional
roll
whole back
regional
roll
Page 44

Verifique que no hay
obstáculos aquí
Verifique que no hay
obstáculos aquí
Cierre del
dispositivo de
masaje para las
piernas.
reclining
• El dispositivo de masaje de las piernas tiene dos funciones.
Cuando está subido funciona para dar masajes en las pantorrillas,
y cuando está bajado para dar masajes en las plantas de los pies.
1. Pulse el botón
• Los botones de modo programado y masaje de piernas
parpadearán.
2. Pulse el botón de masaje de piernas
• Se iniciará el masaje para las piernas.
• Se visualizará la velocidad del masaje.
• Durante el masaje se puede ajustar el ángulo de reclinación.
3. Ajuste de la intensidad del masaje
• La intensidad del masaje se puede ajustar en 2 etapas.
4. Parada automática del masaje de piernas
• Un temporizador detendrá automáticamente la unidad
aproximadamente 15 minutos (entre 15 y 17) después del
comienzo de la sesión.
• Si desea iniciar otra sesión de masaje, pulse el botón .
5. PARADA DEL MODO MANUAL
Pulse el botón para detener el masaje de piernas.
44
MASAJE DE PIERNAS CON EL MODO MANUAL (EP1061
)
Pulsar
Pulsar Pulsar Pulsar
Plantas de los pies Pantorrillas
• Si sus pantorrillas no se encuentran en la posición correcta sobre el reposapiernas, posicione las piernas
correctamente.
1. Pulse el botón
• Los botones de modo programado y masaje de piernas parpadearán.
2. Pulse el botón de masaje de piernas
• Empezará el masaje de vibración.
• La intensidad del masaje se visualizará.
• Durante el masaje se puede ajustar el ángulo de reclinación.
3. Ajuste de la intensidad del masaje
• La intensidad del masaje se puede ajustar en 2 etapas.
4. Parada automática del masaje de piernas
• Un temporizador detendrá automáticamente la unidad
aproximadamente 15 minutos (entre 15 y 17) después del comienzo
de la sesión.
• Si desea iniciar otra sesión de masaje, pulse el botón .
5. PARADA DEL MODO MANUAL
Pulse el botón para detener el masaje de piernas.
MASAJE DE PIERNAS CON EL MODO MANUAL (EP1060
)
Pulsar
suave fuerte off
gentle strong
leg massage
gentle strong
leg massage
gentle strong
leg massage
Pulsar Pulsar Pulsar
NOTA:
(EP1061) NO se siente en el sillón de masaje ni se levante del mismo pisando el reposapiernas mientras
éste está plegado hacia abajo. Quite siempre sus pies del sillón de masaje antes de levantarse.
(EP1060/EP1061) Temporizador integrado para evitar el uso excesivo
• Gracias al temporizador integrado se evita el exceso de uso.
• Durante el modo manual, el temporizador se detiene automáticamente después de 15 minutos (15–17).
*Si desea seguir usando la unidad, es recomendable hacer una pausa de 10 minutos entre masajes para
permitir que el cuerpo se recupere.
slow fast
leg massage
slow fast
leg massage
Alto Bajo Apagado
slow fast
leg massage
slow fast
leg massage
slow fast
gentle strong
leg massage
gentle strong
leg massage
leg massage
Page 45

45
1. V erifique que no hay ningún obstáculo bajo
el respaldo y el reposapiernas
DEVOLVER EL ASIENTO A LA POSICIÓN INICIAL
DESPUÉS DE COMPLETAR EL MASAJE
Verifique que no hay
obstáculos aquí
Verifique que no hay
obstáculos aquí
2. Coloque el asiento en posición vertical
• Cuando se retorna el asiento a la posición vertical, puesto
que se necesita algún tiempo hasta que los rodillos de
masaje alcancen la posición retractada, mantenga
presionado el botón de reclinado hasta que el asiento esté
completamente vertical.
Cierre del
dispositivo de
masaje para las
piernas.
reclining
3. Introduzca el mando de control en el bolsillo
• Evite ayudarse del bolsillo del mando para levantarse del
sillón ya que el exceso de fuerza en el bolsillo puede
desgarrarlo.
4. Devuelva el cojín central a su posición inicial
Pulsar
Page 46

on
off
lock open
lock switch
1. Apague la unidad
z Apague el interruptor de alimentación (posición Off).
x Gire el interruptor de bloqueo a su posición
bloqueada (lock).
DESCONECTAR LA UNIDAD
• Apague siempre el interruptor de alimentación (posición off) y gire el interruptor de bloqueo a su posición
bloqueada (lock).
De lo contrario podrían producirse accidentes si los niños juegan con la unidad.
• No tire del cable de alimentación para desenchufar la unidad de la red. Hágalo siempre cogiendo el enchufe.
De lo contrario podrían producirse descargas eléctricas o cortocircuitos.
• Desenchufe siempre la unidad de la red cuando no la esté usando.
De lo contrario puede producirse deterioro debido al polvo o la humedad, lo cual podría causar un cortocircuito
desencadenando un incendio.
PRECAUCIONES
2. Desenchufe el cable de alimentación
1
Rodamientos, Shiatsu y
Amasar/Rodamientos
Amasar, Rodamientos y
Shiatsu/Vibración
Sueco, Percusión B/
Rodamientos y Shiatsu
Shiatsu y Percusión B/
Rodamientos
Amasar/Percusión B y
Rodamientos
Percusión B/Rodamientos,
Percusión B y Amasar
Amasar/Rodamientos,
Percusión B y Amasar/
Percusión B/Rodamientos
Amasar y Shiatsu
Percusión B,
Percusión B/
Rodamientos y Shiatsu
2 3
6
54
7 8 9
Shiatsu, Percusión A y
Rodamientos
10
Page 47

4746
• En las ilustraciones siguientes se muestran los movimientos de forma esquemática.
• Cuando los programas llegan a su fin, la unidad se detiene automáticamente. (Aunque la duración del modo
programado es de 15 minutos aprox. (entre 12 y 17), esto variará de acuerdo con la posición de los hombros, del
programa seleccionado, independientemente de si la percusión está activada, y del peso de la persona que está
usando la unidad.)
FUERTE
SUAVE
Parte superior del cuerpo
DETALLES DEL MODO PROGRAMADO
1
Rodamientos, Shiatsu y
Amasar/Rodamientos
Amasar, Rodamientos y
Shiatsu/Vibración
Sueco, Percusión B/
Rodamientos y Shiatsu
Shiatsu y Percusión B/
Rodamientos
Amasar/Percusión B y
Rodamientos
Percusión B/Rodamientos,
Percusión B y Amasar
Amasar/Rodamientos,
Percusión B y Amasar/
Percusión B/Rodamientos
Amasar y Shiatsu
Percusión B,
Percusión B/
Rodamientos y Shiatsu
2 3
6
54
7 8 9
Shiatsu, Percusión A y
Rodamientos
10
Parte superior del cuerpo
1
Rodamientos, Amasar y
Sueco/Percusión A/
Rodamientos
2 3
Percusión A, Sueco/
Rodamientos y Sueco/
Percusión A/Rodamientos
Sueco/Rodamientos, Sueco/
Percusión A/Rodamientos y
Sueco/Vibración/Rodamientos
Sueco/Vibración
Sueco/Vibración y
54
Sueco/Percusión A/
Rodamientos
Sueco y Sueco/
6
Percusión A/Rodamientos
7 8 9
Sueco, Shiatsu y Sueco/
Percusión A/Rodamientos
Sueco/Rodamientos y
Sueco/Percusión A/
Rodamientos
Shiatsu, Vibración/
Rodamientos y Shiatsu/
Vibración
10
Sueco/Percusión A/
Rodamientos, Sueco y
Rodamientos
Page 48

• En las ilustraciones siguientes se muestran los movimientos de forma esquemática.
• Cuando los programas llegan a su fin, la unidad se detiene automáticamente. (Aunque la duración del modo
programado es de 15 minutos aprox. (entre 12 y 17), esto variará de acuerdo con la posición de los hombros, del
programa seleccionado, independientemente de si la percusión está activada, y del peso de la persona que está
usando la unidad.)
FUERTE/CUELLO Y HOMBROS
FUERTE/ZONA LUMBAR
Parte superior del cuerpo
Parte superior del cuerpo
1
Rodamientos, Shiatsu y
Amasar/Rodamientos
Percusión B/Rodamientos,
2 3
Percusión B y Amasar
Amasar y Shiatsu
Percusión B, Percusión B/
Rodamientos y Shiatsu
Percusión B/Rodamientos y
54
Amasar/Percusión B/
Rodamientos
Percusión B, Amasar y
6
Percusión B/Rodamientos
7 8 9
Amasar y Shiatsu
1
Amasar/Rodamientos, Sueco/
Percusión B y Percusión B/
Rodamientos
2 3
Rodamientos y
Shiatsu/Vibración
Percusión B, Percusión B/
Rodamientos y Shiatsu
Sueco, Percusión B/
Rodamientos y Shiatsu
Amasar/Percusión B/
Rodamientos
Shiatsu y Percusión B/
Rodamientos
10
Shiatsu, Sueco y
Rodamientos
Percusión B/Rodamientos,
54
Amasar/Rodamientos y
Sueco/Percusión B
Rodamientos y
6
Shiatsu/Vibración
7 8 9
Sueco, Percusión B/
Rodamientos y Shiatsu
Shiatsu y Percusión B/
Rodamientos
Amasar/Rodamientos y
Vibración/Rodamientos
10
Shiatsu y Sueco
Page 49

4948
SUAVE/CUELLO Y HOMBROS
SUAVE/ZONA LUMBAR
Parte superior del cuerpo
Parte superior del cuerpo
• En las ilustraciones siguientes se muestran los movimientos de forma esquemática.
• Cuando los programas llegan a su fin, la unidad se detiene automáticamente. (Aunque la duración del modo
programado es de 15 minutos aprox. (entre 12 y 17), esto variará de acuerdo con la posición de los hombros, del
programa seleccionado, independientemente de si la percusión está activada, y del peso de la persona que está
usando la unidad.)
1
Rodamientos, Amasar y
Sueco/Percusión A/
Rodamientos
Percusión A, Sueco/
2 3
Rodamientos y Sueco/
Percusión A/Rodamientos
Sueco, Sueco/Vibración y
Sueco/Percusión A/
Rodamientos
Sueco y Sueco/
Percusión A/Rodamientos
Percusión A, Sueco/
54
Rodamientos y Sueco/
Percusión A/Rodamientos
Sueco, Sueco/Vibración y
6
Sueco/Percusión A/Vibración
7 8 9
Sueco y Sueco/Percusión A/
Rodamientos
1
Rodamientos, Amasar y
Sueco/Percusión A/
Rodamientos
Sueco/Percusión A/
2 3
Rodamientos, Sueco/
Vibración/Rodamientos y Sueco
Percusión A, Sueco/
Rodamientos y Sueco/
Percusión A/Rodamientos
Sueco, Shiatsu y Sueco/
Percusión A/Rodamientos
Sueco, Sueco/Vibración y
Sueco/Percusión A/
Rodamientos
Shiatsu, Vibración/
Rodamientos y Shiatsu/
Vibración
10
Sueco/Percusión A/
Rodamientos, Sueco y
Rodamientos
Sueco/Rodamientos y
54
Sueco/Percusión A/
Rodamientos
Sueco/Percusión A/
6
Rodamientos, Sueco/
Vibración/Rodamientos y Sueco
7 8 9
Sueco, Shiatsu y Sueco/
Percusión A/Rodamientos
Shiatsu, Vibración/
Rodamientos y Shiatsu/
Vibración
Sueco/Percusión A/
Rodamientos y Sueco
10
Sueco
Page 50

Detergente
suave
Agua
Disolventes
Benceno
Alcohol
Detergente
suave
Agua
Agua
50
Este tipo de masaje emula a los pulgares
de ambas manos que trabajan sobre los
puntos de acupresión. Se trata de una
alternancia de presión y relajación que
transmite la misma sensación que un
masajista de shiatsu profesional. Este tipo
de masajes resulta ideal para aquellas
personas con fatiga y dolores musculares
que necesitan un masaje localizado.
Shiatsu Tap A
Este movimiento reproduce la parte
exterior de los dedos golpeando
rítmicamente en un movimiento diseñado
para penetrar en el cuerpo y relajar los
músculos. Tiene su mejor efecto sobre
los músculos finos del cuello o como final
de masaje.
Este movimiento es similar al de las
palmas de las manos presionando
y friccionando una amplia zona a
ambos lados del cuerpo. Este tipo
de masaje es ideal para personas
que necesitan un extenso masaje
sobre la espalda y la zona lumbar.
Swedish Tap B
Este movimiento reproduce los puños con
rítmicos golpecitos que proporcionan un
sólido golpeteo pensado para eliminar la
rigidez y el cansancio persistentes. Este
tipo de masajes es ideal para músculos
gruesos como los que se encuentran en
los hombros.
Whole Back Roll
Los rodillos de masaje recorren toda la
espalda en dirección ascendente y
descendente desde el cuello hasta la
zona lumbar para estirar los músculos de
la espalda y liberar tensión. Resulta ideal
durante el inicio del masaje ya que es
relativamente suave.
Knead
Este masaje alterna una fuerte presión
con una rápida relajación en un ritmo
ideado para los músculos entumecidos.
Resulta ideal para relajar los músculos
entumecidos en el cuello y los hombros.
Regional Roll
Los rodillos de masaje recorren los
músculos de la espalda pero
concentrándose en una zona localizada.
Resulta ideal en combinación con
amasamiento, percusiones B y
vibraciones.
Vibration
Las pequeñas vibraciones están
pensadas para relajar incluso el cuerpo
más tenso. Combinadas con el masaje de
rodamientos, etc. este tipo de masajes es
ideal para toda la espalda.
DETALLES DEL MODO MANUAL
Page 51

• Friccione la piel sintética suavemente utilizando un paño
suave y seco para la limpieza cotidiana.
(Nunca use trapos que contengan productos químicos.)
• Si se ensucia la piel, aplique una solución de 3–5% de
detergente suave diluido en agua caliente y use un trapo
suave para eliminar la suciedad dando ligeros toques sobre
la superficie. A continuación enjuague bien el trapo y
utilícelo para retirar el detergente, después pase un trapo
seco y deje secar de forma natural.
(Nunca utilice un secador para secar con mayor rapidez la
piel sintética.)
• Si la piel sintética entra en contacto con vinilo durante un
periodo de tiempo prolongado, puede causar su
decoloración.
PIEL SINTÉTICA DE LA ALMOHADA, COJÍN INTERIOR, ASIENTO Y REPOSABRAZOS
LIMPIEZA Y MANTENIMIENTO
z Pase un trapo previamente humedecido con
un detergente suave y bien escurrido.
x Seguidamente pase por toda la unidad un
trapo humedecido sólo con agua.
*Asegúrese de escurrir bien el trapo antes de
pasarlo por el mando de control.
c Deje secar la unidad de forma natural.
• Nunca use benceno, disolventes o alcohol.
TUBOS Y ÁREAS DE PLÁSTICO
z Pase un trapo previamente humedecido con un detergente
suave y bien escurrido por todo el asiento.
x Use un detergente suave para cepillar las áreas donde el
tejido del asiento está particularmente sucio. No cepille en
exceso el tejido puesto que podría producir daños.
c Seguidamente pase por todo el tejido un trapo humedecido
sólo con agua.
v Deje secar el tapizado de forma natural.
TEJIDO DEL ASIENTO
• Desenchufe siempre el cable de alimentación de la red antes de limpiar la unidad. Asegúrese de secarse
perfectamente las manos antes de volver a enchufar la unidad a la red una vez finalizada la limpieza. De lo
contrario podrían originarse descargas eléctricas o incendios.
PRECAUCIONES
51
Detergente
suave
Agua
Disolventes
Benceno
Alcohol
Detergente
suave
Agua
Agua
Page 52

Problema Causa y solución
Ruidos del motor
• El motor retumba cuando está bajo carga.
• El ruido es excesivo durante las percusiones.
(El ruido es más fuerte en la parte superior de la
unidad.)
• El motor suena raro cuando se ajusta la intensidad
del masaje y la separación de rodillos.
• Se escucha un sonido metálico cuando los rodillos
de masaje se desplazan arriba y abajo.
• Se escucha un sonido de fricción producido por los
rodillos de masaje al friccionar el tejido del asiento.
• Se escucha un sonido de fricción producido por el
tejido al friccionar sobre sí mismo.
LOCALIZACIÓN DE AVERÍAS
Estos sonidos son perfectamente normales y no
tienen ningún efecto perjudicial en el funcionamiento
de la unidad.
H
Los rodillos de masaje se detienen durante
el funcionamiento.
Cuando se suben o bajan los rodillos de masaje, si
tropiezan con una pared o un obstáculo, por motivos
de seguridad se detienen. En ese caso, mueva el
sillón o retire el obstáculo y empiece el masaje de
nuevo.
Si todos los indicadores y botones del mando de
control comienzan a parpadear, lo cual es
completamente inusual, apague el interruptor de
alimentación, espere aproximadamente 10 segundos
y vuelva a encenderlo.
Si se aplica una fuerza excesiva sobre los rodillos de
masaje durante el funcionamiento, detendrán su
movimiento por motivos de seguridad. Si se da el
caso, incorpórese ligeramente antes de volver a
iniciar el masaje. Si todos los indicadores y botones
del mando de control comienzan a parpadear, lo
cual es completamente inusual, apague el interruptor
de alimentación, espere aproximadamente 10
segundos y vuelva a encenderlo.
H
No se siente ningún efecto al usar Percusión
A, Percusión B o Vibración.
Si los rodillos de masaje no están en contacto con el
cuerpo, es completamente normal que no se sienta
el movimiento. Por lo tanto, asegúrese de que el
cuerpo está en contacto directo con los rodillos de
masaje.
H
Los rodillos de masaje no alcanzan los
hombros o el cuello.
La posición de los hombros es incorrecta.
(Consulte la página 40)
H
H
Antes de solicitar el servicio de reparaciones para esta unidad, lea la tabla de abajo y verifique las posibles causas
de los problemas. Algunas sencillas verificaciones o pequeños ajustes que usted haga podrán eliminar el problema
y restaurar el funcionamiento correcto. Si tiene alguna duda acerca de los puntos de verificación, o si los remedios
indicados en la tabla no solucionan el problema, llámenos al 1-800-338-0552 para localizar el centro de servicio
más próximo a usted.
Page 53

5352
Problema Causa y solución
No hay respuesta al pulsar el botón de
reclinación.
Cuando se retrae el respaldo, por motivos de
seguridad, los rodillos de masaje se desplazan hacia
la posición de recogida antes de que el respaldo
comience a retraerse.
Recuerde mantener pulsado el botón hasta que el
respaldo quede completamente reclinado.
H
El mando de control se calienta.
Si la unidad se usa de forma continuada durante un
periodo de tiempo prolongado, es normal que el
mando se caliente.
Si éste se caliente en exceso, cese de inmediato el
uso de la unidad y devuélvala para una inspección o
reparación al centro donde la adquirió.
H
La unidad no funciona en absoluto.
• Masaje de la parte superior del cuerpo (cuello
hasta zona lumbar).
• Masaje de piernas.
• Se ha desenchufado el cable de alimentación.
(Consulte la página 37)
• No se ha accionado el interruptor de alimentación.
(Consulte la página 37)
• No se ha pulsado el botón seleccionador del modo
programado o manual después de encender la
unidad. (Consulte las páginas 40 a 43)
Se ha desenchufado el cable de alimentación o
desconectado el tubo de aire.
H
La unidad ha sufrido daños.
Desenchufe inmediatamente el cable de alimentación
de la toma de corriente y solicite que le reparen el sillón
de masaje.
H
El cable de alimentación o el enchufe se
calientan desmesuradamente.
Desenchufe inmediatamente el cable de alimentación
de la toma de corriente y solicite que le reparen el sillón
de masaje.
H
H
La duración de los programas seleccionados
en el modo programado varía.
• Cuando se usa el sillón de masajes en modo
programado, el movimiento se detiene
automáticamente una vez finalizado el programa.
(Aunque la duración del modo programado es de
15 minutos aprox. (entre 12 y 17), esto variará de
acuerdo con la posición de los hombros, del
programa seleccionado, independientemente de si
la percusión está activada, y del peso de la
persona que está usando la unidad.)
H
No es posible abatir la unidad.
No se puede levantar ni bajar el
reposapiernas.
Si la unidad tropieza con un obstáculo o si se aplica
una fuerza excesiva sobre la misma durante el
funcionamiento, la unidad se detendrá por motivos
de seguridad.
Si todos los indicadores y botones del mando de
control comienzan a parpadear, lo cual es
completamente inusual, apague el interruptor de
alimentación, espere aproximadamente 10 segundos
y vuelva a encenderlo.
H
Page 54

54
Alimentación: 120V AC, 60Hz
Consumo de energía: 160W (Aprox. 5W en modo de espera con el mando de control apagado o
cuando la unidad está apagada.)
Masaje de la parte superior del cuerpo
Área de masaje (Arriba-Abajo): 27.6in. (70 cm) aprox.
Área de masaje (Izquierda-Derecha): Distancia entre los rodillos de masaje durante el funcionamiento
2.4 – 5.9in. (6 – 15 cm) aprox.
Área de masaje (Adelante-Atrás): 2.2in. (5,5 cm) aprox.
Ciclo del masaje: Shiatsu : 12 ciclos/min. aprox.
Sueco o tradicional: 11 ciclos/min. aprox.
Amasar: 12 ciclos/min. aprox.
Vibración: 3.000 – 3.600 ciclos/min. aprox.
Tap A: 50 – 3.600 ciclos/min. aprox.
Percusión B: 200 – 300 ciclos/min. aprox.
Rodamientos cuerpo completo
: 2 ciclos/min aprox. (35 seg./ciclo aprox.)
Rodamientos locales:
6 – 10 ciclos/min aprox. (6 – 10 seg./ciclo aprox.)
Masaje para piernas
Velocidad de rodillos: Rápida: 60 ciclos/min. aprox.
Lenta: 50 ciclos/min. aprox.
Ángulo de inclinación: Respaldo: 120°– 170° aprox.
Reposapiernas: 0°– 85° aprox.
Parada automática: 15 min. aprox. para ambos piernas y cuerpo (15 – 17min.)
Dimensiones:
Sin reclinar 41.3#31.5#41.3in. (105#80#105cm)
Reclinado 23.6#31.5#65in. (60#80#165cm)
Peso: 128 lbs. (58 kg)
Peso máximo del usuario: 264 lbs. (120 kg)
DATOS TÉCNICOS (EP1061)
Alimentación: 120V AC, 60Hz
Consumo de energía: 135W (Aprox. 5W en modo de espera con el mando de control apagado o
cuando la unidad está apagada.)
Masaje de la parte superior del cuerpo
Área de masaje (Arriba-Abajo): 27.6in. (70 cm) aprox.
Área de masaje (Izquierda-Derecha): Distancia entre los rodillos de masaje durante el funcionamiento
2.4 – 5.9in. (6 – 15 cm) aprox.
Área de masaje (Adelante-Atrás): 2.2in. (5,5 cm) aprox.
Ciclo del masaje: Shiatsu : 12 ciclos/min. aprox.
Sueco o tradicional: 11 ciclos/min. aprox.
Amasar: 12 ciclos/min. aprox.
Vibración: 3.000 – 3.600 ciclos/min. aprox.
Tap A: 50 – 3.600 ciclos/min. aprox.
Percusión B: 200 – 300 ciclos/min. aprox.
Rodamientos cuerpo completo
: 2 ciclos/min aprox. (35 seg./ciclo aprox.)
Rodamientos locales:
6 – 10 ciclos/min aprox. (6 – 10 seg./ciclo aprox.)
Masaje para piernas
Vibración: Fuerte: 3.000 ciclos/min. aprox.
Suave: 2.500 ciclos/min. aprox.
Ángulo de inclinación: Respaldo: 120°– 170° aprox.
Reposapiernas: 0°– 85° aprox.
Parada automática: 15 min. aprox. para ambos piernas y cuerpo (15 – 17min.)
Dimensiones:
Sin reclinar 41.3#31.5#41.3in. (105#80#105cm)
Reclinado 23.6#31.5#67in. (60#80#170cm)
Peso: 117 lbs. (53 kg)
Peso máximo del usuario: 264 lbs. (120 kg)
DATOS TÉCNICOS (EP1060)
Page 55

Page 56

EP1061/EP1060
EP1061/EP1060
EP1060EP1061
Before operating this unit, please read these instructions completely, and save for future reference.
Antes de utilizar esta unidad, lea completamente estas instrucciones y gurdelas por si necesita consultarlas en el futuro.
Sillón de masaje
Instrucciones de uso
Modelo No.
Panasonic Consumer
Electronics Company
One Panasonic Way 3D-1
Secaucus, New Jersey 07094
1-800-338-0552 for questions and comments.
www.panasonic.com/massage
No.2 EN, SP
(アメリカ)
Printed in JapanP90101060231
Page 57

documentation manual, user maintenance, brochure, user reference, pdf manual
This file has been downloaded from:
User Manual and User Guide for many equipments like mobile phones, photo cameras, monther board, monitors, software, tv, dvd, and othes..
Manual users, user manuals, user guide manual, owners manual, instruction manual, manual owner, manual owner's, manual guide,
manual operation, operating manual, user's manual, operating instructions, manual operators, manual operator, manual product,
 Loading...