

Page 1
Household Massage Lounger
Silla de masaje para el hogar
Model No. EP1014
Modelo No. EP1014
Operating Instructions
Instrucciones
de funcionamiento
Before operating this unit, please read these instructions completely and save this manual for future use.
Antes de utilizar esta unidad, lea completamente estas instrucciones y guarde este manual para
utilizarlo en el futuro en caso de ser necesario.
Page 2

2
TABLE OF CONTENTS
IMPORTANT SAFETY INSTRUCTIONS . . . . . . . . . . . . . . 3
SAFETY PRECAUTIONS. . . . . . . . . . . . . . . . . . . . . . . . . . 4
OPERATING PRECAUTIONS . . . . . . . . . . . . . . . . . . . . . . 5
GROUNDING INSTRUCTIONS . . . . . . . . . . . . . . . . . . . . . 6
HOW TO MOVE THE CHAIR. . . . . . . . . . . . . . . . . . . . . . . 6
PARTS IDENTIFICATION . . . . . . . . . . . . . . . . . . . . . . . . . 7
BEFORE USE. . . . . . . . . . . . . . . . . . . . . . . . . . . . . . . . . . . 8
• PLACE OF USE. . . . . . . . . . . . . . . . . . . . . . . . . . . . . . . . 8
• TURNING ON THE POWER. . . . . . . . . . . . . . . . . . . . . . 8
• BEFORE SITTING DOWN. . . . . . . . . . . . . . . . . . . . . . . . 8
• RECLINING THE CHAIR. . . . . . . . . . . . . . . . . . . . . . . . . 9
• HOW TO EXTEND THE LEGREST MANUALLY . . . . . . 9
HOW TO USE. . . . . . . . . . . . . . . . . . . . . . . . . . . . . . . . . . 10
• TO START/STOP MASSAGE ACTION. . . . . . . . . . . . . 10
• LEG MASSAGER OPERATION . . . . . . . . . . . . . . . . . . 11
• PROGRAMMED MASSAGE . . . . . . . . . . . . . . . . . . . . . 12
• MANUAL MASSAGE. . . . . . . . . . . . . . . . . . . . . . . . . . . 13
• BACK CUSHION AND HEADREST . . . . . . . . . . . . . . . 16
• CUSHION INSERT PAD . . . . . . . . . . . . . . . . . . . . . . . . 16
• DETAILS OF PROGRAMMED MASSAGE . . . . . . . . . . 17
• MASSAGE HEADS’ RANGE OF MOVEMENT. . . . . . . 18
TROUBLESHOOTING GUIDE. . . . . . . . . . . . . . . . . . . . . 19
SPECIFICATIONS . . . . . . . . . . . . . . . . . . . . . . . . . . . . . . 20
ÍNDICE
INSTRUCCIONES DE SEGURIDAD IMPORTANTES. . . 21
PRECAUCIONES DE SEGURIDAD. . . . . . . . . . . . . . . . . 22
PRECAUCIONES PARA LA OPERACIÓN . . . . . . . . . . . 23
INSTRUCCIONES PARA LA CONEXIÓN A TIERRA . . . 24
CÓMO MOVER LA SILLA . . . . . . . . . . . . . . . . . . . . . . . . 24
IDENTIFICACIÓN DE PARTES . . . . . . . . . . . . . . . . . . . . 25
ANTES DE UTILIZAR LA SILLA DE MASAJE. . . . . . . . . 26
• LUGAR DE UTILIZACIÓN. . . . . . . . . . . . . . . . . . . . . . . 26
• CONEXIÓN DE LA ALIMENTACIÓN . . . . . . . . . . . . . . 26
• ANTES DE SENTARSE . . . . . . . . . . . . . . . . . . . . . . . . 26
• RECLINACIÓN DE LA SILLA . . . . . . . . . . . . . . . . . . . . 27
• CÓMO EXTENDER MANUALMENTE EL APOYO
PARA LAS PIERNAS . . . . . . . . . . . . . . . . . . . . . . . . . 27
UTILIZACIÓN . . . . . . . . . . . . . . . . . . . . . . . . . . . . . . . . . . 28
• PARA INICIAR/DETENER LA ACCIÓN DE MASAJE. . 28
•
OPERACIÓN DEL MASAJEADOR DE LAS PIERNAS
. . 29
• MASAJE PROGRAMADO. . . . . . . . . . . . . . . . . . . . . . . 30
• MASAJE MANUAL . . . . . . . . . . . . . . . . . . . . . . . . . . . . 31
• COJÍN DEL RESPALDO Y APOYO PARA
LA CABEZA . . . . . . . . . . . . . . . . . . . . . . . . . . . . . . . . 34
• COJÍN DE ESPUMA . . . . . . . . . . . . . . . . . . . . . . . . . . . 34
• DETALLES DEL MASAJE PROGRAMADO . . . . . . . . . 35
• ALCANCE DE MOVIMIENTO DE LAS CABEZAS
DE MASAJE . . . . . . . . . . . . . . . . . . . . . . . . . . . . . . . . 36
GUÍA PARA LA LOCALIZACIÓN Y SOLUCIÓN DE
PROBLEMAS . . . . . . . . . . . . . . . . . . . . . . . . . . . . . . . . . . 37
ESPECIFICACIONES. . . . . . . . . . . . . . . . . . . . . . . . . . . . 38
– Customer’s Record –
Please record both the model and serial numbers of this
product in the spaces provided. Retain this book, along
with a copy of your purchase receipt, for future reference.
The serial number can be found just above the power
switch at the rear of the chair.
– Anotación del cliente –
Anote los números de modelo y serie de este producto en
los espacios suministrados. Guarde este manual junto con
una copia de su recibo de compra para utilizarlos como
referencia en el futuro.
Model Number
Número de modelo _______________________________
Serial Number
Número de serie _________________________________
Dealer’s Name
Nombre del concesionario _________________________
Date Purchased
Fecha de adquisición _____________________________
Page 3

3
Thank you for purchasing the Panasonic Household Massage Lounger EP1014.
For optimum performance and safety, please read these instructions carefully.
IMPORTANT SAFETY INSTRUCTIONS
When using an electrical appliance, basic precautions should always be followed, including
the following:
Read all instructions before using the massage lounger.
DANGER – To reduce the risk of electric shock:
Always unplug this appliance from the electrical outlet immediately after using and before
cleaning.
WARNING – To reduce the risk of burns, fire, electric shock or injury to persons:
1. An appliance should never be left unattended when plugged in. Unplug from outlet when
not in use.
2. Close and continuous supervision is necessary when this appliance is used by invalids
or disabled persons.
3. Use this appliance only for its intended use as described in this manual.
4. Do not stand on or in the appliance. Use only while seated.
5. Do not use accessories not recommended by the manufacturer.
6. This appliance should not be used by children. Keep children away from massage
lounger. To avoid possible injury always return chair to an upright position and retract
the legrest carefully. Make sure nothing can be caught in the legrest mechanism.
7. Never operate this appliance if it has a damaged cord or plug, if it is not working
properly or if it has been damaged. Call your nearest authorized service center for
repair.
8. Keep the cords away from heated surfaces.
9. Never drop or insert any object into any opening.
10.Do not use outdoors.
11. Do not operate where aerosol spray products are being used or where oxygen is being
administered.
12.T o disconnect, turn all controls to the “off” position, then remove plug from outlet.
13.Connect this appliance to a properly grounded outlet only.
See Grounding Instructions.
14.T o avoid the risk of electric shock or personal injury, do not attempt to open or
disassemble any part of this massage lounger. Never insert hands in areas where there
are moving parts. There are no user-serviceable parts.
SAVE THESE INSTRUCTIONS
Page 4

4
SAFETY PRECAUTIONS
WARNING: To avoid risk of injury
1. This product should not be used by pregnant women, persons who are ill, or persons
with back, neck, shoulder or hip pain, or conditions of any kind, without consulting a
physician prior to use. Do not use on any area of the body that has received medical
treatment without consulting a physician prior to use.
2. Never put any part of the body between the massage heads. The squeezing action of
the massage heads may cause injury. Never put any part of the body between the
armrest and the chair back.
Do not place hands in the mechanical portion of the legrest located under the seat.
3. Do not use against bare skin; always wear clothing.
Thin clothing increases the effectiveness, but exposing the skin directly to the massager
can irritate the skin.
4. Do not use for massaging the head, abdomen, elbows or knees.
5. Do not stretch the back muscles for more than approximately 15 minutes at one time.
To avoid overstretching of muscles and resulting discomfort when first using the chair,
do not use for more than 5 minutes. You can gradually increase duration and intensity
as you adjust to the chair.
Do not massage any one point for longer than 5 minutes at a time.
Excessive massaging can overstimulate the muscles and nerves and result in an
adverse effect.
To prevent excessive massaging, do not use the massager for more than a total of 15
minutes per session. After approximately 15 minutes, the massage heads will return to
the “resting” position and stop.
6. While using the massager, if you start feeling sick, or if the massage seems painful, stop
use immediately.
While using the massager, if the pressure seems too strong, the movement of the
massage heads can be stopped by pressing the “quick stop” button.
7. When the chair back is in a reclined position, do not sit on it, or sit with your legs resting
on the headrest.
Do not sit on the legrest. The chair may fall over.
8. Do not allow children or pets to play on or around the chair, especially during operation.
9. Do not remove the back cushion without first reading instructions on page 16.
Page 5

5
OPERATING PRECAUTIONS
WARNING: To avoid damage to the chair
1. The chair is designed for a maximum user weight of 264 lbs. (120 kg). Exceeding the
maximum weight may cause permanent damage to the massage mechanism and/or
other components of the chair. Any such damage is deemed to be user abuse and is not
covered under the Limited Warranty.
2. Do not sit on or drop the controller. Do not pull the controller cord or the power cord.
Be careful not to catch the cord of the controller between the armrest and the chair
back.
3. Do not treat the chair roughly, such as turning the chair on its side, turning the chair over
or standing on it.
4. Do not treat the covering roughly.
• Keep sharp or pointed objects away from the covering of the chair. Be careful not to
drop lit ashes or matches on the chair.
• Exposure to direct sunlight can cause fading or a change in color of the covering.
5. If the massager functions abnormally, immediately turn off the power and have the
massager checked by an authorized service center.
6. Do not attempt to repair the massager yourself.
7. Do not repeatedly operate any switch at short intervals. Such action may cause the
switch to malfunction.
8. Some noise may be heard coming from the massager while in use. This is due to the
structure of the massager and is normal.
9. Make sure there are no obstacles behind the chair before reclining it. The chair can be
reclined to a maximum angle of 160°. If the back hits a wall or pillar, the chair may
malfunction. Be sure to have ample space behind the chair. Recline the chair slowly in
order to avoid contact with an obstacle.
10.When excessive pressure is applied to the massage heads, they may stop moving for
safety. When moving the heads up from the lowered position, one’s body weight may
stop the heads’ movement. In such case, slightly raise the body and allow the massage
heads to move up.
11. After each massage, slide the power switch, which is located on the back of the chair, to
the “off” position and turn its lock switch to the “lock” position.
CARING FOR THE MASSAGER
• Always unplug the chair before cleaning.
• If the covering becomes soiled, dampen with liquid soap and brush the surface. Wipe with
a cloth dampened with water. Allow to dry naturally. If the plastic portions become soiled
use lukewarm water, with liquid soap on a soft cloth, to clean the surface.
• Do not use thinner, benzene or other solvent-type cleaners. Chemicals can discolor or
damage the materials.
Page 6

Caster
6
GROUNDING INSTRUCTIONS
• This product must be grounded. If it should malfunction, grounding provides the path of
least resistance for electric current to reduce the risk of electric shock.
• This product is equipped with a cord having an equipment-grounding conductor and a
grounding plug. The plug must be plugged into an appropriate outlet that is properly
installed and grounded in accordance with all local codes and ordinances.
DANGER
• Improper connection of the equipment-grounding conductor can result in a risk of electric
shock. Check with a qualified electrician if you are in doubt as to whether the product is
properly grounded. Do not modify the plug provided with the product even if it does not fit
the outlet. Have a proper outlet installed by a qualified electrician.
• This product is for use on a nominal 120-volt
circuit and has a grounding plug that looks like
the plug shown in Figure A. Make sure that the
product is connected to an outlet having the
same configuration as the plug. No adaptor
should be used with this product.
HOW TO MOVE THE CHAIR
CAUTION
Do not move the chair while someone is sitting in it.
Failure to observe this point may cause the chair to tip over, possibly resulting in personal
injury.
Use the casters to move the chair.
• Do not attempt to move the chair by lifting from the front (right illustration). The correct way
to move the chair is by putting your foot on the caster and pushing down from behind the
chair (left illustration).
• It is easier to move the chair if the massage heads have been moved to their resting
positions and the backrest reclined.
• Moving the chair may damage easily marked floor surfaces; therefore, place a mat or
cloth on the floor and move the chair slowly.
• Before pushing down the chair, prepare yourself for its weight and exercise caution when
moving it.
GROUNDED
OUTLET
GROUNDING
PIN
Figure A
CORRECT WRONG
Page 7
7
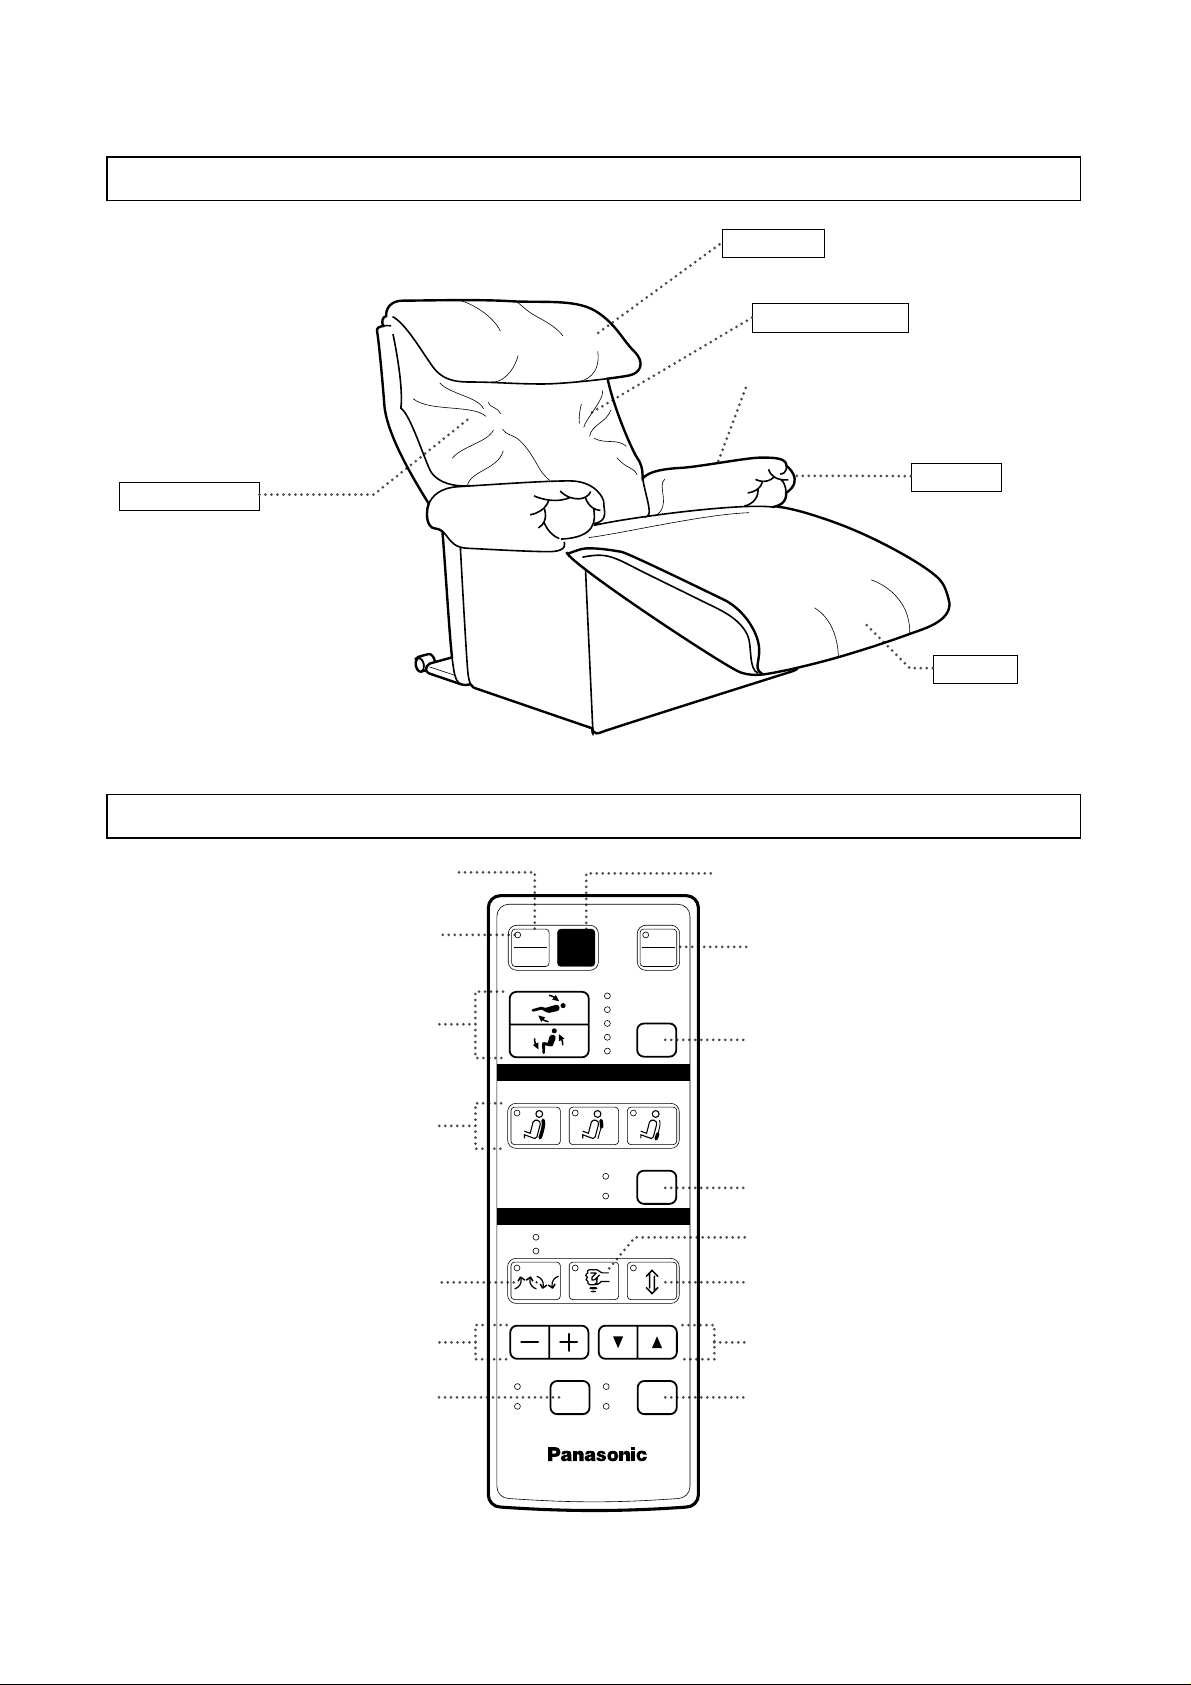
PARTS IDENTIFICATION
MASSAGE LOUNGER
CONTROLLER
• Drapes over the back cushion.
Headrest
(Underneath chair cushion)
Massage heads
Armrest
Controller storage pocket
(Controller can be stored in the
controller pocket [left side].)
Legrest
• Attaches to the chair with zipper.
• Remove for a stronger massage.
Back cushion
Intensity adjustment buttons
On/off button
Operation indicator lamp
Quick stop button
Leg massage on/off button
Reclining buttons
Massage heads adjustment
(neck roller position) button
Programmed massage
course buttons
Tapping on/off button
Kneading (upward/
downward) button
Tapping button
Rolling button
Stroke adjustment button
Width adjustment button
Up/down adjustment buttons
on
off
on
off
quick
stop
leg massage
reclining
1
3
5
neck
roller
position
Programmed Operation
Manual Operation
whole back neck shoulder lower back
tapping
on
off
up
down
knead
tap
roll
intensity
down
up
stroke
24in.
4in.
width
narrow
wide
Page 8
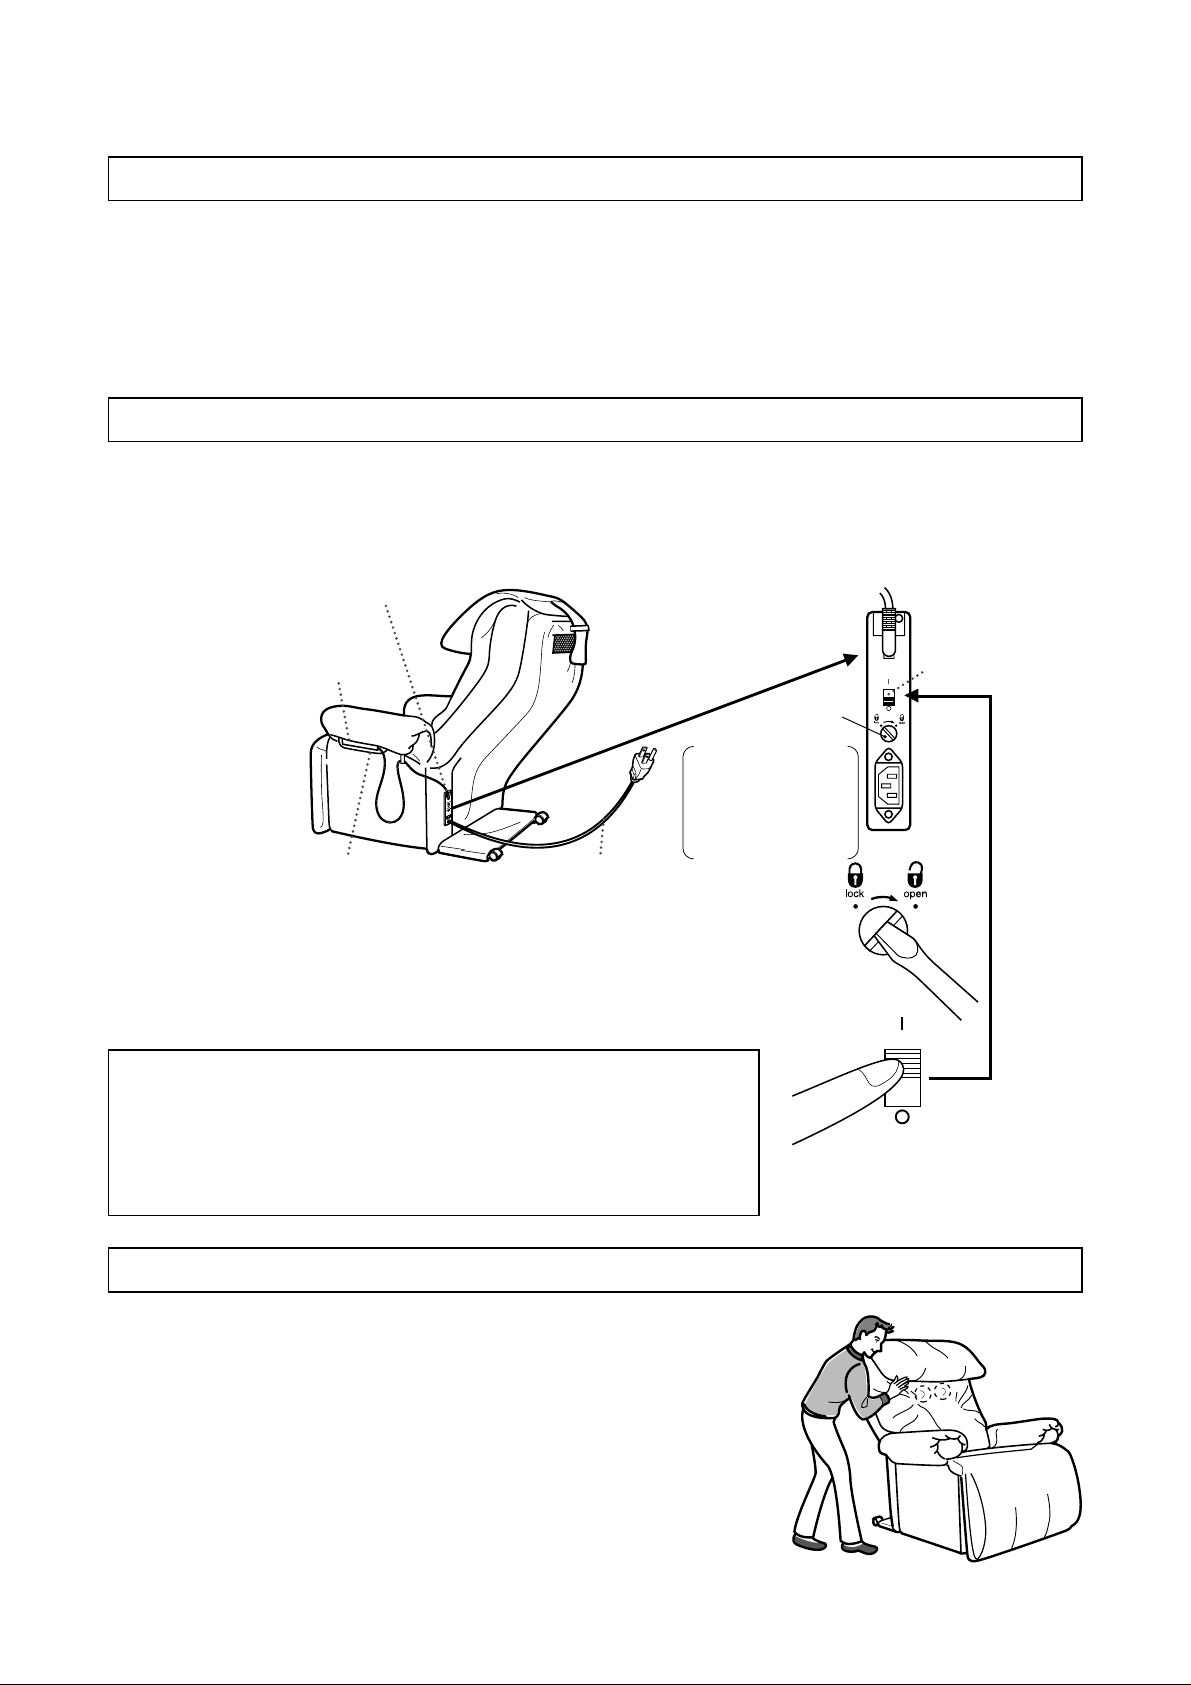
Power switch
Controller
Controller storage pocket
Power plug
Operating lock
switch
Power switch
on
off
on
off
NOTE:
The operating lock
switch prevents the unit
from being turned on
when switch is in the
“lock” position.
8
BEFORE SITTING DOWN
PLACE OF USE
TURNING ON THE POWER
BEFORE USE
• Do not use the massage lounger where it will be exposed to direct sunlight for long periods of time.
Overexposure to harsh light can discolor or harden the cover.
• Do not use the massage lounger in hot or humid places or places where it may become wet from rain,
splashing or dripping water, etc. Water and heat can cause discoloring and mildew.
NOTE:
Position the chair at least 16 in. (40 cm) away from any wall or other obstacle to ensure adequate reclining
space.
First read and familiarize yourself with the safety precautions.
1. Plug the power cord into the inlet located at the rear of the chair.
2. Plug the power cord into an AC outlet.
NOTE:
Be careful not to pinch the cord under the leg frames of the chair or any other objects.
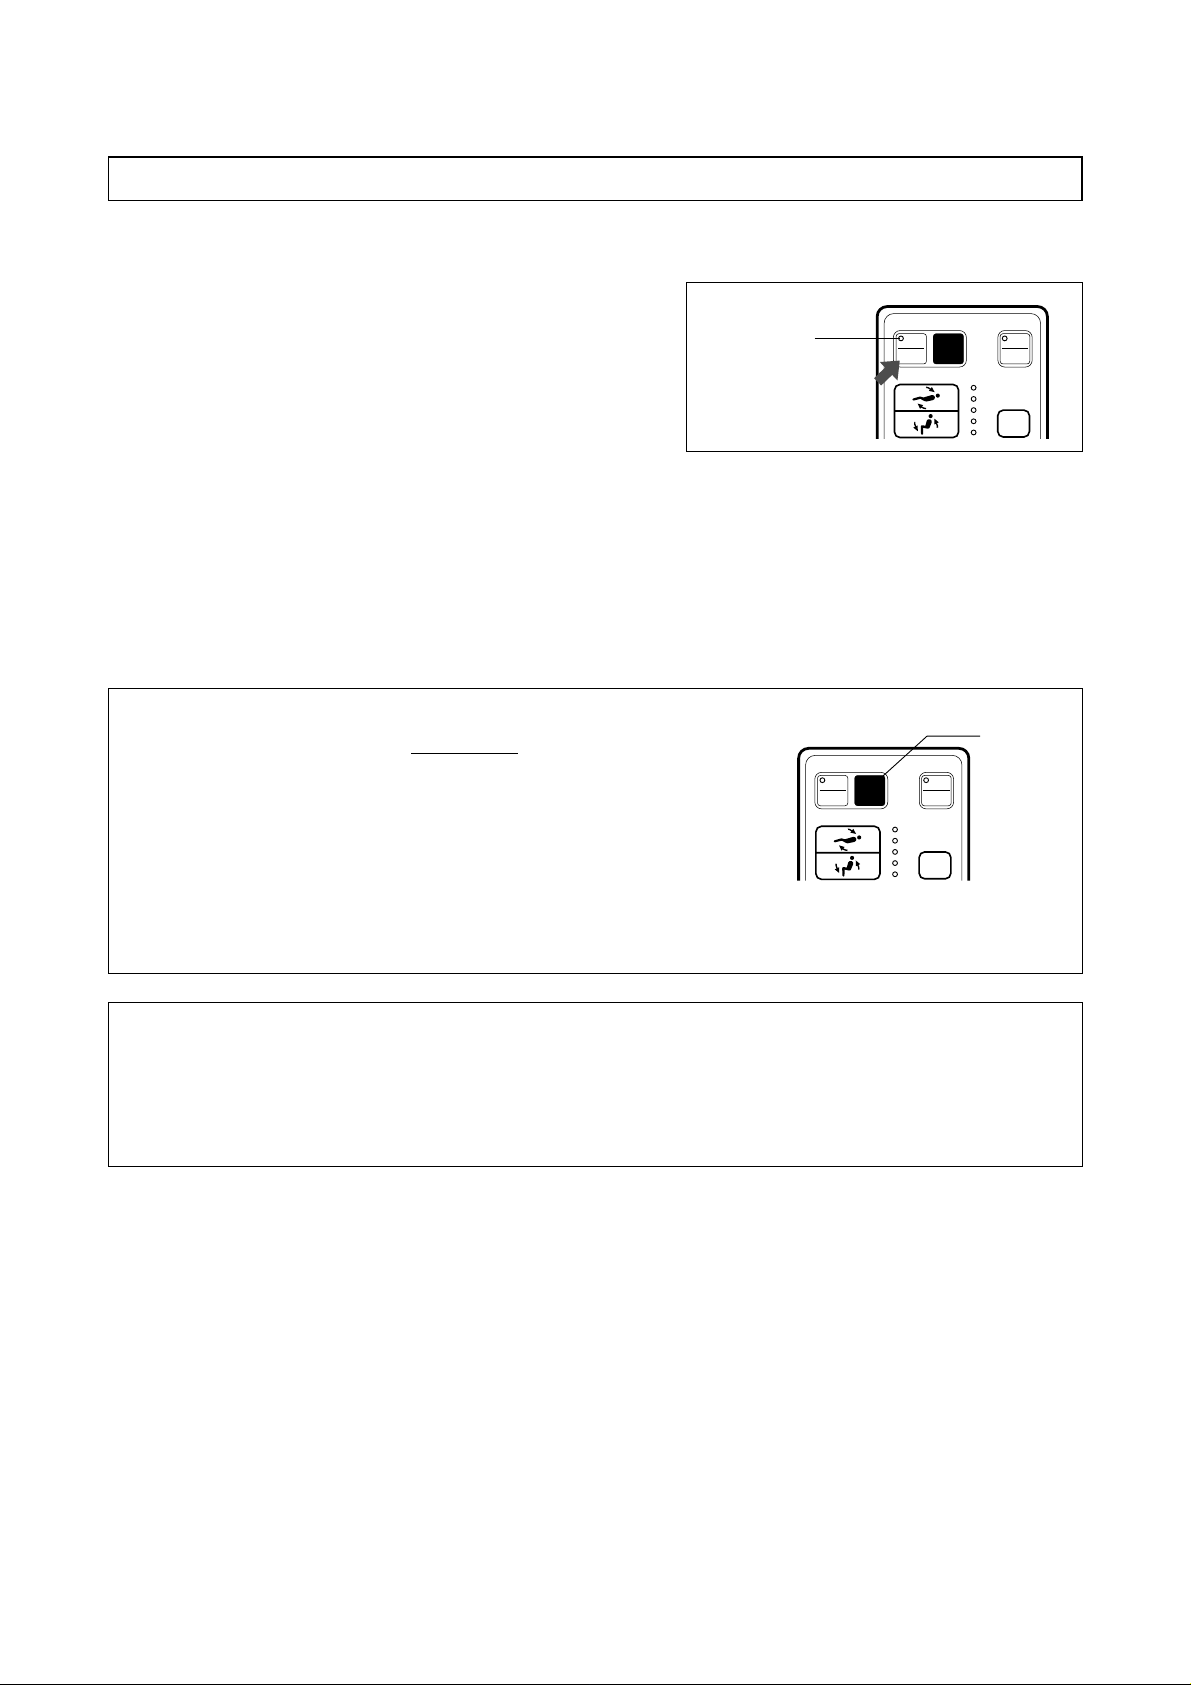
3. Using a flat head screwdriver or similar object, insert into the lock
switch and turn to “open”.
4. Move the power switch to “on”.
• When the operating lock switch is pointing toward “lock”, the power
switch cannot be moved to the “on” position.
After each use
• Be sure to turn the power switch to “off”.
• To prevent children from using this unit, lock the power switch by
moving the operating lock switch to the “lock” position.
• As a further precaution, unplug the power cord from the outlet after
each use.
Do not exceed the maximum user weight of 264 lbs. (120 kg).
Before sitting down, you must first check the position of the massage
heads with your hands.
• The massage heads should be spread apart near the top of the
massage lounger backrest in the resting position.
• If the massage heads are not in their resting position, do not sit down in
the massage lounger. Press the “on/off” button on the controller twice.
Wait for the massage heads to reach the resting position before sitting
down.
After making sure the massage heads are in the resting position, sit
down slowly in the center of the massage lounger.
Page 9
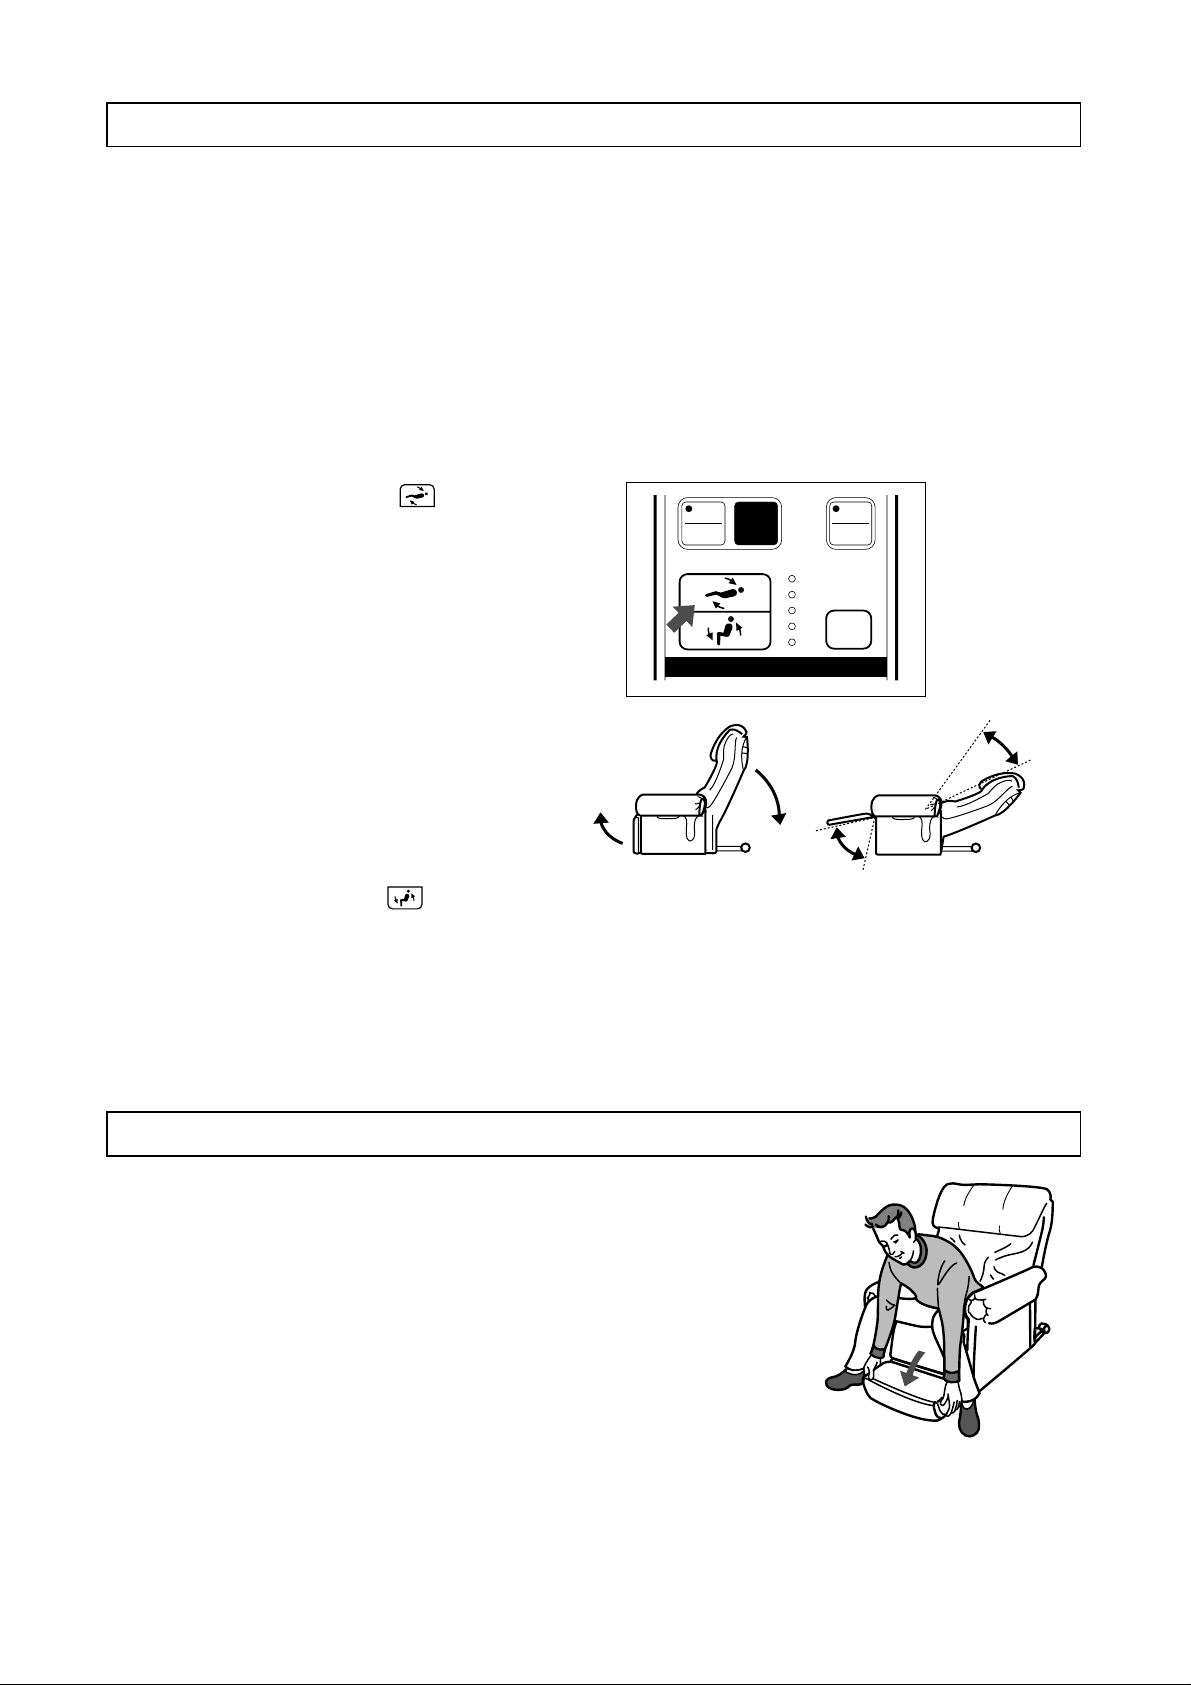
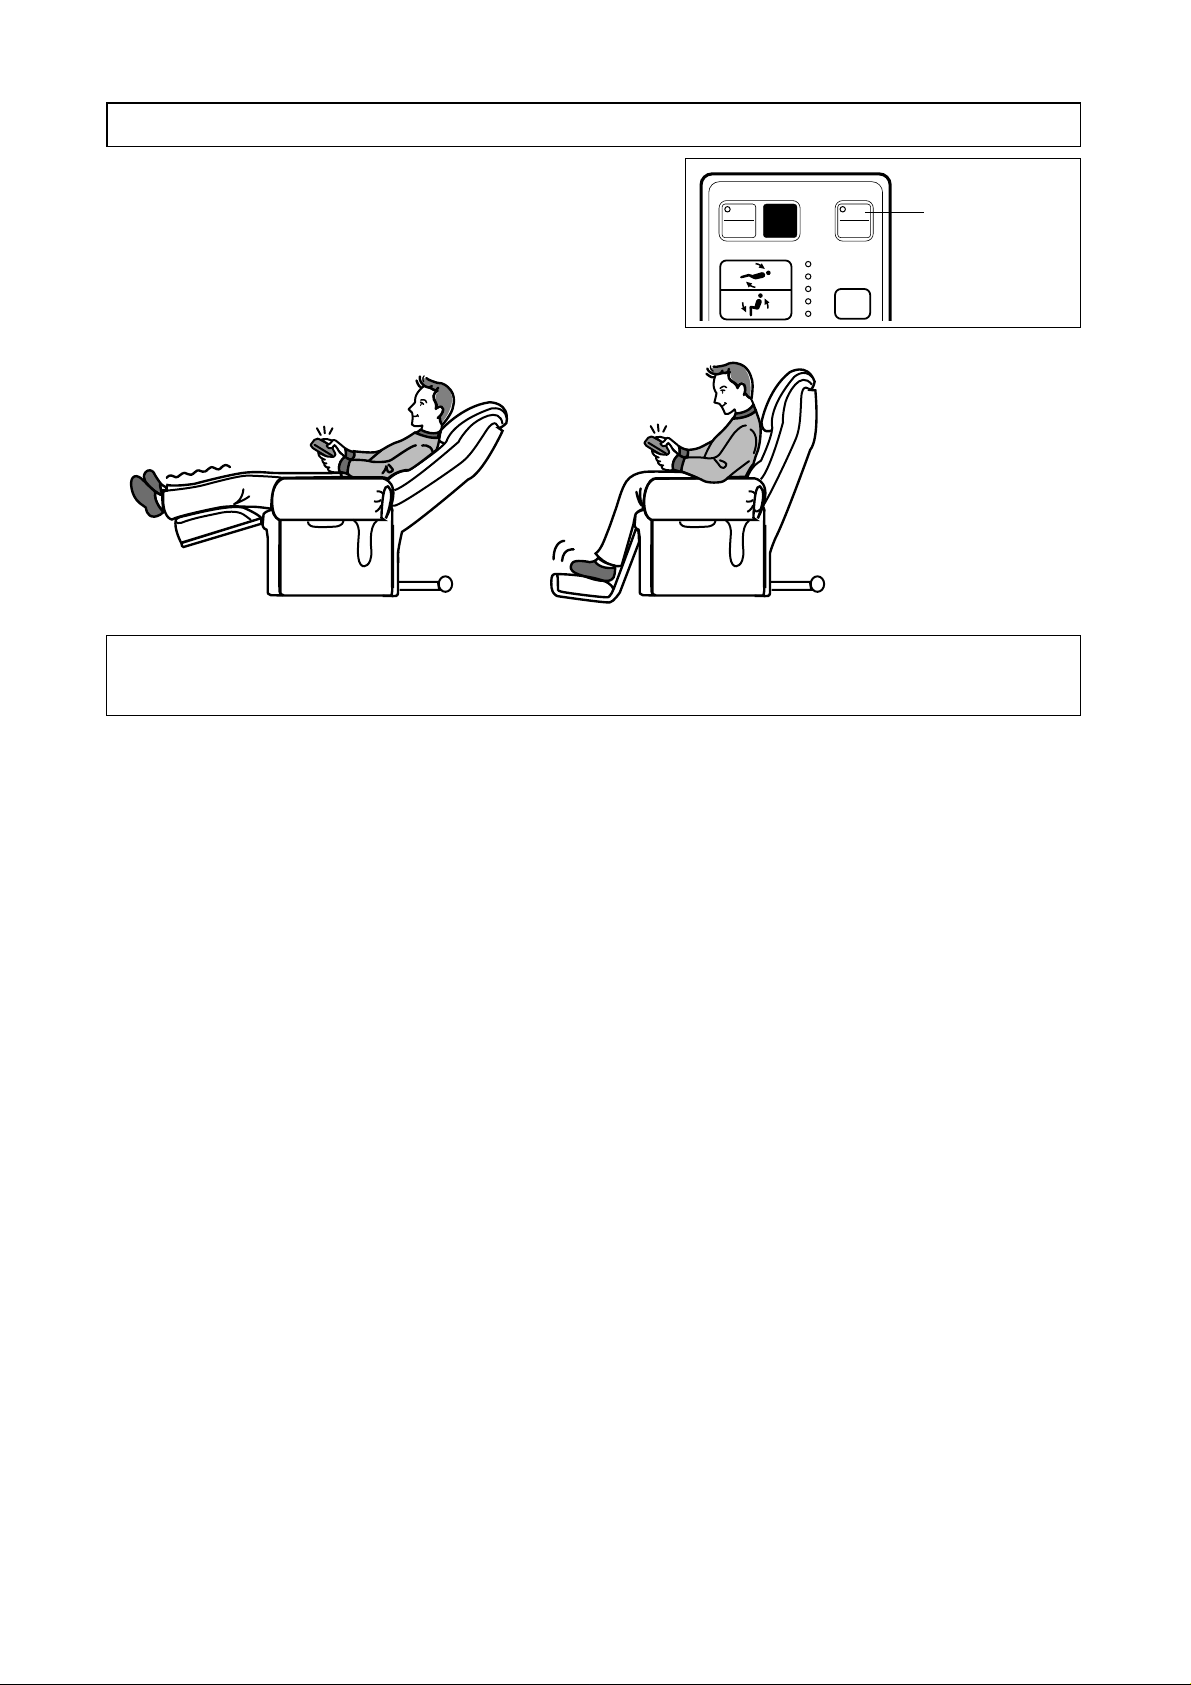
To extend: Press and hold the button.
• While the button is pressed and held, the legrest will
extend and the backrest will recline.
• Release the button when the desired position has
been reached.
9
RECLINING THE CHAIR
HOW TO EXTEND THE LEGREST MANUALLY
By using the reclining button on the controller, the legrest can be raised and lowered automatically in concert
with the movement of the massage lounger’s backrest.
• To avoid possible tipping of the chair, do not sit or lean on the backrest while chair back is in a reclined
position.
• The angle of the chair back can be changed so that the body weight and the massage heads will work
together to determine the strength of the massage.
• Try changing the angle of the chair back to find a comfortable massage of a strength that is most suitable for
you. The more you recline, the more intense the massage will feel. Adding or removing the cushion insert
pad will also increase the intensity.
NOTE:
Position the chair at least 16 in. (40 cm) away from any wall or other obstacle to ensure adequate reclining space.
To lower: Press and hold the button.
• The legrest will be returned to its resting position and the backrest will be raised.
• To obtain the maximum benefit from the massage, let your body relax and recline in a comfortable manner.
NOTE:
After use, always be sure to return the legrest and backrest to their resting positions (legrest lowered and
backrest raised).
The legrest can be raised and lowered independently of the reclining
operation.
Fold the legrest down by hand when massaging the soles of the feet.
• Do not sit on or get off the lounger by standing on the legrest while it is
folded down.
160°
123°
85°
quick
on
stop
off
reclining
Programmed Operation
1
3
5
on
off
neck
roller
position
Page 10
10
HOW TO USE
TO START/STOP MASSAGE ACTION
Before using, first read all the instructions including the warnings and safety and operating precautions, as
well as the section on programmed and manual massage.
1. To operate the massager, press the “on/off” button.
• Check to be sure that the operation indicator lamp is lit.
2. To stop the massager during operation, press the “on/off”
button.
The massage heads will go up, spread out and stop in their
resting position.
• Check to be sure that the operation indicator lamp goes
out.
• With the heads in their resting position, you can sit com-
fortably, using the massager as a regular lounge chair.
• To resume the massage, press the “on/off” button. The
massage action or programmed massage course will
start from the beginning.
• Be sure to store the controller in the pocket on the side of
the left armrest when not in use.
on
off
on
off
quick
stop
leg massage
reclining
1
3
5
neck
roller
position
Operation
indicator lamp
Quick stop button
If you wish to stop the massage immediately, press the “quick stop”
button.
The massage heads will stop where they are.
• Check to be sure that the operation indicator lamp goes out.
• To resume the massage, press the “on/off” button. The massage
action or programmed massage course will start from the beginning.
• To return the massage heads to the resting position, press the on/off
button, wait, then press it again. The massage heads will then stop
in a retracted resting position more comfortable for sitting.
Automatic timer for massage lounger
• To prevent excessive massage, there is a built-in timer which, after approximately 15 minutes of
operation, will automatically return the massage heads to their resting position and stop their motion.
• Turning on the on/off button while the massage heads are moving to their resting position will reset the
time for another 15 minutes (approximately).
• If the programmed massage button is pressed, the unit will stop after finishing the program.
on
off
on
off
quick
stop
leg massage
reclining
1
3
5
neck
roller
position
Quick stop
button
Page 11
11
LEG MASSAGER OPERATION
1. Press the leg massage “on/off” button to turn on the leg
massager.
• Check to be sure that the operation indicator lamp on the
leg massage on/off button is lit.
2. To turn off the leg massager, press this leg massage on/off
button again.
Automatic timer for leg massager
• To prevent continuous operation of the leg massager, there is a built-in timer that will automatically turn
off the leg massager after 30 minutes of operation.
Leg massage
button
on
off
on
off
quick
stop
leg massage
reclining
1
3
5
neck
roller
position
Page 12
12
PROGRAMMED MASSAGE
First read and familiarize yourself with the safety and operating precautions.
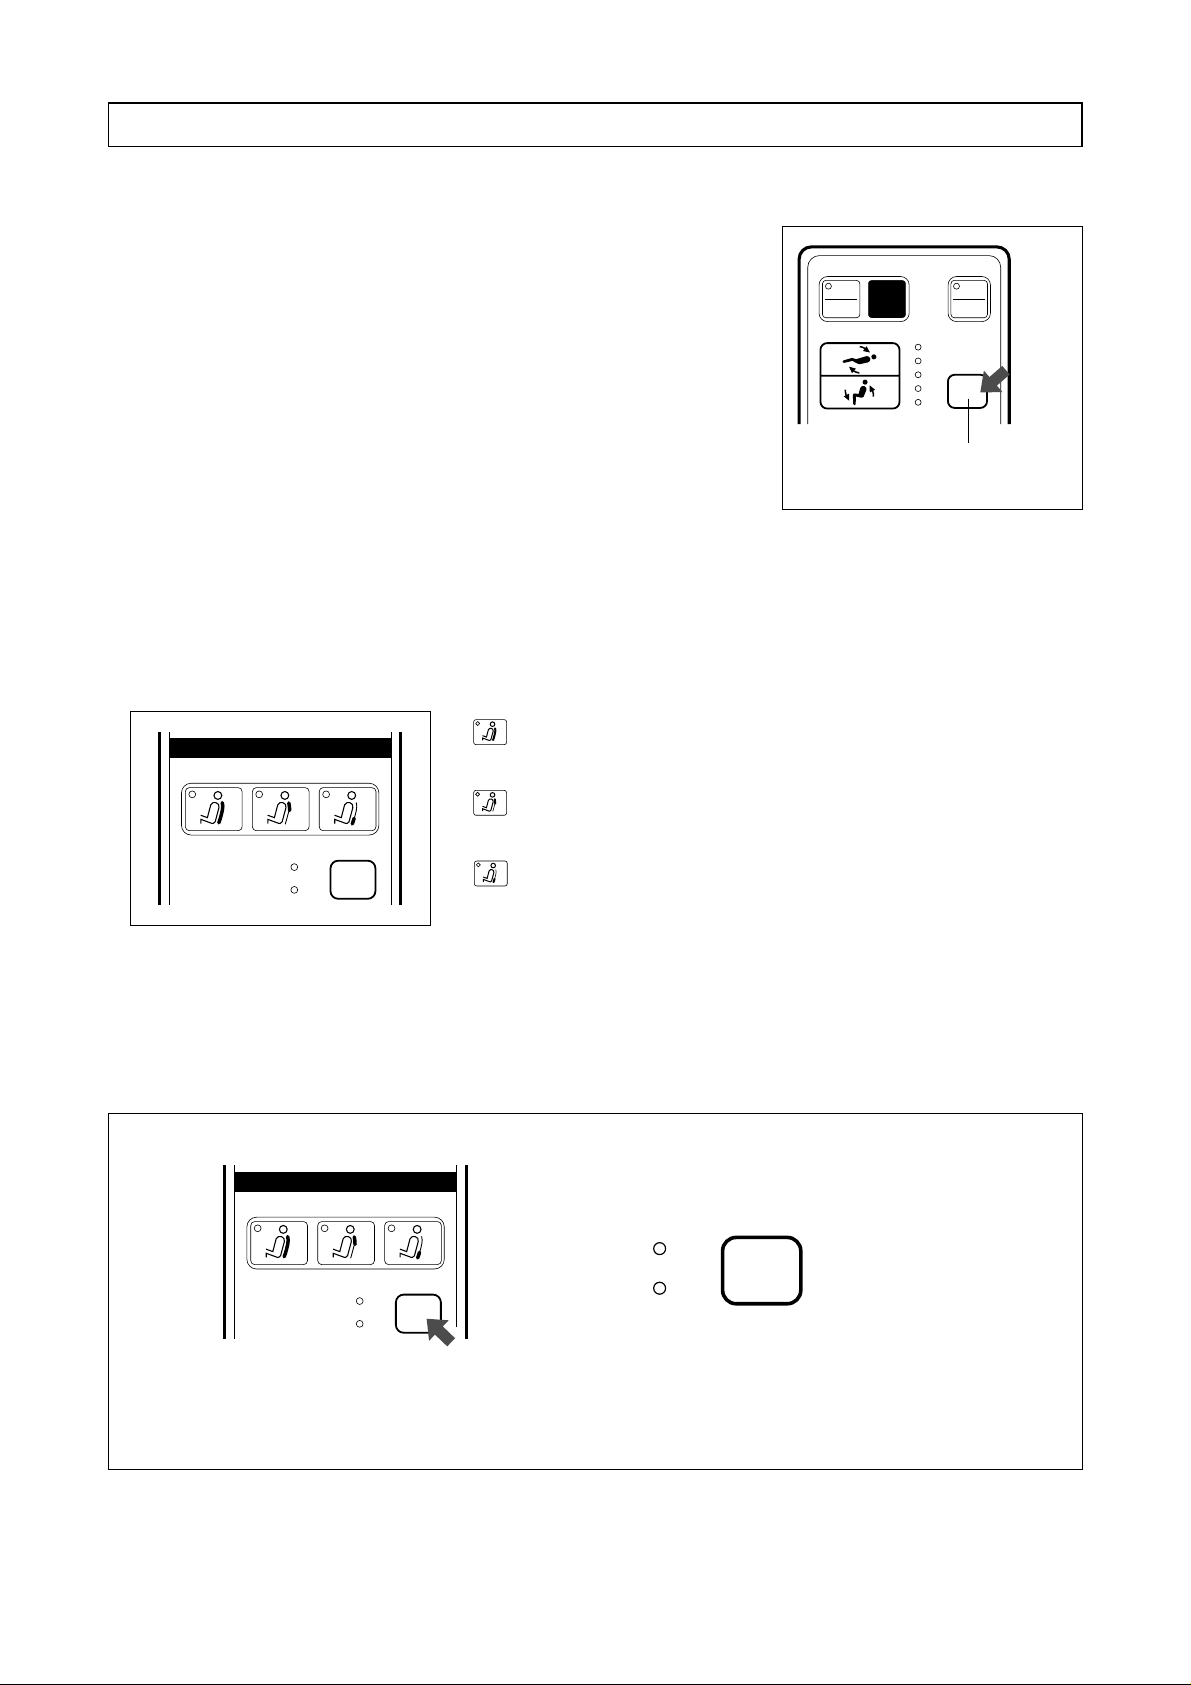
1. Press the “on/off” button.
2. Use the “massage heads adjustment” button (neck roller position) to
toggle from the highest (tallest) setting “1” to the lowest (shortest)
setting “5”, in order to set the massage heads to the desired position
for your neck.
Massage heads (rollers) should rest comfortably at the top of your
shoulders prior to the start of the massage.
• This button is to limit the height of the massage heads against your
neck and head. We recommend that a person who is 6 ft. (1.82 m)
or taller use the setting “1”, while a person who is 5 ft. (1.52 m) or
shorter use the setting “5”.
• Once you have made the adjustment, you can select any massage
setting you like.
• You can adjust the massage head position anytime during
massaging.
3. Press the desired programmed massage course button for the area
of the body you want to have massaged. (See page 17 for details on
the different massage courses.)
• Check to be sure that the course indicator lamp is lit.
Whole back: Massages the whole back.
See massage course on page 17.
Neck shoulder: Massages primarily the neck and shoulders.
See page 17.
Lower back: Massages primarily the lower back.
See page 17.
• If you do not press any button, the whole back course will start automatically about 40 seconds after you
turn on the massager.
• Massage will operate for approximately 15 minutes after pressing the button.
• If you want to change the massage course, press the button of the desired course.
• You may change the massage course at any time during operation without harm.
• Your new instructions will override any previous ones.
FOR THOSE WHO WISH TO HAVE A MASSAGE WITHOUT TAPPING
1. Press the “tapping” button when you do not want tapping in the middle of the programmed massage
course.
(The tapping movement changes into kneading.)
2. Press the tapping button again to re-activate.
Programmed Operation
whole back neck shoulder lower back
tapping
on
off
on
off
on
off
quick
stop
leg massage
reclining
1
3
5
neck
roller
position
Massage heads
adjustment button
Programmed Operation
whole back neck shoulder lower back
tapping
on
tapping
on
off
off
Page 13
13
MANUAL MASSAGE
First read and familiarize yourself with the safety and operating precautions.
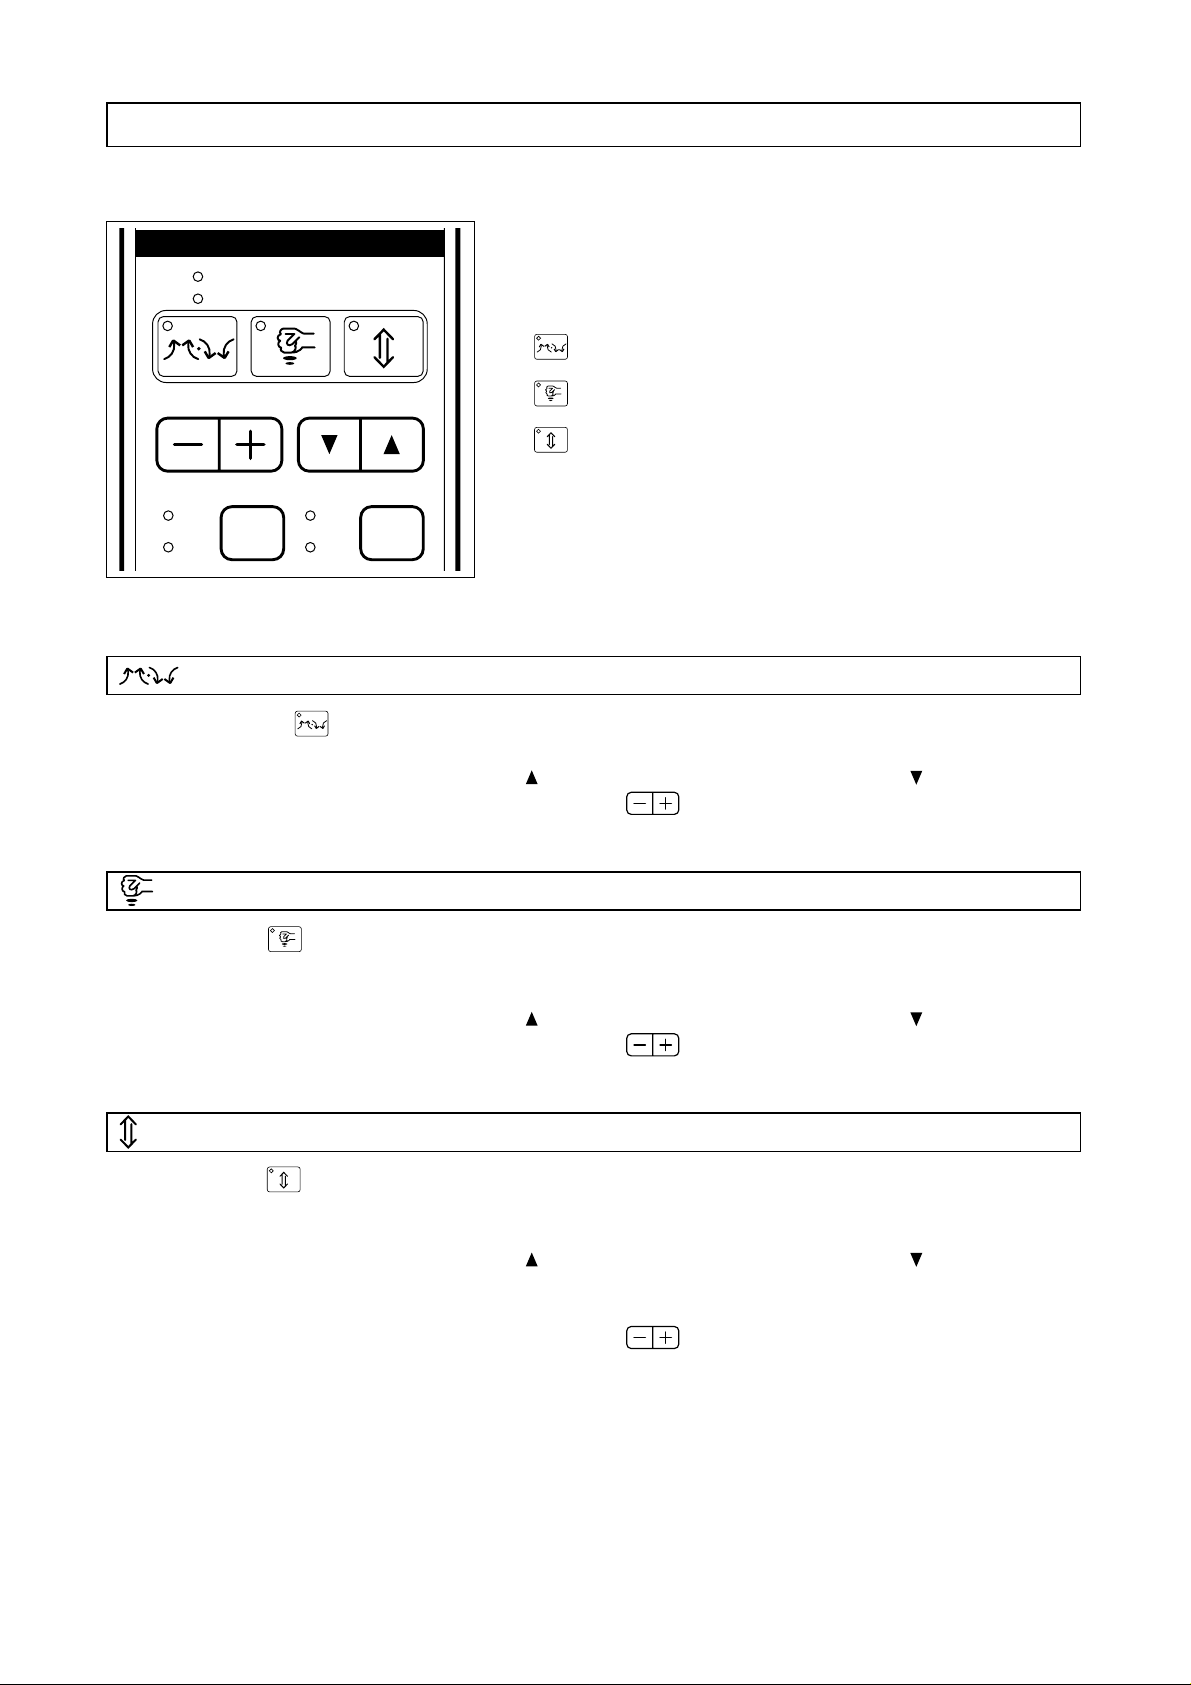
Kneading massage (upward & downward)
Press the button for the desired massage.
• The currently operating massage is indicated by the massage
indicator lamps.
• It is possible to combine different massage types.
Kneading (upward/downward) massage
Tapping massage
Rolling massage
NOTE:
• Do not massage any one point for more than 5 minutes.
• Do not stretch the back muscles for more than approximately
15 minutes at one time. A continuous massage in the same
area may result in soreness.
1. Press the “knead” button. Each time you press the knead button, the kneading direction alternates
between upward and downward.
2. To raise the massage heads, press the “up” button. To lower them, press the “down” button.
3. To adjust the intensity of massage, press the “intensity” buttons.
Tapping massage
1. Press the “tap” button.
The massage heads move to the narrowest position and start the tapping massage.
2. Press the “width” adjustment button to select the width of the massage heads (narrow or wide).
3. To raise the massage heads, press the “up” button. To lower them, press the “down” button.
4. To adjust the intensity of massage, press the “intensity” buttons.
Rolling massage
1. Press the “roll” button.
The massage heads move to the narrowest position and start the rolling massage.
2. Press the “width” adjustment button to select the width of the massage heads (narrow or wide).
3. To raise the massage heads, press the “up” button. To lower them, press the “down” button.
• All functions that include rolling are available for the entire back, or for a limited section of the back, by
pressing the “stroke” adjustment button.
4. To adjust the intensity of massage, press the “intensity” buttons.
Manual Operation
knead
intensity
up
down
tap
down
roll
up
narrow
wide
width
24in.
4in.
stroke
Page 14

14
: possible, : not possible
MANUAL MASSAGE
Kneading rolling massage
1. Press the “knead” button and the “roll” button.
The massage heads start the kneading rolling massage.
2. To raise the massage heads, press the “up” button. To lower them, press the “down” button.
• All functions that include rolling are available for the entire back, or for a limited section of the back, by
pressing the “stroke” adjustment button.
3. To adjust the intensity of massage, press the “intensity” buttons.
NOTE:
When using a two function massage on manual mode, you can eliminate one function by pressing on that
function’s control button. Thus, it is okay to change from kneading/rolling to just kneading by hitting the rolling
button or to just rolling by hitting the kneading button once to toggle it off.
Tapping rolling massage
1. Press the “tap” button and the “roll” button.
The massage heads move to the narrowest position and start the tapping rolling massage.
2. Press the “width” adjustment button to select the width of the massage heads (narrow or wide).
3. To raise the massage heads, press the “up” button. To lower them, press the “down” button.
• All functions that include rolling are available for the entire back, or for a limited section of the back, by
pressing the “stroke” adjustment button.
4. To adjust the intensity of massage, press the “intensity” buttons.
NOTE:
When using a two function massage on manual mode, you can eliminate one function by pressing on that
function’s control button. Thus, it is okay to change from tapping/rolling to just tapping by hitting the rolling
button or to just rolling by hitting the tapping button once to toggle it off.
Adjustability for Manual Massage
Adjustability
Manual Mode
Up/Down
Adjustment
Width Adjustment Stroke Adjustment
Intensity
Adjustment
23 5/8"
(600 mm)
1 3/4"
(45 mm)
23 5/8"
(600 mm)
3 5/16" or 4 5/16"
(85 or 110 mm)
1 3/4"
(45 mm)
23 5/8"
(600 mm)
3 5/16" or 4 5/16"
(85 or 110 mm)
4 3/4" or 23 5/8"
(120 or 600 mm)
5/8"
(15 mm)
23 5/8"
(600 mm)
4 3/4" or 23 5/8"
(120 or 600 mm)
5/8"
(15 mm)
23 5/8"
(600 mm)
3 5/16" or 4 5/16"
(85 or 110 mm)
4 3/4" or 23 5/8"
(120 or 600 mm)
5/8"
(15 mm)
Page 15

15
Massage heads up-down adjustment
Use of the up or down adjustment button allows you to adjust the up and down
direction of the massage heads.
To move the massage heads up, press and hold the “up” button. To lower them,
press the “down” button. You must hold the button down until you reach the spot
you want.
Massage heads width adjustment
(See page 18.)
Use of the width (narrow or wide) adjustment button allows you to select the width
between the massage heads (available only in the tapping, rolling, and tapping
rolling massage modes).
Press the “width” button to change the width.
Massage stroke adjustment
Use of the stroke adjustment button allows you to select the focus area of the
massage strokes (available only in the rolling, kneading rolling, and tapping rolling
massage modes).
Press the “stroke” button to change the stroke.
NOTE:
• Switches between regional and full:
24in.: Approx. 23 5/8 in. (600 mm)
4in.: Approx. 4 3/4 in. (120 mm)
• When “4in.” is selected, you can adjust the height of the massage heads to the
desired position with the up/down adjustment buttons.
Massage intensity adjustment
Use of the intensity adjustment buttons allows you to adjust the intensity of the
massage during manual operation for kneading (upward/downward), tapping, rolling,
kneading rolling, and tapping rolling massage modes.
Press and hold the intensity adjustment button to choose the desired massage
intensity.
NOTE:
• When you adjust the massage intensity, the massage heads’ position may
change.
• The massage heads stop automatically when they reach the maximum or
minimum intensity positions. When you release your finger from the button,
operation will resume.
down
up
width
narrow
wide
stroke
24in.
4in.
intensity
Page 16

16
BACK CUSHION AND HEADREST
CUSHION INSERT PAD
• Fasten the back cushion to the chair and the headrest and insert the weighted flap through the strap
attached behind the chair.
• If you prefer a stronger massage, remove the back cushion.
• When the massage function will be used, remove the headrest or flip the headrest over the back of the chair
before starting the massage.
NOTE:
• This massage lounger is capable of providing a vigorous “shiatsu” massage. The rolling and tapping action
are very strong, and this type of massage may be too strong for people who have not previously experienced a shiatsu massage. For this reason, a foam cushion insert pad is provided to soften the effect of the
massage.
• The cushion insert pad can be removed for a full shiatsu massage, but be aware of the intensity of the
massage you will receive. The first time you try it – if you decide to – sit in a relaxed manner and do not use
it for more than two minutes. After that you should be able to decide whether or not you prefer a massage
with the pad in place.
• This pad is placed underneath the back cushion at the waist position for supporting the back and the waist,
and for overall chair comfort.
• Remove if unwanted during a massage.
Headrest
Back cushion
Weighted flap
Strap
Back cushion
Cushion insert pad
Page 17

17
1 5
10
2
9
3
8
4
7 6
1 5
10
2
9
3
8
4
7 6
1 5
10
2
9
3
8
4
7 6
DETAILS OF PROGRAMMED MASSAGE
Whole back course
Neck and shoulder course
Complete massage
including neck,
shoulders, back
stretching and lower
back
Rolling Tapping rolling/
Kneading rolling
Upward
kneading
Downward/
upward kneading
Tapping
RollingKneading rolling/
Rolling
Upward kneading/
Kneading rolling
TappingKneading rolling/
Tapping rolling
Concentrated
massage of neck
and shoulders
Rolling Tapping rolling/
Kneading rolling
Upward
kneading
Downward/
upward kneading
Tapping
Tapping rolling/
Kneading rolling
Kneading rolling/
Rolling
Upward/
downward kneading
TappingKneading rolling
Lower back course
Concentrated
massage of lower
back
Rolling Kneading rolling/
Tapping rolling
Upward
kneading
Tapping Rolling
TappingTapping rolling/
Rolling
Tapping rollingKneading
rolling
Kneading
rolling
* The above diagrams have been abbreviated to allow easy understanding of the massage action.
Page 18

18
MASSAGE HEADS’ RANGE OF MOVEMENT
• The vertical movement of the massage heads can be set for different areas, giving you a massage any
place you like from the neck to the lower back for all massage types.
Kneading (upward/downward), Kneading rolling, and Regional kneading rolling.
Massage range width: 2 15/16 in. (75 mm) (width cannot be adjusted)
Tapping, Rolling, Regional rolling, Tapping rolling, and Regional tapping rolling
Massage range width: 3 5/16 in. or 4 5/16 in. (85 mm or 110 mm)
The width (distance) between the massage heads can be adjusted in two ranges.
Neck
Lower back
2 15/16 in. (75 mm)
(Minimum width)
23 5/8 in. (600 mm)
Neck
Lower back
23 5/8 in. (600 mm)
3 5/16 in. (85 mm)
4 5/16 in. (110 mm)
Page 19

19
TROUBLESHOOTING GUIDE
Before requesting service for this unit, check the table below for the possible cause of the
problem. Some simple checks or minor adjustment on your part may eliminate the problem
and restore proper operation. If you are in doubt about some of the check points, or if the
remedies indicated in the chart do not solve the problem, call us at 1-800-338-0552 to
locate the servicer near to you.
Problem Probable cause(s) Suggested remedy
Plug the power cord into an AC outlet
(120 V).
The power cord is not plugged in.
Slide the power switch to “on”.The power switch is at the “off ”
position.
Set the operating lock switch to “open”.The operating lock switch is set to
“lock” position.
Massage does not start.
Wait until the massage heads reach the
narrowest position.
The massage heads must move
to the narrowest position for a
rolling massage.
Kneading massage cannot
be changed immediately to
a rolling massage.
Shift your waist forward and recline the
chair back.
Press the “tap” button in the manual
operation mode. Then press the “quick
stop” button to turn off the tapping. Check
under the back cushion and cushion
insert pad with your hands to see
whether the massage heads have
stopped in an aligned position. If not,
repeat this process until the massage
heads are aligned when stopped.
Your shoulders are too high.
This is because an alternating
tapping mechanism is used. It is
not a malfunction.
When stopped, the misalignment
is approx. 13/32 in. (1 cm) at
most.
Massage heads do not
reach your shoulders.
It seems as if the massage
heads are at different
heights.
Remove any obstacles. If the leg
massage operation indicator lamp on the
controller blinks and the chair stops, turn
off the power switch and then turn on
after 10 seconds. Then, press the “on/off”
button on the controller to start the
massage.
During reclining if any force or
resistance is encountered, such
as the chair hitting an obstacle,
the chair may stop for safety.
Raise your back slightly from the
massage heads. If all operation indicator
lamps on the controller blink and the
chair stops, turn off the power switch and
then turn on after 10 seconds. Then,
press the “on/off” button on the controller
to start the massage.
During operation if the chair
encounters any force or
resistance, the massage heads
stop for safety.
Approx. 13/32 in.
(1 cm) at most
Alternating tapping mechanism
Approx. 13/32 in.
(1 cm) at most
Page 20

20
SPECIFICATIONS
Power source: 120 V AC, 60 Hz
Power consumption: 200 W
Kneading speed: Approx. 28 times/min.
Tapping speed: Approx. 500 times/min. (per side)
Rolling massage speed: Approx. 1 cycle every 37 sec.
Massage width: Shoulder / lower back section: Approx. 2 15/16 in. (75 mm)
Back rolling width/tapping width: Narrow: Approx. 3 5/16 in. (85 mm)
Wide: Approx. 4 5/16 in. (110 mm)
Massage heads up/down travel: Approx. 23 5/8 in. (600 mm)
Regional back rolling: Automatic repetition within approx. 4 3/4 in. (120 mm) range
Intensity adjustment: Adjusts massage head protrusion steplessly within approx. 1 3/4 in.
(45 mm) range.
Shoulder position adjustment: 5 steps
Leg massage speed: Approx. 60 cycles/min.
Automatic shut-off: Approx. 15 min.
Dimensions (H x W x D): Not reclined with legrest lowered: 41 11/32 x 34 41/64 x 40 35/64 in.
(1050 x 880 x 1030 mm)
Reclined with legrest extended: 29 9/64 x 34 41/64 x 68 7/64 in.
(740 x 880 x 1730 mm)
Reclining angle: Approx. 123° to 160°
Weight: 121 lbs. (55 kg)
Accessories: Back cushion, headrest, cushion insert pad
Maximum user weight: 264 lbs. (120 kg). See precautions on page 5.
Page 21

21
Gracias por su compra de la silla de masaje para el hogar modelo EP1014 de Panasonic.
Para obtener un rendimiento y seguridad óptimos, lea cuidadosamente estas instrucciones.
INSTRUCCIONES DE SEGURIDAD IMPORTANTES
Cuando se utiliza un aparato eléctrico deben tomarse siempre precauciones básicas,
incluyendo las siguientes:
Lea todas las instrucciones antes de utilizar la silla de masaje.
PELIGRO – Para reducir el riesgo de sufrir una descarga eléctrica:
Desenchufe siempre este aparato de la toma de corriente eléctrica inmediatamente
después de utilizarlo y antes de limpiarlo.
ADVERTENCIA
1. Un aparato nunca debe dejarse sin atender mientras está enchufado. Desenchúfelo de
la toma de corriente cuando no lo utilice.
2. Cuando este aparato sea utilizado por personas inválidas o incapacitadas será
necesario realizar una supervisión cuidadosa y continua.
3. Utilice este aparato sólo con el fin para el que ha sido diseñado y como se describe en
este manual.
4. No se suba a la silla. Utilícela solamente mientras está sentado.
5. No utilice accesorios no recomendados por el fabricante.
6. Los niños no deberán utilizar este aparato. Mantenga a los niños alejados de la silla de
masaje. Para evitar posibles daños vuelva a poner siempre la silla en posición vertical y
pliegue cuidadosamente el apoyo para las piernas. Asegúrese de que no quede nada
atrapado en el mecanismo de apoyo a las piernas.
7. Nunca utilice este aparato si el cable de alimentación o su clavija está estropeado, si no
funciona bien o si ha sido estropeado. Llame a su centro de servicio autorizado más
cercano para que se lo repare.
8. Mantenga los cables alejados de las superficies calientes.
9. Nunca deje caer ni inserte nunca un objeto en el interior del aparato.
10.No lo utilice en exteriores.
11. No lo utilice donde se empleen productos en aerosol ni donde se administre oxígeno.
12.Para desconectarlo, ponga todos los controles en la posición de apagado “off”, y luego
desconecte la clavija de la toma de corriente.
13.Conecte este aparato sólo a una toma de corriente conectada correctamente a tierra.
Consulte las instrucciones de conexión a tierra.
14.Para evitar el peligro de las descargas eléctricas y las heridas en las personas, no
intente abrir ni desarmar ninguna parte de esta silla de masaje. No inserte nunca sus
manos donde haya partes en movimiento. No hay ninguna parte que deba ser reparada
por el usuario.
GUARDE ESTAS INSTRUCCIONES DE
SEGURIDAD
– Para reducir el riesgo de quemaduras, incendios, descargas
eléctricas o lesiones a las personas:
Page 22

22
PRECAUCIONES DE SEGURIDAD
ADVERTENCIA: Para evitar lesiones
1. Las mujeres embarazadas, las personas enfermas o que tengan dolores en la espalda,
cuello, hombros o caderas, o las que padezcan cualquier otra condición, no deberán
utilizar este aparato sin consultar antes a un médico. No lo utilice tampoco en ninguna
parte que haya recibido tratamiento médico sin consultar antes a un médico.
2. No ponga nunca ninguna parte del cuerpo entre las cabezas de masaje. La acción de
apriete de las cabezas de masaje puede causar lesiones. No ponga nunca tampoco
ninguna parte de su cuerpo entre los apoyos para los brazos y el respaldo de la silla.
No ponga las manos en la parte mecánica del apoyo para las piernas situado debajo
del asiento.
3. No utilice la silla de masaje estando desnudo, póngase siempre ropas.
Las ropas finas aumentan la eficacia del masaje, pero la exposición directa de la piel a
la silla de masaje puede causar irritaciones en la piel.
4. No utilice el aparato para dar masajes en la cabeza, el abdomen, los codos y las
rodillas.
5. No estire los músculos de la espalda durante más de 15 minutos aproximadamente
cada vez.
Para evitar estirar excesivamente los músculos y las molestias que esto causa al utilizar
por primera vez la silla, no la utilice durante más de 5 minutos. Podrá aumentar poco a
poco la duración y la intensidad del masaje según se va adaptando a la silla.
No dé masajes a ninguna parte del cuerpo durante más de 5 minutos cada vez. El
masaje excesivo puede sobreestimular los músculos y los nervios y causar un efecto
adverso.
Para evitar el exceso de masaje, no utilice la silla de masaje durante más de 15 minutos
en total por cada sesión. Después de pasar unos 15 minutos, las cabezas de masaje
volverán a la posición de “reposo” y se pararán.
6. Si empieza a sentirse mareado mientras utiliza la silla de masaje, o si el masaje resulta
doloroso, deje de utilizar la silla inmediatamente.
Mientras utiliza la silla de masaje, si la presión parece ser excesiva, el movimiento de
las cabezas de masaje podrá detenerse pulsando el botón de parada rápida “quick
stop”.
7. Cuando el respaldo de la silla esté reclinado, no se siente en él ni se siente con sus
piernas apoyadas en el apoyo para la cabeza.
No se siente en el apoyo para las piernas. La silla podría caerse.
8. No deje que los niños o animales domésticos jueguen en la silla ni a su alrededor,
especialmente mientras ésta está funcionando.
9. No retire el cojín del respaldo sin antes leer las instrucciones de la página 34.
Page 23

23
PRECAUCIONES PARA LA OPERACIÓN
PRECAUCIÓN: Para evitar estropear la silla
1. El peso máximo del usuario deberá ser de 264 lbs. (120 kg). Si se excede el peso
máximo, el mecanismo de masaje y/u otros componentes de la silla podrán sufrir daños
permanentes. Este tipo de daños no está cubierto por la garantía.
2. No se siente encima del controlador y no lo deje caer. No tire del cable del controlador
ni del cable de alimentación. Tenga cuidado para no atrapar el cable del controlador
entre los apoyos para los brazos y el respaldo de la silla.
3. No trate mal la silla como, por ejemplo, dando vuelta a la silla y apoyándola en su
costado, dándola vuelta o poniéndose de pie encima de ella.
4. No trate mal la cubierta.
• Mantenga los objetos afilados o puntiagudos alejados de la cubierta de la silla. Tenga
cuidado para no dejar caer ceniza ni fósforos encendidos en la silla.
• La exposición a la luz solar directa puede ser la cusa de que la cubierta pierda o
cambie su color.
5. Si la silla de masaje funciona mal, desconecte inmediatamente su alimentación y
póngase en contacto con un centro de servicio autorizado para que la verifique.
6. No intente reparar la silla de masaje usted mismo.
7. No manipule repetidamente ningún interruptor con breves intervalos de tiempo. Esto
puede ser la causa de que falle el interruptor.
8. La silla de masaje puede que produzca algunos ruidos al funcionar. Esto se debe a su
estructura. No es ninguna condición anormal.
9. Asegúrese de que no haya ningún obstáculo detrás de la silla cuando la recline. La silla
puede reclinarse con un ángulo máximo de 160°. Si el respaldo golpea contra una
pared o columna, puede que éste funcione mal. Asegúrese de disponer de un espacio
amplio detrás de la silla. Recline lentamente la silla para poder ver rápidamente si hay
algún obstáculo.
10.Cuando se aplique una presión excesiva a las cabezas de masaje, éstas pueden dejar
de moverse por motivos de seguridad. Cuando mueva las cabezas hacia arriba desde
donde están bajadas, el peso del cuerpo podrá parar el movimiento de las cabezas. En
tal caso, levante el cuerpo ligeramente y deje que las cabezas se muevan hacia arriba.
11. Después de cada masaje, deslice el interruptor de la alimentación situado en la parte
trasera de la silla hacia la posición “off” y gire su interruptor de bloqueo hacia la posición
“lock”.
CUIDADOS DE LA SILLA DE MASAJE
• Desenchufe siempre la silla antes de limpiarla.
• Si se ensucia la cubierta, humedézcala con jabón líquido y cepille su superficie. Luego
pase un paño humedecido en agua. Deje que la cubierta se seque naturalmente. Si se
ensucian las partes de plástico, emplee agua templada y jabón líquido en un paño para
limpiar la superficie.
• No utilice diluyente, bencina ni otros productos de limpieza tipo disolvente. Los productos
químicos pueden estropear el color o los materialses.
Page 24

24
Rueda
INSTRUCCIONES PARA LA CONEXIÓN A TIERRA
• Este producto debe ser conectado a tierra. Si funciona mal, la conexión a tierra
proporcionará un camino de mínima resistencia a la corriente eléctrica para reducir el
riesgo de sufrir una descarga eléctrica.
• Este producto está equipado con un cable que dispone de un conductor de conexión a
tierra y de una clavija de conexión a tierra. La clavija deberá enchufarse en una toma de
corriente apropiada que disponga de una puesta a tierra según los códigos y los
reglamentos locales.
PELIGRO
• Una conexión mal hecha del conductor de tierra puede resultar en un riesgo de descarga
eléctrica. Consulte con un electricista cualificado si tiene alguna duda acerca de si el
producto está conectado correctamente a tierra o no. No modifique la clavija suministrada
con el producto aunque ésta no pueda introducirse en la toma de corriente. Pida a un
electricista cualificado que le instale una toma de
corriente apropiada.
• Este producto ha sido diseñado para funcionar
con una corriente nominal de 120 voltios, y tiene
una clavija de conexión a tierra como la ilustrada
en la figura A. Asegúrese de conectar el producto
a una toma de corriente cuya configuración sea
la misma que la de la clavija. Con este producto
no deberá utilizarse ningún adaptador.
CÓMO MOVER LA SILLA
PRECAUCIÓN
No mueva la silla estando alguien sentado en ella.
Si no sigue este consejo, la silla podrá volcar y causar heridas a las personas.
Utilice la rueda para mover la silla.
• No intente mover la silla levantándola desde la parte delantera (ilustración derecha). La
forma correcta de mover la silla consiste en poner su pie en la rueda y empujar hacia abajo
desde detrás de la silla (ilustración izquierda).
• La silla puede moverse más fácilmente si las cabezas de masaje se ponen en las
posiciones de apoyo y se reclina el respaldo de la silla.
• Al mover la silla se pueden marcar fácilmente las superficies de los suelos. Por lo tanto,
ponga una estera o paño sobre el suelo y mueva la silla lentamente.
• Antes de empujar la silla hacia abajo, prepárese usted mismo para sujetar su peso y tenga
mucho cuidado al moverla.
Toma de
corriente con
conexión a tierra
Contacto de
conexión a tierra
Figura A
CORRECTO INCORRECTO
Page 25

25
IDENTIFICACIÓN DE PARTES
SILLA DE MASAJE
CONTROLADOR
• Se pliega sobre el cojín de respaldo.
Apoyo para la cabeza
(Debajo del cojín de la silla)
Bolsillo para guardar el controlador
El controlador se puede guardar en el
bolsillo del controlador (lado izquierdo).
Apoyo para
las piernas
• Se coloca en la silla con una
cremallera.
• Quítelo para recibir un masaje
más fuerte.
Cojín de respaldo
Cabezas de masaje
Apoyo para el brazo
Botones de ajuste de intensidad
Botón de encendido/apagado
Luz indicadora de funcionamiento
Botón de parada rápida
Botón de encendido/apagado de
masaje de las piernas
Botones de reclinación
Botón de ajuste de las cabezas
de masaje
Botones del proceso de
masaje programado
Botón de encendido/apagado de
masaje golpeando
Botón de masaje amasando y
rodando (hacia arriba/hacia abajo)
Botón de masaje golpeando
Botón de masaje rodando
Botón de ajuste de extensión
Botón de ajuste de anchura
Botones de ajuste ascendente/
descendente
on
off
on
off
quick
stop
leg massage
reclining
1
3
5
neck
roller
position
Programmed Operation
Manual Operation
whole back neck shoulder lower back
tapping
on
off
up
down
knead
tap
roll
intensity
down
up
stroke
24in.
4in.
width
narrow
wide
Page 26

26
Interruptor de la alimentación
Controlador
Bolsillo para guardar
el controlador
Cable de alimentación
Interruptor de
la alimentación
on
off
on
off
NOTA:
El interruptor de bloqueo
de operación impide que
la unidad sea encendida
cuando el interruptor se
encuentra en la posición
"lock".
Interruptor
de bloqueo
de operación
ANTES DE SENTARSE
LUGAR DE UTILIZACIÓN
CONEXIÓN DE LA ALIMENTACIÓN
ANTES DE UTILIZAR LA SILLA DE MASAJE
• No utilice la silla de masaje donde quede expuesta a la luz solar directa durante largos periodos de tiempo.
La sobreesposición a la luz intensa puede decolorar o endurecer la cubierta.
• No utilice la silla de masaje en lugares calientes o húmedos ni en lugares donde pueda mojarla la lluvia, el
agua salpicada, el goteo de agua, etc. El agua y el calor pueden causar decoloración y moho.
NOTA:
Coloque la silla a un mínimo de 16" (40 cm) de cualquier pared u otro obstáculo para asegurar un espacio de
reclinación adecuado.
Lea y familiarícese primero con las precauciones de seguridad.
1. Enchufe el cable de alimentación en la entrada situada en la parte trasera de la silla.
2. Enchufe el cable de alimentación en una toma de CA.
NOTA:
Tenga cuidado de no pellizcar el cable de debajo de los marcos de las patas o de cualquier otro objeto.
3. Utilizando un destornillador de punta plana o un objeto similar,
insértelo en el interruptor de bloqueo y gírelo hacia “open”.
4. Mueva el interruptor de la alimentación hacia “on”.
• Cuando el interruptor de bloqueo de operación esté apuntando
hacia “lock”, el interruptor de la alimentación no se podrá mover a
la posición “on”.
Después de cada utilización
• Asegúrese de poner el interruptor de la alimentación en “off”.
• Para impedir que los niños utilicen esta unidad, bloquee el
interruptor de la alimentación poniendo el interruptor de bloqueo de
operación en la posición “lock”.
• Para mayor seguridad, desenchufe el cable de alimentación de la
toma de corriente después de cada utilización.
El usuario no deberá pesar más de 264 lbs. (120 kg).
Antes de sentarse, verifique primero con sus manos la posición de
las cabezas de masaje.
• En la posición de reposo, las cabezas de masaje deberán estar
separadas cerca de la parte superior del respaldo de la silla de masaje.
• Si las cabezas de masaje no están en su posición de reposo, no se
siente en la silla de masaje. Pulse dos veces el botón “on/off” del
controlador. Espere a que las cabezas de masaje alcancen la posición
de reposo antes de sentarse.
Después de asegurarse de que las cabezas de masaje estén en la
posición de reposo, siéntese lentamente en el centro de la silla de
masaje.
Page 27

27
RECLINACIÓN DE LA SILLA
CÓMO EXTENDER MANUALMENTE EL APOYO PARA LAS PIERNAS
Utilizando el botón de reclinación del controlador, el apoyo para las piernas podrá subirse o bajarse
automáticamente junto con el movimiento del respaldo de la silla de masaje.
• Para evitar que vuelque la silla, no se siente ni se apoye en el respaldo mientras éste está reclinado.
• El ángulo del respaldo de la silla se puede cambiar para que el peso del cuerpo y las cabezas de masaje
trabajen juntos para determinar la intensidad del masaje.
• Pruebe a cambiar el ángulo del respaldo de la silla para encontrar una posición de masaje confortable con
una intensidad que sea la más apropiada para usted. Cuando más recline el respaldo, más intenso será el
masaje. Agregar o retirar el cojín también aumentará la intensidad del masaje.
NOTA:
Coloque la silla a un mínimo de
16"
(40 cm) de cualquier pared u otro obstáculo para asegurar un espacio de
reclinación adecuado.
Para extender: Mantenga pulsado el botón .
• Mientras el botón se mantiene pulsado, el apoyo para
las piernas se extenderá y el respaldo se reclinará.
• Suelte el botón al alcanzar la posición deseada.
Para bajar: Mantenga pulsado el botón .
• El apoyo para las piernas volverá a su posición de reposo y el respaldo subirá.
• Para obtener el máximo beneficio del masaje, relaje su cuerpo y reclínese de una forma confortable.
NOTA:
Después de utilizar la silla, asegúrese de volver a poner el apoyo para las piernas y el respaldo en sus
posiciones de reposo (apoyo para las piernas bajado y respaldo subido).
El apoyo para las piernas puede extenderse y plegarse independientemente
de la operación de reclinación:
Pliegue hacia abajo con las manos el apoyo para las piernas cuando quiera
dar un masaje a las plantas de los pies.
• No se siente en la silla de masaje ni se baje apoyándose en el apoyo para
las piernas estando éste plegado.
160°
123°
85°
quick
on
stop
off
reclining
Programmed Operation
1
3
5
on
off
neck
roller
position
Page 28

28
UTILIZACIÓN
PARA INICIAR/DETENER LA ACCIÓN DE MASAJE
Antes de utilizar la silla de masaje, lea todas las instrucciones, incluyendo las advertencias y precauciones de
seguridad y operación, y también la sección del masaje programado y manual.
1. Para utilizar la silla de masaje, pulse el botón “on/off”.
• Asegúrese de que la luz indicadora de operación esté
encendida.
2. Para detener la silla de masaje durante la operación, pulse
el botón “on/off”.
Las cabezas de masaje subirán, se abrirán y se detendrán
en su posición de reposo.
• Asegúrese de que la luz indicadora de operación esté
apagada.
• Con las cabezas en sus posiciones de reposo, usted
podrá sentarse cómodamente y empezar a utilizar su
silla de masaje.
• Para iniciar el masaje, pulse el botón “on/off”. La acción
de masaje o el proceso de masaje programado
empezarán desde el principio.
• Asegúrese de guardar el controlador en el bolsillo del
apoyabrazos izquierdo cuando no lo utilice.
on
off
on
off
quick
stop
leg massage
reclining
1
3
5
neck
roller
position
Luz indicadora
de operación
Botón de parada rápida
Pulse el botón “quick stop” si desea parar inmediatamente el masaje.
Las cabezas de masaje se detendrán donde están.
• Asegúrese de que la luz indicadora de operación esté apagada.
• Para reanudar el masaje, pulse el botón “on/off”. La acción de
masaje o el proceso de masaje programado empezarán desde el
principio.
• Para volver a poner las cabezas de masaje en la posición de
reposo, pulse el botón de encendido/apagado, espere y vuelva a
pulsarlo. Las cabezas de masaje se detendrá en una posición de
reposo retraída que resulta más confortable para sentarse.
Temporizador automático para silla de masaje
• Para impedir un masaje excesivo se ha incorporado un temporizador que, después de unos 15 minutos
de operación, hará que las cabezas de masaje vuelvan automáticamente a su posición de reposo y se
paren.
• Al activar el botón de encendido/apagado mientras las cabezas de masaje se mueven a su posición de
reposo se repondrá el tiempo de masaje durante otros 15 minutos aproximadamente.
• Si se pulsa el botón de masaje programado, la unidad se detendrá después de finalizar el programa.
on
off
on
off
quick
stop
leg massage
reclining
1
3
5
neck
roller
position
Botón de
parada
rápida
Page 29

29
OPERACIÓN DEL MASAJEADOR DE LAS PIERNAS
1. Pulse el botón “on/off” de masaje de las piernas para
encender el masajeador de las piernas.
• Asegúrese de que la luz indicadora de operación del
botón de encendido/apagado de masaje de las piernas
esté encendida.
2. Para apagar el masajeador de las piernas, vuelva a pulsar
este botón de encendido/apagado de masaje de las
piernas.
Temporizador automático para el masajeador de piernas
• Para impedir la operación continua del masajeador de piernas hay un temporizador incorporado que
apaga automáticamente el masajeador de piernas después de 30 minutos de operación.
Botón de masaje
de las piernas
on
off
on
off
quick
stop
leg massage
reclining
1
3
5
neck
roller
position
Page 30

30
MASAJE PROGRAMADO
Lea y familiarícese primero con las precauciones de seguridad y operación.
1. Pulse el botón “on/off”.
2. Utilice el botón de ajuste de las cabezas de masaje (neck roller
position) para cambiar entre el ajuste más alto “1” y el ajuste más
bajo “5”, para que las cabezas de masaje se ajusten en la posición
deseada para su cuello.
Las cabezas de masaje (rodillos) deberán descansar
confortablemente sobre sus hombros antes de iniciar el masaje.
• Este botón sirve para limitar la altura de las cabezas de masaje en
su cuello o cabeza. Nosotros recomendamos que una persona de
6 ft. (1,82 m) o más utilice el ajuste “1”, mientras que otra de 5 ft.
(1,52 m) o menos utilice el ajuste “5”.
• Una vez hecho el ajuste, usted podrá seleccionar cualquier ajuste
de masaje que desee.
• Podrá ajustar la posición de las cabezas de masaje en cualquier
momento durante el masaje.
3. Pulse el botón del proceso de masaje programado deseado para la
parte de su cuerpo donde quiera darse un masaje. (Consulte la
página 35 para conocer detalles sobre los diferentes procesos de
masaje.)
• Asegúrese de que la luz indicadora del proceso de masaje esté encendida.
Toda la espalda: Para dar un masaje en toda la espalda. Vea el
proceso de masaje en la página 35.
Cuello y hombros: Para dar un masaje principalmente en el
cuello y en los hombros. Consulte la página 35.
Parte inferior de la espalda: Para dar un masaje principalmente
en la parte inferior de la espalda. Consulte la página 35.
• Si no pulsa ningún botón, el proceso de masaje de toda la espalda empezará automáticamente unos
40 segundos después de haber encendido la silla de masaje.
• El masaje durará aproximadamente unos 15 minutos después de pulsar el botón.
• Si desea cambiar el proceso de masaje, pulse el botón del proceso deseado.
• Puede cambiar el proceso de masaje en cualquier momento durante la operación sin causar ningún
daño.
• Sus instrucciones nuevas cancelarán las instrucciones anteriores.
PARA LAS PERSONAS QUE NO DESEEN EL MASAJE GOLPEANDO
1. Pulse el botón “tapping” cuando no quiera el masaje golpeando en medio del proceso de masaje
programado.
(El masaje golpeando cambia al masaje amasando.)
2. Pulse de nuevo el botón “tapping” para reactivar el masaje golpeando.
Programmed Operation
whole back neck shoulder lower back
tapping
on
off
on
off
on
off
quick
stop
leg massage
reclining
1
3
5
neck
roller
position
Botón de ajuste
de las cabezas
de masaje
Programmed Operation
whole back neck shoulder lower back
tapping
on
tapping
on
off
off
Page 31

31
MASAJE MANUAL
Lea y familiarícese primero con las precauciones de seguridad y operación
Masaje amasando (hacia arriba/hacia abajo)
Pulse el botón para elegir el masaje deseado.
• El masaje actual se indica mediante las luces indicadoras de
masaje.
• Se pueden combinar diferentes tipos de masaje.
Masaje amasando (hacia arriba/hacia abajo)
Masaje golpeando
Masaje rodando
NOTA:
• No dé un masaje a ningún punto de su cuerpo durante más
de 5 minutos.
• No estire los músculos de la espalda durante más de 15
minutos aproximadamente cada vez. Un masaje continuo en
la misma zona puede causar dolores.
1. Pulse el botón “knead” . Cada vez que usted pulsa este botón, la dirección del masaje amasando
cambia entre masaje hacia arriba y masaje hacia abajo.
2. Para subir las cabezas de masaje, pulse el botón “up” . Para bajarlas, pulse el botón “down” .
3. Para ajustar la intensidad del masaje, pulse los botones “intensity” .
Masaje golpeando
1. Pulse el botón “tap” .
Las cabezas de masaje se mueven a la posición más estrecha y comienza el masaje golpeando.
2. Pulse el botón de ajuste “width” para seleccionar la anchura de las cabezas de masaje (estrecha o ancha).
3. Para subir las cabezas de masaje, pulse el botón “up” . Para bajarlas, pulse el botón “down” .
4. Para ajustar la intensidad del masaje, pulse los botones “intensity” .
Masaje rodando
1. Pulse el botón “roll” .
Las cabezas de masaje se mueven a la posición más estrecha y comienza el masaje rodando.
2. Pulse el botón de ajuste “width” para seleccionar la anchura de las cabezas de masaje (estrecha o ancha).
3. Para subir las cabezas de masaje, pulse el botón “up” . Para bajarlas, pulse el botón “down” .
• Todas las funciones que incluyen el masaje rodando se encuentran disponibles para toda la espalda, o
para una sección limitada de la espalda, pulsando el botón de ajuste “stroke”.
4. Para ajustar la intensidad del masaje, pulse los botones “intensity” .
Manual Operation
knead
intensity
up
down
tap
down
roll
up
narrow
wide
width
24in.
4in.
stroke
Page 32

32
: posible, : imposible
MASAJE MANUAL
Masaje amasando y rodando
1. Pulse el botón “knead” y el botón “roll” .
Las cabezas de masaje empiezan el masaje amasando y rodando.
2. Para subir las cabezas de masaje, pulse el botón “up” . Para bajarlas, pulse el botón “down” .
• Todas las funciones que incluyen el masaje rodando se encuentran disponibles para toda la espalda, o
para una sección limitada de la espalda, pulsando el botón de ajuste “stroke”.
3. Para ajustar la intensidad del masaje, pulse los botones “intensity” .
NOTA:
Cuando utilice un masaje de dos funciones en el modo manual, usted podrá eliminar una de las funciones
pulsando el botón de control de esa función. Por lo tanto, se puede cambiar de masaje amasando y rodando
a masaje amasando solamente pulsando el botón de masaje rodando, o a masaje rodando solamente
pulsando el botón de masaje amasando.
Masaje golpeando y rodando
1. Pulse el botón “tap” y el botón “roll” .
Las cabezas de masaje se mueven a la posición más estrecha y empieza el masaje golpeando y rodando.
2. Pulse el botón de ajuste “witdh” para seleccionar la anchura de las cabezas de masaje (estrecha o ancha).
3. Para subir las cabezas de masaje, pulse el botón “up” . Para bajarlas, pulse el botón “down” .
• Todas las funciones que incluyen el masaje rodando se encuentran disponibles para toda la espalda, o
para una sección limitada de la espalda, pulsando el botón de ajuste “stroke”.
4. Para ajustar la intensidad del masaje, pulse los botones “intensity” .
NOTA:
Cuando utilice un masaje de dos funciones en el modo manual, usted podrá eliminar una de las funciones
pulsando el botón de control de esa función. Por lo tanto, se puede cambiar de masaje golpeando/rodando a
masaje golpeando solamente pulsando el botón de masaje rodando, o a masaje rodando solamente pulsando
el botón de masaje golpeando.
Ajustabilidad para el masaje manual
Ajustabilidad
Modo manual
Ajuste
ascendente/
descendente
Ajuste de anchura Ajuste de extensión
Ajuste de
intensidad
23 5/8"
(600 mm)
1 3/4"
(45 mm)
23 5/8"
(600 mm)
3 5/16" ó 4 5/16"
(85 ó 110 mm)
1 3/4"
(45 mm)
23 5/8"
(600 mm)
3 5/16" ó 4 5/16"
(85 ó 110 mm)
4 3/4" ó 23 5/8"
(120 ó 600 mm)
5/8"
(15 mm)
23 5/8"
(600 mm)
4 3/4" ó 23 5/8"
(120 ó 600 mm)
5/8"
(15 mm)
23 5/8"
(600 mm)
3 5/16" ó 4 5/16"
(85 ó 110 mm)
4 3/4" ó 23 5/8"
(120 ó 600 mm)
5/8"
(15 mm)
Page 33

33
Ajuste de subida y bajada de las cabezas de masaje
La utilización de los botones de ajuste de subida y bajada le permiten ajustar la
dirección ascendente o descendente de las cabezas de masaje.
Para subir las cabezas de masaje, mantenga pulsado el botón “up” . Para
bajarlas, mantenga pulsado el botón “down” . Deberá mantener pulsado el botón
hasta alcanzar el punto deseado.
Ajuste de anchura de las cabezas de masaje
(Consulte las páginas 36.)
La utilización del botón de ajuste de anchura (ancho o estrecho) le permite
seleccionar la anchura entre las cabezas de masaje (sólo disponible en los modos
de masaje golpeando, rodando y golpeando y rodando).
Pulse el botón “width” para cambiar la anchura.
Ajuste de la extensión de masaje
La utilización del botón de ajuste de extensión le permite seleccionar el área de
concentración de las extensiones de masaje (disponible solamente en los modos de
masaje rodando, amasando y rodando, y golpeando y rodando).
Pulse el botón “stroke” para cambiar la extensión.
NOTA:
• Cambia entre zonal y completo:
24in.: 23 5/8" (600 mm) aproximadamente
4in.: 4 3/4" (120 mm) aproximadamente
• Cuando se selecciona “4in.”, usted puede ajustar la altura de las cabezas de
masaje en la posición deseada con los botones de ajuste ascendente/
descendente.
Ajuste de intensidad de masaje
La utilización de los botones de ajuste de intensidad le permiten ajustar la
intensidad del masaje durante la operación manual para los modos de masaje
amasando (hacia arriba/hacia abajo), golpeando, rodando, amasando y rodando, y
golpeando y rodando.
Mantenga pulsado el botón de ajuste de intensidad para elegir la intensidad de
masaje deseada.
NOTA:
• Cuando ajuste la intensidad del masaje, la posición de las cabezas de masaje
podrá cambiar.
• Las cabezas de masaje se paran automáticamente cuando alcanzan las
posiciones de máxima o mínima intensidad. Cuando suelte el botón, la operación
se reanudará.
down
up
width
narrow
wide
stroke
24in.
4in.
intensity
Page 34

34
COJÍN DEL RESPALDO Y APOYO PARA LA CABEZA
COJÍN DE ESPUMA
• Apriete el cojín del respaldo a la silla y al apoyo para la cabeza e inserte la lengüeta con peso a través de la
correa colocada detrás de la silla.
• Si prefiere un masaje más intenso, retire el cojín del respaldo.
• Cuando se utilice la función de masaje, retire el apoyo para la cabeza o desplácelo hacia la parte trasera de
la silla antes de empezar a dar el masaje.
NOTA:
• Esta silla de masaje es capaz de proporcionar un vigoroso masaje “shiatsu”. La acción de masaje rodando
y golpeando es muy fuerte, y este tipo de masaje puede que sea demasiado fuerte para las personas que
no han recibido previamente masajes shiatsu. Por esta razón se ha insertado un cojín de espuma que
suaviza el efecto del masaje.
• El cojín de espuma puede retirarse para recibir un masaje shiatsu completo, pero tenga cuidado con la
intensidad del masaje que usted reciba. La primera vez que lo intente, siéntese de una forma relajada y
procure que el masaje no dure más de dos minutos. Después, usted podrá decidir si desea recibir el masaje
con el cojín de espuma puesto o no.
• El cojín de espuma se coloca debajo del cojín del respaldo, a la altura de la cintura, para que sirva de
apoyo a la espalda y a la cintura, y también para el confort total de la silla.
• Retírelo si no lo desea durante el masaje.
Apoyo para
la cabeza
Cojín del
respaldo
Lengüeta con
peso
Correa
Cojín de respaldo
Cojín de espuma
Page 35

35
1 5
10
2
9
3
8
4
7 6
1 5
10
2
9
3
8
4
7 6
1 5
10
2
9
3
8
4
7 6
DETALLES DEL MASAJE PROGRAMADO
Proceso en toda la espalda
Proceso en el cuello y en los hombros
Masaje completo
incluyendo el cuello, los
hombros, estiramiento
de la espalda y parte
baja de la espalda
Rodando
Golpeando y
rodando/Amasando
y rodando
Amasando
hacia arriba
Amasando hacia
abajo/arriba
Golpeando
RodandoAmasando
y rodando/
Rodando
Amasando hacia
arriba/Amasando
y rodando
Golpeando Amasando y
rodando/Golpeando
y rodando
Masaje concentrado
en el cuello y en los
hombros
Rodando
Golpeando y
rodando/Amasando
y rodando
Amasando
hacia arriba
Amasando hacia
abajo/arriba
Golpeando
Golpeando y
rodando/Amasando
y rodando
Amasando y
rodando/Rodando
Amasando
hacia
arriba/abajo
GolpeandoAmasando y
rodando
Proceso en la parte inferior de la espalda
Masaje concentrado
en la parte inferior
de la espalda
Rodando Amasando y
rodando/Golpeando
y rodando
Amasando
hacia arriba
Golpeando Rodando
GolpeandoGolpeando y
rodando/
Rodando
Golpeando y
rodando
Amasando y
rodando
Amasando y
rodando
* Los diagramas de arriba han sido abreviados para facilitar la comprensión de la acción de masaje.
Page 36

36
ALCANCE DE MOVIMIENTO DE LAS CABEZAS DE MASAJE
• El movimiento vertical de las cabezas de masaje se puede ajustar para zonas diferentes, pudiendo usted
recibir un masaje donde quiera, desde el cuello a la parte inferior de la espalda.
Masajes amasando (ascendente/descendente), amasando y rodando, y amasando y rodando en zona
localizada.
Anchura de la zona de masaje: 2 15/16" (75 mm) (no se puede ajustar la anchura)
Masajes golpeando, rodando, rodando localizado. golpeando y rodando, y golpeando y rodando
localizado
Anchura de la zona de masaje: 3 5/16" ó 4 5/16" (85 ó 110 mm)
La anchura (distancia) entre las cabezas de masaje se puede ajustar de dos formas.
Cuello
Parte inferior
de la espalda
2 15/16" (75 mm)
(Anchura mínima)
23 5/8" (600 mm)
Cuello
Parte inferior
de la espalda
23 5/8" (600 mm)
3 5/16" (85 mm)
4 5/16" (110 mm)
Page 37

37
GUÍA PARA LA LOCALIZACIÓN Y
SOLUCIÓN DE PROBLEMAS
Antes de solicitar reparaciones para esta unidad, verifique la tabla de abajo para ver si
aparece la causa probable del problema. Algunas verificaciones sencillas o pequeños
ajustes de su parte pueden eliminar el problema y hacer que la unidad funcione
correctamente. Si tiene alguna duda acerca de los puntos de verificación, o si los remedios
indicados en la tabla no resuelven el problema, llame al 1-800-338-0552 para localizar al
centro de servicio más próximo a usted.
Problema Causa(s) probable(s) Remedio sugerido
Enchufe el cable de alimentación en una
toma de CA (120 V).
El cable de alimentación no está
enchufado.
Ponga el interruptor de alimentación en “on”.El interruptor de alimentación está en
la posición “off”.
Ponga el interruptor de bloqueo de operación
en “open”.
El interruptor de bloqueo de operación
está en la posición “lock”.
El masaje no empieza.
Espere hasta que las cabezas de masaje
alcancen la posición más estrecha.
Las cabezas de masaje deben
moverse a la posición más estrecha
para un masaje rodando.
El masaje amasando no puede
cambiar inmediatamente a
masaje rodando.
Mueva su cintura hacia delante y recline el
respaldo de la silla.
Pulse el botón “tap” en el modo de operación
manual. Luego pulse el botón “quick stop”
para apagar el masaje golpeando. Verifique
debajo del cojín del respaldo y del cojín de
espuma con sus manos para ver si las
cabezas de masaje se han parado en
posición alineada. Si no, repita este
procedimiento hasta que las cabezas queden
alineadas cuando se paren.
Sus hombros están demasiado altos.
Esto se debe al uso de una
mecanismo de golpes alternativos. No
es un funcionamiento defectuoso.
Al detenerse, el desajuste es de
aproximadamente 13/32" (1 cm) a lo
sumo.
Las cabezas de masaje no
llegan a sus hombros.
Parece como si las cabezas de
masaje estuvieran a alturas
diferentes.
Retire el obstáculo. Si la luz indicadora de
masaje de las piernas del controlador
parpadea y la silla se para, apague la silla
con el interruptor de alimentación y luego
vuelva a encenderla después de 10
segundos. Luego, pulse el botón “on/off” del
controlador para empezar el masaje.
Durante la reclinación, si la silla
golpea, por ejemplo, un obstáculo y
encuentra resistencia, la silla tal vez
deje de funcionar con seguridad.
Levante ligeramente su espalda por encima
de las cabezas de masaje. Si parpadean
todas las luces indicadoras de operación en
el controlador y la silla se detiene, apague la
silla con el interruptor de la alimentación y
luego vuelva encenderla después de 10
segundos. Luego, pulse el botón “on/off” del
controlador para empezar el masaje.
Durante la operación, si la silla
encuentra alguna resistencia, las
cabezas de masaje se paran por
seguridad.
Aproximadamente
13/32" (1 cm) a lo sumo
Mecanismo de golpes alternativos
Aproximadamente
13/32" (1 cm) a
lo sumo
Page 38

38
ESPECIFICACIONES
Fuente de energía: 120 V CA, 60 Hz
Consumo de energía: 200 W
Velocidad amasando: Aproximadamente 28 veces/minuto
Velocidad golpeando: Aproximadamente 500 veces/minuto (por lado)
Velocidad de masaje rodando: Aproximadamente 1 ciclo cada 37 segundos
Anchura de masaje: Sección de hombros/parte inferior de la espalda:
Aproximadamente 2 15/16" (75 mm)
Anchuras de masaje rodando/
golpeando en la espalda: Angosto: Aproximadamente 3 5/16" (85 mm)
Ancho : Aproximadamente 4 5/16" (110 mm)
Desplazamiento ascendente/
descendente de las cabezas de masaje: Aproximadamente 23 5/8" (600 mm)
Masaje rodando localizado en la espalda: Repetición automática en una gama de 4 3/4" (120 mm)
aproximadamente
Ajuste de intensidad: Ajuste sin pasos de la proyección de las cabezas de masaje
dentro de una gama de 1 3/4" (45 mm) aproximadamente
Ajuste de la posición de los hombros: 5 pasos
Velocidad de masaje para el apoyo
para las piernas: 60 ciclos/minuto
Apagado automático: Aproximadamente 15 minutos
Dimensiones (Al x An x F): No reclinada con el apoyo para las piernas bajado:
41 11/32" x 34 41/64" x 40 35/64" (1050 x 880 x 1030 mm)
Reclinada con el apoyo para las piernas extendido:
29 9/64" x 34 41/64" x 68 7/64" (740 x 880 x 1730 mm)
Ángulo de reclinación: Aproximadamente 123° a 160°
Peso: 121 lbs. (55 kg)
Accesorios: Cojín de respaldo, apoyo para la cabeza y cojin de espuma
Peso máximo del usuario: 264 lbs. (120 kg) Consulte las precauciones en la página 23.
Page 39

Page 40

Panasonic Consumer
Electronics Company
One Panasonic Way 4A-3
Secaucus, New Jersey 07094
1-800-338-0552 for questions and comments.
www.panasonic.com/massage
Printed in USANo. 1 EN, SP
Page 41

documentation manual, user maintenance, brochure, user reference, pdf manual
This file has been downloaded from:
User Manual and User Guide for many equipments like mobile phones, photo cameras, monther board, monitors, software, tv, dvd, and othes..
Manual users, user manuals, user guide manual, owners manual, instruction manual, manual owner, manual owner's, manual guide,
manual operation, operating manual, user's manual, operating instructions, manual operators, manual operator, manual product,
 Loading...