

Page 1

Operating Instructions EB-G450
Digital Cellular Main Kit
Telephone
Before operating this equipment please
read these instructions carefully
Page 2

Page 3
Contents
Before You Start
Your Telephone
Basic Operation
Advanced Operation
Stored Numbers
Symbols Used .....................1
Safety Information ...................1
Fitting/Removing the SIM ...............2
Fitting/Removing the Battery ..............2
............................3
Power on/off......................4
Making a Call .....................4
Ending a Call......................5
Answering a Call....................5
Adjusting Volume ...................6
Automatic Redial....................6
Concept of Operation .................7
DTMF Tones ......................7
Call Hold........................8
<
Call Waiting
Note Pad .......................10
Recent Numbers
Phonebook ......................11
Fixed Dial
Service Numbers
Hot Key Telephone Numbers
....................9
<
.................10
>
....................13
>
.................13
>
..........14
Page 4
Alpha Entry
..............................15
Additional Features
Key-guards.......................16
Phonebook
Messages
Call Service
Call Divert
Security
Network
Personalise
u
......................16
?<
.....................17
:
......................17
w<
.....................18
t
........................18
v
......................19
z
......................19
Battery Information
Charging the Battery....................20
Care and Maintenance
..............................21
Other Information
Glossary of Terms.....................22
Trouble Shooting .....................23
Error Messages ......................24
Specifications
Notes
..............................25
..............................26
Page 5
Before You Start
Before You Start
Thank you for purchasing this Panasonic G450 digital cellular telephone. This
telephone is designed to operate on the Global System for Mobile Communications
(GSM).
These operating instructions detail use of the equipment contained in the Main Kit.
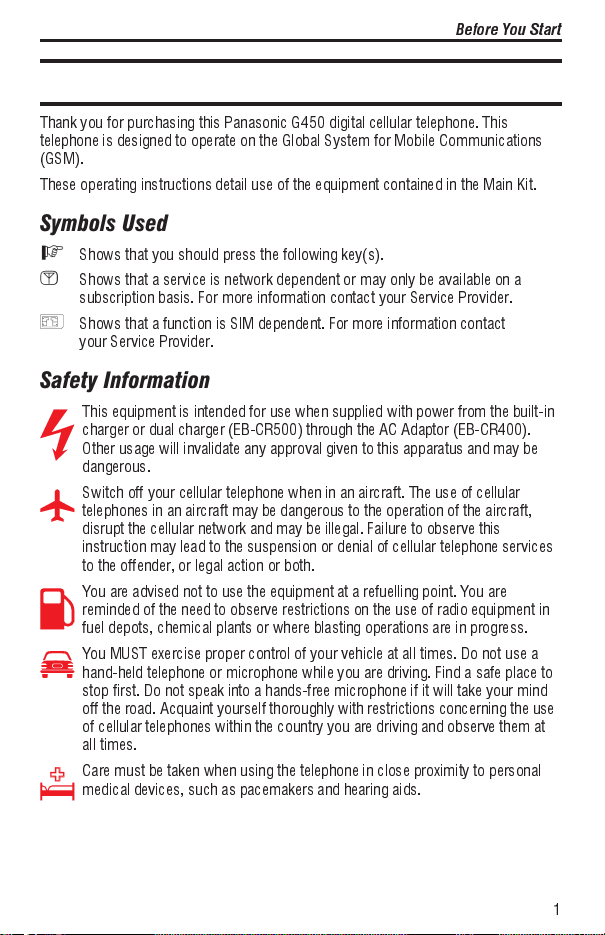
Symbols Used
F
Shows that you should press the following key(s).
<
Shows that a service is network dependent or may only be available on a
subscription basis. For more information contact your Service Provider.
>
Shows that a function is SIM dependent. For more information contact
your Service Provider.
Safety Information
This equipment is intended for use when supplied with power from the built-in
charger or dual charger (EB-CR500) through the AC Adaptor (EB-CR400).
Other usage will invalidate any approval given to this apparatus and may be
dangerous.
Switch off your cellular telephone when in an aircraft. The use of cellular
telephones in an aircraft may be dangerous to the operation of the aircraft,
disrupt the cellular network and may be illegal. Failure to observe this
instruction may lead to the suspension or denial of cellular telephone services
to the offender, or legal action or both.
You are advised not to use the equipment at a refuelling point. You are
reminded of the need to observe restrictions on the use of radio equipment in
fuel depots, chemical plants or where blasting operations are in progress.
You MUST exercise proper control of your vehicle at all times. Do not use a
hand-held telephone or microphone while you are driving. Find a safe place to
stop first. Do not speak into a hands-free microphone if it will take your mind
off the road. Acquaint yourself thoroughly with restrictions concerning the use
of cellular telephones within the country you are driving and observe them at
all times.
Care must be taken when using the telephone in close proximity to personal
medical devices, such as pacemakers and hearing aids.
1
Page 6
Before You Start
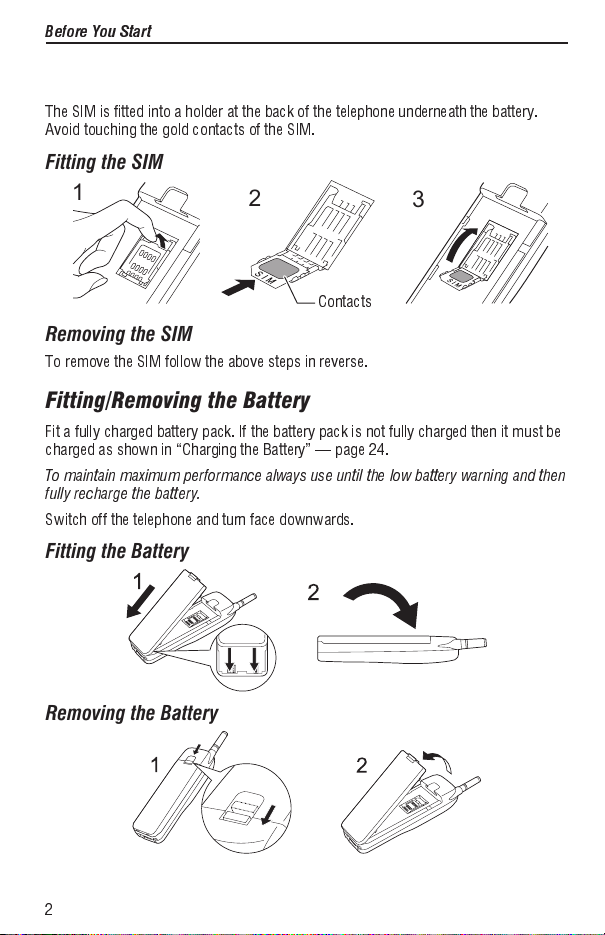
Fitting/Removing the SIM
The SIM is fitted into a holder at the back of the telephone underneath the battery.
Avoid touching the gold contacts of the SIM.
Fitting the SIM
1
2
Contacts
3
Removing the SIM
To remove the SIM follow the above steps in reverse.
Fitting/Removing the Battery
Fit a fully charged battery pack. If the battery pack is not fully charged then it must be
charged as shown in Charging the Battery page 24.
To maintain maximum performance always use until the low battery warning and then
fully recharge the battery.
Switch off the telephone and turn face downwards.
Fitting the Battery
Removing the Battery
2
Page 7
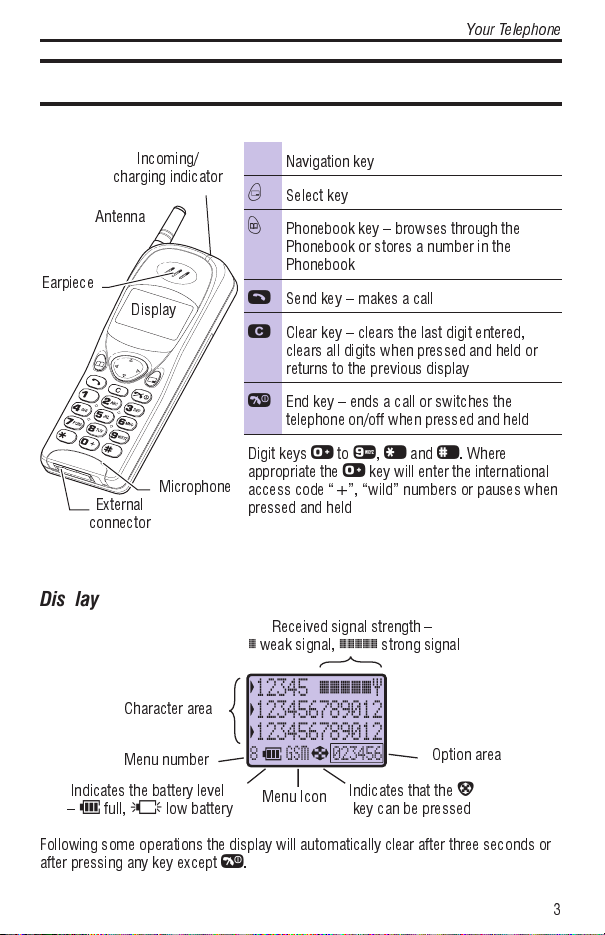
Location of Controls
Incoming/
charging indicator
Antenna
Earpiece
Display
Microphone
External
connector
Display
Your Telephone
g
Navigation key
B
Select key
A
Phonebook key browses through the
Phonebook or stores a number in the
Phonebook
D
Send key makes a call
C
Clear key clears the last digit entered,
clears all digits when pressed and held or
returns to the previous display
E
End key ends a call or switches the
telephone on/off when pressed and held
Digit keys
appropriate the
access code +, wild numbers or pauses when
pressed and held
0to9,*
0
Received signal strength
weak signal,
and#. Where
key will enter the international
strong signal
Your Telephone
Character area
123456789012
123456789012
12345 \\\\\|
E
8
Menu Icon
.
Menu number
Indicates the battery level
H
full,Klow battery
Following some operations the display will automatically clear after three seconds or
after pressing any key except
S
023456
Indicates that the
key can be pressed
Option area
g
3
Page 8

Basic Operation
Basic Operation
Power on/off
FE
and hold to switch power on
FE
and hold to switch power off.
Making a Call
Make sure that the signal strength meter is displayed.
F
area code and telephone number
1
2
FD
Welcome to
Panasonic
GSM
Registered
\\\\\|
GSM 001
Menu
Call successful
00:01 \\\\\|
Voice call
Hold
Emergency Calls
To make an emergency call ensure that the antenna symbol (|) is present. However,
the presence of the antenna symbol does not guarantee that an emergency call can
be made.
F112D
\\\\\|
Calling
Emergency
4
Page 9
Basic Operation
International Dialling
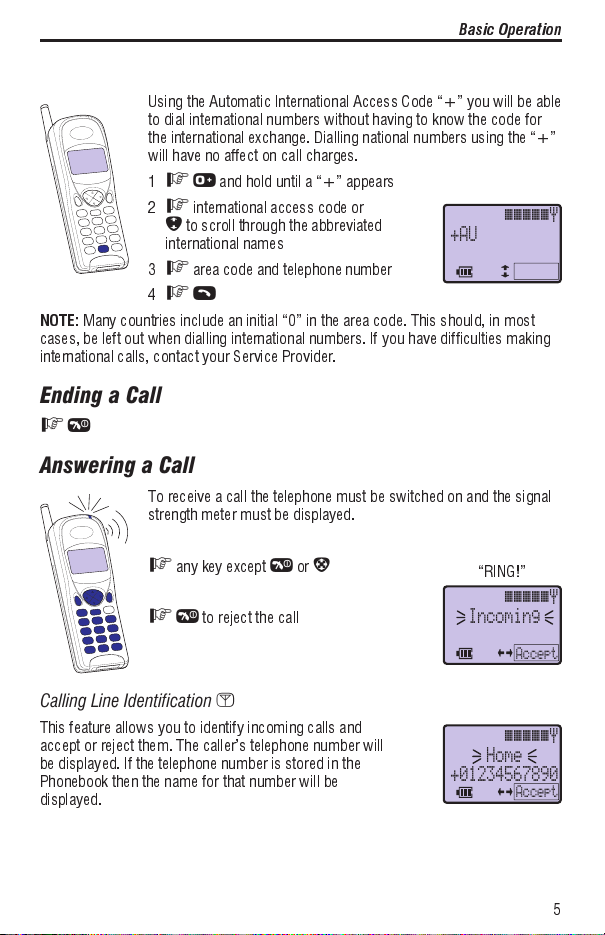
Using the Automatic International Access Code + you will be able
to dial international numbers without having to know the code for
the international exchange. Dialling national numbers using the +
will have no affect on call charges.
F0
1
2
3
4
NOTE:
Many countries include an initial 0 in the area code. This should, in most
cases, be left out when dialling international numbers. If you have difficulties making
international calls, contact your Service Provider.
and hold until a + appears
F
international access code or
e
to scroll through the abbreviated
international names
F
area code and telephone number
FD
\\\\\|
+AU
Ending a Call
FE
Answering a Call
To receive a call the telephone must be switched on and the signal
strength meter must be displayed.
F
any key exceptEor
to reject the call
FE
g
RING!
\\\\\|
Incoming
Calling Line Identification <
This feature allows you to identify incoming calls and
accept or reject them. The callers telephone number will
be displayed. If the telephone number is stored in the
Phonebook then the name for that number will be
displayed.
Accept
\\\\\|
Home
+01234567890
Accept
5
Page 10
Basic Operation
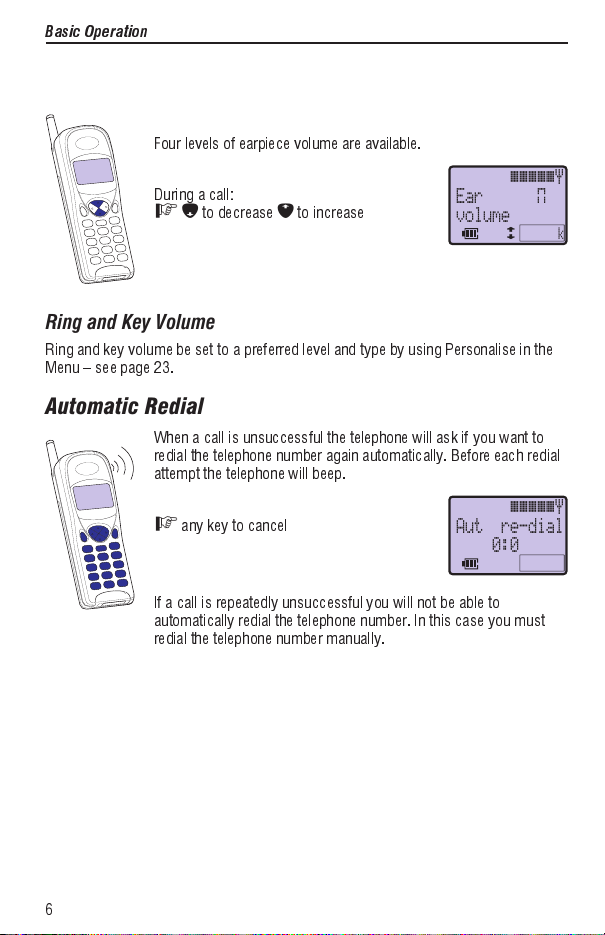
Adjusting Volume
Earpiece Volume
Four levels of earpiece volume are available.
During a call:
Fa
to decreasebto increase
Ear
volume
Ring and Key Volume
\\\\\|
Ring and key volume be set to a preferred level and type by using Personalise in the
Menu see page 23.
Automatic Redial
When a call is unsuccessful the telephone will ask if you want to
redial the telephone number again automatically. Before each redial
attempt the telephone will beep.
F
any key to cancel
If a call is repeatedly unsuccessful you will not be able to
automatically redial the telephone number. In this case you must
redial the telephone number manually.
\\\\\|
Auto re-dial
0:05
Cancel
Ok
6
Page 11

Advanced Operation
Advanced Operation
Concept of Operation
There is a close relationship between the select key, navigation key and the display.
Messages
Call Divert
Call Bar
Calls
Security
e
Pressing up and down (
more information in the main area of the display.
Pressing left and right (
To choose the option press the select key.
) will move the pointer up and down and scroll through
f
) will scroll through options in the option area of the display.
DTMF Tones
DTMF tones can be sent during conversation. These are often used to access voice
mail, paging and computerised home banking.
Send DTMF Tones During a Call
F
digits (0 to 9, # and *)
Pause Dial
Using pauses allows you to send DTMF tones automatically. Each
pause will last for three seconds.
1
F
telephone number
F0
2
3
4
and hold to display P
F
DTMF digits after the pause
Repeat 2 for more pauses
FD
When the call is successful DTMF tones will be sent every
3 seconds or when
D
Enable Disable
\\\\\|
+012345P
is pressed
7
Page 12

Advanced Operation
Call Hold
You can make a second call while speaking to an existing caller.
Holding/Resume a Call
Ff
to display Hold in the option area of the display and press
to display Resume in the option area of the display and press
F f
Making a Second Call
1Ftelephone number, or recall from Phonebook
2
FD
Operation During Two Calls
B
B
Current call
End Both Calls
FE
8
Held call
\\\\\|
Home
Call 2
Swap
2
Swap Between Calls
Ff
to display Swap in the option area of the display followed
B
by
End A Call
to display End in the option area of the display followed
Ff
B
by
Page 13

Advanced Operation
Call Waiting <
A second call can be received, if call waiting is switched on. It is not possible to have
more than one fax or data call. All voice calls must be ended before you can make or
receive a fax or data call.
Receiving a Second Call
Accept a Second Call
to accept the call
FB
When you accept the incoming call the
current call will be placed on hold.
Reject a Second Call
Ff
to display Reject
FB
End Existing Call and Receive Second Call
1
FE
with a waiting call
FD
2
\\\\\|
Incoming
Accept
9
Page 14

Stored Numbers
Stored Numbers
Note Pad
During a call you can enter numbers which you may wish to dial when the call has
ended.
During a call:
F
telephone number
When the call has ended
Recent Numbers <
Recently dialled telephone numbers will be stored in Last dialled.
If Calling Line Identification is available the callers telephone number for an answered
call will be stored in Answered and an unanswered call will be stored in
Unanswered.
When the store is full the next telephone number will overwrite the oldest.
FD
FD
1
2
Fe
Unanswered
B
3
4
Fe
FD
5
to point at Last dialled, Answered or
to point at the telephone number you wish to dial
Quick Tip for Calling Last Dialled Number
To redial your last called telephone number
FDD
Quick Tip for Returning an Unanswered Call <
When the display shows that you have received calls but not answered them.
FB
1
The last callers telephone number will be displayed.
Fe
2
3
10
to point at the telephone number you wish to dial
FD
Page 15

Stored Numbers
Phonebook
Telephone numbers are stored on your SIM. Therefore, the number of locations,
length of name and number of telephone numbers that can be stored are dependent
on your SIM.
Adding a Telephone Number
1Ftelephone number
FA
2
3Fedit the displayed number
4
FB
to enter the telephone number
F
name see Alpha Entry page 17.
5
6
FB
to enter the name
F
location number
7
Automatic Location
The telephone number can be stored automatically at the first available location. This
can be done instead of entering a location number.
FB
when Any is displayed in the option area of the display
Overwrite Protection
If a location is occupied you will be asked if you wish
to overwrite the current information.
FB
to overwrite the selected location
FC
to choose another location number
Location:
(1-250)
_
X
Overwrite?
Home
(181)
M
Any
Ok
11
Page 16

Stored Numbers
Retrieving a Telephone Number
Browse Through the Phonebook
1
FA
2
Fe
to browse through the Phonebook
When searching through the Phonebook telephone
numbers will be listed in the order that was last used by
Phonebook/Browse see page 20.
When the telephone number has been retrieved it can be sent,
edited or deleted.
Send a Retrieved Number
FD
Edit Retrieved Telephone Number
1
Ff
to display Edit in the option area
2
FB
3Fnew telephone number
FB
4
5Fnew name tag
FB
6
Delete
1
Ff
to display Delete in the option area
2
FB
\\\\\|
Home
+01234567890
Edit
M
\\\\\|
Home
+01234567890
Delete
M
Speed Dial
1Flocation number leading zeros may be left out
F#
2
3
FD
12
Page 17

Stored Numbers
Fixed Dial >
The Fixed Dial Store is part of the Phonebook. However, the Fixed Dial Store has
additional security. When the security feature Fixed Dial is switched on it is only
possible to make calls with telephone numbers that are in the Fixed Dial Store.
Fixed Dial telephone numbers cannot be edited before they are dialled but wild
numbers can be used.
The start of a telephone number can be stored in the Fixed Dial Store and when
recalled the remainder added, e.g. calls made to a specific area code.
When Fixed Dial is switched on any manually dialled telephone numbers must match
a telephone number in the Fixed Dial Store.
To add, edit or delete a telephone number in the Fixed Dial Store Fixed Dial must be
switch on see Security page 22. With Fixed Dial switched on all telephone
numbers can be added to the Phonebook, edited or deleted as normal, but you will be
asked for PIN2.
“Wild” Numbers
Wild numbers are spaces that can be stored in a telephone number. The wild
numbers must be filled before the telephone number is dialled. In this way a call can
be restricted to a specific area. The wild numbers can be anywhere within a stored
telephone number.
F0
and hold until _ appears to enter a
wild number
When the telephone number is recalled pressing a numeric
key will fill in a wild number.
\\\\\|
+012345_
Service Numbers >
Your Service Provider may program some special telephone numbers into the Service
Dial area of the Phonebook. It is not possible to modify the telephone numbers stored
in the Service Dial part of the Phonebook.
FA
and hold
Fg
to browse through the Service Dial list of telephone numbers
The telephone number pointed to can only be recalled or dialled.
13
Page 18

Stored Numbers
“Hot Key” Telephone Numbers >
It is possible to dial telephone numbers from the Phonebook or Service Dial part of
Phonebook very quickly. Some Hot Key telephone numbers may be reserved by the
Service Provider, for example the first three Hot Key telephone numbers may be
linked to the Service Dial part of the Phonebook. To select a source for the Hot Key
telephone numbers see Personalise page 23.
F1to9
and hold
14
Page 19

Alpha Entry
Alpha entry is used to enter alphanumeric characters into Phonebook, Short
Messages and the Greeting Message.
Character/Operation
Key
[\ ]
Alpha Entry
^
1
2
3
4
5
6
7
8
9
C
Each time a key is pressed it will display the next character. When another key is
pressed or no key is pressed for a short time the cursor will move to the next
position.
To cycle between numerals (
]
(
@,.;:!¡?¿()&%+/<>=£$¥¤§ 1
ABCabc
DEFdef
GHIghi
JKLjkl
MNOmno
PQRSpqrs
TUVtuv
WXYZwxyz
Deletes the character to the left of the cursor when or clears the entire
entry when pressed and held
) and standard characters ([) pressA.
ABG
DEZ
HQI
KLM
NXO
PRS
TUF
XYW
^
), Greek characters (\), extended characters
AÄÅÆBCÇaàbc 2
DEÉFdeèéf 3
GHIghiì 4
JKLjkl 5
MNÑOÖømnñoòö 6
PQRSpqrsß 7
TUÜVtuùüv 8
WXYZwxyz 9
Editing Alpha Entry
Pressingewill move you up or down one line. Pressingfwill move you left or
right one character.
When the cursor is moved over a character and another key pressed this will insert
the new character.
C
Pressing
will delete the character to the left of the cursor.
15
Page 20

Additional Features
Additional Features
When the word Menu is in the option area of the display pressing the select key will
display a menu of telephone features. To select a features press the up or down (
so that that pointer is showing next to the feature you require then press
the feature number.
A quick way of selecting the menu is to enter the menu number.
C
To leave the menu press
repeatedly.
A menu item may not be available because the telephone is not in a service area or
the SIM being used does not support that feature.
Key-guard s
1 Key-guard
1 Key-guard
1 Key-guard
1 Key-guard
Key-guard will prevent any keys from being accidentally pressed e.g. when the
telephone is being carried.
When a call is received key-guard will be disabled allowing you to press any key to
answer the call. After the call has finished key-guard will be restored.
When the telephone is mounted in the optional Car Mount Kit key-guard will be
disabled.
Emergency calls can still be made.
Phonebook u
Browse
Browse
Browse
2 Phonebook 1
2 Phonebook 1
2 Phonebook 1
2 Phonebook 1
In the Phonebook menu you are able to browse through the Phonebook by location
number or name, add more entries to the Phonebook and review how much space
you have available.
Most common use of the Phonebook is covered in Phonebook see
page 11.
Browse
Create
Create
Create
Create
2
2
2
2
Review
Review
Review
Review
3
3
3
3
My Numbers
My Numbers
My Numbers
My Numbers
4>
4>
4>
4>
B
e
or enter
)
16
Page 21

Messages ?<
Additional Features
3 Messages 1
2
3
4
5
6
Receive list
Send list
Create
Review
Parameters
Broadcasts
Receive
1
Message list
2
Topics
3
Languages
4
Auto delete
1
Lifetime
2
Messge Centre
3
Report
4
Protocol
5
You can receive, display, edit and/or send short text messages, of up to 160
characters.
New messages will automatically be stored in the message area of your SIM. If the
message area is full a new message will be rejected. To receive new messages you
will have to erase unwanted messages, this can be done automatically.
Before you can send a message you must enter the Message Centre number into the
parameters. The Message Centre number will be supplied by your Service Provider.
Broadcast messages can display information about your area, such as traffic or
weather information the information that is available is dependent on your network.
Call Service :
Last call
Last call
Last call
4 Call Service 1
4 Call Service 1
4 Call Service 1
4 Call Service 1
If you are given call charge information by your Service Provider the cost of your calls
can be calculated. The call charge is specified in a price for each unit. The duration of
one unit may vary during the day, peak and off-peak times. Therefore, the call charge
can be calculated accordingly.
PIN2 is required to modify call charge information.
Call times are indicated as:
hours (0-99), minutes (0-59), seconds (0-59) HH:MM:SS.
NOTE:
Call charge information may not give an accurate reflection of the tariffs
charged by the Service Provider.
Last call
All calls
All calls
All calls
All calls
2
2
2
2
Call waiting
Call waiting
Call waiting
Call waiting
3
3
3
3
Display caller's ID
Display caller's ID
Display caller's ID
Display caller's ID
4
4
4
4
Withhold my ID
Withhold my ID
Withhold my ID
Withhold my ID
5
5
5
5
Call charge
Call charge
Call charge
Call charge
6
6
6
6
Cost left
Cost left
Cost left
Cost left
1
1
1
1
Price/unit
Price/unit
Price/unit
Price/unit
2
2
2
2
Maximum cost
Maximum cost
Maximum cost
Maximum cost
3
3
3
3
Warning at4
Warning at4
Warning at4
Warning at4
17
Page 22

Additional Features
Call Divert w<
Voice calls
Voice calls
Voice calls
5 Call Divert 1
5 Call Divert 1
5 Call Divert 1
5 Call Divert 1
2
2
2
2
3
3
3
3
4
4
4
4
5
5
5
5
Voice calls
Fax calls
Fax calls
Fax calls
Fax calls
Data calls
Data calls
Data calls
Data calls
Cancel all
Cancel all
Cancel all
Cancel all
Status
Status
Status
Status
Divert can be used to forward incoming calls to mail box or another telephone, not
necessarily a GSM telephone.
You can divert voice, fax and data call using different circumstances and to different
telephone numbers.
When updating or checking the status of call divert the telephone must be registered
with a network.
Security t
Phone lock
Phone lock
Phone lock
6 Security 1
6 Security 1
6 Security 1
6 Security 1
There are three types of security code for your telephone:
Phone Lock: Control by the lock code and controls telephone security. Factory-set to
0000.
PIN: Controls SIM security.
PIN2: Controls security for Fixed Dial Store and call charge metering.
It is recommended that you memorise your security codes. If you forget them contact
your dealer for the lock code or your Service Provider for PIN and PIN2.
Call Bar is used to restrict certain outgoing and/or incoming calls. Any combination of
call restrictions can be set. Different call bar restrictions can be used for voice, fax
and data calls. Call Bar is controlled by a security password that is supplied by your
Service Provider.
When updating or checking the status of call bar the telephone must be registered
with a network.
When the telephone is locked enter the lock code to restore normal operation.
If the PIN is enabled it will be necessary to enter the PIN every time that the
telephone is switched on.
2
2
2
2
3
3
3
3
4
4
4
4
5
5
5
5
Phone lock
Call bar
Call bar
Call bar
Call bar
PIN
PIN
PIN
PIN
PIN2
PIN2
PIN2
PIN2
Fixed Dial
Fixed Dial
Fixed Dial
Fixed Dial
Bar voice calls
Bar voice calls
Bar voice calls
Bar voice calls
1
1
1
1
Bar fax calls
Bar fax calls
Bar fax calls
Bar fax calls
2
2
2
2
Bar data calls
Bar data calls
Bar data calls
Bar data calls
3
3
3
3
Cancel all
Cancel all
Cancel all
Cancel all
4
4
4
4
Status
Status
Status
Status
5
5
5
5
Password
Password
Password
Password
6
6
6
6
18
Page 23

Additional Features
Network v
New Network
New Network
New Network
7 Network 1
7 Network 1
7 Network 1
7 Network 1
New Network
Search Mode
Search Mode
Search Mode
Search Mode
2
2
2
2
Network List
Network List
Network List
Network List
3
3
3
3
When not in your home country you may use a network that you do not directly
subscribe to, this is called ROAMING. Roaming between networks in your home
country may not be permitted by National Law.
When the search mode is set to automatic the telephone will search through the
preferred network list and select a new network automatically. However, if the search
mode is set to manual you will be asked to select a network from a list.
Personalise z
8 Personalise
8 Personalise
8 Personalise
8 Personalise
The personalise feature will enable you to customise the telephone to operate in a
way that suits you.
The language that the telephone will use for display messages can be changed.
Tones will personalise sounds that the telephone will make during operation. A
different ring can be used for voice, fax, data and messages.
The keep alive timer will delay switching off the telephone, when the telephone is
mounted in the optional Car Mount Kit and the vehicle ignition is turned off. If a call is
in progress after the ignition timer has elapsed the call will be maintained.
When automatic answer is switched on, and the telephone is mounted in the optional
Car Mount Kit, a call can be answered without pressing any keys.
A personalised greeting message can be programmed for when the telephone is
switched on.
Battery life can be increased by changing the brightness of the backlight.
Defaults will return your personal settings to their factory default.
The source for the Hot Key telephone numbers can be set using the Hot Key Dial
menu.
1 Language
1 Language
1 Language
1 Language
2 Tones
2 Tones
2 Tones
2 Tones
3 In car
3 In car
3 In car
3 In car
4 Greeting
4 Greeting
4 Greeting
4 Greeting
5 Backlight
5 Backlight
5 Backlight
5 Backlight
6 DTMF tone length
6 DTMF tone length
6 DTMF tone length
6 DTMF tone length
Defaults
Defaults
Defaults
Defaults
7
7
7
7
12Keep alive
12Keep alive
12Keep alive
12Keep alive
Auto answer
Auto answer
Auto answer
Auto answer
All tones
All tones
All tones
All tones
1
1
1
1
Ring volume
Ring volume
Ring volume
Ring volume
2
2
2
2
Ring type
Ring type
Ring type
Ring type
3
3
3
3
Key volume
Key volume
Key volume
Key volume
4
4
4
4
Warning tones
Warning tones
Warning tones
Warning tones
5
5
5
5
1
1
1
1
2
2
2
2
3
3
3
3
4
4
4
4
Voice calls
Voice calls
Voice calls
Voice calls
Fax calls
Fax calls
Fax calls
Fax calls
Data calls
Data calls
Data calls
Data calls
Messages
Messages
Messages
Messages
19
Page 24

Battery Information
Battery Information
Low Battery
When the battery power is low a warning tone will sound and a
LOW BATTERY message will flash. The power will automatically
shut off shortly after the battery warning tone. Fully charge the
battery pack or replace it with a fully charged one.
During Conversation
Finish your call immediately and fully charge the battery pack or replace it with a fully
charged one.
During Standby
Incoming calls will be rejected and it is not possible to make a call.
Charging the Battery
The battery pack must be attached to the telephone followed the AC Adaptor or
charging will not start.
To maintain maximum performance always use until the low battery warning and then
fully recharge the battery.
To AC
power
Press lock
buttons to
release
Charge indicator will be
red while charging
Battery level indicator will
show the status see
table below
\\\\\|
LOW
BATTERY
NOTE:
DO NOT apply force to the connector as this may damage the telephone and/or
the AC Adaptor.
Operation of Battery Level Indicator
While charging Charging complete
Telephone on
Telephone off
When charging is complete remove the AC Adaptor.
20
GH
G
OFF
Page 25

Care and Maintenance
Care and Maintenance
Pressing any of the keys may produce a loud tone. Avoid holding the telephone
l
close to the ear while pressing the keys.
Extreme temperatures may have a temporary effect on the operation of your
l
telephone. This is normal and does not indicate a fault.
Do not disassemble the equipment. There are no user-serviceable parts.
l
Do not subject the equipment to excessive vibration or shock.
l
Avoid contact with liquids. If the equipment becomes wet immediately remove the
l
power and contact your dealer.
Always use approved accessories in order to maintain optimum performance and
l
avoid damage.
l
The equipment may be cleaned with a soft cloth dampened with a mild detergent
and water. Petroleum based cleaners may damage the equipment.
l
Do not leave the equipment in direct sunlight or a humid, dusty or hot area.
l
Keep metallic items that may accidentally touch the terminals away from the
equipment.
l
Always charge the battery pack in a well ventilated area, not in direct sunlight,
between +5°C and +35°C. It is not possible to recharge the battery pack if it is
outside this temperature range.
l
Avoid recharging battery packs for longer than recommended.
l
Do not incinerate or dispose of the battery packs as ordinary rubbish. The battery
packs must be disposed of in accordance with local legislation and may be
recycled.
l
When disposing of any packing materials or old equipment check with
your local authorities for information on recycling.
21
Page 26

Other Information
Glossary of Terms
Other Information
DTMF Dual Tone Multiple Frequency tones. The numeric keys 0 to 9, and
GSM Global System for Mobile communications. The name given to the
Home country The country where your home network operates.
Home network The GSM network on which your subscription details are held.
Lock code Used for security of your telephone. Factory set to 0000.
Message Centre Where messages are sent before they are forwarded onto their
Network
operator
Password Used for the control of the call bar. Supplied by your Service
PIN Personal Identification Number used for SIM security. Supplied by
PIN2 Personal Identification Number used for the control of Fixed Dial
PUK/ PUK2 PIN/PIN2 Unblocking Key. Used to unblock the PIN/PIN2. Supplied
Registration The act of locking on to a GSM network. This is usually performed
Roaming The ability to use your telephone on networks other than your
Service Provider The organisation responsible for providing access to the GSM
* and # will generate different DTMF tones when pressed during
conversation. These are used to access voice mail, paging and
computerised home banking.
advanced digital technology that your telephone uses.
destination. The Message Centre number may be programmed
into your SIM or supplied by your Service Provider.
The organisation responsible for operating a GSM network. Each
country will have a different network operator.
Provider.
your Service Provider.
Store and call charge metering. Supplied by your Service Provider.
by your Service Provider.
automatically by your telephone.
Home network.
network.
22
Page 27

Other Information
SIM Subscriber Identification Module. A small smart-card which stores
Supplementary
service
Wild numbers Spaces in a stored telephone number. When the telephone number
unique subscriber and user-entered information such as
Phonebook, Fixed Dial Store and short messages. Supplied by
your Service Provider.
Network-controlled GSM functions which your telephone will
support. Supplementary services may only be available on a
subscription basis.
is recalled pressing a numeric key will fill in a space. This can be
used to restrict dialling.
Trouble Shooting
Should any problem persist contact your dealer.
Problem Causes and Solutions
Telephone will not
switch on
Short battery life Battery life is affected by the network you are using and the
Battery level
indicator (
does not light
when charging
Calls cannot be
made
H
Check that the battery pack is fully charged and correctly
connected to the telephone.
condition of the battery pack.
The life of the battery pack is affected by improper charging,
this is inherent in all Ni-MH batteries. To maintain maximum
performance always use until the low battery warning and then
fully recharge the battery pack. To revive the battery pack use
the telephone until it switches off and then fully recharge three
times. However, the battery pack will eventually wear out and
must be replaced with a new one.
If a battery is deeply discharged it will take a short time before
)
there is sufficient power in the telephone to light the battery
level indicator (
The battery pack must be charged in a temperature no lower
than +5°C and no higher than +35°C.
Calls cannot be made when the telephone is locked (Menu:
Security/Mobile Lock) or outgoing calls are barred (Menu: Call
Bar).
Check that the telephone is registered to a network. Move to a
coverage area and operate your telephone after it has registered
with a network.
H
).
23
Page 28

Other Information
Calls cannot be
made from Fixed
Dial Store
Calls cannot be
received
Emergency calls
cannot be made
Telephone
numbers cannot
be recalled
Check the telephone number is stored in the Fixed Dial Store or
your SIM supports Fixed Dial.
To receive a call the telephone must be switched on.
Calls cannot be received when incoming calls are barred
(Menu: Personalise/Call Bar).
Check that the telephone is registered to a network. Move to a
coverage area and operate your telephone after it has registered
with a network.
Check that the antenna symbol (|) is displayed. Move to a
coverage area and operate your telephone when the antenna
symbol is displayed.
Phonebook cannot be recalled when the telephone is locked
(Menu: Security/Mobile Lock) or Fixed Dial is switched on
(Menu: Security/Fixed Dial).
Error Messages
Area not allowed Roaming in the selected area is not allowed
Enter PUK The PIN has been entered incorrectly 10 times. To enter a new
Network not
allowed
PUK blocked The PUK has been entered incorrectly 10 times. Contact your
Security failure The network has detected authentication failure because your
SIM blocked The SIM is blocked because the wrong PUK has been entered
SIM error The telephone has detected a problem with the SIM. Switch the
PIN you must first enter a PUK.
Roaming with the selected network is not allowed
Service Provider.
SIM is not registered with that network. Contact your Service
Provider
ten times. Contact your Service Provider
telephone off and then back on. If the message does not
disappear contact your Service Provider
24
Page 29

Specifications
Specifications
Telephone
Type GSM Class 4
SIM Type Plug in type
Temperature range
Charging
Storage
AC Adaptor
Output voltage 6.7V DC, 550mA
Battery — Attached to Telephone
Weight 185 g 175 g 210 g 250 g
Dimensions
Height
Width
Depth
Supply voltage 4.8 V DC,
Standby time
Talk time
Charge time 90 min 100 min 140 min 260 min
NOTE:
Charge time will be longer when the telephone is turned on.
Battery life is affected by the network you are using and the condition of the battery
pack.
+5°C to +35°C
-20°C to +60°C
Battery pack
(EB-BS500)
141 mm
46 mm
21 mm
600mAh
Ni-MH
upto 70 h
3.0 h
Battery pack
(EB-BS450)
141 mm
46 mm
25 mm
4.8 V DC
650mAh
Ni-MH
upto 80 h
3.5 h
Battery pack
(EB-BM500)
141 mm
46 mm
23 mm
4.8 V DC,
850mAh
Ni-MH
upto 100 h
4.5 h
Battery pack
(EB-BX500)
141 mm
46 mm
32 mm
4.8 V DC,
1600mAh
Ni-MH
upto 200 h
8.5 h
25
Page 30

Notes
Notes
26
Page 31

The Serial Number can be found on the outside of the telephone under the battery.
For your convenience we recommend that you note the following details as a
record of your purchase.
Part Number EB-G450
Serial Number
Dealer Name
Purchase Date
BULL CP8 PATENT
Matsushita Communication Industrial UK Limited
Page 32

Printed in UK
*ZD71785C*
 Loading...