

Panasonic DMR-BS880, DMR-BS780 Operating Instructions

Operating Instructions
2 ALL
3
5
2
EB
Blu-ray Disc Recorder
Model No. DMR-BS880
DMR-BS780
Dear customer
Thank you for purchasing this product. For optimum performance and safety, please read these instructions carefully.
Before connecting, operating or adjusting this product, please read the instructions completely.
Please keep this manual for future reference.
This Blu-ray Disc Recorder is for viewing and recording free to view satellite channels only. It does not
receive pay TV or encrypted channels.
This unit does not have a terrestrial tuner.
DVB and the DVB logos are trademarks of the DVB Project.
∫ Region management information
BDVideo:
Example: Example:
This unit plays BD-Video marked with
labels containing the region code “B”.
Web Site: http://www.panasonic-europe.com
Model number suffix “EB” denotes UK model.
DVDVideo:
This unit plays DVD-Video marked with labels
containing the region number “2” or “ALL”.
VQT2J64

Getting
started
Features Supplied accessories
Please check and identify the supplied accessories.
∫ Easy access to various functions (> 15)
You can access the main function quickly and
easily from FUNCTION MENU display.
∫ Receives freesat - free digital satellite
broadcasts in the UK
Getting started
This unit has two freesat HD tuners built-in. freesat
is a free digital TV service which broadcasts via
satellite so you can receive TV, radio and
interactive TV.
(> 16)
∫ Supports Audio Description signal (> 18)
Audio Description (when broadcast) adds an
additional soundtrack to describe events on screen
(narration) and aids understanding and enjoyment,
particularly for visually-impaired viewers.
∫ Record with High Definition (> 21)
It is possible to record in high definition quality
when the broadcast is high definition.
(Product numbers correct as of April 2010. These
may be subject to change.)
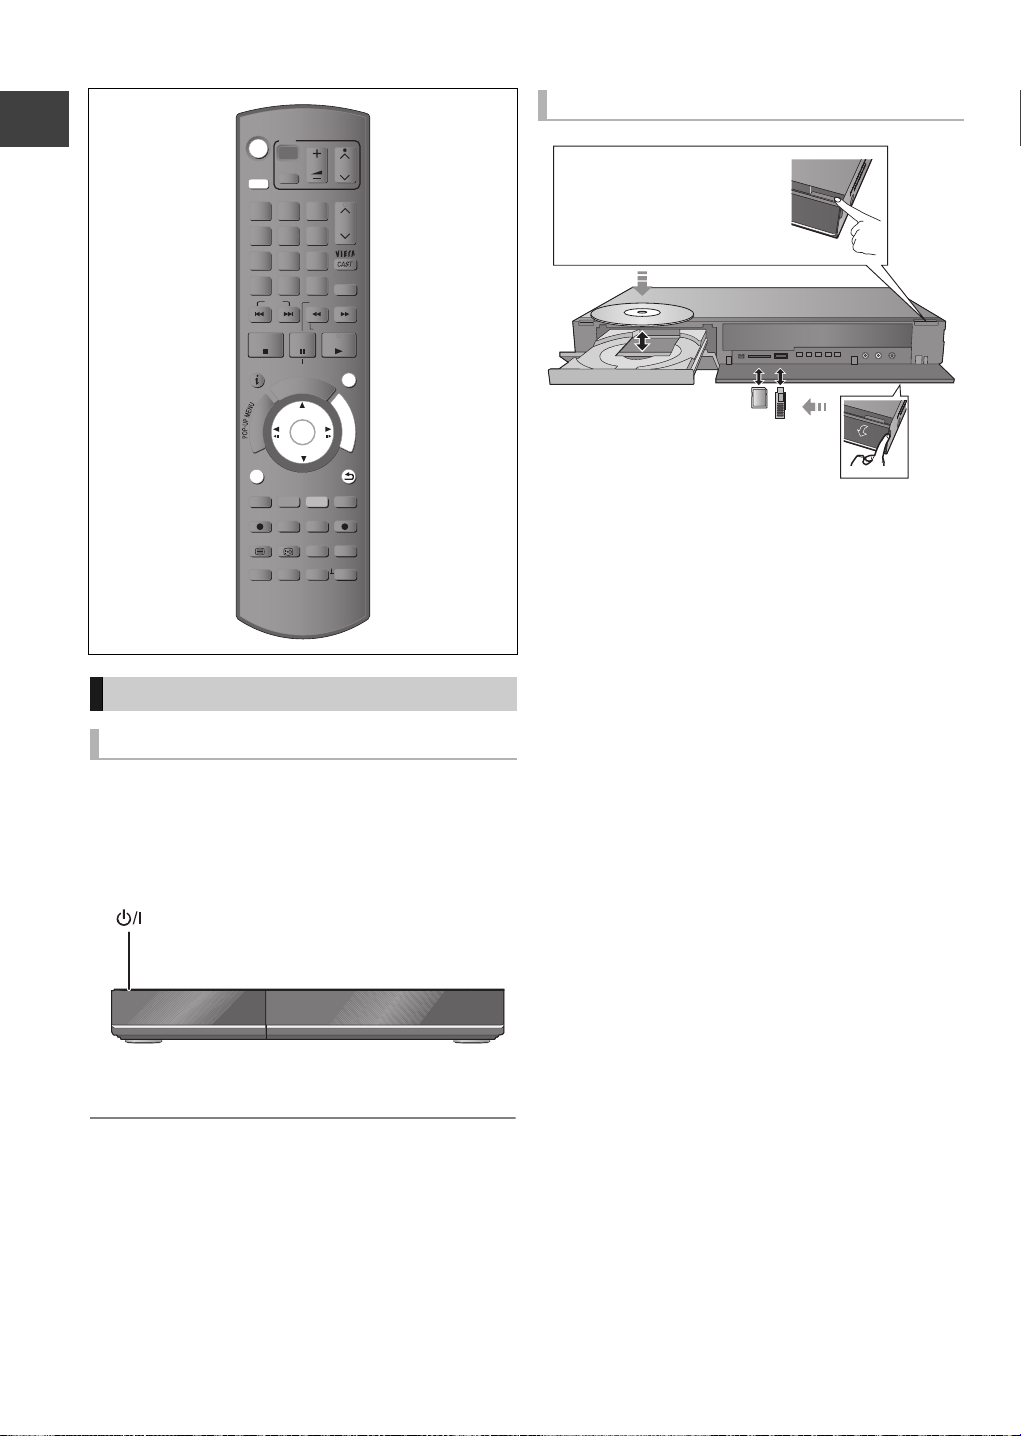
1 Remote control (N2QAYB000473)
2 Batteries for remote control
1 AC mains lead (K2CT2YY00003)
The batteries information
Insert so the poles (i and j) match those in the
remote control.
∫ 2 programmes Simultaneous Recording
(> 22)
It is possible to record 2 programmes being
broadcasted at the same time.
∫ Copy to Blu-ray Disc (> 44)
It can record in high definition quality in addition to
large volume recording.
∫ VIERA CAST (> 65)
Internet services (such as YouTube, Picasa Web
Albums, etc.) can be accessed easily by using the
VIERA CAST button.
∫ DLNA (> 66)
You can enjoy the video and still pictures saved on
the HDD of this unit on DLNA compatible
equipment connected via a network.
∫ VIERA Link “HDAVI ControlTM” (> 68)
Operation of this unit can be controlled by the
remote control of the TV (VIERA) by connecting
with the HDMI cable to the TV (VIERA).
∫ Owner ID (> 86)
Owner ID is an anti-theft function. Entering the PIN
number and owner’s personal information will help
the Police to determine the owner in the case of
theft.
R6/LR6, AA
≥Use alkaline or manganese batteries.
≥Do not mix old and new batteries or different types
at the same time.
≥Do not heat or expose to flame.
≥Do not leave the battery(ies) in an automobile
exposed to direct sunlight for a long period of time
with doors and windows closed.
≥Do not take apart or short circuit.
≥Do not attempt to recharge alkaline or manganese
batteries.
≥Do not use batteries if the covering has been peeled
off.
Mishandling of batteries can cause electrolyte
leakage which can damage items the fluid contacts
and may cause a fire.
Remove if the remote control is not going to be used
for a long period of time. Store in a cool, dark place.
2
VQT2J64
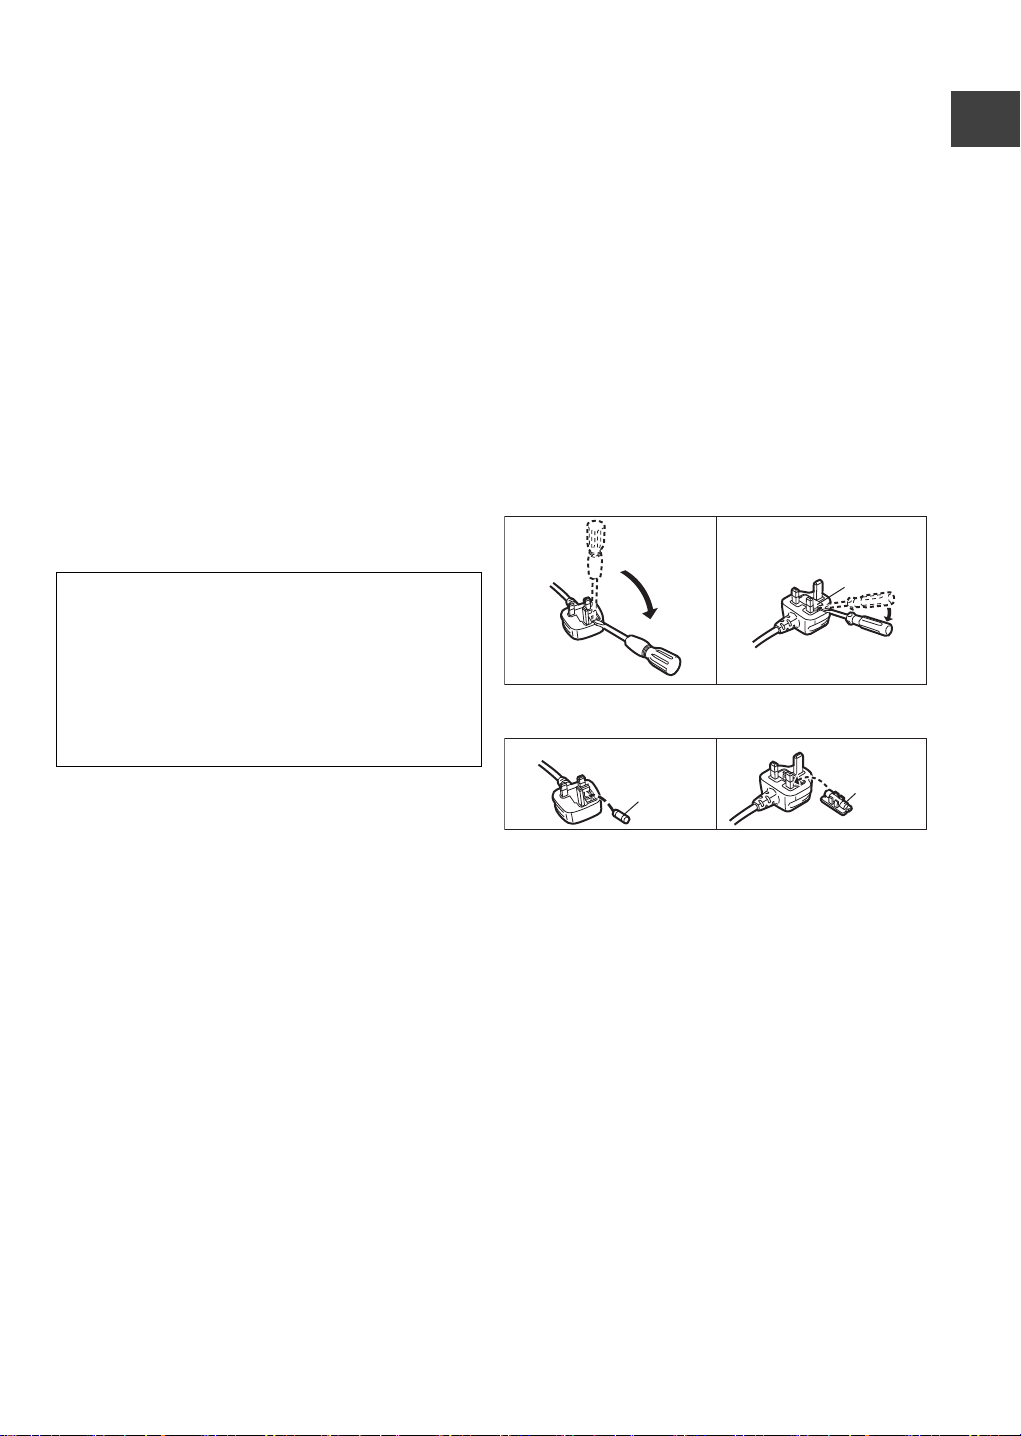
Caution for AC Mains Lead
Figure A Figure B
Fuse
(5 ampere)
Fuse
(5 ampere)
For your safety, please read the following text
carefully.
This appliance is supplied with a moulded three pin
mains plug for your safety and convenience.
A 5-ampere fuse is fitted in this plug.
Should the fuse need to be replaced please ensure
that the replacement fuse has a rating of 5-ampere
and that it is approved by ASTA or BSI to BS1362.
WARNING: DO NOT CONNECT EITHER WIRE TO
THE EARTH TERMINAL WHICH IS MARKED WITH
THE LETTER E, BY THE EARTH SYMBOL Ó OR
COLOURED GREEN OR GREEN/YELLOW.
THIS PLUG IS NOT WATERPROOF—KEEP DRY.
Before use
Remove the connector cover.
Getting started
Check for the ASTA mark Ï or the BSI mark Ì on
the body of the fuse.
If the plug contains a removable fuse cover you must
ensure that it is refitted when the fuse is replaced.
If you lose the fuse cover the plug must not be used
until a replacement cover is obtained.
A replacement fuse cover can be purchased from
your local dealer.
CAUTION!
IF THE FITTED MOULDED PLUG IS UNSUITABLE
FOR THE SOCKET OUTLET IN YOUR HOME
THEN THE FUSE SHOULD BE REMOVED AND
THE PLUG CUT OFF AND DISPOSED OF
SAFELY.
THERE IS A DANGER OF SEVERE ELECTRICAL
SHOCK IF THE CUT OFF PLUG IS INSERTED
INTO ANY 13- AMPERE SOCKET.
If a new plug is to be fitted please observe the wiring
code as stated below.
If in any doubt please consult a qualified electrician.
IMPORTANT
The wires in this mains lead are coloured in
accordance with the following code:
Blue: Neutral, Brown: Live.
As these colours may not correspond with the
coloured markings identifying the terminals in your
plug, proceed as follows:
The wire which is coloured Blue must be connected to
the terminal which is marked with the letter N or
coloured Black or Blue.
The wire which is coloured Brown must be connected
to the terminal which is marked with the letter L or
coloured Brown or Red.
How to replace the fuse
The location of the fuse differ according to the type of
AC mains plug (figures A and B). Confirm the AC
mains plug fitted and follow the instructions below.
Illustrations may differ from actual AC mains plug.
1.Open the fuse cover with a screwdriver.
Figure A Figure B
Fuse cover
2.Replace the fuse and close or attach the fuse cover.
3
VQT2J64

Table of contents
∫ Getting started
Features. . . . . . . . . . . . . . . . . . . . . . . . . . . . . . . . . . . . 2
Supplied accessories. . . . . . . . . . . . . . . . . . . . . . . . . 2
The batteries information . . . . . . . . . . . . . . . . . . . . . 2
Caution for AC Mains Lead . . . . . . . . . . . . . . . . . . . . 3
Control reference guide . . . . . . . . . . . . . . . . . . . . . . . 6
Basic Connection . . . . . . . . . . . . . . . . . . . . . . . . . . . . 8
Network connection . . . . . . . . . . . . . . . . . . . . . . . . . . . . . . . 9
Setting . . . . . . . . . . . . . . . . . . . . . . . . . . . . . . . . . . . . 10
Easy setting . . . . . . . . . . . . . . . . . . . . . . . . . . . . . . . . . . . . 10
Network Easy Settings . . . . . . . . . . . . . . . . . . . . . . . . . . . 12
Tuning in Other Satellite Services . . . . . . . . . . . . . . . . . . . 13
Common Operations . . . . . . . . . . . . . . . . . . . . . . . . 14
∫ Watching broadcasts
Watching broadcasts . . . . . . . . . . . . . . . . . . . . . . . . 16
Watching the Other Satellite Service . . . . . . . . . . . . . . . . 17
Channel information . . . . . . . . . . . . . . . . . . . . . . . . . . . . . 17
Operations while watching broadcast . . . . . . . . . . . . . . . . 18
Using TV Guide system (freesat) . . . . . . . . . . . . . . . . . . . 19
REWIND LIVE TV/PAUSE LIVE TV . . . . . . . . . . . . . . . . . 20
∫ Recording
Recording TV programmes . . . . . . . . . . . . . . . . . . . 21
Operation during recording . . . . . . . . . . . . . . . . . . . . . . . . 22
Direct TV Recording . . . . . . . . . . . . . . . . . . . . . . . . . . . . . 23
Timer recording . . . . . . . . . . . . . . . . . . . . . . . . . . . . 24
Various functions with freesat . . . . . . . . . . . . . . . . . . . . . . 26
Timer recording from channel information. . . . . . . . . . . . . 27
Manual timer recording . . . . . . . . . . . . . . . . . . . . . . . . . . . 28
To confirm and edit a timer programme . . . . . . . . . . . . . . 29
To cancel recording when timer recording has already
begun . . . . . . . . . . . . . . . . . . . . . . . . . . . . . . . . . . . . . . . . 30
Notes on timer recording . . . . . . . . . . . . . . . . . . . . . . . . . . 30
∫ Playing back video
Playing BD-Video or DVD-Video . . . . . . . . . . . . . . 31
Playing recorded video contents . . . . . . . . . . . . . . 33
Using the DIRECT NAVIGATOR (VIDEO) . . . . . . . . . . . . 34
Operation during play . . . . . . . . . . . . . . . . . . . . . . . . . . . . 36
Regarding DivX. . . . . . . . . . . . . . . . . . . . . . . . . . . . . 38
∫ Editing video
Deleting recorded video contents. . . . . . . . . . . . . . 39
Editing recorded video contents. . . . . . . . . . . . . . . 40
Editing titles . . . . . . . . . . . . . . . . . . . . . . . . . . . . . . . . . . . . 40
To create/playback/edit the chapter . . . . . . . . . . . . . . . . . 43
∫ Copying video
Copying titles . . . . . . . . . . . . . . . . . . . . . . . . . . . . . . 44
Copying Title Playing. . . . . . . . . . . . . . . . . . . . . . . . . . . . . 48
Copying HD Video (AVCHD format) from HDD. . . . . . . . . 48
Copying a finalised disc . . . . . . . . . . . . . . . . . . . . . . . . . . . 49
∫ Still pictures
Playing still pictures . . . . . . . . . . . . . . . . . . . . . . . . 50
Start Slideshow . . . . . . . . . . . . . . . . . . . . . . . . . . . . . . . . . 51
Still picture play option . . . . . . . . . . . . . . . . . . . . . . . . . . . . 51
Editing still pictures . . . . . . . . . . . . . . . . . . . . . . . . 52
Still pictures operation . . . . . . . . . . . . . . . . . . . . . . . . . . . . 53
Copying still pictures . . . . . . . . . . . . . . . . . . . . . . . 54
Copying automatically . . . . . . . . . . . . . . . . . . . . . . . . . . . . 54
Copying using the copying list . . . . . . . . . . . . . . . . . . . . . . 54
∫ Music
Playing music/Copying music to HDD. . . . . . . . . . 56
Playing music recorded on HDD . . . . . . . . . . . . . . . . . . . . 57
Operations during music play. . . . . . . . . . . . . . . . . . . . . . . 58
Useful functions during music play. . . . . . . . . . . . . . . . . . . 58
Editing music/playlist . . . . . . . . . . . . . . . . . . . . . . . 59
Editing music . . . . . . . . . . . . . . . . . . . . . . . . . . . . . . . . . . . 59
Album and track operation . . . . . . . . . . . . . . . . . . . . . . . . . 59
∫ With Other Equipment
Copying the HD Video or the SD Video . . . . . . . . . 60
Copying HD Video (AVCHD format) . . . . . . . . . . . . . . . . . 60
Copying SD Video (MPEG2 format). . . . . . . . . . . . . . . . . . 61
Recording from external equipment . . . . . . . . . . . 62
Recording from video equipment . . . . . . . . . . . . . . . . . . . . 62
Recording broadcasts from Set Top Box . . . . . . . . . . . . . . 64
Linked timer recording (SKY Digital STB, etc.)
–EXT LINK . . . . . . . . . . . . . . . . . . . . . . . . . . . . . . . . . . . . . 64
∫ Convenient functions
Using Internet services . . . . . . . . . . . . . . . . . . . . . . 65
Enjoying VIERA CAST . . . . . . . . . . . . . . . . . . . . . . . . . . . . 65
Using the Internet Player service of broadcaster
(freesat) . . . . . . . . . . . . . . . . . . . . . . . . . . . . . . . . . . . . . . . 65
DLNA feature . . . . . . . . . . . . . . . . . . . . . . . . . . . . . . 66
Linked operations with the TV
(VIERA Link “HDAVI Control
Playback menu. . . . . . . . . . . . . . . . . . . . . . . . . . . . . 70
Disc and card management . . . . . . . . . . . . . . . . . . 72
Entering text. . . . . . . . . . . . . . . . . . . . . . . . . . . . . . . 74
Changing the unit’s settings . . . . . . . . . . . . . . . . . 75
Common procedures . . . . . . . . . . . . . . . . . . . . . . . . . . . . . 75
Tuning . . . . . . . . . . . . . . . . . . . . . . . . . . . . . . . . . . . . . . . . 75
HDD / Disc . . . . . . . . . . . . . . . . . . . . . . . . . . . . . . . . . . . . . 78
Picture . . . . . . . . . . . . . . . . . . . . . . . . . . . . . . . . . . . . . . . . 80
Sound. . . . . . . . . . . . . . . . . . . . . . . . . . . . . . . . . . . . . . . . . 80
Display . . . . . . . . . . . . . . . . . . . . . . . . . . . . . . . . . . . . . . . . 82
Connection . . . . . . . . . . . . . . . . . . . . . . . . . . . . . . . . . . . . . 82
Network . . . . . . . . . . . . . . . . . . . . . . . . . . . . . . . . . . . . . . . 84
Others . . . . . . . . . . . . . . . . . . . . . . . . . . . . . . . . . . . . . . . . 84
Software (Firmware) Update . . . . . . . . . . . . . . . . . . 87
Other Settings . . . . . . . . . . . . . . . . . . . . . . . . . . . . . 88
Switching the aspect ratio of the screen . . . . . . . . . . . . . . 88
TV operation. . . . . . . . . . . . . . . . . . . . . . . . . . . . . . . . . . . . 88
HOLD function . . . . . . . . . . . . . . . . . . . . . . . . . . . . . . . . . . 88
Other Connections . . . . . . . . . . . . . . . . . . . . . . . . . 89
Set Top Box or VCR connections . . . . . . . . . . . . . . . . . . . 89
Other TV connections . . . . . . . . . . . . . . . . . . . . . . . . . . . . 89
Amplifier connections . . . . . . . . . . . . . . . . . . . . . . . . . . . . . 89
TM
”/Q Link) . . . . . . . . 68
4
VQT2J64

∫ Troubleshooting
Messages on the unit’s display . . . . . . . . . . . . . . . 90
Troubleshooting guide . . . . . . . . . . . . . . . . . . . . . . 92
Power . . . . . . . . . . . . . . . . . . . . . . . . . . . . . . . . . . . . . . . . . 92
Displays . . . . . . . . . . . . . . . . . . . . . . . . . . . . . . . . . . . . . . . 92
TV screen and video . . . . . . . . . . . . . . . . . . . . . . . . . . . . . 93
Sound. . . . . . . . . . . . . . . . . . . . . . . . . . . . . . . . . . . . . . . . . 93
Operation . . . . . . . . . . . . . . . . . . . . . . . . . . . . . . . . . . . . . . 94
Recording, timer recording and copying . . . . . . . . . . . . . . 94
Play . . . . . . . . . . . . . . . . . . . . . . . . . . . . . . . . . . . . . . . . . . 95
Edit . . . . . . . . . . . . . . . . . . . . . . . . . . . . . . . . . . . . . . . . . . . 96
Still pictures . . . . . . . . . . . . . . . . . . . . . . . . . . . . . . . . . . . . 96
Music . . . . . . . . . . . . . . . . . . . . . . . . . . . . . . . . . . . . . . . . . 96
USB . . . . . . . . . . . . . . . . . . . . . . . . . . . . . . . . . . . . . . . . . . 96
TV Guide . . . . . . . . . . . . . . . . . . . . . . . . . . . . . . . . . . . . . . 96
Broadcast . . . . . . . . . . . . . . . . . . . . . . . . . . . . . . . . . . . . . . 97
VIERA Link. . . . . . . . . . . . . . . . . . . . . . . . . . . . . . . . . . . . . 97
Network . . . . . . . . . . . . . . . . . . . . . . . . . . . . . . . . . . . . . . . 97
To reset this unit. . . . . . . . . . . . . . . . . . . . . . . . . . . . . . . . . 97
∫ Reference
HDD and media information . . . . . . . . . . . . . . . . . . 98
Unit care . . . . . . . . . . . . . . . . . . . . . . . . . . . . . . . . . 102
Media handling. . . . . . . . . . . . . . . . . . . . . . . . . . . . 103
Recording modes and recording contents . . . . . 104
Operations that can be performed
simultaneously . . . . . . . . . . . . . . . . . . . . . . . . . . . . 105
Audio information . . . . . . . . . . . . . . . . . . . . . . . . . 106
Structure of folders displayed by this unit . . . . . 107
Specifications . . . . . . . . . . . . . . . . . . . . . . . . . . . . . 108
Licenses . . . . . . . . . . . . . . . . . . . . . . . . . . . . . . . . . 113
Safety precautions . . . . . . . . . . . . . . . . . . . . . . . . . 115
Glossary . . . . . . . . . . . . . . . . . . . . . . . . . . . . . . . . . 116
Index . . . . . . . . . . . . . . . . . . . . . . . . . . . . . . . . . . . . 119
Getting started
Watching broadcasts
Recording
Playing back video
Editing video
Copying video
Still pictures
Music
With Other Equipment
Convenient functions
Troubleshooting
Reference
About descriptions in these operating
instructions
≥ These operating instructions are applicable to
models DMR-BS880 and DMR-BS780. The
illustrations in these Operating Instructions show
images of DMR-BS880 unless otherwise indicated.
[BS880] :
indicates features applicable to DMR-BS880 only.
[BS780] :
indicates features applicable to DMR-BS780 only.
≥ Pages to be referred to are indicated as “> ±±”.
VQT2J64
5
TIME SLIP
DISPLAY
STATUS
DIRECT TV REC
AD
-10s +60s
REC MODE EXT LINK
REC
TEXT STTL
CHAPTER
F
U
N
C
T
I
O
N
M
E
N
U
D
I
R
E
C
T
N
A
V
I
G
A
T
O
R
G
U
I
D
E
BACK/
RETURN
PLAY/x1.3
PAUSE
PAUSE LIVE TV
STOP
SLOW/SEARCH
SKIP
PROG/CHECK
CH
PAGE
SELECT
INPUT
CH
AV
TV
DRIVE
SELECT
DEL
EXIT
OK
OPTION
MANUAL SKIP
VOL
0
2
abc
5
jkl
8
tuv
1
4
ghi
7
qrs
p
3
def
6
mno
9
xyz
w
REW LIVE TV
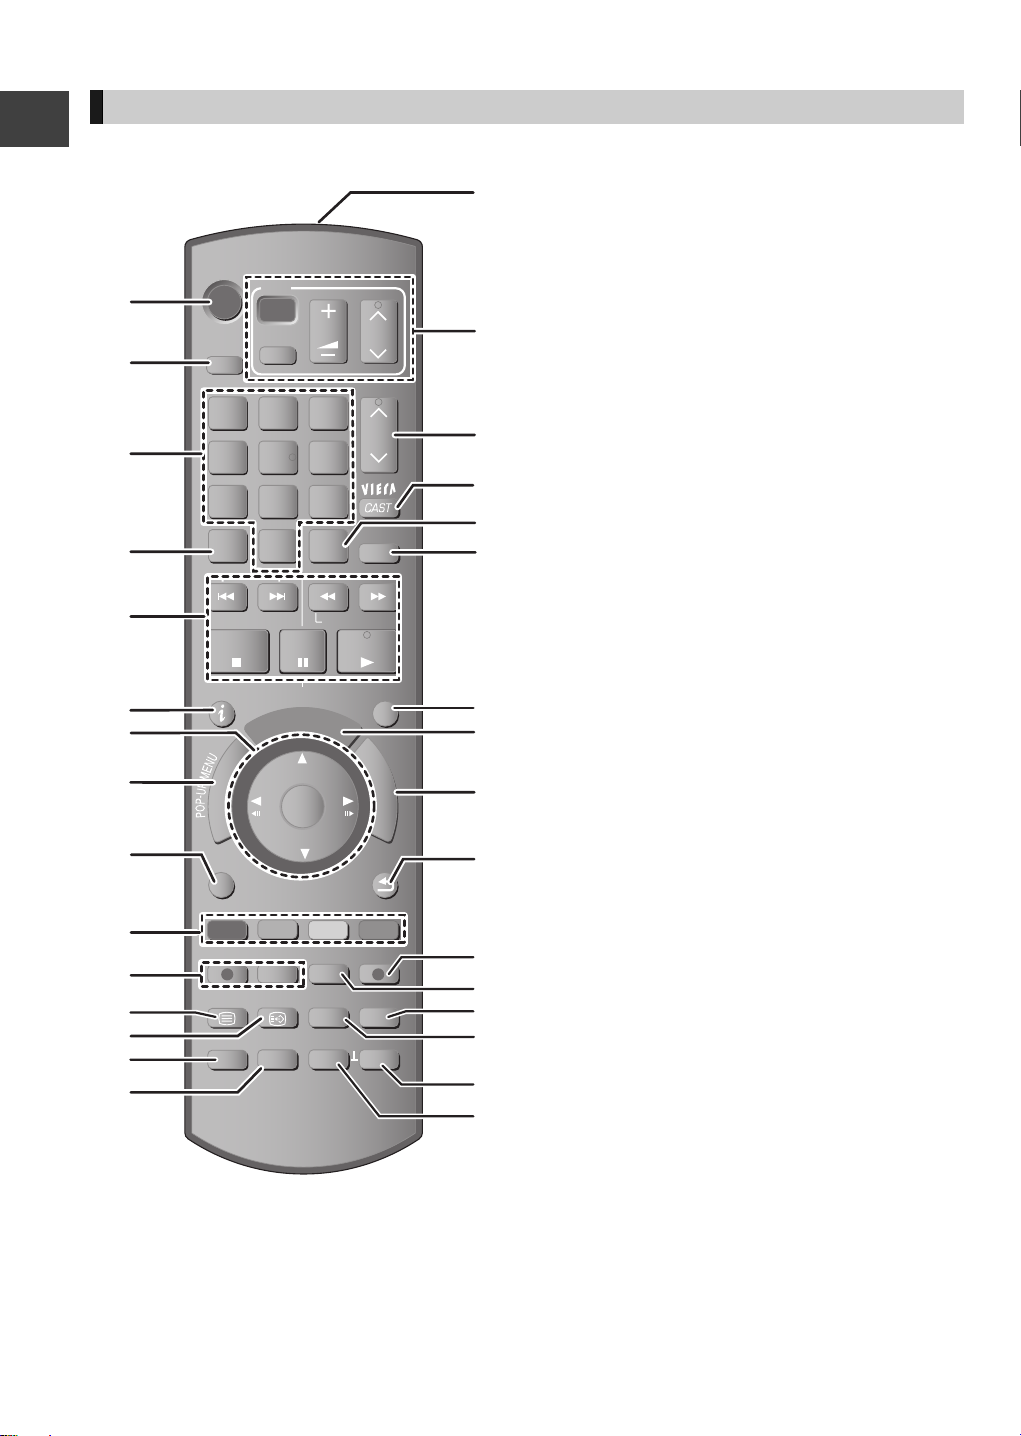
Control reference guide
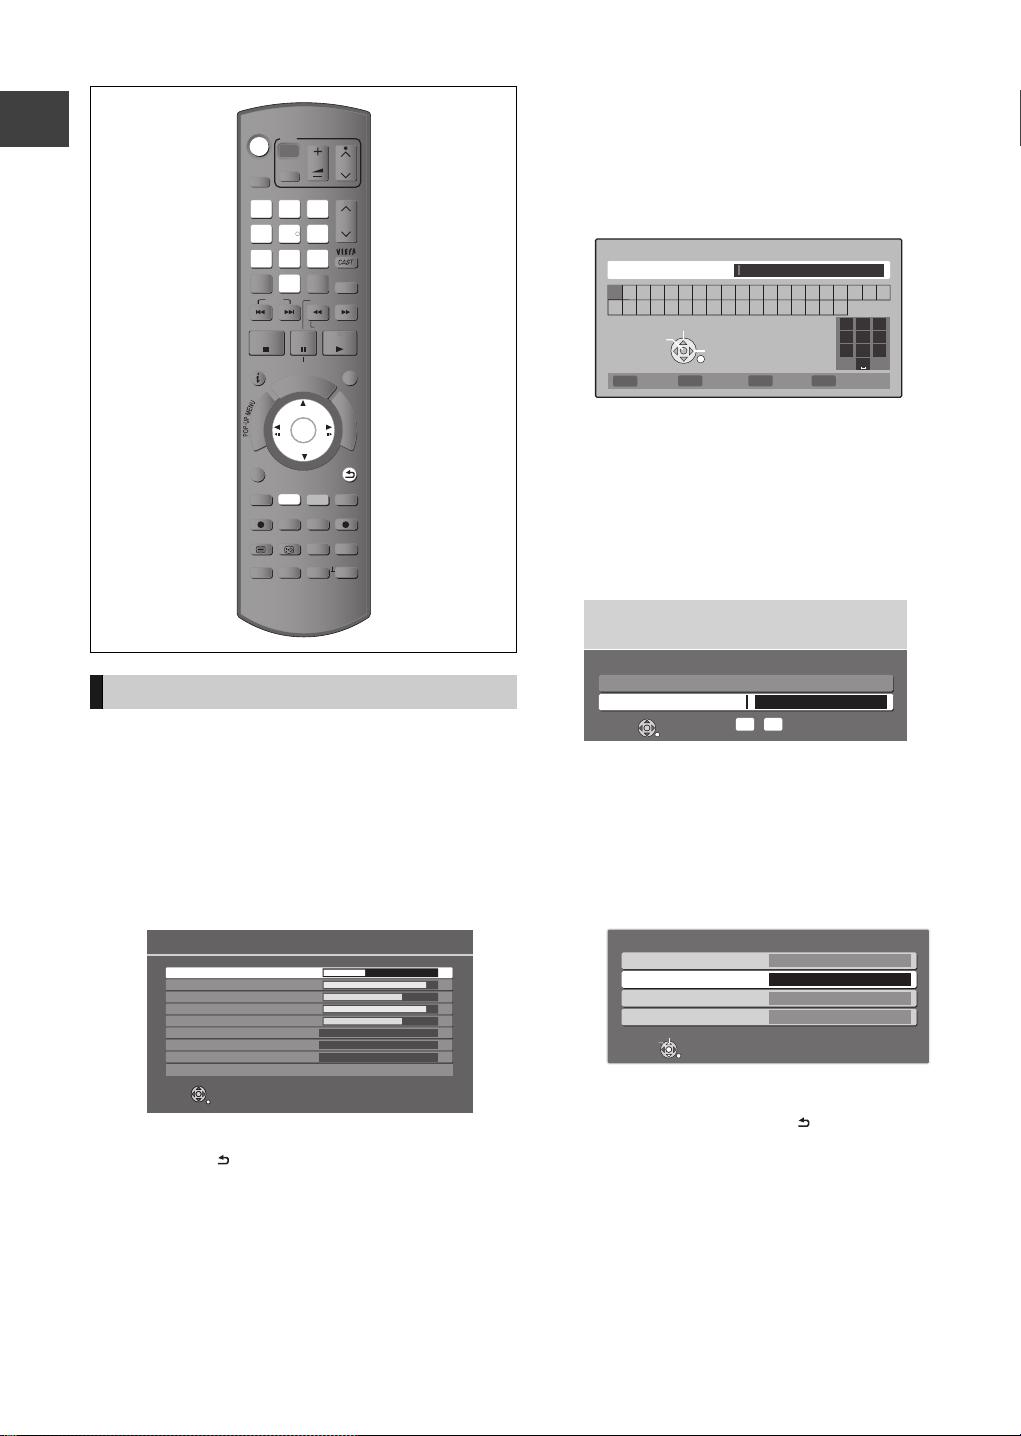
Remote control
Instructions for operations are generally described using the remote control.
1 Turn the unit on or off (> 10, 14)
2 Select drive (HDD, BD, SD or USB) (> 14)
3 Select channels and title numbers, etc./Enter
numbers or characters (The character buttons may
Getting started
be used when operating VIERA CAST contents.)
4 To delete unwanted recorded titles, timer
programmes, still pictures or music (> 39)
5 Basic operations for recording and play
6 Show channel information (> 17)/Programme
information within TV Guide screen (> 19)/Show
status messages (> 37)/Show Information (> 35)
7 Selection/OK, Frame-by-frame (> 37)
8 Show DIRECT NAVIGATOR, Top menu, Pop-up
Menu (> 31, 34)
9 Show OPTION menu (> 40, 52, 59)
: Colour buttons
Use in accordance with instruction on the screen.
; Recording functions
< Show digital text/Teletext (> 18)
= Show subtitles (> 18)
> Create chapter (> 43)
? Skip the specified time (> 37)
@ Transmit the remote control signal
A TV operation area (> 88)
B Channel select (> 16)/
Change pages in the TV Guide system etc. (> 19)
C Show VIERA CAST (> 65)
D Input select (> 16, 21, 62)
E Show Timer Recording screen (> 28)
F Exit the menu screen
G Show the TV Guide screen (> 19)
H Show FUNCTION MENU window (> 15)
I Return to previous screen
J Direct TV recording (> 23)
K EXT LINK function (> 64)
L Show Playback menu (> 70)
M Listen to Audio Description (> 18)
N Skip approx. 1 minute forward (> 36)
O Skip approx. 10 seconds backward (> 36)
6
VQT2J64
Main unit
AV3 I N
30
30
20
20
Pull to flip down the
front panel.
Distance: Within approx. 7 m in front of the unit
∫ Remote Control signal sensor
PLAY
COPYEXT-L
SD USB
HDDSD
BD
Getting started
1 Standby/on switch (Í/I) (> 10, 14)
Press to switch the unit from on to standby mode
or vice versa. In standby mode, the unit is still
consuming a small amount of power.
2 Disc tray (> 14)
3 Connection for digital video (DV) camcorder
(> 62)
4 Blue LED
≥It is possible to set the LED to turn on/off. (> 82)
5 Display (> below)
6 Recording indicator
7 Remote control signal sensor (> above)
The unit’s display
1 SD card slot indicator
2 EXT LINK indicator
3 Copying indicator
4 Disc indicator
5 Drive (HDD, BD or SD) indicator
6 Remote control signal indicator
8 Connection for VCR, Panasonic’s video camera,
etc. (> 62)
9 Open/close disc tray (> 14)
: SD card slot (> 14)
; USB port (> 14)
< Channel select (> 16)
= Start recording (> 21)/Specify a time to stop
recording (> 21)
> Stop
? Start play
Rear panel terminals (> 8, 9, 89)
7 Main display section indicator
8 Playback indicator
9 USB port indicator
: Timer recording indicator
Current time/playback counter, various messages
This indicator lights up when the timer recording
standby is activated.
7
VQT2J64
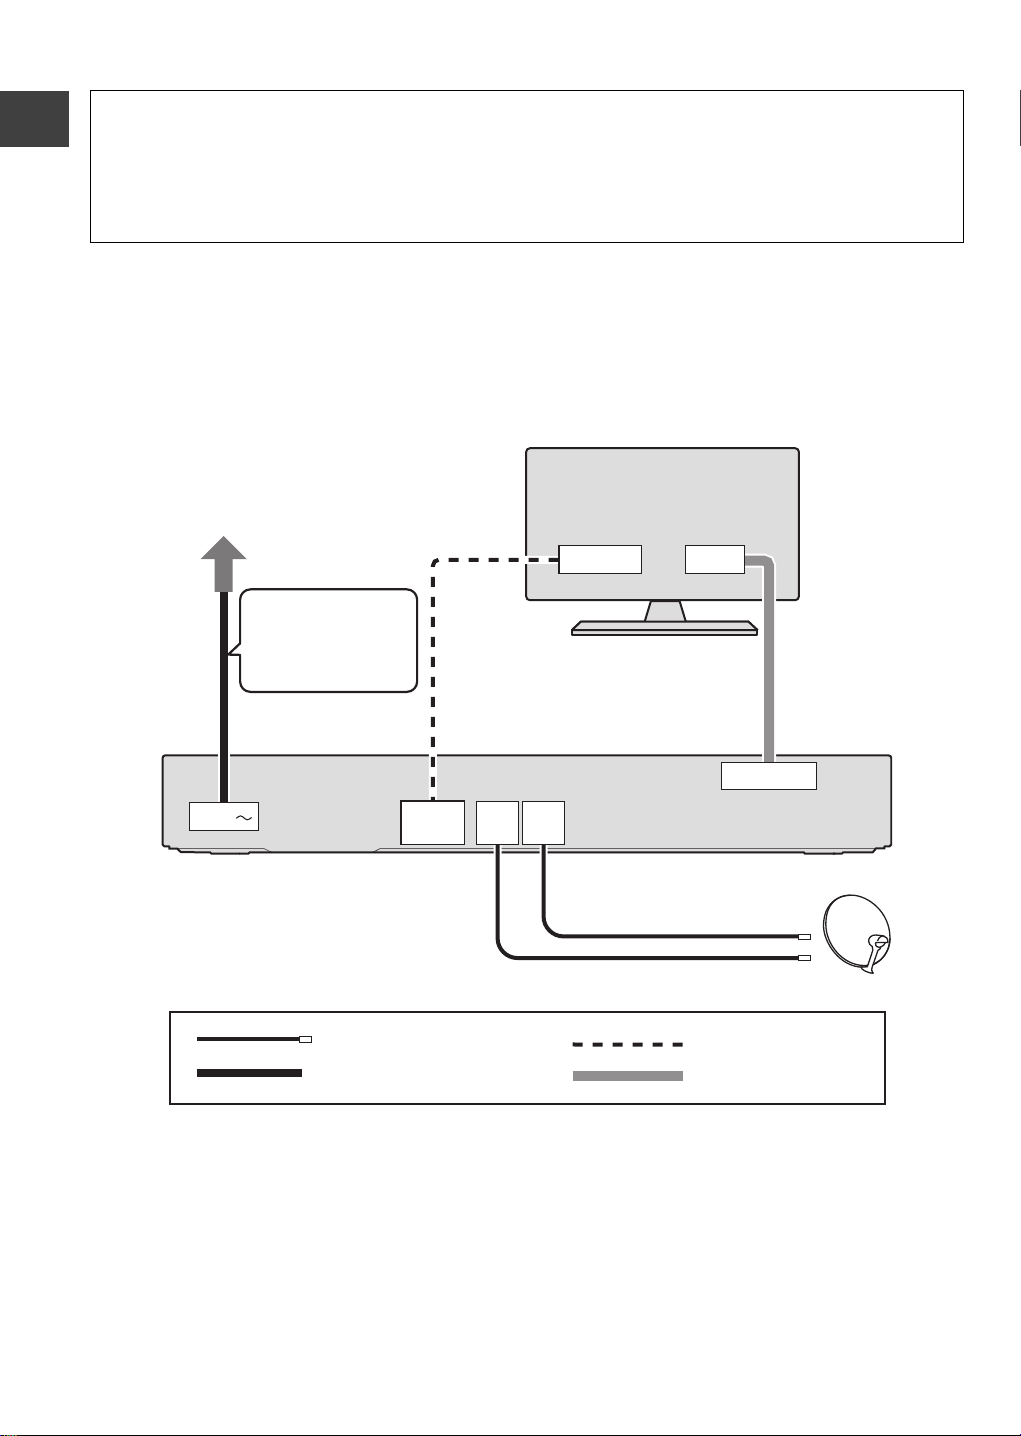
Basic Connection
HDMI IN
AV
HDMI
AV OUT
AV1 (TV)
DISH
IN 1
DISH
IN 2
AC IN
HDMI cable
21-pin Scart cable
Satellite cable
AC mains lead (supplied)
TV’s rear panel
This unit’s rear panel
To household mains socket
(AC 220 to 240 V, 50 Hz)
Connect only after
all other
connections are
complete.
Satellite dish
≥Connect both satellite terminals (DISH IN 1 and DISH IN 2) to the satellite dish when you want to record
2 programmes simultaneously or view TV during recording.
≥Connect DISH IN 1 terminal to the satellite dish when you use only one terminal. In this case, you cannot record
2 programmes simultaneously or view TV during recording.
≥Supply power from another device when you use 2 or more devices to receive satellite broadcast, because this
unit does not supply power when it is turned in standby.
≥Please consult with your Panasonic dealer for details of dish installation.
≥Before connection, turn off all equipment and read the appropriate operating instructions.
Getting started
≥Other Connections (> 89)
When connected to an HDMI compatible unit, you can enjoy high quality, digital video and audio.
≥The HDMI connection supports VIERA Link “HDAVI Control” (> 68).
BE SURE TO READ THE CAUTION FOR AC MAINS LEAD ON PAGE 3
Required setting:
Set “HDMI Video Mode” and “HDMI Audio Output” to “On” (> 83).
(The default setting is “On”.)
After completing the connections, proceed to Easy setting (> 10).
≥Refer to page 90 if “U50”, “U50 1” or “U50 2” appears on the unit’s display.
8
VQT2J64
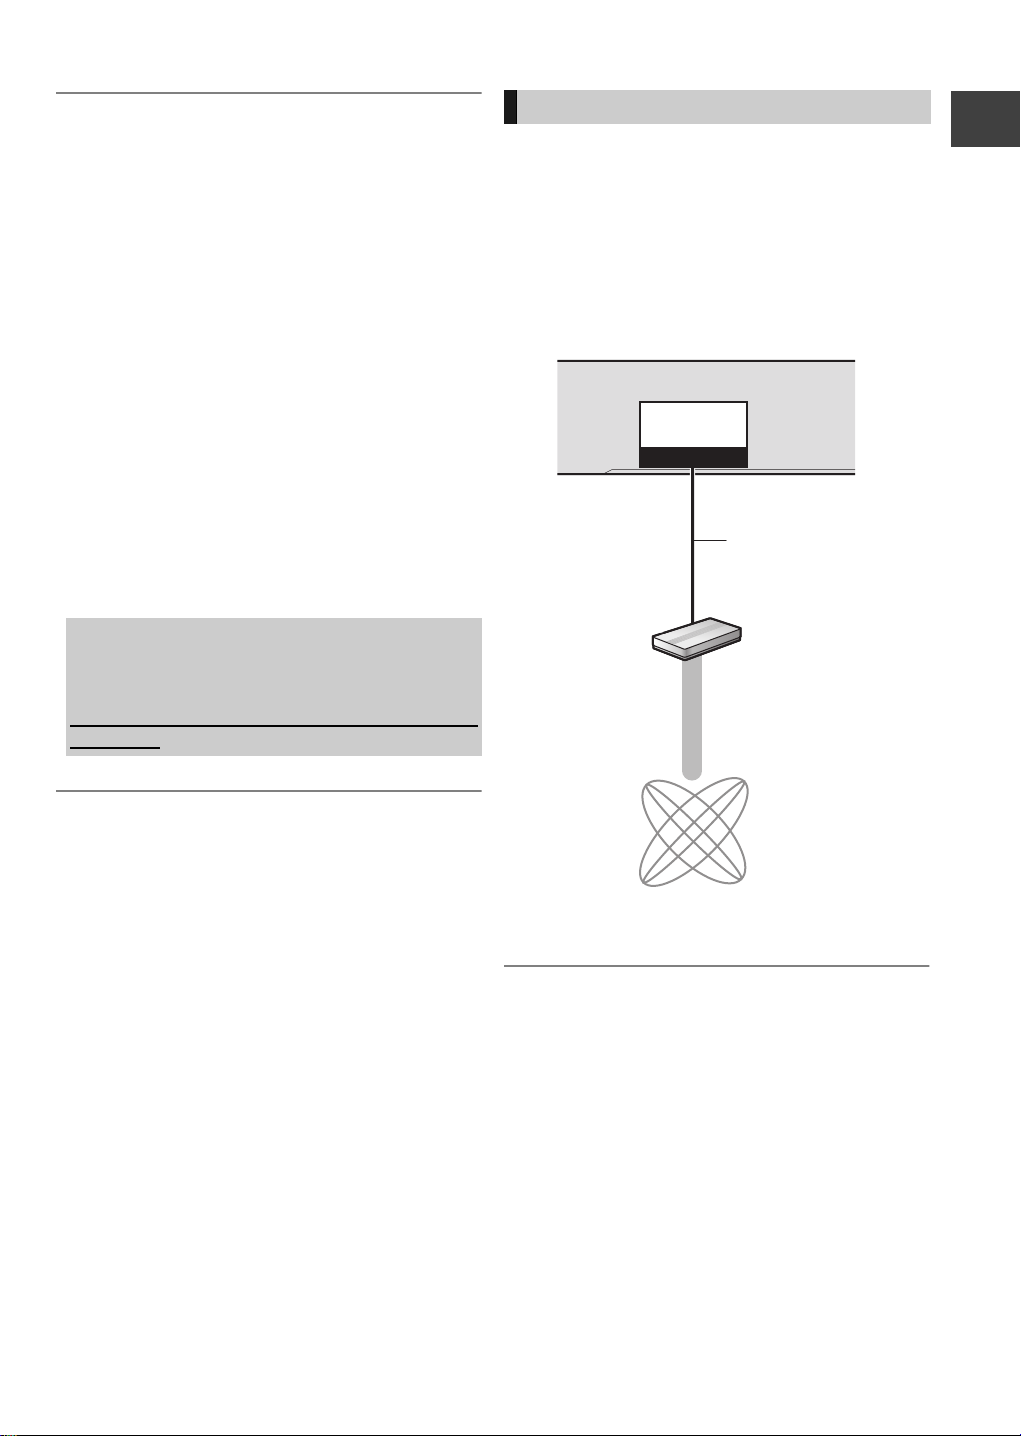
About Satellite tuner
10BASE-T/
100BASE-TX
LAN
This unit’s rear panel
Broadband router,
etc.
Internet
LAN cable
(Straight)
≥The freesat channel uses Astra 2 at 28.2° East, and
Eurobird 1 at 28.5° East satellites.
About HDMI cable
≥Please use High Speed HDMI Cables that have the
HDMI logo (as shown on the cover).
≥When outputting 1080p signal, please use HDMI
Cables 5.0 meters or less.
≥Recommended Panasonic’s HDMI cable part
number:
RP-CDHS15 (1.5 m), RP-CDHS30 (3.0 m), RPCDHS50 (5.0 m), etc.
About a 21-pin Scart cable
You can use a variety of Q Link functions by
connecting the unit to a Q Link compatible TV.
≥Set “AV1 Output” (> 83).
≥If the 21-pin Scart cable and HDMI cable are
connected with a TV, you can use Direct TV
Recording (> 23) or PAUSE LIVE TV programme
(> 20) function when watching a programme via
TV’s tuner.
When the unit is not to be used for a long time
To save power, unplug it from the household mains
socket. This unit consumes a small amount of
power, even when it is turned off
[approx. 0.3 W (Power Save in Standby mode is
activated)]
Network connection
Following functions will be available when this unit is
connected to the network.
≥Enjoying BD-Live discs with Internet (> 31)
≥Automatically acquiring the title of the CD (> 56)
≥Enjoying VIERA CAST (> 65)
≥Enjoying Internet Player (> 65)
≥DLNA function (> 66)
≥Updating the software (firmware) of this unit (> 87)
Getting started
≥ You cannot connect to 2 different satellites at the same
time.
≥ If you connect a DVI device (PC monitors, etc.), we
recommend the device compatible with HDCP (High-Band
width Digital Content Protection):
Depending on the device, images may not display
properly or at all when connecting with a DVI/HDMI
switching cable. (Audio cannot be output.)
≥ If you connect a DVI device that is not compatible with
≥ If you are connecting to a TV that is only compatible with
HDCP, set “HDCP on HDMI Output” to “Off” (> 83).
2 channel audio output, audio with 3 channels or more will
be down mixed (> 116) and output as 2 channels, even if
connecting with an HDMI cable. (Some discs cannot be
down mixed.)
≥ Refer to the operating instructions for the connected
device.
≥ Use only category 5 straight LAN cables (STP) when
connecting to peripheral devices.
≥ Inserting any cable other than a LAN cable in the LAN
terminal can damage the unit.
≥ Please be aware that if you connect to a network without
encryption, a third party may illegitimately intervene and
eavesdrop on the transmissions, and data such as
personal information, confidential information etc. may be
leaked.
9
VQT2J64
TIME SLIP
DISPLAY
STATUS
DIRECT TV REC
AD
-10s +60s
REC MODE
REC
TEXT STTL
CHAPTER
F
U
N
C
T
I
O
N
M
E
N
U
D
I
R
E
C
T
N
A
V
I
G
A
T
O
R
G
U
I
D
E
BACK/
RETURN
PLAY/x1.3
PAUSE
PAUSE LIVE TV
STOP
SLOW/SEARCH
SKIP
PROG/CHECK
CH
PAGE
SELECT
INPUT
CH
AV
TV
DRIVE
SELECT
DEL
EXIT
OK
OPTION
VOL
0
2
abc
5
jkl
8
tuv
1
4
ghi
7
qrs
p
3
def
6
mno
9
xyz
w
EXT LINK
MANUAL SKIP
REW LIVE TV
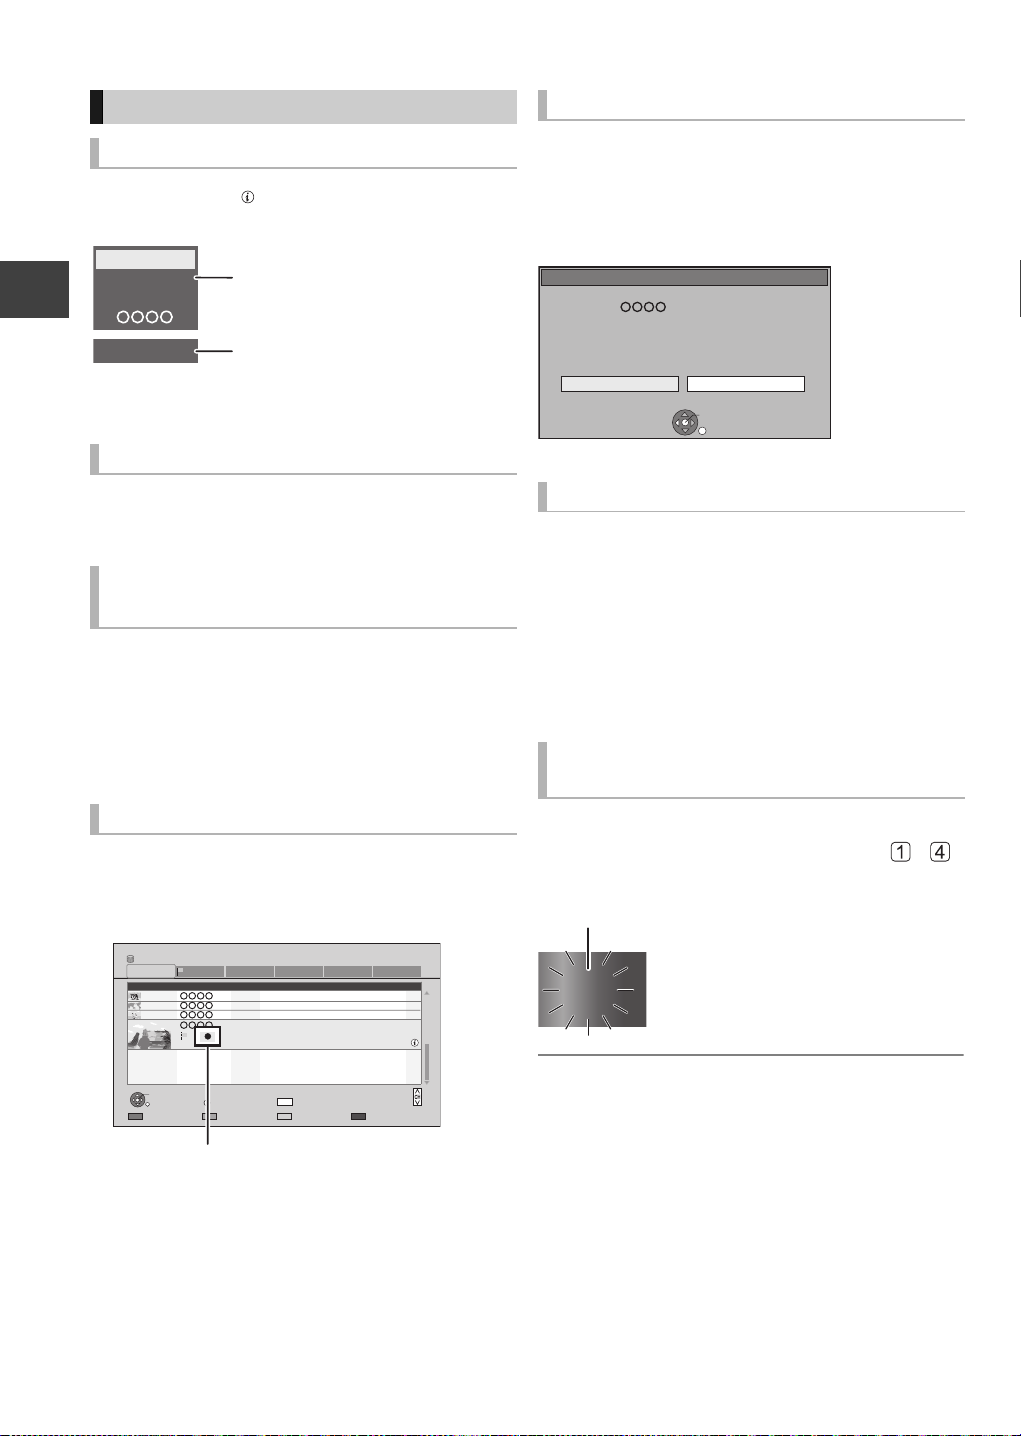
Owner ID-Data Entry
PIN 0000
NAME
HOUSE NO
POSTCODE
RG12 8FP
RETURN
Edit
Select
Setting
Getting started
Easy setting
1 Turn on the TV, then select the
appropriate AV input to suit the
connections to this unit.
2 Press [Í].
freesat Auto Setup starts.
≥Check signal quality/strength displayed on the
screen.
freesat Auto Setup
Searching
DISH Input 1-Signal Quality 0 10
DISH Input 1-Signal Strength 0 10
DISH Input 2-Signal Quality 0 10
DISH Input 2-Signal Strength 0 10
TV Channels Found 0
Radio Channels Found 0
Data Channels Found 0
Channels found, creating channel list.
Exit freesat setup
If freesat Auto Setup fails, press [BACK/
RETURN ] and go to the next step.
≥Check connections and dish alignment, and
perform “freesat Auto Setup” (> 75) after the
settings (> 10-12).
3 Enter your Postcode.
1 Select the character, then press [OK].
2 Repeat step 1.
3 Press the “Green” button to confirm.
≥Your postcode is required to receive local
services and sort the channel order.
Enter Postcode for local channels including space
Postcode
ABCDEFGH I JKLMNOPQRST
UVWXYZ
Set character
Delete
0123456789
Select
Select
RETURN
Confirm
2
1
1
abc
.!:#
4
5
ghi
jkl
7
8
pqrs
tuv
0
Delete all
3
def
6
mno
9
wxyz
≥Clock will be set automatically after entering
postcode.
If the clock setting menu appears (> 85,
Clock)
4 Enter the PIN.
This PIN will be used only for the Owner IDData Entry screen.
You now have the opportunity to enter your
details and help the police to crack crime.
See Instruction Book.
Owner ID
Please enter new PIN
PIN * * * *
RETURN
*
-
PIN entry
0
9
1 Press the number button to enter 4-digit PIN.
2 Repeat step 1 to confirm.
≥Make a note of PIN in case you forget it.
5 Set the Owner ID-Data Entry (“NAME”
and “HOUSE NO”).
1 Select the item, then press [OK].
2 Select the character, then press [OK].
3 Repeat step 2.
4 Press [BACK/RETURN ].
10
VQT2J64
6 Press [BACK/RETURN ].
7 Enter the new PIN.
PIN Entry
Enter a new 4-digit PIN, then press OK.
This PIN will be used for controlling viewing and playback.
PIN will be set to “0000” by pressing “RETURN” when there is no
number input.
- - - -
RETURN
Number
-
0
9
≥Make a note of PIN in case you forget it.
≥The default PIN is “0000”.
1 Select the number, then press [1].
2 Repeat step 1.
3 Press [OK] twice.
8 Set “Power Save” to “On”, “On Timer”
or “Off”, then press [OK].
Power Save in Standby
From To
0
Standby power consumption is reduced by disabling
Quick Start function and AV2 loop-through in standby.
Home Network ( DLNA ) function is not available in both standby
and power on modes.
OK
RETURN
On Power consumption will be reduced
to a minimum level in standby mode.
On
Timer
Set period of power save and then
press [OK].
≥Power Save in Standby mode is
activated at the set time period.
Off It is possible to start quickly from the
standby mode. (Quick Start mode)
≥If you use Home Network (DLNA)
Function (> 66), select "Off". This
function is not available with other
settings.
≥Video from AV2 input cannot be viewed with
this unit in standby mode when Power Save in
Standby mode is activated.
Power Save
On
6
When the following screen appears, Easy setting
is complete.
Easy Setting
Easy Setting has been completed.
To use Internet functions, network connection needs
to be made first. Proceed Network Easy Settings ?
Select “Yes” to start. Select “No” to exit the Setup.
Yes No
OK
≥Select “Yes” to proceed to “Network Easy Settings”.
(> 12)
≥Select “No” to finish the Setup.
To stop partway
Press [BACK/RETURN ].
When the message below appears
No satellite signals detected at dish input 2.
Please check dish installation / connection before starting search,
otherwise record / playback functions will be limited.
This screen appears when this unit does not detect
the connection to DISH IN 2.
When you connect DISH IN 1 only press [OK], then
go to the next step.
When you connect both DISH IN 1 and 2, turn this
unit off and check your connection. Then perform
from step 1.
To display the Owner ID information on TV
Press and hold [∫] on the main unit for more than
5 seconds.
The PIN is not displayed.
¾ To edit the Channel List (> 75, freesat Channel
List)
¾ To check the signal condition (> 77, Signal
Condition)
¾ To change the Owner ID information (> 86,
Owner ID)
¾ To change PIN (> 86, PIN Entry)
Getting started
11
VQT2J64
Setting
OK
RETURN
Network Easy Settings
LAN setup and testing of home network and
internet connections are required for internet
functions. Broadband Internet connection is
necessary for network features.
Please confirm that a LAN cable is connected.
Please refer to the operating instructions.
Press OK to start Network Easy Settings.
Network Easy Settings
After completing “Easy setting”, you can continue with
“Network Easy Settings”.
Follow the on-screen instructions and make
the following settings.
≥Network connection test
≥Home Network (DLNA) function setting
Getting started
≥Internet connection test
When TV picture appears, Setup is complete.
∫ When you experience problems with
settings
≥Network Easy Settings ( Connection Test )
1. LAN cable
connection:
2. IP address
setting:
3. Connection to
gateway:
1. LAN cable
connection:
2. IP address
setting:
3. Connection to
gateway:
1. LAN cable
connection:
2. IP address
setting:
3. Connection to
gateway:
12
VQT2J64
Display
“Fail”
“Fail”
“Fail”
“Pass”
“Fail” or
“Home
network
available”
“Fail”
“Pass”
“Pass”
“Fail”
Check the
following
≥Connection of
the LAN
cables (> 9)
≥Connection
and settings of
the hub and
router
≥Settings of “IP
Address / DNS
Settings”
(> 84)
≥Network Easy Settings ( Internet Connection
Tes t )
Display Check the following
≥Network connections and
Cannot find the
server. (B019)
settings
≥Settings of “IP Address /
DNS Settings” (> 84)
≥The server may be busy or
the service may have been
No connection
could be made to
the server. (B020)
suspended. Please wait a
few moments, and then try
again.
≥Settings of “Proxy Server
Settings” (> 84)
To stop partway
Press [BACK/RETURN ].
To restart Network Easy Settings
1 While stopped
Press [FUNCTION MENU].
2 Select “Others”, then press [OK].
3 Select “Setup”, then press [OK].
4 Select “Network Easy Settings” in “Network”, then
press [OK].
To redo settings individually
1 While stopped
Press [FUNCTION MENU].
2 Select “Others”, then press [OK].
3 Select “Setup”, then press [OK].
4 Select “Network Settings” in “Network”, then press
[OK].
5 Select “IP Address / DNS Settings” (> 84) or
“Proxy Server Settings” (> 84), then press [OK].
Check security before using Home Network
(DLNA) function
If you set “Home Network (DLNA) function” to “On”,
all connected devices on the same network can
access this unit. Ensure that the router for your home
network has adequate security system to prevent
unauthorized access.
≥Refer to the operating instructions of the hub or
router.
≥ Home Network (DLNA) function setting can be set only
when you selected “Off” for “Power Save” in “Easy setting”
(> 11, step 8).
≥ Even if you set “Home Network (DLNA) function” to “Off”, it
is possible to set to “On” later (> 67).

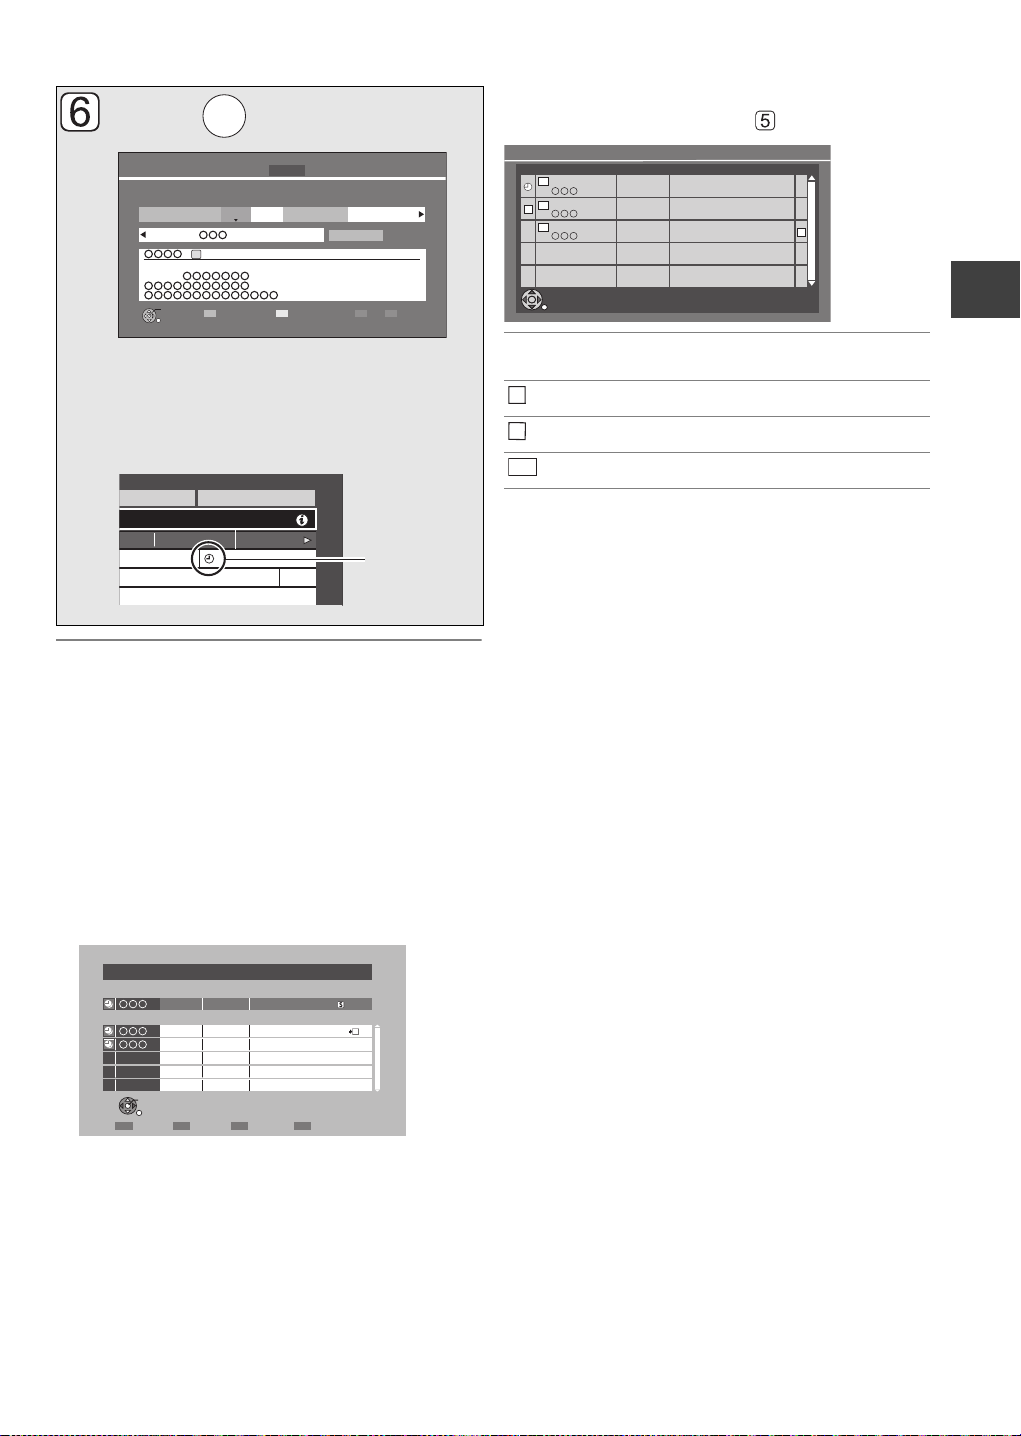
Tuning in Other Satellite
Other Satellite Auto Setup - Satellite Selection
freesat and other channels
Satellite Selection
Astra2/Eurobird
No satellite signals detected at dish input 2.
Please check dish installation / connection before starting search,
otherwise record / playback functions will be limited.
Services
You can tune in to other free channels (Astra 2 at 28.5
degree east) or free channels from other satellites
that you can receive in your area.
1 While stopped
Press [FUNCTION MENU].
2 Select “Others”, then press [OK].
9 Press [OK].
10 Select “Free Channels” or “All
Channels”, then press [OK].
The scan starts.
This may take up to 60 minutes.
Other Satellite Auto Setup
Satellite
Progress
This may take up to 20 minutes.
No.
Astra2/Eurobird
0% 100%
Channel Name
Type Quality
Getting started
3 Select “Setup”, then press [OK].
4 Select “Tuning”, then press [OK].
5 Select “Other Satellite Tuning Menu”,
then press [OK].
6 Select “Auto Setup”, then press [OK].
7 Select the satellite.
≥Astra2/Eurobird
≥Astra1
≥Hotbird
≥Any Satellite: Any satellites that the dish can
§
§
§
pick up from its current position
Check the dish alignment for the satellite you
want to select.
8 Press [OK].
Checking the signals starts. It takes time.
Please follow the instruction on the screen.
≥When you select “Any Satellite” in step 7, go
to step 10.
≥“Locked” appears when the checking is
finished.
Other Satellite Auto Setup - Satellite Selection
Satellite Selection
freesat and other channels
DISH Input 1 - Signal Quality
DISH Input 1 - Signal Strength
DISH Input 1 - Signal Lock
DISH Input 2 - Signal Quality
DISH Input 2 - Signal Strength
DISH Input 2 - Signal Lock
Continue
RETURN
Astra2/Eurobird
0 10
0 10
Locked
0 10
0 10
Locked
Free TV: 0 Pay TV: 0
RETURN
Searching
Radio: 0
When the message below appears (> 11 )
¾ To edit the Channel List (> 76, Other Satellite
Channel List)
¾ To tune other satellite services manually (> 77,
Manual Tuning)
¾ To check the signal condition (> 77, Signal
Condition)
≥ This setup is not required if you are only viewing or
recording from freesat channels.
≥If “Locked” does not appear, the signal is
weak, and Auto Setup cannot start. Check that
the satellite dish is correctly positioned.
13
VQT2J64
Common Operations
Press [< OPEN/CLOSE]
on the main unit to open the
tray and insert a disc.
TV
VOL
AV
abc
def
3
2
mno
jkl
5
6
w
xyz
tuv
9
8
PROG/CHECK
INPUT
0
SELECT
SLOW/SEARCH
REW LIVE TV
PAUSE
PLAY/x1.3
PAUSE LIVE TV
I
D
U
E
G
OK
DIRECT TV REC
EXT LINK
AD
MANUAL SKIP
-10s +60s
CH
PAGE
CH
EXIT
F
U
N
C
T
I
O
N
M
E
N
U
BACK/
RETURN
DISPLAY
DRIVE
SELECT
1
ghi
4
p
qrs
7
Getting started
DEL
SKIP
STOP
STATUS
R
O
T
A
G
I
V
A
N
T
C
E
R
I
D
OPTION
REC
TEXT STTL
CHAPTER
REC MODE
TIME SLIP
Preparations
Turning on this unit
1 Turn on the TV, then select the appropriate
AV input to suit the connections to this
unit.
2 Press [Í] on the remote control or [Í/I]
on this unit.
Inserting or removing a media
≥When the indicator on this unit's display blinks,
do not turn off the unit or remove the media.
Such action may result in loss of the media
contents.
≥When inserting the media, ensure that it is facing
the right way up.
≥When removing the SD card, press on the centre of
the card and pull it straight out.
≥If you connect a Panasonic product with a USB
connection cable, setup screen may be displayed
on the connected equipment. For details, refer to the
instructions for the connected equipment.
∫ To select a drive
Press [DRIVE SELECT] to select the media drive that
you operate.
∫ Release disc protection
[BD-RE] [BD-R] [RAM]
If the disc is protected when writing to the disc,
release the protection (> 72, Setting the protection).
The freesat Auto Setup will start at the initial
power on after purchasing this unit. (> 10)
≥ If the freesat Auto Setup does not start after the initial
power on, turn this unit Off/On once.
14
VQT2J64
Basic operation
OK OK
Select Enter
BACK/
RETURN
EXIT
Page 001/002
CopySelect
OPTION
LIVE CAT 2
SPORTS NEWS
World news
DV 21.02.02
29/10
29/10 2
29/10 1
1
1
1
1
01/01DV
PLAY
RETURN
PICTURE / MUSIC
KD2A
DOG
LIVE CAT
04.10
04/10
29/10
Delete
Page Up
Page Down
DEL
FUNCTION MENU
Drive Select
OK
RETURN
Titles recorded to HDD can be viewed,
edited, or deleted.
Blu-ray
Timer Recording
Copy
Others
Disc / SD Card / USB
Network
Playback Contents
TV Guide
HDD
Video
Picture
Music
This unit is basically operated via the following
method by using the remote control.
FUNCTION MENU screen
You can easily access the desired functions via the
FUNCTION MENU.
1 Press [FUNCTION MENU].
2 Select the item, then press [OK].
≥Repeat step 2 if necessary.
Getting started
To return to the previous
screen
To exit the screen
Display Navigation
Operating method can also be confirmed on the
screen.
Available functions and buttons used are displayed
on each screen.
Menu screen
Menu screen for selecting each operation is displayed
when the media is inserted, and you can access the
operation screen easily.
e.g., [USB]
Play Video ( DivX )
View Pictures ( JPEG )
Play / Copy Music ( MP3 )
Copy Video ( AVCHD )
Copy Video ( MPEG2 )
Copy Pictures ( JPEG )
USB
USB device is inserted.
OK
RETURN
If the menu screen is not displayed, display it by
performing the following operation.
1 While stopped
Press [OPTION].
2 Select “Drive Select”.
3 Select the media.
≥Menu screen for each media appears.
Press
Press
Playback Contents
§
Video (> 33)
Picture (> 50)
Music (> 56)
TV Guide (> 19)
Timer Recording (> 24)
Copy (> 44)
Copy (VIDEO / PICTURE)
Copy Video ( AVCHD ) to Disc
Network (> 65)
Others
Drive Select
§
§
EXT Link Standby (> 64)
Flexible Recording via AV input (> 63)
DV Automatic Recording (> 63)
Setup (> 75)
§
Disc / SD Card / USB
This is a display for when drive select is set
to HDD.
≥ Selectable items will change depending on the type and
status of the media.
VQT2J64
15

Watching broadcasts
Watc h
ing
broad
casts
SELECT
INPUT
OK
G
U
I
D
E
OK
RETURN
All Channels
Entertainment
News & Sport
Movies
Lifestyle
Music
Children
Special Interest
Adult
Favourites
Radio
Shopping
Gaming & Dating
Regional
Interactive
Channel Genre Selection
OK
OK
Select the current
Watching broadcasts
TV
VOL
AV
abc
def
3
2
mno
jkl
5
6
w
xyz
tuv
9
8
PROG/CHECK
INPUT
0
SELECT
SLOW/SEARCH
REW LIVE TV
PAUSE
PLAY/x1.3
PAUSE LIVE TV
I
D
U
E
G
OK
CH
PAGE
CH
EXIT
F
U
N
C
T
I
BACK/
RETURN
O
N
M
E
N
U
DRIVE
SELECT
1
ghi
4
p
qrs
7
DEL
STOP
STATUS
G
I
V
A
N
T
C
E
R
I
D
OPTION
T
A
SKIP
R
O
Press a few times and
select “freesat”, then press
.
Input Selection
AV1
AV2
AV3
DV
freesat
Other Sat.
Select
Change
RETURN
programme, then press
.
WED 13th
19:00-20:00
Time: 19:30 20:00 20:30 21:00 21:30
108 Sky Culture Dream
113
114
115
116
117
120
Select Channel
OK
Select Programme
RETURN
TV Guide: Landscape
Red Cap
Love
News Show News Show
100 Sheep Dream
HD HD
Heartbeat 100 Sheep Dream
HD
Behind me Black House Crowntown Deal
GUIDE
+24 hours Prog.Type Channel Genre
Info
Portrait/Landscape
USO Blue Wave
WED 13/10/2010 19:36
All ChannelsAll Types
HD
paC deRpaC deR
Great Ach...
HD
In the...
Page Up
Page Down
raC desUevaW toHOFU
CH
Select “View”, then press
.
Every time you change the channel, channel
information appears automatically.
Selection Screen
Drama
WED 13/10/2010
19:00 - 20:00
OK
RETURN
Unit’s display
WED 13/10/2010 19:36
View
Single Timer Rec.
Series Timer Rec.
Delete
Series Info
16
VQT2J64
Press .
The Channel Genre Selection screen
appears.
Select the genre, then
press .
The TV Guide list appears.
OK
≥ You can set the time to display the channel information.
(> 82)
≥ You can also select the channel with [WXCH] or the
number buttons.
¾ To watch other satellite services (> 17)
¾ To use TV Guide system (> 19)
Watching the Other Satellite
Channel
names
e.g.,
Service
Channel information
Press [STATUS ].
1 Press [INPUT SELECT] a few times and
select “Other Sat.”, then press [OK].
2 Press [GUIDE].
3 Select the channel, then press [OK].
Other Sat. Channels
1
2
3
4
5
6
7
Select
View
RETURN
≥To change the category, press the “Red”
button.
≥To sort the channel, press the “Blue” button.
Unit’s display
≥ You can also select the channel with [WXCH] or the
number buttons.
≥ There are no programme guide information in other
satellite mode, only list of channel name is available.
Sorting 123...
Page up
Page down
SortingCategory
951 13:07
19:00 - 19:30
Dolby D Subtitles
Now
DA
1 Current Category
2 Title with Guidance information
3 Audio Description
4 Subtitle
5 Digital text/Teletext
6 Multiple audio
To show detailed information
Press [STATUS ] again.
To hide the information screen
Press [EXIT].
To change Category (Other satellite service only)
Press the “Blue” button.
≥Selection of channel is made easy by creating
Favourites of the channels. (> 76, Other Satellite
Favourites Edit)
To switch between the current programme and
the next programme
Press [2, 1].
TXT
freesat Channels
Set timer
Multi Audio
Watching broadcasts
To switch to another channel
Press [3, 4].
≥Press [OK] to watch the channel.
¾ To set the timer programme from channel
information (> 27)
17
VQT2J64

Watching broadcasts
Operations while watching
broadcast
To show subtitle
When “Subtitles” appears in channel information
(> 17)
Press [STTL ].
To hide subtitle
Press [STTL ].
To select Multi Audio
When “Multi Audio” appears in channel information
Watching broadcasts
(> 17)
1 Press [OPTION].
2 Select “Multi Audio”, then press [OK].
3 Select the desired audio.
To exit the screen
Press [EXIT].
To listen to the Audio Description
Audio Description adds an additional soundtrack to
describe events on screen (narration) and aids
understanding and enjoyment, particularly for
visually-impaired viewers.
When “AD” appears in channel information (> 17)
Press [AD].
To switch off
Press [AD].
≥ You can also set “Audio Description” active in the Setup
menu. (> 78)
To vi e w D i gi t al Te xt ( MH E G)
When “TXT” appears in channel information (> 17)
Press [TEXT ].
To select the page or access to certain topic areas
and navigation
Use [3, 4, 2, 1], number buttons or colour buttons,
etc. according to on-screen instructions.
≥ Some functions of digital text are deactivated during
recording.
¾ To use the Internet Player service (> 65)
To view analogue text (Teletext)
Some other satellite channels may broadcast
analogue text (Teletext).
When “TXT” appears in channel information (> 17)
Press [TEXT ].
To select the page
Use [3, 4], number buttons or colour buttons, etc.
according to on-screen instructions.
To exit the teletext screen
Press [TEXT ].
≥ The teletext function depends on respective channels.
≥ You can change the display mode (> 82, Teletext).
To set the channel to skip
The channel is skipped next time you select the
channel with [WXCH].
1 While watching the broadcast to skip
Press [DEL].
2 Press [OK].
18
VQT2J64
Using TV Guide system
Landscape view
Portrait view
All Types
Movies
Entertainment
News & Factual
Sport
Children’s
Education
Lifestyle
Drama
All Types
Prog.Type
All Channels
Entertainment
News & Sport
Movies
Lifestyle
Music
Children
Special Interest
Radio
Shopping
All Channels
Channel Genre
(freesat)
Press [GUIDE].
≥You can switch between Landscape view and
Portrait view each time you press [GUIDE].
WED 13th
19:00-20:00
Time: 19:30 20:00 20:30 21:00 21:30
108 Sky Culture Dream
113
114
115
116
117
120
Select Channel
OK
Select Programme
RETURN
TV Guide: Landscape
Red Cap
News ShowLove Party
100 Sheep Dream
Heartbeat 100 Sheep Dream
HD
Behind me Black House Crowntown Deal
GUIDE
+24 hours Prog.Type Channel Genre
Info
Portrait/Landscape
USO Blue Wave
WED 13/10/2010 19:36
All ChannelsAll Types
HD
paC deRpaC deR
HD
HD
Great Ach...
HDHD
In the...
raC desUevaW toHOFU
Page Up
Page Down
CH
To search the programme
You can search the programme from programme type
and channel genre.
1 Press the “Yellow” button (Prog.Type) or
the “Blue” button (Channel Genre).
2 Select the item, then press [OK].
Watching broadcasts
WED 13th
114 115 116 117 120
19:30-20:00
20:00-21:15
21:15-22:00
22:00-22:45
22:45-23:30
23:30-00:00
0:00-01:00
1:00-01:45
Select Programme
OK
Select Channel
RETURN
TV Guide: Portrait
Love
News Show
Party Also in
Baseball
Ballet
Hourse riding
Curling
Arm wrestling
Info
GUIDE
Portrait/Landscape
+24 hours Prog.Type Channel Genre
All Types
WED 13/10/2010 19:36
All Channels
HD
Also in
HD
Page Down
Page up/down
Press [WXCH].
To view a programme list for another day
Press the “Red” button (Previous) or the “Green”
button (Next).
To see programme information
(Programmes with the symbol)
Press [STATUS ].
To show other pages
Press [CH W] (Previous) or [X CH] (Next).
To exit the screen
Press [STATUS ].
Landscape
view
The programmes belonging to the
selected type or genre are
highlighted.
Portrait view Only the programmes belonging
to the selected type or genre are
CH
displayed.
To return to the previous TV Guide list
Select “All Types” in the “Prog.Type” or “All
Channels” in the “Channel Genre” in step 2.
≥ Channel Genre and programme type may not be assigned
correctly depending on the programme information.
≥ Some broadcast may not send programme information.
¾ Set the timer recording (> 24)
19
VQT2J64

Watching broadcasts
PLAY
20:35 22:35
21:50
18:53:50 11/11/2010
Play 18:53.50
REWIND LIVE TV/PAUSE LIVE
TV
This unit temporarily saves a live TV programme you
are watching with this unit’s tuner on HDD and you
can use the following functions.
REWIND LIVE TV
You can rewind live TV programme up to 2 hours
before as long as temporary save has not been
stopped.
PAUSE LIVE TV
You can pause live TV programme and restart
watching from the paused position.
Watching broadcasts
≥VIERA Link function makes it possible to use the
PAUSE LIVE TV function by pressing “Pause”
button on TV remote control. (> 68)
≥PAUSE LIVE TV also works when watching a
programme via external input.
≥Select the HDD drive to perform these functions
correctly.
1 While watching TV
To stop REWIND LIVE TV or PAUSE LIVE TV
1Press [∫].
2 Select “Yes”, then press [OK].
To display the status
Press [STATUS ].
∫ When watching a programme with this tuner
1 The time that you can rewind the live programme
2 The time of the current playback position
3 The time which is 2 hours after PAUSE LIVE TV or
REWIND LIVE TV started
≥After 2 hours from PAUSE LIVE TV or REWIND
LIVE TV started, current time is displayed.
∫ (PAUSE LIVE TV only)
When watching a programme via external input
∫REWIND LIVE TV
Press [6] to rewind.
≥“REWIND LIVE TV” appears on the unit’s
display.
∫PAUSE LIVE TV
Press [;] to pause.
≥“PAUSE LIVE TV” appears on the unit’s
display.
20:35 22:35
Pause
20:35
2 When you want to resume
Press [1](PLAY/a1.3).
≥You can perform search or Quick View, etc.
≥If temporary save stops (
be performed by that point.
> right), playback will
4 The time of the current playback position.
≥ Temporary save stops in the following cases:
– When switching to other channels or other screen
– When recording of the watching programme is started
– When 2 programmes simultaneous recording is started
– When performing PAUSE LIVE TV or REWIND LIVE TV
for more than 8 hours (This may vary depending on the
HDD free space.)
≥ These functions do not work in the following cases:
– When the clock is not set
– While recording 2 programmes simultaneously
– While copying
– While watching a programme being recorded
– When a radio programme is selected
– (REWIND LIVE TV only)
When “REWIND LIVE TV” is set to “Off” (> 79)
– (PAUSE LIVE TV only)
When a timer recording via external input is started
while watching a programme via external input
20
VQT2J64

Recording TV programmes
Recor
ding
AV3
DV
freesat
Other Sat.
AV2
AV1
Input Selection
RETURN
Change
Select
CH
REC
REC1
“REC1” or “REC2” will light.
Unit’s display
Automatic Stop ( Guide Link ) at 22:00
21:00-22:00
REC1/OTR
Recording Time
Continuous recording
30 min
Life
All recordings (including timer recordings) to
HDD will be made in DR mode only (Direct
Recording).
TV
VOL
AV
PAGE
abc
def
3
2
mno
jkl
5
6
w
xyz
tuv
9
8
PROG/CHECK
INPUT
0
SELECT
SLOW/SEARCH
REW LIVE TV
PAUSE
PLAY/x1.3
PAUSE LIVE TV
I
D
U
E
G
F
U
OK
DIRECT TV REC
EXT LINK
DISPLAY
AD
MANUAL SKIP
-10s +60s
CH
CH
EXIT
N
C
T
I
O
N
M
E
N
U
BACK/
RETURN
DRIVE
SELECT
1
ghi
4
p
qrs
7
DEL
SKIP
STOP
STATUS
O
T
A
G
I
V
A
N
T
C
E
R
I
D
OPTION
REC
TEXT STTL
CHAPTER
R
REC MODE
TIME SLIP
Press .
Recording starts.
Select “Automatic Stop”,
then press .
Recording stops automatically when the
programme ends.
≥“Automatic Stop” cannot be selected
depending on a programme. In this case
select “Recording Time” or “Continuous
recording”. (
OK
> below)
Recording
Recording disc: [HDD]
Recording mode: DR
Press a few times and
INPUT
SELECT
select “freesat” or “Other
Sat.”, then press .
Press to select the
channel.
You can also select the channel with the
number buttons.
OK
To set the recording time
1 Select “Recording Time” or “Continuous recording”
in step .
Recording
Time (One
Touc h
Recording)
You can set the length of
recording time from 30 minutes to
4 hours.
Select the recording time.
≥You can also set the time with
[¥ REC] on the main unit.
Continuous
recording
The recording is continued until
you press [∫].
2 Press [OK].
≥ All subtitles, multiple audio and Audio Description are
recorded.
It can be switched on and off while playing back the title.
≥ When “Automatic Standby after OTR” is set to “On”
(> 84), this unit is turned to standby mode if this unit is not
operated for approximately 5 minutes after completing
Automatic Stop recording or One Touch Recording
(> above).
VQT2J64
21
Recording TV programmes
e.g., While recording 2 programmes simultaneously
REC2
101
105
REC1/OTR AUTO
DDH
Recording programme displayed
on the TV
Recording programme not
displayed on the TV
Unit’s display
Operation during recording
To check the recording programme
Press [STATUS ].
Recording
To switch the Channel
Press [WXCH].
To display the recording programme
on the TV
It is necessary to display the recording programme
onto the TV screen to perform operations such as
pause.
≥Press [INPUT SELECT] to switch the input.
≥Press [WXCH] to switch the channel.
To stop recording
It is necessary to display the programme you want to
stop on the TV. (> left)
Press [∫].
If the following screen appears
Select “Yes”, then press [OK].
Stop Recording
Recording [ ]
Recording of this programme is in progress.
To stop recording, select "Yes" or press STOP.
Stop this recording ?
Yes
OK
No
RETURN
To pause recording
It is necessary to display the programme you want to
pause on the TV. (> left)
Press [;].
≥Press again to restart recording.
(A title is not split into separate titles.)
≥If paused while recording in DR mode, the paused
part may become a still picture for a moment during
playback of that programme.
To perform 2 programmes
simultaneous recording
Chasing playback
Playback the title in the HDD, during recording to the
HDD.
1 Press [DIRECT NAVIGATOR] during
recording.
DIRECT NAVIGATOR
HDD
All
Channel Date Title Name Titles
PLAY
RETURN
PICTURE / MUSIC
“[” is displayed on the recording programme.
2 Select the title, then press [OK].
22
VQT2J64
Time Remaining
04/10
04/10
29/10
29/10
Start Time 22:00
Prog.Type: Drama
OPTION
Grouped Titles
30h30m(DR)
Birds
World news
Football
Dogs and Cats
Rec Time 0h30m(DR)
DEL
Drama Sport Video (AVCHD)MoviesNot Viewed
Delete
Select
Page 003/003
Page Up
Page Down
VIDEO
While recording
Record other programme with steps –
on page 21.
“REC1” and “REC2” will light.
1
1
1
1
REC1
REC2
≥ Either of programmes is necessary to be recorded from
this unit’s tuner.
≥ 2 programmes simultaneous recording is not possible in
the following conditions:
– When only 1 dish is connected
– While recording from DV input, or executing “Flexible
Recording via AV input”
– While high speed copying
≥ Channel or input cannot be switched except the 2
recorded programmes during 2 recording.

Direct TV Recording
Recording disc: [HDD]
Recording mode: DR
You can immediately start recording the watching
programme on the TV without switching the channels
on this unit.
≥You can also use this function with VIERA Link.
(> 68)
≥You can use the function by using the TV’s tuner
when you connect the unit to a Q Link compatible
TV (Recording mode: XP, SP, LP, EP). (> 68)
Press [¥ DIRECT TV REC] and hold for
about 1 second.
To stop recording partway
Press [∫].
≥ If you switch TV channels while recording broadcasting
using the TV’s tuner, Direct TV Recording stops.
≥ During EXT Link Standby mode or recording, Direct TV
Recording is unavailable.
Recording
23
VQT2J64

Timer recording
SELECT
INPUT
OK
G
U
I
D
E
OK
OK
Timer recordings with TV Guide system are for
freesat services only. Use “Manual timer
recording” to set the timer recordings of other
satellite services.
TV
VOL
AV
abc
def
3
mno
jkl
5
6
w
xyz
tuv
9
PROG/CHECK
INPUT
SELECT
SLOW/SEARCH
REW LIVE TV
PAUSE
PLAY/x1.3
PAUSE LIVE TV
I
D
U
E
G
F
OK
CH
PAGE
CH
EXIT
U
N
C
T
I
U
BACK/
RETURN
O
N
M
E
N
DRIVE
SELECT
1
2
ghi
4
p
qrs
8
7
DEL
0
SKIP
Recording
STOP
STATUS
G
I
V
A
N
T
C
E
R
I
D
OPTION
R
O
T
A
Recording disc: [HDD]
Recording mode: DR
Press a few times and
select “freesat”, then press
.
Input Selection
AV1
AV2
AV3
DV
freesat
Other Sat.
Select
Change
RETURN
Press .
The Channel Genre Selection screen
appears.
Select the genre, then
Select the programme,
then press .
WED 13th
19:00-20:00
Time: 19:30 20:00 20:30 21:00 21:30
108 Sky Culture Dream
113
Red Cap
Love
114
100 Sheep Dream
115
HD HD
116
117
120
Select Channel
Heartbeat 100 Sheep Dream
HD
Behind me Black House Crowntown Deal
OK
Select Programme
RETURN
OK
TV Guide: Landscape
News Show News Show
USO Blue Wave
Info
GUIDE
Portrait/Landscape
+24 hours Prog.Type Channel Genre
WED 13/10/2010 19:36
All ChannelsAll Types
HD
paC deRpaC deR
Great Ach...
Page Down
HD
In the...
raC desUevaW toHOFU
Page Up
CH
Select “Single Timer Rec.”
or “Series Timer Rec.”,
then press .
Selection Screen
Drama
WED 13/10/2010
19:00 - 20:00
OK
RETURN
Single Timer Rec.:
Timer programme is set for selected
programme.
Series Timer Rec.:
Timer programme is set for all the episodes of
a series programme.
≥This screen may not appear depending on
the programme.
If “Programme Selection” screen appears
Depending on the signal sent from the
broadcaster, both High Definition picture
programme and Standard Definition picture
programme exist.
Select the programme, then press [OK].
Programme Selection
WED 13/10/2010 19:36
View
Single Timer Rec.
Series Timer Rec.
Delete
Series Info
WED 13/10/2010 19:36
24
VQT2J64
press .
Channel Genre Selection
All Channels
Entertainment
News & Sport
Movies
Lifestyle
Music
Children
Special Interest
OK
RETURN
Radio
Shopping
Gaming & Dating
Interactive
Regional
Adult
Favourites
The same programme in High Definition picture quality exists.
Please choose programme and set the timer recording.
Channel Schedule Contents
HD
OK
RETURN
13/10 WED
23:00 - 0:00
13/10 WED
23:00 - 0:00
2/6. Comedy-drama series about
housemates who are actually awere...
2/6. Comedy-drama series about
housemates who are actually awere...
Press .
OK
All Channels
0:30 1:00
dog Wea
Penguin
Timer
icon (red)
Please delete unnecessary programme to resolve.
OK
RETURN
Overlapped Timer Recording
New Programme
ConfirmDelete Repeat
TUE 08/12 23:15 - 23:45 TWO Wales
Existing Programmes
WED 13/10
23:00 - 23:30 Holiday
WED 13/10
23:00 - 23:30 Animals
Episode 01/ 02
R
Series Information
WED 13/10/2010 19:40
RETURN
13/10 WED
23:00 - 0:00
2/6 Comedy-drama series about
housemates who are actually awere...
HD
HD
HD
Channel Schedule Contents
18/10 MON
23:00 - 0:00
19/10 TUE
23:00 - 0:00
3/6 Comedy-drama series about
housemates who are actually awere...
3/6 Comedy-drama series about
housemates who are actually awere...
S
R
S
HD
To check the schedule of the series
Press the “Blue” button in step .
HD
Start
19:00 20:00
Category/
AV
HDD
Stop
30:24 DR
DriveDRMode
HDD
Date/
Weekly
Renew
OFF
Input Name
(Guide Link)(Series)
Timer Recording Remain WED 13/10/2010 19:36
Channel
Day/Date
108 FRI 13/10
[Prog. Name]
Prog.Type: Drama
[Guidance: ]
OK
RETURN
≥Only “Start” and “Stop” can be changed.
(You can adjust them up to 10 minutes in
case of Series Timer Rec.)
The timer programme is stored and the timer
icon (red) is displayed.
To cancel a timer recording on the TV Guide
screen
1 Select the programme with “F” icon, then press
[OK].
2 Select “Delete” and press [OK].
3 Select “Yes”, then press [OK]. (“F” disappears.)
If “Overlapped Timer Recording” screen appears
You can eliminate the overlapping or may change
with repeat event for the duplicated programme by
following the on-screen instructions.
1 Select “Change”, then press [OK].
2 Follow the on-screen instructions.
Programme for which you set the timer
F
recording
The episode to be recorded
Repeat programme
R
High definition programme
≥ TV Guide system provides programme information only
from the broadcaster displayed on the TV like a TV
programme magazine.
≥ You can enter up to 32 programmes up to a month in
advance.
(Each daily, weekly or series programme is counted as
one programme.)
≥ TV Guide does not work if the clock is not set correctly.
≥ The receipt of the TV Guide system data is only possible
via the aerial input of this unit. The receipt of the TV Guide
data via Set Top Box is not possible.
≥ Some broadcasters may not send programme information.
In this case, set the timer recording manually (> 28).
≥ If the same episode has already been set for series timer
recording at a different time or on another channel
(Repeat programmes), “Series Timer Rec.” will not be
selectable.
≥ Titles recorded using “Series Timer Rec.” are bundled and
displayed as a “group” in the DIRECT NAVIGATOR
screen (> 34).
≥ If the unit cannot record the selected programme, the unit
will record the repeat programme if it is available.
However, this unit will not record the repeat programme, if
any part of the selected programme is recorded.
≥ The series recording will be cancelled if there has been no
episode of the series for 13 weeks.
Recording
Red: Delete programme
Green: Record Repeat programme
Yellow: Stop the operation
25
VQT2J64
Timer recording
Various functions with freesat
This unit has several functions that enable timer
recordings to be controlled by the signal sent from the
broadcaster.
Guide Link
The recording’s start and stop times can be controlled
by the broadcaster, e.g. delayed start.
In order to make the timer recording work
successfully, we recommend you set the start time
earlier and the end time later by some minutes, up to
a maximum of 10 minutes.
≥This is indicated by “Guide Link” in the Timer
Recording screen in step (> 25).
Recording
≥The “Guide Link” function may not work if you
manually change the start time or the stop time over
10 minutes.
Series Timer Recording (> 24)
You can record all the episodes of a series by setting
just one timer recording.
Split Programme
You can record a programme separated into 2 or
more parts by some other programmes, e.g., news.
When setting timer from the 1st split programme,
other parts of the programme will be automatically set
and indicated by the timer icon on the TV Guide.
≥This is indicated by “Split” in the Timer Recording
screen in step (> 25).
Recommendation Booking (> right)
You can record a programme that the broadcaster
recommends.
≥ If the signal is not sent correctly, the recording may lack
the beginning or the ending part of the programmes.
Recording recommended
programme (Recommendation
Booking)
Recording disc: [HDD]
Recording mode: DR
After performing steps — on page 24
If the following screen appears,
Recommendation
Selected programme has a recommendation
list.
View the list ?
Yes No
OK
RETURN
1 Select “Yes”, then press [OK].
“Recommendation List” is displayed.
Recommendation List
Selected Programme
10/03 WED
10/03 WED
OK
RETURN
19:00 - 19:45
19:45 - 20:00
Series Info
Recommended Programmes
2 Select the programme, then press [OK].
3 Go to step on page 25.
≥If “Selection Screen” appears, go to step
on page 24.
26
VQT2J64

Timer recording from channel
information
1 While watching a programme
Press [STATUS ].
951 13:07
19:00 - 19:30
Dolby D
Now
DA Subtitles
freesat Channels
Set timer
Multi Audio
TXT
2 Display the channel information of a
programme to record.
≥Switch the programme with [2, 1].
≥Switch the channel with [3, 4].
3 Press the “Yellow” button.
4 Go to step on page 25.
≥ This function is not available for the programmes that do
not have channel information.
Recording
27
VQT2J64
Timer recording
DEL
Channel Name
Schedule
Drive/Mode
Space
OK
RETURN
CH
Page Up
Page Down
Turn
Timer Off
Resolve overlap
Total 0/32
Timer Recording Remain
30:30 DR
HDD
WED 13/10/2010 19:40
Delete
New Timer Programme
Info
Category/AV
Check for available space on HDD, when
“!” is displayed. (> 29)
Timer icon (red)
Manual timer recording
Timer recording of the programme
Recording disc: [HDD]
Recording mode: DR
Timer recording from the external equipment
Recording disc: [HDD]
Recording mode: XP, SP, LP, EP, FR
1 Press [PROG/CHECK].
Recording
2 Select “New Timer Programme”, then
press [OK].
3 Select the items and change the items
with [3, 4].
4 Press [OK].
The timer programme is stored and the timer
icon (red) is displayed.
Timer Recording Remain
Channel Name
Programme Name
≥ You can enter up to 32 programmes up to a month in
advance.
(Each daily or weekly programme is counted as one
programme.)
HDD WED 13/10/2010 19:41
30:30 DR
Schedule
FRI 15/10
23:00 - 23:30
New Timer Programme
Drive/Mode
HDD
DR
Space
OK
FRI
HDD
Start
23:00 23:30
Category/
AV
30:24 DR
Stop
DriveDRMode
HDD
Input Name
Date/
Weekly
Renew
OFF
Timer Recording Remain WED 13/10/2010 19:40
All Channels
Channel
Day/Date
101
[Prog. Name]
OK
RETURN
≥Channel
You can select Category/AV with the “Red”
button.
≥Day/Date
You can select “Date” or “Weekly” by pressing
the “Green” button. If you select “Weekly”, you
can record the programme weekly or daily.
≥Start/Stop
Press and hold [3, 4] to alter in 15-minute
increments.
≥Mode (> 104, 112)
≥Renew (Auto Renewal Recording)
The unit will record the new programme over
the old one, when “Weekly” is set in “Day/
Date” (> above).
≥Input Name
Press [OK]. (> 74, Entering text)
28
VQT2J64

To confirm and edit a timer
Icons
Guide
S/P
programme
Press [PROG/CHECK].
Timer Recording
HD
HD
OK
RETURN
To exit the timer recording list
Press [PROG/CHECK].
HDDRemain
Channel Name Schedule Drive/Mode Space
Total 4/32
30:30 DR
MON 18/10
22:00 - 23:00
MON 18/10
23:05 - 23:35
MON
23:15 - 23:30
MON 18/10
23:20 - 23:50
New Timer Programme
Delete
DEL
Turn
Resolve overlap
Timer Off
WED 13/10/2010 19:50
HDD
DR
HDD
DR
HDD
DR
HDD
DR
Info
Page Down
Page Up
-->
22/11
OK Displayed if the recording can fit in the
remaining space
>
Daily or weekly timer programme is set. (up
(Date)
to a maximum of one month from the
present time)
! It may not be possible to record because:
≥there is not enough space left.
≥the number of possible titles has reached
OK
OK
!
its maximum. (> 112 )
≥programmes are deactivated.
To show a programme information
CH
Select the programme, then press
[STATUS ].
Additional information is available for these
programmes.
Recording
≥ Failed programmes are deleted from the timer recording
list at 4 a.m. two days later.
≥ “-------” is displayed on a series recording item if there will
be no episode of the series for the next 8 days. We
recommend you delete the “-------” item after you confirm
the last episode of the series is recorded.
Screen icons
Red: Timer recording standby is activated.
F
Grey: Timer recording standby is deactivated.
[ Currently recording programme
Part or all of the programme will not be recorded
since the programme is overlapping.
Press the “Green” button to resolve overlapping.
(> right)
The disc was full.
Copy-protected programme
It was not recorded.
The programme did not complete recording
because of some reason.
Auto Renewal Recording is set (> 28).
freesat programme is selected.
Other satellite programme is selected.
Guide Link (> 26)
Split Programme (> 26)
Series Timer Recording (> 26)
To deactivate a timer programme
Select the programme, then press the “Red”
button.
≥The timer icon “F” (> left) will change from red to
grey.
≥Press the “Red” button again to activate timer
recording standby. (The timer icon “F” will change
to red.)
To change a timer programme
Select the programme, then press [OK].
(> 28, step 3)
To resolve Overlapping
1 Select the programme with , then press
the “Green” button.
2 Follow the on-screen instructions.
≥Programme overlapping can be resolved with
repeat programme if available.
≥ This function is not available for the timer programmes
that were set manually.
To delete a timer programme
Select the programme, then press [DEL].
29
VQT2J64
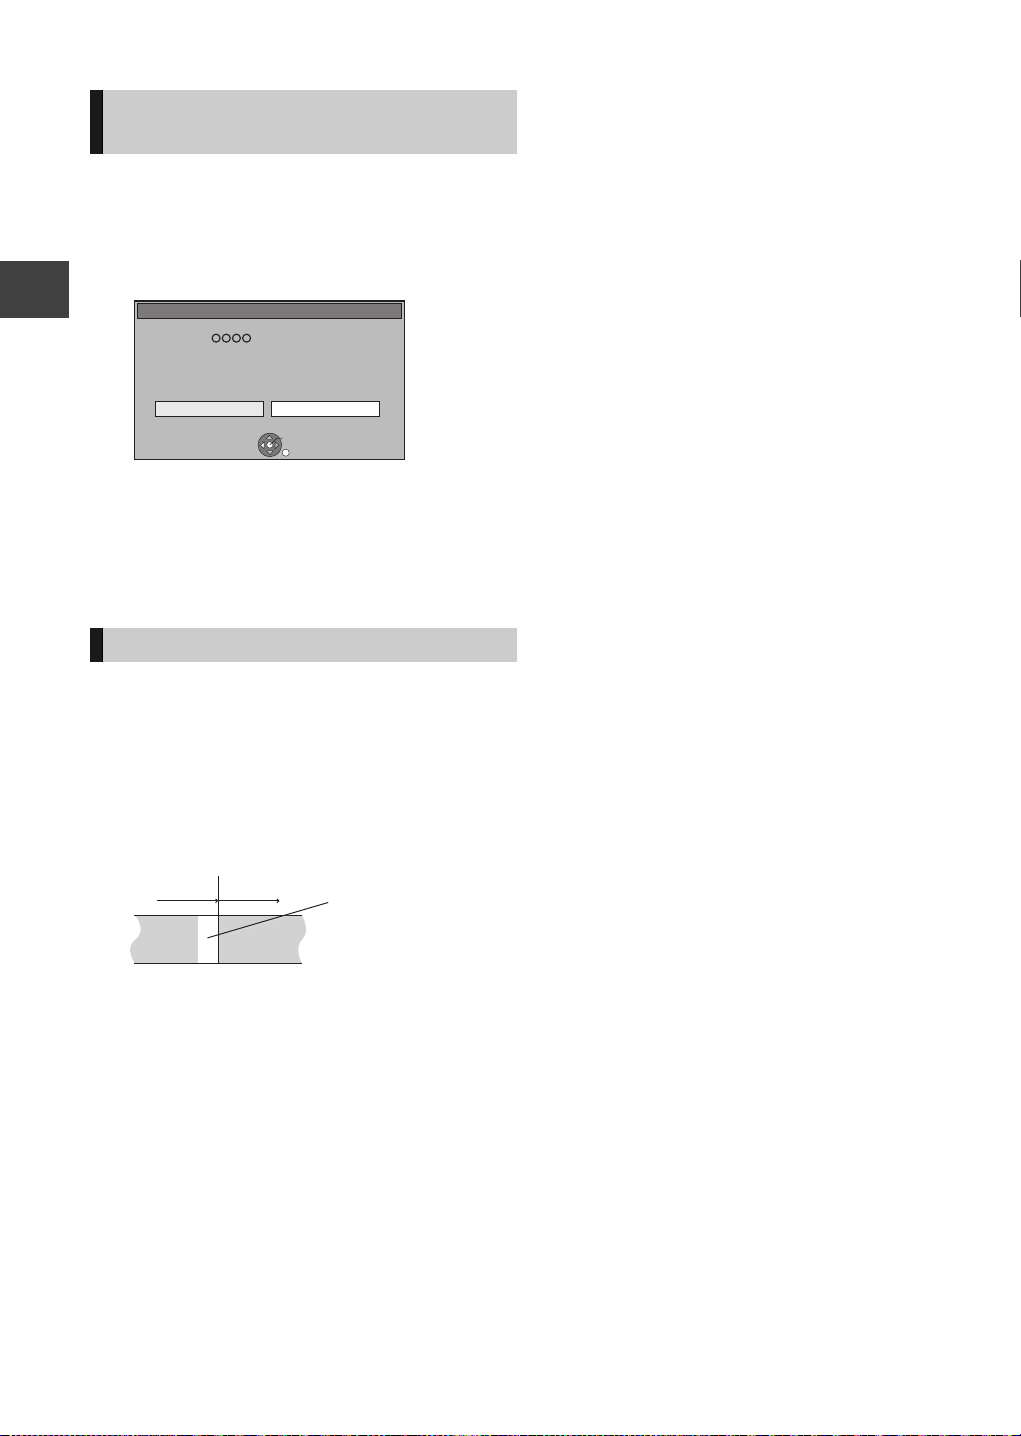
Timer recording
Stop Recording
Yes
No
Timer recording of this programme in progress.
Stop this timer recording ?
Recording [ ]
OK
RETURN
Not recorded
Programme
Recorded Recorded
Programme
To cancel recording when timer
recording has already begun
Press [INPUT SELECT] or [WXCH] to display the
programme to stop recording on the TV screen while
recording 2 programmes simultaneously.
1 Press [∫].
e.g.,
Recording
2 Select “Yes”, then press [OK].
If you have already set a weekly, daily timer
recording, the recording will start at the next
scheduled time.
Notes on timer recording
≥Depending on the state of the unit, playback may
stop when recording begins.
≥Timer recordings do not begin while copying in
normal speed mode.
≥If you turn the unit off during the timer recording, the
recording is continued.
≥When you programme successive timer recordings
to start, last 1 minute of those programmes will not
be recorded.
¾ To start the timer recording while executing
other operation (> 105)
30
VQT2J64
 Loading...