

Panasonic DMR-BS850EB, DMR-BS750EB User Manual

Operating Instructions
Blu-ray Disc Recorder
Model No. DMR-BS850EB
DMR-BS750EB
The illustrations in these Operating Instructions show the images of DMR-BS850EB.
P8 – 15
Quick Start Guide
Dear customer
Thank you for purchasing this product.
For optimum performance and safety, please read these instructions carefully.
Before connecting, operating or adjusting this product, please read the instructions completely.
Please keep this manual for future reference.
Note: “EB” on the packaging indicates the United Kingdom.
Trademark of the DVB Digital Video Broadcasting Project
Declaration of Conformity (12th December 2008)
This Blu-ray Disc Recorder is for viewing and recording free to view channels only, not Pay TV or encrypted channels.
This unit does not have a terrestrial tuner.
Region management information
BD-Video
This unit plays BD-Video marked with labels containing the region code B.
For DMR-BS850
For DMR-BS750
No. 6261
No. 6262
Example:
DVD-Video
The unit plays DVD-Video marked with labels containing the region number “2” or “ALL”.
Web Site: http://www.panasonic-europe.com
EB
Example:
2 ALL
2
3
4
RQT9430-1B

2
RQT9430
Features
Copy high definition video
It is possible to input high definition video (AVCHD)
from the Panasonic’s video camera, etc.
•
Copying HD Video (AVCHD format) (➔ 68)
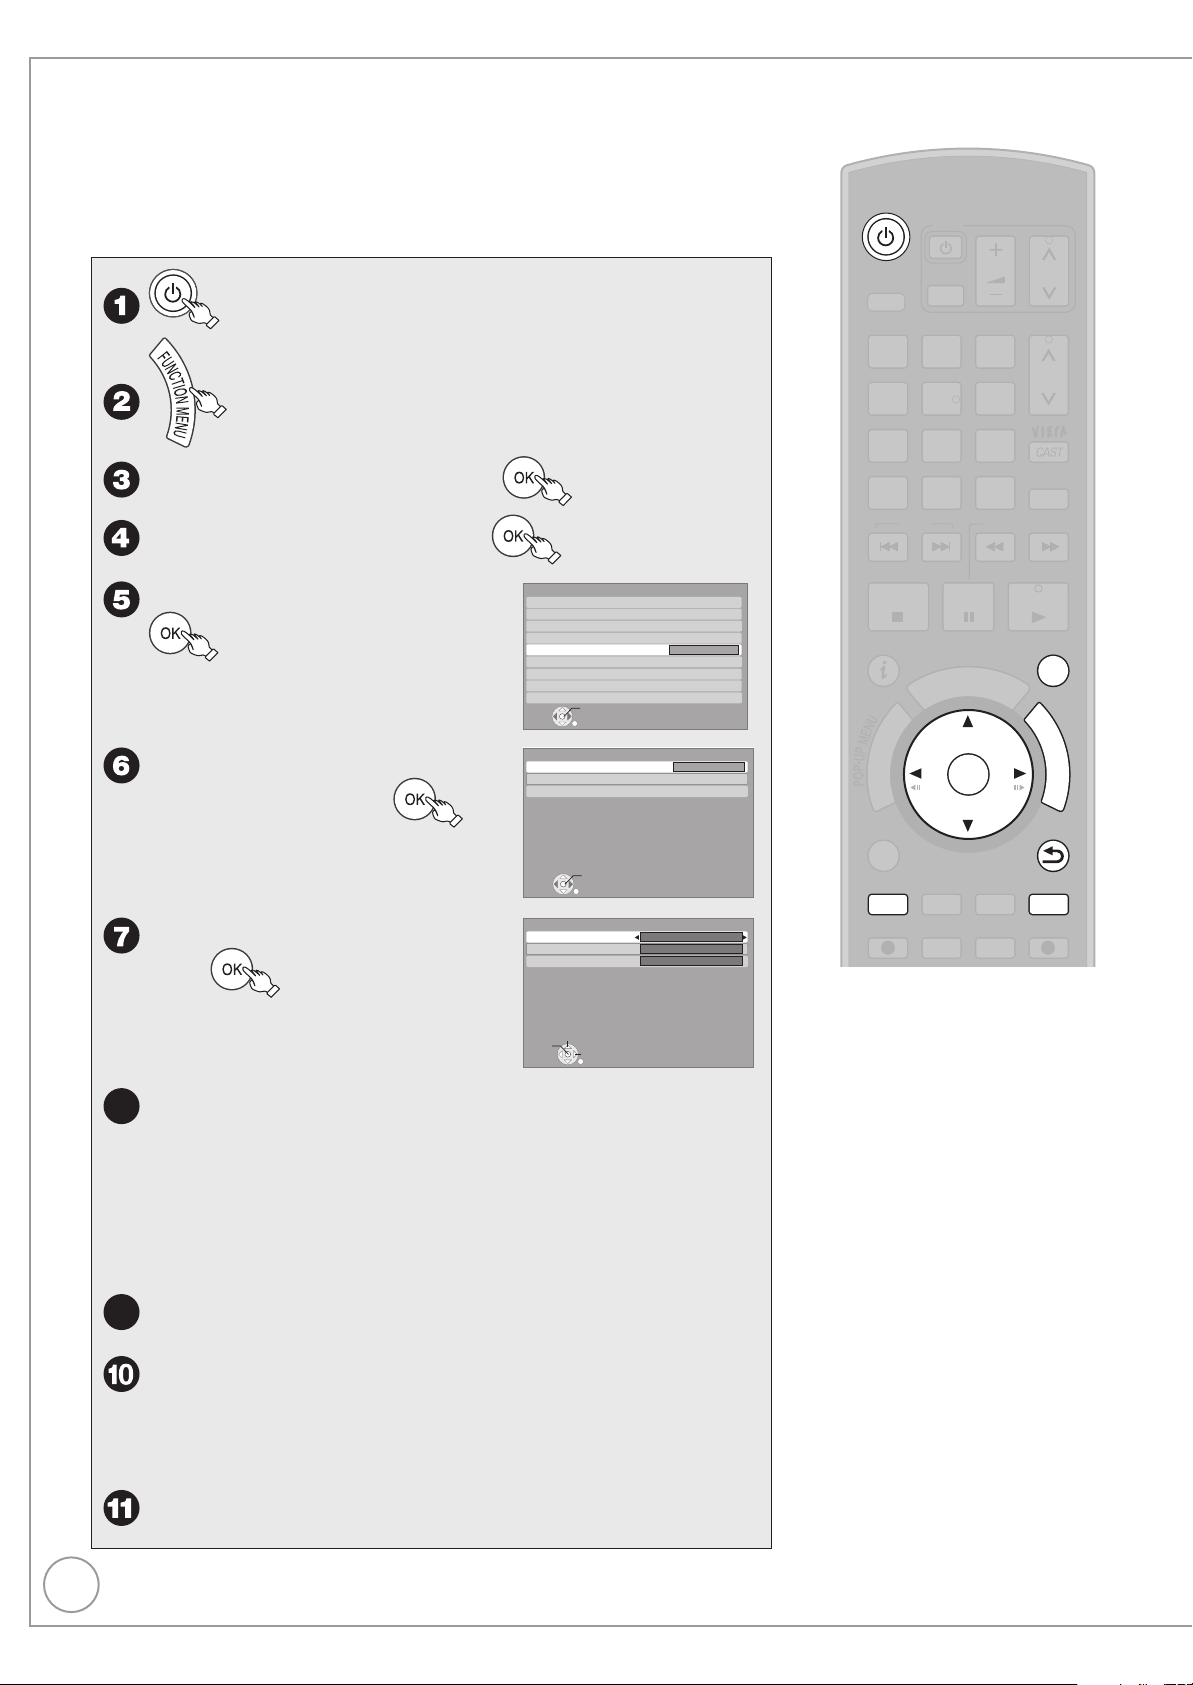
FUNCTION MENU
OK
RETURN
Playback
Recording
Delete
Copy
TV Guide
Other
s
Time Remaining
30:00 DR
HDD
DELETE Navigator
45:54 DR
OK
RETURN
VIDEO
PICTURE
MUSIC
VIDEO PICTURE MUSIC
HDD
Page 01/01
Rec time
0:00(DR)
Titles
Date Channel Time
Grouped Titles
OPTION
01/06
01/06
1:35
12:36
1:13
AV2
AV1
25/05
Born And Bred: A Wrathful
1
1
2
Select
Not viewed
Time Remaining
Title Name
Select a function
and an item.
You can access
selected function
easily.
VIERA
DIGA
Landscape
WED 19/08/2009 13:30
TV Guide:
WED 19th
12:00-20:00 BBC HD Preview
All ChannelsAll Types
Time: 14:00 14:30 15:00 15:30
16:00
108 BBC HD BBC HD Preview
Red Cap
Love USA
100 Sheep Dream
Heartbeat 100 Sheep Dream
UFO Hot Wave Used Car
Behind me Black House Crowntown Deal
USO Blue Wave
In the
Great A
News Show News Show
Red Cap Red Cap
113 ITV2
114 ITV2+1
115 ITV3
116 ITV3+1
117 ITV4
120 Channel4
HD
RETURN
OK
Select Programme
Select Channel
+24 hours Prog. Type Channel Genre
Page Up
Page Down
Portrait/Landscape
Info
CH
GUIDE
This Blu-ray Disc Recorder has two freesat tuners
built-in. freesat is a brand new free digital TV service
which broadcasts via satellite so you can receive TV,
radio, interactive TV.
To enjoy HD programme
You can enjoy the original HD progarmme by
connecting to TV through HDMI.
• Connection
(➔ 10)
• Watching Television (➔ 24)
• Also in HD (➔ 29)
•
Guide Link, Series recording, Split programme (➔ 28)
• 7days EPG
Timer recording is made easier because the TV
Guide allows you to see programme information up
to 7 days ahead. (➔ 43)
Linked operations with the TV
Parental Guidance
Receives freesat - free digital satellite
broadcasts in the UK
freesat HD tuners built-in
Record with High Definition
High Quality Picture
You can enjoy linked operations with the TV and
receiver by using VIERA Link or Q Link.
• Linked operations with the TV (VIERA Link “HDAVI
Control
TM
”/Q Link) (➔ 86)
• Eco-LINK to save power consumption
• Pause Live TV (➔ 93)
It is possible to record in high definition quality when
the broadcast is high definition. (➔ 19)
If the programme is broadcast with HD, this unit let
you inform also in HD event on barner, EPG,
HD Picture Quality recording mode (➔ 19)
Compress the recorded programme (➔ 34)
You can restrict viewing and playback of the titles
that may include contents for adults.
When you record the programme with icon, PIN
is needed to playback the title. (➔ 34)
Convenient Functions !
Copy to Blu-ray Disc
It can record in high definition quality in addition to
large volume recording. (➔ 18)
TWIN HD Satellite Tuner
It is possible to record 2 programmes being
broadcasted at the same time. (➔ 38)
You can access the main function quickly and
easily from FUNCTION MENU display.
• FUNCTION MENU display (➔ 92)
Easy access to various functions
VIERA CAST
TM
You can access a selection of Internet services from
the Home screen with VIERA CAST, for example
YouTube, Picasa Web Albums. (Current as of
February 2009)
• Enjoying VIERA CASTTM (➔ 85)

3
RQT9430
Accessories
Please check and identify the supplied accessories. Use numbers indicated in parentheses when asking for replacement parts.
(Product numbers correct as of April 2009. These may be subject to change.)
1 Remote control (N2QAYB000337) 1 AC mains lead (K2CT3CA00004)
2 Batteries for remote control
(R6 Size)
Sales and Support Information
Customer Care Centre
For customers within the UK: 0844 844 3852
•
For customers within the Republic of Ireland: 01 289 8333
•
Visit our website for product information
•
www.panasonic.co.uk
E-mail: customer.care@panasonic.co.uk
•
Direct Sales at Panasonic UK
For customers: 0844 844 3856
•
Order accessory and consumable items for your product with
•
ease and confidence by phoning our Customer Care Centre
Monday–Thursday 9:00 a.m.– 5:30 p.m., Friday 9:30 a.m.– 5:30
p.m. (Excluding public holidays).
Caution for AC Mains Lead
For your safety, please read the following text carefully.
This appliance is supplied with a moulded three pin mains plug for
your safety and convenience.
A 5-ampere fuse is fitted in this plug.
Should the fuse need to be replaced please ensure that the
replacement fuse has a rating of 5-ampere and that it is approved by
ASTA or BSI to BS1362.
Check for the ASTA mark or the BSI mark on the body of the
fuse.
If the plug contains a removable fuse cover you must ensure that it is
refitted when the fuse is replaced.
If you lose the fuse cover the plug must not be used until a
replacement cover is obtained.
A replacement fuse cover can be purchased from your local dealer.
CAUTION!
IF THE FITTED MOULDED PLUG IS UNSUITABLE FOR THE
SOCKET OUTLET IN YOUR HOME THEN THE FUSE SHOULD
BE REMOVED AND THE PLUG CUT OFF AND DISPOSED OF
SAFELY.
THERE IS A DANGER OF SEVERE ELECTRICAL SHOCK IF THE
CUT OFF PLUG IS INSERTED INTO ANY 13-AMPERE SOCKET.
If a new plug is to be fitted please observe the wiring code as stated
below.
If in any doubt please consult a qualified electrician.
IMPORTANT
The wires in this mains lead are coloured in accordance with the
following code:
Blue: Neutral, Brown: Live.
As these colours may not correspond with the coloured markings
identifying the terminals in your plug, proceed as follows:
The wire which is coloured Blue must be connected to the terminal
which is marked with the letter N or coloured Black or Blue.
The wire which is coloured Brown must be connected to the terminal
which is marked with the letter L or coloured Brown or Red.
For use with this unit only. Do not use it with
•
other equipment. Also, do not use cords for
other equipment with this unit.
Or go on line through our Internet Accessory ordering application
•
at shop.panasonic.co.uk.
Most major credit and debit cards accepted.
•
All enquiries transactions and distribution facilities are provided
•
directly by Panasonic UK Ltd.
It couldn’t be simpler!
•
Also available through our Internet is direct shopping for a wide
•
range of finished products, take a browse on our website for
further details shop.panasonic.co.uk.
Interested in purchasing an extended guarantee?
Please call 0870 240 6284 or visit our website
www.panasonic.co.uk/guarantee.
WARNING: DO NOT CONNECT EITHER WIRE TO THE
EARTH TERMINAL WHICH IS MARKED WITH THE
LETTER E, BY THE EARTH SYMBOL OR COLOURED GREEN
OR GREEN/YELLOW.
THIS PLUG IS NOT WATERPROOF—KEEP DRY.
Before use
Remove the connector cover.
How to replace the fuse
The location of the fuse differ according to the type of AC mains plug
(figures A and B). Confirm the AC mains plug fitted and follow the
instructions below.
Illustrations may differ from actual AC mains plug.
1. Open the fuse cover with a screwdriver.
Figure A Figure B
Fuse cover
2. Replace the fuse and close or attach the fuse cover.
Figure A Figure B
Fuse
(5 ampere)
Fuse
(5 ampere)

4
RQT9430
Table of Contents
Getting started
Getting Started
Features. . . . . . . . . . . . . . . . . . . . . . . . . . . . . . . . . . . . . . . .2
Accessories . . . . . . . . . . . . . . . . . . . . . . . . . . . . . . . . . . . .3
Sales and Support Information . . . . . . . . . . . . . . . . . . . . .3
Caution for AC Mains Lead . . . . . . . . . . . . . . . . . . . . . . . .3
HDD (Hard disk drive) Handling Care . . . . . . . . . . . . . . . . 6
Remote Control Information/Unit Care. . . . . . . . . . . . . . . 7
Remote Control Information. . . . . . . . . . . . . . . . . . . . . . . . . . . . . . 7
Unit Care . . . . . . . . . . . . . . . . . . . . . . . . . . . . . . . . . . . . . . . . . . . .7
Quick Start Guide
Location of Parts/Controls . . . . . . . . . . . . . . . . . . . . . . . 8
Remote Control . . . . . . . . . . . . . . . . . . . . . . . . . . . . . . . . . . . . . . 8
The Unit’s Display . . . . . . . . . . . . . . . . . . . . . . . . . . . . . . . . . . . . 9
Main Unit . . . . . . . . . . . . . . . . . . . . . . . . . . . . . . . . . . . . . . . . . . . 9
Rear Panel . . . . . . . . . . . . . . . . . . . . . . . . . . . . . . . . . . . . . . . . . . 9
Basic Connection . . . . . . . . . . . . . . . . . . . . . . . . . . . . . 10
When your Television has an HDMI input terminal. . . . . . . . . . . 10
When your Television does not have an HDMI input terminal . . 12
Auto Set Up (freesat). . . . . . . . . . . . . . . . . . . . . . . . . . . 13
Tuning in Other Satellite Services . . . . . . . . . . . . . . . . .16
HDD and Disc Information . . . . . . . . . . . . . . . . . . . . . . . . 18
Regarding Blu-ray Disc . . . . . . . . . . . . . . . . . . . . . . . . . . . . . . . . 18
Recording and copying programmes . . . . . . . . . . . . . . . . . . . . . . 19
HDD and Disc Handling . . . . . . . . . . . . . . . . . . . . . . . . . .20
HDD and discs you can use for recording and play. . . . . . . . . . . 20
Play-only discs . . . . . . . . . . . . . . . . . . . . . . . . . . . . . . . . . . . . . . . 22
Discs that cannot be played. . . . . . . . . . . . . . . . . . . . . . . . . . . . . 22
Types of disc for the type of connected TV . . . . . . . . . . . . . . . . .22
USB Memory and Card Handling . . . . . . . . . . . . . . . . . .23
USB memories you can use on this unit . . . . . . . . . . . . . . . . . . . 23
Cards usable on this unit . . . . . . . . . . . . . . . . . . . . . . . . . . . . . . .23
Basic Operations
Watching Television (freesat) . . . . . . . . . . . . . . . . . . . . 24
Selecting a channel with TV Guide . . . . . . . . . . . . . . . . . . . . . . 24
Watching Television of the Other Satellite Service . . 25
Selecting a channel with the channel list . . . . . . . . . . . . . . . . . . 25
Playback. . . . . . . . . . . . . . . . . . . . . . . . . . . . . . . . . . . . . 26
Recording Television Programmes
Timer Recording Using the TV Guide
HDD
(freesat)
Recording the ITV HD, etc. programme . . . . . . . . . . . . . . . . . 29
. . . . . . . . . . . . . . . . . . . . . . . . . . . . . . 28
Copying Titles . . . . . . . . . . . . . . . . . . . . . . . . . . . . . . . . 30
Deleting Titles . . . . . . . . . . . . . . . . . . . . . . . . . . . . . . . . 32
DELETE Navigator. . . . . . . . . . . . . . . . . . . . . . . . . . . . . . . . . . . 32
Delete Titles During Playback . . . . . . . . . . . . . . . . . . . . . . . . . . 32
Title
Recording
Important Notes for Recording . . . . . . . . . . . . . . . . . . . .33
Advanced Recording . . . . . . . . . . . . . . . . . . . . . . . . . . . .35
Recording modes. . . . . . . . . . . . . . . . . . . . . . . . . . . . . . . . . . . . 35
2 programmes simultaneous recording . . . . . . . . . . . . . . . . . . . 36
Specifying the Recording Time . . . . . . . . . . . . . . . . . . . . . . . . . . 37
Direct TV Recording. . . . . . . . . . . . . . . . . . . . . . . . . . . . . . . . . . .37
Playing while you are recording . . . . . . . . . . . . . . . . . . . . . . . . . . 37
Operation during Recording. . . . . . . . . . . . . . . . . . . . . . . . . . . . . 38
Advanced Timer Recording
Manual timer recordings . . . . . . . . . . . . . . . . . . . . . . . . . . . . . . .39
Series recording. . . . . . . . . . . . . . . . . . . . . . . . . . . . . . . . . . . . . . 40
To cancel a timer recording in progress . . . . . . . . . . . . . . . . . . . .41
Auto Renewal Recording . . . . . . . . . . . . . . . . . . . . . . . . . . . . . . .41
If the “Overlapped Timer Recording” screen appears . . . . . . . . . 41
Check, Change, Delete Programmes, or Resolve Overlapping . . 41
To deactivate timer programme
(e.g. to interrupt a daily or weekly timer programming) . . . . . . .42
Notes on timer recording . . . . . . . . . . . . . . . . . . . . . . . . . . . . . . . 42
HDD
HDD
. . . . . . . . . . 27
. . . . . . . . . . . . . . . . . .39
TV Guide system (freesat) . . . . . . . . . . . . . . . . . . . . . . 43
Using the TV Guide list . . . . . . . . . . . . . . . . . . . . . . . . . . . . . . . 43
Selecting the programme from the desired channel genre or
programme type . . . . . . . . . . . . . . . . . . . . . . . . . . . . . . . . . . . 44
Playing Back
Advanced Playback . . . . . . . . . . . . . . . . . . . . . . . . . . . . . 45
Selecting Titles to Play. . . . . . . . . . . . . . . . . . . . . . . . . . . . . . . . .45
Search . . . . . . . . . . . . . . . . . . . . . . . . . . . . . . . . . . . . . . . . . . . . . 46
Skip . . . . . . . . . . . . . . . . . . . . . . . . . . . . . . . . . . . . . . . . . . . . . . . 46
Quick View (Play x1.3) . . . . . . . . . . . . . . . . . . . . . . . . . . . . . . . . .46
Direct Play . . . . . . . . . . . . . . . . . . . . . . . . . . . . . . . . . . . . . . . . . . 46
Slow-motion Play . . . . . . . . . . . . . . . . . . . . . . . . . . . . . . . . . . . . .46
Frame-by-Frame Viewing . . . . . . . . . . . . . . . . . . . . . . . . . . . . . . . 47
Time Slip . . . . . . . . . . . . . . . . . . . . . . . . . . . . . . . . . . . . . . . . . . . 47
Manual Skip . . . . . . . . . . . . . . . . . . . . . . . . . . . . . . . . . . . . . . . . .47
Create Chapters. . . . . . . . . . . . . . . . . . . . . . . . . . . . . . . . . . . . . .47
Display the subtitle during play . . . . . . . . . . . . . . . . . . . . . . . . . .47
Playback of the High Defi nition Video (AVCHD) and
playlists. . . . . . . . . . . . . . . . . . . . . . . . . . . . . . . . . . . . . .48
Playback of the High Defi nition Video (AVCHD) . . . . . . . . . . . . .48
Playback of the playlists created on other equipment . . . . . . . . . 48
To enjoy the BD Video which supports BONUSVIEW
or BD-Live . . . . . . . . . . . . . . . . . . . . . . . . . . . . . . . . . . . . 49
Playing secondary video (picture-in-picture)
and secondary audio . . . . . . . . . . . . . . . . . . . . . . . . . . . . . . . . . 49
Enjoying BD-Live discs with Internet . . . . . . . . . . . . . . . . . . . . . . 49
To enjoy High Bit rate Audio and Video . . . . . . . . . . . . .50
Enjoying High Bit rate Audio with 7.1ch speaker . . . . . . . . . . . . . 50
Regarding 24p output . . . . . . . . . . . . . . . . . . . . . . . . . . . . . . . . .50
Playing DivX . . . . . . . . . . . . . . . . . . . . . . . . . . . . . . . . . . . 51
Playing DivX video contents. . . . . . . . . . . . . . . . . . . . . . . . . . . . .51
Editing
Titles−Editing . . . . . . . . . . . . . . . . . . . . . . . . . . . . . . . . . .53
Accessing the Title View . . . . . . . . . . . . . . . . . . . . . . . . . . . . . . .53
Title Operations . . . . . . . . . . . . . . . . . . . . . . . . . . . . . . . . . . . . . . 53
Create/Playback/Edit of the Chapter. . . . . . . . . . . . . . . .56
Create Chapter Mark . . . . . . . . . . . . . . . . . . . . . . . . . . . . . . . . . .56
Editing and playing chapters . . . . . . . . . . . . . . . . . . . . . . . . . . . .56
Chapter operations . . . . . . . . . . . . . . . . . . . . . . . . . . . . . . . . . . .56
Copying
Copying Titles . . . . . . . . . . . . . . . . . . . . . . . . . . . . . . . . . .57
Copy direction . . . . . . . . . . . . . . . . . . . . . . . . . . . . . . . . . . . . . . . 57
Copy speed . . . . . . . . . . . . . . . . . . . . . . . . . . . . . . . . . . . . . . . . .58
Copying speed when copying from the HDD to BD-R
in High Speed Copy. . . . . . . . . . . . . . . . . . . . . . . . . . . . . . . . . .58
Copy restrictions . . . . . . . . . . . . . . . . . . . . . . . . . . . . . . . . . . . . .58
Copying list icons and functions. . . . . . . . . . . . . . . . . . . . . . . . . .58
Frequently Asked Questions . . . . . . . . . . . . . . . . . . . . . . . . . . . .59
Copy Title Playing . . . . . . . . . . . . . . . . . . . . . . . . . . . . . . . . . . . .60
Copying using the copying list—Copy . . . . . . . . . . . . . . . . . . . . .61
Copying a fi nalised DVD-R, DVD-R DL, DVD-RW (DVD-Video
format), +R and +R DL . . . . . . . . . . . . . . . . . . . . . . . . . . . . . . . 63
With Other Equipment
Recording from a Satellite or Cable Receiver . . . . . . . .64
Manual Recording . . . . . . . . . . . . . . . . . . . . . . . . . . . . . . . . . . . .64
Linked timer recordings with external equipment
(SKY Digital STB, satellite/cable receiver)–EXT LINK. . . . . . . .64
Recording from an External Device . . . . . . . . . . . . . . . . 65
Recording from a VCR, etc. . . . . . . . . . . . . . . . . . . . . . . . . . . . . . 65
Recording from a DV Camcorder. . . . . . . . . . . . . . . . . . . . . . . . .66
Recording via AV3 Input . . . . . . . . . . . . . . . . . . . . . . . . . . . . . . .67
Flexible Recording via AV Input . . . . . . . . . . . . . . . . . . . . . . . . . .67
Copying HD Video (AVCHD format) . . . . . . . . . . . . . . . .68
From an SD card or Discs . . . . . . . . . . . . . . . . . . . . . . . . . . . . . . 68
From a video equipment . . . . . . . . . . . . . . . . . . . . . . . . . . . . . . .68
Copying SD Video (MPEG2 format). . . . . . . . . . . . . . . . .69
From an SD card . . . . . . . . . . . . . . . . . . . . . . . . . . . . . . . . . . . . . 69
From a video equipment . . . . . . . . . . . . . . . . . . . . . . . . . . . . . . .69

5
RQT9430
Still pictures
Still Picture
Playing still pictures. . . . . . . . . . . . . . . . . . . . . . . . . . . . .70
Useful functions during still picture play. . . . . . . . . . . . . . . . . . . . 71
Editing still pictures . . . . . . . . . . . . . . . . . . . . . . . . . . . . .72
Editing still pictures (JPEG) . . . . . . . . . . . . . . . . . . . . . . . . . . . . .72
Still pictures operation . . . . . . . . . . . . . . . . . . . . . . . . . . . . . . . . . 73
Copying still pictures. . . . . . . . . . . . . . . . . . . . . . . . . . . .74
Copying all the still pictures on the USB memory
—Copy All Pictures . . . . . . . . . . . . . . . . . . . . . . . . . . . . . . . . . .74
Copying new still pictures on the SD card
—Copy New Pictures . . . . . . . . . . . . . . . . . . . . . . . . . . . . . . . .74
Copying using the copying list . . . . . . . . . . . . . . . . . . . . . . . . . . . 74
Deleting still pictures . . . . . . . . . . . . . . . . . . . . . . . . . . . .76
Music
Music
Playing music . . . . . . . . . . . . . . . . . . . . . . . . . . . . . . . . . .77
Playing MP3 fi les . . . . . . . . . . . . . . . . . . . . . . . . . . . . . . . . . . . . .77
Playing music CD. . . . . . . . . . . . . . . . . . . . . . . . . . . . . . . . . . . . .77
Playing music recorded on HDD . . . . . . . . . . . . . . . . . . . . . . . . .78
Useful functions during music play. . . . . . . . . . . . . . . . . . . . . . . .79
Editing music/playlist. . . . . . . . . . . . . . . . . . . . . . . . . . . .80
Editing music . . . . . . . . . . . . . . . . . . . . . . . . . . . . . . . . . . . . . . . . 80
Album and track operation . . . . . . . . . . . . . . . . . . . . . . . . . . . . . . 80
Register track to Playlist. . . . . . . . . . . . . . . . . . . . . . . . . . . . . . . .81
Editing Playlist . . . . . . . . . . . . . . . . . . . . . . . . . . . . . . . . . . . . . . . 81
Playlist operation . . . . . . . . . . . . . . . . . . . . . . . . . . . . . . . . . . . . . 81
Copying music to HDD. . . . . . . . . . . . . . . . . . . . . . . . . . .82
About the Gracenote® Database . . . . . . . . . . . . . . . . . . . . . . . . .82
Copying music from a disc or a USB memory . . . . . . . . . . . . . . .82
Deleting music . . . . . . . . . . . . . . . . . . . . . . . . . . . . . . . . .83
Others
Convenient Functions
Entering Text . . . . . . . . . . . . . . . . . . . . . . . . . . . . . . . . . . .84
Enjoying VIERA CAST™ . . . . . . . . . . . . . . . . . . . . . . . . .85
Linked Operations with the TV
(VIERA Link “HDAVI Control™”/Q Link) . . . . . . . . . . 86
Easy control only with VIERA remote control. . . . . . . . . . . . . . . 87
Setting On-Screen Display . . . . . . . . . . . . . . . . . . . . . . .88
Accessing the On-Screen Display . . . . . . . . . . . . . . . . . . . . . . . .88
Information Messages . . . . . . . . . . . . . . . . . . . . . . . . . . . 90
Digital Satellite Channel Information . . . . . . . . . . . . . . . . . . . . . .90
Status Messages . . . . . . . . . . . . . . . . . . . . . . . . . . . . . . . . . . . . .91
Convenient Functions . . . . . . . . . . . . . . . . . . . . . . . . . . . 92
FUNCTION MENU display. . . . . . . . . . . . . . . . . . . . . . . . . . . . . .92
Switch the aspect ratio of the screen . . . . . . . . . . . . . . . . . . . . . . 92
To pause the TV programme you are watching
—Pause Live TV . . . . . . . . . . . . . . . . . . . . . . . . . . . . . . . . . . . .93
Disc and Card Management . . . . . . . . . . . . . . . . . . . . . .94
Accessing the Management Menus. . . . . . . . . . . . . . . . . . . . . . . 94
Setup Menu . . . . . . . . . . . . . . . . . . . . . . . . . . . . . . . . . . . .97
Accessing the Setup Menu . . . . . . . . . . . . . . . . . . . . . . . . . . . . .97
Channel Settings . . . . . . . . . . . . . . . . . . . . . . . . . . . . . . . 97
HDD/Disc Settings . . . . . . . . . . . . . . . . . . . . . . . . . . . . .100
Picture and Sound Settings. . . . . . . . . . . . . . . . . . . . . .102
Display and Connection Settings . . . . . . . . . . . . . . . . .104
Network Settings . . . . . . . . . . . . . . . . . . . . . . . . . . . . . . 106
System Settings . . . . . . . . . . . . . . . . . . . . . . . . . . . . . . . 107
Other Settings. . . . . . . . . . . . . . . . . . . . . . . . . . . . . . . . . 108
HOLD function . . . . . . . . . . . . . . . . . . . . . . . . . . . . . . . . . . . . . .108
Using the Unit’s Remote Control to Operate the TV . . . . . . . . .108
Network Settings . . . . . . . . . . . . . . . . . . . . . . . . . . . . . 109
Testing the connection . . . . . . . . . . . . . . . . . . . . . . . . . . . . . . . 109
Setting the IP address . . . . . . . . . . . . . . . . . . . . . . . . . . . . . . . 109
Setting the DNS-IP. . . . . . . . . . . . . . . . . . . . . . . . . . . . . . . . . . 109
Setting the connection speed. . . . . . . . . . . . . . . . . . . . . . . . . . 109
Setting the proxy server . . . . . . . . . . . . . . . . . . . . . . . . . . . . . . 110
Setting the network service (VIERA CAST) . . . . . . . . . . . . . . . 110
Software Update . . . . . . . . . . . . . . . . . . . . . . . . . . . . . 111
If a software update is available, a notifi cation is displayed . . . 111
The unit’s display during the update . . . . . . . . . . . . . . . . . . . . 111
Reference
Additional Connections . . . . . . . . . . . . . . . . . . . . . . . . .112
Adding a VCR: Connecting to a Television
and a Video Cassette Recorder . . . . . . . . . . . . . . . . . . . . . . .112
Adding a Digital Satellite or Cable Receiver: Connecting to a
Television and a Digital Satellite or Cable Receiver . . . . . . . .112
Using an Audio/Video Cable (not included) . . . . . . . . . . . . . . . .113
Using an S Video Cable (not included). . . . . . . . . . . . . . . . . . . . . .113
Using Component Video Cables (not included) . . . . . . . . . . . . . 113
Using an Audio Cable (not included) for Better Sound . . . . . . .114
Using a Optical Digital Audio Cable (not included)
for Better Sound . . . . . . . . . . . . . . . . . . . . . . . . . . . . . . . . . . .114
Connecting with an HDMI (High Defi nition Multimedia
Interface) Terminal. . . . . . . . . . . . . . . . . . . . . . . . . . . . . . . . . .114
Network connection . . . . . . . . . . . . . . . . . . . . . . . . . . . . . . . . . .115
Operations that can be performed
simultaneously . . . . . . . . . . . . . . . . . . . . . . . . . . . . . 116
Operations that can be performed while recording
or copying a title . . . . . . . . . . . . . . . . . . . . . . . . . . . . . . . . . . 116
Starting of the timer recording
while executing other operation. . . . . . . . . . . . . . . . . . . . . . . 116
Media (Disc/USB Memory/SD Card) Handling . . . . . . .117
Frequently Asked Questions. . . . . . . . . . . . . . . . . . . . . 118
Messages . . . . . . . . . . . . . . . . . . . . . . . . . . . . . . . . . . . .120
When removing a recorded disc . . . . . . . . . . . . . . . . . . . . . . . .121
Troubleshooting Guide . . . . . . . . . . . . . . . . . . . . . . . . .122
Specifi cations . . . . . . . . . . . . . . . . . . . . . . . . . . . . . . . . .134
Copyright, etc.. . . . . . . . . . . . . . . . . . . . . . . . . . . . . . . . .137
Glossary . . . . . . . . . . . . . . . . . . . . . . . . . . . . . . . . . . . . . 138
Safety precautions . . . . . . . . . . . . . . . . . . . . . . . . . . . . .140
Index . . . . . . . . . . . . . . . . . . . . . . . . . . . . . . . . . . . . . . . . 142
About descriptions in these operating instructions
These operating instructions are applicable to models
•
DMR-BS850 and DMR-BS750. Unless otherwise indicated,
illustrations in these operating instructions are DMR-BS850.
DMR-BS850
DMR-BS750
Pages to be referred to are indicated as “➔ ”.
•
: indicates features applicable to DMR-BS850 only.
: indicates features applicable to DMR-BS750 only.
P8 – 15
Quick Start Guide
Basic Operations
RecordingPlaying BackEditingCopying
With Other
Equipment
Still PictureMusic
Functions
Convenient
Reference
6
RQT9430
HDD (Hard disk drive) Handling Care
The HDD is a high precision recording instrument and because of its long recording capability and high speed operation it is a very special
device that is easily susceptible to damage.
As a basic rule, save important content to a disc as backup.
■ The HDD is a device that is not built to withstand vibration/shock or dust
Depending on the setup environment and handling of the HDD some content may become damaged and play and recording may no longer be
possible. Especially during operation, do not subject the unit to any vibration, shock, or remove the AC mains lead from the household mains
socket. In the event of a power failure during recording or play, the content may be damaged.
■ The HDD is a temporary storage device
The HDD is not an everlasting storage device for recorded content. Use the HDD as a temporary storage place for one-off viewing, editing, or
copying. It is recommended to save the recorded content on a disc or to keep the original data or CDs that they were copied from.
■ Immediately save (backup) all content as soon as you feel there may be a problem with the HDD
If there is an irregularity within the HDD, repetitive strange sounds or problems with picture (block noise, etc.) may result. Using the HDD in this
condition may worsen the problem and in the worst case the HDD may no longer be usable. As soon as you notice this type of problem, copy all
content to disc and request service. Recorded content (data) on an HDD that has become unusable is unrecoverable.
When the unit is turned on or off, there may be an unexpected sound. This does not indicate a problem with this unit.
■ Setup precautions
Do not place in an enclosed area where the rear cooling fan
and the cooling vents on the side are covered up.
Place the unit on a surface that is fl at and not subject to
vibration or impact.
Do not place on anything that generates
much heat, for example an audio
amplifi er.
Do not place in an area often subject to
temperature changes.
Place in an area where condensation does
not occur. Condensation is a phenomenon
where moisture forms on a cold surface
when there is an extreme change in
temperature. Condensation may cause internal damage to the unit.
Conditions where condensation may occur
– When there is an extreme change in temperature (moving from a
very hot location to a very cold location, or vice versa, or when
subjected to an air conditioner or when cooled air directly impacts
the unit). When the HDD (warms during operation) is subjected to
cold air, condensation may form on the inside of the HDD and
may cause damage to the HDD heads, etc.
– When there is high humidity or a lot of steam in the room.
– During the rainy season.
In the above situation, without turning the unit on, let the unit
adjust to the room temperature and wait 2–3 hours until
condensation is gone.
DO NOT
This unit
Amplifi er
■ Cigarette smoke etc. causes malfunction or
breakdown
The unit may breakdown if cigarette smoke or bug spray/vapor, etc.
gets inside the unit.
■ While operating
Do not move the unit or subject to vibration or impact. (The HDD
may become damaged.)
Do not remove the AC mains lead from the household mains
socket, or fl ip the power breaker switch.
While the unit is on, the HDD is rotating at high speed. Sound or
movement due to rotation is normal.
■ When moving the unit
1 Turn the unit off. (Wait until “BYE” disappears from the display.)
2 Remove the AC mains lead from the household mains socket.
3 Move only after the unit has come to a complete stop (approx. 2
minutes) in order to avoid subjecting to vibration and shock.
(Even after turning the unit off, the HDD continues operating for a
short time.)
■ Indemnity concerning recorded content
Panasonic does not accept any responsibility for damages directly or indirectly due to any type of problems that result in loss of recording or
edited content (data), and does not guarantee any content if recording or editing does not work properly. Likewise, the above also applies in a
case where any type of repair is made to the unit (including any other non-HDD related component).
7
RQT9430
Remote Control Information/Unit Care
R6/LR6, AA
DO NOT
Remote Control Information
About batteries
Insert so the poles (4 and 3) match those in the remote control.
•
Use alkaline or manganese batteries.
•
Do not mix old and new batteries.
•
Do not use different types at the same time.
•
Do not heat or expose to flame.
•
Do not leave the batteries in an automobile exposed to direct
•
sunlight for a long period of time with doors and windows closed.
Do not take apart or short circuit.
•
Do not attempt to recharge alkaline or manganese batteries.
•
Do not use batteries if the covering has been peeled off.
•
Mishandling of batteries can cause electrolyte leakage which can
damage items the fluid contacts and may cause a fire.
Remove if the remote control is not going to be used for a long period
of time. Store in a cool, dark place.
Unit Care
Using the remote control
Aim at the sensor, avoiding obstacles, up to a maximum range of 7 m
directly in front of the unit.
Remote control signal sensor
20
30
20
30
The precision parts in this unit are readily affected by the
environment, especially temperature, humidity, and dust.
Cigarette smoke also can cause malfunction or breakdown.
To clean this unit, wipe with a soft, dry cloth.
Never use alcohol, paint thinner or benzine to clean this unit.
•
Before using chemically treated cloth, carefully read the instructions
•
that came with the cloth.
Observe the following points to ensure continued listening and
viewing pleasure.
Dust and dirt may adhere to the unit’s lens over time, making it
impossible to record or play discs.
Use the Lens cleaner (not included) about once every year,
depending on frequency of use and the operating environment.
Carefully read the lens cleaner’s instructions before use.
Lens cleaner: RP-CL720E
The manufacturer accepts no responsibility and offers no compensation for loss of recorded or edited
The manufacturer accepts no responsibility and offers no compensation for loss of recorded or edited
material due to a problem with the unit or recordable media, and accepts no responsibility and offers
material due to a problem with the unit or recordable media, and accepts no responsibility and offers
no compensation for any subsequent damage caused by such loss.
no compensation for any subsequent damage caused by such loss.
Examples of causes of such losses are
Examples of causes of such losses are
A disc copied and edited with this unit is played in a Blu-ray Disc Recorder or computer disc drive manufactured by
•
A disc copied and edited with this unit is played in a Blu-ray Disc Recorder or computer disc drive manufactured by
•
another company.
another company.
A disc used as described above and then played again in this unit.
•
A disc used as described above and then played again in this unit.
•
A disc recorded and edited with a Blu-ray Disc Recorder or computer disc drive manufactured by another company is
•
A disc recorded and edited with a Blu-ray Disc Recorder or computer disc drive manufactured by another company is
•
played in this unit.
played in this unit.
Do not place the unit on
amplifi ers or equipment that may
become hot.
The heat can damage the unit.
Select a position with good ventilation when installing the unit. Do
not block the cooling fan on the rear of the unit.
Before moving the unit, ensure the disc tray is empty.
Failure to do so will risk severely damaging the disc and
the unit.
8
RQT9430
BACK/
RETURN
1
4
5
7
6
3
2
9
bk
bp
cr
bs
8
bo
bn
br
bl
bm
cq
bt
ck
cl
bq
co
cn
cm
cp
SKIP
PAGE
0
9
8
7
6
54
3
2
1
DEL
PROG/CHECK
abc def
jkl
ghi
mno
tuv
qrs
p
xyz
w
PLAY/x1.3
G
U
I
D
E
Location of Parts/Controls
Remote Control
Turn the unit on or off .............................................. (➔ 13)
1
Select drive [HDD, BD or SD]. .......................... (➔ 26, 70)
2
Select channels and title numbers etc./Enter numbers
3
or characters (The character buttons may be used when
operating VIERA CAST contents.)
T
o delete unwanted recorded titles, timer programmes,
4
still pictures or music
Basic operations for recording and play
5
Show the digital satellite channel information ........ (➔ 90)
6
Programme information within TV Guide screen ... (➔ 43)
Show status messages........................................... (➔ 91)
Show DIRECT NAVIGATOR/Pop-up Menu/
7
Top Menu .......................................................... (➔ 26, 45)
Selection/OK, Frame-by-frame ......................... (➔ 13, 47)
8
Show OPTION menu
9
Use Colour buttons according to on-screen instructions.
bk
– for switching the DIRECT NAVIGATOR screen
– for TV Guide operations
– disactivating timer programme
– for selecting programme category
– for editing favourites
Recording function
bl
[
[EXT LINK]: Linked timer recordings with external equipment ..... (➔ 64)
[* DIRECT TV REC]: Direct TV recording .................................... (➔ 37)
bm
bn
bo
bp
bq
br
bs
bt
ck
cl
cm
cn
co
cp
cq
cr
REC]: Start recording ............................................................... (➔ 27)
*
[REC MODE]: Change recording mode ........................................ (➔ 64)
Show Digital TEXT (MHEG)/Teletext service .........(➔ 91)
Show subtitles ......................................................... (➔ 91)
Transmission window
TV operations .......................................................(➔ 108)
Channel select/Change pages in the
TV Guide system ........................................ (➔ 24, 27, 43)
Show VIERA CAST ................................................ (➔ 85)
Input select (freesat, Other Sat., AV1, AV2, AV3, AV4,
DV) ........................................................ (➔ 24, 25, 64, 65)
Skip approx. 1 minute forward ................................ (➔ 47)
Exit the menu screen
Show the TV Guide screen ......................... (➔ 24, 28, 43)
Show FUNCTION MENU display ........................... (➔ 92)
By using the FUNCTION MENU display you may
access the main functions (Playback, Recording, etc.)
quickly and easily.
Return to previous screen
Skip the specified time ........................................... (➔ 47)
Create chapters ...................................................... (➔ 56)
Show timer recording list ........................................ (➔ 39)
Show menu for disc playback etc. ..........................(➔ 88)
............................. (➔ 32, 41, 76, 83)
9
RQT9430
The Unit’s Display
6
bk
879
PLAY
EXT-L COPY
SD USB
HDDSDVD
USBDD
D
2345
1
1423
78 bk6
5
bl9bm
STEP 1
SD card slot indicator
1
Linked timer recordings with external equipment
2
indicator .................................................... (➔ 64)
USB port indicator
3
Copying indicator
4
Disc indicator
5
This indicator lights up when a disc is inserted.
Drive (HDD, BD or SD) indicator
6
Select “BD” for any discs. BD indicator will light up.
Main Unit
Disc tray
Standby/on switch (^/I) .............................(➔ 13)
1
Press to switch the unit from on to standby mode
or vice versa. In standby mode, the unit is still
consuming a small amount of power.
Blue LED .............................................................. (➔ 104)
2
• It is possible to set the LED to turn on/off.
Recording indicator (“REC1”, “REC2”)
3
Red indicator light during recording.
REC1, REC2 shows the status of one or twin
recording.
REC indication flash during Recording Pause.
(e.g., when starting Guide LINK recording)
Remote control signal indicator
7
This flashes when it is operated by the remote control.
Main display section
8
Current time/playback counter, various messages
Playback indicator
9
Timer recording indicator (z) ................... (➔ 29
bk
On:
When a timer recording programme is registered.
Flashes:
When the unit cannot record a timer recording programme.
The unit’s display
Disc tray open/close button ..........................(➔ 26)
4
DV IN terminal
5
Remote control
signal sensor
Pull to
flip down
the front
panel.
(for a digital video camcorder) .....................(➔ 65)
SD card slot ................................................(➔ 117)
6
USB port .....................................................(➔ 117)
7
Channel select button .............................(➔ 24, 27)
8
Start recording button ...................................(➔ 27)
9
Stop button .............................................(➔ 26, 27)
bk
Play/✕1.3 button ...........................................(➔ 26)
bl
AV3 input terminals .......................................(➔ 65)
bm
)
Quick Start Guide
Rear Panel
DMR-BS850EBK
SER NO.
PR000001010
AC IN
312 bmblbk bn
Serial number
1
AC IN~ = Power supply
2
Connection for the AC mains lead
Cooling fan
3
Satellite input terminals .....................(➔ 10, 11)
4
HDMI AV OUT terminal ...................(➔ 10, 112)
5
Digital audio and video output terminal
LAN terminal ......................................... (➔ 115)
6
TV set connection
AV2 (EXT) 21-pin Scart terminal ...........(➔ 112)
8
Connection of an external unit
For information about the 21-pin Scart terminal (➔ 112)
AV1 (TV) 21-pin Scart termina
7
l ...(➔ 10, 11, 112)
DISH
18V
13V/
350mA max
IN 1
DISH
IN 2
AV OUT
LAN
10BASE-T
100BASE-TX
465897
9
bk
bl
bm
bn
bo
COMPONENT VIDEO OUT (PROGRESSIVE/
INTERLACE) terminals .........................(➔ 113)
Y = Luminance signal (brightness), PB = Chrominance signal
(colour difference), P
AUDIO/VIDEO output terminals ....(➔ 113, 114)
AV4 input terminals
S VIDEO output terminal .......................(➔ 113)
Digital audio output terminal (optical) ....(➔ 114)
Digital audio output terminal (coaxial).....(➔ 114)
P
Y
B
P
R
AV2(EXT
COMPONENT
VIDEO OUT
AV1
(TV)
OUT
AV4 IN
)
R-AUDIO-L
VIDEO
S VIDEO
OPTICAL
(
PCM/BITSTREAM
DIGITAL
AUDIO
OUT
COAXIAL
)
bo
= Chrominance signal (colour difference)
R
10
RQT9430
Basic Connection
This unit
TV
When your television does not have a digital satellite tuner
A
AV
HDMI IN
AV
HDMI
OUT
AV1 (TV)
HDMI cable (not supplied)
21-pin Scart cable (not supplied)
DISH IN 1
DISH IN 2
To household
mains socket
AC IN
This recorder requires 2 signal feeds from a satellite dish to be able to record 2 different channels at the
same time. Please consult with your Panasonic dealer for details of dish installation.
Connect both satellite terminals (DISH IN 1 and DISH IN 2) to the satellite dish when you want to record 2
•
programmes simultaneously or view TV during recording.
Connect DISH IN 1 terminal to the satellite dish when you use only one terminal. (You cannot view if you
•
connect only DISH IN 2 terminal.) In this case, you cannot record 2 programmes simultaneously or view TV
during recording.
Supply power from another device when you use 2 or more devices to receive satellite broadcast, because this
•
unit does not supply power when it is turned in standby.
Before connection, turn off the mains for all connected equipment and read the appropriate operating instructions.
•
READ THE CAUTION
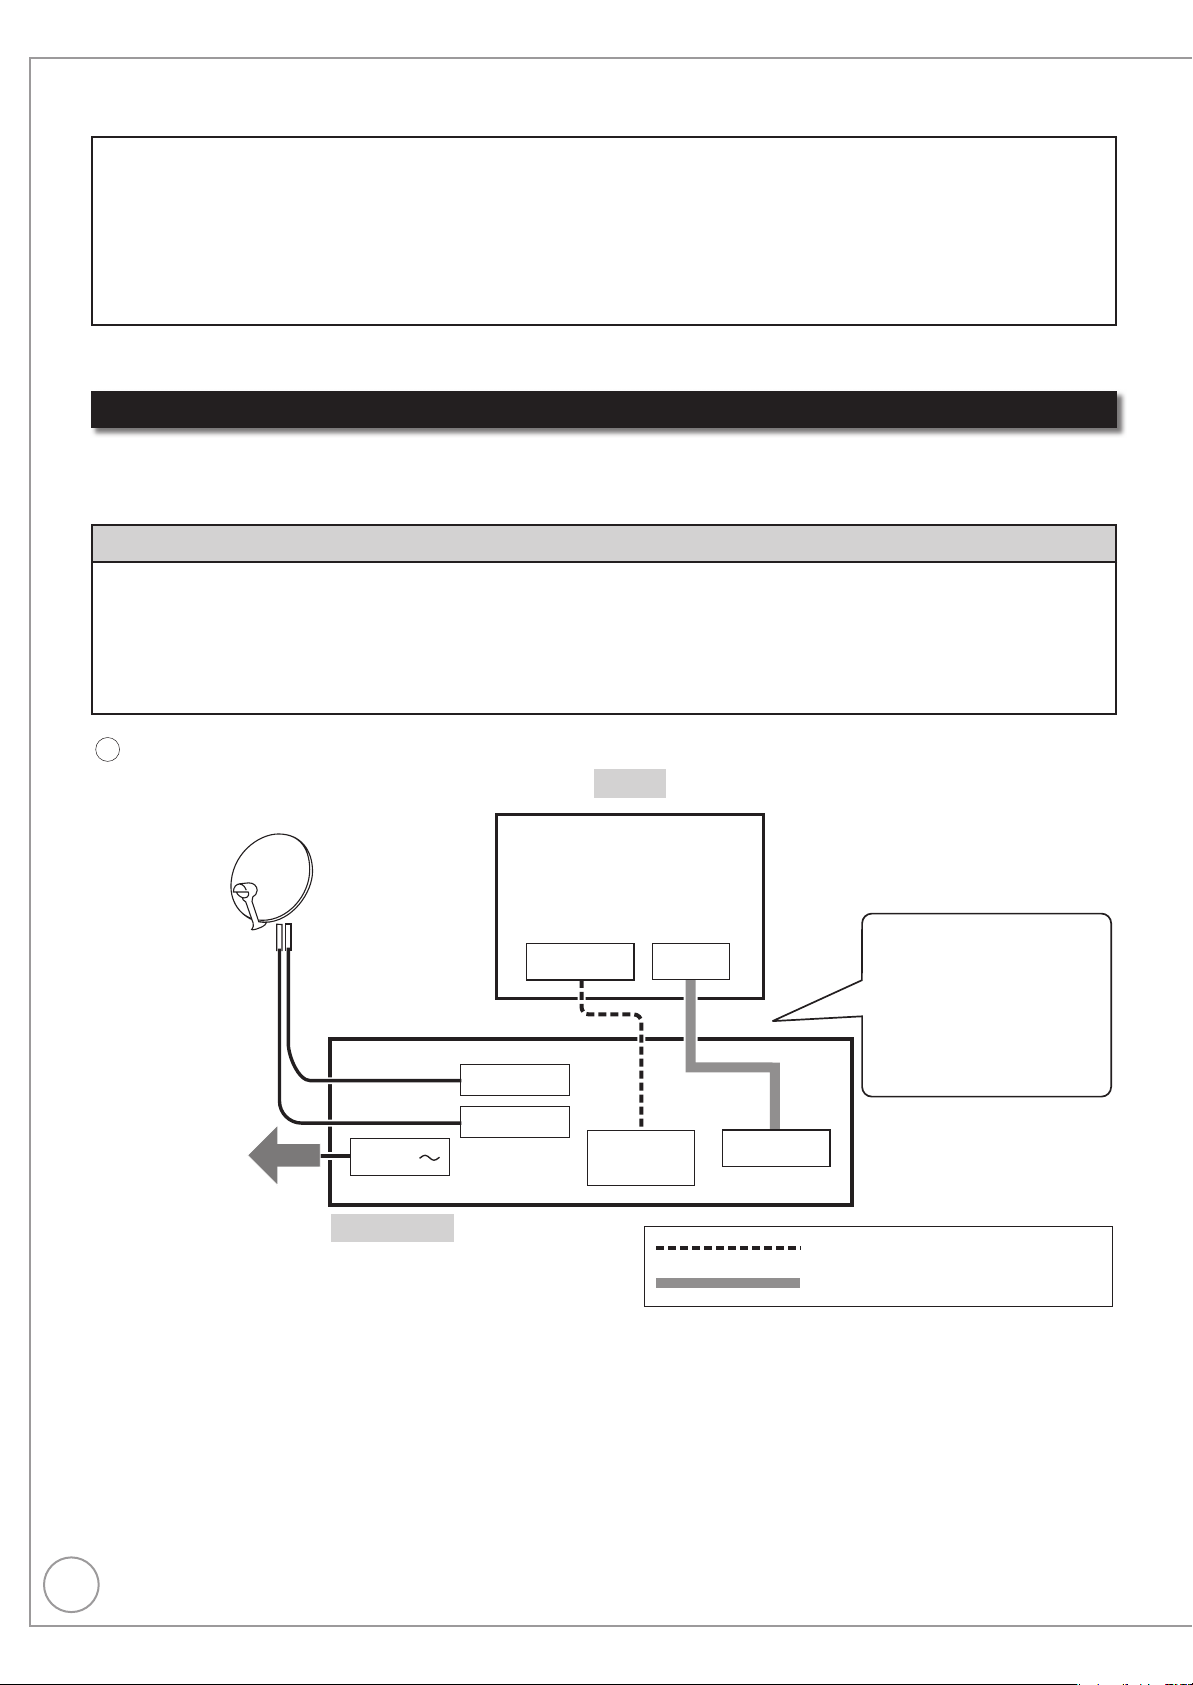
When your Television has an HDMI input terminal
When connected to an HDMI compatible unit, an uncompressed digital audio and video signal is transmitted,
enabling you to enjoy high quality, digital video and audio with just one cable. When connecting to an HDMIcompatible HDTV (High Definition Television), the output can be switched to 1080p, 1080i or 720p HD video.
Regarding VIERA Link “HDAVI ControlTM” function
When connecting with a Panasonic TV (VIERA) or a receiver equipped with the “HDAVI Control” function, linked
operations would be possible. [➔ 86, Linked Operations with the TV (VIERA Link “HDAVI Control™”/Q Link)]
Non-HDMI-compliant cables cannot be utilized.
•
It is recommended that you use Panasonic’s HDMI cable.
•
Recommended part number: RP-CDHG10 (1.0 m), RP-CDHG15 (1.5 m), RP-CDHG20 (2.0 m), RP-CDHG30 (3.0
FOR THE AC MAINS LEAD ON PAGE 3 BEFORE CONNECTION.
m), RP-CDHG50 (5.0 m), etc.
Connecting with a
Panasonic TV (VIERA)
If the 21-pin Scart cable is
connected, the Direct TV
Recording and Pause Live
TV function is available.
(➔ 37)
11
RQT9430
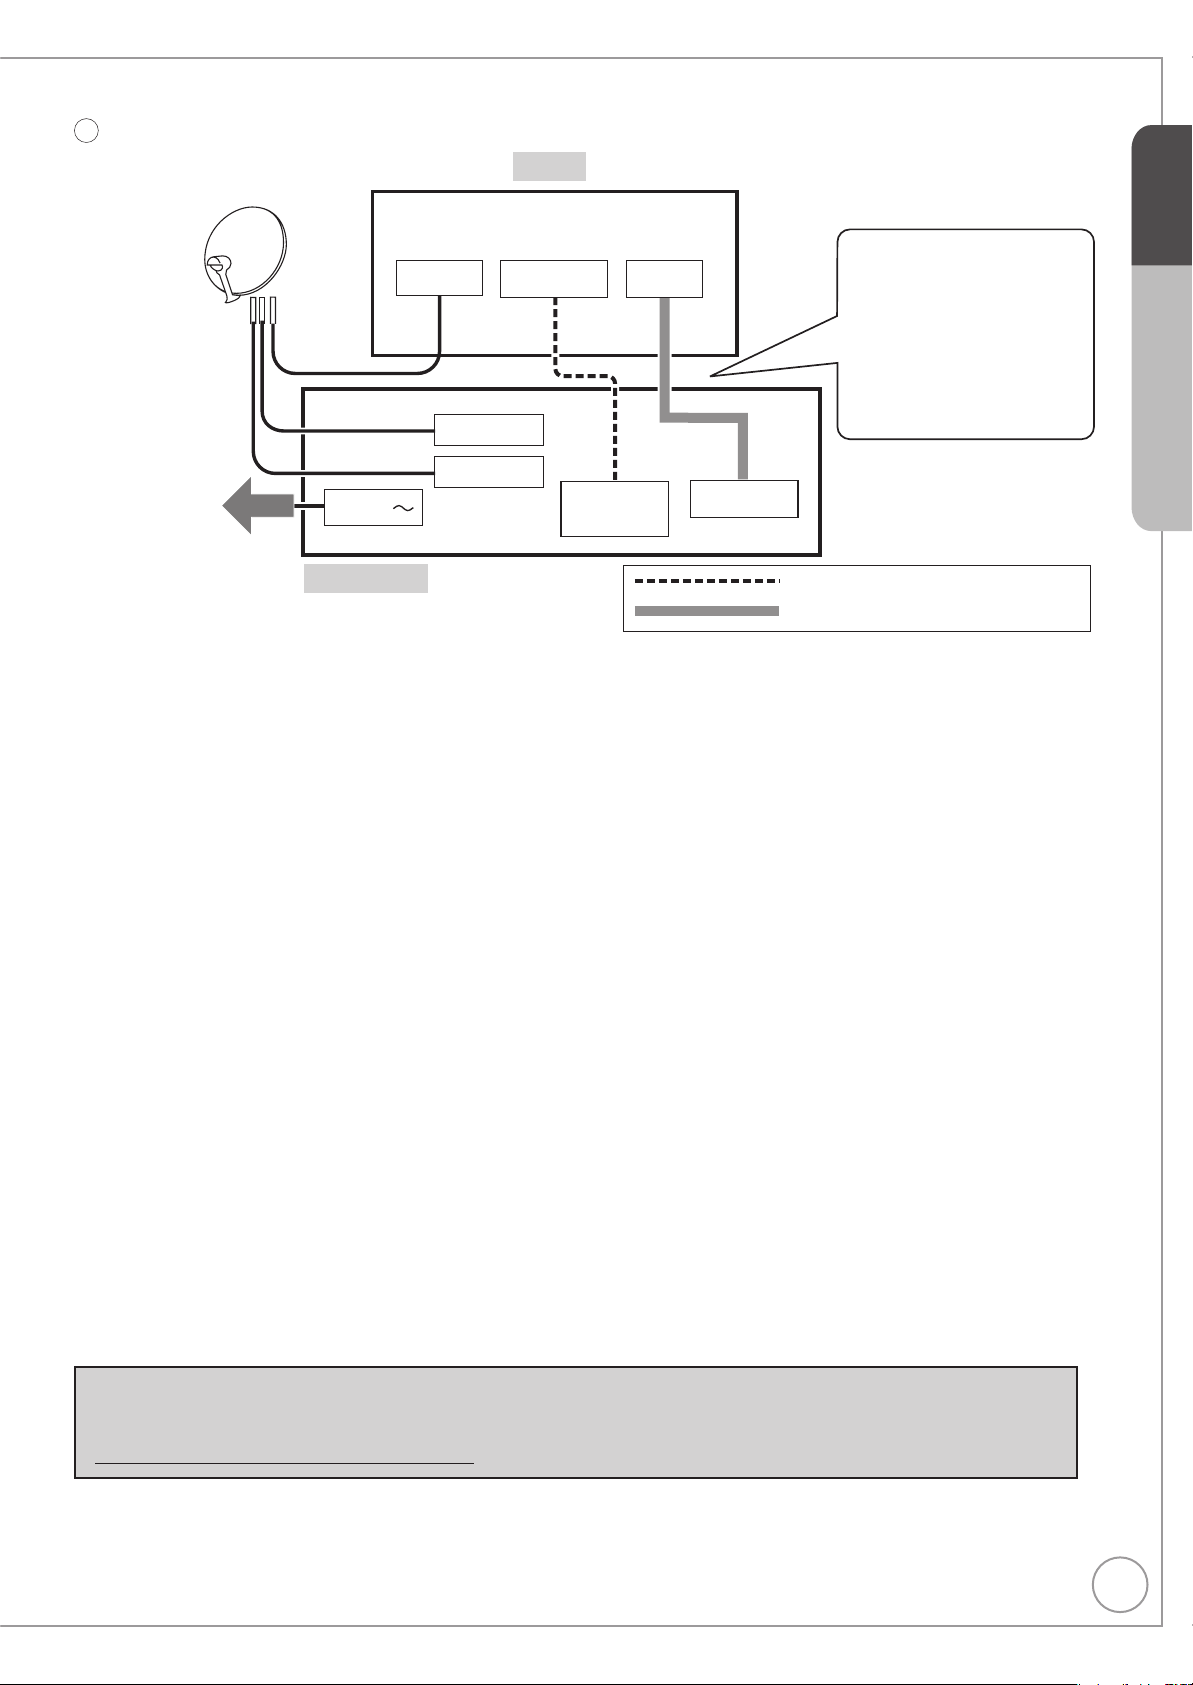
B
When your television has a digital satellite tuner
TV
Connecting with a
Satellite
HDMI IN
AV
Panasonic TV (VIERA)
If the 21-pin Scart cable is
connected, the Direct TV
Recording and Pause Live
TV function is available when
you view other than satellite
programme. (➔ 37)
DISH IN 1
To household
mains socket
AC IN
This unit
DISH IN 2
HDMI
OUT
AV
AV1 (TV)
HDMI cable (not supplied)
21-pin Scart cable (not supplied)
Connect only after all other connections are complete.
After completing the connections, proceed to the TV Tuning (➔ 13).
Refer to page 120 if “U50”, “U50 1” or “U50 2” appears on the unit’s display.
•
HDMI features
Please use High Speed HDMI Cables that have the HDMI logo (as shown on the cover).
•
When outputting 1080p signal, please use the HDMI cables 5.0 meters or less.
•
Set “HDMI Video Mode” and “HDMI Audio Output” to “On” (➔ 105). (The default setting is “On”.)
•
This unit incorporates HDMI™ (V.1.3a with Deep Colour, x.v. Colour™, High Bit rate Audio) technology
•
(➔ 138, 139).
Video sources converted to 1920 × 1080 resolution, while of high quality, will exhibit somewhat lower subjective
•
image resolution than true, native 1080p full-HD sources. See dealer for details.
STEP 2
Quick Start Guide
Notes
The freesat channel uses Astra 2 at 28.2° East, and Eurobird 1 at 28.5° East satellites. To ensure your satellite
•
dish is correctly installed please consult your freesat registered dealer.
If you connect 2 satellite dishes for different satellites (e.g., DISH IN 1: Astra 28.2, DISH IN 2: Astra 19.2), the unit
•
cannot receive the signal correctly.
You can use the unit as one tuner when connecting DISH IN 1 to a satellite dish that can receive SKY.
•
If connecting to equipment that is only compatible with 2 channel audio output, audio with 3 channels or more will
•
be down-mixed (➔ 138) and output as 2 channels, even if connecting with an HDMI cable (some discs cannot be
down-mixed).
For display units compatible with HDCP (High-Band width Digital Content Protection) that are equipped with a
•
digital DVI input terminal (PC monitors, etc.):
Depending on the unit, picture may not display properly or at all when connecting with a DVI/HDMI switching cable
(audio cannot be output).
If you connect a DVI device that is not compatible with HDCP, set “HDCP on HDMI Output” in the Setup menu to
•
“Off” (➔ 105).
Tips
You can check the satellite signal condition using “Signal Condition” in the Setup menu (➔ 98).
When the unit is not to be used for a long time
To save power, unplug it from the household mains socket. This unit consumes a small amount of power,
even when it is turned in standby.
[approx. 0.4 W (“Power Save” is set to “On”)]
12
RQT9430
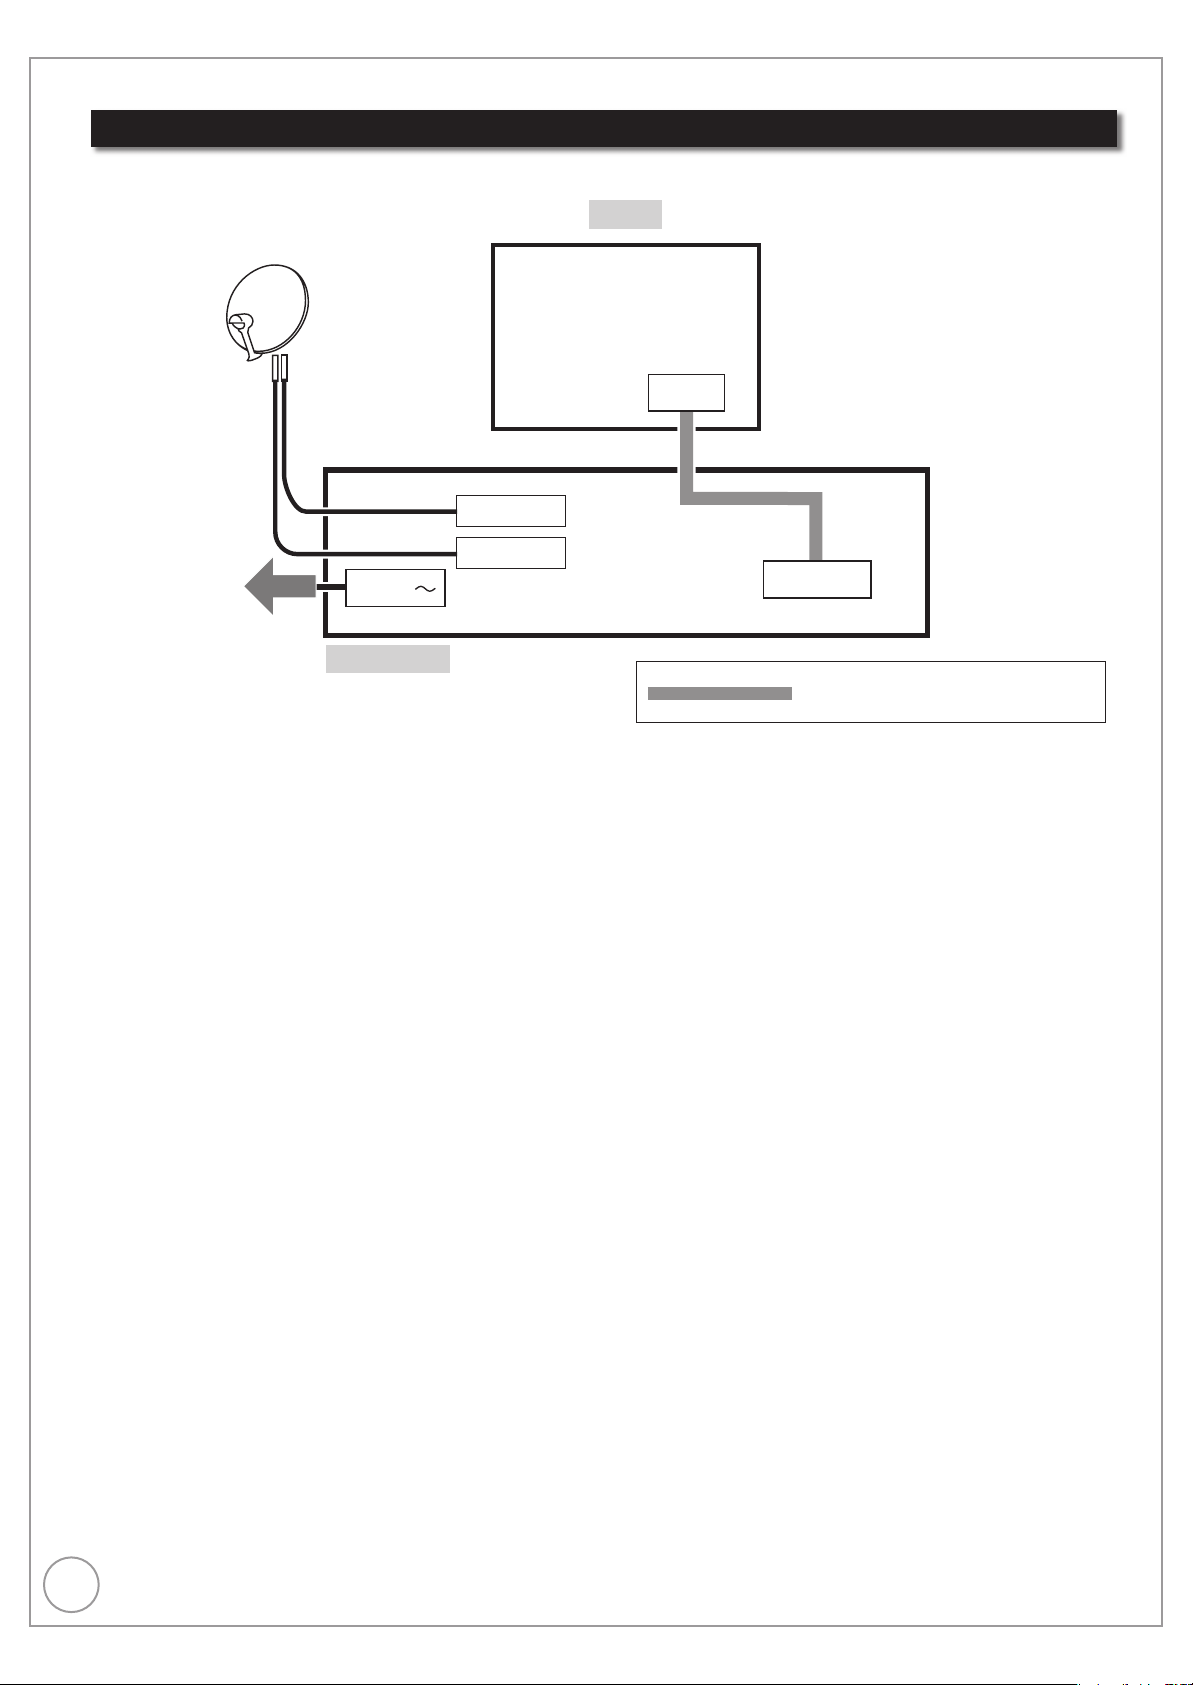
Basic Connection
21-pin Scart cable (not supplied)
This unit
TV
AV
AV1 (TV)
DISH IN 1
DISH IN 2
To household
mains socket
AC IN
When your Television does not have an HDMI input terminal
In this setting, you cannot enjoy HDTV in HD picture quality. The resolution will be 576i/480i.
Connect only after all other connections are complete.
After completing the connections, proceed to the TV Tuning (➔ 13).
Refer to page 120 if “U50”, “U50-1” or “U50-2” appears on the unit’s display.
•
Notes
The freesat channel uses Astra 2 at 28.2° East, and Eurobird 1 at 28.5° East satellites. To ensure your satellite
•
dish is correctly installed please consult your freesat registered dealer.
If you connect 2 satellite dishes for different satellites (e.g., DISH IN 1: Astra 28.2, DISH IN 2: Astra 19.2), the unit
•
cannot receive the signal correctly.
You can use the unit as one tuner when connecting DISH IN 1 to a satellite dish that can receive SKY.
•
Tips
You can check the satellite signal condition using “Signal Condition” in the Setup menu (➔ 98).
•
Additional Connections (➔ 112).
•
13
RQT9430
Auto Set Up (freesat)
Owner ID
Please enter new PIN
PIN * * * *
0
-
PIN entry
9
RETURN
*
You now have the opportunity to enter your
details and help the police to crack crime.
See Instruction Book.
PAU SE
STOP
SLOW/SEARCH
PAGE
CH
AV
TV
DRIVE
SELECT
VOL
SKIP
PLAY/x1.3
SELECT
INPUT
DEL
0
9
8
7
6
54
3
2
1
abc def
jklghi
mno
tuvqrs
p
xyz
w
TIME SLIP
STATUS
REC MODE
REC EXT LINK
CREATE
CHAPTER
G
U
I
D
E
RETURN
BACK/
DIRECT TV REC
EXIT
OK
OPTION
D
I
R
E
C
T
N
A
V
I
G
A
T
O
R
F
U
N
C
T
I
O
N
M
E
N
U
CH
MANUAL SKIP
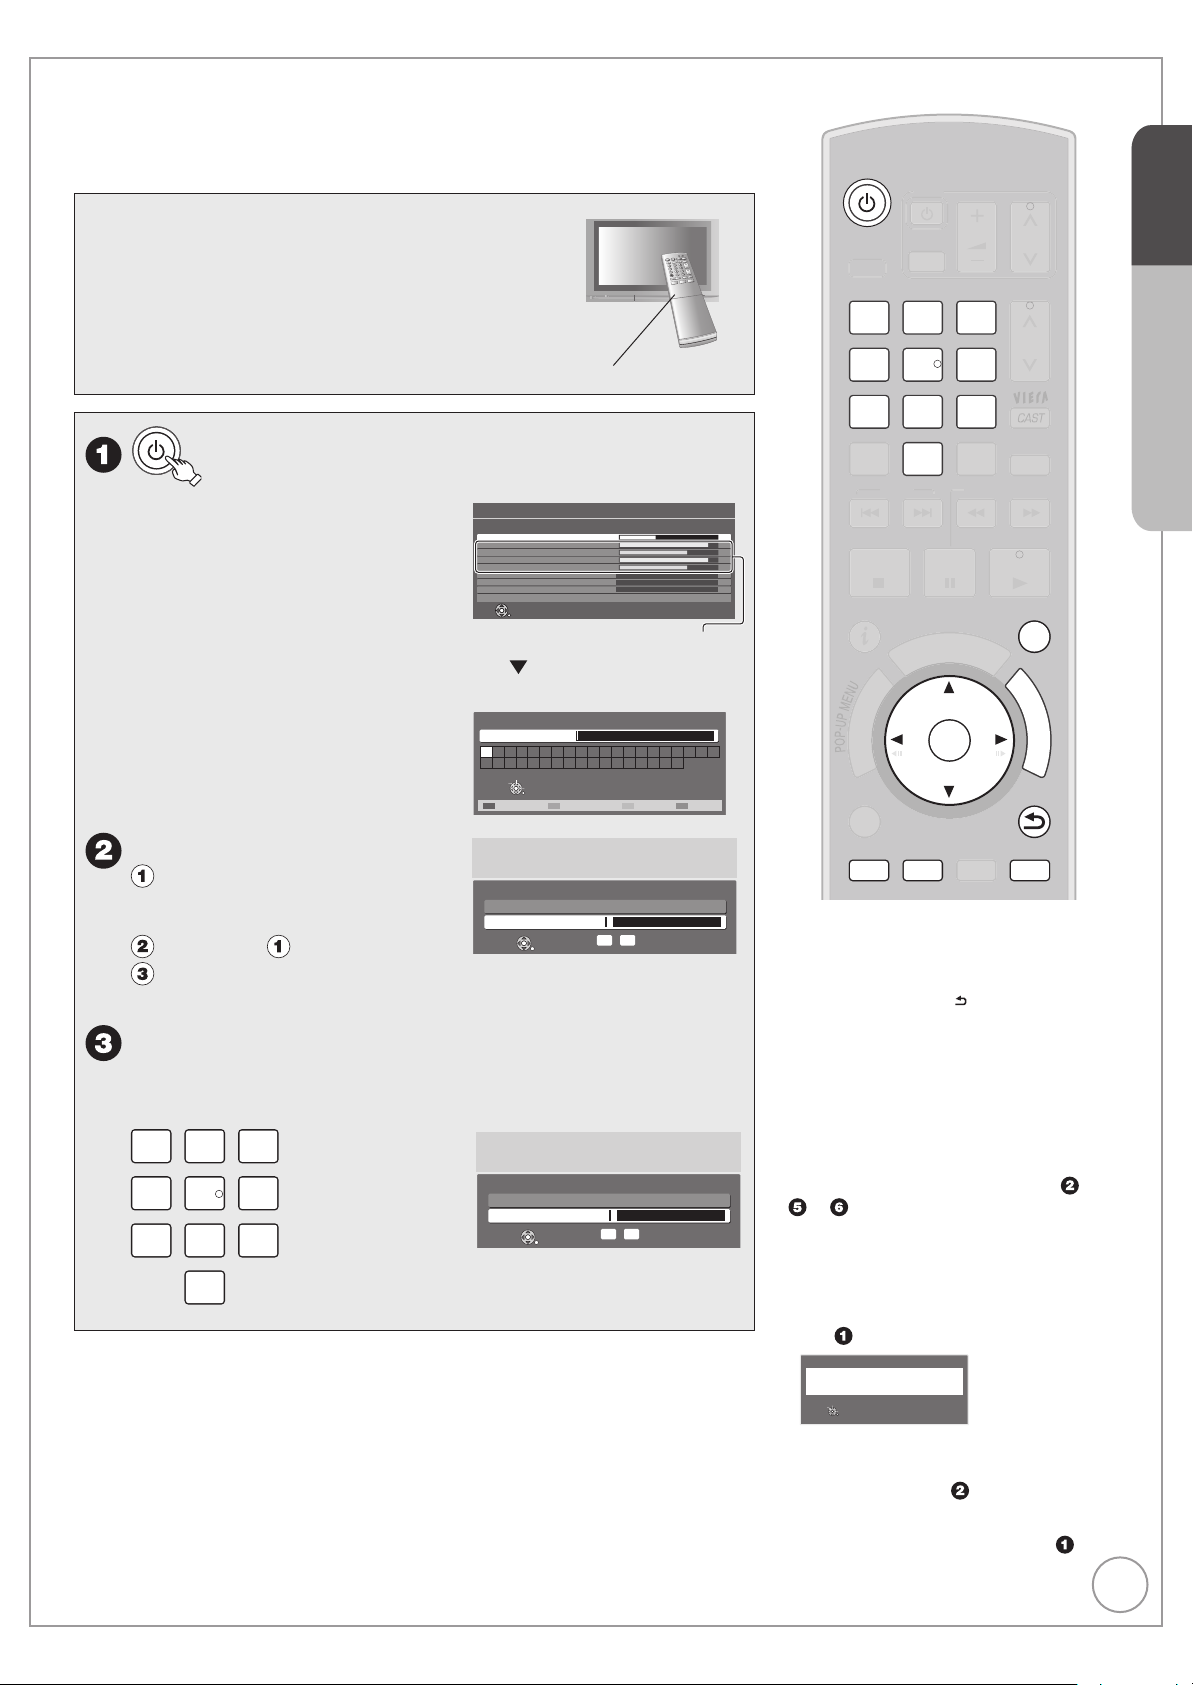
Search and store TV programmes automatically.
These steps are not necessary if the setup has been completed by your local
dealer or freesat registered dealer.
Preparation:
Turn on the television (and connected equipment)
•
and select the video input terminal that this unit is
connected to.
TV’s remote control
to turn the unit on.
STEP 3
Auto Setup will start to search for TV
programmes and store them in the
numbered order as specified by the
broadcasters.
Check signal quality/strength
–
displayed on the screen (➔ right).
If the signal is weak, Auto Setup
will not start. Check that the
satellite dish is correctly positioned
and connected.
Enter your Postcode.
Press [e, r,w, q] to
select the character, then
press
Repeat step .
Press the “Green” button to confirm.
Your postcode is required to receive local services and sort the channel order.
–
Press the numbered buttons to enter your choice
of a 4-digit PIN.
This PIN will be used only for the Owner ID-Data Entry screen.
–
2
1
54
p
8
7
0
[OK].
abc def
3
jklghi
6
tuvqrs
9
freesat Auto Setup
Searching
DISH Input 1-Signal Quality 0 10
DISH Input 1-Signal Strength 0 10
DISH Input 2-Signal Quality 0 10
DISH Input 2-Signal Strength 0 10
TV Channels Found 0
Radio Channels Found 0
Data Channels Found 0
Channels found, creating channel list
Exit freesat setup
The bar appears beside
Signal Quality and Signal
Strength when the signal
is input.
Enter Postcode for local channels including space
Postcode
mno
w
xyz
A B C D E F G H I J K L M N
U V W X Y Z 0 1 2 3 4 5 6
Select
Set character
Select
RETURN
Delete Confirm Delete all
You now have the opportunity to enter your
details and help the police to crack crime.
Owner ID
See Instruction Book.
Please enter new PIN again to confirm
PIN * * * *
RETURN
0
*
-
O P Q R S T
7 8 9
PIN entry
9
(continued on the next page)
Tips
To cancel the Auto Setup
Press [BACK/RETURN ].
To restart the Auto Setup (➔ 98, freesat
Auto Setup)
To correct the character
Press the “Red” button to delete character
one by one.
You can delete all input characters by
pressing the “Blue” button.
You can perform this operation in step
or .
Notes
•
To initialise all settings (➔ 107, Shipping
Condition)
•
When the below screen appears after
step
.
freesat Auto Setup
No satellite signals detected at dish 2 input.
Please check dish installation / connection before starting search,
otherwise record / playback functions will be limited.
Select
Set character
Select
RETURN
This screen appears when this unit does not
detect the connection to DISH IN 2.
When you connect DISH IN 1 only press
[OK], then go to step .
When you connect both
turn this unit off and check your
connection. Then perform from step .
•
The Auto Setup may require a certain
length of time.
DISH IN
1 and 2,
Quick Start Guide
,
14
RQT9430
User input
HOUSE NO
ABCDEFGgHIJKLMN
UVWXYZ 0123456
OPQRST
789! :#
abcdef h i j k lmnopq rs t
uvwxyz( ) +- . *_
RETURN
Set character
Select
Select
Delete Delete all
Power Save
On : Minimise standby power consumption,
without Quick Start function and
AV2 loop-through in standby.
Off : With Quick Start function
and AV2 loop-through in standby.
RETURN
On
Off
OK
Auto Set Up (freesat)
Repeat step to enter PIN
again to confirm.
Owner ID-Data Entry
PIN 0000
NAME
HOUSE NO
POSTCODE RG12 8FP
Select
Change PIN
RETURN
The Owner ID-Data Entry screen appears.
–
Make a note of PIN in case you forget it.
–
Enter your NAME
.
Press [e, r] to select “NAME”, then press [OK].
User input
NAME
A B C D E F GgH I J K L M N
U V W X Y Z 0 1 2 3 4 5 6
a b c d e f h i j k l m n o p q r s t
u v w x y z( ) + - . * _
Select
Set character
Select
RETURN
Delete Delete all
O P Q R S T
7 8 9 ! : #
Press [e, r,w, q] to select the character, then
press [OK].
Repeat step .
Press [BACK/RETURN ] to return to the
Owner ID-Data Entry screen.
Enter your HOUSE NO.
Press [e, r] to select “HOUSE NO”, then press
[OK].
Enter new PIN.
8
This PIN will be used for controlling
–
BD-Video playback
•
DVD-Video playback
•
Accessing to the channels you selected in “Child
•
Lock” (➔ 99)
Playback programmes for adults
•
Using VIERA CAST
•
Make a note of PIN in case you forget it.
–
The default PIN is “0000”.
–
Press [e, r] to select the number, then press [q].
–
You can also use the numbered buttons.
Repeat step for enter 4-digit PIN.
Press [OK] to confirm.
PIN Entry
Remember the PIN.
0 0 0 0
9
Power Save Function: e, r to
select “On” or “Off”, then
OK
Press [
press [OK].
Repeat step .
Press [BACK/RETURN ] to return to the
Owner ID-Data Entry screen.
BACK/
RETURN
to confirm the Owner IDData Entry screen.
e, r,w, q
] to select the character, then
Owner ID-Data Entry
PIN 0000
NAME
HOUSE NO
POSTCODE RG12 8FP
Select
Edit
RETURN
Enter a new 4-digit PIN, then press OK.
This PIN will be used for controlling viewing and playback.
PIN will be set to “0000” by pressing “RETURN” when there is no
number input.
- - - -
RETURN
PIN Entry
Number
EEEE
ABC
-
0
9
–
Set to “On” to reduce power consumption in
standby mode.
The features of the power save function when
the unit is in standby mode are as below.
Power Save On Off
Power
consumption
Startup time Not quick Quick
Front display
Watching the
picture from
the external
equipment
connected to the
AV2 terminal
Auto setup for your unit is complete. You can now make your
•
favourite channels and store them in the required order in the
favourites (➔ 97).
Approx. 0.4 W Approx. 12 W
Turns off
(The clock is not
Stays lighted
displayed.)
cannot do can do
15
RQT9430
To check the signal condition
(➔ 98, Signal Condition)
To tune in other satellite channels
(➔ 16, Tuning in Other Satellite
Services)
To hide unwanted channels
(➔ 98, freesat Channel List)
To change PIN (➔ 107, Owner ID)
To correct the character
Press the “Red” button to delete character one by one.
You can delete all input characters by pressing the “Blue” button.
You can perform this operation in step , or .
To display the Owner ID information on TV
Press and hold [g] on the main unit for more than 5 seconds.
The PIN is not displayed.
After 30 seconds this menu automatically disappears.
You cannot change the Owner ID on this screen.
You can perform this operation after step .
To set the clock manually
Normally this unit obtains time and date information from TV
channels to set its clock and automatically adjusts the time
several times a day.
If the clock is incorrect or cannot be automatically set, perhaps
due to bad signal reception, you will need to adjust the clock
manually.
•
In the case of a power failure, the clock setting remains in
memory for approximately 60 minutes.
1. Press [FUNCTION MENU].
2. Press [e, r] to select “Others”, then press [OK].
3. Press [e, r] to select “Setup”, then press [OK].
4. Press [e, r] to select “Others”, then press [OK].
5. Press [e, r] to select “Clock”, then press [OK].
6. Press [w, q] to select “Off” of “Auto Clock
Setting”.
7. Press [e, r] to select “Manual Setting”, then
press [OK].
8. Press [w, q] to select the item you want to
change.
Hour Minute Second Day Month Year
9. Press [e, r] to change the setting.
10. Press [OK] to confirm new date and time and to
initiate the clock.
STEP 3
Quick Start Guide
Tips
To return to the previous screen
Press [BACK/RETURN
To exit the screen
Press [EXIT].
].
Notes
If a TV station transmits a time setting signal, and when “Auto Clock
Setting” in the Clock setting menu is set to “On”, the automatic time
correction function checks the time and if necessary it is adjusted
several times every day.
16
RQT9430
Tuning in Other Satellite Services
RETURN
Other Satellite Tuning Menu
Auto Setup
Manual Tuning
OK
Access
Dish Setup
PAU SE
STOP
SLOW/SEARCH
PAGE
CH
AV
TV
DRIVE
SELECT
VOL
SKIP
PLAY/x1.3
SELECT
INPUT
DEL
0
9
8
7
6
54
3
2
1
abc def
jklghi
mno
tuvqrs
p
xyz
w
TIME SLIP
STATUS
REC MODE
REC EXT LINK
CREATE
CHAPTER
G
U
I
D
E
RETURN
BACK/
DIRECT
TV
REC
EXIT
OK
OPTION
D
I
R
E
C
T
N
A
V
I
G
A
T
O
R
F
U
N
C
T
I
O
N
M
E
N
U
CH
MANUAL SKIP
You can also view or record other free channels (Astra 2 at 28.5 degree east) or free channels from other satellites
that you can receive in your area.
This setup is not required if you are only viewing or recording from freesat channels.
Search and store TV programmes of the other satellite service automatically.
These steps are not necessary if the setup has been completed by your local
dealer or freesat registered dealer.
to turn the unit on.
8
to select “Others”, then
e, r
to select “Setup”, then
e, r
to select “Tuning”, then
e, r
to select “Other Satellite
e, r
Tuning
freesat Favourites Edit
freesat Channel List
freesat Auto Setup
Other Satellite Channel List
Other Satellite Tuning Menu
Signal Condition
Child Lock
Preferred Multi Audio
Preferred Subtitles
OK
RETURN
Access
Tuning Menu”, then
Other Satellite Auto Setup - Satellite Selection
e, r
then
to select “Auto Setup”,
Satellite Selection
Search Mode
Channel Type
freesat and other satellite channels
Select
Start
Change
w, q
–
•
•
•
•
To tune to other satellites manually (➔ 98)
to select the desired satellite.
You can select from a list of following satellites.
Astra2/Eurobird
Astra1 (The dish will need to be repositioned to receive from these satellites.)
Hotbird (The dish will need to be repositioned to receive from these satellites.)
All (Any satellites that the dish can pick up from its current position.)
RETURN
Astra2/Eurobird
All
All
Tips
To cancel the Auto Setup
Press [EXIT].
Notes
To initialise all settings (➔ 107, Shipping
•
Condition)
9
to select “Search Mode”.
r
to select the search mode.
w, q
–
You can select the search mode from the followings.
•
All : All channels including encrypted channels will be searched.
Free channels
•
to select “Channel Type”.
r
17
RQT9430
w, q
–
•
•
•
to start the Auto
Setup
–
–
–
to select the channel type.
You can select the channel type from the followings.
All : All channels including TV, Radio, Data, etc. will be searched.
TV
Radio
Go to step when you
select “All” in step 8.
It takes time. Please follow the
instruction on the screen.
This unit is checking signals
during displaying “Please wait”.
“Locked” appears when the
Other Satellite Auto Setup - Satellite Selection
Satellite Selection
Search Mode
Channel Type
freesat and other satellite channels
DISH Input 1 - Signal Quality
DISH Input 1 - Signal Strength
DISH Input 1 - Signal Lock
DISH Input 2 - Signal Quality
DISH Input 2 - Signal Strength
DISH Input 2 - Signal Lock
Continue
RETURN
The bar appears beside Signal Quality
and Signal Strength when the signal is
input.
Astra2/Eurobird
All
All
010
010
Locked
010
010
Locked
checking is finished. Both DISH
IN 1 and 2 are checking the signals when both terminals are
connected.
If “Locked” does not appears, the signal is weak, and Auto Setup
•
will not start. Check that the satellite dish is correctly positioned
and corrected.
Notes
•
When the below screen appears after
step .
Other satellite Auto Setup
No satellite signals detected at dish 2 input.
Please check dish installation / connection before starting search,
otherwise record / playback function will be limited.
Select
Set character
Select
RETURN
This screen appears when this unit does
not detect the connection to DISH IN 2.
When you connect DISH IN 1 only press
[OK], then go to step or .
When you connect both
2, turn this unit off and check your
connection. Then perform from step
Auto Setup can take up to 45 minutes.
•
DISH IN
1 and
.
to continue the
Auto Setup.
–
Ensure that signals to both DISH
IN 1 and 2 are locked before
Other Satellite Auto Setup
All other satellite tuning data will be erased.
Continue
RETURN
starting scan.
to start the scan.
–
The scan starts.
Delete unwanted
channels.
–
To delete all channels of each
type on the screen (other than
Free TV), press the “Red”
button. And then press [
to select the channel type you
e, r
Other Satellite Auto Setup - Satellite Scan
Satellite Scan
Please wait... This may take up to 45 minutes to complete.
Free TV Channels found
Free Radio Channels found
Data Channels found
Pay TV Channels found
RETURN
Other Satellite Auto Setup - Select Channels to Remove
Name
BBC R5L
ETV2
BBC 1 Wales
BBC 2 Wales
BBC 1 Scotland
BBC 2 Scotland
Select
Remove
]
Multiple delete
RETURN
Kept Channels:
Available Space:
Found Channels:
0 100%
0
0
0
0
want to delete, press [OK].
To remove the selected channel, press [
–
] to select the channel
e, r
you want to remove, press [OK]. The check mark is removed.
BACK/
RETURN
to confirm deletion.
All Channels
Type Keep
Radio
Free TV
Free TV
Free TV
Free TV
Free TV
111
2888
Page Up
111
Page Down
Channel type
1/19
Tips
To select the type
Press the “Blue” button in step .
CH
Each time you press the “Blue” button, the
type will be changed as follows.
All Channels ➔ Free TV ➔ Pay TV ➔
Radio ➔ Data ➔ Unknown ➔
All Channels ➔ …
To restore all channels
Press the “Red” button, and then press
[e, r] to select “Restore all channels”,
press [OK] in step .
To restore the channel
Press [e, r] to select the channel you
want to restore, press [OK] in step
.
The check mark is displayed.
18
RQT9430
HDD and Disc Information
HDD
+R
+R DL
+RW
BD-RE
BD-R
DVD-RAM
DVD-R
DVD-R DL
DVD-RW
REC
HDD
Cannot doCan do
Discs
HDD
Cannot do Can do
Discs
Landscape
WED 19/08/2009 13:30
TV Guide:
WED 19th
12:00-20:00 BBC HD Preview
All ChannelsAll Types
Time: 14:00 14:30 15:00 15:30 16:00
108 BBC HD BBC HD Preview
Red Cap
Love USA
100 Sheep Dream
Heartbeat 100 Sheep Dream
UFO Hot Wave Used Car
Behind me Black House Crowntown Deal
USO Blue Wave
In the
Great A
News Show News Show
Red Cap Red Cap
113 ITV2
114 ITV2+1
115 ITV3
116 ITV3+1
117 ITV4
120 Channel4
HD
RETURN
OK
Select Programme
Select Channel
+24 hours Prog. Type Channel Genre
Page Up
Page Down
Portrait/Landscape
Info
CH
GUIDE
This unit can record to HDD and copy to the following recording media.
Internal
HDD
BD-RE
BD-RE
BD-R
BD-R
DVD-RAM DVD-R
DVD-RAM
+R
DVD-R
+R DL
+R DL
DVD-R DL
DVD-R DL DVD-RW
+RW
+RW
DVD-RW
Recordings can only be made to HDD in DR mode first, with the same quality as broadcasted, then they can be copied to discs.
Instant record
It can only record to HDD by pressing [* REC].
Record to the HDD and
then copy to the disc.
Timer record
It can only record to HDD when using timer recording.
Record to the HDD and
then copy to the disc.
Regarding Blu-ray Disc
High capacity
The Blu-ray Disc (BD-RE and BD-R) has a lot more capacity compared with the DVD.
When you compare the Blu-ray Disc (single-side dual-layer 50 GB) with the DVD-R (4.7 GB)
DVD-R (4.7 GB)
About 10 DVD-Rs
Blu-ray Disc (50 GB:single-side dual-layer )
When a 2 hour movie is recorded (in SP mode)
About 1 movie (per 1 DVD disc)
About 10 movies
High quality
You can copy the image of the digital broadcasting to Blu-ray discs in the same quality as broadcasted. Therefore, high
definition quality image can be copied as it is.
Blu-ray Disc
DVD-R, etc.
Broadcasted images can be copied as they are
(When copied in DR mode)
Broadcasted images cannot be copied as they are
19
RQT9430
Recording and copying programmes
When copying titles to disc
Copy as they are broadcasted
Copy in high definition for
long recording time1
Copy in standard definition
Quality and speed of copy depends on the type of
disc being used.
Copy in High Speed mode
Copy in Normal Speed mode when copying
the title recorded in DR mode on HDD
(the same quality as broadcast)
Copy as high definition (HD) quality
All subtitles and multiple audio are
copied.
Only one subtitle and one audio can
be copied.
2
Copy as standard definition (SD) quality.
Copy in Normal Speed mode.
Co
with compressed high definition data
py as high definition (HD) quality
1
Data size of the copied title may be larger than the original title, depending on the transfer rate.
It is recommended to use HE or HL mode when you record high definition and long programmes.
2
You cannot switch the subtitle or audio description on or off during playback of the copied title.
Only one subtitleand one audio can
be copied.
2
Goal!
HDD
BD-RE
BD-R
BD-RE
BD-R
Other discs
COPYCOPY
RecordingRecording
Goal!
Goal!
DR mode
All subtitles and multi audio are recorded (selectable during playback).
All recordings are first made to HDD in DR mode only.
DR mode
HG, HX, HE, HL mode
1
XP, SP, LP, EP, FR mode
This unit can record standard or high definition programmes from its built-in satellite tuners onto HDD with the same
quality picture and sound as they are broadcasted. Contents that can be recorded or copied will depend on the copy
management signals being sent by broadcasters. (➔ below)
Notes
Some programmes are copy-restricted and the number of times you can copy in HD quality is assigned by the broadcaster.
•
(➔ 33, Copy-restriction on freesat programmes)
Teletext and Digital TEXT (MHEG) cannot be recorded.
•
20
RQT9430
HDD and Disc Handling
HDD and discs you can use for recording and play
(: Possible, –: Impossible)
Disc type
Hard disk drive (HDD)
Standard symbol
Data that can be recorded and played Video/Still picture/Music
Quality in which video is recorded High defi nition (HD) quality/Standard defi nition (SD) quality
Recording mode in which video is recorded
Rewritable
Timer recording
Recording “HD Copy Once” programmes (➔ 33)
Recording “HD No Copy” programmes (➔ 33)
Disc type
Standard symbol
Data that can be recorded and played Video/Still picture Video
Quality in which video is recorded High defi nition (HD) quality/Standard defi nition (SD) quality
Recording mode in which video is recorded
Rewritable
Timer recording –
Copying “HD Copy Once” titles (➔ 33)
Copying “HD No Copy” titles (➔ 33)
Play on other players It can be played on the players compatible to BD-RE (Ver. 2.1) and BD-R.
Note DL is also included.
DR, HG, HX, HE, HL, XP, SP, LP, EP, FR
BD-RE
(50 GB/25 GB)
BD-RE BD-R
Copy in high defi nition quality (DR, HG, HX, HE, HL) is possible only once.
Copy in standard definition quality (XP, SP, LP, EP, FR mode) is possible.
BD-RE and BD-R that were recorded on this unit may not be played on other Blu-ray
players, etc.
Playback of LTH type BD-R discs may not be possible with players that do not support the
LTH type format.
Single-side dual-layer (50 GB) disc can only be played on the compatible player.
“DL” is a single-side dual-layer disc.
BD-RE (Ver. 1.0) with a cartridge cannot
be used with this unit. (It cannot be used
even if it is taken out from the cartridge)
Use the BD-RE compliant to Blu-ray Disc
Rewritable Format Version 2.1.
DR, HG, HX, HE, HL, XP, SP, LP, EP, FR
HDD
BD-R
(50 GB/25 GB)
–
DL is also included.
“DL” is a single-side dual-layer disc.
LTH type is also included.
For BD-R fi nalised with this unit or other
equipment, only playback is possible on
this unit. (➔ 96, 138)
Recording modes that can be selected differ depending on the recording methods. For details, please refer to the respective operating.
21
RQT9430
Disc type
DVD-RAM DVD-R DVD-R DL DVD-RW
Standard symbol
Data that can be recorded and
played
RAM
Video
Still picture
-R
before fi nalisation
DVD-V
after fi nalisation
-R DL
before
fi nalisation
DVD-V
after fi nalisation
Video
Quality in which video is recorded Standard defi nition (SD) quality
Recording mode in which video is
recorded
Rewritable
XP, SP, LP, EP, FR
–
Timer recording –
Copying “HD Copy Once” titles (➔ 33)
Copy in standard definition quality (XP, SP, LP, EP, FR mode) is possible.
Copying “HD No Copy” titles (➔ 33)
Copy in standard definition quality (XP, SP, LP, EP, FR mode) is possible.
Play on other players
RAM
can be played
back on Panasonic
Finalisation is needed for playback on other equipment.
-R DL
can be played back only on equipment compatible with this disc.
DVD recorders and
DVD-RAM compatible
DVD players.
Note Take the disc out from
the cartridge to use the
DVD-RAM with a
–
cartridge. (TYPE1
cannot be used)
Disc type
Standard symbol
Data that can be recorded and played
+R
before fi nalisation
DVD-V
+R +R DL +RW
+R DL
before fi nalisation
after fi nalisation
DVD-V
after fi nalisation
Video
Quality in which video is recorded Standard defi nition (SD) quality
Recording mode in which video is
recorded
XP, SP, LP, EP, FR
Rewritable –
Timer recording –
Copying “HD Copy Once” titles (➔ 33)
Copy in standard definition quality (XP, SP, LP, EP, FR mode) is possible.
Copying “HD No Copy” titles (➔ 33)
Copy in standard definition quality (XP, SP, LP, EP, FR mode) is possible.
Play on other players
Finalisation is needed for playback on other equipment.
+R DL
can be played back only on equipment compatible with
this disc.
Note
+R +R DL These discs recorded with this unit or with another Panasonic DVD Recorder may be
incompatible. However, discs that are fi nalised are compatible and can be played.
8X Speed +RW disc is not supported.
-RW(V)
before
fi nalisation
DVD-V
after fi nalisation
+RW
+RW
can be played back only
on equipment compatible with
this disc.
If the disc failed to play on other
equipment, we recommend you
create top menu
(➔ 96).
Notes
Discs recorded on equipment other than this unit may not be used for recording on this unit.
This unit cannot record NTSC signals to discs that already have PAL signal recordings. (However, both types of programmes can be recorded
onto the HDD, BD-RE or BD-R.)
You may not be able to record depending on the condition of the discs and you may not be able to play due to the condition of the recording.
■ Regarding 8 cm Disc
This unit cannot record or edit the 8 cm BD-RE, BD-R, DVD-RAM, DVD-R, DVD-R DL, DVD-RW, +R DL or +RW.
Only playback or copy to the HDD is possible.

22
RQT9430
HDD and Disc Handling
Play-only discs
Disc type Logo
BD-Video
DVD-Video
DVD-RW
(DVD Video
Recording
format)
DVD-R
DVD-R DL
CD
Disc
with high
definition
video
(AVCHD)
recorded by
Panasonic’s
video
camera, etc.
Close the session after recording. Play may be impossible on some discs due to the condition of the recording.
Operation and sound quality of CDs that do not conform to CD-DA specifi cations (copy control CDs, etc.) cannot be guaranteed.
•
The producer of the disc can control how discs are played. So you may not always be able to control play as described in these operating
•
instructions. Read the disc’s instructions carefully.
–
–
Standard
symbol
BD-V
DVD- V
-RW(VR)
DivX, MP3,
JPEG
CD
DivX, MP3,
JPEG
AVCHD
Uses
High Defi nition (HD) movie and music discs
This unit can playback BONUSVIEW™ or BD-Live compatible discs.
(➔ 49)
When playing a set of two or more BD-Video discs, the menu screen
may continue to display even if the disc has been ejected.
To enjoy High Bit rate Audio and Video (➔ 50)
Operation of this unit may become slower when the BD-J application
(➔ 138) is executing. This is not malfunction.
High quality movie and music discs
DVD-RW video recorded on another DVD recorder
By formatting (➔ 95) the disc, you can copy onto it in DVD-Video
•
format.
It may be necessary to finalise the disc on the equipment used for
•
recording.
DVD-R
•
•
•
•
•
•
•
Following disc can be played.
BD-RE, BD-R, DVD-RAM, DVD-R, DVD-R DL, DVD-RW, +R, +R DL,
Finalise (➔ 138) the DVD-R, DVD-R DL, DVD-RW, +R or +R DL with
Set “Play Video (AVCHD) on BD-RE/BD-R” to “On” for the disc that
and DVD-R DL with video recorded in DivX (➔ 51)
and DVD-R DL with music recorded in MP3 (➔ 77)
DVD-R
DVD-R and DVD-R DL with still pictures recorded in JPEG (➔ 70)
Recorded audio and music (including CD-R/RW)
You can copy tracks to this unit’s HDD.
and CD-RW with video recorded in DivX (➔ 51)
CD-R
CD-R
and CD-RW with music recorded in MP3 (➔ 77)
CD-Rand CD-RW with still pictures recorded in JPEG (➔ 70)
+RW
the same equipment that was used to record.
has high definition video (AVCHD) recorded by Panasonic’s video
camera, etc. and other video format such as those recorded on this
unit. (➔ 100)
Discs that cannot be played
BD-RE (Ver.1.0)
•
DVD-RAM that cannot be removed from their
•
cartridges
2.6/5.2 GB DVD-RAM, 12 cm
•
3.95/4.7 GB DVD-R for Authoring
•
DVD-R, DVD-R DL, DVD-RW, +R, +R DL recorded
•
on another unit and not finalised (➔ 138)
BD-Video with a region code other than “B”
•
DVD-Video with a region number other than “2” or
•
“ALL”
DVD-Audio
•
HD DVD
•
DVD-ROM, +R 8 cm, CD-ROM, CDV, CD-G, Photo
•
CD, CVD, SVCD, SACD, MV-Disc, PD, Video CD, etc.
Types of disc for the type of
connected TV
When you use the discs recorded either PAL or NTSC, or playback a
title recorded on HDD using PAL or NTSC, refer to this table.
(
: Possible to view, −: Impossible to view)
TV type
Multi-system TV
PAL TV
NTSC TV
1
Select “PAL60” in “NTSC Video Output” (➔ 102).
If your television is not equipped to handle PAL 525/60 signals the
picture will not be shown correctly.
2
Select “NTSC” in “TV System” (➔ 104).
When playing back a disc or title recorded on the HDD, ensure
•
that you match the “TV System” setting to the disc or title (PAL or
NTSC) (➔ 104).
Disc/Titles
recorded on HDD
PAL
NTSC
PAL
NTSC
PAL −
NTSC
Yes /N o
1
(PAL60)
2
23
RQT9430
USB Memory and Card Handling
USB memories you can use on this unit
USB memories can only be used for playback or copy to HDD or discs.
USB memories which are defined as USB mass storage class, and digital cameras that use PTP protocol:
– USB memories that support USB 1.0/1.1 and USB 2.0 Full Speed/High Speed.
USB memories of up to 128 GB can be used.
•
USB memories that support bulk only transfer.
Compatible USB memories
Format
Standard symbol
Data that can be played DivX, MP3, Still pictures (JPEG)
Data that can be copied
•
Despite meeting the conditions mentioned above, there may be USB memories that cannot be used for this unit.
•
CBI (Control/Bulk/Interrupt) is not supported.
Digital Cameras which require additional programme installation when connected to a PC are not supported.
•
MTP (Media Transport Protocol) device is not supported.
•
A multi-port USB card reader is not supported.
•
FAT16 and FAT32 file systems are supported.
UDF/NTFS/exFAT file system is not supported.
•
Depending on the sector size, some files may not work.
•
Only the first partition on USB memories with multi-partition is supported.
•
USB
MP3
It can be copied to HDD.
•
Still pictures (JPEG)
It can be copied to HDD, BD-RE or DVD-RAM.
•
SD Video (MPEG2 format)
HD Video (AVCHD format)
If a Panasonic’s video camera, etc. with HDD is connected to this unit’s USB port:
•
you can copy the SD Video shot with the camera to this unit’s HDD or DVD-RAM. (➔ 69)
–
you can copy the HD Video shot with the camera to this unit’s HDD, BD-RE or BD-R. (➔ 68)
–
Notes
This unit’s USB port does not support bus-powered USB device.
•
Cards usable on this unit
SD cards can be used for playback, copy to HDD or discs or copy from HDD or discs.
•
SD Memory Card1 (from 8 MB to 2 GB)
•
SDHC Memory Card2 (from 4 GB to 32 GB)
Type
Standard symbol
Data that can be
played
Data that can be
copied
Instructions
1
Including miniSD Card and microSD Card
2
Including miniSDHC Card and microSDHC Card
The card types mentioned above will be referred to as “SD card” in these operating instructions.
SD
Still pictures (JPEG)
HD Video (AVCHD format)
Still pictures (JPEG)
It can be copied to/from HDD, BD-RE or DVD-RAM.
•
SD Video (MPEG2 format)
HD Video (AVCHD format)
SD Video shot with a Panasonic’s video camera, etc. can be copied to the HDD or DVD-RAM. (➔ 69)
•
HD Video shot with a Panasonic’s video camera, etc. can be copied to the HDD, BD-RE or BD-R. (➔ 68)
•
You can insert directly into the SD card slot.
1
A miniSD Card and a microSD Card must be used with the adaptor that comes with the card.
2
A miniSDHC Card and microSDHC Card must be used with the adaptor that comes with the card.
Suitable SD cards
When using SD cards 4 GB or larger, only SD cards that display the SDHC logo can be used.
•
Usable memory is slightly less than the card capacity.
•
Please confirm the latest information on the following website.
•
http://panasonic.co.jp/pavc/global/cs (This site is in English only.)
If the SD card is formatted on other equipment, the time necessary for recording may be longer. Also, if the SD card is formatted on a PC,
•
you may not be able to use it on this unit. In these cases, format the card on this unit (➔ 95, 138).
This unit is compatible with SD Memory Cards that meet SD Card Specifications FAT12 and FAT16 formats, as well as SDHC Memory
•
Cards in FAT32 format.
SDHC Memory Cards used for recording with this unit can only be used with other SDHC Memory Card-compatible equipment. SDHC
•
Memory Cards cannot be used with equipment that is only compatible with SD Memory Cards.
We recommend using a Panasonic SD card.
•
Keep the SD Card out of reach of children to prevent swallowing.
•
■ Setting the protection
Switch the write-protect switch to the “LOCK” position.
KCOL
24
RQT9430
Watching Television (freesat)
PAU SE
STOP
SLOW/SEARCH
PAGE
CH
AV
TV
DRIVE
SELECT
VOL
SKIP
PLAY/x1.3
SELECT
INPUT
DEL
0
9
8
7
6
54
3
2
1
abc def
jklghi
mno
tuvqrs
p
xyz
w
STATUS
CREATE
G
U
I
D
E
RETURN
BACK/
EXIT
OK
OPTION
D
I
R
E
C
T
N
A
V
I
G
A
T
O
R
F
U
N
C
T
I
O
N
M
E
N
U
CH
MANUAL SKIP
OK
RETURN
All Channels
Entertainment
News & Sport
Movies
Lifestyle
Music
Children
Special Interest
Radio
Shopping
Gaming & Dating
Regional
Favourites
Channel Genre Selection
Landscape
WED 19/08/2009 13:30
TV Guide:
WED 19th
12:00-20:00 BBC HD Preview
All ChannelsAll Types
Time: 14:00 14:30 15:00 15:30 16:00
108 BBC HD BBC HD Preview
Red Cap
Love USA
100 Sheep Dream
Heartbeat 100 Sheep Dream
UFO Hot Wave Used Car
Behind me Black House Crowntown Deal
USO Blue Wave
In the
Great A
News Show News Show
Red Cap Red Cap
113 ITV2
114 ITV2+1
115 ITV3
116 ITV3+1
117 ITV4
120 Channel4
HD
RETURN
OK
Select Programme
Select Channel
+24 hours Prog. Type Channel Genre
Page Up
Page Down
Portrait/Landscape
Info
CH
GUIDE
Selection Screen
WED 19/08/2009 13:30
RETURN
OK
Millions
4000 FilmFour
Movie
WED 19/08/2009
13:00 - 15:10
View
Single Timer Rec.
Series Timer Rec.
Delete
Selecting a channel with TV Guide
Refer to “TV Guide system (freesat)” (➔ 43) for detailed information.
This unit can receive and record digital satellite channels.
Preparation:
Turn on the television and select the video input terminal that this unit is
connected to.
Important:
This unit has only digital satellite tuners.
to turn the unit on.
a few times and select “freesat”, then
The Channel Genre Selection
–
screen appears.
e, r, w, q
to select the
desired genre, then
The TV Guide list appears.–
to select current
e, r
programme, then
e, r
Selecting a channel without using TV Guide
To select desired channel
Press [1, 2 CH].
to select “View”, then
Tips
To show Digital TEXT (MHEG) and
subtitles (➔ 91)
To select or change Multi Audio/AD
(➔ 90, Multi Audio/AD)
To register the channel to “Favourites”
(➔ 97)
Notes
The TV Guide list is not displayed
•
immediately after initial tuning is done.
Channel number is indicated on the
•
unit’s display as an example, “FS151”.
To directly enter channels
You can also select channels with the numbered buttons.
e. g., “151”: [1] ➔ [5] ➔ [1]
“504”: [5] ➔ [0] ➔ [4]
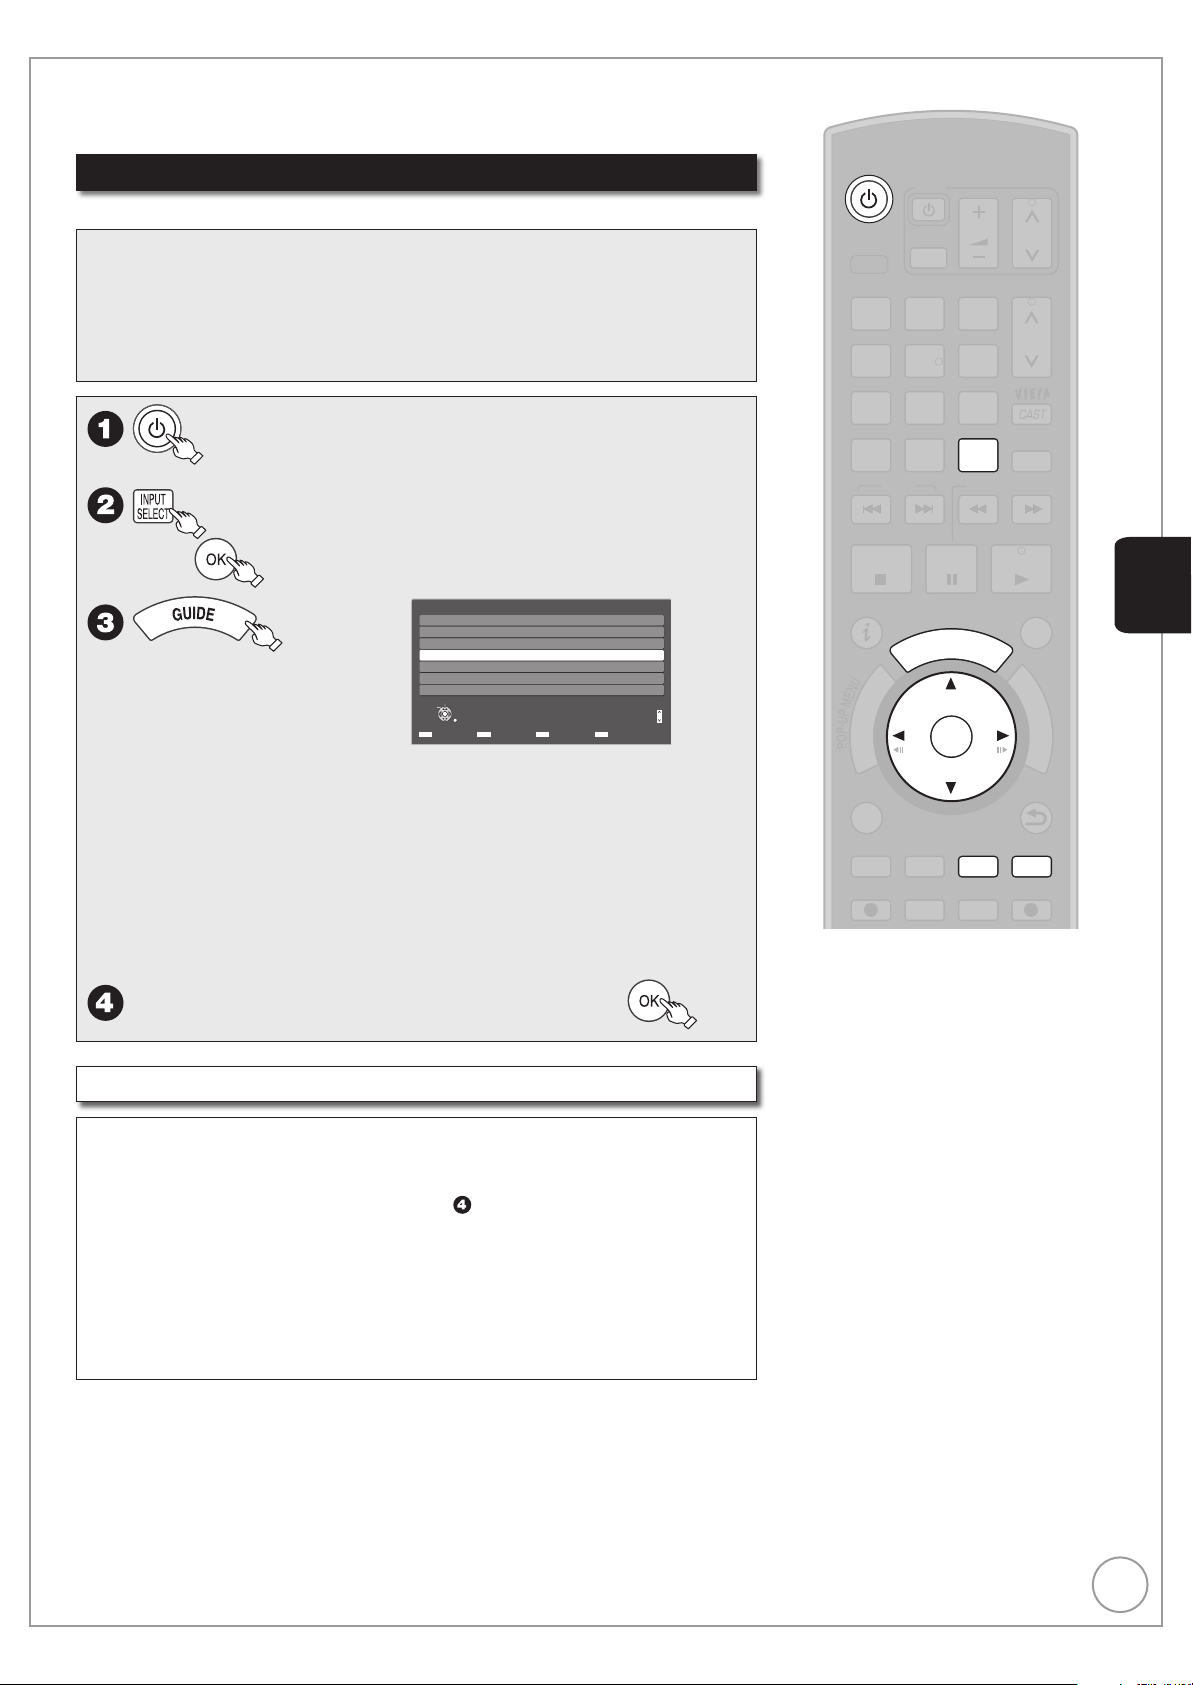
25
RQT9430
PAU SE
STOP
SLOW/SEARCH
PAGE
CH
AV
TV
DRIVE
SELECT
VOL
SKIP
PLAY/x1.3
SELECT
INPUT
DEL
0
9
8
7
6
54
3
2
1
abc def
jklghi
mno
tuvqrs
p
xyz
w
TIME SLIP
STATUS
REC MODE
REC EXT LINK
CREATE
CHAPTER
G
U
I
D
E
RETURN
BACK/
DIRECT
TV
REC
EXIT
OK
OPTION
D
I
R
E
C
T
N
A
V
I
G
A
T
O
R
F
U
N
C
T
I
O
N
M
E
N
U
CH
MANUAL SKIP
Watching Television of the Other Satellite Service
To view or record free channels from other satellite services.
There are no programme guides for these channels. Only the channel list is
available.
Selecting a channel with the channel list
This unit can receive and record digital satellite channels.
Preparation:
Turn on the television and select the video input terminal that this unit is
connected to.
Important:
This unit has only digital satellite tuners.
to turn the unit on.
a few times and select
“Other Sat.”,
then
All Other Sat Channels Sorting:123... Type:All Channels
freesatHome
The channel list appears.
–
To display the type of the
–
selected channel, press the
“Blue” button. Each time you
press the “Blue” button, the
type will be displayed as
follows.
Free TV ➔ Radio ➔ Data ➔ All Channels ➔ Free TV ➔ …
To sort the channel, press the “Yellow” button.
–
Each time you press the “Yellow” button the item will be displayed
as follows.
123 (channel number order) ➔ ABC (channel name order) ➔ …
e, r
Selecting a channel without using the channel list
To select desired channel
Press [1, 2 CH].
You can perform this operation after step .
To directly enter channels
to select the desired channel, then
2
3
freesatSSU
4
Brit Shorts
5
HINRG LOWNRG
6
WELL Class
7
GROOVE
8
-
Select
View
RETURN
Sorting Type
Page Up
Page Down
Basic Operations
CH
Tips
To set the channel list (➔ 98, Channel
Settings)
Notes
There are no programme guide
•
information in other satellite mode, only
list of channel name is available.
Channel number is indicated on the
•
unit’s display as an example, “S1234”.
You can also select channels with the numbered buttons.
e. g., “5”: [5] ➔ [OK]
“88”: [8] ➔ [8] ➔ [OK]
“1234”: [1] ➔ [2] ➔ [3] ➔ [4]
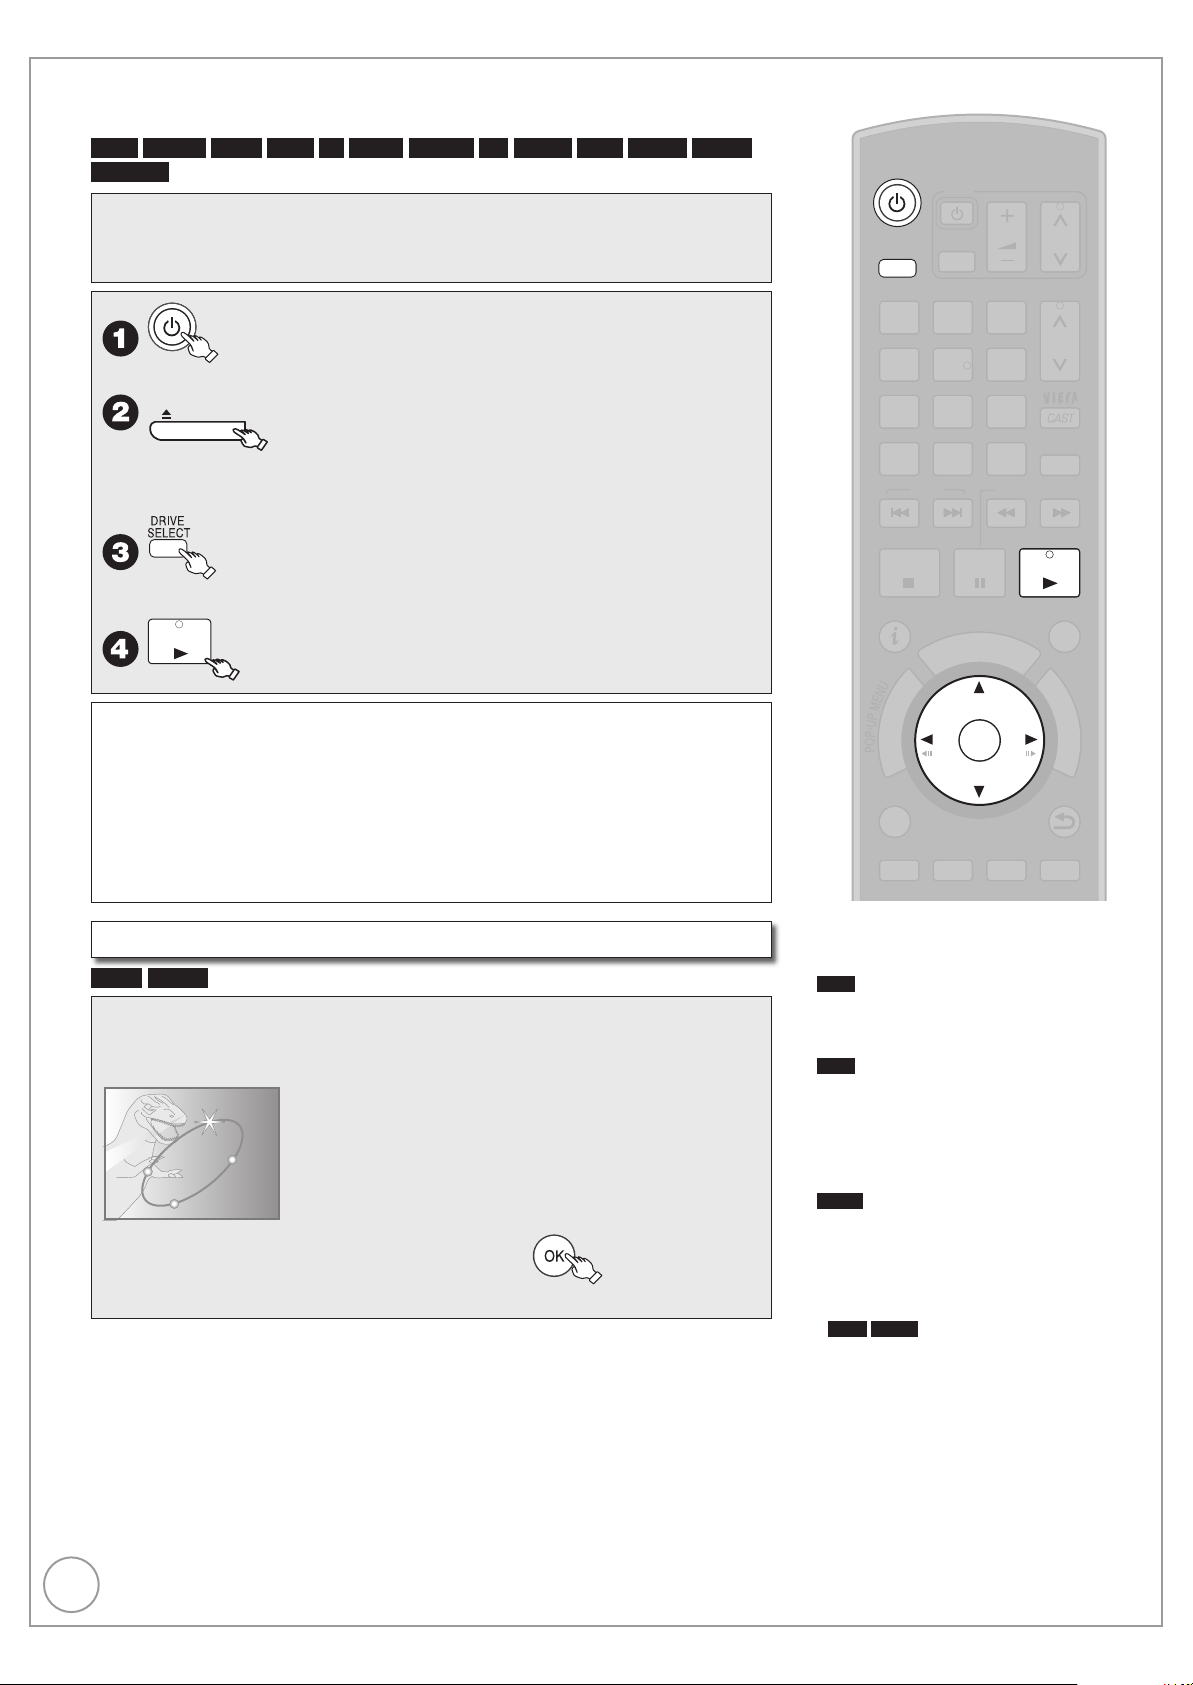
26
RQT9430
PAU SE
STOP
SLOW/SEARCH
PAGE
CH
AV
TV
DRIVE
SELECT
VOL
SKIP
PLAY/x1.3
SELECT
INPUT
DEL
0
9
8
7
6
54
3
2
1
abc def
jklghi
mno
tuvqrs
p
xyz
w
TIME SLIP
STATUS
REC MODE
REC EXT LINK
CREATE
CHAPTER
RETURN
BACK/
DIRECT TV REC
EXIT
OK
OPTION
D
I
R
E
C
T
N
A
V
I
G
A
T
O
R
F
U
N
C
T
I
O
N
M
E
N
U
CH
MANUAL SKIP
G
U
I
D
E
Playback
Refer to “Advanced Playback” (➔ 45 to 47) for detailed information.
HDD
BD-RE BD-R
-RW(VR)
Preparation:
Turn on the television and select the video input terminal that this unit is
connected to.
to turn the unit on.
If you use a disc
OPEN/CLOSE
Insert a disc (➔ 117) and press [; OPEN/CLOSE] again to close
–
the tray.
a few times to select the HDD or BD drive.
–
Select “BD” for any discs.
RAM
-R
-R DL -RW(V) +R +R DL +RW BD-V DVD-V
to open the tray (Button located on front of the unit).
PLAY/x1.3
Stopping Play
Press [g].
–
The stopped position is memorized.
(Resume play function)
This operation may not work
Pausing Play
Press [h].
– Press again to restart play.
depending on a disc or the
position where it was stopped.
Menu screens on the TV
BD-V DVD-V
Generally, menu screens that appear on the TV may be navigated as
follows:
e. g.,
DVD TOP MENU
Chapter List
e, r, w, q
You can sometimes use the numbered buttons to select an item.
Trailer
Play
Subtitles
DINOSAUR
to select an item, then
Tips
To display Pop-up Menu
BD-V
During play
Press [DIRECT NAVIGATOR].
To display Top Menu
BD-V
While playing
1. Press [OPTION].
2. Press [e, r] to select “Top Menu”, then
press [OK].
While stopped
Press [DIRECT NAVIGATOR].
DVD- V
1. Press [OPTION].
2. Press [e, r] to select “Top Menu” , then
press [OK].
Notes
•
•
•
•
•
BD-V
Playback starts from the
DVD- V
point specified by the disc.
Depending on the disc type, playing may
automatically start without pressing [q]
(PLAY).
The unit takes some time to read the
disc before play starts.
Discs continue to rotate while menus
are displayed. Press [g] when you finish
to preserve the unit’s motor and your
television screen.
If “5” appears on the TV, the operation is
prohibited by the unit or disc.
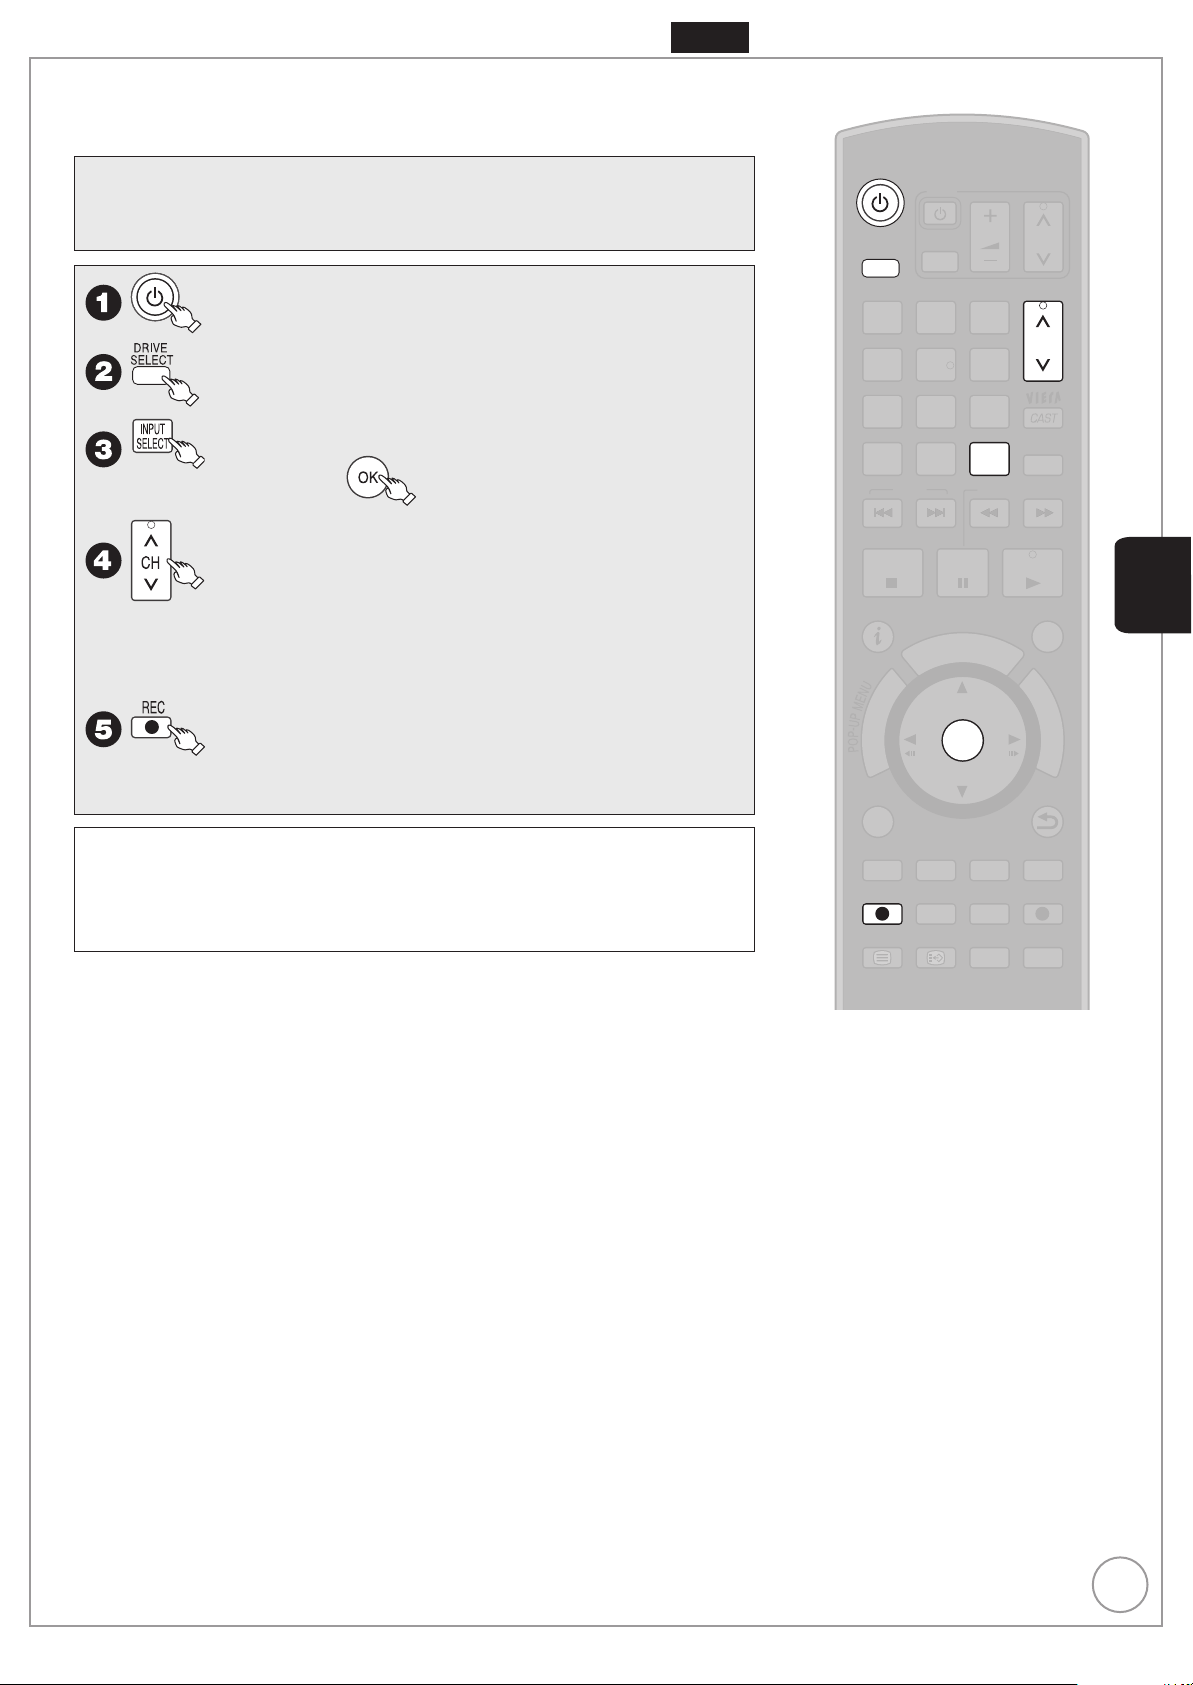
27
RQT9430
Recording Television Programmes
PAU SE
STOP
SLOW/SEARCH
PAGE
CH
AV
TV
DRIVE
SELECT
VOL
SKIP
PLAY/x1.3
SELECT
INPUT
DEL
0
9
8
7
6
54
3
2
1
abc def
jklghi
mno
tuvqrs
p
xyz
w
TIME SLIP
DISPLAY
STATUS
TEXT
REC MODE
REC EXT LINK
CREATE
CHAPTER
G
U
I
D
E
RETURN
BACK/
PROG/CHECK
DIRECT
TV
REC
EXIT
OK
OPTION
STTL
D
I
R
E
C
T
N
A
V
I
G
A
T
O
R
F
U
N
C
T
I
O
N
M
E
N
U
CH
MANUAL SKIP
HDD
Refer to “Important Notes for Recording” (➔ 33 to 34) and “Advanced Recording” (➔ 35 to 38) for detailed
information on recording.
This operation will only record to HDD in DR mode.
Preparation:
Turn on the television and select the video input terminal that this unit is
connected to.
to turn the unit on.
a few times and select the HDD drive.
a few times and select “freesat” or “Other
Sat.”, then
to select desired channel.
–
To select with the numbered buttons
(➔ 24 for freesat, 25 for other satellite services)
–
To record 2 programmes simultaneously. (➔ 36)
Basic Operations
to start recording.
When [* REC] is pressed while a drive other than the HDD is
–
selected, it will automatically switch to HDD and start the recording.
Pausing Recording
Press [h].
– Press again to restart recording.
(The title is not divided.)
Stopping Recording
Press [g].
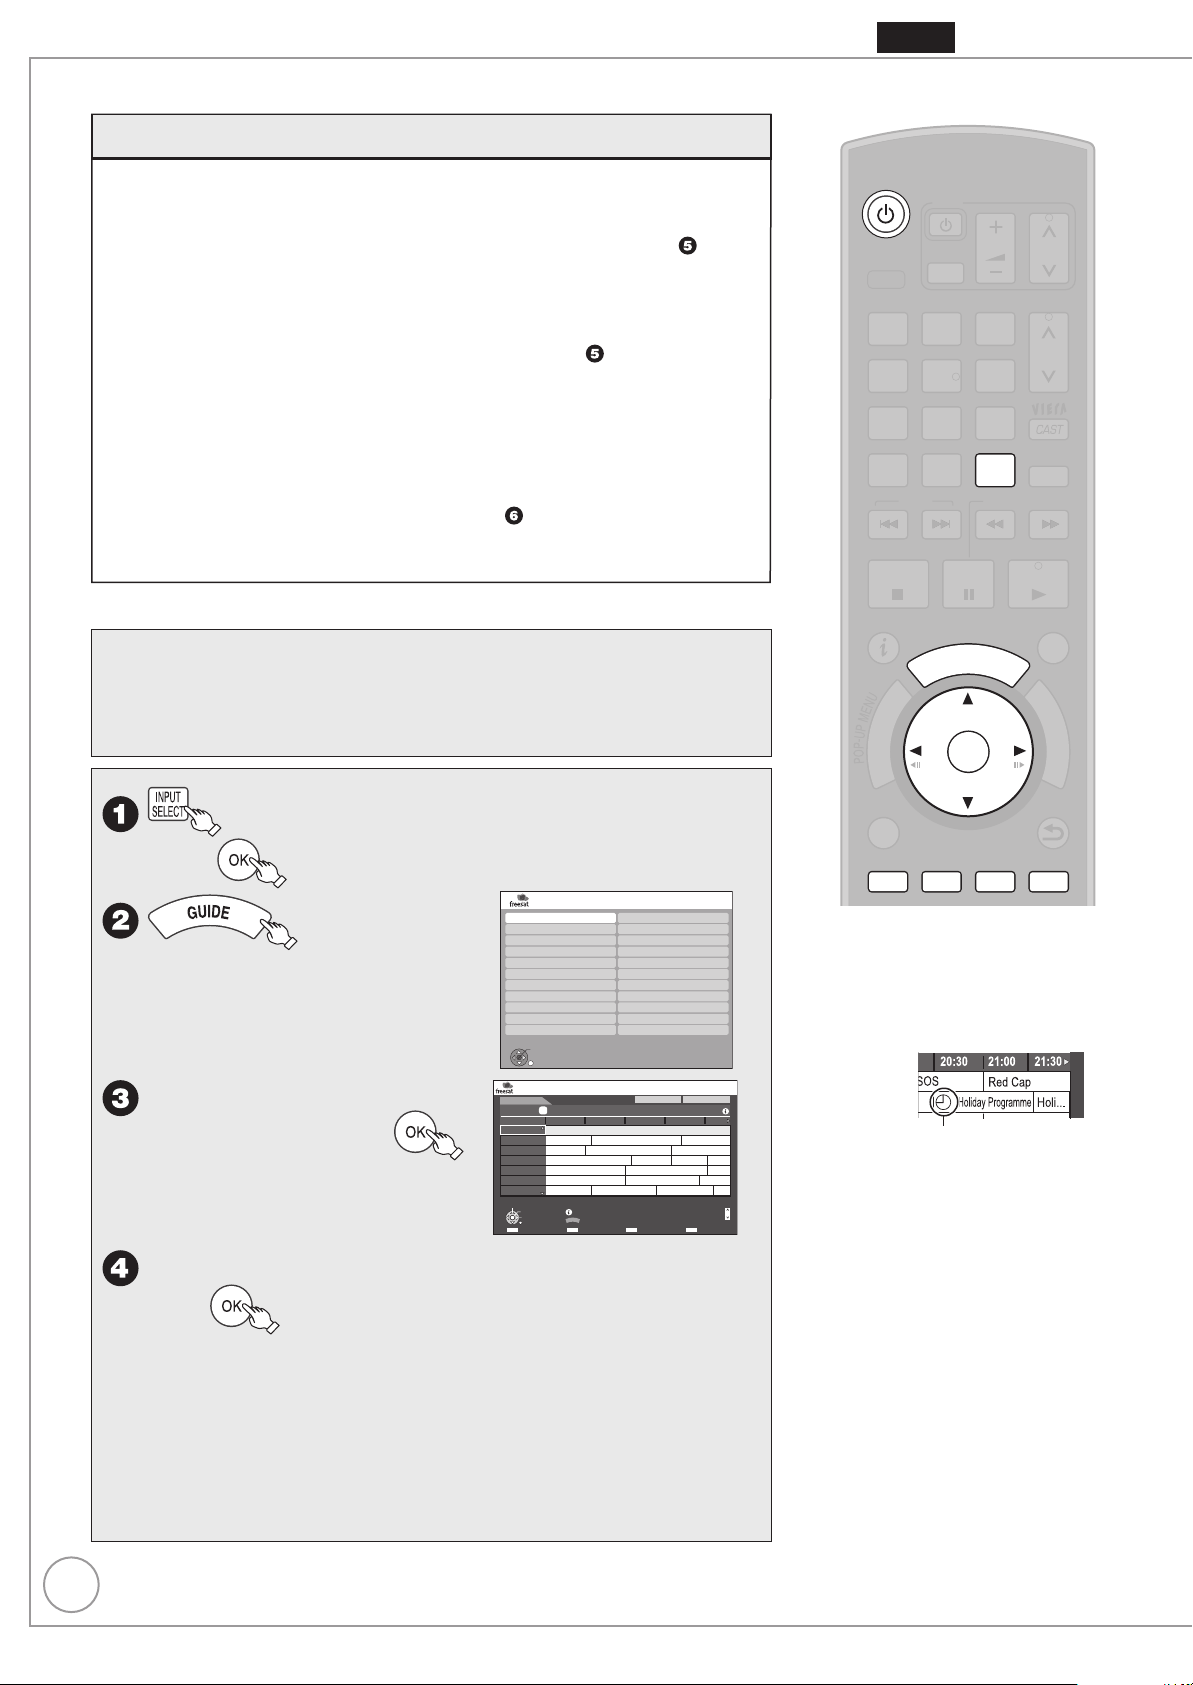
28
RQT9430
PAU SE
STOP
SLOW/SEARCH
PAGE
CH
AV
TV
DRIVE
SELECT
VOL
SKIP
PLAY/x1.3
SELECT
INPUT
DEL
0
9
8
7
6
54
3
2
1
abc def
jklghi
mno
tuvqrs
p
xyz
w
TIME SLIP
STATUS
CREATE
CHAPTER
G
U
I
D
E
RETURN
BACK/
EXIT
OK
OPTION
D
I
R
E
C
T
N
A
V
I
G
A
T
O
R
F
U
N
C
T
I
O
N
M
E
N
U
CH
MANUAL SKIP
Timer Recording Using the TV Guide (freesat)
yy
Various function with freesat
This unit has a function that enables timer recordings to be controlled by the signal sent from
the broadcaster. “Guide Link”, “Series recording” (➔ 40), and “Split Programme” are available.
“Guide Link” — If you set a timer recording from the TV Guide, the recording’s
start and stop times can be controlled by the broadcaster, e.g. delayed start.
This is indicated by “Guide Link” in the Timer Recording screen in step
(➔ 29).
“Series Timer Recording” — You can record all the episodes of a series by setting just
one timer recording (➔ 40).
“Split Programme” — If a programme is separated into 2 or more parts by some other
programmes e.g. news, this unit pauses recording during the gap.
This is indicated by “Split” in the Timer Recording screen
When setting timer from the 1st split programme, other parts of the programme will be automatically
set and indicated by the timer icon on the TV Guide, but not shown on the timer recording list.
If the signal is not sent correctly, the recording may lack the beginning or the
ending part of the programmes.
In order to make the timer recording work successfully, we recommend you
set the start time earlier and the end time later by some minutes, up to a
maximum of 10 minutes for Guide Link to function.
e.g. When you set the timer recording for a programme that will start at 10:00
and end at 11:00, set “9:58” and “11:05” in step
These functions are available for freesat channels only. Use “Manual timer
recording” (➔ 39) to timer record Other Sat. channels.
This operation will only record to HDD in DR mode.
Preparation:
Turn on the television and select the video input terminal that this unit is
•
connected to.
Turn on this unit.
•
Confirm that the clock on the unit’s display is set to the correct time.
•
in step
(➔ 29).
(➔ 29).
HDD
a few times and select “freesat”,
then
screen appears.
e, r, w, q
desired genre, then
The TV Guide list appears.–
e, r, w, q
to select the
to select the desired programme,
The channel genre selection
–
then
To jump back 24 hours, press the “Red” button.
–
You can only jump back to the current date and past information
cannot be viewed.
To jump ahead 24 hours, press the “Green” button to jump ahead
–
by one day.
To display channels sorted in prog. type, press the “Yellow” button.
–
To display channels sorted in channel genre, press the “Blue” button.
–
Channel Genre Selection
All Channels
Entertainment
News & Sport
Movies
Lifestyle
Music
Children
Special Interest
Radio
Shopping
Gaming & Dating
OK
RETURN
WED 19th
12:00-20:00 BBC HD Preview
108 BBC HD BBC HD Preview
113 ITV2
114 ITV2+1
115 ITV3
116 ITV3+1
117 ITV4
120 Channel4
Select Channel
TV Guide:
HD
Time: 14:00 14:30 15:00 15:30 16:00
Red Cap
Love USA
News Show News Show
100 Sheep Dream
Heartbeat 100 Sheep Dream
UFO Hot Wave Used Car
Behind me Black House Crowntown Deal
OK
Info
Select Programme
GUIDE
Portrait/Landscape
RETURN
+24 hours Prog. Type Channel Genre
Favourites
Landscape
Red Cap Red Cap
USO Blue Wave
Regional
WED 19/08/2009 13:30
All ChannelsAll Types
Great A
In the
Page Up
Page Down
Tips
To check programmes for which you
set the timer recording (➔ 41)
To cancel a timer recording
programming
Timer icon
1. Press [e, r, w, q] to select the
programme (the timer icon is displayed),
CH
then press [OK].
2. While “Delete” is selected, press [OK].
3. Press [w, q] to select “Yes”, then press
[OK].
– The timer icon disappears.
To cancel a series timer recording
programme (➔ 40, Series recording)
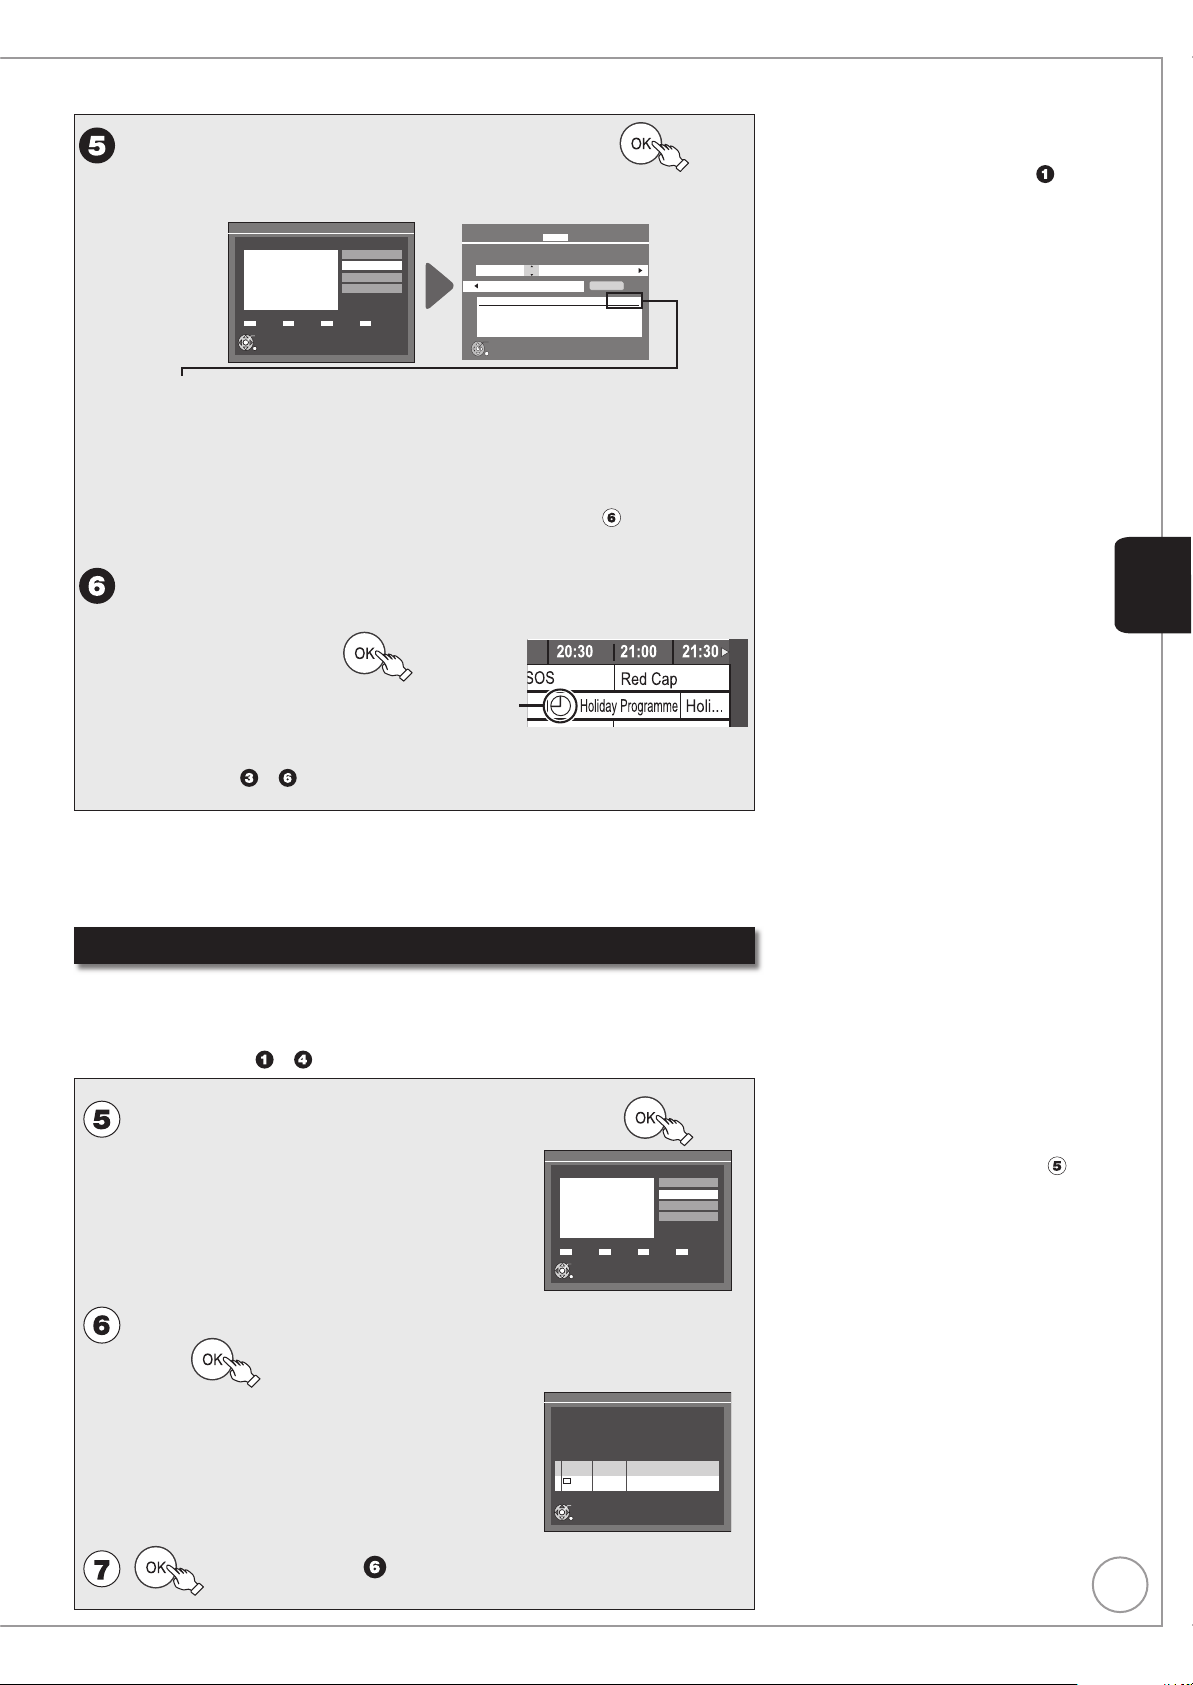
29
RQT9430
e, r to select “Single Timer Rec.”, then
yy
If “Series Timer Rec.” can be selected on the Selection Screen, refer
–
to “Series recording” (➔ 40)
e.g.,
Selection Screen
Millions
4000 FilmFour
Movie
WED 19/08/2009
13:00 - 15:10
OK
RETURN
WED 19/08/2009 13:30
View
Single Timer Rec.
Series Timer Rec.
Delete
Series Info
Timer Recording Remain HDD 30:30 DR WED 19/08/2009 8:59
Channel
Day/Date Start Stop Drive Mode
121 WED19/08 13:10 13:50 HDD DR
[Prog.Name]
BBC News at One
BBS 1 CI (Guide Link)
Genre: News
National and international news from the BBC, followed by Wather.
OK
RETURN
Input Name
(Guide Link) : Guide Link (➔28)
(Series) : Series recording (➔ 40) is set.
(Split) : The programme is split in two or more parts by other programmes. This unit
pauses recording during the gap between the parts of the programme.
This screen may not appear depending on the programme.
The selection screen appears if there are both SD and HD
–
programmes when you select the programme, go to (➔ below,
Recording the ITV HD, etc. programme)
Confirm the programme (start and end time) by
TV magazine, etc. and correct if necessary using
Notes
•
You cannot display the TV Guide when
you select “Other Sat.” on step
The TV Guide list is not displayed
•
immediately after initial tuning is done.
The TV Guide system will not work if
•
the clock is not set correctly.
If “NTSC” has been selected for “TV
•
System” (➔ 104), the TV Guide system
cannot be used.
If you set a timer recording that will
•
overlap with other timer recordings, the
“Overlapped Timer Recording” screen
appears to help you resolve the
overlapping.
Follow the on-screen instructions.
TV Guide will disappear automatically
•
when you do not operate this unit more
than 5 minutes.
.
Basic Operations
e, r, w, q
, then
Timer icon
The timer icon is displayed when the settings are stored and the timer programme is on.
–
–
“z” lights on the unit’s display to indicate timer recording standby has been activated.
Repeat steps – to programme other recordings.
–
Press [^] to turn the unit off.
–
“Guide Link” will not be displayed and will not function under the following conditions.
Timer programmes set manually (➔ 39).
–
Timer programmes set from the TV Guide are modified or start/stop time changed by more
–
than 10 minutes from original time.
Timer programmes set from the TV Guide with the start time modified to later time or the
–
stop time modified to earlier time than the original time.
Recording the ITV HD, etc. programme
When ITV programme is also broadcast, the unit offers to select HD/SD
programme based on the signal sent from the broadcaster.
You can record the ITV HD programme using this unit.
After performing steps
– to select a programme (➔ 28)
e, r to select “Single Timer Rec.”, then
Selection Screen
Little League Champion
103 ITV1 Wales
Sport
TUE 10/03/2009
19:30 - 22:00
OK
RETURN
MON 09/03/2009 22:45
View
Single Timer Rec.
Series Timer Rec.
Delete
Series Info
Tips
To set the series timer recording with
ITV HD programme, etc.
Select “Series Timer Rec.” in step
(➔ 40, Series recording)
.
e, r to select the HD programme for recording,
then
This screen will only appear if there is an
–
HD broadcast of the programme.
Programme Selection
The same programme in High Definition picture quality exists.
Please choose programme and set the timer recording.
Channel Schedule Contents
10/03 TUE
ITV1 Wales
19:30 - 22:00
HD
10/03 TUE
19:30 - 22:00
OK
RETURN
to go to step (➔ above).
MON 09/03/2009 22:45
...Southpaws Action from Anfield of the
second leg of the first knock-out round...
...Southpaws Action from Anfield of the
second leg of the first knock-out round...
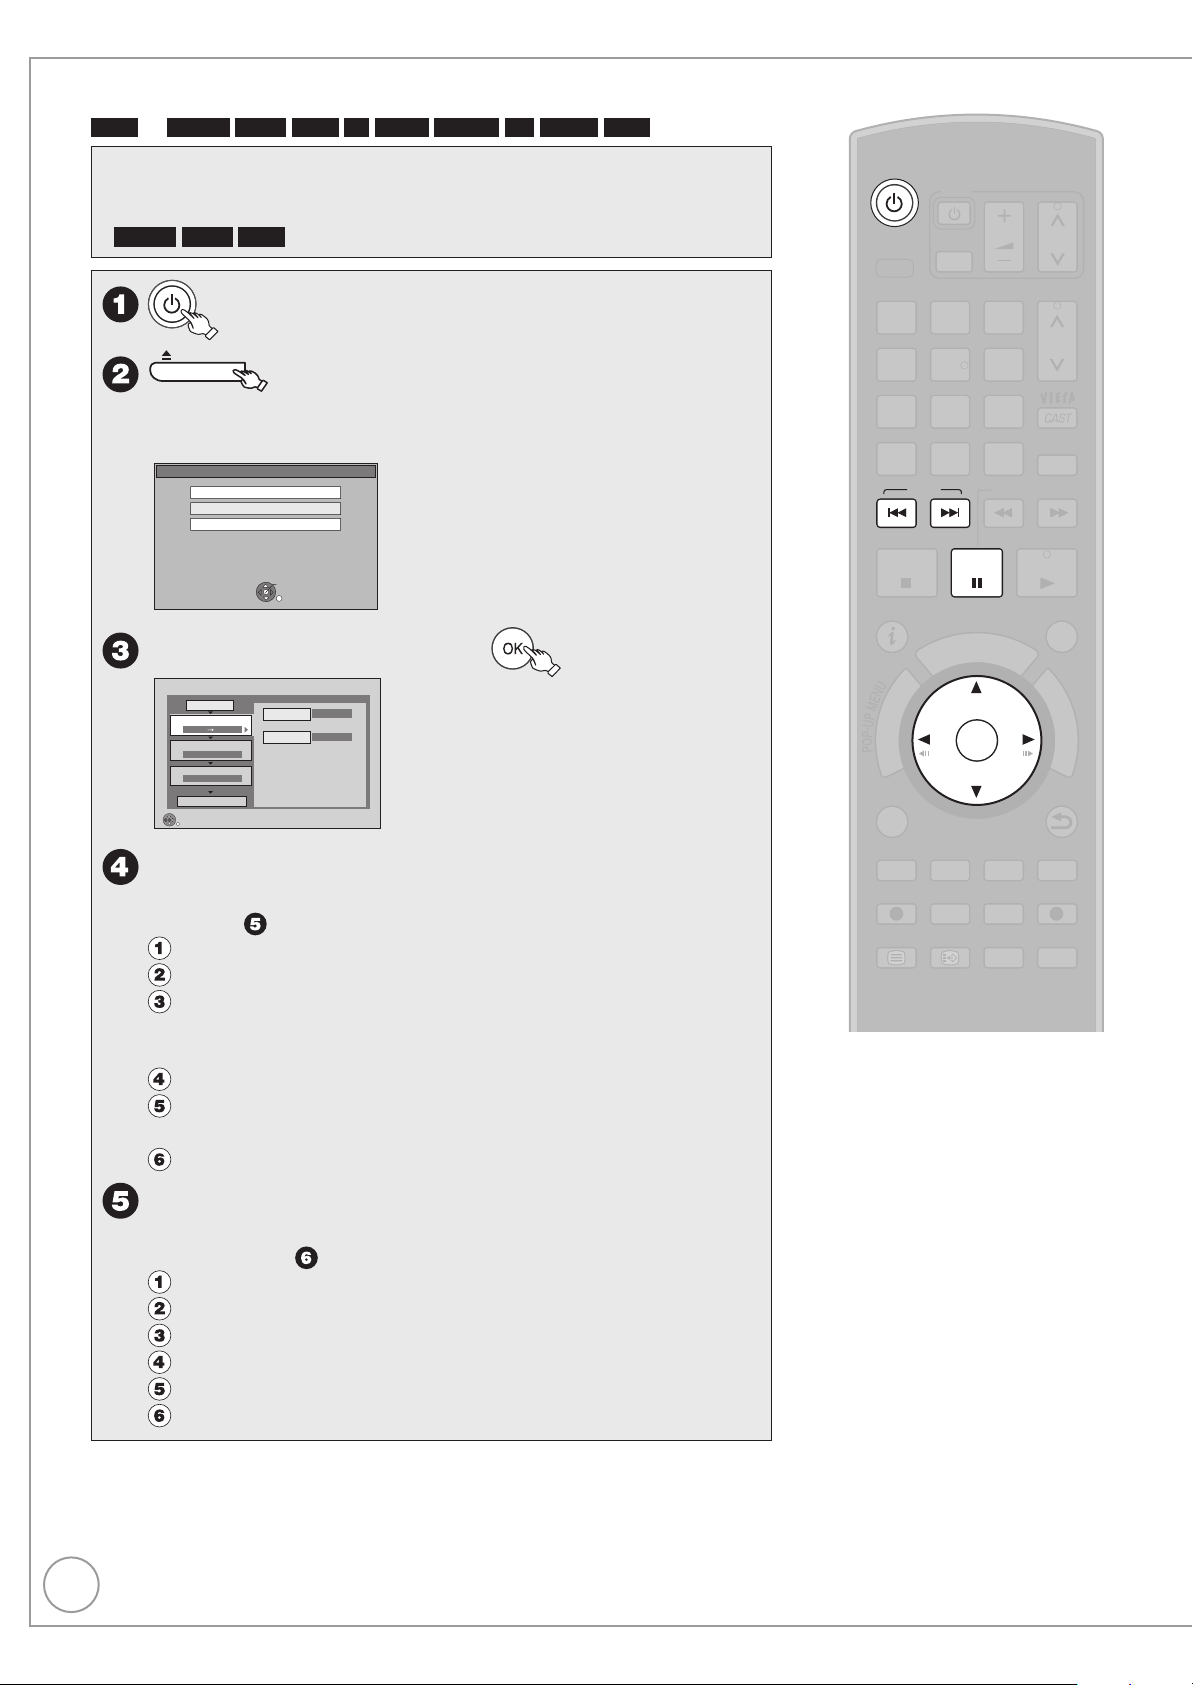
30
RQT9430
Copying Titles
PAU SE
STOP
SLOW/SEARCH
PAGE
CH
AV
TV
DRIVE
SELECT
VOL
SKIP
PLAY/x1.3
SELECT
INPUT
DEL
0
9
8
7
6
54
3
2
1
abc def
jklghi
mno
tuvqrs
p
xyz
w
TIME SLIP
DISPLAY
STATUS
TEXT
REC MODE
REC EXT LINK
CREATE
CHAPTER
G
U
I
D
E
RETURN
BACK/
PROG/CHECK
DIRECT
TV
REC
EXIT
OK
OPTION
STTL
D
I
R
E
C
T
N
A
V
I
G
A
T
O
R
F
U
N
C
T
I
O
N
M
E
N
U
CH
MANUAL SKIP
HDD
BD-RE BD-R RAM
p
-R
-R DL -RW(V) +R +R DL +RW
Preparation:
Turn on the television and select the video input terminal that this unit is
•
connected to.
BD-RE BD-R RAM
•
OPEN/CLOSE
Insert a disc (➔ 117) and press [; OPEN/CLOSE] again to close
–
If the disc is protected, release protection (➔ 94).
to turn the unit on.
to open the tray (Button located on front of the unit).
the tray.
e.g.,
DVD-RAM
Play
Copy
Format Disc
DVD-RAM is inserted.
OK
RETURN
e, r to select “Copy”, then
Copy
Cancel All
Copy Direction
1
Copy Mode
2
VIDEO High Speed
Create List
3
Start Copying
RETURN
BD/DVD HDD
0
Select the copy direction.
HDD
Source
Destination
BD/DVD
Information of the copy destination
– DVD-RAM
– Copy restricted title can be
copied on to disc
Set the copy direction.
–
If you are not going to change the copy direction, press [r]
(➔ step ).
Press [e, r] to select “Copy Direction”, then press [q].
Press [e, r] to select “Source”, then press [OK].
Press [e, r] to select “HDD”, then press [OK].
If you select “HDD”, “Destination” is automatically set
to “BD/DVD”.
Press [e, r] to select “Destination”, then press [OK].
Press [e, r] to select “BD/DVD”, then press [OK].
The same drive as the copy source cannot be selected.
Press [w] to confi rm.
Set the recording mode.
–
If you are not going to change the recording mode, press [r]
twice (➔ step ).
Press [e, r] to select “Copy Mode”, then press [q].
Press [e, r] to select “Format”, then press [OK].
Press [e, r] to select “VIDEO”, then press [OK].
Press [e, r] to select “Recording Mode”, then press [OK].
Press [e, r] to select the mode, then press [OK].
Press [w] to confi rm.
 Loading...