

Page 1
ENGLISH
Model No.
Quick Guide for 4K Photo
Press the shutter button to record a 4K photo. You can select the desired moment from a burst of 4K photos taken at 30 frames/second
and save that moment as a picture of approx. 8 million pixels.
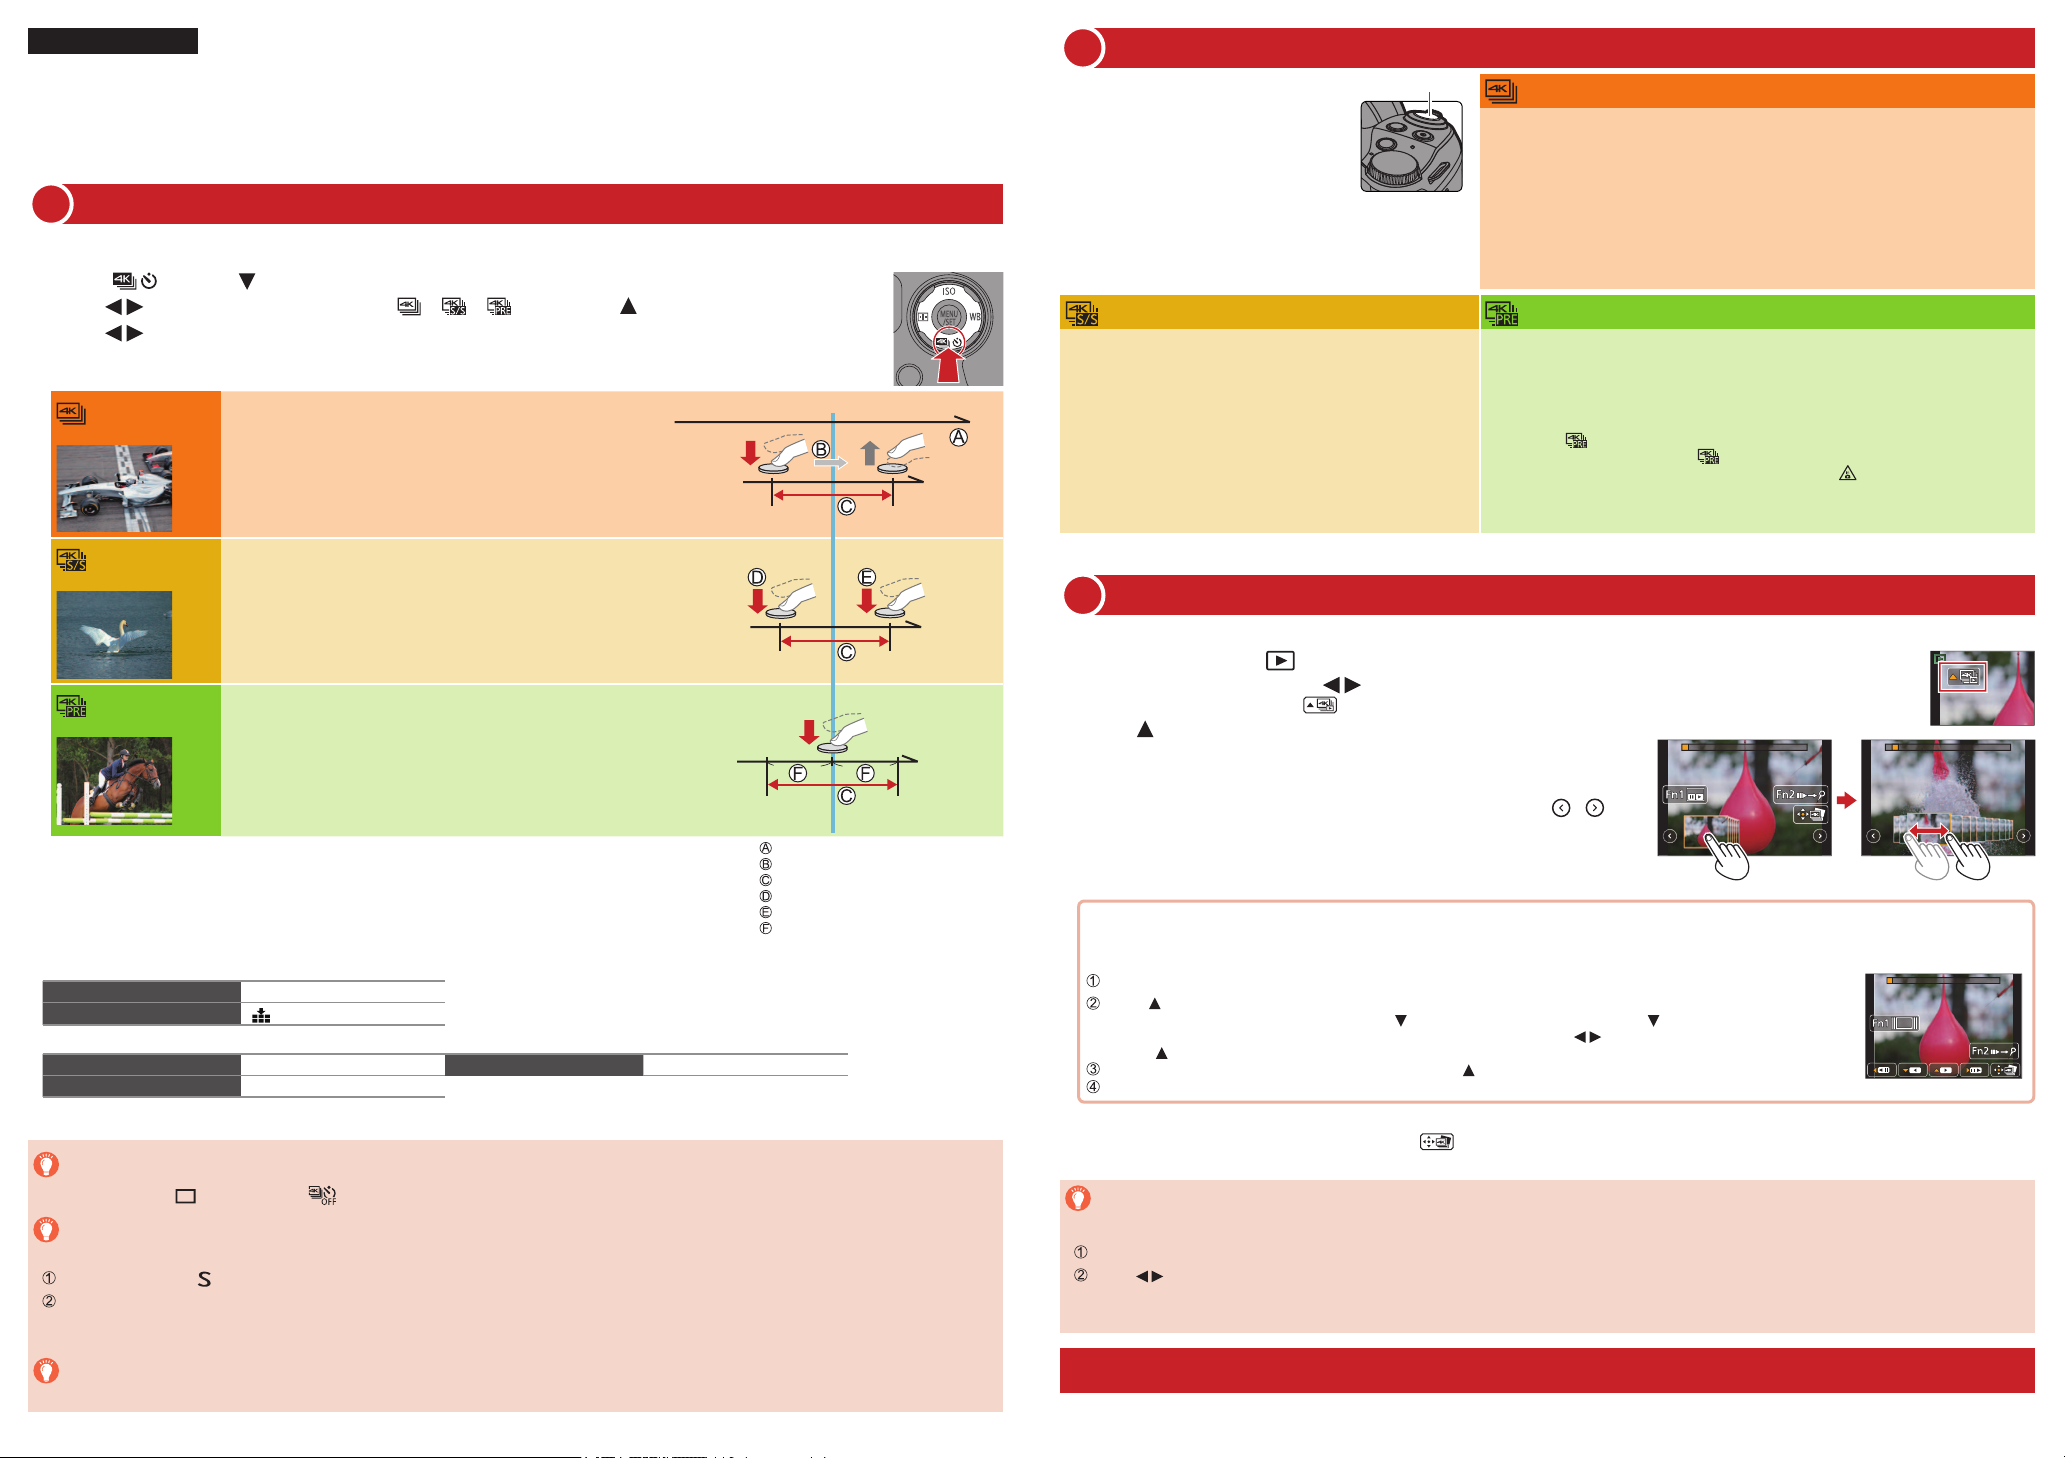
Selecting the method used to record 4K photos
1
To record 4K photos, use a UHS Speed Class 3 card.
●
Press [ ] button ( )
1
Press to select the 4K photo icon ([ ]/[ ]/[ ]) and press
2
Press to select the recording method and press [MENU/SET]
3
[4K Burst]
For capturing the best shot of a fast-moving subject
(e.g., sports, aeroplanes, trains)
Burst recording is performed while the shutter button is
pressed and held.
Continuous recording length: Up to 29 minutes and 59 seconds
●
Photo opportunity
Digital Camera
DMC-FZ300
SQC0252
Recording 4K Photos
2
When you perform 4K burst photo recording, a
4K burst file will be saved in the MP4 format.
When recording 4K photos, the angle of view
●
becomes narrower.
When [Auto Review] is enabled, the
●
picture selection screen will be displayed
automatically after recording.
Shutter button
[4K Burst(S/S)]
Press the shutter button fully
1
Recording is done until the button is pressed the second
●
time.
If you are using Auto Focus, continuous AF will work while
●
recording. Focus will be adjusted continuously.
When you press the [Fn2] button while recording, you can
●
add a marker. (Up to 40 markers for each 4K burst file.)
When selecting and saving pictures from a 4K burst file,
you can skip to the positions where you added markers.
Press the button fully once again
2
Start and stop tones will be heard.
●
[4K Burst]
Press the shutter button halfway
1
Press and hold the shutter button fully for as long as you
2
want to perform recording
The shutter sound will be heard repeatedly.
●
Recording will start approximately 0.5 seconds after you press the shutter button
●
fully. Therefore, press the button fully as soon as possible.
Recording is done while the button is fully pressed.
●
If you are using Auto Focus, continuous AF will work while recording. Focus will be
●
adjusted continuously.
[4K Pre-Burst]
Press the shutter button fully
1
Recording of a 4K burst file will be performed for approximately 1 second before
●
and after the moment that the shutter button is pressed.
The shutter sound will be heard only once.
●
In situations where you want to lock focus and exposure, such as when the
●
subject is not at the center, use [AF/AE LOCK].
Select [ ] ([4K Pre-Burst]) only when recording.
●
When [4K PHOTO] is set to [ ] ([4K Pre-Burst]), the battery drains faster
●
and the camera temperature rises. In some cases, [
recording may stop to protect the camera. Wait until the camera cools down.
] may be displayed and
[4K Burst(S/S)]
[4K Pre-Burst]
You can continue recording without interruption even if the file exceeds 4 GB, but the 4K burst
file will be saved and played back in separate files.
• You cannot record 4K photos in Creative Video Mode, Panorama Shot Mode, etc.
For capturing unpredictable photo opportunities
(e.g., plants, animals, children)
Burst recording starts when the shutter button is pressed and
stops when pressed again.
Continuous recording length: Up to 29 minutes and 59 seconds
●
For recording as needed whenever a photo opportunity
arises (e.g., the moment when a ball is thrown)
Burst recording is performed for approximately 1 second
before and after the moment that the shutter button is
pressed.
Recording length: Approximately 2 seconds
●
Settings are optimized for the 4K Photo function at once.
When you set [4K PHOTO], the following [Rec] menus are fixed.
●
[Picture Size] [4K] (8M)
[Quality]
4K burst files (MP4 motion pictures) are recorded with the following settings.
●
[Rec Format] [MP4] [Rec Quality] [4K/100M/30p]
[Continuous AF] [ON]
To cancel the 4K Photo functions
In step 2, select [ ] ([Single]) or [ ] .
To record the subject with reduced blur
You can reduce the blur of the subject by setting a faster shutter speed.
Set mode dial to [ ]
Set the shutter speed by rotating the rear dial
• Approximate shutter speed for outdoor recording in fine weather conditions: 1/1000 seconds or faster.
• If you increase the shutter speed, the ISO sensitivity becomes higher, which may increase the noise on the screen.
To change the aspect ratio
Selecting [Aspect Ratio] in the [Rec] menu allows you to change the aspect ratio for 4K photos.
[ ]
Flow of time
Press and hold
Recording is performed
Start (First)
Stop (Second)
Approximately 1 second
Selecting pictures from 4K burst file and saving
3
The picture will be saved in JPEG format.
●
Press the Playback ([ ]) button
1
2
Select the 4K burst file with
4K burst files are displayed with [ ] .
●
Press
3
The slide view screen will be displayed.
●
Touch and drag the frames to select the frame you want to
4
save as a picture
You can display the previous or next 45 frames in slide view by touching [ ]/[ ]
●
([4K Burst]/[4K Burst(S/S)] only).
When a file with long burst time is selected ([4K Burst]/[4K Burst(S/S)] only):
Make a rough selection of scenes using the 4K burst playback screen first, and select the desired frame you want to save as a
picture using the slide view screen.
Press [Fn1] button to display the 4K burst playback screen
Press and perform continuous playback
You can start continuous rewind by pressing . To pause the rewind operation, press again.
●
You can start fast rewind/forward during continuous playback by pressing . To return to continuous playback,
●
.
press
On the scene you want to save as a picture, press to stop playback
Press [Fn1] button to display the slide view screen
Press [MENU/SET] to save the picture
5
The same operation can be performed by touching [ ] .
●
Skipping to the scenes you want to save as pictures ([4K Burst(S/S)] only):
By adding markers while recording, you can skip to the positions of the markers on the slide view screen or 4K burst playback screen.
Press [Fn2] button to switch to the mode that allows you to skip to markers
Press to skip to the position of the marker
Press [Fn2] button again to return to the original operation.
●
More detailed instructions on the operation of 4K Photo are contained in “Owner’s Manual for advanced features (PDF format)” in the
supplied disc.
Page 2

FRANÇAIS
Guide rapide pour photo 4K
Enfoncez la touche d’obturateur pour enregistrer une photo 4K. Vous pouvez sélectionner le moment désiré d’une prise de photos 4K en
rafale à 30 trames/seconde et enregistrer ce moment sous forme de photo de 8 millions de pixels environ.
Sélection de la méthode utilisée pour enregistrer des photos 4K
1
Pour enregistrer des photos 4K, utilisez une carte UHS de classe de vitesse 3.
●
Appuyez sur la touche [ ] ( ) .
1
Appuyez sur pour sélectionner l’icône photo 4K ([ ] / [ ] / [ ]) et appuyez sur .
2
Appuyez sur pour sélectionner la méthode d’enregistrement et appuyez sur [MENU/SET].
3
[Rafale 4K]
[Rafale 4K (S/S)]
[Pré-rafale 4K]
Pour capturer la meilleure image d’un sujet se déplaçant
rapidement
(par exemple : sports, avions, trains)
L’enregistrement en rafale s’effectue lorsque la touche
d’obturateur est enfoncée et maintenue.
Durée de l’enregistrement en continu : jusqu’à 29 minutes et
●
59 secondes
Pour capturer un moment imprévisible
(par exemple : plantes, animaux, enfants)
L’enregistrement en rafale commence lorsque la touche
d’obturateur est enfoncée et s’arrête lorsque celle-ci est
enfoncée à nouveau.
Durée de l’enregistrement en continu : jusqu’à 29 minutes et
●
59 secondes
Pour enregistrer une photo lorsqu’une occasion se
présente (par exemple : lorsqu’un ballon est lancé)
L’enregistrement en rafale s’effectue environ 1 seconde avant et
après le moment pendant lequel la touche d’obturateur est enfoncée.
Durée de l’enregistrement : environ 2 secondes
●
Appareil photo numérique
Modèle
Moment à capturer
DMC-FZ300
SQC0252
Enregistrement de photos 4K
2
Lorsque vous enregistrez des photos 4K en
rafale, un fichier de rafale 4K est sauvegardé
au format MP4
Lors de l’enregistrement de photos 4K,
●
l’angle de vue se rétrécit.
Lorsque [Prév.auto] est activé, l’écran
●
de sélection d’images s’affichera
automatiquement après l’enregistrement.
Touche
d’obturateur
[Rafale 4K (S/S)]
Enfoncez complètement la touche d’obturateur.
1
L’enregistrement s’arrête lorsque vous appuyez sur la
●
touche une seconde fois.
Si vous utilisez la mise au point automatique, la mise
●
au point automatique en continu fonctionne pendant
l’enregistrement. La mise au point sera ajustée en continu.
Lorsque vous appuyez sur la touche [Fn2] lors de
●
l’enregistrement, vous pouvez ajouter un marqueur. (Jusqu’à
40 marqueurs pour chaque fichier de rafale 4K.) Lorsque
vous sélectionnez et sauvegardez des images à partir d’un
fichier de rafale 4K, vous pouvez accéder directement aux
positions où vous avez ajouté des marqueurs.
Enfoncez de nouveau la touche d’obturateur
2
[Rafale 4K]
Enfoncez la touche d’obturateur à mi-course.
1
Appuyez sur la touche d’obturateur et maintenez-la complètement
2
enfoncée pendant la durée d’enregistrement souhaitée.
Le son de l’obturateur sera émis plusieurs fois.
●
L’enregistrement commencera approximativement 0,5 seconde après avoir appuyé
●
complètement sur la touche d’obturateur. Par conséquent, appuyez complètement
sur la touche dès que possible.
L’enregistrement est effectué au moment où la touche est complètement enfoncée.
●
Si vous utilisez la mise au point automatique, la mise au point automatique en continu
●
fonctionne pendant l’enregistrement. La mise au point sera ajustée en continu.
[Pré-rafale 4K]
Enfoncez complètement la touche d’obturateur.
1
L’enregistrement d’un fichier de rafale 4K a lieu environ 1 seconde avant et après
●
le moment où vous appuyez sur la touche d’obturateur.
Le son de l’obturateur ne sera émis qu’une seule fois.
●
Dans les situations pour lesquelles vous souhaitez régler la mise au point et
●
l’exposition, lorsqu’un sujet n’est pas au centre par exemple, utilisez la touche
[AF/AE LOCK].
Sélectionnez [ ] ([Pré-rafale 4K]) uniquement lors de l’enregistrement.
●
Lorsque [PHOTO 4K] est défini sur [ ] ([Pré-rafale 4K]), la batterie se décharge
●
plus rapidement et la température de l’appareil photo augmente. Dans certains
] peut s’afficher et l’enregistrement peut s’interrompre pour protéger
cas, [
l’appareil photo. Attendez que l’appareil photo refroidisse.
complètement
Vous entendrez les bruits de début et de fin.
●
Sélection d’images à partir d’un fichier de rafale 4K et sauvegarde
3
L’image est sauvegardée au format JPEG.
●
Appuyez sur la touche de lecture ([ ]).
1
2
Sélectionnez le fichier de rafale 4K avec .
Les fichiers de rafale 4K sont affichés avec [ ] .
●
Appuyez sur .
3
L’écran de la vue diaporama s’affiche.
●
Touchez l’écran et faites glisser les images pour sélectionner
4
l’image que vous souhaitez sauvegarder.
Vous pouvez afficher les 45 images précédentes ou suivantes dans la vue diaporama
●
en touchant [
] / [ ] ([Rafale 4K] / [Rafale 4K (S/S)] uniquement).
Vous pouvez continuer à enregistrer sans interruption même si la taille de fichier dépasse 4 Go,
mais le fichier de rafale 4K sera enregistré et lu dans des fichiers séparés.
• Il n’est pas possible d’enregistrer des photos 4K en mode Films Créatifs, mode Panorama, etc.
Temps écoulé
Touche maintenue enfoncée
Période d’enregistrement
Démarrage (première pression)
Arrêt (seconde pression)
Environ 1 seconde
Les réglages sont optimisés pour la fonction Photo 4K en une fois.
Lorsque vous définissez [PHOTO 4K], les menus [Enr.] suivants sont verrouillés.
●
[Format imag] [4K] (8M)
[Qualité]
Les fichiers de rafale 4K (images animées MP4) sont enregistrés avec les réglages suivants.
●
[Format enregistrement] [MP4] [Qualité enr.] [4K/100M/30p]
[AF continu] [OUI]
Pour annuler les fonctions Photo 4K
À l’étape 2, sélectionnez [ ] ([Simple]) ou [ ] .
Pour enregistrer le sujet en réduisant le flou
Vous pouvez réduire le flou d’un sujet en réglant une vitesse d’obturation plus rapide.
Réglez la molette de sélection de mode sur [ ]
Définissez la vitesse d’obturation en tournant la molette arrière
• Vitesse d’obturation approximative pour la prise de photos à l’extérieur dans de bonnes conditions météo : 1/1000e de seconde ou plus.
• Si vous augmentez la vitesse d’obturation, la sensibilité ISO augmente, ce qui peut augmenter le bruit sur l’écran.
Pour modifier le rapport de format
La sélection [Format] dans le menu [Enr.] vous permet de modifier le rapport de format pour les photos 4K.
[ ]
Lorsqu’un fichier avec un long temps de rafale est sélectionné ([Rafale 4K] / [Rafale 4K (S/S)] uniquement) :
Sélectionnez d’abord les scènes à l’aide de l’écran de lecture de rafale 4K puis sélectionnez la trame que vous souhaitez
sauvegarder comme image à l’aide de l’écran d’affichage des diapositives.
Appuyez sur la touche [Fn1] pour afficher l’écran de lecture en rafale 4K.
Appuyez sur puis lancez la lecture en continu.
Vous pouvez passer à l’image précédente en appuyant sur . Pour mettre cette opération en pause, appuyez à
●
nouveau sur
Vous pouvez passer à l’image précédente ou suivante pendant la lecture en appuyant sur . Pour revenir à la
●
lecture en continu, appuyez sur
Quand vous tombez sur la scène que vous souhaitez sauvegarder sous forme d’image, appuyez sur
pour arrêter la lecture.
Appuyez sur la touche [Fn1] pour afficher l’écran de la vue diaporama.
Appuyez sur [MENU/SET] pour sauvergarder l’image.
5
Vous pouvez effectuer la même opération en appuyant sur [ ].
●
.
.
Passer aux scènes que vous souhaitez sauvegarder sous forme d’images ([Rafale 4K (S/S)] uniquement) :
En ajoutant des marqueurs lors de l’enregistrement, vous passez directement aux positions où se trouvent les marqueurs sur l’écran de
la vue diaporama ou sur l’écran de lecture en rafale 4K.
Appuyez sur la touche [Fn2] pour basculer vers le mode vous permettant d’ignorer les marqueurs.
Appuyez sur pour passer directement à la position du marqueur.
Appuyez à nouveau sur la touche [Fn2] pour retourner à l’opération initiale.
●
Vous trouverez plus d’instructions sur le fonctionnement des photos 4K dans le « Manuel d’utilisation Fonctions avancées »,
disponible en format PDF sur le disque fourni.
 Loading...