

PANASONIC DMC-TZ19EC, DMC-TZ18EP, DMC-TZ18EG, DMC-TZ19EB, DMC-TZ19EF User Manual
Operating Instructions
for advanced features
Digital Camera
Model No. DMC-TZ19
DMC-TZ18
Before use, please read these instructions completely.
VQT3H47

Contents
Before use
Before use ..............................................5
Standard Accessories ...........................7
Names of parts....................................... 8
Cursor button ................................................8
Preparations
Charging the battery .............................9
Guidelines for the number of recordable
pictures and operating time .........................10
Inserting and removing the card
(optional)/the battery ........................... 12
Using the AC adaptor (optional) and DC
coupler (optional) instead of the battery ......13
Picture save destination
(cards and built-in memory) ........................14
Remaining battery and memory capacity ....15
Recording capacity guidelines (pictures/
recording time) ............................................15
Setting the clock .................................. 16
Setting the menu .................................17
Menu type ...................................................18
Using the [Setup] menu ...................... 19
[Clock Set] ...................................................19
[World Time] ................................................19
[Travel Date] ................................................19
[Beep] ..........................................................19
[Volume] ......................................................19
[Cust.Set Mem.] ..........................................20
[LCD Mode] ................................................. 20
[Guide Line] .................................................20
[Histogram] ..................................................20
[Zoom Resume] ...........................................21
[Economy] ...................................................21
[Auto Review] .............................................. 21
[No.Reset] ...................................................22
[Reset] .........................................................22
[USB Mode] .................................................22
[Output] .......................................................23
[Rotate Disp.] ..............................................23
[Version Disp.] .............................................23
[Format] .......................................................23
[Language] ..................................................24
[Demo Mode] ...............................................24
Basics
Basic shooting operation ...................25
Taking still pictures ...................................... 25
Recording motion pictures .........................25
Mode dial .....................................................26
Taking pictures with automatic
settings [Intelligent Auto] Mode ......... 27
About Happy colours ...................................29
Face Detection and Face Recognition ........ 29
AF Tracking .................................................29
Taking pictures with your own
settings [Program AE] Mode .............. 30
Aligning the focus ............................... 31
Taking pictures with zoom .................. 32
[i.ZOOM] ......................................................34
Easy Zoom:
For zooming rapidly to maximum ratio ........ 35
[Digital Zoom] .............................................. 36
Viewing your pictures
[Normal Play] .......................................37
Deleting pictures .................................38
To delete multiple (up to 50) or
all pictures ................................................... 38
Application (Record)
Changing recording information
display .................................................. 39
Taking pictures with flash ................... 40
Taking close-up pictures .................... 42
Taking close-up pictures without standing
close to subject “Tele macro” function .........42
Taking pictures at even closer range
[Macro Zoom] .............................................. 43
Positioning camera and subject
within accessible range for focus
alignment .............................................. 44
Focus range ................................................44
Taking pictures with self-timer ........... 45
Taking pictures with Exposure
Compensation ...................................... 46
Recording while exposure is changed
automatically ([Auto Bracket]) ...........47
Determine aperture and record
[Aperture-Priority] Mode ..................... 48
Determine shutter speed and record
[Shutter-Priority] Mode .......................49
Determine aperture and shutter speed
and record [Manual Exposure] Mode
Register your own settings and record
[Custom] Mode ....................................51
[Cust.Set Mem.] Registering your own
settings .......................................................51
[Custom] Switch to your own settings and
record ......................................................... 52
Taking pictures according to
the scene [Scene Mode]...................... 53
[Portrait] .......................................................54
[Soft Skin] ....................................................54
[Transform] ..................................................54
[Self Portrait] ...............................................54
[Scenery] .....................................................54
[Panorama Assist] .......................................55
[Sports] ........................................................55
[Night Portrait] .............................................55
[Night Scenery] ............................................55
[Food] ..........................................................55
[Party] ..........................................................56
[Candle Light] .............................................. 56
[Baby] ..........................................................56
[Pet] .............................................................56
... 50
[Sunset] .......................................................56
[High Sens.] .................................................56
[Hi-Speed Burst] ..........................................57
[Flash Burst] ................................................ 57
[Starry Sky] ..................................................57
[Fireworks] ...................................................58
[Beach] ........................................................58
[Snow] .........................................................58
[Aerial Photo] ...............................................58
[Pin Hole] .....................................................58
[Film Grain] ..................................................58
[High Dynamic] ............................................59
[Photo Frame] .............................................59
[Underwater] ................................................59
Saving commonly used scenes
[My Scene Mode] ................................. 60
Taking motion pictures
[Motion Picture] Mode ......................... 61
[Rec Quality] ...............................................62
Recording with the Face Recognition
function [Face Recog.] ........................ 63
Registering face pictures ............................64
Editing or deleting information about
registered persons .....................................66
Useful features for travel .................... 68
[Travel Date] ...............................................68
[World Time] ............................................... 69
Using the [Rec] menu .......................... 70
[Aspect Ratio] ..............................................70
[Picture Size] ............................................... 70
[Quality] .......................................................71
[Sensitivity] ..................................................71
[White Balance] ........................................... 72
[AF Mode] ....................................................74
[Quick AF] ....................................................76
[Face Recog.] ..............................................76
[Metering Mode] ..........................................76
[i.Exposure] .................................................77
[Min. Shtr Speed] ........................................77
[i.Resolution] ...............................................77
[Digital Zoom] .............................................. 78
[Burst] ..........................................................78
[Color Mode] ................................................79
[AF Assist Lamp] .........................................80
[Red-Eye Removal] ..................................... 80
[Stabilizer] ...................................................80
[Date Stamp] ...............................................81
[Clock Set] ...................................................81
2 VQT3H47 VQT3H47 3
Contents (Continued)
Using the [Rec] menu for motion
pictures................................................. 82
[Rec Quality] ...............................................82
[Continuous AF] ...........................................82
[Wind Cut] ..................................................82
Using Quick menu ............................... 83
Entering Text ........................................ 84
Application (View)
Viewing as list (Multi Playback/
Calendar Playback) .............................85
Watching motion pictures ..................86
Different playback methods
[Playback Mode] .................................. 87
[Slide Show] ................................................88
[Filtering Play] .............................................90
[Calendar] ....................................................90
Using the [Playback] menu................. 91
[Upload Set] ................................................91
[Title Edit] ....................................................92
[Text Stamp] ................................................93
[Resize] .......................................................95
[Cropping] ....................................................96
[Favorite] .....................................................97
[Print Set] ....................................................98
[Protect] .......................................................99
[Face Rec Edit] ..........................................100
[Copy] ........................................................101
Connecting with other devices
Using with your PC ............................ 102
Copying still pictures and motion pictures
Using “PHOTOfunSTUDIO” to copy pictures
to your computer .......................................105
Uploading pictures to image-sharing
websites ....................................................105
Printing ............................................... 106
Printing multiple pictures ........................... 107
Print with date and text ..............................107
Making print settings on the camera .........108
Viewing on TV screen .......................109
...103
Others
List of LCD monitor displays ............ 110
In recording ............................................... 110
In playback ................................................ 111
Message displays .............................. 112
Q&A Troubleshooting ...................... 114
Usage cautions and notes ................ 120
Before use
■
Camera handling
Keep the camera away from excessive vibration, force,
or pressure.
Avoid using the camera under the following conditions,
●
which may damage the lens, LCD monitor, or camera
body. This may also cause the camera to malfunction or
prevent recording.
• Dropping or hitting the camera against a hard surface
• Sitting down with the camera in your pants pocket or
forcing it into a full bag
• Adding accessories to the camera strap
• Pushing with excessive force on the lens or LCD monitor
The camera is not dust resistant, splash resistant, or
waterproof.
Avoid using the camera in places with excessive dust
or sand, or where water can come into contact with the
camera.
Avoid using the camera under the following conditions,
●
which present a risk that sand, water, or foreign material
may enter the camera through the lens or openings around
buttons. Be especially careful, because these conditions
may damage the camera and such damage may not be
repairable.
• In extremely dusty or sandy places
• In the rain or by the shore, where the camera may be
exposed to water
■
Condensation (lens clouding)
Condensation may occur when the camera is exposed to
●
sudden changes of temperature or humidity. Avoid these
conditions, which may make the lens dirty, cause mold, or
damage the camera.
If condensation does occur, turn off the camera and wait
●
about two hours before using it. Once the camera adjusts
to the surrounding temperature, clouded lenses will clear
naturally.
4 VQT3H47 VQT3H47 5

Before use (Continued) Standard Accessories
■
Always take a test shot first
Before important events when you will use the camera (at weddings, for example), always
take a test shot to make sure that pictures and sound record correctly.
■
No compensation for missed shots
We cannot compensate for missed shots if technical problems with the camera or card
prevent recording.
■
Carefully observe copyright laws.
Unauthorized use of recordings which contain works with copyright for purposes other
than personal use is prohibited under copyright law. Recording of certain material may be
restricted even for the purpose of personal use.
■
Also refer to “Usage cautions and notes” (→120)
Check that all the accessories are supplied before using the camera.
The accessories and their shape will differ depending on the country or area where the
●
camera was purchased.
For details on the accessories, refer to Basic Operating Instructions.
Battery pack is indicated as battery pack or battery in the text.
●
Battery charger is indicated as battery charger or charger in the text.
●
Please dispose of all packaging appropriately.
●
Keep small parts in a safe place out of the reach of children.
●
■
Optional accessories
• Cards are optional. You can record or play back pictures on the built-in memory when
you are not using a card. (→14)
• Consult the dealer or your nearest servicentre if you lose the supplied accessories.
(You can purchase the accessories separately.)
6 VQT3H47 VQT3H47 7
Names of parts
Cursor button
Charging light
([CHARGE])
On: Charging in progress
(Approx. 130 min. if fully
depleted)
Off: Charging complete
If light is flashing:
• Charging may take longer
than normal if battery
temperature is too high or
too low (charging may be
incomplete).
• Battery/charger connector is
dirty. Clean with a dry cloth.
Charging the battery
Always charge before first use! (battery shipped uncharged)
Camera ON/OFF switch
(→16)
Shutter button (→25)
Release lever (→12)
DC coupler cover
(→13)
Mode dial (→26)
Flash (→40)
Zoom lever
(→32)
Microphone∗ (→61)
Speaker (→19, 86)
LCD monitor
(→20, 39, 110, 116)
REC/PLAY switch
(→25)
[EXPOSURE] button
(→48, 49, 50)
[DISP.] button (→39)
Q.MENU/ [ / ]
(Delete/Return) button (→38, 83)
Left cursor button (◄)
• Self-timer (→45)
Self-timer indicator (→45)/
AF Assist Lamp
(→80)
Lens barrel
(→5, 122)
Lens
[E.ZOOM] button
(→35)
Up cursor button (▲)
• Exposure Compensation (→46)
• Auto Bracket (→47)
Tripod receptacle
(→122)
Card/Battery door (→12)
We recommend
using the supplied
hand strap to
avoid dropping
the camera.
[AV OUT/
DIGITAL]
socket
(→103, 106, 109)
Down cursor button (▼)
• Macro Mode (→42)
• AF Lock (AF Tracking) (→29, 74)
In this manual, the button that is used is shaded or indicated by▲▼◄►.
●
The appearance, specifications, and screen display vary depending on the model that is used.
●
The above illustration is of the DMC-TZ18.
●
∗
The DMC-TZ19 has a stereo microphone.
8 VQT3H47 VQT3H47 9
Right cursor button (►)
• Flash (→40)
■
About batteries that you can use with this unit
It has been found that counterfeit battery packs which look very similar to the
genuine products are made available to purchase in some markets. Some of
these battery packs are not adequately protected with internal protection to
meet the requirements of appropriate safety standards. There is a possibility
that these battery packs may lead to fire or explosion. Please be advised that
we are not liable for any accident or failure occurring as a result of use of a
counterfeit battery pack. To ensure that safe products are used we recommend
that a genuine Panasonic battery pack is used.
• Use the dedicated charger and battery.
• The camera has a function for distinguishing batteries which can be used
safely. The dedicated battery supports this function. The only batteries
suitable for use with this unit are genuine Panasonic products and batteries
manufactured by other companies and certified by Panasonic. (Batteries which
do not support this function cannot be used). Panasonic cannot in any way
guarantee the quality, performance or safety of batteries which have been
manufactured by other companies and are not genuine Panasonic products.
Insert the battery terminals and attach the battery
to the charger
1
2
Connect the charger to the
electrical outlet
Plug-in type
●
Battery
Charger
(model-specific)
Inlet type
●
• The AC
mains lead
does not fit
entirely into
the AC input
terminal. A gap will remain.
Detach the battery after charging is
completed

Charging the battery (Continued)
Guidelines for the number of recordable pictures and operating time
The number of recordable pictures or available operating time may vary according to
surrounding environment and usage conditions. Figures may be reduced if flash, zoom,
or other functions are used frequently, or in colder climates.
Number of recordable pictures Approx. 340 pictures
Recording time Approx. 170 min
Recording conditions by CIPA standard
●
• CIPA is an abbreviation of [Camera & Imaging
Products Association].
• [Program AE] Mode
• Temperature: 23 °C/Humidity: 50 %RH when
LCD monitor is on.
• Using a Panasonic SD Memory Card
(32 MB).
• Using the supplied battery.
∗
The number of recordable pictures decreases when [LCD Mode] is used.
Number reduced if intervals are longer – e.g. to approx. one quarter for 2-minute
intervals under the above conditions.
Playback time Approx. 300 minutes
∗
• Starting recording 30 seconds after the
camera is turned on. (When the Optical
Image Stabilizer function is set to [ON].)
• Recording once every 30 seconds with full
flash every second recording.
• Rotating the zoom lever from Tele to Wide or
vice versa in every recording.
• Turning the camera off every 10 recordings
and leaving it until the temperature of the
battery decreases.
By CIPA standard
The time required for charging varies depending on conditions of battery usage.
●
Charging takes longer at high or low temperatures and when the battery has not been
used in some time.
Battery will be warm during charging and for some time thereafter.
●
Battery will run out if not used for long periods of time, even after being charged.
●
Charge the battery with the charger indoors (10 °C - 30 °C).
●
Keep any metal items (such as clips) away from the contact areas of the power plug.
●
Otherwise, a fire and/or electric shocks may be caused by short-circuiting or the
resulting heat generated.
We do not recommend frequently charging the battery.
●
(Frequently charging battery reduces maximum usage time and can cause battery to
expand.)
Do not disassemble or modify the charger.
●
If available battery power is significantly reduced, battery is reaching end of lifespan.
●
Please purchase a new battery.
The battery charger is in the standby condition when the AC power is supplied.
●
The primary circuit is always “live” as long as the battery charger is connected to an
electrical outlet.
When charging:
●
• Remove any dirt on connectors of charger and battery with dry cloth.
• Keep at least 1 m (3.28 feet) away from AM radio (may cause radio interference).
• Noises may be emitted from inside of charger, but this is not a fault.
• After charging, remove the charger from the wall socket, and then remove the battery
from the charger (up to 0.1 W consumed if left in place).
Do not use a damaged or dented battery (especially connectors), e.g. by dropping (can
●
cause faults).
10 VQT3H47 VQT3H47 11
Inserting and removing the card (optional)/ the battery
Lever
Set the camera ON/OFF switch to OFF
Slide to the [OPEN] position
and open the lid
Do not
touch
terminal
Insert the battery and card,
making sure that their
orientation is correct
• Battery: Insert all the way firmly until a
locking sound is heard, and check
that the lever is hooked over the
Charged battery (check orientation)
Card (check orientation: terminals face
LCD)
■
To remove
• To remove battery: • To remove card:
move lever in
direction of arrow.
Lever press down in
Close lid
Slide to the [LOCK] position.
centre.
battery.
• Card: Insert all the way firmly until it clicks.
Release lever
[OPEN] [LOCK]
Using the AC adaptor (optional) and DC coupler (optional)
instead of the battery
By using the AC adaptor (optional) and DC coupler (optional), you can record and play
back without worrying about the remaining battery charge.
The optional DC coupler can only be used with the designated Panasonic AC adaptor.
Insert DC coupler instead of
battery (previous page)
DC IN
socket
DC coupler
Open DC coupler cover
• If difficult to open, with the card/
battery door open, press the coupler
cover from the inside to open it.
Plug AC adaptor into power
outlet
DC coupler
AC adaptor
cover
Align the marks to
connect
Connect AC adaptor to DC IN
socket of DC coupler
Always use genuine Panasonic batteries.
●
If you use other batteries, we cannot guarantee the quality of this product.
●
Remove battery from camera after use.
●
• Keep the battery in a plastic bag, making sure that it is kept away from metallic
objects (such as clips) when carrying or storing the battery.
To remove the card or battery, turn the camera off and wait until the LUMIX indicator
●
on the LCD monitor goes off. (Failure to wait may cause the camera to malfunction and
may damage the card or recorded data.)
Keep the Memory Card out of reach of children to prevent swallowing.
●
Always use a genuine Panasonic AC adaptor (optional).
●
Use the AC adaptor and DC coupler specifically for this camera. Using other adaptors
●
or couplers could cause camera failure.
The possibility to install the camera on a tripod or unipod when the DC coupler is
●
connected depends on the type of tripod or unipod.
When the AC adaptor is connected, always remove the AC adaptor when opening the
●
card/battery door.
Remove the AC adaptor and DC coupler when not in use and close the coupler cover.
●
Also read the AC adaptor and DC coupler operating instructions.
●
12 VQT3H47 VQT3H47 13
Inserting and removing the card (optional)/
the battery (Continued)
Picture save destination (cards and built-in memory)
■
Built-in memory (Approx. 70 MB)
Pictures may be copied between cards and the built-in memory. (→101)
●
The access time for the built-in memory may be longer than the access time for a card.
●
■
Compatible memory cards (optional)
The following SD standard-based cards (Panasonic brand recommended)
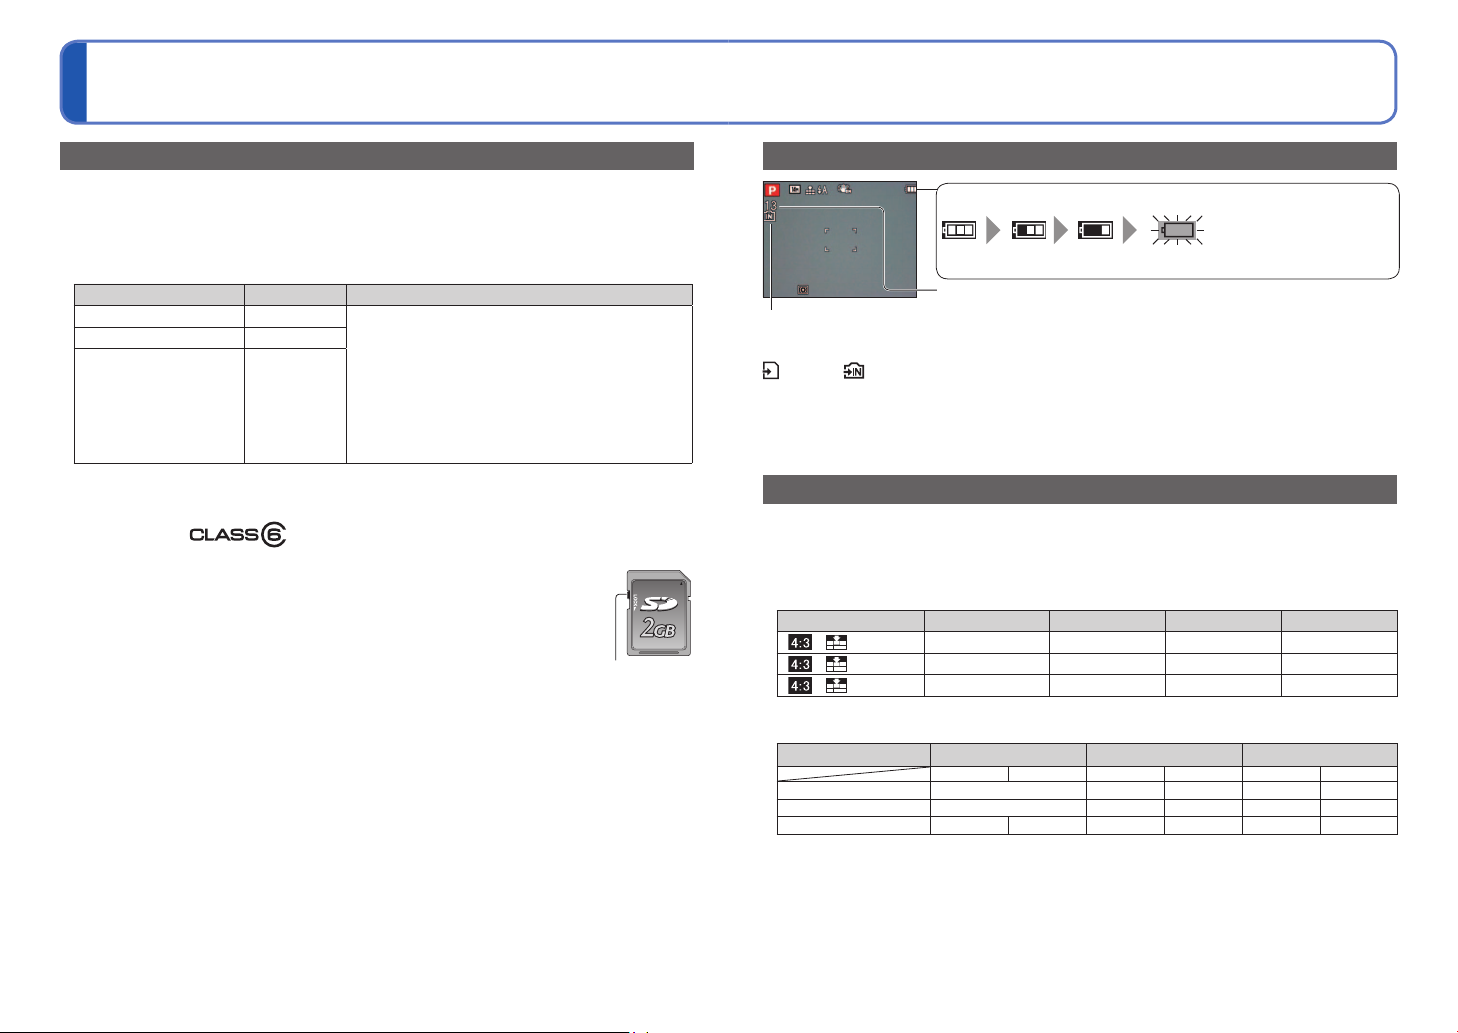
Type of Card Capacity Notes
SD Memory Cards 8 MB – 2 GB
SDHC Memory Cards 4 GB – 32 GB
SDXC Memory Cards 48 GB, 64 GB
∗
SD speed class refers to a specification for sustained write speeds. Confirm the SD speed by
checking the card label or other card related materials.
• Using a card of SD Speed “Class 6”
recommended for recording motion pictures.
• Can be used with devices compatible with the
respective formats.
• Before using SDXC Memory Cards, check that
your computer and other devices support this type
of card.
http://panasonic.net/avc/sdcard/information/SDXC.html
• Only the cards listed on the left with the given
capacities are supported.
(Example)
Please reformat the card with this camera if it has already been
●
formatted with a computer or another device. (→23)
If the write-protect switch is set to “LOCK”, the card cannot be used to
●
record or delete pictures, and it cannot be formatted.
It is recommended that you copy important pictures to your computer
●
(as electromagnetic waves, static electricity, or faults may cause data to
be damaged).
Latest information:
●
http://panasonic.jp/support/global/cs/dsc/ (This Site is English only.)
∗
or above is
Switch
(LOCK)
Remaining battery and memory capacity
Remaining battery (only when using battery)
(flashes red)
If the battery mark flashes red, recharge or replace battery.
Estimated remaining pictures or recording time capacity (press [DISP.]
Displayed when no card is inserted (pictures will be saved to built-in memory)
button to switch display)
When in operation
(Card) or (Built-in memory) are illuminated red.
While the light remains lit, an operation is taking place, such as picture writing, reading, deletion or
formatting. While the light is lit, do not turn off the power or remove battery, card, AC adaptor (optional)
or DC coupler (optional), as this can cause data loss or damage. Keep the camera away from
vibrations, impact, or static electricity. Should any of these cause camera operation to be terminated,
attempt to perform the operation again.
Recording capacity guidelines (pictures/recording time)
The number of pictures you can take and the recording time varies in proportion to card
capacity (and depending on recording conditions and type of card).
When [Upload Set] is set, the number of pictures that can be recorded or the recording
●
time may decrease.
■
Recording picture capacity (still pictures)
[Picture Size] Built-in memory 2 GB 4 GB 16 GB
14M 13 330 670 2740
5M 26 650 1300 5300
0.3M 410 10050 19940 81340
• When the number of recordable pictures exceeds 99,999, “+99999” is displayed.
■
Recording time capacity (motion pictures)
[Rec Quality] Built-in memory 2 GB 4 GB
[HD]
[VGA]
[QVGA]
• Motion pictures can be recorded continuously for up to 15 minutes. Also, continuous recording
exceeding 2 GB is not possible. (Example: [8 min 10 s] with [HD]) To record more than 15 minutes
or 2 GB, press the shutter button again. (Remaining time for continuous recording is displayed on
the screen.) The time displayed in the table is the total time.
1
∗
DMC-TZ18
2
∗
DMC-TZ19
1
∗
2 min 30 s 2 min 20 s 1 h 2 min
2
∗
— 8 min 10 s 8 min 10 s
—
1
∗
21 min 40 s 21 min 20 s 43 min 10 s 42 min 20 s
2
∗
59 min 10 s
1
∗
16 min 20 s 16 min 10 s
2 h 4 min 1 h 57 min
2
∗
14 VQT3H47 VQT3H47 15
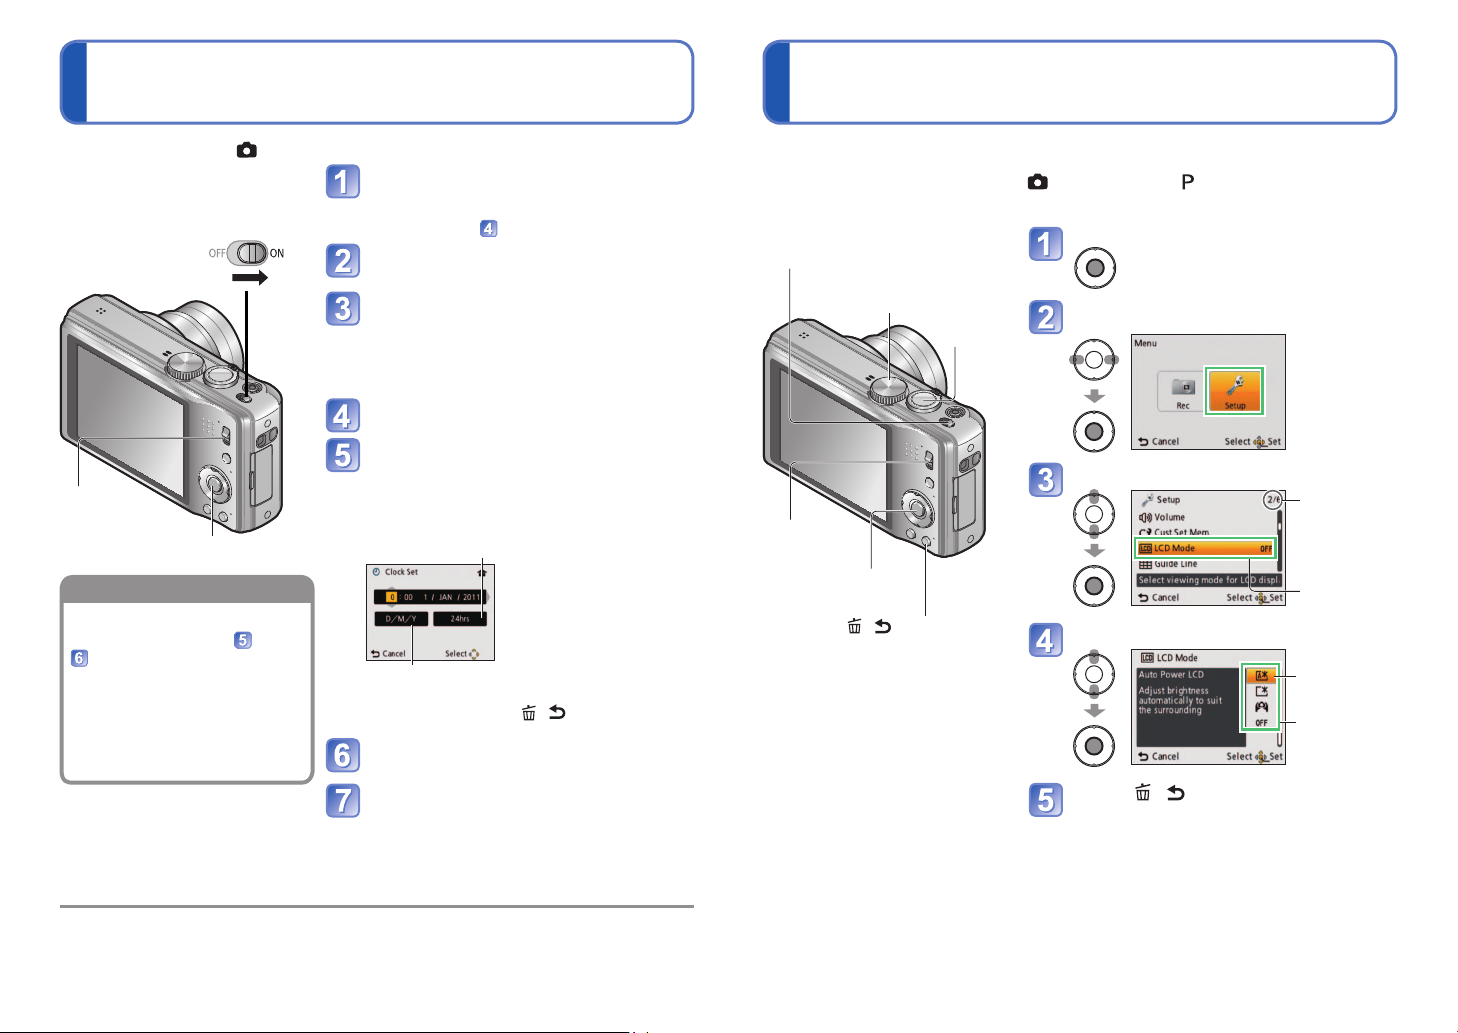
Setting the clock
To change time setting
( The clock is not set when the
camera is shipped.)
Setting the menu
Set REC/PLAY switch to before turning on the power.
Turn on the power
The power is turned on.
If the language select screen is not displayed,
proceed to step
Press [MENU/SET] while the
message is displayed
Press ▲▼ to select the language,
and press [MENU/SET]
The [Please set the clock] message appears.
(This message does not appear in Playback
Mode.)
Press [MENU/SET]
Press ◄► to select the items
(year, month, day, hour, minute,
REC/PLAY
switch
[MENU/SET]
Select [Clock Set] from the
[Setup] menu, perform and
.
• Clock settings will be saved for
approx. 3 months even after
battery is removed, provided
a fully-charged battery was
installed in the camera for 24
hours beforehand.
display order or time display
format), and press ▲▼ to set
Select either [24hrs] or [AM/PM] for the
time display format.
Select the display order for the day, month, and
year ([M/D/Y], [D/M/Y], or [Y/M/D]).
• To cancel → Press [ / ].
Press [MENU/SET]
Confirm the setting and press
[MENU/SET]
Turn on the power again and check the time
display. (Time and date can be displayed by
pressing [DISP.] several times.)
Refer to the following procedures to operate the menus.
(Example) While in [Program AE] Mode, change [LCD Mode] on the [Setup] menu.
.
Camera ON/OFF switch
(REC/PLAY switch: set to ; mode dial: set to )
Bring up the menu
Mode dial
Shutter
button
Select the [Setup] menu
Select the item
Page
(Zoom lever can
REC/PLAY
switch
[MENU/SET]
(menu display/set)
[
button
/ ] (Delete/Return)
Select the setting
be used to switch
to next screen.)
Item
Selected
setting
Settings
Press [ / ] several times
Failure to set the date and time will cause the date/time to be improperly printed when printing
●
pictures at a digital photo centre or when using [Date Stamp] or [Text Stamp].
After the time has been set, the date can be printed correctly even if the date is not displayed on the
●
camera screen.
The menu closes and the monitor returns to the previous screen.
●
16 VQT3H47 VQT3H47 17
Menu type
[Rec] menu (REC/PLAY switch: )
[Motion Picture] menu (REC/PLAY switch: )
Changing picture preferences (→70 - 82)
• Displays settings such as White Balance, Sensitivity, Aspect Ratio, and Picture
Size.
[Setup] menu (REC/PLAY switch: )
Making the camera more convenient to use (→19 - 24)
• Displays settings for ease of use such as adjusting the clock and changing the
beep sounds.
[Playback Mode] menu (REC/PLAY switch: )
Viewing recorded pictures (→87 - 90)
• Choose a playback mode to see Slide Shows or to narrow down the pictures for
display, etc.
[Playback] menu (REC/PLAY switch: )
Using your pictures (→91 - 101)
• Enables you to specify picture protection, cropping, and printing settings for
pictures you have taken.
The operation screen examples in this manual may differ from the actual screen display
●
or some parts of the screen display are omitted.
The menu types and items that are displayed vary according to the mode.
●
The setting methods vary depending on the menu item.
●
In Recording Mode, the menu screen can also be exited by pressing the shutter button
●
halfway.
Using the [Setup] menuSetting the menu (Continued)
For details about the setting procedure in the [Setup] menu (→17)
[Clock Set], [Economy] and [Auto Review] are important for clock setting and
battery life. Please check these before use.
Item Settings, notes
[Clock Set]
(→16)
[World Time]
Set the local time at
travel destination. (→69)
[Travel Date]
Record the number of
days elapsed in your
travels. (→68)
[Beep]
Change or mute the
beep/shutter sounds.
[Volume]
Adjust volume of sound
from speakers (7 levels).
Set time, date, and display format.
[Destination]: Set the local time at travel destination.
[Home]: Set date and time at home area.
[Travel Setup]
[SET] (Register departure and return dates.)/[OFF]
[Location]
[SET] (Input name of destination.)/[OFF]
[Beep Level]
/ / : Low/High/Mute
[Beep Tone]
/ / : Change beep tone.
[Shutter Vol.]
/ / : Low/High/Mute
[Shutter Tone]
/ / : Change shutter tone.
[0] / [1] / [2] / [3] / [4] / [5] / [6]
• Cannot be used to adjust TV speaker volume when
connected to TV.
18 VQT3H47 VQT3H47 19
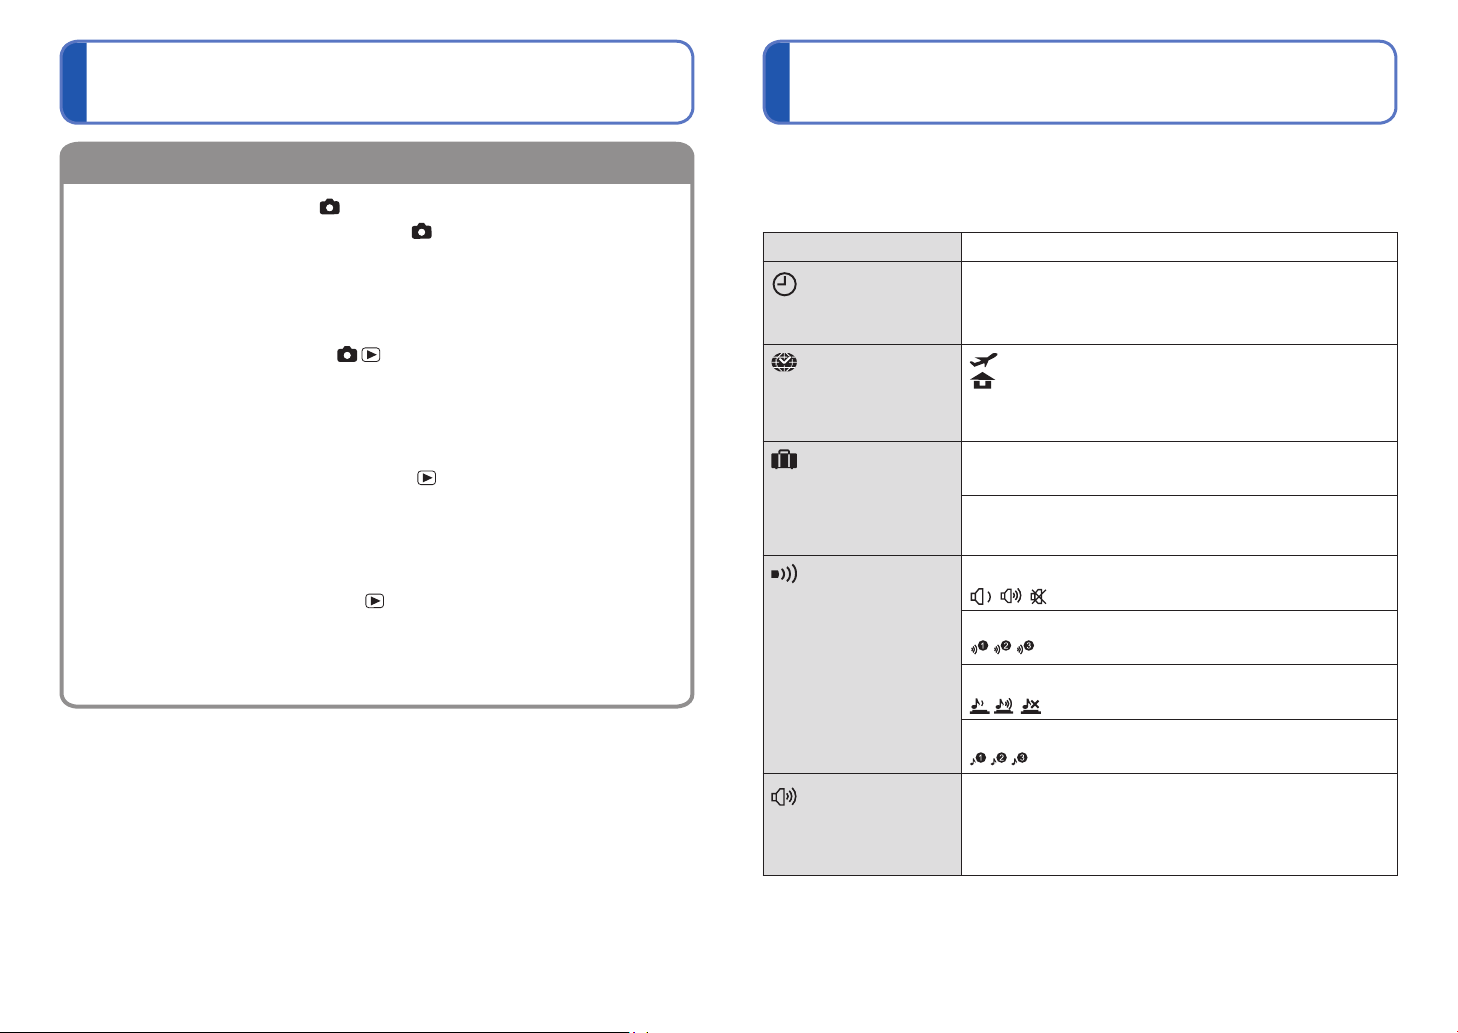
Using the [Setup] menu (Continued)
For details about the setting procedure in the [Setup] menu (→17)
Item Settings, notes
[Cust.Set Mem.]
Register settings on
current camera. (→51)
[LCD Mode]
Make LCD monitor easier
to see.
[Guide Line]
Select recording
information display and
types of guidelines. (→39)
[Histogram]
Check subject brightness
on graph. (→39)
[C1] / [C2] / [C3]
[Auto Power LCD]:
The brightness is adjusted automatically depending on
how bright it is around the camera.
[Power LCD]:
Makes screen brighter than normal (for outdoor use).
[High Angle]:
Makes screen easier to see when taking pictures from
high positions. (becomes harder to see from the front)
[OFF]
• [Auto Power LCD] does not work in Playback Mode.
• [Power LCD] returns to ordinary brightness if there is no
operation for 30 seconds when recording. (Press any
button to make brighter again).
• [High Angle] will be cancelled when power is turned off.
• Because the picture shown on the LCD monitor screen
emphasizes brightness, some subjects may look different
than their actual appearance, but this will not affect the
recorded picture.
• Setting [LCD Mode] will reduce the number of pictures
that can be recorded and recording time.
[Rec. Info.]
[ON] (Display recording information with guide lines.)
[OFF]
[Pattern]
/ : Change the patterns of guide lines.
[ON]/[OFF]
Item Settings, notes
[Zoom Resume]
Remember the zoom
position when turning the
power off.
[Economy]
Turn off the power or
make the LCD monitor
go dark while not using
the camera to minimize
battery consumption.
[Auto Review]
Automatically display
still pictures immediately
after taking them.
[ON]/[OFF]
• Cannot be set when using [Self Portrait] Scene Mode.
[Sleep Mode]
[2 MIN.]/[5 MIN.]/[10MIN.]/[OFF]:
Automatically shut off power while not in use.
• To restore → Press the shutter button halfway, or turn on
the power again.
• Cannot be used in the following cases:
When using AC adaptor (optional) and DC coupler
(optional), when connected to computer/printer, during
motion picture recording/playback, during Slide Shows,
during automatic demo playback
• Settings fixed to [5 MIN.] in [Intelligent Auto] Mode.
[LCD Power Save]
[ON]/[OFF]:
The LCD monitor goes dark to minimize power
consumption.
• Reduces the picture quality of the LCD monitor display
during recording to minimize battery consumption
(except for the Digital Zoom area). Note, however, that
there is no effect on the recorded picture.
• The setting in [LCD Mode] is prioritised over the setting
in [LCD Power Save] for the brightness of the LCD
monitor.
[1 SEC.]/[2 SEC.]
[HOLD]: Auto review screen remains until a button (other
than the [DISP.] button) is pressed
[OFF]
• Fixed to [2 SEC.] in [Intelligent Auto] Mode.
• In [Panorama Assist], [Hi-Speed Burst], [Flash Burst],
and [Photo Frame] Scene Modes, or in [Auto Bracket],
and [Burst] Modes, Auto Review is performed regardless
of setting.
• Motion pictures cannot be automatically reviewed.
20 VQT3H47 VQT3H47 21
Using the [Setup] menu (Continued)
For details about the setting procedure in the [Setup] menu (→17)
Item Settings, notes
[No.Reset]
Reset picture file
numbers.
[Reset]
Reset to the default
settings.
[USB Mode]
Select communication
method for when
connecting camera to a
computer or printer with
USB connection cable.
• The folder number is updated and the file number starts
from 0001.
• A folder number between 100 and 999 can be assigned.
Numbers cannot be reset once folder number reaches
999. In this case, save all necessary pictures to your
computer, and format the built-in memory/card (→23).
• To reset folder number to 100:
First, format the built-in memory or card, and reset the
file numbers using [No.Reset]. Then, select [Yes] on the
folder number reset screen.
[Reset Rec. settings?]
[Reset setup parameters?]
• Information registered in [Face Recog.] is reset if
recording settings are reset.
• Resetting the setup parameters will also reset the
following.
Age in years/months and names in [Baby] and [Pet]
Scene Modes.
• Folder numbers and clock settings will remain
unchanged.
• Camera movement may be audible as the lens function
is reset. This is normal.
[Select on connection]:
Select [PC] or [PictBridge(PTP)] each time you connect to
a computer or PictBridge-compatible printer.
[PictBridge(PTP)]: Select when connecting to a
PictBridge-compatible printer.
[PC]: Select when connecting to a computer.
Item Settings, notes
[Output]
Operates when AV cable
is connected.
[Rotate Disp.]
Automatically rotate
portrait still pictures.
[Version Disp.]
Check the version of the
camera firmware.
[Format]
Use when [Built-In
Memory Error] or
[Memory Card Error]
appears, or when
formatting the built-in
memory or card.
When a card/built-in
memory is formatted,
the data cannot be
restored. Check the
content of the card/
built-in memory
carefully before
formatting.
[Video Out]
[NTSC]/[PAL]
• Change the video output format when connected to a TV,
etc. (Playback Mode only).
[TV Aspect]
/
: Rotate Display is turned on.
: Rotate Display is turned on for TV output only.
[OFF]
• [Rotate Disp.] cannot be used with motion pictures.
•
Still pictures taken with the lens surface facing up or down,
or still pictures taken on other cameras may not rotate.
• Pictures cannot be rotated during Multi Playback.
• Will only be displayed rotated on computer if in Exifcompatible (→37) environment (OS, software).
Current version is displayed.
• This requires a sufficiently charged battery, or an AC
adaptor (optional) and DC coupler (optional). When
formatting the built-in memory, remove the cards.
(Only inserted card will be formatted if present; built-in
memory will be formatted if no card is inserted.)
• Always format cards with this camera.
• All protected pictures and other picture data will be
deleted.
• Do not turn off power or perform other operations during
formatting.
• Formatting the built-in memory may take several
minutes.
• Consult your nearest Service Centre if format cannot be
successfully completed.
22 VQT3H47 VQT3H47 23
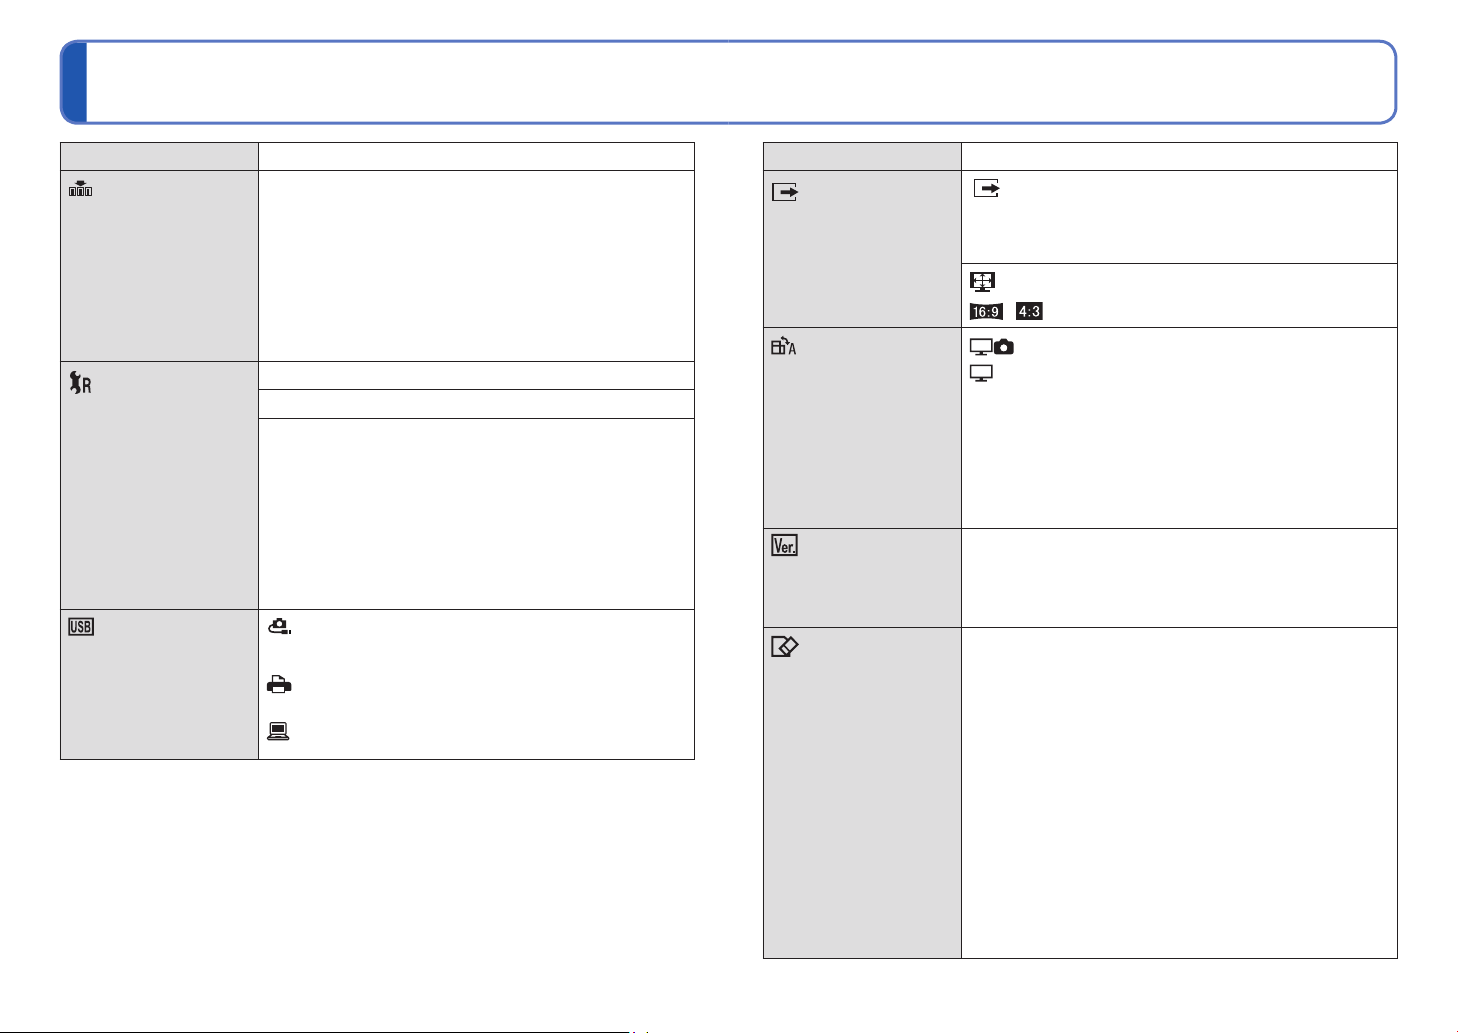
Using the [Setup] menu (Continued) Basic shooting operation
For details about the setting procedure in the [Setup] menu (→17)
Item Settings, notes
[Language]
Change display
language.
[Demo Mode]
View demonstration of
functions.
Set the language displayed on the screen.
[Stabilizer Demo.]:
Extent of jitter is shown on graph (estimate)
Extent of jitter
Extent of jitter after correction
• During demo screen display, the Optical Image Stabilizer
switches ON and OFF every time [MENU/SET] is
pressed.
• Cannot display during Playback Mode.
[Auto Demo]: View introductory Slide Show
[ON]/[OFF]
• To close → Press [MENU/SET]
• [Auto Demo] cannot be displayed on external devices
such as TVs.
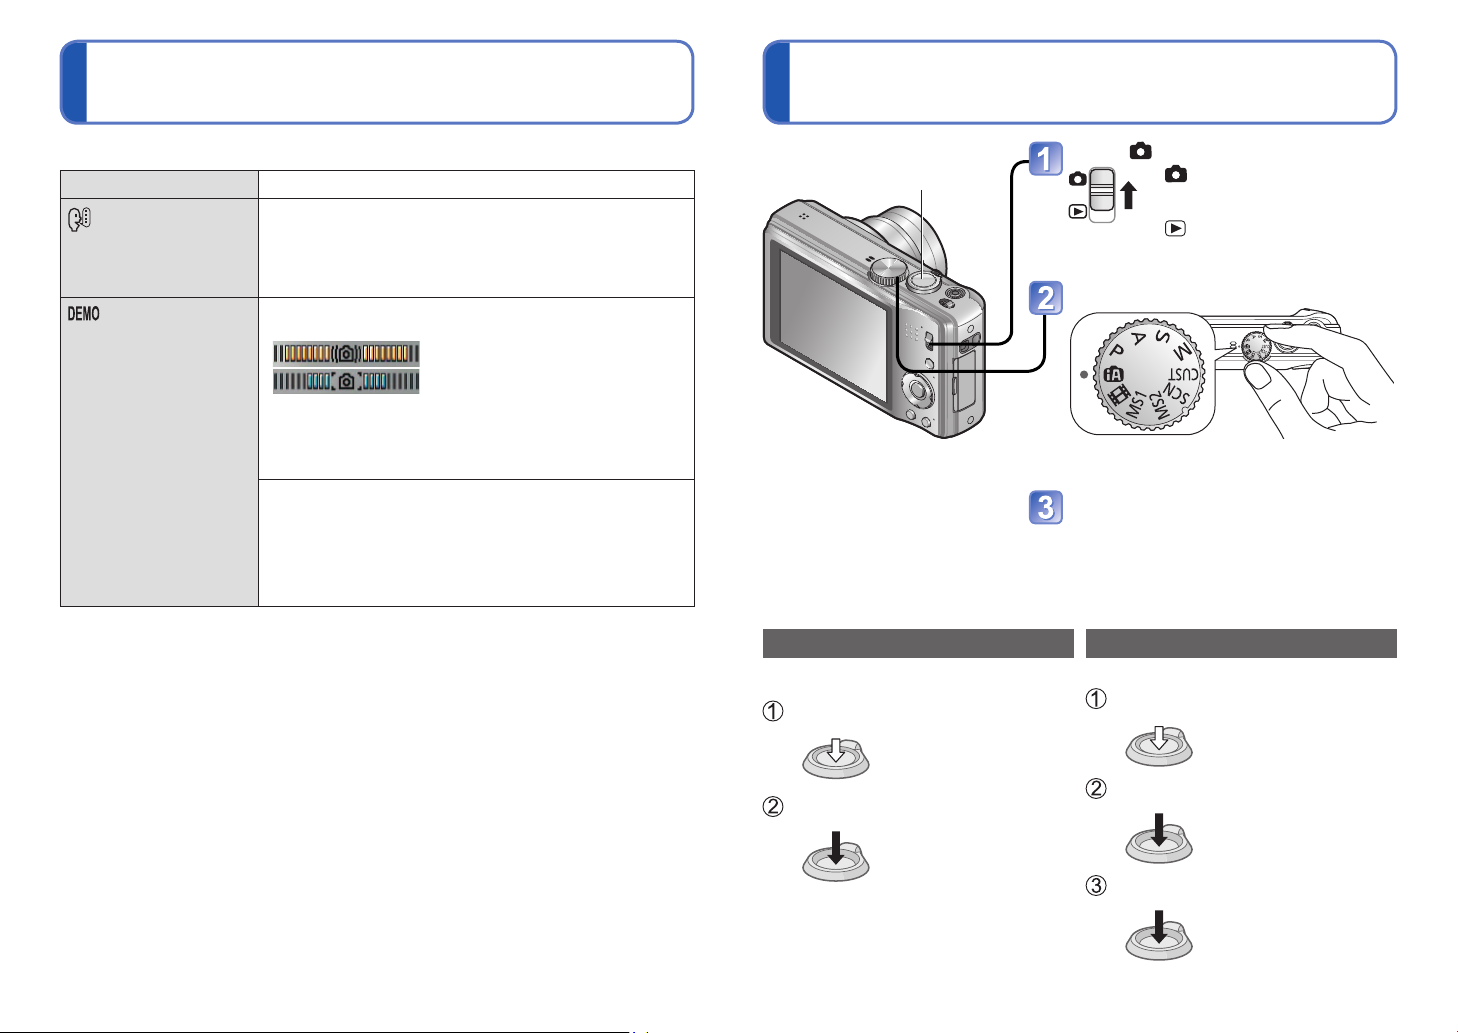
Shutter button
The illustration shows the DMC-TZ18.
Taking still pictures
Press the shutter button
Gently press the shutter button
Press halfway
(Adjust the focus)
Press and hold the shutter button
to take the picture
Press fully
Set to
: Still pictures and motion
pictures can be taken.
: The captured still pictures
and motion pictures can be
played back.
Set to the desired Recording Mode
Align the mode dial correctly to the mode that
you want to use.
Aim the camera and shoot
Recording motion pictures
Press the shutter button
Gently press the shutter button
Press halfway
(Adjust the focus)
Press and hold the shutter button
to begin recording
Press fully
Press the shutter button again to
finish recording
Press fully
24 VQT3H47 VQT3H47 25
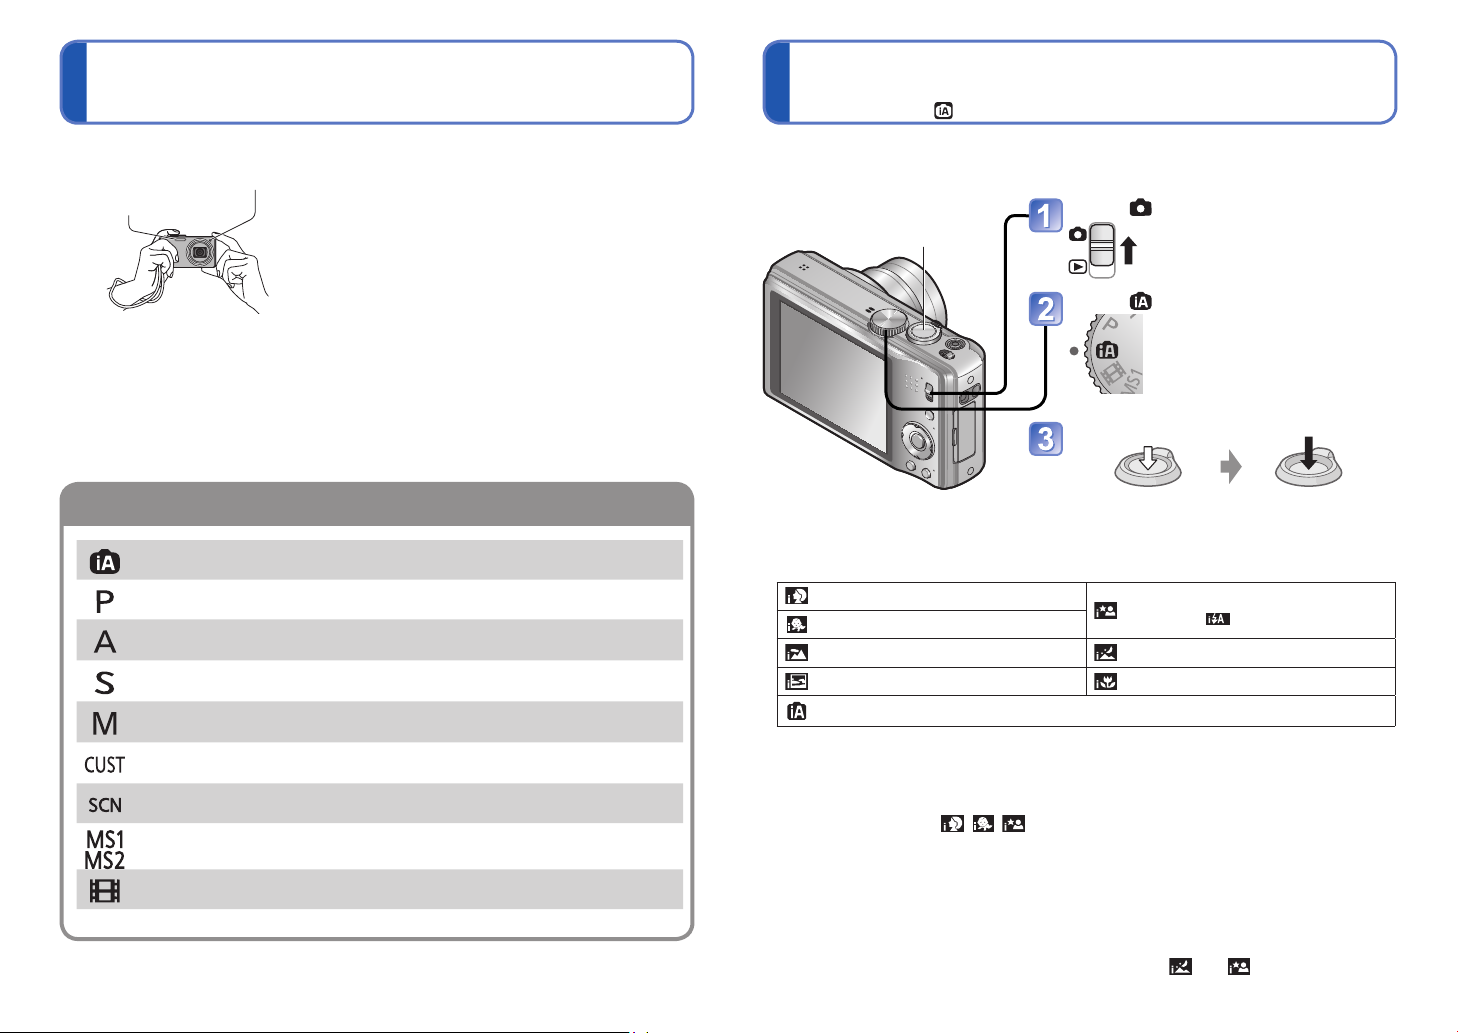
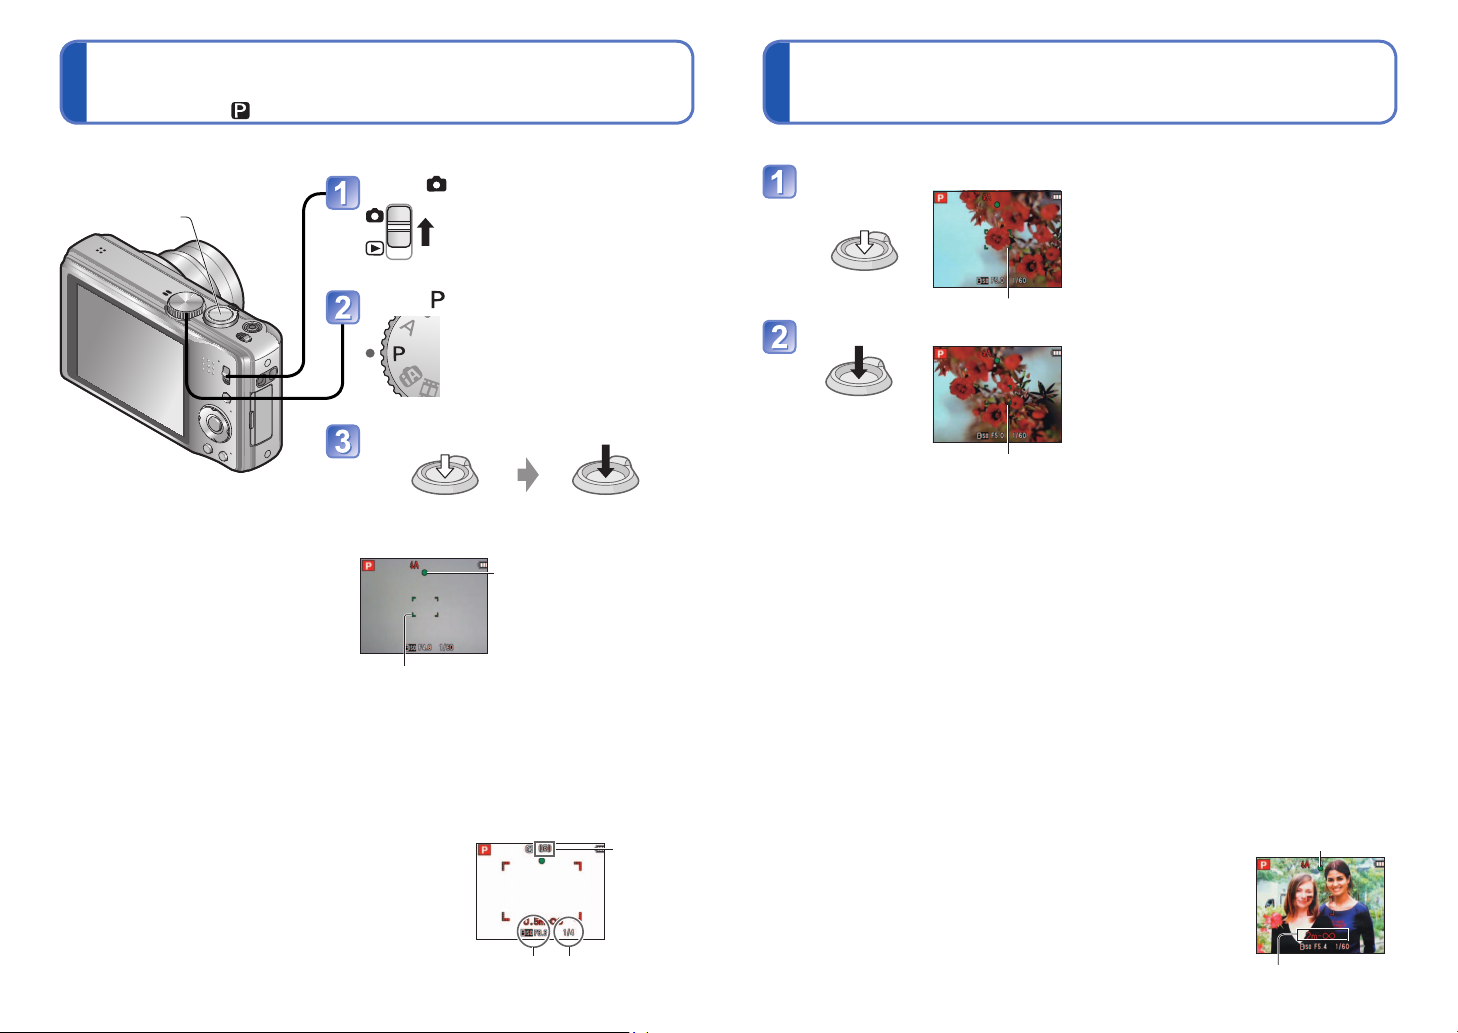
Basic shooting operation (Continued)
Mode dial
Taking pictures with automatic settings
[Intelligent Auto] Mode
Recording Mode:
■
Holding the camera
AF Assist Lamp
Flash
[Intelligent Auto] Mode
[Program AE] Mode
[Aperture-Priority] Mode
[Shutter-Priority] Mode
[Manual Exposure] Mode
[Custom] Mode
[Scene Mode]
[My Scene Mode]
[Motion Picture] Mode
• Stand with your arms close to your body and with your
legs apart.
• Do not touch the lens.
• Do not block the microphone when recording motion
picture. (→8)
• Do not block the flash or the lamp. Do not look at it
from close range.
• Make sure that the camera does not move at the
moment the shutter button is pressed.
• We recommend the use of the hand strap to avoid
dropping the camera.
Take pictures with automatic settings. (→27)
Record pictures with your own settings. (→30)
Determine aperture, then record pictures.
(→48)
Determine shutter speed, then record
pictures. (→49)
Determine aperture and shutter speed, then
record pictures. (→50)
Record pictures using pre-registered settings.
(→51)
Take pictures according to scene. (→53)
Take pictures in frequently-used Scene
Modes. (→60)
Take motion pictures. (→61)
Optimum settings are made automatically from information such as “face”, “movement”,
“brightness”, and “distance” just by pointing the camera at the subject, meaning that clear
pictures can be taken without the need to make settings manually.
Set to
Shutter button
Set to ([Intelligent Auto] Mode)
Take a picture
Press halfway
■
Automatic Scene Detection
Camera identifies the scene when pointed at the subject, and makes optimum settings
automatically.
People are detected
1
Baby is detected
Scenery is detected
A sunset is detected A close-up shot is detected
Reads subject movement to avoid blurring when the scene does not correspond to any of
the above.
1
∗
When babies (under 3 years) that are registered with the Face Recognition function are
recognised.
2
∗
We recommend using a tripod and the self-timer.
If the camera automatically identifies the scene and determines that people appear as
subjects in the picture ( , , ), Face Detection is activated, and the focus and
exposure are adjusted for the recognised faces.
According to the following conditions, different scene types may be determined for the
●
same subject:
Face contrast, conditions of subject (size, distance, colouring, contrast, movement),
zoom ratio, sunset, sunrise, low brightness, jitter
If undesired scene type is selected, we recommend manually selecting the
●
appropriate Recording Mode.
We recommend using a tripod and the self-timer with and .
●
∗
(press lightly to focus)
People and night scenery are detected
(Only when
Night scenery is detected
Press fully
(press the button all the
way to record)
is selected)
2
∗
26 VQT3H47 VQT3H47 27
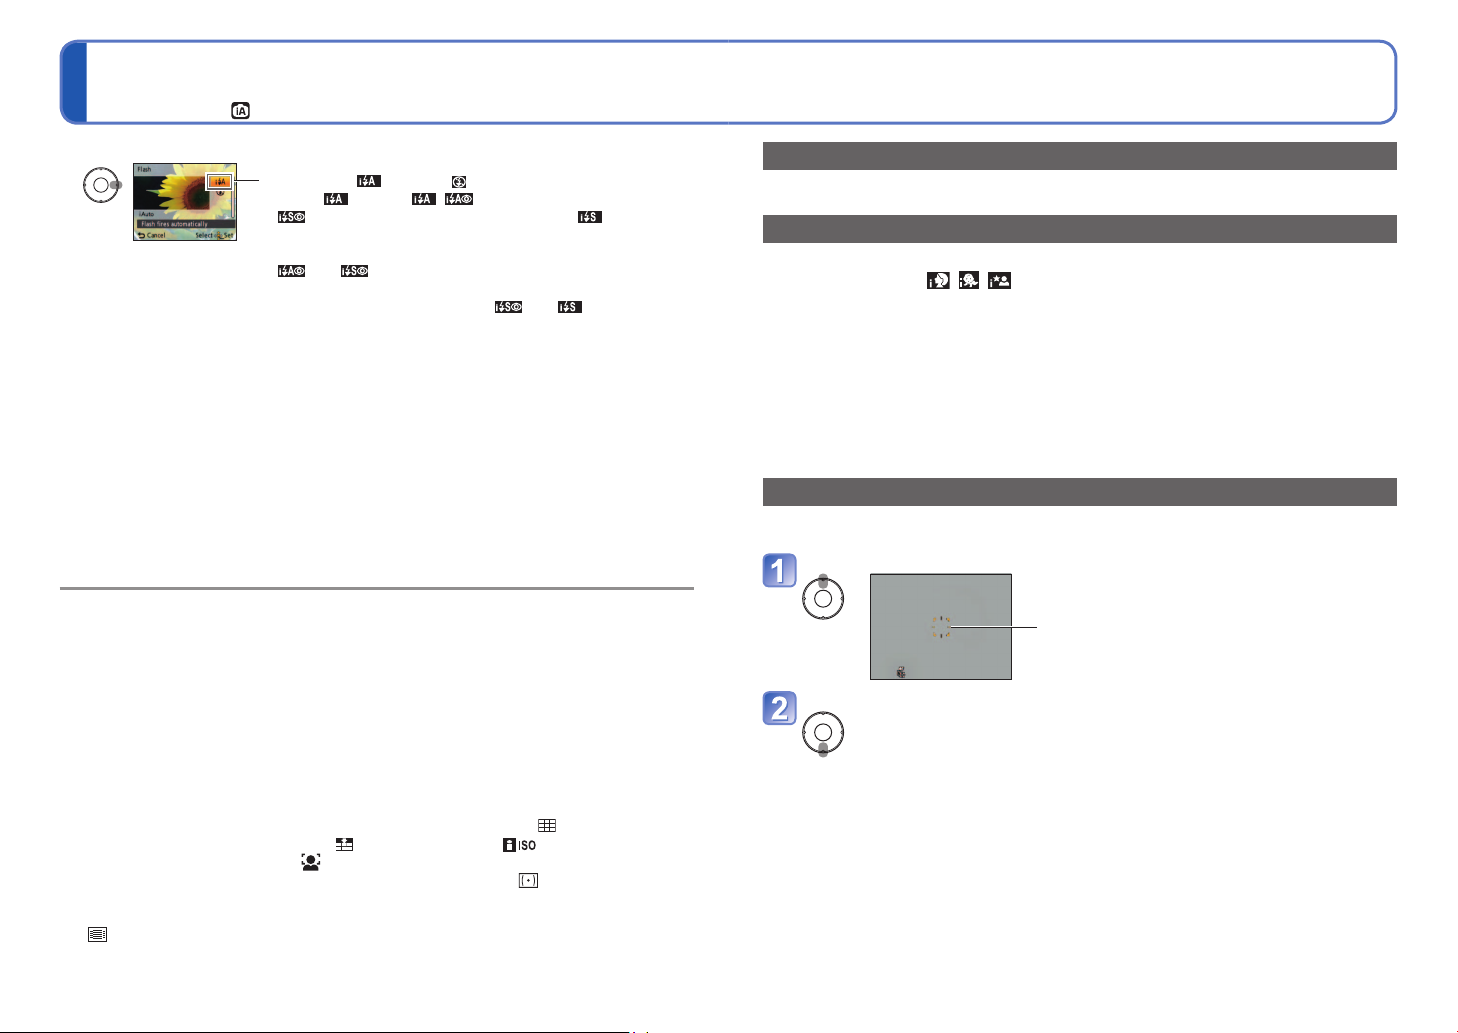
Taking pictures with automatic settings
[Intelligent Auto] Mode (Continued)
Recording Mode:
■
To use flash
Select either (Auto) or (Forced Flash Off).
• When
Sync.) are selected automatically according to the subject
type and brightness. For details (→40).
• and indicate that digital red-eye correction is
activated.
• The shutter speed is slower in and .
Focus range (→44).
●
The following menu items may be set in [Intelligent Auto] Mode:
●
• [Rec] menu:
• [Setup] menu
1
∗
Items that may be set differ from other Recording Modes.
2
∗
Other items on the [Setup] menu will reflect settings made in [Program AE] Mode,
etc.
Backlight Compensation:
●
Backlight refers to the light that shines from behind the subject. When this occurs, the
subject appears darker, and so backlighting is automatically corrected by increasing the
brightness of the entire image.
The settings for the following functions are fixed:
●
• [Auto Review]: [2 SEC.] • [Sleep Mode]: [5 MIN.] • [Guide Line]:
• [White Balance]: [AWB] • [Quality]: (Fine) • [Sensitivity]:
• [Stabilizer]: [ON] • [AF Mode]: (Face Detection)
• [AF Assist Lamp]: [ON] • [Quick AF]: [ON] • [Metering Mode]: (Multiple)
• [i.Exposure]: [STANDARD] • [i.Resolution]: [i.ZOOM]
• [Red-Eye Removal]: [ON] • [Continuous AF]: [ON]
3
∗
(23-area-focusing) when face cannot be recognised
The following functions cannot be used:
●
[Histogram], [Exposure], [Auto Bracket], [WB Adjust.], [Digital Zoom], [Min. Shtr Speed]
[Picture Size]
2
∗
: [Clock Set], [World Time], [Beep]
1
∗
, [Burst], [Color Mode]
is used, , (Auto/Red-Eye Reduction),
(Slow Sync./Red-Eye Reduction) and (Slow
1
∗
, [Face Recog.]
1
∗
, [Language], [Stabilizer Demo.]
3
∗
About Happy colours
If [Color Mode] is set to [Happy], still pictures are clearer, with more vivid colouring.
Face Detection and Face Recognition
If the camera automatically identifies the scene and determines that people appear as
subjects in the picture ( , , ), Face Detection is activated, and the focus and
exposure are adjusted for the recognised faces. (→63)
■
Face Recognition
The faces of people who are taken frequently can be registered together with their
names, ages, and other information.
If pictures are taken with [Face Recog.] (→63) set to [ON], priority is given to the focus
and exposure adjustments of the faces close to those that have been registered. Also,
the camera memorises detected faces during Face Detection, automatically recognises
faces which are taken frequently, and displays them on the face registration screen.
AF Tracking
Even if a subject, where the focus was locked (AF Lock) moves, the camera can continue
to keep it in focus.
Set [AF Mode] to AF Tracking
• To cancel AF Tracking → Press ▲ again.
AF Tracking frame
Align the AF Tracking frame with the subject, and then lock.
• To cancel AF Lock → Press ▼.
• The optimum scene is detected for the subject where the focus was
locked (AF Lock).
• AF Tracking frame
AF Lock successful: Yellow
AF Lock failed: Red (flash)
Face Recognition will be inactive while using AF Tracking.
●
Under certain recording conditions, such as when the subject is small or when it is dark,
●
[AF Tracking] may not operate correctly.
28 VQT3H47 VQT3H47 29
Taking pictures with your own settings
[Program AE] Mode
Recording Mode:
Aligning the focus
Using the [Rec] menu to change settings and set up your own recording environment.
Set to
Shutter button
Set to ([Program AE] Mode)
Take a picture
Press halfway
(press lightly to focus)
Focus display
(when focus is aligned:
flashing → illuminated)
AF area
(aligns focus with subject;
when complete: red → green)
Press fully
(press the button all the
way to record)
Useful when subject is not in the centre of picture.
First adjust focus according to subject
Align the AF area
with the subject
Hold down halfway
AF area
Return to desired composition
Press fully
AF area
Subjects/environments which may
●
make focusing difficult:
• Fast-moving or extremely bright
objects, or objects with no colour
contrast.
• Taking pictures through glass or near
objects emitting light. In dark, or with
significant jitter.
• When too close to object or when
taking pictures of both distant and
close objects together in the same
picture.
If a warning is displayed about jitter, use [Stabilizer], a
●
tripod, or [Selftimer].
If aperture and shutter speed are shown in red, you do
●
not have appropriate exposure. You should either use
the flash, change [Sensitivity] settings or set [Min. Shtr
Speed] to a slower speed.
Jitter alert
display
Aperture value Shutter speed
The focus display flashes and beep sounds when focus is not
●
aligned.
Use the focus range displayed in red as a reference.
Even if the focus display is lit, the camera may be unable to
bring the subject into focus if it is out of range.
AF area is displayed larger in dark conditions or when using
●
Digital Zoom.
Focus display
Focus range
30 VQT3H47 VQT3H47 31
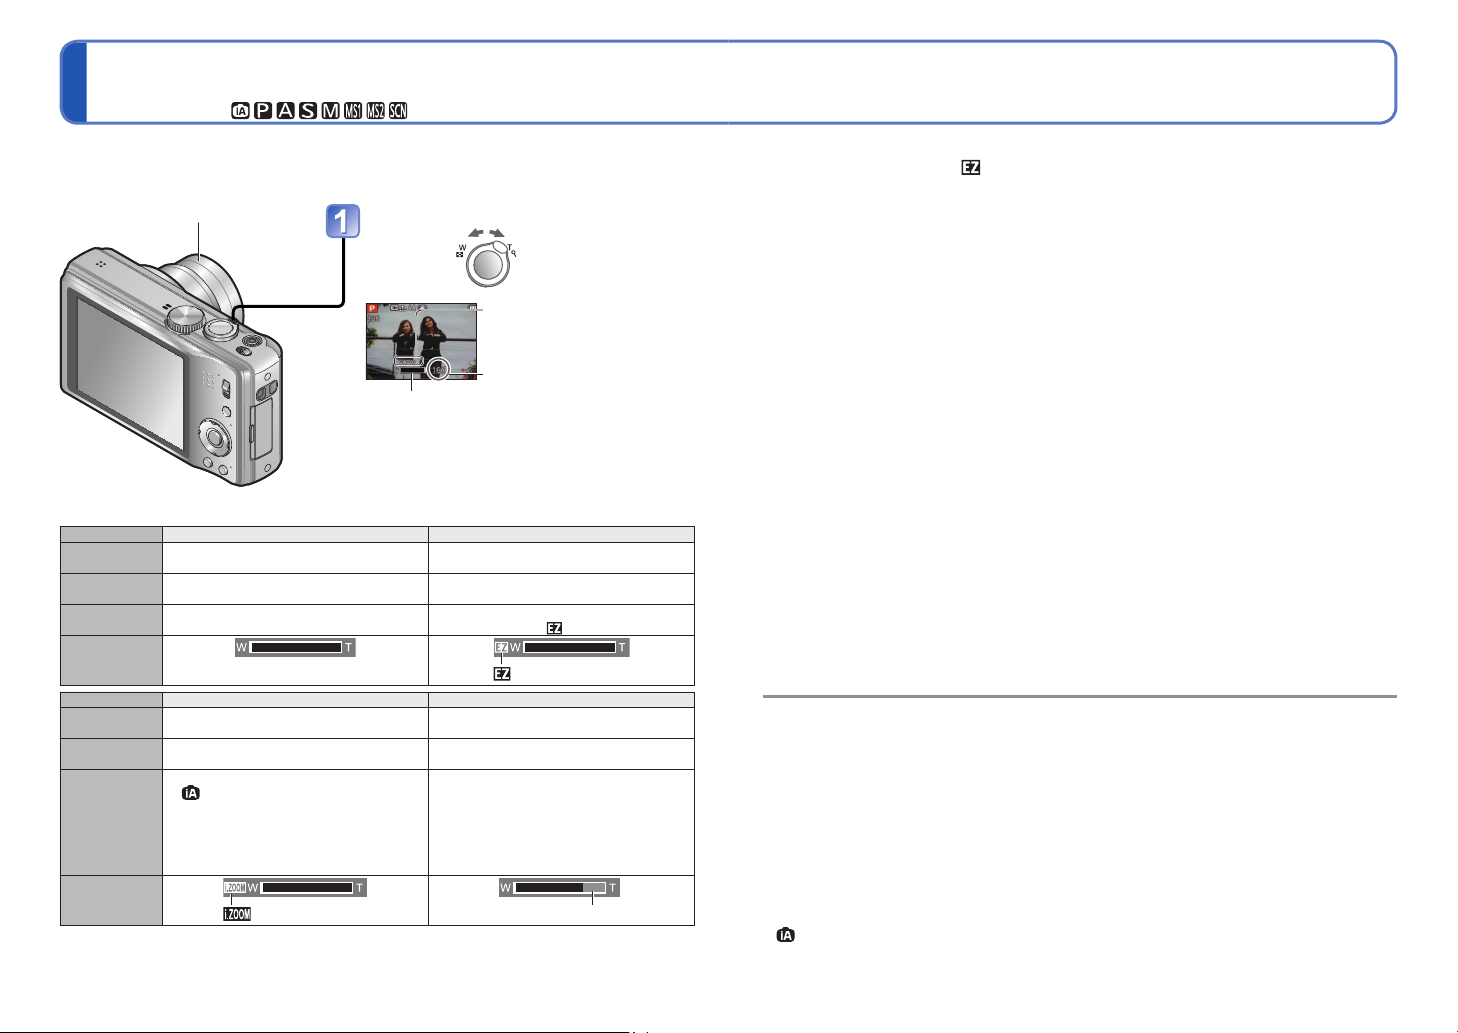
Taking pictures with zoom
Recording Mode:
You can zoom in up to 16 times with “Optical Zoom”, and up to 33.8 times with “Extra
Optical Zoom” (pictures only) with lower picture quality. To zoom further, you can use
[i.ZOOM] or [Digital Zoom].
Do not block the lens barrel movement
while zooming.
Zoom In/Out
Capture a
wider area
(wide-angle)
Zoom bar
Zoom speed can be adjusted.
●
Enlarge
the subject
(telephoto)
Focus
range
Zoom ratio
(approx.)
Zoom slowly → turn slightly
Zoom quickly → turn completely
■
Zoom types
Type Optical Zoom Extra Optical Zoom
Maximum
ratio
Picture quality
deterioration
Operation
conditions
Screen
display
Type i.Zoom Digital Zoom
Maximum
ratio
Picture quality
deterioration
Conditions,
etc.
Screen
display
Approx. 1.3 × the Optical Zoom or
i.Zoom functions in the following cases.
•
([Intelligent Auto] Mode)
• Scene Mode (except for [High Sens.],
[Hi-Speed Burst], [Flash Burst], [Pin
Hole])
• When [i.Resolution] in the [Rec] menu
is set to [i.ZOOM] (→34)
16 × Up to 33.8 ×
No No
None Set [Picture Size] in the [Rec] menu to a
Extra Optical Zoom
Almost none Yes
is displayed
(Depending on the picture size)
(However, the picture size is reduced)
setting for which
Up to 4 × the original zoom ratio
When [Digital Zoom] in the [Rec] menu is
set to [ON] (→36)
Digital Zoom area is displayed
is displayed (→70)
is displayed
What is Extra Optical Zoom (EZ)?
●
If, for example, set to [3M ] (equivalent to 3 million pixels), a picture will only be taken
of a 3M-sized central part of a 14 M (equivalent to 14.1 million pixels) area, meaning
that the picture can be enlarged further.
The zoom ratio and the zoom bar displayed on the screen are estimates.
●
In certain Recording Modes, “Tele macro” function (→42) is activated when maximum
●
zoom ratio is reached.
A greater degree of distortion may be generated by taking wider-angled pictures
●
of close objects, while using more telescopic zoom may result in more colouring
appearing around the outlines of objects.
The camera may make a rattling noise and vibrate when the zoom lever is operated -
●
this is not a fault.
Extra Optical Zoom cannot be used in the following cases:
●
[Macro Zoom], motion picture, [Transform], [High Sens.], [Hi-Speed Burst], [Flash
Burst], [Pin Hole], and [Photo Frame] Scene Modes
Digital Zoom cannot be used in the following modes:
●
([Intelligent Auto] Mode), Scene Modes ([Transform], [High Sens.], [Hi-Speed Burst],
[Flash Burst], [Pin Hole], [Film Grain] and [Photo Frame])
[Zoom Resume] allows zoom ratio to be memorised even if power is turned off.
●
32 VQT3H47 VQT3H47 33
Taking pictures with zoom (Continued)
Recording Mode:
[i.ZOOM]
The camera uses super resolution technology to increase the zoom ratio. Using super
resolution technology, the zoom ratio can be increased up to about 1.3 times higher than
the original zoom ratio with almost no deterioration of picture quality.
Display the [Rec] menu Select [i.ZOOM]
Select [i.Resolution] Press [ / ] several times
When [i.Resolution] is set to [i.ZOOM], super resolution technology is applied to the
●
picture.
The i.Zoom functions in the following cases.
●
• ([Intelligent Auto] Mode)
• Scene Mode (except for [High Sens.], [Hi-Speed Burst], [Flash Burst], [Pin Hole])
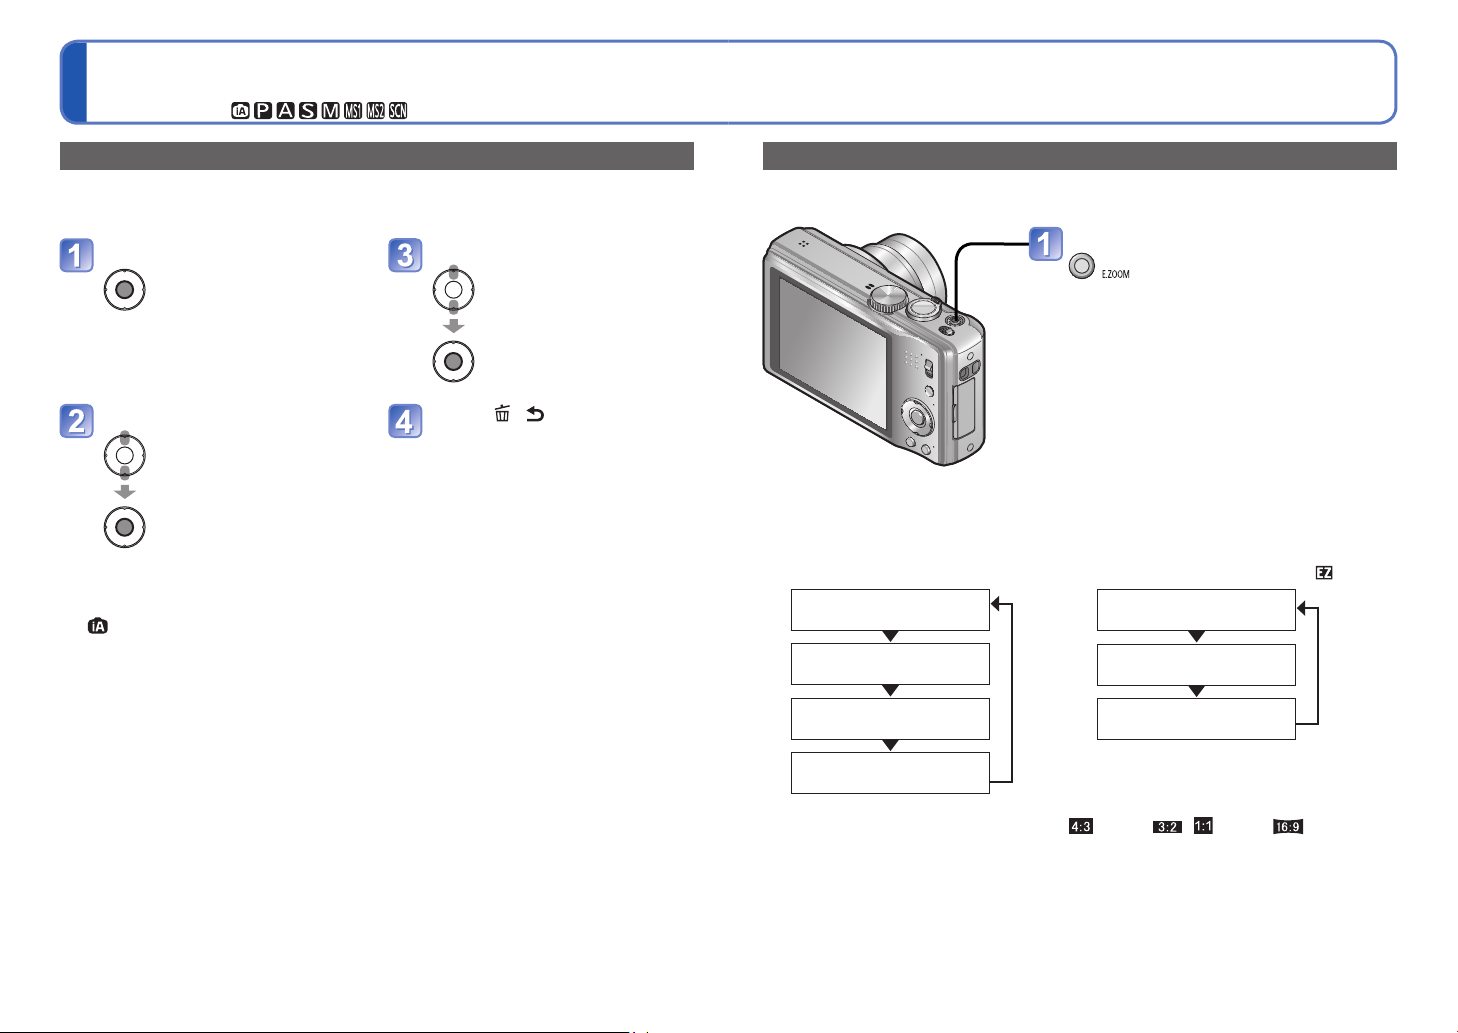
Easy Zoom: For zooming rapidly to maximum ratio
Zoom to max. T in one touch.
The illustration shows the DMC-TZ18.
■
Change of zoom ratio
When the Picture Size is 10.5 M or more
●
Current recording ratio
(or 1 X)
Optical Zoom
Maximum ratio
Extra Optical Zoom
Maximum ratio
1
∗
2
∗
Press to change zoom ratio
Each time you press, the ratio
changes
When the Picture Size is 10 M or less
●
Current recording ratio
(or 1 X)
Extra Optical Zoom
Maximum ratio
Digital Zoom
Maximum ratio
3
∗
Digital Zoom
Maximum ratio
1
∗
When [i.ZOOM] is working, the maximum ratio depends on the [i.ZOOM] settings.
2
∗
The Picture Size temporarily becomes [3M] ( ), [2.5M] ( / ) or [2M] ( ).
3
∗
When [Digital Zoom] in the [Rec] menu is set to [ON].
Easy Zoom does not work while recording motion pictures.
●
3
∗
34 VQT3H47 VQT3H47 35
Taking pictures with zoom (Continued)
Recording Mode:
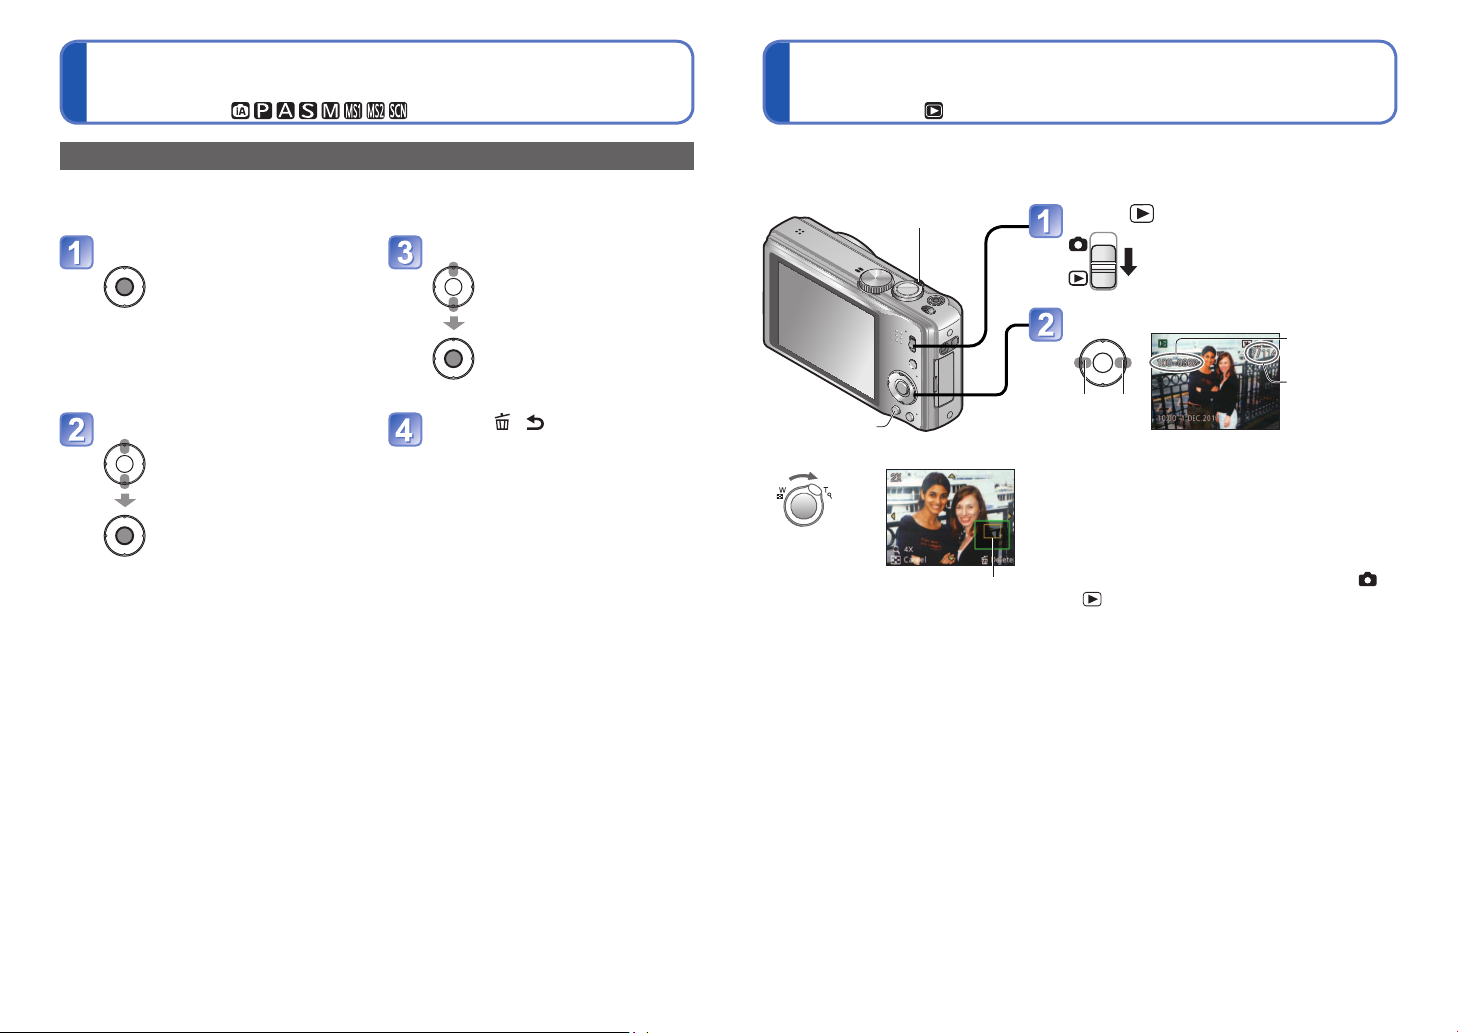
Viewing your pictures [Normal Play]
Playback Mode:
[Digital Zoom]
Zoom 4 times further than Optical/Extra Optical Zoom.
(Note that, with Digital Zoom, enlarging will decrease picture quality.)
Display the [Rec] menu Select [ON]
Select [Digital Zoom] Press [ / ] several times
When a card is in the camera, pictures are played back from the card, and without a card,
pictures are played back from the built-in memory.
Zoom lever
Set to
Scroll through pictures
Folder/File
number
Picture number/
Total pictures
[DISP.]
■
To enlarge (Playback Zoom)
Turn to
T side
Current zoom position
• Each time you turn the zoom lever
toward the T side, the magnification
increases through four levels
after 1x, 2x, 4x, 8x, and 16x. (The
picture quality displayed becomes
successively lower.)
• To reduce zoom→
Turn lever towards W side
• Move zoom position→ ▲▼◄►
Previous Next
Hold down to quickly scroll forwards/
●
backwards.
Scroll speed increases the longer you press.
(Speed may vary according to playback
conditions)
Some pictures edited on a computer may
●
not be viewed on this camera.
If the REC/PLAY switch is moved from to
●
while the power is on, the lens barrel will
be retracted after approx. 15 seconds.
This camera is compliant with the unified
●
DCF (Design rule for Camera File system)
standard formulated by the Japan
Electronics and Information Technology
Industries Association (JEITA), and with Exif
(Exchangeable image file format). Only files
that are DCF-compliant can be played back.
36 VQT3H47 VQT3H47 37
 Loading...