

Page 1
Operating Instructions
for advanced features
Digital Camera
Model No. DMC-LS6
Návod na obsluhu
k rozšíreným funkciám
Digitálny fotoaparát
Model DMC-LS6
Pred použitím si, prosím, pozorne prečítajte tento návod na obsluhu.
Page 2

Obsah
Pred použitím
Upozornenia týkajúce sa
zaobchádzania s týmto prístrojom ...... 4
Dodávané príslušenstvo ....................... 6
Prehľad hlavných súčastí
a ich funkcií ............................................ 7
Tlačidlá kurzora .............................................7
Príprava
Informácie o batériách .......................... 8
Informácie o počte záberov, ktoré je možné
nasnímať a prevádzkovom čase ...................8
Vkladanie a vyberanie karty (voliteľné
príslušenstvo)/batérií .......................... 10
Indikátor stavu batérie a kapacity pamäte ...12
Pamäťové médium na ukladanie snímok
(pamäťová karta a interná pamäť) ..............12
Informácie o kapacite záznamu (počet
obrázkov/záznamový čas) ...........................13
Nastavenie hodín ................................. 14
Základné funkcie
Snímanie s automatickými
nastaveniami
[Intelligent Auto] (Inteligentný
automatický režim) .............................. 16
Používanie zoomu ............................... 18
Režim snímania videozáznamov
[Motion Picture] (Snímanie
videozáznamov) ................................... 19
Prehliadanie snímok [Normal Play]
(Normálne prehliadanie) ..................... 20
Prehrávanie videozáznamov .......................21
Zobrazenie zoznamu (Zobrazenie
viacerých snímok) ............................... 22
Mazanie snímok ................................... 23
Vymazanie viacerých (max. 50) alebo
všetkých snímok ..........................................23
Nastavenia v menu .............................. 24
Používanie menu [Setup]
(Nastavenia) ......................................... 26
[Clock Set] (Nastavenie hodín) ...................26
[Beep] (Zvuková signalizácia) .....................26
[Volume] (Hlasitosť) .....................................26
[Auto Power Off] (Automatické vypnutie
fotoaparátu) .................................................26
[Light Freq.] (Frekvencia osvetlenia) ...........26
[Auto Review] (Automatická kontrola
záberu) ........................................................27
[Reset] (Obnovenie pôvodných
nastavení) ...................................................27
[Version Disp.] (Zobrazenie verzie
rmvéru) ......................................................27
[Format] (Formátovanie) .............................28
[Language] (Jazyk) ......................................28
- 2 -
Page 3

Obsah
Snímanie
Snímanie s vlastnými nastaveniami
[Normal Picture] (Bežné snímky) .......29
Zoznam režimov snímania ......................... 29
Zaostrenie so zmenou kompozície ....30
Zmena zobrazovaných informácií ......31
Snímanie s bleskom ............................32
Snímanie pomocou samospúšte .......34
Snímanie s kompenzáciou
expozície ..............................................35
Snímanie na základe typu scény
[Scene Mode] (Režim snímania
scén) .....................................................36
[Portrait] (Portrét) .......................................37
[Self Portrait] (Autoportrét) ......................... 37
[Scenery] (Krajina) .....................................37
[Panorama Assist]
(Panoráma s asistenciou) ..........................38
[Sports] (Šport) ........................................... 38
[Night Portrait] (Nočný portrét) ................... 39
[Night Scenery] (Nočná krajina) ................. 39
[Food] (Jedlo) ............................................. 39
[Party] (Večierok) ........................................ 39
[Baby] (Dieťa) ............................................. 40
[Sunset] (Západ slnka) ............................... 40
[High Sens.] (Vysoká citlivosť) ...................40
[Fireworks] (Ohňostroj) ............................... 41
[Beach] (Pláž) ............................................. 41
[Snow] (Sneh) ............................................41
Používanie menu [Rec] (Snímanie) ....42
[Picture Size] (Rozlíšenie) .......................... 42
[Rec Quality] (Kvalita záznamu) ................. 43
[Sensitivity] (Citlivosť ISO) .........................43
[White Balance] (Vyváženie bielej) ............. 44
[AF Mode] (Režim automatického
zaostrovania) .............................................. 45
[Digital Zoom] (Digitálny zoom) .................. 46
[Burst] (Sekvenčné snímanie) .................... 46
[Color Mode] (Farebný efekt) ..................... 47
[Red-Eye Removal] (Odstránenie efektu
červených očí) ............................................ 47
[Stabilizer] (Optická stabilizácia obrazu) .... 47
[Date Stamp] (Dátumová pečiatka) ............ 48
[Clock Set] (Nastavenie hodín) ..................48
Prehliadanie/Úpravy
Rôzne spôsoby prehliadania (Režim
prehliadania) ........................................49
[Slide Show] (Prezentácia) ......................... 50
[Category Selection] (Výber podľa
kategórie) ................................................... 51
Používanie menu [Playback]
(Prehliadanie) .......................................52
[Resize] (Zmena rozlíšenia) ....................... 52
[Protect] (Ochrana proti vymazaniu
a zápisu) ..................................................... 54
[Copy] (Kopírovanie) .................................. 55
Pripojenie k inému zariadeniu
Pripojenie k osobnému počítaču .......56
Kopírovanie záznamov do počítača
pomocou programu
„PHOTOfunSTUDIO” .................................58
Tlač snímok ..........................................59
Tlač viacerých snímok ................................ 60
Tlač dátumu ...............................................61
Nastavenie tlače vo fotoaparáte ................. 62
Ďalšie informácie
Zobrazenie na displeji .........................63
Zobrazované hlásenia .........................65
Riešenie problémov ............................67
Upozornenia týkajúce
sa používania fotoaparátu ..................73
Technické údaje ...................................77
- 3 -
Page 4

Cautions on handling this unit
■
Camera handling
Keep the camera away from excessive vibration, force,
or pressure.
●
Avoid using the camera under the following conditions,
which may damage the lens, LCD monitor, or camera
body. This may also cause the camera to malfunction or
prevent recording.
• Dropping or hitting the camera against a hard surface
• Sitting down with the camera in your pants pocket or
forcing it into a full bag
• Adding accessories to the camera strap
• Pushing with excessive force on the lens or LCD monitor
The camera is not dust resistant, splash resistant, or
waterproof.
Avoid using the camera in places with excessive dust
or sand, or where water can come into contact with the
camera.
●
Avoid using the camera under the following conditions,
which present a risk that sand, water, or foreign material
may enter the camera through the lens or openings around
buttons. Be especially careful, because these conditions
may damage the camera and such damage may not be
repairable.
Cautions on handling this unit
Keep the camera away from excessive vibration, force,
or pressure.
●
Avoid using the camera under the following conditions,
which may damage the lens, LCD monitor, or camera
body. This may also cause the camera to malfunction or
prevent recording.
• Dropping or hitting the camera against a hard surface
• Sitting down with the camera in your pants pocket or
forcing it into a full bag
• Adding accessories to the camera strap
• Pushing with excessive force on the lens or LCD monitor
The camera is not dust resistant, splash resistant, or
waterproof.
Avoid using the camera in places with excessive dust
or sand, or where water can come into contact with the
camera.
●
Avoid using the camera under the following conditions,
which present a risk that sand, water, or foreign material
may enter the camera through the lens or openings around
buttons. Be especially careful, because these conditions
may damage the camera and such damage may not be
repairable.
• In extremely dusty or sandy places
• In the rain or by the shore, where the camera may be
exposed to water
●
Condensation may occur when the camera is exposed to
sudden changes of temperature or humidity. Avoid these
conditions, which may make the lens dirty, cause mould, or
damage the camera.
●
If condensation does occur, turn off the camera and wait
about two hours before using it. Once the camera adjusts
to the surrounding temperature, fogginess will clear
Upozornenia týkajúce sa zaobchádzania s týmto prístrojom
■ Zaobchádzanie s fotoaparátom
Fotoaparát nevystavujte silným vibráciám, tlaku alebo
nárazom.
● Fotoaparát nevystavujte nasledujúcim podmienkam. Mohli
by spôsobiť poškodenie objektívu, LCD monitora alebo
tela fotoaparátu. Takisto môžu spôsobiť nefunkčnosť
fotoaparátu alebo zabrániť záznamu.
■ Kondenzácia (zahmlenie objektívu)
• Udieranie fotoaparátom o tvrdý povrch alebo vystavenie
pádu
• Posadenie sa na fotoaparát vo vrecku nohavíc alebo jeho
násilné vtláčanie do plnej batožiny
• Pridávanie príslušenstva na remienok fotoaparátu
• Pôsobenie veľkou silou na objektív alebo LCD monitor
Fotoaparát nie je vodotesný, ani odolný voči prachu
a striekajúcej vode.
Fotoaparát nepoužívajte na miestach s množstvom
prachu alebo piesku, alebo na miesta, kde môže dôjsť do
kontaktu s vodou.
● Fotoaparát nepoužívajte za nasledujúcich podmienok,
ktoré môžu spôsobiť riziko vniknutia piesku, vody, cudzích
materiálov do fotoaparátu prostredníctvom objektívu
alebo otvorov okolo tlačidiel. Postupujte obzvlášť opatrne,
pretože takéto podmienky môžu fotoaparát poškodiť, a toto
poškodenie sa nemusí dať opraviť.
• Na mimoriadne prašných alebo piesčitých miestach
• V daždi alebo na brehu, kde môže byť fotoaparát
vystavený vode
● Ak je fotoaparát vystavený náhlym zmenám teploty alebo
vlhkosti, môže dôjsť ku kondenzácii. Vyhýbajte sa preto
takýmto podmienkam, ktoré môžu spôsobiť znečistenie
optiky, vznik plesní alebo fotoaparát poškodiť.
● Ak dôjde ku kondenzácii, fotoaparát vypnite a pred jeho
ďalším použitím počkajte aspoň dve hodiny. Keď sa teplota
fotoaparátu priblíži k teplote okolia, zahmlenie zmizne
prirodzeným spôsobom.
- 4 -
Page 5

Upozornenia k zaobchádzaniu s týmto prístrojom
■ Najprv vždy vyhotovte skúšobný záber
Ak budete fotoaparát používať na dôležitých udalostiach (napríklad na svadbe), vždy
najprv vyhotovte skúšobné zábery, ktorými si overíte, či sa obraz a zvuk zaznamenáva
správne.
■ Žiadne odškodnenie za nevydarené zábery
Neposkytujeme odškodnenie za nevydarené zábery spôsobené technickými problémami
fotoaparátu alebo pamäťovej karty.
■ Dôkladne dodržiavajte autorské zákony
Neoprávnené použitie záznamov, ktoré obsahujú diela chránené autorským právom,
na iné než osobné použitie, je zakázané podľa autorského zákona. Záznam niektorých
materiálov môže byť obmedzený aj pre osobné účely.
■ Prečítajte si aj časť „Upozornenia týkajúce sa používania fotoaparátu“ (→73)
- 5 -
Page 6

Dodávané príslušenstvo
Pred začatím používania fotoaparátu si skontrolujte dodané príslušenstvo.
Podrobnejšie informácie o príslušenstve nájdete v Základnom návode na obsluhu.
● Obsah dodávaného príslušenstva a vyhotovenie jednotlivých komponentov sa odlišuje
v závislosti od krajiny alebo oblasti, v ktorej ste fotoaparát zakúpili.
● Alkalické batérie typu LR6/AA alebo nabíjateľné Ni-MH (nikelmetalhydridové) batérie
typu HR6/AA sú v texte označované ako batéria (alebo batérie).
● Pamäťová karta SD, pamäťová karta SDHC a pamäťová karta SDXC sú v texte
označované ako pamäťová karta alebo karta.
● Obalový materiál zlikvidujte správnym spôsobom.
● Malé časti uschovajte na bezpečnom mieste mimo dosahu detí.
■ Voliteľné príslušenstvo
• Pamäťové karty sú voliteľné príslušenstvo. Ak nemáte k dispozícii pamäťovú kartu,
môžete na snímanie záberov a ich následné prehliadanie použiť internú pamäť
fotoaparátu.
• Pri strate dodaného príslušenstva sa obráťte na predajcu alebo najbližšie servisné
stredisko. (Príslušenstvo si môžete zakúpiť samostatne.)
- 6 -
Page 7
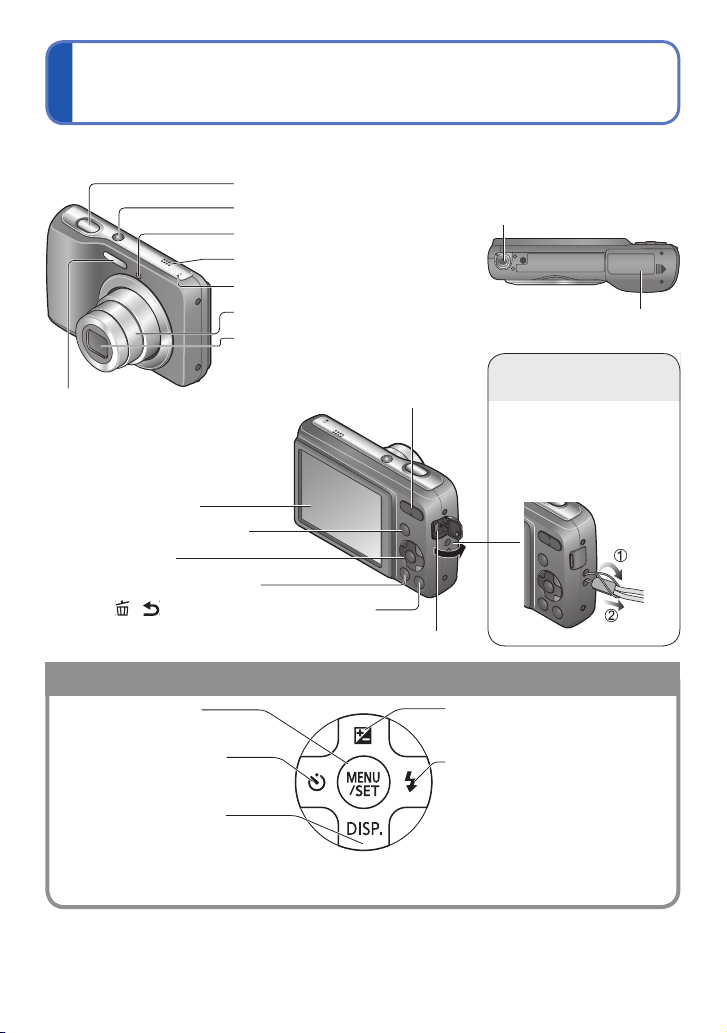
Prehľad hlavných súčastí a ich funkcií
Names and Functions of Main Parts
Tripod receptacle
• Ensure that the tripod is
stable.
Card/Battery door
(→10)
Shutter button (→16)
Power button (→14)
Self-timer indicator (→34)
Speaker
Microphone (→19)
Lens barrel
Lens (→4)
/ ] (Delete/Return) button (→23)
Zoom button (→18)Flash (→32)
Hand strap eyelet
We recommend using
the supplied hand strap
to avoid dropping the
camera.
Names and Functions of Main Parts
Tripod receptacle
• Ensure that the tripod is
stable.
Card/Battery door
(→10)
Shutter button (→16)
Power button (→14)
Self-timer indicator (→34)
Speaker
Microphone (→19)
Lens barrel
Lens (→4)
] (Delete/Return) button (→23)
Zoom button (→18)Flash (→32)
Hand strap eyelet
We recommend using
the supplied hand strap
to avoid dropping the
camera.
Otvor na pripevnenie
Spúšť (→16)
Vypínač (→14)
Indikátor samospúšte (→34)
Reproduktor
Mikrofón (→19)
Tubus objektívu
Objektív (→4)
Blesk (→32)
LCD monitor (→63)
Tlačidlo [MODE] (→29, 49)
Tlačidlá kurzora
Tlačidlo prehliadania (→20)
Tlačidlo [
Tlačidlo [MENU/SET]
(vyvolanie menu/nastavenie) (→24)
Tlačidlo posunu kurzora
doľava (◄)
• Samospúšť (→34)
Tlačidlo posunu kurzora
nadol (▼)
• Prepnutie informačného displeja (→31)
● V tomto návode na obsluhu sú tlačidlá, ktoré máte použiť, zvýraznené sivou farbou, prípadne je
použitý symbol ▲▼◄►.
● Obrázky a zábery obrazoviek v tomto návode na obsluhu sa môžu líšiť od konkrétneho výrobku.
● Niektoré spôsoby držania fotoaparátu môžu blokovať reproduktor a znížiť tak počuteľnosť
zvukovej signalizácie a pod.
/
] (Vymazanie/Návrat) (→23)
Konektor [DIGITAL] (→56, 59)
Tlačidlo zoomu (→18)
Tlačidlá kurzora
statívu
• Zabezpečte, aby bol statív
dostatočne stabilný.
Kryt priestoru na vloženie
karty/batérie (→10)
Uško na upevnenie
remienka na ruku
Aby vám fotoaparát
nespadol na zem, pri práci
s ním si na ruku navlečte
dodaný remienok.
Tlačidlo posunu kurzora
doprava (►)
• Blesk (→32)
Tlačidlo posunu kurzora
nahor (▲)
• Kompenzácia expozície (→35)
- 7 -
Page 8
Informácie o batériách
■ Batérie, ktoré môžete používať v tomto fotoaparáte
V tomto fotoaparáte môžete používať alkalické batérie typu LR6/AA alebo voliteľné
nabíjateľné (nikelmetalhydridové) batérie typu HR6/AA.
● Je možné používať aj batérie typu EVOLTA (EVOIA) (Panasonic).
● Nie je možné použiť nasledujúce batérie:
mangánové batérie, lítiové batérie, niklové batérie, Ni-Cd batérie, oxyridové batérie.
Pri použití takýchto batérií môže dochádzať k nasledujúcim problémom: vytečenie
batérie, nesprávne zobrazenie zostávajúcej kapacity batérie, fotoaparát sa nedá zapnúť,
poškodenie dát zapisovaných do internej pamäti alebo na pamäťovú kartu a k iným.
● Nikdy nepoužívajte batérie uvádzané nižšie.
Batérie s čiastočne alebo úplne odlepeným obalom alebo batérie s plochým pólom .
Informácie o počte záberov, ktoré je možné nasnímať a prevádzkovom čase
Počet statických záberov, ktoré je možné nasnímať alebo prevádzkový čas sa môžu
mierne odlišovať v závislosti od okolitého prostredia alebo spôsobu používania. Tieto
počty sa môžu znížiť pri častom používaní blesku, funkcie zoom, pri častom používaní
iných funkcií alebo v chladnom prostredí.
Priložené batérie alebo
voliteľné alkalické batérie
Panasonic
Počet záberov, ktoré
je možné nasnímať
Záznamový čas Približne 80 minút Približne 160 minút
Dĺžka prehliadania Približne 480 minút Približne 640 minút
Približne 160 záberov Približne 320 záberov
Plne nabité Ni-MH batérie
Panasonic (voliteľné,
kapacita batérie je 1950 mAh)
● Podmienky snímania stanovené štandardom CIPA
• CIPA je skratka názvu organizácie [Camera & Imaging Products Association].
• Režim bežných snímok.
• Teplota: 23 °C/Vlhkosť: 50 % relatívna vlhkosť, LCD monitor je zapnutý.
• Použitie pamäťovej karty SD Panasonic (32 MB).
• Použitie dodaných batérií.
• Prvý záber nasnímaný 30 sekúnd po zapnutí fotoaparátu. (Keď je funkcia optickej
stabilizácie obrazu nastavená na možnosť [ON] (Zap.).)
• Snímanie každých 30 sekúnd s použitím plne nabitého blesku pri každom druhom zábere.
• Pri každom zábere sa zmení nastavenie zoomu z polohy teleskopického záberu do
polohy širokouhlého záberu alebo naopak.
• Po každom desiatom zábere sa fotoaparát vypne a ponechá v nečinnosti, kým sa
teplota batérií nezníži.
V prípade dlhších intervalov sa počet záberov zníži – napr. približne na jednu štvrtinu
v prípade 2-minútových intervalov pri vyššie uvedených podmienkach.
- 8 -
Page 9

Informácie o batériách
Výkon alkalických batérií sa výrazne znižuje pri nízkej okolitej teplote.
(Ak je teplota 0 °C)
Priložené batérie alebo
voliteľné alkalické batérie
Panasonic
Počet záberov, ktoré
je možné nasnímať
Záznamový čas Približne 25 minút Približne 120 minút
Dĺžka prehliadania Približne 200 minút Približne 500 minút
Približne 50 záberov Približne 240 záberov
Plne nabité Ni-MH batérie
Panasonic (voliteľné,
kapacita batérie je 1950 mAh)
● Počet záberov, ktoré je možné nasmínať, záznamový čas a dĺžka prehliadania závisia
od úložiska, stavu batérií a ich značky alebo typu.
● Aby batérie vydržali dlhšie, odporúčame vám fotoaparát v prestávkach medzi
snímaním vypínať. Pri plánovanom dlhodobom používaní fotoaparátu odporúčame
zvoliť nabíjateľné Ni-MH batérie.
● Ak sa dostupná kapacita batérií pri nabitých Ni-MH batériách výrazne znížila, batérie
sú na konci svojej životnosti. Zakúpte si nové batérie.
● Batériu nepoužívajte, ak je poškodená alebo deformovaná napríklad pádom (najmä
ak sú deformované kontakty). Môže spôsobiť poruchu.
- 9 -
Page 10

Vkladanie a vyberanie karty
Setting the clock
The clock is not set when the camera is shipped.
Press the Power button
Power button
Setting the clock
The clock is not set when the camera is shipped.
Press the Power button
The power is turned on.
If the language select screen is not displayed,
proceed to step .
Press [MENU/SET] while the
Power button
Setting the clock
The clock is not set when the camera is shipped.
Press the Power button
The power is turned on.
If the language select screen is not displayed,
proceed to step .
Press [MENU/SET] while the
message is displayed
Press to select the language,
Power button
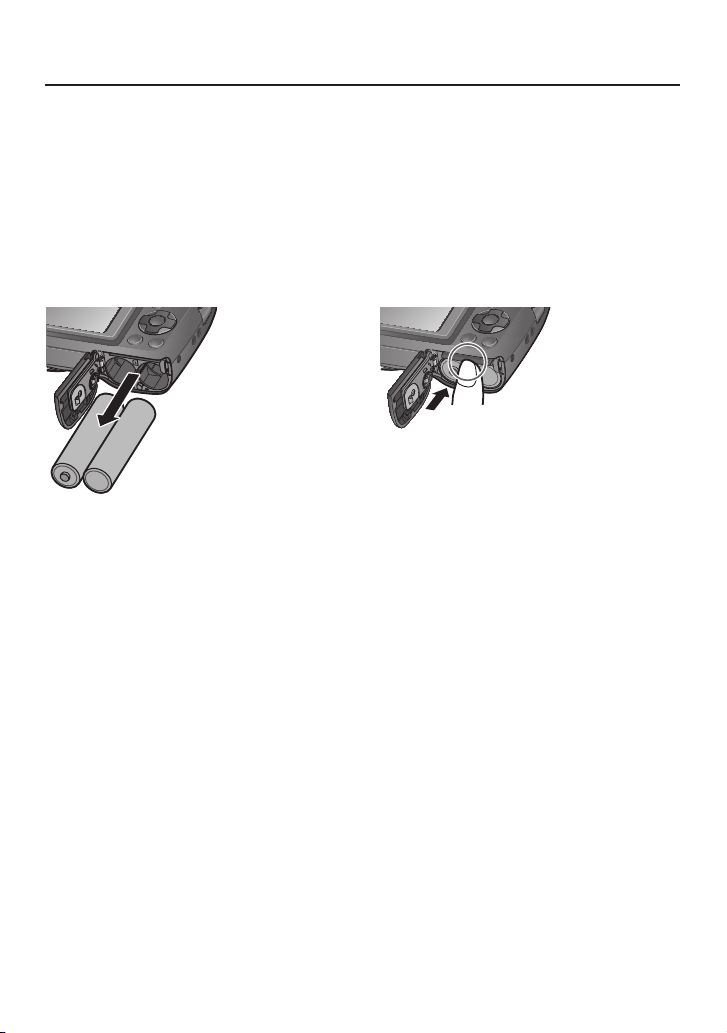
(voliteľné príslušenstvo)/batérií
Postupujte podľa
ilustrácie a pred
otvorením krytu priestoru
na vloženie karty/batérií
(2) ho najprv vysuňte (1).
Zasuňte batérie a kartu
tak, aby ich orientácia
bola správna.
• Batérie: Batérie zasuňte na
doraz so správnou
orientáciou pólov
a .
• Pamäťová karta: Vložte ju úplne
na doraz tak,
aby ste počuli
zackvaknutie.
Nedotýkajte
sa konektora.
Zatvorte kryt priestoru
na vloženie karty/batérie
a zasuňte ho tak, aby
dôkladne zacvakol.
Batéria (skontrolujte orientáciu)
Karta (skontrolujte orientáciu:
konektory smerujú k LCD)
- 10 -
Page 11
Vkladanie a vyberanie karty (voliteľné príslušenstvo)/batérií
Inserting and removing the card (optional)/the batteries
• To remove batteries:
Tilt the camera and catch the batteries
in your hand. Be careful not to drop
them.
• To remove card:
Press the centre of the card and pull the
card straight toward you. Be sure not to
drop the batteries.
• To remove card:
Press the centre of the card and pull the
card straight toward you. Be sure not to
drop the batteries.
■ Vyberanie
Pred vybratím karty alebo batérií fotoaparát vypnite a počkajte, pokiaľ úplne nezhasnú
indikátory na LCD monitore.
(V opačnom prípade by fotoaparát mohol prestať správne fungovať, mohla by sa
poškodiť pamäťová karta alebo na nej uložené snímky.)
• Vyberanie batérií:
Fotoaparát nakloňte a batérie
zachyťte do ruky. Dbajte na to, aby
nevypadli.
• Vyberanie karty:
Zatlačte na stred karty a kartu následne
potiahnite smerom k sebe. Dávajte
pozor, aby nevypadli batérie.
● Ak neplánujete fotoaparát dlhší čas používať, vyberte z neho batérie. Krátko po
skončení používania môžu byť batérie horúce. Vypnite fotoaparát a pred vybratím
batérií počkajte, kým nevychladnú.
● Ak vyberiete batérie z fotoaparátu na viac ako 24 hodín, môžu sa vynulovať hodiny.
● Pri výmete batérií používajte vždy dve nové batérie toho istého typu a značky.
● Aby ste predišli prehltnutiu pamäťovej karty, uchovávajte ju mimo dosahu detí.
- 11 -
Page 12
Vkladanie a vyberanie karty (voliteľné príslušenstvo)/batérií
Inserting and removing the card (optional)/the batteries
Remaining battery and memory capacity
Inserting and removing the card (optional)/the batteries
Remaining battery and memory capacity
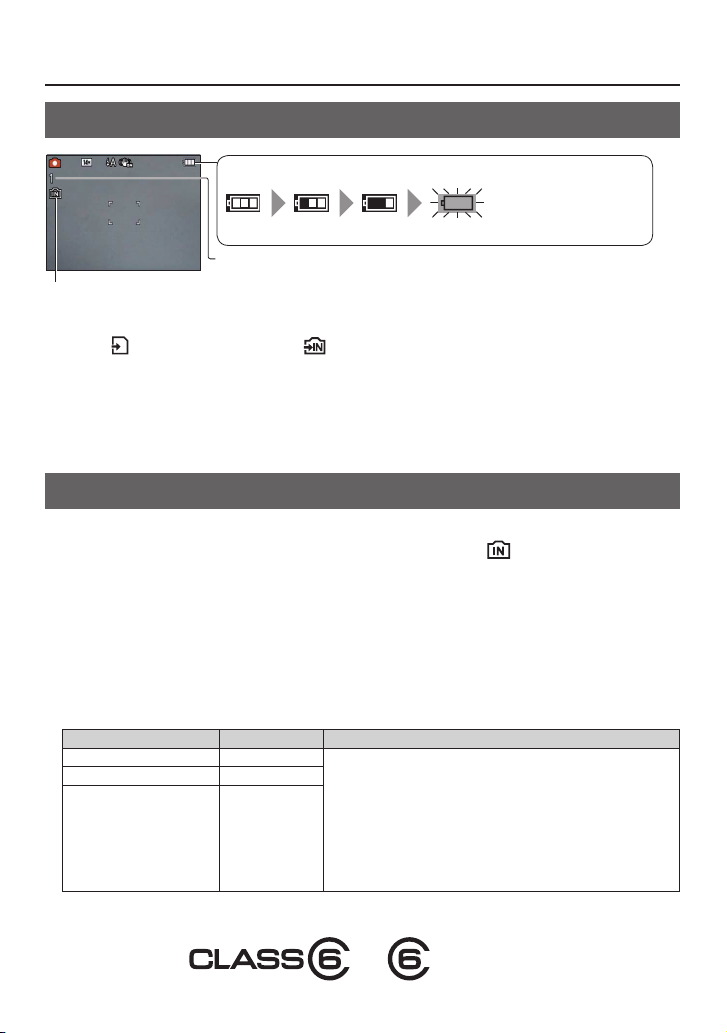
Remaining battery
(flashes red)
If the battery mark flashes red, replace the batteries with new ones.
Estimated remaining pictures or recording time capacity (press to
display on/off)
Displayed when no card is inserted (pictures will be saved to built-in memory)
When in operation
(Card) or (Built-in memory) are illuminated red.
Inserting and removing the card (optional)/the batteries
Remaining battery and memory capacity
Remaining battery
(flashes red)
If the battery mark flashes red, replace the batteries with new ones.
Estimated remaining pictures or recording time capacity (press to
display on/off)
Indikátor stavu batérie a kapacity pamäte
Zostávajúca kapacita batérie
(bliká načerveno)
Ak symbol batérie bliká načerveno, batérie vymeňte za nové.
Predpokladaný zostávajúci počet záberov alebo záznamový čas
(zobrazenie zapnete/vypnete tlačidlom ▼)
Tento indikátor sa zobrazí, keď nie je vložená pamäťová karta (zábery sa budú ukladať do internej pamäte)
Pri používaní
Indikátor
(pamäťová karta) alebo
(interná pamäť) svieti načerveno.
Ak indikátor zostane svietiť, fotoaparát pracuje – napríklad číta alebo zapisuje zábery.
Pokiaľ indikátor svieti, fotoaparát nevypínajte ani z neho nevyberajte batériu alebo kartu,
pretože to môže spôsobiť stratu alebo poškodenie dát.
Fotoaparát chráňte pred vibráciami, nárazmi a statickou elektrinou. Ak niektorý z týchto
faktorov zapríčiní prerušenie úkonu fotoaparátu, pokúste sa úkon vykonať znova.
Pamäťové médium na ukladanie snímok (pamäťová karta a interná pamäť)
Ak je vo fotoaparáte vložená pamäťová karta, snímky sa budú ukladať na pamäťovú
kartu; v opačnom prípade sa budú ukladať do internej pamäte
■ Interná pamäť (Pribl. 10 MB)
● Snímky uložené v internej pamäti môžete kopírovať na pamäťovú kartu a naopak (→55).
● Prístupová doba do internej pamäte môže byť dlhšia ako na kartu.
● Nastavenie [QVGA] v položke [Rec Quality] (Kvalita záznamu) je možné použiť len na
snímanie videozáznamov do internej pamäte.
.
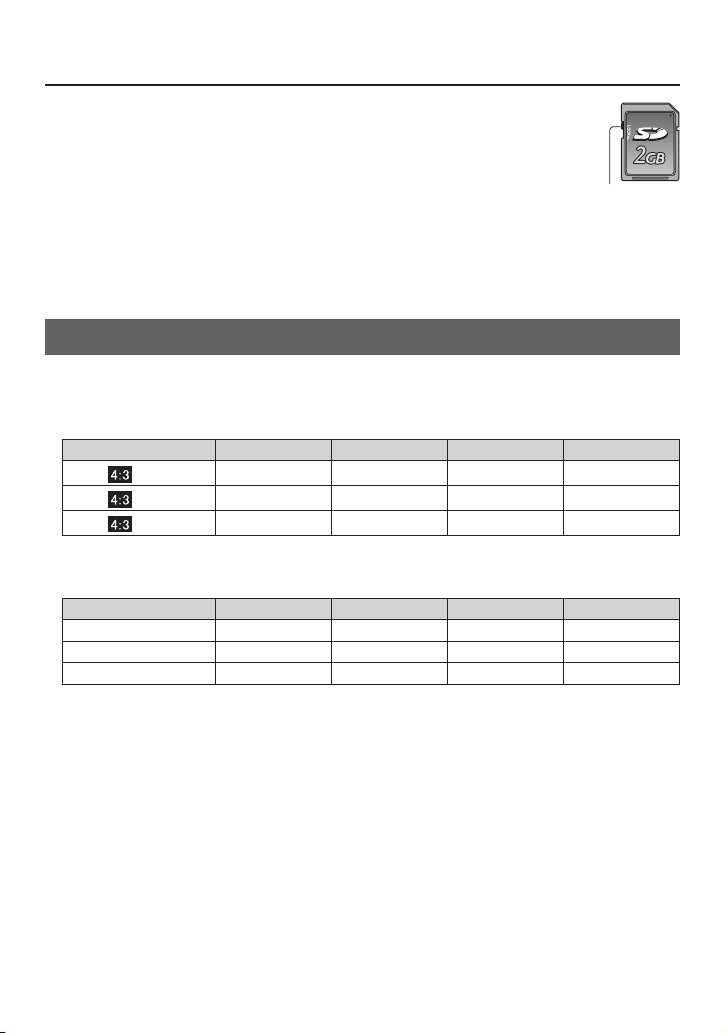
■ Kompatibilné pamäťové karty (voliteľné príslušenstvo)
Pamäťové karty založené na štandarde SD (odporúčame používať karty značky Panasonic)
Typ karty Kapacita Poznámky
Pamäťové karty SD 8 MB – 2 GB • Môžu sa používať v zariadeniach kompatibilných
Pamäťové karty SDHC 4 GB – 32 GB
Pamäťové karty SDXC 48 GB, 64 GB
s príslušnými formátmi.
• Pred použitím pamäťových kariet SDXC skontrolujte, či
váš počítač a ďalšie zariadenia podporujú tento typ kariet.
http://panasonic.net/avc/sdcard/information/SDXC.html
• Podporované sú iba pamäťové karty s príslušnými
kapacitami uvedené vľavo.
• Pri snímaní videozáznamov sa odporúča použiť pamäťovú
kartu SD s rýchlostnou triedou „Class 6“* alebo vyššou.
* Rýchlostná trieda SD znamená rýchlostný štandard pri nepretržitom zápise. Rýchlosť SD
karty nájdete na nálepke na karte alebo v iných materiáloch priložených ku karte.
(Príklad)
- 12 -
Page 13
Vkladanie a vyberanie karty (voliteľné príslušenstvo)/batérií
Inserting and removing the card (optional)/the batteries
Switch (LOCK)
Recording capacity guidelines (pictures/recording time)
[Picture Size] Built-in memory 2 GB 32 GB 64 GB
14M 1 270 4470 8800
Inserting and removing the card (optional)/the batteries
Switch (LOCK)
Recording capacity guidelines (pictures/recording time)
[Picture Size] Built-in memory 2 GB 32 GB 64 GB
14M 1 270 4470 8800
Inserting and removing the card (optional)/the batteries
Switch (LOCK)
Recording capacity guidelines (pictures/recording time)
[Picture Size] Built-in memory 2 GB 32 GB 64 GB
14M 1 270 4470 8800
● Ak ste už pamäťovú kartu naformátovali v počítači alebo v inom zariadení,
znova ju naformátujte v tomto fotoaparáte. (→28)
● Keď je prepínač nastavený do polohy „LOCK“ (zablokované), nie
je možné zapisovať alebo mazať údaje na pamäťovej karte, ani ju
formátovať.
● Vplyvom elektromagnetického vlnenia a statickej elektriny alebo pri
poruche môže dôjsť k poškodeniu údajov. Dôležité údaje by ste preto mali
uložiť na pevný disk osobného počítača.
Prepínač
(poloha
LOCK)
● Najaktuálnejšie informácie:
http://panasonic.jp/support/global/cs/dsc/ (Stránka je k dispozícii len v angličtine.)
Informácie o kapacite záznamu (počet obrázkov/záznamový čas)
Počet snímok, ktoré môžete zaznamenať a záznamový čas sú priamo úmerné kapacite
karty (a závisia od podmienok záznamu a typu karty).
■ Počet statických snímok, ktoré môžete zaznamenať
[Rozlíšenie snímky] Interná pamäť 2 GB 32 GB 64 GB
14M
5M
0.3M
• Keď počet snímok, ktoré je možné zaznamenať, prekročí 99 999, zobrazí sa „+99999“.
■ Záznamový čas v režime snímania videozáznamov
[Kvalita záznamu] Interná pamäť 2 GB 32 GB 64 GB
HD – 10m50s 2h56m00s 5h51m00s
VGA – 23m50s 6h24m00s 12h47m00s
QVGA 19s 1h2m00s 16h46m00s 23h59m00s
• Videozáznam môžete snímať nepretržite až 15 minút. Nie je však možné nepretržité snímanie
videozáznamu presahujúceho 2 GB. Na obrazovke je zobrazený zostávajúci čas nepretržitého
snímania.
1 270 4470 8800
3 730 11940 23010
37 7920 141620 263250
([h], [m] and [s] označujú hodiny, minúty a sekundy.)
- 13 -
Page 14
Nastavenie hodín
Setting the clock
The clock is not set when the camera is shipped.
Press the Power button
Power button
Setting the clock
The clock is not set when the camera is shipped.
Press the Power button
The power is turned on.
If the language select screen is not displayed,
proceed to step .
Press [MENU/SET] while the
message is displayed
Press to select the language,
and press [MENU/SET]
Press [MENU/SET]
Power button
[MENU/SET]
Setting the clock
The clock is not set when the camera is shipped.
Press the Power button
The power is turned on.
If the language select screen is not displayed,
proceed to step .
Press [MENU/SET] while the
Power button
Power button
Setting the clock
The clock is not set when the camera is shipped.
Press the Power button
The power is turned on.
If the language select screen is not displayed,
proceed to step .
Press [MENU/SET] while the
message is displayed
Press to select the language,
Power button
Setting the clock
The clock is not set when the camera is shipped.
Press the Power button
The power is turned on.
If the language select screen is not displayed,
proceed to step .
Press [MENU/SET] while the
message is displayed
Press to select the language,
and press [MENU/SET]
Press [MENU/SET]
Power button
[MENU/SET]
Setting the clock
The clock is not set when the camera is shipped.
Press the Power button
The power is turned on.
If the language select screen is not displayed,
proceed to step .
Press [MENU/SET] while the
message is displayed
Press to select the language,
and press [MENU/SET]
Press [MENU/SET]
Power button
[MENU/SET]
Press to select the items (year, month, day, hour, minute,
Power button
[MENU/SET]
Names and Functions of Main Parts
Tripod receptacle
• Ensure that the tripod is
stable.
Card/Battery door
(→10)
Shutter button (→16)
Power button (→14)
Self-timer indicator (→34)
Speaker
Microphone (→19)
Lens barrel
Lens (→4)
/ ] (Delete/Return) button (→23)
Zoom button (→18)Flash (→32)
Hand strap eyelet
We recommend using
the supplied hand strap
to avoid dropping the
camera.
Names and Functions of Main Parts
Tripod receptacle
• Ensure that the tripod is
stable.
Card/Battery door
(→10)
Shutter button (→16)
Power button (→14)
Self-timer indicator (→34)
Speaker
Microphone (→19)
Lens barrel
Lens (→4)
] (Delete/Return) button (→23)
Zoom button (→18)Flash (→32)
Hand strap eyelet
We recommend using
the supplied hand strap
to avoid dropping the
camera.
Setting the clock
The clock is not set when the camera is shipped.
Press the Power button
The power is turned on.
If the language select screen is not displayed,
proceed to step .
Press [MENU/SET] while the
message is displayed
Press to select the language,
and press [MENU/SET]
Press [MENU/SET]
Power button
[MENU/SET]
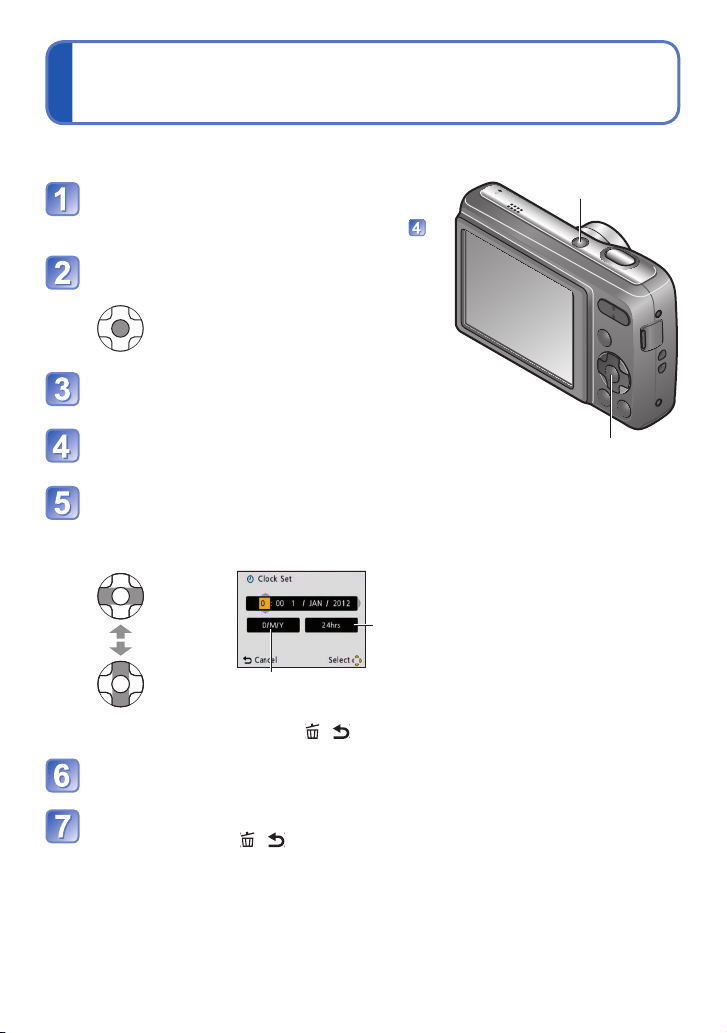
Press to select the items (year, month, day, hour, minute,
display order or time display format), and press to set
Select the
setting
item
Change
the values
and
settings
Select either [24hrs] or [AM/PM]
for the time display format.
Select the display order for the day, month, and year
([M/D/Y], [D/M/Y], or [Y/M/D]).
• To cancel → Press [ / ].
Press [MENU/SET]
Setting the clock
The clock is not set when the camera is shipped.
Press the Power button
The power is turned on.
If the language select screen is not displayed,
proceed to step .
Press [MENU/SET] while the
message is displayed
Press to select the language,
and press [MENU/SET]
Press [MENU/SET]
Power button
[MENU/SET]
Press to select the items (year, month, day, hour, minute,
display order or time display format), and press to set
Select the
setting
item
Change
the values
and
settings
Select either [24hrs] or [AM/PM]
for the time display format.
Select the display order for the day, month, and year
([M/D/Y], [D/M/Y], or [Y/M/D]).
• To cancel → Press [ / ].
Press [MENU/SET]
Confirm the setting and press [MENU/SET]
Names and Functions of Main Parts
Tripod receptacle
• Ensure that the tripod is
stable.
Card/Battery door
(→10)
Shutter button (→16)
Power button (→14)
Self-timer indicator (→34)
Speaker
Microphone (→19)
Lens barrel
Lens (→4)
/ ] (Delete/Return) button (→23)
Zoom button (→18)Flash (→32)
Hand strap eyelet
We recommend using
the supplied hand strap
to avoid dropping the
camera.
Names and Functions of Main Parts
Tripod receptacle
• Ensure that the tripod is
stable.
Card/Battery door
(→10)
Shutter button (→16)
Power button (→14)
Self-timer indicator (→34)
Speaker
Microphone (→19)
Lens barrel
Lens (→4)
] (Delete/Return) button (→23)
Zoom button (→18)Flash (→32)
Hand strap eyelet
We recommend using
the supplied hand strap
to avoid dropping the
camera.
Pri dodaní nie sú hodiny vo fotoaparáte nastavené.
Stlačte vypínač
Fotoaparát sa zapne. Ak sa nezobrazí
obrazovka na výber jazyka, prejdite na krok
.
Počas zobrazenia hlásenia stlačte
tlačidlo [MENU/SET].
Tlačidlami ▲▼ zvoľte jazyk
a stlačte tlačidlo [MENU/SET].
Stlačte tlačidlo [MENU/SET].
Tlačidlami ◄► zvoľte položky (rok, mesiac, deň, hodina,
minúta, poradie zobrazenia alebo formát zobrazovania hodín)
a nastavte ich tlačidlami ▲▼.
• Zrušenie → Stlačte tlačidlo [
Stlačte tlačidlo [MENU/SET]
Potvrďte nastavenie a stlačte tlačidlo [MENU/SET]
• Stlačením tlačidla [
• Fotoaparát vypnite a znova zapnite a skontrolujte zobrazený čas.
(Čas a dátum môžete zobraziť opakovaným stláčaním tlačidla ▼.)
Zvoľte
položku,
ktorú chcete
nastaviť.
Zmeňte
hodnoty
nastavenia.
Zvoľte si poradie zobrazenia položiek deň, mesiac a rok
a
([M/D/Y] (M/D/R), [D/M/Y] (D/M/R) alebo [Y/M/D] (R/M/D)).
Zvoľte formát zobrazovania hodín [24hrs]
(24-hodinový) alebo [AM/PM] (12-hodinový).
/
].
/
] sa vrátite na predchádzajúcu obrazovku.
- 14 -
Tlačidlo [MENU/SET]
Vypínač
Page 15

Nastavenie hodín
Setting the clock
The clock is not set when the camera is shipped.
Press the Power button
The power is turned on.
If the language select screen is not displayed,
proceed to step .
Press [MENU/SET] while the
message is displayed
Press to select the language,
and press [MENU/SET]
Press [MENU/SET]
Power button
[MENU/SET]
Press to select the items (year, month, day, hour, minute,
display order or time display format), and press to set
Select the
setting
item
Change
the values
and
settings
Select either [24hrs] or [AM/PM]
for the time display format.
Select the display order for the day, month, and year
([M/D/Y], [D/M/Y], or [Y/M/D]).
• To cancel → Press [ / ].
Press [MENU/SET]
Zmena nastaveného času
V menu [Rec] (Snímanie) alebo v menu [Setup] (Nastavenia) zvoľte položku [Clock
Set] (Nastavenie hodín) a vykonajte kroky
• Približne po 5 hodinách od vloženia batérií do fotoaparátu zostanú hodiny
nastavené, aj keď batérie na 24 hodín z fotoaparátu vytiahnete.
a
.
● Ak hodiny nenastavíte, na fotograách nebude možné vytlačiť správny dátum, keď si
vytlačenie snímok objednáte vo fotograckom štúdiu, ani keď ho na fotograe pridáte
pomocou funkcie [Date Stamp] (Dátumová pečiatka).
● Ak sú nastavené hodiny, správny dátum budete môcť vytlačiť aj napriek tomu, že
dátum nie je zobrazený na displeji fotoaparátu.
- 15 -
Page 16
Snímanie s automatickými nastaveniami
Setting the clock
The clock is not set when the camera is shipped.
Press the Power button
Power button
Display the screen for Recording
Mode selection
Setting the clock
The clock is not set when the camera is shipped.
Press the Power button
The power is turned on.
If the language select screen is not displayed,
proceed to step .
Press [MENU/SET] while the
Power button
Setting the clock
The clock is not set when the camera is shipped.
Press the Power button
The power is turned on.
If the language select screen is not displayed,
proceed to step .
Press [MENU/SET] while the
message is displayed
Press to select the language,
Power button
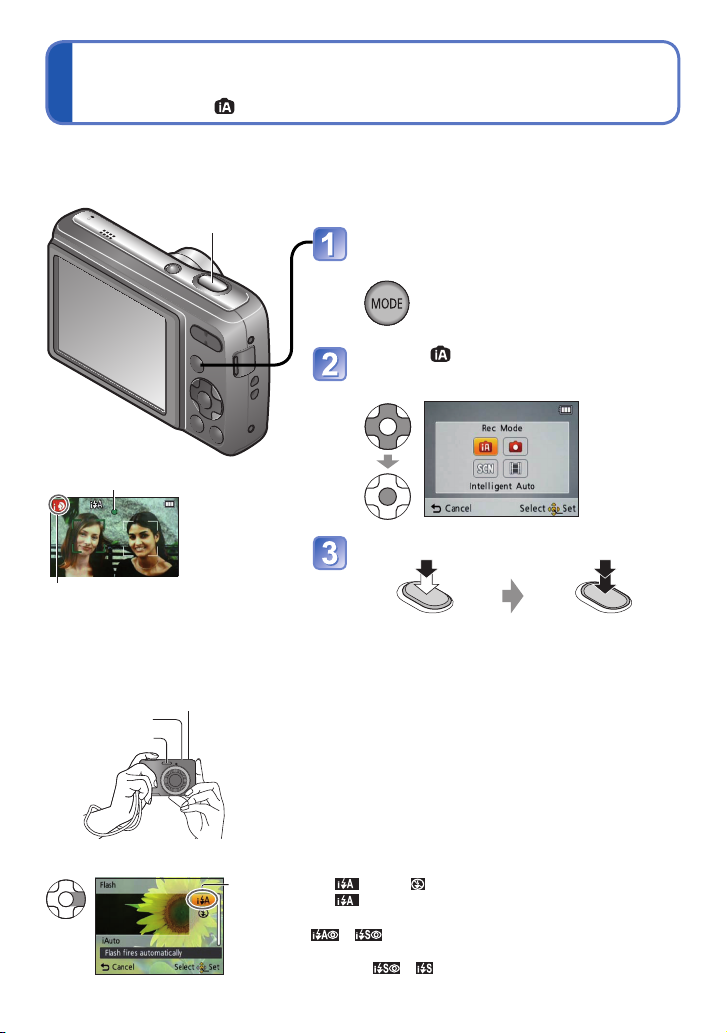
Taking pictures with automatic settings
[Intelligent Auto] Mode
Recording Mode:
Display the screen for Recording
Mode selection
Select [Intelligent Auto] Mode
Take pictures
Optimum settings are made automatically from information such as “face,” “brightness,”
and “distance” just by pointing the camera at the subject, meaning that clear pictures can
be taken without the need to make settings manually.
Basics
Display the screen for Recording
Mode selection
Select [Intelligent Auto] Mode
Take pictures
Press halfway
(press lightly to
focus)
Press fully
(press the button all
the way to record)
Shutter button
Microphone
• To avoid camera shake, hold it with both hands keeping
your arms close to your body and standing with your feet
slightly apart.
• Do not touch the lens.
• Do not block the flash.
Do not look at it from close range.
• Try to hold the camera steady when you press the
shutter button.
• Be careful not to block the microphone or the
speaker.
Taking pictures with automatic settings
[Intelligent Auto] Mode
Recording Mode:
Display the screen for Recording
Mode selection
Select [Intelligent Auto] Mode
Take pictures
Press halfway
(press lightly to
focus)
Press fully
(press the button all
the way to record)
Shutter button
Holding the camera
Speaker
Flash
Microphone
• To avoid camera shake, hold it with both hands keeping
your arms close to your body and standing with your feet
slightly apart.
• Do not touch the lens.
• Do not block the flash.
Do not look at it from close range.
• Try to hold the camera steady when you press the
shutter button.
• Be careful not to block the microphone or the
speaker.
• We recommend the use of the hand strap to avoid
dropping the camera.
To set flash
Select either or .
• When is selected, the type of flash automatically changes
according to the subject and brightness. (→32)
•
and indicate that the Red-Eye Reduction function is
activated.
• The shutter speed is slower in
and .
Display the screen for Recording
Mode selection
Select [Intelligent Auto] Mode
Take pictures
Press halfway
(press lightly to
focus)
Press fully
(press the button all
the way to record)
focus)
Press fully
(press the button all
the way to record)
Display the screen for Recording
Mode selection
Select [Intelligent Auto] Mode
Take pictures
Press halfway
(press lightly to
focus)
Press fully
(press the button all
the way to record)
Display the screen for Recording
Mode selection
Select [Intelligent Auto] Mode
Take pictures
Press halfway
(press lightly to
focus)
Press fully
(press the button all
the way to record)
• To avoid camera shake, hold it with both hands keeping
your arms close to your body and standing with your feet
slightly apart.
• Do not touch the lens.
• Do not block the flash.
Do not look at it from close range.
• Try to hold the camera steady when you press the
shutter button.
• Be careful not to block the microphone or the
speaker.
• We recommend the use of the hand strap to avoid
dropping the camera.
according to the subject and brightness. (→32)
and indicate that the Red-Eye Reduction function is
Display the screen for Recording
Mode selection
Select [Intelligent Auto] Mode
Take pictures
Press halfway
(press lightly to
focus)
Press fully
(press the button all
the way to record)
• To avoid camera shake, hold it with both hands keeping
your arms close to your body and standing with your feet
slightly apart.
• Do not touch the lens.
• Do not block the flash.
Do not look at it from close range.
• Try to hold the camera steady when you press the
shutter button.
• Be careful not to block the microphone or the
speaker.
• We recommend the use of the hand strap to avoid
dropping the camera.
Press fully
(press the button all
the way to record)
[Intelligent Auto] (Inteligentný automatický režim)
Režim snímania:
Optimálne nastavenia sa vykonajú automaticky na základe informácií, ako sú tvár, pohyb,
jas a vzdialenosť len nasmerovaním fotoaparátu na objekt, čo znamená, že zreteľné
snímky nasnímate bez potreby manuálneho nastavenia.
Spúšť
Vyvolajte obrazovku na voľbu
režimu snímania.
Indikátor zaostrenia
(Ak bolo zaostrené: svieti.
Ak nebolo zaostrené: bliká.)
Zvoľte
(Inteligentný automatický režim).
[Intelligent Auto]
Modrý symbol bude dve sekundy
naznačovať rozpoznaný typ scény.
■ Držanie fotoaparátu
■ Nastavenie blesku
Reproduktor
Mikrofón
Blesk
• Aby ste predišli roztraseniu fotoaparátu, držte ho oboma rukami
s ramenami tesne pri tele a mierne sa rozkročte.
• Nedotýkajte sa šošovky objektívu.
• Nezakrývajte blesk.
Nepozerajte do neho z malej vzdialenosti.
• Dbajte na to, aby bol fotoaparát pri stlačení tlačidla spúšte stabilný.
• Dávajte pozor, aby ste nazakryli mikrofón alebo reproduktor.
• Pri práci s fotoaparátom si na ruku navlečte remienok, aby vám
fotoaparát nespadol na zem.
Vyberte buď
• Ak vyberiete
objektu a jasu. (→32)
• Symboly
efektu červených očí.
• Pri použití režimov
Nasnímajte zábery.
Stlačte do polovice
(opatrným stlačením
zaostríte).
(úplným stlačením tlačidla
alebo
, typ blesku sa zmení automaticky v závislosti od
a
indikujú, že je aktivovaná funkcia tlmenia
- 16 -
.
a
bude expozičný čas dlhší.
Stlačte úplne
nasnímate záber).
Page 17

Snímanie s automatickými nastaveniami [Intelligent Auto] (Inteligentný automatický režim)
Taking pictures with automatic settings [Intelligent Auto] Mode
Taking pictures with automatic settings [Intelligent Auto] Mode
Taking pictures with automatic settings [Intelligent Auto] Mode
Taking pictures with automatic settings [Intelligent Auto] Mode
is selected)
Display the screen for Recording
Mode selection
Select [Intelligent Auto] Mode
Take pictures
Press halfway
(press lightly to
focus)
Press fully
(press the button all
the way to record)
Taking pictures with automatic settings [Intelligent Auto] Mode
is selected)
Taking pictures with automatic settings [Intelligent Auto] Mode
Taking pictures with automatic settings [Intelligent Auto] Mode
is selected)
Taking pictures with automatic settings [Intelligent Auto] Mode
is selected)
Taking pictures with automatic settings [Intelligent Auto] Mode
is selected)
*
1
*
3
Taking pictures with automatic settings [Intelligent Auto] Mode
People are detected
Scenery is detected
A close-up shot is detected
People and night scenery are detected (Only when is selected)
Night scenery is detected
When the scene does not correspond to any of the conditions above
*
1
, [Burst], [Color Mode]
*
1
*
2
: [Clock Set], [Beep], [Light Freq.], [Language]
*
3
■ Automatické určenie typu scény
Fotoaparát pri nasmerovaní na objekt rozpozná typ scény a automaticky vykoná
optimálne nastavenia.
Rozpoznajú sa ľudia
Rozpozná sa krajina
Rozpozná sa snímanie z veľmi malých vzdialeností
Rozpoznajú sa ľudia a nočná krajina (len keď je zvolený režim
Rozpozná sa nočná krajina
Ak scéna nezodpovedá žiadnym z vyššie uvedených
Ak je rozpoznaný režim
alebo
, aktivuje sa funkcia rozpoznania tvárí. Expozícia
)
a zaostrenie sa prispôsobí rozpoznaným tváram.
● Pre rovnaký snímaný objekt môžu byť v závislosti od podmienok snímania rozpoznané
rôzne typy scén.
● Ak fotoaparát nastaví nežiadúci typ scény, zvoľte vhodný režim snímania scén ručne.
a
● V režimoch
odporúčame použiť statív a samospúšť.
● V inteligentnom automatickom režime snímania [Intelligent Auto] je možné nastavovať
tieto položky menu:
• Menu [Rec] (Snímanie): [Picture Size] (Rozlíšenie)*
[Color Mode] (Farebný efekt)*
1
1
, [Burst] (Sekvenčné snímanie),
• Menu [Setup] (Nastavenia)*2: [Clock Set] (Nastavenie hodín), [Beep] (Zvuková
signalizácia), [Light Freq.] (Frekvencia osvetlenia), [Language] (Jazyk)
*1 Položky, ktoré môžete nastaviť, sú iné než v ostatných režimoch.
2
*
V iných položkách v menu [Setup] (Nastavenia) sa prejavia nastavenia vykonané
v iných režimoch snímania.
● Nastavenie nasledujúcich položiek nie je možné meniť:
• [Auto Power Off] (Automatické vypnutie fotoaparátu): [5 MIN.] (5 minút)
• [Auto Review] (Automatická kontrola záberu): [ON] (Zap.)
• [Sensitivity] (Citlivosť ISO): [AUTO] (Automaticky)
• [White Balance] (Vyváženie bielej): [AWB] (Automatické vyváženie bielej)
• [AF Mode] (Režim automatického zaostrovania):
• [Red-Eye Removal] (Odstránenie efektu červených očí): [ON] (Zap.)
• [Stabilizer] (Optická stabilizácia obrazu): [ON] (Zap.)
*
3
(zaostrovanie na 9 oblastí) keď sa nedá rozpoznať tvár
(Rozpoznanie tvárí)*
● Nie je možné použiť nasledujúce funkcie:
[Exposure] (Kompenzácia expozície), [Digital Zoom] (Digitálny zoom).
- 17 -
3
Page 18
Using zoom
Recording Mode:
“Optical Zoom” offers 5 x magnification. You can zoom in even closer without the loss of
picture quality by lowering the picture size and using “Extra Optical Zoom.”
For zooming in even closer, “Digital Zoom” (→46) is available.
Zoom In/Out
Capture a
wider area
(wide-angle)
Enlarge
the subject
(telephoto)
Focus range
Zoom ratio (approx.)
Zoom bar
●
Focus after adjusting the zoom.
Setting the clock
The clock is not set when the camera is shipped.
Press the Power button
Power button
Zoom In/Out
Enlarge
the subject
(telephoto)
Using zoom
Recording Mode:
Zoom In/Out
Capture a
wider area
(wide-angle)
Enlarge
the subject
(telephoto)
Focus range
Zoom ratio (approx.)
Zoom bar
●
Focus after adjusting the zoom.
Optical Zoom and Extra Optical Zoom (EZ)
Automatically switches to “Optical Zoom” when using maximum Picture Size (→42), and
to “Extra Optical Zoom” (for further zooming) otherwise. (EZ is short for “Extra Optical
Zoom.”)
• Optical Zoom • Extra Optical Zoom
Capture a
Enlarge
the subject
(telephoto)
Focus range
Zoom ratio (approx.)
Zoom bar
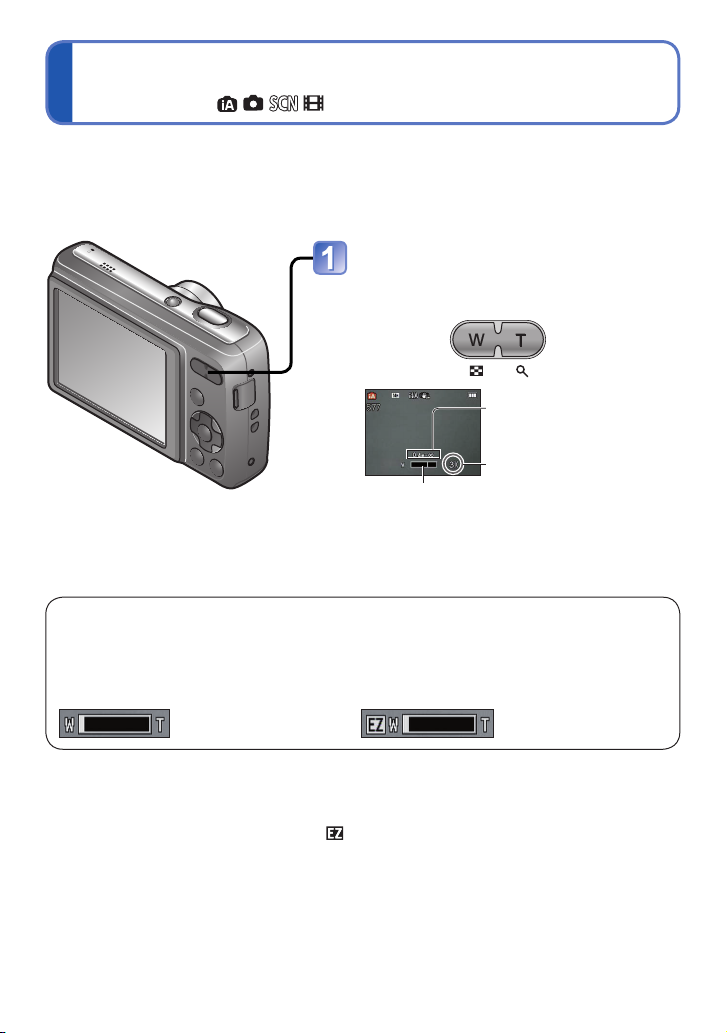
Používanie zoomu
Režim snímania:
Optický zoom poskytuje 5-násobné priblíženie. Znížením rozlíšenia snímky a použitím
funkcie optického extrazoomu môžete dosiahnuť ešte väčšie priblíženie bez zhoršenia
kvality obrazu.
Pre ešte väčšie priblíženie je k dispozícii digitálny zoom (→46).
Priblíženie/oddialenie záberu
pomocou zoomu
Nasnímanie
širšej oblasti
(širokouhlý
záber)
Zväčšenie
objektu
(teleskopický
záber)
Rozsah zaostrenia
Gracký indikátor priblíženia
● Najprv nastavte zoom a až potom zaostrite.
Optický zoom a optický extrazoom (EZ)
Fotoaparát automaticky prepne na optický zoom pri použití maximálneho rozlíšenia
(→42) a na optický extrazoom (pre ešte väčšie priblíženie) pri iných rozlíšeniach.
(EZ je skratka pre optický extrazoom.)
• Optický zoom • Optický extrazoom
● Princíp fungovania optického extrazoomu
Ak zvolíte nastavenie rozlíšenia [3 M ] (zodpovedajúce 3 miliónom obrazových
● Zobrazená hodnota zoomu a lišta so zoomom zobrazená na obrazovke udávajú iba
● Optický extrazoom nie je možné použiť v týchto prípadoch:
pri snímaní videozáznamov a v režime snímania scén [High Sens.] (Vysoká citlivosť).
bodov), v rámci efektívnej plochy CCD snímača sa použije len stredná časť
s rozlíšením 3M (3 milióny obrazových bodov), čo umožní snímať zábery s väčším
priblížením.
približné hodnoty.
- 18 -
Priblíženie (približná
hodnota)
Page 19
Režim snímania videozáznamov
Setting the clock
The clock is not set when the camera is shipped.
Press the Power button
Power button
Display the screen for Recording
Mode selection
Setting the clock
The clock is not set when the camera is shipped.
Press the Power button
The power is turned on.
If the language select screen is not displayed,
proceed to step .
Press [MENU/SET] while the
Power button
Setting the clock
The clock is not set when the camera is shipped.
Press the Power button
The power is turned on.
If the language select screen is not displayed,
proceed to step .
Press [MENU/SET] while the
message is displayed
Press to select the language,
Power button
Setting the clock
The clock is not set when the camera is shipped.
Press the Power button
The power is turned on.
If the language select screen is not displayed,
proceed to step .
Press [MENU/SET] while the
message is displayed
Press to select the language,
and press [MENU/SET]
Press [MENU/SET]
Power button
[MENU/SET]
Press fully
(start recording)
Taking motion pictures [Motion Picture] Mode
Recording Mode:
Display the screen for Recording
Mode selection
Select [Motion Picture] Mode
Start recording
Press halfway
(adjust the focus)
Press fully
(start recording)
• Immediately release the shutter button after
pressing it all the way.
• The focus and zoom will remain as they
were at the beginning of recording.
End recording
Press fully
Taking pictures with automatic settings [Intelligent Auto] Mode
People are detected
Scenery is detected
A close-up shot is detected
People and night scenery are detected (Only when is selected)
Night scenery is detected
When the scene does not correspond to any of the conditions above
*
1
, [Burst], [Color Mode]
*
1
*
2
: [Clock Set], [Beep], [Light Freq.], [Language]
*
3
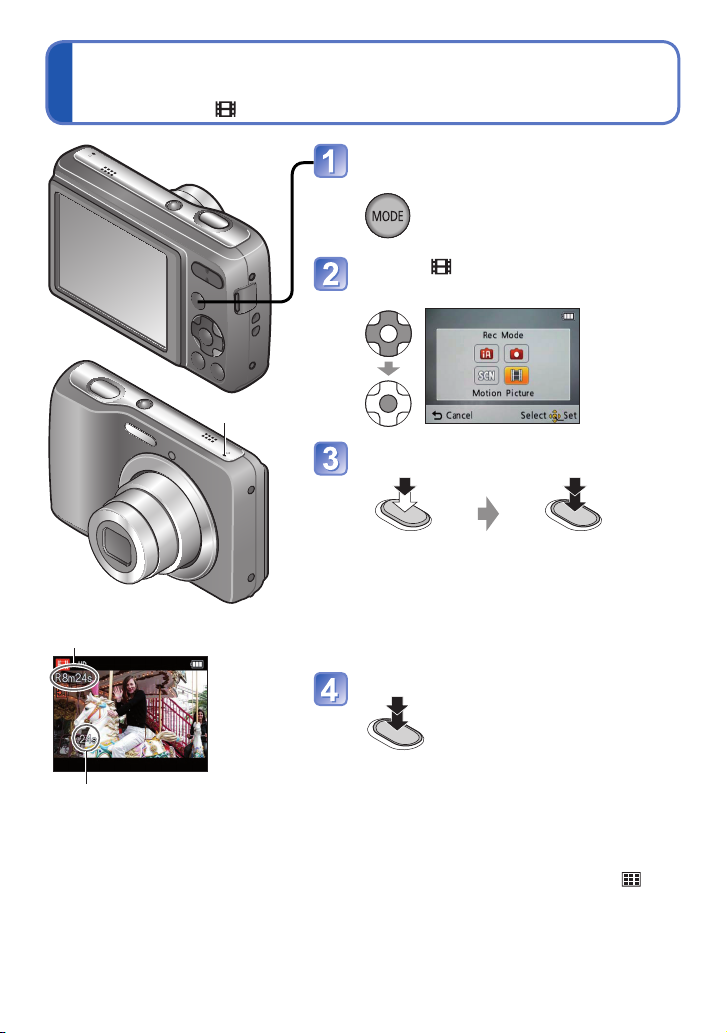
[Motion Picture] (Snímanie videozáznamov)
Režim snímania:
Vyvolajte obrazovku na voľbu
režimu snímania.
Mikrofón
Zvoľte
[Motion Picture]
(Snímanie videozáznamov).
Spustite snímanie.
Stlačte do
polovice
(zaostrenie).
• Spúšť po úplnom stlačení okamžite uvoľnite.
Zostávajúci záznamový čas (približne)
• Zaostrenie a zoom zostávajú od začiatku
snímania pevne nastavené.
Ukončite snímanie.
Uplynutý záznamový čas
● Nezakrývajte mikrofón.
● V závislosti od typu použitej karty sa po nasnímaní videozáznamu môže na istý čas
rozsvietiť indikátor prístupu na kartu. Nejde o poruchu.
● V režime automatického zaostrovania [AF Mode] je pevne nastavená možnosť
(zaostrovanie na 9 oblastí).
● Funkcia [Stabilizer] (Optická stabilizácia obrazu) nefunguje pri snímaní videozáznamov.
● Ak sa kapacita internej pamäte alebo pamäťovej karty v priebehu snímania
videozáznamu zaplní, snímanie sa automaticky zastaví. Snímanie sa môže zastaviť aj
pri niektorých typoch použitej pamäťovej karty.
Stlačte
spúšť úplne.
- 19 -
Stlačte úplne
(spustenie
záznamu).
Page 20

Prehliadanie snímok
Viewing your pictures [Normal Play]
Playback Mode:
When a card is in the camera, pictures are played back from the card, and without a card,
pictures are played back from the built-in memory.
Press the Playback button
• Press again to enter the
Recording Mode.
Scroll through pictures
Previous Next
Picture number/Total pictures
File number
Speaker
Setting the clock
The clock is not set when the camera is shipped.
Press the Power button
Power button
• Press again to enter the
Recording Mode.
Setting the clock
The clock is not set when the camera is shipped.
Press the Power button
The power is turned on.
If the language select screen is not displayed,
proceed to step .
Press [MENU/SET] while the
Power button
• Press again to enter the
Recording Mode.
Viewing your pictures [Normal Play]
Playback Mode:
Press the Playback button
• Press again to enter the
Recording Mode.
Scroll through pictures
Previous Next
Picture number/Total pictures
File number
• Press the shutter button to switch to
Recording Mode.
Current zoom position (displayed for 1 sec.)
Zoom button
Speaker
[Normal Play] (Normálne prehliadanie)
Režim prehliadania:
Keď je vo fotoaparáte vložená karta, prehliadajú sa snímky uložené na karte. Ak karta nie
je vložená, prehliadajú sa snímky z internej pamäte.
Reproduktor
Tlačidlo zoomu
Stlačte tlačidlo prehliadania.
• Opätovným stlačením tlačidla
prejdete do režimu snímania.
Prehliadajte si jednotlivé snímky.
Číslo snímky/Celkový počet snímok
Predchá-
Nasle-
dzajúca
dujúca
■ Priblíženie prehliadaných snímok
Stlačte stranu T
tlačidla zoomu.
• Po každom stlačení strany T tlačidla zoomu sa priblíženie zväčší. Postupne prechádza
cez štyri úrovne od 1×: 2×, 4×, 8× a 16×. (Postupne sa však znižuje aj kvalita obrazu.)
• Ak chcete zmenšiť priblíženie prostredníctvom zoomu → Stlačte stranu W tlačidla
zoomu.
• Posunutie priblíženého výrezu → ▲▼◄►
● Môže sa stať, že niektoré snímky upravené v počítači sa nebudú dať zobraziť v tomto
fotoaparáte.
● Tento fotoaparát je kompatibilný so štandardom DCF (Design rule for Camera File
system), ktorý stanovila organizácia Japan Electronics and Information Technology
Industries Association (JEITA) a so štandardom Exif (Exchangeable image le format).
Prehrávať je možné iba súbory, ktoré sú kompatibilné so štandardom DCF.
• Stlačením spúšte prejdete do režimu
snímania.
Aktuálna hodnota priblíženia
(zobrazí sa na 1 sekundu)
- 20 -
Číslo súboru
Page 21
Prehliadanie snímok [Normal Play] (Normálne prehliadanie)
Setting the clock
The clock is not set when the camera is shipped.
Press the Power button
Power button
Viewing your pictures [Normal Play]
Watching motion pictures
Viewing your pictures [Normal Play]
Watching motion pictures
Select the motion picture and start playback
Motion picture recording time
*
*
When playback starts, the elapsed playback time is displayed in the top right of the
screen.
Example: After 3 minutes and 30 seconds: [3m30s]
: Pause/Play
[MENU/SET]: Stop
: Fast rewind (2 steps)
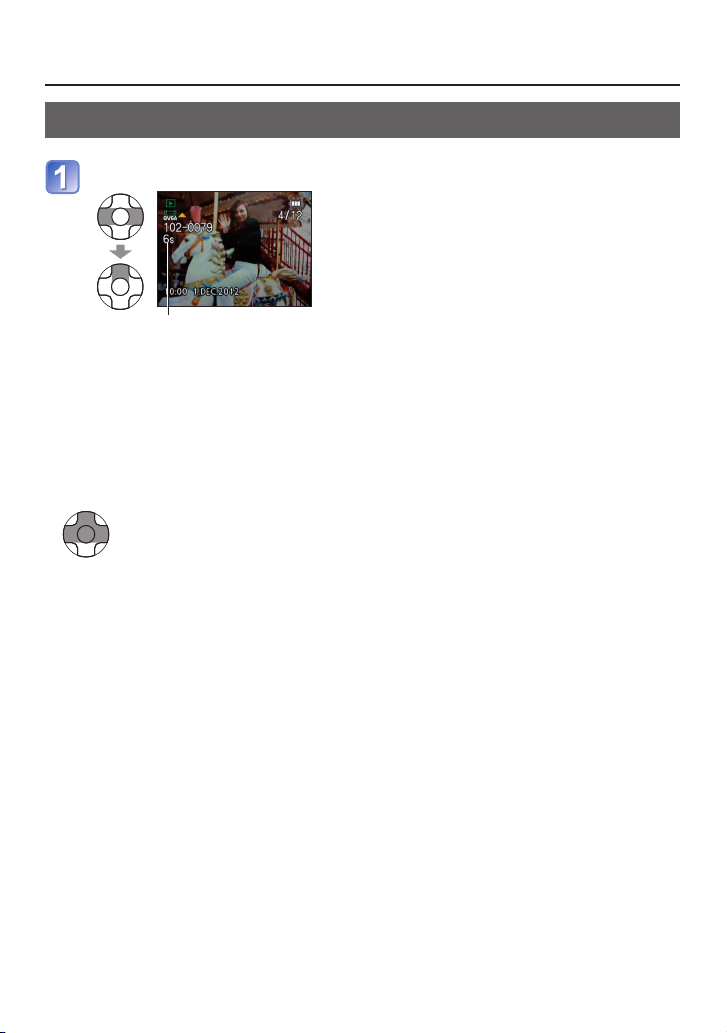
Prehrávanie videozáznamov
Zvoľte videozáznam a spustite prehrávanie.
Záznamový čas videozáznamu*
* Po spustení prehrávania sa v pravom hornom rohu obrazovky zobrazí
uplynutý čas prehrávania.
Príklad: Po 3 minútach a 30 sekundách: [3m30s]
■ Ovládanie prehrávania videozáznamu
[MENU/SET]: Zastavenie
◄: Rýchly posun dozadu (2 kroky)
Posun dozadu po snímkach (počas pozastavenia)
►: Rýchly posun dopredu (2 kroky)
Posun dopredu po snímkach (počas pozastavenia)
● Videozáznamy nasnímané inými zariadeniami sa nemusia dať na tomto fotoaparáte
● Videozáznamy sa dajú prezerať na počítači v programe „PHOTOfunSTUDIO“, ktorý sa
▲: Pozastavenie/spustenie prehrávania
• Stlačením tlačidla ▲ počas rýchleho posunu dozadu alebo dopredu obnovíte
normálnu rýchlosť prehrávania.
• Hlasitosť sa dá nastaviť pomocou tlačidla zoomu.
správne prehrať.
nachádza na priloženom CD-ROM alebo v programe „QuickTime“.
- 21 -
Page 22
Zobrazenie zoznamu (Zobrazenie viacerých snímok)
Viewing as list (Multi Playback)
Playback Mode:
You can view 12 (or 30) pictures at once (Multi Playback).
Press the Playback button
Set to multiple screen display
The display
changes
each time
Date recorded Picture no.
Total no.
Scroll bar
Setting the clock
The clock is not set when the camera is shipped.
Press the Power button
Power button
Setting the clock
The clock is not set when the camera is shipped.
Press the Power button
The power is turned on.
If the language select screen is not displayed,
proceed to step .
Press [MENU/SET] while the
Power button
Press the Playback button
Set to multiple screen display
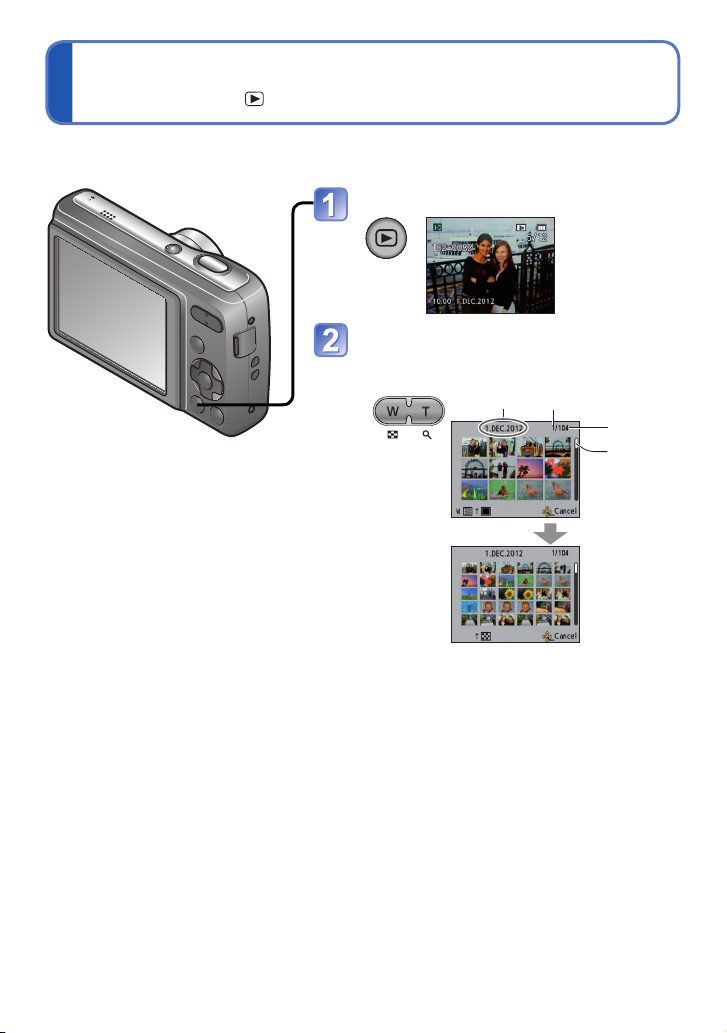
Režim prehliadania:
Môžete zobraziť 12 (alebo 30) snímok naraz (v režime zobrazenia viacerých snímok).
Stlačte tlačidlo prehliadania.
Nastavte zobrazenie viacerých
snímok.
■ Obnovenie
Stlačte stranu T tlačidla zoomu.
■ Prechod zo zobrazenia 12
(30) snímok na zobrazenia
jednej snímky
Tlačidlami ▲▼◄► zvoľte
obrázok a stlačte tlačidlo
[MENU/SET].
Zobrazenie
sa zmení
po každom
stlačení
strany W
Dátum
záznamu
(12 snímok
súčasne)
(30 snímok súčasne)
Č. snímky
Celkový
počet
Indikátor
pozície
v zozname
snímok
● Snímky označené symbolom [!] nie je možné prehliadať.
- 22 -
Page 23
Mazanie snímok
Deleting pictures
Playback Mode:
Pictures will be deleted from the card if the card is inserted, or from the built-in memory if
the card is not inserted. (Deleted pictures cannot be recovered.)
Press to delete the displayed
picture
Select [Yes]
• Do not turn off the power during
deletion.
Setting the clock
The clock is not set when the camera is shipped.
Press the Power button
Power button
Press to delete the displayed
picture
Setting the clock
The clock is not set when the camera is shipped.
Press the Power button
The power is turned on.
If the language select screen is not displayed,
proceed to step .
Press [MENU/SET] while the
Power button
Press to delete the displayed
picture
Select [Yes]
• Do not turn off the power during
deletion.
Setting the clock
The clock is not set when the camera is shipped.
Press the Power button
Power button
Setting the clock
The clock is not set when the camera is shipped.
Press the Power button
The power is turned on.
If the language select screen is not displayed,
proceed to step .
Press [MENU/SET] while the
Power button
Press to delete the displayed
picture
Select [Yes]
• Do not turn off the power during
deletion.
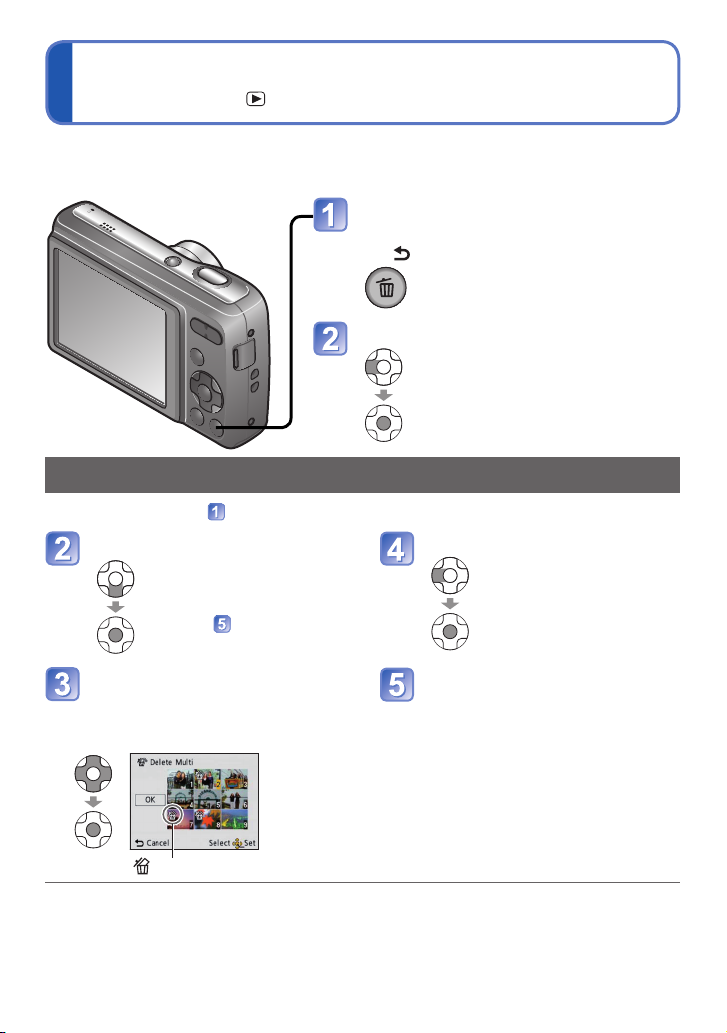
To delete multiple (up to 50) or all pictures
Select type of deletion
• To use [Delete All]
→ go to step
Select [OK]
Setting the clock
The clock is not set when the camera is shipped.
Press the Power button
The power is turned on.
If the language select screen is not displayed,
proceed to step .
Press [MENU/SET] while the
message is displayed
Press to select the language,
and press [MENU/SET]
Press [MENU/SET]
Power button
[MENU/SET]
Press to select the items (year, month, day, hour, minute,
Setting the clock
The clock is not set when the camera is shipped.
Press the Power button
The power is turned on.
If the language select screen is not displayed,
proceed to step .
Press [MENU/SET] while the
message is displayed
Press to select the language,
Power button
Press to delete the displayed
picture
Select [Yes]
• Do not turn off the power during
deletion.
To delete multiple (up to 50) or all pictures
Select type of deletion
• To use [Delete All]
→ go to step
Select the pictures to delete
(Repeat)
• To release
→ Press
[MENU/
SET]
again
Select [OK]
Press to select [Yes],
and then press [MENU/
SET]
• May take time depending on
number of pictures deleted.
Press to delete the displayed
picture
Select [Yes]
• Do not turn off the power during
deletion.
To delete multiple (up to 50) or all pictures
• To use [Delete All]
→ go to step
Picture selected
• To release
→ Press
[MENU/
SET]
again
Select [OK]
Press to select [Yes],
and then press [MENU/
SET]
• May take time depending on
number of pictures deleted.
Setting the clock
The clock is not set when the camera is shipped.
Press the Power button
The power is turned on.
If the language select screen is not displayed,
proceed to step .
Press [MENU/SET] while the
message is displayed
Press to select the language,
and press [MENU/SET]
Press [MENU/SET]
Power button
[MENU/SET]
Select [OK]
Setting the clock
The clock is not set when the camera is shipped.
Press the Power button
The power is turned on.
If the language select screen is not displayed,
proceed to step .
Press [MENU/SET] while the
message is displayed
Press to select the language,
and press [MENU/SET]
Press [MENU/SET]
Power button
[MENU/SET]
Press to select the items (year, month, day, hour, minute,
Režim prehliadania:
Ak je vo fotoaparáte vložená pamäťová karta, vymažú sa snímky z pamäťovej karty; ak
pamäťová karta nie je vložená, vymažú sa snímky z internej pamäte. (Vymazané snímky
už nie je možné obnoviť.)
Stlačením tohto tlačidla vymažte
zobrazenú snímku.
Zvoľte možnosť [Yes] (Áno).
Vymazanie viacerých (max. 50) alebo všetkých snímok
• Počas mazania nevypínajte
fotoaparát.
(po vykonaní kroku
Zvoľte spôsob mazania.
(Tento krok zopakujte pre všetky
● Použite dostatočne nabité batérie.
● V nasledujúcich prípadoch snímky nie je možné vymazať:
• snímky chránené proti vymazaniu a zápisu,
• prepínač karty je v polohe „LOCK“ (zablokovaná karta),
• snímky nezodpovedajú štandardu DCF (→20).
• Ak chcete použiť funkciu
[Delete All] (Vymazať
všetky snímky) → prejdite
na krok
Zvoľte snímky, ktoré
chcete vymazať.
snímky, ktoré chcete vymazať.)
Zvolená snímka
)
.
Zvoľte možnosť [OK].
Stlačením tlačidla ◄
• Zrušenie
označenia
→ Znovu
stlačte
tlačidlo
[MENU/
SET].
zvoľte možnosť [Yes]
(Áno) a potom stlačte
tlačidlo [MENU/SET].
• Čím väčší je počet vymazávaných
snímok, tým dlhšie bude
vymazávanie trvať.
- 23 -
Page 24

Nastavenia v menu
Setting the menu
■
About the menu screen
■
Menu operation flow
Displaying the menu screen
Selecting the menu type
Select the item
Changing the settings
Names and Functions of Main Parts
Tripod receptacle
• Ensure that the tripod is
stable.
Card/Battery door
(→10)
Shutter button (→16)
Power button (→14)
Self-timer indicator (→34)
Speaker
Microphone (→19)
Lens barrel
Lens (→4)
/ ] (Delete/Return) button (→23)
Zoom button (→18)Flash (→32)
Hand strap eyelet
We recommend using
the supplied hand strap
to avoid dropping the
camera.
Names and Functions of Main Parts
Tripod receptacle
• Ensure that the tripod is
stable.
Card/Battery door
(→10)
Shutter button (→16)
Power button (→14)
Self-timer indicator (→34)
Speaker
Microphone (→19)
Lens barrel
Lens (→4)
] (Delete/Return) button (→23)
Zoom button (→18)Flash (→32)
Hand strap eyelet
We recommend using
the supplied hand strap
to avoid dropping the
camera.
■ Informácie o prostredí menu
Tlačidlá, ktoré sa používajú pri
úkonoch v menu
A: Tlačidlo [MENU/SET]
B: Tlačidlá kurzora
C: Tlačidlo [
Kongurácia prostredia menu
D: Popis menu
E: Položky menu
F: Sprievodca úkonmi
■ Typ menu
Menu [Setup] (Nastavenia)
Umožňuje pohodlnejšie používanie fotoaparátu
• Umožňuje jednoduchšie používanie fotoaparátu nastavením hodín, hlasitosti zvuku
a pod.
Menu [Rec] (Snímanie) (len v režime snímania)
Zmena obrazových predvolieb
• Toto menu vám umožňuje určiť farebné podanie, citlivosť ISO, úroveň rozlíšenia
(počet obrazových bodov) a ďalšie nastavenia.
Menu [Playback] (Prehliadanie) (len v režime prehliadania)
Spracovanie snímok
• Toto menu vám umožňuje pre vytvorené snímky nastaviť ochranu pred vymazaním,
zmeniť veľkosť a iné.
/
] (Vymazanie/Návrat)
■ Postupnosť úkonov v menu
Zobrazenie prostredia menu
Voľba typu menu
Voľba položky v menu
Zmena nastavení
Opustenie prostredia menu
- 24 -
Page 25

Nastavenie funkcií menu
Setting the clock
The clock is not set when the camera is shipped.
Press the Power button
Power button
Setting the clock
The clock is not set when the camera is shipped.
Press the Power button
The power is turned on.
If the language select screen is not displayed,
proceed to step .
Press [MENU/SET] while the
Power button
Setting the clock
The clock is not set when the camera is shipped.
Press the Power button
The power is turned on.
If the language select screen is not displayed,
proceed to step .
Press [MENU/SET] while the
message is displayed
Press to select the language,
Power button
Setting the clock
The clock is not set when the camera is shipped.
Press the Power button
The power is turned on.
If the language select screen is not displayed,
proceed to step .
Press [MENU/SET] while the
message is displayed
Press to select the language,
and press [MENU/SET]
Press [MENU/SET]
Power button
[MENU/SET]
Names and Functions of Main Parts
Tripod receptacle
• Ensure that the tripod is
stable.
Card/Battery door
(→10)
Shutter button (→16)
Power button (→14)
Self-timer indicator (→34)
Speaker
Microphone (→19)
Lens barrel
Lens (→4)
/ ] (Delete/Return) button (→23)
Zoom button (→18)Flash (→32)
Hand strap eyelet
We recommend using
the supplied hand strap
to avoid dropping the
camera.
Names and Functions of Main Parts
Tripod receptacle
• Ensure that the tripod is
stable.
Card/Battery door
(→10)
Shutter button (→16)
Power button (→14)
Self-timer indicator (→34)
Speaker
Microphone (→19)
Lens barrel
Lens (→4)
] (Delete/Return) button (→23)
Zoom button (→18)Flash (→32)
Hand strap eyelet
We recommend using
the supplied hand strap
to avoid dropping the
camera.
Setting the clock
The clock is not set when the camera is shipped.
Press the Power button
The power is turned on.
If the language select screen is not displayed,
proceed to step .
Press [MENU/SET] while the
message is displayed
Press to select the language,
and press [MENU/SET]
Press [MENU/SET]
Power button
[MENU/SET]
Press to select the items (year, month, day, hour, minute,
Names and Functions of Main Parts
Tripod receptacle
• Ensure that the tripod is
stable.
Card/Battery door
(→10)
Shutter button (→16)
Power button (→14)
Self-timer indicator (→34)
Speaker
Microphone (→19)
Lens barrel
Lens (→4)
/ ] (Delete/Return) button (→23)
Zoom button (→18)Flash (→32)
Hand strap eyelet
We recommend using
the supplied hand strap
to avoid dropping the
camera.
Names and Functions of Main Parts
Tripod receptacle
• Ensure that the tripod is
stable.
Card/Battery door
(→10)
Shutter button (→16)
Power button (→14)
Self-timer indicator (→34)
Speaker
Microphone (→19)
Lens barrel
Lens (→4)
] (Delete/Return) button (→23)
Zoom button (→18)Flash (→32)
Hand strap eyelet
We recommend using
the supplied hand strap
to avoid dropping the
camera.
Pri používaní menu [Setup] (Nastavenia), [Rec] (Snímanie) a [Playback] (Prehliadanie)
postupujte podľa nižšie uvedeného príkladu.
Príklad: Zmena nastavenia [AF Mode] (Režim automatického zaostrovania) v menu
[Rec] (Snímanie) v rámci režimu [Normal Picture] (Bežné snímky)
Stlačte tlačidlo [MENU/SET].
Zobrazí sa prostredie menu s voľbami.
Tlačidlami ◄► zvoľte možnosť [Rec]
(Snímanie) a stlačte tlačidlo [MENU/SET].
Tlačidlami ▲▼ zvoľte možnosť [AF Mode]
(Režim automatického zaostrovania)
a stlačte tlačidlo [MENU/SET].
G: Stránky
Tlačidlami ▲▼ zvoľte nastavenie a stlačte
tlačidlo [MENU/SET].
Vykoná sa zvolené nastavenie.
• Zrušenie → Stlačte tlačidlo [
H: Nastavenia
I: Zvolené nastavenie
Niekoľkokrát stlačte tlačidlo [
Menu sa zatvorí a zobrazí sa predchádzajúca obrazovka.
● Zobrazené typy menu a jednotlivé položky sa menia v závislosti od režimu.
● Spôsob nastavenia sa mení v závislosti od položky menu.
● V režime snímania môžete prostredie menu zatvoriť aj stlačením spúšte do polovice.
/
].
- 25 -
/
].
Page 26

Používanie menu [Setup] (Nastavenia)
Using the [Setup] menu
Item Settings, Notes
[Clock Set]
Set time, date, and display format.
Using the [Setup] menu
Item Settings, Notes
[Clock Set]
Set time, date, and display format.
[Beep]
/ / : Low/High/Mute
: Low/High/Mute
: Low/High/Mute
: Low/High/Mute
Using the [Setup] menu
Item Settings, Notes
[Clock Set]
Set time, date, and display format.
[Beep]
/ / : Low/High/Mute
[Volume]
[0] / [1] / [2] / [3] / [4] / [5] / [6]
Using the [Setup] menu
Item Settings, Notes
[Clock Set]
Set time, date, and display format.
[Beep]
/ / : Low/High/Mute
[Volume]
[0] / [1] / [2] / [3] / [4] / [5] / [6]
[Auto Power Off]
[2 MIN.]/[5 MIN.]/[10 MIN.]/[OFF]
Using the [Setup] menu
Item Settings, Notes
[Clock Set]
Set time, date, and display format.
[Beep]
/ / : Low/High/Mute
[Volume]
[0] / [1] / [2] / [3] / [4] / [5] / [6]
[Auto Power Off]
[2 MIN.]/[5 MIN.]/[10 MIN.]/[OFF]
• To restore → Turn on the power again.
• Cannot be used in the following cases:
When connected to computer/printer, during motion
picture recording/playback, during Slide Shows
• Specific periods apply in the following situations.
[Intelligent Auto] Mode: [5 MIN.], and when a Slide Show
is paused: [10 MIN.]
[Light Freq.]
[50Hz] / [60Hz]
Pre nastavenie hodín a nastavenie režimu šetrenia batérie sú dôležité položky
[Clock Set] (Nastavenie hodín), [Auto Review] (Automatická kontrola záberu)
a [Auto Power Off] (Automatické vypnutie fotoaparátu). Predým, ako začnete
fotoaparát používať, skontrolujte tieto nastavenia.
Podrobné informácie o postupe pri voľbe nastavení v menu [Setup] (Nastavenia). (→24)
Položka Možnosti nastavenia a ich opis
[Clock Set]
(Nastavenie hodín)
(→14)
[Beep] (Zvuková signalizácia)
Nastavenie hlasitosti
zvukovej signalizácie.
[Volume] (Hlasitosť)
Môžete nastaviť 7
úrovní hlasitosti zvuku
reproduktorov.
[Auto Power Off] (Automatické vypnutie fotoaparátu)
Fotoaparát sa po uplynutí
nastavenej doby nečinnosti
automaticky vypne.
[Light Freq.]
(Frekvencia osvetlenia)
Odstránenie blikania na
LCD monitore.
Nastavenie času, dátumu a formátu, v akom sa budú
zobrazovať.
/
/
: Nízka/Vysoká/Vypnutý zvuk
[0] / [1] / [2] / [3] / [4] / [5] / [6]
[2 MIN.]/[5 MIN.]/[10 MIN.]/[OFF] (Vyp.)
• Prebudenie → Fotoaparát opätovne zapnite.
• Nie je možné použiť v nasledujúcich prípadoch:
po pripojení k počítaču alebo k tlačiarni, počas
snímania/prehrávania videozáznamov alebo počas
prehrávania prezentácií
• V nasledujúcich situáciách sa použijú pevne nastavené
časové intervaly. [Intelligent Auto] (Inteligentný
automatický režim): [5 MIN.] a pri pozastavení
prezentácie: [10 MIN.]
[50Hz] / [60Hz]
Ak pri použití žiarivkového alebo LED osvetlenia LCD
monitor pri snímaní bliká, nastavte frekvenciu elektrickej
siete v oblasti, kde fotoaparát používate.
- 26 -
Page 27

Položka Možnosti nastavenia a ich opis
Using the [Setup] menu
Item Settings, Notes
[Auto Review]
[ON] (Automatically displays for 2 seconds.)/[OFF]
Using the [Setup] menu
Item Settings, Notes
[Auto Review]
[ON] (Automatically displays for 2 seconds.)/[OFF]
• Fixed to [ON] in [Intelligent Auto] Mode.
• Auto review occurs immediately after taking still pictures
in [Burst] mode, or [Panorama Assist] in Scene Mode,
regardless of settings.
• Motion pictures cannot be automatically reviewed.
[Reset]
[Reset Rec. settings?]
[Reset setup parameters?]
• When [Setup] settings are reset, [Age] setting in [Baby]
Scene Mode is also reset.
• Folder numbers and clock settings will remain
unchanged.
[Version Disp.]
Current version is displayed.
[Auto Review] (Automatická kontrola záberu)
Automatické zobrazenie
záberu ihneď po
nasnímaní.
[Reset] (Obnovenie pôvodných nastavení)
Obnovenie pôvodných
nastavení.
[Version Disp.]
(Zobrazenie verzie
rmvéru)
Táto funkcia umožňuje
skontrolovať verziu rmvéru
fotoaparátu.
Používanie menu [Setup] (Nastavenia)
[ON] (Zap.) (Automatické zobrazenie na 2 sekundy.)/
[OFF] (Vyp.)
• V inteligentnom automatickom režime je táto funkcia
pevne nastavená na možnosť [ON] (Zap.).
• V režime [Burst] (Sekvenčné snímanie) alebo
v režime snímania scén [Panorama Assist] (Panoráma
s asistenciou) sa táto funkcia aktivuje automaticky bez
ohľadu na aktuálne nastavenie.
• Automatickú kontrolu záberu nie je možné použiť pri
videozázname.
[Reset Rec. settings?] (Obnoviť pôvodné nastavenia
v menu režimu snímania?)
[Reset setup parameters?] (Obnoviť pôvodný stav
položiek v menu nastavení?)
• Pri obnovení pôvodného stavu položiek v menu [Setup]
(Nastavenia) sa obnoví aj nastavenie [Age] (Vek)
v režime snímania scén [Baby] (Dieťa).
• Nastavenia čísla priečinka a hodín zostanú nezmenené.
Zobrazí sa aktuálna verzia.
● Podrobné informácie o postupe pri voľbe nastavení v menu [Setup] (Nastavenia).
(→24)
- 27 -
Page 28

Položka Možnosti nastavenia a ich opis
Using the [Setup] menu
Item Settings, Notes
[Format]
• Confirm that the batteries have sufficient remaining
Using the [Setup] menu
Item Settings, Notes
[Format]
• Confirm that the batteries have sufficient remaining
power. When formatting the built-in memory, remove the
cards.
(Only inserted card will be formatted if present; built-in
memory will be formatted if no card is inserted.)
• Always format cards with this camera.
• All protected pictures and other picture data will be
deleted.
• Do not turn off power or perform other operations during
formatting.
• Formatting the built-in memory may take several
minutes.
• Consult the dealer or your nearest Service Centre if
format cannot be successfully completed.
[Language]
Set the language displayed on the screen.
[Format] (Formátovanie)
Túto funkciu použite,
keď sa zobrazí hlásenie
[Built-In Memory Error]
(Chyba internej pamäte)
alebo [Memory Card Error]
(Chyba pamäťovej karty),
alebo pri formátovaní
internej pamäte alebo
pamäťovej karty.
Pri naformátovaní
pamäťovej karty/internej
pamäte sa dáta vymažú
a nebudú sa dať obnoviť.
Pred formátovaním
pozorne skontrolujte
obsah pamäťovej karty/
internej pamäte.
[Language] (Jazyk)
Voľba jazyka používaného
v menu.
Používanie menu [Setup] (Nastavenia)
• Batérie musia mať dostatočnú zostávajúcu kapacitu.
Pred formátovaním internej pamäte vyberte pamäťovú
kartu.
(Ak je vložená pamäťová karta, naformátuje sa iba
tá. Interná pamäť sa naformátuje len vtedy, ak nie je
vložená žiadna pamäťová karta.)
• Pamäťovú kartu formátujte výhradne vo fotoaparáte.
• Všetky zábery chránené proti vymazaniu vrátane
ostatných obrazových dát sa vymažú.
• Počas formátovania fotoaparát nevypínajte ani
neobsluhujte.
• Formátovanie internej pamäte môže trvať niekoľko
minút.
• Ak sa formátovanie nedá úspešne dokončiť, obráťte sa
na predajcu alebo najbližšie servisné stredisko.
Nastavte jazyk, ktorý sa bude zobrazovať na displeji.
● Podrobné informácie o postupe pri voľbe nastavení v menu [Setup] (Nastavenia).
(→24)
- 28 -
Page 29

Snímanie s vlastnými nastaveniami
Taking pictures with your own settings
[Normal Picture] Mode
Recording Mode:
Recording
Using the [Rec] menu to change settings and set up your own recording environment.
Display the screen for Recording
Mode selection
Select [Normal Picture] Mode
Setting the clock
The clock is not set when the camera is shipped.
Press the Power button
Power button
Display the screen for Recording
Mode selection
Setting the clock
The clock is not set when the camera is shipped.
Press the Power button
The power is turned on.
If the language select screen is not displayed,
proceed to step .
Press [MENU/SET] while the
Power button
Display the screen for Recording
Mode selection
Select [Normal Picture] Mode
Setting the clock
The clock is not set when the camera is shipped.
Press the Power button
The power is turned on.
If the language select screen is not displayed,
proceed to step .
Press [MENU/SET] while the
message is displayed
Press to select the language,
Power button
Jitter alert
display
Press fully
(press the button all
the way to record)
[Normal Picture] (Bežné snímky)
Režim snímania:
Pomocou menu [Rec] (Snímanie) si môžete nastavenia snímania upraviť podľa potreby.
Spúšť
Vyvolajte obrazovku na voľbu
režimu snímania.
Zvoľte
[Normal Picture]
(Bežné snímky).
Nasnímajte záber.
● Ak sa zobrazí upozornenie na chvenie, použite
funkciu [Stabilizer] (Optická stabilizácia obrazu),
statív alebo funkciu [Selftimer] (Samospúšť).
● Ak nie je možné nastaviť správnu expozíciu,
hodnotu clony a expozičného času sa zobrazia
v červenej farbe. Použite blesk alebo zmeňte
nastavenia položky [Sensitivity] (Citlivosť ISO).
[Intelligent Auto] (Inteligentný
automatický režim)
[Normal Picture] (Bežné snímky)
[Scene Mode] (Režim snímania scén)
[Motion Picture] (Snímanie
videozáznamov)
Zoznam režimov snímania
Stlačte do polovice
(opatrným
stlačením
zaostríte).
Hodnota clony Expozičný čas
Pri snímaní sa použijú automatické
nastavenia zvolené fotoaparátom.
Pri snímaní môžete použiť vlastné
nastavenia.
Snímanie prispôsobené snímanej
scéne.
Snímanie videozáznamov. (→19)
- 29 -
Stlačte úplne
(úplným stlačením
tlačidla nasnímate
záber).
Varovanie
pred
roztraseným
záberom
(→16)
-
(→36)
Page 30

Zaostrenie so zmenou kompozície
Setting the clock
The clock is not set when the camera is shipped.
Press the Power button
Power button
Focus display
( When focus is aligned: illuminated
When focus is not aligned: flashing)
AF area
( When focus is aligned: green
When focus is not aligned: red)
Setting the clock
The clock is not set when the camera is shipped.
Press the Power button
The power is turned on.
If the language select screen is not displayed,
proceed to step .
Press [MENU/SET] while the
Power button
halfway
Focus display
( When focus is aligned: illuminated
When focus is not aligned: flashing)
AF area
( When focus is aligned: green
When focus is not aligned: red)
●
Subjects/environments which may
make focusing difficult:
•
Fast-moving or extremely bright
objects, or objects with no colour
contrast.
• Taking pictures through glass or
near objects emitting light. In the
Aligning the focus
First adjust focus according to subject
Align the AF area
with the subject
Hold down
halfway
Focus display
( When focus is aligned: illuminated
When focus is not aligned: flashing)
AF area
( When focus is aligned: green
When focus is not aligned: red)
Return to desired composition
Press fully
AF area
●
Subjects/environments which may
make focusing difficult:
•
Fast-moving or extremely bright
objects, or objects with no colour
contrast.
• Taking pictures through glass or
near objects emitting light. In the
dark, or with significant jitter.
•
When too close to object or when
taking pictures of both distant and
close objects together in the same
picture.
■
Focus range
Táto funkcia je praktická, keď sa snímaný objekt nenachádza v strede záberu.
Najprv zaostrite na želaný objekt.
Zarovnajte oblasť
automatického
zaostrovania
s objektom.
Stlačte spúšť
■ Rozsah zaostrenia
● Keď sa nepodarilo zaostriť, bliká indikátor zaostrenia a počuť
zvukovú signalizáciu.
Ako pomôcku použite rozsah zaostrenia, zobrazený červenou
Ak je objekt mimo rozsahu zaostrenia, môže sa stať, že fotoaparát
● Pri snímaní v tmavom prostredí alebo pri snímaní v rozsahu
do polovice.
Fotoaparát namierte tak, aby ste dosiahli želanú kompozíciu záberu.
Stlačte spúšť
úplne.
Vzdialenosť medzi objektívom
Priblíženie
1 × (Max. W)
5 × (Max. T)
farbou.
nedokáže na objekt zaostriť, aj keď indikátor zaostrenia svieti.
digitálneho zoomu je zobrazená oblasť automatického
zaostrovania väčšia než zvyčajne.
Oblasť automatického
zaostrovania
a snímaným objektom
Indikátor zaostrenia
(Ak je zaostrené: svieti.
Ak nie je zaostrené: bliká.)
Oblasť automatického zaostrovania
(Ak je zaostrené: zelená.
Ak nie je zaostrené: červená.)
● Objekty a podmienky snímania, pri
ktorých je ťažké zaostriť:
• Rýchlo sa pohybujúce objekty, veľmi
jasné objekty a málo kontrastné objekty.
• Pri fotografovaní cez sklo alebo v blízkosti
silných zdrojov svetla. V tme, alebo pri
nadmernom chvení fotoaparátu.
• Pri fotografovaní z príliš malej vzdialenosti,
alebo ak sa v zábere nachádzajú súčasne
blízke aj vzdialené objekty.
15 cm 60 cm
Mení sa postupne
- 30 -
Rozsah zaostrenia
Page 31

Zmena zobrazovaných informácií
Changing recording information display
You can switch between the various types of information shown on the LCD monitor, such
as recording information.
Press to change display
Setting the clock
The clock is not set when the camera is shipped.
Press the Power button
Power button
Changing recording information display
Press to change display
Changing recording information display
Picture information
Picture information +
Recording information No display
Press to change display
Táto funkcia umožňuje prepínať rôzne informácie zobrazené na LCD monitore, napríklad
informácie o snímaní.
Stláčaním tohto tlačidla meňte druh
zobrazenia.
● V režime snímania
Informácie o snímaní Nič nie je zobrazené.
● V režime prehliadania
Informácie o snímke
Informácie o snímke + Informácie o snímaní Nič nie je zobrazené.
● Pri prehrávaní videozáznamu alebo prezentácie sa na LCD monitore zobrazujú alebo
nezobrazujú informácie o spôsobe ovládania.
- 31 -
Page 32

Snímanie s bleskom
Taking pictures with flash
Recording Mode:
Display [Flash]
Select the desired type
(Can also be selected with .)
Setting the clock
The clock is not set when the camera is shipped.
Press the Power button
Power button
Setting the clock
The clock is not set when the camera is shipped.
Press the Power button
The power is turned on.
If the language select screen is not displayed,
proceed to step .
Press [MENU/SET] while the
Power button
.)
Taking pictures with flash
Recording Mode:
Display [Flash]
Select the desired type
(Can also be selected with .)
Type, operations Uses
[Auto]
Taking pictures with flash
Recording Mode:
Display [Flash]
Select the desired type
(Can also be selected with .)
Type, operations Uses
[Auto]
• Automatically judges whether or not to flash
Normal use
[Auto/Red-Eye]
*
Taking pictures with flash
Recording Mode:
Display [Flash]
Select the desired type
(Can also be selected with .)
Type, operations Uses
[Auto]
• Automatically judges whether or not to flash
Normal use
[Auto/Red-Eye]
*
• Automatically judges whether or not to flash (reduce
red-eye)
Taking pictures of subjects in
dark places
[Forced Flash On]
• Always flash
Taking pictures with backlight
or under bright lighting (e.g.
fluorescent)
[Forced On/Red-Eye]
*
• Always flash (reduce red-eye)
[Slow Sync./Red-Eye]
*
Taking pictures of subjects
Taking pictures with flash
Recording Mode:
Display [Flash]
Select the desired type
(Can also be selected with .)
Type, operations Uses
[Auto]
• Automatically judges whether or not to flash
Normal use
[Auto/Red-Eye]
*
• Automatically judges whether or not to flash (reduce
red-eye)
Taking pictures of subjects in
dark places
[Forced Flash On]
• Always flash
Taking pictures with backlight
or under bright lighting (e.g.
fluorescent)
[Forced On/Red-Eye]
*
• Always flash (reduce red-eye)
[Slow Sync./Red-Eye]
*
• Automatically judges whether or not to flash (reduce red-
eye; slow shutter speed to take brighter pictures)
Taking pictures of subjects
against a nightscape (tripod
recommended)
[Forced Flash Off]
Places where flash use is
*
1
*
3
Režim snímania:
Zobrazte obrazovku [Flash]
(Blesk).
Zvoľte režim blesku.
(Možná je aj voľba tlačidlom ►.)
[Auto] (Automatický)
• Fotoaparát automaticky rozhodne o použití blesku.
[Auto/Red-Eye] (Automatický/Odstránenie efektu
červených očí)
• Fotoaparát automaticky rozhodne o použití blesku (s funkciou
redukcie efektu červených očí)
[Forced Flash On] (Trvalá aktivácia blesku)
• Blesk sa aktivuje pri každom snímaní
[Forced On/Red-Eye] (Trvalá aktivácia/Odstránenie efektu
červených očí)
• Blesk sa aktivuje pri každom snímaní (s funkciou redukcie
efektu červených očí).
[Slow Sync./Red-Eye] (Pomalá sychronizácia/Odstránenie
efektu červených očí)
• Fotoaparát sa automaticky rozhodne, či použiť blesk alebo nie
(s funkciu redukcie červených očí a nízkou rýchlosťou
uzávierky kvôli nasnímaniu jasnejších záberov).
[Forced Flash Off] (Trvalé vyradenie blesku)
• Blesk sa neaktivuje za žiadnych okolností
* Keď je v režime snímania aktivovaná položka [Red-Eye Removal] (Odstránenie efektu
červených očí), zobrazí sa symbol
a obrazové dáta sa skorigujú. (Len keď je položka [AF Mode] (Režim automatického
zaostrovania) nastavená na
Režim blesku a jeho opis Použitie
*
*
*
(rozpoznanie tvárí).)
Bežné snímanie
Pri fotografovaní ľudí
v tmavom prostredí
Pri snímaní objektu, ktorý
je osvetlený zozadu alebo
pod jasným svetlom (napr.
svetlom zo žiariviek)
Pri snímaní objektov
s nočnou krajinou v pozadí
(odporúčame použiť statív)
, automaticky sa rozpozná efekt červených očí
- 32 -
Pri fotografovaní na
miestach, kde je používanie
blesku zakázané
Page 33

■ Dostupné nastavenia v každom režime
Taking pictures with flash
○
: Default setting)
Taking pictures with flash
■
Available types in each mode
(○: Available, –: Not available,
○
: Default setting)
○○○–○–○○–○
○–○○––––○–––
○–○○○–○–○○○○
–––––––○––––
–––––○–○––––
○○○○○○○○○○○○
Display the screen for Recording
Mode selection
Select [Intelligent Auto] Mode
Take pictures
Press halfway
(press lightly to
focus)
Press fully
(press the button all
the way to record)
Display the screen for Recording
Mode selection
Select [Intelligent Auto] Mode
Take pictures
Press halfway
(press lightly to
focus)
Press fully
(press the button all
the way to record)
• To avoid camera shake, hold it with both hands keeping
your arms close to your body and standing with your feet
slightly apart.
• Do not touch the lens.
• Do not block the flash.
Do not look at it from close range.
• Try to hold the camera steady when you press the
shutter button.
• Be careful not to block the microphone or the
speaker.
• We recommend the use of the hand strap to avoid
dropping the camera.
according to the subject and brightness. (→32)
and indicate that the Red-Eye Reduction function is
Display the screen for Recording
Mode selection
Select [Intelligent Auto] Mode
Take pictures
Press halfway
(press lightly to
focus)
Press fully
(press the button all
the way to record)
• To avoid camera shake, hold it with both hands keeping
your arms close to your body and standing with your feet
slightly apart.
• Do not touch the lens.
• Do not block the flash.
Do not look at it from close range.
• Try to hold the camera steady when you press the
shutter button.
• Be careful not to block the microphone or the
speaker.
• We recommend the use of the hand strap to avoid
dropping the camera.
Press fully
(press the button all
the way to record)
Taking pictures with flash
○
: Default setting)
[Scene Mode]
○○
*
1
○○○–○–○○–○
○–○○––––○–––
○–○○○–○–○○○○
–––––––○––––
–––––○–○––––
○○○○○○○○○○○○
Set to , , or according to the subject and brightness.
.
Taking pictures with flash
○
: Default setting)
[Scene Mode]
○○
*
1
○○○–○–○○–○
○–○○––––○–––
○–○○○–○–○○○○
–––––––○––––
–––––○–○––––
○○○○○○○○○○○○
.
Taking pictures with flash
○
: Default setting)
[Scene Mode]
*
1
○○○–○–○○–○
.
Taking pictures with flash
○
: Default setting)
[Scene Mode]
*
1
○○○–○–○○–○
.
Taking pictures with flash
○
: Default setting)
[Scene Mode]
○○○–○–○○–○
.
Taking pictures with flash
Recording Mode:
Display [Flash]
Select the desired type
(Can also be selected with .)
Type, operations Uses
[Auto]
Taking pictures with flash
Recording Mode:
Display [Flash]
Select the desired type
(Can also be selected with .)
Type, operations Uses
[Auto]
• Automatically judges whether or not to flash
Normal use
[Auto/Red-Eye]
*
Taking pictures with flash
Recording Mode:
Display [Flash]
Select the desired type
(Can also be selected with .)
Type, operations Uses
[Auto]
• Automatically judges whether or not to flash
Normal use
[Auto/Red-Eye]
*
• Automatically judges whether or not to flash (reduce
red-eye)
Taking pictures of subjects in
dark places
[Forced Flash On]
• Always flash
Taking pictures with backlight
or under bright lighting (e.g.
fluorescent)
[Forced On/Red-Eye]
*
• Always flash (reduce red-eye)
[Slow Sync./Red-Eye]
*
Taking pictures of subjects
focus)
Press fully
(press the button all
the way to record)
Taking pictures with flash
Recording Mode:
Display [Flash]
Select the desired type
(Can also be selected with .)
Type, operations Uses
[Auto]
(○: Dostupné, –: Nedostupné,
1
*
○○
: Pôvodné nastavenie)
[Scene Mode] Režim snímania scén
Snímanie s bleskom
*1 Nastavte na
• Blesk nie je možné použiť v režime snímania videozáznamov a v týchto režimoch
snímania scén:
,
• Pri zvolení iného režimu snímania scén sa blesk nastaví do režimu predvoleného pre
,
,
alebo
v závislosti od objektu a okolitého jasu.
,
,
,
.
daný režim snímania scén.
■ Dosah blesku, ak je položka [Sensitivity] (Citlivosť ISO) nastavená na AUTO
Poloha W (Max.) Pribl. 0,6 m – 4,6 m
Poloha T (Max.) Pribl. 0,6 m – 2,0 m
● Blesk sa použije dvakrát. Zostaňte v stabilnej polohe dovtedy, pokiaľ blesk neprestane blýskať.
● Expozičný čas sa nastaví takto:
•
,
,
,
•
2
*
Hodnota sa môže tiež líšiť podľa režimov [Intelligent Auto] (Inteligentný automatický režim),
[Scene Mode] (Režim snímania scén) a pod.
● Účinok funkcie redukcie efektu červených očí sa môže u jednotlivých osôb odlišovať a je
ovplyvnený faktormi ako vzdialenosť objektu, či sa snímaná osoba pri prvom záblesku pozerala do
fotoaparátu a podobne. V niektorých prípadoch môže byť účinok funkcie redukcie efektu červených
očí zanedbateľný.
● Blesku (→7) sa nedotýkajte a nepozerajte doň z malej vzdialenosti (t.j. niekoľko cm).
Osvetlenie objektov bleskom z veľmi malej vzdialenosti môže v dôsledku vysokej teploty
a intenzity svetla spôsobiť zmenu ich farby alebo zdeformovanie.
● Pri zmene režimu snímania sa môže zmeniť režim blesku.
● Pri zvolení iného režimu snímania scén sa blesk nastaví do režimu predvoleného pre daný režim
snímania scén.
● Keď je položka [Sensitivity] (Citlivosť ISO) nastavená na možnosť [AUTO], citlivosť ISO sa
automaticky nastaví v rozsahu do 800.
● Ak tieto symboly (napr.
● Nedostatok svetla môže zabrániť správnej expozícii alebo vyváženiu bielej.
● Účinok blesku môže byť menej zreteľný pri snímaní s kratším expozičným časom.
● Ak je batéria takmer vybitá, alebo ak blesk používate viackrát po sebe, čas nabíjania blesku sa predĺži.
,
: 1/8*2 – 1/2000
: 1/60 – 1/2000
) blikajú (nabíjanie blesku), nedá sa nasnímať záber.
- 33 -
Page 34

Snímanie pomocou samospúšte
Setting the clock
The clock is not set when the camera is shipped.
Press the Power button
Power button
Setting the clock
The clock is not set when the camera is shipped.
Press the Power button
The power is turned on.
If the language select screen is not displayed,
proceed to step .
Press [MENU/SET] while the
Power button
.)
Setting the clock
The clock is not set when the camera is shipped.
Press the Power button
The power is turned on.
If the language select screen is not displayed,
proceed to step .
Press [MENU/SET] while the
message is displayed
Press to select the language,
Power button
Display [Selftimer]
Select time duration
(Can also be selected with .)
Take a picture
Press the shutter button fully to make the self-
timer indicator flash and start recording after
the preset time.
Taking pictures with the self-timer
Recording Mode:
We recommend using a tripod. This is also effective for correcting jitter when pressing the
shutter button, by setting the self-timer to 2 seconds.
Display [Selftimer]
Select time duration
(Can also be selected with .)
Take a picture
Press the shutter button fully to make the self-
timer indicator flash and start recording after
the preset time.
• To cancel while in operation
→ Press [MENU/SET]
Režim snímania:
Odporúčame používať statív. Nastavenie samospúšte na 2 sekundy je užitočné napríklad
aj na stabilizáciu chvenia fotoaparátu spôsobeného stlačením spúšte.
Zobrazte obrazovku [Selftimer]
(Samospúšť).
Zvoľte oneskorenie samospúšte.
(Možná je aj voľba tlačidlom ◄.)
Nasnímajte záber.
Po úplnom stlačení spúšte začne
blikať indikátor samospúšte a aktivuje
sa spustenie snímania po uplynutí
nastaveného času.
• Ak chcete zrušiť odpočítavanie
Indikátor samospúšte
● Pri úplnom stlačení spúšte sa automaticky zaostrí bezprostredne pred nasnímaním
záberu.
● V režime snímania scén [Self Portrait] (Autoportrét) nie je dostupná možnosť [10sec.]
(10 sekúnd).
→ Stlačte tlačidlo [MENU/SET].
- 34 -
Page 35

Snímanie s kompenzáciou expozície
Taking pictures with Exposure Compensation
Recording Mode:
Under-exposed Optimum exposure Over-exposed
Taking pictures with Exposure Compensation
Recording Mode:
Corrects exposure to obtain optimum exposure (for example, if there is difference
between brightness of object and background). Depending on the brightness, this may be
impossible in some cases.
Under-exposed Optimum exposure Over-exposed
Plus direction Minus direction
Display [Exposure]
Select a value
No compensation
Setting the clock
The clock is not set when the camera is shipped.
Press the Power button
Power button
Setting the clock
The clock is not set when the camera is shipped.
Press the Power button
The power is turned on.
If the language select screen is not displayed,
proceed to step .
Press [MENU/SET] while the
Power button
No compensation
Režim snímania:
Slúži na korekciu a dosiahnutie optimálnej expozície (napríklad pri rozdielnom jase
objektu a pozadia). V niektorých prípadoch (v závislosti od jasu scény) nie je možné
použiť kompenzáciu expozície.
Podexponované Optimálna expozícia Preexponované
Smerom do plusu Smerom do mínusu
Zobrazte obrazovku [Exposure]
(Expozícia).
Nastavte hodnotu.
Bez kompenzácie
● Po nastavení kompenzácie expozície sa zobrazí nastavená hodnota (napríklad
● Hodnota kompenzácie expozície ostane uložená v pamäti aj po vypnutí fotoaparátu.
- 35 -
).
Page 36

Snímanie na základe typu scény
Taking pictures according to the scene
[Scene Mode]
Recording Mode:
Using [Scene Mode] enables you to take pictures with optimum settings (exposure,
colouring, etc.) for given scenes.
Display the screen for Recording
Mode selection
Select [Scene Mode]
Setting the clock
The clock is not set when the camera is shipped.
Press the Power button
Power button
Display the screen for Recording
Mode selection
Setting the clock
The clock is not set when the camera is shipped.
Press the Power button
The power is turned on.
If the language select screen is not displayed,
proceed to step .
Press [MENU/SET] while the
Power button
Setting the clock
The clock is not set when the camera is shipped.
Press the Power button
The power is turned on.
If the language select screen is not displayed,
proceed to step .
Press [MENU/SET] while the
message is displayed
Press to select the language,
Power button
●
Scene menu
[Scene Mode] (Režim snímania scén)
Režim snímania:
Použitie režimu [Scene Mode] (Režim snímania scén) vám umožňuje snímať zábery
s optimálnymi nastaveniami (expozícia, farebné podanie a pod.) s ohľadom na príslušné
scény.
Vyvolajte obrazovku na voľbu
režimu snímania.
Zvoľte
[Scene Mode]
(Režim snímania scén).
Zvoľte a nastavte scénu.
● Menu scén
● Ak použijete nevhodný režim snímania scén, farebný tón výsledných snímok sa môže
od skutočnej scény líšiť.
● Nasledujúce parametre v menu [Rec] (Snímanie) sa nastavia automaticky a nie je
možné zvoliť ich manuálne.
[Sensitivity] (Citlivosť ISO), [Color Mode] (Farebný efekt)
- 36 -
Page 37

Snímanie na základe typu scény [Scene Mode] (Režim snímania scén)
Taking pictures according to the scene [Scene Mode]
Improves the skin tone of subjects for a healthier appearance in bright
daylight conditions.
Taking pictures according to the scene [Scene Mode]
Improves the skin tone of subjects for a healthier appearance in bright
daylight conditions.
Tips
• The closer the zoom is positioned to the T (telephoto) edge and the closer the
camera is brought to the subject, the greater the effect will be.
Take pictures of yourself.
Tips
• Use of the 2-second self-timer is recommended when the shutter speed is
slow or jitter occurs easily.
Takes clear pictures of wide, distant subjects.
[Portrait] (Portrét)
[Self Portrait] (Autoportrét)
[Scenery] (Krajina)
Umožňuje dosiahnuť lepšie podanie farby pleti a zdravší vzhľad
pokožky pri snímaní za jasného dňa.
Tipy
• Čím viac je zoom nastavený k polohe T (teleskopický záber)
a fotoaparát bližšie k objektu, tým bude efekt výraznejší.
Snímanie portrétu seba samého.
Tipy
• Pri dlhšom expozičnom čase sa odporúča použiť 2-sekundovú
samospúšť, pretože môže ľahko dôjsť k rozmazaniu záberu.
Snímanie širokouhlých záberov vzdialených objektov.
● Spôsob voľby scény. (→36)
● Použitie blesku v jednotlivých režimoch snímania scén. (→33)
- 37 -
Page 38

Snímanie na základe typu scény [Scene Mode] (Režim snímania scén)
Taking pictures according to the scene [Scene Mode]
Use the supplied software to join multiple pictures into a single panorama
picture.
Use to select the recording direction, and press [MENU/SET] to set.
Take the picture.
Select [Next], and press [MENU/SET] to set.
• Alternatively, press the shutter button halfway.
• You can take pictures again by selecting [Retake].
Change the composition and take the picture so that a part of the picture
overlaps with the previous picture.
• To take more pictures, select [Next] and repeat steps
and .
Taking pictures according to the scene [Scene Mode]
• Alternatively, press the shutter button halfway.
• You can take pictures again by selecting [Retake].
overlaps with the previous picture.
• To take more pictures, select [Next] and repeat steps
and .
Taking pictures according to the scene [Scene Mode]
Use the supplied software to join multiple pictures into a single panorama
picture.
Use to select the recording direction, and press [MENU/SET] to set.
Take the picture.
Select [Next], and press [MENU/SET] to set.
• Alternatively, press the shutter button halfway.
• You can take pictures again by selecting [Retake].
Change the composition and take the picture so that a part of the picture
overlaps with the previous picture.
• To take more pictures, select [Next] and repeat steps
and .
Section of picture that was taken last time
After you finish taking pictures, select [Exit], and press [MENU/SET] to set.
Tips
• Use a tripod.
• When it is dark, use the self-timer to record pictures.
Notes
• The focus, zoom, Exposure Compensation, White Balance, shutter speed,
and ISO Sensitivity are all fixed at the setting for the first picture.
• Panorama picture stitching cannot be performed by this camera. Use the
software on the supplied CD-ROM “PHOTOfunSTUDIO” to make the pictures
you record into a panorama still picture with your computer.
Takes pictures of scenes with fast movement, e.g. sports.
Priloženým softvérom môžete spojiť viacero snímok do jedného
panoramatického záberu.
1 Pomocou tlačidiel ▲▼ zvoľte smer snímania a nastavenie potvrďte
stlačením tlačidla [MENU/SET].
2 Nasnímajte záber.
3 Zvoľte možnosť [Next] (Ďalej) a nastavenie potvrďte stlačením tlačidla
[MENU/SET].
• Alebo stlačte tlačidlo spúšte do polovice.
• Zábery môžete nasnímať nanovo voľbou možnosti [Retake] (Znovu
nasnímať).
4 Zmeňte kompozíciu a nasnímajte záber tak, aby sa časť záberu
prekrývala s predchádzajúcim záberom.
• Ak chcete nasnímať viac záberov, zvoľte
možnosť [Next] (Ďalej) a zopakujte kroky
3 a 4.
[Panorama Assist] (Panoráma s asistenciou)
[Sports] (Šport)
● Spôsob voľby scény. (→36)
● Použitie blesku v jednotlivých režimoch snímania scén. (→33)
Časť záberu, ktorý bol nasnímaný naposledy
5 Po skončení snímania záberov zvoľte možnosť [Exit] (Koniec)
a potvrďte ju stlačením tlačidla [MENU/SET].
Tipy
• Použite statív.
• Keď je tma, použite na snímanie samospúšť.
Poznámky
• Pre zaostrenie, zoom, kompenzáciu expozície, vyváženie bielej,
expozičný čas a citlivosť ISO sa použijú hodnoty nastavené pri prvom
zábere.
• Obrázky sa nedajú spojiť do panorámy priamo vo fotoaparáte.
Nasnímané obrázky spojte do panorámy na počítači v programe
„PHOTOfunSTUDIO“, ktorý sa nachádza na priloženom CD-ROM disku.
Snímanie záberov rýchlo sa pohybujúcich objektov, napr. pri
športových podujatiach.
Tipy
• Snímajte zo vzdialenosti minimálne 5 m.
- 38 -
Page 39

Snímanie na základe typu scény [Scene Mode] (Režim snímania scén)
Taking pictures according to the scene [Scene Mode]
Takes pictures of people and nightscapes with close to actual brightness.
Tips
Taking pictures according to the scene [Scene Mode]
Takes pictures of people and nightscapes with close to actual brightness.
Tips
• Use flash.
• Subject should not move.
• Tripod, self-timer recommended.
Takes clear pictures of night scenes.
Tips
• Tripod, self-timer recommended.
Taking pictures according to the scene [Scene Mode]
Takes pictures of people and nightscapes with close to actual brightness.
Tips
• Use flash.
• Subject should not move.
• Tripod, self-timer recommended.
Takes clear pictures of night scenes.
Tips
• Tripod, self-timer recommended.
Notes
• Shutter speed may slow down up to 8 seconds.
• After recording, the shutter may stay closed (up to 8 seconds) to process the
signal. This is not a malfunction.
Takes natural-looking pictures of food.
Brighten subjects and background in pictures of indoor events, such as
weddings.
Tips
[Night Portrait] (Nočný portrét)
[Night Scenery] (Nočná krajina)
[Food] (Jedlo)
[Party] (Večierok)
Snímanie záberov osôb s nočnou krajinou v pozadí s prirodzeným
jasom.
Tipy
• Použite blesk.
• Snímaný objekt by sa nemal hýbať.
• Odporúčame vám použiť statív a funkciu samospúšte.
Umožňuje snímať jasné zábery nočnej krajiny.
Tipy
• Odporúčame vám použiť statív a funkciu samospúšte.
Poznámky
• Expozičný čas sa môže predĺžiť až na 8 sekúnd.
• Po skončení snímania môže zostať uzávierka zatvorená (až na
8 sekúnd) kvôli spracovaniu signálu. Nejde o poruchu.
Snímanie záberov jedla v prirodzených farbách.
Umožňuje nasnímať jasné zábery objektov a pozadia v interiéri,
napríklad na svadobnej hostine.
Tipy
• Snímajte zo vzdialenosti približne 1,5 m.
• Zoom: Širokouhlý záber W
• Použite blesk.
• Odporúčame vám použiť statív a funkciu samospúšte.
● Spôsob voľby scény. (→36)
● Použitie blesku v jednotlivých režimoch snímania scén. (→33)
- 39 -
Page 40

Snímanie na základe typu scény [Scene Mode] (Režim snímania scén)
Taking pictures according to the scene [Scene Mode]
Uses weak flash to bring out skin colours.
• To record age
Select [Age], and press [MENU/SET].
Select [SET] with , and press [MENU/SET].
Set birthday with , and press [MENU/SET].
Select [Exit] with , and press [MENU/SET].
Taking pictures according to the scene [Scene Mode]
Uses weak flash to bring out skin colours.
• To record age
Select [Age], and press [MENU/SET].
Select [SET] with , and press [MENU/SET].
Set birthday with , and press [MENU/SET].
Select [Exit] with , and press [MENU/SET].
Tips
• Make sure [Age] is [ON] before taking a picture.
Notes
• You can perform print settings on your computer using the software
“PHOTOfunSTUDIO” on the supplied CD-ROM when you print [Age] on a still
picture.
Takes clear pictures of scenes such as sunsets.
Prevents blurring of subject in dark, indoor conditions.
[Baby] (Dieťa)
[Sunset] (Západ slnka)
[High Sens.] (Vysoká citlivosť)
V tomto režime sa použije blesk slabšej intenzity, aby vynikla farba
pleti.
• Záznam veku
1 Zvoľte možnosť [Age] (Vek) a stlačte tlačidlo [MENU/SET].
2 Tlačidlami ▲▼zvoľte možnosť [SET] (Nastaviť) a stlačte tlačidlo
[MENU/SET].
3 Tlačidlami ▲▼◄► nastavte dátum narodenia a stlačte tlačidlo
[MENU/SET].
4 Tlačidlami ▲▼zvoľte možnosť [Exit] (Koniec) a stlačte tlačidlo
[MENU/SET].
Tipy
• Pred nasnímaním záberu nezabudnite nastaviť položku [Age] (Vek) na
[ON] (Zap.).
Poznámky
• Ak chcete na snímku vytlačiť vek, na nastavenie tlače použite program
„PHOTOfunSTUDIO“, ktorý sa nachádza na priloženom CD-ROM disku.
Umožňuje snímať krajšie zábery západu slnka.
Zabraňuje rozmazaniu objektov na záberoch nasnímaných v tmavom
interiéri.
Pomocou tlačidiel ▲▼ zvoľte zobrazovací pomer a rozlíšenie, a stlačte
tlačidlo [MENU/SET].
● Spôsob voľby scény. (→36)
● Použitie blesku v jednotlivých režimoch snímania scén. (→33)
- 40 -
Page 41

Snímanie na základe typu scény [Scene Mode] (Režim snímania scén)
Taking pictures according to the scene [Scene Mode]
Takes clear pictures of fireworks in the night sky.
Tips
• Stand at least 10 m (33 feet) away.
Taking pictures according to the scene [Scene Mode]
Takes clear pictures of fireworks in the night sky.
Tips
• Stand at least 10 m (33 feet) away.
• Tripod recommended.
Notes
• Shutter speed is fixed to 1/4. (Setting of shutter speed changes if exposure
compensation is operated)
Brings out the clear blues of the sky and the sea without darkening
subject.
Notes
• Do not touch camera with wet hands.
• Beware of sand and sea water.
Brings out the natural colour of snow in ski slope and mountain scenes.
[Fireworks] (Ohňostroj)
[Beach] (Pláž)
[Snow] (Sneh)
Umožňuje nasnímať jasné zábery ohňostroja na nočnej oblohe.
Tipy
• Snímajte zo vzdialenosti minimálne 10 m.
• Odporúčame použiť statív.
Poznámky
• Expozičný čas je pevne nastavený na 1/4. (Pri nastavení expozičnej
kompenzácie sa expozičný čas zmení)
Umožňuje nasnímať zábery s výraznou modrou farbou oblohy a mora
pri zachovaní správneho jasu objektu.
Poznámky
• Fotoaparát nechytajte mokrými rukami.
• Dávajte pozor, aby sa fotoaparát nedostal do kontaktu s morskou vodou
a pieskom.
Pri snímaní záberov na lyžiarskom svahu alebo v prostredí
zasnežených hôr na snímke vynikne biela farba snehu.
● Spôsob voľby scény. (→36)
● Použitie blesku v jednotlivých režimoch snímania scén. (→33)
- 41 -
Page 42

Používanie menu [Rec] (Snímanie)
Using the [Rec] menu
[Picture Size]
Recording pixel level type
14 M 4320×3240
10 M
*
3648×2736
5 M
2560×1920
3 M
*
2048×1536
0.3 M
640×480
Using the [Rec] menu
[Picture Size]
Recording pixel level type
14 M 4320×3240
10 M
*
3648×2736
5 M
2560×1920
3 M
*
2048×1536
0.3 M
640×480
Using the [Rec] menu
[Picture Size]
Recording pixel level type
14 M 4320×3240
10 M
*
3648×2736
5 M
2560×1920
3 M
*
2048×1536
0.3 M
640×480
Using the [Rec] menu
[Picture Size]
Recording pixel level type
14 M 4320×3240
10 M
*
3648×2736
5 M
2560×1920
3 M
*
2048×1536
0.3 M
640×480
Using the [Rec] menu
[Picture Size]
Recording pixel level type
14 M 4320×3240
10 M
*
3648×2736
5 M
2560×1920
3 M
*
2048×1536
0.3 M
640×480
Using the [Rec] menu
[Picture Size]
Recording pixel level type
14 M 4320×3240
10 M
*
3648×2736
5 M
2560×1920
3 M
*
2048×1536
0.3 M
640×480
12.5 M 4320×2880
Using the [Rec] menu
[Picture Size]
Recording pixel level type
14 M 4320×3240
10 M
*
3648×2736
5 M
2560×1920
3 M
*
2048×1536
0.3 M
640×480
12.5 M 4320×2880
10.5 M 4320×2432
Using the [Rec] menu
[Picture Size]
Recording pixel level type
14 M 4320×3240
10 M
*
3648×2736
5 M
2560×1920
3 M
*
2048×1536
0.3 M
640×480
Using the [Rec] menu
[Picture Size]
Recording pixel level type
14 M 4320×3240
10 M
*
3648×2736
5 M
2560×1920
3 M
*
2048×1536
0.3 M
640×480
12.5 M 4320×2880
Using the [Rec] menu
[Picture Size]
Recording pixel level type
14 M 4320×3240
10 M
*
3648×2736
5 M
2560×1920
3 M
*
2048×1536
0.3 M
640×480
12.5 M 4320×2880
10.5 M 4320×2432
Podrobné informácie o postupe pri voľbe nastavení v menu [Rec] (Snímanie) (→24)
[Picture Size] (Rozlíšenie)
Nastavenie rozlíšenia (počtu obrazových bodov) statických snímok. Toto nastavenie
určuje, koľko snímok môžete zaznamenať.
■ Režim snímania:
■ Nastavenia:
Počet obrazových bodov na snímke
14 M
10 M *
5 M
3 M *
0.3 M
12.5 M
10.5 M
4320 × 3240
3648 × 2736
2560 × 1920
2048 × 1536
640 × 480
4320 × 2880
4320 × 2432
* Toto nastavenie nie je dostupné v režime
([Intelligent Auto] (Inteligentný
automatický režim)).
●
● Optický extrazoom sa dá použiť pre rozlíšenia snímok označené symbolom .
● Optický extrazoom nie je dostupný v nasledujúcich prípadoch.
- Režim [Motion Picture] (Snímanie videozáznamov)
predstavujú zobrazovacie pomery statických snímok.
- V režime snímania scén [High Sens.] (Vysoká citlivosť)
● V závislosti od snímaného objektu alebo podmienok počas snímania môžu mať snímky
mozaikový vzhľad.
Voľba vhodného nastavenia
Väčšie rozlíšenie snímky Menšie rozlíšenie snímky
Vyššia kvalita snímok Nižšia kvalita snímok
Budete môcť nasnímať menej záberov. Budete môcť nasnímať viac záberov.
- 42 -
Page 43

Používanie menu [Rec] (Snímanie)
Podrobné informácie o postupe pri voľbe nastavení v menu [Rec] (Snímanie) (→24)
[Rec Quality] (Kvalita záznamu)
Tu môžete nastaviť rozlíšenie videozáznamov.
■ Režim snímania:
■ Nastavenia:
Kvalita obrazu Rozlíšenie snímky
[HD] 1280 × 720 obrazových bodov
[VGA] 640 × 480 obrazových bodov
[QVGA]* 320 × 240 obrazových bodov
* Pri snímaní do internej pamäte je pevne nastavená možnosť [QVGA].
● V závislosti od prostredia snímania videozáznamu môže statická elektrina alebo
elektromagnetické vlny spôsobiť chvíľkovú stratu obrazu z obrazovky alebo
zaznamenanie šumu.
● Pri snímaní videozáznamov odporúčame použiť batérie s dostatočnou kapacitou.
● Ak sa videozáznam nasnímaný týmto fotoaparátom pokúsite prehrať na iných
zariadeniach, prehrávanie nemusí byť možné alebo môže byť kvalita obrazu alebo
zvuku nízka. Okrem toho sa môžu zobrazovať nesprávne informácie o snímaní.
Počet
snímok
30 sn/s
Zobrazovací pomer
snímky
16:9
4:3
[Sensitivity] (Citlivosť ISO)
Pomocou tejto položky môžete manuálne nastaviť citlivosť ISO (citlivosť fotoaparátu na
svetlo).
Ak chcete snímať zábery v tmavom prostredí, nastavte vyššiu citlivosť ISO.
■ Režim snímania:
■ Nastavenia: [AUTO] (Automaticky) / [100] / [200] / [400] / [800] / [1600]
Voľba vhodného nastavenia
[Sensitivity] (Citlivosť ISO) [100] [1600]
Umiestnenie
(odporúčané)
Expozičný čas Dlhší Kratší
Šum Nízky Vysoký
Rozostrenie objektu Väčšie Menšie
Jasné (vonku) Slabé osvetlenie
● [AUTO] (Automaticky) automaticky nastaví na základe jasu hodnotu v rozsahu do 800.
● Podrobnejšie informácie o účinnom dosahu blesku (→33)
- 43 -
Page 44

Používanie menu [Rec] (Snímanie)
Using the [Rec] menu
[White Balance]
(outdoor, cloudy sky) /
Using the [Rec] menu
(outdoor, cloudy sky) /
Using the [Rec] menu
[White Balance]
(outdoor, cloudy sky) /
Using the [Rec] menu
(outdoor, cloudy sky) /
Using the [Rec] menu
[White Balance]
(outdoor, cloudy sky) /
Using the [Rec] menu
(outdoor, cloudy sky) /
Using the [Rec] menu
(outdoor, cloudy sky) /
Using the [Rec] menu
[White Balance]
AWB] (automatic) / (outdoor, clear sky) / (outdoor, cloudy sky) /
(outdoor, shade) / (incandescent lighting) /
(uses value set in
) / (set manually)
Cloudy sky (rain)
Shade
Incandescent lighting
Sunset/sunrise
Candlelight
Sunlight
White fluorescent lighting
Blue sky
●
Picture may appear red or blue if out of
range. This function may also not work
correctly even within the range if there are
many light sources present.
●
Under fluorescent lighting, LED lighting
fixture etc., the appropriate White Balance
will vary depending on the lighting type, so
use [AWB] or [ ].
●
White Balance setting is fixed to [AWB] in the
following Scene Modes:
[Scenery], [Night Portrait], [Night Scenery],
Using the [Rec] menu
(outdoor, cloudy sky) /
Using the [Rec] menu
(outdoor, cloudy sky) /
Using the [Rec] menu
(outdoor, cloudy sky) /
Using the [Rec] menu
(outdoor, cloudy sky) /
Podrobné informácie o postupe pri voľbe nastavení v menu [Rec] (Snímanie) (→24)
[White Balance] (Vyváženie bielej)
Ak farby pôsobia neprirodzene, táto funkcia umožňuje prispôsobenie farebnosti zdroju
svetla.
■ Režim snímania:
■ Nastavenia: [AWB] (automatické) /
Rozsah, pre ktorý dokáže fotoaparát nastaviť vyváženie bielej automaticky:
10000K
9000K
8000K
7000K
6000K
5000K
4000K
3000K
2000K
K = stupnica teploty farieb v kelvinoch
Modrá obloha
Zamračená obloha (dážď)
Tieň
Slnečné svetlo
Biele žiarivkové osvetlenie
Žiarovkové osvetlenie
Západ/východ slnka
Osvetlenie pri sviečkach
zamračená obloha) /
osvetlenie) /
(používa hodnotu nastavenú v
(nastavené manuálne)
● Ak snímate mimo uvedeného rozsahu, snímky môžu
mať červený alebo modrý nádych. Pri snímaní objektu
obklopeného viacerými svetelnými zdrojmi nemusí
automatické nastavenie vyváženia bielej fungovať
správne ani v rámci účinného rozsahu.
● Pri žiarivkovom osvetlení, LED svietidlách a pod.
sa bude správne vyváženie bielej meniť v závislosti
od typu osvetlenia, preto použite režim [AWB]
(Automatické vyváženie bielej) alebo [
● Vyváženie bielej je pevne nastavené na možnosť
[AWB] (Automatické vyváženie bielej) v nasledujúcich
režimoch snímania scén:
[Scenery] (Krajina), [Night Portrait] (Nočný portrét),
[Night Scenery] (Nočná krajina), [Food] (Jedlo),
[Party] (Večierok), [Sunset] (Západ slnka), [Fireworks]
(Ohňostroj), [Beach] (Pláž), [Snow] (Sneh)
● Ak sa režim snímania scén zmenil, vyvážanie bielej sa
automaticky nastaví na možnosť [AWB] (Automatické
vyváženie bielej).
(vonku, jasná obloha) /
(vonku, v tieni) /
(žiarovkové
(vonku,
) /
].
■ Manuálne nastavenie vyváženia bielej (
1 Zvoľte možnosť
2 Fotoaparát nasmerujte na biely objekt (napr. hárok
papiera) a stlačte tlačidlo [MENU/SET].
• Vyváženie bielej sa nastaví na
• Hodnota vyváženia bielej ostane uložená v pamäti aj
po vypnutí fotoaparátu.
• Ak je snímaný objekt príliš svetlý alebo príliš tmavý,
môže sa stať, že vyváženie bielej nebude fungovať.
V takom prípade upravte jas objektu na vhodnú
úroveň a znova nastavte vyváženie bielej.
a stlačte tlačidlo [MENU/SET].
.
- 44 -
)
Nasníma sa iba záber bielych
objektov v rámčeku (krok 2)
Page 45

Používanie menu [Rec] (Snímanie)
*
1
*
3
Taking pictures with automatic settings [Intelligent Auto] Mode
People are detected
Scenery is detected
A close-up shot is detected
People and night scenery are detected (Only when is selected)
Night scenery is detected
When the scene does not correspond to any of the conditions above
*
1
, [Burst], [Color Mode]
*
1
*
2
: [Clock Set], [Beep], [Light Freq.], [Language]
*
3
Using the [Rec] menu
[AF Mode]
Taking front-on pictures of
people
(Face Detection)
Detected faces (up to 11 people) and adjusts exposure and focus
accordingly.
AF area
Yellow: When the shutter button is
pressed halfway, the frame
turns green when the camera is
focused.
White: Displayed when more than one
face is detected. Other faces
that are the same distance away
as faces within the yellow AF
area are also focused.
(AF area displayed
(9-area-focusing)
Automatically focuses on any of 9 points.
(1-area-focusing)
Focuses on AF area in centre of picture. (Recommended when
focus is difficult to align)
*
1
*
3
Using the [Rec] menu
[AF Mode]
Detected faces (up to 11 people) and adjusts exposure and focus
accordingly.
AF area
Yellow: When the shutter button is
pressed halfway, the frame
turns green when the camera is
focused.
White: Displayed when more than one
Taking pictures with automatic settings [Intelligent Auto] Mode
People are detected
Scenery is detected
A close-up shot is detected
People and night scenery are detected (Only when is selected)
Night scenery is detected
When the scene does not correspond to any of the conditions above
*
1
, [Burst], [Color Mode]
*
1
*
2
: [Clock Set], [Beep], [Light Freq.], [Language]
*
3
Using the [Rec] menu
[AF Mode]
Taking front-on pictures of
people
(Face Detection)
Detected faces (up to 11 people) and adjusts exposure and focus
accordingly.
AF area
Yellow: When the shutter button is
pressed halfway, the frame
turns green when the camera is
focused.
White: Displayed when more than one
face is detected. Other faces
that are the same distance away
as faces within the yellow AF
area are also focused.
(AF area displayed
(9-area-focusing)
Automatically focuses on any of 9 points.
(1-area-focusing)
Focuses on AF area in centre of picture. (Recommended when
focus is difficult to align)
Taking pictures with automatic settings [Intelligent Auto] Mode
People are detected
Scenery is detected
A close-up shot is detected
People and night scenery are detected (Only when is selected)
Night scenery is detected
When the scene does not correspond to any of the conditions above
*
1
, [Burst], [Color Mode]
*
1
*
2
: [Clock Set], [Beep], [Light Freq.], [Language]
*
3
Podrobné informácie o postupe pri voľbe nastavení v menu [Rec] (Snímanie) (→24)
[AF Mode] (Režim automatického zaostrovania)
Pomocou tejto položky môžete zvoliť vhodnú metódu zaostrovania pre danú polohu
objektu alebo počet objektov v zábere.
■ Režim snímania:
■ Nastavenia:
Snímanie ľudí spredu
(Rozpoznanie tvárí)
Objekt sa nenachádza v strede
záberu
(oblasť automatického
zaostrovania sa zobrazí až
po zaostrení).
(zaostrovanie na 9 oblastí)
Určená oblasť zaostrovania
(zaostrovanie na 1 oblasť)
● Oblasť automatického zaostrovania sa zobrazí väčšia pri fotografovaní na tmavých
miestach alebo keď používate digitálny zoom a pod.
● Funkciu rozpoznania tvárí nie je možné nastaviť v nasledujúcich prípadoch:
Režimy snímania scén [Panorama Assist] (Panoráma s asistenciou), [Night Scenery]
(Nočná krajina), [Food] (Jedlo)
● Ak fotoaparát v režime rozpoznania tvárí identikuje niečo iné ako ľudskú tvár, zvoľte
iný režim.
● Ak nie je možné tváre rozpoznať, pretože objekty pozerajú inam než do fotoaparátu
alebo sa rýchlo pohybujú, režim automatického zaostrovania sa prepne na
/
/
Fotoaparát rozpozná tváre (až 11 osôb) a následne prispôsobí
expozíciu a zaostrenie.
Oblasť automatického zaostrovania
Žltá: Keď stlačíte spúšť do
polovice a fotoaparát
zaostrí, farba rámika sa
zmení na zelenú.
Biela: Zobrazí sa, keď fotoaparát
rozpozná viac než jednu
tvár. Zaostrené budú aj
ďalšie tváre, ktoré sú
v rovnakej vzdialenosti ako
Fotoaparát automaticky zaostrí na niektoré z 9 miest.
Fotoaparát zaostrí na objekt v oblasti automatického
zaostrovania v strede záberu (odporúčané pri problematickom
zaostrovaní).
- 45 -
tváre v žltých oblastiach
automatického zaostrovania.
.
Page 46

Používanie menu [Rec] (Snímanie)
Using the [Rec] menu
[Digital Zoom]
■
Mode:
■
Settings: [ON]/[OFF]
Digital Zoom area is displayed within zoom bar on screen.
• Zoom motion stops momentarily when entering
Digital Zoom range.
Using the [Rec] menu
[Digital Zoom]
• Zoom motion stops momentarily when entering
Digital Zoom range.
• Within Digital Zoom range, AF area is displayed
larger when the shutter button is pressed halfway.
• We recommend using a tripod and [Selftimer].
[Burst]
Podrobné informácie o postupe pri voľbe nastavení v menu [Rec] (Snímanie) (→24)
[Digital Zoom] (Digitálny zoom)
Až 4-násobne znásobuje efekt optického zoomu alebo optického extrazoomu.
(Priblížením záberu pomocou digitálneho zoomu sa zníži kvalita snímok.)
■ Režim snímania:
■ Nastavenia: [ON] (Zap.)/[OFF] (Vyp.)
Na grackom indikátore priblíženia sa zobrazí rozsah digitálneho zoomu.
Rozsah digitálneho zoomu
● V režime snímania scén sa položka [High Sens.] (Vysoká citlivosť) pevne nastaví na
[OFF] (Vyp.).
● V režime snímania videozáznamov nie je možné zmeniť nastavenie. Prejaví sa v ňom
nastavenie z iného režimu snímania.
• Pred vstúpením do rozsahu digitálneho zoomu sa
priebeh funkcie zoomu na chvíľu zastaví.
• Pri priblížení v rozsahu digitálneho zoomu je
oblasť automatického zaostrovania, zobrazená pri
polovičnom stlačení spúšte, väčšia než zvyčajne.
• Odporúčame použiť statív a funkciu [Selftimer]
(Samospúšť).
[Burst] (Sekvenčné snímanie)
Táto funkcia umožňuje nasnímať statické zábery v rýchlom slede. Po úplnom stlačení
spúšte sa statické zábery budú snímať dovtedy, kým spúšť neuvoľníte.
■ Režim snímania:
■ Nastavenia:
Rýchlosť Počet snímok
Pribl. 0,8 snímok za sekundu Pokiaľ sa nezaplní pamäťová karta/interná pamäť
● Frekvencia sekvenčného snímania sa môže znížiť, ak je nastavená vysoká citlivosť
ISO alebo ak sa expozičný čas predĺži pri snímaní na tmavých miestach.
● Ak zvolíte funkciu sekvenčného snímania, blesk nie je dostupný.
● Ak snímate pohybujúce sa objekty a dochádza k veľkým rozdielom v jase, fotoaparát
nemusí nastaviť optimálnu expozíciu.
● V režimoch snímania scén [Panorama Assist] (Panoráma s asistenciou) a [Fireworks]
(Ohňostroj) sa pevne nastaví možnosť [OFF] (Vyp.).
● Ak je zapnutá samospúšť, nasnímajú sa 3 zábery.
/[OFF] (Vyp.)
- 46 -
Page 47

Používanie menu [Rec] (Snímanie)
Taking pictures with flash
Recording Mode:
Display [Flash]
Select the desired type
(Can also be selected with .)
Type, operations Uses
[Auto]
• Automatically judges whether or not to flash
Normal use
[Auto/Red-Eye]
*
Taking pictures with flash
Recording Mode:
Display [Flash]
Select the desired type
(Can also be selected with .)
Type, operations Uses
[Auto]
• Automatically judges whether or not to flash
Normal use
[Auto/Red-Eye]
*
• Automatically judges whether or not to flash (reduce
red-eye)
Taking pictures of subjects in
dark places
[Forced Flash On]
• Always flash
Taking pictures with backlight
or under bright lighting (e.g.
fluorescent)
[Forced On/Red-Eye]
*
• Always flash (reduce red-eye)
[Slow Sync./Red-Eye]
*
Taking pictures of subjects
*
1
*
3
Podrobné informácie o postupe pri voľbe nastavení v menu [Rec] (Snímanie) (→24)
[Color Mode] (Farebný efekt)
Funkcia umožňuje nastavenie farebných efektov.
■ Režim snímania:
■ Nastavenia: [STANDARD] (Štandardný)/[VIVID] (Živý)* (ostrejší)/[B&W] (ČB)/
[SEPIA] (Sépia)
* Iba
[Normal Picture] (Bežné snímky) a [Motion Picture] (Snímanie videozáznamov)
[Red-Eye Removal] (Odstránenie efektu červených očí)
Ak použijete blesk spolu s funkciou redukcie efektu červených očí (
fotoaparát automaticky rozpozná červené oči a vykoná korekciu dát statických záberov.
■ Režim snímania:
■ Nastavenia: [ON] (Zap.)/[OFF] (Vyp.)
● Dostupné len keď je položka [AF Mode] (Režim automatického zaostrovania)
nastavená na
● Efekt červených očí sa za určitých podmienok nemusí dať odstrániť.
● Keď je vybrané nastavenie [ON] (Zap.), na symbole blesku sa objaví indikátor
Pomocou tejto funkcie fotoaparát automaticky identikuje chvenie a eliminuje jeho vplyv
na snímky.
■ Režim snímania:
■ Nastavenia: [ON] (Zap.)/[OFF] (Vyp.)
● V režime snímania scén [Self Portrait] (Autoportrét) sa pevne nastaví možnosť [ON] (Zap.).
● Optická stabilizácia obrazu nemusí byť dostatočná v týchto prípadoch:
silné chvenie, vysoká miera priblíženia zoomom (aj v rámci rozsahu digitálneho
zoomu), rýchlo sa pohybujúce objekty, snímanie vo vnútri alebo na nedostatočne
osvetlených miestach (v dôsledku dlhšieho expozičného času).
(rozpoznanie tvárí).
[Stabilizer] (Optická stabilizácia obrazu)
- 47 -
),
.
Page 48

Používanie menu [Rec] (Snímanie)
Podrobné informácie o postupe pri voľbe nastavení v menu [Rec] (Snímanie) (→24)
[Date Stamp] (Dátumová pečiatka)
U statických snímok je možné do záberu zaznamenať údaje o dátume a čase.
■ Režim snímania:
■ Nastavenia: [W/O TIME] (Bez času)/[WITH TIME] (S časom)/[OFF] (Vyp.)
● Dátumové pečiatky sa u statických snímok nedajú vymazať.
● Dátum sa nedá pridať, ak je nastavená možnosť [Burst] (Sekvenčné snímanie).
● V režime snímania scén [Panorama Assist] (Panoráma s asistenciou) sa pevne nastaví
možnosť [OFF] (Vyp.).
● V prípade snímok s dátumom vloženým pomocou tejto funkcie už nepožadujte tlač
dátumu vo fotograckom štúdiu ani ju nenastavujte na tlačiarni. (Oba dátumy by sa
mohli prekrývať.)
● V inteligentnom automatickom režime [Intelligent Auto] nie je možné zmeniť
nastavenie. Prejaví sa v ňom nastavenie z iného režimu snímania.
[Clock Set] (Nastavenie hodín)
Nastavte hodiny (→14). Táto položka má rovnakú funkciu ako položka [Clock Set]
(Nastavenie hodín) v menu [Setup] (Nastavenia).
- 48 -
Page 49

Rôzne spôsoby prehliadania (Režim prehliadania)
Different playback methods (Playback Mode)
Playback Mode:
Recorded pictures can be played back in a variety of ways.
Playback/Editing
Press the Playback button
Display the screen for Playback
Mode selection
Select the method of playback
Setting the clock
The clock is not set when the camera is shipped.
Press the Power button
Power button
• Press again to enter the
Recording Mode.
Setting the clock
The clock is not set when the camera is shipped.
Press the Power button
The power is turned on.
If the language select screen is not displayed,
proceed to step .
Press [MENU/SET] while the
Power button
Display the screen for Recording
Mode selection
Setting the clock
The clock is not set when the camera is shipped.
Press the Power button
The power is turned on.
If the language select screen is not displayed,
proceed to step .
Press [MENU/SET] while the
message is displayed
Press to select the language,
Power button
Režim prehliadania:
Obrazové záznamy sa dajú prehliadať rôznymi spôsobmi.
Stlačte tlačidlo prehliadania.
Vyvolajte menu na voľbu režimu
Zvoľte spôsob prehliadania.
■ [Normal Play] (Normálne
prehliadanie) (→20)
■ [Slide Show] (Prezentácia)
(→50)
■ [Category Selection] (Výber
podľa kategórie) (→51)
prehliadania.
● Ak vo fotoaparáte nie je vložená pamäťová karta, zobrazia sa snímky uložené
v internej pamäti.
● Keď prepnete z režimu snímania do režimu prehliadania, automaticky sa nastaví režim
prehliadania [Normal Play] (Normálne prehliadanie).
- 49 -
Page 50

Rôzne spôsoby prehliadania (Režim prehliadania)
Setting the clock
The clock is not set when the camera is shipped.
Press the Power button
Power button
Different playback methods (Playback Mode)
[Slide Show]
[All] Playback of all still pictures
[Category
Selection]
Select a category and play back. (Select category with
and press [MENU/SET].) (→51)
Setting the clock
The clock is not set when the camera is shipped.
Press the Power button
The power is turned on.
If the language select screen is not displayed,
proceed to step .
Press [MENU/SET] while the
Power button
Different playback methods (Playback Mode)
[Slide Show]
Select a category and play back. (Select category with
and press [MENU/SET].) (→51)
(While paused)
Next
Setting the clock
The clock is not set when the camera is shipped.
Press the Power button
The power is turned on.
If the language select screen is not displayed,
proceed to step .
Press [MENU/SET] while the
Power button
Podrobné informácie o spôsobe prepínania režimu prehliadania (→49)
[Slide Show] (Prezentácia)
Automatické prehrávanie statických snímok za sebou.
Zvoľte spôsob prehliadania.
[All] (Všetky) Prehliadanie všetkých statických snímok
[Category Selection]
(výber podľa kategórie)
Zvoľte kategóriu a prehliadanie. (Kategóriu zvoľte
pomocou ▲▼◄► a stlačte tlačidlo [MENU/SET].) (→51)
Zvoľte položku [Start] (Štart) a stlačte tlačidlo [MENU/SET].
■ Ovládanie prezentácie
Pozastavenie/spustenie prezentácie
(počas pozastavenia)
Predchádzajúca
Zastavenie
(počas pozastavenia)
Nasledujúca
■ Zmena nastavení, ako napr. trvanie prehliadania
1 V kroku
2 Zvoľte položku, ktorej nastavenie chcete zmeniť.
[Duration] (Interval
zobrazovania snímky)
[Repeat] (Opakovanie) [ON] (Zap.)/[OFF] (Vyp.)
● V prezentácii nemôžete prehrávať videozáznamy. Keď zvolíte kategóriu [Motion
Picture] (Videozáznamy), úvodné zobrazenia videozáznamov sa budú prehrávať ako
statické zábery v prezentácii obrazových záznamov.
zvoľte položku [Setup] (Nastavenie) a stlačte tlačidlo [MENU/SET].
[1 SEC.] (1 sekunda) / [2 SEC.] (2 sekundy) / [3 SEC.] (3 sekundy) /
[5 SEC.] (5 sekúnd)
[Setup] (Nastavenie)
- 50 -
Page 51

Rôzne spôsoby prehliadania (Režim prehliadania)
Setting the clock
The clock is not set when the camera is shipped.
Press the Power button
Power button
Different playback methods (Playback Mode)
[Category Selection]
[Category] Recording information such as Scene Modes
[Portrait]/ /
[Self Portrait]/[Night Portrait]/
/[Baby]
[Scenery]/ /[Sunset]
[Night Portrait]/ /[Night Scenery]/
Taking pictures according to the scene [Scene Mode]
Improves the skin tone of subjects for a healthier appearance in bright
daylight conditions.
Taking pictures with automatic settings [Intelligent Auto] Mode
Taking pictures with automatic settings [Intelligent Auto] Mode
is selected)
Taking pictures with flash
○
: Default setting)
[Scene Mode]
○○
*
1
○○○–○–○○–○
○–○○––––○–––
○–○○○–○–○○○○
–––––––○––––
–––––○–○––––
○○○○○○○○○○○○
Set to , , or according to the subject and brightness.
.
Taking pictures with automatic settings [Intelligent Auto] Mode
Taking pictures according to the scene [Scene Mode]
Takes pictures of people and nightscapes with close to actual brightness.
Tips
Taking pictures with automatic settings [Intelligent Auto] Mode
is selected)
Taking pictures with automatic settings [Intelligent Auto] Mode
is selected)
Different playback methods (Playback Mode)
[Category Selection]
Recording information such as Scene Modes
[Portrait]/ /
[Self Portrait]/[Night Portrait]/
/[Baby]
[Scenery]/ /[Sunset]
[Night Portrait]/ /[Night Scenery]/
[Sports]/[Party]/[Fireworks]/[Beach]/[Snow]
Taking pictures according to the scene [Scene Mode]
Uses weak flash to bring out skin colours.
• To record age
Select [Age], and press [MENU/SET].
Select [SET] with , and press [MENU/SET].
Set birthday with , and press [MENU/SET].
Select [Exit] with , and press [MENU/SET].
Taking pictures according to the scene [Scene Mode]
Takes pictures of people and nightscapes with close to actual brightness.
Tips
• Use flash.
• Subject should not move.
• Tripod, self-timer recommended.
Takes clear pictures of night scenes.
Tips
• Tripod, self-timer recommended.
Notes
• Shutter speed may slow down up to 8 seconds.
• After recording, the shutter may stay closed (up to 8 seconds) to process the
signal. This is not a malfunction.
Takes natural-looking pictures of food.
Podrobné informácie o spôsobe prepínania režimu prehliadania (→49)
[Category Selection] (Výber podľa kategórie)
Množstvo zobrazovaných snímok je možné zmenšiť a prehliadať iba zvolenú kategóriu.
Zvoľte kategóriu a stlačte tlačidlo [MENU/SET].
[Category]
(Kategória)
Informácie o zázname, napríklad režim snímania scén
[Portrait] (Portrét)/
(Nočný portrét)/
[Scenery] (Krajina)/
[Night Portrait] (Nočný portrét)/
krajina)/
[Sports] (Šport)/[Party] (Večierok)/[Fireworks] (Ohňostroj)/[Beach]
(Pláž)/[Snow] (Sneh)
[Baby] (Dieťa)
[Food] (Jedlo)
[Motion Picture] (Snímanie videozáznamov)
/[Self Portrait] (Autoportrét)/[Night Portrait]
/[Baby] (Dieťa)
/[Sunset] (Západ slnka)
/[Night Scenery] (Nočná
- 51 -
Page 52

Setting the clock
The clock is not set when the camera is shipped.
Press the Power button
Power button
[Resize]
Setting the clock
The clock is not set when the camera is shipped.
Press the Power button
The power is turned on.
If the language select screen is not displayed,
proceed to step .
Press [MENU/SET] while the
Power button
[Resize]
Setting the clock
The clock is not set when the camera is shipped.
Press the Power button
The power is turned on.
If the language select screen is not displayed,
proceed to step .
Press [MENU/SET] while the
message is displayed
Press to select the language,
Power button
[Resize]
Current size
Size after change
Setting the clock
The clock is not set when the camera is shipped.
Press the Power button
The power is turned on.
If the language select screen is not displayed,
proceed to step .
Press [MENU/SET] while the
message is displayed
Press to select the language,
and press [MENU/SET]
Press [MENU/SET]
Power button
[MENU/SET]
[Resize]
Current size
Size after change
• After confirmation, press [ / ] to return to the menu screen.
Používanie menu [Playback] (Prehliadanie)
Names and Functions of Main Parts
Tripod receptacle
• Ensure that the tripod is
stable.
Card/Battery door
(→10)
Shutter button (→16)
Power button (→14)
Self-timer indicator (→34)
Speaker
Microphone (→19)
Lens barrel
Lens (→4)
/ ] (Delete/Return) button (→23)
Zoom button (→18)Flash (→32)
Hand strap eyelet
We recommend using
the supplied hand strap
to avoid dropping the
camera.
Names and Functions of Main Parts
Tripod receptacle
• Ensure that the tripod is
stable.
Card/Battery door
(→10)
Shutter button (→16)
Power button (→14)
Self-timer indicator (→34)
Speaker
Microphone (→19)
Lens barrel
Lens (→4)
] (Delete/Return) button (→23)
Zoom button (→18)Flash (→32)
Hand strap eyelet
We recommend using
the supplied hand strap
to avoid dropping the
camera.
Režim prehliadania:
Podrobné informácie o postupe pri voľbe nastavení v menu [Playback] (Prehliadanie)
(→24)
[Resize] (Zmena rozlíšenia)
Rozlíšenie snímky sa dá znížiť tak, aby vyhovovalo prílohe e-mailu a použitiu na
internetových stránkach, atď. (Rozlíšenie statických záberov nasnímaných s najnižšou
úrovňou rozlíšenia sa už nedá viac znížiť.)
Príprava: Stlačte tlačidlo [MENU/SET]→ Menu [Playback] (Prehliadanie) → Zvoľte
položku [Resize] (Zmena rozlíšenia).
■
[SINGLE] (Jedna snímka)
Zvoľte možnosť [SINGLE] (Jedna snímka).
Zvoľte snímku.
Zvoľte rozlíšenie.
Zvoľte možnosť [Yes] (Áno).
• Po potvrdení sa stlačením tlačidla [
Aktuálne rozlíšenie
Upravené rozlíšenie
- 52 -
/
] vrátite do menu.
Page 53

■ [MULTI] (Viacero snímok)
Setting the clock
The clock is not set when the camera is shipped.
Press the Power button
Power button
Setting the clock
The clock is not set when the camera is shipped.
Press the Power button
Power button
Setting the clock
The clock is not set when the camera is shipped.
Press the Power button
The power is turned on.
If the language select screen is not displayed,
proceed to step .
Press [MENU/SET] while the
Power button
Using the [Playback] menu
Setting the clock
The clock is not set when the camera is shipped.
Press the Power button
The power is turned on.
If the language select screen is not displayed,
proceed to step .
Press [MENU/SET] while the
message is displayed
Press to select the language,
Power button
Using the [Playback] menu
Resize setting
Setting the clock
The clock is not set when the camera is shipped.
Press the Power button
The power is turned on.
If the language select screen is not displayed,
proceed to step .
Press [MENU/SET] while the
message is displayed
Press to select the language,
and press [MENU/SET]
Press [MENU/SET]
Power button
[MENU/SET]
Using the [Playback] menu
Resize setting
• To cancel → Press [MENU/SET] again.
Setting the clock
The clock is not set when the camera is shipped.
Press the Power button
The power is turned on.
If the language select screen is not displayed,
proceed to step .
Press [MENU/SET] while the
message is displayed
Press to select the language,
and press [MENU/SET]
Press [MENU/SET]
Power button
[MENU/SET]
Press to select the items (year, month, day, hour, minute,
Using the [Playback] menu
Resize setting
• To cancel → Press [MENU/SET] again.
Používanie menu [Playback] (Prehliadanie)
V kroku
na predchádzajúcej strane zvoľte možnosť
[MULTI] (Viacero snímok)
Zvoľte rozlíšenie.
Zvoľte snímku. (max. 50 snímok)
Snímka určená na spracovanie
funkciou Resize (Zmena rozlíšenia)
• Zrušenie → Znovu stlačte tlačidlo [MENU/SET].
Zvoľte možnosť [OK].
Zvoľte možnosť [Yes] (Áno).
● Zmenou rozlíšenia sa zníži kvalita snímky.
● Rozlíšenie sa nedá zmeniť u nasledujúcich snímok.
• Videozáznamy
• Statické snímky označené dátumom pomocou funkcie [Date Stamp] (Dátumová
pečiatka)
- 53 -
Page 54

Používanie menu [Playback] (Prehliadanie)
Setting the clock
The clock is not set when the camera is shipped.
Press the Power button
Power button
Using the [Playback] menu
[Protect]
Setting the clock
The clock is not set when the camera is shipped.
Press the Power button
The power is turned on.
If the language select screen is not displayed,
proceed to step .
Press [MENU/SET] while the
Power button
Using the [Playback] menu
[Protect]
●
[SINGLE]
●
[MULTI]
• To cancel → Press
[MENU/SET] again.
• After confirmation,
press [ / ] to
return to the menu
screen.
Names and Functions of Main Parts
Tripod receptacle
• Ensure that the tripod is
stable.
Card/Battery door
(→10)
Shutter button (→16)
Power button (→14)
Self-timer indicator (→34)
Speaker
Microphone (→19)
Lens barrel
Lens (→4)
/ ] (Delete/Return) button (→23)
Zoom button (→18)Flash (→32)
Hand strap eyelet
We recommend using
the supplied hand strap
to avoid dropping the
camera.
Names and Functions of Main Parts
Tripod receptacle
• Ensure that the tripod is
stable.
Card/Battery door
(→10)
Shutter button (→16)
Power button (→14)
Self-timer indicator (→34)
Speaker
Microphone (→19)
Lens barrel
Lens (→4)
] (Delete/Return) button (→23)
Zoom button (→18)Flash (→32)
Hand strap eyelet
We recommend using
the supplied hand strap
to avoid dropping the
camera.
Setting the clock
The clock is not set when the camera is shipped.
Press the Power button
Power button
Podrobné informácie o postupe pri voľbe nastavení v menu [Playback] (Prehliadanie)
(→24)
[Protect] (Ochrana proti vymazaniu a zápisu)
Nastavenie ochrany snímok proti vymazaniu. Umožňuje chrániť dôležité snímky pred
náhodným vymazaním.
Príprava: Stlačte tlačidlo [MENU/SET] → Menu [Playback] (Prehliadanie) → Zvoľte
[Protect] (Ochrana proti vymazaniu/zápisu)
Zvoľte možnosť [SINGLE] (Jedna snímka) alebo [MULTI]
(Viacero snímok)
Zvoľte snímky a vykonajte nastavenie.
Zrušenie nastavenia pre všetky snímky
■
V kroku
■ Zrušenie procesu v priebehu rušenia ochrany proti vymazaniu a zápisu pre
všetky snímky
Stlačte tlačidlo [MENU/SET].
● Nastavenie ochrany proti vymazaniu a zápisu nemusí byť účinné pri práci s pamäťovou
kartou v iných zariadeniach.
● Naformátovaním pamäťového média sa vymažú všetky uložené údaje, vrátane
chránených snímok.
● Nastavením prepínača ochrany proti vymazaniu a zápisu na pamäťovej karte do
polohy LOCK (Zablokované) ochránite pred vymazaním aj snímky, pre ktoré nebola
nastavená ochrana.
● [SINGLE]
(Jedna snímka)
zvoľte [CANCEL] (Zrušiť) a následne [Yes] (Áno).
Chránená snímka Chránená snímka
● [MULTI]
(Viac snímok)
- 54 -
• Zrušenie → Znovu
stlačte tlačidlo
[MENU/SET].
• Po potvrdení sa
stlačením tlačidla
[
menu.
/
] vrátite do
Page 55

Používanie menu [Playback] (Prehliadanie)
Setting the clock
The clock is not set when the camera is shipped.
Press the Power button
Power button
Using the [Playback] menu
[Copy]
: Copy all pictures from built-in memory to card (go to step ).
: Copy 1 picture at a time from card to built-in memory.
Using the [Playback] menu
[Copy]
: Copy all pictures from built-in memory to card (go to step ).
Setting the clock
The clock is not set when the camera is shipped.
Press the Power button
The power is turned on.
If the language select screen is not displayed,
proceed to step .
Press [MENU/SET] while the
message is displayed
Press to select the language,
Power button
Using the [Playback] menu
[Copy]
: Copy all pictures from built-in memory to card (go to step ).
: Copy 1 picture at a time from card to built-in memory.
Setting the clock
The clock is not set when the camera is shipped.
Press the Power button
The power is turned on.
If the language select screen is not displayed,
proceed to step .
Press [MENU/SET] while the
message is displayed
Press to select the language,
Power button
Using the [Playback] menu
[Copy]
: Copy all pictures from built-in memory to card (go to step ).
: Copy 1 picture at a time from card to built-in memory.
• To cancel → Press [MENU/SET].
• After confirmation, press [ / ] to return to the menu screen.
Names and Functions of Main Parts
Tripod receptacle
• Ensure that the tripod is
stable.
Card/Battery door
(→10)
Shutter button (→16)
Power button (→14)
Self-timer indicator (→34)
Speaker
Microphone (→19)
Lens barrel
Lens (→4)
/ ] (Delete/Return) button (→23)
Zoom button (→18)Flash (→32)
Hand strap eyelet
We recommend using
the supplied hand strap
to avoid dropping the
camera.
Names and Functions of Main Parts
Tripod receptacle
• Ensure that the tripod is
stable.
Card/Battery door
(→10)
Shutter button (→16)
Power button (→14)
Self-timer indicator (→34)
Speaker
Microphone (→19)
Lens barrel
Lens (→4)
] (Delete/Return) button (→23)
Zoom button (→18)Flash (→32)
Hand strap eyelet
We recommend using
the supplied hand strap
to avoid dropping the
camera.
Using the [Playback] menu
[Copy]
: Copy all pictures from built-in memory to card (go to step ).
Using the [Playback] menu
[Copy]
: Copy all pictures from built-in memory to card (go to step ).
: Copy 1 picture at a time from card to built-in memory.
Podrobné informácie o postupe pri voľbe nastavení v menu [Playback] (Prehliadanie)
(→24)
[Copy] (Kopírovanie)
Táto funkcia umožňuje skopírovať obrazové dáta uložené v internej pamäti na pamäťovú
kartu alebo naopak.
Príprava: Stlačte tlačidlo [MENU/SET]→ Menu [Playback] (Prehliadanie) → Zvoľte
možnosť [Copy] (Kopírovanie)
Zvoľte spôsob (smer) kopírovania.
: Na pamäťovú kartu sa naraz skopírujú všetky snímky uložené
: Kopírovanie po 1 snímke z pamäťovej karty do internej pamäte.
Ak ste zvolili smer
v internej pamäti. Pokračujte krokom
, pomocou tlačidiel ◄► zvoľte snímku
.
a stlačte tlačidlo [MENU/SET].
Zvoľte možnosť [Yes] (Áno).
● Kopírovanie snímok môže trvať niekoľko minút. Počas kopírovania fotoaparát
nevypínajte ani neobsluhujte.
● Ak sa pri kopírovaní z internej pamäte na kartu (
súbory snímok s rovnakými názvami (číslo priečinka/číslo súboru) ako snímky,
ktoré chcete skopírovať, vytvorí sa nový priečinok, do ktorého sa snímky skopírujú.
Pri kopírovaní z pamäťovej karty do internej pamäte (
názvami neskopírujú.
● Nastavenie [Protect] (Ochrana proti vymazaniu a zápisu) sa neskopíruje. Nastavte ho
znova po skončení kopírovania.
● Skopírujú sa len snímky nasnímané digitálnym fotoaparátom Panasonic (LUMIX).
• Zrušenie → Stlačte tlačidlo [MENU/SET].
• Po potvrdení sa stlačením tlačidla [
/
) na cieľovom médiu nachádzajú
] vrátite do menu.
) sa súbory s rovnakými
- 55 -
Page 56

Pripojenie k osobnému počítaču
Using with your PC
Pictures and motion pictures can be imported from the camera to your computer by
connecting the two together.
• If your computer does not support SDXC Memory Cards, a message will be displayed
requesting you to format the card. (Do not format the card. This will erase recorded
pictures.) If the card is not recognised, refer to the following support website:
http://panasonic.net/avc/sdcard/information/SDXC.html
Getting Ready:
• Make sure to insert batteries with sufficient power.
• When importing pictures from the built-in memory, remove any memory cards.
Check socket direction and insert straight in.
(Damage to socket shape can lead to faulty
Connecting with other devices
Connect camera to
computer
• Please make sure you use the
supplied USB connection cable.
Use of cables other than the
supplied USB connection cable
may cause malfunction.
Select [PC] on the camera
Operate with your computer
Setting the clock
The clock is not set when the camera is shipped.
Press the Power button
Power button
Setting the clock
The clock is not set when the camera is shipped.
Press the Power button
The power is turned on.
If the language select screen is not displayed,
proceed to step .
Press [MENU/SET] while the
Power button
• Please make sure you use the
supplied USB connection cable.
Use of cables other than the
supplied USB connection cable
may cause malfunction.
Setting the clock
The clock is not set when the camera is shipped.
Press the Power button
The power is turned on.
If the language select screen is not displayed,
proceed to step .
Press [MENU/SET] while the
message is displayed
Press to select the language,
Power button
Po prepojení fotoaparátu a počítača budete môcť importovať statické zábery
a videozáznamy z fotoaparátu do počítača.
• Ak váš počítač nepodporuje pamäťové karty SDXC, zobrazí sa výzva, aby ste kartu
naformátovali. (Kartu neformátujte. Vymazali by sa všetky zaznamenané snímky.)
Ak počítač nerozpozná pamäťovú kartu, informácie nájdete na nasledujúcej webovej
stránke:
http://panasonic.net/avc/sdcard/information/SDXC.html
Príprava:
• Vložte batérie s dostatočnou kapacitou.
• Ak chcete preniesť snímky z internej pamäte, pred zapnutím fotoaparátu z neho
vyberte pamäťovú kartu.
Skontrolujte orientáciu konektora a zasuňte do
neho koncovku v priamom smere. (Poškodenie
konektora môže spôsobiť poruchu spojenia.)
Indikátor prístupu [Access]
(Prebieha posielanie dát)
• Keď je zobrazený
indikátor prístupu
[Access] (Prebieha
posielanie dát),
neodpájajte USB kábel.
■ Zrušenie spojenia
Kliknite na ikonu Safely Remove Hardware (Bezpečné odstránenie hardvéru) na
paneli úloh systému Windows → odpojte USB kábel → vypnite fotoaparát.
USB kábel
(vždy používajte
dodaný kábel)
Pripojte fotoaparát
k osobnému počítaču.
• Používajte iba dodaný USB
kábel. Použitím iného ako
dodaného USB kábla by ste
mohli zapríčiniť poruchu.
Vo fotoaparáte zvoľte
nastavenie [PC] (Počítač).
Na ovládanie prenosu
použite počítač.
- 56 -
Page 57

Pripojenie k osobnému počítaču
Using with your PC
Setting the clock
The clock is not set when the camera is shipped.
Press the Power button
The power is turned on.
If the language select screen is not displayed,
proceed to step .
Press [MENU/SET] while the
Power button
Ak chcete so snímkami pracovať prostredníctvom počítača, môžete pomocou myši
skopírovať súbory alebo celé priečinky so súbormi z fotoaparátu do počítača.
■ Zobrazenie názvov priečinkov a súborov na počítači
(Statické snímky/videozáznamy)
DCIM
100_PANA
P1000001.JPG
● Windows
Disky sa zobrazia
v priečinku My Computer
(Tento počítač) alebo
Computer (Počítač).
● Mac
Disky sa zobrazia na
pracovnej ploche.
(Zobrazia sa pod
názvom LUMIX, NO_
NAME alebo Untitled.)
:
P1000999.JPG
101_PANA
:
999_PANA
MISC
* Situácie, v ktorých sa vytvorí nový priečinok:
• ak priečinok, do ktorého sa pridali snímky, už obsahuje súbor s číslom 999,
• ak karta už obsahuje priečinok s rovnakým číslom (ktorý obsahuje napríklad snímky
zaznamenané inými fotoaparátmi, atď.).
■ Keď používate operačný systém Windows XP, Windows Vista, Windows
7 alebo Mac OS X
Fotoaparát môžete pripojiť k počítaču, aj keď v kroku
vyberiete možnosť [PictBridge(PTP)].
• Z fotoaparátu sa môžu prenášať len obrazové záznamy. (Pri operačných systémoch
Windows Vista a Windows 7 je možné aj vymazanie obrazových záznamov.)
• Ak je na pamäťovej karte uložených 1 000 snímok alebo viac, môže sa stať, že ich
nebude možné importovať.
(max. 999 snímok/priečinok)
JPG:
Statické snímky
MOV:
*
Videozáznamy
na predchádzajúcej strane
● Používajte výhradne dodaný USB kábel.
● Pred vkladaním a vyberaním pamäťovej karty vypnite fotoaparát.
● Ak sa počas prenosu vybijú batérie, ozve sa zvukový signál. Pomocou počítača prenos
okamžite ukončite. Použite dostatočne nabité batérie.
● Niektoré počítače dokážu načítavať dáta priamo z pamäťovej karty fotoaparátu.
Podrobnejšie informácie si prečítajte v návode na používanie počítača.
● Ďalšie informácie si prečítajte v návode na používanie počítača.
- 57 -
Page 58

Pripojenie k osobnému počítaču
Kopírovanie záznamov do počítača pomocou programu
„PHOTOfunSTUDIO“
Pomocou programu „PHOTOfunSTUDIO“, ktorý sa nachádza na priloženom CD-ROM
disku, je možné počítačom spravovať obrazové záznamy.
● Hlavné funkcie programu „PHOTOfunSTUDIO“
• Kopírovanie záznamov do počítača
• Zálohovanie záznamov, ktoré boli skopírované do počítača, na média ako napr. DVD
• Úprava statických snímok v počítači
• Spojenie statických snímok vytvorených v režime snímania scény [Panorama Assist]
(Panoráma s asistenciou) do panorámy
• Priloženie záznamov do e-mailu
• Odovzdanie záznamov na YouTube alebo Facebook
● Po importe snímok do počítača ich môžete vytlačiť alebo odoslať e-mailom.
- 58 -
Page 59

Tlač snímok
Printing
• Make sure to insert batteries with sufficient power.
• When printing pictures from the built-in memory, remove any memory cards.
• Adjust the print quality or other settings on your printer, as needed.
Connect camera to
printer
• Make sure you use the supplied
USB connection cable. Use of
cables other than the supplied
USB connection cable may cause
malfunction.
Select [PictBridge(PTP)]
on the camera
Press to select a
picture to print, and then
press [MENU/SET]
Check socket direction and insert straight in.
(Damage to socket shape can lead to faulty
Setting the clock
The clock is not set when the camera is shipped.
Press the Power button
Power button
Setting the clock
The clock is not set when the camera is shipped.
Press the Power button
The power is turned on.
If the language select screen is not displayed,
proceed to step .
Press [MENU/SET] while the
Power button
• Make sure you use the supplied
USB connection cable. Use of
cables other than the supplied
USB connection cable may cause
malfunction.
Setting the clock
The clock is not set when the camera is shipped.
Press the Power button
The power is turned on.
If the language select screen is not displayed,
proceed to step .
Press [MENU/SET] while the
message is displayed
Press to select the language,
Power button
Setting the clock
The clock is not set when the camera is shipped.
Press the Power button
The power is turned on.
If the language select screen is not displayed,
proceed to step .
Press [MENU/SET] while the
message is displayed
Press to select the language,
and press [MENU/SET]
Press [MENU/SET]
Power button
[MENU/SET]
• Make sure you use the supplied
USB connection cable. Use of
cables other than the supplied
USB connection cable may cause
malfunction.
Po pripojení fotoaparátu k tlačiarni podporujúcej štandard PictBridge môžete tlač snímok
ovládať priamo z fotoaparátu.
Niektoré tlačiarne dokážu načítavať dáta priamo z pamäťovej karty fotoaparátu.
Podrobnejšie informácie si prečítajte v návode na obsluhu tlačiarne.
Príprava:
• Vložte batérie s dostatočnou kapacitou.
• Ak chcete vytlačiť snímky z internej pamäte, pred zapnutím fotoaparátu z neho vyberte
pamäťovú kartu.
• Na tlačiarni nastavte požadované parametre tlače (kvalitu tlače atď.).
Skontrolujte orientáciu konektora a zasuňte do
neho koncovku v priamom smere. (Poškodenie
konektora môže spôsobiť poruchu spojenia.)
• Keď je zobrazený
symbol
upozorňuje na to, aby
ste neodpájali kábel
(tento symbol nemusí
byť na niektorých
tlačiarňach zobrazený),
neodpájajte USB kábel.
, ktorý
USB kábel
(vždy používajte dodaný kábel)
■ Zrušenie tlače
Stlačte tlačidlo [MENU/SET].
- 59 -
Pripojte fotoaparát
k tlačiarni.
• Používajte iba dodaný USB kábel.
Použitím iného ako dodaného USB
kábla by ste mohli zapríčiniť poruchu.
Vo fotoaparáte zvoľte
[PictBridge (PTP)].
Pomocou tlačidiel ◄►
zvoľte snímku, ktorú
chcete vytlačiť a stlačte
tlačidlo [MENU/SET].
Zvoľte možnosť [Print
start] (Spustenie tlače).
(Nastavenie tlače (→62))
Page 60

Tlač viacerých snímok
Setting the clock
The clock is not set when the camera is shipped.
Press the Power button
Power button
Setting the clock
The clock is not set when the camera is shipped.
Press the Power button
The power is turned on.
If the language select screen is not displayed,
proceed to step .
Press [MENU/SET] while the
message is displayed
Press to select the language,
Power button
Printing
Printing multiple pictures
Setting the clock
The clock is not set when the camera is shipped.
Press the Power button
The power is turned on.
If the language select screen is not displayed,
proceed to step .
Press [MENU/SET] while the
Power button
Printing
Printing multiple pictures
• [Multi Select]: Scroll between pictures with , select pictures
with [MENU/SET] to print. (Press [MENU/SET] again to
release selection.)
Press to select [OK], and press [MENU/SET].
• [Select All]: Print all pictures.
Setting the clock
The clock is not set when the camera is shipped.
Press the Power button
The power is turned on.
If the language select screen is not displayed,
proceed to step .
Press [MENU/SET] while the
message is displayed
Press to select the language,
Power button
Setting the clock
The clock is not set when the camera is shipped.
Press the Power button
The power is turned on.
If the language select screen is not displayed,
proceed to step .
Press [MENU/SET] while the
message is displayed
Press to select the language,
and press [MENU/SET]
Press [MENU/SET]
Power button
[MENU/SET]
Tlač snímok
V kroku
na predchádzajúcej strane zvoľte možnosť [Multi
Print] (Tlač viacerých snímok).
Zvoľte požadovanú položku.
• [Multi Select] (Voľba viacerých snímok):
1 Pomocou tlačidiel ▲▼◄► sa posúvajte medzi snímkami
a tlačidlom [MENU/SET] zvoľte snímky, ktoré chcete vytlačiť.
(Opätovným stlačením tlačidla [MENU/SET] zrušíte označenie snímky.)
2 Tlačidlom ◄ zvoľte položku [OK] a stlačte tlačidlo [MENU/SET].
• [Select All] (Voľba všetkých snímok):
Vytlačia sa všetky snímky.
Spustite tlač (predchádzajúca strana, krok
).
● Ak sa zobrazí výzva na potvrdenie tlače, zvoľte [Yes] (Áno).
● Oranžový symbol ● zobrazený počas tlače indikuje chybovú správu.
● Pri tlači veľkého počtu snímok sa tlač môže rozdeliť do niekoľkých časových úsekov.
(Informácia o zostávajúcom počte výtlačkov sa môže líšiť od nastaveného počtu.)
● Používajte výhradne dodaný USB kábel.
● Po ukončení tlače odpojte USB kábel.
● Pred vkladaním a vyberaním pamäťovej karty vypnite fotoaparát.
● Ak sa počas komunikácie vybijú batérie, ozve sa zvukový signál. Zrušte tlač a odpojte
USB kábel. Použite dostatočne nabité batérie.
- 60 -
Page 61

Tlač dátumu
Tlač snímok
● Tlač vo fotograckom štúdiu: Vytlačiť sa dá iba dátum nasnímania. Tlač dátumu si
• O možnosti tlače snímok s pomerom strán 16:9 sa informujte priamo v konkrétnom
fotograckom štúdiu.
● Použitie počítača: Tlač dátumu nasnímania a textových informácií môžete nastaviť
pomocou softvéru PHOTOfunSTUDIO na dodanom CD-ROM
disku.
● Použitie tlačiarne: Dátum nasnímania môžete vytlačiť nastavením položky [Print with
Date] (Tlač dátumu) (→62) na [ON] (Zap.) po pripojení k tlačiarni
podporujúcej tlač dátumu.
objednajte priamo vo fotograckom štúdiu.
- 61 -
Page 62

Setting the clock
The clock is not set when the camera is shipped.
Press the Power button
Power button
Printing
Making print settings on the camera
Nastavenie tlače vo fotoaparáte
Setting the clock
The clock is not set when the camera is shipped.
Press the Power button
The power is turned on.
If the language select screen is not displayed,
proceed to step .
Press [MENU/SET] while the
Power button
Printing
Printing
[ON]/[OFF]
(printer takes priority)
[L/3.5”×5”] (89×127 mm)
[2L/5”×7”] (127×178 mm)
[POSTCARD] (100×148 mm)
[16:9] (101.6×180.6 mm)
[A4] (210×297 mm)
[A3] (297×420 mm)
[10×15 cm] (100×150 mm)
[4”×6”] (101.6×152.4 mm)
[8”×10”] (203.2×254 mm)
[LETTER] (216×279.4 mm)
(54×85.6 mm)
Printing
[ON]/[OFF]
(printer takes priority)
[L/3.5”×5”] (89×127 mm)
[2L/5”×7”] (127×178 mm)
[POSTCARD] (100×148 mm)
[16:9] (101.6×180.6 mm)
[A4] (210×297 mm)
[A3] (297×420 mm)
[10×15 cm] (100×150 mm)
[4”×6”] (101.6×152.4 mm)
[8”×10”] (203.2×254 mm)
[LETTER] (216×279.4 mm)
(54×85.6 mm)
Printing
[A3] (297×420 mm)
[10×15 cm] (100×150 mm)
[4”×6”] (101.6×152.4 mm)
[8”×10”] (203.2×254 mm)
[LETTER] (216×279.4 mm)
(54×85.6 mm)
Printing
[ON]/[OFF]
(printer takes priority)
[L/3.5”×5”] (89×127 mm)
[2L/5”×7”] (127×178 mm)
[POSTCARD] (100×148 mm)
[16:9] (101.6×180.6 mm)
[A4] (210×297 mm)
[A3] (297×420 mm)
[10×15 cm] (100×150 mm)
[4”×6”] (101.6×152.4 mm)
[8”×10”] (203.2×254 mm)
[LETTER] (216×279.4 mm)
(54×85.6 mm)
(4 pictures)
Printing
[A3] (297×420 mm)
[10×15 cm] (100×150 mm)
[4”×6”] (101.6×152.4 mm)
[8”×10”] (203.2×254 mm)
[LETTER] (216×279.4 mm)
(54×85.6 mm)
(4 pictures)
Printing
(54×85.6 mm)
(4 pictures)
Printing
[A3] (297×420 mm)
[10×15 cm] (100×150 mm)
[4”×6”] (101.6×152.4 mm)
[8”×10”] (203.2×254 mm)
[LETTER] (216×279.4 mm)
(54×85.6 mm)
(4 pictures)
Printing
(54×85.6 mm)
(4 pictures)
Printing
[ON]/[OFF]
(printer takes priority)
[L/3.5”×5”] (89×127 mm)
[2L/5”×7”] (127×178 mm)
[POSTCARD] (100×148 mm)
[16:9] (101.6×180.6 mm)
[A4] (210×297 mm)
[A3] (297×420 mm)
[10×15 cm] (100×150 mm)
[4”×6”] (101.6×152.4 mm)
[8”×10”] (203.2×254 mm)
[LETTER] (216×279.4 mm)
(54×85.6 mm)
(Nastavenia vykonajte pred voľbou položky [Print Start] (Spustenie tlače))
Zvoľte položku.
Zvoľte nastavenie.
Tlač snímok
Položka Nastavenia
[Print with Date]
(Tlač dátumu)
[Num.of prints]
(Počet kópií)
[Paper Size]
(Formát papiera)
[Page Layout]
(Rozvrhnutie strany)
[ON] (Zap.)/[OFF] (Vyp.)
Nastavte počet kópií (maximálne 999).
(uprednostnia sa nastavenia
tlačiarne)
[L/3.5”×5”] (89 × 127 mm)
[2L/5”×7”] (127 × 178 mm)
[POSTCARD] (100 × 148 mm)
[16:9] (101,6 × 180,6 mm)
[A4] (210 × 297 mm)
(uprednostnia sa nastavenia tlačiarne) /
okrajov) /
(4 fotograe)
(1 fotograa, s okrajmi) /
[A3] (297 × 420 mm)
[10×15 cm] (100 × 150 mm)
[4”×6”] (101,6 × 152,4 mm)
[8”×10”] (203,2 × 254 mm)
[LETTER] (216 × 279,4 mm)
[CARD SIZE] (54 × 85,6 mm)
(2 fotograe) /
● Zobrazia sa iba možnosti kompatibilné s tlačiarňou.
● Ak chcete použiť rozvrhnutie
(2 fotograe na stranu) alebo
stranu) pre jedinú snímku, nastavte pre danú snímku počet kópií 2, resp. 4.
● Ak chcete snímky vytlačiť s rozmermi alebo rozložením, ktoré fotoaparát
nepodporuje, zvoľte možnosť
tlačiarni. (Podrobnejšie informácie si prečítajte v návode na obsluhu tlačiarne.)
● Pri nastavení položky [Print with Date] (Tlač dátumu) na [ON] (Zap.) skontrolujte
aj nastavenia tlače dátumu na tlačiarni (uprednostňovať sa môžu nastavenia na
tlačiarni).
a potom tieto položky nastavte priamo na
(1 fotograa, bez
(4 fotograe na
- 62 -
Page 63

Zobrazenie na displeji
12 3 4
10
List of LCD monitor displays
Recording Mode (→16, 19, 29, 36)
Picture Size (→42)
Recording quality (→43)
Flash Mode (→32)
Optical Image Stabiliser (→47)
Jitter alert (→29)
White Balance (→44)
Colour Mode (→47)
Battery capacity (→12)
Burst Mode (→46)
Focus (→16)
AF area (→30)
Self-timer Mode (→34)
9
ISO Sensitivity (→43)
Aperture value/Shutter speed (→29)
10
Exposure Compensation (→35)
11
Current date/time
12
Age in years/months (→40)
13
Elapsed recording time (→19)
14
Date Stamp (→48)
15
Save destination (→12)
Recording state
16
Number of recordable pictures (→13)
Remaining recording time (→19)
RXXhXXmXXs
*
12 3 4
5
6
7
8
9
10
12
13
15
16
11
14
Stlačením tlačidla ▼ môžete meniť zobrazenie (→31).
Počas snímania
■
16
15
14
13
12
11
1 Režim snímania (→16, 19, 29, 36)
2 Rozlíšenie snímky (→42)
Kvalita záznamu (→43)
3 Režim blesku (→32)
Optický stabilizátor obrazu (→47)
Upozornenie na chvenie fotoaparátu
Vyváženie bielej (→44)
Farebný efekt (→47)
4 Indikátor stavu batérie (→12)
5 Režim sekvenčného snímania (→46)
6 Zaostrenie (→16)
7 Oblasť automatického zaostrovania
(→29)
9 Citlivosť ISO (→43)
Hodnota clony/expozičný čas (→29)
10 Kompenzácia expozície (→35)
11 Aktuálny dátum a čas
12 Vek v rokoch/mesiacoch (→40)
13 Uplynutý záznamový čas (→19)
14 Dátumová pečiatka (→48)
15 Pamäťové médium na ukladanie
Stav snímania
16 Počet záberov, ktoré je možné
Zostávajúci záznamový čas (→19)
obrazových záznamov (→12)
nasnímať (→13)
5
6
7
8
9
(→30)
8 Režim samospúšte (→34)
Rozsah zaostrenia
Zoom (→18, 46)
* [h], [m] and [s] označujú hodiny, minúty a sekundy.
• Uvedené zobrazenia slúžia len ako príklady. Skutočné zobrazenie môže byť odlišné.
RXXhXXmXXs*
- 63 -
Page 64

■ Počas prehliadania
List of LCD monitor displays
1
4
32
Zobrazenie na displeji
10
9
8
7
6
1 Režim prehliadania (→49)
2 Snímka chránená proti vymazaniu
(→54)
Dátumová pečiatka (→48)
Farebný efekt (→47)
3 Rozlíšenie snímky (→42)
4 Indikátor stavu batérie (→12)
5 Číslo snímky/Celkový počet snímok
(→20)
Uplynutý čas prehrávania (→21)
6 Dátum a čas nasnímania
Vek v rokoch/mesiacoch (→40)
Citlivosť ISO (→43)
Hodnota clony/expozičný čas (→29)
5
7 Režim snímania (→16, 19, 29, 36)
Režim blesku (→32)
Vyváženie bielej (→44)
Kompenzácia expozície (→35)
8 Záznamový čas videozáznamu (→21)
XXhXXmXXs*
9 Číslo priečinka/číslo súboru (→20, 57)
Pamäťové médium na ukladanie
obrazových záznamov (→12)
10 Videozáznam (→21)
Symbol upozorňujúci na zákaz
odpojenia kábla (→59)
* [h], [m] and [s] označujú hodiny, minúty a sekundy.
• Uvedené zobrazenia slúžia len ako príklady. Skutočné zobrazenie môže byť odlišné.
- 64 -
Page 65

Zobrazované hlásenia
Vysvetlenie najdôležitejších hlásení, ktoré sa môžu zobraziť na LCD monitore fotoaparátu a postup
v prípade ich zobrazenia.
[Some pictures cannot be deleted] (Niektoré snímky sa nedajú vymazať)
[This picture cannot be deleted] (Snímka sa nedá vymazať)
● Snímky, ktoré nezodpovedajú štandardu DCF, sa vymazať nedajú (→20).
→ Uložte potrebné dáta na pevný disk osobného počítača alebo iné záznamové médium
a pamäťovú kartu naformátujte pomocou funkcie [Format] (Formátovanie) vo fotoaparáte. (→28)
[No additional selections can be made] (Nie je možné vybrať žiadne ďalšie snímky)
● Prekročili ste počet snímok, ktoré je možné naraz vymazať.
● Prekročili ste počet snímok, pri ktorých je možné naraz použiť funkciu [Resize] (Zmena rozlíšenia).
[Please turn camera off and then on again] (Vypnite fotoaparát a opäť ho zapnite)
[System Error] (Systémová chyba)
● Objektív nefunguje správne.
→ Fotoaparát znovu zapnite.
(Ak sa hlásenie zobrazuje aj naďalej, obráťte sa na svojho predajcu alebo najbližší servis.)
[Some pictures cannot be copied] (Niektoré snímky sa nedajú skopírovať)
[Copy could not be completed] (Kopírovanie nie je možné dokončiť)
● V nasledujúcich prípadoch nie je možné snímky skopírovať:
→ Pri kopírovaní z pamäťovej karty sa v internej pamäti už nachádza snímka s rovnakým názvom
ako snímka, ktorú chcete skopírovať.
→ Súbor nezodpovedá štandardu DCF.
→ Snímky boli vytvorené alebo upravené na inom zariadení.
[Not enough space on built-in memory] (V internej pamäti nie je dosť voľného miesta)
[Not enough memory on the card] (Na karte nie je dosť voľného miesta)
● Kapacita internej pamäte alebo pamäťovej karty je zaplnená. Pri kopírovaní snímok z internej
pamäte na pamäťovú kartu (dávkové kopírovanie) sa skopíruje len taký objem dát, ktorý sa zmestí
na voľné miesto na pamäťovej karte.
[Built-In Memory Error] (Chyba internej pamäte)
[Format built-in memory?] (Chcete internú pamäť naformátovať?)
● Toto hlásenie sa zobrazí, ak ste internú pamäť naformátovali pomocou osobného počítača a pod.
→ Internú pamäť znovu naformátujte vo fotoaparáte. Dáta uložené v internej pamäti sa pritom vymažú.
[Memory card error. This card cannot be used in this camera. Format this card?]
(Chyba pamäťovej karty. Túto kartu nie je možné používať v tomto fotoaparáte.
Chcete pamäťovú kartu naformátovať?)
● Fotoaparát nepodporuje formát vloženej pamäťovej karty.
→ Uložte potrebné dáta na pevný disk osobného počítača alebo iné záznamové médium
a pamäťovú kartu naformátujte pomocou funkcie [Format] (Formátovanie) vo fotoaparáte. (→28)
[Insert SD card again] (Znovu vložte SD kartu)
[Try another card] (Skúste použiť inú kartu)
● Nedá sa pristupovať k údajom na pamäťovej karte.
→ Kartu znova vložte do fotoaparátu.
● Vložte inú pamäťovú kartu.
- 65 -
Page 66

Zobrazované hlásenia
[Memory Card Error] (Chyba pamäťovej karty)
[Memory card parameter error] (Chyba parametra pamäťovej karty)
● Pravdepodobne nejde o pamäťovú kartu typu SD.
● Ak chcete použiť pamäťovú kartu s kapacitou 4 GB alebo vyššou, môžete použiť len pamäťovú
kartu SDHC alebo SDXC.
[Read Error] (Chyba pri čítaní údajov)/[Write Error] (Chyba pri zapisovaní údajov)
[Please check the card] (Skontrolujte, prosím, kartu)
● Chyba pri čítaní údajov.
→ Skontrolujte, či ste kartu vložili správne (→10).
● Chyba pri zapisovaní údajov.
→ Vypnite fotoaparát a vyberte pamäťovú kartu. Kartu znovu vložte do fotoaparátu, zapnite
fotoaparát a pokúste sa údaje znovu prečítať alebo zapísať.
● Pamäťová karta je možno poškodená.
● Vložte inú pamäťovú kartu.
[Motion recording was cancelled due to the limitation of the writing speed of the card
(Snímanie videozáznamu nie je možné v dôsledku nedostatočnej rýchlosti zápisu dát na
pamäťovú kartu)
● Na snímanie videozáznamov použite pamäťové karty SD s rýchlostnou triedou* Class 6 alebo
vyššou.
* Rýchlostná trieda SD znamená rýchlostný štandard pri nepretržitom zápise.
● Ak sa snímanie zastavilo aj pri použití karty s rýchlostnou triedou Class 6 alebo vyššou, znamená
to, že došlo k zhoršeniu rýchlosti zápisu dát. Odporúčame preto zálohovanie dát a naformátovanie
karty. (→28)
● V závislosti od typu použitej pamäťovej karty sa môže stať, že sa snímanie samovoľne zastaví.
[A folder cannot be created] (Nie je možné vytvoriť nový priečinok)
● Bolo už vytvorených 999 priečinkov.
→ Uložte potrebné dáta na pevný disk osobného počítača alebo iné záznamové médium
a pamäťovú kartu naformátujte pomocou funkcie [Format] (Formátovanie) vo fotoaparáte. (→28)
- 66 -
Page 67

Riešenie problémov
Pred navštívením servisu najskôr vyskúšajte odporúčané opatrenia uvedené na stranách (→67 - 72).
Ak problém pretrváva, je možné, že použitím funkcie [Reset] (Obnovenie pôvodných nastavení)
v menu [Setup] (Nastavenia) sa táto záležitosť vyrieši.
(Vezmite však do úvahy, že okrem niekoľkých položiek, ako je napríklad [Clock Set] (Nastavenie
hodín), sa všetky nastavenia vrátia na pôvodné hodnoty ako pri zakúpení fotoaparátu.)
Batéria, napájanie
Napriek tomu, že je batéria úplne nabitá, sa fotoaparát vypne hneď po zapnutí.
Zostávajúca kapacita batérie je nízka aj po vložení nových batérií.
● Batérie sú opotrebované.
● Zostávajúca kapacita batérií nemusí byť v závislosti od ich značky alebo prevádzkovej kapacity
zobrazená presne.
Fotoaparát po zapnutí nefunguje.
● Batérie nie sú vložené správne (→10) alebo potrebujú nabiť.
Fotoaparát sa pri používaní vypína.
● Batérie sú opotrebované.
● Pravdepodobne je aktivovaný režim [Auto power Off] (Automatické vypnutie fotoaparátu). (→26)
→ Fotoaparát znovu zapnite.
Snímanie
Nie je možné nasnímať záber.
● Skontrolujte, či nie je zaplnená kapacita internej pamäte alebo pamäťovej karty. → Vymazaním
nepotrebných snímok uvoľnite dostupnú pamäť (→23).
Nasnímané zábery sú vyblednuté.
● Objektív je znečistený alebo sa na objektíve nachádzajú odtlačky prstov.
→ Povrch objektívu utrite mäkkou suchou handričkou.
● Objektív je zahmlený (→4).
Nasnímané zábery sú príliš jasné alebo príliš tmavé.
● Nastavte expozíciu (→35).
Jedným stlačením spúšte sa súčasne nasnímajú 2 alebo 3 zábery.
● Fotoaparát je nastavený do režimu [Burst] (Sekvenčné snímanie) (→46).
Snímaný objekt nie je správne zaostrený.
● Nie je nastavený režim zodpovedajúci vzdialenosti snímaného objektu. (Rozsah zaostrenia závisí
od nastaveného režimu snímania.)
● Snímaný objekt sa pravdepodobne nachádza mimo rozsahu zaostrenia.
● Pri snímaní sa pravdepodobne triasol fotoaparát alebo sa hýbal objekt (→47).
Nasnímané zábery sú rozmazané. Funkcia optickej stabilizácie obrazu je neúčinná.
● Pri fotografovaní v tmavých priestoroch sa nastaví dlhší expozičný čas a optická stabilizácia obrazu
nemusí byť dostatočne účinná.
→ Fotoaparát držte pevne oboma rukami, ramená držte tesne pri tele.
→ Funkciu [Digital Zoom] (Digitálny zoom) nastavte na [OFF] (Vyp.) a [Sensitivity] (Citlivosť ISO) na
[AUTO] (Automaticky). (→43, 46)
- 67 -
Page 68

Riešenie problémov
Snímanie (pokračovanie)
Snímky sú zrnité alebo je na nich zreteľný šum.
● Zábery boli pravdepodobne nasnímané pri vysokej citlivosti ISO alebo pri dlhom expozičnom čase.
(Predvoleným nastavením funkcie [Sensitivity] (Citlivosť ISO) je [AUTO] (Automaticky) – preto sa na
snímkach nasnímaných vo vnútri môže objaviť šum.)
→ Znížte nastavenie [Sensitivity] (Citlivosť ISO) (→43).
→ Snímajte na lepšie osvetlených miestach.
● Pravdepodobne je aktivovaný režim [High Sens.] (Vysoká citlivosť).
(Zrnitosť snímok sa v dôsledku vysokej citlivosti môže mierne zvýšiť.)
Jas alebo farebný tón zaznamenanej snímky sú iné ako v skutočnosti.
● Pri snímaní pri žiarivkovom osvetlení alebo LED svietidlách atď. môže skrátenie expozičného času
viesť k zmene jasu a farieb záberu. Ide však o charakteristický jav pre tento druh osvetlenia. Nie je
to porucha.
Pri snímaní alebo stlačení spúšte do polovice sa na LCD monitore môže
zobraziť červený pruh alebo celá obrazovka môže mať červenkastý
nádych.
● Je to jav typický pre CCD snímače, a vyskytuje sa vtedy, keď snímaný
objekt obsahuje svetlé plochy. Okolo týchto oblastí sa môže objaviť aj
mierne rozostrenie obrazu, nejde však o poruchu. K tomuto javu dochádza
na videozáznamoch, nie však na statických záberoch.
● Odporúčame vám, aby ste pri fotografovaní dbali na to, aby ste obrazovku
nevystavovali slnečnému žiareniu ani inému zdroju silného svetla.
Snímanie videozáznamu sa samovoľne zastavilo.
● Pri snímaní na niektoré pamäťové karty sa môže stať, že sa na chvíľu zobrazí indikátor prístupu na
pamäťové médium a snímanie sa samovoľne zastaví.
● Na snímanie videozáznamov použite pamäťové karty SD s rýchlostnou triedou* Class 6 alebo
vyššou.
* Rýchlostná trieda SD znamená rýchlostný štandard pri nepretržitom zápise.
● Ak sa snímanie zastavilo aj pri použití karty s rýchlostnou triedou Class 6 alebo vyššou, znamená
to, že došlo k zhoršeniu rýchlosti zápisu dát. Odporúčame preto zálohovanie dát a naformátovanie
karty. (→28)
Hlasitosť zvukovej signalizácie je nízka.
● Reproduktor je zakrytý.
- 68 -
Page 69

Riešenie problémov
focus)
Press fully
(press the button all
the way to record)
LCD monitor
Keď je fotoaparát zapnutý, LCD monitor sa niekedy automaticky vypína.
● Po snímaní sa LCD monitor vypne až dovtedy, kým nie je možné opäť snímať.
Jas na LCD monitore sa na chvíľu znížil alebo zvýšil.
● Pri polovičnom stlačení spúšte fotoaparát nastavuje clonu.
(Nasnímaný záber to neovplyvní.)
Obraz na LCD monitore pri používaní fotoaparátu vo vnútri bliká.
● Ak pri použití žiarivkového alebo LED osvetlenia LCD monitor pri snímaní bliká, prostredníctvom
položky [Light Freq.] (Frekvencia osvetlenia) v menu [Setup] (Nastavenia) nastavte frekvenciu
elektrickej siete v danej oblasti. (→26)
Na LCD monitore sa zobrazujú čierne, červené, modré a zelené body alebo šum. Pri dotyku
LCD monitora dochádza ku skreleniu obrazu.
● Nie je potrebné sa znepokojovať, pretože nejde o poruchu. Tieto javy neovplyvnia výsledné snímky.
Nezobrazuje sa dátum alebo vek.
● Aktuálny dátum a vek sa zobrazia na 5 sekúnd, keď zapnete fotoaparát, prepnete z režimu
prehliadania do režimu snímania alebo keď prepnete do režimu snímania scén [Baby] (Dieťa).
Blesk
Blesk sa neaktivuje.
● Je nastavený režim blesku [Forced Flash Off] (Trvalé vyradenie blesku)
● Blesk sa deaktivuje, ak používate režim [Burst] (Sekvenčné snímanie) alebo ak používate
nasledujúce režimy snímania scén. [Scenery] (Krajina), [Panorama Assist] (Panoráma
s asistenciou), [Night Scenery] (Nočná krajina), [Sunset] (Západ slnka), [Fireworks] (Ohňostroj)
(→32).
Prehliadanie
Snímky sa pri prehliadaní nezobrazia.
● Stlačte tlačidlo prehliadania
● V internej pamäti ani na karte sa nenachádzajú žiadne zábery (zábery sa zobrazia z karty, ak je
vložená, alebo z internej pamäte, ak karta nie je vložená).
● Fotoaparát je prepnutý do režimu [Category Selection] (Výber podľa kategórie).
→ Zvoľte režim prehliadania [Normal Play] (Normálne prehliadanie) (→49).
Namiesto čísla priečinka a čísla súboru sa zobrazí indikátor [-]. Obraz na LCD monitore ostane
čierny.
● Je možné, že zábery boli upravené v počítači alebo nasnímané prostredníctvom digitálneho
fotoaparátu inej značky.
● Táto situácia môže vzniknúť aj vtedy, keď ihneď po nasnímaní záberu vyberiete batérie alebo keď
sa pri snímaní záberov vybije batéria.
→ Na vymazanie takýchto snímok použite funkciu [Format] (Formátovanie) (→28).
- 69 -
Page 70

Riešenie problémov
Q&A Troubleshooting
Q&A Troubleshooting
Q&A Troubleshooting
Q&A Troubleshooting
Q&A Troubleshooting
Q&A Troubleshooting
Prehliadanie (pokračovanie)
Hlasitosť pri prehliadaní a hlasitosť zvukovej signalizácie je nízka.
● Reproduktor je zakrytý.
Na zaznamenanej snímke sú biele okrúhle miesta, pripomínajúce mydlové
bubliny.
● Ak fotografujete s bleskom v tmavom prostredí alebo vo vnútri, na snímkach sa
môžu objaviť okrúhle biele body, ktoré sú spôsobené odrazom svetla blesku od
prachových častíc nachádzajúcich sa vo vzduchu. Nejde o poruchu. Typickým
znakom tohto javu je rôzny počet a poloha okrúhlych bodov na každej snímke.
Zobrazí sa hlásenie [Thumbnail is displayed] (Zobrazený miniatúrny náhľad).
● Pravdepodobne ide o snímky nasnímané iným zariadením. V takom prípade sa snímky môžu
zobraziť v zníženej kvalite.
Červené oblasti zaznamenanej snímky sa zobrazili čierne.
● Ak objekty na snímke, nasnímané s funkciou digitálneho odstránenia červených očí (
), obsahujú vzory, kde sú červené oblasti obklopené farbami blízkymi farbe pleti, môže funkcia
digitálneho odstránenia červených očí spôsobiť, že tieto červené oblasti sa začiernia.
→ Odporúča sa fotografovať s režimom blesku nastaveným na
[Red-Eye Removal] (Odstránenie efektu červených očí) nastaviť pred snímaním na [OFF] (Vyp.).
Zvuk nasnímaných videozáznamov sa niekedy preruší.
● Počas snímania videozáznamu fotoaparát automaticky nastavuje clonu. Vtedy môže dôjsť
k prerušeniu zvuku. Nejde o poruchu.
Videozáznamy nasnímané týmto fotoaparátom nie je možné prehrať na iných zariadeniach.
● Videozáznamy (vo formáte Motion JPEG) nasnímané týmto fotoaparátom sa nemusia dať prehrať
digitálnymi fotoaparátmi iných značiek. Videozáznamy zaznamenané týmto fotoaparátom nie je
okrem toho možné prehrávať na digitálnych fotoaparátoch Panasonic LUMIX predávaných pred
júlom 2008. (Videozáznamy zaznamenané digitálnymi fotoaparátmi Panasonic LUMIX predávanými
pred týmto dátumom je však možné prehrávať na tomto fotoaparáte.)
,
alebo
,
,
, alebo funkciu
- 70 -
Page 71

Riešenie problémov
Using the [Rec] menu
[Picture Size]
Recording pixel level type
14 M 4320×3240
10 M
*
3648×2736
5 M
2560×1920
3 M
*
2048×1536
0.3 M
640×480
12.5 M 4320×2880
10.5 M 4320×2432
Počítač, tlačiareň
Snímky sa nedajú preniesť do osobného počítača.
● Fotoaparát nie je správne pripojený k počítaču (→56).
● Skontrolujte, či počítač rozpoznal fotoaparát.
● Pred pripojením fotoaparátu k počítaču vyberte nastavenie [PC]. (→56)
Počítač nerozpoznal pamäťovú kartu (rozpoznal iba internú pamäť).
● Odpojte USB kábel. Do fotoaparátu vložte pamäťovú kartu a USB kábel znova pripojte.
Počítač nerozpoznal pamäťovú kartu.
(Používate pamäťovú kartu SDXC.)
● Skontrolujte, či váš počítač podporuje pamäťové karty SDXC.
http://panasonic.net/avc/sdcard/information/SDXC.html
● Po vložení karty sa zobrazí výzva na formátovanie karty, avšak formátovanie karty nespúšťajte.
● Ak na LCD monitore zostáva zobrazený indikátor prístupu [Access] (Prebieha posielanie dát),
vypnite fotoaparát a odpojte USB kábel.
Snímky sa po pripojení fotoaparátu k tlačiarni nedajú vytlačiť.
● Použitá tlačiareň pravdepodobne nepodporuje štandard PictBridge.
● Funkciu [USB Mode] (Režim komunikácie cez USB rozhranie) nastavte na možnosť [PictBridge
(PTP)]. (→59)
Dátum sa nedá vytlačiť.
● Pred tlačou vykonajte nastavenie tlače dátumu.
→ Prostredníctvom dodaného softvéru: Zvoľte nastavenie tlače „with dates“ (s dátumami).
● Pri snímaní použite funkciu [Date Stamp] (Dátumová pečiatka). (→48)
Okraje vytlačených snímok sú orezané.
● Ak používate tlačiareň s funkciou orezania snímky alebo s funkciou tlače bez okrajov, túto funkciu
pred tlačou vypnite.
(Podrobnejšie informácie si prečítajte v návode na obsluhu tlačiarne.)
● Snímky boli zaznamenané so zobrazovacím pomerom
→ Vo fotograckom štúdiu sa informujte, či je možná tlač vo formáte 16:9.
.
- 71 -
Page 72

Riešenie problémov
Ďalšie situácie
Položky v menu sa nezobrazujú v požadovanom jazyku.
● Zmeňte nastavenie položky [Language] (Jazyk) (→28).
Fotoaparát sa zahrieva.
● Povrch fotoaparátu sa počas používania môže zahriať. Nemá to však vplyv na fungovanie alebo
kvalitu fotoaparátu.
V objektíve sa ozýva cvaknutie.
● Ak sa mení jas záberu, v objektíve sa môže ozvať cvaknutie a obraz na monitore sa môže
v dôsledku nastavovania clony výrazne zmeniť.
(Výsledné snímky to však neovplyvní.)
Fotoparát zobrazuje nesprávny čas.
● Fotoaparát ste pravdepodobne dlhší čas nepoužívali.
Znova nastavte hodiny (→14).
Keď sa snímky snímajú s použitím zoomu, sú mierne skreslené a okolo snímaného objektu sa
nachádzajú farby, ktoré sa v skutočnej scéne nevyskytujú.
● V závislosti od veľkosti zoomu môžu byť nasnímané zábery mierne skreslené a okolo snímaných
objektov alebo na rôznych miestach záberu môže dôjsť k farebnému posunu. Nejde však
o poruchu.
Čísla súborov sa nezaznamenávajú postupne.
● Po vytvorení nového priečinka sa súbory začnú číslovať od nuly (→57).
Čísla súborov nie sú zaznamenané v stúpajúcom poradí.
● Pravdepodobne ste vybrali/vložili batériu zo/do zapnutého fotoaparátu.
(Ak sa správne nezaznamenajú čísla priečinkov/súborov, číslovanie sa môže vrátiť o niekoľko
snímok späť.)
- 72 -
Page 73

Upozornenia týkajúce sa používania fotoaparátu
Keď sa fotoaparát používa
● Po dlhšom používaní sa fotoaparát môže zahriať. Nejde však o poruchu.
● Zabezpečte dostatočný odstup fotoaparátu od zariadení vysielajúcich elektromagnetické
žiarenie (ako je napríklad mikrovlnná rúra, TV prijímač, herné zariadenia atď.).
• Ak fotoaparát používate v blízkosti TV prijímača, alebo na TV prijímači, jeho elektromagnetické
žiarenie môže rušiť zaznamenávaný obraz a zvuk.
• Fotoaparát nepoužívajte v blízkosti mobilných telefónov. Mohlo by to nepriaznivo ovplyvniť
zaznamenávaný obraz a zvuk.
• Fotoaparát nepoužívajte v blízkosti reproduktorov alebo silných motorov, ktorých silné magnetické
polia by mohli poškodiť zaznamenávané údaje a skresľovať zábery.
• Elektromagnetické žiarenie generované mikroprocesormi nepriaznivo ovplyvňuje činnosť
fotoaparátu a spôsobuje skreslenie obrazu a zvuku.
• Ak je činnosť fotoaparátu nepriaznivo ovplyvnená magnetickým poľom iného zariadenia
a fotoaparát prestane správne fungovať, vypnite ho a vyberte batériu. Batériu následne opäť
vložte a fotoaparát zapnite.
Fotoaparát nepoužívajte v blízkosti rozhlasových vysielačov a vedení s vysokým napätím.
• Snímanie záberov v blízkosti rozhlasových vysielačov alebo vedenia s vysokým napätím môže
mať negatívny vplyv na kvalitu snímok a zaznamenaného zvuku.
● Dodané káble nepredlžujte (nenadpájajte).
● Na fotoaparát nestriekajte prostriedky proti hmyzu ani iné prchavé látky (kryt fotoaparátu sa môže
poškodiť a povrchová úprava sa môže začať olupovať).
● V lete fotoaparát a batérie nikdy nenechávajte v automobile alebo na kapote. Mohlo by dôjsť
k unikaniu elektrolytu z batérie alebo zahrievaniu, a v dôsledku vysokej teploty k požiaru alebo
vybuchnutiu batérie.
Starostlivosť o fotoaparát
Z fotoaparátu pred čistením vyberte batérie a utrite ho mäkkou a suchou handričkou.
● Odolné nečistoty odstráňte navlhčenou handričkou a povrch fotoaparátu nakoniec utrite suchou
handričkou.
● Na čistenie fotoaparátu nepoužívajte benzén, riedidlá, lieh ani saponáty. Mohli by spôsobiť
poškodenie krytu fotoaparátu a olupovanie povrchovej úpravy.
● Skôr ako použijete chemicky napustenú handričku, dôkladne si prečítajte informácie uvedené na jej
obale.
Keď sa fotoaparát určitý čas nepoužíva
● Pred vytiahnutím batérií a pamäťovej karty fotoaparát vypnite.
● Zabezpečte, aby sa fotoaparát nedotýkal obalu z gumy alebo plastu.
● Ak ho chcete odložiť do zásuvky a pod., priložte k nemu prípravok na zníženie vlhkosti (silica gél).
- 73 -
Page 74

Upozornenia týkajúce sa používania fotoaparátu
Pamäťové karty
● Aby nedošlo k poškodeniu karty a údajov, dodržiavajte nasledujúce pokyny.
• Pamäťovú kartu nevystavujte vysokým teplotám, priamemu slnečnému svetlu,
elektromagnetickému žiareniu a statickej elektrine.
• Pamäťovú kartu neohýbajte, nevystavujte otrasom a dávajte pozor, aby vám nespadla.
• Nedotýkajte sa kontaktov na zadnej strane pamäťovej karty a dbajte na to, aby sa nedostali do
styku s nečistotami, prachom a vodou.
● Likvidácia pamäťovej karty alebo zmena vlastníctva.
• Formátovaním alebo vymazaním prostredníctvom fotoaparátu alebo osobného počítača sa zmení
iba informácia o správe súborov, ale dáta na pamäťovej karte sa úplne nevymažú. Ak chcete
pamäťovú kartu zahodiť alebo odovzdať inej osobe, odporúčame vám fyzicky zničiť samotnú
kartu, alebo uložené dáta úplne odstrániť pomocou komerčne dostupného softvéru na mazanie
dát. S dátami uloženými na pamäťovej karte zaobchádzajte zodpovedne.
LCD monitor
● Na LCD monitor silno netlačte. Mohli by ste spôsobiť nerovnomerné rozloženie farieb alebo
poškodenie monitora.
● LCD monitor nedrhnite a netlačte naň.
● V chladnom prostredí alebo v iných situáciách, keď je fotoaparát chladný, môže LCD monitor
bezprostredne po zapnutí fotoaparátu reagovať pomalšie ako zvyčajne. Keď sa vnútorná teplota
fotoaparátu zvýši, obnoví sa normálny jas LCD monitora.
Batérie
● Ak neplánujete fotoaparát dlhší čas používať, vyberte z neho batérie.
• Ak batérie vo fotoaparáte ponecháte, bude ním pretekať slabý elektrický prúd aj vo vypnutom
stave, a batérie sa budú pomaly vybíjať.
• Pri príliš vysokej alebo nízkej teplote, alebo pri vysokej vlhkosti, môžu konektory skorodovať
a spôsobiť poruchu.
• Batérie skladujte na chladnom mieste (15 °C až 25 °C) s nízkou vlhkosťou (40% RV až 60% RV),
kde nedochádza k prudkým zmenám teplôt.
• Batérie chráňte pre batoľatami a deťmi.
● Batérie nehádžte, nevystavuje pádom a silným nárazom.
• Ak batéria náhodou spadne, skontrolujte, či sa nepoškodili jej kontakty.
• Nepoužívajte batérie, ktoré vykazujú znaky vytečenia, deformácie, odfarbenia a pod. Ak batérie
vytečú, vytiahnite ich z fotoaparátu, priestor na batérie dôkladne vyutierajte a vložte nové batérie
alebo plne nabité Ni-MH batérie.
● Používajte vždy suché a čisté batérie.
• Batérie neponárajte do pitnej alebo morskej vody a dávajte pozor, aby sa ich kontakty nedostali do
kontaktu s vodou.
• Ak sa na póloch batérií nachádzajú cudzie látky, ako je napríklad mastnota alebo nečistoty,
dĺžka prehliadania alebo snímania sa môže výrazne skrátiť. Pred vložením batérií do fotoaparátu
vyčistite ich póly mäkkou suchou handričkou.
- 74 -
Page 75

Upozornenia týkajúce sa používania fotoaparátu
● Obal batérií neolupujte a neškrabte.
• Nepoužívajte komerčne dostupné batérie, ktoré sú úplne alebo čiastočne odokryté. Nepoužívajte
batérie s plochými pólmi . Pri používaní takýchto batérií môže dôjsť k vytečeniu, prehrievaniu
alebo k explózii.
● Ak sa chystáte používať fotoaparát vonku, vezmite si so sebou náhradné nabité batérie.
• Pri fotografovaní v chladnom počasí, napríklad na lyžiarskom svahu, sa záznamový čas skracuje.
Pri nízkej okolitej teplote (10 °C alebo menej) sa výkon batérie znižuje a dĺžka prehliadania
alebo snímania sa môže výrazne skrátiť. Hlavne pri používaní alkalických batérií ich pred
použitím zohrejte vo vrecku a pod. Vreckové ohrievače alebo kovové predmety, ako sú napríklad
zapaľovače, nesmú prísť do kontaktu s batériami, ktoré zohrievate napr. vo vrecku a pod.
Po obnovení normálnej teploty sa obnoví aj pôvodný výkon batérie.
• Výkon batérie sa môže výrazne líšiť v závislosti od značky použitej batérie, doby skladovania od
dátumu výroby a podmienok skladovania.
• V závislosti od teploty a podmienok používania nemusí fotoaparát fungovať správne alebo batérie
sa môžu vybiť (zostávajúca úroveň batérií nemusí byť indikovaná správne). Nejde o poruchu.
• Ak nebudete opotrebované batérie určitú dobu používať, môžu dočasne obnoviť časť svojej
kapacity. Nedajú sa však používať dlhodobo. Nahraďte ich novými batériami.
Nabíjateľné batérie Ni-MH
● V tomto fotoaparáte môžete používať Ni-MH batérie nabité vhodnou nabíjačkou. Nesprávne
zaobchádzanie s batériami však môže spôsobiť ich vytečenie, prehrievanie, požiar alebo explóziu.
Dodržujte nasledujúce pokyny.
• Batérie sa nemusia dať normálne nabiť, ak sú ich póly znečistené. Póly batérií a nabíjačky
dôkladne vyčistite mäkkou suchou handričkou.
• Obal Ni-MH batérií neolupujte a neškrabte.
• Batérie, ktoré sú použité po prvý raz, alebo ktoré sa dlhší čas nepoužívali, sa nemusia dať úplne
nabiť. Je to spôsobené charakterom Ni-MH batérií a nejde o poruchu. Po niekoľkých nabíjacích
cykloch sa výkon batérií vráti do normálu.
• Batérie odporúčame nabíjať až po ich úplnom vybití. Ak budete batérie nabíjať pred ich úplným
vybitím, ich výkon sa môže znížiť. (Nazýva sa to „pamäťový efekt.“)
Ak dôjde k „pamäťovému efektu“, používajte batérie dovtedy, pokiaľ fotoaparát neprestane
fungovať, a následne ich plne nabite. Po niekoľkých nabíjacích cykloch sa výkon batérií obnoví.
• Po úplnom nabití Ni-MH batérií ich prestaňte nabíjať.
• Ni-MH batérie sa časom samovoľne vybíjajú a ak ich dlhodobo nepoužívate, ich výkon klesá.
Ak batérie ponecháte v takomto stave vo fotoaparáte, môžu sa vybiť tak, že sa nebudú dať
používať ani po opätovnom nabití.
• Pri dlhodobom skladovaní odporúčame batérie raz za rok nabiť. Po úplnom vybití vyberte batérie
z fotoaparátu a znova ich vložte.
- 75 -
Page 76

Upozornenia týkajúce sa používania fotoaparátu
• Ni-MH batérie majú obmedzenú životnosť. Ich výkon sa počas používania a v priebehu času
postupne znižuje. Ak je i po ich plnom nabití prevádzkový čas fotoaparátu mimoriadne krátky,
batérie pravdepodobne dosiahli koniec svojej životnosti. Zakúpte si nové batérie.
• Prečítajte si návod na použitie nabíjačky batérií.
Likvidácia použitých nabíjateľných batérií
● Oba póly zaizolujte napr. lepiacou páskou.
● Batérie nerozoberajte.
Osobné informácie
Ak v režime [Baby] (Dieťa) nastavíte položku [Age] (Vek), majte na pamäti, že fotoaparát aj snímky
budú obsahovať osobné informácie.
● Prehlásenie
• V dôsledku poruchy, vplyvom statickej elektriny, nehody, nesprávnej funkčnosti, opravy alebo
iných činností môže dôjsť k pozmeneniu alebo strate dát obsahujúcich osobné informácie.
Spoločnosť Panasonic žiadnym spôsobom nezodpovedá za žiadne priame ani nepriame škody,
ktoré vznikli v dôsledku poškodenia alebo straty informácií, resp. osobných informácií.
● Pri odovzdávaní fotoaparátu do servisu, inej osobe alebo likvidácii
• Vykonajte obnovu pôvodných nastavení, a ochráňte tak osobné informácie. (→27)
• Ak máte snímky uložené v internej pamäti, v prípade potreby ich skopírujte na pamäťovú kartu
(→55) a internú pamäť naformátujte (→28).
• Z fotoaparátu vyberte pamäťovú kartu.
• Pri oprave fotoaparátu sa môže obnoviť štandardné nastavenie internej pamäte a jednotlivých
položiek.
• Ak vykonanie uvedených činností nie je možné v dôsledku poruchy fotoaparátu, obráťte sa na
predajcu, u ktorého ste fotoaparát zakúpili, alebo na najbližšie servisné stredisko.
Pri likvidácii pamäťovej karty alebo jej odovzdávaní inej osobe si prečítajte časť „Likvidácia
pamäťovej karty alebo zmena vlastníctva“ v predchádzajúcej časti.
- 76 -
Page 77

Technické údaje
Napájanie Jednosmerné, 3 V Alkalické batérie LR6/AA (2) (priložené)
Príkon Počas snímania: 1,4 W
Počet efektívnych
obrazových bodov
Obrazový snímač 1/2,33-palcový CCD snímač, celkový počet obrazových bodov je
Objektív 5-násobný optický zoom
Stabilizácia obrazu Optická metóda
Digitálny zoom Max. 4-násobný
Optický extrazoom Max. 10,5-násobný
Zaostrovanie Rozpoznávanie tvárí/Zaostrovanie na 9 oblastí/Zaostrovanie na 1 oblasť
Rozsah zaostrenia
Režim bežných
snímok 15 cm až ∞ (širokouhlý záber)/0,6 m až ∞ (teleskopický záber)
Režim snímania
scén Vyššie uvedené hodnoty sa môžu líšiť.
Systém uzávierky Elektronická uzávierka + mechanická uzávierka
Citlivosť ISO AUTO/100/200/400/800/1600
Expozičný čas 8 až 1/2000 s
Vyváženie bielej Automatické vyváženie bielej [AWB]/Denné svetlo/Zamračené/Tieň/
Expozícia (AE) AUTO (naprogramovaná automatická expozícia AE)
Expozimeter Viacbodové meranie
LCD displej 2,7” TFT LCD (4:3) (Pribl. 230 400 bodov)
Blesk Účinný dosah blesku:
Mikrofón Monofónny
Reproduktor Monofónny
Jednosmerné, 2,4 V Nabíjateľné Ni-MH (nikelmetalhydridové) batérie
HR6/AA (2)
Počas prehliadania: 0,8 W
14 100 000
14 500 000
Filter základných farieb
f = 4,7 mm až 23,5 mm
(ekvivalent klasického fotoaparátu s 35 mm lmom: 26 mm až 130 mm)/
F2,8 (Max. W) až F6,5 (Max. T)
(Ak je rozlíšenie snímky nastavené na 3 milióny obrazových bodov [3M]
alebo menej.)
Režim [High Sens.] (Vysoká citlivosť): 1600 – 6400
Žiarovkové osvetlenie/Ručné nastavenie
Kompenzácia expozície (-2 EV až +2 EV, s krokom 1/3 EV)
(zorné pole približne 100 %)
(ISO AUTO) Cca 0,6 m až 4,6 m (Široký)
- 77 -
Page 78

Technické údaje
Záznamové médium Zabudovaná pamäť (cca 10 MB)/Pamäťová karta SD/
Rozlíšenie
Statické zábery Keď je zobrazovací pomer [4:3]
Videozáznamy 1280 × 720 obraz. bodov* / 640 × 480 obraz. bodov* / 320 × 240 obraz. bodov
Formát záznamu
Statické zábery JPEG (Design rule for Camera File system, založené na štandarde Exif 2.3)
Videozáznamy QuickTime Motion JPEG (videozáznamy so zvukom)
Rozhranie
Digitálne USB 2.0 (vysokorýchlostné)
Konektory Digitálny: Samostatný konektor (8 vývodov)
Rozmery Približne 96,5 mm (Š) × 62,0 mm (V) × 27,2 mm (H)
Hmotnosť S pamäťovou kartou a batériou: Cca 172 g
Prevádzková teplota Medzi 0 °C a 40 °C
Prevádzková vlhkosť Medzi 10 % RV a 80 % RV
Pamäťová karta SDHC/Pamäťová karta SDXC
4320 × 3240 obraz. bodov / 3648 × 2736 obraz. bodov /
2560 × 1920 obraz. bodov /
2048 × 1536 obraz. bodov / 640 × 480 obraz. bodov
Keď je zobrazovací pomer [3:2]
4320 × 2880 obrazových bodov
Keď je zobrazovací pomer [16:9]
4320 × 2432 obrazových bodov
30 sn/s
(* Iba pri použití pamäťovej karty SD)
Dáta z počítača nie je možné skopírovať do fotoaparátu prostredníctvom
pripojenia cez USB kábel.
(bez prečnievajúcich častí)
Bez pamäťovej karty a batérie: Cca 125 g
- 78 -
Page 79

• Logo SDXC je ochranná známka spoločnosti SD-3C, LLC.
• SDXC Logo is a trademark of SD-3C, LLC.
• QuickTime and the QuickTime logo are trademarks or registered
trademarks of Apple Inc., used under license therefrom.
• Other names, company names, and product names printed in these
instructions are trademarks or registered trademarks of the companies
• Názov QuickTime a logo QuickTime sú ochranné známky alebo
registrované ochranné známky spoločnosti Apple Inc., používané
v súlade s licenciou.
• Ostatné názvy, názvy výrobcov a označenia produktov uvedené
v tomto návode sú ochranné známky alebo registrované ochranné
známky príslušných vlastníkov.
Page 80

Viac informácií získate na adrese:
Panasonic Marketing Europe GmbH
organizačná zložka Slovenská republika
Štúrova 11
811 01 Bratislava 1
telefón: + 421 2 206 22 211
zákaznícka linka: + 421 2 206 22 911
fax: + 421 2 206 22 311
e-mail: panasonic.bratislava@eu.panasonic.com
aktuálne info na www.panasonic.sk
 Loading...