

Page 1
Panasonic
Digital Camera
Operating Instructions
Model No.
DMC-LC43A
TM
LEICA
DC VARIO-ELMARIT
Before use, please read these
instructions completely.
VQT0E51
Page 2

Dear Customer,
We would like to take this opportunity to
thank you for purchasing this Panasonic
Digital Camera. Please read these
Operating Instructions carefully and
keep them handy for future reference.
Information for
Your Safety
WARNING
TO REDUCE THE RISK OF FIRE
OR SHOCK HAZARD AND
ANNOYING INTERFERENCE, USE
ONLY THE RECOMMENDED
ACCESSORIES AND DO NOT
EXPOSE THIS EQUIPMENT TO
RAIN OR MOISTURE. DO NOT
REMOVE THE COVER (OR BACK);
THERE ARE NO USER
SERVICEABLE PARTS INSIDE.
REFER SERVICING TO QUALIFIED
SERVICE PERSONNEL.
Safety
Carefully observe copyright laws.
Recording of pre-recorded tapes or
discs or other published or
broadcast material for purposes
other than your own private use may
infringe copyright laws. Even for the
purpose of private use, recording of
certain material may be restricted.
• Please note that the actual controls
and components, menu items, etc. of
your Digital Camera may look
somewhat different from those shown
in the illustrations in these Operating
Instructions.
• SD Logo is a trademark.
• Other names, company names, and
product names printed in these
instructions are trademarks or
registered trademarks of the
companies concerned,
IF THE POWER CORD OF THIS
EQUIPMENT IS DAMAGED, IT MUST
BE REPLACED WITH AN
ELECTRICALLY APPROVED POWER
CORD.
Page 3

Contents
Safety
Information for Your Safety...................
Preparation
Standard Accessories
Names of the Components
LCD Monitor Display
Quick Guide..........................................10
Charging the Batteries
Inserting the Batteries.........................12
Inserting the Card
Turning Power on/off............................19
Attaching the Strap
Using the LCD Monitor
Using the Optical Viewfinder
The Shutter Button
(Pressing halfway/Pressing fully)... 22
The Mode Dial
Operating the Menu
Setting the Date/Time (Clock Set)... 25
......................................
Recording images (basic)
Taking Pictures
Taking Pictures in Simple Mode.........28
Checking the Captured Picture
(Review)
Recording Motion Images
Using the Optical Zoom
Using the Digital Zoom
Taking Pictures using the
Built-in Flash
Taking Pictures with the
Self-timer
.............................................
...........................................
...........................
...................
...........................
........................
................................
..............................
........................
..............
.............................
....................................
..................
.....................
.......................
.....................................
8
11
17
20
21
22
23
24
26
31
5
6
29
30
32
33
35
Recording images (advanced)
Taking Pictures with Audio
Changing the Picture Size
Changing the Quality
2
(Data Compression Ratio)
Taking Pictures using
Macro Mode.......................................39
Taking Pictures using
Portrait Mode
Taking Pictures using
Landscape Mode..............................41
Taking Pictures using
Night Portrait Mode...........................42
Using the Color Effect
Taking Pictures using Spot Mode .... 44
Compensating the Exposure
Taking Pictures using Auto
Exposure (AE) Bracket
Using the AF/AE Lock
Adjusting the Color Tone or the
Contrast (Picture Adjustment)
Setting the White Balance
Setting ISO Sensitivity.................
Taking Pictures using Burst Mode ... 52
....................................
.........................
........................
Playback
Playing Back Still Pictures
Playing Back Still Pictures
with Audio
9 Images Multi Playback
Using the Playback Zoom
Playing Back Motion Images
.........................................
Editing
Deleting Images...................................58
Writing the Print Information to
the Card (DPOF Setting)..................61
Protecting Images on the Card
................
..................
..............
.............
....................
........
..................
.......
.................
..................
................
.............
..........
36
37
38
40
43
45
46
47
48
49
51
53
54
55
56
57
64
Page 4

Technical use
Playing Back with Slide Show
(Automatic Playback)
Adding Audio to Recorded Pictures
(Audio Dubbing)................................67
Resizing Recorded Pictures
Trimming Recorded Pictures
Formatting the Card
Adjusting the LCD Monitor
Brightness
Using the Auto Review........................73
Setting up the Operational Sound.... 74
Setting up the Power Save Mode .... 75
Saving the Power Consumption
(Economy mode)...............................76
Resetting the File Number
Initializing the settings
Playing Back Images with
a TV Monitor.......................................79
Connecting to a PC..............................80
USB DIRECT-PRINT.............................81
USB DIRECT-PRINT
(Single Picture)
USB DIRECT-PRINT (DPOF)
Using the AC Adaptor
After Use...............................................85
.........................................
.......................
...............
..............
.............................
..................
........................
.................................
...............
.........................
65
68
69
71
72
77
78
82
83
84
Others
The Menu Items
Cautions for Use
Message Indications ..........................
Troubleshooting..................................93
Specifications......................................94
...................................
.................................
86
88
92
Page 5
preparation
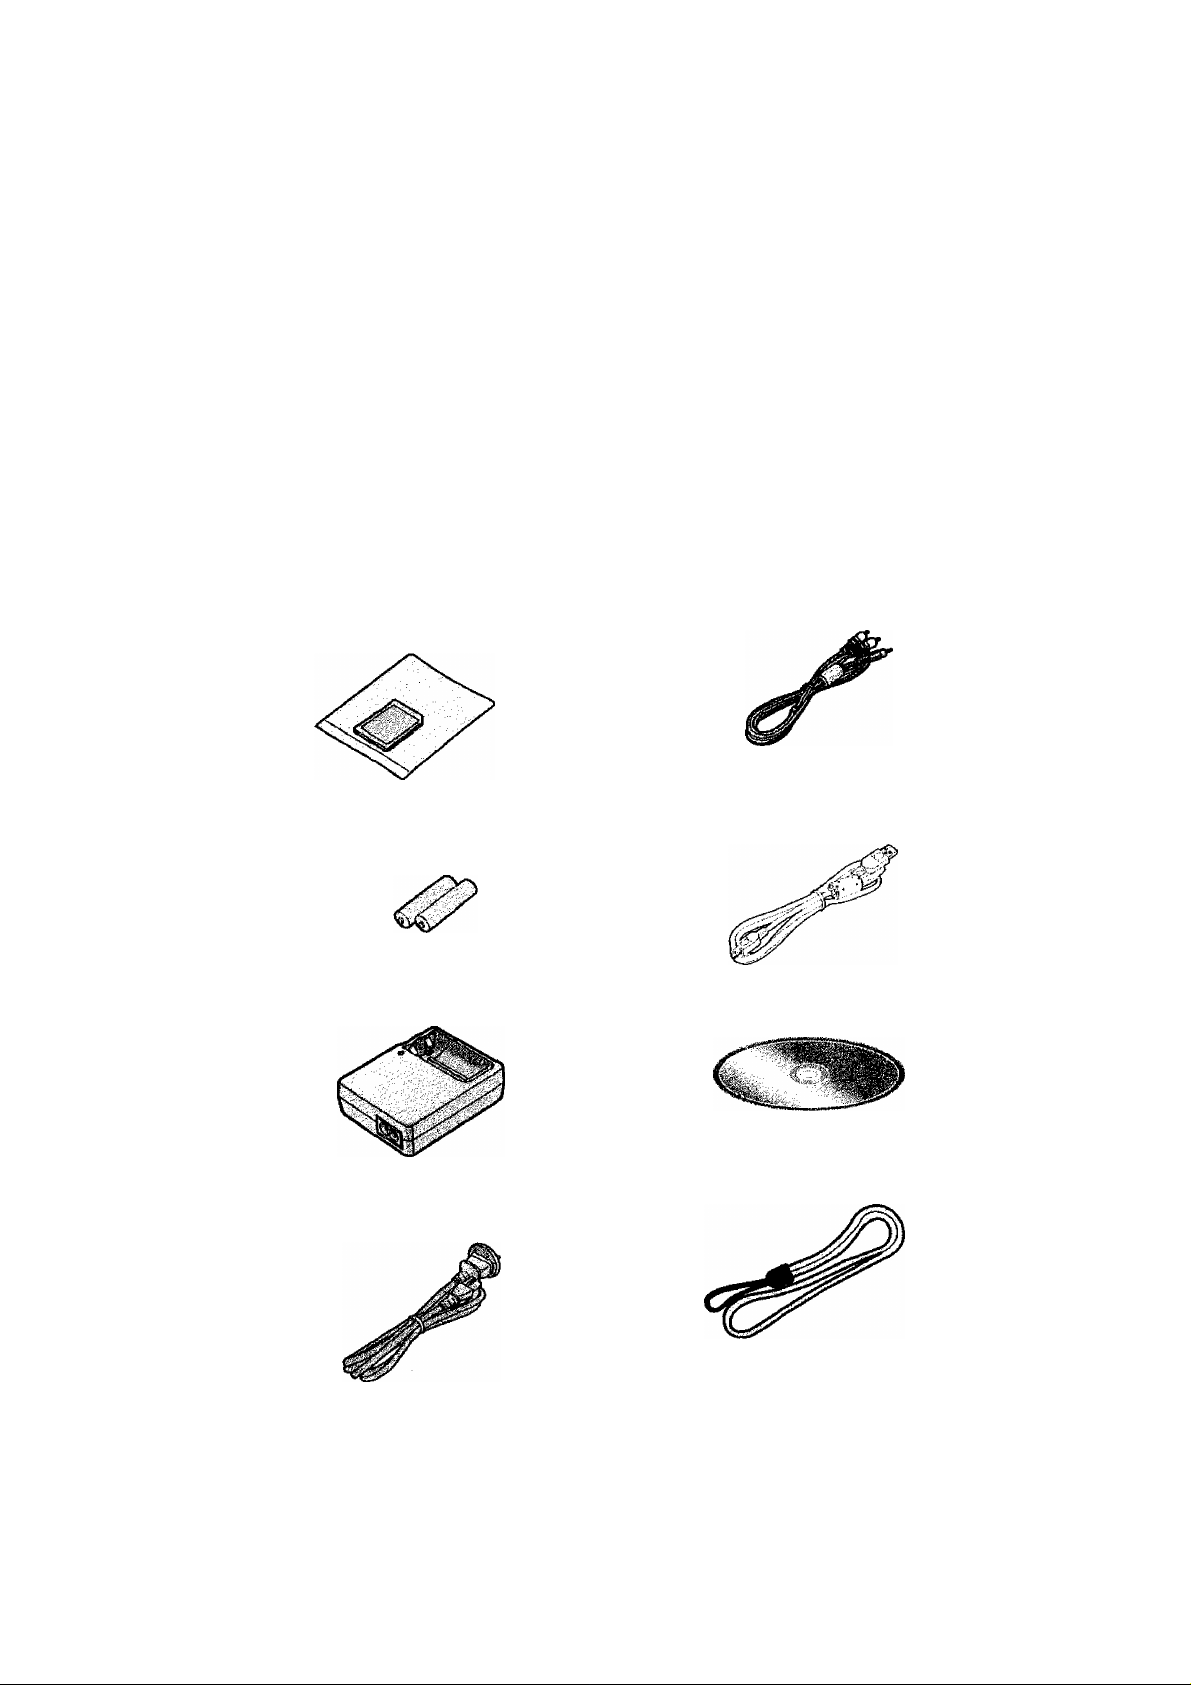
Standard Accessories
Before using your camera, check the contents.
1 SD Memory Card (16 MB)
RP-SD016B
(In the text, it is indicated as “Card”)
2 AA Ni-MH (nickel-metal hydride)
Batteries
3 Battery Charger
DE-894A
4 AC Cable
K2CJ2DA00002
5 AN Cable
K2KD3CB00001
6 USB Connection Cable
K2KZ4CB00005
7 CD-ROM
VFF0184
8 Strap
VFC3994
Page 6
Preparation
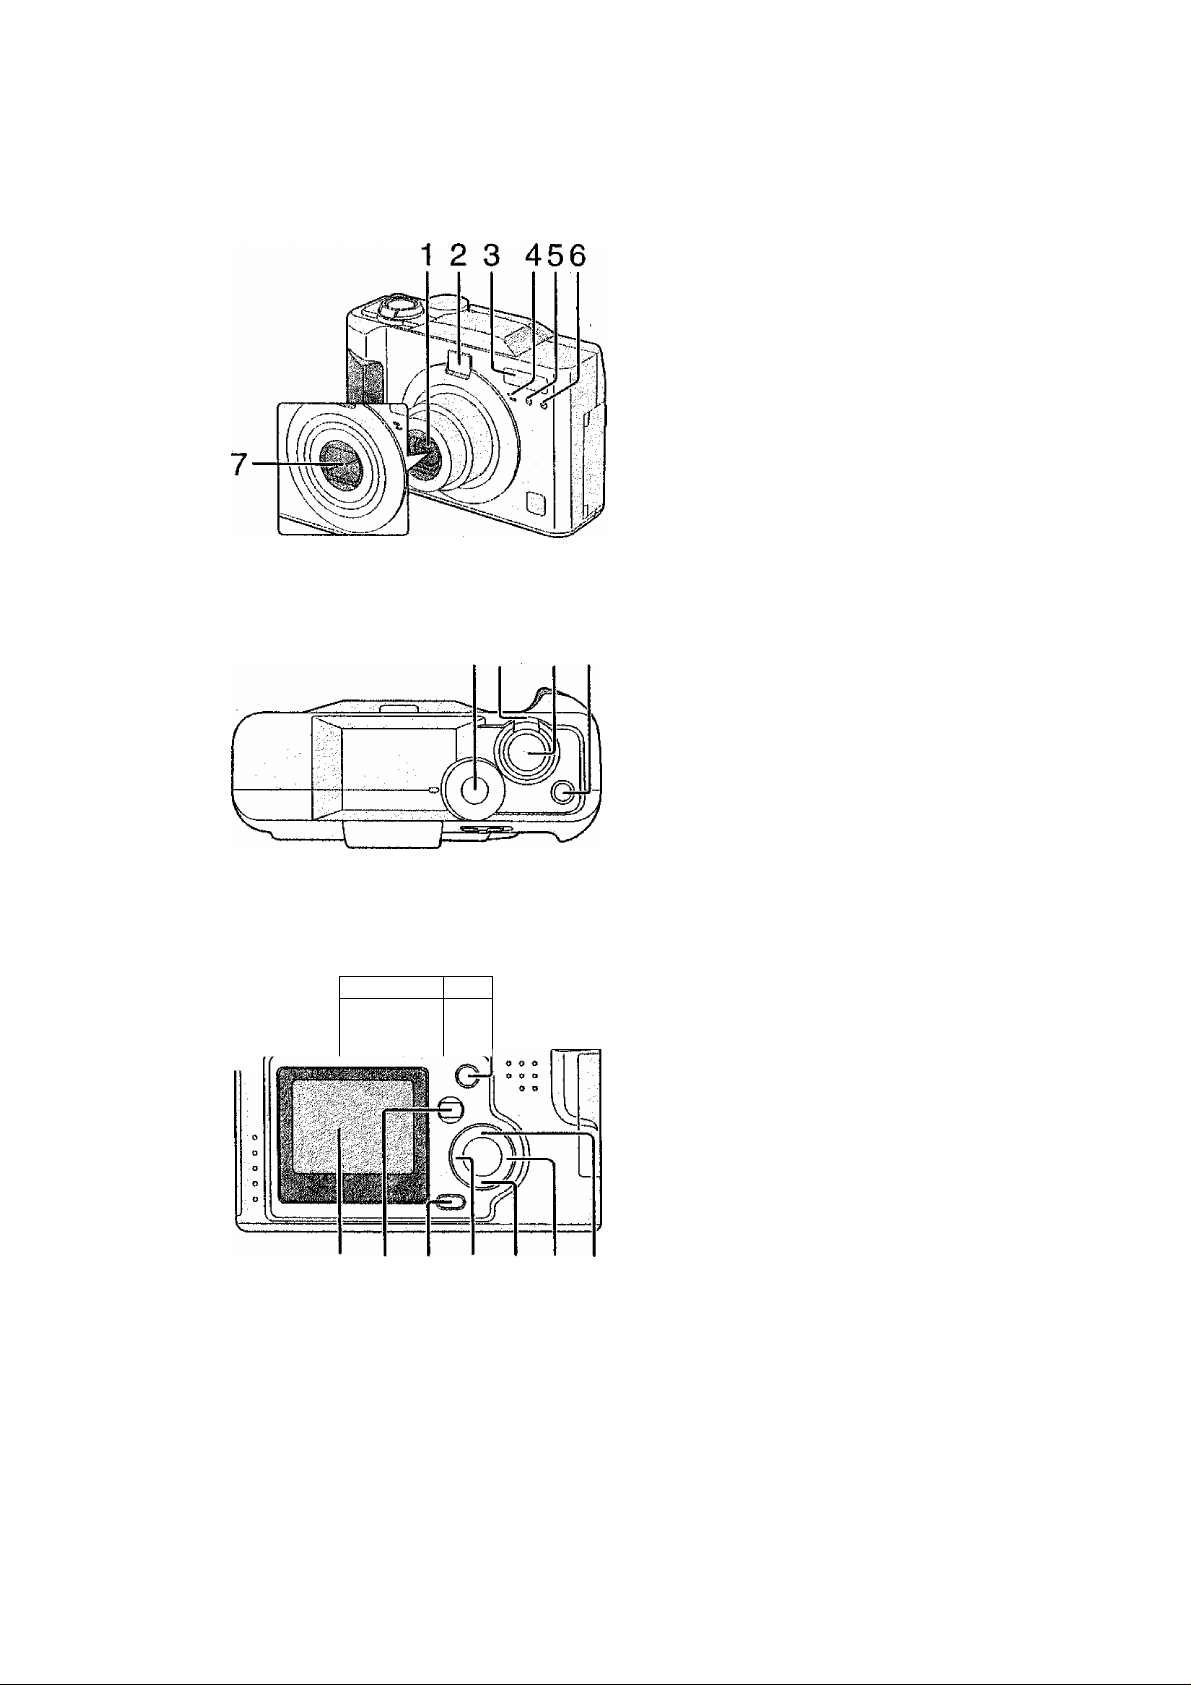
Names of the Components
[Front View]
1 Lens
2 Optica) Finder (P26)
3 Flash
4 Microphone (P30, P36, P67)
5 Flash Sensor (P34)
6 Self-timer Indicator (P35)
7 Lens Cover
[Top View]
8 Mode Dial (P23)
8 9 1011
9 Zoom Lever (P31, P32)
10 Shutter Button (P22)
11 Single/Burst Mode Button
(P52)
12 13 14 15 16
w
iK^lJ
17 18 19 20 2122 23
[Back View]
12 Optical Finder (P26)
13 Status Indicator (PI 9)
14 Flash/Access Indicator (P19)
15 DISPLAY Button (P21)
16 Power Switch (PI 9)
17 LCD Monitor (P8, P26)
18 MENU Button (P24)
19 Delete Button (P29, P58)
20 -^/Self-timer Button (P35)
21 T/REVIEW/SET Button (P29)
22 ►/Flash Mode Button (P33)
23 A/Exposure Compensation
Button (P45)/
Auto Bracket Button (P46)
Page 7
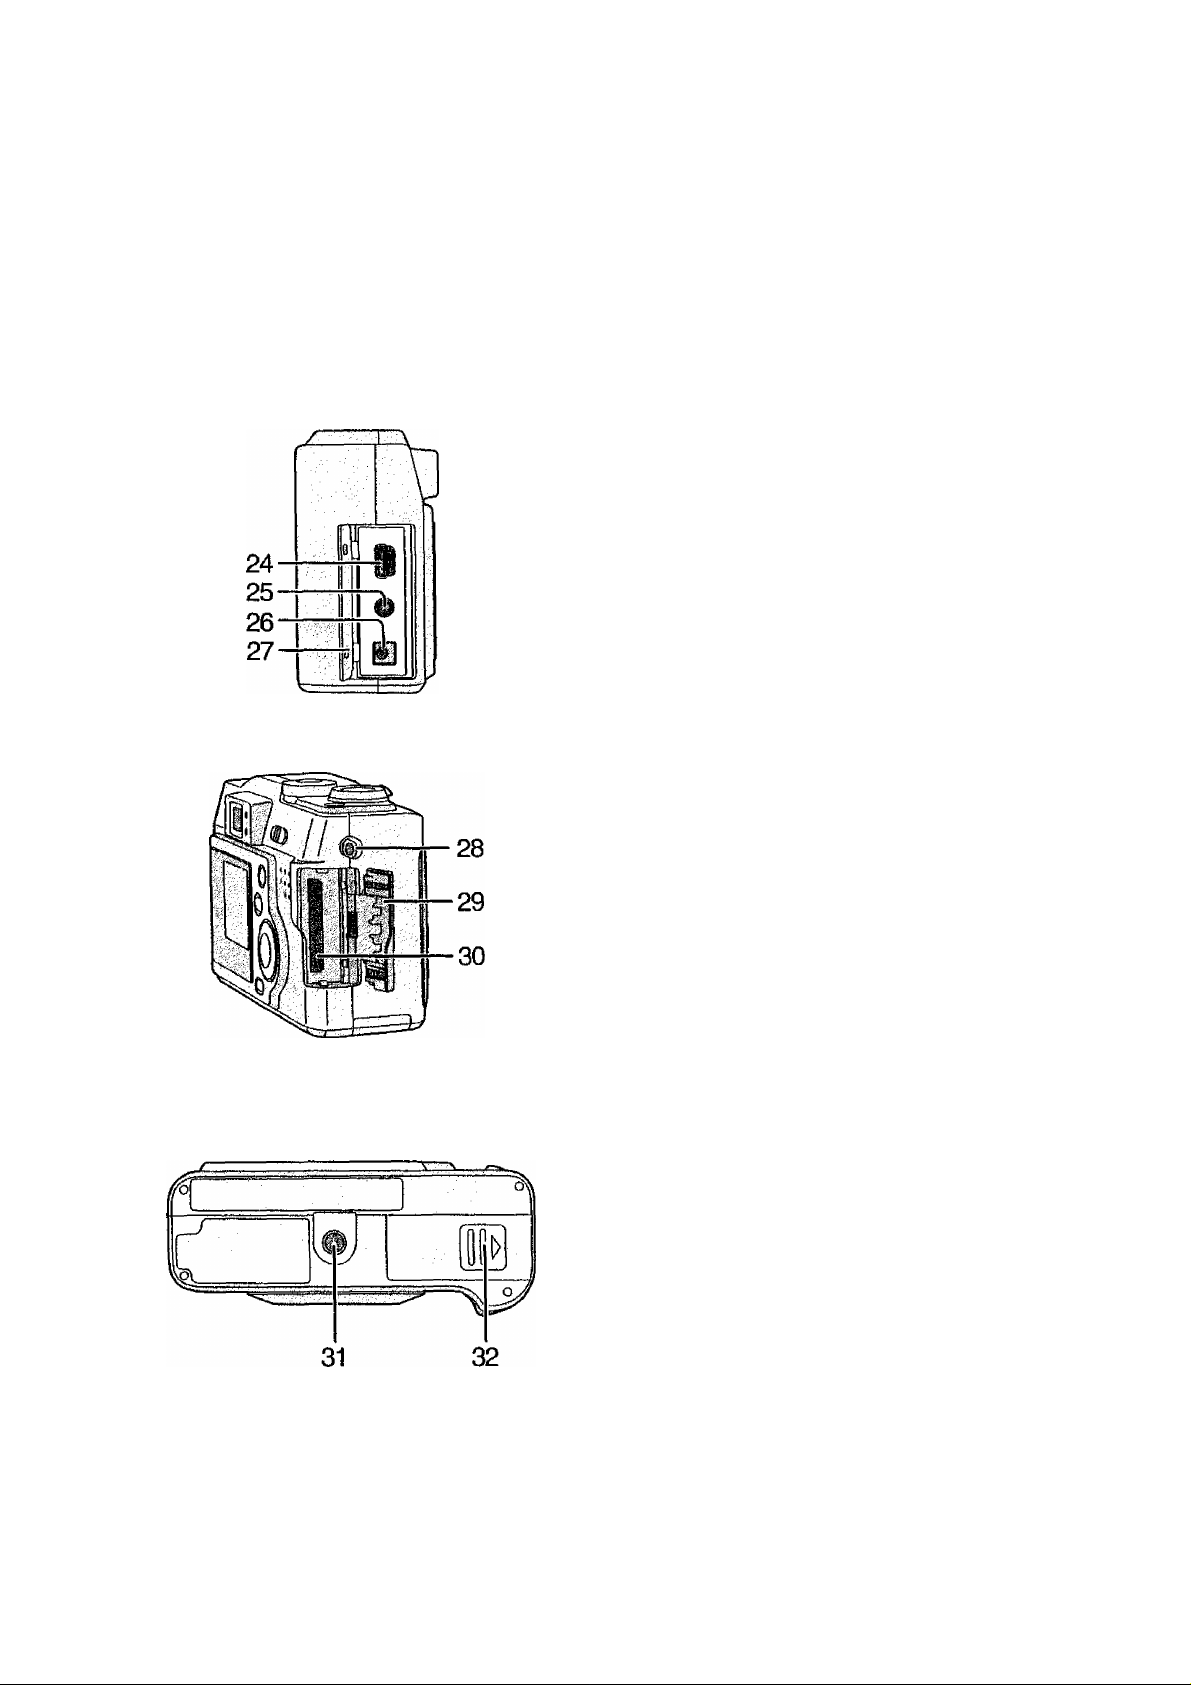
Preparation
[Left View]
24 USB Socket (Spin) (P80)
25 AA/OUT Socket (P79)
26 DC IN Socket (P84)
27 Terminal Door (P84)
[Right View]
28 Strap Eyelet (P20)
29 Memory Card Door (P17)
30 Memory Card Slot (P17)
[Bottom View]
31 Tripod Receptacle
32 Battery Door (PI2)
Page 8

Preparation
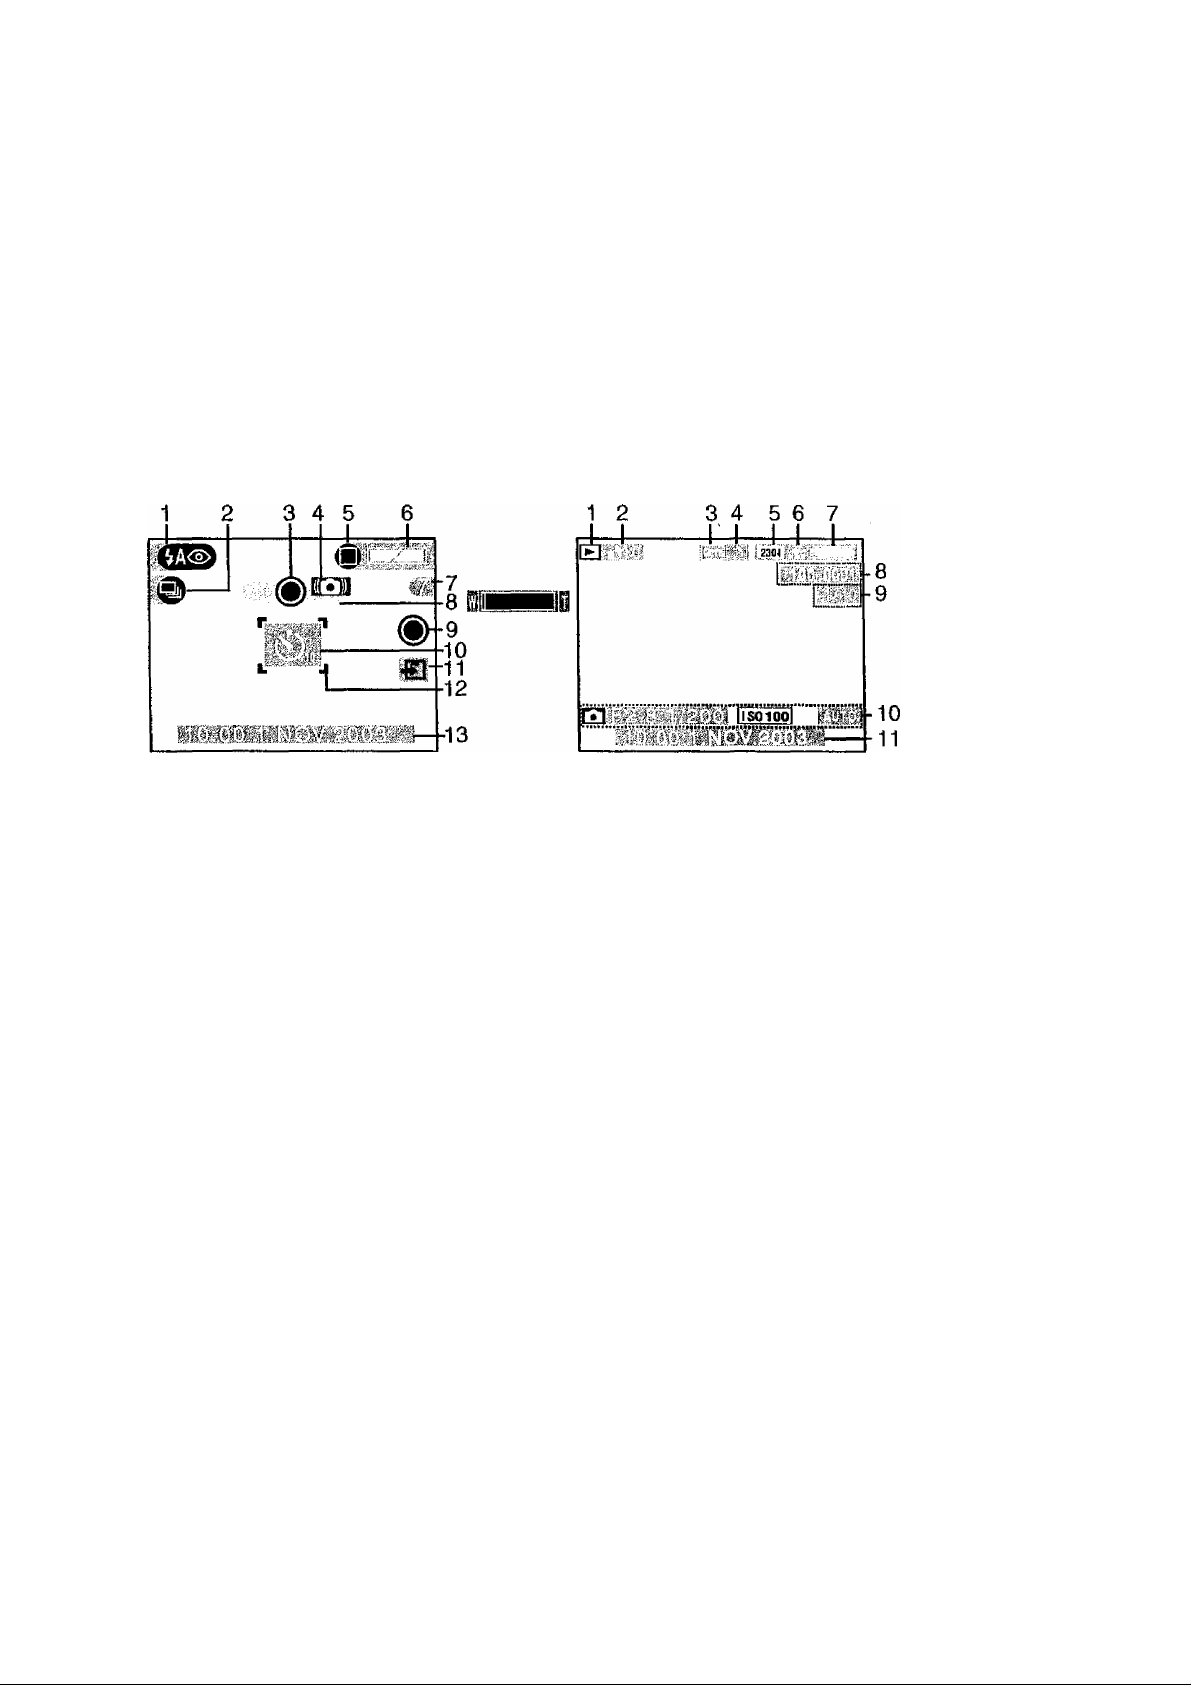
LCD Monitor Display
[In recording]
1 REC mode {P23)
2 Flash mode (P33)
3 White balance (P49)
4 ISO sensitivity (P51)
5 Picture size (P37)
6 Quality (data compression ratio)
(P38)
7 Battery indicator (P15)
8 Frame/Time remain
In motion image mode: XXX S
9 Shutter Jiggle alert (P27)
10 Recording indication
11 Audio REC (P36)
12 Zoom (P31, P32)
(digital zoom ON:
13 Self-timer mode (P35)
19 Current date and time (P25)
• It is displayed for about 5 seconds
after turning on the power or setting
the clock.
20
L j: Spot AF area (P44)
21
“f* ’ Spot metering target (P44)
22
Focus indication (P26)
Burst mode (P52)
23
24
Color Effect mode (P43)
14 Card access indication (PI 8)
15 AFarea(P26)
16 Aperture indicatlon/Shutter speed
indication (P26)
17 Exposure compensation (P45)
18 Auto bracket (P46)
8
Page 9
Preparation
[In recording in Simple mode]
1 Flash mode (P33)
2 Burst mode (P52)
3 Focus indication (P26)
4 Shutter Jiggle alert (P27)
5 Picture mode (P28)
6 Battery indicator (P15)
7 Frame/Time remain
8 Zoom(P31)
9 Recording indication
10 Self-timer mode (P35)
11 Card access indication (PI 8)
12 AFarea(P26)
13 Current date and time (P25)
• It is displayed for about 5 seconds
after turning on the power or setting
the clock.
[In playback]
1 Playback mode
2 DPOF(P61.P65)
Bl(White):
DPOF setting for printing
Bl(Gfeen):
DPOF setting for Slide Show
BJ(Green with DPOF number):
DPOF setting for printing and
Slide Show
3 Protected image (P64)
4 Image with audio (P54, P67)
5 Picture size (P37)
6 Quality (data compression ratio)
(P38)
e : In motion image mode (P30)
In simple mode:
B|: ENLARGE
E); 4"x6710xl5cm
□ : INTERNET
7 Battery indicator (P15)
8 Folder/File number
9 Page/Total images
10 RECdata
It will be displayed when the
[DISPLAY] button is pressed.
11 Recorded date and time
Page 10
Quick Guide
Preparation
©e
Charge the batteries with the supplied
charger when using Ni-MH batteries.
Prepare following items.
• Camera
• Batteries (Ni-MH batteries/Alkaline batteries)
• Card
Check that the power switch is set to [OFF]
and the lens is stored.
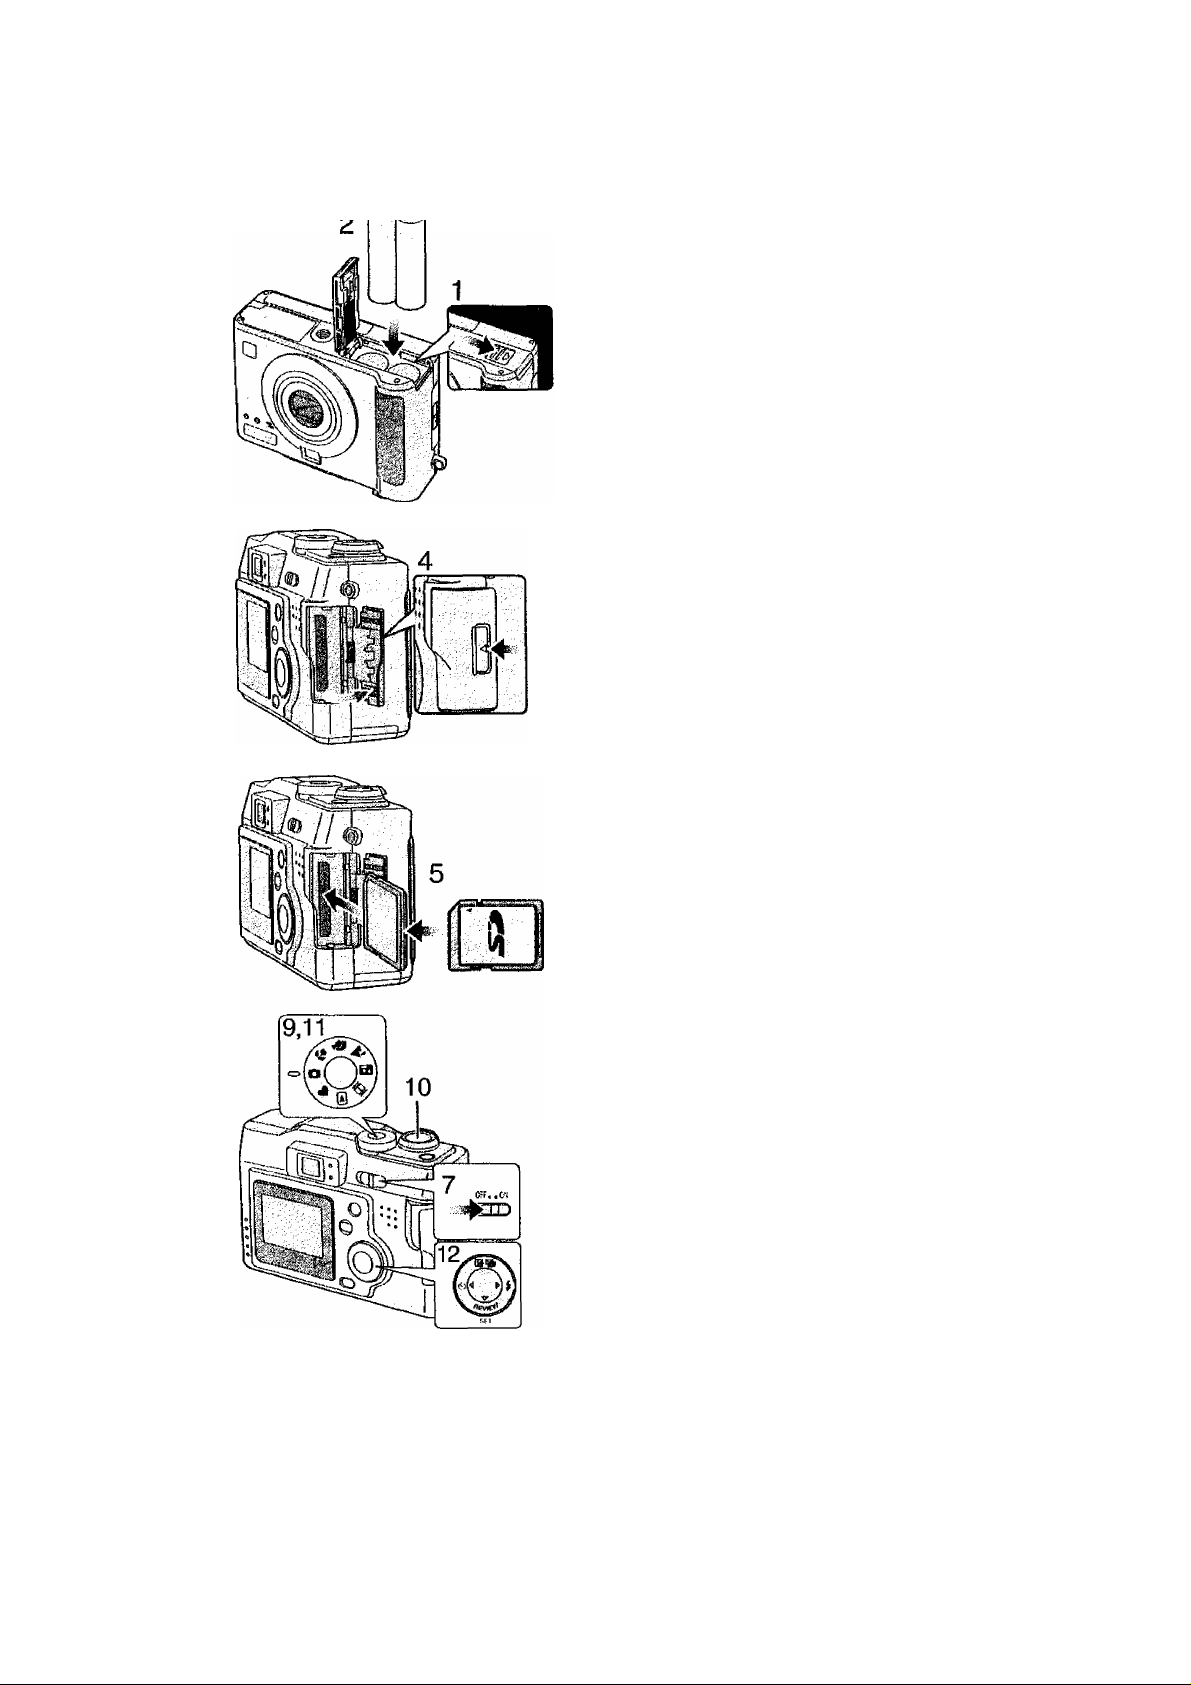
[Preparation]
1 Slide the door to the direction of the
arrow to open the battery door.
2 insert the batteries into the camera.
(P12)
• Insert batteries observing the direction of
the 0 and 0 polarities.
3 Close the battery door.
4 Slide the door to the direction of the
arrow to open the Memory Card door.
5 Insert the card into the camera. (P17)
6 Close the Memory Card door.
[Recording]
7 Set the power switch to [ON]. (PI 9)
8 Set date/time. (P25)
9 Set the mode dial to Normal picture
mode [Q]* (P23)
10 Take a picture.
[Playback]
11 Set the mode dial to playback [(^].
12 Press to select the picture you
want to view. (P53)
10
Page 11
Preparation
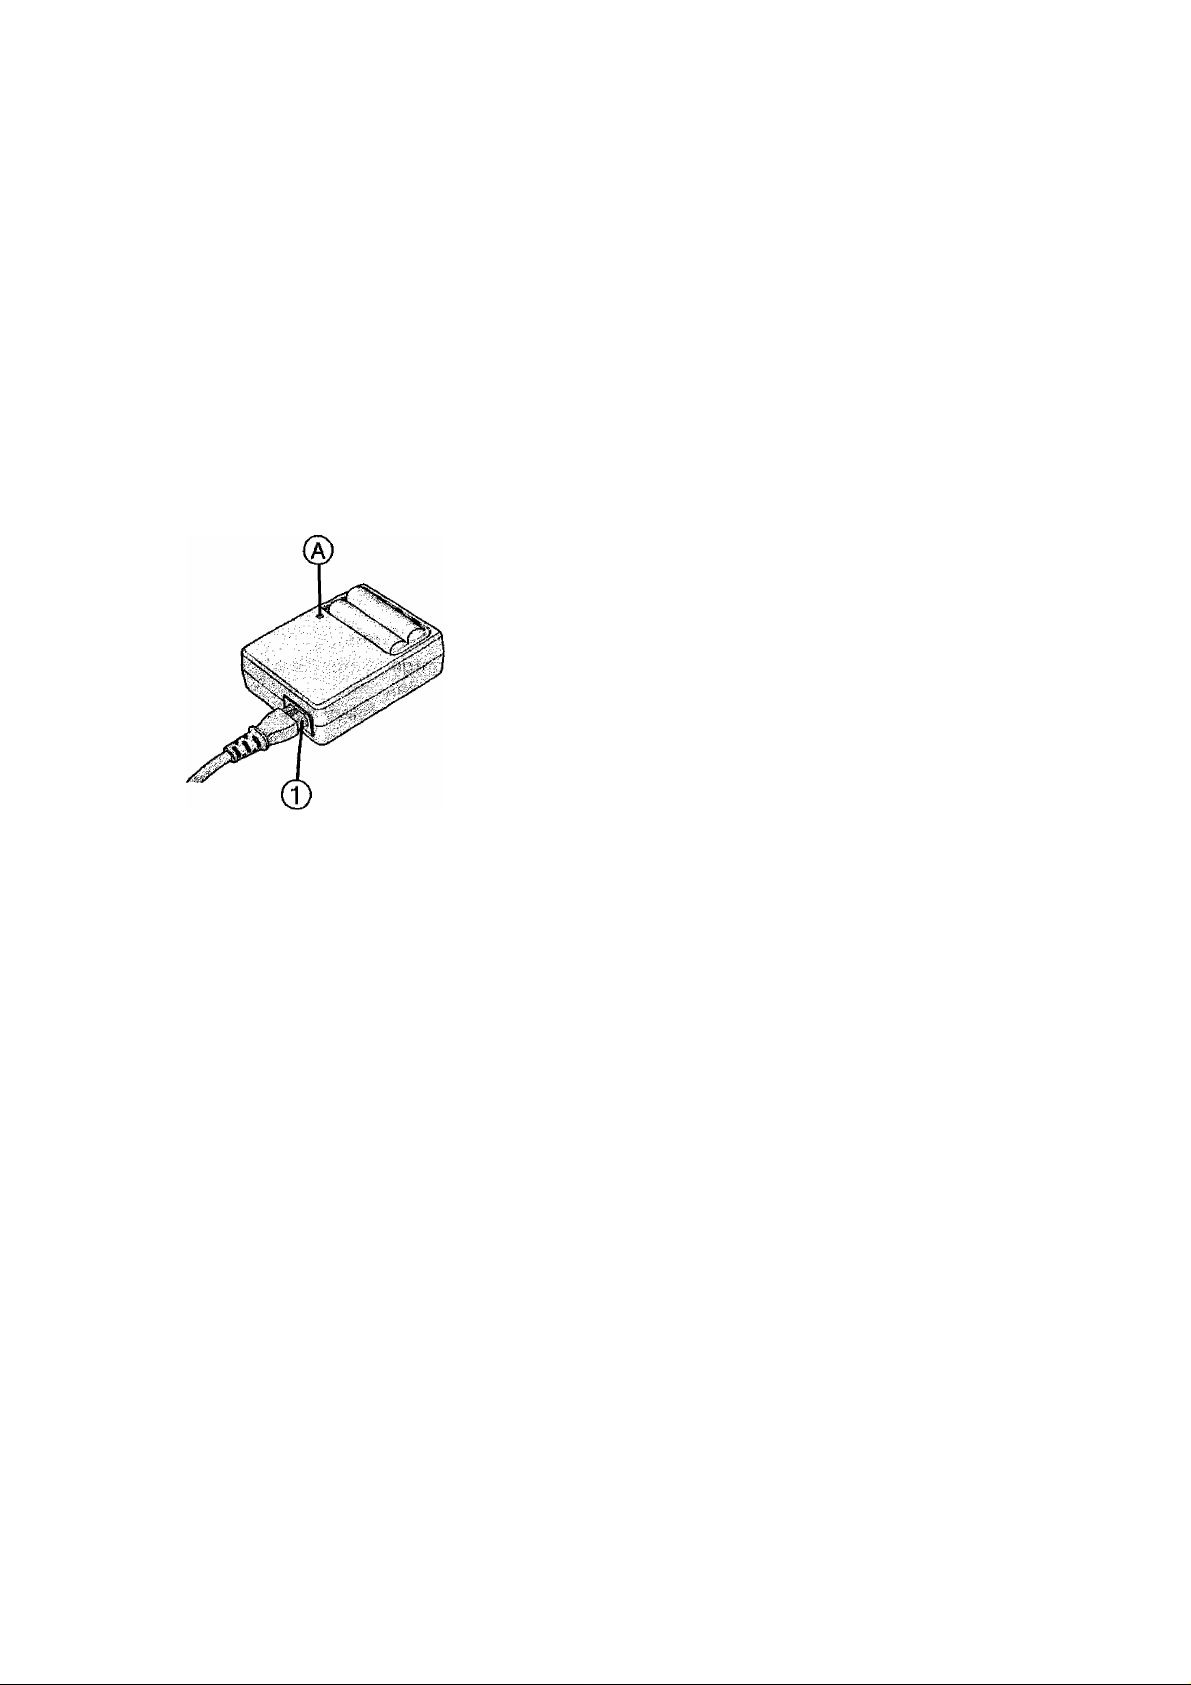
Charging the Batteries
1 Insert batteries into the charger.
2 Connect the AC Mains Lead to the
charger and AC mains socket.
• The AC Mains Lead does not fit entirely
into the socket. A gap wiil remain as
shown ©.
• The charge lamp ® lights and charge
starts.
\ Charge is completed when the charge
lamp is no longer illuminated.
• Charging takes in about 5 hours.
Confirm that batteries are inserted properly.
Disconnect the charger from the electrical
outlet after the charging is completed.
I Environment/charge error
Charge in a place with a surrounding
temperature of 0-40°C (also temperature
of the battery).
When charging starts, the charge lamp
tights.
If after charging starts the charge lamp
blinks, it indicates a charge error.
In this case, remove the charger from the
electrical outlet, take out batteries, check
whether the surrounding temperature or the
batteries are too hot or cold, and charge
again. An error cannot be cancelled by
turning the power off/on. If after charging
again the charge lamp still blinks, consult
your nearest servicenter.
► Use Panasonic AA Ni-MH (nickel-metal
hydride) Batteries.
11
Page 12
Preparation
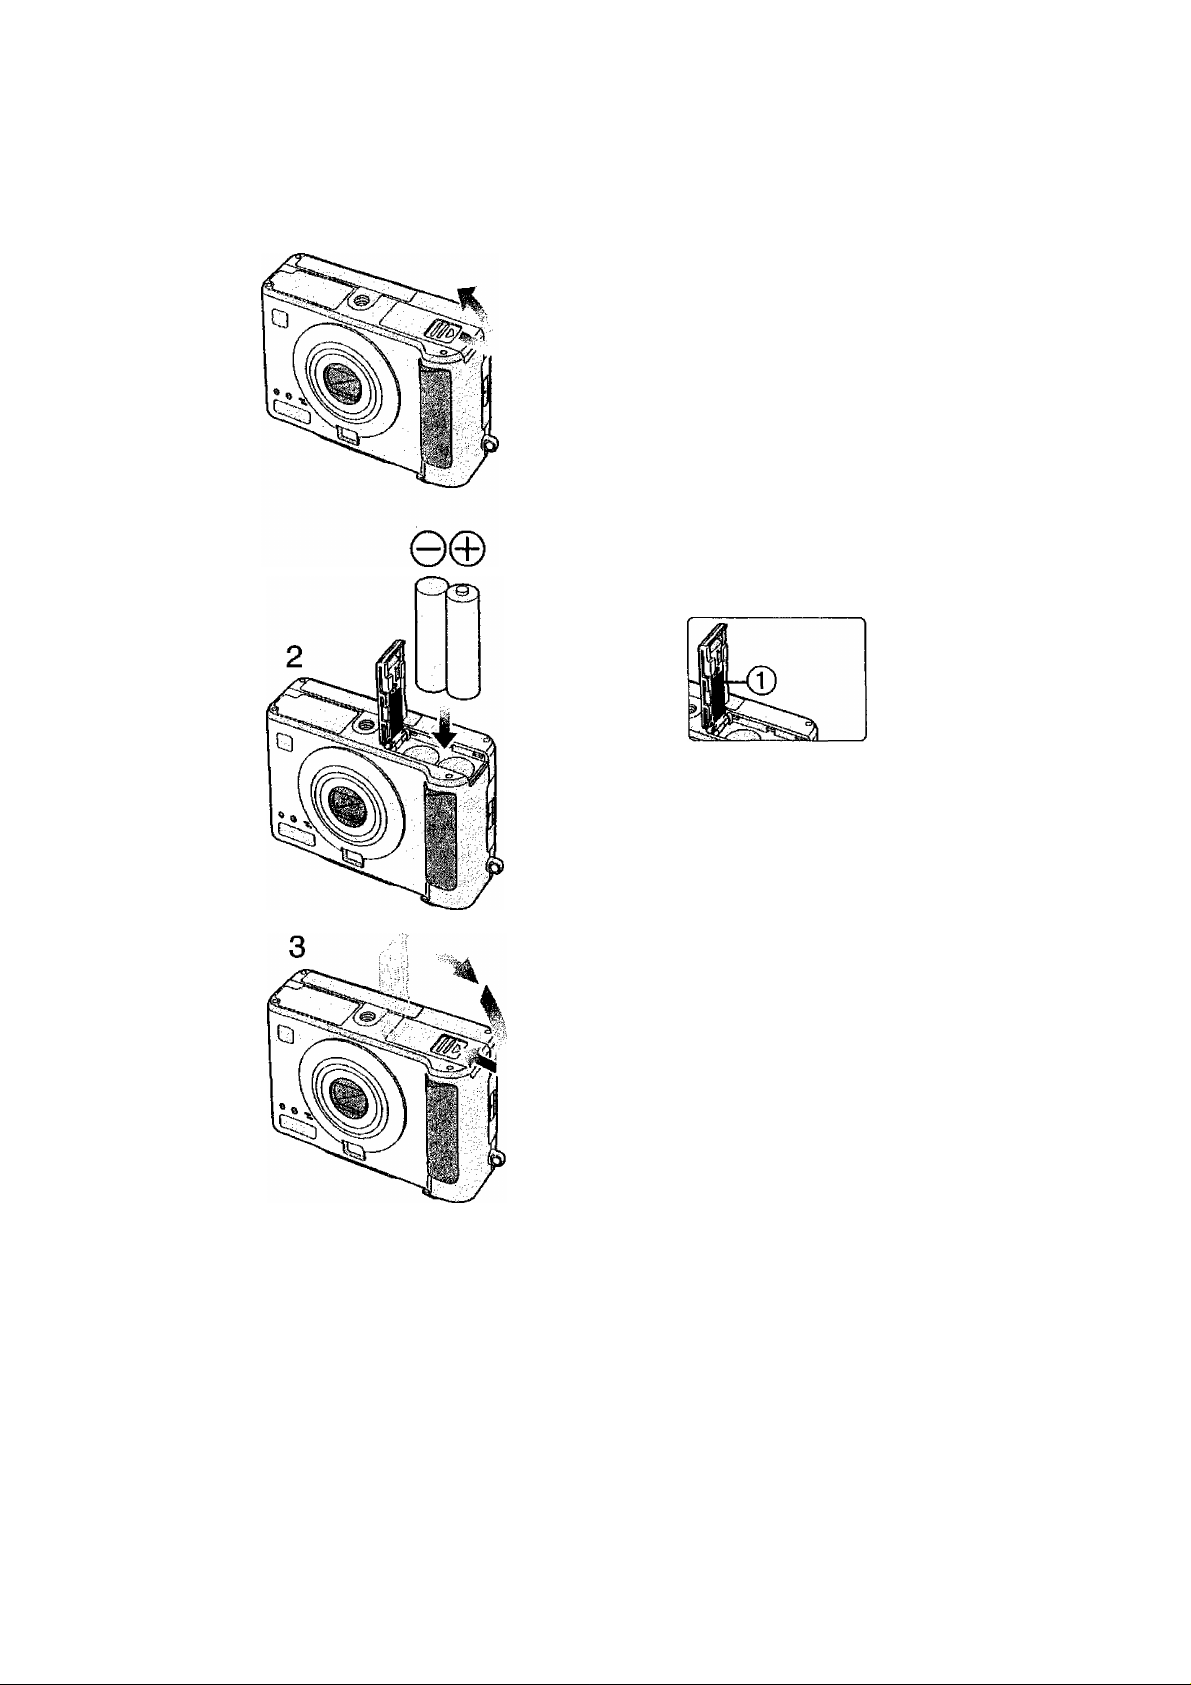
Inserting the Batteries
[Preparation]
• Check that the power switch is set to [OFF]
and the lens is stored.
1 Slide the door to the direction of the
arrow to open the battery door.
2 Insert the batteries.
• Use the charged batteries when using
Ni-MH batteries.
• insert batteries observing the direction of
the 0 and 0 polarities.
3 Slide the door to the direction of the
arrow to close the battery door.
• Do not peel off the sticker 0 because of
the protection of the battery.
When the new batteries are inserted in the
camera for more than 3 hours, the clock
setting is memorized by the camera for
about 3 months even after the batteries are
removed. (The time may be shorter if the
batteries are not charged sufficiently)
When the clock setting is cancelled, please
set the date/time again, (P25)
When the card is being accessed, do not
remove the batteries.
CAUTION
Danger of explosion if battery is
incorrectly replaced. Replace only with the
same or equivalent type recommended by
the manufacturer. Dispose of used
batteries according to the manufacturer’s
instructions.
12
Page 13
Preparation
H Available batteries
Use Panasonic AA Ni-MH batteries (nickel-metal hydride) or AA Alkaline
batteries (Optional). (We recommend that you use Panasonic
batteries)
• The performance of the batteries may vary depending on brand or storage
terms/condition of the battery. And it may cause the malfunction or the
available recording time may become shorter.
• The performance of the batteries decreases temporally in cold place, so use them
after warming them in your pocket. The batteries recovers in normal temperature.
• The battery indicator may not be displayed correctly depending on the
temperature or condition used. So, even if the battery indicator is not empty, the
power may be turned off. It is not a malfunction.
Unavailable batteries
Manganese batteries Nickel batteries
Ni-cd batteries Lithium batteries
The operation of the batteries above are not warranted. And those may cause the
malfunctions as follows;
• The battery indicator is not displayed correctly.
• The power is not turned on.
• Data in the cards are destoroyed.
Nickel Manganese batteries
• When using the Nickel Manganese batteries, the battery indicator may not be
displayed correctly depending on the temperature or condition used. So, even if
the battery indicator is not empty, the power may be turned off. It is not a
malfunction. The available time becomes extremely short in cold place, so use
them after warming them in your pocket.
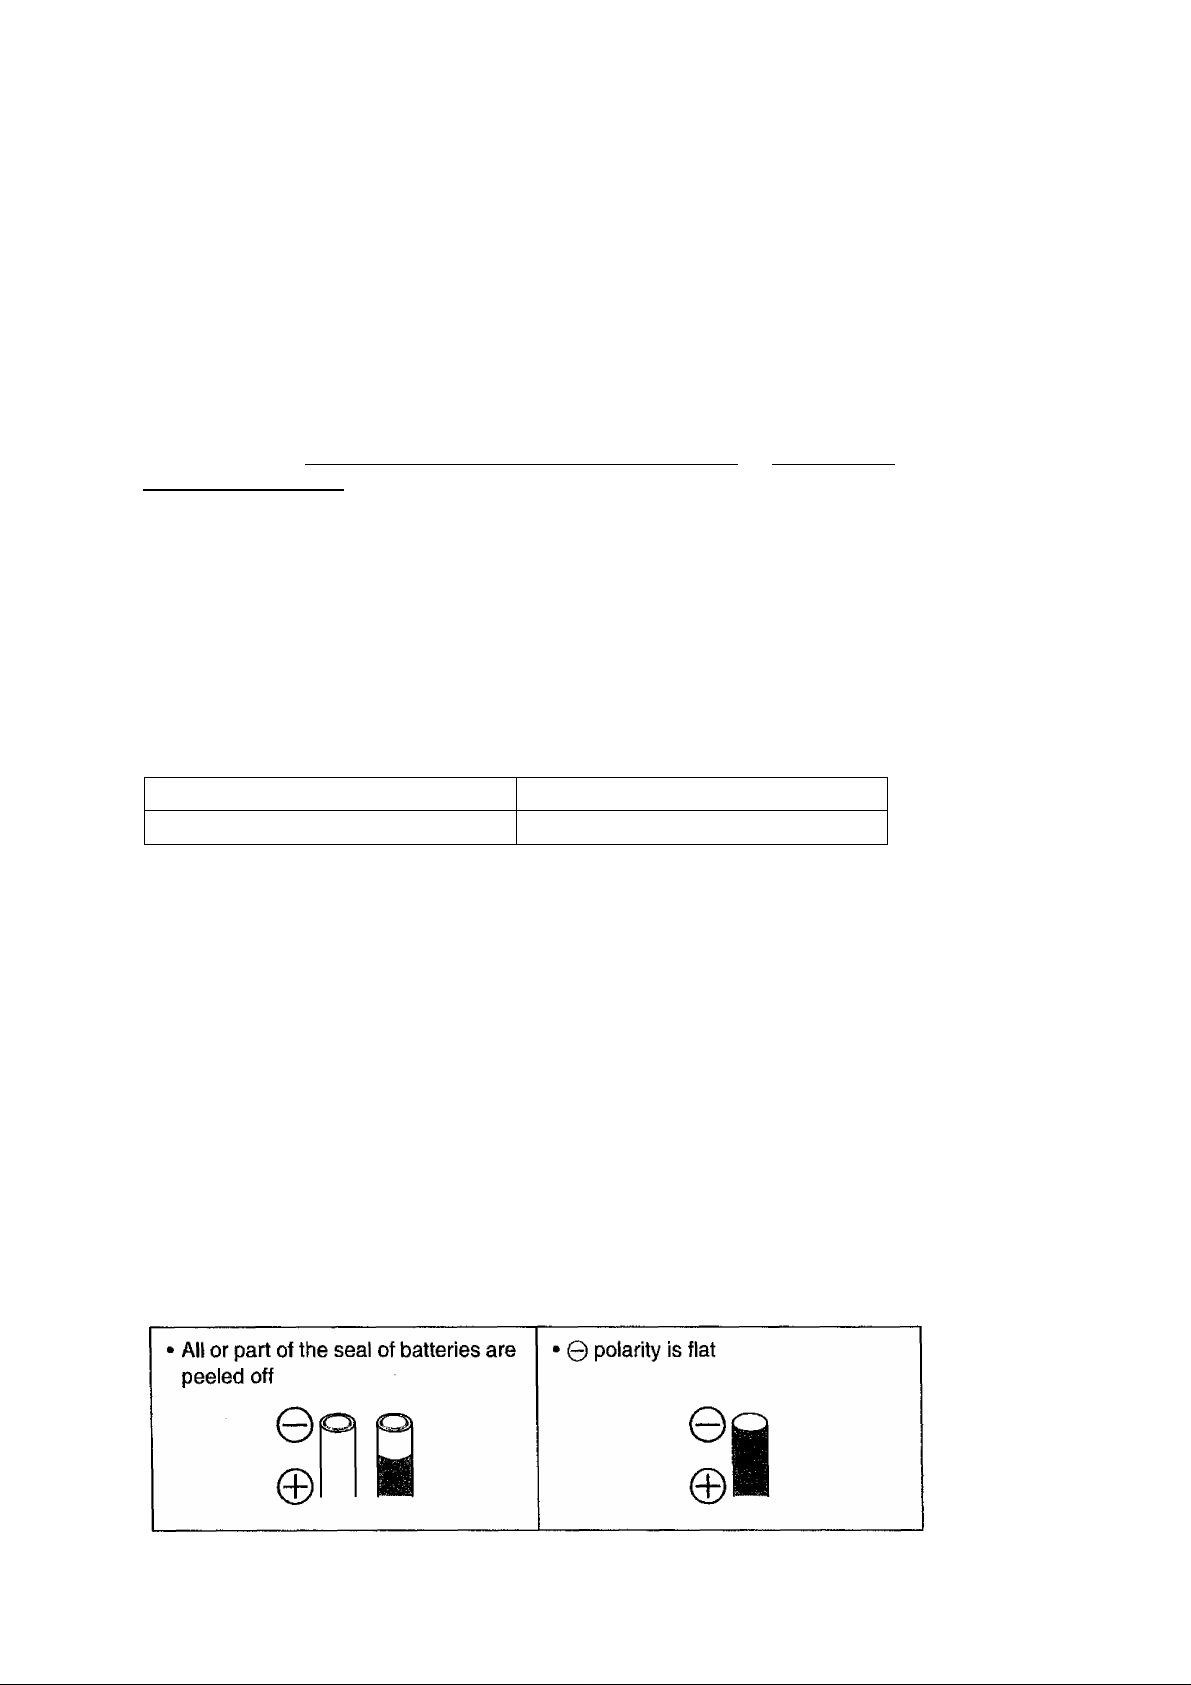
B Unavailable form of the batteries The following batteries cannot be uesd.
• It causes leakage, generation of heat or burst.
• All or part of the seal of some batteries sold on the market are not covered. Do not
use them.
13
Page 14

Preparation
B Caution for the batteries
If you mistake handling the batteries, leakage, generation of heat and
fire or burst may occurr. Keep the following cautions;
• Do not deassemble, process or give the pressure to the batteries.
• Do not heat or throw into the fire.
• Do not keep 0 and 0 polarities into contact with the metal (necklace or hairpin
etc.) or bring them together.
• Be careful so that no water or sea water enters, or do not soak the termnal of the
batteries.
• Do not pee! off or damage the covered seal.
• Do not drop or throw the batteries so that the batteries are not shocked.
• Do not use the batteries when you noticed leakage or change of shape and color
etc.
• Do not store in the place in high temperature or humidity.
• Do not leave within children’s reach.
• Do not mistake the direction of the 0 and Q polarities when inserting the batteries
into the camera.
• Do not mix new batteries and old batteries.
• Change to both new batteries when changing ones.
• Do not use differernt kind of batteries.
• If you will not be using the camera for a long time, remove the batteries.
• The temperature of batteries may become high instantly after use. Remove the
batteries after turning the power switch off and waiting for the temperature of them
to decrease.
• The performance of the batteries decreases and available recording/playback time
becomes extremely short in cold place. Especially, the time becomes short when
using Alkaline batteries, so use them after warming them in your pocket. When
warming them, be careful so that the batteries are not attached to the metal etc,
directly.
• If the dirt like the sebum attaches to the batteries, available record ing/p layback
time becomes extremely short. Wipe the 0 and 0 polarities using the dry and soft
cloth carefully before inserting them.
If the leakage occurred, wipe the liquid attatched to the battery insertion part and
then insert the new batteries.
When the liquid is attached to your hands or clothes, wash them using water.
When the liquid enters your eyes, your eyesight may be lost. Wash them using
clear water instantly without rubbing them and then consult for a doctor.
14
Page 15

Preparation
■ Ni-MH Battery (Nickel Metal Hydride)
The battery charger should only be used with the Ni-MH batteries.
However, when mistaking handling them, leakage, generation of heat
and fire or burst may be occurred. Keep the following cautions;
• If the dirt is attatched to the 0 and 0 polarities, charging may not be performed
correctly. Wipe the 0 and 0 polarities and terminal of the charger carefully using
dry and soft cloth.
• The Ni-MH batteries which are newly purchased or not used for a long time may
not charged fully. It is because of the characteristic of the batteries and not a
malfunction. Charging several times makes them recover.
• It is recommended to charge after using up the battery power. If repeating
charging without using up the battery power, it may be difficult to last the battery
power. (It is called “memory effect”) When the memory effect occurs, repeat
charging fully several times after using up them.
• Even when the Ni-MH batteries are not used, the battery power decreases
because of natural electric discharge. It is recommended to recharge the batteries
just before use.
• Do not charge the full-charged batteries continuously.
• Do not peel off or damage the covered seal.
• Read the Operating Instructions for the battery charger.
Ni-MH batteries have a limited life. As you pile up to use or time has passed, the
battery power decreases gradually. If available time has become much shorter,
purchase the new batteries.
• The battery’s life differs depending on the condition stored or used or environment.
■ Battery indicator
The remaining battery power is displayed on the LCD monitor. (This is not displayed
when using AC adaptor (optional, DMW-AC2))
: The battery power is sufficient
: The remaining power is low
; There is little remaining power
■ (blink): Replace the batteries
When using new Ni-MH batteries the battery Indicator may not be
displayed correctly because of the characteristic of the batteries, not
because of a malfunction. If you repeatedly discharge and charge the
batteries fully, the battery indicator will be displayed correctly.
• The battery indicator may not be displayed correctly depending on the
temperature or condition used. So, even if the battery indicator is not empty, the
power may be turned off. It is not a malfunction.
• Even if the battery indicator becomes empty when leaving them for a while, the
battery power may recover. However, they wilt not be usable, so replace them to
new ones once the battery indicator becomes empty.
Page 16

Preparation
■ Available recording/playback time
Measured under the following conditions:
• Shooting once every 30 seconds, flash every other shot.
• Measured using supplied SD Memory Card.
• Temperature: 25°C/Humidity: 60%
Batteries'- .;'y,;Vv'-i-
Fully charged batteries
(supplied)
Fully charged Panasonic Ni-MH
(nicket-metal hydride) batteries
(Optional: HHR-3EPP)
doniihudus ■j^pO;^ih
Recording with LCD monitor on
Approx. 95 min.
(equal to 190 still pictures)
Recording with LCD monitor off
Approx. 4 h 30 min.
(equal to 540 still pictures)
Playback time
Approx. 3 h.
Recording with LCD monitor on
Approx. 120 min.
(equal to 240 stilt pictures)
Recording with LCD monitor off
Approx. 6 h.
(equal to 720 still pictures)
Playback time
Approx. 4 h.
Recording with LCD monitor on
Approx. 75 min.
(equal to 150 still pictures)
Panasonic Alkaline batteries
The times shown in the table are approximate times. The times may vary
depending on the condition.
Available recording/playback time varies depending on the batteries used.
Recording with LCD monitor off
Approx. 5 h.
(equal to 600 still pictures)
Playback time
Approx. 3 h 30 min.
16
Page 17
Inserting the Card
Preparation
[Preparation]
• Check that the power switch is set to [OFF]
and the lens is stored.
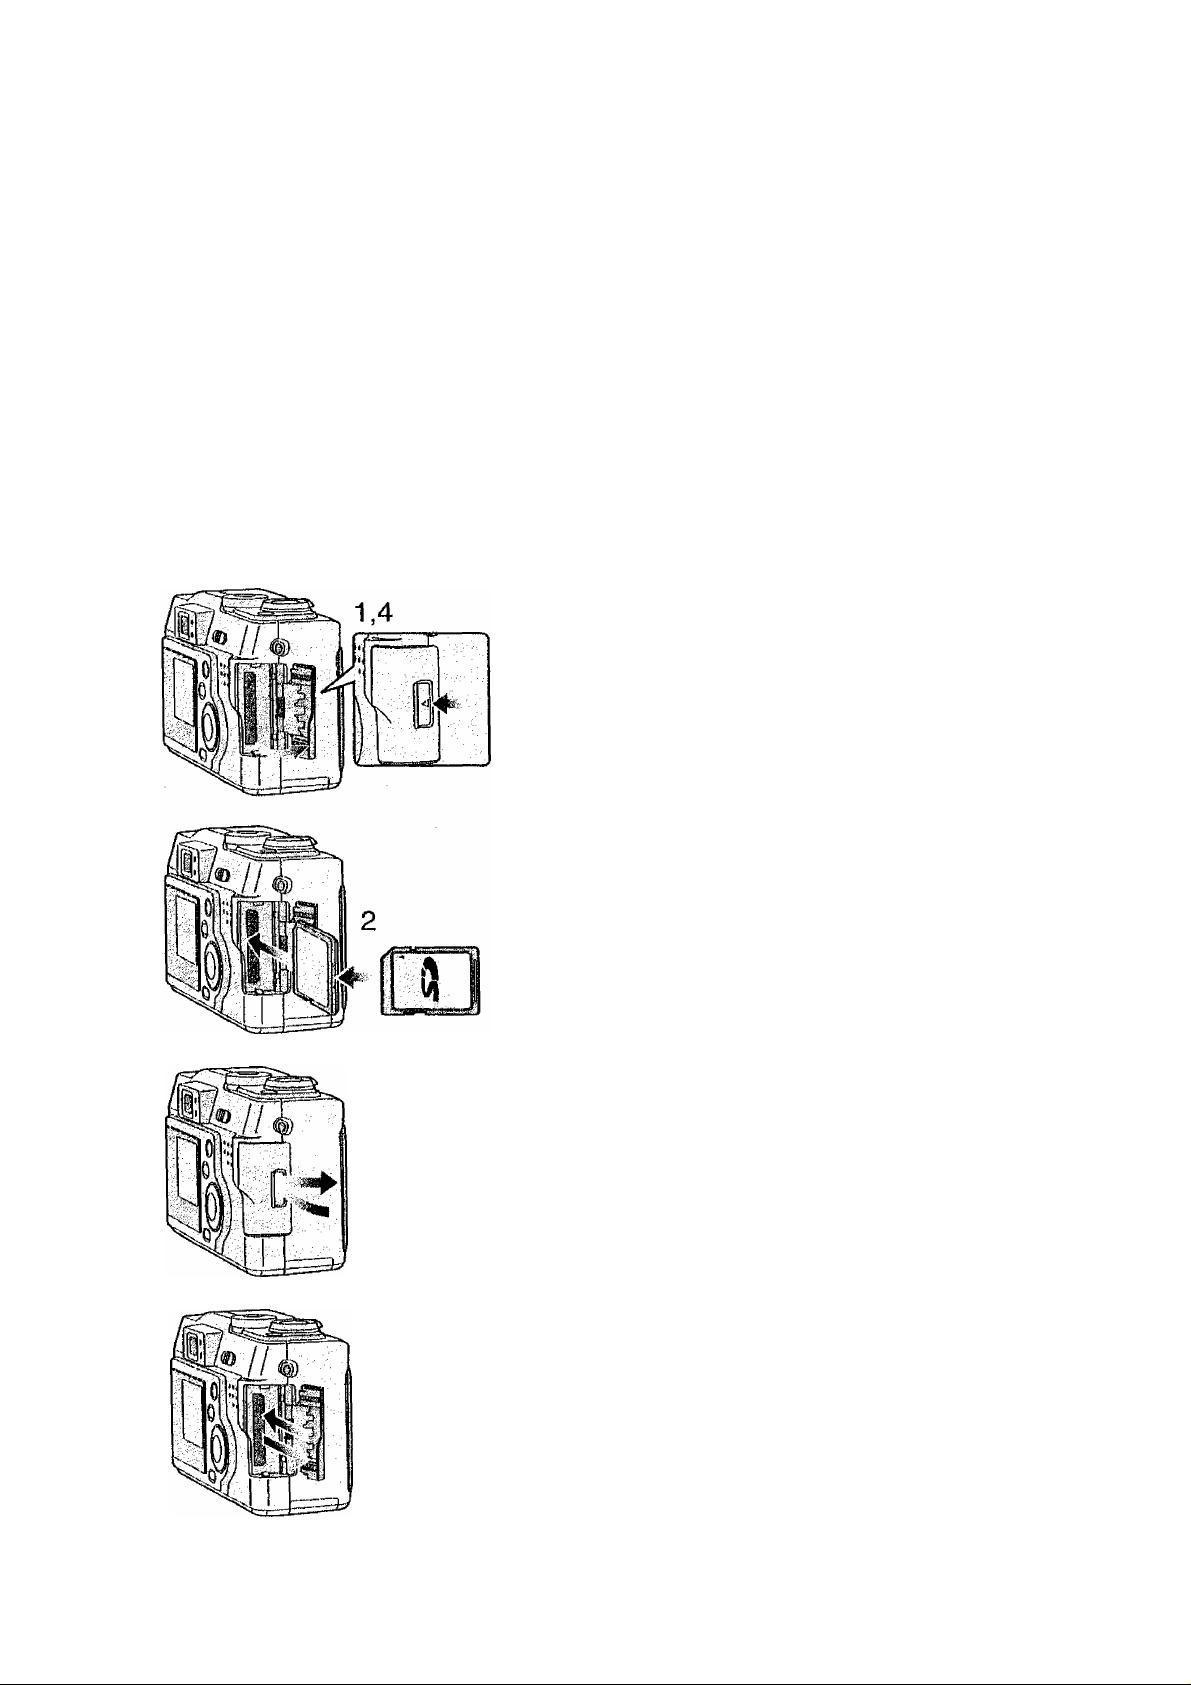
[Inserting the card]
1 Slide the door in the direction of the
arrow to open the Memory Card door.
2 Insert the card until the label of the
card is hidden.
• The card clicks when you insert it
correctly.
• Check the direction of the card.
• Do not touch the connection terminals on
the back side of the card.
3 Slide the door to the direction of the
arrow to close the Memory Card door.
[Removing the card]
3,7
5,6
4 Slide in the direction of the arrow to
open the Memory Card door.
5
Press the card to release.
Pull the card out.
6
Slide the door to the direction of the
7
arrow to close the Memory Card door.
If you are using a MultiMediaCard type
memory card and the Memory Card door
cannot close, the card may be installed
backwards. Remove the card and reverse it,
then try to dose the door again.
If the Memory Card door cannot be
completely closed, take the card out and
insert it again.
If the card cannot be fully inserted, verify
whether the direction of the card is correct.
We recommend that you use a Panasonic
branded SD Memory Card. (Use only the
genuine card)
' If the card is not fully inserted, the card may
be damaged.
Page 18
Preparation
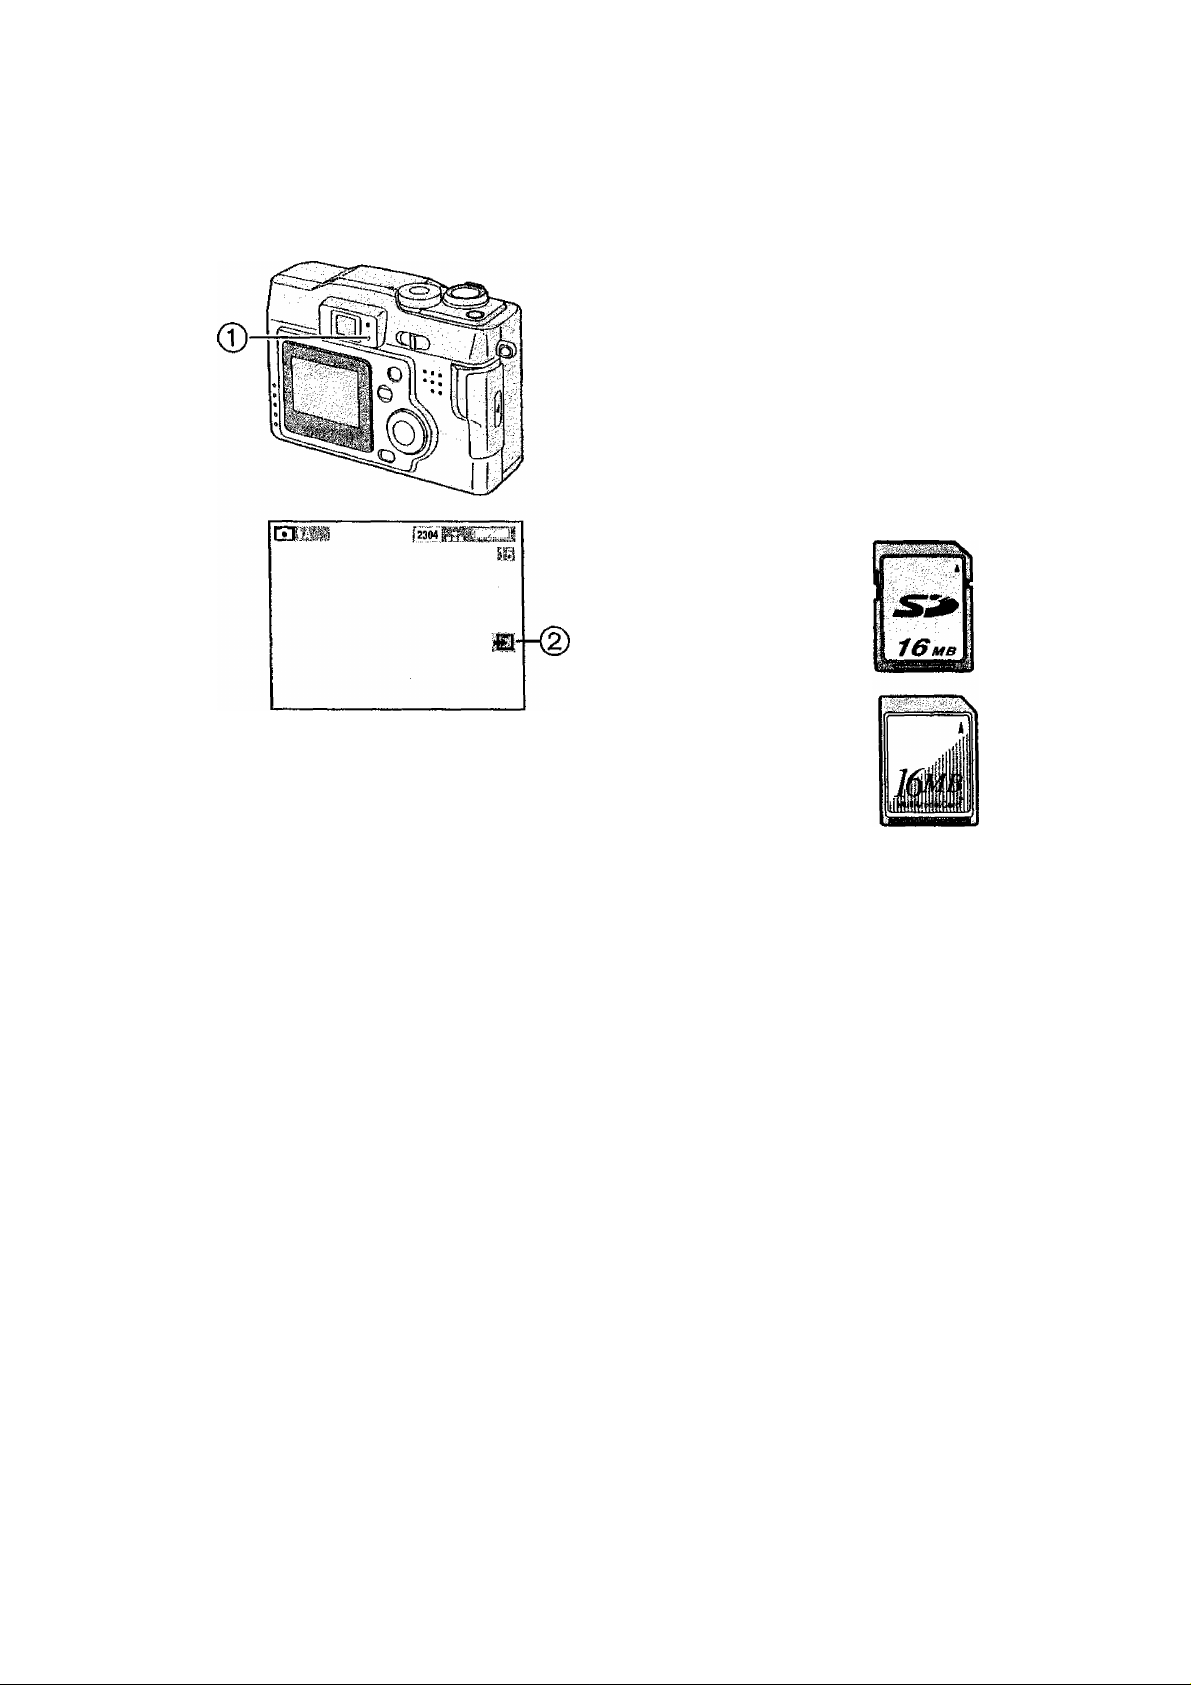
Access to the card
When the card is being accessed, the
flash/access indicator (T) and card
access indication (2) lights.
When the flash/access indicator 0 and
the card access indication (D lights;
• Do not turn off the camera.
• Do not remove the batteries or pull out
the card.
• Do not remove the AC adaptor,
{optional, DMW-AC2)
The card and the card contents may be
destroyed and the camera may not
operate normally.
As there is a risk that the data on the
card may be damaged or erased due to
the electrical noise, static electricity or
the defects of camera/card, please back
up your data on your PC using USB
connection. (P80)
ISD Memory Card (supplied)
and MultiMediaCard (optional)
The SD Memory Card and
MultiMediaCard are small, lightweight,
removable external cards. The reading/
writing speed of SD Memory Card is
fast. The SD Memory Card is equipped
with a write protection switch that can
inhibit writing and formatting. (When the
switch is moved towards the [LOCK]
side, it is not possible to write or delete
data on the card and format It. When the
switch is unlocked, these functions
become available)
SD Memory Card
MultiMediaCard
• The reading/writing
speed of
MultiMediaCards is
slower than SD Memory
cards. When
MultiMediaCards are used, the
performance of certain features may
be slightly slower than advertised.
• After recording motion images using
the MultiMediaCard, the flash/access
indicator and the card access
indication may appear for a while, but
this is not a malfunction.
• Keep the Memory Card out of reach of
children to prevent swallowing.
18
Page 19
Preparation
Turning Power on/off
® 1.2
When the power switch is turned on, do not hold the lens cover. If the lens cover
does not open, [SYSTEM ERROR] is displayed. Turn the power switch off and on.
Do not make a pressure on the lens when the lens tube comes out.
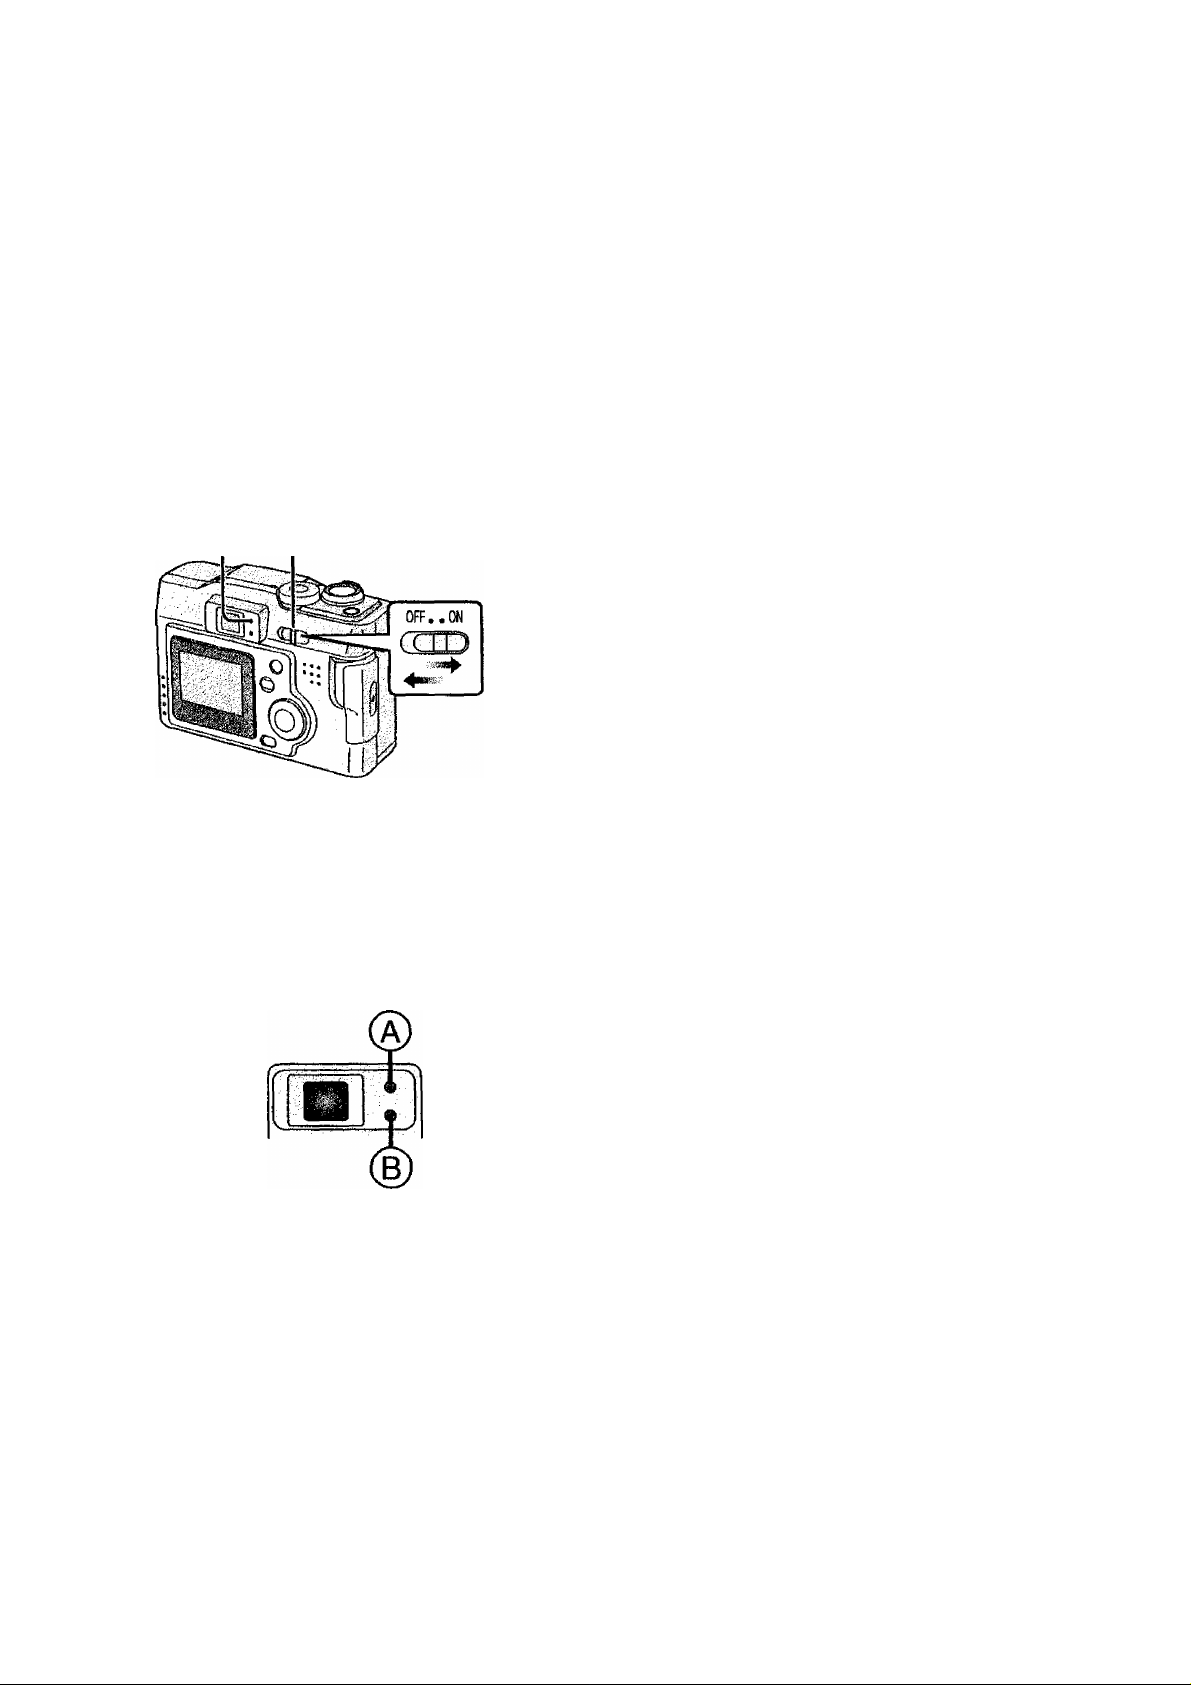
1 Set the power switch to [ON].
• The Status indicator © lights.
2 Set the power switch to [OFF].
■ Status Indicator ®
Lighting:
• When turning the Power switch to [ON].
Blinking:
• While the focus is being adjusted or the
focus is not properly adjusted,
• When the card is not inserted.
• When no space is left on the card.
• When the remaining battery power is low.
(blink siowly)
B Flash/Access Indicator ©
Lighting:
• When accessing the card.
• When the flash fires. (It lights when the
shutter is pressed halfway)
• When sending data to PC.
Blinking:
• When charging the flash.
• When setting the flash mode to forced off
and recording in dark places.
(blink slowly)
Page 20
Preparation
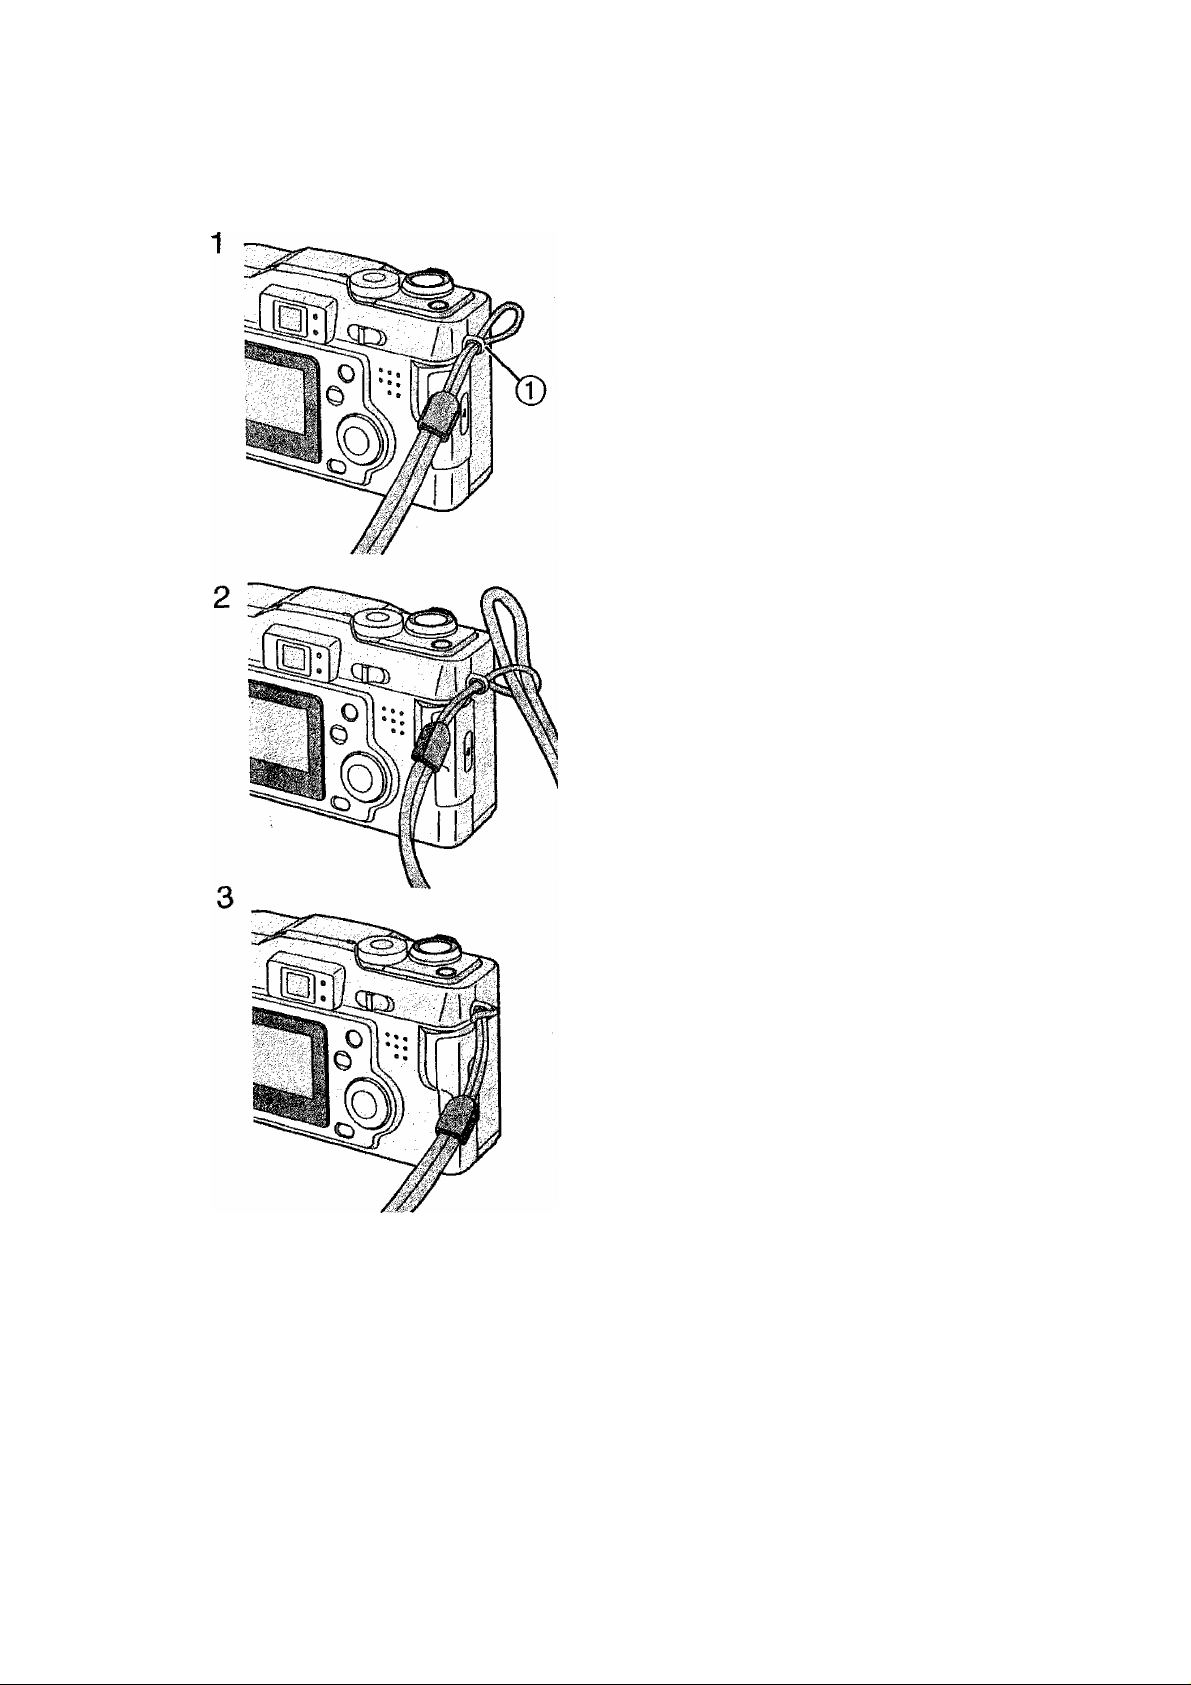
Attaching the Strap
1 Pass the top of the strap through the
2 Pass the opposite side of the strap
3 Pull the strap.
strap eyelet 0.
through its ring shaped part.
20
Page 21
Preparation
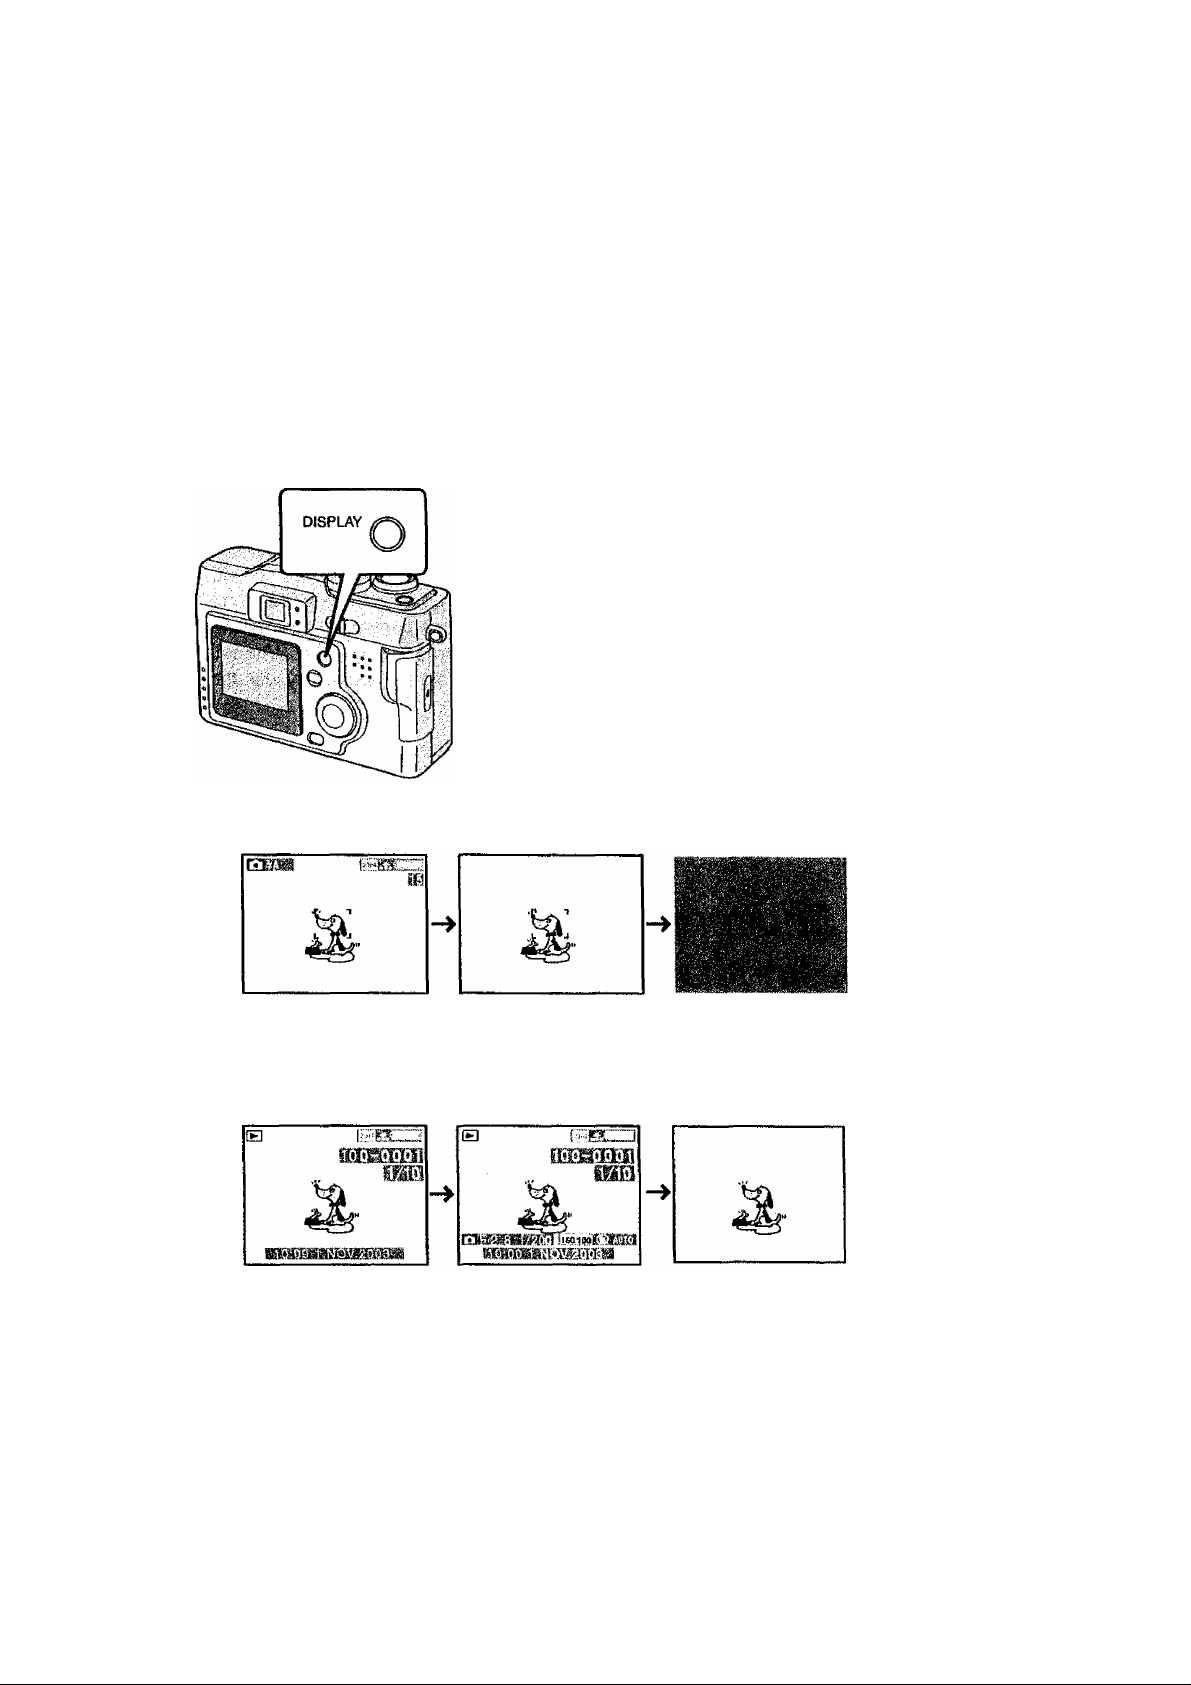
Using the LCD Monitor
Every time you press the [DISPLAY] button,
the display of the LCD monitor changes as
shown below.
[In recording]
[In playback]
Page 22
Preparation
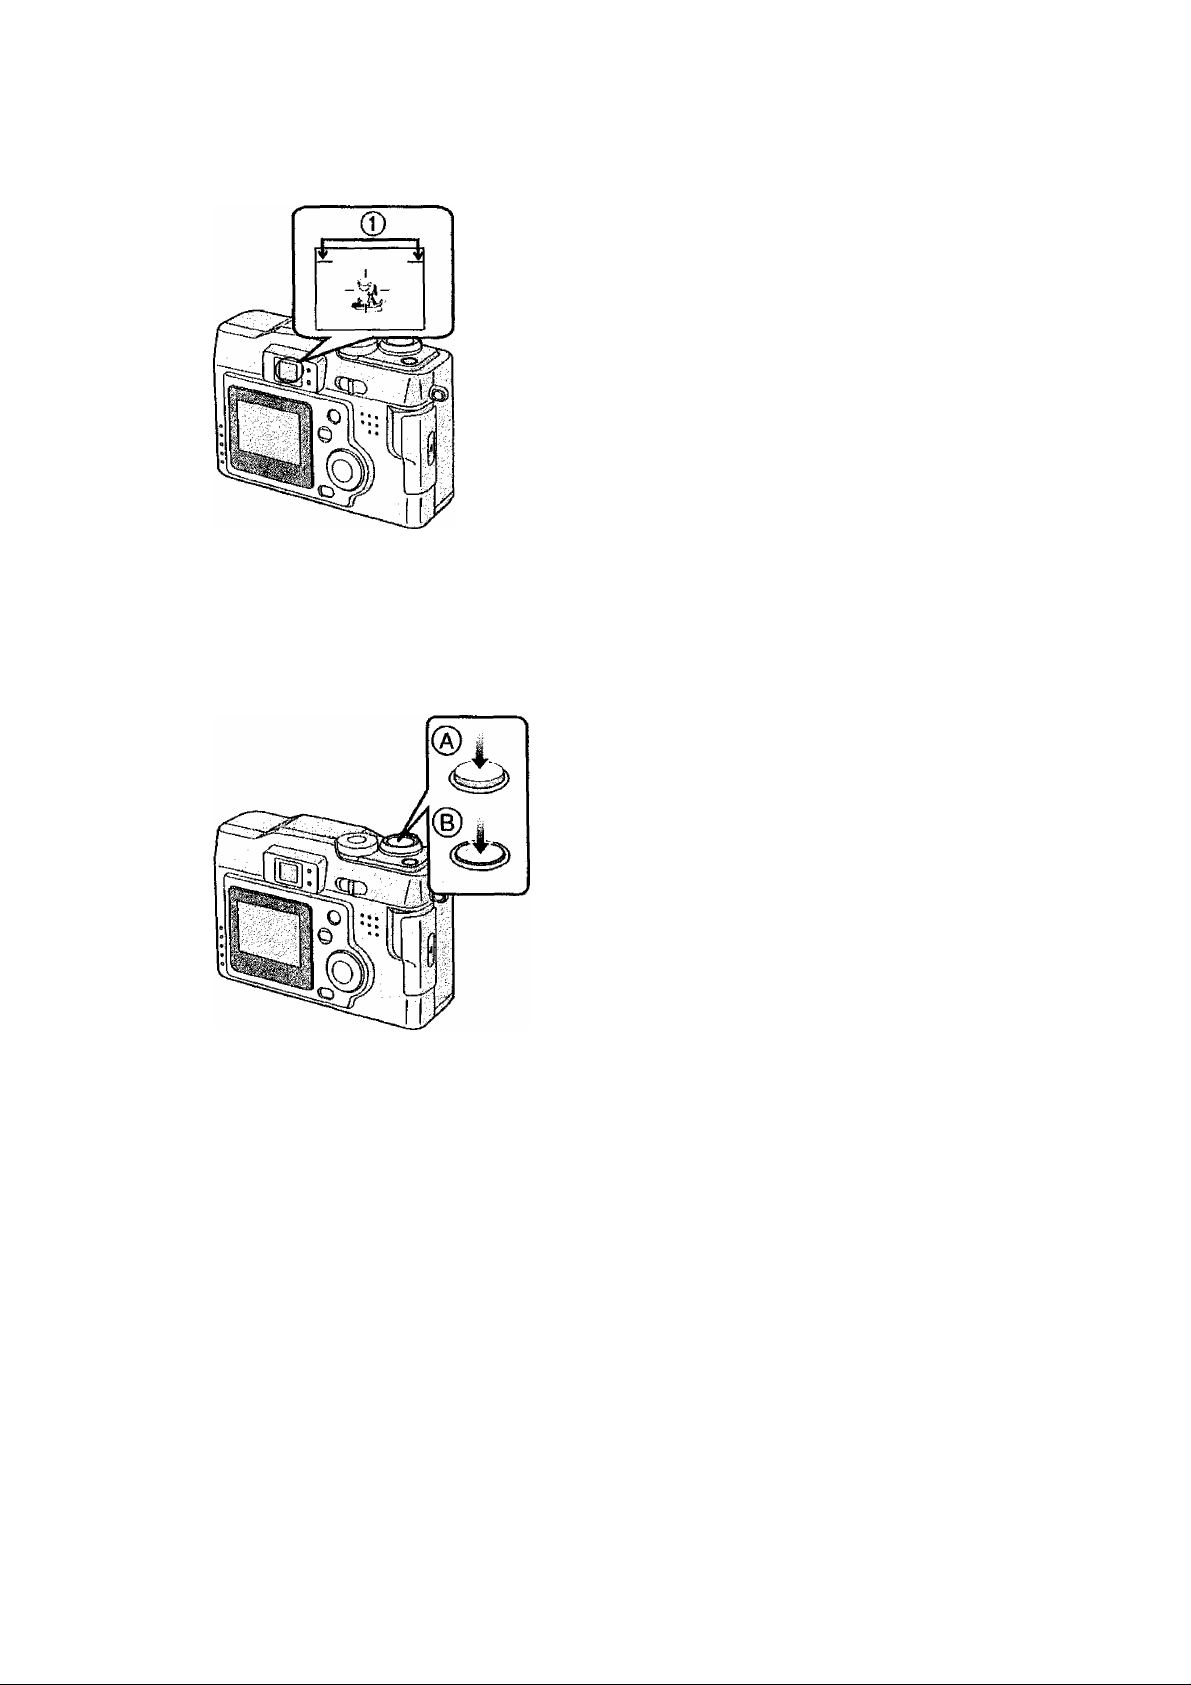
Using the Optical Viewfinder
Parallax compensation mark
• If you take a picture of the subject at a
distance between 70 cm -120 cm with the
zoom in tele position, match the top of the
subject with the parallax compensation
mark 0, in order not to cut It. When an
accurate framing is necessary, use the LCD
monitor.
The Shutter Button (Pressing halfway/Pressing fully)
The shutter button is activated in 2 steps:
“pressing halfway” and “pressing fully”.
Pressing halfway ®
• Focus and exposure are locked.
Pressing fully (g)
• The picture is captured. In motion image
mode, the recording starts.
You can adjust volume of the operational sound in the menu. (P74)
If you press the shutter button fully in a single stroke, the captured picture may
appear shaken or unfocused. (The camera may be moved during capturing)
22
Page 23
Preparation
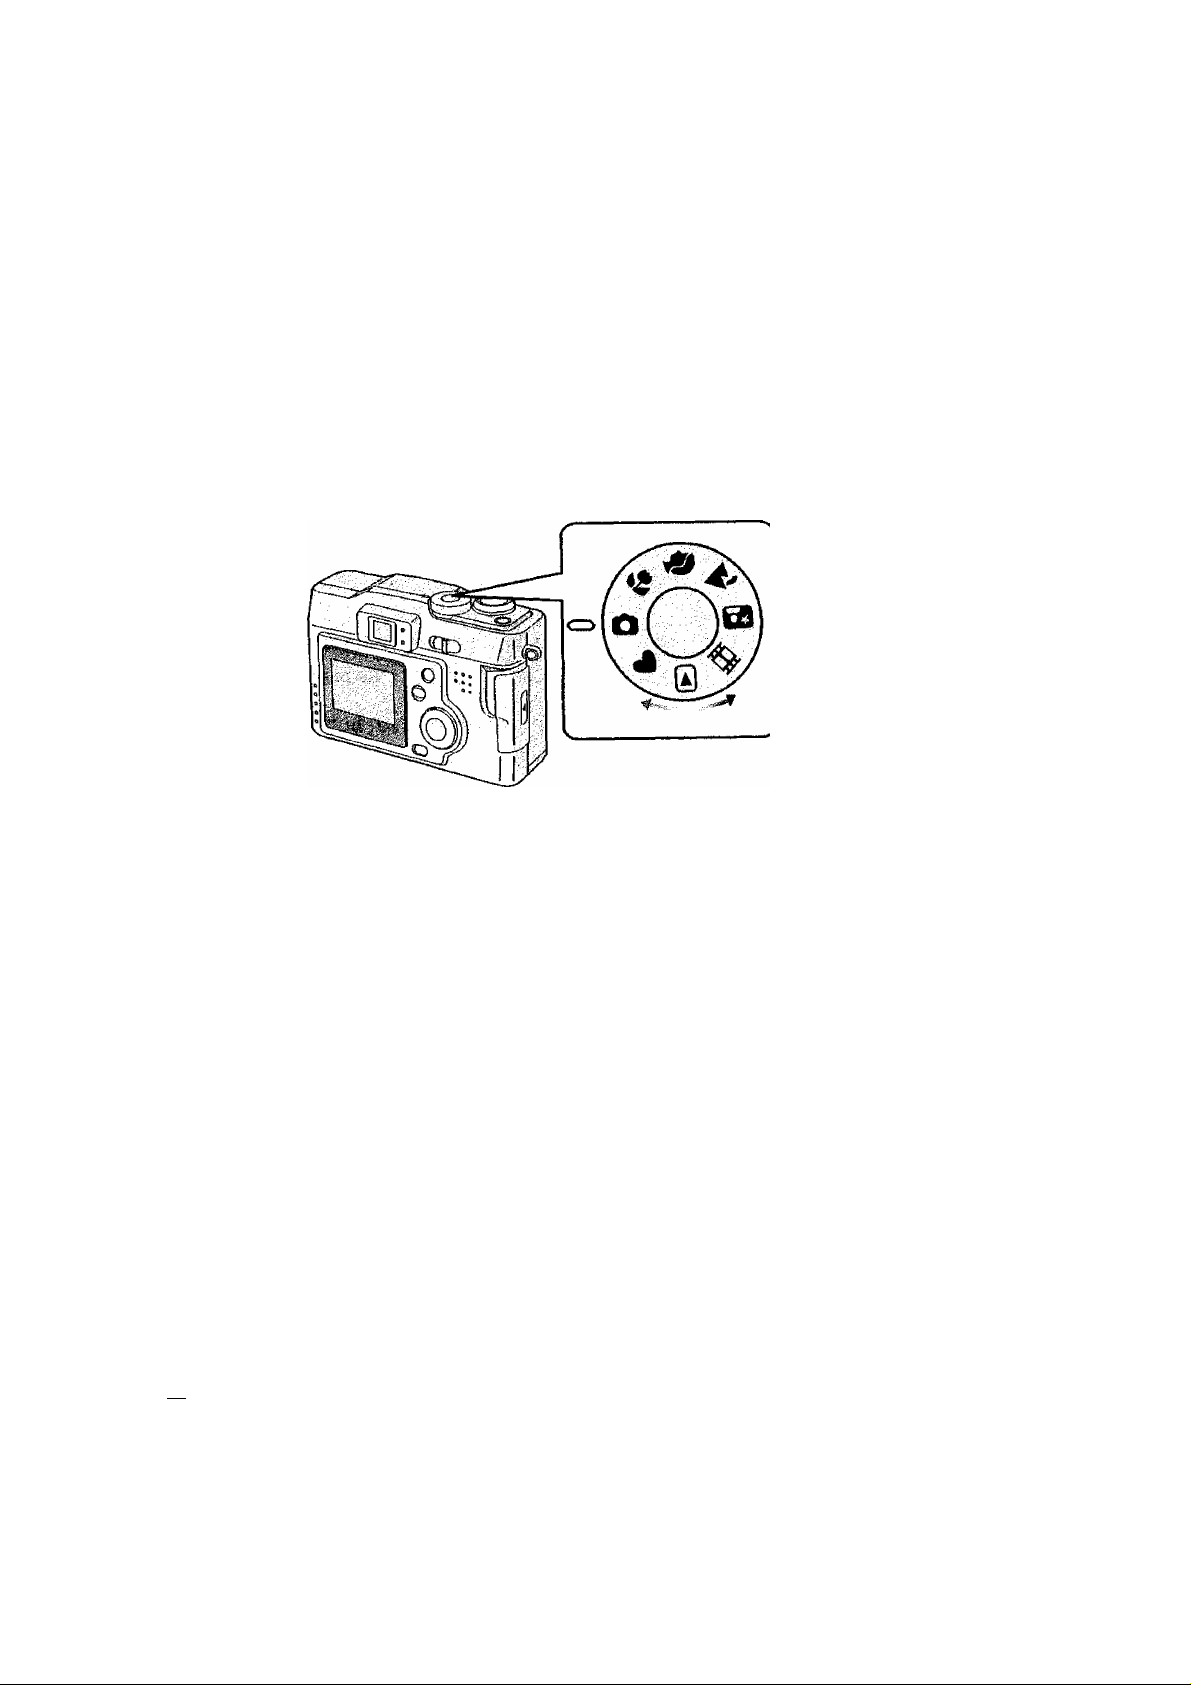
The Mode Dial
You can choose a desired mode by the mode dial.
[Q : Playback (P53)
Playback recorded images.
V : Simple mode (P28)
Menu options are minimized and many settings are preset. This is a fast and easy
way for beginners to start using the camera and become familiar with its many
features.
: Normal Picture (P26)
The shutter speed and the aperture value are automatically adjusted.
: Macro mode (P39)
When you take pictures from a distance closer than 50 cm, set the camera in macro
mode. This allows you to get closer to the subject up to 50 cm (Tele), 10 cm (Wide).
: Portrait mode (P40)
This mode allows you to easily achieve the depth of focus effect. The subject stands
out in front of an unfocused background.
: Landscape mode (P41)
You can capture sharp and crisp landscape photos easily. Please note that this
mode is suitable for landscape farther than 10 m away and in daylight.
ro: Night portrait mode (P42)
When you take pictures of, for example, your friends in front of beautiful night
illumination scenery, this mode allows you to get the appropriate exposure for your
subject as well as the background, using flash and slow shutter.
e ; Motion images mode (P30)
Use this mode when recording motion images.
Page 24
Preparation
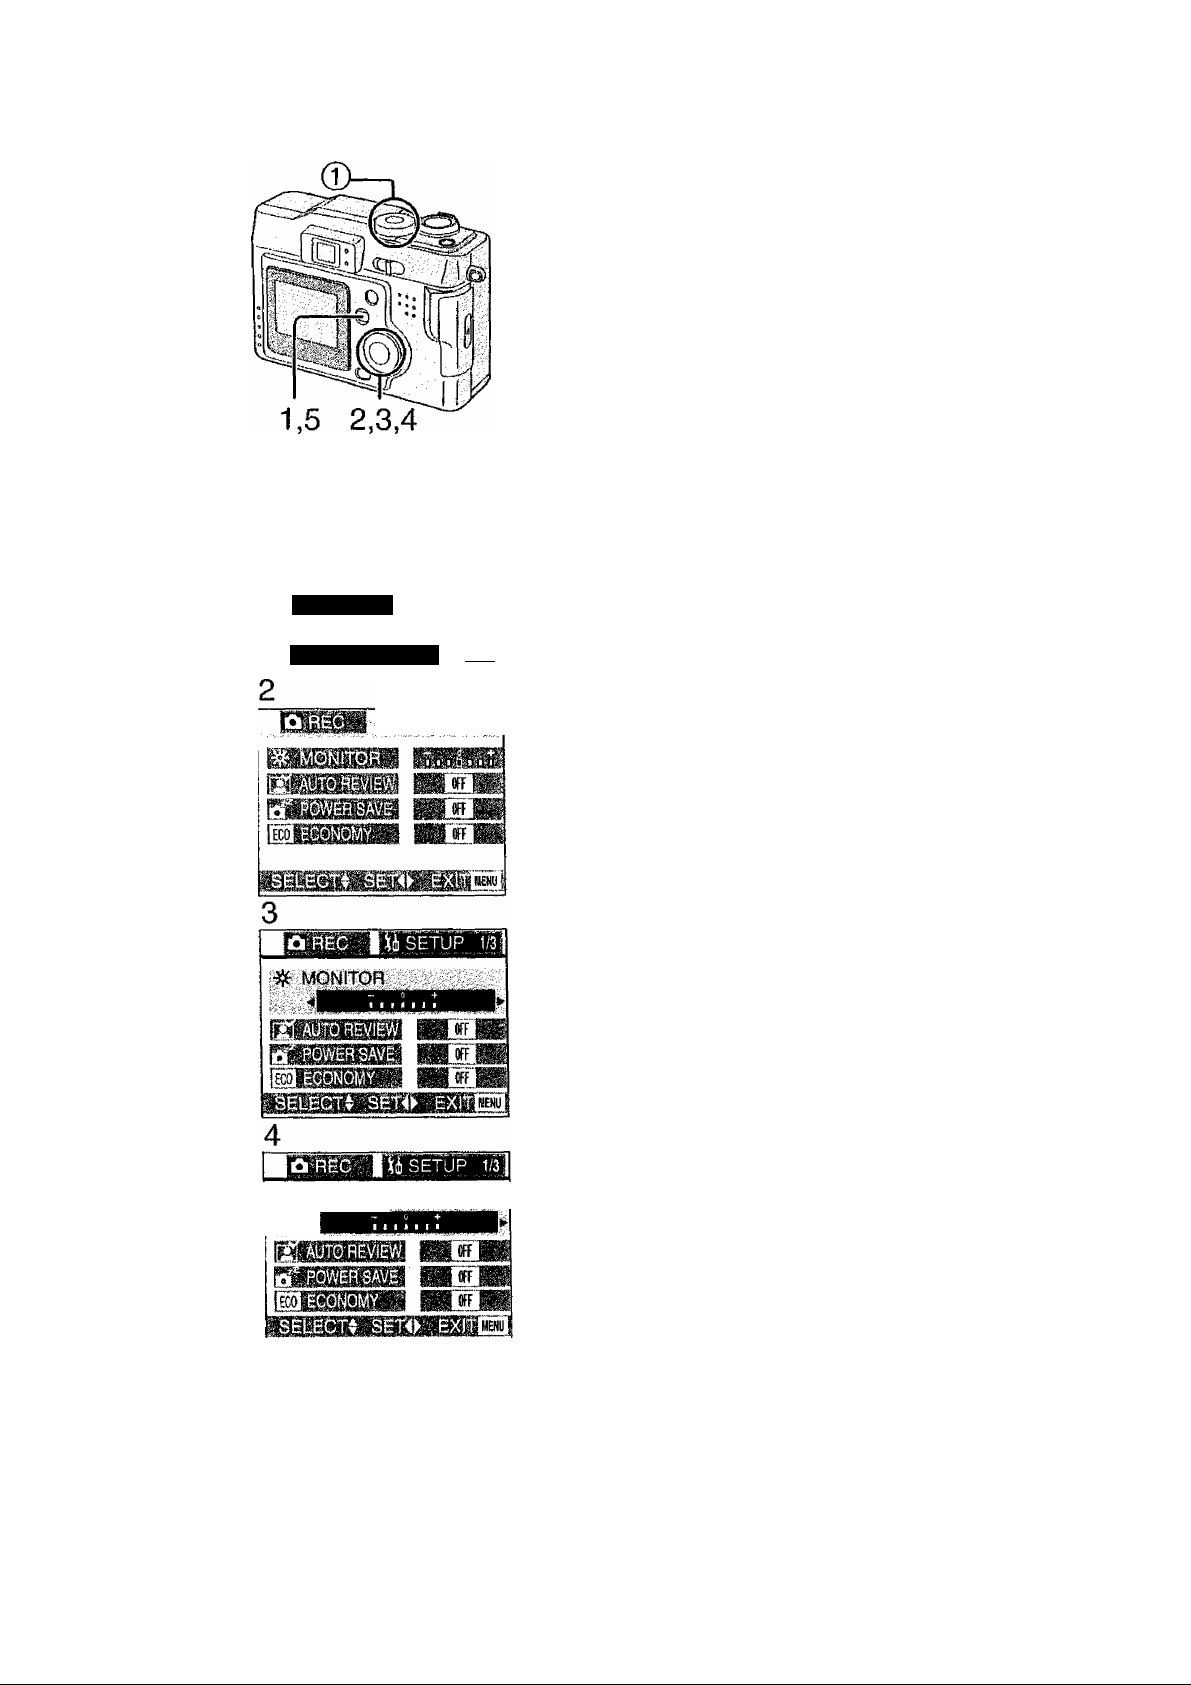
Operating the Menu
The camera menu allows you to configure the
Record and Playback modes, date and time,
and various other operational sounds the
camera produces. Follow these instructions.
[Preparation]
• Set the mode dial to the recording mode
1 Press the [MENU] button.
(except for [V]) or the playback mode.
1
[3Beci/3
&B|
iH
O
SPOT MOD
2304
OFF
jiou]
|®|$ETUP i/3
• If you set the mode dial 0 to the
recording mode, the REC menu is
displayed; if you set it to the playback
mode, the playback menu is displayed.
2 Press 3 Press A/T to choose the item. 4 Press ◄/► to set the item. 5 Press the [MENU] button.
• The menu will disappear.
^ MpNjtpii^
4
24
Page 25
Preparation
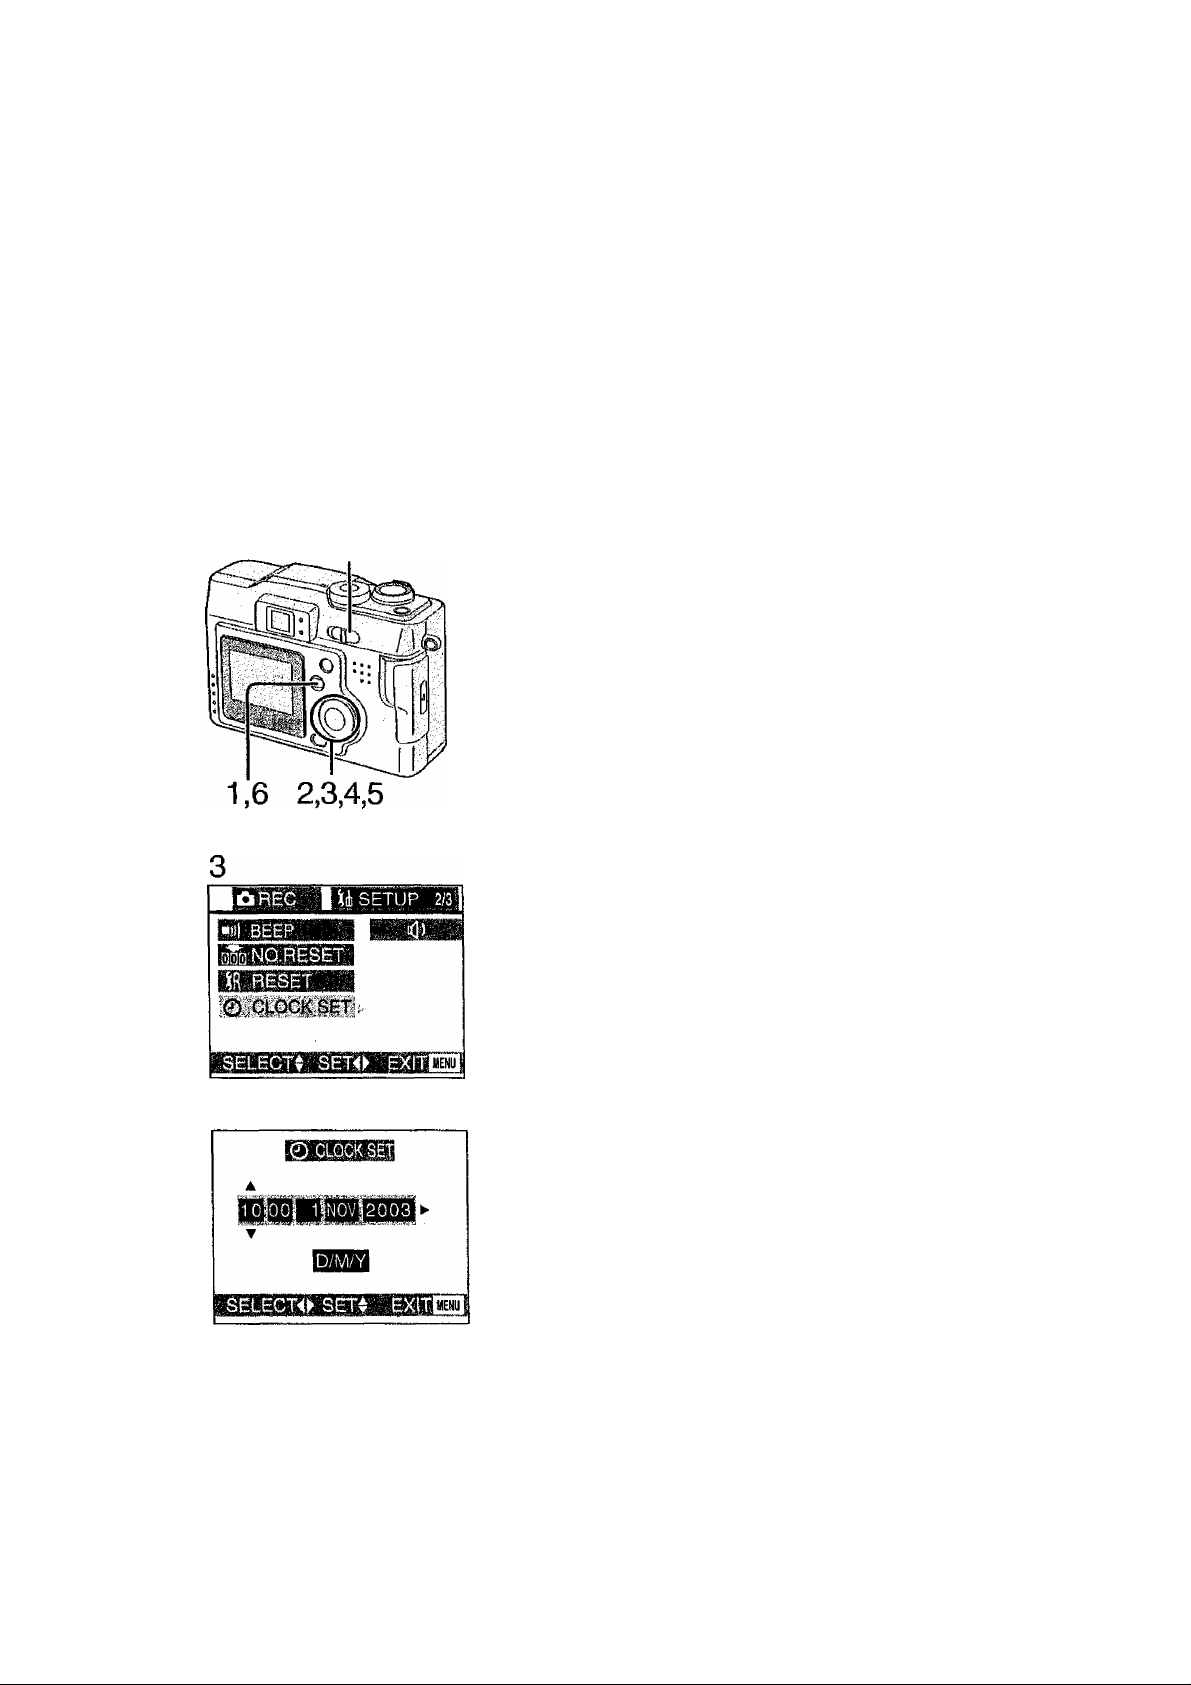
Setting the Date/Time (Clock Set)
If the message [PLEASE SET THE CLOCK]
appears, set the date and time.
You can go to the setup menu by pressing the
[MENU] button while the message is
displayed.
You can set the year from 2003 to 2099. The
24-hour system is used.
1 Press the [MENU] button.
2 Press > to open the setup menu.
• In simple mode, skip this step.
3 Press A/T to select [CLOCK SET],
and then press
4 Press A/V/-^/^ to set date and time,
and then press ^.
5 Press A/V to select [M/D/Y], [D/M/Y] or
[Y/M/D].
4,5
6 Press the [MENU] button 2 times.
• The menu will disappear.
7 Check if the date/time setting is
displayed correctly, after turning the
camera [OFF] and [ON].
When the new batteries are inserted in the
camera for more than 3 hours, the time and
date will be held for approximately 3 months
if the battery is removed. If the batteries
were not new, the time may not be retained
properly. If the time/date setting is lost
please reset it.
Page 26
Taking Pictures
Recording images (basic)
By only pressing the shutter button, the
exposure (shutter speed and aperture value)
will be automatically adjusted and the picture
will be taken.
[Preparation]
• Insert the card. (P17)
• Set the power switch to [ON]. (PI9)
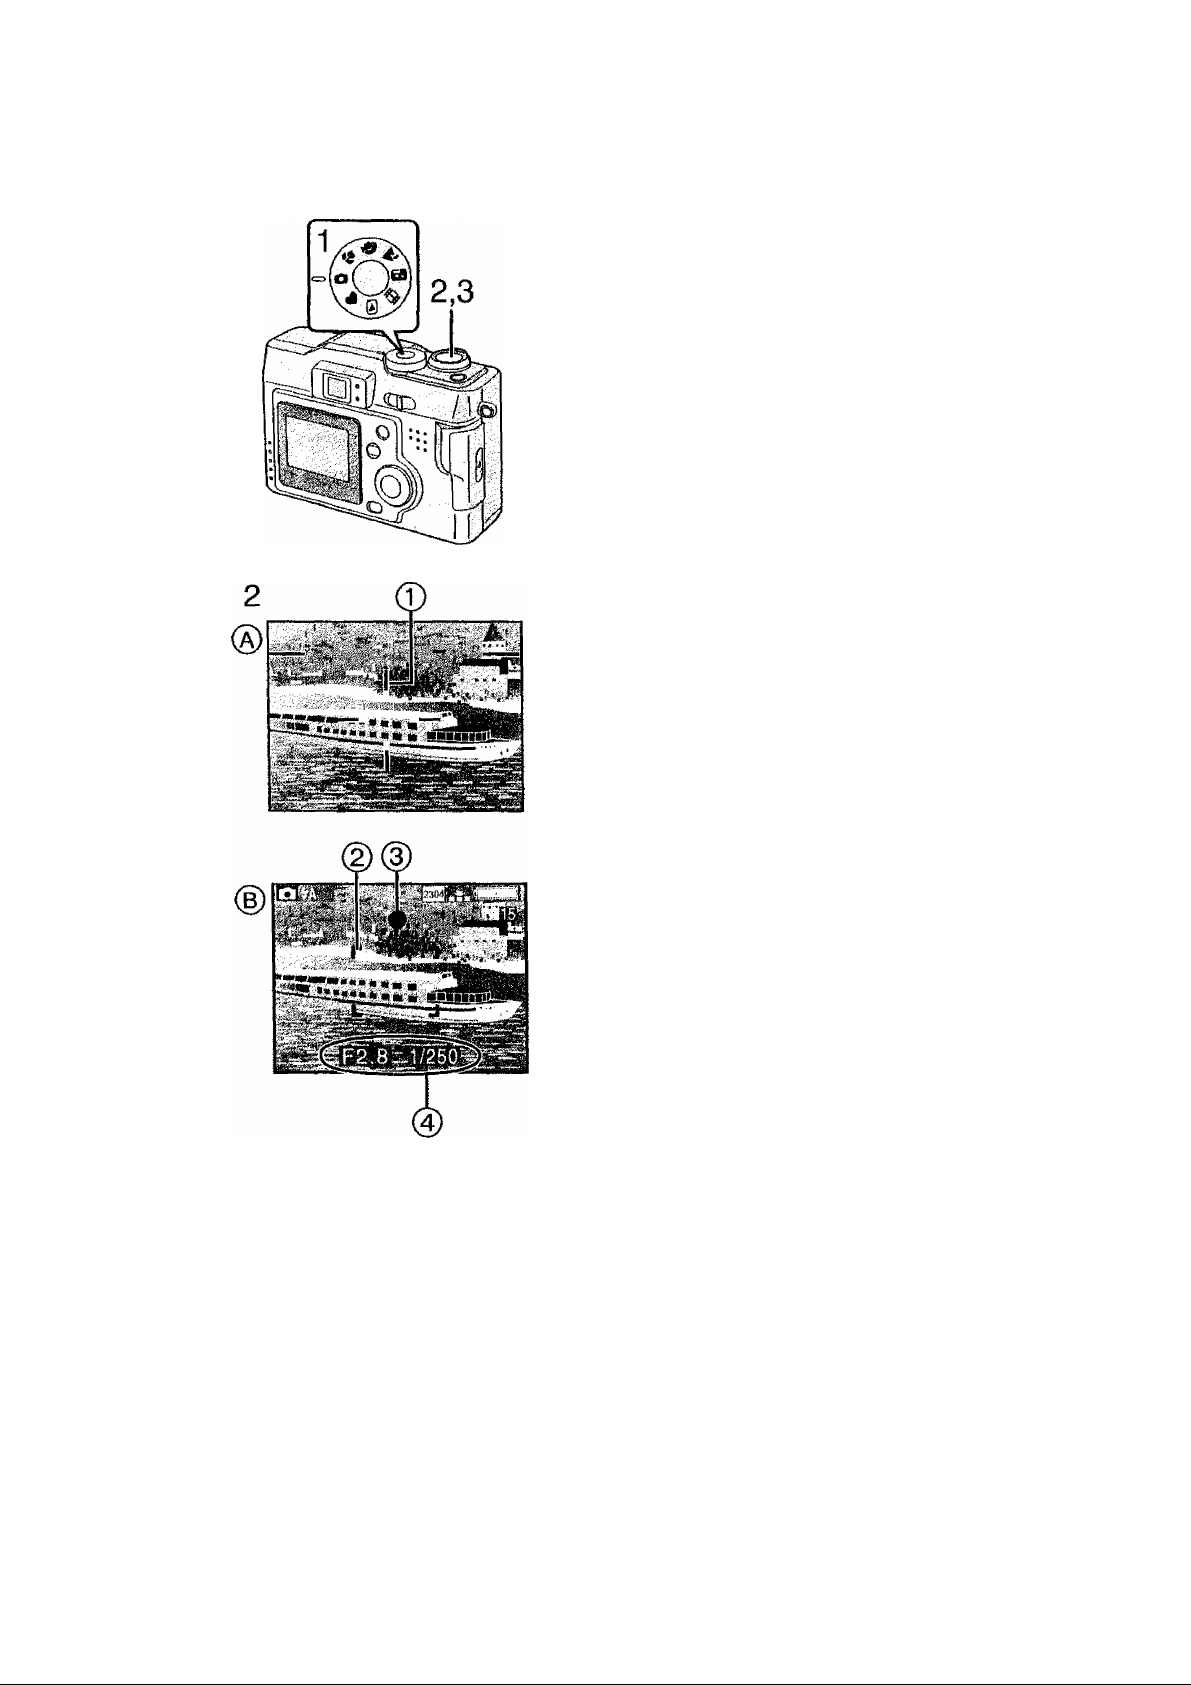
1 Set the mode dial to normal picture
mode [Q1.
2 [® Optical finder]
Center the subject in the AF target 0
inside the optical finder and press the
shutter button halfway.
[(|) LCD monitor]
After centering the subject in the
AF area (2) on the LCD monitor, press
the shutter button halfway.
• When the focus is adjusted, the focus
indication [•] (3) appears.
• When the focus indication flashes, the
focus is not adjusted. Press the shutter
button halfway to adjust the focus again.
• The shutter speed and the aperture value
0 are automatically adjusted and
displayed on the LCD monitor.
• When the subject is out of the AF area,
use the AF/AE lock. (P47)
3 Press the shutter button fully to take
the picture.
• After taking a picture, when the auto
review (P73) is set to [1SEC.]/[3SEC.l,
the picture is displayed on the LCD
monitor for 1 or 3 seconds.
26
Page 27

Recording images (basic)
• If you do not press the shutter button halfway, shutter jiggle may occur or the focus
may not be adjusted properly.
• Even when the focus indication is displayed and the focus is properly adjusted, it
will be cancelled if you release the shutter button.
Press the button halfway again.
• When setting [ECONOMY] to [ON], if you do not operate the camera for approx,
15 seconds, the LCD monitor turns off. {If you press any buttons, the LCD monitor
turns on)
• When power saving time is set, if you do not operate the camera for a while, it is
automatically turned off at the set time. To operate the camera again, press the
shutter button or turn the power switch first to [OFF] and then to [ON]. (P75)
• The brightness of the LCD monitor may differ from that of the recorded pictures. In
particular, when taking pictures In dark places with a long time exposure, darkness
appears on the LCD monitor, but the recorded pictures are bright.
• If the exposure is not properly set, the color of the aperture value and the shutter
speed on the LCD monitor becomes red.
• In the following cases, the focus may not be adjusted properly.
1 Recording a scene including subjects both near and far
2 Recording a scene through dirty glass
3 Recording an illuminated subject
4 Recording in a dark place
5 Recording moving subject
6 Recording a subject with a little contrast
7 Recording with shutter jiggle
• We recommend that you set the clock setting again before taking pictures.
• When the brightness of the LCD monitor changes such as while zooming or
panning, you may hear a click sound from the lens or the image on the LCD
monitor may change suddenly; this is not a malfunction. The sound is caused by
the camera automatically adjusting the aperture value.
• When pressing the shutter button in low light/dark conditions, the LCD monitor
display may become bright or whitish. However, the recorded picture will not be
influenced. This function make it easy to adjust the focus.
About shutter jiggle
• Be careful to prevent shutter jiggle when you press the shutter button.
• When the shutter jiggle can easily occur, the shutter jiggle alert (T) appears.
• We recommend you use a tripod when the shutter jiggle alert appears.
Page 28
Recording images (basic)
Taking Pictures in Simple Mode
• Offering simplified menu for ease of use.
• The picture size is easy to select.
• The icons on the display are shown larger.
We recommend you use this mode when you ask someone to take a picture.
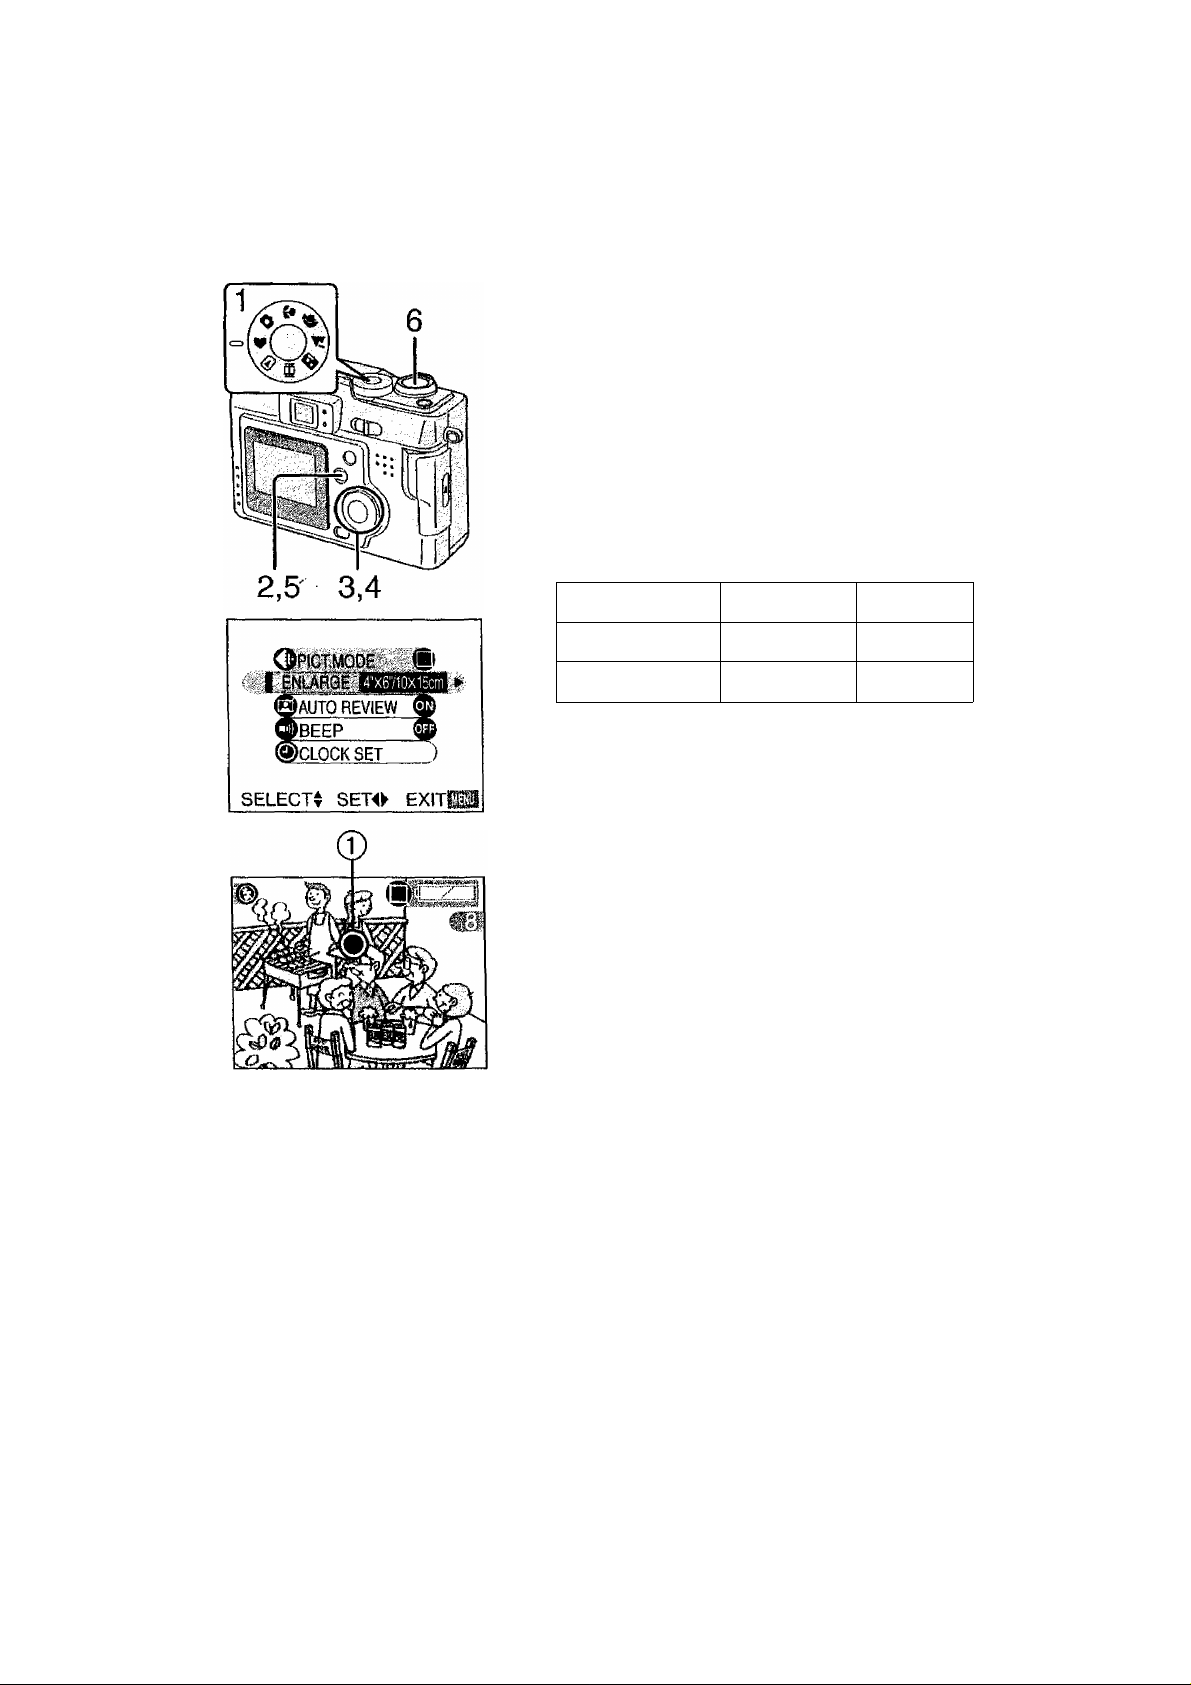
1 Set the mode dial to Simple mode [ V]-
2 Press the [MENU] button.
3 Press A/T to select [PICT.MODE].
• [AUTO REVIEW] (P73)
• [BEEP] (P74)
• [CLOCK SET] (P25)
4 Press to select [ENLARGE],
[4"x6710Xl5cm] or [INTERNET],
ENLARGE
4" X 6710x15cm
INTERNET
[ENLARGE] Selection is intended for
situations when large printing is desired.
The camera is preset to [2304x 1728] in
[Fine] picture mode.
[4" X 6710x15cm] Selection will offer an
easy way to produce small "general
purpose” prints.
[INTERNET] Selection favors smaller file
size, optimized for home page and e-mail
use.
Press the [MENU] button.
5
Take a picture.
6
The burst mode is available only with the low speed. (P52)
If the distance between the camera and the object is beyond the recordable range
(Tele: 50 cm - , Wide; 10 cm - «>), the focus may not be adjusted properly even
if the focus indication © is lit.
The settings (except for the clock setting) of the simple mode will not be applied to
the other recording modes.
Burst mode will not operate as described if a MultiMediaCard type Memory Card is
used.
Only the quality (data compression ratio) cannot be changed on the [PICT.MODE]
menu.
28
2304x1728
1280x960
640x480
Fine
Fine
Standard
Page 29
Recording images (basic)
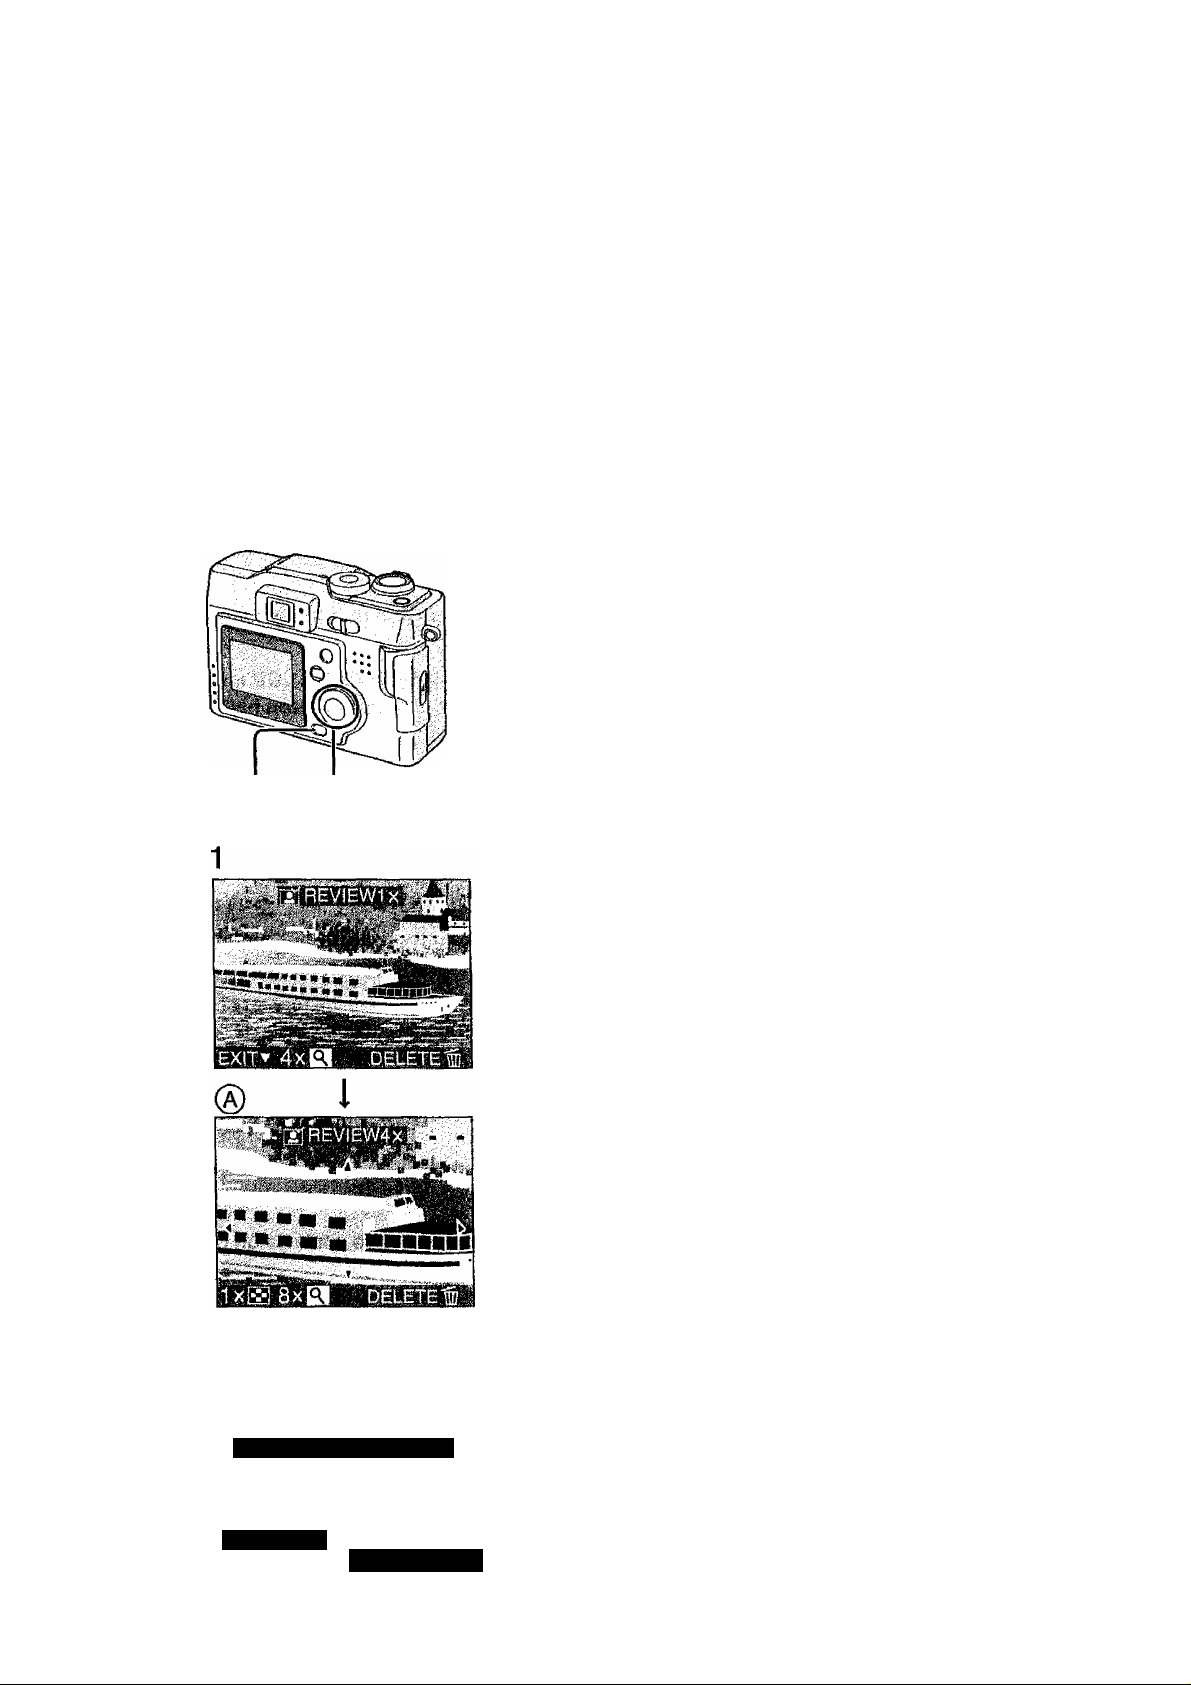
Checking the Captured Picture (Review)
After taking a picture, the Auto review (P73)
feature will cause the captured picture to be
displayed on the LCD monitor for the
designated time — 1 or 3 seconds. You may
also check the picture using the method
described below.
1 After taking a picture, press the
▼/[REVIEW/SET] button.
2 1,3,4
• The last captured picture is dispiayed for
about 5 seconds. If you rotate the zoom
lever towards ], the captured picture is
zoomed 4 times (®) and 8 times if you
rotate it once again. You can also change
the position with
• You can check the previous or following
picture with ◄/►.
■ Erasing the captured picture
during the review
2 Press [^3. 3 When the message [DELETE THIS
PICTURE?] is displayed, press ^ to
select [YES].
4 Press the Y /[REVIEW/SET] button.
• The picture is erased.
• Once erased, pictures cannot be
recovered.
• Multi images or all images can be
deleted. Read pages 59, 60 to operate
them.
Ji/HJOTAULf:
Press the shutter button halfway to cancel
the review.
In motion image mode mi Review cannot
be used.
Page 30

Recording images (basic)
Recording Motion Images
With this camera you can also record motion
images. (If using the supplied 16 MB SD
Memory Card, it is possible to record for up to
about 80 seconds)
1 Set the mode dial to motion image
mode [Ol-
2 Center the subject on the LCD monitor
and press the shutter button halfway.
• When the focus is adjusted, the focus
indication @ [•] appears.
3 By pressing the shutter button fully,
the recording starts.
• The audio REC starts simultaneously.
(Ф Microphone)
4 By pressing the shutter button fully
again, recording stops.
• If during the recording the memory of the
card becomes full, the recording is
slopped automatically.
•
• Audio cannot be played back from this camera. Connect to a television or PC
to play back audio.
• The picture size is fixed to 320x240 pixels.
• The remaining time displayed on the LCD monitor is an approximation.
• You cannot record motion images without audio.
• If using the MultiMediaCard, after recording motion images, the card access
indication and the flash/access indicator may appear for a while, but this is not a
malfunction.
• After recording starts, the auto focus/zoom/white balance/aperture values are
locked (with the first frame).
• Recording could suddenly stop when recording motion images with cards other
than a Panasonic SD Memory Card.
• When the motion image recorded with this camera is played back on other
equipment, the quality of pictures and sounds may be deteriorated or pictures may
not be able to be played back.
• In motion image mode review cannot be used.
30
Page 31

Recording images (basic)
Using the Optical Zoom
The Optical Zoom allows you to bring your
subject up to 3 times closer. It also allows you
to zoom back so that landscape scenes can
be photographed at a wide angle.
[Preparation]
• Set the mode dial except for [(^j. (P23)
1 Aim the camera at the subject and
adjust the size with the zoom lever.
To make subjects closer (Tele):
Rotate towards T.
To make subjects wider (Wide angle):
Rotate towards W.
2 Take a picture.
• The focus is adjusted at a distance of more
than 50 cm. For details on macro mode/
simple mode, read pages 28, 39.
• The picture may be slightly distorted
according to the lens. The distortion will
increase as you make subjects wider and
closer.
•
Page 32

Recording images (basic)
Using the Digital Zoom
The Digital Zoom feature allows you to bring
the subject an additional 3 times closer,
thereby achieving an overall effective 9x
zoom. In some cases the use of Digital Zoom
can cause a slight deterioration of picture
quality.
[Preparation]
• Set the mode dial except for
(P23)
1 Press the [MENU] button.
2 Press A/y to select [D.ZOOM].
3 Press ► to set to [ON].
4 Press the [MENU] button.
♦ The menu will disappear.
The zoom adjustment and recording method
are the same as in "Using the Optical
Zoom”. (P31)
When the digital zoom is set to [ON], the
digital zoom indication © appears.
When entering the digital zoom range, the
zoom bar will pause.
The digital zoom is cancelled when the LCD
monitor turns off.
When using the digital zoom the picture
quality becomes deteriorated.
We recommend that you use a tripod in the
digital zoom range.
32
Page 33

Recording images (basic)
Taking Pictures using the Built-in Flash
[Preparation]
• Set the mode dial except for
[(B]/[2k]/[0]. (P23)
1 Press [i].
• Every time you press [^l, the available
settings will appear as shown below,
(There are settings that cannot be set
according to the REC mode. Those that
cannot be set are not displayed when
pressing [4 ]. Refer to the table on the
left.)
t 4
»s<s>ca^
a
àà,
m
e
Im
0
0
0
GEP
0
i
“
13KÈ
0
0
0
0
™
i
- ~ -
-
—
0
0
0
0
—
- -
ES
0
0
—
0
0
0
-
0
-
0
0
0
0
AUTO
The flash fires automatically according to
the lighting condition.
aBa: AUTO/Red-eye reduction
The flash fires automatically according to
the recording situation.
It reduces the red-eye phenomenon (When
a subject’s eyes appear red in flash light).
Use it when you take pictures of people or
animals in low lighting conditions.
H: Forced ON
The flash fires every time a picture is
captured.
Use this setting when your subject is
back-lit or under fluorescent light.
Page 34

Recording images (basic)
Slow
When you take a picture with a dark
background landscape, it makes the flash
fire and the shutter speed slow, so that the
dark background landscape will become
bright. Simultaneously it reduces the
red-eye phenomenon. We recommend that
you use a tripod.
Forced OFF
Even being in dark places, the flash does
not fire.
Set it when you take pictures in places
where using flash is not allowed.
sync. /R ed- eye re duct io n
Do not stare at the flash light from close proximity when using the flash.
The available flash range is about 50 cm -140 cm (Tele), 30 cm-2,4 m (Wide).
When the shutter jiggle alert is displayed within the available flash range, we
recommend using the flash.
Do not cover the flash sensor (T) with your fingers or other items. Otherwise,
brightness cannot be perceived.
In landscape mode ["¡¡^ ]/motion Image mode lOl* setting is fixed to the
Forced OFF [fmi
When you set to burst mode or auto bracket, only 1 picture is taken for every flash
firing.
' The flash indication becomes red when pressing the shutter button halfway.
' When the flash/access indication (|) and the flash indication blink red, you cannot
take a picture even when you press the shutter button fully.
' If the battery indicator is less than hr^l or setting [ECONOMY] to [ON], the LCD
monitor turns off during charging the flash.
' When using the flash, do not let subjects get too close to the flash. The shape or
color of subjects may be changed because of the heat and light of the flash.
• When taking a picture with the flash, the white balance will be automatically
adjusted (tor AUTO and Halogen mode), but the white balance may not be
properly adjusted when the Photo Flash is insufficient.
• When taking a picture with the flash after setting the white balance manually, the
white balance may not be properly adjusted. We recommend setting the white
balance to [AUTO] when using the flash. (P49)
34
Page 35

Recording images (basic)
Taking Pictures with the Self-timer
Using the Self Timer feature, you can be part
of the picture. The camera will automatically
take a photo either 2 or 10 seconds after the
shutter button is pressed.
[Preparation]
• Set the mode dial except for [® ]/[Ol-
(P23)
1 Press the [(;^] button.
• Every time you press it, what is displayed
changes as shown below.
1(10 s) l(2s)
lal: Self-timer set to 10 seconds
i™: Self-timer set to 2 seconds
When these indicators are not displayed,
self-timer setting is cancelled.
OFF
2 Press the shutter button fully.
• The self-timer indicator© blinks and the
shutter is activated after 10 seconds (or
2 seconds).
• When setting the self-timer, the focus and
exposure are not adjusted by pressing the
shutter button halfway. When pressing the
button fully, they are automatically
adjusted just before recording.
• If you press the [MENU] button when the
self-timer is set, the self-timer setting is
cancelled.
In simple mode [ V]> you can only set to 10 seconds [Bfll].
In burst mode, the self-timer setting applies to the first picture only.
We recommend you using a tripod when setting the self-timer.
Page 36

Recording images (advanced)
Taking Pictures with Audio
You can take a picture with audio for
5
5 seconds.
[Preparation]
• Set the mode dial except for
[® (P23)
1 Press the [MENU] button.
2 Press A/T to select [AUDIO REC.]. 3 Press > to set to [ON], 4 Press the [MENU] button.
• The menu will disappear.
• This Icon [|J] will appear on the LCD
monitor.
5 Press the shutter button fully and take
a picture.
2,3
■
OFF
HHri
sexo exitEII
• It is not necessary to continue pressing
the shutter button.
• Audio is recorded from the built-in
microphone © of the camera.
• 5 seconds later, the audio recording is
stopped automatically.
• If you press the [MENU] button during the
audio recording, it will be cancelled.
Audio cannot be played back from this
camera. Connect to a television or PC to
play back audio.
Using this feature will result in fewer images
being able to be saved.
When setting to burst mode/auto bracket, it
is not possible to take a picture with audio.
(P46, P52)
The picture with audio cannot be resized or
trimmed. (P68, P69)
36
Page 37

Recording /mages (advanced)
Changing the Picture Size
You can choose among 4 picture size
settings.
[Preparation]
• Set the mode dial except for
[®]/[VMO].(P23)
1 Press the [MENU] button.
2 Press A/T to select [PICT.SIZE].
3 Press to select the picture size.
1,4 2,3
2,3
REC1/3iU SETUP
0
2304
: 2304x1728 pixels
1600
; 1600x1200 pixels
1280
: 1280x960 pixels
640 ; 640x480 pixels
B1PICT.SIZE
ÎS QUftLiiTY . ■
lisi
SPOT-MODE
s0léoti::;set^Iî:;: exit
In motion image mode [Ol. the picture size is fixed to 320x240 pixels.
The smaller the picture size you select, the more pictures you can store on the
Memory Card. In addition, a small data volume allows you attach the picture to an
e-mail or post it on a web site more easily. If you select a larger picture size, the
printed picture will be clearer, especially with larger sized prints.
16Q0 1230 640
UEKU
Press the [MENU] button.
The menu will disappear.
Page 38

Recording images (advanced)
Changing the Quality (Data Compression Ratio)
You can choose among 2 quality levels. (Data
Compression Ratio)
[Preparation]
• Set the mode dial except for
[{ByiVMOl- (P23)
1 Press the [MENU] button.
2 Press A/Y to select [QUALITY].
3 Press ◄/► to select the quality (Data
Compression Ratio).
•H : Fine (Low compression)
It gives priority to picture quality to
record high quality pictures.
• Bi; Standard (Standard compression)
It gives priority to the number of
recordable pictures and records
standard quality pictures.
4 Press the [MENU] button.
• The menu will disappear.
Picture size/Quality and number of recordable pictures (16 MB/64 MB SD Memory
Card)
Picture size
2304x1728
1600x1200
1280x960
640x480
!n motion
image mode
The numbers shown in the table are approximate numbers. The number of
recordable pictures changes depending on the subject.
It may happen that pictures appear like a mosaic depending on the scene
characteristics.
Remaining frame which is displayed on the LCD monitor may not correspond with
recorded frames, however, this is not a malfunction.
16 MB (supplied)
PLfl
oTa
8 16
17 34
22 43
69
ts
129
80 seconds 350 seconds
64 MB (optional)
LLU
35 70
74 149
96
298
184
553
38
Page 39

Recording images (advanced)
Taking Pictures using Macro Mode
When you take pictures from a distance closer
than 50 cm (Tele), set the camera in macro
mode [^]. This allows you to get closer to the
subject up to 10 cm (Wide).
Macro Mode [¿fi]
50 cm
1
------------
10 cm
W
Normal recording
T
w
50 cm
1
1
50 cm
1 ,
oo
1 Set the mode dial to Macro mode
2 Take a picture.
Select the flash setting depending on the situation. (P33)
The available flash range is about 50 cm -140 cm (Tele), 30 cm - 2.4 m (Wide).
When the shutter jiggle alert is displayed within the available flash range, we
recommend using the flash.
When the camera lens is at a distance over the available range from the subject,
focus may not be adjusted even if the focus indication appears.
When selecting the macro mode, optical finder functionality is limited. Use the
LCD monitor.
Page 40

Recording images (advanced)
Taking Pictures using Portrait Mode
This mode allows you to easily achieve the
depth of focus effect. The subject stands out
in front of an unfocused background.
We recommend placing the subject much
closer and allowing for proper distance
between subject and background.
Please note that this mode is suitable for
outdoor situations under sunlight.
1 Set the mode dial to Portrait mode [ ^ ]. 2 Take a picture.
[AUTO] setting in [W.BALANCE] makes on recording outdoors in the daytime.
When using indoors, the color balance can change. You can change the white
balance setting. (P49)
40
Page 41

Recording images (advanced)
Taking Pictures using Landscape Mode
In Landscape mode the camera is adjusted to
produce the greatest depth of field. This mode
works best outdoors under direct sunlight at
distances exceeding 10 m.
1 Set the mode dial to Landscape mode
[¡4]-
2 Take a picture.
• Flash is set to Forced OFF
• The focus is adjusted at a distance of 10 m - co (Tele), 3 m - oo (Wide).
• [AUTO] setting in [W.BALANCE] makes on recording outdoors in the daytime.
When using indoors, the color balance can change. You can change the white
balance setting. (P49)
Page 42

Recording images (advanced)
Taking Pictures using Night Portrait
Mode
The Night portrait mode combines the
electronic flash with a “slow shutter*' mode.
This unique feature allows you to photograph
close subjects against the natural night
background. Since the shutter speed is slow,
we highly recommend using a tripod to steady
the camera.
The subject should be positioned within the
available flash range. (Tele; 50 cm -140 cm,
Wide: 30 cm-2.4 m)
We recommend you to set the zoom lever
towards W.
1 Set the mode dial to Night portrait
mode [0].
2 Take a picture.
When flash is set to Forced OFF [^3), you can capture the night illumination
scenery itself with slower shutter speed. (Max: about 8 seconds)
When taking a picture in a dark place, noise may appear. To avoid noise, we
recommend setting the picture adjustment to [NATURAL]. (P48)
42
Page 43

Recording images (advanced)
Using the Color Effect
This function enables the use of 3 kinds of
color effects.
[Preparation]
• Set the mode dial except for
[(BwvMBi. (P23)
1 Press the [MENU] button.
2 Press A/T to select [COL.EFFECT].
3 Press to select [OFF], [COOL],
[WARM] or [B/W].
• COOL: The picture becomes bluish.
2,3
REC2/3 gmSETUF
H
m sE.rij6(TiyiTt
mo\o BEc;
• WARM: The picture becomes reddish.
• B/W: The picture becomes black and
white.
4 Press the [MENU] button.
• The menu will disappear.
• The indication [|cooD/|M1/[B/wl] © will
appear.
/IQ
Page 44

Recording images (advanced)
Taking Pictures using Spot Mode
When this mode is selected, both the focus
and the exposure will be adjusted to spot on a
limited area. This is suitable when you take
pictures in delicate light conditions and intend
to take a picture of a specific area.
[Preparation]
• Set the mode dial except for
(P23)
1 Press the [MENU] button.
1,4 2,3^^
2 Press A/r to select [SPOT MODE]. 3 Press ► to set to [ON]. 4 Press the [MENU] button.
• The menu will disappear.
• The spot AF area l j © and spot
metering target + © appears.
5 Center the subject in the spot AF area. 6 Take a picture.
When the subject is dark, the focus may not be adjusted properly.
Background may become dark or whitish depending on the subject which is being
set to the appropriate exposure in the spot AF area.
If the subject is out of the spot AF area, use the AF/AE lock. (P47)
44
Page 45

Recording images (advanced)
Compensating the Exposure
In some situations the illumination of the
background and your subject may differ. Auto
exposure systems may not always calculate
the exposure correctly. This is a normal
situation. This feature allows you to manually
compensate the exposure.
[Preparation]
• Set the mode dial except for
[®]/[Wrai. (P23)
1,2,3
1 Press the [¡^ l^ ] button.
2 Press </>• to compensate the
exposure.
• You can compensate from -2 EV to +2
EV with 1/3 EV step.
(EV is an abbreviation of Exposure Value,
and it is the amount of light given to the
CCD by the aperture value and the
shutter speed)
• The compensation state may be different
from the recorded picture. Confirm the
playback picture.
3 Press the T/{REVIEW/SET] button.
• The compensation window will close.
• The compensation state is not reflected
by the brightness of the LCD monitor.
• The exposure compensation indication ®
will appear.
4 Take a picture.
•
• Depending on brightness of the subject, the range which is possible to
compensate the exposure will be limited.
Page 46

Recording images (advanced)
Taking Pictures using Auto Exposure
(AE) Bracket
Pressing the shutter button once, the camera
will automatically take 3 pictures changing
exposure according to the set exposure
compensation value.
[Preparation]
• Set the mode dial except for
[CE)]^[V]/[Ol.{P23)
1 Press the [|2 Iglj ] button 2 times to
select [igjj AUTO BRACKET].
2 Press then press ◄/► to set the
exposure compensation range.
• OFF
• -1 EV- + 1 EV
(1/3 EV step)
3 Press the T/[REVIEW/SET] button.
• The compensation window will close.
• The auto bracket indication © appears.
4 Take a picture.
• Once you take a picture, auto bracket will be cancelled automatically.
• When flash fires, you can take only 1 picture. Auto bracket setting cannot be
cancelled.
• When setting auto bracket, you cannot take a still picture with audio.
• Depending on brightness of the subject, the range which is possible to
compensate the exposure pictures using auto bracket will be limited.
46
Page 47

Recording images (advanced)
Using the AF/AE Lock
Normally, the camera focuses in the center
area of the picture. Depending on how you
compose the photo, your subject may not be
in the center. Using AF/AE Lock you can
focus on your subject, reposition the camera,
and the camera wifi maintain proper focus.
AF: Auto focus
AE: Auto exposure
[Preparation]
• Set the mode dial except for [(3]. (P23)
1 Aim the camera at the subject on
which you want to adjust the focus to
enter the AF area @ on the LCD
monitor and then keep pressing the
shutter button halfway (AF/AE lock).
• When the focus is adjusted, the focus
indication (i) [•] appears.
2 Move the camera keeping the chosen
composition and press the shutter
button all the way.
Before pressing the shutter button, you can
set the AF/AE lock again and again.
Page 48

Recording images (advanced)
Adjusting the Color Tone or the
Contrast (Picture Adjustment)
This function enables to adjust the color tone
or the contrast.
[Preparation]
• Set the mode dial except for
l(E)]/[¥]/[EBl- (P23)
1 Press the [MENU] button. 2 Press A/T to select [PICT.ADJ.].
1,4
3 Press ◄/► to select [NATURAL],
[STANDARD] or [VIVID].
• [NATURAL]; The picture becomes softer.
• [VIVID]; The picture becomes sharper.
4 Press the [MENU] button.
• The menu will disappear.
When using Vivid mode in low light situations it is possible that a slight increase in
color noise will be seen. Proper lighting is recommended.
48
Page 49

Fiecording images (advanced)
Setting the White Balance
Auto White Balance is designed to
automatically adjust the camera to produce
natural flesh tones. In most situations it works
fine. In some situations where several
different types of lighting are present,
enhanced performance can be achieved by
setting the white balance manually.
[Preparation]
• Set the mode dial except for
1 Press the [MENU] button.
(P23)
2,3
REC1/3
H
CH ^ * -A-
ri
.strQUAMTV-::;
ED SPOTMODE;
.SaeCT^'.-S® EXIT
2304
2 Press A/T to select [W.BALANCE].
3 Press to select the mode.
• AUTO: if the auto white balance is set
• 13 (Daylight):
for recording outdoors on a bright day
• n (Cloudy):
for recording under a cloudy and shady
sky
• ISi (Halogen):
for recording under halogen lighting
• 19 (White set):
for manual setting (Read the following
page where the manual setting is
explained in detail)
4 Press the [MENU] button.
• The menu will disappear.
The setting of the white balance is applied to the other recording modes.
In simple mode [^1 or motion image mode [ei. the white balance is fixed to
[AUTO].
When taking a picture with the flash, the white balance will be automatically
adjusted (for AUTO and Halogen mode), but the white balance may not be
properly adjusted when the flash light is insufficient.
Page 50

1,6 2,3,4
Recording images (advanced)
To set manually (White set)
Here the white set mode of white balance is
explained.
[Preparation]
• Set the mode dial except for
[(Bl/iVFlOl- (P23)
1 Press the [MENU] button.
2 Press A/T to select [W.BALANCE],
3 Press ◄/► to set to white set [Q].
Only when setting the white balance again
4 Press ►.
• The message "FRAME THE CAMERA AT
THE WHITE SURFACE AND PRESS
SHUTTER” is displayed.
5 Aim the camera at a sheet of white
paper 0 or simiiar object so that It
compietely fills the frame to white on
the screen and press the shutter
button all the way.
IFRAME THE CAMERA
AT THE WHITE SURFACE!
[AND PRESS SHUTTER
CAN0Elh
• White balance is set.
6 Press the [MENU] button.
• The menu will disappear.
When taking a picture with the flash after
setting the white balance manually, the
white balance may not be properly adjusted.
We recommend setting the white balance to
[AUTO] when using the flash.
HE№
50
Page 51

Recording images (advanced)
Setting ISO Sensitivity
The ISO setting adjusts the camera’s
sensitivity to light. Generally, the lower the
ISO setting, the better the picture quality will
be. Increasing the ISO value will make the
camera more sensitive in low light.
[Preparation]
• Set the mode dial except for
[(SMVllOl- (P23)
1 Press the [MENU] button.
2 Press A/T to select [SENSITIVITY],
2,3
50 100 2C
I3.D.-Z0QM ■
..:seiEGT4.'.s£T<^-.Exn:
3 Press to select the sensitivity.
• AUTO: The ISO sensitivity is
automatically adjusted. If your picture is
still too dark, please use the flash.
1SO50
ISO100
ISO200
i
Press the [MENU] button.
The menu will disappear.
In motion image mode lei or simple mode [%0], ISO sensitivity is fixed to
[AUTO].
When you take a picture in high ISO sensitivity, picture noise appears and the
picture quality deteriorates.
Page 52

Recording images (advanced)
Taking Pictures using Burst Mode
By continuously pressing the shutter button, it
is possible to record in burst mode.
Burst
speed
4 frames/
second
g<iL
[Preparation]
• Set the mode dial except for
(P23)
2 frames/
second
Number of recordable
pictures
rYH
5 frames 7 frames
5 frames
a
7 frames
1 Press [E^].
Every time you press it, what is displayed
changes as shown below.
OFF
_i
Qi|H: High speed
Oil L: Low speed
When these indicators are not displayed,
burst mode is cancelled.
2 Press the shutter button halfway to
lock the focus, then press it fully to
take pictures in sequence.
• It is possible to record 4 frames in 1 second
in high speed burst mode, at a shutter
speed higher than 1/60, but the flash does
not fire simultaneously.
• If the flash fires, it is possible to record only
1 frame.
• In simple mode [|^], the shutter speed is
fixed to the low speed. (P28)
• You cannot take still pictures with audio in
the burst mode.
• Burst mode will not perform as described if
a MultiMediaCard is used in place of SD
Memory Card. The reading/writing speed of
MultiMediaCard is slower than SD Memory
Card.
52
Page 53

Playback
Playing Back Still Pictures
1 Set the mode dial to playback E®].
• The last recorded picture is played back.
2 Press < to play back the previous
picture.
Press to play back the next picture.
• Every time you press ◄/►, the previous
(or next) picture is played back.
• The first picture follows the last one.
[Fast forwarding/Fast rewinding]
During playback, continue pressing ◄/►.
► ; Fast forward
◄ ; Fast rewind
• The file number increases/decreases. When
releasing ◄/►, the picture corresponding to
the current file number is displayed.
This camera is based on the DCF standards (Design rule for Camera File system)
which were established by the Japan Electronics and Information Technology
Industries Association (JEITA).
The file format that can be played back with this camera is JPEG. (There are also
pictures that cannot be played back in JPEG format)
When playing back still pictures that have been recorded with other equipment, the
quality of pictures may be deteriorated and pictures may not be able to be played
back.
When changing the folder name or file name on PC, the pictures may not be able
to be played back.
Page 54

Playback
Playing Back Still Pictures with Audio
1 Set the mode dial to playback [CB1-
2 Press ◄/► to select the f ile with audio
icon
3 Press the T/[REVIEW/SET] button to
play back the audio.
2,3
©■
Audio cannot be played back from this
camera. Connect to a television to play
back audio.
54
Page 55

Playback
9 Images Multi Playback
It is possible to display 9 images at once.
[Preparation]
• Set the mode dial to playback [[0]. (P23)
1 During playback, rotate the zoom lever
towards fEH]-
• Multi playback (9 frames) starts.
2 Press to select images.
• To return to the normal indication, rotate
the zoom iever towards [C^]. The image
with the file number colored in yellow is
displayed.
Page 56

Playback
Using the Playback Zoom
During playback it is possible to enlarge
pictures. (2 times/4 times/8 times/16 times)
[Preparation]
• Set the mode dial to playback [¡^]. (P23)
1 During playback, rotate the zoom lever
towards [C^].
• The more the zoom lever rotates towards
[C^], the more the zoom magnification
ratio increases.
• The more the zoom lever rotates towards
[El ], the more the zoom magnification
ratio decreases.
• Use A/T/-^/^ to change the area to be
enlarged.
■ To delete a picture during the
playback zoom
Press [^].
When this message is displayed "DELETE
THIS PICTURE?”, press to select
[YES], and press the T/[REVIEW/SET]
button. (P58)
The more the zoom magnification increases, the more the picture quality
deteriorates.
The playback zoom may not operate if pictures have been recorded with other
equipment.
56
Page 57

Playback
Playing Back Motion Images
[Preparation]
• Set the mode dial to playback [(5]. (P23)
1 Press ◄/► to select the file with the
motion image icon (D-
2 Press the ▼/[REVIEW/SET] button to
play back the motion image.
• By pressing T, motion image playback
will stop.
• The Icon (2) is corresponding to the
button.
[E] m
During motion image playback, continue
pressing
►; Fast forward
◄ : Fast rewind
• When releasing the button, it turns to
normal motion image playback.
[To pause]
Press A during motion image playback.
[Fast forwarding/Fast rewinding]
• Press ▲ again to cancel pause.
• Audio cannot be played back from this camera. Connect to a television or PC
to play back audio.
• The play back zoom cannot be used while playing back motion images.
• The file format that can be played back with this camera is QuickTime Motion
JPEG.
• It could happen that the Motion JPEG file recorded by a PC or other equipment
cannot be played back with this camera.
• When playing back motion images that have been recorded with other equipment,
the quality of images may be deteriorated or images may not be able to be played
back.
• When using a high capacity Memory Card, it is possible that fast rewinding may be
slower.
•
Page 58

Deleting Images
2,3
#'dfetET,E SiNGie
Editing
Images recorded on the card can be deleted.
Once deleted, images cannot be recovered.
[Preparation]
• Set the mode dial to playback [[0]. (P23)
• When an image is protected, it cannot be
deleted. Cancel the protect setting. (P64)
[Delete single image]
1 Press to select the image to be
deleted.
2 Press [-§].
3 Press ◄ to select [YES].
4 Press the T/[REVIEW/SET] button.
• The selected image is deleted.
tiETV MULTI/ALLS
58
Page 59

Editing
[Delete multi images]
It is possible to delete up to 50 images all at
once.
1
Press [^] 2 times.
2
Press A/T to select [MULTI DELETE]
and then press
3 Press to select the images to be
deleted.
1,5 2,3,4,6,7
3,4
^ MULTI DELETE
SELECT^► DELETE
MARK/UNMARK^ ^EXITH
4 Press the ▼/[REVIEW/SET] button.
• The selected images are displayed with
[|p]. Pressing the T/[REVIEW/SET]
button again, the setting is cancelled.
• The indication [l^] blinks red if the
selected image is protected. Cancel the
protect setting. (P64)
5 Press [^]. 6 When this message is displayed
“DELETE THE PICTURES YOU
MARKED?”, press M to select [YES].
7 Press the T/[REVIEW/SET] button.
• The selected multi images are deleted all
at once.
Page 60

Editing
[Delete all images]
Once deleted, images cannot be recovered.
1 Press [^] 2 times.
2 Press A/T to select [ALL DELETE]
and then press
3 When this message is displayed
“DELETE ALL PICTURES?”, press ◄
to select [YES].
4 Press the T/[REVIEW/SET] button.
♦ Images that are protected or out of DCF
standards (P53) are not deleted.
Do not turn the power switch off or remove
the card during deleting.
When the remaining power is low or many
pictures are deleted, use the batteries which
the remaining power is enough or AC
adaptor (optional, DMW-AC2).
60
Page 61

Editing
Writing the Print Information to the
Card (DPOF Setting)
DPOF is the abbreviation for Digital Print
Order Format. This feature allows you to
designate which images will be printed. Some
photo printers as well as many commercial
photo-processing companies support DPOF,
[Preparation]
• Set the mode dial to playback [(Q]. (P23)
[Single copy setting]
1 Press the [MENU] button.
2,3
PLAY1/2
PBIBi
i> AUDlQ'DUB.^:
I m
11
CANC^
ij«!!]
2 Press A/T to select [DPOF PRINT]
and then press
3 Select [SINGLE] and then press
4 Press ◄/► to select 1 image.
5 Press A/T to select the number of
sheets.
• The number of sheets can be set from 1
to 999.
6 Press the [MENU] button 2 times.
• The menu will disappear.
[To cancel]
Set the number of sheets to 0 in step 5 of the
[Single copy setting].
Page 62

Editing
[Multi copy setting]
1 Press the [MENU] button.
2 Press A/T to select [DPOF PRINT]
and then press ^.
3 Press A/T to select [MULTI] and then
press ►.
4 Press to select the image. 5 Press A/V to select the number of
sheets.
• The number of sheets can be set from 1
to 999.
6 Repeat steps 4 and 5, and at the end
press the [MENU] button 2 times.
• The DPOF setting of multi images is set
at once.
• The menu will disappear.
[To cancel]
Set the number of sheets to 0 in step 5 of the
[Multi copy setting].
If the file is not based on the DCF standard,
the DPOF setting cannot be set.
DCF is abbreviation of [Design rule for
Camera File system], stipulated by JEITA
[Japan Electronics and Information
Technology Industries Association].
When using the DPOF feature, this camera
will overwrite any previous DPOF settings
made by other products.
62
Page 63

Editing
[To cancel all settings]
1 Press the [MENU] button.
2 Press A/T to select [DPOF PRINT]
and then press
3 Press A/T to select [CANCEL] and
then press
4 When this message is displayed
“CANCEL ALL DPOF PRINT
SETTINGS?”, press ◄ to select [YES].
2,3
PLAYt/2
B
Or> PBOTECTi ^^
ilWBWSWH
BEirasBiiBM
i AUDIO DUB,:-
;iV;GAr^lGeC.AtiUlíPOi
CANGEt-ALL DPap;::
:^PR1MT SE^WS^ ;
SELECT^»“ SETT
■ii>;DPOF INDEX
SBTWEX:PR!.N№
SiNGUE;:
mm;-:
5 Press the T/[REVIEW/SET] button.
• All DPOF settings are cancelled.
6 Press the [MENU] button.
• The menu will disappear.
[Index setting/to cancel]
1 Press the [MENU] button.
2 Press A/T to select [DPOF PRINT]
and then press
3 Press A/T to select [INDEX] and then
press >•.
4 When this message is displayed “SET
INDEX PRINT?”, press M to select
[YES].
• When the index is already set, the
message ® “SET/CANCEL INDEX
PRINT?” is displayed.
Press ◄/► to select [SET], [CANCEL] or
[NO].
®
SELECT^^
KTO-BiaiiiiHa
set/cancel;]ndex;
PRINTS
SET CANCEL
SELECT^^
■'SErri
5 Press the T/[REVIEW/SET] button.
• All images are set/cancelled.
6 Press the [MENU] button.
• The menu will disappear.
SETT
CO
Page 64

Editing
Protecting Images on the Card
Using this feature, important photos can be
protected from accidentally being deleted.
This feature cannot protect photos or any
data on the Card if the entire card is
formatted.
[Preparation!
• Set the mode dial to playback [(Щ]. (P23)
[Single setting/to cancel]
1 Press the [MENU] button.
2 Press Ж /Т to select [PROTECT] and
then press ^.
3 Press Ж/Т to select [SINGLE] and
then press >.
rmmm
iffl I ЩшЗйЗ|ЬЯй^Щ8вя
4,5
(i>
■' Qfei '■’'«rii'T -i ► ‘ ■
SET/CANCEL’T ЕХ1ТШ
Formatting the card will erase all the data on the card, even if you protect the
images in this procedure.
When trying to delete a protected file, these messages are displayed 'THIS
PICTURE IS PROTECTED” or “PROTECTED PICTURES REMAIN
UNDELETED". If you want to delete this file, cancel the protect setting first.
The protect setting may not be effective in other products.
Sliding the SD Memory Card Write-Protect switch to [LOCK] prevents the picture
from deletion even if the protection is not set.
The audio dubbing cannot be used with protected images. (P67)
lOOSOOOl
№№01
4 Press to select 1 image. 5 Press the T/[REVIEW/SET] button.
• The protect icon 0 appears.
• By pressing T/[REVIEW/SET] again, the
protection is cancelled and the icon will
disappear.
6 Press the [MENU] button 2 times.
• The menu will disappear.
[Multi setting/To cancel all settings]
1 The method is the same as in “Writing
the Print Information to the Card
(DPOF Setting)”. (P61-P63)
64
Page 65

Technical use
Playing Back with Slide Show
(Automatic Playback)
All pictures selected in the card can be played
back one-by-one automatically.
[Preparation]
• Set the mode dial to playback [(^l- (P23)
1 Press the [MENU] button. 2 Press A/ T to select [SLIDE SHOW]
and then press
3 Press A/ T to select [ALL]/[DPOF] and
2,3
nmÉai^É ig^ü
bull
■aigiijaiMi itsEa
|»F
I
MEN U
I
then press ►.
• [ALL]: for playing back all pictures
• [DPOF]: for playing back the DPOF set
pictures
4 Press AlWKfP- for setting below.
• [DURATION]: It can be set among 1,2,3
and 5 seconds.
• [AUDIO]: It can be set to [ON] or [OFF].
By setting it to [ON], it is possible to play
back the still pictures with audio in slide
show.
• [DPOF SET] (Only when setting to
[DPOF]): You can select the pictures you
want to set to the Slide Show.
• [CANCEL ALL] (Only when setting to
[DPOF]): You can cancel the Slide Show
setting.
* •
6
START SLIDE SHQM
STQP MENU
5 Press A/ T to select [START].
6 Press ►.
• The slide show starts.
• By pressing the [MENU] button, it stops.
Page 66

Technicat use
• In motion image playback, slide show is not available.
• The DPOF setting of slide show will not be applied to the DPOF printing.
• If the audio recording time is longer than the setting time on [DURATION]. When
setting [AUDIO] to [ON], the next picture appears after finishing the audio
playback.
• Audio cannot be played back from this camera. Connect to a television to
play back audio.
• When editing with the supplied software [SD Viewer for DSC] recorded on the
CD-ROM, you can play back in SD slide show with this camera. (P91)
• Images that are set DPOF with the supplied software [SD Viewer for DSC]
recorded on the CD-ROM cannot be played back in DPOF slide show with this
camera. Set DPOF slide show on this camera.
• When using the DPOF feature, this camera will overwrite any previous DPOF
settings made by other products.
66
Page 67

Technical use
Adding Audio to Recorded Pictures
(Audio Dubbing)
It is possible to add a 10-second narration to
a recorded picture.
[Preparation]
♦ Set the mode dial to playback [[0]. (P23)
1 Press the [MENU] button. 2 Press A/T to select [AUDIO DUB.] and
then press >.
3 Press ◄/► to select the picture. 4 Press the Y/[REVIEW/SET] button, to
start audio recording. (0 Microphone)
• When audio has already been recorded,
after the audio dubbing the original audio
is overwritten.
• When audio has already been recorded,
this message is displayed “OVERWRITE
AUDIO DATA?”. Then press ◄/► to
select [YES] and press the
PLAY1/2
orimoTECT
DPOF PRiWT
T/[REV!EW/SET] button, to start audio
recording.
5 Press the T^REVIEW/SET] button, to
stop audio recording.
iraggaiMsa-flMmiiiii
3,4
im
SELECT4»^
STARTS
lOO-OOOi.
mmm
• Even if you do not press the
▼/[REVIEW/SET] button, after about
10 seconds the audio recording stops
automatically.
6 Press the [MENU] button 2 times.
• The menu will disappear.
• Adding audio will use additional memory.
Using this feature will result in fewer images
being able to be saved.
• The audio dubbing cannot be used with
motion images.
• The audio dubbing cannot be used with
protected images.
Page 68

Technical use
Resizing Recorded Pictures
It is possible to reduce the recorded picture
Size. This function is useful if you want to
reduce the volume of the picture for the
purpose of attaching it to an e-mail or
uploading it to a web-site.
[Preparation]
• Set the mode dial to playback [(Q]- (P23)
1,8 2,3,4,5,6,7
2
1 Press the [MENU] button.
2 Press A/V to select [RESIZE] and then
press ►.
3
Press to select the picture, and then press T.
4 Press to select the size.
1600
; 1600x1200
i28ol: 1280x960
[iiol: 640 X 480
5 Press the T/[REVIEW/SET] button to
set the size.
6 When this message is dispiayed
“DELETE ORIGINAL PICTURE?”,
press to select [YES] or [NO].
7 Press the T/[REVIEW/SET] button. 8 Press the [MENU] button 2 times.
• The menu will disappear.
it is not possible to resize pictures in a size
lower than/equal to [640x480] or with an
aspect ratio that is not 4:3.
It may not be possible to resize the pictures
recorded with other equipment.
It is not possible to resize a motion
image/still picture with audio.
68
Page 69

Technical use
Trimming Recorded Pictures
It is possible to cut off the unnecessary parts
of the picture (trimming), and enlarge the
remaining parts of the picture.
[Preparation]
• Set the mode dial to playback [(31- (P23)
1 Press the [MENU] button.
PLAY2/2
El
SELECT^^
:.$ETT . E
4,5,6
i iH»
2 Press A/T to select [TRIMMING] and
then press ►.
3 Press to select the picture, and
then press T.
4 Rotate the zoom lever towards [C^ ] to
make subject appear closer, and
towards [[^1 to make subjects appear
further away.
5 Press Al'fKiP' to shift pictures.
6 Press the shutter button to set.
■m SQEiM
Page 70

Technical use
7 When this message is displaved
“DELETE ORIGINAL PICTURE?”,
press to select [YES] or [NO].
8 Press the ▼/[REVIEW/SET| button.
9 Press the [MENU] button 2 times.
• The menu will disappear.
• Trimming images will use additional memory
if the original image is saved.
• It is not possible to resize pictures in a size
lower than [640x480] or with an aspect ratio
that is not 4:3.
• You cannot operate trimming on pictures
recorded with other equipment.
• Trimming is not possible for a motion
image/still picture with audio.
• The picture size of the trimmed pictures may
become smaller than that of the original one
depending on the cut size.
• The picture quality of the trimmed picture
becomes inferior.
70
Page 71

Technical use
Formatting the Card
Usually, it is not necessary to format the card
(initializing). Format the card when this
message is displayed “MEMORY CARD
ERROR”.
• If the card has been formatted by a PC or
other equipment, format the card on the
camera again.
[Preparation]
• Set the mode dial to playback [(3 ]■ (P23)
1 Press the [MENU] button.
2 Press A/T to select [FORMAT] and
PLAY2/2
13
3 When this message is displayed
then press
“DELETE ALL DATA ON THE MEMORY
CARD?”, press M to select [YES].
4 Press the T/[REVIEW/SET] button.
■SEl:EGT^'' GETO^’:’^EXtr
■Eflaagm
delete: ALL D^:;
• The card is formatted.
• After formatting, recorded images and
any other data cannot be recovered.
ON THE.MEMdffi^GARG'i^
SELECT^►
When formatting, use the batteries which the remaining power is enough or AC
adaptor (optional, DMW-AC2).
During formatting, do not turn the power off.
If the card cannot be formatted, consult your dealer.
sety
Page 72

Technical use
Adjusting the LCD Monitor Brightness
You can adjust the brightness of the LCD
monitor.
[Preparation]
• Press the [DISPLAY] button to select the
display of LCD monitor. (P21)
• Set the mode dial except for [^]. (P23)
1 Press the [MENUl button. 2 Press ► to open the setup menu. 3 Press A/Y to select [MONITOR]. 4 Press ◄/► to adjust the brightness.
5 Press the [MENU] button.
• The menu will disappear.
In simple mode [Vl> LCD monitor
brightness is fixed to [0].
Adjusting the LCD monitor will not lighten or
darken the actual photograph.
Adjusting the LCD monitor to brighten the
image may incorrectly display the scene to
be brighter than the actual photo will be. In
most cases the default setting will produce
the best performance and closest
reproduction of the actual scene.
72
Page 73

Technical use
Using the Auto Review
Recording with the auto review set to
[1SEC.]/[3SEC.] the recorded picture is
automatically displayed on the LCD monitor
for 1 or 3 seconds.
[Preparation]
• Set the mode dial except for fWl/fW1.
(P23)
1 Press the [MENU] button.
2 Press ► to open the setup menu.
3 Press A/V to select [AUTO REVIEW]. 4 Press ◄/► to select [1 SEC.] or [3SEC.].
5 Press the [MENU] button.
• The menu will disappear.
lliAWWiW
Even when setting the auto review to [1SEC.]/[3SEC.], it is not available in motion
image mode lOl-
When recording in burst mode, auto bracket, still picture with audio modes, the
recorded picture is automatically displayed.
In simple mode [^], the auto review setting becomes [ON] (2 seconds) or [OFF].
Page 74

Technical use
Setting up the Operational Sound
It is possible to set the sound volume when
the menu operations are done.
1 Press the [MENU] button.
2 Press ^ to open the setup menu.
• In simple mode, skip this step.
3 Press A/T to select [BEEP].
4 Press to adjust the operational
sound volume.
1,5 2,3,4
5 Press the [MENU] button.
• The menu will disappear.
In simple mode [^^], the setting becomes
[ON] or [OFF],
74
Page 75

Technical use
Setting up the Power Save Mode
In this mode, if the camera is not operated for
a certain amount of time, it is automatically
turned off.
1 Press the [MENU] button.
2 Press ► to open the setup menu.
3 Press A/Y to select [POWER SAVE]. 4 Press ◄/► to choose the setting time.
• [2 MIN.]
• [5 MIN.]
3,4
1 iii SETUPI/3I
•[10 MIN.]
• [OFF]: The power is not turned off
automatically.
AUTOBEVIBV:
.dTptjwi
■rV""
ECONOWIY"^;
SEUECT^. 'SET^^.:,£X!T
$№, lyMiil, OFF
OFF
MENU
5 Press the [MENU] button.
• The menu will disappear.
If you want to cancel the power save mode, turn the power switch to [ON] again
after turning it to [OFF], or press the shutter button.
When using AC adaptor (optional, DMW-AC2)/recording the motion image/playing
back the motion image/during slide show, the power save mode is not available.
In simple mode [^], the power save is fixed to [2 MIN.].
Page 76

Technical use
Saving the Power Consumption
(Economy mode)
If the camera is not operated for about
15 seconds, the LCD monitor display turns off
and power consumption is saved.
• When setting [ECONOMY] to [ON], the LCD
monitor display is turned off during charging
the flash.
• When setting [ECONOMY] to [ON], power
save setting time is fixed to [2 MIN,].
[Preparation]
• Set the mode dial except for [(►)]/[ VJ-
(P23)
3,4
SETUP 1/i]
OEHBEl
AUTQ:R6ViE№
: SEl.EGT^..:SET4^.... EXiTia:
• When using AC adaptor (optional, DMW-AC2)/recording the motion image, the
economy mode is not available.
• The economy mode does not work during the menu screen is displayed or the
self-timer is set.
1 Press the [MENU] button. 2 Press ^ to open the setup menu. 3 Press A/T to select [ECONOMY]. 4 Press ► to select [ON],
5 Press the [MENU] button.
• The menu will disappear.
• The message [MONITOR OFF] flashes for
some seconds before LCD monitor display
is turned off.
• The LCD monitor turns on when pressing
any buttons.
* •
76
Page 77

Technicat use
Resetting the File Number
As the file numbers are recorded sequentially
by the camera, when you use two or more
cards, it may happen that the file numbers on
your cards do not start from 0001.
Use this function when you insert a new card
or perform the new recording on the recorded
card and you want to start recording from the
file number 0001.
[Preparation]
• Set the mode dial except for
(P23)
3
iiP.
I|i BEEP
© CLOCK SET
REBET FiLEm
iNTHECAE^EA?:
SELECT^^
SETUP 2/
m
::NQ.BESEt;
NO
1 Press the [MENU] button.
1
2 Press ^ to open the setup menu. 3 Press A/V to select [NO.RESET] and
then press >.
4 When this message is displayed
‘‘RESET FILE NO. IN THE CAMERA?”,
press ◄ to select [YES].
5 Press the T/[REVIEW/SET] button. 6 Press the [MENU] button.
• The menu will disappear.
Page 78

Technical use
Initializing the settings
This feature allows you to easily reset the
camera to the factory default settings.
[Preparation]
• Set the mode dial except for [[Q]/[|^].
(P23)
1 Press the [MENU] button.
2 Press ^ to open the setup menu.
3 Press A/T to select [RESET] and then
1,8 2,3,4,5,6,7
press ►.
4 When this message is displayed
“RESET REC. SETTINGS?”, press ◄
to select [YES].
5 Press the T/[REVIEW/SET] button.
• The message "REC SETTING RESET
COMPLETED" is displayed for about
2 seconds.
R RESET
REC. SETTiNG.S?
RESET-SETUP"
PARAMETERS?,
NO
6 When this message is displayed
“RESET SETUP PARAMETERS?”,
press ◄ to select [YES].
7 Press the T/[REVIEW/SET] button to
set.
• The clock setting is not reset.
8 Press the [MENU] button.
• The menu will disappear.
SETT’
78
Page 79

Technical use
Playing Back Images with a TV Monitor
By connecting the camera to a television via the supplied AA/ cable ©, it is possible
to view and play back the recorded images.
[Preparation]
• Turn the camera and the television off.
1 Connect the A/V cable 0 to the AA/ OUT socket of the camera.
2 Connect the AA/ cable to the video in and the audio In sockets of the TV.
• Yellow; to the video in socket
• White: to the audio in socket
3 Turn the television on and select external input.
4 Turn the camera on and then set the mode dial to playback [@].
• The image is displayed on the television.
■ Viewing images in other countries
When setting [VIDEO OUT] on the menu, you can view images on the TV in other
countries (regions) which use the NTSC or PAL system.
• Even if you set menu selection for [VIDEO OUT] to [PAL], the output signal is still
NTSC.
• When connecting to a TV, use the batteries which the remaining power is enough
or AC adaptor (optional, DMW-AC2).
• Do not use any other cables except the supplied one.
• The A/V cable cannot be connected to the “antenna" connection of your television.
Your TV must provide separate audio and video connections for this feature to
operate correctly.
• Read the TV operating instructions too.
•
Page 80

Technical use
Connecting to a PC
[Preparation]
• If your PC uses Microsoft Windows® 98 or Windows® 98 Second Edition, a USB
driver must be installed from the CD that is included. If you are using a newer
Microsoft operating system such as Windows® Me, Windows® 2000, or Windows'^
XP {Home Edition/Professional), no USB driver needs to be installed. Your PC
should recognize the camera automatically.
©
1 Insert the Memory Card into the camera, and turn the power switch to
[ON].
2 Connect the camera to a PC via the supplied USB connection cable (T).
[Windows]
The drive is shown on the [My Computer] folder.
• If it is the first time you are connecting the camera to a PC, the required driver is
installed automatically so that the camera can be recognized by the Windows
Plug and Play, then it is shown on the [My Computer] folder.
[Macintosh]
The drive is shown on the screen.
• The flash/access indicator lights during access.
• When the battery power is lost during access, the data may be destroyed. The
battery indicator does not appear. So when connecting to a PC, use the batteries
which the remaining power is enough or AC adaptor (|) (optional, DMW-AC2).
• When connecting to a PC, pictures and sounds are not output from the AN OUT
socket.
• For further information (software installation), read the supplied operating
instructions for PC connection.
80
Page 81

Technieal use
USB DIRECT-PRINT
By connecting the camera to a printer corresponding to USB DIRECT-PRINT via the
supplied USB connection cable, it is possible to print directly.
{Please ask the manufacturer of the printer about the corresponding models)
(Read the printer operating instructions too)
1 Insert the Memory Card into the camera, and turn the power switch to
[ON].
2 Turn on the printer.
3 Connect the camera to the printer via the supplied USB cable 0.
• When connecting to a printer, use the batteries which the remaining power is
enough or AC adaptor (g) (optional, DMW-AC2).
• Disconnect the USB connection cable and DC cable after printing.
ft1
•
Page 82

Technical use
USB DIRECT-PRINT (Single Picture)
[Preparation]
• Connect the camera to a printer. (P81)
1 Only when DPOF is already set, press
◄ to select [SINGLE PICTURE], and
then press the T/[REVIEW/SET]
button.
• When DPOF is not set, this screen is
skipped.
2 Press ◄/► to select the picture to be
printed, and then press the
T/[REV1EW/SET] button.
• The message “PLEASE SELECT THE
PICTURE TO PRINT’ is displayed for
2 seconds.
3 Press ▲, and press to set the
number of sheets, and then press the
3,4
LS CHECK THE PRINTE
TABTPRINTING? ,
St
▼/[REVIEW/SET] button.
4 Press ◄ to select [YES].
• The message “PLS CHECK THE
PRINTER START PRINTING ?” is
displayed.
fBo4Ìff|
^^DOmOOl'
5 Press the T/[REVIEW/SET] button.
• Printing starts.
Press the [MENU] button, and you can stop
printing.
82
•
Page 83

Technical use
USB DIRECT-PRINT (DPOF)
[Preparation]
• Connect the camera to a printer. (P81)
• Write the print information to the card
(DPOF setting), (P61)
1 Press ► to select [DPOF].
Press the [MENU] button, and you can
change the DPOF setting. (P61)
Press the T/[REVIEW/SET] button.
The message “PLS CHECK THE
PRINTER START PRINTING ?” is
displayed.
Press M to select [YES], and then
press the T/[REVIEW/SET] button.
Printing starts.
Press the [MENU] button, and you can stop
printing.
When the number of total images is more
than 255, the number of remaining images
will be displayed as
83
Page 84

Technical use
Using the Optional AC Adaptor
If you use an AC adaptor (optional, DMW-AC2), you can use the camera without
worrying about battery discharge.
[Preparation]
• Check that the power switch is set to [OFF] and the lens is stored.
1 Connect the AC power plug to the AC outlet.
THE SOCKET OUTLET SHALL BE
INSTALLED NEAR THE EQUIPMENT
AND SHALL BE EASILY ACCESSIBLE.
2 Open the terminal door. 3 Connect the AC adaptor to the DC IN socket
• Do not use the AC adaptor other than the optional one (DMW-AC2).
• The camera becomes warm during use. However, this is not a malfunction.
• The battery cannot be charged in the camera with the AC adaptor connected.
• When disconnecting/connecting the AC adaptor with the power switch turned
on using the batteries, the data in the card may be destoroyed or the operation
may be impossible. Be sure to disconnect/connect the AC adaptor after turning
the power switch off.
84
Page 85

After Use
Technical use
After using the camera, it is recommended
that you complete the following steps:
Turn the power switch to [OFF], (P19)
Eject the card, (PI7)
Remove the batteries.
If you will not be using the camera for a long time, remove the batteries. (When
you insert the batteries again, set the date/time)
85
Page 86

The Menu Items
5—^^jso SENSrriVW^:
50 100 200
[a
Others
REC mode menu
1 W.BALANCE (P49)
2 PICTSIZE (P37)
3 QUALITY (P38)
4 SPOT MODE (P44)
5 SENSITIVITY (P51)
6 AUDIO REC. (P36)
7 D.ZOOM(P32)
8 COLEFFECT (P43)
iHREC3/3
1
ptot.ADJ.:
I “ -{ec6 Kpipi SSKlii-
16— Bi^aGi
17- ^i
CLOCK SET
l:
MOFF
i№L£
9 PICT.ADJ. (P48)
10 MONITOR (P72)
11 AUTO REVIEW (P73)
12 POWER SAVE (P75)
13 ECONOMY (P76)
14 BEEP(P74)
15 NO.RESET (P77)
16 RESET (P78)
17 CLOCK SET (P25)
B :L№GUA№^
18 LANGUAGE
86
Page 87

others
Simple mode menu
• For items without number, refer to those with
the same name.
19 PICTMODE (P28)
Playback mode menu
• For items without number, refer to those with
the same name.
S PLAYl/2'^
20
PROTECT
214BEHBII
IO|jSlIiDESPO№
22
■ij AUDIO DUST
23- -
Fi.RESlEE'
24- -
1SEU^OT4;SETi^ ^"EKiT
a PLAY^SiiEHTgp';
25—ESBSi
"ttj BEEP'
■©".(JIOGKEET
;C:i:E!u^T| U SETUP
..............
sHsmii M2MjiN.i
fPpW
■SET^fiTiKlf
..........
MEi)|
2/2
20 PROTECT (P64)
21 DPOF PRINT (P61)
22 SLIDE SHOW (P65)
23 AUDIO DUB. (P67)
24 RESIZE (P68)
25 TRIMMING (P69)
26 FORMAT (P71)
27 VIDEO OUT (P79)
27-
a, VIDEO out;: NfSCH
■SELECTf'SETi^TEXIT
Page 88

Cautions for Use
others
In the event of abnormal operation (e.g.
if the unit emits smoke or an unusual
smell), immediately stop operating the
unit and consult the Panasonic
Customer Care Centre on 132600.
■ Cautions for Use
Keep the digital camera away
from magnetized equipment
(such as a microwave oven, TV,
video game equipment, etc.).
• If you use the digital camera on or
near a TV, images and sounds may be
disturbed due to electromagnetic wave
radiation.
• Do not use the digital camera near a
cell phone because doing so may
cause noise to adversely affect the
images and sounds.
• Recorded data may be damaged, or
images may be distorted by strong
magnetic fields created by speakers or
large motors.
• Electromagnetic wave radiation
generated by a microprocessor may
adversely affect the digital camera,
causing the disturbance of images and
sounds.
• If the digital camera is affected by
magnetically charged equipment and
does not function properly, turn the
camera off and detach the batteries
and then connect the batteries again.
Thereafter, turn the camera on.
Do not use the digital camera
near radio transmitters or
high-voltage lines.
If you record near radio transmitters or
high-voltage lines, recorded images or
sounds may be adversely affected.
Do not spray insecticides or
volatile chemicals onto the
digital camera.
• If the digital camera is sprayed with
such chemicals, the camera body may
be damaged and the surface finish
may peel off.
• Do not keep rubber or plastic products
in contact with the digital camera for a
long period of time.
When you use the digital camera
on a beach or similar place, do
not let sand or fine dust get into
the camera.
Sand or dust may damage the digital
camera or card. (Care should be taken
when inserting and removing the card)
When you use your digital
camera on a rainy or snowy day
or on a beach, make sure that no
water enters the digital camera.
• Water may cause the digital camera or
card to malfunction. (Irreparable
damage may occur)
• If sea water splashes onto the digital
camera, wet a soft cloth with tap
water, wring it well, and use it to wipe
the camera body carefully. Then, wipe
it again thoroughly with a soft dry
cloth.
Do not use the digital camera for
surveillance purpose or other
business use.
• If you use the digital camera for a long
period of time, the internal
temperature increases and,
consequently, this may cause
malfunction.
• The digital camera is not intended for
business use.
88
Page 89

Oÿiers
Do not use benzine, thinner or
alcohol for cleaning the digital
camera.
• The camera body may be deformed
and the surface finish may peel off.
• Before cleaning the camera, detach
the batteries.
• Wipe the digital camera with a soft, dry
cloth. To remove stubborn stains, wipe
with a cloth that is soaked in a
detergent diluted with water and
afterward finish wiping with a dry cloth.
• For storing or transporting the digital
camera, place it In a bag or case lined
with soft pads to prevent the coating
on the camera body from being worn.
After use, be sure to take the
card out, and detach the
batteries.
If the batteries are left on the digital
camera for a long time, the voltage
drops excessively.
Always keep the terminals of the
batteries clean.
Prevent the terminals from getting
clogged with dirt, dust, or other
substances.
If you drop the battery accidentally,
check to see if the battery body and
terminals are deformed. Attaching a
deformed battery to the digital camera
may damage the camera.
Be sure to remove the batteries
after use.
Be sure to remove the batteries from the
digital camera. (If they are left attached
to the digital camera, a minute amount
of current is consumed even when the
digital camera power is off) If the
batteries are left attached to the digital
camera for a long time, discharge takes
place.
Dispose of unusable batteries.
• The batteries have a limited life.
• Do not throw the batteries into fire
because it may cause an explosion.
89
Page 90

Others
B Condensation
When condensation has taken
place:
Set the power switch to [OFF]
and leave the digital camera in
this condition for about 1 hour.
When the camera becomes close
to the ambient temperature, the
fog disappears naturally.
B Cautions for Storage
Before storing the digital camera, take
the card out and detach the batteries.
Store all the components in a dry place
with a relatively stable temperature.
(Recommended temperature:
15X to 25X,
Recommended humidity; 40% to 60%)
Digital camera
• Wrap it with a soft cloth to prevent dust
from getting into the camera.
• Do not leave the camera in places that
expose it to high temperature.
Card
• When the card is being read, do not
remove the card, turn off the power, or
subject it to vibration or impact.
• Do not leave the card in places where
there is high temperature or direct
sunlight, or where electromagnetic
waves or static electricity are easily
generated.
• Do not bend or drop the card. The
card or the recorded content may be
damaged.
• After use, be sure to remove the card
from the digital camera.
• Do not touch the terminals on the back
of the card with your fingers. Do not
allow dirt, dust or water to enter it.
Batteries
• Do not leave the camera and the
battery at the place where the
temperature is too high, such as inside
the car during the midsummer.
• Extremely high or low temperatures
will shorten the life of batteries.
• If the batteries are kept in smoky or
dusty places, the terminals may rust
and cause malfunctions.
• Do not allow the battery terminals to
come in contact with metal objects
(such as necklaces, hairpins, etc.).
This can result in a short circuit or heat
generation, and if you touch the
battery in this condition, you may be
badly burned.
90
Page 91

Others
LCD monitor
LCD monitor
• In a place with drastic temperature
changes, condensation may form on
the LCD monitor. Wipe it with soft dry
cloth.
• If the digital camera is extremely cold
when you turn the power on, the
image on the LCD monitor is slightly
darker than usual at first. However, as
the internal temperature increases, it
goes back to the normal brightness.
Extremely high precision technology
is employed to produce the LCD
monitor screen featuring a total of
approximately 114,000 pixels. The
result is more than 99.99% effective
pixels with a mere 0.01% of the
pixels inactive or always lit. However,
this is not a malfunction and does
not affect the recorded picture.
I Folder Composition
When a Memory Card with data
recorded on it is inserted into a PC, the
folders shown below will be displayed.
SD Memory S
Card I
^ DCIM
Lioo__PANA
EXPORT
Mise
In the 100„PANA folder it is possible to
record up to 999 images.
In the MISC folder it is possible to
record the files that have been set with
DPOF settings.
■ SD Slide Show
If setting the SD slide show with the
[SD Viewer for DSC] which is in the
supplied CD-ROM, when playing back,
the message “START SD SLIDE
SHOW?” is displayed. Select [YES] and
press the Y/[REVIEW/SET] button to
start the SD slide show. Select [NO] and
press the T/[REVIEW/SET] button to
start normal playback.
Q1
Page 92

Message Indications
others
[NO MEMORY CARD]
Insert the Memory Card.
[THIS MEMORY CARD IS
PROTECTED]
Cancel the Memory Card lock.
[NO VALID IMAGE TO PLAY]
Carry out playback after recording or
after inserting the Memory Card with a
recorded image.
[MEMORY CARD FULL]/
[NOT ENOUGH MEMORY IN THE
CARD]
Insert a new Memory Card or delete
unnecessary data.
[MEMORY CARD ERROR]
Failed access to Memory Card.
Insert the card again.
[READ ERROR]
Data reading error.
Play It back again.
[WRITE ERROR]
Data writing error.
Turn the camera [OFF] and remove the
card. Then insert the card and turn the
camera back [ON], Be sure camera is
[OFF] before removing or inserting the
card to avoid damaging the card.
[SYSTEM ERROR]
When the camera does not work
correctly because of the pressure to the
lens, this message is displayed. Turn
the power switch to [ON] again.
[THIS PICTURE IS PROTECTED]
After cancelling the protect setting, you
can delete or overwrite the image.
[THIS PICTURE CANT BE
DELETED]/[SOME PICTURES
CANT BE DELETED]
If the image is not based on the DCF
standard, it is not possible to delete
selected pictures.
[NO ADDITIONAL DELETE
SELECTIONS CAN BE MADE]
You have exceeded the number of
images that can be set at once with
multi-deleting setting.
[CANT BE SET ON THIS
PICTURE]/[CANT BE SET ON
SOME PICTURES]
If the image is not based on the DCF
standard, it is not possible to set the
DPOF or audio dubbing.
[MEMORY CARD ERROR
FORMAT THIS CARD?]
The format of this card cannot be
recognized by the camera. Format the
card again with the camera.
[MODE DIAL IS NOT IN THE
PROPER POSITION]
This message is displayed when you
turn on the camera with the mode dial in
the wrong position.
Rotate the mode dial to the proper
position.
[PLEASE SET THE CLOCK]
This message is displayed when you
use the camera for the first time or you
do not use the camera for a long time.
Set the clock again.
92
Page 93

Troubleshooting
Others
1: The power does not turn on.
1-1; Are the batteries inserted? Check
whether the batteries are
inserted.
1- 2: Is the battery power sufficient?
Use a battery that has been
sufficiently charged.
2: As the power is turned on, it
turns off immediateiy.
2- 1; Is the battery power insufficient to
operate the camera? Charge the
battery or replace it with charged
one.
2- 2: Is the batteries other than the
recommended ones used?
3: The image cannot be recorded.
3- 1: Is the Memory Card inside?
3-2: is the mode dial correctly set?
Check it.
3- 3: There is no memory capacity left
on the card. Before recording,
delete some images.
4; The image is not displayed on
the LCD monitor.
4- 1: Is the LCD monitor set to OFF?
4-2: Does the economy mode work?
8:
The image will not play back.
8-1:
Is the Memory Card inside?
8-2:
There is no image in the Memory
Card.
8- 3:
The mode dial is not set to
playback [[Q].
9:
The Image is not displayed on
the television.
9- 1:
9-2:
Is the camera correctly
connected with the TV? Check it.
Set the TV to video input mode.
When connecting to a PC,
10:
images cannot be transferred.
10-1: Check that the camera is
correctly connected to the PC.
10- 2: Is the camera correctly
recognized by the PC?
11: The clock setting is reset.
11- 1: If you do not use the camera for a
long time, the clock setting may
be reset. When the message
[PLEASE SET THE CLOCK]
appears, set the clock again.
11 -2; When you take a picture before
setting the clock, [0:00 0.0.0] is
recorded.
5: The LCD monitor is too bright
or dark.
5: Adjust the brightness of the LCD
monitor.
6: Flash does not light.
6: The flash mode is set to forced
OFF, Change the flash mode.
7: The display or images on the
LCD monitor are not focused.
7: Set the mode dial to the mode
corresponding to the distance to
the subject.
12: When you rotate the zoom
lever from T to W, and then
release it, the image may
appear closer for a moment
again and the camera may
vibrate.
12; This is the operation for keeping
the focus accuracy. However, this
is not malfunction.
13: Noise appears on the LCD
monitor.
13: In dark places, noise may appear
to maintain the brightness of the
LCD monitor. This does not affect
the images you are recording.
93
Page 94

others
Specifications
Digital Camera Information for your safety
I
Power Consumption:
тш
!
Effective number of pixels
Image sensor
Lens
Digital zoom
Focus
Focus range
Shutter system
Burst recording
Motion image recording
ISO sensitivity
Shutter speed
White balance
Exposure (AE)
Metering mode
LCD monitor
Optical finder
Flash
Microphone
Recording media
Recording size
Quality
1.7 W (When recording with LCD monitor to on)
0.7 W (When recording with LCD monitor to off)
1.0 W (When playing back with LCD monitor)
4.0 Million Pixels
1/2.5" CCD, total pixel number 4,230,000
Primary color filter
Optical 3x zoom, f~5.8-17.4 mm (35 mm film
camera equivalent: 35-105 mm)/F2.8-4.9
Max 3x
Auto/Macro
Normal/Spot AF change (Spot mode)
Auto; 50 cm (Wide)/50 cm (Tele) - , Macro/
Simple: 10 cm (Wide)/50 cm (Tele) - oo
Electronic shutter+Mechanical shutter
4 frames/second, Max 7 frames (standard)/
5 frames (fine) (Performance is only with SD Memory
Card. MultiMediaCard performance will be less.)
320x240 pixels (10 frames/second with audio)
AUTO/50/100/200
8-1/2,000
Motion image mode: 1/30-1/2,000
AUTO/Daylight/Cloudy/Ha!ogen/White set
Program AE
Exposure compensation (1/3 EV Step, -2-+2 EV)
Multi/Spot (Spot mode)
1.5" low-temperature polycrystatline TFT LCD
(114,000 pixels) (field of view ratio 100%)
Real-image zoom finder
Flash range:
Approx. 30 cm-2.4 m (Wide)/
Approx. 50 cm -140 cm (Tele)
AUTO, AUTO/Red-eye reduction, Forced ON, Slow
sync./Red-eye reduction, Forced OFF
Monaura!
SD Memory Card/MultiMediaCard
2304x1728 pixels, 1600x1200 pixels,
1280x960 pixels, 640x480 pixels (Still picture)
320x240 (Motion image)
Fine/Standard
94
Page 95

Recording file format
Still Picture
Still picture with audio
Motion Image
Interface
Digital
Analog video/audio
Terminal
USB
Analog video/audio
DC IN
Dimensions (WxHxD)
Weight
Operating Temperature
Operating Humidity
Power Source
Charger
(Panasonic DE-894)
Others
JPEG (Design rule for Camera File system, based on
Exif 2.2 standard), DPOF corresponding
JPEG (Design rule for Camera File system, based on
Exif 2.2 standard)
+640x480 QuickTime (stilt picture with audio)
QuickTime Motion JPEG (motion image with audio)
USB
NTSC/PAL Composite/Audio line output (monaural)
5 pin Mini USB
0 2.5 mm jack
EIAJ type 1 jack
96x65.5x34 mm (excluding the projection part)
Approx. 170 g (excluding Memory Card and battery)
Approx. 215 g (with Memory Card and battery)
0°C-40°C
10%-80%
A A Ni-MH (nickel-metal hydride) batteries (2 pieces)
AC adaptor (DMW-AC2)
AA Alkaline batteries (2 pieces) (optional)
Information for your safety
110 V-240 V, '-'50/60 Hz, 0.07 A
1.5 V = 0.4Ax2
95
Page 96

VQT0E51
Matsushita Electric Industrial Co., Ltd.
Web Site;http;//www.panasonic.co.jp/global/
 Loading...