

Page 1
Operating Instructions
Digital Camera/Lens Kit
Model No. DMC-L10K
Before connecting, operating or adjusting this product,
please read the instructions completely.
For USA assistance, please call: 1-800-272-7033 or send e-mail to : digitalstillcam@us.panasonic.com
For Canadian assistance, please call: 1-800-99-LUMIX (1-800-995-8649) or
send e-mail to: lumixconcierge@ca.panasonic.com
PP
VQT1G28
Page 2

Before Use
Before Use
Dear Customer,
Thank you for choosing Panasonic!
You have purchased one of the most
sophisticated and reliable products on the
market today. Used properly, we’re sure it
will bring you and your family years of
enjoyment. Please take time to fill in the
information below.
The serial number is on the tag located on
the underside of your Camera. Be sure to
retain this manual as your convenient
Camera information source.
Model No.
Serial No.
Information for Your Safety
WARNING:
TO REDUCE THE RISK OF FIRE,
ELECTRIC SHOCK OR PRODUCT
DAMAGE,
• DO NOT EXPOSE THIS APPARATUS
TO RAIN, MOISTURE, DRIPPING OR
SPLASHING AND THAT NO
OBJECTS FILLED WITH LIQUIDS,
SUCH AS VASES, SHALL BE
PLACED ON THE APPARATUS.
• USE ONLY THE RECOMMENDED
ACCESSORIES.
• DO NOT REMOVE THE COVER (OR
BACK); THERE ARE NO USER
SERVICEABLE PARTS INSIDE.
REFER SERVICING TO QUALIFIED
SERVICE PERSONNEL.
Carefully observe copyright laws.
Recording of pre-recorded tapes or
discs or other published or broadcast
material for purposes other than your
own private use may infringe copyright
laws. Even for the purpose of private
use, recording of certain material may
be restricted.
2
VQT1G28
RBRC
Li-ion
A lithium ion battery that is recyclable powers the product you
have purchased. Please call 1-800-8-BATTERY for information
TM
on how to recycle this battery.
Page 3

• Please note that the actual controls and
components, menu items, etc. of your
Digital Camera may look somewhat
different from those shown in the
illustrations in these Operating
Instructions.
• Four Thirds
TM
is a trademark.
• SDHC Logo is a trademark.
• Adobe is a trademark or registered
trademark of Adobe Systems
Incorporated in the United States and/or
other countries.
• Leica is a registered trademark of Leica
Microsystems IR GmbH.
• Elmar is a registered trademark of Leica
Camera AG.
• Other names, company names, and
product names printed in these
instructions are trademarks or registered
trademarks of the companies concerned.
THE SOCKET OUTLET SHALL BE
INSTALLED NEAR THE EQUIPMENT
AND SHALL BE EASILY ACCESSIBLE.
Before Use
CAUTION
Danger of explosion if battery is
incorrectly replaced. Replace only with
the same or equivalent type
recommended by the manufacturer.
Dispose of used batteries according to
the manufacturer’s instructions.
Warn ing
Risk of fire, explosion and burns. Do not
disassemble, heat above 60 xC (140 oF)
or incinerate.
Product Identification Marking is located
on the bottom of units.
THE FOLLOWING APPLIES ONLY IN
CANADA.
This Class B digital apparatus complies
with Canadian ICES-003.
VQT1G28
3
Page 4

Before Use
THE FOLLOWING APPLIES ONLY IN
THE U.S.A.
FCC Note:
This equipment has been tested and
found to comply with the limits for a Class
B digital device, pursuant to Part 15 of the
FCC Rules. These limits are designed to
provide reasonable protection against
harmful interference in a residential
installation. This equipment generates,
uses, and can radiate radio frequency
energy and, if not installed and used in
accordance with the instructions, may
cause harmful interference to radio
communications. However, there is no
guarantee that interference will not occur
in a particular installation. If this
equipment does cause harmful
interference to radio or television
reception, which can be determined by
turning the equipment off and on, the user
is encouraged to try to correct the
interference by one or more of the
following measures:
• Reorient or relocate the receiving
antenna.
• Increase the separation between the
equipment and receiver.
• Connect the equipment into an outlet on
a circuit different from that to which the
receiver is connected.
• Consult the dealer or an experienced
radio/TV technician for help.
FCC Caution: To assure continued
compliance, follow the
attached installation
instructions and use only
shielded interface cables
with ferrite core when
connecting to computer or
peripheral devices.
Any changes or modifications not
expressly approved by the party
responsible for compliance could void the
user’s authority to operate this equipment.
4
VQT1G28
Declaration of Conformity
Trade Name: Panasonic
Model No.: DMC-L10
Responsible party: Panasonic
Corporation of
North America
One Panasonic Way,
Secaucus, NJ 07094
Support Contact: Panasonic
Consumer
Electronics Company
1-800-272-7033
This device complies with Part 15 of the
FCC Rules. Operation is subject to the
following two conditions: (1) This device
may not cause harmful interference, and
(2) this device must accept any
interference received, including
interference that may cause undesired
operation.
Page 5
-If you see this symbol-
Information on Disposal in other
Countries outside the European
Union
This symbol is only valid in the European
Union.
If you wish to discard this product, please
contact your local authorities or dealer
and ask for the correct method of
disposal.
∫ About the battery pack
CAUTION
Battery pack (Lithium ion battery pack)
• Use the specified unit to recharge the
battery pack.
• Do not use the battery pack with
equipment other than the specified
unit.
• Do not get dirt, sand, liquids, or other
foreign matter on the terminals.
• Do not touch the plug terminals
(i and j) with metal objects.
• Do not disassemble, remodel, heat or
throw into fire.
If any electrolyte should come into
contact with your hands or clothes,
wash it off thoroughly with water.
If any electrolyte should come into
contact with your eyes, never rub the
eyes. Rinse eyes thoroughly with water,
and then consult a doctor.
Before Use
∫ About the battery charger
CAUTION!
DO NOT INSTALL OR PLACE THIS
UNIT IN A BOOKCASE, BUILT-IN
CABINET OR IN ANOTHER CONFINED
SPACE. ENSURE THE UNIT IS WELL
VENTILATED. TO PREVENT RISK OF
ELECTRIC SHOCK OR FIRE HAZARD
DUE TO OVERHEATING, ENSURE
THAT CURTAINS AND ANY OTHER
MATERIALS DO NOT OBSTRUCT THE
VENTILATION VENTS.
Battery charger
This battery charger operates on AC
between 110 V and 240 V.
But
• In the U.S.A. and Canada, the battery
charger must be connected to a 120 V
AC power supply only.
• When connecting to an AC supply
outside of the U.S.A. or Canada, use a
plug adaptor to suit the AC outlet
configuration.
• When connecting to a supply of greater
than AC 125V, ensure the cord you use
is suited to the voltage of the AC supply
and the rated current of the battery
charger.
• Contact an electrical parts distributor for
assistance in selecting a suitable AC
plug adaptor or AC cord set.
VQT1G28
5
Page 6
Before Use
∫ Care of the camera
• Do not strongly shake or bump the
camera by dropping it etc.
This unit may malfunction, recording
pictures may no longer be possible or the
lens or the LCD monitor may be
damaged.
• Be particularly careful in the following
places as they may cause this unit to
malfunction.
– Places with a lot of sand or dust.
– Places where water can come into
contact with this unit such as when
using it on a rainy day or on a beach.
• This unit is not waterproof. If rain water
or other drops of water splash onto the
camera, wipe it with a dry cloth.
• Do not put your hands inside the
mirror. Do not press, push or use a
blower brush to forcefully blow air on the
shutter curtains as they are very thin. Be
careful as they may get scratched, bent or
damaged.
∫ About Condensation (When the lens
is fogged up)
• Condensation occurs when the ambient
temperature or humidity changes. Be
careful of condensation since it causes
lens stains, fungus and camera
malfunction.
• If condensation occurs, turn the camera
off and leave it for about 2 hours. The fog
will disappear naturally when the
temperature of the camera becomes close
to the ambient temperature.
∫ Read together with the “Cautions for
Use”. (P134)
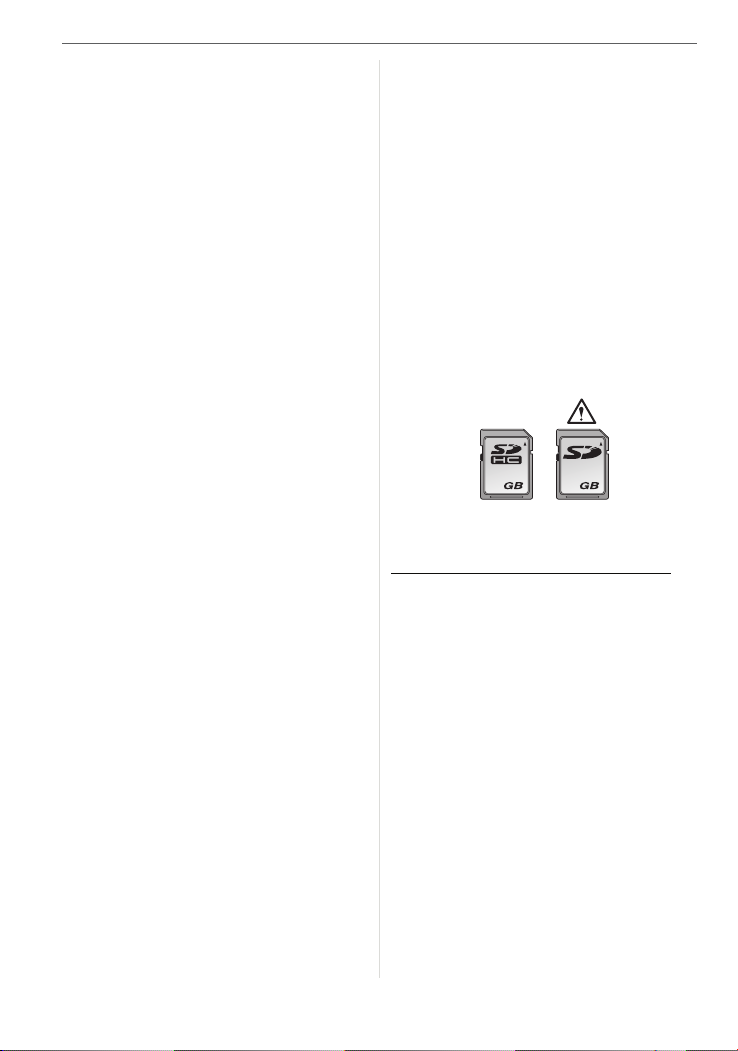
∫ About cards that can be used in this
unit
You can use an SD Memory Card, an
SDHC Memory Card and a
MultiMediaCard.
• When the term card is used in these
operating instructions this refers to the
following types of Memory Cards.
– SD Memory Card (8 MB to 2 GB)
– SDHC Memory Card (4 GB)
– MultiMediaCard (still pictures only)
More specific information about memory
cards that can be used with this unit.
• You can only use an SDHC Memory Card
if using cards with 4 GB or more capacity.
• A 4 GB Memory Card without an SDHC
logo is not based on the SD Standard and
will not work in this product.
OK
44
Please confirm the latest information on the
following website.
http://panasonic.
(This Site is English only.)
co.jp/pavc/global/cs
6
VQT1G28
Page 7

Contents
Before Use
Information for Your Safety ......................2
Preparation
Standard Accessories .............................. 9
Names of the Components .................... 11
Rotating the LCD monitor ......................13
About the Lens .......................................13
Attaching/Detaching the Lens ................14
Attaching the Lens Hood .......................15
Attaching the Strap ................................16
Attaching the Eyepiece Cap ..................17
Attaching the Magnifier Eye Cup ...........18
Charging the Battery with
the Charger ............................................18
About the Battery (charging/number of
recordable pictures) ...............................19
Inserting/Removing the Battery ............. 21
Inserting/Removing the Card
(Optional) ...............................................22
About the Card (optional) .......................23
Turning the Camera On .........................24
Setting Date/Time (Clock Set) ............... 24
• Changing the clock setting ............... 25
About the Mode Dial ..............................25
Setting the Menu .................................... 26
About the Setup Menu ...........................28
Switching between the Viewfinder
Display/Live View Display ......................32
Basic
Taking Pictures with the Viewfinder ....... 35
• Tips for taking good pictures
with Viewfinder ................................35
• Making the Viewfinder easier to see
(Diopter adjustment) ........................35
• Changing the information display
on the LCD monitor .........................36
• Making the LCD monitor screen
easier to see ....................................36
Matching the Focus and the Exposure
Automatically
(AF: Auto Focus/Program AE mode) ..... 36
• Taking good pictures .......................39
• Continuously focusing on a subject
(AFC) (When taking pictures with
the Viewfinder) .................................39
Taking Pictures in Auto Mode ................40
Aperture-priority AE ...............................41
Shutter-priority AE .................................42
Manual Exposure ................................... 42
Compensating the Exposure .................44
Taking Pictures with Manual Focus .......45
Taking Pictures with the Zoom ...............47
Playing Back Pictures ............................ 48
• Changing the Information Displayed
on the playback screen .................... 48
Deleting Pictures ....................................49
Using the Playback Zoom ......................51
Displaying Multiple Screens (Multi
Playback) ...............................................52
Displaying Pictures by Recording Date
(Calendar Playback) ..............................53
Advanced
Taking Pictures with Live View ..............54
• Tips for taking good pictures
with Live View ..................................54
• Changing the Information
Displayed .........................................55
• Brightening the LCD Monitor ........... 56
• LCD Monitor .....................................57
• Auto focus when taking pictures
with Live View ..................................58
• AF mode when taking pictures
with Live View ..................................60
• Manual focus when taking pictures
with Live View ..................................62
Taking Pictures using the Built-in
Flash ......................................................64
• Adjusting the flash output ................68
Setting to the 2nd Curtain Synchro
•
Fixing the Focus and the Exposure
(AF/AE Lock) .........................................69
Taking Pictures using Burst Mode .........71
Taking Pictures using Auto Bracket ....... 72
..... 68
VQT1G28
7
Page 8

Taking Pictures with the Self-timer ........ 74
Adjusting the White Balance .................. 75
• Resetting the white balance ............76
• Setting the color temperature .......... 77
• Finely adjusting the white balance ... 77
Setting the Light Sensitivity .................... 78
• Setting the maximum sensitivity
setting .............................................. 80
Deciding the Method to Measure
Brightness (Metering mode) .................. 81
Registering Personal Menu Settings
(Registering custom settings) ................ 82
Taking pictures in Custom mode ........... 83
Taking expressive portraits and
landscape pictures (Advanced scene
mode) .....................................................84
• [PORTRAIT] ....................................85
• [SCENERY] ..................................... 85
• [MACRO] .........................................86
• [SPORTS] ........................................87
• [NIGHT PORTRAIT] ........................ 87
Taking pictures that match the scene
being recorded (Scene mode) ............... 88
• [SUNSET] ........................................89
• [FOOD] ...........................................89
• [BABY1]/[BABY2] ............................89
• [PET] ................................................90
Menu Settings
Using the [REC] Mode Menu ................. 91
• [FILM MODE] ...................................92
• [ASPECT] ........................................94
• [PICT.SIZE]/[QUALITY] ................... 94
• [OIS MODE] ..................................... 96
• [EX. OPT. ZOOM] ............................97
• [D.ZOOM] .......................................98
• [FLASH] ........................................... 99
• [FLASH SYNC.] ...............................99
• [FLASH ADJUST.] ...........................99
• [MULTI. EXPO.] ............................. 100
• [BURST RATE] ..............................102
• [AUTO BRACKET] ......................... 102
• [SELF-TIMER] ...............................102
• [MIRROR UP] ................................ 102
• [COLOR SPACE] ...........................103
• [LONG SHTR NR] .........................103
Using the [CUSTOM MENU] ............... 104
8
VQT1G28
Using the [PLAY] mode menu ............. 108
• [SLIDE SHOW] .............................. 109
• [FAVORITE] ................................... 110
• [ROTATE DISP.]/[ROTATE] .......... 111
• [DPOF PRINT] ............................... 112
• [PROTECT] ....................................114
• [RESIZE] ........................................115
• [TRIMMING] ...................................116
• [ASPECT CONV.] ..........................117
Connecting to other equipment
Connecting to a PC ..............................118
Printing the Pictures ............................. 120
Playing Back Pictures on a TV
Screen .................................................124
Others
Using the External Flash ......................125
Using the MC Protector/PL Filter ......... 126
Using the Remote Shutter ................... 127
Using the AC Adaptor ..........................128
Displaying the Time at the Travel
Destination (World Time) ..................... 129
Screen Display ..................................... 131
Cautions for Use ..................................134
Message Display .................................137
Troubleshooting ...................................139
Number of recordable pictures ............144
Specifications .......................................147
Digital Camera Accessory System ...... 150
Digital Camera Accessory Order Form
(For USA Customers) .......................... 151
Request for Service Notice
(For USA Only) ....................................152
Limited Warranty (For USA Only) ........153
Customer Services Directory
(For USA Only) ....................................155
Index ....................................................158
Page 9
Preparation
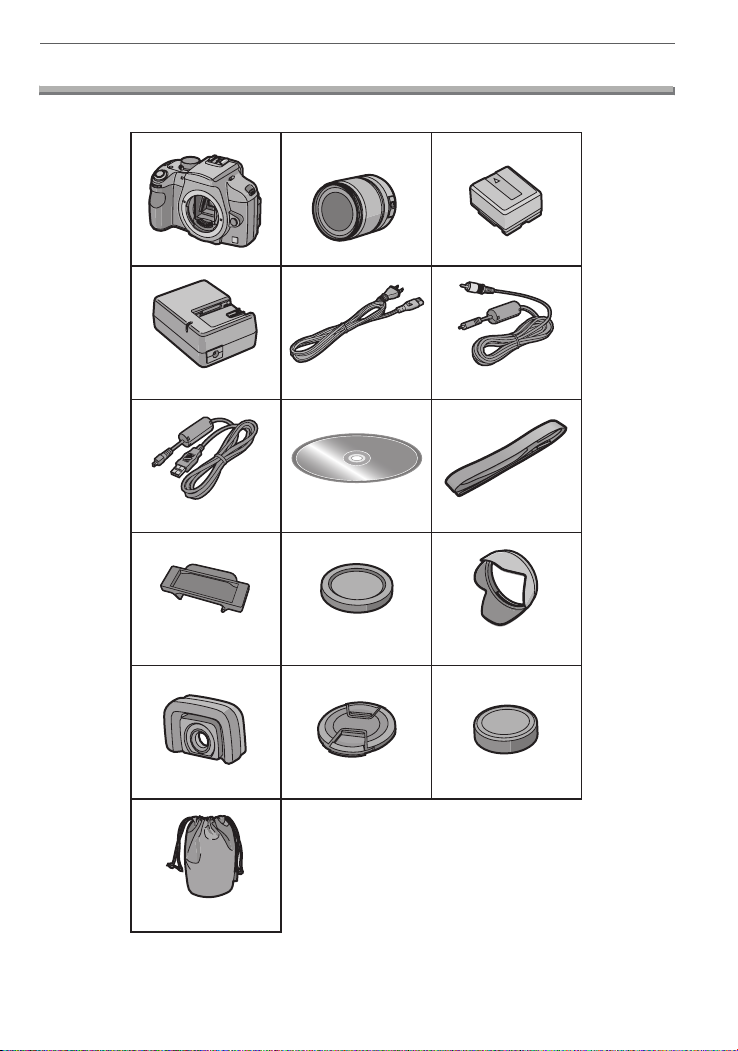
Standard Accessories
Check that all the accessories are included before using the camera.
Preparation
1
4
DE-A38F
7
K1HA08CD0013 VFC4268
10
VGQ8990
13
2
5
K2CA2EA00002 K1HA08CD0015
8
11
VKF4091
14
3
DMW-BLA13PP
6
9
12
VYC0972
15
16
VYC0973
VFC4206
VYF3160
VFC4185
9
VQT1G28
Page 10

Preparation
1 Digital Camera Body
(This is referred to as camera body in
these operating instructions.)
2 Interchangeable Lens
“LEICA D VARIO-ELMAR 14–50 mm/
F3.8– 5.6/ASPH./MEGA O.I.S.”
(This is referred to as lens in these
operating instructions.)
3 Battery Pack
(This is referred to as battery in these
operating instructions.)
4 Battery Charger/AC Adaptor
(This is referred to as charger in these
operating instructions.)
5 AC Cable
6 Video Cable
7 USB Connection Cable
8CD-ROM
9Strap
10 Eyepiece Cap
(This is attached to the strap at the time
of purchase.)
11 Body Cap
(This is attached to the camera body at
the time of purchase.)
12 Lens Hood
13 Magnifier Eye Cup
14 Lens Cap
(This is attached to the interchangeable
lens at the time of purchase.)
15 Lens Rear Cap
(This is attached to the interchangeable
lens at the time of purchase.)
16 Lens Storage Bag
further information about obtaining
replacement parts.
• SD Memory Card, SDHC Memory Card
and MultiMediaCard are indicated as card
in the text.
• The card is optional.
• For information about optional
accessories, refer to the “Digital Camera
Accessory System”. (P150)
• If any accessories are lost, customers in
the USA should contact Panasonic’s parts
department at 1 800 833-9626 and
customers in Canada should contact
1 800 99-LUMIX (1-800-995-8649) for
10
VQT1G28
Page 11
Preparation
3
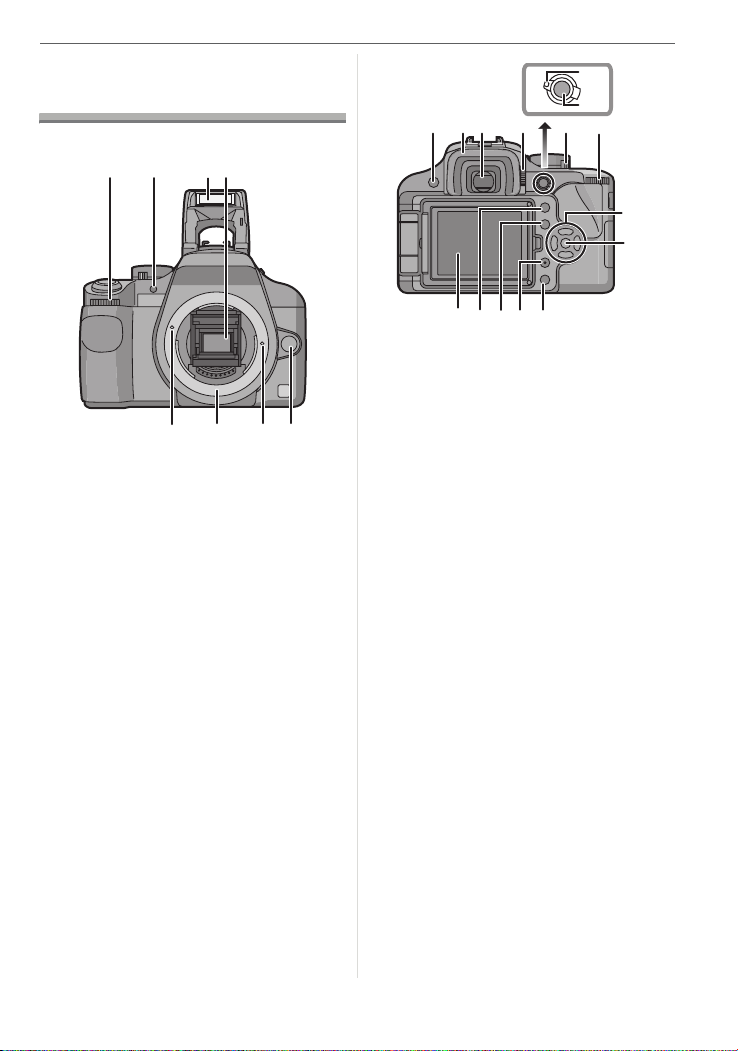
Names of the Components
∫ Camera body
14
1 Front dial (P41, 42, 45, 51)
2 AF assist lamp (P106)
Self-timer indicator (P74)
3 Flash (P64)
4 Mirror
5 Lens fitting mark (P14)
6 Mount
7 Lens lock pin
8 Lens release button (P15)
32
5876
13
AFS
AFL
AFC
AEL
MF
14
12
15109 11
16
22
2
17 1918
20 21
9 [LIVE VIEW] button (P34, 54)
10 Eye cup (P17)
11 Viewfinder (P32, 35, 131)
12 Diopter adjustment dial (P35)
13 Focus mode lever (P36, 40, 45, 58, 60,
62)
14 [AFL/AEL] button (P69)
15 Camera ON/OFF switch (P24)
16 Rear dial (P42, 44, 51, 52, 116)
17 LCD monitor (P33, 36, 48, 54, 55, 56,
57, 131)
18 Playback button (P48, 49, 51, 52, 53,
124)
19 [DISPLAY] button (P36, 48, 55)
[LCD MODE] button (P56)
20 [FUNC] button (P91)
21 Delete button (P49)
22 Cursor buttons
3/ISO (P78)
2/AF mode (P60)
1/Metering mode (P81)
4/WB (White balance) (P75)
23 [MENU/SET] button (P24)
11
VQT1G28
Page 12
Preparation
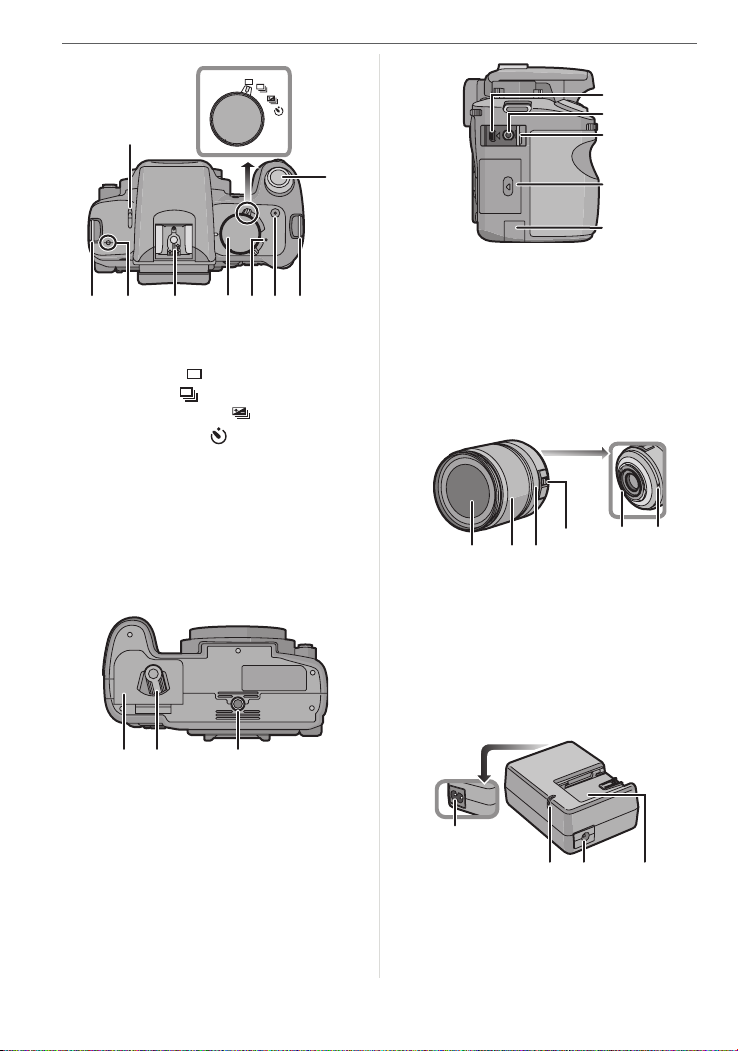
7
8
6
9
25
24
26
27 29 3228 27
3130
24 Flash Open Lever (P64)
25 Drive mode lever
Single (P36):
Burst (P71):
Auto bracket (P72):
Self-timer (P74):
26 Shutter button (P36)
27 Strap eyelet (P16)
28 Focus distance reference mark (P46)
29 Hot shoe (P125)
30 Mode dial (P25)
31 Status indicator (P24)
32 [FILM MODE] button (P93)
3
3
3
3
40
36 [DIGITAL/V.OUT] socket (P118, 120, 124)
37 [REMOTE] socket (P127)
38 Terminal door
39 Card door (P22)
40 DC cable cover (P128)
∫ Lens
“LEICA D VARIO-ELMAR 14–50 mm/
F3.8–5.6/ASPH./MEGA O.I.S.”
45 46
44
434241
41 Lens surface
42 Zoom ring (P47, 97, 98)
43 Focus ring (P45, 62)
44 [O.I.S.] switch (P14)
45 Contact point
46 Lens fitting mark (P14)
33 3534
33 Battery door (P21)
34 Open/Close lever (P21)
35 Tripod receptacle
• When you use a tripod, make sure it is
stable when the camera is attached to
it.
12
VQT1G28
∫ Battery charger/AC adaptor (P18, 128)
47
49 5048
47 Power input socket [AC IN]
48 [CHARGE] indicator
49 Power output socket [DC OUT]
50 Battery holder
Page 13

Preparation
Rotating the LCD monitor
At the time when this camera is purchased,
the LCD monitor is set inside the frame of
the camera body. Move the LCD monitor in
the directions shown in the figure below.
1
2
3
1 Open the LCD monitor opening knob
A with your finger.
2 It can be rotated 180o forwards.
• It can only be rotated 90o towards you.
3 Return the monitor to its original
position.
• Refer to the following for details on
how to rotate the LCD monitor.
LCD monitor rotation direction
1 Maximum 180o
2 270o
About the Lens
You can use the supplied lens or a lens that
is compatible with the lens mount standard
for the “Four Thirds System (Four Thirds
Mount)” with this unit.
Select a lens that matches the scene being
recorded and your use of the pictures.
If you use a lens other than a dedicated
interchangeable lens, auto focus cannot be
activated and accurate metering is not
possible. Also, some functions will not work.
∫ “Four Thirds Mount”
This is the lens mount standard for the
“Four Thirds System”.
These are interchangeable lenses newly
developed specifically for the optical design
requirements of digital cameras.
Using a lens other than the supplied lens
∫
• Depending on the type of lens, you may
not be able to use some functions such as
contrast AF (P58), the direction detection
function (P35) and OIS mode (P96).
• The available flash range etc. differs
depending on the aperture value of the
lens you are using.
• Take some test pictures with the lens you
are using.
• The camera automatically switches to
phase difference AF [ ] (P59) if you
use a lens that does not support contrast
AF (P58) even if [LIVE VIEW AF] (P107)
in the [CUSTOM MENU] menu is set to
[ ] (P58). Check the following for
compatible lenses.
∫ Lenses that support contrast AF and
the direction detection function
(As of October 2007)
The compatible lenses are L-RS014050
(supplied lens) and L-RS014150
(November 2007 planned release).
Refer to the catalog, website etc. for the
latest information.
13
VQT1G28
Page 14

Preparation
2
1
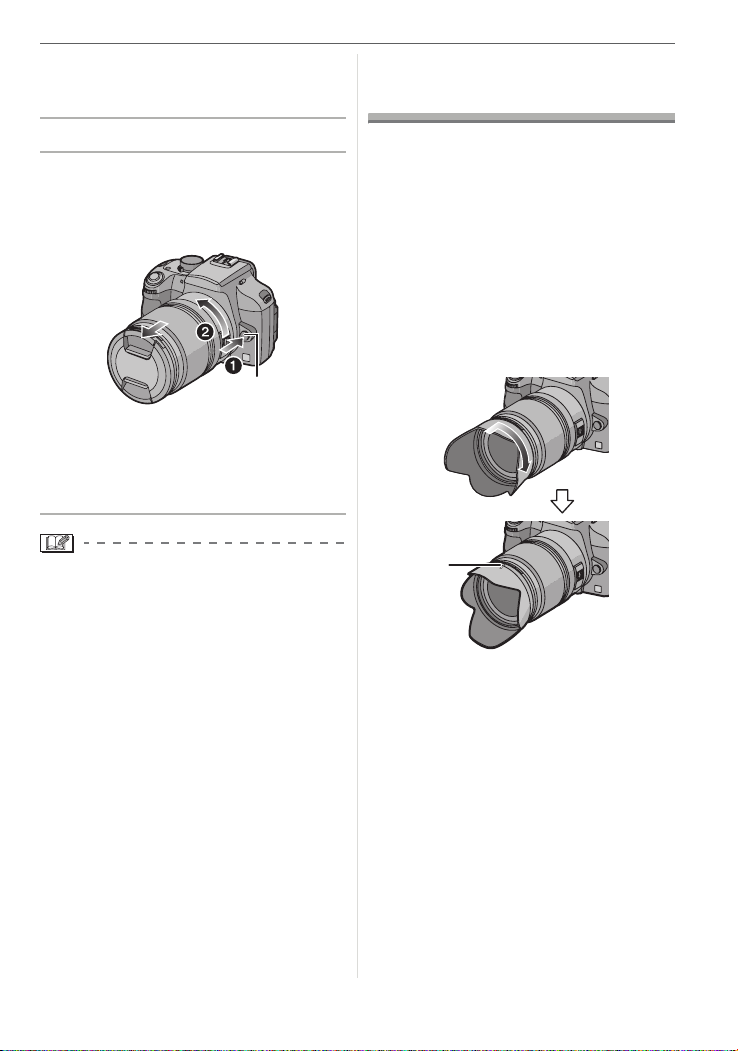
Attaching/Detaching the Lens
• Check that the camera is turned off.
• Close the flash.
∫ Attaching a lens to the camera body
1 Turn the lens rear cap A and the
body cap B in the direction of the
arrow to detach them.
1
2
A
• Do not put your hands inside the mirror.
2 Align the lens fitting marks C
(red marks) on the camera body
and the lens and then rotate the
lens in the direction of the arrow
until it clicks.
B
3 Detach the lens cap.
∫ Optical image stabilizer
The supplied lens has an optical image
stabilizer function.
The optical image stabilizer function is set
for activation when the lens is attached to
the camera body.
Set the [O.I.S.] switch to [ON].
C
• Do not press the lens release button
when you attach a lens.
• Do not try to attach the lens when
holding it at an angle to the camera
body as the lens mount may get
scratched.
• Check that the lens is attached
correctly.
14
VQT1G28
• You can change the optical image
stabilizer mode to [MODE1], [MODE2] or
[MODE3] using [OIS MODE] in the [REC]
mode menu. (P96) It is set to [MODE1] at
the time of purchase.
• We recommend setting the [O.I.S.] switch
to [OFF] when using a tripod. If the [O.I.S.]
switch is set to [OFF], [ ] is displayed
on the LCD monitor.
Page 15
∫ Detaching a lens from the camera
body
• Check that the camera is turned off.
1 Attach the lens cap.
2 Press the lens release button D
while turning the lens as far as
possible in the direction of the
arrow to detach it.
D
• Always attach the body cap to the
camera body so that dirt or dust does
not get inside.
• Attach the lens rear cap so that the lens
contact point does not get scratched.
Preparation
Attaching the Lens Hood
In bright sunlight or backlight, the lens hood
will minimize lens flare and ghosting. The
lens hood cuts off excess lighting and
improves the picture quality.
• Check that the camera is turned off.
• Close the flash.
Insert the lens hood on the lens
with the short sides at the top and
bottom and then turn it in the
direction of the arrow until it
clicks.
• Change lenses where there is not a lot of
dirt or dust.
• When you turn the camera off or carry the
camera, attach the lens cap to protect the
surface of the lens.
• Detach the lens cap before taking
pictures.
• Be careful not to lose the lens cap, the
lens rear cap and the body cap.
A
A Fit to the mark.
15
VQT1G28
Page 16
Preparation
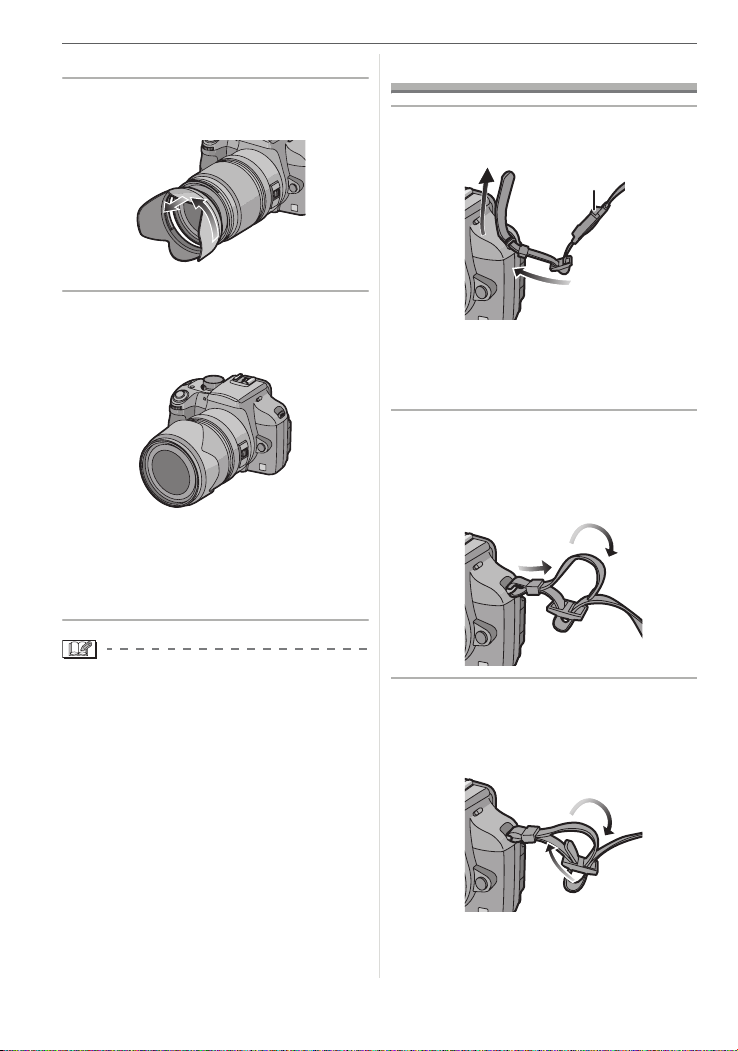
∫ Temporarily storing the lens hood
1 Turn the lens hood in the
direction of the arrow to detach it.
2 Reverse the lens hood and then
attach it in the same way as
shown previously.
• Attach the lens cap.
• When temporarily storing the lens
hood, check that it is firmly attached
and that it does not appear in the
picture.
Attaching the Strap
1 Pass the strap through the strap
eyelet on the camera body.
A
A Eyepiece cap
• Attach the strap so that the side with
the eyepiece cap attached to it is near
the Viewfinder.
2 Pass the end of the strap through
the ring in the direction of the
arrow and then pass it through
the stopper.
• Hold the short sides of the lens hood
when attaching or detaching it.
• When taking pictures with the flash with
the lens hood attached, the lower portion
of the screen may turn dark (vignetting
effect) and the control of the flash may be
disabled because the photo flash may be
obscured by the lens hood. We
recommend detaching the lens hood.
• When using the AF assist lamp in the
dark, detach the lens hood.
• For details on how to attach the MC
protector and the PL filter, refer to P126.
16
VQT1G28
3 Pass the end of the strap through
the hole on the other side of the
stopper.
Page 17

Preparation
4 Pull the other side of the strap
and then check that it will not
come out.
• Perform steps 1 to 4 and then attach
the other side of the strap.
• Be sure to follow the steps and attach the
strap correctly.
• Check that the strap is firmly attached to
the camera.
• Attach the strap so that the “L
is on the outside.
UMIX” LOGO
Attaching the Eyepiece Cap
When taking pictures with your eye
removed from the Viewfinder, light may
enter the Viewfinder and affect the
exposure and focus.
Attach the eyepiece cap so that light does
not enter the Viewfinder and prevent
accurate exposure when taking pictures
with Live View (P54) or the Self-timer (P74)
and when using the remote shutter
(DMW-RSL1; optional) (P127).
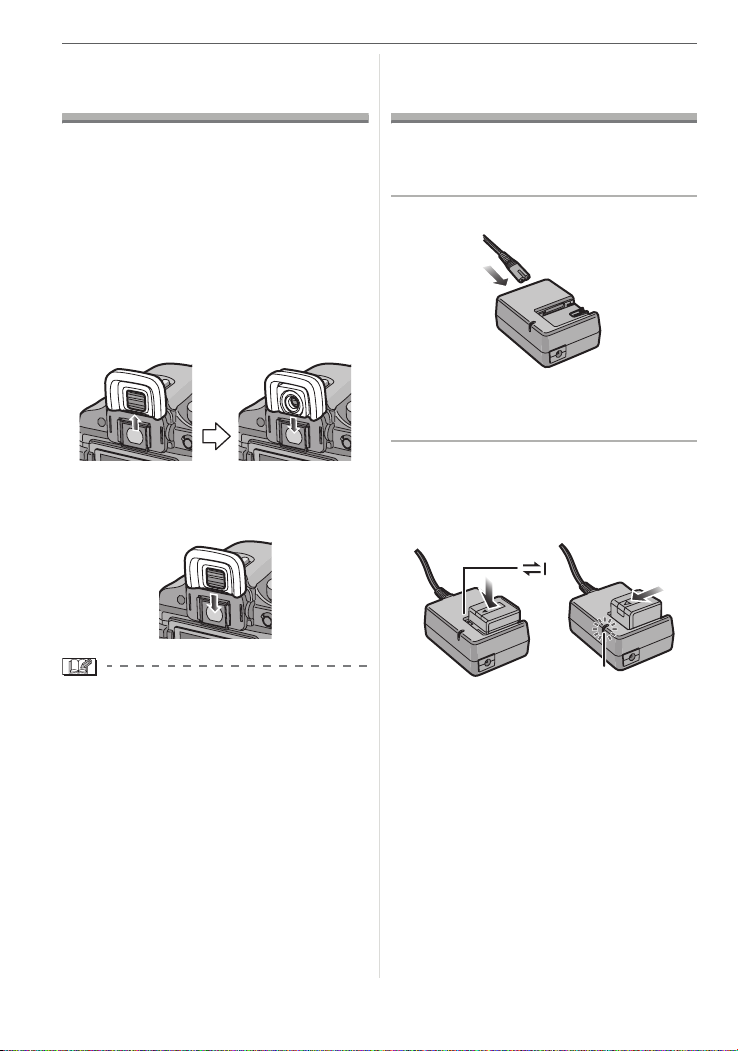
∫ Attaching the eyepiece cap
1 Slide the eye cup from the bottom to
detach it.
2 Slide the eyepiece cap from the top.
• The eyepiece cap is attached to the
strap.
∫ Attaching the eye cup
Slide the eye cup from the top.
• Be careful not to lose the eye cup.
• Consult the dealer if you lose the eye cup
(VYQ4130).
• Keep the eyepiece cap out of reach of
children to prevent swallowing.
• Keep the eye cup out of reach of children
to prevent swallowing.
17
VQT1G28
Page 18
Preparation
A
Attaching the Magnifier Eye Cup
You can magnify the field of view of the
Viewfinder by 1.2 times.
This makes it easier to fix the focus when
taking pictures with manual focus and
taking close-up pictures.
∫ Attaching the magnifier eye cup
1 Slide the eye cup from the bottom to
detach it.
2 Slide the magnifier eye cup from the
top.
∫ Attaching the eye cup
Slide the eye cup from the top.
Charging the Battery with the Charger
• The battery is not charged when the
camera is shipped. Charge the battery
before use.
1 Connect the AC cable.
• The battery cannot be charged when
the DC cable (DMW-DCC1; optional) is
connected to the AC adaptor.
2 Align the battery with the marks
on the charger and then place it
straight into the charger. Check
that it is firmly attached.
• Keep the magnifier eye cup out of reach of
children to prevent swallowing.
• Keep the eye cup out of reach of children
to prevent swallowing.
18
VQT1G28
• Charging starts when the [CHARGE]
indicator A lights green.
Page 19

Preparation
3 Detach the battery after charging
is completed.
A
• Charging is completed when the
[CHARGE] indicator A turns off (after
about 140 minutes).
• Do not use any other AC cables except
the supplied one.
• After charging is completed, be sure to
disconnect the AC cable from the
electrical outlet.
• The battery becomes warm after using it
and during and after charging. The
camera also becomes warm during use.
This is not a malfunction.
• The battery will be exhausted if left for a
long period of time after being charged.
Recharge the battery when it is
exhausted.
• The battery can be charged even if it is
not fully discharged.
• Use the dedicated charger and battery.
• Use the charger indoors.
• Do not disassemble or modify the
charger.
• The battery charger is in the standby
condition when the AC cable is
connected. The primary circuit is always
“live” as long as the power cord is
connected to an electrical outlet.
About the Battery
(charging/number of recordable
pictures)
∫ Battery indication
The remaining battery power appears on
the screen.
• The battery indication turns red and blinks.
(The status indicator blinks when the LCD
monitor turns off.) Recharge the battery or
replace it with fully charged battery.
[This does not appear when using the AC
adaptor. (P128)]
∫ The battery life
The number of recordable pictures
when using the Viewfinder
(By CIPA standard in program AE mode)
Number of
recordable
pictures
Recording conditions by CIPA standard
• Temperature: 23 oC (73.4 oF)/
Humidity: 50% when LCD monitor is on.
• Using a Panasonic SD Memory Card
(128 MB).
• Using the supplied battery.
• Using the supplied lens.
• Starting recording 30 seconds after the
camera is turned on. (When the optical
image stabilizer function is set to
[MODE1])
• Recording once every 30 seconds with
full flash every second recording.
• Turn the camera off every 10 recordings.
¢ The number of recordable pictures
decreases in Auto power LCD mode or
Power LCD mode. (P56)
• CIPA is an abbreviation of “Camera &
Imaging Products Association”.
Approx. 450 pictures
(Approx. 225 min)
¢
19
VQT1G28
Page 20

Preparation
The number of recordable pictures
varies depending on the recording
interval time. If the recording interval
time becomes longer, the number of
recordable pictures decreases.
[e.g. When recording once every
2 minutes, the number of recordable
pictures decreases to about 120.]
The number of recordable pictures
when using the LCD monitor (Live View)
(The conditions are the same as the
CIPA standard.)
Number of
recordable
Approx. 280 pictures
(Approx. 140 min)
pictures
Playback time
Playback time Approx. 280 min
The number of recordable pictures and the
playback time will vary depending on the
operating conditions of the unit and the
storing conditions of the battery.
∫ Charging
Charging time Approx. 140 min
Charging time and number of recordable
pictures with the optional battery pack
(DMW-BLA13PP) are the same as above.
• The [CHARGE] indicator lights when
charging starts.
∫ Charging conditions
• Charge the battery in a temperature
between 10 oC to 35 oC. (50 oF to 95 oF).
(The battery temperature should also be
the same.)
• The performance of the battery may
temporarily deteriorate and the operating
time may become shorter in low
temperature conditions (e.g. skiing/
snowboarding).
• The battery may swell and its operating
time may become shorter as the number
of times it is charged increases. For long
term battery use, we recommend you do
not frequently charge the battery before it
is exhausted.
∫ When the [CHARGE] indicator flashes
• The battery is over discharged
(discharged excessively). In a while, the
[CHARGE] indicator will light up and
normal charging will start.
• The battery temperature is excessively
high or low. The charging time will be
longer than normal. Also, charging may
not be completed.
• When the operating time of the camera
becomes extremely short even after properly
charging the battery, the life of the battery
may have expired. Buy a new battery.
20
VQT1G28
Page 21
Preparation
Inserting/Removing the Battery
• Check that the camera is turned off.
• Close the flash.
1 Slide the release lever in the
direction of the arrow (OPEN
side) and then open the battery
door.
• Always use genuine Panasonic
batteries (DMW-BLA13PP).
• If you use other batteries, we cannot
guarantee the quality of this product.
2 Insert:
Insert the charged battery fully
until it clicks.
Remove:
Push the lever A in the direction
of the arrow to remove.
3 1:
Close the battery door.
2:
Slide the release lever in the
direction of the arrow (CLOSE
side) and then close it firmly.
• Remove the battery after use.
• Do not remove the card or the battery
while the card is being accessed. The
data may be damaged. (P23)
• Do not remove the battery with the
camera turned on since the settings on
the camera may not be stored properly.
• The supplied battery is designed only
for the camera. Do not use it with any
other equipment.
A
• Be careful of the direction indicated by
the mark [ ] on the battery when
inserting the battery.
21
VQT1G28
Page 22
Preparation
Inserting/Removing the Card (Optional)
• Check that the camera is turned off.
• Close the flash.
• Prepare a card. (optional)
1 Slide the card door to open it.
2 Insert:
Insert the card fully until it clicks
and it is locked.
Remove:
Push the card until it clicks, then
pull the card out upright.
3 1:
Close the card door.
2:
Slide the card door to the end and
then close it firmly.
• If the card door cannot be completely
closed, remove the card and insert it
again.
• Always turn the camera off before
opening the card door.
• The card and the data may be damaged
if it is inserted or removed while the
camera is on.
• We recommend using a Panasonic SD
Memory Card or SDHC Memory Card.
(P6)
• Check the direction of the card.
• Do not touch the connection terminals
on the back side of the card.
• The card may be damaged if it is not
fully inserted.
22
VQT1G28
Page 23
About the Card
125
ISO
100
19
F5.6P
STANDARD
1
(optional)
∫ Access to the card
The card access indication A lights when
pictures are being recorded onto the card.
Preparation
• The reading/writing speed of an SD
Memory Card and an SDHC Memory
Card is fast. Both types of card are
equipped with a Write-Protect switch A
that prevents writing and formatting the
card. (If the switch is slid to the [LOCK]
side, it is not possible to write or delete
data on the card and format it. When the
switch is slid to the other side, these
functions become available.)
B
F5.6
A
ISO
100
125
A
STANDARD
19
B When taking pictures with Live View
When the card access indication lights,
pictures are being read or deleted or the
card is being formatted (P32). Do not:
• turn the camera off.
• remove the battery or the card.
• shake or impact the camera.
• disconnect the DC cable (DMW-DCC1;
optional) if you use the AC adaptor
(P128).
The card and the data may be damaged or
the camera may not operate normally.
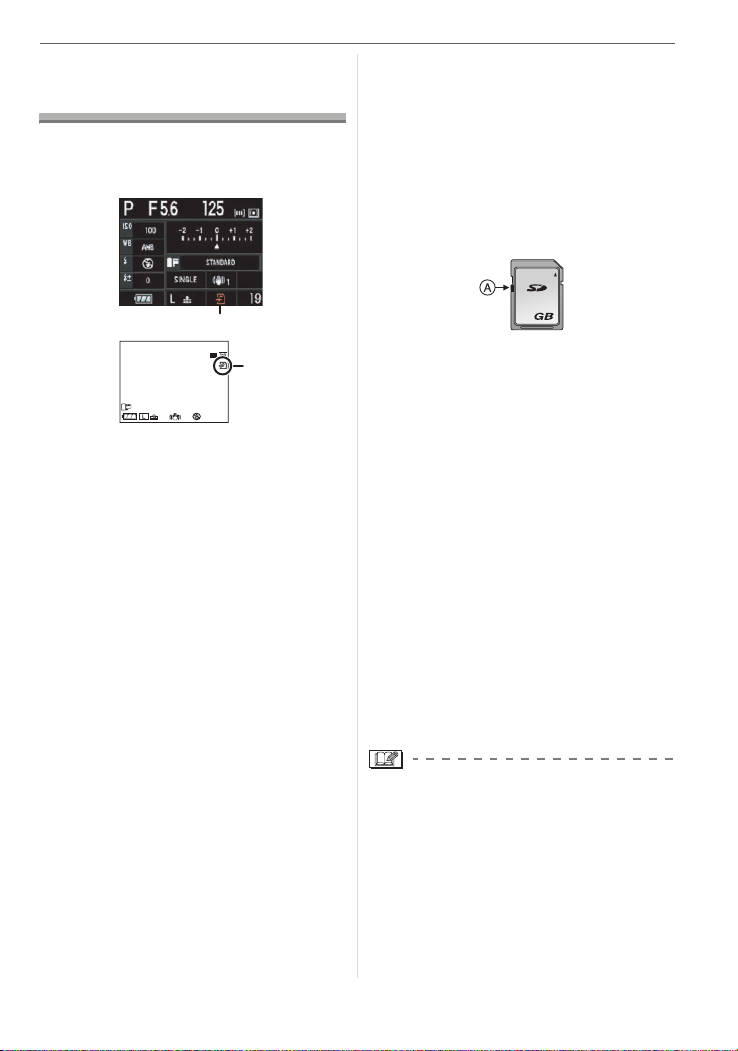
∫ Card (optional)
• The SD Memory Card, SDHC Memory
Card and MultiMediaCard are small,
lightweight, removable external cards.
Read P6 for information about cards that
can be used in this unit.
• The SDHC Memory Card is a memory
card standard decided by the SD
Association in 2006 for high capacity
memory cards more than 2 GB.
2
• This unit (SDHC compatible equipment) is
compatible with SD Memory Cards based
on SD Memory Card Specifications and
formatted in FAT12 system and FAT16
system. It is also compatible with SDHC
Memory Cards based on SD Memory
Card Specifications and formatted in
FAT32 system.
• You can use an SDHC Memory Card in
equipment that is compatible with SDHC
Memory Cards however you cannot use
an SDHC Memory Card in equipment that
is only compatible with SD Memory Cards.
(Always read the operating instructions for
the equipment being used. If you also
order a photo studio to print pictures, ask
the photo studio before printing.) (P6)
• Refer to P144 for information about the
number of recordable pictures for each
card.
• The data on the card may be damaged or
lost due to electromagnetic waves, static
electricity or breakdown of the camera or
the card. We recommend storing
important data on a PC etc.
• Do not format the card on your PC or
other equipment. Format it on the camera
only to ensure proper operation. (P32)
• Keep the Memory Card out of reach of
children to prevent swallowing.
23
VQT1G28
Page 24
Preparation
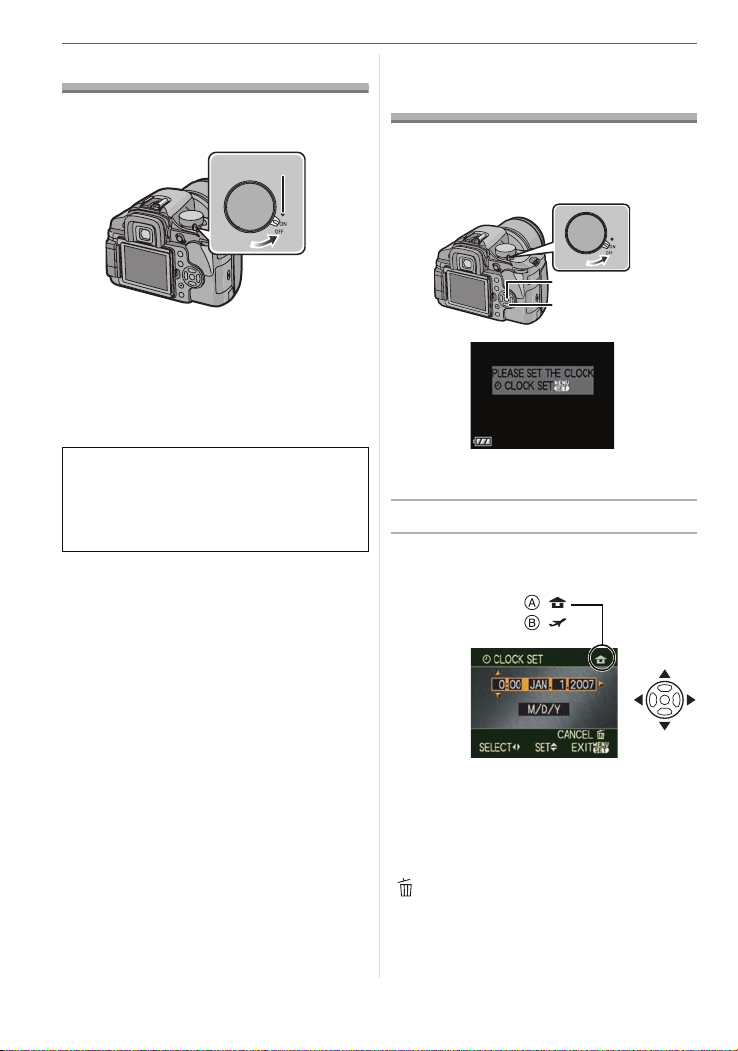
Turning the Camera On
Set the camera ON/OFF switch to
[ON].
A
• The status indicator A lights when you set
the switch to [ON]. The status indicator
blinks if the remaining battery power
becomes low.
• The camera turns off when you set the
switch to [OFF].
Dust reduction function
When the camera is turned on, the dust
reduction function is automatically
activated to shake off any dust on the front
part of the image sensor.
Setting Date/Time (Clock Set)
∫ Initial setting
The clock is not set so the following screen
appears when you turn the camera on.
A
B
A [MENU/SET] button
B Cursor buttons
1 Press [MENU/SET].
2 Press 3/4/2/1 to select the
date and time.
:
:
24
VQT1G28
A Time at the home area
B Time at the travel destination (P129)
2/1: Select the desired item.
3/4: Set the display order for the
date and time.
: Cancel without setting the
clock.
• You can also use the front dial or the
rear dial to set.
Page 25
Preparation
3 Press [MENU/SET] to set.
• Turn the camera off after finishing
setting the clock. Then turn it on and
check that the clock setting is correct.
Changing the clock setting
1 Press [MENU/SET] to display the
menu.
2 Press 3/4/2/1 to select
[CLOCK SET] in the [SETUP] menu
[ ] and then press 1. (P28)
3 Set as shown on steps
4 Press [MENU/SET] to close the menu.
• When a fully charged battery has been
inserted for more than 24 hours, charging
of the built-in battery for the clock is
completed so the clock setting will be
stored (in the camera) for at least
3 months even if the battery is removed.
(If you insert a battery that is not
sufficiently charged, the length of time that
the clock setting is stored may become
less.) However the clock setting is
canceled after this time. In this case, set
the clock again.
• You can set the year from 2000 to 2099.
The 24-hour system is used.
• If the date is not set in the camera it will
not be printed correctly when you use a
photo printing service, even if the store
provides a date printing option for your
photographs. (P113)
• If the date is set in the camera it will be
printed correctly even if the date is not
displayed on the screen of the camera.
2 and 3.
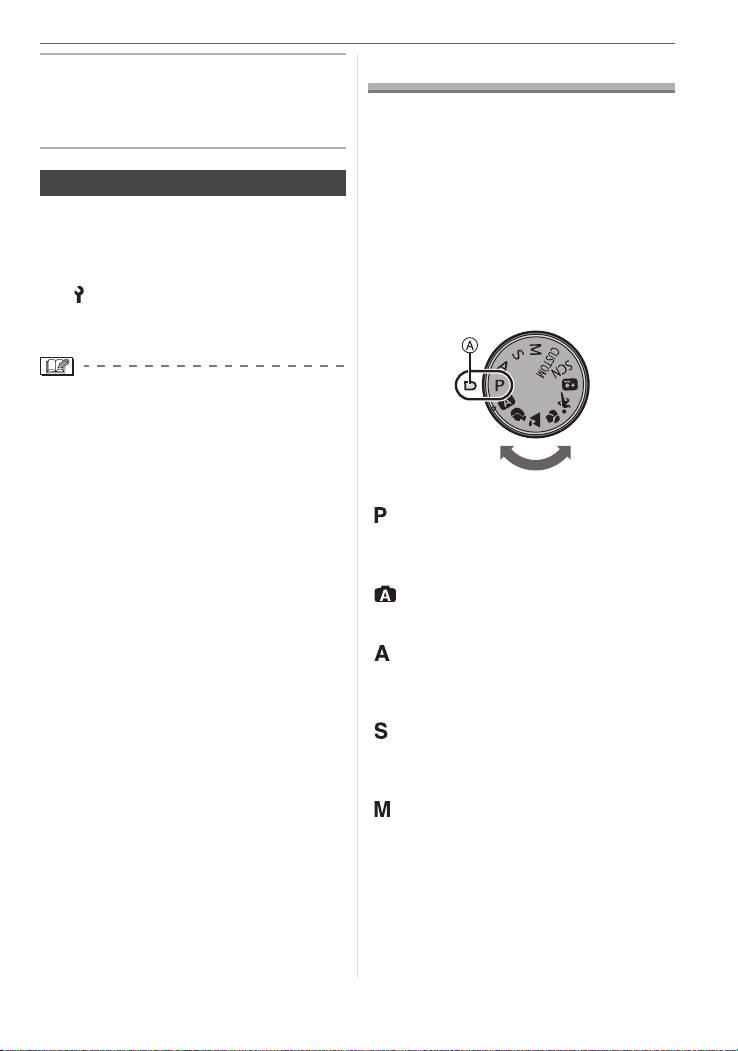
About the Mode Dial
If you turn on this unit and then rotate
the mode dial, you can switch to a scene
mode etc. that matches your recording
purpose.
∫ Switching the mode by rotating the
mode dial
Align a desired mode with part A.
Rotate the mode dial slowly and surely to
adjust to each mode. (The mode dial
rotates 360o)
∫ Basic
Program AE mode (P36)
The exposure is automatically adjusted by
the camera.
Auto mode (P40)
This mode is recommended for beginners.
Aperture-priority AE mode (P41)
The shutter speed is automatically
determined by the aperture value you set.
Shutter-priority AE mode (P42)
The aperture value is automatically
determined by the shutter speed you set.
Manual exposure mode (P42)
The exposure is adjusted by the aperture
value and the shutter speed which are
manually adjusted.
25
VQT1G28
Page 26
Preparation
∫ Advanced
Custom mode (P83)
Use this mode to take pictures with
previously registered settings.
Scene mode (P88)
This allows you to take pictures that match
the scene being recorded.
Advanced scene mode
Portrait mode (P85)
Use this mode to take pictures of people.
Scenery mode (P85)
Use this mode to take pictures of scenery.
Macro mode (P86)
This allows you to take close-up pictures
of a subject.
Sports mode (P87)
Use this mode to take pictures of sporting
events, etc.
Night portrait mode (P87)
Use this mode to take pictures of night
scenes and people with night time
scenery.
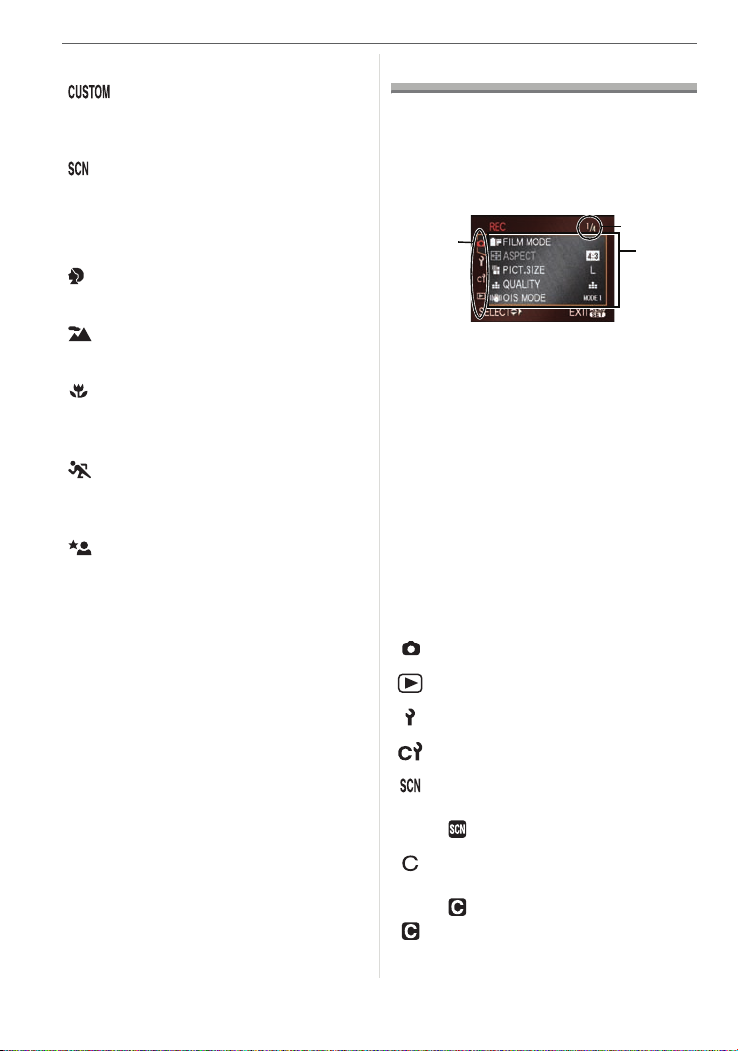
Setting the Menu
∫ Displaying the menu screens
Press [MENU/SET].
e.g.: The first page of the total 4 pages is
displayed.
A
A Menu icons
B Current page
C Menu items and settings
• You can also rotate the front dial or the
rear dial to select menu items and
settings.
• The menu icons and the menu items that
are displayed differ depending on the
position of the mode dial.
• If you set [MENU RESUME] (P107) in the
[CUSTOM MENU] menu to [ON], the
screen shows the last selected menu item
when the camera was turned off.
∫ About the menu icons
[REC] mode menu (P91)
B
C
26
VQT1G28
[PLAY] mode menu (P108)
[SETUP] menu (P28)
[CUSTOM MENU] menu (P104)
[SCENE MODE] menu (P88)
This is displayed when the mode dial is
set to [ ].
[CUSTOM MODE] menu (P83)
This is displayed when the mode dial is
set to [ ].
[ ] means the Custom mode.
Page 27

∫ Setting menu items
• The following example shows how to set
[FLASH] when program AE mode [ ] is
selected.
1
Press 3/4 to select the menu item.
A
Preparation
∫ Closing the menu screen
Press [MENU/SET].
• You can also press the shutter button
halfway to close the menu.
∫ Switching to other menus
(The screens show switching to the
[SETUP] menu as an example.)
1 Press 2 on a menu screen.
• Press 4 at A to switch to the next
screen.
• You can also use the front dial or the
rear dial to select a menu item.
2 Press 1.
3 Press 3/4 to select the setting.
4 Press [MENU/SET] to set.
MENU
/SET
2 Press 4 to select the [SETUP]
menu icon [ ].
3 Press 1.
• Select a menu item next and set it.
• If you want to switch to a different
menu, select the appropriate menu icon
2.
in step
VQT1G28
27
Page 28
Preparation
About the Setup Menu
• Set items as required.
• Select [RESET] to return the settings to
the initial settings at the time of purchase.
(P29)
• [CLOCK SET], [AUTO REVIEW] and
[POWER SAVE] are important items.
Check their settings before using them.
[CLOCK SET]
(Changing the date and time.)
MENU
Press [ ] to display the [SETUP] menu
/SET
and select the item to set. (P26)
Change date and time. (P24)
[AUTO REVIEW]
(Displaying the recorded picture.)
MENU
Press [ ] to display the [SETUP] menu
/SET
and select the item to set. (P26)
Set the length of time that the picture is
displayed after taking it.
[REVIEW]: This is useful for confirming
the composition of the whole
screen.
[OFF]
[1 SEC.]
[2 SEC.]
[3 SEC.]
[HOLD] The recorded picture
[ZOOM]: The recorded picture is
[OFF]
[1 SEC.]
[2 SEC.]
[3 SEC.]
• If [ZOOM] is set to [OFF], the playback
screen display can be switched during
28
VQT1G28
remains displayed.
enlarged 4 times and
appears on the screen. This
is useful for confirming the
focus.
The picture is not enlarged if
you use burst mode or auto
bracket.
auto review when taking pictures with the
drive mode lever set to [ ] (P36) or
[ ] (P74).
• When [HOLD] has been selected, the
zoom time cannot be set.
• When [HOLD] has been selected, press
the shutter button halfway to release
the auto review.
• If you use burst mode (P71) or auto
bracket (P72), the auto review function is
activated regardless of the setting for auto
review. (The picture is not enlarged.)
• If [HIGHLIGHT] (P30) is set to [ON], white
saturated areas appear blinking in black
and white when the auto review function is
activated.
[POWER SAVE]
(Turning off this unit automatically.)
MENU
Press [ ] to display the [SETUP] menu
/SET
and select the item to set. (P26)
Power save mode is activated (the camera
is automatically turned off to save the
battery life) if the camera has not been
used for the time selected on the setting.
[OFF], [1MIN.], [2MIN.], [5MIN.], [10MIN.]
• Press the shutter button halfway or turn
this unit off and on to cancel power save
mode.
• Power save mode is not activated in the
following cases.
– When using the AC adaptor (P128)
– When connecting to a PC or a printer
– During a slide show
Page 29

Preparation
[WORLD TIME] (P129)
MENU
Press [ ] to display the [SETUP] menu
/SET
and select the item to set. (P26)
Set the time in your home area and travel
destination.
[]: Travel destination area
[]: Your home area
[MONITOR]
MENU
Press [ ] to display the [SETUP] menu
/SET
and select the item to set. (P26)
The brightness of the screen can be
adjusted in 7 steps.
[LCD AUTO]
MENU
Press [ ] to display the [SETUP] menu
/SET
and select the item to set. (P26)
If you set [ON] and take pictures with the
Viewfinder, the LCD monitor turns off while
the shutter button is pressed halfway.
[OFF]
[ON]
[BEEP]
MENU
Press [ ] to display the [SETUP] menu
/SET
and select the item to set. (P26)
Set the focus confirmation beep, the
self-timer beep and the alarm beep.
[OFF]
[ON]
[NO.RESET]
MENU
Press [ ] to display the [SETUP] menu
/SET
and select the item to set. (P26)
Reset the file number of the next recording
to 0001.
• The folder number is updated and the file
number starts from 0001. (P119)
• A folder number between 100 and 999
can be assigned.
When the folder number reaches 999, the
number cannot be reset. We recommend
formatting the card after saving the data
on a PC or elsewhere.
• To reset the folder number to 100, format
the card first (P32) and then use
[NO.RESET] to reset the file number. A
reset screen for the folder number will
appear after this. Select [YES] to reset the
folder number.
[RESET]
MENU
Press [ ] to display the [SETUP] menu
/SET
and select the item to set. (P26)
The following settings are reset to the initial
settings.
– [REC] mode menu settings
– [SETUP]/[CUSTOM MENU] menu
settings
• [FAVORITE] (P110) is fixed to [OFF] and
[ROTATE DISP.] (P111) is fixed to [ON].
• If the [SETUP] menu settings are reset,
the following settings are also reset.
– The birthday settings for [BABY1]/
[BABY2] (P89) and [PET] (P90) in scene
mode
– [FILM MODE] (P92)
– The [WORLD TIME] (P129) setting
• The folder number and the clock setting
are not changed.
29
VQT1G28
Page 30

Preparation
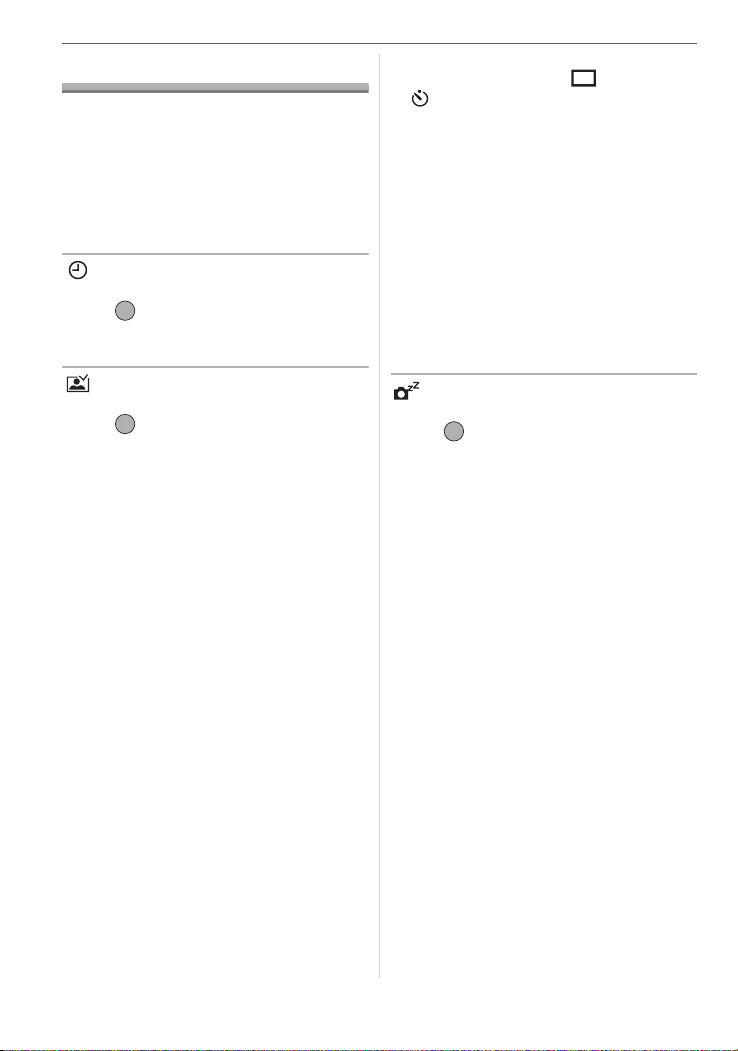
[USB MODE]
MENU
Press [ ] to display the [SETUP] menu
/SET
and select the item to set. (P26)
Select the USB communication system
after or before connecting the camera to
your PC or your printer with the USB
connection cable (supplied). (P118, 120)
[ SELECT ON CONNECTION]:
Select either [PC] or [PictBridge (PTP)]
if you connected the camera to a PC or
a printer supporting PictBridge.
[PC]:
Set after or before connecting to a PC.
[ PictBridge (PTP)]:
Set after or before connecting to a
printer supporting PictBridge.
• When [PC] is selected, the camera is
connected via the “USB Mass Storage”
communication system.
• When [PictBridge (PTP)] is selected, the
camera is connected via the “PTP (Picture
Transfer Protocol)” communication
system.
[HIGHLIGHT]
MENU
Press [ ] to display the [SETUP] menu
/SET
and select the item to set. (P26)
[OFF] No highlight display
[ON] When the auto review function
is activated or when playing
back, white saturated areas
appear blinking in black and
white.
[ON]
[OFF]
• If there are any white saturated areas, we
recommend compensating the exposure
towards negative (P44) referring to the
histogram (P55) and then taking the
picture again. It may result in a better
quality picture.
• There may be white saturated areas if the
distance between the camera and the
subject is too close when taking pictures
with the flash.
If [HIGHLIGHT] is set to [ON] in this case,
the area directly illuminated by the photo
flash will become white saturated and
appear blinking in black and white on the
LCD monitor.
[VIDEO OUT]
MENU
Press [ ] to display the [SETUP] menu
/SET
and select the item to set. (P26)
Set to match the color television system in
each country.
[NTSC]: Video output is set to NTSC
system.
[PAL]: Video output is set to PAL
system.
• Video output is available in playback
mode only.
30
VQT1G28
Page 31

Preparation
[TV ASPECT]
MENU
Press [ ] to display the [SETUP] menu
/SET
and select the item to set. (P26)
Set to match the type of TV.
[]:When connecting to a 16:9
screen TV.
[]: When connecting to a 4:3
screen TV.
• The TV aspect setting is effective in video
output only.
[LANGUAGE]
MENU
Press [ ] to display the [SETUP] menu
/SET
and select the item to set. (P26)
Set the language displayed on the screen.
[ENGLISH], [DEUTSCH], [FRANÇAIS],
[ESPAÑOL], [ITALIANO], [ ]
• If you set a different language by mistake,
select [ ] from the menu icons to set the
desired language.
[VERSION DISP.]
Ver.
MENU
Press [ ] to display the [SETUP] menu
/SET
and select the item to set. (P26)
This enables the firmware versions of the
camera and lens to be checked.
• [–. –] is displayed as the lens firmware
when the lens is not mounted.
[SCENE MENU] (P84, 88)
MENU
Press [ ] to display the [SETUP] menu
/SET
and select the item to set. (P26)
Set the screen that will appear when the
mode dial is set to [ ]/[ ]/[ ]/[ ]/
[ ]/[ ].
[OFF]: The recording screen in the
currently selected advanced
scene mode or scene mode
appears.
[AUTO]: The advanced scene mode
or [SCENE MODE] menu
screen appears.
When [OFF] is set
When [AUTO] is set
31
VQT1G28
Page 32

Preparation
[FORMAT]
MENU
Press [ ] to display the [SETUP] menu
/SET
and select the item to set. (P26)
It is not usually necessary to format a card.
Format it when the message [MEMORY
CARD ERROR] appears.
• Formatting irretrievably deletes all the
data including any protected pictures.
Check the data carefully before
formatting.
• If the card has been formatted on a PC or
other equipment, format it on the camera
again.
• Use a sufficiently charged battery (P18) or
the AC adaptor (P128) when formatting.
• Do not turn the camera off during
formatting.
• You cannot format an SD Memory Card or
an SDHC Memory Card when the card’s
Write-Protect switch is set to [LOCK].
• If the card cannot be formatted, consult
your nearest Service Center.
For USA assistance, please call: 1-800-272-7033
or send e-mail to : digitalstillcam@us.panasonic.com
For Canadian assistance, please call:
1-800-99-LUMIX (1-800-995-8649) or
send e-mail to: lumixconcierge@ca.panasonic.com
Switching between the Viewfinder Display/ Live View Display
∫ Screen display in program AE mode
[ ] (at the time of purchase) (P35)
Viewfinder Display
1
ISO
2
9
8
7
6
5
1 AF frame (P35, 37)
2 AF-LED (P106)
3 ISO sensitivity (P78)
• Lights when the ISO is set to other
than [AUTO].
4 Exposure compensation value (P44)
5 Number of recordable pictures
• You can display up to 99 pictures only
on the Viewfinder.
6 Metering mode (P81)
7 Focus (P39)
8 Shutter speed (P37, 42)
9 Aperture value (P37, 41, 42)
ISO
3
4
32
VQT1G28
Page 33

Information Display on the LCD Monitor
19
125
F5.6P
STANDARD
ISO
100
1
(When taking pictures with the
Viewfinder)
1
2 3
45
18
17
16
15
14
6
7
8
13 1211 910
1 Recording mode (P25)
2 Aperture value (P41, 42)
3 Shutter speed (P42)
4 AF frame setting (P37)
5 Metering mode (P81)
6 Exposure compensation (P44)
7 Film mode (P92)
8 Optical image stabilizer (P14, 96)
9 Number of recordable pictures
10 Card access (P23)
11 Quality (P94)
12 Picture size (P94)
13 Battery indication (P19)
14 Single (P36)
15 Flash output adjustment (P68)
16 Flash setting (P64)
17 White balance (P75)
18 ISO sensitivity (P78)
Preparation
∫ LCD Monitor Display when taking
pictures with Live View (P54)
1 2 3
F5.6
125
456
ISO
100
7, 8
9
17
STANDARD
16
15 111314 10
12
19
1 Recording mode (P25)
2 Aperture value (P58)
3 Shutter speed (P58)
4 ISO sensitivity (P78)
5 AF mode (P60)
6 Metering mode (P81)
7 Recording state
• Flashes red.
8 Focus (P58)
• Lights green.
9 Card access (P23)
• Lights red.
10 Number of recordable pictures
11 Flash setting (P64)
12 Optical image stabilizer (P14, 96)
13 Quality (P94)
14 Picture size (P94)
15 Battery indication (P19)
16 Film mode (P92)
17 AF area (P58, 60)
• Refer to P131 for information about other
screen displays.
33
VQT1G28
Page 34

Preparation
B
∫ Switching the screen display
You can switch the screen display by
pressing [LIVE VIEW].
Switching the screen display allows you to
take pictures while showing the subject on
the Viewfinder or to take pictures while
showing the subject on the LCD monitor.
A
A [LIVE VIEW] button
B LCD monitor
Read “Taking Pictures with the Viewfinder”
(P35) and “Taking Pictures with Live View”
(P54) for details.
34
VQT1G28
Page 35

Basic
Taking Pictures with the Viewfinder
You can take pictures while showing the
subject on the Viewfinder.
When taking pictures with Live
View, press [LIVE VIEW] to switch
to the Viewfinder recording
screen.
A
A When taking pictures with Live View
B When taking pictures with the
Viewfinder
Tips for taking good pictures with
Viewfinder
• Hold the camera gently with both hands,
keep your arms still at your side and stand
with your feet slightly apart.
• When taking pictures, make sure your
footing is stable and there is no danger of
colliding with another person, a ball etc.
• Make sure the camera does not shake
when you press the shutter button.
B
Basic
• Pictures may not be displayed vertically if
they were taken with the camera aimed up
or down.
• You can only use the direction detection
function when using a compatible lens.
(P13)
(Refer to the catalog, website etc. for
compatible lenses.)
Making the Viewfinder easier to
see (Diopter adjustment)
Look at the Viewfinder in a bright
place and then rotate the diopter
adjustment dial to where the line
of the AF frame is clearest.
∫ Direction detection function
Pictures recorded with the camera held
vertically are played back vertically
(rotated). (Only when [ROTATE DISP.]
(P111) is set to [ON])
35
VQT1G28
Page 36

Basic
Changing the information display
on the LCD monitor
Press [DISPLAY] to change.
CD
C Normal display
D No display
E
E [DISPLAY]/[LCD MODE] button
F LCD monitor
• You can also take pictures while looking at
the LCD monitor. (Live View)
Refer to P54 for more information.
Making the LCD monitor screen
easier to see
You can make the LCD monitor
screen easier to see by pressing
[LCD MODE] for 1 second and
then pressing 3/4 to select a
mode.
• Read P56 for details.
Matching the Focus
and the Exposure
Automatically
(AF: Auto Focus/Program AE
mode [ ])
The camera automatically sets the aperture
value and the shutter speed according to
the brightness of the subject.
Phase difference AF is activated when
taking pictures with the Viewfinder.
• Remove the lens cap.
• Turn the camera on. (P24)
• Set the drive mode lever to [ ].
A
A Shutter button
1 Set the focus mode lever to [AFS].
• “AFS” is an abbreviation of “Auto Focus
Single”. The focus is fixed when you
press the shutter button halfway.
36
VQT1G28
Page 37

Basic
2 Aim the AF frame B to the point
you want to focus on and then
press the shutter button halfway.
F Viewfinder Display
• You can check the aperture value C
and shutter speed D.
• The camera beeps and the focus
indication E lights when the subject is
focused.
• The focus indication blinks when the
subject is not focused. In this case, a
picture is not taken. Press the shutter
button halfway to focus on the subject
again.
• Refer to P39 for information about
subjects that are difficult to focus on.
• The camera focuses on any of 3 focus
area points– left, right or center in the
AF frame and a lamp (AF-LED display)
lights where the subject is focused. You
can change the setting for the AF-LED
display in the [CUSTOM MENU] menu.
(P106)
• Refer to P38 for information about
Program shift.
• The focus range is 0.29 m (0.95 feet)
to ¶. (when the supplied lens is
attached)
• If the ISO sensitivity is set to [ISO100]
and the aperture value is set to F3.8
(when the supplied lens is attached), the
shutter speed is automatically set
between about 15 seconds and 1/4000th
of a second.
3 Press the shutter button fully to
take the picture.
• A picture is not taken until the subject is
brought into focus.
• If you want to press the shutter button
fully to take a picture even when the
subject is not focused, set
[FOCUS PRIORITY] in the [CUSTOM
MENU] menu to [OFF]. (P106)
• We recommend checking that the clock is
set properly before taking pictures. (P24)
• When a time is set for power save (P28),
the camera automatically turns off if you
do not operate it within the set time. To
operate the camera again, press the
shutter button halfway or turn the camera
off and on.
∫ Setting the AF frame for phase
difference AF
If you press 2 while taking pictures with
the Viewfinder, the AF frame setting screen
is displayed.
If you press 2/1, you can select the AF
frame setting from AUTO (any of 3 focus
area points– left, right or center), left fix,
center fix or right fix.
• If you set [AUTO], the focus position is not
predetermined. It is set to a position
automatically determined by the camera
at the time of focusing. If you want to
determine the focus position to take
pictures, select a setting other than
[AUTO].
37
VQT1G28
Page 38

Basic
P
B
∫ Program shift
In program AE mode, you can change the
preset aperture value and shutter speed
without changing the exposure. This is
called program shift.
You can make the background more blurred
by decreasing the aperture value or record
a moving subject more dynamically by
slowing the shutter speed when taking a
picture in program AE mode.
• Press the shutter button halfway and then
rotate the front dial to activate program
shift while the aperture value and the
shutter speed are displayed on the
Viewfinder (about 10 seconds).
ISO
ISO
A
• The program shift indication A appears
on the screen if program shift is activated.
• To cancel program shift, turn the camera
off or rotate the front dial until the program
shift indication disappears.
Example of program shift when using
the supplied lens
j1
0123456789 10 11 12 13 14
2
2.8
4
5.6
A
8
11
16
22
4 2 1 1
1
1
1
1
/
2
1
/
/
/
/
4
/
8
15
30
60
1
1
1
/
/
/
125
250
500
(Ev)
15
16
17
18
19
20
1
1
1
/
/
/
1000
2000
4000
A Aperture value
B Shutter speed
1 Program shift amount
2 Program line chart
• You can change the operation method of
the dials with [DIAL SET.] (P105) in the
[CUSTOM MENU] menu.
• If the exposure is not adequate when the
shutter button is pressed halfway, the
aperture value and the shutter speed on
the LCD monitor (information display
screen) turn red. The aperture value and
the shutter speed blink on the Viewfinder.
(They do not blink when the flash is
activated.)
• Program shift is canceled and the camera
returns to normal program AE mode if
more than 10 seconds pass after program
shift is activated. However, the program
shift setting is memorized.
• Depending on the brightness of the
subject, program shift may not be
activated.
38
VQT1G28
Page 39

Taking good pictures
∫ Focusing
• The focus range with auto focus is
0.29 m (0.95 feet) to ¶. (when the
supplied lens is attached)
• If the distance between the camera and
the subject is beyond the focus range of
the camera, the picture may not be
properly focused even if the focus
indication lights.
• The camera will not focus on subjects
properly in the following cases.
– When there are both near and distant
subjects in a scene.
– When there is dirt or dust on glass
between the lens and the subject.
– When there are illuminated or glittering
objects around the subject.
– When taking a picture in dark places.
– When the subject is moving fast.
– When the scene has low contrast.
– When jitter occurs.
– When recording a very bright subject.
– When taking pictures of objects with a
repeated pattern e.g. the windows on a
building.
We recommend taking pictures using AF/
AE lock (P104). In dark places, the AF
assist lamp (P106) may turn on for
focusing on the subject.
• Even when the focus indication appears
and the subject is focused, it is canceled if
you release the shutter button. Press the
shutter button halfway again.
∫ Preventing jitter (camera shake)
• Be careful of jittering when pressing the
shutter button.
• We recommend using a tripod. Also, be
careful how you hold the camera (P35).
Using the self-timer (P74) or the remote
shutter (DMW-RSL1; optional) (P127)
prevents jittering caused by pressing the
shutter button when you are using a
tripod.
Basic
• Shutter speed will be slower particularly in
the following cases. Keep the camera still
from the moment the shutter button is
pressed until the image appears. We
recommend using a tripod.
– Slow sync. (P65)
– Slow sync./Red-eye reduction (P65)
– In [NIGHT PORTRAIT] mode (P87)
– When you set to a slow shutter speed
(P42)
∫ Exposure
• If [LCD AUTO] in the [SETUP] menu is set
to [OFF] and you press the shutter button
halfway when the exposure is not
adequate, the aperture value A and the
shutter speed B turn red. The aperture
value and the shutter speed blink on the
Viewfinder. (They do not blink when the
flash is activated.)
A
B
• When most of the subject is bright, such
as during fine weather or snow, the
recorded pictures may become dark. In
these cases, compensate the exposure
towards positive. (P44)
Continuously focusing on a
subject (AFC)
(When taking pictures with the
Viewfinder)
This mode allows you to compose a picture
more easily by continuously focusing on the
movement of the subject while the shutter
button is pressed halfway.
When taking pictures of a moving subject,
the camera predicts the movement of the
subject and focuses on it. (motion
prediction)
39
VQT1G28
Page 40

Basic
• Check that the camera is set to taking
pictures with the Viewfinder. When taking
pictures with Live View, press [LIVE
VIEW] to switch the setting so the camera
is set to taking pictures with the
Viewfinder. (P35)
Set the focus mode lever to
[AFC].
• “AFC” is an abbreviation of “Auto Focus
Continuous”. The camera is continuously
focusing on the subject while the shutter
button is pressed halfway.
• It may take time to focus on the subject if
you rotate the zoom ring from Wide to Tele
or suddenly change the subject from a
distant one to a nearby one.
• Press the shutter button halfway again
when it is difficult to focus on the subject.
• Refer to P71 for information about
focusing on the subject in burst mode.
• [AFC] in focus mode is not activated when
taking pictures with Live View.
If you switch the focus mode lever to
[AFC], the message [SWITCH TO AFS]
appears and [AFS] in focus mode is set.
Taking Pictures in Auto Mode
This mode allows beginners to take pictures
easily. Only the basic functions appear in the
menu to make operations simple.
Switch the focus mode lever to [AFS] or
[AFC].
∫ Changing the settings
Press [MENU/SET] to display the [REC]
mode menu, the [SETUP] menu or the
[CUSTOM MENU] menu and then select
the item to set. (P26)
Items that can be set
Menu Item
[REC] mode
menu
[SETUP] menu
[CUSTOM MENU]
menu
∫ Auto Mode Settings
In auto mode, other settings are fixed as
follows. For details, refer to the pages
corresponding to each item.
• Light Sensitivity (P78):
[AUTO]
• Metering mode (P81):
[]
• White Balance (P75):
[AWB]
• [AF] (P37, 60):
Face detection
(When taking pictures with Live View)
3-area-focusing
(When taking pictures with the Viewfinder)
• [FILM MODE] (P92):
[STANDARD]
• [OIS MODE] (P96):
[MODE1]
[ASPECT] (P94)
[PICT.SIZE] (P94)
[QUALITY] (P94)
“About the Setup Menu”
P28 to 32
[CUST. SET MEM.]
(P104)
[DISPLAY SET] (P107)
40
VQT1G28
Page 41

• [EX. OPT. ZOOM] (P97):
[OFF]
• [D.ZOOM] (P98):
[OFF]
• [FLASH] (P64):
[AUTO]
• [FLASH SYNC.] (P68):
[1ST]
• [FLASH ADJUST.] (P68):
[0]
• [BURST RATE] (P71):
High speed
• [AUTO BRACKET] (P72):
[STEP]: [ ]
[SEQUENCE]: [0/`/_]
• Self-timer (P74):
10 seconds
• [MIRROR UP] (P102):
[ON]
• [COLOR SPACE] (P103):
[sRGB]
• [LONG SHTR NR] (P103):
[ON]
• [AF/AE LOCK] (P104):
[AE]
• [AF/AE LOCK HOLD] (P104):
[OFF]
• [ISO LIMIT SET] (P80):
[OFF]
• [FOCUS PRIORITY] (P106):
[ON]
• [AF ASSIST LAMP] (P106):
[ON]
• [AF+MF] (P106):
[OFF]
• [AF-LED] (P106):
[ON]
• [LIVE VIEW AF] (P107):
[]
• [MENU RESUME] (P107):
[ON]
• [SHOOT W/O LENS] (P107):
[OFF]
1
EV
/
3
Basic
Aperture-priority AE [ ]
Set the aperture value to a higher number
when you want a sharp focus background.
Set the aperture value to a lower number
when you want a soft focus background.
1 Rotate the front dial left and right
to set the aperture value.
2 Take a picture.
• You can change the operation method of
the dials with [DIAL SET.] (P105) in the
[CUSTOM MENU] menu.
• If [LCD AUTO] in the [SETUP] menu is set
to [OFF] and you press the shutter button
halfway when the exposure is not
adequate, the aperture value and the
shutter speed on the LCD monitor
(information display screen) turn red. The
aperture value and the shutter speed blink
on the Viewfinder. (They do not blink when
the flash is activated.)
• When most of the subject is bright, such
as during fine weather or snow, the
recorded pictures may become dark. In
these cases, compensate the exposure
towards positive. (P44)
• When you use a lens with an aperture
ring, the setting for the front dial becomes
effective if you rotate the aperture ring to
the [A] position and the aperture ring
setting takes priority if you rotate the
aperture ring to a position other than [A].
41
VQT1G28
Page 42

Basic
Shutter-priority AE [ ]
When you want to take a sharp picture of a
fast moving subject, set with a faster
shutter speed. When you want to create a
trail effect, set to a slower shutter speed.
1 Rotate the front dial left and right
to set the shutter speed.
2 Take a picture.
• You can change the operation method of
the dials with [DIAL SET.] (P105) in the
[CUSTOM MENU] menu.
• If [LCD AUTO] in the [SETUP] menu is set
to [OFF] and you press the shutter button
halfway when the exposure is not
adequate, the aperture value and the
shutter speed on the LCD monitor
(information display screen) turn red. The
aperture value and the shutter speed blink
on the Viewfinder. (They do not blink when
the flash is activated.)
• When most of the subject is bright, such
as during fine weather or snow, the
recorded pictures may become dark. In
these cases, compensate the exposure
towards positive. (P44)
• When the flash is activated, the shutter
speed cannot be set to faster than 1/160th
of a second. (P67)
• If you press the shutter button fully when
the shutter speed is slow, the shutter
speed on the screen counts down.
42
VQT1G28
• We recommend using a tripod when the
shutter speed is slow.
• You cannot set Slow sync. [ ] and Slow
sync./Red-eye reduction [ ]. (P65)
• Intelligent ISO sensitivity control cannot
be set.
• The ISO sensitivity is automatically set to
[AUTO] if you switch from intelligent ISO
sensitivity control to shutter-priority AE mode.
Manual Exposure [ ]
Determine the exposure by manually setting
the aperture value and the shutter speed.
1 Rotate the front or rear dial to the
left or right to set the aperture
value or the shutter speed.
BA
Set the aperture value A.
Set the shutter speed B.
2 Press the shutter button halfway.
C
ISO
D
C Viewfinder Display
• Manual exposure assistance D
appears for about 10 seconds to show
an approximation of the exposure
condition.
Page 43

• If the exposure is not adequate, check
the aperture value and the shutter
speed that have been set.
• You can also check the manual
exposure assistance on the LCD
monitor when taking pictures with the
Viewfinder or with Live View.
3 Press the shutter button fully to
take the picture.
∫ Manual Exposure Assistance
The exposure is
adequate.
Set to faster shutter
speed or larger aperture
value.
Set to slower shutter
speed or smaller
aperture value.
• The manual exposure assistance is an
approximation. We recommend checking
the pictures using Auto Review.
∫ About [B] (Bulb)
If you set the shutter speed to [B], the
shutter stays open while the shutter button
is pressed fully (up to about 8 minutes).
The shutter closes if you release the
shutter button.
Use this when you want to keep the shutter
open for a long time to take pictures of
fireworks, a night scene etc.
• If you set the shutter speed to [B], [ ]
is displayed on the Viewfinder and [B] is
displayed on the LCD monitor.
• When you take pictures with the shutter
speed set to [B], use a sufficiently charged
battery. (P18)
• We recommend using a tripod or the
remote shutter (DMW-RSL1; optional)
when you take pictures with the shutter
speed set to [B]. Refer to P127 for
information about the remote shutter.
• When you take pictures with the shutter
speed set to [B], noise may become
Basic
visible. To avoid picture noise, we
recommend setting [LONG SHTR NR] in
the [REC] mode menu to [ON] before
taking pictures. (P103)
• The manual exposure assistance does not
appear.
• You can change the operation method of
the dials with [DIAL SET.] (P105) in the
[CUSTOM MENU] menu.
• If you press the shutter button fully when
the shutter speed is slow, the shutter
speed on the screen counts down.
• We recommend using a tripod when the
shutter speed is slow.
• If [LCD AUTO] in the [SETUP] menu is set
to [OFF] and you press the shutter button
halfway when the exposure is not
adequate, the aperture value and the
shutter speed on the LCD monitor
(information display screen) turn red. The
aperture value and the shutter speed blink
on the Viewfinder.
• You cannot set the following items in
manual exposure.
– AUTO [ ], AUTO/Red-eye reduction
[ ], Slow sync. [ ] and Slow
sync./Red-eye reduction [ ]
– Intelligent ISO sensitivity control or
[AUTO] in ISO sensitivity. (The ISO
sensitivity is automatically set to
[ISO100] if you switch from Intelligent
ISO sensitivity control or [AUTO] to
manual exposure.)
– Exposure compensation
• When you use a lens with an aperture
ring, the aperture ring setting takes
priority.
43
VQT1G28
Page 44

Basic
19
STANDARD
−
1+1+10−2
+2
1
/
3
1
ISO
100
Compensating the Exposure
Use this function when you cannot achieve
appropriate exposure due to the difference
in brightness between the subject and the
background. Look at the following
examples.
Under exposed
Compensate the exposure towards
positive.
Properly
exposed
1 Rotate the rear dial to
compensate the exposure.
B
A
ISO
STANDARD
ISO
100
+2
19
A Viewfinder Display
B When taking pictures with Live View
• You can compensate from [j2EV] to
[i2 EV] in steps of [1/3 EV].
• Select [0] to return to the original
exposure.
• [ ] and the selected exposure
compensation value are displayed on
the Viewfinder.
• The exposure compensation value is
displayed on the LCD monitor when
taking pictures with Live View. Refer to
P54 for information about Live View.
2 Press the shutter button halfway
to set the selected exposure.
Compensate the exposure towards
44
VQT1G28
Over exposed
negative.
Page 45

∫ If you are using the front dial to
compensate the exposure
If you set [DIAL SET.] (P105) in the [CUSTOM
MENU] menu to [ EXPOSURE COMP.],
you can compensate the exposure by the
front dial. (It is set to [ EXPOSURE
COMP.] at the time of purchase.)
1 Press [MENU/SET] to display the
menu.
2
Press 3/4/2/1 to select
[DIAL SET.] in the [CUSTOM MENU]
menu [ ] and then press 1.
3
Press 4 to select [ EXPOSURE
COMP.] and then press [MENU/SET].
Basic
Taking Pictures with Manual Focus
Use this function when you want to fix the
focus or when the distance between the
lens and the subject is determined and you
do not want to activate auto focus.
1 Set the focus mode lever to [MF].
MENU
/SET
4 Press [MENU/SET] to close the
menu.
• You can also press the shutter button
halfway to close the menu.
• After performing steps 1 to 4, rotate the
front dial to compensate the exposure.
• EV is an abbreviation of “Exposure Value”. It
refers to the amount of light given to the CCD
by the aperture value and the shutter speed.
• The set exposure value is memorized
even if the camera is turned off.
• The compensation range of the exposure
will be limited depending on the
brightness of the subject.
• Rotate the dial slowly but surely.
• You cannot compensate the exposure in
the following cases.
– Manual exposure mode
2 Rotate the focus ring to focus on
the subject.
• The focus indication lights on the
Viewfinder when the focus ring is
rotated to focus on the subject. The
focus area is fixed to the AF frame on
the center of the screen.
3 Take the picture.
45
VQT1G28
Page 46

Basic
∫ Technique for Manual focus
1 Rotate the focus ring.
2 Rotate it a little more.
3 Finely focus on the subject by rotating
the focus ring slowly in reverse.
• If you use the zoom function after focusing
on the subject, focus on the subject again.
• After turning the camera off and then on
again or canceling power save mode,
focus on the subject again.
∫ About the focus distance reference
mark
The focus distance reference mark is a
mark used to measure the focus distance.
Use this when taking pictures with manual
focus or taking close-up pictures.
• If the distance between the camera and
the subject is beyond the focus range of
the camera, the picture may not be
properly focused even if the focus
indication lights.
• The available flash range is about 2.0 m
(6.6 feet) to 5.5 m (18.0 feet) (Wide)
(When the ISO sensitivity is set to
[AUTO].). We recommend setting the flash
to Forced OFF [ ] when you take
pictures at close range.
• If you are taking close-up pictures
– We recommend using a tripod and the
self-timer (P74).
– The effective focus range (depth of field)
is significantly narrowed. Therefore, if
the distance between the camera and
the subject is changed after focusing on
the subject, it may become difficult to
focus on it again.
– The resolution of the periphery of the
picture may decrease slightly. This is not
a malfunction.
A
C
B
A Focus distance reference mark
B Focus distance reference line
C [0.29] m (0.95 feet)
46
VQT1G28
Page 47

Taking Pictures with
B
the Zoom
With the 14 mm to 50 mm focal length of
the supplied lens (35 mm film camera
equivalent: 28 mm to 100 mm), you can
make people and subjects appear closer
(up to 3.6a optical zoom) and landscapes
can be recorded in wide angle.
Basic
∫ To make subjects appear further away
use (Wide)
Rotate the zoom ring towards
Wide.
14 mm
(35 mm film camera equivalent: 28 mm)
1a
A
A Te l e
B Wide
∫ To make subjects appear closer use
(Tele)
Rotate the zoom ring towards
Tele.
50 mm
(35 mm film camera equivalent: 100 mm)
3.6a
• If you use the zoom function after focusing
on the subject, focus on the subject again.
47
VQT1G28
Page 48

Basic
Playing Back Pictures
1 Press [ ].
2 Press 2/1 or rotate the front dial
to select the picture.
or
2/ : Play back the previous picture
1/ : Play back the next picture
• The first recorded picture will be
displayed after the last recorded
picture.
• When [ROTATE DISP.] is set to [ON],
pictures recorded by holding the
camera vertically are played back
vertically. (P111)
(You can only use this when using a
lens that supports the direction
detection function. (P13))
• This camera is based on the DCF
standard “Design rule for Camera File
system” which was established by the
“Japan Electronics and Information
Technology Industries Association
(JEITA)”.
• The LCD monitor may not be able to
display the details of the recorded
pictures. You can use the playback zoom
(P51) to check the details of the pictures.
• If you play back pictures that have been
recorded with other equipment, the picture
quality may deteriorate. (The pictures are
displayed as [THUMBNAIL IS
DISPLAYED] on the screen.)
• If you change a folder name or file name
on your PC, the pictures may not play
back on the camera.
• If you play back a non-standard file, the
folder/file number is indicated by [—] and
the screen may turn black.
Changing the Information
Displayed on the playback screen
Press [DISPLAY] to switch the
monitor screen.
A
• If you press and hold 2/1, you can
play back the pictures in succession.
∫ To finish playback
Press [ ] again or press the shutter
button halfway.
48
VQT1G28
B
A [DISPLAY] button
B LCD monitor
• The [DISPLAY] button is not activated
when the menu screen is displayed.
You can only select Normal display or
No display in playback zoom (P51) and
during a slide show (P109).
Page 49

• Refer to P55 for information about the
STANDARD
ISO
100
0
s
RGB
ISO
100
0
1/19
F5.6
125P
ISO
100
histogram E
.
C
ISO
100
F5.6
125
1/19
Basic
Deleting Pictures
Press [ ].
D
F5.6 125
ISO
P
STANDARD
10:00 DEC. 1. 2007
36482736
100
100-0001
AF
RGB
G
EF
F5.6 125
ISO
100
1/19
100-0001
C Normal display
D Detailed information display
E Histogram display
F Highlight display
¢
G No display
¢ This is displayed if [HIGHLIGHT] (P30)
in the [SETUP] menu is set to [ON].
• The detailed information display,
histogram display and highlight display do
not appear during the following.
– Playback zoom
– Multi playback
– Calendar playback
∫ To delete a single picture
1 Press 2/1 or rotate the front dial
to select the picture.
or
2/ : Play back the previous picture
1/ : Play back the next picture
2 Press [ ].
3 Press 3 to select [YES] and then
press [MENU/SET].
MENU
/SET
• While the picture is being deleted, [ ]
appears on the screen.
49
VQT1G28
Page 50

Basic
∫ To delete [MULTI DELETE]/
[ALL DELETE]
1 Press [ ] twice.
2
Press 3/4 to select
[MULTI DELETE] or [ALL DELETE]
and then press [MENU/SET].
MENU
/SET
• If you select [MULTI DELETE], perform
3 onwards.
steps
• If you select [ALL DELETE], perform
steps
5 onwards.
• When [FAVORITE] (P110) is set to
[ON], [ALL DELETE EXCEPT ]
appears. If you select
[ALL DELETE EXCEPT ], perform
5 onwards. (However, if none of
steps
the pictures have [ ] displayed, you
cannot select
[ALL DELETE EXCEPT ] even if
[FAVORITE] is set to [ON].)
3 Press 2/1 to select the picture
and then press 4 to set.
(Only when selecting [MULTI DELETE])
• Repeat the above procedure.
• [ ] appears on the selected pictures. If
4 is pressed again, the setting is
canceled.
• The icon [ ] blinks red if the selected
picture is protected and cannot be
deleted. Cancel the protect setting and
then delete the picture. (P114)
4 Press [ ].
5 Press 3 to select [YES] and then
press [MENU/SET].
(Screen when selecting
[MULTI DELETE])
MENU
/SET
• [DELETE ALL PICTURES ON THE
MEMORY CARD ?] is displayed when
using [ALL DELETE] and [DELETE ALL
EXCEPT ?] is displayed when using
[ALL DELETE EXCEPT ].
• If you press [MENU/SET] while deleting
pictures using [ALL DELETE] or
[ALL DELETE EXCEPT ], the
deleting will stop halfway.
• Once deleted, pictures cannot be
recovered. Double-check pictures before
deleting them.
• Do not turn off the camera while deleting.
• Use a sufficiently charged battery (P18) or
the AC adaptor (P128) when deleting.
• It is possible to delete up to 50 pictures at
one time using [MULTI DELETE].
• The greater the number of pictures the
longer it takes to delete them.
• The pictures are not deleted even if you
select [ALL DELETE] or
[ALL DELETE EXCEPT ] in the
following cases.
– The Write-Protect switch on the SD
Memory Card or the SDHC Memory
Card is slid to the [LOCK] side. (P23)
– The file does not conform to the DCF
standard. (P48)
– The pictures are protected [ ]. (P114)
50
VQT1G28
Page 51

Using the Playback Zoom
1 Press [ ].
2 Rotate the rear dial right to
enlarge the picture.
A
• 1a>2a>4a>8a> 16a
• The magnification becomes lower when
you rotate the rear dial left after
enlarging the picture. The magnification
becomes higher when you rotate the
rear dial right.
• When you change the magnification,
the zoom position indication A appears
for about 1 second so that you can
check the position of the enlarged
section.
3 Press 3/4/2/1 to move the
position.
• When you move the position to be
displayed, the zoom position indication
appears for about 1 second.
∫ To stop using the playback zoom
Rotate the rear dial left or press [MENU/
SET].
Basic
∫ Switching the displayed image while
maintaining the playback zoom
You can switch the displayed image while
maintaining the same zoom magnification
and zoom position for the playback zoom.
Rotate the front dial during
playback zoom to switch images.
: To move to the previous image.
: To move to the next image.
∫ Deleting a picture during the playback
zoom
1 Press [ ].
2 Press 3 to select [YES].
3 Press [MENU/SET].
• Even if the indications on the screen are
turned off in normal playback mode (P48),
the magnification and operation appear on
the screen when the playback zoom is
activated. You can switch between
displaying or not displaying the indications
on the screen by pressing [DISPLAY].
When you set the magnification to 1a, the
indications on the screen are displayed as
in normal playback mode.
• The more a picture is enlarged, the
rougher it becomes.
• If you want to save the enlarged picture,
use the trimming function. (P116)
• The playback zoom may not operate if
pictures have been recorded with other
equipment.
• The zoom magnification and the zoom
position are canceled when the camera is
turned off (including power save mode).
• The zoom position returns to the center in
the following images.
– Images with different aspect ratios
– Images with different numbers of
recorded pixels
– Images with a different rotation direction
(when [ROTATE DISP.] is set to [ON])
51
VQT1G28
Page 52

Basic
Displaying Multiple Screens (Multi Playback)
1 Press [ ].
2 Rotate the rear dial left to display
multiple screens.
(Screen when 9 screens are displayed)
• 1 screen>9 screens>25 screens>
Calendar screen display (P53)
• After multiple screens are displayed,
rotate the rear dial further left to display
25 screens and the calendar screen
(P53). Rotate the rear dial right to
return to the previous screen.
3 Press 3/4/2/1 to select a
picture.
A
∫ Examples of 25 screens
∫ To return to normal playback
Rotate the rear dial right or press [MENU/
SET].
• The picture framed in orange is displayed
on the 1 screen playback screen.
∫ To delete a picture during multi
playback
1 Press 3/4/2/1 to select a picture
and then press [ ].
2 Press 3 to select [YES].
3 Press [MENU/SET].
• Even if the indications on the screen are
turned off in normal playback mode (P48),
the recording information etc. appears on
the screen in multi playback. If you return
to the previous screen, the indications on
the screen are displayed as in normal
playback mode.
• Pictures will not be displayed in the
rotated direction even if [ROTATE DISP.] is
set to [ON]. (P111)
• The recording date and number of the
selected picture and the total number of
recorded pictures A are displayed.
• Depending on the recorded pictures
and the settings, the following icons are
displayed on the screen.
–[FAVORITE] [ ]
– [BABY1]/[BABY2] [ ] and [PET]
[ ] in scene mode
– Travel destination [ ]
• You can also use the front dial to select.
52
VQT1G28
Page 53

Displaying Pictures by
Recording Date
(Calendar Playback)
You can display pictures by recording date
using the calendar playback function.
1 Press [ ].
2 Rotate the rear dial left to display
the calendar screen.
• The recording date of the picture
selected in the playback screen
becomes the date selected when the
calendar screen is first displayed.
• If there are multiple pictures with the
same recording date, the first picture
recorded on that day is displayed.
• The calendar is displayed monthly.
3 Press 3/4/2/1 to select the
date to be played back.
2/1: Select the date
3/4: Select the month
• If there were no pictures recorded
during a month, the month is not
displayed.
4 Press [MENU/SET] to display the
pictures that were recorded on
the selected date.
MENU
/SET
Basic
• The pictures that were recorded on the
selected date are displayed on the
9 screens playback screen.
• Rotate the rear dial left to return to the
calendar screen display.
5 Press 3/4/2/1 to select a
picture and then press [MENU/
SET].
• The selected picture is displayed on the
1 screen playback screen.
∫ To return to the 1 screen playback
screen
After the calendar screen is displayed,
rotate the rear dial right to display
25 screens, 9 screens (P52) and the
1 screen playback screen.
• The pictures are displayed without being
rotated even if you set [ROTATE DISP.] to
[ON]. (P111)
• You can display the calendar between
January 2000 and December 2099.
• If the recording date of the picture
selected in 25 screen multi playback is not
between January 2000 and December
2099, the camera automatically displays it
in the oldest calendar date.
• Pictures processed on a PC or other
equipment may be displayed with dates
different from the actual recording dates.
• If the date is not set in the camera (P24),
the recording date is set as January 1st,
2007.
• If you take pictures after setting the travel
destination in [WORLD TIME] (P129), the
pictures are displayed by the dates at the
travel destination in calendar playback.
53
VQT1G28
Page 54

Advanced
Advanced
Taking Pictures with Live View
You can take pictures while showing the
subject on the LCD monitor.
This is called Live View.
This is useful as it allows you to check the
composition on the LCD monitor.
Press [LIVE VIEW] to switch to
the Live View recording screen.
AB
A When taking pictures with the
Viewfinder
B When taking pictures with Live View
∫ You can do the following when taking
pictures with Live View
• Guide lines display (P55)
You can take pictures with
well-designed composition by viewing
the balance of the subject.
• Histogram display (P55)
You can display the exposure of a
picture as a graph.
• LCD mode (P56)
You can set Power LCD to make the
LCD monitor screen become brighter
than normal and Auto power LCD to
automatically activate Power LCD in
bright places such as outdoors etc.
• AF mode setting (P60)
You can match the focus to the
recording situation and the composition
you want to take. You can only select
face detection etc. if [LIVE VIEW AF]
(P107) is set to [ ].
• MF assist (P63)
You can enlarge a section of the screen
for adjusting the focus.
• Aspect ratio (P94)
You can take pictures with a wide angle
of view.
54
VQT1G28
• Extended optical zoom (P97)
You can enlarge the picture with no
picture quality deterioration.
• Digital zoom (P98)
You can further enhance the zoom
magnification.
• Refer to P132 for information about the
screen display when taking pictures with
Live View.
• Attach the eye piece cap when taking
pictures with Live View. (P17)
• The exposure and the color tone may
differ when taking pictures with Live View
and when taking pictures with the
Viewfinder.
• [AFC] in focus mode is not activated when
taking pictures with Live View. (P39)
If you switch the focus mode lever to
[AFC], the message [SWITCH TO AFS]
appears and [AFS] in focus mode is set.
Tips for taking good pictures with
Live View
A
• Hold the camera gently with both hands,
keep your arms still at your side and stand
with your feet slightly apart.
• Make sure the camera does not shake
when you press the shutter button.
• Do not cover the AF assist lamp with your
fingers or other objects.
• If the LCD monitor screen is difficult to see
because of light from the sun etc. shining
on it, we recommend using your hand or
another object to block the light when
using the camera.
• When holding the camera vertically, hold it
with the AF assist lamp A at the top of the
camera.
Page 55

Changing the Information
C
125
ISO
100
19
F5.6P
STANDARD
1
125
ISO
100
19
F5.6P
STANDARD
1
Displayed
Press [DISPLAY] to switch the
monitor screen.
A
B
A [DISPLAY] button
B LCD monitor
• The [DISPLAY] button is not activated
when the menu screen is displayed.
• You can set the information to display
on the LCD monitor. (P107)
ISO
100
F5.6
125
STANDARD
F5.6
STANDARD
19
D
ISO
100
125
19
1
EF
G
2
Advanced
∫ Recording guide lines display
When you align the subject on the
horizontal and vertical guide lines or the
cross point of these lines, you can take
pictures with well-designed composition by
viewing the size, the slope and the balance
of the subject.
Guide line 1
∫ Histogram
A histogram is a graph that displays
brightness along the horizontal axis (black
to white) and the number of pixels at each
brightness level on the vertical axis.
It allows you to easily check a picture’s
exposure.
1 When the values are distributed evenly,
the exposure is proper and the
brightness is well-balanced.
2 When the values are concentrated on
the left, the picture is under exposed.
3 When the values are concentrated on
the right, the picture is over exposed.
C Normal display
D Display with histogram
E No display (Recording guide line 1)
F No display (Recording guide line 2)
G No display
¢1 Histogram
¢2 You can set the position of the guide
lines in advance with [GUIDE 2] in
[DISPLAY SET] (P107) in the
[CUSTOM MENU] menu.
55
VQT1G28
Page 56

Advanced
A
2
2
2
Examples of histogram
B
1
2
Brightening the LCD Monitor
1
Press [LCD MODE] A for 1 second.
A
C
3
A Properly Exposed
B Under Exposed
C Over Exposed
¢ Histogram
• When the recorded picture and the
histogram do not match each other
under the following conditions, the
histogram is displayed in orange.
– When the flash is activated.
– When the flash is closed.
• When the brightness of the LCD
monitor is not correctly displayed in
dark places.
• When the exposure is not adequately
adjusted.
• The histogram is an approximation in
recording mode.
• The histogram displayed in this camera
does not match histograms displayed by
picture editing software used in PCs etc.
• Check for any white saturated areas with
the highlight feature when the auto review
function is activated. (P30)
56
VQT1G28
2 Press 3/4 to select a mode.
[]:
[AUTO
POWER LCD]
[]:
[POWER LCD]
[OFF] The LCD monitor returns
The Power LCD is
automatically activated in
bright places such as
outdoors etc. When the
Power LCD is activated,
[ ] changes to [ ].
The LCD monitor
becomes brighter and
easier to see even when
taking pictures outdoors.
to the normal brightness.
3 Press [MENU/SET].
• The [AUTO POWER LCD] icon
([ ]([ ])) or [POWER LCD] icon
([ ]) appears.
Page 57

∫ Canceling setting
If you press and hold [LCD MODE] again
for 1 second the screen shown in step
displayed. Select [OFF] to cancel a setting.
2 is
Advanced
∫ Taking pictures at a high angle
Take hold of the LCD monitor open knob A
with your fingers, pull the knob towards you
and rotate the monitor 180o.
• The number of recordable pictures
decreases in Auto power LCD mode or
Power LCD mode.
• The brightness of the pictures displayed
on the LCD monitor screen are increased
in Auto power LCD and Power LCD.
Therefore, some subjects may look
different on the LCD monitor. However,
this does not affect the recorded pictures.
• The LCD monitor automatically returns to
normal brightness after 30 seconds when
recording in Power LCD mode. Press any
button to make the LCD monitor bright
again.
If the screen is difficult to see because of
•
light from the sun etc. shining on it, use your
hand or another object to block the light.
• Auto power LCD mode is not activated in
the following case.
– In playback mode [ ]
LCD Monitor
This is convenient as it allows you to take
pictures from various angles by adjusting
the LCD monitor when taking pictures with
Live View.
∫ Taking pictures at a normal angle
A
• This is convenient when there is someone
in front of you and you cannot get close to
the subject.
∫ Taking pictures at a low angle
Take hold of the LCD monitor open knob
with your fingers, and pull the knob toward
you and rotate the monitor 180o.
• This is convenient when taking pictures of
flowers etc. that are in a low position.
LCD monitor rotation direction
1 Maximum 180o
2 270o
57
VQT1G28
Page 58

Advanced
∫ Taking pictures with the camera held
vertically
Take hold of the LCD monitor open knob
with your fingers, open the LCD monitor
and rotate it to an angle that makes it easy
to see.
Taking pictures at a normal angle
Taking pictures at a high angle
• When holding the edge of the LCD
monitor, there may be some distortion,
however this is not a malfunction.
Moreover, this has no effect on the taken
pictures or playback.
• When not using the LCD monitor it is
recommended that you close it with the screen
facing inwards to prevent dirt and scratches.
Auto focus when taking pictures
with Live View
If auto focus is used when taking pictures
with Live View, you can only take pictures
with face detection (P60) etc. in AF mode if
[LIVE VIEW AF] (P107) is set to contrast
AF [ ].
1 Set the focus mode lever to [AFS].
Taking pictures at a low angle
• Only rotate the LCD monitor after
opening it wide enough, and be careful
not to use excessive force as it may be
damaged.
58
VQT1G28
2 Aim the screen at the point you
want to focus on and then press
the shutter button halfway.
BC
A
E
D
Page 59

• The camera beeps and the focus
indication lights (green) C when the
subject is focused.
• The focus indication blinks (green)
when the subject is not focused. In this
case, a picture is not taken. Press the
shutter button halfway to focus on the
subject again.
• Refer to P39 for information about
subjects that are difficult to focus on.
• You can check the aperture value A
and the shutter speed B.
• If the AF mode D is set to [ ], [ ],
[ ] or [ ], the AF area E is not
displayed until the picture is brought
into focus. (P60)
• The focus range is 0.29 m (0.95 feet)
to ¶. (when the supplied lens is
attached)
3 Press the shutter button fully to
take the picture.
• A picture is not taken until the subject is
brought into focus.
• If you want to press the shutter button
fully to take a picture even when the
subject is not focused, set
[FOCUS PRIORITY] in the [CUSTOM
MENU] menu to [OFF]. (P106)
• The shutter sound is heard twice when
1 picture is taken. The first shutter
sound is heard when the shutter returns
to the position before a picture is taken
and the second shutter sound is heard
when the picture is actually taken.
Advanced
red. (However, they do not turn red when
the flash is activated.)
• The brightness of the LCD monitor may
differ from the brightness of the recorded
pictures especially when recording in dark
places.
∫ Switching to Phase difference AF
You can set Phase difference AF if you
press [MENU/SET] to display the
[CUSTOM MENU] menu and then set
[LIVE VIEW AF] (P107) to [ ].
• When you press the shutter button
halfway, the mirror goes down and then
goes up to enable the camera to focus.
At this time, the same sound is heard as
when the shutter button is pressed fully.
However a picture is not taken.
• If the shutter button is pressed fully and
then released, the shutter sound is heard.
However a picture is not taken.
• The time between pressing the shutter
button fully and the picture being taken
(release time lag) becomes even longer than
when taking pictures with the Viewfinder.
• The camera automatically switches to phase
difference AF [ ] (P59) if you use a lens that
does not support contrast AF (P13) even if
[LIVE VIEW AF] (P107) in the [CUSTOM
MENU] menu is set to [ ] (P58).
• If you press the shutter button halfway
when the exposure is not adequate, the
aperture value and the shutter speed turn
59
VQT1G28
Page 60

Advanced
AF mode when taking pictures
with Live View
Setting the method used to focus
Reset [LIVE VIEW AF] (P107) in the
[CUSTOM MENU] menu to [ ] if it is set
to [ ].
Select the mode that matches the
recording conditions and the composition.
1 Set the focus mode lever to [AFS].
2 Press 2 ().
3 Press 2/1 to select AF mode and
then press [MENU/SET] to close.
MENU
/SET
• You can also use the front dial or the
rear dial to select.
• You can also press the shutter
button halfway to close.
Face detection:
The camera
automatically detects the
person’s face. The focus
can then be adjusted to
fit that face no matter
what portion of the picture it is in.
9-area-focusing:
The camera focuses on
any of 9 focus areas.
This is effective when
the subject is not in the
center of the screen.
Multi-area-focusing:
The camera focuses on
any of the selected
areas. This is effective
when the subject is not
in the center of the
screen.
3-area-focusing:
The camera focuses on
any of 3 focus areas
points – left, right or
center. This is effective
when the subject is not
in the center of the screen.
1-area-focusing:
The camera focuses on
the subject in the AF
area on the center of
the screen.
Spot-focusing:
The camera focuses on
a limited narrow area in
the screen.
60
VQT1G28
Page 61

∫ About face detection
This function detects a person’s face in the
image area so that the focus can be
adjusted properly. This is particularly
effective in preventing errors such as when
the focus is on the background when taking
a commemorative photograph.
• When the camera detects a person’s face,
the following color AF area is displayed.
Yellow:
When the shutter button is pressed
halfway, the frame turns green when the
camera is focused.
White:
Displayed when more than one face is
detected. Other faces that are the same
distance away as faces within the yellow
AF areas are also focused.
• Up to 15 AF areas are displayed.
• When [ ] is selected and the metering
mode is set to multiple [ ], the camera
will adjust the exposure to suit the
person’s face.
• Under certain picture-taking conditions
including the following cases, the face
detection function may fail to work,
making it impossible to detect faces. [AF]
is switched to [ ].
– When the face is not facing the camera
– When the face is at an angle
– When the face is extremely bright or
dark
– When there is little contrast on the faces
– When the facial features are hidden
behind sunglasses, etc.
– When the face appears small on the
screen
– When there is rapid movement
– When the subject is other than a human
being
– When the camera is shaking
• The face detection function is not
activated when using the digital zoom.
Advanced
• The AF area displayed is bigger than
usual when taking pictures in dark places
or when using the digital zoom.
• The camera is focusing on all the AF
areas when multiple AF areas (max.
9 areas) light at the same time.
The focus position is not predetermined. It
is set to a position automatically
determined by the camera at the time of
focusing. If you want to determine the
focus position to take pictures, switch the
AF mode to [ ] or [ ].
• If the AF mode is set to [ ], [ ], [ ]
or [ ] the AF area is not displayed until
the picture is brought into focus.
• Switch the AF mode to [ ] if it is difficult
to focus using [ ].
• This setting is fixed to face detection when
taking pictures with Live View in auto
mode [ ].
• It is not possible to set face detection in
the following cases.
– In [FOOD] in scene mode
• The camera automatically switches to
phase difference AF [ ] (P59) if you
use a lens that does not support contrast
AF (P13) even if [LIVE VIEW AF] (P107)
in the [CUSTOM MENU] menu is set to
[ ] (P58).
61
VQT1G28
Page 62

Advanced
∫ About AF area selection
You can select the AF area when [ ],
[ ] or [ ] is selected.
1 Set the focus to [AFS].
2 Press 2 ().
3 Press 2/1 to select AF mode and
then press 4.
4 Move the AF area with 3/4/2/1.
When selecting [ ]
You can select the AF area frame as shown
in the following illustration by pressing 3/
4/2/1.
• You can also use the front dial or the rear
dial to select the AF area frame.
Manual focus when taking
pictures with Live View
1 Set the focus mode lever to [MF].
5 Press [MENU/SET] to close.
When selecting [ ] or [ ]
You can select 1 AF area from the
11 areas.
• The spot metering target can also be
moved to match the AF area when using
[].
62
VQT1G28
Page 63

2 Rotate the focus ring to focus on
the subject.
• [ ] appears on the LCD monitor for
about 5 seconds if you set to take
pictures with manual focus.
3 Take the picture.
Advanced
∫ About MF Assist
If you press [MENU/SET] after pressing 2
when taking pictures with manual focus, the
MF assist screen is enlarged 8 times and it
becomes easier to focus.
1 Press 2 to display the MF assist
screen.
2 Press 3/4/2/1 to change the
position of the MF assist screen.
∫ Technique for Manual focus
1 Rotate the focus ring.
2 Rotate it a little more.
3 Finely focus on the subject by rotating
the focus ring slowly in reverse.
3 Press [MENU/SET] to magnify the
MF assist screen.
MENU
/SET
• Rotate the focus ring to focus on the
subject.
• The enlarged area can be moved by
pressing 3/4/2/1.
63
VQT1G28
Page 64

Advanced
4 Press [MENU/SET] to close MF
assist.
Press the flash until it clicks.
• Be sure to close the flash when not in use.
• The flash setting is fixed to Forced OFF
[ ] while the flash is closed.
MENU
/SET
• The screen returns to the previous
screen.
• The MF assist disappears in the following
cases.
– About 10 seconds after you stop
pressing 3/4/2/1 or rotating the focus
ring
– When the shutter button is pressed
halfway
• The MF assist returns to the center of the
screen when the camera is turned off and
then on again.
• You cannot use MF assist when using the
digital zoom.
Taking Pictures using the Built-in Flash
∫ Switching to the appropriate flash
setting
Set the flash to match the recording.
1 Press [MENU/SET] to display the
menu.
2 Press 3/4/2/1 to select
[FLASH] in the [REC] menu [ ]
and then press 1.
3 Press 3/4 to select the mode
and then press [MENU/SET].
MENU
/SET
• Refer to “Available flash settings by
recording mode” on P66 for information
about available flash settings.
• You can also use the front dial or the
rear dial to select a menu item.
4 Press [MENU/SET] to close the
menu.
• You can also press the shutter button
halfway to close the menu.
A
A To open the flash
Slide the [ OPEN] lever.
B To close the flash
64
VQT1G28
OPEN
B
• [ ] is displayed on the Viewfinder if you
open the flash.
• You can also use [FUNC] to set. (P91)
Page 65

Advanced
:AUTO
The flash is automatically activated when
the recording conditions make it
necessary.
: AUTO/Red-eye reduction
The flash is automatically activated when
the recording conditions make it
necessary.
It is activated once before the actual
recording to reduce the red-eye
phenomenon (eyes of the subject
appearing red in the picture) and then
activated again for the actual recording.
• Use this when you take pictures of
people in low lighting conditions.
: Forced ON
The flash is activated every time
regardless of the recording conditions.
• Use this when your subject is back-lit
or under fluorescent light.
: Forced ON/ Red-eye reduction
The flash is activated every time
regardless of the recording conditions.
Simultaneously it reduces the red-eye
phenomenon.
• Use this when your subject is back-lit
or under fluorescent light.
: Slow sync./Red-eye reduction
If you take a picture with a dark
background landscape, this feature will
slow the shutter speed when the flash is
activated so that the dark background
landscape will become bright.
Simultaneously it reduces the red-eye
phenomenon.
• Use this when you take pictures of
people in front of a dark background.
: Forced OFF
The flash is fixed to Forced OFF [ ]
when it is closed.
The flash is not activated in any recording
conditions.
• Use this when you take pictures in
places where the use of the flash is not
permitted.
¢ The flash is activated twice. The
interval between the first and
second flash is longer when [ ],
[ ] or [ ] is set. The subject
should not move until the second
flash is activated.
: Slow sync.
If you take a picture with a dark
background landscape, this feature will
slow the shutter speed when the flash is
activated so that the dark background
landscape will become bright.
• Use this when you take pictures of
people in front of a dark background.
65
VQT1G28
Page 66

Advanced
∫ Available flash settings by recording
mode
The available flash settings depend on the
recording mode.
(±: Available, —: Not available, ¥: Initial
setting)
¥ —————±
¥±±±±±±
¥±±±±±±
¥±±±——±
——¥±——±
±¥±———±
¥±±———±
±¥±———±
±¥±——±±
——————¥
——————¥
——————¥
——————¥
¥ — ± ———±
¥ — ± ———±
¥ — ± ———±
¥ — ± ———±
¥ — ± ———±
¥ — ± ———±
¥ — ± ———±
—————¥±
——————¥
——————¥
——————¥
——————¥
¥ — ± ———±
1
±¥±———±
2
±¥±———±
¥ — ± ———±
• You cannot set AUTO/Red-eye reduction
[ ], Forced ON/Red-eye reduction
[ ] or Slow sync./Red-eye reduction
[ ] when 2nd Curtain Synchro is set.
• The flash setting may change if the
recording mode is changed. Set the flash
setting again if necessary.
• The flash setting is memorized even if the
camera is turned off. However, the
advanced scene mode or the scene mode
flash setting is reset to the initial setting if
the advanced scene mode or the scene
mode is changed and then used.
The available flash range to take pictures
∫
(when the supplied lens is attached)
The available flash settings for the built-in flash
differ depending on the ISO sensitivity setting.
ISO
sensitivity
AUTO
ISO100
ISO200
ISO400
ISO800
ISO1600
Available flash range
Wide Tele
2.0 m
(6.6 feet) to
5.5 m
(18.0 feet)
2.0 m
(6.6 feet) to
2.8 m
(9.2 feet)
2.0 m
(6.6 feet) to
3.9 m
(12.8 feet)
2.0 m
(6.6 feet) to
5.5 m
(18.0 feet)
2.0 m
(6.6 feet) to
7.8 m
(25.6 feet)
2.0 m
(6.6 feet) to
11.0 m
(36.1 feet)
1.0 m
(3.3 feet) to
3.7 m
(12.1 feet)
1.0 m
(3.3 feet) to
1.9 m
(6.2 feet)
1.0 m
(3.3 feet) to
2.6 m
(8.5 feet)
1.0 m
(3.3 feet) to
3.7 m
(12.1 feet)
1.0 m
(3.3 feet) to
5.3 m
(17.4 feet)
1.0 m
(3.3 feet) to
7.5 m
(24.6 feet)
66
VQT1G28
Page 67

• The available flash range is an
approximation.
• Refer to P78 for the ISO sensitivity.
• Refer to P39, 86 for the focus range.
• If the distance between the camera and
the subject is less than 2.0 m (6.6 feet)
when taking a picture with the flash, the
photo flash will be obscured by the lens
and one part of the screen will become
dark. Check the distance between the
camera and the subject when taking a
picture.
• To avoid picture noise, we recommend
reducing the ISO sensitivity before taking
pictures. (P78)
∫ Shutter speed for each flash setting
Flash setting
:AUTO
Shutter speed
(Sec.)
¢1
to 1/4000
1/30
:AUTO/
Red-eye reduction
¢2
: Forced ON
1/30
to 1/160
: Forced ON/
Red-eye reduction
: Slow sync.
1 to 1/4000
: Slow sync./
Red-eye reduction
¢1 This becomes 60 seconds in [ ]
¢2 This becomes 60 seconds in [ ]
mode and B (Bulb) in [ ] mode.
• When the flash is activated, the shutter
speed cannot be set to faster than 1/160th
of a second.
• Do not look directly at the flash at
close range when it is activated.
• Do not bring the flash too close to
objects or close the flash while it is
activated. The objects may be
discolored by its heat or lighting.
• Do not cover the photo flash with your
fingers or other objects.
Advanced
• Do not carry the camera using the opened
built-in flash.
• Do not close the flash soon after it is
activated prior to taking pictures due to
Auto/Red-eye reduction etc. It causes a
malfunction.
• If you press the shutter button halfway
when the flash is activated, the flash icon
on the LCD monitor turns red.
• When you take a picture beyond the
available flash range, the exposure may
not be adjusted properly and the picture
may become bright or dark.
• The white balance may not be properly
adjusted if the flash level is insufficient.
(P75)
• If you repeat taking a picture, it may not
actually be taken even if the flash is
activated. Take a picture after the access
indication disappears.
• The red-eye reduction effect differs
between people. Also, if the subject was
far away from the camera or was not
looking at the first flash, the effect may not
be evident.
• When the flash is being charged, the flash
icon blinks red, and you cannot take a
picture even when you press the shutter
button fully.
• When taking pictures in burst mode or
auto bracket, only 1 picture is recorded for
every flash activated.
• If you take pictures with the flash when
the lens hood is attached, the flash
may be obscured by the lens hood.
• When you attach an external flash, it takes
priority over the built-in flash. Refer to
P125 for the external flash.
67
VQT1G28
Page 68

Advanced
Adjusting the flash output
Adjust the flash output when the subject is
small or reflection ratio is extremely high or
low.
1 Press [MENU/SET] to display the
menu.
2 Press 3/4/2/1 to select
[FLASH ADJUST.] in the [REC]
menu [ ] and then press 1.
3
Press 2/1 to adjust the flash
output and then press [MENU/SET].
MENU
/SET
• Select [0] to return to the original flash
output.
• You can also use the front dial or the
rear dial to set.
4 Press [MENU/SET] to close the
menu.
• You can also press the shutter button
halfway to close the menu.
Setting to the 2nd Curtain Synchro
2nd curtain synchro activates the flash just
before the shutter closes when taking
pictures of moving objects such as cars
using a slow shutter speed.
1 Press [MENU/SET] to display the
menu.
2 Press 3/4/2/1 to select
[FLASH SYNC.] in the [REC]
menu [ ] and then press 1.
3 Press 4 to select [2ND] and then
press [MENU/SET].
MENU
/SET
• You can also use the front dial or the
rear dial to select a menu item.
4 Press [MENU/SET] to close the
menu.
• You can also press the shutter button
halfway to close the menu.
∫ 1st curtain synchro
2560
P
A
19
• You can adjust from [`2EV] to [_2 EV] in
steps of [1/3 EV].
• If you adjust the flash output, the adjusted
flash output value is displayed on the LCD
monitor. Also, [ ] is displayed on the
Viewfinder.
• The flash output setting is memorized
even if the camera is turned off.
68
VQT1G28
1/25F2.8
• The normal method when taking
pictures with the flash.
Page 69

∫ 2nd curtain synchro
125
ISO
100
19
F5.6P
STANDARD
1
AEL
2560
P
A
2
19
1/25F2.8
• The light source appears behind the
subject and picture becomes dynamic.
Advanced
Fixing the Focus and
the Exposure
(AF/AE Lock)
• Set it to [1ST] normally.
• [2ND] is displayed in the flash icon on the
LCD monitor if you set [FLASH SYNC.] to
[2ND].
• The flash sync. settings are also effective
when using an external flash. (P125)
• When a fast shutter speed is set, the effect
of 2nd curtain synchro may deteriorate.
• You cannot set AUTO/Red-eye reduction
[ ], Forced ON/Red-eye reduction
[ ] or Slow sync./Red-eye reduction
[ ] when [FLASH SYNC.] is set to [2ND].
This is useful when you want to take a
picture of a subject outside the AF frame or
the contrast is too strong and you cannot
achieve appropriate exposure.
∫ Fixing the exposure only
1 Align the screen with the subject
that you want to fix the exposure
of.
A
A Viewfinder Display
2 Press and hold [AFL/AEL] to fix
the exposure.
D
D
D
C
AEL
F5.6
STANDARD
ISO
100
125
19
B
ISO
AEL
B Viewfinder Display
C When taking pictures with Live View
D AE lock indication
• The aperture value and the shutter
speed light.
69
VQT1G28
Page 70

Advanced
• If you release [AFL/AEL],
[AF/AE LOCK] is canceled.
3 While pressing [AFL/AEL], move
the camera as you compose the
picture.
4 Press the shutter button halfway
to focus on the subject and then
press it fully.
E
ISO
AEL
E Viewfinder Display
∫ Fixing the focus or the focus/the
exposure
1 Press [MENU/SET] to display the
menu.
2 Press 3/4/2/1 to select [AF/
AE LOCK] in the [CUSTOM
MENU] menu [ ] and then
press 1.
3 Press 3/4 to select [AF] or [AF/
AE] and then press [MENU/SET].
MENU
/SET
• You can also use the front dial or the
rear dial to select a menu item.
4 Press [MENU/SET] to close the
menu.
• You can also press the shutter button
halfway to close the menu.
When [AF] is selected
(Fixing the focus only)
1 Aim the AF frame at the subject.
2 Press and hold [AFL/AEL] to fix the
focus.
• The focus indication lights when the
subject is focused.
• If you release [AFL/AEL],
[AF/AE LOCK] is canceled.
3 While pressing [AFL/AEL], move the
camera as you compose the picture
and then press the shutter button fully.
When [AF/AE] is selected
(Fixing the focus and the exposure)
1 Aim the AF frame at the subject.
2 Press and hold [AFL/AEL] to fix the
focus and the exposure.
• The focus indication, aperture value
and the shutter speed light when the
subject is focused and the exposure is
set.
• If you release [AFL/AEL],
[AF/AE LOCK] is canceled.
3 While pressing [AFL/AEL], move the
camera as you compose the picture
and then press the shutter button fully.
• If you set [AF/AE LOCK HOLD] in the
[CUSTOM MENU] menu to [ON], you can
fix the focus and the exposure even if you
release the [AFL/AEL] button after
pressing it. (P104)
• AF Lock only is effective when taking
pictures in manual exposure mode.
• AE Lock only is effective when taking
pictures with manual focus.
• In auto mode [ ], the setting is fixed to
AE lock.
70
VQT1G28
Page 71

Advanced
Taking Pictures using Burst Mode
1 Set the drive mode lever to [ ].
A
A When burst mode is set to high speed
[H].
2 Focus on the subject and take a
picture.
• Hold down the shutter button fully to
activate the burst mode.
∫ Changing the burst speed
1 Press [MENU/SET] to display the
menu.
2 Press 3/4/2/1 to select
[BURST RATE] in the [REC] menu
[ ] and then press 1.
3 Press 3/4 to select [H] (High
speed) or [L] (Low speed) and
then press [MENU/SET].
MENU
/SET
• You can also use the front dial or the
rear dial to select a menu item.
4 Press [MENU/SET] to close the
menu.
• You can also press the shutter button
halfway to close the menu.
∫ Burst speed
(High) (Low)
Burst speed
(pictures/
second)
• The burst speed is constant regardless of
the transfer speed of the card.
• The burst speeds indicated are when the
shutter speed is faster than 1/60 and the
flash is not activated.
• The burst mode speed may become
slower depending on the following
settings.
– ISO sensitivity (P78)
– Picture size (P94)
– Quality (P94)
– Focus priority (P106)
– Focus mode
• Since the shutter speed becomes slower
in dark places, the burst speed (pictures/
second) may become slower.
∫ Number of pictures recorded in burst
mode
Number of
recordable pictures (pictures)
• Refer to P94 for information about RAW
files.
• When there are no RAW files, pictures
can be taken until the capacity of the card
becomes full. However the burst speed
will become slower halfway. The exact
timing of this depends on the picture size,
the setting for [QUALITY] and the type of
card used.
32
With RAW files
max. 3
Without RAW
files
Depends on
the remaining
capacity of the
card
71
VQT1G28
Page 72

Advanced
125
ISO
100
19
F5.6P
STANDARD
1
∫ Focusing in burst mode
The focus changes depending on the
setting for [FOCUS PRIORITY] in the
[CUSTOM MENU] menu (P106) and the
focus mode setting.
Focus mode
AFS
¢1
AFC
MF –
Focus
Priority
ON
OFF
ON Normal focusing
OFF
Focus
At the first picture
Predicted
focusing
Focus set with
manual focus
¢2
¢3
¢1 When you take pictures using Live
View, the focus mode setting is [AFS]
and the focus is fixed at the first picture.
¢2 The burst speed may become slower
because the camera is continuously
focusing on the subject.
¢3 The burst speed does not become as
slow as when [FOCUS PRIORITY] is
set to [ON].
• We recommend using the remote shutter
(DMW-RSL1; optional) when you want to
keep the shutter button pressed fully while
taking pictures in burst mode. Refer to
P127 for information about the remote
shutter.
• The exposure and the white balance vary
depending on the burst mode setting.
When burst mode is set to [ ], they are
fixed to the values set for the first picture.
When the burst speed is set to [ ], they
are adjusted each time you take a picture.
• The auto review function is activated
regardless of the setting for auto review.
(The picture is not enlarged.)
• When the flash is activated, you can take
only 1 picture.
• The burst speed is fixed to high speed
[ ] in auto mode [ ].
Taking Pictures using Auto Bracket
In this mode, 3 pictures are recorded in the
selected exposure compensation range
each time the shutter button is pressed.
You can select the picture with the desired
exposure among different exposures.
1 Set the drive mode lever to [ ].
A
BC
ISO
A Auto Bracket (When [ ] is set)
B Viewfinder Display
C When taking pictures with Live View
• [ ] is displayed on the Viewfinder. (It
is displayed on the LCD monitor when
taking pictures with Live View.)
2 Focus on the subject and take a
picture.
• If you press and hold the shutter button,
the number of pictures that you set is
taken.
• The auto bracket indication blinks until
the number of pictures that you set (3)
is taken.
• The picture count is reset to [0] if you
change the auto bracket setting,
change the setting on the drive mode
lever or turn the camera off before all
the pictures that you set are taken.
F5.6
STANDARD
ISO
100
125
19
1
1
EV
/
3
72
VQT1G28
Page 73

∫ Changing the settings for [STEP] and
[SEQUENCE] in auto bracket
1 Press [MENU/SET] to display the
menu.
2 Press 3/4/2/1 to select
[AUTO BRACKET] in the [REC]
menu [ ] and then press 1.
3 Press 3/4 to select [STEP] or
[SEQUENCE] and then press 1.
4 Press 3/4 to select the setting
and then press [MENU/SET].
MENU
/SET
• You can also use the front dial or the
rear dial to set.
When [STEP] has been selected in the
screen shown in step
•[STEP]
1
EV
/
–[ ]
3
2
EV
–[ ]
/
3
1
EV
–[ ]
1
1
EV
–[ ]
/
3
–[ ]
2
1
EV
/
3
–[ ]
2
EV
When [SEQUENCE] has been selected
in the screen shown in step
• [SEQUENCE]
–[0/`/_]
–[`/0/_]
3
3
Advanced
5 Press [MENU/SET] twice to close
the menu.
• You can also press the shutter button
halfway to close the menu.
• When taking pictures using auto bracket
after setting the exposure compensation
range, the pictures taken are based on the
selected exposure compensation range.
• The auto review function is activated
regardless of the setting for auto review.
(The picture is not enlarged.)
• The exposure may not be compensated
with auto bracket depending on the
brightness of the subject.
• When the flash is activated or the number
of recordable pictures is 2 or less, you can
take only 1 picture.
• [STEP] is fixed to [ ] and
[SEQUENCE] is fixed to [0/j/i] in auto
mode [ ].
1
EV
/
3
73
VQT1G28
Page 74

Advanced
A
B
Taking Pictures with the Self-timer
1 Set the drive mode lever to [ ].
A Self-timer set to [ ]
2 Focus on the subject and take a
picture.
• A picture is not taken until the subject is
brought into focus.
• If you want to press the shutter button
fully to take a picture even when the
subject is not focused, set
[FOCUS PRIORITY] in the [CUSTOM
MENU] menu to [OFF]. (P106)
• The self-timer indicator
B blinks and the
shutter is activated
after 10 seconds (or
2 seconds).
When [ ] is selected, the self-timer
•
indicator blinks again after the first and
the second pictures are taken and the
shutter is activated 2 seconds after it
blinks.
74
VQT1G28
• If you press [MENU/SET] while taking a
picture with the self-timer, it is canceled.
∫ Changing the time setting for the
self-timer
1 Press [MENU/SET] to display the
menu.
2 Press 3/4/2/1 to select
[SELF-TIMER] in the [REC] menu
[ ] and then press 1.
3 Press 3/4 to select the mode
and then press [MENU/SET].
MENU
/SET
Item Settings
10 seconds
10 seconds/3 pictures
2second
• If you set [ ], after 10 seconds the
camera takes 3 pictures at about
2 second intervals.
• You can also use the front dial or the
rear dial to select a menu item.
4 Press [MENU/SET] to close the
menu.
• You can also press the shutter button
halfway to close the menu.
• When using a tripod etc., setting the
self-timer to 2 seconds is a convenient
way to avoid the jitter caused by pressing
the shutter button.
• If you set [MIRROR UP] in the [REC]
mode menu to [ON], you can prevent jitter
(camera shake) caused by the mirror.
(P102)
Page 75

• In auto mode [ ], the self-timer is fixed
to 10 seconds.
• We recommend using a tripod when
taking pictures with the self-timer. (When
you use a tripod, make sure the tripod is
stable when the camera is attached to it.)
• Depending on the recording conditions,
the recording interval may become more
than 2 seconds when [ ] is selected.
• The flash output may not be constant
when [ ] is selected.
Advanced
Adjusting the White Balance
This function allows you to reproduce a
white color close to real life in pictures
recorded under sunlight, halogen lighting
etc. in which the white color may appear
reddish or bluish. Select a setting that
matches the recording conditions.
1 Press 4 ().
2 Press 2/1 to select the white
balance and then press [MENU/
SET] to set.
• You can also use the front dial or the
rear dial to select items.
• You can also press the shutter button
halfway to close the menu.
[AWB]
(Auto white
balance)
[]
(Daylight)
[]
(Cloudy)
for auto setting
for recording outdoors on
a bright day
for recording outdoors on
a cloudy day
MENU
/SET
75
VQT1G28
Page 76

Advanced
[]
(Shade)
[]
(Halogen)
[]
(Flash)
[]
(White set 1)
for recording outdoors in
the shade on a bright day
for recording under
halogen lighting
for recording with the
flash only
for using the preset white
balance
[]
(White set 2)
[]
(Color
for using the preset color
temperature setting
temperature
setting)
• [ ] is displayed on the Viewfinder if you
set the white balance to a setting other
than [AWB].
• You can also use [FUNC] to set. (P91)
∫ Auto white balance
The available white balance range is shown
in the following illustration. When you take
a picture beyond the available white
balance range, the picture may appear
reddish or bluish. Even within the confines
of the range, the auto white balance may
not operate properly if there are many light
sources or there is no color close to white.
In these cases, adjust the white balance.
1 Auto white balance will work in the
following range.
2 Blue sky
3 Cloudy sky (Rain)
4 Shade
5 TV screen
6 Sunlight
7 White fluorescent light
8 Incandescent light bulb
9 Sunrise and sunset
10 Candlelight
2)
3)
4)
5)
1)
6)
7)
8)
9)
10)
KlKelvin Color Temperature
• You can finely adjust the white balance.
(P77)
• The optimum white balance under
fluorescent light differs depending on the
type of fluorescent light so use [AWB],
[] or [].
• When you take a picture with the flash, the
white balance may not be properly
adjusted if the flash level is insufficient.
• The white balance cannot be set in the
following cases.
– In auto mode [ ]
– In [OUTDOOR PORTRAIT] and
[INDOOR PORTRAIT] in [PORTRAIT]
mode
– In [SCENERY] mode
– In [OUTDOOR SPORTS] and [INDOOR
SPORTS] in [SPORTS] mode
– In [NIGHT PORTRAIT] mode
– In [SUNSET] and [FOOD] in scene
mode
Resetting the white balance
Use this to set the white balance manually.
1 Select [ ] or [ ] with step 2 on
P75 and then press 3.
76
VQT1G28
Page 77

Advanced
2 Aim the camera at a sheet of
white paper, or an object that is
white etc. so that the frame in the
center is filled by the white object
only and then press [MENU/SET].
MENU
/SET
• You may not be able to set a new white
balance if the subject is too bright or too
dark. In this case, adjust the subject to an
appropriate brightness and then reset the
white balance.
Setting the color temperature
You can set the color temperature manually
for taking natural pictures in different
lighting conditions. The color of light is
measured as a number in degrees Kelvin.
As the color temperature becomes high the
picture becomes bluish and as the color
temperature becomes low the picture
becomes reddish. (P76)
1 Select [ ] with step 2 on P75
and then press 3.
2 Press 3/4 to select the color
temperature and then press
[MENU/SET].
MENU
/SET
• You can set a color temperature from
[2500K] to [10000K].
• You can also use the front dial or the
rear dial to select items.
Finely adjusting the white balance
You can finely adjust the white balance
when you cannot acquire the desired hue
by setting the white balance.
1 Select the white balance with
step 2 on P75 and then press 4.
2 Press 3/4/2/1 to finely adjust
the white balance and then press
[MENU/SET].
MENU
/SET
2: A (AMBER: ORANGE TINT)
1: B (BLUE: BLUISH)
3: G_ (GREEN: GREENISH)
4: M` (MAGENTA: REDDISH)
• If you finely adjust the white balance to
A (amber), the white balance icon on
77
VQT1G28
Page 78

Advanced
the LCD monitor will change to orange.
If you finely adjust the white balance to
B (blue), the white balance icon on the
LCD monitor will change to blue.
• If you finely adjust the white balance to
G_ (green) or M` (magenta), [_]
(green) or [`] (magenta) appears
beside the white balance icon on the
LCD monitor.
• Press [FUNC] to return to the center
point.
• Select the center point if you are not
finely adjusting the white balance.
• You can finely adjust the white balance
independently for each white balance
item.
• The white balance fine adjustment setting
is reflected in the picture when using the
flash.
• The white balance fine adjustment setting
is memorized even if the camera is turned
off.
• The white balance fine adjustment level
returns to the standard setting (center
point) in the following cases.
– When you reset the white balance in
[ ] or [ ] (P76)
– When you reset the color temperature
manually in [ ] (P77)
• You cannot finely adjust the white balance
in the following cases.
– In auto mode [ ]
– In [OUTDOOR PORTRAIT] and
[INDOOR PORTRAIT] in [PORTRAIT]
mode
– In [SCENERY] mode
– In [OUTDOOR SPORTS] and [INDOOR
SPORTS] in [SPORTS] mode
– In [NIGHT PORTRAIT] mode
– In [SUNSET] and [FOOD] in scene
mode
Setting the Light Sensitivity
ISO is a measure of sensitivity to light. The
higher the sensitivity is set, the less light is
needed to take a picture so the camera
becomes more suitable for recording in
dark places.
1 Press 3().
A
A Viewfinder Display
B When taking pictures with Live View
2 Press 2/1 to select the ISO
sensitivity and then press [MENU/
SET] to set.
• You can also use the front dial or the
rear dial to select items.
• You can also press the shutter button
halfway to set.
B
ISO
MENU
/SET
78
VQT1G28
Page 79

ISO sensitivity 100 1600
Use in bright
places
(e.g. outdoors)
Use in dark
places
Suitable
Not
suitable
Not
suitable
Suitable
Shutter speed Slow Fast
Noise Less Increased
ISO sensitivity Settings
The ISO sensitivity is
AUTO
automatically adjusted
according to the
brightness.
The ISO sensitivity is
¢
(Intelligent)
adjusted according to
the movement of the
subject and the
brightness.
100 The ISO sensitivity is
200
400
fixed to various
settings.
800
1600
¢ When taking pictures with Live View
only
• You can set [ISO LIMIT SET]. (P80)
• When setting to [AUTO], the ISO
sensitivity is automatically increased
between [ISO100] and [ISO400]
according to the brightness. (It can only
increase up to [ISO200] when [ISO LIMIT
SET] is set to [ISO200].)
• The ISO sensitivity automatically
increases up to [ISO800] if you select
[].
Advanced
∫ About [ ] (Intelligent ISO
sensitivity control)
(When taking pictures with Live View
only)
The camera detects the movement of the
subject near the center of the screen and
then sets the optimal ISO sensitivity and
shutter speed according to the movement
and the brightness of the subject.
• Jitter is avoided when taking pictures
indoors of a moving subject by increasing
the ISO sensitivity and making the shutter
speed faster.
1/125 ISO800
• Noise is avoided when taking pictures
indoors of a subject with no movement by
decreasing the ISO sensitivity.
1/30 ISO200
• The shutter speed is not fixed when the
shutter button is pressed halfway. It is
continuously changing to match the
movement of the subject until the shutter
button is pressed fully. Confirm the actual
shutter speed on the information display
for the picture being played back.
• You can also use [FUNC] to set. (P91)
• If you select [ ], digital zoom cannot be
used.
• Depending on the brightness and how fast
the subject is moving, jitter may not be
avoided even if [ ] is selected.
79
VQT1G28
Page 80

Advanced
• The camera may not be able to detect the
movement of the subject in the following
cases.
– When the moving subject is small
– When the moving subject is at the edge
of the screen
– When the subject starts moving the
instant the shutter button is pressed fully
– While AF is activated
• The setting is fixed to [ ] in the
following cases.
– In [BABY1]/[BABY2] and [PET] in scene
mode
– In [INDOOR PORTRAIT], [I.ISO
MACRO], [NORMAL SPORTS],
[OUTDOOR SPORTS] and [INDOOR
SPORTS] in advanced scene mode
• Program shift cannot be activated when
the ISO sensitivity is set to [ ].
• You cannot select [ ] in shutter-priority
AE mode and manual exposure mode.
Also, you cannot select [AUTO] in manual
exposure mode.
• To avoid picture noise, we recommend
reducing the ISO sensitivity, setting
[NOISE RED.] in [FILM MODE] towards
[_] or setting the items except
[NOISE RED.] towards [`] to take
pictures. (P93)
Setting the maximum sensitivity
setting
If you set a maximum setting for the ISO
sensitivity, the camera automatically
changes to the optimal ISO sensitivity for
the brightness of the subject.
1 Press [MENU/SET] to display the
menu.
2 Press 3/4/2/1 to select [ISO
LIMIT SET] in the [CUSTOM
MENU] menu [ ] and then
press 1.
3 Press 3/4 to select the ISO
sensitivity and then press [MENU/
SET].
MENU
/SET
• You can also use the front dial or the
rear dial to select a menu item.
4 Press [MENU/SET] to close the
menu.
• You can also press the shutter button
halfway to close the menu.
80
VQT1G28
Page 81

Advanced
Deciding the Method
to Measure Brightness
(Metering mode)
1 Press 1 ().
A
A Viewfinder Display
B When taking pictures with Live View
2 Press 2/1 to select the metering
method and then press [MENU/
SET] to set.
B
ISO
Multiple:
This is the method in which the
camera measures the most suitable
exposure by judging the allocation of
brightness on the whole screen
automatically. Usually, we
recommend using this method.
Center weighted:
This is the method used to focus on
the subject on the center of the
screen and measure the whole
screen evenly.
Spot:
This is the method used to focus on
the subject in the limited narrow area
on the center of the screen.
• Metering mode is fixed to multiple [ ] in
auto mode [ ].
• The camera will adjust the exposure to
suit the person’s face only when the AF
mode is set to [ ] and multiple [ ] is
selected.
• When spot [ ] is selected and the AF
mode is set to [ ] or [ ], the camera
will also move the spot metering target to
match the AF area.
MENU
/SET
• You can also use the front dial or the
rear dial to select items.
• You can also press the shutter button
halfway to close the menu.
81
VQT1G28
Page 82

Advanced
Registering Personal
Menu Settings
(Registering custom settings)
You can use custom set to save the current
menu settings for the camera. You can save
up to 3 menu settings in advance for future
use.
• Set to the mode dial to the desired mode
and select the desired menu settings in
advance.
1 Press [MENU/SET] to display the
menu.
2 Press 3/4/2/1 to select
[CUST. SET MEM.] in the
[CUSTOM MENU] menu [ ] and
then press 1.
3 Press 3/4 to select [ SET1],
[ SET2] or [ SET3] and then
press [MENU/SET].
• When [YES] is selected, the settings
that were previously stored are
overwritten.
• You cannot save the following menu
item because they affect other
recording modes.
–[CLOCKSET]
5 Press [MENU/SET] to close the
menu.
• You can also press the shutter button
halfway to close the menu.
MENU
/SET
4 Press 3 to select [YES] and then
press [MENU/SET].
MENU
/SET
82
VQT1G28
Page 83

Advanced
125
ISO
100
19
F3.8P
STANDARD
11
Taking pictures in Custom mode
You can select one of your own custom
settings to suit the picture-taking conditions
and other factors from among the
registered patterns you have saved as
custom settings ahead of time.
1 Press [MENU/SET] to display the
menu.
2 Press 3/4 to select [ SET1],
[ SET2] or [ SET3].
• Press 1 to display the settings for each
menu item. (Press 2 to return to the
selection screen.)
• Only some of the menu items are
displayed. (Refer to the following for the
menu items that are displayed.)
– [AF/AE LOCK]
– [AF/AE LOCK HOLD]
–[AF+MF]
– [FOCUS PRIORITY]
– [AF ASSIST LAMP]
– [LIVE VIEW AF]
– [BURST RATE]
–[AUTOREVIEW]
– [LONG SHTR NR]
– [SHOOT W/O LENS]
3 Press [MENU/SET] to set.
MENU
/SET
A
F3.8
STANDARD
ISO
100
125
19
11
A When taking pictures with Live View
• Saving of the selected custom settings
is displayed on the screen.
∫ When changing the menu settings
Even if the menu settings are changed
temporarily with [ SET1], [ SET2] or
[ SET3] selected, what has been
registered will remain unchanged.
To change what has been registered,
overwrite the registered data using [CUST.
SET MEM.] (P104) on the [CUSTOM
MENU] menu.
• Even if the birthday setting for [BABY1]/
[BABY2] or [PET] in scene mode (P88) is
changed in custom mode, it will not be
registered. If you want to register the
changed setting, overwrite the registered
data using [CUST. SET MEM.] in the
[CUSTOM MENU] menu.
• At the time of purchase, the initial settings
for the program AE mode [ ] are
registered in [ SET1], [ SET2] or
[SET3].
83
VQT1G28
Page 84

Advanced
Taking expressive
portraits and
landscape pictures
(Advanced scene mode)
In this mode, you can take quality pictures
of such subjects as people, sporting events
and activities, macro, scenery, and people
in night scenes in accordance with the
surrounding conditions.
1 Press 2/1 to select the
advanced scene mode.
(Screen when selecting [ ])
A
A When taking pictures with Live View
2 Press [MENU/SET] to set.
• You can also press the shutter button
halfway to set.
• The menu screen is switched to the
recording screen in the selected
advanced scene mode.
• Press 1 and then perform steps
2 to change the advanced scene mode.
1 and
∫ About the information
• If you press [DISPLAY] when selecting an
advanced scene mode in step
explanations about each advanced scene
mode are displayed. (If you press
[DISPLAY] again, the screen returns to
the screen shown in step
• The following items cannot be set in
advanced scene mode because the
camera automatically adjusts them to the
optimal setting.
– [SENSITIVITY]
– [METERING MODE]
– Items other than [STANDARD] and
[STANDARD] ( ) in film mode.
∫ About the aperture value and the
shutter speed when you select a
creative setting
• You can change the aperture value and
the shutter speed if you select a creative
setting in advanced scene mode. If you
cannot get an adequate exposure when
you rotate the front dial, the aperture
value and the shutter speed or the
selection cursor will turn red.
B
1,
1.)
84
VQT1G28
B When taking pictures with Live View
Page 85

Advanced
[PORTRAIT]
The person stands out from the
background and has a healthier
complexion.
[NORMAL PORTRAIT]
Shades the background and photographs
skin color beautifully.
[OUTDOOR PORTRAIT]
Prevents faces from appearing dark when
shooting outside.
[INDOOR PORTRAIT]
Sets the ISO sensitivity setting to the
appropriate setting to prevent blurring of
photo subject for indoor photography.
(Intelligent ISO sensitivity control)
[CREATIVE PORTRAIT]
You can change the amount of
background blurring by changing the
aperture value (P41).
¢ Intelligent ISO sensitivity control is
activated when taking pictures with
Live View only.
∫ Technique for Portrait mode
To increase the effectiveness of this mode:
1 Rotate the zoom lever as far as
possible to Tele.
2 Move close to the subject to make this
mode more effective.
¢
[SCENERY]
This allows you to take pictures of a wide
landscape.
[NORMAL SCENERY]
The focus adjusts onto far away subjects
as a priority.
[NATURE]
The best setting for shooting natural
scenery.
[ARCHITECTURE]
This setting takes sharp photographs of
architecture. The guide lines are
displayed. (P55)
[CREATIVE SCENERY]
The shutter speed (P42) can be changed
with the [NORMAL SCENERY] setting.
• The flash setting is fixed to Forced OFF
[].
• The setting on the AF assist lamp is
disabled.
• The white balance cannot be set.
• In [INDOOR PORTRAIT], the Intelligent
ISO sensitivity control operates, and the
maximum ISO sensitivity level becomes
[ISO400]. In other modes, the ISO
sensitivity is fixed to [ISO100].
• The white balance can be set when
[NORMAL PORTRAIT] or [CREATIVE
PORTRAIT] is selected.
• The initial setting for [AF] is [ ] when
taking picture with Live View.
• Digital zoom cannot be used.
85
VQT1G28
Page 86

Advanced
[MACRO]
This mode allows you to take close-up
pictures of a subject, e.g. when taking
pictures of flowers.
(The distance from the subject that you can
take close-up pictures differs depending on
the lens you are using.)
[NORMAL MACRO]
Priority is given to focusing on a subject
close to the camera.
[I.ISO MACRO]
The camera senses the movement of the
subject and sets the optimum ISO
sensitivity to prevent subject blur.
(Intelligent ISO sensitivity control)
[CREATIVE MACRO]
You can change the aperture value (P41)
with the [NORMAL MACRO] setting.
¢ Intelligent ISO sensitivity control is
activated when taking pictures with
Live View only.
∫ Focus range
(With the supplied lens)
A
¢
• We recommend using a tripod and the
self-timer in macro mode.
• When a subject is close to the camera, the
effective focus range (depth of field) is
significantly narrowed. Therefore, if the
distance between the camera and the
subject is changed after focusing on the
subject, it may become difficult to focus on
it again.
• If the distance between the camera and
the subject is beyond the focus range of
the camera, the picture may not be
properly focused even if the focus
indication lights.
• If [LIVE VIEW AF] is set to contrast AF
when taking pictures with Live View,
priority is given to a subject close to the
camera so it takes longer to focus when
taking pictures of a distant subject.
• The available flash range is about 2.0 m
(6.6 feet) to 5.5 m (18.0 feet) (Wide).
(When the ISO sensitivity is set to
[AUTO].) We recommend setting the flash
to Forced OFF [ ] when you take
pictures at close range.
• When you take pictures at close range,
the resolution of the periphery of the
picture may decrease slightly. This is not a
malfunction.
• If the lens becomes dirty with fingerprints
or dust, the lens may not be able to focus
on the subject correctly.
• Digital zoom cannot be used.
C
B
A Focus distance reference mark
B Focus distance reference line
C [0.29] m (0.95 feet)
86
VQT1G28
Page 87

[SPORTS]
Set here when you want to take pictures of
sports scenes or other fast-moving events.
[NORMAL SPORTS]
¢
Controls the ISO sensitivity while stopping
movement with a high shutter speed.
(Intelligent ISO sensitivity control)
[OUTDOOR SPORTS]
¢
Fast shutter speed for stopping movement
when taking photographs outdoors in
good weather.
(Intelligent ISO sensitivity control)
[INDOOR SPORTS]
¢
Increases the ISO sensitivity and
increases the shutter speed to prevent
blurring for indoor photography.
(Intelligent ISO sensitivity control)
[CREATIVE SPORTS]
The shutter speed (P42) can be changed
with the [NORMAL SPORTS] setting.
¢ Intelligent ISO sensitivity control is
activated when taking pictures with
Live View only.
• The white balance can be set when
[NORMAL SPORTS] or [CREATIVE
SPORTS] is selected.
• Digital zoom cannot be used.
[NIGHT PORTRAIT]
This allows you to take pictures of a person
and the background with near real-life
brightness.
[NIGHT PORTRAIT]
Use when taking photographs of people
with night scenery as a background.
[NIGHT SCENERY]
Night scenery is vividly photographed with
a slow shutter.
Advanced
[ILLUMINATIONS]
Night time illuminations are photographed
beautifully.
[CREATIVE NIGHT SCENERY]
The aperture value (P41) can be changed
with the [NIGHT SCENERY] setting.
∫ Technique for Night portrait mode
• Open the flash when
[NIGHT PORTRAIT] is selected.
• Since the shutter speed becomes slower,
we recommend using a tripod and the
self-timer for taking pictures.
• When [NIGHT PORTRAIT] is selected,
keep the subject still for about 1 second
after taking the picture.
• When [NIGHT PORTRAIT] is selected, we
recommend rotating the zoom lever to
Wide (1k) and being about 2.0 m
(6.6 feet) from the subject when taking a
picture.
• For information on the available flash
range, see P66.
• Be sure to close the flash when not in use.
• The shutter may remain closed after
taking the picture. This is due to signal
processing and is not a malfunction.
• Noise may become visible when you take
pictures in dark places.
• The flash cannot be set for settings except
for [NIGHT PORTRAIT].
• When [NIGHT PORTRAIT] is selected,
the flash settings become Slow sync./
Red-eye reduction [ ], and the flash
is activated every time.
• When [NIGHT SCENERY] is selected,
ISO sensitivity is fixed to [ISO100].
• The AF assist lamp is disabled for settings
other than [NIGHT PORTRAIT].
• The white balance cannot be set.
• When [NIGHT PORTRAIT] is selected,
the initial setting for [AF] in Live View
recording is [ ].
87
VQT1G28
Page 88

Advanced
Taking pictures that match the scene being recorded (Scene mode)
When you select a scene mode to match
the subject and recording situation, the
camera sets the optimal exposure and hue
to obtain the desired picture.
• Refer to P89 to 90 and “About the
information ” for details about each
scene mode.
1 Press 2/1 to select the scene
mode.
2 Press [MENU/SET] to set.
• The menu screen is switched to the
recording screen in the selected scene
mode.
• To change the scene mode, press
[MENU/SET] to display the menu, press
3/4/2/1 to select the scene mode in
the scene menu [ ] and then press
[MENU/SET] again.
∫ About the information
• If you press [DISPLAY] when selecting a
scene mode in step
each scene mode are displayed. (If you
press [DISPLAY] again, the screen
returns to the [SCENE MODE] menu.)
• The flash setting is memorized even if the
camera is turned off. However, the scene
mode flash setting is reset to the initial
setting when the scene mode is changed.
• When you take a picture with a scene
mode that is not adequate for the
purpose, the hue of the picture may differ
from the actual scene.
• If you press 2 when selecting [SUNSET]
• The following items cannot be set in scene
1, the [SCENE MODE] menu [ ]
in step
is selected. If you then press 4 and select
the [REC] mode menu [ ], the [SETUP]
menu [ ] or the [CUSTOM MENU] menu
[ ], you can set the desired items.
mode because the camera automatically
adjusts them to the optimal setting.
– [SENSITIVITY]
– [METERING MODE]
– Items other than [STANDARD] and
[STANDARD] ( ) in film mode.
1, explanations about
88
VQT1G28
Page 89

[SUNSET]
MENU
Press [ ] to display the [SCENE MODE]
/SET
menu and select a scene mode. (P88)
Select this when you want to take pictures
of a sunset. This allows you to take vivid
pictures of the red color of the sun.
• The flash setting is fixed to Forced OFF
[].
• The setting on the AF assist lamp is
disabled.
• The white balance cannot be set.
[FOOD]
MENU
Press [ ] to display the [SCENE MODE]
/SET
menu and select a scene mode. (P88)
This mode allows you to take pictures of
food with a natural hue without being
affected by the ambient light in restaurants
etc.
• The white balance cannot be set.
1
[BABY1]/[BABY2]
2
MENU
Press [ ] to display the [SCENE MODE]
/SET
menu and select a scene mode. (P88)
This takes pictures of a baby with a healthy
complexion. When you use the flash, the
light from it is weaker than usual.
You can set different birthdays in [BABY1]
and [BABY2]. You can then display the
ages when playing back the pictures.
• The age of the baby can be printed out
using the [LUMIX Simple Viewer] or
[PHOTOfunSTUDIO-viewer-] software on
the CD-ROM (supplied). [For details on
printing, refer to the operating instructions
(PDF file) of the software.]
Advanced
∫ Age display setting
• To have the age displayed, first set the
birthday and then be sure to set
[WITH AGE] before taking the pictures.
∫ Birthday setting
1 Press 3/4 to select [BIRTHDAY SET.]
and then press [MENU/SET].
2 When a message appears, press 2/1
to select items (Year/Month/Day) and
then press 3/4 to set them.
3 Press [MENU/SET] to finish the setting.
• You can also use the front dial or the
rear dial to set.
• Intelligent ISO sensitivity control is
activated, and maximum ISO sensitivity
level becomes [ISO400], in [BABY1]/
[BABY2] (When taking pictures with Live
View only).
• The age and the current date and time are
both displayed for about 5 seconds when
the camera is turned on in [BABY1]/
[BABY2].
The age display style differs depending on
•
the language setting in the recording mode.
• If the age is not properly displayed, check
the clock and birthday settings.
• If the camera is set to [WITHOUT AGE],
the age is not recorded even if the time
and birthday are set. This means the age
cannot be displayed even if camera is set
to [WITH AGE] after taking the pictures.
• You can reset the birthday setting with
[RESET].
• Digital zoom cannot be used.
• The initial setting for [AF] when taking
pictures with Live View is face detection.
89
VQT1G28
Page 90

Advanced
[PET]
MENU
Press [ ] to display the [SCENE MODE]
/SET
menu and select a scene mode. (P88)
Select this when you want to take pictures
of a pet such as a dog or a cat.
You can set the birthday of your pet. You
can then display the age when playing back
the pictures.
• The age of the pet can be printed out
using the [LUMIX Simple Viewer] or
[PHOTOfunSTUDIO-viewer-] software on
the CD-ROM (supplied). [For details on
printing, refer to the operating instructions
(PDF file) of the software.]
Refer to [BABY1]/[BABY2] on P89 for
information about the age display setting
and the birthday setting.
• The initial setting for the AF assist lamp is
[OFF]. (P106)
• Years prior to 2000 cannot be selected for
the [BIRTHDAY SET.] setting.
• Intelligent ISO sensitivity control is
activated, and maximum ISO sensitivity
level becomes [ISO800], in [PET] (When
taking pictures with Live View only).
• The initial setting for [AF] when taking
pictures with Live View is 9-area-focusing.
• Refer to [BABY1]/[BABY2] for other
information about this mode.
90
VQT1G28
Page 91

Menu Settings
Using the [REC] Mode Menu
Increase the variety of pictures you can take
by setting color effect, picture adjustment etc.
The menu items that can be set differ
depending on the recording mode.
∫ Setting from the menu screen
Press [MENU/SET] to display the [REC]
mode menu and then select the item to
set. (P26)
Items that can be set
(Recording in program AE mode [ ])
Menu
screen
1/4
2/4
3/4
4/4
: [FILM MODE] (P92)
: [ASPECT] (P94)
: [PICT.SIZE] (P94)
: [QUALITY] (P94)
: [OIS MODE] (P96)
:
: [D.ZOOM] (P98)
:[FLASH] (P99)
: [FLASH SYNC.] (P99)
: [FLASH ADJUST.]
: [MULTI. EXPO.] (P100)
: [BURST RATE] (P102)
:
: [SELF-TIMER] (P102)
: [MIRROR UP] (P102)
: [COLOR SPACE]
: [LONG SHTR NR]
Item
[EX. OPT. ZOOM] (P97)
(P99)
[AUTO BRACKET] (P102)
(P103)
(P103)
Menu Settings
∫ Using the FUNCTION setting
• You can use [FUNC] to easily set the
following items when taking pictures.
(When program AE mode [ ] is set.)
– White balance (P75)
– ISO sensitivity (P78)
– [PICT.SIZE] (P94)
– [QUALITY] (P94)
– [OIS MODE] (P96)
– [FLASH] (P64)
1 Press [FUNC] when recording.
2 Press 3/4/2/1 to select the
menu item and the setting and
then press [MENU/SET] to close
the menu.
MENU
• You can also use the front dial or the
rear dial to select items.
• You can also close the menu by
pressing [FUNC].
• You can also press the shutter button
halfway to close the menu.
/SET
91
VQT1G28
Page 92

Menu Settings
[FILM MODE]
Setting the color tone of the
picture to be recorded
[You can only select [STANDARD] and
[STANDARD] ( ) in [ ], [ ], [ ],
[ ], [ ] and [ ] mode.]
MENU
Press [ ] to display the [REC] mode
/SET
menu and select the item to set. (P26)
Every type of film for film cameras has its
own color tone and contrast characteristics.
In film mode, you can select the color tone
of the pictures from 9 types in the same
way as you would select different films for
film cameras.
Select different settings in film mode to
match the recording situation and your
picture of the recording.
1 Press 2/1 or use the rear dial to
select an item.
or
• When you press [DISPLAY] on the
screen shown above, explanations
about each film mode are displayed.
(When you press [DISPLAY] again, the
screen returns to the previous screen.)
2 Press [MENU/SET] to close the
menu.
• You can also press the shutter button
halfway to close the menu.
∫ Setting and effect
• [STANDARD] (COLOR)
This is the standard setting.
• [DYNAMIC] (COLOR)
The saturation and contrast of the stored
colors are increased.
• [NATURE] (COLOR)
Brighter red, green and blue. Enhanced
beauty of nature.
• [SMOOTH] (COLOR)
The contrast is lowered for smoother and
clearer color.
• [NOSTALGIC] (COLOR)
Lower saturation and contrast. Reflecting
passage of time.
• [VIBRANT] (COLOR)
Higher saturation and contrast than
dynamic.
• [STANDARD] ( )
This is the standard setting.
•[DYNAMIC] ( )
The contrast is increased.
•[SMOOTH] ( )
Smooths the picture without losing the
skin texture.
• [MY FILM1]
• [MY FILM2]
The saved setting is used.
• In film mode, the camera may do
something equivalent to pull processing or
push processing to create a picture with
particular characteristics. The shutter
speed may become very slow at this time.
• You can also use the [FILM MODE] button
to switch to Live View and to set film
mode. The exposure and the color tone in
Live View may be different from the
recorded picture.
92
VQT1G28
Page 93

∫ Adjusting each film mode to the
desired setting
1 Press 3/4 or use the front dial
on the screen shown in step 1 on
page 92 to select an item.
2 Press 2/1 or use the rear dial to
adjust the item and then press
[FILM MODE].
or
Menu Settings
[CONTRAST]
Increases the difference between
[_]
the brightness and the darkness
in the picture.
Decreases the difference
[`]
between the brightness and the
darkness in the picture.
[SHARPNESS]
[_] The picture is sharply defined.
[`] The picture is softly focused.
[SATURATION]
The colors in the picture become
[_]
vivid.
The colors in the picture become
[`]
natural.
3 Press 3/4 to select the item and
then press [MENU/SET].
MENU
/SET
• You can register 2 settings. ([MY FILM1]
and [MY FILM2]
(After registering, the film mode name that
was registered previously is displayed.)
• [STANDARD] is registered in [MY FILM1]
and [STANDARD] ( ) is registered in
[MY FILM2] at the time of purchase.
4 Press [MENU/SET] to close the
menu.
• You can also press the shutter button
halfway to close the menu.
[NOISE RED.]
The noise reduction effect is
[_]
enhanced. Picture resolution may
deteriorate slightly.
The noise reduction effect is
[`]
reduced. You can obtain pictures
with higher resolution.
• Noise may become visible when you take
pictures in dark places. To avoid picture
noise, we recommend setting
[NOISE RED.] towards [_] or setting the
items except [NOISE RED.] towards [`] to
take pictures.
• If you adjust a film mode, [_] is displayed
beside the film mode name on the LCD
monitor.
• You cannot adjust [SATURATION] in the
black and white settings in film mode.
• Film mode cannot be adjusted in
advanced scene mode and scene mode.
93
VQT1G28
Page 94

Menu Settings
[ASPECT]
Setting the aspect ratio of
pictures (When taking pictures
with Live View only)
MENU
/SET
Press [ ] to display the [REC] mode
menu and select the item to set. (P26)
By changing the aspect ratio, you can
select an angle of view that matches the
subject.
• Press [LIVE VIEW] to switch the camera
beforehand to taking pictures with Live
View. (P54)
Select to take pictures with the
same aspect ratio as a 4:3 TV or a
computer monitor.
Select to take pictures with the same
3:2 aspect ratio as 35 mm film.
This is suitable for landscapes etc.
where a wide view is preferable.
This is also suitable for playing
back pictures on a wide-screen
TV, high-definition TV etc.
[PICT.SIZE]/[QUALITY]
Setting a picture size and quality
that match your use of the
pictures
MENU
/SET
Press [ ] to display the [REC] mode
menu and select the item to set. (P26)
A digital picture is made of numerous dots
called pixels. Although you cannot see the
difference on the camera’s screen, the
more the pixels the finer the picture will be
when it is printed on a large piece of paper
or displayed on a computer monitor. Picture
quality refers to the compression rate when
saving digital pictures.
A Many pixels (Fine)
B Few pixels (Rough)
¢ These pictures are examples to
show the effect.
∫ Number of pixels
When you select a larger picture size [ ]
(10 million pixels), you can print pictures
clearly.
If a small number of pixels [ ] (3 million
pixels) is selected, the size of the data will
be small, so more pictures can be
recorded.
• The number of pixels that can be selected
differs depending on the aspect ratio.
• The ends of the recorded pictures may be
cut at printing. Check this before
recording. (P142)
94
VQT1G28
Page 95

∫ When the aspect ratio is [ ].
3648k2736 pixels
(10 million pixels)
2816k2112 pixels
(6 million pixels)
2048k1536 pixels
(3 million pixels)
∫ When the aspect ratio is [ ].
(When taking pictures with Live View
only)
3648k2432 pixels
(9 million pixels)
2816k1880 pixels
(5.3 million pixels)
2048k1360 pixels
(2.8 million pixels)
∫ When the aspect ratio is [ ].
(When taking pictures with Live View
only)
3648k2056 pixels
(7.5 million pixels)
2816k1584 pixels
(4.5 million pixels)
1920k1080 pixels
(2 million pixels)
∫ Quality
You can increase the number of recordable
pictures without changing the picture size if
quality is set to [ ].
Fine (Low compression):
This gives priority to
picture quality. Picture
quality will be high.
Standard (High
compression):
This gives priority to the
number of recordable
pictures. Standard quality
pictures are recorded.
Menu Settings
RAW_Fine:
This sets the quality to
[RAW] and also
simultaneously creates a
fine JPEG picture.
RAW_Standard:
This sets the quality to
[RAW] and also
simultaneously creates a
standard JPEG picture.
RAW:
Set to process images in
high-resolution on a PC.
The maximum picture
size for each aspect ratio
is fixed.
A JPEG is not created.
• You can enjoy more advanced picture
editing if you use RAW files. You can save
RAW files in a file format (JPEG, TIFF
etc.) that can be displayed on your PC
etc., develop them and edit them using the
software “SILKYPIX Developer Studio” by
Ichikawa Soft Laboratory on the CD-ROM
(supplied).
• If you set [EX. OPT. ZOOM] (P97) to [ON]
when taking pictures with Live View, [EZ]
is displayed on the screen when the
picture size is set to a size other than the
maximum picture size for each aspect
ratio. “EZ” is an abbreviation of “Extended
optical Zoom”.
• Refer to P144 for information about the
number of recordable pictures.
• You cannot select the following functions
when the quality is set to [ ], [ ]
or [ ].
–[EX.OPT.ZOOM]
– [D.ZOOM]
–[RESIZE]
–[TRIMMING]
– [ASPECT CONV.]
95
VQT1G28
Page 96

Menu Settings
[OIS MODE]
Optical Image Stabilizer
MENU
/SET
Press [ ] to display the [REC] mode
menu and select the item to set. (P26)
This mode detects jitter and compensates
for it.
• Check that the [O.I.S.] switch on the lens
is set to [ON].
[MODE1]
()
[MODE2]
()
[MODE3]
()
Camera shake is corrected at
all times in the mode for
taking pictures. It enables you
to take pictures with stability
after deciding on the
composition using the
telephoto function.
Camera shake is corrected
when the shutter button is
pressed. The resulting
correction is more effective.
Camera shake is corrected for
up/down movements. This
mode is ideal for panning (a
method of taking pictures
which involves turning the
camera to track the
movements of a subject which
continues to move in a fixed
direction).
• The stabilizer function may not be
effective in the following cases.
– When there is a lot of jitter.
– When the zoom magnification is high.
– When using the digital zoom.
– When taking pictures while following a
moving subject.
– When the shutter speed becomes
slower to take pictures indoors or in dark
places.
Be careful of camera jitter when you press
the shutter button.
• You cannot select [OIS MODE] in the
following cases.
– When using a lens that does not have an
optical image stabilizer function
– When auto mode [ ] is selected
• The panning effect in [MODE3] is more
difficult to achieve in the following cases.
– In brightly lit places such as in broad
daylight on a summer’s day
– When the shutter speed is faster than1/100th
of a second.
– When you move the camera too slowly
because the subject is moving slowly.
(The background will not become a blur.)
– When the camera does not keep up with
the subject satisfactorily
• We recommend taking pictures with the
Viewfinder when panning in [MODE3].
96
VQT1G28
Page 97

[EX. OPT. ZOOM]
T
B
1
Enlarging a picture with no picture
quality deterioration (When taking
pictures with Live View only)
MENU
/SET
Press [ ] to display the [REC] mode
menu and select the item to set. (P26)
Normally you can take pictures with a
maximum focal length of 50 mm (35 mm
film camera equivalent: 100 mm) using the
supplied lens.
However, if you set [EX. OPT. ZOOM] to
[ON] when the picture size is set to a size
other than the maximum picture size for
each aspect ratio ([ ]/[ ]/[ ]), a
maximum focal length of 89 mm can be
achieved (35 mm film camera equivalent:
178 mm) with no picture quality
deterioration.
• Press [LIVE VIEW] to switch the camera
beforehand to taking pictures with Live
View. (P54)
∫ Extended optical zoom mechanism
Example: When you set the picture size to
[ ] (3 million pixels), the 10 million pixels
CCD area is cropped to the center 3 million
pixels area, allowing a picture with a higher
zoom effect. (¢ is the equivalent value for a
35 mm film camera.)
This feature is displayed in gray when
taking pictures with Viewfinder.
Menu Settings
Example: [ ] (3 million pixels)
2 Extended optical zoom [ON]
Example: [ ] (6 million pixels)
3 Extended optical zoom [ON]
Example: [ ] (3 million pixels)
A optical zoom
B Extended optical zoom
∫ Picture size and extended optical
zoom magnification
Aspect
ratio
Picture
size
(10M)
(9M)
(7.5M)
(6M)
(5.3M)
(4.5M)
(3M)
(2.8M)
(2M)
Extended
optical zoom
magnification
Cannot set
1.3a
1.8a
Focus range
of the
supplied lens
14 mm to
50 mm
(28 mm to
100 mm)
18 mm to
64.5 mm
(36 mm to
129 mm)
24.5 mm to
89 mm
(49 mm to
178 mm)
¢ 35 mm film camera equivalent
¢
¢
¢
W
14 mm
(28 mm)
2
18 mm
(36 mm)
3
24.5 mm
A
W
B
W
(49 mm)
1 Extended optical zoom [OFF]
T
50 mm
(100 mm)
T
64.5 mm
(129 mm)
T
89 mm
(178 mm)
97
VQT1G28
Page 98

Menu Settings
• Refer to P94 for aspect ratio and P94 for
picture size.
• “EZ” is an abbreviation of
“Extended optical Zoom”.
• You can further enhance the zoom
magnification with the extended optical
zoom without worrying about further
picture distortion.
• When [EX. OPT. ZOOM] is set to [ON],
[ ] is displayed on the screen if you set a
picture size that activates the extended
optical zoom.
• If you set [QUALITY] to [RAW_FINE],
[RAW_STANDARD] or [RAW], the
extended optical zoom is not activated.
• The picture may stop moving for a
moment before being brought into focus
when you press the shutter button
halfway. This is not a malfunction.
[D.ZOOM]
Further extending the zoom
(When taking pictures with Live
View only)
MENU
/SET
Press [ ] to display the [REC] mode
menu and select the item to set. (P26)
You can further enhance the zoom
magnification that you had when using the
optical zoom (this includes when using the
extended optical zoom), by 2a or 4a with
the digital zoom.
You can take pictures with a maximum focal
length of 200 mm (35 mm film camera
equivalent: 400 mm) with the supplied lens.
Also, if you set a picture size that activates
the extended optical zoom, you can take
pictures with a maximum focal length of
356 mm (35 mm film camera equivalent:
712 mm).
• Press [LIVE VIEW] to switch the camera
beforehand to taking pictures with Live
View. (P54)
≥
[OFF] :
W
14 mm
(28 mm)
≥
[2k] :
W
28 mm
(56 mm)
≥
[4k] :
56 mm
(112 mm)
W
¢ 35 mm film camera equivalent
A Optical zoom
B Digital zoom
A
B
T
50 mm
(100 mm)
B
T
100 mm
(200 mm)
T
200 mm
(400 mm)
98
VQT1G28
Page 99

∫ Using the digital zoom together with
the extended optical zoom
Example: When the digital zoom is set to
[4a] and the picture size to [ ] (3 million
pixels), you can use the extended optical
zoom at the same time.
W
98 mm
(196 mm)
T
356 mm
(712 mm)
¢ 35 mm film camera equivalent
C Digital zoom and extended optical
zoom
• A big AF area (P61) is displayed when
using the digital zoom. Also, the stabilizer
function may not be effective.
• In digital zoom, the larger the picture the
lower the picture quality.
• When using the digital zoom, we
recommend using a tripod and the
self-timer (P74) for taking pictures.
• The digital zoom does not work in the
following cases:
– In auto mode [ ]
– When Intelligent ISO sensitivity control
is set to [ON]
– In [PORTRAIT], [MACRO] and
[SPORTS] in advanced scene mode
– In [BABY1]/[BABY2] and [PET] in scene
mode
– When the quality is set to [RAW_FINE],
[RAW_STANDARD] or [RAW]
• The AF mode is fixed to 1-area-focusing
when using the digital zoom.
• The picture may stop moving for a
moment before being brought into focus
when you press the shutter button
halfway. This is not a malfunction.
Menu Settings
[FLASH]
Switching to the appropriate flash
setting
MENU
/SET
Press [ ] to display the [REC] mode
menu and select the item to set. (P26)
You can switch the flash setting.
Refer to P64 for more information.
[FLASH SYNC.]
Setting to the 2nd Curtain
Synchro
MENU
/SET
Press [ ] to display the [REC] mode
menu and select the item to set. (P26)
You can set to the 2nd curtain synchro.
Refer to P68 for more information.
[FLASH ADJUST.]
Adjusting the flash output
MENU
/SET
Press [ ] to display the [REC] mode
menu and select the item to set. (P26)
You can adjust the flash output.
Refer to P68 for more information.
99
VQT1G28
Page 100

Menu Settings
[MULTI. EXPO.]
Taking pictures and superimposing
them over each other
MENU
/SET
Press [ ] to display the [REC] mode
menu and select the item to set. (P26)
Using this function, you can achieve the
kind of effect that is obtained when an
image is exposed two or three times.
• When you use the Live View function, you
can take pictures while checking the
composition of the overall photos.
• When you take pictures using the
viewfinder, you can check the composition
using the review images.
• If the intervals between taking pictures are
long, check the setting for power save
mode, and ensure that the power will not
turn off before you finish taking pictures.
1 Press 3 to select [START] and
then press 1.
A When taking pictures using the
Viewfinder
B When taking pictures using the Live
View
C After the first picture has been taken
• After taking the picture, press the
shutter button halfway down to take the
next picture.
• Press 3/4 to select [NEXT], [RETAKE]
or [EXIT] and then press [MENU/SET]
for one of the following operations.
[NEXT]: Advance to the next
picture.
[RETAKE]: Return to the first picture.
[EXIT]: Record the image of the
first picture, and finish the
multiple exposure
picture-taking session.
3 Decide on the composition, and
take the second picture.
D
2 Decide on the composition, and
take the first picture.
A
C
B
100
VQT1G28
D When taking pictures using the Live
View
• After taking the picture, the first and
second pictures taken will be
superimposed over each other and
displayed.
• After taking the picture, press the
shutter button halfway down to take the
next picture.
• Press 3/4 to select [NEXT], [RETAKE]
or [EXIT] and then press [MENU/SET]
for one of the following operations.
 Loading...