

Page 1
P
until
2013/10/31
DMC-GM1KP-VQT5D49_eng.book 1 ページ 2013年10月8日 火曜日 午後6時57分
Basic Owner’s Manual
Digital Camera/
Lens Kit
Model No. DMC-GM1K
Please read these instructions carefully before using this product, and
save this manual for future use.
More detailed instructions on the operation
of this camera are contained in “Owner’s
Manual for advanced features (PDF
format)” in the supplied CD-ROM. Install it on your PC to
read it.
Register online at www.panasonic.com/register (U.S. customers only)
For USA and Puerto Rico assistance, please call: 1-800-211-PANA(7262) or,
contact us via the web at: http://www.panasonic.com/contactinfo
VQT5D49
F1013WT0
Page 2
Date of Purchase
Dealer Purchased From
Dealer Address
Dealer Phone No.
Model No.
Serial No.
DMC-GM1KP-VQT5D49_eng.book 2 ページ 2013年10月2日 水曜日 午後6時54分
-If you see this symbol-
Information on Disposal in other Countries outside the European
Union
This symbol is only valid in the European Union.
If you wish to discard this product, please contact your local authorities or
dealer and ask for the correct method of disposal.
Dear Customer,
Thank you for choosing Panasonic!
You have purchased one of the most sophisticated and reliable products on the market
today. Used properly, we’re sure it will bring you and your family years of enjoyment.
Please take time to fill in the information below. The serial number is on the tag located on
the underside of your camera. Be sure to retain this manual as your convenient camera
information source.
Please note that the actual controls and components, menu items, etc. of your Digital Camera
may look somewhat different from those shown in the illustrations in this Owner’s Manual.
Carefully observe copyright laws.
•
Recording of pre-recorded tapes or discs or other published or broadcast material for purposes
other than your own private use may infringe copyright laws. Even for the purpose of private
use, recording of certain material may be restricted.
A lithium ion battery that is recyclable powers the product you have
purchased. Please call 1-800-8-BATTERY for information on how to
recycle this battery.
Information for Your Safety
WARNING:
To reduce the risk of fire, electric shock or product damage,
•
Do not expose this unit to rain, moisture, dripping or splashing.
• Use only the recommended accessories.
• Do not remove covers.
• Do not repair this unit by yourself. Refer servicing to qualified service personnel.
VQT5D49 (ENG)
2
Page 3
DMC-GM1
DMC-GM1KP-VQT5D49_eng.book 3 ページ 2013年10月2日 水曜日 午後6時54分
The socket outlet shall be installed near the equipment and shall be easily accessible.
∫ Product identification marking
Product Location
Digital Camera Bottom
Battery charger Bottom
FCC Note:
This equipment has been tested and found to comply with the limits for a Class B digital
device, pursuant to Part 15 of the FCC Rules. These limits are designed to provide
reasonable protection against harmful interference in a residential installation. This
equipment generates, uses, and can radiate radio frequency energy and, if not installed
and used in accordance with the instructions, may cause harmful interference to radio
communications. However, there is no guarantee that interference will not occur in a
particular installation. If this equipment does cause harmful interference to radio or
television reception, which can be determined by turning the equipment off and on, the
user is encouraged to try to correct the interference by one or more of the following
measures:
•
Reorient or relocate the receiving antenna.
• Increase the separation between the equipment and receiver.
• Connect the equipment into an outlet on a circuit different from that to which the receiver is
connected.
• Consult the dealer or an experienced radio/TV technician for help.
FCC Caution: To assure continued compliance, follow the attached installation
instructions and use only shielded interface cables with ferrite core when
connecting to computer or peripheral devices.
Any changes or modifications not expressly approved by the party responsible for
compliance could void the user’s authority to operate this equipment.
Declaration of Conformity
Trade Name: Panasonic
Model No.: DMC-GM1
Responsible Party:Panasonic Corporation of North America
Two Riverfront Plaza, Newark, NJ 07102-5490
Support Contact Telephone No.:1-800-211-PANA (7262)
This device complies with Part 15 of the FCC Rules. Operation is subject to the
following two conditions: (1) This device may not cause harmful interference, and (2)
this device must accept any interference received, including interference that may
cause undesired operation.
(ENG) VQT5D49
3
Page 4
DMC-GM1KP-VQT5D49_eng.book 4 ページ 2013年10月2日 水曜日 午後6時54分
Certification and Compliance
See Camera for the certification and compliance mark specific to that device.
1 Select
2 Select
3
Contains FCC ID: VPYLBXN604
This transmitter must not be co-located or operated in conjunction with any other
antenna or transmitter.
This equipment complies with FCC radiation exposure limits set forth for an
uncontrolled environment and meets the FCC radio frequency (RF) Exposure
Guidelines in Supplement C to OET65.
This equipment has very low levels of RF energy that are deemed to comply without
testing of specific absorption ratio (SAR).
∫ About the battery pack
CAUTION
Battery pack (Lithium ion battery pack)
Use the specified unit to recharge the battery pack.
•
• Do not use the battery pack with equipment other than the specified unit.
• Do not get dirt, sand, liquids, or other foreign matter on the terminals.
• Do not touch the plug terminals (i and j) with metal objects.
• Do not disassemble, remodel, heat or throw into fire.
If any electrolyte should come into contact with your hands or clothes, wash it off
thoroughly with water.
If any electrolyte should come into contact with your eyes, never rub the eyes. Rinse
eyes thoroughly with water, and then consult a doctor.
[Wi-Fi]
in the [Setup] menu.
[Wi-Fi Setup]
Press
3/4 to select [Approved Regulations], and then press [MENU/SET]
in the [Wi-Fi] menu.
.
CAUTION
Danger of explosion if battery is incorrectly replaced. Replace only with the type
•
recommended by the manufacturer.
• When disposing of the batteries, please contact your local authorities or dealer and ask for
the correct method of disposal.
•
Do not heat or expose to flame.
• Do not leave the battery(ies) in a car exposed to direct sunlight for a long period of time with
doors and windows closed.
Warn ing
Risk of fire, explosion and burns. Do not disassemble, heat above 60xC (140oF) or incinerate.
VQT5D49 (ENG)
4
Page 5
DMC-GM1KP-VQT5D49_eng.book 5 ページ 2013年10月2日 水曜日 午後6時54分
∫ About the battery charger
CAUTION!
To reduce the risk of fire, electric shock or product damage,
•
Do not install or place this unit in a bookcase, built-in cabinet or in another confined
space. Ensure this unit is well ventilated.
Battery charger
This battery charger operates on AC between 110 V and 240 V.
But
•
In the U.S.A. and Canada, the battery charger must be connected to a 120 V AC power supply only.
• When connecting to an AC supply outside of the U.S.A. or Canada, use a plug adaptor to
suit the AC outlet configuration.
Cautions for Use
Do not use any other USB connection cables except the supplied one or a genuine Panasonic
•
USB connection cable (DMW-USBC1: optional).
• Use a “High Speed HDMI micro cable” with the HDMI logo.
Cables that do not comply with the HDMI standards will not work.
“High Speed HDMI micro cable” (Type D–Type A plug, up to 2 m (6.6 feet) long)
• Always use a genuine Panasonic AV cable (DMW-AVC1: optional).
Keep this unit as far away as possible from electromagnetic equipment (such as
microwave ovens, TVs, video games etc.).
•
If you use this unit on top of or near a TV, the pictures and/or sound on this unit may be
disrupted by electromagnetic wave radiation.
• Do not use this unit near cell phones because doing so may result in noise adversely affecting
the pictures and/or sound.
• Recorded data may be damaged, or pictures may be distorted, by strong magnetic fields
created by speakers or large motors.
• Electromagnetic wave radiation may adversely affect this unit, disturbing the pictures and/or
sound.
• If this unit is adversely affected by electromagnetic equipment and stops functioning properly,
turn this unit off and remove the battery or disconnect AC adaptor (DMW-AC8PP: optional).
Then reinsert the battery or reconnect AC adaptor and turn this unit on.
Do not use this unit near radio transmitters or high-voltage lines.
If you record near radio transmitters or high-voltage lines, the recorded pictures and/or sound
•
may be adversely affected.
• Before cleaning the camera, remove the battery or the DC coupler (DMW-DCC15:
optional), or disconnect the power plug from the outlet.
• Do not press the monitor with excessive force.
• Do not press the lens with excessive force.
• Do not use solvents such as benzine, thinner, alcohol, kitchen detergents, etc., to clean
the camera, since it may deteriorate the external case or the coating may peel off.
• Do not leave the camera with the lens facing the sun as rays of light from the sun may
cause it to malfunction.
(ENG) VQT5D49
5
Page 6
DMC-GM1KP-VQT5D49_eng.book 6 ページ 2013年10月4日 金曜日 午後2時5分
Contents
Information for Your Safety................. 2
• Cautions for Use ............................. 5
Preparation
Reading the Owner's Manual
(PDF format) ......................................... 7
Care of the camera .............................. 8
Standard Accessories ......................... 9
Names and Functions of
Components........................................11
Preparation......................................... 14
• Changing the Lens........................ 14
• Attaching the Shoulder Strap ........ 14
• Charging the Battery ..................... 15
• Inserting/Removing the Battery..... 16
• Inserting/Removing the Card
(Optional) ...................................... 16
• Formatting the card
(initialization)................................. 17
• Setting Date/Time (Clock Set)....... 17
Setting the Menu................................ 18
• Setting menu items ....................... 18
Calling frequently-used menus
instantly (Quick Menu) ...................... 19
Assigning frequently used functions
to the buttons (function buttons)
Basic
Taking a Still picture.......................... 20
Recording Motion Picture ................. 20
Selecting the Recording Mode ......... 21
Playing Back Pictures/
Motion Pictures.................................. 22
• Playing Back Pictures ................... 22
• Playing Back Motion Pictures........ 22
Deleting Pictures ............................... 23
....... 19
Recording
Taking Pictures using the Automatic
Function (Intelligent Auto Mode)...... 24
Taking Pictures with
Manual Focus ..................................... 26
Wi-Fi
Controlling with a Smartphone/
Tablet................................................... 27
• Installing the smartphone/
tablet app “Image App ” ................. 27
• Connecting to a smartphone/
tablet .............................................28
• Taking pictures via a smartphone/
tablet (remote recording)...............28
Saving images stored in the camera/
•
Sending images in the camera to
..........................................28
an SNS
About the supplied software
About the supplied software............. 29
Others
Monitor Display .................................. 30
Menu list..............................................35
• [Rec].............................................. 35
• [Motion Picture]..............................36
• [Custom]........................................37
• [Setup]........................................... 38
• [Playback]......................................39
Troubleshooting ................................. 40
Specifications.....................................44
Digital Camera Accessory System ... 50
Digital Camera Accessory Order
Form(For USA and Puerto Rico
Customers) ......................................... 51
Limited Warranty (ONLY FOR U.S.A.
AND PUERTO RICO) ..........................52
VQT5D49 (ENG)
6
Page 7
DMC-GM1KP-VQT5D49_eng.book 7 ページ 2013年10月2日 水曜日 午後6時54分
Preparation
Reading the Owner's Manual (PDF format)
More detailed instructions on the operation of this camera are contained in
“Owner’s Manual for advanced features (PDF format)” in the supplied CD-ROM.
Install it on your PC to read it.
∫ For Windows
1 Turn the PC on and insert the CD-ROM containing the Owner's Manual
(supplied).
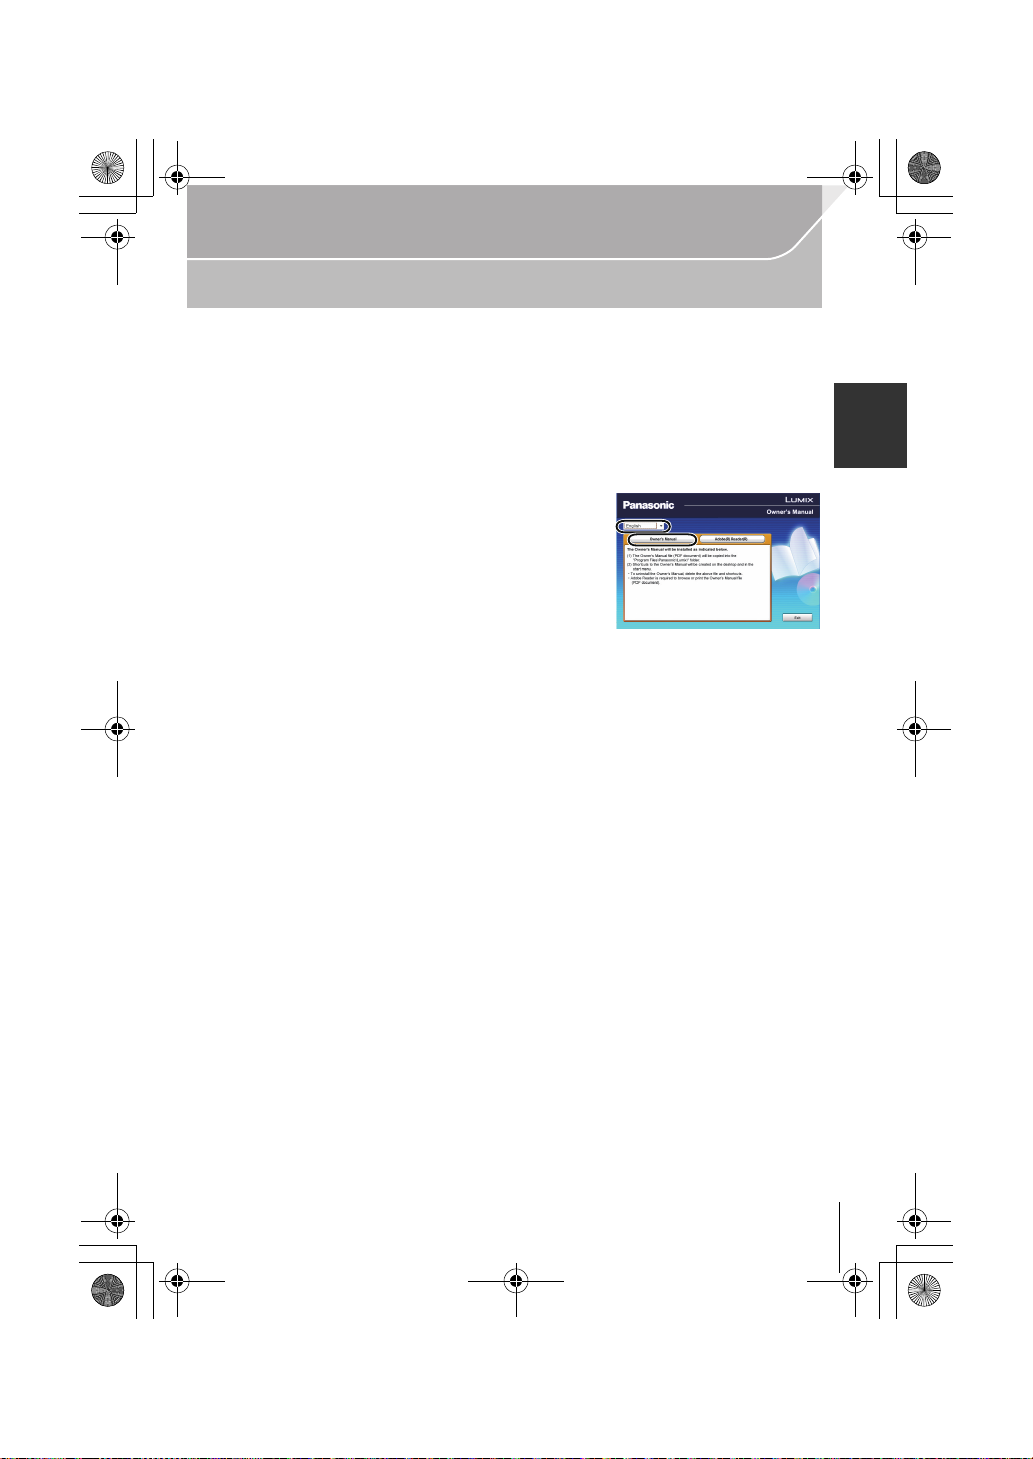
2 Select the desired language and then click
[Owner’s Manual] on the install menu to install.
If the automatic playback screen is displayed, you can
•
display the menu by selecting and executing
[Manual.exe].
• In Windows 8, you can display the menu by clicking a
message that is displayed after inserting the CD-ROM
and then selecting and executing [Manual.exe].
• You can also display the menu by double-clicking
[VFFXXXX] in [Computer] (XXXX differs depending on
the model).
3 Double click the “Owner’s Manual” shortcut icon on the desktop.
∫ When the Owner's Manual (PDF format) will not open
You will need Adobe Acrobat Reader 5.0 or later or Adobe Reader 7.0 or later to browse or
print the Owner’s Manual (PDF format).
You can download and install a version of Adobe Reader that you can use with your OS from
•
the following Web Site.
http://get.adobe.com/reader/otherversions
∫ To uninstall the Owner’s Manual (PDF format)
Delete the PDF file from the “Program Files\Panasonic\Lumix\” folder.
∫ For Mac
1 Turn the PC on and insert the CD-ROM containing the Owner’s Manual
(supplied).
2 Open the “Manual” folder in the CD-ROM and then copy the PDF file with the
desired language inside the folder.
3 Double click the PDF file to open it.
(ENG) VQT5D49
7
Page 8

DMC-GM1KP-VQT5D49_eng.book 8 ページ 2013年10月2日 水曜日 午後6時54分
Preparation
Care of the camera
Do not subject to strong vibration, shock, or pressure.
•
The lens, monitor, or external case may be damaged if used in the following conditions.
It may also malfunction or image may not be recorded if you:
– Drop or hit the camera.
– Press hard on the lens or the monitor.
This camera is not dust/drip/water proof.
Avoid using the camera in places with a lot of dust, water, sand, etc.
Liquid, sand and other foreign material may get into the space around the lens, buttons, etc. Be
•
particularly careful since it may not just cause malfunctions, but it may also become irreparable.
– Places with a lot of sand or dust.
– Places where water can come into contact with this unit, such as when using it on a rainy day
or at the beach.
Do not place your hands inside the mount of the digital camera body. Since the
sensor unit is a precision apparatus, it may cause a malfunction or damage.
∫ About Condensation (When the lens or monitor is fogged up)
•
Condensation occurs when the ambient temperature or humidity changes. Be careful of
condensation since it causes lens and monitor stains, fungus and camera malfunction.
• If condensation occurs, turn the camera off and leave it for about 2 hours. The fog will
disappear naturally when the temperature of the camera becomes close to the ambient
temperature.
VQT5D49 (ENG)
8
Page 9
DMC-GM1KP-VQT5D49_eng.book 9 ページ 2013年10月4日 金曜日 午後2時5分
Preparation
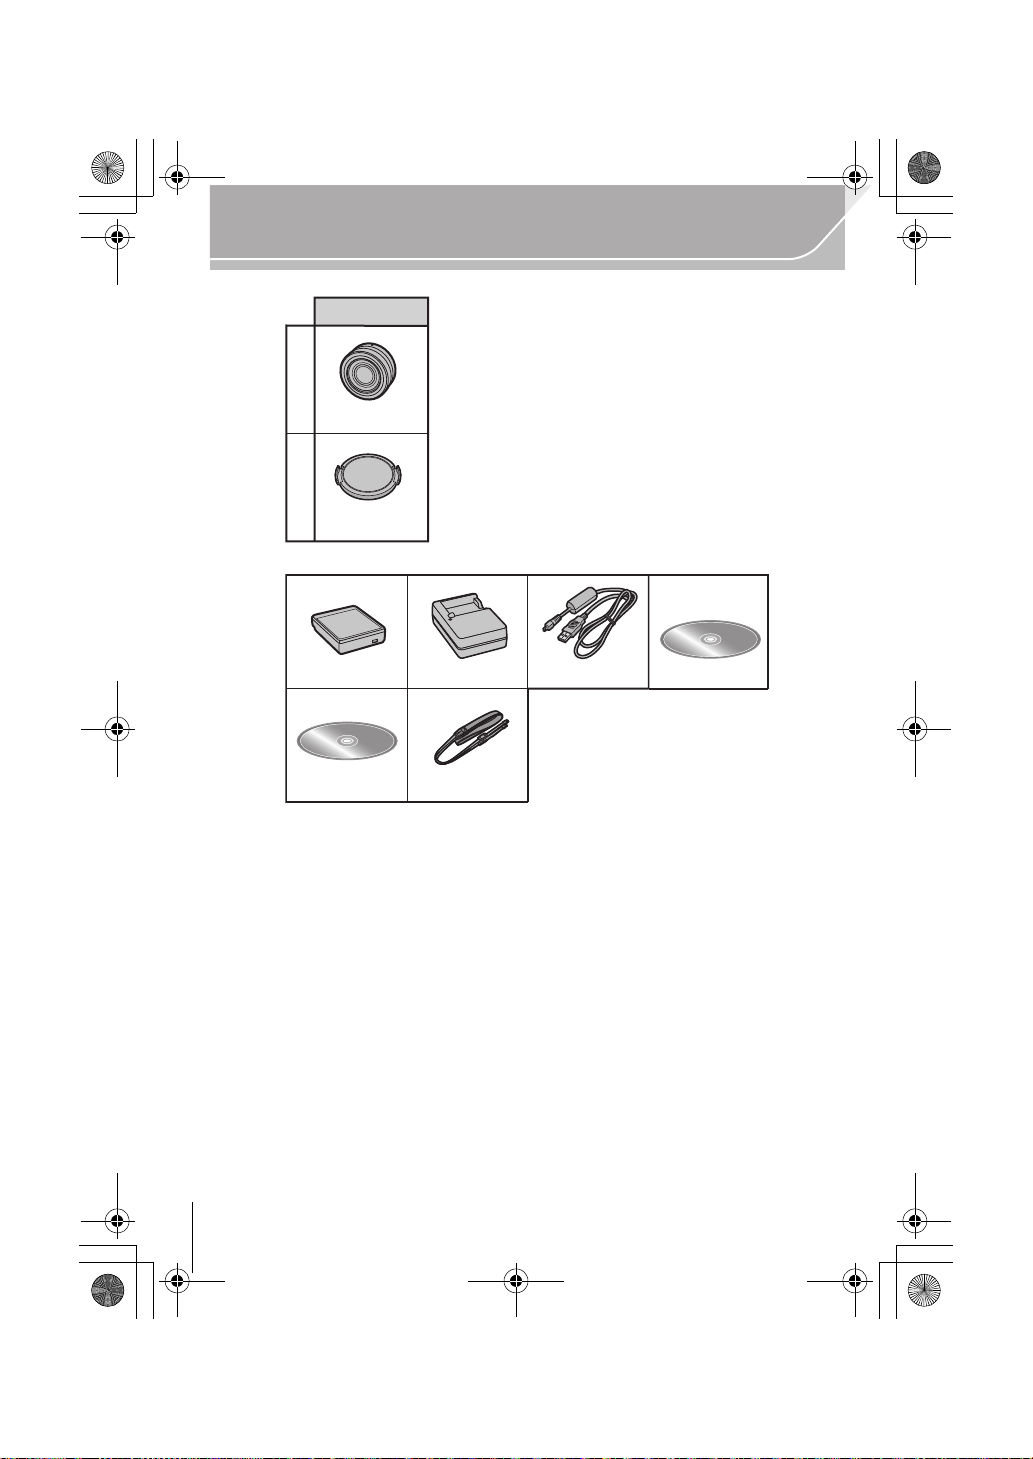
Standard Accessories
Check that all the accessories are supplied before using the camera.
Product numbers correct as of October 2013. These may be subject to change.
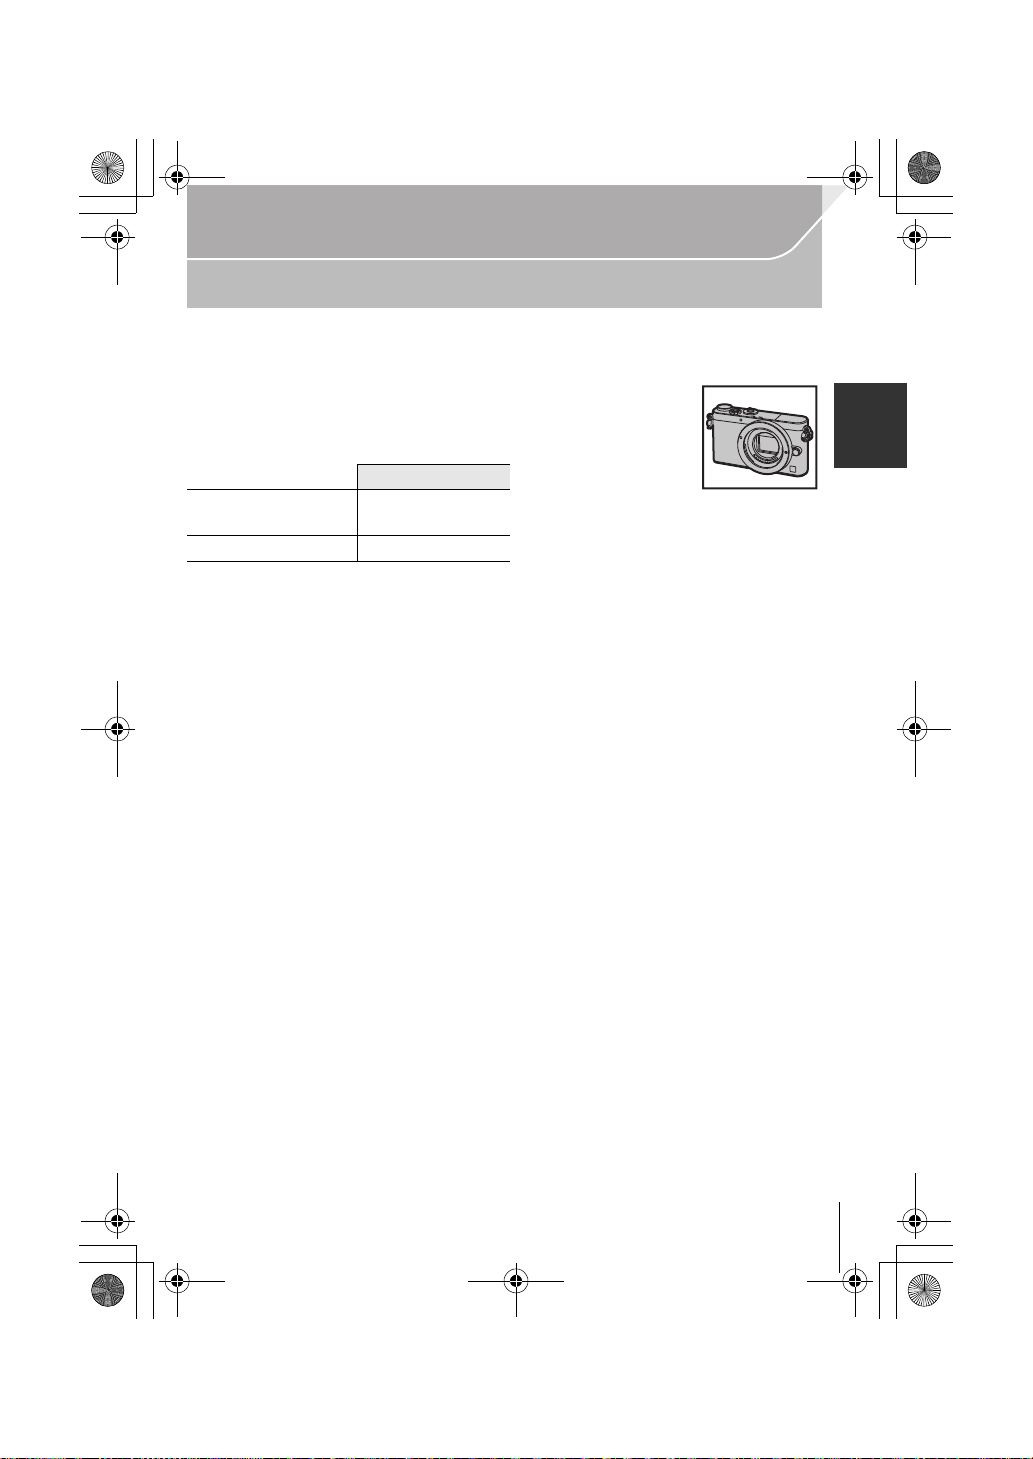
Digital Camera Body
(This is referred to as camera body in this owner’s manual.)
(±: Included, —: Not included)
DMC-GM1K
1 Interchangeable
Lens
¢1
2 Lens Cap ±
3Battery Pack
(Indicated as battery pack or battery in the text)
Charge the battery before use.
4 Battery Charger
(Indicated as battery charger or charger in the text)
5 USB Connection Cable
6 CD-ROM
Software:
•
Use it to install the software to your PC.
7 CD-ROM
•
Owner’s Manual for advanced features:
Use it to install to your PC.
8 Shoulder Strap
¢1 This is referred to as lens in this owner’s manual.
¢2 This is attached to the interchangeable lens at the time of purchase.
¢3 This is attached to the camera body at the time of purchase.
•
SD Memory Card, SDHC Memory Card and SDXC Memory Card are indicated as
• The card is optional.
• Description in this owner’s manual is based on the interchangeable lens (H-FS12032).
• Do not leave any metal items (such as clips) near the contact areas of the power plug or
near the batteries.
• Store the battery in a cool and dry place with a relatively stable temperature: (Recommended
temperature: 15 oC to 25 oC (59 oF to 77 oF), Recommended humidity: 40%RH to 60%RH)
• Do not store the battery for a long time while fully charged.
• When storing the battery for a long period of time, we recommend charging it once a year.
Remove the battery from the camera and store it again after it has completely discharged.
• If any accessories are lost, customers should contact Panasonic’s parts department at
1-800-833-9626 for further information about obtaining replacement parts.
¢3
±
¢2
card
in the text.
(ENG) VQT5D49
9
Page 10
DMC-GM1K
1
2
VFF1243 VFC5071
DE-A99B
K1HY08YY0031
34 56
78
VYF3562
DMW-BLH7PP
H-FS12032
DMC-GM1KP-VQT5D49_eng.book 10 ページ 2013年10月2日 水曜日 午後6時54分
Preparation
VQT5D49 (ENG)
10
Page 11
2
3
1
45 67
8
12
14 1613 15 17
9 10 11
DMC-GM1KP-VQT5D49_eng.book 11 ページ 2013年10月2日 水曜日 午後6時54分
Preparation
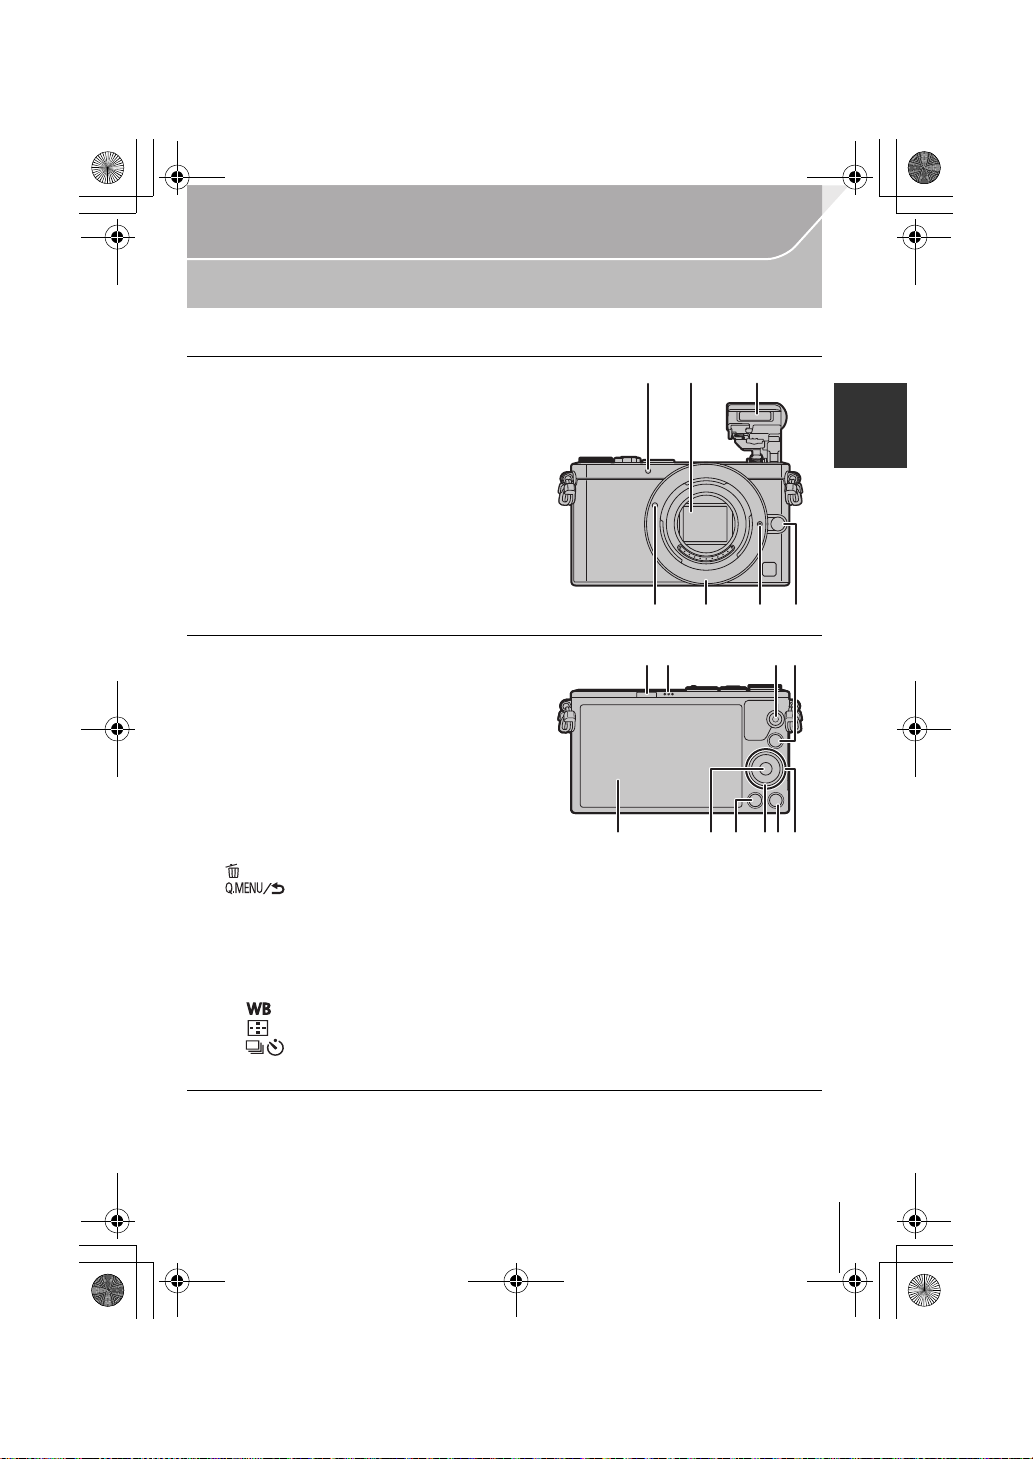
Names and Functions of Components
∫ Camera body
1 Self-timer indicator/
AF Assist Lamp
2 Sensor
3Flash
4 Lens fitting mark (P14)
5 Mount
6 Lens lock pin
7 Lens release button (P14)
8 Flash open lever
•
The flash opens, and recording with the flash
becomes possible.
9 Speaker
•
Be careful not to cover the speaker with your
finger. Doing so may make sound difficult to
hear.
10 Motion picture button (P20)
11 [(] (Playback) button (P22)
12 Touch screen/monitor (P13)
13 [MENU/SET] button (P18)
14 [ ] (Delete) button (P23)/
[ ] (Quick Menu/Return) button (P19)
15 Control dial
16 [DISP.] button
Each time this is pressed, the display on the monitor is switched.
•
17 Cursor buttons
3/[È] (Exposure Compensation)
1/[ ] (White Balance)
2/[ ] (Auto Focus Mode)
4/[ ] (Drive mode)
Single/Burst/Auto bracket/Self-timer
(ENG) VQT5D49
11
Page 12
21 22 25
2019
18
24
23
27
26
28
DMC-GM1KP-VQT5D49_eng.book 12 ページ 2013年10月4日 金曜日 午後2時5分
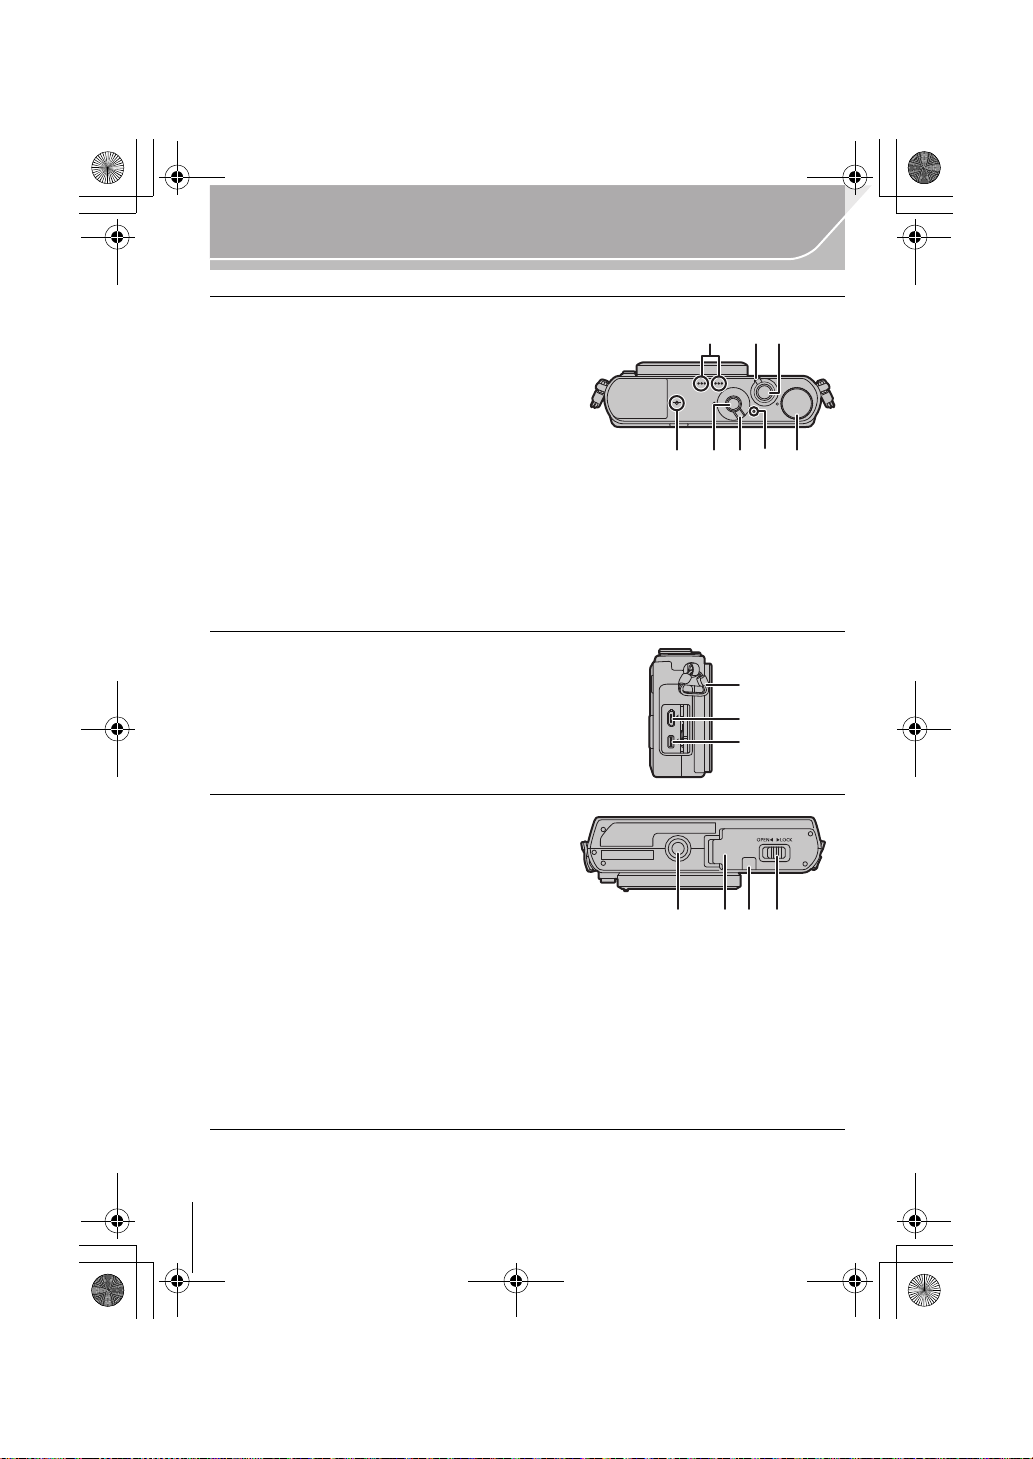
Preparation
18 Stereo microphone
•
Be careful not to cover the microphone with
your finger. Doing so may make sound
difficult to record.
19 Camera ON/OFF switch (P17)
20 Shutter button (P20)
21 Focus distance reference mark
22 [Fn1] button (P19)
At the time of purchase, [Wi-Fi] is set to
•
[Fn1]. (P27)
23 Focus mode lever (P26)
24 Status indicator (P17)/
®
connection lamp
Wi-Fi
•
The lamp lights green when the camera is turned on, and lights blue when it is connected
to Wi-Fi.
25 Mode dial (P21)
26 Shoulder strap eyelet (P14)
•
Be sure to attach the shoulder strap when
using the camera to ensure that you will not
drop it.
27 [HDMI] socket
28 [AV OUT/DIGITAL] socket
29 Tripod mount
•
A tripod with a screw length of 5.5 mm
(0.22 inch) or more may damage this unit if
attached.
30 Card/Battery door (P16)
31 DC coupler cover
When using an AC adaptor, ensure that the
•
Panasonic DC coupler (DMW-DCC15:
optional) and AC adaptor (DMW-AC8PP: optional) are used.
• Always use a genuine Panasonic AC adaptor (DMW-AC8PP: optional).
• It is recommended to use a fully charged battery or AC adaptor when recording motion
pictures.
• If while recording motion pictures using the AC adaptor and the power supply is cut off
due to a power outage or if the AC adaptor is disconnected etc., the motion picture will not
be recorded.
32 Release lever (P16)
VQT5D49 (ENG)
12
30 31 3229
Page 13
34 5 612
Fn6
2.0X
DMC-GM1KP-VQT5D49_eng.book 13 ページ 2013年10月4日 金曜日 午後2時5分
Preparation
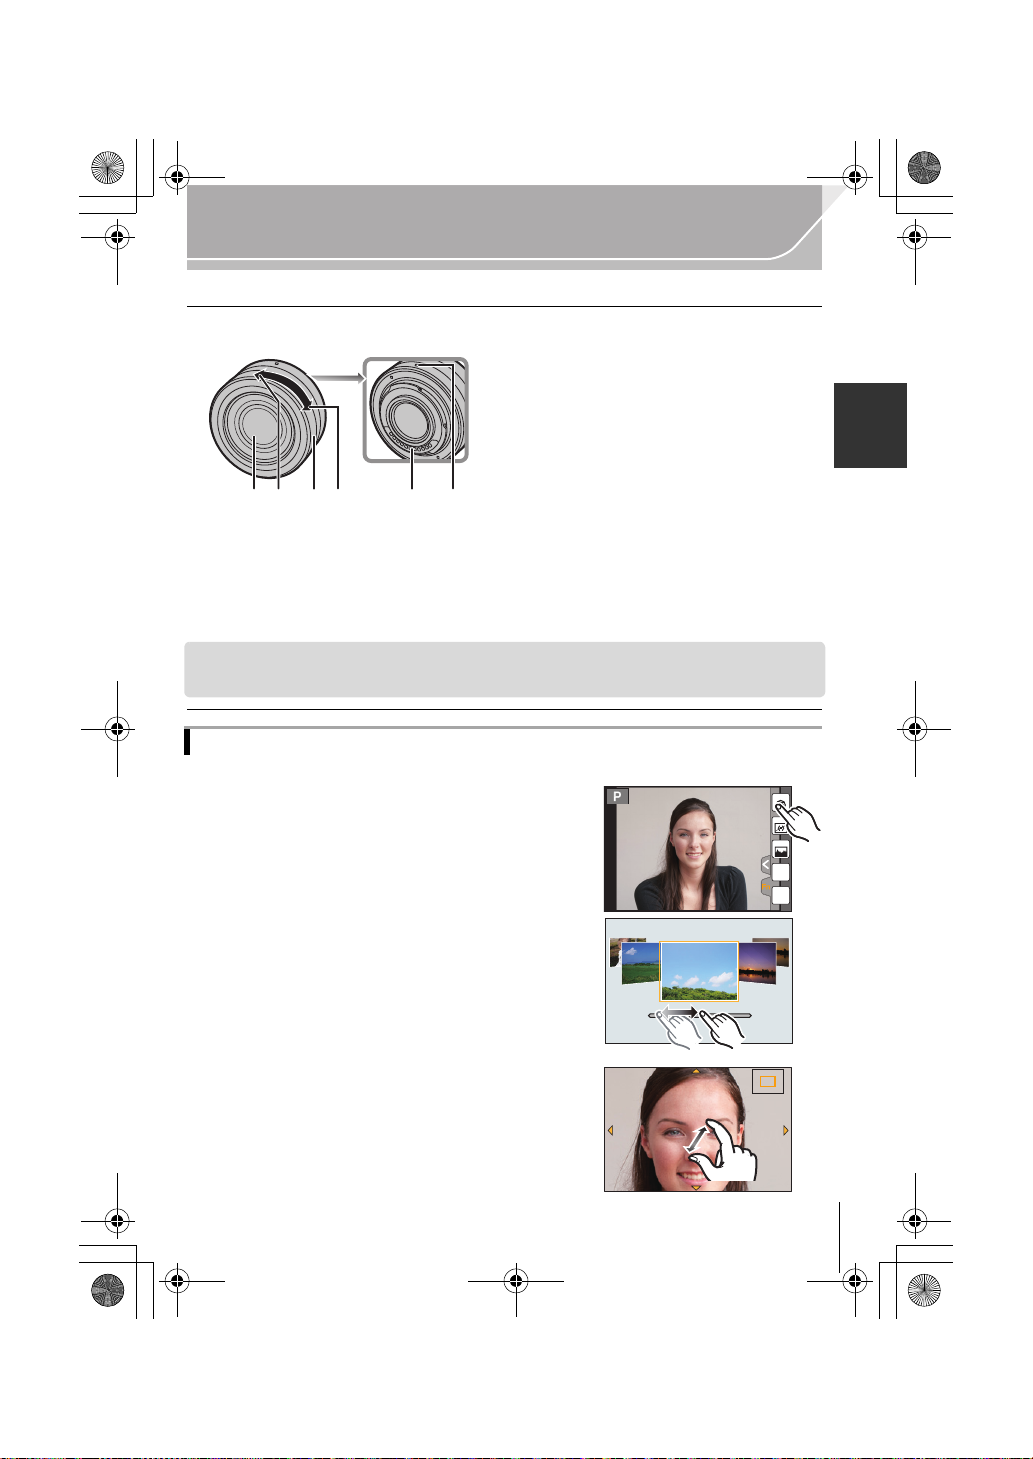
∫ Lens
H-FS12032
1 Lens surface
2Tele
3 Zoom ring
4Wide
5 Contact point
6 Lens fitting mark
• The interchangeable lens (H-FS12032) does not have a focus ring, but you can use manual
focus by operating the camera. Refer to P26 for details.
Touch screen (capacitive)
Operate the touch screen directly with your finger.
∫ Touch
To touch and release the touch screen.
• When selecting features using the touch screen, be sure to
touch the center of the desired icon.
Fn2
Fn6
Fn3
Fn4
Fn5
Fn6
∫ Drag
A movement without releasing the touch screen.
This can also be used to move to the next image during
playback, etc.
2.0X2.0X
∫ Pinch (enlarge/reduce)
2.0X
Pinch the touch panel apart (enlarge) or together
(reduce) with two fingers.
(ENG) VQT5D49
13
Page 14
234
DMC-GM1KP-VQT5D49_eng.book 14 ページ 2013年10月2日 水曜日 午後6時54分
Preparation
Preparation
• Check that the camera is turned off.
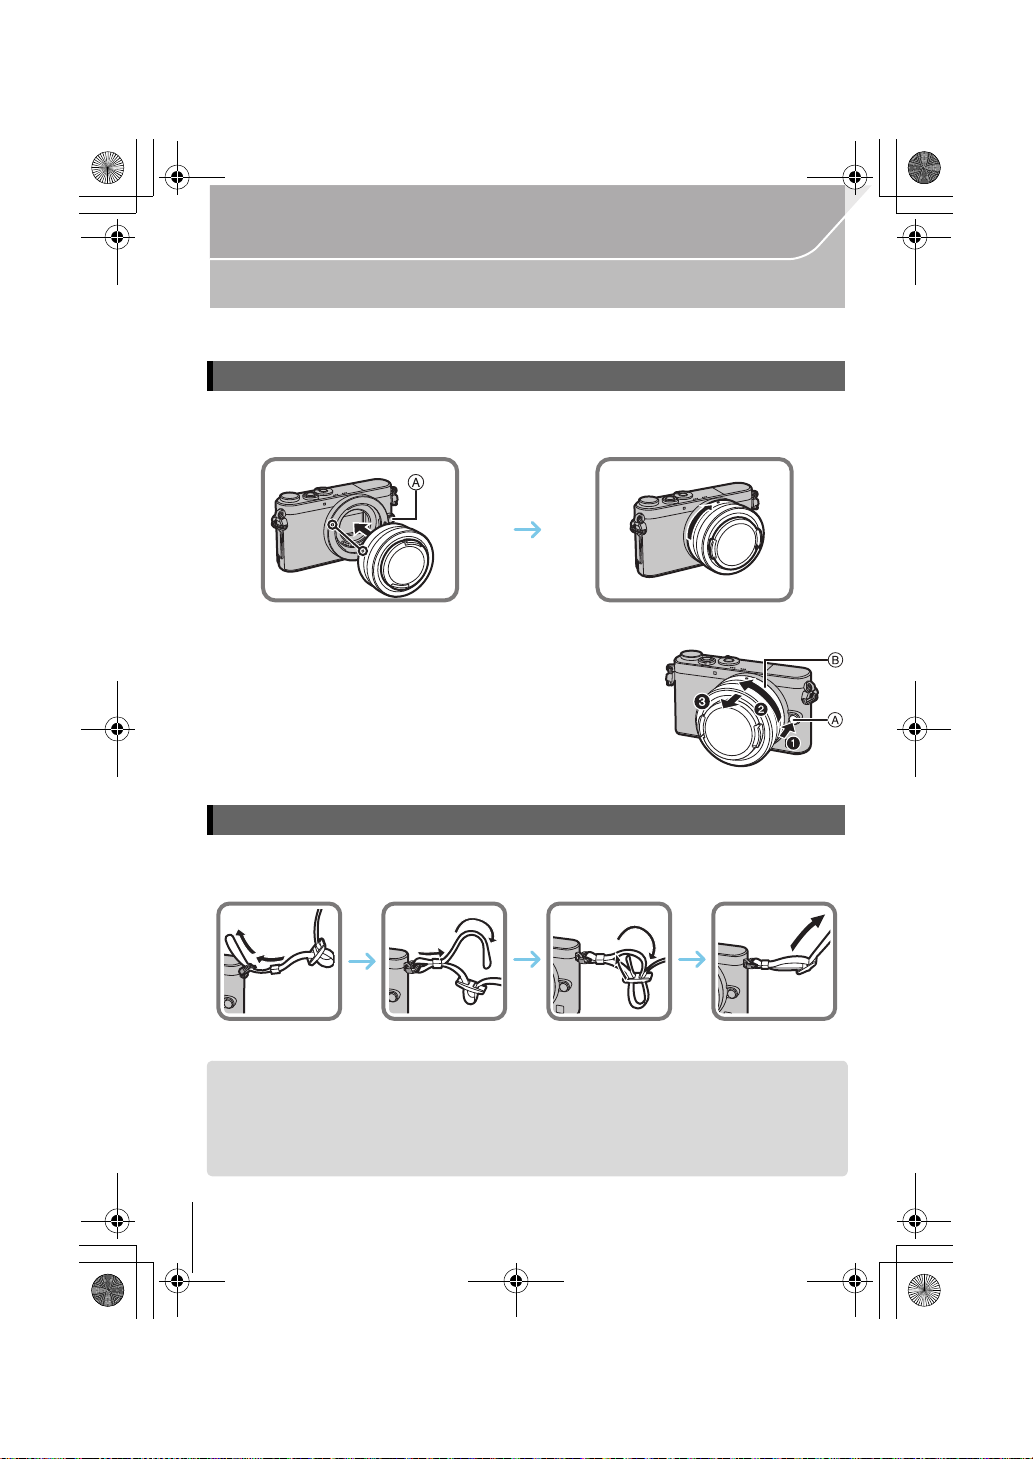
Changing the Lens
• When attaching or detaching the interchangeable lens (H-FS12032), retract the lens barrel.
•
Change lenses where there is not a lot of dirt or dust.
• Do not press the lens release button A when you attach a lens.
∫ Detaching the lens
1 Attach the lens cap.
2 While pressing on the lens release button A, rotate
the lens toward the arrow until it stops and then
remove.
Hold and rotate the base area of the lens B.
•
Attaching the Shoulder Strap
• We recommend attaching the shoulder strap when using the camera to prevent it from
dropping.
1
• Perform steps 1 to 4 and then attach the other side of the shoulder strap.
• Use the shoulder strap around your shoulder.
– Do not wrap the strap around your neck.
– It may result in injury or accident.
• Do not leave the shoulder strap where an infant can reach it.
– It may result in an accident by mistakenly wrapping around the neck.
VQT5D49 (ENG)
14
Page 15
90°
DMC-GM1KP-VQT5D49_eng.book 15 ページ 2013年10月2日 水曜日 午後6時54分
Preparation
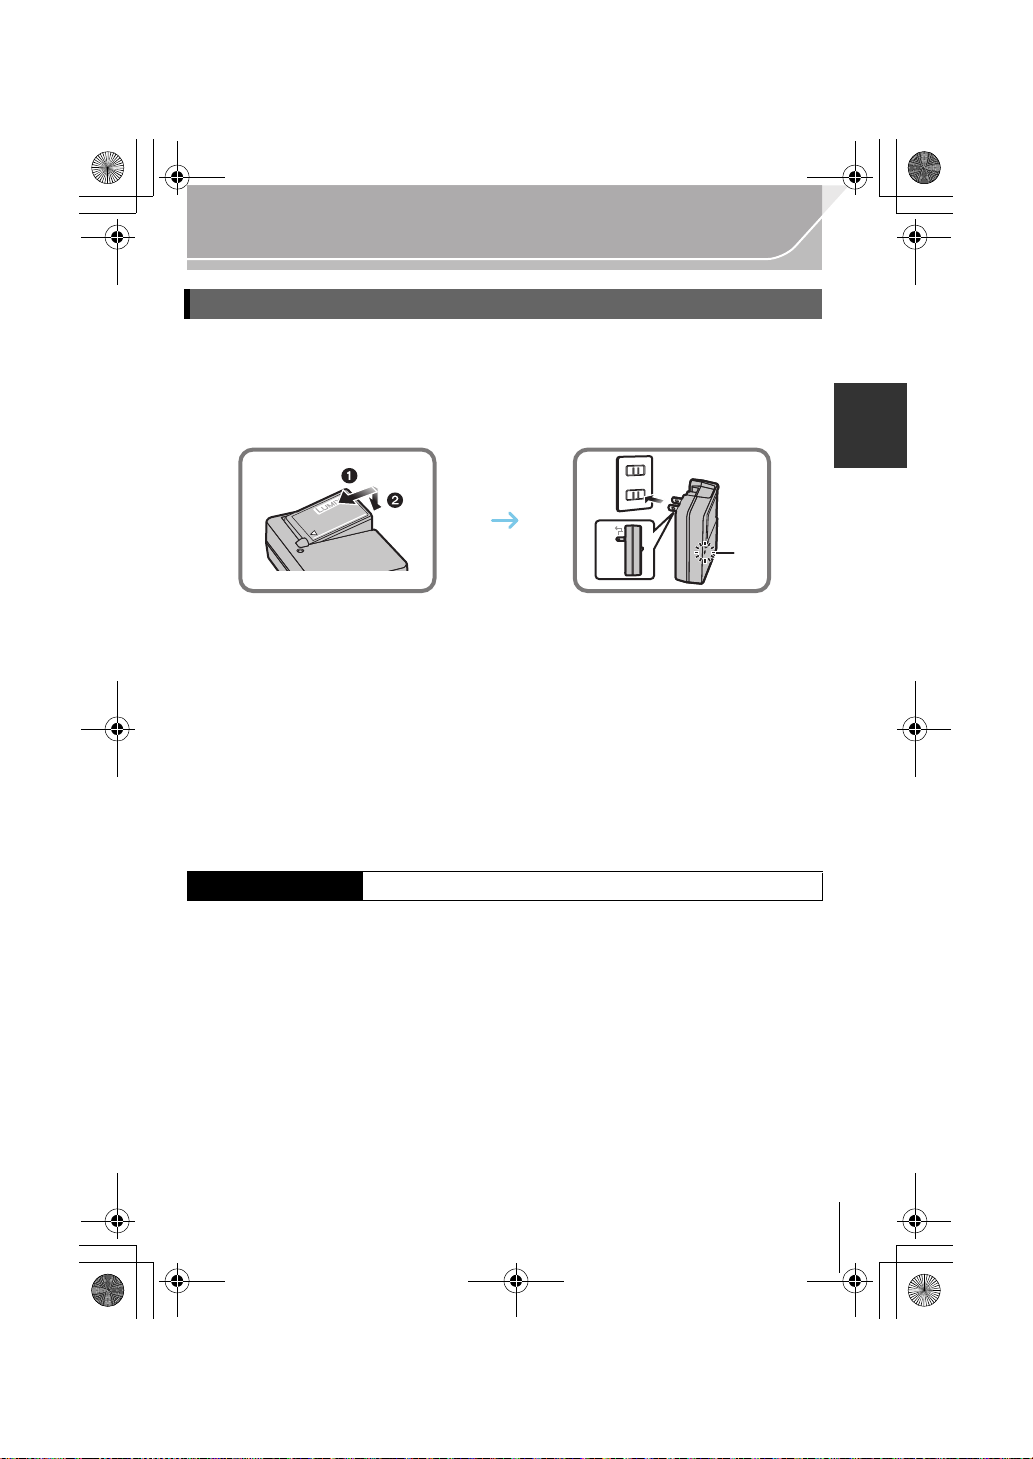
Charging the Battery
The battery that can be used with this unit is DMW-BLH7PP.
•
The battery is not charged when the camera is shipped. Charge the battery before use.
1 Attach the battery paying attention to the direction of the battery.
2 Connect the charger to the electrical outlet.
•
The [CHARGE] indicator A lights up and charging begins.
∫ About the [CHARGE] indicator
On: Charging.
Off: Charging has completed.
When the [CHARGE] indicator flashes
•
– The battery temperature is too high or too low. It is recommended to charge the battery again
in an ambient temperature of between 10 oC and 30 oC (50 oF and 86 oF).
– The terminals of the charger or the battery are dirty. In this case, wipe them with a dry cloth.
(Disconnect the charger from the electrical socket and detach the
battery after charging is completed.)
∫ Charging time
Charging time Approx. 130 min
•
The indicated charging time is for when the battery has been discharged completely.
The charging time may vary depending on how the battery has been used.
The charging time for the battery in hot/cold environments or a battery that has not been
used for a long time may be longer than normal.
(ENG) VQT5D49
15
Page 16
DMC-GM1KP-VQT5D49_eng.book 16 ページ 2013年10月2日 水曜日 午後6時54分
Preparation
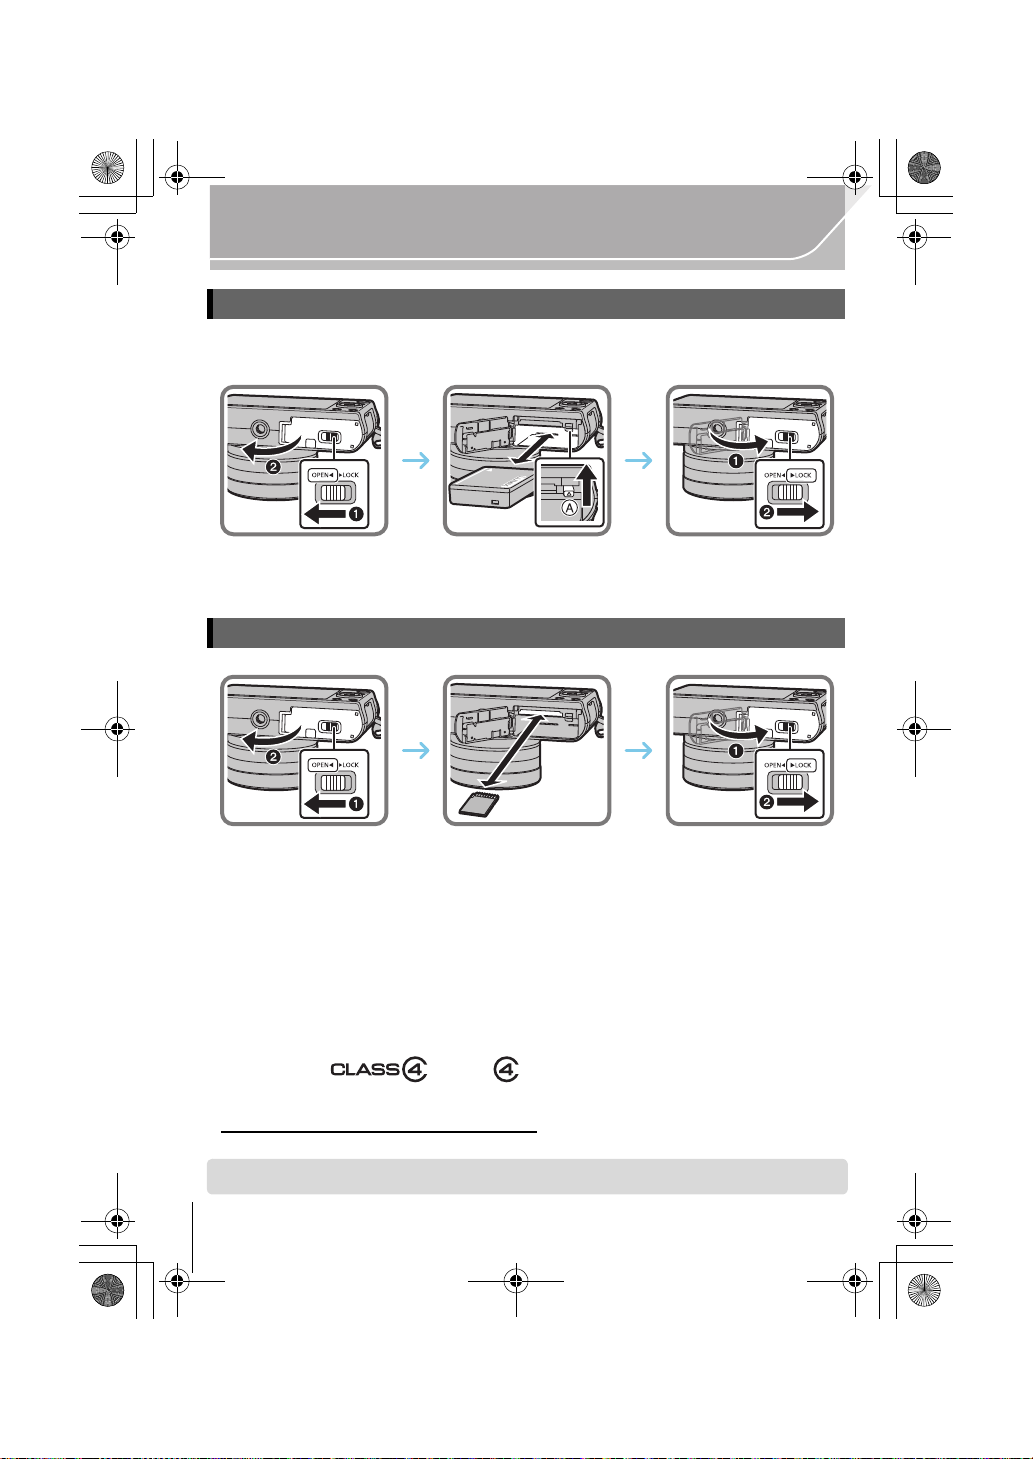
Inserting/Removing the Battery
• Always use genuine Panasonic batteries (DMW-BLH7PP).
• If you use other batteries, we cannot guarantee the quality of this product.
• Being careful about the battery orientation, insert all the way until you hear a locking sound and
then check that it is locked by lever A.
Pull the lever A in the direction of the arrow to remove the battery.
Inserting/Removing the Card (Optional)
• Push it securely all the way until you hear a “click” while being careful about the direction in
which you insert it.
∫ About cards that can be used with this unit
SD Memory Card (8 MB to 2 GB)
SDHC Memory Card (4 GB to 32 GB)
SDXC Memory Card (48 GB, 64 GB)
∫ About the motion picture recording and SD speed class
Confirm the SD Speed Class (the speed standard regarding continuous writing) on a card
label etc. when you record a motion picture. Use a card with SD Speed Class with
“Class 4” or more for [AVCHD]/[MP4] motion picture recording.
e.g.:
Please confirm the latest information on the following website.
•
http://panasonic.jp/support/global/cs/dsc/
(This Site is English only.)
• Keep the Memory Card out of reach of children to prevent swallowing.
VQT5D49 (ENG)
16
Page 17

DMC-GM1KP-VQT5D49_eng.book 17 ページ 2013年10月4日 金曜日 午後2時5分
Preparation
Formatting the card (initialization)
Format the card before recording a picture with this unit.
Since data cannot be recovered after formatting, make sure to back up necessary
data in advance.
Select the menu. (P18)
[MENU] > [Setup] > [Format]
Confirmation screen is displayed. It is executed when [Yes] is selected.
•
Setting Date/Time (Clock Set)
• The clock is not set when the camera is shipped.
Turn the camera on.
1
• When the camera is turned on, the status indicator 1
lights up green.
Press [MENU/SET].
2
Press 2/1 to select the items (year, month,
3
day, hour, minute), and press 3/4 to set.
Press [MENU/SET] to set.
4
Press [MENU/SET] in the confirmation screen.
5
• When an interchangeable lens (H-FS12032) is used and the lens barrel is retracted,
recording is not possible (a message will be displayed). Rotate the zoom ring to extend
the lens.
(ENG) VQT5D49
17
Page 18

A
DMC-GM1KP-VQT5D49_eng.book 18 ページ 2013年10月8日 火曜日 午後6時57分
Preparation
Setting the Menu
Setting menu items
Press [MENU/SET].
1
Press 3/4 of the cursor button to select the
2
menu item and press [MENU/SET].
Press 3/4 of the cursor button to select the
3
setting and press [MENU/SET].
• Depending on the menu item, its setting may not appear
or it may be displayed in a different way.
∫ Close the menu
Press [ ] or press the shutter button halfway.
∫ Switching to other menus
e.g.: Switching to the [Setup] menu from [Rec] menu.
1 Press 2.
2 Press 3/4 to select [ ] or another of the menu
toggle icons A.
3 Press [MENU/SET].
VQT5D49 (ENG)
18
Page 19

AFSAFS
AU
TO
603.5
0
AWB
60
i
L
4:3
DMC-GM1KP-VQT5D49_eng.book 19 ページ 2013年10月8日 火曜日 午後6時57分
Preparation
Calling frequently-used menus instantly
(Quick Menu)
By using the Quick Menu, some of the menu settings can be easily found.
•
The features that can be adjusted using Quick Menu are determined by the mode or a display
style the camera is in.
Press [ ] to display the Quick Menu.
1
Rotate the control dial to select the menu
2
item, and press 4 or 3.
• The menu item can also be selected by pressing 2/1.
Rotate the control dial to select the setting.
3
• The setting can also be selected with 2/1.
Press [ ] to exit the menu once the setting is complete.
4
• You can close the menu by pressing the shutter button halfway.
Assigning frequently used functions to the
buttons
You can assign recording functions, etc. to specific buttons and icons.
1 Select the menu.
[MENU] > [Custom] > [Fn Button Set]
2 Press 3/4 to select the function button you want to
assign a function to and then press [MENU/SET].
3
Press 3/4 to select the function you want to assign
and then press [MENU/SET].
• Some functions cannot be assigned depending on the
function button.
(function buttons)
(ENG) VQT5D49
19
Page 20

6060603.53.53.5
B
A
R1m
37
s
3
s
B
A
DMC-GM1KP-VQT5D49_eng.book 20 ページ 2013年10月8日 火曜日 午後6時57分
Basic
Taking a Still picture
• When the interchangeable lens (H-FS12032) is attached, extend the lens barrel before use.
• Set the drive mode to [ ] (single) by pressing 4().
Select the Recording Mode. (P21)
1
Press the shutter button halfway to focus.
2
A Aperture value
B Shutter speed
• Aperture value and shutter speed are displayed.
(It will flash in red if the correct exposure is not
achieved, except when set to flash.)
•
When the image is correctly focused, the
picture will be taken, since the [Focus/Release
Priority] is set initially to [FOCUS].
Press the shutter button fully (push it in further), and take
3
the picture.
Recording Motion Picture
This camera can record full high definition motion pictures compatible with the AVCHD
format or motion pictures recorded in MP4. Audio will be recorded in stereo.
Start recording by pressing the motion picture button.
1
A Elapsed recording time
B Available recording time
•
Recording of motion picture appropriate for each mode is possible.
•
If approximately 1 minute elapses without an operation
being performed, part of the display will disappear. Press
[DISP.] or touch the monitor to make the display reappear.
• Release the motion picture button right after you press it.
Stop the recording by pressing the motion
2
picture button again.
3
s
3
• Maximum time to record motion pictures continuously
with [MP4] is 29 minutes 59 seconds or up to 4 GB.
(For [FHD/30p] in [MP4] format, the file size is large and so
the recordable time will drop below 29 minutes 59 seconds.)
• When a high ambient temperature, continuous motion
picture recording or other conditions are causing the
camera to overheat, [ ] flashes. If a message is
displayed after [ ] flashes, the camera will turn off automatically to protect itself.
When this happens, some functions will be disabled until the camera cools down.
• Still picture recording is also possible during the motion picture recording by fully
pressing the shutter button.
VQT5D49 (ENG)
20
s
37
R1m37s
Page 21

DMC-GM1KP-VQT5D49_eng.book 21 ページ 2013年10月2日 水曜日 午後6時54分
Basic
Selecting the Recording Mode
Select the mode by rotating the mode dial.
• Rotate the mode dial slowly to select the desired mode.
Intelligent Auto Mode
The subjects are recorded using settings automatically selected by the camera.
Intelligent Auto Plus Mode
Allows you to adjust the brightness and color hue when in Intelligent Auto Mode.
Program AE Mode
Records at the aperture value and shutter speed set by the camera.
Aperture-Priority AE Mode
The shutter speed is automatically determined by the aperture value you set.
Shutter-Priority AE Mode
The aperture value is automatically determined by the shutter speed you set.
Manual Exposure Mode
The exposure is adjusted by the aperture value and the shutter speed which are
manually adjusted.
Creative Video Mode
Records motion pictures with a manually set aperture value and shutter speed.
¢ You cannot take still pictures.
Custom Mode
Use this mode to take pictures with previously registered settings.
Scene Guide Mode
This mode allows you to take pictures that match the scene being recorded.
Creative Control Mode
Record while checking the image effect.
(ENG) VQT5D49
21
Page 22

1/981/981/981/98
12s12s12s12s
A
DMC-GM1KP-VQT5D49_eng.book 22 ページ 2013年10月4日 金曜日 午後2時5分
Basic
Playing Back Pictures/Motion Pictures
Playing Back Pictures
Press [(].
1
Press 2/1.
2
2: Play back the previous picture
1: Play back the next picture
Playing Back Motion Pictures
This unit was designed to play motion pictures using the AVCHD, MP4 and QuickTime
Motion JPEG formats.
Motion pictures are displayed with the motion picture icon ([ ]).
•
Press 3 to play back.
A Motion picture recording time
• After playback starts, the elapsed playback time is displayed on
the screen.
∫ Operations during Motion Picture Playback
3 Play/Pause 4 Stop
Fast rewind
Frame-by-frame
rewind
(while pausing)
Reduce volume level
2
VQT5D49 (ENG)
22
Fast forward
1
Frame-by-frame
forward
(while pausing)
Increase volume
level
Page 23

'HOHWH6LQJOH
'HOHWH0XOWL
'HOHWH$OO
2.
DMC-GM1KP-VQT5D49_eng.book 23 ページ 2013年10月2日 水曜日 午後6時54分
Basic
Deleting Pictures
Once deleted, pictures cannot be recovered.
To delete a single picture
In Playback Mode, select the picture to delete
1
and then press [ ].
• The same operation can be performed by touching [ ].
Press 3 to select [Delete Single] and then
2
press [MENU/SET].
• Confirmation screen is displayed.
Picture is deleted by selecting [Yes].
To delete multiple pictures (up to 100¢) or all the pictures
¢ Picture groups are treated as a single picture.
(All the pictures in the selected picture group will be deleted.)
In Playback Mode, press [ ].
1
Press 3/4 to select [Delete Multi] or [Delete All] and then press [MENU/SET].
2
• [Delete All] > Confirmation screen is displayed.
Pictures are deleted by selecting [Yes].
• It is possible to delete all pictures except the ones set as favorite when [All Delete
Except Favorite] is selected with the [Delete All] set.
(When [Delete Multi] is selected)
3
Press 3/4/2/1 to select the picture, and then
press [MENU/SET] to set.
• [‚] appears on the selected pictures.
If [MENU/SET] is pressed again, the setting is canceled.
(When [Delete Multi] is selected)
4
Press 2 to select [OK], and then press [MENU/SET] to execute.
• Confirmation screen is displayed.
Pictures are deleted by selecting [Yes].
(Repeat this step.)
(ENG) VQT5D49
23
Page 24

60
i
4
DMC-GM1KP-VQT5D49_eng.book 24 ページ 2013年10月8日 火曜日 午後6時57分
Recording
Taking Pictures using the Automatic Function
(Intelligent Auto Mode)
Recording Mode:
In this mode, the camera makes the optimal settings for the subject and scene, so we
recommend it when you wish to leave the settings to the camera and record without
thinking about them.
Set the mode dial to [¦].
1
• The camera will switch to either the most recently used
of Intelligent Auto Mode or Intelligent Auto Plus Mode.
At the time of purchase, the mode is set to Intelligent
Auto Plus Mode. (P24)
Align the screen with the subject.
2
• When the camera identifies the optimum scene, the icon
of the scene concerned is displayed in blue for 2 seconds,
after which its color changes to the usual red. (Automatic
scene detection)
• When the subject is touched, AF Tracking function works.
It is also possible by pressing the cursor button towards 2, and then pressing the
shutter button halfway.
∫ Switching between Intelligent Auto Plus Mode and Intelligent Auto Mode
1 Press [MENU/SET].
2 Press 2.
3 Press 3/4 to select the [ ] or [ ] tab.
4 Press 2/1 to select [ ] or [ ] and then press
[MENU/SET].
If [DISP.] is pressed, the description of the selected mode
•
will be displayed.
∫ Recording night scenes ([iHandheld Night Shot])
When [iHandheld Night Shot] is set to [ON] and [ ] is detected while taking handheld
night shots, pictures of the night scenery will be taken at a high burst speed and composed
into a single picture.
[MENU] > [Rec] > [iHandheld Night Shot] > [ON]/[OFF]
VQT5D49 (ENG)
24
Page 25

SSSSSS
FF
250500
4.0 5.6 8.0
3060125
±0±0
+1+1 +2+2 +3+3 +4+4 +5+5
-5-5-4-4-3-3-2-2-1-
100
A
B
DMC-GM1KP-VQT5D49_eng.book 25 ページ 2013年10月8日 火曜日 午後6時57分
Recording
∫ Combining pictures into a single picture with rich gradation ([iHDR])
When [iHDR] is set to [ON] and there is, for example, strong contrast between the
background and the subject, multiple still pictures are recorded with differing exposures
and combined to create a single still picture rich in gradation.
[iHDR] works automatically as needed. When it does, [ ] is displayed on the screen.
[MENU] > [Rec] > [iHDR] > [ON]/[OFF]
∫ Taking a picture with a blurred background (Defocus Control)
You can easily set the blurriness of the background while checking the screen.
1 Press 3 to display the setting screen.
Each time 3 is pressed in Intelligent Auto Plus Mode, the camera switches between
•
brightness setting operation, Defocus Control operation, and normal operation.
• Each time 3 is pressed in Intelligent Auto Mode, the camera switches between Defocus
Control operation and normal operation.
2 Rotate the control dial to set the blurriness.
Recording images by changing the brightness or color tone
Recording Mode:
This mode enables you to change the brightness and color tone to your preferred settings
from the ones set by the camera.
∫ Setting brightness
1 Press 3 to display the setting screen.
•
Each press of 3 switches among brightness setting, Defocus Control and end operation.
2 Rotate the control dial to adjust brightness.
∫ Setting color
1 Press 1 to display the setting screen.
2 Rotate the control dial to adjust color.
•
This will adjust the color of the image from a reddish color
to a bluish color.
• Press [MENU/SET] to return to the recording screen.
AB
(ENG) VQT5D49
B
25
Page 26

AF
+
C
BD
A
DMC-GM1KP-VQT5D49_eng.book 26 ページ 2013年10月4日 金曜日 午後2時5分
Recording
Taking Pictures with Manual Focus
Applicable modes:
Use this function when you want to fix the focus or when the distance between the lens
and the subject is determined and you do not want to activate Auto Focus.
The operations to focus manually differ depending on the lens used.
When using an interchangeable lens (H-FS12032) with no focus ring
1 Set the focus mode lever to [MF].
2 Press 2 ().
3 Press 3/4/2/1 to move the MF area, and press
[MENU/SET].
The MF area can also be moved by dragging the screen (P13).
•
• Pressing [DISP.] will return the MF area back to the center.
4 Press 2/1 to focus.
A Slide bar
B MF Assist (enlarged screen)
C MF Guide
D Peaking
• Pressing and holding 2/1 will increase the focus speed.
• Focus can also be adjusted by dragging the slide bar.
•
Rotating the control dial will enlarge/reduce the MF Assist size.
• When [Peaking] in the [Custom] menu is set to [ON],
in-focus portions are highlighted.
• The MF area setting screen can be displayed by pressing 4.
∫ Displaying the MF Assist
•
It can be displayed by rotating the focus ring, pinching out (P13) the screen, or touching the screen
twice. (In [Miniature Effect] of Creative Control Mode, it cannot be displayed by touching the screen)
•
It can also be displayed by pressing 2 of the cursor button to display the MF area setup screen,
using the cursor button to decide the MF area position, and then pressing [MENU/SET].
∫ Closing the MF Assist
•
It will close when the shutter button is pressed halfway.
• You can also close MF Assist by pressing [MENU/SET] or touching [Exit].
• It will also close when the screen is touched twice.
• When displayed by rotating the focus ring, it is closed approximately 10 seconds after
operations are stopped.
VQT5D49 (ENG)
26
Page 27

DMC-GM1KP-VQT5D49_eng.book 27 ページ 2013年10月4日 金曜日 午後2時5分
Wi-Fi
Controlling with a Smartphone/Tablet
Using a smartphone/tablet, you can record images on
the camera and save them.
You need to install “Panasonic Image App” (referred to
as “Image App” from this point on) on your
smartphone/tablet.
∫ About the [Wi-Fi] button
At the time of purchase, [Wi-Fi] is set to [Fn1].
In the chapter for “Wi-Fi”, [Fn1] is written as [Wi-Fi].
Refer to P19 for details about the function button.
•
Installing the smartphone/tablet app “Image App”
The “Image App” is an application provided by Panasonic.
•
OS
For AndroidTM apps:
For iOS apps:
¢ Connecting to this unit with [Wi-Fi Direct] requires Android OS 4.0 or higher and Wi-Fi
Direct
TM
support.
Android 2.2 to Android 4.3
iOS 5.0 to iOS 7.0
¢
1 Connect the smartphone/tablet to a network.
TM
SM
Store”.
”.
2 (Android)
Select “Google Play
(iOS) Select “App Store
3 Enter “Panasonic Image App ” into the search box.
4 Select “Panasonic Image App ” and install it.
• Use the latest version.
• The service may not be able to be used properly depending on the type of smartphone/tablet
being used.
For information on the “Image App”, refer to the support site below.
http://panasonic.jp/support/global/cs/dsc/
(This Site is English only.)
• When downloading the app on a mobile network, high packet communication fees may be
incurred depending on the details of your contract.
(ENG) VQT5D49
27
Page 28

DMC-GM1KP-VQT5D49_eng.book 28 ページ 2013年10月8日 火曜日 午後6時57分
Wi-Fi
Connecting to a smartphone/tablet
By pressing and holding [Wi-Fi], you can easily establish a connection.
Preparations:
Install the “Image App” in advance. (P27)
•
1 Press and hold [Wi-Fi].
•
The information (SSID and password) required for directly
connecting your smartphone/tablet to this unit is displayed.
• Except for when connecting for the first time, the screen
from the previous connection is displayed.
2 Operate the smartphone/tablet.
1 Turn on the Wi-Fi function.
2 Select the SSID that matches the one displayed on
the screen of this unit, and then enter the password.
3 Start “Image App ”. (P27)
When the connection is complete, live images being
•
captured by the camera are displayed on the
smartphone/tablet.
Taking pictures via a smartphone/tablet (remote recording)
1 Connect to a smartphone/tablet.
2 Select [ ] on the smartphone/tablet.
•
The recorded images are saved in the camera.
• Some settings are not available.
• The screen differs depending on the OS.
• When a high ambient temperature, continuous motion picture recording or other
conditions are causing the camera to overheat, [ ] flashes. If a message is displayed
after [ ] flashes, the camera will turn off automatically to protect itself. When this
happens, some functions will be disabled until the camera cools down.
Saving images stored in the camera/Sending images in the camera to an SNS
1 Connect to a smartphone/tablet.
2 Select [ ] on a smartphone/tablet.
3 Drag an image.
•
If an image is touched, the picture will be played back in an
enlarged size.
• The function can be assigned to the top, bottom, left or
right according to your preference.
VQT5D49 (ENG)
28
Page 29

DMC-GM1KP-VQT5D49_eng.book 29 ページ 2013年10月4日 金曜日 午後2時5分
About the supplied software
About the supplied software
The supplied CD-ROM includes the following software.
Install the software on to your computer before use.
PHOTOfunSTUDIO 9.2 AE (Windows XP/Vista/7/8)
•
• SILKYPIX Developer Studio
(Windows XP/Vista/7/8, Mac OS X v10.5/v10.6/v10.7/v10.8)
For details on how to use the SILKYPIX Developer Studio, refer to the “Help” or the
Ichikawa Soft Laboratory’s support website:
http://www.isl.co.jp/SILKYPIX/english/p/support/
• LoiLoScope 30 day full trial version (Windows XP/Vista/7/8)
– This will only install a shortcut to the trial version download site.
For more information on how to use LoiLoScope, read the LoiLoScope manual
available for download at the link below.
Manual URL: http://loilo.tv/product/20
∫ Installing supplied software
•
Before inserting the CD-ROM, close all running applications.
1 Check the environment of your PC.
•
For details about information such as the operating environment or operating method,
refer to the “Owner’s Manual for advanced features (PDF format)” or the operating
instructions for the respective software programs.
2 Insert the CD-ROM with the supplied software.
3 Click on the [Recommended Installation] on the install menu to install.
•
If the automatic playback screen is displayed, you can display the menu by selecting and
executing [InstMenu.exe].
• In Windows 8, you can display the menu by clicking a message that is displayed after
inserting the CD-ROM and then selecting and executing [InstMenu.exe].
• You can also display the menu by double-clicking [VFFXXXX] in [Computer] (XXXX differs
depending on the model).
• Proceed with installation according to messages appearing on the screen.
• The software compatible with your PC will be installed.
• On the Mac, SILKYPIX can be installed manually.
1 Insert the CD-ROM with the supplied software.
2 Double-click on the automatically displayed folder.
3 Double-click the icon in the application folder.
Not available in these cases:
“PHOTOfunSTUDIO” and “LoiLoScope” are not compatible with Mac.
•
(ENG) VQT5D49
29
Page 30

1
Recording Mode
Custom settings
Photo Style
Creative control
adjustment display
‰ŒFlash Mode
Flash
Extended Tele
Conversion (when
recording motion
pictures)
Recording format/
Recording quality
Picture size/Aspect Ratio
Extended Tele
Conversion (when
taking still pictures)
Card (displayed only
during recording)
Elapsed recording time
¢
1
Simultaneous
recording indicator
Peaking
989898
2
0000200200
6060603.53.53.5
AFSAFSAFS
L
4:3
00
AELAELAEL
BKTBKTBKT
AWBAWBAWB
HH
C2-1
1
EXPSEXPS
8m30
s
HDR/iHDR
Multi exposure
Digital Zoom
Electronic shutter
Picture Mode (Still picture
priorities)
Overheat indicator
2
A › Quality
Focus Mode
šØAF Mode
Face Recognition
AF Lock
Burst
Auto Bracket
Self-timer
Battery indication
Optical Image Stabilizer
¢2
Jitter alert
Recording state (Flashes
red)/Focus (Lights green)
Focus (Under low illumination)
Connected to Wi-Fi
Histogram
3
Name
¢
3
Number of days that have passed since the
departure date
¢
4
Age
¢
3
Location
¢
4
Current date and time/Travel destination setting
¢
4
:
“
ラュン
AFS
AFF
AFC
AFL
LOW
DMC-GM1KP-VQT5D49_eng.book 30 ページ 2013年10月8日 火曜日 午後6時57分
30
Others
Monitor Display
In recording
P
4:3
L
4:3
EXM
VQT5D49 (ENG)
Page 31

4
AF area
Spot metering target
Self-timer
¢5
Mic level display
Silent Mode
AE Lock
Metering Mode
Program Shift
3.5 Aperture value
60 Shutter speed
Exposure compensation value
Brightness
Manual Exposure Assistance
ISO sensitivity
989898
HH
2
0000200200
6060603.53.53.5
AFSAFSAFS
L
4:3
00
AELAELAEL
BKTBKTBKT
AWBAWBAWB
AEL
AE
5
Dial operation guide
White Balance Bracket
White Balance Fine
Adjustment
VÐîÑ
White Balance
Color
98
Number of recordable
pictures
¢6
Available recording time
¢1, 6
Touch tab
Touch tab
Touch tab
Touch tab
Touch tab
6
Exposure meter
Focal distance display
Step z oom
BKT
AWB
1
R8
m30s
DMC-GM1KP-VQT5D49_eng.book 31 ページ 2013年10月8日 火曜日 午後6時57分
Others
¢1 h: hour, m: minute, s: second.
¢2 Only available when a lens that supports the Stabilizer function is attached.
¢3 This is displayed for about 5 seconds when the camera is turned on if the [Profile Setup]
setting is set.
¢4 This is displayed for about 5 seconds when the camera is turned on, after setting the clock
and after switching from Playback Mode to Recording Mode.
¢5 This is displayed during countdown.
¢6 It is possible to switch the display between the number of recordable pictures and available
recording time with the [Remaining Disp.] setting in the [Custom] menu.
(ENG) VQT5D49
31
Page 32

ISOISO
SSSSSS
FF
Fn5Fn5Fn5Fn5
Fn6Fn6Fn6Fn6
Fn3Fn3Fn3Fn3
Fn2Fn2Fn2Fn2
Fn4Fn4Fn4Fn4
Touch zoom
Touch Shutter
Touch AE
Peaking
Fn2 (Function button)
Fn3 (Function button)
Fn4 (Function button)
Fn5 (Function button)
Fn6 (Function button)
Color
Defocus control function
×
AE
Fn2
Fn3
Fn4
Fn5
Fn6
Brightness
Type of defocus ([Miniature Effect])
One point color
Position of the light source
Creative control adjustment
Aperture value
Shutter speed
ISO sensitivity
Microphone level adjustment
F
DMC-GM1KP-VQT5D49_eng.book 32 ページ 2013年10月4日 金曜日 午後2時5分
Others
In recording
SS
ISO
VQT5D49 (ENG)
32
Page 33

1
Playback Mode
Protected picture
Number of prints
Location Information display
Ü Favorites
å Cable disconnect prohibit icon
Motion picture playback
Continuous Burst Picture
Group Playback
Continuous [Time Lapse Shot]
Picture Group Playback
Continuous playback of the
Stop Motion Animation Group
‘ Stamped with text indication
Elapsed playback time
¢1
2
Picture size/Aspect Ratio
Recording format/Recording
quality
A › Quality
Battery indication
1/98 Picture number/Total pictures
Connected to Wi-Fi
Number of pictures in burst
Motion picture recording
time
¢1
606060F3.5F3.5
F3.5
00
$:%$:%$:%
11
1/981/981/98
2
0000200200
L
4:3
67'$<67'$<67'$<67'$<
SLFSLFSLFSLF
PRQWK GD\VPRQWK GD\VPRQWK GD\VPRQWK GD\V
SLF
3
Clear Retouch completed icon
Currently retrieving
information icon
Playback (Motion Pictures)
Number of days that have
passed since the departure
date
Burst Picture Group Display
[Time Lapse Shot] Picture
Group Display
Display for the Stop Motion
Animation Group
Silent Mode
Age
Multi Playback
Delete
4
Name
¢2
Location
¢2
Title
¢2
5
Recording information
¢3
¢1 h: hour, m: minute, s: second.
¢2 It is displayed in order of [Title],
[Location], [Name] ([Baby1]/[Baby2],
[Pet]), [Name] ([Face Recog.]).
¢3 This is not displayed for motion pictures
recorded in [AVCHD].
67'$<
PRQWKGD\V
DMC-GM1KP-VQT5D49_eng.book 33 ページ 2013年10月8日 火曜日 午後6時57分
In playback
3D
8m30
4:3
AVCHD
FHD
8m30
Others
s
L
60i
s
(ENG) VQT5D49
33
Page 34

F3.5
60
P
s
RGB
AFS
200
0
WBWB
ISOISO
AWB
STD.STD.STD.
L
4:3
100-0001
'(&
1
Recording information
Intelligent Dynamic Range
Control
¢1
HDR¢2/iHDR
¢2
Intelligent Resolution
Shading Compensation
¢2
2
Recorded date and time/World Time
3
Picture size/Aspect Ratio
A › Quality
Color space
¢2
100-0001 Folder/File number
¢1
L
4:3
1/98
F3.5
60
ISO
200
0
100-0001
1
3
Histogram
2
Recording information
¢1
1/98 Picture number/Total pictures
100-0001 Folder/File number
¢1
DMC-GM1KP-VQT5D49_eng.book 34 ページ 2013年10月8日 火曜日 午後6時57分
Others
In playback
Detailed information display
Histogram display
¢1 This is not displayed for motion pictures recorded in [AVCHD].
¢2 This is not displayed for motion pictures.
VQT5D49 (ENG)
34
Page 35

DMC-GM1KP-VQT5D49_eng.book 35 ページ 2013年10月2日 水曜日 午後6時54分
Others
Menu list
[Rec]
• If any of the settings common to both the [Rec] and [Motion Picture] menus have been
changed, the corresponding setting in the other menu will also be changed.
[Photo Style]
[Aspect Ratio] Sets the aspect ratio of the image.
[Picture Size] Set the number of pixels.
[Quality] Set the compression rate at which the pictures are to be stored.
[Sensitivity] This allows the sensitivity to light (ISO sensitivity) to be set.
[Metering Mode] Sets the light metering method for measuring brightness.
[Burst Rate] Sets the burst speed for burst recording.
[Auto Bracket]
[Self Timer] Sets the manner in which the self-timer works.
[i.Dynamic] (Intelligent
dynamic range control)
[i.Resolution] Records pictures with more defined outlines and sense of clarity.
[iHandheld Night Shot]
[iHDR]
[HDR]
[Multi Exp.]
[Time Lapse Shot]
[Stop Motion Animation] A stop motion picture is created by splicing pictures together.
[Shutter Type]
[Flash] Sets the manner in which the flash works.
[Red-Eye Removal]
You can select effects to match the type of image you wish to record.
You can adjust the color and image quality of the effects.
Sets single/burst recording, compensation range and recording
sequence for Auto Bracket recording.
Adjusts the contrast and exposure.
Pictures of the night scenery will be taken at a high burst speed and
composed into a single picture.
There is, for example, strong contrast between the background and the
subject, multiple still pictures are recorded with differing exposures and
combined to create a single still picture rich in gradation.
You can combine 3 pictures with different levels of exposure into a single
picture with rich gradation.
Gives an effect like multi exposure. (up to 4 times equivalent per a single image)
You can set the recording start time, the recording interval and the
number of pictures, and automatically record subjects such as animals
and plants as time elapses.
This enables you to choose whether pictures will be taken with the
Electronic Front Curtain or the electronic shutter.
Automatically detects red-eye caused by the flash and corrects the
image data accordingly.
(ENG) VQT5D49
35
Page 36

DMC-GM1KP-VQT5D49_eng.book 36 ページ 2013年10月4日 金曜日 午後2時5分
Others
[ISO Limit Set]
[ISO Increments] The ISO sensitivity settings values changes in steps of 1/3 EV or 1 EV.
[Extended ISO] ISO sensitivity can be set up to minimum [ISO125].
[Long Shtr NR]
[Shading Comp.]
[Ex. Tele Conv.]
[Digital Zoom]
[Color Space]
[Stabilizer]
[Face Recog.] Sets the focus and exposure automatically prioritizing registered faces.
[Profile Setup]
When the ISO sensitivity is set to [AUTO] or [ ], an optimal ISO
sensitivity is set with the selected value as an upper limit.
You can eliminate the noise caused by recording with a slower shutter speed.
If the screen periphery darkens as a result of lens characteristics, the
brightness in this region will be corrected.
When the number of pixels is set to anything other than [L], the Tele
effect is increased without degradation in image quality.
Increases the Tele effect.
The higher the level of magnification, the greater the degradation in image quality.
Set this when you want to correct the color reproduction of the recorded
pictures on a PC, printer etc.
When camera shake is sensed during recording, the camera corrects it automatically.
If you set the name and birthday of your baby or pet in advance, you can
record their name and age in months and years in the images.
[Motion Picture]
• [Photo Style], [Sensitivity], [Metering Mode], [i.Dynamic], [i.Resolution] and [Digital Zoom] are
common to both the [Rec] menu and [Motion Picture] menu. Changing these settings in one of
these menus is reflected in other menu.
For details, refer to the explanation for the corresponding setting in the [Rec] menu.
[Rec Format] Sets the file format for the motion pictures you record.
[Rec Quality] This sets up the picture quality of motion pictures.
[Exposure Mode]
[Picture Mode]
[Continuous AF] Continues to focus on the subject for which focus has been achieved.
[Rec Highlight] White saturated areas appear blinking in black and white.
[Ex. Tele Conv.] Increases the Tele effect.
[Flkr Decrease]
[Silent Operation]
[Mic Level Disp.] Set whether or not the mic levels are displayed on the screen.
[Mic Level Adj.] Adjust the sound input level to 4 different levels.
[Wind Cut]
Select the method for setting the aperture value and shutter speed in
Creative Video Mode.
Sets the recording method for still pictures during motion picture recording.
The shutter speed can be fixed to reduce the flicker or striping in the motion picture.
Enables touch operations to allow silent use while recording motion pictures.
Reduces the wind noise effectively if there is wind noise when recording sound.
VQT5D49 (ENG)
36
Page 37

DMC-GM1KP-VQT5D49_eng.book 37 ページ 2013年10月2日 水曜日 午後6時54分
Others
[Custom]
[Cust.Set Mem.] Registers the current camera settings as custom set.
[Silent Mode] Disables operational sounds and output of light at once.
[AF/AE Lock]
[Half Press Release]
[AFS/AFF] Assigns [AFS] or [AFF] to [AFS] of the focus mode lever.
[Quick AF]
[Pinpoint AF Time]
[Pinpoint AF Display]
[AF Assist Lamp]
[Focus/Release Priority] It will set so no picture can be taken when it is out of focus.
[AF+MF] You can set the focus manually after the automatic focus has finished.
[MF Assist] Sets the display method of MF Assist (enlarged screen).
[MF Assist Display]
[MF Guide]
[Peaking] In-focus portions are highlighted when focus is being adjusted manually.
[Histogram] This allows you to set either to display or not display the histogram.
[Guide Line] This will set the pattern of guide lines displayed when taking a picture.
[Highlight]
[Constant Preview]
[Expo.Meter] Set whether or not to display the exposure meter.
[Dial Guide] Set whether or not to display the dial operation guide.
[Rec Area]
[Remaining Disp.]
[Auto Review] Displays a picture immediately after it is taken.
[Fn Button Set]
Sets the fixed content for focusing and exposure when the AF/AE lock is on.
The shutter will immediately fire when the shutter button is pressed halfway.
Speeds up the focusing that takes place when you press the shutter button.
Sets the time for which the screen is enlarged when the shutter button is
pressed halfway with Auto Focus Mode set to [ ].
Sets whether to display the assist screen that appears when Auto Focus
Mode is set to [ ] in a window or full screen.
AF assist lamp will illuminate the subject when the shutter button is pressed half-way
making it easier for the camera to focus when recording in low light conditions.
Sets whether MF Assist (enlarged screen) will appear in a windowed
screen display or in a full screen display.
When you set the focus manually, an MF guide that allows you to check
the direction to achieve focus is displayed.
When the Auto Review function is activated or when playing back, white
saturated areas appear blinking in black and white.
You can check the effects of the chosen aperture and shutter speed on
the recording screen in Manual Exposure Mode.
This changes the angle of view during motion picture recording and
still picture recording.
This will switch display between the number of recordable pictures and
available recording time.
You can assign various recording and other functions to the function button.
(ENG) VQT5D49
37
Page 38

DMC-GM1KP-VQT5D49_eng.book 38 ページ 2013年10月4日 金曜日 午後2時5分
Others
[Q.MENU] Switch the setting method of Quick Menu.
[Video Button] Enables/disables the motion picture button.
[Power Zoom Lens]
[Lens w/o Focus Ring] Sets the control dial operation for MF Assist.
[Touch Settings] Enables/disables the Touch operation.
[Touch Scroll]
[Menu Guide]
[Shoot w/o Lens]
Sets the screen display and lens operations when using an interchangeable
lens that is compatible with power zoom (electrically operated zoom).
This allows you to set the speed of continuously forwarding or rewinding
pictures using touch operation.
Set the screen that is displayed when the mode dial is set to and .
Sets whether or not the shutter can be released when no lens is
attached to the main body.
[Setup]
[Clock Set] Setting Date/Time.
[World Time] Sets the times for the region where you live and your holiday destination.
[Travel Date]
[Wi-Fi] Configure the each setting for Wi-Fi functions.
[Beep]
[Speaker Volume] Adjust the volume of the speaker to any of 7 levels.
[Monitor Display] Brightness, color, or red or blue tint of the Monitor is adjusted.
[Monitor Luminance] Set the monitor brightness to suit the amount of surrounding light.
[Economy]
[USB Mode]
[Output] This sets how the unit connects to a television etc.
[VIERA Link] Equipment that supports the VIERA Link will connect automatically.
[3D Playback] Set the output method for 3D pictures.
[Menu Resume] Stores the location of the last-used menu item for each menu.
[Menu Background] Set the background color for the menu screen.
[Menu Information]
[Language] Set the language displayed on the screen.
[Version Disp.]
[Exposure Comp. Reset]
VQT5D49 (ENG)
38
Departure date and return date of the trip as well as the name of the
travel destination can be set.
This allows you to set the volume for electronic sound and the electronic shuttersound.
Suppresses the unit’s power consumption to prevent the battery from being run down.
Sets the communication method when connecting using the USB
connection cable (supplied).
Descriptions of menu items or their settings are displayed on the menu screen.
This enables the firmware versions of the camera and lens to be checked.
An exposure value can be reset when the Recording Mode is changed
or the camera is turned off.
Page 39

DMC-GM1KP-VQT5D49_eng.book 39 ページ 2013年10月4日 金曜日 午後2時5分
Others
[Self Timer Auto Off] Sets whether or not to cancel the self-timer when this unit is turned off.
[No.Reset] Returns the image file number to 0001.
[Reset] The recording or setup/custom settings are reset to the default.
[Reset Wi-Fi Settings]
[Pixel Refresh] It will perform optimization of imaging device and image processing.
[Sensor Cleaning]
[Format] The card is formatted.
Reset all settings in the [Wi-Fi] menu to factory default settings.
(Excluding [LUMIX CLUB])
Dust reduction to blow off the debris and dust that have affixed to the
front of the imaging device is performed.
[Playback]
[2D/3D Settings] Switches the playback method for 3D images.
[Slide Show] Selects the type etc. of the images and plays back in order.
[Playback Mode]
[Location Logging]
[Clear Retouch] You can erase unnecessary parts recorded on the pictures taken.
[Title Edit] Input texts (comments) on the recorded pictures.
[Text Stamp]
[Video Divide] Splits the recorded motion picture in two.
[Time Lapse Video]
[Stop Motion Video] Creates a motion picture from the Stop Motion Animation group.
[Resize] Reduces the image size (number of pixels).
[Cropping] Crops the recorded image.
[Rotate] Rotate pictures manually in 90o steps.
[Rotate Disp.]
[Favorite] Marks can be added to images, and images can be set as favorites.
[Print Set] Sets the images for printing and the number of prints.
[Protect] Protects images to prevent deletion by mistake.
[Face Rec Edit] Removes or changes information relating to personal identity.
[Delete Confirmation]
Selects the type etc. of the images and plays back only particular images.
The location information (longitude/latitude) acquired by the
smartphone/tablet can be sent to the camera and written in images.
Stamps the recorded pictures with recording date and time, names,
travel destination, travel date, etc.
Creates a motion picture from a set of group pictures recorded with the [Time Lapse Shot].
This mode allows you to display pictures vertically if they were recorded
holding the camera vertically.
This sets which option, [Yes] or [No], will be highlighted first when the
confirmation screen for deleting a picture is displayed.
(ENG) VQT5D49
39
Page 40

DMC-GM1KP-VQT5D49_eng.book 40 ページ 2013年10月2日 水曜日 午後6時54分
Others
Troubleshooting
First, try out the following procedures.
If the problem is not resolved, it may be improved by selecting [Reset] on the [Setup] menu.
The camera cannot be operated even when it is turned on.
The camera turns off immediately after it is turned on.
The battery is exhausted.
•
> Charge the battery.
• If you leave the camera on, the battery will be exhausted.
> Turn the camera off frequently by using the [Economy] etc.
This unit suddenly turns off during recording.
•
When a high ambient temperature, continuous recording in Burst Mode or of a motion picture,
continuous use of a Wi-Fi connection or other conditions are causing the camera to overheat, [ ]
flashes. If a message is displayed after [ ] flashes, the camera will turn off automatically to protect
itself. When this happens, some functions will be disabled until the camera cools down.
The subject is not focused properly.
• The subject is beyond the focus range of the camera.
• There is camera shake (jitter) or the subject is moving slightly.
• Is [Focus/Release Priority] in the [Custom] menu set to [RELEASE]?
• Is the AF Lock applied incorrectly?
The recorded picture is blurred.
The Optical Image Stabilizer is not effective.
• The shutter speed will become slower and the Optical Image Stabilizer function may not work
properly when taking pictures especially in dark places.
> We recommend holding the camera firmly with both hands when taking pictures.
We recommend using a tripod and the self-timer when taking pictures with a slow shutter speed.
>
• Are you using a lens which supports the Stabilizer function?
• When a moving subject is recorded with the electronic shutter, the subject may appear
distorted on the picture.
Striping or flicker may appear under lighting such as fluorescent lighting and LED lighting fixture.
• This is characteristic of MOS sensors which serve as the
camera’s pickup sensors.
This is not a malfunction.
• Are you taking pictures with the electronic shutter?
> When using the electronic shutter, lowering the shutter speed
may reduce the effect of the horizontal stripes.
VQT5D49 (ENG)
40
Page 41

DMC-GM1KP-VQT5D49_eng.book 41 ページ 2013年10月2日 水曜日 午後6時54分
Others
The brightness or the hue of the recorded picture is different from the actual scene.
• When recording under fluorescent or LED lighting fixture, etc., increasing the shutter speed
may introduce slight changes to brightness and color. These are a result of the characteristics
of the light source and do not indicate a malfunction.
• When recording subjects in extremely bright locations or recording under fluorescent lighting,
LED lighting fixture, mercury lamp, sodium lighting, etc., the colors and screen brightness may
change or horizontal striping may appear on the screen.
Recording motion pictures is not possible.
•
You may not be able to record for a short while after turning this unit on when using a large capacity card.
The screen may be blacked out momentarily, or the unit may record noise.
•
The screen may be blacked out momentarily, or the unit may record noise due to static electricity
or electromagnetic waves etc. depending on the environment of the motion picture recording.
The flash is not activated.
• Is the flash closed?
> Open the flash.
• When the electronic shutter is used, the flash is not activated.
> Set [Shutter Type] to [AUTO] or [EFC].
• When [Silent Mode] is set to [ON], the flash is not activated.
> Set [Silent Mode] to [OFF].
The picture is not played back.
There are no recorded pictures.
• Is the card inserted?
• Is there a picture on the card?
• Is this a folder or picture which was processed in the PC?
If it is, it cannot be played back by this unit.
> It is recommended to use the “PHOTOfunSTUDIO” software in the CD-ROM (supplied) to
write pictures from PC to card.
• Has [Playback Mode] been set for playback?
> Change to [Normal Play].
The folder number and the file number are displayed as [—] and the screen turns black.
• Is this a non-standard picture, a picture which has been edited using a PC or a picture which
was taken by another make of digital camera?
• Did you remove the battery immediately after picture-taking or did you take the picture using a
battery with a low remaining charge?
> To delete such pictures, make a backup of the data and format the card.
(ENG) VQT5D49
41
Page 42

DMC-GM1KP-VQT5D49_eng.book 42 ページ 2013年10月2日 水曜日 午後6時54分
Others
[Thumbnail is displayed] appears on the screen.
• Is it a picture that has been recorded with other equipment?
In such cases, these pictures may be displayed with a deteriorated picture quality.
Motion pictures recorded with this model cannot be played back on other
equipment.
• Motion pictures recorded in [AVCHD] or [MP4] may be played back with poor picture or sound
quality or playback may not be possible even when played back with equipment compatible
with these formats. Also, the recording information may not be displayed properly.
A Wi-Fi connection cannot be established.
Radio waves get disconnected.
Wireless access point is not displayed.
∫ General tips for using a Wi-Fi connection
•
Use within the communication range of the device to be connected.
•
Is any device, such as microwave oven, cordless phone, etc., that uses 2.4 GHz frequency operated nearby?
>
Radio waves may get interrupted when used simultaneously. Use them sufficiently away from the device.
• When the battery indicator is flashing red, the connection with other equipment may not start or
the connection may be disrupted.
(A message such as [Communication error] is displayed.)
∫ About a wireless access point
•
Check if the wireless access point to connect is in operating state.
•
The camera may not display or connect to a wireless access point depending on the radio wave condition.
> Move this unit closer to the wireless access point.
> Remove the obstacles between this unit and the wireless access point.
> Change the direction of this unit.
> Change the location and orientation of the wireless access point.
> Perform the [Manual Connection].
•
It may not display even if the radio waves exist depending on the setting of the wireless access point.
> Check the settings of the wireless access point.
> When the network SSID of the wireless access point is set not to broadcast, the wireless
access point may not be detected. Enter the network SSID to start the connection or enable
the SSID broadcast of the wireless access point.
• Connection types and security setting methods are different depending on the wireless access
point. (Refer to the operating instructions of the wireless access point.)
•
Is the 5 GHz/2.4 GHz switchable wireless access point connected to other equipment using the 5 GHz band?
> The use of a wireless access point that can use 5 GHz/2.4 GHz simultaneously is
recommended. It cannot be used simultaneously with this camera if it is not compatible.
Images cannot be transmitted to a PC.
•
When the firewall of the OS, security software, etc. is enabled, connecting to the PC may not be possible.
VQT5D49 (ENG)
42
Page 43

DMC-GM1KP-VQT5D49_eng.book 43 ページ 2013年10月2日 水曜日 午後6時54分
Others
Transmission of the image fails midway. Some images cannot be transmitted.
• Image cannot be transmitted when the battery indicator is flashing red.
• Is the size of the image too large?
> Reduce the image size at [Size], and then send.
> Transmit after dividing the motion picture with [Video Divide].
• File format of the motion picture that can be sent differs depending on the destination.
• Capacity or number of images in the web service is full.
Login to “LUMIX CLUB”, and check the status of the destination on the web service link settings.
>
The motion pictures cannot be played back on a TV.
•
Are you trying to play back the motion pictures by directly inserting the card in the card slot of the TV?
> Connect the camera to the TV with the AV cable (optional), or with the HDMI micro cable,
and then play back the motion pictures on the camera.
VIERA Link does not work.
• Is it connected properly with the HDMI micro cable?
• Is the [VIERA Link] on this unit set to [ON]?
If the input channel does not switch automatically, use the remote control for the TV to switch it.
>
> Check the VIERA Link setting on the connected device.
> Turn this unit off and on.
> Set [HDAVI Control] to [Off] on the TV and then turn it back to [On].
(Refer to the operating instructions of the TV for details.)
The shutter remains closed when the camera is turned off (including Sleep Mode).
• If the camera is shaken, it may cause the shutter to close. This is not a malfunction. Do not put
your finger in the mount. Turning on the camera will re-open the shutter.
There is a sound from lens unit.
• It is a sound of lens movement or aperture operation when this unit is turned on or off, and it is
not a malfunction.
•
The sound, which is caused by the automatic adjustment of the aperture, is heard when the brightness
has changed due to, for example, zooming or the movement of the camera. This is not a malfunction.
The camera becomes warm.
• The surface of the camera may become warm during use. This does not affect the performance
or quality of the camera.
The clock is reset.
• If you do not use the camera for a long time, the clock may be reset.
> [Please set the clock] message will be displayed; please reset the clock. (P17)
(ENG) VQT5D49
43
Page 44

DMC-GM1KP-VQT5D49_eng.book 44 ページ 2013年10月8日 火曜日 午後6時57分
Others
Specifications
Specifications are subject to change without notice.
Digital Camera Body (DMC-GM1):
Information for your safety
Power Source: DC 8.4 V
Power Consumption: 2.3 W (When recording)
[When the Interchangeable lens (H-FS12032) is used]
1.5 W (When playing back)
[When the Interchangeable lens (H-FS12032) is used]
Camera effective
pixels
Image sensor 4/3q Live MOS sensor, total pixel number 16,840,000 pixels,
Digital Zoom Max. 4k
Extended Tele
Conversion
Focus Auto Focus/Manual Focus,
Shutter type Electronically-controlled, single curtain focal-plane shutter/
16,000,000 pixels
Primary color filter
When taking still pictures:
Max. 2k (When a picture size of [S] (4 M), aspect ratio of [4:3]
is selected.)
When recording motion pictures:
2.4k/3.6k/4.8k
Face Detection/AF Tracking/23-area-focusing/
1-area-focusing/Pinpoint (Touch focus area selection
possible)
Electronic shutter
VQT5D49 (ENG)
44
Page 45

DMC-GM1KP-VQT5D49_eng.book 45 ページ 2013年10月4日 金曜日 午後2時5分
Others
Burst recording
Burst speed Mechanical shutter:
5 pictures/second (High speed),
4 pictures/second (Middle speed),
2 pictures/second (Low speed)
Electronic shutter:
40 pictures/second (Super high speed),
10 pictures/second (High speed),
4 pictures/second (Middle speed),
2 pictures/second (Low speed)
Number of
recordable pictures
Max. 7 pictures (when there are RAW files)
Depends on the capacity of the card
(when there are no RAW files)
¢
ISO sensitivity
(Standard Output
Sensitivity)
AUTO/ /125
(1/3 EV step change possible)
¢Only available when [Extended ISO] is set.
/200/400/800/1600/3200/6400/12800/25600
Minimum Illumination Approx. 9 lx (when i-Low light is used, the shutter speed is
1/30th of a second)
[When the Interchangeable lens (H-FS12032) is used]
Shutter speed 60 seconds to 1/500th of a second (Mechanical shutter)
1 seconds to 1/16000th of a second (Electronic shutter)
Taking still pictures during motion picture recording:
Motion picture priorities: 1/25th of a second to 1/16000th of a second
Still picture priorities: 60 seconds to 1/16000th of a second
Metering range EV 0 to EV 18
White Balance Auto White Balance/Daylight/Cloudy/Shade/Incandescent
lights/Flash/White set1/White set2/White Balance K set
Exposure (AE) Program AE (P)/Aperture-priority AE (A)/Shutter-priority AE
(S)/Manual exposure (M)/AUTO
Exposure Compensation (1/3 EV Step, j5EV to i5EV)
Metering Mode Multiple/Center weighted/Spot
Monitor 3.0q TFT LCD (3:2) (Approx. 1,040,000 dots)
(field of view ratio about 100%)
Touch screen
(ENG) VQT5D49
45
Page 46

DMC-GM1KP-VQT5D49_eng.book 46 ページ 2013年10月4日 金曜日 午後2時5分
Others
Flash Built-in pop up flash
GN 5.6 equivalent (ISO200·m)
[GN 4.0 equivalent (ISO100·m)]
Flash range:
Approx. 90 cm (3.0 feet) to 4.5 m (15.0 feet)
[When the Interchangeable lens (H-FS12032) is mounted,
WIDE, [ISO AUTO] is set]
AUTO, AUTO/Red-Eye Reduction, Forced ON, Forced ON/
Red-Eye Reduction, Slow Sync., Slow Sync./Red-Eye
Reduction, Forced OFF
Flash synchronization
speed
Equal to or smaller than 1/50th of a second (Mechanical
shutter)
Microphone Stereo
Speaker Monaural
¢
Recording media SD Memory Card/SDHC Memory Card
¢
(¢ UHS-I-compatible)
Card
/SDXC Memory
Picture size
Still picture When the aspect ratio setting is [4:3]
4592k3448 pixels, 3232k2424 pixels, 2272k1704 pixels
When the aspect ratio setting is [3:2]
4592k3064 pixels, 3232k2160 pixels, 2272k1520 pixels
When the aspect ratio setting is [16:9]
4592k2584 pixels, 3232k1824 pixels, 1920k1080 pixels
When the aspect ratio setting is [1:1]
3424k3424 pixels, 2416k2416 pixels, 1712k1712 pixels
VQT5D49 (ENG)
46
Page 47

DMC-GM1KP-VQT5D49_eng.book 47 ページ 2013年10月4日 金曜日 午後2時5分
Others
Recording quality
Motion pictures [AVCHD]
1920k1080/60i (Sensor output is 60 frames/sec.) (17 Mbps)/
1920k1080/60i (Sensor output is 30 frames/sec.) (24 Mbps)/
1920k1080/24p (Sensor output is 24 frames/sec.) (24 Mbps)/
1280k720/60p (Sensor output is 60 frames/sec.) (17 Mbps)
[MP4]
1920k1080/30p (Sensor output is 30 frames/sec.) (20 Mbps)/
1280k720/30p (Sensor output is 30 frames/sec.) (10 Mbps)/
640k480/30p (Sensor output is 30 frames/sec.) (4 Mbps)
Quality RAW/RAWiFine/RAWiStandard/Fine/Standard/MPOiFine/
MPOiStandard
Recording file format
Still Picture RAW/JPEG (based on “Design rule for Camera File system”,
based on “Exif 2.3” standard, DPOF corresponding)/MPO
Motion pictures AVCHD/MP4
R
Audio compression AVCHD Dolby
Digital (2 ch)
MP4 AAC (2 ch)
Interface
Digital “USB 2.0” (High Speed)
Analog video/audio NTSC
Audio line output (monaural)
Terminal
[AV OUT/DIGITAL] Dedicated jack (8 pin)
[HDMI] MicroHDMI TypeD
(ENG) VQT5D49
47
Page 48

DMC-GM1KP-VQT5D49_eng.book 48 ページ 2013年10月8日 火曜日 午後6時57分
Others
Dimensions Approx. 98.5 mm (W)k54.9 mm (H)k30.4 mm (D)
[3.88q (W)k2.16q(H)k1.20q (D)]
(excluding the projecting parts)
Mass (weight) Approx. 204 g/0.45 lb
[with the card and battery]
Approx. 173 g/0.38 lb (camera body)
Approx. 274 g/0.60 lb
[with the Interchangeable lens (H-FS12032), card and battery]
Operating temperature
0 oC to 40 oC (32 oF to 104 oF)
Operating humidity 10%RH to 80%RH
Language select [ENGLISH]/[ESPAÑOL]
Wireless transmitter
Compliance standard IEEE 802.11b/g/n (standard wireless LAN protocol)
Frequency range used
2412 MHz to 2462 MHz (1 to 11ch)
(central frequency)
Encryption method Wi-Fi compliant WPA
TM
/WPA2
TM
Access method Infrastructure mode
Battery Charger (Panasonic DE-A99B):
Information for your safety
Input: 110 V to 240 V, 50/60 Hz, 0.15 A
Output: 8.4 V, 0.43 A
Equipment mobility:
Movable
Battery Pack (lithium-ion) (Panasonic DMW-BLH7PP):
Information for your safety
Voltage/capacity: 7.2 V/680 mAh
VQT5D49 (ENG)
48
Page 49

DMC-GM1KP-VQT5D49_eng.book 49 ページ 2013年10月4日 金曜日 午後2時5分
Others
Interchangeable Lens H-FS12032
“LUMIX G VARIO 12–32 mm/F3.5–5.6 ASPH./MEGA O.I.S.”
Focal length f=12 mm to 32 mm
(35 mm film camera equivalent: 24 mm to 64 mm)
Aperture type 7 diaphragm blades/circular aperture diaphragm
Aperture range F3.5 (Wide) to F5.6 (Tele)
Minimum aperture
F22
value
Lens construction 8 elements in 7 groups (3 aspherical lenses, 1 ED lenses)
In focus distance 0.2 m (0.66 feet) to ¶ (from the focus distance reference line)
(focal length 12 mm to 20 mm),
0.3 m (0.98 feet) to ¶ (from the focus distance reference line)
(focal length 21 mm to 32 mm)
Maximum image
0.13k (35 mm film camera equivalent: 0.26k)
magnification
Optical Image
Available
Stabilizer
[O.I.S.] switch None
(Setting of the [Stabilizer] is done in [Rec] menu.)
Mount “Micro Four Thirds Mount”
Angle of view 84x (Wide) to 37x (Tele)
Filter diameter 37 mm
Max. diameter Approx. 55.5 mm (2.19 inch)
Overall length Approx. 24 mm (0.94 inch)
(from the tip of the lens to the base side of the lens mount
when the lens barrel is recessed)
Mass (weight) Approx. 70 g/0.15 lb
L
(ENG) VQT5D49
49
Page 50

DMC-GM1KP-VQT5D49_eng.book 50 ページ 2013年10月2日 水曜日 午後6時54分
Others
Digital Camera Accessory System
Description Accessory#
Battery Pack DMW-BLH7
AC Adaptor
DC Coupler
Body Cap DMW-BDC1
Hand grip DMW-HGR1
Tripod Adaptor
USB connection Cable DMW-USBC1
AV C abl e DM W-AV C 1
Mount Adaptor DMW-MA1, DMW-MA2M, DMW-MA3R
¢1 The AC Adaptor (optional) can only be used with the designated Panasonic DC Coupler
¢2 Use if the attached lens is in contact with the tripod pedestal.
Product numbers correct as of October 2013. These may be subject to change.
•
Some optional accessories may not be available in some countries.
•
NOTE: Accessories and/or model numbers may vary between countries. Consult your local dealer.
• For lens-related optional accessories such as compatible lenses and filters, refer to catalogs/
Web pages, etc.
¢1
¢1
¢2
DMW-AC8
DMW-DCC15
DMW-TA1
(optional). The AC adaptor (optional) cannot be used by itself.
VQT5D49 (ENG)
50
Page 51

DMC-GM1KP-VQT5D49_eng.book 51 ページ 2013年10月4日 金曜日 午後2時5分
Others
Digital Camera Accessory Order Form
(For USA and Puerto Rico Customers)
Please photocopy this form when placing an order.
1. Digital Camera Model #
2. Items Ordered
QuantityAccessory # Price EachDescription Total Price
Shipping & Handling
Subtotal
Your State & Local Sales Tax
To ta l
3. Method of payment (check one)
American Express
VISA
MasterCard
Discover
Credit Card #
Expiration Date
Customer Signature
(Please do not send cash)
4. Shipping information (UPS delivery requires complete street address)
Ship To:
Mr.
Mrs.
Ms.
First Last
Street Address
City State Zip
TO OBTAIN ANY OF OUR DIGITAL CAMERA ACCESSORIES YOU CAN DO ANY OF
VISIT YOUR LOCAL PANASONIC DEALER
CALL PANASONIC’S ACCESSORY ORDER LINE AT 1-800-332-5368
MAIL THIS ORDER TO: PANASONIC NATIONAL PARTS CENTER
THE FOLLOWING:
OR
[6 AM-6 PM M-F, PACIFIC TIME]
20421 84th Ave S., Kent, WA 98032
OR
Phone#:
Day
Night
( )
()
$6.95
(ENG) VQT5D49
51
Page 52

DMC-GM1KP-VQT5D49_eng.book 52 ページ 2013年10月2日 水曜日 午後6時54分
Others
Limited Warranty
(ONLY FOR U.S.A. AND PUERTO RICO)
Panasonic Products Limited Warranty
Limited Warranty Coverage (For USA and Puerto Rico Only)
If your product does not work properly because of a defect in materials or workmanship,
Panasonic Corporation of North America (referred to as “the warrantor”) will, for the length
of the period indicated on the chart below, which starts with the date of original purchase
(“warranty period”), at its option either (a) repair your product with new or refurbished
parts, (b) replace it with a new or a refurbished equivalent value product, or (c) refund your
purchase price. The decision to repair, replace or refund will be made by the warrantor.
Product or Part Name Parts Labor
Digital Camera 1 Year 1 Year
All included Accessories
(Except Non-Rechargeable Batteries)
Only Non-Rechargeable Batteries 10 Days Not Applicable
During the “Labor” warranty period there will be no charge for labor. During the “Parts”
warranty period, there will be no charge for parts. This Limited Warranty excludes both
parts and labor for non-rechargeable batteries, antennas, and cosmetic parts (cabinet).
This warranty only applies to products purchased and serviced in the United States or
Puerto Rico. This warranty is extended only to the original purchaser of a new product
which was not sold “as is”.
90 Days Not Applicable
VQT5D49 (ENG)
52
Page 53

DMC-GM1KP-VQT5D49_eng.book 53 ページ 2013年10月4日 金曜日 午後2時5分
Others
Mail-In Service--Online or Telephone Repair Request
Online Repair Request
To submit a new repair request and for quick repair status visit our Web Site at
www.panasonic.com/repair
Telephone Repair Request
You may contact us at: 1-800-211-PANA (7262)
When shipping the unit, carefully pack, include all supplied accessories listed in the
Owner’s Manual, and send it prepaid, adequately insured and packed well in a carton box.
When shipping Lithium Ion batteries please visit our Web Site at
www.panasonic.com/BatteryHandling
to date information. Include a letter detailing the complaint, a return address and provide a
daytime phone number where you can be reached. A valid registered receipt is required
under the Limited Warranty.
IF REPAIR IS NEEDED DURING THE WARRANTY PERIOD, THE PURCHASER WILL
BE REQUIRED TO FURNISH A SALES RECEIPT/PROOF OF PURCHASE
INDICATING DATE OF PURCHASE, AMOUNT PAID AND PLACE OF PURCHASE.
CUSTOMER WILL BE CHARGED FOR THE REPAIR OF ANY UNIT RECEIVED
WITHOUT SUCH PROOF OF PURCHASE.
.
as Panasonic is committed to providing the most up
Limited Warranty Limits And Exclusions
This warranty ONLY COVERS failures due to defects in materials or workmanship, and
DOES NOT COVER normal wear and tear or cosmetic damage. The warranty ALSO
DOES NOT COVER damages which occurred in shipment, or failures which are caused
by products not supplied by the warrantor, or failures which result from accidents, misuse,
abuse, neglect, mishandling, misapplication, alteration, faulty installation, set-up
adjustments, misadjustment of consumer controls, improper maintenance, power line
surge, lightning damage, modification, introduction of sand, humidity or liquids,
commercial use such as hotel, office, restaurant, or other business or rental use of the
product, or service by anyone other than a Factory Service Center or other Authorized
Servicer, or damage that is attributable to acts of God.
(ENG) VQT5D49
53
Page 54

DMC-GM1KP-VQT5D49_eng.book 54 ページ 2013年10月2日 水曜日 午後6時54分
Others
THERE ARE NO EXPRESS WARRANTIES EXCEPT AS LISTED UNDER “LIMITED
WARRANTY COVERAGE”.
THE WARRANTOR IS NOT LIABLE FOR INCIDENTAL OR CONSEQUENTIAL
DAMAGES RESULTING FROM THE USE OF THIS PRODUCT, OR ARISING OUT OF
ANY BREACH OF THIS WARRANTY.
(As examples, this excludes damages for lost time, travel to and from the servicer, loss of
or damage to media or images, data or other memory or recorded content. The items
listed are not exclusive, but for illustration only.)
ALL EXPRESS AND IMPLIED WARRANTIES, INCLUDING THE WARRANTY OF
MERCHANTABILITY, ARE LIMITED TO THE PERIOD OF THE LIMITED WARRANTY.
Some states do not allow the exclusion or limitation of incidental or consequential damages,
or limitations on how long an implied warranty lasts, so the exclusions may not apply to you.
This warranty gives you specific legal rights and you may also have other rights which vary
from state to state. If a problem with this product develops during or after the warranty
period, you may contact your dealer or Service Center. If the problem is not handled to
your satisfaction, then write to the warrantor’s Consumer Affairs Department at the
addresses listed for the warrantor.
PARTS AND SERVICE, WHICH ARE NOT COVERED BY THIS LIMITED WARRANTY,
ARE YOUR RESPONSIBILITY.
Customer Services Directory (United States and Puerto Rico)
Obtain Product Information and Operating Assistance; locate your nearest Dealer
or Service Center; purchase Parts and Accessories; or make Customer Service
and Literature requests by visiting our Web Site at:
http://www.panasonic.com/help
or, contact us via the web at:
http://www.panasonic.com/contactinfo
You may also contact us directly at:
1-800-211-PANA (7262)
Monday-Friday 9am-9pm, Saturday-Sunday 10am-7pm EST
For hearing or speech impaired TTY users, TTY: 1-877-833-8855
Accessory Purchases (United States and Puerto Rico)
Purchase Parts, Accessories and Owner’s Manual online for all Panasonic Products by
visiting our Web Site at:
http://www.pstc.panasonic.com
Or, send your request by E-mail to:
npcparts@us.panasonic.com
You may also contact us directly at:
1-800-332-5368 (Phone) 1-800-237-9080 (Fax Only)
(Monday-Friday 9am-9pm EST)
Panasonic National Parts Center
20421 84th Ave S., Kent, WA 98032
(We accept Visa, MasterCard, Discover Card, American Express)
For hearing or speech impaired TTY users, TTY: 1-866-605-1277
As of July 2013
VQT5D49 (ENG)
54
Page 55

DMC-GM1KP-VQT5D49_eng.book 55 ページ 2013年10月2日 水曜日 午後6時54分
Others
This product incorporates the following software:
(1) the software developed independently by or for Panasonic Corporation,
(2) the software owned by third party and licensed to Panasonic Corporation, and/or
(3) open source software
The software categorized as (3) is distributed in the hope that it will be useful, but
WITHOUT ANY WARRANTY, without even the implied warranty of MERCHANTABILITY
or FITNESS FOR A PARTICULAR PURPOSE.
Please refer to the detailed terms and conditions thereof displayed by selecting [MENU/
SET] > [Setup] > [Version Disp.] > [Software info].
G MICRO SYSTEM is a lens exchange type digital camera
•
system of LUMIX based on a Micro Four Thirds System
standard.
• Micro Four Thirds™ and Micro Four Thirds Logo marks are
trademarks or registered trademarks of Olympus Imaging
Corporation, in Japan, the United States, the European Union
and other countries.
• Four Thirds™ and Four Thirds Logo marks are trademarks or
registered trademarks of Olympus Imaging Corporation, in
Japan, the United States, the European Union and other
countries.
• SDXC Logo is a trademark of SD-3C, LLC.
• “AVCHD” and the “AVCHD” logo are trademarks of Panasonic
Corporation and Sony Corporation.
• Manufactured under license from Dolby Laboratories.
Dolby and the double-D symbol are trademarks of Dolby
Laboratories.
• HDMI, the HDMI Logo, and High-Definition Multimedia Interface
are trademarks or registered trademarks of HDMI Licensing
LLC in the United States and other countries.
• HDAVI Control™ is a trademark of Panasonic Corporation.
• Adobe is a trademark or registered trademark of Adobe
Systems Incorporated in the United States and/or other
countries.
• Mac and Mac OS are trademarks of Apple Inc., registered in the U.S. and other countries.
• App Store is a service mark of Apple Inc.
(ENG) VQT5D49
55
Page 56

DMC-GM1KP-VQT5D49_eng.book 56 ページ 2013年10月2日 水曜日 午後6時54分
• QuickTime and the QuickTime logo are trademarks or
registered trademarks of Apple Inc., used under license
therefrom.
• Windows and Windows Vista are either registered trademarks
or trademarks of Microsoft Corporation in the United States
and/or other countries.
• Android and Google Play are trademarks or registered
trademarks of Google Inc.
• The Wi-Fi CERTIFIED Logo is a certification mark of the Wi-Fi
Alliance.
• The Wi-Fi Protected Setup Mark is a mark of the Wi-Fi
Alliance.
• “Wi-Fi”, “Wi-Fi Protected Setup”, “Wi-Fi Direct”, “WPA” and
“WPA2” are marks or registered marks of the Wi-Fi Alliance.
• DLNA, the DLNA Logo and DLNA CERTIFIED are
trademarks, service marks, or certification marks of the Digital
Living Network Alliance.
• This product uses “DynaFont” from DynaComware
Corporation. DynaFont is a registered trademark of DynaComware Taiwan Inc.
• Other names of systems and products mentioned in these instructions are usually the
registered trademarks or trademarks of the manufacturers who developed the system or
product concerned.
This product is licensed under the AVC patent portfolio license for the personal and noncommercial use of a consumer to (i) encode video in compliance with the AVC Standard (“AVC
Video”) and/or (ii) decode AVC Video that was encoded by a consumer engaged in a personal
and non-commercial activity and/or was obtained from a video provider licensed to provide
AVC Video. No license is granted or shall be implied for any other use. Additional information
may be obtained from MPEG LA, LLC. See http://www.mpegla.com
.
Panasonic Corporation of North America
Two Riverfront Plaza, Newark, NJ 07102-5490
Panasonic Corporation 2013
Printed in China
 Loading...