


Panasonic DMC-GH4KBODY User Manual
Basic Owner’s Manual
Digital Camera/
Body
Model No. DMC-GH4
Please read these instructions carefully before using this product, and
save this manual for future use.
More detailed instructions on the operation of this camera are
contained in “Owner’s Manual for advanced features (PDF
format)” in the supplied DVD. Install it on your PC to read it.
Register online at www.panasonic.com/register (U.S. customers only)
If you have any questions, visit:
USA : www.panasonic.com/support
Canada : www.panasonic.ca/english/support
VQT5H68
PCP
F0314WT0

Dear Customer,
Thank you for choosing Panasonic!
You have purchased one of the most sophisticated and reliable products on the market
today. Used properly, we’re sure it will bring you and your family years of enjoyment.
Please take time to fill in the information below. The serial number is on the tag located on
the underside of your camera. Be sure to retain this manual as your convenient camera
information source.
Date of Purchase
Dealer Purchased From
Dealer Address
Please note that the actual controls and components, menu items, etc. of your Digital Camera
may look somewhat different from those shown in the illustrations in this Owner’s Manual.
Carefully observe copyright laws.
•
Recording of pre-recorded tapes or discs or other published or broadcast material for purposes
other than your own private use may infringe copyright laws. Even for the purpose of private
use, recording of certain material may be restricted.
A lithium ion battery that is recyclable powers the product you have
purchased. Please call 1-800-8-BATTERY for information on how to
recycle this battery.
Dealer Phone No.
Model No.
Serial No.
Information for Your Safety
WARNING:
To reduce the risk of fire, electric shock or product damage,
•
Do not expose this unit to rain, moisture, dripping or splashing.
• Use only the recommended accessories.
• Do not remove covers.
• Do not repair this unit by yourself. Refer servicing to qualified service personnel.
The socket outlet shall be installed near the equipment and shall be easily accessible.
VQT5H68 (ENG)
2

∫ Product identification marking
Product Location
Digital Camera Bottom
Battery charger Bottom
THE FOLLOWING APPLIES ONLY IN THE U.S.A.
FCC Note:
This equipment has been tested and found to comply with the limits for a Class B digital
device, pursuant to Part 15 of the FCC Rules. These limits are designed to provide
reasonable protection against harmful interference in a residential installation. This
equipment generates, uses, and can radiate radio frequency energy and, if not installed
and used in accordance with the instructions, may cause harmful interference to radio
communications. However, there is no guarantee that interference will not occur in a
particular installation. If this equipment does cause harmful interference to radio or
television reception, which can be determined by turning the equipment off and on, the
user is encouraged to try to correct the interference by one or more of the following
measures:
•
Reorient or relocate the receiving antenna.
• Increase the separation between the equipment and receiver.
• Connect the equipment into an outlet on a circuit different from that to which the receiver is
connected.
• Consult the dealer or an experienced radio/TV technician for help.
FCC Caution: To assure continued compliance, follow the attached installation
instructions and use only shielded interface cables with ferrite core when
connecting to computer or peripheral devices.
Any changes or modifications not expressly approved by the party responsible for
compliance could void the user’s authority to operate this equipment.
Declaration of Conformity
Trade Name: Panasonic
Model No.: DMC-GH4
Responsible Party:Panasonic Corporation of North America
Two Riverfront Plaza, Newark, NJ 07102-5490
Support Contact: http://www.panasonic.com/contactinfo
This device complies with Part 15 of the FCC Rules. Operation is subject to the
following two conditions: (1) This device may not cause harmful interference, and (2)
this device must accept any interference received, including interference that may
cause undesired operation.
DMC-GH4
(ENG) VQT5H68
3

THE FOLLOWING APPLIES ONLY IN THE U.S.A.
Certification and Compliance
See Camera for the certification and compliance mark specific to that device.
1 Select
2 Select
3
Contains FCC ID: VPYLBXN604
This transmitter must not be co-located or operated in conjunction with any other
antenna or transmitter.
This equipment complies with FCC radiation exposure limits set forth for an
uncontrolled environment and meets the FCC radio frequency (RF) Exposure
Guidelines in Supplement C to OET65.
This equipment has very low levels of RF energy that are deemed to comply without
testing of specific absorption ratio (SAR).
THE FOLLOWING APPLIES ONLY IN CANADA.
CAN ICES-3(B)/NMB-3(B)
This device complies with RSS-210 of the IC Rules.
Operation is subject to the following two conditions:
(1)This device may not cause harmful interference,
(2)This device must accept any interference received,
including interference that may cause undesired operation of the device.
[Wi-Fi]
in the [Setup] menu.
[Wi-Fi Setup]
Press
3/4 to select [Approved Regulations], and then press [MENU/SET]
in the [Wi-Fi] menu.
.
This equipment complies with IC radiation exposure limits set forth for an uncontrolled
environment and meets RSS-102 of the IC radio frequency (RF) Exposure rules.
This equipment has very low levels of RF energy that are deemed to comply without
testing of specific absorption ratio (SAR).
VQT5H68 (ENG)
4

∫ About the battery pack
CAUTION
Battery pack (Lithium ion battery pack)
•
Use the specified unit to recharge the battery pack.
• Do not use the battery pack with equipment other than the specified unit.
• Do not get dirt, sand, liquids, or other foreign matter on the terminals.
• Do not touch the plug terminals (i and j) with metal objects.
• Do not disassemble, remodel, heat or throw into fire.
If any electrolyte should come into contact with your hands or clothes, wash it off
thoroughly with water.
If any electrolyte should come into contact with your eyes, never rub the eyes. Rinse
eyes thoroughly with water, and then consult a doctor.
CAUTION
•
Danger of explosion if battery is incorrectly replaced. Replace only with the type
recommended by the manufacturer.
• When disposing of the batteries, please contact your local authorities or dealer and ask for
the correct method of disposal.
•
Do not heat or expose to flame.
• Do not leave the battery(ies) in a car exposed to direct sunlight for a long period of time with
doors and windows closed.
Warnin g
Risk of fire, explosion and burns. Do not disassemble, heat above 60xC (140oF) or incinerate.
∫ About the battery charger
CAUTION!
To reduce the risk of fire, electric shock or product damage,
•
Do not install or place this unit in a bookcase, built-in cabinet or in another confined
space. Ensure t his unit is well ventilated.
Battery charger
This battery charger operates on AC between 110 V and 240 V.
But
•
In the U.S.A. and Canada, the battery charger must be connected to a 120 V AC power supply only.
• When connecting to an AC supply outside of the U.S.A. or Canada, use a plug adaptor to
suit the AC outlet configuration.
• When connecting to a supply of greater than AC 125 V, ensure the cord you use is suited to
the voltage of the AC supply and the rated current of the battery charger.
• Contact an electrical parts distributor for assistance in selecting a suitable AC plug adaptor
or AC cord set.
(ENG) VQT5H68
5

Cautions for Use
• Do not use any other USB connection cables except the supplied one or a genuine Panasonic
USB connection cable (DMW-USBC1: optional).
• Use a “High Speed HDMI micro cable” with the HDMI logo.
Cables that do not comply with the HDMI standards will not work.
“High Speed HDMI micro cable” (Type D– Type A plug, up to 2 m (6.6 feet) long)
• Always use a genuine Panasonic AV cable (DMW-AVC1: optional).
• Always use a genuine Panasonic remote shutter (DMW-RSL1: optional).
• Do not use the synchro cables with the length of 3 m (9.8 feet) or more.
Keep this unit as far away as possible from el ectromagnetic equipment (such as
microwave ovens, TVs, video games etc.).
•
If you use this unit on top of or near a TV, the pictures and/or sound on this unit may be
disrupted by electromagnetic wave radiation.
• Do not use this unit near cell phones because doing so may result in noise adversely affecting
the pictures and/or sound.
• Recorded data may be damaged, or pictures may be distorted, by strong magnetic fields
created by speakers or large motors.
•
Electromagnetic wave radiation may adversely affect this unit, disturbing the pictures and/or sound.
• If this unit is adversely affected by electromagnetic equipment and stops functioning properly,
turn this unit off and remove the battery or disconnect AC adaptor (DMW-AC10PP: optional).
Then reinsert the battery or reconnect AC adaptor and turn this unit on.
Do not use this unit near radio transmitters or high-voltage lines.
If you record near radio transmitters or high-voltage lines, the recorded pictures and/or sound
•
may be adversely affected.
VQT5H68 (ENG)
6

• Before cleaning the camera, remove the battery or the DC coupler (DMW-DCC12:
optional), or disconnect the power plug from the outlet.
• Do not press the monitor with excessive force.
• Do not press the lens with excessive force.
• Do not spray the camera with insecticides or volatile chemicals.
•
Do not keep rubber or plastic products in contact with the camera for a long period of time.
• Do not use solvents such as benzine, thinner, alcohol, kitchen detergents, etc., to clean
the camera, since it may deteriorate the external case or the coating may peel off.
• Do not leave the camera with the lens facing the sun, as rays of light from the sun may
cause it to malfunction.
• Always use the supplied cords and cables.
• Do not extend the cords or the cables.
• During access (image writing, reading and deleting, formatting etc.), do not turn this unit
off, remove the battery, card or disconnect the AC adaptor (DMW-AC10PP: optional).
Furthermore, do not subject the camera to vibration, impact or static electricity.
• The data on the card may be damaged or lost due to electromagnetic waves, static electricity or
breakdown of the camera or the card. We recommend storing important data on a PC etc.
• Do not format the card on your PC or other equipment. Format it on the camera only to ensure
proper operation.
• The battery is not charged when the camera is shipped. Charge the battery before use.
• The battery is a rechargeable lithium ion battery. If the temperature is too high or too
low, the operating time of the battery will become shorter.
• The battery becomes warm after using and during and after charging. The camera also
becomes warm during use. This is not a malfunction.
• Do not leave any metal items (such as clips) near the contact areas of the power plug or
near the batteries.
• Store the battery in a cool and dry place with a relatively stable temperature: [Recommended
temperature: 15 oC to 25 oC (59 oF to 77 oF), Recommended humidity: 40%RH to 60%RH]
• Do not store the battery for a long time while fully charged. When storing the battery for a
long period of time, we recommend charging it once a year. Remove the battery from the
camera and store it again after it has completely discharged.
-If you see this symbol-
Information on Disposal in other Countries outside the European
Union
This symbol is only valid in the European Union.
If you wish to discard this product, please contact your local authorities or
dealer and ask for the correct method of disposal.
(ENG) VQT5H68
7

Contents
Information for Your Safety ................. 2
• Cautions for Use ..............................6
Preparation
Care of this Camera ............................10
Standard Accessories ........................ 11
Names and Functions of Components....... 12
About the Lens ................................... 14
Cards Compatible with this unit........ 15
Preparation ..........................................16
• Attaching the Shoulder Strap .........16
• Charging the Battery......................16
• Inserting/Removing the Battery......17
• Inserting/Removing the Card
(Optional).......................................17
• Changing the Lens.........................18
• Opening the Monitor ......................18
• Setting Date/Time (Clock Set) .......19
• Diopter adjustment.........................19
Basic Operations ................................20
• Tips for taking good pictures ..........20
• Zoom operations............................20
• Shutter button (Taking pictures) .....21
• Motion picture button
(Recording motion pictures) ..........21
• Mode dial
(Selecting a Recording Mode) .......22
• Rear Dial/Front Dial .......................23
• Control Dial ....................................23
• Cursor buttons/[MENU/SET] button..... 23
• [DISP.] button (Switching the
displayed information) ...................24
• [LVF] button (Switching the Monitor/
Viewfinder)........................................25
• Touch panel (Touch operations).....26
Optical Image Stabilizer .....................27
Calling frequently-used menus
instantly (Quick Menu) .......................27
Setting menu items ............................ 28
Configuring basic settings of
this unit (Setup Menu) ........................ 29
• Formatting the card (initialization).....29
• Restoring the default settings ([Reset]).... 29
• Conserving the battery life
([Economy]) ...................................29
Easy Recording
Taking Pictures using the Automatic
Function (Intelligent Auto Mode).......30
• Recording night scenes
([iHandheld Night Shot]) ................31
• Combining pictures into a single picture
VQT5H68 (ENG)
8
with rich gradation ([iHDR]) ................. 32
• Taking a picture with a blurred
background (Defocus Control) ...... 32
• Recording images by changing the
brightness or color tone ................ 32
Taking Pictures with different image
effects (Creative Control Mode) ........ 33
Taking Pictures Using the Touch
Function .............................................. 34
• Taking pictures using the Touch
Shutter function............................. 34
• Easily Optimizing the Brightness
for a Specified Area (Touch AE)........35
Recording
Taking Pictures with Auto Focus...... 36
• Selecting the Focus Mode
(AFS/AFF/AFC)............................. 36
• Selecting the Auto Focus Mode .... 37
• Setting up position of the AF area/
changing size of the AF area ........ 38
• Setting the AF area position with
the Touch Pad ............................... 39
Taking Pictures with
Manual Focus ..................................... 40
Select a Drive Mode ........................... 41
Taking Pictures using Burst Mode ... 41
Taking Pictures using Auto Bracket ........ 42
Taking Pictures with the Self-timer.......... 42
Taking Pictures Automatically at Set
Intervals ([Time Lapse Shot]) ............ 43
Creating Stop Motion Pictures
([Stop Motion Animation]) ................. 45
Setting the Picture Quality and Size........ 47
• Setting the aspect ratio of pictures....... 47
• Setting the number of pixels ......... 47
• Setting the compression rate of
pictures ([Quality]) ......................... 48
Setting the Light Sensitivity .............. 49
Adjusting the White Balance ............ 50
Taking Pictures with Your Favorite
Settings (Program AE Mode) ............ 51
Taking Pictures by Specifying the
Aperture/Shutter Speed..................... 52
• Aperture-Priority AE Mode ............ 52
• Shutter-Priority AE Mode............... 52
• Manual Exposure Mode ................ 52
• Confirm the Effects of Aperture and
Shutter Speed (Preview Mode) ..... 53
Compensating the Exposure ............ 54
Selecting the Method for Measuring
Brightness ([Metering Mode]) ........... 54
Fixing the Focus and the Exposure
(AF/AE Lock) ...................................... 55
Disabling Operational Sounds and the
Output of Light at once ([Silent Mode])..... 56

Taking Pictures with No Shutter Sound
([Electronic Shutter]) ................................. 56
Taking pictures by using the flash ... 57
• Changing Flash Mode ................... 57
Motion Picture
Recording Motion Picture ................. 58
• Recording motion pictures in 4K ... 59
• Setting the format, size and
recording frame rate ...................... 59
• How to set focus when recording a
motion picture ([Continuous AF])......62
Recording motion pictures with
manually set aperture value/shutter
speed (Creative Video Mode) ............ 62
• Minimizing operational sounds
during motion picture recording..... 63
Using Advanced Settings and Recording
Functions for Motion Pictures.................. 64
• [Luminance Level] ......................... 64
• Checking areas that may be white
saturated ([Zebra Pattern])............ 64
• Recording while monitoring camera
images........................................... 65
• Reducing flickering and horizontal
stripes on images
([Synchro Scan]) ........................... 66
• Recording in Slow or Fast Motion
([Variable Frame Rate])................. 66
• Changing the system frequency.... 67
Playback/Editing
Playing Back Pictures........................ 68
Playing Back Motion Pictures ........... 68
Switching the Playback Method ....... 69
• Using the Playback Zoom ............. 69
• Displaying multiple screens
(Multi Playback)............................. 69
• Displaying Pictures by Recording
Date (Calendar Playback) ............. 69
Deleting Pictures ................................ 70
Using the [Playback] Menu ............... 71
• [RAW Processing] ......................... 71
• [Video Divide] ................................ 72
Wi-Fi/NFC
Wi-FiR function/NFC function ........... 73
What you can do with the Wi-Fi
function ............................................... 75
Controlling with a Smartphone/Tablet..... 76
• Installing the smartphone/tablet app
“Image App ” .................................. 76
• Connecting to a smartphone/tablet ...... 76
• Taking images via a smartphone/
tablet (remote recording) ............... 80
• Playing back images in the camera...... 80
• Saving images stored in the camera.... 80
• Sending images in the camera to an
SNS..................................................81
• Adding location information to
images stored in the camera from
a smartphone/tablet.......................82
Setting up a connection to a PC via a
wireless access point.........................83
Customization
Change the Quick Menu to your
preferred item .....................................85
Assigning frequently used functions
to the buttons (function buttons)...... 85
Registering your preferred settings
(Custom Mode) ...................................86
• Registering Personal Menu Settings
(Registering custom settings) ........ 86
• Recording using registered
custom set .....................................86
Others
Playing Back Pictures on
a TV Screen .........................................87
Saving still pictures and motion
pictures on your PC ........................... 88
• About the supplied software ..........88
Monitor Display/Viewfinder Display..... 92
Message Display.................................97
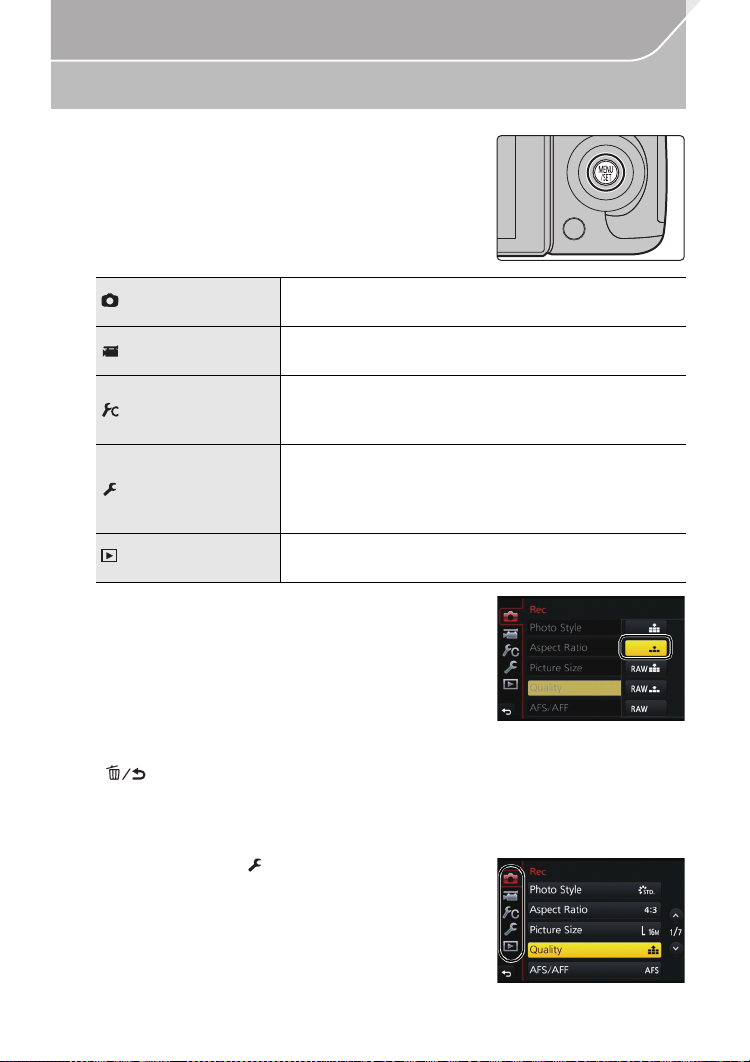
Menu list ..............................................99
• [Rec] ..............................................99
• [Motion Picture] ............................101
• [Custom] ...................................... 102
• [Setup] .........................................104
• [Playback] .................................... 106
Troubleshooting ............................... 107
Cautions for Use............................... 113
Specifications ................................... 116
Digital Camera Accessory System..... 123
Reading the Owner ’s Manual
(PDF format) ...................................... 124
Digital Camera Accessory Order Form
(For USA Customers).............................. 125
Limited Warranty
(ONLY FOR U.S.A.) ........................... 126
Limited Warranty
(ONLY FOR CANADA) ...................... 129
(ENG) VQT5H68
9

Preparation
Care of this Camera
To avoid damaging your camera and to experience the maximum enjoyment you
should exercise the following precautions.
• The lens, monitor and the camera body can sustain damage if the camera body is dropped or
subjected to excessive temperature, moisture, water or dust.
• The monitor can be damaged if excessive pressure is applied to the screen surface, during
actual use or while cleaning.
∫ Splash Proof
Splash Proof is a term used to describe an extra level of protection this camera offers
against exposure to a minimal amount of moisture, water or dust. Splash Proof does not
guarantee that damage will not occur if this camera is subjected to direct contact with
water.
In order to minimize the possibility of damage please be sure the following precautions are
taken:
–
The Splash Proof feature works in conjunction with the H-HS12035 and H-HS35100 lenses
that were specifically designed to support this feature.
– Make sure the built-in flash is closed.
– Make sure that all doors, socket caps and terminal covers are securely closed.
– Make sure that you are in a dry and secure place when changing the battery, lens or memory
card. After changing, make sure their protective doors are securely closed.
– If this camera is exposed to water, sand or any other foreign material clean it as soon as
possible, taking the necessary precautions that the foreign substance does not get inside the
camera.
– Under no circumstances should you touch or place any foreign objects within the camera or
in close proximity of the camera’s image sensor.
∫ Condensation
•
Condensation may occur on the lens, monitor or in the viewfinder when the room temperature
or humidity changes rapidly. This may cause the image to temporarily become hazy. If this
occurs, turn the camera off and allow the camera to sit in a temperature stable environment for
several minutes. It will clear by itself.
• If you know that you will be moving between areas where there will be a large change in
temperature or humidity, you can help prevent condensation forming on the camera by placing
the camera in a large plastic zipper bag, so condensation will form on the bag, not the camera.
Allow the temperature to stabilize before removing the camera from the bag.
VQT5H68 (ENG)
10

Preparation
Standard Accessories
Check that all the accessories are supplied before using the camera.
Product numbers correct as of March 2014. These may be subject to change.
Digital Camera Body
(This is referred to as camera body in this Owner’s Manual.)
1 Battery Pack
(Indicated as battery pack or battery in the text)
12
Charge the battery before use.
2 Battery Charger
(Indicated as
3 AC Cable
4 USB Connection Cable
battery charger
or
charger
in the text)
DMW-BLF19PP
3
5DVD
Software:
•
Use it to install the software to your PC.
• Owner’s Manual for advanced features:
Use it to install to your PC.
6 Shoulder Strap
7Body Cap
8 Hot shoe cover
9Eye Cup
10 Flash synchro socket cap
11 Cover for the battery grip connector
12 Cover for the interface unit connector
¢ This is attached to the camera body at the time of
purchase.
¢
¢
¢
¢
¢
¢
• SD Memory Card, SDHC Memory Card and SDXC
Memory Card are indicated as card in the text.
K2CA2CA00025
5
7
VKF4971
9
• The card is optional.
• Description in this Owner’s Manual is based on the
interchangeable lens (H-HS12035).
VYK6T25
(For U.S.A. only)
•
If accessories are lost, customers can visit us at
www.panasonic.com/support
about obtaining replacement parts.
for further information
(For Canada only)
•
If any accessories are lost, customers in Canada
should visit our support page at www.panasonic.ca/
english/support for further information about obtaining replacement parts.
11
VKF5104
DMW-BTC10PP
4
K1HY08YY0031
6
VFC5122VFW0106
8
VYF3522
10
VKF5108
12
VKF5289
(ENG) VQT5H68
11
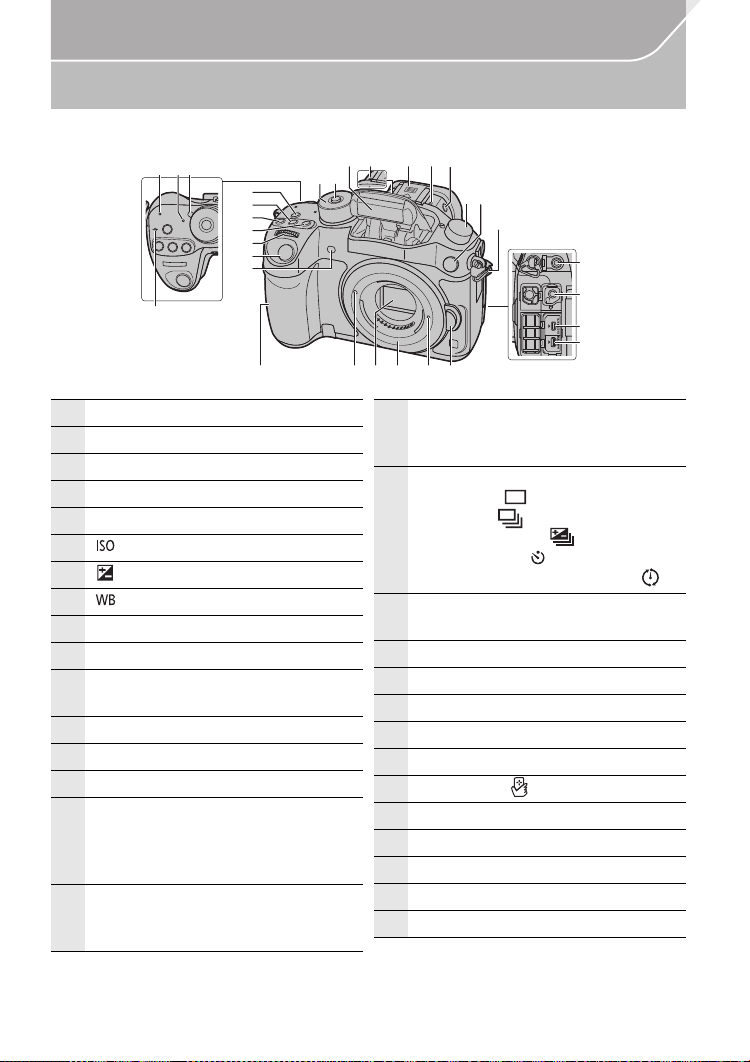
Preparation
1 Wi-Fi® connection lamp
2 Status indicator (P19)
3 Camera ON/OFF switch (P19)
4 Focus distance reference mark
5 [Wi-Fi] button (P74)/[Fn1] button (P85)
6 [ ](ISO sensitivity) button (P49)
7
[ ](Exposure Compensation) button (P54)
8 [ ](White Balance) button (P50)
9 Front dial (P23)
10 Shutter button (P21)
11
Self-timer indicator (P42)/
AF Assist Lamp (P103)
12 Mode dial (P22)
13 Mode dial lock button (P22)
14 Flash (P57)
15
Stereo microphone (P102)
• Be careful not to cover the microphone
with your finger. Doing so may make
sound difficult to record.
16
Hot shoe (Hot shoe cover)
• Keep the Hot Shoe Cover out of reach
of children to prevent swallowing.
17
Flash open button (P57)
• The flash opens, and recording with the
flash becomes possible.
18
Drive mode dial
Single (P41):
Burst (P41):
Auto Bracket (P42):
Self-timer (P42):
Time Lapse/Animation (P43, 45):
19
Flash synchro socket
(Flash synchro socket cap)
20 Shoulder strap eyelet (P16)
21 [MIC] socket
22 Headphone socket (P102, 105)
23 [AV OUT/DIGITAL] socket (P87, 90)
24 [HDMI] socket (P87)
25 NFC antenna [ ] (P81)
26 Lens fitting mark (P18)
27 Sensor
28 Mount
29 Lens lock pin
30 Lens release button (P18)
Names and Functions of Components
∫ Camera body
1
2 3
5
6
7
8
9
10
11
4
15 16 1514
12
13
17
1819
29 302625 2827
20
21
22
23
24
VQT5H68 (ENG)
12

32
31 Touch screen/monitor (P26)
32 [(] (Playback) button (P68)
33 [LVF] button (P25)/[Fn5] button (P85)
34 Eye sensor (P26)
35
Eye Cup (P114)
• Keep the eye cup out of reach of
children to prevent swallowing.
36 Viewfinder (P25)
37 Diopter adjustment dial (P19)
38 Motion picture button (P58)
39
[Q.MENU] button (P27)/[Fn2] button (P85)
40
[ ] (Auto Focus Mode) button (P36)/
[Fn3] button (P85)
41 Rear dial (P23)
42
Speaker (P104)
• Be careful not to cover the speaker with
your finger. Doing so may make sound
difficult to hear.
43
[DISP.] button (P24)
• Each time this is pressed, the display
on the monitor is switched.
44 [AF/AE LOCK] button (P55)
45 Focus mode lever (P36, 40)
46 [REMOTE] socket
47 Cursor buttons (P23)
48 Control dial (P23)
49 [MENU/SET] button (P23, 28)
50 Card door (P17)
51
[ ] (Delete/Cancel) button (P70)/
[Fn4] button (P85)
52
Tripod mount
• A tripod with a screw length of 5.5 mm
(0.22 inch) or more may damage this
unit if attached.
53
Cover for the interface unit connector
• Keep the cover for the interface unit
connector out of reach of children to
prevent swallowing.
•
This connector cover is for a professional
motion picture device (U.S.A.: DMW-YAGH
(P123), Canada: AG-YAGH). For details on
AG-YAGH, refer to the site below.
http://pro-av.panasonic.net
54
Cover for the battery grip connector
• Keep the cover for the battery grip
connector out of reach of children to
prevent swallowing.
55
DC coupler cover
• When using an AC adaptor,
ensure that the Panasonic DC
coupler (DMW-DCC12: optional)
and AC adaptor (DMW-AC10PP:
optional) are used.
•
Always use a genuine Panasonic AC
adaptor (DMW-AC10PP: optional).
•
It is recommended to use a fully
charged battery or AC adaptor when
recording motion pictures.
•
If while recording motion pictures
using the AC adaptor and the power
supply is cut off due to a power
outage or if the AC adaptor is
disconnected etc., the motion
picture will not be recorded.
56 Battery door (P17)
57 Release lever (P17)
33
36
34 35 37
38 40
Preparation
42
4339 41
44
45
31
53 55 56 5754
52
50
51
47
48
49
46
(ENG) VQT5H68
13

Preparation
About the Lens
∫ Micro Four Thirds™ mount specification lens
This unit can use the dedicated lenses compatible with the Micro Four Thirds System lens
mount specification (Micro Four Thirds mount).
∫ Four Thirds™ mount specification lens
Lens with the Four Thirds mount specification can be used by using the mount adaptor
(DMW-MA1: optional).
∫ Leica mount specification lens
When you use the M mount adaptor or R mount adaptor (DMW-MA2M, DMW-MA3R:
optional), you can use Leica M Mount or Leica R Mount interchangeable lenses.
For certain lenses, the actual distance at which the subject is in focus may differ slightly from
•
the rated distance.
• When using a Leica lens mount adaptor, set [Shoot w/o Lens] (P104) to [ON].
For details on the lens used, refer to the website.
Refer to catalogs/Web pages for most current information regarding compatible lenses.
http://panasonic.jp/support/global/cs/dsc/
(This Site is English only.)
The available flash range etc. differs depending on the aperture value of the lens you are using.
•
• The focal length noted on the lens in use is equivalent to double when converted to the 35 mm
film camera.
(It will be equivalent to 100 mm lens when a 50 mm lens is used.)
Refer to the website for details about the 3D interchangeable lens.
VQT5H68 (ENG)
14

Preparation
Cards Compatible with this unit
The following cards which conform to the SD standard can be used with this unit.
(These cards are indicated as card in the text.)
SD Memory Card
(8 MB to 2 GB)
SDHC Memory Card
(4 GB to 32 GB)
SDXC Memory Card
(48 GB, 64 GB)
∫ About the motion picture recording and speed class
According to the [Rec Format] (P59) and [Rec Quality] (P59) of a motion picture, the
required card differs. Use a card that meets the following ratings of the SD Speed Class or
UHS Speed Class.
SD Speed Class and UHS Speed Class are the speed standards regarding continuous writing.
•
To check the class, see the labelled side, etc. of the card.
[Rec Format]
[AVCHD] All Class 4 or higher
[Rec Quality]
• SDHC Memory Cards and SDXC Memory Cards can be
used only with their compatible devices.
• Check that the PC and other equipment are compatible when
using the SDXC Memory Cards.
http://panasonic.net/avc/sdcard/information/SDXC.html
• This unit is compatible with UHS-I UHS Speed Class 3
standard SDHC/SDXC memory cards.
• Only the cards with capacity listed left can be used.
Bit rate in
¢
Speed class Label example
100 Mbps UHS Speed Class 3
[MP4]
28 Mbps or lower Class 4 or higher
100 Mbps or higher UHS Speed Class 3
[MP4 (LPCM)]/
[MOV]
¢ Bit rates vary depending on the item selected in [Rec Quality] in the [Motion Picture] menu.
For details, refer to P59.
50 Mbps
UHS Speed Class 1 or
higher
Class 10
• Please confirm the latest information on the following website.
http://panasonic.jp/support/global/cs/dsc/
(This Site is English only.)
(ENG) VQT5H68
15
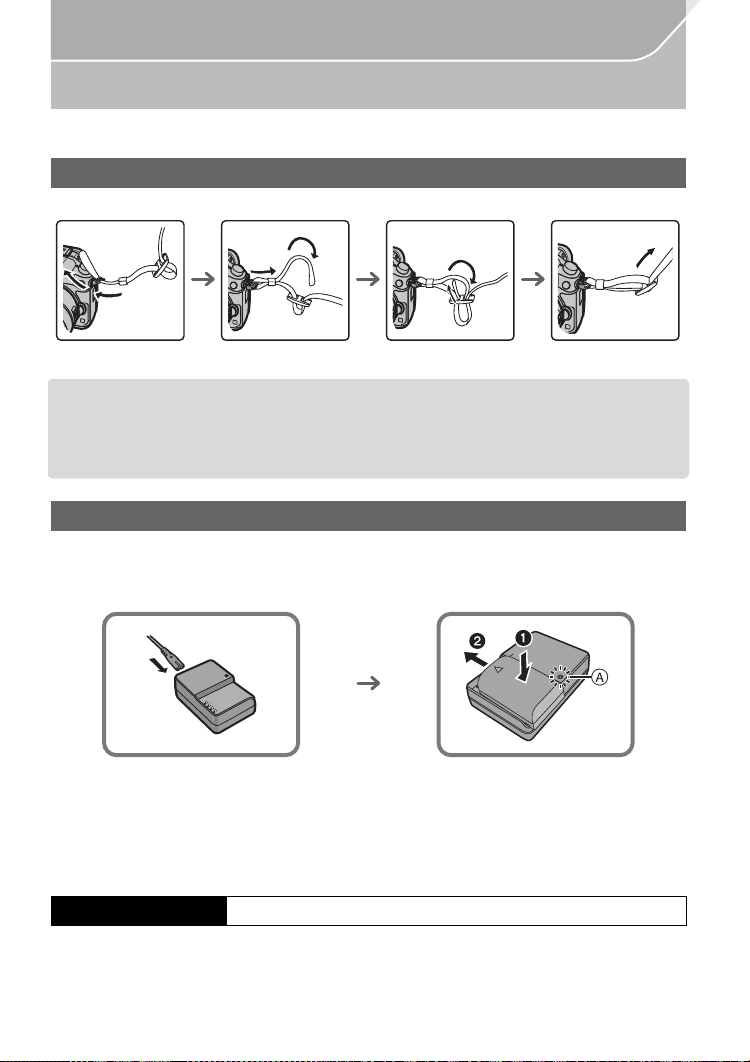
Preparation
Preparation
• Check that the camera is turned off.
Attaching the Shoulder Strap
•
We recommend attaching the shoulder strap when using the camera to prevent it from dropping.
1 2 3
• Perform steps 1 to 4 and then attach the other side of the shoulder strap.
• Use the shoulder strap around your shoulder.
– Do not wrap the strap around your neck.
– It may result in injury or accident.
• Do not leave the shoulder strap where an infant can reach it.
– It may result in an accident by mistakenly wrapping around the neck.
4
Charging the Battery
The battery that can be used with this unit is DMW-BLF19PP.
1 Connect the AC cable.
2 Attach the battery paying attention to the direction of the battery.
The [CHARGE] indicator A lights up and charging begins.
•
∫ About the [CHARGE] indicator
The [CHARGE] indicator turns on:
The [CHARGE] indicator is turned on during charging.
The [CHARGE] indicator turns off:
The [CHARGE] indicator will turn off once the charging has completed without any problem.
(Disconnect the charger from the electrical socket and detach the battery after charging is completed.)
∫ Charging time
Charging time Approx. 220 min
•
The indicated charging time is for when the battery has been discharged completely.
The charging time may vary depending on how the battery has been used. The charging
time for the battery in hot/cold environments or a battery that has not been used for a
long time may be longer than normal.
VQT5H68 (ENG)
16
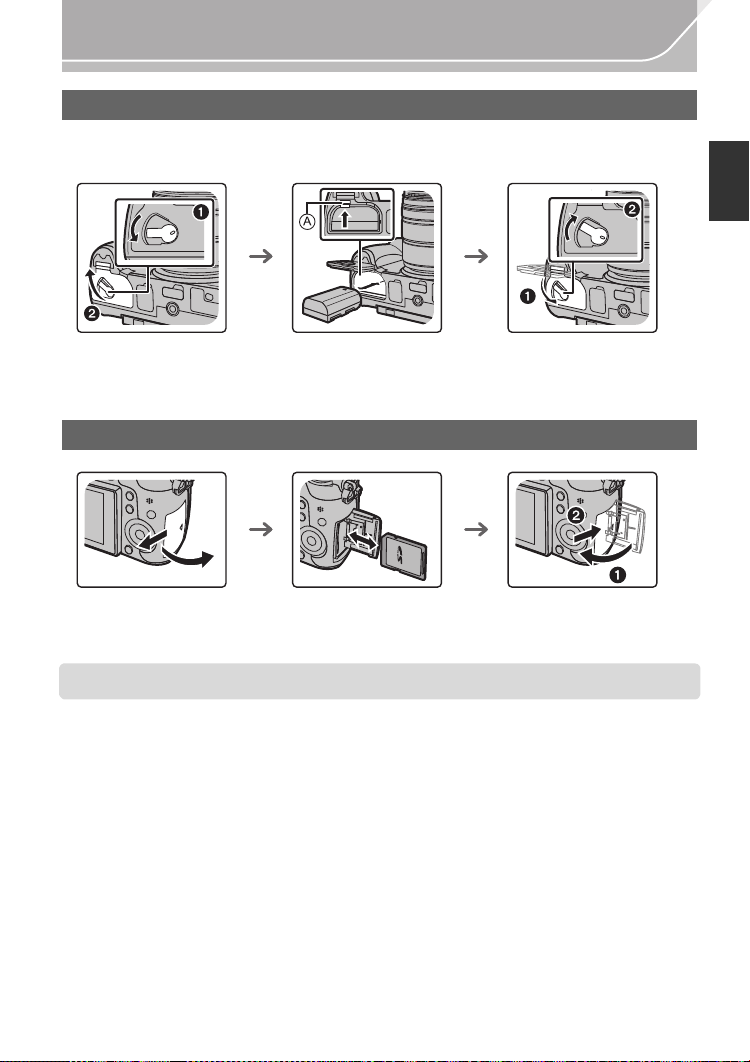
Preparation
Inserting/Removing the Battery
• Always use genuine Panasonic batteries (DMW-BLF19PP).
• If you use other batteries, we cannot guarantee the quality of this product.
ヰヱユワ
ヰヱユワ
ロヰヤレ
ロヰヤレ
ヰヱユワ
ロヰヤレ
• Being careful about the battery orientation, insert all the way until you hear a locking sound and
then check that it is locked by lever A.
Pull the lever A in the direction of the arrow to remove the battery.
Inserting/Removing the Card (Optional)
• Push it securely all the way until you hear a “click” while being careful about the direction in
which you insert it.
To remove the card, push the card until it clicks, then pull the card out upright.
• Keep the Memory Card out of reach of children to prevent swallowing.
(ENG) VQT5H68
17

Preparation
Changing the Lens
• Change lenses where there is not a lot of dirt or dust.
• Do not press the lens release button A when you attach a lens.
∫ Detaching the lens
1 Attach the lens cap.
2 While pressing on the lens release button B,
rotate the lens toward the arrow until it stops and
then remove.
Opening the Monitor
At the time when this camera is purchased, the monitor is stowed in the camera body.
Bring out the monitor as shown below.
1 Open the monitor. (Maximum 180o)
2 It can be rotated 180o forward.
3 Return the monitor to its original position.
Only rotate the monitor after opening it wide enough, and be careful not to use
•
excessive force as it may be damaged.
VQT5H68 (ENG)
18

Setting Date/Time (Clock Set)
• The clock is not set when the camera is shipped.
1 Turn the camera on.
•
The status indicator 1 lights when you turn this unit
on.
2 Press [MENU/SET].
3 Press 2/1 to select the items (year, month, day, hour,
minute), and press 3/4 to set.
4 Press [MENU/SET].
•
Confirmation screen is displayed. Press [MENU/SET].
• A message prompting you to set [Home] in [World Time] will
be displayed. Press [MENU/SET].
5 Press 2/1 to select the home area, and then press
[MENU/SET].
Diopter adjustment
Adjust the diopter to suit your vision so that you can see
the characters displayed in the viewfinder clearly.
A Diopter adjustment dial
Preparation
OFF
ON
(ENG) VQT5H68
19
Preparation
Basic Operations
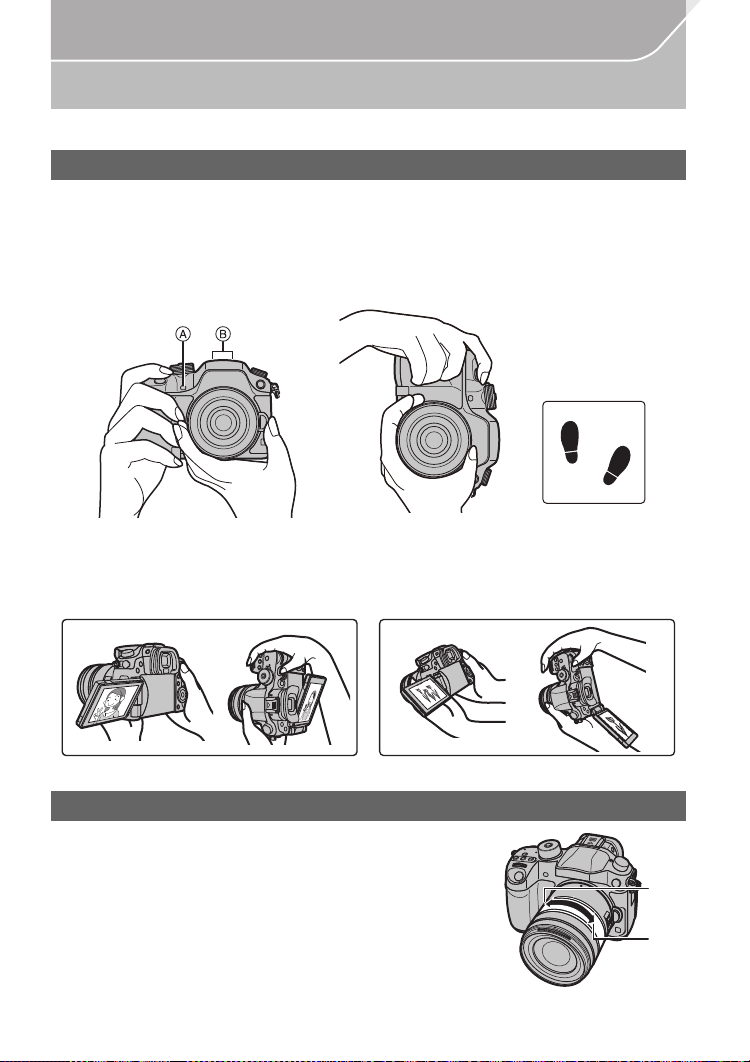
Tips for taking good pictures
Hold the camera gently with both hands, keep your arms still at your side
and stand with your feet slightly apart.
• Do not cover the flash, the AF assist lamp A, the microphone B (P12) or Speaker with
your fingers or other objects.
• Be careful not to move the camera when you press the shutter button.
• Be sure to remove the lens cap when recording.
∫ Free angle shooting
The monitor can be rotated to suit your needs. This is convenient as it allows you to take
pictures from various angles by adjusting the monitor.
Taking pictures at a high angle Taking pictures at a low angle
Zoom operations
When using the interchangeable lens (H-HS12035)
Rotate the zoom ring of the lens.
A Te l e
B Wide
VQT5H68 (ENG)
20
Preparation
2.8
C
AB
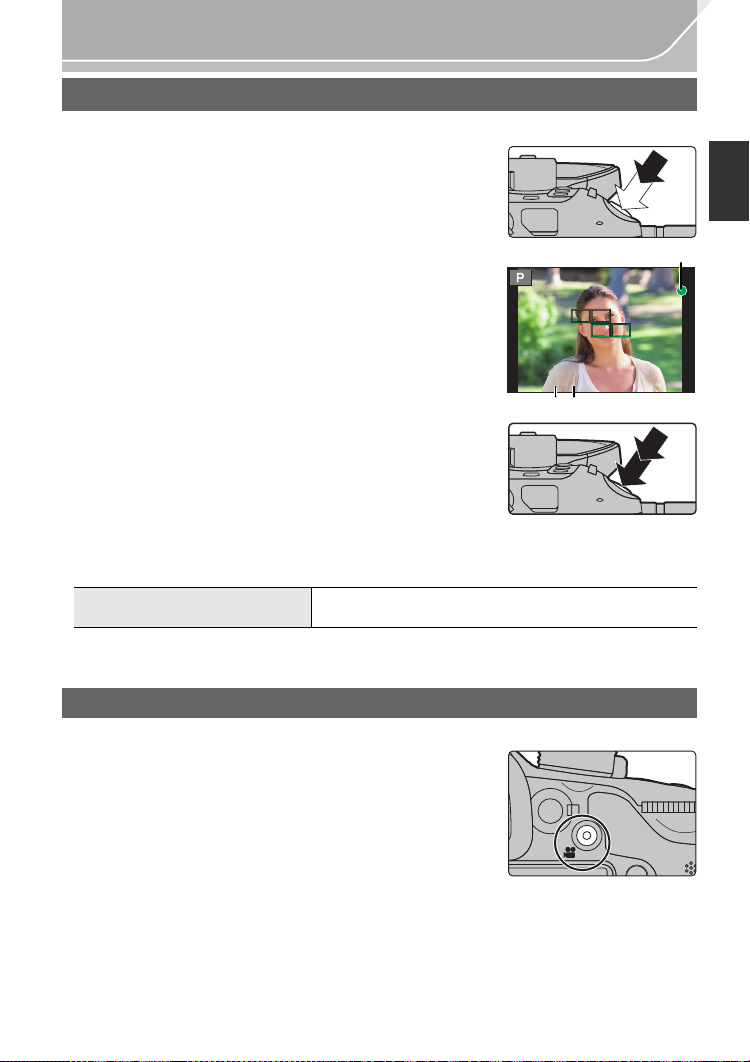
Shutter button (Taking pictures)
The shutter button works in two steps. To take a picture, press it.
Press the shutter button halfway to focus.
A Aperture value
B Shutter speed
C Focus indication
• Aperture value and shutter speed are displayed.
(It will flash in red if the correct exposure is not achieved, except
when set to flash.)
• Once the subject is in focus, the focus indication is displayed.
(When the subject is not in focus, the indication flashes)
6060602.8
2.8
Press the shutter button fully (push it in further),
and take the picture.
• When the image is correctly focused, the picture will be taken, since the [Focus/Release
Prior ity] ( P103) is set initially to [FOCUS].
• The focus range is different depending on the lens used.
When the interchangeable lens
(H-HS12035) is used
• Even during menu operation or image playback, if you press the shutter button halfway, you
can instantly set the camera ready for recording.
0.25 m (0.82 feet) to ¶ (from the focus distance
reference line)
Motion picture button (Recording motion pictures)
Press the motion picture button to start and stop recording a motion picture.
Start recording by pressing the motion picture
button.
• Release the motion picture button right after you press it.
Stop the recording by pressing the motion picture
button again.
• Since motion picture recording stops only after you press the motion picture button, the sound
of the operation may be noticeable. (P58)
(ENG) VQT5H68
21
Preparation
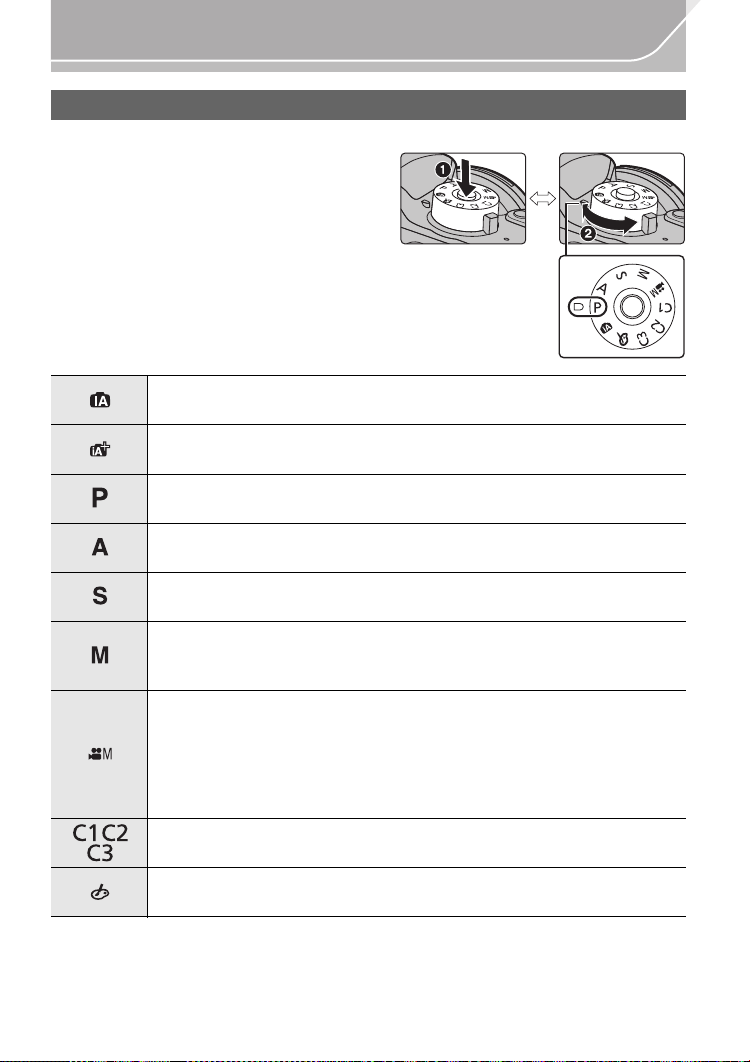
Mode dial (Selecting a Recording Mode)
Rotate the mode dial to switch the Recording Mode.
Press the mode dial lock button 1 to
release the lock.
• The dial is locked if the mode dial lock button is
depressed. Each press locks/unlocks the dial.
Rotate the mode dial 2 and adjust the
recording mode.
• After adjusting the recording mode, press the
mode dial lock button to lock the dial.
Intelligent Auto Mode (P30)
The subjects are recorded using settings automatically selected by the camera.
Intelligent Auto Plus Mode (P31)
Allows you to adjust the brightness and color hue when in Intelligent Auto Mode.
Program AE Mode (P51)
Records at the aperture value and shutter speed set by the camera.
Aperture-Priority AE Mode (P52)
The shutter speed is automatically determined by the aperture value you set.
Shutter-Priority AE Mode (P52)
The aperture value is automatically determined by the shutter speed you set.
Manual Exposure Mode (P52)
The exposure is adjusted by the aperture value and the shutter speed which are
manually adjusted.
Creative Video Mode (P62)
Records a motion picture with the aperture value and the shutter speed you
specify. In this recording mode, all the motion picture functions become
available. For example, you can record motion pictures in 4K (motion pictures
with their size set to [4K] or [C4K] in [Rec Quality]).
¢ You cannot take still pictures.
Custom Mode (P86)
Use this mode to take pictures with previously registered settings.
Creative Control Mode (P33)
Record while checking the image effect.
VQT5H68 (ENG)
22

Preparation
Rear Dial/Front Dial
Rotating:
Selection of items or setting of values is performed during the various settings.
•
This Owner ’s Manual describe operations of the rear dial/front dial as follows:
e.g.: When rotating the rear dial to the left
or right
e.g.: When rotating the front dial to the left
or right
Allows you to set the aperture, shutter speed, and other settings when in / / / modes.
Mode dial Rear Dial Front dial
(P51) Program Shift Program Shift
(P52) Aperture value Aperture value
(P52) Shutter speed Shutter speed
(P52) Shutter speed Aperture value
• In [Dial Set.] in the [Custom] menu, you can change the operation methods of the front dial and
rear dial. (P104)
Control Dial
Rotating the control dial:
Selection of items or setting of values etc., is performed.
•
The operation of rotating the control dial is illustrated as below in
This Owner’s Manual.
Example: When rotating the control dial to the left or right:
Cursor buttons/[MENU/SET] button
Pressing the cursor button:
Selection of items or setting of values etc., is performed.
Pressing [MENU/SET]:
Confirmation of setting contents, etc., is performed.
• This Owner’s Manual express the up, down, left, and right of the
cursor button as 3/4/2/1.
(ENG) VQT5H68
23
Preparation
ュリヴヱハ
AFS
AFS
AFSAFS
98
AWB
0 0
0
Fn
ISO
AUTO
Wi-Fi
L
4:3
Even when the camera is operated using the touch screen, it is
possible to operate with the cursor button and [MENU/SET]
button if a guide like the one shown on the right is displayed.
Even on menu screens etc. on which the guide is not displayed,
you can make settings and selections by operating the buttons.
By assigning [Cursor Button Lock] to a function button, you can disable the cursor buttons, the
•
[MENU/SET] button, and the control dial. (P85)
[DISP.] button (Switching the displayed information)
Press [DISP.] to switch the information displayed on the
screen.
In Recording Mode
•
Screen will switch as follows:
(Example of monitor display)
With information
MOV
4:3
p
L
24
FHD
AFS
Without
information
With information
(tilt sensor
display)
MOV
4:3
p
L
24
FHD
AFS
Without
information (tilt
sensor display)
0
989898
0
989898
On-monitor
Tur ned off
information
¢1 It is displayed when the [Monitor Info. Disp.] of the [Custom] menu is set to [ON]. (P103)
Settings can be adjusted directly by touching each of the items displayed on the screen.
• If you set [Guide Line] in the [Custom] menu, the guide lines are displayed. (P103)
• If no operation is performed, part of the information on the screen will gradually become darker
after approximately 10 seconds has passed, and will no longer be displayed after
approximately 1 minute has passed. Pressing the [DISP.] button or touching the monitor will
make the display reappear. This operation is to prevent screen burn-in and is not a malfunction.
24
VQT5H68 (ENG)
recording
¢1

Preparation
AWB
98
WB
ISO
STD.
ロヷョ
Fn5
In Playback Mode
• Screen will switch as follows:
Without
information
(Highlight
¢1, 2
display)
With
information
0
2
60F3.5
Detailed
¢1
4:3
L
1/98
1/98
AWB
00
information
display
60
F3.5
0
WB
AWB
ISO
200
AFS
P
2014.12. 1 10:00
s
4:3
L
RGB
STD.
STD.
100-0001
Histogram
display
1/98
F3.5
60
ISO
0
100-0001
200
Without
information
¢1 If no operation is performed, part of the information on the screen will gradually become
darker after approximately 10 seconds has passed, and will no longer be displayed after
approximately 1 minute has passed. Pressing the [DISP.] button or touching the monitor will
make the display reappear. This operation is to prevent screen burn-in and is not a
malfunction.
¢2 This is displayed if [Highlight] (P103) in the [Custom] menu is set to [ON].
[LVF] button (Switching the Monitor/Viewfinder)
Press [LVF] to switch between the Monitor and Viewfinder.
A Eye sensor
Press [LVF].
ロヷョ
• The monitor/viewfinder will switch as follows:
Automatic viewfinder/
monitor switching
¢3
Viewfinder display
¢3 If [Eye Sensor AF] in the [Custom] menu is set to [ON], the camera automatically adjusts the
focus as the eye sensor is activated. (P102)
¢3
Monitor display
(ENG) VQT5H68
25

Preparation
Fn7
2.0X
∫ Using the eye sensor to switch between the Monitor and Viewfinder
Automatic viewfinder/monitor switching enables the eye
sensor to switch the display to the viewfinder automatically
when you bring your eye or an object near it.
•
When the viewfinder surface becomes dirty, remove the eyecup,
blow away the dust with a blower (commercially available), and
wipe the surface lightly with a dry, soft cloth.
Touch panel (Touch operations)
Touch panel of this unit is capacitive. Touch the panel directly with your bare finger.
∫ Touch
To touch and release the touch screen.
• When selecting features using the touch screen, be sure to
touch the center of the desired icon.
∫ Drag
A movement without releasing the touch screen.
This can also be used to move to the next image during
playback, etc.
-5 0 +5
DISP.カスタム登録
6WDQGDUG
Fn6
Fn7
Fn7
Fn8
Fn9
Fn10
±0
S
±0
±0
±0
±0
∫ Pinch (enlarge/reduce)
Pinch the touch panel apart (enlarge) or together
(reduce) with two fingers.
VQT5H68 (ENG)
26
2.0X2.0X
2.0X
Preparation
AFS
Optical Image Stabilizer
The camera detects jitter during recording and automatically corrects it, so you can record
images with reduced jitter.
A lens which supports the stabilizer function is required.
–
The interchangeable lens (H-HS12035) supports the stabilizer function.
•
When using an interchangeable lens with O.I.S. switch (such as H-HS12035), stabilizer function is
activated if the O.I.S. switch of the lens is set to [ON]. ([ ] is set at the time of purchase)
∫ Setting the Stabilizer in the [Rec] menu
1 Select the menu. (P28)
MENU
> [Rec] > [Stabilizer]
2 Press 3/4 to select the item and then press [MENU/SET].
[]
([Normal])
[]
([Panning])
[OFF] [Stabilizer] does not work.
Exit the menu after it is set.
•
Vertical and horizontal shake are compensated for.
Camera shake is corrected for up/down movements.
This mode is ideal for panning (a method of taking pictures which involves
turning the camera to track the movements of a subject which continues to
move in a fixed direction).
Calling frequently-used menus instantly
(Quick Menu)
By using the Quick Menu, some of the menu settings can be easily found.
•
The features that can be adjusted using Quick Menu are determined by the mode or a display
style the camera is in.
Press [Q.MENU] to display the Quick Menu.
1
Fn2
ヲハヮユワヶ
MOV
4:3
L
p
AFS
24
Rotate the front dial to select the menu item.
2
Rotate the rear dial to select the setting.
3
Press [Q.MENU] to exit the menu once the
4
setting is complete.
FHD
0
603.5
AU
(ENG) VQT5H68
AWB
TO
27
Preparation
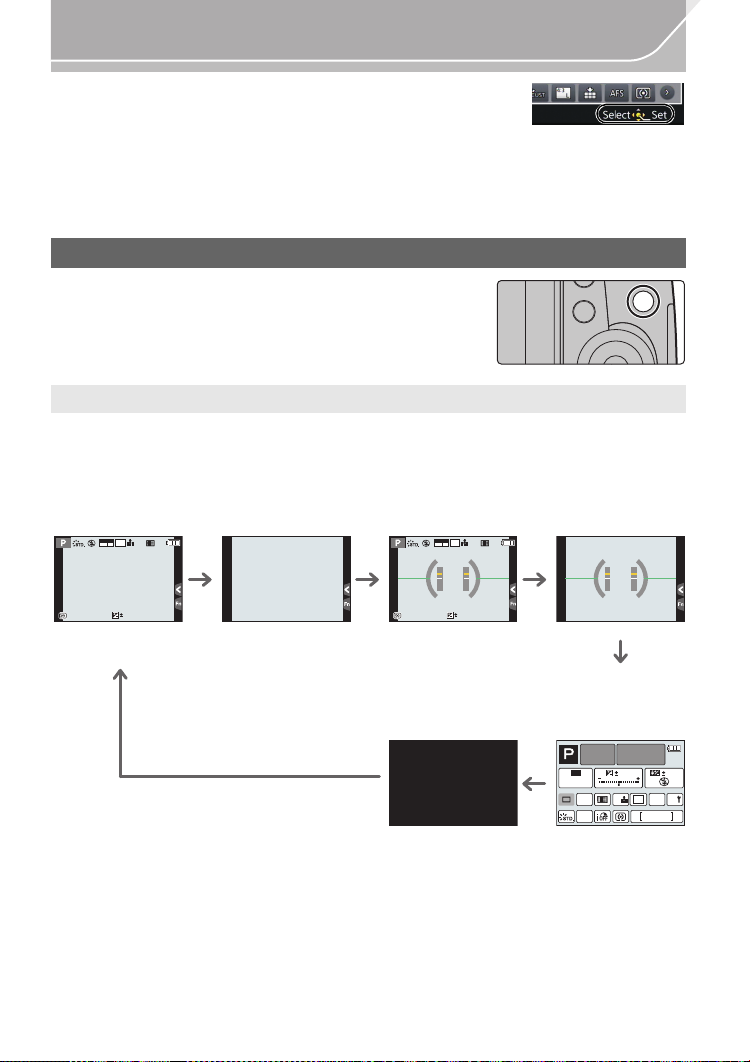
Setting menu items
Press [MENU/SET].
1
[Rec] (P99)
[Motion Picture]
(P101)
[Custom] (P102)
[Setup] (P104)
[Playback] (P106)
Press 3/4 of the cursor button to select the
2
This menu lets you set the aspect ratio, number of pixels
and other aspects of the pictures you are recording.
This menu lets you set the [Rec Format], [Rec Quality], and
other aspects for motion picture recording.
Operation of the unit , such as displaying of the screen and
button operations, can be set up according to your preferences.
Also, it is possible to register the modified settings.
This menu lets you perform the clock settings, select the
operating beep tone settings and set other settings which
make it easier for you to operate the camera.
You can also configure the settings of Wi-Fi related functions.
This menu lets you set the Protection, Cropping or Print
Settings, etc. of recorded pictures.
menu item and press [MENU/SET].
Press 3/4 of the cursor button to select the
3
setting and press [MENU/SET].
• Depending on the menu item, its setting may not appear
or it may be displayed in a different way.
∫ Close the menu
Press [ ] or press the shutter button halfway.
∫ Switching to other menus
e.g.: Switching to the [Setup] menu from [Rec] menu.
1 Press 2.
2 Press 3/4 to select [ ] or another of the menu
toggle icons.
•
You can also select the menu toggle icons by rotating the
front dial.
3 Press [MENU/SET].
•
Select a menu item next and set it.
VQT5H68 (ENG)
28
Preparation
Configuring basic settings of this unit (Setup Menu)
The [Setup] menu contains some important settings relating to the camera’s clock and power.
Check the settings of this menu before proceeding to use the camera. (P104)
Formatting the card (initialization)
Format the card before recording a picture with this unit.
Since data cannot be recovered after formatting, make sure to back up necessary
data in advance.
Select the menu. (P28)
MENU
> [Setup] > [Format]
Confirmation screen is displayed. It is executed when [Yes] is selected.
•
Restoring the default settings ([Reset])
The recording or setup/custom settings are reset to the default.
Select the menu. (P28)
MENU
> [Setup] > [Reset]
•
Confirmation screens are displayed in the sequence of the [Rec] settings and the [Setup]/
[Custom] settings. It is executed when [Yes] is selected.
• The folder number and the clock setting are not changed.
Conserving the battery life ([Economy])
The unit can be set up to prevent unnecessary battery consumption.
Select the menu. (P28)
MENU
> [Setup] > [Economy]
[Sleep Mode]
[Auto LVF/Monitor
Off]
•
Press the shutter button halfway or turn the camera off and on to cancel [Sleep Mode].
• To turn the monitor/viewfinder on again, press any button or touch the monitor.
The camera is automatically turned off if the camera has not been
used for the time selected on the setting.
[10MIN.]/[5MIN.]/[2MIN.]/[1MIN.]/[OFF]
The monitor/viewfinder is automatically turned off if the camera
has not been used for the time selected on the setting.
[5MIN.]/[2MIN.]/[1MIN.]
(ENG) VQT5H68
29
Easy Recording
4
Taking Pictures using the Automatic Function
(Intelligent Auto Mode)
Recording Mode:
In this mode, the camera makes the optimal settings for the subject and scene, so we recommend it
when you wish to leave the settings to the camera and record without thinking about them.
The camera detects scenes automatically (Scene Detection) ( : When takin g
pictures, : When recording motion pictures)
[i-Portrait] [i-Scenery] [i-Macro] [i-Night Portrait]¢1[i-Night Scenery]
[iHandheld Night
1
¢2
Shot]
¦
Set the mode dial to [¦].
[i-Food] [i-Baby]
¢1 Only displayed when the built-in flash is open.
¢2 Only displayed when [iHandheld Night Shot] is set to [ON]. (P31)
¢3 When [Face Recog.] is set to [ON], [ ] will be displayed for
birthdays of registered faces already set only when the Face/Eye of
a person 3 years old or younger is detected.
• [¦] is set if none of the scenes are applicable, and the standard
settings are set.
• The camera will switch to either the most recently used
of Intelligent Auto Mode or Intelligent Auto Plus Mode.
At the time of purchase, the mode is set to Intelligent
Auto Plus Mode. (P31)
Align the screen with the subject.
2
• When the camera identifies the optimum scene, the icon
of the scene concerned is displayed in blue for 2 seconds,
after which its color changes to the usual red. (Automatic
scene detection)
VQT5H68 (ENG)
30
¢3
[i-Sunset] [i-Low Light]
MOV
FHD
p
24