

Panasonic DMC-G85 Owner’s Manual
Owner’s Manual
for advanced features
Digital Camera
Model No. DMC-G85
Please read these instructions carefully before using this product,
and save this manual for future use.
Message Display P318
Troubleshooting P320
Finding the information you need P2
Contents P4
Contents by Function P9
Menu list P185
Register online at http://shop.panasonic.com/support
(U.S. customers only)
DVQP1003ZA
F0916HN0
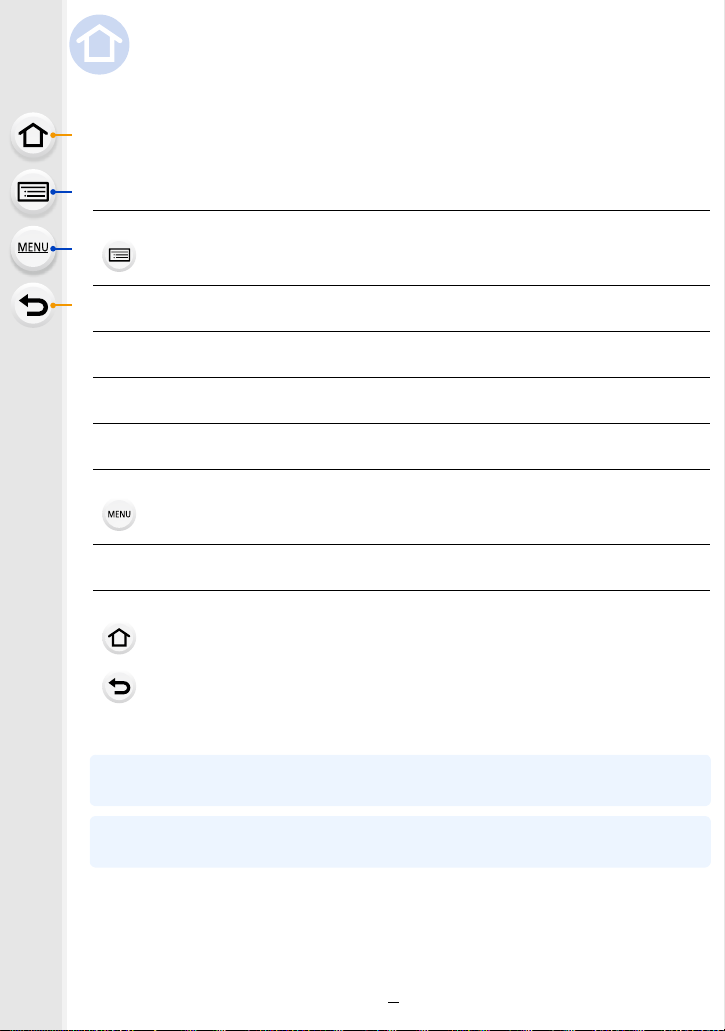
Finding the information you need
In this “Owner’s Manual for advanced features”, you can find the information you need
from the following pages.
By clicking a page number, you can jump to the linked page and quickly find the
information.
Search from “Contents”
Click this icon to jump to “Contents”.
Search from the list of function names P9
Search from the list of buttons and dials P14
Search from the list of screens and icons P311
Search from “Message Display” P318
Search from “Menu list”
Click this icon to jump to “Menu list”.
Search from “Troubleshooting” P320
Click this icon to jump to “Finding the information you need”.
Click this icon to return to the previously displayed page.
For details on how to use this manual, see the next page.
P4
P185
P3
Wi-FiR function
P249
2
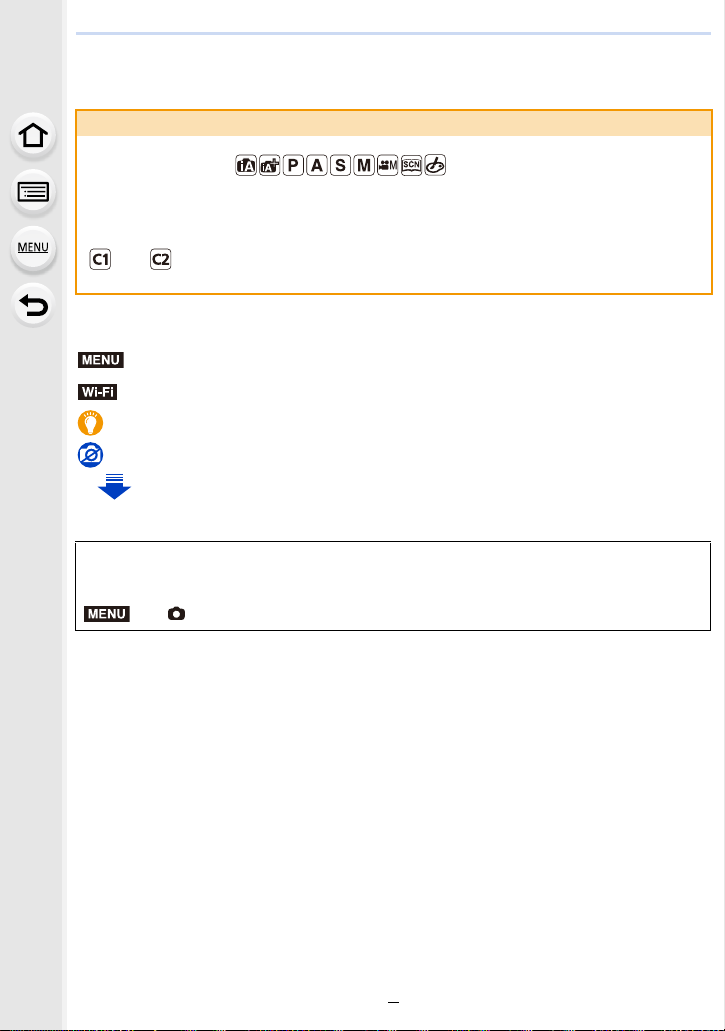
How to use this manual
Wi-Fi
MENU
About the indication of the applicable mode
Applicable modes:
The icons indicate the modes available for a function.
• Black icons: Applicable modes
• Gray icons: Unavailable modes
and will differ depending on the Recording Modes registered under custom
settings.
∫ About the symbols in the text
MENU
: Indicates that the menu can be set by pressing [MENU/SET] button.
: Indicates that the Wi-Fi setting can be made by pressing [Wi-Fi] button.
: Tips for skillful use and points for recording.
: Conditions in which a particular function cannot be used.
: Continued to next page.
Click a cross reference in the text to jump to the corresponding page.
•
In this owner’s manual, steps for setting a menu item are described as follows.
Example: In the [Rec] menu, change [Quality] from [
A] to [›]
> [Rec] > [Quality] > [›]
• Description in this owner’s manual is based on the interchangeable lens (H-FS12060).
3

Contents
Finding the information you need..............................................................................2
How to use this manual.............................................................................................3
Contents by Function ................................................................................................9
1. Before Use
Care of the camera .................................................................................................12
Standard Accessories .............................................................................................13
Names and Functions of Components....................................................................14
About the Lens........................................................................................................17
2. Getting Started/Basic Operations
Attaching the Shoulder Strap ..................................................................................18
Charging the Battery ...............................................................................................19
• Charging.........................................................................................................19
• Approximate operating time and number of recordable pictures....................21
Inserting/Removing the Battery...............................................................................24
Inserting/Removing the Card (Optional)..................................................................25
Card Information .....................................................................................................26
• Formatting the card (initialization) ..................................................................27
• Approximate number of recordable pictures and available recording time ....28
Attaching/Removing the Lens .................................................................................30
Opening the Monitor/Adjusting the Monitor.............................................................33
Setting Date/Time (Clock Set).................................................................................34
• Re-adjusting the clock ....................................................................................35
Basic Operations.....................................................................................................36
• Tips for taking good pictures ..........................................................................36
• Using the Viewfinder.......................................................................................37
• Shutter button (Taking pictures) .....................................................................39
• Motion picture button (Recording motion pictures).........................................39
• Mode dial (Selecting a Recording Mode) .......................................................40
• Front Dial/Rear Dial........................................................................................41
• Cursor buttons/[MENU/SET] button ...............................................................44
• [DISP.] button (Switching the displayed information)......................................45
• Touch screen (Touch operations) ...................................................................48
• Taking Pictures Using the Touch Function .....................................................49
Setting menu items .................................................................................................51
Calling frequently-used menus instantly (Quick Menu)...........................................53
• Customizing the Quick Menu settings ............................................................54
Assigning frequently used functions to the buttons (function buttons) ....................55
Entering Text ...........................................................................................................58
4

3. Recording Modes
Taking Pictures using the Automatic Function
(Intelligent Auto Mode)............................................................................................59
• Taking handheld shots of night scenes ([iHandheld Night Shot]) ...................62
• Combining pictures into a single picture with rich gradation ([iHDR]).............63
• Taking a picture with a blurred background (Defocus Control).......................64
• Recording images by changing the brightness or color tone .........................65
Taking Pictures with Automatically Adjusted Aperture and Shutter Speed
(Program AE Mode) ................................................................................................66
Taking Pictures by Specifying the Aperture/Shutter Speed.....................................68
• Aperture-Priority AE Mode .............................................................................69
• Shutter-Priority AE Mode................................................................................69
• Manual Exposure Mode .................................................................................70
• Confirm the Effects of Aperture and Shutter Speed (Preview Mode) .............72
• Easily set aperture/shutter speed for suitable exposure (One Push AE) .......73
Taking Pictures that match the Scene being recorded (Scene Guide Mode)..........74
• Taking panorama pictures ([Panorama Shot]) ................................................77
Taking Pictures with different image effects (Creative Control Mode).....................79
Recording motion pictures with manually set aperture value/shutter speed
(Creative Video Mode) ............................................................................................85
• Minimizing operational sounds during motion picture recording ....................86
Registering your preferred settings (Custom Mode) ...............................................87
• Registering Personal Menu Settings (Registering custom settings) ..............87
• Recording using registered custom set..........................................................88
4. Focus, Brightness (Exposure) and Color tone Settings
Adjusting Focus Automatically ................................................................................89
• Focus Mode (AFS/AFF/AFC) .........................................................................91
• Auto Focus Mode ...........................................................................................93
• Setting up position of the AF area/changing size of the AF area ...................98
• Setting the AF area position with the Touch Pad..........................................100
• Optimizing the focus and brightness for a touched position .........................101
Adjusting Focus Manually .....................................................................................102
Fixing the Focus and the Exposure (AF/AE Lock) ................................................105
Compensating the Exposure.................................................................................106
Setting the Light Sensitivity...................................................................................108
Adjusting the White Balance ................................................................................. 110
5. 4K Photo and Drive Settings
Select a Drive Mode..............................................................................................114
Taking Pictures using Burst Mode.........................................................................115
Recording 4K Photos............................................................................................118
• Notes on the 4K Photo function....................................................................122
Selecting pictures from 4K burst file and saving ...................................................125
5

Controlling Focus After Recording (Post Focus/Focus Stacking) .........................129
• Recording with the Post Focus function.......................................................130
• Selecting the desired focus area and saving a picture .................................132
• Merging multiple pictures to widen the focus range (Focus Stacking)..........133
Taking Pictures with the Self-timer........................................................................135
Taking Pictures with Time Lapse Shot/Stop Motion Animation .............................136
• Taking Pictures Automatically at Set Intervals ([Time Lapse Shot]) .............136
• Creating Stop Motion Pictures ([Stop Motion Animation]) ............................138
• Creating motion pictures from recorded pictures .........................................140
Taking Pictures While Adjusting a Setting Automatically (Bracket Recording) .....141
• Exposure Bracket .........................................................................................142
• Aperture Bracket ..........................................................................................143
• Focus Bracket ..............................................................................................143
6. Stabilizer, Zoom and Flash
Image Stabilizer.....................................................................................................144
Taking Pictures with the Zoom ..............................................................................148
• Raising the telescopic effect.........................................................................149
• Zooming using touch operations (Touch zoom) ...........................................153
Taking pictures by using the flash .........................................................................154
Setting the Flash Functions ..................................................................................156
• Changing the firing mode .............................................................................156
• Changing Flash Mode ..................................................................................157
• Setting to the 2nd Curtain Synchro...............................................................159
• Adjust the flash output..................................................................................160
• Synchronizing the output of the flash to the Exposure Compensation .........160
Taking Pictures with Wireless Flashes ..................................................................161
• Using other settings for wireless flash recording ..........................................163
7. Recording Motion Pictures
Recording Motion Picture/4K Motion Picture ........................................................164
• Setting the format, size and recording frame rate ........................................166
• How to set focus when recording a motion picture ([Continuous AF]) .........168
Recording Motion Pictures that Pan and Zoom While Maintaining a
Fixed Camera Position ([4K Live Cropping]).........................................................169
Recording still pictures while recording motion pictures .......................................172
Recording Snap Movies ........................................................................................174
8. Playing Back and Editing Images
Playing Back Pictures ...........................................................................................177
Playing Back Motion Pictures................................................................................178
• Creating Still Pictures from a Motion Picture ................................................179
Switching the Playback Method ............................................................................180
• Using the Playback Zoom ............................................................................180
• Displaying multiple screens (Multi Playback) ...............................................181
6

• Displaying Pictures by Recording Date (Calendar Playback) ......................181
Playing Back Group Pictures ................................................................................182
Deleting Pictures...................................................................................................184
9. Using Menu Functions
Menu list................................................................................................................185
• [Rec] menu...................................................................................................185
• [Motion Picture] menu ..................................................................................206
• [Custom] menu .............................................................................................209
• [Setup] menu................................................................................................219
• [Playback] menu...........................................................................................227
10. Using the Wi-Fi function
What you can do with the Wi-FiR function.............................................................249
Wi-Fi function........................................................................................................250
Controlling with a Smartphone/Tablet ...................................................................252
• Installing the smartphone/tablet app “Image App ” .......................................252
• Connecting to a smartphone/tablet...............................................................253
• Taking images via a smartphone/tablet (remote recording)..........................257
• Playing back images in the camera..............................................................258
• Saving images stored in the camera ............................................................258
• Sending images in the camera to an SNS ...................................................259
• Adding location information to images stored in the camera from a
smartphone/tablet ........................................................................................259
• Combining motion pictures recorded with Snap Movie according to your
preference on a smartphone/tablet ..............................................................261
Displaying pictures on a TV ..................................................................................262
Sending images ....................................................................................................263
Sending images to a smartphone/tablet................................................................267
Printing Wirelessly.................................................................................................268
Sending images to AV device ...............................................................................269
Sending images to PC ..........................................................................................270
Using Web services ..............................................................................................272
• When sending images to web service ..........................................................272
• When sending images to [Cloud Sync. Service] ..........................................275
Registering to the “LUMIX CLUB”.........................................................................276
• About the [LUMIX CLUB] .............................................................................276
About Connections................................................................................................280
• Connecting via a wireless access point (via the network) ............................281
• Connecting the camera and another device directly (direct connection)......283
• Connecting quickly with the same settings as the previous ones
([Select a destination from History]/[Select a destination from Favorite]) ....284
[Wi-Fi Setup] Menu ...............................................................................................286
7

11. Connecting to other equipment
Watching 4K motion pictures on a TV/ Saving 4K motion pictures on your PC or
recorder.................................................................................................................288
• Watching motion pictures in 4K....................................................................288
• Storing 4K motion pictures ...........................................................................289
Playing Back Pictures on a TV Screen .................................................................290
• Using VIERA Link (HDMI) ............................................................................293
Saving still pictures and motion pictures on your PC ............................................294
• Downloading software ..................................................................................295
• Transferring images to a PC.........................................................................297
Saving still pictures and motion pictures on a Recorder .......................................299
Printing the Pictures..............................................................................................300
Enjoying 3D pictures .............................................................................................303
12. Others
Optional accessories.............................................................................................306
Monitor Display/Viewfinder Display.......................................................................311
Message Display...................................................................................................318
Troubleshooting ....................................................................................................320
Cautions for Use ...................................................................................................329
8

Contents by Function
Recording
Recording
Recording Mode.............................. P40
[Preview]..........................................P72
[Panorama Shot] .............................P77
[Time Lapse Shot] .........................P136
[Stop Motion Animation] ................P138
Aperture Bracket ...........................P143
Focus Bracket ...............................P143
[Multi Exp.].....................................P196
[Silent Mode] .................................P209
3D recording..................................P303
4K photo
[4K PHOTO] ..................................P118
[Post Focus] ..................................P129
Focus (AF/MF)
[Focus Mode]................................... P91
[AF Mode]........................................P93
Adjusting the AF area position ........ P98
Manual Focus................................P102
[AF/AE Lock] .................................P105
Drive
[Drive Mode] ..................................P114
[Burst]............................................P115
Maximum number of pictures that
can be taken continuously ............. P116
[Self Timer]....................................P135
Picture Quality and Color Tone
[Sensitivity].....................................P108
[White Balance]..............................P110
[Photo Style] ..................................P186
[Filter Settings]...............................P188
[Picture Size]..................................P190
[Quality]..........................................P191
[Highlight Shadow].........................P193
[i.Dynamic].....................................P194
[i.Resolution]..................................P194
[HDR] .............................................P195
[Long Shtr NR] ...............................P200
[Shading Comp.]............................P200
[Diffraction Compensation] ............P201
[Color Space] .................................P201
Exposure
[Touch AE].......................................P50
[One Push AE] .................................P73
[AF/AE Lock]..................................P105
Exposure Compensation ...............P106
Exposure Bracket ..........................P142
[Metering Mode].............................P192
Stabilizer
Dual I.S..........................................P144
5-Axis Hybrid Image Stabilizer.......P144
Flash
[Flash Mode] ..................................P157
2nd curtain synchro .......................P159
[Flash Adjust.] ................................P160
Wireless flash settings ...................P1
Monitoring
HDMI output while recording .........P291
61
9
Motion Picture
Motion Picture
Creative Video Mode ....................... P85
[Silent Operation].............................P86
[Rec Format]..................................P166
[Rec Quality]..................................P166
Motion pictures in 4K ..................... P164
[4K Live Cropping].........................P169
Recording still pictures while
recording motion pictures ..............P172
[Snap Movie] .................................P174
Image
[Luminance Level] .........................P206
Setup/Custom
Basic settings
[Format]........................................... P27
[Clock Set].......................................P34
Display switching.............................P45
How to set menu items....................P51
[Q.MENU] ........................................P53
[Beep] ............................................P220
[Economy] .....................................P222
Playback
Playback
Picture playback ............................P177
Motion picture playback.................P178
Playback Zoom..............................P180
Multi Playback ...............................P181
Delete ............................................P184
[Auto Review] ................................P217
Playback/display settings
[Slide Show] ..................................P229
[Rotate]/[Rotate Disp.] ...................P244
Audio
[Mic Level Adj.] ..............................P207
[Mic Level Limiter]..........................P207
[Wind Noise Canceller] ..................P208
[Lens Noise Cut] ............................P208
[Wind Cut]......................................P308
Screen settings
[Mic Level Disp.] ............................P207
[Center Marker]..............................P214
[Zebra Pattern] ...............................P215
[Monochrome Live View] ...............P216
[Reset] (initialization) .....................P225
[Sensor Cleaning] ..........................P226
Customization
[CUSTOM]
Function buttons ..............................P55
Custom Mode ..................................P87
[Custom] menu ..............................P209
Edit
Focus Stacking ..............................P133
[RAW Processing]..........................P233
[4K PHOTO Bulk Saving]...............P235
[Light Composition]........................P236
[Clear Retouch]..............................P237
[Resize]..........................................P242
[Cropping] ......................................P243
Adding information
[Location Logging] .........................P232
[Title Edit].......................................P238
[Text Stamp] ..................................P239
Image settings
[Favorite]........................................P245
[Print Set].......................................P246
[Protect] .........................................P247
in the Quick Menu .........P54
10

Wi-Fi
Connect
“Image App” ..................................P252
[WPS (Push-Button)] .............P281, 283
Direct connection........................... P283
Image App
Remote recording..........................P257
Saving images ...............................P258
Sending images..................... P259, 267
Sending and adding location
information.....................................P259
Combining motion pictures
recorded with [Snap Movie] ........... P261
Connections with other devices
PC
“PHOTOfunSTUDIO” ....................P295
“SILKYPIX Developer Studio” ....... P296
Transferring images to a PC .........P270
TV
Playing Back Pictures on a TV
Screen ...........................................P290
[VIERA Link]..................................P293
In combination with other devices
Playing back pictures on a TV .......P262
Printing images ..............................P268
Sending images to an AV
device ............................................P269
Sending images to a PC ................P270
Sending images to a web
service ...........................................P272
Using [Cloud Sync. Service] ..........P275
Recorder
Dubbing .........................................P299
Printer
PictBridge ......................................P300
11

1. Before Use
Care of the camera
Do not subject to strong vibration, shock, or pressure.
•
The lens, monitor, or external case may be damaged if used in the following conditions.
It may also malfunction or image may not be recorded if you:
– Drop or hit the camera.
– Press hard on the lens or the monitor.
∫ Splash Proof
Splash Proof is a term used to describe an extra level of protection this camera offers
against exposure to a minimal amount of moisture, water or dust. Splash Proof does not
guarantee that damage will not occur if this camera is subjected to direct contact with
water.
In order to minimize the possibility of damage please be sure the following precautions are
taken:
The Splash Proof feature works in conjunction with the lenses that were specifically designed
–
to support this feature.
– Make sure the built-in flash is closed.
– Make sure that all doors, socket caps and terminal covers are securely closed.
– Make sure that you are in a dry and secure place when changing the battery, lens or memory
card. After changing, make sure their protective doors are securely closed.
– If this camera is exposed to water, sand or any other foreign material clean it as soon as
possible, taking the necessary precautions that the foreign substance does not get inside the
camera.
– Under no circumstances should you touch or place any foreign objects within the camera or
in close proximity of the camera’s image sensor.
If sand, dust, or liquids such as water droplets adhere to the monitor, wipe them off with a
dry soft cloth.
Not doing so may cause the monitor to respond incorrectly to touch operations.
–
– If the monitor is closed when such liquids are present, malfunction may result.
If you shake the camera while it is turned off, its sensors may move or a rattling sound
may be heard. The sound is caused by the In-Body Image Stabilizer, and this is not a
malfunction.
∫ About Condensation (When the lens, the viewfinder or monitor is fogged up)
•
Condensation occurs when the ambient temperature or humidity changes. Be careful of
condensation since it causes lens, viewfinder and monitor stains, fungus and camera
malfunction.
• If condensation occurs, turn the camera off and leave it for about 2 hours. The fog will
disappear naturally when the temperature of the camera becomes close to the ambient
temperature.
12

1. Before Use
Standard Accessories
Check that all the accessories are supplied before using the camera.
The accessories and their shape will differ depending on the country or area where the camera
•
was purchased.
For details on the accessories, refer to “Basic Owner’s Manual”.
• Battery Pack is indicated as battery pack or battery in the text.
• Battery Charger is indicated as battery charger or charger in the text.
• SD Memory Card, SDHC Memory Card and SDXC Memory Card are indicated as card in the
text.
• The card is optional.
13
1. Before Use
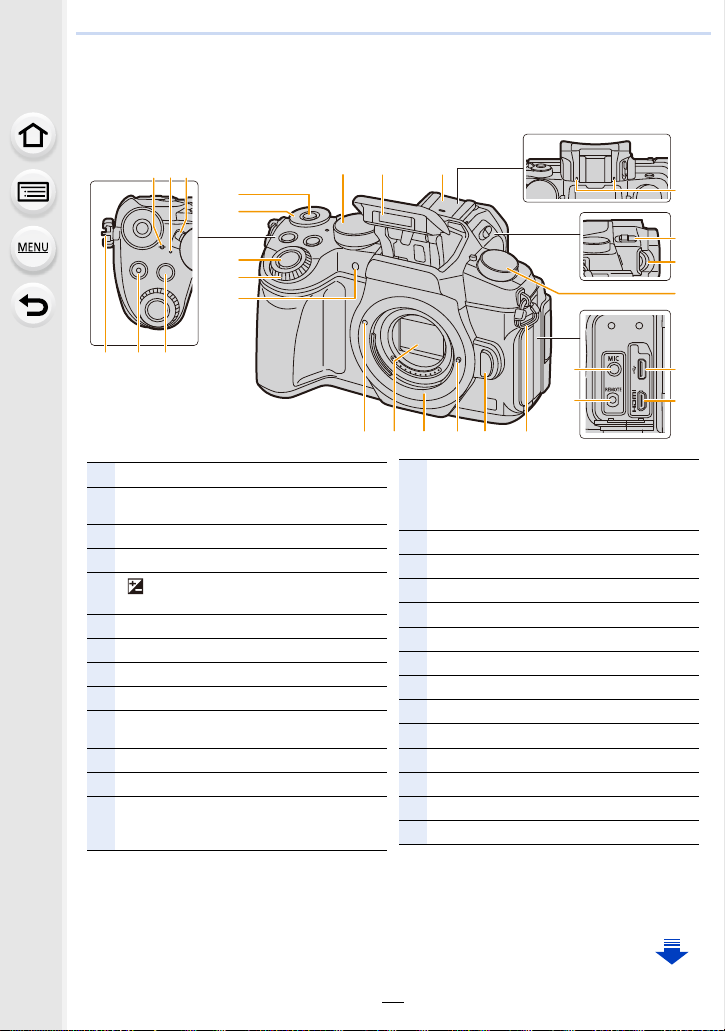
6
4
24 2327 2526
12
7
9
10
20
1 32
22 5
22
13
11
8
18
19
21
16
15
14
17
1
Focus distance reference mark (P104)
2
Status indicator (P34)/
Wi-Fi
®
connection lamp (P250)
3
Camera ON/OFF switch (P34)
4
Motion picture button (P164)
5
[ ] (Exposure Compensation) button
(P106)/[Fn1] button (P55)
6
Function button (Fn11) (P55)
7
Rear dial (P41)
8
Shutter button (P39)
9
Front dial (P41)
10
Self-timer indicator (P135)/
AF Assist Lamp (P210)
11
Mode dial (P40)
12
Flash (P154)
13
Hot shoe (Hot shoe cover) (P306)
• Keep the Hot Shoe Cover out of reach of
children to prevent swallowing.
14
Stereo microphone (P207)
• Be careful not to cover the microphone with
your finger. Doing so may make sound
difficult to record.
15
Flash open lever (P154)
16
Diopter adjustment dial (P37)
17
Drive mode dial (P114)
18
[MIC] socket (P307)
19
[REMOTE] socket (P309)
20
USB socket (P297, 300)
21
[HDMI] socket (P290)
22
Shoulder strap eyelet (P18)
23
Lens release button (P31)
24
Lens lock pin
25
Mount
26
Sensor
27
Lens fitting mark (P30)
Names and Functions of Components
∫ Camera body
14
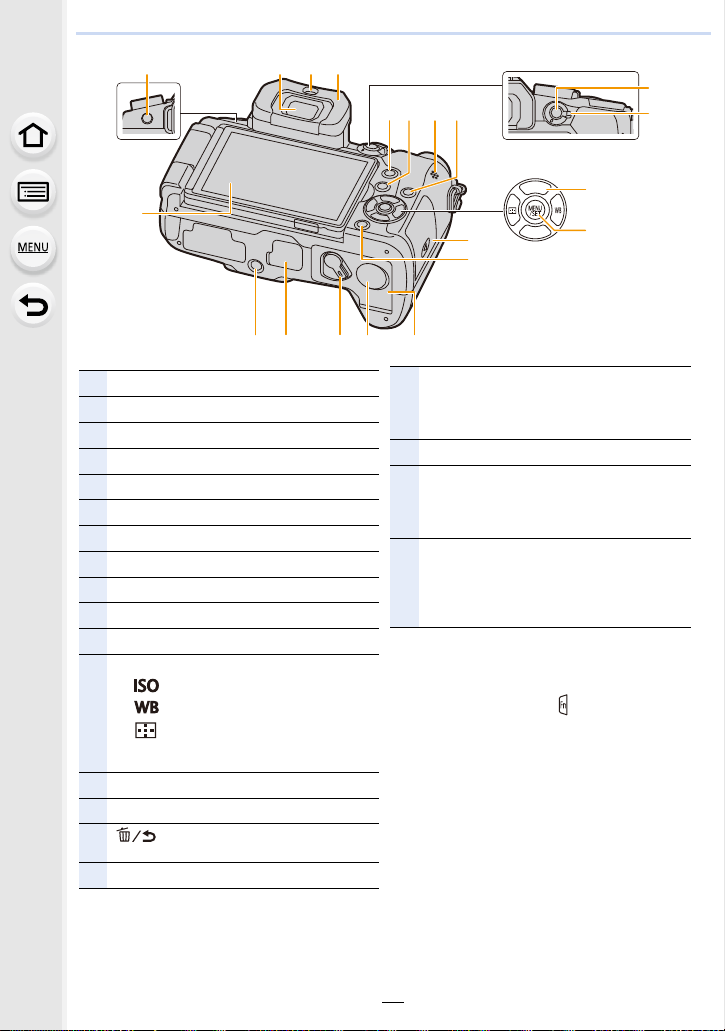
1. Before Use
リヴヰ
ョㄏピ
28
39
40
42
30 31
34
35
3633
32
47 4344
37
41
29
46 45
38
∫ About the function button ([Fn6] to
[Fn10])
•
Function buttons ([Fn6] to [Fn10]) (P55) are
touch icons. Touch the [ ] tab on the
recording screen to display them.
28
Touch screen (P48)/monitor (P311)
29
[LVF] button (P37)/[Fn5] button (P55)
30
Viewfinder (P37)
31
Eye sensor (P38)
32
Eyecup (P330)
33
[Q.MENU] button (P53)/[Fn2] button (P55)
34
[(] (Playback) button (P177)
35
Speaker (P220)
36
[DISP.] button (P45, 47)
37
[AF/AE LOCK] button (P105)
38
Focus mode lever (P89, 102)
39
Cursor buttons (P44)
3/[ ] (ISO sensitivity) (P108)
1/[ ] (White Balance) (P110)
2/[ ] (Auto Focus Mode) (P93)
4/[Fn3] (P55)
40
[MENU/SET] button (P44, 51)
41
Card door (P25)
42
[ ] (Delete/Cancel) button (P184)/
[Fn4] button (P55)
43
Battery door (P24)
44
DC coupler cover (P310)
• When using an AC adaptor, ensure that the
Panasonic DC coupler (optional) and AC
adaptor (optional) are used.
45
Release lever (P24)
46
Cover for the battery grip connector (P309)
• Keep the cover for the battery grip connector
out of reach of children to prevent
swallowing.
47
Tripod mount (P335)
• It may not be possible to attach and securely
fasten a tripod with a screw length of 5.5 mm
(0.22 inch) or more to the camera. Doing so
may also damage the camera.
15
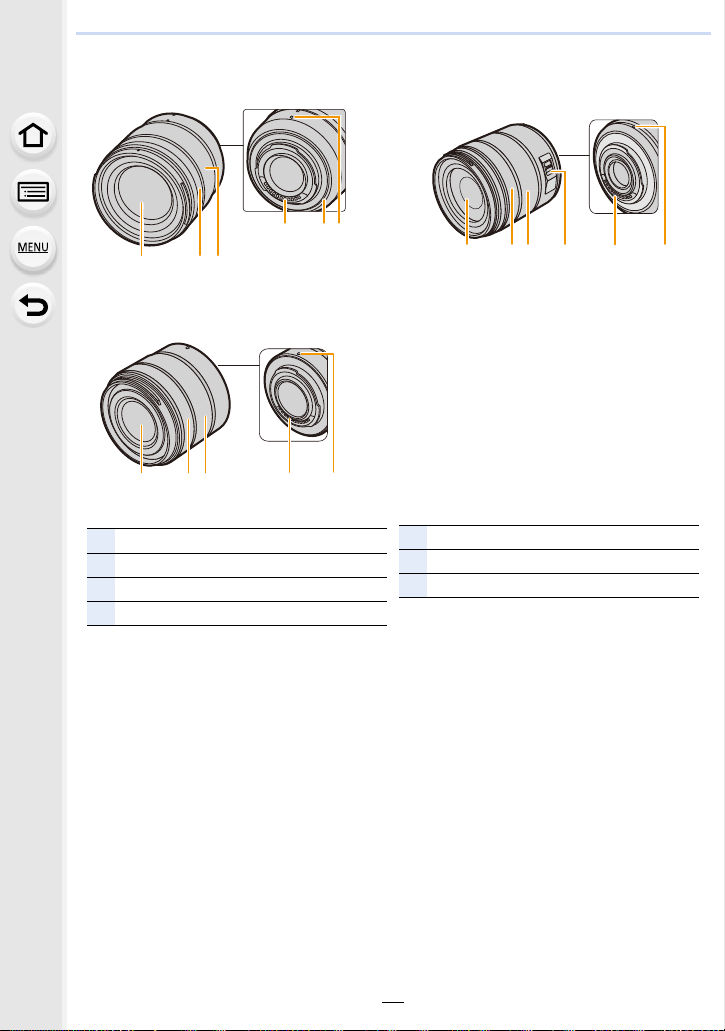
1. Before Use
1237 4 6
23 4 61
1
Lens surface
2
Focus ring (P102)
3
Zoom ring (P148)
4
Contact point
5
Lens mount rubber (P331)
6
Lens fitting mark (P30)
7
O.I.S. switch (P144)
∫ Lens
H-FS12060 H-FS14140
56
4
23
1
H-FS1442A
16
1. Before Use
About the Lens
This unit can use the dedicated lenses compatible with
the Micro Four Thirds
TM
System lens mount specification
(Micro Four Thirds mount).
You can also use a lens of any of the following
standards by attaching a mount adaptor.
Lens Mount adaptor
Four Thirds™ mount specification
lens
Leica M Mount interchangeable lens M Mount Adaptor (DMW-MA2M: optional)
Leica R Mount interchangeable lens R Mount Adaptor (DMW-MA3R: optional)
When using a Leica lens mount adaptor, set [Shoot w/o Lens] (P218) to [ON].
•
Mount Adaptor (DMW-MA1: optional)
About the lens and functions
Depending on the lens used, certain functions, such as Auto Focus, Image Stabilizer, and
zoom functions, may be disabled or operate differently.
For details on the lens used, refer to the website.
Refer to catalogs/Web pages for most current information regarding compatible lenses.
http://panasonic.jp/support/global/cs/dsc/
(This Site is English only.)
The focal length noted on the lens in use is equivalent to double when converted to the 35 mm
•
film camera.
(It will be equivalent to 100 mm lens when a 50 mm lens is used.)
About the firmware of your interchangeable lens
For smoother recording, we recommend updating the firmware of the interchangeable lens
to the latest version.
To view the latest information on the firmware or to download the firmware, visit the
•
support site below:
http://panasonic.jp/support/global/cs/dsc/
(This Site is English only.)
• To check the firmware version of the interchangeable lens, attach it to the camera body and
select [Version Disp.] in the [Setup] menu.
17
2. Getting Started/Basic Operations
A
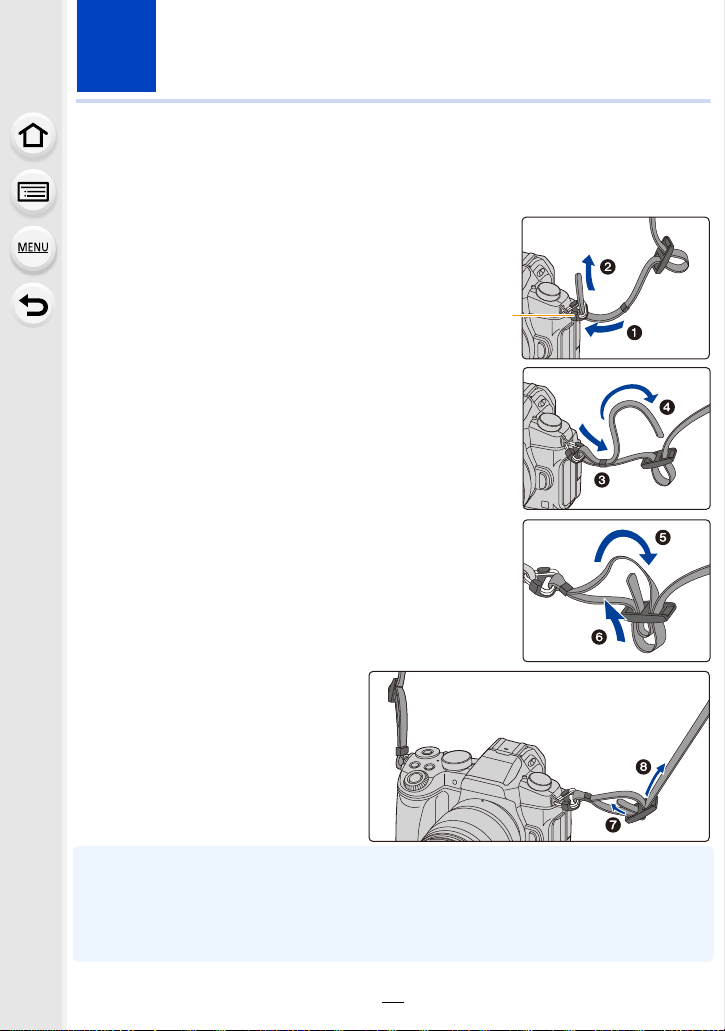
Attaching the Shoulder Strap
• We recommend attaching the shoulder strap when using the camera to prevent it from
dropping.
Pass the shoulder strap through the
1
shoulder strap eyelet on the camera body.
A: Shoulder strap eyelet
Pass the end of the shoulder strap
2
through the ring in the direction of the arrow
and then pass it through the stopper.
Pass the end of the shoulder strap
3
through the hole on the other side of the
stopper.
Pull the shoulder strap and
4
then check that it will not
come out.
• Perform steps 1 to 4 and then
attach the other side of the
shoulder strap.
• Use the shoulder strap around your shoulder.
– Do not wrap the strap around your neck.
It may result in injury or accident.
• Do not leave the shoulder strap where an infant can reach it.
– It may result in an accident by mistakenly wrapping around the neck.
18
2. Getting Started/Basic Operations
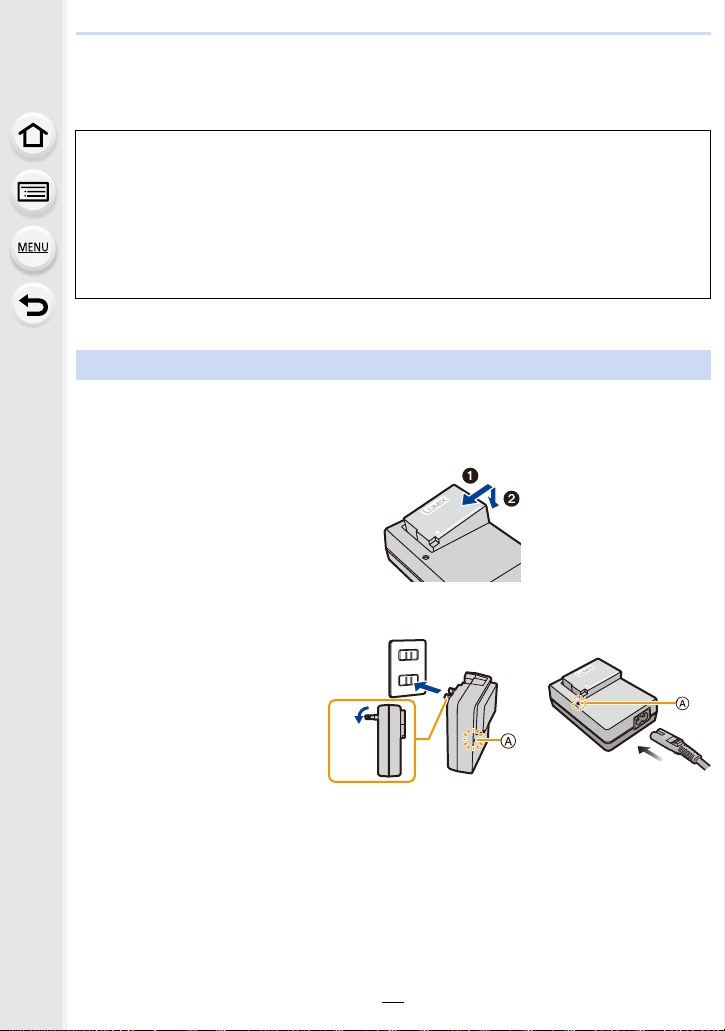
Charging the Battery
∫ About batteries that you can use with this unit
It has been found that counterfeit battery packs which look very similar to the
genuine product are made available for purchase in some markets. Some of
these battery packs are not adequately protected with internal protection to meet
the requirements of appropriate safety standards. There is a possibility that
these battery packs may lead to fire or explosion. Please be advised that we are
not liable for any accident or failure occurring as a result of use of a counterfeit
battery pack. To ensure that safe products are used, we recommend that a
genuine Panasonic battery pack is used.
Use the dedicated charger and battery.
•
Charging
• The battery is not charged when the camera is shipped. Charge the battery before use.
• Charge the battery with the charger indoors.
Attach the battery
1
paying attention to the
direction of the battery.
Connect the charger to
2
the electrical outlet.
• The [CHARGE] indicator A
lights up and charging
begins.
plug-in type inlet type
19
2. Getting Started/Basic Operations
AFSAFS
L
4:3
∫ About the [CHARGE] indicator
On: Charging.
Off: Charging has completed.
(Disconnect the charger from the electrical socket and detach the
battery after charging is completed.)
•
When the [CHARGE] indicator flashes
– The battery temperature is too high or too low. It is recommended to charge the battery again
in an ambient temperature of between 10 oC and 30 oC (50 oF and 86 oF).
– The terminals of the charger or the battery are dirty. In this case, wipe them with a dry cloth.
∫ Charging time
Charging time Approx. 140 min
•
The indicated charging time is for when the battery has been discharged completely.
The charging time may vary depending on how the battery has been used.
The charging time for the battery in hot/cold environments or a battery that has not been
used for a long time may be longer than normal.
∫ Battery indication
The indication turns red and blinks if the remaining battery power is exhausted.
•
(The status indicator also blinks)
Recharge the battery or replace it with a fully charged battery.
• Do not leave any metal items (such as clips) near the contact areas of the power plug.
Otherwise, a fire and/or electric shocks may be caused by short-circuiting or the
resulting heat generated.
• The battery can be recharged even when it still has some charge left, but it is not
recommended that the battery charge be frequently topped up while the battery is fully
charged.
(Since characteristic swelling may occur.)
20
2. Getting Started/Basic Operations
Approximate operating time and number of recordable pictures
By CIPA (Camera & Imaging Products Association) standard
When a Panasonic SDHC memory card and the supplied battery are used
∫ Recording still pictures (when using the Monitor)
When the interchangeable lens (H-FS12060) is used
Number of recordable pictures Approx. 330 pictures
Recording time Approx. 165 min
When the interchangeable lens (H-FS14140) is used
Number of recordable pictures Approx. 320 pictures
Recording time Approx. 160 min
When the interchangeable lens (H-FS1442A) is used
Number of recordable pictures Approx. 330 pictures
Recording time Approx. 165 min
∫ Recording still pictures (when using the Viewfinder)
The numbers in parentheses indicate the values that result when [Power Save LVF
Shooting] (P222) is set to [3SEC] and works as intended. (Based on the test conditions
derived from the CIPA standard and specified by Panasonic)
When the interchangeable lens (H-FS12060) is used
Number of recordable pictures Approx. 320 pictures (Approx. 800 pictures)
Recording time Approx. 160 min
When the interchangeable lens (H-FS14140) is used
Number of recordable pictures Approx. 310 pictures (Approx. 800 pictures)
Recording time Approx. 155 min
When the interchangeable lens (H-FS1442A) is used
Number of recordable pictures Approx. 320 pictures (Approx. 800 pictures)
Recording time Approx. 160 min
21
2. Getting Started/Basic Operations
∫ Recording motion pictures (when using the monitor)
[AVCHD] (Recording with picture quality set to [FHD/17M/60i])
When the interchangeable lens (H-FS12060) is used
Recordable time Approx. 120 min
Actual recordable time Approx. 60 min
When the interchangeable lens (H-FS14140) is used
Recordable time Approx. 120 min
Actual recordable time Approx. 60 min
When the interchangeable lens (H-FS1442A) is used
Recordable time Approx. 120 min
Actual recordable time Approx. 60 min
[MP4] (Recording with picture quality set to [FHD/28M/60p])
When the interchangeable lens (H-FS12060) is used
Recordable time Approx. 110 min
Actual recordable time Approx. 55 min
When the interchangeable lens (H-FS14140) is used
Recordable time Approx. 110 min
Actual recordable time Approx. 55 min
When the interchangeable lens (H-FS1442A) is used
Recordable time Approx. 110 min
Actual recordable time Approx. 55 min
22

2. Getting Started/Basic Operations
[MP4] (Recording with picture quality set to [4K/100M/30p])
When the interchangeable lens (H-FS12060) is used
Recordable time Approx. 90 min
Actual recordable time Approx. 45 min
When the interchangeable lens (H-FS14140) is used
Recordable time Approx. 90 min
Actual recordable time Approx. 45 min
When the interchangeable lens (H-FS1442A) is used
Recordable time Approx. 90 min
Actual recordable time Approx. 45 min
•
Actual recordable time is the time available for recording when repeating actions such as
turning this unit on and off, starting/stopping recording, etc.
∫ Playback (when using the monitor)
When the interchangeable lens (H-FS12060) is used
Playback time Approx. 220 min
When the interchangeable lens (H-FS14140) is used
Playback time Approx. 230 min
When the interchangeable lens (H-FS1442A) is used
Playback time Approx. 230 min
•
The operating times and number of recordable pictures will differ according to the
environment and the operating conditions.
For example, in the following cases, the operating times shorten and the number of recordable
pictures is reduced.
– In low-temperature environments, such as on ski slopes.
– When flash is used repeatedly.
• When the operating time of the camera becomes extremely short even after properly charging
the battery, the life of the battery may have expired. Buy a new battery.
23
2. Getting Started/Basic Operations
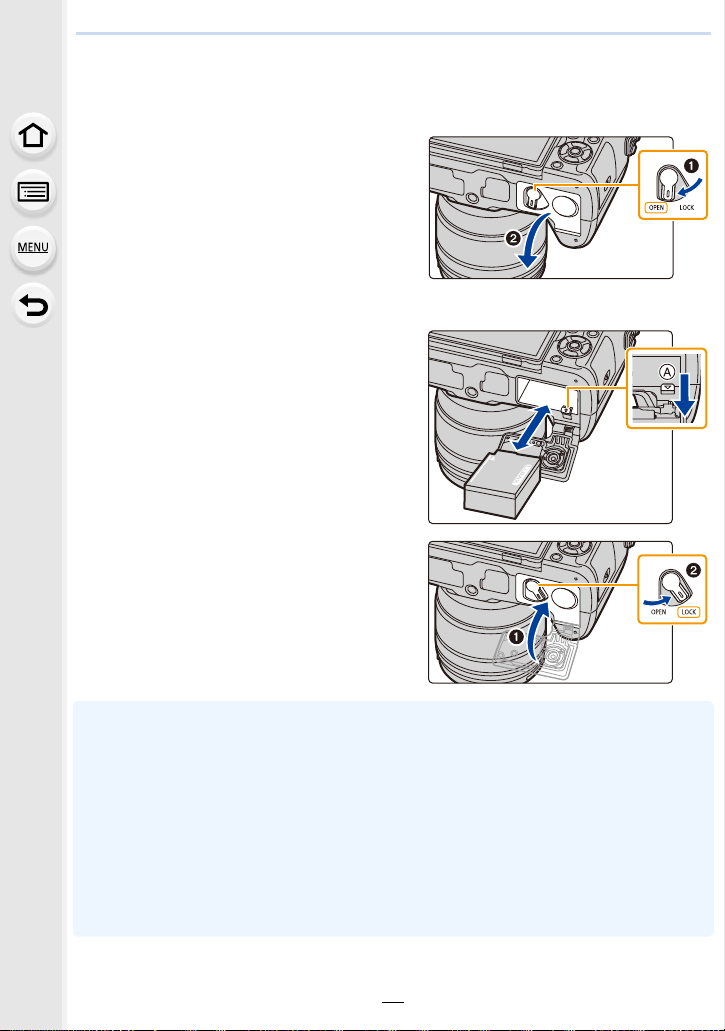
Inserting/Removing the Battery
• Check that this unit is turned off.
1: Slide the release lever in the
1
direction of the arrow (to the
OPEN side).
2: Open the battery door.
• Always use genuine Panasonic
batteries.
• If you use other batteries, we cannot guarantee the quality of this product.
Being careful about the battery
2
orientation, insert all the way until
you hear a locking sound and then
check that it is locked by lever A.
Pull the lever A in the direction of
the arrow to remove the battery.
1: Close the battery door.
3
2: Slide the release lever in the
direction of the arrow.
• Confirm that there is no foreign matter adhered on the inner side (rubber seal) of the battery
door.
• Remove the battery after use.
(The battery will be exhausted if left for a long period of time after being charged.)
• The battery becomes warm after using it and during and after charging. The camera also
becomes warm during use. This is not a malfunction.
• Before removing the battery, turn the camera off, and wait until the status indicator has gone off
completely.
(Otherwise, this unit may no longer operate normally and the card itself may be damaged or the
recorded pictures may be lost.)
• Be careful when removing the battery as the battery will jump out.
24
2. Getting Started/Basic Operations
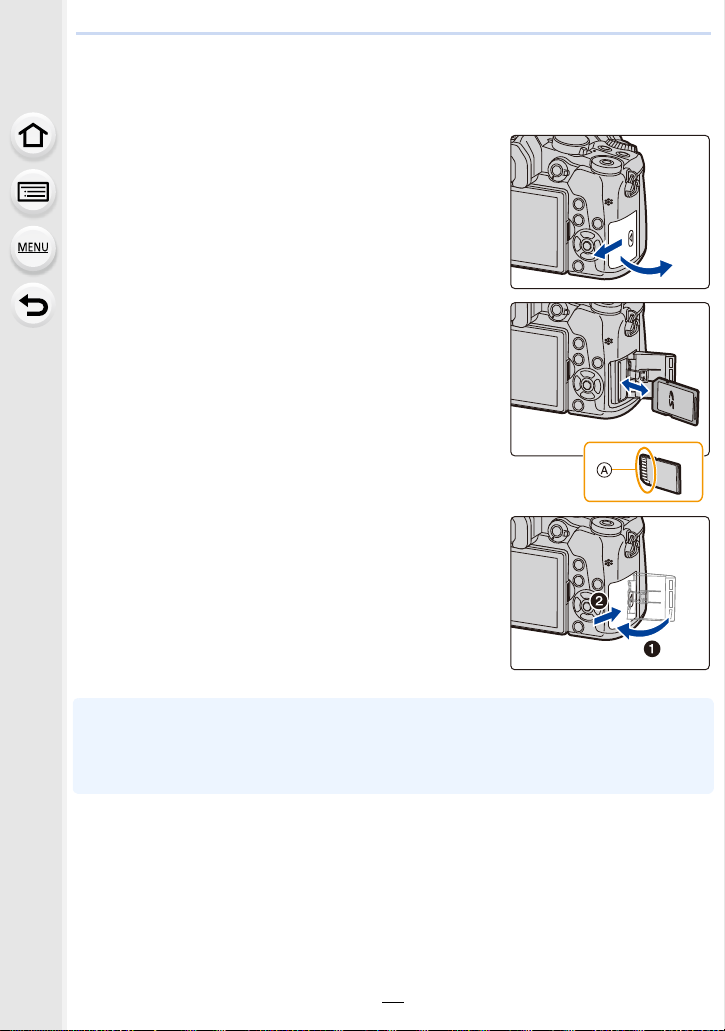
Inserting/Removing the Card (Optional)
• Check that this unit is turned off.
Slide the card door to open it.
1
Push it securely all the way until you hear a
2
“click” while being careful about the
direction in which you insert it.
To remove the card, push the card until it
clicks, then pull the card out upright.
A: Do not touch the connection terminals of the card.
1: Close the card door.
3
2: Slide the card door to the end and then
close it firmly.
• Before removing the card, turn the camera off, and wait until the status indicator has gone off
completely.
(Otherwise, this unit may no longer operate normally and the card itself may be damaged or the
recorded pictures may be lost.)
25
2. Getting Started/Basic Operations
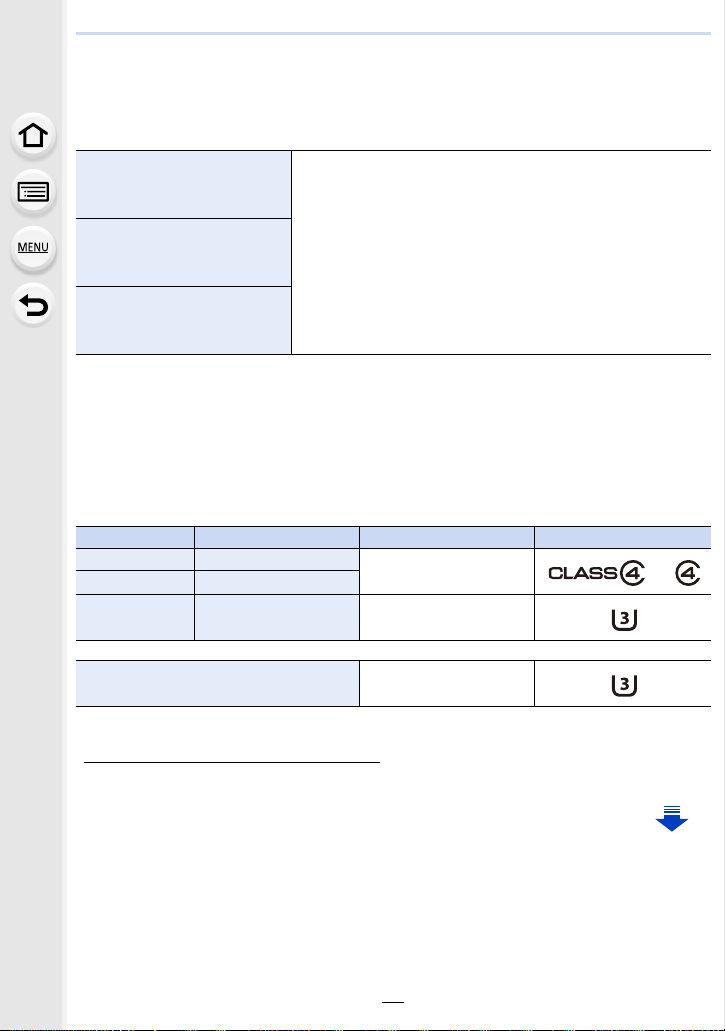
Card Information
The following cards which conform to the SD standard can be used with this unit.
(These cards are indicated as card in the text.)
SD Memory Card
(512 MB to 2 GB)
SDHC Memory Card
(4 GB to 32 GB)
SDXC Memory Card
(48 GB to 128 GB)
∫ About motion picture/4K photo recording and speed class ratings
According to the [Rec Format] (P166) and [Rec Quality] (P166) of a motion picture, the
required card differs. To record 4K photos, you need a card with a speed class rating that
supports 4K photo recording. Use a card that meets the following ratings of the SD Speed
Class or UHS Speed Class.
SD Speed Class and UHS Speed Class are the speed standards regarding continuous writing.
•
To check the class, see the labeled side, etc. of the card.
[Rec Format] [Rec Quality] Speed class Label example
[AVCHD] All
[MP4] FHD/HD
• This unit is compatible with UHS-I/UHS-II UHS Speed Class
3 standard SDHC/SDXC memory cards.
• Operation of the cards on the left has been confirmed with
Panasonic’s cards.
Class 4 or higher
[MP4] 4K UHS Speed Class 3
When recording with the 4K Photo/
Post Focus function
UHS Speed Class 3
• Please confirm the latest information on the following website.
http://panasonic.jp/support/global/cs/dsc/
(This Site is English only.)
26
2. Getting Started/Basic Operations
Access to the card
The access indication displays red when pictures are being recorded on
the card.
During access (image writing, reading and deleting, formatting etc.), do
•
not turn this unit off, remove the battery, card or disconnect the AC
adaptor (optional). Furthermore, do not subject the camera to vibration, impact or static
electricity.
The card or the data on the card may be damaged, and this unit may no longer operate
normally.
If operation fails due to vibration, impact or static electricity, perform the operation
again.
• If you set the Write-Protect switch A to “LOCK”, you may not be able to write,
delete or format the data or display it by recording date.
• The data on the card may be damaged or lost due to electromagnetic waves,
static electricity or breakdown of the camera or the card. We recommend storing
important data on a PC etc.
• Keep the Memory Card out of reach of children to prevent swallowing.
Formatting the card (initialization)
Format the card before recording a picture with this unit.
Since data cannot be recovered after formatting, make sure to back up necessary
data in advance.
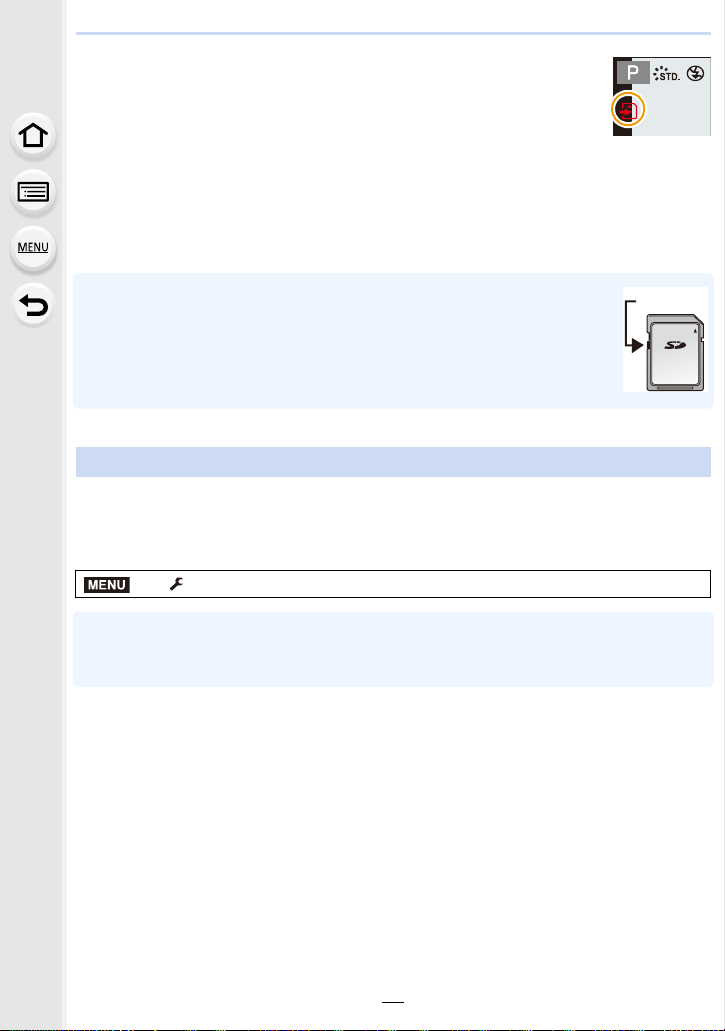
Select the menu. (P51)
MENU
> [Setup] > [Format]
Use a battery with sufficient battery power or the AC adaptor (optional) when formatting. Do not
•
turn the camera off during formatting.
• If the card has been formatted on a PC or other equipment, format it on the camera again.
27

2. Getting Started/Basic Operations
Approximate number of recordable pictures and available recording time
∫ Number of recordable pictures
•
Aspect ratio [4:3], Quality [A]
[Picture Size] 16 GB 32 GB 64 GB 128 GB
L (16M) 1810 3630 7260 14380
M (8M) 3310 6640 13000 25740
S (4M) 5670 11360 21480 42540
• Aspect ratio [4:3], Quality [ ]
[Picture Size] 16 GB 32 GB 64 GB 128 GB
L (16M) 550 1110 2230 4420
M (8M) 640 1290 2580 5120
S (4M) 700 1410 2800 5550
∫ Available recording time (when recording motion pictures)
•
“h” is an abbreviation for hour, “m” for minute and “s” for second.
• The recordable time is the total time of all the motion pictures which have been recorded.
• [AVCHD]
[Rec Quality] 16 GB 32 GB 64 GB 128 GB
[FHD/28M/60p]
1h10m 2h30m 5h00m 9h55m
[FHD/17M/60i]
[FHD/24M/30p]/
[FHD/24M/24p]
2h00m 4h5m 8h15m 16h25m
1h25m 2h55m 5h50m 11h35m
• [MP4]
[Rec Quality] 16 GB 32 GB 64 GB 128 GB
[4K/100M/30p]/
[4K/100M/24p]
[FHD/28M/60p]
[FHD/20M/30p]
[HD/10M/30p]
20m00s 41m00s 1h20m 2h45m
1h10m 2h25m 5h00m 9h55m
1h35m 3h15m 6h40m 13h15m
3h5m 6h20m 12h45m 25h20m
28

2. Getting Started/Basic Operations
• Depending on the recording conditions and the type of card, the number of recordable pictures
and available recording time vary.
• AVCHD motion pictures:
You can continue recording without interruption even if the file size exceeds 4 GB, but the
motion picture file will be divided.
• MP4 motion pictures with a [Rec Quality] size of [FHD] or [HD]:
You can continue recording without interruption even if the continuous recording time exceeds
30 minutes or the file size exceeds 4 GB, but the motion picture file will be divided and
recorded/played back separately.
• MP4 motion pictures with a [Rec Quality] size of [4K]:
Motion picture file will be recorded and played back in separate files in the following cases.
(You can continue recording without interruption.)
– When using an SDHC memory card: If the file exceeds 4 GB
– When using an SDXC memory card: If the continuous recording time exceeds 3 hours and
4 minutes or If the file exceeds 96 GB
• The maximum available continuous recording time is displayed on the screen.
29
2. Getting Started/Basic Operations
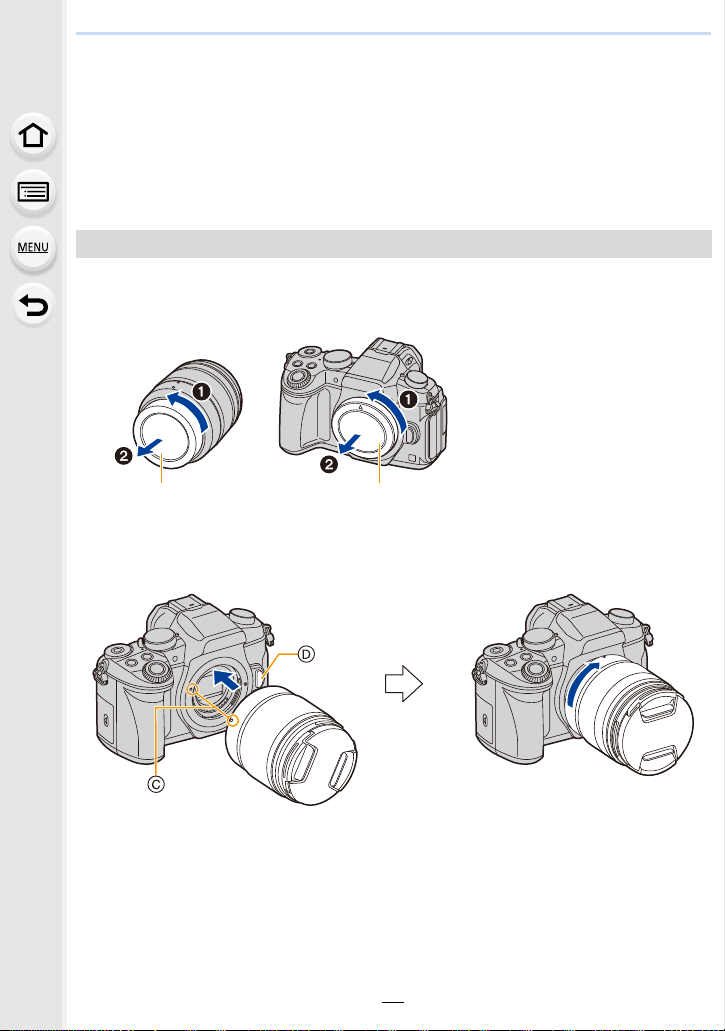
Attaching/Removing the Lens
By changing the lens, you will increase your picture taking-options and further your
enjoyment of the camera.
Check that the camera is turned off.
•
• Change lenses where there is not a lot of dirt or dust. Refer to P330 when dirt or dust gets on
the lens.
Attaching the lens
Turn the lens rear cap A and the body cap B in the direction of the
1
arrow to detach them.
Align the lens fitting marks C and then rotate the lens in the direction
2
of the arrow until it clicks.
• Do not press the lens release button D when you attach a lens.
• Do not try to attach the lens when holding it at an angle to the camera body as the lens
mount may get scratched.
30
 Loading...