

Page 1

GC
Basic Operating Instructions
Digital Camera
Model No. DMC-FZ40
Before use, please read these instructions completely.
Please also refer to the Operating
Instructions (PDF format)
contained on the CD-ROM
(supplied).
You can learn about advanced operation methods
and check the Troubleshooting.
VQT2X30
Page 2

Dear Customer,
We would like to take this opportunity to thank you for purchasing this
Panasonic Digital Camera. Please read these Operating Instructions
carefully and keep them handy for future reference. Please note that the
actual controls and components, menu items, etc. of your Digital Camera
may look somewhat different from those shown in the illustrations in these
Operating Instructions.
Carefully observe copyright laws.
• Recording of pre-recorded tapes or discs or other published or broadcast
material for purposes other than your own private use may infringe copyright
laws. Even for the purpose of private use, recording of certain material may be
restricted.
Information for Your Safety
WARNING:
TO REDUCE THE RISK OF FIRE, ELECTRIC SHOCK OR PRODUCT
DAMAGE,
• DO NOT EXPOSE THIS APPARATUS TO RAIN, MOISTURE, DRIPPING
OR SPLASHING AND THAT NO OBJECTS FILLED WITH LIQUIDS, SUCH
AS VASES, SHALL BE PLACED ON THE APPARATUS.
• USE ONLY THE RECOMMENDED ACCESSORIES.
• DO NOT REMOVE THE COVER (OR BACK); THERE ARE NO USER
SERVICEABLE PARTS INSIDE. REFER SERVICING TO QUALIFIED
SERVICE PERSONNEL.
THE SOCKET OUTLET SHALL BE INSTALLED NEAR THE
EQUIPMENT AND SHALL BE EASILY ACCESSIBLE.
∫ Product Identification Marking
Product Location
Digital camera Bottom
Battery charger Bottom
2
VQT2X30 (ENG)
Page 3

∫ About the battery pack
CAUTION
Danger of explosion if battery is incorrectly replaced. Replace only with
the same or equivalent type recommended by the manufacturer. Dispose
of used batteries according to the manufacturer’s instructions.
• Do not heat or expose to flame.
• Do not leave the battery(ies) in an automobile exposed to direct sunlight for a
long period of time with doors and windows closed.
Warn ing
Risk of fire, explosion and burns. Do not disassemble, heat above 60 xC
or incinerate.
∫ About the battery charger
CAUTION!
• DO NOT INSTALL OR PLACE THIS UNIT IN A BOOKCASE, BUILT-IN
CABINET OR IN ANOTHER CONFINED SPACE. ENSURE THE UNIT IS
WELL VENTILATED. TO PREVENT RISK OF ELECTRIC SHOCK OR FIRE
HAZARD DUE TO OVERHEATING, ENSURE THAT CURTAINS AND ANY
OTHER MATERIALS DO NOT OBSTRUCT THE VENTILATION VENTS.
• DO NOT OBSTRUCT THE UNIT’S VENTILATION OPENINGS WITH
NEWSPAPERS, TABLECLOTHS, CURTAINS, AND SIMILAR ITEMS.
• DO NOT PLACE SOURCES OF NAKED FLAMES, SUCH AS LIGHTED
CANDLES, ON THE UNIT.
• DISPOSE OF BATTERIES IN AN ENVIRONMENTALLY FRIENDLY
MANNER.
• The battery charger is in the standby condition when the AC power supply cord
is connected. The primary circuit is always “live” as long as the power cord is
connected to an electrical outlet.
(ENG) VQT2X30
3
Page 4

∫ Cautions for Use
Fuse cover
Figure A Figure B
Figure A Figure B
Fuse
(5 ampere)
Fuse
(5 ampere)
• Do not use any other AV cables except the supplied one.
• Do not use any other USB connection cables except the supplied one.
• Always use a genuine Panasonic HDMI mini cable (RP-CDHM15, RP-CDHM30;
optional).
Part numbers: RP-CDHM15 (1.5 m), RP-CDHM30 (3.0 m)
Keep this unit as far away as possible from electromagnetic equipment
(such as microwave ovens, TVs, video games etc.).
• If you use this unit on top of or near a TV, the pictures and/or sound on this unit
may be disrupted by electromagnetic wave radiation.
• Do not use this unit near cell phones because doing so may result in noise
adversely affecting the pictures and/or sound.
• Recorded data may be damaged, or pictures may be distorted, by strong
magnetic fields created by speakers or large motors.
• Electromagnetic wave radiation generated by microprocessors may adversely
affect this unit, disturbing the pictures and/or sound.
• If this unit is adversely affected by electromagnetic equipment and stops
functioning properly, turn this unit off and remove the battery or disconnect AC
adaptor (DMW-AC8G; optional). Then reinsert the battery or reconnect AC
adaptor and turn this unit on.
Do not use this unit near radio transmitters or high-voltage lines.
• If you record near radio transmitters or high-voltage lines, the recorded pictures
and/or sound may be adversely affected.
∫ How to replace the Fuse
The location of the fuse differ according to the type of AC cable (figures A
and B).
Confirm the AC cable fitted and follow the instructions below.
Illustrations may differ from actual AC cable.
1 Open the fuse cover
with a screwdriver.
2 Replace the fuse and
close or attach the fuse
cover.
4
VQT2X30 (ENG)
Page 5

-If you see this symbol-
Information on Disposal in other Countries outside
the European Union
This symbol is only valid in the European Union.
If you wish to discard this product, please contact your
local authorities or dealer and ask for the correct
method of disposal.
(ENG) VQT2X30
5
Page 6

Contents
Information for Your Safety........................................................................... 2
Standard Accessories ...................................................................................7
Names of the Components ...........................................................................8
Charging the Battery ................................................................................... 11
About the Built-in Memory/the Card ............................................................ 14
Inserting and Removing the Card (optional)/the Battery ............................. 15
Setting Date/Time (Clock Set)..................................................................... 16
• Changing the clock setting .................................................................... 16
Setting the Menu......................................................................................... 17
Selecting the [REC] Mode...........................................................................18
Taking pictures using the automatic function
ñ: Intelligent Auto Mode) ......................................................................... 20
(
• Scene Detection.................................................................................... 21
• AF Tracking Function............................................................................ 21
Taking pictures with your favourite settings
( : Programme AE Mode) ........................................................................ 22
• Programme shift....................................................................................23
Compensating the Exposure....................................................................... 24
Taking pictures by specifying the aperture/shutter speed ........................... 25
• [ ] Aperture-Priority AE .....................................................................25
• [ ] Shutter-Priority AE.......................................................................25
Taking picture by setting the exposure manually........................................ 26
Recording Motion Picture............................................................................27
Playing back Pictures ([NORMAL PLAY])...................................................28
Deleting Pictures......................................................................................... 29
Reading the Operating Instructions
(PDF format) ............................................................................................... 30
Specifications.............................................................................................. 32
6
VQT2X30 (ENG)
Page 7

Standard Accessories
3
12
45
67
89
10
VFC4453
DE-A84B
K1HA14AD0003 K1HA14CD0004
VYQ5607
DMW-BMB9E
VYQ5606
VFF0680
: K2CT39A00002
: K2CQ29A00002
Check that all the accessories are supplied before using the camera.
Product numbers correct as of July 2010. These may be subject to change.
1 Battery Pack
(Indicated as battery pack or
battery in the text)
Charge the battery before use.
2 Battery Charger
(Indicated as battery charger or
charger in the text)
3AC Cable
: Hong Kong Special Administrative
A
Region of China and Saudi Arabia
B
: Areas Other than Hong Kong
Special Administrative Region of
China and Saudi Arabia
4 USB Connection Cable
5AV Cable
6 CD-ROM
• Software:
Use it to install the software to your
PC.
7 CD-ROM
• Operating Instructions
8 Shoulder Strap
9 Lens Cap/Lens Cap String
10 Lens Hood
• SD Memory Card, SDHC Memory Card
and SDXC Memory Card are indicated
as card in the text.
• The card is optional.
You can record or play back pictures
on the built-in memory when you are
not using a card.
• Consult the dealer or your nearest
Service Centre if you lose the supplied
accessories. (You can purchase the
accessories separately.)
(ENG) VQT2X30
7
Page 8

Names of the Components
1Lens
2Flash
3 Self-Timer indicator
AF assist lamp
4 Lens hood attachment part
5 [Q.MENU] button/Delete button
6 [DISPLAY] button
7[AF/AF#/MF] button
8 LCD monitor
9 Flash open button
10 Diopter adjustment dial
11 Viewfinder
12 [EVF/LCD] button
13 [AF/AE LOCK] button
14 Rear dial
Rear dial is described as follows in these operating instructions.
e.g.: Rotating left or right e.g.: Pressing the rear dial
15 Playback button
16 [MENU/SET] button
8
VQT2X30 (ENG)
Page 9

17 Cursor buttons
AV OUT/DIGITAL
2/ Self-Timer button
4/ Function button
Assign [REC] Mode menu to 4 button. It is convenient to register [REC]
Mode menu that is used often.
[ASPECT RATIO]/[QUALITY]/[METERING MODE]/[WHITE BALANCE]/
[I.EXPOSURE]/[COLOR EFFECT]/[GUIDE LINE]/[ REC AREA]/
[REMAINING DISP.]
1/ISO
3/ Exposure compensation/
Auto Bracket/Flash output adjustment
In these operating instructions, the cursor buttons are described as shown
in the figure below or described with 3/4/2/1.
e.g.: When you press the 4 (down) button
18 Stereo microphone
19 Zoom lever
20 Shutter button
21 Motion picture button
22 [FOCUS] button
23 Power lamp
24 Camera ON/OFF switch
25 Mode dial
26 Shoulder strap eyelet
27 [HDMI] socket
28 [AV OUT/DIGITAL] socket
29 Terminal door
or
Press 4
(ENG) VQT2X30
CUST
M
9
Page 10

30 Speaker
31 Lens barrel
32 Release lever
33 Tripod receptacle
• When you use a tripod, make sure the
tripod is stable when the camera is
attached to it.
34 Card/Battery door
35 DC coupler cover
• When using an AC adaptor, ensure that
the Panasonic DC coupler (DMW-DCC6;
optional) and AC adaptor (DMW-AC8G;
optional) are used.
• Always use a genuine Panasonic AC
adaptor (DMW-AC8G; optional).
• When using an AC adaptor, use the AC
Cable supplied with the AC adaptor.
• We recommend you use a battery with
sufficient battery power or the AC adaptor
when recording motion pictures.
• If while recording motion pictures using the
AC adaptor and the power supply is cut off
due to a power outage or if the AC adaptor
is disconnected etc., the motion picture
being recorded will not be recorded.
10
VQT2X30 (ENG)
Page 11

Charging the Battery
∫ About batteries that you can use with this unit
The battery that can be used with this unit is DMW-BMB9E.
It has been found that counterfeit battery packs which look very similar
to the genuine product are made available to purchase in some markets.
Some of these battery packs are not adequately protected with internal
protection to meet the requirements of appropriate safety standards.
There is a possibility that these battery packs may lead to fire or
explosion. Please be advised that we are not liable for any accident or
failure occurring as a result of use of a counterfeit battery pack. To
ensure that safe products are used we would recommend that a genuine
Panasonic battery pack is used.
• Use the dedicated charger and battery.
• The camera has a function for distinguishing batteries which can be used
safely. The dedicated battery (DMW-BMB9E) supports this function. The
only batteries suitable for use with this unit are genuine Panasonic
products and batteries manufactured by other companies and certified by
Panasonic. (Batteries which do not support this function cannot be used).
Panasonic cannot in any way guarantee the quality, performance or safety
of batteries which have been manufactured by other companies and are
not genuine Panasonic products.
∫ Charging
•
The battery is not charged when the camera is shipped. Charge the battery
before use.
• Charge the battery with the charger indoors.
• It is recommended to charge the battery in a temperature between
10 oC to 30 oC. (The battery temperature should also be the same.)
Attach the battery paying
attention to the direction of the
battery.
(ENG) VQT2X30
11
Page 12

Connect the AC cable.
• Disconnect the charger from the
electrical socket and detach the battery
after charging is completed.
∫ About the [CHARGE] indicator
The [CHARGE]
indicator turns on: The [CHARGE] indicator A is turned on and charging will
The [CHARGE]
indicator turns off: The [CHARGE] indicator A of the charger will turn off
•
When the [CHARGE] indicator flashes
– The battery temperature is too high or too low. It is recommended to charge
the battery again in an ambient temperature of between 10 oC to 30 oC.
– The terminals of the charger or the battery are dirty. In this case, wipe them
with a dry cloth.
start.
once the charging has completed without any problem.
12
VQT2X30 (ENG)
Page 13

∫ Charging
Charging time Approx. 155 min
∫ Recording still pictures (When using the LCD monitor/Viewfinder)
Number of recordable
pictures
Recording time Approx. 290 min
Recording conditions by CIPA standard
Approx. 580 pictures
(By CIPA standard in
Programme AE Mode)
• CIPA is an abbreviation of [Camera & Imaging Products Association].
• Temperature: 23 oC/Humidity: 50%RH when LCD monitor is on.
• Using a Panasonic SD Memory Card (32 MB).
• Using the supplied battery.
• Starting recording 30 seconds after the camera is turned on. (When the Optical
Image Stabilizer Function is set to [AUTO].)
• Recording once every 30 seconds with full flash every second recording.
• Rotating the zoom lever from Tele to Wide or vice versa in every recording.
• Turning the camera off every 10 recordings and leaving it until the temperature
of the battery decreases.
∫ Playback (When using the LCD monitor/Viewfinder)
Playback time Approx. 540 min
(ENG) VQT2X30
13
Page 14
About the Built-in Memory/the Card
Built-in Memory
• Memory size: Approx. 40 MB
• The built-in memory can be used as a temporary storage device when the card
being used becomes full.
•
The access time for the built-in memory may be longer than the access time for a card.
Card
The following cards which conform to the SD video standard can be used with this unit.
(These cards are indicated as card in the text.)
Type of card which can be
used with this unit
SD Memory Card
(8 MB to 2 GB)
SDHC Memory Card
(4 GB to 32 GB)
SDXC Memory Card
(48 GB, 64 GB)
• SDHC Memory Card can be used with SDHC
Memory Card or SDXC Memory Card compatible
equipment.
• SDXC Memory Card can only be used with
SDXC Memory Card compatible equipment.
• Check that the PC and other equipment are
compatible when using the SDXC Memory
Cards.
http://panasonic.net/avc/sdcard/information/
SDXC.html
• Only cards bearing the SDHC logo (indicating that the card conforms to SD
video standards) may be used as 4 GB to 32 GB cards.
• Only cards bearing the SDXC logo (indicating that the card conforms to SD
video standards) may be used as 48 GB, 64 GB cards.
• Use a card with SD Speed Class
motion pictures in [AVCHD Lite]. Also, use a card with SD Speed Class with
“Class 6” or higher when recording motion pictures in [MOTION JPEG].
¢ SD Speed Class is the speed standard regarding continuous writing.
• Please confirm the latest information on the following website.
http://panasonic.jp/support/global/cs/dsc/
(This Site is English only.)
¢
with “Class 4” or higher when recording
Note
Keep the Memory Card out of reach of children to prevent swallowing.
•
Remarks
14
VQT2X30 (ENG)
Page 15

Inserting and Removing the Card
B
(optional)/the Battery
• Turn the power switch to [OFF] and confirm that the lens barrel is retracted.
• Close the flash.
• We recommend using a Panasonic card.
Slide the release lever in the
direction of the arrow and open the
card/battery door.
• Always use genuine Panasonic batteries
(DMW-BMB9E).
• If you use other batteries, we cannot
guarantee the quality of this product.
Battery: Insert until it is locked by
the lever A being careful about
the direction you insert it. Pull the
lever A in the direction of the
arrow to remove the battery.
Card: Push it fully until it clicks
being careful about the direction
you insert it. To remove the card,
push the card until it clicks, then
pull the card out upright.
B: Do not touch the connection terminals of the card.
• The card may be damaged if it is not fully inserted.
1:Close the card/battery door.
2:Slide the release lever in the
direction of the arrow.
OPEN
OPEN
LOCK
LOCK
(ENG) VQT2X30
15
Page 16

Setting Date/Time (Clock Set)
• The clock is not set when the camera is shipped.
Turn the camera on.
A [MENU/SET] button
B Cursor buttons
• The lens barrel extends.
Press [MENU/SET].
Press 3/4 to select the language, and press [MENU/SET].
Press [MENU/SET].
Press 2/1 to select the items
(year, month, day, hour, minute,
display sequence or time display
format), and press 3/4 to set.
• You can cancel without setting the clock by pressing [‚].
Press [MENU/SET] to set.
Press [MENU/SET].
• Press [‚] to return to the settings screen.
Changing the clock setting
Select [CLOCK SET] in the [REC] or [SETUP] menu, and press 1.
• It can be changed in steps 5 and 6 to set the clock.
16
VQT2X30 (ENG)
Page 17

Setting the Menu
This section describes how to select the Programme AE Mode settings, and the
same setting can be used for the [MOTION PICTURE] menu, [PLAYBACK] menu
and [SETUP] menu as well.
Example: Setting [AF MODE] from [Ø] to [š] in the Programme AE Mode.
Press [MENU/SET] to display the menu.
Press 3/4 to select [AF MODE], and then
press 1.
• Depending on the item, its setting may not appear or
it may be displayed in a different way.
Press 3/4 to select [š] and then press
[MENU/SET] to set.
Press [MENU/SET] to close the menu.
Switching to other menus
e.g.: Switching to the [SETUP] menu
1 Press [MENU/SET] to display the menu.
2 Press 2.
3 Press 4 to select the [SETUP] menu icon
[].
4 Press 1.
•
Select a menu item next and set it.
(ENG) VQT2X30
17
Page 18
Mode switching
CUST
M
Basic
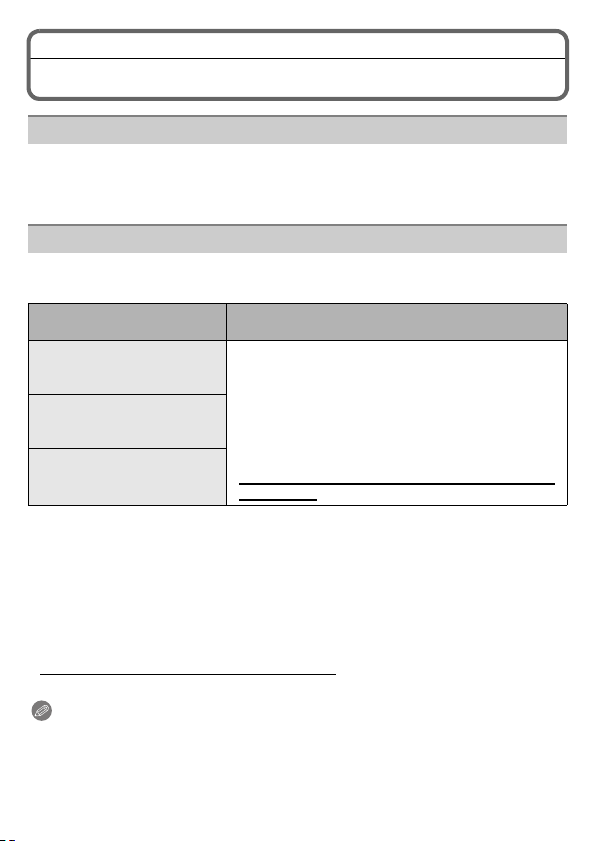
Selecting the [REC] Mode
Turn the camera on.
• The power lamp 2 lights when you turn this unit
on 1.
Switching the mode by rotating the
mode dial.
Align a desired mode with part A.
•
Rotate the mode dial slowly and surely to
adjust to each mode. (
rotates 360 o
)
∫ Basic
Intelligent Auto Mode
The subjects are recorded using settings automatically selected by the camera.
Programme AE Mode
The subjects are recorded using your own settings.
18
VQT2X30 (ENG)
The mode dial
M
CUST
Page 19

∫ Advanced
Aperture-Priority AE Mode
The shutter speed is automatically determined by the aperture value you set.
Shutter-Priority AE Mode
The aperture value is automatically determined by the shutter speed you set.
Manual Exposure Mode
The exposure is adjusted by the aperture value and the shutter speed which
are manually adjusted.
Creative Motion Picture Mode
Record motion picture with manual settings.
Custom Mode
Use this mode to take pictures with previously registered settings.
Scene Mode
This allows you to take pictures that match the scene being recorded.
My Colour Mode
Use this mode to check colouring effects, select a colour mode from among
twelve colour modes, and then take pictures.
∫ Advanced Scene Mode
Portrait Mode
Use this mode to take pictures of people.
Scenery Mode
Use this mode to take pictures of scenery.
Sports Mode
Use this mode to take pictures of sporting events, etc.
Close-up Mode
Use this mode to take pictures of a close-by subject.
Night Portrait Mode
Use this mode to take pictures of night scenes and people against night time
scenery.
(ENG) VQT2X30
19
Page 20

[REC] Mode: ñ
1
2
Taking pictures using the automatic
function
(ñ: Intelligent Auto Mode)
The camera will set the most appropriate settings to match the subject and the
recording conditions so we recommend this mode for beginners or those who
want to leave the settings to the camera and take pictures easily.
Set the mode dial to [ñ].
Hold this unit gently with both hands, keep your arms still
at your side and stand with your feet slightly apart.
Press the shutter button halfway to
focus.
• The focus indication 1 (green) lights when
the subject is focused.
• The AF area 2 is displayed around the
subject’s face by the Face Detection
function. In other cases, it is displayed at
the point on the subject which is in focus.
• The focus range is 1 cm (Wide)/1 m (Tele)
to ¶.
Press the shutter button fully
(push it in further), and take the
picture.
20
VQT2X30 (ENG)
Page 21

Scene Detection
When the camera identifies the optimum scene, the icon of the scene concerned
is displayed in blue for 2 seconds, after which its colour changes to the usual red.
¦ > [i-PORTRAIT]
[i-SCENERY]
[i-MACRO]
[i-NIGHT PORTRAIT]
[i-NIGHT SCENERY]
[i-SUNSET]
[i-BABY]
•
[¦] is set if none of the scenes are applicable, and the standard settings are set.
• When [ ],[ ] or [ ] is selected, the camera automatically detects a person’s
face, and it will adjust the focus and exposure. (Face Detection)
• Only when [ ] is selected
AF Tracking Function
It is possible to set the focus to the specified subject.
Press [FOCUS].
1
•
[ ] is displayed in the upper left of the
screen.
• AF Tracking frame is displayed in the centre
of the screen.
• Press [FOCUS] again to cancel.
2 Bring the subject to the AF Tracking
frame, and press [AF/AE LOCK] to lock
the subject.
AF tracking frame will turn yellow.
•
• An optimum scene for the specified subject
will be chosen.
• Press [FOCUS] to cancel.
(ENG) VQT2X30
21
Page 22

[REC] Mode: ³
CUST
M
Taking pictures with your favourite
settings
( : Programme AE Mode)
The camera automatically sets the shutter speed and the aperture value
according to the brightness of the subject.
You can take pictures with greater freedom by changing various settings in [REC]
menu.
Set the mode dial to [ ].
Aim the AF area at the point you
want to focus on.
Press the shutter button halfway to
focus.
• The focus range is 30 cm (Wide)/
2 m (Tele) to ¶.
Press the halfway pressed shutter
button fully to take a picture.
22
VQT2X30 (ENG)
Page 23

Programme shift
1 2 3 4 5 6 7 8 9 10 11 12 13
1 1
/
2
1
/
4
1
/
8
1
/
15
1
/
30
1
/
60
1
/
125
1
/
250
1
/
500
1
/
1000
1
/
2000
2
2.8
4
5.6
8
11
(B)
(A)
14
In Programme AE Mode, you can change the preset
aperture value and shutter speed without changing
the exposure. This is called programme shift.
You can make the background more blurred by
decreasing the aperture value or record a moving
subject more dynamically by slowing the shutter
speed when taking a picture in Programme AE Mode.
• Press the shutter button halfway and then use the rear dial to activate
programme shift while the aperture value and the shutter speed are displayed on
the screen (about 10 seconds).
• The programme shift indication A appears on the screen when programme shift
is activated.
• Programme shift is cancelled if the camera is turned off or the rear dial is rotated
until the programme shift indication disappears.
∫ Example of programme shift
(A): Aperture value
(B): Shutter speed
1 Programme shift amount
2 Programme shift line chart
3 Programme shift limit
(ENG) VQT2X30
23
Page 24
[REC] Mode:
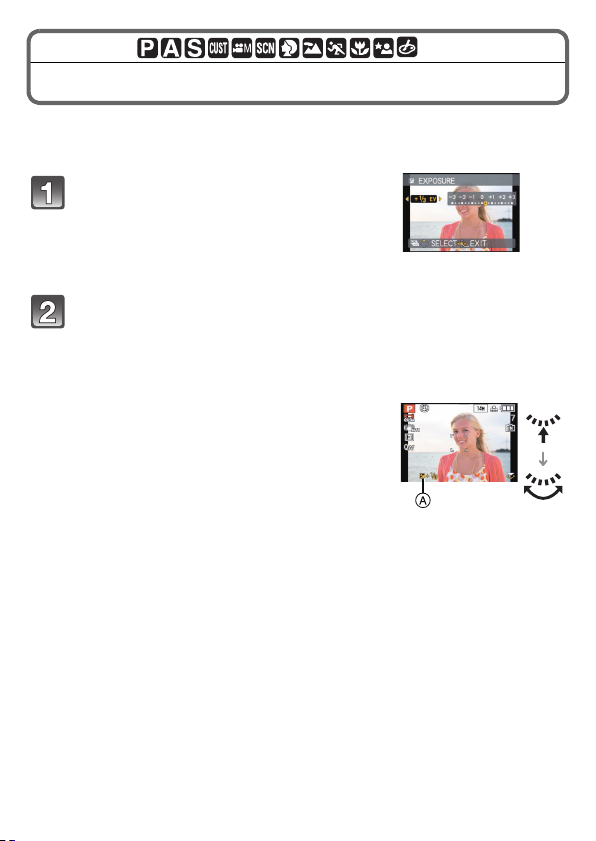
Compensating the Exposure
Use this function when you cannot achieve appropriate exposure due to the
difference in brightness between the subject and the background.
Press 3 [È] until [EXPOSURE]
appears, compensate the exposure
with 2/1.
• Select [0 EV] to return to the original
exposure.
Press [MENU/SET] to finish.
• You can also press the shutter button halfway
to finish.
∫ Operate with the rear dial
1 Press the rear dial to select [È], and then
rotate the rear dial to compensate the
exposure.
A Exposure compensation value
2 Press the shutter button halfway to finish.
24
VQT2X30 (ENG)
Page 25

[REC] Mode:
Taking pictures by specifying the aperture/
shutter speed
[ ] Aperture-Priority AE
Set the aperture value to a higher number when you want a sharp focus
background. Set the aperture value to a lower number when you want a soft focus
background.
Set the mode dial to [ ].
Rotate the rear dial to set the
aperture value.
Take a picture.
[ ] Shutter-Priority AE
When you want to take a sharp picture of a fast moving subject, set with a faster
shutter speed. When you want to create a trail effect, set to a slower shutter
speed.
Set the mode dial to [ ].
Rotate the rear dial to set the
shutter speed.
Take a picture.
(ENG) VQT2X30
25
Page 26

[REC] Mode:
Taking picture by setting the exposure
manually
Determine the exposure by manually setting the aperture value and the shutter
speed.
Set the mode dial to [²].
• The Manual Exposure Assistance A appears for about 10 seconds.
Rotate the rear dial to set the
aperture and shutter speed.
B Aperture Value
C Shutter Speed
• It will switch between aperture setting
operation and shutter speed setting
operation every time the rear dial is pressed.
Press the shutter button halfway.
• The Manual Exposure Assistance A
appears for about 10 seconds.
• Set the aperture value and the shutter
speed again when the exposure is not
adequate.
Take the picture.
∫ Manual Exposure Assistance
The exposure is adequate.
Set to faster shutter speed or larger aperture value.
Set to slower shutter speed or smaller aperture value.
•
The Manual Exposure Assistance is an approximation.
26
VQT2X30 (ENG)
Page 27

[REC] Mode:
B
A
C
Advanced (Recording pictures)
Recording Motion Picture
This can record high definition motion pictures compatible with the AVCHD
format or motion pictures recorded in Motion JPEG.
Audio will be recorded in stereo.
• Close the flash. (It is recommended that you close the flash when recording
motion pictures. However, leaving the flash open will not result in a significant
difference in sound quality.)
M
Select the mode.
Start recording by pressing the
motion picture button.
A Available recording time
B Elapsed recording time
• Release the motion picture button right
after you press it.
• The recording state indicator (red) C will
flash while recording motion pictures.
Stop the recording by pressing the motion picture button
again.
• If the built-in memory or the card becomes full in the middle of recording,
the camera stops recording automatically.
Note
Motion picture recorded continuously in [MOTION JPEG] is up to 2 GB. Only the
•
maximum recordable time for 2 GB is displayed on the screen.
• Maximum time to record motion pictures continuously with [AVCHD Lite] is
13 hours 3 minutes 20 seconds. Screen will only display up to 13 hours
3 minutes 20 seconds. However, the recording may stop before that depending
on the remaining battery level.
CUST
CUST
M
(ENG) VQT2X30
27
Page 28

[PLAYBACK] Mode: ¸
Playing back Pictures ([NORMAL PLAY])
Press [(].
Press 2/1 to select the picture.
• After selecting the motion picture, press 3
to start playback.
28
VQT2X30 (ENG)
Page 29

[PLAYBACK] Mode: ¸
Deleting Pictures
Once deleted, pictures cannot be recovered.
• Pictures on the built-in memory or the card, which are being played back will be
deleted.
Select the picture to be deleted,
and then press [‚].
Press 2 to select [YES] and then
press [MENU/SET].
(ENG) VQT2X30
29
Page 30

Reading the Operating Instructions
(PDF format)
• You have practised the basic operations introduced in these operating
instructions and want to progress to advanced operations.
• You want to check the Troubleshooting.
In these kinds of situations refer to Operating Instructions (PDF format) contained
on the CD-ROM (supplied).
∫ For Windows
Turn the PC on and insert the CD-ROM containing the
Operating Instructions (supplied).
Select the desired language
and then click [Operating
Instructions] to install.
Double click the “Operating
Instructions” shortcut icon on
the desktop.
30
VQT2X30 (ENG)
Page 31

∫ When the Operating Instructions (PDF format) will not open
You will need Adobe Acrobat Reader 5.0 or later or Adobe Reader 7.0 or later to
browse or print the Operating Instructions (PDF format).
Insert the CD-ROM containing the Operating Instructions (supplied), click A and
then follow the messages on the screen to install.
(Compatible OS: Windows 2000 SP4/Windows XP SP2 or SP3/Windows Vista
SP1 or SP2/Windows 7)
• You can download and install a version of Adobe Reader that you can use with
your OS from the following Web Site.
http://get.adobe.com/reader/otherversions
∫ To uninstall the Operating Instructions (PDF format)
Delete the PDF file from the “Program Files\Panasonic\Lumix\” folder.
• When the contents in the Program Files folder cannot be displayed, click the
[Show the contents of this folder] to display them.
∫ For Macintosh
Turn the PC on and insert the CD-ROM containing the
Operating Instructions (supplied).
Open the “Manual” folder in the CD-ROM and then copy
the PDF file with the desired language inside the folder.
Double click the PDF file to open it.
(ENG) VQT2X30
31
Page 32

Others
Specifications
Digital Camera: Information for your safety
Power Source: DC 8.4 V
Power
Consumption: 1.3 W (When recording with LCD Monitor)
Camera effective
pixels
: 14,100,000 pixels
Image sensor:
Lens:
Digital Zoom: Max. 4k
Extra
Optical Zoom:
1.1 W (When recording with Viewfinder)
0.7 W (When playing back with LCD Monitor)
0.5 W (When playing back with Viewfinder)
1/2.33q CCD, total pixel number 14,500,000 pixels,
Primary colour filter
Optical 24k zoom f = 4.5 mm to 108 mm
35 mm film camera conversion:
25 mm to 600 mm (4:3),
27 mm to 654 mm (still pictures 16:9),
29 mm to 693 mm (motion pictures 16:9),
26 mm to 624 mm (3:2),
30 mm to 709 mm (1:1)
Wide end: F2.8 to F8.0
(when recording motion pictures: F2.8 to F11)
Tele end: F5.2 to F8.0
(when recording motion pictures: F5.2 to F11)
Max. 50.6k
(When set to 3,000,000 pixels [3M] or less)
32
VQT2X30 (ENG)
Page 33

Focus range: AF: 30 cm (Wide)/2 m (Tele) to 
Shutter system:
AF Macro/MF/Intelligent Auto:
1 cm (Wide)/1 m (Tele) to 
Scene Mode: There may be differences in the above
settings.
Electronic shutteriMechanical shutter
Burst recording
Burst speed: Approx. 1.8 pictures/second
Number of
recordable
pictures: Max. 5 pictures (Standard), Max. 3 pictures (Fine).
Hi-speed burst
Burst speed: Approx. 10 pictures/second (Speed priority)
Approx. 6 pictures/second (Image priority)
[3M (4:3), 2.5M (3:2), 2M (16:9) or 2.5M (1:1) is selected
as the picture size.]
Number of
recordable
pictures: Approx. 15 to 100
Minimum
illuminance: Approx. 6 lx (when i-low light is used)
Shutter speed
Still picture: 60 seconds to 1/2000th of a second
Motion pictures: 1/30 to 1/20000th of a second
Exposure (AE): Programme AE (P)/Aperture-Priority AE (A)/
Metering mode: Multiple/Centre weighted/Spot
[STARRY SKY] Mode: 15 seconds, 30 seconds,
60 seconds
Creative Motion Picture Mode
(Manual Exposure/Manual Focus): 1/8 to 1/20000th of a
second
Shutter-Priority AE (S)/Manual Exposure (M)
Exposure compensation (1/3 EV Step, j3EV to i3EV)
(ENG) VQT2X30
33
Page 34

LCD monitor: 3.0q TFT LCD (3:2)
Viewfinder: Colour LCD Viewfinder (Approx. 202,000 dots)
Flash: Built-in pop up flash
Microphone: Stere o
Speaker: Monaural
Recording media: Built-in Memory (Approx. 40 MB)/SD Memory Card/
Recording file format
Still Picture: JPEG (based on “Design rule for Camera File system”,
Motion pictures
with audio: AVCHD Lite/QuickTime Motion JPEG
Interface
Digital: “USB 2.0” (High Speed)
Analogue video/
audio: NTSC/PAL Composite (Switched by menu)
Ter mi nal
[AV OUT/DIGITAL]: Dedicated jack (14 pin)
[HDMI]: MiniHDMI TypeC
(Approx. 230,000 dots) (field of view ratio about 100%)
(field of view ratio about 100%)
(with diopter adjustment j4 to i4 diopter)
Flash range: [ISO AUTO]
Approx. 30 cm to 9.5 m (Wide)
AUTO, AUTO/Red-eye reduction, Forced flash ON
(Forced ON/Red-eye reduction), Slow sync./
Red-eye reduction, Forced flash OFF
SDHC Memory Card/SDXC Memory Card
based on “Exif 2.3” standard)/RAW, DPOF corresponding
Audio line output (stereo)
34
VQT2X30 (ENG)
Page 35

Dimensions: Approx. 120.3 mm (W)k79.8 mm (H)k91.9 mm (D)
Mass: Approx. 498 g (with card and battery)
Operating
temperature:
Operating humidity: 10%RH to 80%RH
Battery Charger
(Panasonic
DE-A84B): Information for your safety
Input: AC 110 V to 240 V, 50/60 Hz, 0.15 A
Output: DC 8.4 V, 0.43 A
Battery Pack
(lithium-ion)
(Panasonic
DMW-BMB9E): Information for your safety
Voltage/capacity: 7.2 V/895 mAh
(excluding the projecting parts)
Approx. 454 g (excluding card and battery)
0 oC to 40 oC
(ENG) VQT2X30
35
Page 36

• SDXC Logo is a trademark of SD-3C, LLC.
Panasonic Corporation
Web Site: http://panasonic.net
Panasonic Corporation 2010
• The “AVCHD”, “AVCHD Lite” and the “AVCHD”, “AVCHD Lite” logo are
trademarks of Panasonic Corporation and Sony Corporation.
• Manufactured under license from Dolby Laboratories.
Dolby and the double-D symbol are trademarks of Dolby Laboratories.
• HDMI, the HDMI Logo, and High-Definition Multimedia Interface are
trademarks or registered trademarks of HDMI Licensing LLC in the United
States and other countries.
• HDAVI Control™ is a trademark of Panasonic Corporation.
• QuickTime and the QuickTime logo are trademarks or registered trademarks
of Apple Inc., used under license therefrom.
• Microsoft product screen shot(s) reprinted with permission from Microsoft
Corporation.
• Other names, company names, and product names printed in these
instructions are trademarks or registered trademarks of the companies
concerned.
This product is licensed under the AVC patent portfolio license for the personal
and non-commercial use of a consumer to (i) encode video in compliance with
the AVC Standard (“AVC Video”) and/or (ii) decode AVC Video that was
encoded by a consumer engaged in a personal and non-commercial activity
and/or was obtained from a video provider licensed to provide AVC Video. No
license is granted or shall be implied for any other use. Additional information
may be obtained from MPEG LA, LLC. See http://www.mpegla.com
.
 Loading...