

Page 1
Operating Instructions
for advanced features
Digital Camera
Model No. DMC-FZ35
Before connecting, operating or adjusting this product,
please read the instructions completely.
VQT2F10
Page 2

Contents
Before Use
Quick Guide ..............................................5
Standard Accessories ............................... 7
Names of the Components ....................... 8
Attaching the Lens Cap/
Shoulder Strap ........................................ 11
Attaching the Lens Hood.........................13
Preparation
Charging the Battery ............................... 15
• About the Battery (charging/
number of recordable pictures).........18
Inserting and Removing the Card
(optional)/the Battery ...............................20
About the Built-in Memory/the Card ........22
Setting Date/Time (Clock Set)................. 24
• Changing the clock setting ................25
Setting the Menu .....................................26
• Setting menu items ........................... 27
• Using the quick menu .......................29
About the Setup Menu ............................30
Basic
Selecting the [REC] mode, and recording
still pictures or motion pictures ................ 39
• Taking the still picture .......................42
• Recording the motion picture ............42
Taking pictur es using the automatic
function (Intelligent Auto Mode) .............. 43
• Scene detection ................................ 44
• AF Tracking Function........................45
• Settings in Intelligent Auto Mode ...... 46
Taking pictur es wit h your favor ite
settings (Program AE Mode) ...................48
• Focusing ........................................... 49
• When the subject is not in focus
(such as when it is not in the center
of the composition of the pictur e
you want to take) ..............................49
• Preventing jitter (camera shake) .......50
• Direction detection function...............50
• Enlarge the focus point
(display focus point).......................... 50
• Program shift.....................................51
Taking Pictures with the Zoom ................52
• Using the Optical Zoom/
Using the Extended Optical zoom
(EZ)/Using the Digital Zoom..............52
Playing back Pictures
([NORMAL PLAY]) ..................................55
• Confirm the picture in [REC] Mode
(Review)............................................56
• Displaying Mult iple Screens
(Multi Playback) ................................56
• Using the Playback Zoom .................56
• Switching the [PLAYBACK] Mode .....57
Deleting Pictures .....................................58
• To delete a single picture ..................58
• To delete multiple pictures
(up to 50) or all the pictures ..............59
Advanced (Recording pictures)
About the LCD Monitor/Viewfinder ..........60
Taking Pictures using the
Built-in Flash............................................64
• Switching to the appropriate
flash setting.......................................64
Taking Close-up Pictures ........................70
• [AF MACRO] ....................................71
• [MACRO ZOOM] ..............................72
Taking Pictures with the Self-timer..........73
Compensating the Exposure ...................75
Taking Pictures using Auto Bracket/
Color Bracket...........................................76
• Auto Bracket......................................76
• Color Bracket ....................................77
Taking Pictures using Burst Mode...........78
Taking pictures by specifying the
aperture / shutter speed ..........................80
• Aperture-priority AE ..........................80
• Shutter-priority AE ............................80
Taking a picture by setting the exposure
manually..................................................81
Aperture Value and Shutter Speed .........82
Taking Pictures with Manual Focus.........83
• MF ASSIST .......................................84
Taking pictures while adjusting color
(My color mode) ......................................86
Registering Personal Menu Settings
(Registering custom settings)..................88
Taking pictures in Custom Mode .............89
Taking expressive portraits and
landscape pictures
(Advanced Scene Mode).........................90
• [PORTRAIT] .....................................91
• [SCENERY] ......................................92
• [SPORTS] ........................................92
• [CLOSE-UP] .....................................93
- 2 -
Page 3

• [NIGHT PORTRAIT].........................94
Taking pictur es that match the scene
being recorded (Scene Mode)................. 95
• [PANORAMA ASSIST]..................... 96
• [PARTY] ........................................... 97
• [CANDLE LIGHT] ............................. 97
• [BABY1]/ [BABY2] ............................ 98
• [PET] ................................................ 99
• [SUNSET] ........................................ 99
• [HIGH SENS.] .................................. 99
• [HI-SPEED BURST] ....................... 100
• [FLASH BURST] ............................101
• [PANNING]..................................... 102
• [STARRY SKY] ..............................103
• [FIREWORKS] ...............................104
• [BEACH]......................................... 105
• [SNOW] .......................................... 105
• [AERIAL PHOTO] .......................... 105
• [PIN HOLE] ....................................106
• [FILM GRAIN] ................................106
• [HIGH DYNAMIC] ..........................107
• [PHOTO FRAME]...........................107
Recording Motion Picture......................108
• Changing [REC MODE] and
[REC QUALITY].............................. 112
Recording Motion Pictures with
Manual Settings
(Creative Motion Picture Mode) ............ 115
Taking a picture with Face Recognition
function..................................................117
• Face Settings ..................................118
• Auto Registration ............................122
• Sensitivity ........................................123
Useful Functions at Travel
Destinations .......................................... 124
• Recording which Day of the
Vacation and the Location of the
Vacation ..........................................124
• Reco rding Dates/Times at
Overseas Travel Destinations
(World Time) ...................................127
Using the [REC] Mode menu ................ 129
• [PICTURE SIZE] ............................129
• [QUALITY]......................................130
• [ASPECT RATIO]...........................131
• [INTELLIGENT ISO].......................131
• [SENSITIVITY] ............................... 132
• [ISO LIMIT SET].............................132
• [WHITE BALANCE]........................133
• [FACE RECOG.] ............................135
• [AF MODE]..................................... 136
• [PRE AF] ........................................140
• [AF/AE LOCK]................................141
• [METERING MODE] ......................142
• [I.EX POSURE] (Intelligent exposure
adjustment) .....................................142
• [MIN. SHTR SPEED]......................143
• [DIGITAL ZOOM] ...........................143
• [COLOR EFFECT] .........................144
• [PICT. ADJ.] ...................................144
• [STABILIZER].................................145
• [AF ASSIST LAMP] ........................146
• [FLASH SYNCHRO].......................147
• [RED-EYE REMOVAL] ...................147
• [CONVERSION] .............................148
• [CLOCK SET] .................................148
Using the [MOTION PICTURE] Mode
menu .....................................................149
• [REC MODE] ..................................149
• [REC QUALITY] .............................149
• [EXPOSURE MODE] .....................149
• [CONTINUOUS AF] .......................150
• [WIND CUT] ...................................150
Advanced (Playback)
Playing Back Pict ures in Sequence
(Slide Show) ..........................................151
Selecting Pictures and Playing them
Back ([MODE PLAY]/
[CATEGORY PLAY]/
[FAVORITE PLAY]) ...............................154
• [MODE PLAY] ................................154
• [CATEGORY PLAY] .......................154
• [FAVORITE PLAY] .........................155
Playing Back Motion Pictures ................156
• Motion pictures ................................156
Using the [PLAYBACK] Mode menu .....157
• [CALENDAR]..................................157
• [TITLE EDIT] ..................................158
• [TEXT STAMP]...............................160
• [RESIZE] Reducing the picture size
(number of pixels) ...........................162
• [TRIMMING] ...................................163
• [LEVELING]....................................164
• [ROTATE DISP.] ............................165
• [FAVORITE] ...................................166
• [PRINT SET] ..................................167
• [PROTECT] ....................................169
• [FACE REC EDIT] ..........................170
• [COPY] ...........................................171
Connecting to other equipment
Playing Back Pictures on a TV Screen..... 172
• Playing back pictures using the
AV cable (supplied).........................172
• Playing back pictures on a TV with
an SD Memory Card slot.................173
- 3 -
Page 4

• Playing back on the TV with
HDMI socket ...................................173
Saving the recorded still pictures and
motion pictures ...................................... 179
• Copy the playback image using
an AV cable ....................................179
• Copying to a PC ..............................180
Connecting to a PC ...............................180
Printing the Pictures ..............................184
• Selecting a single picture and
printing it ......................................... 185
• Selecting multiple pictures and
printing them ...................................186
• Print Settings...................................187
Using the Conversion Lens
(optional) ...............................................190
Using the Protector/Filter ......................192
Others
Screen Display ...................................... 193
Cautions for Use ...................................196
Message Display ................................... 201
Troubleshooting ....................................204
Number of Recordable Pictures and
Available Recording Time .....................215
- 4 -
Page 5

Before Use
Before Use
Quick Guide
This is an overview of how to record and play back pictures with the camera. For each
step, be sure to refer to the pages indicated in brackets.
Charge the battery. (P15)
• The battery is not charged when the
camera is shipped. Charge the battery
before use.
Insert the battery and the card.
(P20)
• When you do not use the card, you can
record or play back pictures on the
built-in m emory. (P22) Refer to P23
when you use a card.
plug-in type
90°
inlet type
Turn the camera on to take
pictures.
1 Slide the [REC]/[PLAYBACK] selector
switch to [!].
2 Press the shutter button to take
pictures. (P42)
- 5 -
Page 6

Before Use
Play back the pictures.
1 Slide the [REC]/[PLAYBACK] selector
switch to [(].
2 Select the picture you want to view.
(P55)
- 6 -
Page 7

Before Use
Standard Accessories
Check that all the accessories are included before using the camera.
The accessories and their shape will differ depending on the country or area where the camera
•
was purc hased.
For details on the accessories, refer to Basic Operating Instructions.
• Battery Pack is indicated as battery pack or battery in the text.
• Battery Charger is indicated as battery charger or charger in the text.
• SD Memory Card and SDHC Memory Card are indicated as card in the text.
• The card is optional.
You can record or play back pictures on the built-in memory when you are not using a
card.
• If any accessories are lost, customers in the USA and Puerto Rico should contact Panasonic’s
parts department at 1 800 833-9626 and customers in Canada should contact 1 800 99 -LUMIX
(1-800-995-8649) for further information about obtaining replacement parts.
- 7 -
Page 8
Before Use
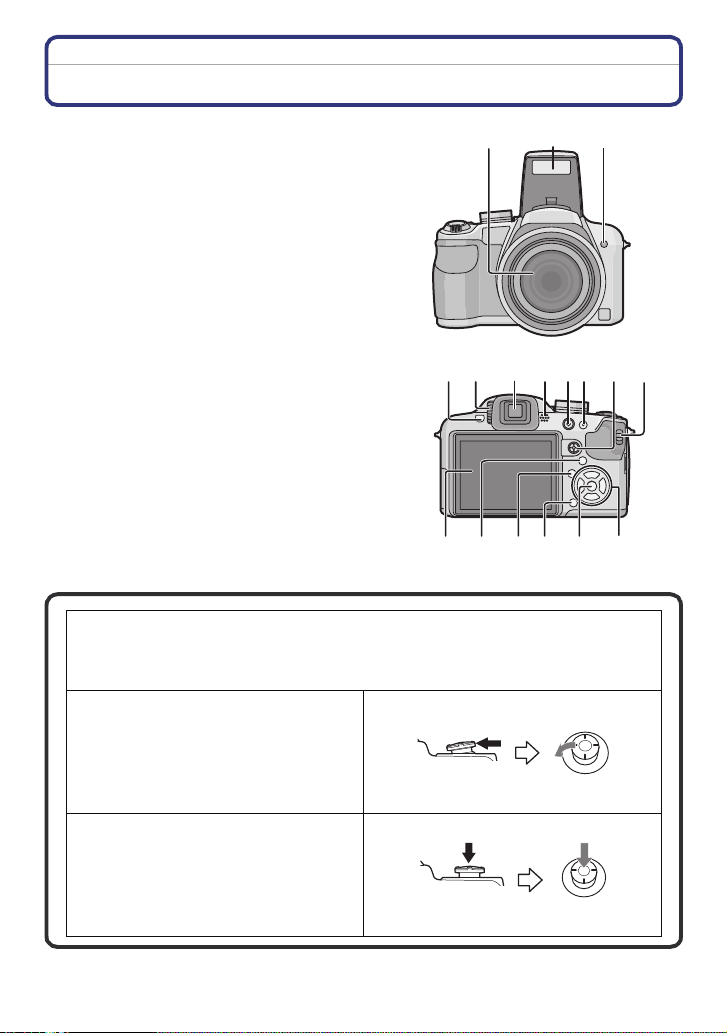
Names of the Components
1Lens (P197)
2Flash (P64)
3 Self-timer indicator (P73)
AF assist lamp (P146)
4 Flash open button (P64)
5 Diopter adjustment dial (P61)
6 Viewfinder (P60, 193)
7 Speaker (P156)
8 Motion picture button (P42, 108)
9 [AF/AE LOCK] button (P45, 138, 141)
10 Joystick (P29, 51, 75, 80, 81, 83, 115 )
The joystick is operated in two different ways: it can be moved in the up, down, left
and right directions to perform an operation, or it can be pressed to select. In these
operating instructions, it is pictured as shown in the figure below or described with
3/4/2/1.
Example: When the joystick is moved
toward 2 (left)
Place your finger on the right side of the
joystick, and move the joystick toward
the left.
Push the joystick straight in.
123
6
7109845
12
14
13
or Move 2
15
16
11
17
- 8 -
or Press
Page 9
Before Use
11 [REC]/[PLAYBACK] selector switch (P26)
12 LCD monitor (P60, 193)
13 [EVF/LCD] button (P60)
14 [DISPLAY] button (P60)
15 Delete button (P58)/
Single or Burst Mode button (P78)
16 [MENU/SET] button (P24)
17 Cursor buttons
2/ Self-timer button (P73)
4/ Function button (P31)
Assign [REC] Mode menu to 4 button. It is convenient to register [REC] Mode
menu that is used often.
[REVIEW]/[SENSITIVITY]/[WHITE BALANCE]/[METERING MODE]/[AF MODE]/
[I.EXPOSURE]
1/ Flash setting button (P64)
3/ Exposure compensation (P75)/
Auto Bracket (P76)/Color Bracket (P77)/Flash output adjustment (P67)
In these operating instructions, the cursor buttons are described as shown in the
figure below or described with 3/4/2/1.
e.g.: When you press the 4 (down) button
18 Stereo microphone (P109)
19 Zoom lever (P52)
20 Shutter button (P43)
21 [FOCUS] button (P45, 85, 139)
22 Mode dial (P39)
23 Camera ON/OFF switch (P24)
24 Power lamp (P39)
25 [AF/AF#/MF] button (P70, 83)
- 9 -
or
Press 4
19 20
21
18
CUST
M
22 2423
25
Page 10
Before Use
26 Shoulder strap eyelet (P12)
Be sure to attach the shoulder strap wh en
•
using the camera to ensure that you will
not drop it.
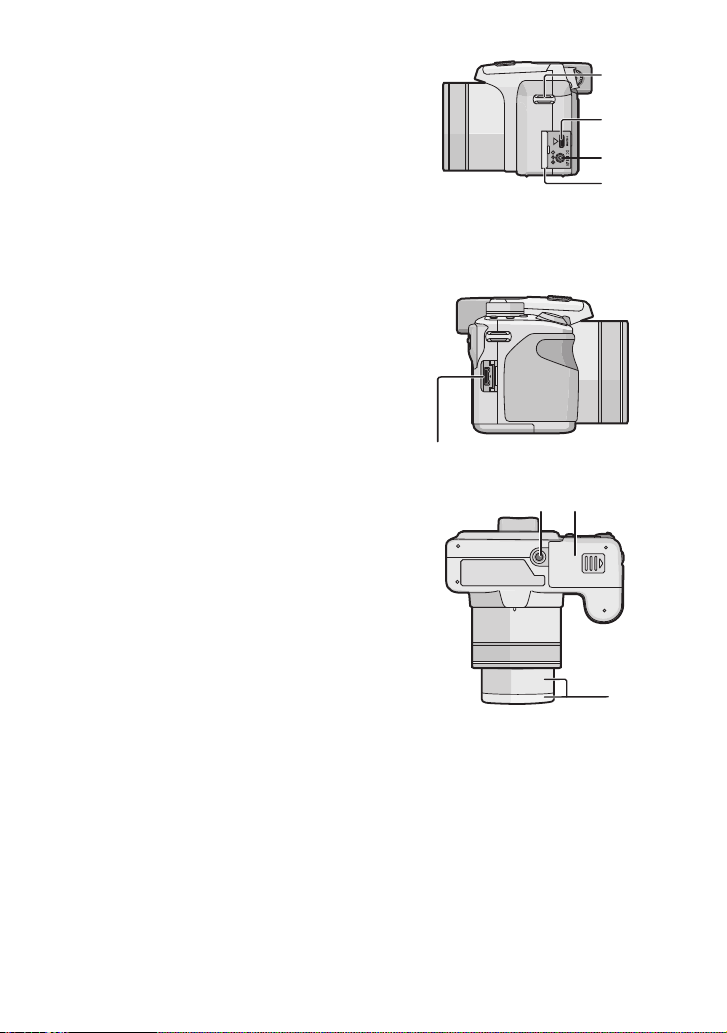
27 [HDMI] socket (P174, 176)
28 [DC IN] socket
•
This is used to connect an AC adaptor
(optional).
• Always use a genuine Panasonic AC
adaptor (optional).
• This camera cannot charge the battery
even when the AC adaptor (optional) is
connected to it.
29 Terminal door
30 [DIGITAL/AV OUT] socket (P172, 179,
181, 184)
26
27
28
29
30
31 Tripod receptacle
•
When you use a tripod, make sure the tripod
is stable when the camera is attached to it.
32 Card/Battery door (P20)
33 Lens barrel (P192)
31 32
33
- 10 -
Page 11
Before Use
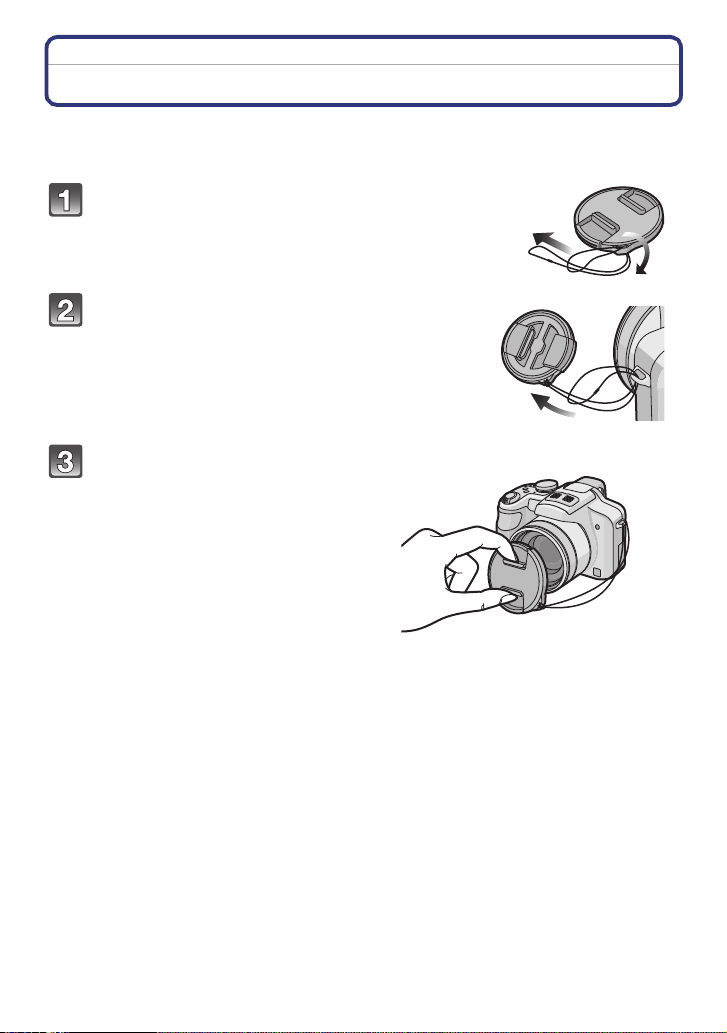
Attaching the Lens Cap/Shoulder Strap
∫ Lens Cap
•
When you turn the camera off, carry the camera or play back the pictures, attach the lens cap
to protect the surface of the lens.
Pass the string through the hole on the lens
cap.
Pass the same string through the hole on
the camera.
Attach the lens cap.
• Detach the lens cap before turning on the
camera in the Recording Mode.
• Do not hang or swing around this unit with
the lens cap string a ttached.
• Be careful not to lose the lens cap.
- 11 -
Page 12
Before Use
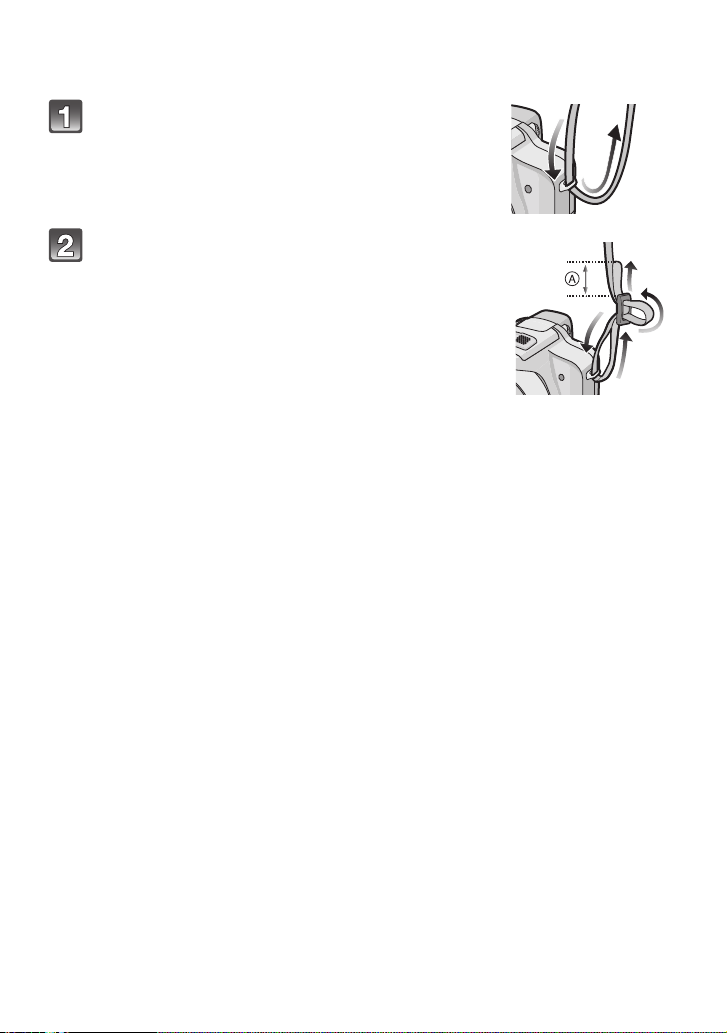
∫ Shoulder Strap
•
We recommend attaching the shoulde r strap when using the camera to prevent it from
dropping.
Pass the shoulder strap through the hole at
the shoulder strap eyelet.
Pass the shoulder strap through the stopper
and fasten the shoulder strap.
A Pull the shoulder strap 2 cm (0.07 feet) or more.
• Attach the shou lder strap to the other side of the camera
being careful not to twist it.
• Check that the shoulder strap is firmly attached to the
camera.
• Attach the shou lder stra p so that the “LUMIX” LOGO is on
the outside.
- 12 -
Page 13
Before Use
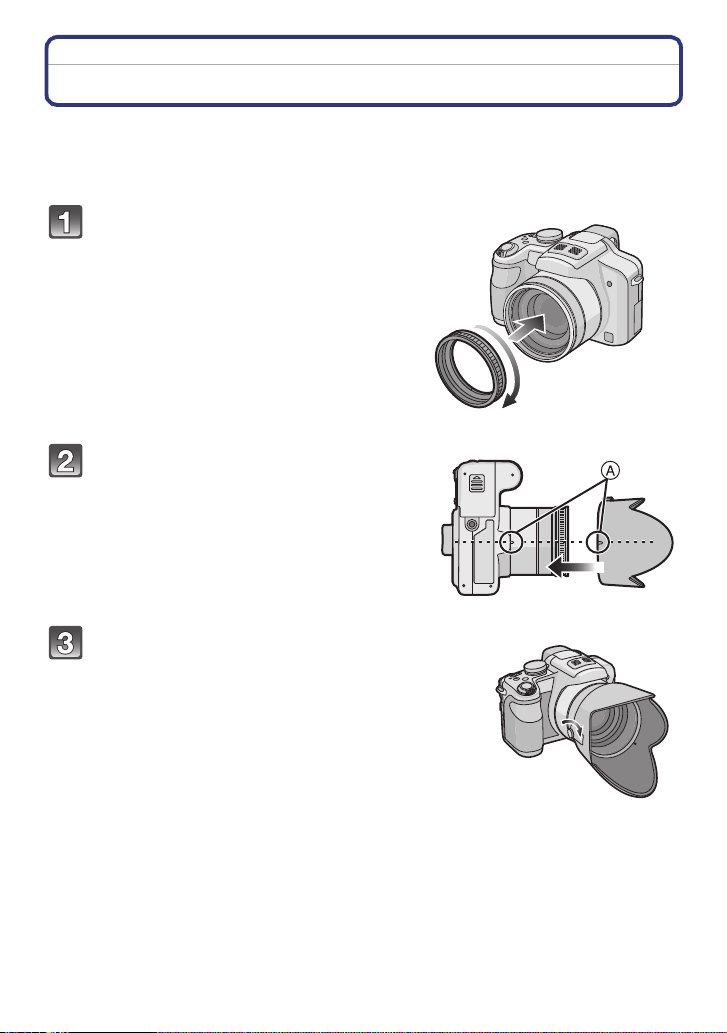
Attaching the Lens Hood
In bright sunlight or backlight, the lens hood will minimize lens flare and ghosting. The lens
hood cuts off excess lighting and improves the picture quality.
•
Check that the camera is turned off.
• Close the flash.
Securely attach the hood adaptor
so that it is all the way into the
lens barrel.
• Do not tighten the hood adaptor too much.
• When attaching the hood adaptor, take
extra care not to cross-thread.
When removing it, do not squeeze it as it
will not unscrew freely.
Place the camera upside down, align
the mark on the lens hood with the
mark A on the camera and then insert
the lens hood.
• Ensure the screw is loose and then attach the
lens hood.
Tighten the screw.
• Do not tighten the screw too much.
- 13 -
Page 14

Before Use
∫ Removing the hood adaptor
Grasp the base of the hood adaptor to remove it.
•
Note
You cannot attach the lens hood the oppo site way.
•
• When taking p ictures with flash with the lens hood attached, the lowe r portion of the photo may
turn dark (vignetting effect) and the control of the flash may be disabled because the photo
flash may be obscured by the lens hood. We recommend detaching the lens hood.
• When using the AF assist lamp in the dark, detach the lens hood.
• For details on how to attach the MC protector, ND filter and PL filter, refer to P192.
• You cannot attach the conversion lens when the hood adaptor is attached. (P190)
- 14 -
Page 15
Preparation
Preparation
Charging the Battery
∫ About batteries that you can use with this unit
It has been found that counterfeit battery packs which look very similar to the
genuine product are made available to purchase in some markets. Some of these
battery packs are not adequately protected with internal protection to meet the
requirements of appropriate safety standards. There is a possibility that these
battery packs may lead to fire or explosion. Please be advised that we are not
liable for any accident or failure occurring as a result of use of a counterfeit
battery pack. To ensure that safe products are used we would recommend that a
genuine Panasonic battery pack is used.
•
Use the dedicated charger and battery. The quality, performance and safety of third party
batteries other than those that are genuine are not guaranteed.
• The battery is not charged when the camera is shipped. Charge the battery before use.
• Charge the battery with the charger indoors.
• Charge the battery in a temperature between 10 oC to 35 oC (50 oF to 95 oF). (The battery
temperature should also be the same.)
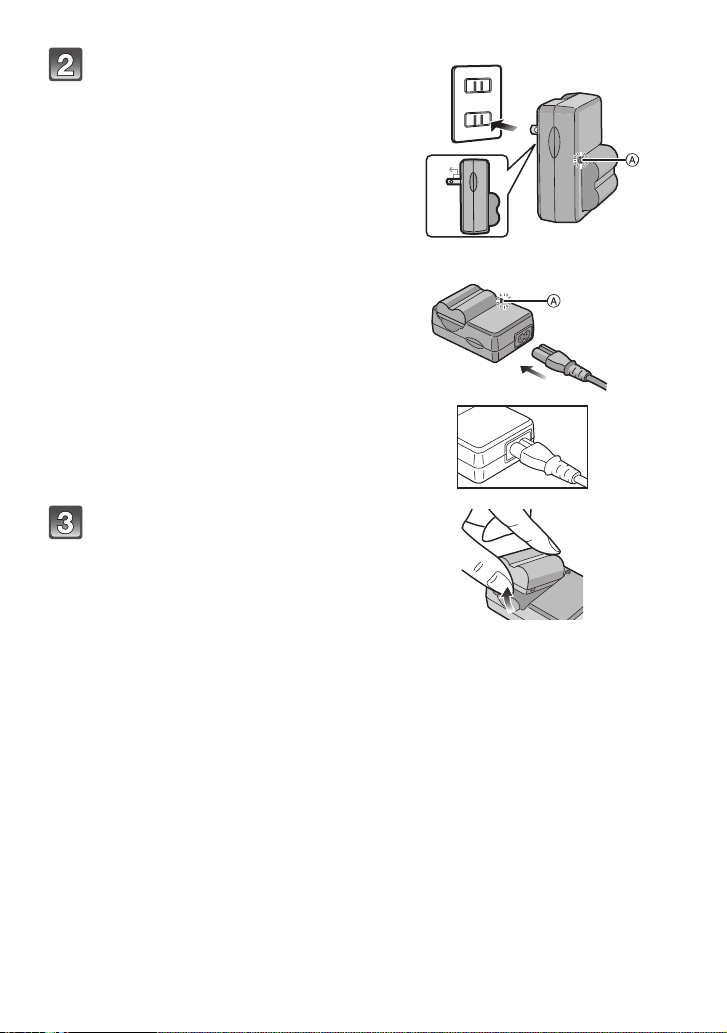
Attach the battery paying
attention to the direction of the
battery.
- 15 -
Page 16
Preparation
Connect the charger to the
electrical outlet.
• The AC cable does not fit entirely into
the AC input terminal. A gap will remain
as shown on the right.
• Charging starts when the [CHARGE]
indicator A lights green.
• Charging is complete when the
[CHARGE] indicator A turns off.
Detach the battery after
charging is completed.
plug-in type
90°
inlet type
- 16 -
Page 17
Preparation
∫ Charging
Charging time Approx. 120 min
The indicated charging time is for when the battery has been discharged completely.
•
The charging time may vary depending on how the battery has been used. The charging
time for the battery in hot/cold environments or a battery that has not been used for long
time may be longer than normal.
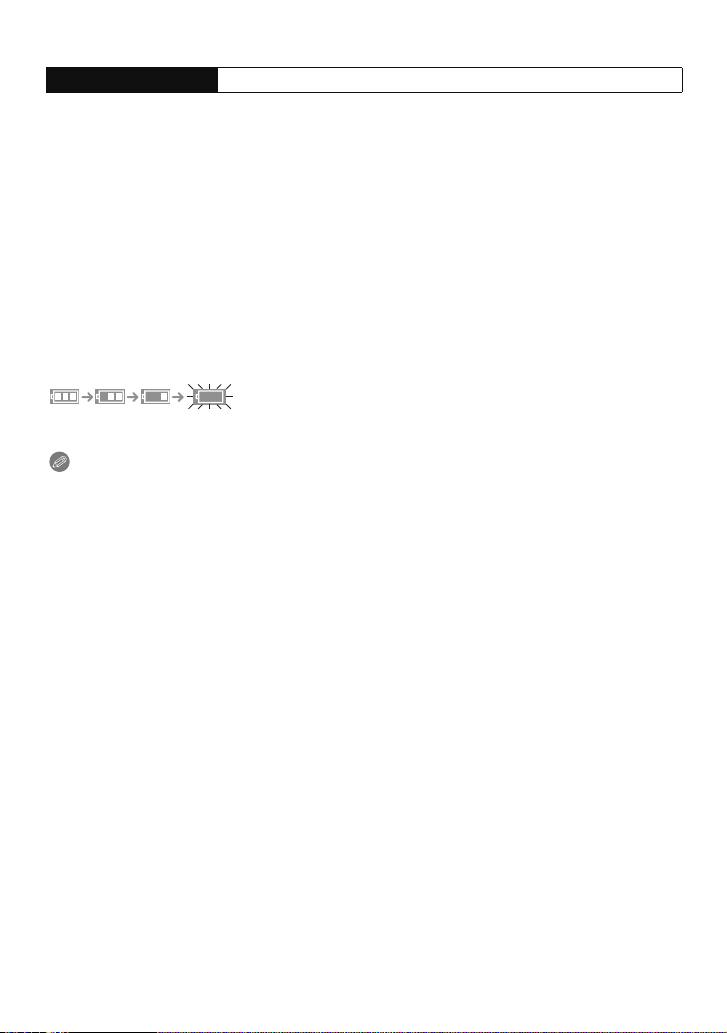
When the charging has been completed successfully, the [CHARGE] indicator turns off.
Charging time and number of recordable pictures with the optional battery pack are the
same as above.
∫ When the [CHARGE] indicator flashes
•
The battery temperature is excessively high or low. The charging time will be longer than
normal. Also, charging may not be completed.
• The terminals of the charger or the battery are dirty. In this case, wipe them with a dry cloth.
∫ Battery indication
The battery indication is displayed on the LCD monitor/Viewfinder.
[It does not appear when you use the camera with the AC adaptor (optional) connected.]
The indication turns red and blinks if the remaining battery power is exhausted. (The power
•
lamp also blinks) Recharge the battery or replace it with a fully charged battery.
Note
After charging is completed, be sure to disconnect the power supply device from the electrical
•
outlet.
• The battery becomes warm after using it and during and after charging. The camera also
becomes warm during use. This is not a malfunction.
• The battery will become discharged if left for a long period of time after being charged.
• The battery can be recharged even when it still has some charge left, but it is not
recommend ed that the battery charge be frequently topped up while the battery is fully
charged. (The battery has characteristics that will reduce its operating duration and cause the
battery to swell up.)
• When the operating time of the camera becomes extremely short even after properly charging
the battery, the life of the battery may have expired. Buy a new battery.
• Do not leave any metal items (such as clips) near the contact areas of the power plug.
Otherwise, a fire and/or electric shocks may be caused by short-circuiting or the
resulting heat generated.
- 17 -
Page 18

Preparation
About the Battery Life
∫ Recording still pictures (When using the LCD monitor/Viewfinder)
Number of recordable
pictures
Recording time Approx. 235 min
Recording conditions by CIPA standard
•
CIPA is an abbreviation of [Camera & Imaging Products Association].
• Temperature: 23 oC (73.4 oF)/Humidity: 50% when LCD monitor is on.
• Using a Panasonic SD Memory Card (32 MB).
• Using the supplied battery.
• Starting recording 30 seconds after the camera is turned on. (When the optical image stabilizer
function is set to [AUTO].)
• Recording once every 30 seconds with full flash every second recording.
• Rotating the zoom lever from Tele to Wide or vice versa in every recording.
• Turning the camera off every 10 recordings and leaving it until the temperature of the battery
decreases.
¢ The number of record able pictures decreases in Auto Power LCD Mode and Power LCD
Mode. (P31)
The number of recordab le pict ures varies depending on the recording interval time.
If the recording interval time becomes longer, the number of recordable pictures
decreases.
[e.g. When recording once every 2 minutes, the number of recordable pictures
decreases to about 117.]
Approx. 470 pictures
(By CIPA standard in Program AE
Mode)
¢
- 18 -
Page 19

Preparation
∫ Recording motion pictures (When using the LCD monitor/Viewfinder)
(Recording with picture quality
Continuous
recordable time
(motion pictures)
Actual recordable time
(motion pictures)
These are standard times taken at a temperature of 23 oC (73.4 oF) and a humidity of 50%.
•
• The time available for recording varies depending on the environment, the interval
between recordings, and the manner of use.
• Actual recordable time is the time available for recording when repeating actions such as
switching the power supply [ON] / [OFF], starting/stop ping recording, zoom operatio n etc.
¢ Motion picture recorded continuously in [MOTION JPEG] is up to 2 GB. Only the maximum
recordable time for 2 GB is displayed on the screen.
[AVCHD Lite]
set to [SH]([ ]))
Approx. 150 min Approx. 150 min
Approx. 80 min Approx. 80 min
[MOTION JPEG]
(Recording with picture quality
set to [HD]([ ]))
¢
¢
∫ Playback (When using the LCD monitor/Viewfinder)
Playback time Approx. 480 min
The number of recordable pictures and playback time will vary depending on the operating
conditions and storing condition of the battery.
Note
•
The battery may swell and its operating time may become shorter as the number of times it is
charged increases. For long term battery use, we recommend you do not frequently charge the
battery before it is exhau sted.
• The performance of the battery may temporarily deteriorate and the operating time may
become shorter in low temperature conditions (e.g. skiing/snowboarding).
- 19 -
Page 20
Preparation
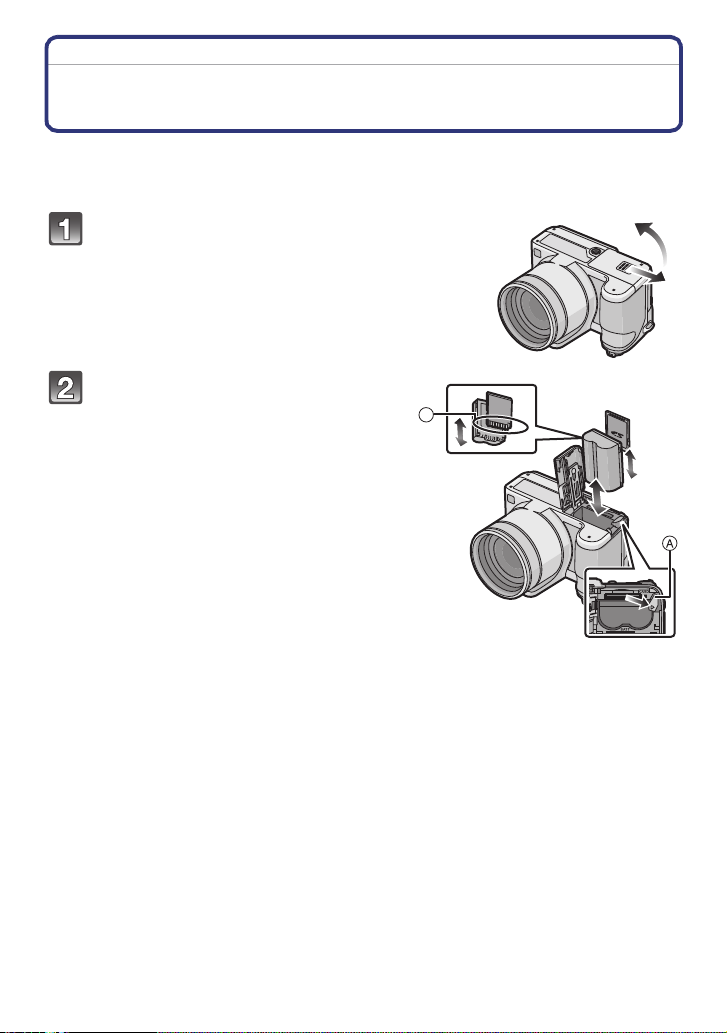
Inserting and Removing the Card (optional)/the Battery
• Check that this unit is turned off.
• Close the flash.
• We recommend using a Panasonic card.
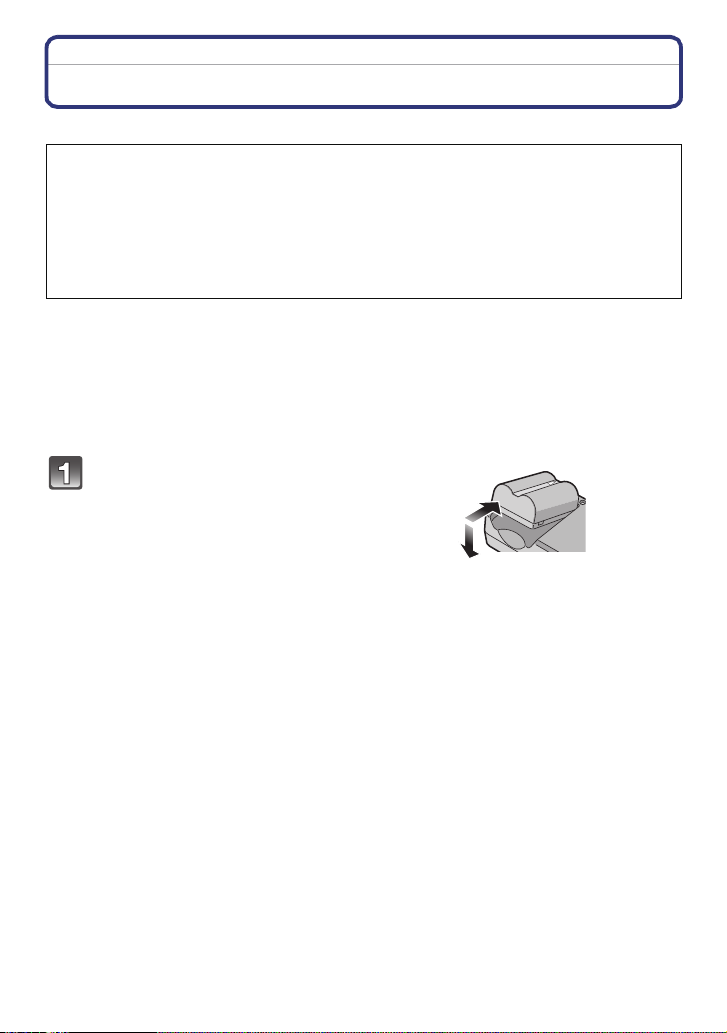
Slide the card/battery door to open it.
• Always use genuine Panasonic batteries.
• If you use other batteries, we cannot guarantee the
quality of this product.
Battery: Insert until it is locked by
the lever A being careful about the
direction you insert it. Pull the lever
A in the direction of the arrow to
remove the battery.
Card: Push it fully until it clicks
being careful about the direction
you insert it. To remove the card,
push the card until it clicks, then
pull the card out upright.
B: Do not touch the connection terminals of
the card.
•
The card may be damaged if it is not fully
inserted.
B
- 20 -
Page 21

Preparation
1:Close the card/battery door.
2:Slide the card/battery door to the end
and then close it firmly.
• If the card/battery door cannot be completely
closed, remove the card, check its direction and
then insert it again.
Note
Remove the battery after use.
•
• Do not remove the battery while the power is on as the settings on the camera may not be
stored properly.
• The supplied battery is designed on ly for the camera. Do not use it with any other equ ipment.
• Before removing the card or battery, turn the camera off, and wait until the power lamp has
gone off comple tely.
(Otherwise, this unit may no longer op erate normally and the card itself may be damaged or the
recorded pictures may be lost.)
- 21 -
Page 22

Preparation
About the Built-in Memory/the Card
The following operations can be performed using this unit.
When a card has not been inserted: Pictures can be recorded in
•
the b uilt-in memory a nd p layed back.
• Wh en a card has b een inserted: Pictures can be recorded on the
card and played back.
• When using the built-in memory
k
>ð (access indication
• Wh en using the card
† (access indication
¢ The access indication lights red when pictures are being recorded on the built-in me mory (or
the card).
• You can copy the recorded pictures to a card. (P171)
• Memory size: Approx. 40 MB
• Recordable motion pictures: QVGA (320k240 pixels) only
• The built-in memory can be used as a temporary storage device when the card being used
becomes full.
• The access time for the built-in memory may be longer than the access time for a card.
¢
)
¢
)
Built-in Memory
- 22 -
Page 23

Preparation
Card
The following types of cards can be used with this unit.
(These cards are indicated as card in the text.)
Type of card Characteristics
SD Memory Card (8 MB to 2 GB)
(Formatted using the FAT12 or FAT16
format in compliance with the SD
standard)
SDHC Memory Card (4 GB to
¢
32 GB)
(Formatted using the FAT32 format in
compliance with the SD standard)
¢ The SDHC Memory Card is a memory card standard decided by the SD Association in 2006
for high capacity memory cards more than 2 GB.
¢ You can use an SDHC Memory Card in equipment that is compa tible with SDHC Memory
Cards however you cannot use an SDHC Memory Card in equipment that is only compatible
with SD Memory Cards. (Always read the operating instructions for the equipment being
used.)
• Fast recording and writing speed
• Write-Protect switch A provided (When
this switch is set to the [LOCK] position,
no further data writing, deletion or
formatting is possible. The ability to
write, delete and format data is restored
when the switch is return ed to its
original position.)
A
2
• You can only use cards with SDHC logo (indicating compliance with the SD standard) if using
cards with 4 GB or more capacity.
• It is recommended to use a card with SD Speed Class
motion pictures.
¢ SD speed class is the speed standard regarding continuous writing.
¢
with “Class 6” or higher when recording
• Please confirm the latest information on the following website.
http://panasonic.jp/support/global/cs/dsc/
(This Site is English only.)
Note
Do not turn this unit off, remove its battery or card, or disconnect the AC adaptor
•
(optional) when the access indication is lit [when pictures are being written, read or
deleted, or the built-in memory or the card is being formatted (P37)]. Furthermore, do not
subje ct the camera to vibration, impact or static electricity.
The card or the data on the card may be damaged, and this unit may no longer operate
normally.
If operation fails due to vibration, impact or static electricity, perform the operation
again.
• The data on the built-in memory or the card may be damage d or lost due to electromagnetic
waves, static electricity or breakdown of the camera or the card. We recommend storing
important data on a PC etc.
• Do not format the card on your PC or other equipment. Format it on the camera only to ensure
proper operation. (P37)
• Keep the Memory Card out of reach of children to prevent swallowing.
- 23 -
Page 24
Preparation
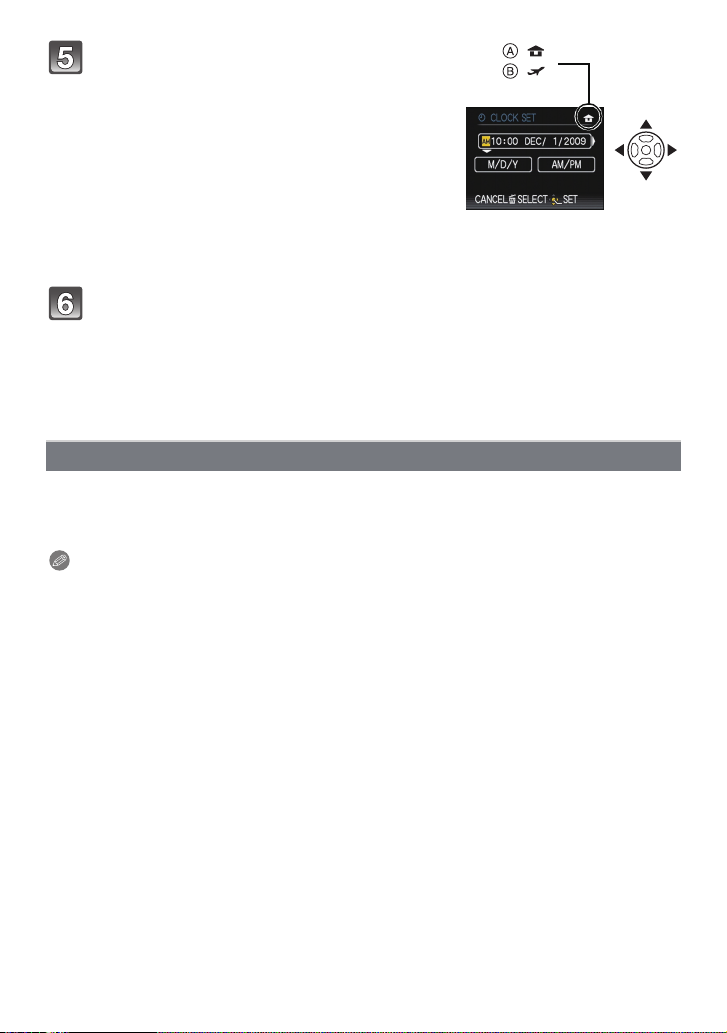
Setting Date/Time (Clock Set)
• The clock is not set when the camera is shipped.
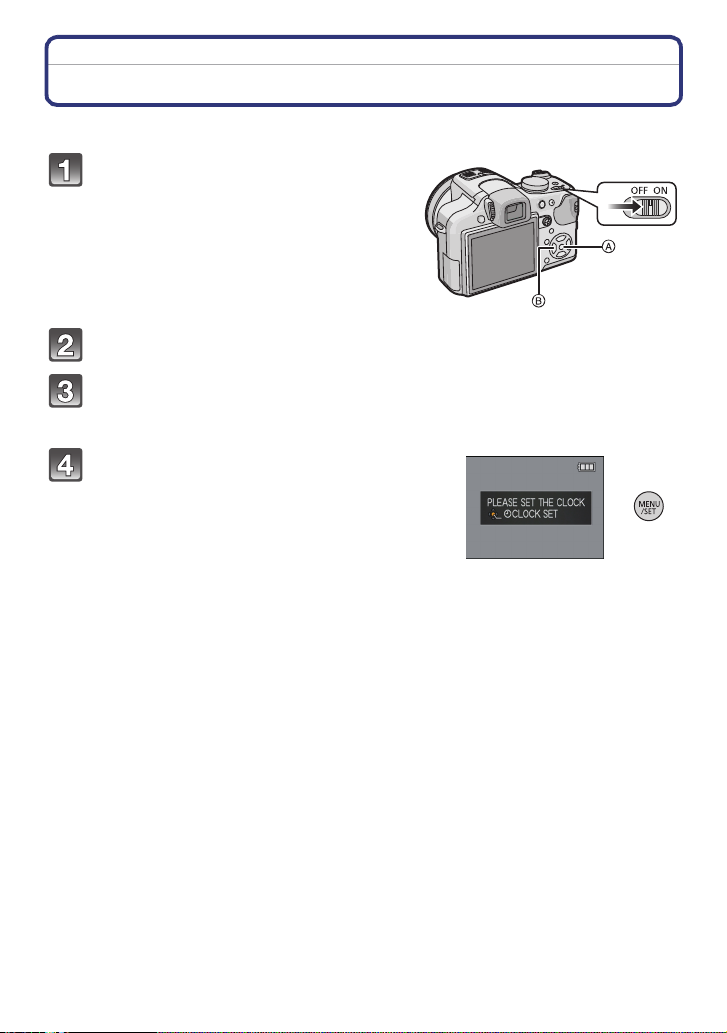
Turn the camera on.
A [MENU/SET] button
B Cursor buttons
• If the language select screen is not displayed,
proceed to step
Press [MENU/SET].
Press 3/4 to select the language, and press [MENU/SET].
• The [PLEASE SET THE CLOCK] message appears. (This message does not appear in
[PLAYBACK] Mode.)
Press [MENU/SET].
4.
- 24 -
Page 25
Preparation
Press 2/1 to select the items (year, month,
day, hour, minute, display sequence or time
:
:
display format), and press 3/4 to set.
A: Time at the home area
B: Time at the travel destination (P127)
‚: Cancel without setting the clock.
•
Select either [24HRS] or [AM/PM] for the time display
format.
• AM/PM is displayed when [AM/PM] is selected.
• When [AM/PM] is selected as the time display format, midnight is displayed as AM
12:00 and n oon is displayed as PM 12:00. This display format is common in the US and
elsewhere.
Press [MENU/SET] to set.
• After completing the clock settings, turn the camera off. Then turn the camera back on,
switch to Recording Mode, and check that the display reflects the settings that were
performed.
• When [MENU/SET] has been pressed to complete the settings without the clock havin g
been set, se t the clock corre ctly by following the
below.
“Changing the clock setting” procedure
Changing the clock setting
Select [CLOCK SET] in the [REC] or [SETUP] menu, and press 1. (P27)
It can be change d in steps 5 and 6 to set the clock.
•
• Once a charged battery has been installed for 24 hours, the clock setting is maintained
for 3 months using the built-in clock battery even without the battery.
Note
The clock is displayed w hen [DISPLAY] is pressed several times during recording.
•
• You can set the year from 2000 to 2099.
• If the clock is not set, the correct date cannot be printed when you stamp the date on the
pictures with [TEXT STAMP] (P160) or order a photo studio to print the pictures.
• If the clock is set, the correct date can be printed even if the date is not displayed on the screen
of the camera.
- 25 -
Page 26
Preparation
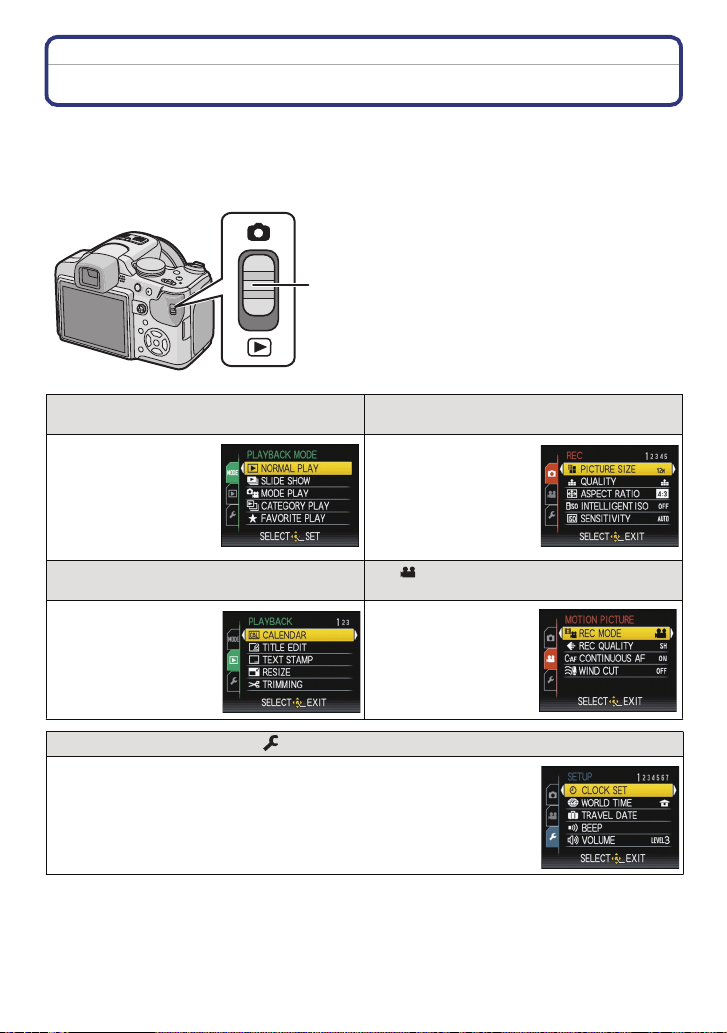
Setting the Menu
This camera offers menu selections that allow you to customize its operation to maximize
your picture taking experience.
In particular, the [SETUP] menu contains some important settings relating to the camera’s
clock and power. Check the settings of this menu before proceeding to use the camera.
A [REC]/[PLAYBACK] selector switch
[PLAYBACK MODE] Playback Mode menu
• This menu lets you
select the setting of
the playback methods
such as playback or
slide show of only the
pictures set as
[FAVORITE].
( [PLAYBACK] Mode menu (P157 to 171)
• This menu lets you
make the protection,
trimming or print
settings, etc. of
recorded pictures.
(P57, 151 to155)
! [REC] Mode menu (P129 to 148)
• This menu le ts you
set the coloring,
sensitivity, aspect
ratio, number of pixels
and other aspects of
the pictures you are
recording.
[MOTION PICTURE] Mode menu
(P149 to P150)
• This menu le ts you
set the [REC MODE],
[REC QUALITY], and
other aspects for
motion picture
recording.
[SETUP] menu (P30 to 38)
• This menu lets you perform the clock settings, select the operating
beep tone settings and set other settings which make it easier for you
to operate the camera.
• The [SETUP] menu can be set from either the [REC MODE] or
[PLAYBACK MODE].
- 26 -
Page 27
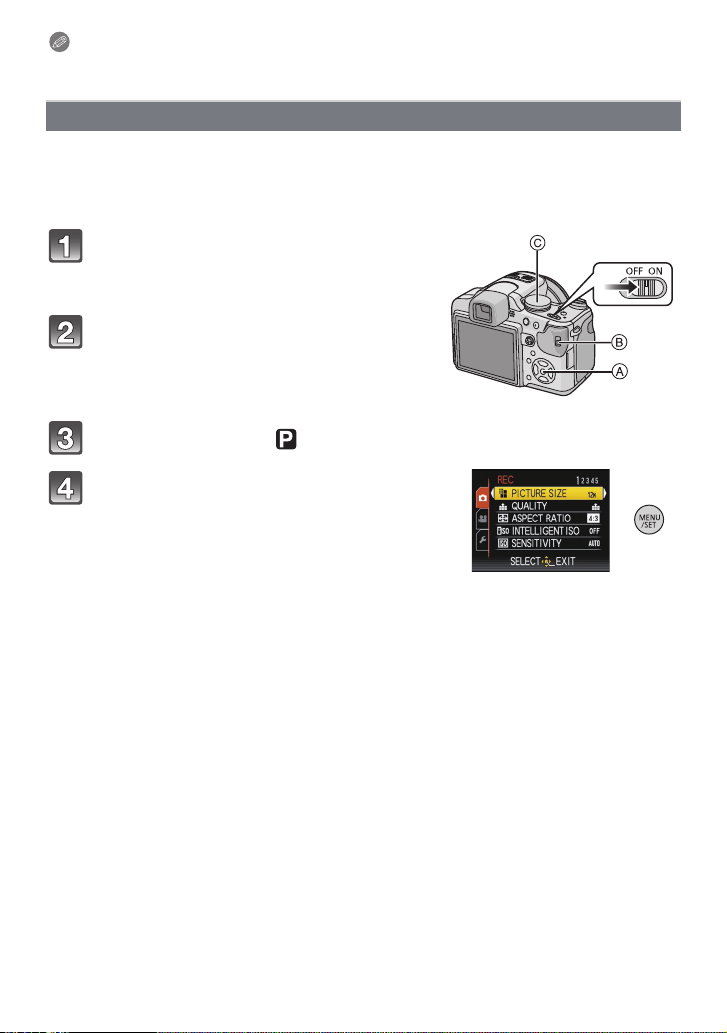
Preparation
Note
Due to the camera’s specifications, it may not be possible to set some of the functions or
some functions may not work in some of the conditions under which the camera is used.
Setting menu items
This section describes how to select the Program AE Mode settings, and the same setting
can be used for the [PLAYBACK] menu and [SETUP] menu as well.
Example: Setting [AF MODE] from [Ø] to [š] in the Program AE Mode
•
3/4/2/1 in the steps can be operated with the joystick too.
Turn the camera on.
A [MENU/SET] button
B [REC]/[PLAYBACK] selector switch
C Mode dial
Slide the [REC]/[PLAYBACK] selector
switch to [!].
• When selecting the [PLAYBACK] Mode menu
settings, set the [REC]/[PLAYBACK] selector switch
to [(], and proceed to step
4.
Set the mode dial to [ ].
Press [MENU/SET] to display the menu.
• You can switch men u screens from any menu item by
rotating th e zoom lever.
- 27 -
Page 28
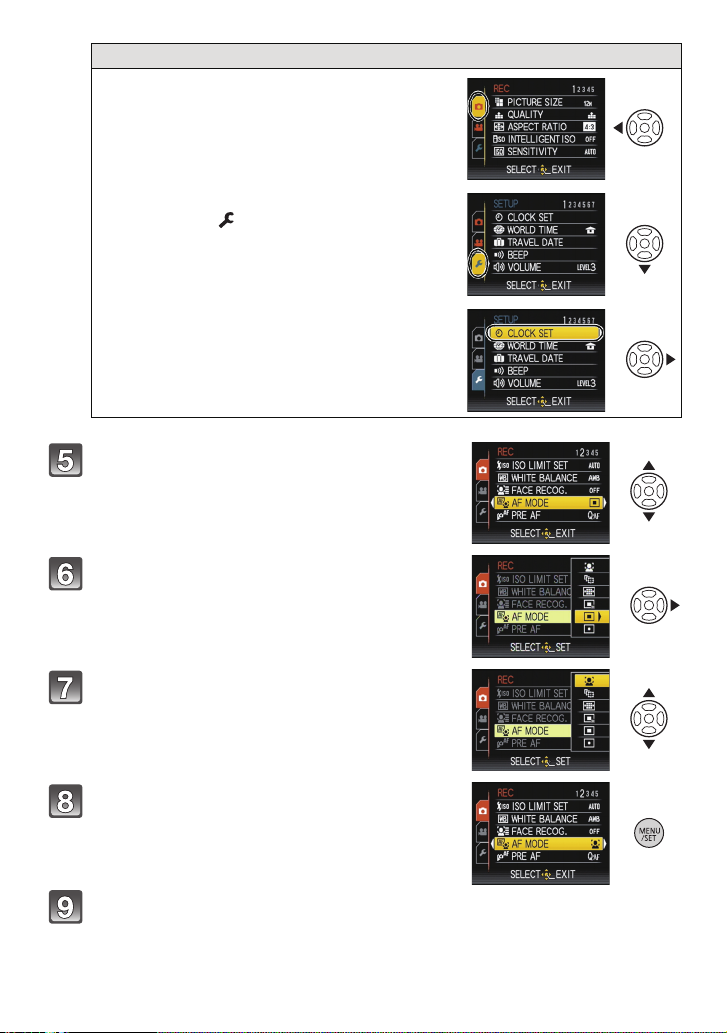
Preparation
Switching to the [SETUP] menu
1 Press 2.
2 Press 4 to select the [SETUP]
menu icon [ ].
3 Press 1.
•
Select a menu item next and set it.
Press 3/4 to select [AF MODE].
• Select the item at the very bottom, and press 4 to
move to the second screen.
Press 1.
• Depending on the item, its setting may not appear or it
may be displayed in a different way.
Press 3/4 to select [š].
Press [MENU/SET] to set.
Press [MENU/SET] to close the menu.
- 28 -
Page 29

Preparation
A
Using the quick menu
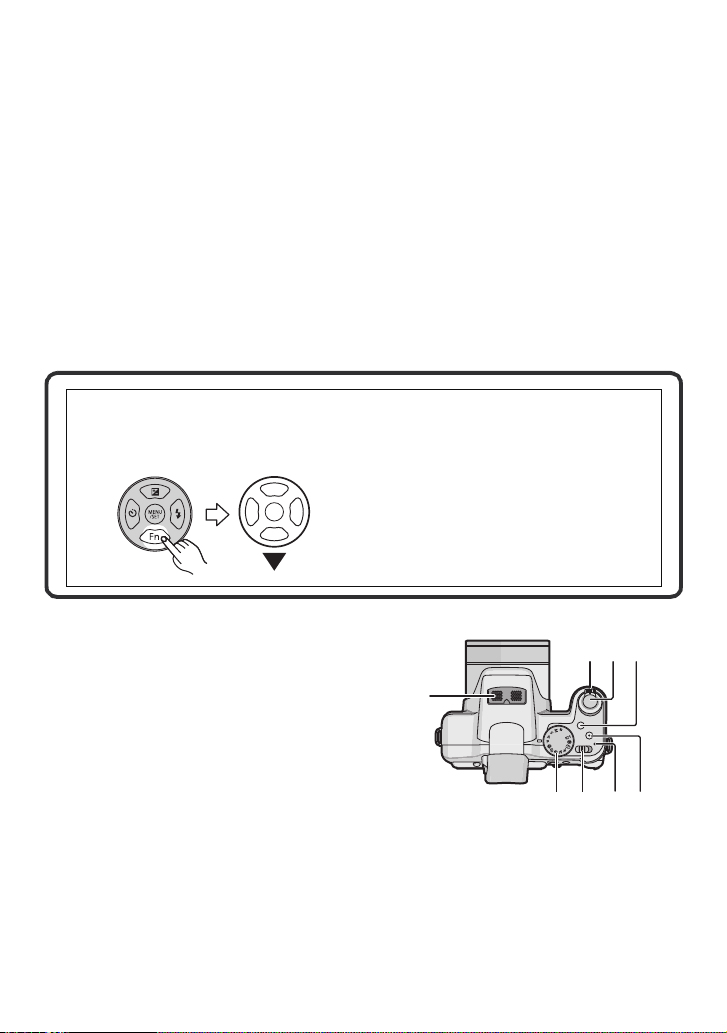
By using the quick menu, some of the menu settings can be easily found.
Some of the menu items cannot be set by the modes.
•
Press and hold down the joystick in
Recording Mode until the [Q.MENU] is
displayed.
Press 3/4/2/1 to select the menu item and
the setting and then press [MENU/SET] to
close the menu.
A The items to be set and the settings are displayed.
• You can set the following items in detail by pressing [DISPLAY].
[WHITE BALANCE] (P133)/[AF MODE] (P136)/[STABILIZER] (P145)
- 29 -
Page 30
Preparation
Perform these settings if you need to.
About the Setup Menu
[CLOCK SET], [ECONOMY] and [AUTO REVIEW] are important items. Check their
settings before using them.
•
In the Intelligent Auto Mode, only [CLOCK SET], [WORLD TIME], [BEEP], [LANGUAGE] and
[STABILIZER DEMO.] (P38) can be set.
For details on how to select the [SETUP] menu settings, refer to P27.
U [CLOCK SET] Setting Date/Time.
Refer to P24 for details.
•
Set the time in your home area and travel destination.
“ [DESTINATION]:
[WORLD TIME]
• Refer to P127 for details.
— [TRAVEL DATE]
• Refer to P124 for details.
r [BEEP]
Travel destination area
– [HOME]:
Your home area
Set the departure date and the return date of the vacation.
[TRAVEL SETUP]
[OFF]/[SET]
[LOCATION]
[OFF]/[SET]
This allows you to set the beep and shutter sound.
r [BEEP LEVEL]:
[s] (Muted)
[t] (Low)
[u] (High)
[BEEP TONE]:
1 2 3
[]/[]/[]
[SHUTTER VOL.]:
[] (Muted)
[] (Low)
[] (High)
[SHUTTER TONE]:
1 2 3
[]/[]/[]
- 30 -
Page 31

Preparation
u [VOLUME] Adjust the volume of the speaker to any of 7 levels.
• When you connect the camera to a TV, the volume of the TV speakers does not change.
[CUST. SET MEM.]
• Refer to P88 for details.
\
Up to 3 current camera settings can be registered as custom
settings.
(Recording Mode only)
Assign [REC] Mode menu to 4 button. It is convenient to register
[Fn BUTTON SET]
[REC] Mode menu that is used often.
[REVIEW]/[SENSITIVITY]/[WHITE BALANCE]/
[METERING MODE]/[AF MODE]/[I.EXPOSURE]
• Fixed to [REVIEW] in Advanced Scene Mode or Scene Mode.
• Refer to P56 for details about the review.
• Refer to P129 for details about the [REC] Mode menu.
[MONITOR/
VIEWFINDER]
You can adjust the brightness of the monitor or the Viewfinder in
7 steps.
These menu settings make it easier to see the LCD monitor when
you are in bright places.
[OFF]
LCD
[LCD MODE]
„ [AUTO POWER LCD]:
The brightness is adjusted automatically depending on how bright
it is around the camera.
… [POWER LCD]:
The LCD monitor becomes brighter and easier to see even when
taking pictures outdoors.
• The brightness of the pictures displayed on the LCD monitor is increased so some subjects
may appear differently from actuality on the LCD monitor. However, this does not affect the
recorded pictures.
• The LCD monitor automatically returns to normal brightness after 30 seconds when recording
in Power LCD Mode. Press any button to make the LCD monitor bright again.
• If the screen is difficult to see because of light from the sun etc. shining on it, use your hand or
another object to block the light.
• The number of recordable pictures decreases in Auto Power LCD Mo de and Power LCD Mode.
• [AUTO POWER LCD] cannot be selected in Playback Mode.
- 31 -
Page 32

Preparation
[DISPLAY SIZE]
Change the display size of some icons and menu screens.
[STANDARD]/[LARGE]
Set the pattern of the guide lines displayed when taking pictures.
You can also set whether or not to have the recording information
[GUIDE LINE]
displayed when the guide lines are displayed. (P60)
[REC. INFO.]:
[OFF]/[ON]
[PATTERN]:
[]/[]
• The [PATTERN] setting is fixed to [ ] in the Intelligent auto mode.
This allows you to set either to display or not display the
[HISTOGRAM]
histogram. (P63)
[OFF]/[ON]
[RECAREA]
Angle of view for motion picture recording can be checked.
[OFF]/[ON]
• Motion picture recording frame display is only an approximation.
• Recording frame display may disappear when zooming to Tele depending on the picture size
setting.
• This cannot be used during Intelligent Auto Mode.
When the Auto Review function is activated or when playing back,
[HIGHLIGHT]
white saturated areas appear blinking in black and white.
[OFF]/[ON]
• If there are any white saturated areas, we recommend
compensating the exposure towards negative (P75)
referring to the histogram (P63) and then taking the
picture again. It may result in a better quality picture.
• There may be white saturated areas if the distance
between the camera and the subject is too close when
taking pictures with the flash.
If [HIGHLIGHT] is set to [ON] in this case, the area
directly illuminated by the photo flash will become white saturated and appear blinking in black
and white.
• Highlighting does not work during Multi-Pla yback (P56), Calendar Search (P157), Playback
Zoom (P56), or Motion Picture Playback (P156).
[ON]
[OFF]
- 32 -
Page 33

Preparation
In Manual Focus, the assistance screen appears on the center of
the screen to facilitate focusing on the subject.
[OFF]
[MF ASSIST]
[MF1]:
The center of the screen is enlarged.
[MF2]:
The center of the screen is enlarged over the whole screen.
• Refer to P83 for details.
You can conserve the battery life by setting these menus.
Also, it will turn off the LCD monitor automatically when not in use
to prevent discharge of the battery.
p [POWER SAVE]:
The camera is automatically turned off if the camera has not been
q [ECONOMY]
used for the time selected on the setting.
[OFF]/[2MIN.]/[5MIN.]/[10MIN.]
[AUTO LCD OFF]:
The LCD monitor is automatically turned off if the camera has not
been used for the time selected on the setting.
[OFF]/[15SEC.]/[30SEC.]
• Press the shutter button halfway or turn the camera off and on to cancel [POWER SAVE].
• [POWER SAVE] is set to [5MIN.] in the Intelligent Auto Mode
• [POWER SAVE] is fixed to [2MIN.] when [AUTO LCD OFF] is set to [15SEC.] or [30SEC.].
• Press any button to turn on the LCD monitor again.
• [AUTO LCD OFF] does not work while operating Menu or Playback Zoom.
• [POWER SAVE] does not work in the following cases.
– When using the AC adap tor
– When connecting to a PC or a printer
– When recording or playing back motion pictures
– During a slide show
– [AUTO DEMO]
• [AUTO LCD OFF] does not work in the following cases.
– When using the AC adap tor
– When connecting to a PC or a printer
– While the self-timer is set
– When recording or playing back motion pictures
– During a slide show
– While the menu screen is displayed
– [AUTO DEMO]
- 33 -
Page 34

Preparation
If you selected the Viewfinder in a Recording Mode, the display
[PLAY ON LCD]
will automatically switch to the LCD monitor when reviewing or
playing back the pictures.
[OFF]/[ON]
• Refer to P62 for details.
Set the length of time that the picture is displayed after taking it.
[OFF]
[1SEC.]
o [AUTO REVIEW]
[2SEC.]
[HOLD]: The pictures are displayed until one any of the buttons
is pressed.
[ZOOM]: The picture is displayed for 1 second and then
enlarged 4k and displayed for 1 more second.
• The Auto Review function is activated regardless of its setting when using Auto Bracket (P76)/
Color Bracket (P77), [HI-SPEED BURST] (P100), [FLASH BURST] (P101) and
[PHOTO FRAME] (P107) in Scene Mode and Burst Mode (P78). (The pictures cannot be
enlarged.)
• In Intelligent Auto Mode, the Auto Review function is fixed to [2SEC.].
• If [HIGHLIGHT] (P32) is set to [ON], white saturated areas appear blinking in black and white
when the Auto Review function is activated.
• [AUTO REVIEW] does not work when recording motion pictures.
Record the zoom position when the camera is turned off.
[ZOOM RESUME]
[OFF]
[ON]
It will automatically return to the zoom position when the power
was switched [OFF], next time you turn the power [ON].
• Focus position will not be recorded.
v [NO.RESET] Reset the file number of the next recording to 0001.
• The folder number is up dated and the file number starts from 0001. (P183 )
• A folder number between 100 and 999 can be assigned.
When the folde r number reaches 999, the number canno t be reset. We recommend formatting
the card (P37) after saving the data on a PC or elsewhere.
• To reset the folder number to 100, format the built-in memory or the card first and then use this
function to reset the file number.
A reset screen for the folder number will then appear. Select [YES] to reset the folder number.
- 34 -
Page 35

Preparation
w [RESET]
• When the [RESET] setting is selected during recording, the operation that resets the lens is
also performed at the same time. You will hear the sound of the lens operating but this is
normal and not indicative of malfunctioning.
• When the [REC] Mode settings are reset, data registered with [FACE RECOG.] will be also
reset, too.
• When [SETUP] menu settings are reset, the following settings are also reset. In addition,
[ROTATE DISP.] (P165) is set to [ON], and [FAVORITE] (P166) is set to [OFF] in [PLAYBACK]
Mode menu.
– The birthday and name settings for [BABY1]/[BABY2] (P98) and [PET] (P99) in Scene Mode.
– The [TRAVEL DATE] (P124) setting. (Departure date, return d ate, destination)
– The [WORLD TIME] (P127) setting.
– The [CUST. SET MEM.] (P88) setting.
– Position memorized in [ZOOM RESUME]/[MENU RESUME].
• The folder number and the clock setting are not changed.
The [REC] or [SETUP] menu settings are reset to the initial
settings.
Select the USB communication system after or before connecting
the camera to your PC or your printer with the USB connection
cable (supplied).
y [SELECT ON CONNECTION]:
x [USB MODE]
Select either [PC] or [PictBridge(PTP)] if you connected the
camera to a PC or a printer supporting PictBridge.
{ [PictBridge(PTP)]:
Set after or before connecting to a printer supporting PictBridge.
z [PC]:
Set after or before connecting to a PC.
• When [PC] is selected, the camera is connected via the “USB Mass Storage” communication
system.
• When [PictBridge(PTP)] is selected, the camera is connected via the “PTP (Picture Transfer
Protocol)” communication system.
- 35 -
Page 36

Preparation
Set to match the type of TV.
(Playback Mode only)
[TV ASPECT]
[W]: When connecting to a 16:9 screen TV.
[X]: When connecting to a 4:3 screen TV.
• This will work when the AV cable is connected.
Set the format for the HDMI output when playing back on the
HDMI compatible high definition TV connected with this unit using
the HDMI mini cable (optional).
[AUTO]:
The output resolution is automatically set based on the
information from the connected TV.
[HDMI MODE]
[1080i]:
The interlace method with 1080 available scan lines is used for
output.
[720p]:
The progressive method with 720 available scan lines is used for
output.
[480p]:
The progressive method with 480 available scan lines is used for
output.
• Interlace method/progressive method
i= interlace scanning is scanning the screen with half of the effective scanning lines every 1/60
seconds, where p= progressive scanning is a high density image signal that is scanning the
screen with all the effective scanning lines every 1/60 seconds.
The [HDMI] terminal on this unit is compatible with high definition output [1080i]. It is necessary
to have a compatible TV to enjoy progressive and high definition images.
• If the images are not output on the TV when the setting is [AUTO], match with the image format
your TV can display, and select number of effective scanning lines. (Please read the operating
instructions for the TV.)
• This will work when the HDMI mini cable (optional) is connected.
• Refer to P174 for details.
- 36 -
Page 37

Preparation
Setup so this unit can be controlled by the remote control of the
VIERA by automatically coupling this unit with the VIERA Link
compatible equipment using HDMI mini cable (optional).
[VIERA Link]
[OFF]: Operation is performed with the buttons on this unit.
[ON]: Remote control operation of the VIERA Link
compatible equipment is enabled. (Not all operations
are possible)
Button operation of the main unit will be limited.
• This will work when the HDMI mini cable (optional) is connected.
• Refer to P176 for details.
Set the screen that is displayed when the mode dial is set to ,
, , , and .
[OFF]: The recording screen in the currently selected
} [SCENE MENU]
Advanced Scene Mode (P90) or Scene Mode (P95)
appears.
[AUTO]: The Advanced Scene Mode or Scene Mode menu
screen appears.
The last operated menu position is saved even if the camera is
[MENU RESUME]
turned off.
[OFF]/[ON]
[VERSION DISP.] It is possible to check which version of firmware is on the camera.
The built-in memory or card is formatted.
[FORMAT]
Formatting permanently deletes all data on your memory
card. Please be sure all pictures and motion pictures are
saved elsewhere before using th is feature.
• Use a battery with sufficient battery power or the AC adaptor (optional) when formatting. Do not
turn the camera off du ring formatting.
• If a card has been inserted, only the card is formatted. To format the built-in memory, remove
the card.
• If the card has been formatted on a PC or other equipment, format it on the camera again.
• It may take longer to format the built-in memory than the card.
• If the built-in memory or the card cannot be formatted, consult your nearest Service Center.
For USA and Puerto Rico assistance, please call:
1-800-211-PANA(7262) or, contact us via the web at:
http://www.panasonic.com/contactinfo
For Canadian assistance, please call:
1-800-99-LUMIX (1-800-995-8649) or
send e-mail to: lumixconcierge@ca.panasonic.com
- 37 -
Page 38

Preparation
A B
~ [LANGUAGE] Set the language displayed on the screen.
• If you set a different language by mistake, select [~] from the menu icons to set the desired
language.
Displays the amount of jitter the camera has detected
([STABILIZER DEMO.])
The camera’s features are displayed as slide shows. ([AUTO
DEMO])
[STABILIZER DEMO.]
A Amount of jitter
[DEMO MODE]
DEMO
B Amount of jitter after correction
[AUTO DEMO]:
[OFF]
[ON]
• The stabilizer function is switched between [ON] and [OFF] every time [MENU/SET] is pressed
during the [STABILIZER DEMO.].
• In Playback Mode, [STABILIZER DEMO.] cannot be displayed.
• Press [DISPLAY] to close [STABILIZER DEMO.].
• [STABILIZER DEMO.] is an approximation.
• [AUTO DEMO] has no TV o utput capability even when it is in Playback Mode.
• You can also display [STABILIZER DEMO.] by using the quick menu. (P29)
• Press [MENU/SET] to close [AUTO DEMO].
- 38 -
Page 39

Basic
Mode switching
Basic
Selecting the [REC] mode, and recording still pictures or motion pictures
Turn the camera on.
A [REC]/[PLAYBACK] selector switch
• The power lamp 2 lights when you turn this
unit on 1.
Slide the [REC]/[PLAYBACK]
selector switch to [!].
Switching the mode by rotating
the mode dial.
Align a desired mode with part B.
•
Rotate the mode dial slowly and surely
to adjust to each mode. (
rotates 360 o
)
The mode dial
M
CUST
- 39 -
Page 40

Basic
∫ Basic
Intelligent auto mode (P43)
The subjects are recorded using settings automatically selected by the camera.
Program AE mode (P48)
The subjects are recorded using your own settings.
∫ Advanced
Aperture-priority AE mode (P80)
The shutter speed is automatically determined by the aperture value you set.
Shutter-priority AE mode (P80)
The aperture value is automatically determined by the shutter speed you set.
Manual exposure mode (P81)
The exposure is adjusted by the aperture value and the shutter speed which are
manually adjusted.
Creative motion picture mode (P115)
Record motion picture with manual settings.
Custom mode (P89)
Use this mode to take pictures with previously registered settings.
Scene mode (P95)
This allows you to take pictures that match the scene being recorded.
My Color mode (P86)
Easily adjust color, brightness and saturation when taking a picture.
- 40 -
Page 41

Basic
∫ Advanced Scene Mode
Portrait mode (P91)
Use this mode to take pictures of people.
Scenery mode (P92)
Use this mode to take pictures of scenery.
Sports mode (P92)
Use this mode to take pictures of sporting events, etc.
Close-up mode (P93)
Use this mode to take pictures of a close-by subject.
Night portrait mode (P94)
Use this mode to take pictures of night scenes and people against night time scenery.
- 41 -
Page 42

Basic
A Shutter button
B Motion picture button
Taking the still picture
Press the shutter button halfway to focus.
Press the shutter button fully (push it in further), and take
the picture.
∫ For more details, refer to the explanation of each recording mode.
Recording the motion picture
Press the motion picture button to start the recording.
Press the motion picture button again to stop the recording.
• Sound will go off when pressing the motion picture button indicating start/
stop of motion picture recording.
Sound volume can be set in [BEEP LEVEL] (P30).
∫ Recording of motion picture appropriate for each mode is possible. For more
details, refer to “Recording Motion Picture” (P108).
∫ Tips for taking good pictures
A AF assist lamp
• Hold the camera gently with both hands, keep your arms still a t your
side and stand with your feet slightly apart.
• Be careful not to move the camera when you press the shutter
button.
• Do not cover the fla sh or the AF assist lamp w ith your fingers or
other objects.
• Do not touch the front of the lens.
• When taking pictures, make sure your footing is stable and there is
no danger of colliding with another person, an object etc.
- 42 -
Page 43

Basic
1
2
[REC] Mode: ñ
Taking pictures using the automatic function
(Intelligent Auto Mode)
The camera will set the most appropriate settings to match the subject and the recording
conditions so we recommend this mode for beginners or those who want to leave the
settings to the camera and take pictures easily.
•
The following functions are activated automatically.
– Scene detection/[STABILIZER]/[INTELLIGENT ISO]/Face detection/ [QUICK AF]/
[I.EXPOSURE] (Intelligent Exposure)/Digital Red-eye Correction/Backlight Compensation
Slide the [REC]/[PLAYBACK] selector switch to [!].
Set the mode dial to [ñ].
Press the shutter button halfway to focus.
• The focus indication 1 (green) lights when the subject
is focused.
• The AF area 2 is displayed around the subject’s face
by the Face Detection function. In other cases, it is
displayed at the point on the subject which is in focus.
• The focus range is 1 cm (0.04 feet) (Wide)/1 m
(3.28 feet) (Tele) to ¶.
• The maximum close-up distance (the shortest distance
at which the subject can be taken) differs depending on
the zoom magnification.
Press the shutter button fully (push it in
further), and take the picture.
•
The access indication (P22) lights red when pictures are
being recorded on the built-in memory (or the card).
∫ When taking pictu res using the flash (P64)
•
Open the flash when the flash is to be used. (P64)
• [ ], [ ], [ ] or [ ] is set depending on the type of subject and brightness.
• When [ ] or [ ] is displayed, the Digital red-eye correction is turned on.
• Shutter speed will be slow when using [ ] or [ ].
∫ When taking pictures using the zoom (P52)
∫ When recording motion pictures (P108)
∫ To take pictures using the Face Recognition fu nction (which stores faces of
frequent subjects with information such as their names and birthdays) (P117)
- 43 -
Page 44

Basic
Scene detection
When the camera identifies the optimum scene, the icon of the scene concerned is
displayed in blue for 2 seconds, after which its color changes to the usual red.
>
¦
• [¦] is set if none of the scenes are applicable, and the stand ard settings are set.
• When [ ],[ ] or [ ] is selected, the camera automatically detects a person’s face, and it will
adjust the focus and exposure. (Face detection) (P137)
• If a tripod is used, for instance, and the camera has judged that camera shake is minimal when
the Scene Mode has been identified as [ ], the shutter speed will be set to a maximum of
8 seconds.Take care not to move the camera while taking pictures.
• When [FACE RECOG.] is set to [ON], an d the face similar to the registered fa ce is detected, [R]
is displayed in the top rig ht of [ ], [ ] and [ ].
¢ When [FACE RECOG.] is set to [ON], [ ] will be displayed for birthdays of registered faces
already set only when the face of a person 3 years old or younge r is detected.
Note
Due to conditions such as the ones below, a different scene may be identified for the same
•
subject.
– Subject conditions: When the face is bright or dark, The size of the subject, The distance to
the subject, The contrast of the subject, When the subject is moving
– Recording conditions: Sunset, Sunrise, Under low brightness conditions, When the camera is
shaken, When zoom is used
• To take pictures in an intended scene, it is recommended that you take pictures in the
appropriate Recording Mode.
• The Backlight Compensation
Backlight refers to when light comes from the back of a subject.
In this case, the subject will become dark, so this function compensates the backlight by
brightening the whole of the picture automatically.
[i-PORTRAIT]
[i-SCENERY]
[i-MACRO]
[i-NIGHT PORTRAIT]
[i-NIGHT SCENERY]
¢
[i-BABY]
• Only when [‡] is selected
- 44 -
Page 45

Basic
AF Tracking Function
It is possible to set the focus to the specified subject. Focus will keep following the subject
automatically even if it moves.
1
Press [FOCUS].
•
[ ] is displayed in the upper left of the screen.
• AF Tracking frame is displayed in the center of the
screen .
• Press [FOCUS] again to cancel.
2 Bring the subject to the AF tracking frame, and
press [AF/AE LOCK] to lock the subject.
AF tracking frame will turn yellow.
•
• An optimum scene for the specified subject will be
chosen.
• Press [FOCUS] to cancel.
Note
•
[FACE RECOG.] does not work during AF tracking.
• Please read the Note regarding the AF tracking on P138.
- 45 -
Page 46

Basic
Settings in Intelligent Auto Mode
• Only the following functions can be set in this mode.
[REC] Mode menu
– [PICTURE SIZE]
¢1 The settings which can be selected are different from when other [REC] Modes are used.
[MOTION PICTURE] Mode menu
– [REC MODE] (P112)/[REC QUALITY]
¢2 The settings which can be selected are different from when other [REC] Modes are used.
[SETUP] menu
– [CLOCK SET]/[WORLD TIME]/[BEEP]/[LANGUAGE]/[STABILIZER DEMO.]
• The settings of the following items are fixed.
[Fn BUTTON SET] (P31) o
[GUIDE LINE] (P32) ([REC. INFO.]: [OFF])
[ECONOMY]
([POWER SAVE]) (P33)
[AUTO REVIEW] (P34) [2SEC.]
[QUALITY] (P130) A
[INTELLIGENT ISO]
(P131)
[ISO LIMIT SET] (P132) 1600
[WHITE BALANCE]
(P133)
[AF MODE] (P136) š (Set to [ ] when a face cannot be detected)
[PRE AF] (P140)
[METERING MODE]
(P142)
[I.EXPOSURE] (P142) [STANDARD]
[STABILIZER] (P145) AUTO
[AF ASSIST LAMP] (P146) [ON]
[FLASH SYNCHRO]
(P147)
[RED-EYE REMOVAL]
(P147)
[CONTINUOUS AF] (P150) [ON]
[WIND CUT] (P150) [OFF]
¢1
(P129)/[COLOR EFFECT]¢1 (P144)/[FACE RECOG.] (P117)
¢2
(P112)
Item Settings
[5MIN.]
[ON] (The maximum ISO sensitivity: [ISO1600])
[AWB]
C
¢3
[1ST]
[ON]
- 46 -
Page 47

Basic
¢3 Fix to [MODE 1] during motion picture recording
• The following functio ns cannot be used.
– [AUTO LCD OFF]/Auto Bracket/ Color Bracket/Flash output adjustment / White balance fine
adjustment/[AF/AE LOCK]/[MIN. SHTR SPEED]/[DIGITAL ZOOM]/[PICT. ADJ.]/
[HISTOGRAM]/Out of frame display
• [CONVERSION] on the [REC] Mode menu and the other items on the [SETUP] menu can be
set in a mode such as the Program AE Mode. What is set will be reflected in the Intelligent Auto
Mode.
- 47 -
Page 48

Basic
[REC] Mode: ³
Taking pictures with your favorite settings
(Program AE Mode)
The camera automatically sets the shutter speed and the aperture value according to the
brightness of the subject.
You can take pictures with greater freedom by changing various settings in [REC] menu.
Slide the [REC]/[PLAYBACK]
selector switch to [!].
A Mode dial
B [REC]/[PLAYBACK] selector switch
Set the mode dial to [ ].
• To change the setting while taking pictures,
“Using the [REC] Mode menu”
refer to
(P129).
M
CUST
Aim the AF area at the point you
want to focus on.
Press the shutter button halfway to focus.
• The focus range is 30 cm (0.99 feet) (Wide)/2 m
(6.57 feet) (Tele)
• If pictures are to be taken at an even closer range,
refer to
“Taking Close-up Pictures” (P70).
to ¶.
Press the halfway pressed shutter button
fully to take a picture.
• The access indication lights (P22) red when pictures
are being recorded on the built-in memory (or the
card).
∫ To adjust the exposure and take pictures at times when the image appears too
dark (P75)
∫ To adjust the colors and take pictures at times when the image appears too red
(P133)
∫ When recording motion pictures (P108)
- 48 -
Page 49

Basic
B
E
D
FG
A
C
1/125
F2.8
ISO
100
1/125
F2.8
ISO
100
Focusing
Aim the AF area at the subject, and then press the shutter button halfway.
Focus
When the subject is
focused
When the subject
is not focused
Focus indication On Blinks
AF area White>Green White>Red
¢1
Sound
A Focus indicatio n
B AF area (normal)
C AF area (when using the digital zoom or when it is dark)
D Recording distance range display (when zooming)
E Aperture value
F Shutter speed
G ISO sensitivity
¢1 Sound volume can be set in [SHUTTER VOL.] (P30).
¢2
¢2
Beeps 2 times Beeps 4 times
¢2 If correct exposure cannot be achieved, it will be displayed in red.
(However, it will not be displayed in red when the flash is used.)
When the subject is not in focus (such as when it is not in the center of
the composition of the picture you want to take)
1 Aim the AF area at the subject, and then press the shutter button halfway to fix the
focus and exposure.
2 Press and hold the shutter button halfway while moving the camera as you
compose the picture.
You can repeatedly retry the actions in step 1
•
before pressing the shutter button fully.
We recommend that you use the Face
Detection function when taking pictures of
people. (P136)
∫ Subjects and recording conditions
which are difficult to focus
•
Fast-moving subjects, extremely bright subjects or subjects without contrast
• When the recording distance range display has appeared in red.
• When recording subjects through windows or near shiny objects
• When it is dark or when jitter occurs
• When the came ra is too close to the subject or when taking a picture of both distant and near
subjects
F2.8
1/125
1/125F2.8
ISO
ISO
100
100
F2.8
1/125
1/125F2.8
ISO
ISO
100
100
- 49 -
Page 50

Basic
Preventing jitter (camera shake)
When the jitter alert [ ] appears, use [STABILIZER] (P145), a tripod or the self-timer
(P73).
•
Shutter speed will be slower particularly in the following cases. Keep the camera still from the
moment the shutter button is pressed until the picture appears on the screen. We recommend
using a tripod.
– Slow sync./Red-eye reduction
– [NIGHT PORTRAIT] and [NIGHT SCENERY] in the Advanced Scene Mode (P90)
– In [PARTY], [CANDLE LIGHT], [STARRY SKY] or [FIREWORKS] in Scene Mode (P95)
– When the shutter speed is slowed in [MIN. SHTR SPEED]
Direction detection function
Pictures recorded with the camera held vertically are played back vertically (rotated). (Only
when [ROTATE DISP.] (P165) is set to [ON])
•
The direction detection function may not operate corre ctly if recording is performed with the
camera aimed up or down.
• Motion pictures taken with the camera held vertically are not displayed vertically.
Enlarge the focus point (display focus point)
This unit will remember the focus point during the recording, and it can be enlarged with
that point as a center.
Press [FOCUS] during image playback
• Focus point may not be the center of enlargement when it is
at the edge of the image.
• Refer to “Using the Playback Zoom” (P56) for operation
during zooming.
• It will return to the original enlargement if [FOCUS] is pressed
again.
• Following pictures cannot be enlarged because there is no
focus point:
– Picture that was taken without focusing
– Picture that was taken with manual focus
– Picture that was taken with a different camera
W T
- 50 -
Page 51

Basic
Program shift
In Program AE Mode, you can change the preset aperture
value and shutter speed without changing the exposure.
This is called program shift.
You can make the background more blurred by decreasing
the aperture value or record a moving subject more
dynamically by slowing the shutter speed when taking a
picture in Program AE Mode.
•
Press the shutter button halfway and then use the joystick to
activate program shift while the aperture value and the
shutter speed are displayed on the screen (abou t 10 seconds).
• The program shift indication A appears on the screen when program shift is activated.
• Program shift is canceled if the camera is turned off or the joystick is moved up and down until
the program shift indication disappears.
∫ Example of program shift
(A): Aperture value
(B): Shutter speed
1 Program shift amount
2 Program shift line chart
3 Program shift limit
1 2 3 4 5 6 7 8 9 10 11 12 13
2
2.8
4
(A)
5.6
8
11
1 1
1
/
/
2
4
Note
•
If the exposure is not adequate when the shutter button is pre ssed halfway, the aperture value
and shutter speed turns red.
• Program shift is canceled and the came ra return s to normal Program AE Mode if more than
10 seconds pass after program shift is activated. However, the program shift setting is
memorized.
• Depending on the brightness of the subject, program shift may not be activated.
A
14
1
1
1
1
1
1
1
1
/
/
/
/
8
/
15
30
60
125
(B)
1
/
/
/
/
250
500
1000
2000
- 51 -
Page 52

Basic
[REC] Mode:
Taking Pictures with the Zoom
Using the Optical Zoom/Using the Extended Optical zoom (EZ)/Using
the Digital Zoom
You can zoom-in to make people and objects appear closer or zoom-out to record
landscapes in wide angle. To make subjects appear even closer [maximum of 35.2k], do
not set the picture size to the highest setting for each aspect ratio (X/Y/W).
Even higher levels of magnification are possible when [DIGITAL ZOOM] is set to [ON] in
[REC] menu.
To make subjects appear closer use (Tele)
Rotate the zoom lever towards Tele.
To make subjects appear further away use (Wide)
Rotate the zoom lever towards Wide.
∫ Changing the zoom speed
You can operate the zoom at 2 speeds
depending on the rotation angle of the zoom
lever.
The zoom speed becomes slower when the
rotation angle is small and the zoom speed
becomes faster when the rotation angle is
large.
A Fast
B Slow
C Zoom lever
• Zoom speed cannot be changed in recording motion pictures (P108).
W T
W T
∫ Saving the zoom position (Zoom resume)
•
Refer to P34 for details.
- 52 -
Page 53

Basic
∫ Types of zooms
Feature Optical zoom
Maximum
magnification
Picture
quality
18k 35.2k
No deterioration No deterioration
Conditions None
Screen
display
•
When using the zoom function, an estimate of the focus range will appear in conjunction
with the zoom display bar. (Example: 0.3 m (0.99 ft.) –¶)
¢ The magnification level differs depending on [PICTURE SIZE] and [ASPECT RATIO] setting.
W
Extended optical zoom
[PICTURE SIZE] with
(P129) is selected.
T
(EZ)
¢
W
A
A [ ] is displayed.
Digital zoom
72k [including optical zoom
18k]
140k [including extended
optical zoom 35.2k]
The higher the magnification
level, the greater the
deterioration.
[DIGITAL ZOOM] (P143) on
the [REC] menu is set to [ON].
T
W
W
B The digital zoom range is
displayed.
B
T
T
- 53 -
Page 54

Basic
∫ Extended optical zoom mechanism
When you set the picture size to [ ] (3 million pixels), the 12M (12.1 million pixels) CCD
area is cropped to the center 3M (3 million pixels) area, allowing a picture with a higher
zoom effect.
Note
•
The digital zoom cannot be set when õ has been selected.
• The indicated zoom magnification is an approximation.
• “EZ” is an abbre viation of “Extended optical Zoom”.
• The optical zoom is set to Wide (1k) when the camera is turned on.
Zoom position is as when the power was turned off if the [ZOOM RESUME] (P3 4) is set to
[ON].
• If you use the zoom function after focusin g on the subject, focus on the subject again.
• The lens barrel extends or retracts according to the zoom position. Take care not to interrupt
the motion of the lens barrel while the zoom lever is rotated.
• When you rotate the zoom lever, you may hear some sound from the camera or the camera
may shake. This is not a malfunction.
• When using the digital zoom, [STABILIZER] may not be effective.
• When using the digital zoom, we recommend using a tripod and the self-timer (P73) for taking
pictures.
• The extended optical zoom cannot be used in the following cases.
– In Macro Zoom Mode
– In [HIGH SENS.], [HI-SPEED BURST], [FLASH BURST], [PIN HOLE], [FILM GRAIN] and
[PHOTO FRAME] in Scene Mode
– When recording motion pictures
– When [QUALITY] is set to [ ] or [ ]
• [DIGITAL ZOOM] cannot be used in the following cases.
– In [INDOOR PORTRAIT] in [PORTRAIT]
– In [NORMAL SPORTS], [OUTDOOR SPORTS] and [INDOOR SPORTS] in [SPORTS]
– In [BABY1]/[BABY2], [PET], [HIGH SENS.], [HI-SPEED BURST], [FLASH BURST],
[PIN HOLE], [FILM GRAIN] or [PHOTO FRAME] in Scene Mode
– When [INTELLIGENT ISO] is set
– When [QUALITY] is set to [ ] or [ ]
- 54 -
Page 55

Basic
A
B
[PLAYBACK] Mode: ¸
Playing back Pictures ([NORMAL PLAY])
Slide the [REC]/[PLAYBACK] selector
switch A to [(].
• Normal playback is set automatically in the
following cases.
– When the mode was switched from the [REC]
to [PLAYBACK].
– When the camera was turned on while the
[REC]/[PLAYBACK] selector switch was at
[(].
Press 2/1 to select the picture.
A File number
B Picture number
2: Play back the previous picture
1: Play back the next picture
• Speed of picture forwarding/rewinding
changes depending on the playback status.
∫ Fast forwarding/Fast rewinding
Press and hold 2/1 during playback.
2: Fast rewind
1: Fast forward
The file number A and the picture number B only change one by one. Release 2/1 when the
•
number of the d esired picture appears to play back the picture.
• If you keep pressing 2/1, the number of pictures forwarded/rewound increases.
- 55 -
Page 56

Basic
A
A
Confirm the picture in [REC] Mode (Review)
You can confirm the picture in [REC] Mode. You can also move between pictures using
2/1, use zoom playback (P56), or delete pictures (P58).
1 Select the [Fn BUTTON SET] on the [SETUP] menu, and then press 1.
2 Press 3/4 to select [REVIEW] and then press [MENU/SET] to set.
•
You can review by pressing 4 in [REC] Mode if it is set.
Displaying Multiple Screens (Multi Playback)
Rotate the zoom lever towards [L] (W).
1screen>12 screens>30 screens>Calendar screen
display (P157)
A Number of the selected picture and the total numbe r of
recorded pictures
• Rotate the zoom lever towards [Z] (T) to return to the
previous screen.
• Pictures are not rotated for display.
W T
• Pictures displayed using [ ] cannot be played back.
∫ To return to normal playback
1 Press 3/4/2/1 to select a picture.
•
An icon will be displayed depending on the recorded picture and the settings.
2 Press [MENU/SET].
•
The picture that was selected will appear.
Using the Playback Zoom
Rotate the zoom lever towards [Z] (T).
1k>2k>4k>8k>16k
When you rotate the zoom lever towards [L] (W) after
•
enlarging the picture, the magnification be comes lower.
• When you change the magnification, the zoom position
indication A appears for about 1 second, and the position of
the enlarged section can be moved by pressing 3/4/2/1.
• The more a picture is enlarged, the more its quality
deteriorates.
• When you move the position to be displayed, the zoom
position indicatio n appears for about 1 second .
• Focus point will be enlarged when [FOCUS] is pressed. (P50)
• You can review next picture in enlarged vie w by pressing 2/1
on the joystick.
W T
- 56 -
Page 57

Basic
Note
This camera complies with the DCF standard “Design rule for Camera File system” established
•
by JEITA “Japan Electronics and Information Technology Industries Association” and with Exif
“Exchangeable Image File Format”. Files which do not comply with the DCF standard cannot
be played back.
• The lens barrel retracts about 15 seconds after switching from [REC] Mode to [PLAYBACK]
Mode.
• You can also delete the recording information etc. on the LCD mo nitor/Viewfinder during
playback zoom by pressing [DISPLAY].
• If you want to save the enlarg ed picture , use the trimming function. (P163)
• The playback zoom may not operate if pictures have been recorded with other equipment.
• Playback zoom is not available during motion picture playback.
Switching the [PLAYBACK] Mode
1
Press [MENU/SET] during playback.
2 Press 1.
3 Press 3/4 to select the item and then press
[MENU/SET].
[NORMAL PLAY] (P55)
All the pictures are played back.
[SLIDE SHOW] (P151)
The pictures are played back in sequence.
[MODE PLAY] (P154)
Playback in [PICTURE], [AVCHD Lite]
¢1 This is the specification to record and play back high definition images.
[CATEGORY PLAY] (P154)
The pictures grouped together in categories are played back.
¢
[FAVORITE PLAY] (P155)
2
Your favorite pictures are played back.
¢
2 [FAVORITE PLAY] is not displayed when [FAVORITE] has not been set.
¢1
, or [MOTION JPEG] can be selected.
- 57 -
Page 58

Basic
[PLAYBACK] Mode: ¸
Deleting Pictures
Once deleted, pictures cannot be recovered.
Pictures on the built-in memory or the card, which is being played back will be deleted.
•
To delete a single picture
Select the picture to be deleted, and then
press [‚].
A [DISPLAY] button
‚] button
B [
Press 2 to select [YES] and then press
[MENU/SET].
- 58 -
Page 59

Basic
To delete multiple pictures (up to 50) or all the pictures
Press [‚].
Press 3/4 to select [DELETE MULTI] or [DELETE ALL] and then
press [MENU/SET].
• [DELETE ALL] > step 5.
Press 3/4/2/1 to select the picture, and
then press [DISPLAY] to set. (Repeat this
step.)
• [ ] appears on the selected pictures. If [DISPLAY] is
pressed again, the setting is canceled.
Press [MENU/SET].
Press 3 to select [YES] and then press [MENU/SET] to set.
∫ When [DELETE ALL] has been selected with the [FAVORITE] (P166) setting
The selection screen is displayed again. Select [DELETE ALL] or
[ALL DELETE EXCEPTÜ], press 3 to select [YES] and delete the pictures.
([ALL DELETE EXCEPTÜ] cannot be selected if no pictures have been set as
[FAVORITE].)
Note
•
Do not turn the came ra off while deleting (while [‚] is displayed). Use a battery with a sufficient
power or the AC adaptor (optiona l).
• If you press [MENU/SET] while deleting pictures using [DELETE MULTI], [DELETE ALL] or
[ALL DELETE EXCEPTÜ], the deleting will stop halfway.
• Depending on the number of pictures to be deleted , it may take some time to delete them.
• If pictures do not conform to the DCF standard or are protected (P169), they will not be deleted
even if [DELETE ALL] or [ALL DELETE EXCEPTÜ] is selected.
- 59 -
Page 60

Advanced (Recording pictures)
R1m19s
Advanced (Recording pictures)
About the LCD Monitor/Viewfinder
∫ Switching the LCD monitor/Viewfinder
Press [EVF/LCD] to switch the monitor screen.
A Viewfinder
B [EVF/LCD] button
C LCD monitor
• When the LCD monitor turns on, the Viewfinder turns off
(and vice versa).
∫ Selecting the screen to be used
C
Press [DISPLAY] to change.
D [DISPLAY] button
• When the menu screen appears, the [DISPLAY] button is not activated. During Playback Zoom
(P56), while playing ba ck motio n pictures (P156) and during a slide show (P151), you can only
select “Normal display J” or “No display L”.
In Recording Mode
E Normal display
F Normal display
G No display
H No display (Recording
guideline)
I Out-of-frame display
¢1, 3
¢1, 2
¢1, 2
¢4
R1m19s
555
R1m19s
D
- 60 -
Page 61

Advanced (Recording pictures)
1/5
1/5
In Playback Mode
J Normal display
K Display with recording
information
L No display
¢
1
1/5
1/5 1/5
1/5
¢1 If the [HISTOGRAM] in [SETUP] menu is set to [ON], histogram will be displayed.
¢2 It will switch between available recording time and number of recordable pictures.
¢3 Set the pattern of the guidelines displayed by setting [GUIDE LINE] in [SETUP] menu. You
can also set whether or not to have the recording information displayed when the guidelines
are displayed.
¢4 When the number of pictures remaining is more than 1000 or the time remaining in recording
motion pictures is more than 1000 seconds, [ ] is displayed.
Note
[NIGHT PORTRAIT] (P94), [STARRY SKY] and [FIREWORKS] in Scene Mode (P95), the
•
guideline is gray.
• In [PHOTO FRAME] in Scene Mode, the guideline is not displayed. (P107)
∫ Out-of-frame display
Recording information is displayed on the bottom and right edges of the screen. You can
therefore concentrate on the subject when taking pictures without being obstructed by
information displayed on the screen.
∫ Diopter adjustment
Adjust the diopter to suit your vision so that
you can see the Viewfinder clearly.
•
Press [EVF/LCD] to display the viewfinder.
Look at the display on the Viewfinder and
rotate the diopter adjustment dial to
where the screen is clearest.
555
- 61 -
Page 62

Advanced (Recording pictures)
∫ Monitor priority
When [PLAY ON LCD] is set to [ON] on the [SETUP] menu (P34), the LCD monitor is
turned on in t he following cases.
You can save the time it would take to switch the display to the LCD monitor even when
using the Viewfinder to record.
•
When switching from Recording Mode to Playback Mode.
• When reviewing pictures.
• When turning the camera on in Playback Mode.
∫ Recording guide line
When you align the subject on the horizontal
and vertical guide lines or the cross point of
these lines, you can take pictures with
well-designed composition by viewing the size,
the slope and the balance of the subject.
A []:This is used when dividing the entire screen into 3k3 fo r tak ing pictures with a
B []:This is used when you want to position the subject at the exact center of the
well-balanced composition.
screen.
- 62 -
Page 63

Advanced (Recording pictures)
10:00 DEC .1.2009
10:00 DEC .1.2009
10:00 DEC .1.2009
1/5
1/5
1/5
∫ About the Histogram
A histogram is a graph that displays brightness along the horizontal axis (black to white)
and the number of pixels at each brightness level on the vertical axis.
It allows you to easily check a picture’s exposure.
Examples of histogram
1 Properly Exposed
2 Under Exposed
3 Overexposed
¢ Histogram
10:00 DEC .1.2009
10:00 DEC .1.2009 10:00 DEC .1.2009
1/5
1/5 1/5
10:00 DEC .1.2009 10:00 DEC .1.2009
1/5 1/5
1/5
10:00 DEC .1.2009
Note
When the recorded picture and the histogram do not match each other under the
•
following conditions, the histogram is displayed in orange.
– When the manual exposure assistance is other than [n0EV] during exposure compensation
or in the Manual Exposure Mode
– When the flash is activated
– In [STARRY SKY] or [FIREWORKS] in Scene Mode (P95)
– When the flash is closed
• When the brig htness of the screen is not correctly displayed in dark places
• When the exposure is not adequately adjusted
• The histogram is an approximation in Recording Mode.
• The histogram of a picture may not match in Recording Mode and Playback Mode.
• The histogram displayed in this camera does not match histogr ams displayed by picture editing
software used in PCs etc.
• Histograms are not displayed in the following cases.
– Intelligent Auto Mod e
– Multi Playback
– In [PHOTO FRAME] in Scene Mode
– Recording motion pictures
– Playback zoom
– Calendar search
– When HDMI cable is connected
- 63 -
Page 64

Advanced (Recording pictures)
[REC] Mode:
Taking Pictures using the Built-in Flash
A To open the flash
Press the flash open button.
B To close the flash
Press the flash until it clicks.
Be sure to close the flash when not in use.
•
• The flash setting is fixed to [Œ] while the flash
is closed.
Switching to the appropriate flash setting
Set the flash to match the recording.
Open the flash.
•
Press 1 [‰].
Press 3/4 to select a mode.
• You can also press 1 [‰] to select.
• For information about flash settings that can be selected, refer to
“Available flash settings by Recording Mode”. (P66)
Press [MENU/SET].
• You can also press the shutter button halfway to finish.
• The menu screen disappears after ab out 5 seconds. At this time, the selected item is
automatically set.
- 64 -
Page 65

Advanced (Recording pictures)
Item Description of settings
‡: AUTO
:
AUTO/Red-eye
reduction
‰: Forced flash ON
Forced ON/Red-eye
reduction
Slow sync./Red-eye
reduction
Œ:
¢ The flash is activated twice. The subject should not move until the second flash is
¢
:
¢
:
¢
Forced flas h OFF
activated.
Flash interval depends on the brightness of the subject.
[RED-EYE REMOVAL] (P147) on the [REC] Mode menu is set to [ON], [ ] appears on
the flash icon.
The flash is automatically activated when the recording conditions make
it necessary.
The flash is automatically activated when the recording conditions make
it necessary.
It is activated once before the actual re cording to reduce the red-eye
phenomenon (eyes of the subject appearing red in the picture) and then
activated again for the actual recording.
• Use this when you take pictures of people in low lighting
conditions.
The flash is activated e very time regardless of the recording cond itions.
• Use this when your subject is back-lit or under fluorescent light.
• The flash setting is set to [ ] only when you set [PARTY] or
[CANDLE LIGHT] in Scene Mode. (P95)
When taking p ictures against a dark background landscape , this feature
will slow the shutter speed when the flash is activated. Dark background
landscape will appear brighter. Simultaneously it reduces the red-eye
phenomenon.
• Use this when you take pictures of people in front of a dark
background.
• Using a slower speed can cause motion blur. Using a tripod can
enhance your photos.
The flash is not activated in any recording conditions.
• Use this when you take pictures in place s where the use of the
flash is not permitted.
∫ About the digital red-eye correction
When [RED-EYE REMOVAL] (P147) has been set to [ON] and red-eye reduction ([ ],
[ ], [ ]) is selected, digital red-eye correction is performed whenever the flash is
used. The camera automatically detects red-eye and corrects the picture. (Only available
when [AF MODE] is set to [š] and Face Detection is active)
•
Under certain circumstances, red-eye cannot be corrected.
• In the following cases, digital red-eye correction does not work.
– When the flash setting is set to [‡], [‰] or [Œ]
– When [RED-EYE REMOVAL] is set to [OFF]
– When [AF MODE] is set to anything except [š]
- 65 -
Page 66

Advanced (Recording pictures)
∫ Available flash settings by Recording Mode
The available flash settings depend on the Recording Mode.
(±: Available, —: Not available, ¥: Initial setting of Advanced Scene Mode and Scene
Mode)
‡ ‰ Œ ‡ ‰ Œ
¢
±
ñ
1
¢ When [‡] is selected, [ ], [ ], [ ] or [ ] is set depending on the type of
subject and brightness.
• The flash setting may change if the Recording Mode is changed. Set the flash setting again if
necessary.
• The flash setting is memorized even if the camera is turned off. However, the Advanced Scene
Mode or the Scene Mode flash setting is reset to the in itial setting when the Advan ced Scene
Mode or the Scene Mode is changed.
————± ———¥ — ±
±±±±— ± —————¥
±±±±— ± —————¥
±±±——± —————¥
±±±——± —————¥
—————¥
—————¥
±¥±——±
±¥±——±
¥±±——±
±¥±——±
±¥±——±
—————¥
—————¥ ——¥ ———
—————¥¥— ± ——±
—————¥
¥ — ± —— ±
¥ — ± —— ±
¥ — ± —— ±
¥ — ± —— ±
¥ — ± —— ±¥— ± —— ±
¥ — ± —— ±¥— ± —— ±
¥ — ± —— ± ———¥ — ±
¥ — ± —— ±¥±±——±
———¥±±
2
———±¥±
3
±¥±——±
:
±¥±——±
;
¥ — ± ——±
í
—————¥
ï
¥ — ± ——±
9
—————¥
ô
—————¥
5
—————¥
4
——¥ —— ±
6
¥ — ± ——±
8
—————¥
7
• Flash will not be activated when record ing a motio n picture.
- 66 -
Page 67

Advanced (Recording pictures)
∫ The available flash range to take pictures
•
The available flash range is an approximation.
ISO sensitivity
AUTO
ISO80 30 cm (0.99 feet) to 2.7 m (8.85 feet) 1.0 m (3.28 feet) to 1.7 m (5.58 feet)
ISO100 30 cm (0.99 feet) to 3.0 m (9.84 feet) 1.0 m (3.28 feet) to 1.9 m (6.23 feet)
ISO200 40 cm (1.32 feet) to 4.2 m (13.8 feet) 1.0 m (3.28 feet) to 2.7 m (8.85 feet)
ISO400 60 cm (1.97 feet) to 6.0 m (19.7 feet) 1.0 m (3.28 feet) to 3.8 m (12.5 feet)
ISO800 80 cm (2.62 feet) to 8.5 m (27.9 feet) 1.0 m (3.28 feet) to 5.4 m (17.7 feet)
ISO1600
• In [HIGH SENS.] (P99) in Scene Mode, the ISO sensitivity automatically switches to between
[ISO1600] and [ISO6400] and the available flash range also differs.
Wide: Approx. 1.15 m (3.77 feet) to approx. 24.2 m (79.3 feet)
Tele: Approx. 1.0 m (3.28 feet) to approx. 15.4 m (50.5 feet)
• In [FLASH BURST] (P101) in Scene Mode, the ISO sensitivity automatically switches to
between [ISO100] and [ISO3200] and the available flash range also differs.
Wide: Approx. 30 cm (0.99 fee t) to approx. 4.0 m (13.1 feet)
Tele: Approx. 1.0 m (3.28 feet) to approx. 2.5 m (8.20 feet)
¢ When the [ISO LIMIT SET] (P132) is set to [AUTO]
30 cm (0.99 feet) to 8.5 m
(27.9 feet)
1.15 m (3.77 feet) to 12.1 m
(39.7 feet)
Wide Tel e
¢
Available flash range
1.0 m (3.28 feet) to 5.4 m
(17.7 feet)
1.0 m (3.28 feet) to 7.7 m (25.3 feet)
¢
∫ Adjust the flash output
Adjust the flash output when the subject is small, or the reflectivity is very high or low.
1 Press 3 (È) several times to display [FLASH], and then
press 2/1 to set the flash output.
•
You can adjust from [j2 EV] to [i2 EV] in steps of [1/3 EV].
• Select [0 EV] to return to the original flash output.
2 Press [MENU/SET] to close the menu.
•
You can also close the menu by pressing the shutter button
halfway.
Note
•
When the flash output is adjusted, the flash output value appears on the upper left of the
screen.
• The flash output setting is memorized even if the camera is tur ned off.
• You can not se t [FLASH] in the fo llow ing cases.
– In Intelligent Auto Mode
– In [SCENERY]
– In [NIGHT SCENERY], [ILLUMINATIONS] and [CREATIVE NIGHT SCENERY] in
[NIGHT PORTR AIT]
– In [PANORAMA ASSIST], [SUNSET], [HI-SPEED BURST], [STARRY SKY], [FIREWORKS]
and [AERIAL PHOTO] in Scene Mode
– In Creative Motion Picture Mode
– My Color mode
- 67 -
Page 68

Advanced (Recording pictures)
∫ Shutter speed for each flash setting
Flash setting Shutter speed (Sec.) Flash setting Shutter speed (Sec.)
‡
¢1
1/30
‰
¢1 It may vary depending on the [MIN. SHTR SPEED] setting (P143).
• Refer to P82 for details about the Aperture-priority AE, Shutter-priority AE, and Manual
exposure.
• In Intelligen t Auto Mode, shutter speed changes depending on the identified scene.
• In Advanced Scene Mode (P90) and Scene Mode (P95), the shutter speeds will differ from
those described above.
• in Mode
• , and in Mode
to 1/2000th 1¢1 to 1/2000th
Œ
Mode Shutter speed (Sec.)
1 or 1/4 to 1/2000th
¢2
• :, ; and í in [SCENE MODE]
• in Mode
• in Mode
• in Mode
• in Mode
8 to 1/2000th
• , and in Mode
• , (in shutter speed priority) and in
[SCENE MODE]
• 5 in [SCENE MODE] 15, 30, 60
• 4 in [SCENE MODE] 1/4, 2
¢2 The shutter speed becomes a maximum of 1 second in the following cases.
¢3
– When the optical image stabilizer is set to [OFF].
– When the camera has determined that there is little jitter when the optical image stabilizer is
set.
¢3 The maximum shutter speed is selected when the amount of jitter is minimal while
[STABILIZER] is set or when [STABILIZER] is set to [OFF].
• It will become 1/4 to 1/2000th of a second in other Advanced Scene Modes and Scene Modes.
- 68 -
Page 69

Advanced (Recording pictures)
Note
Do not bring the flash too close to objects or close the flash while it is activated. The
•
objects may be discolored by its heat or lighting.
• Do not close the flash soon after the flash is activated prior to taking pictures due to AUTO/
Red-eye red uction etc. It causes a malfunction.
• When you take a picture beyond the available flash range, the exposure may not be adjusted
properly and the pictur e may become bright or dark.
• When the flash is being charged, the flash icon blinks red, and you cannot take a picture even
when you press the shutter button fully.
• The white balance may not be properly adjusted if the flash level is insufficient for the subject.
• The flash effect may not be sufficient when using [FLASH BURST] (P101) in Scene Mode or
when shutter speed is fast.
• When taking a picture with the flash, we recommend removing the lens hood. In some
cases it may not allow the scene to be illuminated properly.
• It may take time to charge the flash if you repeat taking a picture. Take a picture after the
access indication disappears.
• The red-eye reduction effect differs between people. Also, if the subject was far a way from the
camera or was not looking at the first flash, the effect may not be evident.
• Flash is fixed to [Œ] when the [CONVERSION] (P148) is set to [ ] or [ ].
C
- 69 -
Page 70

Advanced (Recording pictures)
[REC] Mode:
Taking Close-up Pictures
Press and hold [AF/AF#/MF] until the
focus switching screen appears.
Press 3/4 to select [AF MACRO] or
[MACRO ZOOM].
Press [MENU/SET].
• You can also press the shutter button halfway to finish.
• The menu screen disappears after ab out 5 seconds. At this time, the selected item is
automatically set.
Press the shutter button halfway to focus
and then press it fully to take the picture.
• [ ] is displayed during AF Macro Mode and [ ]
is displayed during Macro Zoom Mode.
• To cancel, select the [AF] in step 2.
• Zoom range, focus range, and zoom magnification
are displayed during zooming.
- 70 -
Page 71

Advanced (Recording pictures)
[AF MACRO]
This mode allows you to take close-up pictures of a subject, e.g. when taking pictures of
flowers. You can take pictures of a subject as close as 1 cm (0.04 feet) from the lens by
rotating the zoom lever upmost to Wide (1k).
As you rotate the zoom lever towards Tele, the distance at which you can take close-up
pictures changes in steps. The maximum distance for close-up pictures is 2 m (6.57 feet)
(4k-10k).
∫ Focus range
¢ The focus range changes in steps.
1 cm (0.04 feet)
0
2 m (6.57 feet)
1 m (3.28 feet)
∫ Tele-macro function
You can take a picture as close as 1 m (3.28 feet) when the zoom is set to 11k-18k (close
to fully tele) ([ ] is displayed on the screen).
It is convenient to take pictures of flowers on the ground standing, or take close-up
pictures of insects that may run away when you get too close.
•
Jitter may occur when using the tele-macro function. If you cannot use a tripod, it is
recommended to take a picture in the light condition that will allow shutter speed of 1/60 or
higher to maintain the jitter compensation function.
• If you focus on the subject at 2 m (6.57 feet) or less distant posit ion with te le-macro function
when setting the optical zoom magnification in 18
the optical zoom magnification to 11
k or less, the subject becomes unfocused.
k and then rotate the zoom lever for setting
- 71 -
Page 72

Advanced (Recording pictures)
A
B
[MACRO ZOOM]
You can take a picture with the digital zoom up to 3k while maintaining the distance to the
subject for the extreme Wide position [1 cm (0.04 feet)].
A Recording distance range
B Zoom range
• Recording distance range will be 1 cm (0.04 feet) to ¶ during
Macro Zoom Mode regardless of the zoom position.
• Zoom range will be displayed in blue. (digital zoom range)
• The image quality is poorer than during normal recording.
• Macro zoom recording is not available in the following
settings.
– When [ ] in [AF MODE] is set.
– When the [CONVERSION] (P148) is set to [ ] or [ ].
• The following functio ns are not activated.
– Extended optical zoom
– [INTELLIGENT ISO]
Note
We recommend using a tripod and the self-timer.
•
• We recommend setting the flash to [Œ] when you take pictures at close range.
• If the distance between the camera and the subject is beyond the focus range of the camera,
the picture may not be properly focused even if the focus indication lights.
• When a subject is close to the camera, the effective focus range is significantly narrowed.
Therefore, if the distance between the camera and the subject is changed after focusing on the
subject, it may become difficult to focus on it again.
• AF Macro Mode gives priority to a subject close to the camera. Ther efore, if the distance
between the camera and the subject is far, it takes longer to focus on it.
• When you take pictures at close range, the resolution of the periphery of the picture may
decrease slightly. This is not a malfunction.
• If the lens becomes dirty with fingerprints or dust, the lens may not be able to focus on the
subject correctly.
C
- 72 -
Page 73

Advanced (Recording pictures)
[REC] Mode:
Taking Pictures with the Self-timer
Press 2 [ë].
Press 3/4 to select a mode.
• You can also press 2 [ë] to select .
• If you set [10S/3PICTURES], after 10 seconds the
camera takes 3 pictures at about 2 second intervals.
Press [MENU/SET].
• You can also press the shutter button halfway to finish.
• The menu screen disappears after ab out 5 seconds. At this time, the selected item is
automatically set.
Press the shutter button halfway to focus
and then press it fully to take the picture.
• The self-timer indicator A blinks and the shutter is
activated after 10 seconds (or 2 seconds).
• If you press [MENU/SET] while the self-timer is set, the
self-timer setting is canceled.
• When [10S/3PICTURES] is selected, the self-timer
indicator blinks again after the first and the second
pictures are taken and the shutter is activated
2 seconds after it blinks.
A
- 73 -
Page 74

Advanced (Recording pictures)
Note
When using a tripod etc., setting the self-timer to 2 seconds is a convenient way to avoid the
•
jitter caused by pressing the shutter button.
• When you press the shutter button once fully, the subject is automatically focused just before
recording. In dark places, the self-timer indicator will blink and then may turn on brightly
operating as an AF assist lamp (P146) to allow the camera to focus on the subject.
• We recommend using a tripod when recording with the self-timer.
• The number of pictures which can be taken in Burst Mode is fixed to 3.
• The number of pictures which can be taken in [FLASH BURST] (P101) is fixed to 5.
• Depending on the recording conditions, the recording interval may become more than
2 seconds when [10S/3PICTURES] is selected.
• The flash output may not be constant when [10S/3PICTURES] is selected.
• [10S/3PICTURES] cannot be set when any of Intelligent Auto Mode, Auto Bracket, Color
Bracket, or [PANORAMA ASSIST], [FLASH BURST] or [PHOTO FRAME] in Scene Mode is
set.
• You cannot use Burst Mode when [10S/3PICTURES] is selected.
• Setting of the self-time r cannot be performed in following conditions.
– In [HI-SPEED BURST] in Scene Mode
– When recording motion pictures
- 74 -
Page 75

Advanced (Recording pictures)
[REC] Mode:
Compensating the Exposure
Use this function when you cannot achieve appropriate exposure due to the difference in
brightness between the subject and the background. Look at the following examples.
Under exposed
Properly
exposed
Overexposed
Compensate the exposure
towards positive.
Compensate the exposure
towards negative.
Press 3 [È] until [EXPOSURE] appears,
compensate the exposure with 2/1.
• Select [0 EV] to return to the original exposure.
Press [MENU/SET] to finish.
• You can also press the shutter button halfway to finish.
∫ Operate with the joystick
Tilt the joystick toward 2 to select [È], and then move
3/4 to compensate the exposure.
A Exposure compensation value
• Select [È] only to return to the original exposure (0 EV).
• Press the shutter button halfway to finish.
Note
•
EV is an abbreviation of [Exposure Value]. It refers to the amount of light
given to the CCD by the aperture value and the shutter speed.
• The exposure compensation value appears on the lower left of the screen.
• The set exposure value is memorized even if the camera is turned off.
• The compensation range of the exposure will be limited depending on the brightness of the
subject.
• Exposure compensation cannot be used when in [STARRY SKY] in Scene Mode.
A
- 75 -
Page 76

Advanced (Recording pictures)
Taking Pictures using Auto Bracket/ Color Bracket
Auto Bracket
[REC] Mode:
In this mode, 3 pictures are aut omatically recorded in the selected exposure
compensation range each time the shutter button is pr essed. You can select the picture
with the desired exposure from the 3 pictures with different exposures.
With Auto Bracket d1 EV
1st picture 2nd picture 3rd picture
d0EV j1 EV i1 EV
Press 3 [È] several times until [AUTO BRACKET]
appears, set the compensation range of the
exposure with 2/1.
• When you do not use Auto Bracket, select [OFF] (0).
Press [MENU/SET] to finish.
• You can also press the shutter button halfway to finish.
• You cannot use the Auto Bracket in following conditions.
– In [PANORAMA ASSIST], [HI-SPEED BURST],
[FLASH BURST], [STARRY SKY], [PIN HOLE], [FILM GRAIN]
and [PHOTO FRAME] in Scene Mode
– When [QUALITY] is set to [ ] or [ ]
– When record ing motion pictures
- 76 -
Page 77

Advanced (Recording pictures)
Color Bracket
[REC] Mode:
In this mode, up to 3 pictures in black & white, standard, or sepia in the selected modes
are automatically recorded each time the shutter button is pressed.
Press 3 [È] several times to display [AUTO BRACKET].
Press [DISPLAY] to display [COLOR BRACKET].
• It is switched between Auto Bracket and Color Bracket every
time [DISPLAY] is pressed.
Press 2/1 to select the mode.
OFF
[MODE1]:
[B/W]/[STANDARD]
[MODE2]: [STANDARD]/[SEPIA]
[MODE3]:
[B/W]/[STANDARD]/[SEPIA]
Press [MENU/SET] to close the menu.
• You can also press the shutter button halfway to finish.
• You cannot use Color Bracket in the following cond itions:
– When [QUALITY] is set to [ ] or [ ]
– When record ing motion pictures
Note
•
When setting Auto Bracket, [ ] appears on the screen.
• When setting Color Bracket, [ ] appears on the screen.
• When taking pictures using Auto Bracket after setting the exposure compensation range, the
pictures taken are based on the selected exposure compensation range.
When the exposure is compensated, the exposure compensation value appears on the lower
left of the screen.
• The exposure may not be compensated with Auto Bracket depending on the brightness of the
subject.
• The Auto Bracket/Color Bracket setting is canceled if you turn the camera off or
[POWER SAVE] is activated.
• When Auto Bracket/Color Bracket is set, the Auto Review function is activated regardless of the
Auto Review setting. (The picture is not enlarged.) You cannot set the Auto Review function in
the [SETUP] menu.
• In Shutter-Priority AE and Manual Exposure, if the shutter speed is set to more than 1 second,
Auto Bracket is canceled.
• [Œ] is set for the flash when Auto Bracket/Color Bracket is set.
• Bu rst is canceled when Auto Bracket/Color Bracket is set.
• The one set last will take precedence. (Auto Bracket and Color Bracket cannot be set
simultaneously.)
- 77 -
Page 78

Advanced (Recording pictures)
[REC] Mode:
Taking Pictures using Burst Mode
Pictures are taken continuously while the shutter button is pressed.
Select the ones you really like from among the pictures you have taken.
Press [˜/‚] to display the Burst Mode selection
menu, and then press 3/4 to select the Burst
Mode.
A [˜/‚] button
Press [MENU/SET].
• You can also press the shutter button halfway to finish.
• The menu screen disappears after about 5 seconds. At this time,
the selected item is automatically set.
Take a picture.
• Hold down the shutter button fully to activate the Burst Mode.
[OFF] ˜
Burst speed (pictures/
second)
—approx. 2.3
A
¢
Number of
recordable
pictures
¢ The burst speed is constant regardless of the transfer speed of the card.
•
The burst speed values given above apply when the shutter speed is 1/60 or faster and
when the flash is not activated.
A —max. 3
› —max. 5
- 78 -
Page 79

Advanced (Recording pictures)
Note
Focus, exposure and white balance are fixed to the settings used for the first picture.
•
• When the self-timer is used, the number of recordable pictures in Burst Mode is fixed to 3.
• If you are following a moving subject while taking pictures in a place (landscape) indoors,
outdoors etc. wh ere the re is a large difference between the light and shade, it may take time
until the exposure is stable. If burst is used at this time, the exposure may not become optimal.
• The burst speed (pictures/second) may become slower depending on the recording
environment such as in dar k places, if the ISO sensitivity is high etc.
• Burst Mode is not canceled when the camera is switched off.
• If you take pictures in Burst Mode with the built-in memory, it will take time to write the picture
data.
• [Œ] is set for the flash when burst is set.
• Au to Bracket/Color Bracket is canceled when burst is set.
• You cannot use Burst Mode in the following conditions.
– In [PANORAMA ASSIST], [HI-SPEED BURST], [FLASH BURST], [STARRY SKY],
[PIN HOLE], [FILM GRAIN], [HIGH DYNAMIC] and [PHOTO FRAME] in Scene Mode
– When [QUALITY] is set to [ ] or [ ]
– When recording motion pictures
- 79 -
Page 80

Advanced (Recording pictures)
[REC] Mode:
Taking pictures by specifying the aperture / shutter speed
Aperture-priority AE
Set the aperture value to a higher number when you want a sharp focus background. Set
the aperture value to a lower number when you want a soft focus background.
Set the [REC]/[PLAYBACK] selector switch to [!], and then set the
mode dial to [ ].
Tilt the joystick towards 3/4 to set the
aperture value.
Take a picture.
Shutter-priority AE
When you want to take a sharp picture of a fast moving subject, set with a faster shutter
speed. When you want to create a trail effect, set to a slower shutter speed.
Set the [REC]/[PLAYBACK] selector switch to [!], and then set the
mode dial to [ ].
Tilt the joystick towards 3/4 to set the
shutter speed.
Take a picture.
Note
Refer to P82 for the available aperture values and the shutter speed.
•
• The brightness of the LCD monitor/Viewfinder and the recor ded pictures may differ. Check the
pictures using the review function or Playback Mode.
• Set the aperture value to a higher number when the subject is too bright. Set the aperture value
to a lower number when the subject is too dim.
• The aperture value and the shutter speed displayed on the screen turn red when the exposure
is not adequate.
• We recommend using a tripod when the shutter speed is slow.
• [ ] cannot be set for shutter-priority AE
- 80 -
Page 81

Advanced (Recording pictures)
[REC] Mode:
Taking a picture by setting the exposure manually
Determine the exposure by manually setting the aperture value and the shutter speed.
Set the [REC]/[PLAYBACK] selector switch to [!], and then set the
mode dial to [ ].
• The Manual Exposure Assistance A appears for about 10 seconds.
Tilt the joystick towards 3/4/2/1 to set
the aperture value and the shutter speed.
B Aperture Value
C Shutter Speed
•
Focus can be set manually when [MF] is displaying.
(P83)
Press the shutter button halfway.
• The Manual Exposure Assistance A appears for
about 10 seconds.
• Set the aperture value and the shutter speed again
when the exposure is not adequate.
C
B
Take the picture.
∫ Manual Exposure Assistance
The exposure is adequate.
Set to faster shutter speed or larger aperture value.
Set to slower shutter speed or smaller aper ture value.
The Manual Exposure Assistance is an approximation. We recommend checking the pictures
•
after taking them by using the review function.
Note
•
Refer to P82 for the available aperture values and the shutter speed.
• The brightness of the LCD monitor/Viewfinder may differ from the brightness of the actual
pictures. Check the pictures using the Review function or Playback Mode.
• If the exposure is not adequate, the aperture value and the shutter speed turn red when the
shutter button is pressed halfwa y.
• [ ] for flash cannot be set.
A
- 81 -
Page 82

Advanced (Recording pictures)
Aperture Value and Shutter Speed
Aperture-priority AE
Available Aperture Value
(Per 1/3 EV)
F8.0 8 to 1/2000
F7.1 F6.3 F5.6 8 to 1/1600
F5.0 F4.5 F4.0 8 to 1/1300
F3.6 F3.2 F2.8 8 to 1/1000
Shutter-priority AE
Available Shutter Speed (Sec)
(Per 1/3 EV)
86543.2
2.5 2 1.6 1.3 1
1/1.3 1/1.6 1/2 1/2.5 1/3.2
1/4 1/5 1/6 1/8 1/10
1/13 1/15 1/20 1/25 1/30
1/40 1/50 1/60 1/80 1/100
1/125 1/160 1/200 1/250 1/320
1/400 1/500 1/640 1/800 1/1000
1/1300 F4.0 to F8.0
1/1600 F5.6 to F8.0
1/2000 F8.0
Shutter Speed (Sec)
Aperture Value
F2.8 to F8.0
Manual exposure
Available Aperture Value
(Per 1/3 EV)
F2.8 to F3.6 60 to 1/1000
F4.0 to F5.0 60 to 1/1300
F5.6 to F7.1 60 to 1/1600
F8.0 60 to 1/2000
Note
The aperture values given in the table above are values when the zoom lever is rotated to
•
Wide.
• Depending on the zoom mag nification, some of the aperture values cannot be selected.
Available Shutter Speed (Sec)
(Per 1/3 EV)
- 82 -
Page 83

Advanced (Recording pictures)
∞
3.3
ft.
6.6
∞
3.3
ft.
6.6
[REC] Mode:
Taking Pictures with Manual Focus
Use this function when you want to fix the f ocus or when the distance between the lens
and the subject is determined and you do not want to activate Auto Focus.
Press and hold [AF/AF#/MF] until the
focus switching screen appears.
Press 3/4 to select [MF] and then press
[MENU/SET].
ft.
∞
6.6
3.3
• [MF] is displayed while in Manual Focus Mode.
Tilt the joystick towards 3/4 to focus on
the subject.
A Focus range
B MF assistance
ft.
6.6
3.3
• MF assistance disappea rs about 2 seconds after
you stop operating the joystick.
• Focus range disappears about 5 seconds after you
stop operating the joystick.
• When recording motion pictures, MF assistance is not displayed but focus can be
adjusted.
Take the picture.
• To cancel, select the [AF] in step 2.
- 83 -
Page 84

Advanced (Recording pictures)
3.3
∞
6.6
3.3
∞
6.6
ft.
ft.
MF ASSIST
If you tilt the joystick towards 3/4 when [MF ASSIST] is set to [MF1] or [MF2], MF
assistance is activated and the screen is enlarged. This allows you to focus on the subject
more easily.
Select [MF ASSIST] on the [SETUP] menu. (P27)
Press 3/4 to select [MF1] or [MF2] and then press [MENU/SET].
[MF1] The center of the screen is enlarged. You can adjust the focus while
determining the composition of the whole of the screen.
[MF2] The center of the screen is enlarged over the whole screen. This is
convenient for adjusting the focus in wide angle shots for which changes
in focus are difficult to grasp.
[OFF] The screen is not enlarged.
Press [MENU/SET] to close the menu.
• You can also press the shutter button halfway to finish.
∫ Changing the zoom area
The magnified area can be changed while
the screen is expanded using MF Assist.
This is convenient when you want to change
the focus position to take pictures.
1 Display MF Assist with 3/4 on the
joystick.
2 Change the area to be expanded with the
cursor buttons 3/4/2/1.
3 Press [MENU/SET] to set.
•
The following will return the MF assistance to
the original position.
– Changing the picture size or aspect.
– Turning the camera off.
ft.
6.6
3.3
ft.
6.6
3.3
- 84 -
Page 85

Advanced (Recording pictures)
∫ Technique for Manual focus
1 Focus by tilting the joystick toward 3/4.
2 Tilt it a little more in the same direction.
3 Tilt the joystick in the opposite direction to
finely focus on the subject.
∫ Prefocus
This is a technique for focusing in advance on the point the pictures will be taken when it is
difficult to focus on the subject with Auto Focus due to its quick motion. (e.g. [PANNING]
(P102) in Scene Mode)
This function is suitable when the distance between the camera and the subject is certain.
∫ One shot AF
You can focus on the subject with Auto Focus by selecting [MF] with [AF/AF#/MF] button
and then pressing [FOCUS] button.
This is convenient for prefocus.
Note
•
If you focus on the subject in Wide and then rotate the zoom lever to Tele, the focus may not be
adequate. In this case, focus on the subject again.
• The MF assistance does not appear when using the digital zoom.
• The distance to the subject displayed on the screen in Manual Focus is an approximation of the
focus position. Use the MF assistance screen for a final check of the focus.
• After canceling Power Save Mode, focus on the subject again.
- 85 -
Page 86

Advanced (Recording pictures)
[REC] mode:
Taking pictures while adjusting color
(My color mode)
Easily confirm the subject on the LCD monitor or viewfinder and adjust the color,
brightness, or saturation before taking a picture.
Set the mode dial to [ ].
Press 2/1 to select an item and press 3/4 to
adjust the item.
Item Adjustment contents
This will adjust the color of the
[COLOR]
[BRIGHTNESS]
[SATURATION]
[RESET] Return all settings to default
• Description of adjustment is displayed by pressing [DISPLAY]. (It will return to selection
screen when it is pressed again.)
Press [MENU/SET] to set.
• You can also press the shutter button halfway to set.
• Recording screen is displayed.
∫ Return My color settings to default
1 Select [RESET] in above step 2.
2 Press 3 to select [YES] and press [MENU/SET].
•
Adjusted value for each item r eturns to standard (center point).
image from red light to blue light.
(11 steps in n5)
This will adjust the brightness of
the image. (13 steps in n6)
This will adjust the color intensity
of the image from black and
white to vivid color.
(11 steps in n5)
- 86 -
Page 87

Advanced (Recording pictures)
Note
If you wish to ad just the My Color setting again, press [MENU/SET] and 1, and then return to
•
above step
• During motion picture recording, settings for My color mode are used.
• Adjustments made with My color mode are not in effect in other recording modes.
• My Color setting set is memorized even if the camera is turned off.
• Icons for the adjusted items are displayed in the LCD monitor/viewfinder when the My Color
settings are adjusted. Displayed icon is the one for direction of adjustment.
• Auto Bracket/Color Bracket cann ot be used in My Color mode.
2 (when [MENU RESUME] (P37) is [OFF]).
• AF tracking may not function if you adjust [SATURATION] to make the color lighter.
- 87 -
Page 88

Advanced (Recording pictures)
[REC] Mode:
Registering Personal Menu Settings (Registering
custom settings)
It is possible to register up to 3 sets of current camera settings as custom sets.
Set to the mode dial to the desired mode and select the de sired menu settings in advance.
•
Select [CUST. SET MEM.] on the [SETUP] menu. (P27)
Press 3/4 to select the custom set to register and
then press [MENU/SET].
Press 3 to select [YES] and then press [MENU/
SET].
• When [YES] is selected, the settings that were previously
stored are overwritten.
Press [MENU/SET] to close the menu.
• You can also press the shutter button halfway to close the menu.
Note
You cannot save the following menu items because they affect other Recording Modes.
•
– [CLOCK SET], [WORLD TIME], [TRAVEL DATE], [BEEP], [VOLUME], [MONITOR/
VIEWFINDER], [LCD MODE], [ECONOMY], [AUTO REVIEW], [ZOOM RESUME],
[NO.RESET], [RESET], [USB MODE], [TV ASPECT], [HDMI MODE], [VIERA Link],
[SCENE MENU], [VERSION DISP.], [LANGUAGE] and [DEMO MODE] in the [SETUP] menu
– [BABY1]/[BABY2] or [PET] birthday and name settings in Scene Mode
– Data registered with [FACE RECOG.]
- 88 -
Page 89

Advanced (Recording pictures)
[REC] Mode:
Taking pictures in Custom Mode
You can select one of your own custom settings saved with [CUST. SET MEM.] to suit the
picture-taking conditions.
Initial setting of the Program AE Mode is registered as the custom settings initially.
Slide the [REC]/[PLAYBACK] selector switch to [!].
Set the mode dial to [ ].
A Display custom settings
A
Press 3/4 to select the custom settings you
want to use, and then press [MENU/SET].
• Press [DISPLAY] to display the settings for each menu item.
(Press 2/1 to change between screens, and press
[DISPLAY] to return to the selection screen.)
• Only the main menu items are displayed.
Press [MENU/SET] to enter the settings.
A Saving of the selected custom settings is
displayed on the screen.
∫ When changing the menu settings
Even if the menu settings are changed temporarily with [ ], [ ] or [ ] selected,
what has been registered will remain unchanged.
To change what has been registered, overwrite the registered data using
[CUST. SET MEM.] (P88) on the setup menu.
Note
•
You cannot register the settings of the following menu items as a Custom Mode. If they are
changed, other Recording Modes will also be affected.
– [CLOCK SET], [WORLD TIME], [TRAVEL DATE], [BEEP], [VOLUME], [MONITOR/
VIEWFINDER], [LCD MODE], [ECONOMY], [AUTO REVIEW], [ZOOM RESUME],
[NO.RESET], [RESET], [USB MODE], [TV ASPECT], [HDMI MODE], [VIERA Link],
[SCENE MENU], [VERSION DISP.], [LANGUAGE] and [DEMO MODE] in the [SETUP] menu
– [BABY1]/[BABY2] or [PET] birthday and name settings in Scene Mode
– Data registered with [FACE RECOG.]
- 89 -
Page 90

Advanced (Recording pictures)
[REC] Mode:
Taking expressive portraits and landscape pictures (Advanced Scene Mode)
You can take high-quality pictures of such subjects as people, scenery, sporting events
and activities, people in night scenes and flowers in accordance with the surrounding
conditions.
Slide the [REC]/[PLAYBACK] selector switch to [!].
Set the mode dial.
Press 3/4 to select the Advanced Scene Mode.
Press [MENU/SET] to set.
• The menu screen is switched to the recording screen in the
selected Advanced Scene Mode.
∫ About the information
•
If you press [DISPLAY] when selecting an Advanced Scene Mode in
3, explanations about each Advanced Scene Mode are
step
displayed. (If you press [DISPLAY] again, the screen returns to the
screen shown in step
Note
Return to above step 3 after pressing the [MENU/SET] to change the Advanced Scene Mode
•
(when [MENU RESUME] (P37) is [OFF]).
• Refer to P68 for information about the shutter speed.
• The Advanced Scene Mode flash setting is reset to the initial setting when the Advanced Scene
Mode is changed.
• When you take a picture with a Advan ced Scene Mode that is not adequate for the purpose,
the hue of the picture may differ from the actual scene.
• The following items cannot be set in Advanced Scene Mode because the camera automatically
adjusts them to the optimal setting.
– [INTELLIGENT ISO]/[SENSITIVITY]/[ISO LIMIT SET]/[METERING MODE]/[I.EXPOSURE]/
[COLOR EFFECT]/[PICT. ADJ.]/[MIN. SHTR SPEED]/[FLASH SYNCHRO]
3.)
- 90 -
Page 91

Advanced (Recording pictures)
[PORTRAIT]
The person stands out from the background and has a healthier complexion.
[NORMAL PORTRAIT]
Shades the background and photographs skin color beautifully.
[SOFT SKIN]
Makes the skin surface appear especially smooth.
•
When [SOFT SKIN] is selected, if a part of the background is a color similar to the color of
the person’s skin, it also may show some smoothing.
• When [SOFT SKIN] is selected, this mode may not be effective when there is insufficient
brightness.
[OUTDOOR PORTRAIT]
Prevents faces from appearing dark when taking pictures outside.
[INDOOR PORTRAIT]
Sets the ISO sensitivity setting to the appropriate setting to prevent blurring of photo
subject for indoor photography.
[CREATIVE PORTRAIT]
You can change the amount of background blurring by changing the aperture value
(P80). (Set value will not be applied for motion picture recording.)
∫ Technique for Portrait Mode
To make this mode more effective:
1 Rotate the zoom lever as far as possible to Tele.
2 Move close to the subject to make this mode more effective.
Note
•
When recording motion pictures in [SOFT SKIN], the setting will be applied.
[NORMAL PORTRAIT], [OUTDOOR PORTRAIT], [INDOOR PORTRAIT] and
[CREATIVE PORTRAIT] produce motion pictures using settings suitable for recording
people.
• In [INDOOR PORTRAIT], the [INTELLIGENT ISO] operates, an d the maximum ISO sensitivity
level becomes [ISO800].
• The initial setting for [AF MODE] is [š].
- 91 -
Page 92

Advanced (Recording pictures)
[SCENERY]
This allows you to take pictures of a wide landscape.
[NORMAL SCENERY]
The focus adjusts onto far away subjects as a priority.
[NATURE]
The best sett ing for taking pictures of natural scenery.
[ARCHITECTURE]
This setting takes sharp photographs of architecture. The guidelines are displayed.
(P32)
[CREATIVE SCENERY]
The shutter speed (P80) can be changed in the [NORMAL SCENERY] setting. (Set
value will not be applied for motion picture recording.)
Note
•
It produces motion pictures using settings suitable for recording scenery during the
motion picture recording.
• The flash setting is fixed to [Œ].
• The focus range is 5 m (16.4 feet) to ¶.
[SPORTS]
Set here when you want to take pictures of sports scenes or other fast-moving events.
[NORMAL SPORTS]
Controls the ISO sensitivity while stopping movement with a high shutter speed.
[OUTDOOR SPORTS]
Fast shutter speed for stopping movement when taking photographs outdoors in good
weather.
[INDOOR SPORTS]
Increases the ISO sensitivity and increases the shutter speed to prevent blurring for
indoor photography.
Where higher ISO setting is used, the photo may show slightly more noise. This is
normal, this is not a malfunction.
[CREATIVE SPORTS]
The shutter speed (P80) can be changed in the [NORMAL SPORTS] setting. (Set
value will not be applied for motion picture recording.)
Note
It will be a normal motion picture recording during the motion picture recording.
•
• This mode is suitable for taking pictures of subjects at distances of 5 m (16.4 feet) or more.
- 92 -
Page 93

Advanced (Recording pictures)
[CLOSE-UP]
This mode allows you to take close-up pictures of a subject, e.g. when taking pictures of
flowers.
[FLOWER]
Flowers outdoors are recorded with natural colors in macro settings. The guidelines
are displayed. (P62)
[FOOD]
You can take pictures of food with a natural hue without being affected by the ambient
light in restaurants etc.
[OBJECTS]
You can take clear and vivid pictures of accessories or small objects in a collection.
[CREATIVE CLOSE-UP]
You can change the degree of blurring of the backgr ound by changing the aperture
value in the macro settings. (P80) (Set value will not be applied for motion picture
recording.)
Note
•
During motion pictu re recording, the motion picture will reflect the settings for each
mode with [FLOWER], [FOOD] and [OBJECTS]. [CREATIVE CLOSE-UP] is suitable for
near distance motion picture recording.
• We recommend usin g a tripod and the self-timer.
• We recommend setting the flash to [Œ] when you take pictures at close range.
• The range in which the focus is adjusted is shown below.
– [FOOD]: 1 cm (0.04 feet) (wide)/2 m (6.57 feet) (Tele) to ¶
–
[FLOW ER]/[OBJECTS]/[CREATIVE CLOSE- UP]: 1 cm (0.04 feet) (wide)/1 m (3.2 8 fe et)
(Tele) to
• If the distance between the camera and the subject is beyond the focus range of the camera,
the picture may not be properly focused even if the focus indication lights.
• When a subject is close to the camera, the effective focus range is significantly narrowed.
Therefore, if the distance between the camera and the subject is changed after focusing on the
subject, it may become difficult to focus on it again.
• Close-up Mode gives priority to a subject close to the camera. Therefore, if the distance
between the camera and the subject is far, it takes longer to focus on it.
• When you take pictures at close range, the resolution of the periphery of the picture may
decrease slightly. This is not a malfunction.
• If the lens becomes dirty with fingerprints or dust, the lens may not be able to focus on the
subject correctly.
¶
- 93 -
Page 94

Advanced (Recording pictures)
[NIGHT PORTRAIT]
This allows you to take pictures of a person and the background with near real-life
brightness.
[NIGHT PORTRAIT]
Uses when taking photographs of people with night scenery as a background.
•
Open the flash.
(You can set to [ ].)
The initial setting for [AF MODE] is [š].
•
[NIGHT SCENERY]
Night scenery is vividly photographed with the maximum 8 second slow shutter.
•
The flash setting is fixed to [Œ].
[ILLUMINATIONS]
Illuminations are photographed beautifully.
•
The flash setting is fixed to [Œ].
[CREATIVE NIGHT SCENERY]
The aperture value (P80) can be changed in the [NIGHT SCENERY] setting. (Set
value will not be applied for motion picture recording.)
•
The flash setting is fixed to [Œ].
∫ Technique for Night Portrait Mode
•
Since the shutter speed becomes slower, we recommend using a tripod and the self-timer for
taking pictures.
• When selecting [NIGHT PORTRAIT], ask the subject not to move while taking a picture.
• When [NIGHT PORTRAIT] is selected, we recommend rotating the zoom lever to Wide (1k)
and being about 1.5 m (4.92 feet) from the subject when taking a picture.
Note
During motion picture recording, low light settings are used, which will provide better
•
pictures in dimly lit rooms or at nightfall.
• The range in which the focus is adjusted is shown below.
– [NIGHT PORTRAIT]: 0.9 m (2.96 feet) to 5 m (16.4 feet) (Wide)
– [NIGHT SCENERY]/[ILLUMINATIONS]/[CREATIVE NIGHT SCENERY]: 5 m (16.4 feet) to ¶
• Noise may become visible when you take pictures in dark places.
• The shutter may remain closed (max. about 8 sec.) after taking the picture because of signa l
processing. This is not a malfunction.
- 94 -
Page 95

Advanced (Recording pictures)
[REC] Mode:
Taking pictures that match the scene being recorded (Scene Mode)
When you select a Scene Mode to match the subject and recording situation, the camera
sets the optimal exposure and hue to obtain the desired picture.
Slide the [REC]/[PLAYBACK] selector switch to [!].
Set the mode dial to [ ].
Press 3/4/2/1 to select the Scene Mode.
• You can switch menu screens from any menu item by rotating
the zoom lever.
Press [MENU/SET] to set.
• The menu screen is switched to the recording screen in the
selected Scene Mode.
∫ About the information
•
If you press [DISPLAY] when selecting a Scene Mode in step 3,
explanations about each Scene Mode are displayed. (If you press
[DISPLAY] again, the screen returns to the Scene Mode menu.)
Note
To change the Scene Mode, press [MENU/SET] and then press 1, and return to step 3 above
•
(when [MENU RESUME] (P37) is [OFF]).
• Refer to P68 for information about the shutter speed.
• The Scene Mode flash setting is reset to the initial setting when the Scene Mode is changed.
• When you take a picture with a Scene Mode that is not adequate for the purpose, the hue of the
picture may differ from the actual scene.
• The following items cannot be set in Scene Mode because the camera automatically adjusts
them to the optimal setting.
– [INTELLIGENT ISO]/[SENSITIVITY]/[ISO LIMIT SET]/[METERING MODE]/[I.EXPOSURE]/
[COLOR EFFECT]/[PICT. ADJ.]/[MIN. SHTR SPEED]/[FLASH SYNCHRO]
- 95 -
Page 96

Advanced (Recording pictures)
[PANORAMA ASSIST]
You can take pictures with connections suitable for creating panorama images.
∫ Setting the recording direction
1 Press 3/4 to select the recording direction and then press
[MENU/SET].
•
The horizontal/vertical guideline will be displayed.
2 Take the picture.
•
You can retake the picture by selecting [RETAKE].
3 Press 3 to select [NEXT] and then
press [MENU/SET].
You can also press the shutter button halfway to set the menu.
•
• Part of the recorded image is displayed as a transparent image.
4 Take picture after moving the camera horizontally or
vertically so the transparent image overlaps.
When taking the third and later pictures, repeat steps 3 and 4.
•
• You can retake the picture by selecting [RETAKE].
5 Press 3/4 to select [EXIT] and then
press [MENU/SET].
Note
It will be a normal motion picture recording during the motion picture recording.
•
• The flash setting is fixed to [Œ].
• The focus, zoom, exposure, white balance, shutter speed and ISO sensitivity are fixed to the
settings for the first picture.
• The shutter may remain closed (max. about 8 sec.) after taking the picture because of signa l
processing. This is not a malfunction.
• We recommend using a tripod .
• The recorded images can be combined into panorama pictures using the software “ArcSoft
Panorama Maker” on the CD-ROM (supplied).
- 96 -
Page 97

Advanced (Recording pictures)
[PARTY]
Select this when you want to take pictures at a wedding reception, an indoor party etc.
This allows you to take pictures of people and the background with near real-life
brightness.
∫ Technique for Party Mode
•
Open the flash. (You can set to [ ] or [ ].)
• We recommend usin g a tripod and the self-timer for taking pictures.
• We recommend rotating th e zoom lever to Wide (1k) and being about 1.5 m (4.92 feet) from
the subject when taking pictures.
Note
The initial setting for [AF MODE] is [š].
•
[CANDLE LIGHT]
This mode allows you to take pictures with a candle-lit atmosphere.
∫ Technique for Candle Light Mode
•
This is more effective when taking pictures without using the flash.
• We recommend usin g a tripod and the self-timer for taking pictures.
Note
The focus ran ge is 1 cm (0.04 feet) (Wide)/2 m (6 .57 feet) (Tele) to ¶.
•
• The initial setting for [AF MODE] is [š].
- 97 -
Page 98

Advanced (Recording pictures)
[BABY1]/ [BABY2]
This takes pictures of a baby with a healthy complexion. When you use the flash, the light
from it is weaker than usual.
It is possible to set different birthdays and names for [BABY1] and [BABY2]. You can
select to have these appear at the time of playback, or have them stamped on the
recorded image using [TEXT STAMP] (P160).
∫ Birthday/Name setting
1 Press 3/4 to select [AGE] or [NAME] and then press 1.
2 Press 3/4 to select [SET] and then press [MENU/SET].
3 Enter the birthday or name.
Birthday:
2/1: Select the items (year/month/day).
3/4: Setting.
[MENU/SET]: Exit.
Name: For details on how to enter characters, read the [TITLE EDIT] section on P158.
•
When the birthday or name is set, [AGE] or [NAME] is automatically set to [ON].
• If [ON] is selected when the birthday or name has not been registered, the setting screen
appears automatically.
4 Press [MENU/SET] to finish.
∫ To cancel [AGE] and [NAME]
Select the [OFF] setting in step
Note
During motion picture recording, settings for [PORTRAIT] are used.
•
• The age and name can be printed out using the “PHOTOfunSTUDIO 4.0 HD Edition” bundled
software on the CD-ROM (supplied).
• If [AGE] or [NAME] is set to [OFF] even wh en the birthday or name ha s been set, the age or
name will not be displayed. Before taking pictures, set [AGE] or [NAME] to [ON].
• The focus range is 1 cm (0.04 feet) (W ide)/2 m (6.57 feet) (Tele) to ¶.
• [INTELLIGENT ISO] is activated, and maximum ISO sensitivity level becomes [ISO1600].
• If the camera is turned on with [BABY1]/[BABY2] set, the age and name are displayed at the
lower left of the screen for about 5 second s, along with the current date and time.
• If the age is not properly displayed, check the clock and birthday settings.
• If the quality is set to [ ] or [ ] and pictures are taken, the name is not registered on the
pictures.
• The birthday setting and name setting can be reset with [RESET].
• The initial setting for [AF MODE] is [š].
2 of the “Birthday/Name setting” procedure.
- 98 -
Page 99

Advanced (Recording pictures)
[PET]
Select this when you want to take pictures of a pet such as a dog or a cat.
You can set your pet’s birthday and name. You can select to have these appear at the time
of playback, or have them stamped on the recorded image using [TEXT STAMP] (P160).
For information about [AGE] or [NAME], refer to [BABY1]/[BABY2] on P98.
Note
•
It will be a normal motion picture recording during the motion picture recording.
• The initial setting for the AF assist lamp is [OFF].
• The initial setting for [AF MODE] is [ ].
• Refer to [BABY1]/[BABY2] for other information about this mode.
[SUNSET]
Select this when you want to take pictures of sunset view. This allows you to take vivid
pictures of the red color of the sun.
Note
•
The flash setting is fixed to [Œ].
[HIGH SENS.]
This mode minimizes the jitter of the subjects, and enables you to take pictures of these
subjects in dimly lit rooms. (Select this for high-sensitivity processing. The sensitivity
automatically switches to between [ISO1600] and [ISO6400].)
∫ Picture size and aspect ratio
1 Press 3/4 to select the picture size and aspect ratio and then press [MENU/
SET] to set.
3M (4:3), 2.5M (3:2) or 2M (16:9) is selected as the picture size.
•
2 Take pictures.
Note
[QUALITY] is automatically fixed to [›].
•
• You can take pictures suitable for 4qk6q/10k15 cm printing.
• The focus range is 1 cm (0.04 feet) (W ide)/2 m (6.57 feet) (Tele) to ¶.
- 99 -
Page 100

Advanced (Recording pictures)
[HI-SPEED BURST]
This is a convenient mode for shooting rapid movement or a decisive moment.
∫ Picture size and aspect ratio
1 Press 3/4 to select [SPEED PRIORITY] or [IMAGE PRIORITY] and then press
[MENU/SET] to set.
2 Press 3/4 to select the picture size and aspect ratio and then press [MENU/
SET] to set.
•
3M (4:3), 2.5M (3:2) or 2M (16:9) is selected as the picture size.
3 Take pictures.
•
Still pictures are taken continuously while the shutter button is pressed fully.
Maximum Burst speed
Number of recordable
pictures
• The burst speed changes according to the recording conditions.
• The number o f burst recording pictures are limited by the picture -taking conditions and the type
and/or status of the card used.
• The number of burst recording pictures increase immediately after formatting .
approx. 10 pictures/second (Speed priority)
approx. 6 pictures/second (Image priority)
approx. 15 to 100
Note
It will be a normal motion picture recording during the motion picture recording.
•
• The flash setting is fixed to [Œ].
• [QUALITY] is automatically fixed to [›].
• You can take pictures suitable for 4qk6q/10k15 cm printing.
• The focus range is 1 cm (0.04 feet) (W ide)/2 m (6.57 feet) (Tele) to ¶.
• The focus, zoom, exposure, white balance, shutter speed and ISO sensitivity are fixed to the
settings for the first picture.
• The ISO sensitivity is automatically adjusted. Note, however, that the ISO sensitivity is set high
to achieve a high shutter speed.
• Depending on the operating conditions, it may take time to take the next picture if you repeat
taking a picture.
- 100 -
 Loading...