

Panasonic DMC-FZ330 Instruction Manual
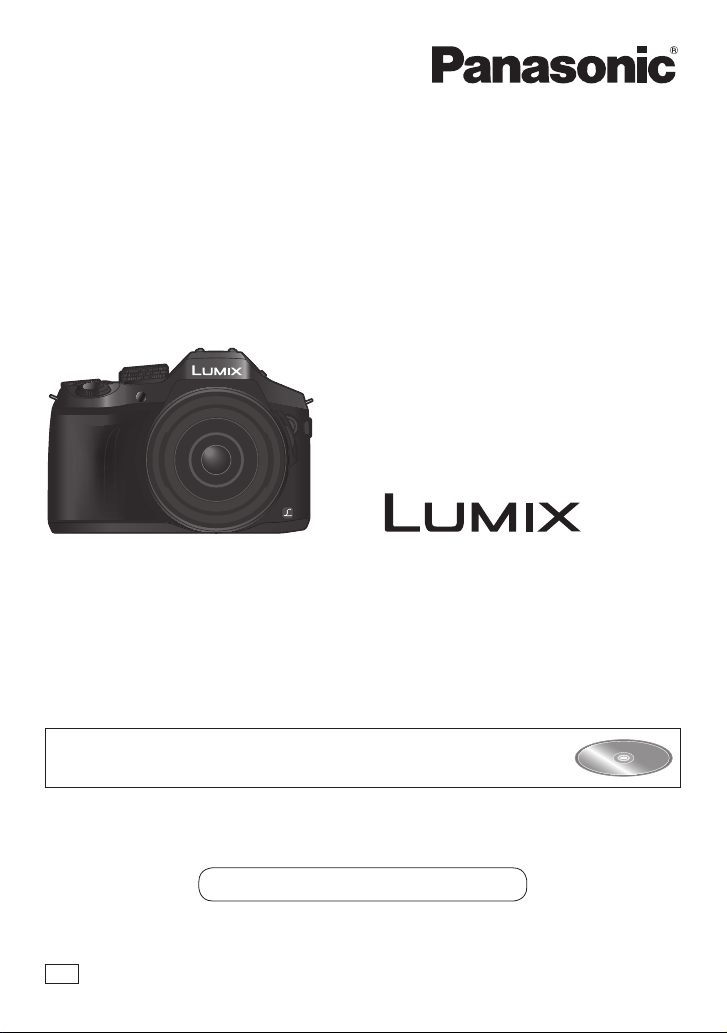
Basic Operating Instructions
Digital Camera
Model No. DMC-FZ330
Please read these instructions carefully before using this product, and save this manual
for future use.
More detailed instructions on the operation of this camera are
contained in “Operating Instructions for advanced features (PDF
format)” in the supplied disc.
Web Site: http://www.panasonic.com
Model number suffix “EB” denotes UK model.
EB
SQT0962-1
M0715KZ1067
Dear Customer,
We would like to take this opportunity to thank you for purchasing this Panasonic Digital
Camera. Please read these Operating Instructions carefully and keep them handy for
future reference. Please note that the actual controls and components, menu items, etc.
of your Digital Camera may look somewhat different from those shown in the illustrations
in these Operating Instructions.
Carefully observe copyright laws.
• Recording of pre-recorded tapes or discs or other published or broadcast material for
purposes other than your own private use may infringe copyright laws. Even for the
purpose of private use, recording of certain material may be restricted.
Information for Your Safety
WARNING:
To reduce the risk of fire, electric shock or product damage,
• Do not expose this unit to rain, moisture, dripping or splashing.
• Use only the recommended accessories.
• Do not remove covers.
• Do not repair this unit by yourself. Refer servicing to qualified service
personnel.
The socket outlet shall be installed near the equipment and shall be easily accessible.
■
Product identification marking
Product Location
Digital camera Bottom
Battery charger Bottom
■
About the battery charger
CAUTION!
To reduce the risk of fire, electric shock or product damage,
• Do not install or place this unit in a bookcase, built-in cabinet or in another
confined space. Ensure this unit is well ventilated.
• The battery charger is in the standby condition when the AC power supply cord is
connected. The primary circuit is always “live” as long as the power cord is connected
to an electrical outlet.
SQT0962 (ENG)
2

■
About the battery pack
CAUTION
• Danger of explosion if battery is incorrectly replaced. Replace only with the type
recommended by the manufacturer.
• When disposing of the batteries, please contact your local authorities or dealer and
ask for the correct method of disposal.
• Do not heat or expose to flame.
• Do not leave the battery(ies) in a car exposed to direct sunlight for a long period of time
with doors and windows closed.
Warning
Risk of fire, explosion and burns. Do not disassemble, heat above 60 °C or incinerate.
■
Cautions for Use
• Do not use any other USB connection cables except the supplied one or a genuine
Panasonic USB connection cable (DMW-USBC1: optional).
• Always use a genuine Panasonic AV cable (DMW-AVC1: optional).
• Use a “High Speed HDMI micro cable” with the HDMI logo. Cables that do not comply
with the HDMI standards will not work.
“High Speed HDMI micro cable” (Type D-Type A plug, up to 2 m (6.6 feet) long)
• Always use a genuine Panasonic shutter remote control (DMW-RSL1: optional).
Keep this unit as far away as possible from electromagnetic equipment (such as
microwave ovens, TVs, video games etc.).
• If you use this unit on top of or near a TV, the pictures and/or sound on this unit may be
disrupted by electromagnetic wave radiation.
• Do not use this unit near cell phones because doing so may result in noise adversely
affecting the pictures and/or sound.
• Recorded data may be damaged, or pictures may be distorted, by strong magnetic
fields created by speakers or large motors.
• Electromagnetic wave radiation may adversely affect this unit, disturbing the pictures
and/or sound.
• If this unit is adversely affected by electromagnetic equipment and stops functioning
properly, turn this unit off and remove the battery or disconnect AC adaptor (DMWAC10E: optional). Then reinsert the battery or reconnect AC adaptor and turn this unit
on.
Do not use this unit near radio transmitters or high-voltage lines.
• If you record near radio transmitters or high-voltage lines, the recorded pictures and/or
sound may be adversely affected.
SQT0962 (ENG)
3

Declaration of Conformity (DoC)
Hereby, “Panasonic Corporation” declares that this product is in compliance with the
essential requirements and other relevant provisions of Directive 2014/53/EU.
Customers can download a copy of the original DoC to our RE products from our DoC
server:
http://www.doc.panasonic.de
Contact to Authorized Representative:
Panasonic Marketing Europe GmbH, Panasonic Testing Centre, Winsbergring 15, 22525
Hamburg, Germany
Wireless transmitter:
Frequency range used: 2412 MHz to 2462 MHz (Central frequency)
Max. output power: 13 dBm (EIRP)
SQT0962 (ENG)
4
These symbols indicate separate collection of waste
electrical and electronic equipment or waste batteries.
More detailed information is contained in “Operating
Instructions for advanced features (PDF format)”.

Caution for AC Mains Lead
For your safety, please read the following text carefully.
This appliance is supplied with a moulded three pin mains plug for your safety and convenience.
A 5-ampere fuse is fitted in this plug.
Should the fuse need to be replaced please ensure that the replacement fuse has a rating
of 5-ampere and that it is approved by ASTA or BSI to BS1362.
Check for the ASTA mark or the BSI mark on the body of the fuse.
If the plug contains a removable fuse cover you must ensure that it is refitted when the
fuse is replaced.
If you lose the fuse cover the plug must not be used until a replacement cover is
obtained.
A replacement fuse cover can be purchased from your local dealer.
■
Before use
Remove the connector cover.
■
How to replace the fuse
The location of the fuse differ according to the type of AC mains plug (figures A and B).
Confirm the AC mains plug fitted and follow the instructions below.
Illustrations may differ from actual AC mains plug.
1. Open the fuse cover with a screwdriver.
Figure A Figure B
Fuse cover
2. Replace the fuse and close or attach the fuse cover.
Figure A
Fuse
(5 ampere)
Figure B
Fuse
(5 ampere)
SQT0962 (ENG)
5

Contents
■
Information for Your Safety ................ 2
Preparations
■
Before use ........................................... 8
■
Standard accessories ......................... 9
■
Names and Functions
of Main Parts ..................................... 10
■
Preparations ...................................... 12
Attaching the Lens Hood .............................12
Attaching the Lens Cap ...............................13
Attaching the Shoulder Strap ......................13
Charging the battery .................................... 14
Inserting and removing the battery/the card
(optional) .....................................................15
Formatting the card (initialisation) ...............16
Opening the Monitor .................................... 17
Setting the clock ..........................................17
Basics
■
Zoom lever/Side lever (Use zoom)
■
Shutter button (Taking pictures) ..... 18
■
Mode dial
(Select the recording mode) ............ 19
■
Focus mode lever ............................. 19
■
Side dial / Rear dial ........................... 20
■
Side button ........................................ 21
■
[LVF] button
(Switching between the monitor
and viewfinder) .................................. 22
■
Touch screen (Touch operations).... 22
■
Setting the menu ............................... 23
■
Calling frequently-used menus
instantly (Quick Menu) .................... 24
■
Assigning frequently used
functions to the buttons
(Function buttons) ............................ 24
... 18
Recording
■
Taking pictures with automatic
settings (Intelligent Auto Mode) ..... 25
Switching between Intelligent Auto Plus
Mode and Intelligent Auto Mode ..................25
Taking pictures using a handheld camera
([iHandheld Night Shot]) ..............................25
Combining pictures into a single still
picture with rich gradation ([iHDR]) .............26
Defocusing the background
(Defocus control function) ...........................26
Recording images by changing the
brightness (exposure) or colour tone ..........26
■
Recording motion pictures by
setting the aperture value/shutter
speed (Creative Video Mode) .......... 27
■
Setting the picture quality
and size .............................................. 27
Changing the aspect ratio of the
still pictures .................................................27
Setting the picture size ................................28
Setting the compression rate of pictures
([Quality]) .....................................................28
■
Taking close-up pictures
(Macro recording) ............................. 29
■
Taking pictures with
Manual Focus .................................... 29
■
Selecting a Drive Mode ..................... 30
■
Recording 4K Photos ....................... 31
Selecting pictures from 4K burst file and
saving ..........................................................32
■
Correcting jitter ................................. 33
■
Zoom types and use ......................... 33
■
Recording motion pictures .............. 34
Recording 4K motion pictures .....................35
SQT0962 (ENG)
6

Playback
■
Viewing your pictures ....................... 36
■
Viewing motion pictures .................. 37
■
Deleting pictures ............................... 38
■
Using the [Playback] menu .............. 39
[RAW Processing] .......................................39
Wi-Fi
■
What you can do with the
Wi-Fi® function .................................. 41
■
Operating the camera by
connecting it to a smartphone ......... 42
Installing the smartphone/tablet app
“Panasonic Image App” ...............................42
Connecting to a smartphone .......................43
Taking pictures via a smartphone
(remote recording) .......................................44
Playing back pictures in the camera on
a smartphone ..............................................44
Saving pictures in the camera to a
smartphone .................................................44
Sending pictures in the camera to
social networking services ..........................44
Adding location information to pictures
in the camera from a smartphone ...............45
Combining motion pictures recorded
with Snap Movie according to your
preference on a smartphone .......................45
Others
■
Reading the Operating Instructions
(PDF format) ...................................... 46
■
About supplied software .................. 47
Installing supplied software .........................47
■
List of monitor/viewfinder
displays .............................................. 48
■
Menu list ............................................ 52
■
Q&A Troubleshooting ...................... 54
■
Specifications .................................... 59
■
Digital Camera Accessory System
... 62
■
About the symbols in the text
Indicates that the menu can be set by pressing [MENU/SET] button.
In this Operating Instructions, steps for setting a menu item are described as follows:
→ [Rec] → [Quality] → [ ]
SQT0962 (ENG)
7

Preparations
Preparations
Before use
Care of the camera
To avoid damaging your camera and to experience the maximum enjoyment you
should exercise the following precautions.
The lens, monitor and the camera body can sustain damage if the camera body is dropped or
●
subjected to excessive temperature, moisture, water or dust.
The monitor can be damaged if excessive pressure is applied to the screen surface, during actual
●
use or while cleaning.
■
Splash Proof
Splash Proof is a term used to describe an extra level of protection this camera offers
against exposure to a minimal amount of moisture, water or dust. Splash Proof does
not guarantee that damage will not occur if this camera is subjected to direct contact
with water.
In order to minimise the possibility of damage please be sure the following precautions
are taken:
• Make sure the built-in flash is closed.
• Make sure that all doors are securely closed.
• Make sure that you are in a dry and secure place when changing the battery or memory card.
After changing, make sure their protective doors are securely closed.
• If this camera is exposed to water, sand or any other foreign material clean it as soon as possible,
taking the necessary precautions that the foreign substance does not get inside the camera.
• Under no circumstances should you place any foreign objects within the camera.
If sand, dust, or liquids such as water droplets adhere to the camera, wipe them off with
a dry soft cloth.
• Not doing so may result in incorrect recognition of touch operations or erroneous flash display.
• If the monitor is closed when such liquids are present, malfunction may result.
■
Condensation
Condensation may occur on the lens, monitor or in the viewfinder when the room temperature or
●
humidity changes rapidly. This may cause the image to temporarily become hazy. If this occurs,
turn the camera off and allow the camera to sit so that the camera temperature can stabilise to the
room’s ambient temperature. The required time will vary and can take up to an hour. It will clear
by itself.
If you know that you will be moving between areas where there will be a large change in
●
temperature or humidity, you can help prevent condensation forming on the camera by placing the
camera in a large plastic zipper bag, so condensation will form on the bag, not the camera. Allow
the temperature to stabilise before removing the camera from the bag.
■
Caring for your camera
To clean your camera, remove the battery, the DC coupler (DMW-DCC8: optional) or a card, or
●
disconnect the power plug from the outlet, and wipe with a soft, dry cloth.
Do not press the monitor with excessive force.
●
Do not press the lens with excessive force.
●
Do not keep rubber or plastic products in contact with the camera for a long period of time.
●
Do not use benzine, thinners, alcohol, or kitchen detergent, as these may damage the outer
●
casing and finish of the camera.
Do not leave the camera with the lens facing the sun as rays of light from the sun may cause it to
●
malfunction.
Do not extend the supplied cord or cable.
●
SQT0962 (ENG)
8
Preparations
While the camera is accessing the card (for an operation such as picture writing, reading,
●
deletion, or formatting), do not turn off the camera or remove the battery, card, AC adaptor (DMWAC10E: optional) or DC coupler (DMW-DCC8: optional).
The data on the card may be damaged or lost due to electromagnetic waves, static electricity or
●
breakdown of the camera or the card. We recommend storing important data on a PC etc.
Do not format the card on your PC or other equipment. Format it on the camera only to ensure
●
proper operation.
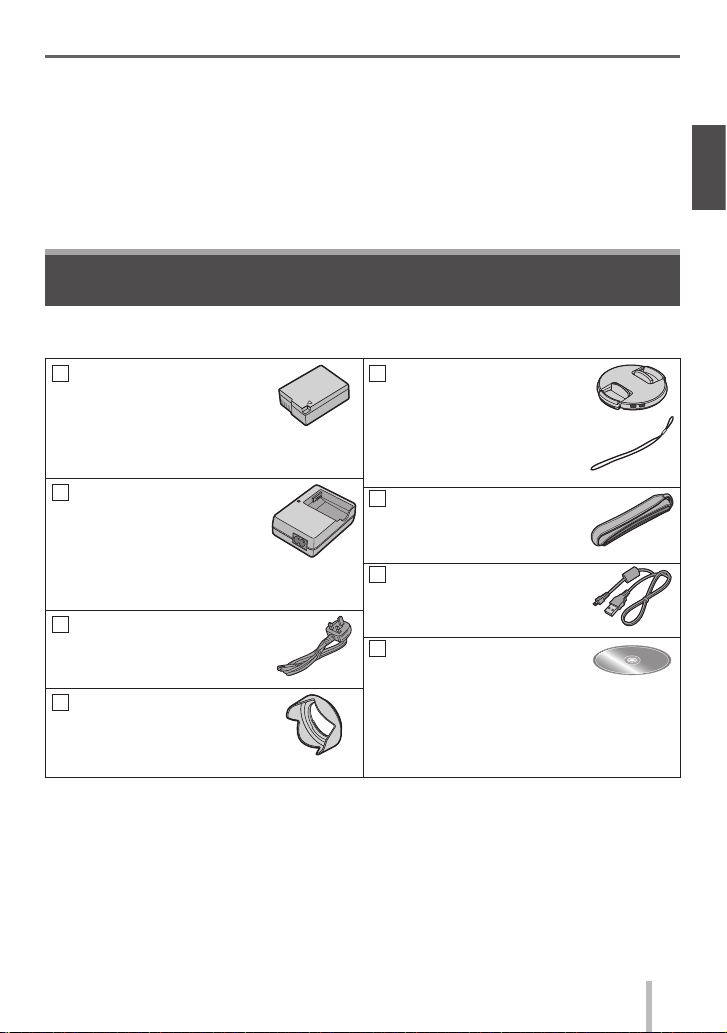
Standard accessories
Check that all the accessories are supplied before using the camera. Part numbers are as
of July 2015. These may be subject to change.
Battery pack
DMW-BLC12E
• Charge the battery
before use.
Battery pack is indicated as battery
pack or battery in the text.
Battery charger
DE-A80A
Battery charger is indicated as battery
charger or charger in the text.
AC mains lead
K2CT3YY00034
Lens hood
SYQ0547
• Cards are optional.
• SD Memory Card, SDHC Memory Card and SDXC Memory Card are indicated as card
in the text.
• Consult the dealer or your nearest Service Centre if you lose the supplied accessories.
(You can purchase the accessories separately.)
• Please dispose of all packaging appropriately.
• Keep small parts in a safe place out of the reach of children.
• The illustrations and screens in this manual may differ from the actual product.
Lens cap / Lens cap
string
VYQ5607
Shoulder strap
VFC4453
USB connection cable
K1HY08YY0031
DVD
SFM0099
• Software:
Use it to install the software on your
PC.
• Operating Instructions for advanced
features
SQT0962 (ENG)
9
Preparations
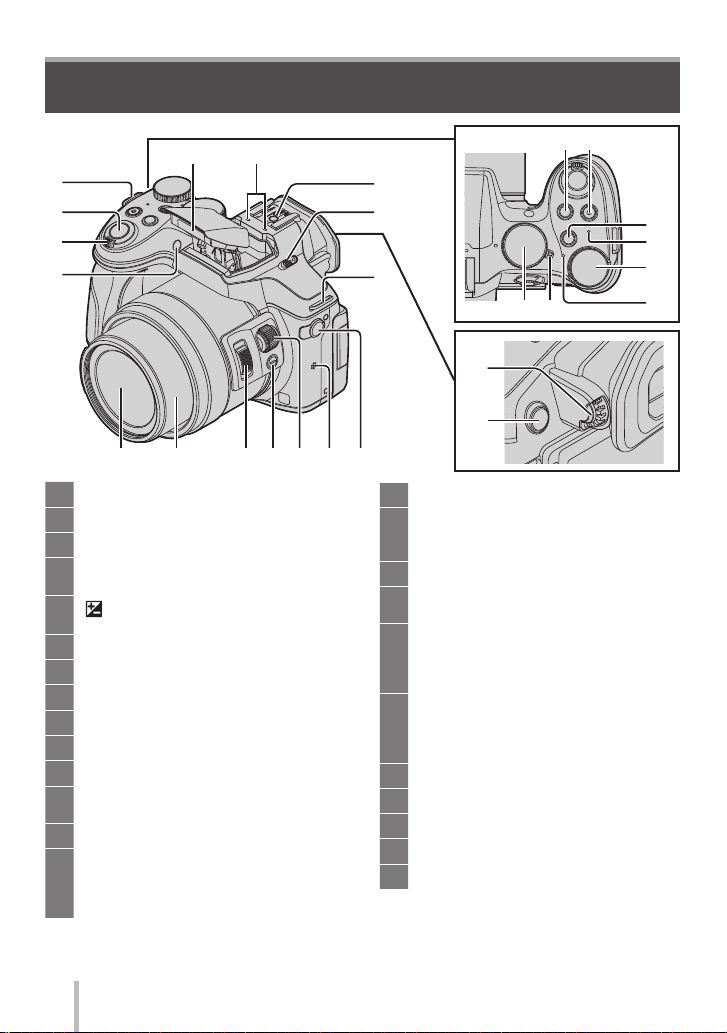
Names and Functions of Main Parts
13 14
1
2
3
4
Shoulder strap eyelet (→13)
1
Shutter button (→18)
2
Zoom lever (→18)
3
Self-timer indicator /
4
AF Assist Lamp
5
[ ] (Exposure Compensation) button /
[Fn1] button (→24)
Motion picture button (→34)
6
[Fn2] button (→24)
7
Wi-Fi® connection lamp
8
Rear dial (→20)
9
Status indicator (→17)
10
Camera [ON/OFF] switch (→17)
11
Mode dial (→19)
12
Use this to select the recording mode.
Flash
13
Stereo microphone
14
Be careful not to cover the microphone
with your finger. Doing so may make
sound difficult to record.
5 6
15
16
7
8
1
11 12
9
10
17
18
19 20 21 22 23 24 25
Hot shoe
15
Flash open lever
16
The flash opens, and recording with the
flash becomes possible.
Diopter adjustment dial (→22)
17
[LVF] button (→22) /
18
[Fn4] button (→24)
[MIC] socket
19
An external microphone (optional) can
record higher quality audio than the
built-in microphone.
Speaker
20
Be careful not to cover the speaker with
your finger. Doing so may make sound
difficult to hear.
Side dial (→20)
21
Side button (→21)
22
Side lever (→18)
23
Lens barrel
24
Lens
25
SQT0962 (ENG)
10
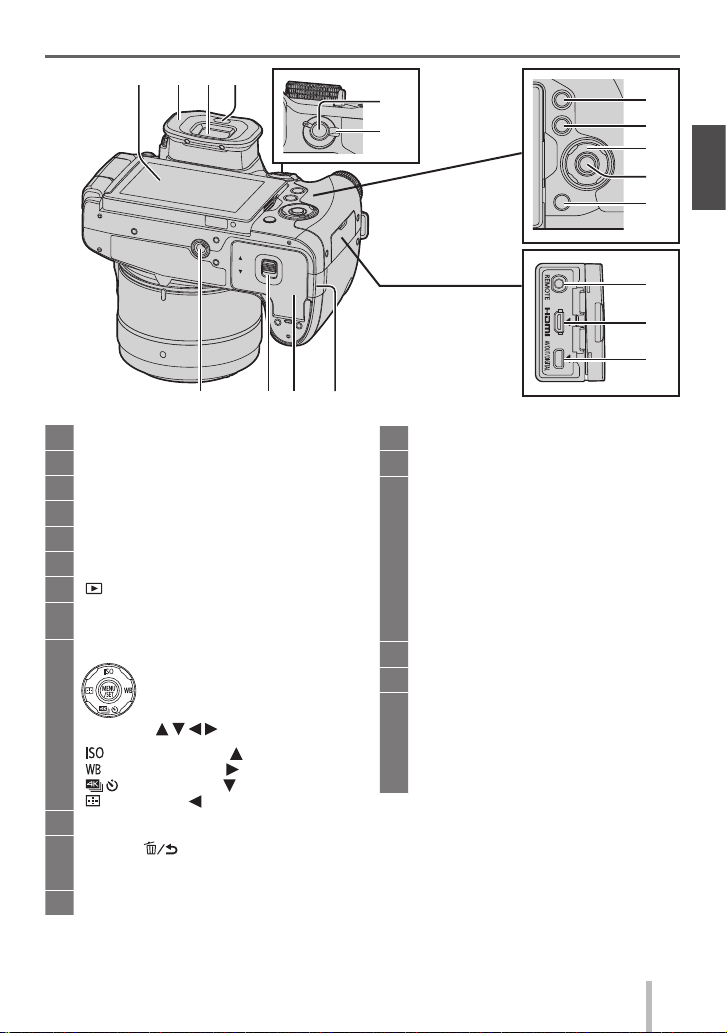
26 27 28 29
43 42 41 40
30
31
Preparations
32
33
34
35
36
37
38
39
Touch screen / monitor (→17, 22, 48)
26
Eye cup
27
Viewfinder (→22)
28
Eye sensor (→22)
29
[AF/AE LOCK] button
30
Focus mode lever (→19)
31
[ ] (Playback) button (→36)
32
[DISP.] button
33
Use this to change display.
Cursor button
34
[ ] (ISO sensitivity) ( )
[
[
[
[MENU/SET] button
35
[Q.MENU ] (Delete/Cancel) button
36
(→24, 38) /
[Fn3] button (→24)
[REMOTE] socket
37
• Selection of items or setting of
values etc., is performed.
• In this manual, the button that
is to be used is indicated by
.
] (White Balance) ( )
] (Drive Mode) ( ) (→30)
] (AF Mode) ( )
[HDMI] socket
38
[AV OUT/DIGITAL] socket
39
DC coupler cover (→15)
40
• Always use a genuine Panasonic AC
adaptor (DMW-AC10E: optional).
• When using an AC adaptor, ensure
that the Panasonic DC coupler (DMWDCC8: optional) and AC adaptor
(DMW-AC10E: optional) are used.
• When using an AC adaptor, use the
AC mains lead supplied with the AC
adaptor.
Card/Battery door (→15)
41
Release lever (→15)
42
Tripod mount
43
Do not attach this unit to tripods that
have screws with a length of 5.5 mm
(0.22 inch) or more. Doing so may
damage this unit or the unit may not be
secured properly on the tripod.
SQT0962 (ENG)
11
Preparations
Preparations
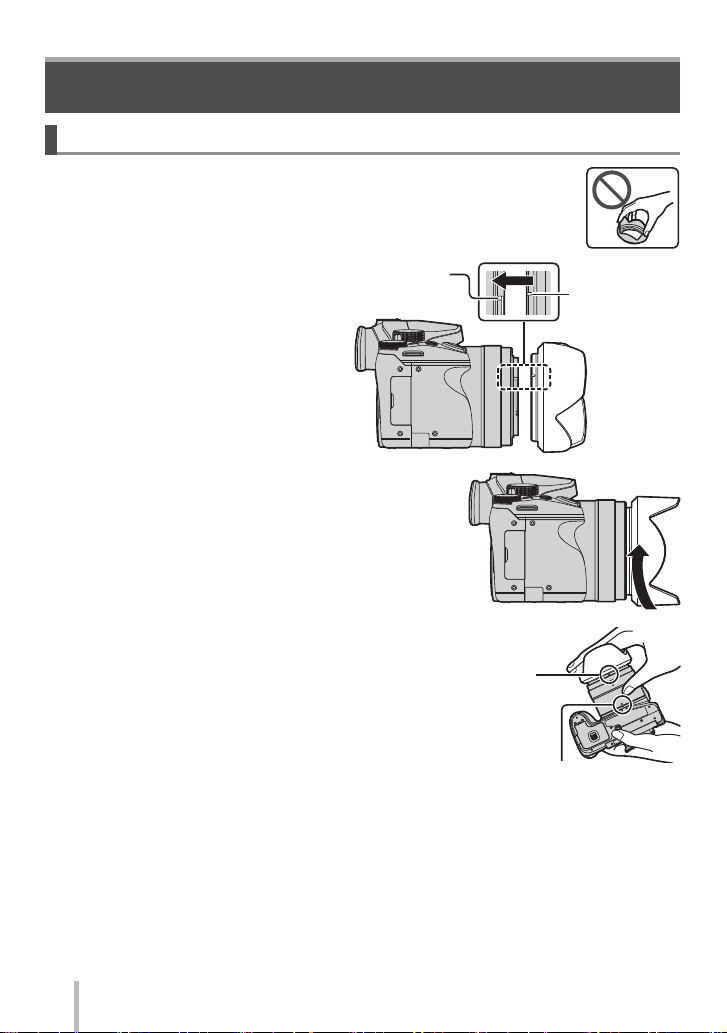
Attaching the Lens Hood
• Do not hold the lens hood in such a way that it will be bent.
• Make sure that the camera is turned off.
• Be sure to close the flash beforehand.
Align the mounting
1
mark on the lens
hood a little above the
mounting mark on the
tip of the lens
Turn the lens hood in the
2
direction of the arrow to secure it
Turn the lens hood until it clicks
3
and align the mounting mark on
the lens hood with the mark at the
bottom of the camera
• Make sure the lens hood is secured
properly and its reflection does not fall on
images.
When temporarily detaching and carrying the lens hood, we recommend attaching with the
●
orientation reversed.
Return it to the normal direction when taking pictures.
If you attach the lens hood while using the flash, the flash light would be blocked by the lens hood
●
causing the bottom part of images to be darkened (vignetting) and also making it impossible to
modulate the light. It is recommended to remove the lens hood before using the flash.
Mounting mark on
the tip of the lens
Mounting mark
on the lens hood
Mark at the bottom
of the camera
Mounting mark
on the lens hood
SQT0962 (ENG)
12
Preparations
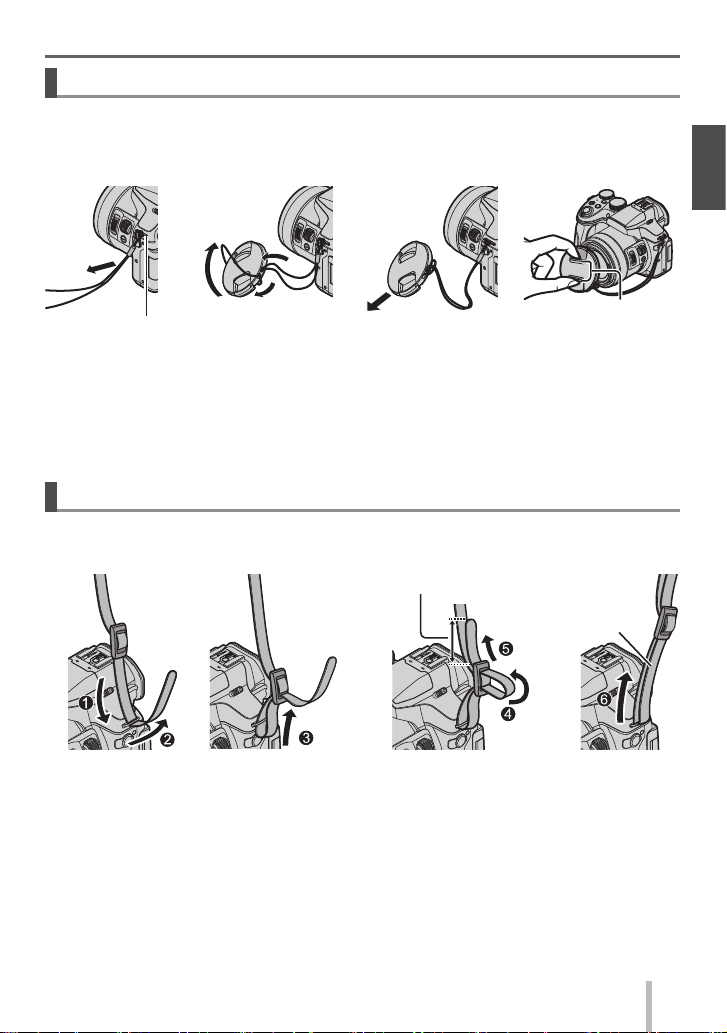
Attaching the Lens Cap
Cover the lens with the lens cap to protect it when you are not taking pictures.
• Do not hang or swing around the camera with the lens cap string.
• Make sure to detach the lens cap when turning this unit on.
• Be careful that the lens cap string does not become entangled with the shoulder strap.
1
2
3
4
Shoulder strap eyelet
Pass the string through the hole on the camera
1
Pass the string through the lens cap, and then pass the lens cap through the
2
loop formed by the string
Fasten the string
3
Attach the lens cap
4
Attaching the Shoulder Strap
We recommend attaching the shoulder strap when using the camera to prevent it from
dropping.
1
• Perform steps 1 to 4 and then attach the other side of the shoulder strap.
• Use the shoulder strap around your shoulder.
– Do not wrap the strap around your neck. It may result in injury or accident.
• Do not leave the shoulder strap where an infant can reach it.
– It may result in an accident by mistakenly wrapping around the neck.
2
Pull the shoulder strap
3
2 cm (0.066 feet) or more.
Pinch here to attach or
detach the cap.
4
Make sure the
strap does not
come off
SQT0962 (ENG)
13
Preparations
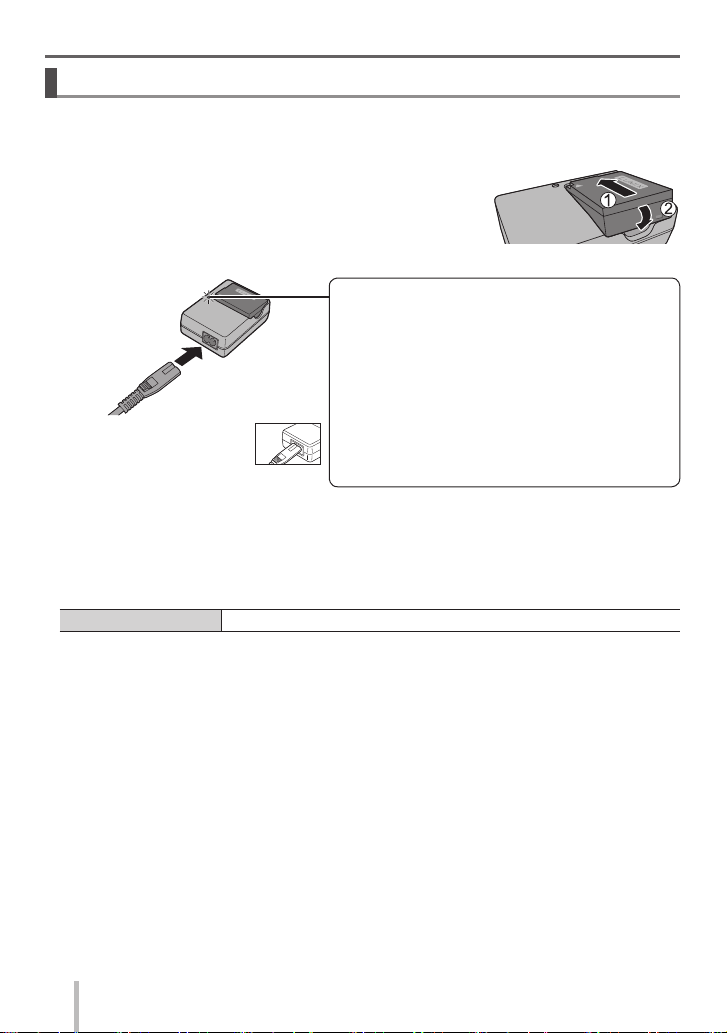
Charging the battery
The battery that can be used with this unit is DMW-BLC12E.
The battery is not charged when the camera is shipped. Charge the battery before use.
• Use the dedicated charger and battery.
Attach the battery paying attention to the direction of
1
the battery
Connect the charger to the electrical outlet
2
Charging light ([CHARGE])
On: Charging in progress
Off: Charging complete
If light is flashing:
• Battery temperature is too high or too low.
• The AC mains lead
does not fit entirely into
the AC input terminal.
A gap will remain.
• Charge the battery with the charger indoors.
Detach the battery after charging is completed
3
■
Notes on charging time
Charging time Approx. 140 min
• The charging time indicated above is the time required for charging in case when the
battery is completely used up. The time required for charging differs depending on
conditions of battery usage. Charging takes longer in cases when temperatures are
either high or low and when the battery has not been used for a long period of time.
We recommend charging in a location where
the ambient temperature is between 10 °C
and 30 °C (50 °F to 86 °F).
• Battery/charger connector is dirty. Clean with
a dry cloth.
SQT0962 (ENG)
14
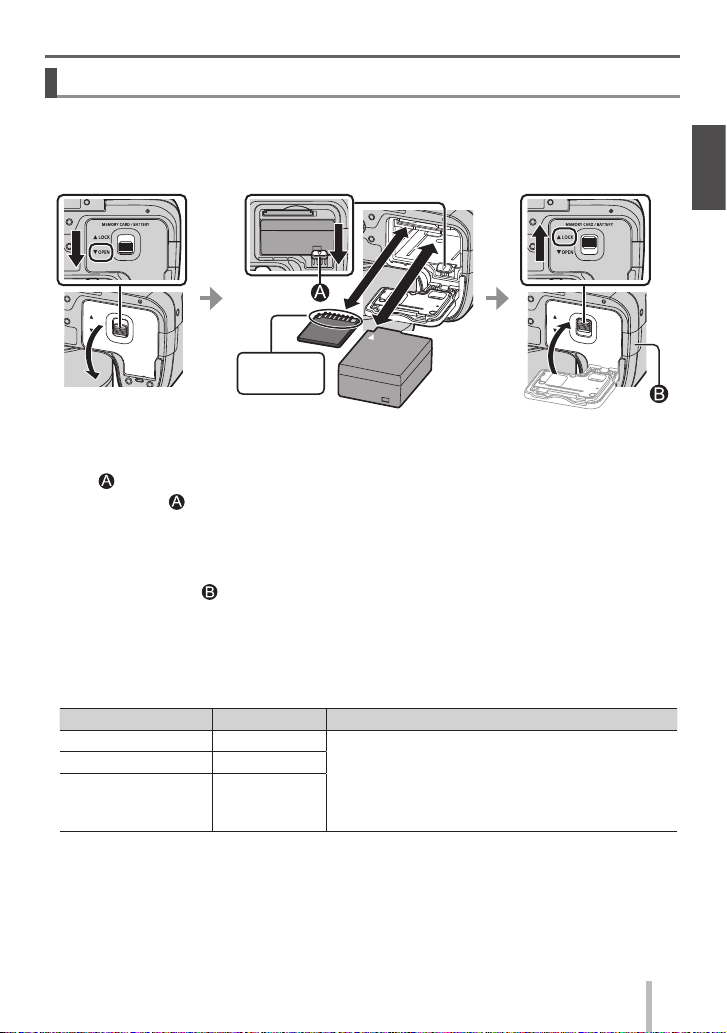
Inserting and removing the battery/the card (optional)
• Always use genuine Panasonic batteries (DMW-BLC12E).
• If you use other batteries, we cannot guarantee the quality of this product.
• Make sure that the camera is turned off.
Preparations
Battery:
●
Do not touch
the terminal
Insert the battery all the way firmly until a locking sound is heard, and check that the
lever is hooked over the battery.
Move the lever in the direction of the arrow to remove the battery.
Card:
●
Insert the card all the way firmly until it clicks.
To remove the card, push the centre of the card until it clicks, then pull the card out
upright.
DC coupler cover ( ):
●
Make sure the DC coupler cover is securely closed, and then close the card/battery
door.
■
About the Card
The following SD standard-based cards (Panasonic brand recommended) can be used.
Type of Card Capacity Notes
SD Memory Cards 512 MB – 2 GB • Operation of the cards on the left has been confirmed
SDHC Memory Cards 4 GB – 32 GB
SDXC Memory Cards 48 GB – 128 GB
with Panasonic’s cards.
• Can be used with devices compatible with the
respective formats.
• This unit is compatible with UHS-
Class 3 standard SDHC/SDXC memory cards.
UHS Speed
• Keep the Memory Card out of reach of children to prevent swallowing.
SQT0962 (ENG)
15
Preparations
■
About motion picture/4K photo recording and speed class ratings
According to the [Rec Format] (→35) and [Rec Quality] (→35) of a motion picture, the
required card differs. To record 4K photos, you need a card with a speed class rating
that supports 4K photo recording. Use a card that meets the following ratings of the SD
Speed Class or UHS Speed Class.
• SD Speed Class and UHS Speed Class are the speed standards regarding
continuous writing. Confirm the SD speed by checking the card label or other card
related materials.
[Rec Format] [Rec Quality] Speed class Label example
[AVCHD] All
[MP4] [FHD]/[HD]/[VGA]
[MP4] [4K]/[High Speed Video] UHS Speed Class 3
Class 4 or higher
When recording 4K photos UHS Speed Class 3
• Latest information:
http://panasonic.jp/support/global/cs/dsc/
(This site is available in English only.)
Formatting the card (initialisation)
Format the card before recording a picture with this unit. Since data cannot be
recovered after formatting, make sure to back up necessary data in advance.
Set the menu (→23)
1
→ [Setup] → [Format]
• A confirmation screen is displayed. If you select [Yes], the operation is executed.
SQT0962 (ENG)
16
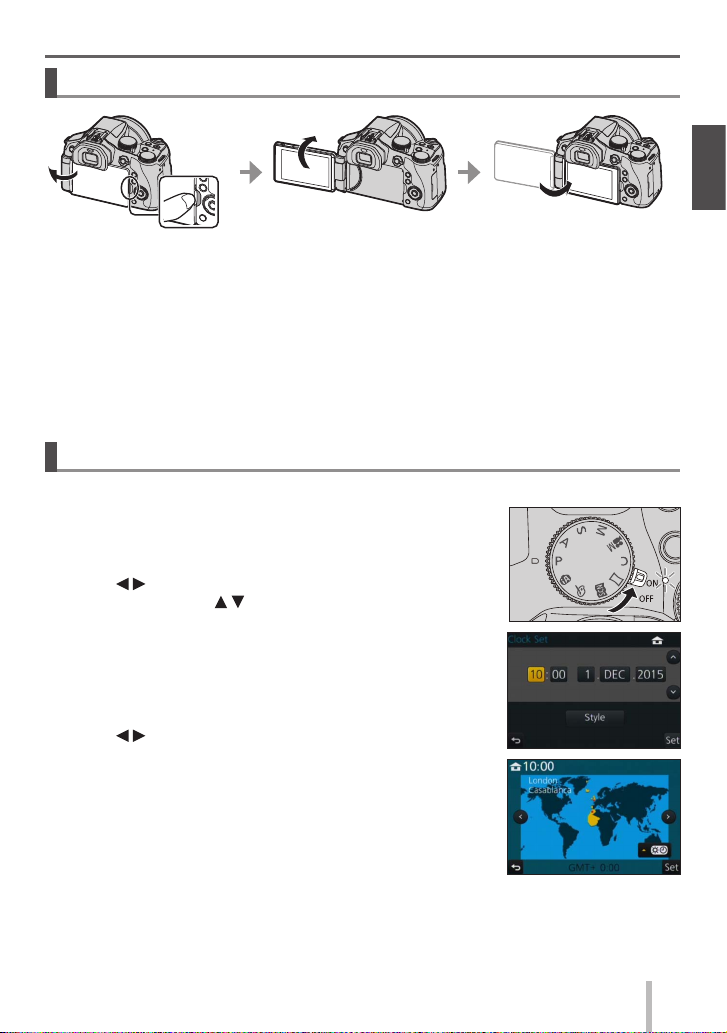
Opening the Monitor
Preparations
1
Place your finger in the cleft on the right side of the monitor and open the
1
monitor toward the left side (maximum 180°)
It can be rotated 180° to the direction of the lens
2
Return the monitor to its original position
3
Only rotate the monitor after opening it wide enough, and be careful not to use excessive
●
force. Doing so may cause damage to this unit.
When not using the monitor it is recommended that you close it with the screen facing inward to
●
prevent dirt and scratches.
Setting the clock
The clock is not set when the camera is shipped.
Turn the camera on
1
• The status indicator lights up when you turn this unit on.
Press [MENU/SET]
2
Press to select the items (year, month, day, hour,
3
minute), and press to set
Press [MENU/SET]
4
When [The clock setting has been completed.] is
5
displayed, press [MENU/SET]
When [Please set the home area] is displayed, press
6
[MENU/SET]
Press to set your home area and press
7
[MENU/SET]
2
3
SQT0962 (ENG)
17
Basics
Basics
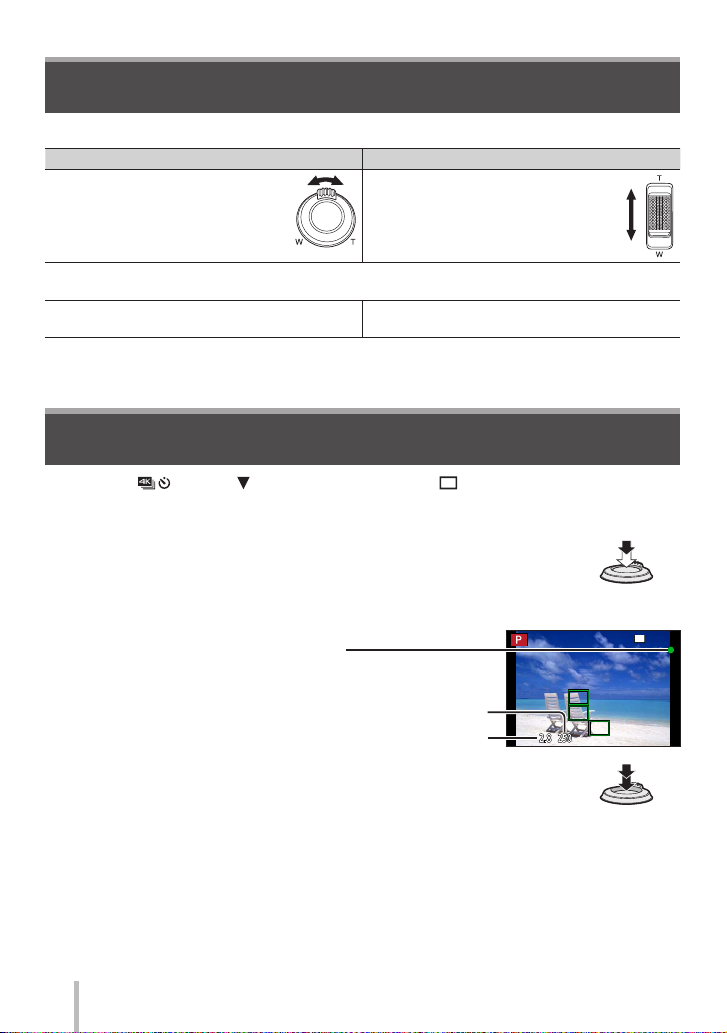
Zoom lever/Side lever (Use zoom)
You can adjust the area of a picture to be taken using the zoom or side lever.
Zoom lever Side lever
Move the zoom lever
Slide the side lever
T side: Telephoto, Enlarge the subject
W side: Wide-angle, Capture a wider area
Turning angle is large: Zoom speed is high
Turning angle is small: Zoom speed is low
Do not touch the lens barrel during zooming.
●
For details about zoom types and use, refer to (→33).
●
Slide width is large: Zoom speed is high
Slide width is small: Zoom speed is low
Shutter button (Taking pictures)
• Press the [ ] button ( ) to set the drive mode to [ ] ([Single]).
Press the shutter button halfway (press lightly) to
1
focus on the subject
• The aperture value and shutter speed are displayed. (If the
aperture value and shutter speed are shown in red and flashing,
you do not have the appropriate exposure, unless you are using
the flash.)
Press the shutter button fully (push the button all
2
the way), and take the picture
Pictures can be taken only when the image is correctly focused as long as the [Focus/
●
Release Priority] is set to [FOCUS].
Even during menu operation or picture playback, if you press the shutter button halfway, you can
●
instantly set the camera ready for recording.
Focus display
( When focus is aligned: illuminated
When focus is not aligned: flashing)
Shutter speed
Aperture value
SQT0962 (ENG)
18
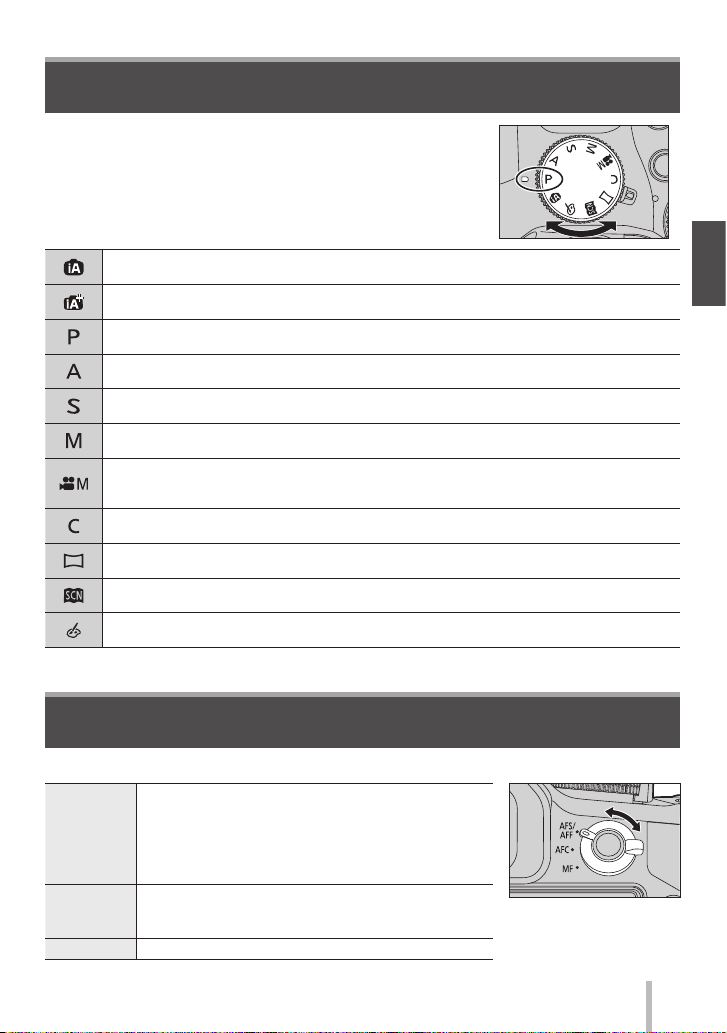
Mode dial (Select the recording mode)
Set to the desired recording mode
1
• Rotate the mode dial slowly to select the desired
mode.
Intelligent Auto Mode (→25)
Take pictures with automatic settings.
Intelligent Auto Plus Mode (→25)
Allows you to adjust the brightness (exposure) and colour hue as desired.
Programme AE Mode
Take pictures with automatic shutter speed and aperture value settings.
Aperture-Priority AE Mode
Determine aperture, then record pictures.
Shutter-Priority AE Mode
Determine shutter speed, then record pictures.
Manual Exposure Mode
Determine aperture and shutter speed, then record pictures.
Creative Video Mode (→27)
Determine aperture and shutter speed, then record motion pictures.
• You cannot take still pictures.
Custom Mode
Record pictures using pre-registered settings.
Panorama Shot Mode
Record panorama pictures.
Scene Guide Mode
Take pictures using Scene modes.
Creative Control Mode
Take pictures by selecting your preferred picture effect.
Basics
Focus mode lever
Set the focusing operation to be performed when the shutter button is pressed halfway.
Auto Focus. Focus is set automatically when the shutter
button is pressed halfway.
[AFS/AFF]
[AFC]
[MF] Manual Focus. (→29)
[AFS]: Focus will be fixed while it is pressed halfway.
[AFF]: If the subject moves while the shutter button is
pressed halfway, the focus is corrected to match
the movement automatically.
Auto Focus. While the shutter button is pressed
halfway, focusing is constantly performed to match the
movement of the subject.
SQT0962 (ENG)
19
Basics
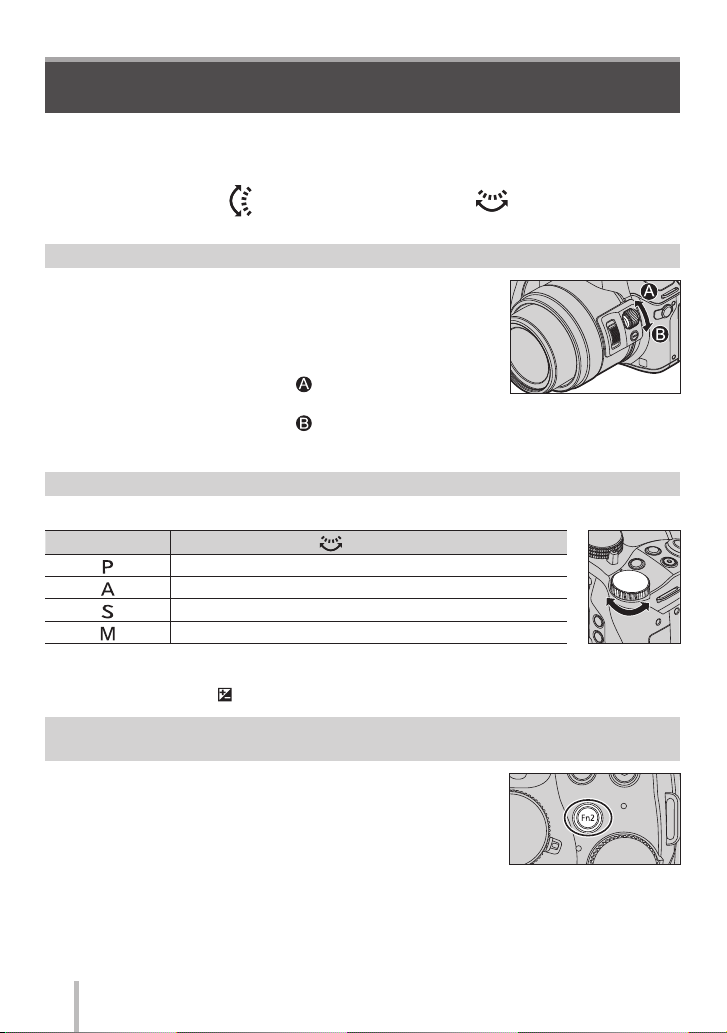
Side dial / Rear dial
Rotate the side dial to adjust focus, and rotate the rear dial to set the aperture value and
shutter speed. You can also select items and set numeric values.
• This operating instructions describes operations of the dials as follows:
Rotating the side dial:
Rotating the rear dial:
Side dial
You can adjust focus in the following cases:
• In Manual Focus
• In Auto Focus
(Only when the focus mode lever is set to [AFS/AFF], and
[AF+MF] in [Custom] menu is set to [ON])
Rotating the side dial to the side :
Focusing on a nearby subject
Rotating the side dial to the side
Focusing on a distant subject
:
Rear dial
You can set the aperture value, shutter speed, and other settings when in following recording modes.
1
Mode dial
[ ]
[ ]
[
[
1
You can make the settings with the side dial as well. (→21)
2
You can switch between the shutter speed setting operation and the aperture value setting
operation each time the [
Programme Shift
Aperture value
Shutter speed
]
]
Shutter speed / Aperture value
] button/[Fn1] button is pressed.
Rear dial
2
Temporarily changing the items assigned to the side/rear dials
([Dial Operation Switch])
You can temporarily change the items assigned to the side/
rear dials using the function button to which [Dial Operation
Switch] is assigned.
[Dial Operation Switch] is assigned to [Fn2] at the time of
purchase.
• You can set the items to be assigned temporarily to the side/
rear dials in [Dial Operation Switch Setup] in [Dial Set.] in
the [Custom] menu.
SQT0962 (ENG)
20
 Loading...