

Page 1
CD RECEIVER
RADIO CD
CD PLAYER
DEH-1350MP
DEH-1350MPG
English
Español
Português (B)
Owner’s Manual
Manual de instrucciones
Manual do proprietário
Page 2
Thank you for purchasing this PIONEER
product.
To ensure proper use, please read through this
manual before using this product. It is especially important that you read and observe
WARNINGs and CAUTIONs in this manual.
Please keep the manual in a safe and accessible
place for future reference.
About this unit
CAUTION
This product is a class 1 laser product classified under the Safety of laser products, IEC
60825-1:2007, and contains a class 1M laser
module. To ensure continued safety, do not remove any covers or attempt to gain access to
the inside of the product. Refer all servicing to
qualified personnel.
CAUTION—CLASS 1M INVISIBLE LASER
RADIATION WHEN OPEN, DO NOT VIEW
DIRECTLY WITH OPTICAL INSTRUMENTS.
CAUTION
! Do not allow this unit to come into contact
with liquids. Electrical shock could result.
Also, damage to this unit, smoke, and overheating could result from contact with liquids.
! Always keep the volume low enough to hear
outside sounds.
! Avoid exposure to moisture.
! If the battery is disconnected or discharged,
any preset memory will be erased.
! Should this unit fail to operate properly, please
contact your dealer or nearest authorized
PIONEER Service Station.
CAUTION:
USE OF CONTROL OR ADJUSTMENT OR
PERFORMANCE OF PROCEDURES
OTHER THAN THOSE SPECIFIED HEREIN
MAY RESULT IN HAZARDOUS RADIATION
EXPOSURE.
CAUTION:
THE USE OF OPTICAL INSTRUMENTS
WITH THIS PRODUCT WILL INCREASE
EYE HAZARD.
En
2
Section
01
Before You Start
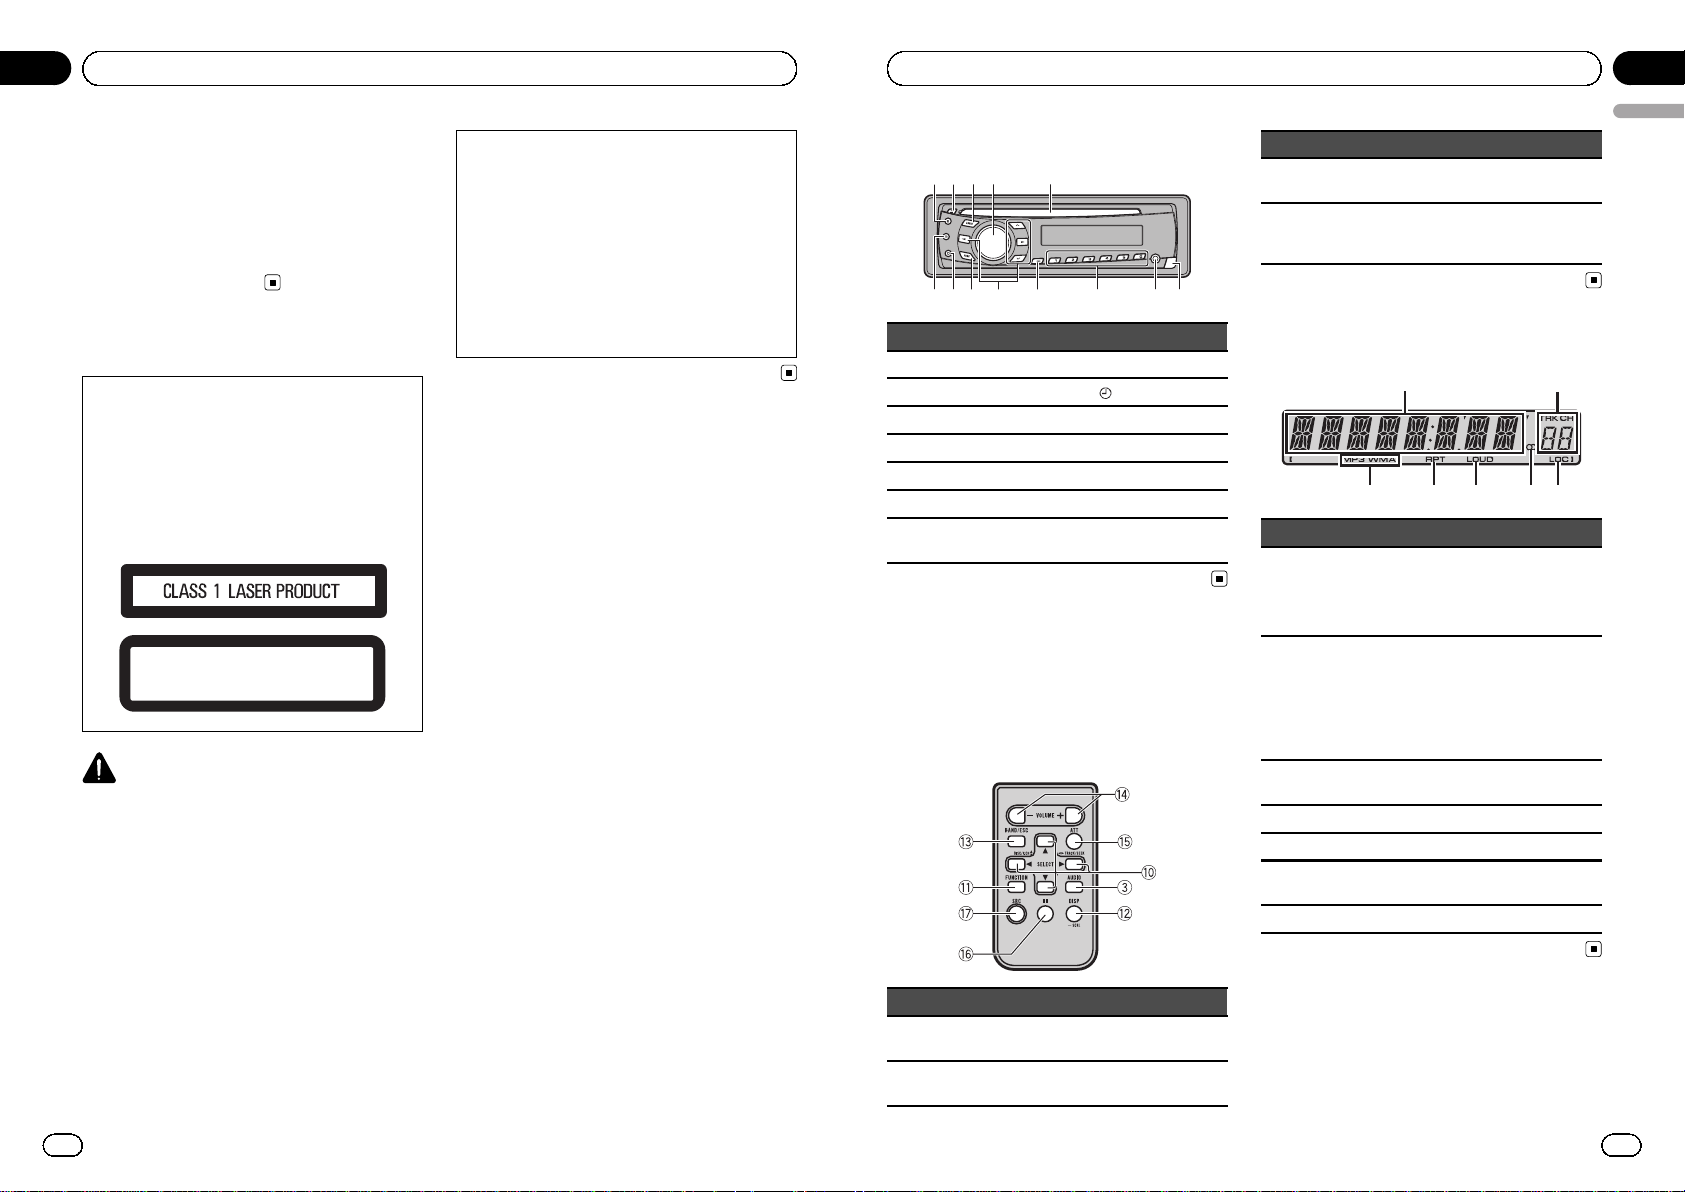
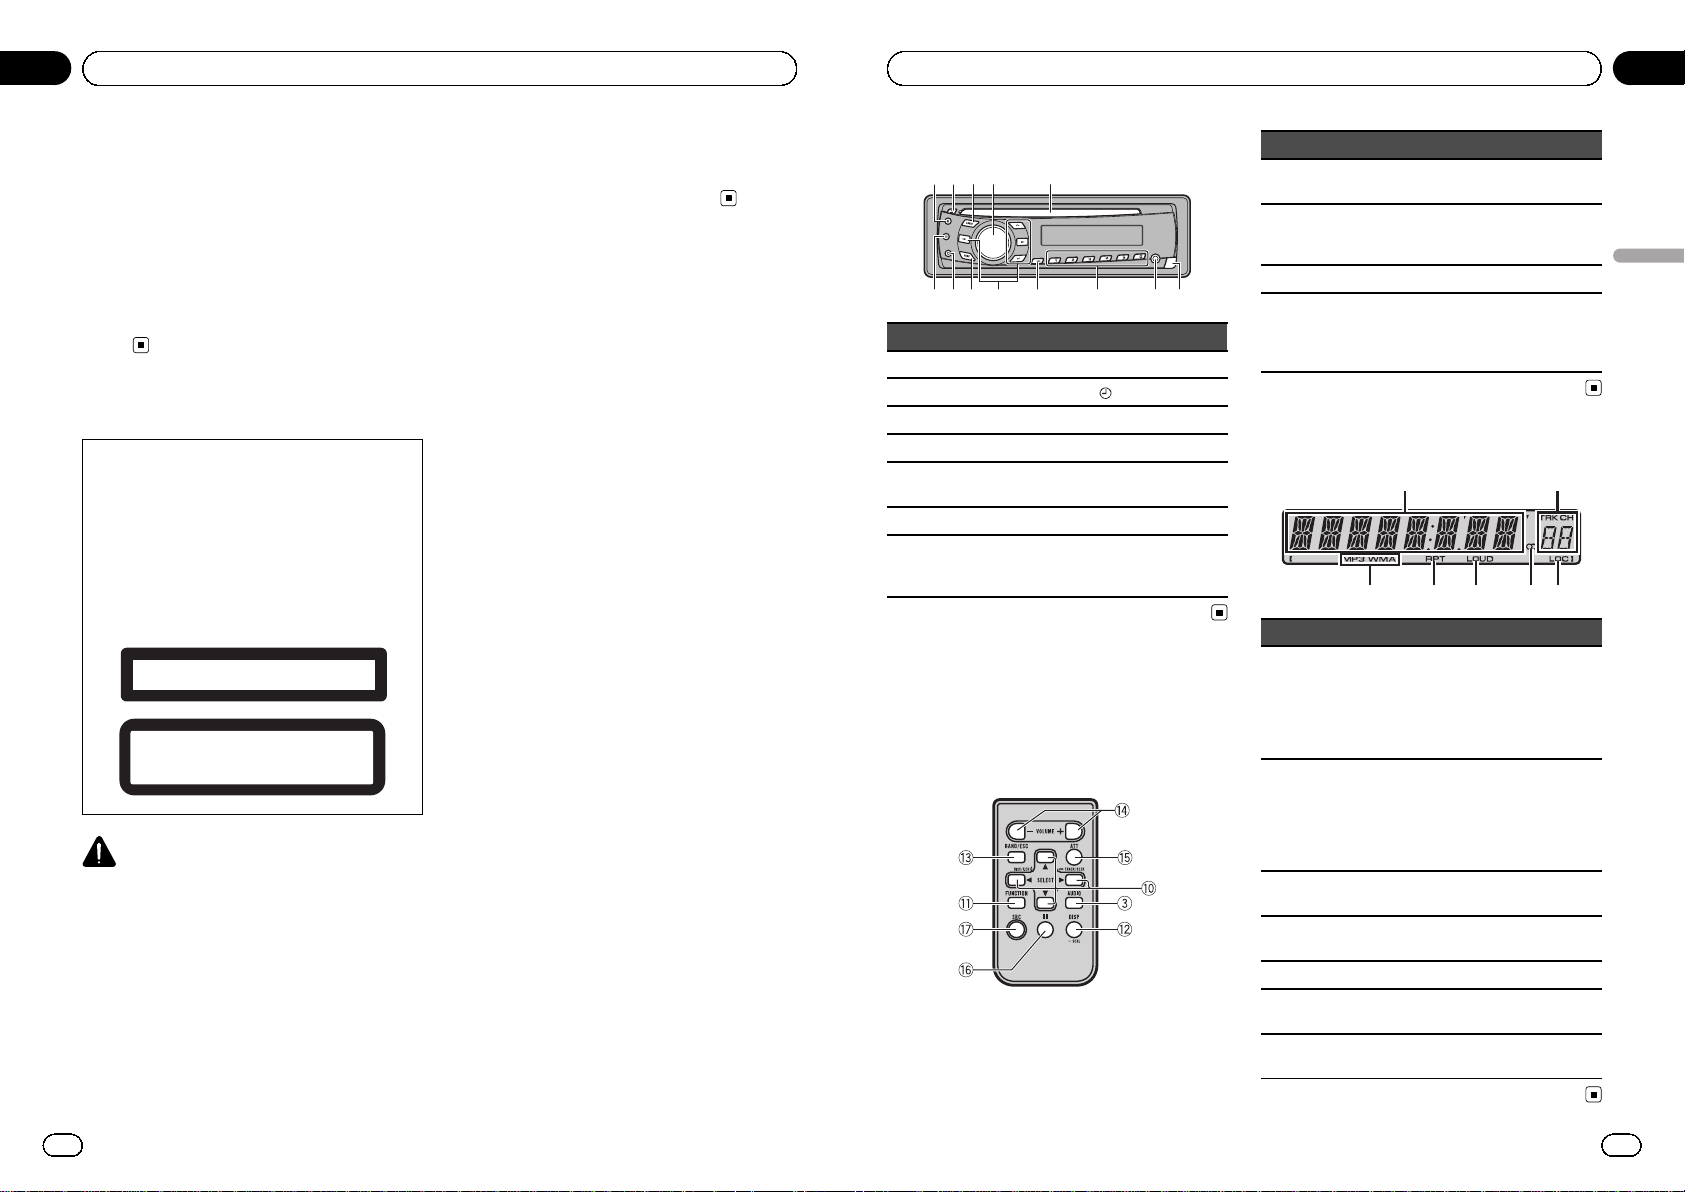
Head unit
a 6789bcd
123 4 5
Button Button
1 E (EQ/LOUD) 8 1 to 6
2 h (eject) 9
(clock)
3 AUDIO a a/b/c/d
4 SRC/OFF b FUNC
5 Disc loading slot c D (DISP/SCRL)
6 Detach button d B (BAND/ESC)
7
AUX input jack (3.5
mm stereo jack)
Remote control
Operation is the same as when using the buttons on the head unit. See the explanation of
the head unit about the operation of each button with the exception of ATT, which is explained below.
Part State
e
VOLUME
(+/-)
Press to increase or decrease volume.
f ATT
Press to mute. Press again to unmute.
Part State
g e (pause)
Press to pause or resume playback.
h
SRC
(source)
Press to cycle through all the
available sources. Press and hold
to turn the source off.
Display indication
3
2
1
4 5 6 7
Indicator State
1
Main display section
! Tuner: band and frequency
! Built-in CD player: elapsed
playback time and text information
2
Preset
number/
track number
! The track number or preset
number.
! If a track number 100 or more
is selected, d on the left of
the track number indicator
will light.
3
MP3/
WMA
The type of the currently playing
file.
4 RPT Repeat play is turned on.
5 LOUD Loudness is on.
6 5 (stereo)
Receiving the stereo broadcasting.
7 LOC Local seek tuning is on.
En
3
English
Section
02
Operating this unit
Page 3
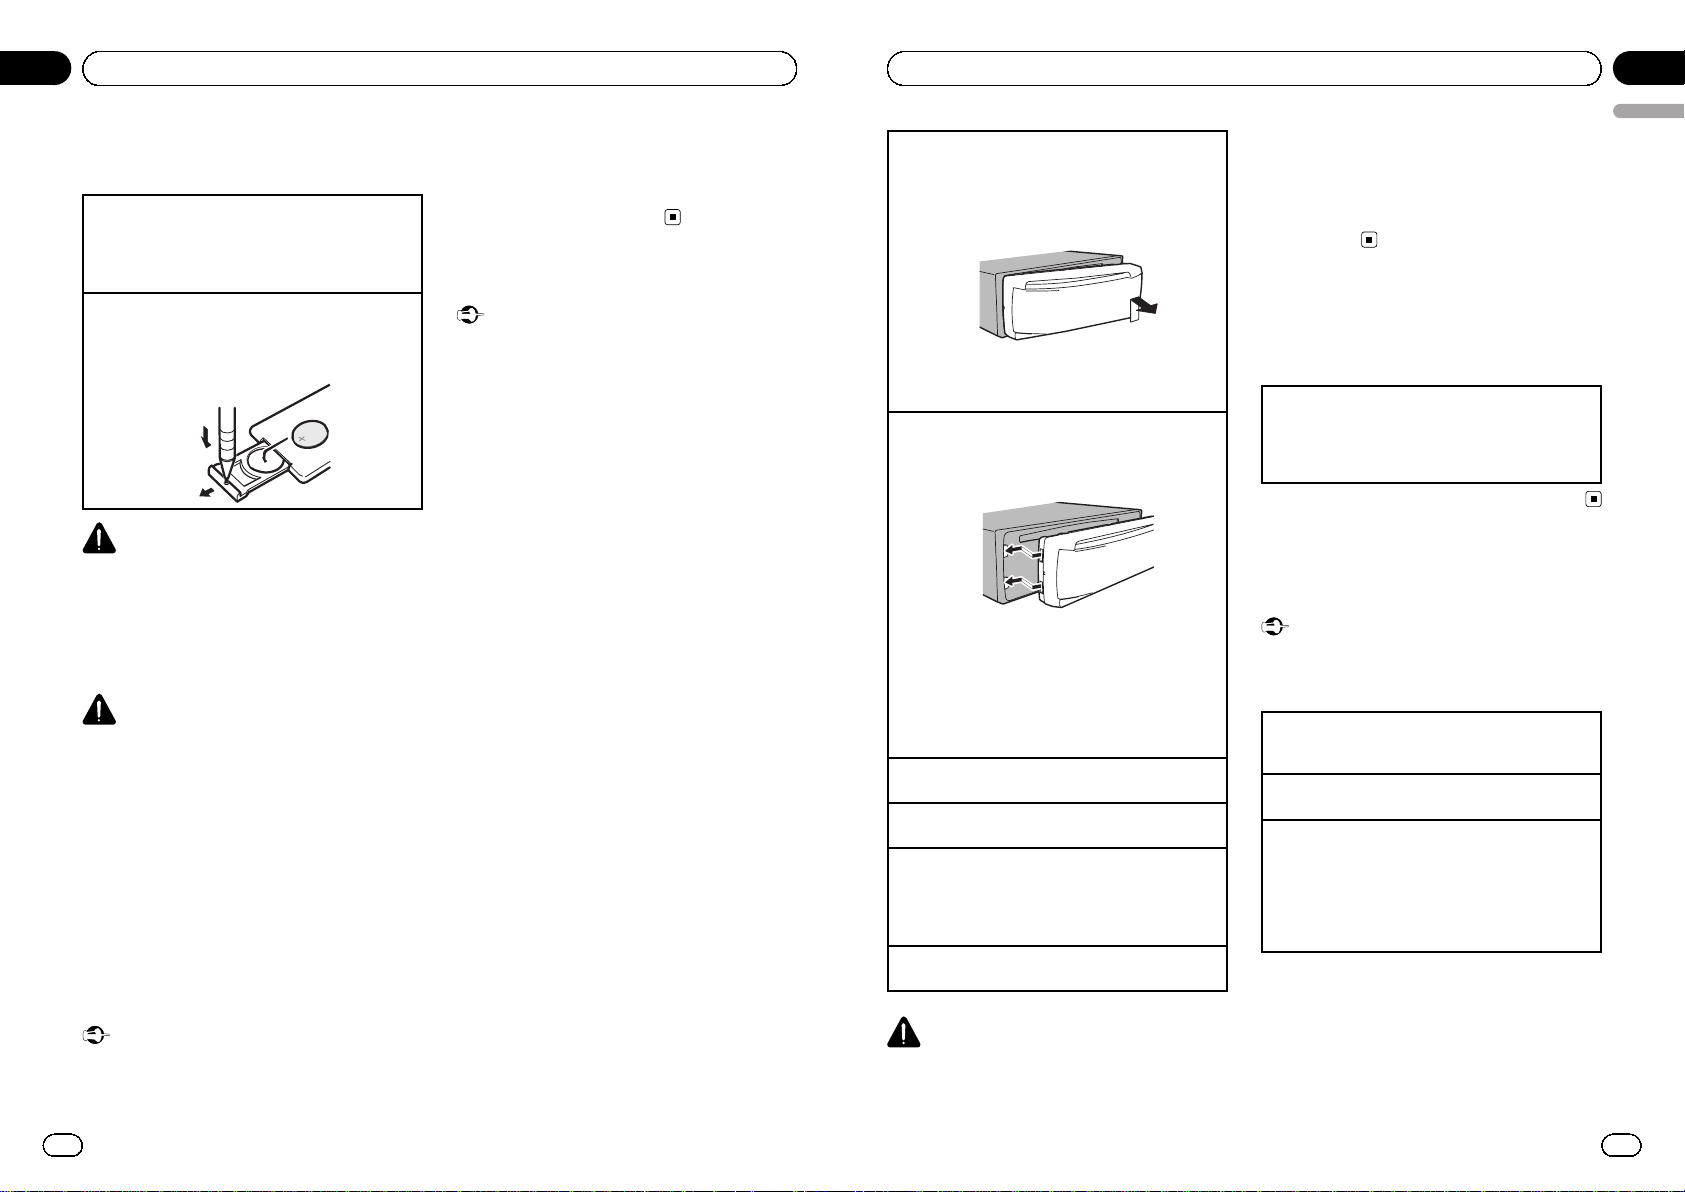
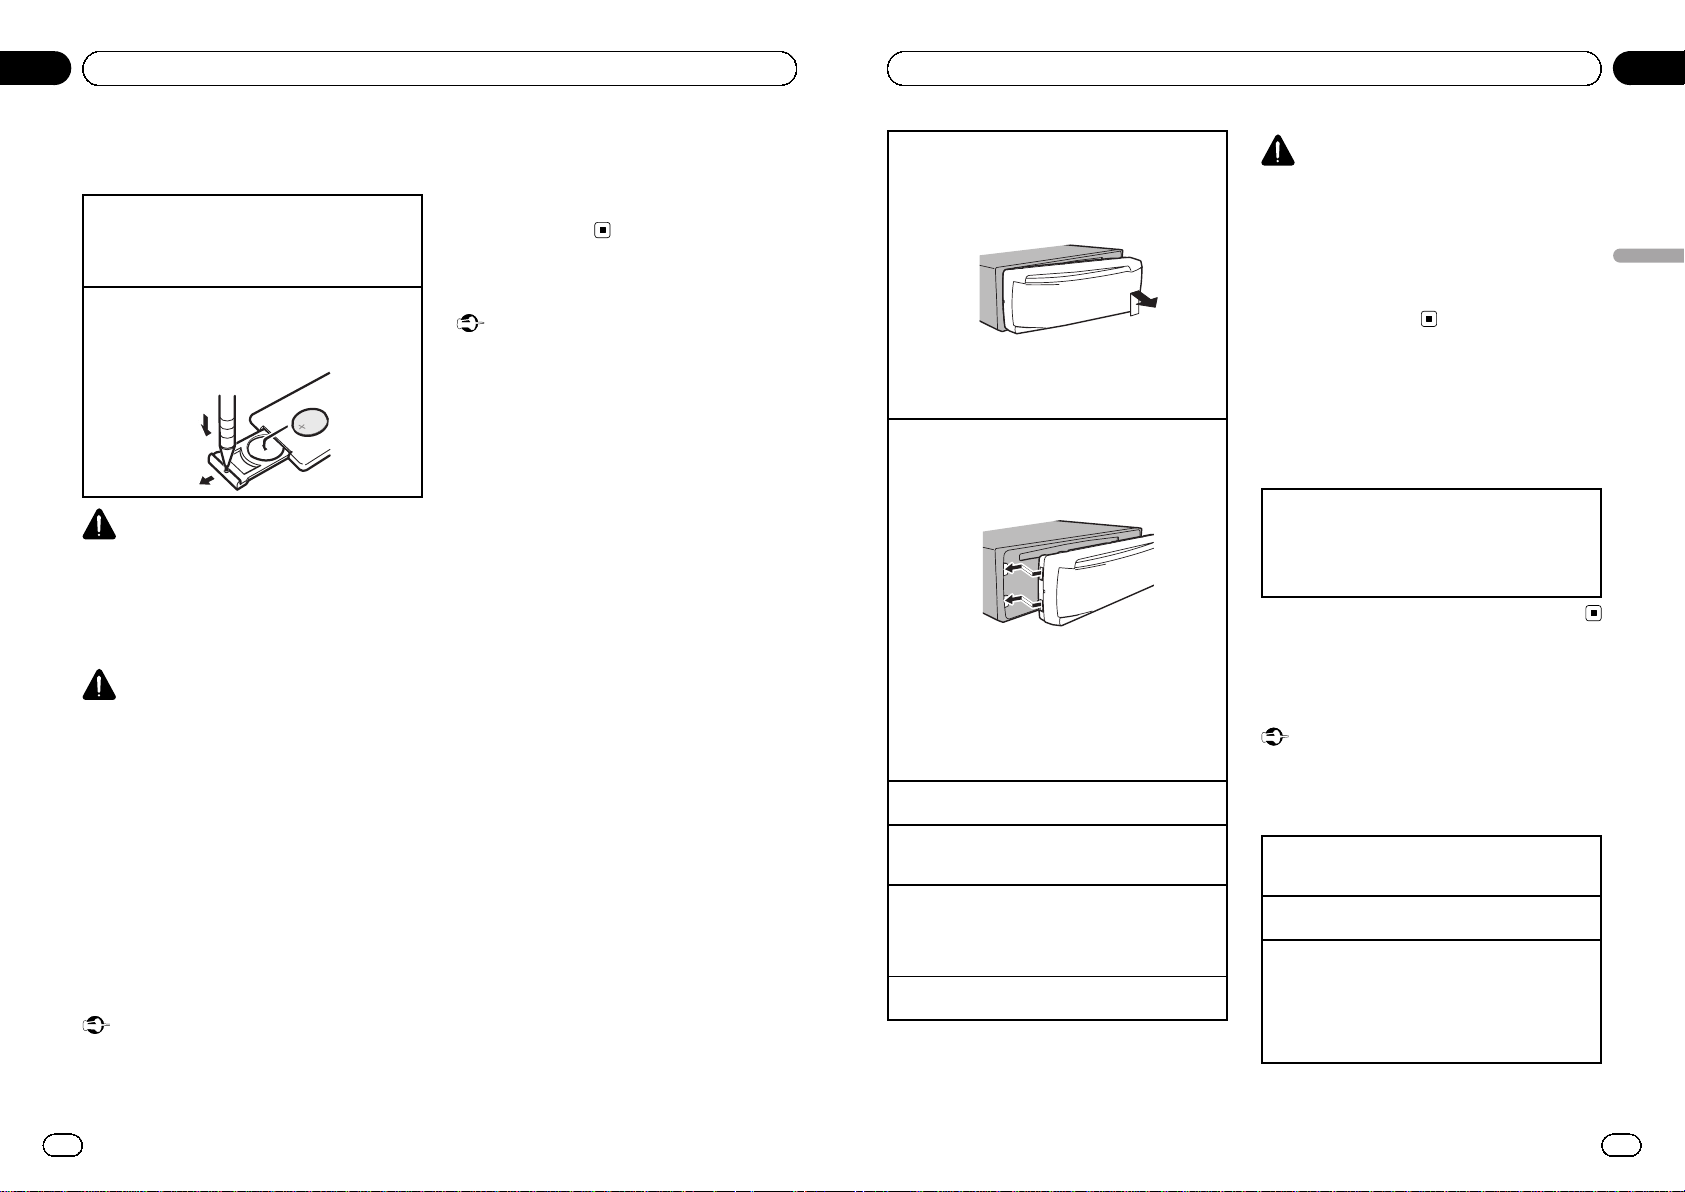
Use and care of the remote
control
Using the remote control
1 Point the remote control in the direction of the
front panel to operate.
When using for the first time, pull out the film
protruding from the tray.
Replacing the battery
1 Slide the tray out on the back of the remote con-
trol.
2 Insert the battery with the plus (+) and minus (–)
poles aligned properly.
WARNING
! Keep the battery out of the reach of children.
Should the battery be swallowed, consult a
doctor immediately.
! Batteries (battery pack or batteries installed)
must not be exposed to excessive heat such
as sunshine, fire or the like.
CAUTION
! Use one CR2025 (3 V) lithium battery.
! Remove the battery if the remote control is not
used for a month or longer.
! There is a danger of explosion if the battery is
incorrectly replaced. Replace only with the
same or equivalent type.
! Do not handle the battery with metallic tools.
! Do not store the battery with metallic objects.
! If the battery leaks, wipe the remote control
completely clean and install a new battery.
! When disposing of used batteries, comply
with governmental regulations or environmental public institutions’ rules that apply in your
country/area.
Important
! Do not store the remote control in high tem-
peratures or direct sunlight.
! The remote control may not function properly
in direct sunlight.
! Do not let the remote control fall onto the
floor, where it may become jammed under the
brake or accelerator pedal.
Basic Operations
Important
! Handle gently when removing or attaching
the front panel.
! Avoid subjecting the front panel to excessive
shock.
! Keep the front panel out of direct sunlight and
high temperatures.
! To avoid damage to the device or vehicle inter-
ior, remove any cables and devices attached
to the front panel before detaching it.
En
4
Section
02
Operating this unit
Removing the front panel to protect your unit from
theft
1 Press the detach button to release the front
panel.
2 Push the front panel upward and pull it toward
you.
3 Always keep the detached front panel in a protec-
tion device such as a protection case.
Re-attaching the front panel
1 Slide the front panel to the left.
Make sure to insert the tabs on the left side of the
head unit into the slots on the front panel.
2 Press the right side of the front panel until it is
firmly seated.
If you cannot attach the front panel to the head
unit successfully, make sure that you are placing
the front panel onto the head unit correctly. Forcing the front panel into place may result in damage to the front panel or head unit.
Turning the unit on
1 Press SRC/OFF to turn the unit on.
Turning the unit off
1 Press SRC/OFF and hold until the unit turns off.
Selecting a source
1 Press SRC/OFF to cycle through the sources
listed below:
TUNER (tuner)—CD (built-in CD player)—AUX
(AUX)
Adjusting the volume
1 Turn SRC/OFF to adjust volume.
CAUTION
For safety reasons, park your vehicle when removing the front panel.
Note
When this unit’s blue/white lead is connected to
the vehicle’s auto-antenna relay control terminal,
the vehicle’s antenna extends when this unit’s
source is turned on. To retract the antenna, turn
the source off.
Menu operations identical
for function settings/audio
adjustments/initial settings
Returning to the ordinary display
Canceling the initial setting menu
1 Press B (BAND/ESC) .
You can also cancel initial settings by holding
down SRC/OFF until the unit turns off.
Tuner
Basic Operations
Important
If you are using this unit in North, Central or
South America, reset the AM tuning step (refer to
AM (AM tuning step) on page 8).
Selecting a band
1 Press B (BAND/ESC) until the desired band (F1,
F2, F3 for FM or AM) is displayed.
Manual tuning (step by step)
1 Press c or d.
Seeking
1 Press and hold c or d, and then release.
You can cancel seek tuning by briefly pressing c
or d.
While pressing and holding c or d, you can skip
stations. Seek tuning starts as soon as you release c or d.
En
5
English
Section
02
Operating this unit
Page 4
Storing and recalling stations
for each band
% When you find a station that you want
to store in memory, press one of the preset
tuning buttons (1 to 6) and hold until the
preset number stops flashing.
Stored radio station frequency can be recalled
by pressing the preset tuning button.
# Press a or b to recall radio station frequen-
cies.
Function settings
% Press FUNC to select the function.
After selecting, perform the following procedures to set the function.
BSM (best stations memory)
BSM (best stations memory) automatically stores the
six strongest stations in the order of their signal
strength.
Storing broadcast frequencies with BSM may replace
broadcast frequencies you have saved using 1 to 6.
1 Press a to turn BSM on.
The six strongest broadcast frequencies are
stored in the order of their signal strength.
To cancel the storage process, press b.
LOCAL (local seek tuning)
Local seek tuning lets you tune in to only those radio
stations with sufficiently strong signals for good reception.
1 Press a or b to turn local seek tuning on or off.
2 Press c or d to set the sensitivity.
FM: LOCAL 1 —LOCAL 2—LOCAL 3—LOCAL 4
AM: LOCAL 1—LOCAL 2
The highest level setting allows reception of only
the strongest stations, while lower levels allow the
reception of weaker stations.
CD
Basic Operations
Playing a CD/CD-R/CD-RW
1 Insert the disc into the disc loading slot with the
label side up.
Ejecting a CD/CD-R/CD-RW
1 Press h.
Selecting a folder
1 Press a or b.
Selecting a track
1 Press c or d.
Fast forwarding or reversing
1 Press and hold c or d.
When playing compressed audio, there is no
sound during fast forward or reverse.
Switching between compressed audio and CD-DA
1 Press B (BAND/ESC) .
Displaying text information
Selecting the desired text information
1 Press D (DISP/SCRL) .
Scrolling the text information to the left
1 Press and hold D (DISP/SCRL).
Notes
! Depending on the version of iTunes used to
write MP3 files to a disc or media file types, incompatible text stored within an audio file
may be displayed incorrectly.
! Text information items that can be changed
depend on the media.
Function settings
% Press FUNC to select the function.
After selecting, perform the following procedures to set the function.
RPT (repeat play)
1 Press c or d to select the repeat range.
DSC – Repeat all tracks
TRK – Repeat the current track
FLD – Repeat the current folder
En
6
Section
02
Operating this unit
RDM (random play)
1 Press a or b to turn random play on or off.
When random play is on, RDM appears in the display.
If you turn random play on during folder repeat,
FRDM appears in the display.
SCAN (scan play)
Scan play searches for a song within the selected repeat range.
1 Press a to turn scan play on.
If you turn scan play on during FLD, FSCN appears in the display.
2 When you find the desired track press b to turn
scan play off.
If the display has automatically returned to the
playback display, select SCAN again by pressing
FUNC.
After scanning of a disc (folder) is finished, normal playback of the tracks begins.
PAUSE (pause)
1 Press a or b to pause or resume.
SRTRV (sound retriever)
Automatically enhances compressed audio and restores rich sound.
1 Press a or b to select your favorite setting.
OFF (off)—1—2
1 is effect ive for low compression rates, and 2 is
effective for high compression rates.
FF/REV (fast forward/reverse)
You can switch the search method between fast forward/reverse and searching every 10 tracks. Selecting
ROUGH enables you to search every 10 tracks.
1 Press d to select ROUGH.
FF/REV – Fast forward and reverse
ROUGH – Searching every 10 tracks
To select FF/REV, press c.
2 Press B (BAND/ESC) to return to the playback dis-
play.
3 Press and hold c or d to search every 10 tracks
on a disc (folder).
If the rest of track number is less than 10, press
and hold c or d recalls the first (last) one.
Audio Adjustments
Audio Adjustments
% Press AUDIO to select the audio function.
After selecting, perform the following procedures to set the audio function.
FAD (fader/balance adjustment)
1 Press a or b to adjust fader (front/rear speaker
balance).
2 Press c or d to adjust the balance (left/right
speaker balance).
BASS/MID/TREBLE (equalizer adjustment)
! Adjusted equalizer curve settings are stored in
CUSTOM.
1 Press a or b to adjust the level.
Adjustment range: +6 to -6
LOUD (loudness)
Loudness compensates for deficiencies in the lowand high-frequency ranges at low volume.
1 Press a or b to turn loudness on or off.
2 Press c or d to select the desired setting.
LOW (low)—HI (high)
! You can also turn loudness on or off by pressing
and holding E (EQ/LOUD).
SLA (source level adjustment)
SLA (Source Level Adjustment) lets you adjust the vo-
lume level of each source to prevent radical changes
in volume when switching between sources.
! When selecting FM as the source, you cannot
switch to SLA.
! Settings are based on the FM volume level, which
remains unchanged.
! The AM volume level can also be adjusted with
this function.
1 Press a or b to adjust the source volume.
Adjustment range: SLA +4 to SLA –4
Using the equalizer
% Press E (EQ/LOUD) to select the equalizer.
DYNAMIC—VOCAL—NATURAL—CUSTOM
—FLAT—POWERFUL
! CUSTOM allows you to create a customized
setting.
En
7
English
Section
02
Operating this unit
Page 5
Other Functions
Adjusting initial settings
1 Press SRC/OFF and hold until the unit
turns off.
2 Press SRC/OFF and hold until the clock
appears in the display.
3 Press FUNC to select the initial setting.
After selecting, perform the following procedures to set the initial setting.
Setting the clock
1 Press c or d to select the segment of the clock
display you wish to set.
Hour—Minute
2 Press a or b to put a clock right.
FM (FM tuning step)
The FM tuning step employed by seek tuning can be
switched between 100 kHz, the preset step, and 50
kHz.
! If seek tuning is performed in 50 kHz steps, sta-
tions may be tuned in imprecisely. Tune in the stations with manual tuning or use seek tuning
again.
1 Press c or d to select the FM tuning step.
50 (50 kHz)—100 (100 kHz)
AM (AM tuning step)
The AM tuning step can be switched between 9 kHz,
the preset step, and 10 kHz. When using the tuner in
North, Central or South America, reset the tuning
step from 9 kHz (531 kHz to 1 602 kHz allowable) to 10
kHz (530 kHz to 1 640 kHz allowable).
1 Press c or d to select the AM tuning step.
9 (9 kHz)—10 (10 kHz)
AUX (auxiliary input)
Activate this setting when using an auxiliary device
connected to this unit.
1 Press a or b to turn auxiliary setting on or off.
Displaying the clock
% Press to turn the clock display on or
off.
# The clock display disappears temporarily
when you perform other operations, but the clock
display appears again after 25 seconds.
Using an AUX source
1 Insert the stereo mini plug into the
AUX input jack.
2 Press SRC/OFF to select AUX as the
source.
# AUX cannot be selected unless the auxiliary
setting is turned on. For more details, refer to
AUX (auxiliary input) on this page.
En
8
Section
02
Operating this unit
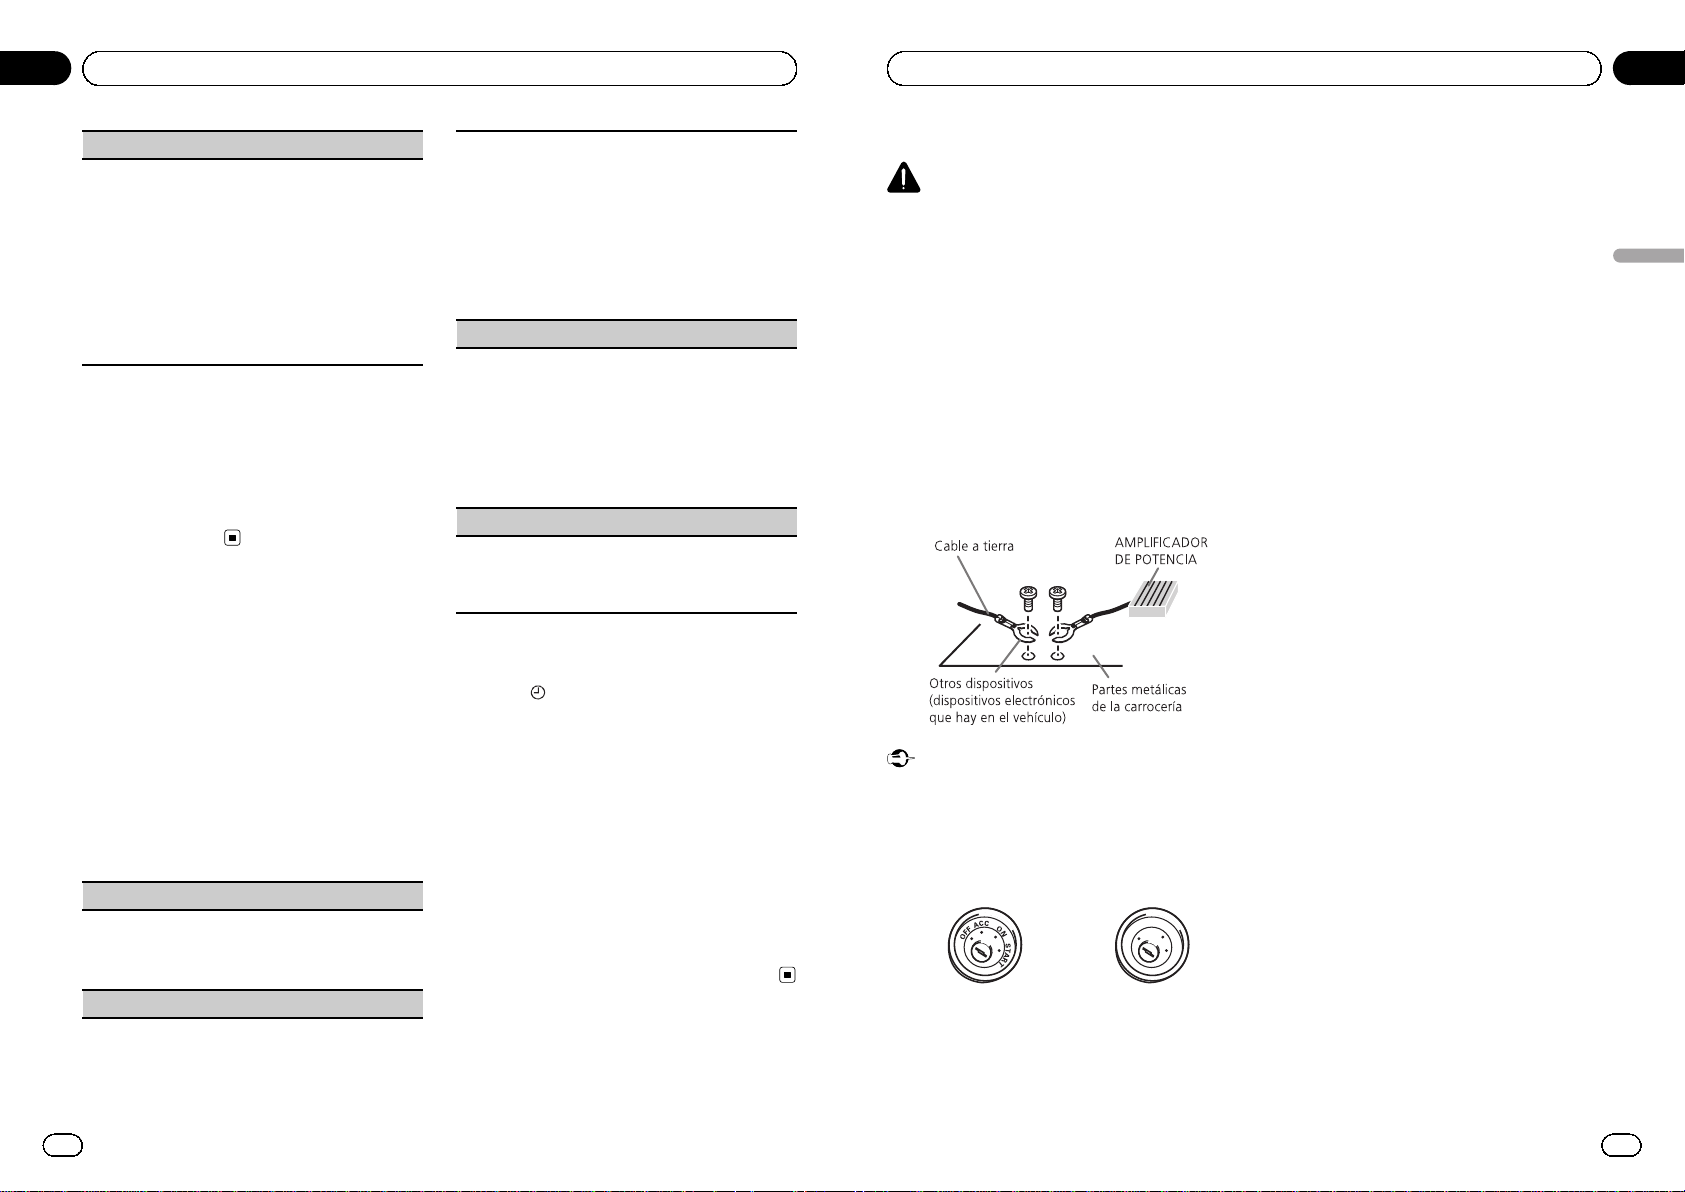
Connections
WARNING
! Use speakers over 50 W (output value) and be-
tween 4 W to 8 W (impedance value). Do not
use 1 W to 3 W speakers for this unit.
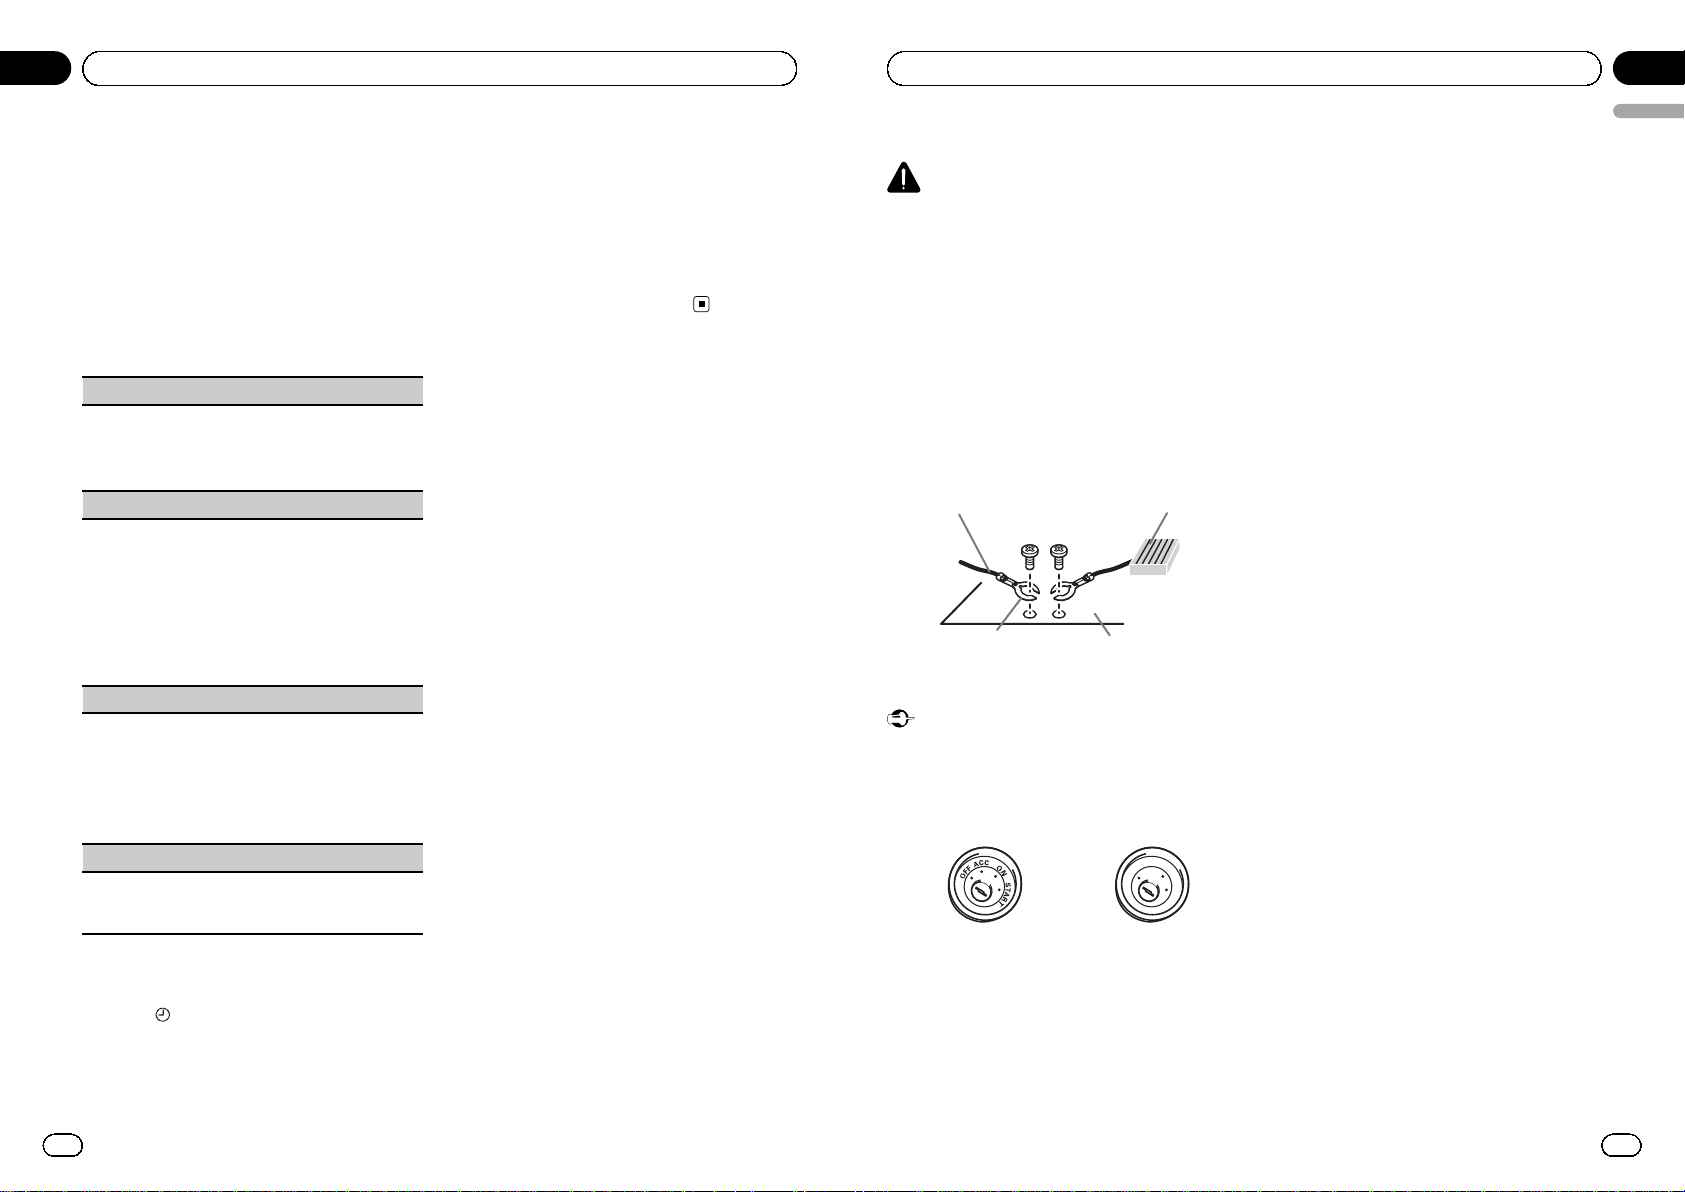
! The black cable is ground. When installing
this unit or power amp (sold separately), make
sure to connect the ground wire first. Ensure
that the ground wire is properly connected to
metal parts of the car’s body. The ground wire
of the power amp and the one of this unit or
any other device must be connected to the car
separately with different screws. If the screw
for the ground wire loosens or falls out, it
could result in fire, generation of smoke or
malfunction.
Ground wire
Metal parts of car’s body
POWER AMP
Other devices
(Another electronic
device in the car)
Important
! When installing this unit in a vehicle without
an ACC (accessory) position on the ignition
switch, failure to connect the red cable to the
terminal that detects operation of the ignition
key may result in battery drain.
O
N
S
T
A
R
T
O
F
F
ACC position No ACC positio n
! Use this unit with a 12-volt battery and nega-
tive grounding only. Failure to do so may result
in a fire or malfunction.
! To prevent a short-circuit, overheating or mal-
function, be sure to follow the directions
below.
— Disconnect the negative terminal of the
battery before installation.
— Secure the wiring with cable clamps or ad-
hesive tape. Wrap adhesive tape around
wiring that comes into contact with metal
parts to protect the wiring.
— Place all cables away from moving parts,
such as the gear shift and seat rails.
— Place all cables away from hot places,
such as near the heater outlet.
— Do not connect the yellow cable to the bat-
tery by passing it through the hole to the
engine compartment.
— Cover any disconnected cable connectors
with insulating tape.
— Do not shorten any cables.
— Never cut the insulation of the power cable
of this unit in order to share the power
with other devices. The current capacity of
the cable is limited.
— Use a fuse of the rating prescribed.
— Never wire the negative speaker cable di-
rectly to ground.
— Never band together negative cables of
multiple speakers.
! When this unit is on, control signals are sent
through the blue/white cable. Connect this
cable to the system remote control of an external power amp or the vehicle’s auto-antenna
relay control terminal (max. 300 mA 12 V DC).
If the vehicle is equipped with a glass antenna, connect it to the antenna booster power
supply terminal.
! Never connect the blue/white cable to the
power terminal of an external power amp.
Also, never connect it to the power terminal of
the auto antenna. Doing so may result in battery drain or a malfunction.
En
9
English
Section
03
Installation
Page 6
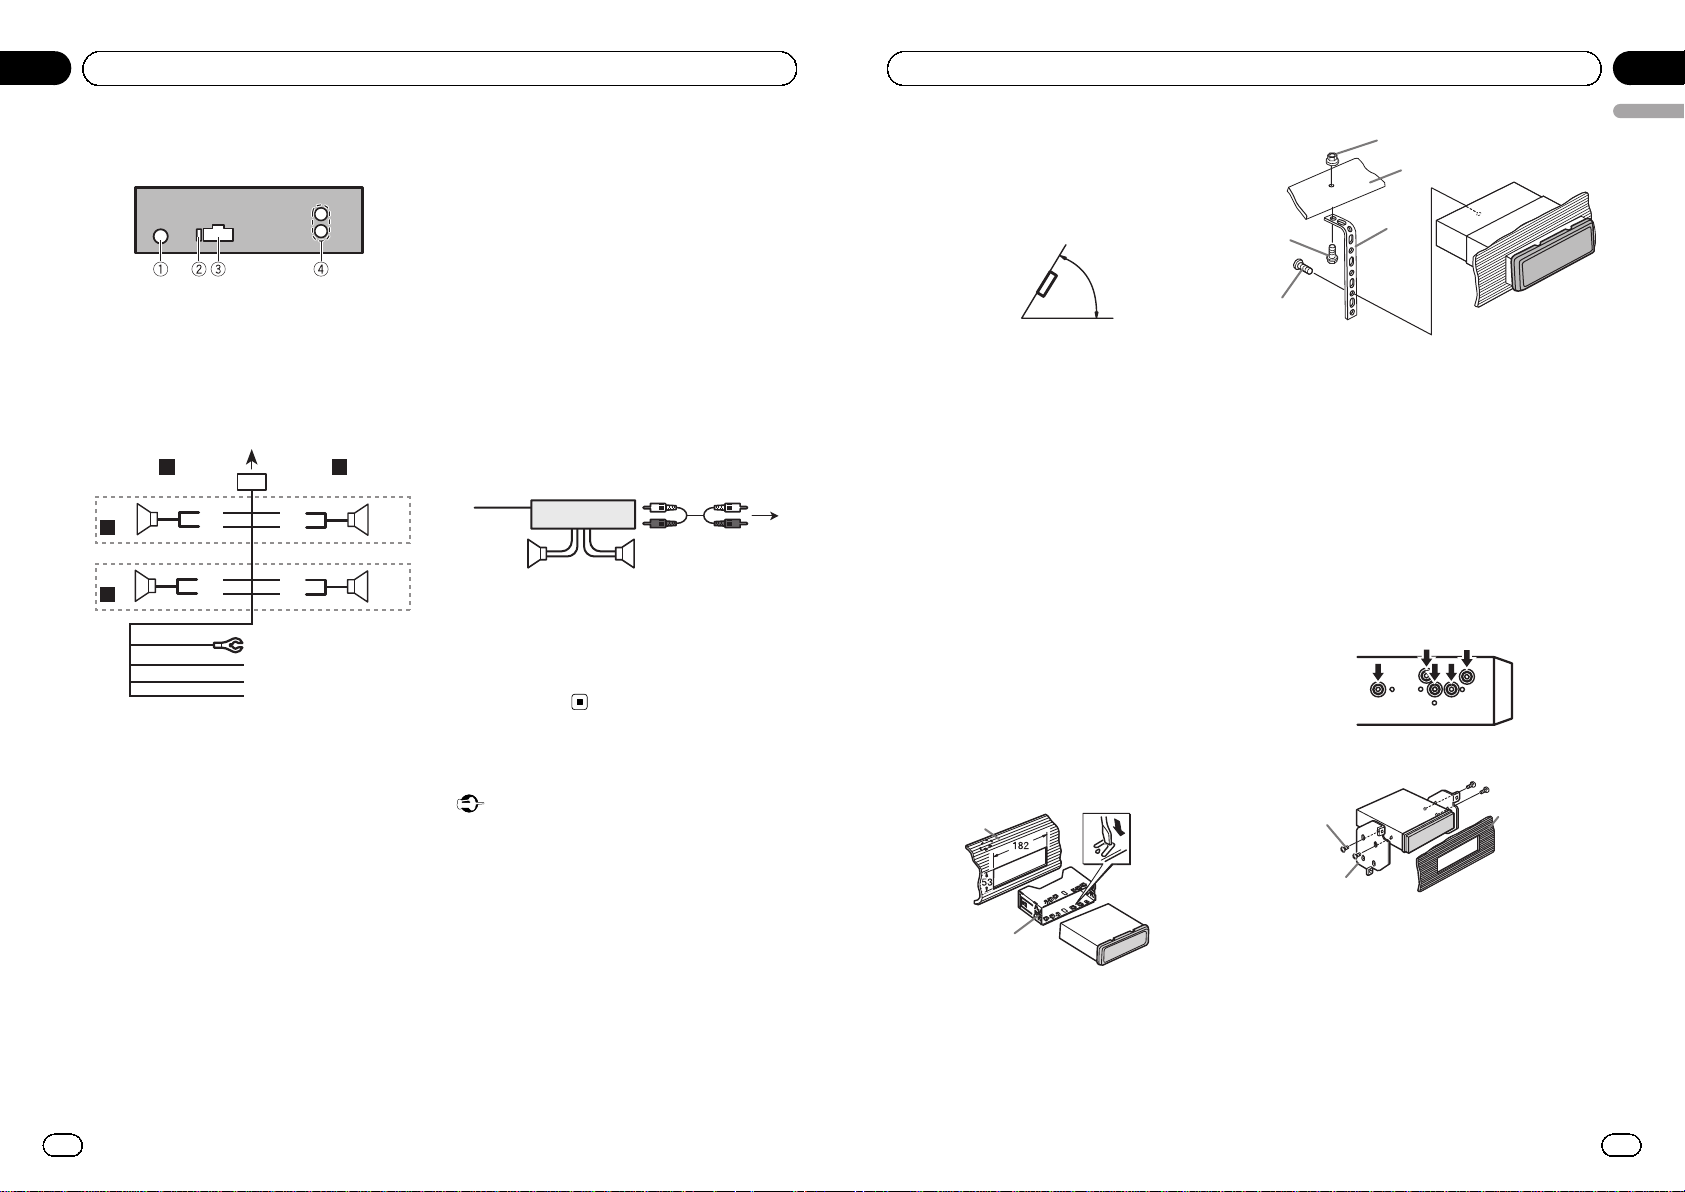
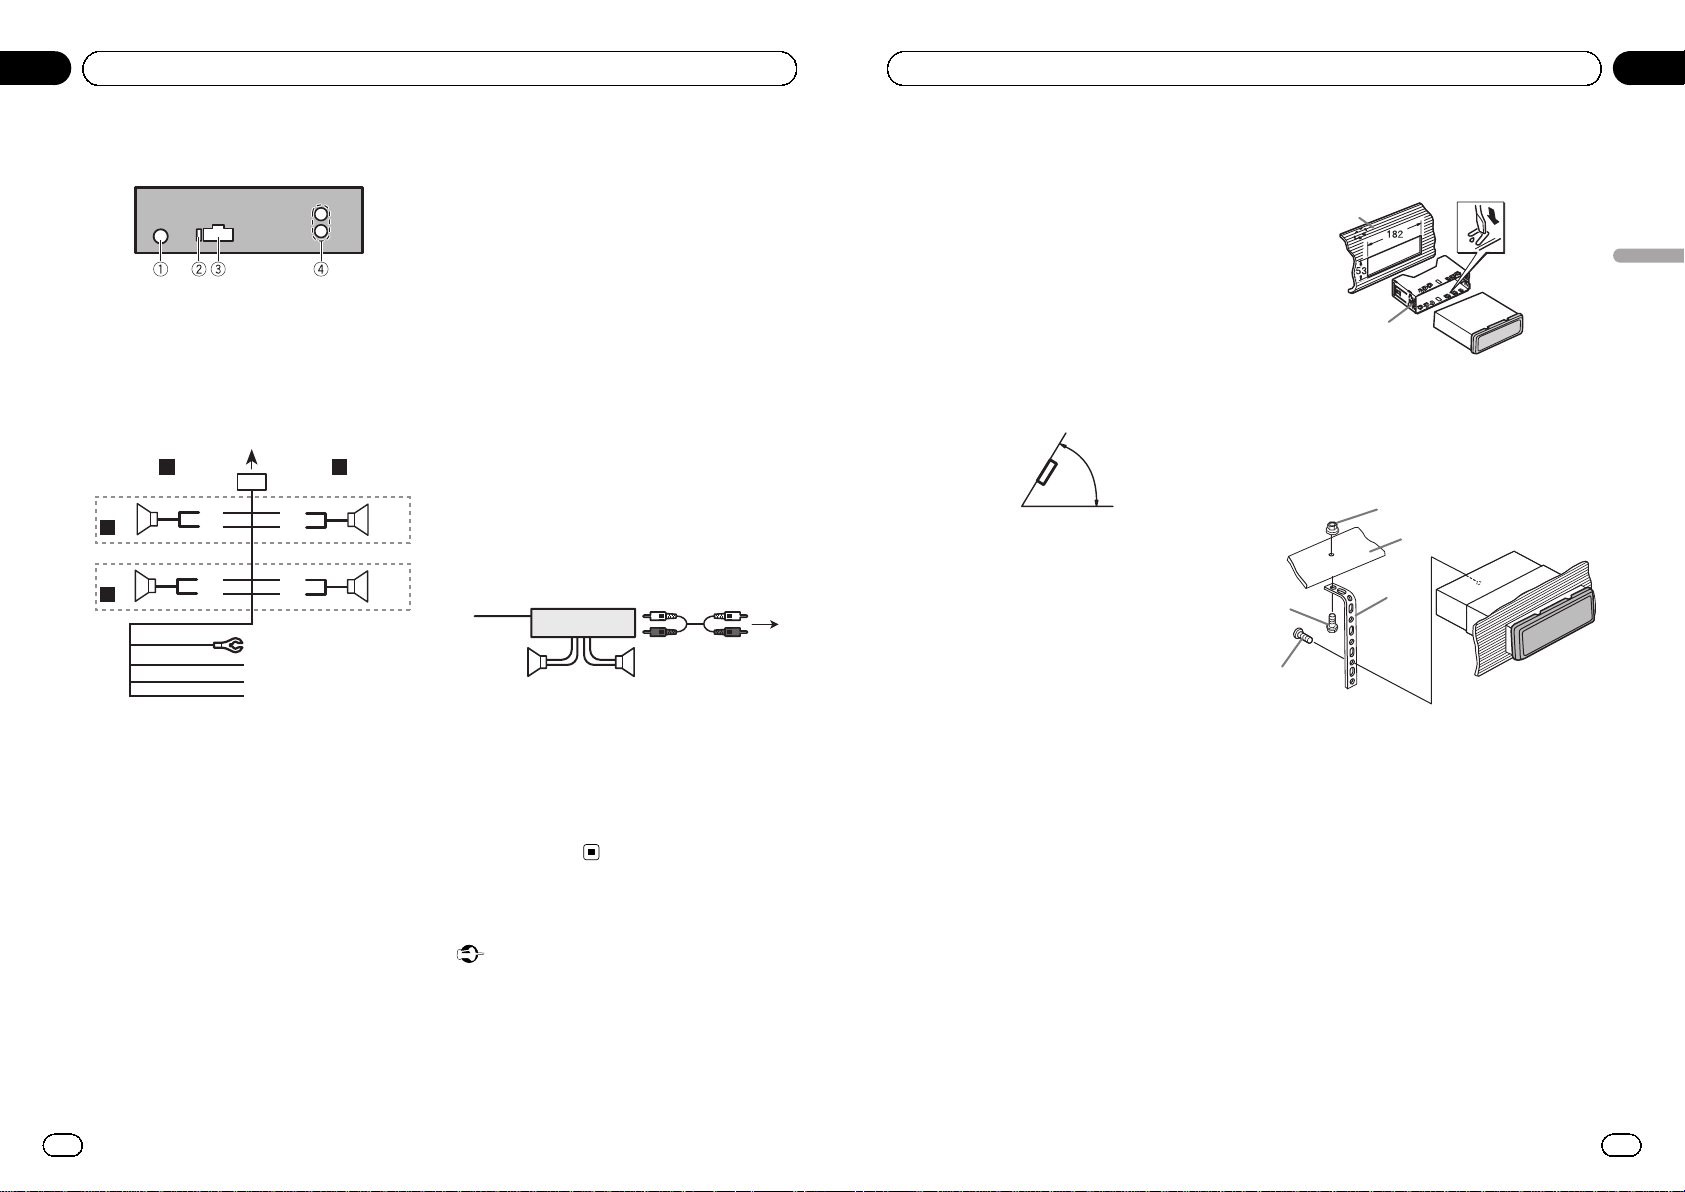
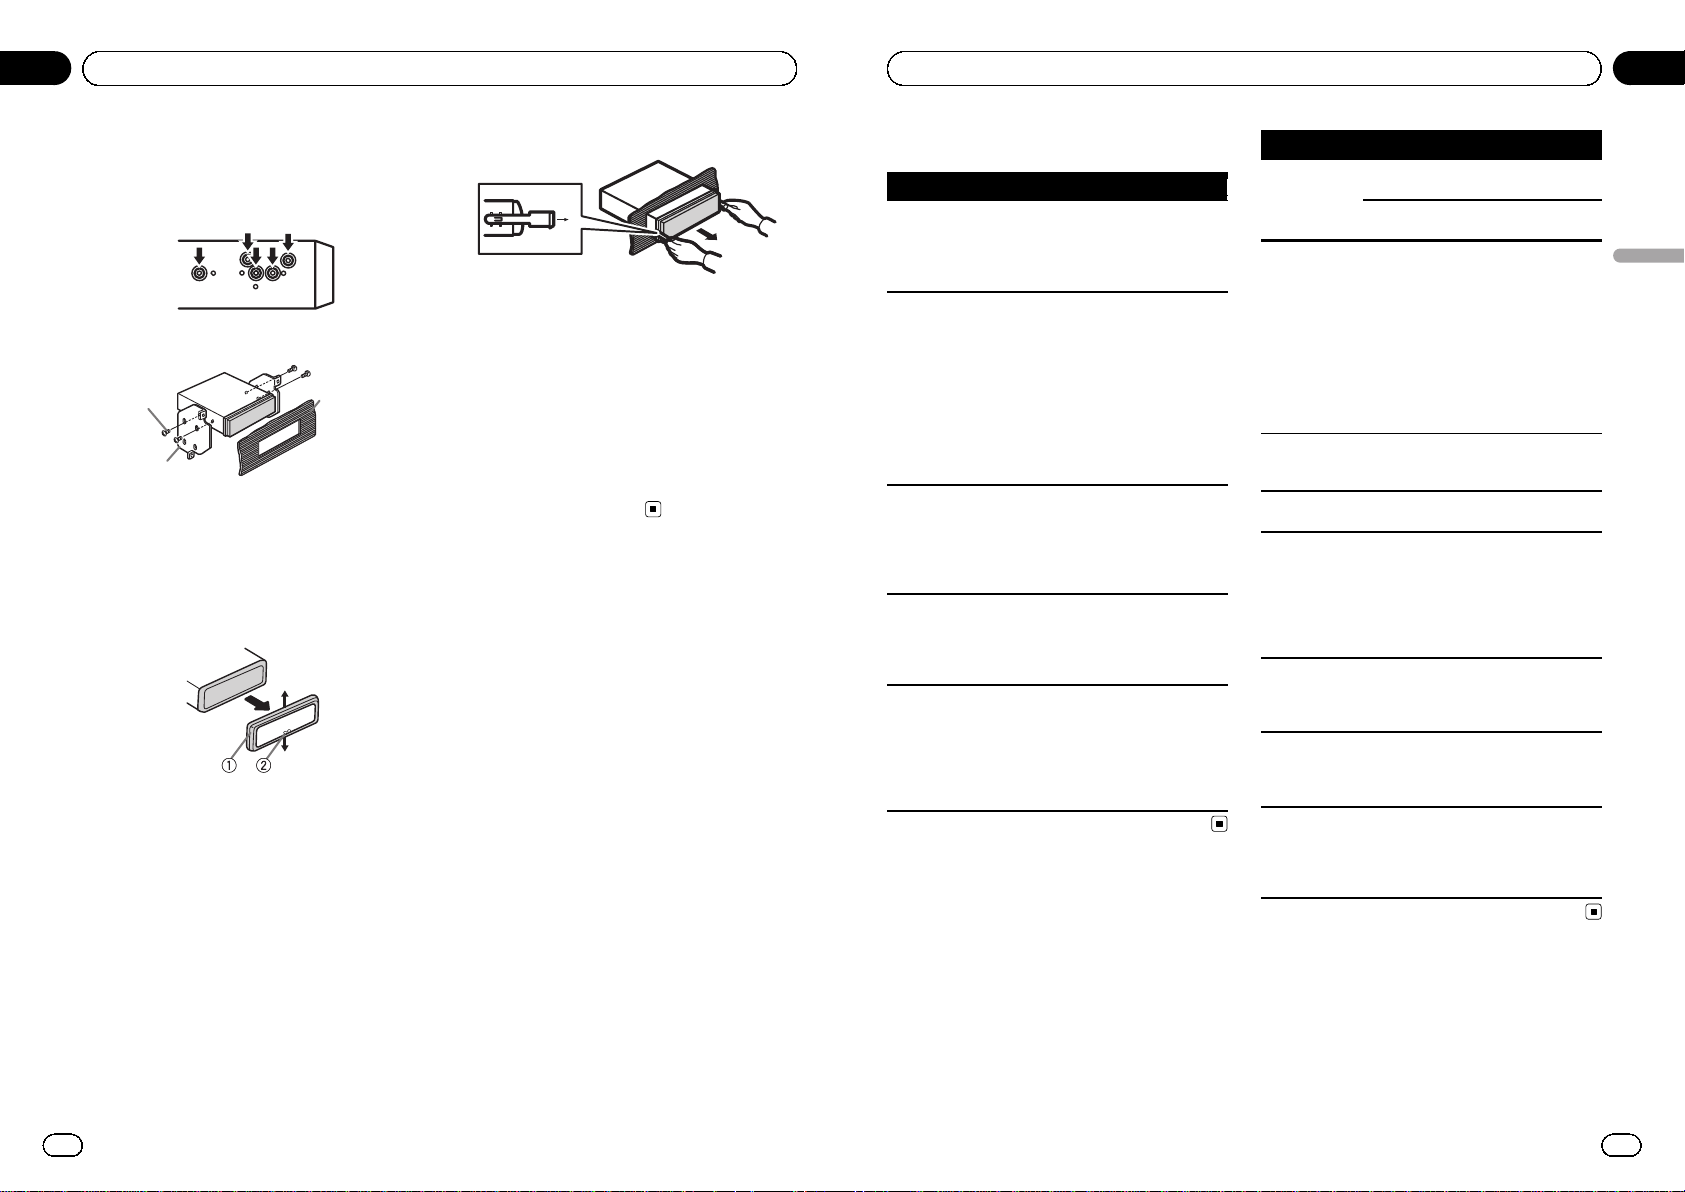
This unit
1 Antenna input
2 Fuse (10 A)
3 Power cord input
4 Rear output
Power cord
1
8
9
c
d
6
32
4
5
7
a
b
e
f
h
g
LR
F
R
1 To power cord input
2 Left
3 Right
4 Front speaker
5 Rear speaker
6 White
7 White/black
8 Gray
9 Gray/black
a Green
b Green/black
c Violet
d Violet/black
e Black (chassis ground)
Connect to a clean, paint-free metal location.
f Yellow
Connect to the constant 12 V supply terminal.
g Red
Connect to terminal controlled by ignition
switch (12 V DC).
h Blue/white
Connect to system control terminal of the
power amp or auto-antenna relay control
terminal (max. 300 mA 12 V DC).
Note
With a 2 speaker system, do not connect anything
to the speaker leads that are not connected to
speakers.
Power amp (sold separately)
Perform these connections when using the
optional amplifier.
1
4
2
55
3
1 System remote control
Connect to Blue/white cable.
2 Power amp (sold separately)
3 Connect with RCA cables (sold separately)
4 To Rear output
5 Rear speaker
Installation
Important
! Check all connections and systems before
final installation.
! Do not use unauthorized parts as this may
cause malfunctions.
! Consult your dealer if installation requires dril-
ling of holes or other modifications to the vehicle.
! Do not install this unit where:
— it may interfere with operation of the vehi-
cle.
— it may cause injury to a passenger as a re-
sult of a sudden stop.
En
10
Section
03
Installation
! The semiconductor laser will be damaged if it
overheats. Install this unit away from hot
places such as near the heater outlet.
! Optimum performance is obtained when the
unit is installed at an angle of less than 60°.
60°
! To ensure proper heat dispersal when using
this unit, make sure you leave ample space
behind the rear panel and wrap any loose
cables so they are not blocking the vents
when installing the unit.
DIN front/rear mount
This unit can be properly installed using either
front-mount or rear-mount installation.
DIN Front-mount
1 Insert the mounting sleeve into the
dashboard.
For installation in shallow spaces, use the supplied mounting sleeve. If there is enough
space, use the mounting sleeve that came
with the vehicle.
2 Secure the mounting sleeve by using a
screwdriver to bend the metal tabs (90°)
into place.
1
2
1 Dashboard
2 Mounting sleeve
3 Install the unit as illustrated.
Use commercially available parts when installing.
1
2
3
4
5
1 Nut
2 Firewall or metal support
3 Metal strap
4 Screw
5 Screw (M4 × 8)
# Make sure that the unit is installed securely in
place. An unstable installation may cause skipping or other malfunctions.
DIN Rear-mount
1 Determine the appropriate position
where the holes on the bracket and the
side of the unit match.
2 Tighten two screws on each side.
1
2
3
1 Truss screw (5 mm × 8 mm)
2 Mounting bracket
3 Dashboard or console
En
11
English
Section
03
Installation
Page 7
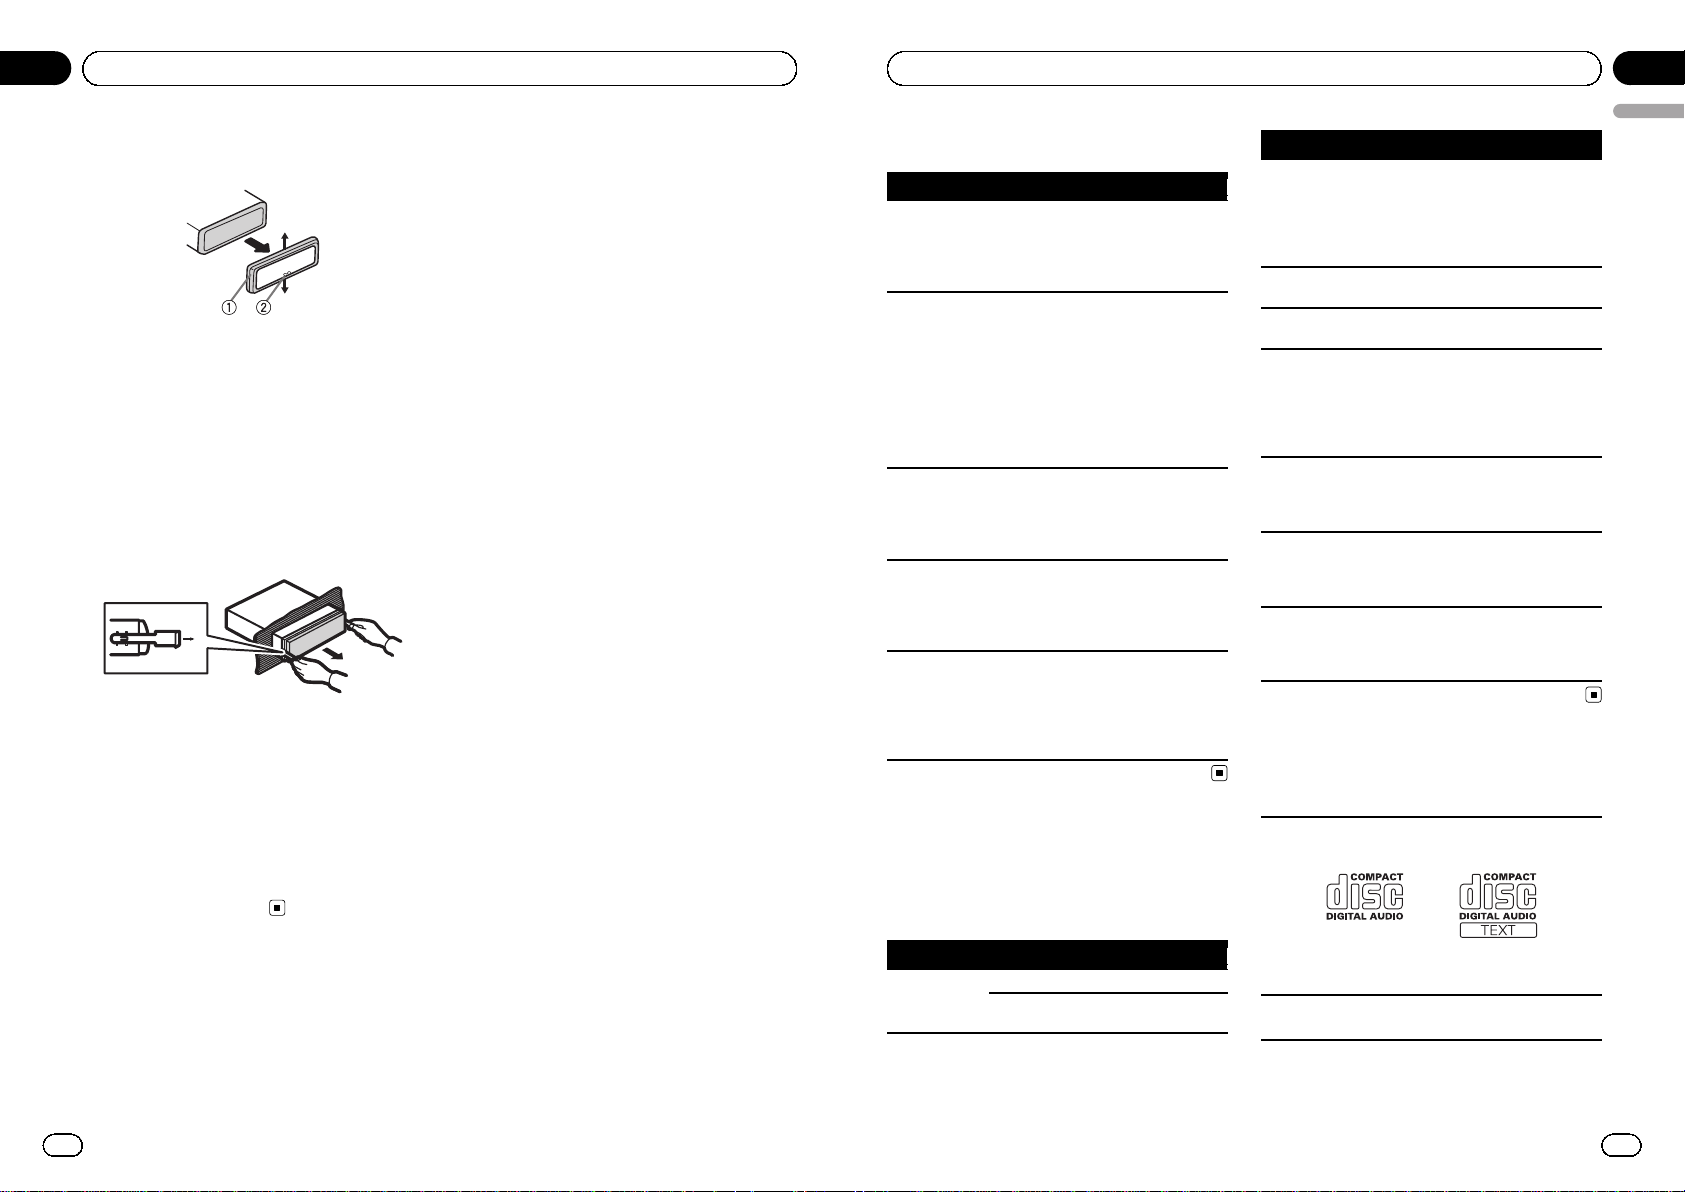
Removing the unit
1 Remove the trim ring.
1 Trim ring
2 Notched tab
! Releasing the front panel allows easier ac-
cess to the trim ring.
! When reattaching the trim ring, point the
side with the notched tab down.
2 Insert the supplied extraction keys into
both sides of the unit until they click into
place.
3 Pull the unit out of the dashboard.
Removing and re-attaching the front
panel
You can remove the front panel to protect your
unit from theft.
Press the detach button and push the front
panel upward and pull it toward you.
For details, refer to Removing the front panel to
protect your unit from theft and Re-attaching
the front panel on page 5.
En
12
Section
03
Installation
Troubleshooting
Symptom Cause Action
The display
automatically
returns to the
ordinary display.
You did not perform any operation within about
30 seconds.
Perform operation
again.
The repeat play
range changes
unexpectedly.
Depending on
the repeat play
range, the selected range may
change when selecting another
folder or track, or
when fast forwarding/reversing.
Select the repeat
play range again.
A subfolder is
not played
back.
Subfolders cannot be played
when FLD (folder
repeat) is selected.
Select another repeat play range.
NO XXXX appears when a
display is changed (NO T-TTL,
for example).
There is no text
information embedded.
Switch the display
or play another
track/file.
The unit is malfunctioning.
There is interference.
You are using a
device, such as a
cellular phone,
that transmits
electric waves
near the unit.
Move electrical devices that may be
causing the interference away from
the unit.
Error messages
When you contact your dealer or your nearest
Pioneer Service Center, be sure to note the
error message.
Message Cause Action
ERROR-11, 12,
17, 30
The disc is dirty. Clean the disc.
The disc is
scratched.
Replace the disc.
Message Cause Action
ERROR-10, 11,
12, 15, 17, 30,
A0
There is an electrical or mechanical error.
Turn the ignition
switch OFF and
back ON, or switch
to a different
source, then back
to the CD player.
ERROR-15 The inserted disc
is blank
Replace the disc.
ERROR-23 Unsupported CD
format
Replace the disc.
FRMTREAD Sometimes there
is a delay between the start of
playback and
when you start to
hear any sound.
Wait until the message disappears
and you hear
sound.
NO AUDIO The inserted disc
does not contain
any playable
files.
Replace the disc.
PROTECT All the files on
the inserted disc
are embedded
with DRM.
Replace the disc.
SKIPPED The inserted disc
contains DRM
protected WMA
files.
Replace the disc.
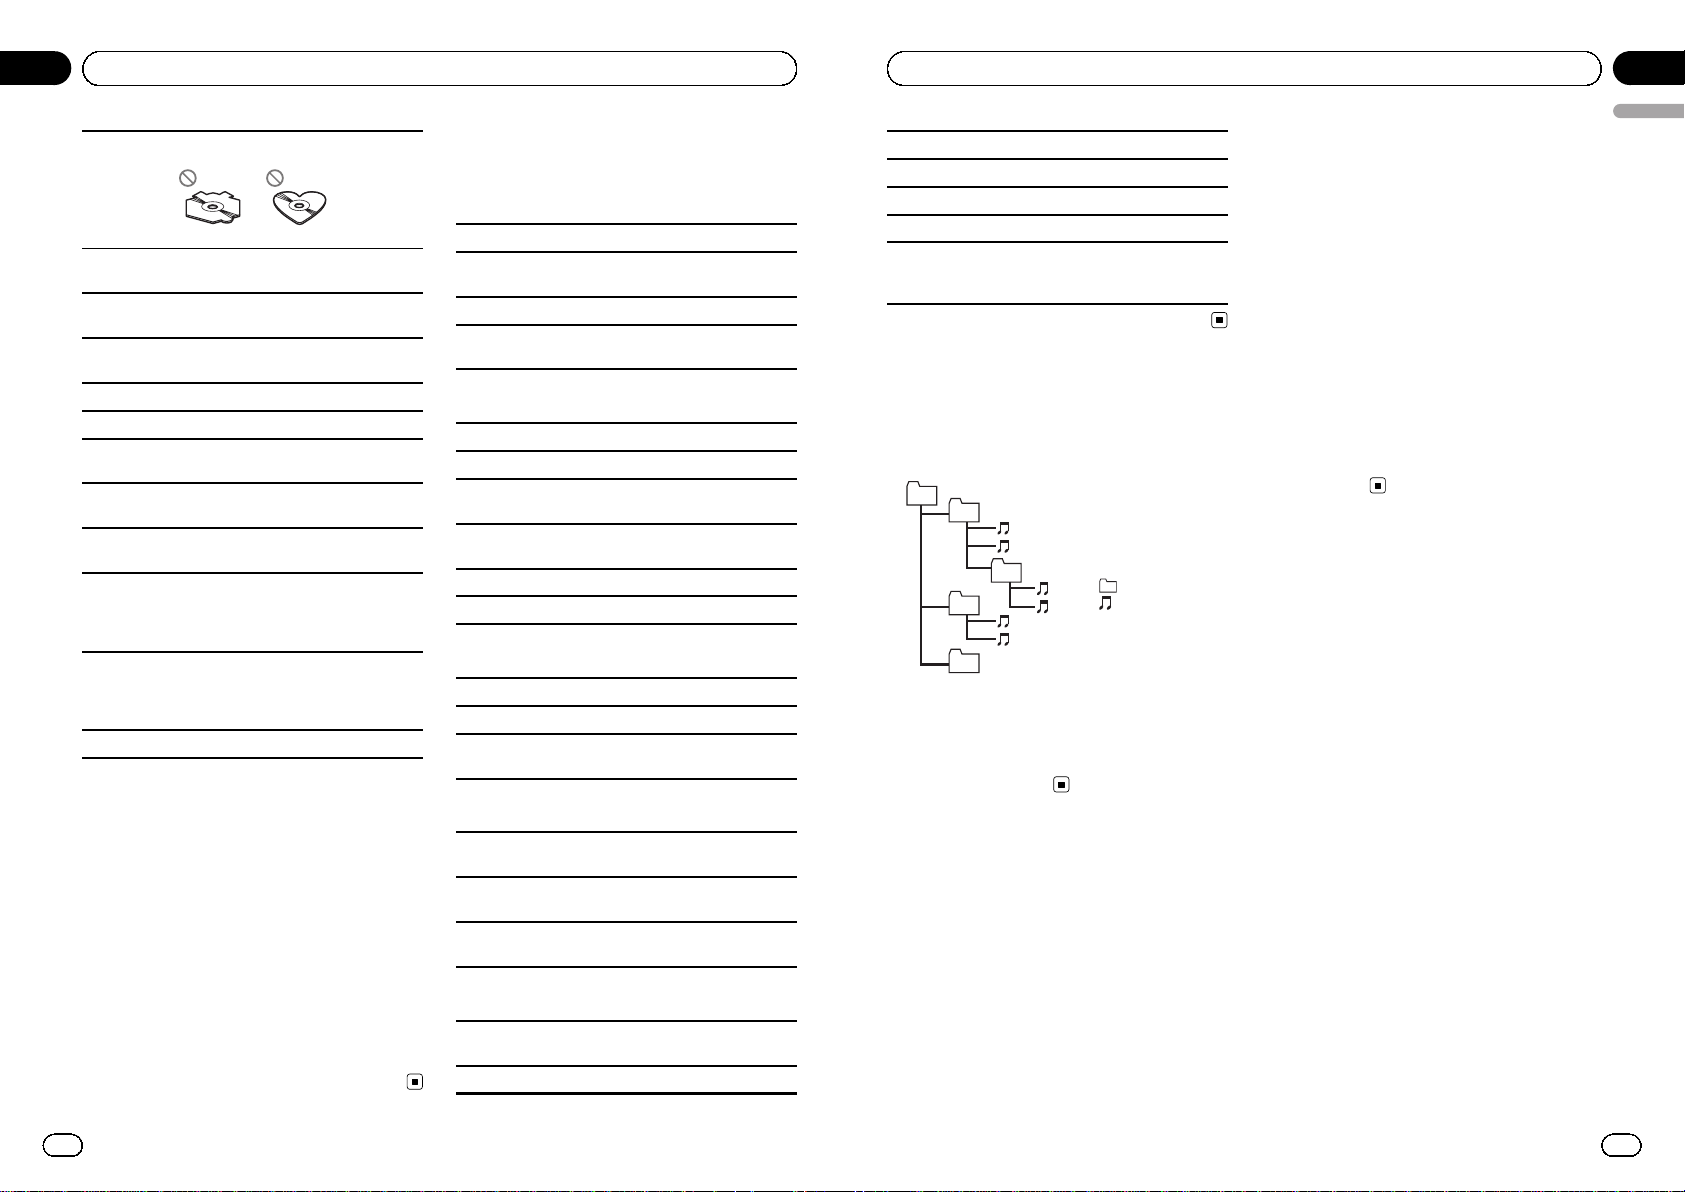
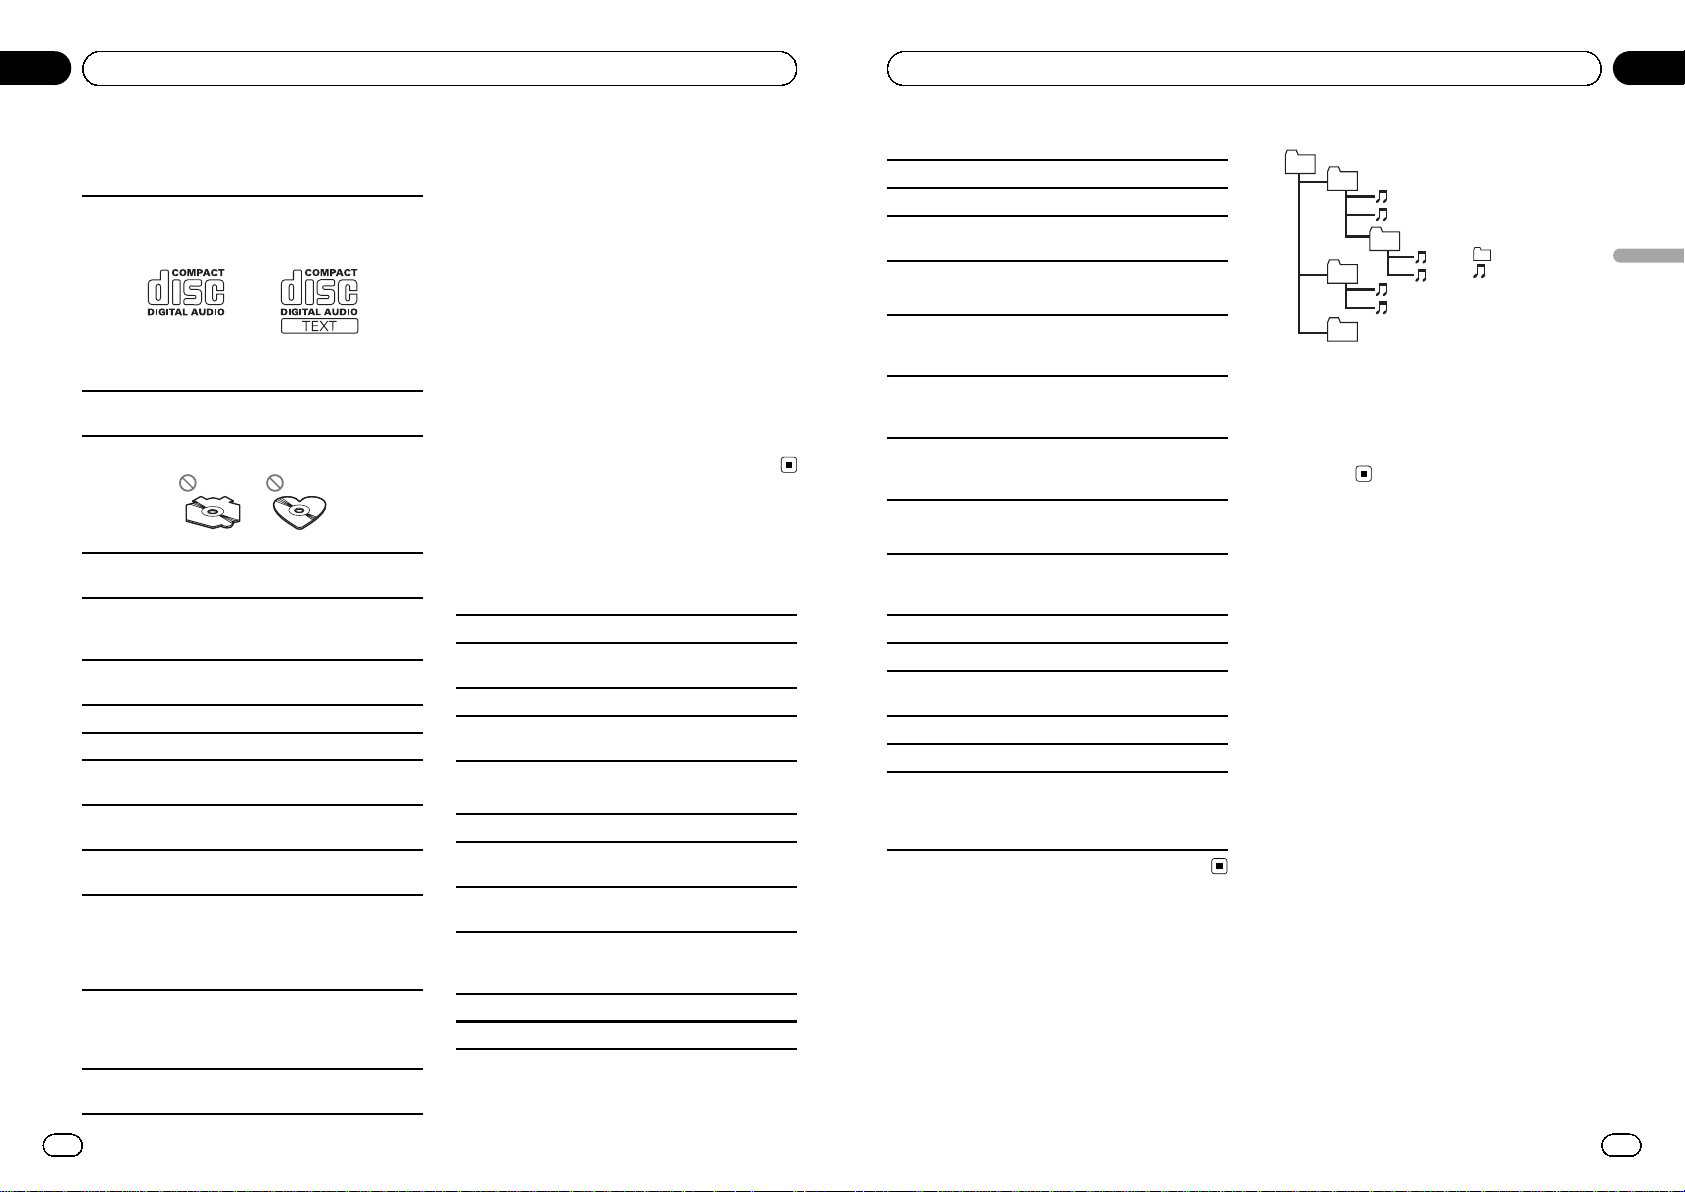
Handling guideline
Discs and player
Use only discs featuring either of following two logos.
Use 12-cm disc. Do not use 8-cm disc or an adapter
for 8-cm disc.
En
13
English
Appendix
Additional Information
Page 8
Use only conventional, fully circular discs. Do not use
shaped discs.
Do not insert anything other than a CD into the CD
loading slot.
Do not use cracked, chipped, warped, or otherwise
damaged discs as they may damage the player.
Unfinalized CD-R/CD-RW disc playback is not possible.
Do not touch the recorded surface of the discs.
Store discs in their cases when not in use.
Avoid leaving discs in excessively hot environments
including under direct sunlight.
Do not attach labels, write on or apply chemicals to
the surface of the discs.
To clean a CD, wipe the disc with a soft cloth outward
from the center.
Condensation may temporarily impair the player’s
performance. Leave it to adjust to the warmer temperature for about one hour. Also, wipe any damp
discs with a soft cloth.
Playback of discs may not be possible because of
disc characteristics, disc format, recorded application, playback environment, storage conditions, and
so on.
Road shocks may interrupt disc playback.
DualDiscs
DualDiscs are two-sided discs that have a recordable
CD for audio on one side and a recordable DVD for
video on the other.
Since the CD side of DualDiscs is not physically compatible with the general CD standard, it may not be
possible to play the CD side with this unit.
Frequent loading and ejecting of a DualDisc may result in scratches on the disc. Serious scratches can
lead to playback problems on this unit. In some
cases, a DualDisc may become stuck in the disc loading slot and will not eject. To prevent this, we recommend you refrain from using DualDisc with this unit.
Please refer to the information from the disc manufacturer for more detailed information about DualDiscs.
Compressed audio
compatibility
WMA
File extension: .wma
Bit rate: 48 kbps to 320 kbps (CBR), 48 kbps to 384
kbps (VBR)
Sampling frequency: 32 kHz to 48 kHz
Windows Media Audi o Professional, Lossless, Voice:
No
MP3
File extension: .mp3
Bit rate: 8 kbps to 320 kbps (CBR), VBR
Sampling frequency: 8 kHz to 48 kHz (32, 44.1, 48 kHz
for emphasis)
Compatible ID3 tag version: 1.0, 1.1, 2.2, 2.3, 2.4 (ID3
tag Version 2.x is given priority over Version 1.x.)
M3u playlist: No
MP3i (MP3 interactive), mp3 PRO: No
WAV
File extension: .wav
Quantization bits: 8 and 16 (LPCM), 4 (MS ADPCM)
Sampling frequency: 16 kHz to 48 kHz (LPCM), 22.05
kHz and 44.1 kHz (MS ADPCM)
Supplemental information
Only the first 32 characters can be displayed as a file
name (including the file extension) or a folder name.
This unit may not operate correctly depending on the
application used to encode WMA files.
There may be a slight delay when starting playback of
audio files embedded with image data.
Disc
Playable folder hierarchy: up to eight tiers (A practical
hierarchy is less than two tiers.)
Playable folders: up to 99
En
14
Appendix
Additional Information
Playable files: up to 999
File system: ISO 9660 Level 1 and 2, Romeo, Joliet
Multi-session playback: Yes
Packet write data transfer: No
Regardless of the length of blank section between the
songs of the original recording, compressed audio
discs play with a short pause between songs.
Sequence of audio files
The user cannot assign folder numbers and
specify playback sequences with this unit.
Example of a hierarchy
Level 1 Level 2 Level 3 Level 4
01
02
03
04
05
: Folder
: Compressed
audio file
01 to 05: Folder
number
1 to 6: Playback
sequence
Disc
! Folder selection sequence or other opera-
tion may differ depending on the encoding
or writing software.
Copyright and trademark
iTunes
Apple and iTunes are trademarks of Apple
Inc., registered in the U.S. and other countries.
MP3
Supply of this product only conveys a license
for private, non-commercial use and does not
convey a license nor imply any right to use
this product in any commercial (i.e. revenuegenerating) real time broadcasting (terrestrial,
satellite, cable and/or any other media), broadcasting/streaming via internet, intranets and/
or other networks or in other electronic content distribution systems, such as pay-audio or
audio-on-demand applications. An independent license for such use is required. For details, please visit
http://www.mp3licensing.com.
WMA
Windows Media and the Windows logo are trademarks or registered trademarks of Microsoft
Corporation in the United States and/or other
countries.
This product includes technology owned by
Microsoft Corporation and cannot be used or
distributed without a license from Microsoft
Licensing, Inc.
Specifications
General
Rated power source ............... 14.4 V DC
(allowable voltage range:
12.0 V to 14.4 V DC)
Grounding system ................... Negative type
Maximum current consumption
..................................................... 10.0 A
Dimensions (W × H × D):
DIN
Chassis ..................... 178 mm × 50 mm × 165
mm
Nose ........................... 188 mm × 58 mm × 17 mm
D
Chassis ..................... 178 mm × 50 mm × 165
mm
Nose ........................... 170 mm × 46 mm × 17 mm
Weight .......................................... 1.3 kg
Audio
Maximum power output ....... 50 W × 4
Continuous power output ... 22 W × 4 (50 Hz to 15 000
Hz, 5 % THD, 4 W load, both
channels driven)
Load impedance ...................... 4 W (4 W to 8 W allowable)
Preout maximum output level
..................................................... 2.0 V
Tone controls:
Bass
Frequency ................ 100 Hz
En
15
English
Appendix
Additional Information
Page 9

Gain ............................ ±12 dB
Mid
Frequency ................ 1 kHz
Gain ............................ ±12 dB
Treble
Frequency ................ 10 kHz
Gain ............................ ±12 dB
CD player
System .......................................... Compact disc audio system
Usable discs .............................. Compact disc
Signal-to-noise ratio ............... 94 dB (1 kHz) (IEC-A net-
work)
Number of channels .............. 2 (stereo)
WMA decoding format ......... Ver. 7, 7.1, 8, 9, 10, 11, 12
(2ch audio)
(Windows Media Player)
MP3 decoding format ........... MPEG-1 & 2 Audio Layer 3
WAV signal format .................. Linear PCM & MS ADPCM
FM tuner
Frequency range ...................... 87.5 MHz to 108.0 MHz
Usable sensitivity ..................... 11 dBf (0.7 µV/75 W, mono,
S/N: 30 dB)
Signal-to-noise ratio ............... 72 dB (IEC-A network)
AM tuner
Frequency range ...................... 531 kHz to 1 602 kHz (9 kHz)
530 kHz to 1 640 kHz (10
kHz)
Usable sensitivity ..................... 25 µV (S/N: 20 dB)
Signal-to-noise ratio ............... 62 dB (IEC-A network)
Infrared remote control
Wavelength ................................. 940 nm ±50 nm
Output ........................................... typ; 12 mw/sr per Infrared
LED
Note
Specifications and the design are subject to modifications without notice.
En
16
Appendix
Additional Information
17
English
Page 10
Gracias por haber adquirido este producto
PIONEER.
Lea con detenimiento este manual antes de
utilizar el producto por primera vez para que
pueda darle el mejor uso posible. Es muy importante que lea y observe la información que
aparece bajo los mensajes de ADVERTEN-
CIA y PRECAUCIÓN en este manual. Una
vez leído, guarde el manual en un lugar seguro
y a mano para que pueda consultarlo en el
futuro.
Acerca de esta unidad
PRECAUCIÓN
Este producto contiene un diodo de láser de
clase 1, clasificado en la directiva IEC 608251:2007 concerniente a la Seguridad de los productos láser. Para garantizar la seguridad continua, no extraiga ninguna tapa ni intente
acceder a la parte interna del producto. Solicite a personal cualificado que realice todos los
trabajos de mantenimiento.
PRODUCTO LASER CLASE 1
PRECAUCIÓN—LOS PRODUCTOS LÁSER CLASE 1M
EMITEN RADIACIÓN INVISIBLE UNA VEZ ABIERTOS. NO
LOS MIRE DIRECTAMENTE CON INSTRUMENTOS ÓPTICOS.
PRECAUCIÓN
! No permita que esta unidad entre en contacto
con líquidos, ya que puede producir una descarga eléctrica. Además, el contacto con líquidos puede causar daños en la unidad, humo y
recalentamiento.
! Mantenga siempre el volumen lo suficiente-
mente bajo como para poder escuchar los sonidos que provienen del exterior.
! Evite la exposición a la humedad.
! Si se desconecta o se descarga la batería,
cualquier memoria preajustada se borrará.
! En caso de que esta unidad no funcione co-
rrectamente, póngase en contacto con su
concesionario o con el centro de servicio
PIONEER autorizado más cercano.
Es
18
Sección
01
Antes de comenzar
Unidad principal
a 6789bcd
123 4 5
Botón Botón
1 E (EQ/LOUD) 8 1 a 6
2 h (expulsar) 9
(reloj)
3 AUDIO a a/b/c/d
4 SRC/OFF b FUNC
5
Ranura de carga de
discos
c D (DISP/SCRL)
6 Botón de soltar d B (BAND/ESC)
7
Conector de entrada AUX (conector
estéreo de 3,5 mm)
Mando a distancia
Las funciones se utilizan de la misma manera
que al usar los botones de la unidad principal.
Consulte la explicación de la unidad principal
acerca del uso de cada botón, con excepción
de ATT, que se explica a continuación.
Parte Estado
e
VOLUME
(+/-)
Pulse para aumentar o disminuir
el volumen.
f ATT
Pulse para silenciar. Pulse de
nuevo para desactivar el silenciamiento.
g e (pausa) Púlselo para pausar o reanudar.
h
SRC (fuente)
Presione este botón para visualizar todas las fuentes disponibles.
Manténgalo presionado para apagar la fuente.
Indicaciones de pantalla
3
2
1
4 5 6 7
Indicador Estado
1
Sección
principal
de la pantalla
! Sintonizador: banda y fre-
cuencia
! Reproductor de CD incorpora-
do: tiempo de reproducción
transcurrido e información de
texto
2
Númeo de
presintonía/número de pista
! El número de pista o de pre-
sintonía.
! Si se selecciona un número
de pista 100 o superior, d se
iluminará a la izquierda del indicador de número de pista.
3
MP3/
WMA
El tipo de archivo que se está reproduciendo actualmente.
4 RPT
La repetición de reproducción
está activada.
5 LOUD Sonoridad activada.
6
5 (estéreo)
Recepción de la transmisión estéreo.
7 LOC
Sintonización por búsqueda local
activada.
Es
19
Sección
Español
02
Utilización de esta unidad
Page 11
Uso y cuidado del mando a
distancia
Uso del man do a distancia
1 Apunte el mando a distancia hacia el panel de-
lantero para que funcione la unidad.
Al utilizar el mando a distancia por primera vez,
extraiga la película que sobresale de la bandeja.
Reemplazo de la batería
1 Deslice y extraiga la bandeja de la parte posterior
del mando a distancia.
2 Inserte la pila con los polos positivo (+) y negati-
vo (–) en la dirección correcta.
ADVERTENCIA
! Mantenga la pila fuera del alcance de los
niños. En caso de ingestión accidental de
ésta, consulte a un médico de inmediato.
! Las pilas o baterías no deben exponerse a
altas temperaturas ni fuentes de calor como
el sol, el fuego, etc.
PRECAUCIÓN
! Utilice una sola batería de litio CR2025 (3 V).
! Extraiga la pila si no piensa utilizar el mando
a distancia durante un mes o más tiempo.
! Si la pila se sustituye de forma incorrecta exis-
te cierto riesgo de explosión. Reemplácela
sólo por una del mismo tipo o equivalente.
! No manipule la pila con herramientas metáli-
cas.
! No guarde la pila junto a objetos metálicos.
! En el caso de que se produzcan fugas de la
pila, limpie completamente el mando a distancia e instale una pila nueva.
! Para desechar las pilas usadas, cumpla con
los reglamentos gubernamentales o las normas ambientales pertinentes de las instituciones públicas aplicables en su país/zona.
Importante
! No guarde el mando a distancia en lugares ex-
puestos a altas temperaturas o a la luz solar
directa.
! Es posible que el mando a distancia no fun-
cione correctamente si lo expone a la luz solar
directa.
! No deje caer el mando a distancia al suelo, ya
que puede quedar atascado debajo del freno
o del acelerador.
Funciones básicas
Importante
! Proceda con cuidado al retirar o colocar el
panel delantero.
! Evite someter el panel delantero a impactos
excesivos.
! Mantenga la carátula fuera del alcance de la
luz solar directa y no la exponga a temperaturas elevadas.
! Para evitar que el dispositivo o el interior del
vehículo sufran daños, extraiga cualquier
cable o dispositivo conectado al panel delantero antes de extraerlo.
Es
20
Sección
02
Utilización de esta unidad
Extracción del panel delantero para proteger la unidad contra robo
1 Pulse el botón de soltar para liberar el panel de-
lantero.
2 Empuje el panel delantero hacia arriba y tire de él
hacia sí.
3 Mantenga siempre el panel delantero que se ha
extraído en su medio de protección, como por
ejemplo su caja protectora.
Colocación del panel delantero
1 Deslice la carátula hacia la izquierda.
Inserte las pestañas que hay en la parte izquierda
de la unidad principal dentro de las ranuras del
panel delantero.
2 Pulse el lado derecho del panel delantero hasta
que se asiente firmemente.
Si no logra encajar adecuadamente el panel delantero a la unidad principal, colóquelo en la unidad principal de la forma correcta. No apriete ni
use la fue rza para encajarlo, ya que puede provocar daños en el panel delantero o en la unidad
principal.
Encendido de la unidad
1 Pulse SRC/OFF para encender la unidad.
Apagado de la unidad
1 Mantenga presionado SRC/OFF hasta que se apa-
gue la unidad.
Selección de una fuente
1 Pulse SRC/OFF para visualizar las fuentes que se
indican a continuación:
TUNER (sintonizador)—CD (reproductor de CD
incorporado)—AUX (AUX)
Ajuste del volumen
1 Haga girar SRC/OFF para ajustar el volumen.
PRECAUCIÓN
Por motivos de seguridad, detenga su vehículo
antes de extraer el panel delantero.
Nota
Si el cable azul/blanco de esta unidad está conectado al terminal de control del relé de la antena
automática del vehículo, la antena se extiende
cuando se enciende el equipo. Para retraer la antena, apague la fuente.
Las operaciones del menú
son idénticas para los
ajustes de función/ajustes
de audio/ajustes iniciales
Para volver a la visualización normal
Para cancelar el menú de ajustes iniciales
1 Pulse B (BAND/ESC).
También se pueden cancelar los ajustes iniciales
presionando SRC/OFF hasta que se apague la
unidad.
Sintonizador
Funciones básicas
Importante
Si se utiliza esta unidad en América del Norte,
América Central o América del Sur, se deberá restablecer el paso de sintonía de AM (consulte AM
(paso de sintonía de AM) en la página 24).
Selección de una banda
1 Presione B (BAND/ESC) hasta que se visualice la
banda deseada (F1, F2, F3 para FM o AM).
Sintonización manual (paso a paso)
1 Pulse c o d.
Búsqueda
1 Mantenga pulsado c o d y luego suéltelo.
Se puede cancelar la sintonización por búsqueda
pulsando brevemente c o d.
Al mantener pulsado c o d se pueden saltar las
emisoras. La sintonización por búsqueda comienza inmediatamente después de que suelte c o d.
Es
21
Sección
Español
02
Utilización de esta unidad
Page 12

Almacenamiento y recuperación
de emisoras para cada banda
% Cuando encuentre la emisora que
desea almacenar en la memoria, pulse uno
de los botones de ajuste de presintonías (1
a 6) y manténgalo pulsado hasta que el número de presintonía deje de parpadear.
Una frecuencia de emisora de radio almacenada se puede recuperar pulsando el botón de
ajuste de presintonías.
# Presione a o b para recuperar las frecuen-
cias de las emisoras de radio.
Ajustes de funciones
% Pulse FUNC para seleccionar la función.
Una vez seleccionada, siga los siguientes
pasos para ajustar la función:
BSM (memoria de las mejores emisoras)
BSM (memoria de las mejores emisoras) guarda
automáticamente las seis emisoras más fuertes ordenadas por la intensidad de la señal.
Al almacenar frecuencias con la función BSM, se
pueden reemplazar las frecuencias que se almacenaron con las teclas 1 a 6.
1 Pulse a para activar la función BSM.
Las seis frecuencias de las emisoras de mayor intensidad se almacenarán en orden según la intensidad de las señales.
Para cancelar el proceso de almacenamiento, presione b.
LOCAL (sintonización por búsqueda local)
La sintonización por búsqueda local le permite sintonizar sólo las emisoras de radio con señales lo suficientemente intensas como para asegurar una
correcta recepción.
1 Presione a o b para activar o desactivar la sinto-
nización por búsqueda local.
2 Presione c o d para ajustar la sensibilidad.
FM: LOCAL 1 —LOCAL 2—LOCAL 3—LOCAL 4
AM: LOCAL 1—LOCAL 2
El ajuste de nivel superior sólo permite recibir las
emisoras con las señales más intensas, mientras
que los ajustes más bajos permiten recibir las
emisoras con señales más débiles de manera progresiva.
CD
Funciones básicas
Reproducción de un CD/CD-R/CD-RW
1 Inserte el disco en la ranura de carga de discos
con el lado de la etiqueta hacia arriba.
Expulsión de un CD/CD-R/CD-RW
1 Pulse h.
Selección de una carpeta
1 Pulse a o b.
Selección de una pista
1 Pulse c o d.
Avance rápido o retroceso
1 Mantenga pulsado c o d.
Al reproducir audio comprimido, no hay sonido
durante el avance rápido o el retroceso.
Cambio entre audio comprimido y CD-DA
1 Pulse B (BAND/ESC).
Visualización de información
de texto
Selección de la información de texto deseada
1 Pulse D (DISP/SCRL).
Desplazamiento de la información de texto a la izquierda
1 Mantenga pulsado D (DISP/SCRL).
Notas
! Según la versión de iTunes utilizada para gra-
bar archivos MP3 en un disco u otro tipo de
archivos de medios, es posible que los textos
contenidos en el archivo de audio no se muestren correctamente si su formato es incompatible.
! Los elementos de información de texto pue-
den cambiar según el tipo de medio.
Ajustes de funciones
% Pulse FUNC para seleccionar la función.
Una vez seleccionada, siga los siguientes
pasos para ajustar la función:
Es
22
Sección
02
Utilización de esta unidad
RPT (repetición de reproducción)
1 Presione c o d para seleccionar la gama de repe-
tición.
DSC – Repite todas las pistas
TRK – Repite la pista actual
FLD – Repite la carpeta actual
RDM (reproducción aleatoria)
1 Presione a o b para activar o desactivar la repro-
ducción aleatoria.
Cuando la repetición aleatoria está activada, en el
display aparece RDM.
Si activa la reproducción aleatoria durante la repetición de carpeta, FRDM aparece en el display.
SCAN (reproducción con exploración)
La reproducción con exploración busca una canción
dentro de la gama de repetición seleccionada.
1 Pulse a para activar la función de reproducción
con exploración.
Si activa la reproducción con exploración durante
FLD, en el display aparece FSCN.
2 Cuando encuentre la pista deseada, pulse b para
desactivar la reproducción con exploración.
Si el display vuelve automáticamente a la visualización de reproducción, seleccione SCAN de
nuevo presionando FUNC.
Una vez finalizada la exploración de un disco (carpeta), comenzará la reproducción normal de las
pistas.
PAUSE (pausa)
1 Pulse a o b para pausar o reanudar.
SRTRV (Sound Retriever)
Mejora automáticamente el audio comprimido y restaura el sonido óptimo.
1 Presione a o b para seleccionar el ajuste favori-
to.
OFF (desactivado)—1—2
1 es efectivo para tasas de compresión baja, y 2
para tasas de compresión alta.
FF/REV (avance rápido/retroceso)
Se puede cambiar el método de búsqueda entre las
opciones de avance rápido/retroceso y búsqueda
cada 10 pistas. Seleccionar ROUGH le permite realizar la búsqueda cada 10 pistas.
1 Presione d para seleccionar ROUGH.
FF/REV – Avance rápido y retroceso
ROUGH– Búsqueda cada 10 pistas
Para seleccionar FF/REV, presione c.
2 Pulse B (BAND/ESC) para volver a la pantalla de
reproducción.
3 Mantenga presionado c o d para buscar cada 10
pistas en un disco (carpeta).
Si el número de pistas restantes es inferior a 10,
mantenga presionado c o d para recuperar la
primera (última).
Ajustes de audio
Ajustes de audio
% Pulse AUDIO para seleccionar la función
de audio.
Una vez seleccionada, siga los siguientes
pasos para ajustar la función de audio:
FAD (ajuste del fader/balance)
1 Pulse a o b para ajustar el fader (balance entre
los altavoces delanteros y traseros).
2 Pulse c o d para ajustar el balance (equilibro de
los altavoces izquierdos y derechos).
BASS/MID/TREBLE (ajuste de ecualizador)
! Los ajustes de la curva de ecualización configura-
dos se almacenan en CUSTOM.
1 Pulse a o b para ajustar el nivel.
Gama de ajuste: +6 a -6
LOUD (sonoridad)
La sonoridad compensa las deficiencias en las
gamas de frecuencias bajas y altas cuando se escucha a un volumen bajo.
1 Pulse a o b para activar o desactivar la sonori-
dad.
2 Pulse c o d para seleccionar el ajuste deseado.
LOW (bajo)—HI (alto)
! También se puede activar o desactivar la sonori-
dad presionando E (EQ/LOUD).
Es
23
Sección
Español
02
Utilización de esta unidad
Page 13
SLA (ajuste del nivel de fuente)
SLA (ajuste del nivel de fuente) le permite ajustar el
nivel de volumen de cada fuente para evitar cambios
radicales en el volumen cuando se cambia entre las
fuentes.
! Al seleccionar FM como fuente, no se puede cam-
biar a SLA.
! Los ajustes se basan en el nivel de volumen de
FM, que se mantiene inalterado.
! El nivel del volumen de AM también se puede
ajustar con esta función.
1 Pulse a o b para ajustar el volumen de la fuente.
Gama de ajuste: SLA +4 a SLA – 4
Uso del ecualizador
% Presione E (EQ/LOUD) para seleccionar
el ecualizador.
DYNAMIC—VOCAL—NATURAL—CUSTOM
—FLAT—POWERFUL
! CUSTOM le permite crear un ajuste
personalizado.
Otras funciones
Configuración de los ajustes
iniciales
1 Mantenga presionado SRC/OFF hasta
que se apague la unidad.
2 Presione SRC/OFF y mantenga presionado hasta que el reloj aparezca en el display.
3 Pulse FUNC para seleccionar la configuración inicial.
Una vez seleccionada, siga los siguientes
pasos para configurar el ajuste inicial:
Ajuste del reloj
1 Presione c o d para seleccionar el segmento de
la visualización del reloj que desea ajustar.
Hora—Minuto
2 Presione a o b para poner el reloj en hora.
FM (paso de sintonía de FM)
El paso de sintonía de FM que utiliza la sintonización
por búsqueda se puede cambiar entre 100 kHz, el
paso predefinido y 50 kHz.
! Si la sintonización por búsqueda se realiza en
pasos de 50 kHz, es posible que las emisoras se
sintonicen de manera imprecisa. En ese caso, sintonícelas manualmente o vuelva a utilizar la función de sintonización por búsqueda.
1 Pulse c o d para seleccionar el paso de sintonía
de FM.
50 (50 kHz)—100 (100 kHz)
AM (paso de sintonía de AM)
El paso de sintonía de AM se puede cambiar entre 9
kHz, el paso predefinido y 10 kHz. Si se utiliza el sintonizador en América del Norte, América Central o
América del Sur, se deberá cambiar el paso de sintonía de 9 kHz (531 a 1 602 kHz permisibles) a 10 kHz
(530 a 1 640 kHz permisibles).
1 Presione c o d para seleccionar el paso de sinto-
nía de AM.
9 (9 kHz)—10 (10 kHz)
AUX (entrada auxiliar)
Active este ajuste si utiliza un dispositivo auxiliar conectado a esta unidad.
1 Pulse a o b para activar o desactivar el ajuste au-
xiliar.
Visualización del reloj
% Pulse para activar o desactivar la vi-
sualización del reloj.
# La visualización del reloj desaparece momentáneamente cuando se utilizan otras funciones,
pero vuelve a aparecer después de 25 segundos.
Uso de una fuente AUX
1 Inserte el miniconector estéreo en el conector de entrada AUX.
2 Presione SRC/OFF para seleccionar AUX
como la fuente.
# No se puede seleccionar AUX si no se activa
el ajuste auxiliar. Para obtener más información,
consulte AUX (entrada auxiliar) en esta página.
Es
24
Sección
02
Utilización de esta unidad
Conexiones
ADVERTENCIA
! Utilice altavoces de más de 50 W (valor de sa-
lida) y de entre 4 W y8W (valor de impedancia). No utilice altavoces de 1 W a3W con esta
unidad.
! El cable negro es el cable a tierra. Cuando ins-
tale esta unidad o el amplificador de potencia
(vendido por separado), siempre conecte primero el cable a tierra. Compruebe que el
cable de tierra está conectado adecuadamente a las partes metálicas de la carrocería del
automóvil. El cable a tierra del amplificador, el
de esta unidad o el de cualquier otro dispositivo debe conectarse al automóvil por separado
usando tornillos diferentes. Si el tornillo para
el cable a tierra se afloja o se cae, puede provocar incendios, humo o averías.
Importante
! Cuando esta unidad se instale en un vehículo
sin posición ACC (accesorio) en la llave de encendido, el cable rojo se debe conectar al terminal que pueda detectar la operación de la
llave de encendido. De lo contrario, puede
descargarse la batería.
O
N
S
T
A
R
T
O
F
F
Posición ACC Sin posición ACC
! Utilice esta unidad únicamente con una bate-
ría de 12 voltios y conexión a tierra negativa.
De lo contrario, pueden producirse incendios
o averías.
! Para evitar cortocircuitos, sobrecalentamiento
o fallos de funcionamiento, asegúrese de seguir las siguientes instrucciones.
— Desconecte el terminal negativo de la bate-
ría antes de la instalación.
— Asegure el cableado con pinzas para ca-
bles o cinta adhesiva. Envuelva con cinta
adhesiva las partes en contacto con piezas
metálicas para proteger el cableado.
— Coloque todos los cables alejados de las
partes móviles, como la palanca de cambios y los rieles de los asientos.
— Coloque todos los cables alejados de luga-
res calientes, como cerca de la salida del
calefactor.
— No conecte el cable amarillo a la batería
pasándolo a través del orificio hasta el
compartimiento del motor.
— Cubra con cinta aislante los conectores de
cables que queden desconectados.
— No acorte ningún cable.
— Nunca corte el aislamiento del cable de ali-
mentación de esta unidad para compartir
la corriente con otros equipos. La capacidad de corriente del cable es limitada.
— Utilice un fusible con la intensidad nomi-
nal indicada.
— Nunca conecte el cable negativo de los al-
tavoces directamente a tierra.
— Nunca empalme los cables negativos de
varios altavoces.
! Cuando se enciende esta unidad, se emite
una señal de control a través del cable azul/
blanco. Conecte este cable al mando a distancia del sistema de un amplificador de potencia externo o al terminal de control del relé de
la antena automática del vehículo (máx. 300
mA 12 V CC). Si el vehículo posee una antena
integrada en el cristal del parabrisas, conéctela al terminal de la fuente de alimentación del
amplificador de la antena.
! Nunca conecte el cable azul/blanco al termi-
nal de potencia de un amplificador de potencia externo. Ni tampoco lo conecte al terminal
de potencia de la antena automática. De lo
contrario, puede descargarse la batería o producirse un fallo de funcionamiento.
Es
25
Sección
Español
03
Instalación
Page 14
Esta unidad
1 Entrada de la antena
2 Fusible (10 A)
3 Entrada del cable de alimentación
4 Salida trasera
Cable de alimentación
1
8
9
c
d
6
32
4
5
7
a
b
e
f
h
g
LR
F
R
1 A la toma del cable de alimentación
2 Izquierda
3 Derecha
4 Altavoz delantero
5 Altavoz trasero
6 Blanco
7 Blanco/negro
8 Gris
9 Gris/negro
a Verde
b Verde/negro
c Violeta
d Violeta/negro
e Negro (toma de tierra del chasis)
Conectar a una parte metálica limpia, sin pintura.
f Amarillo
Conectar al terminal de alimentación constante 12 V.
g Rojo
Conectar al terminal controlado por la llave de
encendido (12 V CC).
h Azul/blanco
Conectar al terminal de control del sistema
del amplificador de potencia o al terminal de
control del relé de la antena (máx. 300 mA 12
V CC).
Nota
Con un sistema de 2 altavoces, no conecte ningún otro aparato a las salidas de cable que no
estén conectadas a los altavoces.
Amplificador de potencia (se
vende por separado)
Realice estas conexiones cuando utilice el amplificador opcional.
1
4
2
55
3
1 Control remoto del sistema
Conexión a cable azul/blanco.
2 Amplificador de potencia (se vende por sepa-
rado)
3 Conectar con cables RCA (se venden por se-
parado)
4 A la salida trasera
5 Altavoz trasero
Instalación
Importante
! Compruebe todas las conexiones y sistemas
antes de la instalación final.
! No utilice piezas no autorizadas, ya que pue-
den causar fallos de funcionamiento.
Es
26
Sección
03
Instalación
! Consulte a su distribuidor si para la instala-
ción es necesario taladrar orificios o hacer
otras modificaciones al vehículo.
! No instale esta unidad en un lugar donde:
— pueda interferir con el manejo del ve-
hículo.
— pueda lesionar a un pasajero como conse-
cuencia de un frenazo brusco.
! El láser semiconductor se dañará si se sobre-
calienta. Instale esta unidad alejada de zonas
que alcancen altas temperaturas, como cerca
de la salida del calefactor.
! Se logra un rendimiento óptimo si la unidad
se instala en un ángulo inferior a 60°.
60°
! Cuando instale esta unidad y con el fin de ase-
gurar la dispersión apropiada del calor durante el uso de la misma, asegúrese de dejar un
amplio espacio por detrás del panel trasero y
enrolle cualesquiera cables sueltos de modo
que no bloqueen las aberturas de ventilación.
Montaje delantero/posterior DIN
Esta unidad puede instalarse correctamente
tanto si se realiza una instalación frontal o trasera.
Montaje delantero DIN
1 Inserte el manguito de montaje en el
salpicadero.
Si realiza la instalación en un espacio poco
profundo, utilice el manguito de montaje suministrado. Si hay suficiente espacio, utilice el
manguito de montaje que venía con el vehículo.
2 Fije el manguito de montaje utilizando
un destornillador para doblar las pestañas
metálicas (90°) y colocarlas en su lugar.
1
2
1 Salpicadero
2 Manguito de montaje
3 Instale la unidad según la ilustración.
En la instalación, emplee piezas disponibles
en el mercado.
1
2
3
4
5
1 Tuerca
2 Muro cortafuego o soporte de metal
3 Correa metálica
4 Tornillo
5 Tornillo (M4 × 8)
# Asegúrese de que la unidad esté firmemente
instalada en su lugar. Una instalación inestable
puede causar saltos en el audio o un mal funcionamiento de la unidad.
Es
27
Sección
Español
03
Instalación
Page 15
Montaje trasero DIN
1 Determine la posición correcta, de
modo que los orificios del soporte y del lateral de la unidad coincidan.
2 Apriete los dos tornillos en cada lado.
1
2
3
1 Tornillo de cabeza redonda (5 mm × 8 mm)
2 Carcasa
3 Salpicadero o consola
Retirada de la unidad
1 Retire el anillo de guarnición.
1 Anillo de guarnición
2 Pestaña con muesca
! Libere el panel delantero para acceder más
fácilmente al anillo de guarnición.
! Al volver a colocar el anillo de guarnición,
oriente hacia abajo la pestaña con muesca.
2 Inserte en ambos lados de la unidad las
llaves de extracción provistas hasta que se
escuche un ligero chasquido.
3 Extraiga la unidad del salpicadero.
Retirada y colocación del panel
delantero
Puede extraer el panel delantero para proteger
la unidad contra robo.
Pulse el botón de soltar, empuje el panel delantero hacia arriba y tire de él hacia sí.
Para obtener más información, consulte Ex-
tracción del panel delanter o para proteger la unidad contra robo y Colocación del panel
delantero en la página 21.
Es
28
Sección
03
Instalación
Solución de problemas
Síntoma Causa Resolución
La pantalla
vuelve automáticamente a la
visualización
normal.
No ha realizado
ninguna operación en aproximadamente 30
segundos.
Realice la operación de nuevo.
La gama de repetición de reproducción
cambia de manera inesperada.
Dependiendo de
la gama de repetición de reproducción, la gama
seleccionada
puede cambiar
cuando seleccione otra carpeta o
pista o cuando
utilice el avance
rápido/retroceso.
Seleccione de
nuevo la gama de
repetición de reproducción.
No se reproduce una subcarpeta.
No se pueden reproducir las subcarpetas cuando
se selecciona
FLD (repetición
de carpeta).
Seleccione otra
gama de repetición
de reproducción.
NO XXXX aparece cuando se
cambia un display (NO T-TTL,
por ejemplo).
No hay información de texto incorporada.
Cambie la pantalla
o reproduzca otra
pista/archivo.
La unidad no
funciona correctamente.
Hay una interferencia.
Está usando un
dispositivo, como
un teléfono
móvil, que transmite ondas eléctricas cerca de la
unidad.
Aleje de la unidad
los dispositivos
eléctricos que puedan estar causando interferencias.
Mensajes de error
Cuando contacte con su concesionario o con
el Servicio Técnico Oficial de Pioneer más cercano, asegúrese de anotar el mensaje de
error.
Mensaje Causa Resolución
ERROR-11, 12,
17, 30
El disco está
sucio.
Limpie el disco.
El disco está rayado.
Reemplace el
disco.
ERROR-10, 11,
12, 15, 17, 30,
A0
Se ha producido
un error eléctrico
o mecánico.
Cambie la llave de
encendido del
automóvil a la posición de desactivación y luego pase
de nuevo a activación, o cambie a
una fuente diferente, y después vuelva a activar el
reproductor de CD.
ERROR-15 El disco inser-
tado aparece en
blanco
Reemplace el
disco.
ERROR-23 Formato de CD
no compatible
Reemplace el
disco.
FRMTREAD A veces se pro-
duce un retraso
entre el comienzo de la reproducción y la
emisión del sonido.
Espere hasta que
el mensaje desaparezca y oiga sonido.
NO AUDIO El disco inser-
tado no contiene
archivos reproducibles.
Reemplace el
disco.
PROTECT Todos los archi-
vos del disco insertado tienen
DRM integrado.
Reemplace el
disco.
SKIPPED El disco inser-
tado contiene archivos WMA
protegidos con
DRM.
Reemplace el
disco.
Es
29
Apéndice
Español
Información adicional
Page 16
Pautas para el manejo
Discos y reproductor
Use únicamente discos que tengan uno de los siguientes dos logos.
Utilice discos de 12 cm. No utilice discos de 8 cm o
un adaptador de discos de 8 cm.
Utilice sólo discos convencionales y completamente
circulares. No use discos con formas irregulares.
No inserte ningún otro elemento que no sea un CD
en la ranura de inserción de CD.
No use discos con roturas, picaduras, deformados o
dañados de otro modo, ya que pueden causar daños
al reproductor.
No es posible reproducir discos CD-R/CD-RW no finalizados.
No toque la superficie grabada de los discos.
Cuando no utilice los discos, guárdelos en sus cajas.
Evite dejar discos en ambientes excesivamente calientes o expuestos a la luz solar directa.
No fije etiquetas, no escriba ni aplique sustancias
químicas en la superficie de los discos.
Para limpiar un CD, pásele un paño suave desde el
centro hacia afuera.
La condensación puede afectar temporalmente al
rendimiento del reproductor. Deje que se adapte a la
temperatura más cálida durante aproximadamente
una hora. Además, si los discos tienen humedad, séquelos con un paño suave.
Quizá no pueda reproducir algunos discos debido a
sus características, formato, aplicación grabada, entorno de reproducción, condiciones de almacenamiento u otras causas.
Las vibraciones en las carreteras pueden interrumpir
la reproducción de un disco.
Discos dobles
Los discos dobles son discos de dos caras que incluyen un CD grabable de audio en una cara y un DVD
grabable de vídeo en la otra cara.
Debido a que la cara del CD de los discos dobles no
es físicamente compatible con el estándar general de
CD, es posible que no se pueda reproducir la cara del
CD en esta unidad.
La carga y expulsión frecuente de un disco doble
puede producir rayaduras en el disco. Las rayaduras
graves pueden producir problemas de reproducción
en esta unidad. En algunos casos, un disco doble
puede atascarse en la ranura de carga del disco y no
se expulsará. Para evitarlo, recomendamos que no
utilice un disco doble en esta unidad.
Consulte la información del fabricante del disco para
obtener más información sobre los discos dobles.
Compatibilidad con audio
comprimido
WMA
Extensión de archivo: .wma
Velocidad de grabación: 48 kbps a 320 kbps (CBR), 48
kbps a 384 kbps (VBR)
Frecuencia de muestreo: 32 kHz a 48 kHz
Windows Media Audi o Professional, Lossless, Voice:
no
MP3
Extensión de archivo: .mp3
Velocidad de grabación: 8 kbps a 320 kbps (CBR),
VBR
Frecuencia de muestreo: de 8 kHz a 48 kHz (32, 44,1 y
48 kHz para énfasis)
Versiones de etiqueta ID3 compatibles: 1.0, 1.1, 2.2,
2.3, 2.4 (la etiqueta ID3 Versión 2.x tiene prioridad
sobre la Versión 1.x).
Lista de reproducción M3u: no
MP3i (MP3 interactivo), mp3 PRO: no
Es
30
Apéndice
Información adicional
WAV
Extensión de archivo: .wav
Bits de cuantificación: 8 y 16 (LPCM), 4 (MS ADPCM)
Frecuencia de muestreo: 16 kHz a 48 kHz (LPCM),
22,05 kHz y 44,1 kHz (MS ADPCM)
Información complementaria
Sólo se pueden visualizar los primeros 32 caracteres
como nombre de archivo (incluida la extensión) o
nombre de carpeta.
Esta unidad puede no funcionar correctamente, dependiendo de la aplicación utilizada para codificar archivos WMA.
Es posible que se produzca un pequeño retardo al iniciar la reproducción de archivos de audio integrados
con datos de imagen.
Disco
Jerarquía de carpetas reproducibles: hasta ocho niveles (una jerarquía práctica de carpetas tiene menos
de dos niveles).
Carpetas reproducibles: hasta 99
Archivos reproducibles: hasta 999
Sistema de archivos: ISO 9660 Nivel 1 y 2, Romeo, Joliet
Reproducción multisesión: sí
Transferencia de datos en formato Packet Write: no
Independientemente de la longitud de la sección en
blanco que haya entre las canciones de la grabación
original, los discos de audio comprimidos se reproducirán con una breve pausa entre cada canción.
Secuencia de archivos de
audio
El usuario no puede asignar números de carpeta ni especificar secuencias de reproducción con esta unidad.
Ejemplo de una jerarquía
1
2
3
4
5
6
01
02
03
04
05
Nivel 1 Nivel 2 Nivel 3 Nivel 4
: carpeta
: archivo de audio
comprimido
01 a 05: número de
carpeta
1 a 6: secuencia
de reproducción
Disco
! La secuencia de selección de carpetas u
otras operaciones pueden diferir, dependiendo del software de codificación o
escritura.
Copyright y marca registrada
iTunes
Apple e iTunes son marcas comerciales de
Apple Inc., registradas en los EE. UU. y otros
países.
MP3
La venta de este producto sólo otorga una licencia para su uso privado, no comercial. No
otorga ninguna licencia ni concede ningún
derecho a utilizar este producto en transmisiones comerciales (es decir, lucrativas) en tiempo real (terrestres, vía satélite, por cable y/o
por cualquier otro medio), transmisiones/
streaming por Internet, intranets y/u otras
redes o en otros sistemas de distribución de
contenido electrónico, como por ejemplo, aplicaciones de pago por escucha (pay-audio) o
audio bajo demanda (audio-on-demand). Se
necesita una licencia independiente para su
uso comercial. Para obtener más información,
visite
http://www.mp3licensing.com.
Es
31
Apéndice
Español
Información adicional
Page 17

WMA
Windows Media y el logotipo de Windows son
marcas comerciales o marcas registradas de
Microsoft Corporation en Estados Unidos y/o
en otros países.
Este producto incluye tecnología propiedad de
Microsoft Corporation, y no se puede usar ni
distribuir sin una licencia de Microsoft
Licensing, Inc.
Especificaciones
Generales
Fuente de alimentación nominal
..................................................... 14,4 V CC
(gama de tensión permisible: 12,0 V a 14,4 V CC)
Sistema de derivación a tierra
..................................................... Tipo negativo
Consumo máximo de corriente
..................................................... 10,0 A
Dimensiones (An × Al × Pr):
DIN
Bastidor .................... 178 mm × 50 mm × 165
mm
Cara anterior .......... 188 mm × 58 mm × 17 mm
D
Bastidor .................... 178 mm × 50 mm × 165
mm
Cara anterior .......... 170 mm × 46 mm × 17 mm
Peso ............................................... 1,3 kg
Audio
Potencia de salida máxima
..................................................... 50 W × 4
Potencia de salida continua
..................................................... 22 W × 4 (50 a 15 000 Hz, 5
% THD, 4 W de carga,
ambos canales activados)
Impedancia de carga ............. 4 W (4 W a8W permisible)
Nivel de salida máxima del preamplificador (Pre-out)
..................................................... 2,0 V
Controles de tono:
Graves
Frecuencia .............. 100 Hz
Ganancia ................. ±12 dB
Medios
Frecuencia .............. 1 kHz
Ganancia ................. ±12 dB
Agudos
Frecuencia .............. 10 kHz
Ganancia ................. ±12 dB
Reproductor de CD
Sistema ........................................ Sistema de audio de discos
compactos
Discos utilizables .................... Disco compacto
Relación de señal a ruido .... 94 dB (1 kHz) (red IEC-A)
Número de canales ................ 2 (estéreo)
Formato de decodificación WMA
..................................................... Ver. 7, 7.1, 8, 9, 10, 11, 12
(audio 2 canales)
(Windows Media Player)
Formato de decodificación MP3
..................................................... MPEG-1 & 2 Audio Layer 3
Formato de señal WAV ......... PCM lineal & MS ADPCM
Sintonizador de FM
Gama de frecuencias ............ 87,5 MHz a 108,0 MHz
Sensibilidad utilizable ........... 11 dBf (0,7 µV/75 W, mono,
señal/ruido: 30 dB)
Relación de señal a ruido .... 72 dB (red IEC-A)
Sintonizador de AM
Gama de frecuencias ............ 531 kHz a 1 602 kHz (9 kHz)
530 kHz a 1 640 kHz (10 kHz)
Sensibilidad utilizable ........... 25 µV (señal/ruido: 20 dB)
Relación de señal a ruido .... 62 dB (red IEC-A)
Nota
Las especificaciones y el diseño están sujetos a
modificaciones sin previo aviso.
Es
32
Apéndice
Información adicional
33
Español
Page 18

Agradecemos por você ter adquirido este
produto PIONEER.
Leia este manual antes de utilizar o produto
para garantir seu uso adequado. É especialmente importante que você leia e observe as
ADVERTÊNCIAS eosAVISOS neste ma-
nual. Guarde-o em local seguro e acessível para
referência futura.
Sobre esta unidade
AVISO
Este é um produto laser classe 1, classificado
de acordo com a Segurança de produtos laser,
IEC 60825-1:2007, e contém um módulo laser
classe 1M. Para garantir segurança contínua,
não remova nenhuma tampa nem tente acessar o interior do produto. Todo tipo de manutenção deverá ser executado por pessoal
qualificado.
PRODUTO A LASER DA CLASSE 1
CUIDADO—RADIAÇÃO A LASER INVISÍVEL DA
CLASSE 1M QUANDO ABERTO, NÃO OLHE
DIRETAMENTE COM INSTRUMENTOS ÓPTICOS.
AVISO
! Não permita que esta unidade entre em con-
tato com líquidos. Há risco de choque elétrico. Além disso, o contato com líquidos pode
causar danos, fumaça e superaquecimento
dessa unidade.
! Sempre deixe o volume baixo para poder ouvir
os sons do tráfego.
! Evite a exposição à umidade.
! Se a bateria do carro estiver desconectada ou
descarregada, a memória programada será
apagada.
! Se esta unidade não funcionar corretamente,
entre em contato com o revendedor ou a cen-
tral de serviços autorizada da PIONEER mais
próxima.
Ptbr
34
Seção
01
Antes de utilizar este produto
Unidade principal
a 6789bcd
123 4 5
Botão Botão
1 E (EQ/LOUD) 8 1 a 6
2 h (Ejetar) 9
(Hora)
3 AUDIO a a/b/c/d
4 SRC/OFF b FUNC
5
Slot de carregamento de disco
c D (DISP/SCRL)
6 Botão Desencaixar d B(BAND/ESC)
7
Conector de entrada AUX (conector
estéreo de 3,5 mm)
Controle remoto
A operação é a mesma que ao utilizar os botões na unidade principal. Consulte a explicação da unidade principal sobre a operação de
cada botão, com exceção de ATT, que será explicado posteriormente.
Parte Estado
e
VOLUME
(+/-)
Pressione para aumentar ou diminuir o volume.
f ATT
Pressione para emudecer. Pressione novamente para cancelar.
g e (Pausa)
Pressione para pausar ou retomar
a reprodução.
h
SRC
(Fonte)
Pressione para percorrer todas as
fontes disponíveis. Pressione e segure para desligar a fonte.
Indicação no display
3
2
1
4 5 6 7
Indicador Estado
1
Seção principal do
display
! Sintonizador: banda e fre-
quência
! CD player incorporado: tempo
de reprodução decorrido e informações de texto
2
Número
programado/número
da faixa
! O número programado ou o
número da faixa.
! Se for selecionado um núme-
ro de faixa 100 ou mais, d
acenderá ao lado esquerdo do
indicador de número de faixa.
3
MP3/
/WMA
O tipo do arquivo atualmente
sendo reproduzido.
4 RPT
Reprodução com repetição está
ativada.
5 LOUD A sonoridade está ativada.
6
5 (Estéreo)
Recebendo a transmissão estéreo.
7 LOC
A sintonia por busca local está
ativada.
Ptbr
35
Seção
Português (B)
02
Funcionamento desta unidade
Page 19

Utilização e cuidados do
controle remoto
Utilização do controle remoto
1 Aponte o controle remoto para a direção do pai-
nel frontal para operá-lo.
Ao utilizar pela primeira vez, puxe o filme que se
projeta da bandeja.
Substituição da bateria
1 Deslize para fora a bandeja na parte posterior do
controle remoto.
2 Insira a bateria com os polos de mais (+) e
menos (–) corretamente alinhados.
ADVERTÊNCIA
! Mantenha a bateria fora do alcance de crian-
ças. Caso ela seja ingerida, consulte um médico imediatamente.
! As baterias (bateria ou baterias instaladas)
não devem ser expostas a calor excessivo,
como luz direta do sol, fogo ou situação semelhante.
AVISO
! Utilize uma bateria de lítio CR2025 (3 V).
! Remova a bateria, se não for utilizar o controle
remoto por um mês ou mais.
! Se a bateria for substituída incorretamente,
haverá perigo de explosão. Substitua-a apenas
por uma do mesmo tipo ou equivalente.
! Não manuseie a bateria com ferramentas me-
tálicas.
! Não armazene a bateria com objetos metáli-
cos.
! Em caso de vazamento da bateria, limpe com-
pletamente o controle remoto e instale uma
nova bateria.
! Ao descartar baterias usadas, certifique-se de
estar em conformidade com as regulamentações governamentais ou com as normas das
instituições públicas do meio ambiente que
se aplicam ao seu país/região.
Importante
! Não deixe o controle remoto exposto a tempe-
raturas altas ou à luz direta do sol.
! Pode ser que o controle remoto não funcione
corretamente se ficar exposto à luz direta do
sol.
! Não deixe o controle remoto cair no chão,
onde possa ficar preso embaixo do pedal do
freio ou acelerador.
Operações básicas
Importante
! Ao remover ou colocar o painel frontal, manu-
seie-o com cuidado.
! Evite expor o painel frontal a impactos exces-
sivos.
! Mantenha o painel frontal distante da luz dire-
ta do sol e não o exponha a temperaturas
altas.
! Para evitar que ocorram danos ao dispositivo
ou interior do veículo, remova quaisquer
cabos e dispositivos acoplados ao painel frontal antes de retirá-lo.
Ptbr
36
Seção
02
Funcionamento desta unidade
Remoção do painel frontal para proteger a unidade
contra roubo
1 Pressione o botão Desencaixar para soltar o pai-
nel frontal.
2 Empurre o painel frontal para cima e o puxe em
sua direção.
3 Sempre mantenha o painel frontal removido em
um dispositivo de proteção, como um estojo.
Recolocação do painel frontal
1 Deslize o painel frontal para a esquerda.
Certifique-se de inserir as linguetas no lado esquerdo da unidade principal nos slots do painel
frontal.
2 Pressione o lado direito do painel frontal até o
seu total encaixe.
Se você não conseguir colocar o painel frontal na
unidade principal com êxito, verifique se está colocando-o corretamente na unidade principal.
Forçar o encaixe do painel frontal poderá ocasionar danos a ele ou à unidade principal.
Como ligar a unidade
1 Pressione SRC/OFF para ligar a unidade.
Como desligar a unidade
1 Pressione e segure SRC/OFF até desligar a unida-
de.
Seleção de uma fonte
1 Pressione SRC/OFF para percorrer as fontes lista-
das abaixo:
TUNER (Sintonizador)—CD (CD player incorporado)—AUX (AUX)
Ajuste do volume
1 Gire SRC/OFF para ajustar o volume.
AVISO
Por razões de segurança, estacione seu veículo
ao remover o painel frontal.
Nota
Quando o fio condutor azul/branco desta unidade
é conectado ao terminal de controle do relé da
antena automática do veículo, a antena se estende quando a fonte da unidade é ligada. Para retrair a antena, desligue a fonte.
As operações de menu são
idênticas às dos ajustes de
função/ajustes de áudio/
/ajustes iniciais
Retorno à visualização normal
Cancela o menu de ajuste inicial
1 Pressione B (BAND/ESC).
Também é possível cancelar os ajustes iniciais ao
pressionar SRC/OFF até desligar a unidade.
Sintonizador
Operações básicas
Importante
Se você estiver utilizando esta unidade na América do Norte, Central ou do Sul, reajuste o passo
de sintonia AM (consulte AM (Passo de sintonia
AM) na página 40).
Seleção de uma banda
1 Pressione B (BAND/ESC) até visualizar a banda
desejada (F1, F2 , F3 para FM ou AM).
Sintonia manual (passo a passo)
1 Pressione c ou d.
Busca
1 Pressione e segure c ou d e, depois, solte.
Você pode cancelar a sintonia por busca ao pressionar c ou d rapidamente.
Enquanto você pressiona e segura c ou d, poderá pular as emissoras. A sintonia por busca começará assim que c ou d for liberado.
Ptbr
37
Seção
Português (B)
02
Funcionamento desta unidade
Page 20

Armazenamento e chamada
das emissoras de cada banda
% Ao encontrar uma emissora que deseja
armazenar na memória, pressione e segure
um dos botões de sintonia de emissora programada (1 a 6), até o número programado
parar de piscar.
A frequência da emissora de rádio armazenada pode ser chamada da memória ao pressionar o botão de sintonia de emissora
programada.
# Pressione a ou b para chamar da memória
as freqüências das emissoras de rádio.
Configurações de funções
% Pressione FUNC para selecionar a função.
Após selecionar, execute os seguintes procedimentos para definir a função.
BSM (Memória das melhores emissoras)
A BSM (Memória das melhores emissoras) armazena
automaticamente as seis emissoras mais fortes na
ordem de intensidade do sinal.
O armazenamento das freqüências de transmissão
com BSM pode substituir as freqüências de transmissão gravadas utilizando 1 a 6.
1 Pressione a para ativar BSM.
As seis freqüências de transmissão mais fortes
são armazenadas na ordem da intensidade do
sinal.
Para cancelar o processo de armazenamento,
pressione b.
LOCAL (Sintonia por busca local)
A sintonia por busca local permite que você sintonize
apenas as emissoras de rádio com sinais suficientemente fortes para uma boa recepção.
1 Pressione a ou b para ativar ou desativar a sinto-
nia por busca local.
2 Pressione c ou d para ajustar a sensibilidade.
FM: LOCAL 1 —LOCAL 2—LOCAL 3—LOCAL 4
AM: LOCAL 1—LOCAL 2
O ajuste do nível mais alto permite a recepção somente das emissoras com sinais mais fortes, enquanto os níveis mais baixos permitem a
recepção das emissoras com sinais mais fracos.
CD
Operações básicas
Reprodução de um CD/CD-R/CD-RW
1 Insira o disco no slot de carregamento com a eti-
queta voltada para cima.
Ejeção de um CD/CD-R/CD-RW
1 Pressione h.
Seleção de uma pasta
1 Pressione a ou b.
Seleção de uma faixa
1 Pressione c ou d.
Avanço rápido ou retrocesso
1 Pressione e segure c ou d.
Ao reproduzir um áudio compactado, o som não
é transmitido durante as operações de avanço rápido ou retrocesso.
Alternância entre áudio compactado e CD-DA
1 Pressione B (BAND/ESC).
Visualização de informações de
texto
Seleção de informações de texto desejadas
1 Pressione D (DISP/SCRL).
Rolagem das informações de texto para a esquerda
1 Pressione e segure D (DISP/SCRL).
Notas
! Dependendo da versão do iTunes usada para
gravar arquivos de MP3 em um disco ou tipos
de arquivo de mídia, o texto incompatível armazenado em um arquivo de áudio poderá
ser exibido incorretamente.
! Os itens de informações de texto que podem
ser alterados dependem da mídia.
Ptbr
38
Seção
02
Funcionamento desta unidade
Configurações de funções
% Pressione FUNC para selecionar a função.
Após selecionar, execute os seguintes procedimentos para definir a função.
RPT (Reprodução com repetição)
1 Pressione c ou d para selecionar a série de repe-
tição.
DSC – Repete todas as faixas
TRK – Repete a faixa atual
FLD – Repete a pasta atual
RDM (Reprodução aleatória)
1 Pressione a ou b para ativar ou desativar a repro-
dução aleatória.
Quando a reprodução aleatória estiver ativada,
RDM será visualizado no display.
Se você ativar a reprodução aleatória durante a repetição de pasta, FRDM será visualizado no display.
SCAN (Reprodução com exploração)
A reprodução aleatória procura uma música dentro
da série de repetição selecionada.
1 Pressione a para ativar a reprodução com explo-
ração.
Se você ativar a reprodução com exploração durante FLD, FSCN será visualizado no display.
2 Ao encontrar a faixa desejada, pressione b para
desativar a reprodução com exploração.
Se o display tiver retornado automaticamente ao
display de reprodução, selecione SCAN mais uma
vez ao pressionar FUNC.
Depois que a procura de um disco (pasta) for concluída, a reprodução normal das faixas começará.
PAUSE (Pausa)
1 Pressione a ou b para pausar ou retomar.
SRTRV (Recuperação de som)
Aprimora automaticamente o áudio compactado e
restaura um som rico.
1 Pressione a ou b para selecionar o seu ajuste fa-
vorito.
OFF (Desativado)—1—2
1 terá efeito para taxas de compactação baixas e
2 terá efeito para taxas de compactação altas.
FF/REV (Avançar/retroceder rapidamente)
Você pode alternar o método de busca entre avanço/
/retrocesso rápido e busca a cada 10 faixas. Selecionar ROUGH permitirá uma busca a cada 10 faixas.
1 Pressione d para selecionar ROUGH.
FF/REV – Avanço rápido e retrocesso
ROUGH – Busca a cada 10 faixas
Para selecionar FF/REV, pressione c.
2 Pressione B (BAND/ESC) para retornar ao display
de reprodução.
3 Pressione e segure c ou d para fazer a busca a
cada 10 faixas em um disco (pasta).
Se o restante do número de faixa for menor que
10, pressione e segure c ou d para chamar da
memória o primeiro (último).
Ajustes de áudio
Ajustes de áudio
% Pressione AUDIO para selecionar a função de áudio.
Após selecionar, execute os seguintes procedimentos para definir a função de áudio.
FAD (Ajuste de fader/equilíbrio)
1 Pressione a ou b para ajustar o fader (equilíbrio
dos alto-falantes dianteiros/traseiros).
2 Pressione c ou d para ajustar o equilíbrio (equilí-
brio dos alto-falantes esquerdos/direitos).
BASS/MID/TREBLE (Ajuste do equalizador)
! Os ajustes da curva do equalizador definidos são
armazenados em CUSTOM.
1 Pressione a ou b para ajustar o nível.
Faixa de ajuste: +6 a -6
LOUD (Sonoridade)
A sonoridade compensa as deficiências das faixas de
frequência baixas e altas com volume baixo.
1 Pressione a ou b para ativar ou desativar a sono-
ridade.
2 Pressione c ou d para selecionar o ajuste deseja-
do.
LOW (Baixa)—HI (Alta)
! Também é possível ativar ou desativar a sonorida-
de ao pressionar e segurar E (EQ/LOUD).
Ptbr
39
Seção
Português (B)
02
Funcionamento desta unidade
Page 21

SLA (Ajuste de nível de fonte)
SLA (Ajuste de nível de fonte) permite ajustar o nível
de volume de cada fonte para evitar mudanças radicais de volume ao alternar entre as fontes.
! Ao selecionar FM como a fonte, você não pode al-
ternar para SLA.
! Os ajustes são baseados no nível de volume de
FM, que permanece inalterado.
! O nível de volume de AM também pode ser ajus-
tado com essa função.
1 Pressione a ou b para ajustar o volume da fonte.
Faixa de ajuste: SLA +4 a SLA –4
Utilização do equalizador
% Pressione E (EQ/LOUD) para selecionar
o equalizador.
DYNAMIC—VOCAL—NATURAL—CUSTOM
—FLAT—POWERFUL
! CUSTOM permite criar um ajuste
personalizado.
Outras funções
Definição dos ajustes iniciais
1 Pressione e segure SRC/OFF até desligar
a unidade.
2 Pressione e segure SRC/OFF até visualizar a hora no display.
3 Pressione FUNC para selecionar o ajuste
inicial.
Após selecionar, execute os seguintes procedimentos para definir o ajuste inicial.
Ajuste da hora
1 Pressione c ou d para selecionar o segmento da
hora visualizada que deseja ajustar.
Horas—Minutos
2 Pressione a ou b para acertar a hora do relógio.
FM (Passo de sinton ia FM)
O passo de sintonia FM empregado pela sintonia por
busca pode ser alternado entre 100 kHz, o passo programado e 50 kHz.
! Se a sintonia por busca for executada em passos
de 50 kHz, as emissoras poderão ser sintonizadas
de forma imprecisa. Sintonize as emissoras utilizando a sintonia manual ou utilize novamente a
sintonia por busca.
1 Pressione c ou d para selecionar o passo de sin-
tonia FM.
50 (50 kHz)—100 (100 kHz)
AM (Passo de sintonia AM)
O passo de sintonia AM pode ser alternado entre 9
kHz, o passo predefinido e 10 kHz. Ao utilizar o sintonizador na América do Norte, Central ou do Sul, reajuste o passo de sintonia de 9 kHz (531 a 1 602 kHz
permissível) para 10 kHz (530 a 1 640 kHz permissível).
1 Pressione c ou d para selecionar o passo de sin-
tonia AM.
9 (9 kHz)—10 (10 kHz)
AUX (Entrada auxiliar)
Ative este ajuste ao utilizar um dispositivo auxiliar conectado a esta unidade.
1 Pressione a ou b para ativar ou desativar o ajuste
auxiliar.
Exibição da hora
% Pressione para ativar ou desativar o
display de hora.
# O display de hora desaparece temporariamente quando se executa outra operação, mas
retorna depois de 25 segundos.
Utilização de uma fonte AUX
1 Insira o miniplugue estéreo no conector
AUX de entrada.
2 Pressione SRC/OFF para selecionar AUX
como a fonte.
# A opção AUX não poderá ser selecionada a
menos que o ajuste auxiliar esteja ativado. Para
obter mais detalhes, consulte AUX (Entrada auxi-
liar) nesta página.
Ptbr
40
Seção
02
Funcionamento desta unidade
Conexões
ADVERTÊNCIA
! Utilize alto-falantes com mais de 50 W (valor
de saída) e entre 4 W a8W (valor de impedância). Não utilize alto-falantes de 1 W a3W
nesta unidade.
! O cabo preto é o terra. Ao instalar esta unida-
de ou amplificador de potência (vendido separadamente), conecte primeiro o fio terra.
Certifique-se de que o fio terra seja corretamente conectado às peças metálicas do
corpo do carro. O fio terra do amplificador de
potência e o desta unidade ou de qualquer
outro dispositivo devem ser conectados ao
carro separadamente com parafusos diferentes. Se o parafuso do fio terra ficar solto ou
cair, isso poderá causar incêndio, geração de
fumaça ou problemas de funcionamento.
Importante
! Quando esta unidade estiver instalada em um
veículo sem uma posição ACC (acessório) na
chave de ignição, se você não conectar o
cabo vermelho ao terminal que detecta a operação da chave de ignição, a bateria poderá
ser descarregada.
O
N
S
T
A
R
T
O
F
F
Posição ACC Sem posição ACC
! Utilize esta unidade somente com bateria de
12 volts e aterramento negativo. Do contrário,
poderá ocasionar incêndio ou problemas de
funcionamento.
! Para evitar curto-circuito, superaquecimento
ou problemas de funcionamento, siga as instruções abaixo.
— Desconecte o terminal negativo da bateria
antes da instalação.
— Proteja a fiação com presilhas para cabos
ou fita adesiva. Para proteger a fiação, utilize fita adesiva ao redor da fiação que fica
em contato com as peças metálicas.
— Coloque todos os cabos afastados de
peças que se movimentam, como a marcha e os trilhos do assento.
— Coloque todos os cabos afastados de luga-
res que possam aquecer, como perto da
saída do aquecedor.
— Não conecte o cabo amarelo à bateria pas-
sando-o pelo orifício em direção ao compartimento do motor.
— Cubra quaisquer conectores de cabo des-
conectados com fita isolante.
— Não encurte os cabos.
— Nunca corte o isolamento do cabo de ali-
mentação desta unidade para compartilhar a energia com outros dispositivos. A
capacidade de corrente do cabo é limitada.
— Utilize um fusível com a classificação pres-
crita.
— Nunca faça a conexão do cabo negativo
do alto-falante diretamente ao terra.
— Nunca conecte juntos os cabos negativos
de vários alto-falantes.
! Quando esta unidade estiver ligada, os sinais
de controle serão emitidos pelo cabo azul/
/branco. Conecte esse cabo ao controle remoto do sistema de um amplificador de potência
externo ou terminal de controle do relé da antena automática do veículo (máx. 300 mA 12 V
CC). Se o veículo estiver equipado com uma
antena acoplada ao vidro, conecte-a ao terminal da fonte de alimentação do intensificador
da antena.
Ptbr
41
Seção
Português (B)
03
Instalação
Page 22

! Nunca conecte o cabo azul/branco ao termi-
nal de potência de um amplificador externo.
Além disso, nunca o conecte ao terminal de
potência da antena automática. Se fizer isso,
a bateria poderá descarregar ou apresentar
defeitos.
Esta unidade
1 Entrada da antena
2 Fusível (10 A)
3 Entrada do cabo de alimentação
4 Saída traseira
Cabo de alimentação
1
8
9
c
d
6
32
4
5
7
a
b
e
f
h
g
LR
F
R
1 Para a entrada do cabo de alimentação
2 Da esquerda
3 Da direita
4 Alto-falante dianteiro
5 Alto-falante traseiro
6 Branco
7 Branco/preto
8 Cinza
9 Cinza/preto
a Verde
b Verde/preto
c Violeta
d Violeta/preto
e Preto (terra do chassi)
Conecte a um local com metal livre de tinta e
limpo.
f Amarelo
Conecte ao terminal da fonte de alimentação
constante de 12 V.
g Vermelho
Conecte ao terminal controlado pela chave de
ignição (12 V CC).
h Azul/branco
Conecte ao terminal de controle do sistema
do amplificador de potência ou ao terminal de
controle do relé da antena automática (máx.
300 mA, 12 V CC).
Nota
Com um sistema de 2 alto-falantes, não conecte
nada aos condutores não conectados aos alto-falantes.
Amplificador de potência
(vendido separadamente)
Faça essas conexões ao utilizar o amplificador
opcional.
1
4
2
55
3
1 Controle remoto do sistema
Conecte ao cabo azul/branco.
2 Amplificador de potência (vendido separada-
mente)
3 Conecte com cabos RCA (vendido separada-
mente)
4 Para a saída traseira
5 Alto-falante traseiro
Ptbr
42
Seção
03
Instalação
Instalação
Importante
! Verifique todas as conexões e os sistemas
antes da instalação final.
! Não utilize peças não autorizadas, pois isso
pode causar problemas de funcionamento.
! Consulte o revendedor se a instalação exigir a
perfuração de orifícios ou outras modificações no veículo.
! Não instale esta unidade onde:
— possa existir interferência com a operação
do veículo.
— possa causar danos a um passageiro,
como resultado de uma parada brusca.
! O laser semicondutor será danificado se supe-
raquecer. Instale esta unidade afastada de lugares que possam aquecer, como perto da
saída do aquecedor.
! Um ótimo desempenho é obtido quando a
unidade é instalada a um ângulo inferior a
60°.
60°
! Na instalação, para assegurar a dispersão de
calor apropriada ao utilizar esta unidade, certifique-se de deixar um espaço amplo atrás do
painel traseiro e amarre os cabos soltos de
forma que não bloqueiem as saídas de ar.
Montagem dianteira/traseira DIN
Esta unidade pode ser instalada adequadamente usando a instalação da montagem
frontal ou posterior.
Montagem dianteira DIN
1 Insira a manga de montagem no painel.
Para a instalação em espaços rasos, utilize a
manga de montagem fornecida. Se houver
espaço suficiente, utilize a manga de montagem fornecida com o veículo.
2 Fixe a manga de montagem utilizando
uma chave de fenda para dirigir as linguetas de metal (90°) ao local apropriado.
1
2
1 Painel
2 Manga de montagem
3 Instale a unidade conforme a ilustração.
Utilize peças comercializadas convencionalmente para a instalação.
1
2
3
4
5
1 Porca
2 Firewall ou suporte de metal
3 Tiras de metal
4 Parafuso
5 Parafuso (M4 × 8)
# Verifique se a unidade foi instalada com segurança no local. Uma instalação instável pode
fazer com que ela pule ou apresente problemas
de funcionamento.
Ptbr
43
Seção
Português (B)
03
Instalação
Page 23

Montagem traseira DIN
1 Determine a posição apropriada em
que os orifícios no suporte e a lateral da
unidade coincidem.
2 Aperte dois parafusos em cada lado.
1
2
3
1 Parafusos de cabeça treliçada (5 mm × 8
mm)
2 Suporte de montagem
3 Painel ou console
Remoção da unidade
1 Remova o anel de acabamento.
1 Anel de acabamento
2 Guia chanfrada
! Se você retirar o painel frontal, o acesso ao
anel de acabamento ficará mais fácil.
! Ao recolocar o anel de acabamento no
lugar, direcione o lado com a lingueta entalhada para baixo.
2 Insira as chaves de extração fornecidas
nas laterais da unidade até ouvir um clique
de encaixe.
3 Puxe a unidade para fora do painel.
Remoção e reconexão do painel
frontal
Você pode remover o painel frontal para proteger a unidade contra roubo.
Pressione o botão para desencaixar, empurre
o painel frontal para cima e puxe-o em sua direção.
Para obter detalhes, consulte Remoção do pai-
nel frontal para proteger a unidade contra roubo
e Recolocação do painel frontal na página 37.
Ptbr
44
Seção
03
Instalação
Solução de problemas
Sintoma Causa Ação
O display retorna automaticamente ao
normal.
Você ficou sem
executar uma
operação por
aproximadamente 30 segundos.
Execute a operação novamente.
A série de reprodução com
repetição
muda inesperadamente.
Dependendo da
série de reprodução com repetição, a série
selecionada
pode mudar ao
selecionar outra
pasta ou faixa,
ou ao executar o
avanço rápido/retrocesso.
Selecione a série
de reprodução
com repetição novamente.
Uma subpasta
não é reproduzida.
As subpastas
não podem ser
reproduzidas
quando a opção
FLD (Repetição
de pasta) está selecionada.
Selecione outra
série de reprodução com repetição.
NO XXXX é visualizado
quando um display é alterado
(por exemplo,
NO T-TTL).
Não há informações de texto incorporadas.
Alterne o display
ou reproduza outra
faixa/arquivo.
A unidade está
com defeito.
Há interferência.
Você está usando
um dispositivo,
como um telefone celular, que
transmite ondas
elétricas perto da
unidade.
Distancie da unidade os dispositivos
elétricos que possam causar interferência.
Mensagens de erro
Ao entrar em contato com o revendedor ou a
Central de Serviços da Pioneer mais próxima,
anote a mensagem de erro.
Mensagem Causa Ação
ERROR-11, 12,
17, 30
O disco está
sujo.
Limpe o disco.
O disco está riscado.
Substitua o disco.
ERROR-10, 11,
12, 15, 17, 30,
A0
Há um erro elétrico ou mecânico.
Desligue a chave
de ignição (OFF) e
volte a ligá-la (ON),
ou alterne para
uma fonte diferente e, em seguida,
volte ao CD player.
ERROR-15 O disco inserido
está vazio
Substitua o disco.
ERROR-23 Formato de CD
não suportado
Substitua o disco.
FRMTREAD Às vezes, há um
atraso entre o início da reprodução e o início da
recepção do
som.
Aguarde até que a
mensagem desapareça e você ouvirá o som.
NO AUDIO O disco inserido
não contém arquivos que possam ser
reproduzidos.
Substitua o disco.
PROTECT Todos os arqui-
vos no disco inserido estão
incorporados
com DRM.
Substitua o disco.
SKIPPED O disco inserido
contém arquivos
WMA protegidos
por DRM.
Substitua o disco.
Ptbr
45
Apêndice
Português (B)
Informações adicionais
Page 24

Orientações de manuseio
Discos e player
Utilize apenas os discos com os logotipos a seguir.
Utilize um disco de 12 cm. Não utilize um disco de 8
cm nem um adaptador para discos de 8 cm.
Utilize apenas discos convencionais, totalmente circulares. Não utilize discos com outros formatos.
Não insira outros objetos que não sejam CDs no slot
de carregamento de CD.
Não utilize discos rachados, lascados, tortos ou com
defeitos, pois podem danificar o CD player.
Não é possível reproduzir CD -R/CD-RW não finalizados.
Não toque na superfície gravada dos discos.
Quando não for utilizá-los, guarde os discos em suas
caixas.
Evite deixar os discos em ambientes excessivamente
quentes ou expostos à luz direta do sol.
Não cole etiquetas, escreva ou aplique produtos químicos à superfície dos discos.
Para remover sujeiras de um CD, limpe-o com um tecido macio, do centro para fora.
A condensação pode prejudicar temporariamente o
desempenho do CD player. Não o utilize por aproximadamente uma hora, para que se ajuste à temperatura mais quente. Além disso, seque os discos com
um pano macio.
A reprodução de discos pode não ser possível devido
às suas características, aos seus formatos, ao aplicativo gravado, ao ambiente de reprodução, às condições de armazenamento e assim por diante.
Impactos nas estradas ao dirigir podem interromper
a reprodução do disco.
Discos duais
Discos duais são discos com dois lados que possuem, de um lado, um CD de áudio gravável e, do
outro, um DVD de vídeo gravável.
Como o lado do CD dos discos duais não é compatível com o padrão dos CDs comuns, talvez não seja
possível reproduzir o lado do CD nesta unidade.
Inserir e ejetar um disco dual com frequência pode
causar arranhões no disco. Arranhões profundos
podem causar problemas na reprodução com esta
unidade. Em alguns casos, o disco dual pode ficar
preso no slot de carregamento e não ser ejetado. Para
evitar que isso aconteça, recomendamo s que você
não use discos duais nesta unidade.
Consulte as informações fornecidas pelo fabricante
do disco para saber mais a respeito dos discos duais.
Compatibilidade com
compressão de áudio
WMA
Extensão de arquivo: .wma
Taxa de bit: 48 kbps a 320 kbps (CBR), 48 kbps a 384
kbps (VBR)
Frequência de amostragem: 32 kHz a 48 kHz
Windows Media Audi o Professional, Sem perdas, Voz:
Não
MP3
Extensão de arquivo: .mp3
Taxa de bit: 8 kbps a 320 kbps (CBR), VBR
Frequência de amostragem: 8 kHz a 48 kHz (32, 44,1,
48 kHz para ênfase)
Versão de identificação ID3 compatível: 1.0, 1.1, 2.2,
2.3, 2.4 (a versão de identificação ID3 2.x tem prioridade sobre a versão 1.x.)
Lista de reprodução M3u: não
MP3i (MP3 interativo), mp3 PRO: não
Ptbr
46
Apêndice
Informações adicionais
WAV
Extensão de arquivo: .wav
Bits de quantização: 8 e 16 (LPCM), 4 (MS ADPCM)
Frequência de amostragem: 16 kHz a 48 kHz (LPCM),
22,05 kHz e 44,1 kHz (MS ADPCM)
Informações suplementares
Apenas os primeiros 32 caracteres podem ser visualizados como um nome de arquivo (incluindo a extensão do arquivo) ou um nome de pasta.
Dependendo do aplicativo utilizado para codificar arquivos WMA, pode ser que esta unidade não opere
corretamente.
Pode ocorrer um pequeno atraso ao iniciar a reprodução de arquivos de áudio incorporados com dados de
imagem.
Disco
Hierarquia de pastas reproduzíveis: até oito camadas
(uma hierarquia prática contém menos de duas camadas).
Pastas reproduzíveis: até 99
Arquivos reproduzíveis: até 999
Sistema de arquivos: ISO 9660 níveis 1 e 2, Romeo,
Joliet
Reprodução de múltiplas sessões: sim
Transferência de dados por gravação de pacotes: não
Independentemente da duração de uma seção sem
gravação entre as músicas da gravação original, os
discos de áudio compactado serão reproduzidos com
uma curta pausa entre as músicas.
Sequência de arquivos de
áudio
O usuário não pode atribuir números de pasta
e especificar as sequências de reprodução
com esta unidade.
Exemplo de uma hierarquia
1
2
3
4
5
6
01
02
03
04
05
Nível 1 Nível 2 Nível 3 Nível 4
: Pasta
: Arquivo de
áudio compactado
01 a 05: Número de
pasta
1 a 6: Sequência
de reprodução
Disco
! A sequência de seleção de pastas ou outra
operação pode ser diferente, dependendo
do software de codificação ou gravação.
Direitos autorais e marcas
comerciais
iTunes
Apple e iTunes são marcas comerciais da
Apple Inc., registradas nos Estados Unidos e
em outros países.
MP3
O fornecimento deste produto dá o direito a
apenas uma licença para uso particular e não
comercial, e não dá o direito a uma licença
nem implica qualquer direito de uso deste produto em qualquer transmissão em tempo real
(terrestre, via satélite, cabo e/ou qualquer
outro meio) comercial (ou seja, que gere receita), transmissão/reprodução via Internet, intranets e/ou outras redes ou em outros sistemas
de distribuição de conteúdo eletrônico, como
aplicativos de áudio pago ou áudio por demanda. É necessária uma licença independente para tal uso. Para obter detalhes, visite
http://www.mp3licensing.com.
WMA
Windows Media e o logotipo do Windows são
marcas comerciais ou registradas da
Microsoft Corporation nos Estados Unidos e/
/ou em outros países.
Ptbr
47
Apêndice
Português (B)
Informações adicionais
Page 25

Este produto inclui a tecnologia proprietária
da Microsoft Corporation e não pode ser utilizado nem distribuído sem uma licença da
Microsoft Licensing, Inc.
Especificações
Geral
Fonte de alimentação nominal
..................................................... 14,4 V CC
(faixa de tensão permissível:
12,0 V a 14,4 V CC)
Sistema de aterramento ...... Tipo negativo
Consumo máx. de energia
..................................................... 10,0 A
Dimensões (L × A × P):
DIN
Chassi ....................... 178 mm × 50 mm × 165
mm
Face ............................ 188 mm × 58 mm × 17 mm
D
Chassi ....................... 178 mm × 50 mm × 165
mm
Face ............................ 170 mm × 46 mm × 17 mm
Peso ............................................... 1,3 kg
Áudio
Potência de saída máxima
..................................................... 50 W × 4
Potência de saída contínua
..................................................... 22 W × 4 (50 a 15 000 Hz, 5
% de THD, carga de 4 W,
ambos os canais aciona-
dos)
Impedância de carga ............. 4 W (4 W a8W permissível)
Nível de saída máx. pré-saída
..................................................... 2,0 V
Controles de tons:
Graves
Frequência .............. 100 Hz
Ganho ....................... ±12 dB
Médio
Frequência .............. 1 kHz
Ganho ....................... ±12 dB
Agudos
Frequência .............. 10 kHz
Ganho ....................... ±12 dB
CD player
Sistema ........................................ Sistema de áudio de CDs
Discos utilizáveis ..................... CDs
Relação do sinal ao ruído .... 94 dB (1 kHz) (rede IEC-A)
Número de canais .................. 2 (estéreo)
Formato de decodificação WMA
..................................................... Ver. 7, 7.1, 8, 9, 10, 11, 12
(áudio de 2 canais)
(Windows Media Player)
Formato de decodificação MP3
..................................................... MPEG-1 & 2 Camada de
áudio 3
Formato de sinal WAV ........... PCM Linear e MS ADPCM
Sintonizador de FM
Faixa de frequência ................ 87,5 MHz a 108,0 MHz
Sensibilidade utilizável ......... 11 dBf (0,7 µV/75 W, mono,
Sinal/Ruído: 30 dB)
Relação do sinal ao ruído .... 72 dB (rede IEC-A)
Sintonizador de AM
Faixa de freqüências .............. 531 kHz a 1 602 kHz (9 kHz)
530 kHz a 1 640 kHz (10 kHz)
Sensibilidade utilizável ......... 25 µV (Sinal/Ruído: 20 dB)
Relação do sinal ao ruído .... 62 dB (rede IEC-A)
Nota
As especificações e o design estão sujeitos a modificações sem aviso prévio.
Ptbr
48
Apêndice
Informações adicionais
49
Português (B)
Page 26

感謝您
購買本先鋒產品。
為確保使用方式正確,使用本產品前請詳閱本
手冊。 尤為重要的是要閱讀並遵照本手冊中
的警告與注意。
請將本手冊存放於安全及將
來參考時方便取得的地方。
關於本機
注意
本產品屬IEC 60825-1:2007雷射安全產品分類
之類別 1 雷射產品,並包含1M級雷射模組。為
避免發生危險,切勿拆下任何機蓋或試圖接觸
本機內部。所有維修事宜應交由專業人員處
理。
注意
! 請勿讓本機接觸到液體。否則可能造成人員
觸電。 此外,接觸到液體可能導致本機損
壞、冒煙和過熱。
! 請務必保持在適當的低音量,確保能聽見外
面的聲響。
! 避免暴露在濕氣中。
! 若與電池中斷連接或電池電量耗盡,將清除
所有預設記憶。
! 如果本機無法正常運作,請聯絡您的經銷商
或最近的先鋒授權服務站。
Zhtw
50
節
01
開始使用前
主機
a 6789bcd
123 4 5
按鈕 按鈕
1 E (EQ/LOUD) 8 1 至 6
2 h(退出) 9
(時鐘)
3 AUDIO a a/b/c/d
4 SRC/OFF b FUNC
5 碟片槽 c D (DISP/SCRL)
6 拆卸按鈕 d B (BAND/ESC)
7
AUX輸入插孔(3.5
mm立體聲插孔)
遙控器
其作用與主機上的按鈕相同。有關各按鈕的操
作,請參閱主機的介紹,但ATT除外,對它的
介紹見下文。
部位 狀態
e
VOLUME
(+/-)
按此按鈕可調高或調低音量。
f ATT
按此按鈕可靜音。再按一次即可
取消靜音。
部位 狀態
g e(暫停) 按此按鈕可暫停或繼續播放。
h
SRC(播放
來源)
按下可切換所有可用播放來源。
按住該按鈕可關閉播放來源。
顯示指示
3
2
1
4 5 6 7
指示器 狀態
1
主顯示幕
部分
! 調諧器:頻段與頻率
! 內置式CD播放器:已播放的時
間及文字資訊
2
預設號碼
/曲目號
碼
! 曲目號碼或預設號碼。
! 如果選擇100以上的曲目號
碼,曲目號碼指示器左邊的d
將亮起。
3
MP3/
WMA
目前正在播放檔案的類型。
4 RPT 重複播放功能已開啟。
5 LOUD 響度開啟。
6
5(立體
聲)
接收立體聲廣播。
7 LOC 本地頻道搜尋開啟。
Zhtw
51
節
中文
02
操作本機
Page 27

遙控器的使用與保養
使用遙控器
1 將遙控器對著前面板進行操作。
首次使用時,請拉出從托盤伸出的薄片。
更換電池
1 滑出遙控器的背板。
2 裝入電池,正極(+)與負極(-)端的電極確實
對齊。
警告
! 請將電池存放在兒童無法拿取之處。若誤吞
電池,請立即就醫。
! 電池(已安裝的電池組或電池)不得暴露在
陽光直射、火源等類似的過熱環境下。
注意
! 請使用CR2025(3V)鋰電池。
! 至少一個月不使用遙控器時,請取出電池。
! 如果換用錯誤的電池,則會有爆炸的危險。
僅限換用相同或同類型的電池。
! 請勿使用金屬工具夾取電池。
! 請勿將電池存放於金屬置物盒中。
! 如果電池漏液,請將遙控器徹底擦拭乾淨並
裝上新電池。
! 處理廢舊電池時,請遵守政府條例或適用於
貴國或地區的環境公共指令規則。
重要事項
! 請勿將遙控器存放於高溫或陽光直射的區域
中。
! 遙控器在陽光直射下可能無法正常工作。
! 請勿讓遙控器掉落到地板上,否則可能卡在
煞車或油門踏板之下。
基本操作
重要事項
! 拆卸或安裝前面板時動作要輕巧。
! 請避免使前面板受到劇烈撞擊。
! 請將前面板遠離陽光直射和高溫。
! 拆下前面板前拔除所有連接本機的纜線及裝
置,可避免裝置或車子內部受損。
拆下前面板可防止本機遭竊
1 按下拆卸按鈕以取下前面板。
2 向上推起前面板,然後拉向您的方向。
3 務必將卸下的前面板放置在保護裝置中,如保護
盒。
重新安裝前面板
1 將前面板向左滑動。
請確定將主機左側上的突出部位插入前面板的插
槽中。
2 按下前面板右側,直至其固定。
若您無法順利的將前面板安裝在主機上,請確定
可正確的將前面板放置在主機上。 強制固定前面
板可能會導致前面板或主機受損。
開啟本機電源
1 按SRC/OFF可開啟本機電源。
關閉本機電源
1 按住SRC/OFF直至本機關閉。
選擇播放來源
1 按下SRC/OFF可切換下列播放來源:
TUNER(調諧器)-CD(內置式CD播放器)-
AUX(AUX)
調整音量
1 轉動SRC/OFF可調整音量。
Zhtw
52
節
02
操作本機
注意
為了安全起見,拆下前面板時請先停好車輛。
註
當本機的藍色/白色引線連接至汽車自動天線中
繼控制端子時,汽車天線會在本機播放來源啟動
時伸出。收回天線時,請關閉播放來源。
功能表的操作與功能設定/音訊
調整/初始設定完全相同
返回一般顯示畫面
取消初始設定選單
1 按B (BAND/ESC)。
初始設定亦可通過按住SRC/OFF直至本機關閉以
取消。
調諧器
基本操作
重要事項
如果在北美,中美或南美使用本機,請重設AM調
頻間隔(請參閱第55頁上
AM(AM調頻間
隔)
)。
選擇波段
1 按B (BAND/ESC)直至所需的波段(F1,F2,F3為
FM或AM)顯示。
手動調整(逐格)
1 按c或d。
搜尋
1 按住c或d,然後放開。
搜尋調頻可透過快速按c或d取消。
按住c或d時,您可以跳過電台。搜尋調頻會在
放開c或d的同時啟動。
儲存和調用各頻段的電台
% 找到欲儲存於記憶體中的電台時,按住
(1至6)其中一個預設調頻按鈕,直至其預
設號碼停止閃爍。
按預設調頻按鈕可調出儲存的電台頻率。
# 按下a或b可調用廣播電台頻率。
功能設定
% 按FUNC可選擇功能。
選擇後,執行下列程序以設定功能。
BSM(電台自動存儲)
BSM(電台自動存儲)自動依電台的訊號強度儲存六
個最強的電台。
使用BSM儲存廣播頻率可能取代已經用1至6儲存的廣
播頻率。
1 按a開啟BSM。
六個訊號最強的廣播頻率依訊號強弱程度儲存。
取消保存進程時,請按b。
LOCAL(本地頻道搜尋)
本地頻道搜尋只能收聽訊號夠強,且接收效果良好的
廣播電台。
1 按a或b開啟或關閉本地頻道搜尋。
2 按c或d設定靈敏度。
FM: LOCAL 1-LOCAL 2-LOCAL 3 -LOCAL 4
AM: LOCAL 1-LOCAL 2
最高等級僅接收訊號最強的電台。隨著等級降
低,可接收的電台訊號將逐漸減弱。
CD
基本操作
播放CD/CD-R/CD-RW
1 將碟片標籤面朝上插入碟片槽。
退出CD/CD-R/CD-RW
1 按h。
選擇資料夾
1 按a或b。
選擇曲目
1 按c或d。
快速前進或快速倒轉
1 按住c或d。
播放壓縮音訊時,快速前進或快速倒轉時無聲。
切換壓縮音訊和CD-DA
1 按B (BAND/ESC)。
Zhtw
53
節
中文
02
操作本機
Page 28

顯示文字資訊
選擇所需的文字資訊
1 按D (DISP/SCRL)。
捲動文字資訊至左側
1 按住D (DISP/SCRL)。
註
! 視用於將MP3檔案寫入碟片或媒體檔案類型的
iTunes版本而定,儲存在音訊檔案中的不相
容文字可能會錯誤顯示。
! 可變更的文字資訊項目視媒體而定。
功能設定
% 按FUNC可選擇功能。
選擇後,執行下列程序以設定功能。
RPT(重播)
1 按c或d選擇重播範圍。
DSC-重播所有曲目
TRK-重播目前曲目
FLD-重播目前資料夾
RDM(隨機播放)
1 按a或b開啟或關閉隨機播放。
當隨機播放開啟時,RDM在顯示幕中出現。
您可在重播資料夾過程中開啟隨機播放,FRDM
將出現在顯示幕中。
SCAN(掃描播放)
掃描播放會搜尋在重播範圍內的歌曲。
1 按a開啟掃描播放。
您可在FLD過程中開啟掃描播放,FSCN將出現在
顯示幕中。
2 找到所需的曲目時按b,關閉掃描播放。
如果顯示幕已經自動返回播放顯示,通過按FUNC
可重新選擇SCAN。
在光碟(資料夾)掃描結束之後,曲目將正常播
放。
PAUSE(暫停)
1 按a或b可暫停或繼續播放。
SRTRV(數位音樂修補)
自動增強壓縮音訊並還原豐富聲音。
1 按a或b選擇常用設定。
OFF(關閉)-1-2
1對低壓縮率有影響,而2則對高壓縮率有影響。
FF/REV(快進/快倒)
您可在快進/快倒與以10首曲目為單位搜尋之間切換
搜尋方法。 選擇ROUGH可讓您以每10個音軌搜尋。
1 按d選擇ROUGH。
FF/REV-快速前進與快速倒轉
ROUGH-以10首曲目為單位搜尋
選擇FF/REV時,按c。
2 按B (BAND/ESC)返回播放顯示。
3 按住c或d在光碟(資料夾)中以10首曲目為單
位搜尋。
如果剩餘的曲目號碼小於10,可按住c或d調出
第一首(最後一首)。
音訊調整
音訊調整
% 按AUDIO可選擇音訊功能。
選擇後,執行下列程序以設定音訊功能。
FAD(淡化器/平衡調整)
1 按a或b可調整淡化器(前置/後置揚聲器平
衡)。
2 按c或d可調整平衡(左置/右置揚聲器平
衡)。
BASS/MID/TREBLE(等化器調整)
! 經調整的等化器曲線設定會儲存在CUSTOM中。
1 按a或b調整等級。
調整範圍: +6 至 -6
LOUD(響度)
響度可在低音量時補償低音及高頻範圍中的不足。
1 按a或b啟動或關閉響度。
2 按c或d選擇所需設定。
LOW(低)-HI(高)
! 亦可通過按住E (EQ/LOUD)開關響度。
SLA(音源電平調整)
SLA(音源電平調整)可調整各播放來源的音量電
平,以免在播放來源之間切換時音量驟然變化。
! 選擇FM調諧器作為播放來源時,您無法切換至
SLA。
! 設定以FM調諧器的音量電平為依據,該音量電平
保持不變。
! 也可以使用此功能調整AM調諧器的音量等級。
1 按a或b調整播放源音量。
調整範圍: SLA +4 至 SLA –4
Zhtw
54
節
02
操作本機
使用等化器
% 按E (EQ/LOUD)選擇等化器。
DYNAMIC-VOCAL-NATURAL-CUSTOM
-FLAT-POWERFUL
! CUSTOM可讓您建立自訂設定。
其他功能
調整初始設定
1 按住SRC/OFF直至本機關閉。
2 按住SRC/OFF直至時鐘在顯示幕中出現。
3 按FUNC可選擇初始設定。
選擇後,執行下列程序以進行初始設定。
設定時鐘
1 按c或d選擇所需設定之時鐘顯示部分。
時-分
2 按a或b以正確設定時鐘。
FM(FM調頻間隔)
搜尋調頻所用之FM調頻間隔可在100 kHz、預設間隔
及50 kHz之間進行切換。
! 如果搜尋調頻以50 kHz為間隔進行,則會無法準
確收聽電台。請用手動調頻或再次使用搜尋調頻
收聽電台。
1 按c或d選擇FM調頻間隔。
50(50 kHz)-100(100 kHz)
AM(AM調頻間隔)
AM調頻間隔可在9 kHz、預設間隔及10 kHz之間切換。
在北美、中美或南美使用調諧器時,請將調頻間隔從
9 kHz(容許範圍531 kHz至1 602 kHz)重設為10 kHz
(容許範圍530 kHz至1 640 kHz)。
1 按c或d選擇AM調頻間隔。
9(9 kHz)-10(10 kHz)
AUX(輔助輸入)
使用連接至本機的輔助裝置時,請啟動此設定。
1 按a或b開啟或關閉輔助設定。
顯示時鐘
% 按 可打開或關閉時鐘顯示。
# 進行其他操作時,時鐘顯示會暫時消失;但
是在25秒後時鐘顯示會再次出現。
使用AUX播放來源
1 將立體聲迷你插頭插入AUX輸入插孔。
2 按SRC/OFF選擇AUX作為播放來源。
# 除非開啟輔助設定,否則無法選擇AUX。更多
詳情請參閱本頁上
AUX(輔助輸入)
。
Zhtw
55
節
中文
02
操作本機
Page 29

連接
警告
! 使用超過50 W(輸出值)與介於 4 W 至 8 W
(阻抗值)的揚聲器。 本機請勿使用1 W 至3
W 揚聲器。
! 黑色纜線為接地。安裝本機或功率放大器
(另售)時,請確實優先連接接地線。確定
接地線已正確連接至車輛本體的金屬部位。
功率放大器的接地線及本機或其他裝置,必
須以不同的螺絲分別連接車輛。若接地線的
螺絲鬆動或掉落,可能會導致起火、冒煙或
故障。
重要事項
! 當本機安裝在點火開關沒有ACC(附加)位置
的車輛中時,若無法將紅色纜線連接可以偵
測點火開關運作的端子上,可能會導致電池
電量耗盡。
O
N
S
T
A
R
T
O
F
F
ACC位置 無ACC位置
! 本機限使用12伏特電池與負接地。不這麼做
可能會導致起火或故障。
! 為防止短路,過熱或故障發生,請務必遵守
下列指示。
— 安裝之前請斷開電池的負極。
— 以纜線夾或膠帶固定纜線。請使用膠帶包
覆纜線與金屬部位接觸的部分以保護纜
線。
— 請勿將纜線置於活動部件上,比如汽車排
檔與座位扶手。
— 請勿將纜線置於受熱位置,比如暖風機出
口附近。
— 請勿將黃色纜線穿過引擎室的孔連接至電
池。
— 以絕緣膠帶包覆任何未連接的纜線接頭。
— 請勿縮短纜線長度。
— 切勿為了與其他裝置共用電源而割開本機
電源線絕緣層。纜線的電流負載量有一定
限度。
— 請使用規定額定值的保險絲。
— 請勿將揚聲器負極線直接接地。
— 請勿將多個揚聲器的負極線綑紮在一起。
! 當本機電源開啟時,控制訊號會透過藍/白
色纜線輸出。請將其連接至外部功率放大器
系統遙控器或車輛的自動天線中繼控制端子
(最大300 mA 12 V DC)。若車輛配備有玻璃
天線,請將其連接至天線增強電源端子。
! 切勿將藍/白纜線連接到外部的變壓電源端
子。同時,請避免將其連接到自動天線的電
源端子。這麼做可能會導致電源電量耗盡或
故障。
本機
1 天線輸入
2 保險絲(10 A)
3 電源線輸入
4 後置輸出
Zhtw
56
節
03
安裝
電源線
1
8
9
c
d
6
32
4
5
7
a
b
e
f
h
g
LR
F
R
1 至電源線輸入
2 左置
3 右置
4 前置揚聲器
5 後置揚聲器
6 白
7 白/黑
8 灰
9 灰/黑
a 綠
b 綠/黑
c 紫
d 紫/黑
e 黑(機身接地)
連接到乾淨、無塗料的金屬部位。
f 黃
連接到固定的12 V電源端子。
g 紅
連接到由點火開關(12 V DC)控制的端子。
h 藍/白
連接到功率放大器的系統控制端子或自動天
線中繼控制端子(最大300 mA 12 V DC)。
註
使用雙揚聲器系統時,請勿連接任何物品到未與
揚聲器連接的揚聲器接線。
功率放大器(另售)
使用選購的放大器時,請執行這些連接。
1
4
2
55
3
1 系統遙控器
連接至藍色/白色纜線。
2 功率放大器(另售)
3 以RCA纜線連接(另售)
4 至後置輸出
5 後置揚聲器
安裝
重要事項
! 最後安裝之前,請檢查所有的連接和系統。
! 請勿使用未獲授權的部分,這麼做可能會造
成故障。
! 若安裝需要在車輛上鑽孔或進行其他修改,
請洽詢您的經銷商。
! 請勿將本機安裝在:
— 可能會干擾車輛操作的位置。
— 因突然停車可能會傷及乘客的位置。
! 半導體雷射在過熱的狀況下可能會損壞。請
勿將本機安裝在受熱位置,例如暖風機出口
附近。
! 當本機以小於60°的角度安裝時,會獲得最
佳效能。
60°
Zhtw
57
節
中文
03
安裝
Page 30

! 為了確保在使用本機時能有適當的散熱,安
裝時請確認在後面板後方留有足夠的空間,
並纏住鬆散的纜線,以防其堵住出風口。
ఎנߩജၴ
ᖒࣨ
DIN前/後座
本機可使用前座或後座安裝進行正確安裝。
DIN前座
1 將座套插入儀表板中。
在狹窄空間中安裝時,請使用隨附的座套。若
有足夠的空間,請使用車輛隨附的座套。
2 使用螺絲起子折彎金屬突出部位(90°)
至定位,藉以固定座套。
1
2
1 儀表板
2 座套
3 依照圖示方式安裝本機。
安裝時,請使用市售零件。
1
2
3
4
5
1 螺帽
2 防火牆或金屬支架
3 金屬帶
4 螺絲
5 螺絲(M4×8)
# 確認本機已確實安裝至定位。安裝不確實可
能會造成跳動或其他故障。
DIN後座
1 選定適當的位置,讓托架孔與本機側面密
合。
2 鎖緊各邊的兩顆螺絲。
1
2
3
1 十字槽螺絲(5mm×8mm)
2 托架
3 儀表板或操縱台
Zhtw
58
節
03
安裝
移除本機
1 取下飾環。
1 飾環
2 缺口突出部位
! 拆下前面板後,可更輕易的進入飾環。
! 若您要重新裝上飾環,請對準有向下缺口
突出部位的側邊並接上飾環。
2 將隨附的抽取鑰匙插入本機的兩側,使其
卡至定位。
3 將本機拉出儀表板。
拆下並重新安裝前面板
您可拆下前面板以防止本機遭竊。
按下拆卸按鍵並向上推入前面板,再朝您的方
向拉。
如需詳細資料,請參閱
拆下前面板可防止本機
遭竊
及第52頁上
重新安裝前面板
。
Zhtw
59
節
中文
03
安裝
Page 31

故障排除
故障情況 原因 措施
顯示畫面會自
動返回一般顯
示畫面。
您無法在30秒內
執行任何操作。
再執行操作一次。
重播範圍意外
變更。
選擇其他資料夾
或曲目,或快速
前進/快速倒轉
時,根據重播範
圍的不同,選擇
的範圍可能會變
更。
再次選擇重播範
圍。
子資料夾未播放。選擇FLD(重播
資料夾)時,無
法播放子資料
夾。
選擇其他重播範
圍。
顯示畫面變更
時(例如NO T-
TTL),出現
NO XXXX。
無內嵌文字資訊。切換顯示畫面或播
放其他曲目/檔
案。
本機故障中。
有干擾產生。
您正在使用的裝
置如手機,所傳
送的電波太靠近
本機。
將可能會造成干擾
的電子裝置遠離本
機。
錯誤訊息
與經銷商或就近的先鋒授權服務中心聯絡時,
請務必記錄錯誤訊息。
訊息 原因 措施
ERROR-11, 12,
17, 30
碟片髒污。 清潔碟片。
碟片有刮傷。 請更換碟片。
ERROR-10, 11,
12, 15, 17, 30,
A0
有電氣或機械錯誤。關閉點火開關,然
後再開啟,或切換
至其他播放來源,
然後再回到CD播放
器。
ERROR-15 插入碟片是空的 請更換碟片。
ERROR-23 不支援CD格式 請更換碟片。
FRMTREAD 在開始播放及開
始聽見聲音之
間,有時會出現
延遲。
等到訊息消失後才
聽見聲音。
NO AUDIO 插入的 碟片不含
任何可播放的檔
案。
請更換碟片。
訊息 原因 措施
PROTECT 插入之碟片上的
所有檔案均內嵌
DRM。
請更換碟片。
SKIPPED 插入的碟片包含
受DRM保護的WMA
檔案。
請更換碟片。
操作指南
碟片與播放器
請僅使用具有以下兩種標誌之一的碟片。
請使用12 cm的碟片。請勿使用8cm的碟片,或播放8
cm碟片時請勿使用轉接器。
僅限使用傳統的圓形碟片。不可使用其他形狀的碟
片。
CD槽中請勿插入CD以外的任何其他物品。
請勿使用破裂、缺口、扭曲或有其他瑕疵的碟片,否
則可能會損壞播放器。
未最終化的CD-R/CD-RW碟片無法播放。
請勿觸摸碟片的錄製面。
碟片不使用時,請存放在護套中。
謹防將碟片放在極高溫的環境(包括陽光直射之
下)。
請勿在碟片表面黏貼標籤、書寫或使用化學藥品。
清潔CD時,請用軟布從中心向外擦拭碟片。
凝結可能會暫時影響播放器之效能。請將其放置約一
小時,適應較高的溫度。同時,請用軟布擦拭潮溼的
碟片。
Zhtw
60
附錄
附加資訊
由於碟片特性、碟片格式、錄製的應用軟體、播放環
境、存放條件等原因,碟片可能無法播放。
道路顛簸會中斷碟片的播放。
雙面碟
雙面碟有兩面,一面為音訊的可燒錄CD,另一面為視
訊的可燒錄DVD。
由於雙面碟的CD面不能相容一般的CD標準,因此可能
無法在本機上播放CD面。
經常載入和退出雙面碟可能會刮壞碟片。嚴重的刮痕
會導致本機無法播放碟片。有時雙面碟可能會卡在碟
片槽中而無法退出。為防止這種情形發生,建議您不
要在本機中播放雙面碟。
如需有關雙面碟的詳細資料,請參閱碟片製造商提供
的資訊。
壓縮音訊相容性
WMA
副檔名:.wma
位元率:48 kbps至320 kbps(CBR),48 kbps至384
kbps(VBR)
取樣頻率:32 kHz至48 kHz
Windows Media Audio Professional,Lossless,語
音:無
MP3
副檔名:.mp3
位元率:8 kbps至320 kbps(CBR),VBR
取樣頻率:8 kHz至48 kHz(32, 44.1,48 kHz用於加
強)
相容的ID3標籤版本:1.0、1.1、2.2、2.3、2.4
(ID3標籤2.x版本優先於1.x版本。)
M3u播放清單:無
MP3i(互動式MP3),mp3 PRO:無
WAV
副檔名:.wav
量化位元數:8與16(LPCM),4(MS ADPCM)
取樣頻率:16 kHz至48 kHz(LPCM),22.05 kHz及
44.1 kHz(MS ADPCM)
補充資訊
只能顯示前32個字元作為檔案名稱(包括副檔名)或
資料夾名稱。
本機可能會因使用將WMA檔案編碼的應用程式,而無
法正常運作。
開始播放內嵌影像資料的音訊檔案時,可能會略有延
遲。
碟片
可播放的資料夾階層:最多八層(實際的階層少於兩
層)。
可播放的資料夾:最多99
可播放的檔案:最多999
檔案系統:ISO 9660 Level 1及2、Romeo、Joliet
多區段播放:可
封包寫入資料傳送:無
無論原始錄製歌曲之間空白部分的長短,壓縮音訊播
放時歌曲之間都會出現短暫的暫停。
音訊檔案順序
使用者無法使用本機指定資料夾編號和播放順
序。
階層實例
1
2
3
4
5
6
01
02
03
04
05
:資料夾
:壓縮音訊檔案
01至05: 資料夾編
號
1至6:播放順序
碟片
! 資料夾選擇順序或其他操作可能會因編碼
或寫入軟體而異。
Zhtw
61
附錄
中文
附加資訊
Page 32

版權及商標
iTunes
Applei與Tunes為Apple Inc. 在美國與其他國
家註冊的商標。
MP3
本產品僅針對私人、非商業的使用提供授權許
可;除此之外,並未提供授權許可,或暗示任
何使用者具有將本產品用於任何商業(即創造
營收)即時播放(陸上、衛星、有線和/或任
何其他媒體)、透過網際網路、內部網路和/
或其他網路的廣播/串流,或其他電子內容傳
播系統(如付費音訊或隨選音訊應用程式)之
權利。此類用途須另行授權許可。 如需詳細
資料,請造訪
http://www.mp3licensing.com。
WMA
Windows Media及Windows標誌是Microsoft
Corporation於美國及/或其他國家的商標或
註冊商標。
本產品採用Microsoft Corporation開發之技
術,未獲Microsoft Licensing, Inc.授權不得
使用或散布本技術。
規格
一般
額定電源 ...................................... 14.4 V DC
(容許電壓範圍: 12.0 V至
14.4 V DC)
接地系統 ...................................... 負極型
最大電流消耗 ............................ 10.0 A
尺寸(寬×高×深):
DIN
機身 ............................ 178 mm × 50 mm × 165 mm
前端部分 .................. 188 mm × 58 mm × 17 mm
D
機身 ............................ 178 mm × 50 mm × 165 mm
前端部分 .................. 170 mm × 46 mm × 17 mm
重量 ................................................ 1.3 kg
音訊
最大輸出功率 ............................ 50 W × 4
連續輸出功率 ............................ 22 W × 4(50 Hz至15 000
Hz,5% THD,4 W負載,雙
聲道驅動)
負載阻抗 ...................................... 4 W (容許範圍4 W至8 W)
前輸出最大輸出電平 ............. 2.0 V
音調控制:
低音
頻率 ............................ 100 Hz
增益 ............................ ±12 dB
中頻
頻率 ............................ 1 kHz
增益 ............................ ±12 dB
高音
頻率 ............................ 10 kHz
增益 ............................ ±12 dB
CD播放器
系統 ................................................ CD音訊系統
可用碟片 ...................................... CD
訊噪比 ........................................... 94 dB(1 kHz)(IEC-A網
路)
聲道數 ........................................... 2(立體聲)
WMA解碼格式 .............................. 第7、7.1、8、9、10、11、
12版本(雙聲道音訊)
(Windows Media Player)
MP3解碼格式 .............................. MPEG-1 & 2 Audio Layer 3
WAV訊號格式 .............................. 線性PCM&MS ADPCM
FM調諧器
頻率範圍 ...................................... 87.5 MHz至108.0 MHz
有效靈敏度 ................................. 11 dBf(0.7 μV/75 W,單
聲道,S/N: 30 dB)
訊噪比 ........................................... 72 dB(IEC-A網路)
AM調諧器
頻率範圍 ...................................... 531 kHz至1 602 kHz(9
kHz)
530 kHz至1 640 kHz(10
kHz)
可用靈敏度 ................................. 25 μV(S/N:20 dB)
訊噪比 ........................................... 62 dB(IEC-A網路)
註
規格與設計可能改變,恕不另行通知。
Zhtw
62
附錄
附加資訊
Zhtw
63
中文
Page 33

Zhtw
64
Zhtw
65
中文
Page 34

ﺍﻟﻘﺮﺹ
!ﻗﺪﻳﺨﺘﻠﻒﺗﺴﻠﺴﻞﺍﺧﺘﻴﺎﺭﺍﻟﻤﺠﻠﺪﺃﻭﺃﻱﻋﻤﻠﻴﺔﺃﺧﺮﻯﺣﺴﺐ
ﺍﻟﺘﺸﻔﻴﺮﺃﻭﺑﺮﺍﻣﺞﺍﻟﻜﺘﺎﺑﺔ.
ﺣﻘﻮﻕﺍﻟﻨﺸﺮﻭﺍﻟﻌﻼﻣﺎﺕﺍﻟﺘﺠﺎﺭﻳﺔ
iTunes
AppleﻭiTunesﻫﻤﺎﻋﻼﻣﺘﺎﻥﺗﺠﺎﺭﻳﺘﺎﻥﻟﺸﺮﻛﺔApple Inc.
،ﻣﺴﺠﻠﺘﺎﻥﻓﻲﺍﻟﻮﻻﻳﺎﺕﺍﻟﻤﺘﺤﺪﺓﻭﺩﻭﻝﺃﺧﺮﻯ.
MP3
ﺗﻮﺭﻳﺪﻫﺬﺍﺍﻟﻤُﻨﺘﺞﻻﻳﺸﺘﻤﻞﺇﻻﻋﻠﻰﺗﺮﺧﻴﺺﻟﻼﺳﺘﺨﺪﺍﻡﺍﻟﺸﺨﺼﻲ
ﻏﻴﺮﺍﻟﺘﺠﺎﺭﻱﻭﻻﻳﺸﺘﻤﻞﻋﻠﻰﺗﺮﺧﻴﺺﺃﻭﻳﻌﻨﻲﺿﻤﻨﻴًﺎﺃﻱﺣﻖ
ﺑﺎﺳﺘﺨﺪﺍﻡﺍﻟﻤُﻨﺘﺞﻓﻲﺃﻱﺑﺚﺗﺠﺎﺭﻱ)ﺃﻱﻳﺤﻘﻖﺇﻳﺮﺍﺩًﺍ(ﻓﻲﺍﻟﺰﻣﻦ
ﺍﻟﻔﻌﻠﻲ)ﺃﺭﺿﻲ،ﻓﻀﺎﺋﻲ،ﺳﻠﻜﻲﻭ/ﺃﻭﺃﻱﻭﺳﺎﺋﻂﺃﺧﺮﻯ(ﻭﻻﺍﻟﺒﺚ/
ﺍﻟﻨﻘﻞﺍﻟﻤﺒﺎﺷﺮﻋﺒﺮﺷﺒﻜﺔﺍﻹﻧﺘﺮﻧﺖ،ﺍﻟﺸﺒﻜﺎﺕﺍﻟﺪﺍﺧﻠﻴﺔﻭ/ﺃﻭﺍﻟﺸﺒﻜﺎﺕ
ﺍﻷﺧﺮﻯﺃﻭﻓﻲﺃﻱﺃﻧﻈﻤﺔﺃﺧﺮﻯﻟﺘﻮﺯﻳﻊﺍﻟﻤﺤﺘﻮﻳﺎﺕﺍﻹﻟﻜﺘﺮﻭﻧﻴﺔ،
ﻣﺜﻞﺍﺳﺘﺨﺪﺍﻣﺎﺕﺍﻟﺘﺸﻐﻴﻞﺑﻤﻘﺎﺑﻞﺃﻭﺍﻟﺘﺸﻐﻴﻞﺣﺴﺐﺍﻟﻄﻠﺐ.ﻣﺜﻞﻫﺬﻩ
ﺍﻻﺳﺘﺨﺪﺍﻣﺎﺕﺗﺘﻄﻠﺐﺗﺮﺧﻴﺼًﺎﻣﻨﻔﺼﻼً.ﺑﺨﺼﻮﺹﺍﻟﺘﻔﺎﺻﻴﻞ،
ﻳُﺮﺟﻲﺯﻳﺎﺭﺓﻣﻮﻗﻊ
http://www.mp3licensing.com.
WMA
Windows MediaﻭﺷﻌﺎﺭWindowsﻫﻤﺎﻋﻼﻣﺘﺎﻥ
ﺗﺠﺎﺭﻳﺘﺎﻥﻣﺴﺠﻠﺘﺎﻥﻟﺸﺮﻛﺔMicrosoft Corporationﻓﻲ
ﺍﻟﻮﻻﻳﺎﺕﺍﻟﻤﺘﺤﺪﺓﻭ/ﺃﻭﺩﻭﻝﺃﺧﺮﻯ.
ﻫﺬﺍﺍﻟﺠﻬﺎﺯﻳﺤﺘﻮﻱﻋﻠﻰﺗﻘﻨﻴﺔﻣﻤﻠﻮﻛﺔﻟﺸﺮﻛﺔMicrosoft
Corporationﻭﻻﻳﻤﻜﻦﺍﺳﺘﺨﺪﺍﻣﻬﺎﺃﻭﺗﻮﺯﻳﻌﻬﺎﺑﺪﻭﻥﺗﺮﺧﻴﺺ
ﻣﻦﺷﺮﻛﺔMicrosoft Licensing, Inc.
ﺍﻟﻤﻮﺍﺻﻔﺎﺕ
ﻋﺎﻡ
ﻣﺼﺪﺭﺍﻟﻄﺎﻗﺔﺍﻟﻤﺤﺪﺩ.........................١٤٫٤ﻓﻮﻟﺖﺗﻴﺎﺭﻣﺴﺘﻤﺮ
)ﻣﺪﻯﻧﻄﺎﻕﺍﻟﺠﻬﺪﺍﻟﻤﺴﻤﻮﺡﺑﻪ:١٢٫٠
ﻓﻮﻟﺖﺇﻟﻰﻓﻮﻟﺖ١٤٫٤ﺗﻴﺎﺭﻣﺴﺘﻤﺮ(
ﻧﻈﺎﻡﺍﻟﺘﺄﺭﻳﺾ...................................ﻧﻮﻉﺳﺎﻟﺐ
ﺍﻟﺤﺪﺍﻷﻗﺼﻰﻻﺳﺘﻬﻼﻙﺍﻟﺘﻴﺎﺭ.............١٠٫٠ﺃﻣﺒﻴﺮ
ﺍﻷﺑﻌﺎﺩ)ﻃﻮﻝ×ﻋﺮﺽ×ﺍﺭﺗﻔﺎﻉ(:
DIN
ﺍﻟﻬﻴﻜﻞ...........................١٧٨ﻣﻢ×٥٠ﻣﻢ×١٦٥ﻣﻢ
ﺍﻟﻤﻘﺪّﻣﺔ..........................١٨٨ﻣﻢ×٥٨ﻣﻢ×١٧ﻣﻢ
D
ﺍﻟﻬﻴﻜﻞ...........................١٧٨ﻣﻢ×٥٠ﻣﻢ×١٦٥ﻣﻢ
ﺍﻟﻤﻘﺪّﻣﺔ..........................١٧٠ﻣﻢ×٤٦ﻣﻢ×١٧ﻣﻢ
ﺍﻟﻮﺯﻥ................................................١٫٣ﻛﺠﻢ
ﺍﻟﺼﻮﺕ
ﺍﻟﺤﺪﺍﻷﻗﺼﻰﻟﺨﺮﺝﺍﻟﻄﺎﻗﺔ.................٥٠ﻭﺍﺕ×٤
ﺧﺮﺝﺍﻟﺘﻴﺎﺭﺍﻟﻤﺴﺘﻤﺮ...........................٢٢ﻭﺍﺕ×٤)ﻣﻦ٥٠ﻫﺮﺗﺰﺇﻟﻰ
١٥٠٠٠ﻫﺮﺗﺰ،ﺗﺸﻮﻳﺶﺗﻮﺍﻓﻘﻲﻛﻠﻲ٥
٪ﺣﻤﻮﻟﺔ٤ﺃﻭﻡ،ﻣﻊﺩﻓﻊﻛﻠﺘﻲﺍﻟﻘﻨﺎﺗﻴﻦ(
ﻣﻌﺎﻭﻗﺔﺍﻟﺤﻤﻮﻟﺔ..................................٤ﺃﻭﻡ)ﻣﺴﻤﻮﺡﺑﻪﻣﻦ٤ﺃﻭﻡﺇﻟﻰ٨ﺃﻭﻡ(
ﺍﻟﺤﺪﺍﻷﻗﺼﻰﻟﻤﺴﺘﻮﻯﺍﻟﺨﺮﺝﺍﻟﻤﺒﺪﺋﻲ
.....................................................٢٫٠ﻓﻮﻟﺖ
ﺃﺩﻭﺍﺕﺍﻟﺘﺤﻜﻢﻓﻲﺍﻟﻨﻐﻤﺔ:
ﺍﻟﺠﻬﻴﺮ
ﺍﻟﺘﺮﺩﺩ............................١٠٠ﻫﺮﺗﺰ
ﺍﻟﻜﺴﺐ...........................±١٢ﺩﻳﺴﻴﺒﻞ
ﻣﺘﻮﺳﻂ
ﺍﻟﺘﺮﺩﺩ............................١ﻙﻫﺮﺗﺰ
ﺍﻟﻜﺴﺐ...........................±١٢ﺩﻳﺴﻴﺒﻞ
ﺍﻟﻌﻠﻮ
ﺍﻟﺘﺮﺩﺩ............................١٠ﻙﻫﺮﺗﺰ
ﺍﻟﻜﺴﺐ...........................±١٢ﺩﻳﺴﻴﺒﻞ
ﻣﺸﻐّﻞﺃﻗﺮﺍﺹCD
ﺍﻟﻨﻈﺎﻡ................................................ﻧﻈﺎﻡﺻﻮﺗﻲﻷﻗﺮﺍﺹﺍﻟﻤﺪﻣﺠﺔ
ﺍﻷﻗﺮﺍﺹﺍﻟﻘﺎﺑﻠﺔﻟﻼﺳﺘﺨﺪﺍﻡ..................ﻗﺮﺹﻣﺪﻣﺞ
ﻧﺴﺒﺔﺍﻹﺷﺎﺭﺓﺇﻟﻰﺍﻟﻀﻮﺿﺎﺀ...............٩٤ﺩﻳﺴﻴﺒﻞ)١ﻙﻫﺮﺗﺰ()ﺷﺒﻜﺔ
IEC-A(
ﻋﺪﺩﺍﻟﻘﻨﻮﺍﺕ......................................٢)ﺳﺘﺮﻳﻮ(
ﺗﻨﺴﻴﻖﺗﺮﻣﻴﺰWMA........................ﺍﻹﺻﺪﺍﺭﺍﺕ7ﻭ7.1ﻭ8ﻭ9ﻭ10
ﻭ11ﻭ12)ﻗﻨﺎﺗﺎﻥﺻﻮﺗﻴﺘﺎﻥ(
)Windows Media Player(
ﺗﻨﺴﻴﻖﺗﺮﻣﻴﺰMP3..........................MPEG-1 & 2 Audio Layer 3
ﺗﻨﺴﻴﻖﺇﺷﺎﺭﺓWAV..........................Linear PCM & MS ADPCM
ﻣﻮﺍﻟﻒFM
ﻧﻄﺎﻕﺍﻟﺘﺮﺩﺩﺍﺕ..................................٨٧٫٥ﻡﻫﺮﺗﺰﺇﻟﻰ١٠٨٫٠ﻡﻫﺮﺗﺰ
ﺣﺴﺎﺳﻴﺔﻗﺎﺑﻠﻴﺔﺍﻻﺳﺘﺨﺪﺍﻡ....................ﻫﻲ١١ﺩﻳﺴﻴﺒﻞﻑ)٠٫٧ﻣﺎﻳﻜﺮﻭ
ﻓﻮﻟﺖ/٧٥ﺃﻭﻡ،ﺃﺣﺎﺩﻱﺍﻟﺼﻮﺕ،ﻧﺴﺒﺔ
ﺍﻹﺷﺎﺭﺓﺇﻟﻰﺍﻟﻀﻮﺿﺎﺀ:٣٠ﺩﻳﺴﻴﺒﻞ(
ﻧﺴﺒﺔﺍﻹﺷﺎﺭﺓﺇﻟﻰﺍﻟﻀﻮﺿﺎﺀ...............٧٢ﺩﻳﺴﻴﺒﻞ)ﺷﺒﻜﺔIEC-A(
ﻣﻮﺍﻟﻒAM
ﻧﻄﺎﻕﺍﻟﺘﺮﺩﺩﺍﺕ..................................٥٣١ﻙﻫﺮﺗﺰﺇﻟﻰ١٦٠٢ﻙﻫﺮﺗﺰ)٩
ﻙﻫﺮﺗﺰ(
٥٣٠ﻙﻫﺮﺗﺰﺇﻟﻰ١٦٤٠ﻙﻫﺮﺗﺰ
)١٠ﻙﻫﺮﺗﺰ(
ﺣﺴﺎﺳﻴﺔﻗﺎﺑﻠﻴﺔﺍﻻﺳﺘﺨﺪﺍﻡ....................٢٥ﻣﺎﻳﻜﺮﻭﻓﻮﻟﺖ)ﻧﺴﺒﺔﺍﻹﺷﺎﺭﺓﺇﻟﻰ
ﺍﻟﻀﻮﺿﺎﺀ:٢٠ﺩﻳﺴﻴﺒﻞ(
ﻧﺴﺒﺔﺍﻹﺷﺎﺭﺓﺇﻟﻰﺍﻟﻀﻮﺿﺎﺀ...............٦٢ﺩﻳﺴﻴﺒﻞ)ﺷﺒﻜﺔIEC-A(
ﻣﻼﺣﻈﺔ
ﺍﻟﻤﻮﺍﺻﻔﺎﺕﻭﺍﻟﺘﺼﻤﻴﻢﻋﺮﺿﺔﻟﻠﺘﻌﺪﻳﻞﺑﺪﻭﻥﺇﺷﻌﺎﺭﻣﺴﺒﻖ.
Ar
١٥
ﺍﻟﻤﻠﺤﻘﺎﺕ
ﻣﻌﻠﻮﻣﺎﺕﺇﺿﺎﻓﻴﺔ
ﻗﺪﻻﻳﻜﻮﻥﺗﺸﻐﻴﻞﺍﻷﻗﺮﺍﺹﻣﻤﻜﻨًﺎﺑﺴﺒﺐﺧﺼﺎﺋﺺﺍﻟﻘﺮﺹﻭﺗﻨﺴﻴﻖﺍﻟﻘﺮﺹ
ﻭﺍﻟﺘﻄﺒﻴﻖﺍﻟﻤﺴﺠﻞﻭﺑﻴﺌﺔﺍﻟﺘﺸﻐﻴﻞﻭﻇﺮﻭﻑﺍﻟﺘﺨﺰﻳﻦﻭﻏﻴﺮﻫﺎ.
ﺍﻟﻌﻮﺍﺋﻖﻓﻲﺍﻟﻄﺮﻳﻖﻗﺪﺗﻌﻴﻖﺗﺸﻐﻴﻞﺍﻟﻘﺮﺹ.
ﺍﻷﻗﺮﺍﺹﺍﻟﻤﺰﺩﻭﺟﺔDualDiscs
DualDiscsﻫﻲﺃﻗﺮﺍﺹﺫﺍﺕﻭﺟﻬﻴﻦﺗﺘﻜﻮﻥﻣﻦﻗﺮﺹCDﻗﺎﺑﻞﻟﺘﺴﺠﻴﻞ
ﺍﻟﺼﻮﺕﻋﻠﻰﺃﺣﺪﺍﻟﻮﺟﻬﻴﻦﻭﻗﺮﺹDVDﻗﺎﺑﻞﻟﺘﺴﺠﻴﻞﺍﻟﻔﻴﺪﻳﻮﻋﻠﻰﺍﻟﻮﺟﻪ
ﺍﻵﺧﺮ.
ﺑﻤﺎﺃﻥﻭﺟﻪﻗﺮﺹCDﻓﻲﺍﻷﻗﺮﺍﺹﺍﻟﻤﺰﺩﻭﺟﺔDualDiscsﻻﻳﺘﻮﺍﻓﻖ
ﻣﺎﺩﻳﺎًﻣﻊﻣﻌﻴﺎﺭCDﺍﻟﻌﺎﻡﻓﻘﺪﻻﻳﻜﻮﻥﺑﺎﻹﻣﻜﺎﻥﺗﺸﻐﻴﻞﻭﺟﻪﻗﺮﺹCD
ﺑﺎﺳﺘﺨﺪﺍﻡﻫﺬﻩﺍﻟﻮﺣﺪﺓ.
ﻛﺜﺮﺓﺇﺩﺧﺎﻝﻭﺇﺧﺮﺍﺝﺍﻟﻘﺮﺹﺍﻟﻤﺰﺩﻭﺝDualDiscﻳﻤﻜﻦﺃﻥﻳﺆﺩﻱﺇﻟﻰ
ﺧﺪﻭﺵﻋﻠﻰﺍﻟﻘﺮﺹ.ﻭﺍﻟﺨﺪﻭﺵﺍﻟﻜﺒﻴﺮﺓﻳﻤﻜﻦﺃﻥﺗﺆﺩﻱﺇﻟﻰﻣﺸﺎﻛﻞﻓﻲﺗﺸﻐﻴﻞ
ﺍﻟﺠﻬﺎﺯ.ﻭﻓﻲﺑﻌﺾﺍﻟﺤﺎﻻﺕ،ﻳﻤﻜﻦﻟﻠﻘﺮﺹﺍﻟﻤﺰﺩﻭﺝDualDiscﺃﻥ
ﻳﻠﺘﺼﻖﺑﻔﺘﺤﺔﺇﺩﺧﺎﻝﺍﻷﻗﺮﺍﺹﻭﻻﻳﻤﻜﻦﺇﺧﺮﺍﺟﻪ.ﻟﻤﻨﻊﺫﻟﻚ،ﻧﻮﺻﻲ
ﺑﺎﻻﻣﺘﻨﺎﻉﻋﻦﺍﺳﺘﺨﺪﺍﻡﺍﻷﻗﺮﺍﺹﺍﻟﻤﺰﺩﻭﺟﺔDualDiscsﻣﻊﻫﺬﺍﺍﻟﺠﻬﺎﺯ.
ﻳﺮﺟﻰﺍﻟﺮﺟﻮﻉﺇﻟﻰﻣﻌﻠﻮﻣﺎﺕﺻﺎﻧﻊﺍﻟﻘﺮﺹﻟﻤﺰﻳﺪﻣﻦﺍﻟﻤﻌﻠﻮﻣﺎﺕﺍﻟﻤﻔﺼﻠﺔ
ﺣﻮﻝﺍﻷﻗﺮﺍﺹﺍﻟﻤﺰﺩﻭﺟﺔDualDiscs.
ﺗﻮﺍﻓﻖﺳﻤﻌﻲﻣﻀﻐﻮﻁ
WMA
ﺍﻣﺘﺪﺍﺩﺍﻟﻤﻠﻒ:.wma
ﻣﻌﺪّﻝﺍﻟﺒِﺖ:٤٨ﻙﺏ/ﺙﺇﻟﻰ٣٢٠ﻙﺏ/ﺙ)ﻣﻌﺪﻝﺑِﺖﻣﺴﺘﻤﺮCBR(،
٤٨ﻙﺏ/ﺙﺇﻟﻰ٣٨٤ﻙﺏ/ﺙ)ﻣﻌﺪﻝﺑِﺖﻣﺘﻐﻴّﺮVBR(
ﺗﺮﺩﺩﺍﻟﻤﻌﺎﻳﻨﺔ:ﻣﻦ٣٢ﻙﻫـﺇﻟﻰ٤٨ﻙﻫـ
Windows Media Audio Professional،ﻋﺪﻳﻢﺍﻟﻔﻘﺪ،ﺻﻮﺕ:ﻻ
MP3
ﺍﻣﺘﺪﺍﺩﺍﻟﻤﻠﻒ:.mp3
ﻣﻌﺪّﻝﺍﻟﺒِﺖ:٨ﻙﺏ/ﺙﺇﻟﻰ٣٢٠ﻙﺏ/ﺙ)ﻣﻌﺪﻝﺑِﺖﻣﺴﺘﻤﺮCBR(،
ﻣﻌﺪﻝﺑِﺖﻣﺘﻐﻴّﺮVBR
ﺗﺮﺩﺩﺍﻟﻤﻌﺎﻳﻨﺔ:٨ﻙﻫـﺇﻟﻰ٤٨ﻙﻫـ)٣٢،٤٤٫١،٤٨ﻟﻺﺑﺮﺍﺯ(
ﻣﺘﻮﺍﻓﻘﺔﻣﻊﺇﺻﺪﺍﺭID3 tagﺭﻗﻢ:1.0،1.1،2.2،2.3،2.4)ﻳﺘﻢ
ﺇﻋﻄﺎﺀﺍﻷﻭﻟﻮﻳﺔﻟﻺﺻﺪﺍﺭID3 tag 2.xﻋﻠﻰﺍﻹﺻﺪﺍﺭID3 tag 1.x.(
ﻗﺎﺋﻤﺔﺗﺸﻐﻴﻞM3u:ﻻ
MP3i (MP3ﺗﻔﺎﻋﻠﻲ(،mp3 PRO:ﻻ
WAV
ﺍﻣﺘﺪﺍﺩﺍﻟﻤﻠﻒ:.wav
ﺍﻟﺒِﺖﺍﻟﻜﻤّﻲ:٨ﻭ١٦)LPCM(،٤)MS ADPCM(
ﺗﺮﺩﺩﺃﺧﺬﺍﻟﻌﻴﻨﺔ:١٦ﻙﻫـﺇﻟﻰ٤٨ﻙﻫـ)LPCM(،٢٢٫٠٥ﻙﻫـﻭ٤٤٫١
ﻙﻫـ)MS ADPCM(
ﻣﻌﻠﻮﻣﺎﺕﺗﻜﻤﻴﻠﻴﺔ
ﻳﻤﻜﻦﻋﺮﺽﺃﻭﻝ٣٢ﺣﺮﻓًﺎﻛﺎﺳﻢﻣﻠﻒ)ﻳﺘﻀﻤﻦﺍﻣﺘﺪﺍﺩﺍﻟﻤﻠﻒ(ﺃﻭﺍﺳﻢﻣﺠﻠﺪ.
ﻗﺪﻻﻳﻌﻤﻞﻫﺬﺍﺍﻟﺠﻬﺎﺯﺑﻄﺮﻳﻘﺔﺻﺤﻴﺤﺔﻭﺫﻟﻚﺗﺒﻌًﺎﻟﻠﺒﺮﻧﺎﻣﺞﺍﻟﺘﻄﺒﻴﻘﻲ
ﺍﻟﻤﺴﺘﺨﺪﻡﻟﺘﺸﻔﻴﺮﻣﻠﻔﺎﺕWMA.
ﻗﺪﻳﻜﻮﻥﻫﻨﺎﻙﺗﺄﺧﻴﺮﺑﺴﻴﻂﻋﻨﺪﺑﺪﺀﺗﺸﻐﻴﻞﻣﻠﻔﺎﺕﺍﻟﺼﻮﺕﺍﻟﻤﻀﻤﻨﺔﺑﺒﻴﺎﻧﺎﺕ
ﺍﻟﺼﻮﺭ.
ﺍﻟﻘﺮﺹ
ﺍﻟﺘﺴﻠﺴﻞﺍﻟﻬﺮﻣﻲﻟﻠﻤﺠﻠﺪﺍﻟﻘﺎﺑﻞﻟﻠﺘﺸﻐﻴﻞ:ﻣﺎﻳﺼﻞﺇﻟﻰﺛﻤﺎﻥﻃﺒﻘﺎﺕ)ﺍﻟﺘﺴﻠﺴﻞ
ﺍﻟﻬﺮﻣﻲﺍﻟﻔﻌﻠﻲﺃﻗﻞﻣﻦﻃﺒﻘﺘﻴﻦ.(
ﺍﻟﻤﺠﻠﺪﺍﺕﺍﻟﻘﺎﺑﻠﺔﻟﻠﺘﺸﻐﻴﻞ:ﺣﺘﻰ٩٩
ﺍﻟﻤﻠﻔﺎﺕﺍﻟﻘﺎﺑﻠﺔﻟﻠﺘﺸﻐﻴﻞ:ﺣﺘﻰ٩٩٩
ﻧﻈﺎﻡﺍﻟﻤﻠﻔﺎﺕ:ISO 9660ﺍﻟﻤﺴﺘﻮﻯ١ﻭ٢،RomeoﻭJoliet
ﺍﻟﺘﺸﻐﻴﻞﻣﺘﻌﺪﺩﺍﻟﺠﻠﺴﺎﺕ:ﻧﻌﻢ
ﻧﻘﻞﺑﻴﺎﻧﺎﺕﻛﺘﺎﺑﺔﺍﻟﻤﺠﻤﻮﻋﺎﺕ:ﻻ
ﺑﻐﺾﺍﻟﻨﻈﺮﻋﻦﻃﻮﻝﺍﻟﻤﻘﻄﻊﺍﻟﻔﺎﺭﻍﺑﻴﻦﺃﻏﻨﻴﺎﺕﺍﻟﺘﺴﺠﻴﻞﺍﻷﺻﻠﻲ،ﻳﺘﻢ
ﻋﺮﺽﺃﻗﺮﺍﺹﺍﻟﺼﻮﺕﺍﻟﻤﻀﻐﻮﻃﺔﺑﻮﻗﻔﺔﻣﺆﻗﺘﺔﻗﺼﻴﺮﺓﺑﻴﻦﺍﻷﻏﻨﻴﺎﺕ.
ﺗﺴﻠﺴﻞﻣﻠﻔﺎﺕﺍﻟﺼﻮﺕ
ﻻﻳﺴﺘﻄﻴﻊﺍﻟﻤﺴﺘﺨﺪﻡﺗﻌﻴﻴﻦﺃﺭﻗﺎﻡﺍﻟﻤﺠﻠﺪﺍﺕﻭﺗﺤﺪﻳﺪﺗﺴﻠﺴﻼﺕ
ﺍﻟﺘﺸﻐﻴﻞﺑﻬﺬﻩﺍﻟﻮﺣﺪﺓ.
ﻣﺜﺎﻝﻋﻠﻰﺍﻟﺘﺴﻠﺴﻞﺍﻟﻬﺮﻣﻲ
1
2
3
4
5
6
02
03
04
05
:ﻣﺠﻠﺪ
:ﻣﻠﻒﺻﻮﺕﻣﻀﻐﻮﻁ
٠١ﺇﻟﻰ٠٥:ﺭﻗﻢﺍﻟﻤﺠﻠﺪ
1ﺇﻟﻰ6:ﺗﺴﻠﺴﻞﺍﻟﺘﺸﻐﻴﻞ
Ar
١٤
ﺍﻟﻤﻠﺤﻘﺎﺕ
ﺍﻟﻌﺮﺑﻴﺔ
ﻣﻌﻠﻮﻣﺎﺕﺇﺿﺎﻓﻴﺔ
Page 35

ﺣﻞﺍﻟﻤﺸﺎﻛﻞ
ﺍﻷﻋﺮﺍﺽﺍﻟﺴﺒﺐﺍﻹﺟﺮﺍﺀ
ﺗﻌﻮﺩﺍﻟﺸﺎﺷﺔﺗﻠﻘﺎﺋﻴًﺎ
ﺇﻟﻰﺍﻟﻮﺿﻊﺍﻟﻌﺎﺩﻱ.
ﻟﻢﺗﻘﻢﺑﺘﻨﻔﻴﺬﺃﻳﺔﻋﻤﻠﻴﺎﺕ
ﺧﻼﻝﺣﻮﺍﻟﻲ٣٠ﺛﺎﻧﻴﺔ.
ﻗﻢﺑﺈﺟﺮﺍﺀﺍﻟﻌﻤﻠﻴﺔﻣﺮﺓ
ﺃﺧﺮﻯ.
ﻳﺘﻐﻴﺮﻧﻄﺎﻕﺗﺸﻐﻴﻞ
ﺍﻟﺘﻜﺮﺍﺭﺑﺸﻜﻞﻏﻴﺮ
ﻣﺘﻮﻗﻊ.
ﺑﻨﺎﺀًﻋﻠﻰﻧﻄﺎﻕﺗﺸﻐﻴﻞ
ﺍﻟﺘﻜﺮﺍﺭ،ﻗﺪﻳﺘﻐﻴﺮﺍﻟﻨﻄﺎﻕ
ﺍﻟﻤﺨﺘﺎﺭﻋﻨﺪﺍﺧﺘﻴﺎﺭﻣﺠﻠﺪ
ﺃﻭﻣﻘﻄﻮﻋﺔﺃﺧﺮﻯﺃﻭ
ﻋﻨﺪﺍﻟﺘﻘﺪﻳﻢ/ﺍﻟﺘﺮﺟﻴﻊ
ﺍﻟﺴﺮﻳﻊ.
ﻗﻢﺑﺎﺧﺘﻴﺎﺭﻧﻄﺎﻕﺗﺸﻐﻴﻞ
ﺍﻟﺘﻜﺮﺍﺭﻣﺮﺓﺃﺧﺮﻯ.
ﻻﻳﺘﻢﺗﺸﻐﻴﻞﻣﺠﻠﺪ
ﻓﺮﻋﻲ.
ﻻﻳﻤﻜﻦﺗﺸﻐﻴﻞﺍﻟﻤﺠﻠﺪﺍﺕ
ﺍﻟﻔﺮﻋﻴﺔﻋﻨﺪﺍﺧﺘﻴﺎﺭ
FLD)ﺗﻜﺮﺍﺭﻣﺠﻠﺪ(.
ﺍﺧﺘﺮﻧﻄﺎﻕﺗﺸﻐﻴﻞﺗﻜﺮﺍﺭ
ﺁﺧﺮ.
ﻳﻈﻬﺮNO XXXX
ﻋﻨﺪﺗﻐﻴﺮﻋﺮﺽ
)NO T-TTL،ﻋﻠﻰ
ﺳﺒﻴﻞﺍﻟﻤﺜﺎﻝ(.
ﻻﺗﻮﺟﺪﻣﻌﻠﻮﻣﺎﺕﻧﺼﻴﺔ
ﻣﺘﻀﻤﻨﺔ.
ﻗﻢﺑﺘﺤﻮﻳﻞﺍﻟﻌﺮﺽﺃﻭ
ﺍﻟﺘﺸﻐﻴﻞﺇﻟﻰﻣﻠﻒ/ﻣﺴﺎﺭ
ﺁﺧﺮ.
ﺍﻟﻮﺣﺪﺓﻣﻌﻄﻠﺔ.
ﺛﻤﺔﺗﺸﻮﻳﺶ.
ﺇﻧﻚﺗﺴﺘﺨﺪﻡﺟﻬﺎﺯًﺍ-ﻣﺜﻞ
ﻫﺎﺗﻒﺧﻠﻮﻱ-ﻳﺒﺚ
ﻣﻮﺟﺎﺕﻛﻬﺮﺑﻴﺔﺑﺎﻟﻘﺮﺏ
ﻣﻦﺍﻟﻮﺣﺪﺓ.
ﺃﺑﻌﺪﻋﻦﺍﻟﻮﺣﺪﺓﺍﻷﺟﻬﺰﺓ
ﺍﻟﻜﻬﺮﺑﻴﺔﺍﻟﺘﻲﻗﺪﺗﺴﺒﺐ
ﺗﺸﻮﻳﺸًﺎ.
ﺭﺳﺎﺋﻞﺍﻟﺨﻄﺄ
ﻋﻨﺪﻣﺎﺗﺘﺼﻞﺑﻮﻛﻴﻠﻚﺃﻭﺑﺄﻗﺮﺏﻣﺮﻛﺰﺻﻴﺎﻧﺔﺗﺎﺑﻊﻟﺸﺮﻛﺔ
Pioneer،ﺗﺄﻛﺪﻣﻦﺗﺴﺠﻴﻞﺭﺳﺎﻟﺔﺍﻟﺨﻄﺄ.
ﺍﻟﺮﺳﺎﻟﺔﺍﻟﺴﺒﺐﺍﻹﺟﺮﺍﺀ
ERROR-11, 12,
17, 30
ﺍﻟﻘﺮﺹﻣﺘﺴﺦ.ﻧﻈّﻒﺍﻟﻘﺮﺹ.
ﺍﻟﻘﺮﺹﻣﺨﺪﻭﺵ.ﺍﺳﺘﺒﺪﻝﺍﻟﻘﺮﺹ.
ERROR-10, 11,
12, 15, 17, 30,
A0
ﻳﻮﺟﺪﻋﻄﻞﻛﻬﺮﺑﻲﺃﻭ
ﻣﻴﻜﺎﻧﻴﻜﻲ.
ﻗﻢﺑﺈﺩﺍﺭﺓﻣﻔﺘﺎﺡﺗﺸﻐﻴﻞ
ﺍﻟﻤﺤﺮﻙﻟﻮﺿﻊﺍﻹﻳﻘﺎﻑ
OFFﻭﺍﻟﻌﻮﺩﺓﻟﻮﺿﻊ
ﺍﻟﺘﺸﻐﻴﻞONﺃﻭﻗﻢ
ﺑﺎﻟﺘﺤﻮﻳﻞﺇﻟﻰﻣﺼﺪﺭ
ﻣﺨﺘﻠﻒﺛﻢﺍﻟﻌﻮﺩﺓﺇﻟﻰﻣﺸﻐّﻞ
ﺍﻷﻗﺮﺍﺹCD.
ERROR-15ﺍﻟﻘﺮﺹﺍﻟﺬﻱﺗﻢﺇﺩﺧﺎﻟﻪ
ﻓﺎﺭﻍ
ﺍﺳﺘﺒﺪﻝﺍﻟﻘﺮﺹ.
ERROR-23ﺗﻨﺴﻴﻖﺍﻟﻘﺮﺹCDﻏﻴﺮ
ﻣﺪﻋﻮﻡ
ﺍﺳﺘﺒﺪﻝﺍﻟﻘﺮﺹ.
FRMTREADﺃﺣﻴﺎﻧًﺎﻳﺤﺪﺙﺗﺄﺧﻴﺮﺑﻴﻦ
ﺑﺪﺀﺍﻟﺘﺸﻐﻴﻞﻭﺳﻤﺎﻉﺃﻱ
ﺻﻮﺕ.
ﺍﻧﺘﻈﺮﺣﺘﻰﺗﺨﺘﻔﻲﺍﻟﺮﺳﺎﻟﺔ
ﻭﺗﺴﻤﻊﺻﻮﺗًﺎ.
NO AUDIOﺍﻟﻘﺮﺹﺍﻟﺬﻱﺗﻢﺇﺩﺧﺎﻟﻪ
ﻻﻳﺤﺘﻮﻱﻋﻠﻰﺃﻱﻣﻠﻔﺎﺕ
ﻗﺎﺑﻠﺔﻟﻠﺘﺸﻐﻴﻞ.
ﺍﺳﺘﺒﺪﻝﺍﻟﻘﺮﺹ.
ﺍﻟﺮﺳﺎﻟﺔﺍﻟﺴﺒﺐﺍﻹﺟﺮﺍﺀ
PROTECTﻛﻞﺍﻟﻤﻠﻔﺎﺕﻓﻲﺍﻟﻘﺮﺹ
ﺍﻟﺬﻱﺗﻢﺇﺩﺧﺎﻟﻪﻣﺤﻤﻴﺔ
ﺑﺤﻘﻮﻕDRM.
ﺍﺳﺘﺒﺪﻝﺍﻟﻘﺮﺹ.
SKIPPEDﺍﻟﻘﺮﺹﺍﻟﺬﻱﺗﻢﺇﺩﺧﺎﻟﻪ
ﻳﺤﺘﻮﻱﻋﻠﻰﻣﻠﻔﺎﺕ
WMAﻣﺤﻤﻴﺔﺑﺤﻘﻮﻕ
DRM.
ﺍﺳﺘﺒﺪﻝﺍﻟﻘﺮﺹ.
ﺍﻟﺘﻌﺎﻣﻞﻣﻊﺍﻹﺭﺷﺎﺩﺍﺕ
ﺍﻷﻗﺮﺍﺹﻭﺍﻟﻤﺸﻐﻞ
ﻗﻢﺑﺎﺳﺘﺨﺪﺍﻡﺍﻷﻗﺮﺍﺹﺍﻟﺘﻲﻋﻠﻴﻬﺎﺃﺣﺪﺍﻟﺸﻌﺎﺭﻳﻦﺍﻟﺘﺎﻟﻴﻴﻦﻓﻘﻂ.
ﺍﺳﺘﺨﺪﻡﻗﺮﺻًﺎ١٢ﺳﻢ.ﻭﻻﺗﺴﺘﺨﺪﻡﻗﺮﺻًﺎ٨ﺳﻢﺃﻭﻣﻬﺎﻳﺌًﺎﻷﻗﺮﺍﺹ٨ﺳﻢ.
ﺍﺳﺘﺨﺪﻡﻓﻘﻂﺍﻷﻗﺮﺍﺹﺍﻟﺘﻘﻠﻴﺪﻳﺔﺍﻟﻤﺴﺘﺪﻳﺮﺓﺑﺎﻟﻜﺎﻣﻞ.ﻻﺗﺴﺘﺨﺪﻡﺍﻷﻗﺮﺍﺹ
ﺍﻟﻤﺸﻜّﻠﺔ.
ﻻﺗﻘﻢﺑﺈﺩﺧﺎﻝﺃﻱﺷﻲءﺁﺧﺮﺧﻼﻑﻗﺮﺹCDﺩﺍﺧﻞﻓﺘﺤﺔﺗﺤﻤﻴﻞﺍﻟﻘﺮﺹ
CD.
ﻻﺗﺴﺘﺨﺪﻡﺃﻗﺮﺍﺻًﺎﻣﺘﺸﻘﻘﺔﺃﻭﻣﺨﺪﻭﺷﺔﺃﻭﻣﺸﻮﻫﺔﻭﺇﻻﻓﺎﻥﺍﻷﻗﺮﺍﺹﺍﻟﺘﺎﻟﻔﺔﻗﺪ
ﺗﺆﺩﻱﺇﻟﻰﺗﻠﻒﺍﻟﻤﺸﻐﻞ.
ﺗﺸﻐﻴﻞﺃﻗﺮﺍﺹCD-R/CD-RWﻏﻴﺮﺍﻟﻤﺨﺘﻮﻣﺔﻏﻴﺮﻣﻤﻜﻦ.
ﻻﺗﻠﻤﺲﺳﻄﺢﺍﻷﻗﺮﺍﺹﺍﻟﻤﺴﺠﻠﺔ.
ﻗﻢﺑﺘﺨﺰﻳﻦﺍﻷﻗﺮﺍﺹﻓﻲﺍﻟﻌﻠﺐﺍﻟﺨﺎﺻﺔﺑﻬﺎﻋﻨﺪﻋﺪﻡﺍﻻﺳﺘﺨﺪﺍﻡ.
ﺗﻔﺎﺩﻯﺗﺮﻙﺍﻷﻗﺮﺍﺹﻓﻲﺃﺟﻮﺍﺀﺣﺎﺭﺓﺟﺪًﺍﺑﻤﺎﻓﻲﺫﻟﻚﺗﺤﺖﺃﺷﻌﺔﺍﻟﺸﻤﺲ
ﺍﻟﻤﺒﺎﺷﺮﺓ.
ﻻﺗﻘﻢﺑﻠﺼﻖﺑﻄﺎﻗﺎﺕﻋﻠﻰﺃﺳﻄﺢﺍﻷﻗﺮﺍﺹﺃﻭﺍﻟﻜﺘﺎﺑﺔﻋﻠﻴﻬﺎﺃﻭﺗﻌﺮﻳﻀﻬﺎ
ﻟﻤﻮﺍﺩﻛﻴﻤﺎﻭﻳﺔ.
ﻟﺘﻨﻈﻴﻒﻗﺮﺹCD،ﺍﻣﺴﺢﺍﻟﻘﺮﺹﺑﺎﺳﺘﺨﺪﺍﻡﻗﻄﻌﺔﻗﻤﺎﺵﻧﺎﻋﻤﺔﻟﻠﺨﺎﺭﺝﻣﻦ
ﺍﻟﻤﺮﻛﺰ.
ﻗﺪﻳﻀﻌﻒﺍﻟﺘﻜﺜﻒﺃﺩﺍﺀﺍﻟﻤﺸﻐﻞﻟﻔﺘﺮﺓﻣﺆﻗﺘﺔ.ﺍﺗﺮﻙﺍﻷﻣﺮﻟﻴﺘﻢﺗﻌﺪﻳﻠﻪﺑﺪﺭﺟﺔ
ﺣﺮﺍﺭﺓﺃﺩﻓﺄﻟﻤﺪﺓﺳﺎﻋﺔﺗﻘﺮﻳﺒًﺎ.ﺍﻣﺴﺢﺃﻱﺃﻭﺳﺎﺥﻋﻦﺍﻷﻗﺮﺍﺹﺑﻘﻄﻌﺔﻗﻤﺎﺵ
ﻧﺎﻋﻤﺔ.
Ar
١٣
ﺍﻟﻤﻠﺤﻘﺎﺕ
ﻣﻌﻠﻮﻣﺎﺕﺇﺿﺎﻓﻴﺔ
ﻓﻚﺍﻟﻮﺣﺪﺓ
١ﻓﻚﺣﻠﻘﺔﺍﻟﺘﺸﻄﻴﺐ.
1ﺣﻠﻘﺔﺍﻟﺘﺸﻄﻴﺐ
2ﻟﺴﻴﻦﻣﺜﻠﻮﻡ
!ﻳﺴﻤﺢﻓﻚﺍﻟﻠﻮﺣﺔﺍﻷﻣﺎﻣﻴﺔﺑﻮﺻﻮﻝﺃﺳﻬﻞﺇﻟﻰﺣﻠﻘﺔﺍﻟﺘﺸﻄﻴﺐ.
!ﻋﻨﺪﺇﻋﺎﺩﺓﺗﺮﻛﻴﺐﺣﻠﻘﺔﺍﻟﺘﺸﻄﻴﺐ؛ﻭﺟّﻪﺍﻟﺠﺎﻧﺐﺫﺍﺍﻟﻠﺴﺎﻥ
ﺍﻟﻤﺜﻠﻮﻡﻷﺳﻔﻞ.
٢ﺃﺩﺧﻞﻣﻔﺎﺗﻴﺢﺍﻻﺳﺘﺨﺮﺍﺝﺍﻟﻤﺮﻓﻘﺔﻓﻲﻛﻼﺟﺎﻧﺒﻲﺍﻟﻮﺣﺪﺓﺇﻟﻰ
ﺃﻥﺗﺴﺘﻘﺮﻓﻲﻣﻜﺎﻧﻬﺎ.
٣ﺍﺳﺤﺐﺍﻟﻮﺣﺪﺓﺧﺎﺭﺝﻟﻮﺣﺔﺍﻟﻌﺪﺍﺩﺍﺕ.
ﻓﻚﻭﺇﻋﺎﺩﺓﺗﻮﺻﻴﻞﺍﻟﻠﻮﺣﺔﺍﻷﻣﺎﻣﻴﺔ
ﻳﻤﻜﻦﻓﻚﺍﻟﻠﻮﺣﺔﺍﻷﻣﺎﻣﻴﺔﻟﺤﻤﺎﻳﺔﺍﻟﻮﺣﺪﺓﺍﻷﻣﺎﻣﻴﺔﻣﻦﺍﻟﺴﺮﻗﺔ.
ﺍﺿﻐﻂﺯﺭﺍﻟﻔﻚ،ﺛﻢﺣﺮﻙﺍﻟﻠﻮﺣﺔﺍﻷﻣﺎﻣﻴﺔﻷﻋﻠﻰﻭﺍﺳﺤﺒﻬﺎﻧﺤﻮﻙ.
ﻟﻠﺘﻔﺎﺻﻴﻞ،ﺭﺍﺟﻊ
ﻓﻚﺍﻟﻠﻮﺣﺔﺍﻷﻣﺎﻣﻴﺔﻟﺤﻤﺎﻳﺔﺍﻟﻮﺣﺪﺓﻣﻦﺍﻟﺴﺮﻗﺔ
ﻭ
ﺇﻋﺎﺩﺓﺗﻮﺻﻴﻞﺍﻟﻠﻮﺣﺔﺍﻷﻣﺎﻣﻴﺔ
ﻓﻲﺻﻔﺤﺔ٥.
Ar
١٢
ﺍﻟﻘﺴﻢ
ﺍﻟﻌﺮﺑﻴﺔ
٠٣
ﺍﻟﺘﺮﻛﻴﺐ
Page 36

!ﻟﻠﺘﺄﻛﺪﻣﻦﺍﻟﺘﺒﺪﻳﺪﺍﻟﺼﺤﻴﺢﻟﻠﺤﺮﺍﺭﺓﻋﻨﺪﺍﺳﺘﺨﺪﺍﻡﻫﺬﻩﺍﻟﻮﺣﺪﺓ،ﺗﺄﻛﺪ
ﻣﻦﺗﺮﻙﻣﺴﺎﺣﺔﻭﺍﺳﻌﺔﺧﻠﻒﺍﻟﻠﻮﺣﺔﺍﻟﺨﻠﻔﻴﺔﻭﻟﻒﺃﻳﺔﻛﺒﻼﺕ
ﻣﻔﻜﻮﻛﺔﺑﺤﻴﺚﻻﺗﺴﺪﺍﻟﻔﺘﺤﺎﺕﻋﻨﺪﺗﺮﻛﻴﺐﺍﻟﻮﺣﺪﺓ.
ﺗﺮﻛﻴﺐDINﺍﻷﻣﺎﻣﻲ/ﺍﻟﺨﻠﻔﻲ
ﻳﻤﻜﻦﺗﺮﻛﻴﺐﻫﺬﻩﺍﻟﻮﺣﺪﺓﺗﺮﻛﻴﺒًﺎﺻﺤﻴﺤًﺎﺑﺎﺳﺘﺨﺪﺍﻡﺍﻟﺘﺮﻛﻴﺐ
ﺍﻷﻣﺎﻣﻲﺃﻭﺍﻟﺨﻠﻔﻲ.
ﺗﺮﻛﻴﺐDINﺍﻷﻣﺎﻣﻲ
١ﺃﺩﺧﻞﺟﻠﺒﺔﺍﻟﺘﺮﻛﻴﺐﻓﻲﻟﻮﺣﺔﺍﻟﻌﺪﺍﺩﺍﺕ.
ﻟﻠﺘﺮﻛﻴﺐﻓﻲﺍﻟﻤﺴﺎﺣﺎﺕﺍﻟﺼﻐﻴﺮﺓ،ﺍﺳﺘﺨﺪﻡﺟﻠﺒﺔﺍﻟﺘﺮﻛﻴﺐﺍﻟﻤﺮﻓﻘﺔ.
ﻭﺇﺫﺍﻛﺎﻥﻫﻨﺎﻙﻣﺴﺎﺣﺔﻛﺎﻓﻴﺔ،ﺍﺳﺘﺨﺪﻡﺟﻠﺒﺔﺍﻟﺘﺮﻛﻴﺐﺍﻟﻤﺮﻓﻘﺔﻣﻊ
ﺍﻟﺴﻴﺎﺭﺓ.
٢ﻗﻢﺑﺘﺜﺒﻴﺖﺟﻠﺒﺔﺍﻟﺘﺮﻛﻴﺐﺑﺎﺳﺘﺨﺪﺍﻡﻣﻔﻚﻟﺜﻨﻲﺍﻷﺷﺮﻃﺔ
ﺍﻟﻤﻌﺪﻧﻴﺔ)٩٠ﺩﺭﺟﺔ(ﻓﻲﻣﻜﺎﻧﻬﺎ.
1
2
1ﻟﻮﺣﺔﺍﻟﻌﺪﺍﺩﺍﺕ
2ﺟﻠﺒﺔﺍﻟﺘﺮﻛﻴﺐ
٣ﺭﻛّﺐﺍﻟﻮﺣﺪﺓﻛﻤﺎﻓﻲﺍﻟﺸﻜﻞ.
ﺍﺳﺘﺨﺪﻡﺃﺟﺰﺍﺀﻣﺘﺎﺣﺔﺗﺠﺎﺭﻳًﺎﻋﻨﺪﺍﻟﺘﺮﻛﻴﺐ.
1
2
3
4
5
1ﺻﺎﻣﻮﻟﺔ
2ﺣﺎﺟﺰﺃﻭﺩﻋﺎﻣﺔﻣﻌﺪﻧﻴﺔ
3ﺷﺮﻳﻂﻣﻌﺪﻧﻲ
4ﺑﺮﻏﻲ
5ﺑﺮﻏﻲ)M4 × ٨(
#ﺗﺄﻛﺪﻣﻦﺗﺮﻛﻴﺐﺍﻟﻮﺣﺪﺓﺑﺈﺣﻜﺎﻡﻓﻲﻣﻜﺎﻧﻬﺎ.ﺍﻟﺘﺮﻛﻴﺐﻏﻴﺮﺍﻟﻤﺴﺘﻘﺮ
ﻗﺪﻳﺘﺴﺒﺐﻓﻲﺗﺠﺎﻭﺯﺃﻭﺃﻋﻄﺎﻝﺃﺧﺮﻯ.
ﺗﺮﻛﻴﺐDINﺍﻟﺨﻠﻔﻲ
١ﺣﺪﺩﺍﻟﻮﺿﻊﺍﻟﻤﻨﺎﺳﺐﺣﻴﺚﺗﺘﻮﺍﻓﻖﻓﺘﺤﺎﺕﺍﻟﻜﺘﻴﻔﺔﻣﻊﺟﺎﻧﺐ
ﺍﻟﻮﺣﺪﺓ.
٢ﺍﺭﺑﻂﻣﺴﻤﺎﺭﻳﻦﻋﻠﻰﻛﻞﺟﺎﻧﺐ.
1
2
3
1ﻣﺴﻤﺎﺭﺭﺑﻂ)٥ﻣﻠﻢ×٨ﻣﻠﻢ(
2ﻛﺘﻴﻔﺔﺍﻟﺘﺮﻛﻴﺐ
3ﻟﻮﺣﺔﺍﻟﻌﺪﺍﺩﺍﺕﺃﻭﻟﻮﺣﺔﺍﻟﺘﺤﻜﻢ
Ar
١١
ﺍﻟﻘﺴﻢ
٠٣
ﺍﻟﺘﺮﻛﻴﺐ
ﺳﻠﻚﺍﻟﻜﻬﺮﺑﺎﺀ
1
8
9
c
d
6
32
4
5
7
a
b
e
f
h
g
LR
F
R
1ﺇﻟﻰﺩﺧﻞﺳﻠﻚﺍﻟﻜﻬﺮﺑﺎﺀ
2ﻳﺴﺎﺭ
3ﻳﻤﻴﻦ
4ﺳﻤﺎﻋﺔﺃﻣﺎﻣﻴﺔ
5ﺳﻤﺎﻋﺔﺧﻠﻔﻴﺔ
6ﺃﺑﻴﺾ
7ﺃﺑﻴﺾ/ﺃﺳﻮﺩ
8ﺭﻣﺎﺩﻱ
9ﺭﻣﺎﺩﻱ/ﺃﺳﻮﺩ
aﺃﺧﻀﺮ
bﺃﺧﻀﺮ/ﺃﺳﻮﺩ
cﺑﻨﻔﺴﺠﻲ
dﺑﻨﻔﺴﺠﻲ/ﺃﺳﻮﺩ
eﺃﺳﻮﺩ)ﺃﺭﺿﻲﺍﻟﺸﺎﺳﻴﻪ(
ﺻﻞﺑﻤﻮﻗﻊﻣﻌﺪﻧﻲﻧﻈﻴﻒﺧﺎﻝٍﻣﻦﺍﻟﺪﻫﺎﻧﺎﺕ.
fﺃﺻﻔﺮ
ﺻﻞﺑﻄﺮﻑﺍﻹﻣﺪﺍﺩﺍﻟﺪﺍﺋﻢ١٢ﻓﻮﻟﺖ.
gﺃﺣﻤﺮ
ﺻﻞﺑﻄﺮﻑﻣﺤﻜﻮﻡﺑﻤﻔﺘﺎﺡﺍﻹﺷﻌﺎﻝ)١٢ﻓﻮﻟﺖﺗﻴﺎﺭﻣﺴﺘﻤﺮ(.
hﺃﺯﺭﻕ/ﺃﺑﻴﺾ
ﺻﻞﺑﻄﺮﻑﺗﺤﻜﻢﺍﻟﻨﻈﺎﻡﺑﻤﻀﺨﻢﻗﺪﺭﺓﺃﻭﻃﺮﻑﺗﺤﻜﻢﻣﺮﺣﻞ
ﺍﻟﻬﻮﺍﺋﻲﺍﻟﺘﻠﻘﺎﺋﻲ)ﺍﻟﺤﺪﺍﻷﻗﺼﻰ٣٠٠ﻣﻴﻠﻠﻲﺃﻣﺒﻴﺮ١٢ﻓﻮﻟﺖﺗﻴﺎﺭ
ﻣﺴﺘﻤﺮ(.
ﻣﻼﺣﻈﺔ
ﻣﻊﻧﻈﺎﻡﺍﻟﺴﻤﺎﻋﺘﻴﻦ,ﻻﺗﺼﻞﺃﻱﺷﻲءﺑﺄﺳﻼﻙﺍﻟﺴﻤﺎﻋﺔﻏﻴﺮﺍﻟﻤﺘﺼﻠﺔ
ﺑﺎﻟﺴﻤﺎﻋﺎﺕ.
ﻣﻀﺨﻢﻗﺪﺭﺓ)ﻳﺒﺎﻉﺑﺸﻜﻞﻣﻨﻔﺼﻞ(
ﻧﻔﺬﻫﺬﻩﺍﻟﻮﺻﻼﺕﻋﻨﺪﺍﺳﺘﺨﺪﺍﻡﻣﻀﺨﻢﺍﺧﺘﻴﺎﺭﻱ.
1
4
2
55
3
1ﻭﺣﺪﺓﺍﻟﺘﺤﻜﻢﻋﻦﺑﻌﺪﻓﻲﺍﻟﻨﻈﺎﻡ
ﺻﻞﺑﺎﻟﻜﺎﺑﻞﺍﻷﺯﺭﻕ/ﺍﻷﺑﻴﺾ.
2ﻣﻀﺨﻢﻗﺪﺭﺓ)ﻳﺒﺎﻉﺑﺸﻜﻞﻣﻨﻔﺼﻞ(
3ﺻﻞﺑﻜﺒﻼﺕRCA)ﺗُﺒﺎﻉﺑﺸﻜﻞﻣﻨﻔﺼﻞ(
4ﺇﻟﻰﺍﻟﺨﺮﺝﺍﻟﺨﻠﻔﻲ
5ﺳﻤﺎﻋﺔﺧﻠﻔﻴﺔ
ﺍﻟﺘﺮﻛﻴﺐ
ﻫﺎﻡ
!ﺗﺤﻘﻖﻣﻦﻛﺎﻓﺔﺍﻟﺘﻮﺻﻴﻼﺕﻭﺍﻷﻧﻈﻤﺔﻗﺒﻞﺍﻟﺘﺮﻛﻴﺐﺍﻟﻨﻬﺎﺋﻲ.
!ﻻﺗﺴﺘﺨﺪﻡﺃﺟﺰﺍﺀﻏﻴﺮﻣﺮﺧﺼﺔﺣﻴﺚﻗﺪﻳﺘﺴﺒﺐﺫﻟﻚﻓﻲﺣﺪﻭﺙ
ﺃﻋﻄﺎﻝ.
!ﺍﺳﺘﺸﺮﺍﻟﻮﻛﻴﻞﺇﺫﺍﻛﺎﻥﺍﻟﺘﺮﻛﻴﺐﻳﺘﻄﻠﺐﺛﻘﺐﻓﺘﺤﺎﺕﺃﻭﺗﻌﺪﻳﻼﺕ
ﺃﺧﺮﻯﺑﺎﻟﺴﻴﺎﺭﺓ.
!ﻻﺗﻘﻢﺑﺘﺮﻛﻴﺐﻫﺬﻩﺍﻟﻮﺣﺪﺓﻓﻲﺍﻷﻣﺎﻛﻦﺍﻟﺘﺎﻟﻴﺔ:
—ﺣﻴﺚﻳﻤﻜﻦﺃﻥﺗﺘﺪﺍﺧﻞﻣﻊﺗﺸﻐﻴﻞﺍﻟﺴﻴﺎﺭﺓ.
—ﺣﻴﺚﻳﻤﻜﻦﺃﻥﺗﺤﺪﺙﺇﺻﺎﺑﺔﻟﻠﺮﺍﻛﺐﻛﻨﺘﻴﺠﺔﻟﻠﺘﻮﻗﻒﺍﻟﻤﻔﺎﺟﺊ.
!ﺳﻴﺘﻠﻒﻟﻴﺰﺭﺷﺒﻪﺍﻟﻤﻮﺻﻞﻓﻲﺣﺎﻟﺔﺍﻟﺴﺨﻮﻧﺔﺍﻟﺰﺍﺋﺪﺓ.ﻗﻢﺑﺘﺮﻛﻴﺐ
ﻫﺬﻩﺍﻟﻮﺣﺪﺓﺑﻌﻴﺪًﺍﻋﻦﺍﻷﻣﺎﻛﻦﺍﻟﺴﺎﺧﻨﺔﻣﺜﻞﺍﻷﻣﺎﻛﻦﺍﻟﻘﺮﻳﺒﺔﻣﻦ
ﻣﺨﺮﺝﺳﺨﺎﻥ.
!ﻳﺘﻢﺍﻟﺤﺼﻮﻝﻋﻠﻰﺃﻓﻀﻞﺃﺩﺍﺀﻋﻨﺪﺗﺮﻛﻴﺐﺍﻟﻮﺣﺪﺓﺑﺰﺍﻭﻳﺔﺃﻗﻞﻣﻦ
٦٠ﺩﺭﺟﺔ.
60°
Ar
١٠
ﺍﻟﻘﺴﻢ
ﺍﻟﻌﺮﺑﻴﺔ
٠٣
ﺍﻟﺘﺮﻛﻴﺐ
Page 37

ﺍﻟﺘﻮﺻﻴﻼﺕ
ﺗﺤﺬﻳﺮ
!ﺍﺳﺘﺨﺪﻡﺳﻤﺎﻋﺎﺕﺑﻄﺎﻗﺔﺃﻛﺜﺮﻣﻦ٥٠ﻭﺍﺕ)ﻗﻴﻤﺔﺍﻟﺨﺮﺝ(ﻭﺑﻴﻦ٤
ﺃﻭﻡﺇﻟﻰ٨ﺃﻭﻡ)ﻗﻴﻤﺔﺍﻟﻤﻌﺎﻭﻗﺔ(.ﻻﺗﺴﺘﺨﺪﻡﺍﻟﺴﻤﺎﻋﺎﺕ١ﺃﻭﻡﺇﻟﻰ٣
ﺃﻭﻡﻟﻬﺬﻩﺍﻟﻮﺣﺪﺓ.
!ﺍﻟﻜﺒﻞﺍﻷﺳﻮﺩﻫﻮﻛﺒﻞﺍﻷﺭﺿﻲ.ﻋﻨﺪﺗﺮﻛﻴﺐﻫﺬﻩﺍﻟﻮﺣﺪﺓﺃﻭﻣﻀﺨﻢ
ﺍﻟﻄﺎﻗﺔ)ﻳﺒﺎﻉﺑﺸﻜﻞﻣﻨﻔﺼﻞ(؛ﺗﺄﻛﺪﻣﻦﺗﻮﺻﻴﻞﺳﻠﻚﺍﻷﺭﺿﻲﺃﻭﻻً.
ﺗﺄﻛﺪﺃﻥﺳﻠﻚﺍﻷﺭﺿﻲﻣﺘﺼﻞﺑﺸﻜﻞﺻﺤﻴﺢﺑﺎﻷﺟﺰﺍﺀﺍﻟﻤﻌﺪﻧﻴﺔﻣﻦ
ﺟﺴﻢﺍﻟﺴﻴﺎﺭﺓ.ﻳﺠﺐﺗﻮﺻﻴﻞﺳﻠﻚﺍﻷﺭﺿﻲﻟﻤﻀﺨﻢﺍﻟﻄﺎﻗﺔﻭﻟﻬﺬﻩ
ﺍﻟﻮﺣﺪﺓﺃﻭﺃﻱﺟﻬﺎﺯﺁﺧﺮﺑﺎﻟﺴﻴﺎﺭﺓﺑﺸﻜﻞﻣﺴﺘﻘﻞﺑﺎﺳﺘﺨﺪﺍﻡﺑﺮﺍﻍ
ﻣﺨﺘﻠﻔﺔ.ﺇﺫﺍﺗﺤﺮﺭﺑﺮﻏﻲﺍﻷﺭﺿﻲﺃﻭﺳﻘﻂ؛ﻓﻘﺪﻳﻨﺘﺞﻋﻨﻪﺣﺮﻳﻖﺃﻭ
ﻇﻬﻮﺭﺩﺧﺎﻥﺃﻭﻋﻄﻞ.
ﻫﺎﻡ
!ﻋﻨﺪﺗﺮﻛﻴﺐﻫﺬﻩﺍﻟﻮﺣﺪﺓﻓﻲﺳﻴﺎﺭﺓﺑﺪﻭﻥﺿﺒﻂﻣﻔﺘﺎﺡﺗﺸﻐﻴﻞ
ﺍﻟﺴﻴﺎﺭﺓﻋﻠﻰﻭﺿﻊACC)ﻣﻠﺤﻘﺎﺕ(،ﻗﺪﻳﺘﺴﺒﺐﻋﺪﻡﺗﻮﺻﻴﻞ
ﺍﻟﻜﺒﻞﺍﻷﺣﻤﺮﺑﺎﻟﻄﺮﻑﺍﻟﺬﻱﻳﻜﺘﺸﻒﺗﺸﻐﻴﻞﻣﻔﺘﺎﺡﺗﺸﻐﻴﻞﺍﻟﺴﻴﺎﺭﺓ
ﻓﻲﺗﺴﺮﻳﺐﺑﺎﻟﺒﻄﺎﺭﻳﺔ.
O
N
S
T
A
R
T
O
F
F
ﺑﻼﻭﺿﻊACC ﻭﺿﻊACC
!ﺍﺳﺘﺨﺪﻡﻫﺬﻩﺍﻟﻮﺣﺪﺓﻣﻊﺑﻄﺎﺭﻳﺔ١٢ﻓﻮﻟﺖﻭﺗﺄﺭﻳﺾﺳﺎﻟﺐﻓﻘﻂ.
ﻭﻋﺪﻡﺍﻻﻟﺘﺰﺍﻡﺑﺬﻟﻚﻗﺪﻳﻨﺘﺞﻋﻨﻪﺣﺮﻳﻖﺃﻭﻋﻄﻞ.
!ﻟﻤﻨﻊﺣﺪﻭﺙﻣﺎﺱﻛﻬﺮﺑﺎﺋﻲﺃﻭﺳﺨﻮﻧﺔﺯﺍﺋﺪﺓﺃﻭﻋﻄﻞ،ﺗﺄﻛﺪﻣﻦ
ﺍﺗﺒﺎﻉﺍﻟﺘﻮﺟﻴﻬﺎﺕﺃﺩﻧﺎﻩ.
—ﺍﻓﺼﻞﺍﻟﻄﺮﻑﺍﻟﺴﺎﻟﺐﻟﻠﺒﻄﺎﺭﻳﺔﻗﺒﻞﺗﺮﻛﻴﺒﻬﺎ.
—ﻗﻢﺑﺘﺜﺒﻴﺖﺍﻟﺘﻮﺻﻴﻼﺕﺍﻟﻜﻬﺮﺑﺎﺋﻴﺔﺑﺎﺳﺘﺨﺪﺍﻡﻣﺸﺎﺑﻚﻛﺒﻼﺕﺃﻭ
ﺃﺷﺮﻃﺔﻻﺻﻘﺔ.ﻗﻢﺑﻠﻒﺍﻟﺸﺮﻳﻂﺍﻟﻼﺻﻖﺣﻮﻝﺍﻷﺳﻼﻙﺍﻟﺘﻲ
ﺗﺘﻼﻣﺲﻣﻊﺃﺟﺰﺍﺀﻣﻌﺪﻧﻴﺔﻟﺤﻤﺎﻳﺔﺍﻷﺳﻼﻙ.
—ﺿﻊﻛﺎﻓﺔﺍﻟﻜﺒﻼﺕﺑﻌﻴﺪًﺍﻋﻦﺍﻷﺟﺰﺍﺀﺍﻟﻤﺘﺤﺮﻛﺔﻣﺜﻞﺫﺭﺍﻉﻧﻘﻞ
ﺍﻟﺴﺮﻋﺔﻭﻗﻀﺒﺎﻥﺍﻟﻤﻘﻌﺪ.
—ﺿﻊﻛﺎﻓﺔﺍﻟﻜﺒﻼﺕﺑﻌﻴﺪًﺍﻋﻦﺍﻷﻣﺎﻛﻦﺍﻟﺴﺎﺧﻨﺔﻣﺜﻞﺍﻷﻣﺎﻛﻦ
ﺍﻟﻘﺮﻳﺒﺔﻣﻦﻣﺨﺮﺝﺍﻟﺴﺨﺎﻥ.
—ﻻﺗﻮﺻﻞﺍﻟﻜﺒﻞﺍﻷﺻﻔﺮﺑﺎﻟﺒﻄﺎﺭﻳﺔﻋﻦﻃﺮﻳﻖﺗﻤﺮﻳﺮﻩﺧﻼﻝ
ﺍﻟﻔﺘﺤﺔﺇﻟﻰﻣﻜﺎﻥﺍﻟﻤﺤﺮﻙ.
—ﻗﻢﺑﺘﻐﻄﻴﺔﺃﻳﺔﻣﻮﺻﻼﺕﻛﺒﻼﺕﻣﻔﺼﻮﻟﺔﺑﺸﺮﻳﻂﻋﺎﺯﻝ.
—ﻻﺗُﻘﺼﺮﺃﻱﻛﺒﻼﺕ.
—ﻻﺗﻘﻄﻊﻋﺎﺯﻝﻛﺒﻞﺍﻟﻄﺎﻗﺔﺍﻟﺨﺎﺹﺑﻬﺬﻩﺍﻟﻮﺣﺪﺓﻟﻤﺸﺎﺭﻛﺔ
ﺍﻟﻄﺎﻗﺔﻣﻊﺃﺟﻬﺰﺓﺃﺧﺮﻯ.ﺍﻟﻘﺪﺭﺓﺍﻟﺤﺎﻟﻴﺔﻟﻠﻜﺒﻞﻣﺤﺪﻭﺩﺓ.
—ﺍﺳﺘﺨﺪﻡﻓﻴﻮﺯﺑﺎﻟﻤﻘﻨﻦﺍﻟﻤﺤﺪﺩ.
—ﻻﺗﻘﻢﻣﻄﻠﻘﺎﺑﺘﻮﺻﻴﻞﻛﺒﻞﺍﻟﺴﻤﺎﻋﺔﺍﻟﺴﺎﻟﺐﺑﺎﻷﺭﺽﻣﺒﺎﺷﺮﺓ.
—ﻻﺗﺮﺑﻂﺍﻟﻜﺒﻼﺕﺍﻟﺴﺎﻟﺒﺔﻟﻌﺪﺓﺳﻤﺎﻋﺎﺕﻣﻌًﺎﻣﻄﻠﻘًﺎ.
!ﻋﻨﺪﺗﺸﻐﻴﻞﻫﺬﻩﺍﻟﻮﺣﺪﺓ،ﻳﺘﻢﺇﺭﺳﺎﻝﺇﺷﺎﺭﺍﺕﺍﻟﺘﺤﻜﻢﺧﻼﻝﺍﻟﻜﺒﻞ
ﺍﻷﺯﺭﻕ/ﺍﻷﺑﻴﺾ.ﺻﻞﻫﺬﺍﺍﻟﻜﺒﻞﺑﻨﻈﺎﻡﺍﻟﺘﺤﻜﻢﻋﻦﺑﻌﺪﺍﻟﺨﺎﺹ
ﺑﻄﺮﻑﺗﺤﻜﻢﻣﺮﺣﻞﺍﻟﻬﻮﺍﺀﺍﻟﺘﻠﻘﺎﺋﻲﺍﻟﺨﺎﺹﺑﺎﻟﺴﻴﺎﺭﺓﺃﻭﺃﻣﺒﻴﺮﻃﺎﻗﺔ
ﺧﺎﺭﺟﻴﺔ)ﺍﻟﺤﺪﺍﻷﻗﺼﻰ٣٠٠ﻣﻠﻠﻲﺃﻣﺒﻴﺮ١٢ﻓﻮﻟﺖﺗﻴﺎﺭﻣﺴﺘﻤﺮ(.
ﺇﺫﺍﻛﺎﻧﺖﺍﻟﺴﻴﺎﺭﺓﻣﺠﻬﺰﺓﺑﻬﻮﺍﺋﻲﺯﺟﺎﺝ،ﻗﻢﺑﺘﻮﺻﻴﻠﻪﺑﻄﺮﻑ
ﻣﺼﺪﺭﻃﺎﻗﺔﻣﻌﺰﺯﺍﻟﻬﻮﺍﺋﻲ.
!ﻻﺗﻮﺻﻞﻣﻄﻠﻘﺎًﺍﻟﻜﺒﻞﺍﻷﺑﻴﺾ/ﺍﻷﺯﺭﻕﺑﻄﺮﻑﺍﻟﻄﺎﻗﺔﺍﻟﺨﺎﺹ
ﺑﺄﻣﺒﻴﺮﻃﺎﻗﺔﺟﻬﺎﺯﺧﺎﺭﺟﻲ.ﻭﺃﻳﻀًﺎﻻﺗﻮﺻﻠﻪﺑﻄﺮﻑﺍﻟﻄﺎﻗﺔ
ﺍﻟﺨﺎﺹﺑﺎﻟﻬﻮﺍﺋﻲﺍﻟﺘﻠﻘﺎﺋﻲ.ﺍﻟﻘﻴﺎﻡﺑﺬﻟﻚﻗﺪﻳﺆﺩﻱﺇﻟﻰﺗﺴﺮﺏﺍﻟﺒﻄﺎﺭﻳﺔ
ﺃﻭﻋﻄﻞ.
ﻫﺬﻩﺍﻟﻮﺣﺪﺓ
1ﺩﺧﻞﻫﻮﺍﺋﻲ
2ﻣﻨﺼﻬﺮ)١٠ﺃﻣﺒﻴﺮ(
3ﺩﺧﻞﺳﻠﻚﺍﻟﻜﻬﺮﺑﺎﺀ
4ﺧﺮﺝﺧﻠﻔﻲ
Ar
٩
ﺍﻟﻘﺴﻢ
٠٣
ﺍﻟﺘﺮﻛﻴﺐ
!ﻳﺘﻢﺗﺨﺰﻳﻦﺇﻋﺪﺍﺩﺍﺕﻣﻨﺤﻨﻰﺍﻟﻤﻮﺍﺯﻥﺍﻟﻤﻀﺒﻮﻃﺔﻓﻲCUSTOM.
1ﺍﺿﻐﻂﻋﻠﻰﺍﻟﺰﺭaﺃﻭbﻟﻀﺒﻂﺍﻟﻤﺴﺘﻮﻯ.
ﻧﻄﺎﻕﺍﻟﻀﺒﻂ:+6ﺇﻟﻰ-6
LOUD)ﻋﻠﻮﺍﻟﺼﻮﺕ(
ﻭﻇﻴﻔﺔﻋﻠﻮﺍﻟﺼﻮﺕﺗﻌﻮّﺽﺍﻟﻨﻘﺺﻓﻲﻧﻄﺎﻗﺎﺕﺍﻟﺘﺮﺩﺩﺍﻟﻤﻨﺨﻔﺾﻭﺍﻟﻌﺎﻟﻲ
ﻋﻨﺪﻣﺎﻳﻜﻮﻥﻣﺴﺘﻮﻯﺍﻟﺼﻮﺕﻣﻨﺨﻔﻀﺎً.
1ﺍﺿﻐﻂﻋﻠﻰaﺃﻭbﻟﺘﺸﻐﻴﻞﻋﻠﻮﺍﻟﺼﻮﺕﺃﻭﺇﻳﻘﺎﻑﺗﺸﻐﻴﻠﻪ.
2ﺍﺿﻐﻂﻋﻠﻰcﺃﻭdﻟﺘﺤﺪﻳﺪﺍﻹﻋﺪﺍﺩﺍﻟﻤﺮﻏﻮﺏ.
LOW)ﻣﻨﺨﻔﺾ(—HI)ﻣﺮﺗﻔﻊ(
!ﻳﻤﻜﻦﺃﻳﻀًﺎﺗﺸﻐﻴﻞﻋﻠﻮﺍﻟﺼﻮﺕﻭﺇﻳﻘﺎﻓﻪﺑﺎﻟﻀﻐﻂﻣﻊﺍﻻﺳﺘﻤﺮﺍﺭﻋﻠﻰE
(EQ/LOUD).
SLA)ﺿﺒﻂﻣﺴﺘﻮﻯﺍﻟﻤﺼﺪﺭ(
ﺗﺘﻴﺢSLA)ﻋﻤﻠﻴﺎﺕﺿﺒﻂﻣﺴﺘﻮﻯﺍﻟﻤﺼﺪﺭ(ﺿﺒﻂﻣﺴﺘﻮﻯﺍﻟﺼﻮﺕﻟﻜﻞ
ﻣﺼﺪﺭﻟﻤﻨﻊﺣﺪﻭﺙﺗﻐﻴّﺮﺍﺕﺟﻮﻫﺮﻳﺔﻓﻲﺍﻟﺼﻮﺕﻋﻨﺪﺍﻟﺘﺒﺪﻳﻞﺑﻴﻦﺍﻟﻤﺼﺎﺩﺭ.
!ﻋﻨﺪﺍﺧﺘﻴﺎﺭFMﻛﻤﺼﺪﺭ،ﻻﻳﻤﻜﻨﻚﺍﻟﺘﺤﻮﻳﻞﺇﻟﻰSLA.
!ﺗﻌﺘﻤﺪﺍﻹﻋﺪﺍﺩﺍﺕﻋﻠﻰﻣﺴﺘﻮﻯﺻﻮﺕFMﻭﺍﻟﺬﻱﻳﻈﻞﺩﻭﻥﺗﻐﻴﻴﺮ.
!ﻳﻤﻜﻦﺃﻳﻀًﺎﺿﺒﻂﻣﺴﺘﻮﻯﺻﻮﺕAMﺑﺎﺳﺘﺨﺪﺍﻡﻫﺬﻩﺍﻟﻮﻇﻴﻔﺔ.
1ﺍﺿﻐﻂﻋﻠﻰﺍﻟﺰﺭaﺃﻭbﻟﻀﺒﻂﻣﺴﺘﻮﻯﺻﻮﺕﺍﻟﻤﺼﺪﺭ.
ﻧﻄﺎﻕﺍﻟﻀﺒﻂ:SLA +4ﺇﻟﻰSLA – 4
ﺍﺳﺘﻌﻤﺎﻝﺍﻟﻤﻮﺍﺯﻥ
%ﺍﺿﻐﻂE (EQ/LOUD)ﻻﺧﺘﻴﺎﺭﺍﻟﻤﻮﺍﺯﻥ.
DYNAMIC—VOCAL—NATURAL—CUSTOM
—FLAT—POWERFUL
!ﻳﺴﻤﺢCUSTOMﺑﺈﻧﺸﺎﺀﺇﻋﺪﺍﺩﻣﺨﺼﺺ.
ﻭﻇﺎﺋﻒﺃﺧﺮﻯ
ﺿﺒﻂﺍﻹﻋﺪﺍﺩﺍﺕﺍﻷﻭﻟﻴﺔ
١ﺍﺿﻐﻂﺍﻟﺰﺭSRC/OFFﻣﻊﺍﻻﺳﺘﻤﺮﺍﺭﺣﺘﻰﻳﺘﻢﺇﻳﻘﺎﻑ
ﺗﺸﻐﻴﻞﺍﻟﻮﺣﺪﺓ.
٢ﺍﺿﻐﻂﻣﻊﺍﻻﺳﺘﻤﺮﺍﺭﻋﻠﻰSRC/OFFﺇﻟﻰﺃﻥﺗﻈﻬﺮ
ﺍﻟﺴﺎﻋﺔﻓﻲﺍﻟﺸﺎﺷﺔ.
٣ﺍﺿﻐﻂﻋﻠﻰFUNCﻟﺘﺤﺪﻳﺪﺍﻹﻋﺪﺍﺩﺍﻷﻭﻟﻲ.
ﺑﻌﺪﺍﻻﺧﺘﻴﺎﺭ؛ﻧﻔﺬﺍﻟﺨﻄﻮﺍﺕﺍﻟﺘﺎﻟﻴﺔﻟﻀﺒﻂﺍﻹﻋﺪﺍﺩﺍﻷﻭﻟﻲ.
ﺇﻋﺪﺍﺩﺍﻟﺴﺎﻋﺔ
1ﺍﺿﻐﻂcﺃﻭdﻻﺧﺘﻴﺎﺭﺧﺎﻧﺔﺍﻟﺴﺎﻋﺔﺍﻟﺘﻲﺗﻮﺩﺿﺒﻄﻬﺎ.
ﺩﻗﻴﻘﺔ—ﺳﺎﻋﺔ
2ﺍﺿﻐﻂaﺃﻭbﻟﺘﺼﺤﻴﺢﺍﻟﺴﺎﻋﺔ.
FM)ﻣﺮﺣﻠﺔﻣﻮﺍﻟﻔﺔﺍﻟﻤﻮﺟﺔFM(
ﻣﺮﺣﻠﺔﻣﻮﺍﻟﻔﺔﺍﻟﻤﻮﺟﺔFMﺍﻟﺘﻲﺗﻢﺍﺳﺘﺨﺪﺍﻣﻬﺎﺑﻮﺍﺳﻄﺔﻣﻮﺍﻟﻔﺔﺍﻟﺒﺤﺚﻳﻤﻜﻦ
ﺗﺤﻮﻳﻠﻬﺎﺑﻴﻦ١٠٠ﻙﻫﺮﺗﺰﻭﻣﺮﺣﻠﺔﺍﻟﻀﺒﻂﺍﻟﻤﺴﺒﻖﻭ٥٠ﻙﻫﺮﺗﺰ.
!ﺇﺫﺍﺗﻢﺍﻟﻘﻴﺎﻡﺑﻤﻮﺍﻟﻔﺔﺍﻟﺒﺤﺚﻋﻠﻰﺧﻄﻮﺍﺕﻛﻞﺧﻄﻮﺓ٥٠ﻙﻫﺮﺗﺰ،ﻗﺪﻳﺘﻢ
ﺍﻟﻤﻮﺍﻟﻔﺔﻋﻠﻰﺍﻟﻤﺤﻄﺎﺕﺑﺸﻜﻞﻏﻴﺮﺩﻗﻴﻖ.ﻗﻢﺑﺎﻟﻤﻮﺍﻟﻔﺔﻋﻠﻰﺍﻟﻤﺤﻄﺎﺕ
ﺑﺎﺳﺘﺨﺪﺍﻡﺍﻟﻤﻮﺍﻟﻔﺔﺍﻟﻴﺪﻭﻳﺔﺃﻭﺍﺳﺘﺨﺪﻡﻣﻮﺍﻟﻔﺔﺍﻟﺒﺤﺚﻣﺮﺓﺃﺧﺮﻯ.
1ﺍﺿﻐﻂﻋﻠﻰcﺃﻭdﻟﺘﺤﺪﻳﺪﻣﺮﺣﻠﺔﻣﻮﺍﻟﻔﺔﺍﻟﻤﻮﺟﺔFM.
50)٥٠ﻙﻫﺮﺗﺰ(—100)١٠٠ﻙﻫﺮﺗﺰ(
AM)ﻣﺮﺣﻠﺔﻣﻮﺍﻟﻔﺔﺍﻟﻤﻮﺟﺔAM(
ﻣﺮﺣﻠﺔﻣﻮﺍﻟﻔﺔAMﻳﻤﻜﻦﺗﻐﻴﻴﺮﻫﺎﺑﻴﻦ٩ﻙﻫﺮﺗﺰ،ﻭﻣﺮﺣﻠﺔﺍﻟﻀﺒﻂﺍﻟﻤﺴﺒﻖ
ﻭ١٠ﻙﻫﺮﺗﺰ.ﻋﻨﺪﺍﺳﺘﺨﺪﺍﻡﺍﻟﻤﻮﺍﻟﻒﻓﻲﺃﻣﺮﻳﻜﺎﺍﻟﺸﻤﺎﻟﻴﺔﺃﻭﺍﻟﻮﺳﻄﻰﺃﻭ
ﺍﻟﺠﻨﻮﺑﻴﺔ،ﺃﻋِﺪﺿﺒﻂﻣﺮﺣﻠﺔﺍﻟﻤﻮﺍﻟﻔﺔﻣﻦ٩ﻙﻫﺮﺗﺰ)ﺍﻟﻨﻄﺎﻕﺍﻟﻤﺴﻤﻮﺡﺑﻪ
٥٣١ﻙﻫﺮﺗﺰﺇﻟﻰ١٦٠٢ﻙﻫﺮﺗﺰ(ﺇﻟﻰ١٠ﻙﻫﺮﺗﺰ)ﺍﻟﻨﻄﺎﻕﺍﻟﻤﺴﻤﻮﺡﺑﻪ
٥٣٠ﻙﻫﺮﺗﺰﺇﻟﻰ١٦٤٠ﻙﻫﺮﺗﺰ(.
1ﺍﺿﻐﻂﻋﻠﻰcﺃﻭdﻟﺘﺤﺪﻳﺪﻣﺮﺣﻠﺔﻣﻮﺍﻟﻔﺔﺍﻟﻤﻮﺟﺔAM.
9)٩ﻙﻫـ(—10)١٠ﻙﻫـ(
AUX)ﺇﺩﺧﺎﻝﻣﺴﺎﻋﺪ(
ﻗﻢﺑﺘﻔﻌﻴﻞﻫﺬﺍﺍﻹﻋﺪﺍﺩﻋﻨﺪﺍﺳﺘﺨﺪﺍﻡﺟﻬﺎﺯﺇﺿﺎﻓﻲﻣﻮﺻﻞﺑﻬﺬﺍﺍﻟﺠﻬﺎﺯ.
1ﺍﺿﻐﻂﻋﻠﻰaﺃﻭbﻟﺘﺸﻐﻴﻞﺍﻹﻋﺪﺍﺩﺍﻹﺿﺎﻓﻲﺃﻭﺇﻳﻘﺎﻑﺗﺸﻐﻴﻠﻪ.
ﻋﺮﺽﺍﻟﺴﺎﻋﺔ
%ﺍﺿﻐﻂﻋﻠﻰﻟﺘﺸﻐﻴﻞﺷﺎﺷﺔﺍﻟﺴﺎﻋﺔﺃﻭﺇﻳﻘﺎﻑﺗﺸﻐﻴﻠﻬﺎ.
#ﺗﺨﺘﻔﻲﺷﺎﺷﺔﺍﻟﺴﺎﻋﺔﻣﺆﻗﺘﺎًﻋﻨﺪﻗﻴﺎﻣﻚﺑﻌﻤﻠﻴﺎﺕﺗﺸﻐﻴﻞﺃﺧﺮﻯ،
ﻭﻟﻜﻦﺗﻌﻮﺩﻟﻠﻈﻬﻮﺭﻣﺮﺓﺃﺧﺮﻯﺑﻌﺪ٢٥ﺛﺎﻧﻴﺔ.
ﺍﺳﺘﺨﺪﺍﻡﻣﺼﺪﺭAUX
١ﺃﺩﺧِﻞﻗﺎﺑﺲﺍﻻﺳﺘﺮﻳﻮﺍﻟﺼﻐﻴﺮﻓﻲﻣﻘﺒﺲﺍﻟﺪﺧﻞAUX.
٢ﺍﺿﻐﻂﺍﻟﺰﺭSRC/OFFﻹﺧﺘﻴﺎﺭAUXﻛﻤﺼﺪﺭ.
#ﻻﻳﻤﻜﻦﺍﺧﺘﻴﺎﺭAUXﺇﻻﺇﺫﺍﺗﻢﺗﺸﻐﻴﻞﺍﻹﻋﺪﺍﺩﺍﻟﻤﺴﺎﻋﺪ.ﻟﻤﺰﻳﺪ
ﻣﻦﺍﻟﺘﻔﺎﺻﻴﻞ،ﺭﺍﺟﻊ
AUX)ﺇﺩﺧﺎﻝﻣﺴﺎﻋﺪ(
ﻓﻲﻫﺬﻩﺍﻟﺼﻔﺤﺔ.
Ar
٨
ﺍﻟﻘﺴﻢ
ﺍﻟﻌﺮﺑﻴﺔ
٠٢
ﺗﺸﻐﻴﻞﻫﺬﺍﺍﻟﺠﻬﺎﺯ
Page 38

ﺍﻟﺘﻘﺪﻳﻢﺃﻭﺍﻟﺘﺮﺟﻴﻊﺍﻟﺴﺮﻳﻊ
1ﺍﺿﻐﻂﻣﻊﺍﻻﺳﺘﻤﺮﺍﺭﻋﻠﻰcﺃﻭd.
ﻋﻨﺪﺗﺸﻐﻴﻞﺍﻟﺼﻮﺕﺍﻟﻤﻀﻐﻮﻁ،ﻻﻳﺼﺪﺭﺻﻮﺕﻋﻨﺪﺍﻟﺘﻘﺪﻳﻢﺃﻭﺍﻟﺘﺮﺟﻴﻊ
ﺍﻟﺴﺮﻳﻊ.
ﺍﻟﺘﺤﻮﻳﻞﺑﻴﻦﺍﻟﺼﻮﺕﺍﻟﻤﻀﻐﻮﻁﻭCD-DA
1ﺍﺿﻐﻂB (BAND/ESC).
ﻋﺮﺽﺍﻟﻤﻌﻠﻮﻣﺎﺕﺍﻟﻨﺼﻴﺔ
ﺍﺧﺘﻴﺎﺭﺍﻟﻤﻌﻠﻮﻣﺎﺕﺍﻟﻨﺼﻴﺔﺍﻟﻤﺮﻏﻮﺑﺔ
1ﺍﺿﻐﻂD (DISP/SCRL).
ﺗﻤﺮﻳﺮﺍﻟﻤﻌﻠﻮﻣﺎﺕﺍﻟﻨﺼﻴﺔﺇﻟﻰﺍﻟﻴﺴﺎﺭ
1ﺍﺿﻐﻂﻣﻊﺍﻻﺳﺘﻤﺮﺍﺭﻋﻠﻰD (DISP/SCRL).
ﻣﻼﺣﻈﺎﺕ
!ﺗﺒﻌًﺎﻹﺻﺪﺍﺭiTunesﺍﻟﻤﺴﺘﺨﺪﻡﻟﻜﺘﺎﺑﺔﻣﻠﻔﺎﺕMP3ﻋﻠﻰﻗﺮﺹ
ﺃﻭﺃﻧﻮﺍﻉﻣﻠﻔﺎﺕﺍﻟﻮﺳﺎﺋﻂ،ﻗﺪﻳﻈﻬﺮﺍﻟﻨﺺﻏﻴﺮﺍﻟﻤﺘﻮﺍﻓﻖﺍﻟﻤﺨﺰﻥ
ﻓﻲﺍﻟﻤﻠﻒﺍﻟﺼﻮﺗﻲﺑﻄﺮﻳﻘﺔﻏﻴﺮﺻﺤﻴﺤﺔ.
!ﺗﻌﺘﻤﺪﻋﻨﺎﺻﺮﺍﻟﻤﻌﻠﻮﻣﺎﺕﺍﻟﻨﺼﻴﺔﺍﻟﺘﻲﻳﻤﻜﻦﺗﻐﻴﻴﺮﻫﺎﻋﻠﻰ
ﺍﻟﻮﺳﺎﺋﻂ.
ﺇﻋﺪﺍﺩﺍﺕﺍﻟﻮﻇﺎﺋﻒ
%ﺍﺿﻐﻂﻋﻠﻰFUNCﻟﺘﺤﺪﻳﺪﺍﻟﻮﻇﻴﻔﺔ.
ﺑﻌﺪﺍﻻﺧﺘﻴﺎﺭ؛ﻧﻔﺬﺍﻹﺟﺮﺍﺀﺍﺕﺍﻟﺘﺎﻟﻴﺔﻟﻀﺒﻂﺍﻟﻮﻇﻴﻔﺔ.
RPT)ﺗﺸﻐﻴﻞﻣﺘﻜﺮﺭ(
1ﺍﺿﻐﻂcﺃﻭdﻻﺧﺘﻴﺎﺭﻧﻄﺎﻕﺍﻟﺘﻜﺮﺍﺭ.
DSC–ﺗﻜﺮﺍﺭﺟﻤﻴﻊﺍﻟﻤﺴﺎﺭﺍﺕ
TRK–ﺗﻜﺮﺍﺭﺍﻟﻤﺴﺎﺭﺍﻟﺤﺎﻟﻲ
FLD–ﺗﻜﺮﺍﺭﺍﻟﻤﺠﻠﺪﺍﻟﺤﺎﻟﻲ
RDM)ﺗﺸﻐﻴﻞﻋﺸﻮﺍﺋﻲ(
1ﺍﺿﻐﻂaﺃﻭbﻟﺘﺸﻐﻴﻞﺍﻟﻌﺮﺽﺍﻟﻌﺸﻮﺍﺋﻲﺃﻭﺇﻳﻘﺎﻑﺗﺸﻐﻴﻠﻪ.
ﻋﻨﺪﻣﺎﺗﻜﻮﻥﻭﻇﻴﻔﺔﺍﻟﺘﺸﻐﻴﻞﺍﻟﻌﺸﻮﺍﺋﻲﻓﻲﻭﺿﻊﺍﻟﺘﺸﻐﻴﻞ،ﻳﻈﻬﺮRDM
ﻋﻠﻰﺍﻟﺸﺎﺷﺔ.
ﻓﻲﺣﺎﻟﺔﺗﺸﻐﻴﻞﺍﻟﺘﺸﻐﻴﻞﺍﻟﻌﺸﻮﺍﺋﻲﺃﺛﻨﺎﺀﺗﻜﺮﺍﺭﻣﺠﻠﺪ,ﻳﻈﻬﺮFRDM
ﻋﻠﻰﺍﻟﺸﺎﺷﺔ.
SCAN)ﺗﺸﻐﻴﻞﺍﻟﻤﺴﺢﺍﻻﺳﺘﻄﻼﻋﻲ(
ﻳﻘﻮﻡﺗﺸﻐﻴﻞﺍﻟﻤﺴﺢﺍﻻﺳﺘﻄﻼﻋﻲﺑﺎﻟﺒﺤﺚﻋﻦﺃﻏﻨﻴﺔﻣﺎﺿﻤﻦﻧﻄﺎﻕﺍﻟﺘﻜﺮﺍﺭ
ﺍﻟﻤﺤﺪﺩ.
1ﺍﺿﻐﻂaﻟﺘﺸﻐﻴﻞﺍﻟﺘﺸﻐﻴﻞﺍﻻﺳﺘﻄﻼﻋﻲ.
ﻓﻲﺣﺎﻟﺔﺗﺸﻐﻴﻞﺍﻟﺘﺸﻐﻴﻞﺍﻻﺳﺘﻄﻼﻋﻲﺃﺛﻨﺎﺀFLD,ﻳﻈﻬﺮFSCNﻋﻠﻰ
ﺍﻟﺸﺎﺷﺔ.
2ﻋﻨﺪﻣﺎﺗﻌﺜﺮﻋﻠﻰﺍﻟﻤﺴﺎﺭﺍﻟﻤﺮﻏﻮﺏ،ﺍﺿﻐﻂbﻹﻳﻘﺎﻑﺍﻟﺘﺸﻐﻴﻞ
ﺍﻻﺳﺘﻄﻼﻋﻲ.
ﺇﺫﺍﻋﺎﺩﺕﺍﻟﺸﺎﺷﺔﺗﻠﻘﺎﺋﻴﺎًﺇﻟﻰﻋﺮﺽﺍﻻﺳﺘﻤﺎﻉ،ﻓﺎﺧﺘﺮSCANﻣﺮﺓ
ﺃﺧﺮﻯﺑﻀﻐﻂFUNC.
ﺑﻌﺪﺍﻻﻧﺘﻬﺎﺀﻣﻦﺍﺳﺘﻄﻼﻉﺃﺳﻄﻮﺍﻧﺔ)ﻣﺠﻠﺪ(،ﻳﺒﺪﺃﺍﻟﻌﺮﺽﺍﻟﻌﺎﺩﻱ
ﻟﻠﻤﺴﺎﺭﺍﺕ.
PAUSE)ﺇﻳﻘﺎﻑﻣﺆﻗﺖ(
1ﺍﺿﻐﻂﻋﻠﻰaﺃﻭbﻟﻺﻳﻘﺎﻑﺍﻟﻤﺆﻗﺖﺃﻭﺍﻟﻤﺘﺎﺑﻌﺔ.
SRTRV)ﻣﺴﺘﺮﺟﻊﺍﻟﺼﻮﺕ(
ﻳﻘﻮﻡﺗﻠﻘﺎﺋﻴًﺎﺑﺘﺤﺴﻴﻦﺍﻟﺼﻮﺕﺍﻟﻤﻀﻐﻮﻁﻭﺍﺳﺘﻌﺎﺩﺓﺍﻟﺼﻮﺕﺍﻟﺜﺮﻱ.
1ﺍﺿﻐﻂaﺃﻭbﻻﺧﺘﻴﺎﺭﺍﻹﻋﺪﺍﺩﺍﻟﻤﻔﻀﻞ.
OFF)ﺇﻳﻘﺎﻑ(—1—2
ﻳﻜﻮﻥ1ﻓﻌﺎﻻًﻟﻤﻌﺪﻻﺕﺍﻟﻀﻐﻂﺍﻟﻤﻨﺨﻔﻀﺔﻭﻳﻜﻮﻥ2ﻓﻌﺎﻻًﻟﻤﻌﺪﻻﺕ
ﺍﻟﻀﻐﻂﺍﻟﻌﺎﻟﻴﺔ.
FF/REV)ﺗﻘﺪﻳﻢ/ﺗﺮﺟﻴﻊﺳﺮﻳﻊ(
ﻳﻤﻜﻦﺗﺒﺪﻳﻞﻃﺮﻳﻘﺔﺍﻟﺒﺤﺚﺑﻴﻦﺍﻟﺘﻘﺪﻳﻢ/ﺍﻟﺘﺮﺟﻴﻊﺍﻟﺴﺮﻳﻊﻭﺍﻟﺒﺤﺚﻓﻲﻛﻞ١٠
ﻣﺴﺎﺭﺍﺕ.ﻭﻳﺘﻴﺢﺍﺧﺘﻴﺎﺭROUGHﺍﻟﺒﺤﺚﻓﻲﻛﻞ١٠ﻣﺴﺎﺭﺍﺕ.
1ﺍﺿﻐﻂdﻻﺧﺘﻴﺎﺭROUGH.
FF/REV–ﺍﻟﺘﻘﺪﻳﻢﻭﺍﻟﺘﺮﺟﻴﻊﺍﻟﺴﺮﻳﻊ
ROUGH–ﺍﻟﺒﺤﺚﻓﻲﻛﻞ١٠ﻣﺴﺎﺭﺍﺕ
ﻻﺧﺘﻴﺎﺭFF/REV،ﺍﺿﻐﻂc.
2ﺍﺿﻐﻂﺍﻟﺰﺭB (BAND/ESC)ﻟﻠﻌﻮﺩﺓﺇﻟﻰﻋﺮﺽﺍﻟﺘﺸﻐﻴﻞ.
3ﺍﺿﻐﻂﻣﻊﺍﻻﺳﺘﻤﺮﺍﺭﻋﻠﻰcﺃﻭdﻟﻠﺒﺤﺚﻓﻲﻛﻞ١٠ﻣﺴﺎﺭﺍﺕﻋﻠﻰ
ﻗﺮﺹ)ﻣﺠﻠﺪ(.
ﺇﺫﺍﻛﺎﻥﺑﺎﻗﻲﻋﺪﺩﺍﻟﻤﺴﺎﺭﺍﺕﺃﻗﻞﻣﻦ١٠،ﻓﺎﺿﻐﻂﻣﻊﺍﻻﺳﺘﻤﺮﺍﺭﻋﻠﻰ
cﺃﻭdﻻﺳﺘﺪﻋﺎﺀﺃﻭﻝ)ﺁﺧﺮ(ﻣﺴﺎﺭ.
ﻋﻤﻠﻴﺎﺕﺿﺒﻂﺍﻟﺼﻮﺕ
ﻋﻤﻠﻴﺎﺕﺿﺒﻂﺍﻟﺼﻮﺕ
%ﺍﺿﻐﻂﻋﻠﻰAUDIOﻟﺘﺤﺪﻳﺪﻭﻇﻴﻔﺔﺍﻟﺼﻮﺕ.
ﺑﻌﺪﺍﻻﺧﺘﻴﺎﺭ،ﻧﻔﺬﺍﻟﺨﻄﻮﺍﺕﺍﻟﺘﺎﻟﻴﺔﻟﻀﺒﻂﻭﻇﻴﻔﺔﺍﻟﺼﻮﺕ.
FAD)ﺿﺒﻂﺍﻟﻤﻀﺎﺋﻞ/ﺍﻟﺘﻮﺍﺯﻥ(
1ﺍﺿﻐﻂaﺃﻭbﻟﻀﺒﻂﺍﻟﻤﻀﺎﺋﻞ)ﺗﻮﺍﺯﻥﺍﻟﺴﻤﺎﻋﺎﺕﺍﻷﻣﺎﻣﻴﺔ/ﺍﻟﺨﻠﻔﻴﺔ(.
2ﺍﺿﻐﻂcﺃﻭdﻟﻀﺒﻂﺍﻟﺘﻮﺍﺯﻥ)ﺗﻮﺍﺯﻥﺍﻟﺴﻤﺎﻋﺎﺕﺍﻟﻴﺴﺮﻯ/ﺍﻟﻴﻤﻨﻰ(.
BASS/MID/TREBLE)ﺿﺒﻂﺍﻟﻤﻮﺍﺯﻥ(
Ar
٧
ﺍﻟﻘﺴﻢ
٠٢
ﺗﺸﻐﻴﻞﻫﺬﺍﺍﻟﺠﻬﺎﺯ
ﺗﻨﺒﻴﻪ
ﻟﺪﻭﺍﻋﻲﺍﻟﺴﻼﻣﺔ؛ﺃﻭﻗﻒﺍﻟﻤﺮﻛﺒﺔﻋﻨﺪﻓﻚﺍﻟﻠﻮﺣﺔﺍﻷﻣﺎﻣﻴﺔ.
ﻣﻼﺣﻈﺔ
ﻋﻨﺪﺗﻮﺻﻴﻞﺍﻟﺴﻠﻚﺍﻷﺯﺭﻕ/ﺍﻷﺑﻴﺾﻟﻬﺬﺍﺍﻟﺠﻬﺎﺯﺑﻄﺮﻑﺍﻟﺘﺤﻜﻢﻓﻲ
ﻣﺮﺣﻞﺍﻟﻬﻮﺍﺋﻲﺍﻟﺘﻠﻘﺎﺋﻲﻟﻠﺴﻴﺎﺭﺓ،ﻳﺘﻢﻣﺪّﻫﻮﺍﺋﻲﺍﻟﺴﻴﺎﺭﺓﻋﻨﺪﺗﺸﻐﻴﻞ
ﻣﺼﺪﺭﻫﺬﺍﺍﻟﺠﻬﺎﺯ.ﻟﻀﻢّﺍﻟﻬﻮﺍﺋﻲ،ﺃﻭﻗﻒﺍﻟﻤﺼﺪﺭ.
ﻋﻤﻠﻴﺎﺕﺍﻟﻘﻮﺍﺋﻢﻣﺘﻄﺎﺑﻘﺔﻓﻲ
ﺇﻋﺪﺍﺩﺍﺕﺍﻟﻮﻇﺎﺋﻒ/ﺗﻌﺪﻳﻼﺕ
ﺍﻟﺼﻮﺕ/ﺍﻹﻋﺪﺍﺩﺍﺕﺍﻷﻭﻟﻴﺔ
ﺍﻟﺮﺟﻮﻉﺇﻟﻰﺍﻟﻌﺮﺽﺍﻟﻤﻌﺘﺎﺩ
ﺇﻟﻐﺎﺀﻗﺎﺋﻤﺔﺍﻹﻋﺪﺍﺩﺍﻷﻭﻟﻲ
1ﺍﺿﻐﻂB (BAND/ESC).
ﻳﻤﻜﻦﺃﻳﻀًﺎﺇﻟﻐﺎﺀﺍﻹﻋﺪﺍﺩﺍﺕﺍﻷﻭﻟﻴﺔﺑﺎﻟﻀﻐﻂﺍﻟﻤﺴﺘﻤﺮﻋﻠﻰSRC/
OFFﺇﻟﻰﺃﻥﺗﻨﻄﻔﺊﺍﻟﻮﺣﺪﺓ.
ﺍﻟﻤﻮﺍﻟﻒ
ﺍﻟﻌﻤﻠﻴﺎﺕﺍﻷﺳﺎﺳﻴﺔ
ﻫﺎﻡ
ﺇﺫﺍﻛﻨﺖﺗﺴﺘﺨﺪﻡﻫﺬﺍﺍﻟﺠﻬﺎﺯﻓﻲﺷﻤﺎﻝﺃﻭﻭﺳﻂﺃﻭﺟﻨﻮﺏﺃﻣﺮﻳﻜﺎ،ﻗﻢ
ﺑﺈﻋﺎﺩﺓﺿﺒﻂﻣﺮﺣﻠﺔﻣﻮﺍﻟﻔﺔﺍﻟﻤﻮﺟﺔAM)ﺭﺍﺟﻊ
AM)ﻣﺮﺣﻠﺔﻣﻮﺍﻟﻔﺔ
ﺍﻟﻤﻮﺟﺔAM(
ﻓﻲﺻﻔﺤﺔ٨(.
ﺍﺧﺘﻴﺎﺭﻣﻮﺟﺔ
1ﺍﺿﻐﻂﻋﻠﻰB (BAND/ESC)ﺇﻟﻰﺃﻥﺗﻈﻬﺮﺍﻟﻤﻮﺟﺔﺍﻟﻤﺮﻏﻮﺑﺔ)F1
ﻭF2ﻭF3ﻟﻤﻮﺟﺔFMﺃﻭAM(.
ﺍﻟﻤﻮﺍﻟﻔﺔﺍﻟﻴﺪﻭﻳﺔ)ﺧﻄﻮﺓﺑﺨﻄﻮﺓ(
1ﺍﺿﻐﻂcﺃﻭd.
ﺍﻟﺒﺤﺚ
1ﺍﺿﻐﻂﻣﻊﺍﻻﺳﺘﻤﺮﺍﺭﻋﻠﻰcﺃﻭd،ﻭﻣﻦﺛﻢﺍﺗﺮﻛﻪ.
ﻳﻤﻜﻨﻚﺇﻟﻐﺎﺀﻣﻮﺍﻟﻔﺔﺍﻟﺒﺤﺚﻋﻦﻃﺮﻳﻖﺿﻐﻂcﺃﻭdﻟﻤﺪﺓﻗﺼﻴﺮﺓ.
ﺃﺛﻨﺎﺀﺍﻟﻀﻐﻂﻣﻊﺍﻻﺳﺘﻤﺮﺍﺭﻋﻠﻰcﺃﻭd،ﻳﻤﻜﻨﻚﺗﺨﻄّﻲﺍﻟﻤﺤﻄﺎﺕ.
ﺗﺒﺪﺃﻣﻮﺍﻟﻔﺔﺍﻟﺒﺤﺚﺑﻤﺠﺮﺩﺃﻥﺗﺘﺮﻙcﺃﻭd.
ﺗﺨﺰﻳﻦﺍﻟﻤﺤﻄﺎﺕﻭﺍﺳﺘﺪﻋﺎﺅﻫﺎﻟﻜﻞﻣﻮﺟﺔ
%ﻋﻨﺪﻣﺎﺗﻌﺜﺮﻋﻠﻰﺍﻟﻤﺤﻄﺔﺍﻟﺘﻲﺗﺮﻳﺪﺗﺨﺰﻳﻨﻬﺎﻓﻲﺍﻟﺬﺍﻛﺮﺓ،
ﺍﺿﻐﻂﺃﺣﺪﺃﺯﺭﺍﺭﻣﻮﺍﻟﻔﺔﺍﻟﻀﺒﻂﺍﻟﻤﺴﺒﻖ)1ﺇﻟﻰ6(ﻭﺍﺳﺘﻤﺮﻓﻲ
ﺍﻟﻀﻐﻂﺇﻟﻰﺃﻥﻳﺘﻮﻗﻒﺭﻗﻢﺍﻟﻀﺒﻂﺍﻟﻤﺴﺒﻖﻋﻦﺍﻟﻮﻣﻴﺾ.
ﻳﻤﻜﻦﺍﺳﺘﺪﻋﺎﺀﺗﺮﺩﺩﻣﺤﻄﺎﺕﺍﻟﺮﺍﺩﻳﻮﺍﻟﻤﺨﺰﻧﺔﺑﺎﻟﻀﻐﻂﻋﻠﻰﺯﺭ
ﻣﻮﺍﻟﻔﺔﺍﻟﻀﺒﻂﺍﻟﻤﺴﺒﻖ.
#ﺍﺿﻐﻂaﺃﻭbﻻﺳﺘﺪﻋﺎﺀﺗﺮﺩﺩﺍﺕﻣﺤﻄﺔﺍﻟﺮﺍﺩﻳﻮ.
ﺇﻋﺪﺍﺩﺍﺕﺍﻟﻮﻇﺎﺋﻒ
%ﺍﺿﻐﻂﻋﻠﻰFUNCﻟﺘﺤﺪﻳﺪﺍﻟﻮﻇﻴﻔﺔ.
ﺑﻌﺪﺍﻻﺧﺘﻴﺎﺭ؛ﻧﻔﺬﺍﻹﺟﺮﺍﺀﺍﺕﺍﻟﺘﺎﻟﻴﺔﻟﻀﺒﻂﺍﻟﻮﻇﻴﻔﺔ.
BSM)ﺫﺍﻛﺮﺓﺃﻓﻀﻞﻣﺤﻄﺎﺕ(
ﺗﻘﻮﻡBSM)ﺫﺍﻛﺮﺓﺃﻓﻀﻞﻣﺤﻄﺎﺕ(ﺑﺘﺨﺰﻳﻦﺗﺮﺩﺩﺍﺕﺃﻗﻮﻯﺳﺖﻣﺤﻄﺎﺕ
ﺗﻠﻘﺎﺋﻴًﺎﻭﺫﻟﻚﺣﺴﺐﺗﺮﺗﻴﺐﻗﻮﺓﺇﺷﺎﺭﺗﻬﺎ.
ﺗﺨﺰﻳﻦﺗﺮﺩﺩﺍﺕﺍﻟﺒﺚﺑﺎﺳﺘﻌﻤﺎﻝﺍﻟﻮﻇﻴﻔﺔBSMﻗﺪﻳﻘﻮﻡﺑﺎﺳﺘﺒﺪﺍﻝﺗﺮﺩﺩﺍﺕ
ﺍﻟﺒﺚﺍﻟﺘﻲﻗﻤﺖﺑﺤﻔﻈﻬﺎﺑﺎﺳﺘﻌﻤﺎﻝ1ﺇﻟﻰ6.
1ﺍﺿﻐﻂaﻟﺘﺸﻐﻴﻞﻭﻇﻴﻔﺔBSM.
ﺃﻗﻮﻯﺳﺘﺔﺗﺮﺩﺩﺍﺕﺑﺚﻳﺘﻢﺗﺨﺰﻳﻨﻬﺎﺣﺴﺐﺗﺮﺗﻴﺐﻗﻮﺓﺇﺷﺎﺭﺗﻬﺎ.
ﻹﻟﻐﺎﺀﻋﻤﻠﻴﺔﺍﻟﺘﺨﺰﻳﻦ،ﺍﺿﻐﻂb.
LOCAL)ﻣﻮﺍﻟﻔﺔﺍﻟﺒﺤﺚﺍﻟﻤﺤﻠﻲ(
ﺗﺘﻴﺢﻟﻚﻭﻇﻴﻔﺔﻣﻮﺍﻟﻔﺔﺍﻟﺒﺤﺚﺍﻟﻤﺤﻠﻲﺍﻟﻤﻮﺍﻟﻔﺔﻋﻠﻰﻣﺤﻄﺎﺕﺍﻟﺮﺍﺩﻳﻮﺍﻟﺘﻲ
ﺗﺘﻤﺘﻊﺑﺈﺷﺎﺭﺍﺕﻗﻮﻳﺔﻭﺍﺳﺘﻘﺒﺎﻝﺟﻴّﺪﺑﺼﻮﺭﺓﻛﺎﻓﻴﺔ.
1ﺍﺿﻐﻂaﺃﻭbﻟﺘﺸﻐﻴﻞﻣﻮﺍﻟﻔﺔﺍﻟﺒﺤﺚﺍﻟﻤﺤﻠﻲﺃﻭﺇﻧﻬﺎﺋﻬﺎ.
2ﺍﺿﻐﻂcﺃﻭdﻟﻀﺒﻂﺍﻟﺤﺴﺎﺳﻴﺔ.
FM:LOCAL 1—LOCAL 2—LOCAL 3—LOCAL 4
AM:LOCAL 1—LOCAL 2
ﻳﺴﻤﺢﺇﻋﺪﺍﺩﺃﻋﻠﻰﻣﺴﺘﻮﻯﺑﺎﺳﺘﻘﺒﺎﻝﺃﻗﻮﻯﺍﻟﻤﺤﻄﺎﺕﻓﻘﻂﻓﻲﺣﻴﻦﺃﻥ
ﺍﻟﻤﺴﺘﻮﻳﺎﺕﺍﻷﻗﻞﺗﺴﻤﺢﺑﺎﺳﺘﻘﺒﺎﻝﻣﺤﻄﺎﺕﺃﺿﻌﻒ.
CD
ﺍﻟﻌﻤﻠﻴﺎﺕﺍﻷﺳﺎﺳﻴﺔ
ﺗﺸﻐﻴﻞﺃﻗﺮﺍﺹCD/CD-R/CD-RW
1ﺃﺩﺧﻞﺍﻟﻘﺮﺹﻓﻲﻣﻨﻔﺬﺗﺤﻤﻴﻞﺍﻷﻗﺮﺍﺹﺑﺤﻴﺚﻳﻜﻮﻥﺟﺎﻧﺐﺍﻟﻤﻠﺼﻖ
ﻷﻋﻠﻰ.
ﺇﺧﺮﺍﺝﺃﻗﺮﺍﺹCD/CD-R/CD-RW
1ﺍﺿﻐﻂh.
ﺍﺧﺘﻴﺎﺭﻣﺠﻠﺪ
1ﺍﺿﻐﻂaﺃﻭb.
ﺍﺧﺘﻴﺎﺭﻣﺴﺎﺭ
1ﺍﺿﻐﻂcﺃﻭd.
Ar
٦
ﺍﻟﻘﺴﻢ
ﺍﻟﻌﺮﺑﻴﺔ
٠٢
ﺗﺸﻐﻴﻞﻫﺬﺍﺍﻟﺠﻬﺎﺯ
Page 39

ﺍﺳﺘﺨﺪﺍﻡﻭﺣﺪﺓﺍﻟﺘﺤﻜﻢﻋﻦﺑﻌﺪ
ﻭﺍﻟﻌﻨﺎﻳﺔﺑﻬﺎ
ﺍﺳﺘﺨﺪﺍﻡﻭﺣﺪﺓﺍﻟﺘﺤﻜﻢﻋﻦﺑﻌﺪ
1ﻗﻢﺑﺘﻮﺟﻴﻪﻭﺣﺪﺓﺍﻟﺘﺤﻜﻢﻋﻦﺑﻌﺪﻧﺤﻮﺍﻟﻠﻮﺣﺔﺍﻷﻣﺎﻣﻴﺔﻟﻠﺘﺸﻐﻴﻞ.
ﻋﻨﺪﺍﻻﺳﺘﻌﻤﺎﻝﻷﻭﻝﻣﺮﺓ،ﺍﺳﺤﺐﺍﻟﺸﺮﻳﻂﺍﻟﺒﺎﺭﺯﻣﻦﺍﻟﺪﺭﺝ.
ﺍﺳﺘﺒﺪﺍﻝﺍﻟﺒﻄﺎﺭﻳﺔ
1ﺣﺮﻙﺍﻟﺤﺎﻣﻞﻟﻠﺨﺎﺭﺝﻓﻲﻣﺆﺧﺮﺓﻭﺣﺪﺓﺍﻟﺘﺤﻜﻢﻋﻦﺑﻌﺪ.
2ﺃﺩﺧﻞﺍﻟﺒﻄﺎﺭﻳﺔﻣﻊﻣﺤﺎﺫﺍﺓﻋﻼﻣﺘﻲﺍﻟﻤﻮﺟﺐ)+(ﻭﺍﻟﺴﺎﻟﺐ)–(ﺑﺸﻜﻞ
ﺻﺤﻴﺢ.
ﺗﺤﺬﻳﺮ
!ﺍﺣﺘﻔﻆﺑﺎﻟﺒﻄﺎﺭﻳﺔﺑﻌﻴﺪًﺍﻋﻦﻣﺘﻨﺎﻭﻝﺍﻷﻃﻔﺎﻝ.ﺇﺫﺍﺗﻢﺍﺑﺘﻼﻉﺍﻟﺒﻄﺎﺭﻳﺔ،
ﺭﺍﺟﻊﺍﻟﻄﺒﻴﺐﻋﻠﻰﺍﻟﻔﻮﺭ.
!ﻳﻨﺒﻐﻲﻋﺪﻡﺗﻌﺮﻳﺾﺍﻟﺒﻄﺎﺭﻳﺎﺕ)ﻣﺠﻤﻮﻋﺔﺍﻟﺒﻄﺎﺭﻳﺔﺃﻭﺍﻟﺒﻄﺎﺭﻳﺎﺕ
ﺍﻟﻤﺮﻛﺒﺔ(ﻟﻠﺤﺮﺍﺭﺓﺍﻟﺰﺍﺋﺪﺓﻣﺜﻞﺃﺷﻌﺔﺍﻟﺸﻤﺲﺃﻭﺍﻟﺤﺮﻳﻖﺃﻭﻣﺎﺷﺎﺑﻪ
ﺫﻟﻚ.
ﺗﻨﺒﻴﻪ
!ﺍﺳﺘﺨﺪﻡﺑﻄﺎﺭﻳﺔﻟﻴﺜﻴﻮﻡCR2025)٣ﻓﻮﻟﺖ(ﻭﺍﺣﺪﺓ.
!ﺃﺧﺮﺝﺍﻟﺒﻄﺎﺭﻳﺔﻓﻲﺣﺎﻟﺔﻋﺪﻡﺍﺳﺘﺨﺪﺍﻡﻭﺣﺪﺓﺍﻟﺘﺤﻜﻢﻋﻦﺑﻌﺪﻟﻤﺪﺓ
ﺷﻬﺮﺃﻭﺃﻛﺜﺮ.
!ﺍﺳﺘﺒﺪﺍﻝﺍﻟﺒﻄﺎﺭﻳﺔﺑﻄﺮﻳﻘﺔﻏﻴﺮﺻﺤﻴﺤﺔﻗﺪﻳﻌﺮﺿﻬﺎﻟﺨﻄﺮ
ﺍﻻﻧﻔﺠﺎﺭ.ﺍﺳﺘﺒﺪﻟﻬﺎﺑﻨﻮﻉﻣﺸﺎﺑﻪﺃﻭﻣﻜﺎﻓﺊﻓﻘﻂ.
!ﻻﺗﺘﻌﺎﻣﻞﻣﻊﺍﻟﺒﻄﺎﺭﻳﺔﺑﺎﺳﺘﺨﺪﺍﻡﺃﺩﻭﺍﺕﻣﻌﺪﻧﻴﺔ.
!ﻻﺗﻘﻢﺑﺘﺨﺰﻳﻦﺍﻟﺒﻄﺎﺭﻳﺔﻣﻊﺃﺷﻴﺎﺀﻣﻌﺪﻧﻴﺔ.
!ﺇﺫﺍﺗﺴﺮّﺏﺳﺎﺋﻞﺍﻟﺒﻄﺎﺭﻳﺔ،ﻓﺎﻣﺴﺢﻭﺣﺪﺓﺍﻟﺘﺤﻜﻢﻋﻦﺑﻌﺪﻟﺘﻨﻈﻴﻔﻬﺎ
ﺗﻤﺎﻣًﺎﻭﻗﻢﺑﺘﺮﻛﻴﺐﺑﻄﺎﺭﻳﺔﺟﺪﻳﺪﺓ.
!ﻋﻨﺪﺍﻟﺘﺨﻠﺺﻣﻦﺍﻟﺒﻄﺎﺭﻳﺎﺕﺍﻟﻤﺴﺘﻌﻤﻠﺔ،ﺍﻟﺘﺰﻡﺑﺎﻟﻠﻮﺍﺋﺢﺍﻟﺤﻜﻮﻣﻴﺔﺃﻭ
ﻗﻮﺍﻋﺪﺍﻟﻬﻴﺌﺎﺕﺍﻟﺒﻴﺌﻴﺔﺍﻟﻌﺎﻣﺔﺍﻟﻤﻄﺒﻘﺔﻓﻲﺑﻠﺪﻙ/ﻣﻨﻄﻘﺘﻚ.
ﻫﺎﻡ
!ﻻﺗﻘﻢﺑﺘﺨﺰﻳﻦﻭﺣﺪﺓﺍﻟﺘﺤﻜﻢﻋﻦﺑﻌﺪﻓﻲﺩﺭﺟﺎﺕﺣﺮﺍﺭﺓﻣﺮﺗﻔﻌﺔﺃﻭ
ﻓﻲﺿﻮﺀﺍﻟﺸﻤﺲﺍﻟﻤﺒﺎﺷﺮ.
!ﻗﺪﻻﺗﻌﻤﻞﻭﺣﺪﺓﺍﻟﺘﺤﻜﻢﻋﻦﺑﻌﺪﺑﻄﺮﻳﻘﺔﺻﺤﻴﺤﺔﻓﻲﺿﻮﺀ
ﺍﻟﺸﻤﺲﺍﻟﻤﺒﺎﺷﺮ.
!ﻻﺗﺪﻉﻭﺣﺪﺓﺍﻟﺘﺤﻜﻢﻋﻦﺑﻌﺪﺗﺴﻘﻂﻋﻠﻰﺍﻷﺭﺿﻴﺔﺣﻴﺚﻗﺪﺗﺤﺘﺒﺲ
ﺗﺤﺖﺩﻭﺍﺳﺔﺍﻟﻔﺮﺍﻣﻞﺃﻭﺩﻭﺍﺳﺔﺍﻟﺴﺮﻋﺔ.
ﺍﻟﻌﻤﻠﻴﺎﺕﺍﻷﺳﺎﺳﻴﺔ
ﻫﺎﻡ
!ﺗﻌﺎﻣﻞﺑﺮﻓﻖﻋﻨﺪﻓﻚﺍﻟﻠﻮﺣﺔﺍﻷﻣﺎﻣﻴﺔﺃﻭﺗﺮﻛﻴﺒﻬﺎ.
!ﺗﺠﻨّﺐﺗﻌﺮﻳﺾﺍﻟﻠﻮﺣﺔﺍﻷﻣﺎﻣﻴﺔﻟﻠﺼﺪﻣﺎﺕﺍﻟﺸﺪﻳﺪﺓ.
!ﺍﺣﺘﻔﻆﺑﺎﻟﻠﻮﺣﺔﺍﻷﻣﺎﻣﻴﺔﺑﻌﻴﺪًﺍﻋﻦﺃﺷﻌﺔﺍﻟﺸﻤﺲﺍﻟﻤﺒﺎﺷﺮﺓﻭﺩﺭﺟﺎﺕ
ﺍﻟﺤﺮﺍﺭﺓﺍﻟﻌﺎﻟﻴﺔ.
!ﻓﻚﺍﻟﻜﺒﻼﺕﻭﺍﻷﺟﻬﺰﺓﺍﻟﻤﻮﺻﻠﺔﺑﺎﻟﻠﻮﺣﺔﺍﻷﻣﺎﻣﻴﺔﻗﺒﻞﻓﺼﻠﻬﺎ
ﻟﺘﺠﻨﺐﺗﻠﻒﺍﻟﺠﻬﺎﺯﺃﻭﺍﻷﺟﺰﺍﺀﺍﻟﺪﺍﺧﻠﻴﺔﻟﻠﺴﻴﺎﺭﺓ.
ﻓﻚﺍﻟﻠﻮﺣﺔﺍﻷﻣﺎﻣﻴﺔﻟﺤﻤﺎﻳﺔﺍﻟﻮﺣﺪﺓﻣﻦﺍﻟﺴﺮﻗﺔ
1ﺍﺿﻐﻂﺯﺭﺍﻟﻔﺼﻞﻟﻔﺘﺢﺍﻟﻠﻮﺣﺔﺍﻷﻣﺎﻣﻴﺔ.
2ﺍﺿﻐﻂﺍﻟﻠﻮﺣﺔﺍﻷﻣﺎﻣﻴﺔﻷﻋﻠﻰﻭﺍﺳﺤﺒﻬﺎﻧﺤﻮﻙ.
3ﺍﺣﺘﻔﻆﺩﺍﺋﻤًﺎﺑﺎﻟﻮﺍﺟﻬﺔﺍﻷﻣﺎﻣﻴﺔﺍﻟﻤﻔﻜﻮﻛﺔﻓﻲﻭﺣﺪﺓﺣﻤﺎﻳﺔﻣﺜﻞﺣﺎﻭﻳﺔ
ﺣﻤﺎﻳﺔ.
ﺇﻋﺎﺩﺓﺗﻮﺻﻴﻞﺍﻟﻠﻮﺣﺔﺍﻷﻣﺎﻣﻴﺔ
1ﺣﺮﻙﺍﻟﻠﻮﺣﺔﺍﻷﻣﺎﻣﻴﺔﻟﻠﻴﺴﺎﺭ.
ﺗﺄﻛﺪﻣﻦﺇﺩﺧﺎﻝﺍﻷﻟﺴﻦﻋﻠﻰﺍﻟﺠﺎﻧﺐﺍﻷﻳﺴﺮﻟﻠﻮﺣﺪﺓﺍﻟﺮﺋﻴﺴﻴﺔﻓﻲﺍﻟﻔﺘﺤﺎﺕ
ﻋﻠﻰﺍﻟﻠﻮﺣﺔﺍﻷﻣﺎﻣﻴﺔ.
2ﺍﺿﻐﻂﻋﻠﻰﺍﻟﺠﺎﻧﺐﺍﻷﻳﻤﻦﻣﻦﺍﻟﻠﻮﺣﺔﺍﻷﻣﺎﻣﻴﺔﺣﺘﻰﺗﺴﺘﻘﺮﻓﻲﻣﻜﺎﻧﻬﺎ
ﺑﺈﺣﻜﺎﻡ.
ﺇﺫﺍﺗﻌﺬﺭﺗﻮﺻﻴﻞﺍﻟﻠﻮﺣﺔﺍﻷﻣﺎﻣﻴﺔﺑﺎﻟﻮﺣﺪﺓﺍﻟﺮﺋﻴﺴﻴﺔﺑﻨﺠﺎﺡ،ﻓﺘﺄﻛﺪﻣﻦ
ﻭﺿﻊﺍﻟﻠﻮﺣﺔﺍﻷﻣﺎﻣﻴﺔﻋﻠﻰﺍﻟﻮﺣﺪﺓﺍﻟﺮﺋﻴﺴﻴﺔﺑﺸﻜﻞﺻﺤﻴﺢ.ﻭﻗﺪﻳﺘﺴﺒﺐ
ﻭﺿﻊﺍﻟﻠﻮﺣﺔﺍﻷﻣﺎﻣﻴﺔﻓﻲﻣﻜﺎﻧﻬﺎﺑﺎﻟﻘﻮﺓﻓﻲﺗﻠﻒﺍﻟﻠﻮﺣﺔﺍﻷﻣﺎﻣﻴﺔﺃﻭ
ﺍﻟﻮﺣﺪﺓﺍﻟﺮﺋﻴﺴﻴﺔ.
ﺗﺸﻐﻴﻞﺍﻟﺠﻬﺎﺯ
1ﺇﺿﻐﻂﺍﻟﺰﺭSRC/OFFﻟﺘﺸﻐﻴﻞﺍﻟﻮﺣﺪﺓ.
ﺇﻳﻘﺎﻑﺗﺸﻐﻴﻞﺍﻟﺠﻬﺎﺯ
1ﺍﺿﻐﻂﺍﻟﺰﺭSRC/OFFﻣﻊﺍﻻﺳﺘﻤﺮﺍﺭﺣﺘﻰﻳﺘﻢﺇﻳﻘﺎﻑﺗﺸﻐﻴﻞﺍﻟﻮﺣﺪﺓ.
ﺍﺧﺘﻴﺎﺭﻣﺼﺪﺭ
1ﺍﺿﻐﻂSRC/OFFﻟﻠﺘﺒﺪﻳﻞﺑﻴﻦﺍﻟﻤﺼﺎﺩﺭﺍﻟﻤﺬﻛﻮﺭﺓﺃﺩﻧﺎﻩ:
TUNER)ﺍﻟﻤﻮﺍﻟﻒ(—CD)ﻣﺸﻐّﻞﺃﻗﺮﺍﺹCDﻣﺪﻣﺞ(—AUX
)AUX(
ﺿﺒﻂﻣﺴﺘﻮﻯﺍﻟﺼﻮﺕ
1ﻗﻢﺑﺈﺩﺍﺭﺓSRC/OFFﻟﻀﺒﻂﻣﺴﺘﻮﻯﺍﻟﺼﻮﺕ.
Ar
٥
ﺍﻟﻘﺴﻢ
٠٢
ﺗﺸﻐﻴﻞﻫﺬﺍﺍﻟﺠﻬﺎﺯ
ﺍﻟﻮﺣﺪﺓﺍﻟﺮﺋﻴﺴﻴﺔ
a 6789bcd
123 4 5
ﺍﻟﺰﺭﺍﻟﺰﺭ
1E (EQ/LOUD)81ﺇﻟﻰ6
2h)ﺇﺧﺮﺍﺝ(9
)ﺍﻟﺴﺎﻋﺔ(
3AUDIOaa/b/c/d
4SRC/OFFbFUNC
5ﻓﺘﺤﺔﺗﺤﻤﻴﻞﺍﻟﻘﺮﺹcD (DISP/SCRL)
6ﺍﻟﺰﺭﻓﺼﻞdB(BAND/ESC)
7
ﻣﻘﺒﺲﺇﺩﺧﺎﻝAUX)ﻣﻘﺒﺲ
ﺍﺳﺘﺮﻳﻮ٣٫٥ﻣﻢ(
ﻭﺣﺪﺓﺍﻟﺘﺤﻜﻢﻋﻦﺑﻌﺪ
ﺍﻟﺘﺸﻐﻴﻞﻳﺘﻢﺑﻨﻔﺲﻃﺮﻳﻘﺔﺍﻟﺘﺸﻐﻴﻞﻋﻨﺪﺍﺳﺘﻌﻤﺎﻝﺍﻷﺯﺭﺍﺭﺍﻟﻤﻮﺟﻮﺩﺓ
ﻋﻠﻰﺍﻟﻮﺣﺪﺓﺍﻟﺮﺋﻴﺴﻴﺔ.ﺍﻧﻈﺮﺷﺮﺡﺍﻟﺠﻬﺎﺯﺍﻟﺮﺋﻴﺴﻲﺣﻮﻝﺍﺳﺘﺨﺪﺍﻡ
ﻛﻞﺯﺭﺑﺎﺳﺘﺜﻨﺎﺀATT،ﺍﻟﻤﻮﺿﺢﺃﺩﻧﺎﻩ.
ﺍﻟﺠﺰﺀﺍﻟﺤﺎﻟﺔ
e
VOLUME
(+/-)
ﺍﺿﻐﻂﻟﺮﻓﻊﻣﺴﺘﻮﻯﺍﻟﺼﻮﺕﺃﻭﺧﻔﻀﻪ.
fATT
ﺍﺿﻐﻂﻟﻜﺘﻢﺍﻟﺼﻮﺕ.ﺍﺿﻐﻂﻣﺮﺓﺃﺧﺮﻯﻹﻟﻐﺎﺀ
ﺍﻟﻜﺘﻢ.
ﺍﻟﺠﺰﺀﺍﻟﺤﺎﻟﺔ
g
e)ﺇﻳﻘﺎﻑ
ﻣﺆﻗﺖ(
ﺍﺿﻐﻂﻹﻳﻘﺎﻑﺍﻟﻌﺮﺽﻣﺆﻗﺘًﺎﺃﻭﺍﺳﺘﺌﻨﺎﻓﻪ.
h
SRC
)ﺍﻟﻤﺼﺪﺭ(
ﺍﺿﻐﻂﻟﻠﺘﺒﺪﻳﻞﺍﻟﺪﻭﺭﻱﺑﻴﻦﺟﻤﻴﻊﺍﻟﻤﺼﺎﺩﺭ
ﺍﻟﻤﺘﻮﻓﺮﺓ.ﺍﺿﻐﻂﻭﺍﺳﺘﻤﺮﺑﺎﻟﻀﻐﻂﻹﻳﻘﺎﻑ
ﺍﻟﻤﺼﺪﺭ.
ﺑﻴﺎﻥﺷﺎﺷﺔﺍﻟﻌﺮﺽ
3
2
1
4 5 6 7
ﺍﻟﻤﺆﺷﺮﺍﻟﺤﺎﻟﺔ
1
ﻗﺴﻢﺍﻟﻌﺮﺽ
ﺍﻟﺮﺋﻴﺴﻲ
!ﺍﻟﻤﻮﺍﻟﻒ:ﺍﻟﺤﺰﻣﺔﻭﺍﻟﺘﺮﺩﺩ
!ﻣﺸﻐﻞﺃﻗﺮﺍﺹCDﺍﻟﻤﺪﻣﺞ:ﺍﻟﻮﻗﺖ
ﺍﻟﻤﻨﻘﻀﻲﻟﻠﺘﺸﻐﻴﻞﻭﺍﻟﻤﻌﻠﻮﻣﺎﺕﺍﻟﻨﺼﻴﺔ
2
ﺭﻗﻢﺍﻟﻀﺒﻂ
ﺍﻟﻤﺴﺒﻖ/ﺭﻗﻢ
ﺍﻟﻤﺴﺎﺭ
!ﺭﻗﻢﺍﻟﻤﺴﺎﺭﺃﻭﺭﻗﻢﺍﻟﻀﺒﻂﺍﻟﻤﺴﺒﻖ.
!ﻓﻲﺣﺎﻟﺔﺍﺧﺘﻴﺎﺭﻣﺴﺎﺭﺭﻗﻢ١٠٠ﺃﻭﺃﻛﺜﺮ،
ﻳﻀﻲءdﻋﻠﻰﻳﺴﺎﺭﻣﺆﺷﺮﺭﻗﻢﺍﻟﻤﺴﺎﺭ.
3
MP3/
WMA
ﻧﻮﻉﺍﻟﻤﻠﻔﺎﺕﺍﻟﺬﻱﻳﺘﻢﺗﺸﻐﻴﻠﻪﺣﺎﻟﻴًﺎ.
4RPTﺗﻜﺮﺍﺭﺍﻟﺘﺸﻐﻴﻞﻗﻴﺪﺍﻟﺘﺸﻐﻴﻞ.
5LOUDﻋﻠﻮﺍﻟﺼﻮﺕﻗﻴﺪﺍﻟﺘﺸﻐﻴﻞ.
65)ﺍﺳﺘﺮﻳﻮ(ﺍﺳﺘﻘﺒﺎﻝﺍﻟﺒﺚﺍﻻﺳﺘﺮﻳﻮ.
7LOCﻣﻮﺍﻟﻔﺔﺍﻟﺒﺤﺚﺍﻟﻤﺤﻠﻲﻗﻴﺪﺍﻟﺘﺸﻐﻴﻞ.
Ar
٤
ﺍﻟﻘﺴﻢ
ﺍﻟﻌﺮﺑﻴﺔ
٠٢
ﺗﺸﻐﻴﻞﻫﺬﺍﺍﻟﺠﻬﺎﺯ
Page 40

ﺷﻜﺮًﺍ
ﻟﺸﺮﺍﺀﻫﺬﺍﺍﻟﻤﻨﺘﺞﻣﻦPIONEER.
ﻟﻠﺘﺄﻛﺪﻣﻦﺍﻻﺳﺘﺨﺪﺍﻡﺍﻟﺼﺤﻴﺢ،ﻳﺮﺟﻰﻗﺮﺍﺀﺓﻫﺬﺍﺍﻟﺪﻟﻴﻞﺟﻴﺪًﺍﻗﺒﻞ
ﺍﺳﺘﺨﺪﺍﻡﻫﺬﺍﺍﻟﻤﻨﺘﺞ.ﻣﻦﺍﻟﻤﻬﻢﺑﺼﻔﺔﺧﺎﺻﺔﻗﺮﺍﺀﺓﻋﻨﺎﺻﺮﺗﺤﺬﻳﺮ
ﻭﺗﻨﺒﻴﻪﺍﻟﻮﺍﺭﺩﺓﻓﻲﻫﺬﺍﺍﻟﺪﻟﻴﻞﻭﺍﻻﻟﺘﺰﺍﻡﺑﻬﺎ.
ﻳﺮﺟﻰﺍﻻﺣﺘﻔﺎﻅﺑﻬﺬﺍ
ﺍﻟﺪﻟﻴﻞﻓﻲﻣﻜﺎﻥﺁﻣﻦﻭﻳﺴﻬﻞﺍﻟﻮﺻﻮﻝﺇﻟﻴﻪﻟﻠﺮﺟﻮﻉﺇﻟﻴﻪﻓﻲ
ﺍﻟﻤﺴﺘﻘﺒﻞ.
ﺣﻮﻝﻫﺬﺍﺍﻟﺠﻬﺎﺯ
ﺗﻨﺒﻴﻪ
ﻫﺬﺍﺍﻟﻤُﻨﺘَﺞﻫﻮﻣﻨﺘﺞﻟﻴﺰﺭﻣﻦﺍﻟﻔﺌﺔ1ﻳﻨﺪﺭﺝﺿﻤﻦﺳﻼﻣﺔﻣﻨﺘﺠﺎﺕ
ﺍﻟﻠﻴﺰﺭ،IEC 60825-1:2007،ﻭﻳﺤﺘﻮﻱﻋﻠﻰﻭﺣﺪﺓﻟﻴﺰﺭﻣﻦ
ﺍﻟﻔﺌﺔ1M.ﻟﻀﻤﺎﻥﺍﻟﺴﻼﻣﺔﺍﻟﻤﺴﺘﻤﺮﺓ،ﻻﺗﻨﺰﻉﺃﻱﺃﻏﻄﻴﺔﺃﻭﺗﺤﺎﻭﻝ
ﺍﻟﻨﻔﺎﺫﺇﻟﻰﺩﺍﺧﻞﺍﻟﻤُﻨﺘَﺞ.ﺃﺳﻨِﺪﺃﻋﻤﺎﻝﺍﻟﺼﻴﺎﻧﺔﺇﻟﻰﺍﻟﻔﻨﻴﻴﻦﺍﻟﻤﺆﻫﻠﻴﻦ.
ﺗﻨﺒﻴﻪ
!ﻻﺗﺪﻉﻫﺬﺍﺍﻟﺠﻬﺎﺯﻳﻼﻣﺲﺍﻟﺴﻮﺍﺋﻞ.ﺇﺫﻳﻤﻜﻦﺃﻥﻳﺆﺩﻱﺫﻟﻚﺇﻟﻰ
ﺻﺪﻣﺎﺕﻛﻬﺮﺑﺎﺋﻴﺔ.ﻛﻤﺎﻳﻤﻜﻦﺃﻥﺗﺆﺩﻱﻣﻼﻣﺴﺔﺍﻟﺴﻮﺍﺋﻞﺇﻟﻰﺗﻠﻒ
ﻫﺬﺍﺍﻟﺠﻬﺎﺯﺃﻭﺇﻟﻰﺩﺧﺎﻥﺃﻭﺳﺨﻮﻧﺔﺯﺍﺋﺪﺓ.
!ﺍﺣﺮﺹﺩﺍﺋﻤًﺎﻋﻠﻰﺟﻌﻞﻣﺴﺘﻮﻯﺍﻟﺼﻮﺕﻣﻨﺨﻔﻀًﺎﺑﺸﻜﻞﻛﺎﻑ
ﻟﺴﻤﺎﻉﺍﻷﺻﻮﺍﺕﺍﻟﺨﺎﺭﺟﻴﺔ.
!ﺗﺠﻨﺐﺗﻌﺮﻳﺾﺍﻟﺠﻬﺎﺯﻟﻠﺮﻃﻮﺑﺔ.
!ﺇﺫﺍﺗﻢﻓﺼﻞﺍﻟﺒﻄﺎﺭﻳﺔﺃﻭﺗﻔﺮﻳﻎﺷﺤﻨﻬﺎ،ﻓﺴﻴﺘﻢﻣﺴﺢﺃﻱﺫﺍﻛﺮﺓﺿﺒﻂ
ﻣﺴﺒﻖ.
!ﺇﺫﺍﻟﻢﺗﻌﻤﻞﻫﺬﻩﺍﻟﻮﺣﺪﺓﺑﺼﻮﺭﺓﺻﺤﻴﺤﺔ،ﻳﺮﺟﻰﺍﻻﺗﺼﺎﻝﺑﺄﻗﺮﺏ
ﻭﻛﻴﻞﻟﺪﻳﻚﺃﻭﻣﺤﻄﺔﺧﺪﻣﺔﻣﺮﺧّﺼﺔﻣﻦﺑﺎﻳﻮﻧﻴﺮ
PIONEER.
Ar
٣
ﺍﻟﻘﺴﻢ
٠١
ﻗﺒﻞﺃﻥﺗﺒﺪﺃ
Ar
٢
ﺍﻟﻘﺴﻢ
ﺍﻟﻌﺮﺑﻴﺔ
٠٠
Page 41

١٩
Fa
١٨
Fa
ﯽﺳﺭﺎﻓ
Page 42

١٧
Fa
ﺮﺘﺸﯿﺑ ﺕﺎﻋﻼﻃﺍ
ﻪﻤﻴﻤﺿ
١۶
Fa
ﯽﺳﺭﺎﻓ
ﻂﺳﻮﺘﻣ یﺍﺪﺻ
ﺰﺗﺮﻫﻮﻠﯿﮐ ١ ...............................ﺲﻧﺎﮐﺮﻓ
ﻞﺑ ﯽﺳﺩ ±١٢ ..................................ﺖﻓﺎﯾﺭﺩ
ﺮﯾﺯ یﺍﺪﺻ
ﺰﺗﺮﻫﻮﻠﯿﮐ ١٠ ...............................ﺲﻧﺎﮐﺮﻓ
ﻞﺑ ﯽﺳﺩ ±١٢ ..................................ﺖﻓﺎﯾﺭﺩ
یﺩ ﯽﺳ ﻩﺪﻨﻨﮐ ﺶﺨﭘ
ﻩﺩﺮﺸﻓ ﮏﺴﻳﺩ ﯽﺗﻮﺻ ﻢﺘﺴﻴﺳ .....................................................ﻢﺘﺴﯿﺳ
ﻩﺩﺮﺸﻓ ﮏﺴﯾﺩ ....................... ﻩﺩﺎﻔﺘﺳﺍ ﻞﺑﺎﻗ یﺎﻫ ﮏﺴﯾﺩ
(ﺰﺗﺮﻫﻮﻠﯿﮐ ١) ﻞﺑ ﯽﺳﺩ ٩۴ .......................ﺖﯾﺯﺍﺭﺎﭘ ﻪﺑ ﻝﺎﻨﮕﯿﺳ ﺖﺒﺴﻧ
(IEC-A ﻪﮑﺒﺷ)
(ﻮﻳﺮﺘﺳﺍ) ٢ ...........................................ﺎﻫ ﻝﺎﻧﺎﮐ ﺩﺍﺪﻌﺗ
12 ،11 ،10 ،9 ،8 ،7.1 ،7 ﻪﺨﺴﻧ .......................... WMA ﯽﯾﺎﺸﮔﺰﻣﺭ ﺖﻣﺮﻓ
(ﻪﻟﺎﻧﺎﮐ ٢ یﺍﺪﺻ)
(Windows Media Player)
2 Audio Layer 3 ﻭ MPEG-1 ............................ MP3 ﯽﯾﺎﺸﮔﺰﻣﺭ ﺖﻣﺮﻓ
MS ADPCM ﻭ ﯽﻄﺧ PCM ............................... WAV ﻝﺎﻨﮕﻴﺳ ﺖﻣﺮﻓ
FM ﺏﺎﯾ ﺝﻮﻣ
ﺰﺗﺮﻫﺎﮕﻣ ١٠٨/٠ ﺎﺗ ﺰﺗﺮﻫﺎﮕﻣ ٨٧/۵ .......................................ﺲﻧﺎﮐﺮﻓ ﻩﺩﻭﺪﺤﻣ
،ﻮﻧﻮﻣ ،ﻢﻫﺍ ٧۵/μV٠/٧) ١١ dBf .........................ﻩﺩﺎﻔﺘﺳﺍ ﻞﺑﺎﻗ ﺖﯿﺳﺎﺴﺣ
(ﻞﺑ ﯽﺳﺩ ٣٠ :S/N
(IEC-A ﻪﮑﺒﺷ) ﻞﺑ ﯽﺳﺩ ٧٢ .......................ﺖﯾﺯﺍﺭﺎﭘ ﻪﺑ ﻝﺎﻨﮕﯿﺳ ﺖﺒﺴﻧ
AM ﺏﺎﯾ ﺝﻮﻣ
ﺰﺗﺮﻫﻮﻠﯿﮐ ١,۶٠٢ ﺎﺗ ﺰﺗﺮﻫﻮﻠﯿﮐ ۵٣١ .......................................ﺲﻧﺎﮐﺮﻓ ﻩﺩﻭﺪﺤﻣ
(ﺰﺗﺮﻫﻮﻠﯿﮐ ٩)
ﺰﺗﺮﻫﻮﻠﯿﮐ ١۶۴٠ ﺎﺗ ﺰﺗﺮﻫﻮﻠﯿﮐ ۵٣٠
(ﺰﺗﺮﻫﻮﻠﯿﮐ ١٠)
(ﻞﺑ ﯽﺳﺩ ٢٠ :S/N) ٢۵ μV .........................ﻩﺩﺎﻔﺘﺳﺍ ﻞﺑﺎﻗ ﺖﯿﺳﺎﺴﺣ
(IEC-A ﻪﮑﺒﺷ) ﻞﺑ ﯽﺳﺩ ۶٢ .......................ﺖﯾﺯﺍﺭﺎﭘ ﻪﺑ ﻝﺎﻨﮕﯿﺳ ﺖﺒﺴﻧ
ﻪﺘﮑﻧ
.ﺪﻨﮐ ﺮﯿﯿﻐﺗ ﻡﻼﻋﺍ ﻥﻭﺪﺑ ﯽﺣﺍﺮﻃ ﻭ ﺕﺎﺼﺨﺸﻣ ﺖﺳﺍ ﻦﮑﳑ
Page 43

ﺮﺘﺸﯿﺑ ﺕﺎﻋﻼﻃﺍ
ﻪﻤﻴﻤﺿ
١۵
Fa
٩٩٩ ﺎﺗ ﺮﺜﮐﺍﺪﺣ :ﺶﺨﭘ ﻞﺑﺎﻗ یﺎﻫ ﻞﻳﺎﻓ
Joliet ،Romeo ،٢ ﻭ ١ ﺢﻄﺳ ISO 9660 :ﻞﻳﺎﻓ ﻢﺘﺴﻴﺳ
ﻪﻠﺑ :یﺍ ﻪﺴﻠﺟﺪﻨﭼ ﺶﺨﭘ
ﺮﻴﺧ :یﺍ ﻪﺘﺴﺑ ﱳﻣ ﻩﺩﺍﺩ ﻝﺎﻘﺘﻧﺍ
،ﻪﯿﻟﻭﺍ ﻂﺒﺿ ﻡﺎﮕﻨﻫ ﺭﺩ ﺎﻫ ﮓﻨﻫﺁ ﻦﯿﺑ ﯽﻟﺎﺧ ﺶﺨﺑ ﻝﻮﻃ ﱳﻓﺮﮔ ﺮﻈﻧ ﺭﺩ ﻥﻭﺪﺑ
.ﺩﻮﺷ ﯽﻣ ﺶﺨﭘ ﺎﻫ ﮓﻨﻫﺁ ﻦﯿﺑ ﻩﺎﺗﻮﮐ ﻪﻔﻗﻭ ﮏﯾ ﺎﺑ ﻩﺩﺮﺸﻓ ﯽﺗﻮﺻ یﺎﻫ ﮏﺴﯾﺩ
ﯽﺗﻮﺻ یﺎﻫ ﻞﯾﺎﻓ ﯽﻟﺍﻮﺗ
ﻩﺩﺮﮐ ﻦﯿﯿﻌﺗ ﺍﺭ ﺎﻫ ﻪﺷﻮﭘ یﺎﻫ ﻩﺭﺎﻤﺷ ﻩﺎﮕﺘﺳﺩ ﻦﯾﺍ ﺎﺑ ﺪﻧﺍﻮﺗ ﯽﳕ ﺮﺑﺭﺎﮐ
.ﺪﻨﮐ ﺺﺨﺸﻣ ﺍﺭ ﺎﻬﻧﺁ ﺶﺨﭘ ﯽﻟﺍﻮﺗ ﻭ
ﺩﻮﺟﻮﻣ ﯽﻟﺍﻮﺗ ﺯﺍ یﺍ ﻪﻧﻮﳕ
Level 1 Level 2 Level 3 Level 4
01
02
03
04
05
ﻪﺷﻮﭘ :
ﯽﺗﻮﺻ ﻞﯾﺎﻓ :
ﻩﺩﺮﺸﻓ
ﻩﺭﺎﻤﺷ :٠۵ ﺎﺗ ٠١
ﻪﺷﻮﭘ
ﯽﻟﺍﻮﺗ :6 ﺎﺗ 1
ﺶﺨﭘ
ﮏﺴﻳﺩ
ﺎﯾ ﻪﺷﻮﭘ ﺏﺎﺨﺘﻧﺍ ﯽﻟﺍﻮﺗ ،ﺭﺍﺰﻓﺍ ﻡﺮﻧ ﱳﺷﻮﻧ ﺎﯾ یﺭﺍﺬﮔﺰﻣﺭ ﻪﺑ ﻪﺘﺴﺑ
.ﺪﺷﺎﺑ ﺕﻭﺎﻔﺘﻣ ﺖﺳﺍ ﻦﮑﳑ ﺎﻫﺩﺮﮐﺭﺎﮐ ﺮﮕﯾﺩ
یﺭﺎﲡ ﺖﻣﻼﻋ ﻭ یﺭﺍﺩﺮﺑ ﻪﺨﺴﻧ ﻖﺣ
iTunes
ﺭﺩ ﻩﺪﺷ ﺖﺒﺛ ،Apple Inc. یﺭﺎﲡ یﺎﻫ ﺖﻣﻼﻋ iTunes ﻭ Apple
.ﺪﻨﺘﺴﻫ ﺎﻫﺭﻮﺸﮐ ﺮﮕﯾﺩ ﻭ ﺎﮑﯾﺮﻣﺁ
MP3
ﯽﺼﺨﺷ ﻩﺩﺎﻔﺘﺳﺍ یﺍﺮﺑ ﺯﻮﺠﻣ ﻪﺋﺍﺭﺍ ﺎﺑ ﻂﻘﻓ ﻝﻮﺼﺤﻣ ﻦﯾﺍ ﻪﺋﺍﺭﺍ
ﺎﺑ ﻪﻄﺑﺍﺭ ﺭﺩ ﯽﻘﺣ ﻪﻧﻮﮔﺮﻫ ﺎﯾ ﻭ ﺯﻮﺠﻣ ﻭ ﻪﺘﻓﺮﮔ ﺕﺭﻮﺻ یﺭﺎﲡﺮﯿﻏ ﻭ
،ﯽﻧﺎﻬﺟ یﺎﻫ ﻪﻧﺎﺳﺭ) ﺶﺨﭘ ﻉﻮﻧ ﺮﻫ ﺭﺩ ﻝﻮﺼﺤﻣ ﻦﯾﺍ ﺯﺍ ﻩﺩﺎﻔﺘﺳﺍ
،(ﺪﻣﺁﺭﺩ ﺪﯿﻟﻮﺗ ﻑﺪﻫ ﺎﺑ) یﺭﺎﲡ (ﻪﻧﺎﺳﺭ ﻉﺍﻮﻧﺍ ﺮﮕﯾﺩ ﺎﯾ ﻭ ﯽﻠﺑﺎﮐ ،ﻩﺭﺍﻮﻫﺎﻣ
•
ﺮﮕﯾﺩ ﺎﯾ ﺎﻫ ﻪﮑﺒﺷ ﺮﮕﯾﺩ ﺎﯾ/ﻭ ﺖﻧﺍﺮﺘﻨﯾﺍ ،ﺖﻧﺮﺘﻨﯾﺍ ﻖﯾﺮﻃ ﺯﺍ ﺶﺨﭘ/ﺶﺨﭘ
ﺯﺍ ﯽﯾﺎﻫ ﻪﻣﺎﻧﺮﺑ ﺪﻨﻧﺎﻣ ﯽﮑﯿﻧﻭﺮﺘﮑﻟﺍ یﺍﻮﺘﺤﻣ ﻊﯾﺯﻮﺗ یﺎﻫ ﻢﺘﺴﯿﺳ
ﻦﯿﻨﭼ یﺍﺮﺑ .ﺪﻨﮐ ﯽﳕ ﻪﺋﺍﺭﺍ ﯽﺘﺳﺍﻮﺧﺭﺩ یﺍﺪﺻ ﻭ ﯽﺘﺧﺍﺩﺮﭘ یﺍﺪﺻ ﻉﻮﻧ
ﺯﺍ ﻉﻼﻃﺍ یﺍﺮﺑ .ﺩﻮﺷ ﻪﯿﻬﺗ ﻪﻧﺎﮔﺍﺪﺟ ﺯﻮﺠﻣ ﺪﯾﺎﺑ یﺍ ﻩﺩﺎﻔﺘﺳﺍ ﺩﺭﺍﻮﻣ
ﺖﯾﺎﺳ ﺯﺍ ﺕﺎﯿﺋﺰﺟ
.ﺪﯿﻨﮐ ﻥﺪﯾﺩ http://www.mp3licensing.com
WMA
ﺎﻳ یﺭﺎﲡ یﺎﻫ ﺖﻣﻼﻋ ،Windows یﻮﮔﻮﻟ ﻭ Windows Media
ﻩﺪﺤﺘﻣ ﺕﻻﺎﻳﺍ ﺭﺩ Microsoft ﺖﮐﺮﺷ ﻩﺪﺷ ﺖﺒﺛ یﺭﺎﲡ یﺎﻫ ﺖﻣﻼﻋ
.ﺖﺳﺍ ﺎﻫ ﺭﻮﺸﮐ ﺮﻳﺎﺳ ﺎﻳ/ﻭ
Microsoft Corporation ﻪﺑ ﻖﻠﻌﺘﻣ یﺭﻭﺁ ﻦﻓ یﺍﺭﺍﺩ ﻝﻮﺼﺤﻣ ﻦﯾﺍ
ﻥﺎﮑﻣﺍ Microsoft Licensing, Inc .ﺯﺍ ﺯﻮﺠﻣ ﺐﺴﮐ ﻥﻭﺪﺑ ﻭ ﺖﺳﺍ
.ﺖﺷﺍﺩ ﺪﻫﺍﻮﺨﻧ ﺩﻮﺟﻭ ﻥﺁ ﻊﯾﺯﻮﺗ ﺎﯾ ﻩﺩﺎﻔﺘﺳﺍ
ﺕﺎﺼﺨﺸﻣ
ﯽﻠﮐ ﺩﺭﺍﻮﻣ
ﻢﯿﻘﺘﺴﻣ ﻕﺮﺑ ﺖﻟﻭ١۴/۴ ........................ﻩﺪﺷ یﺪﻨﺑ ﻪﺟﺭﺩ ﻕﺮﺑ ﻊﺒﻨﻣ
ﺎﺗ ﺖﻟﻭ ١٢/٠ :ﺯﺎﺠﻣ ژﺎﺘﻟﻭ ﻩﺩﻭﺪﺤﻣ)
(ﻢﯿﻘﺘﺴﻣ ﻥﺎﯾﺮﺟ ﺖﻟﻭ ١۴/۴
ﯽﻔﻨﻣ ﻉﻮﻧ .............................ﯽﻨﻴﻣﺯ ﻝﺎﺼﺗﺍ ﻢﺘﺴﻴﺳ
ﺮﭙﻣﺁ ١٠/٠ ........................ ﻕﺮﺑ ﻑﺮﺼﻣ ﻥﺍﺰﯿﻣ ﺮﺜﮐﺍﺪﺣ
:(ﺮﻄﻗ × ﻝﻮﻃ × ﺽﺮﻋ) ﺩﺎﻌﺑﺍ
DIN
× ﺮﺘﻣ ﯽﻠﯿﻣ ۵٠ × ﺮﺘﻣ ﯽﻠﯿﻣ ١٧٨ ................................ ﯽﺳﺎﺷ
ﺮﺘﻣ ﯽﻠﯿﻣ ١۶۵
× ﺮﺘﻣ ﯽﻠﯿﻣ ۵٨ × ﺮﺘﻣ ﯽﻠﯿﻣ ١٨٨ ......... (ﻮﻠﺟ ﺖﻤﺴﻗ) ﻪﻏﺎﻣﺩ
ﺮﺘﻣ ﯽﻠﯿﻣ ١٧
D
× ﺮﺘﻣ ﯽﻠﯿﻣ ۵٠ × ﺮﺘﻣ ﯽﻠﯿﻣ ١٧٨ ................................ ﯽﺳﺎﺷ
ﺮﺘﻣ ﯽﻠﯿﻣ ١۶۵
× ﺮﺘﻣ ﯽﻠﯿﻣ ۴۶ × ﺮﺘﻣ ﯽﻠﯿﻣ ١٧٠ ......... (ﻮﻠﺟ ﺖﻤﺴﻗ) ﻪﻏﺎﻣﺩ
ﺮﺘﻣ ﯽﻠﯿﻣ ١٧
ﻡﺮﮔﻮﻠﯿﮐ ١/٣ ...............................................................ﻥﺯﻭ
ﺍﺪﺻ
۴ × ﺕﺍﻭ ۵٠ .................................. ﻕﺮﺑ ﯽﺟﻭﺮﺧ ﺮﺜﮐﺍﺪﺣ
،ﺰﺗﺮﻫ ١۵ ٠٠٠ ﺎﺗ ﺰﺗﺮﻫ ۵٠) ۴ × ﺕﺍﻭ ٢٢ ................................... ﯽﻟﺍﻮﺘﻣ ﻕﺮﺑ ﯽﺟﻭﺮﺧ
ﻝﺎﻌﻓ ﻦﯿﺣ ﺭﺩ ،ﯽﻠﮐ ﺭﺎﺑ ﻢﻫﺍ ۴ ،THD ٪ ۵
(ﻝﺎﻧﺎﮐ ﻭﺩ ﺮﻫ ﻥﺩﻮﺑ
(ﺖﺳﺍ ﺯﺎﺠﻣ ﻢﻫﺍ ٨ ﺎﺗ ۴) ﻢﻫﺍ ۴ ................................................ﺭﺎﺑ ﺲﻧﺍﺪﭙﻣﺍ
ﻩﺪﺷ ﺪﯿﻟﻮﺗ ﺶﯿﭘ ﺯﺍ ﯽﺟﻭﺮﺧ ﺢﻄﺳ ﺮﺜﮐﺍﺪﺣ
ﺖﻟﻭ ٢/٠ ...........................................................
:ﮓﻨﻫﺁ یﺎﻫ ﻝﺮﺘﻨﮐ
ﰈ یﺍﺪﺻ
ﺰﺗﺮﻫ ١٠٠ ...............................ﺲﻧﺎﮐﺮﻓ
ﻞﺑ ﯽﺳﺩ ±١٢ ..................................ﺖﻓﺎﯾﺭﺩ
ﺮﺘﺸﯿﺑ ﺕﺎﻋﻼﻃﺍ
ﻪﻤﻴﻤﺿ
١۴
Fa
ﯽﺳﺭﺎﻓ
ﺭﺎﮐ ﻪﺑ ﺯﺍ .ﺪﯿﻨﮐ ﻩﺩﺎﻔﺘﺳﺍ ﻞﮑﺷ یﺍ ﻩﺮﯾﺍﺩ ﹰﻼﻣﺎﮐ ﻭ ﯽﻟﻮﻤﻌﻣ یﺎﻫ ﮏﺴﯾﺩ ﺯﺍ ﻂﻘﻓ
.ﺪﯿﻨﮐ یﺭﺍﺩﺩﻮﺧ ﺭﺍﺩ ﻞﮑﺷ یﺎﻫ ﮏﺴﯾﺩ ﻥﺩﺮﺑ
.ﺪﻴﻨﮑﻧ ﺩﺭﺍﻭ ﮏﺴﻳﺩ یﺭﺍﺬﮔﺭﺎﺑ ﻑﺎﮑﺷ ﺭﺩ یﺮﮕﻳﺩ ﺰﻴﭼ ،یﺩ ﯽﺳ ﺯﺍ ﺮﻴﻏ
ﻭ ﯽﮔﺩﺭﻮﺧ ﭻﯿﭘ ،ﯽﮕﺘﺴﮑﺷ ،ﯽﮔﺩﺭﻮﺧ کﺮﺗ یﺍﺭﺍﺩ یﺎﻫ ﮏﺴﯾﺩ ﻥﺩﺮﺑ ﺭﺎﮐ ﻪﺑ ﺯﺍ
ﺩﻮﺷ ﻩﺪﻨﻨﮐ ﺶﺨﭘ ﻪﺑ ﻥﺪﻣﺁ ﺩﺭﺍﻭ ﺐﯿﺳﺁ ﺐﺒﺳ ﺖﺳﺍ ﻦﮑﳑ ﻪﮐ ﺕﻼﮑﺸﻣ ﺮﮕﯾﺩ
.ﺪﯿﻨﮐ یﺭﺍﺩﺩﻮﺧ
.ﺖﺴﯿﻧ ﺮﯾﺬﭘ ﻥﺎﮑﻣﺍ ﻩﺪﺸﻧ ﯽﯾﺎﻬﻧ CD-R/CD-RW ﮏﺴﯾﺩ ﺶﺨﭘ
.ﺪﯿﻨﮐ یﺭﺍﺩﺩﻮﺧ ﮏﺴﯾﺩ ﻩﺪﺷ ﻂﺒﺿ ﺢﻄﺳ ﻥﺩﺮﮐ ﺲﳌ ﺯﺍ
ﺹﻮﺼﺨﻣ ﻪﻈﻔﺤﻣ ﺭﺩ ﺍﺭ ﺎﻬﻧﺁ ،ﺪﯿﻨﮐ ﯽﳕ ﻩﺩﺎﻔﺘﺳﺍ ﺎﻫ ﮏﺴﯾﺩ ﺯﺍ ﻪﮐ ﯽﻣﺎﮕﻨﻫ
.ﺪﯿﻫﺩ ﺭﺍﺮﻗ ﺩﻮﺧ
ﺶﺑﺎﺗ ﺮﺑﺍﺮﺑ ﺭﺩ ﻪﻠﻤﺟ ﺯﺍ ﻡﺮﮔ ﺭﺎﯿﺴﺑ یﺎﻫ ﻥﺎﮑﻣ ﺭﺩ ﺎﻫ ﮏﺴﯾﺩ ﻥﺩﺮﮐ ﺎﻫﺭ ﺯﺍ
.ﺪﯿﻨﮐ یﺭﺍﺩﺩﻮﺧ ﺪﯿﺷﺭﻮﺧ ﺭﻮﻧ ﻢﯿﻘﺘﺴﻣ
ﯽﯾﺎﯿﻤﯿﺷ ﺩﺍﻮﻣ ﻥﺩﺮﺑ ﺭﺎﮐ ﻪﺑ ﺎﯾ ﮏﺴﯾﺩ ﺢﻄﺳ یﻭﺭ ﺮﺑ ﱳﺷﻮﻧ ،ﺐﺴﭼﺮﺑ ﻝﺎﺼﺗﺍ ﺯﺍ
.ﺪﯿﻨﮐ یﺭﺍﺩﺩﻮﺧ ﺎﻫ ﮏﺴﯾﺩ ﺢﻄﺳ یﻭﺭ ﺮﺑ
.ﺪﻴﻫﺩ ﻡﺎﳒﺍ ،ﻥﻭﺮﻴﺑ ﻪﺑ ﺰﮐﺮﻣ ﺖﻤﺳ ﺯﺍ ﻡﺮﻧ ﻪﭼﺭﺎﭘ ﮏﻳ ﺎﺑ ﺍﺭ یﺩ ﯽﺳ ﻥﺩﺮﮐ ﺰﻴﲤ
.ﺩﻮﺷ ﯽﻣ ﻩﺪﻨﻨﮐ ﺶﺨﭘ ﺩﺮﮐﺭﺎﮐ ﺭﺩ ﺺﻘﻧ ﺩﺎﺠﯾﺍ ﺐﺒﺳ ﺞﯾﺭﺪﺗ ﻪﺑ ﻥﺎﻌﯿﻣ ﺪﯿﻟﻮﺗ
ﺭﺍﺮﻗ ﺮﺘﺸﯿﺑ یﺎﻣﺩ ﺎﺑ ﯽﻧﺎﮑﻣ ﺭﺩ ﺖﻋﺎﺳ ﮏﯾ ﯽﺒﯾﺮﻘﺗ ﻥﺎﻣﺯ ﺕﺪﻣ یﺍﺮﺑ ﺍﺭ ﮏﺴﯾﺩ
.ﺪﯿﻨﮐ ﮏﺸﺧ ﻡﺮﻧ ﻪﭼﺭﺎﭘ ﮏﯾ ﺎﺑ ﺍﺭ ﺏﻮﻃﺮﻣ یﺎﻫ ﮏﺴﯾﺩ ﻦﯿﻨﭽﻤﻫ .ﺪﯿﻫﺩ
ﻂﺒﺿ ﻪﻣﺎﻧﺮﺑ ،ﮏﺴﯾﺩ ﺖﻣﺮﻓ ،ﮏﺴﯾﺩ ﺕﺎﺼﺨﺸﻣ ﻞﯿﻟﺩ ﻪﺑ ﺎﻫ ﮏﺴﯾﺩ ﺶﺨﭘ
ﻥﺎﮑﻣﺍ ﺖﺳﺍ ﻦﮑﳑ ﺩﺭﺍﻮﻣ ﺮﮕﯾﺩ ﻭ یﺯﺎﺳ ﻩﺮﯿﺧﺫ ﻂﯾﺍﺮﺷ ،ﺶﺨﭘ ﻂﯿﺤﻣ ،ﻩﺪﺷ
.ﺪﺷﺎﺒﻧ ﺮﯾﺬﭘ
.ﺪﻨﮐ ﻒﻗﻮﺘﻣ ﺍﺭ ﮏﺴﯾﺩ ﺶﺨﭘ ﺪﻧﺍﻮﺗ ﯽﻣ ﺮﯿﺴﻣ ﺭﺩ ﺖﮐﺮﺣ ﺯﺍ ﻞﺻﺎﺣ یﺎﻫ ﻥﺎﮑﺗ
(ﯽﯾﺎﺗﻭﺩ یﺎﻫ ﮏﺴﯾﺩ) DualDisc
ﻞﺑﺎﻗ یﺩ ﯽﺳ ﮏﯾ یﺍﺭﺍﺩ ﻪﮐ ﺩﻮﺷ ﯽﻣ ﻪﺘﻔﮔ ﯽﯾﺎﻫ ﮏﺴﯾﺩ ﻪﺑ ﯽﯾﺎﺗﻭﺩ یﺎﻫ ﮏﺴﯾﺩ
ﺮﮕﯾﺩ ﻑﺮﻃ ﺭﺩ ﻢﻠﯿﻓ یﺍﺮﺑ ﻂﺒﺿ ﻞﺑﺎﻗ DVD ﮏﯾ ﻭ ﻑﺮﻃ ﮏﯾ یﻭﺭ ﺮﺑ ﺍﺪﺻ یﺍﺮﺑ ﻂﺒﺿ
.ﺪﻨﺘﺴﻫ ﻥﺁ
ﺎﺑ ﯽﮑﻳﺰﻴﻓ ﺮﻈﻧ ﺯﺍ ﺎﻫ DualDisc ﻪﺑ ﻁﻮﺑﺮﻣ یﺩ ﯽﺳ ﺖﻤﺳ ﻪﮑﻨﻳﺍ ﻞﻴﻟﺩ ﻪﺑ
ﺎﺑ یﺩ ﯽﺳ ﺖﻤﺳ ﺶﺨﭘ ﻥﺎﮑﻣﺍ ﺪﻳﺎﺷ ،ﺖﺴﻴﻧ ﺭﺎﮔﺯﺎﺳ یﺩ ﯽﺳ ﯽﻣﻮﻤﻋ ﺩﺭﺍﺪﻧﺎﺘﺳﺍ
. ﺪﺷﺎﺑ ﻪﺘﺷﺍﺪﻧ ﺩﻮﺟﻭ ﻩﺎﮕﺘﺳﺩ ﻦﻳﺍ
ﺮﺑ ﺵﺍﺮﺧ ﺩﺎﺠﯾﺍ ﺐﺒﺳ ﺩﺎﯾﺯ ﺭﺎﯿﺴﺑ ﺕﺎﻌﻓﺩ ﻪﺑ DualDisc ﻥﺩﺭﻭﺁ ﻥﻭﺮﯿﺑ ﻭ ﻥﺩﺍﺩ ﺭﺍﺮﻗ
ﺭﺩ ﺶﺨﭘ ﺭﺩ ﻞﮑﺸﻣ ﺯﻭﺮﺑ ﺐﺒﺳ یﺪﺟ ﻭ ﻖﯿﻤﻋ یﺎﻫ ﺵﺍﺮﺧ .ﺩﻮﺷ ﯽﻣ ﮏﺴﯾﺩ یﻭﺭ
ﺭﺍﺮﻗ ﻑﺎﮑﺷ ﺭﺩ DualDisc ﺖﺳﺍ ﻦﮑﳑ ﻂﯾﺍﺮﺷ ﯽﺧﺮﺑ ﺭﺩ .ﺩﻮﺷ ﯽﻣ ﻩﺎﮕﺘﺳﺩ ﻦﯾﺍ
،ﺮﻣﺍ ﻦﯾﺍ ﺯﻭﺮﺑ ﺯﺍ یﺮﯿﮔﻮﻠﺟ یﺍﺮﺑ .ﺩﻮﺸﻧ ﺝﺭﺎﺧ ﻭ ﺪﻨﮐ ﺮﯿﮔ ﻩﺎﮕﺘﺳﺩ ﻥﻭﺭﺩ ﮏﺴﯾﺩ ﻥﺩﺍﺩ
.ﺪﯿﻨﮐ یﺭﺍﺩﺩﻮﺧ ﻩﺎﮕﺘﺳﺩ ﻦﯾﺍ ﺭﺩ DualDisc ﻥﺩﺮﺑ ﺭﺎﮑﺑ ﺯﺍ ﻪﮐ ﻢﯿﻨﮐ ﯽﻣ ﻪﯿﺻﻮﺗ
ﻂﺳﻮﺗ ﻩﺪﺷ ﻪﺋﺍﺭﺍ ﺕﺎﻋﻼﻃﺍ ﻪﺑ ،DualDisc ﻩﺭﺎﺑﺭﺩ ﺮﺘﺸﯿﺑ ﺕﺎﻋﻼﻃﺍ ﺐﺴﮐ یﺍﺮﺑ
.ﺪﯿﻨﮐ ﻪﻌﺟﺍﺮﻣ ﮏﺴﯾﺩ ﻩﺪﻧﺯﺎﺳ
ﻩﺩﺮﺸﻓ یﺍﺪﺻ یﺭﺎﮔﺯﺎﺳ
WMA
.wma :ﻞﻳﺎﻓ ﺪﻧﻮﺴﭘ
،(CBR) ﻪﻴﻧﺎﺛ ﺮﺑ ﺖﻴﺑ ﻮﻠﻴﮐ ٣٢٠ ﺎﺗ ﻪﻴﻧﺎﺛ ﺮﺑ ﺖﻴﺑ ﻮﻠﻴﮐ ۴٨ :ﺖﯿﺑ ﺖﻋﺮﺳ
(VBR) ﻪﻴﻧﺎﺛ ﺮﺑ ﺖﻴﺑ ﻮﻠﻴﮐ ٣٨۴ ﺎﺗ ﻪﻴﻧﺎﺛ ﺮﺑ ﺖﻴﺑ ﻮﻠﻴﮐ ۴٨
ﺰﺗﺮﻫﻮﻠﯿﮐ ۴٨ ﺎﺗ ﺰﺗﺮﻫﻮﻠﯿﮐ ٣٢ :ﻪﻧﻮﳕ ﺲﻧﺎﮐﺮﻓ
ﺮﻴﺧ :Windows Media Audio Professional, Lossless, Voice
MP3
.mp3 :ﻞﻳﺎﻓ ﺪﻧﻮﺴﭘ
VBR ،(CBR) ﻪﯿﻧﺎﺛ ﺮﺑ ﺖﯾﺎﺑﻮﻠﯿﮐ ٣٢٠ ﺎﺗ ﻪﯿﻧﺎﺛ ﺮﺑ ﺖﯾﺎﺑﻮﻠﯿﮐ ٨ :ﺖﯿﺑ ﺖﻋﺮﺳ
یﺍﺮﺑ ﺰﺗﺮﻫﻮﻠﯿﮐ ۴٨ ،۴۴/١ ،٣٢) ﺰﺗﺮﻫ ﻮﻠﻴﮐ ۴٨ ﺎﺗ ﺰﺗﺮﻫ ﻮﻠﻴﮐ ٨ :ﻪﻧﻮﳕ ﺲﻧﺎﮐﺮﻓ
(ﺪﯿﮐﺄﺗ
ID3 ﺐﺴﭼﺮﺑ 2.x ﻪﺨﺴﻧ) 2.4 ،2.3 ،2.2 ،1.1 ،1.0 :ﺭﺎﮔﺯﺎﺳ ID3 ﺐﺴﭼﺮﺑ ﻪﺨﺴﻧ
.(ﺩﺭﺍﺩ ﺖﻳﻮﻟﻭﺍ 1.x ﻪﺨﺴﻧ ﺮﺑ
ﺮﻴﺧ :M3u ﺶﺨﭘ ﺖﺴﯿﻟ
ﺮﻴﺧ :mp3 PRO ،(ﯽﻠﻣﺎﻌﺗ MP3) MP3i
WAV
.wav :ﻞﻳﺎﻓ ﺪﻧﻮﺴﭘ
(MS ADPCM) ۴ ،(LPCM) ١۶ ﻭ ٨ :یﺯﺎﺳ ﯽﻤﮐ یﺎﻫ ﺖﻴﺑ
ﻭ ﺰﺗﺮﻫ ﻮﻠﻴﮐ ٢٢/٠۵ ،(LPCM) ﺰﺗﺮﻫ ﻮﻠﻴﮐ ۴٨ ﺎﺗ ﺰﺗﺮﻫ ﻮﻠﻴﮐ ١۶ :ﻪﻧﻮﳕ ﺲﻧﺎﮐﺮﻓ
(MS ADPCM) ﺰﺗﺮﻫ ﻮﻠﻴﮐ ۴۴/١
ﯽﻠﻴﻤﮑﺗ ﺕﺎﻋﻼﻃﺍ
ﺶﻳﺎﳕ ﻞﺑﺎﻗ ﻪﺷﻮﭘ ﺎﻳ (ﻞﻳﺎﻓ ﺪﻧﻮﺴﭘ ﻞﻣﺎﺷ) ﻞﻳﺎﻓ ﻡﺎﻧ ﺯﺍ ﯽﻳﺍﺪﺘﺑﺍ ﻪﺴﯾﻮﻧ ٣٢ ﻂﻘﻓ
.ﺖﺳﺍ
ﻦﯾﺍ ﺖﺳﺍ ﻦﮑﳑ WMA یﺎﻫ ﻞﯾﺎﻓ یﺭﺍﺬﮔﺰﻣﺭ ﺭﺩ ﻩﺩﺎﻔﺘﺳﺍ ﺩﺭﻮﻣ ﻪﻣﺎﻧﺮﺑ ﻪﺑ ﻪﺘﺴﺑ
.ﺪﻨﮑﻧ ﺭﺎﮐ ﯽﺘﺳﺭﺪﺑ ﻩﺎﮕﺘﺳﺩ
یﺎﻫ ﻩﺩﺍﺩ ﻩﺍﺮﻤﻬﺑ ﺩﻮﺟﻮﻣ ﯽﺗﻮﺻ یﺎﻫ ﻞﯾﺎﻓ ﺶﺨﭘ ﻉﻭﺮﺷ ﻡﺎﮕﻨﻫ ﺖﺳﺍ ﻦﮑﳑ
.ﺪﺷﺎﺑ ﻪﺘﺷﺍﺩ ﺩﻮﺟﻭ ﺮﯿﺧﺄﺗ ﯽﻤﮐ ،یﺮﯾﻮﺼﺗ
ﮏﺴﻳﺩ
ﹰﻼﻤﻋ ﺐﺗﺍﺮﻣ ﻪﻠﺴﻠﺳ) ﻩﺩﺭ ﺖﺸﻫ ﺎﺗ ﺮﺜﮐﺍﺪﺣ :ﺶﺨﭘ ﻞﺑﺎﻗ ﻪﺷﻮﭘ ﺐﺗﺍﺮﻣ ﻪﻠﺴﻠﺳ
(.ﺖﺳﺍ ﻩﺩﺭ ﻭﺩ ﺯﺍ ﺮﺘﻤﮐ
٩٩ ﺎﺗ ﺮﺜﮐﺍﺪﺣ :ﺶﺨﭘ ﻞﺑﺎﻗ یﺎﻫ ﻪﺷﻮﭘ
Page 44

ﺮﺘﺸﯿﺑ ﺕﺎﻋﻼﻃﺍ
ﻪﻤﻴﻤﺿ
١٣
Fa
ﺐﯿﻋ ﻊﻓﺭ
ﺖﻣﻼﻋﺖﻠﻋ
ﻡﺯﻻ ﻡﺍﺪﻗﺍ
(ﻉﺎﺟﺭﺍ ﻪﺤﻔﺻ)
ﺭﻮﻃ ﻪﺑ ﺶﻳﺎﳕ ﻪﺤﻔﺻ
ﻪﺤﻔﺻ ﻪﺑ ﺭﺎﮐﺩﻮﺧ
.ﺩﺩﺮﮔ ﯽﻣ ﺯﺎﺑ ﻝﻮﻤﻌﻣ
ﹰ
ﺎﺒﻳﺮﻘﺗ ﺕﺪﻣ ﻪﺑ ﺎﻤﺷ
ﯽﻠﻤﻋ ﭻﻴﻫ ﻪﻴﻧﺎﺛ ٣٠
.ﺪﻳﺍ ﻩﺩﺍﺪﻧ ﻡﺎﳒﺍ
ﻩﺭﺎﺑﻭﺩ ﺍﺭ ﺮﻈﻧ ﺩﺭﻮﻣ ﻞﻤﻋ
.ﺪﻴﻫﺩ ﻡﺎﳒﺍ
یﺭﺍﺮﮑﺗ ﺶﺨﭘ ﻩﺩﻭﺪﺤﻣ
ﻩﺮﻈﺘﻨﻣ ﺮﻴﻏ ﺭﻮﻃ ﻪﺑ
.ﺪﻨﮐ ﯽﻣ ﺮﻴﻴﻐﺗ
ﻩﺩﻭﺪﺤﻣ ﻪﺑ ﻪﺘﺴﺑ
ﻩﺩﻭﺪﺤﻣ ،یﺭﺍﺮﮑﺗ ﺶﺨﭘ
ﺭﺩ ﺖﺳﺍ ﻦﮑﳑ ﯽﺑﺎﺨﺘﻧﺍ
ﻪﺷﻮﭘ ﺏﺎﺨﺘﻧﺍ ﻡﺎﮕﻨﻫ
ﺭﺩ ﺎﻳ ﺮﮕﻳﺩ کﺍﺮﺗ ﺎﻳ
ﻊﻳﺮﺳ ﺖﮐﺮﺣ ﻡﺎﮕﻨﻫ
،ﺐﻘﻋ ﻪﺑ ﻭﺭ/ﻮﻠﺟ ﻪﺑ ﻭﺭ
.ﺪﻨﮐ ﺮﻴﻴﻐﺗ
ﺍﺭ یﺭﺍﺮﮑﺗ ﺶﺨﭘ ﻩﺩﻭﺪﺤﻣ
. ﺪﻴﻨﮐ ﺏﺎﺨﺘﻧﺍ ﻩﺭﺎﺑﻭﺩ
یﺎﻫ ﻪﺷﻮﭘ ﺯﺍ ﯽﮑﻳ
.ﺩﻮﺷ ﯽﳕ ﺶﺨﭘ ﯽﻋﺮﻓ
ﯽﳕ ﺍﺭ ﯽﻋﺮﻓ یﺎﻫ ﻪﺷﻮﭘ
ﺏﺎﺨﺘﻧﺍ ﻡﺎﮕﻨﻫ ﺭﺩ ﻥﺍﻮﺗ
(ﻪﺷﻮﭘ ﺭﺍﺮﮑﺗ) FLD
.ﺩﺮﮐ ﺶﺨﭘ
یﺍﺮﺑ ﺍﺭ یﺮﮕﻳﺩ ﻩﺩﻭﺪﺤﻣ
.ﺪﻴﻨﮐ ﺏﺎﺨﺘﻧﺍ ﺶﺨﭘ ﺭﺍﺮﮑﺗ
NO XXXX
ﺩﻮﺷ ﯽﻣ ﺮﻫﺎﻇ
ﻪﺤﻔﺻ ﻪﮐ ﯽﻣﺎﮕﻨﻫ
ﺪﻨﮐ ﯽﻣ ﺮﯿﯿﻐﺗ ﺶﯾﺎﳕ
ﻥﺍﻮﻨﻌﺑ ،NO T-TTL)
.(ﻝﺎﺜﻣ
ﯽﻨﺘﻣ ﺕﺎﻋﻼﻃﺍ ﭻﯿﻫ
.ﺩﺭﺍﺪﻧ ﺩﻮﺟﻭ ﮏﺴﯾﺩ ﻥﻭﺭﺩ
ﻩﺩﺍﺩ ﺮﯿﯿﻐﺗ ﺍﺭ ﺶﯾﺎﳕ ﻪﺤﻔﺻ
ﺍﺭ ﺮﮕﯾﺩ ﻞﯾﺎﻓ/کﺍﺮﺗ ﮏﯾ ﺎﯾ
.ﺪﯿﻨﮐ ﺶﺨﭘ
ﺭﺎﮐ ﺖﺳﺭﺩ ﻩﺎﮕﺘﺳﺩ
.ﺪﻨﮐ ﯽﳕ
.ﺩﺭﺍﺩ ﺩﻮﺟﻭ ﻞﺧﺍﺪﺗ
ﻩﺩﺎﻔﺘﺳﺍ ﻝﺎﺣ ﺭﺩ ﺎﻤﺷ
ﺮﻴﻈﻧ ،ﺭﺍﺰﺑﺍ ﮏﻳ ﺯﺍ
ﺭﺩ ﻪﮐ ﺪﻴﺘﺴﻫ ،ﻞﻳﺎﺑﻮﻣ
ﺝﺍﻮﻣﺍ ﻩﺎﮕﺘﺳﺩ ﯽﮑﻳﺩﺰﻧ
ﺮﺸﺘﻨﻣ ﯽﮑﯾﺮﺘﮑﻟﺍ
.ﺪﻨﮐ ﯽﻣ
ﻦﮑﳑ ﻪﮐ ﺍﺭ ﯽﻗﺮﺑ یﺎﻫﺭﺍﺰﺑﺍ
،ﺪﻧﻮﺷ ﻝﻼﺘﺧﺍ ﺚﻋﺎﺑ ﺖﺳﺍ
ﺭﻭﺩ ﻩﺎﮕﺘﺳﺩ ﯽﮑﻳﺩﺰﻧ ﺯﺍ
.ﺪﻴﻨﮐ
ﺎﻄﺧ یﺎﻫ ﻡﺎﻴﭘ
ﻡﺎﯿﭘ ،Pioneer ﺕﺎﻣﺪﺧ ﺰﮐﺮﻣ ﻦﯾﺮﺘﮑﯾﺩﺰﻧ ﺎﯾ ﻩﺪﻨﺷﻭﺮﻓ ﺎﺑ ﺱﺎﲤ ﻡﺎﮕﻨﻫ
.ﺪﯿﻫﺩ ﻉﻼﻃﺍ ﺎﻬﻧﺁ ﻪﺑ ﺍﺭ ﺎﻄﺧ
ﻡﺎﻴﭘﺖﻠﻋﻡﺯﻻ ﻡﺍﺪﻗﺍ
ERROR-11, 12,
17, 30
.ﺖﺳﺍ ﻒﻴﺜﮐ ﮏﺴﻳﺩ.ﺪﻴﻨﮐ ﺰﻴﲤ ﺍﺭ ﮏﺴﻳﺩ
یﺍﺭﺍﺩ ﮏﺴﯾﺩ
.ﺖﺳﺍ ﯽﮔﺪﯿﺷﺍﺮﺧ
.ﺪﻴﻨﮐ ﺾﻳﻮﻌﺗ ﺍﺭ ﮏﺴﻳﺩ
ﻡﺎﻴﭘﺖﻠﻋﻡﺯﻻ ﻡﺍﺪﻗﺍ
ERROR-10, 11,
12, 15, 17,
30, A0
ﯽﮑﯾﺮﺘﮑﻟﺍ یﺎﻄﺧ ﮏﯾ
ﻩﺩﺍﺩ ﺥﺭ ﯽﮑﯿﻧﺎﮑﻣ ﺎﯾ
.ﺖﺳﺍ
ﺍﺭ ﺕﺭﺎﺘﺳﺍ ﭻﻴﻳﻮﺳ
ﺲﭙﺳ ﻭ ﻩﺩﺮﮐ ﺵﻮﻣﺎﺧ
ﻊﺒﻨﻣ ﺎﻳ ،ﺪﻴﻨﮐ ﻦﺷﻭﺭ
ﺲﭙﺳ ﻭ ﺪﻴﻫﺩ ﺮﻴﻴﻐﺗ ﺍﺭ
ﺍﺭ یﺩ ﯽﺳ ﻩﺪﻨﻨﮐ ﺶﺨﭘ
.ﺪﯿﻨﮐ یﺯﺍﺪﻧﺍ ﻩﺍﺭ
ERROR-15 ﯽﻟﺎﺧ ﻩﺪﺷ ﺩﺭﺍﻭ ﮏﺴﻳﺩ
ﺖﺳﺍ
.ﺪﻴﻨﮐ ﺾﻳﻮﻌﺗ ﺍﺭ ﮏﺴﻳﺩ
ERROR-23 یﺩ ﯽﺳ ﺖﻣﺮﻓ
ﻩﺪﺸﻧ ﯽﻧﺎﺒﯿﺘﺸﭘ
.ﺪﻴﻨﮐ ﺾﻳﻮﻌﺗ ﺍﺭ ﮏﺴﻳﺩ
FRMTREAD ﻥﺎﻣﺯ ﻦﯿﺑ ﻊﻗﺍﻮﻣ ﯽﺧﺮﺑ
ﯽﻧﺎﻣﺯ ﻭ ﺶﺨﭘ ﻉﻭﺮﺷ
ﺪﯾﻮﻨﺷ ﯽﻣ ﺍﺭ ﺍﺪﺻ ﻪﮐ
.ﺩﺭﺍﺩ ﺩﻮﺟﻭ ﺮﯿﺧﺄﺗ ﯽﺗﺪﻣ
ﻮﺤﻣ ﻡﺎﯿﭘ ﺎﺗ ﺪﯿﻧﺎﲟ ﺮﻈﺘﻨﻣ
.ﺪﯾﻮﻨﺸﺑ ﺍﺭ ﺍﺪﺻ ﻭ ﺩﻮﺷ
NO AUDIO ﻥﻭﺭﺩ ﻪﮐ ﯽﮑﺴﯾﺩ
ﺪﯾﺍ ﻩﺩﺍﺩ ﺭﺍﺮﻗ ﻩﺎﮕﺘﺳﺩ
ﯽﺸﺨﭘ ﻞﺑﺎﻗ ﻞﯾﺎﻓ ﭻﯿﻫ
.ﺩﺭﺍﺪﻧ
.ﺪﻴﻨﮐ ﺾﻳﻮﻌﺗ ﺍﺭ ﮏﺴﻳﺩ
PROTECT ﺭﺩ ﻪﮐ ﯽﯾﺎﻫ ﻞﯾﺎﻓ ﻡﺎﲤ
یﺍﺭﺍﺩ ﺩﺭﺍﺩ ﺩﻮﺟﻭ ﮏﺴﯾﺩ
.ﺪﻨﺘﺴﻫ DRM
.ﺪﻴﻨﮐ ﺾﻳﻮﻌﺗ ﺍﺭ ﮏﺴﻳﺩ
SKIPPED ﻥﻭﺭﺩ ﻪﮐ ﯽﮑﺴﯾﺩ
ﺪﯾﺍ ﻩﺩﺍﺩ ﺭﺍﺮﻗ ﻩﺎﮕﺘﺳﺩ
WMA یﺎﻫ ﻞﯾﺎﻓ یﺍﺭﺍﺩ
DRM ﻂﺳﻮﺗ ﻪﮐ ﺖﺳﺍ
.ﺪﻧﻮﺷ ﯽﻣ ﺖﻈﻓﺎﺤﻣ
.ﺪﻴﻨﮐ ﺾﻳﻮﻌﺗ ﺍﺭ ﮏﺴﻳﺩ
ﺎﻫ ﻞﻤﻌﻟﺍﺭﻮﺘﺳﺩ ﺯﺍ ﻩﺩﺎﻔﺘﺳﺍ
ﻩﺪﻨﻨﮐ ﺶﺨﭘ ﻭ ﺎﻫ ﮏﺴﻳﺩ
.ﺪﻴﻨﮐ ﻩﺩﺎﻔﺘﺳﺍ ،ﺪﻨﺘﺴﻫ ﺮﻳﺯ یﻮﮔﻮﻟ ﻭﺩ ﺯﺍ ﯽﮑﻳ یﺍﺭﺍﺩ ﻪﮐ ﯽﻳﺎﻫ ﮏﺴﻳﺩ ﺯﺍ ﻂﻘﻓ
یﺮﺘﻣ ﯽﺘﻧﺎﺳ ٨ ﮏﺴﯾﺩ ﺯﺍ ﻩﺩﺎﻔﺘﺳﺍ ﺯﺍ .ﺪﯿﻨﮐ ﻩﺩﺎﻔﺘﺳﺍ یﺮﺘﻣ ﯽﺘﻧﺎﺳ ١٢ ﮏﺴﯾﺩ ﺯﺍ
.ﺪﯿﻨﮐ یﺭﺍﺩﺩﻮﺧ یﺮﺘﻣ ﯽﺘﻧﺎﺳ ٨ ﮏﺴﯾﺩ ﺹﻮﺼﺨﻣ ﺭﻮﺘﭘﺍﺩﺁ ﺎﯾ
ﺐﺼﻧ
ﺶﺨﺑ
٠٣
١٢
Fa
ﯽﺳﺭﺎﻓ
ﻩﺎﮕﺘﺳﺩ ﻥﺩﺮﮐ ﺝﺭﺎﺧ
.ﺪﯿﻨﮐ ﺍﺪﺟ ﺍﺭ ﻢﯾﺮﺗ ﻪﻘﻠﺣ ١
ﻢﯾﺮﺗ ﻪﻘﻠﺣ
1
ﺭﺍﺩ ﻪﻧﺍﺪﻧﺩ ﻪﻧﺎﺑﺯ
2
ﻢﯾﺮﺗ ﻪﻘﻠﺣ ﻪﺑ ﺪﯿﻧﺍﻮﺗ ﯽﻣ ﺮﺗ ﺖﺣﺍﺭ ﻮﻠﺟ ﻪﺤﻔﺻ ﻥﺩﺮﮐ ﺎﻫﺭ ﺎﺑ
.ﺪﯿﺷﺎﺑ ﻪﺘﺷﺍﺩ ﯽﺳﺮﺘﺳﺩ
ﺪﯿﻫﺩ ﺭﺍﺮﻗ یﺍ ﻪﻧﻮﮔ ﻪﺑ ﺍﺭ ﻥﺁ ﻑﺮﻃ ﻭﺩ ،ﺵﺮﺑ ﻪﻘﻠﺣ ﻝﺎﺼﺗﺍ ﻡﺎﮕﻨﻫ
.ﺪﺷﺎﺑ ﻦﯿﯾﺎﭘ ﺖﻤﺳ ﻪﺑ ﻪﻧﺍﺪﻧﺩ یﺍﺭﺍﺩ ﻪﻧﺎﺑﺯ ﻪﮐ
ﺪﯿﻨﮐ ﺩﺭﺍﻭ ﻩﺎﮕﺘﺳﺩ ﻑﺮﻃ ﻭﺩ ﺭﺩ ﺍﺭ ﻩﺪﺷ ﻪﺋﺍﺭﺍ ﺝﻭﺮﺧ یﺎﻫﺪﯿﻠﮐ ٢
.ﺪﻧﺮﯿﮕﺑ ﺭﺍﺮﻗ ﺩﻮﺧ یﺎﺟ ﺭﺩ ﮏﯿﻠﮐ یﺍﺪﺻ ﺎﺑ ﺎﺗ
.ﺪﯿﺸﮑﺑ ﻥﻭﺮﯿﺑ ﺩﺭﻮﺒﺷﺍﺩ ﺯﺍ ﺍﺭ ﻩﺎﮕﺘﺳﺩ ٣
ﯽﯾﻮﻠﺟ ﻪﺤﻔﺻ ﺩﺪﺠﻣ ﻝﺎﺼﺗﺍ ﻭ ﻥﺩﺮﮐ ﺍﺪﺟ
.ﺪﯿﻨﮐ ﺍﺪﺟ ﺍﺭ ﯽﯾﻮﻠﺟ ﻪﺤﻔﺻ ﺪﯿﻧﺍﻮﺗ ﯽﻣ ،ﻩﺎﮕﺘﺳﺩ ﻥﺪﺷ ﻩﺪﯾﺩﺯﺩ ﺯﺍ یﺮﯿﮔﻮﻠﺟ یﺍﺮﺑ
ﻭ ﺪﯿﻫﺩ ﺭﺎﺸﻓ ﻻﺎﺑ ﺖﻤﺳ ﻪﺑ ﺍﺭ ﯽﯾﻮﻠﺟ ﻪﺤﻔﺻ ،ﺪﯿﻫﺩ ﺭﺎﺸﻓ ﺍﺭ یﺯﺎﺳﺍﺪﺟ ﻪﻤﮐﺩ
ﺍﺪﺟ ﻪﺑ ﻁﻮﺑﺮﻣ ﺶﺨﺑ ﻪﺑ ،ﺕﺎﯿﺋﺰﺟ ﺯﺍ ﻉﻼﻃﺍ یﺍﺮﺑ .ﺪﯿﺸﮑﺑ ﺩﻮﺧ ﻑﺮﻃ ﻪﺑ ﺍﺭ ﻥﺁ ﺲﭙﺳ
ﻝﺎﺼﺗﺍ ﻭ ﻥﺪﺷ ﻩﺪﯾﺩﺯﺩ ﺮﺑﺍﺮﺑ ﺭﺩ ﻩﺎﮕﺘﺳﺩ ﺯﺍ ﺖﻈﻓﺎﺤﻣ یﺍﺮﺑ ﯽﯾﻮﻠﺟ ﻪﺤﻔﺻ ﻥﺩﺮﮐ
.ﺪﯿﻨﮐ ﻪﻌﺟﺍﺮﻣ 4 ﻪﺤﻔﺻ ﺭﺩ ﯽﯾﻮﻠﺟ ﻪﺤﻔﺻ ﺩﺪﺠﻣ
•
•
Page 45

ﺐﺼﻧ
ﺶﺨﺑ
٠٣
١١
Fa
ﺯﺍ ﻩﺩﺎﻔﺘﺳﺍ ﻡﺎﮕﻨﻫ ﺕﺭﺍﺮﺣ ﺐﺳﺎﻨﻣ ﯽﮔﺪﻨﮐﺍﺮﭘ ﺯﺍ ﻥﺎﻨﯿﻤﻃﺍ یﺍﺮﺑ
ﺭﺍﺮﻗ ﯽﺘﺸﭘ ﻪﺤﻔﺻ ﺖﺸﭘ ﺭﺩ یﺩﺎﯾﺯ یﺎﻀﻓ ﺪﯾﻮﺷ ﻦﺌﻤﻄﻣ ،ﻩﺎﮕﺘﺳﺩ
ﻩﺎﮕﺘﺳﺩ ﺐﺼﻧ ﻡﺎﮕﻨﻫ ﺎﺗ ﺪﯿﻧﺎﺷﻮﭙﺑ ﺍﺭ ﻞﺷ ﻞﺑﺎﮐ ﻉﻮﻧ ﺮﻫ ﻭ ﺪﯾﺍ ﻩﺩﺍﺩ
.ﺪﻨﮑﻧ ﺩﻭﺪﺴﻣ ﺍﺭ ﺬﻓﺎﻨﻣ
DIN ﻮﻠﺟ/ﺐﻘﻋ ﺏﺎﻗ
ﺭﻮﻄﺑ ﺐﻘﻋ ﺎﯾ ﻮﻠﺟ ﺏﺎﻗ ﺯﺍ ﻩﺩﺎﻔﺘﺳﺍ ﺎﺑ ﺍﺭ ﻩﺎﮕﺘﺳﺩ ﻦﯾﺍ ﺪﯿﻧﺍﻮﺗ ﯽﻣ
.ﺪﯿﻨﮐ ﺐﺼﻧ ﺢﯿﺤﺻ
DIN ﻮﻠﺟ ﺏﺎﻗ
.ﺪﯿﻨﮐ ﺩﺭﺍﻭ ﺩﺭﻮﺒﺷﺍﺩ ﻥﻭﺭﺩ ﺍﺭ ﺏﺎﻗ ﺪﻠﺟ ١
ﻩﺪﺷ ﻪﺋﺍﺭﺍ ﺏﺎﻗ ﺪﻠﺟ ﺯﺍ ﻖﻤﻋ ﻢﮐ یﺎﻫﺎﻀﻓ ﺭﺩ ﺐﺼﻧ یﺍﺮﺑ
ﯽﺑﺎﻗ ﺪﻠﺟ ﺯﺍ ،ﺪﯾﺭﺍﺩ ﺭﺎﯿﺘﺧﺍ ﺭﺩ ﯽﻓﺎﮐ یﺎﻀﻓ ﺮﮔﺍ .ﺪﯿﻨﮐ ﻩﺩﺎﻔﺘﺳﺍ
.ﺪﯿﻨﮐ ﻩﺩﺎﻔﺘﺳﺍ ﻩﺪﺷ ﻪﺋﺍﺭﺍ ﻞﯿﺒﻣﻮﺗﺍ ﻩﺍﺮﻤﻫ ﻪﮐ
ﻪﻧﺎﺑﺯ ﻥﺩﺮﮐ ﻢﺧ یﺍﺮﺑ ﯽﺘﺷﻮﮔ ﭻﯿﭘ ﺭﺎﭼﺁ ﮏﯾ ﺯﺍ ﻩﺩﺎﻔﺘﺳﺍ ﺎﺑ ٢
.ﺪﯿﻨﮐ ﻢﮑﺤﻣ ﺍﺭ ﺏﺎﻗ ﺪﻠﺟ ﺩﻮﺧ یﺎﺟ ﺭﺩ (ﻪﺟﺭﺩ ٩٠) یﺰﻠﻓ یﺎﻫ
1
2
ﺩﺭﻮﺒﺷﺍﺩ
1
ﺏﺎﻗ ﺪﻠﺟ
2
.ﺪﯿﻨﮐ ﺐﺼﻧ ﻩﺪﺷ ﻩﺩﺍﺩ ﻥﺎﺸﻧ ﻪﮐ ﺭﻮﻄﻧﺎﻤﻫ ﺍﺭ ﻩﺎﮕﺘﺳﺩ ٣
.ﺪﯿﻨﮐ ﻩﺩﺎﻔﺘﺳﺍ ﺭﺍﺯﺎﺑ ﺭﺩ ﺩﻮﺟﻮﻣ ﺕﺎﻌﻄﻗ ﺯﺍ ﺐﺼﻧ ﻡﺎﮕﻨﻫ
•
1
2
3
4
5
ﻩﺮﻬﻣ
1
یﺰﻠﻓ ﻥﺎﺒﯿﺘﺸﭘ ﺎﯾ ﻝﺍﻭﺮﯾﺎﻓ
2
یﺰﻠﻓ ﺭﺍﻮﻧ
3
ﭻﯿﭘ
4
(M4 × 8) ﭻﯿﭘ
5
.ﺪﺷﺎﺑ ﻩﺪﺷ ﺐﺼﻧ ﺩﻮﺧ ﻞﺤﻣ ﺭﺩ ﻢﮑﺤﻣ ﻩﺎﮕﺘﺳﺩ ﺪﯾﻮﺷ ﻦﺌﻤﻄﻣ
ﺮﯾﺎﺳ ﺎﯾ ﻪﻌﻄﻗ ﻥﺪﺷ ﺎﺠﺑﺎﺟ ﻪﺑ ﺮﺠﻨﻣ ﺖﺳﺍ ﻦﮑﳑ ﺕﺎﺒﺛ ﯽﺑ ﺐﺼﻧ
.ﺩﻮﺷ ﺖﺳﺭﺩﺎﻧ یﺎﻫﺩﺮﮑﻠﻤﻋ
DIN ﺐﻘﻋ ﺏﺎﻗ
ﻪﯾﺎﭘ یﻭﺭ یﺎﻫ ﺥﺍﺭﻮﺳ ﻪﮑﯾﺭﻮﻃ ﺪﯿﻨﮐ ﻦﯿﯿﻌﺗ ﺍﺭ ﺐﺳﺎﻨﻣ ﻞﺤﻣ ١
.ﺪﻧﺮﯿﮕﺑ ﺭﺍﺮﻗ ﻢﻫ ﻞﺑﺎﻘﻣ ﻩﺎﮕﺘﺳﺩ ﻑﺍﺮﻃﺍ ﻭ
.ﺪﯿﻨﮐ ﻢﮑﺤﻣ ﺍﺭ ﻑﺮﻃ ﻭﺩ ﭻﯿﭘ ﻭﺩ ٢
1
2
3
(ﺮﺘﻣ ﯽﻠﯿﻣ ٨ × ﺮﺘﻣ ﯽﻠﯿﻣ ۵) ﺎﭘﺮﺧ ﭻﯿﭘ
1
ﺏﺎﻗ ﻪﯾﺎﭘ
2
ﻝﻮﺴﻨﮐ ﺎﯾ ﺩﺭﻮﺒﺷﺍﺩ
3
■
ﺐﺼﻧ
ﺶﺨﺑ
٠٣
١٠
Fa
ﯽﺳﺭﺎﻓ
(ﺮﭙﻣﺁ ١٠) ﺭﻮﯿﻓ
2
ﻕﺮﺑ ﻢﯿﺳ یﺩﻭﺭﻭ
3
ﺐﻘﻋ ﯽﺟﻭﺮﺧ
4
ﻕﺮﺑ ﻢﯿﺳ
1
8
9
c
d
6
32
4
5
7
a
b
e
f
h
g
LR
F
R
ﻕﺮﺑ ﻢﯿﺳ یﺩﻭﺭﻭ ﻪﺑ
1
ﭗﭼ
2
ﺖﺳﺍﺭ
3
ﻮﻠﺟ یﻮﮔﺪﻨﻠﺑ
4
ﺐﻘﻋ یﻮﮔﺪﻨﻠﺑ
5
ﺪﯿﻔﺳ
6
ﯽﺑﺁ/ﺪﯿﻔﺳ
7
یﺮﺘﺴﮐﺎﺧ
8
ﻩﺎﯿﺳ/یﺮﺘﺴﮐﺎﺧ
9
ﺰﺒﺳ
a
ﻩﺎﯿﺳ/ﺰﺒﺳ
b
ﺶﻔﻨﺑ
c
ﻩﺎﯿﺳ/ﺶﻔﻨﺑ
d
(ﻦﯿﻣﺯ ﯽﺳﺎﺷ) ﻩﺎﯿﺳ
e
.ﺪﯿﻨﮐ ﻞﺻﻭ ﮓﻧﺭ ﻥﻭﺪﺑ ،ﺰﯿﲤ یﺰﻠﻓ ﻞﺤﻣ ﮏﯾ ﻪﺑ
ﺩﺭﺯ
f
.ﺪﯿﻨﮐ ﻞﺻﻭ ﺖﻟﻭ ١٢ ﺖﺑﺎﺛ ﻊﺒﻨﻣ ﻪﻧﺎﯾﺎﭘ ﻪﺑ
ﺰﻣﺮﻗ
g
ﻥﺎﯾﺮﺟ ﺖﻟﻭ ١٢) ﺕﺭﺎﺘﺳﺍ ﭻﯿﯾﻮﺳ ﺎﺑ ﻩﺪﺷ ﻝﺮﺘﻨﮐ ﻪﻧﺎﯾﺎﭘ ﻪﺑ
.ﺪﯿﻨﮐ ﻞﺻﻭ (ﻢﯿﻘﺘﺴﻣ
ﺪﯿﻔﺳ/ﯽﺑﺁ
h
ﺖﻳﻮﻘﺗ ﻝﺮﺘﻨﮐ ﻪﻧﺎﻳﺎﭘ ﺎﯾ ﻕﺮﺑ ﺮﯾﺎﻓ ﯽﻠﭙﻣﺁ ﻢﺘﺴﯿﺳ ﻝﺮﺘﻨﮐ ﻪﻧﺎﯾﺎﭘ ﻪﺑ
(ﻢﯿﻘﺘﺴﻣ ﻥﺎﯾﺮﺟ ﺖﻟﻭ ١٢ ﺮﭙﻣﺁ ﯽﻠﯿﻣ ٣٠٠ ﺮﺜﮐﺍﺪﺣ) ﺭﺎﮐﺩﻮﺧ ﱳﻧﺁ
.ﺪﯿﻨﮐ ﻞﺻﻭ
ﻪﺘﮑﻧ
ﻪﮐ ﻮﮔﺪﻨﻠﺑ یﺎﻫ ﻢﯿﺳ ﻪﺑ ﺍﺭ یﺰﯿﭼ ﭻﯿﻫ ،ﯽﯾﻮﮔﺪﻨﻠﺑ ٢ ﻢﺘﺴﯿﺳ ﮏﯾ ﺎﺑ
.ﺪﯿﻨﮑﻧ ﻞﺻﻭ ﺪﻨﺘﺴﯿﻧ ﻞﺻﻭ ﺎﻫﻮﮔﺪﻨﻠﺑ ﻪﺑ
(ﺪﺳﺭ ﯽﻣ ﺵﻭﺮﻓ ﻪﺑ ﻪﻧﺎﮔﺍﺪﺟ) ﻕﺮﺑ ﺮﯾﺎﻓ ﯽﻠﭙﻣﺁ
.ﺪﯿﻫﺩ ﻡﺎﳒﺍ یﺭﺎﯿﺘﺧﺍ ﺮﯾﺎﻓ ﯽﻠﭙﻣﺁ ﺯﺍ ﻩﺩﺎﻔﺘﺳﺍ ﻡﺎﮕﻨﻫ ﺍﺭ ﺕﻻﺎﺼﺗﺍ ﻦﯾﺍ
1
4
2
55
3
ﻢﺘﺴﯿﺳ ﺭﻭﺩ ﻩﺍﺭ ﺯﺍ ﻝﺮﺘﻨﮐ
1
ﺪﯿﻨﮐ ﻞﺼﺘﻣ ﺪﯿﻔﺳ/ﯽﺑﺁ ﻢﯿﺳ ﻪﺑ
(ﺪﺳﺭ ﯽﻣ ﺵﻭﺮﻓ ﻪﺑ ﻪﻧﺎﮔﺍﺪﺟ) ﻕﺮﺑ ﺮﯾﺎﻓ ﯽﻠﭙﻣﺁ
2
(ﺪﺳﺭ ﯽﻣ ﺵﻭﺮﻓ ﻪﺑ ﻪﻧﺎﮔﺍﺪﺟ) RCA یﺎﻫ ﻞﺑﺎﮐ ﺎﺑ ﻝﺎﺼﺗﺍ
3
ﺐﻘﻋ ﯽﺟﻭﺮﺧ ﻪﺑ
4
ﺐﻘﻋ یﻮﮔﺪﻨﻠﺑ
5
ﺐﺼﻧ
ﻢﻬﻣ
.ﺪﯿﻨﮐ ﯽﺳﺭﺮﺑ ﯽﯾﺎﻬﻧ ﺐﺼﻧ ﺯﺍ ﻞﺒﻗ ﺍﺭ ﺎﻫ ﻢﺘﺴﯿﺳ ﻭ ﺕﻻﺎﺼﺗﺍ ﻪﻤﻫ
ﺩﺮﮑﻠﻤﻋ ﻪﺑ ﺮﺠﻨﻣ ﺪﻧﺍﻮﺗ ﯽﻣ ﺍﺮﯾﺯ ﺪﯿﻨﮑﻧ ﻩﺩﺎﻔﺘﺳﺍ ﺯﺎﺠﻣ ﺮﯿﻏ ﺕﺎﻌﻄﻗ ﺯﺍ
.ﺩﻮﺷ ﺖﺳﺭﺩﺎﻧ
ﺪﯾﺭﺍﺩ ﻞﯿﺒﻣﻮﺗﺍ ﺭﺩ ﺕﺍﺮﯿﯿﻐﺗ ﺮﯾﺎﺳ ﺎﯾ ﺥﺍﺭﻮﺳ ﺩﺎﺠﯾﺍ ﻪﺑ ﺯﺎﯿﻧ ﺐﺼﻧ یﺍﺮﺑ ﺮﮔﺍ
.ﺪﯾﺮﯿﮕﺑ ﺱﺎﲤ ﻩﺪﻨﺷﻭﺮﻓ ﺎﺑ
:ﻪﮐ ﺪﯿﻨﮑﻧ ﺐﺼﻧ ﯽﯾﺎﺟ ﺭﺩ ﺍﺭ ﻩﺎﮕﺘﺳﺩ ﻦﯾﺍ
.ﺪﺷﺎﺑ ﻪﺘﺷﺍﺩ ﺩﻮﺟﻭ ﻞﯿﺒﻣﻮﺗﺍ ﺩﺮﮑﻠﻤﻋ ﺎﺑ ﻞﺧﺍﺪﺗ ﻝﺎﻤﺘﺣﺍ
ﺩﻮﺟﻭ ﯽﻧﺎﻬﮔﺎﻧ ﻒﻗﻮﺗ ﻪﺠﯿﺘﻧ ﺭﺩ ﺮﻓﺎﺴﻣ ﻪﺑ ﺐﯿﺳﺁ ﻝﺎﻤﺘﺣﺍ
.ﺪﺷﺎﺑ ﻪﺘﺷﺍﺩ
ﻪﻤﻫ .ﺪﻨﯿﺑ ﯽﻣ ﺐﯿﺳﺁ ﺪﺣ ﺯﺍ ﺶﯿﺑ ﻥﺪﺷ ﻡﺮﮔ ﺕﺭﻮﺻ ﺭﺩ ﺎﻧﺎﺳﺭ ﻪﻤﯿﻧ ﺭﺰﯿﻟ
.ﺪﯾﺭﺍﺩ ﻪﮕﻧ ﺭﻭﺩ یﺭﺎﺨﺑ ﯽﺟﻭﺮﺧ ﺪﻨﻧﺎﻣ ﻍﺍﺩ یﺎﻫ ﺖﻤﺴﻗ ﺯﺍ ﺍﺭ ﺎﻫ ﻞﺑﺎﮐ
ﺯﺍ ﺮﺘﻤﮐ ﻪﯾﻭﺍﺯ ﺭﺩ ﻩﺎﮕﺘﺳﺩ ﻪﮐ ﺪﯾﺁ ﯽﻣ ﺖﺳﺩ ﻪﺑ ﯽﻧﺎﻣﺯ ﻪﻨﯿﻬﺑ ﺩﺮﮑﻠﻤﻋ
.ﺩﻮﺷ ﺐﺼﻧ ﻪﺟﺭﺩ ۶٠
60°
•
•
•
•
—
—
•
•
Page 46

ﺐﺼﻧ
ﺶﺨﺑ
٠٣
٩
Fa
ﺕﻻﺎﺼﺗﺍ
ﺭﺍﺪﺸﻫ
ﻢﻫﺍ ٨ ﺎﺗ ﻢﻫﺍ ۴ ﻦﯿﺑ ﻭ (ﯽﺟﻭﺮﺧ ﺭﺍﺪﻘﻣ) ﺕﺍﻭ ۵٠ ﺯﺍ ﺮﺗﻻﺎﺑ یﺎﻫﻮﮔﺪﻨﻠﺑ ﺯﺍ
یﺍﺮﺑ ﻢﻫﺍ ٣ ﺎﺗ ﻢﻫﺍ ١ یﺎﻫﻮﮔﺪﻨﻠﺑ ﺯﺍ .ﺪﯿﻨﮐ ﻩﺩﺎﻔﺘﺳﺍ (ﺲﻧﺍﺪﭙﻣﺍ ﺭﺍﺪﻘﻣ)
.ﺪﯿﻨﮑﻧ ﻩﺩﺎﻔﺘﺳﺍ ﻩﺎﮕﺘﺳﺩ ﻦﯾﺍ
ﺮﯾﺎﻓ ﯽﻠﭙﻣﺁ ﺎﯾ ﻩﺎﮕﺘﺳﺩ ﻦﯾﺍ ﻝﺎﺼﺗﺍ ﻡﺎﮕﻨﻫ .ﺖﺳﺍ ﯽﻨﯿﻣﺯ ﻩﺎﯿﺳ ﻞﺑﺎﮐ
.ﺪﯿﻨﮐ ﻞﺻﻭ ﺍﺭ ﯽﻨﯿﻣﺯ ﻢﯿﺳ ﺍﺪﺘﺑﺍ (ﺪﺳﺭ ﯽﻣ ﺵﻭﺮﻓ ﻪﺑ ﻪﻧﺎﮔﺍﺪﺟ) ﻕﺮﺑ
ﻪﻧﺪﺑ یﺰﻠﻓ یﺎﻫ ﺖﻤﺴﻗ ﻪﺑ ﯽﺘﺳﺭﺩ ﻪﺑ ﯽﻨﯿﻣﺯ ﻢﯿﺳ ﺪﯾﻮﺷ ﻦﺌﻤﻄﻣ
ﻪﺑ ﻁﻮﺑﺮﻣ ﻭ ﻕﺮﺑ ﺮﯾﺎﻓ ﯽﻠﭙﻣﺁ ﯽﻨﯿﻣﺯ ﻢﯿﺳ .ﺪﺷﺎﺑ ﻩﺪﺷ ﻞﺻﻭ ﻦﯿﺷﺎﻣ
یﺎﻫ ﭻﯿﭘ ﺎﺑ ﻪﻧﺎﮔﺍﺪﺟ ﺭﻮﻄﺑ ﺪﯾﺎﺑ ﺮﮕﯾﺩ ﻩﺎﮕﺘﺳﺩ ﻉﻮﻧ ﺮﻫ ﺎﯾ ﻩﺎﮕﺘﺳﺩ ﻦﯾﺍ
ﺎﯾ ﺩﻮﺷ ﻞﺷ ﯽﻨﯿﻣﺯ ﻢﯿﺳ ﭻﯿﭘ ﺮﮔﺍ .ﺩﻮﺷ ﻞﺻﻭ ﻦﯿﺷﺎﻣ ﻪﺑ ﯽﺗﻭﺎﻔﺘﻣ
ﺩﺮﮑﻠﻤﻋ ﺎﯾ ﺩﻭﺩ ﺵﺮﺘﺴﮔ ،یﺯﻮﺳ ﺶﺗﺁ ﻪﺑ ﺮﺠﻨﻣ ﺪﻧﺍﻮﺗ ﯽﻣ ،ﺩﻮﺷ ﺝﺭﺎﺧ
.ﺩﻮﺷ ﯽﻣ ﺖﺳﺭﺩﺎﻧ
ﯽﻨﯿﻣﺯ ﻢﯿﺳ
ﻦﯿﺷﺎﻣ ﻪﻧﺪﺑ یﺰﻠﻓ ﺕﺎﻌﻄﻗ
ﻕﺮﺑ ﺮﯾﺎﻓ ﯽﻠﭙﻣ
ﺁ
ﺎﻫ ﻩﺎﮕﺘﺳﺩ ﺮﯾﺎﺳ
ﻩﺎﮕﺘﺳﺩ ﺮﮕﯾﺩ)
ﯽﮑﯿﻧﻭﺮﺘﮑﻟﺍ
(ﻦﯿﺷﺎﻣ ﺭﺩ
ﻢﻬﻣ
ﻡﺯﺍﻮﻟ) ACC ﺖﯿﻌﻗﻮﻣ ﻥﻭﺪﺑ ﻞﻴﺒﻣﻮﺗﺍ ﺭﺩ ﻩﺎﮕﺘﺳﺩ ﻦﯾﺍ ﺐﺼﻧ ﻡﺎﮕﻨﻫ
یﺍ ﻪﻧﺎﯾﺎﭘ ﻪﺑ ﺰﻣﺮﻗ ﻞﺑﺎﮐ ﻝﺎﺼﺗﺍ ﻡﺪﻋ ،ﺕﺭﺎﺘﺳﺍ ﭻﯿﯾﻮﺳ یﻭﺭ ﺮﺑ (ﯽﺒﻧﺎﺟ
ﻪﺑ ﺮﺠﻨﻣ ﺖﺳﺍ ﻦﮑﳑ ﺪﻨﮐ ﯽﻣ ﯽﺑﺎﯾﺩﺭ ﺍﺭ ﺕﺭﺎﺘﺳﺍ ﺪﯿﻠﮐ ﺩﺮﮑﻠﻤﻋ ﻪﮐ
.ﺩﻮﺷ یﺮﺗﺎﺑ ﻪﯿﻠﺨﺗ
ACC ﺖﯿﻌﻗﻮﻣ
O
N
S
T
A
R
T
O
F
F
ACC ﺖﯿﻌﻗﻮﻣ ﻥﻭﺪﺑ
ﻩﺩﺎﻔﺘﺳﺍ ﯽﻔﻨﻣ ﯽﻨﯿﻣﺯ ﻝﺎﺼﺗﺍ ﻭ ﺖﻟﻭ ١٢ یﺮﺗﺎﺑ ﺎﺑ ﻂﻘﻓ ﻩﺎﮕﺘﺳﺩ ﻦﯾﺍ ﺯﺍ
ﺎﯾ یﺯﻮﺳ ﺶﺗﺁ ﻪﺑ ﺮﺠﻨﻣ ﺪﻧﺍﻮﺗ ﯽﻣ ﺩﺭﻮﻣ ﻦﯾﺍ ﻪﺑ ﯽﻬﺟﻮﺗ ﯽﺑ .ﺪﯿﻨﮐ
.ﺩﻮﺷ ﯽﻣ ﺖﺳﺭﺩﺎﻧ ﺩﺮﮑﻠﻤﻋ
ﺩﺮﮑﻠﻤﻋ ﺎﯾ ﺪﺣ ﺯﺍ ﺶﯿﺑ ﻥﺪﺷ ﻡﺮﮔ ،ﻩﺎﺗﻮﮐ ﺭﺍﺪﻣ ﺩﺎﺠﯾﺍ ﺯﺍ یﺮﯿﮔﻮﻠﺟ یﺍﺮﺑ
.ﺪﯿﻨﮐ ﺖﯾﺎﻋﺭ ﺍﺭ ﺮﯾﺯ یﺎﻫ ﻞﻤﻌﻟﺍﺭﻮﺘﺳﺩ ،ﺖﺳﺭﺩﺎﻧ
.ﺪﯿﻨﮐ ﺍﺪﺟ ﺐﺼﻧ ﺯﺍ ﻞﺒﻗ ﺍﺭ یﺮﺗﺎﺑ ﯽﻔﻨﻣ ﻪﻧﺎﯾﺎﭘ
•
•
•
•
•
—
ﺭﺍﻮﻧ .ﺪﯿﻨﮐ ﻢﮑﺤﻣ ﺐﺴﭼ ﺭﺍﻮﻧ ﺎﯾ ﻞﺑﺎﮐ یﺎﻫ ﺖﺴﺑ ﺍﺭ ﻢﯿﺳ
یﺰﻠﻓ یﺎﻫ ﺖﻤﺴﻗ ﺎﺑ ﺱﺎﲤ ﺭﺩ ﻪﮐ ﯽﺸﮐ ﻢﯿﺳ ﺭﻭﺩ ﻪﺑ ﺍﺭ ﺐﺴﭼ
.ﺩﻮﺷ ﺖﻈﻓﺎﺤﻣ ﯽﺸﮐ ﻢﯿﺳ ﺯﺍ ﺎﺗ ﺪﯾﺪﻨﺒﺑ ﺩﺭﺍﺩ ﺭﺍﺮﻗ
ﻭ ﻩﺪﻧﺩ ﻡﺮﻫﺍ ﺪﻨﻧﺎﻣ کﺮﺤﺘﻣ یﺎﻫ ﺖﻤﺴﻗ ﺯﺍ ﺍﺭ ﺎﻫ ﻞﺑﺎﮐ ﻪﻤﻫ
.ﺪﯾﺭﺍﺩ ﻪﮕﻧ ﺭﻭﺩ ﯽﻟﺪﻨﺻ ﻞﯾﺭ
ﺭﻭﺩ یﺭﺎﺨﺑ ﯽﺟﻭﺮﺧ ﺪﻨﻧﺎﻣ ﻍﺍﺩ یﺎﻫ ﺖﻤﺴﻗ ﺯﺍ ﺍﺭ ﺎﻫ ﻞﺑﺎﮐ ﻪﻤﻫ
.ﺪﯾﺭﺍﺩ ﻪﮕﻧ
ﻪﻈﻔﺤﻣ ﻪﺑ ﻁﻮﺑﺮﻣ ﺥﺍﺭﻮﺳ ﺯﺍ ﻥﺁ ﻥﺩﺮﮐ ﺩﺭ ﺎﺑ ﺍﺭ ﮓﻧﺭﺩﺭﺯ ﻞﺑﺎﮐ
.ﺪﯿﻨﮑﻧ ﻞﺻﻭ یﺮﺗﺎﺑ ﻪﺑ ﺭﻮﺗﻮﻣ
.ﺪﯿﻧﺎﺷﻮﭙﺑ ﻖﯾﺎﻋ ﺭﺍﻮﻧ ﺎﺑ ﺍﺭ ﻞﺼﺘﻣ ﺮﯿﻏ ﻞﺑﺎﮐ یﺎﻫ ﻂﺑﺍﺭ
.ﺪﯿﻨﮑﻧ ﻩﺎﺗﻮﮐ ﺍﺭ ﺎﻫ ﻞﺑﺎﮐ
یﺍﺮﺑ ﻕﺮﺑ ﻩﺩﺎﻔﺘﺳﺍ یﺍﺮﺑ ﺍﺭ ﻩﺎﮕﺘﺳﺩ ﻦﯾﺍ ﻕﺮﺑ ﻞﺑﺎﮐ ﻖﯾﺎﻋ ﺰﮔﺮﻫ
ﺩﻭﺪﺤﻣ ﻞﺑﺎﮐ ﯽﻠﻌﻓ ﺖﯿﻓﺮﻇ .ﺪﯿﻨﮑﻧ ﺍﺪﺟ ﺎﻫ ﻩﺎﮕﺘﺳﺩ ﺮﯾﺎﺳ
.ﺖﺳﺍ ﻩﺪﺷ
.ﺪﯿﻨﮐ ﻩﺩﺎﻔﺘﺳﺍ ﺯﺎﺠﻣ ﻩﺩﻭﺪﺤﻣ ﺭﻮﯿﻓ ﺯﺍ
ﻞﺻﻭ ﻦﯿﻣﺯ ﻪﺑ ﹰﺎﻤﯿﻘﺘﺴﻣ ﺍﺭ ﯽﻔﻨﻣ یﻮﮔﺪﻨﻠﺑ ﻞﺑﺎﮐ ﺰﮔﺮﻫ
.ﺪﯿﻨﮑﻧ
.ﺪﯿﻨﮑﻧ ﻞﺻﻭ ﻢﻫ ﻪﺑ ﺍﺭ ﻮﮔﺪﻨﻠﺑ ﺪﻨﭼ ﯽﻔﻨﻣ یﺎﻫ ﻞﺑﺎﮐ ﺰﮔﺮﻫ
ﻖﯾﺮﻃ ﺯﺍ ﻝﺮﺘﻨﮐ یﺎﻫ ﻝﺎﻨﮕﯿﺳ ،ﺖﺳﺍ ﻦﺷﻭﺭ ﻩﺎﮕﺘﺳﺩ ﻪﮐ ﯽﻣﺎﮕﻨﻫ
ﺭﻭﺩ ﻩﺍﺭ ﺯﺍ ﻝﺮﺘﻨﮐ ﻪﺑ ﺍﺭ ﻞﺑﺎﮐ ﻦﯾﺍ .ﺩﻮﺷ ﯽﻣ ﻝﺎﺳﺭﺍ ﺪﯿﻔﺳ/ﯽﺑﺁ ﻞﺑﺎﮐ
ﺭﺎﮐﺩﻮﺧ ﱳﻧﺁ ﺖﻳﻮﻘﺗ ﻝﺮﺘﻨﮐ ﻪﻧﺎﻳﺎﭘ ﺎﯾ ﯽﺟﺭﺎﺧ ﻕﺮﺑ ﺮﯾﺎﻓ ﯽﻠﭙﻣﺁ ﻢﺘﺴﯿﺳ
ﻞﺻﻭ (ﻢﯿﻘﺘﺴﻣ ﻥﺎﯾﺮﺟ ﺖﻟﻭ ١٢ ﺮﭙﻣﺁ ﯽﻠﯿﻣ ٣٠٠ ﺮﺜﮐﺍﺪﺣ) ﻞﻴﺒﻣﻮﺗﺍ
ﻪﻧﺎﯾﺎﭘ ﻪﺑ ﺍﺭ ﻥﺁ ،ﺪﺷﺎﺑ یﺍ ﻪﺸﯿﺷ ﱳﻧﺁ ﻪﺑ ﺰﻬﺠﻣ ﻞﯿﺒﻣﻮﺗﺍ ﺮﮔﺍ .ﺪﯿﻨﮐ
.ﺪﯿﻨﮐ ﻞﺻﻭ ﱳﻧﺁ ﻩﺪﻨﻨﮐ ﺖﯾﻮﻘﺗ یﻭﺮﯿﻧ ﻩﺮﯿﺧﺫ
ﻞﺻﻭ ﯽﺟﺭﺎﺧ ﻕﺮﺑ ﺮﯾﺎﻓ ﯽﻠﭙﻣﺁ ﻕﺮﺑ ﻪﻧﺎﯾﺎﭘ ﻪﺑ ﺍﺭ ﺪﯿﻔﺳ/ﯽﺑﺁ ﻞﺑﺎﮐ ﺰﮔﺮﻫ
ﺭﺩ .ﺪﯿﻨﮑﻧ ﻞﺻﻭ ﺭﺎﮐﺩﻮﺧ ﱳﻧﺁ ﻕﺮﺑ ﻪﻧﺎﯾﺎﭘ ﻪﺑ ﺍﺭ ﻥﺁ ﺰﮔﺮﻫ ﻦﯿﻨﭽﻤﻫ .ﺪﯿﻨﮑﻧ
.ﺩﻮﺷ ﯽﻣ ﺖﺳﺭﺩﺎﻧ ﺩﺮﮑﻠﻤﻋ ﺐﺟﻮﻣ ﺎﯾ ﻩﺪﺷ ﻪﯿﻠﺨﺗ یﺮﺗﺎﺑ ﺕﺭﻮﺻ ﻦﯾﺍ
ﻩﺎﮕﺘﺳﺩ ﻦﯾﺍ
ﱳﻧﺁ یﺩﻭﺭﻭ
1
—
—
—
—
—
—
—
—
—
—
•
•
ﻩﺎﮕﺘﺳﺩ ﺯﺍ ﻩﺩﺎﻔﺘﺳﺍ
ﺶﺨﺑ
٠٢
٨
Fa
ﯽﺳﺭﺎﻓ
(FM ﯽﺑﺎﻳ ﺝﻮﻣ ﻡﺎﮔ) FM
ﺯﺍ ﺮﯾﺩﺎﻘﻣ ،ﺰﺗﺮﻫﻮﻠﯿﮐ ١٠٠ ﻦﯿﺑ ﯽﺑﺎﯾ ﺝﻮﻣ ﻖﯾﺮﻃ ﺯﺍ ﺪﯿﻧﺍﻮﺗ ﯽﻣ ﺍﺭ FM ﯽﺑﺎﯾ ﺝﻮﻣ ﻡﺎﮔ
.ﺪﯿﻫﺩ ﺮﯿﯿﻐﺗ ﺰﺗﺮﻫﻮﻠﯿﮐ ۵٠ ﻭ ﻩﺪﺷ ﻦﯿﯿﻌﺗ ﺶﯿﭘ
ﺎﻫ ﻩﺎﮕﺘﺴﯾﺍ ﻢﯿﻈﻨﺗ ،ﺩﻮﺷ ﻡﺎﳒﺍ یﺰﺗﺮﻫ ۵٠ ﻞﺻﺍﻮﻓ ﺎﺑ ﯽﺑﺎﯾ ﺝﻮﻣ ﺮﮔﺍ
ﺍﺪﯿﭘ ﺍﺭ ﺎﻫ ﺎﮕﺘﺴﯾﺍ ﯽﺘﺳﺩ ﯽﺑﺎﯾ ﺝﻮﻣ ﺯﺍ ﻩﺩﺎﻔﺘﺳﺍ ﺎﺑ .ﺩﻮﺷ ﯽﳕ ﻡﺎﳒﺍ ﯽﺘﺳﺭﺪﺑ
.ﺪﯿﻨﮐ ﺭﺍﺮﮑﺗ ﹰﺍﺩﺪﺠﻣ ﺍﺭ ﯽﻟﻮﻤﻌﻣ ﯽﺑﺎﯾ ﺝﻮﻣ ﺎﯾ ﻭ ﺪﯿﻨﮐ
.ﺪﯿﻫﺩ ﺭﺎﺸﻓ ﺍﺭ ﺎﯾ ،FM ﯽﺑﺎﯾ ﺝﻮﻣ ﻡﺎﮔ ﺏﺎﺨﺘﻧﺍ یﺍﺮﺑ
1
(ﺰﺗﺮﻫﻮﻠﯿﮐ ١٠٠) 100—(ﺰﺗﺮﻫﻮﻠﯿﮐ ۵٠) 50
•
(AM ﯽﺑﺎﻳ ﺝﻮﻣ ﻡﺎﮔ) AM
ﻩﺪﺷ ﻦﯿﯿﻌﺗ ﺶﯿﭘ ﺯﺍ ﻪﻠﺻﺎﻓ ،ﺮﺗﺮﻫﻮﻠﯿﮐ ٩ ﻦﯿﺑ ﺪﯿﻧﺍﻮﺗ ﯽﻣ ﺍﺭ AM ﯽﺑﺎﯾ ﺝﻮﻣ ﻡﺎﮔ
یﺎﮑﯾﺮﻣﺁ ﺭﺩ ﻩﺪﻨﻨﮐ ﻢﯿﻈﻨﺗ ﺯﺍ ﻩﺩﺎﻔﺘﺳﺍ ﻡﺎﮕﻨﻫ .ﺪﯿﻫﺩ ﺮﯿﯿﻐﺗ ﺰﺗﺮﻫﻮﻠﯿﮐ ١٠ ﻭ
ﺰﺗﺮﻫﻮﻠﯿﮐ ۵٣١) ﺰﺗﺮﻫﻮﻠﯿﮐ ٩ ﺯﺍ ﺍﺭ ﯽﺑﺎﯾ ﺝﻮﻣ ﻡﺎﮔ ،ﯽﺑﻮﻨﺟ ﻭ یﺰﮐﺮﻣ ،ﯽﻟﺎﻤﺷ
ﺰﺗﺮﻫﻮﻠﯿﮐ ١۶۴٠ ﺎﺗ ﺰﺗﺮﻫﻮﻠﯿﮐ ۵٣٠) ﺰﺗﺮﻫﻮﻠﯿﮐ ١٠ ﺎﺗ (ﺯﺎﺠﻣ ﺰﺗﺮﻫﻮﻠﯿﮐ ١۶٠٢ ﺎﺗ
.ﺪﯿﻨﮐ ﻢﯿﻈﻨﺗ ﹰﺍﺩﺪﺠﻣ (ﺯﺎﺠﻣ
.ﺪﯿﻫﺩ ﺭﺎﺸﻓ ﺍﺭ ﺎﯾ ،AM ﯽﺑﺎﯾ ﺝﻮﻣ ﻡﺎﮔ ﺏﺎﺨﺘﻧﺍ یﺍﺮﺑ
1
(ﺰﺗﺮﻫﻮﻠﯿﮐ ١٠) 10—(ﺰﺗﺮﻫﻮﻠﯿﮐ ٩) 9
(ﯽﮑﻤﮐ یﺩﻭﺭﻭ) AUX
ﻢﯿﻈﻨﺗ ﻦﯾﺍ ،ﻩﺎﮕﺘﺳﺩ ﻦﯾﺍ ﻪﺑ ﻞﺼﺘﻣ ﯽﮑﻤﮐ ﻩﺎﮕﺘﺳﺩ ﮏﯾ ﺯﺍ ﻩﺩﺎﻔﺘﺳﺍ ﻡﺎﮕﻨﻫ
.ﺪﯿﻨﮐ ﻝﺎﻌﻓ ﺍﺭ
.ﺪﻴﻫﺩ ﺭﺎﺸﻓ ﺍﺭ ﺎﯾ ،ﯽﮑﻤﮐ ﺕﺎﻤﯿﻈﻨﺗ ﻥﺩﺮﮐ ﺵﻮﻣﺎﺧ ﺎﯾ ﻦﺷﻭﺭ یﺍﺮﺑ
1
ﺖﻋﺎﺳ ﺶﯾﺎﳕ
ﺭﺎﺸﻓ ﺍﺭ ،ﺖﻋﺎﺳ ﻪﺤﻔﺻ ﻥﺩﺮﮐ ﻥﺩﺮﮐ ﺵﻮﻣﺎﺧ/ﻦﺷﻭﺭ یﺍﺮﺑ
.ﺪﻴﻫﺩ
ﻪﺤﻔﺻ ﺪﯿﻨﮐ ﯽﻣ ﻝﺎﻌﻓ ﺍﺭ ﺎﻫﺩﺮﮑﻠﻤﻋ ﺮﯾﺎﺳ ﻪﮐ ﯽﻣﺎﮕﻨﻫ
ﺖﻋﺎﺳ ﻪﺤﻔﺻ ﺎﻣﺍ ﺩﻮﺷ ﯽﻣ ﺮﻫﺎﻇ ﺖﻗﻮﻣ ﺭﻮﻄﺑ ﺖﻋﺎﺳ
.ﺩﻮﺷ ﯽﻣ ﺮﻫﺎﻇ ﻪﯿﻧﺎﺛ ٢۵ ﺯﺍ ﺪﻌﺑ ﻩﺭﺎﺑﻭﺩ
AUX ﻊﺒﻨﻣ ﺯﺍ ﻩﺩﺎﻔﺘﺳﺍ
.ﺪﻴﻨﮐ ﺩﺭﺍﻭ AUX یﺩﻭﺭﻭ ﺶﻴﻓ ﻥﻭﺭﺩ ﺍﺭ ﻮﻳﺮﺘﺳﺍ ﮏﭼﻮﮐ ﻝﺎﺼﺗﺍ ١
.ﺩﻮﺷ ﺏﺎﺨﺘﻧﺍ ﻊﺒﻨﻣ ﻥﺍﻮﻨﻋ ﻪﺑ AUX ﺎﺗ ﺪﻴﻫﺩ ﺭﺎﺸﻓ ﺍﺭ SRC/OFF ٢
ﻝﺎﻌﻓ ﯽﮑﻤﮐ ﺕﺎﻤﯿﻈﻨﺗ ﺍﺮﯾﺯ ﺩﺭﺍﺪﻧ ﺩﻮﺟﻭ AUX ﺏﺎﺨﺘﻧﺍ ﻥﺎﮑﻣﺍ
ﻦﯾﺍ ﺭﺩ (ﯽﮑﻤﮐ یﺩﻭﺭﻭ) AUX ﻪﺑ ﺮﺘﺸﯿﺑ ﺕﺎﻋﻼﻃﺍ یﺍﺮﺑ .ﺪﻨﺘﺴﻫ
.ﺪﯿﻨﮐ ﻪﻌﺟﺍﺮﻣ ﻪﺤﻔﺻ
•
•
Page 47

ﻩﺎﮕﺘﺳﺩ ﺯﺍ ﻩﺩﺎﻔﺘﺳﺍ
ﺶﺨﺑ
٠٢
٧
Fa
(ﺐﻘﻋ/ﻮﻠﺟ ﻪﺑ ﻊﯾﺮﺳ ﺖﮐﺮﺣ) FF/REV
ﺮﻫ یﻮﺠﺘﺴﺟ ﻭ ﺐﻘﻋ/ﻮﻠﺟ ﻪﺑ ﻊﯾﺮﺳ ﺖﮐﺮﺣ ﻦﯿﺑ ﺍﺭ ﻮﺠﺘﺴﺟ ﺵﻭﺭ ﺪﯿﻧﺍﻮﺗ ﯽﻣ
کﺍﺮﺗ ١٠ ﺮﻫ ﺪﻨﮐ ﯽﻣ ﮏﻤﮐ ﺎﻤﺷ ﻪﺑ ROUGH ﺏﺎﺨﺘﻧﺍ .ﺪﯿﻫﺩ ﺮﯿﯿﻐﺗ کﺍﺮﺗ ١٠
.ﺪﯿﻨﮐ ﻮﺠﺘﺴﺟ ﺍﺭ
.ﺪﯿﻫﺩ ﺭﺎﺸﻓ ROUGH ﺏﺎﺨﺘﻧﺍ یﺍﺮﺑ ﺍﺭ
1
ﺐﻘﻋ ﻭ ﻮﻠﺟ ﻪﺑ ﻊﯾﺮﺳ ﺖﮐﺮﺣ – FF/REV
کﺍﺮﺗ ١٠ ﺮﻫ یﻮﺠﺘﺴﺟ – ROUGH
.ﺪﯿﻫﺩ ﺭﺎﺸﻓ ﺍﺭ FF/REV ، ﺏﺎﺨﺘﻧﺍ یﺍﺮﺑ
.ﺪﯿﻫﺩ ﺭﺎﺸﻓ ﺍﺭ B (BAND/ESC) ﺶﯾﺎﳕ ﻪﺤﻔﺻ ﻪﺑ ﺖﺸﮔﺮﺑ یﺍﺮﺑ
2
ﻩﺩﺍﺩ ﺭﺎﺸﻓ ﺍﺭ ﺎﯾ (ﻪﺷﻮﭘ) ﮏﺴﯾﺩ یﻭﺭ ﺮﺑ کﺍﺮﺗ ١٠ ﺮﻫ یﻮﺠﺘﺴﺟ یﺍﺮﺑ
3
.ﺪﯾﺭﺍﺩ ﻪﮕﻧ ﻭ
ﻦﯿﻟﻭﺍ ﺎﯾ ﻥﺩﺍﺩ ﺭﺎﺸﻓ،ﺪﺷﺎﺑ ١٠ ﺯﺍ ﺮﺘﻤﮐ ﻩﺪﻧﺎﻤﯿﻗﺎﺑ کﺍﺮﺗ ﺩﺍﺪﻌﺗ ﺮﮔﺍ
.ﺪﻨﮐ ﯽﻣ ﯽﻧﺍﻮﺧﺯﺎﺑ ﺍﺭ کﺍﺮﺗ (ﻦﯾﺮﺧﺁ)
ﺭﺎﮐﺩﻮﺧ ﻢﻴﻈﻨﺗ
ﺭﺎﮐﺩﻮﺧ ﻢﻴﻈﻨﺗ
.ﺪﯿﻫﺩ ﺭﺎﺸﻓ ﺍﺭ AUDIO ﯽﺗﻮﺻ ﺩﺮﮑﻠﻤﻋ ﺏﺎﺨﺘﻧﺍ یﺍﺮﺑ
ﻡﺎﳒﺍ ﺍﺭ ﺮﻳﺯ ﺕﺎﻣﺍﺪﻗﺍ ﯽﺗﻮﺻ ﺩﺮﮑﻠﻤﻋ ﻢﻴﻈﻨﺗ یﺍﺮﺑ ،ﺏﺎﺨﺘﻧﺍ ﺯﺍ ﺲﭘ
.ﺪﻴﻫﺩ
(ﻥﺯﺍﻮﺗ/ﺭﺪﻴﻓ ﻢﻴﻈﻨﺗ) FAD
ﺭﺎﺸﻓ ﺍﺭ ﺎﯾ (ﺐﻘﻋ/ﻮﻠﺟ یﻮﮔﺪﻨﻠﺑ یﺍﺪﺻ ﻥﺯﺍﻮﺗ) ﺭﺪﯿﻓ ﻢﯿﻈﻨﺗ یﺍﺮﺑ
1
.ﺪﯿﻫﺩ
ﺭﺎﺸﻓ ﺍﺭ ﺎﯾ (ﺖﺳﺍﺭ/ﭗﭼ یﻮﮔﺪﻨﻠﺑ یﺍﺪﺻ ﻥﺯﺍﻮﺗ) ﻥﺯﺍﻮﺗ ﻢﯿﻈﻨﺗ یﺍﺮﺑ
2
.ﺪﯿﻫﺩ
(ﺭﺰﻳﻻﺍﻮﮐﺍ ﻢﻴﻈﻨﺗ) BASS/MID/TREBLE
.ﺩﻮﺷ ﯽﻣ ﻩﺮﯿﺧﺫ CUSTOM ﺭﺩ ﻩﺪﺷ ﻢﯿﻈﻨﺗ ﺭﺰﻳﻻﺍﻮﮐﺍ ﯽﻨﺤﻨﻣ ﺕﺎﻤﻴﻈﻨﺗ
.ﺪﻴﻫﺩ ﺭﺎﺸﻓ ﺍﺭ ﺎﯾ ،ﺢﻄﺳ ﻢﯿﻈﻨﺗ یﺍﺮﺑ
1
-۶ ﺎﺗ +۶ :ﻢﻴﻈﻨﺗ ﻩﺩﻭﺪﺤﻣ
•
(یﺪﻨﻠﺑ) LOUD
ﺎﺑ ﻥﺍﻮﺗ ﯽﻣ ﺍﺭ ﻢﮐ یﺍﺪﺻ ﻥﺍﺰﯿﻣ ﺭﺩ ﻻﺎﺑ ﻭ ﻦﯿﯾﺎﭘ یﺎﻫ ﺲﻧﺎﮐﺮﻓ ﺭﺩ ﺩﻮﺟﻮﻣ یﺎﻫ ﺺﻘﻧ
.ﺩﺮﮐ ﻥﺍﺮﺒﺟ ﺍﺪﺻ ﻥﺩﺮﮐ ﺪﻨﻠﺑ
.ﺪﻴﻫﺩ ﺭﺎﺸﻓ ﺍﺭ ﺎﯾ ،ﺍﺪﺻ یﺪﻨﻠﺑ ﻥﺍﺰﯿﻣ ﻥﺩﺮﮐ ﺵﻮﻣﺎﺧ ﺎﯾ ﻦﺷﻭﺭ یﺍﺮﺑ
1
.ﺪﯿﻫﺩ ﺭﺎﺸﻓ ﺍﺭ ﺎﯾ ،ﻩﺍﻮﳋﺩ ﺕﺎﻤﯿﻈﻨﺗ ﺏﺎﺨﺘﻧﺍ یﺍﺮﺑ
2
(ﺩﺎﯾﺯ) HI—(ﻢﮐ) LOW
یﺪﻨﻠﺑ E (EQ/LOUD) ﱳﺷﺍﺩ ﻪﮕﻧ ﻭ ﻥﺩﺍﺩ ﺭﺎﺸﻓ ﺎﺑ ﺪﯿﻧﺍﻮﺗ ﯽﻣ ﻦﯿﻨﭽﻤﻫ
.ﺪﯿﻨﮐ ﺵﻮﻣﺎﺧ ﺎﯾ ﻦﺷﻭﺭ ﺍﺭ ﺍﺪﺻ
•
(ﻊﺒﻨﻣ ﺢﻄﺳ ﻢﻴﻈﻨﺗ) SLA
ﮏﻳﺮﻫ یﺍﺪﺻ ﺢﻄﺳ ﻪﮐ ﺪﻫﺩ ﯽﻣ ﻥﺎﮑﻣﺍ ﺎﻤﺷ ﻪﺑ (ﻊﺒﻨﻣ ﺢﻄﺳ ﻢﻴﻈﻨﺗ) SLA
ﲔﺑ ﺯﺍ ﺏﺎﺨﺘﻧﺍ ﻡﺎﮕﻨﻫ ﺭﺩ ﯽﺳﺎﺳﺍ ﯽﺗﻮﺻ ﺕﺍﺮﻴﻴﻐﺗ ﺯﺍ یﺮﻴﮔﻮﻠﺟ یﺍﺮﺑ ﺍﺭ ﻊﺑﺎﻨﻣ ﺯﺍ
.ﺪﻴﻨﮐ ﻢﻴﻈﻨﺗ ،ﻊﺑﺎﻨﻣ
.ﺩﺭﺍﺪﻧ ﺩﻮﺟﻭ SLA ﻪﺑ ﻲﻳﺎﺠﺑﺎﺟ ﻥﺎﮑﻣﺍ ،ﻊﺒﻨﻣ ﻥﺍﻮﻨﻋ ﻪﺑ FM ﺏﺎﺨﺘﻧﺍ ﻡﺎﮕﻨﻫ
ﻥﻭﺪﺑ ﻪﮐ ﺪﻧﺮﯿﮔ ﯽﻣ ﻡﺎﳒﺍ FM یﺍﺪﺻ ﻥﺍﺰﯿﻣ ﺢﻄﺳ ﺱﺎﺳﺍ ﺮﺑ ﺕﺎﻤﯿﻈﺗ ﻦﯾﺍ
.ﺪﻧﻮﺷ ﯽﻣ ﻆﻔﺣ ﺮﯿﯿﻐﺗ ﭻﯿﻫ
.ﺪﯿﻨﮐ ﻢﯿﻈﻨﺗ ﺰﯿﻧ ﺍﺭ AM یﺍﺪﺻ ﺢﻄﺳ ﺪﯿﻧﺍﻮﺗ ﯽﻣ ﺩﺮﮑﻠﻤﻋ ﻦﯾﺍ ﺯﺍ ﻩﺩﺎﻔﺘﺳﺍ ﺎﺑ
.ﺪﻴﻫﺩ ﺭﺎﺸﻓ ﺍﺭ ﺎﯾ ،ﻊﺒﻨﻣ یﺍﺪﺻ ﻥﺍﺰﯿﻣ ﻢﯿﻈﻨﺗ یﺍﺮﺑ
1
SLA –4 ﺎﺗ SLA +4 :ﻢﻴﻈﻨﺗ ﻩﺩﻭﺪﺤﻣ
•
•
•
ﺭﺰﯾﻻﺍﻮﮐﺍ ﺯﺍ ﻩﺩﺎﻔﺘﺳﺍ
.ﺪﯿﻨﮐ ﺏﺎﺨﺘﻧﺍ ﺍﺭ E (EQ/LOUD) ﺭﺰﯾﻻﺍﻮﮐﺍ ﺏﺎﺨﺘﻧﺍ یﺍﺮﺑ
DYNAMIC—VOCAL—NATURAL—CUSTOM—
FLAT—POWERFUL
ﯽﺷﺭﺎﻔﺳ ﻢﯿﻈﻨﺗ ﮏﯾ ﺪﻫﺩ ﯽﻣ ﻩﺯﺎﺟﺍ ﺎﻤﺷ ﻪﺑ CUSTOM
.ﺪﯿﻨﮐ ﺩﺎﺠﯾﺍ
ﺎﻫﺩﺮﮑﻠﻤﻋ ﺮﻳﺎﺳ
ﻪﯿﻟﻭﺍ ﺕﺎﻤﯿﻈﻨﺗ ﻡﺎﳒﺍ
ﻩﺎﮕﺘﺳﺩ ﺎﺗ ﺪﻳﺭﺍﺩ ﻪﮕﻧ ﻭ ﻩﺩﺍﺩ ﺭﺎﺸﻓ ﺍﺭ SRC/OFF ﻪﻤﮐﺩ ١
.ﺩﻮﺷ ﺵﻮﻣﺎﺧ
ﺭﺩ ﺖﻋﺎﺳ ﺎﺗ ﺪﻳﺭﺍﺩ ﻪﮕﻧ ﻭ ﻩﺩﺍﺩ ﺭﺎﺸﻓ ﺍﺭ SRC/OFF ﻪﻤﮐﺩ ٢
.ﺩﻮﺷ ﺮﻫﺎﻇ ﺶﯾﺎﳕ ﻪﺤﻔﺻ
.ﺪﯿﻫﺩ ﺭﺎﺸﻓ ﺍﺭ FUNC ﻪﯿﻟﻭﺍ ﻢﯿﻈﻨﺗ ﺏﺎﺨﺘﻧﺍ یﺍﺮﺑ ٣
ﺍﺭ ﺮﻳﺯ ﺕﺎﻣﺍﺪﻗﺍ ﻪﻴﻟﻭﺍ ﺕﺎﻤﻴﻈﻨﺗ ﻡﺎﳒﺍ یﺍﺮﺑ ،ﺏﺎﺨﺘﻧﺍ ﺯﺍ ﺲﭘ
.ﺪﻴﻫﺩ ﻡﺎﳒﺍ
ﺖﻋﺎﺳ ﻢﯿﻈﻨﺗ
،ﺪﻳﺭﺍﺩ ﺍﺭ ﻥﺁ ﻢﻴﻈﻨﺗ ﺪﺼﻗ ﻪﮐ ﺖﻋﺎﺳ ﻪﺤﻔﺻ ﺯﺍ ﯽﺘﻤﺴﻗ ﺏﺎﺨﺘﻧﺍ یﺍﺮﺑ
1
.ﺪﻴﻫﺩ ﺭﺎﺸﻓ ﺍﺭ ﺎﯾ
ﻪﻘﻴﻗﺩ—ﺖﻋﺎﺳ
.ﺪﻴﻫﺩ ﺭﺎﺸﻓ ﺍﺭ ﺎﯾ ،ﺖﺳﺍﺭ ﺖﻤﺳ ﺭﺩ ﺖﻋﺎﺳ ﻥﺩﺍﺩ ﺭﺍﺮﻗ یﺍﺮﺑ
2
•
ﻩﺎﮕﺘﺳﺩ ﺯﺍ ﻩﺩﺎﻔﺘﺳﺍ
ﺶﺨﺑ
٠٢
۶
Fa
ﯽﺳﺭﺎﻓ
(ﯽﻠﺤﻣ ﯽﺑﺎﻳ ﺝﻮﻣ) LOCAL
ﺍﺭ ﯽﯾﻮﯾﺩﺍﺭ یﺎﻫ ﻩﺎﮕﺘﺴﯾﺍ ﻂﻘﻓ ﺎﺗ ﺪﻫﺩ ﯽﻣ ﻥﺎﮑﻣﺍ ﺎﻤﺷ ﻪﺑ ﯽﻠﺤﻣ ﯽﺑﺎﯾ ﺝﻮﻣ
.ﺪﻨﺷﺎﺑ ﺭﺍﺩﻮﺧﺮﺑ ﺐﺳﺎﻨﻣ ﺖﻓﺎﯾﺭﺩ یﺍﺮﺑ ﯽﻓﺎﮐ ﻝﺎﻨﮕﯿﺳ ﺕﺭﺪﻗ ﺯﺍ ﻪﮐ ﺪﯿﺑﺎﯿﺑ
.ﺪﯿﻫﺩ ﺭﺎﺸﻓ ﺍﺭ ﺎﯾ ﯽﺑﺎﯾ ﺝﻮﻣ ﻥﺩﺮﮐ ﺵﻮﻣﺎﺧ ﺎﯾ ﻦﺷﻭﺭ یﺍﺮﺑ
1
.ﺪﯿﻫﺩ ﺭﺎﺸﻓ ﺍﺭ ﺎﯾ ﺖﯿﺳﺎﺴﺣ ﻢﯿﻈﻨﺗ یﺍﺮﺑ
2
FM: LOCAL 1—LOCAL 2—LOCAL 3—LOCAL 4
AM: LOCAL 1—LOCAL 2
ﻦﯾﺮﺗ یﻮﻗ ﻂﻘﻓ ﺎﺗ ﺪﻫﺩ ﯽﻣ ﻥﺎﮑﻣﺍ ﺎﻤﺷ ﻪﺑ ﻢﯿﻈﻨﺗ ﺢﻄﺳ ﻦﯾﺮﺗﻻﺎﺑ
ﺎﻤﺷ ﻪﺑ ﺮﺗ ﻦﯿﯾﺎﭘ ﺕﺎﻤﯿﻈﻨﺗ ﻪﮐ ﯽﻟﺎﺣ ﺭﺩ ،ﺪﯿﻨﮐ ﺖﻓﺎﯾﺭﺩ ﺍﺭ ﺎﻫ ﻩﺎﮕﺘﺴﯾﺍ
.ﺪﯿﻨﮐ ﺖﻓﺎﯾﺭﺩ ﺍﺭ ﺮﺗ ﻒﯿﻌﺿ یﺎﻫ ﻩﺎﮕﺘﺴﯾﺍ ﺎﺗ ﺪﻨﻫﺩ ﯽﻣ ﻥﺎﮑﻣﺍ
یﺩ ﯽﺳ
ﯽﻠﺻﺍ یﺎﻫﺩﺮﮑﻠﻤﻋ
CD/CD-R/CD-RW ﮏﻳ ﺶﺨﭘ
ﻪﮐ ﺪﯾﺭﺍﺬﮕﺑ ﮏﺴﯾﺩ ﻥﺩﺍﺩ ﺭﺍﺮﻗ ﺹﻮﺼﺨﻣ ﻑﺎﮑﺷ ﻥﻭﺭﺩ یﺍ ﻪﻧﻮﮕﺑ ﺍﺭ ﮏﺴﯾﺩ
1
.ﺪﺷﺎﺑ ﻻﺎﺑ ﻑﺮﻃ ﻪﺑ ﻥﺁ ﺐﺴﭼﺮﺑ یﺍﺭﺍﺩ ﺖﻤﺳ
CD/CD-R/CD-RW ﻥﺩﺮﮐ ﺝﺭﺎﺧ
.ﺪﻴﻫﺩ ﺭﺎﺸﻓ ﺍﺭ
1
ﻪﺷﻮﭘ ﮏﻳ ﺏﺎﺨﺘﻧ
ﺍ
.ﺪﯿﻫﺩ ﺭﺎﺸﻓ ﺍﺭ ﺎﯾ
1
کﺍﺮﺗ ﮏﻳ ﺏﺎﺨﺘﻧ
ﺍ
.ﺪﯿﻫﺩ ﺭﺎﺸﻓ ﺍﺭ ﺎﯾ
1
ﺐﻘﻋ ﻪﺑ ﻭﺭ ﺎﻳ ﻮﻠﺟ ﻪﺑ ﻭﺭ ﻊﻳﺮﺳ ﺖﮐﺮﺣ
.ﺪﯾﺭﺍﺩ ﻪﮕﻧ ﻭ ﺪﯿﻫﺩ ﺭﺎﺸﻓ ﺍﺭ ﺎﯾ
1
ﻪﺑ ﻭﺭ ﺎﻳ ﻮﻠﺟ ﻪﺑ ﻭﺭ ﻊﻳﺮﺳ ﺖﮐﺮﺣ ﲔﺣ ﺭﺩ ،ﻩﺩﺮﺸﻓ یﺍﺪﺻ ﺶﺨﭘ ﻥﺎﻣﺯ ﺭﺩ
.ﺖﺷﺍﺩ ﺪﻫﺍﻮﺨﻧ ﺩﻮﺟﻭ ﯽﻳﺍﺪﺻ ﺐﻘﻋ
CD-DA ﻭ ﻩﺩﺮﺸﻓ یﺍﺪﺻ ﲔﺑ ﺯﺍ ﺏﺎﺨﺘﻧ
ﺍ
.ﺪﯿﻫﺩ ﺭﺎﺸﻓ ﺍﺭ B (BAND/ESC)
1
ﯽﻨﺘﻣ ﺕﺎﻋﻼﻃﺍ ﺶﻳﺎﳕ
ﻩﺍﻮﳋﺩ ﯽﻨﺘﻣ ﺕﺎﻋﻼﻃﺍ ﺏﺎﺨﺘﻧ
ﺍ
.ﺪﯿﻫﺩ ﺭﺎﺸﻓ ﺍﺭ D (DISP/SCRL)
1
ﭗﭼ ﺖﻤﺳ ﻪﺑ ﯽﻨﺘﻣ ﺕﺎﻋﻼﻃﺍ ﻥﺩﺍﺩ ﺖﮐﺮﺣ
.ﺪﯾﺭﺍﺩ ﻪﮕﻧ ﻭ ﺪﯿﻫﺩ ﺭﺎﺸﻓ ﺍﺭ D (DISP/SCRL)
1
ﺕﺎﮑﻧ
یﺎﻫ ﻞﯾﺎﻓ ﱳﺷﻮﻧ یﺍﺮﺑ ﻩﺪﺷ ﻩﺩﺎﻔﺘﺳﺍ iTunes ﻪﺨﺴﻧ ﻪﺑ ﻪﺘﺴﺑ
ﱳﻣ ﺖﺳﺍ ﻦﮑﳑ ،ﻪﻧﺎﺳﺭ یﺎﻫ ﻞﯾﺎﻓ ﻉﺍﻮﻧﺍ ﺎﯾ ﮏﺴﯾﺩ ﮏﯾ یﻭﺭ ﺮﺑMP3
ﻩﺩﺍﺩ ﻥﺎﺸﻧ ﯽﺘﺳﺭﺩ ﻪﺑ ﯽﺗﻮﺻ ﻞﯾﺎﻓ ﻩﺍﺮﻤﻫ ﻪﺑ ﻩﺪﺷ ﻩﺮﯿﺧﺫ ﺭﺎﮔﺯﺎﺳﺎﻧ
.ﺩﻮﺸﻧ
.ﺩﺭﺍﺩ ﯽﮕﺘﺴﺑ ﻪﻧﺎﺳﺭ ﻪﺑ ﺪﻨﮐ ﺮﯿﯿﻐﺗ ﺪﻧﺍﻮﺗ ﯽﻣ ﻪﮐ ﯽﻨﺘﻣ ﺕﺎﻋﻼﻃﺍ ﺩﺭﺍﻮﻣ
•
•
ﺩﺮﮑﻠﻤﻋ ﺕﺎﻤﻴﻈﻨﺗ
.ﺪﯿﻫﺩ ﺭﺎﺸﻓ ﺍﺭ FUNC ﺩﺮﮑﻠﻤﻋ ﺏﺎﺨﺘﻧﺍ یﺍﺮﺑ
.ﺪﻴﻫﺩ ﻡﺎﳒﺍ ﺍﺭ ﺮﻳﺯ ﺕﺎﻣﺍﺪﻗﺍ ﺩﺮﮑﻠﻤﻋ ﻢﻴﻈﻨﺗ یﺍﺮﺑ ،ﺏﺎﺨﺘﻧﺍ ﺯﺍ ﺲﭘ
(ﺶﺨﭘ ﺭﺍﺮﮑﺗ) RPT
.ﺪﯿﻫﺩ ﺭﺎﺸﻓ ﺍﺭ ﺎﯾ ،ﺭﺍﺮﮑﺗ ﻩﺩﻭﺪﺤﻣ ﺏﺎﺨﺘﻧﺍ یﺍﺮﺑ
1
ﺎﻫ کﺍﺮﺗ ﻡﺎﲤ ﺭﺍﺮﮑﺗ – DSC
ﯽﻠﻌﻓ کﺍﺮﺗ ﺭﺍﺮﮑﺗ – TRK
ﯽﻠﻌﻓ ﻪﺷﻮﭘ ﺭﺍﺮﮑﺗ – FLD
(ﯽﻓﺩﺎﺼﺗ ﺶﺨﭘ) RDM
.ﺪﻴﻫﺩ ﺭﺎﺸﻓ ﺍﺭ ﺎﯾ ،ﯽﻓﺩﺎﺼﺗ ﺶﺨﭘ ﻥﺩﺮﮐ ﺵﻮﻣﺎﺧ ﺎﯾ ﻦﺷﻭﺭ یﺍﺮﺑ
1
ﺶﯾﺎﳕ ﻪﺤﻔﺻ یﻭﺭ ﺮﺑ RDM ،ﺖﺳﺍ ﻦﺷﻭﺭ ﯽﻓﺩﺎﺼﺗ ﺶﺨﭘ ﻪﮐ ﯽﻣﺎﮕﻨﻫ
.ﺩﻮﺷ ﯽﻣ ﺮﻫﺎﻇ
یﻭﺭ ﺮﺑ FRDM ،ﺪﯿﻨﮐ ﻦﺷﻭﺭ ﺍﺭ ﯽﻓﺩﺎﺼﺗ ﺶﺨﭘ ﻪﺷﻮﭘ ﺭﺍﺮﮑﺗ ﻝﻮﻃ ﺭﺩ ﺮﮔﺍ
.ﺩﻮﺷ ﯽﻣ ﺮﻫﺎﻇ ﺶﯾﺎﳕ ﻪﺤﻔﺻ
(ﺶﺨﭘ ﻦﮑﺳﺍ) SCAN
.ﺩﺯﺍﺩﺮﭘ ﯽﻣ ﻩﺪﺷ ﺏﺎﺨﺘﻧﺍ ﺭﺍﺮﮑﺗ ﻩﺩﻭﺪﺤﻣ ﺭﺩ ﮓﻨﻫﺁ یﻮﺠﺘﺴﺟ ﻪﺑ ﺶﺨﭘ ﻦﮑﺳﺍ
.ﺪﻴﻫﺩ ﺭﺎﺸﻓ ﺍﺭ ﺶﺨﭘ ﻦﮑﺳﺍ ﻥﺩﺮﮐ ﻦﺷﻭﺭ یﺍﺮﺑ
1
ﻪﺤﻔﺻ یﻭﺭ ﺮﺑ FSCN ،ﺪﯿﻨﮐ ﻦﺷﻭﺭ ﺍﺭ ﺶﺨﭘ ﻦﮑﺳﺍ FLD ﻝﻮﻃ ﺭﺩ ﺮﮔﺍ
.ﺩﻮﺷ ﯽﻣ ﺮﻫﺎﻇ ﺶﯾﺎﳕ
.ﺪﯿﻫﺩ ﺭﺎﺸﻓ ﺶﺨﭘ ﻦﮑﺳﺍ ﻥﺩﺮﮐ ﺵﻮﻣﺎﺧ یﺍﺮﺑ ﺍﺭ ،ﻩﺍﻮﳋﺩ کﺍﺮﺗ ﱳﻓﺎﯾ ﻡﺎﮕﻨﻫ
2
ﻩﺭﺎﺑﻭﺩ ،ﺪﺷﺎﺑ ﻪﺘﺸﮔﺮﺑ ﺶﺨﭘ ﻪﺤﻔﺻ ﻪﺑ ﺭﺎﮐﺩﻮﺧ ﺭﻮﻄﺑ ﺶﯾﺎﳕ ﻪﺤﻔﺻ ﺮﮔﺍ
ﻥﺩﺍﺩ ﺭﺎﺸﻓ ﺎﺑ ﺍﺭ SCAN
.ﺪﯿﻨﮐ ﺏﺎﺨﺘﻧﺍ FUNC
ﺎﻫ کﺍﺮﺗ یﺩﺎﻋ ﺶﺨﭘ ،ﺪﺷ ﻡﺎﲤ (ﻪﺷﻮﭘ) ﮏﺴﯾﺩ ﻥﺩﺮﮐ ﻦﮑﺳﺍ ﻪﮑﻨﯾﺍ ﺯﺍ ﺪﻌﺑ
.ﺩﻮﺷ ﯽﻣ ﻉﻭﺮﺷ
(ﺚﮑﻣ) PAUSE
.ﺪﻴﻫﺩ ﺭﺎﺸﻓ ﺍﺭ ﺎﯾ ،ﺶﺨﭘ ﻪﻣﺍﺩﺍ ﺎﻳ ﺶﺨﭘ ﺭﺩ ﺚﮑﻣ ﺩﺎﺠﻳﺍ یﺍﺮﺑ
1
(ﺍﺪﺻ ﺏﺎﻳﺯﺎﺑ) SRTRV
ﯽﺑﺎﯾﺯﺎﺑ ﺍﺭ ﺮﺗﺮﺑ ﺖﻔﯿﮐ ﺎﺑ ﯽﯾﺍﺪﺻ ﻭ ﺪﻫﺩ ﯽﻣ ﺎﻘﺗﺭﺍ ﺭﺎﮐﺩﻮﺧ ﺭﻮﻄﺑ ﺍﺭ ﻩﺩﺮﺸﻓ یﺍﺪﺻ
.ﺪﻨﮐ ﯽﻣ
.ﺩﻮﺷ ﺏﺎﺨﺘﻧﺍ ﺎﻤﺷ ﻩﺍﻮﳋﺩ ﺕﺎﻤﻴﻈﻨﺗ ﺎﺗ ﺪﻴﻫﺩ ﺭﺎﺸﻓ ﺍﺭ ﺎﯾ
1
2—1—(ﺵﻮﻣﺎﺧ) OFF
یﺯﺎﺳ ﻩﺩﺮﺸﻓ یﻻﺎﺑ یﺎﻫ ﺥﺮﻧ یﺍﺮﺑ 2 ﻭ یﺯﺎﺳ ﻩﺩﺮﺸﻓ ﲔﻳﺎﭘ یﺎﻫ ﺥﺮﻧ یﺍﺮﺑ 1
.ﺖﺳﺍ ﺮﺛﻮﻣ
Page 48

ﻩﺎﮕﺘﺳﺩ ﺯﺍ ﻩﺩﺎﻔﺘﺳﺍ
ﺶﺨﺑ
٠٢
۵
Fa
ﻩﺎﮕﺘﺳﺩ ﻥﺩﺮﮐ ﻦﺷﻭﺭ
.ﺪﻴﻫﺩ ﺭﺎﺸﻓ ﺍﺭ SRC/OFF ﻩﺎﮕﺘﺳﺩ ﻥﺩﺮﮐ ﻦﺷﻭﺭ یﺍﺮﺑ
1
ﻩﺎﮕﺘﺳﺩ ﻥﺩﺮﮐ ﺵﻮﻣﺎﺧ
.ﺩﻮﺷ ﺵﻮﻣﺎﺧ ﻩﺎﮕﺘﺳﺩ ﺎﺗ ﺪﻳﺭﺍﺩ ﻪﮕﻧ ﻭ ﻩﺩﺍﺩ ﺭﺎﺸﻓ ﺍﺭ SRC/OFF ﻪﻤﮐﺩ
1
ﻊﺒﻨﻣ ﺏﺎﺨﺘﻧﺍ
:ﺪﯿﻫﺩ ﺭﺎﺸﻓ ﺍﺭ SRC/OFF ،ﺮﯾﺯ ﺭﺩ ﻩﺪﺷ ﺖﺳﺮﻬﻓ ﻊﺑﺎﻨﻣ ﻥﺎﻴﻣ ﺭﺩ ﺶﺧﺮﭼ یﺍﺮﺑ
1
AUX (AUX)—(ﯽﻠﺧﺍﺩ یﺩ ﯽﺳ ﻩﺪﻨﻨﮐ ﺶﺨﭘ) CD—(ﺏﺎﯾ ﺝﻮﻣ) TUNER
ﺍﺪﺻ ﻥﺍﺰﯿﻣ ﻢﻴﻈﻨﺗ
.ﺪﻴﻧﺎﺧﺮﭽﺑ ﺍﺭ SRC/OFF ﺍﺪﺻ ﻢﻴﻈﻨﺗ یﺍﺮﺑ
1
ﻁﺎﻴﺘﺣﺍ
ﻪﯿﻠﻘﻧ ﻪﻠﯿﺳﻭ ،ﯽﯾﻮﻠﺟ ﻪﺤﻔﺻ ﻥﺩﺮﮐ ﺍﺪﺟ ﻡﺎﮕﻨﻫ ؛ﯽﻨﻤﯾﺍ ﻆﻔﺣ یﺍﺮﺑ
.ﺪﯿﻨﮐ ﻒﻗﻮﺘﻣ ﺍﺭ ﺩﻮﺧ
ﻪﺘﮑﻧ
ﱳﻧﺁ ﺖﻳﻮﻘﺗ ﻝﺮﺘﻨﮐ ﻪﻧﺎﻳﺎﭘ ﻪﺑ ﻩﺎﮕﺘﺳﺩ ﺪﻴﻔﺳ/ﯽﺑﺁ ﻢﻴﺳ ﻝﺎﺼﺗﺍ ﺕﺭﻮﺻ ﺭﺩ
ﯽﻣ ﺯﺎﺑ ،ﻩﺎﮕﺘﺳﺩ ﻊﺒﻨﻣ ﻥﺪﺷ ﻝﺎﻌﻓ ﺯﺍ ﺲﭘ ﻞﻴﺒﻣﻮﺗﺍ ﱳﻧﺁ ،ﻞﻴﺒﻣﻮﺗﺍ ﺭﺎﮐﺩﻮﺧ
.ﺪﻴﻨﮐ ﻝﺎﻌﻓﺮﻴﻏ ﺍﺭ ﻊﺒﻨﻣ ،ﱳﻧﺁ ﻥﺩﺮﮐ ﻊﻤﺟ یﺍﺮﺑ .ﺩﻮﺷ
/ﺩﺮﮑﻠﻤﻋ ﺕﺎﻤﻴﻈﻨﺗ یﺍﺮﺑ ﻪﮐ ﻮﻨﻣ یﺎﻫﺩﺮﮑﻠﻤﻋ
ﺪﻨﺘﺴﻫ کﺮﺘﺸﻣ ﻪﻴﻟﻭﺍ ﺕﺎﻤﻴﻈﻨﺗ/ﺍﺪﺻ ﺕﺎﻤﻴﻈﻨﺗ
ﻝﻮﻤﻌﻣ ﻪﺤﻔﺻ ﻪﺑ ﺖﺸﮔﺯﺎﺑ
ﻪﻴﻟﻭﺍ ﺕﺎﻤﻴﻈﻨﺗ یﻮﻨﻣ ﻮﻐﻟ
.ﺪﯿﻫﺩ ﺭﺎﺸﻓ ﺍﺭ B (BAND/ESC)
1
SRC/OFF ﱳﺷﺍﺩ ﻪﮕﻧ ﻦﯿﯾﺎﭘ ﺎﺑ ﺍﺭ ﻪﯿﻟﻭﺍ ﺕﺎﻤﯿﻈﻨﺗ ﺪﯿﻧﺍﻮﺗ ﯽﻣ ﻦﯿﻨﭽﻤﻫ
.ﺩﻮﺷ ﺵﻮﻣﺎﺧ ﻩﺎﮕﺘﺳﺩ ﺎﺗ ﺪﯿﻨﮐ ﻮﻐﻟ
ﺏﺎﯾ ﺝﻮﻣ
ﯽﻠﺻﺍ یﺎﻫﺩﺮﮑﻠﻤﻋ
ﻢﻬﻣ
ﯽﻣ ﻩﺩﺎﻔﺘﺳﺍ ﯽﺑﻮﻨﺟ ﻭ یﺰﮐﺮﻣ ،ﯽﻟﺎﻤﺷ یﺎﮑﯾﺮﻣﺁ ﺭﺩ ﻩﺎﮕﺘﺳﺩ ﻦﯾﺍ ﺯﺍ ﺮﮔﺍ
ﺝﻮﻣ ﻡﺎﮔ) AM ﻪﺑ) ﺪﯿﻨﮐ ﻢﯿﻈﻨﺗ ﺍﺩﺪﺠﻣ ﺍﺭ AM ﯽﺑﺎﻳ ﺝﻮﻣ ﻡﺎﮔ ،ﺪﯿﻨﮐ
.(ﺪﯿﻨﮐ ﻪﻌﺟﺍﺮﻣ ٨ ﻪﺤﻔﺻ ﺭﺩ (AM ﯽﺑﺎﻳ
ﺪﻧﺎﺑ ﺏﺎﺨﺘﻧ
ﺍ
(AM ﺎﯾ FM یﺍﺮﺑ F3 ،F2 ،F1) ﻩﺍﻮﳋﺩ ﺪﻧﺎﺑ ﺎﺗ ﺪﯿﻫﺩ ﺭﺎﺸﻓ ﺍﺭ B (BAND/ESC)
1
.ﺩﻮﺷ ﻩﺩﺍﺩ ﻥﺎﺸﻧ
(ﻡﺎﮔ ﻪﺑ ﻡﺎﮔ) ﯽﺘﺳﺩ ﯽﺑﺎﻳ ﺝﻮﻣ
.ﺪﯿﻫﺩ ﺭﺎﺸﻓ ﺍﺭ ﺎﯾ
1
ﻮﺠﺘﺴﺟ
.ﺪﻴﻨﮐ ﺎﻫﺭ ﺲﭙﺳ ﻭ ﺪﻳﺭﺍﺩ ﻪﮕﻧ ﻭ ﻩﺩﺍﺩ ﺭﺎﺸﻓ ﺍﺭ ﺎﯾ
1
.ﺪﯿﻨﮐ ﻮﻐﻟ ﺎﯾ ﺮﺼﺘﺨﻣ ﻥﺩﺍﺩ ﺭﺎﺸﻓ ﺎﺑ ﺍﺭ ﯽﺑﺎﯾ ﺝﻮﻣ ﺪﯿﻧﺍﻮﺗ ﯽﻣ
.ﺪﻳﻮﺷ ﺩﺭ ﺎﻬﻫﺎﮕﺘﺴﻳﺍ ﺯﺍ ﺪﻴﻧﺍﻮﺗ ﯽﻣ ﺎﯾ ﱳﺷﺍﺩ ﻪﮕﻧ ﻭ ﻥﺩﺍﺩ ﺭﺎﺸﻓ ﺎﺑ
.ﺩﻮﺷ ﯽﻣ ﺯﺎﻏﺁ ﯽﺑﺎﯾ ﺝﻮﻣ ، ﺎﯾ ﻥﺩﺮﮐ ﺎﻫﺭ ﺾﺤﻣ ﻪﺑ
یﺍﺮﺑ ﺎﻫ ﻩﺎﮕﺘﺴﯾﺍ ﯽﻧﺍﻮﺧﺯﺎﺑ ﻭ یﺯﺎﺳ ﻩﺮﯿﺧﺫ
ﺪﻧﺎﺑ ﺮﻫ
ﻪﻈﻓﺎﺣ ﺭﺩ ﺍﺭ ﻩﺪﺷ ﺖﻓﺎﻳ ﻩﺎﮕﺘﺴﻳﺍ ﻪﮐ ﺪﻴﻫﺍﻮﺧ ﯽﻣ ﺮﮔﺍ
ﻦﯿﯿﻌﺗ ﺶﻴﭘ ﺯﺍ ﯽﺑﺎﻳ ﺝﻮﻣ یﺎﻫ ﻪﻤﮐﺩ ﺯﺍ ﯽﮑﻳ ،ﺪﻴﻨﮐ ﻩﺮﻴﺧﺫ
ﻥﺩﺯ ﮏﻤﺸﭼ ﻒﻗﻮﺗ ﻥﺎﻣﺯ ﺎﺗ ﻭ ﻩﺩﺍﺩ ﺭﺎﺸﻓ ﺍﺭ (۶ ﺎﺗ ١) ﻩﺪﺷ
.ﺪﻳﺭﺍﺩ ﻪﮕﻧ ،ﻩﺪﺷ ﻦﯿﯿﻌﺗ ﺶﯿﭘ ﺯﺍ ﻩﺭﺎﻤﺷ
ﻩﺪﺷ ﻦﯿﯿﻌﺗ ﺶﯿﭘ ﺯﺍ ﯽﺑﺎﯾ ﺝﻮﻣ ﻪﻤﮐﺩ ﻥﺩﺍﺩ ﺭﺎﺸﻓ ﺎﺑ ﺪﯿﻧﺍﻮﺗ ﯽﻣ
.ﺪﯿﻨﮐ ﯽﻧﺍﻮﺧﺯﺎﺑ ﺍﺭ ﻩﺪﺷ ﻩﺮﯿﺧﺫ ﯽﯾﻮﯾﺩﺍﺭ ﻩﺎﮕﺘﺴﯾﺍ ﺲﻧﺎﮐﺮﻓ
.ﺪﯿﻫﺩ ﺭﺎﺸﻓ ﯽﯾﻮﯾﺩﺍﺭ ﻩﺎﮕﺘﺴﯾﺍ یﺎﻫ ﺱﺎﮐﺮﻓ ﯽﻧﺍﻮﺧﺯﺎﺑ یﺍﺮﺑ ﺍﺭ ﺎﯾ
ﺩﺮﮑﻠﻤﻋ ﺕﺎﻤﻴﻈﻨﺗ
.ﺪﯿﻫﺩ ﺭﺎﺸﻓ ﺍﺭ FUNC ﺩﺮﮑﻠﻤﻋ ﺏﺎﺨﺘﻧﺍ یﺍﺮﺑ
:ﺪﻴﻫﺩ ﻡﺎﳒﺍ ﺍﺭ ﺮﻳﺯ ﺕﺎﻣﺍﺪﻗﺍ ﺩﺮﮑﻠﻤﻋ ﻢﻴﻈﻨﺗ یﺍﺮﺑ ،ﺏﺎﺨﺘﻧﺍ ﺯﺍ ﺲﭘ
(ﺎﻫ ﻩﺎﮕﺘﺴﻳﺍ ﻦﻳﺮﺘﻬﺑ ﻪﻈﻓﺎﺣ) BSM
ﻦﯾﺮﺘﯾﻮﻗ ﺯﺍ ﺩﺭﻮﻣ ﺶﺷ ﺭﺎﮐﺩﻮﺧ ﺭﻮﻄﺑ (ﺎﻫ ﻩﺎﮕﺘﺴﻳﺍ ﻦﻳﺮﺘﻬﺑ ﻪﻇ.ﻑﺎﺣ) BSM
.ﺪﻨﮐ ﯽﻣ ﻩﺮﯿﺧﺫ ﺎﻬﻧﺁ ﻝﺎﻨﮕﯿﺳ ﺕﺭﺪﻗ ﺐﯿﺗﺮﺗ ﻪﺑ ﺍﺭ ﻩﺎﮕﺘﺴﯾﺍ
ﺎﺑ ﻪﮐ ﺍﺭ ﺶﺨﭘ یﺎﻫ ﺲﻧﺎﮐﺮﻓ ﺖﺳﺍ ﻦﮑﳑ BSM ﺎﺑ ﺶﺨﭘ یﺎﻫ ﺲﻧﺎﮐﺮﻓ ﻩﺮﯿﺧﺫ
.ﺪﯾﺎﳕ ﻦﯾﺰﮕﯾﺎﺟ ﺪﯾﺍ ﻩﺩﺮﮐ ﻩﺮﯿﺧﺫ ۶ ﺎﺗ ١ ﺯﺍ ﻩﺩﺎﻔﺘﺳﺍ
.ﺪﻴﻫﺩ ﺭﺎﺸﻓ ﺍﺭ BSM ﻥﺩﺮﮐ ﻝﺎﻌﻓ یﺍﺮﺑ
1
ﺎﻬﻧﺁ ﻝﺎﻨﮕﯿﺳ ﺕﺭﺪﻗ ﺐﯿﺗﺮﺗ ﻪﺑ ﺶﺨﭘ یﺎﻫ ﺲﻧﺎﮐﺮﻓ ﻦﯾﺮﺘﯾﻮﻗ ﺯﺍ ﺩﺭﻮﻣ ﺶﺷ
.ﺪﻧﻮﺷ ﯽﻣ ﻩﺮﯿﺧﺫ
.ﺪﯿﻫﺩ ﺭﺎﺸﻓ ﺍﺭ ،یﺯﺎﺳ ﻩﺮﯿﺧﺫ ﻞﺣﺍﺮﻣ ﻮﻐﻟ یﺍﺮﺑ
■
ﻩﺎﮕﺘﺳﺩ ﺯﺍ ﻩﺩﺎﻔﺘﺳﺍ
ﺶﺨﺑ
٠٢
۴
Fa
ﯽﺳﺭﺎﻓ
ﺭﻭﺩ ﻩﺍﺭ ﺯﺍ ﻝﺮﺘﻨﮐ ﺯﺍ ﺖﺒﻗﺍﺮﻣ ﻭ ﻩﺩﺎﻔﺘﺳﺍ
ﺭﻭﺩ ﻩﺍﺭ ﺯﺍ ﻝﺮﺘﻨﮐ ﺯﺍ ﻩﺩﺎﻔﺘﺳﺍ
.ﺪﯾﺮﯿﮕﺑ ﯽﯾﻮﻠﺟ ﻪﺤﻔﺻ ﻞﺑﺎﻘﻣ ﺭﺩ ﺍﺭ ﻥﺁ ﺭﻭﺩ ﻩﺍﺭ ﺯﺍ ﻝﺮﺘﻨﮐ ﺎﺑ ﻥﺩﺮﮐ ﺭﺎﮐ ﻡﺎﮕﻨﻫ
1
.ﺪﯿﺸﮑﺑ ﻥﻭﺮﯿﺑ ﯽﻨﯿﺳ ﺯﺍ ﺍﺭ ﺩﻮﺟﻮﻣ ﯽﮔﺪﻣﺁﺮﺑ ،ﺭﺎﺑ ﻦﯿﻟﻭﺍ یﺍﺮﺑ ﻩﺩﺎﻔﺘﺳﺍ ﻡﺎﮕﻨﻫ
یﺮﺗﺎﺑ ﺾﻳﻮﻌﺗ
. ﺪﻴﺸﮑﺑ ﻥﻭﺮﻴﺑ ﺍﺭ ﺭﻭﺩ ﻩﺍﺭ ﺯﺍ ﻝﺮﺘﻨﮐ ﺖﺸﭘ ﺭﺩ ﻊﻗﺍﻭ یﺮﺗﺎﺑ ﻪﻈﻔﺤﻣ
1
.ﺪﻴﻨﮐ یﺭﺍﺬﮔﺎﺟ (–) ﯽﻔﻨﻣ ﻭ (+) ﺖﺒﺜﻣ یﺎﻫ ﺐﻄﻗ ﻪﺑ ﻪﺟﻮﺗ ﺎﺑ ﺍﺭ ﺎﻫ یﺮﺗﺎﺑ
2
ﺭﺍﺪﺸﻫ
ﻥﺪﺷ ﻩﺪﻴﻌﻠﺑ ﺕﺭﻮﺻ ﺭﺩ .ﺪﯿﻫﺩ ﺭﺍﺮﻗ ﻥﺎﮐﺩﻮﮐ ﺱﺮﺘﺳﺩ ﺯﺍ ﺭﻭﺩ ﺍﺭ یﺮﺗﺎﺑ
.ﺪﻴﻨﮐ ﻪﻌﺟﺍﺮﻣ ﮏﺷﺰﭘ ﻪﺑ ﹰﺍﺭﻮﻓ ،یﺮﺗﺎﺑ
ﺽﺮﻌﻣ ﺭﺩ ﺪﻳﺎﺒﻧ (ﻩﺪﺷ ﺐﺼﻧ یﺎﻫ یﺮﺗﺎﺑ ﺎﻳ یﺮﺗﺎﺑ ﻪﺘﺴﺑ) ﺎﻫ یﺮﺗﺎﺑ
ﺭﺍﺮﻗ ﻪﺑﺎﺸﻣ ﺩﺭﺍﻮﻣ ﺎﻳ ﺶﺗﺁ ،ﺪﻴﺷﺭﻮﺧ ﺭﻮﻧ ﺪﻨﻧﺎﻣ ﺪﺣ ﺯﺍ ﺶﻴﺑ یﺎﻣﺮﮔ
.ﺪﻧﺮﻴﮕﺑ
ﻁﺎﻴﺘﺣﺍ
.ﺪﻴﻨﮐ ﻩﺩﺎﻔﺘﺳﺍ (ﺖﻟﻭ ٣) CR2025 ﻡﻮﻴﺘﻴﻟ یﺮﺗﺎﺑ ﺯﺍ
ﯽﳕ ﻩﺩﺎﻔﺘﺳﺍ یﺮﺘﺸﯿﺑ ﺕﺪﻣ ﺎﯾ ﻩﺎﻣ ﮏﯾ یﺍﺮﺑ ﺭﻭﺩ ﻩﺍﺭ ﺯﺍ ﻝﺮﺘﻨﮐ ﺯﺍ ﺮﮔﺍ
.ﺪﯿﻨﮐ ﺝﺭﺎﺧ ﻥﺁ ﺯﺍ ﺍﺭ یﺮﺗﺎﺑ ،ﺪﯿﻨﮐ
ﻂﻘﻓ ﺍﺭ یﺮﺗﺎﺑ .ﺩﺭﺍﺩ ﺩﻮﺟﻭ ﺭﺎﺠﻔﻧﺍ ﺮﻄﺧ ،یﺮﺗﺎﺑ ﻩﺎﺒﺘﺷﺍ ﺾﯾﻮﻌﺗ ﺕﺭﻮﺻ ﺭﺩ
.ﺪﯿﻨﮐ ﺾﯾﻮﻌﺗ ﻥﺎﺴﮑﯾ ﻭ ﻪﺑﺎﺸﻣ ﻪﻧﻮﳕ ﺎﺑ
.ﺪﯾﺮﯿﮕﻧ یﺰﻠﻓ یﺎﻫﺭﺍﺰﺑﺍ ﺎﺑ ﺍﺭ یﺮﺗﺎﺑ
.ﺪﯿﻨﮐ یﺭﺍﺩﺩﻮﺧ یﺰﻠﻓ یﺎﻫﺭﺍﺰﺑﺍ ﺭﺩ یﺮﺗﺎﺑ یﺭﺍﺪﻬﮕﻧ ﺯﺍ
ﻭ ﺪﯿﻨﮐ ﺰﯿﲤ ﹰﻼﻣﺎﮐ ﺍﺭ ﺭﻭﺩ ﻩﺍﺭ ﺯﺍ ﻝﺮﺘﻨﮐ ،یﺮﺗﺎﺑ ﺭﺩ ﯽﺘﺸﻧ ﺩﻮﺟﻭ ﺕﺭﻮﺻ ﺭﺩ
.ﺪﯿﻫﺩ ﺭﺍﺮﻗ ﻥﺁ ﻥﻭﺭﺩ ﺪﯾﺪﺟ یﺮﺗﺎﺑ ﮏﯾ
ﺎﯾ ﯽﺘﻟﻭﺩ ﻦﯿﻧﺍﻮﻗ ﺯﺍ ،ﻩﺪﺷ ﻩﺩﺎﻔﺘﺳﺍ یﺎﻫ یﺮﺗﺎﺑ ﱳﺧﺍﺪﻧﺍ ﺭﻭﺩ ﻡﺎﮕﻨﻫ
ﺭﺩ ﻪﮐ ﯽﻄﯿﺤﻣ ﻭ ﯽﻣﻮﻤﻋ ﺕﺎﺴﺳﺆﻣ ﻂﺳﻮﺗ ﻩﺪﺷ ﻦﯿﯿﻌﺗ ﻦﯿﻧﺍﻮﻗ
.ﺪﯿﻨﮐ یﻭﺮﯿﭘ ﺩﻮﺷ ﯽﻣ ﻝﺎﻤﻋﺍ ﺎﻤﺷ ﻪﻘﻄﻨﻣ ﺎﯾ ﺭﻮﺸﮐ
ﻢﻬﻣ
ﺶﺑﺎﺗ ﺎﺑ ﯽﻧﺎﮑﻣ ﺭﺩ ﺎﯾ ﻻﺎﺑ یﺎﻣﺩ ﺭﺩ ﺭﻭﺩ ﻩﺍﺭ ﺯﺍ ﻝﺮﺘﻨﮐ یﺭﺍﺪﻬﮕﻧ ﺯﺍ
.ﺪﯿﻨﮐ یﺭﺍﺩﺩﻮﺧ ﺪﯿﺷﺭﻮﺧ ﺭﻮﻧ ﻢﯿﻘﺘﺴﻣ
•
•
•
•
•
•
•
•
•
•
ﻪﺑ ﺪﯿﺷﺭﻮﺧ ﺭﻮﻧ ﻢﯿﻘﺘﺴﻣ ﺶﺑﺎﺗ ﺭﺩ ﺭﻭﺩ ﻩﺍﺭ ﺯﺍ ﻝﺮﺘﻨﮐ ﺖﺳﺍ ﻦﮑﳑ
.ﺪﻨﮑﻧ ﺭﺎﮐ ﯽﺘﺳﺭﺩ
ﺯﺎﮔ ﺎﯾ ﺰﻣﺮﺗ ﻝﺍﺪﭘ ﺮﯾﺯ ﻥﺩﺮﮐ ﺮﯿﮔ ﻭ ﻦﯿﻣﺯ یﻭﺭ ﺮﺑ ﺭﻭﺩ ﻩﺍﺭ ﺯﺍ ﻝﺮﺘﻨﮐ ﻥﺩﺎﺘﻓﺍ ﺯﺍ
.ﺪﯿﻨﮐ یﺭﺍﺩﺩﻮﺧ
ﯽﻠﺻﺍ یﺎﻫﺩﺮﮑﻠﻤﻋ
ﻢﻬﻣ
.ﺪﻴﻨﮐ ﻞﻤﻋ ﻁﺎﻴﺘﺣﺍ ﺎﺑ ،ﯽﻳﻮﻠﺟ ﻪﺤﻔﺻ ﺐﺼﻧ ﺎﻳ ﱳﺷﺍﺩﺮﺑ ﻡﺎﮕﻨﻫ ﺭﺩ
.ﺪﻳﺰﻴﻫﺮﭙﺑ ،ﺪﻳﺪﺷ یﺎﻬﻧﺎﮑﺗ ﺽﺮﻌﻣ ﺭﺩ ﯽﻳﻮﻠﺟ ﻪﺤﻔﺻ ﻥﺩﺍﺩ ﺭﺍﺮﻗ ﺯﺍ
یﺎﻣﺩ ﻭ ﺪﻴﺷﺭﻮﺧ ﺭﻮﻧ ﻢﻴﻘﺘﺴﻣ ﺶﺑﺎﺗ ﺽﺮﻌﻣ ﺭﺩ ﺍﺭ ﯽﻳﻮﻠﺟ ﻪﺤﻔﺻ
.ﺪﻴﻫﺪﻧ ﺭﺍﺮﻗ ﻻﺎﺑ
،ﻞﻴﺒﻣﻮﺗﺍ ﯽﻠﺧﺍﺩ یﺎﻬﺘﻤﺴﻗ ﺎﻳ ﻩﺎﮕﺘﺳﺩ ﻥﺪﻳﺩ ﺐﻴﺳﺁ ﺯﺍ یﺮﻴﮔﻮﻠﺟ یﺍﺮﺑ
،ﻥﺁ ﱳﺷﺍﺩﺮﺑ ﺯﺍ ﻞﺒﻗ ﺍﺭ ﯽﻳﻮﻠﺟ ﻪﺤﻔﺻ ﻪﺑ ﻞﺼﺘﻣ ﺕﺍﺰﻴﻬﲡ ﻭ ﺎﻫ ﻞﺑﺎﮐ
.ﺪﻴﻨﮐ ﺍﺪﺟ
ﻩﺎﮕﺘﺳﺩ ﺖﻗﺮﺳ ﺯﺍ یﺮﻴﮔﻮﻠﺟ یﺍﺮﺑ ﯽﻳﻮﻠﺟ ﻪﺤﻔﺻ ﱳﺷﺍﺩﺮﺑ
.ﺩﻮﺷ ﺩﺍﺯﺁ ﯽﻳﻮﻠﺟ ﻪﺤﻔﺻ ﺎﺗ ﺪﻴﻫﺩ ﺭﺎﺸﻓ ﺍﺭ یﺯﺎﺳﺍﺪﺟ ﻪﻤﮐﺩ
1
.ﺪﯿﺸﮑﺑ ﺩﻮﺧ ﻑﺮﻃ ﻪﺑ ﻭ ﺪﯿﻫﺩ ﺭﺎﺸﻓ ﻻﺎﺑ ﻑﺮﻃ ﻪﺑ ﺍﺭ ﯽﯾﻮﻠﺟ ﻪﺤﻔﺻ
2
ﻪﻈﻔﺤﻣ ﺪﻨﻧﺎﻣ ﻆﻓﺎﺤﻣ ﻩﺎﮕﺘﺳﺩ ﮏﯾ ﺭﺩ ﺍﺭ ﻩﺪﺷ ﺍﺪﺟ ﯽﯾﻮﻠﺟ ﻪﺤﻔﺻ
3
.ﺪﯿﻫﺩ ﺭﺍﺮﻗ ﻆﻓﺎﺤﻣ
ﯽﻳﻮﻠﺟ ﻪﺤﻔﺻ ﻩﺭﺎﺑﻭﺩ ﺐﺼﻧ
.ﺪﯿﻧﺍﺰﻐﻠﺑ ﭗﭼ ﻑﺮﻃ ﻪﺑ ﺍﺭ ﯽﯾﻮﻠﺟ ﻪﺤﻔﺻ
1
یﺎﻫ ﻑﺎﮑﺷ ﻥﻭﺭﺩ ﻪﺑ ﺍﺭ ﯽﻠﺻﺍ ﻩﺎﮕﺘﺳﺩ ﭗﭼ ﺖﻤﺳ ﺭﺩ ﺩﻮﺟﻮﻣ یﺎﻫ ﻪﻧﺎﺑﺯ
.ﺪﯿﻨﮐ ﺩﺭﺍﻭ ﯽﯾﻮﻠﺟ ﻪﺤﻔﺻ ﺭﺩ ﺩﻮﺟﻮﻣ
.ﺩﻮﺷ ﻢﮑﺤﻣ ﺩﻮﺧ یﺎﺟ ﺭﺩ ﹰﻼﻣﺎﮐ ﺎﺗ ﺪﻴﻫﺩ ﺭﺎﺸﻓ ﺍﺭ ﯽﻳﻮﻠﺟ ﻪﺤﻔﺻ ﺖﺳﺍﺭ ﺖﻤﺳ
2
ﻞﺻﻭ ﯽﻠﺻﺍ ﻩﺎﮕﺘﺳﺩ ﻪﺑ ﺍﺭ ﯽﯾﻮﻠﺟ ﻪﺤﻔﺻ ﺖﯿﻘﻓﻮﻣ ﺎﺑ ﺪﯿﻧﺍﻮﺗ ﯽﳕ ﺮﮔﺍ
ﺭﺍﺮﻗ ﯽﻠﺻﺍ ﻩﺎﮕﺘﺳﺩ ﺭﺩ ﯽﺘﺳﺭﺩ ﻪﺑ ﺍﺭ ﯽﯾﻮﻠﺟ ﻪﺤﻔﺻ ﺪﯾﻮﺷ ﻦﺌﻤﻄﻣ ،ﺪﯿﻨﮐ
ﻪﺑ ﺖﺳﺍ ﻦﮑﳑ ﺪﯿﻫﺩ ﺭﺎﺸﻓ ﺩﻮﺧ یﺎﺟ ﺭﺩ ﺍﺭ ﯽﯾﻮﻠﺟ ﻪﺤﻔﺻ ﺮﮔﺍ .ﺪﯾﺍ ﻩﺩﺍﺩ
.ﺩﻮﺷ ﺩﺭﺍﻭ ﺐﯿﺳﺁ ﯽﻠﺻﺍ ﻩﺎﮕﺘﺳﺩ ﺎﯾ ﯽﯾﻮﻠﺟ ﻪﺤﻔﺻ
•
•
•
•
•
•
Page 49

ﻩﺎﮕﺘﺳﺩ ﺯﺍ ﻩﺩﺎﻔﺘﺳﺍ
ﺶﺨﺑ
٠٢
٣
Fa
ﯽﻠﺻﺍ ﻩﺎﮕﺘﺳﺩ
a 6789bcd
12
3 4 5
ﻪﻤﮐﺩﻪﻤﮐﺩ
1
E (EQ/LOUD)
8
۶ ﺎﺗ ١
2
(ﺝﻭﺮﺧ)
9
(ﺖﻋﺎﺳ)
3
AUDIO
a
///
4
SRC/OFF
b
FUNC
5
ﻥﻭﺭﺩ ﮏﺴﯾﺩ ﻥﺩﺍﺩ ﺭﺍﺮﻗ ﻑﺎﮑﺷ
ﻩﺎﮕﺘﺳﺩ
c
D (DISP/SCRL)
6
یﺯﺎﺳﺍﺪﺟ ﻪﻤﮐﺩ
d
B (BAND/ESC)
7
ﺶﻴﻓ) AUX یﺩﻭﺭﻭ ﺶﻴﻓ
(یﺮﺘﻣ ﯽﻠﻴﻣ ٣/۵ یﻮﻳﺮﺘﺳﺍ
ﺭﻭﺩ ﻩﺍﺭ ﺯﺍ ﻝﺮﺘﻨﮐ
ﻩﺎﮕﺘﺳﺩ یﻭﺭ یﺎﻫ ﻪﻤﮐﺩ ﺯﺍ ﻪﮐ ﺖﺳﺍ ﯽﻧﺎﻣﺯ ﻥﺎﻤﻫ ﺪﻨﻧﺎﻣ ﺩﺮﮑﻠﻤﻋ
ﻩﺭﺎﺑﺭﺩ ﯽﻠﺻﺍ ﻩﺎﮕﺘﺳﺩ ﺕﺎﺤﯿﺿﻮﺗ ﻪﺑ .ﺪﯿﻨﮐ ﯽﻣ ﻩﺩﺎﻔﺘﺳﺍ ﯽﻠﺻﺍ
.ﺪﯿﻨﮐ ﻪﻌﺟﺍﺮﻣ ﻩﺪﻣﺁ ﺮﯾﺯ ﺭﺩ ﻪﮐ ATT ﺰﺟ ﻪﺑ ﺎﻫ ﻪﻤﮐﺩ ﺯﺍ ﮏﯾ ﺮﻫ ﺩﺮﮑﻠﻤﻋ
ﺶﺨﺑﺖﻴﻌﺿﻭ
e
VOLUME (+/-).ﺪﻴﻫﺩ ﺭﺎﺸﻓ ﺍﺪﺻ ﺶﻫﺎﮐ ﺎﯾ ﺶﻳﺍﺰﻓﺍ یﺍﺮﺑ
f
ATT
،ﺍﺪﺻ ﻩﺭﺎﺑﻭﺩ ﻞﺻﻭ یﺍﺮﺑ .ﺪﻴﻫﺩ ﺭﺎﺸﻓ ﺍﺪﺻ ﻊﻄﻗ یﺍﺮﺑ
.ﺪﻴﻫﺩ ﺭﺎﺸﻓ ﻩﺭﺎﺑﻭﺩ
ﺶﺨﺑﺖﻴﻌﺿﻭ
g
(ﺚﮑﻣ)
ﺍﺭ ﻪﻤﮐﺩ ﻦﯾﺍ ﺶﺨﭘ ﻪﻣﺍﺩﺍ ﺎﯾ ﺖﻗﻮﻣ ﻒﻗﻮﺗ یﺍﺮﺑ
.ﺪﯿﻫﺩ ﺭﺎﺸﻓ
h
SRC
(ﻊﺒﻨﻣ)
ﺍﺭ ﻪﻤﮐﺩ ﻦﯾﺍ ،ﺩﻮﺟﻮﻣ ﻊﺑﺎﻨﻣ ﻡﺎﲤ ﻥﺎﯿﻣ ﺭﺩ ﺶﺧﺮﭼ یﺍﺮﺑ
ﺍﺭ ﻪﻤﮐﺩ ﻦﯾﺍ ،ﻊﺒﻨﻣ ﻥﺩﺮﮐ ﺵﻮﻣﺎﺧ یﺍﺮﺑ .ﺪﯿﻫﺩ ﺭﺎﺸﻓ
.ﺪﯾﺭﺍﺪﻬﮕﻧ ﻭ ﺪﯿﻫﺩ ﺭﺎﺸﻓ
ﻪﺤﻔﺻ ﺶﻳﺎﳕ
3
2
1
4 5 6 7
ﺮﮕﻧﺎﺸﻧﺖﻴﻌﺿﻭ
1
ﯽﻠﺻﺍ ﺶﺨﺑ
ﺶﻳﺎﳕ
ﺲﻧﺎﮐﺮﻓ ﻭ ﺪﻧﺎﺑ :ﺏﺎﯾ ﺝﻮﻣ
یﺮﭙﺳ ﻥﺎﻣﺯ :ﯽﻠﺧﺍﺩ یﺩ ﯽﺳ ﻩﺪﻨﻨﮐ ﺶﺨﭘ
ﯽﻨﺘﻣ ﺕﺎﻋﻼﻃﺍ ﻭ ﺶﺨﭘ ﺯﺍ ﻩﺪﺷ
•
•
2
ﺶﻴﭘ ﺯﺍ ﻩﺭﺎﻤﺷ
/ﻩﺪﺷ ﲔﻴﻌﺗ
کﺍﺮﺗ ﻩﺭﺎﻤﺷ
.کﺍﺮﺗ ﻩﺭﺎﻤﺷ ﺎﯾ ﻩﺪﺷ ﲔﻴﻌﺗ ﺶﻴﭘ ﺯﺍ ﻩﺭﺎﻤﺷ
ﺏﺎﺨﺘﻧﺍ یﺮﺘﮔﺭﺰﺑ ﺩﺪﻋ ﺎﯾ ١٠٠ کﺍﺮﺗ ﻩﺭﺎﻤﺷ ﺮﮔﺍ
کﺍﺮﺗ ﻩﺭﺎﻤﺷ ﺮﮕﻧﺎﺸﻧ ﭗﭼ ﺖﻤﺳ ﺭﺩ ،ﺩﻮﺷ
.ﺩﻮﺷ ﯽﻣ ﻦﺷﻭﺭ
•
•
3
MP3/WMA.ﯽﻠﻌﻓ ﺶﺨﭘ ﻝﺎﺣ ﺭﺩ ﻞﯾﺎﻓ ﻉﻮﻧ
4
RPT.ﺩﻮﺷ ﯽﻣ ﻦﺷﻭﺭ ﺶﺨﭘ ﺭﺍﺮﮑﺗ
5
LOUD.ﺖﺳﺍ ﻦﺷﻭﺭ ﺍﺪﺻ یﺪﻨﻠﺑ
6
(ﻮﻳﺮﺘﺳﺍ) .ﻮﯾﺮﺘﺳﺍ ﺶﺨﭘ ﺖﻓﺎﯾﺭﺩ
7
LOC.ﺖﺳﺍ ﻝﺎﻌﻓ ﯽﻠﺤﻣ ﯽﺑﺎﻳ ﺝﻮﻣ
ﺭﺎﮐ ﻪﺑ ﻉﻭﺮﺷ ﺯﺍ ﻞﺒﻗ
ﺶﺨﺑ
٠١
٢
Fa
ﯽﺳﺭﺎﻓ
.ﻢﯾﺮﮑﺸﺘﻣ PIONEER ﻝﻮﺼﺤﻣ ﻦﯾﺍ ﺪﯾﺮﺧ ﺮﻃﺎﺧ ﻪﺑ ﺎﻤﺷ ﺯﺍ
،ﻝﻮﺼﺤﻣ ﺯﺍ ﻩﺩﺎﻔﺘﺳﺍ ﺯﺍ ﻞﺒﻗ ،ﻥﺁ ﺢﯿﺤﺻ ﺩﺮﮑﻠﻤﻋ ﺯﺍ ﻥﺎﻨﯿﻤﻃﺍ یﺍﺮﺑ
ﺩﺭﺍﻮﻣ ﺖﯾﺎﻋﺭ ﻭ ﻪﻌﻟﺎﻄﻣ .ﺪﯿﻨﮐ ﻪﻌﻟﺎﻄﻣ ﻞﻣﺎﮐ ﺭﻮﻄﺑ ﺍﺭ ﻪﭼﺮﺘﻓﺩ ﻦﯾﺍ
ﺯﺍ ﺖﺳﺍ ﻩﺪﺷ ﻩﺩﺭﻭﺁ ﺎﻤﻨﻫﺍﺭ ﻪﭼﺮﺘﻓﺩ ﻦﯾﺍ ﺭﺩ ﻪﮐ ﻁﺎﯿﺘﺣﺍ ﻭ ﺭﺍﺪﺸﻫ
.ﺖﺳﺍ ﺭﺍﺩﺭﻮﺧﺮﺑ ﯽﺻﺎﺧ ﺖﯿﻤﻫﺍ
ﻩﺩﺎﻔﺘﺳﺍ یﺍﺮﺑ ﻪﮐ ﺪﯿﻨﮐ یﺭﺍﺪﻬﮕﻧ ﻦﻤﯾﺍ ﯽﻧﺎﮑﻣ ﺭﺩ ﺍﺭ ﺎﻤﻨﻫﺍﺭ ﻪﭼﺮﺘﻓﺩ
.ﺪﺷﺎﺑ ﯽﺳﺮﺘﺳﺩ ﻞﺑﺎﻗ ﯽﺘﺣﺍﺭ ﻪﺑ یﺪﻌﺑ یﺎﻫ
ﻩﺎﮕﺘﺳﺩ ﻦﻳﺍ ﻩﺭﺎﺑﺭﺩ
ﻁﺎﻴﺘﺣﺍ
ﻩﺎﮕﺘﺳﺩ ﻥﺎﯿﻣ ﺭﺩ ﻪﮐ ﺖﺳﺍ ١ ﻩﻭﺮﮔ یﺭﺰﯿﻟ ﻝﻮﺼﺤﻣ ﮏﯾ ﻩﺎﮕﺘﺳﺩ ﻦﯾﺍ
ﻭ ﺖﺳﺍ ﻩﺪﺷ یﺪﻨﺑ ﻪﻘﺒﻃ ،IEC 60825-1:2007 ،ﻦﻤﯾﺍ ﺭﺰﯿﻟ ﺎﺑ ﯽﯾﺎﻫ
،ﯽﻨﻤﯾﺍ ﻆﻔﺣ ﺭﻮﻈﻨﻣ ﻪﺑ .ﺪﺷﺎﺑ ﯽﻣ 1M ﻩﻭﺮﮔ ﺭﺰﯿﻟ ﻝﻭﺪﻣ ﮏﯾ ﻞﻣﺎﺷ
یﺭﺍﺩﺩﻮﺧ ﻩﺎﮕﺘﺳﺩ ﯽﻠﺧﺍﺩ ﺶﺨﺑ ﺎﺑ ﺱﺎﲤ ﺯﺍ ﻭ ﺎﻫ ﺶﮐﻭﺭ ﻥﺩﺮﮐ ﺍﺪﺟ ﺯﺍ
.ﺪﯿﻨﮐ ﺭﺍﺬﮔﺍﻭ ﺺﺼﺨﺘﻣ ﺩﺍﺮﻓﺍ ﻪﺑ ﺍﺭ ﺕﺍﺮﯿﻤﻌﺗ ﻪﯿﻠﮐ .ﺪﯿﯾﺎﳕ
ﻁﺎﻴﺘﺣﺍ
ﻕﺮﺑ ﺖﺳﺍ ﻦﮑﳑ .ﺪﯿﻨﮐ یﺭﺍﺩﺩﻮﺧ ﻩﺎﮕﺘﺳﺩ ﻦﯾﺍ ﺎﺑ ﺕﺎﻌﯾﺎﻣ ﺱﺎﲤ ﺯﺍ
ﺖﺳﺍ ﻦﮑﳑ ﺕﺎﻌﯾﺎﻣ ﺎﺑ ﺱﺎﲤ ﺕﺭﻮﺻ ﺭﺩ ﻦﯿﻨﭽﻤﻫ .ﺩﻮﺷ ﺩﺎﺠﯾﺍ ﯽﮕﺘﻓﺮﮔ
.ﺩﻮﺷ ﻡﺮﮔ ﺪﺣ ﺯﺍ ﺶﯿﺑ ﺎﯾ ﻩﺪﺷ ﺩﺎﺠﯾﺍ ﺩﻭﺩ ،ﺩﻮﺷ ﺩﺭﺍﻭ ﺐﯿﺳﺁ ﻩﺎﮕﺘﺳﺩ ﻪﺑ
یﺍﺪﺻ ﺎﺗ ﺪﯿﻨﮐ ﻆﻔﺣ ﯽﺒﺳﺎﻨﻣ ﺢﻄﺳ ﺭﺩ ﻭ ﻢﮐ ﺍﺭ ﺍﺪﺻ ﻪﺸﯿﻤﻫ
.ﺪﯾﻮﻨﺸﺑ ﺍﺭ ﻑﺍﺮﻃﺍ ﻂﯿﺤﻣ
.ﺪﯿﻨﮐ یﺭﺍﺩﺩﻮﺧ ﺖﺑﻮﻃﺭ ﺎﺑ ﻩﺎﮕﺘﺳﺩ ﺱﺎﲤ ﺯﺍ
ﺯﺍ ﺩﺭﺍﻮﻣ ﻪﯿﻠﮐ ،ﻥﺁ ژﺭﺎﺷ ﻥﺪﺷ ﯽﻟﺎﺧ ﺎﯾ یﺮﺗﺎﺑ ﻝﺎﺼﺗﺍ ﻊﻄﻗ ﺕﺭﻮﺻ ﺭﺩ
.ﺩﻮﺷ ﯽﻣ کﺎﭘ ﻪﻈﻓﺎﺣ ﺭﺩ ﻩﺪﺷ ﻢﯿﻈﻨﺗ ﺶﯿﭘ
ﺰﮐﺮﻣ ﻦﯾﺮﺘﮑﯾﺩﺰﻧ ﺎﯾ ﻩﺪﻨﺷﻭﺮﻓ ﻪﺑ ،ﺩﺮﮑﻧ ﺭﺎﮐ ﯽﺘﺳﺭﺪﺑ ﻩﺎﮕﺘﺳﺩ ﺮﮔﺍ
.ﺪﯿﻨﮐ ﻪﻌﺟﺍﺮﻣ PIONEER ﺯﺎﺠﻣ ﺕﺍﺮﯿﻤﻌﺗ
•
•
•
•
•
:ﻁﺎﻴﺘﺣﺍ
ﺯﺍ ﺮﻴﻏ ﯽﺗﺭﻮﺻ ﻪﺑ ﻞﺣﺍﺮﻣ یﺍﺮﺟﺍ ﺎﻳ ﻢﻴﻈﻨﺗ ﺎﻳ ﻝﺮﺘﻨﮐ ﺯﺍ ﻩﺩﺎﻔﺘﺳﺍ
ﺭﺎﺸﺘﻧﺍ ﺚﻋﺎﺑ ﺖﺳﺍ ﻦﮑﳑ ،ﺖﺳﺍ ﻩﺪﺷ ﺮﮐﺫ ﺎﺠﻨﻳﺍ ﺭﺩ ﻪﮐ یﺩﺭﺍﻮﻣ
.ﺩﻮﺷ کﺎﻧﺮﻄﺧ ﻊﺸﻌﺸﺗ
:ﻁﺎﻴﺘﺣﺍ
ﺍﺭ ﯽﻤﺸﭼ ﺕﺍﺮﻄﺧ ﻩﺎﮕﺘﺳﺩ ﻦﻳﺍ ﺭﺩ یﺭﻮﻧ یﺎﻫﺭﺍﺰﺑﺍ ﺯﺍ ﻩﺩﺎﻔﺘﺳﺍ
.ﺩﺍﺩ ﺪﻫﺍﻮﺧ ﺶﻳﺍﺰﻓﺍ
Page 50

Page 51

Page 52

PIONEER CORPORATION
1-1, Shin-ogura, Saiwai-ku, Kawasaki-shi,
Kanagawa 212-0031, JAPAN
PIONEER ELECTRONICS (USA) INC.
P.O. Box 1540, Long Beach, California 90801-1540, U.S.A.
TEL: (800) 421-1404
PIONEER EUROPE NV
Haven 1087, Keetberglaan 1, B-9120 Melsele, Belgium/Belgique
TEL: (0) 3/570.05.11
PIONEER ELECTRONICS ASIACENTRE PTE. LTD.
253 Alexandra Road, #04-01, Singapore 159936
TEL: 65-6472-7555
PIONEER ELECTRONICS AUSTRALIA PTY. LTD.
178-184 Boundary Road, Braeside, Victoria 3195, Australia
TEL: (03) 9586-6300
PIONEER ELECTRONICS OF CANADA, INC.
300 Allstate Parkway, Markham, Ontario L3R 0P2, Canada
TEL: 1-877-283-5901
TEL: 905-479-4411
PIONEER ELECTRONICS DE MEXICO, S.A. de C.V.
Blvd.Manuel Avila Camacho 138 10 piso
Col.Lomas de Chapultepec, Mexico, D.F. 11000
TEL: 55-9178-4270
先鋒股份有限公司
總公司: 台北市中山北路二段44號13樓
電話:
(02) 2521-3588
先鋒電子(香港)有限公司
香港九龍尖沙嘴海港域世界商業中心
9樓901-6
電話:
室
(0852) 2848-6488
Published by Pioneer Corporation. Copyright ©2010 by Pioneer Corporation. All rights reserved.
<KNAZX> <10F00000>
Printed in Thailand
<QRD3062-A/N> ES
 Loading...