

Page 1

Operating Instructions
Digital Camera
DC-S1R
DVQP1848ZA
F0319MR1049
Page 2

Please read these instructions carefully before using this product, and
save this manual for future use.
Dear Customer,
We would like to take this opportunity to thank you for purchasing this Panasonic
Digital Camera. Please read this document carefully and keep it handy for future
reference. Please note that the actual controls and components, menu items, etc. of
your Digital Camera may look somewhat different from those shown in the illustrations
in this document.
Carefully observe copyright laws.
Recording of pre-recorded tapes or discs or other published or broadcast material for
purposes other than your own private use may infringe copyright laws. Even for the
purpose of private use, recording of certain material may be restricted.
2
Page 3
About Operating Instructions
0 This document provides an explanation with the assumption that menu settings are
in the default settings.
0 Description in this document is based on the interchangeable lens (S-R24105).
Symbols Used in the Text
Symbols for recording modes, pictures, and videos that can be used
In this document, symbols are placed at the start of functional explanations (recording
modes, pictures, and videos) showing conditions in which these functions can be
used.
Black icons show conditions in which these can be used, and grey icons show
conditions in which these cannot be used.
Example: /
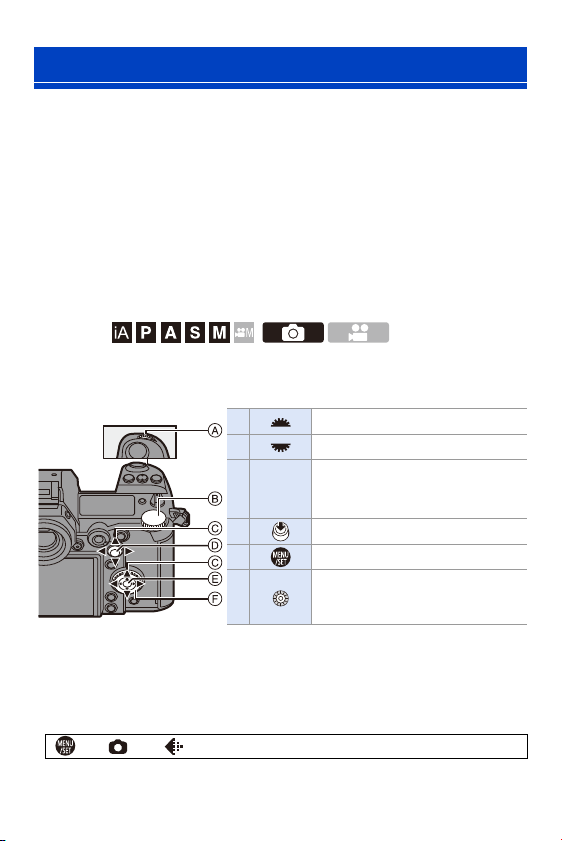
Operating symbols
In this document, camera operation is explained using the following symbols:
A Front dial
B Rear dial
C 3421
D Press the centre of the joystick
E [MENU/SET] button
F Control dial
0 For information about operation methods of the operation part, refer to page 62.
0 Other symbols, such as icons shown on the camera screen, are also used in
explanations.
0 This document describes the procedure for selecting menu items as follows:
Example) Set [Picture Quality] of the [Photo] ([Image Quality]) menu to [STD.].
¨ [ ] ¨ [ ] ¨ [Picture Quality] ¨ Select [STD.]
For information about menu operation methods, refer to page 73.
Cursor button up/down/left/right
or
Joystick up/down/left/right
3
Page 4

About Operating Instructions
Notification classification symbols
In this document, notifications are classified and described using the following
symbols:
To confirm prior to using the function
Hints for better use of the camera and tips for recording
Notifications and supplementary items regarding specifications
Related information and page number
4
Page 5

Chapters
1. Introduction
2. Getting Started
3. Basic Operations
4. Easy Recording
5. Image Recording
6. Focus/Zoom
7. Drive/Shutter
8. Metering/Exposure/ISO Sensitivity
9. White Balance/Image Quality
10. Flash
11. Recording Videos
12. Playing Back and Editing of Images
13. Camera Customisation
14. Menu Guide
15. Wi-Fi/Bluetooth
16. Connecting to Other Devices
17
31
56
77
82
91
125
178
194
216
230
259
277
303
370
426
17. Materials
445
5
Page 6

Contents
About Operating Instructions .......................................................3
Chapters ...................................................................................... 5
Contents by Function .................................................................14
1. Introduction 17
Before Use .................................................................................17
Standard Accessories................................................................20
Lenses That Can Be Used......................................................... 21
Memory Cards That Can Be Used.............................................22
Names of Parts .......................................................................... 24
Camera.............................................................................................. 24
Supplied Lens.................................................................................... 28
Displaying Viewfinder/Monitor ...........................................................29
Status LCD Display ........................................................................... 30
2. Getting Started 31
Attaching a Shoulder Strap ........................................................31
Charging the Battery .................................................................. 33
Charging with the Charger ................................................................ 33
Battery Insertion ................................................................................ 36
Charging the Battery with the Camera .............................................. 38
Charging While Using the Camera .................................................... 40
Notifications Regarding Charging/Power Supply............................... 42
[Power Save Mode] ........................................................................... 44
Inserting Cards (Optional)..........................................................46
Formatting Cards (Initialisation)......................................................... 48
Attaching a Lens........................................................................49
Attaching a Lens Hood ...................................................................... 51
Setting the Clock (When Turning On for the First Time)............53
6
Page 7

Contents
3. Basic Operations 56
Basic Recording Operations ...................................................... 56
How to Hold the Camera....................................................................56
Adjusting the Angle of the Monitor .....................................................58
Taking Pictures ..................................................................................59
Recording Videos...............................................................................60
Selecting the Recording Mode...........................................................61
Camera Setting Operations ....................................................... 62
Display Settings......................................................................... 66
Setting the Viewfinder ........................................................................66
Switching Between the Monitor and Viewfinder .................................67
Switching the Display Information......................................................68
Turning On the Status LCD Backlight ................................................70
Quick Menu ............................................................................... 71
Menu Operation Methods.......................................................... 73
[Reset]................................................................................................76
4. Easy Recording 77
Intelligent Auto Mode ................................................................. 77
Recording Using Touch Functions ............................................ 80
Touch Shutter ....................................................................................80
Touch AE ...........................................................................................81
5. Image Recording 82
[Aspect Ratio] ............................................................................ 82
[Picture Size] ............................................................................. 83
[Picture Quality] ......................................................................... 85
[Double Card Slot Function] ...................................................... 87
[Folder / File Settings]................................................................ 88
[File Number Reset]................................................................... 90
7
Page 8

Contents
6. Focus/Zoom 91
Selecting the Focus Mode .........................................................91
Using AF ....................................................................................92
[AF Custom Setting(Photo)] .............................................................. 96
Selecting the AF Mode .............................................................. 98
[Face/Eye/Body/Animal Detect.]....................................................... 99
[Tracking]........................................................................................ 102
[225-Area]....................................................................................... 104
[Zone (Vert./ Horz.)]/ [Zone (Square)]/ [Zone (Oval)]...................... 105
[1-Area+]/ [1-Area].......................................................................... 107
[Pinpoint] ........................................................................................ 108
[Custom1] to [Custom3].................................................................. 110
AF Area Movement Operation .................................................112
Moving the AF Area by Touch ......................................................... 113
Moving the AF Area Position with the Touch Pad ...........................115
[Focus Switching for Vert / Hor]....................................................... 116
Record Using MF.....................................................................117
Recording Images with Zoom ..................................................121
Extra Tele Conversion..................................................................... 122
7. Drive/Shutter 125
Selecting the Drive Mode.........................................................125
Taking Burst Pictures...............................................................126
6K/4K Photo Recording ...........................................................130
Notes on 6K/4K Photos ...................................................................135
Selecting Pictures from a 6K/4K Burst File .............................. 138
Correcting Pictures After Recording
(Post-Recording Refinement) .......................................................... 140
Picture Selection Operations ........................................................... 141
Recording with Time Lapse Shot............................................. 145
Recording with Stop Motion Animation....................................148
Time Lapse Shot/Stop Motion Animation Videos ....................151
Recording Using the Self-timer................................................153
Bracket Recording ...................................................................155
8
Page 9

Contents
Post-Focus Recording ............................................................. 161
Selecting the Focus Position for the Picture to Save .......................164
Focus Stacking ................................................................................166
[Silent Mode]............................................................................ 169
[Shutter Type] .......................................................................... 170
Image Stabiliser....................................................................... 172
Image Stabiliser Settings .................................................................174
8. Metering/Exposure/ISO Sensitivity 178
[Metering Mode]....................................................................... 178
Programme AE Mode .............................................................. 179
Aperture-Priority AE Mode....................................................... 181
Shutter-Priority AE Mode ......................................................... 183
Manual Exposure Mode........................................................... 185
Preview Mode .......................................................................... 188
Exposure Compensation ......................................................... 189
Locking Focus and Exposure (AF/AE Lock) ............................ 191
Setting the ISO Sensitivity .......................................................192
9. White Balance/Image Quality 194
Setting the White Balance (WB) .............................................. 194
Adjusting the White Balance ............................................................197
[Photo Style] ............................................................................ 199
[Filter Settings]......................................................................... 204
[Simultaneous Record w/o Filter] .....................................................209
[High Resolution Mode] ........................................................... 210
[HLG Photo] ............................................................................. 214
10. Flash 216
Using an External Flash (Optional).......................................... 216
Removing the Hot Shoe Cover ........................................................216
Setting Flash Functions ........................................................... 219
[Firing Mode]/[Manual Flash Adjust.] ...............................................219
[Flash Mode] ....................................................................................220
9
Page 10

Contents
[Flash Synchro] ............................................................................... 223
Adjusting the Flash Output ..............................................................224
[Auto Exposure Comp.] ................................................................... 225
[Red-Eye Removal] ......................................................................... 225
Recording Using a Wireless Flash...........................................226
11. Recording Videos 230
Recording Videos ....................................................................230
Video Settings.......................................................................... 233
[Rec. File Format]............................................................................ 233
[Rec Quality].................................................................................... 234
[Image Area of Video]...................................................................... 238
[Continuous AF]............................................................................... 239
[AF Custom Setting(Video)]............................................................. 240
[Luminance Level] ........................................................................... 241
Recording While Controlling Overexposure (Knee)......................... 241
Displaying/Setting the Sound Recording Level ............................... 243
Creative Video Mode ...............................................................244
[CreativeVideo Combined Set.] .......................................................246
[High Speed Video] ......................................................................... 247
Recording Videos Using a Connected External Device...........248
External Monitor/Recorder ([HDMI Rec Output])............................. 248
External Microphones (Optional) ..................................................... 253
XLR Microphone Adaptor (Optional) ............................................... 256
Headphones .................................................................................... 257
12. Playing Back and Editing of Images 259
Playing Back Pictures .............................................................. 259
Playing Back Videos................................................................261
Extracting a Picture ......................................................................... 263
Switching the Display Mode.....................................................264
Enlarged Display ............................................................................. 264
Thumbnail Screen ........................................................................... 266
Calendar Playback .......................................................................... 267
Group Images .......................................................................... 268
10
Page 11

Contents
Deleting Images....................................................................... 269
[RAW Processing] ................................................................... 271
[Video Divide] .......................................................................... 276
13. Camera Customisation 277
Fn Buttons ............................................................................... 278
Register Functions to the Fn Buttons...............................................279
Use the Fn Buttons ..........................................................................285
Fn Lever .................................................................................. 286
Register a Function to the Fn Lever.................................................286
Use the Fn Lever .............................................................................288
[Dial Operation Switch] ............................................................ 289
Register Functions to the Dials ........................................................289
Temporarily Change Dial Operation ................................................290
Quick Menu Customisation......................................................291
Register to the Quick Menu .............................................................291
Custom Mode .......................................................................... 296
Register in Custom Mode ................................................................296
Using Custom Mode ........................................................................298
Calling Settings ................................................................................299
My Menu .................................................................................. 300
Registration in My Menu ..................................................................300
Edit My Menu ...................................................................................301
[Save/Restore Camera Setting]...............................................302
14. Menu Guide 303
[Photo] Menu ........................................................................... 304
[Video] Menu ........................................................................... 318
[Custom] Menu ........................................................................ 325
[Setup] Menu ........................................................................... 349
[Playback] Menu ...................................................................... 361
Entering Characters................................................................. 369
11
Page 12

Contents
15. Wi-Fi/Bluetooth 370
Wi-Fi/Bluetooth Functions........................................................370
Connecting to a Smartphone ...................................................372
Installing “LUMIX Sync ” .................................................................. 373
Connecting to a Smartphone (Bluetooth Connection) ..................... 374
Connecting to a Smartphone ([Wi-Fi connection])........................... 377
Terminating the Wi-Fi Connection ................................................... 382
Operating the Camera with a Smartphone..............................383
[Remote shooting] ........................................................................... 384
[Shutter Remote Control]................................................................. 386
Transferring Recorded Images........................................................ 388
Transferring Recorded Images Automatically ................................. 390
Recording Location Information ...................................................... 392
Camera Power Operations .............................................................. 393
Automatically Setting the Clock ....................................................... 394
Saving Settings Information ............................................................ 395
Sending Images from the Camera...........................................396
[Smartphone]................................................................................... 399
[PC] ................................................................................................. 402
[Printer]............................................................................................ 405
[Web service]................................................................................... 407
[Cloud Sync. Service] ...................................................................... 410
Wi-Fi Connections ...................................................................412
[Via Network] ................................................................................... 412
[Direct] ............................................................................................. 416
Connect to Wi-Fi Using Previously Saved Settings......................... 417
Send Settings and Selecting Images.......................................419
Image Send Settings ....................................................................... 419
Selecting Images............................................................................. 420
[Wi-Fi Setup] Menu ..................................................................421
“LUMIX CLUB” ................................................................................ 422
12
Page 13

Contents
16. Connecting to Other Devices 426
Viewing on a TV ...................................................................... 426
Importing Images to a PC........................................................ 430
Installing Software............................................................................430
Copying Images to a PC ..................................................................433
Storing on a Recorder ............................................................. 436
Tethered Recording ................................................................. 438
Installing Software............................................................................438
Operating the Camera from a PC ....................................................439
Printing .................................................................................... 441
17. Materials 445
Using Optional Accessories..................................................... 445
Battery Grip (Optional) .....................................................................445
Shutter Remote Control (Optional) ..................................................446
AC Adaptor (Optional)/DC Coupler (Optional) .................................447
Monitor/Viewfinder Displays .................................................... 448
Recording Screen ............................................................................448
Playback Screen ..............................................................................453
Message Displays ...................................................................456
Troubleshooting....................................................................... 459
Cautions for Use...................................................................... 470
Usage Duration, Number of Pictures ....................................... 480
Number of Recordable Pictures, Recordable Time .................482
List of Default Settings/Saving Customisation/
Copied Settings ....................................................................... 485
List of Functions That Can Be Set in Each Recording
Mode........................................................................................497
Specifications .......................................................................... 502
Index ........................................................................................ 509
Trademarks and Licences .......................................................517
13
Page 14

Contents by Function
Power Source
Charging l 33
Charging error l 35
Battery indication l 42
Power supply l 40
[Battery Information] l 356
Power save function l 44
Usage duration, Number of
pictures
Card
Cards that can be used l 22
[Card Format] l 48
[Double Card Slot Function] l 87
[Destination Card Slot] l 87
Switching the playback card l 260
Folder structure l 435
[Folder / File Settings] l 88
[File Number Reset] l 90
Entering characters l 369
Number of recordable
pictures, Recordable time
Lens
Attaching l 49
[Image Stabilizer] l 172
Basic Settings
[Language] l 359
[Clock Set] l 53
[Time Zone] l 359
[Beep] l 354
[Copyright Information] l 350
[Reset] l 76
Viewfinder
Dioptre adjustment l 66
Display magnification l 66
Eye sensor l 67
[Eye Sensor AF] l 332
l 40
l 480
l 266
l 482
Display
Recording screen l 448
Playback screen l 453
Viewfinder l 29
Stat us LC D l 30
Control panel l 451
Switching display l 68
Monitor/viewfinder
adjustment
Monitor/viewfinder
luminance
Display speed l 351
Level gauge l 339
Grid lines l 341
[Histogram] l 340
[Sheer Overlay] l 347
Checking overexposure l 346
[HLG View Assist] l 347
AF/MF
Focus mode l 91
Selecting the AF mode l 98
Face/eye/human detection l 99
Animal detection l 100
Movement tracking l 102
[AF ON] l 94
Moving the AF area l 112
Enlarged display l 94
Setting the AF sensitivity l 96
AF/AE Lock l 191
Touch AF l 114
[Touch Pad AF] l 11 5
[AF Assist Light] l 309
MF l 11 7
[MF Guide] l 330
[MF Assist] l 330
[Focus Peaking] l 310
l 352
l 352
l 331
l 11 9
14
Page 15

Contents by Function
Drive
Drive mode l 125
Burst l 126
[6K/4K PHOTO] l 130
[Time Lapse Shot] l 145
Recording with Stop Motion
Animation
[Self Timer] l 153
[Post-Focus] l 161
Image Quality
[Picture Size] l 83
[Picture Quality] l 85
RAW l 85
JPEG l 85
Aspect ratio l 82
[White Balance] l 194
[Photo Style] l 199
[Filter Settings] l 204
[Color Space] l 328
[6K/4K PHOTO Noise
Reduction]
[Flicker Decrease (Photo)] l 315
[Long Exposure NR] l 306
[i.Dynamic Range] l 307
[Vignetting Comp.] l 308
[Diffraction Compensation] l 308
Taking Pictures
Recording mode l 61
Quick menu l 71
Zoom l 121
[Ex. Tele Conv.] l 122
[Image Stabilizer] l 172
Bracket recording l 155
Bulb recording
[High Resolution Mode] l 210
[Multiple Exposure] l 316
[HLG Photo] l 214
[Shutter Type] l 170
[Silent Mode] l 169
Remote control recording l 446
Screen display l 448
l 148
l 140
l 187
Exposure
[Exposure Comp.] l 189
Programme Shift l 180
Preview mode
[Metering Mode] l 178
AE Lock l 191
[One Push AE] l 283
[Touch AE] l 81
[Sensitivity] l 192
[Extended ISO] l 327
Video Recording
Video recording l 230
Creative Video mode l 244
[Rec. File Format] l 233
[AVCHD] l 233
[MP4] l 233
[Rec Quality] l 234
Resolution l 234
Frame rate l 234
Bit rate l 234
Angle of view l 238
Exposure settings l 231
Setting the AF sensitivity l 240
[Continuous AF] l 239
[High Speed Video] l 247
Luminance level l 241
Knee l 241
Sound recording l 243
Headphones l 257
[Sound Output] l 257
Wind noise reduction l 323
Attenuator l 243
[Flicker Decrease (Video)] l 320
HDMI output l 248
Output bit value (HDMI) l 251
External microphone l 253
XLR Microphone Adaptor l 256
Remote control recording l 446
l 188
15
Page 16

Contents by Function
Flash
External flash l 216
[Firing Mode] l 219
[Flash Mode] l 220
Flash output adjustment l 224
[Flash Synchro] l 223
[Wireless Flash Setup] l 226
Playback
[Auto Review] l 338
Playing back pictures l 259
Playing back videos l 261
Thumbnail display l 266
Calendar display l 267
Enlarged display l 264
Group images l 268
Saving 6K/4K photos l 138
Viewing on a TV l 426
Deleting l 269
Screen display l 453
Editing of Images
[RAW Processing] l 271
[Protect] l 365
[Rating] l 365
[Resize] l 366
[Rotate] l 366
[Video Divide] l 276
[Copy] l 367
Customisation
[Custom] menu l 325
Function button l 278
Function lever l 286
Custom recording mode l 296
My Menu l 300
Quick menu l 291
Dial operation l 289
Saving camera settings l 302
Connecting with Other
Devices
Sending images (PC) l 430
Printing l 441
Viewing on a TV l 426
HDMI output l 428
Tethered recording l 438
Cable holder l 249
Wi-Fi/Bluetooth
Bluetooth connection l 374
[Wi-Fi connection] l 377
[Wi-Fi Setup] l 421
Smartphone app “LUMIX
Sync”
[Remote shooting] l 384
Location information l 392
Sending images
([Smartphone])
Sending images ([PC]) l 402
Sending images ([Printer]) l 405
Sending images ([Web
service])
Sending images ([Cloud
Sync. Service])
Saving camera settings l 395
“LUMIX CLUB” l 422
Software
“PHOTOfunSTUDIO ” l 431
“SILKYPIX ” l 432
“LUMIX Tether” l 438
Maintenance
[Sensor Cleaning] l 359
[Pixel Refresh] l 359
l 412
l 372
l 388
l 399
l 407
l 410
16
Page 17

1. Introduction
Before Use
Firmware of Your Camera/Lens
Firmware updates may be provided in order to improve camera capabilities or to add
functionality. For smoother recording, we recommend updating the firmware of the
camera/lens to the latest version.
0 For the latest information on the firmware or to download/
update the firmware, visit the following support website:
https://panasonic.jp/support/global/cs/dsc/
(English only)
0 To check the firmware version of the camera/lens, attach the lens to
the camera and select [Firmware Version] in the [Setup] ([Others])
menu. You can also update the firmware in [Firmware Version]. (l 360)
0 This document provides explanations for camera firmware version 1.0.
Handling of the Camera
Do not subject the camera to strong vibration, impacts, or pressure.
These may cause a malfunction or damage.
– Do not drop or knock against hard surfaces.
– Do not push hard on the lens section or monitor.
If sand, dust, or liquid gets on the monitor, wipe it off with a dry soft
cloth.
– Touch operations may be incorrectly recognised.
When using in low temperatures (s10 oC to 0 oC (14 oF to 32 oF))
– Before use, attach a Panasonic lens with a minimum recommended operating
temperature of j10 oC (14 oF).
17
Page 18

1. Introduction
Do not place a hand inside the camera mount.
This may cause a failure or damage because the sensor is a precision
device.
If you shake the camera while turning the camera off, a sensor may
operate or a rattling sound may be heard. This is caused by the image
stabiliser mechanism in the body. It is not a malfunction.
Splash Resistant
Splash Resistant is a term used to describe an extra level of
protection this camera offers against exposure to a minimal amount
of moisture, water or dust. Splash Resistant does not guarantee that
damage will not occur if this camera is subjected to direct contact
with water.
In order to minimise the possibility of damage please be sure the
following precautions are taken:
– Splash Resistant works in conjunction with the lenses that were specifically
designed to support this feature.
– Securely close the doors, socket caps, contact points cover, etc.
– When the lens or cap is removed or a door is open, do not allow sand, dust, and
moisture to enter inside.
– If liquid gets on the camera, wipe it off with a dry soft cloth.
Condensation (When the Lens, the Viewfinder or Monitor
is Fogged Up)
0 Condensation occurs when there are temperature or humidity differences. Be careful
because condensation can lead to stains or mould on the lens, viewfinder, and
monitor or cause a failure.
0 If condensation occurs, turn off the camera and leave it for approx. 2 hours. The fog
will disappear naturally when the temperature of the camera becomes close to the
ambient temperature.
Be Sure to Perform Trial Recording in Advance
Perform trial recording in advance of an important event (wedding, etc.) to check that
recording can be performed normally.
18
Page 19

1. Introduction
No Compensation Regarding Recording
Please note that compensation cannot be provided in the event that recording could
not be performed due to a problem with the camera or a card.
Be Careful with Regard to Copyrights
Under copyright law, you may not use the images and audio you have recorded for
other than personal enjoyment without the permission of the copyright holder.
Be careful because there are cases where restrictions apply to recording even for the
purpose of personal enjoyment.
Also Read “Cautions for Use” (l 470)
19
Page 20

1. Introduction
Standard Accessories
Check that all the accessories are supplied before using the camera.
0
The accessories and their shape will differ depending on the country or area where
the camera was purchased.
For details on the accessories, refer to “Operating Instructions” (supplied).
0 Digital camera body is referred to as camera in this document.
0 Battery pack is referred to as battery pack or battery in this document.
0 Battery charger is referred to as battery charger or charger in this document.
0 The memory card is optional.
20
Page 21

1. Introduction
Lenses That Can Be Used
The lens mount of this camera is compliant with the L-Mount standard of
Leica Camera AG. It can be used with 35 mm full-frame compatible
interchangeable lenses and APS-C size interchangeable lenses of this
standard.
In this document, a 35-mm full-frame interchangeable lens compliant with the Leica
0
Camera AG L-Mount standard is referred to as a full-frame lens, and an APS-C-
size interchangeable lens compliant with this standard is referred to as an APS-C
lens. When no differentiation is made between full-frame lenses and APS-C lenses,
they are both referred to as the lens.
Notes on the Use of APS-C Lenses
When APS-C lenses are used, some functions, such as image area, are
disabled or operate differently. (l 82, 83, 130, 161, 170, 204, 210, 214,
238, 316)
0 Refer to catalogues/websites for most current
information regarding supported lenses.
https://panasonic.jp/support/global/cs/dsc/
(English only)
0 The angle of view while recording with an APS-C lens is equivalent to the
angle of view of a focal length of 1.5k when converted to the focal length of a
35 mm film camera. (If a 50 mm lens is used, the angle of view will be
equivalent to a 75 mm lens.)
21
Page 22

1. Introduction
Memory Cards That Can Be Used
You can use an XQD memory card and SD memory card with this camera.
0
An XQD memory card is referred to as XQD card in this document.
SD memory card, SDHC memory card, and SDXC memory card are referred to by
the generic name of SD card.
When not differentiating between an XQD card and SD card, a card is referred to as
simply card.
XQD card
XQD memory card
(32 GB to 256 GB)
0
AVCHD videos cannot be recorded with an XQD card.
SD card
SD memory card
(512 MB to 2 GB)
SDHC memory card
(4 GB to 32 GB)
SDXC memory card
(48 GB to 128 GB)
0
For the latest information, check the following support
website.
https://panasonic.jp/support/global/cs/dsc/
(English only)
0 Operation with Sony XQD G Series/M Series has
been verified for this camera.
(As of January 2019)
0 The camera supports SDHC/SDXC memory cards
compliant with UHS Speed Class 3 of the UHS-
II standard.
UHS-
I/
0 The camera supports
SDHC/SDXC memory
cards compliant with
Video Speed Class 90 of
II standard.
the UHS-
0 Operation with the Panasonic cards on the left has
been verified.
22
Page 23
1. Introduction
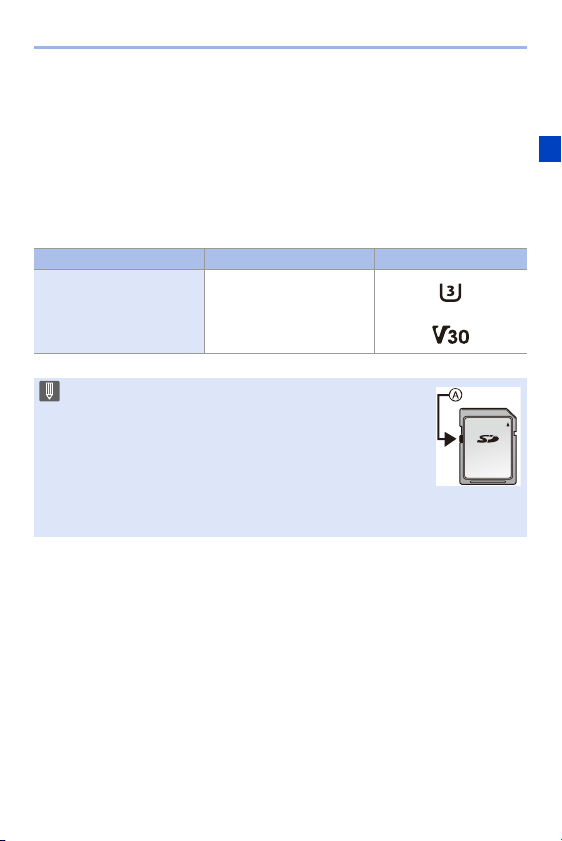
SD Cards That Can Be Used Stably with This Camera
To ensure the following recording functions can be used stably, use a card
of the supported SD Speed Class, UHS Speed Class, and Video Speed
Class.
Speed classes are SD card standards to guarantee the minimum speed necessary
0
for continuous writing.
0 When using an XQD card, you will be able to use the functions regardless of the type
of card.
Recording function Speed Class Example of indication
4K video
High Speed Video
6K/4K Photo
Post-Focus
UHS Speed Class 3
Video Speed Class 30 or
higher
0 If you set the write-protect switch A of an SD card to
“LOCK”, you may not be able to write or delete data, format
the card, or display the data in recording date and time
order.
0 The data stored on a card may be damaged due to
electromagnetic waves, static electricity or a failure of the
camera or card. We recommend backing up important data.
0 Keep the memory card out of reach of children to prevent swallowing.
23
Page 24
1. Introduction
Names of Parts
Camera
1
2
3
4
5
6
7
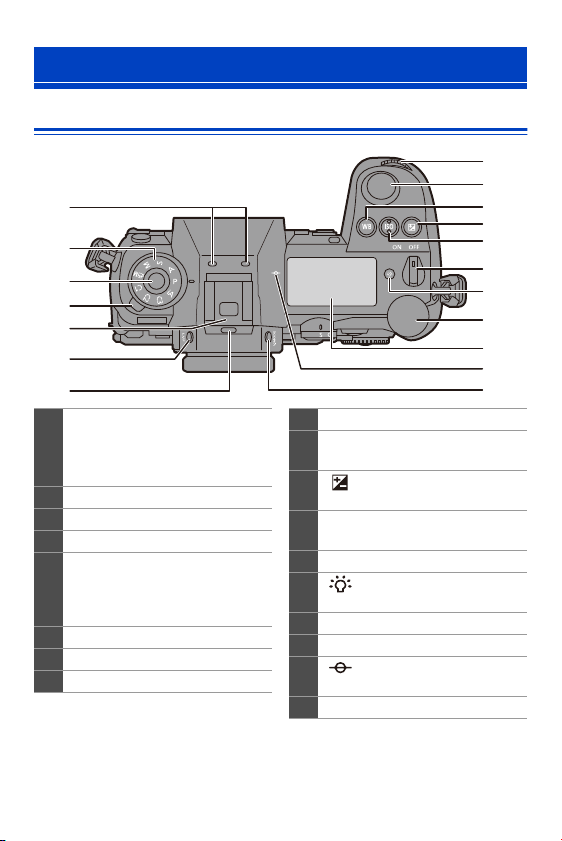
Stereo microphone (l 243)
0 Take care not to block the
1
microphone with a finger. Audio
will be difficult to record.
Mode dial (l 61)
2
Mode dial lock button (l 61)
3
4 Drive mode dial (l 125)
Hot shoe (hot shoe cover) (l 216)
• Keep the hot shoe cover out of
5
reach of children to prevent
swallowing.
6 [LVF] button (l 67)
Speaker (l 354)
7
Front dial (l 63)
8
Shutter button (l 59)
9
[WB] (White Balance) button
10
(l 194)
[ ] (Exposure compensation)
11
button (l 189)
[ISO] (ISO sensitivity) button
12
(l 192)
Camera on/off switch (l 53)
13
[ ] (Status LCD backlight)
14
button (l 70, 353)
Rear dial (l 63)
15
Status LCD (l 30, 353)
16
[ ] (Recording distance
17
reference mark) (l 120)
[V.MODE] button (l 66)
18
8
9
10
11
12
13
14
15
16
17
18
24
Page 25
1. Introduction
5
4
3
2
1
7
8
16
17
6
9
10
13
14
15
11
12
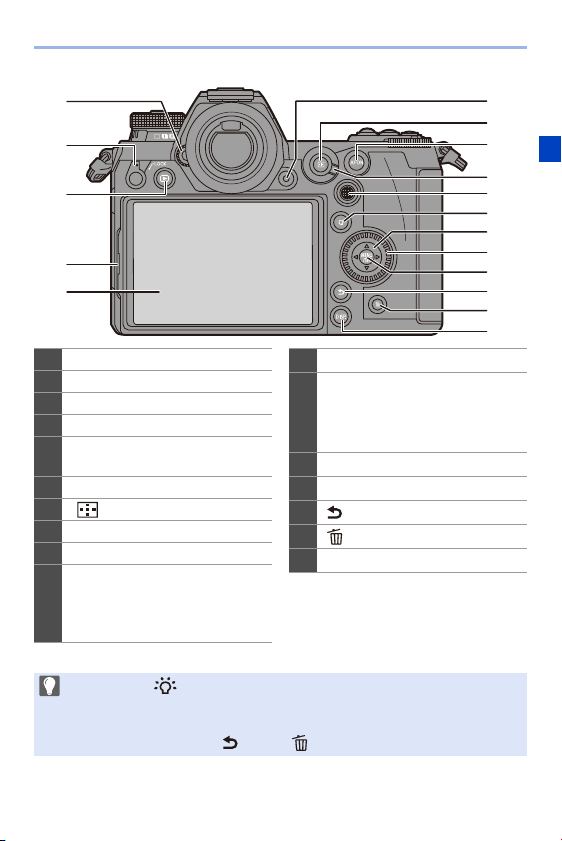
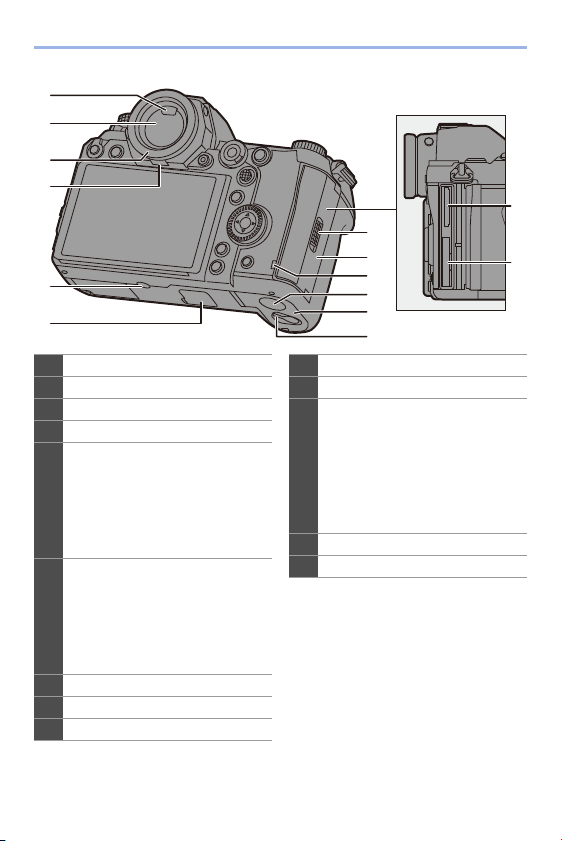
Dioptre adjustment dial (l 66)
1
Operation lock lever (l 65)
2
3 [(] (Playback) button (l 259)
Monitor lock lever (l 58)
4
Monitor (l 448)/
5
Touch screen (l 64)
6 Video rec. button (l 230)
[ ] (AF mode) button (l 92)
7
[AF ON] button (l 94)
8
9 Focus mode lever (l 92, 117 )
Joystick (l 64)/
Fn buttons (l 278)
10
Centre: Fn8, 3: Fn9, 1: Fn10,
4:Fn11, 2: Fn12
0 If you press [ ], the following buttons light.
The lighting timing can be changed in [Illuminated Button] in the [Custom]
([Operation]) menu. (l 337)
–[(] button/[Q] button/[ ] button/[ ] button/[DISP.] button
[Q] button (l 71)
11
Cursor buttons (l 63)/
Fn buttons (l 278)
12
3: Fn13, 1: Fn14, 4: Fn15,
2: Fn16
13 Control dial (l 63)
14 [MENU/SET] button (l 63, 73)
15 [ ] (Cancel) button (l 75)
16 [ ] (Delete) button (l 269)
17 [DISP.] button (l 68)
25
Page 26
1. Introduction
1
2
3
4
5
6
Eye sensor (l 67)
1
2 Viewfinder (l 67)
Eye cup (l 473)
3
Eye cup lock lever (l 473)
4
Tripod mount (l 478)
0 If you attempt to attach a tripod
with a screw length of 5.5 mm
5
(0.22 inch) or more, you may not
be able to securely fix it in place
or it may damage the camera.
Battery grip connector (cover for
the battery grip connector)
(l 445)
6
0 Keep the cover for the battery
grip connector out of reach of
children to prevent swallowing.
Card slot 2 (l 46)
7
Card slot 1 (l 46)
8
9 Card door lock lever (l 46)
9
10
11
12
13
14
Card door (l 46)
10
11 Card access lamp (l 47)
DC Coupler cover (l 447)
0 When using an AC adaptor,
ensure that the Panasonic DC
12
Coupler (DMW-DCC16:
optional) and AC Adaptor
(DMW-AC10: optional) are
used.
13 Battery door (l 36)
Battery door release lever (l 36)
14
7
8
26
Page 27
1. Introduction
1
2
3
4
5
6
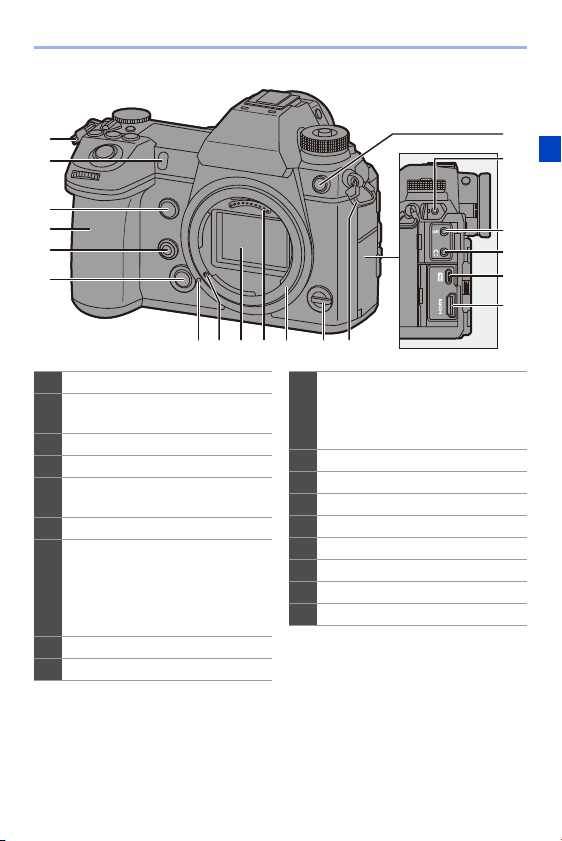
1 Shoulder strap eyelet (l 31)
Self-timer lamp (l 153)/
2
AF assist lamp (l 309)
Fn button (Fn1) (l 278)
3
Grip
4
Preview button (l 188)/
5
Fn button (Fn2) (l 278)
Lens release button (l 50)
6
Flash synchro socket (flash
synchro socket cap) (l 217)
0 Keep the flash synchro socket
7
cap out of reach of children to
prevent swallowing.
[REMOTE] socket (l 446)
8
9 [MIC] socket (l 253)
7
8
9
10
11
12
16 15 14 1317 118
Headphone socket (l 257)
0 Excessive sound pressure from
10
earphones and headphones can
cause hearing loss.
USB port (l 433, 441)
11
[HDMI] socket (l 426)
12
Fn lever (l 286)
13
Mount
14
Contact points
15
Sensor
16
Lens lock pin
17
18 Lens fitting mark (l 50)
27
Page 28
1. Introduction
7 8 91 2 3 4 5 6
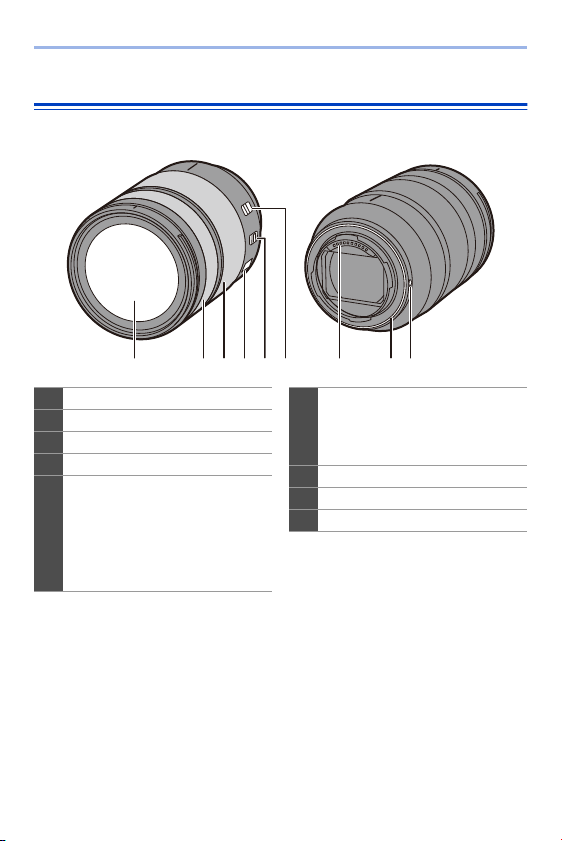
Supplied Lens
S-R24105
Lens surface
1
Focus ring (l 11 8)
2
3 Zoom ring (l 121)
O.I.S. switch (l 173)
4
[AF/MF] switch (l 92, 11 7)
0 You can switch between AF and
MF.
5
If [MF] is set on either the lens or
camera, operation will be with
MF.
28
Zoom lock switch
0 When you set the focal length to
6
24 mm and set the switch to
[LOCK], the zoom ring is locked.
Contact points
7
Lens mount rubber (l 474)
8
9 Lens fitting mark (l 50)
Page 29
1. Introduction
999
ISO
100
F
4.060
L
FINE
AFSAFS
8 9 1011 12 13 14 15 16 17
1 2 43 5 6 7
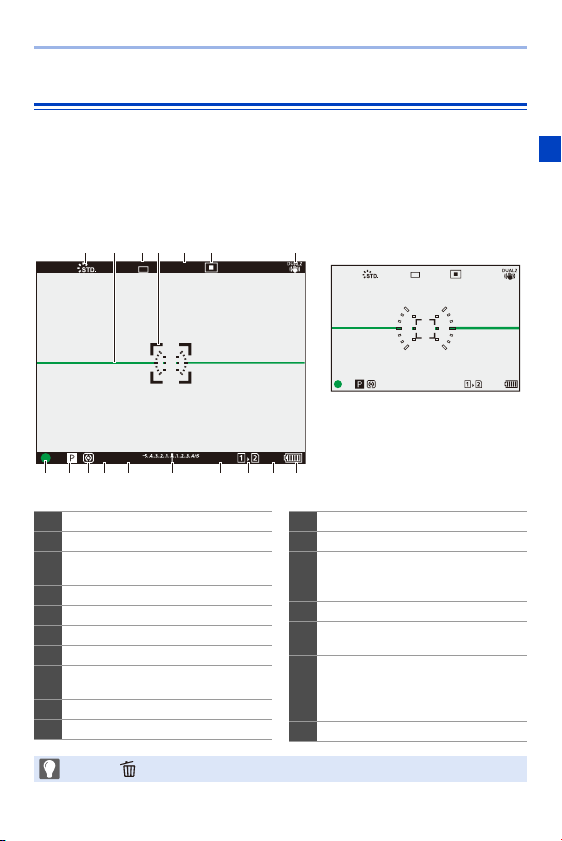
Displaying Viewfinder/Monitor
At the time of purchase, the viewfinder/monitor displays the following
icons.
For information about the icons other than those described here, refer to
page 448.
Viewfinder Monitor
FINE
L
AFSAFS
999
ISO
100F4.060±0
Photo Style (l 199)
1
Level gauge (l 339)
2
Picture quality (l 85)/
3
Picture size (l 83)
AF area (l 11 2)
4
Focus mode (l 91, 117)
5
6
7
8
9
10
AF mode (l 98)
Stabiliser (l 172)
Focus (lit green) (l 59)/Recordin g
state (lit red) (l 211, 230)
Recording mode (l 61 )
Metering mode (l 178)
0 Press [ ] to switch between display/hide of the level gauge.
Shutter speed (l 59)
11
Aperture value (l 59)
12
Exposure compensation value
(l 189)/Manual Exposure Assist
13
(l 186)
ISO sensitivity (l 192)
14
Card slot (l 46)/Double card slot
15
function (l 87)
Number of recordable pictures
(l 482)/Number of pictures that can
16
be taken continuously (l 128)/
Available recording time (l 483)
Battery indication (l 42)
17
29
Page 30
1. Introduction
1
8
9
42
14 13 12 11 10
6
375
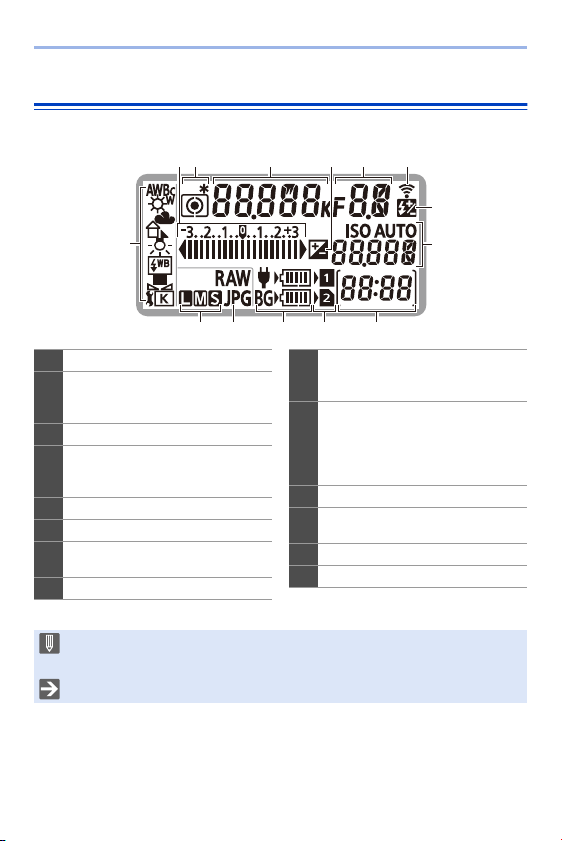
Status LCD Display
This displays the recording settings of the camera.
White balance (l 194)
1
Exposure compensation value
(l 189)/
2
Exposure Bracket (l 158)
Metering mode (l 17 8)
3
Shutter speed (l 59)/
White balance (Colour
4
Temperatures) (l 195)
Exposure compensation (l 189)
5
Aperture value (l 59)
6
Wireless (Wi-Fi/Bluetooth)
7
connection state (l 370)
Flash output adjustment (l 224)
8
ISO sensitivity (l 192)/
Exposure compensation value
9
(l 189)
Number of recordable pictures
(l 482)/
Number of pictures that can be taken
10
continuously (l 128)/
Available recording time (l 483)
Card slot (l 46)
11
Battery indication (l 42)/
12
Power supply indication (l 40)
Picture quality (l 85)
13
Picture size (l 83)
14
0 Recording information is not displayed on the status LCD during playback and
menu operation.
0 Lighting method of the status LCD backlight (l 70)
30
Page 31

2. Getting Started
Attaching a Shoulder Strap
Attach a shoulder strap to the camera with the following procedure to
prevent it from dropping.
Pass the shoulder strap
1
through the shoulder strap
eyelet A.
Pass the end of the shoulder
2
strap through the ring and
then pass it through the
fastener.
Pass the end of the shoulder
3
strap through the other hole of
the fastener.
Pull the shoulder strap and
4
check that it will not come out.
0 Attach the opposite end of the shoulder
strap with the same procedure.
31
Page 32

2. Getting Started
0 Use the shoulder strap around your shoulder.
– Do not wrap the strap around your neck.
It may result in injury or accident.
0 Do not leave the shoulder strap where an infant can reach it.
– It may result in an accident by mistakenly wrapping around the neck.
32
Page 33

2. Getting Started
Charging the Battery
You can charge the battery either using the supplied charger, or in the
camera body.
If you turn on the camera, you can also charge the battery while the
camera is powered from an electrical outlet.
Instead of using an electrical outlet, you can also connect the camera
using a device that supports USB PD (USB Power Delivery).
0 The battery that can be used with the camera is DMW-BLJ31. (As of
January 2019)
0 The battery is not charged at the time of purchase. Charge the battery before
use.
Charging with the Charger
Charging time Approx. 130 min
0 Use the supplied charger and AC adaptor.
0 The indicated charging time is for when the battery has been discharged completely.
The charging time may vary depending on how the battery has been used.
The charging time for the battery in hot/cold environments or a battery that has not
been used for a long time may be longer than normal.
0 Use the products supplied with the camera for charging.
0 Use the charger indoors.
33
Page 34

2. Getting Started
Connect the charger and the
1
AC adaptor with the USB
connection cable (C–C).
0 Hold the plugs and insert them straight.
(Inserting these at an angle may cause
deformation or malfunction)
Connect the AC mains lead to
2
the AC adaptor and then
insert into the electrical
outlet.
Insert the battery.
3
≥Insert the terminal end of the
battery and push.
≥The [CHARGE] lamp A blinks and
charging begins.
0 Do not use any other USB connection cables except the supplied USB
connection cable (C–C).
This may cause malfunction.
0 Do not use any other AC adaptors except the supplied one.
This may cause malfunction.
0 Do not use any other AC mains leads except the supplied one.
This may cause malfunction.
34
Page 35

[CHARGE] Lamp
Charging
status
[CHARGE]
lamp
0% to 49% 50% to 79% 80% to 99% 100%
A Blinking B Lit C Off
0 After charging, disconnect the power source connection and remove the
battery.
0 If the [50%] lamp is blinking quickly, then charging is not occurring.
– The temperature of the battery or surroundings is either too high or too low.
Try charging at an ambient temperature between 10 °C and 30 °C (50 oF
and 86 oF).
– The terminals of the charger or the battery are dirty.
Remove the connection to the power source, and wipe with a dry cloth.
2. Getting Started
35
Page 36

2. Getting Started
Battery Insertion
0 Always use genuine Panasonic batteries (DMW-BLJ31).
0 If you use other batteries, we cannot guarantee the quality of this product.
Turn off the camera.
1
Open the battery door.
2
≥Move the battery door release lever
to the [OPEN] position.
Insert the battery.
3
≥Insert the terminal end of the
battery and push until a locking
sound is heard.
0
Check that the lever A is holding the
battery in place.
Close the battery door.
4
≥Close the battery door, and move
the battery door release lever to the
[LOCK] position.
36
Page 37

2. Getting Started
Removing the Battery
1
Turn off the camera.
2
Open the battery door.
Check that the card access lamp A is off
0
and then open the battery door.
3
Push the lever B in the direction of the
arrow and then remove the battery.
0 Ensure that no foreign objects are adhering to the inner side (rubber seal) of
the battery door.
0 Remove the battery after use.
(The battery will drain if left inserted in the camera for a long period of time.)
0 The battery becomes warm after use, during charging, and immediately after
charging.
The camera also becomes warm during use. This is not a malfunction.
0 Check that the camera is turned off and the card access lamp is off before
removing the battery.
(The camera may stop operating correctly or the card and recorded images
may be damaged.)
0 Be careful when removing the battery as the battery will jump out.
37
Page 38

2. Getting Started
Charging the Battery with the Camera
Charging time Approx. 140 min
0 Using the camera body and the supplied AC adaptor.
The camera is turned off.
0 The indicated charging time is for when the battery has been discharged completely.
The charging time may vary depending on how the battery has been used.
The charging time for the battery in hot/cold environments or a battery that has not
been used for a long time may be longer than normal.
0 Use the products supplied with the camera for charging.
Turn off the camera.
1
Insert the battery into the camera.
2
Connect the camera USB port and the AC adaptor using
3
the USB connection cable (C–C).
0 Hold the plugs and insert them straight.
(Inserting these at an angle may cause deformation or malfunction)
38
Page 39

2. Getting Started
Connect the AC mains lead to
4
the AC adaptor and then insert
into the electrical outlet.
≥The battery display on the status LCD
will blink, and charging starts.
0 You can also charge the battery by connecting a USB device (PC, etc.) and
the camera with the USB connection cable (C–C or A–C).
In that case, charging may take a while.
0 When using the Battery Grip (DMW-BGS1: optional), the battery within the
Battery Grip will also be charged.
0 Do not use any other USB connection cables except the supplied USB
connection cables (C–C and A–C).
This may cause malfunction.
0 Do not use any other AC adaptors except the supplied one.
This may cause malfunction.
0 Do not use any other AC mains leads except the supplied one.
This may cause malfunction.
0 Even when the camera on/off switch is set to [OFF] thus turning the camera
off, it consumes power.
When the camera will not be used for a long time, remove the power plug from
the electrical outlet in order to save power.
39
Page 40

2. Getting Started
Status LCD Display
Charging status Charging Charging complete Charging error
Display
0 After charging, disconnect the connection to the power source.
0 When an error is displayed, charging is not possible.
– The temperature of the battery or surroundings is either too high or too low.
Try charging at an ambient temperature between 10 °C and 30 °C (50 oF
and 86 oF).
Charging While Using the Camera
When charging with both the camera body and the supplied AC adaptor
(l 38), you can charge while the camera is being supplied with power by
turning the camera on. You can record while charging.
This is also possible by connecting devices that support USB PD (USB
Power Delivery) to the camera.
A AC adaptor B Devices that support USB PD (mobile
Insert the battery into the camera.
0
battery, etc.)
0 Connect using the supplied USB connection cable (C–C).
0 Use a device (mobile battery, etc.) with an output of 9 V/3 A (27 W or more) that
supports USB PD.
0 When the camera is on, charging will take longer than when the camera is off.
40
Page 41

2. Getting Started
0 Even when connecting with devices that support USB PD, you may not be
able to charge while using the camera.
0 If connecting with devices (PC, etc.) that do not support USB PD and turning
the camera on, then this will supply power only.
0 If the camera temperature rises under the any of following conditions,
charging may stop. If the temperature rises further, [ ] will be displayed,
and power supply will stop.
Wait until the camera cools down.
– When continuously recording video, etc. while charging/supplying power
– When the ambient temperature is high
0 Turn off the camera before connecting or disconnecting the power plug.
0 Remaining charge in the battery may decrease depending on usage
conditions. When the battery level is depleted, the camera will turn off.
0 Depending on the power supply capabilities of the connected devices,
charging may not be possible.
41
Page 42

2. Getting Started
Notifications Regarding Charging/Power Supply
Power Indications
Indication on status LCD Indication on monitor
A Receiving power from the USB
connection cable
B Power source
C The battery level of the battery in the
camera
80% or higher
79% to 60%
59% to 40%
39% to 20%
19% or below
Low battery
Blinking
0 Charge or replace the battery.
D The battery level of the battery in the
Battery Grip
E Battery indication
F Using the battery in the Battery Grip
0 The battery level indicated on the screen is approximate.
The exact level varies depending on the environment and the operating conditions.
0 The highest battery level reading of C or D blinks during charging.
0 When a charging error occurs, the status LCD display icon A blinks.
42
Page 43

2. Getting Started
0 It has been found that counterfeit battery packs which look very similar
to the genuine product are made available for purchase in some
markets. Some of these battery packs are not adequately protected with
internal protection to meet the requirements of appropriate safety
standards. There is a possibility that these battery packs may lead to fire
or explosion. Please be advised that we are not liable for any accident or
failure occurring as a result of use of a counterfeit battery pack. To
ensure that safe products are used, we recommend that a genuine
Panasonic battery pack is used.
0 Do not leave any metal items (such as clips) near the contact areas of the
power plug.
Otherwise, a fire and/or electric shocks may be caused by short-circuiting or
the resulting heat generated.
0 Do not use the AC adaptor, AC mains lead, or USB connection cables (C–C
and A–C) on other devices.
This may cause a malfunction.
0 Do not use USB extension cables or USB conversion adaptors.
0 The battery can be charged even when it still has some charge left, but it is not
recommended that the battery charge be frequently topped up while the
battery is fully charged.
(Since characteristic swelling may occur.)
0 If there is a power outage or other problem with the electrical outlet, then
charging may not complete successfully.
Reconnect the power plug.
0 Do not connect to keyboards or printer USB ports, or to USB hubs.
0 If the connected PC enters sleep status, then charging/power supply may
stop.
0 The battery level display on the monitor can be changed to a percentage:
[] ¨ [ ] ¨ [Remaining Battery Level] (l 352)
0 You can confirm the degree of deterioration of the battery:
[] ¨ [ ] ¨ [Battery Information] (l 356)
43
Page 44

2. Getting Started
[Power Save Mode]
This is a function to automatically turn the camera to sleep (power save)
status or turn off the viewfinder/monitor if no operation is performed for a
set time. Reduces battery consumption.
¨ [ ] ¨ [ ] ¨ Select [Power Save Mode]
[Sleep Mode] Sets the amount of time until the camera is put into sleep.
[Sleep Mode(Wi-
Fi)]
[Auto LVF/
Monitor Off]
[Power Save
LVF Shooting]
To recover from [Sleep Mode], [Sleep Mode(Wi-Fi)], or [Power Save LVF Shooting],
0
perform one of the following operations:
– Press the shutter button halfway.
– Set the camera on/off switch to [OFF] and then [ON] again.
0 To recover from [Auto LVF/Monitor Off], press one of the buttons.
Sets the camera to sleep 15 minutes after being disconnected
from Wi-Fi.
Sets the amount of time it takes for the viewfinder/monitor to turn
off.
(The camera is not turned off.)
Puts the camera into sleep when the recording screen is
displayed using automatic viewfinder/monitor switching.
0 [Power Save LVF Shooting] does not work when [Time to
Sleep] is set to [OFF].
[Time to
Sleep]
[Method of
Activation]
Sets the amount of time until the camera is put
into sleep.
Sets the screen where the camera is put to sleep.
[Only Control Panel]:
Puts the camera into sleep only when the control
panel (l 68) is displayed.
[While Recording Standby]:
Puts the camera into sleep from any screen
during recording standby.
44
Page 45

2. Getting Started
0 [Power Save Mode] does not work during the following operations:
– PC or printer connection
– Video recording/video playback
– [6K/4K Pre-Burst] recording
– [Time Lapse Shot]
– [Stop Motion Animation] (when [Auto Shooting] is set)
– [Multiple Exposure] recording
– During HDMI output for recording
0 The settings will be as follows when using the AC Adaptor (DMW-AC10:
optional):
– [Sleep Mode], [Sleep Mode(Wi-Fi)], and [Power Save LVF Shooting]:
Disabled
– [Auto LVF/Monitor Off]: [5MIN.]
45
Page 46

2. Getting Started
Inserting Cards (Optional)
You can use an XQD card and SD card with this camera. (l 22)
Open the card door.
1
≥Slide the card door in the direction
of the arrow while pushing down the
card door lock lever.
Insert the cards.
2
A Card slot 1: XQD card
B Card slot 2: SD card
≥Match the orientation of the cards
as shown in the figure and then
insert them firmly until they click.
0
Do not touch the SD card connection
contacts C.
Close the card door.
3
≥Close the card door and slide it
firmly in the direction of the arrow
until it clicks.
The cards are displayed on the status
0
LCD.
0 You can set the way to record to card slots 1 and 2.
[] ¨ [ ] ¨ [Double Card Slot Function] (l 87)
46
Page 47

2. Getting Started
Card Access Indications
The card access lamp lights while the card
is being accessed.
Removing a Card
1
Open the card door.
Check that the card access lamp A is off
0
and then open the card door.
2
Push the card until it clicks and then
pull the card out straight.
0 The card may be hot just after the camera has been used. Be careful when
removing.
0 Do not perform the following operations during access.
The camera may operate incorrectly or the card and recorded images
may be damaged.
– Turn off the camera.
– Remove the battery or card or disconnect the power plug.
– Subject the camera to vibration, impacts, or static electricity.
47
Page 48

2. Getting Started
Formatting Cards (Initialisation)
Format the cards with the camera before use in order to ensure optimal
card performance.
0 When a card is formatted, all of the data stored in the card is erased and
cannot be restored.
Save a backup of necessary data before formatting the card.
¨ [ ] ¨ [ ] ¨ Select [Card Format]
Settings: [Card Slot 1(XQD)]/[Card Slot 2(SD)]
0 Do not turn off the camera or perform another operation during formatting.
0 Take care not to turn off the camera while formatting is in progress.
0 Cards that have not been formatted after purchase should be formatted on the
camera.
0 If the card has been formatted with a PC or other device, format it again with
the camera.
48
Page 49

2. Getting Started
Attaching a Lens
You can attach the Leica Camera AG L-Mount standard lens to this
camera.
For information about the lens that can be used, refer to page 21.
0 Change the lens in a location where there is not a lot of dirt and dust. If dirt or
dust gets on the lens, refer to page 472.
0 Change the lens while the lens cap is attached.
Turn off the camera.
1
Turn the lens rear cap and the body cap in the direction
2
of the arrow to remove them.
≥When removing the body cap, rotate it while pressing the lens
release button A.
49
Page 50

2. Getting Started
Align the lens fitting marks B on the lens and camera
3
and then rotate the lens in the direction of the arrow.
≥Attach the lens by rotating it until it clicks.
0 Insert the lens straight in.
Inserting this at an angle to attach it may damage the camera lens mount.
Removing a Lens
1
Turn off the camera.
2
While pressing the lens release button
A, rotate the lens in the direction of the
arrow until it stops and then remove it.
0 After removing the lens, be sure to attach the body cap and the lens rear cap.
50
Page 51

2. Getting Started
Attaching a Lens Hood
For recording against strong backlight, a lens hood can reduce the
inclusion of unwanted light in images and drop in contrast resulting from
the irregular reflection of light that occurs within the lens.
It allows you take more beautiful pictures by cutting out excess light.
When attaching the lens hood (flower shape) supplied with the
interchangeable lens (S-R24105)
Hold the lens hood by placing your
fingers as shown in the figure.
Do not hold the lens hood in such a way
0
that it will become bent.
Align mark A ( ) on the
1
lens hood with the mark on the
tip of the lens.
Rotate the lens hood in the
2
direction of the arrow to align
mark B ( ) on the lens hood
with the mark on the tip of the
lens.
≥Attach the lens hood by rotating it
until it clicks.
51
Page 52

2. Getting Started
Removing the Lens Hood
While pressing the lens hood button, rotate
the lens hood in the direction of the arrow
and then remove it.
0 The lens hood can be attached in the reverse direction when carrying the
camera.
1 Remove the lens hood.
2 Align mark C ( ) on the lens hood with the mark on the tip of the lens.
3 Attach the lens hood by rotating it in the direction of the arrow until it clicks.
52
Page 53

2. Getting Started
Setting the Clock (When Turning On for the First Time)
When you turn the camera on for the first time, a screen to set the time
zone and clock appears.
Be sure to set these settings before use to ensure images are recorded
with the correct date and time information.
Set the camera on/off switch
1
to [ON].
≥If the language select screen is not
displayed, proceed to Step
When [Please set the language] appears, press or
2
3
4
5
.
Set the language.
≥Press 34 to select the language and then press or .
When [Please set the time zone] appears, press or
.
Set the time zone.
≥Press 21 to select the time zone
and then press or .
0 If you are using Daylight Savings
[ ], press 3. (The time will
move forward by 1 hour.)
To return to the normal time, press
3 again.
A Time difference from GMT (Greenwich Mean Time)
.
4
53
Page 54

2. Getting Started
When [Please set the clock] appears, press or .
6
Set the clock.
7
21: Select an item (year, month,
day, hour, minute, or second).
34: Select a value.
To set the display order B and
time display format C
≥If you select [Style] and then press
or , the screen for setting
the display order and time display
format appears.
Confirm your selection.
8
≥Press or .
When [The clock setting has been completed.] appears,
9
press or .
54
Page 55

2. Getting Started
0 If the camera is used without setting the clock, it will be set to 0:00:00, 1st
January 2019.
0 Clock settings are maintained for approx. 3 months using the built-in clock
battery even without the battery.
(Leave the fully-charged battery in the camera for approx. 24 hours to charge
the built-in battery.)
0 [Time Zone] and [Clock Set] can be changed from the menu:
– ¨ [ ] ¨ [ ] ¨ [Time Zone] (l 359)
– ¨ [ ] ¨ [ ] ¨ [Clock Set]
55
Page 56

3. Basic Operations
Basic Recording Operations
How to Hold the Camera
To minimise camera shake, hold the camera so that it will not move during
recording.
Hold the camera with both hands, keep your arms still at your
side, and stand with your feet shoulder width apart.
≥Hold the camera firmly by wrapping your right hand around the camera
grip.
≥Support the lens from below with your left hand.
0
Do not cover the AF assist lamp A or microphone B with your fingers or other
objects.
56
Page 57

3. Basic Operations
Vertical Orientation Detection Function
This function detects when pictures were
recorded with the camera held vertically
orientated.
With the default settings, pictures are
automatically played back vertically
oriented.
If you set [Rotate Disp.] to [OFF], pictures will be
0
played back without being rotated. (l 363)
0 When the camera is tilted significantly up or down, the vertical orientation
detection function may not work correctly.
0 Images recorded using the following functions cannot be displayed vertically
orientated:
– Video recording/[6K/4K PHOTO]/[Post-Focus]
57
Page 58

3. Basic Operations
Adjusting the Angle of the Monitor
This camera has a 3-axis tiltable monitor.
Adjust the angle of the monitor to match the recording conditions.
This is useful for high and low angle recording.
≥High angle recording (horizontal
position)
≥Low angle recording (horizontal
position)
≥High angle recording/Low angle recording (vertical position)
Open the monitor while pushing up on the monitor lock lever.
0
0 Take care not to trap a finger in the monitor.
0 Do not apply an excessive force to the monitor. This may cause damage or
malfunction.
0 When you will not use the camera, fully close the monitor by returning it to its
original position.
0 When attaching to a tripod, close the monitor by returning it to its original
position.
0 The opening angle of the monitor may be limited by the tripod used.
58
Page 59

Taking Pictures
F4.0F4.0F4.0606060
Adjust the focus.
1
≥Press the shutter button halfway
(press it gently).
≥The aperture value A and shutter
speed B are displayed.
(When the correct exposure cannot
be obtained, the indications blink in
red.)
≥Once the subject is in focus, the
focus indication C lights.
(When the subject is not in focus,
the indication blinks.)
You can also perform the same operation by pressing [AF ON].
0
Start recording.
2
≥Press the shutter button fully (press
it further).
3. Basic Operations
59
Page 60

3. Basic Operations
0 Recorded pictures can be displayed automatically by setting [Auto Review] of
the [Custom] ([Monitor / Display]) menu. You can also change the picture
display duration to your preferred setting. (l 338)
0 With the default settings, you cannot take a picture until the subject is
brought into focus.
If you set [Focus/Shutter Priority] in the [Custom] ([Focus/Shutter])
menu to [BALANCE] or [RELEASE], you will be able to take a picture
even when the subject is not in focus. (l 329)
Recording Videos
Start recording.
1
≥Press the video rec. button.
0
Release the video rec. button right after
you press it.
Stop recording.
2
≥Press the video rec. button again.
60
Page 61

3. Basic Operations
Selecting the Recording Mode
While pressing the mode dial lock button (1), rotate the
mode dial (2).
iA Intelligent Auto mode (l 77)
P Programme AE mode (l 179)
A Aperture-Priority AE mode (l 181)
S Shutter-Priority AE mode (l 183)
M Manual Exposure mode (l 185)
Creative Video mode (l 244)
C1/C2/C3 Custom mode (l 296)
61
Page 62

3. Basic Operations
45678 3 2
1
Camera Setting Operations
When changing the camera settings, operate the camera using the
following operation parts.
To prevent accidental operation, you can disable operation with the
operation lock lever.
1 Front dial (l 63)
Rear dial (l 63)
2
Control dial (l 63)
3
4 Cursor buttons (l 63)
[MENU/SET] button (l 63)
5
Joystick (l 64)
6
7 Touch screen (l 64)
Operation lock lever (l 65)
8
62
Page 63

Front Dial ( )/Rear Dial ( )
Rotate:
Selects an item or numeric value.
Sets the aperture, shutter speed, and other
0
settings when you are recording in the P/A/S/M
modes.
The operation method can be changed in [Dial
Set.]. (l 336)
Control Dial ( )
Rotate:
Selects an item or numeric value.
Adjusts the headphone volume during recording.
0
The function can be changed in [Control Dial
Assignment] of [Dial Set.]. (l 336)
Cursor Buttons (3421)
Press:
Selects an item or numeric value.
3. Basic Operations
[MENU/SET] Button ( )
Press:
Confirms a setting.
Displays the menu during recording and
0
playback.
63
Page 64

3. Basic Operations
Joystick (3421/)
The joystick can be operated in 8 directions by tilting it up, down, left, right
and diagonally and by pressing the centre part.
A Tilt: Selects an item or numeric value, or
moves a position.
B Press: Confirms a setting.
When recording, this moves the AF area and MF
0
Assist.
The joystick functions for recording can be
changed in [Joystick Setting]. (l 337)
Touch Screen
Operations can be performed by touching the icons, slide bars, menus,
and other items displayed on the screen.
A Touch
Operation of touching and then lifting your
finger from the touch screen.
B Drag
Operation of moving a finger while it
touches the touch screen.
C Pinch (widen/narrow)
Operations of widening the distance
between two fingers (pinch out) and
narrowing the distance between two fingers
(pinch in) while they are touching the touch
screen.
64
Page 65

3. Basic Operations
0 Touch the screen with clean and dry fingers.
0 If you will use a commercially available monitor protection sheet, observe the
precautions for the sheet.
(Visibility and operability may be impaired depending on the type of monitor
protection sheet.)
0 The touch screen may not operate correctly in the following cases:
– When you are wearing gloves
– When the touch screen is wet
0 Touch operations can be disabled:
[] ¨ [ ] ¨ [Touch Settings] (l 333)
Operation Lock Lever
Aligning the operation lock lever with the
[LOCK] position disables the following
operation parts.
The operation parts to disable can be set in
[Lock Lever Setting] of the [Custom]
([Operation]) menu. (l 334)
– Cursor buttons
– [MENU/SET] button
– Joystick
– Touch screen
– Front dial
– Rear dial
– Control dial
– [DISP.] button
65
Page 66

3. Basic Operations
Display Settings
Setting the Viewfinder
Adjusting the Viewfinder Dioptre
Rotate the dioptre adjustment dial
while looking through the
viewfinder.
0 Adjust the dioptre until you can see the
characters clearly.
Switching the Viewfinder Display Magnification
Press [V.MODE].
≥The display magnification of the
viewfinder can be switched between
3 levels.
66
Page 67

3. Basic Operations
Switching Between the Monitor and Viewfinder
With the default settings, automatic viewfinder/monitor switching is set.
When you look through the viewfinder, the eye sensor works and the
camera switches from monitor display to viewfinder display.
You can switch to viewfinder display or monitor display with [LVF].
Press [LVF] A.
B Eye sensor
Automatic viewfinder/
monitor switching
Viewfinder display Monitor display
0 The eye sensor may not work correctly due to the shape of eyeglasses, the
way the camera is held, or bright light shining around the eyepiece.
0 The camera does not switch between the viewfinder and monitor
automatically during video playback.
0 When the monitor is open, the eye sensor does not work.
0 To focus when looking through the viewfinder:
[] ¨ [ ] ¨ [Eye Sensor AF] (l 332)
0 The sensitivity of the eye sensor can be changed:
[] ¨ [ ] ¨ [Eye Sensor] (l 353)
67
Page 68

3. Basic Operations
Switching the Display Information
The recording information (icons) on the recording screen and playback
screen can be hidden.
The monitor on the rear of the camera can be set to display only recording
information or turned off.
Press [DISP.].
≥The display information is switched.
Recording Screen
Monitor
With information
FINE
L
AFSAFS
±
0
Viewfinder
With information
FINE
L
AFSAFS
999
Without
information
Without
information
Control panel Turned off
0 0
0
3:2
OFF
Fn
999
999
ISO
AUTO
AFS FINE
AWB
68
999
Page 69

3. Basic Operations
100
100-0001
ISO
0
F4.0
60
10:00 1.DEC.2019
s
RGB
1/5
FINE
AFS
STD.
L
3:2
AWB
0 Press [ ] to switch between display/hide of the level gauge.
This can also be set by using [Level Gauge]. (l 339)
Control panel operation
You can touch items on the control panel to directly change their settings. These
can also be changed with the following operations:
1 Press one of the cursor buttons to enable
selection of items.
0 Selected items are displayed in yellow.
2 Rotate or to select an item.
0 You can also select by pressing 3421.
ISO
AUTO
AFS FINE
AWB
3 Rotate to change the settings values.
0 The types of screen to display on the monitor can be restricted:
[] ¨ [ ] ¨ [Show/Hide Monitor Layout] (l 345)
0 The display can be changed so that live view and display information do not
overlap:
[] ¨ [ ] ¨ [LVF/Monitor Disp. Set] (l 343)
Playback Screen
With information
100-0001 1/999
10:00 1.DEC.2019
FINE
±
L
0
ISO
100F4.060
Detailed
information
¢1
display
Without
information
Display without
highlights
0 0
0
3:2
blinking
OFF
Fn
999
999
¢2
¢1 Pressing 34 switches the display information.
– Detailed information display
– Histogram display
– Photo Style display
– White balance display
– Lens information display
¢2 This is a screen without blinking highlights display that is shown when [Blinking
Highlights] of the [Custom] ([Monitor / Display]) is set to [ON].
In other than this screen, overexposed parts of the screen will blink. (l 345)
69
Page 70

3. Basic Operations
Turning On the Status LCD Backlight
Press [ ].
≥The backlight will turn on.
≥If the camera is left without any
operations for approx. 5 seconds, the
backlight turns off.
0 With the default settings, the illumination button
will also light.
0 If you press [ ] again or fully press the shutter button, the backlight turns off.
0 The status LCD backlight and illumination button do not light while you are using the
following functions:
– Video recording/[6K/4K PHOTO]/[Post-Focus]
– Burst recording
– Playback
– Menu
– Quick menu
0 The lighting method of the status LCD backlight can be changed:
[] ¨ [ ] ¨ [Status-LCD] (l 353)
70
Page 71

3. Basic Operations
00 0
AWB
3:2
0 0
0
AUTO
ISO
00 0
AWB
3:2
0 0
0
AUTO
ISO
Quick Menu
This menu enables you to quickly set functions that are frequently used
during recording without calling the menu screen. You can also change the
Quick menu display method and the items to display.
Display the Quick menu.
1
≥Press [Q].
Select a menu item.
2
≥Press 3421.
≥Directions on the diagonal can also
be selected using the joystick.
≥Selection is also possible by
rotating .
≥Selection is also possible by
touching a menu item.
Select a setting item.
3
≥Rotate or .
≥Selection is also possible by
touching a setting item.
Close the Quick menu.
4
≥Press the shutter button halfway.
≥You can also close the menu by
pressing [Q].
71
Page 72

3. Basic Operations
0 Some items cannot be set depending on the recording mode or camera
settings.
0 The Quick menu can be customised:
[] ¨ [ ] ¨ [Q.MENU Settings] (l 291)
72
Page 73

3. Basic Operations
Menu Operation Methods
In this camera, the menu is used for setting a wide variety of functions and
performing camera customisations.
Menu operation is possible in a variety of ways including using the cursors,
joystick, dials, and touch.
Configuration and operation parts of the menu
The menu can be operated by pressing 21 to move between menu screens.
Use the operation parts indicated below to operate the main tab, the sub tab, and
menu items without moving to the corresponding menu levels.
0 You can also operate the menu by touching the icons on the main tab and the sub
tab, menu items and setting items.
A Main tab ([Q] button)
B Sub tab ( )
C Menu item ( )
D Setting item
Display the menu.
1
≥Press .
Select a main tab.
2
≥Press 34 to select a main tab and
then press 1.
≥You can also perform the same
operation by rotating to select
the main tab and then pressing
or .
73
Page 74

3. Basic Operations
Select a sub tab.
3
≥Press 34 to select a sub tab and
then press 1.
≥You can also perform the same
operation by rotating to select
the sub tab and then pressing
or .
Select a menu item.
4
≥Press 34 to select a menu item
and then press 1.
≥You can also perform the same
operation by rotating to select
the menu item and then pressing
or .
Select a setting item and then
5
confirm your selection.
≥Press 34 to select a setting item
and then press or .
≥You can also perform the same
operation by rotating to select
the setting item and then pressing
or .
The display and selection methods differ depending on the setting item.
0
74
Page 75

3. Basic Operations
Close the menu.
6
≥Press the shutter button halfway.
≥You can also close the menu by
pressing [ ] several times.
0 For details about menu items, refer to Menu Guide. (l 303)
Displaying Descriptions About Menu Items and Settings
If you press [DISP.] while a menu item or
setting item is selected, a description about
the item is displayed on the screen.
Greyed Out Menu Items
Menu items that cannot be set are
displayed greyed out.
If you press or while a greyed out
menu item is selected, the reason why it
cannot be set is displayed.
The reason why a menu item cannot be set may
0
not be displayed depending on the menu item.
75
Page 76

3. Basic Operations
[Reset]
Return each of the following settings to the default setting:
– Recording settings
– Network settings (settings of [Wi-Fi Setup] and [Bluetooth])
– Setup and custom settings (other than [Wi-Fi Setup] and [Bluetooth])
¨ [ ] ¨ [ ] ¨ Select [Reset]
0 If you reset the setup and custom settings, the following settings will also be
reset:
– Settings of [Rotate Disp.], [Picture Sort], [Magnify from AF Point], [HLG View
Assist (Monitor)], and [Delete Confirmation] in the [Playback] menu
0 The folder numbers and clock settings are not reset.
0 List of default settings (l 485)
76
Page 77

4. Easy Recording
Intelligent Auto Mode
The [iA] mode (Intelligent Auto mode) can record images using settings
automatically selected by the camera.
The camera detects the scene to set the optimal recording settings
automatically to match the subject and recording conditions.
Set the mode dial to [iA].
1
Aim the camera at the subject.
2
≥When the camera detects the
scene, the recording mode icon
changes.
(Automatic Scene Detection)
Adjust the focus.
3
≥Press the shutter button halfway.
≥Once the subject is in focus, the
focus indication lights.
(When the subject is not in focus,
the indication blinks.)
[ ] of the AF mode works and the AF area is displayed aligned to any
0
humans or animals.
77
Page 78

4. Easy Recording
Start recording.
4
≥Press the shutter button fully.
0 Backlight compensation operates automatically to prevent subjects from
appearing dark when there is a backlight.
Types of Automatic Scene Detection
: Scenes detected during picture taking
: Scenes detected during video recording
:
:
i-Low Light
:
¢2
i-Night Scenery
i-Portrait & Animal
i-Night Portrait
¢1 Detected when animal detection is disabled.
¢2 Detected when using an external flash.
i-Portrait
:
¢1
:
:
78
i-Scenery
:
i-Food
:
:
i-Macro
:
i-Sunset
Page 79

4. Easy Recording
0 If none of the scenes are applicable, recording is with [ ] (standard setting).
0 Different scene types may be selected for the same subject depending on the
recording conditions.
AF Mode
Changing the AF mode.
0
Each press of [ ] changes the AF mode.
The camera detects a person’s face, eyes,
and body (entire body or upper half of the
body) and the body of animals, and adjusts
([Face/Eye/
Body/Animal
Detect.])
the focus.
0 Each press of switches the person,
animal or eye to be brought into focus. It
cannot be switched by touching.
0 Animal detection will maintain the enable/disable setting selected
during other than [iA] mode.
When the focus mode is set to [AFC], the
AF area follows the movement of the
subject, maintaining focusing.
([Tracking])
Aim the AF area over the subject and then
press and hold the shutter button halfway.
0 The camera will track the subject while the shutter button is
pressed halfway or fully.
0 For information about AF modes, refer to page 99 and 102.
Flash
When recording using a flash, the camera switches to the appropriate flash
mode for the recording conditions.
When Slow Sync. ([ ], [ ]), be careful with regard to camera shake
because the shutter speed becomes slow.
0 When [ ] or [ ], Red-Eye Removal works.
0 For information about external flashes, refer to page 216.
79
Page 80

4. Easy Recording
××
××
×
Recording Using Touch Functions
Touch Shutter
This function focuses on a touched position and then releases the shutter.
0 With the default settings, the Touch Tab is not displayed.
Set [Touch Tab] to [ON] in [Touch Settings]. (l 333)
Touch [ ].
1
Touch [ ].
2
≥The icon changes to [ ]
indicating that you can start Touch
Shutter recording.
Touch the subject you wish to
3
focus on.
≥The AF operates and the image will
be recorded.
How to Disable Touch Shutter
Touch [ ].
The icon changes to [ ].
0
0 If focus adjustment failed, the AF area will be lit red.
80
Page 81

4. Easy Recording
×
AE
ュリヴヱハ
6HW
5HVHW
Touch AE
This function adjusts the brightness according to a touched position.
When a subject’s face appears dark, you can make the screen brighter to
match the face.
0 With the default settings, the Touch Tab is not displayed.
Set [Touch Tab] to [ON] in [Touch Settings]. (l 333)
Touch [ ].
1
Touch [ ].
2
≥The Touch AE settings screen
appears.
Touch the subject to which
3
you wish to adjust the
brightness.
0 To return the position to which to adjust
the brightness to the centre, touch
[Reset].
Touch [Set].
4
×
How to Disable Touch AE
Touch [ ].
0 You can also adjust both the focus and brightness to those of the position you
touch. (At this time, Touch AE is not available):
[] ¨ [ ] ¨ [Touch Settings] ¨ [Touch AF] ¨ [AF+AE] (l 11 3)
81
Page 82

5. Image Recording
[Aspect Ratio]
You can select the image aspect ratio.
¨ [ ] ¨ [ ] ¨ Select [Aspect Ratio]
[4:3] Aspect ratio of a 4:3 monitor
[3:2] Aspect ratio of a standard film camera
[16:9] Aspect ratio of a 16:9 TV
[1:1] Square aspect ratio
[65:24]
[2:1]
0 [16:9] and [1:1] aspect ratios are not available when using the following
functions:
– 6K photo
– [Post-Focus] (when set to [6K 18M])
0 [65:24] and [2:1] aspect ratios are not available when using the following
functions:
– [iA] mode
– Taking burst pictures
– [6K/4K PHOTO]/[Post-Focus]
– [Time Lapse Shot]
– [Stop Motion Animation]
– [HLG Photo]
– [High Resolution Mode]
– [Filter Settings]
– [Multiple Exposure]
0 When using APS-C lenses, [65:24]/[2:1] are not available.
0 You can register functions to Fn buttons:
[] ¨ [ ] ¨ [Fn Button Set] ¨ [Setting in REC mode] ¨ [Aspect Ratio]
(l 278)
Panoramic aspect ratio
82
Page 83

5. Image Recording
[Picture Size]
Sets the picture’s image size. The image size varies depending on the
[Aspect Ratio] or the lens used.
When an APS-C lens is used, the image area switches to the one for
APS-C, thereby narrowing the angle of view.
¨ [ ] ¨ [ ] ¨ Select [Picture Size]
[Aspect
Ratio]
[4:3]
[3:2]
[16:9]
[1:1]
[65:24] [L] (26M) 8368k3088 s
[2:1] [L] (35M) 8368k4184 s
When [Ex. Tele Conv.] is set, the [M] and [S] image sizes are indicated with [ ].
0
When using full-frame lenses When using APS-C lenses
[L] (41.5M) 7440k5584 [L] (18M) 4880k3664
[M] (21M) 5296k3968 [M] (9M) 3472k2608
[S] (10.5M) 3792k 2848 [S] (4.5M) 2480k1856
[L] (46.5M) 8368k5584 [L] (20M) 5504k3664
[M] (23.5M) 5952k3968 [M] (10M) 3920k2608
[S] (12M) 4272k2848 [S] (5M) 2784k1856
[L] (39.5M) 8368k4712 [L] (17M) 5504k3096
[M] (20M) 5952k3352 [M] (8M) 3840k2160
[S] (10M) 4272k2400 [S] (2M) 1920k1080
[L] (31M) 5584k5584 [L] (13.5M) 3664k3664
[M] (15.5M) 3968k3968 [M] (7M) 2608k2608
[S] (8M) 2848k2848 [S] (3.5M) 1856k1856
Picture size
83
Page 84

5. Image Recording
0 [Picture Size] is not available when the following functions are being used:
– [6K/4K PHOTO]/[Post-Focus]
– [RAW] ([Picture Quality])
– [High Resolution Mode]
– [Multiple Exposure]
0 You can register functions to Fn buttons:
[] ¨ [ ] ¨ [Fn Button Set] ¨ [Setting in REC mode] ¨ [Picture Size]
(l 278)
84
Page 85

[Picture Quality]
Set the compression rate used for storing pictures.
¨ [ ] ¨ [ ] ¨ Select [Picture Quality]
Setting File format Settings details
[FINE]
[STD.]
[RAWrFINE]
[RAWrSTD.]
[RAW] RAW This records RAW images.
JPEG
RAWiJPEG
JPEG images that give priority to image quality.
JPEG images of standard image quality.
This is useful for increasing the number of
recordable pictures without changing the picture
size.
This records RAW and JPEG images ([FINE] or
[STD.]) simultaneously.
5. Image Recording
85
Page 86

5. Image Recording
Note on RAW
RAW format refers to a data format of images that have not been processed on
the camera.
Playback and editing of RAW images require the camera or the dedicated
software.
0 You can process RAW images on the camera. (l 271)
0 Use software (“SILKYPIX Developer Studio” by Ichikawa Soft Laboratory) to
process and edit RAW files on a PC. (l 430)
0 Pictures taken with [RAW] cannot be displayed enlarged to the maximum
magnification during playback.
Take pictures with [RAWiFINE] or [RAWiSTD.] if you want to check their
focus on the camera after recording.
0 RAW images are always recorded in the [L] size of the [3:2] aspect ratio.
0 When you delete an image recorded with [RAWiFINE] or [RAWiSTD.] on
the camera, both the RAW and JPEG images will be deleted simultaneously.
0 [Picture Quality] is not available when the following functions are being used:
– [6K/4K PHOTO]/[Post-Focus]
– [High Resolution Mode]
– [Multiple Exposure]
0 You can register functions to Fn buttons:
[] ¨ [ ] ¨ [Fn Button Set] ¨ [Setting in REC mode] ¨ [Picture Quality]
(l 278)
86
Page 87

5. Image Recording
[Double Card Slot Function]
This sets the way recording to the card slots 1 and 2 is performed.
¨ [ ] ¨ [ ] ¨ Select [Double Card Slot Function]
Selects the priority of card slots for recording.
[Relay Rec]
[Recording
Method]
[Backup
Rec]
[Allocation
Rec]
0 The double slot function is not available for AVCHD videos, as these cannot
be recorded to card slot 1 (XQD card).
Notes about Backup Recording
0 We recommend using cards of the same capacity.
0 When using the following combinations of cards, recording videos, 6K/4K
photos, and recording with [Post-Focus] are not available:
– SDXC memory card and XQD card of 32 GB or less
– SD memory card or SDHC memory card, and XQD card over 32 GB
0 You can register card switching of [Destination Card Slot] to the Fn button:
[] ¨ [ ] ¨ [Fn Button Set] ¨ [Setting in REC mode] ¨ [Destination
Card Slot] (l 278)
[Destination Card Slot]: [ ]/[ ]
Relays recording to the card in the other card
slot after the first card runs out of free space.
Records the same images to both cards
simultaneously.
Allows you to specify the card slot to be used for
recording for different image formats.
[JPEG/HLG Photo Destn.]/[RAW Destination]/
[6K/4K Photo Destination]/[Video
Destination]
87
Page 88

5. Image Recording
100ABCDE
PABC0001.JPG
[Folder / File Settings]
Set the folder and file name where to save the images.
Folder name File name
1 Folder number (3 digits, 100 to 999) 3
2 5-character user-defined segment 4 3-character user-defined segment
Colour space
([P]: sRGB, [ _ ]: AdobeRGB)
5 File number (4 digits, 0001 to 9999)
6 Extension
¨ [ ] ¨ [ ] ¨ Select [Folder / File Settings]
[Select
Folder]
Selects a folder for storing images.
0 The folder name and the number of files that can be stored will
¢
be indicated.
Creates a new folder with an incremented folder number.
0 If there are no recordable folders in the card, a screen for
[Create a New
Folder]
[File Name
Setting]
¢ When [Double Card Slot Function] is set to [Allocation Rec], [Select Folder (Slot
1(XQD))] and [Select Folder (Slot 2(SD))] will be displayed.
resetting the folder number is displayed.
Increments the folder number without changing the
[OK]
5-character user-defined segment (2 above).
[Change]
[Folder
Number
Setting]
Changes the 5-character user-defined segment
(2 above). This will also increment the folder number.
Uses the 3-character user-defined segment
(4 above) to set the folder number (1 above).
Link]
[User
Changes the 3-character user-defined segment
(4 above).
0 Follow the steps on page 369 when the character entry screen is displayed.
Available characters: alphabetic characters (upper-case), numerals, [ _ ]
88
Page 89

5. Image Recording
0 Each folder can store up to 1000 files.
0 File numbers are assigned sequentially from 0001 to 9999 in the order of
recording.
If you change the storage folder, a number continuing on from the last file
number will be assigned.
0 In the following cases, a new folder with an incremented folder number will be
created automatically when the next file is saved:
– The number of files in the current folder reaches 1000.
– The file number reaches 9999.
0 New folders cannot be created when there are folders numbered from 100 all
the way up to 999.
We recommend backing up your data and formatting the card.
0 [Select Folder] is not available when [Backup Rec] in [Double Card Slot
Function] is being used.
89
Page 90

5. Image Recording
[File Number Reset]
Resets the file number of the next recording to 0001.
¨ [ ] ¨ [ ] ¨ Select [File Number Reset]
Settings: [Card Slot 1(XQD)]/[Card Slot 2(SD)]
0 When recording is performed after resetting this item, the folder number is
updated and the file number starts from 0001.
0 Folder numbers from 100 to 999 can be assigned.
When the folder number reaches 999, the file number cannot be reset.
We recommend backing up your data and formatting the card.
0 To reset the folder number to 100:
1 Perform [Card Format] to format the card.
2 Perform [File Number Reset] to reset the file number.
3 Select [Yes] on the folder number reset screen.
90
Page 91

6. Focus/Zoom
Selecting the Focus Mode
Select the focusing method (focus mode) to match subject movement.
Set the focus mode lever.
This is suitable for recording still subjects.
[S]
([AFS])
([AFC])
[MF]
While the shutter button is pressed halfway, this maintains a single
point of focus.
The focus stays locked while the shutter button is pressed halfway.
This is suitable for recording moving subjects.
While the shutter button is pressed halfway, the focus is constantly
[C]
adjusted according to the movement of the subject.
0 This predicts the movement of the subject, maintaining focusing.
(Movement prediction)
Manual focusing. Use this when you want to fix the focus or avoid
activating AF. (l 11 7)
0 [AFC] works in the same manner as [AFS] in the following situations:
– [ ] mode
– In low light situations
0 When the following functions are being used, [AFC] switches to [AFS]:
– [65:24]/[2:1] ([Aspect Ratio])
– [High Resolution Mode]
0 When using [High Speed Video], [AFS] and [AFC] change to [MF].
0 This function is not available for Post-Focus recording.
91
Page 92

6. Focus/Zoom
Using AF
AF (Auto Focus) refers to automatic focusing.
Select the focus mode and the AF mode appropriate for the subject and
scene.
Set the focus mode to [S] or
1
[C].
≥Set the focus mode lever. (l 91)
Select the AF mode.
2
≥Press [ ] to display the AF mode
selection screen, and set using
or . (l 98)
0
In [iA] mode, each press of [ ]
switches between [ ] and [ ].
(l 79)
Press the shutter button
3
halfway.
≥The AF operates.
0
If maintaining focus on the subject is
difficult during video recording with [AFC],
press the shutter button halfway again to
re-adjust the focus.
92
Page 93

6. Focus/Zoom
Focus
In focus Not in focus
Focus icon A Lights Blinking
AF area B Green Red
AF beep Two beeps —
Low illumination AF
0
In dark environments, low illumination AF automatically operates, and the focus icon
is indicated as [ ].
LOW
0 Achieving focus may take more time than usual.
Starlight AF
0
If the camera detects stars in the night sky after determining low illumination AF, then
Starlight AF will be activated.
When focus is achieved, the focus icon will display [ ], and the AF area will be
displayed on the area in focus.
STAR
0 Edges of the screen cannot detect Starlight AF.
93
Page 94

6. Focus/Zoom
[AF ON] button
You can also activate AF by pressing [AF ON].
Subjects and recording conditions that make focusing difficult with AF
mode
– Fast-moving subjects
– Extremely bright subjects
– Subjects without contrast
– Subjects recorded through windows
– Subjects near shiny objects
– Subjects in very dark locations
– When recording subjects both distant and near
0 When recording with [AFC], if you move the zoom from the wide-angle end to
the telephoto end, or suddenly reduce the distance to the subject, it may take
time to achieve focus.
0 If using the zoom after achieving focus, the focus may be erroneous. In that
case, re-adjust the focus.
0 The AF beep volume and sound can be changed:
[] ¨ [ ] ¨ [Beep] ¨ [AF Beep Volume]/[AF Beep Tone] (l 354)
Magnify the AF Area Position ([AF-Point Scope])
This magnifies the focus position when the AF mode is [ ], [ ], or [ ].
(In other AF modes, the centre of the screen is magnified.)
This magnifies the subject, allowing you to check focus and observe an
enlarged subject as with a telephoto lens.
Use the Fn button registered with [AF-Point Scope] to operate. In default settings,
0
this is registered in [Fn1].
For information about the Fn button, refer to page 278.
94
Page 95

6. Focus/Zoom
On the recording screen, press and hold
[Fn1].
Part of the screen is displayed enlarged while
0
[Fn1] is pressed and held.
0 When the screen is enlarged, pressing the
shutter button halfway re-acquires focus in a
small central AF area.
0 When the screen is enlarged, turn or
to adjust the magnification.
Use for more detailed adjustments.
0 If the camera temperature rises under any of the following conditions, [ ]
may be displayed and use of AF Point Scope may not be possible.
Wait until the camera cools down.
– During continuous usage of AF Point Scope
– When the ambient temperature is high
0 When the screen is enlarged, [AFC] changes to [AFS].
0 When the following functions are being used, AF Point Scope cannot be used:
– Video recording/[6K/4K PHOTO]/[Post-Focus]
– [65:24]/[2:1] ([Aspect Ratio])
– [Miniature Effect] ([Filter Settings])
– [Multiple Exposure]
0 You can change the display method of the magnified screen:
[] ¨ [ ] ¨ [AF-Point Scope Setting] (l 332)
95
Page 96

6. Focus/Zoom
[AF Custom Setting(Photo)]
Select features of AF operation when recording using [AFC] that are
appropriate for the subject and scene.
Each of these features can be further customised.
Set the focus mode to [AFC].
1
(l 91)
Set [AF Custom
2
Setting(Photo)].
≥ ¨ [ ] ¨ [ ] ¨ [AF Cu sto m
Setting(Photo)]
[Set 1] Basic general-purpose setting
[Set 2]
[Set 3]
[Set 4]
0 When the following function is being used, [AF Custom Setting(Photo)] is not
available:
– [6K/4K PHOTO]
0 You can register functions to Fn buttons:
[] ¨ [ ] ¨ [Fn Button Set] ¨ [Setting in REC mode] ¨ [AF Custom
Setting(Photo)] (l 278)
Setting in which the subject moves in only one direction at a
constant speed
Setting for scenes in which the subject moves in random
directions, and obstacles are likely to appear
Setting for scenes where the speed of the subject changes
significantly
96
Page 97

Adjusting AF Custom Settings
1
Press 21 to select the AF Custom setting type.
2
Press 34 to select items and press 21 to adjust.
To reset settings to the default, press [DISP.].
0
3
Press or .
Sets the tracking sensitivity for the movement of subjects.
When the distance to the subject changes drastically, the
i
camera re-adjusts the focus immediately. You can bring
[AF Sensitivity]
[AF Area
Switching
Sensitivity]
different subjects into focus one after another.
When the distance to the subject changes drastically, the
camera waits for a short period of time before re-adjusting
j
the focus. This allows you to prevent the focus from being
accidentally re-adjusted when, for example, an object
moves across the image.
Sets the sensitivity for switching the AF area to match subject
movement.
(When in an AF mode where the AF area uses 225-area
focusing)
When the subject moves out of the AF area, the camera
i
immediately switches the AF area to keep the subject in
focus.
The camera switches the AF area at a gradual pace.
j
Effects caused by a slight movement of the subject or by
obstacles in front of the camera will be minimised.
Sets the level of movement prediction for changes in the speed
of subject movement.
0 At larger setting values, the camera tries to maintain focus by
[Moving Object
Prediction]
responding even to sudden movements of the subject.
However, the camera becomes more sensitive to slight
movements of the subject, so focusing may become unstable.
0 This is suited to a subject with minimal changes in speed.
i1
These are suited to a subject that changes its speed.
i2
6. Focus/Zoom
97
Page 98

6. Focus/Zoom
Selecting the AF Mode
Select the focusing method to match the position and number of subjects.
Press [ ].
1
≥The AF mode selection screen
appears.
Select the AF mode.
2
≥Press 21 to select an item and
then press or .
[Face/Eye/Body/
Animal Detect.]
[Tracking] l 102
[225-Area] l 104
[Zone (Vert./ Horz.)] l 105
[Zone (Square)]
[Zone (Oval)] l 105
[1-Area+] l 107
[1-Area] l 107
[Pinpoint] l 108
ヤヒ
to [Custom1] to
ヤピ
¢ This is not displayed with the default settings. From [Show/Hide AF Mode],
you can set the items to display on the selection screen. (l 331)
[Custom3]
¢
l 99
¢
l 105
l 11 0
98
Page 99

6. Focus/Zoom
0 In [Time Lapse Shot], [ ] cannot be used.
0 When the focus mode is set to [AFC], [ ] is not available.
0 When the following functions are being used, the AF mode is fixed to [ ]:
– [65:24]/[2:1] ([Aspect Ratio])
– [Miniature Effect] ([Filter Settings])
0 The AF mode cannot be set when using Post-Focus.
[Face/Eye/Body/Animal Detect.]
The camera detects a person’s face, eyes, and body (entire body or upper
half of the body) and adjusts the focus.
With the default settings, animal detection will also operate, enabling
detection of animals, such as birds, canines (including wolves), and felines
(including lions).
When the camera detects a person’s face
(A/B) or body or an animal’s body (C), an
AF area is displayed.
Yellow
White
Eye detection works only for the eyes inside the
0
yellow frame (A).
AF area to be brought into focus.
The camera selects this
automatically.
Displayed when multiple subjects
are detected.
0 When a person’s eyes are detected, the eye closer to the camera will be
brought into focus.
The exposure will be adjusted to the face. (When [Metering Mode] is set to
[])
0 The camera can detect the faces of up to 15 people.
0 The camera can detect a combined total of up to 3 human and animal bodies.
0 If any humans or animals are not detected, the camera operates as [ ].
99
Page 100

6. Focus/Zoom
Specify the Person, Animal, or Eye to Bring into Focus
When the person or animal to be brought into focus is shown using the
white AF area, you can change this to a yellow AF area.
≥Touch operation
Touch the person, animal or eye indicated
with the white AF area.
The AF area will change to yellow.
0
0 Touching outside the AF area displays the AF
area setting screen. Touch [Set] to set the [ ]
AF area at the position touched.
0 To cancel the setting, touch [ ].
≥Button operation
Press .
0
Each press of switches the person, animal or eye to be brought into focus.
0 To cancel the settings specified, press again.
Enable/Disable Animal Detection
1
Press [ ] to display the AF mode selection screen.
2
Select [ ] and then press 3.
This disables animal detection, and the icon changes to [ ].
0
0 Press 3 again to enable animal detection.
100
 Loading...