

Page 1
Users’ Guide
Upgrade Utility
for Audio Mixer
WR-DA7
Version 2.0
The meter bridge shown in photo is one of the optional accessories.
Before attempting to connect or operate this product, please read these instructions completely.
Page 2

TRADEMARKS
All trademarks are the property of their respective copyright holder for use in
this document, including but not limited to;
ProTools is a registered trademark of DigiDesign
ADAT is a registered trademark of ALESIS Corp.
CS-10 is a registered trade mark of JL Cooper Electronics
Macintosh is a registered trademark of Apple Computer, Inc.
Windows is either a trademark or a registered trademark of Microsoft
Corporation
Copyright 2000
Limit of Liability/Disclaimer of Warranty: The author, Audio Video Systems
Division of Matsushita Communication Industrial Co., LTD and Professional
Audio Division of Panasonic Broadcast and Digital Systems Company have
used their best efforts in preparing this book. However, Audio/Video Systems
Division of Matsushita Communication Industrial Co., LTD and Professional
Audio Division of Panasonic Broadcast and Digital Systems Company make
no representation or warranties with respect to the accuracy or completeness
of the contents of this book and hereby specifically disclaims any implied
warranties or merchantability or fitness for any particular purpose and shall
in no event be liable for any loss of profit or any other commercial damage,
including but not limited to special, incidental, consequential, or other
damages.
2
Page 3

Panasonic DA7 Upgrade Utility License Agreement
Matsushita Communication Industrial Co., Ltd. (“MCI”) permits you to use the
Panasonic DA7 Upgrade Utility software (“Software”) on condition of your acceptance
of the following terms. As use of the Software shall be deemed that you have
accepted the following terms, please read the following terms carefully before you use
the Software.
1. Copyright and License for use
MCI grants you an individual and a non-exclusive right to use the Software on only
single computer. You own the magnetic media on which the Software is originally or
subsequently recorded or fixed, but MCI retains title to and ownership in the Software.
The Software and the accompanying documentation are copyrighted by MCI.
2. Prohibition and Restrictions
You may not modify, adapt, translate, decompile, disassemble, reverse-engineer, or
create derivative works based on the Software, nor may you allow another person to
do so. The Software may not be duplicated, corrected, modified, lent, leased, sold,
distributed, licensed or disposed of in any other way in part or in whole. The Software
may not be transmitted over a network to another computer without written
authorization from MCI. You may transfer the Software and accompanying
documentation on a permanent basis to transferee provided it is for non-commercial
purposes and you retain no copies and recipient agrees to the terms of this
Agreement.
3. Limited Responsibility
MCI shall not be liable for any direct, indirect, consequential, or incidental damages
(including damages from but not limited to data loss, loss of business profit, business
interruption, or loss of business information) arising out of the use of or inability to use
the Software even, if MCI has been advised of the possibility of such damages.
3
Page 4

4
(This page left blank intentionally.)
Page 5

5
The DA7 Upgrade Utility
Users’ Guide
Introduction
Welcome to New Version 2.0 Operating System for the DA7.
We hope you are enjoying your DA7, and that you will find that the 64
enhancements we have included in the Version 2.0 operating system will
increase your enjoyment of our product. Please note that there are changes
in the default settings of the DA7, some of which will affect how you operate
your mixer. Please take a few moments to review the changes.
This document covers ALL upgraded features to the original DA7 Operating
System (Version 1.01/1.02). Therefore, we strongly recommend that you
review this document before you upgrade your console so that you are
familiar with all the new features.
We also recommend that you print and keep this document as a supplement
to the DA7 operation manual that came with your DA7. If you would like to
have an electronic copy of the DA7 user guide, it can be downloaded from
http://www.panasonic.com/proaudio. Once you have entered this site, go to
the download section and select DA7 User Guide.
Page 6

6
Important Notes:
Due to the fact that there are many new default settings in the Version
2.0 upgrade, we are recommending that you do a Master Reset of the
console after the upgrade. Therefore you should backup any settings
in the Libraries, Scene Memories, Mixes, etc. BEFORE you begin the
upgrade process. Instruction for this process can be found in Section
1. After the upgrade, make certain that you look at the MIDI REMOTE
and INPUT MTX windows on the LCD to see if they are properly
assigned. If they are not, please reset them to your desired settings or,
do a master reset to the console to return the DA7 to the new factory
default settings.
There are several updates to the default settings that may have an affect on
the settings in your console. This will protect you from accidental erasure of
any of your presets. After the upgrade, simply restore the data you have
saved following the instructions in Section 1.
If you are planning to use our optional automation software package (MAX),
please be aware that you must be running at least O.S. Version 1.10 for it to
operate properly, and we recommend that you upgrade your DA7 to Version
2.0 for optimum performance.
Some of the features documented here are from intermediate upgrade
versions. If you are upgrading your console from Version 1.01 or 1.02, all of
the features in this document will apply to you. If you have previously
upgraded your console to Version 1.10-1.20-1.21 or 1.22, you have already
been using some of the features documented here in Section 2.
If you are upgrading from version 1.21 or 1.22, you should follow all the
instructions in Section 1, and then you may proceed directly to Section 3.
Contents:
Section 1 - Upgrade Utility instructions
Section 2 - Upgrade from Version 1.01/1.02/1.10/1.20
Section 3 - Upgrade from Version 1.21 or 1.22
Section 4 - APPENDIX - New Default Settings
Page 7

1-1
Section 1
Upgrade Utility Instructions
Contents
Preface . . . . . . . . . . . . . . . . . . . . . . . . . . . . . . . . . . . . . . 1-2
Installation. . . . . . . . . . . . . . . . . . . . . . . . . . . . . . . . . . . 1-2
Cables and Connections. . . . . . . . . . . . . . . . . . . . . . . . . 1-4
Setting up the DA7. . . . . . . . . . . . . . . . . . . . . . . . . . . . . 1-5
Operating the DA7 Upgrade Utility . . . . . . . . . . . . . . . . . 1-7
[SETUP] . . . . . . . . . . . . . . . . . . . . . . . . . . . . . . . . . . 1-8
[VERSION]. . . . . . . . . . . . . . . . . . . . . . . . . . . . . . . . 1-9
[BACKUP]. . . . . . . . . . . . . . . . . . . . . . . . . . . . . . . . . 1-10
[UPGRADE] . . . . . . . . . . . . . . . . . . . . . . . . . . . . . . . 1-13
[RESTORE] . . . . . . . . . . . . . . . . . . . . . . . . . . . . . . . . 1-16
[EXIT] . . . . . . . . . . . . . . . . . . . . . . . . . . . . . . . . . . . 1-18
Troubleshooting. . . . . . . . . . . . . . . . . . . . . . . . . . . . . . . 1-19
Page 8

1-2
Preface
The DA7 Upgrade Utility is a multifunction software manager program
specifically designed to allow you to perform operating system upgrades, as
well as backup and restore functions for the library, scene memory,
automation data, as well as setup data for the DA7.
Using the serial ports on the DA7 and your computer, data can be sent to or
from a DA7 and then saved to your computer hard disk for backup and
retrieval. The memories and programs can be retrieved individually, or in
groups. The retrieved memory and program titles can be edited using the
computer’s keyboard. The data, including edited titles, can be transmitted
between the computer and the DA7.
Installation
It is recommended that you perform a backup of your current data BEFORE
you perform an upgrade to your DA7's operating system.
Macintosh Version
1. Copy the files for installation file (DA7UPINS) to a folder on to your hard
drive.
2. Once you have loaded the file, you need to open the folder to gain access
to the following files:
DA7UPG - Executable file of the Upgrade Utility
V200R23.mot - Upgrade file for the DA7
CNV - Data Conversion folder for old backup versions
BKUP - Backup Data folder
3. Open the file “DA7UPG”.
4. Test the communication path between the computer and your DA7 by
clicking on the "VERSION" button on your computer in the open window.
If it is properly connected, you will see the version of software that is
currently in your DA7 displayed, and the “BACKUP” and “RESTORE”
buttons will become active. (You need to set up DA7 and Upgrade Utility
Configuration before test. To set up Configuration, read the following
chapter “Cables and Connections”, “Setting up the DA7”, and “[Setup]” in
“Operating the DA7 Upgrade Utility”.)
Page 9

1-3
Windows Version
1. Copy the files for installation file (DA7UPINS.EXE) to folder on to your
hard drive.
2. Double–click on “DA7IPINS.exe”, If you are "unzipping" the file, you can
unzip it. The installation file installs the upgrade utility in
“C:\UpgradeDA7”.
3. Once you have loaded the file, you need to open the folder to gain access
to the following files:
DA7UPG.exe - Executable file of the Upgrade Utility
V200R23.mot - Upgrade file for the DA7
CNV - Data Conversion folder for old backup versions
BKUP - Backup Data folder
4. Click on "DA7UPG.exe" to open the utility.
5. Test the communication path between the computer and your DA7 by
clicking on the "VERSION" button on your computer in the open window.
If it is properly connected, you will see the version of software that is
currently in your DA7 displayed, and the BACKUP and RESTORE buttons
will become active. (You need to set up DA7 and Upgrade Utility
Configuration before test. To set up Configuration, read the following
chapter “Cables and Connections”, “Setting up the DA7”, and “[Setup]” in
“Operating the DA7 Upgrade Utility”.)
Page 10
1-4
Cables and Connections
For Macintosh Computer
Use ONLY the recommended serial cable (cross cable) with a wiring
pattern as described below. This cable is the same cable used for the
ImageWriter II printer. Do NOT use a standard Macintosh Serial cable.
Use this to connect between the modem port or printer port of the
computer and the TO PC port of the DA7.
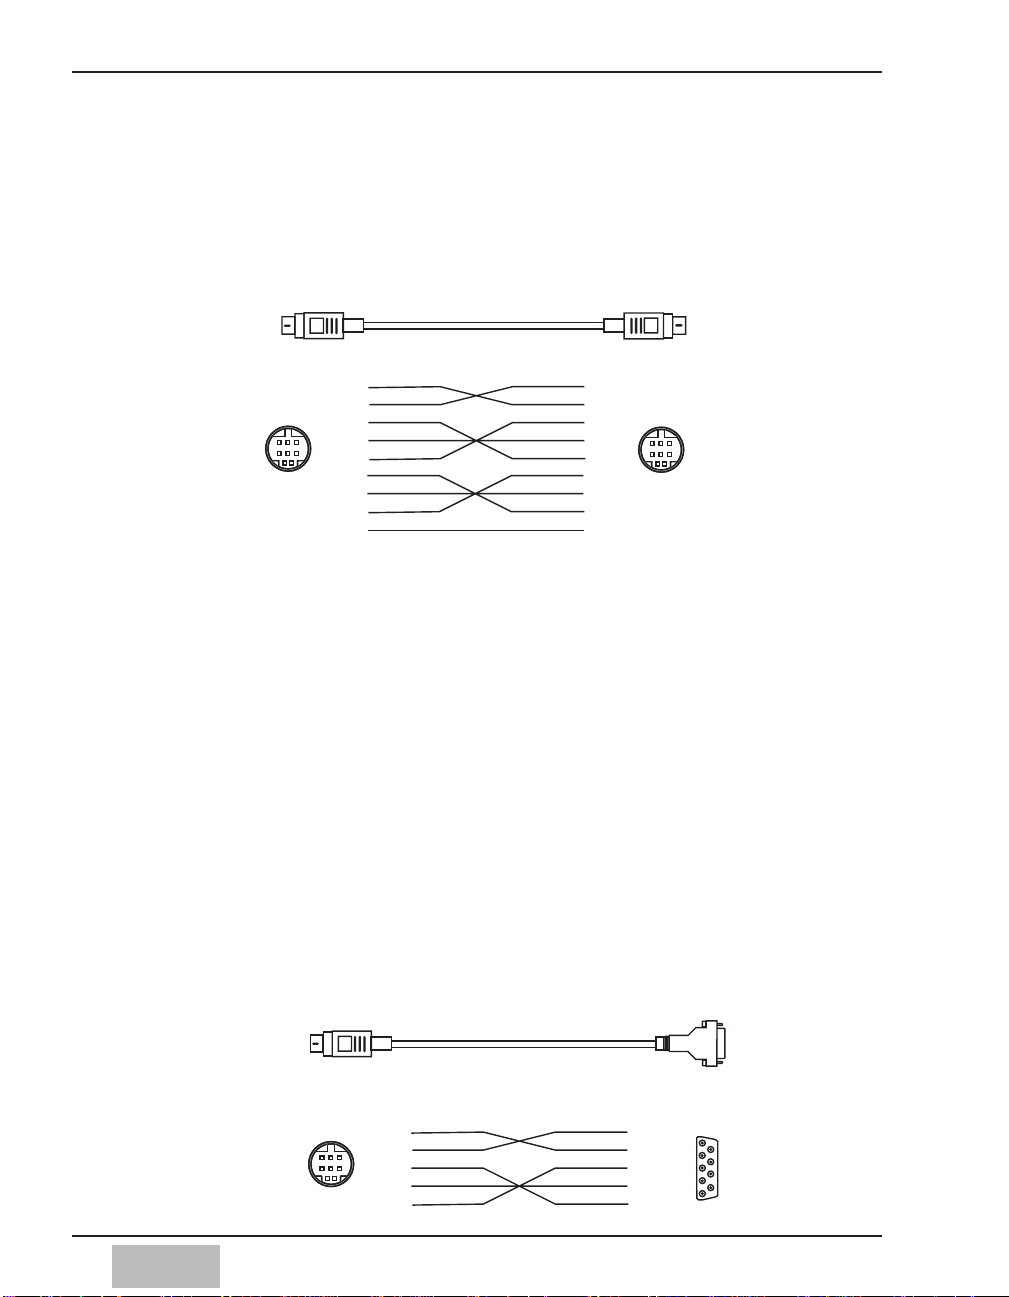
For Windows/95 or PC compatible computer
Use ONLY a serial cable with a wiring pattern as described below. This
cable is available from Panasonic Pro Audio in the United States, part
number DA/DB-DIN. Do NOT use a standard serial cable.
Use this cable to connect between the serial port (COM1, COM2, COM3
or COM4) of your PC and the TO PC port of the DA7.
When using a Windows computer, use the following cable:
Pinout configuration of the cable. When building this cable, connect the
pins in the following manner:
DA7 port (Mini DIN 8p) pin # PC port (D-sub 9p) pin #
1 . . . . . .8
2 . . . . . .7
3 . . . . . .2
4 . . . . . .5
5 . . . . . .3
7
8
3
5
2
1
2
3
4
5
Pin #
Pin #
1
2
3
4
5
6
7
8
Frame
1
2
3
4
5
6
7
8
Frame
Shield wire
Pin #
Pin #
Mini DIN 8 (Male) DB9 (Female)
Windows
Computer
TO PC of the DA7
Mini DIN 8 (Male)
Mini DIN 8 (Male)
TO PC of the DA7
MODEM or
Printer port of
Mac Computer
Page 11
1-5
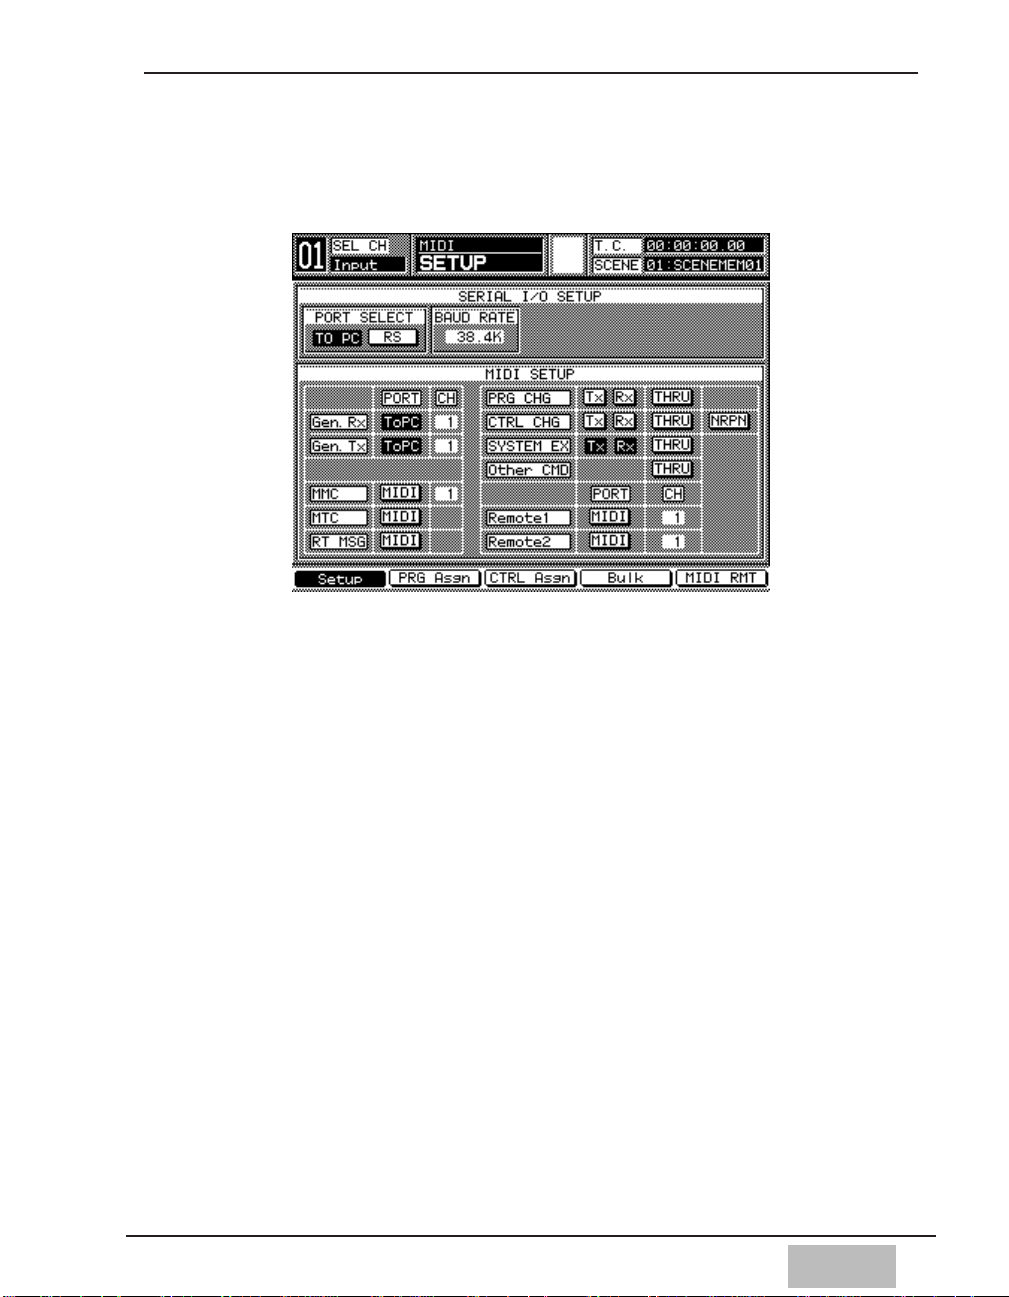
Setting up the DA7
Set up the DA7 for transmitting and receiving data with your PC.
1. Select the MIDI button in the SETUP section on the TopPanel of the DA7
to display the [MIDI>SETUP] Window of the LCD display. This is so you
can set up the transmit and receive data parameters.
2. Select [TO PC] in the [PORT SELECT] area in the [SERIAL I/O SETUP]
area.
3. Cursor to [BAUD RATE] within the [SERIAL I/O SETUP] area of the
[MIDI>SETUP] window. Use the parameter dial to select [38.4K].
4. Cursor to [PORT], and select [TO PC] in both the [Gen RX] and [Gen TX]
fields in [MIDI>SETUP] window.
5. Cursor to the [CH] area. Be sure to select the same MIDI CH numbers
that are used on the Upgrade Utility’s [SET UP] window in the [Gen RX]
and [Gen TX] fields. Remember that all MIDI channel #s must be the
same.
6. Cursor to the [SYSTEM EX] field. Select [TX] and press ENTER. Select
[RX] and press ENTER.
MIDI SETUP Window
Page 12
1-6
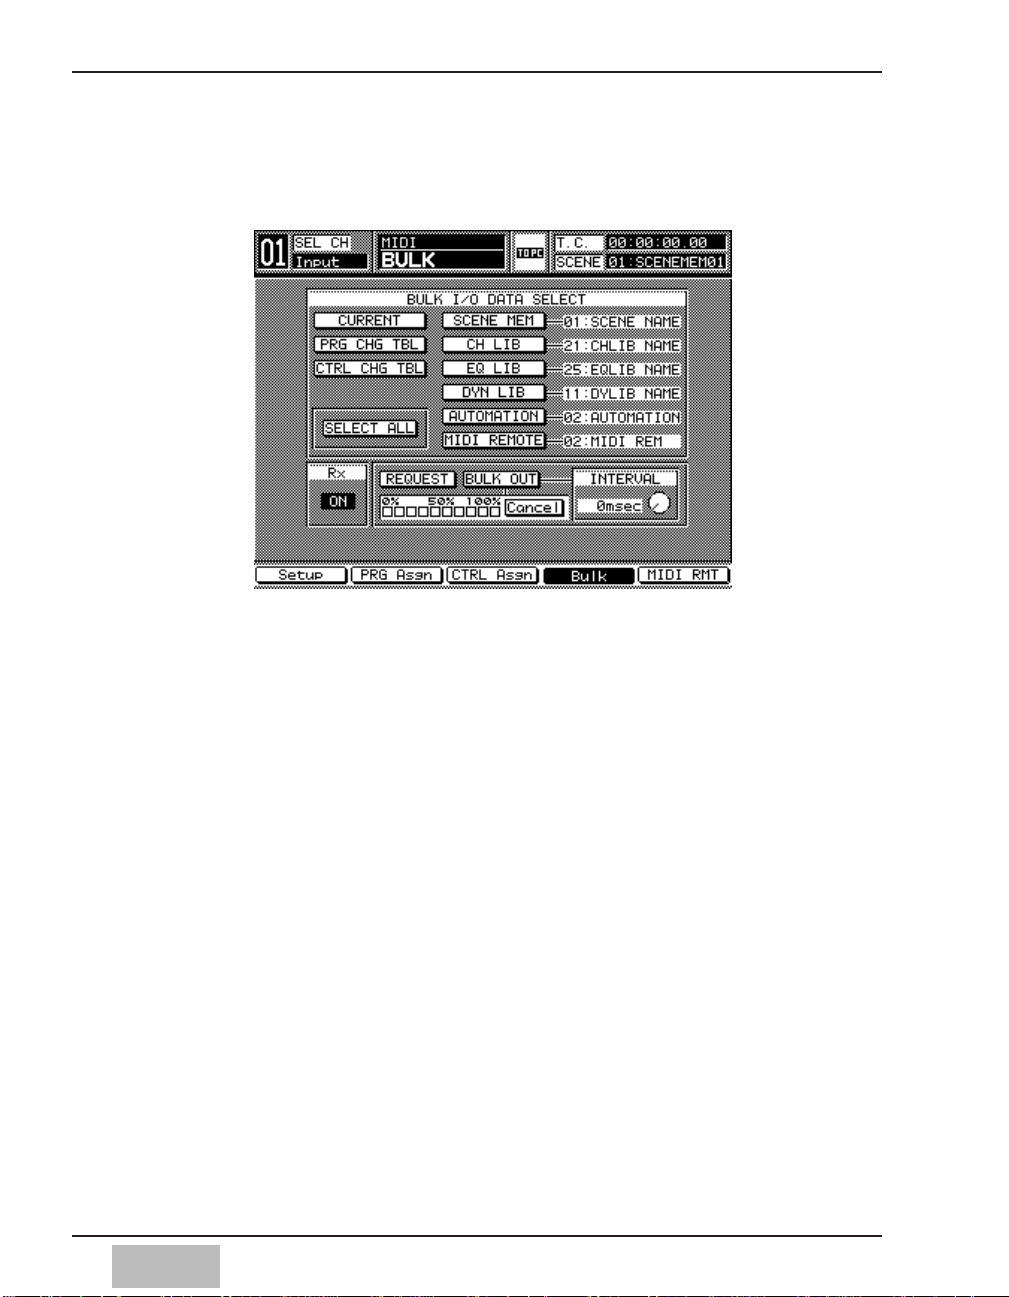
7. Select the MIDI button so as to display the [MIDI BULK] window on the
LCD display. Cursor to the [RX] field. Select [RX] and press ENTER . The
RX field appears in inverse video.
MIDI BULK Window
Page 13
1-7
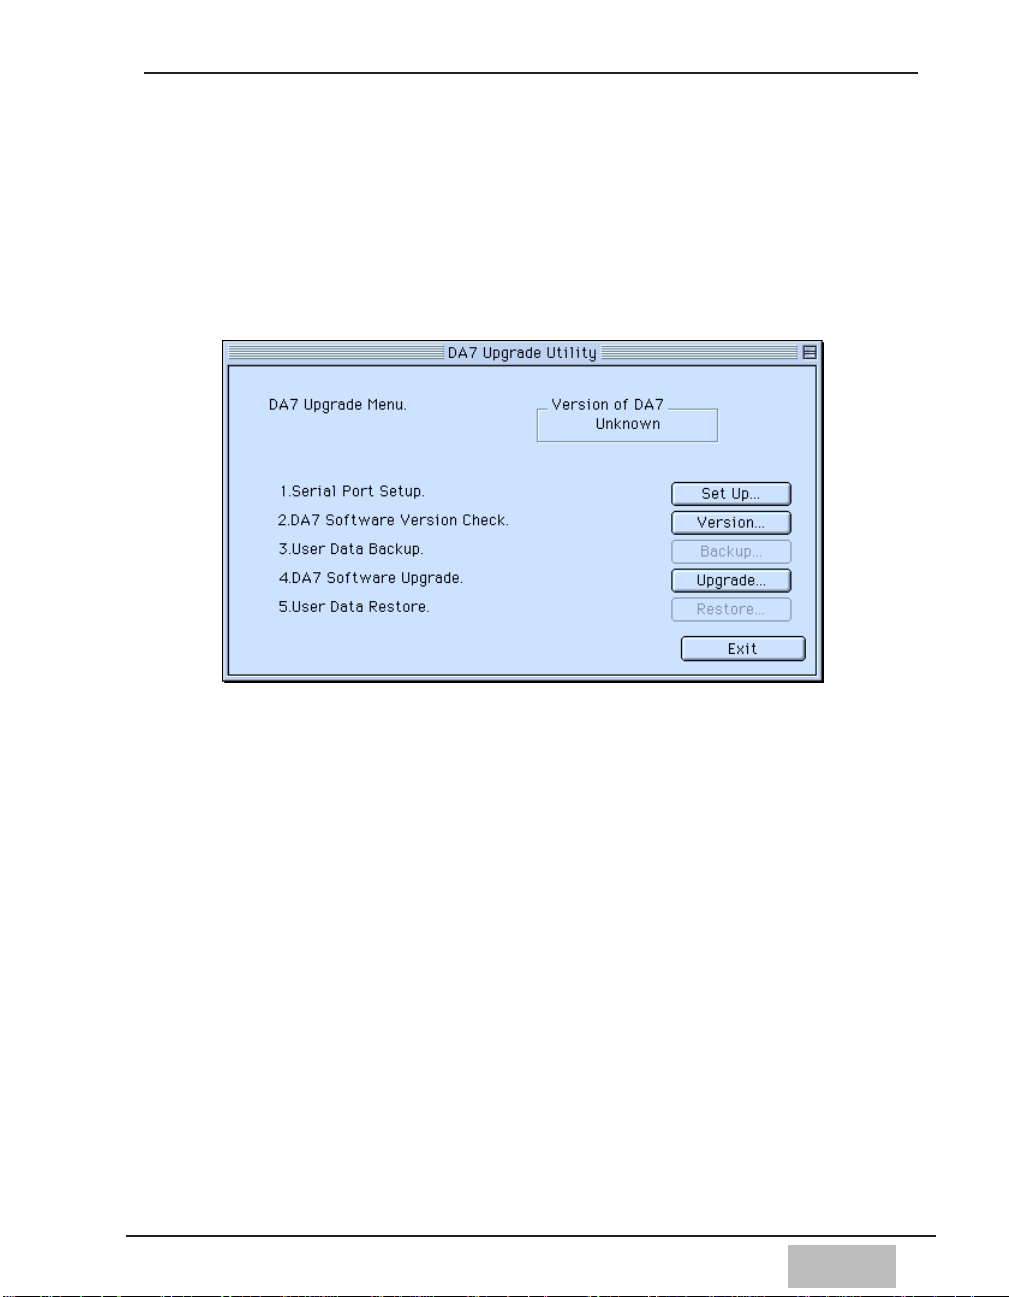
Operating the DA7 Upgrade Utility
Menu window
Start by displaying the [Menu] window -[DA7 Upgrade Utility] -on your
computer. Select the function that you want to perform by pressing:
Set Up, Version, Backup, Upgrade, Restore or Exit.
[Setup] This button accesses the [Setup] window. This is where you
select the Serial Ports and the MIDI Channels to be used for
transmitting and receiving data with the DA7.
[Version] This button accesses the information about the software version
that currently resides within your DA7.
[Backup] This button accesses the area where you begin the process of
backing up the data from the DA7, and where you select the
types of data (such as Mixes, Scene Memories, etc) to be backed
up.
[Upgrade] This button accesses the area where you begin the process of
upgrading the software in the DA7 (An upgrade takes
approximately 20 minutes). The upgrade procedure begins by
restarting the DA7. You will then receive messages that display
both on the computer monitor and the LCD panel of the DA7
with instructions for upgrading the console.
[Restore] This button accesses the area where you begin the process of
restoring the user data that was saved in the backup operation.
[Exit] This button closes the DA7’s Upgrade Utility.
Page 14
1-8
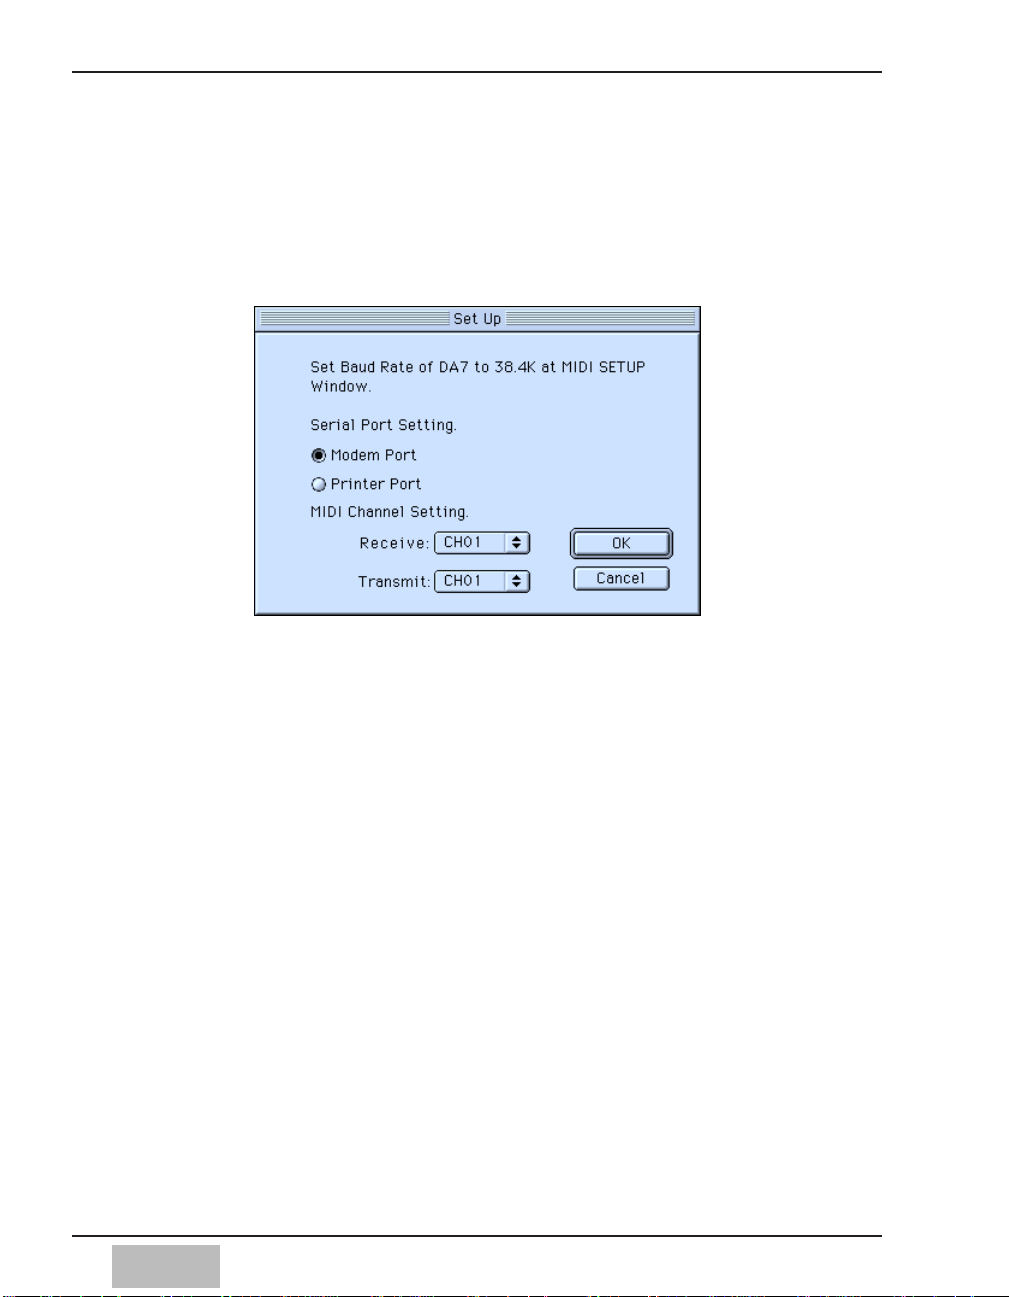
[SETUP]
Clicking on the [Setup] button displays the [Setup] window. This is where
you select the Serial Ports and the MIDI Channels to be used for transmitting
and receiving data with the DA7.
Selecting the serial port
For Macintosh: Select either the Modem Port or Printer Port
For Windows/95: Select from COM1, COM2, COM3 or COM4 Port
Selecting the MIDI channels (for transmitting and receiving)
Any MIDI Channel 1 through 16 can be selected for Receiving and
Transmitting data. Once you have selected a channel in the upgrade utility
window, you must also check that it is selected to the same channel that has
been set in the [Gen RX] and [Gen TX] fields of the [MIDI>SETUP] Area of
the DA7’s [MIDI>SETUP] window.
Page 15
1-9
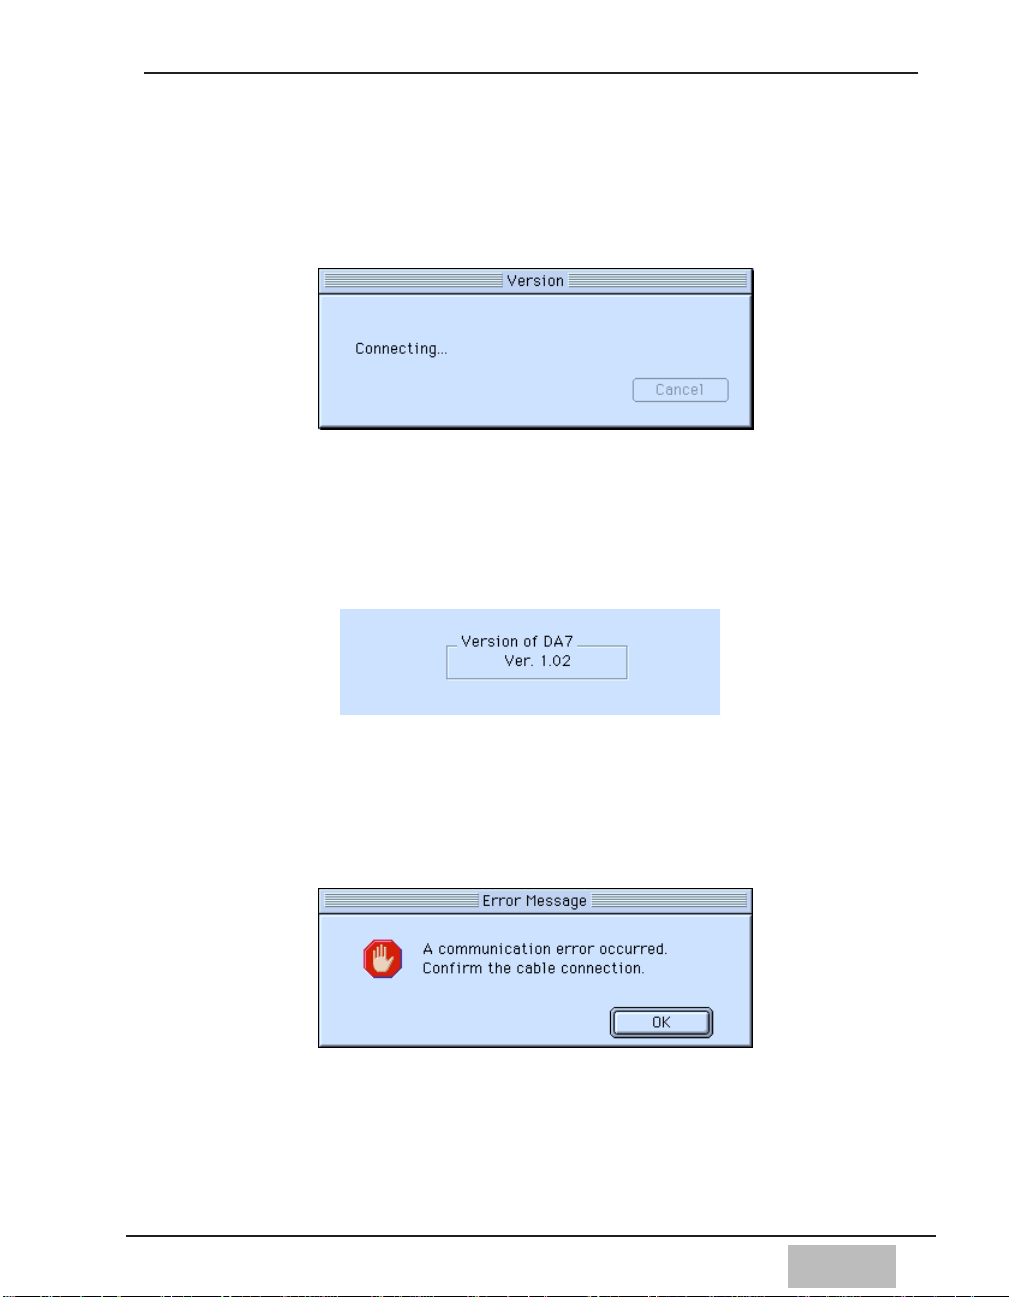
[VERSION]
Clicking on the [Version] button opens a window with a text line saying,
“connecting...” in it.
When a successful upgrade has been completed, the window returns to the
Menu window, displaying the version number of the DA7 at the top right.
If the connection was not made successfully an error message will appear.
Click the [OK] button to go back to [Menu] window and check the set up
ports and connections.
Page 16
1-10
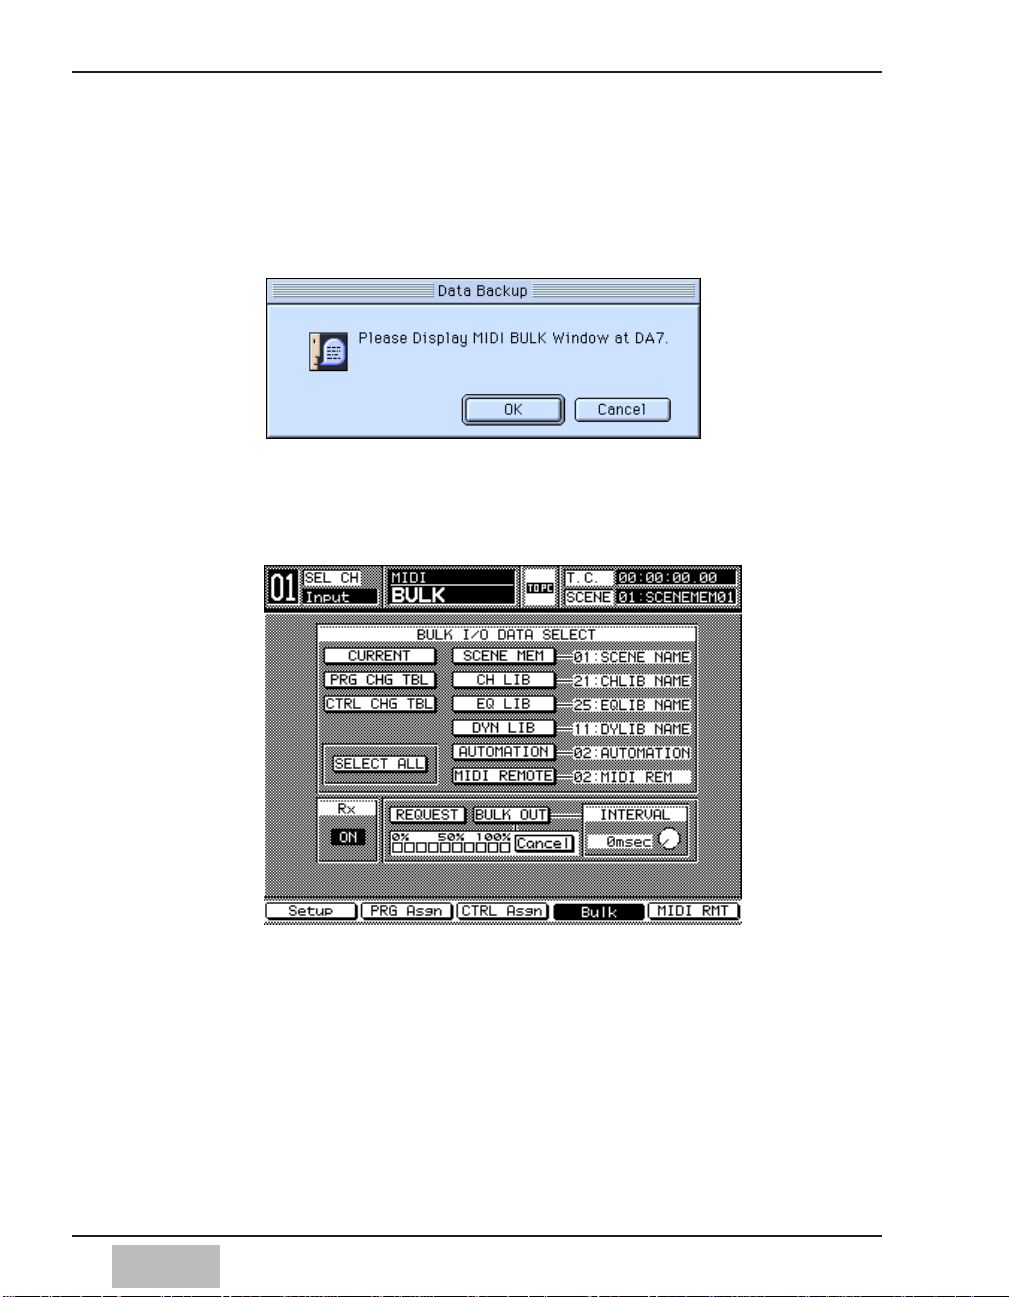
[BACKUP]
1. Clicking on the [Backup] button in the [Menu] window displays the
“Please Display MIDI BULK Window at DA7.”
2. Press the [MIDI] button in the SET UP section on the Top Panel of the DA7
until the [MIDI>BULK] window appears on the DA7’s LCD.
3. Click the [OK] button in the [Backup] window on the computer’s display.
Page 17

1-11
[BACKUP]
4. The [DATA Selection] window appears. Select the data that you need to
backup onto your computer from the following list:
[CURRENT] Current Set Data
[PRG CHG TBL] Program Change Table
[CTRL CHG TBL] Control Change Table
[SCENE MEM] Scene Memory
[CH LIB] Channel Library
[EQ LIB] Equalizer Library
[DYN LIB] Dynamics Library
[AUTOMATION] Automation
[MIDI REMOTE] MIDI Remote Library
5. Click the [Backup] button after making a selection.
Page 18
1-12
[BACKUP]
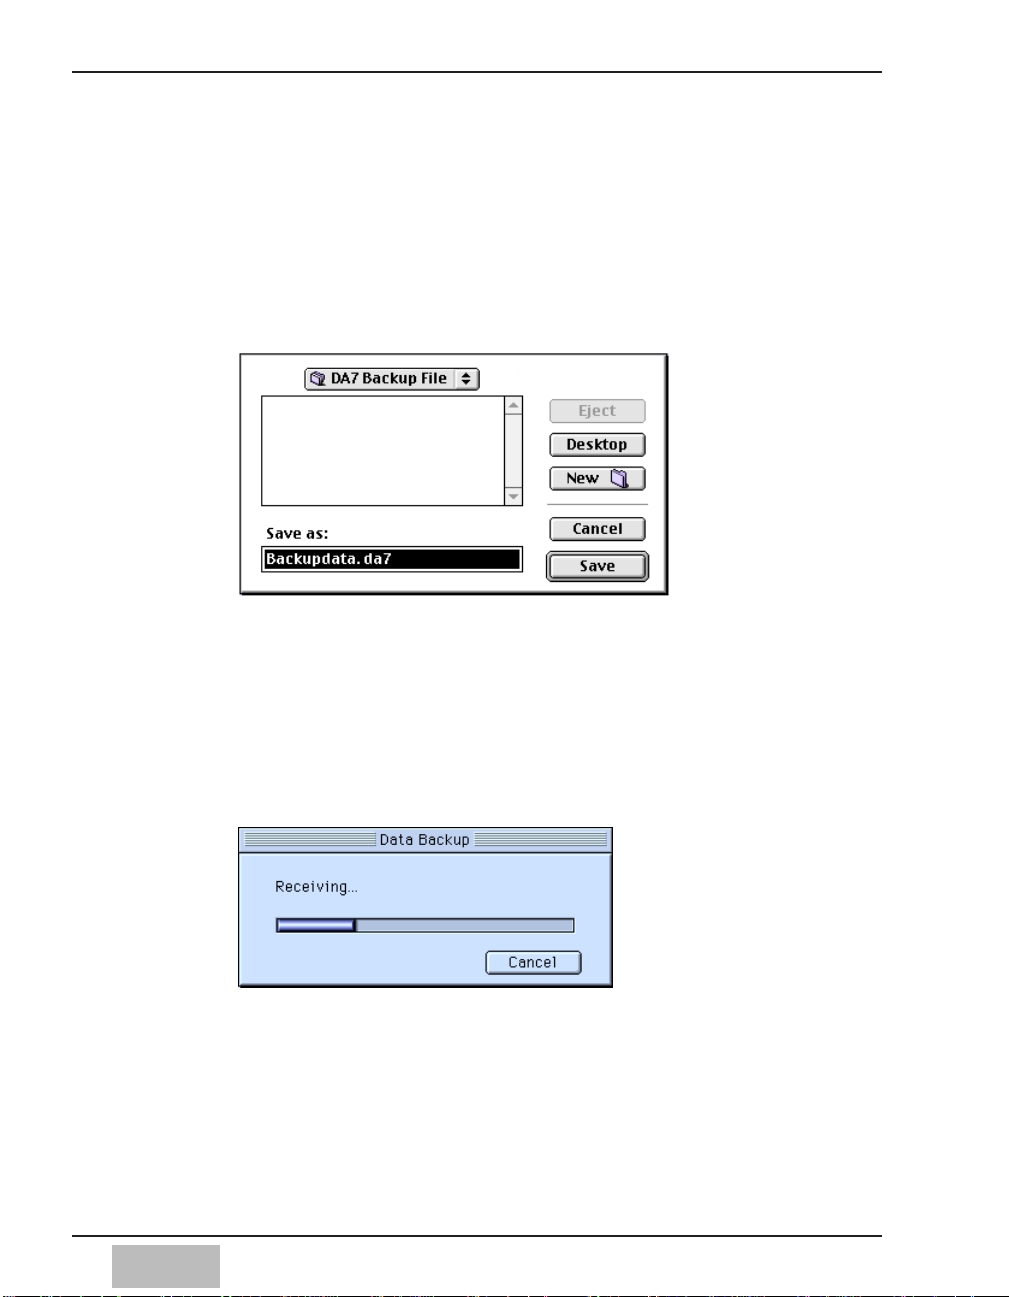
6. A dialogue box for designating the file to be saved appears. In this box,
select the folder named "backupdata". If there is no folder already created,
you MUST create a folder with the file name "backupdata".
Once this folder is open, you can name the file in which you are saving
the data from your DA7. The name of this data file can be anything you
wish, however, the file name cannot contain any spaces.
7. Click the [Save] button in the dialogue box for Mac, or click the [OPEN]
button for Windows 95. Data reception will begin automatically. A bar
graph will display the progress. When data reception is finished, the bar
graph disappears and returns to the [DATA Selection] window.
8. Click the [Cancel] button to return to the [Menu] window.
Page 19
1-13
[UPGRADE]
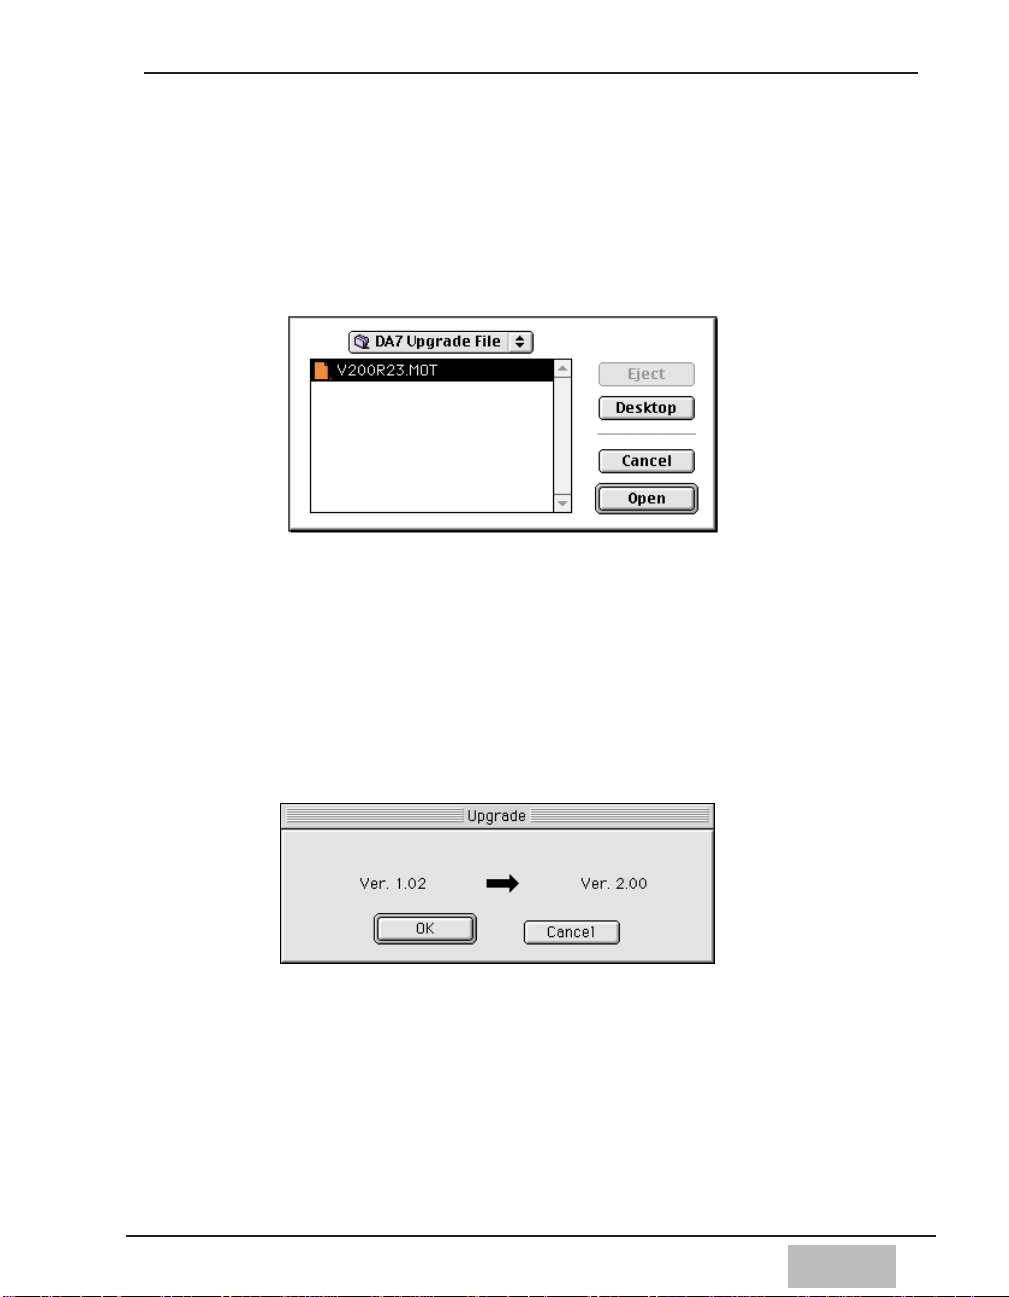
1. Clicking the [Upgrade] button in the [Menu] window of your computer
will display a dialogue box showing the source folders and files. Open a
folder and select the file for upgrading the DA7. (ex. V200R23.mot.)
2. Click the [Open] button of the source dialogue box.
3. The Upgrade box is displayed and asks you to confirm both the existing
version number and the new one. Click the [OK] button to confirm that
the two versions numbers displayed are correct.
Page 20
1-14
[UPGRADE]
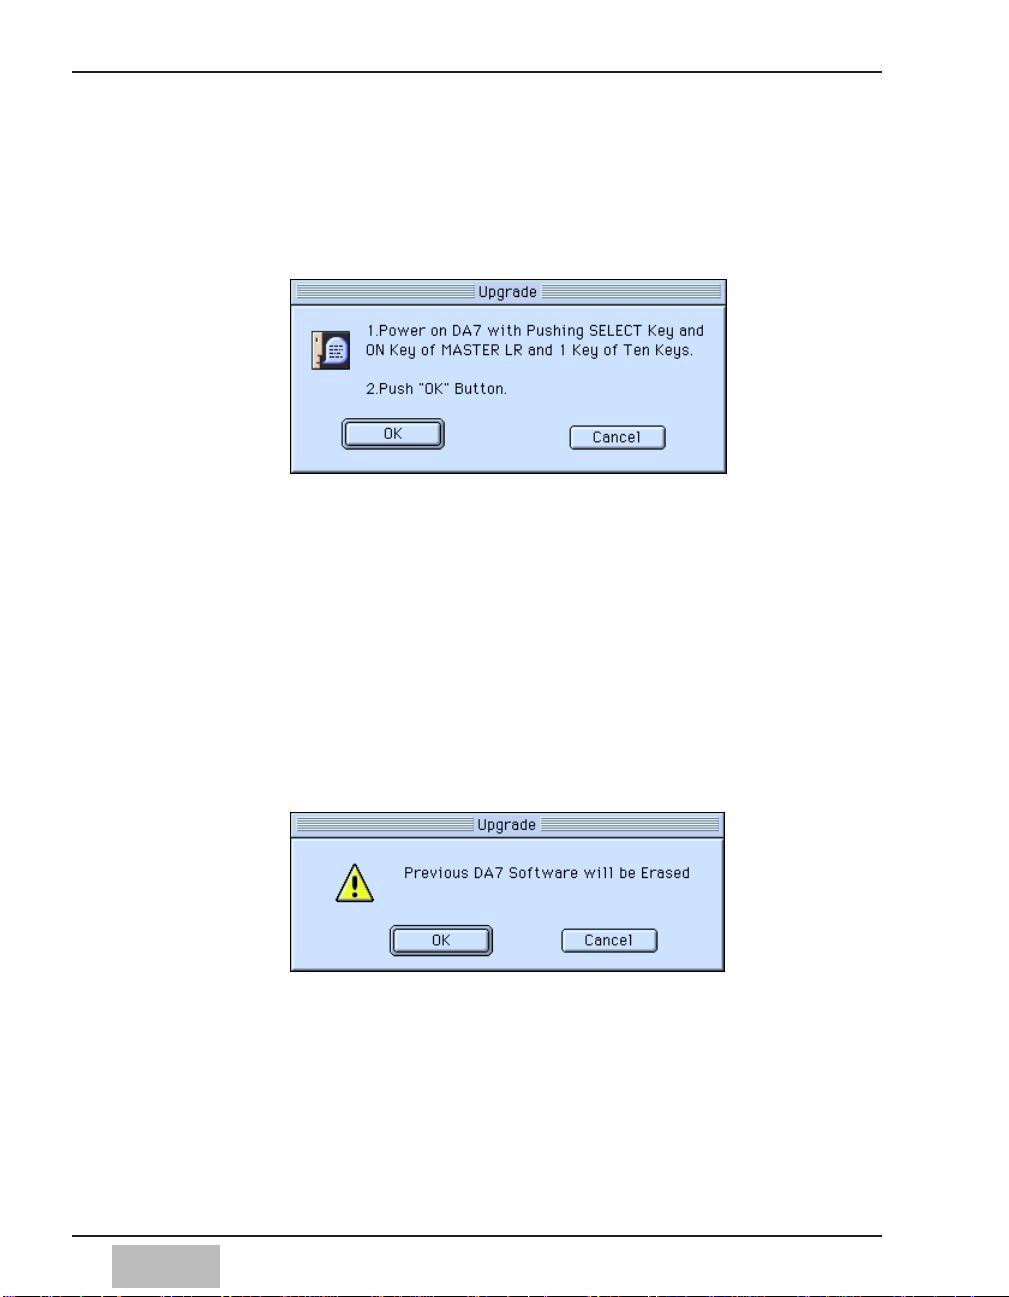
4. Follow the instructions on your computer’s display.
• Power OFF the DA7.
• Power ON the DA7 while simultaneously holding down the SELECT
and ON keys of the MASTER LR Channel and the #1 key on the
numeric Ten Key Pad. A message confirming the start of the upgrade
will be displayed.
• Cursor to the [OK] button on the DA7 and press the ENTER key
5. Click the [OK] button on the computer’s display. A message confirming
that a previous program in the DA7 will be erased will appear. This is
normal.
6. On the DA7 LCD display, Cursor to the [OK] button.
Page 21
1-15
[UPGRADE]
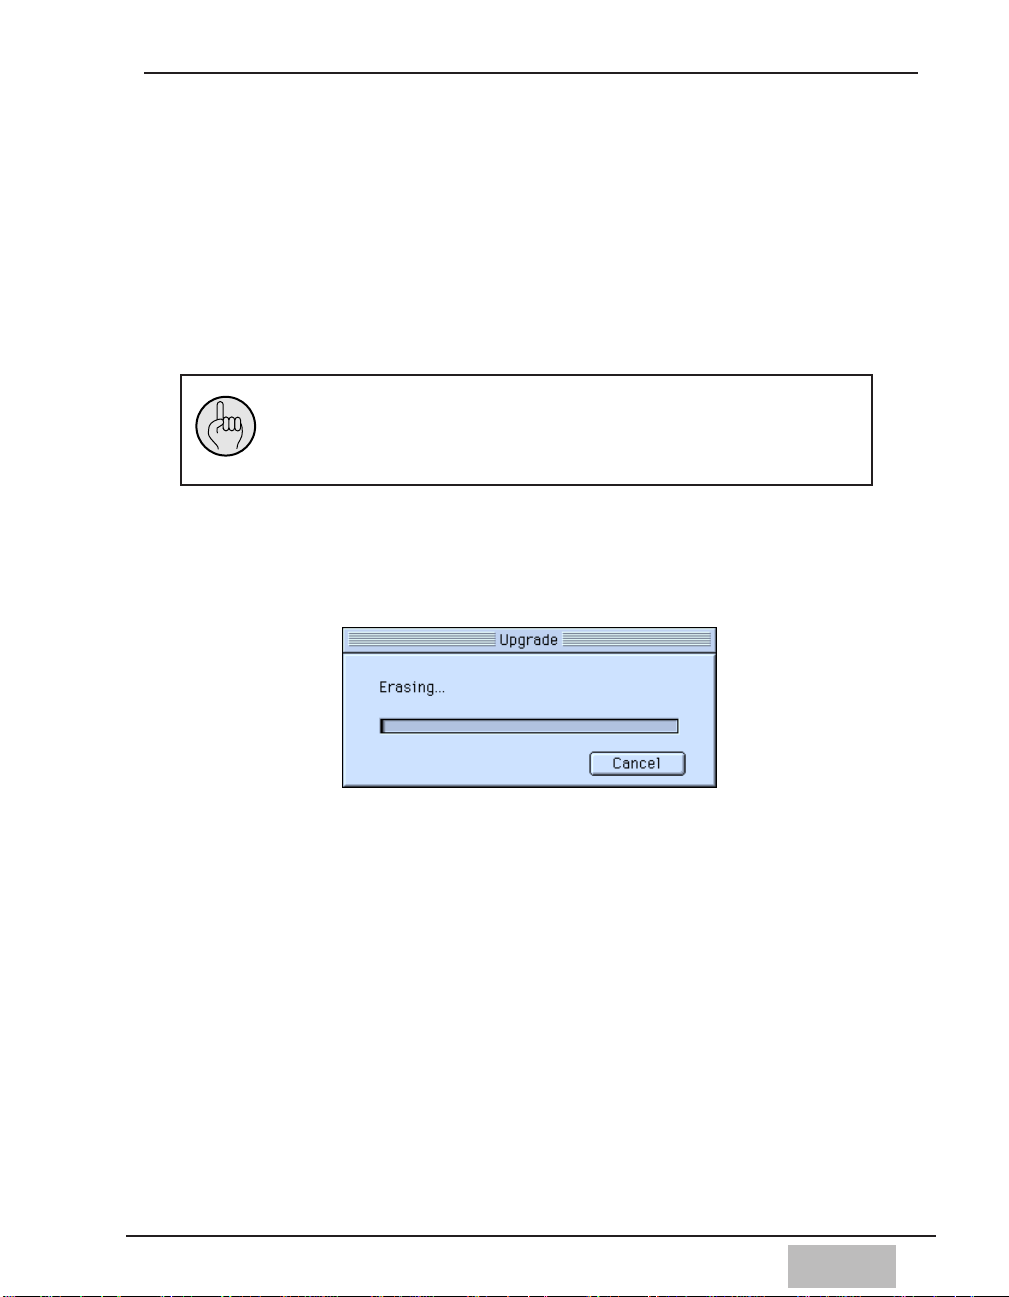
7. Click the [OK] button on both the DA7 and your computer to begin the
upgrade process.
You will see a message saying the internal memory of the DA7 will be
erased.
You must complete steps 5 - 7 within 30 seconds, or the DA7
will exit the updating mode and go back to normal operation.
If this occurs, start the upgrade process again at Step 4.
8. While the program is being erased, a bar graph will appear on the
computer’s display and the READ LED in the Scene Memory section will
flash.
After erasing the existing version is performed, writing of the new version
begins writing. While writing, a bar graph will appear and the WRITE LED
will flash.
9. After upgrading to the new OS version, the DA7 will restart. The DA7 will
return to its normal startup window, and the [Menu] window will appear
again on the computer display. This upgrade process will take
approximately 20 minutes to complete.
Exiting the Upgrade Utility
Clicking on the [EXIT] button in the [Menu] window will close this utility.
Page 22

1-16
[RESTORE]
1. Clicking on this button displays the message “Please Display MIDI BULK
Window at DA7” on your computer’s display.
2. Press the MIDI button in the SETUP section of the DA7’s Top Panel until
the [MIDI>BULK] window appears on the DA7’s LCD.
3. Click the [OK] button in the [Data Restore] window on the computer
display. The Source selection window appears.
4. Select a folder, then a file that you are going to move back into the DA7.
After making the selection, click the [OPEN] button.
Page 23

1-17
[RESTORE]
5. A dialogue box will appear inquiring what version of the operating system
of the DA7 was used to create the data, and the current version of the
operating system that is now in the DA7. For example, if you used OS
Version 1.02 to create the data you wish to restore, and you have
upgraded to OS Version 2.0, you need convert the settings to use the old
data on your DA7.
Click the [OK] button if these are correct. Or click the [Skip] button if the
file does not need conversion. Otherwise select the [Cancel] button.
6. If conversion is required, the confirmation dialogue box will appear again
and inquire about the versions. Clicking the [OK] button starts converting
the setups format from the previous to the latest. A bar graph shows the
conversion progress.
Page 24

1-18
[RESTORE]
7. After converting the files, data transmission starts from the computer to
the DA7 and a bar graph will be displayed.
8. The bar graph disappears and the [Source selection] window returns
when transmission is complete.
[EXIT]
Click this button to exit the DA7 Upgrade Utility.
Page 25

1-19
Troubleshooting
Although it is rare, under some circumstances you may experience problems
with the upgrade procedure. The most common problems arise when there
is an interruption to the transmission of the data. This can be caused by a
power failure, or by accidentally removing the upgrade cable during the
upgrade process.
If this occurs, you will probably end up with a blue screen on the DA7 and it
will not operate. However, you can still upgrade the DA7 in the following
manner.
1) Power on the DA7. (The DA7 displays only a blue screen.)
2) Open the Upgrade Utility and restart the upgrade procedure. Follow
all the directions in the upgrade procedure, but do not perform any
functions that require you to operate the DA7.
3) Once you have started the procedure, you will see the bar graph
transmitting in Step7, but the READ button and WRITE buttons on
the Top Panel may not light or flash, or may flash in a unnatural
pattern. This is normal.
4) You may also have to perform the above procedure several times,
because you have to re-synchronize the Upgrade Utility and the
internal processor of the DA7. Rest assured that it will perform the
upgrade once this synchronization takes place.
If the message “It can’t be connected with DA7. Confirm the port setting.” or
“Communication error. Confirm the connection.” is displayed, check the
following:
Connections
• Confirm if the correct type of cable is being used.
• Confirm that the DA7 and the computer are connected with the correct
port settings.
Page 26

DA7 Settings
• Confirm that [TO PC] is selected for [PORT SELECT] in [MIDI > SETUP]
window.
• Confirm that [38.4k] is selected for [BAUD RATE] in [MIDI > SETUP]
window.
• Confirm that [TO PC] is selected for PORT of [Gen Rx] and [Gen TX] in the
[MIDI > SETUP] window.
• Confirm that the RECEIVE channel of the Upgrade Utility is the same as the
TRANSMIT channel of the DA7. (CH of [Gen TX] in [MIDI > SETUP]
window)
• Confirm that the TRANSMIT channel of the Upgrade Utility is the same as
the RECEIVE channel of the DA7. (CH of [Gen RX] in [MIDI > SETUP]
window)
• Confirm that [TX] and [RX] are selected (inverse video) for [SYSTEM EX]
in the [MIDI > SETUP] window.
• Confirm that the [MIDI > BULK] window is displayed for BACKUP or
RESTORE.
• Confirm that you have correctly selected [RX] to ON in the [MIDI BULK]
window on the LCD display. Cursor to the [RX] field. Select [RX] and press
ENTER.
1-20
Page 27

2-1
Section 2
Upgrade From Version
1.01/1.02/1.10/1.20
Features of Version 2.0
(These features are for DA7 users who are upgrading from Versions 1.01 /
1.02 / 1.10 / 1.20 and are not described in the original DA7 manual. You
should keep this document if you have any questions about the functionality
of the features described here. If you are upgrading from Version 1.21 or
1.22, please skip Section 2.
Page 28

2-2
Contents
1. New Bi-directional communication mode from the MIDI REMOTE.
2. New visual indicators in Automation with Surround.
3. New monitoring functions in the Surround Mode.
4. New shortcuts for the Set up Windows.
5. New shortcut to recall all SCENES directly from the Ten Key Pad.
6. New Screen navigation using Cursor Repeat Functions.
7. New shortcut to Toggle input sources for channels 9-16.
8. New Shortcut to the MONITOR A DIM function.
9. Parameter changes can now be made when MMC or CURSOR mode is
enabled.
10. New shortcut to return to the [CHANNEL] window from the [D-I/O>TO
SLOT] window.
11. Output assignments are now saved when using the DIRECT button.
12. The[AUTOMATION>EXECUTE] default window has changed.
13. New Automation default.
14. New Cursor position default for the [AUTOMATION>EXECUTE] window.
15. New confirmation message when the Automation stops due to low
memory.
16. New indication of the START SCENE in the [AUTOMATION>EXECUTE]
window.
17. New visual indication of LOCATE points.
18. New LOOP and PLAY Mode.
19. MMC ON/OFF is now available when Pop Up windows are displayed.
20. New Warning Message for Surround AUTO MOVE.
Page 29

2-3
21. New shortcut to set gain to zero for individual frequency bands in the
EQUALIZER.
22. Modifications to the Center Frequency Bands of the Equalizer.
23. New graphics in the [EQUALIZER] window.
24. New visual displays in the [DYNAMICS] and [EQUALIZER] windows.
25. New factory defaults for SOLO functions.
26. New factory default settings in the [UTILITY>USER CUSTOM] window.
27. The Selected CHANNEL number is now displayed at all times.
28. New visual indication of LINKED CHANNELS.
29. Dynamics settings are saved when switching from COMP+GATE to
EXPANDER.
30. Improved Surround LCD Screen display.
31. Slot 2 and Slot 3 can now accept AES/EBU cards as the word clock
master.
32. Improvement of the metering in the LCD display.
33. Correction for the output level of the Oscillator.
34. Correction in the display of MMC command.
35. New default BUS assignments when creating a stereo BUS.
36. Correction of the sub-code data in the digital output signal.
37. All Control Change Numbers are now available for MIDI Remote mode.
Page 30

2-4
1. New Bi-directional communication mode from the MIDI REMOTE.
Previous Versions: The DA7 would only transmit MIDI data, as assigned in
the [MIDI>MIDI RMT] Window. It could not receive MIDI Control Change
Messages.
Version 2.0: The DA7 can now transmit and receive MIDI data. Settings in
the [MIDI>MIDI CTRL ASGN] window can now be changed by receiving
external Control Change Messages from an outside MIDI controller.
2. New visual indicators in Automation with Surround.
Previous Versions: The cursor display for recording Surround Automation
information was displayed only in a single color, making visual indication
between playback and record difficult.
Version 2.0: The Surround Automation Window now displays two types of
pointers in the Jog&Fader and Pattern Modes. During playback, a black
pointer will indicate the playback data. While a white pointer indicates the
real-time operations. While recording automation, the black pointer indicates
the data that is being recorded in real time, and the white pointer indicates
data that was recorded previously. With this modification, you can punch in
and out of record more easily in the Surround Sound Mode.
3. New monitoring functions in the Surround Mode.
Previous Versions: There are several different combinations listed below.
Version 2.0: When the SURROUND MONITOR is ENABLED from the
[SOLO/MONITOR] window, and the MONITOR buses are being used for
monitoring Surround information, then selecting one of the source buttons,
such as L/R, 2TR A, or AUX, in Monitor A or B, will MUTE the other output
buses.
Note: Remember, in Surround, MONITOR A L/R is Front Lef t/Right,
MONITOR B L/R is Center/Sub, and MASTER L/R is Surround L/R.
When you cancel the source for the selected MONITOR, normal Surround
Monitor mode returns.
Previous Versions: Using a channel SOLO button in the Surround Mode did
not mute all buses.
Version 2.0: If a channel SOLO is selected in the Surround Monitor mode,
all of the bus outputs except the MONITOR A outputs are muted. When you
cancel the SOLO mode, the normal Surround Monitor mode returns.
Page 31

2-5
Previous Versions: SURROUND MONITOR MASTER LEVEL was only
accessed from within the [SOLO/MONITOR] window.
Version 2.0: The SURROUND MONITOR MASTER LEVEL can be adjusted
using the AUX SEND LEVEL knob in the AUX section on the Top Panel of the
DA7. When the SURROUND MONITOR is ENABLED from the
[SOLO/MONITOR] window, and the individual CHANNEL [PAN/SURROUND]
window is displayed, the MASTER LEVEL of the SURROUND MONITOR buses
can be adjusted using the AUX SEND LEVEL knob in the AUX section on the
Top Panel of the DA7.
4. New shortcuts for the Set up Windows.
Previous Versions: Not Implemented (This shortcut was introduced in
Version 1.10.)
Version 2.0: The Windows for the various Set-Up functions can now be
directly accessed by pressing the desired Set-Up keys, then enter the number
of the Window using the 10 Keypad. Of course, you must be familiar with the
Windows of the DA7 to go directly to them! The following chart shows the
Set Up buttons, the 10 Key # to press, and which of the Windows is recalled:
SET UP KEY TEN KEY NUMBER WINDOW RECALLED
(Window Group)
[UTILITY] [1] [UTILITY>OSC/BATT]
[UTILITY] [2] [UTILITY>CONFIG]
[UTILITY] [3] [UTILITY>USR CSTM]
[MIDI] [1] [MIDI>SETUP]
[MIDI] [2] [MIDI>PRG ASGN]
[MIDI] [3] [MIDI>CTRL ASGN]
[MIDI] [4] [MIDI>BULK]
[MIDI] [5] [MIDI>MIDI RMT]
[D-I/O] [1] [D-I/O>INPUT SET]
[D-I/O] [2] [D-I/O>TO SLOT]
[D-I/O] [3] [D-I/O>DITHER]
[GROUP] [1] [GROUP>FADER GRP]
[GROUP] [2] [GROUP>MUTE GRP]
[GROUP] [3] [GROUP>LINK/STR]
To be continued
Page 32

2-6
Continued from the previous page
SET UP KEY TEN KEY NUMBER WINDOW RECALLED
(Window Group)
[METER] [1] [METER>INPUT1-32]
[METER] [2] [METER>BUS/AUX]
[METER] [3] [METER>SLOT]
[AUTOMATION] [1] [AUTOMATION>SETUP]
[AUTOMATION] [2] [AUTOMATION>EXECUTE]
[AUTOMATION] [3] [AUTOMATION>EVT EDIT]
5. New shortcut to recall all SCENES directly from the Ten Key Pad.
Previous Versions: The 50 Scenes in the Scene Memory were only accessible
from within the [SCENE MEMORY RD/WR] window. If the 10 KEY SCENE
RECALL mode was selected to ON in the [UTILITY>CONFIG] window, only
the first 10 scenes could be recalled from the TEN KEY PAD.
Version 2.0: When the 10 KEY SCENE RECALL mode is selected to ON in the
[UTILITY>CONFIG] window, any of the 50 scenes can be selected from the
TEN KEY PAD on the Top Panel of the DA7 by entering 2 digits on the 10 KEY
PAD. You must enter "0" before the scene number to recall scenes 01-09. The
scene is recalled immediately after pressing the last number. Example: If you
wanted to change a scene during automation recording, i.e. going from scene
12 to scene 24, you could get ready to punch the scene in, by selecting the '2'
on the 10 Key Pad, then precisely when you wanted the scene to change,
press the '4', and the scene will change to scene 24. The same applies in live
applications where you will want to manually change from scene to scene
without going to the [SCENE MEMORY>RD/WR] window.
6. New Screen navigation using Cursor Repeat Functions.
Previous Versions: The ARROW keys must be pressed repeatedly to move
the cursor within the LCD screen.
Version 2.0: By holding down any of the cursor ARROW keys, the cursor will
move continuously within the rows or columns of the LCD screen. (The LCD
Screen is laid out on a Row/Column Grid for navigation)
Page 33

2-7
7. New shortcut to toggle input sources for channels 9-16.
Previous Versions: Selection of Analog mic/line input sources 9-16 or the
inputs from CARD SLOT #3 were only selectable from the [D-I/O>INPUT
SET] window.
Version 2.0: Analog mic/line inputs 9-16 can be toggled between the inputs
from CARD SLOT #3 by pressing the MMC/CURSOR button and the D-I/O
button simultaneously. This is an easy way to switch from your tracking
inputs to your tape returns, if you are recording 24 tracks. Another
application would be using the ADDA card in SLOT 3 as additional analog
inputs from a remote location. This shortcut now allows you easy access to
these multiple inputs.
8. New Shortcut to the MONITOR A DIM function.
Previous Versions: The MONITOR A DIM was only adjustable from within
the [SOLO/MONITOR] window.
Version 2.0: By pressing the MMC/CURSOR button and the SOLO MONITOR
button simultaneously, MONITOR A will DIM (attenuate) by 20dB.
9. Parameter changes can now be made by using the JOG DIAL when
the MMC or CURSOR mode is enabled.
Previous Versions: To change any of the parameters of a Soft Knob or
addressable box in the LCD display, while MMC or CURSOR was enabled, you
must first turn off the MMC or CURSOR function to make the changes using
the JOG DIAL.
Version 2.0: This has been changed so that even if MMC is ENABLED, or the
JOG DIAL is in CURSOR mode, the JOG DIAL can be used to change the
parameters of a soft knob, or an addressable box in the LCD display, by first
selecting the box, and by pressing ENTER. The JOG DIAL can now enter data
in the selected field. Press ENTER again to return to the previous mode.
Page 34

2-8
10. New shortcut to return to the [CHANNEL] window from the [D I/O>TO SLOT] window.
Previous Versions: To return to the [CHANNEL] window from within the
[D-I/O>TO SLOT] window, you had to press the CHANNEL button in the
MASTER DISPLAY section.
Version 2.0: Now to return to the [CHANNEL] window from the [D -I/O>TO
SLOT] window, press the DIRECT key in the assignment section of the
centrally assignable channel strip on the Top Panel of the DA7.
11. Output assignments are now saved when using the DIRECT button.
Previous Versions: Assignments were cleared when using the DIRECT
button
Version 2.0: All previous assignments are now saved when the DIRECT
button is pressed for direct channel assignments to the CARD SLOTS.
12. The [AUTOMATION>EXECUTE] default window has changed.
Previous Versions: Arming the Automation via the AUTOMATION/AUX LED
button on the Top Panel puts Automation into Record, and retains the
currently selected LCD screen.
Version 2.0: Now when you press the AUTOMATION/AUX LED button on the
Top Panel of the DA7 to enable Automation for recording, the
[AUTOMATION>EXECUTE] window is displayed on the LCD.
13. New Automation default.
Previous Versions: When executing a NEW MIX in the
[AUTOMATION>SETUP] window, the DA7 did not change the FADER EDIT
MODE. The default was the DA7 would recall the last selection of the FADER
EDIT MODE, and it would be used for the NEW MIX.
Version 2.0: When NEW MIX is selected in the [AUTOMATION>SETUP]
window, the FADER EDIT MODE automatically defaults to ABSOLUTE.
14. New Cursor position default for the [AUTOMATION>EXECUTE]
window.
Previous Versions: The Factory default cursor position in the
[AUTOMATION>EXECUTE] window was within the HOURS box of the TIME
CODE OFFST.
Page 35

2-9
Version 2.0: When accessing the [AUTOMATION>EXECUTE] window, the
cursor position now defaults to the TIME BASE area.
15. New confirmation message when the Automation stops due to low
memory.
Previous Versions: No warning was displayed when the Automation stopped
recording because the automation memory was full.
Version 2.0: Now, when the internal memory for Automation is full,
recording will stop and a confirmation message, "NO MEMORY FOR
AUTOMATION RECORDING", will be displayed. If you see this message on a
regular basis, you should consider ways to conserve the internal automation
memory by using different mixing techniques. One method of conserving
memory is to use scene memory recall during automation. For example,
scene 1 could be the start of the verse, scene 2 could be the chorus. Then
instead of making lots of moves to go from the verse to the chorus, simply
recall a scene. Utilizing this method, the savings to the automation memory
is substantial. If this method is not sufficient, you should consider our
optional MAX software automation package.
16. New indication of a new START SCENE in the
[AUTOMATION>EXECUTE] window.
Previous Versions: In the [AUTOMATION>EXECUTE] window, the START
SCENE would flash momentarily when entering a new START SCENE.
Version 2.0: Now when a new START SCENE is written, the TIME CODE
DISPLAY will change to inverse video momentarily. This confirms that the
new START SCENE has been written.
17. New visual indication of LOCATE points.
Previous Versions: Not Implemented (This shortcut was introduced in
Version 1.10.)
Version 2.0: In the [AUTOMATION>EXECUTE] window, pushing a LOCATE
button while in the MMC mode will momentarily display the location points
destination time code in inverse video in the TIME CODE DISPLAY.
Page 36

2-10
18. New LOOP and PLAY Mode.
Previous Versions: It was necessary to select the LOOP button under MMC
in the [AUTOMATION>EXECUTE] window when the MMC mode was
enabled to perform this function. You then needed to press PLAY to begin
the LOOP.
Version 2.0: Pressing the LOOP button on the 10 KEY PAD, or the LOOP
button under MMC in the [AUTOMATION>EXECUTE] window when the
MMC mode is enabled, sends all MMC devices to LOCATE POINT ONE and
starts the PLAY function. (*Note: The LOOP function loops between LOCATE
POINT ONE and LOCATE POINT TWO)
19. MMC ON/OFF functions while Pop Up windows are displayed.
Previous Versions: The Pop Up Windows must be closed before MMC
functions can be turned On or Off.
Version 2.0: When a Pop Up window, such as the NAME EDITOR or
REMOTE COMMAND EDIT TABLE, is displayed MMC functions can now be
turned ON or OFF
20. New Warning Message for Surround AUTO MOVE.
Previous Versions: Not Implemented (This message was introduced in
Version 1.10.)
Version 2.0: Attempting to put more than 8 channels into SURROUND AUTO
MOVE when the CHANNEL [PAN/ASSIGN>SURROUND] window is active,
displays the Warning Message "ALREADY MOVING 8 CHANNELS". It is not
possible to automate more than 8 channels of Surround panning using the
internal automation system.
21. New shortcut to set gain to zero for individual frequency bands in
the EQUALIZER.
Previous Versions: It was necessary to select the individual frequency band
and turn the GAIN knob until the gain reaches 0.0dB.
Version 2.0: The GAIN of an EQ band can be set to FLAT (0.0dB), without
changing the frequency or Q, by pressing and holding down the (H, HM, LM,
L) LED button in the equalizer section for 2 seconds. You can also clear ALL
of the EQUALIZER bands at once by using the FLAT shortcut on the
EQUALIZER window, or by pressing the FREQUENCY button on the Top
Panel.
Page 37

2-11
22. Modifications to the Center Frequency Bands of the Equalizer.
Previous Versions Version 2.0
22Hz 22.4Hz
32Hz 31.5Hz
110Hz 112Hz
130Hz 125Hz
23. New graphics in the [EQUALIZER] window.
Previous Versions: The graph was displayed with a dotted line, and the
moving frequency line was solid.
Version 2.0: The lines for the scale of the graph are now solid, and the
moving line for the selected frequency is dotted.
24. New visual displays in the [DYNAMICS] and [EQUALIZER] windows.
Previous Versions: The A/B button was momentarily displayed in inverse
video when selected.
Version 2.0: The A/B buttons of the [DYNAMICS] and [EQUALIZER] windows
now display in inverse video when selected. By selecting the A/B button in
the window and pressing the ENTER button, or by pressing the bottom most
knob of the EQ or DYNAMICS section, will change the box to inverse video
and normal video alternately.
25. The factory defaults for SOLO functions, selected in the [SOLO
MONITOR] window, are PFL for POSITION and MIX for MODE.
Previous Versions Version 2.0
SOLO POSITION IN PLACE PFL
SOLO MODE SOLO MIX
Page 38

2-12
26. New factory default settings in the [UTILITY>USER CUSTOM]
window.
Previous Versions: The factory default settings in the [UTILITY>USER
CUSTOM] window followed the channels themselves, i.e. CHANNEL ONE was
assigned to CHANNEL ONE, etc. There was not a NONE selection.
Version 2.0: The factory default settings in the [UTILITY>USER CUSTOM]
window are NONE. You can now assign NONE to a channel, avoiding
doubled channel assignments, such as CHANNEL 12 assigned to CHANNEL
ONE and CHANNEL 12.
27. The Selected CHANNEL number is now displayed at all times.
Previous Versions: The currently selected CHANNEL number was not shown
on the LCD display at all times.
Version 2.0: The currently selected CHANNEL number is now displayed in
the upper left corner of the LCD display on all screens at all times,
28. New visual indication of LINKED CHANNELS.
Previous Versions: The LINKED CHANNELS were visually indicated in the
LCD display only.
Version 2.0: One of the SELECT LED's of the linked channels will flash to
display the CHANNEL that is selected when the CHANNELS are linked in
stereo or dual mono. This gives you a visual indication that the channels are
linked together, and lets you know which channel you are currently have
selected in the LCD window and the central channel strip.
29. Dynamics settings are saved when switching from COMP+GATE to
EXPANDER.
Previous Versions: When switching between the COMP+GATE and the
EXPANDER functions in the [DYNAMICS] window, the settings were reset to
the default values.
Version 2.0: All settings are now saved when you switch the DYNAMICS
functions from COMP+GATE to EXPANDER. Parameters such as
THRESHOLD, RATIO, and ATTACK, no longer reset to factory defaults when
you switch between the functions.
Page 39

2-13
30. Improved Surround LCD Screen display.
The screen re-draw time has been improved in V2.0 when in the Surround
Sound mode. (e.g. using Auto Move function),.
31. Slot 2 and Slot 3 can now accept AES/EBU cards as the word clock
master.
Previous Versions: When the AES/EBU card (WR-AESS) was installed in slot 2
or slot 3, it appeared as if the card could be selected as word clock master,
however it was not actually selected.
Version 2.0: When the AES/EBU card (WR-AESS) is installed in slot 2 or slot
3, it can be selected as word clock master.
32. Improvement of the metering in the LCD display.
Previous versions: The levels displayed on the meters in the METER
window of the LCD screen was different from that of the Meter Bridge.
Version 2.0: The levels displayed on the meters in the METER window of the
LCD screen are now the same as the Meter Bridge
33. Correction for the output level of the Oscillator.
Previous Versions: The output level of the Oscillator was 0.8dB lower than
the level that was displayed in the Oscillator window.
Version 2.0: The output of the Oscillator is now correct.
34. Correction in the display of MMC command.
Previous Versions: When the STOP command was sent, <PAUSE> was
displayed, and when the PAUSE command was sent, <STOP> was displayed
in the bottom right of the LCD screen.
Version 2.0: Now when the STOP command is sent, <STOP> is displayed,
and when the PAUSE command is sent, <PAUSE> is displayed in the bottom
right of the LCD screen
Page 40

2-14
35. New default BUS assignments when creating a stereo BUS.
Previous Versions: When the BUS was set to stereo, the BUS assignments
from the monaural channel was copied to the other channel of the pair.
Version 2.0: This problem is solved.
36. Correction of the sub-code data in the digital output signal.
Previous Versions: The sub-code data was always AES/EBU for the REC OUT,
AUX1, 2 and the AES/EBU Card (WR-AESS). The DA7 would only send
AES/EBU sub-code data, even if S/PDIF was selected using the hardware
switches.
Version 2.0: The format of the sub-code data can now be selected from
AES/EBU and S/PDIF from within the DIGITAL OUTPUT SELECT Window in
the Digital I/O screen. However, the buttons for switching the sub-code
format in the screen do not change the hardware switches used for selecting
the electric specification on the rear panel or on the AES/EBU cards. These
selections must be made in addition to the settings in the DIGITAL OUTPUT
SELECT Window. Therefore, the output switch and the sub-code area for
must be in the same position.
[D-IO>INPUT SET] window
Page 41

2-15
1. Cursor to the desired sub-code area and press the ENTER button.
The sub-code area toggles and appears in inverse video if S/PDIF
is selected, or in normal video if AES/EBU is selected.
2. Set the output switches on the AES/EBU Cards and on the DA7’s
Rear Panel to the same position that the respective sub-code area
is selected to in the DIGITAL OUTPUT SELECT within the [D-IO
INPUT SET] window. These switches set only the electrical
differences of RS-422/110 Ω for AES/EBU or 0.5 V/75 Ω for S/PDIF,
while the sub-code areas select the sub-code data in the output
signals. Therefore, for proper operation, the output switch and
the sub-code area for must be in the same position.
37. All Control Change Numbers are available for MIDI Remote mode.
Previous Versions: You could not select MIDI Control Change numbers 6,
38, 96, 97, 98, 99, 100 or 101. They had been reserved by the DA7 operating
system.
Version 2.0: You can now select any Control Change Number up to 119.
Page 42

(This page left blank intentionally.)
Page 43

3-1
Section 3
Upgrade From Version 1.21
or 1.22
Features of Version 2.0
These features are for DA7 users who are upgrading from Version 1.21/1.22
and are not described in the DA7 manual. All of the features described in
Section 1 are included in the Version 2.0 upgrade, even though you may
already have some of those functions from a previous version.
Page 44

3-2
Contents
1. Improved resolution for the Gain Reduction meters.
2. Easier Copying of Channel settings in Multi Channel View.
3. New LAYER LINK options in TANDEM mode.
4. MIDI/Custom Fader Layer Settings can now be stored in Scene Memory.
5. New EQ default settings for Filter Types.
6. New shortcut for returning to the CHANNEL window.
7. New default setting of PAN positions when stereo is cancelled.
8. New feature allows Soloing of the Surround Channels.
9. New feature allows monitoring of Tape Returns in Surround Monitor.
10. New 3+1 Surround Mode.
11. New method for controlling Surround LR/FR Position in Jog & Fader
mode.
12. New method for controlling Surround Sub level.
13. New feature allows communication with Digital Audio Workstations
(DAW) in the MIDI Remote window.
14. New feature allows the routing of inputs to an assignable Input Matrix.
15. New feature allows Fader Grouping of the Output Bus Channels.
16. New feature implements an Input to Output Routing Window.
17. New feature allows UNDO after Enabling the AUTOMATION.
18. Manual Locate in the Timecode display area.
19. New feature allows separate IN and OUT X-FADE times of scene
memories.
20. New feature allows VTR Control using RS-422 9pin protocol.
21. New shortcut for switching the built-in oscillator on / off.
Page 45

3-3
22. New shortcut to switch the built-in SOLO-MUTE on / off.
23. New Threshold level adjustment of analog input PEAK/SIGNAL LEDs.
24. Correction of freezing when faders are moved manually during
Automation playback.
25. New factory default settings.
26. New LCD Display default Change.
27. New default setting for Compressor/Limiter
Page 46

3-4
1. Improved resolution for the Gain Reduction meters.
Previous Versions: The DA7's internal Gain Reduction metering was
calibrated in 10dB/increments.
Version 2.0: The DA7's internal Gain Reduction metering is calibrated in
2dB/increments.
[CHANNEL] window
[DYNAMICS] window
Page 47

3-5
2. Easier Copying of Channel Settings in Multi Channel View.
Previous Versions: The Channel Settings could only be copied from one
channel to another by using the Multi Channel View window. You then had
to press the [COPY] soft button in the LCD display.
Version 2.0: In addition to the method described above, you may also copy
settings for [CHANNEL], [EQ], [DYNAMICS], and [SURROUND] using the
following method as well. Enter the Multi-Channel mode on the DA7 by
pressing the Multi-Channel View button on the Top Panel. This button is
located in the LCD display bridge.
While this window is displayed, press the SELECT button of the channel that
you would like to copy from, then press the SELECT button of the channel
that you would like to copy it to.
Notes: In Multi Channel View, you can not use the short cut ON/OFF of Channel
LINK or STEREO.
3. New LAYER LINK options in TANDEM mode.
Previous Versions: The default setting was ON, therefore the fader layer
selection on one DA7 was duplicated on the Tandem DA7.
Version 2.0: You can select either ON or OFF in the LAYER LINK area of the
[D-IO>SLOT] window. If OFF is selected, the fader layers will not be
duplicated between the two Tandem connected consoles, and you operate
each DA7’s layer selection separately while still in the Tandem mode.
[D-IO>TO SLOT] window
Page 48

3-6
4. MIDI/Custom Fader Layer Settings can now be stored in Scene
Memory
Previous Versions: The Scene memory did not include the Custom/MIDI
Layer settings, therefore they could not be stored.
Version 2.0: You can save the Custom/MIDI Layer settings to Scenes
Memories 0 through 10. When you recall Scenes 0 through 10, the
Custom/MIDI Layer settings will be recalled.
5. New EQ default settings for Filter Types
Previous Versions: When you changed the EQ Filter types, the DA7
defaulted to settings of the Q to 1.0 and the Gain to 0.0dB automatically.
Version 2.0: The DA7 retains the values of Q and Gain, even when you
change EQ Filter types.
6. New shortcut for returning to the CHANNEL window
Previous Versions: Not Implemented
Version 2.0: The [CHANNEL] window changes to the [SURROUND] window
whenever the PAN knob is pressed. To return from the [SURROUND] to the
[CHANNEL] window after it has been unintentionally selected, press the PAN
knob again. Use this shortcut to change the [SURROUND] window back to
the [CHANNEL] window.
7. New default setting of PAN positions when stereo is canceled
Previous Versions: Center was the default setting for both channels. When
you assigned channels from STEREO to MONO, the DA7 would return the
PAN for both channels to the center.
Version 2.0: Now if you place a pair of channels into the STEREO mode and
then select them back to MONO, the default is now left for the odd channels
and right for the even channels.
Odd channel Even channel
Page 49

3-7
8. New feature allows Soloing of the Surround Channels
Previous Versions: When monitoring with the Surround Sound enabled, you
could not Solo the Surround enabled Channels. (Solo was always (in stereo)
from the Monitor A signal path.)
Version 2.0: When the [SOLO POSITION] is set to [IN PLACE] from within
the Solo/Monitor Window, then SOLOing of the Surround Channels will
appear in the Surround Monitor. To adjust the monitor level, make the
adjustments to the [MASTER LEVEL] in the [SURROUND MONITOR], instead
of [SOLO LEVEL].
Caution: while you are recording Surround signals to Tape, do not use this
feature as it can cause a feedback loop.
9. New feature allows monitoring of Tape Returns in Surround Monitor
(Playback Only)
Previous Versions: The Surround Sound output signals could be monitored
through the Tape Sends only.
Version 2.0: The Surround signals can be monitored through the Tape
returns in SLOT #1-#3. To monitor the signals of SLOT 1, press #1 in the
Ten-key while holding down the MMC button. Similarly, to monitor SLOT 2
press #2 in the Ten-key while holding down the MMC button, to monitor
SLOT 3, press #3 in the Ten Key Pad while holding down the MMC button.
To return to normal operation, press the same buttons on the Ten Key Pad
again.
Caution: while you are recording Surround signals to Tape, do not use this
feature as it can cause a feedback loop.
Page 50

3-8
10. New 3+1 Surround Mode
Previous Versions: The Surround Mode was always set to 5.1.
Version 2.0: Selecting the Surround Mode for 5.1 or 3+1 is now possible in
the [UTILITY>CONFIG] window. If [3+1 SURROUND MONITOR] area is
[OFF], then the mode is 5.1 Surround. If [3+1 SURROUND MODE] area is
[ON], then the mode is 3+1.
In 3+1 Surround Mode, Bus1 is "L", Bus2 is "R", Bus3 is "C", and Bus4 is "S".
"S" is for rear signals. And Bus5 through 8 operates as the normal Buses.
When the [SURROUND MONITOR] in the [SOLO/MON] window is [ON], or
if the Surround Channel is Soloed, then this function can not be changed. To
change this function, turn the SURROUND MONITOR and all of Surround
Channel’s Solo to off.
[UTILITY>CONFIG] window
Page 51

3-9
11.New method or controlling the Surround LR/FR Position in Jog &
Fader mode
Previous Versions: Adjustments to the Surround Left-Right Position are
controlled using the JOG dial. Surround Front-Rear Position is controlled
using the MASTER LR FADER.
Version 2.0: Along with the above operations, adjustments to surround LeftRight Position can be performed by using the PAN knob and adjustments for
the Surround Front-Rear Position by using the upper knob in the DYNAMICS
Section.
12. New method for controlling Surround Sub
Previous Versions: To make adjustments to the Surround Sub send level,
you could only adjust it from within the [SEND VOL] Surround Mode.
Version 2.0: The Surround Sub level can now be adjusted in all of the
Surround modes.
13. New feature allows communication with Digital Audio Workstations
(DAW) in the MIDI Remote window
Previous Versions: This mode was not implemented.
Version 2.0: From the [UTILITY>USER CSTM] window, you can now select
the DAW MODE. Once you have selected the [DAW] button, you can use the
Custom/MIDI Layer to control a Digital Audio Workstation from the Top Panel
of the DA7. Many DAWs, such as ProTools, are controllable from an external
MIDI controller.
In order to make this DAW MODE compatible with as many Digital Audio
Workstations as possible, we have implemented a MIDI protocol that
conforms to the JL Cooper CS-10 Workstation Controller. To configure the
DAW MODE to work properly with your DAW, you should consult the
operation manual of your workstation for the configuration of your system.
Page 52

3-10
CAUTION: This window should be checked immediately after you upgrade the
console. Because this is a new feature, it is possible for the Input Channels to
be assigned randomly. If they are incorrect, simply press either the MIDI RMT
or the DAW button depending on what is displayed in the window. Once you
press the default button in each section and return to normal operation, it
should display NONE in each space. This is the correct default and your DA7
will recall it You will only need to do this once at the time you upgrade.
The [MIDI>MIDI RMT] window displays ‘DAW MODE’ in the Library’s
[TITLE]. You can not store, edit and recall the parameters of settings stored
in this library.
Operation with ProTools
The following instructions should be confirmed with the user manual for
your ProTools set-up. It is included here as a reference guide only. ProTools
will communicate with the DA7 in the same manner as a JL Cooper CS-10.
Cursor to the desired [DAW] button in the FADER area and press the ENTER
button.
[UTILITY>USER CSTM] window
[MIDI>MIDI RMT] window
Page 53

3-11
The [DAW] button will toggle and appear in inverse video if DAW MODE is
selected.
Then press the [EXECUTE] button to determine the ProTools settings.
Next, launch ProTools. (If you launch ProTools without changing the mode,
the DA7 will sometimes recall a scene.)
From within the ProTools software, select the JL Cooper [CS-10] as the
Controller type. The Machine ID should be set to 16. If you use more than 8
(up to 16) channels, then you should set the [CS-10] to X2 in the OMS
menu. The Second CS-10's Machine ID should be 15. (Refer to ProTools
Manual.)
The DA7 can only control and link the operation of FADER, MUTE, SOLO,
and PAN from the Top Panel for ProTools.
From ProTools, operation of the Audio Channels on the DA7 is linked with
MUTE and SOLO only. From the MIDI Channels, DA7 is linked with FADER,
MUTE, SOLO, and PAN.
When the MUTE or SOLO is operated from the ProTools screen, the DA7 will
only perform the last operated function (MUTE or SOLO) from the DA7 only.
i.e.
1. You have pressed MUTE on a channel from the DA7.
2. At this time, if you operate MUTE from ProTools screen, then the
DA7 will be in the same mode as ProTools and will perform the
same function. However, If you operate SOLO from the ProTools
screen, then the DA7 will not be connected with ProTools.
3. You have pressed SOLO on a channel from the DA7.
4. At this time, if you operate SOLO from ProTools screen, then the
DA7 will be in the same mode as ProTools and will perform the
same function. However, if you operate MUTE from ProTools
screen, then DA7 will not be connected with ProTools.
Operation with other Digital Audio Workstations
Consult the user manual of your DAW for operation of MIDI controllers. The
DAW MODE in the DA7 sends a MIDI Command Protocol compatible with
the JL Cooper CS-10.
Page 54

3-12
14. New feature allows the routing of Inputs to an assignable Input
Matrix
Previous Versions: The Audio Input signals were pre-assigned to the Faders.
Version 2.0: The Audio Input signals can now be re-assigned (in-groups of
eight channels) to a Fader within its group. This is a new window. It is called
[INPUT MTX] and is located in the [UTILITY] window group.
Move the Cursor to the channel area, and the desired INPUT box. Select the
desired Audio Channel by using the JOG dial. The INPUT box will appear in
inverse video. Then, press ENTER button. If you press the [DEFAULT] button,
the INPUT box area will change to its normal assignments for each FADER.
CAUTION: This window should be checked immediately after you upgrade the
console. Because this is a new feature, it is possible for the Input Channels to
be assigned randomly. If they are incorrect, simply press the default button in
each section to return to normal operation. You will only need to do this when
you upgrade.
[UTILITY>INPUT MTX] window
Page 55

3-13
15. New feature allows Fader Grouping of the Output Bus Channels
Previous Versions: The Bus Channels could not be included in Fader
Groups.
Version 2.0: The Bus Channels can now be assigned to new Fader Groups 5
and 6. The Bus Channels' Fader Group is assignable in the lower level of the
right side in [GROUP>FADER GRP] window.
To place a Bus into a group, Cursor to [GRP] 5 or 6 by using the UP or
DOWN ARROW button to highlight Group 5 or 6. With the CURSOR in the
CURSOR mode, use the Jog Dial to select the desired Bus channel, or press
the SELECT button of the Bus channel that you wish to place in a group.
The selection of a Bus in a group is represented by a highlighted black box
or “–” mark. The black box means that it is included within the Fader Group,
and the “–” mark means that it is not included within the Fader Group.
Press the ENTER button, then Group 5 or 6 will be toggled. Inverse video
means Enable Fader Group, and normal video means Disable Fader Group.
[GROUP>FADER GRP] window
Page 56

3-14
16. New feature implements an Input to Output Routing Window
Previous Version: Not implemented
Version 2.0: This is a New Window. The [ROUTING] in [GROUP] window
group is used for selecting the routing of the Inputs and Aux Returns to Bus,
Master LR, and Surround Enable/Disable.
If the Input or Aux Return channel is selected to Stereo, then the Center Line
between the Odd and Even channels will disappear. (e.g. at above graphics,
INPUT 3 and 4.)
If the Bus channel is selected to Stereo, then the BUS channel is toggled and
is displayed in inverse video. (e.g. at above graphics, BUS 5,6, and 7,8).
When this window is displayed, the assignments can be changed the by using
the 10 keypad in the selected channel of this window “Selected” means
cursor on this window (e.g. at above graphics, Input 6.) Don’t confuse this
with channel selecting. (e.g. at above graphics, Input 01) #1 through #8 is
for Bus Assign, #9 is for Master LR Assign, and #0 is for Surround
Enable/Disable.
When this window is selected, the Console's LED field indicators will display
Routing.
FADER/AUX1 through PAN/SURR/AUX4 are displayed as Bus Assign, Odd Bus
Assignments are Green, Even Bus Assignments are Red, and Both Bus
[GROUP>ROUTING] window
Page 57

3-15
Assignments are Amber. LIBRARY/AUX5 are displayed Master LR Assign,
Master LR Assign is Amber. SEL/MAN/AUX6 is displayed Surround
Enable/Disable, Surround Enable is Amber.
17. New feature allows UNDO after Enabling the AUTOMATION
Previous Versions: When AUTOMATION is enabled, the DA7 read the Start
Scene automatically, however you could not execute the UNDO to return to
its previous status.
Version 2.0: The Current Status can be recalled by pressing the UNDO/REDO
button to return to the previous status before the Automation was enabled.
18. Manual Locate in the Timecode display area
Previous Versions: To enter a new Location in the Timecode for the MTR, it
needed to be entered as a Locate Point.
Version 2.0: In the [AUTOMATION>EXECUTE] window, you can move the
cursor into the [TIMECODE] area and press the ENTER button. Now the
Timecode can be entered directly by using the Ten Key Pad.
When a number is entered, the cursor will move to next column
automatically. Use the LEF T and RIGHT ARROW buttons to move the cursor.
When the desired Timecode is selected, press the ENTER button, the MTR
will search to the selected Timecode location.
[AUTOMATION>EXECUTE] window
Page 58

19. New feature allows separate IN and OUT X-FADE times of scene
memories
Previous Versions: The FADER IN and OUT times were set to the same
settings.
Version 2.0: The FADER IN and OUT times are Independent and can be
adjusted using the Two soft-knobs in the [SCENE MEMORY>XFADE] window.
20. New feature allows VTR control with RS-422 9-pin protocol
Previous Versions: Only MMC (MIDI Machine Control) was available.
Version 2.0: Now either MMC or VTR control can be selected.
1. Connect a VTR to the RS-422/485 port on the DA7’s Rear Panel.
2. Set the RS422 9PIN PROTOCOL to ON in the [UTILITY>CONFIG]
window.
3. Operate the ARROW buttons on the DA7’s Top Panel in the MMC
mode. Operative buttons are PLAY, FF, REW, and STOP and
LOCATE.
3-16
[SCENE MEMORY>XFADE] window
Page 59

When the RS-422 9PIN PROTOCOL area is ON:
* The REPLAY and LOOP buttons will not function.
* The Communication speed must be set to 38.4 KBPS.
When the RS-422 9PIN PROTOCOL area is OFF, MMC will be the default.
21. New shortcut for switching the built-in oscillator on / off
To switch the internal oscillator [ON] or [OFF] press the UTILITY button
while holding down the MMC button on the DA7’s Top Panel.
22. New shortcut to switch the built-in SOLO-MUTE on / off
To switch the SOLO -MUTE [ON] or [OFF] press the UNDO/REDO button
while holding down the MMC button on the DA7’s Top Panel.
3-17
[UTILITY>CONFIG] window
Page 60

23. New Threshold level adjustment of analog input PEAK/SIGNAL LEDs
Previous Versions: The Threshold of the PEAK/SIGNAL LED was fixed at
-6.0dB.
Version 2.0: The Threshold of the PEAK/SIGNAL LED can now be adjusted
from -10dB through 0.0dB. In the [UTILITY>OSC/BATT] window, there is a
[PEAK LED THL] knob with a value in middle level of right side.
Cursor to the [PEAK LED THL] knob, and operate JOG dial. Factory
Default value is -6.0dB.
24. Correction of freezing when faders are moved manually during
Automation playback
Previous Version: While Automation is being played back, if you manually
move the faders, the DA7 will occasionally freeze-up and stop all functions.
This is most likely to occur when FADER FADE events (not FADER events) are
playing back.
Version 2.0: This has been resolved.
3-18
[UTILITY>INPUT MTX] window
Page 61

3-19
25. New factory default settings
Previous Version: The factory defaults for the AUX Sends and the BUS
Channels were OFF. The Fader Levels for the Aux Sends and BUS Channels
were (– ∞ dB).
Version 2.0: The factory defaults for the AUX Sends and the BUS Channels
are now ON.
The FADER Levels for the AUX Sends and BUS Channels are now set to
±0dB.
26. New LCD Display default Change
Previous Version: Several windows in the LCD display were hot highlighted.
Version 2.0: Now, once you change the value in the [TIME BASE], [SETUP]
or [EXECUTE] area in the [AUTOMATION] window, and the [SAMPLE] value
of the [DELAY] area in the [DYNAMICS] window, along with the other
parameters, will display their values in reverse video until you press the
[ENTER] key.
27. New default setting for Compressor/Limiter
Previous Version: The default setting for the Compressor/Limiter Attack time
was 10ms.
Version 2.0: The new default setting for the Compressor/Limiter Attack time
is now 35ms. All other settings remain the same.
Page 62

(This page left blank intentionally)
Page 63

Section 4
APPENDIX
New Default Settings
Upgraded Default Settings
From Versions 1.10/ V1.02/ 1.1./ 1.20
The comparison of the latest version (V 2.00) with the previous versions
(V1.00 through 1.20) is shown.
Window Group [MONITOR SETUP]
Item Parameter Previous V 2.00
SOLO MON POSITION IN PLACE PFL
MODE SOLO MIX
Window Group [CUSTOMIZE]
Item Parameter Previous V 2.00
ASSIGN CH CH1 INPUT 1 NONE
CH2 INPUT 2 NONE
CH3 INPUT 3 NONE
CH4 INPUT 4 NONE
CH5 INPUT 5 NONE
CH6 INPUT 6 NONE
CH7 INPUT 7 NONE
CH8 INPUT 8 NONE
CH9 INPUT 9 NONE
CH10 INPUT10 NONE
CH11 INPUT11 NONE
CH12 INPUT12 NONE
CH13 INPUT13 NONE
4-1
Page 64

CH14 INPUT14 NONE
CH15 INPUT15 NONE
CH16 INPUT16 NONE
BUS1 BUS 1 NONE
BUS3 BUS 3 NONE
BUS5 BUS 5 NONE
BUS7 BUS 7 NONE
Window Group [DIGITAL INPUT]
Item Parameter Previous V 2.00
DIGITAL OUTPUT REC-OUT AUX1/2 --- AES/EBU
SELECT SLOT 1 1-4 --- AES
SLOT 1 5-8 --- AES
SLOT 2 1-4 --- AES
SLOT 2 5-8 --- AES
SLOT 3 1-4 --- AES
SLOT 3 5-8 --- AES
4-2
Page 65

4-3
Upgraded Default Settings
From Version 1.21 to Version 2.00
The comparison of the latest version (V 2.00) with the previous version
(V 1.21) is shown.
Window Group [CHANNEL]
Item Parameter Previous V 2.00
CH ON (for AUX SEND&BUS only) OFF ON
FADER (for AUX SEND&BUS only) – ∞ 0
Window Group [DYNAMICS]
Item Parameter Previous V 2.00
COMP+GATE COMP ATT 10ms 35ms
EXPANDER EXP ATT 10ms 35ms
Window Group [OSCILLATOR]
Item Parameter Previous V 2.00
PEAK THL LEVEL --- -6.0
Window Group [CONFIGRATION]
Item Parameter Previous V 2.00
CONFIG RS422 9PIN --- OFF
PROTOCOL
3+1 SURROUND --- OFF
MODE
Page 66

4-4
Window Group [INPUT MATRIX]
Item Parameter Previous V 2.00
FDR 1 --- INPUT 1
FDR 2 --- INPUT 2
FDR 3 --- INPUT 3
FDR 4 --- INPUT 4
FDR 5 --- INPUT 5
FDR 6 --- INPUT 6
FDR 7 --- INPUT 7
FDR 8 --- INPUT 8
FDR 9 --- INPUT 9
FDR 10 --- INPUT 10
FDR 11 --- INPUT 11
FDR 12 --- INPUT 12
FDR 13 --- INPUT 13
FDR 14 --- INPUT 14
FDR 15 --- INPUT 15
FDR 16 --- INPUT 16
FDR 17 --- INPUT 17
FDR 18 --- INPUT 18
FDR 19 --- INPUT 19
FDR 20 --- INPUT 20
FDR 21 --- INPUT 21
FDR 22 --- INPUT 22
FDR 23 --- INPUT 23
FDR 24 --- INPUT 24
FDR 25 --- INPUT 25
FDR 26 --- INPUT 26
FDR 27 --- INPUT 27
FDR 28 --- INPUT 28
FDR 29 --- INPUT 29
FDR 30 --- INPUT 30
FDR 31 --- INPUT 31
FDR 32 --- INPUT 32
Page 67

Window Group [SLOT OUT]
Item Parameter Previous V 2.00
SLOT 3 TANDEM LAYER LINK --- ON
Window Group [FADER GROUP]
Item Parameter Previous V 2.00
GROUP 5 ON/OFF --- ON
GROUP 6 ON/OFF --- ON
BUS 1 GROUP 5 ON/OFF --- OFF
BUS 2 GROUP 5 ON/OFF --- OFF
BUS 3 GROUP 5 ON/OFF --- OFF
BUS 4 GROUP 5 ON/OFF --- OFF
BUS 5 GROUP 5 ON/OFF --- OFF
BUS 6 GROUP 5 ON/OFF --- OFF
BUS 7 GROUP 5 ON/OFF --- OFF
BUS 8 GROUP 5 ON/OFF --- OFF
BUS 1 GROUP 6 ON/OFF --- OFF
BUS 2 GROUP 6 ON/OFF --- OFF
BUS 3 GROUP 6 ON/OFF --- OFF
BUS 4 GROUP 6 ON/OFF --- OFF
BUS 5 GROUP 6 ON/OFF --- OFF
BUS 6 GROUP 6 ON/OFF --- OFF
BUS 7 GROUP 6 ON/OFF --- OFF
BUS 8 GROUP 6 ON/OFF --- OFF
4-5
Page 68

avM0200-0 Printed in Japan
© Matsushita Communication Industrial Co., Ltd. 2000
 Loading...