

Page 1
Q
U
I
C
K
G
U
I
D
E
/
G
U
I
D
E
R
A
P
I
D
E
/
G
U
Í
A
R
Á
P
I
D
A
G
U
I
A
R
Á
P
I
D
O
/
G
U
I
A
R
Á
P
I
D
O
/
Q
U
I
C
K
G
U
I
D
E
/
G
U
Í
A
R
Á
P
I
D
A
Q
U
I
C
K
G
U
I
D
E
/
G
U
Í
A
R
Á
P
I
D
A
Σ
Υ
Ν
Τ
Ο
Μ
Ο
Σ
Ο
∆
Η
Γ
Ο
Σ
Σ
Υ
Ν
Τ
Ο
Μ
Ο
Σ
Ο
∆
Η
Γ
Ο
Σ
Oper
atin
g Inst
ructi
ons
Air
Con
ditione
r
Ind
oo
r Uni
t
Outdoo
r
U
nit
CS-E7
GKEW
CU
-E7GKE
CS-E9
GKEW
CU
-E9GKE
CS-E1
2GKE
W
CU-E12
GKE
F565
488
ENGLIS
H
2
~
7
Before operating
t
he uni
t,
read t
h
ese oper
atin
g
instructions t
hor
oug
hly
and keep
th
em for f
utu
r
e
reference.
ES
P
AÑOL
8
~
13
An
tes d
e
u
tiliz
ar l
a uni
d
ad,
sírvase lee
r a
tentame
nte
esta
s
in
struc
cione
s
de func
ion
amie
nto
y
conservarlas
como fut
u
ro
elemento
de consul
ta
.
PO
R
TUGUÊ
S
14
~
19
Antes de li
gar a
unidade
,
leia cuida
dosamente
este
manual
de
util
izaçã
o
e g
uard
e-o para futu
ra
referênc
ia.
E
ΛΛ
ΗΝΙ
ΚΆ
20
~
2
5
Πρ
οτ
ού
θέσετε
τη
μονάδ
α
σε
λει
τ
ουργία,
δια
βάσ
τε
προσ
εκ
τι
κ
ά
αυτές
τις
οδηγίες
χρήσ
ης
κ
αι
φυ
λ
άξ
τε
τι
ς
για
μελ
λ
οντι
κή
αναφ
ο
ρ
ά
.
Manufactu
red b
y:
P
anaso
ni
c
HA
Air
-C
ondit
ioning
(M)
Sdn.
B
h
d.
Lot 2,
P
ersiaran
T
engk
u
Ampua
n, S
e
ction 21, S
ha
h
Ala
m
Indu
strial S
ite,
40300 Shah
Alam, S
el
a
ngo
r
,
Malaysia
.
©
2
00
6 P
ana
sonic H
A
Air-Co
n
diti
oning
(M) S
dn Bhd (
1
1969-T).
All
rights
reserved.
Una
uthor
ize
d copyin
g an
d
distri
bution
is
a vi
olati
on o
f
la
w
.
Ma
tsushita Elect
ric Industrial
C
o
.,
Ltd.
Web Site: http:/
/
w
w
w
.pa
na
sonic.co.j
p/g
loba
l/
Printed in Ma
la
ysia
OFSC06
08-00
e op
er
ation.
te
nga el
funcio
nam
iento.
e/De
sligu
e a u
ni
dade.
/
.
ura
.
Select fan speed.
Selecci
one l
a ve
locid
ad
del
ventil
ado
r
.
Selecci
one a ve
locid
ad
e da
ventil
ador
.
.
Adjust th
e air
flow direction
louve
r
.
Ajuste
la p
ersiana
de d
irección
del fl
ujo
de ai
re.
Ajuste
a pl
aca de di
recç
ão d
o
fluxo
de
a
r.
.
4
4
5
5
et
ailed explanat
ion
, pleas
e refer to
pages
4 ~ 5.
ión detallada,
por favor
lea
las
pági
nas 10
y
11.
páginas
16 ~ 17 par
a obter
uma explicaçã
o mais p
orm
enorizada
.
,
22 ~ 23
.
F565734
0!42/,
3%.3/2
Air Conditioner
Indoor Unit Outdoor Unit
CS-E7GKEW CU-E7GKE
CS-E9GKEW CU-E9GKE
CS-E12GKEW CU-E12GKE
CS-E15GKEW CU-E15GKE-1
CS-E15GKE-3 CU-E15GKE-3
Operating Instructions
ESPAÑOL 14 ~ 19
Antes de utilizar la unidad,
ENGLISH 2 ~ 7
Before operating the unit,
read these operating
instructions thoroughly
and keep them for future
reference.
Q
U
I
C
K
G
U
I
D
G
E
U
/
G
Í
A
U
R
I
D
Á
E
P
I
R
D
A
A
P
I
D
E
/
Manufactured by:
Panasonic HA Air-Conditioning (M) Sdn. Bhd.
Lot 2, Persiaran Tengku Ampuan, Section 21, Shah Alam
Industrial Site, 40300 Shah Alam, Selangor, Malaysia.
FRANÇAIS 8 ~ 13
Avant d’utiliser l’appareil,
lisez ce mode d’emploi dans
son intégralité et conservezle pour toute référence
ultérieure.
© 2006 Panasonic HA Air-Conditioning
(M) Sdn. Bhd. (11969-T). All rights
reserved. Unauthorized copying and
distribution is a violation of law.
sírvase leer atentamente
estas instrucciones
de funcionamiento y
conservarlas como futuro
elemento de consulta.
Page 2
Air
inlet
Air
outlet
Air
inlet
Air
inlet
Air
outlet
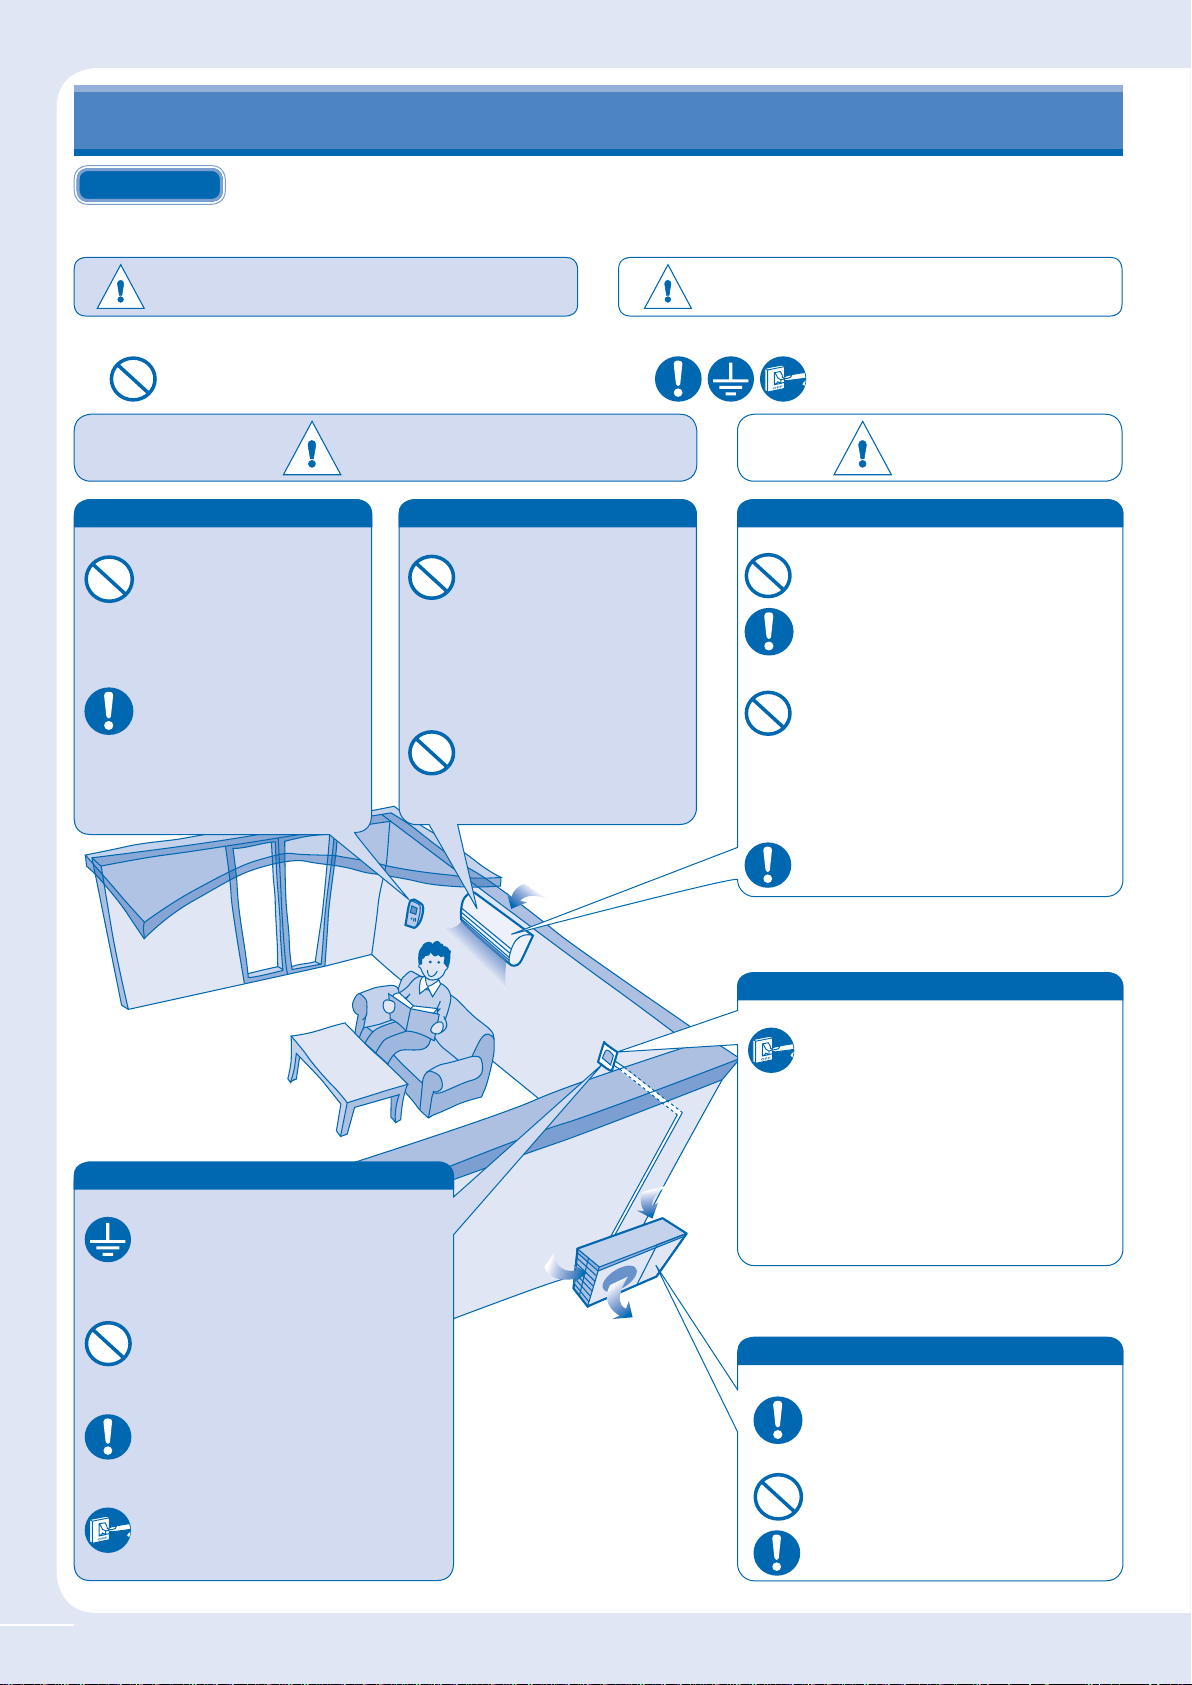
SAFETY PRECAUTIONS
DEFINITION
To prevent personal injury, injury to others, or property damage, please observe the following.
Incorrect operation due to failure to follow instructions may cause harm or damage, the seriousness of which is classifi ed as below:
Warning
The instructions to be followed are classifi ed by the following symbols:
This symbol denotes an action that is
PROHIBITED.
Remote Control
During Operation
• Do not use rechargeable
(Ni-Cd) batteries.
• Do not allow infants and
small children to play with
the remote control to prevent
them from accidentally
swallowing the batteries.
• Remove the batteries if the
unit is not going to be used
for a long period of time.
• New batteries of the same
type must be inserted
following the polarity stated
to prevent malfunction of the
remote control.
This sign warns of death or serious
injury.
Warning
Indoor Unit
During Installation
• Do not install, remove and
reinstall the unit by yourself;
improper installation will
cause leakage, electric
shock or fi re. Please consult
an authorized dealer or
specialist for the installation
work.
During Operation
• Do not insert your fi ngers or
other objects into the indoor
or outdoor unit.
• Do not attempt to repair the
unit by yourself.
Air
inlet
Caution
During Installation
During Operation
This sign warns of injury or damage
to property.
These symbols denote actions
that are COMPULSORY.
Caution
Indoor Unit
• Do not install the unit in a potentially
explosive atmosphere.
• Ensure that the drainage pipe is
connected properly. Otherwise, leakage
may occur.
• Do not wash the unit with water, benzene,
thinner or scouring powder.
• Do not use for other purposes such as
preservation of food.
• Do not use any combustible equipment in
front of the airfl ow outlet.
• Do not expose directly to cold air for a
long period.
• Aerate the room regularly.
Power Supply
During Installation
• This equipment must be earthed and
installed with ELCB. Otherwise, it may
cause electrical shock or fi re in case of
malfunction.
During Operation
• Do not share the same power outlet with
other equipment.
• Do not modify power cords.
• Do not use extension cords.
• Do not operate with wet hands.
• Use the specifi ed supply cord.
• If the supply cord is damaged, it must be
replaced by the manufacturer, its service
agent or similarly qualifi ed persons in
order to avoid a hazard.
• In case of emergency or abnormal
conditions (burnt smell, etc), turn off the
power supply, and consult your nearest
dealer.
Air
outlet
Air
inlet
Air
outlet
Air
inlet
Power Supply
During Operation
• Switch off the power supply before
cleaning or servicing.
• Turn off the power supply if the unit is not
used for a long period of time.
• This air conditioner is equipped with a
built-in surge protective device.
However, in order to further protect your
air conditioner from being damaged by
abnormally strong lightning activity, you
may want to disconnect it from the power
supply. Do not touch the air conditioner
during lightning, it may cause electric
shock.
Outdoor Unit
During Installation
• Ensure that the drainage pipe is
connected properly. Otherwise, leakage
may occur.
During Operation
• Do not sit or place anything on the indoor
or outdoor unit.
• After long periods of use, make sure the
installation rack is not damaged.
2
Page 3
REGULAT ORY INFORMATION
The appliance is not intended for use by young children or the infi rm person without
supervision. Young children should be supervised to ensure that they do not play with the
appliance.
ENVIRONMENTAL REQUIREMENTS
Battery Disposal
The batteries must be recycled or disposed of properly.
END-OF-LIFE DISPOSAL
“Instructions for end-user” for air conditioners:
This air conditioner bears the above mark, indicating that electrical
equipment should not be disposed of alongside general household waste.
European Community countries (*), should have a dedicated collection
system for these products. Do not try to dismantle the system yourself as this
could have harmful effects on your health and on the environment as a result
of incorrect waste handling. This dismantling and disposal of refrigerant,
oil and other parts must be done by a qualifi ed installer in accordance with
relevant local and national regulations. Air conditioners must be treated at a
specialized treatment facility for re-use, recycling and recovery and should
not be disposed of in the municipal waste stream. Please contact your
installer, dealer or local authority for more information. Penalties may also
be applicable for incorrect disposal of waste products, in accordance with
national legislation.
*subject to the national law of each member state
Information on Disposal in other countries outside the European Union
This symbol is only valid in the European Union. If you wish to discard this
product, please contact your installer, dealer or local authority and ask for the
correct method of disposal.
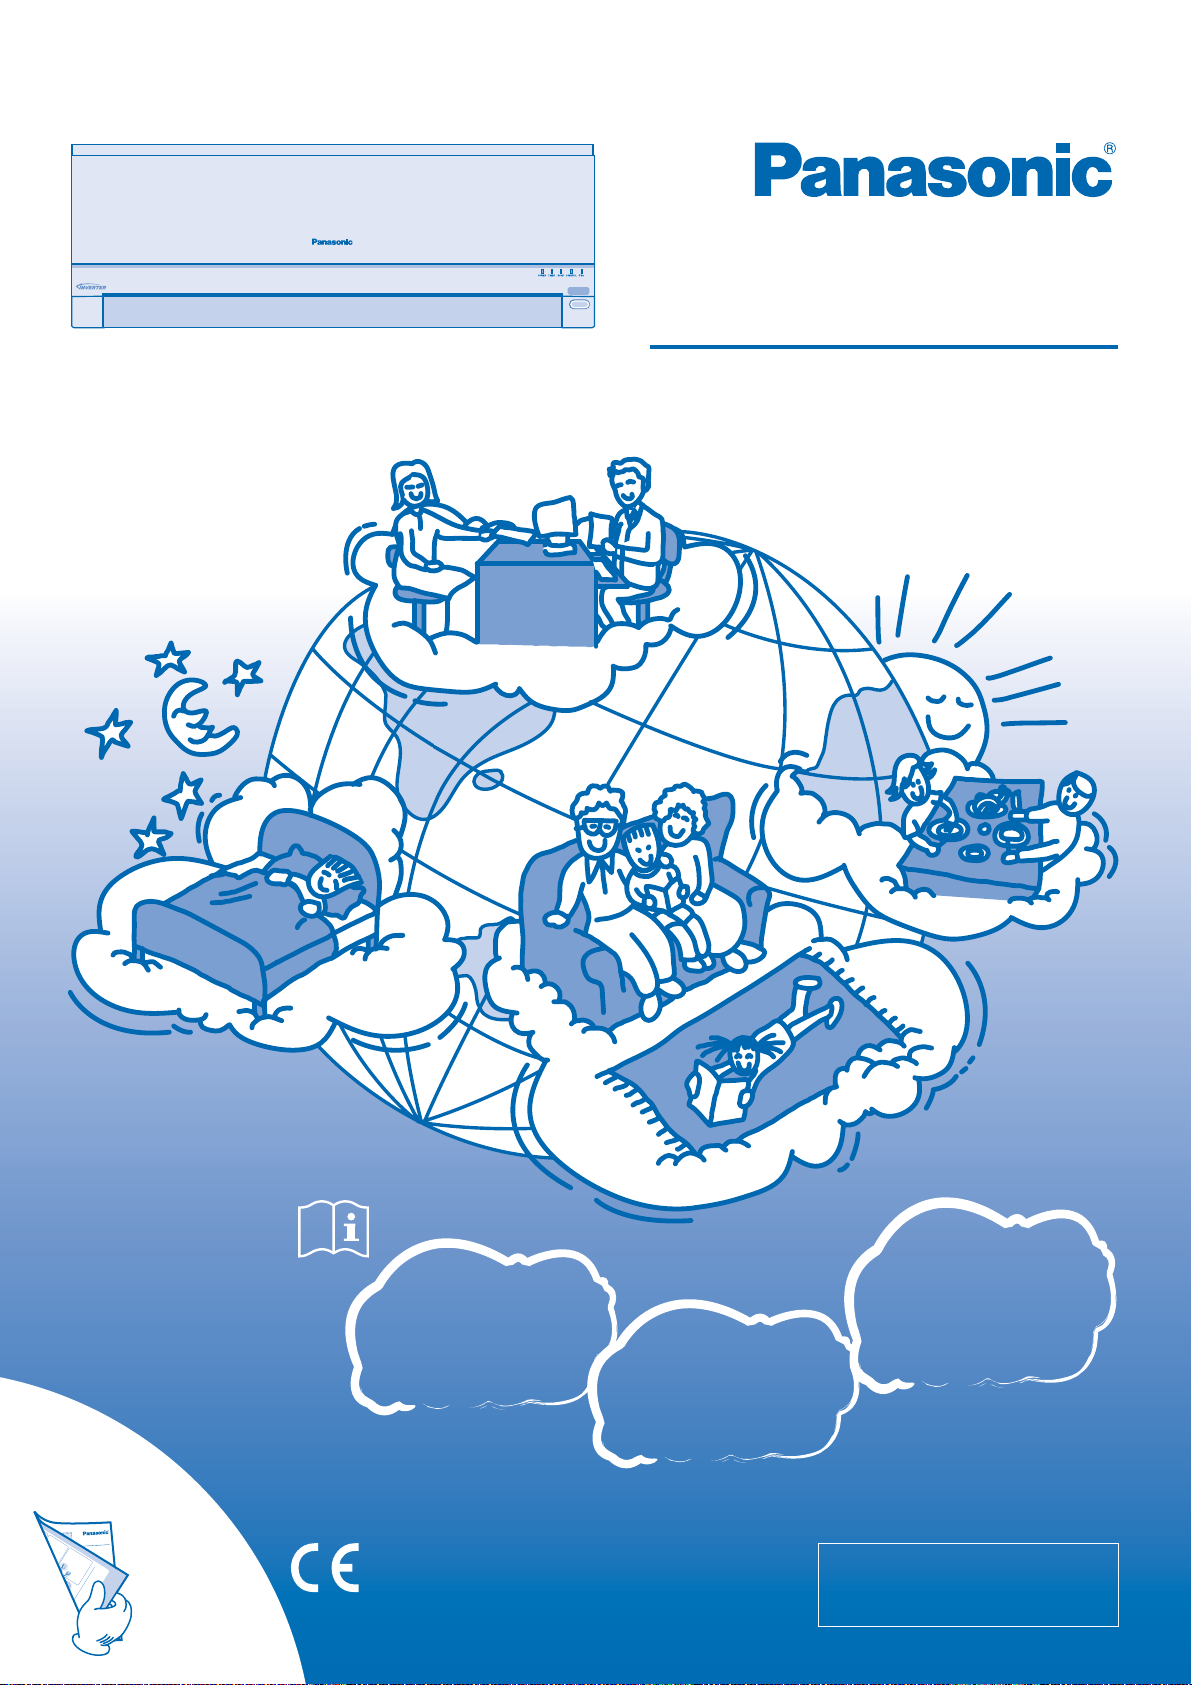
Thank you for purchasing
Air Conditioner
TABLE OF CONTENTS
SAFETY PRECAUTIONS
2
REGULATORY INFORMATION
3
HOW TO OPERATE
4~5
CARE & CLEANING
TROUBLESHOOTING
7
QUICK GUIDE
Back cover
6
ENGLISHENGLISHENGLISHENGLISH
OPERATION CONDITION
Use this air conditioner under the following temperature range.
Temperature (°C)
COOLING
HEATING
Maximum
Minimum
Maximum
Minimum
Indoor Outdoor
*DBT *WBT *DBT *WBT
32 23 43 26
16 11 16 11
30 – 24 18
16 – -5 -6
*DBT: Dry bulb temperature
*WBT: Wet bulb temperature
Note:
The illustrations in this manual are for
explanation purposes only and may differ
from the actual unit. It is subjected to change
without notice for future improvement.
3
Page 4
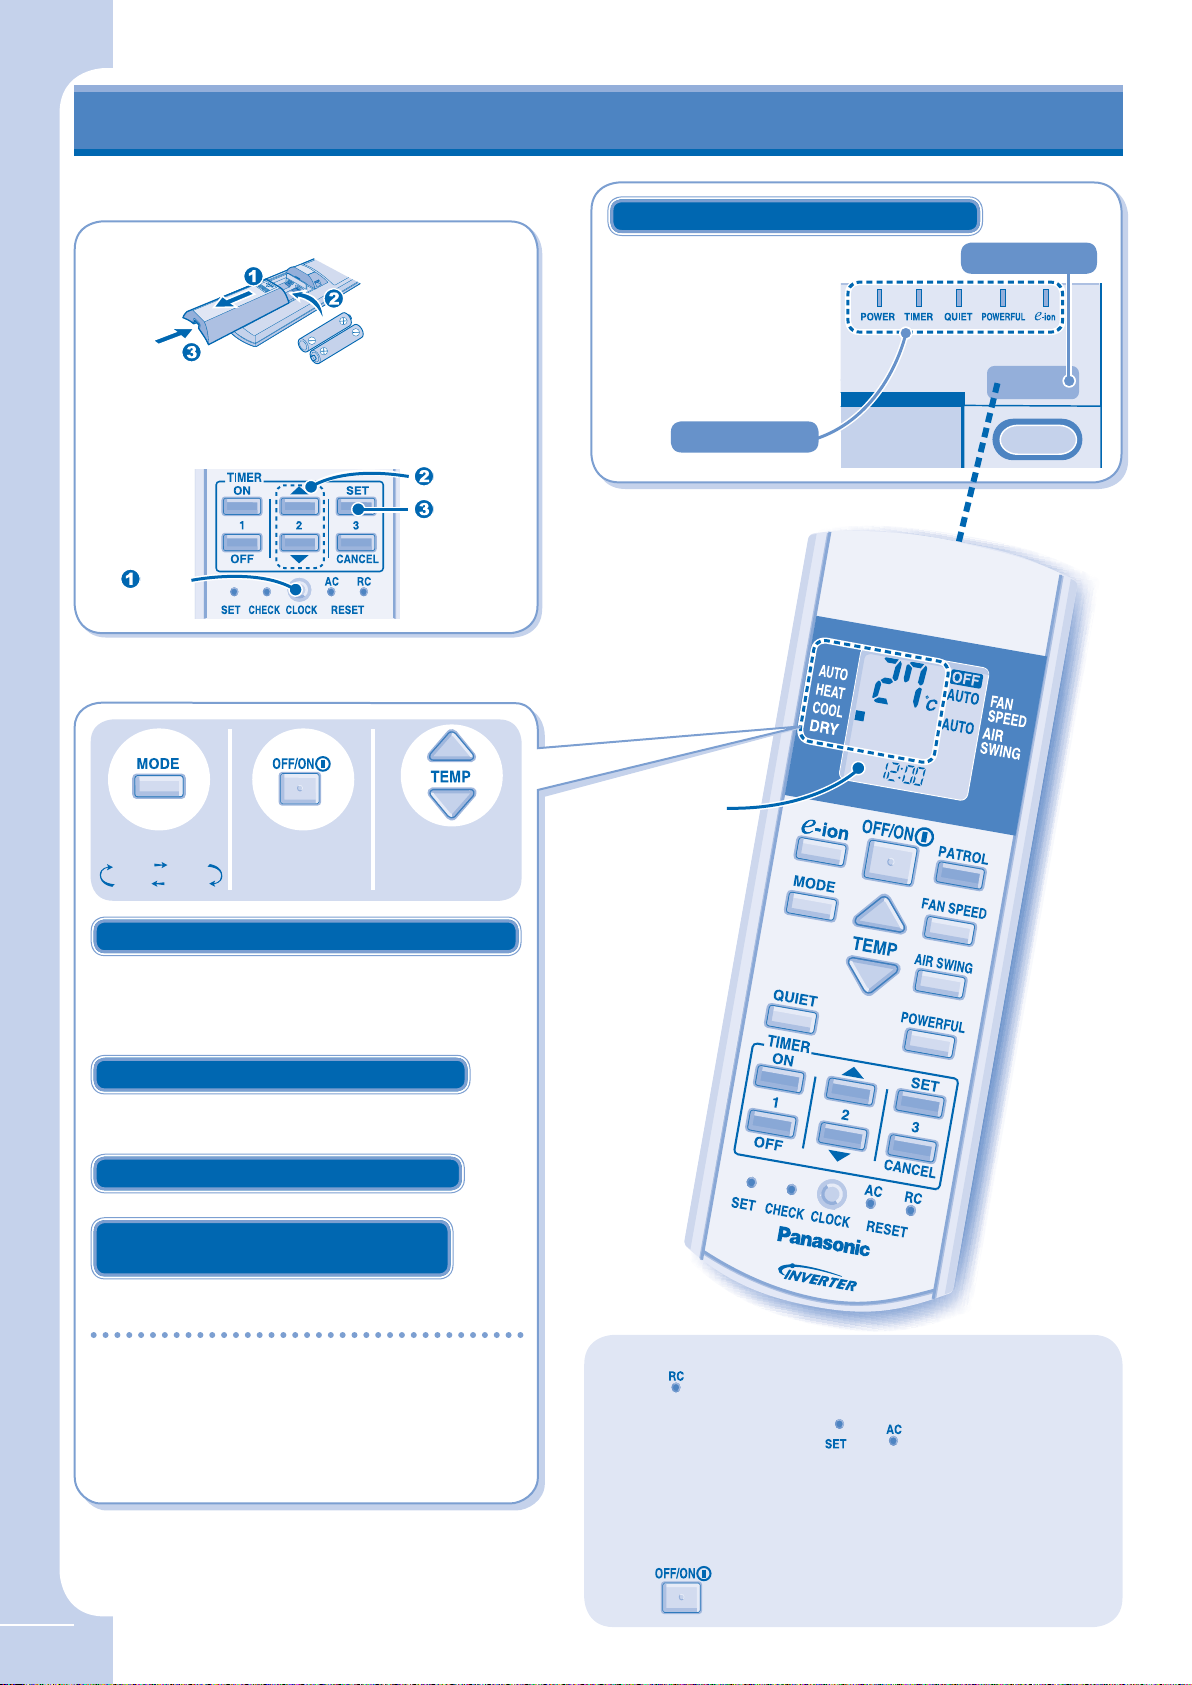
HOW TO OPERATE
RECEIVER
RECEIVER
REMOTE CONTROL PREPARATION
REMOTE CONTROL PREPARATION
MODE OPERATION
MODE OPERATION
INDICATOR
INDICATOR
REMOTE CONTROL PREPARATION
REMOTE CONTROL PREPARATION
Inserting the batteries
Pull out
Insert AAA or
R03 batteries
• The batteries can be used for approximately 1 year.
Replace the batteries when the remote control display or
transmission signal becomes weak.
Setting the current time
Press
MODE OPERATION
MODE OPERATION
Close
Set time
Confi rm
REMOTE CONTROL TRANSMITTER
• Make sure it is not
obstructed.
• Certain fl uorescent lights
may interfere with signal
transmission. Please
consult your nearest
dealer.
INDICATOR
INDICATOR
Maximum distances : 8m
RECEIVER
RECEIVER
0!42 /,
3%.3/2
Select Turn on Adjust
AUTO HEAT
DRY COOL
AUTO MODE - FOR YOUR CONVENIENCE
• Unit selects the operation mode according to temperature
setting, outdoor and room temperature.
• Operation mode is reselected every 30 minutes. During
operation mode selection the power indicator blinks.
HEAT MODE - TO ENJOY WARM AIR
• In heat mode, it takes a while for the unit to warm up. The
power indicator blinks during this operation.
COOL MODE - TO ENJOY COOL AIR
DRY MODE - TO DEHUMIDIFY THE
ENVIRONMENT
• During soft dry operation, the indoor fan operates at low
fan speed to give a very gentle cooling operation.
● The range of temperature for selection is
16°C ~ 30°C.
Operating the unit within the recommended
●
temperature could induce energy saving.
HEAT MODE : 20°C ~ 24°C.
COOL MODE : 26°C ~ 28°C.
DRY MODE : 1°C ~ 2°C lower than room temperature.
temperature
Remote
control
display
Notes:
• Press
default setting.
• For normal operation, the
in use.
• While using remote control, please be aware of the OFF
indication on the remote control display to prevent the unit
from starting / stopping improperly.
• PATROL operates automatically once the unit is switched on
RESET button to restore the remote control’s
and RESET buttons are not
4
with
button.
Page 5
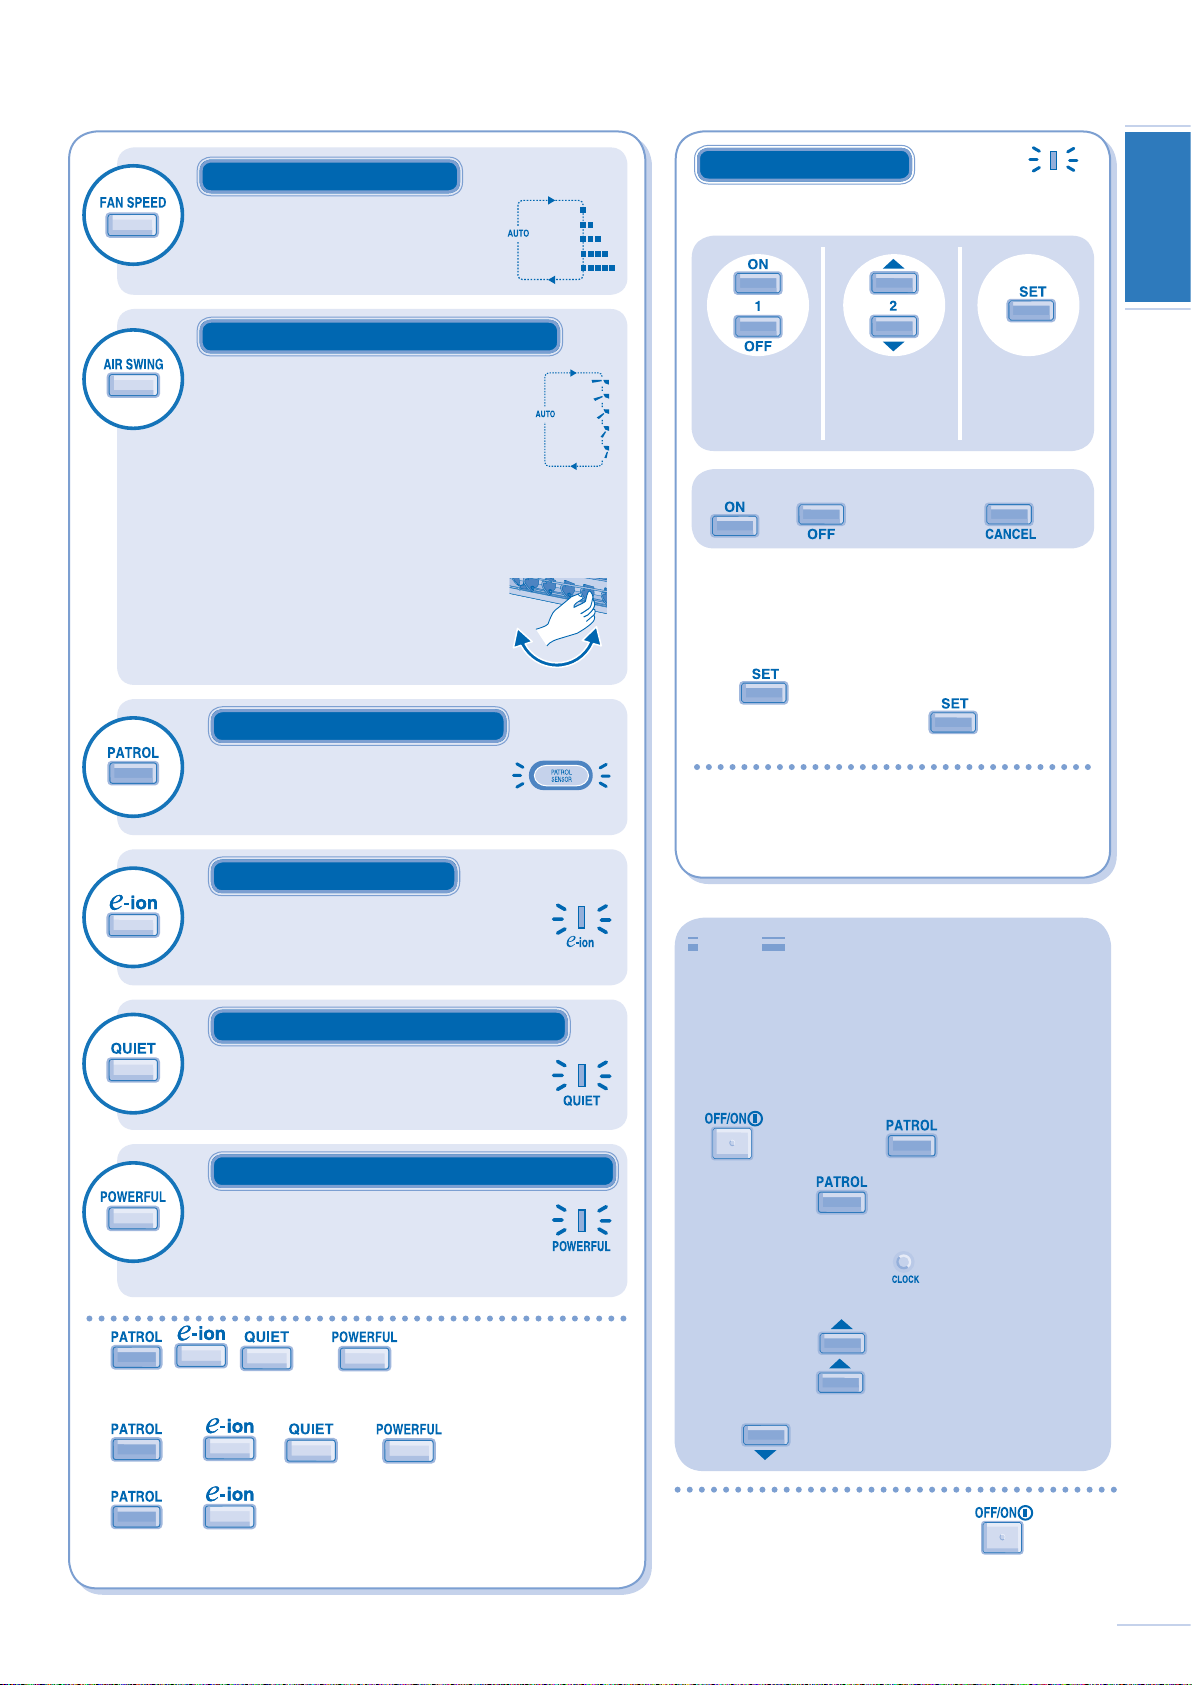
FEATURE OPERATION
FEATURE OPERATION
FEATURE OPERATION
TIMER SETTING
TIMER SETTING
FEATURE OPERATION
TIMER SETTING
TIMER SETTING
TO SELECT FAN SPEED
• There are 5 fan speeds, as well as
automatic*.
* For automatic fan speed, the speed
of the indoor fan is automatically
adjusted according to the operation.
TO ADJUST AIRFLOW DIRECTION
• Keeps the room ventilated.
• There are 5 options for vertical airfl ow
direction.
• If automatic vertical airfl ow direction
has been set, the louvers swing up/
down automatically.
• In heat mode, the air blows horizontally
for a while, then starts to blow
downwards.
• Do not adjust the vertical airfl ow
direction louvers by hand.
• Horizontal airfl ow direction louver is
manually adjustable.
TO MONITOR AIR QUALITY
• This setting enables the patrol sensor
to automatically detect the air quality.
• When the air quality is unsatisfactory,
e-ion operation will start automatically.
TO ENJOY CLEAN AIR
• This setting provides clean air by producing
negative ions to attract dust which will then
be captured at the positively charged e-ion
fi lters.
TO ENJOY QUIET ENVIRONMENT
• This setting provides a quiet environment by
reducing the airfl ow noise.
TO SET THE TIMER
• When you want the air conditioner to turn ON or OFF
automatically at a preset time.
Select ON
or OFF
timer.
Set the
desired
time.
the setting.
4)-%2
Confi rm
To cancel ON or OFF timer, press
or , then press .
• When ON Timer is set, the unit may start earlier (up
to 30 minutes) before the actual set time in order to
achieve the temperature you preferred.
• The timers repeat daily once set.
• If there is a power failure, you can restore the
previous setting (once power is resumed) by pressing
the
• If the timer is cancelled, press
previous setting.
The timer is based on the time set in the remote
●
control.
You can set your preferred time for ON and OFF
●
timers.
Hints
■ Temperature setting of 1°C higher in cool mode or
2°C lower in heat mode than the desired temperature
performs a 10% power saving.
■ To reduce power consumption during cool mode, close
the curtains to prevent the sunlight and heat from
coming in.
■ To disable the PATROL operation during unit start with
button.
to restore the
ENGLISHENGLISHENGLISHENGLISH
TO ACHIEVE TEMPERATURE QUICKLY
• This setting enables the desired
temperature to be reached quickly.
• POWERFUL operation will run for 20
minutes, after that this operation will stop
automatically.
● , , and operations are available in all
modes and could be cancelled by pressing the respective button
again.
●
●
and or and operations could not be
activated at the same time.
and operations could be activated even when the
air-conditioner is turned off. In this condition, once e-ion indicator
is ON, the unit will operate with AUTO fan speed and air swing.
, press and hold for 5 seconds then
release.
To reset, press
release.
■ To set either 12-hour (am/pm) or 24-hour time
indication, press and hold
seconds.
■ To dim the indicator display on the air conditioner:
Press and hold
To reset, press again for 5 seconds.
■ To switch the temperature setting to °C or °F, press and
hold for approximately 10 seconds.
● To turn off the air conditioner, press .
again for 5 seconds then
for approximately 5
for 5 seconds.
5
Page 6

FRONT PANEL
FRONT PANEL
Remove
INDOOR UNIT
INDOOR UNIT
e-ion AIR PURIFYING SYSTEM
e-ion AIR PURIFYING SYSTEM
CARE & CLEANING
AUTO OFF/ON BUTTON
AUTO OFF/ON BUTTON
AIRFLOW DIRECTION
LOUVER
AIRFLOW DIRECTION
LOUVER
Switch off the power supply before cleaning
e-ion AIR PURIFYING SYSTEM
e-ion AIR PURIFYING SYSTEM
Do not touch during operation
e-ion FILTERS
• Clean the fi lters regularly.
• Wash/rinse the fi lters gently with water to avoid
damage to the fi lter surface.
• Dry the fi lters thoroughly under the shade, away
from fi re or direct sunlight.
• Replace any damage fi lter.
Part no.: CWD00K1001 (Left and Right)
FRONT PANEL
FRONT PANEL
Raise and pull to
remove. Wash gently
and dry.
Remove
ACTIVE e-ion POWER MODULE
ACTIVE e-ion GENERATOR
Clean with dry cotton
bud.
• Active e-ion
generator cleaning is
recommended every 6
months.
INDOOR UNIT
INDOOR UNIT
Wipe the unit
gently with a
soft, dry cloth.
AIRFLOW DIRECTION
AIRFLOW DIRECTION
LOUVER
LOUVER
WASHING INSTRUCTIONS
• Do not use benzene, thinner or scouring powder.
• Use only soap (
• Do not use water hotter than 40°C.
pH7) or neutral household detergent.
6
AUTO OFF/ON BUTTON
AUTO OFF/ON BUTTON
To operate the air-conditioner when the remote
control is misplaced or malfunctioned.
Action Mode
Press once. Automatic
Press and hold until you hear one beep,
then release.
Press and hold until you hear one beep
then release.
Press and hold until you hear two beeps
then release.
• To turn off, press the AUTO OFF/ON button again.
Cooling
Heating
Hints
■ Clean the fi lter regularly for best performance and to reduce
power consumption.
■ Please consult your nearest dealer for seasonal inspection.
Page 7

TROUBLESHOOTING
The following symptoms do not indicate malfunction.
Symptom Cause
Mist emerges from indoor unit.
Water fl owing sound during operations.
The room has a peculiar odour.
Indoor fan stops occasionally during
automatic fan speed setting.
Operation is delayed a few minutes after
restart.
Outdoor unit emits water/steam.
Timer indicator is always on.
Power indicator blinks during operation
and the indoor fan is stopped.
Indoor fan stops occasionally during
heating operation.
Power indicator blinks before the unit is
switched on.
Check the following before calling for servicing.
Symptom Check
Heating/Cooling operation is not working
effi ciently.
Noisy during operation.
Remote control does not work.
The unit does not work.
■
Condensation effect due to cooling process.
■
Refrigerant fl ow inside the unit.
■
This may due to damp smell emitted by the wall, carpet, furniture or clothing.
■
This helps to remove the surrounding odours.
■
The delay is a protection to the unit’s compressor.
■
Condensation or evaporation occurs on pipes.
■
The timer setting repeats daily once set.
■
The unit is in defrost mode, and the melted frost is drained from the outdoor unit.
■
To avoid unintended cooling effect.
■
This is a preliminary step in preparation for the operation when the ON timer has been set.
■
Set the temperature correctly.
■
Close all doors and windows.
■
Clean or replace the fi lters.
■
Clear any obstruction at the air inlet and air outlet vents.
■
Check if the unit has been installed at an incline.
■
Close the front panel properly.
■
Insert the batteries correctly.
■
Replace weak batteries.
■
Check if the circuit breaker is tripped.
■
Check if timers have been set.
ENGLISHENGLISHENGLISHENGLISH
Patrol sensor or e-ion indicator on the
indoor unit is blinking.
The unit stops and the timer indicator
blinks.
■
Press or twice. If the patrol sensor or e-ion indicator still blinking, please consult
your nearest dealer.
Press for 5 seconds.
■
Turn the unit off and reveal the error code to your nearest dealer.
Note:
• The unit may be operable (with 4 beeps) on a limited basis, depending on the error.
FOR EXTENDED NON-USE
• Activate heat mode for 2~3 hours to thoroughly dry the unit.
• Turn off the power supply.
• Remove the remote control batteries.
SEASONAL INSPECTION AFTER EXTENDED
NON-USE
• Checking of remote control batteries.
• No obstruction at air inlet and air outlet vents.
• After 15 minutes of operation, it is normal to have the following
temperature difference between air inlet and air outlet vents:
Cooling: ≥ 8°C
Heating: ≥ 14°C
TIMER
ON SET
132
OFF CANCEL
AC RC
RESET SET CHECK CLOCK
Press until you hear
beep sound, then jot
down the error code.
Press for 5 seconds
to quit checking.
NON SERVICEABLE CRITERIAS
TURN OFF POWER SUPPLY and CALL Authorized Distributor
under the following conditions:
• Abnormal noise during operation.
• Water/foreign particles have entered the remote control.
• Water leaks from Indoor unit.
• Circuit breaker switches off frequently.
• Power cord becomes unnaturally warm.
• Switches or buttons are not functioning properly.
7
Page 8

Entrada
de aire
Salida
de aire
PRECAUCIONES DE SEGURIDAD
Entrada
de aire
Entrada
de aire
Salida
de aire
DEFINICIÓN
Para prevenir daños personales, daños a otras personas o daños materiales, se deben seguir las instrucciones siguientes.
El uso incorrecto por no seguir las instrucciones puede causar daños o averías; su gravedad se clasifi ca con las indicaciones siguientes:
Esta indicación advierte del
Advertencia
Las instrucciones que deben seguirse están clasifi cadas mediante los siguientes símbolos:
Este símbolo denota una acción que está
PROHIBIDA.
posible peligro de muerte o de
daños graves.
Precaución
Esta indicación advierte de los
posibles daños o desperfectos
materiales.
Estos símbolos denotan acciones
que son OBLIGATORIAS.
Mando a Distancia
Durante el funcionamiento
• No utilice pilas recargables
(Ni-Cd).
• No permita que bebés y
niños pequeños jueguen
con el mando a distancia
para evitar que ingieran
accidentalmente las pilas.
• Extraiga las pilas si no va
a utilizar la unidad durante
un periodo prolongado de
tiempo.
• Para que el mando a
distancia funcione bien, es
necesario insertar las pilas
según la polaridad indicada.
Fuente de energía
Durante la instalación
• Este equipo debe estar conectado a tierra e
instalado con interruptor de circuito con toma
de tierra. De lo contrario, podría provocar
descargas eléctricas o un incendio en caso
de mal funcionamiento.
Durante el funcionamiento
• No conecte otros aparatos a la misma toma
de corriente.
• No manipule los cables de alimentación.
• No utilice cables de extensión.
• No utilice la unidad con las manos mojadas.
• Utilice el cable de alimentación especifi cado.
• Para evitar riesgos, si el cable de
alimentación está dañado y es necesario
cambiarlo, deberá hacerlo el fabricante, un
representante del servicio técnico o una
persona cualifi cada.
• En caso de emergencia o condiciones
anormales (olor a quemado, etc.), apáguelo,
y consulte su proveedor más cercano.
Advertencia
Durante la instalación
Durante el funcionamiento
Unidad Interior
• No instale, desinstale ni
reinstale la unidad usted
mismo; una instalación
incorrecta podría causar fugas
de agua, descargas eléctricas
o incendios. Consulte con un
distribuidor autorizado o con
un especialista para realizar el
trabajo de instalación.
• No introduzca los dedos ni
ningún otro objeto en la unidad
interior o exterior.
• No intente reparar la unidad
usted mismo.
Entrada
de aire
Salida
de aire
Entrada
de aire
Salida
de aire
Entrada
de aire
Precaución
Unidad Interior
Durante la instalación
• No instale la unidad en una atmósfera
potencialmente explosiva.
• Verifi que que los tubos de drenaje estén
conectados adecuadamente. De lo
contrario, podrían producirse pérdidas de
agua.
Durante el funcionamiento
• No lave la unidad con agua, benceno,
disolvente o limpiador en polvo.
• No utilice la unidad para otros fi nes, como
la conservación de alimentos.
• No utilice ningún equipo combustible en
la dirección del fl ujo de aire.
• No se exponga directamente al aire frío
durante un periodo prolongado de tiempo.
• Ventile la habitación con regularidad.
Fuente de energía
Durante el funcionamiento
• Apague la unidad antes de proceder a la
limpieza o al mantenimiento.
• Desconecte la unidad si no va a utilizarla
durante un periodo prolongado de tiempo.
• Este aparato de aire acondicionado
dispone de un dispositivo incorporado
de protección frente a sobrecargas. Sin
embargo, y para evitar posibles averias
provocadas por tormentas eléctricas
especialmente violentas, se recomienda
desenchufar la unidad. No toque el
aparato de aire acondicionado si hay
tormentas: podría sufrir una descarga
eléctrica.
Unidad Exterior
Durante la instalación
• Verifi que que los tubos de drenaje estén
conectados adecuadamente. De lo
contrario, podrían producirse pérdidas de
agua.
Durante el funcionamiento
• No apoye ni coloque ningún objeto en la
unidad interior o exterior.
• Después de haber utilizado la unidad
durante periodos de tiempo prolongados,
compruebe que el bastidor de instalación
no esté dañado.
14
Page 9

INFORMACIÓN REGLAMENTARIA
Este aparato no debe ser utilizado por niños ni por personas discapacitadas sin
supervisión. Se debe vigilar que los niños no jueguen con el aparato.
REQUISITOS MEDIOAMBIENTALES
Cómo deshacerse de las pilas
Debe reciclar las pilas o deshacerse de ellas correctamente.
CÓMO DESHACERSE DEL APARATO
“Instrucciones para usuarios fi nales” de aparatos de aire acondicionado:
Este aparato de aire acondicionado incluye la marca mostrada arriba, que
indica que no debe deshacerse del equipo eléctrico del mismo modo que
lo haría con otros desechos domésticos. Los países de la Comunidad
Europea (*) cuentan con un sistema dedicado a la recolección de este tipo
de productos. No intente desmontar el sistema por sus propios medios,
ya que podría tener efectos nocivos sobre su salud y dañar el entorno
por la manipulación incorrecta de desechos. La extracción y desechado
del refrigerante, el aceite y otras piezas debe ser llevado a cabo por
un instalador cualifi cado y siempre siguiendo las normativas locales y
nacionales correspondientes. Los aparatos de aire acondicionado deben
tratarse como dispositivos de tratamiento especializado para su reutilización,
reciclaje y recuperación, y no deben eliminarse dentro del fl ujo normal de
desechos municipales. Póngase en contacto con un instalador, distribuidor
o autoridad local para obtener más información. También se pueden aplicar
sanciones por una incorrecta manipulación de productos de desecho, según
las leyes nacionales.
*sujeto a la legislación nacional de cada Estado Miembro
Información relativa al modo de deshacerse de productos eléctricos en
otros países fuera de la Unión Europea
Estos símbolos sólo son válidos en la Unión Europea. Si quiere deshacerse
de este producto, póngase en contacto con un instalador, distribuidor o
autoridad local para informarse sobre el método más adecuado.
Muchas gracias por elegir una
unidad de aire acondicionado
CONTENIDO
PRECAUCIONES DE
SEGURIDAD
14
INFORMACIÓN
REGLAMENTARIA
15
PARA PONER EN
FUNCIONAMIENTO
16~17
CUIDADO Y LIMPIEZA
18
LOCALIZACIÓN DE AVERÍAS
19
GUÍA RÁPIDA
ENGLISHESPAÑOLESPAÑOLENGLISH
CONDICIONES DE FUNCIONAMIENTO
Utilice este aparato de aire acondicionado dentro del siguiente intervalo de temperaturas.
Temperatura (°C)
ENFRIAMIENTO
CALENTAMIENTO
Máxima
Mínima
Máxima
Mínima
Interior Exterior
*DBT *WBT *DBT *WBT
32 23 43 26
16 11 16 11
30 – 24 18
16 – -5 -6
*DBT: Temperatura en seco
*WBT: Temperatura en húmedo
Cubierta trasera
Nota:
Las ilustraciones de este manual sirven
únicamente para describir las explicaciones
y pueden no coincidir exactamente con las
del aparato suministrado. Están sujetas
a cambios sin previo aviso con el fi n de
mejorar el producto.
15
Page 10

PARA PONER EN FUNCIONAMIENTO
RECEPTOR
RRECEPTOR
PREPARACIÓN DEL MANDO A
DISTANCIA
PREPARACIÓN DEL MANDO A
DISTANCIA
MODO DE OPERACIÓN
MODO DE OPERACIÓN
INDICADOR
INDICADOR
PREPARACIÓN DEL MANDO A
PREPARACIÓN DEL MANDO A
DIST ANCIA
DIST ANCIA
Insertar las baterías
Quite
Inserte pilas AAA
o R03
• La vida útil de las pilas suele ser aproximadamente de
1 año. Cambie las pilas cuando la pantalla del mando a
distancia o la señal de transmisión se vuelvan débiles.
Programar la hora
Pulse
MODO DE OPERACIÓN
MODO DE OPERACIÓN
Cierre
Ajuste la hora
Confi rmar
TRANSMISOR DE MANDO A DISTANCIA
• Asegúrese de que el
paso de la señal no esté
obstruido.
• Algunos tipos de lámparas
fl uorescentes pueden
interferir en la transmisión
de la señal. Consulte
con el distribuidor más
cercano.
INDICADOR
INDICADOR
Distancia máxima : 8m
ECEPTOR
RECEPTOR
0!42 /,
3%.3/2
Seleccionar Conectar Ajuste de
AUTO HEAT
DRY COOL
MODO AUTOMÁTICO - PARA SU CONVENIENCIA
• La unidad selecciona automáticamente el modo de
funcionamiento según los ajustes de temperatura y las
temperaturas interior y exterior.
• El modo de operación es seleccionado nuevamente cada
30 minutos. Durante la selección del modo de operación
el indicador de encendido parpadea.
MODO CALOR - PARA DISFRUTAR DE AIRE
CALIENTE
• En el modo de calentamiento, la unidad tarda unos
instantes en calentarse. El indicador de encendido
parpadea durante el funcionamiento.
MODO FRÍO - PARA DISFRUTAR DE AIRE
FRÍO
MODO DESHUMIDIFICACIÓN - PARA
DESHUMIDIFICAR EL AMBIENTE
• En modo deshumidifi cación, el ventilador interior funciona
a baja velocidad para lograr una función de suave
refrigeración.
● El rango de temperaturas para seleccionar va de
16°C ~ 30°C.
El funcionamiento de la unidad dentro de la
●
temperatura recomendada podría resultar en el
ahorro de energía.
MODO CALOR : 20°C ~ 24°C.
MODO FRÍO : 26°C ~ 28°C.
MODO DESHUMIDIFICACIÓN : 1°C ~ 2°C menos que la
temperatura ambiente.
temperatura
Pantalla del
mando a
distancia
Notas:
• Pulse el botón
predeterminados del mando a distancia.
• En funcionamiento normal, los botones
utilizan.
• Mientras utilice el mando a distancia, procure estar atento
al indicador OFF de la pantalla del mando a distancia para
impedir que la unidad comience / pare incorrectamente.
• PATROL funciona automáticamente una vez que la unidad
es encendida con el botón
RESET para restablecer los ajustes
y RESET no se
.
16
Page 11

TIPO DE OPERACIÓN
TIPO DE OPERACIÓN
TIPO DE OPERACIÓN
AJUSTE DE TEMPORIZADOR
AJUSTE DE TEMPORIZADOR
TIPO DE OPERACIÓN
AJUSTE DE TEMPORIZADOR
AJUSTE DE TEMPORIZADOR
PARA SELECCIONAR LA
VELOCIDAD DEL VENTILADOR
• Hay 5 niveles de velocidad del ventilador,
además de la velocidad automática*.
* Si está ajustada la velocidad automática
del ventilador, la velocidad del
ventilador se ajustará automáticamente
según el tipo de funcionamiento.
PARA REGULAR LA DIRECCIÓN DE LA
CORRIENTE DE AIRE
• Mantiene la habitación ventilada.
• Existen 5 opciones para la dirección
vertical del fl ujo de aire.
• Si está ajustada la dirección vertical del
fl ujo de aire automática, la persiana sube
y baja automáticamente.
• En el modo de calor, el aire sale
horizontalmente por un rato, luego
comienza a soplar hacia abajo.
• No ajuste la persiana vertical de dirección
del fl ujo de aire manualmente.
• La dirección de la corriente de aire
horizontal se regula manualmente.
P ARA SUPER VISAR LA CALIDAD DE AIRE
• Este ajuste permite al sensor del detector
reconocer automáticamente la calidad
del aire.
• Cuando la calidad del aire es
insatisfactoria, la operación de e-ión
comenzará automáticamente.
PARA AJUSTAR EL
TEMPORIZADOR
• Cuando usted quiere poner automáticamente en ON
(encender) o en OFF (apagar) el acondicionador de
aire a una hora predeterminada.
Ajuste el
temporizador
de activación
Ajuste
la hora
deseada.
Confi rme el
4)-%2
ajuste.
(ON) o de
desactivación
(OFF).
Para cancelar el temporizador de
activación (ON) o el de desactivación
(OFF), pulse o y, después,
pulse .
• Cuando el temporizador ON está programado, la
unidad puede comenzar antes (hasta 30 minutos) del
tiempo real programado para alcanzar la temperatura
que usted eligió.
• El ajuste del temporizador se repite todos los días.
• En caso de fallo eléctrico, puede restablecer el ajuste
previo (con la unidad encendida de nuevo) pulsando
el botón
• Si se cancela el temporizador, pulse
restablecer el ajuste previo.
.
para
ENGLISHESPAÑOLESPAÑOLENGLISH
PARA DISFRUTAR DEL AIRE LIMPIO
• Este ajuste produce el efecto de aire limpio
gracias a la generación de iones negativos
que atraen el polvo que entonces será
capturado en los fi ltros positivos de e-ión.
PARA DISFRUTAR DE UN AMBIENTE
TRANQUILO
• Este ajuste proporciona un ambiente silencioso
gracias a la reducción del ruido del fl ujo de aire.
ALCANZAR TEMPERATURA
RÁPIDAMENTE
• Este ajuste permite conseguir rápidamente la
temperatura deseada.
• La operación POWERFUL durará 20 minutos,
después la unidad volverá al ajuste deseado.
● Las funciones , , y están disponibles
en todos los modos y se pueden cancelar volviendo a pulsar el
botón correspondiente.
Los funcionamientos
●
pueden activar simultáneamente.
Las operaciones
●
cuando el acondicionador de aire se encuentre apagado. En
esta condición, una vez que el indicador de e-ión es puesto en
ON, la unidad funcionará con la velocidad AUTO (automática) de
ventilador y oscilación de aire.
y o y no se
y podrían ser activadas incluso
El temporizador se basa en el tiempo programado
●
desde el mando a distancia.
Puede programar su hora deseada para el
●
temporizador de activación (ON) o de desactivación
(OFF).
Sugerencia
■ Se puede ahorrar un 10% de electricidad si ajusta la
temperatura 1°C por encima de la temperatura deseada
durante la función de enfriamiento o 2°C por debajo
durante la función de calentamiento.
■ Para reducir el consumo de electricidad durante el modo
de refrigeración, cierre las cortinas para evitar que entre la
luz solar y el calor.
■ Para deshabilitar la operación PATROL durante el
comienzo del funcionamiento de la unidad con
presione y sostenga
suéltelo.
Para reiniciar, presione otra vez durante 5
segundos y luego suéltelo.
■ Para ajustar el formato de hora en 12 (am/pm) o 24
horas, pulse y mantenga presionado el botón
aproximadamente 5 segundos.
■ Para reducir la intensidad de la pantalla en el
acondicionador de aire:
Pulse y mantenga presionado el botón
segundos.
Para reiniciar, vuelva a pulsar el botón durante 5
segundos.
■ Para cambiar el ajuste de temperatura a °C o °F, pulsar y
mantener presionado durante aproximadamente
10 segundos.
● Para apagar el acondicionador de aire, apriete .
durante 5 segundos y luego
,
durante
durante 5
17
Page 12

SISTEMA DE PURIFICACIÓN DE AIRE de e-ión
SISTEMA DE PURIFICACIÓN DE AIRE de e-ión
PANEL FRONTAL
PANEL FRONTAL
Extraer
UNIDAD
INTERIOR
UNIDAD
INTERIOR
CUIDADO Y LIMPIEZA
BOTÓN DE ENCENDIDO/APAGADO
AUTOMÁTICO (AUTO OFF/ON)
BOTÓN DE ENCENDIDO/APAGADO
AUTOMÁTICO (AUTO OFF/ON)
PERSIANA DE DIRECCIÓN
DEL FLUJO DE AIRE
PERSIANA DE DIRECCIÓN
DEL FLUJO DE AIRE
Apague la unidad antes de limpiarla
SISTEMA DE PURIFICACIÓN DE AIRE de e-ión
SISTEMA DE PURIFICACIÓN DE AIRE de e-ión
No toque durante el funcionamiento
FILTROS de e-ión
• Limpie los fi ltros regularmente.
• Lave/enjuague los fi ltros con agua, con cuidado
para evitar dañar la superfi cie del mismo.
• Secar minuciosamente los fi ltros a la sombra,
lejos del fuego o la luz solar directa.
• Reemplace los fi ltros dañados.
Nº de referencia: CWD00K1001 (Izquierda y
derecha)
PANEL FRONTAL
PANEL FRONTAL
Elevar el panel y tirar
de él para quitarlo.
Lávelo suavemente y
séquelo.
Extraer
MÓDULO de e-iones POWER ACTIVO
GENERADOR de e-iones ACTIVO
Límpielos con
un bastoncillo de
algodón seco.
• Se recomienda limpiar
el generador de e-iones
activo cada 6 meses.
UNIDAD
UNIDAD
INTERIOR
INTERIOR
Limpie la unidad
suavemente con
un paño suave y
seco.
PERSIANA DE DIRECCIÓN
PERSIANA DE DIRECCIÓN
DEL FLUJO DE AIRE
DEL FLUJO DE AIRE
INSTRUCCIONES DE LAVADO
• No utilice benceno, disolvente o limpiador en polvo.
• Utilice sólo jabones (
• No utilice agua con una temperatura superior a 40°C.
pH7) o detergentes domésticos neutros.
18
BOTÓN DE ENCENDIDO/APAGADO
BOTÓN DE ENCENDIDO/APAGADO
AUTOMÁTICO (AUTO OFF/ON)
AUTOMÁTICO (AUTO OFF/ON)
Para poner en funcionamiento el acondicionador de
aire cuando el mando a distancia se haya extraviado
o no funcione.
Acción Modo
Pulsar una vez.
Pulsar y mantener presionado hasta
que suene un pitido; después, soltar.
Pulsar y mantener presionado hasta
que suene un pitido; después, soltar.
Pulsar y mantener presionado hasta
que suenen dos pitidos; después, soltar.
• Para apagar (OFF), volver a pulsar el botón de
encendido/apagado automático (AUTO OFF/ON).
Funcionamiento
automático
Enfriamiento
Calentamiento
Sugerencia
■ Limpie el fi ltro regularmente para conseguir los mejores
resultados y reducir el consumo eléctrico.
■ Consulte con su distribuidor más cercano para realizar
inspecciones periódicas.
Page 13

LOCALIZACIÓN DE AVERÍAS
Las siguientes señales no indican un mal funcionamiento.
Señal Causa
Sale neblina de la unidad interior.
Se escucha un sonido similar a agua
fl uyendo durante el funcionamiento.
Hay un olor extraño en la habitación.
El ventilador interior se para de vez en
cuando con la velocidad del ventilador
automática.
El aparato tarda varios minutos en funcionar
tras volver a encenderlo.
La unidad exterior emite agua o vapor.
El indicador TIMER siempre está encendido.■ Una vez confi gurado, el ajuste del temporizador se repite todos los días.
El indicador de encendido parpadea durante
el funcionamiento y el ventilador interior se
detiene.
El ventilador interior se para de vez en
cuando durante la función de calentamiento.
El indicador de encendido parpadea antes
de encender la unidad.
Compruebe lo siguiente antes de llamar a un técnico.
Señal Compruebe
Las operaciones calor/frío no funcionan
efi cientemente.
Funcionamiento ruidoso.
El mando a distancia no funciona.
La unidad no funciona.
El sensor del detector o el indicador de
e-ión sobre la unidad de interior titila.
La unidad se detiene y el indicador de
tiempo titila.
■
Efecto de condensación producido durante el proceso de enfriamiento.
■
Flujo del refrigerante en el interior de la unidad.
■
Puede ocurrir debido al olor a humedad producido por las paredes, las alfombras, los
muebles o las telas de la habitación.
■
Con esto se eliminan los malos olores del ambiente.
■
El retraso responde a un dispositivo de protección del compresor de la unidad.
■
Se produce condensación o evaporación en los tubos.
■
La unidad está en modo descongelar, y el hielo derretido es desagotado por la unidad
exterior.
■
Para evitar un efecto de enfriamiento indeseado.
■
Se trata de un paso preliminar para preparar el funcionamiento cuando se ha ajustado el
temporizador de encendido.
■
Programe la temperatura correctamente.
■
Cierre todas las puertas y ventanas.
■
Limpie o sustituya los fi ltros.
■
Limpie cualquier obstrucción en la entrada y salida de aire.
■
Compruebe si la unidad ha sido instalada en una inclinación.
■
Cierre el panel delantero correctamente.
■
Inserte las baterías correctamente.
■
Reemplace las baterías débiles.
■
Compruebe si el disyuntor está activado.
■
Compruebe si los temporizadores han sido programados.
■
Presione
titila, por favor consulte a su distribuidor más cercano.
■
Apague la unidad y lleve el código de error al distribuidor más cercano.
o dos veces. Si el sensor del detector o el indicador de e-ión todavía
Pulse durante 5
segundos.
TIMER
ON SET
132
OFF CANCEL
AC RC
RESET SET CHECK CLOCK
Pulse hasta escuchar un
pitido y, después, apunte el
código del error.
Pulse para abandonar la
comprobación.
Nota:
• En función del error, podrá utilizar la unidad (con cuatro pitidos) con limitaciones.
ENGLISHESPAÑOLESPAÑOLENGLISH
SI NO SE VA A UTILIZAR LA UNIDAD
DURANTE UN PERIODO PROLONGADO DE
TIEMPO
• Active el modo de calentamiento durante 2 a 3 horas para secar
bien la unidad.
• Apague la unidad.
• Extraiga las pilas del mando a distancia.
INSPECCIÓN PERIÓDICA TRAS NO
UTILIZAR LA UNIDAD DURANTE UN TIEMPO
PROLONGADO DE TIEMPO
• Verifi que las pilas del mando a distancia.
• Compruebe que las tomas de entrada y salida de las rejillas de
ventilación no estén obstruidas.
• Tras 15 minutos de funcionamiento, es normal que se produzca
la siguiente diferencia de temperatura entre las tomas de entrada
y salida de las rejillas de ventilación:
Enfriamiento: ≥ 8°C
Calentamiento: ≥ 14°C
NO UTILICE LA UNIDAD SI
Si se dan las siguientes circunstancias, CORTE LA
ALIMENTACIÓN y LLAME al distribuidor autorizado:
• Si escucha ruidos extraños durante el funcionamiento.
• Si entra agua o elementos extraños en el mando a distancia.
• Si hay escapes de agua de la unidad interior.
• Si el interruptor del circuito salta frecuentemente.
• El cable de alimentación está demasiado caliente.
• Los interruptores o los botones no funcionan correctamente.
19
Page 14

1
1
2
2
3
3
4
4
5
5
QUICK GUIDE/GUIDE RAPIDE/GUÍA RÁPIDA
3
Select the desired temperature.
Sélectionnez la température
souhaitée.
Seleccione la temperature
deseada.
1
Select the desired mode.
Sélectionnez le mode de
fonctionnement souhaité.
Seleccione el modo deseado.
AUTO HEAT
DRY COOL
4
Select fan speed.
Permet de sélectionner la
vitesse du ventilateur.
Seleccione la velocidad del
ventilador.
2
Start/stop the operation.
Mettez l’appareil sous/hors
tension.
Inicie/detenga el funcionamiento.
For detailed explanation, please refer to pages 4 ~ 5.
Pour plus de détails, veuillez consulter les pages 10 et 11.
Para una explicación detallada, por favor lea las páginas 16 y 17.
5
Adjust the airfl ow direction
louver.
Permet d’ajuster la claire-voie
d’orientation du fl ux d’air.
Ajuste la persiana de dirección
del fl ujo de aire.
F565734
Matsushita Electric Industrial Co., Ltd.
Web Site: http://www.panasonic.co.jp/global/
Printed in Malaysia
OFSC0703-00
 Loading...