

Page 1

Color Television
Operating Instructions
®
CT-27SX11
CT-27SX11U
CT-27SX31
CT-27SX31U
CT-32SX31
CT-32SX31U
CT-36SX31
CT-32SX31U
CT-F2911
CT-F2911X
CT-F2921L
CT-F2931
CT-F2931X
CT-F2941L
CT-F3431
CT-F3431X
CT-F3441L
For assistance, please call: 1-800-211-PANA (7262) or
send e-mail to: [email protected] (USA only)
TQB2AA0372 10409
PRINTED IN USA
Page 2

Page 3

T
ABLE OF CONTENTS
Ta ble of Contents
Feature Comparison Chart ......................................3
Congratulations........................................................4
Customer Record ........................................................ ....... ...... 4
Care and Cleaning ...................................................................4
Specifications ...........................................................................4
Installation.................................................................5
Television Location...................................................................5
Optional Cable Connections.....................................................6
AC Power Supply Cord ............................................................6
Cable / Antenna Connection ....................................................6
Optional Equipment Connections...........................7
VCR Connection (CT-27SX11/U)..................................................7
Cable Box Connection
VCR and Cable Box Connection
VCR Connection ....................................................................10
Cable Box Connection ...........................................................11
VCR and Cable Box Connection ...........................................12
Program Out Connection (Prog. Out) ....................................13
Amplifier Connection (To Audio Amp) ...................................13
Digital TV - Set-Top Box (DTV-STB) or
DVD Player Connection .......................................................14
Picture In Picture (PIP) Operation ........................15
Main Menu...............................................................16
Remote Control Buttons.........................................................16
Remote Control Guide............................................................16
Main Menu Feature Chart.......................................17
Special Features.....................................................20
Menu Languages....................................................................20
Program Channels .................................................................20
CC (Closed Captioning) .........................................................20
Other Adjustments .................................................................21
Sleep Timer.............................................. ....... ...... .................22
Timer.............................. ............................................. ....... ....2 2
Picture - Video Adjustments...................................................23
Picture - Other Adjustments...................................................23
Channels - Caption.................................................................24
Video Input Skip Feature........................................................24
Lock - Mode............................................................................25
Troubleshooting Chart...........................................26
Read these instructions completely before operating TV.
Contents are subject to change without notice or obligation.
Copyright 2001 by Matsushita Electric Corporation of America. All rights reserv ed.
Unauthorized copying and distribution is a violation of law.
(CT-27SX11/U) .........................................8
(CT-27SX11/U)..........................9
2
Page 4

Feature Comparison Chart
MODELS
F
EATURE COMPARISON CHART
FEATURES
MENU LANGUAGE
ENG/SPAN/FR
NO PIP
2 TUNER PIP
VIDEO INPUT
PICTURE MEMORY
V-CHIP CAPABILITY
75 OHM INPUT
2RF
CHANNEL INFO BANNER
VIDEO INPUT SKIP
VIDEO NORM
AUDIO NORM
STEREO
AI SOUND
CT- 27 SX11
r r r r r r r r
r r
r r r r r r r r
r r r r r r r r
r r
r r r r r r r r
r r r r r r r r
r r r r r r r r
r r r r r r r r
r r r r r r r r
r r r r r r r r
CT-27SX31
CT-27SX11U
r r r r r r
r r r r r r
CT- 27 SX31U
CT-32SX31
CT- 32 SX31U
CT-36SX31
CT- 36 SX31U
BASS/BALANCE/TREBLE
SURROUND
A/V IN
(REAR/FRONT)
AUDIO OUT
A/V PROGRAM OUT
S-VHS INPUT
A/V JACKS AUDIO SPECIAL FEATURES
COMPONENT INPUT
HEADPHONE JACK
BBE
r r r r r r r r
r r r r r r r r
r r r r r r r r
3
(2/1)3 (2/1)3 (2/1)3 (2/1)3 (2/1)3 (2/1)3 (2/1)3 (2/1)
r r r r r r r r
r r r r r r
2
2
2
2
2
2
2
2
1/1
1/1
1/1
1/1
1/1
1/1
1/1
1/1
r r r r r r r r
r r r r r r r r
3
Page 5
C
ONGRATULATIONS
Congratulations
Your new Panasonic Tau television is designed to provide state-of-the-art picture
quality and features an innovative PureFlat
compact, elegant styling is designed to give you many years of enjoyment. It was
thoroughly tested and tuned at the factory for best performance.
Customer Record
The model and serial numb er of this product are locate d on the back of the TV. You
should note the model and serial number in the space provided and retain as a
permanent record of your purchase. This will aid in identification in the event of theft or
loss. Product registraton for U.S. customers is available at: www.prodreg.com/
panasonic.
Care and Cleaning
Screen (Turn TV Off)
r Use a mild soap solution or window cleaner with a soft clean cloth. DO NOT USE
r Avoid excessive moisture and wipe dry.
Note: Do not spray any type of cleaning fluid directly on the screen.
Cabinet and Remote Control
r For cabinets and remote control, use a soft cloth dampened with water or a mild detergent
r Do not use benzene, thinner or other petroleum based products.
TM
picture tube. The new gray cabinet with
Model
Number
Serial
Number
ABRASIVE CLEANERS.
solution. Avoid excessive moisture and wipe dry.
Specifications
Power Source
CT-27SX11 (2.4A) CT-32SX31 (3.0A) CT-36SX31 (3.0A)
CT-27SX11U (2.4A) CT-32SX31U (3.0A) CT-36SX31U (3.0A)
CT-27SX31 (2.5A)
CT-27SX31U (2.5A)
Channel Capability - 181 VHF-12; UHF-56; Cable-113
Video Input Jacks 1Vp-p, 75 Ohm, Phono Jack Type
Audio Input Jacks 500mV RMS 47K Ohm
Audio Output Jacks 0-2.0V RMS 4.7K Ohm
Component Input (Y / PB / PR)
S-Video Input Jacks S-Video (Y-C) Connector
Specifications are subject to change without notice or obligation.
4
120V AC, 60Hz
75 Ohm, Phono Jack Type
Page 6

Installation
Te levision Location
This unit is intended to be used with an optional stand or entertainment center.
Consult your dealer for available options.
r Avoid excessive sunlight or bright lights, including reflections.
r Keep away from excessive heat or moisture. Inadequate ventilation may cause internal
r Fluorescent lighting may reduce remote control transmitting range.
r Keep away from magnetic equipment, including motors, fans and external sp eakers.
CAUTION: Use this television receiver only with the cart, stand, tripod,
bracket, or table specified by the manufacturer, or sold with the apparatus. When
a cart is used, use caution when mov ing th e c art/ apparatus combina tio n to av oi d
injury from tip-over. In order to avoid injury to children, never place your
television receiver on a piece of furniture that is capable of being tilted by a child
leaning on it, pulling on it, standing on it, or climbing on it.
CT-27SX11/CT-27SX11U:
CAUTION:
Use with other carts (or stands) is capable of resulting in instability causing possible
injury.
component failure.
This television receiver for use only with PANASONIC TY-27SX31P stand.
I
NSTALLATION
CT-27SX31/CT-27SX31U:
CAUTION:
Use with other carts (or stands) is capable of resulting in instability causing possible
injury.
This television receiver for use only with PANASONIC TY-27SX31P stand.
CT-32SX31/CT-32SX31U:
CAUTION:
Use with other carts (or stands) is capable of resulting in instability causing possible
injury.
This television receiver for use only with PANASONIC TY-32SX31P stand.
CT-36SX31/CT-36SX31U:
CAUTION:
Use with other carts (or stands) is capable of resulting in instability causing possible
injury.
This television receiver for use only with PANASONIC TY-36SX31P stand.
5
Page 7
I
I
NSTALLATION
Optional Cable Connections
Shielded audio and video cables should be used between components. For best
results:
r Use 75-ohm coaxial shielded cables.
r Use appropriate input and output connectors, that match your component connectors.
r Avoid long cables to minimize interference.
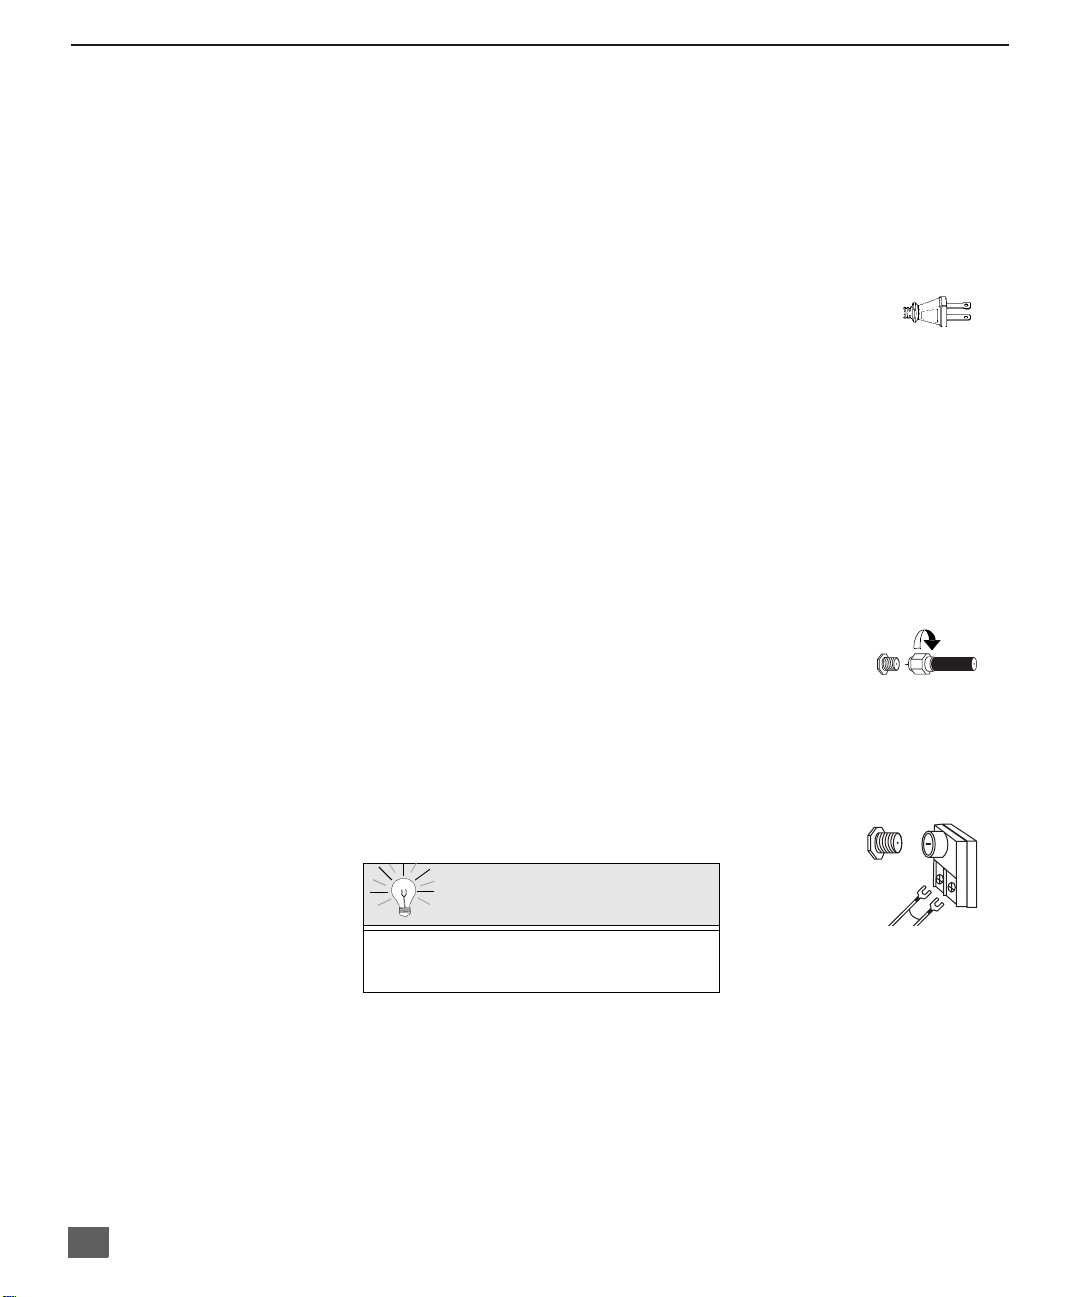
AC Power Supply Cord
CAUTION: TO PREVENT ELECTRIC SHOCK MATCH WIDE
BLADE OF PLUG TO WIDE SLOT OF AC OUTLET AND FULLY
INSERT. DO NOT USE A PLUG WITH A RECEPT AC LE OR OTHER
OUTLET UNLESS THE BLADE CAN BE FULLY INSERTED TO
PREVENT BLADE EXPOSURE.
PROTECT POWER CORDS FROM BEING WALKED ON, ROLLED OVER,
CRIMPED, BENT OR PINCHED, PARTICULARLY AT PLUGS, CONVENIENCE
RECEPTACLES, AND THE POINT WHERE THEY EXIT FROM THE APPARATUS.
Cable / Antenna Connection
For proper reception, either a cable or antenna connection is required.
Cable Connection
Connect the cable supplied by your local cable company.
Note: A cable converter box may be required for proper reception.
Check with your local cable company for compatibility
requirements.
Antenna Connections
r For proper reception of VHF/UHF channels, an external antenna is required. For best
reception an outdoor antenna is recommended.
r Antenna Mode must be set to TV.
Polarized plug
Incoming Cabl e from
Cable Company
75 Ohm VHF/UHF
on back of TV
ncoming Cable from
Home Antenna
Cable Preset
Cable Mode is preset at the factory. Antenna
users must change to Antenna Mode in the
Setup Menu.
6
Page 8

Optional Equipment Connections
I
NSTALLATION
7
Page 9
I
CONNECTIONS ON BACK OF TV
NSTALLATION
Cable Box Connection
(For models CT-27SX11/U)
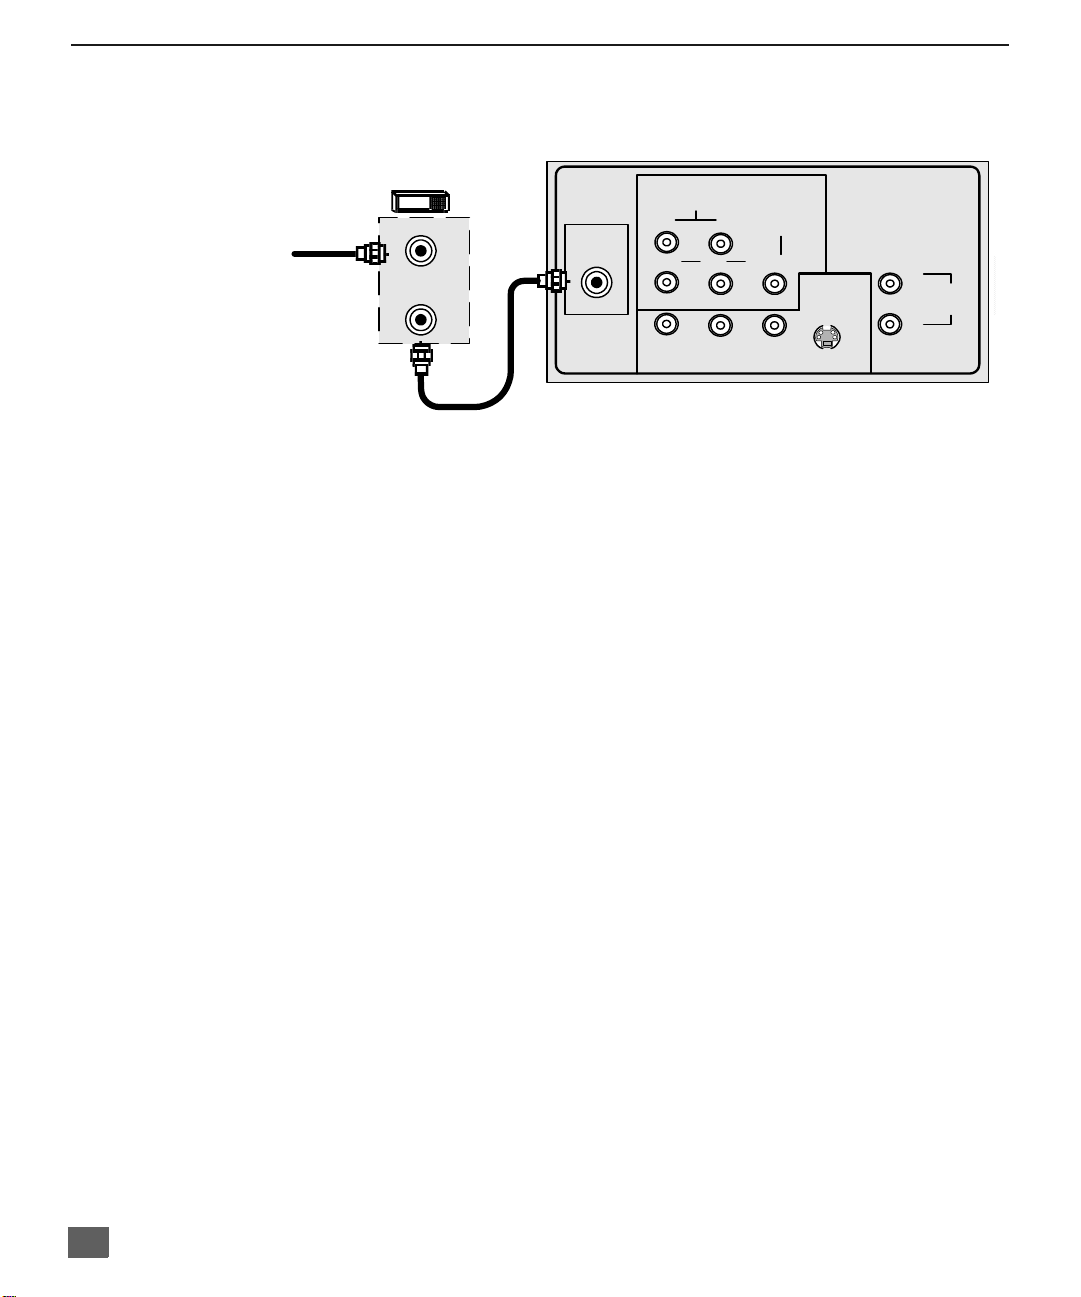
Follow this diagram when connecting your television to a cable box only.
INCOMING
CABLE
CABLE BOX
ANT IN
ANT OUT
ANT
CABLES NOT SUPPLIED
AUDIO
R
P
P
R
RL
COMPONENT
L
VIDEO INPUT
B
INPUT 1
Y/VIDEO
VIDEO
INPUT 2
S-VIDEO
L
TO AUDIO
AMP
R
Note: The remote control must be programmed with supplied codes to operate the cable
box. See Programming the Remote Control in the Remote Control Quick Reference
Guide.
Viewing a premium (scrambled) cable channel
Procedure
1. Tune the television to Channel 3 or 4 depending the RF out setting of the cable box.
2. Using the cable box, tune to the premium cable channel you want to view.
8
Page 10
I
NSTALLATION
VCR and Cable Box Connection
(For models CT-27SX11/U)
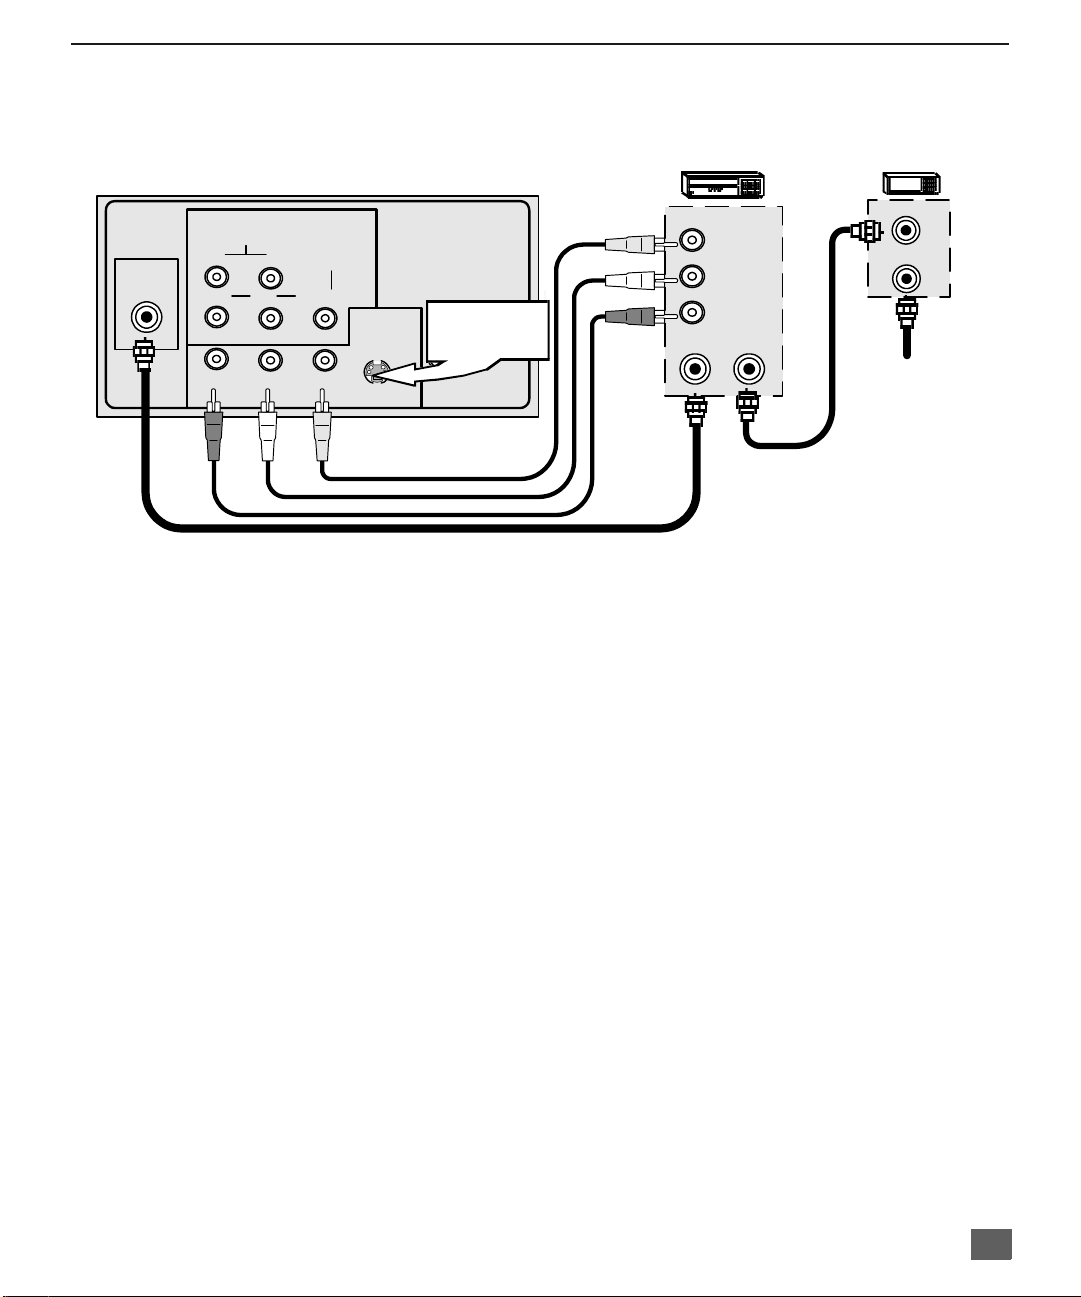
Follow this diagram when connecting your television to both a VCR and a cable box.
ANT
CONNECTIONS ON BACK OF TV
AUDIO
R
P
P
R
RL
COMPONENT
L
VIDEO INPUT
B
INPUT 1
Y/VIDEO
INPUT 2
S-VIDEO
VIDEO
CABLES NOT SUPPLIED
Use either the
L
TO AUDIO
S-Video or V ideo
AMP
connection.
R
VIDEO OUT
AUDIO OUT
ANT OUT
VCR
L
R
ANT IN
CABLE BOX
ANT OUT
ANT IN
Incoming Cable
Note: The remote control must be programmed with supplied codes to operate the VCR and
cable box. See Programming the Remote Control in the Remote Control Quick
Reference Guide.
Viewing a premium (scrambled) cable channel
Procedure
1. Tune the television to CH 3 or CH 4 depending on the Cable box RF out.
2. Using the cable vox, tune to the premium caable channel you want to view.
Recording a premium (scrambled) cable channel
Procedure
1. Press the TV/VIDEO button on the remote control to select the video input ( VIDEO 1,
VIDEO 2, etc.) connected to your VCR.
2. Turn the VCR ON.
3. Tune the VCR to Channel 3 or 4, depending on your VCR.
4. Using your cable box, tune to the premium cable channel you want to record.
5. Begin recording.
9
Page 11
I
NSTALLATION
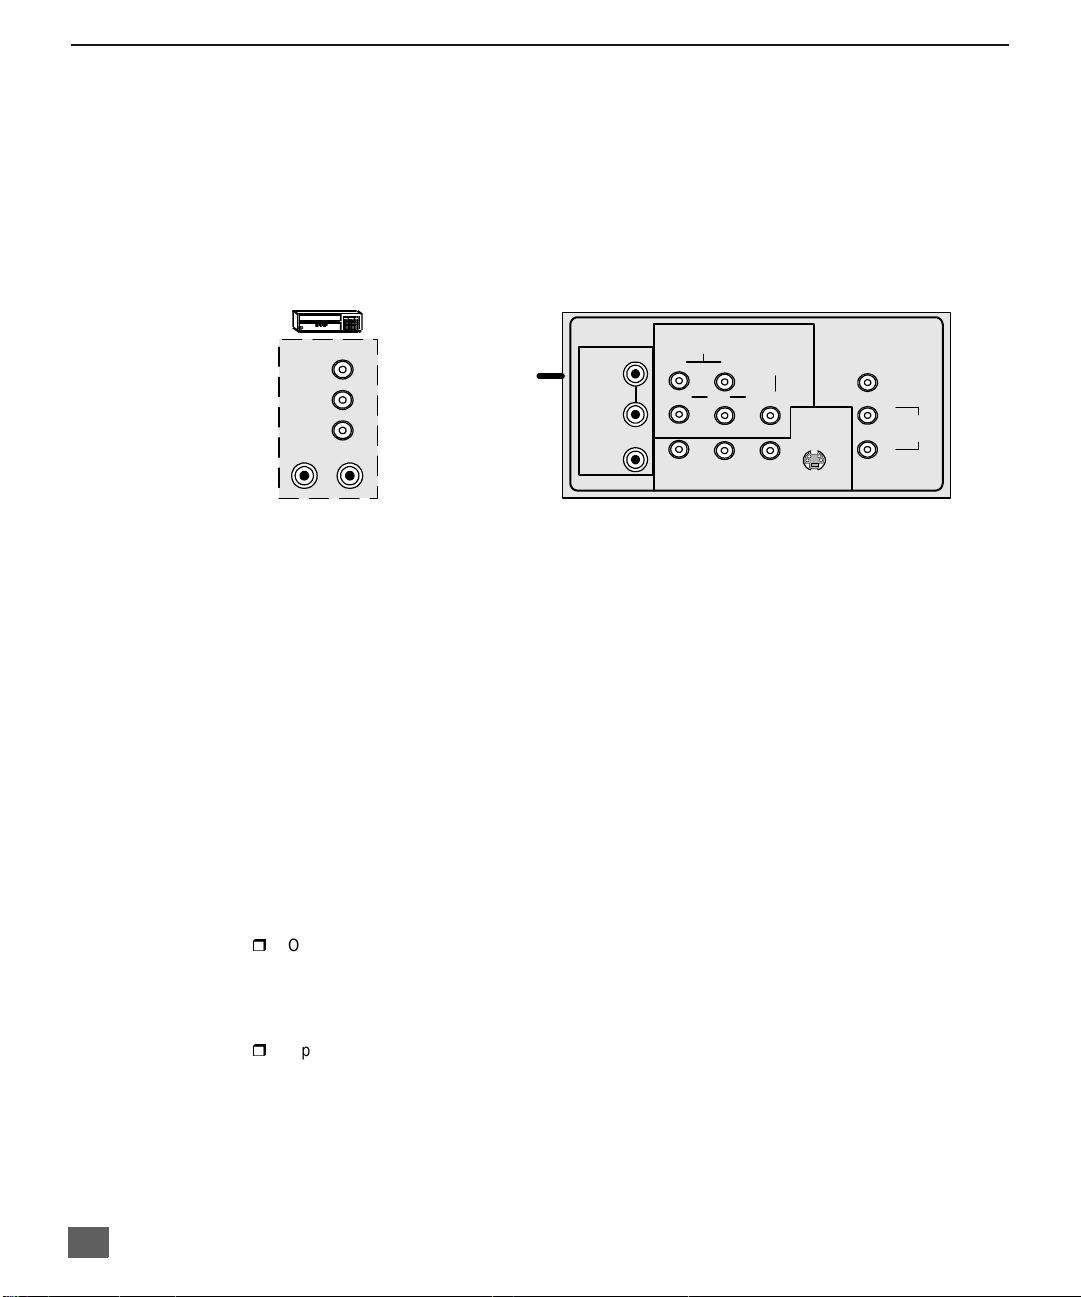
VCR Connection
(For models CT-27SX31/U, CT-32SX31/U, and CT-36SX31/U)
Follow this diagram when connecting your television to a VCR only.
Note: VIDEO 1input is a dual-purpose input. It is primarily intended for connection
with 480i devices such as a DVD player using the Y P
jacks and Audio L & R jacks. However, it can also be connected to
conventional co mpos ite vi deo so urces such as a VC R, u sing o nly th e Y/V ide o
jack and Audio L & R jacks. The on-screen label will display Component or
Video 1 depending on which source is connected.
component video
B PR
CONNECTIONS ON BACK OF TV (may vary)
L
P
B
INPUT 1
COMPONENT
VIDEO INPUT
Y/VIDEO
VIDEO
INPUT 2
S-VIDEO
PROG.
L
TO AUDIO
R
AUDIO
R
P
R
RL
OUT
AMP
VIDEO OUT
AUDIO OUT
ANT OUT
VCR
ANT IN
Incoming
Cable
L
R
ANT 1
SPLIT
OUT
ANT 2
CABLES NOT SUPPLIED
Note: The remote control must be programmed with supplied codes to operate the
VCR. See Programming the Remote Control in the Remote Control Quick
Reference Guide.
Viewing a television program
Procedure
1. Select ANT1 in the SET UP menu under Prog Chan (Program Channels).
2. Tune the television to the television program you want to view.
Viewing a video
Procedure
r
Option A
1. Select ANT1 in the SET UP menu under Prog Chan (Program Channels).
2. Press the TV/VIDEO button on the remote control to select the video input (VIDEO 1,
VIDEO 2, etc.) connecte d to your VCR.
3. Begin the vide o.
r
Option B
1. Select ANT2 in the SET UP menu under Prog Chan (Program Channels).
2. Tune the television to Ch annel 3 or 4, depending on your VC R.
3. Begin the vide o.
10
Page 12
I
NSTALLATION
VCR Connection (cont.)
Recording a television program
Procedure
r
Option A (Recording and viewing the same program )
1. Select ANT2 in the SET UP menu under Prog Chan (Program Channels).
2. Tune the television to Ch annel 3 or 4, depending on your VC R.
3. Using the VCR, tu ne to t he t el ev is io n pr ogram you want to record.
4. Begin recording.
r
Option B (Recording one pr ogram while viewing another pr ogram)
1. Select ANT1 in the SET UP menu under Prog Chan (Program Channels).
2. Press the TV/VIDEO button on the remote control to select the video input (VIDEO 1,
VIDEO 2, etc.) connecte d to your VCR.
3. Using the VCR, tu ne to t he t el ev is io n pr ogram you want to record.
4. Begin recording.
5. Press the TV/VIDEO button on the remote control to switc h back to TV mode.
6. Tune the television to the television program you want to view.
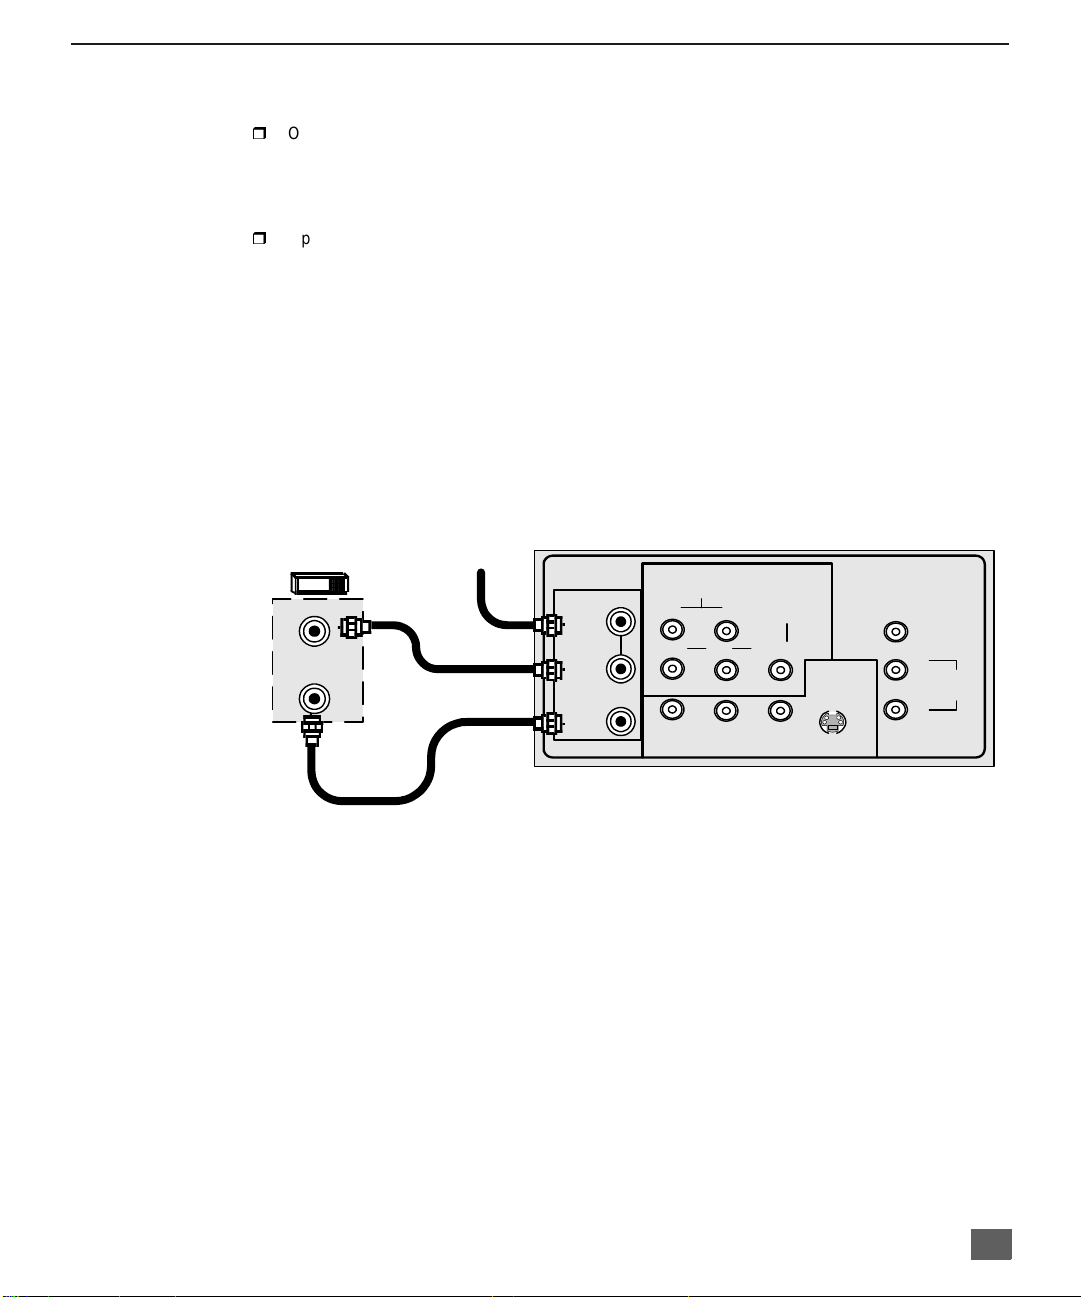
Cable Box Connection
(For models CT-27SX31/U, CT-32SX31/U and CT-36SX31/U.)
Follow this diagram when connecting your television to a cable box only.
CABLE BOX
ANT IN
ANT OUT
INCOMING
CABLE
CABLES NOT SUPPLIED
ANT 1
SPLIT
OUT
ANT 2
CONNECTIONS ON BACK OF TV (may vary)
AUDIO
R
P
P
R
RL
COMPONENT
L
VIDEO INPUT
Y/VIDEO
B
INPUT 1
VIDEO
INPUT 2
S-VIDEO
L
R
PROG.
OUT
TO AUDIO
AMP
Note: The remote control must be programmed with supplied codes to operate the cable
box. See Programming the Remote Control in the Remote Control Quick Reference
Guide.
Viewing a premium (scrambled) cable channel
Procedure
1. Select ANT2 in the SET UP menu under Prog Chan (Program Channels).
2. Tune the television to Channel 3.
3. Using the cable box, tune to the premium cable channel you want to view.
Note: T o use spe cial fe atures such as Favorite C hanne ls and Channel C aptio ns (se e Specia l
Features section for more information), ANT1 must be selected in the SET UP menu
under Prog Chan.
11
Page 13
I
NSTALLATION
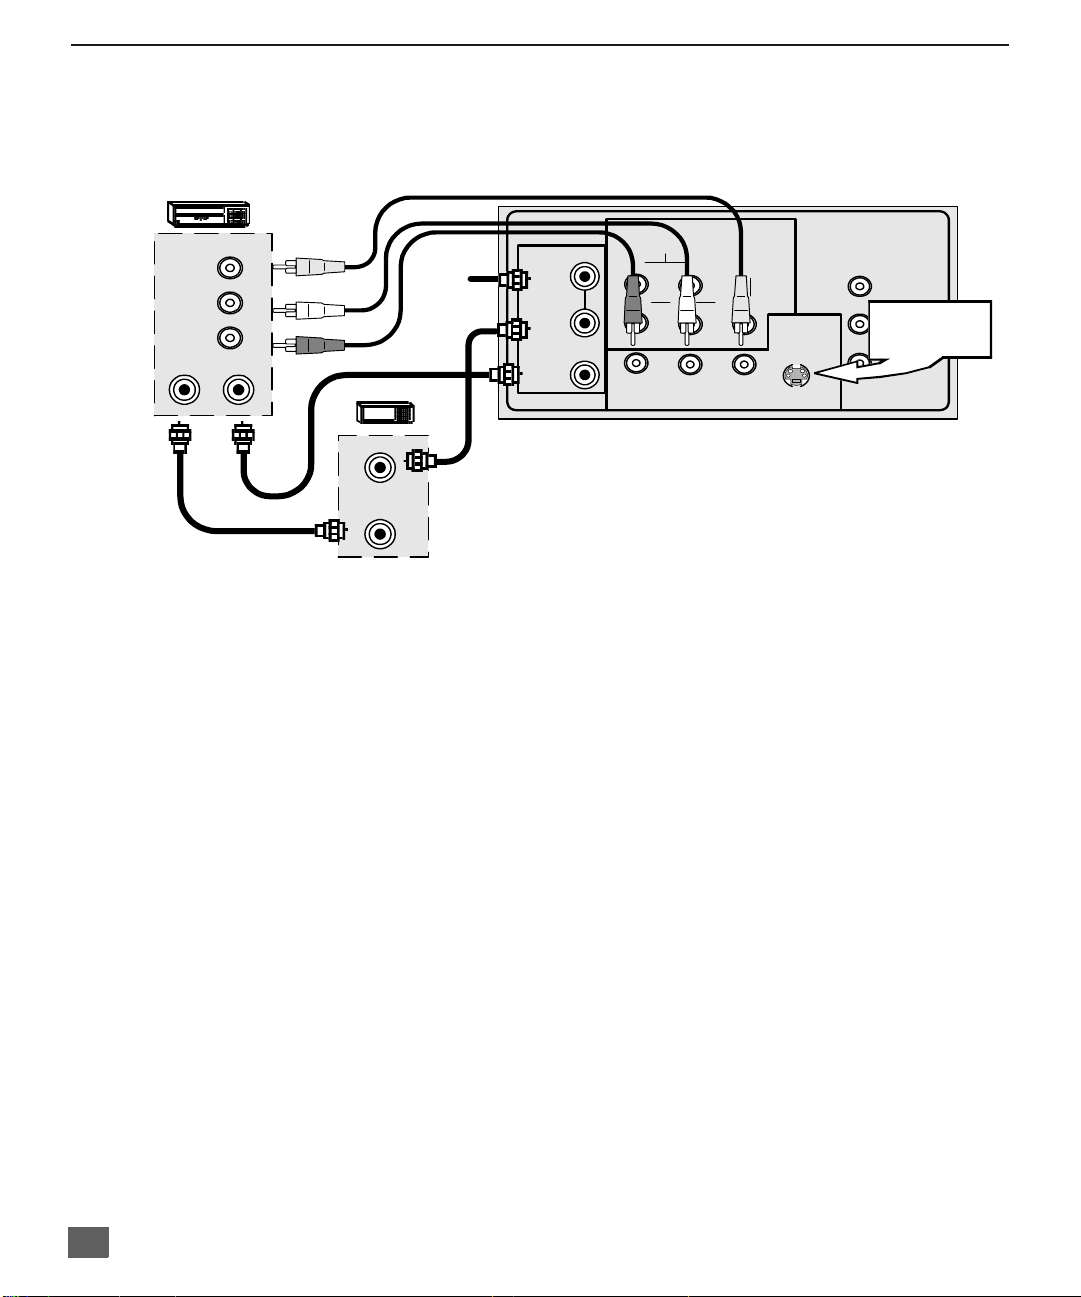
VCR and Cable Box Connection
(For models CT-27SX31/U, CT-32SX31/U, and CT-36SX31/U)
Follow this diagram when connecting your television to both a VCR and a cable box.
VIDEO OUT
AUDIO OUT
ANT IN
VCR
ANT OUT
Incoming
Cable
L
R
CABLE BOX
ANT IN
ANT OUT
ANT 1
SPLIT
OUT
ANT 2
CABLES NOT SUPPLIED
CONNECTIONS ON BACK OF TV (may vary)
AUDIO
R
P
P
R
RL
COMPONENT
L
VIDEO INPUT
B
INPUT 1
Y/VIDEO
VIDEO
INPUT 2
S-VIDEO
PROG.
OUT
Use either the
L
S-Video or V ideo
TO AUDIO
connecti on.
R
Note: The remote control must be programmed with supplied codes to operate the VCR and
cable box. See Programming the Remote Control in the Remote Control Quick
Reference Guide.
Viewing a premium (scrambled) cable channel
Procedure
1. Select ANT2 in the SET UP menu under Prog Chan (Program Channels).
2. Tune the television to Channel 3.
3. Using the cable box, tune to the premium cable channel you want to view.
Note: T o use spe cial fe atures such as Favorite C hanne ls and Channel C aptio ns (se e Specia l
Features section for more information), ANT1 must be selected in the SET UP menu
under Prog Chan.
Recording a premium (scrambled) cable channel
Procedure
1. Select ANT2 in the SET UP menu under Prog Chan.
2. Press the TV/VIDEO button on the remote control to select the video input ( VIDEO 1,
VIDEO 2, etc.) connected to your VCR.
3. Turn the VCR ON.
4. Tune the VCR to Channel 3 or 4, depending on your VCR.
5. Using your cable box, tune to the premium cable channel you want to record.
6. Begin recording.
Note: To view a different channel while recording:
• Select ANT1 in the SET UP menu under Prog Chan.
• Press the TV/VIDEO button on the remote control to select TV mode.
• Tune the television to a television program (except another premium cable channel).
AMP
12
Page 14

I
NSTALLATION
Program Out Connection (PROG. OUT)
(For models CT-27SX31/U, CT-32SX31/U, and CT-36SX31/U)
To use the TV audio and video with optional video equipment, use PROG. OUT and TO AUDIO
AMP terminals on the back of the TV.
Note: When a component input video signal is connected to Video 1 (Y, P
main picture is Component, the Program output video will be luminance signal (no color).
) terminals, and the TV
B, PR
Procedure
1. Connect optional video equipment to PROG. OUT video and TO AUDIO AMP R/L
Audio terminals.
2. PROG OUT terminal display is the same as the on screen display.
See optional equipment manual for further instructions for recording or monitoring.
CABLES NOT SUPPLIED
MONITOR VCR
OR
ANT 1
SPLIT
OUT
ANT 2
CONNECTIONS ON BACK OF TV (may vary)
AUDIO
R
P
P
R
RL
COMPONENT
L
VIDEO INPUT
Y/VIDEO
B
INPUT 1
INPUT 2
S-VIDEO
VIDEO
Amplifier Connection (To Audio Amp)
Connect to an external audio amplifier input for listening to a stereo system.
Note: TO AUDIO AMP terminals cannot be connected directly to external speakers.
Audio Adjustments
1. Select TV SPEAKERS ON from AUDIO menu.
2. Set amplifier volume to minimum.
3. Adjust TV volume to desired level.
4. Adjust amplifier volume to match the TV.
5. Select TV SPEAKERS OFF&VAO from AUDIO menu.
6. Volume, mute, bass, treble and balance are now controlled from the TV.
Note: In OFF&FAO the volume is controlled by the external amplifier.
CONNECTIONS ON BACK OF TV (may vary)
External Amplifier
CABLES NOT SUPPLIED
ANT 1
SPLIT
OUT
ANT 2
AUDIO
R
P
P
R
RL
COMPONENT
L
VIDEO INPUT
B
INPUT 1
Y/VIDEO
INPUT 2
S-VIDEO
VIDEO
PROG.
L
TO AUDIO
R
PROG.
OUT
L
TO AUDIO
AMP
R
OUT
AMP
13
Page 15
I
NSTALLATION
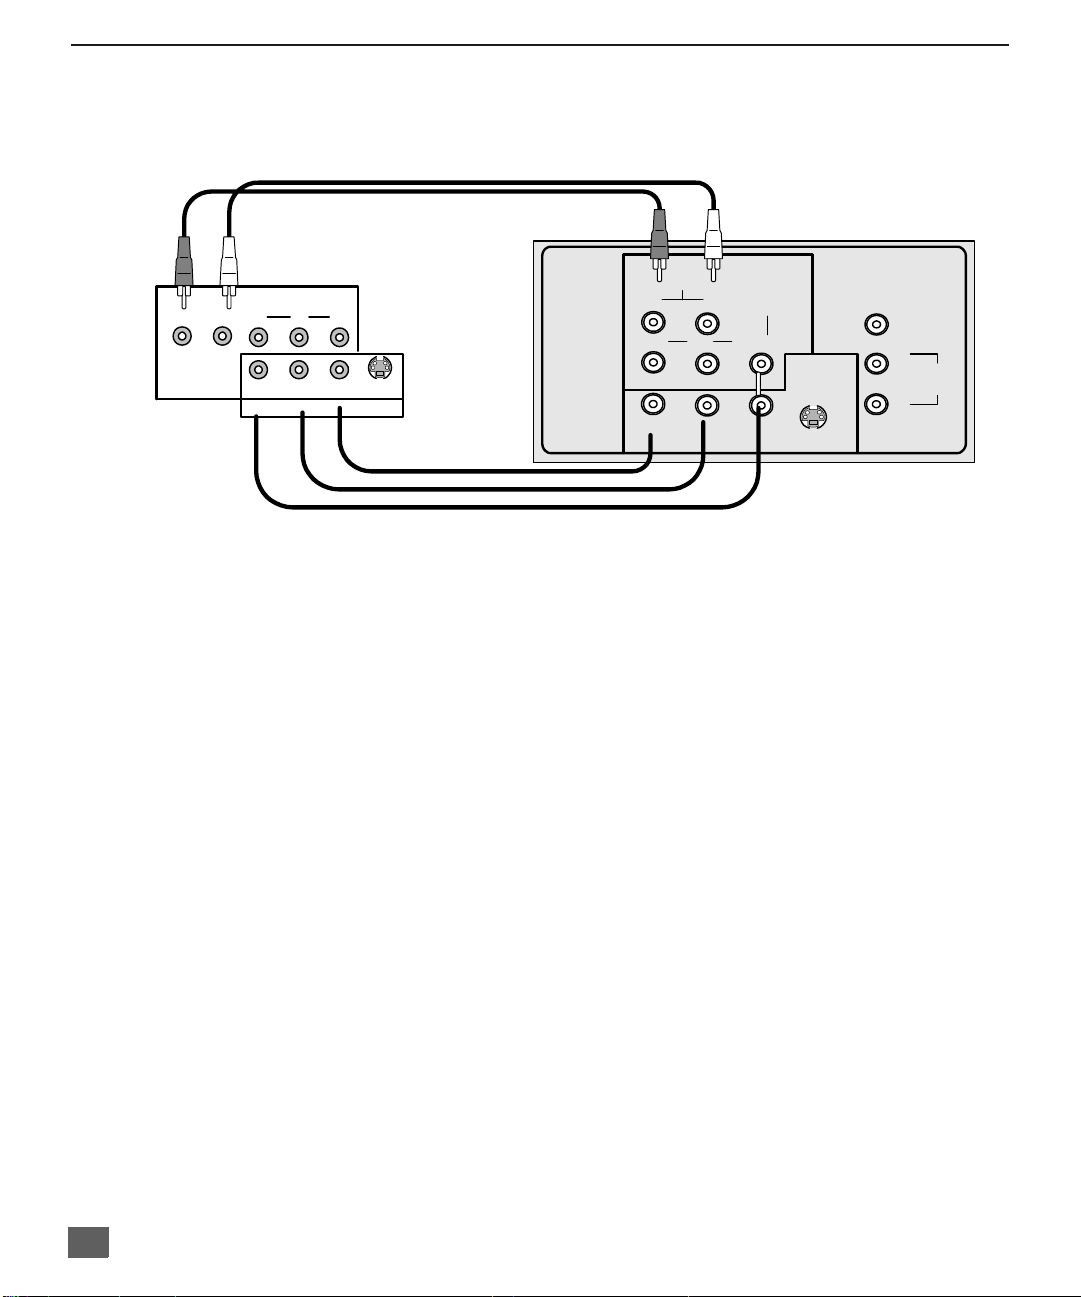
Digital TV - Set-Top Box (DTV-STB) or DVD Player Connection
Use this diagram to connec t the Panasonic DTV-STB (Digital TV-Set-Top Box) to the
back of your TV.
TERMINALS ON BACK OF DTV-STB OR DVD PLAYER
CABLES NOT SUPPLIED
R-AUDIO-
L
P
Y
B
R-AUDIO-LVIDE
NTSC OUTPUT
P
R
S-
O
VIDEO
Notes:
r There are three video inputs, Y, PB, and PR. Separate component color inputs provide
luminance and color separation. Use the L (left) and R (right) audio inputs.
r Select DTV-STB to 480i output mode. TV set can receive 480i si gna l o nly.
COMPONENT VIDEO INPUT TERMINALS ON BACK OF TV
AUDIO
R
P
P
B
R
RL
COMPONENT
L
VIDEO INPUT
Y/VIDEO
VIDEO
(MAY VARY)
INPUT 1
INPUT 2
S-VIDEO
PROG.
OUT
L
TO AUDIO
AMP
R
14
Page 16

Picture In Picture (PIP) Operation
(For models CT-27SX31/U, CT-32SX31/U, and CT-36SX31/U)
This television includes a two tuner Picture In Picture (PIP) feature. This allows
watching two (2) live broadcasts at the same tim e with or without an external video
source (VCR).
Basic PIP Operation
Procedure
Press the PIP button on the remote control to display the
Note: The audio is for the Main Picture only.
1. Choose channels for the
up/down buttons.
2. Choose channels for the
buttons or by using the numeric keypad.
PIP
frame onscreen.
PIP
frame by pressing the remote control PIP CHANNEL
Main Picture
by pressing the remote control CH up/down
SWAP Button
The SWAP button switches the PIP and Main
Picture source. Press the RECALL button for
onscreen PIP and Main Picture source status.
I
NSTALLATION
PIP Operation with a Cable Box
(For connections - refer to page 11)
Procedure
r To view premium (scrambled) cable channels through your cable box in the
Note: Use this procedure if you want to watch premium cable channels in the Main Picture
while viewing a television program or video in the PIP frame.
1. Select ANT2 in the SET UP menu under Prog Chan (Program Channels).
2. Tune television to Channel 3.
3. Press the PIP button on the remote control to display the
Note: The audio is for the Main Picture only.
4. Verify the cable box is ON.
5. Choose channels for the
6. Choose channels for the
and using the PIP CHANNEL up/down buttons.
Note: Swap is not available when us ing the cable box to tune cha nnels . If your cable bo x ha s
a video output, it can be connected to the television to allow you to use all PIP
functions. See the equipment manual for more information. (Tune the PIP to the video
input connected to the cable box).
Main Picture
PIP frame
by tuning the cable box.
by pressing the TV button on the remote control
PIP
frame onscreen.
Main Picture
:
15
Page 17
M
AIN MENU
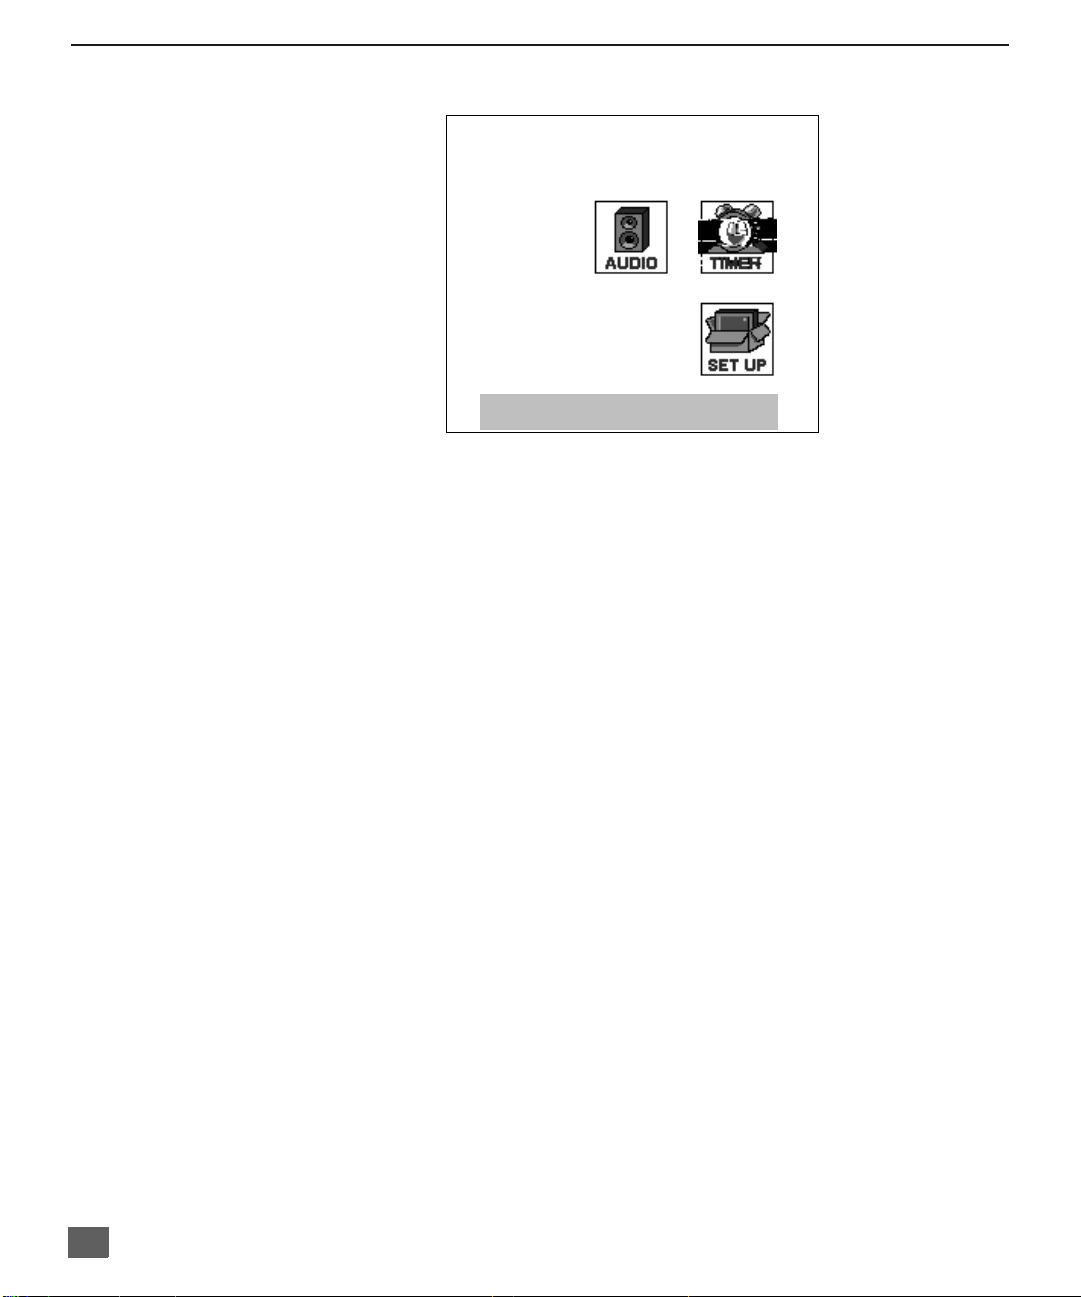
Main Menu
Main Menu
EXIT
Procedures
1. Press the ACTION button on the remote control to display Main Menu.
2. Press the CH up/down or VOL right/left button to highlight the desired icon.
3. Press the ACTION button to display icon features and submenus.
4. Press the CH up/down buttons to select desired icon features.
5. Press the VOL right button to highlight submenus.
6. Press the CH up/down to select desired submenu.
7. Press the VOL right/left button to select or adjust submenu.
8. Press the ACTION button repeatedly to exit menus.
Remote Control Buttons
Remote Control Guide
The Re mote Control Quick Reference Guide is located within the package provided
with this TV.
16
Page 18
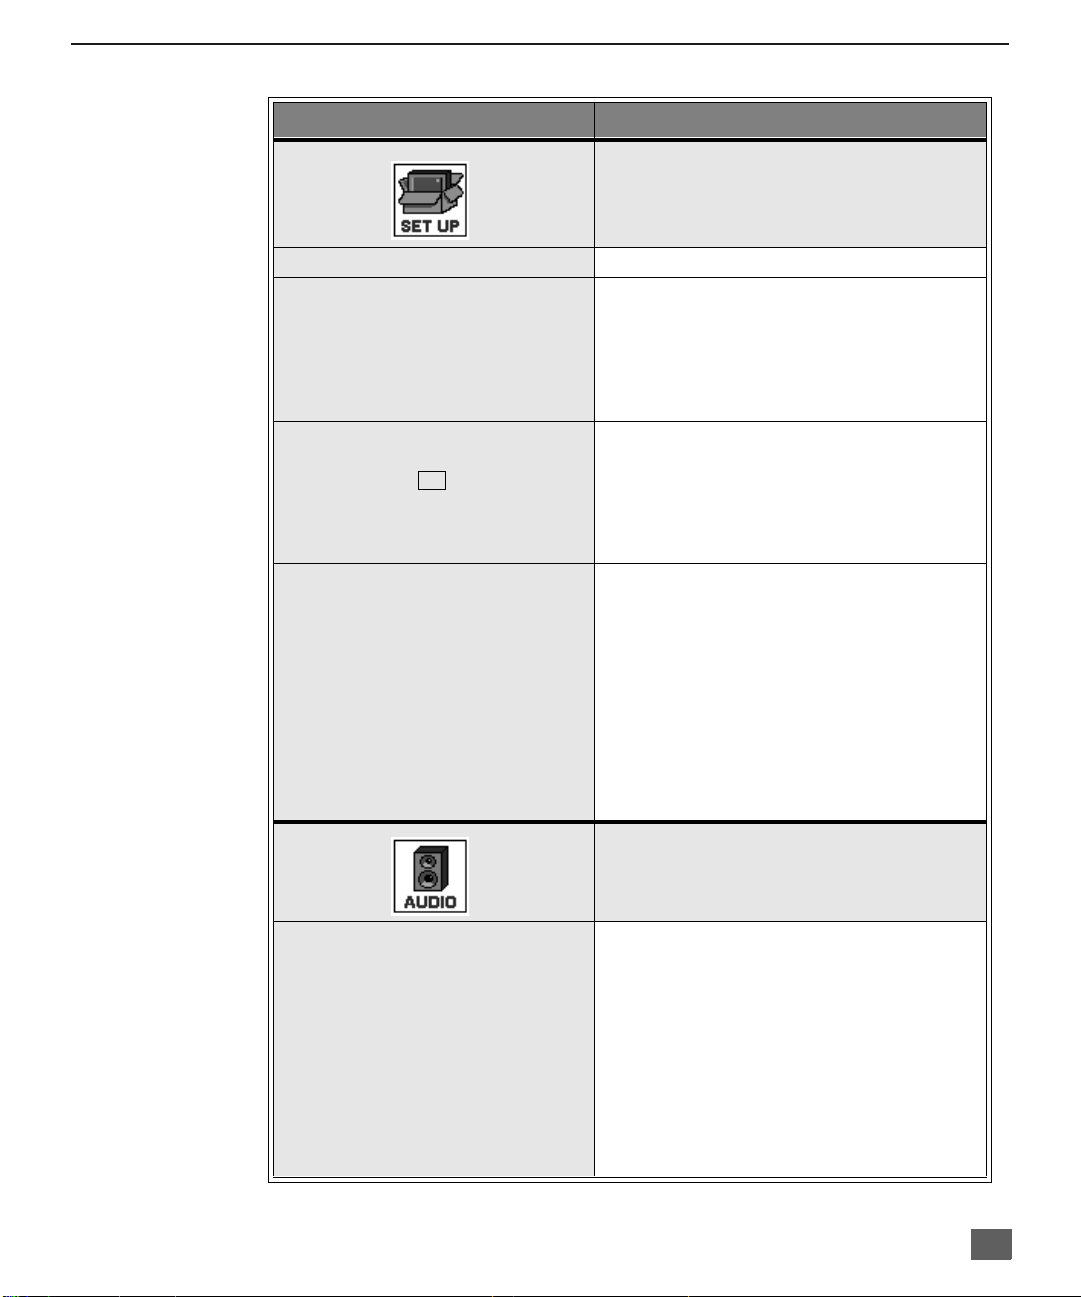
Main Menu Feature Char t
M
ENU
M
AIN MENU FEATURE CHART
D
ESCRIPTION
SET UP
LANGUAGES
PROG. CHAN
(Program Channels)
CC
(Closed Captioning)
OTHER ADJ.
r Select English, Spanish, or French menu.
r MODE - Sele ct Cable or TV. See Installa-
tion section in manual.
r AUTO PROGRAM - Automatically program
channels having a signal into memory.
r MANUAL PROGRAM - Manually add or
delete channels from memory.
r CC ON MUTE - Activate C1-C2 for Closed
Captioning display when the remote MUTE
button is p ressed.
r CC MODE - Select C1 or C2 for Closed
Captioning, program guides and other
information.
r AUTO POWER ON - Select SET to power
up the TV at the same time as the Cable
Box or other components or select OFF.
r CHAN BANNER - Select ON to display
onscreen banner when changing channels.
Note: Press RECALL to display onscreen
Channel Banner at any time.
r GEOMAGNETIC CORR - Use to adjust the
discoloration (some models) or tilt (some
models) due to earth’s magnetic field in
the area.
AUDIO ADJ.
(Adjustments)
AUDIO
r MODE - Select STEREO, SAP (Second
Audio Program) or MONO. (Use MONO
when stereo signal is weak.)
r BASS - Increase or decrease the bass
response.
r TREBLE - Increase or decrease the treble
response.
r BALANCE - Emphasize the left/right
speaker volume.
r NORMAL - Reset BASS, TREBLE and
BALANCE to factory default.
17
Page 19
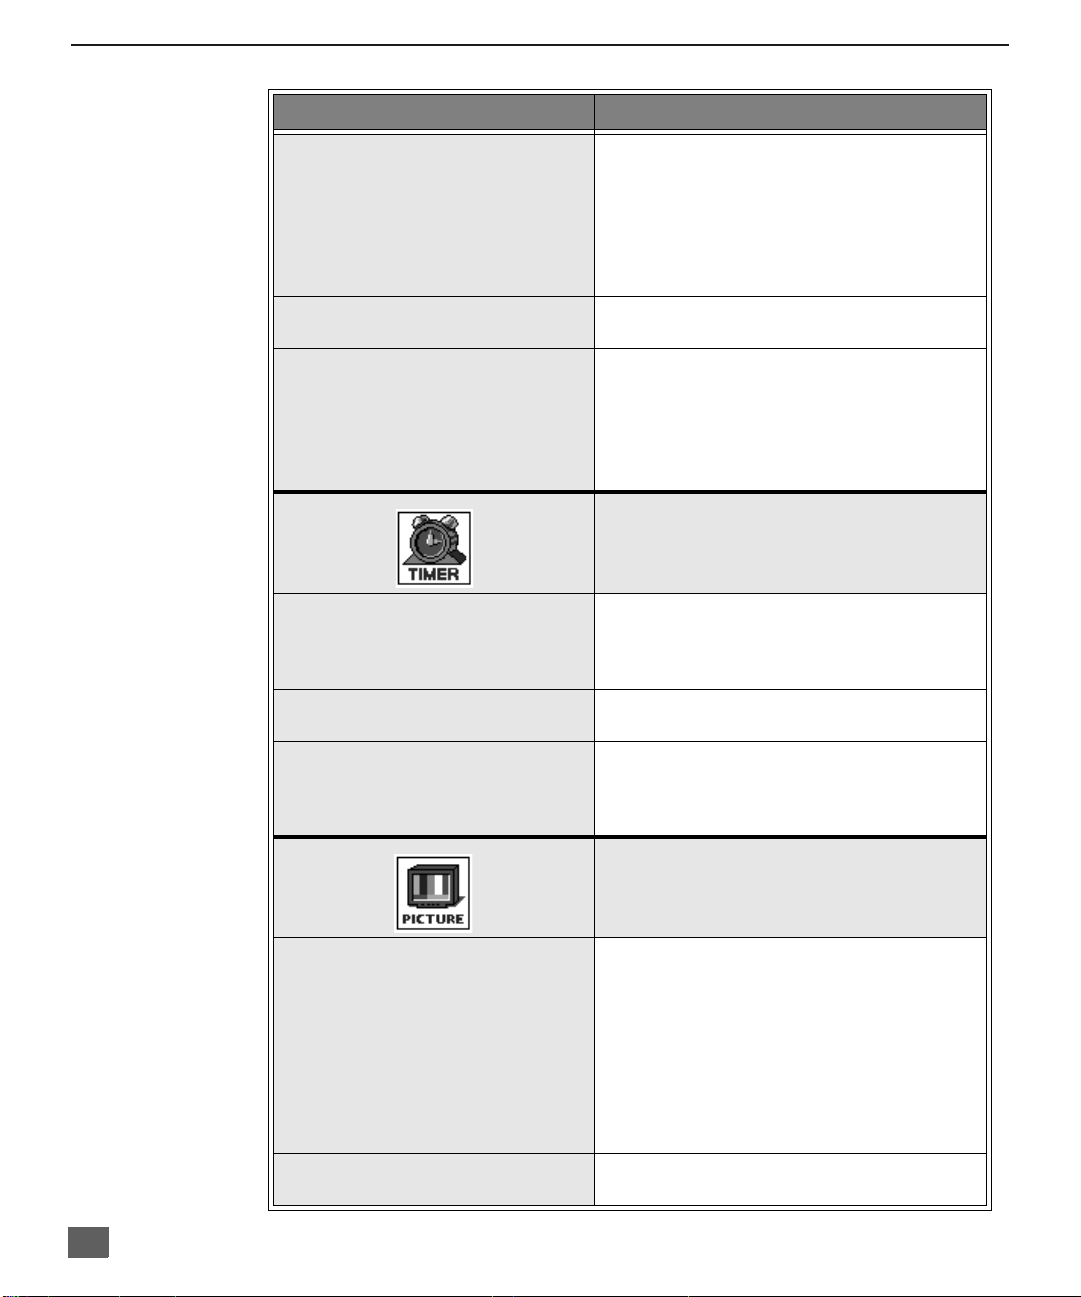
M
AIN MENU FEATURE CHART
Main Menu Feature Chart (Cont.)
M
ENU
OTHER ADJ.
(Adjustments)
SURROUND
SPEAKERS
CLOCK SET
SLEEP
TIMER
r AI SOUND - Automatically adjust volume
to maintain a comfortable listening level.
(AI sound is not available in VIDEO mode).
r BBE - Sound technology enhances speech
intelligibility and restores the dynamic
range of musical passages to provide
outstanding natural sound
r MODE - Enhances audio response when
listening to stereo.
r ON - TV speakers operate normally.
r OFF & VAO (Variable Audio Output) -
TV speakers off - audio adjustable by TV.
r OFF & FAO (Fixed Audio Output)-
TV speakers off - audio adjustable only by
the external amplifier.
r Set the time and the day of the week.
(Time will display onscreen after turning on
the television, pressing the RECALL button
or changing channels).
r Set timer to turn off TV in 30, 60 or
90 minutes. Select NO to turn timer off.
r Set timer to automatically turn television on
and off at selected times, on selected
channels, and on selected days. (Clock
must be set to use Timer features).
D
ESCRIPTION
TIMER
18
VIDEO ADJ.
(Adjustments)
OTHER ADJ.
(Adjustments)
PICTURE
r COLOR - Adjust desired color intensity.
r TINT - Adjust natural flesh tones.
r BRIGHTNESS - Adjust dark areas for crisp
detail.
r PICTURE - Adjust white areas of picture.
r SHARPNESS - Adjust clarity of outline
detail.
r NORMAL- Reset all picture adjustments to
factory default settings.
r COLOR TEMP - Adjust white balance to
COOL (blue), WARM (red) or NORMAL .
Page 20
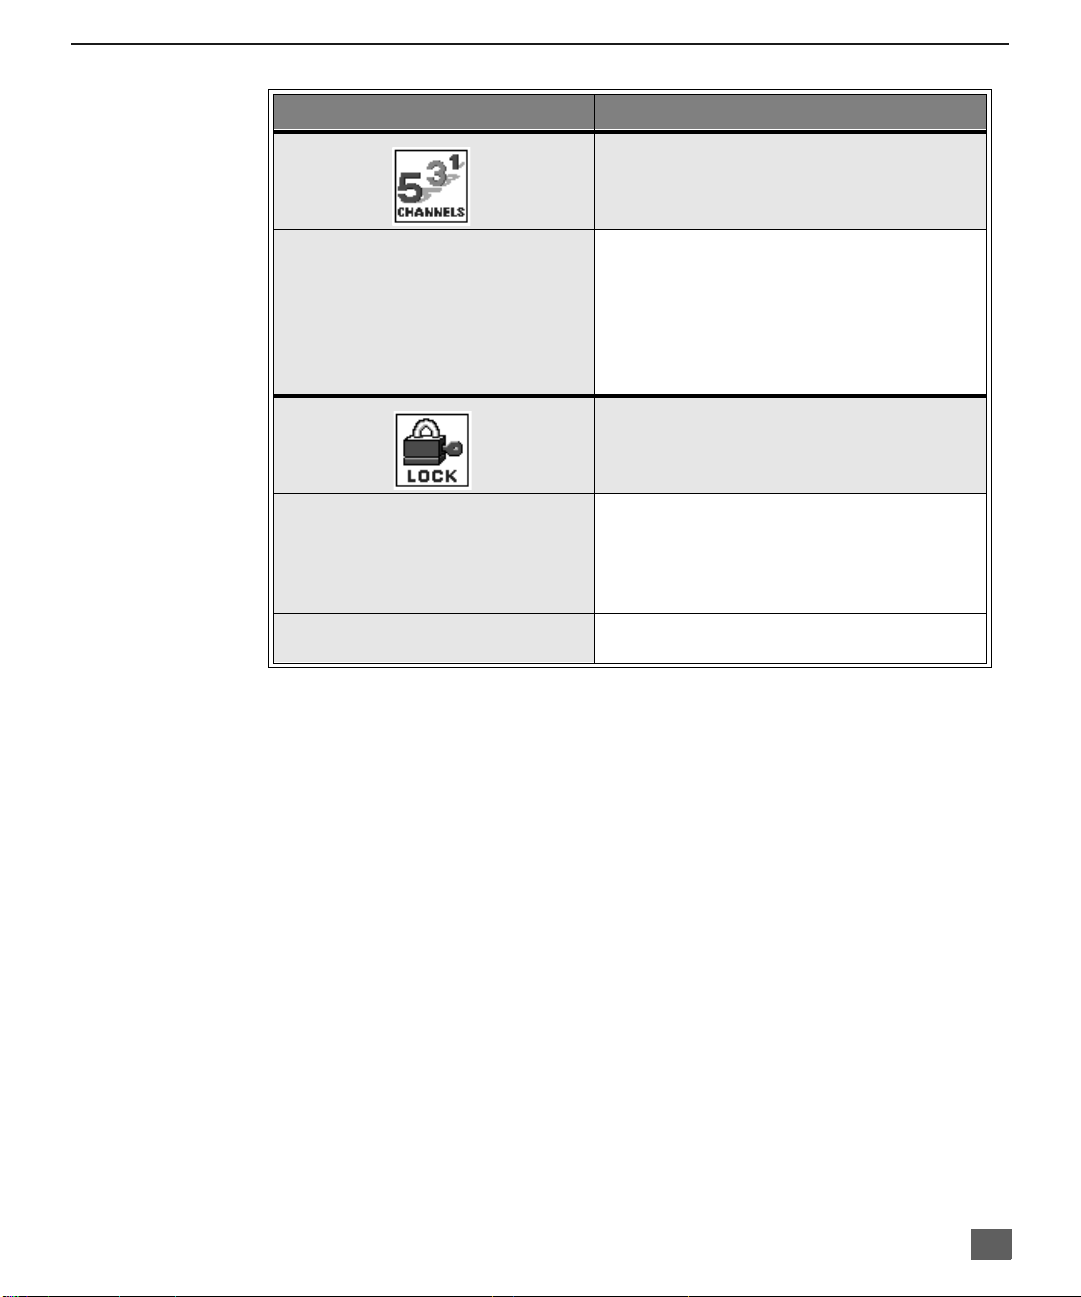
M
AIN MENU FEATURE CHART
Main Menu Feature Chart (Cont.)
M
ENU
CAPTION
MODE
HOW LONG?
r MANUAL CAPTION - Enter channel
numbers and captions manually.
r INPUT LABEL - Label video connections
for onscreen display of optional equipment.
Note: This receiver has a video input skip feature,
which will allow the user to skip Input
modes when pressing TV/VIDEO button.
r Lock All Channels or Game with a secret
code.
Note: For more information about Block
Programs, see the V-CHIP Parental Lock
manual provided with the TV package.
r Select the period of time (12, 24, 48 hours
or ALWAYS) for your option to be locked.
D
ESCRIPTION
CHANNELS
LOCK
19
Page 21
S
CC
PECIAL FEATURES
Special Features
SET UP
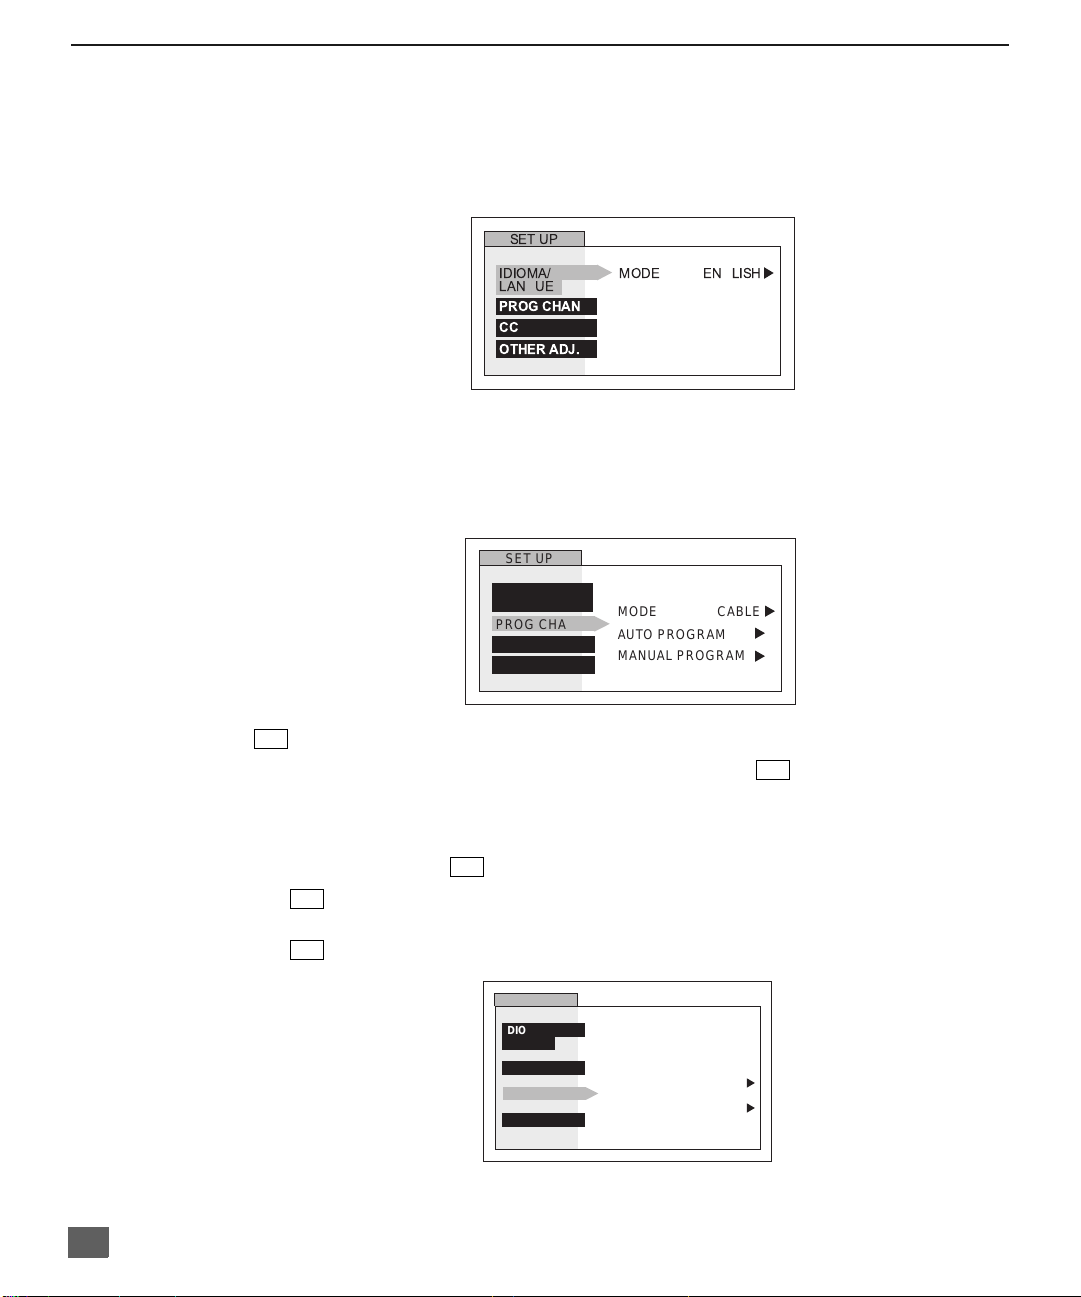
Menu Languages
In SET UP Menu, selec t IDIOMA / LAN GUE to ch ange menu language t o ENGLISH,
ESPAÑOL (Spanish), or FRANÇAIS (French).
Prog Chan (Program Channels)
In SET UP menu under PROG CHAN select:
r MODE to select TV (antenna) or CABLE mode depending on the signal source.
r AUTO PROGRAM to automatically program all channels with a signal.
r MANUAL PROGRAM to manually add or delete channels.
SET UP
IDIOMA/
LANGUE
PROG CHAN
CC
OTHER ADJ.
SET UP
IDIOMA/
LANGUE
PROG CHAN
CC
OTHER ADJ.
MODE ENGLISH
MODE
AUTO PROGRAM
MANUAL PROGRAM
CABLE
u
u
u
u
20
CC
(Closed Captioning)
This television contains a built-in decoder that displays (clos ed captioned) text
CC
across the screen. It allows the vi ewer to read the dialogue of a tel evision program or
other information. The program viewed must include Closed Captioning for the feature
to work.
in SET UP menu under , select:
r On Mute to activate C1-C2 for Closed Captioning display when the remote MUTE
CC
button is pr essed.
CC
r
MODE to select C1 or C2 for Closed Captioning, program guides and other information.
SET UP
IDIOMA/
LANGUE
PROG CHAN
CC
OTHER ADJ.
CC ON MUTE
CC MODE
NO
u
OFF
u
Page 22
S
PECIAL FEATURES
Other Adjustments
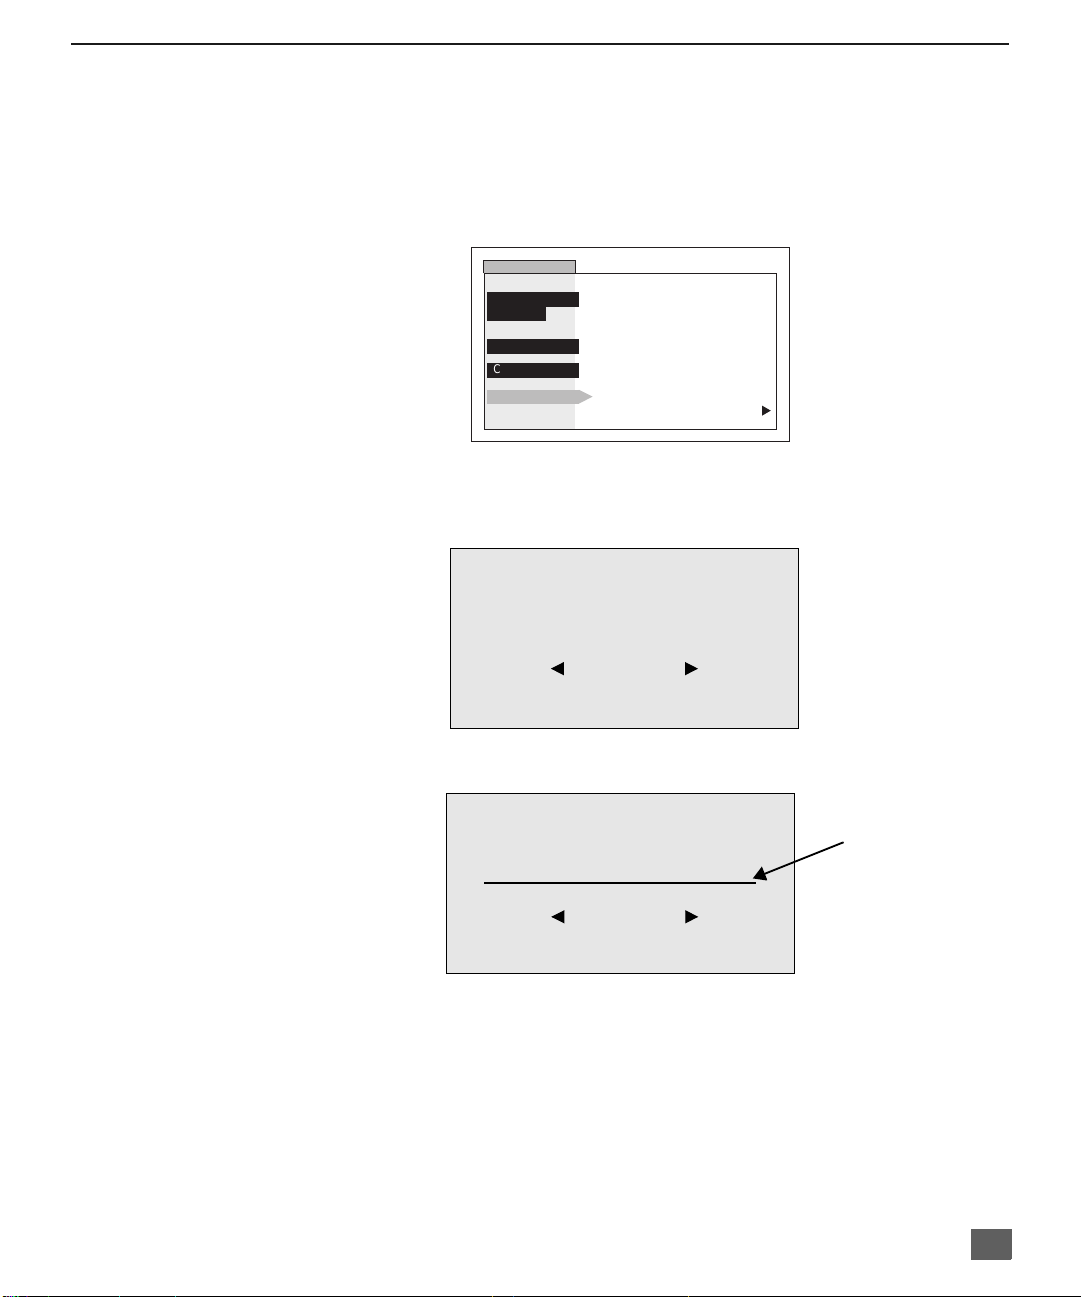
r AUTO POWER ON - Select SET to power up the TV at the sa me ti me as th e Cab le Bo x or
other components or select OFF.
r CHANNEL BANNER - Select ON to display onscreen banner when changing channels.
r GEOMAGNETIC CORR (CORRECTION) - Adjusts discoloration of the picture due to
earth’s magnetic field in the area (for models CT-32SX31/U and CT-36SX31/U).
For models CT-27SX11/U and CT-27SX31/U this feature is used to adjust the tilt of the
picture due to earth’s magnetic field in the area.
SETUP
IDIOMA/
LANGUE
PROG CHAN
CC
OTHER ADJ.
AUTO POWER ON
CHANNEL BANNER
GEOMAGNETIC CORR
OFF
ON
u
GEOMAGNETIC CORRECTION SUB-MENU
(FOR MODELS CT-32SX31/U AND CT-36SX31/U)
GEOMAGNETIC CORRECTION
0
- - - - - - - l - - - - - - -
TO ADJUST
PRESS ACTION TO EXIT
(FOR MODELS CT-27SX11/U AND CT-27SX31/U)
GEOMAGNETIC CORRECTION
0
- - - - - - - l - - - - - - -
TO ADJUST
PRESS ACTION TO EXIT
tilt adjustment bar
Note: Geomagnetic Correction may be required at Set Up time or when the TV set
is moved to a different location.
Procedure
r In SET UP Menu, under OTHER ADJ. select GEOMAGNETIC CORR. (CORRECTION).
r Press u button to display the GEOMAGNETIC CORRECTION sub-menu.
r Press t or u button until the discoloration disappears (for models CT-32SX31/U and
CT-36SX31/U only).
r Press t or u button to adjust the tilt adjustment bar until it is parallel to the bottom of the
picture frame (for models CT-27SX11/U and CT-27SX31/U only).
21
Page 23
S
PECIAL FEATURES
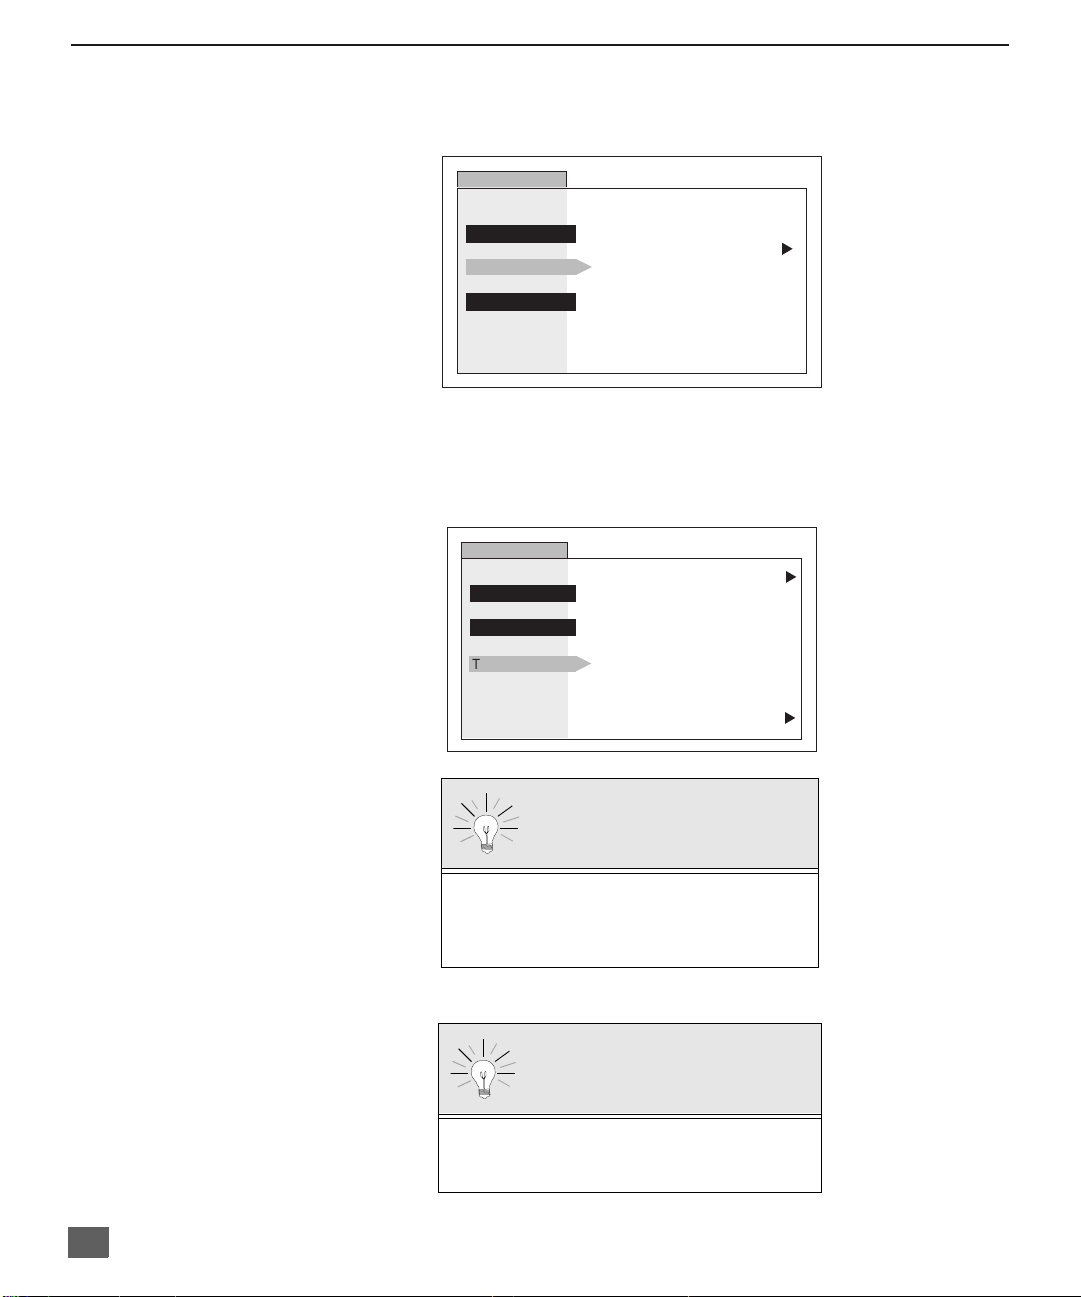
TIMER
Sleep
In TIMER menu, sel ect SLEEP to t urn TV off in 30, 60 or 90 minutes . Select NO to
turn off timer
.
TIMER
CLOCK SET
SLEEP
TIMER
HOW LONG?
NO
u
Timer
In TIMER menu, select timer to turn the television on and off at selected times, on
selected channels, and on selected days.
Note: TIME must be entered in CLOCK SET to operate TIMER features.
TIMER
CLOCK SET
SLEEP
TIMER
DAY MON-FRI
ON TIME - - : - -
OFF TIME - - : - -
ENTER CHANNEL - - -
SET
NO
u
u
22
Turn Off After 90 Minutes
The TV automatically turns OFF after 90 minutes
when turned on by the TIMER. If the OFF tim e is
selected or if a key is pressed, the automatic OFF
after 90 minutes will be cancelled.
TIMER Activation
The TIMER is active when the TV is OFF or ON.
The TV will switch to the selected channel at the
selected time set in the TIMER.
Page 24
PICTURE
S
PECIAL FEATURES
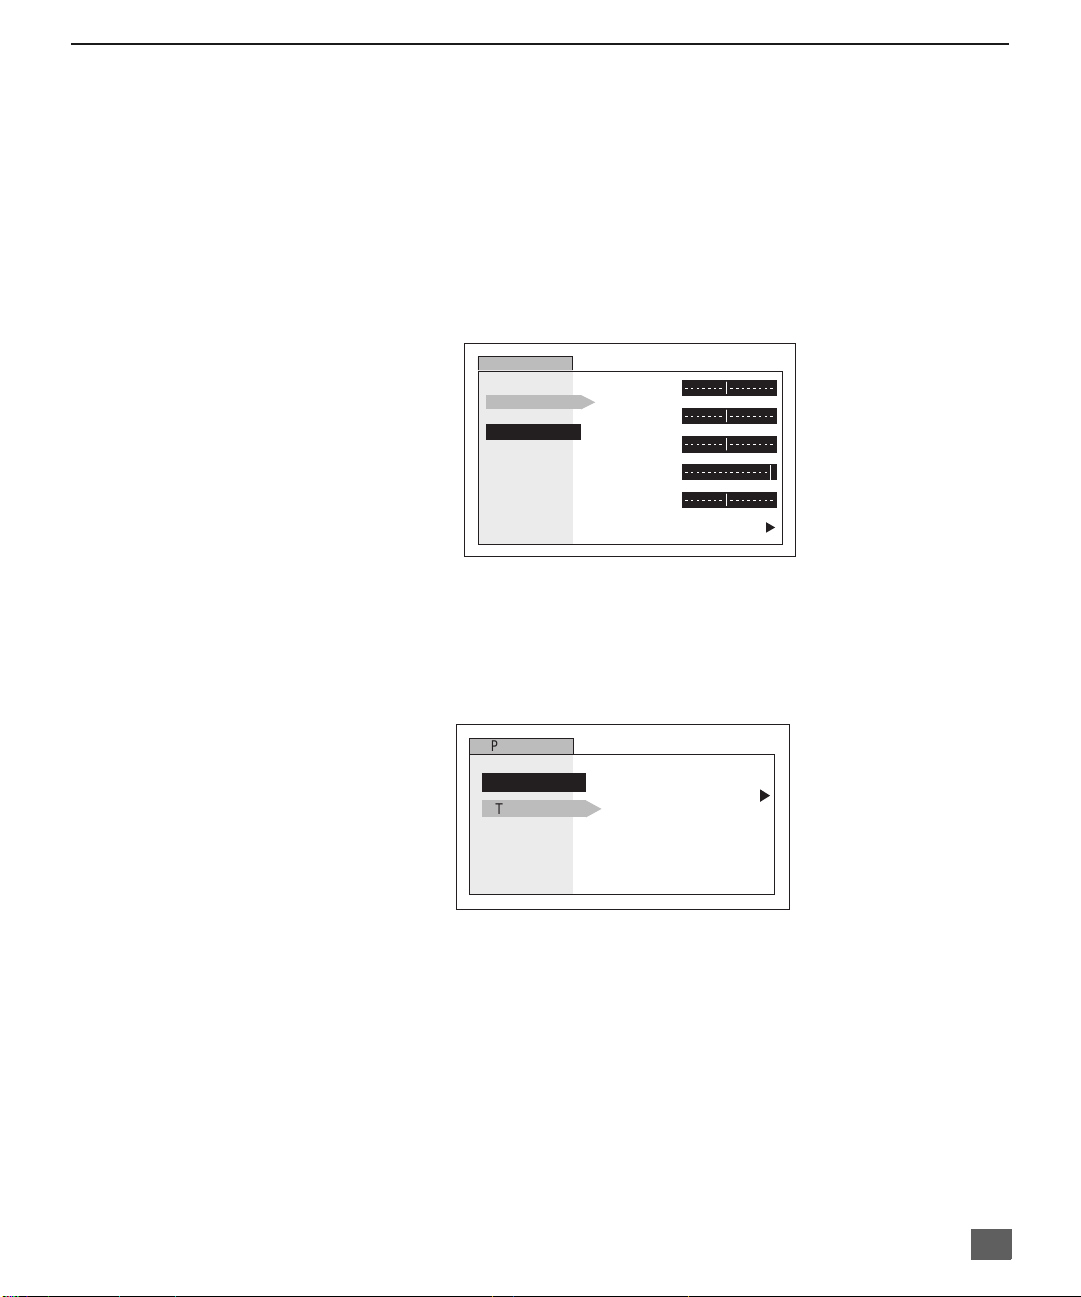
Video Adjustments
In Picture menu under VIDEO ADJ. select:
r COLOR - Adjust desired color intensity.
r TINT - Adjust natural flesh tones.
r BRIGHTNESS - Adjust dark areas for crisp detail.
r PICTURE - Adjust white areas of picture.
r SHARPNESS - Adjust clarity of outline detail.
r NORMAL - Reset all picture adjustments to factory default settings.
Note: Picture adjustments can be individually set for each video input mode.
PICTURE
VIDEO ADJ.
OTHER ADJ.
COLOR
TINT
BRIGHTNESS
PICTURE
SHARPNESS
NORMAL
NO
u
Other Adjustments
In Picture menu under OTHER ADJ. select:
r COLOR TEMP to increase and decrease WARM (red) and COOL (blue) colors to suit
personal preferences.
PICTURE
VIDEO ADJ.
OTHER ADJ.
COLOR TEMP NORMAL
u
23
Page 25
S
PECIAL FEATURES
CHANNELS
Caption
In CHANNELS menu under CAPTION select:
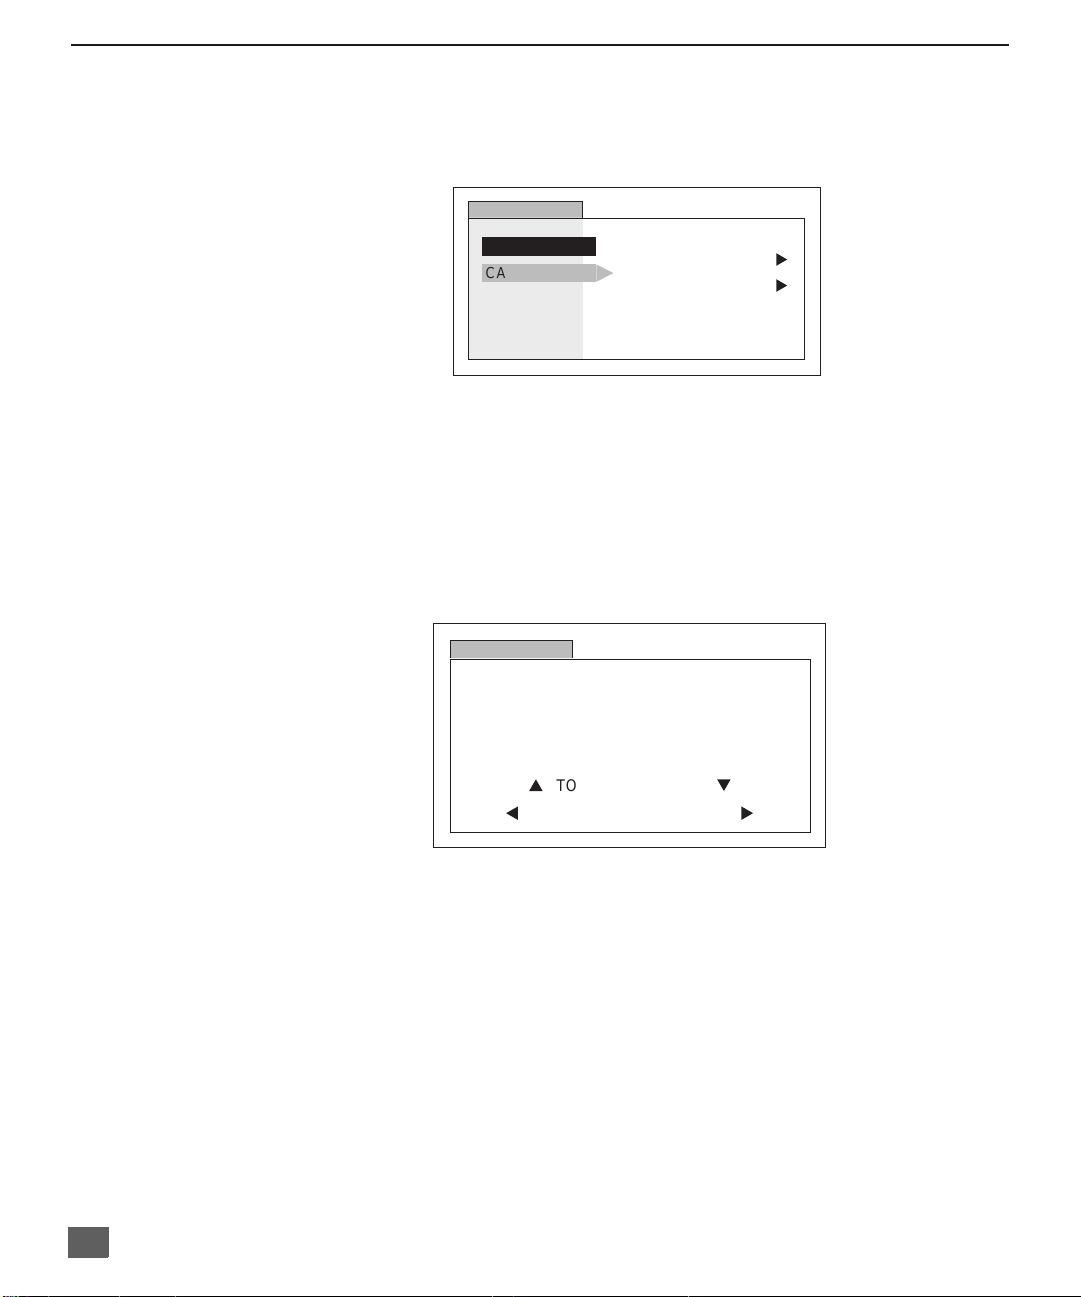
r MANUAL CAPTION to enter numbers and captions manually.
r INPUT LABEL to label video input connections for onscreen display.
CHANNELS
FAVORITES
CAPTION
MANUAL CAPTION
INPUT LABEL
u
u
Video Input Skip Feature
This receiver has a video input skip feature, which will allow the user to skip desired
Input modes when pressing TV/VIDEO button.
r Select desired video Input mode (VIDEO 1, VIDEO 2, or VIDEO 3.)
r Press the volume left button while the first character is highlighted to skip selected Video
mode.
Note: To delete skip feature, press the volume right button while the desired video input mode is
highlighted.
CHANNELS
p
t
TO SELECT CHARACTER
INPUT LABEL
VIDEO1
VIDEO2
VIDEO3
TO MOVE CURSOR
SKIP
SKIP
- - - - - - - -
q
u
24
Page 26

LOCK
S
PECIAL FEATURES
MODE
To use LOCK options:
r ENTER CODE FIRST - Use the numeric keypad to enter a four-digit secret code. After
entering your secret code for the first time, the onscreen display will change to CHANGE
CODE.
Note: Use a code that is easy to remember or record it in a safe place.
In MODE submenu select:
LOCK SET to choose:
r OFF - To turn lock function off.
r ALL - To lock all channels and video input s .
r CHANNEL - To lock up to four channels of your choice.
r GAME - To lock channels 3, 4 and video inputs.
BLOCK PROGRAMS - To use Block Programs Ratings.
CHANGE CODE - Use numeric keypad to change your four-digit secret code.
Note: If in CHANGE COD E y ou e nter a di ffere nt code from the on e u se d p rev io usl y,
the new code becomes the controlling code.
Press the ACTION button to return to submenu, then selec t HOW LONG to choose
the period of time you want your option to be locked (12, 24, 48 hours or ALWAYS).
Note: Be cautious when selecting ALWAYS. If ALWAYS is selected, and you forget
your secret code, the television must be serviced by a qualified technician in
order to clear the LOCK setup.
Press the ACTION button to return to submenu, and to exit menus.
LOCK
MODE
HOW LONG?
LOCK SET
BLOCK PROGRAMS:
U.S. TV PROGRAMS
STATUS
ENTER CODE
FIRST
OFF
OFF
- - - -
Note: If GAME, CHANNEL or ALL is selected, and if a blocked channel or video input is
selected, the message PG (Parent Guard) displays in the upper right corner of the
television screen
Unlock LOCK SET by reentering the same four-digit secret code and selecting OFF.
For more information about Block Programs, see the V-CHIP Parental Lock
manual provided with the TV package.
25
Page 27
T
?
VIDEO 1
ROUBLESHOOTING CHART
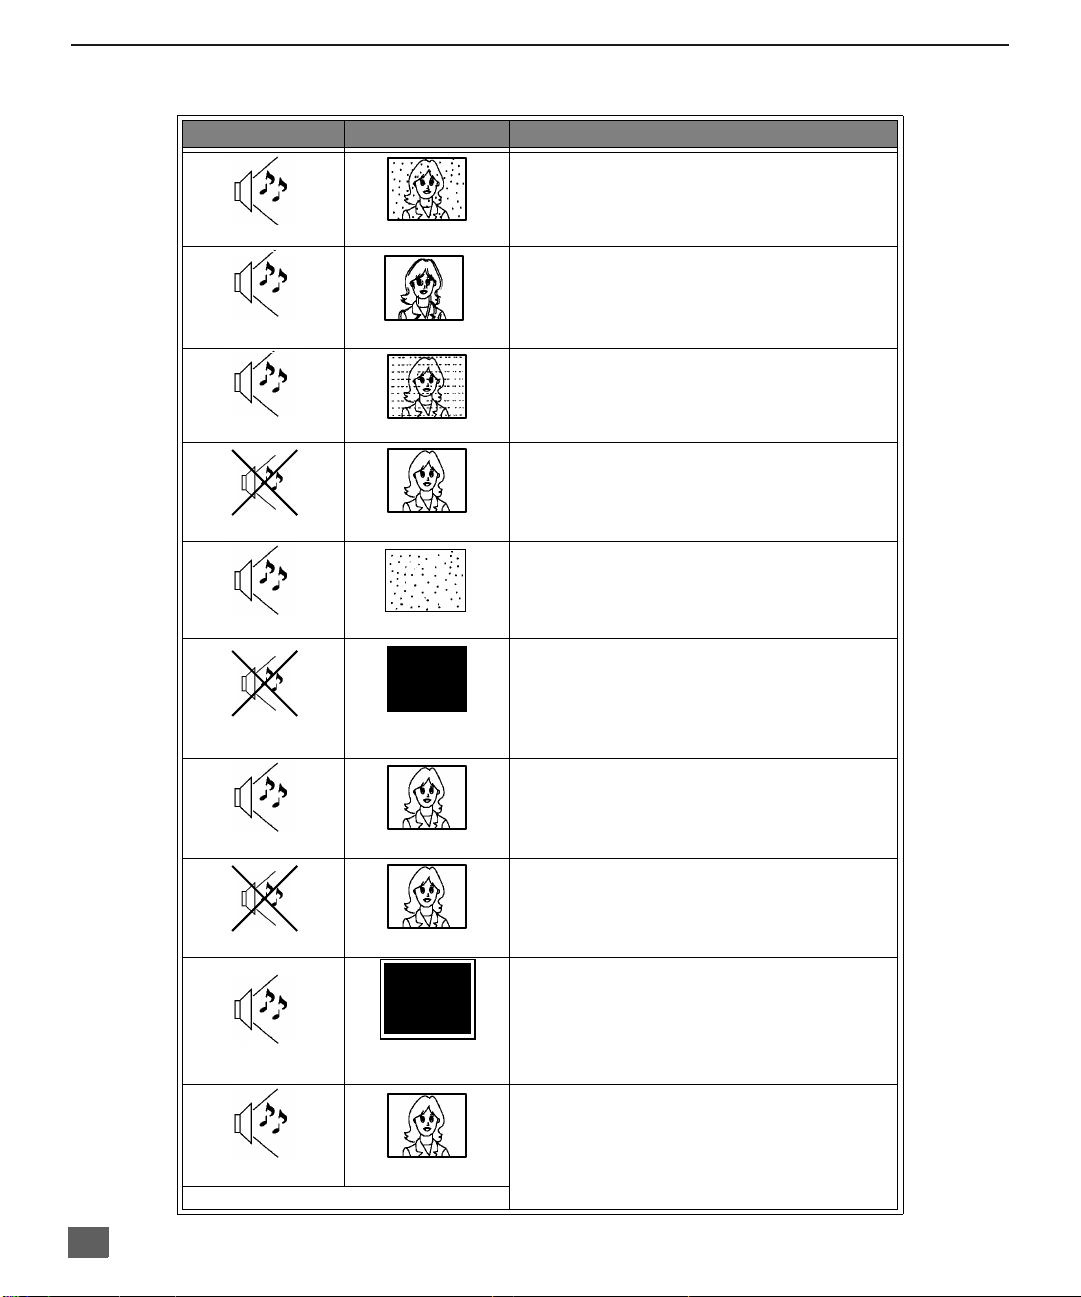
Before calling for service, determine the symptoms and follow suggested solutions.
A
UDIO
Troubleshooting Chart
V
IDEO
Adjust Antenna Location and Connection
Solutions
Noisy Audio
Noisy Audio
Noisy Audio
No Audio
Noisy Audio
No Audio
Normal Audio
Snowy Video
Multiple Image
Interference
Normal Video
No Video with Snow
No Video / No PIP
No Color
Adjust Antenna Location and Connection
Check Antenna Lead-in Wire
Move TV from Electrical Appliances, Lights, Vehicles,
and Medical Equipment
Increase Volume
Check Mute
Check TV SPEAKERS on/off
Change Channel
Set TV or Cable Mode Properly
Check Antenna Cables
Check Power Cord is Plugged into Active Outlet
Adjust Brightness and Audio Controls
Change Channel
Check Cable Connections
Program the Remote Control Again
Check Second Video Source Operation
Adjust Color Settings
Change Channel
26
Wrong Audio
Normal Audio
Normal Audio
Intermittent Remote Control Operation
Normal Video
Missing Video
Input mode
Normal Video
Check Audio Is Set To Stereo Or Mono, Not SAP
De-Select Skip Feature Located In The Channel
Menu
Replace Remote Control Batteries
Page 28

N
OTES
27
Page 29

N
OTES
Notes
28
Panasonic Consumer Electronics Company,
Division of Matsushita
Electric Corporation of America
One Panasonic Way
Secaucus, New Jersey 07094
www.panasonic.com
(800) 222-4213
Panasonic de Mexico, S.A, de C.V.
Amores No. 1120
Col. Del Valle C.P. 03100
México, D.F.
Tel. (915 ó 015) 488-1000
Fax (915 ó 015) 575-6763, 575-6765
Panasonic Sales Company,
Division of Matsushita Electric
of Puerto Rico Inc. (“PSC”)
Ave. 65 de Infantería, Km 9.5
San Gabriel Industrial Park
Carolina, Puerto Rico 00985
Tel. (787) 750-4300
Fax (787) 768-2910
Page 30

Televisor a color
Instrucciones de Operación
®
CT-27SX11
CT-27SX11U
CT-27SX31
CT-27SX31U
CT-32SX31
CT-32SX31U
CT-36SX31
CT-32SX31U
CT-F2911
CT-F2911X
CT-F2921L
CT-F2931
CT-F2931X
CT-F2941L
CT-F3431
CT-F3431X
CT-F3441L
Para asistencia llame al teléfono: 1-800-211-PANA (7262)
o envíe un correo electrónico a la dirección:
[email protected] (Solo en Estados Unidos)
TQB2AA0372 10409
IMPRESO EN EE.UU.
Page 31
ADVERTENCIA
RIESGO DE SACUDIDAS
ELECTRICAS. NO ABRIR.
ADVERTENCIA: A fin de reducir el riesgo de sacudidas eléctricas, no
deberán quitarse n i la cubierta n i la tapa posteri or. No hay en el interior pi eza
alguna que el usuario tenga que reparar. Todo servicio habrá de brindarlo
personal de reparación capacitado.
El propósito del relámpago con
punta de flecha dentro de un
triángulo es el de advertir al
usuario de que existen piezas
internas del producto que
representan riesgo de que las
personas reciban sacudidas
eléctricas.
ADVERTENCIA: Con el objeto de pr evenir el riesgo de incendio o de sacudi da
eléctrica, este aparato no deberá verse expuesto a la lluvia ni a la humedad.
El propósito del signo de
exclamación dentro de un
triángulo es el de advertir al
usuario de que los
documentos que acompañan
al aparato incluyen
importantes instrucciones de
funcionamiento y reparación.
1
Page 32

I
NDICE
Indice
Tabla de Comparación de Características.............3
Felicidades................................................................4
Registro del Usuario ...............................................................4
Cuidado y Limpieza..................................................................4
Especificaciones.......................................................................4
Instalación.................................................................5
Ubicación de la Televisión........................................................5
Conexiones de Cable Opcional................................................6
Cable de Suministro de Corriente Alterna................................6
Conexiones de Cable / Antena ................................................6
Conexiones de Equipo Opcional.............................7
Conexión de la Videocasetera
(para los modelos CT-F2911/X, CT-F2921L y CT-27SX11/U.) ..................7
Conexión del Decodificador de Cable
(para los modelos CT-F2911/X, CT-F2921L y CT-27SX11/U.) ..................8
Conexiónes del Decodificador de Cable y Videocasetera
(para los modelos CT-F2911/X, CT-F2921L y CT-27SX11/U.) ..................9
Conexión de la Videocasetera ...............................................10
Conexión del Decodificador de Cable....................................11
Conexiones del Decodificador de Cable y Videocasetera .....12
Conexión de Salida del Programa (PROG. OUT)..................13
Sonido / TO AUDIO AMP.......................................................13
Conexión del Decodificador de Televisión
Digital (DTV-STB) ...............................................................14
Operación de Imagen en Imagen (IDI).................15
Menu Principal........................................................16
Botones del Control Remoto..................................................16
Guía del Control Remoto........................................................16
Tabla de Características del Menu Principal........17
Funciones Especiales............................ ..... ..... ......21
Ajuste - Idiomas......................................................................21
Programación de Canales......................................................21
CC (Substitulos) .....................................................................21
Otros Aj. Autoencendido/Canal Info/Corr Geomagnetica.......22
Cronómetro - Apagado...........................................................23
Cronom .......................... ............................................. ....... ....2 3
Imagen - Imagen Ajustes .......................................................24
Imagen - Otros Ajustes...........................................................24
Canales - Titulos ....................................................................25
Funcion Para Cancelar Entradas De Video ...........................25
Bloqueo - Modo......................................................................26
Cuadro de Localización de Fallas.........................27
Lea estas instrucciones completamente antes de operar la T.V.
El contenido está sujeto a cambios sin previo aviso u obligación.
Derechos reservados 2001 por Matsushita Electric Corporation of America. Todos
los derechos reservados. La copia y distribución sin autorización es violación de
la ley.
2
Page 33
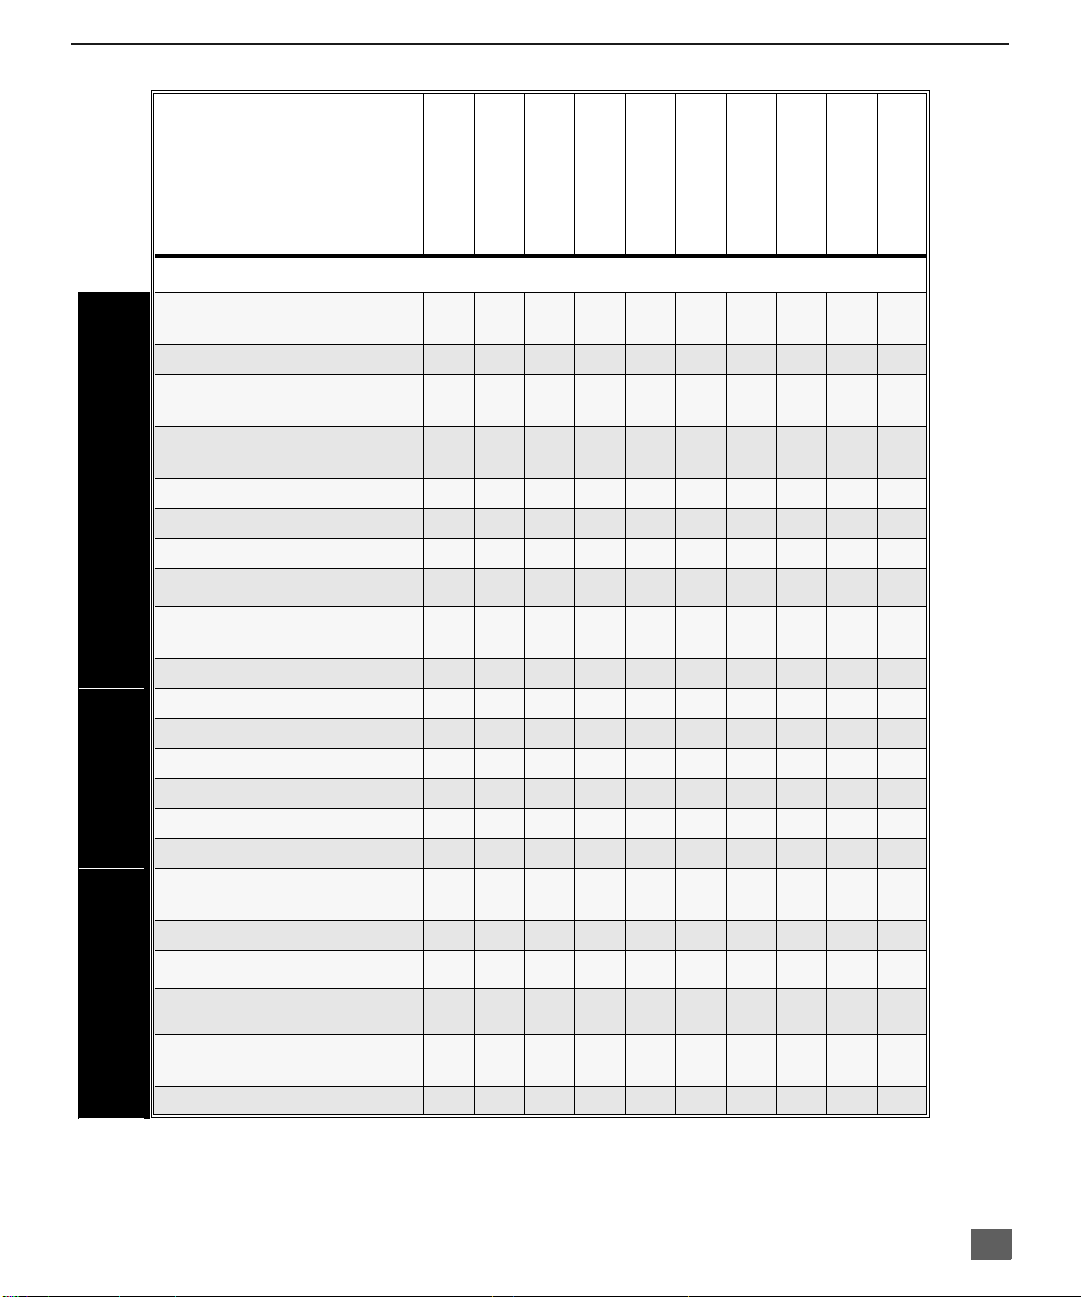
Tabla de Comparación de Características
MODELOS
T
ABLA DE COMPARACIÓN DE CARACTERÍSTICAS
CARACTERISTICAS
LENGUAJE DEL MENÚ
ENG/ESP/FRAN
NO IMAGEN EN IMAGEN
IMAGEN EN IMAGEN CON 2
SINTONIZADORES
ENTRADA DE VIDEO
MEMORIA DE IMAGEN
CAPACIDAD DE V-CHIP
ENTRADA DE 75 OHM
2RF
INFORMACIÓN DEL CANAL
FUNCION PARA CANCELAR
ENTRADAS DE VIDEO
CARACTERÍSTICAS ESPECIALES
BAJOS/BALANCE/AGUDOS
AUDIO
(POSTERIOR/DELANTERA)
VIDEO NORM
AUDIO NORM
ESTEREO
SONIDO IA
SONIDO ENVOLVENTE
BBE
ENTRADA A/V
SALIDA AUDIO
CT-27SX11/U
r r r r r r r r r r
r r r
r r r r r r r r r r
r r r r r r r r r r
r r r
r r r r r r r r r r
r r r r r r r r r r
r r r r r r r r r r
r r r r r r r r r r
r r r r r r r r r r
r r r r r r r r r r
r r r r r r r r r r
r r r r r r r r r r
r r r r r r r r r r
3
3
(2/1)
(2/1)3(2/1)3 (2/1)3 (2/1)3 (2/1)3 (2/1)
r r r r r r r r r r
CT -27SX31/U
r r r r r r r
r r r r r r r
CT-F2921L
CT-F2911/X
CT -F2931/X
CT-F2941L
CT -32SX31/U
(2/1)
3
CT -F3431/X
3
(2/1)
CT-F3441L
3
(2/1)
CT -36SX31/U
SALIDA DE PROGRAMA A/V
ENTRADA S-VHS
CONECTORES
DE A/V
ENTRADA DE VIDEO
COMPUESTO
CONECTOR DE AUDIFONOS
r r r r r r r
2
2
(1/1)
(1/1)2(1/1)2 (1/1)2 (1/1)2 (1/1)2 (1/1)2 (1/1)2(1/1)2 (1/1)
r r r r r r r r r r
r r r r r r r r r r
3
Page 34
F
ELICIDADES
Felicidades
Su nueva televisión Panasonic Tau esta diseñada para proporcionarle permanentemente
imagenes con calidad artística, e incluye dentro de sus características la inovadora pantalla
plana PureFlat
esta diseñado p ar a da rle m uc ho s añ os de s ati sf ac ció n. Fue completament e p rov ado y a jus tado
en la fábrica para su mejor desempeño.
Registro del Usuario
El modelo y el n úme r o d e s eri e d e es te pr odu cto s e loc aliz an en l a parte posterior de
este TV. Deberá anotar el modelo y el número de serie en los espacios que se
proveen a continu ación y consérvel os permanentemente como comprobaci ón de su
compra. Esto le ayudar á a identifi carlo en caso de robo ó pérd ida. Los consu midores
en los Estados Unidos de América pueden registrar su producto en la siguiente
dirección electrónica:
www.prodreg.com/panasonic.
Cuidado y Limpieza
Pantalla (Apagar la Televisión)
r Use una solución de jabón suave o limpiador de vidrio con un paño suave y limpio. NO
USE LIMPIADORES ABRASIVOS.
r Evite la hum edad excesiva y seque bien.
Nota: Evite rociar cualquier tipo de limpiadores directamente sobre la pantalla.
Gabinete y Control Remoto
r Para gabinetes y control remoto use un paño humedecido con agua o una solución
detergente suave. Evite el exceso de humedad y frote hasta secar.
r No use benceno, diluyentes u otros productos a base de petróleo.
Especificaciones
Fuente de Potencia
CT-F291 1 (2,4A) CT-F2931 (2,5A) CT-F3431 (3,0A)
CT-27SX1 1 (2,4A) CT-27SX31 (2,5A) CT-32SX31 (3,0A)
CT-27SX1 1U (2,4A) CT-27SX31U (2,5A) CT-32SX31U (3,0A)
MR
. El nuevo gabinete con acabado en gris de un compacto y elegante estilo
Número de
Modelo
Número de
Serie
CT-36SX31U (3,0A)
CT-36SX31U (3,0A)
120Vca, 60Hz
CT-F291 1X (2,4A) CT-F 2931X (2,5A) CT-F3431X (3,0A)
CT-F2921L (2,4A) CT-F2941L (2,5A) CT-F3441L (3,0A)
Capacidad de Canales - 181 VHF-12; UHF-56; Cable-125
Ter m inales de Entrada de Video
T erminales de Entrada de Audio 500mV rms 47Kilo Ohmios
Ter m ina les de Salida de Audio 0-2.0V RMS 4,7Kilo Ohmios
Componente Entrada de Vídeo
Terminal de Entrada S-Video Conectores S-Video (Y-C)
Auto (110Vca-220Vca)
1Vp-p, 75 Ohmios,Terminal tipo
75 Ohmios,Terminal tipo
Las especificaciones están sujetas a cambios sin previo aviso ni obligación alguna.
4
127Vca, 60Hz
50/60Hz
fonográfico
fonográfico
Page 35

Instalación
Ubicación de la Televisión
Esta unidad puede ser utilizada como un centro d e entretenimiento. Consulte a su
distribuidor para obtener opciones disponibles.
r Evite el exceso de luz del sol u otras luces brillantes, incluyendo reflejos.
r Mantenga alejada la uni dad del exce so de c alor o humed ad. Ventilación inadecuada puede
causar fallas en componentes internos.
r Iluminación fluorecente puede reducir la transmisión del Control Remoto.
r Evite el equipo magnético, incluyendo motores, ventiladores ó bocinas externas.
PRECAUCIÓN: Use únicament e con el mueble, mesa , cómoda o libre ro
especificado por el fabricante o comprado con el aparato. Si mueve el
mueble con el aparato sobre de el, tenga mucho cuidado de que el aparato
no caiga sobre usted al empujar. Para evitar lesiones a infantes, nunca
coloque el telev isor en mu ebles que puedan s er incl inados o movidos por
un niño
CT-F3441L
PRECAUCIÓN:
PANASONIC TY-32HX40P. Si lo utilixa con algun otro mueble o porta-televisor,
podria ser fragil o inestable, lo que podria ocacionar un accidente.
CT-F3431
PRECAUCIÓN:
PANASONIC TY-32HX40P. Si lo utilixa con algun otro mueble o porta-televisor,
podria ser fragil o inestable, lo que podria ocacionar un accidente.
CT-F3431X
PRECAUCIÓN: Este televisor debe ser utilizado unicamente con el mueble
PANASONIC TY-32HX40P. Si lo utilixa con algun otro mueble o porta-televisor,
podria ser fragil o inestable, lo que podria ocacionar un accidente.
CT-27SX11/CT-27SX11U:
PRECAUCIÓN: Este televisor debe ser utilizado unicamente con el mueble
PANASONIC TY-27SX31P. Si lo utilixa con algun otro mueble o porta-televisor,
podria ser fragil o inestable, lo que podria ocacionar un accidente.
CT-27SX31/CT-27SX31U:
PRECAUCIÓN: Este televisor debe ser utilizado unicamente con el mueble
PANASONIC TY-27SX31P. Si lo utilixa con algun otro mueble o porta-televisor,
podria ser fragil o inestable, lo que podria ocacionar un accidente.
CT-32SX31/CT-32SX31U:
PRECAUCIÓN: Este televisor debe ser utilizado unicamente con el mueble
PANASONIC TY-32SX31P. Si lo utilixa con algun otro mueble o porta-televisor,
podria ser fragil o inestable, lo que podria ocacionar un accidente.
CT-36SX31/CT-36SX31U:
PRECAUCIÓN: Este televisor debe ser utilizado unicamente con el mueble
PANASONIC TY-36SX31P. Si lo utilixa con algun otro mueble o porta-televisor,
podria ser fragil o inestable, lo que podria ocacionar un accidente.
.
I
NSTALACIÓN
Este televisor debe ser utilizado unicamente con el mueble
Este televisor debe ser utilizado unicamente con el mueble
5
Page 36
I
NSTALACIÓN
Conexiones de Cable Opcional
Cables blindados de Audio y Video deben usarse entre los componentes.
Para mejores resultados:
r Use cable coaxial blindado de 75-ohmios.
r Use los conectores de entrada y salida apropiados, iguales a los de su componente.
r Evite el uso de cables largos para minimizar interferencia.
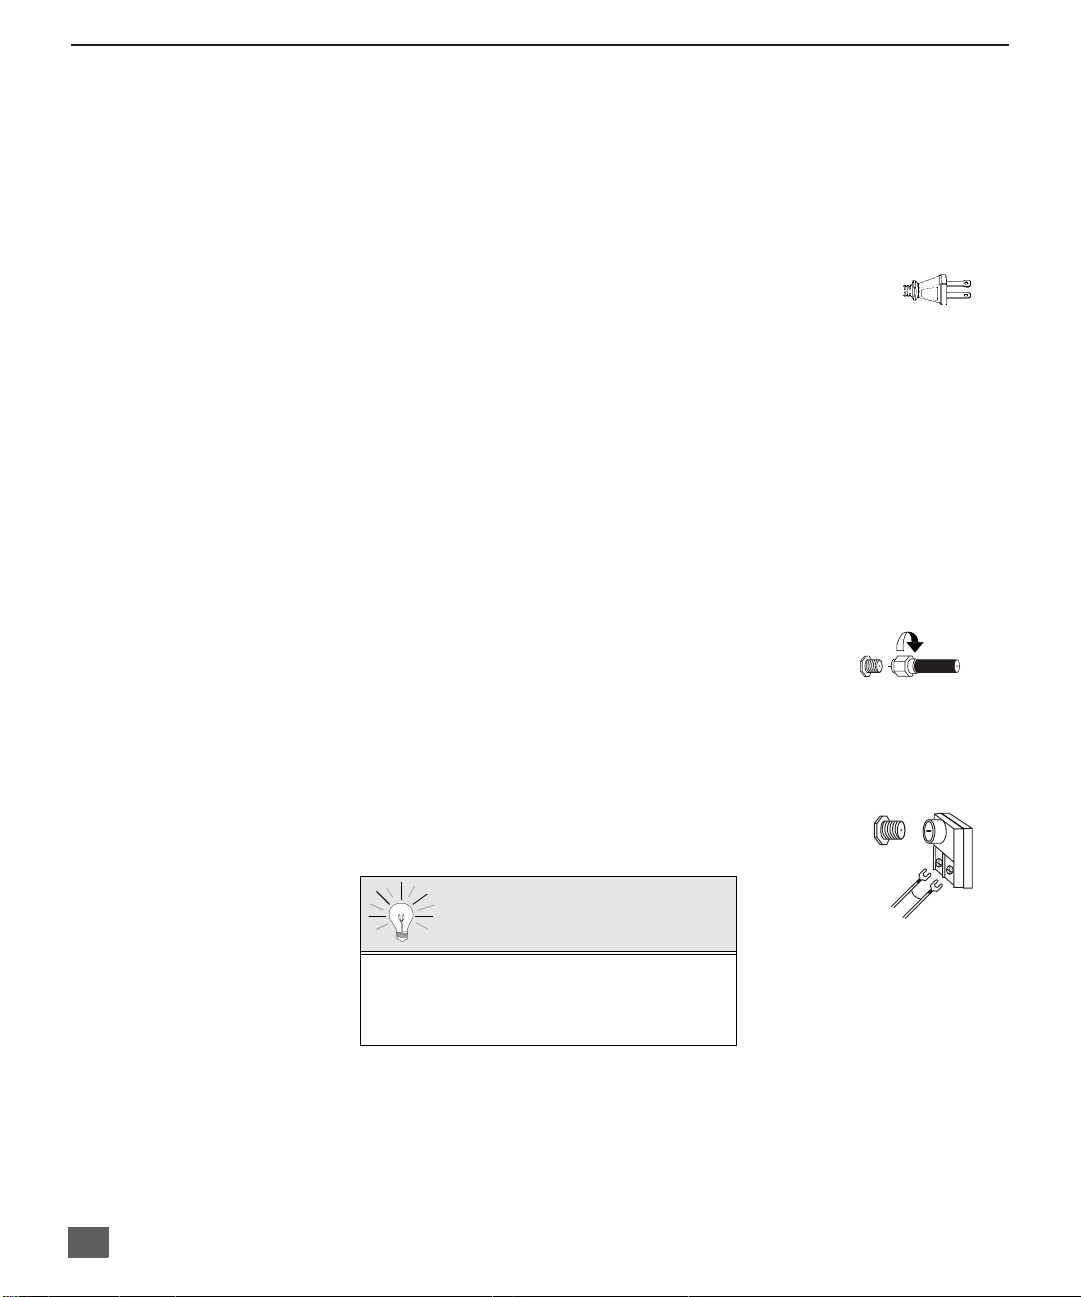
Cable de Suministro de Corriente Alterna
PRECAUCION: PARA PREVENIR UNA DESCARGA ELECTRICA,
BUSQUE LA HOJA ANCHA DEL ENCHUFE E INSERTELA POR
COMPLETO EN LA RENDIJA ANCHA CORRESPONDIENTE DE
LA TOMA DE CORRIENTE ALTERNA. NO USE ESTE ENCHUFE
CON UN RECEPTACULO U OTRA TOMA DE CORRIENTE SALVO
QUE LA HOJA SE PUEDA INSERTAR POR COMPLETO PARA
PREVENIR LA EXPOSICION DE LA HOJA.
PROTEJA EL CABLE DE AC DE SER PISADO, ENRROLLADO, PLEGADO,
TROZADO O PERFORADO, PARTICULARMENTE EN LOS CONECTORES Y EN
LOS PUNTOS DONDE SALEN DEL APARATO.
Conexión de Cable / Antena
Para una recepción adecuada, se requiere una conexión de cable o antena.
Conexión de cable
Conecte el cable suministrado por su compañía local de cable.
Nota: Puede ser necesaria una caja convertidora de cable para una
recepción adecuada. Verifique con su compañía de Cable
sobre los requisitos de compatibilidad.
Enchufe polarizado
Cable de Entrada de
la Compañía de Cable
75 Ohmios VHF/UHF
en la parte posterior de la TV
Conexión de Antena
r Para una recepción adecuada de canales VHF/UHF, se requiere de
una antena externa. Para la mejor recepción posible, se recomienda
una antena al exterior.
r La Modalidad de Antena debe estar ajustada en la televisión.
Cable de Entrada de
una Antena de Casa
Cable Predispuesto
La modalidad de cable está predispuesta de
fábrica. Usuarios de antena deberán cambiar a
modalidad de antena en el menú de Ajuste
(SETUP).
6
Page 37
Conexiones de Equipo Opcional
INFORMACIÓN IMPORTANTE SOBRE EL USO DE JUEGOS DE VIDEO,
COMPUTADORAS, TELETEXTOS U OTROS DESPLIEGUES DE IMAGEN FIJA.
El uso extensiv o de materia les de program ación con imagen fi ja pueden cau sar una
“imagen de sombra ” permanente en el tubo de imagen. Esta ima gen de fondo se ve
en programas normales en la forma de una imagen fija estacionaria. Este tipo de
deterioración en el tubo de imagen es irreversible pero puede ser limitada de acuerdo
a las siguientes indicaciones:
A. Reduzca el ajuste de brillo/contraste a un nivel mínimo.
B. No utilice la imagen fija por largos períodos de tiempo.
C. Apague el televisor cuando no lo observe.
Nota: Cualquier marca o imagen que se retiene en el tubo de imagen como resultado del
uso de imagen fija no se considera un defecto de funcionamiento y como tal, no está
cubierto por la garantía. Este producto no está diseñado para mostrar patrones de
imagen fija por largos períodos de tiempo.
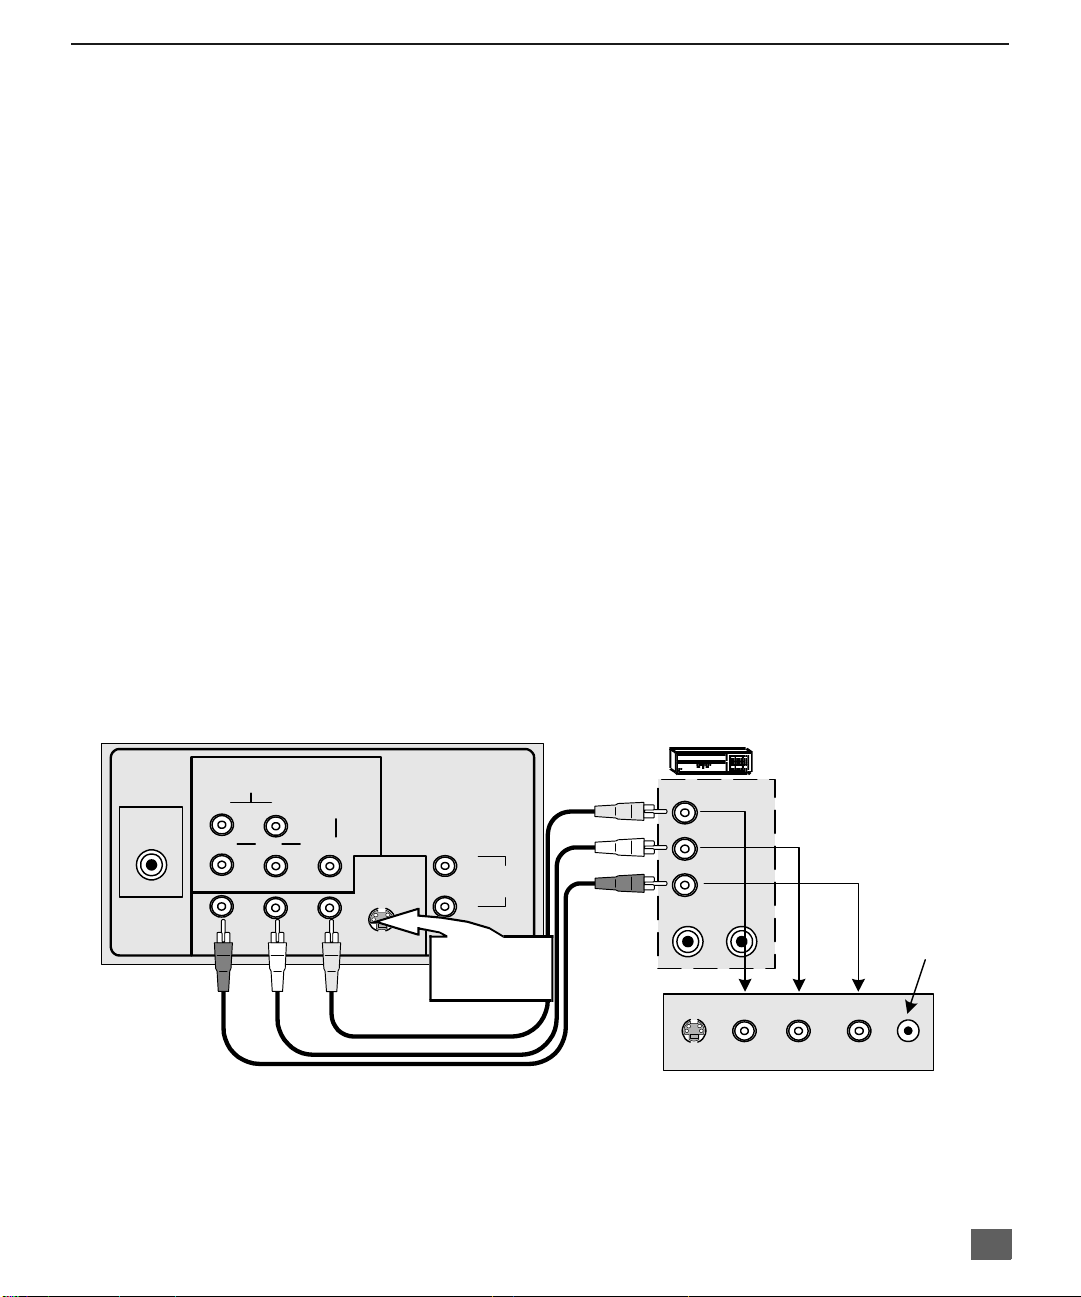
Conexión de la Videocasetera
(para los modelos CT-F2911/X, CT-F2921L y CT-27SX11/U.)
Videocaseteras, equipo de videodiscos, equipo de videojuegos y teletexto pueden
también ser conectados a la entrada de conexión de vídeo. Vea el manual de su
equipo opcional para más información.
Nota: La entrada de VIDEO 1 es una entrada de propósito dual. Es para conectar equipos de 480i
principalmente, tal como un reproductor de DVD usando los conectores de video por
componentes Y P
de video compuesto convencionales como una videocasetera, usando solo los conectores de Y/
Video y AUDIO L y R. La información en pantalla mostrará Componente ó Video 1 dependiendo
de que fuente este conectada.
TERMINALES EN PARTE POSTERIOR DE LA TV (Puede variar)
COMPONENT
L
VIDEO INPUT
B
INPUT 1
Y/VIDEO
INPUT 2
S-VIDEO
VIDEO
ANT
AUDIO
R
P
P
R
RL
y los conectores de audio L y R. Pero además pueden conectarse fuentes
B PR
L
TO AUDIO
R
Use la conexión
S-VIDEO o la
conexión VIDEO.
AMP
C
ONEXIONES DE EQUIPO OPCIONAL
Videocasetera
VIDEO OUT
L
AUDIO OUT
R
ANT IN
ANT OUT
INPUT 3
Entrada para audifonos
conector de 1/8"
CABLES NO INCLUIDOS
S-VIDEO VIDEO L AUDIO R HPJ
TERMINALES EN EL FRENTE DE LA TEL EVISIO N
Procedimiento
1. Conect e el equipo como se muestra a la parte frontal o posterior de la entrada de Audio/Vídeo.
Nota: Conexiones de Audio/Vídeo frontales y de la parte posterior no pueden usarse al mismo tiempo.
2. Seleccione la Modalidad de Vídeo presionando el botón de TV/VIDEO.
3. Opere el equipo opcional tal como se instruye en el manual del equipo.
7
Page 38
C
ONEXIONES DE EQUIPO OPCIONAL
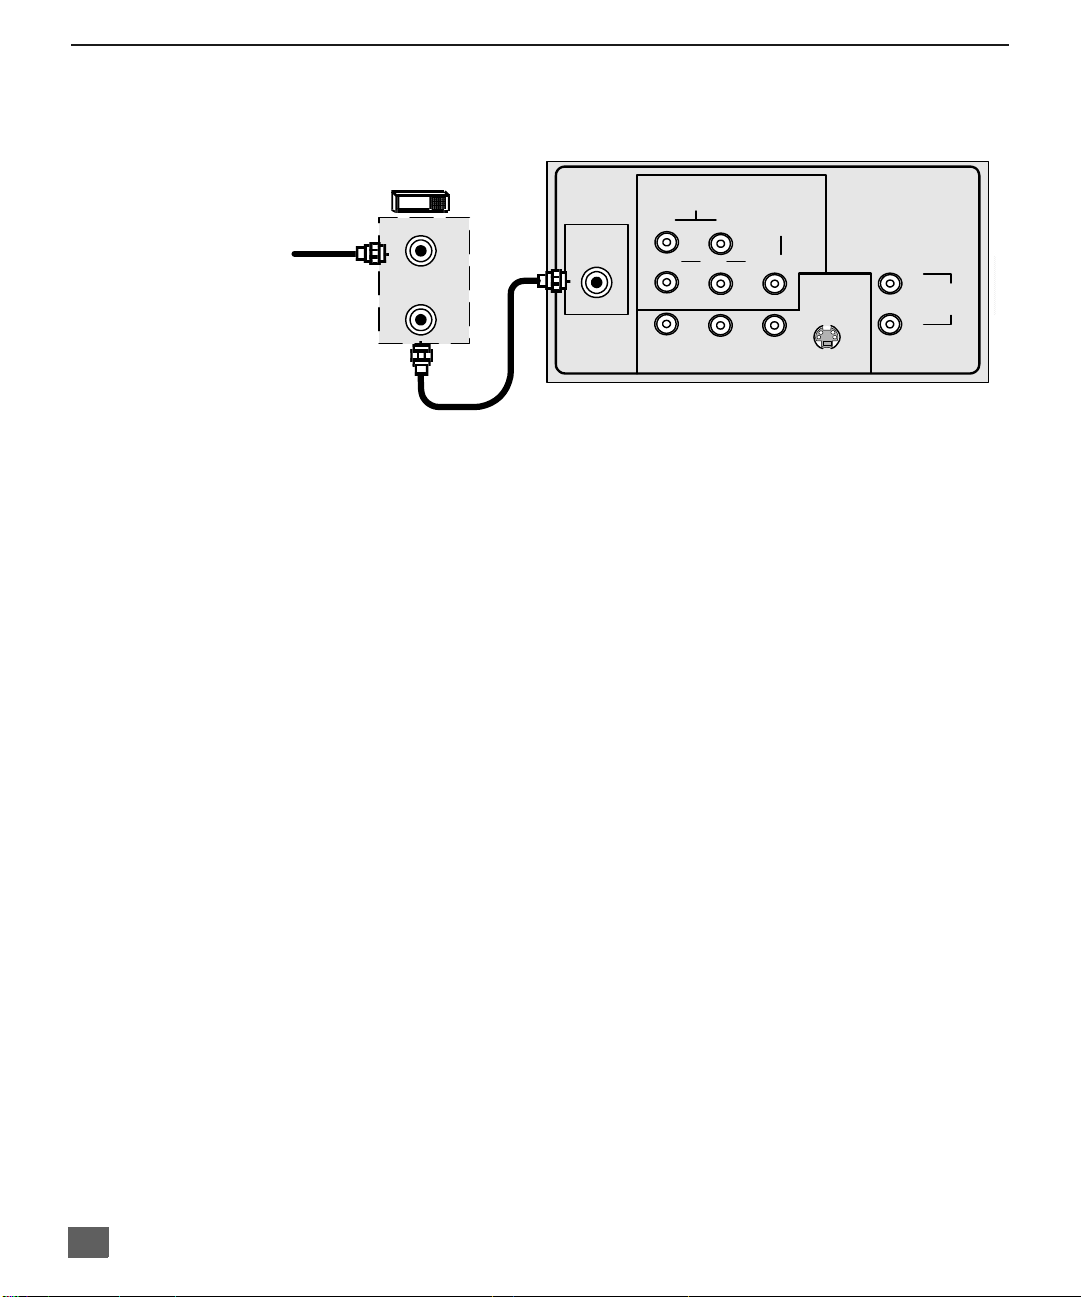
Conexión del Decodificador de Cable
(para los modelos CT-F2911/X, CT-F2921L y CT-27SX11/U.)
Siga este diagrama cuando conecte su televisión solamente a un decodificador de cable
TERMINALES EN LA PARTE POSTERIOR DE LA TV
COMPONENT
L
VIDEO INPUT
B
INPUT 1
Y/VIDEO
S-VIDEO
VIDEO
ANT
CABLES NO INCLUIDOS
AUDIO
R
P
P
R
RL
INPUT 2
L
R
Nota:
DECODIFICADOR
DE CABLE
Cable de
entrada
ANT IN
ANT OUT
El control remoto de be se r programado con los códigos que se incl uy en p a ra o perar el
decodificador de cable. Vea Programación del Control Remoto en la Guía de
Referencia Rápida para el Control Remoto.
Viendo un Canal de Cable Premium (codificado)
Procedimiento
1. Sintonize la televisión al canal 3.
2. Usando el decodificador de cable, sintonize el canal de cable premium que desea ver.
TO AUDIO
AMP
8
Page 39
C
ONEXIONES DE EQUIPO OPCIONAL
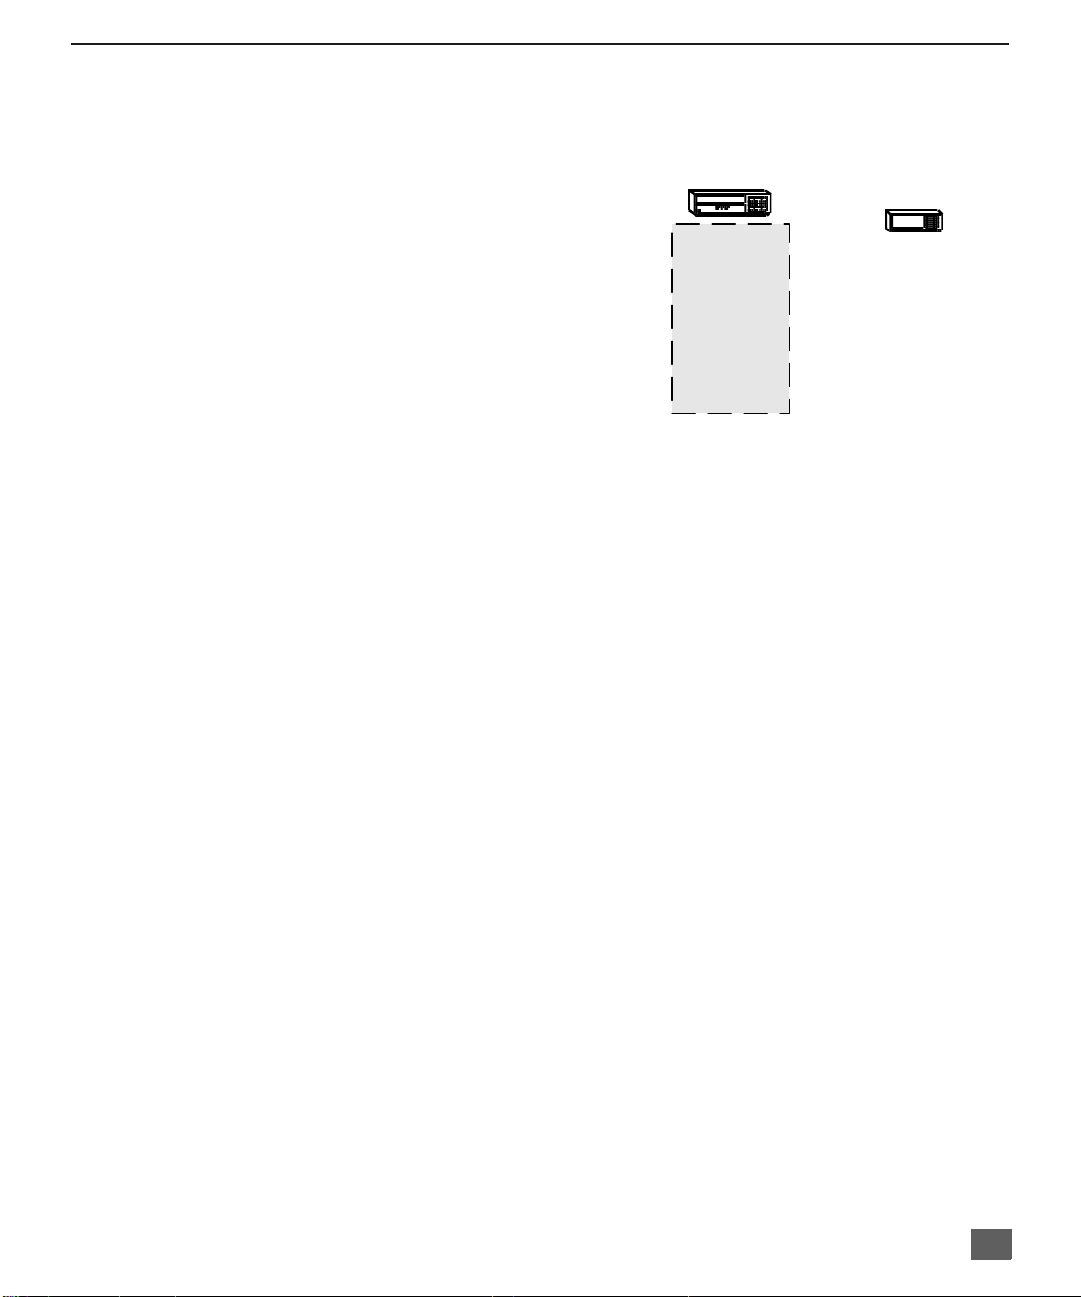
Conexiones del Decodificador de Cable y Videocastera
(para los modelos CT-F2911/X, CT-F2921L y CT-27SX11/U.)
Siga este diagrama cuando conecte su televisión tanto a una videocasetera como a un decodificador de
cable.
Nota: El control remoto debe ser programado con los códigos que se incluyen para operar la
videocasetera y decodificador de cable (caja de cable). Vea Programación del Control
Remoto en la Guía de Referencia Rápida para el Control Remoto.
Viendo un canal de cable premium (codificado)
Procedimiento
1. Sintonize la televisión al canal 3.
2. Usando el decodificador de cable, sintonize al canal de cable premium que desea ver.
Grabando un canal de cable premium (codificado)
Procedimiento
1. Presione el b otó n T V/VIDEO en el co ntrol rem oto pa ra selec ciona r la entrada de vídeo
(VIDEO 1, VIDEO 2, etc) que está conectada con su videocasetera.
2. Encienda la videocasetera.
3. Sintonize la videocasetera al canal 3 o 4, dependiendo de su videocasetera.
4. Usando el decodificador de cable, sintonize al canal de cable premium que desea
grabar.
5. Comienze a grabar.
Nota: Para ver un canal diferente mientras graba:
• Seleccione ANT1 en el menú de SET UP bajo PROG CNLS.
• Presione el botón
• Sintonize la televisión a un programa de televisión (excepto otro canal de cable premium).
TV/VIDEO
en el control remoto para seleccionar la modalidad de televisión.
9
Page 40
C
ONEXIONES DE EQUIPO OPCIONAL
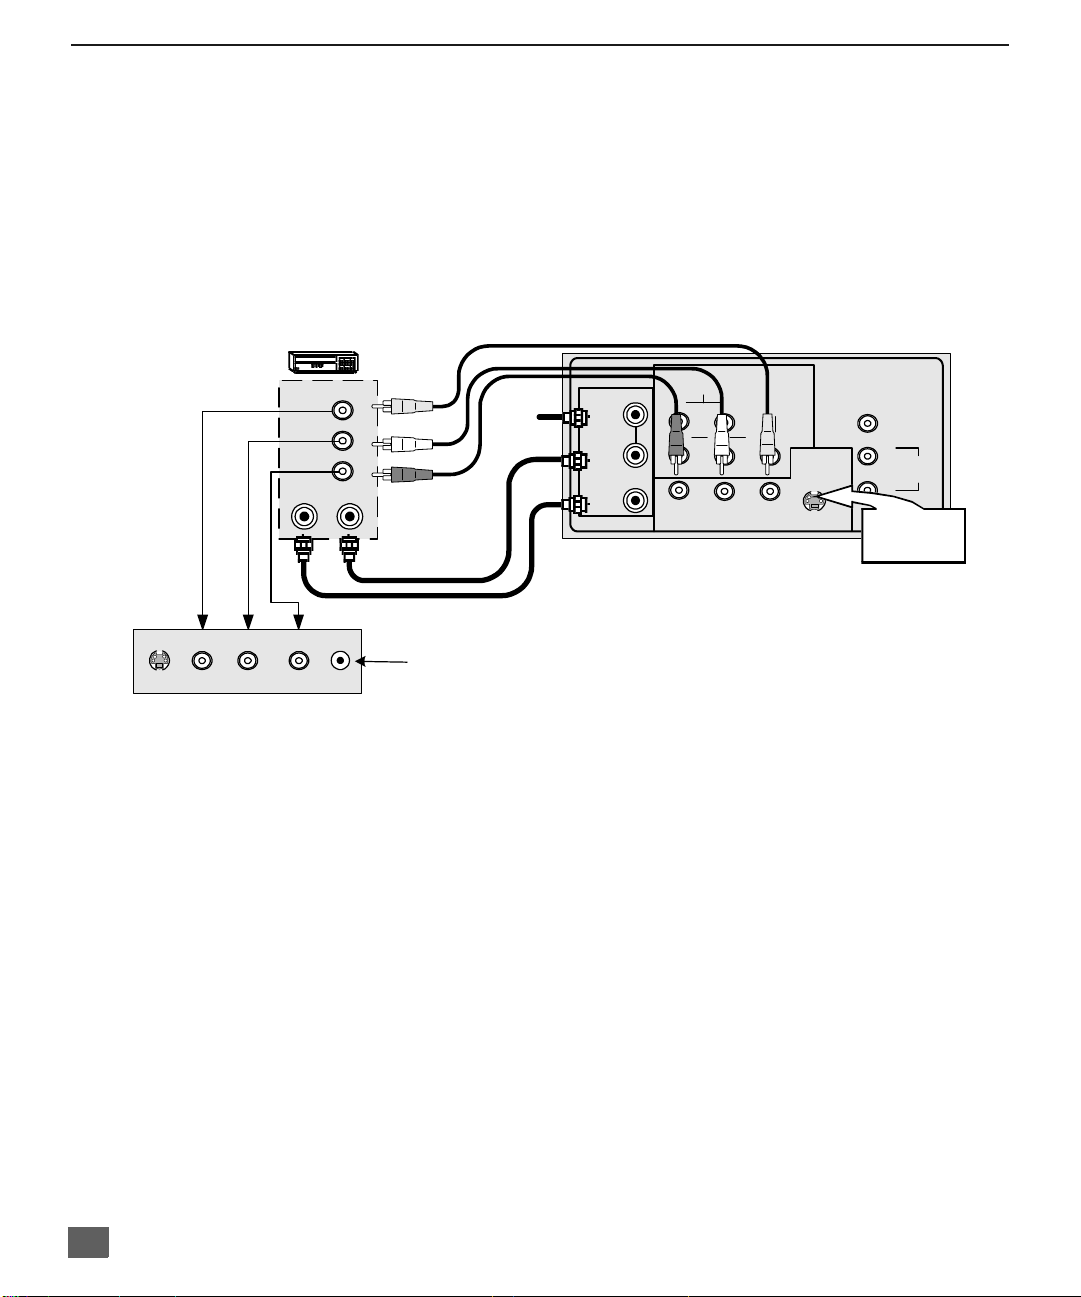
Conexión de la Videocasetera
(para los modelos CT-F2931/X, CT- F2941L, CT-F3431/X, CT-F3441L, CT-27SX31/U, CT- 32SX 31/U, y
CT-36SX31/U.)
Siga este diagrama cuando conecte su televisión solamente a una videocasetera.
Nota: La entrada de VIDEO 1 es una entrada de propósito dual. Es para conectar equipos de 480i
principalmente, tal como un reproductor de DVD usando los conectores de video por
componentes Y P
de video compuesto convencionales como una videocasetera, usando solo los conectores de Y/
Video y AUDIO L y R. La información en pantalla mostrará Componente ó Video 1 dependiendo
de que fuente este conectada.
VIDEOCASETERA
VIDEO OUT
L
AUDIO OUT
R
ANT OUT
ANT IN
CABLES NO INCLUIDOS
y los conectores de audio L y R. Pero además pueden conectarse fuentes
B PR
Cable de
entrada
AUDIO
ANT 1
SPLIT
OUT
ANT 2
TERMINALES EN LA PART E POST ERI O R DE LA T V
R
P
R
RL
(Puede variar)
L
P
B
INPUT 1
COMPONENT
VIDEO INPUT
Y/VIDEO
VIDEO
INPUT 2
S-VIDEO
PROG.
OUT
L
TO AUDIO
AMP
R
Use la conexión
S-VIDEO o la
conexión VIDEO.
INPUT 3
S-VIDEO VIDEO L AUDIO R HPJ
Nota: El control remoto debe ser programado con los códigos que se incluyen para operar la
videocasetera. Vea Programación del Co ntrol R emoto en l a Guía de Referenci a Rápida
para el Control Remoto.
Viendo un programa de televisión
Procedimiento
1. Seleccione ANT1 en el menú de SET UP (Ajuste) bajo PROG CNLS (Prog ramación
de canales).
2. Sintonize la televisión al programa de televisión que desea ver.
Viendo un vídeo
Procedimiento
r Opción A
1. Seleccione ANT1 en el menú de SET UP bajo PROG CNLS.
2. Presione el bot ón de TV/VIDEO en el control remoto para seleccionar la entrada de
vídeo (VIDEO 1, VIDEO 2, etc.) que está conectada a su videocasetera.
3. Comience el vídeo.
r Opción B
1. Seleccione ANT2 en el menú de SET UP bajo PROG CNLS.
2. Sintonize su televisión al canal 3 ó 4, dependiendo de su Videocasetera.
3. Comience el vídeo.
Entrada para audifonos
conector de 1/8"
10
Page 41
C
ONEXIONES DE EQUIPO OPCIONAL
Conexión de la Videocasetera (cont.)
Grabando un programa de televisión
Procedimiento
r Opción A (Grabando y viendo el mismo programa)
1. Seleccione ANT2 en el menú de SET UP bajo PROG CNLS.
2. Sintonize su televisión al canal 3 ó 4, dependiendo de su videocasetera.
3. Usando la videocasetera, sintonize el programa de televisión que desea grabar.
4. Comience a grabar.
r Opción B (Grabando un programa mientras se ve otro programa)
1. Seleccione ANT1 en el menú de SET UP bajo PROG CNLS.
2. Presione el bot ón de TV/VIDEO en el control remoto para seleccionar la entrada de
vídeo ( VIDEO 1, VIDEO 2, etc.) que está conectada a su videocasetera.
3. Usando la videocasetera, sintonize el programa de televisión que desea grabar.
4. Comience a grabar.
5. Presione el botón de TV/VIDEO en el control remoto para regresar a la modalidad de PTV.
6. Sintonize su televisión al programa de televisión que desea ver.
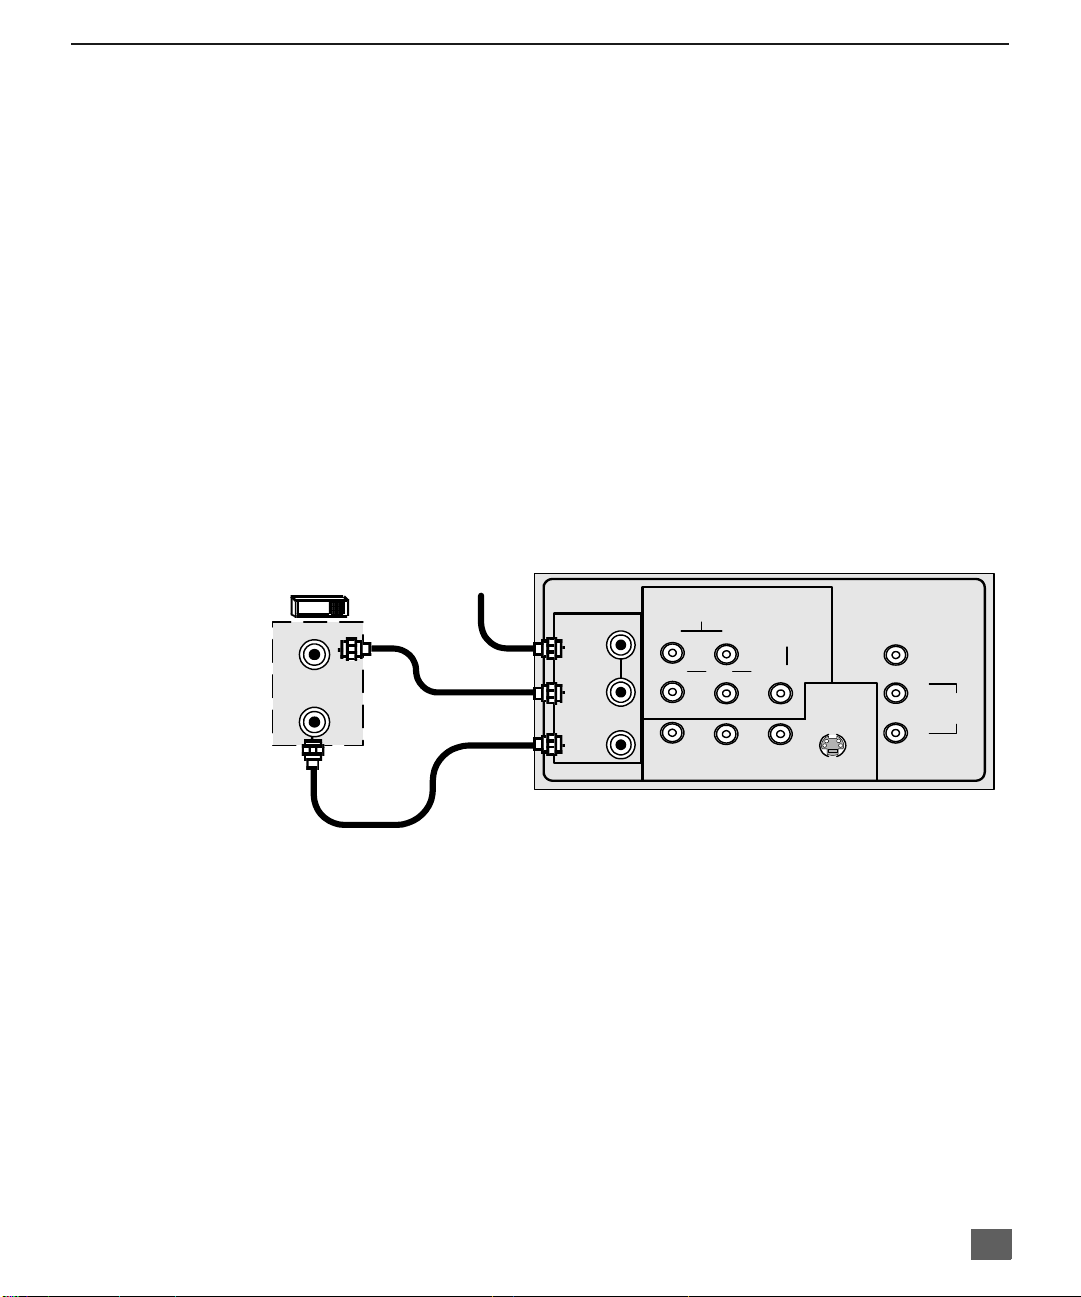
Conexión del Decodificador de Cable
(para los modelos CT-F2931/X, CT- F2941L, CT-F3431/X, CT-F3441L, CT-27SX31/U, CT- 32SX 31/U, y
CT-36SX31/U.)
Siga este diagrama cuando conecte su televisión solamente a un decodificador de cable.
DECODIFICADOR
DE CABLE
ANT IN
ANT OUT
CABLES NO INCLUIDOS
Cable de
entrada
AUDIO
ANT 1
SPLIT
OUT
ANT 2
TERMINALES EN LA PART E PO STERIOR DE LA TV (Puede varia r)
R
P
P
R
RL
COMPONENT
L
VIDEO INPUT
Y/VIDEO
B
INPUT 1
INPUT 2
S-VIDEO
VIDEO
PROG.
OUT
L
TO AUDIO
AMP
R
Nota: El control remoto debe ser programado con los códigos que se incluyen para operar el
decodificador de cable. Vea Programación del Control Remoto en la Guía de
Referencia Rápida para el Control Remoto.
Viendo un Canal de Cable Premium (codificado)
Procedimiento
1. Seleccione ANT2 en el menú de SET UP (Ajuste) bajo PROG CNLS (Prog ramación
de Canales).
2. Sintonize la televisión al canal 3.
3. Usando el decodificador de cable, sintonize el canal de cable premium que desea ver.
Nota: Para usar funciones especiales tales como Canales Favoritos y Títulos de Canal (vea la
sección de Funciones Espe ciale s pa ra más informac ión), AN T1 debe est ar sele ccio nada
en el menú de SET UP bajo PROG CNLS.
11
Page 42
C
ONEXIONES DE EQUIPO OPCIONAL
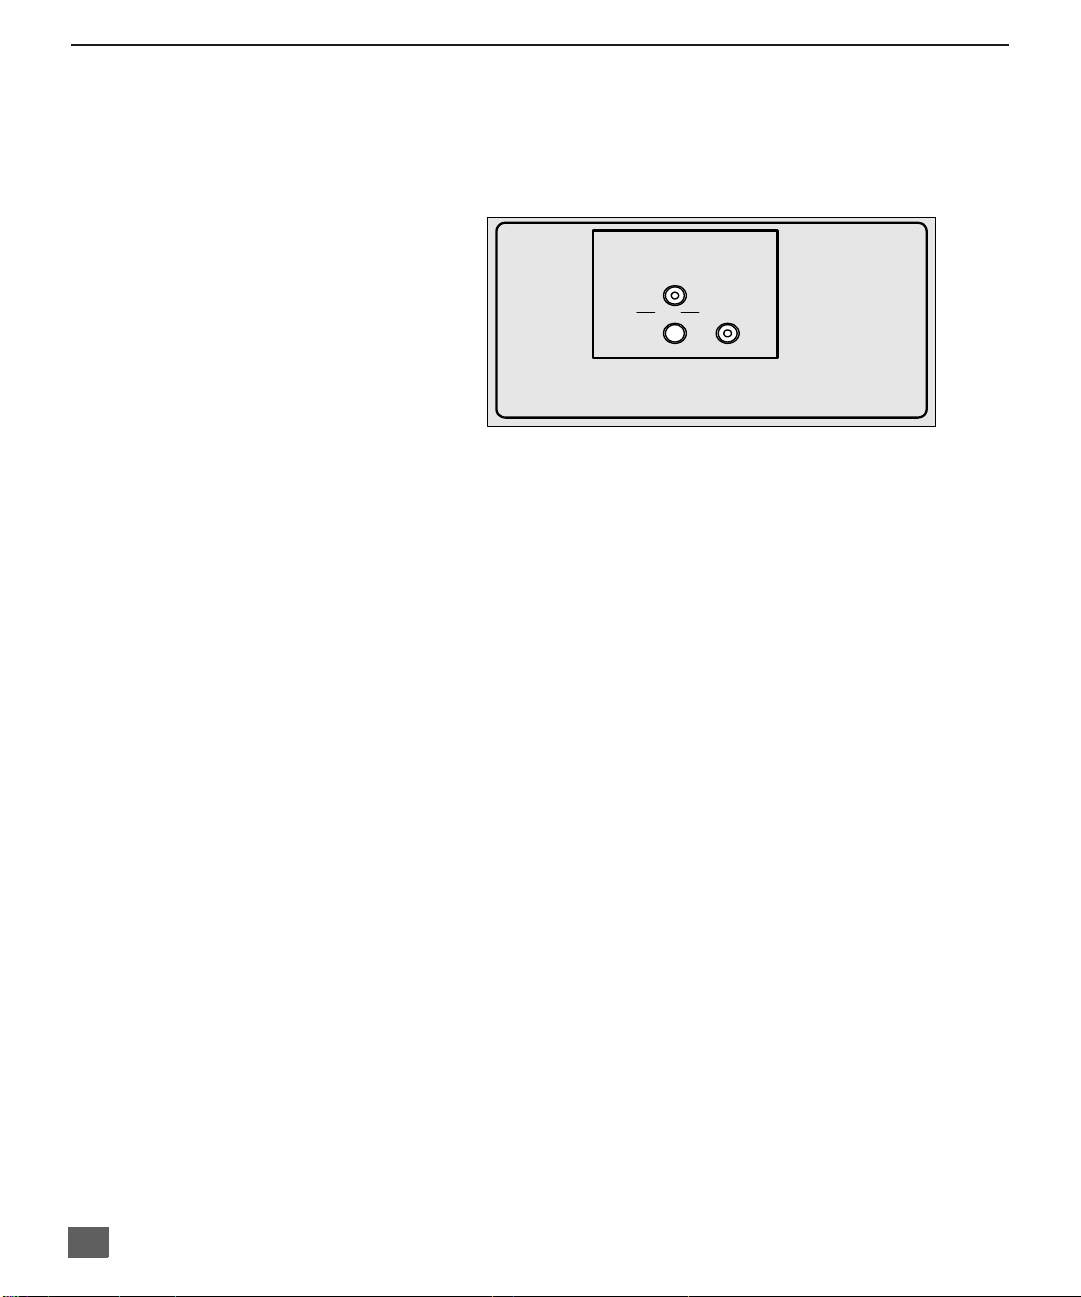
Conexiones del Decodificador de Cable y Videocastera
(para los modelos CT-F2931/X, CT- F2941L, CT-F3431/X, CT-F3441L, CT-27SX31/U, CT- 32SX 31/U, y
CT-36SX31/U.)
Siga este diagrama cuando conecte su televisión tanto a una videocasetera como a un decodificador de
cable.
AUDIO
P
P
R
Nota: El control remoto debe ser programado con los códigos que se incluyen para operar la
videocasetera y decodificador de cable (caja de cable). Vea Programación del Control
Remoto en la Guía de Referencia Rápida para el Control Remoto.
COMPONENT
L
VIDEO INPUT
B
INPUT 1
Y/VIDEO
Viendo un canal de cable premium (codificado)
Procedimiento
1. Seleccione ANT2 en el menú de SET UP (Ajuste) bajo PROG CNLS (Prog ramación
de canales).
2. Sintonize la televisión al canal 3.
3. Usando el decodificador de cable, sintonize al canal de cable premium que desea ver.
Nota: Para usar la funciones especiales tales como Canales Favoritos y Títulos de canal (vea
la sección de Funciones Especiales para más información), ANT1 debe estar
seleccionada en el menú de SET UP bajo PROG CNLS.
Grabando un canal de cable premium (codificado)
Procedimiento
1. Seleccione ANT2 en el menú de SET UP bajo PROG CNLS.
2. Presione el b otó n T V/VIDEO en el co ntrol rem oto pa ra selec ciona r la entrada de vídeo
(VIDEO 1, VIDEO 2, etc) que está conectada con su videocasetera.
3. Encienda la videocasetera.
4. Sintonize la videocasetera al canal 3 o 4, dependiendo de su videocasetera.
5. Usando el decodificador de cable, sintonize al canal de cable premium que desea
grabar.
6. Comienze a grabar.
Nota: Para ver un canal diferente mientras graba:
• Seleccione ANT1 en el menú de SET UP bajo PROG CNLS.
• Presione el botón
• Sintonize la televisión a un programa de televisión (excepto otro canal de cable premium).
TV/VIDEO
en el control remoto para seleccionar la modalidad de televisión.
12
Page 43
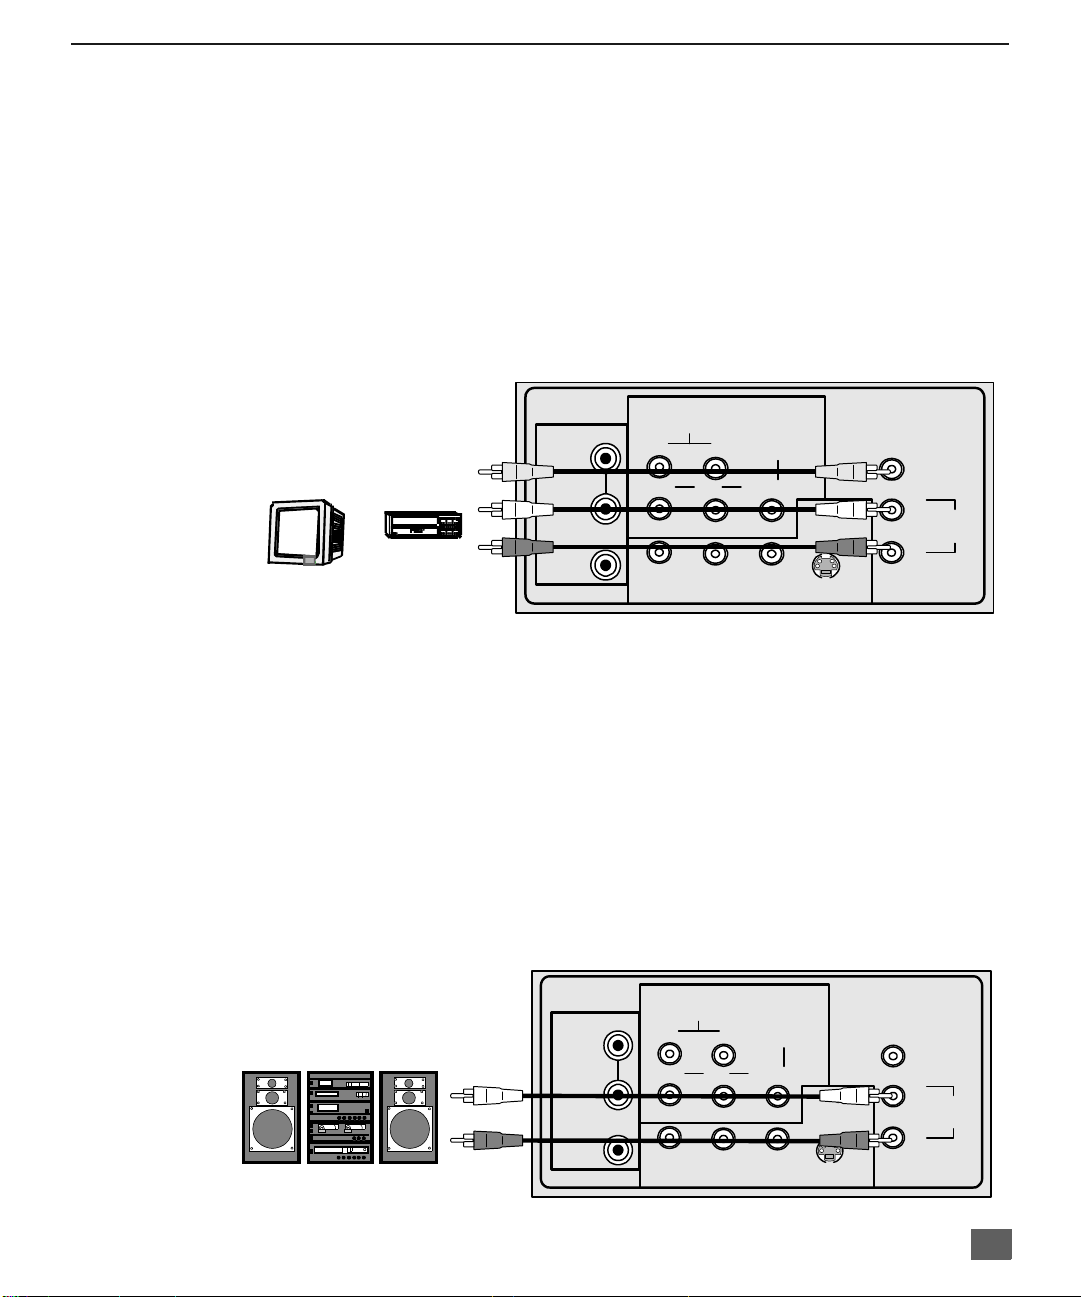
Conexión de Salida del Programa (PROG. OUT)
(para los modelos CT-F2931/X, CT- F2941L, CT-F3431/X, CT-F3441L, CT-27SX31/U, CT- 32SX 31/U, y
CT-36SX31/U.)
Para visualizar en la Televisión el Video y el Audio con equipo opcional de vídeo conéctese a
las terminales PROG.OUT en la parte posterior de la Televisión.
Nota: Cuando conecte señal de video compuesto a la entrada de video 1, y esta sea la imagen
principal, la señal de salida del conector PROGRAM OUT sera sin color.
Procedimiento
1. Conecte el equipo opcional de video a las terminales PROG OUT y TO AUDIO AMP
R/L.
2. El desplegado de terminal PROG. OUT es el mismo que el desplegado en pantalla.
Véase el manual de equipo opcional para instrucciones acerca del grabado ymonitoreo.
TERMINALES EN LA PARTE POSTERIOR DE LA TV (Puede variar)
C
ONEXIONES DE EQUIPO OPCIONAL
MONITOR
Sonido / TO AUDIO AMP
Conecte a la terminal de entrada del AMP (amplificador) de sonido externo para
escuchar el sonido en sistema estéreo.
Nota: Las terminales TO AUDIO AMP no pueden ser usadas directamente para bocinas externas.
Ajustes de Sonido (Audio)
1. Seleccionar ALTAVOCES SI en el menú de SONIDO (AUDIO).
2. Ajust e el volumen del AMP (amplificador) al mínimo.
3. Ajust e el volumen de la Televisión al nivel des eado.
4. Ajust e el volumen del AMP hasta igualar el de la Televisión.
5. Seleccionar ALTAVOCES NO&VAO en el menú de SONIDO (AUDIO).
6. Ahora puede seleccionar el volumen, y el silencio, usando los controles de la Televisión.
Nota: En NO&FAO el audio se controla mediante el control de volumen del sistema del amplificador
externo.
AMPLIFICADOR EXTERNAS
CABLES NO INCLUIDOS
VIDEOCAS ETERA
O
CABLES NO INCLUIDOS
COMPONENT
L
VIDEO INPUT
Y/VIDEO
VIDEO
INPUT 1
S-VIDEO
INPUT 2
PROG.
OUT
L
TO AUDIO
AMP
R
ANT 1
SPLIT
OUT
ANT 2
AUDIO
R
P
P
B
R
RL
TERMINALES EN LA PARTE POSTERIOR DE LA TV (Puede variar)
TERMINALES EN PARTE POSTERIOR DE LA TV
AUDIO
ANT 1
SPLIT
OUT
ANT 2
R
P
P
R
RL
COMPONENT
L
VIDEO INPUT
B
INPUT 1
Y/VIDEO
VIDEO
INPUT 2
S-VIDEO
PROG.
OUT
L
TO AUDIO
AMP
R
13
Page 44
C
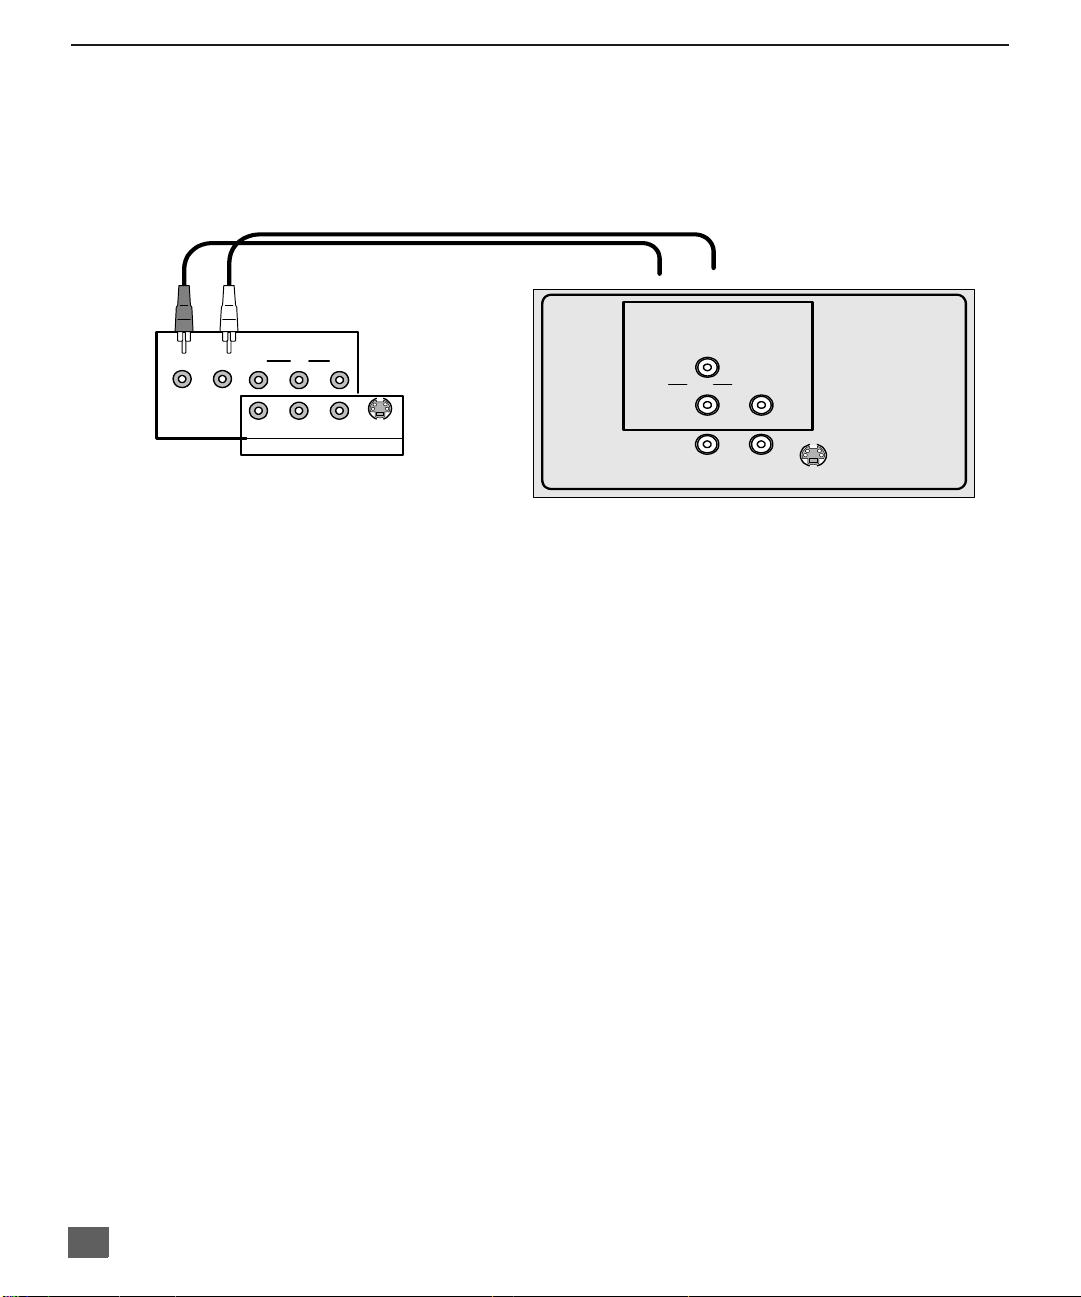
ONEXIÓN DEL DECODIFICADOR DE TELEVISIÓN DIGITAL
(DTV-STB)
Conexión del Decodificador de Televisión Digital (DTV-STB)
Utilice este diagrama para conectar el decodificador de Televisión Digital Panasonic
(DTV-STB) a su Televisor.
R-AUDIO-
L
P
Y
B
R-AUDIO-LVIDE
NTSC OUTPUT
P
R
O
S-VIDEO
AUDIO
P
P
R
RL
COMPONENT
L
VIDEO INPUT
B
INPUT 1
Y/VIDEO
VIDEO
Notas:
r El televisor tiene un grupo de entradas de video compuesto, que tiene tres entradas: Y, P
y PR. Los entradas separadas para las señales compuestas de color, proveen una mejor
separación de luminancia y color. Utilice las entradas de audio compuesto; Izquierda (L) y
Derecha (R) para conectar las salidas de audio de su Decodificador de Televisión Digital
Panasonic (DTV-STB).
r Seleccione el modo de salida para formato 480i del DTV-STV. El televisor solo puede
recibir señales en formato 480i.
B
14
Page 45

Operación de Imagen en Imagen (IDI)
(para los modelos CT-F2931/X, CT- F2941L, CT-F3431/X, CT-F3441L, CT-27SX31/U, CT- 32SX 31/U, y
CT-36SX31/U.)
Esta televisión incluye la característica de Imagen en Imagen con un sintonizador dual. Esto le
permite ver dos (2) transmisiones en vivo al mismo tiempo con o sin una fuente de vídeo
externa tal como videocasetera, decodificador de cable, etc.
Operación Básica de IDI
Procedimiento
Presione el botón PIP en el control remoto para desplegar el recuadro
Nota: El Audio es sólo de la Imagen Principal.
1. Escoja canale s para el recuadro
IDI) arriba/abajo en el control remoto.
2. Escoja canales para la
abajo o usando el teclado numérico.
Imagen Principal
O
PERACIÓN DE IMAGEN EN IMAGEN
IDI
en pantalla.
IDI
presionando el bot ón PIP CHANNEL (Canales de
presionando los botones CH (Canal) arriba/
(IDI)
Operación de IDI con un Decodificador de Cable
(Vea pagina 11 para conecciones)
Procedimiento
r Para ver canales de cable premium a través del decodificador de cable en la
Principal
Nota: Use este procedimiento si desea ver canales de c able premium en la Imagen Principal mientra s
1. Seleccione ANT2 en el menú de SET UP (Ajuste) bajo PROG CNLS (Prog ramación
2. Sintonize la televisión al canal 3.
3. Presione el botón PIP en el control remoto para desplegar el recuadro de
4. Verifique que su decodificador de cable esté Encendido.
5. Escoja canales para la
6. Escoja ca nal es p a r a e l recu ad ro d e
:
ve un programa de televisión o vídeo en el recuadro de IDI.
de canales).
pantalla.
Nota: El Audio es sólo de la Imagen Principal.
Imagen Principal
sintonizando su decodificador de cable.
IDI
Imagen
IDI
en
15
Page 46
M
ENU PRINCIPAL
Menu Principal
Procedimiento
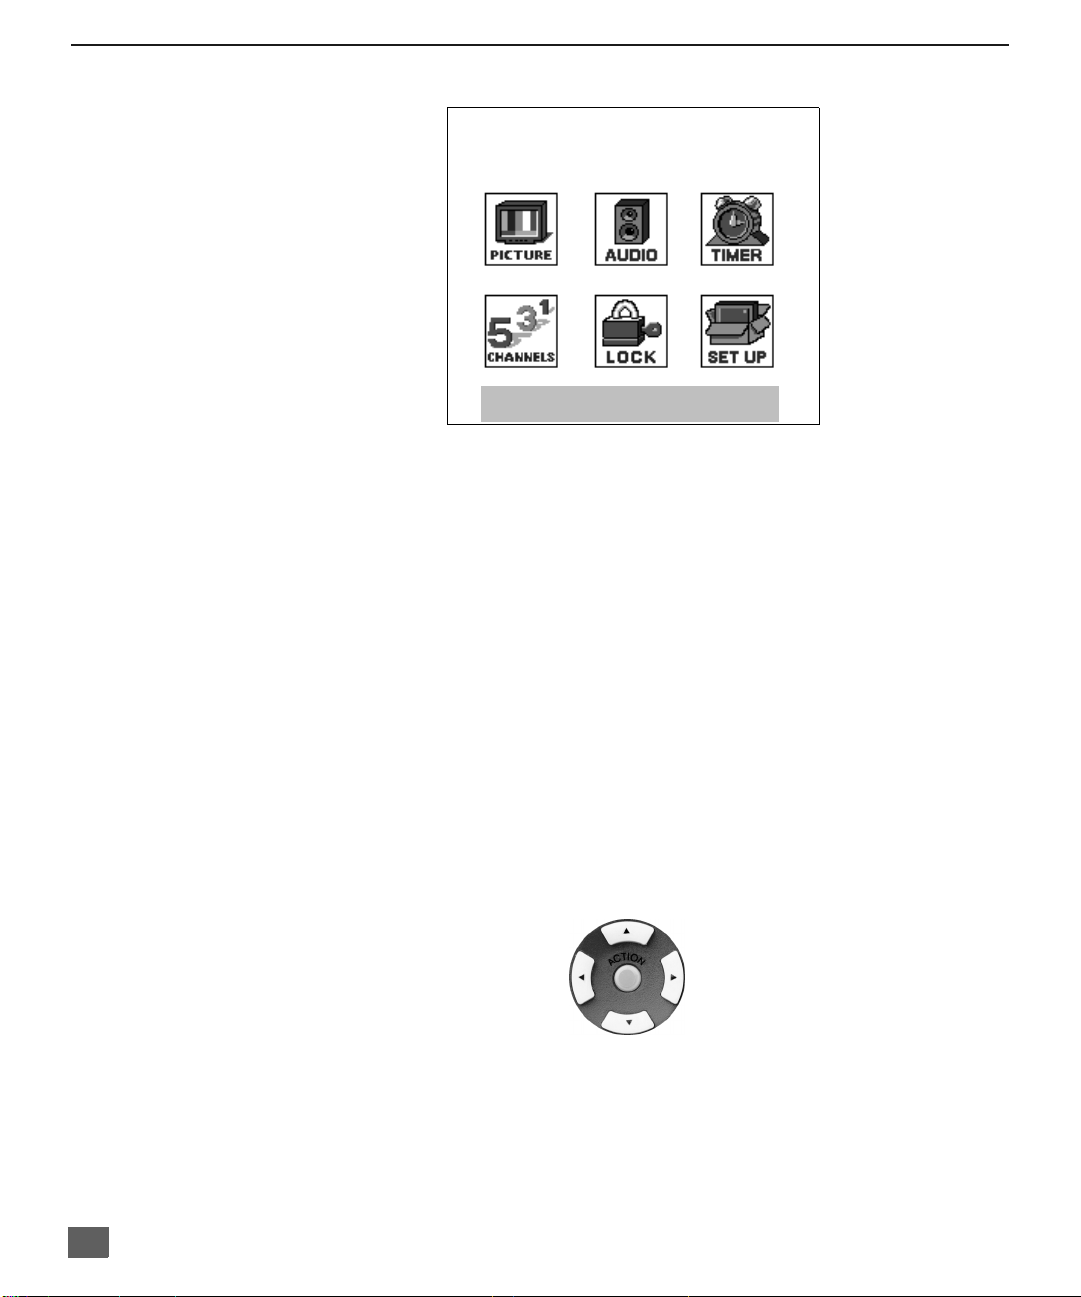
1. Presione el boton ACTION en el control remoto para desplegar el menu principal.
2. Presione los botones de CH pq y VOL tu para seleccionar e l icono
3. Presione ACTION para desplegar las funciones y submenus del icono
4. Presione CH pq para seleccionar las funciones del icono seleccionado.
5. Presione VOL u para accesar los subm enus.
6. Presione los botones de CH pq para seleccionar el submenu deseado.
7. Presion VOL tu para seleccionar o ajustar un submenu.
8. Presione ACTION repetidamente en el control remoto para salir de los menus.
Menú Principal
EXIT
deseado.
seleccionado.
Botones del Control Remoto
Guía del Control Remoto
La Guía de Referencia Rápida para el Control Remoto, se encuentra en el paquete
proporcionado con la TV.
16
Botones para Acce sar Opciones
CH
VOLVOL
CH
Page 47
T
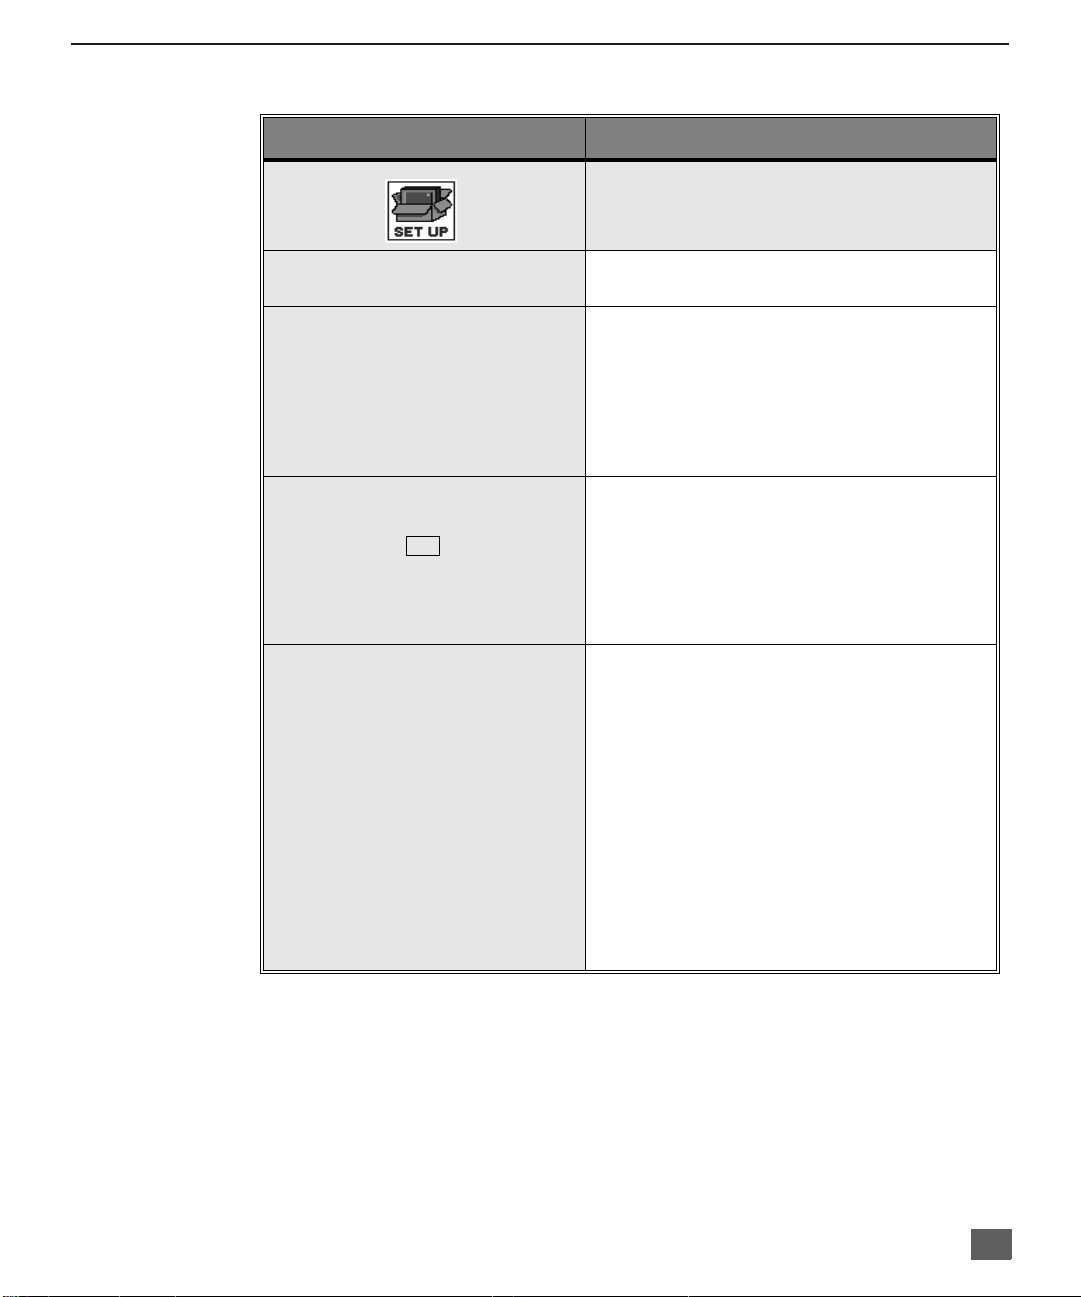
ABLA DE CARACTERÍSTICAS DEL MENU PRINCIPAL
Tabla de Características del Menu Principal
M
ENU
D
ESCRIPCIÓN
AJUSTE
IDIOMA
PROG CNLS
(Programación de Canales)
CC
(Closed Captioned - Subtítulos)
OTROS AJ
(Otros Ajustes)
r Seleccione menús de Inglés, Español, o
Francés.
r MODO - Selecci one Cable o Televisión. Vea
la sección de Instalación en su manual.
r PROGRAMA AUTO - Programación
automática de los canales con señal en la
memoria.
r PROGRAMA MANUAL - Manualmente
incluye o anula canales en memoria.
r CC EN MUDO - Seleccione C1, hasta C2
para visualizar Subtítulos en pantalla cuando
el botón MUTE ( MUDO) del control re moto
es presionado.
r MODALIDAD CC - Seleccione C1 ó C2 para
información transmitida, si está disponible,
en un cuadro grande negro.
r AUTOENCENDIDO - Seleccione SET
(AJUSTE) para encender la televisión al
mismo tiempo que la Caja del Cable u otros
componentes, ó seleccione NO.
r CANAL INFO - Seleccione SI para desplegar
la información cuando cambie de canal.
Nota: Presione RECALL para desplegar la
INFORMACION DEL CANAL.
r CORR GEOMAGNETICA - Debido al Campo
Magnético de cada zona, serán necesarios
algunos ajustes (algu nos modelos). Ajusta la
inclinación del cuadro debido al campo
magnético de la tierra en el área (algunos
modelos).
17
Page 48
T
ABLA DE CARACTERÍSTICAS DEL MENU PRINCIPAL
Tabla de Características del Menu Principal
M
ENU
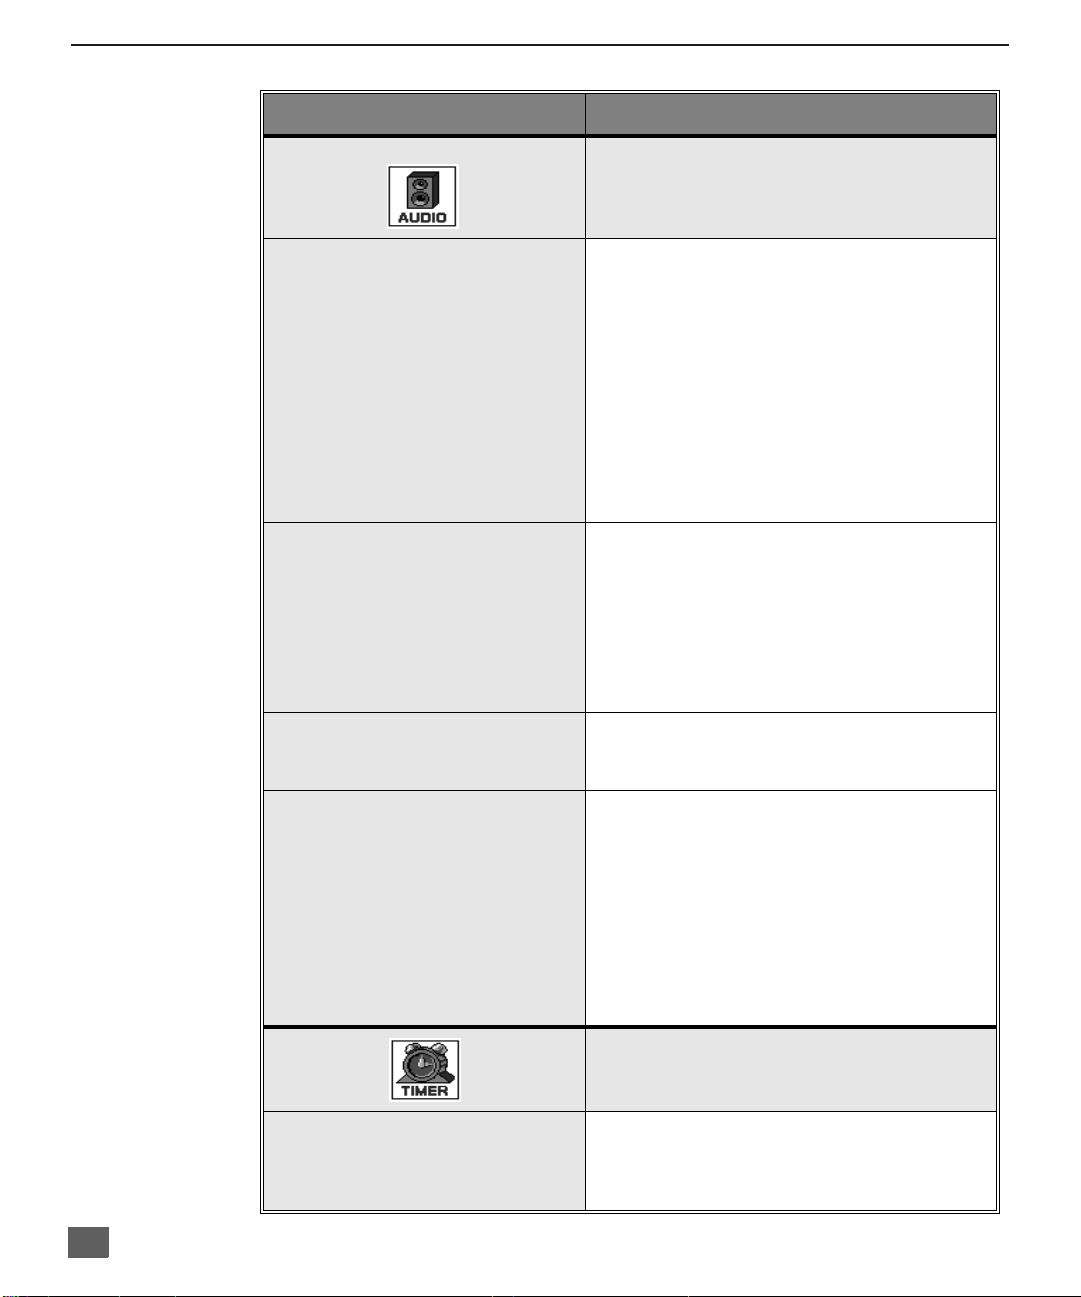
AJ AUDIO
(Ajustes de Sonido)
OTROS AJ
(Otros Ajustes)
SONIDO ENVOLVEN TE
ALT AVOCES
D
ESCRIPCIÓN
SONIDO
r MODO - Seleccione ESTEREO, SAP
(Programa Secundario De Sonido) ó MONO
(use MONO cuando la señal de estéreo es
débil).
r BAJOS - Aumenta o disminuye la respuesta
de los bajos.
r ALTOS - Aumenta o disminuy e l a r e spu es ta
de los altos.
r BALANCE - Enfatiza el volumen del altavoz
DERECHO / IZQUIERDO.
r NORMAL - Reajusta BAJOS, ALTOS y
BALANCE a los nive les prefija dos de fáb ric a.
r IA SONIDO - Automáticamente ajusta el
volumen, para mantener confortable el nivel
a escuchar. (El SONIDO IA no está
disponible en la modalidad de VIDEO).
r BBE - La tecnologia de sonido BBE mejora el
entendimiento de los discursos y restaura el
rango dinámico de pasajes musicales para
proveer un sonido natural sobresaliente.
r MODO - Use la función de sonido a mbiental
para mejorar la r esp ue sta au dit i va cuan d o se
escucha una t ransmisión en estéreo.
r SI - Altavoces de la TV funcionan
normalmente.
r APAGADAS Y SALIDA DE AUDIO
VARIABLE - Altavoces de la TV están
apagados, el sonido va de acuerdo al de la
Te levisíon.
r APAGADAS y SALIDA DE AUDIO FIJA -
Altavoces de la TV están apagados, el
sonido se ajusta sólo con amplificador
externo.
18
AJUSTE DE RELOJ
CRONOMETRO
r Cuando se ajusta, TIME (HORA) aparecerá en
pantalla después de presionar el botón de
POWER (ENC/APAG), el botón RECALL
(LLAMADA), o al cambiar canales .
Page 49
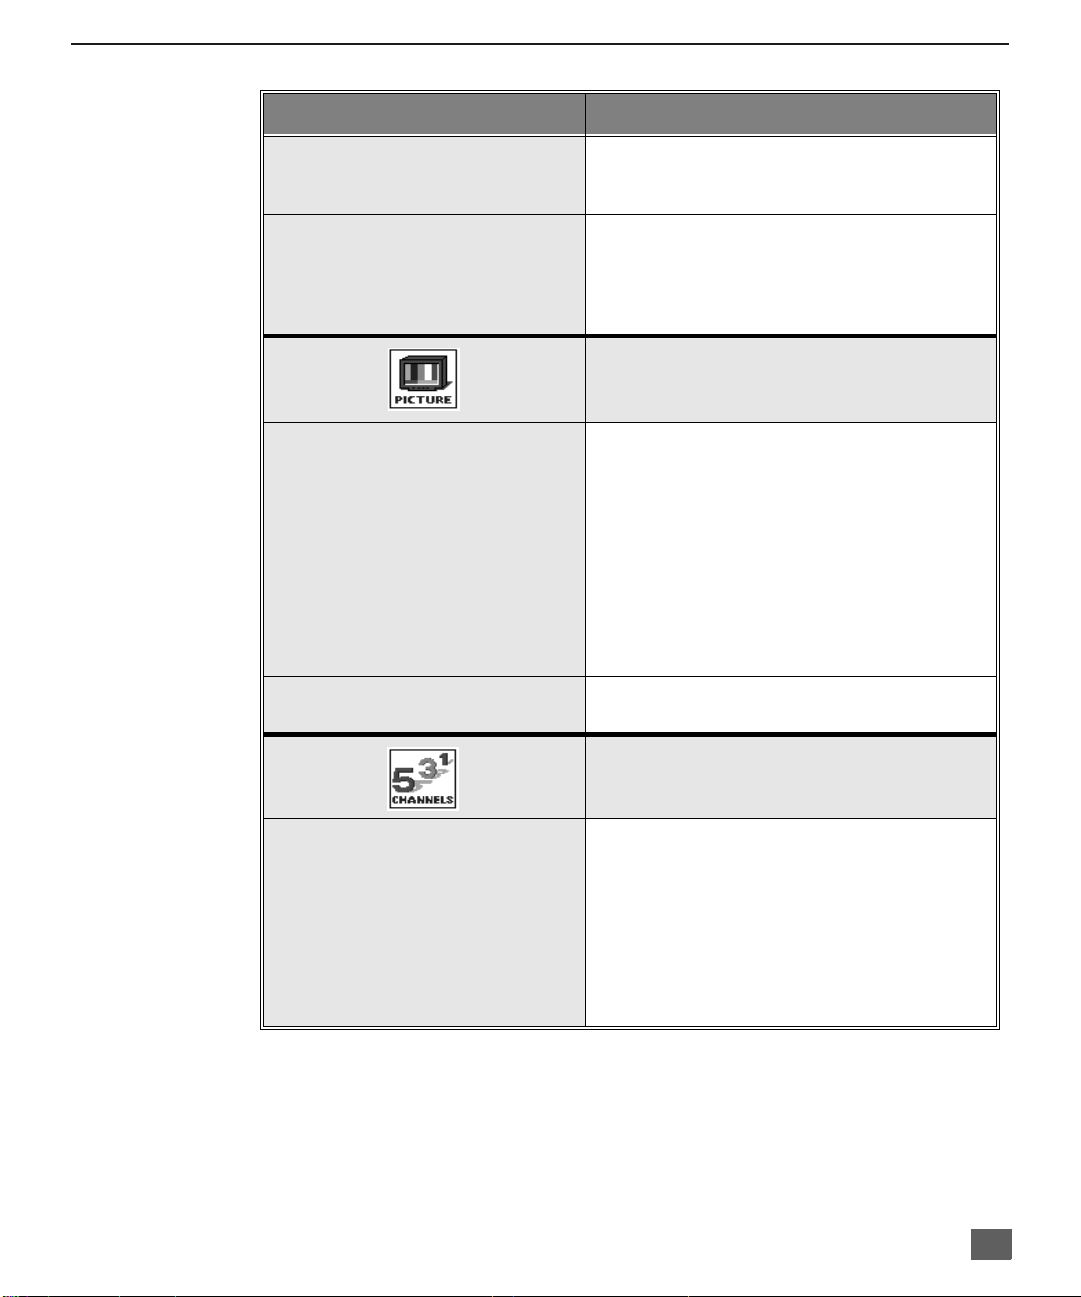
T
ABLA DE CARACTERÍSTICAS DEL MENU PRINCIPAL
Tabla de Características del Menu Principal
M
ENU
D
ESCRIPCIÓN
APAGADO
(Apagado Automático)
CRONOM
AJ. IMAGEN.
(Ajustes)
OTROS AJ.
(Otros Ajustes)
r Programe la TV para que automáticamente
se apague en 30, 60, ó 90 minutos.
Seleccione NO para apagar el cronómetro.
r Programe cronómetro s para que enciendan y
apaguen automáticamente a la Televisión en
la hora, canal y días seleccionados (El reloj
debe de estar ajustado a tiempo para poder
hacer uso del cronómetro).
IMAGEN
r COLOR - Ajusta la intensidad del color
deseada.
r TINTE - Ajusta los tonos naturales de la piel.
r BRILLO - Ajusta las áreas oscuras para
detalles más nítidos.
r CONTRASTE - Ajusta las áreas blancas de
la imagen.
r NITIDEZ- Ajusta para dar mejor clari dad a los
detalles de la silueta.
r NORMAL- Reajusta todas las modificaciones
de la imagen a los predispuestos de fábrica.
r TEMP COLOR - Ajusta la preferencia de
color AZUL, ROJO, o NORMAL.
TITULOS
CANALES
r MANUAL - Introduzca los números de los
canales y sus títulos/siglas manualmente.
r PONGA TITULO (SIGLAS) - Ponga título a
las entradas de video desplegadas en
pantalla y conexiones opcionales de equipo.
Nota: Este televisor tiene una función que permite
evitar la visualización de alguna de las
entradas de video cuando presione
TV/VIDEO en el control remoto.
19
Page 50
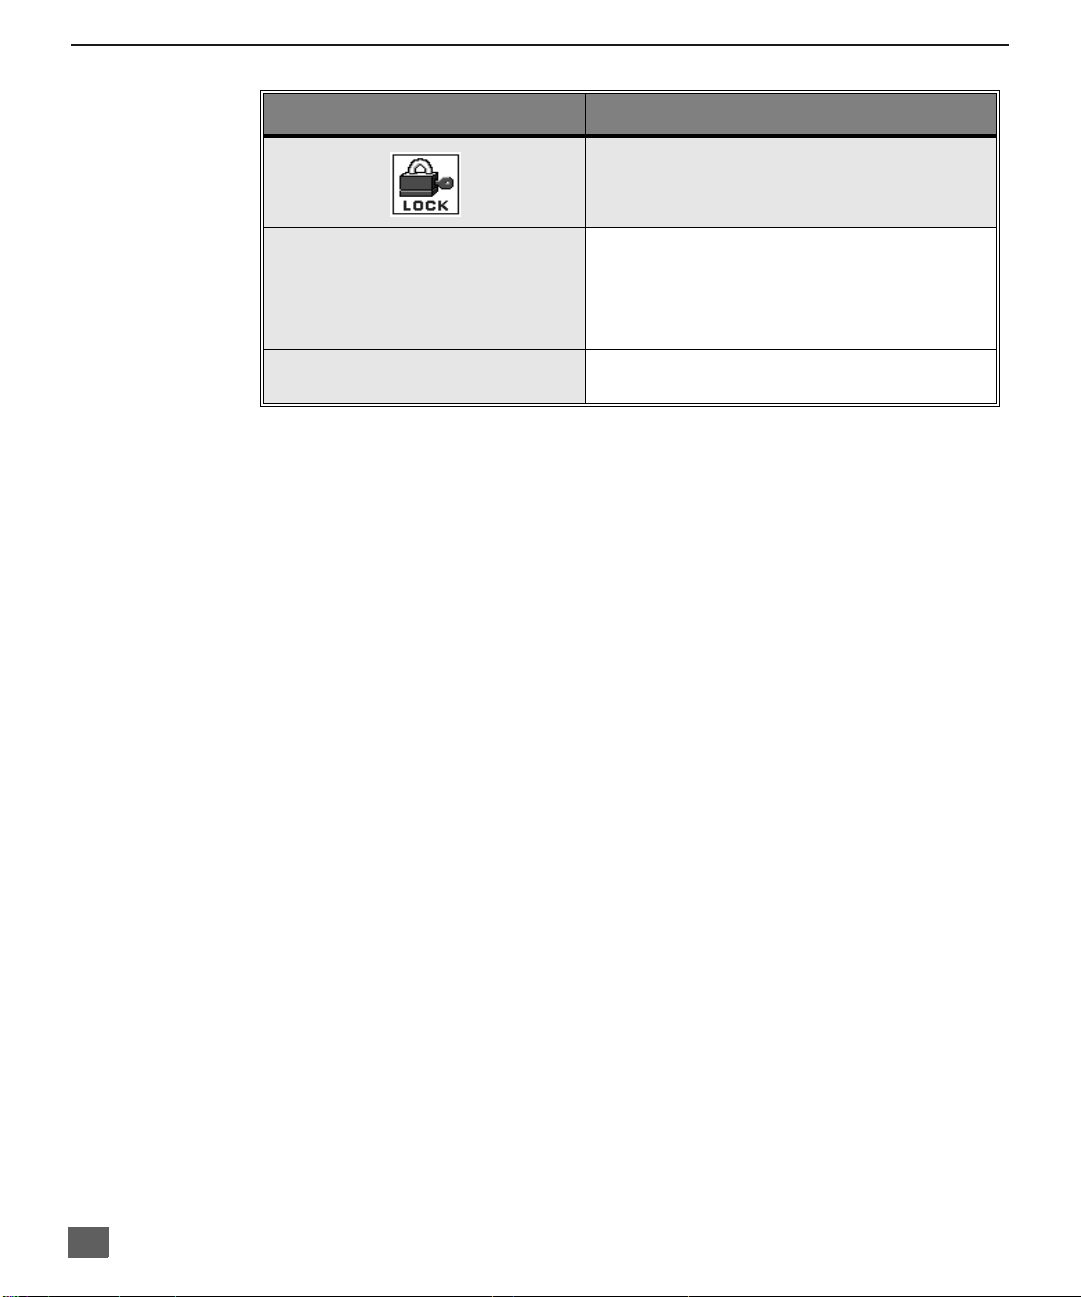
T
ABLA DE CARACTERÍSTICAS DEL MENU PRINCIPAL
Tabla de Características del Menu Principal
M
ENU
MODO
TIEMPO
D
ESCRIPCIÓN
BLOQUEO
r Active el bloqueo en Todos, Canales o Juego
con un código secreto.
Nota: Para más información acerca de programas
r Seleccione la duración del bloqueo (12, 24,
vea el manual V-CHIP Guía de los Padres
incluido en el paquete de la televisión.
48 horas o SIEMPRE).
20
Page 51
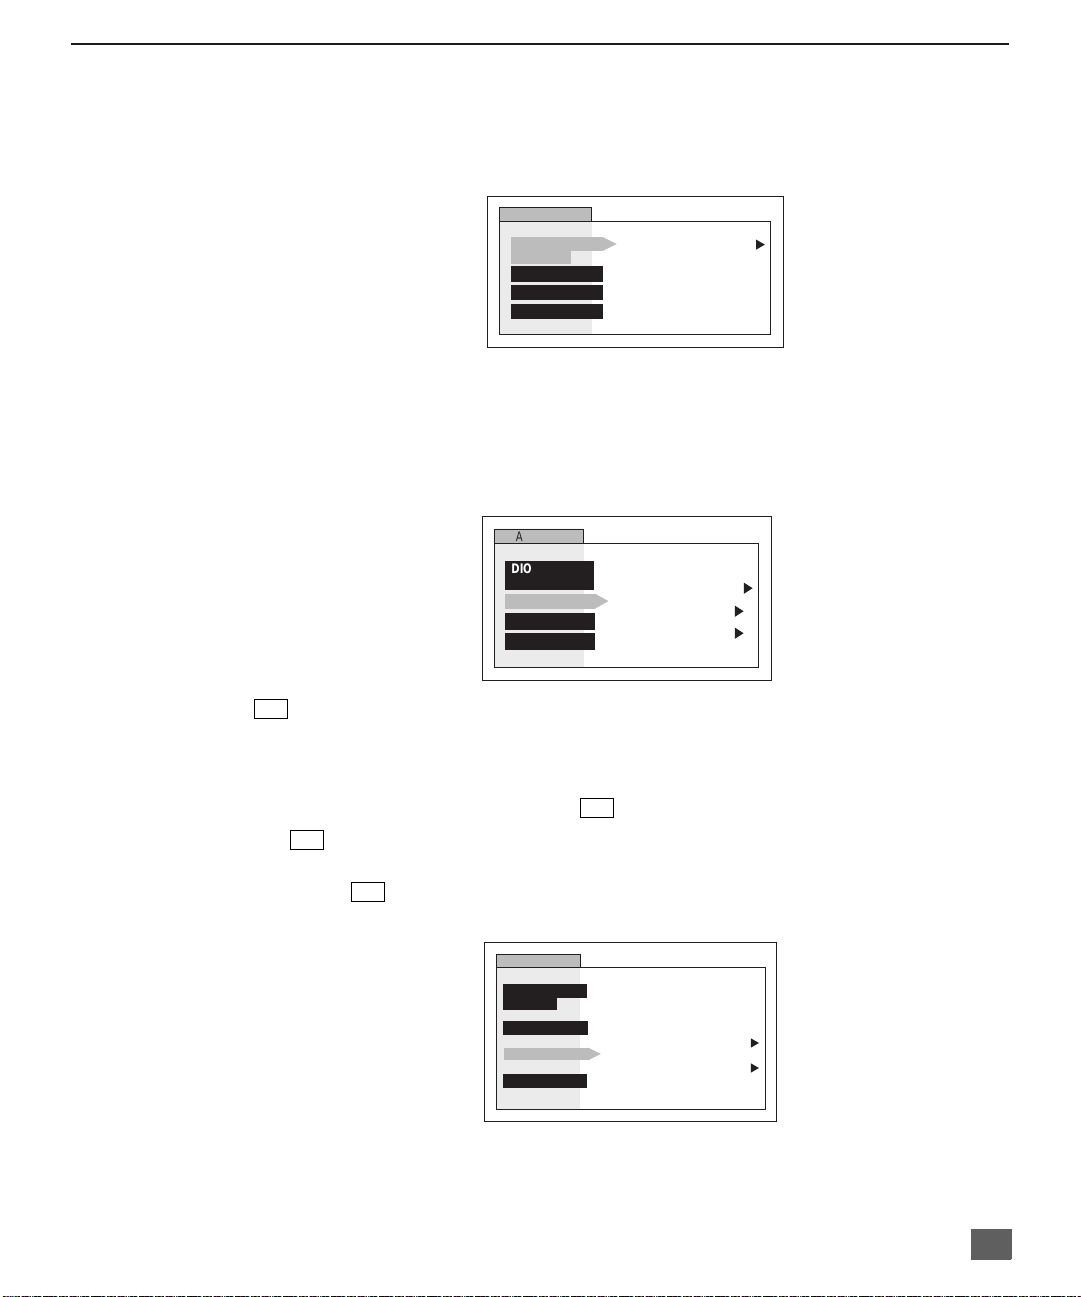
Funciones Especiales
Ajuste
IDIOMAS
En el menú de SET UP (AJUSTE) bajo IDIOMA/LANGUE seleccione el idioma del menú
ENGLISH (Inglés), ESPAÑOL o FRANCAIS (Francés).
PROG CNLS (Programación de Canales)
En el menú de SETUP bajo PROG CNLS seleccione:
r MODE para seleccionar la modalidad de TV (antena) o CABLE dependiendo de la fuente
de la señal.
r PROGRAMA AUTO para programar automáticamente todos los canales con señal.
r PROGRAMA MANUAL para manualmente incluir o borrar canales.
AJUSTE
IDIOMA/
LANGUE
PROG CNLS
CC
OTROS AJ.
AJUSTE
IDIOMA/
LANGUE
PROG CNLS
CC
OTROS AJ.
MODO ESPAÑOL
MODO
PROGRAMA AUTO
PROGRAMA MANUAL
CABLE
F
UNCIONES ESPECIALES
u
u
u
u
CC
(Subtitulos)
Esta televisión tiene un decodificador ingrado que despliega substitulos en pantalla. Permite al
usario leer el diálogo de un programa de televisión o otra información. El programa visto debe
incluir la modalidad de substitulos para que esta función opere.
En el menú de SET UP (AJUSTE0 bajo seleccione:
r EN MUDO para seleccionar C1, hasta C2 para visualizar Subtítulos en pantalla
CC
CC
cuando el botón MUTE (MUDO) del control remoto es presionado.
r MODO para seleccionar C1 ó C2 para información transmitida, si está disponible, en
CC
un cuadro grande negro.
AJUSTE
IDIOMA/
LANGUE
PROG CNLS
CC
OTROS AJ.
CC EN MUDO
MODO CC
NO
u
NO
u
21
Page 52
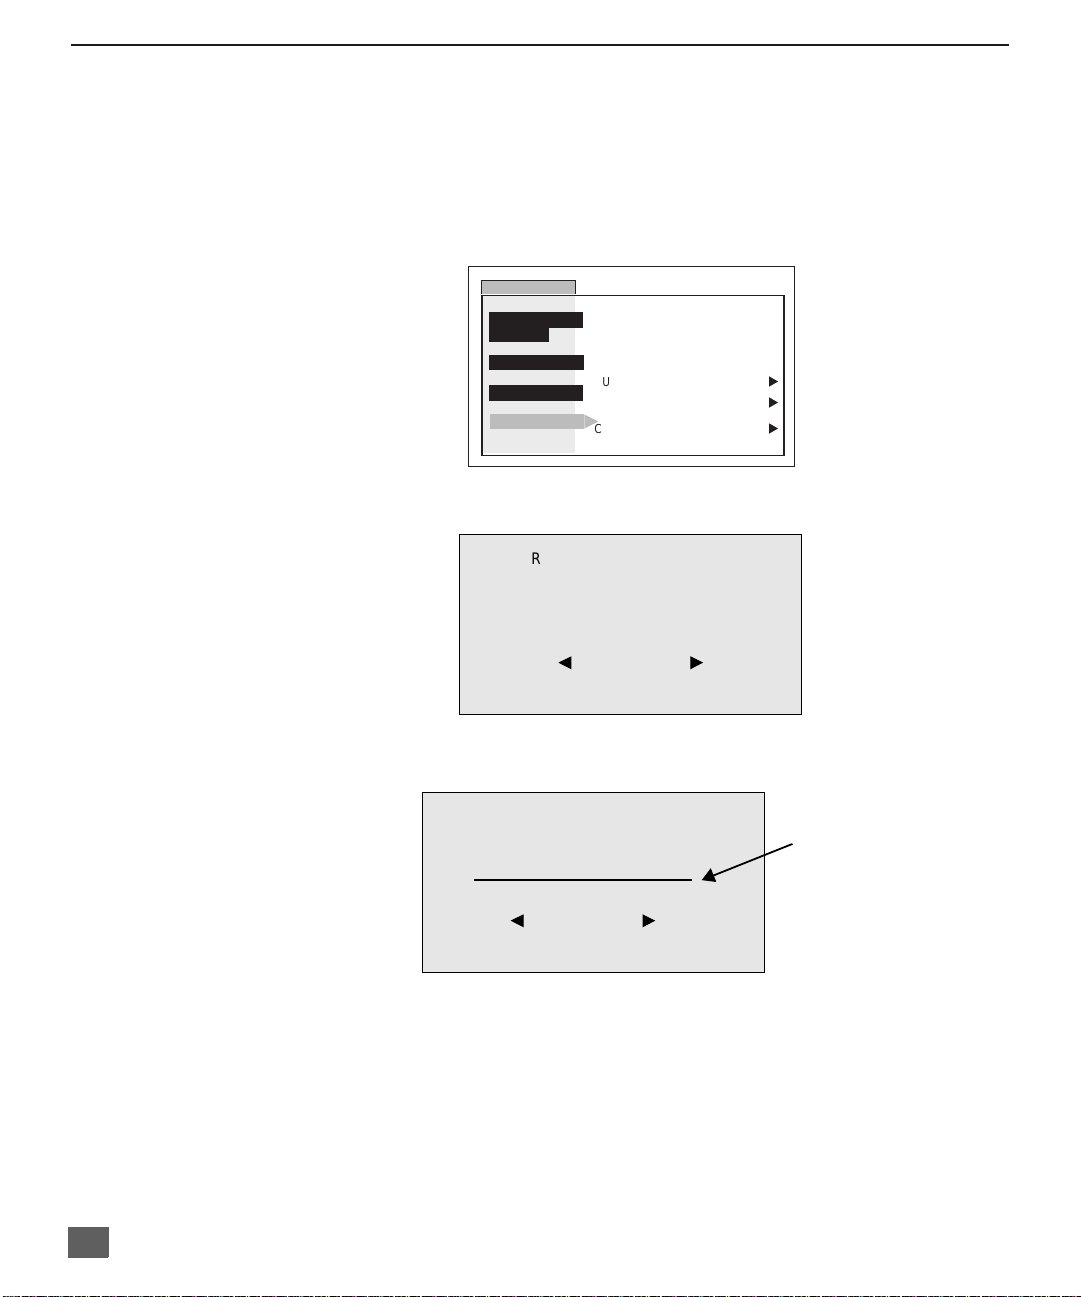
F
UNCIONES ESPECIALES
Otros Aj.
r AUTOENCENDIDO - Seleccione SET (AJUSTE) para encender la televisión al mismo
r CANAL INFO.
r CORR GEOMAGNETICA - Debido al Campo Magnético de cada zona, serán necesarios
tiempo que la Caja del Cable u otros componentes, ó seleccione NO.
- Seleccione SI para desplegar la información cuando cambie de canal.
algunos ajustes (para los modelos CT-F3431, CT-F3431X, CT-F3441L, CT-32SX31/U, y
CT-36SX31/U). Ajusta la inclinación del cuadro debido al campo magnético de la tierra en
el área. (Para los modelos CT-F2911/X, CT-F2921L, CT-F2931/X, CT-F2941L,
CT-27SX11/U y CT-27SX31/U.)
(Para los modelos CT-F3431, CT-F3431X y CT-F3441L, CT-32SX31/U, y CT-36SX31/U)
AJUSTE
IDIOMA/
LANGUE
PROG CNLS
CC
OTROS AJ.
Menú del Corrección Geomagnética
CORRECCION GEOMAGNETICA
AUTOENCENDIDO
CANAL INFO.
CORR GEOMAGNETICA
0
- - - - - - - l - - - - - - -
SI
SI
u
u
u
22
ADJUSTE
PRESIONE ACTION PARA SALIR
(Para los modelos CT-F2911/X,CT-F2921L, CT-F2931/X, CT-F2941L, CT-27SX11/U y
CT-27SX31/U.)
CORRECCION GEOMAGNETICA
0
- - - - - - - l - - - - - - -
ADJUSTE
PRESIONE ACTION PARA SALIR
Nota: Corrección Geomagnética puede requerirse al momento de hacer los ajustes iniciales o cuando
el TV se ha movido de lugar.
barra de ajuste de
inclinación
Procedimiento
r En el menú de SETUP, bajo OTROS AJ seleccione CORR. GEOMAGNETICA.
r Presione el botón u para desplegar el sub-menú de Correc ci ón Geom agn éti ca .
r Presione el botón t ó u hasta que la decoloración desaparesca.
(para los modelos CT-F3431, CT- F3431X, CT-F3441L, CT-32SX31/U, y CT-36SX31/U.)
r Presione el botón t ó u para ajustar la barra del ajuste de la inclinación paralela al fondo
del marco.
CT-27SX31/U.)
(para los modelos CT-F2911/X, CT-F2921L, CT-F2931/X, CT-F2941L, CT-27SX11/U, y
Page 53
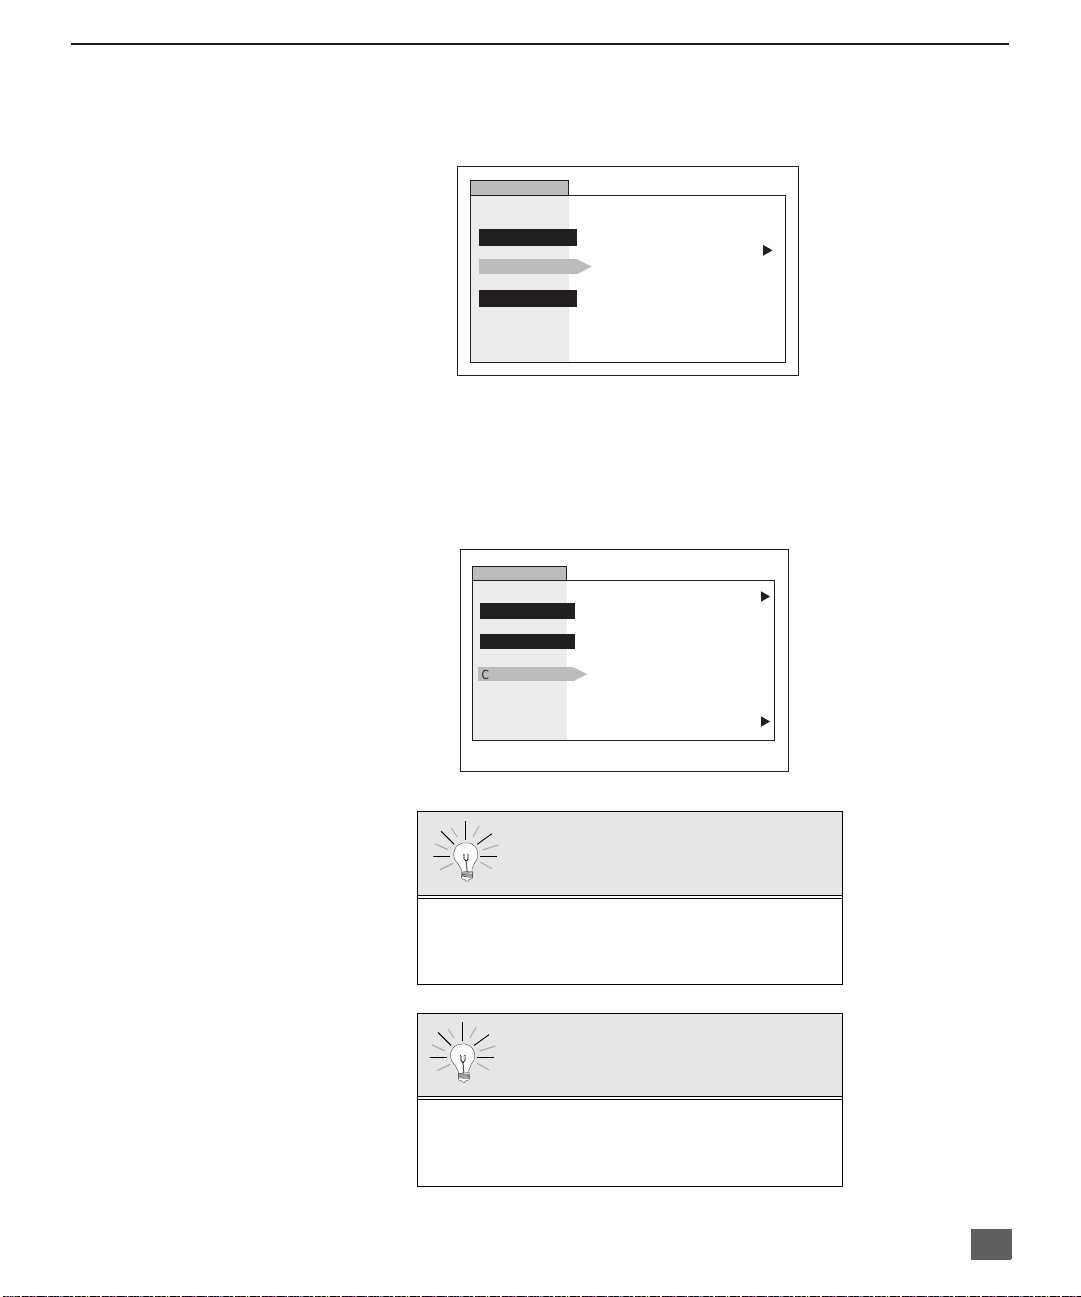
CRONOMETRO
F
UNCIONES ESPECIALES
Apagado
En el menú de TIME R, sele ccio ne APAGADO para poder apagar la Televisión en 30,
60 ó 90 minutos. Seleccione NO para desactivar el CRONOMETRO
CRONOMETRO
.
RELOJ
APAGADO
CRONOM
TIEMPO?
NO
u
CRONOM
En el menú de TIMER seleccione cronómetros, CRONOM para encender o apagar la
Televisión a la hora seleccionada de un canal seleccionado, en los días seleccionados.
Nota: La HORA debe anotarse en el menú de RELOJ para que las funciones del
CRONOMETRO funcionen.
CRONOMETRO
RELOJ
APA GADO
CRONOM
DIA LUN-VIE
ENCENDER - - : - -
APAGAR - - : - -
ELIJA CANAL - - -
FIJO
PONER TIEMPO
NO
u
u
Apagado después de 90 minutos
La Televisión se apaga automáticamente después de 90
minutos cuando se encendió con el CRONÓMETRO. Si
se selecciona APAGAR o si se presiona una tecla, el
apagado automático de 90 minutos se cancela.
Activación del CRONÓMETRO
El CRONOMETRO está activo cuando la Televisión está
apagada o encendida. La Televisión cambiará al canal
seleccionado a la hora seleccionada según se anotó en
el CRONOMETRO.
23
Page 54
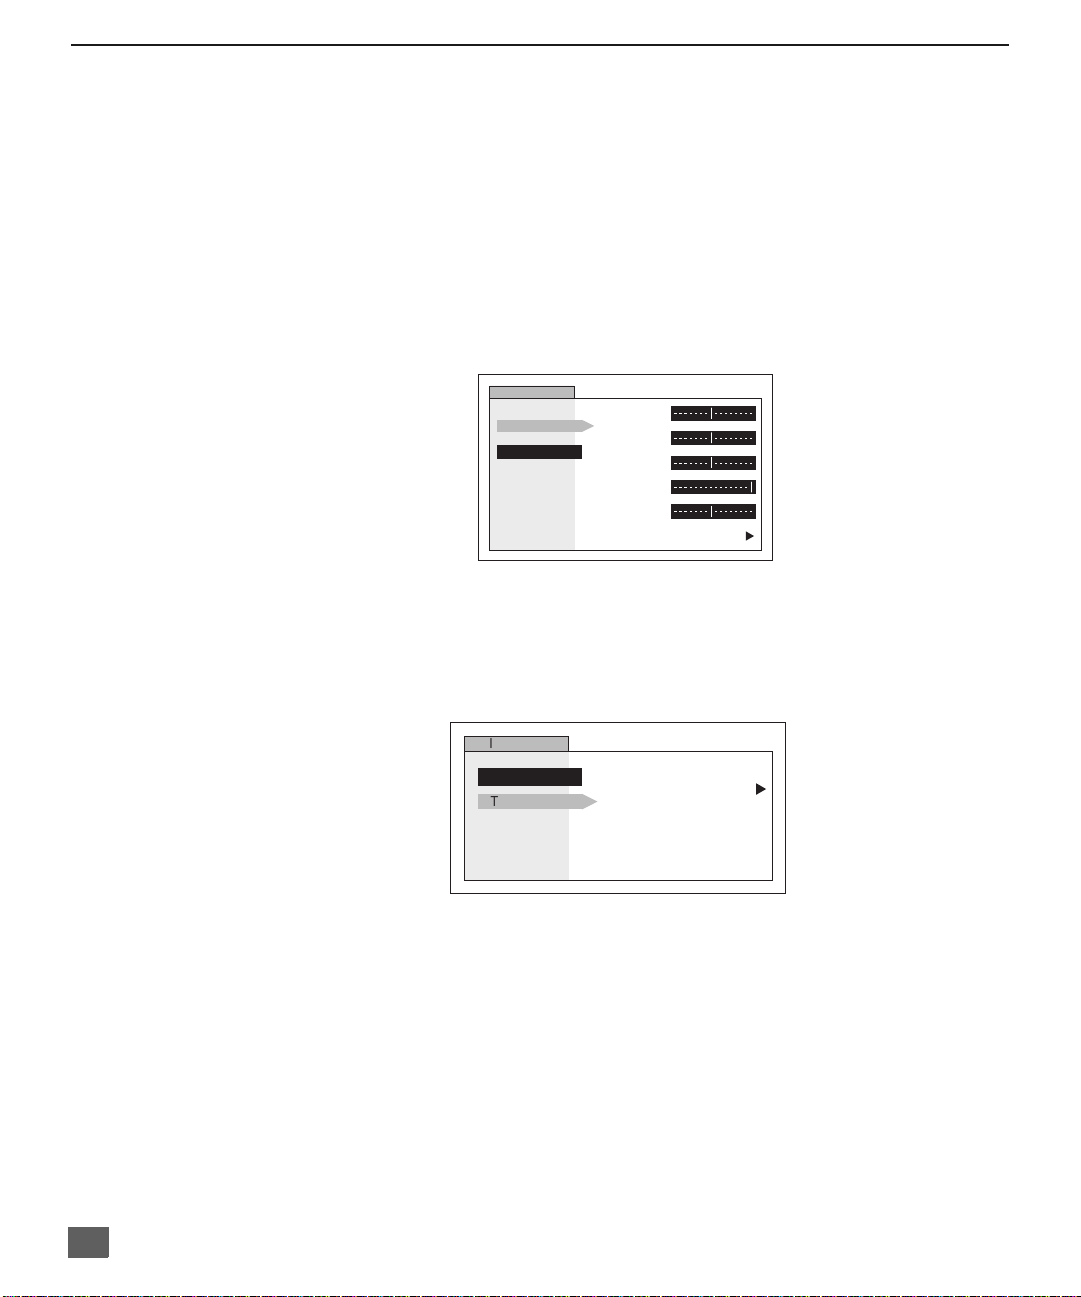
F
UNCIONES ESPECIALES
IMAGEN
Imagen Adjustes
En el menú de PICTURE (Imagen) bajo AJ. IMAGEN seleccione:
r COLOR - Ajusta la intensidad del color deseada.
r TINTE - Ajusta los tonos naturales de la piel.
r BRILLO - Ajusta las áreas oscuras para detales más nítidos.
r CONTRASTE - Ajusta las áreas blancas de la imagen.
r NITIDEZ - Ajusta para dar mejor claridad a los detalles de la silueta.
r NORMAL - Reajust a toda s las m odifi cacio nes de la imagen a lo s predi spues tos de fábric a.
Nota: Los ajustes de Video pueden hacerse para cada entrada de Video de manera
Otros Ajustes
En el menú de PICTURE (Imagen) bajo OTROS AJ. seleccione:
r TEMP COLOR (temperatura) para aumentar o disminuir el rojo y el azul para acomodarse
independiente.
IMAGEN
AJ.IMAGEN
OTROS AJ.
a las preferencias personales.
COLOR
TINTE
BRILLO
CONTRASTE
NITIDEZ
NORMAL
NO
u
24
IMAGEN
AJ.IMAGEN
OTROS AJ.
TEMP COLOR NORMAL
u
Page 55
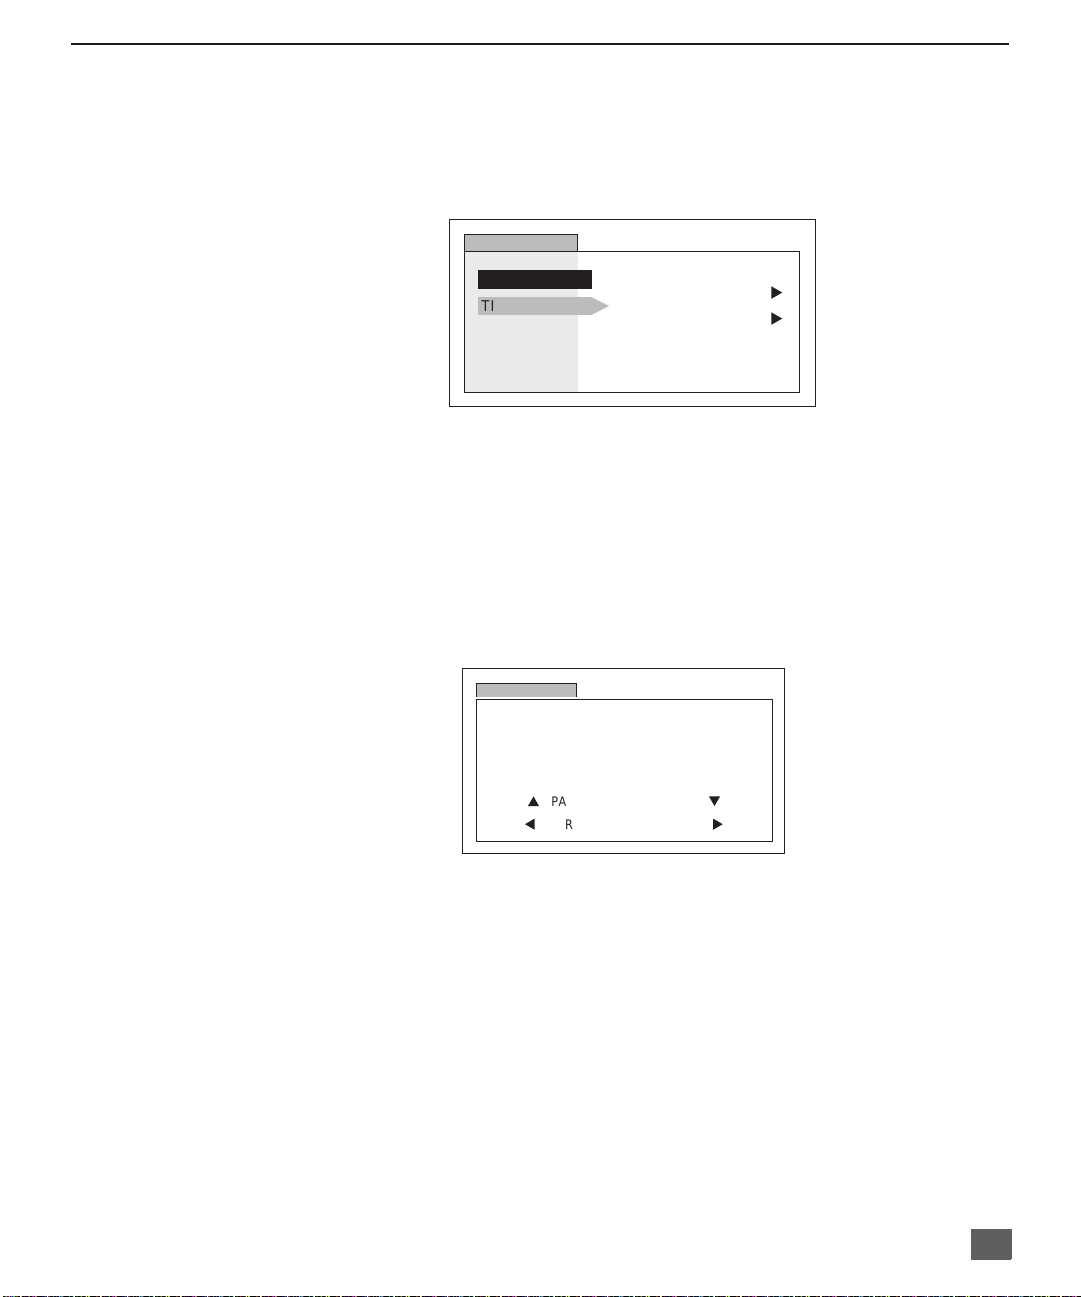
CANALES
F
UNCIONES ESPECIALES
Título
En el menú de CHANNELS bajo TITULO seleccione:
r MANUAL para introducir los números y títulos manualmente.
r PONGA TITULO para cla sific ar las co nexio nes de e ntrada de vídeo que se vis ualizan en la
pantalla.
CANALES
FAVORITOS
TITULOS
MANUAL
PONGA TITULO
u
u
Funcion Para Cancelar Entradas De Video
Este televisor tiene una función que permite ev itar la visualización de algu na de las
entradas de video cuando presione TV/VIDEO en el control remoto.
r Seleccione la entrada de video que quiera bloquear (VIDEO1, VIDEO2 o VIDEO3).
r Para activar la función de Cancelar, presione el botón de volumen menos con el cursor en
el primer caracter.
Nota: Para desactivar la función, presione el botón de volumen mas, con el cursor en el primer caracter
CANALES
PONGA TITULO
VIDEO1
VIDEO2
VIDEO3
p
PARA MOVER CURSOR
t
PARA ESCOGER CARAC
- - - - - - - CANCELAR
CANCELAR
q
u
25
Page 56
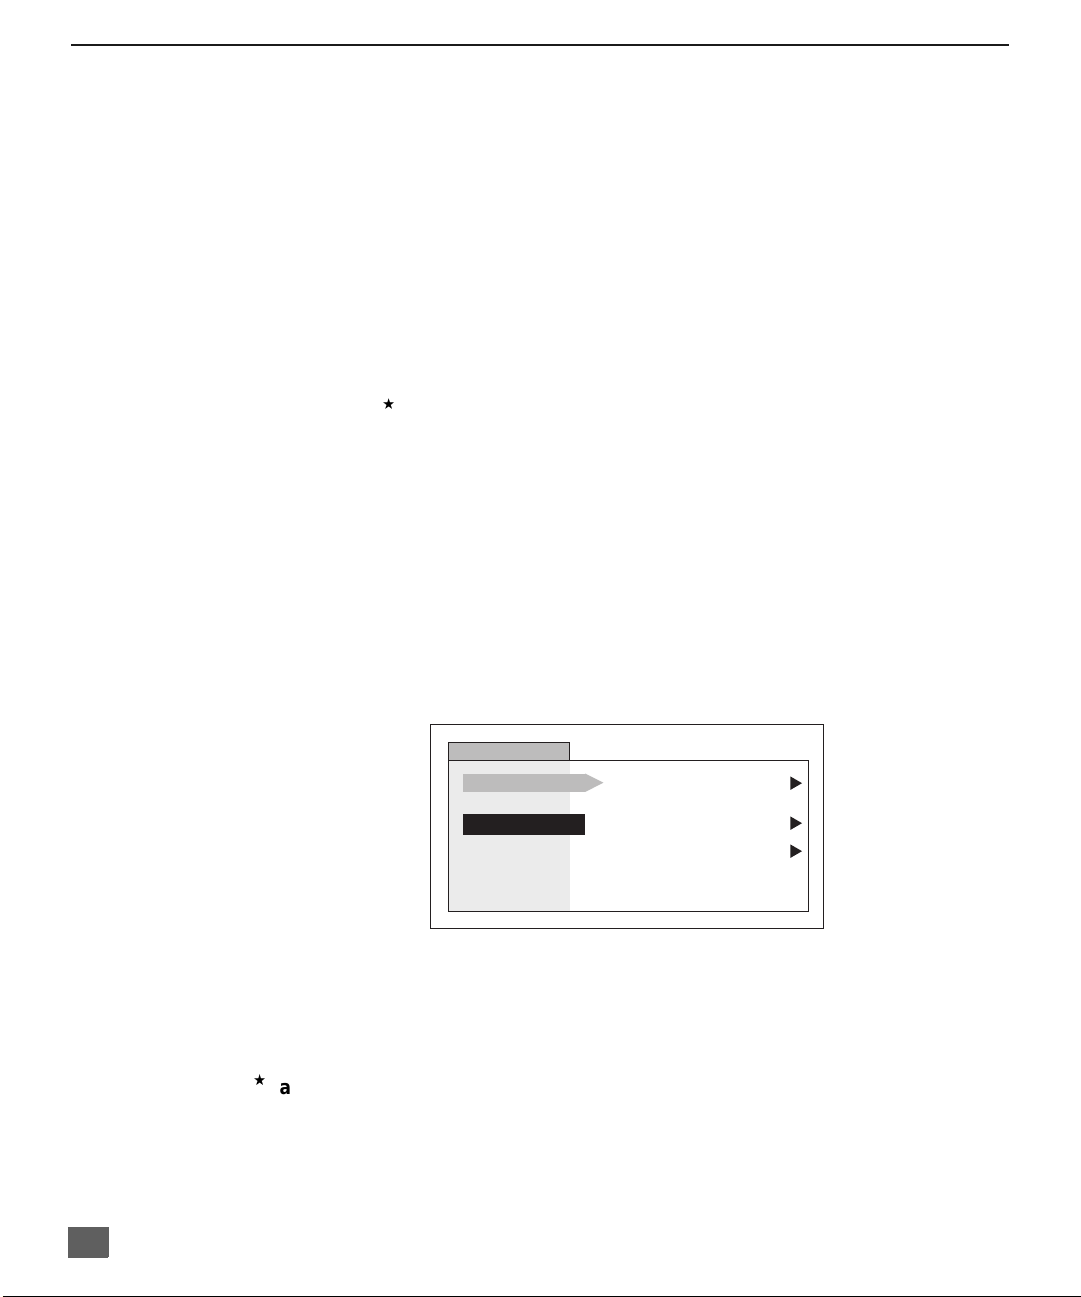
F
UNCIONES ESPECIALES
BLOQUEO
MODO
Para usar las opciones de BLOQUEO:
r ELIJA CODIGO - Use el teclado numérico para introducir un código secreto de cuatro
Nota: Use un código que sea fácil de recordar y escríbalo en un lugar seguro.
En el submenú de MODO seleccione:
BLOQUEO para seleccionar :
r NO - Para apagar la función de bloqueo.
r TODOS- Para bloquear todos los canales y entradas de vídeo.
r CANAL - Para bloquear hasta cuatro canales de su elección.
r JUEGO - Para bloquear los canales 3, 4 y las entradas de vídeo.
PROGRAMAS - Para usar clasificaciones en programas y vídeos.
CAMBIAR CODIGO - Para cambiar su código secreto de cuatro dígitos.
Nota: Si en la opción de CAMBIAR CÓDIGO se introduce un código diferente al usado
Presione el botón ACTION (ACCION) para regresar al submenú, seleccione TIEMPO
para seleccionar la duración del bloqueo (12, 24, 48 horas o SIEMPRE).
Nota: Sea cuidadoso al seleccionar SIEMPRE. Si siempre está seleccionado, y usted olvida
Presione el botó n ACTION (ACCION) para reg resar a los submenús, y salir de los
menús.
dígitos. Después de introducir su código por primera vez, el mensaje en pantalla cambia a
CAMBIAR CODIGO.
previamente, el código nuevo se convierte en el código controlador.
su código secreto la televisión deberá ser atendida por un técnico calificado para
limpiar el ajuste del bloqueo.
26
BLOQUEO
MODO
TIEMPO?
BLOQUEO
PROGRAMAS:
PELICULAS DE EEUU
ACTIVADO
CAMBIO DE
CLAVE
NO
NO
- - - -
u
u
u
Nota: Si JUEGO, CANAL o T ODO es tá se lecci onado , y si una de las e ntradas de ví deo o de
los canales bloqueados es seleccionado, el mensaje PG (Protección de los Padres)
se mostrará en la esquina superior derecha de la pantalla de la televisión.
Desactive BLOQUEO al introdu cir nu evamente su códi go secreto de cuatr o dígitos y
seleccionando BLOQUEO NO.
Para más información acerca de programas vea el manual V-CHIP Guía de los
Padres incluido en el paquete de la televisión.
Page 57
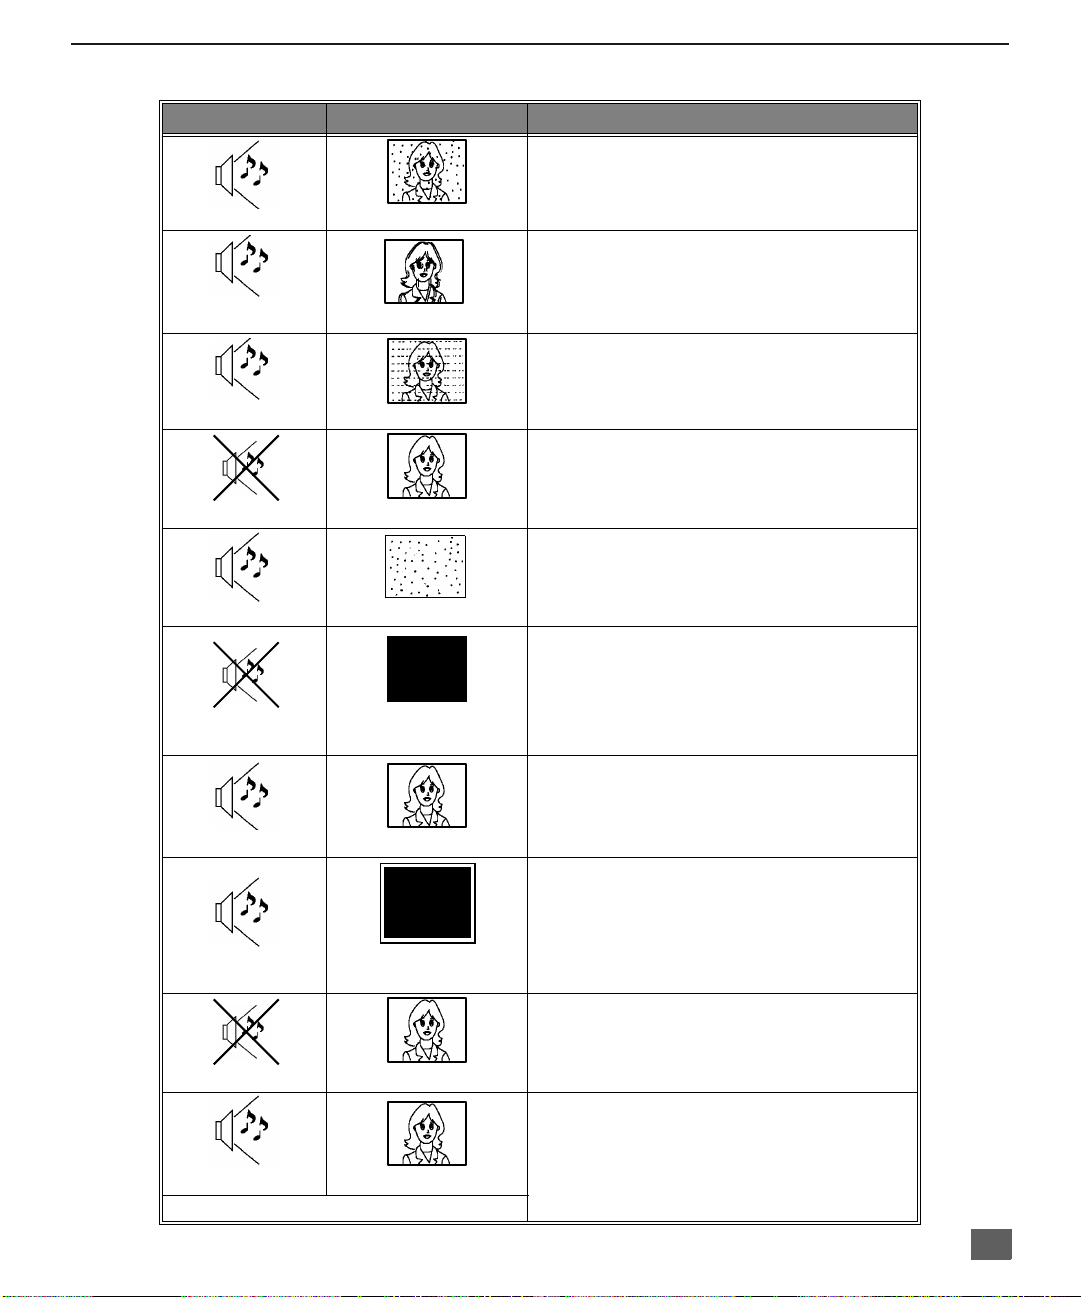
C
?
VIDEO 1
UADRO DE LOCALIZACIÓN DE FALLAS
Cuadro de Localización de Fallas
Antes de solicitar servicio, establezca los síntomas y lleve a cabo las siguientes posibles soluciones.
S
ONIDO
I
MAGEN
Soluciones
Ajuste la Ubicación y / o Conexión de la Antena
Sonido Ruidoso
Sonido Ruidoso
Sonido Ruidoso
Sin Sonido
Sonido Ruidoso
Sin Sonido
Sonido Normal
Imagen Moteada
Imagen Múltiple
Interferencia
Imagen Normal
Sin Imagen
Sin Imagen/sin IDI
Sin Color
Ajuste la Ubicación y la Conexión de la Antena
Verifique el Cable de Entrada de la Antena
Aleje la TV de los Aparatos Electrodomésticos,
Luces, Vehículos y Equipo Médico
Aumente el Volumen
Revise Mute (MUDO)
Revise en el Menú de Audio: ALTAVOCES SI
Cambie el Canal
Ajuste apropiadamente la modalidad de TV o del Cable
Verifique los Cables de la Antena
Verifique que el Cable de Corriente este Enchufado a
una toma de Corriente Activa
Ajuste los Controles de Brillo y Audio
Cambie el Canal
Verifique las Conexiones del Cable
Programe otra vez el Control Remoto
Verifiq ue la Operación de la Segunda Fuente de V ideo
Ajuste el Color
Cambie el Canal
Sonido Normal
Sonido Erróneo
Sonido Normal
Operación Intermitente del Control Remoto
Ausencia de
entrada de Video
Imagen Normal
Imagen Normal
Desactive la función de Skip en el menú de Canales
Verifique en el menú de AUDIO que el Ajuste se
encuentre en Estéreo o Mono, no en SPA
Reemplace las Pilas del Control Remoto
27
Page 58

N
OT AS
28
Panasonic Consumer Electronics Company,
Division of Matsushita
Electric Corporation of America
One Panasonic Way
Secaucus, New Jersey 07094
www.panasonic.co m
(800) 222-4213
Panasonic de Mexico, S.A, de C.V.
Amores No. 1120
Col. Del Valle C.P. 03100
México, D.F.
Tel. (915 ó 015) 488-1000
Fax (915 ó 015) 575-6763, 575-6765
Panasonic Sales Company,
Division of Matsushita Electric
of Puerto Rico Inc. (“PSC”)
Ave. 65 de Infantería, Km 9.5
San Gabriel Industrial Park
Carolina, Puerto Rico 00985
Tel. (787) 750-4300
Fax (787) 768-2910
 Loading...