

Page 1
Operating Instructions
F567943
F1101-02
Panasonic Corporation
Website: http://panasonic.net/
Printed in China
MODE
AUTOHEAT
DRYCOOL
Select the desired mode.
Seleccione el modo deseado.
Selezionare la modalità desiderata.
Seleccione o modo de funcionamento pretendido.
Избор на желания режим на работа.
Odaberite željeni način.
İstenilen modu seçin.
OFF/ON
Start/stop the operation.
Inicie/detenga el funcionamiento.
Avviare/arrestare l’apparecchio.
Ligue/Desligue a unidade.
Включване/спиране.
Pokrenite/zaustavite rad.
Çalışmayı başlatın/durdurun.
2
TEMP
Select the desired temperature.
Seleccione la temperature deseada.
Selezionare la temperatura desiderata.
Programe a temperatura desejada.
Настройка на желаната температура.
Odaberite željenu temperaturu.
İstenilen sıcaklığı seçin.
3
• Telecomando: Operazioni
Поставете AAA или R03 батерии (могат да се използват приблизително една година) •
Umetnite AAA ili R03 baterije (mogu se koristiti ~ 1 godinu) •
AAA veya R03 pil kullanın (~ 1 yıl kullanılabilir)
3
Close the cover • Cierre la tapa • Chiudere il coperchio • Feche a tampa • Затворете капака •
Zatvorite pokrov • Kapağı kapatın.
Pursuant to at the directive 2004/108/EC, article 9(2)
Panasonic Testing Centre
Panasonic Service Europe, a division of
Panasonic Marketing Europe GmbH
Winsbergring 15, 22525 Hamburg, F.R. Germany
EEE COMPLIES WITH DIRECTIVE OF TURKEY
EEE YÖNETMELİĞİNE UYGUNDUR
BU ÜRÜNÜN KULLANIM ÖMRÜ 10 YILDIR
2
1
3
Air Conditioner
Indoor Unit Outdoor Unit
CS-YE9MKX CU-YE9MKX
CS-YE12MKX CU-YE12MKX
CS-YE18MKX CU-YE18MKX
ENGLISH
Before operating the unit, read these operating instructions
thoroughly and keep them for future reference.
ESPAÑOL
Antes de utilizar la unidad, sírvase leer atentamente estas
instrucciones de funcionamiento y conservarlas como futuro
elemento de consulta.
ITALIANO
Prima di utilizzare l’unità si prega di leggere attentamente le
istruzioni e di conservare questo opuscolo per potervi fare
riferimento in futuro.
PORTUGUÊS
Antes de ligar a unidade, leia cuidadosamente este manual
de utilização e guarde-o para futura referência.
БЪЛГАРСКИ
Преди да задействате климатика, прочетете внимателно
инструкциите за употреба и ги запазете за бъдещи
справки.
HRVATSKI
Prije uključivanja jedinice, temeljito pročitajte ove upute i
zadržite ih radi uporabe u budućnosti.
TÜRKÇE
Üniteyi çalıştırmadan önce, bu çalışma talimatlarını tam
olarak okuyun ve gelecekte başvurmak üzere saklayın.
QUICK GUIDE
Operating
Instructions
Air Conditioner
Indoor Unit Outdoor Unit
S-PA7GKD U-PA7GKD
S-PA9GKD U-PA9GKD
S-PA12GKD U-PA12GKD
GUÍA RÁPIDA
GUIDA RAPIDA
SNELLE GIDS
БЪРЗ СПРАВОЧНИК
BRZE UPUTE
HIZLI REHBER
© Panasonic Home Appliances Air-Conditioning
(Guangzhou) Co., Ltd. 2010. Unauthorized
copying and distribution is a violation of law.
F567943
Page 2
ENGLISH Thank you for purchasing Panasonic Air Conditioner
TABLE OF CONTENTS
SAFETY PRECAUTIONS ................................................................................................................8~9
REMOTE CONTROL ..................................................................................................................10~11
INDOOR UNIT .................................................................................................................................... 12
TROUBLESHOOTING ....................................................................................................................... 13
INFORMATION ...........................................................................................................................50~55
PRODUCT SPECIFICATION ............................................................................................................. 56
QUICK GUIDE ...............................................................................................................BACK COVER
NOTE: The illustrations in this manual are for explanation purposes only and may differ from the actual unit. It is
CONTENIDO
PRECAUCIONES DE SEGURIDAD ........................................................................................... 14~15
MANDO A DISTANCIA ............................................................................................................... 16~17
UNIDAD INTERIOR ........................................................................................................................... 18
LOCALIZACIÓN DE AVERÍAS .......................................................................................................... 19
INFORMACIÓN ........................................................................................................................... 50~55
ESPECIFICACIONES DEL PRODUCTO .......................................................................................... 56
GUÍA RÁPIDA ................................................................................................ CUBIERTA TRASERA
NOTA: Las ilustraciones de este manual sirven únicamente para describir las explicaciones y pueden no coincidir
INDICE
PRECAUZIONI PER LA SICUREZZA ........................................................................................20~21
TELECOMANDO ........................................................................................................................22~23
UNITÀ INTERNA ................................................................................................................................ 24
SOLUZIONE DEI PROBLEMI ............................................................................................................ 25
INFORMAZIONI .......................................................................................................................... 50~55
SPECIFICHE DEL PRODOTTO ........................................................................................................ 56
GUIDA RAPIDA ...................................................................................COPERCHIO POSTERIORE
subjected to change without notice for future improvement.
ESPAÑOL Muchas gracias por elegir una unidad de aire acondicionado Panasonic
exactamente con las del aparato suministrado. Están sujetas a cambios sin previo aviso con el n de mejorar
el producto.
ITALIANO Grazie per aver acquistato un climatizzatore Panasonic
NOTA: le illustrazioni contenute in questo manuale sono riportate esclusivamente a scopo esplicativo e potrebbero
2
differire dall’apparecchio vero e proprio. I contenuti del presente manuale sono soggetti a modica senza
preavviso e verranno aggiornati in base alle innovazioni future.
Page 3
PORTUGUÊS Obrigado por adquirir o Ar Condicionado da Panasonic
ÍNDICE
PRECAUÇÕES DE SEGURANÇA ............................................................................................. 26~27
CONTROLO REMOTO ............................................................................................................... 28~29
UNIDADE INTERIOR ......................................................................................................................... 30
RESOLUÇÃO DE PROBLEMAS ....................................................................................................... 31
INFORMAÇÃO ............................................................................................................................ 50~55
ESPECIFICAÇÃO DO PRODUTO ..................................................................................................... 56
GUIA RÁPIDO ......................................................................................................TAMPA TRASEIRA
NOTA: As ilustrações deste manual têm apenas um carácter explicativo e podem diferir da unidade real. Estão
СЪДЪРЖАНИЕ
ПРЕДПАЗНИ МЕРКИ ................................................................................................................32~33
ДИСТАНЦИОННО УПРАВЛЕНИЕ ............................................................................................34~35
ВЪТРЕШНА ЧАСТ ........................................................................................................................... 36
ОТСТРАНЯВАНЕ НА ПРОБЛЕМИ .................................................................................................. 37
ИНФОРМАЦИЯ .......................................................................................................................... 50~55
СПЕЦИФИКАЦИЯ НА ИЗДЕЛИЕТО ............................................................................................... 56
БЪРЗ СПРАВОЧНИК .............................................................................ПОСЛЕДНА СТРАНИЦА
ЗАБЕЛЕЖКА: Илюстрациите в това ръководство са предназначени само за разяснение и могат да се
HRVATSKI Zahvaljujemo vam na kupovini klimatizacijskog uređaja Panasonic
SADRŽAJ
MJERE PREDOSTROŽNOSTI ................................................................................................... 38~39
DALJINSKI UPRAVLJAČ ...........................................................................................................40~41
UNUTARNJA JEDINICA .................................................................................................................... 42
OTKLANJANJE POTEŠKOĆA ......................................................................................................... 43
INFORMACIJE ............................................................................................................................ 50~55
SPECIFIKACIJE PROIZVODA .......................................................................................................... 56
BRZE UPUTE ...............................................................................................STRAŽNJA STRANICA
sujeitas a alteração sem aviso prévio para ns de melhoramento futuro.
БЪЛГАРСКИ Благодарим Ви, че закупихте климатик Panasonic
различават от действителния уред. Възможни са промени без предупреждение за бъдещи
подобрения.
NAPOMENA : Ilustracije u ovom priručniku služe samo za ogled i mogu se razlikovati od stvarne jedinice. Mogu se
promijeniti bez obavijesti radi poboljšanja u budućnosti.
3
Page 4

TÜRKÇE Panasonic Klima Cihazını seçtiğiniz için teşekkür ederiz.
İÇİNDEKİLER
GÜVENLİK ÖNLEMLERİ ............................................................................................................ 44~45
UZAKTAN KUMANDA ................................................................................................................ 46~47
İÇ ÜNİTE ............................................................................................................................................ 48
SORUN GİDERME ............................................................................................................................. 49
BİLGİ ........................................................................................................................................... 50~55
ÜRÜN TEKNİK ÖZELLİKLERİ .......................................................................................................... 56
HIZLI REHBER .............................................................................................................ARKA KAPAK
NOT: Bu kılavuzdaki çizimler yalnızca açıklama amaçlıdır ve asıl üniteden farklı olabilir. Gelecekteki geliştirmeler için
bildirimde bulunulmaksızın değiştirilebilir.
4
Page 5
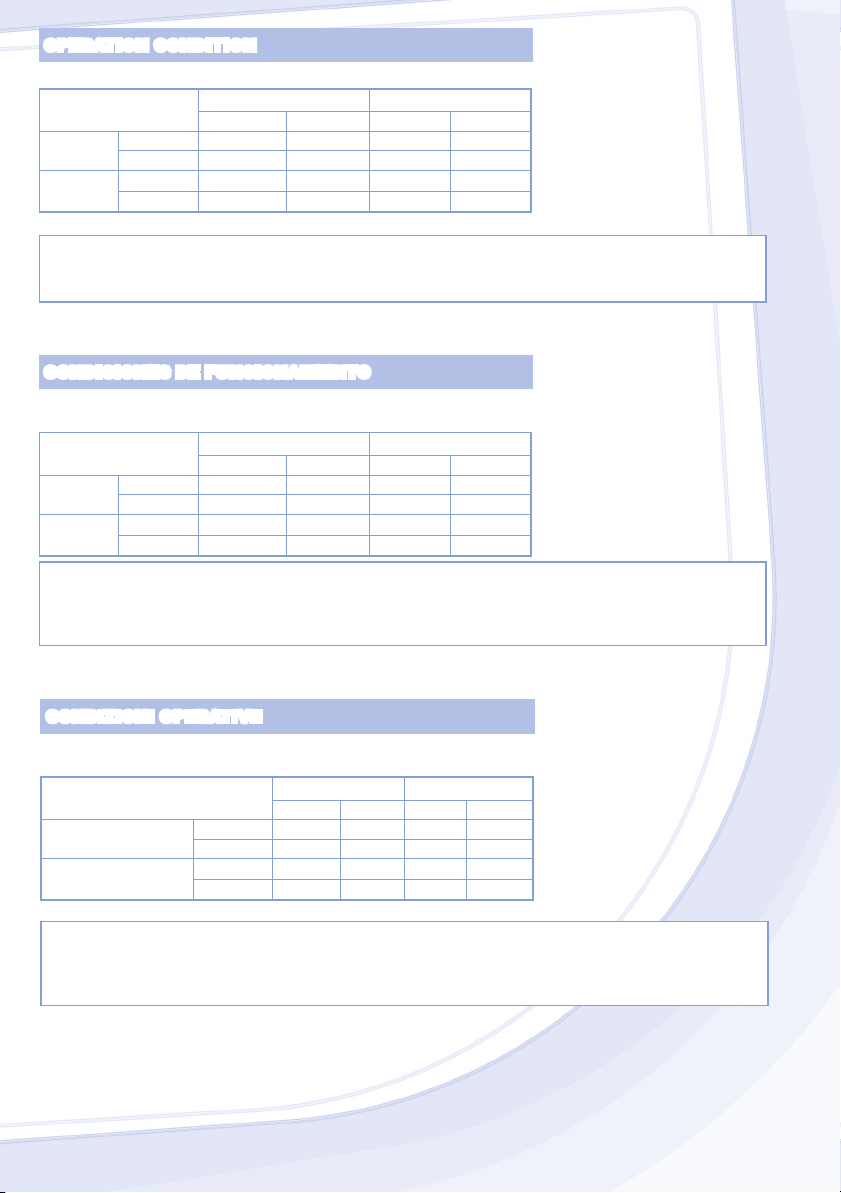
OPERATION CONDITION
Use this air conditioner under the following temperature range
Temperature (°C)
COOLING
HEATING
NOTICE: • This model is not suitable for 24 hours non-stopping operation in heating mode below -5°C.
When the outdoor temperature is below -5°C and you use this model out of above conditions, the
CONDICIONES DE FUNCIONAMIENTO
Utilice este aparato de aire acondicionado dentro del siguiente intervalo de
temperaturas
Temperatura (°C)
MODO
FRÍO
MODO
CALOR
AVISO: • Este modelo no está preparado para un funcionamiento continuo durante 24 horas en modo de
Maximum 32 23 43 26
Minimum 16 11 16 11
Maximum 30 - 24 18
Minimum 16 - -5 -6
outdoor unit might be frozen up and stop operation for protection control.
Máximo 32 23 43 26
Mínimo 16 11 16 11
Maximum 30 - 24 18
Minimum 16 - -5 -6
calefacción bajo -5°C. Cuando la temperatura exterior sea inferior a -5°C y utilice este modelo fuera de
las condiciones de arriba, la unidad exterior se podría congelar y parar el funcionamiento para control
de protección.
Indoor Outdoor
*DBT *WBT *DBT *WBT
* DBT: Dry bulb temperature
* WBT: Wet bulb temperature
Interior Exterior
*DBT *WBT *DBT *WBT
* DBT: Temperatura en seco
* WBT: Temperatura en húmedo
CONDIZIONI OPERATIVE
Questo condizionatore può essere utilizzato con temperature rientranti nel seguente
intervallo
Temperatura (°C)
RAFFREDDAMENTO
RISCALDAMENTO
AVVISO: • Questo modello non è adatto al funzionamento ininterrotto per 24 ore in modalità di riscaldamento
in temperature inferiori a -5°C. Quando la temperatura esterna è inferiore a -5°C e si utilizza questo
modello al di fuori delle condizioni di cui sopra, l’unità esterna potrebbe bloccarsi e arrestare il
funzionamento rispondendo ad un comando di sicurezza.
Massimo 32 23 43 26
Minimo 16 11 16 11
Massimo 30 - 24 18
Minimo 16 - -5 -6
Interna Esterna
*DBT *WBT *DBT *WBT
* DBT: Temperatura con bulbo secco
* WBT: Temperatura con bulbo bagnato
5
Page 6
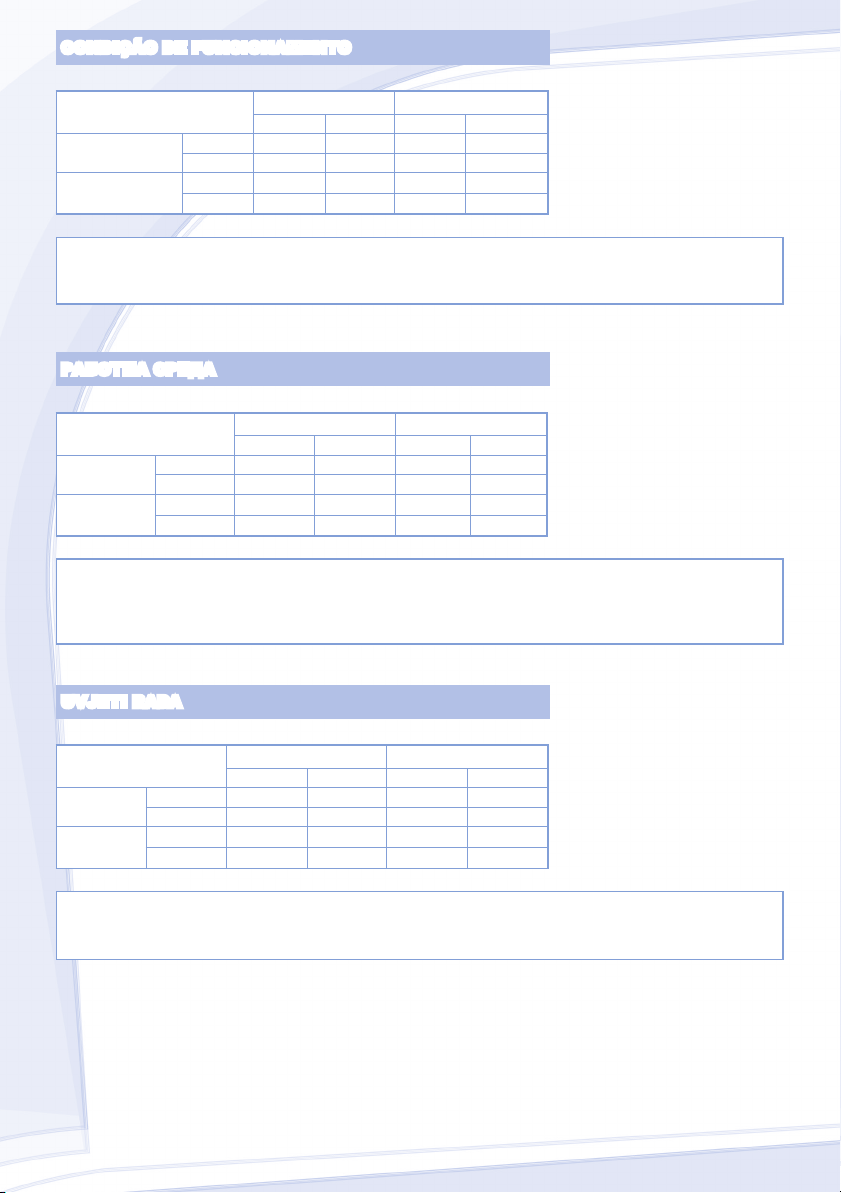
CONDIÇÃO DE FUNCIONAMENTO
Utilize este ar condicionado com o seguinte intervalo de temperatura
Temperatura (°C)
RESFRIAMENTO
AQUECIMENTO
Máxima 32 23 43 26
Mínima 16 11 16 11
Máxima 30 - 24 18
Mínima 16 - -5 -6
Interior Exterior
*DBT *WBT *DBT *WBT
* DBT: Temperatura de bolbo Seco
* WBT: Temperatura de bolbo Húmido
ATENÇÃO: • Este modelo não pode funcionar durante 24 horas continuamente no modo de aquecimento a menos
РАБОТНА СРЕДА
Използвайте този климатик в следните температурни граници
Температура (°C)
ОХЛАЖДАНЕ
ОТОПЛЕНИЕ
ЗАБЕЛЕЖКА: • Този модел не е подходящ за непрекъсната 24-часова работа в режим на отопление
UVJETI RADA
Ovaj klimatizacijski uređaj koristite u sljedećem temperaturnom rasponu
Temperatura (°C)
HLAĐENJE
GRIJANJE
de -5°C. Quando a temperatura exterior for inferior a -5°C e usar este modelo fora das condições de
cima, a unidade exterior pode congelar-se e parar o funcionamento para controlo de protecção.
В закрито помещение На открито
Максимум 32 23 43 26
Минимум 16 11 16 11
Максимум 30 - 24 18
Минимум 16 - -5 -6
Maksimum 32 23 43 26
Minimum 16 11 16 11
Maksimum 30 - 24 18
Minimum 16 - -5 -6
*DBT *WBT *DBT *WBT
* DBT:
Темпераτура без оτчиτане
влажносττа на въздуха
* WBT:
Темпераτура с оτчиτане
влажносττа на въздуха
под -5°C. Когато външната температура е под -5°C, а Вие използвате този модел извън
гореспоменатите условия, външният агрегат може да замръзне и да спре работа с цел
контрол на защитата.
Unutarnja Vanjska
*DBT *WBT *DBT *WBT
* DBT: Dry bulb temperature mjerenje temperature izlaganjem
termometra zraku, ali ne i vlazi
* WBT: ry bulb temperature mjerenje temperature izlaganjem
termometra i zraku i vlazi
NAPOMENA: • Ovaj model nije pogodan za neprekidan 24-satni rad s načinom grijanja pri temperaturi manjoj od
6
-5°C. Ako je vanjska temperatura niža do -5°C, a ovaj model koristite ne pridržavajući se uvjeta
gore, vanjska se jedinica može zamrznuti i prekinuti s radom uslijed zaštitne kontrolne mjere.
Page 7
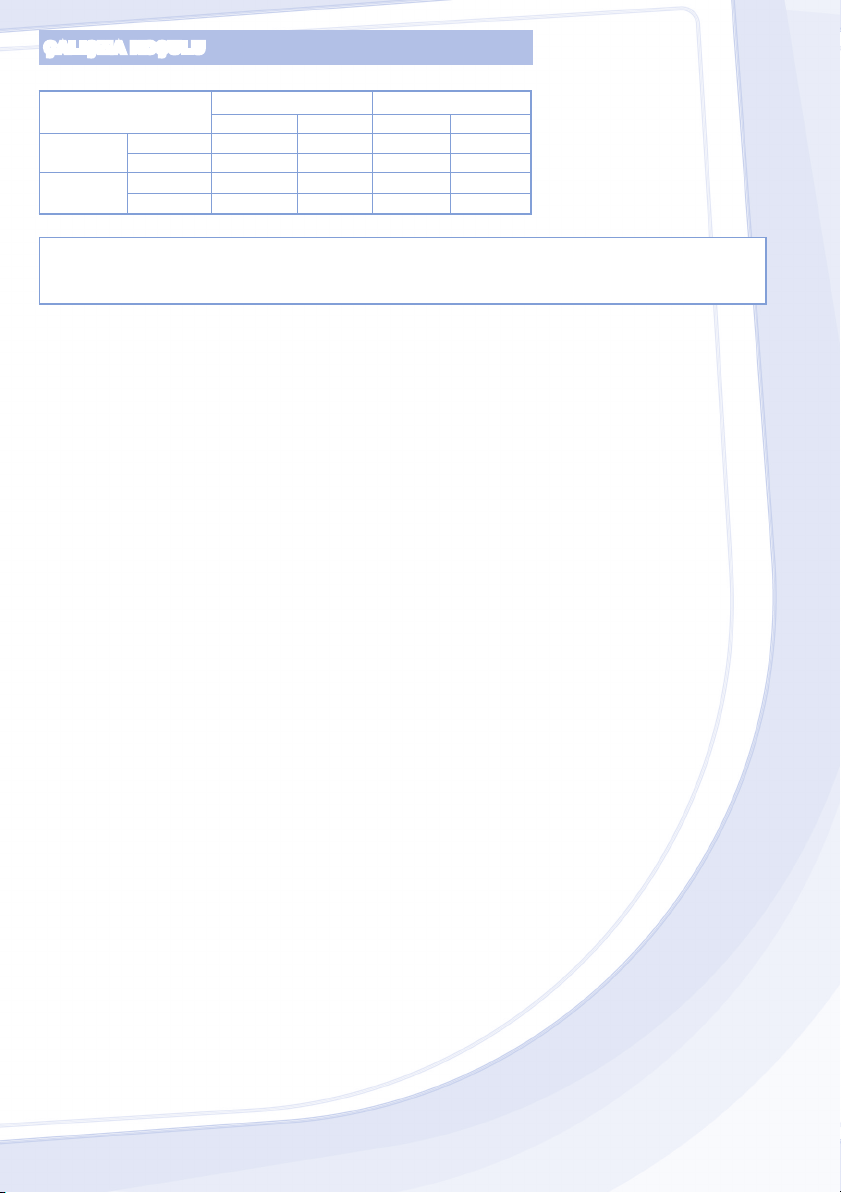
ÇALIŞMA KOŞULU
Bu klima cihazını aşağıdaki sıcaklık aralıklarında kullanın
Sıcaklık (°C)
SOĞUTMA
ISITMA
Maksimum 32 23 43 26
Minimum 16 11 16 11
Maksimum 30 - 24 18
Minimum 16 - -5 -6
İç Dış
*DBT *WBT *DBT *WBT
* DBT: Kuru termometre sıcaklığı
* WBT: Yaş Termometre sıcaklığı
DİKKAT: • Bu model -5°C’nin altında ısıtma modunda 24 saat durdurulmadan çalışma için uygun değildir. Dış
sıcaklık -5°C’nin altında olduğunda ve yukarıdaki koşulların dışında bu modeli kullandığınız zaman, dış
unite donabilir ve koruma kontrolü için çalışmayı durdurabilir.
7
Page 8
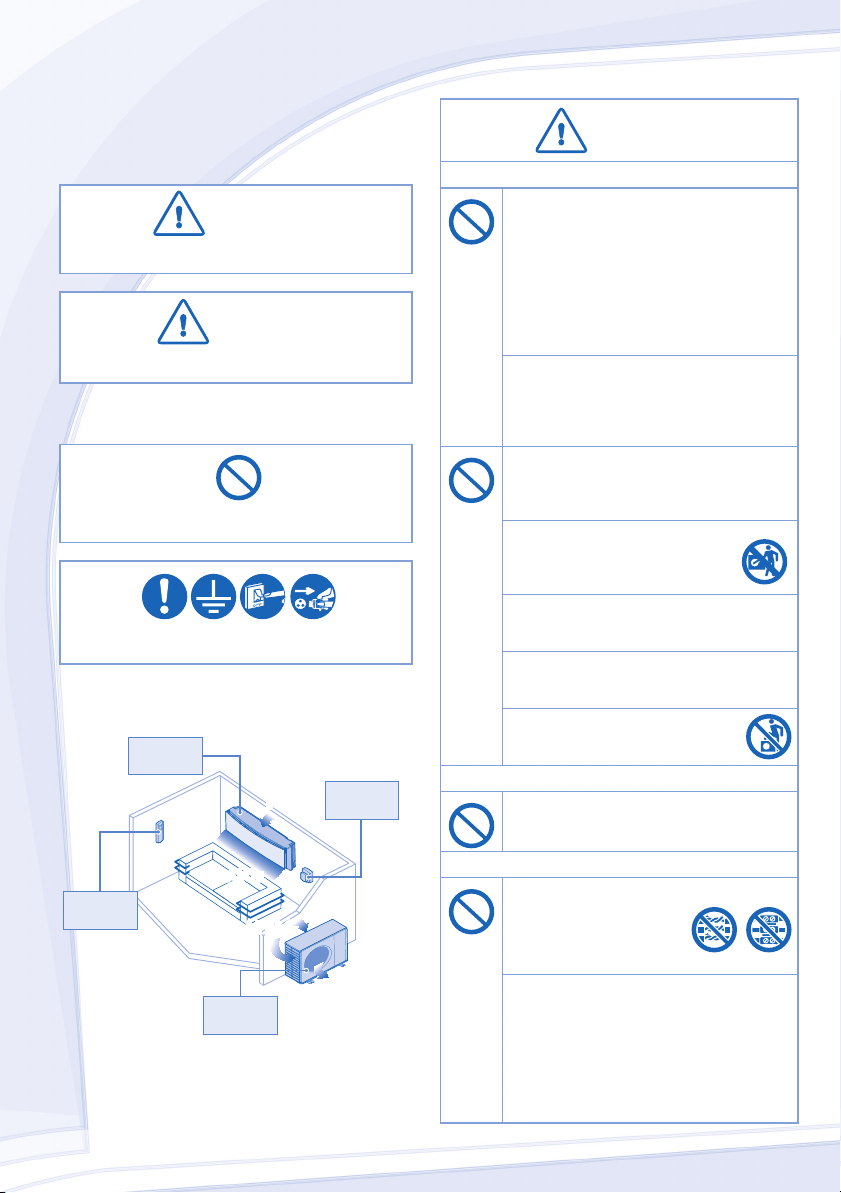
SAFETY PRECAUTIONS
To prevent personal injury, injury to others, or property
damage, please comply the following.
Incorrect operation due to failure to follow instructions
may cause harm or damage, the seriousness of which is
classied as below:
WARNING
This sign warns of death or serious injury.
This sign warns of injury or damage to property.
The instructions to be followed are classied by the following
symbols:
This symbol denotes an action that is
These symbols denote an action that is
CAUTION
PROHIBITED
COMPULSORY.
WARNING
INDOOR UNIT AND OUTDOOR UNIT
This appliance is not intended for use by
persons (including children) with reduced
physical, sensory or mental capabilities, or lack
of experience and knowledge, unless they have
been given supervision or instruction concerning
use of the appliance by a person responsible for
their safety. Children should be supervised to
ensure that they do not play with the appliance.
Please consult authorized dealer or specialist to
clean the internal parts, repair, install, remove
and reinstall the unit. Improper installation and
handling will cause leakage, electric shock or
re.
Do not install the unit in a potentially explosive
or ammable atmosphere. Failure to do so could
result in re.
Do not insert your ngers or other
objects into the air conditioner indoor
or outdoor unit, rotating parts may
cause injury.
Do not touch the outdoor unit during lightning, it
may cause electric shock.
Do not expose yourself directly to cold air for a
long period to avoid excess cooling.
Do not sit or step on the unit, you
may fall down accidentally.
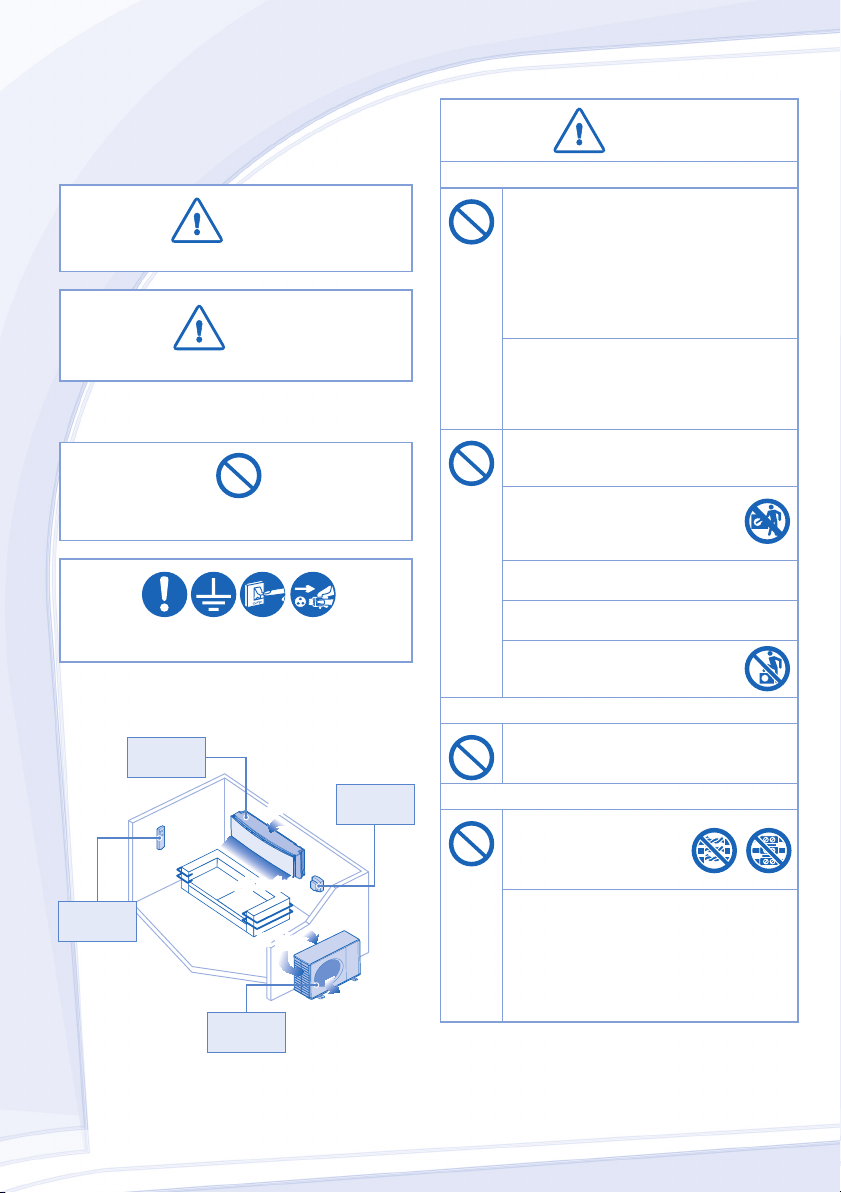
REMOTE CONTROL
Indoor
Unit
Air Inlet
Power
Supply
POWER SUPPLY
Do not allow infants and small children to play
with the remote control to prevent them from
accidentally swallowing the batteries.
Do not use modied cord,
joint cord, extension cord or
unspecied cord to prevent
overheat and re.
To prevent overheating, re or electric shock:
• Do not share the same power outlet with other
equipment.
Remote
Control
Air Outlet
Air Inlet
• Do not operate with wet hands.
• Do not over bend the power supply cord.
Air Outlet
Outdoor
• Do not operate or stop the unit by inserting or
pulling out the power plug.
Unit
8
Page 9
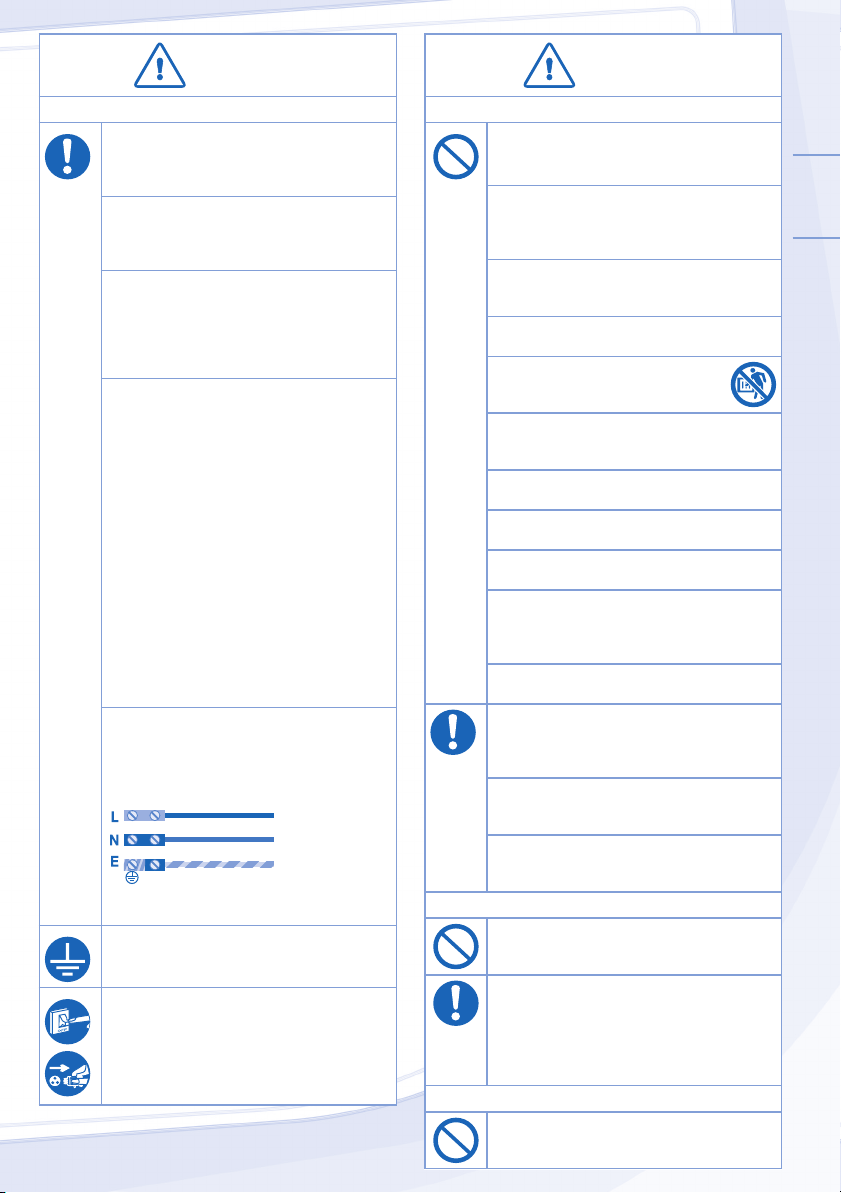
POWER SUPPLY
If the supply cord is damage, it must be
replaced by the manufacturer, its service agent
or similarly qualied persons in order to avoid
a hazard.
It is strongly recommended to be installed
with Earth Leakage Circuit Breaker (ELCB)
or Residual Current Device (RCD) to prevent
electric shock or re.
To prevent overheating, re or electric shock:
• Insert the power plug properly.
• Dust on the power plug should be periodically
wiped with a dry cloth.
Stop using the product when any abnormality/
failure occurs and disconnect the power plug or
turn off the power switch and breaker.
(Risk of smoke/re/electric shock)
Examples of abnormality/failure
• The ELCB trips frequently.
• Burning smell is observed.
• Abnormal noise or vibration of the unit is
observed.
• Water leaks from the indoor unit.
• Power cord or plug becomes abnormally hot.
• Fan speed cannot be controlled.
• The unit stops running immediately even if it is
switched on for operation.
• The fan does not stop even if the operation is
stopped.
Contact immediately your local dealer for
maintenance/repair.
Replacement or installation of power plugs shall
be performed by authorized/qualied personnel
only. The wires in this mains lead are coloured
in accordance with the following code:
Terminals
Red
Black
Green/Yellow
Wiring colour may vary depending on a country
wiring code’s standard.
This equipment must be earthed to prevent
electric shock or re.
Prevent electric shock by switching off the
power supply and unplug when:
- Before cleaning or servicing.
- Extended non-use.
- Abnormally strong lightning activity.
WARNING
wires
live
neutral
earth
colours (IEC Standard)
brown
blue
green-yellow
CAUTION
INDOOR UNIT AND OUTDOOR UNIT
Do not wash the indoor unit with water,
benzene, thinner or scouring powder to avoid
damage or corrosion at the unit.
Do not use for preservation of precise equipment,
food, animals, plants, artwork or other objects.
This may cause quality deterioration, etc.
Do not use any combustible equipment in front
of the airow outlet to avoid re propagate.
Do not expose plants or pet directly to airow to
avoid injury, etc.
Do not touch the sharp aluminium n,
sharp parts may cause injury.
Do not switch ON the indoor unit when waxing
the oor. After waxing, aerate the room properly
before operating the unit.
Do not install the unit in oily and smoky areas to
prevent damage to the unit.
Do not dismantle the unit for cleaning purpose
to avoid injury.
Do not step onto unstable bench when cleaning
the unit to avoid injury.
Do not place vase or water container on the
unit. Water may enter the unit and degrade the
insulation. This may cause an electric shock.
Do not left the window open during Cool/Dry
mode operation to prevent water leakage.
Ensure drainage pipe is connected properly and
keep drainage outlet clear of gutters, containers
or does not immersed in water to prevent water
leakage.
After long period of use or use with any
combustible equipment, aerate the room
regularly.
After long period of use, make sure the
installation rack is not deteriorate to prevent the
unit from falling down.
REMOTE CONTROL
Do not use rechargeable (Ni-Cd) batteries.
It may damage the remote control.
To prevent malfunction or damage of the remote
control:
• Remove the batteries if the unit is not going to
be used for a long period of time.
• New batteries of the same type must be
inserted following the polarity stated.
POWER SUPPLY
Do not pull the cord to disconnect the plug to
prevent electric shock.
ENGLISH
9
Page 10
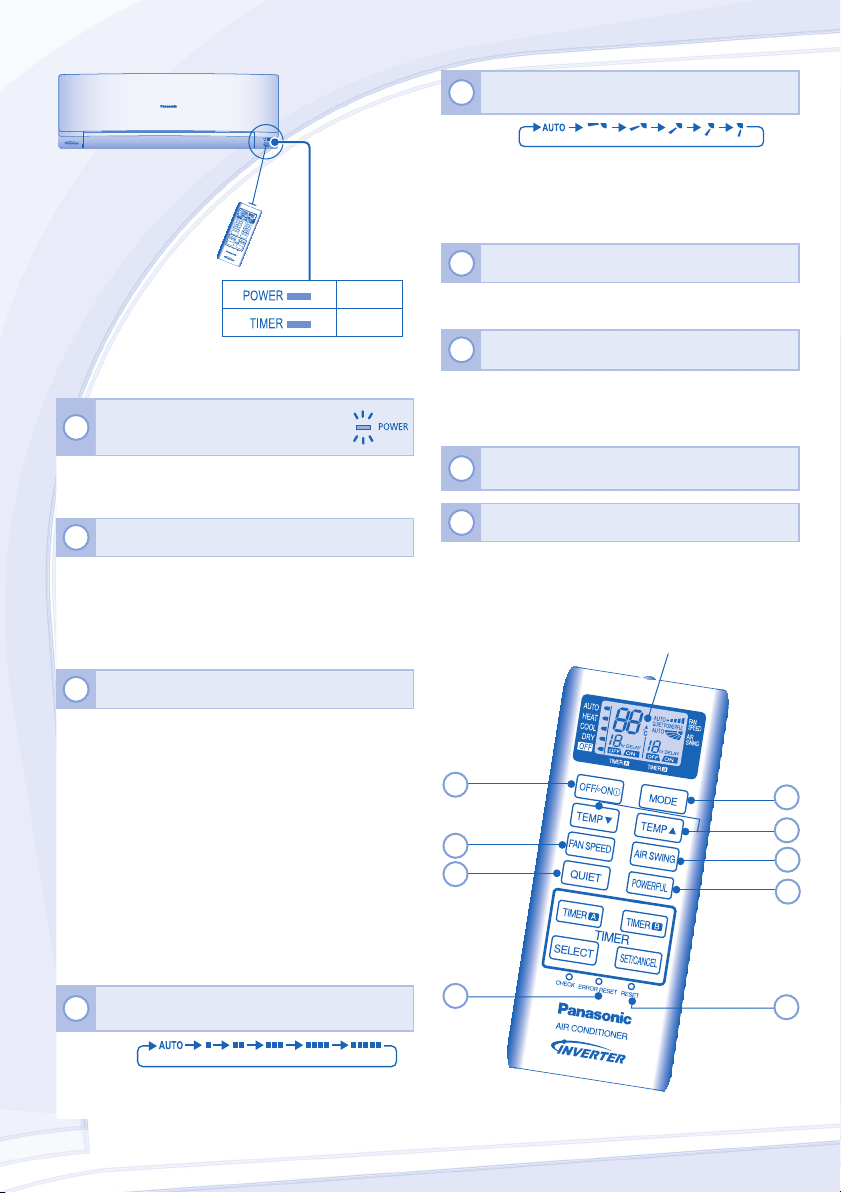
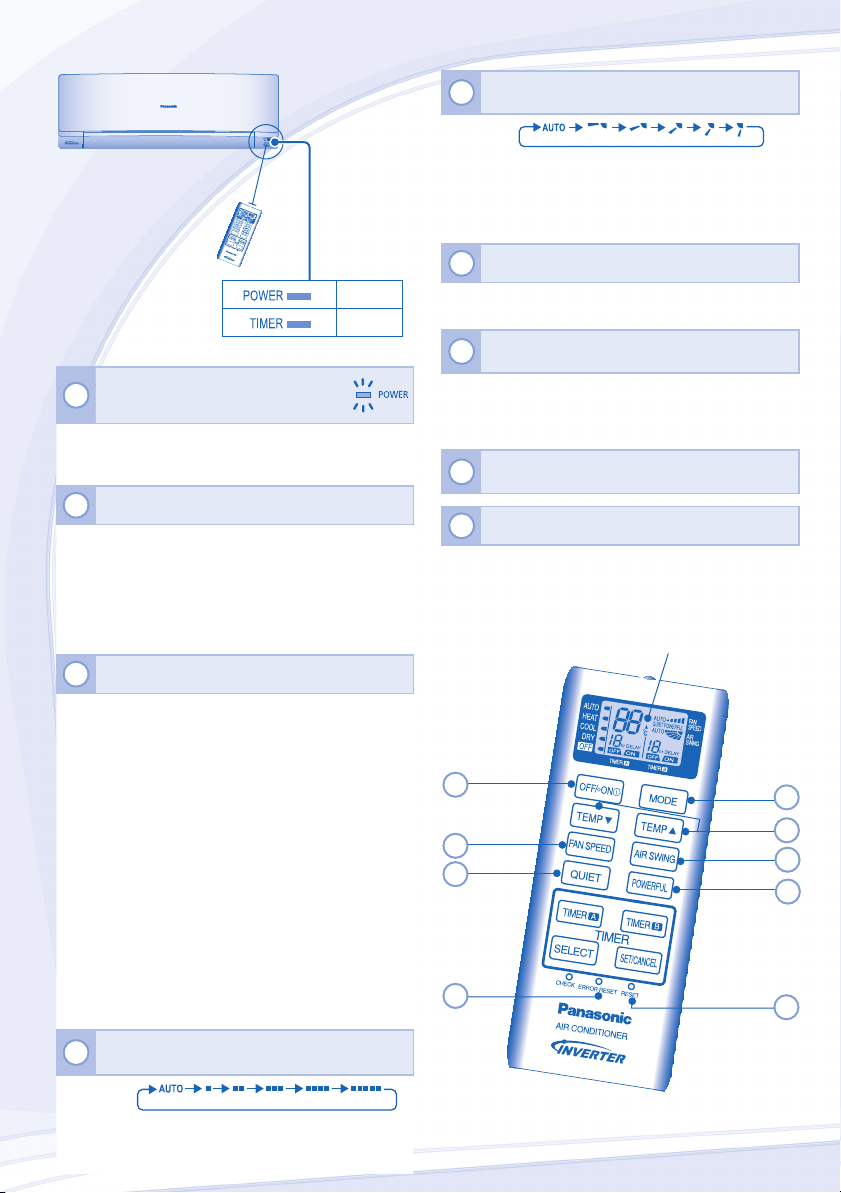
REMOTE CONTROL
FAN SPEED
AIR SWING
TO ADJUST AIRFLOW DIRECTION
5
(5 OPTIONS)
Maximum distances: 8m
/
QUIET
POWERFUL
A
SELECT
B
SET/CANCEL
CHECK
ERROR RESETRESET
AIR CONDITIONER
(GREEN)
(ORANGE)
Press the remote control’s button
1
TO TURN ON OR OFF THE UNIT
• Please be aware of the OFF indication on the remote
control display to prevent the unit from starting/stopping
improperly.
2
TO SET TEMPERATURE
• Selection range: 16°C ~ 30°C.
• Operating the unit within the recommended temperature
could induce energy saving.
HEAT mode : 20°C ~ 24°C.
COOL mode : 26˚C ~ 28˚C.
DRY mode : 1˚C ~ 2˚C lower than room temperature.
3
TO SELECT OPERATION MODE
AUTO mode - For your convenience
• During operation mode selection the power indicator
blinks.
• Unit selects the operation mode according to the indoor
intake temperature and remote control temperature.
HEAT mode - To enjoy warm air
• In heat mode, it may take a while for the unit to warm up.
The POWER indicator blinks during preheating.
COOL mode - To enjoy cool air
• Use curtains to screen off sunlight and outdoor heat to
reduce power consumption during cool mode.
DRY mode - To dehumidify the environment
• Unit operates at low fan speed to give a gentle cooling
operation.
4
TO SELECT OPERATION MODE
• Keeps the room ventilated.
• In COOL mode, if AUTO is set, the louver swing up/down
automatically.
• In HEAT mode, if AUTO is set, the horizontal louver x at
predetermined position.
6
TO ACHIEVE TEMPERATURE QUICKLY
• This setting enables the desired set temperature to be
reached quickly.
7
TO ENJOY QUIET ENVIRONMENT
• This setting provides a quiet environment by reducing the
airow noise.
• POWERFUL AND QUIET operations can not be activated
at the same time.
PRESS TO RESTORE THE REMOTE CONTROL’S
8
DEFAULT SETTING
9
NOT USED IN NORMAL OPERATIONS
Remote Control display
1
4
7
9
3
2
5
6
8
• For AUTO, the indoor fan speed is automatically adjusted
according to the operation mode.
10
Page 11
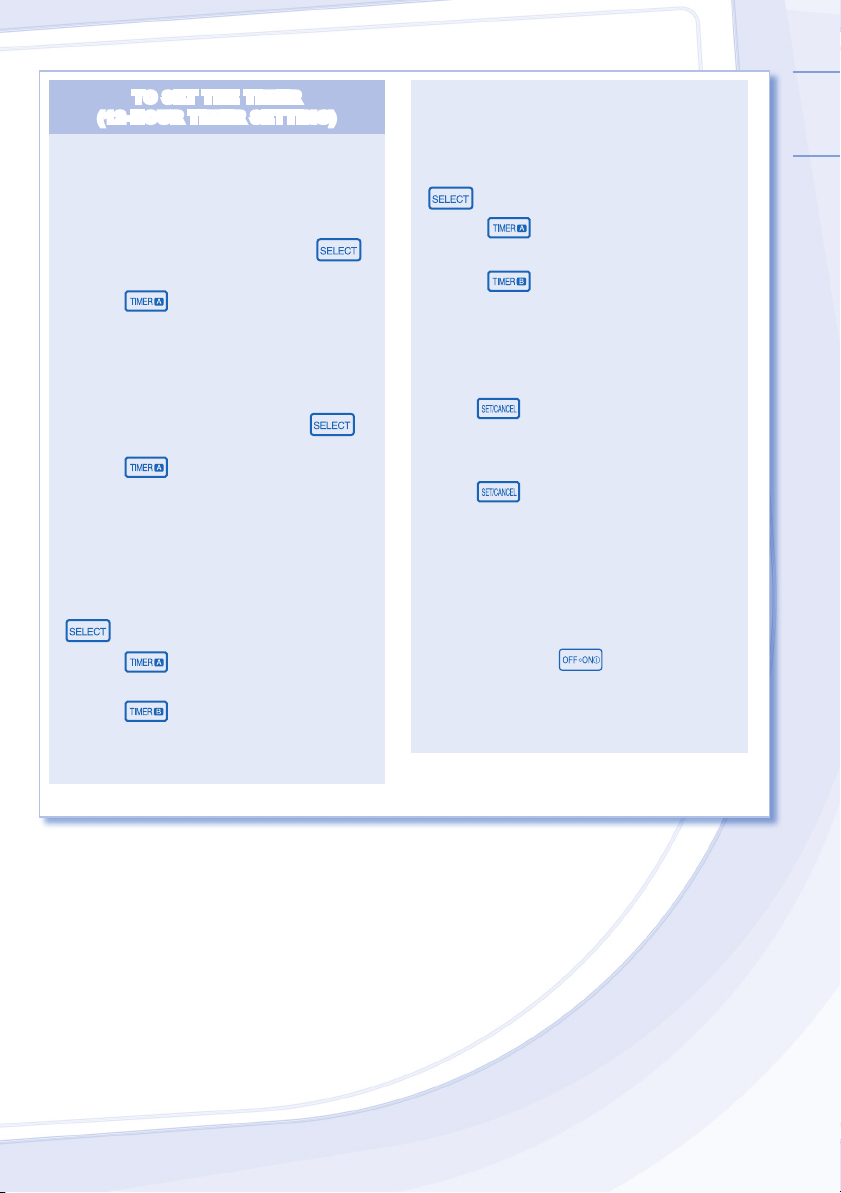
TO SET THE TIMER
(12-HOUR TIMER SETTING)
• When you want the air conditioner to turn ON or OFF
automatically.
DELAY OFF-TIMER
For example, to stop the air conditioner 5 hours later.
1 To select the Delay OFF-TIMER, press the
button once.
2 Press the
button to select the delay hour.
• The OFF-TIMER can only be set while the air-
conditioner is in operation.
DELAY ON-TIMER
For example, to start the air conditioner 2 hours later.
1 To select the Delay ON-TIMER, press the
button once.
2 Press the
button to select the delay hour.
• The ON-TIMER can only be set while the air-
conditioner is not in operation.
DELAY OFF AND ON TIMER
For example, to stop the air conditioner 3 hours later
and start 4 hours later.
1 To select the Delay OFF and ON Timer, press the
button twice repeatedly.
2 Press the
button to select the delay hour for
OFF Timer.
3 Press the
button to select the delay hour for
ON Timer.
• This mode of timer can only be set while the air-
conditioner is in operation.
DELAY ON AND OFF TIMER
For example, to start the air conditioner 7 hours later
and stop 10 hours later.
1 To select the Delay ON and OFF Timer, press the
button twice repeatedly.
2 Press the
ON Timer.
3 Press the
button to select the delay hour for
button to select delay hour for OFF
Timer.
• This mode of timer can only be set while the air-
conditioner is not in operation.
TO CONFIRM THE TIMER SETTING
Press the
button once to activate the timer
operation which will start when the set time is reached.
TO CANCEL THE TIMER SETTING
Press the
button again to cancel the timer
operation.
• The timer indicator of the indoor unit will light up
during the timer operation.
• When ON Timer is set, the unit may start earlier
before the actual set time in order to achieve the
desired temperature on time.
/
• If you press operation
button during the timer
setting operation, timer setting will be cancelled.
• If timer is cancelled manually or due to power failure,
you can restore the timer again by repeating steps
above (once power is resumed).
ENGLISH
11
Page 12

INDOOR UNIT
• Switch off the power supply before cleaning.
CAUTION
WASHING INSTRUCTIONS HINT
• Do not use benzene, thinner or scouring powder.
• Use only soap ( pH7) or neutral household detergent.
• Do not use water hotter than 40°C.
• Do not touch the aluminium n, sharp parts may cause injury.
• To ensure optimal performance of the unit, cleaning
NOTE
• If chemical cloth is used to wipe the unit, instruction for
maintenance have to be carried out at regular intervals.
the cloth should be followed.
1
INDOOR UNIT
2
5
6
4
• Wipe the unit gently with a soft, dry cloth.
2
FRONT PANEL
Remove Front Panel
• Raise and pull to remove the front panel.
• Wash gently and dry.
Close Front Panel
• Press down both ends of the front panel to close it securely.
3
RECEIVER
4
ALUMINIUM FIN
5
HORIZONTAL AIRFLOW DIRECTION LOUVER
• Manually adjustable.
WARNING
Be careful not to insert your ngers into the
unit to avoid injuring by cross-ow fan.
1
7
8
3
7
AUTO OFF/ON BUTTON
• Use when remote control is misplaced or malfunction.
Action Mode
Press once. Auto
Press and hold until 1 beep is heard,
then release.
Press and hold until you hear double
beep sound, then release.
Cooling
Heating
Press the button to turn off.
8
AIR FILTERS
• Clean the lters regularly.
• Wash/rinse the lters gently with water to avoid damage
to the lter surface.
• Dry the lters thoroughly under the shade, away from
re or direct sunlight.
• Replace any damage lter.
6
VERTICAL AIRFLOW DIRECTION LOUVER
• Do not adjust by hand.
12
Page 13

TROUBLESHOOTING
The following symptoms do not indicate malfunction.
SYMPTOM CAUSE
Mist emerges from indoor unit. ► • Condensation effect due to cooling process.
Water owing sound during operation. ► • Refrigerant ow inside the unit.
The room has a peculiar odour. ► • This may due to damp smell emitted by the wall, carpet,
Indoor fan stops occasionally during automatic fan speed
setting.
Operation is delayed a few minutes after restart. ► • The delay is a protection to the unit’s compressor.
Outdoor unit emits water/steam. ► • Condensation or evaporation occurs on pipes.
The unit operates automatically when power is resumed
after a power failure.
Indoor fan stops occasionally during heating operation. ► • To avoid unintended cooling effect.
Power indicator blinks before the unit is switched on. ► • This is a preliminary step in preparation for the operation
Cracking sound during operation. ► • Changes of temperature cause the expansion/
Check the following before calling for servicing.
SYMPTOM CHECK
Heating/Cooling operation is not working efciently. ► • Set the temperature correctly.
Noisy during operation. ► • Check if the unit has been installed at an incline.
Remote control does not work.
(Display is dim or transmission signal is weak.)
The unit does not work. ► • Check if the circuit breaker is tripped.
The unit does not receive the signal from the remote
control.
furniture or clothing.
► • This helps to remove the surrounding odours.
► • It is the Auto Restart function of the unit. Operation will
be restarted automatically under the previous operation
mode and air ow direction when power is resumed as
the operation is not stopped by remote control.
when the ON timer has been set.
contraction of the unit.
• Close all doors and windows.
• Clean or replace the lters.
• Clear any obstruction at the air inlet and air outlet vents.
• Close the front panel properly.
► • Insert the batteries correctly.
• Replace weak batteries.
• Check if timers have been set.
► • Make sure the receiver not obstructed.
• Certain uorescent lights may interfere with signal
transmitter. Please consult authorized dealer.
ENGLISH
The unit stops and the timer indicator blinks.
Use remote control to retrieve error code.
/
POWERFUL
QUIET
Press for 5
1
seconds.
Turn the unit off and reveal the error code to authorized dealer.
4
SELECT
CHECK
A B
SET/CANCEL
ERROR RESET RESET
Press until you hear
2
beep sound, then jot
down the error code.
Press for 5 seconds
3
to quit checking.
Note:
• For certain error, you may
restart the unit with limited
operation with 4 beeps
during operation starts.
13
Page 14
PRECAUCIONES DE SEGURIDAD
Para evitar lesiones personales, lesiones a terceros, o daños
materiales, cumpla lo siguiente.
El uso incorrecto por no seguir las instrucciones puede
causar daños o averías; su gravedad se clasica con las
indicaciones siguientes:
ADVERTENCIA
Esta indicación advierte del posible peligro de muerte o de
Esta indicación advierte de los posibles daños o
Las instrucciones que deben seguirse están clasicadas
mediante los siguientes símbolos:
Este símbolo denota una acción que está
Estos símbolos denotan acciones que son
Unidad
Interior
Mando a
Distancia
daños graves.
PRECAUCIÓN
desperfectos materiales.
PROHIBIDA.
OBLIGATORIAS.
Entrada de
aire
Salida de aire
Entrada de aire
Unidad
Exterior
Fuente de
energía
Salida de aire
ADVERTENCIA
UNIDAD INTERIOR Y UNIDAD EXTERIOR
Este aparato no debe ser utilizado por personas
(incluyendo niños) con discapacidades
mentales, sensoriales o físicas, o falta de
experiencia y conocimiento, a menos que hayan
recibido formación o supervisión en relación al
uso del aparato por una persona responsable
por su seguridad. Los niños deberían estar
supervisados para asegurar que no juegan con
el aparato.
Consulte a un distribuidor autorizado o
especialista para limpiar las piezas internas,
reparar, instalar, retirar y reinstalar la unidad.
Una instalación y uso incorrectos provocarán
fugas, descargas eléctricas o incendios.
No instale la unidad en ambientes
potencialmente explosivos o inamables. En
caso contrario, podría provocar accidentes de
incendios.
No introduzca los dedos u otros objetos
en la unidad exterior o interior del
aire acondicionado, ya que las partes
rotatorias podrían provocarle lesiones.
No toque la unidad exterior durante un
relámpago, ya que podría causar una descarga
eléctrica.
No se exponga directamente al aire frío por un
periodo prolongado de tiempo, así evitará el
enfriamiento excesivo.
No se siente o pare sobre la unidad,
se podría caer accidentalmente.
MANDO A DISTANCIA
No permita que bebés y niños pequeños
jueguen con el mando a distancia para evitar
que ingieran accidentalmente las pilas.
FUENTE DE ENERGÍA
No utilice un cable modicado,
unido con otro, un cable de
extensión o un cable no
especicado para evitar
sobrecalentamiento e incendios.
Para prevenir sobrecalentamiento, incendios o
descargas eléctricas:
• No comparta un único enchufe con otros
equipos.
• No utilice el equipo con las manos húmedas.
• No incline el cable del suministro eléctrico.
• No encienda ni detenga el equipo enchufando
o desenchufando el cable de alimentación.
14
Page 15
FUENTE DE ENERGÍA
Para evitar riesgos, si el cable de alimentación
está dañado y es necesario cambiarlo, deberá
hacerlo el fabricante, un representante del
servicio técnico o una persona cualicada.
Se recomienda altamente instalarlo con
un disyuntor de fuga a tierra (ELCB) o un
dispositivo residual actual (RCD) para evitar
descargas eléctricas o incendios.
Para prevenir sobrecalentamiento, incendios o
descargas eléctricas:
• Enchufe el cable de alimentación
adecuadamente.
• El polvo del enchufe debe limpiarse
continuamente con un paño seco.
Ya no utilice el producto si se presenta alguna
anomalía/falla, y desconecte el enchufe
o apague el interruptor de alimentación e
interruptor.
(Riesgo de humo/incendio/descarga eléctrica)
Ejemplos de anomalías/fallas
• Activación frecuente del ELCB.
• Olor a quemado.
• Ruido o vibración anormales de la unidad.
• Filtración de agua desde la unidad interior.
• Calentamiento inusual del cable o enchufe.
• La velocidad del ventilador no puede
controlarse.
• La unidad deja de funcionar inmediatamente,
incluso si se enciende para su operación.
• El ventilador no se detiene, incluso si la
operación se suspende.
Contáctese inmediatamente con su distribuidor
local, para mantención/reparación.
Sólo personal autorizado/cualicado debe
reemplazar o instalar los enchufes. Los cables
de la red de distribución eléctrica tienen colores,
de acuerdo al siguiente código.
Terminales
Rojo
Negro
Verde/Amarillo
Los colores de los cables pueden variar de
acuerdo al código estándar de cada país.
Este equipo deberá conectarse a tierra para
evitar descargas eléctricas o incendios.
Evite descargas eléctricas desconectando la
alimentación eléctrica cuando:
- Antes de limpiarlo o repararlo.
- Largo periodo en desuso.
- Tormentas eléctricas especialmente violentas.
ADVERTENCIA
cables
masa
neutro
tierra
colores (Estándar IEC)
marrón
azul
verde-amarillo
PRECAUCIÓN
UNIDAD INTERIOR Y UNIDAD EXTERIOR
No limpie la unidad interior con agua, benceno,
disolvente o limpiador en polvo, para evitar
daño o corrosión en la unidad.
No lo utilice para la conservación de equipos,
alimentos, animales, plantas, material gráco u
otros objetos. Esto puede provocar el deterioro
de la calidad, etc.
No utilice ningún equipo combustible delante
de la salida de aire pare evitar que se propague
un incendio.
No exponga directamente a las plantas o mascotas
a las corrientes de aire, para evitar daños, etc.
No tocar las partes de aluminio
angulosas, pueden causar daños.
No encienda la unidad cuando encere el
suelo. Después de encerar, airee la habitación
correctamente antes de usar la unidad.
No instale la unidad en áreas aceitosas y llenas
de humo, para prevenir que la unidad se dañe.
No desmonte la unidad para limpiarla, así
evitará daños.
Cuando limpie la unidad, no pase sobre un
banco inestable, así evitará daños.
No coloque un vaso o recipiente con agua en
la unidad. El agua puede entrar en la unidad y
degradar el aislamiento, lo cual puede provocar
una descarga eléctrica.
No deje la ventana abierta durante la operación en
modo Frío/Seco, para prevenir la ltración de agua.
Asegúrese de que el tubo de drenaje esté
conectado correctamente y mantenga el drenaje
libre de surcos y contenedores, o no lo sumerja
en agua, para prevenir la ltración de ésta.
Después de utilizar por un largo periodo, o de
utilizar con cualquier equipo inamable, ventile
el área periódicamente.
Después de un largo periodo de uso, asegúrese
de que la ranura de instalación no se encuentre
deteriorada, para evitar que la unidad se caiga.
MANDO A DISTANCIA
No utilice pilas recargables (Ni-Cd). Podría
dañar el control remoto.
Para prevenir una función inadecuada o daño
en el control remoto:
•
Extraiga las pilas si el equipo no va a ser utilizado
durante un periodo prolongado de tiempo.
• Es necesario insertar las pilas según la
polaridad indicada.
FUENTE DE ENERGÍA
No tire el cable para desconectar el enchufe,
así evitará una descarga eléctrica.
ESPAÑOL
15
Page 16
MANDO A DISTANCIA
FAN SPEED
AIR SWING
PARA REGULAR LA DIRECCIÓN DE LA
5
CORRIENTE DE AIRE (5 OPCIONES)
Distancia máxima: 8m
/
QUIET
POWERFUL
A
SELECT
B
SET/CANCEL
CHECK
ERROR RESETRESET
AIR CONDITIONER
(VERDE)
(NARANJA)
Pulse el botón del control remoto
CONECTAR O DESCONECTAR LA
1
UNIDAD
• Por favor esté al tanto de la indicación OFF en la pantalla
del mando a distancia para impedir que la unidad
comience o se detenga incorrectamente.
2
PARA AJUSTAR LA TEMPERATURA
• Rango de selección: 16°C ~ 30°C.
• El funcionamiento de la unidad dentro de la temperatura
recomendada podría resultar en el ahorro de energía.
Modo CALOR : 20°C ~ 24°C.
Modo FRÍO : 26˚C ~ 28˚C.
Modo DESHUMIDIFICACIÓN : 1°C ~ 2°C menos que la
temperatura ambiente.
3
SELECCIONAR MODO DE OPERACIÓN
Modo AUTOMÁTICO - Para su comodidad
• Durante la selección del modo de funcionamiento el
indicador de encendido parpadea.
• La unidad selecciona el modo de operación de acuerdo
con la temperatura interna y con la temperatura del
control remoto.
Modo CALOR - Para disfrutar de aire caliente
• En modo calor, puede pasar un rato hasta que el
equipo se caliente. El indicador POWER (ENCENDIDO)
parpadea durante el precalentamiento.
Modo FRÍO - Para disfrutar de aire frío
• Use cortinas para proteger de luz solar y el calor exterior y
así reducir el consumo eléctrico durante el modo de frío.
Modo DESHUMIDIFICACIÓN - Para deshumidicar el
ambiente
• La unidad funciona en la velocidad de ventilador bajo para
proporcionar una agradable refrigeración.
• Mantiene la habitación ventilada.
• En los modos COOL (FRÍO), si se selecciona AUTO, las
palas se moverán de arriba a abajo automáticamente.
• En el modo CALOR, si AUTOMÁTICO está activado, la
rejilla horizontal se ja a una posición determinada.
6
PARA ALCANZAR LA TEMPERATURA
• Esta conguración permite que la temperatura deseada
se alcance rápidamente.
PARA DISFRUTAR DE UN AMBIENTE
7
SILENCIOSO
• Esta conguración proporciona un ambiente silencioso
reduciendo el ruido de la salida de aire.
• Los modos POWERFUL y QUIET no pueden activarse
simultáneamente.
PRESIONE PARA RESTABLECER EL AJUSTE DE
8
FÁBRICA DEL MANDO A DISTANCIA
9
NO UTILIZADO EN FUNCIONES NORMALES
Pantalla del mando a distancia
1
4
7
9
3
2
5
6
8
4
SELECCIONAR MODO DE OPERACIÓN
• Para AUTO (automático), la velocidad de ventilador de
interior es ajustada automáticamente según el modo de
16
operación.
Page 17
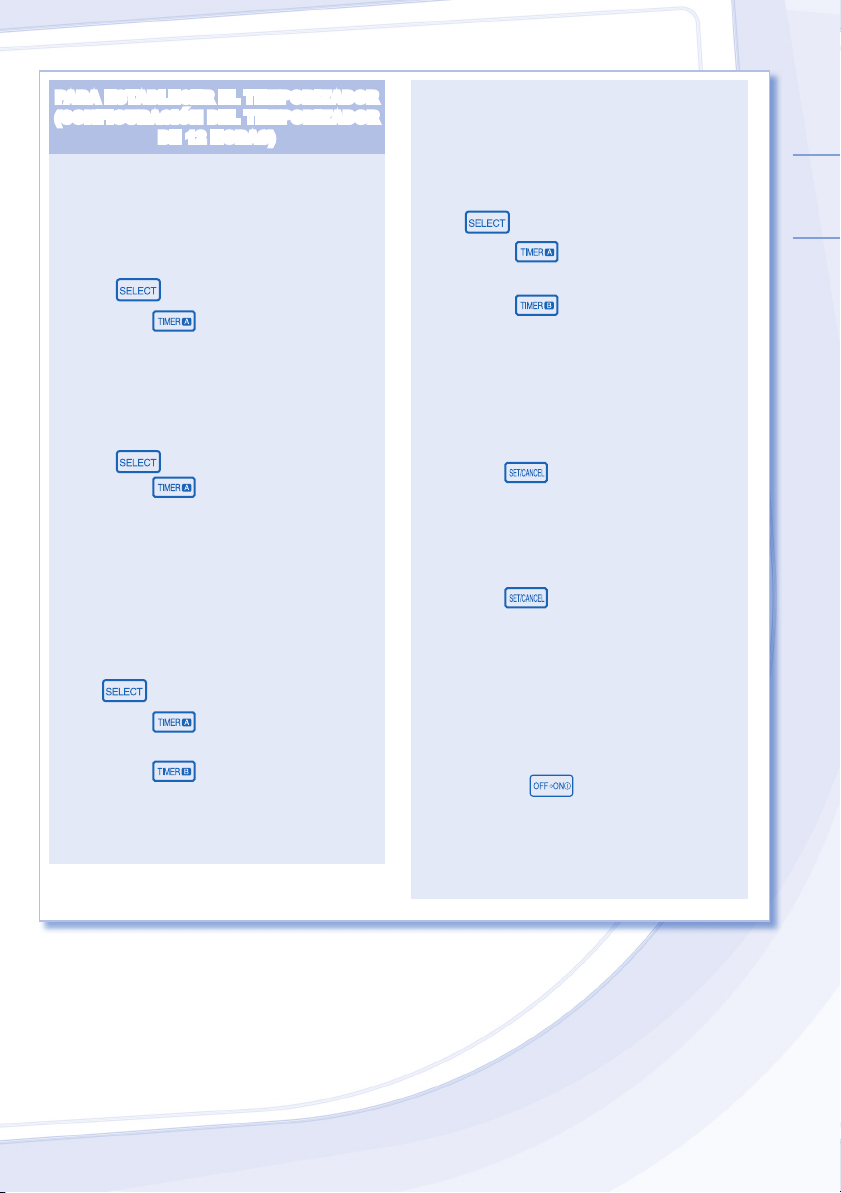
PARA ESTABLECER EL TEMPORIZADOR
(CONFIGURACIÓN DEL TEMPORIZADOR
DE 12 HORAS)
• Cuando desea que el equipo se encienda o apague
automáticamente.
TEMPORIZADOR DE APAGADO
Por ejemplo, para apagar el equipo 5 horas después.
1 Para seleccionar el temporizador de apagado, pulse
el botón
2 Pulse el botón
una vez.
para programar una hora.
• El temporizador de apagado sólo puede establecerse
cuando el equipo está en funcionamiento.
TEMPORIZADOR DE ENCENDIDO
Por ejemplo, para encender el equipo 2 horas después.
1 Para seleccionar el temporizador de encendido, pulse
el botón
2 Pulse el botón
una vez.
para programar una hora.
• El temporizador de encendido sólo puede
establecerse cuando el equipo no está en
funcionamiento.
TEMPORIZADOR DE APAGADO Y ENCENDIDO
Por ejemplo, para apagar el equipo 3 horas después y
encenderlo 4 horas después.
1 Para seleccionar los temporizadores de retardo de
OFF (APAGADO) y ON (ENCENDIDO), pulse el
botón
2 Pulse el botón
dos veces.
para programar la hora de
APAGADO.
3 Pulse el botón
para programar la hora de
ENCENDIDO.
• Este temporizador de encendido sólo puede
establecerse cuando el equipo está en
funcionamiento.
TEMPORIZADOR DE ENCENDIDO Y APAGADO
Por ejemplo, para encender el equipo 7 horas después
y apagarlo 10 horas después.
1 Para seleccionar los temporizadores de retardo de
ON (ENCENDIDO) y OFF (APAGADO), pulse el
botón
2 Pulse el botón
dos veces.
para programar la hora de
ENCENDIDO.
3 Pulse el botón
para programar la hora de
APAGADO.
• Este temporizador de encendido sólo puede
establecerse cuando el equipo no está en
funcionamiento.
PARA CONFIRMAR LA CONFIGURACIÓN DE
TEMPORIZADO
Pulse el botón
una vez para activar el
funcionamiento de temporizado que empezará cuando
el tiempo establecido se alcance.
PARA CANCELAR LA CONFIGURACIÓN DE
TEMPORIZADO
Pulse el botón
otra vez para cancelar el
funcionamiento temporizado.
• El indicador de temporizador de la unidad interior se
encenderá durante el funcionamiento temporizado.
• Cuando el temporizador de encendido esté
congurado, la unidad podría comenzar a funcionar
antes de la hora congurada para lograr la
temperatura deseada a tiempo.
/
• Si pulsa el botón
durante el funcionamiento
temporizado, el temporizador será cancelado.
• Si el temporizador se cancela manualmente o debido
a un corte de energía, puede restablecerlo repitiendo
los pasos descritos arriba (una vez se restablezca la
alimentación).
ESPAÑOL
17
Page 18
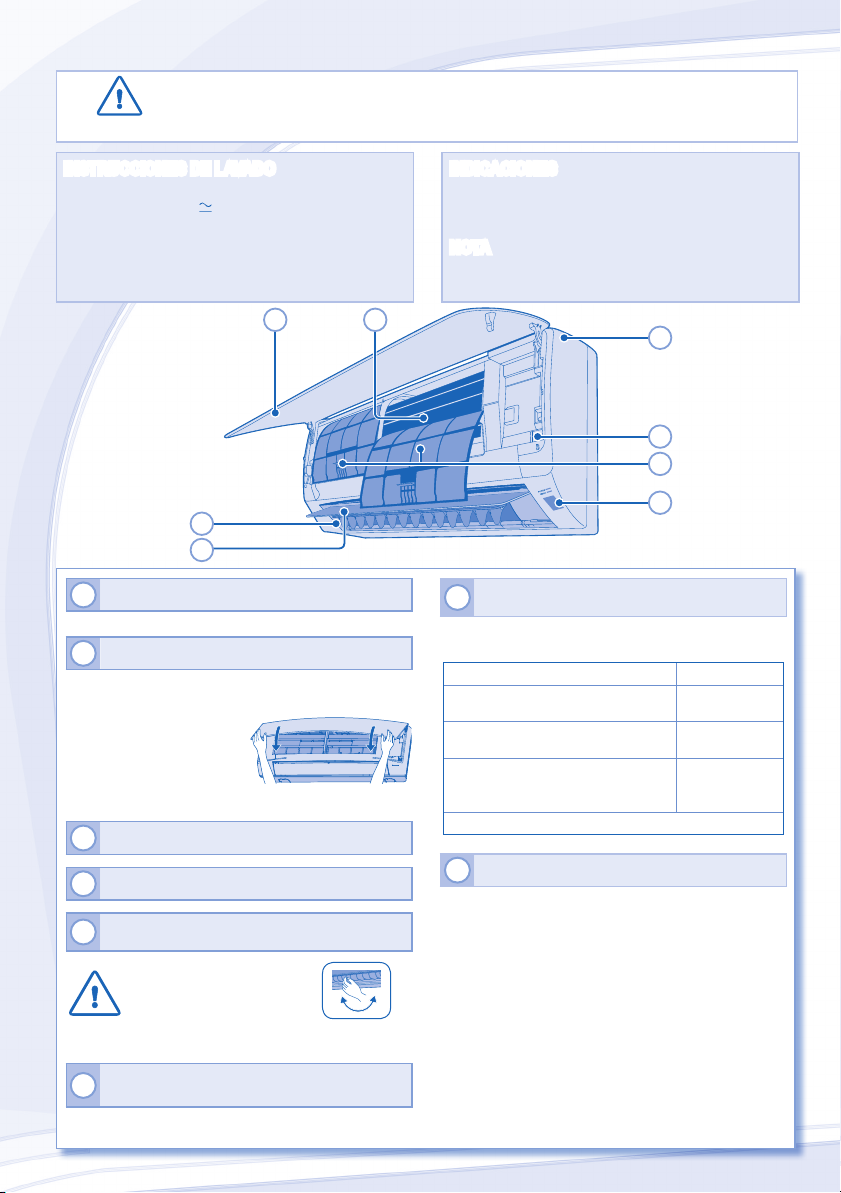
UNIDAD INTERIOR
• Apague la unidad antes de limpiarla.
• No toque la las partes angulosas de aluminio pueden causar
PRECAUCIÓN
INSTRUCCIONES DE LAVADO INDICACIONES
• No utilice benceno, disolvente o limpiador en polvo.
• Utilice sólo jabones ( pH7) o detergentes domésticos
neutros.
• No utilice agua con una temperatura superior a 40°C.
heridas.
5
6
• Para garantizar un rendimiento óptimo de la unidad,
el mantenimiento de la limpieza se debe realizar en
intervalos regulares.
NOTA
• Si se emplean paños químicos para limpiar el equipo,
debe seguir las instrucciones de dicho paño.
2
4
1
7
8
3
1
UNIDAD INTERIOR
• Limpie la unidad suavemente con un paño suave y seco.
2
PANEL FRONTAL
Retire el panel frontal
• Levante y tire del panel frontal para retirarlo.
• Lávelo con cuidado y séquelo.
Cierre el panel frontal
• Pulse hacia abajo los dos extremos del panel frontal para
cerrarlo herméticamente.
3
RECEPTOR
4
ALETA DE ALUMINIO
REJILLA DE DIRECCIÓN DE CORRIENTE DE
5
AIRE HORIZONTAL
• Manualmente ajustable.
ATENCIÓN
Tenga cuidado de no insertar los dedos en la unidad
para evitar heridas causadas por el ventilador.
REJILLA DE DIRECCIÓN DE CORRIENTE DE
6
AIRE VERTICAL
• No lo ajuste manualmente.
18
BOTÓN DE ENCENDIDO/APAGADO
7
AUTOMÁTICO (AUTO OFF/ON)
• Utilizado cuando el mando a distancia está extraviado o
funciona mal.
Acción Modo
Pulsar una vez. Funcionamiento
automático
Presione y mantenga hasta que
escuche un pitido, luego suéltelo.
Enfriamiento
Pulsar y mantener presionado hasta
que suenen dos pitidos, después
Calentamiento
soltar.
Presione el botón para apagar.
8
FILTRO DE AIRE
• Limpie los ltros regularmente.
• Lave/enjuague los ltros con agua, con cuidado para
evitar dañar la supercie del mismo.
• Secar minuciosamente los ltros a la sombra, lejos del
fuego o la luz solar directa.
• Reemplace los ltros dañados.
Page 19

LOCALIZACIÓN DE AVERÍAS
Las siguientes señales no indican un mal funcionamiento.
SEÑAL CAUSA
Sale neblina de la unidad interior. ► • Efecto de condensación producido durante el proceso
Se escucha un sonido similar a agua uyendo durante el
funcionamiento.
Hay un olor extraño en la habitación. ► • Puede ocurrir debido al olor a humedad producido por las
El ventilador interior se para de vez en cuando con la
velocidad del ventilador automática.
El aparato tarda varios minutos en funcionar tras volver a
encenderlo.
La unidad exterior emite agua o vapor. ► • Se produce condensación o evaporación en los tubos.
El equipo funciona automáticamente cuando la
alimentación se restablece tras un fallo de corriente.
El ventilador interior se para de vez en cuando durante la
función de calentamiento.
El indicador de encendido parpadea antes de encender
la unidad.
Sonido seco (de chasquido) durante el funcionamiento. ► • Los cambios de temperatura causan la expansión/
Compruebe lo siguiente antes de llamar a un técnico.
SEÑAL COMPRUEBE
Las funciones calor/frío no funcionan ecientemente. ► • Programe la temperatura correctamente.
Funcionamiento ruidoso. ► • Compruebe si la unidad ha sido instalada en una inclinación.
El mando a distancia no funciona.
(La pantalla está oscura o la señal de transmisión es débil.)
La unidad no funciona. ► • Compruebe si el disyuntor está activado.
La unidad no recibe la señal del mando a distancia. ► • Asegúrese de que el receptor no esté obstruido.
La unidad se detiene y el indicador de tiempo parpadea.
Use el control remoto para recuperar el código de error.
/
Pulse hasta escuchar
2
un pitido y, después,
apunte el código del
POWERFUL
QUIET
Pulse
1
durante 5
segundos.
Apague la unidad e informe el código de error al distribuidor autorizado.
4
SELECT
CHECK
A B
SET/CANCEL
ERROR RESET RESET
error.
Pulse para abandonar la
3
comprobación.
de enfriamiento.
► • Flujo del refrigerante en el interior de la unidad.
paredes, las alfombras, los muebles o las telas de la habitación.
► • Con esto se eliminan los malos olores del ambiente.
► • El retraso responde a un dispositivo de protección del
compresor de la unidad.
► • Es la función de reanudación automática del equipo.
El funcionamiento se restablecerá en el mismo modo y
dirección de aire en que se encontraba anteriormente
cuando se restablece la corriente ya que el funcionamiento
no se ha detenido mediante el mando a distancia.
► • Para evitar un efecto de enfriamiento indeseado.
► • Se trata de un paso preliminar para preparar el funcionamiento
cuando se ha ajustado el temporizador de encendido.
contracción de la unidad.
• Cierre todas las puertas y ventanas.
• Limpie o sustituya los ltros.
• Limpie cualquier obstrucción en la entrada y salida de aire.
• Cierre el panel delantero correctamente.
► • Inserte las baterías correctamente.
• Reemplace las baterías débiles.
• Compruebe si los temporizadores han sido programados.
• Ciertas luces uorescentes puede interferir con el transmisor
de señal. Consulte con un distribuidor autorizado.
Nota:
• Para cierto error, puede
reiniciar la unidad con el
funcionamiento limitado
con 4 pitidos durante el
inicio de la operación.
ESPAÑOL
19
Page 20

PRECAUZIONI PER LA
SICUREZZA
Per evitare lesioni personali, lesioni ad altri o danni alla
proprietà, rispettare quanto segue.
In caso di uso scorretto dovuto alla mancata osservanza
delle istruzioni, si possono provocare iincidenti o danni di
varia natura, la cui gravità è indicata dai seguenti simboli:
AVVERTENZE
Unità
ATTENZIONE
materiali.
Ingresso aria
Uscita aria
Uscita aria
Ingresso aria
Ingresso aria
Unità
Esterna
Alimentazione
Uscita aria
Questo simbolo indica un pericolo di morte o lesioni gravi.
Questo simbolo indica un rischio di lesioni o danni
Le istruzioni sono classicate in varie tipologie,
contrassegnate dai seguenti simboli:
Questo simbolo indica un’azione PROIBITA.
Questi simboli indicano azioni OBBLIGATORIE.
Interna
Telecomando
AVVERTENZE
UNITÀ INTERNA E UNITÀ ESTERNA
L’uso di questo apparecchio non è destinato
a persone con capacità siche, sensoriali
o mentali ridotte (compresi i bambin i), o
mancanza di esperienza o competenza, a meno
che non siano supervisionate o istruite sull’uso
dell’apparecchio da una persona responsabile
della loro sicurezza. Fare attenzione che i
bambini non giochino con l’apparecchio.
Consultare un rivenditore autorizzato o uno
specialista per pulire le parti interne, per
riparare, installare, rimuovere e reinstallare
l’unità. L’installazione e la gestione non corrette
provocano perdite, shock elettrico o incendio.
Non installare l’unità in un ambiente con
atmosfera potenzialmente esplosiva o
inammabile. La mancata esecuzione di ciò può
causare un incendio.
Non inserire dita o altri oggetti nell’unità
interna o esterna del condizionatore
d’aria, i componenti rotanti possono
provocare lesioni.
Non toccare l’unità esterna durante temporali
con fulmini, ciò potrebbe provocare una scossa
elettrica.
Non esporsi direttamente all’aria fredda per
un lungo periodo di tempo, per evitare un
raffreddamento eccessivo.
Non sedersi o camminare sull’unità,
si può cadere in modo accidentale.
TELECOMANDO
Non permettere a bambini piccoli di giocare con
il telecomando, al ne di evitare che ingeriscano
accidentalmente le batterie.
ALIMENTAZIONE
Per evitare surriscaldamento
e incendio, non utilizzare un
cavo modicato, un
connettore, una prolunga o un
cavo non specicato.
Per evitare surriscaldamento, incendio o shock
elettrico:
• Non usare la stessa presa di alimentazione
per più apparecchi.
• Non usare con le mani bagnate.
• Non piegare troppo il cavo di alimentazione.
• Non azionare o arrestare l’unità inserendo o
estraendo la spina di alimentazione.
20
Page 21

ALIMENTAZIONE
Se il cavo di alimentazione è stato danneggiato,
rivolgersi al produttore, ad un centro di
assistenza autorizzato o ad un tecnico
qualicato onde evitare rischi.
Per evitare scosse o incendio, si raccomanda
fortemente l’installazione di un salvavita contro
le perdite a terra (ELCB) o un interruttore
differenziale (RCD).
Per evitare surriscaldamento, incendi o shock
elettrico:
• Inserire correttamente il cavo di alimentazione.
• La polvere sulla spina elettrica deve essere
rimossa periodicamente con un panno
asciutto.
Interrompere l’uso del prodotto quando si
vericano anomalie/guasti e scollegare la
spina elettrica o disattivare l’alimentazione e
l’interruttore.
(Rischio di fumo/incendio/shock elettrico)
Esempi di anomalia/guasto
• L’ELCB scatta di frequente.
• Si osserva odore di bruciato.
• Si osservano rumori anomali o vibrazione
dell’unità.
• Ci sono perdite di acqua dall’unità interna.
• Il cavo di alimentazione o la spina diventano
insolitamente caldi.
• Impossibile controllare la velocità della
ventola.
• L’unità smette di funzionare immediatamente
anche se è accesa.
• La ventola non si arresta anche se il
funzionamento è interrotto.
Contattare immediatamente il rivenditore locale
per manutenzione/riparazione.
La sostituzione o la installazione delle spine
elettriche deve essere eseguita solo da
personale autorizzato/qualicato. I cavi della
rete elettrica sono colorati secondo il codice
che segue:
Terminali
Rosso
Nero
Verde/giallo
Il colore dei cavi può variare a seconda dello
standard dei codici di una nazione.
Il presente apparecchio deve avere la messa a
terra per prevenire scosse o incendio.
Evitare scosse togliendo la corrente nei
seguenti casi:
- Prima di pulire o eseguire la manutenzione.
- Inutilizzo prolungato dell’apparecchio.
- Attività anomala delle spie luminose.
AVVERTENZE
cavi
fase
neutrale
terra
colori (Standard IEC)
marrone
blu
verde-giallo
ATTENZIONE
UNITÀ INTERNA E UNITÀ ESTERNA
Non lavare l’unità interna con acqua, benzina,
solventi o polvere abrasiva per evitare danni o
corrosione all’unità.
Non usare per conservare apparecchi di
precisione, alimenti, animali, piante, opere d’arte
o altri oggetti. Questo potrebbe provocare un
deterioramento della qualità, ecc.
Per evitare la propagazione di un incendio, non
utilizzare apparecchi combustibili davanti alla
presa d’aria.
Non esporre pianti o animali direttamente al
usso dell’aria per evitare lesioni, ecc.
Non toccare l’aletta in alluminio
aflata, parti aflate possono causare
delle lesioni.
Non accendere l’unità interna quando si passa
la cera sul pavimento. Dopo tale operazione,
aerare accuratamente la stanza prima di
mettere in funzione l’unità.
Per evitare danni all’unità, non installare l’unità
in aree piene di olio e fumo.
Per evitare lesioni, non smontare l’unità per
scopi di pulizia.
Per evitare lesioni, non salire su supporti
instabili quando si pulisce l’unità.
Non mettere vasi o contenitori pieni di acqua
sull'unità. L’acqua potrebbe entrare nell’unità
e rovinare l’isolamento. Questo potrebbe
provocare uno shock elettrico.
Non lasciare la nestra aperta durante la
modalità Freddo/Deumidicazione per evitare
perdite di acqua.
Assicurare che il tubo di scarico sia collegato
correttamente e tenere l’uscita di scarico libera
da canaletti, contenitori o non immergere in
acqua per evitare perdite di acqua stessa.
Dopo un lungo periodo di uso o dopo uso con
apparecchi alimentati da combustibile, aerare
l’ambiente.
Quando l’apparecchio è stato utilizzato per un
lungo periodo, assicurarsi che la struttura di
sostegno installata non si sia deteriorata, in
modo da evitare la caduta dell’unità.
TELECOMANDO
Non utilizzare batterie ricaricabili (Ni-Cd). Può
danneggiare il telecomando.
Per evitare malfunzionamenti o danni al telecomando:
• Rimuovere le batterie se l’unità non sarà usata
per molto tempo.
• Bisogna inserire batterie nuove dello stesso
tipo, seguendo la polarità prevista.
ALIMENTAZIONE
Non tirare il cavo per scollegare la spina al ne
di impedire shock elettrico.
ITALIANO
21
Page 22

TELECOMANDO
FAN SPEED
AIR SWING
REGOLAZIONE DELLA DIREZIONE DEL FLUSSO
5
DELL’ARIA (5 OPZIONI)
Distanza massima: 8m
/
QUIET
POWERFUL
A
SELECT
B
SET/CANCEL
CHECK
ERROR RESETRESET
AIR CONDITIONER
(VERDE)
(ARANCIONE)
Premere il tasto del telecomando
PER ACCENDERE O SPEGNERE
1
L’UNITÀ
• Si prega di notare l’indicazione di spegnimento (OFF)
sul display del telecomando per evitare l’avvio/arresto
accidentale dell’unità.
2
PER IMPOSTARE LA TEMPERATURA
• Intervallo di selezione: 16°C ~ 30°C.
• L’utilizzo dell’unità entro la temperatura consigliata può
determinare dei risparmi di energia.
Modalità RISCALDAMENTO : 20°C ~ 24°C.
Modalità RAFFREDDAMENTO : 26°C ~ 28°C.
Modalità DEUMIDIFICAZIONE : 1°C ~ 2°C in meno della
temperatura ambiente.
3
PER IMPOSTARE LA TEMPERATURA
Modalità AUTO - Per la propria comodità
• Durante le seleziona l’indicatore di alimentazione lampeggia.
• L’unità seleziona la modalità di funzionamento secondo
la temperatura interna di ingresso e la temperatura del
telecomando.
Modalità RISCALDAMENTO - Per godere dell’aria calda
• In modalità riscaldamento, ci può volere un pò di
tempo perché l’unità si riscaldi. L’indicatore POWER
(ALIMENTAZIONE) lampeggia durante il
pre-riscaldamento.
Modalità RAFFREDDAMENTO - Per godere dell’aria
fresca
• Per risparmiare energia mentre il condizionatore è in
modalità di raffreddamento, utilizzare delle tende per
impedire l’ingresso di calore e della luce solare.
Modalità DEUMIDIFICAZIONE - Per deumidicare
l’ambiente
• La ventola dell’unità opera a bassa velocità, al ne di eseguire
l’operazione di raffreddamento in maniera molto delicata.
4
PER IMPOSTARE LA TEMPERATURA
• Mantenere l’ambiente ventilato.
• In modalità COOL (FREDDO), se è impostata l’opzione
AUTO, la griglia si sposta su/giù.
• In modalità HEAT (CALDO), se è impostata l’opzione
AUTO, la griglia orizzontale per lo spostamento dell’aria si
porta a una posizione predeterminata.
PER RAGGIUNGERE RAPIDAMENTE LA
6
TEMPERATURA
• Questa impostazione consente di raggiungere
rapidamente la temperatura impostata desiderata.
7
PER GODERE DI UN AMBIENTE SILENZIOSO
• Questa impostazione garantisce un ambiente silenzioso
riducendo il rumore del usso dell’aria.
• Il funzionamento POTENTE e quello SILENZIOSO non
possono essere attivati contemporaneamente.
PREMERE PER RIPRISTINARE L’IMPOSTAZIONE
8
PREDEFINITA DEL TELECOMANDO
9
DA NON UTILIZZARE IN OPERAZIONI NORMALI
Display telecomando
1
4
7
9
3
2
5
6
8
• Per la modalità automatica, la velocità della ventola
interna viene regolata automaticamente in base alla
modalità operativa.
22
Page 23

PER IMPOSTARE IL TIMER
(12- IMPOSTAZIONE TIMER ORARIO)
• Quando si desidera che l’apparecchio si accenda o
spenga automaticamente.
TIMER SPEGNIMENTO RITARDATO
Per esempio, per spegnere il condizionatore d’aria 5
ore dopo.
1 Per selezionare il timer di spegnimento ritardato,
premere una volta il tasto
2 Premere il tasto
.
per selezionare il tempo di
ritardo.
• Il timer di spegnimento può essere impostato solo
mentre il condizionatore d’aria è in uso.
TIMER ACCENSIONE RITARDATA
Per esempio, per avviare il condizionatore d’aria 2 ore
dopo.
1 Per selezionare il timer di accensione ritardata,
premere una volta il tasto
2 Premere il tasto
.
per selezionare il tempo di
ritardo.
• Il timer di accensione può essere impostato solo
mentre il condizionatore d’aria non è in uso.
TIMER SPEGNIMENTO E ACCENSIONE RITARDATI
Per esempio, per spegnere il condizionatore d’aria 3
ore dopo e riavviarlo 4 ore dopo.
1 Per selezionare il timer di spegnimento e accensione
in ritardo, premere il tasto
due volte
ripetutamente..
2 Premere il tasto
per selezionare il tempo di
ritardo per il timer di spegnimento.
3 Premere il tasto
per selezionare il tempo di
ritardo per il timer di accensione.
• Questa modalità di timer può essere impostata solo
mentre il condizionatore d’aria è in uso.
TIMER ACCENSIONE E SPEGNIMENTO RITARDATI
Per esempio, per avviare il condizionatore d’aria 7 ore
dopo e spegnerlo 10 ore dopo.
1 Per selezionare il timer di accensione e spegnimento
in ritardo, premere il tasto
due volte
ripetutamente.
2 Premere il tasto
per selezionare il tempo di
ritardo per il timer di accensione.
3 Premere il tasto
per selezionare il tempo di
ritardo per il timer di spegnimento.
• Questa modalità di timer può essere impostata solo
mentre il condizionatore d’aria non è in uso.
PER CONFERMARE LE IMPOSTAZIONI DEL TIMER
Premere il tasto
una volta per attivare il
funzionamento del timer che si avvierà quando viene
raggiunta l’ora impostata.
PER ANNULLARE LE IMPOSTAZIONI DEL TIMER
Premere di nuovo il tasto
per annullare il timer
di accensione.
• La spia del timer dell’unità interna si accende durante
il funzionamento del timer.
• Quando si imposta il timer di accensione, l’unità
può avviarsi prima del tempo reale impostato per
raggiungere in tempo la temperatura desiderata.
/
• Se si preme il tasto
durante il funzionamento
con il timer impostato, le impostazioni del timer
saranno annullate.
• Se il timer viene annullato manualmente per
un’assenza di elettricità, è possibile ripristinare il
timer nuovamente ripetendo le fasi suddette (quando
l’elettricità è nuovamente presente).
ITALIANO
23
Page 24

UNITÀ INTERNA
• Spegnere l’apparecchio prima di pulirlo.
• Non toccare l’aletta in alluminio, le parti afliate potrebbero
ATTENZIONE
ISTRUZIONI PER IL LAVAGGIO SUGGERIMENTI
• Non lavare l’apparecchio con benzene, solventi o
polveri abrasive.
• Impiegare esclusivamente saponi o detergenti neutri per
la casa ( pH7).
• Non usare acqua ad una temperatura superiore a 40°C.
causare lesioni.
2
5
6
• Per assicurare una performance ottimale dell’unità, pulizia e
manutenzione devono essere eseguite a intervalli regolari.
NOTA
• Se si usa un panno chimico per pulire l’unità, è
necessario seguire le istruzioni del panno stesso.
4
1
7
8
3
1
UNITÀ INTERNA
• Asciugare l’apparecchio con un panno morbido e asciutto.
2
PANNELLO ANTERIORE
Rimuovere il pannello anteriore
• Sollevare e tirare per rimuovere il pannello anteriore.
• Lavare delicatamente ed asciugare.
Chiudere il pannello
anteriore
• Premere sulle estremità del
pannello anteriore per chiuderlo in modo sicuro.
3
RICEVITORE
4
ALETTA IN ALLUMINIO
ALETTA DI DIREZIONE ORIZZONTALE DEL
5
FLUSSO D’ARIA
• Regolabili a mano.
AVVERTENZA
Fare attenzione a non mettere le dita
nell’unità per evitare lesioni a causa della
ventola di usso.
ALETTA DI DIREZIONE VERTICALE DEL
6
FLUSSO D’ARIA
• Non regolare manualmente.
24
7
TASTO AUTO OFF/ON
• Da utilizzare quando il telecomando è fuori posto o
presenta anomalie.
Azione Modalità
Premere una volta. Automatico
Premere e tenere premuto no a
quando non si sente 1 bip, quindi
Raffreddamento
rilasciare.
Tenere premuto no a che si sente un
doppio bip, poi rilasciare.
Riscaldamento
Premere il tasto per spegnere.
8
FILTRO DELL’ARIA
• Pulire i ltri regolarmente.
• Lavare/risciacquare delicatamente i ltri con acqua al
ne di evitare danni alla loro supercie.
• Asciugare accuratamente i ltri all’ombra, lontano da
amme o dalla luce diretta del sole.
• Sostituire i ltri danneggiati.
Page 25

SOLUZIONE DEI PROBLEMI
Le condizioni seguenti indicano un guasto.
CONDIZIONE CAUSA
Sembra che dall’unità interna fuoriesca della nebbia. ► • Effetto di condensa dovuto al processo di raffreddamento.
Rumore di acqua durante il funzionamento. ► • Flusso del refrigerante all’interno dell’unità.
L’ambiente ha un odore particolare. ► • Può essere dovuto a un odore di umido proveniente dai muri,
La ventola interna si arresta di tanto in tanto quando
si imposta la modalità di regolazione automatica della
velocità della ventola.
L’operazione è ritardata di qualche minuto dopo il riavvio. ► • Il ritardo è una protezione del compressore dell’apparecchio.
Dall’unità esterna fuoriesce acqua/vapore. ► • Condensa o evaporazione nei condotti.
L’unità funziona automaticamente quando l’alimentazione
riprende dopo un’interruzione di elettricità.
La ventola interna si arresta di tanto in tanto quando si
imposta la modalità riscaldamento.
L’indicatore POWER lampeggia prima che l’unità si accenda. ► • Si tratta di un passo preliminare in vista del
Rumori di urti durante il funzionamento. ► • I cambiamenti di temperatura causano l’espansione/
Eseguire i controlli seguenti prima di rivolgersi all’assistenza.
CONDIZIONE CONTROLLARE
La modalità di riscaldamento/raffreddamento non funziona
in maniera efciente.
Rumore durante il funzionamento. ► • Vericare che l’unità sia stata installata in maniera
Il telecomando non funziona.
(Il display è oscurato oppure il segnale di trasmissione è debole.)
L’apparecchio non funziona. ► • Vericare se è si è attivato l’interruttore di circuito.
L’unità non riceve il segnale dal telecomando. ► • Assicurarsi che il ricevitore non sia ostruito.
L’unità si ferma e l’indicatore del timer lampeggia.
Usare il telecomando per vedere il codice di errore.
/
Premere nché non si
2
sente un “beep”, quindi
annotare il codice di errore.
POWERFUL
QUIET
Premere
1
per 5
secondi.
Spegnere l’unità e mostrare il codice di errore al rivenditore autorizzato.
4
SELECT
CHECK
A B
SET/CANCEL
ERROR RESET RESET
Premere per uscire
3
dal controllo.
ai tappeti, dai mobili o dagli indumenti presenti nella stanza.
► • Ciò consente di eliminare gli odori circostanti.
► • È la funzione di riavvio automatico dell’unità. Il
funzionamento si riavvia automaticamente secondo la
precedente modalità di funzionamento e la direzione del
usso dell’aria quando l’alimentazione riprende poiché il
funzionamento non è interrotto dal telecomando.
► • Funzionalità studiata per evitare un effetto di
raffreddamento non intenzionale.
funzionamento quando si imposta il timer di accensione.
contrazione dell’unità.
► • Impostare la temperatura corretta.
• Chiudere tutte le porte e nestre.
• Pulire o sostituire i ltri.
• Eliminare le eventuali ostruzioni alle bocchette di
ingresso ed uscita dell’aria.
inclinata.
• Chiudere correttamente il pannello anteriore.
► • Inserire le batterie in maniera corretta.
• Sostituire le batterie quasi scariche.
• Vericare se sono stati impostati i timer.
• Alcune luci uorescenti potrebbero interferire con il
trasmettitore di segnale. Consultare un rivenditore autorizzato.
Nota:
• Per alcuni errori è
possibile riavviare l’unità
con una operazione
limitata con 4 bip durante
l’avvio.
ITALIANO
25
Page 26

PRECAUÇÕES DE SEGURANÇA
Para evitar danos pessoais, danos a outros, ou danos na
propriedade, por favor cumpra o seguinte.
A utilização incorrecta devido ao incumprimento das
instruções pode resultar em ferimentos ou danos cuja
gravidade é classicada da seguinte forma:
AVISO
Este símbolo indica perigo de morte ou ferimento grave.
Este símbolo indica perigo de ferimento ou danos de bens.
As instruções a seguir são classicadas com os seguintes
símbolos:
Este símbolo indica uma acção PROIBIDA.
Estes símbolos indicam acções OBRIGATÓRIAS.
Unidade
Interior
Controlo
Remoto
CUIDADO
Entrada de ar
Saída de ar
Entrada de ar
Unidade
Exterior
Fonte de
alimentação
Saída de ar
AVISO
UNIDADE INTERIOR E UNIDADE EXTERIOR
Este dispositivo não se destina ao uso por
pessoas (incluindo crianças) com reduzidas
capacidades físicas, sensoriais ou mentais, ou
falta de experiência e conhecimento, excepto
se tiverem supervisão ou instrução relacionadas
com o uso do dispositivo por uma pessoa
responsável pela sua segurança. As crianças
devem ser supervisionadas para assegurar que
não brincam com o dispositivo.
Por favor consulte o representante autorizado
ou especialista para limpar as partes internas,
reparar, instalar, remover e reinstalar a unidade.
A instalação inadequada e manutenção pode
provocar fuga, choque eléctrico ou incêndio.
Não instale a unidade numa ambiente
potencialmente explosivo ou inamável. Se não
zer isso, pode provocar incêndio por acidente.
Não coloque os seus dedos ou outros
objectos na unidade de ar condicionado
interior ou exterior, as partes rotativas
podem provocar ferimentos.
Não toque na unidade exterior em caso de
relâmpagos, pode provocar choque eléctrico.
Para evitar frio excessivo não se exponha
directamente ao ar frio durante um longo
período de tempo.
Não se sente na unidade ou utilize-a
como um degrau, pode cair
acidentalmente.
CONTROLO REMOTO
Não deixe as crianças brincar com o controlo remoto
para impedir que engulam acidentalmente as
pilhas.
FONTE DE ALIMENTAÇÃO
Não utilize um cabo modicado,
com união, com extensão ou
não especicado para evitar o
sobreaquecimento e incêndio.
Para prevenir sobreaquecimento, fogo ou
choque eléctrico:
• Não compartilhe a mesma tomada eléctrica
com outro equipamento.
• Não opere a unidade com as mãos molhadas.
• Não dobre o cabo de alimentação
• Não opere ou desligue a unidade introduzindo
ou puxando o cabo de alimentaçao da tomada.
26
Page 27

FONTE DE ALIMENTAÇÃO
Se o cabo de alimentação estiver danicado,
terá de ser substituído pelo fabricante, agente
de assistência ou técnico qualicado para evitar
situações de perigo.
É fortemente recomendada a instalação do
Disjuntor com fuga à terra (ELCB) ou um
Dispositivo de Corrente Residual (RCD) para
evitar choque eléctrico ou incêndio.
Para prevenir sobreaquecimento, fogo ou
choque eléctrico:
• Introduza o cabo de alimentação
correctamente.
• O pó da tomada deve ser limpo
periodicamente com um pano seco.
Não utilize o produto quando ocorrer
alguma anomalia/falha e desligue o cabo de
alimentação ou desligue o interruptor ou o
disjuntor.
(Risco de fumo/fogo/choque eléctrico)
Exemplos de anomalias/falhas
• Se ELCB dá problemas frequentemente.
• Se sentir o cheiro a queimado.
• Se ouvir barulho anormal ou vibração da
unidade.
• Se sair água da unidade interior.
• Se o cabo de alimentação ou a tomada
carem anormalmente quentes.
• Se não conseguir controlar a velocidade da
ventoinha.
• Se a unidade deixar de funcionar
imediatamente, ainda que ligada.
• Se a ventoinha não parar, ainda que
desligada.
Contacte imediatamente o seu fornecedor local
para manutenção/reparação.
A substituição ou a instalação de tomadas
deverá ser efectuada apenas por pessoal
autorizado/qualicado. Os os do cabo de
alimentação são coloridos, de acordo com o
seguinte código:
Terminais
Vermelho
Preto
Verde/Amarelo
Cores de os podem variar-se dependente do
padrão de cores de o de cada país.
Este equipamento deve ter ligação terra para
evitar choque eléctrico ou incêndio.
Evitar choque eléctrico ao desligar a fonte de
alimentação quando:
- Antes da limpeza ou manutenção.
- Não utilização prolongada.
- Forte actividade de relâmpagos fora do
normal.
AVISO
Fios
vivo
neutro
terra
Cores (Padrão CEI)
Marrom
azul
verde-amarelo
CUIDADO
UNIDADE INTERIOR E UNIDADE EXTERIOR
Para evitar danos ou corrosão da unidade não
lave a unidade interior com água, benzina,
diluente ou pó áspero.
Não utilize o aparelho para a preservação de
determinados equipamentos, comida, animais,
plantas, arte ou outros objectos. Isso poderá
conduzir à deterioração de qualidades, etc.
Não utilize nenhum equipamento de combustão
em frente à saída de ar para evitar a
propagação de incêndio.
Para evitar ferimentos, etc., não exponha plantas ou
animais domésticos directamente à saída de ar.
Não toque na rebarba de alumínio
aada, as peças aadas podem
provocar lesões.
Não ligue (ON) a unidade interior quando encera o
chão. Após encerar, areje a divisão adequadamente
antes de colocar a unidade a funcionar.
Para prevenir danos na unidade não instalar a
unidade em áreas com óleos e fumos.
Para evitar ferimentos não desmonte a unidade
para limpeza.
Para evitar ferimentos não pise uma superfície
instável enquanto limpa a unidade.
Não coloque vasos ou recipiente de água na
unidade. A água pode penetrar na unidade e
prejudicar o isolamento. Isso pode causar um
choque eléctrico.
Para prevenir fugas de água não deixe a janela aberta
durante o funcionamento dos modos Frio/Secar.
Para prevenir fugas de água certique-se que o
tubo de drenagem está ligado adequadamente
e mantenha a saída da drenagem livre de
calhas e recipientes e não a imerja em água.
Após longo período de utilização ou com
qualquer equipamento que use combustível, é
necessário ventilar o quarto regularmente.
Após longo período de uso, certique-se que
a armação da instalação não está deteriorada
para evitar que a unidade caia.
CONTROLO REMOTO
Não utilize pilhas recarregáveis (Ni-Cd). Pode
danicar o controlo remoto.
Para prevenir mau funcionamento ou danos do
controlo remoto:
• Remova as pilhas se nào for usar a unidade
por um longo período de tempo.
• Introduza pilhas novas do mesmo tipo seguindo
as indicações de polaridade indicadas.
FONTE DE ALIMENTAÇÃO
Para prevenir choques eléctricos não puxe o
cabo para desligar da tomada.
PORTUGUÊS
27
Page 28

CONTROLO REMOTO
FAN SPEED
AIR SWING
PARA AJUSTAR A DIRECÇÃO DO FLUXO DE AR
5
(5 OPÇÕES)
Distância máxima: 8m
/
QUIET
POWERFUL
A
SELECT
B
SET/CANCEL
CHECK
ERROR RESETRESET
AIR CONDITIONER
(VERDE)
(LARANJA)
Prima o botão do controlo remoto
PARA LIGAR OU DESLIGAR
1
(ON/ OFF) A UNIDADE
• Por favor tenha atenção à indicação de desligado (OFF)
no visor do controlo remoto, para evitar que a unidade
inicie/pare inapropriadamente.
2
PARA CONFIGURAR A TEMPERATURA
• Selecção de alcance: 16°C ~ 30°C.
• Funcionar com a unidade dentro da temperatura
recomendada poderá poupar energia.
Modo de AQUECIMENTO : 20°C ~ 24°C.
Modo de ARREFECIMENTO : 26°C ~ 28°C.
Modo SECO : 1°C ~ 2°C abaixo da temperatura ambiente.
3
PARA SELECCIONAR O MODO DE OPERAÇÃO
Mode AUTOMÁTICO - Para sua conveniência
• Durante a selecção do modo de funcionamento o
indicador de potência pisca.
• A unidade selecciona o modo de funcionamento de
acordo com a temperatura do interior e com a temperatura
do controlo remoto.
Mode de AQUECIMENTO - Para desfrutar de ar quente
• No modo de calor, a unidade pode demorar um pouco a
aquecer. O indicador de POWER (energia) pisca durante
o pré-aquecimento.
Mode de ARREFECIMENTO - Para desfrutar de ar fresco
• Utilize cortinas para evitar a luz solar e o calor exterior,
para reduzir o consumo de energia durante o modo frio.
Mode SECO - Para desumidicar o ambiente
• A unidade opera a uma velocidade baixa da ventoinha
para dar uma refrigeração suave.
4
PARA SELECCIONAR O MODO DE OPERAÇÃO
• Mantém a ventilação da sala.
• No modo COOL (FRIO), se estiver denido AUTO, a
alavanca balança cima/para baixo automaticamente.
• No modo HEAT (CALOR), se estiver denido
AUTO, a alavanca horizontal xa-se numa posição
predeterminada.
PARA ALCANÇAR A TEMPERATURA
6
RAPIDAMENTE
• Esta programação permite alcançar rapidamente a
temperatura desejada.
7
PARA DESFRUTAR DE UM AMBIENTE SILENCIOSO
• Esta programação fornece um abiente silecioso reduzindo
o barulho da saída de ar.
• Os modos POWERFUL e QUIET não podem ser
activados ao mesmo tempo.
PRIMA PARA RESTABELECER AS
8
CONFIGURAÇÕES PADRÃO DO CONTROLO
REMOTO
9
NÃO UTILIZADO EM OPERAÇÕES NORMAIS
Visor do Controlo Remoto
1
4
7
9
3
2
5
6
8
• Para AUTO, a velocidade da ventoinha interior é ajustada
automaticamente de acordo com o modo de operação.
28
Page 29

PARA AJUSTAR O TEMPORIZADOR
(CONFIGURAÇÃO DE TEMPORIZADOR DE 12 HORAS)
• Quando quer ligar (ON) ou desligar (OFF) a unidade
de ar condicionado automaticamente.
PROGRAMAR O TEMPORIZADOR DE
DESLIGAMENTO DIFERIDO
Por exemplo, para desligar automaticamente o
aparelho daí a 5 horas.
1 Para escolher o desligamento diferido, pressione uma
vez o botão
2 Pressione o botão
.
para escolher a horas de
desligamento.
• Este modo do temporizador só pode ser programado
quando a unidade setiver a funcionar.
PROGRAMAR A LIGAÇÃO DIFERIDA
PROGRAMAR A LIGAÇÃO (ON) E O
DESLIGAMENTO (OFF) DIFERIDOS
Por exemplo, para ligar o aparelho 7 horas mais tarde e
desligá-lo 10 horas depois.
1 Para selecionar a Demora de Temporizador ON
(LIGADO) e OFF (DESLIGADO), pressione o botão
duas vezes.
2 Pressione o botão
ligação (ON).
3 Pressione o botão
desligamento (OFF).
• Este modo do temporizador só pode ser programado
quando a unidade não estiver a funcionar.
PARA CONFIRMAR A PROGRAMAÇÃO DO
TEMPORIZADOR
Por exemplo, para ligar automaticamente o aparelho
dentro de duas horas.
1 Para seleccionar o Retardação do ON-TIMER, prima
uma vez.
2 Pressione o botão
para escolher a hora de
ligação.
• Este modo do temporizador só pode ser programado
quando a unidade não estiver a funcionar.
PROGRAMAR O DESLIGAMENTO (OFF) E A
LIGAÇÃO (ON) DIFERIDOS
Por exemplo, para desligar o aparelho 3 horas depois e
ligá-lo quatro horas depois.
1 Para selecionar a Demora de Temporizador OFF
(DESLIGADO) e ON (LIGADO), pressione o botão
duas vezes.
2 Pressionar o botão
para escolher a hora de
desligamento (OFF).
3 Pressionar o botão
para escolher a hora para
a ligação (ON).
• Este modo do temporizador só pode ser programado
Pressione uma vez o botão
funcionamento do temporizador, que irá começar
quando se atingir a hora programada.
PARA CANCELAR A PROGRAMAÇÃO DO
TEMPORIZADOR
Pressione de novo o botão
operação do temporizador.
• O indicador de temporizador da unidade interior vai
acender-se durante operação de temporizador.
• Quando o indicador de temporizador estiver ligado,
o aparelho pode ligar-se antes da hora predenida
de forma a ser alcançada a temperatura desejada a
tempo.
• Se prima o botão
temporizador, a programação vai ser cancelada.
• Se o temporizador é cancelado manualmente ou
devido a uma falha de corrente, você pode restaurar
o temporizador novamente, repetindo os passos
acima (depois de reiniciação de poder).
quando a unidade estiver em funcionamento.
para escolher a hora de
para escolher a hora de
para activar o
para cancelar a
/
durante a programação de
PORTUGUÊS
29
Page 30

UNIDADE INTERIOR
• Desligue a unidade antes de efectuar a limpeza.
• Não toque nas alhetas de alumínio, a parte aada pode causar
CUIDADO
INSTRUÇÕES DE LIMPEZA SUGESTÃO
• Não utilize benzina, diluente nem pó de limpeza
abrasivo.
• Utilize apenas sabões ( pH7) ou detergente de uso
doméstico neutro.
• Não utilize água com uma temperatura superior a 40°C.
ferimentos.
2
5
6
• Para assegurar um óptimo desempenho da unidade, a limpeza
de manutenção tem que ser executada em intervalos regulares.
NOTA
• Se for usado um pano com produto químico para limpar a
unidade, as instruções para o tecido devem ser seguidas.
4
1
7
8
3
1
UNIDADE INTERIOR
• Limpe cuidadosamente a unidade com um pano macio
e seco.
2
PAINEL FRONTAL
Retire o painel frontal
• Levante e puxe para retirar o painel frontal.
• Lave-o com cuidado e seque-o.
Feche o painel frontal
• Pressione para baixo os dois extremos do painel frontal
para fechá-lo com segurança.
3
RECEPTOR
4
ALHETAS DE ALUMÍNIO
DIFUSOR DA DIRECÇÃO DO FLUXO DE AR
5
HORIZONTAL
• Ajustável manualmente.
AVISO
Cuide para não colocar os dedos dentro da unidade
evitando machucar-se pelo ventilador centrífugo.
DIFUSOR DA DIRECÇÃO DO FLUXO DE AR
6
VERTICAL
• Não ajuste com a mão.
30
7
BOTÃO AUTO OFF/ON
• Utilizado quando o controlo remoto está mal colocado
ou avariado.
Acção Modo
Prima uma vez. Automático
Prima sem soltar até ouvir 1 sinal
sonoro e, em seguida, liberte.
Prima sem soltar até ouvir um sinal
sonoro duplo e, em seguida, libere.
Arrefecimento
Aquecimento
Prima o botão para desligar.
8
FILTRO DO AR
• Limpe os ltros regularmente.
• Lave/passe os ltros suavemente por água para evitar a
ocorrência de danos na superfície do ltro.
• Seque os ltros cuidadosamente à sombra, longe de
chamas acesas ou da luz solar directa.
• Substitua os ltros danicados.
Page 31

RESOLUÇÃO DE PROBLEMAS
Os seguintes sintomas não indicam uma avaria do aparelho.
SINTOMA CAUSA
Sai névoa da unidade interior. ► • Efeito de condensação devido ao processo de
Ouve-se o uxo de água quando a unidade está a funcionar. ► • Fluxo do líquido de refrigeração no interior da unidade.
A sala tem um odor estranho. ► • Pode ser devido a um odor de humidade produzido pela
O ventilador interior pára ocasionalmente quando o modo
de velocidade automática do ventilador está programado.
O funcionamento é atrasado durante alguns minutos após
a reprogramação.
A unidade exterior produz água/vapor. ► • Existe condensação ou evaporação nos tubos.
A unidade funciona automaticamente quando a corrente é
reposta depois da falha de corrente.
O ventilador interior pára ocasionalmente no modo de
aquecimento.
O indicador de alimentação pisca antes da unidade ser
ligada.
Som de quebra durante o funcionamento. ► • Mudanças de temperatura causam a expansão/
Verique o seguintes antes de pedir assistência.
SINTOMA VERIFICAR
O modo de aquecimento/arrefecimento não está a
funcionar de maneira eciente.
Ruído durante o funcionamento. ► • Certique-se de que a unidade foi instalada numa inclinação.
O controlo remoto não funciona.
(O visor está escuro ou o sinal de transmissão está fraco.)
A unidade não funciona. ► • Verique se o disjuntor disparou.
A unidade não recebe o sinal do controlo remoto. ► • Certique-se que o receptor não está obstruído.
A unidade desliga-se e o indicador do temporizador começa a piscar.
Utilize o controlo remoto para obter o código de erro.
/
Prima até ouvir um sinal sonoro
2
e, em seguida, anote o código
de erro.
POWERFUL
QUIET
Prima
1
durante 5
segundos.
Desligue a unidade e indique o código de erro ao revendedor autorizado.
4
SELECT
CHECK
A B
SET/CANCEL
ERROR RESET RESET
Prima para sair da
3
vericação.
arrefecimento.
parede, alcatifa, mobília ou vestuário.
► • Isto ajuda a remover os odores do ambiente.
► • O atraso é um mecanismo de protecção do compressor
da unidade.
► • É a função de reiniciar automaticamente (Auto Restart)
a unidade. Quando a corrente for reposta a operação vai
ser automaticamente reiniciada no modo da operação e
direção do uxo de ar anteriores, pois a operação não
está cancelada com o controlo remoto.
► • Para evitar o efeito de arrefecimento acidental.
► • Este é um passo preliminar para a operação, quando o
temporizador ON estiver denido.
contracção da unidade.
► • Congure a temperatura correctamente.
• Feche todas as portas e janelas.
• Limpe ou substitua os ltros.
• Limpe qualquer obstrução que se encontra na entrada
do ar e nas aberturas de ventilação de saída do ar.
• Feche o painel dianteiro devidamente.
► • Introduza as pilhas devidamente.
• Substitua as pilhas gastas.
• Verique se o temporizador foi congurado.
• Algumas luzes uorescentes podem interferir com o
transmissor de sinal. Consulte o revendedor autorizado.
Nota:
• Para um certo erro, pode
reiniciar a unidade com
funcionamento limitado
com 4 bips enquanto inicia
o funcionamento.
PORTUGUÊS
31
Page 32

ПРЕДПАЗНИ МЕРКИ
За да избегнете телесни повреди, нараняване на други
хора или имущество, моля спазвайте следното.
Неправилното функциониране поради неспазване
на инструкциите може да причини щети или вреди,
класифицирани както следва:
ПРЕДУПРЕЖДЕНИЕ
Този знак предупреждава за опасност от смърт или
Този знак предупреждава за опасност от наранявания
Инструкциите, които трябва да се спазват, са
класифицирани със следните символи:
Този символ обозначава съответното действие
Тези символи обозначават действия, които са
Дистанционно
управление
32
тежки наранявания.
или имуществени щети.
като ЗАБРАНЕНО.
ЗАДЪЛЖИТЕЛНИ.
Вътрешна
Част
Изходен отвор за въздух
Входен отвор за въздух
Външна
ВНИМАНИЕ
Входен отвор за въздух
Част
Електрозахранване
Изходен отвор
за въздух
ПРЕДУПРЕЖДЕНИЕ
ВЪТРЕШЕН И ВЪНШЕН МОДУЛ
Уредът не е предназначен за използване
от хора (вкл. деца) с намалени физически,
сетивни или психични проблеми или нямащи
съответния опит и познания, докато не бъдат
инструктирани или наблюдавани от човек,
отговорен за безопасността, за начина на
използване на уреда. Наблюдавайте децата,
за да се уверите, че не си играят с уреда.
Моля, посъветвайте се с оторизиран
дилър или специалист за почистване
на вътрешните части, ремонт, монтаж,
преместване и повторно инсталиране на
уреда. Неправилните монтаж и боравене ще
доведат до течове, токов удар или пожар.
Не монтирайте модула в помещения с
потенциално експлозивна или запалима
атмосфера. В противен случай може да се
стигне до пожар.
Не пъхайте пръстите си или други
обекти във вътрешния или външния
модул на климатика, въртящите
се части могат да предизвикат
наранявания.
Не докосвайте външния модул по време на
гръмотевична буря, това може да доведе до
токов удар.
Не се излагайте директно на студен въздух
за продължителен период от време, за да
избегнете прекомерно охлаждане.
Не сядайте и не стъпвайте върху
модула, тъй като случайно може
да паднете.
ДИСТАНЦИОННО УПРАВЛЕНИЕ
Не позволявайте на бебета и малки деца
да играят с дистанционното управление, за
да ги предпазите от случайно поглъщане на
батериите.
ЕЛЕКТРОЗАХРАНВАНЕ
Не използвайте модифициран
кабел, свързван кабел,
удължител или неуказан
кабел, за да избегнете
прегряване и пожар.
За да предотвратите прегряване, пожар или
токов удар:
• Не включвайте друго оборудване в същия
контакт.
• Не работете с мокри ръце.
• Не прегъвайте захранващия кабел.
• Не пускайте и не спирайте уреда чрез
включване на или изключване с щепсела.
Page 33

ПРЕДУПРЕЖДЕНИЕ
ЕЛЕКТРОЗАХРАНВАНЕ
Ако захранващият кабел е повреден, той трябва
да бъде подменен от производителя, неговия
сервизен агент или подобно квалифицирани
лица с цел да се избегне опасност.
Силно препоръчително е да се монтира
заземителен автоматичен прекъсвач (ELCB)
или устройство за диференциална защита
(RCD), за да избегнете токов удар или пожар.
За да предотвратите прегряване, пожар или
токов удар:
• Вкарайте добре щепсела.
• Прахът по щепсела на захранващия кабел трябва
да се избърсва периодично със суха кърпа.
Преустановете използването на продукта,
ако възникне необичайна работа или
неизправност, и изключете щепсела на
захранващия кабел или превключвателя на
захранването и прекъсвача.
(Риск от дим/пожар/токов удар)
Примери за необичайна работа/неизправност
• Прекъсвачът на веригата с утечка в земята
се включва често.
• Усеща се миризма на изгоряло.
• Чува се необичаен шум или се усещаща
вибриране на уреда.
• От вътрешния уред тече вода.
• Захранващият кабел или щепселът се
нагорещяват необичайно.
• Скоростта не вентилатора не може да се
контролира.
• Уредът спира да работи незабавно, дори
ако е включен за работа.
• Вентилаторът не спира, дори ако работата
е прекратена.
Свържете се незабавно с местния дилър за
профилактика/ремонт.
Смяната или монтажа на щепсел на
захранващия кабел трябва да се извършва
само от оторизиран/квалифициран
персонал. Кабелите в този проводник
за електрическата мрежа са оцветени
съобразно следните общоприети принципи:
Клеми
Червен
Черен
Зелен/Жълт
Цветът на проводниците може да бъде
различен в зависимост от цветния код на
стандарта на съответната страна.
Това оборудване трябва да е заземено, за
да се предотврати токов удар или пожар.
Избегнете токов удар, като изключите
захранването, когато:
- Преди почистване или обслужване.
- Продължителен престой.
- Необикновено силна гръмотевична активност.
проводници
фаза
неутрален
земя
цветове (IEC стандарт)
кафяв
син
зелен – жълт
ВНИМАНИЕ
ВЪТРЕШЕН И ВЪНШЕН МОДУЛ
Не мийте вътрешния уред с вида, бензен,
разредител или абразивен прах, за да
избегнете увреждане или корозия на уреда.
Не използвайте уреда за съхранение на
прецизно оборудване, храна, животни,
растения, произведения на изкуството или
други предмети. Това може да доведе до
влошаване на качеството и т.н.
Не ползвайте уреди, които горят пред
изхода за въздуха, за да се избегне
разпространение на огъня.
Не излагайте растения или домашни
животни директно на въздушния поток, за да
избегнете нараняване и т.н.
Не докосвайте острото алуминиево
ребро. Острите части могат да
предизвикат наранявания.
Не включвайте вътрешния модул, когато
полирате пода. След полиране, проветрете
стаята добре, преди да използвате модула.
Не монтирайте уреда в мазни и задимени
зони, за да избегнете увреждането му.
Не разглобявайте уреда с цел почистване,
за да избегнете нараняване.
Не стъпвайте върху нестабилна поставка, когато
почиствате уреда, за да избегнете нараняване.
Не поставяйте ваза или съд с вода върху уреда.
Водата може да влезе в уреда и да повреди
изолацията. Това може да доведе до токов удар.
Не оставяйте прозореца отворен по време на
работа в режим на охлаждане/изсушаване, за
да предотвратите водни течове.
Уверете се, че дренажната тръба е правилно
свързана и поддържайте дренажния отвор
далеч от улуци и съдове и не го потапяйте
във вода, за да предотвратите водни течове.
След дълъг период на употреба или
използване заедно с отоплителни уреди,
проветрявайте редовно стаята.
След дълъг престой се уверете, че
монтажното шаси не е повредено, за да
избегнете падане на модула.
ДИСТАНЦИОННО УПРАВЛЕНИЕ
Не използвайте акумулаторни (Ni-Cd) батерии.
То може да повреди дистанционното
управление.
За да предотвратите неизправност или
повреда на дистанционното управление:
• Свалете батериите, ако устройството няма
да бъде използвано дълго време.
• Трябва да се поставят нови батерии от същия
тип, като се спазва указаната полярност.
ЕЛЕКТРОЗАХРАНВАНЕ
Не дърпайте кабела, за да изключите
щепсела, за да предотвратите токов удар.
БЪЛГАРСКИ
33
Page 34

ДИСТАНЦИОННО УПРАВЛЕНИЕ
FAN SPEED
AIR SWING
ЗА НАСТРОЙВАНЕ ПОСОКАТА НА
5
ВЪЗДУШНИЯ ПОТОК (5 ВЪЗМОЖНОСТИ)
Максимално разстояние: 8м
/
QUIET
POWERFUL
A
SELECT
B
SET/CANCEL
CHECK
ERROR RESETRESET
AIR CONDITIONER
(ЗЕЛЕН)
(ОРАНЖЕВ)
Натиснете бутона на дистанционното управление
1
ЗА ДА ВКЛЮЧИТЕ ИЛИ ИЗКЛЮЧИТЕ УРЕДЪТ
• Моля обърнете внимание на индикатора OFF на
дистанционното управление, за да предотвратите
неправилното включване/изключване на уреда.
2
ЗА ДА НАСТРОИТЕ ТЕМПЕРАТУРАТА
• Диапазон на избираемата температура: 16°C до 30°C.
• Ако устройството работи в препоръчаните
температурни граници, може да се спести енергия.
Режим на ОТОПЛЕНИЕ : 20°C ~ 24°C.
Режим на ОХЛАЖДАНЕ : 26°C ~ 28°C.
Режим на МЕКО ИЗСУШАВАНЕ : 1°C ~ 2°C по-ниска
от стайната температура.
3
ЗА ДА ИЗБЕРЕТЕ РЕЖИМ НА РАБОТА
АВТОМАТИЧЕН режим на работа - За ваше удобство
• По време на избиране на режима на работа
индикаторът мига.
• Уредът избира работния режим според вътрешната
температура на вентилация и температурата,
зададена с дистанционното управление.
Режим на ОТОПЛЕНИЕ - За да сенаслаждавате на
топъл въздух
• В режим на отопление може да отнеме известно
време, докато уредът загрее. Индикаторът POWER
(ВКЛ.) мига по време на предварителното загряване.
Режим на ОХЛАЖДАНЕ - За да се наслаждавате на
студен въздух
• За да намалите разхода на електроенергия, когато
уредът е в режим на охлаждане, дръпнете пердетата,
за да предотвратите проникване на слънчева
светлина и топлина отвън.
Режим на МЕКО ИЗСУШАВАНЕ - За да се насладите
на тиха среда
• Уредът работи на ниска скорост, за да гарантира
умерено охлаждане на въздуха.
4
ЗА ДА ИЗБЕРЕТЕ РЕЖИМ НА РАБОТА
• Поддържа стаята проветрена.
• В режим COOL (ОХЛАЖДАНЕ), ако е зададен режим
AUTO (АВТОМАТИЧЕН), жалузите се движат нагоре/
надолу автоматично.
• В режим HEAT (ОТОПЛЕНИЕ), ако е настроен режим
AUTO (АВТОМАТИЧЕН), хоризонталните жалузи се
фиксират в предварително настроената позиция.
ЗА БЪРЗО ПОСТИГАНЕ НА ЖЕЛАНАТА
6
ТЕМПЕРАТУРА
• Тази настройка дава възможност за бързо достигане
на желаната температура.
7
ЗА ДА СЕ НАСЛАДИТЕ НА ТИШИНАТА
• Тази настройка осигурява тиха околна среда чрез
намаляване на шума на въздушния поток.
• МОЩНА И ТИХА работа не могат да се постигнат
едновременно.
НАТИСНЕТЕ, ЗА ДА ВЪЗСТАНОВИТЕ
8
ФАБРИЧНИТЕ НАСТРОЙКИ НА
ДИСТАНЦИОННОТО УПРАВЛЕНИЕ
НЕ СЕ ИЗПОЛЗВА В НОРМАЛНИ РЕЖИМИ НА
9
РАБОТА
Дисплей на дистанционното управление
1
4
7
9
3
2
5
6
8
• При режим AUTO скоростта на вътрешния вентилатор
се настройва автоматично според режима на работа.
34
Page 35

НАСТРОЙКА НА ТАЙМЕРА
(НАСТРОЙКА НА ТАЙМЕРА ЗА 12 ЧАСА)
• Когато искате въздушният кондиционер да се
включи или изключи автоматично.
ТАЙМЕР ЗА ЗАДРЪЖКА НА ИЗКЛЮЧВАНЕТО
Например, да спре въздушния кондиционер след
5 часа.
1 За да изберете таймера за задръжка на
изключването, натиснете веднъж бутона
2 Натиснете бутона
, за да изберете часа на
.
задръжката.
• Таймерът за изключване може да се настрои само
когато въздушният кондиционер работи.
ТАЙМЕР ЗА ЗАДРЪЖКА НА ВКЛЮЧВАНЕТО
Например да се включи въздушният кондиционер
след 2 часа.
1 За да изберете таймера за задръжка на
включването, натиснете веднъж бутона
2 Натиснете бутона
, за да изберете часа на
.
задръжката.
• Таймерът за включване може да се настрои само
когато въздушният кондиционер не работи.
ТАЙМЕР ЗА ЗАДРЪЖКА НА ИЗКЛЮЧВАНЕТО И
ВКЛЮЧВАНЕТО
Например, да спре въздушният кондиционер след 3
часа и да се включи след 4 часа.
1 За да изберете Delay OFF (ИЗКЛЮЧЕНО
Забавяне) и ON Timer (ВКЛЮЧЕН Таймер),
натиснете два пъти бутона
последователно.
2 Натиснете бутона
, за да изберете часа на
задръжката на изключване на таймера.
3 Натиснете бутона
, за да изберете часа на
задръжката на включване на таймера.
• Този режим на таймера може да се настрои само
когато въздушният кондиционер работи.
ТАЙМЕР ЗА ЗАДРЪЖКА НА ВКЛЮЧВАНЕТО И
ИЗКЛЮЧВАНЕТО
Например, да включи въздушният кондиционер след
7 часа и да се изключи след 10 часа.
1 За да изберете Delay ON (ВКЛЮЧЕНО Забавяне)
и OFF Timer (ИЗКЛЮЧЕН Таймер), натиснете два
пъти бутона
2 Натиснете бутона
последователно.
, за да изберете часа на
задръжката на включване на таймера.
3 Натиснете бутона
, за да изберете часа на
задръжката на изключване на таймера.
• Този режим на таймера може да се настрои само
когато въздушният кондиционер не работи.
ПОТВЪРЖДАВАНЕ НА НАСТРОЙКИТЕ НА
ТАЙМЕРА
Натиснете бутона
, за да включите таймера,
който ще стартира уреда, когато бъде достигнато
времето.
ИЗКЛЮЧВАНЕ НА НАСТРОЙКИТЕ НА ТАЙМЕРА
Натиснете бутона
отново, за да отмените
работата на таймера.
• Индикаторът на уреда за работа в помещение ще
свети при работещ таймер.
• Когато таймерът за ВКЛЮЧВАНЕ е настроен,
уредът може да започне по-рано от определеното
време, за да може да достигне желаната
температура навреме.
/
• Ако натиснете оперативният
бутон по
време на настройката на таймера, настройката му
се отменя.
• Ако таймерът бъде отменен ръчно или
поради отпадане на захранването, можете
да го възстановите отново, като повторите
горепосочените стъпки (след възстановяване на
захранването).
БЪЛГАРСКИ
35
Page 36

ВЪТРЕШНА ЧАСТ
• Изключете захранването преди почистване.
• Не докосвайте алуминиевото ребро, острата част може да причини
ВНИМАНИЕ
ИНСТРУКЦИИ ЗА ИЗМИВАНЕ СЪВЕТ
• Не използвайте бензин, разредител или абразивни
прахове.
• Използвайте само сапуни ( pH7) или неутрални
домакински прахове.
• Не използвайте вода, по-гореща от 40°C.
нараняване.
• За да гарантирате максимална производителност на
уреда, трябва да го почиствате на редовни интервали.
ЗАБЕЛЕЖКА
• Ако използвате химическа тъкан за изтриване на
уреда, спазвайте инструкцията за тъканта.
1
ВЪТРЕШНА ЧАСТ
2
5
6
4
• Внимателно забършете уреда с мек, сух парцал.
2
ПРЕДЕН ПАНЕЛ
Сваляне на предния панел
• Повдигнете и издърпайте предния панел, за да го свалите.
• Измийте го внимателно и го подсушете.
Затваряне на предния
панел
• Натиснете надолу двата края на предния панел, за да го
затворите здраво.
3
ПРИЕМНИК
4
АЛУМИНИЕВО РЕБРО
ХОРИЗОНТАЛЕН ВЕНТИЛАЦИОНЕН ОТВОР
5
ЗА НАСОЧВАНЕ НА ПОТОКА
• Регулира се ръчно.
ПРЕДУПРЕЖДЕНИЕ
Внимавайте да не бръкнете с пръсти в устройството
за избягване на нараняване от вентилатора за
напречния поток.
1
7
8
3
7
БУТОН AUTO OFF/ON
• Използвайте, когато дистанционното управление е
изгубено или е повредено.
Действие Режим
Натиснете веднъж. Автоматичен
Натиснете и задръжте, докато
чуете 1 сигнал „бийп“, след което
Охлаждане
пуснете.
Натиснете и задръжте, докато
чуете двоен звуков сигнал „бип“ и
Отопляване
после отпуснете.
Натиснете бутона, за да изключите уреда.
8
ВЪЗДУШЕН ФИЛТЪР
• Почиствайте филтрите редовно.
• Внимателно почистете/измийте филтрите с вода, за
да не нараните повърхността им.
• Внимателно изсушете филтрите на сенчесто място,
далеч от огън и пряка слънчева светлина.
• Подменяйте повредените филтри.
6
ВЕРТИКАЛЕН ВЕНТИЛАЦИОНЕН ОТВОР ЗА НАСОЧВАНЕ НА ПОТОКА
• Не настройвайте ръчно.
36
Page 37

ОТСТРАНЯВАНЕ НА ПРОБЛЕМИ
Следните симптоми при работата на уреда не означават неизправност.
СИМПТОМ ПРИЧИНА
От вътрешната част излиза замъглен въздух. ► • Кондензиране поради процеса на охлаждане.
Звук от течаща вода по време на работа. ► • Охлаждаща течност вътре в уреда.
Стаята има странна миризма. ► • Това може да е миризмата на влагата, отделяна от
Вътрешният вентилатор спира от време на време при
настройка за автоматично регулиране на скоростта.
Работата се забавя с няколко минути след рестартиране. ► • Закъснението служи за защита на компресора на уреда.
Външната част отделя вода/пара. ► • По тръбите се получава кондензация или изпаряване.
Уредът се включва автоматично след възстановяване
на захранването след спиране на тока.
Вътрешният вентилатор спира от време на време при
отопляване.
Индикаторът за захранване мига преди уредът да се
включи.
Пукане по време на работа. ► • Температурните промени могат да доведат до
Проверете следните неща, преди да се обадите на оторизиран сервиз.
СИМПТОМ ПРОВЕРКА
Уредът не работи ефикасно в режим на отопление/
охлаждане.
Шум по време на работа. ► • Проверете дали уредът не е монтиран под наклон.
Дистанционното управление не работи.
(Дисплеят е изгаснал или предавателният сигнал е слаб.)
Уредът не работи. ► • Проверете дали автоматичният прекъсвач е изключен.
Уредът не получава сигнали от дистанционното
управление.
Уредът спира да работи и индикаторът за таймера мига.
Използвайте дистанционното управление, за да получите кода за грешка.
Натиснете, докато чуете
едно пиукане, след което си
2
запишете кода за грешка.
Натиснете за 5 секунди, за
3
край на проверката.
1
Натиснете
за 5
секунди.
/
QUIET
SELECT
CHECK
POWERFUL
A B
SET/CANCEL
ERROR RESET RESET
стените, килима, мебелите или дрехите.
► • Това спомага за отстраняване на околните миризми.
► • Това е функцията „автоматично рестартиране“
на устройството. Работата се възстановява
автоматично в предишния режим и посока на
въздушния поток, ако не бъде прекратена с
дистанционното управление.
► • С цел да се избегне нежелан охлаждащ ефект.
► • Това е предварителна стъпка в подготовката за
работа, когато ON таймерът е бил зададен.
разширяване или свиване на уреда.
► • Задайте правилно температурата.
• Затворете всички врати и прозорци.
• Почистете или сменете филтрите.
• Почистете входните и изходни вентилационни отвори.
• Затворете правилно предния панел.
► • Поставете правилно батериите.
• Сменете изхабените батерии.
• Проверете дали таймерът е настроен.
► • Уверете се, че няма прегради.
• Някои флуоресцентни светлини могат да доведат
до смущения при предаването на сигнала. Моля
обърнете се към оторизиран дилър.
Забележка:
При определени грешки Вие
•
трябва да рестартирате уреда
с намалена производителност
с 4 сигнала “бип” по време на
започване на неговата работа.
БЪЛГАРСКИ
Изключете модула и покажете кода за грешка на оторизирания дилър.
4
37
Page 38

MJERE PREDOSTROŽNOSTI
Da biste spriječili ozljeđivanje ili oštećenja imovine, molimo
pridržavajte se sljedećeg.
Nepravilna uporaba zbog nepridržavanja sljedećih uputa
može uzrokovati ozljede ili oštećenja čija je ozbiljnost
klasicirana je dolje:
UPOZORENJE
Ovaj simbol upozorava na mogućnost smrti ili teških
Ovaj simbol upozorava na mogućnost ozljeda ili
Upute kojih se treba pridržavati klasicirane su sljedećim
simbolima:
Ovaj simbol označava radnju koja je
Ovi simboli označavaju radnju koja je
ozljeda.
OPREZ
oštećivanja imovine.
ZABRANJENA
OBVEZATNA.
UPOZORENJE
UNUTARNJA JEDINICA I VANJSKA JEDINICA
Ovaj uređaj nije namijenjen za uporabu od
strane osoba (uključujući i djecu) smanjenih
zičkih, motoričkih ili mentalnih sposobnosti,
ili nedovoljnog iskustva i znanja, osim ako ih
nadgleda ili su dobili upute o korištenju uređaja
od osobe odgovorne za njihovu sigurnost. Djecu
treba nadgledati kako bi se spriječilo da se
igraju s uređajem.
Za čišćenje unutarnjih dijelova, popravke,
ugradnju, uklanjanje i ponovnu ugradnju
jedinice se molimo posavjetujte s ovlaštenim
zastupnikom ili stručnjakom. Nepravilna
ugradnja i rukovanje uzrokovat će curenje plina,
električni udar ili požar.
Jedinicu ne ugrađujte u potencijalno
eksplozivnoj ili zapaljivoj atmosferi.
Nepoštivanje ovog može uzrokovati požar.
Ne umećite prste ili druge predmete
u unutarnju ili vanjsku jedinicu
klimatizacijskog dijelova jer bi vas mogli
ozlijediti pokretni dijelovi.
Ne dodirujte vanjsku jedinicu za vrijeme
grmljavine, mogućnost električnog udara.
Ne izlažite se neposredno hladnom zraku kako
biste spriječili prekomjerno pothlađivanje.
Ne sjedite i ne gazite na jedinicu,
mogli biste slučajno pasti.
38
Daljinski
upravljač
Unutarnja
jedinica
Ulaz zraka
Izlaz zraka
Ulaz zraka
Vanjska
jedinica
Napajanje
Izlaz zraka
DALJINSKI UPRAVLJAČ
Ne dopustite djeci i novorođenčadi da se igraju
s daljinskim upravljačem kako ne bi slučajno
progutali baterije.
NAPAJANJE
Ne koristite modicirane
kabele, produžne kabele ili
kabele koji nisu specicirani
kako biste spriječili pregrijavanje i požar.
Da biste spriječili pregrijavanje, požar ili
električni udar:
• Istu utičnicu ne koristite za napajanje druge
opreme.
• Ne rukujte mokrim rukama.
• Kabel napajanja ne savijajte previše.
• Ne uključujte, niti isključujte jedinicu
umetanjem ili izvlačenjem utikača napajanja.
Page 39

NAPAJANJE
UPOZORENJE
Ako se kabel napajanja ošteti, treba ga
zamijeniti proizvođač, njegov servisni
predstavnik ili slično kvalicirana osoba kako bi
se izbjegle opasnosti.
Izričito preporučujemo ugradnju s prekidačem
strujnog kruga s detekcijom proboja prema
uzemljenju (ELCB) ili rezidualnog strujnog
uređaja (RCD) kako biste spriječili električni
udar ili požar.
Da biste spriječili pregrijavanje, požar ili
električni udar:
• Pravilno ukopčajte utikač napajanja.
• Prašinu s utikača napajanja treba povremeno
obrisati suhom krpom.
Prestanite koristiti proizvod u slučaju bilo kakvih
neuobičajenosti/ kvarova i iskopčajte utikač
napajanja ili isključite prekidač napajanja i
prekidač strujnog kruga.
(Opasnost od dima/požara/električnog udara)
Primjeri neuobičajenosti/kvarova
• ELCB često izbacuje.
• Primjećuje se miris paljevine.
• Primjećuju se nenormalna buka i vibracije
jedinice.
• Iz unutarnje jedinice curi voda.
• Kabel ili utikač napajanja nenormalno se griju.
• Nije moguće upravljati brzinom ventilatora.
• Jedinica se se odmah zaustavlja čak i nakon
uključivanja.
• Ventilator se ne zaustavlja čak ni nakon
isključivanja.
Odmah se obratite svom lokalnom predstavniku
radi održavanja/popravka.
Zamjenu ili ugradnju električnih utikača smije
vršiti isključivo ovlašteno/kvalicirano osoblje.
Žice u ovom vodu napajanja obojene u skladu
sa sljedećim:
Stezaljke
Crvena
Crna
Zeleno/žuta
žice
faza
nula
uzemljenje
boje (IEC standard)
smeđa
plava
zeleno-žuta
Boje žica mogu se razlikovati ovisno o
standardu za ožičenja u dotičnoj državi.
Ovu opremu treba uzemljiti kako bi se spriječio
električni udar ili požar.
Spriječite električni udar isključivanjem
napajanja i iskopčavanjem utikača u sljedećim
slučajevima:
- Prije čišćenja ili servisiranja.
- Dulje razdoblje nekorištenja.
- Osobito jakog grmljavinskog nevremena.
OPREZ
UNUTARNJA JEDINICA I VANJSKA JEDINICA
Unutarnju jedinicu ne perite vodom, benzenom,
razrjeđivačem ili abrazivnim prahom kako biste
izbjegli oštećenja i korodiranje jedinice.
Ne koristite za čuvanje precizne opreme, hrane,
životinja, biljaka, umjetnina ili drugih predmeta. To
može uzrokovati pogoršanje kakvoće itd.
Ispred izlaza zraka ne koristite nikakvu zapaljivu
opremu kako biste spriječili širenje vatre.
Ne izlažite biljke neposredno strujanju zraka jer
biste ih mogli oštetiti, itd.
Ne dodirujte oštre aluminijske
rešetke, oštri dijelovi mogu uzrokovati
ozljede.
Ne uključujte unutarnju jedinicu kada laštite
pod. Nakon laštenja, propisno prozračite
prostoriju prije uključivanja jedinice.
Jedinicu ne ugrađujte u područjima s uljem i
dimom kako biste spriječili oštećivanje jedinice.
Ne rastavljajte jedinicu radi čišćenja kako biste
spriječili ozljede.
Prilikom čišćenja ne penjite se na nestabilne
klupe ili stolice kako biste izbjegli ozljede.
Na jedinicu ne postavljajte vaze ili posude s
vodom. Voda može prodrijeti u jedinicu i oslabiti
izolaciju. To može uzrokovati električni udar.
Tijekom rada s načinom rada za hlađenje/
sušenje ne ostavljajte otvoren prozor kako
bistre spriječili curenje vode.
Pobrinite se da pipa za odvod vode bude
pravilno povezana i da izlaz za odvod vode
bude odmaknut od slivnika, spremnika te da ne
bude uronjen u vodu kako biste spriječili curenje
vode.
Nakon dugotrajne uporabe ili uporabe bilo
kakve zapaljive opreme, temeljito prozračite
prostoriju.
Nakon dugotrajne uporabe uvjerite se da
ugradbeni nosač nije oslabio kako biste spriječili
pad jedinice.
DALJINSKI UPRAVLJAČ
Ne koristite baterije koje se mogu puniti (Ni-Cd).
Mogu oštetiti daljinski upravljač.
Da biste spriječili kvar ili oštećivanje daljinskog
upravljača:
• Uklonite baterije ako jedinicu nećete koristiti
dulje vrijeme.
• Nove baterije istok tipa treba umetnuti prateći
naznačen polaritet.
NAPAJANJE
Kada iskopčavate utikač ne povlačite kabel
napajanja kako biste spriječili električni udar.
HRVATSKI
39
Page 40

DALJINSKI UPRAVLJAČ
Maksimalne udaljenosti: 8m
/
QUIET
POWERFUL
A
SELECT
B
SET/CANCEL
CHECK
ERROR RESETRESET
AIR CONDITIONER
(ZELENA)
(NARANČASTA)
ZA PODEŠAVANJE SMJERA PROTOKA ZRAKA
5
(5 OPCIJA)
AIR SWING
• Održava prostoriju prozračenom.
• Ako se u načinu COOL (Hlađenje) odabere AUTO
(Automatski), smjer ispuhivanja zraka se automatski
mijenja gore/ dolje.
• Ako se u načinu HEAT (Grijanje) odabere AUTO
(Automatski), vodoravni smjer ispuhivanja zraka se ksira
u unaprijed određenom položaju.
6
ZA BRZO POSTIZANJE TEMPERATURE
• Ova postavka omogućuje brzo postizanje željene
temperature.
Pritisnite gumb na daljinskom upravljaču
ZA UKLJUČIVANJE ILI
1
ISKLJUČIVANJE JEDINICE
• Molimo, obratite pažnju na oznaku OFF (Isklj.) na zaslonu
daljinskog upravljača kako biste spriječili nepropisno
pokretanje/zaustavljanje jedinice.
2
ZA POSTAVLJANJE TEMPERATURE
• Raspon odabira: 16°C ~ 30°C.
• Rad unutar preporučenog temperaturnog raspona može
uštedjeti energiju.
Način HEAT (Grijanje) : 20°C ~ 24°C.
Način COOL (Hlađenje) : 26˚C ~ 28˚C.
Način DRY (Sušenje) : 1˚C ~ 2˚C niže od temperature
prostorije.
3
ZA ODABIR NAČINA RADA
AUTOMATSKI način - za vašu udobnost
• Tijekom odabira načina rada treperi indikator napajanja.
• Jedinica odabire način rada sukladno ulaznoj temperaturi
prostorije i temperaturi na daljinskom upravljaču.
Način GRIJANJA - kako uživati u toplom zraku
• Kod načina rada grijanja može proteći određeno vrijeme
dok se jedinica zagrije. Tijekom predgrijanja treperi
indikator POWER (Napajanje).
Način HLAĐENJA - kako uživati u hladnom zraku
• Pomoću zavjesa zaklonite sunčevu svjetlost i vanjsku
toplinu kako biste smanjili potrošnju energije tijekom
hlađenja.
Način SUŠENJA - za odvlaživanje okoline
• Jedinica radi s niskom brzinom ventilatora kako bi postigla
nježan učinak hlađenja.
4
ZA ODABIR NAČINA RADA
7
ZA UŽIVANJE U TIHOM OKRUŽENJU
• Ova postavka omogućuje tiho okruženje smanjivanjem
šume ispuhivanja zraka.
• Funkcije POWERFUL (Snažno) i QUIET (Tiho) ne mogu
se istovremeno aktivirati.
PRITISNITE ZA VRAĆANJE ZADANIH POSTAVKI
8
DALJINSKOG UPRAVLJAČA
9
NE KORISTI SE ZA UOBIČAJEN RAD
Zaslon daljinskog upravljača
1
4
7
9
3
2
5
6
8
AIR SWING
• Kod AUTO (Automatskog) načina rada brzina ventilatora
automatski se podešava sukladno načinu rada.
40
Page 41

ZA POSTAVLJANJE TAJMERA
(POSTAVKE 12-SATNOG TAJMERA)
• Kada želite automatski uključiti ili isključiti
klimatizacijski uređaj.
TAJMER ODGODE ISKLJUČIVANJA
Na primjer, za zaustavljanje klimatizacijskog uređaja 5
sati kasnije.
1 Za odabir tajmera za odgodu isključivanja jednom
pritisnite gumb
2 Pritisnite gumb
.
za odabir sati odgode.
• Tajmer isključivanja može se postaviti samo kad
klimatizacijski uređaj radi.
TAJMER ODGODE UKLJUČIVANJA
Na primjer, za pokretanje klimatizacijskog uređaja 2
sata kasnije.
1 Za odabir tajmera za odgodu uključivanja jednom
pritisnite gumb
2 Pritisnite gumb
.
za odabir sati odgode.
• Tajmer uključivanja može se postaviti samo kad
klimatizacijski uređaj ne radi.
TAJMER ODGODE ISKLJUČIVANJA I
UKLJUČIVANJA
Na primjer, za zaustavljanje klimatizacijskog uređaja 3
sata kasnije i ponovno pokretanje za 4 sata.
1 Za odabir tajmera za odgodu isključivanja i
uključivanja dvaput za redom pritisnite gumb
2 Pritisnite gumb
za odabir sati odgode za
tajmer isključivanja.
3 Pritisnite gumb
za odabir sati odgode za
tajmer uključivanja.
• Ovaj način tajmera može se postaviti samo kad
klimatizacijski uređaj radi.
TAJMER ODGODE UKLJUČIVANJA I
ISKLJUČIVANJA
Na primjer, za pokretanje klimatizacijskog uređaja 7 sati
kasnije i zaustavljanje nakon 10 sati.
1 Za odabir tajmera za odgodu uključivanja i
isključivanja dvaput za redom pritisnite gumb
2 Pritisnite gumb
za odabir sati odgode za
tajmer uključivanja.
3 Pritisnite gumb
za odabir sati odgode za
tajmer isključivanja.
• Ovaj način tajmera može se postaviti samo kad
klimatizacijski uređaj ne radi.
ZA POTVRDU POSTAVKI TAJMERA
Pritisnite gumb uključivanja
za aktiviranje rada
tajmera koji će se pokrenuti u postavljeno vrijeme.
ZA PONIŠTAVANJE POSTAVKI TAJMERA
Ponovno pritisnite gumb
za poništavanje rada
tajmera.
• Indikator tajmera unutarnje jedinice zasvijetlit će za
vrijeme rada tajmera.
• Kada je postavljen tajmer za uključivanje, jedinica
se može pokrenuti prije stvarnog postavljenog
vremena kako bi se pravovremeno postigla željena
temperatura.
.
• Ako tijekom postavljanja tajmera pritisnete gumb za
/
rad
, postavljanje tajmera bit će poništeno.
• Ako se tajmer prekine ručno ili uslijed nestanka
električnog napajanja, možete ponovno postaviti
tajmer ponavljanjem gornjih koraka (nakon povratka
električnog napajanja).
.
HRVATSKI
41
Page 42

UNUTARNJA JEDINICA
• Prije čišćenja isključite napajanje.
• Ne dodirujte aluminijske rešetke, oštri dijelovi mogu uzrokovati
OPREZ
UPUTE ZA PRANJE SAVJET
• Ne koristite benzen, razrjeđivač ili abrazivni prašak.
• Uporabite isključivo sapun( pH7) ili neutralni
deterdžent za domaćinstva.
• Ne koristite vodu topliju od 40°C.
ozljede.
5
6
• Da biste osigurali optimalan rad jedinice, čišćenje treba
vršiti u redovitim vremenskim intervalima.
NAPOMENA
• Ako za brisanje jedinice koristite maramicu s kemijskim
sredstvom, pridržavajte se uputa za uporabu maramice.
2
4
1
7
8
3
1
UNUTARNJA JEDINICA
• Jedinicu pažljivo obrišite mekom, suhom krpom.
2
PREDNJA PLOČA
Uklonite prednju ploču
• Podignite i povucite prednju ploču kako biste je uklonili.
• Pažljivo operite i osušite.
Zatvorite prednju ploču
• Pritisnite prema dolje oba kraja prednje ploče kako biste
je pravilno zatvorili.
3
PRIJEMNIK
4
ALUMINIJSKA REŠETKA
REBRA ZA VODORAVNO PODEŠAVANJE
5
SMJERA ISPUHIVANJA
• Mogu se podešavati ručno.
UPOZORENJE
Pazite da ne umetnete prste u jedinicu kako biste
izbjegli ozljede uslijed ventilatora za poprečni protok.
REBRA ZA OKOMITO PODEŠAVANJE SMJERA
6
ISPUHIVANJA
• Ne podešavajte ih ručno.
42
GUMB ZA UKLJUČIVANJE /ISKLJUČIVANJE I
7
AUTOMATSKI RAD
• Uporabite ga ako izgubite ili se pokvari daljinski
upravljač.
Radnja Način rada
Pritisnite jednom. Automatski
Pritisnite i držite dok se ne začuje 1
zvučni signal, potom ga otpustite.
Hlađenje
Pritisnite i držite dok se ne začuje
dvojni zvučni signal, potom ga
Grijanje
otpustite.
Pritisnite gumb za isključivanje.
8
FILTRI ZRAKA
• Redovito čistite ltre.
• Pažljivo operite/isperite ltre vodom kako biste izbjegli
oštećivanje površine ltara.
• Filtre dobro osušite u sjeni, podalje od neposredne
sunčeve svjetlosti.
• Zamijenite svaki ltar koji se ošteti.
Page 43

OTKLANJANJE POTEŠKOĆA
Sljedeći simptomi ne označavaju kvar.
SIMPTOM UZROK
Iz unutarnje jedinice izlazi magla. ► • Učinak kondenzacije uslijed postupka hlađenja.
Zvuk pretakanja vode za vrijeme rada. ► • Protok rashladnog sredstva unutar jedinice.
U prostoriji se osjeti neobičan miris. ► • Razlog može biti miris vlage koji potječe iz zida, tepiha,
Ventilator unutarnje jedinice se povremeno zaustavlja
tijekom postavke automatske brzine ventilatora.
Rad se odgađa nekoliko minuta nakon ponovnog pokretanja. ► • Odgoda predstavlja zaštitu kompresora jedinice.
Vanjska jedinica ispušta vodu/paru. ► • Kondenzacija ili isparavanje događa se u cijevima.
Jedinica radi automatski kada se vrati električna energija
nakon prekida.
Ventilator unutarnje jedinice se povremeno zaustavlja
tijekom grijanja.
Indikator napajanja treperi prije uključivanja jedinice. ► • To je preliminarni korak u pripremi na rad kada je
Pucketavi zvuk za vrijeme rada. ► • Promjene temperature uzrokuju širenje/ skupljanje jedinice.
Prije poziva radi servisiranja provjerite sljedeće stavke.
SIMPTOM PROVJERITE
Grijanje/hlađenje ne radi učinkovito. ► • Pravilno postavite temperaturu.
Buka za vrijeme rada. ► • Provjerite je li jedinica montirana na kosini.
Daljinski upravljač ne radi.
(Zaslon je zamagljen ili je prijenosni signal slab).
Jedinica ne radi. ► • Provjerite je li izbacio prekidač strujnog kruga.
Jedinica ne prima signal iz daljinskog upravljača. ► • Provjerite da ispred daljinskog upravljača nema prepreka.
pokućstva ili odjeće.
► • To pomaže pri uklanjanju mirisa iz okruženja.
► • To je funkcija automatskog ponovnog pokretanja
jedinice. Rad će se automatski ponovno pokrenuti s
prethodnim načinom rada i smjerom ispuhivanja zraka
nakon povratka električne energije budući da rad nije bio
zaustavljen preko daljinskog upravljača.
► • Za izbjegavanje neželjenog hlađenja.
postavljen tajmer za uključivanje.
• Zatvorite sva vrata i prozore.
• Očistite ili zamijenite ltre.
• Odmaknite sve prepreke ispred ulaznih i izlaznih
ventilacijskih otvora.
• Pravilno zatvorite prednju ploču.
► • Pravilno umetnite baterije.
• Zamijenite slabe baterije.
• Provjerite jesu li postavljeni tajmeri.
• Određena uorescentna svjetla mogu ometati prijenos
signala. Molimo, posavjetujte se s ovlaštenim predstavnikom.
HRVATSKI
Jedinica se zaustavlja i indikator tajmera treperi.
Uporabite daljinski upravljač kako biste saznali šifru kvara.
/
POWERFUL
QUIET
Pritisnite
1
na 5
sekundi.
Isključite jedinici i šifru kvara dojavite ovlaštenom predstavniku.
4
SELECT
CHECK
A B
SET/CANCEL
ERROR RESET RESET
Pritisnite i držite
2
dok ne začujete
zvučni signal, potom
zapišite šifru kvara.
Pritisnite na 5 sekundi
3
kako biste završili s
provjerom.
Napomena:
• Kod određenih pogrešaka
ćete možda moći ponovno
pokrenuti jedinicu s
ograničenim funkcijama sa
4 zvučna signala tijekom
pokretanja rada.
43
Page 44

GÜVENLİK ÖNLEMLERİ
Kişisel yaralanmaları, başkalarının yaralanmasını veya malın
hasar görmesini engellemek için, lütfen aşağıdakilere uyun.
Talimatları takip etmekte sorun olması nedeniyle yanlış
çalıştırma, ciddiyeti aşağıda sınıandırılan şekilde zarar veya
hasara neden olabilir.
UYARI
Bu işaret ölüm ya da ciddi yaralanma konusunda uyarıda
Bu işaret yaralanma ya da mal hasarı konusunda uyarıda
Takip edilecek talimatlar aşağıdaki sembollerle sınıandırılır:
Bu sembol YASAKLANAN bir eyleme işaret eder
Bu semboller ZORUNLU bir eyleme işaret eder
bulunur.
DİKKAT
bulunur.
İÇ ÜNİTE VE DIŞ ÜNİTE
Bu cihaz, düşük ziksel, duyusal veya zihinsel
kapasiteli (çocuklar dahil) veya tecrübe ve
bilgi eksiği olan kişiler tarafından, yetkili bir kişi
tarafından cihazın kullanımına ilişkin gözetim
veya talimat verilmedikçe kullanılmamalıdır.
Çocukların, cihazla oynamadığından emin
olmak için gözetim altında tutulmaları gerekir.
Lütfen dahili parçaları temizlemek, üniteyi
onarmak, takmak, sökmek ve yeniden takmak
için yetkili satıcıya veya uzmana danışın. Uygun
olmayan takma ve kullanma kaçak olmasına,
elektrik çarpmasına ya da yangına neden
olacaktır.
Üniteyi potansiyel olarak patlayıcı ve yanıcı
ortamda takmayın. Bu konuya uymama yangına
neden olabilir.
Parmaklarınızı veya başka nesnelerini
klima cihazının iç veya dış ünitesine
sokmayın, dönen parçalar yaralanmaya
neden olabilir.
Yıldırım sırasında dış üniteye dokunmayın,
elektrik çarpmasına neden olabilir.
Aşırı soğuktan kaçınmak için uzun süre
doğrudan soğuk havaya maruz kalmayın.
Ünitenin üzerine oturmayın veya
çıkmayın, kaza sonucu düşebilirsiniz.
UYARI
44
Uzaktan
Kumanda
İç Ünite
Hava Girişi
Hava Çıkışı
Hava Girişi
Dış Ünite
Güç
Kaynağı
Hava Çıkışı
UZAKTAN KUMANDA
Kaza sonucu pilleri yutmalarını önlemek
için bebeklerin ve küçük çocukların uzaktan
kumandayla oynamalarına izin vermeyin.
GÜÇ KAYNAĞI
Aşırı ısınma ve yangını
önlemek için değiştirilen
kablo, birleştirme kablosu,
uzatma kablosu veya
belirtilmeyen bir kabloyu kullanmayın.
Aşırı ısınmayı, yangını veya elektrik çarpmasını
önlemek için:
• Aynı güç prizini diğer ekipmanla birlikte
paylaştırmayın.
• Islak elle çalıştırmayın.
• Elektrik kablosunu aşırı bükmeyin.
• Cihazı şini takarak ya da çıkartarak
çalıştırmayın ya da durdurmayın.
Page 45

GÜÇ KAYNAĞI
Eğer elektrik kablosu hasar görürse, tehlikeli
durumları önlemek için üretici veya üreticinin
yetkili servisleri ya da aynı nitelikteki kişilerce
değiştirilmelidir.
Elektrik çarpması ve yangınların önlenmesi
için Toprak Kaçağı Devre Kesici (ELCB) veya
Kaçak Akım Koruma Rölesi (RCD) kullanılması
tavsiye edilir.
Aşırı ısınmayı, yangını veya elektrik çarpmasını
önlemek için:
• Elektrik şini doğru şekilde takın.
• Elektrik şindeki toz periyodik olarak kuru bir
bezle silinmelidir.
Herhangi bir anormallik/arıza oluştuğu zaman
ürünü kullanmayı durdurun ve elektrik şini
sökün veya güç anahtarını ve devre kesiciyi
kapatın.
(Duman/yangın/elektrik çarpması riski)
Anormallik/arıza örnekleri
• ELCB sıkça takılır.
• Yanık kokusu gözlemlenir.
• Anormal gürültü veya ünite titreşimi
gözlemlenir.
• İç üniteden su sızar.
• Elektrik şi veya prizi anormal sıcak olur.
• Fan hızı kontrol edilemez.
• Anahtar çalıştırılmak üzere açılsa bile ünite
hemen durur.
• Çalışması durdurulsa bile fan durmaz.
Bakım/onarım için yerel satıcınızla hemen
iletişim kurun.
Elektrik şlerinin değiştirilmesi veya takılması
yalnızca yetkili/nitelikli personel tarafından
gerçekleştirilmelidir. Ana şebekedeki kablolar
aşağıdaki kodlara göre renklendirilmiştir:
Kablo tesisatının rengi ülkenin kablo kodu
standardına bağlı olarak çeşitlilik gösterebilir.
Bu ekipman elektrik çarpması veya yangını
önlemek için topraklanmalıdır.
Şu durumlarda güç kaynağını kapatıp şi
sökerek elektrik çarpmasını önleyin:
- Temizleme ve servisten önce.
- Uzun süreli kullanılmayacağında.
- Anormal şiddetli yıldırım olduğunda.
Terminaller
Kırmızı
Siyah
Yeşil/Sarı
UYARI
kablolar
toprak
Renkler (IEC Standardı)
canlı
kahverengi
nötr
mavi
yeşil-sarı
İÇ ÜNİTE VE DIŞ ÜNİTE
Ünitenin hasar görmesini veya aşınmasını
engellemek için benzen, tiner veya ovma tozu
kullanmayınız.
Hassas cihazlar, yiyecek, hayvanlar, bitkiler,
sanat eserleri ve diğer nesnelerin korunması için
kullanmayınız. Bu durum kalitenin bozulmasına
v.s. yol açabilir.
Alev yayılmasından kaçınmak için hava akışı
çıkışının önünde yanıcı herhangi bir ekipman
kullanmayın.
Yaralanmayı vs. engellemek için bitkilerin ya da
evcil hayvanların doğrudan hava akımına maruz
kalmamasını sağlayın.
Keskin alüminyum kanada
dokunmayın, keskin parçalar
yaralanmaya neden olabilir.
Zemini cilalarken iç üniteyi AÇMAYIN.
Cilalamadan sonra, üniteyi çalıştırmadan önce
odayı düzgün şekilde havalandırın.
Ünitenin hasar görmesini engellemek için
üniteyi yağlı ve isli alanlara takmayın.
Yaralanmadan kaçınmak için üniteyi temizleme
amacıyla parçalara ayırmayın.
Üniteyi temizlerken yaralanmaktan kaçınmak için
sabit durmayan bir malzemenin üzerine çıkmayın.
Ürünün vazo veya sürahi gibi herhangi bir şey
koymayın. Ünitenin içine su girebilir ve yalıtımı
bozabilir. Bu, elektrik çarpmasına neden olabilir.
Soğuk/Kuru modlu çalıştırma sırasında, su
sızmasını önlemek için pencereyi açık bırakmayın.
Tahliye borusunun düzgün şekilde takıldığından
ve su sızıntısını önlemek için tahliye çıkışını
oluklardan, kaplardan uzak tutun ve suya
girmediğinden emin olun.
Uzun süre kullanımından sonra ya da yanıcı
bir ekipmanla kullanımı halinde, odayı düzenli
olarak havalandırın.
Uzun süre kullanımdan sonra, ünitenin
düşmesini engellemek için montaj askının
yıpranmadığından emin olun.
UZAKTAN KUMANDA
Şarj edilebilir (Ni-Cd) piller kullanmayın. Bu
uzaktan kumandaya zarar verebilir.
Uzaktan kumandanın yanlış çalışmasını ya da
zarar görmesini engellemek için:
• Ünite uzun süre kullanılmayacaksa pilleri çıkarın.
• Aynı tipte olan yeni piller, belirtilen kutup
yönlerine göre yerleştirilmelidir.
GÜÇ KAYNAĞI
Elektrik çarpmasını engellemek için bağlantıyı
kesmek amacıyla kabloyu çekmeyin.
DİKKAT
TÜRKÇE
45
Page 46

UZAKTAN KUMANDA
Maksimum uzaklık 8m
/
QUIET
POWERFUL
A
SELECT
B
SET/CANCEL
CHECK
ERROR RESETRESET
AIR CONDITIONER
(YEŞİL)
(TURUNCU)
Uzaktan kumandanın düğmesine basın
ÜNİTEYİ AÇMAK YA DA KAPAMAK
1
İÇİN
• Ünitenin yanlış bir şekilde başlatılmasını/durdurulmasını
engellemek için uzaktan kumanda ekranında yer alan
KAPALI göstergesine dikkat edin.
2
SICAKLIĞI AYARLAMAK İÇİN
• Seçim Aralığı: 16°C ~ 30°C.
• Üniteyi tavsiye edilen sıcaklıklarda çalıştırmak enerji
tüketiminin düşürülmesine yardımcı olabilir.
HEAT (ISITMA) modu: 20°C ~ 24°C.
COOL (SOĞUTMA) modu: 26˚C ~ 28˚C.
DRY (NEM ALMA) modu: Oda sıcaklığından 1˚C ~ 2˚C
daha düşük.
HAVA AKIŞ YÖNÜNÜ AYARLAMAK İÇİN
5
(5 SEÇENEK)
AIR SWING
• Odanın havadar olmasını sağlar.
• COOL (Soğutma) modunda OTOMATİK ayarlanmışsa,
kanat kapakları aşağı/yukarı doğru otomatik olarak salınır.
• HEAT (Isıtma) modunda OTOMATİK ayarlanmışsa kanat
kapakları belirli bir konumda kalır.
6
İSTENEN SICAKLIĞA HEMEN ULAŞMAK İÇİN
• Bu ayar istenen sıcaklığa hemen ulaşılmasını sağlar.
7
SESSİZ BİR ORTAMIN KEYFİNİ ÇIKARMAK İÇİN
• Bu ayar, hava akışı gürültüsünü azaltarak sessiz bir ortam
sağlar.
• GÜÇLÜ VE SESSİZ işlemleri aynı anda etkinleştirilemez.
UZAKTAN KUMANDANIN VARSAYILAN
8
AYARLARINA DÖNMEK İÇİN BASIN
9
NORMAL İŞLEMLERDE KULLANILMAZ
Uzaktan Kumanda ekranı
3
ÇALIŞMA MODUNU SEÇMEK İÇİN
OTOMATIK modu – Size uygun koşullar için
• Mod seçme işlemi esnasında güç göstergesi yanıp söner.
• Ünite, çalýþtýrma modunu iç mekan emme sýcaklýðý ve
uzaktan kumanda sýcaklýðýna göre seçer.
HEAT (ISITMA)
modu
- Sıcak havanın keyni çıkarın
• Heat (ısıtma) modunda ünitenin ortam ısısını yükseltmesi
zaman alabilir. Isıtma öncesi GÜÇ göstergesi yanıp söner.
COOL (SOĞUTMA) modu – Serin havanın keyni çıkarın
• Cool (soğutma) modunda, güç tüketimini azaltmak için
güneş ışığını ve dış ortam ısısını engellemek amacıyla
perde kullanın.
DRY (NEM ALMA) modu – Ortam nemini giderir
• Ünite, yavaş bir soğutma işlemi sağlamak için düşük fan
hızında çalışır.
4
ÇALIŞMA MODUNU SEÇMEK İÇİN
FAN SPEED
• OTOMATİK seçilirse, fan hızı çalışma moduna göre
otomatik olarak ayarlanır.
46
1
4
7
3
2
5
6
9
8
Page 47

ZAMANLAYICIYI AYARLAMAK
(12 SAAT ZAMANLAYICI AYARI) İÇİN
• Klimayı otomatik olarak AÇMAK/KAPAMAK istediğiniz
durumlarda.
GECİKMELİ KAPATMA ZAMANLAYICISI
Örneğin klimayı 5 saat sonra durdurmak için;
1 Gecikmeli KAPATMA ZAMANLAYICISI’nı seçmek için
düğmesine bir kez basın.
2 Gecikme saatini seçmek için
düğmesine
basın.
• KAPATMA ZAMANLAYICISI yalnızca klima
çalışıyorken ayarlanabilir.
GECİKMELİ AÇMA ZAMANLAYICISI
Örneğin klimayı 2 saat sonra başlatmak için;
1 Gecikmeli AÇMA ZAMANLAYICISI’nı seçmek için
düğmesine bir kez basın.
2 Gecikme saatini seçmek için
düğmesine
basın.
• AÇMA ZAMANLAYICISI yalnızca klima çalışıyorken
ayarlanabilir.
GECİKMELİ KAPATMA VE AÇMA ZAMANLAYICISI
Örneğin klimayı 3 saat sonra durdurup 4 saat sonra
tekrar başlatmak için;
1 Gecikmeli KAPATMA ve AÇMA ZAMANLAYICISI’nı
seçmek için
düğmesine iki kez üst üste basın.
2 KAPATMA Zamanlayıcısının gecikme saatini seçmek
için
düğmesine basın.
3 AÇMA Zamanlayýcýsýnýn gecikme saatini seçmek
için
düðmesine basýn.
• Bu zamanlayıcı modu yalnızca klima çalışıyorken
ayarlanabilir.
GECİKMELİ AÇMA VE KAPATMA ZAMANLAYICISI
Örneğin klimayı 7 saat sonra başlatıp 10 saat sonra
durdurmak için;
1 Gecikmeli AÇMA ve KAPATMA ZAMANLAYICISI’nı
seçmek için
düğmesine iki kez üst üste basın.
2 AÇMA Zamanlayıcısının gecikme saatini seçmek için
düğmesine basın.
3 KAPATMA Zamanlayıcısının gecikme saatini seçmek
için
düğmesine basın.
• Bu zamanlayıcı modu yalnızca klima çalışmıyorken
ayarlanabilir.
ZAMANLAYICI AYARINI ONAYLAMAK İÇİN
Belirtilen süreye erişildiğinde başlayacak olan
zamanlayıcı işlemini etkinleştirmek için
düğmesine bir kez basın.
ZAMANLAYICI AYARINI İPTAL ETMEK İÇİN
Zamanlayıcının çalışmasını iptal etmek için
düğmesine tekrar basın.
• İç ünitenin zamanlayıcı göstergesi, zamanlayıcının
çalışması esnasında yanacaktır.
• AÇMA zamanlayıcısı ayarlandığında, istenen oda
sıcaklığına zamanında erişmek için ünite belirtilen
saatten önce çalışmaya başlayabilir.
/
• Zamanlayıcı ayarlama işlemi esnasında
işlemi düğmesine basarsanız, zamanlayıcı ayarı iptal
edilecektir.
• Zamanlayıcı manuel olarak ya da güç arızası
nedeniyle iptal edilirse, aşağıdaki adımları
tekrarlayarak zamanlayıcıyı tekrar ayarlayabilirsiniz.
(güç tekrar sağlandığında)
TÜRKÇE
47
Page 48

İÇ ÜNİTE
• Temizlemeden önce güç kaynağını kapatın.
• Alüminyum kanatlara dokunmayın, keskin kısımları yaralanmaya
DİKKAT
YIKAMA TALİMATLARI İPUCU
• Benzen, tiner ya da temizleme tozu kullanmayın.
• Yalnıza sabun ( pH7) ya da nötr deterjanları kullanın.
• 40°C’den daha sıcak su kullanmayın.
neden olabilir.
• Ünitenin optimum performansı gösterdiğinden emin
olmak için, temizlik bakımı düzenli aralıklarla yapılmalıdır.
NOT
• Üniteyi silmek için kimyasal bir bez kullanılırsa bez için
gerekli talimatlar izlenmelidir.
1
2
5
6
İÇ ÜNİTE
4
• Üniteyi yumuşak, kuru bir bez ile hassas bir şekilde silin.
2
ÖN PANEL
Ön Paneli Çıkarın
• Ön paneli çıkarmak için kaldırın ve çekin.
• Hassas bir şekilde silerek kurulayın.
Ön Paneli Kapatın
• Güvenli bir şekilde kapamak için ön paneli iki tarafından bastırın.
3
ALICI
4
ALÜMİNYUM FİN
5
YATAY HAVA YÖNLENDİRME PANJURU
• Manuel olarak ayarlanabilir.
UYARI
Çapraz akım fanıyla yaralanmaktan sakınmak için
parmaklarınızı ünite içine koymamaya dikkat edin.
1
7
8
3
7
OTOMATİK AÇMA/KAPAMA DÜĞMESİ
• Uzaktan kumanda kaybolduğunda ya da arızalı
olduğunda kullanın.
İşlem Mod
Bir kez basın. Otomatik
1 bip sesi duyulana kadar basılı tutun,
sonra bırakın.
Çift bip sesi duyulana kadar basılı
tutun, sonra bırakın.
Soğutma
Isıtma
Kapatmak için düğmeye basın.
8
HAVA FİLTRELERİ
• Filtreleri düzenli olarak temizleyin.
• Filtre yüzeyine zarar vermemek için hassas bir şekilde
yıkayın/durulayın.
• Filtreleri doğrudan ateşe ya da güneş ışığına maruz
bırakmadan gölge bir alanda kurutun.
• Zarar gören ltreyi değiştirin.
6
• El ile ayarlamayın.
48
DİKEY HAVA YÖNLENDİRME PANJURU
Page 49

SORUN GİDERME
Aşağıdaki belirtiler bir arızaya işaret etmez.
BELİRTİ NEDEN
İç üniteden duman çıkar. ► • Soğutma işlemi nedeniyle yoğuşma gerçekleşir.
Çalışma sırasında akan su sesi. ► • Ünite içinde soğutucu akışı.
Odada sıra dışı bir koku var. ► • Bu duvar, halı, mobilya ya da giysilerden yayılan nem
İç ünite fan, otomatik fan hızı ayarlama sırasında zaman
zaman duruyor.
Çalışma yeniden başlamadan sonra birkaç dakika gecikiyor. ► • Gecikme ünitenin kompresörünü korumak içindir.
Dış ünite su/buhar çıkarıyor. ► • Borularda yoğunlaşma ya da buharlaşma meydana geliyor.
Bir kesintiden sonra elektrik geldiğinde ünite otomatik
olarak çalışıyor.
Isıtma işlemi sırasında iç ünite fanı zaman zaman duruyor. ► • İstenmeyen soğutma etkisini önlemek için.
Güç göstergesi, ünite açýlmadan yanýp sönüyor. ► • ON (Açma) zamanlayıcısı ayarlandığı zaman bu çalışma
Çalışma sırasında çatlama sesleri geliyor. ► • Sıcaklık değişimleri ünitenin genleşmesine/büzülmesine
Servisi aramadan önce aşağıdakileri kontrol edin.
SEMPTOM KONTROL
Isıtma/Soğutma işlemi etkili biçimde çalışmıyor. ► • Sıcaklığı doğru şekilde ayarlayın.
Çalışırken gürültü. ► • Ünitenin eğimli takılıp takılmadığını kontrol edin.
Uzaktan kumanda çalışmıyor.
(Ekran loş veya transmisyon sinyali zayıf.)
Ünite çalışmıyor. ► • Devre kesicinin kapanıp kapanmadığını kontrol edin.
Ünite uzaktan kumandadan sinyal almıyor. ► • Alıcının engellenmediğinden emin olun.
kokusundan kaynaklanabilir.
► • Bu çevredeki kokularý gidermeye yardýmcý olur.
► • Bu ünitenin Otomatik Yeniden Başlatma işlevidir.
Çalışma uzaktan kumanda tarafından durdurulmadığı
için elektrik geldiğinde ünite otomatik olarak önceki
çalışma modunda ve hava akım yönünde yeniden
çalışmaya başlar.
hazırlığındaki ilk adımdır.
neden oluyor.
• Tüm kapıları ve pencereleri kapatın.
• Filtreyi temizleyin ya da değiştirin.
• Hava girişi ve hava çıkışı ağızlarında herhangi bir engel
varsa temizleyin.
• Ön paneli düzgün şekilde kapatın.
► • Pilleri düzgün biçimde takın.
• Zayıf pilleri değiştirin.
• Zamanlayıcıların ayarlanıp ayarlanmadığını kontrol edin.
• Belli üoresan lambalar sinyal vericisine müdahalede
bulunabilir. Lütfen yetkili satıcınıza danışın.
TÜRKÇE
Ünite duruyor ve zamanlayıcı göstergesi yanıp sönüyor.
Hata kodunu almak için uzaktan kumandayı kullanın.
/
POWERFUL
QUIET
5 saniye
1
boyunca
basın.
Üniteyi kapatın ve hata kodunu yetkili satıcıya bildirin.
4
SELECT
CHECK
A B
SET/CANCEL
ERROR RESET RESET
Bip sesini duyuncaya
2
kadar basın, daha
sonra hata kodunu
hızla not edin.
Kontrolden çıkmak
3
için 5 saniye
boyunca basın.
Not:
• Belli bir hata için,
çalıştırma başlatıldığı
sırada 4 bipli sınırlı bir
çalıştırmayla üniteyi
yeniden başlatabilirsiniz.
49
Page 50

INFORMATION/INFORMACIÓN/INFORMAZIONI/
INFORMAÇÃO/ИНФОРМАЦИЯ/INFORMACIJE/BİLGİ
Information for Users on Collection and Disposal of Old Equipment and Used Batteries
These symbols on the products, packaging, and/or accompanying documents mean that used electrical and electronic
products and batteries should not be mixed with general household waste.
For proper treatment, recovery and recycling of old products and used batteries, please take them to applicable collection
points, in accordance with your national legislation and the Directives 2002/96/EC and 2006/66/EC.
By disposing of these products and batteries correctly, you will help to save valuable resources and prevent any potential
negative effects on human health and the environment which could otherwise arise from inappropriate waste handling.
For more information about collection and recycling of old products and batteries, please contact your local municipality,
your waste disposal service or the point of sale where you purchased the items.
Penalties may be applicable for incorrect disposal of this waste, in accordance with national legislation.
For business users in the European Union
If you wish to discard electrical and electronic equipment, please contact your dealer or supplier for further information.
[Information on Disposal in other Countries outside the European Union]
These symbols are only valid in the European Union. If you wish to discard these items, please contact your local
authorities or dealer and ask for the correct method of disposal.
Note for the battery symbol (bottom two symbol examples):
This symbol might be used in combination with a chemical symbol. In this case it complies with the requirement set by the
Pb
Directive for the chemical involved.
Información para Usuarios sobre la Recolección y Eliminación de aparatos viejos y baterías usadas
Estos símbolos en los productos, embalajes y/o documentos adjuntos, signican que los aparatos eléctricos y
electrónicos y las baterías no deberían ser mezclados con los desechos domésticos.
Para el tratamiento apropiado, la recuperación y el reciclado de aparatos viejos y baterías usadas, por favor, observe las
normas de recolección aplicables, de acuerdo a su legislación nacional y a las Directivas 2002/96/CE y 2006/66/CE.
Al desechar estos aparatos y baterías correctamente, Usted estará ayudando a preservar recursos valiosos y a prevenir
cualquier potencial efecto negativo sobre la salud de la humanidad y el medio ambiente que, de lo contrario, podría surgir
de un manejo inapropiado de los residuos.
Para mayor información sobre la recolección y el reciclado de aparatos y baterías viejas, por favor, contacte con su
comunidad local, su servicio de eliminación de residuos o al comercio donde adquirió estos aparatos.
Podrán aplicarse penas por la eliminación incorrecta de estos residuos, de acuerdo a la legislación nacional.
Para usuarios empresariales en la Unión Europea
Si usted desea desechar aparatos eléctricos y electrónicos, por favor contacte con su distribuidor o proveedor a n de
obtener mayor información.
[Informacion sobre la Eliminación en otros Países fuera de la Unión Europea]
Estos símbolos sólo son válidos dentro de la Unión Europea. Si desea desechar estos objetos, por favor contacte con sus
autoridades locales o distribuidor y consulte por el método correcto de eliminación.
Nota sobre el símbolo de la bateria (abajo, dos ejemplos de símbolos):
Este símbolo puede ser usado en combinación con un símbolo químico. En este caso, el mismo cumple con los
Pb
requerimientos establecidos por la Directiva para los productos químicos involucrados.
Informazioni per gli utenti sulla raccolta e l’eliminazione di vecchie apparecchiature e batterie usate
Questi simboli sui prodotti, sull’imballaggio, e/o sulle documentazioni o manuali accompagnanti i prodotti indicano che i
prodotti elettrici, elettronici e le batterie usate non devono essere buttati nei riuti domestici generici.
Per un trattamento adeguato, recupero e riciclaggio di vecchi prodotti e batterie usate, vi preghiamo di portarli negli
appositi punti di raccolta, secondo la legislazione vigente nel vostro Paese e le Direttive 2002/96/EC e 2006/66/EC.
Smaltendo correttamente questi prodotti e le batterie, contribuirete a salvare importanti risorse e ad evitare i potenziali effetti
negativi sulla salute umana e sull’ambiente che altrimenti potrebbero vericarsi in seguito ad un trattamento inappropriato dei riuti.
Per ulteriori informazioni sulla raccolta e sul riciclaggio di vecchi prodotti e batterie, vi preghiamo di contattare il vostro
comune, i vostri operatori per lo smaltimento dei riuti o il punto vendita dove avete acquistato gli articoli.
Sono previste e potrebbero essere applicate sanzioni qualora questi riuti non siano stati smaltiti in modo corretto ed in
accordo con la legislazione nazionale.
Per utenti commerciali nell’Unione Europea
Se desiderate eliminare apparecchiature elettriche ed elettroniche, vi preghiamo di contattare il vostro commerciante od il
fornitore per maggiori informazioni.
[Informazioni sullo smaltimento riuti in altri Paesi fuori dall’Unione Europea]
Questi simboli sono validi solo all’interno dell’Unione Europea. Se desiderate smaltire questi articoli, vi preghiamo di
contattare le autorità locali od il rivenditore ed informarvi sulle modalità per un corretto smaltimento.
Nota per il simbolo delle batterie (esempio con simbolo chimico riportato sotto il simbolo principale):
Questo simbolo può essere usato in combinazione con un simbolo chimico; in questo caso è conforme ai requisiti indicati
Pb
50
dalla Direttiva per il prodotto chimico in questione.
Page 51

Informações para Utilizadores referentes à Recolha e Eliminação de Equipamentos Velhos e Baterias
Estes símbolos nos produtos, embalagens e documentos signicam que os produtos eléctricos e electrónicos usados
nao podem ser misturados com os resíduos urbanos.
Para o tratamento apropriado, recuperação e reciclagem de produtos velhos e baterias usadas, solicitamos que os
coloque em pontos de recolha próprios, de acordo com a Legislacao Nacional e com as Directivas Europeias 2002/96/
EC e 2006/66/EC.
A eliminação correcta deste produto ajudará a poupar recursos valioso e evitar quaisquer potenciais efeitos negativos na
saúde humana e no ambiente, os quais poderiam resultar de um tratamento incorrecto de Resíduos.
Para mais informacoes sobre a recolha e reciclagem de produtos velhos e baterias, por favor, contacte as autoridades
locais responsáveis pela recolha de resíduos ou o ponto de venda onde o produto foi adquirido.
De acordo com a legislacao nacional, podem ser apçlicadas multas caso seja feita a eliminação incorrecta destes resíduos.
Para Uitlizadores Não Particulares da União Europeia
Se pretender eliminar equipamentos eléctricos e electrónicos, por favor, contacte o seu Distribuídor ou Produtor para obter
mais informações.
[Informação sobre a eliminação noutros países fora da União Europeia]
Estes símbolos são válidos, apenas, na União Europeia. Se pretender eliminar este produto contacte, por favor, as
autoridades locais responsáveis pela recolha de resíduos ou o ponto de venda onde o produto foi adquirido e solicite
informação sobre o método de eliminação correcto.
Nota para os símbolos de baterias (dois exemplos de símbolos):
Pb
Este símbolo pode ser utilizado em conjugação com um símbolo químico. Neste caso, terá de proceder em conformidade
com o estabelecido na Directiva referente aos produtos químicos utilizados.
Информация за събиране и изхвърляне на стари електроуреди и батерии
Тези символи, поставени на продуктите, опаковките и/или съпътстващите ги документи обозначават електронни
уреди, които не трябва да бъдат изхвърляни заедно с потока битови отпадъци.
3а да бъдат правилно третирани и рециклирани, моля да предадете тези продукти на специално
предназначените за тази цел места, спазвайки разпоредбите на националното законодателство и европейските
директиви 2002/96/EC и 2006/66/EC.
Спазвайки инструкциите за правилното изхвърляне на такива уреди и батерии, вие ще помогнете да запазим
ценни ресурси и да предотвратим възможни негативни ефекти върху човешкото здраве и околната среда.
Моля, обърнете се към местните общински власти или търговския обект, откъдето сте закупили продукта, за
да получите допълнителна информация за най-близкия събирателен пункт или място за изхвърляне на стари
електроуреди и батерии.
При направилно изхвърляне на уреда, може да понесете наказателна отговорност, в съответствие разпоредбите
на националното законодателство.
За бизнес потребители в Европейския Съюз
Ако желаете да изхвърлите ненужни електроуреди, моля свържете се с вашия дилър или доставчик за повече информация.
[Информация за страни извън Европейския Съюз]
Тези символи са валидни само в рамките на Европейския Съюз. Ако желаете да се освободите от тези отпадъчни
продукти, моля свържете се с местните органи на властта или вашия доставчик, за да получите информация за
тяхното коректно изхвърляне.
Забележка за символите върху батерии (последните два символа в ляво):
Pb
Тези символи могат да бъдат използвани заедно с химически символ. В такъв случай те спазват изискванията
определени от директива за съответния химикал.
Informacije za korisnike o prikupljanju i odlaganju u otpad stare opreme i iskorištenih baterija
Ovi simboli na proizvodima, pakiranjima i/ili pripadajućoj dokumentaciji znače da iskorištene električne i elektroničke
proizvode i baterije ne treba miješati s običnim otpadom iz domaćinstava.
Radi pravilne obrade, obnavljanja i recikliranja starih proizvoda i rabljenih baterija, molimo odnesite u odgovarajuće
centre za prikupljanje, u skladu s vašim nacionalnim zakonodavstvom i direktivama 2002/96/EC i 2006/66/EC.
Pravilnim odlaganjem ovih proizvoda i baterija pomoći ćete u očuvanju vrijednih sirovina i spriječit ćete sve potencijalne
neželjene utjecaje na zdravlja ljudi i okoliš koje bi inače proizašle iz nepropisne obrade otpada.
Za više informacija o prikupljanju i recikliranju starih proizvoda i baterija, molimo obratite se svojoj lokalnoj upravi, službi
za zbrinjavanje otpada ili trgovini u kojoj ste kupili te proizvode.
Za neodgovarajuće odlaganje ovog otpada mogu se primjenjivati kazne u skladu s nacionalnim zakonodavstvom.
Za poslovne korisnike u Europskoj Uniji
Ako se želite riješiti električne i elektronske opreme, molimo obratite se vašem trgovcu ili dobavljaču za više informacija.
[Informacije o odlaganju u otpad u drugim državama izvan Europske Unije]
Ovi simboli vrijede samo za Europsku uniju. Ako se želite riješiti ovih proizvoda, ,molimo obratite se vašim lokalnoj upravi ili
trgovcu i upitajte ih o pravilnom načinu odlaganja u otpad.
Napomena za simbol baterija (primjeri: dva simbola dolje):
Ovaj se simbol može koristiti u kombinaciji sa simbolom za kemikalije. U ovom slučaju sukladan je s odredbama direktive
Pb
za sadržane kemikalije.
51
Page 52

Eski Ekipmanın ve Kullanılmış Pillerin Toplanması ve Atılmasına dair Kullanıcı Bilgileri
Ürünlerin, ambalajın ve/veya diğer belgelerin üzerindeki bu semboller kullanılmış elektrikli ve elektronik ürünlerin ve
pillerin genel ev atığıyla karıştırılmaması gerektiği anlamına gelir.
Eski ürünlerin ve kullanılmış pillerin düzgün işlenmesi, geri kazanımı ve geri dönüşümü için bunları lütfen ulusal yasalara
ve 2002/96/EC ve 2006/66/EC Direktierine uygun olarak gereken toplama noktalarına götürün.
Bu ürünleri ve pilleri doğru şekilde atarak, değerli kaynakların korunmasına yardımcı olacak ve uygunsuz atık
kullanımından doğacak olan insan sağlığı ve çevre üzerindeki olası olumsuz herhangi bir etkiyi engelleyeceksiniz.
Eski ürünlerin ve pillerin toplanması ve geri dönüştürülmesi hakkında daha fazla bilgi için lütfen yerel belediyenize, atık
imha servisine veya ürünleri satın aldığınız satış noktasına başvurun.
Bu atığın yanlış şekilde atılması durumunda, ulusal yasalar uyarınca cezalar uygulanabilir.
Avrupa Birliği’ndeki işletme kullanıcıları için
Elektrikli ve elektronik ekipmanı atmayı istediğiniz takdirde, daha fazla bilgi için lütfen satıcı veya tedarikçinizle iletişim
kurun.
[Avrupa Birliği dışındaki başka bir Ülkede Elden Çıkarmaya dair Bilgi]
Bu semboller yalnızca Avrupa Birliği’nde geçerlidir. Bu malzemeleri atmak istediğiniz takdirde, lütfen yerel yetkililerinizle
veya satıcınızla iletişim kurun ve doğru atma yöntemini öğrenin.
Pil sembolü için not (iki alt sembol örneği):
Bu sembol bir kimyasal sembolle birlikte kullanılabilir. Bu durumda ilgili kimyasala dair Direktin getirdiği koşullara uyar.
Pb
52
Page 53

FOR SEASONAL INSPECTION AFTER EXTENDED NON-USE
• Checking of remote control batteries.
• No obstruction at air inlet and air outlet vents.
• Use Auto OFF/ON button to select Cooling/Heating operation,
after 15 minutes of operation, it is normal to have the following
temperature difference between air inlet and air outlet vents:
Cooling: ≥ 8°C Heating: ≥ 14°C
FOR EXTENDED NON-USE
• Activate Heat mode for 2~3 hours to remove moisture left in
the internal parts thoroughly to prevent mould growth.
• Turn off the power supply.
• Remove the remote control batteries.
NON SERVICEABLE CRITERIAS
TURN OFF POWER SUPPLY then please consult
authorized dealer under the following conditions:
• Abnormal noise during operation.
• Water/foreign particles have entered the remote
control.
• Water leaks from Indoor unit.
• Circuit breaker switches off frequently.
• Power cord becomes unnaturally warm.
• Switches or buttons are not functioning properly.
• The timer indicator blinks and the unit can not
be operated.
PARA INSPECCIÓN ESTACIONAL DESPUÉS DE UN LARGO
PERÍODO EN DESUSO
• Verique las pilas del mando a distancia.
• Compruebe que las tomas de entrada y salida de las rejillas
de ventilación no estén obstruidas.
• Use el botón Auto OFF/ON (apagado/encendido automático)
para seleccionar el funcionamiento de Refrigeración/
Calefacción. Después de 15 minutos de funcionamiento, es
normal tener la siguiente diferencia de temperatura entre la
ventilación del aire que ingresa y el aire que sale:
Enfriamiento: ≥ 8°C Calentamiento: ≥ 14°C
SI NO SE VA A UTILIZAR LA UNIDAD DURANTE UN
PERIODO PROLONGADO DE TIEMPO
• Active el modo CALOR durante 2~3 horas para retirar
totalmente la humedad restante en las piezas internas para
evitar que se origine moho.
• Apague la unidad.
• Extraiga las pilas del mando a distancia.
PER L’ISPEZIONE STAGIONALE DOPO UN PERIODO DI
INATTIVITÀ PROLUNGATO
• Controllo delle batterie del telecomando.
• Nessuna ostruzione alle bocchette di ingresso ed uscita
dell’aria.
• Usare il tasto OFF/ON automatico per selezionare la
funzione di raffreddamento/riscaldamento dopo 15 minuti dal
funzionamento, è normale avere la seguente differenza di
temperatura tra le bocchette di entrata e di uscita dell’aria:
Raffreddamento: ≥ 8°C Riscaldamento: ≥ 14°C
PRIMA DI LUNGHI PERIODI DI INATTIVITÀ
• Attiva la funzione di Riscaldamento per 2-3 ore per rimuovere
completamente l’umidità rimasta nelle parti interne, in modo da
evitare la formazione di muffa.
• Spegnere l’apparecchio.
• Togliere le batterie dal telecomando.
NO UTILICE LA UNIDAD SI
APAGUE EL SUMINISTRO DE ENERGÍA y luego
consulte con el distribuidor autorizado bajo las
siguientes condiciones:
• Si escucha ruidos extraños durante el
funcionamiento.
• Si entra agua o elementos extraños en el mando
a distancia.
• Si hay escapes de agua de la unidad interior.
•
Si el interruptor del circuito salta frecuentemente.
•
El cable de alimentación está demasiado caliente.
• Los interruptores o los botones no funcionan
correctamente.
• El indicador de temporizado parpadea y el
equipo no funciona.
FUNZIONAMENTO ANOMALO
TOGLIERE LA CORRENTE, quindi consultare
un rivenditore autorizzato in base alle seguenti
condizioni:
• Durante il funzionamento si sentono rumori
anomali.
• Penetrazione di acqua o di corpi estranei nel
telecomando.
• L’unità interna perde acqua.
• L’interruttore salvavita scatta frequentemente.
• Il cavo di alimentazione su surriscalda in modo
anomalo.
•
Funzionamento anomalo di interruttori o pulsanti.
•
La spia del timer lampeggia e l’unità non può
essere azionata.
53
Page 54

PARA UMA INSPECÇÃO SAZONAL APÓS NÃO UTILIZAÇÃO
PROLONGADA
• Verique as pilhas do controlo remoto.
• Os orifícios de entrada e saída devem estar desobstruídos.
• Use a tecla Auto OFF/ON (Ligar/Desligar automático) para
seleccionar a operação de Arrefecimento/Aquecimento
(COOL/HEAT), após 15 minutos de funcionamento, é normal
ter a seguinte diferença de temperatura entre as aberturas de
ventilação de entrada e saída de ar:
Arrefecimento: ≥ 8°C Aquecimento: ≥ 14°C
PARA PREPARAR A UNIDADE PARA UM PERÍODO DE
INACTIVIDADE PROLONGADO
• Activar o modo Calor durante 2~3 horas para remover
completamente a humidade nas partes internas para evitar o
crescimento de mofo.
• Desligue a unidade.
• Remova as pilhas do controlo remoto.
CRITÉRIOS SEM MANUTENÇÃO
DESLIGUE A ALIMENTAÇÃO e consulte em
seguida um revendedor autorizado nas seguintes
condições:
• Ruído anormal durante o funcionamento.
• Água/partículas estranhas entraram no controlo
remoto.
• Fuga de água da unidade interior.
• Os interruptores do disjuntor desligamse
frequentemente.
• O o distribuidor de corrente aquece de forma
anormal.
• Os interruptores ou botões não estão a
funcionar devidamente.
• O indicador de temporizador pisca e a unidade
não funciona.
ПРИ СЕЗОНЕН ПРЕГЛЕД СЛЕД ПРОДЪЛЖИТЕЛНО
НЕИЗПОЛЗВАНЕ
• Проверка на батериите на дистанционното управление.
• Никакви прегради на входните и изходни вентилационни
отвори.
• Използвайте бутона за автоматично ВКЛ./ИЗКЛ. (Auto
OFF/ON), за да изберете режим на охлаждане/отопление.
Нормално е, след 15 минути работа, да имате следната
температурна разлика между отворите за входящ и
изходящ въздух:
Охлаждане: ≥ 8°C Отопляване: ≥ 14°C
ПРИ ПРОДЪЛЖИТЕЛНО НЕИЗПОЛЗВАНЕ
• Активирайте режима на отопление за 2~3 часа, за да
премахнете напълно влагата, останала във вътрешните
части и да предотвратите натрупването на прах.
• Изключете захранването.
• Извадете батериите на дистанционното управление.
ZA SEZONSKE PROVJERE NAKON DULJEG RAZDOBLJA
NEKORIŠTENJA
• Provjera baterija daljinskog upravljača.
• Bez prepreka ispred ulaznih i izlaznih ventilacijskih otvora.
• Uporabite gumb za uključivanje /isključivanje i automatski
kako biste odabrali hlađenje/grijanje. Nakon 15 minuta rada,
uobičajene su sljedeće razlike u temperaturi između ulaznih i
izlaznih ventilacijskih otvora:
Hlađenje: ≥ 8°C Grijanje: ≥ 14°C
ZA DULJA RAZDOBLJA NEKORIŠTENJA
• Aktivirajte način rada za grijanje na 2~3 sata kako biste sasvim
eliminirali vlagu koja je preostala u unutarnjim dijelovima kako
biste spriječili razvoj plijesni.
• Isključite napajanje.
• Uklonite baterije iz daljinskog upravljača.
КРИТЕРИИ ЗА ПОВРЕДА
ИЗКЛЮЧЕТЕ ЗАХРАНВАНЕТО, след което се
обърнете към оторизирания дилър в следните
случаи:
• Необичаен звук по време на работа.
• Вода/чужди частици са попаднали в
дистанционното управление.
• Изтича вода от Вътрешния уред.
• Прекъсвачът на ел. верига се изключва
често.
• Захранващият кабел се загрява необичайно.
• Копчетата или бутоните не функционират
правилно.
• Индикаторът на таймера мига и устройството
не работи.
UVJETI KOJI SPRJEČAVAJU RAD
ISKLJUČITE NAPAJANJE i potom se posavjetujte
s ovlaštenim zastupnikom u sljedećim
slučajevima:
• Nenormalna buka za vrijeme rada.
• Voda/strane čestice su prodrli u daljinski
upravljač.
• Iz unutarnje jedinice curi voda.
• Prekidač strujnog kruga često izbacuje.
• Kabel napajanja se pretjerano grije.
• Prekidači ili gumbi ne funkcioniraju pravilno.
• Indikator tajmera treperi i jedinicom se ne može
upravljati.
54
Page 55

UZUN SÜRE KULLANIM DIŞI KALDIKTAN SONRA
SEZONLUK İNCELEME İÇİN
• Uzaktan kumanda pillerin kontrol edilmesi.
• Hava giriş ve çıkış kanallarında herhangi bir engel
bulunmamalı.
• Soğutma/Isıtma işlemini seçmek için, 15 dakika çalıştıktan
sonra Otomatik AÇMA/KAPATMA düğmesini kullanın, hava
giriş ve hava çıkış kanallarında aşağıdaki sıcaklık farkının
bulunması normaldir:
Soğutma: ≥ 8°C Isıtma: ≥ 14°C
UZUN SÜRE KULLANILMAYACAĞINDA
• Küf oluşmasını önlemek için iç parçalarda kalan nemi tam
olarak temizlemek üzere Isıtma modunu 2-3 saat boyunca
etkinleştirin.
• Güç kaynağını kapatın.
• Uzaktan kumanda pillerini çıkartın.
ÜRÜNE MÜDEHALE EDİLMEMESİ GEREKEN
DURUMLAR
Aşağıdaki koşullarda GÜÇ KAYNAĞINI KAPATIN,
daha sonra lütfen yetkili satıcıya danışın:
• Çalışırken anormal ses.
• Uzaktan kumandaya su/yabancı parça girişi.
• İç üniteden su sızıntısı.
• Devre kesici çok sık kapanıyor.
• Güç kablosu doğal olmayan şekilde sıcak.
• Anahtarlar veya düğmeler düzgün çalışmıyor.
• Zamanlayıcı göstergesi yanıp sönüyor ve ünite
çalıştırılamıyor.
55
Page 56

PRODUCT SPECIFICATION
Indoor Unit
Outdoor Unit
Power/Current
Refrigerant
Cooling Capacity
Heating Capacity
Noise Level
Model
JIS C 9612
[<70 dB(A)]
Conditions
1m Distance
Max. cooling/
heating
operation
Sound power
level
CS-YE9MK
CU-YE9MK
COOL HEAT COOL HEAT COOL HEAT
Single, 230V,50Hz Single, 230V,50Hz Single, 230V,50Hz
[kW] 0.760 0.880 1.020 1.105 1.660 1.615
[A] 3.60 4.10 4.90 5.20 7.90 7.70
[kg]
[kW] 2.50 3.30 5.00
[kW] 3.20 4.00 5.50
[dB(A)]
[dB(A)]
R410A
0.780
40 40 42 42 46 46
47 48 48 50 50 52
56 56 58 58 62 62
63 64 64 66 66 68
X
CS-YE12MKX
X
CU-YE12MKX
R410A
0.880
CU-YE18MKX
CS-YE18MKX
R410A
1.15
Air Circulation
Product Weight
kg
Dimensions (H x W x D)
Test conditions
1.
Temperature (°C)
COOLING 27 19 35 24
HEATING 20 12 7 6
2. Standard piping length: 7.5 m (Includes Indoor Unit piping length).
56
[m3/min.] 12.5 13.0 13.5 13.9 14.6 15.3
[kg]
283 x 803 x 214 283 x 803 x 214 283 x 803 x 214
[mm]
Indoor Outdoor
*DBT *WBT *DBT *WBT
540 x 780 x 289 540 x 780 x 289 540 x 780 x 289
8.0 8.0 7.5
22 26.5 31.5
Page 57

k
57
Page 58

MEMO
Page 59

MEMO
Page 60

QUICK GUIDE/GUÍA RÁPIDA/GUIDA RAPIDA/GUΙA RÁPIDO/
БЪРЗ СПРАВОЧНИК/BRZE UPUTE/HIZLI REHBER
Remote Control Preparation • Preparación Del Mando A Distancia • Telecomando: Operazioni
Preliminari • Preparação Do Controlo Remoto • Подготвяне На Дистанционното Управление •
Priprema daljinskog upravljača • Uzaktan Kumanda Hazırlanması
Remove the battery cover • Retire la tapa de las pilas • Rimuovere il coperchio batteria • Remova
a tampa da bateria • Свалете капака за батериите • Uklonite pokrov baterija •
1
Pil kapağını çıkartın.
Insert AAA or R03 batteries (can be used ~ 1 year) •
2
2
1
3
Inserte pilas AAA o R03 (puede ser usado ~ 1 año) •
Inserire batterie AAA o R03 (può essere utilizzato per circa 1 anno) •
Introduza pilhas AAA ou R03 (pode ser utilizado ~ 1 ano) •
Поставете AAA или R03 батерии (могат да се използват приблизително една година) •
Umetnite AAA ili R03 baterije (mogu se koristiti ~ 1 godinu) •
AAA veya R03 pil kullanın (~ 1 yıl kullanılabilir)
Close the cover • Cierre la tapa • Chiudere il coperchio • Feche a tampa • Затворете капака •
3
Zatvorite pokrov • Kapağı kapatın.
1
AUTO HEAT
DRY COOL
Select the desired mode.
Seleccione el modo deseado.
Selezionare la modalità desiderata.
Seleccione o modo de funcionamento pretendido.
Избор на желания режим на работа.
Odaberite željeni način.
İstenilen modu seçin.
2
Start/stop the operation.
Inicie/detenga el funcionamiento.
Avviare/arrestare l’apparecchio.
Ligue/Desligue a unidade.
Включване/спиране.
Pokrenite/zaustavite rad.
Çalışmayı başlatın/durdurun.
3
Select the desired temperature.
Seleccione la temperature deseada.
Selezionare la temperatura desiderata.
Programe a temperatura desejada.
Настройка на желаната температура.
Odaberite željenu temperaturu.
İstenilen sıcaklığı seçin.
MODE
OFF/ON
TEMP
2 1
Pursuant to at the directive 2004/108/EC, article 9(2)
Panasonic Testing Centre
Panasonic Service Europe, a division of
Panasonic Marketing Europe GmbH
Winsbergring 15, 22525 Hamburg, F.R. Germany
EEE COMPLIES WITH DIRECTIVE OF TURKEY
EEE YÖNETMELİĞİNE UYGUNDUR
BU ÜRÜNÜN KULLANIM ÖMRÜ 10 YILDIR
3
Printed in China
Panasonic Corporation
Website: http://panasonic.net/
F567943
F1102-03
 Loading...