

Page 1
Panasonic
Room Air Conditioner
Ope r a ti ng In s tr u ct i o ns
■ Indoor Outdoor
Model CS-XC181KP Mcxiel CU-XC181KP
CS-XC241KP CU-XC241KP
Before using your air-condttioner, please
read this operating instructions carefully
and keep it for future reference.
ENGLISH.............P. 1 - R 22
ESPANOL
...........
R 23-P 44
F561637
Page 2
Contents
Safety Precautions..........................................................2-4
- Installation precautions
- Operation precautions
Name of Each Part..............................................................5-6
- Indoor unit
- Outdoor unit
- Accessories
- Remote control
Preparation Before Operation...........................................7-8
- Before operating the unit
- How to insert batteries
- Operating the remote control
How to Operate.............................................................9- 10
Setting the Timer
Convenient Operation
- Sleep mode
- When remote control cannot be used
- OFF/ON remote control signal receiving
sound
Operation Hints............................................................15-16
Better Care and Maintenance....................................17 - 18
- Cleaning the air conditioner and air filters
- Cleaning of front panel
- Replacement of air purifying filters
- When not using the air conditioner for a
long period
- Pre-season inspection
Troubleshooting.......................................................... 19-20
- Normal operation
- Abnormal operation
- Call the dealer immediately
.........................................................
.................................................
11-12
13-14
►
1
Page 3
Safety Precautions
oi0T:jr^i nlou 0h:^
To prevent personal injury, injury to others and property damage, the following instructions must be followed.
■ Incorrect operation due to ignoring of instructions will cause harm or damage, the seriousness of which is
classified as follows :
r:io
01 [0
Warning : This sign warns of death or serious injury.
ÎA
A
Caution :
■ The instructions to be followed are classified by the following symbols :
0
0 ®
This sign warns of injury or damage to property only.
________________________________________!______________________________________
This symbol (with a white background) denotes an action that is
PROHIBITED.
These symbols (with a black background) denote an action that is
COMPULSORY.
_ _ J
)
A
f\ Warning
A
Do not install, remove and reinstall the unit yourself.
Improper installation will cause leakage, electric shock or fire. Please consult an authorized dealer or
specialist for the installation work.
This room air conditioner must be earthed.
Irnproper grounding could cause
electric shock.
Ensure that drainage piping is connected
properly.
Otherwise, water will leak out.
o
o
Do not install the unit in a place where there
may be explosive gas leaks.
Gas teaks near the unit could cause
fires.
0
2
◄
Page 4
©[oxioata
y^Warning
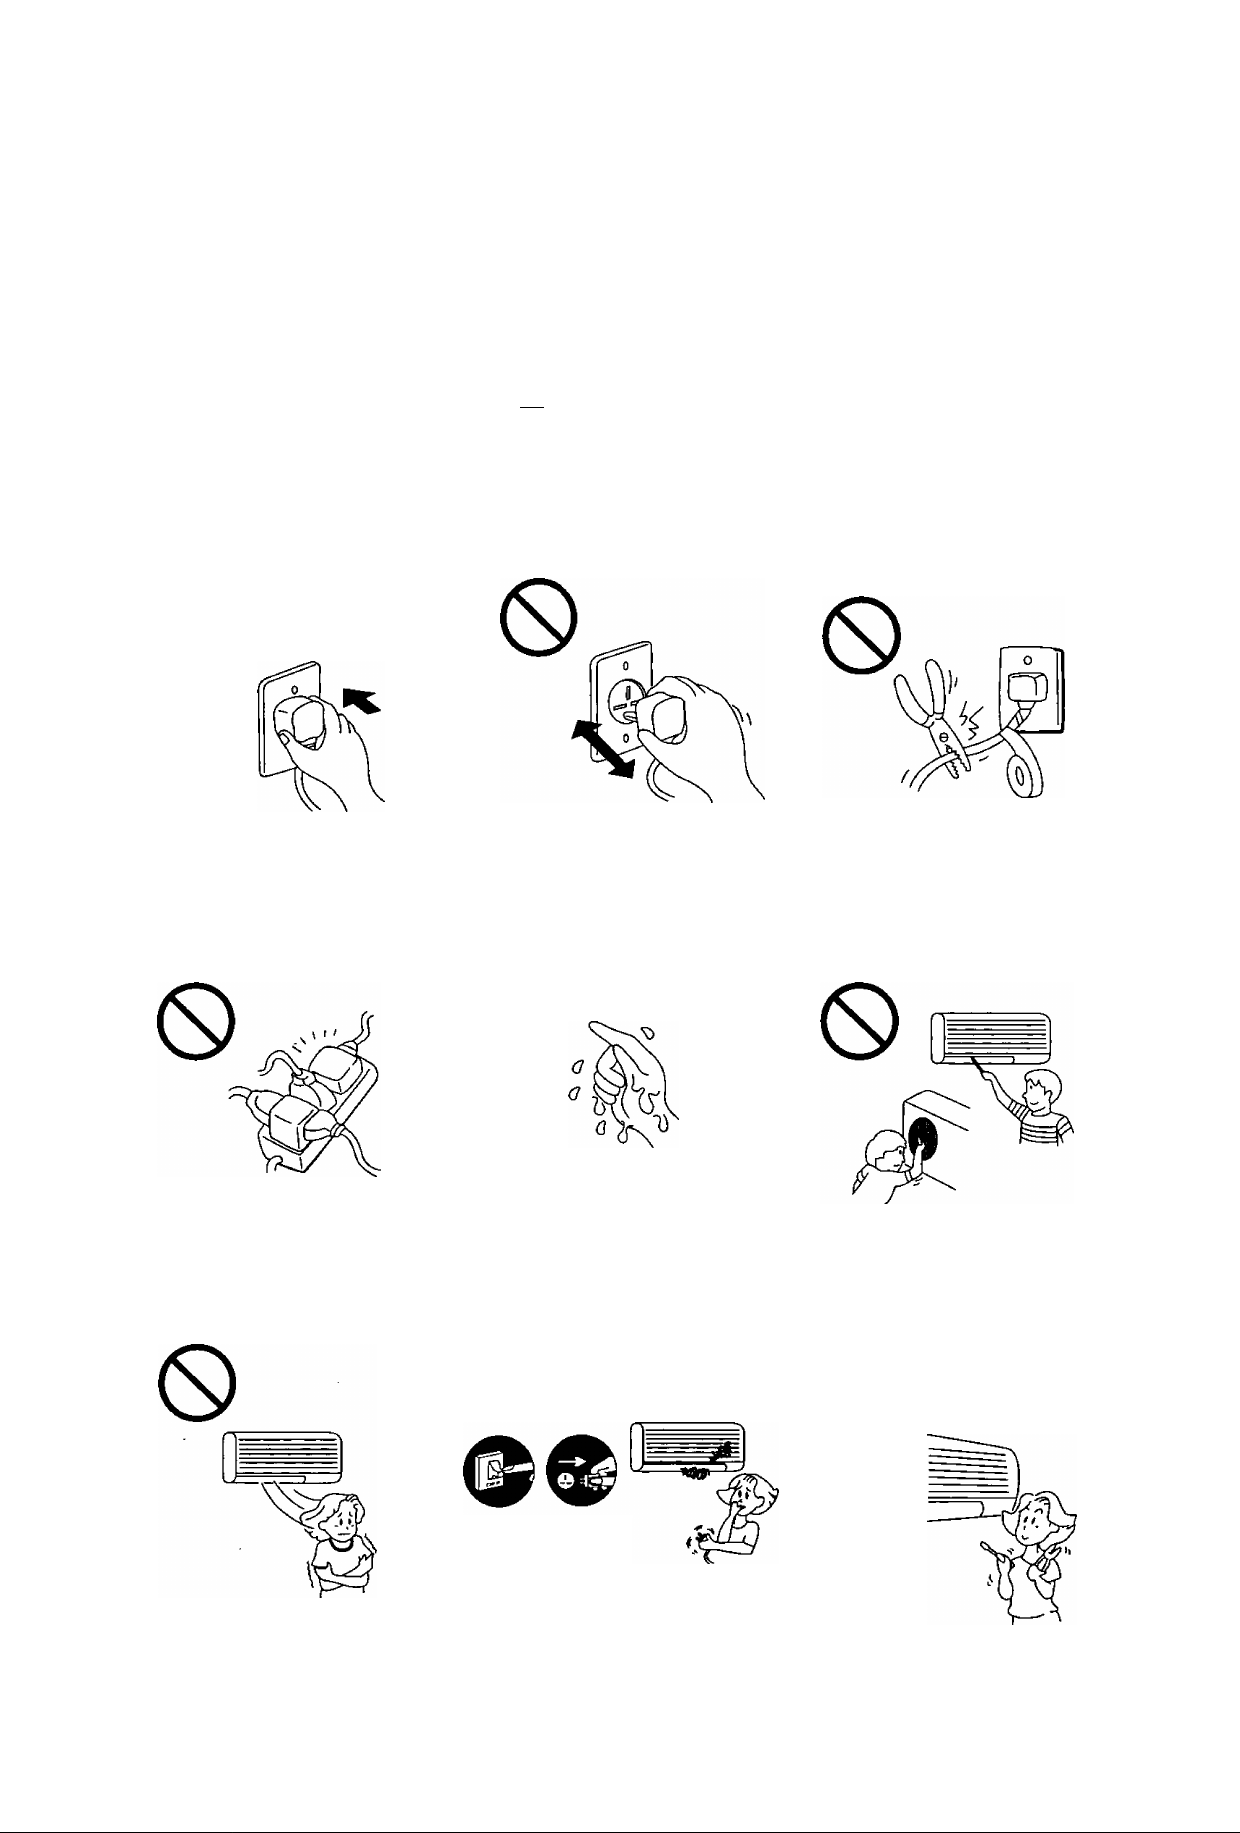
Insert the power plug
properly.
Heat generated by a loose power
plug could cause electric shock
or fire.
o
Do not modify the length of
the power cord or use an
extension cord.
It could cause electric shock or
fire,
Do not operate or stop the
unit by inserting or pulling
out the power plug.
It could cause electric shock or fire.
Do not operate the unit with
wet hands.
It could cause an electric shock.
0
Do not damage or use an
unspecified power cord.
It will cause electrical shock or
fire.
Do not insert finger, sticks
or other objects into the
units.
It could lead to physical injury
and cause damage to the units.
Do not be directly exposed
to the cold airstream for too
long.
It could lead to health problems.
►
3
If there is a smell of burning,
stop the air conditioner and
disconnect the power supply.
The heat generated could cause
electric shock or fire. Please con
sult an authorized dealer or service
center.
Switch off Disconnect
the breaker, the power
plug.
Do not try to repair the unit
yourself.
It could lead to fire or cause an
electric shock. Please call an au
thorized dealer or service center.
0
Page 5
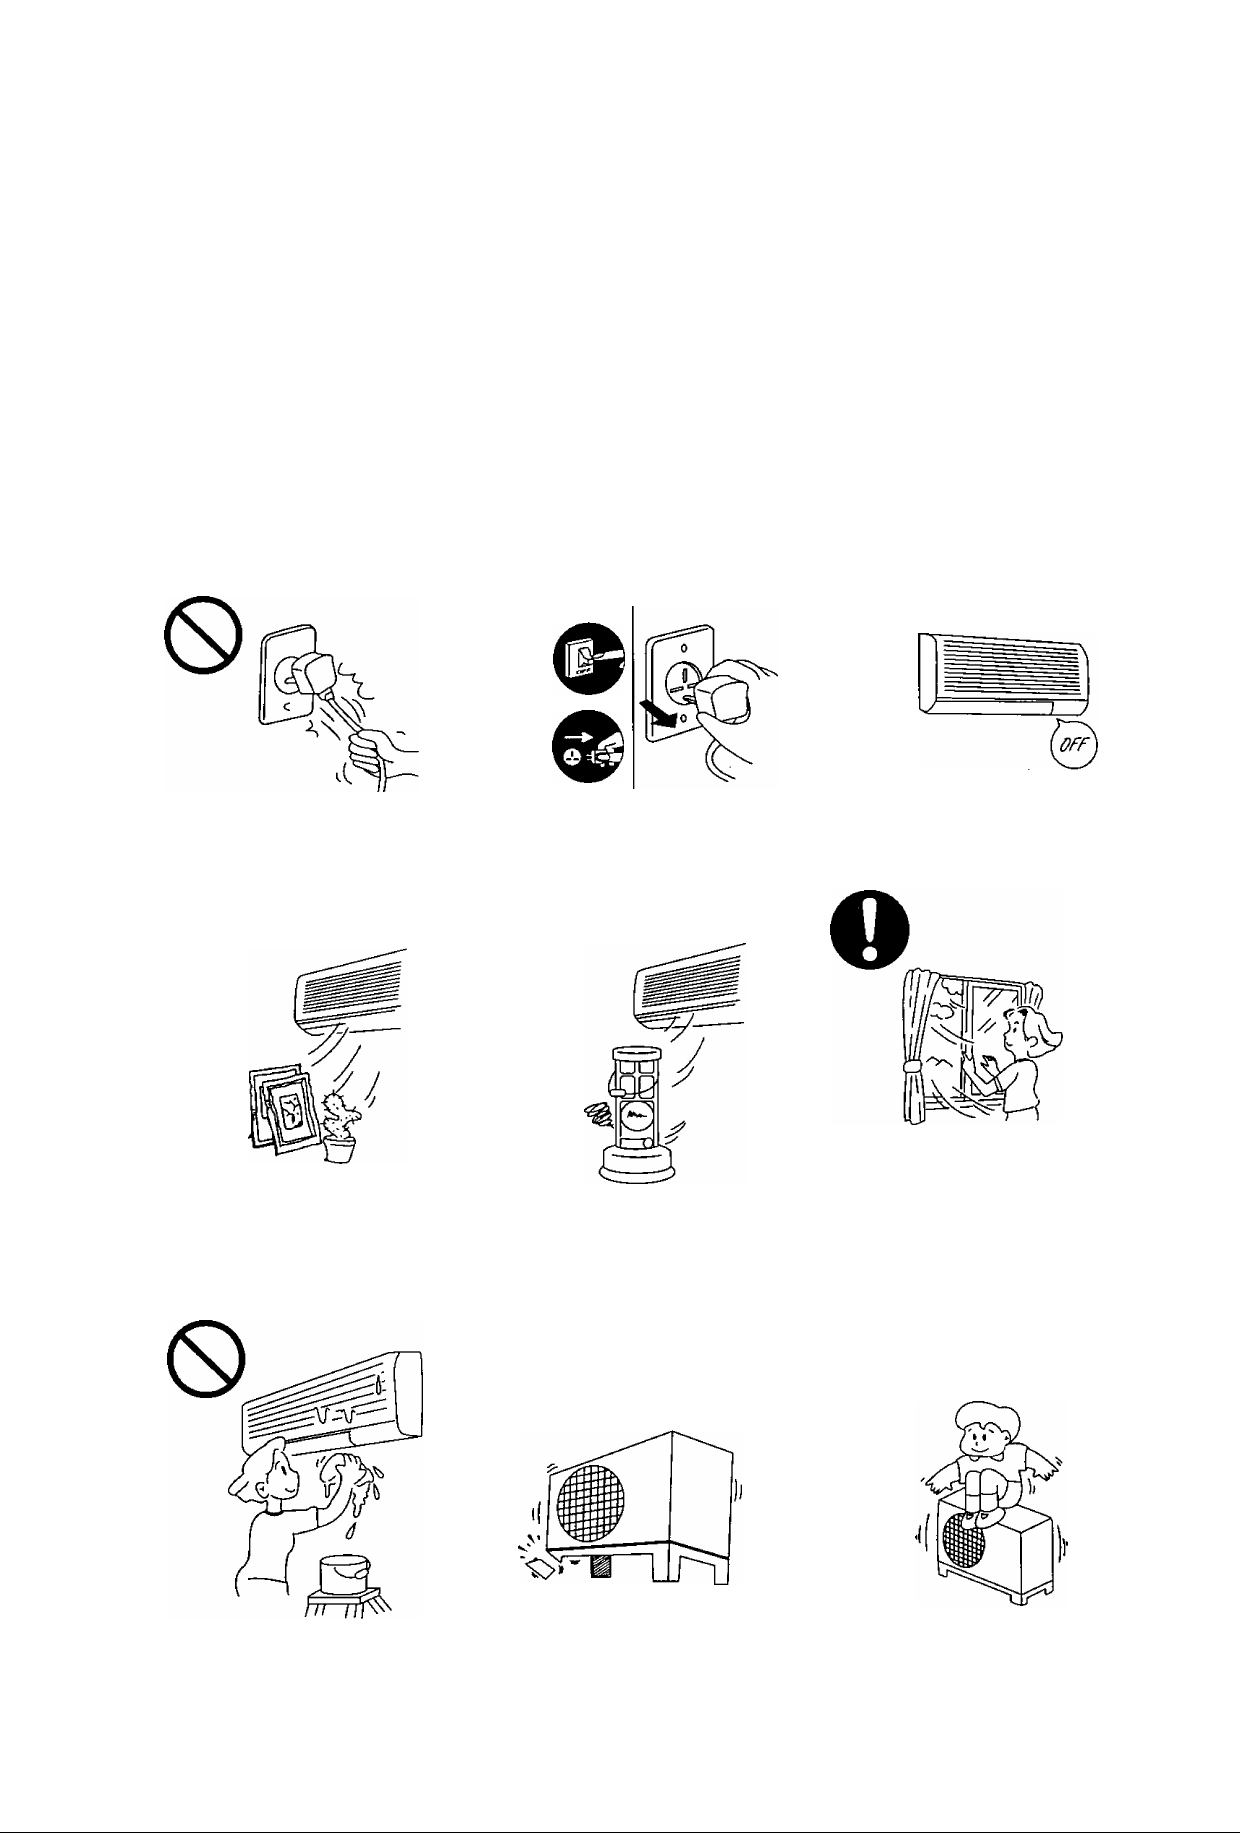
A
Caution
Do not remove the power
plug by pulling the cord.
Hold the plug when disconnect
ing the plug from the wall outlet.
Do not use for other pur
poses.
Do not use for preservation pur
poses. It will affect food quality,
animals or plants.
0
Switch off the power supply if
the unit is not going to be
used for a long period of time.
If dust accumulates on the plug, it
will generate heat and this could
cause a fire.
Switch off
the breaker.
Disconnect
the power
plug.
Do not place combustor in the
path of the airflow from the
unit.
Incomplete combustion could
cause toxic gas (CO) poisoning.
0
When cleaning the unit, re
move the plug.
This is to prevent injury due to the
rotating fan in the unit.
o
Ventilate the room regularly.
If not ventilated regularly, the lack
of oxygen could cause headaches.
Do not wash the unit with
water.
It could cause an electric shock.
Inspect the unit for any
damage.
Ensure that the necessary repairs
are carried out.
o
Do not sit or place anything
on the outdoor unit.
You might fall off or the unit might
collapse.
0
4
◄
Page 6
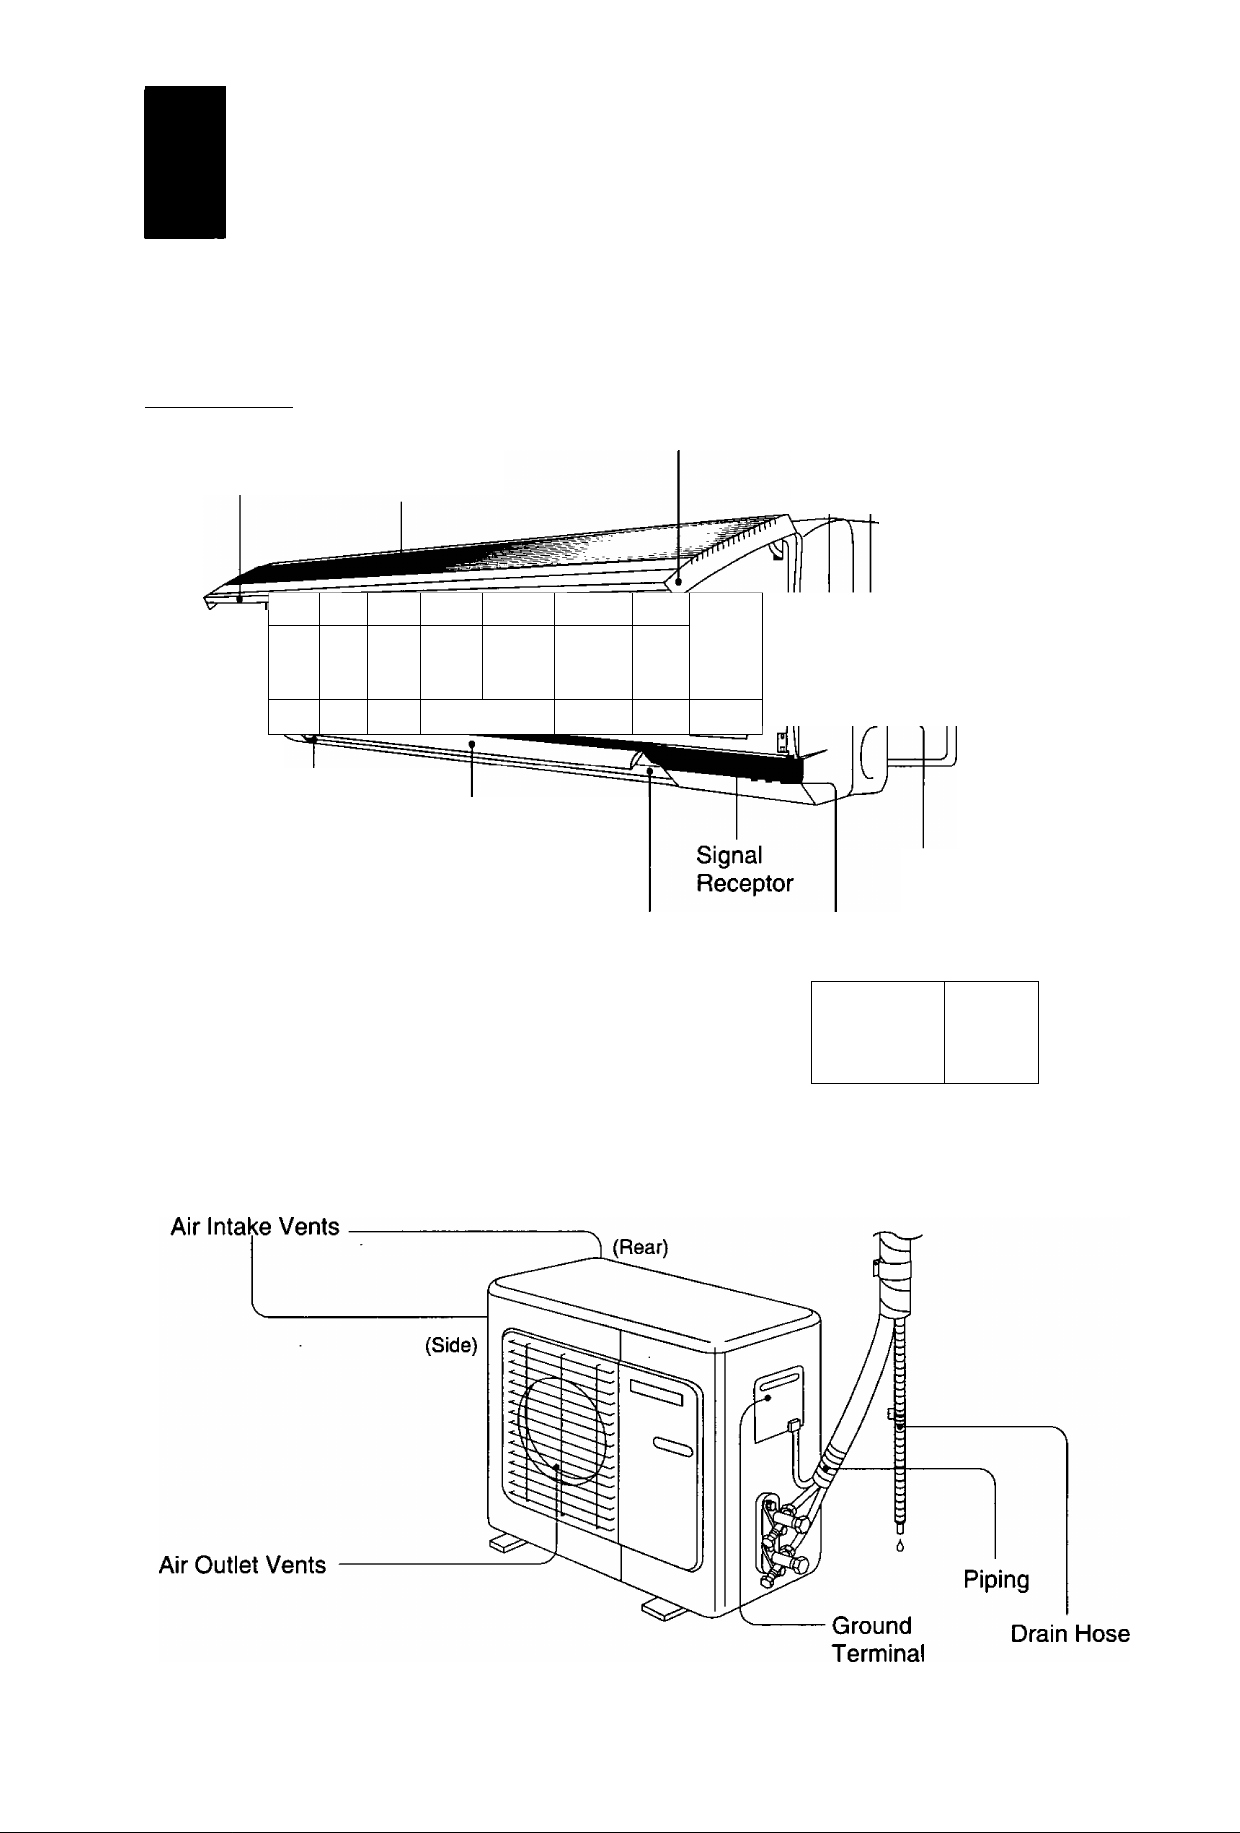
Name of Each Part
( Oaiijlaa? amli
Panel Opener Test Run Button
Front Panel Air Intake Vent
f
/
_
Air Outlet Vent
Vertical Airflow
Direction Louver
;
(
——
Horizontal
AirflowDirection Louver
(Manually adjusted)
El-i
Auto Operation Button
1
Power Supply
Cord
Power Switch
Operation Indication
Lamps
POWER : Red ^
1=1 SLEEP : Orange
1=] TIMER :
V
_________
Orange ^
(oteMsxsg Gaiiffi ]
►
5
(Inside Cover)
Page 7
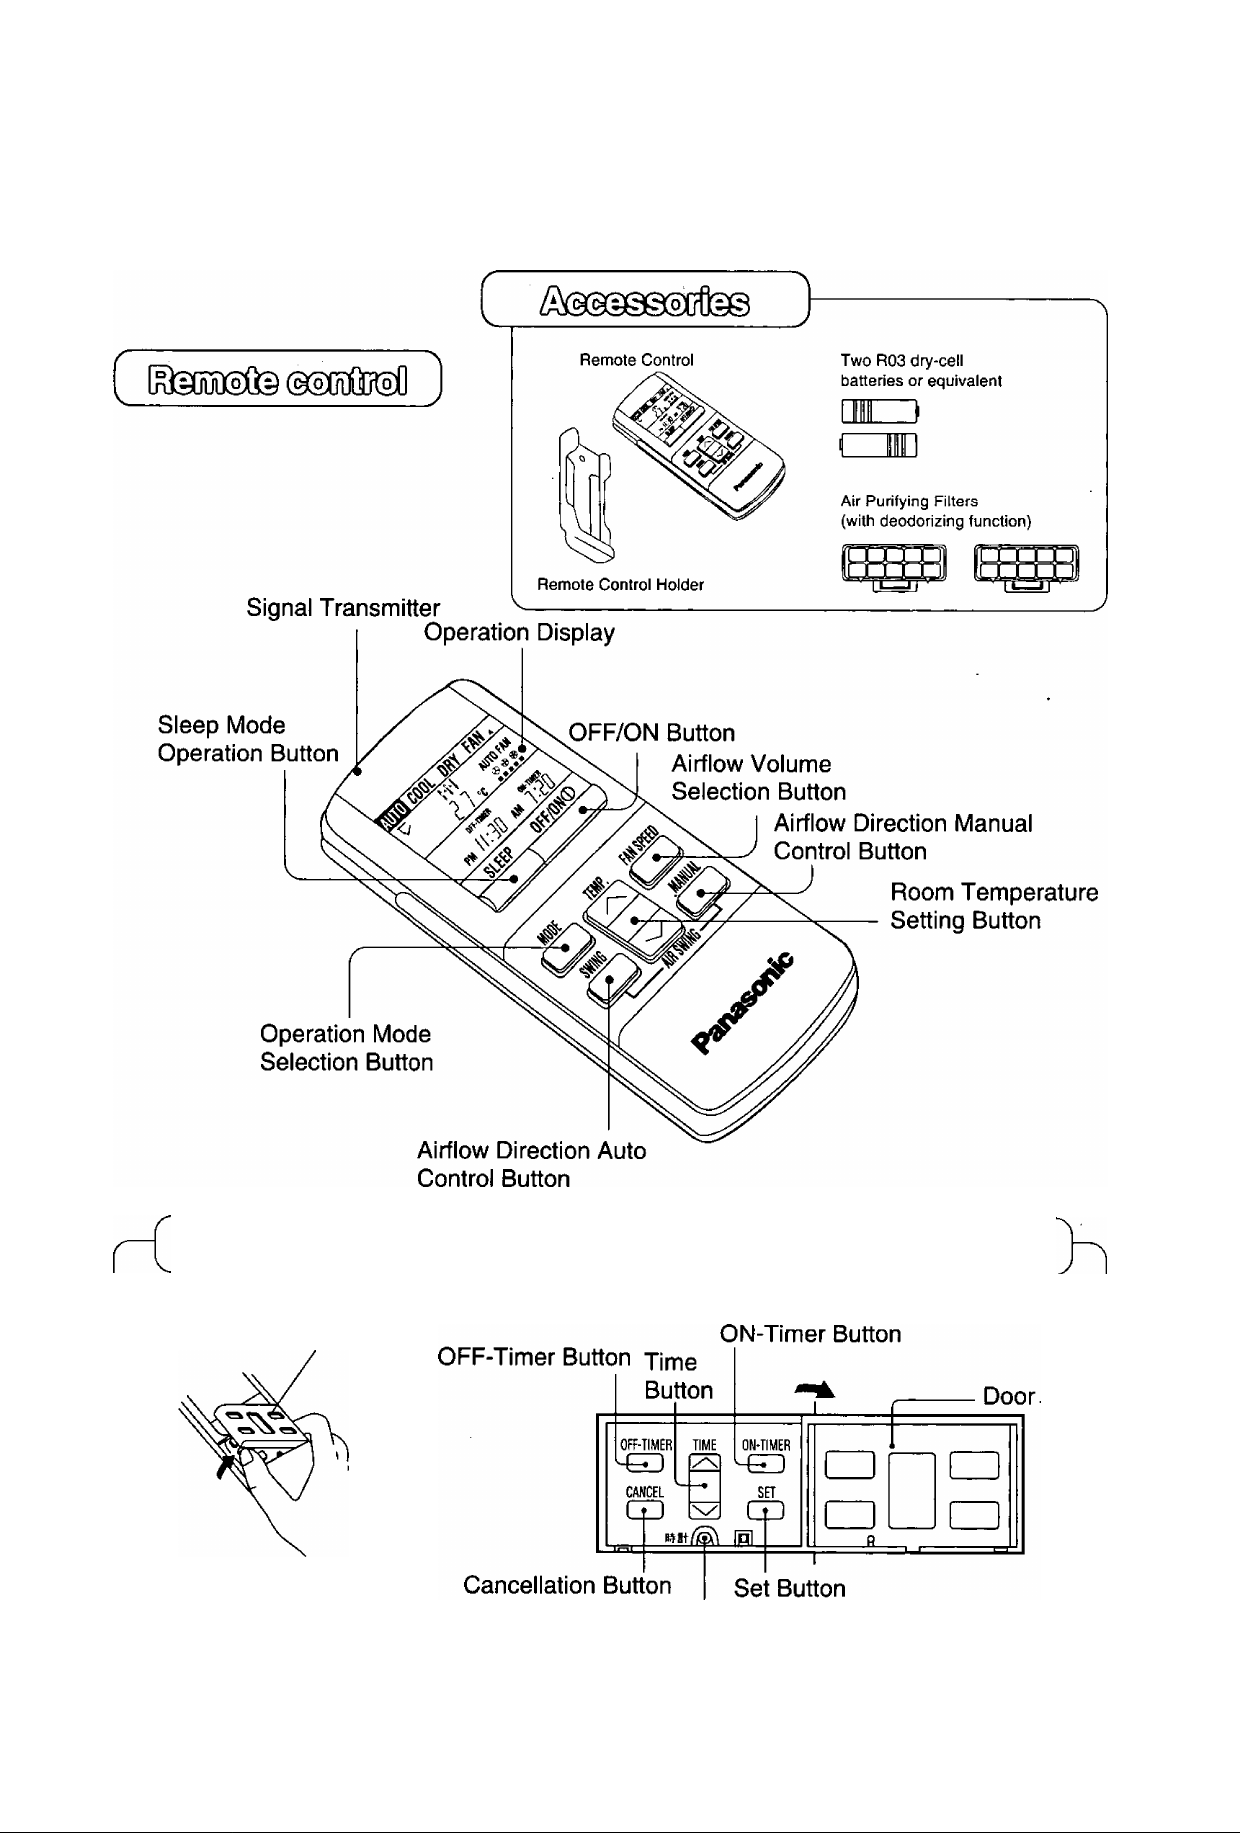
Separate displays and functions are available when the door is opened.
Door
Clock Button
6
◄
Page 8
C
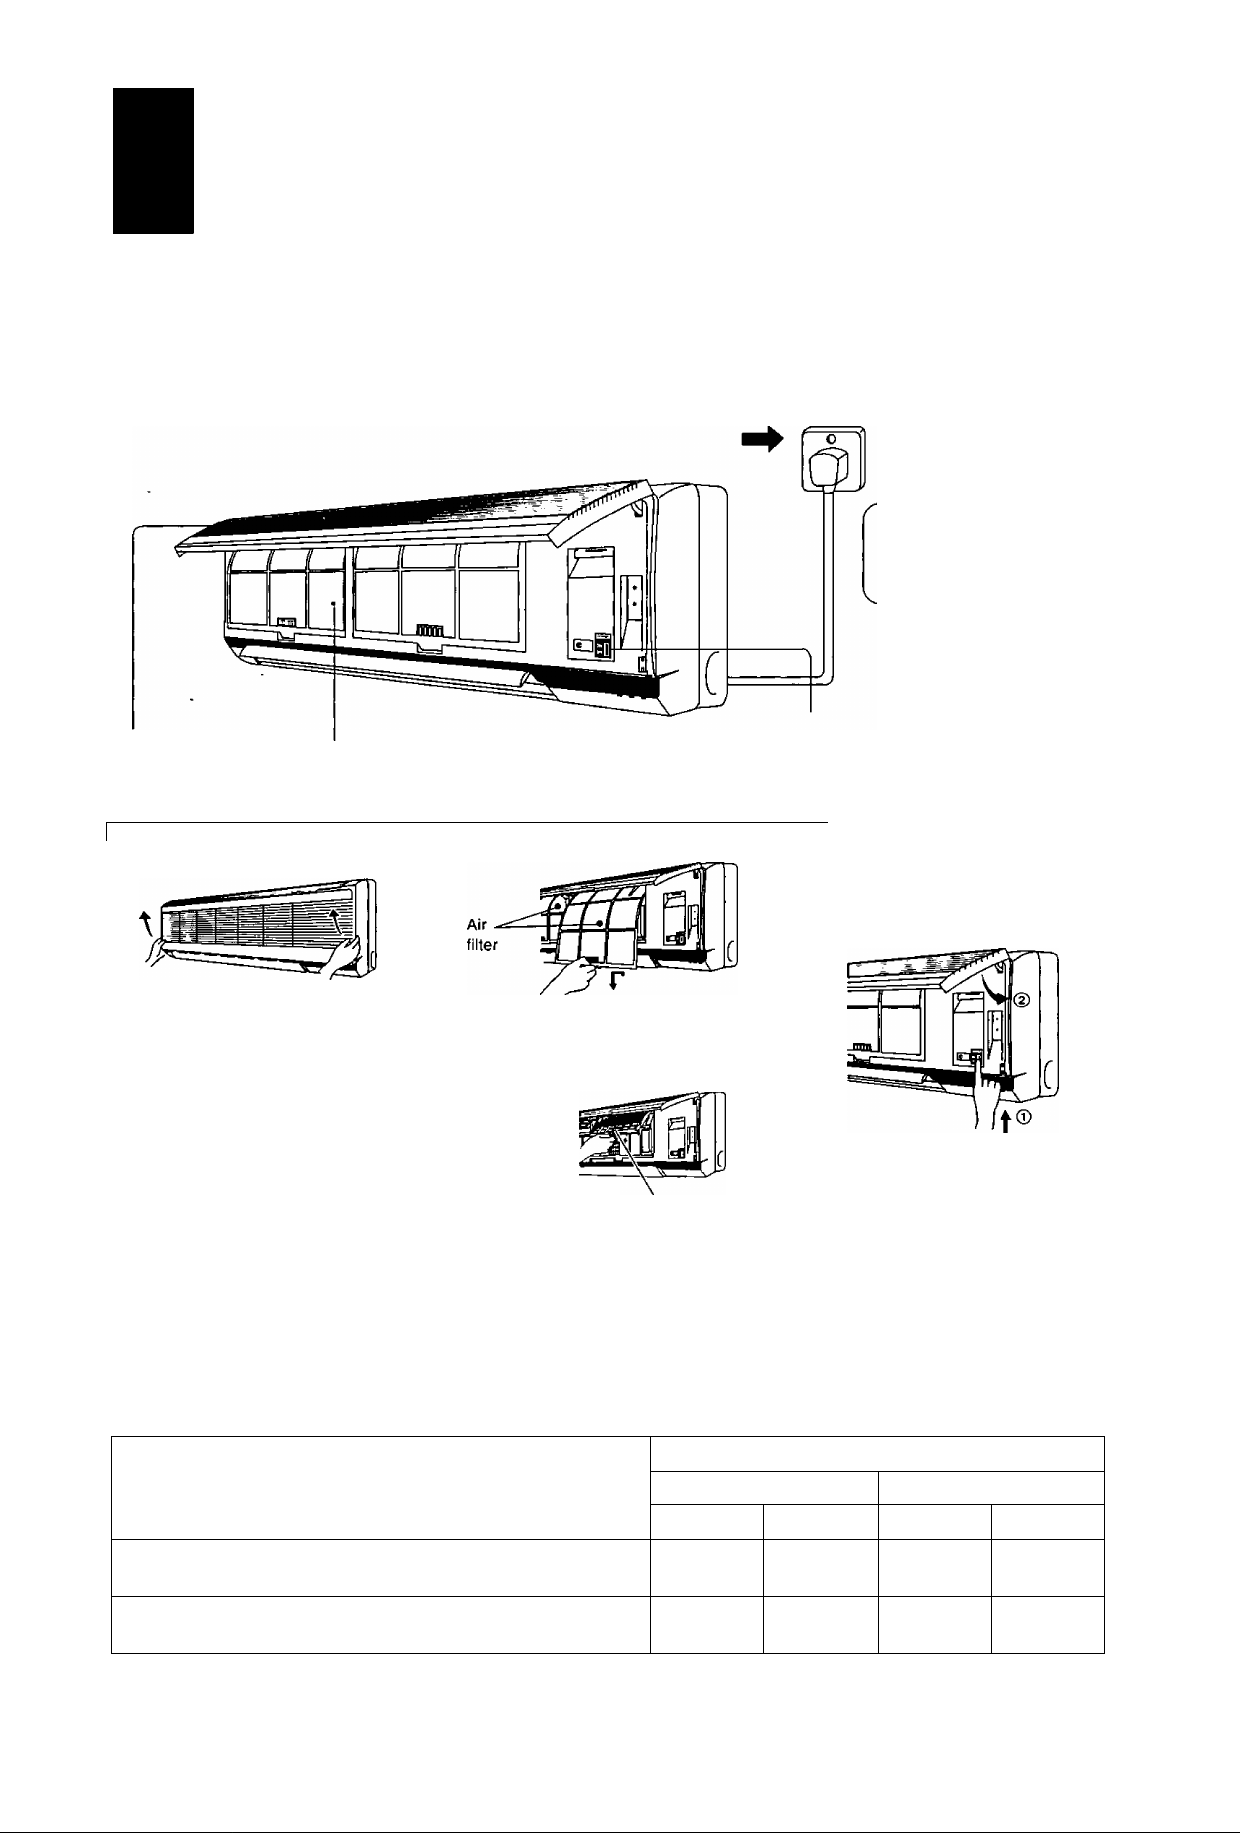
Preparation Before Operation
1
Insert power plug
into an electrical
outlet.
2
Open the front panel.
Hoid the panei openers at both
sides and pull up the front panel.
<Note>
3
Remove air filter.
Hold the tab to raise up
slightly and then pull down.
Insert air purifying filter.
Be careful not to
hurt your hands by Air purifying
metal parts.
4
Switch on the power switch and close the front panel.
Use under the following conditions:
DBT: Dry Bulb Temperature
WBT: Wet Bulb Temperature
Maximum Temperature 32
Minimum Temperature
\____________________________________________________
►
7
Indoor Outdoor
DBT WBT DBT
43 26
16
16
23
11
Cooling ^
WBT
11
J
Page 9
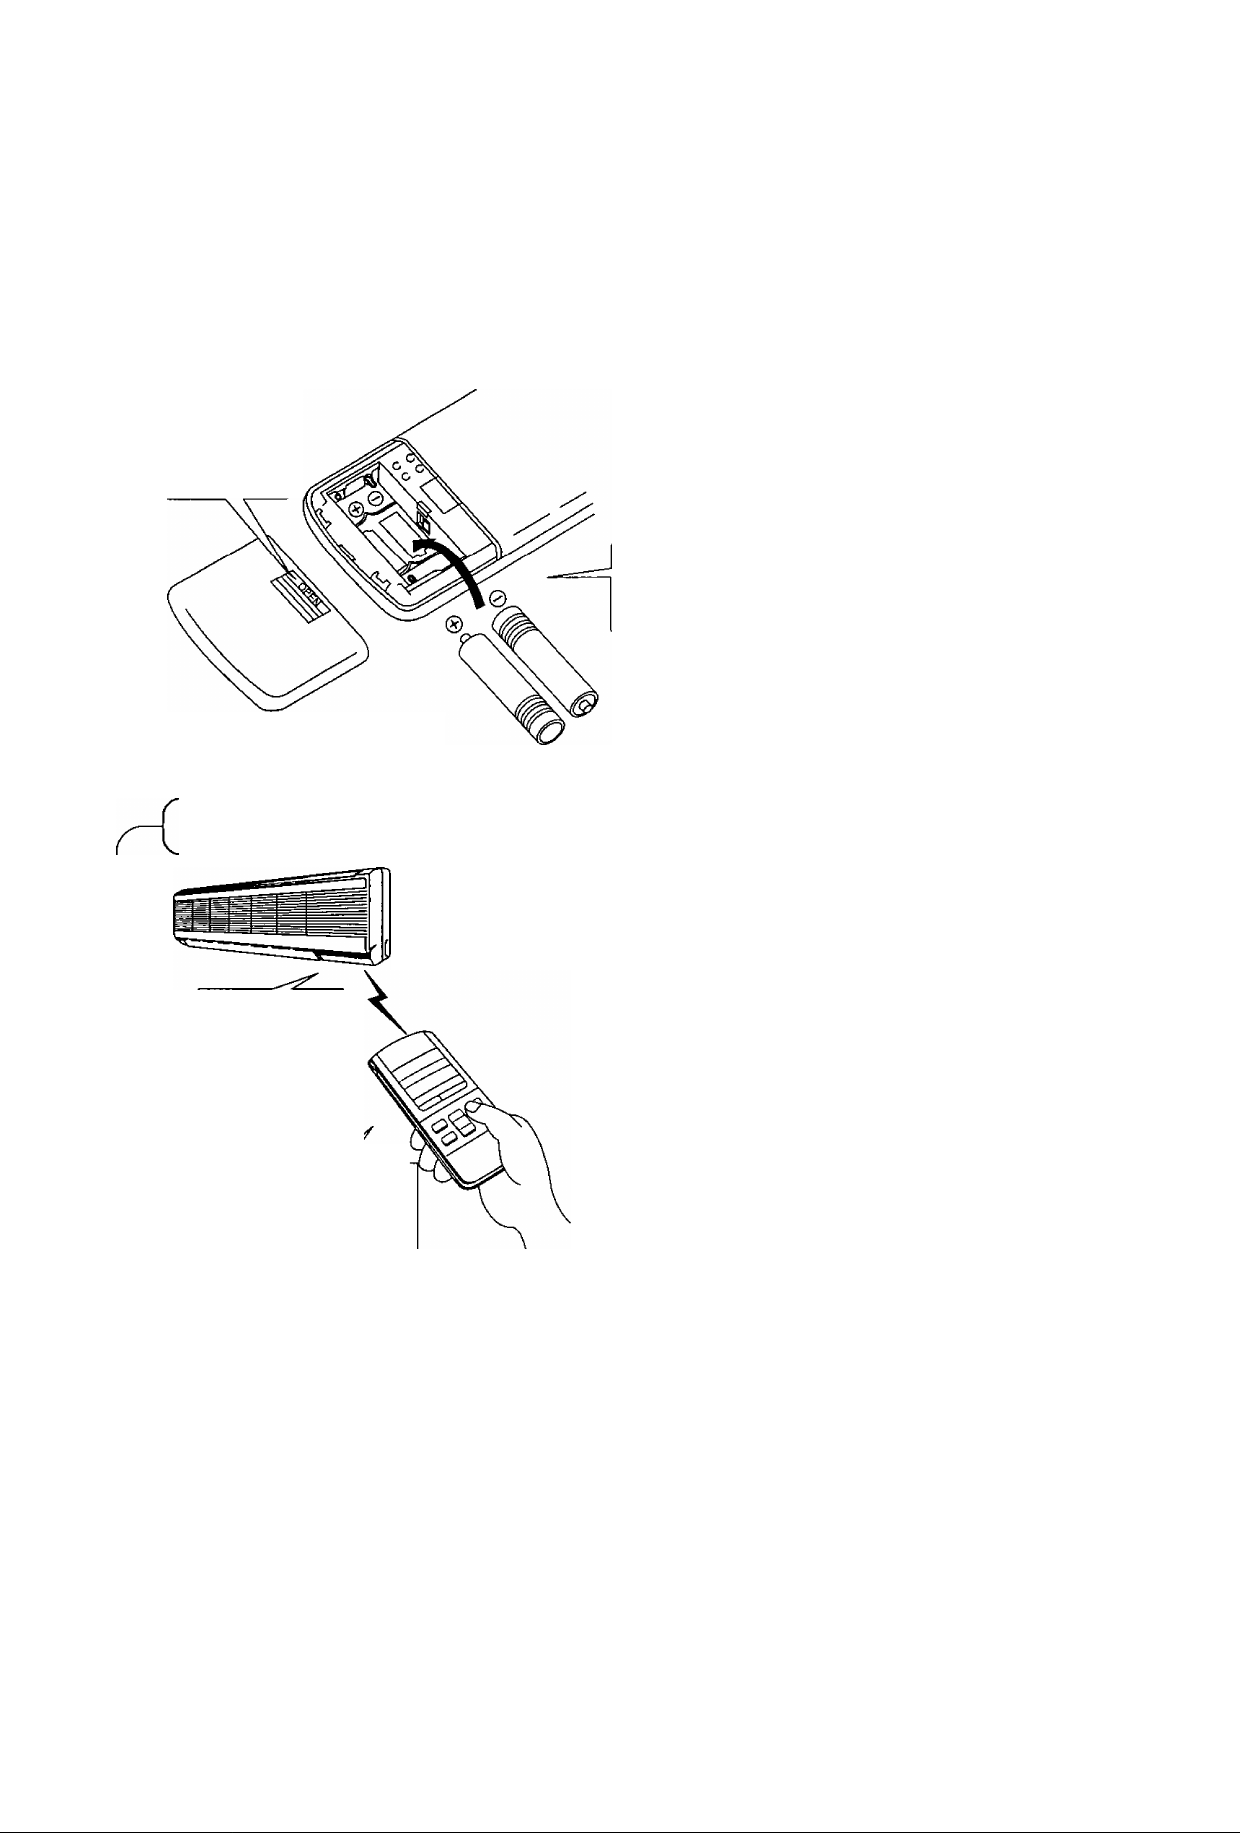
GftsM ife BoimfQ
Gently press the
place marlted
[OPEN) and slide
the cover toward
you.
(Two R03 dry-cell
batteries or equivalent)
Make sure that the
signal path is not
obstructed.
Fix the cover to the back of the remote
control (“PM 12:00” will flash in the opera
tion display.)
©0 Be sure
that the (+) and
(~) directions
are correct.
I "I . ri ri
PM ic . uu
^ / I I \
If the display does not appear when the batteries
are inserted, remove the batteries and
insert them once more.
Aim at the signal receptor on the room air condi
tioner when operating.
Do not drop or throw the remote control.
Do not place the remote control in a location that
is exposed to direct sunlight or next to a heating
unit or other heat source.
The maximum dis
tance at which signals
can be received is
about 10 m.
Set the power switch to “O” (OFF) when:
■ The air conditioner is not going to be used for
an extended period of time.
If the power switch is left at “I" (ON), approximately
3.25 watts of electric power are used even if the main
unit is turned off by remote control.
■ There is a danger of lightning.
The air conditioner is provided with a built-in protective
device, but the control equipment may be adversely
affected depending on the extent of lightning activity.
Signal received sound.
One short beep or one long beep.
Regarding the batteries.
■ The batteries can be used for approximately one year.
■ Do not use rechargeable (Ni-Cd) batteries,
because such batteries differ from standard
dry-cell batteries in shape, dimensions and
performance.
■ Be sure to replace the batteries with two new
batteries of the same type.
■ Remove the batteries if the air conditioner is not going
to be used for an extended period of time.
8
<
Page 10
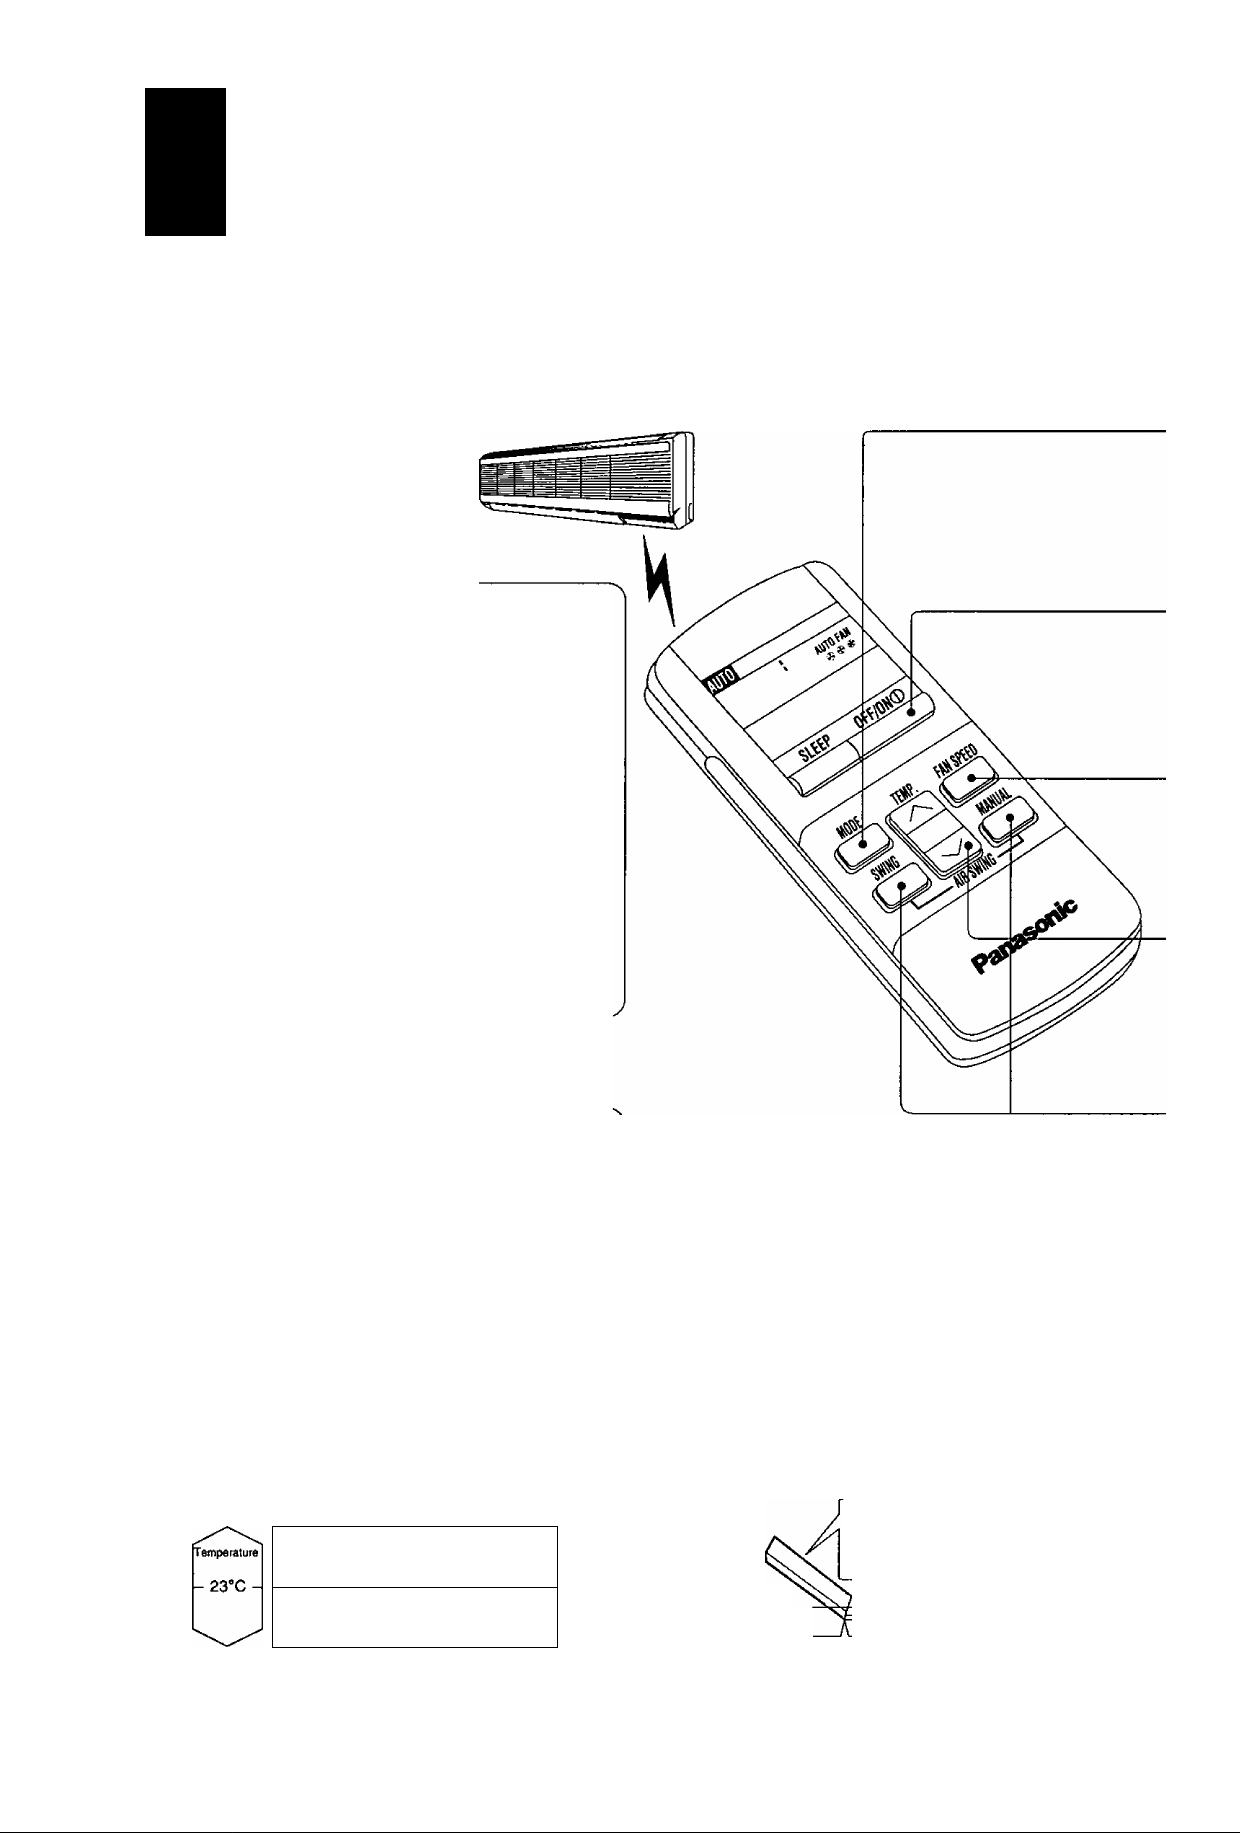
How to Operate
Auto Restart Control.
If there is a power failure, operation will be
automatically restarted after 3 minutes when the
power is resumed with previous operation mode
and airflow direction.
(When the operation is not stopped by remote
control.)
If you intend not to continue the operation when
the power is resumed, switch off the power
switch at main unit or power supply.
When you switch on the power switch, the
operation will be automatically restarted
with previous operation mode and airflow
direction.
Note: 1. If you do not require Auto Restart
Control, please consult your dealer.
2. Auto Restart Control is not available
when Timer or Sleep Mode is set.
Recommended temperature for health
and comfort.
For Cooling ; 26“C - 28X
For Soft Dry : 1®C - 2°C lower than
room temperature.
<Operation Details>
AUTO - Automatic Operation.
■ Once the Automatic Operation is selected, the in
door temperature sensor operates automatically
to select the desired operation mode with Cooling
or Soft Dry.
COOLING
SOFT DRY
Temp, set at
25°C
Temp, set at
22“C
DRY - Soft Dry Operation.
■ Soft Dry is a very gentle Cooling Operation
consisting primarily of dehumidifying. It does not
lower the room temperature very much.
Cooling Operation
until room tem
perature reaches
the setting temper
ature
Setting
Temperature
When room temperature reaches the setting temperature, operation will switch to Soft Dry.
Operation will be switch
ed on and oti for up to
10 min on arxJ 6 min oft
during Soft Dry
Super Low air
flow amount
J
è
►
9
Page 11
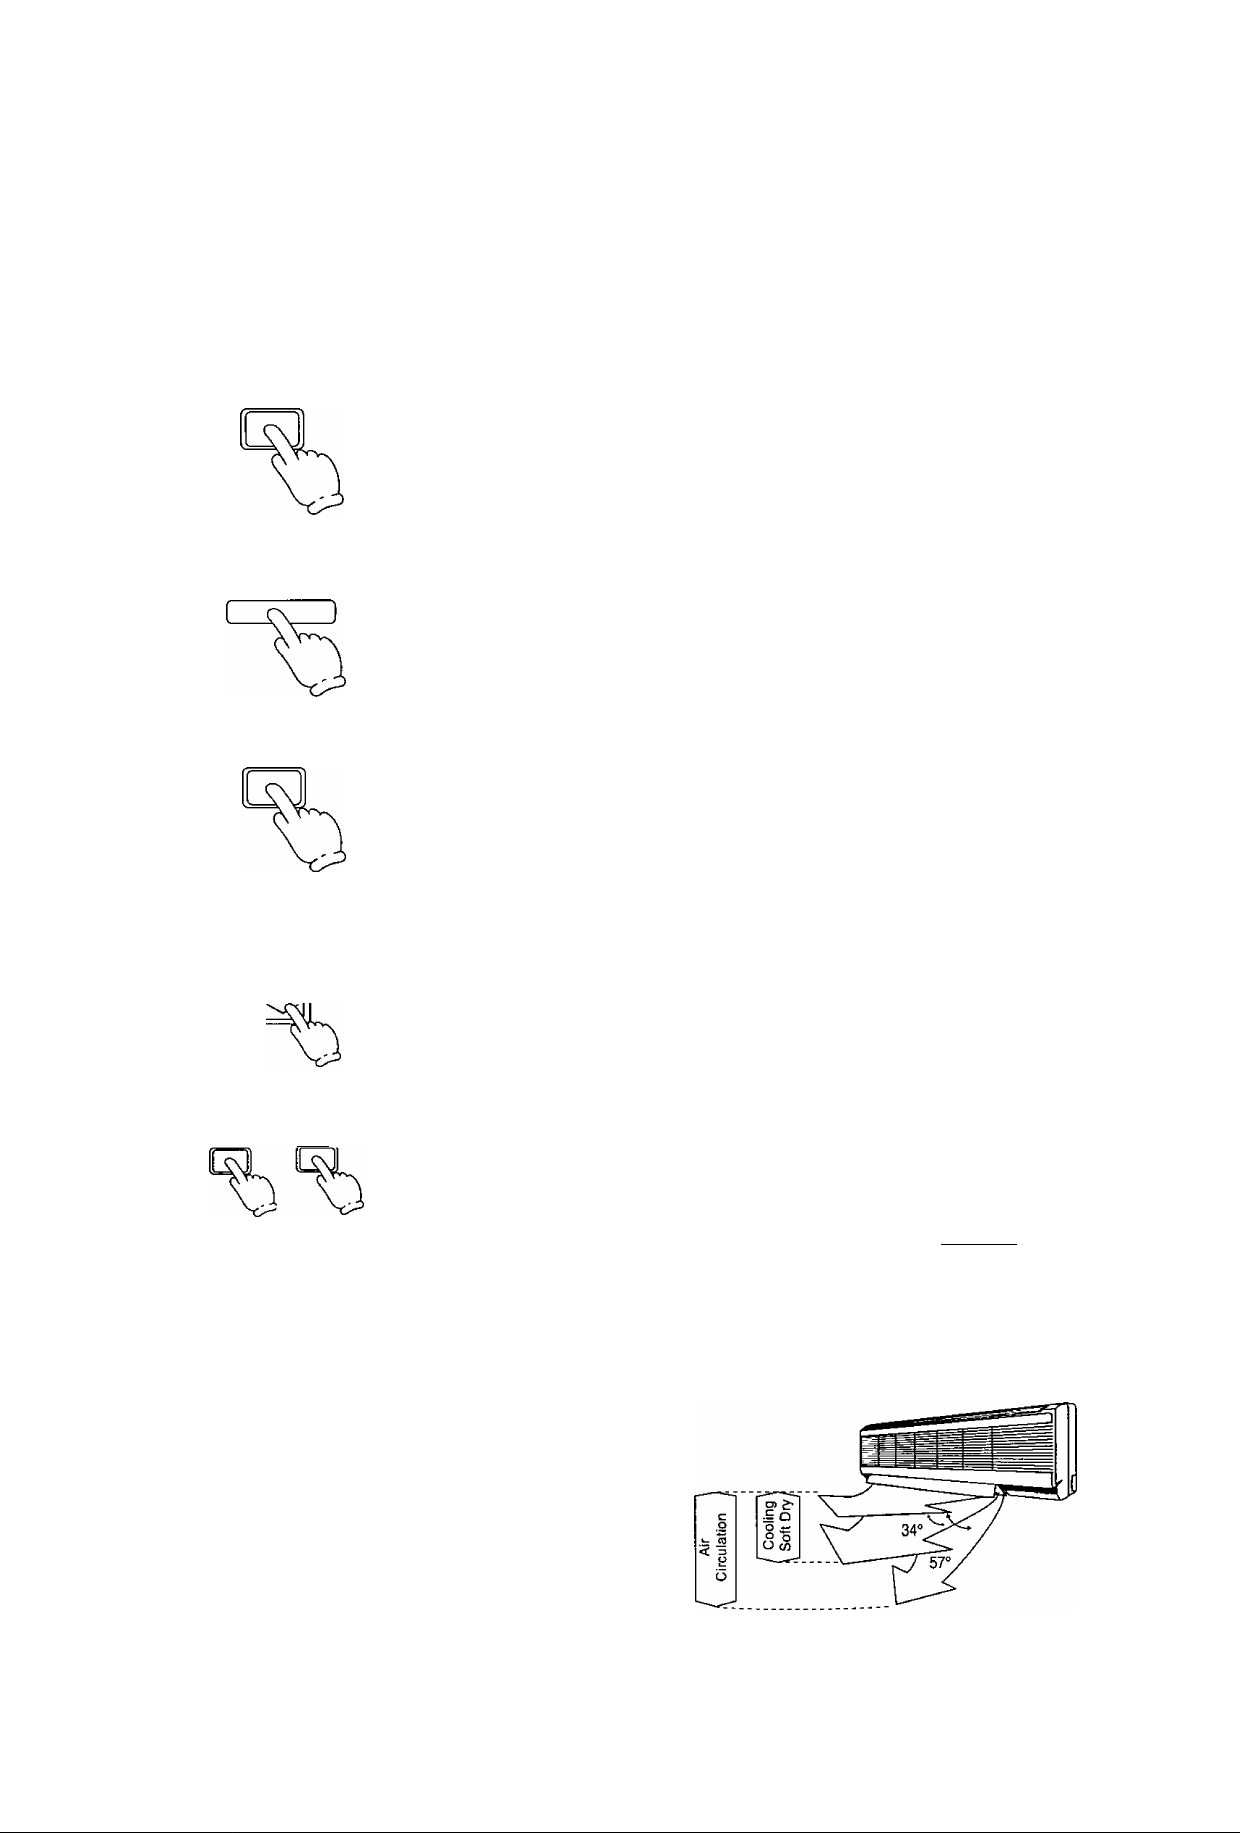
1
2
MODE
OFF/ON ®
Press to select operation mode.
■ The display changes in the order
AUTO -> COOL -► DRY FAN
each time the button is pressed.
Press to start the operation.
■ Operation indication lamp (RED) will light up.
■ Press once more, to stop the operation.
3
5
FAN SPEED
TEMP.
SWING MANUAL
Press to select airflow volume.
■ The display changes in the order.
® @ ® ® ®
AUTO FAN ^
Automatic Low
Press to select room temperature.
■ Cooling, Soft Dry, Air Circulation - Select temperature as desired.
(16“C~30°C)
■ Automatic.
2°C lower than
standard
_ wmfiL .. I
Press ([^ continuously.
■ The vertical airflow direction louver will move up and down. Release the
button when the louver is at the desired position.
_ SWING
Press ■
■ The vertical airflow direction louver will swing up and down automatically.
To stop the automatic airflow direction operation, press button.
Medium
standard
H
® ®
III
High
2“C higher than
standard
ilANUAL
FAN - Air Circulation Operation.
■ When the room temperature reaches the setting
temperature, operation commences at Low air
flow volume. It stops when the room temperature
drops to 2X below the setting temperature (It is
useful when using a heater).
Automatic Airflow Volume.
■ The speed of the indoor fan is adjusted automati
cally according to the operation. The indoor fan
stops occasionally during cooling operation.
Range of louver adjustment.
10
◄
Page 12
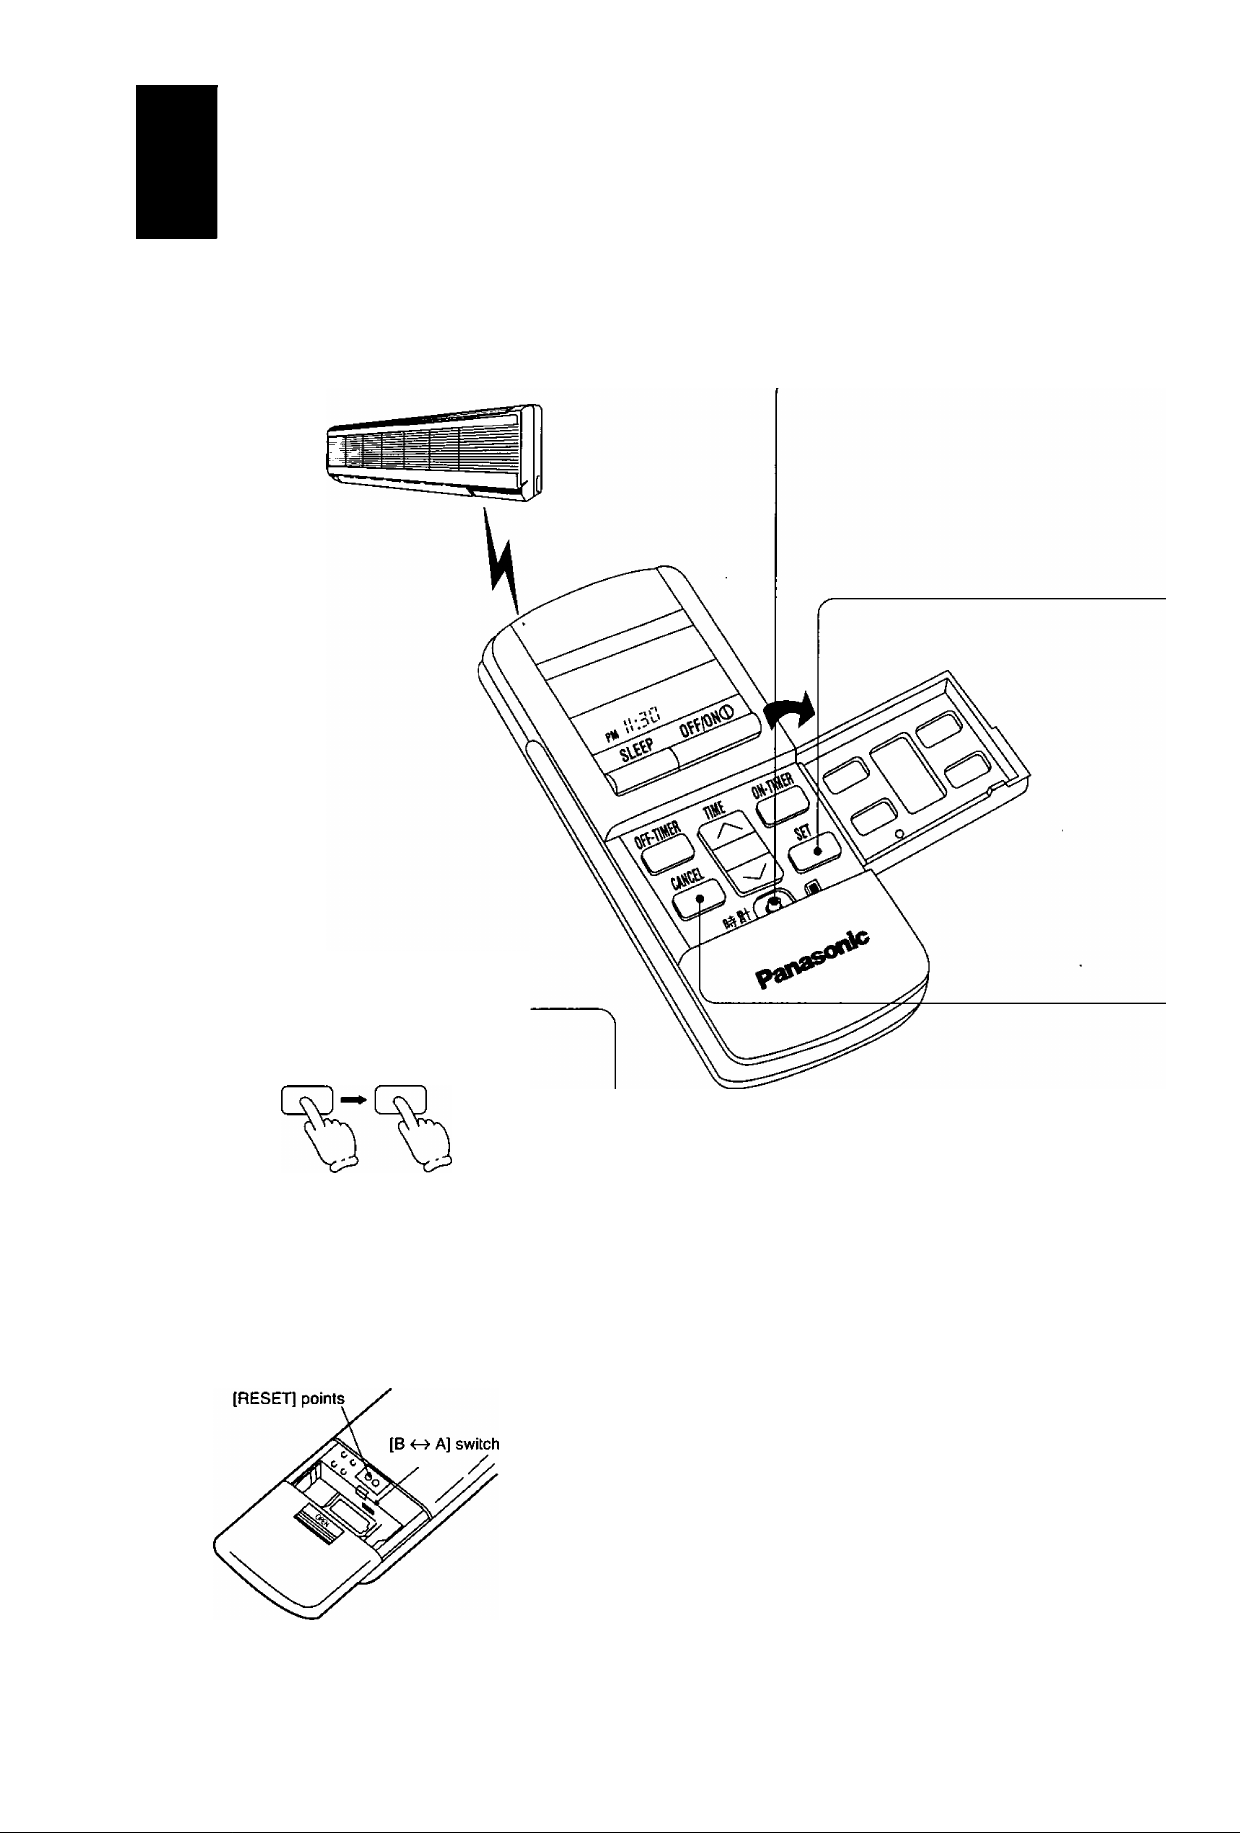
Setting the Timer
If there is a power failure.
To reset the Timer.
(Example) If the OFF Timer has been set.
OFF-TIMER SET
Even if there is a power failure, the setting
time is still stored in the memory because the
remote control is a battery operated type.
<Note>
Regarding remote control.
If the current time is not set correctly, correct
Timer setting will not be possible.
When the Timer is set, the current time display will
vanish.
[RESET] points will clear the memory once they
are shorted.
►
[B A] switch is used when two air conditioners
units have been installed in one room. Please
consult your dealer.
11
Page 13
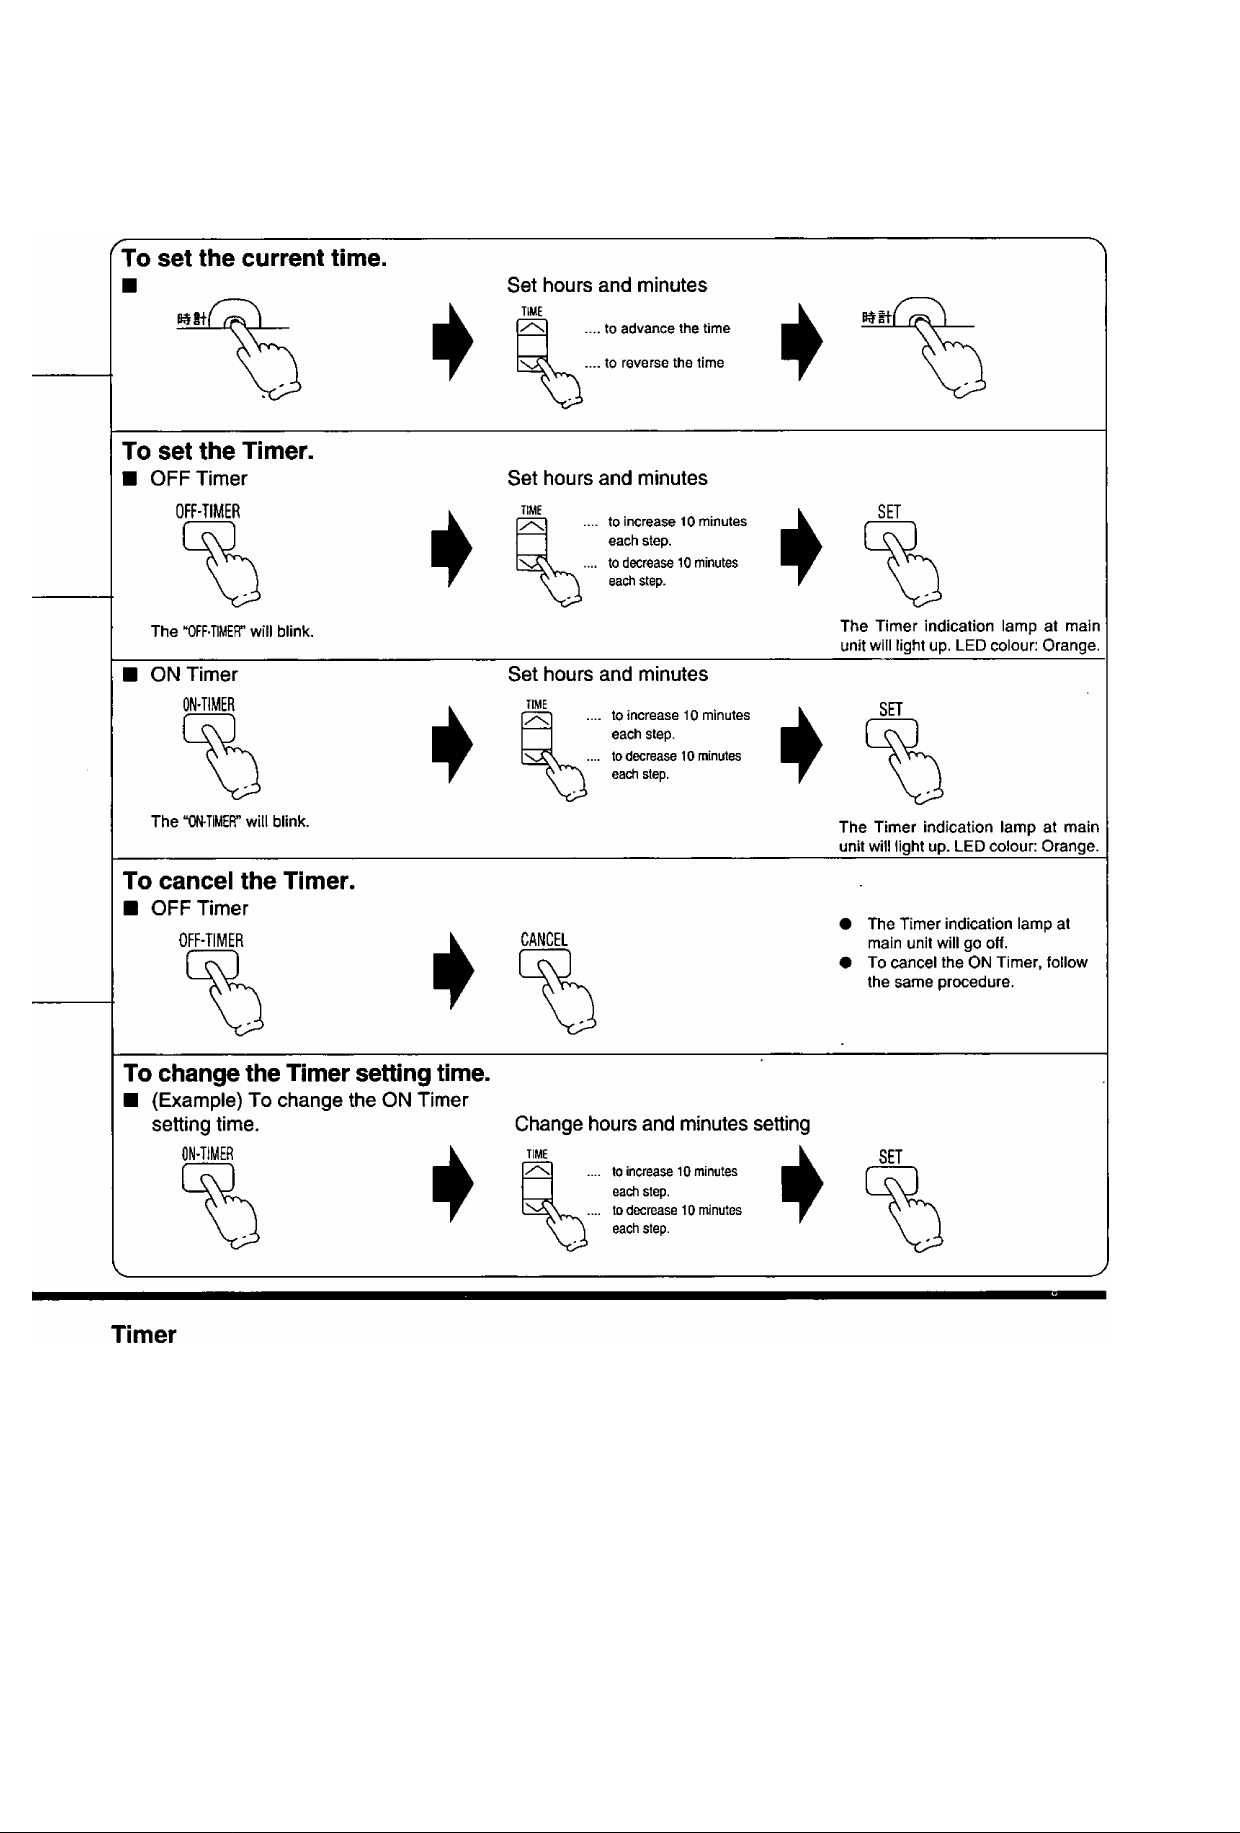
The ON Timer and OFF Timer can only be set
once during a day.
The operation will start before the actual setting
time with ON Timer setting.
^ " —
Automatic, Cooling and Soft Dry ;
15 minutes before
This is to allow time to attain your desired set
temperature.
Setting the OFF Timer.
This is useful for saving electricity costs in
curred by forgetting to turn off the air condi
tioner.
Setting the ON Timer.
If the air conditioner is set before you go out,
the room temperature will be close to your
desired temperature when you return.
12
◄
Page 14
Convenient Operation
oTofiJ
C
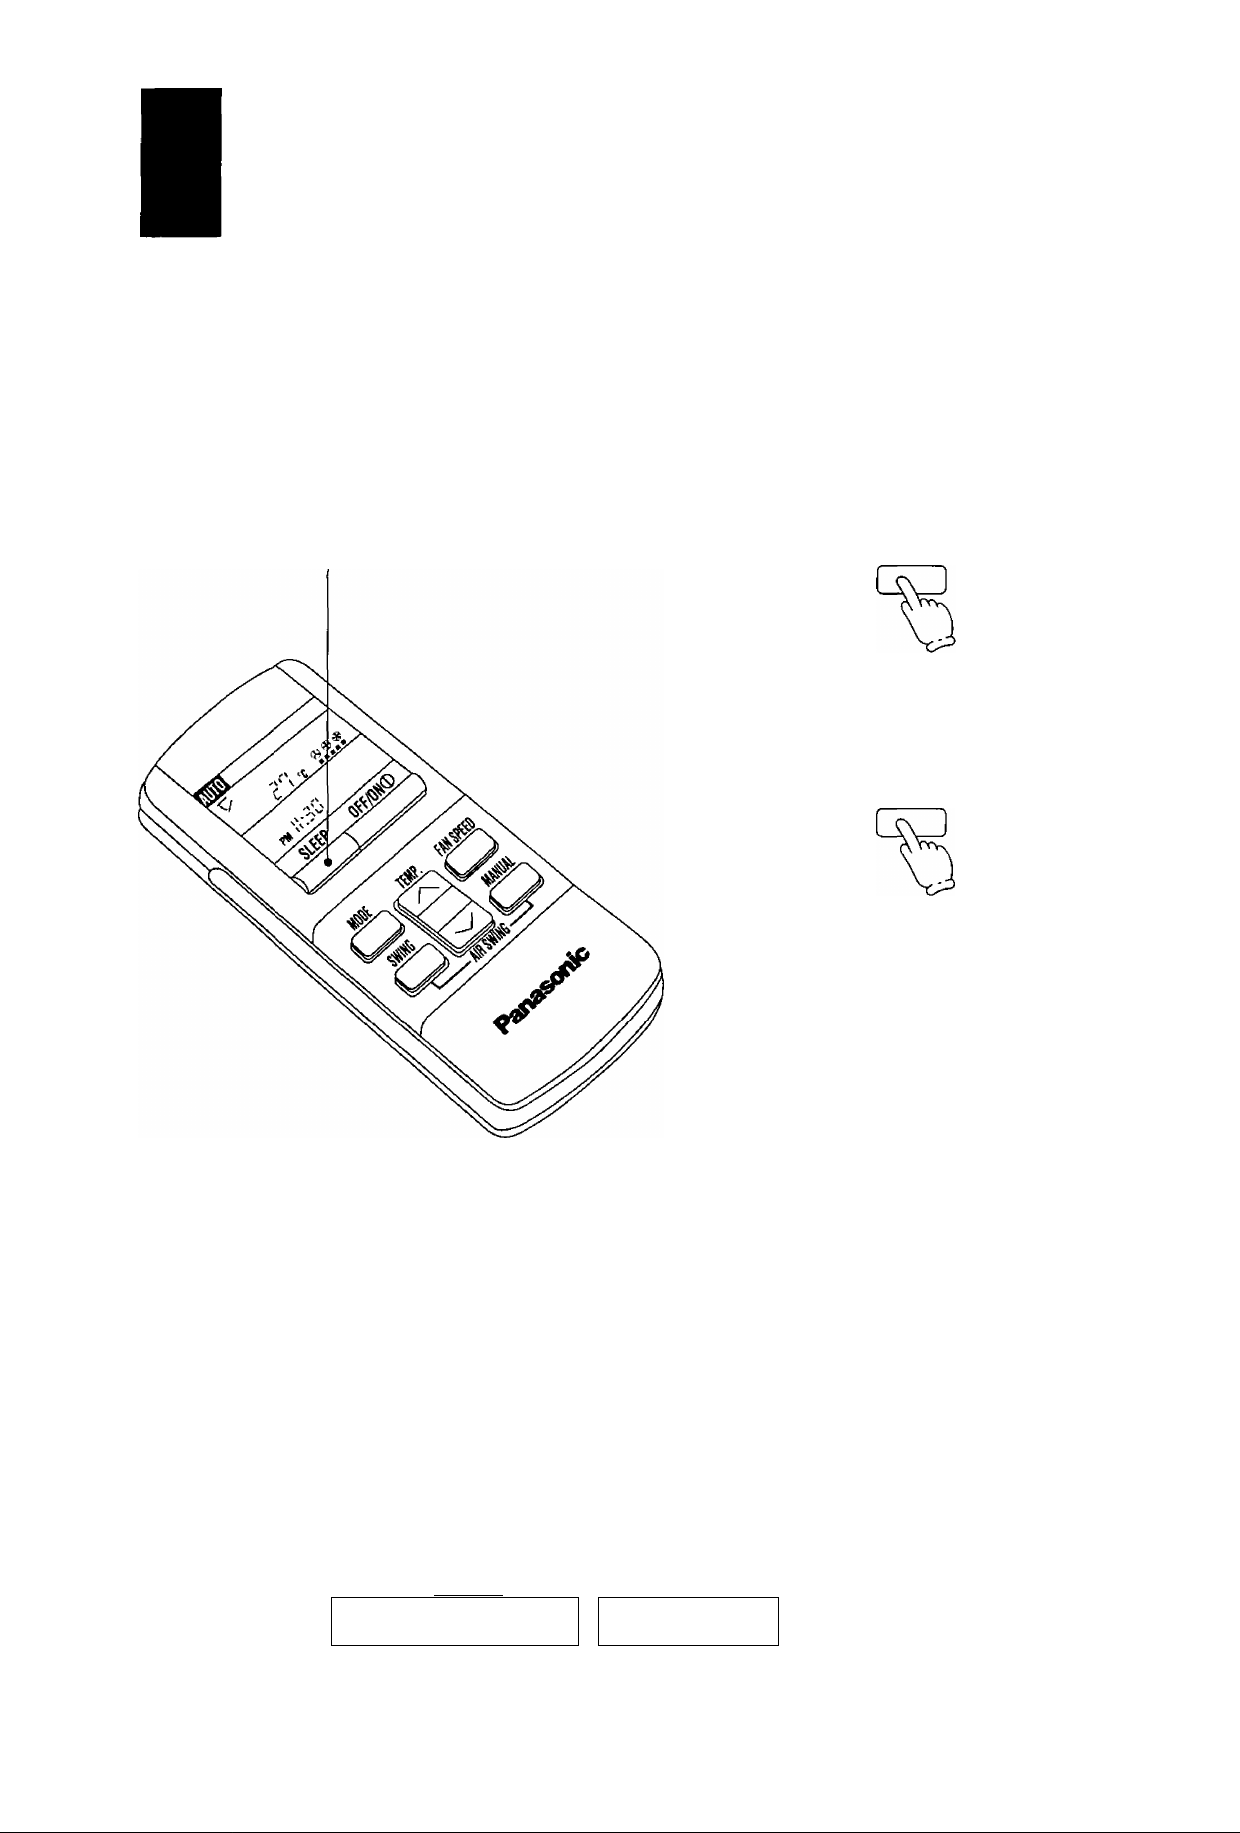
This is to gain a comfortable room temperature while sleeping.
J
To set Sleep Mode.
■ Press
SLEEP
(The sleep indication lamp on the
main unit will light up.)
To cancel Sleep Mode.
■ Press once more
SLEEP
(The sleep indication lamp on the
main unit will switch off.)
Sleep Mode Operation.
■ When the room temperature reaches
the setting temperature or after 1
hour of operation, sleep shift
operation starts and the airflow
volume will automatically change to
low.
■ Sleep Mode Operation time is 8
hours.
■ When using together with the Timer,
the Timer has priority.
<lnfornnation>
■ Cooling or Soft Dry Operation for Sleep Mode movement will start to avoid overcooling.
Approx. O-S^C increase
TEMP.
lU
CL
O P
E<
t=£
UJ CL
«5
UJ
Sleep Operation button is
pressed
Approx. 0.5°C increase
y¡ 0-1 hour
1 hour
Sleep shift operation
starts
Approx. 8 hours after
sleep shift operation
starts, stops automati
cally.
TIME
►
13
Page 15
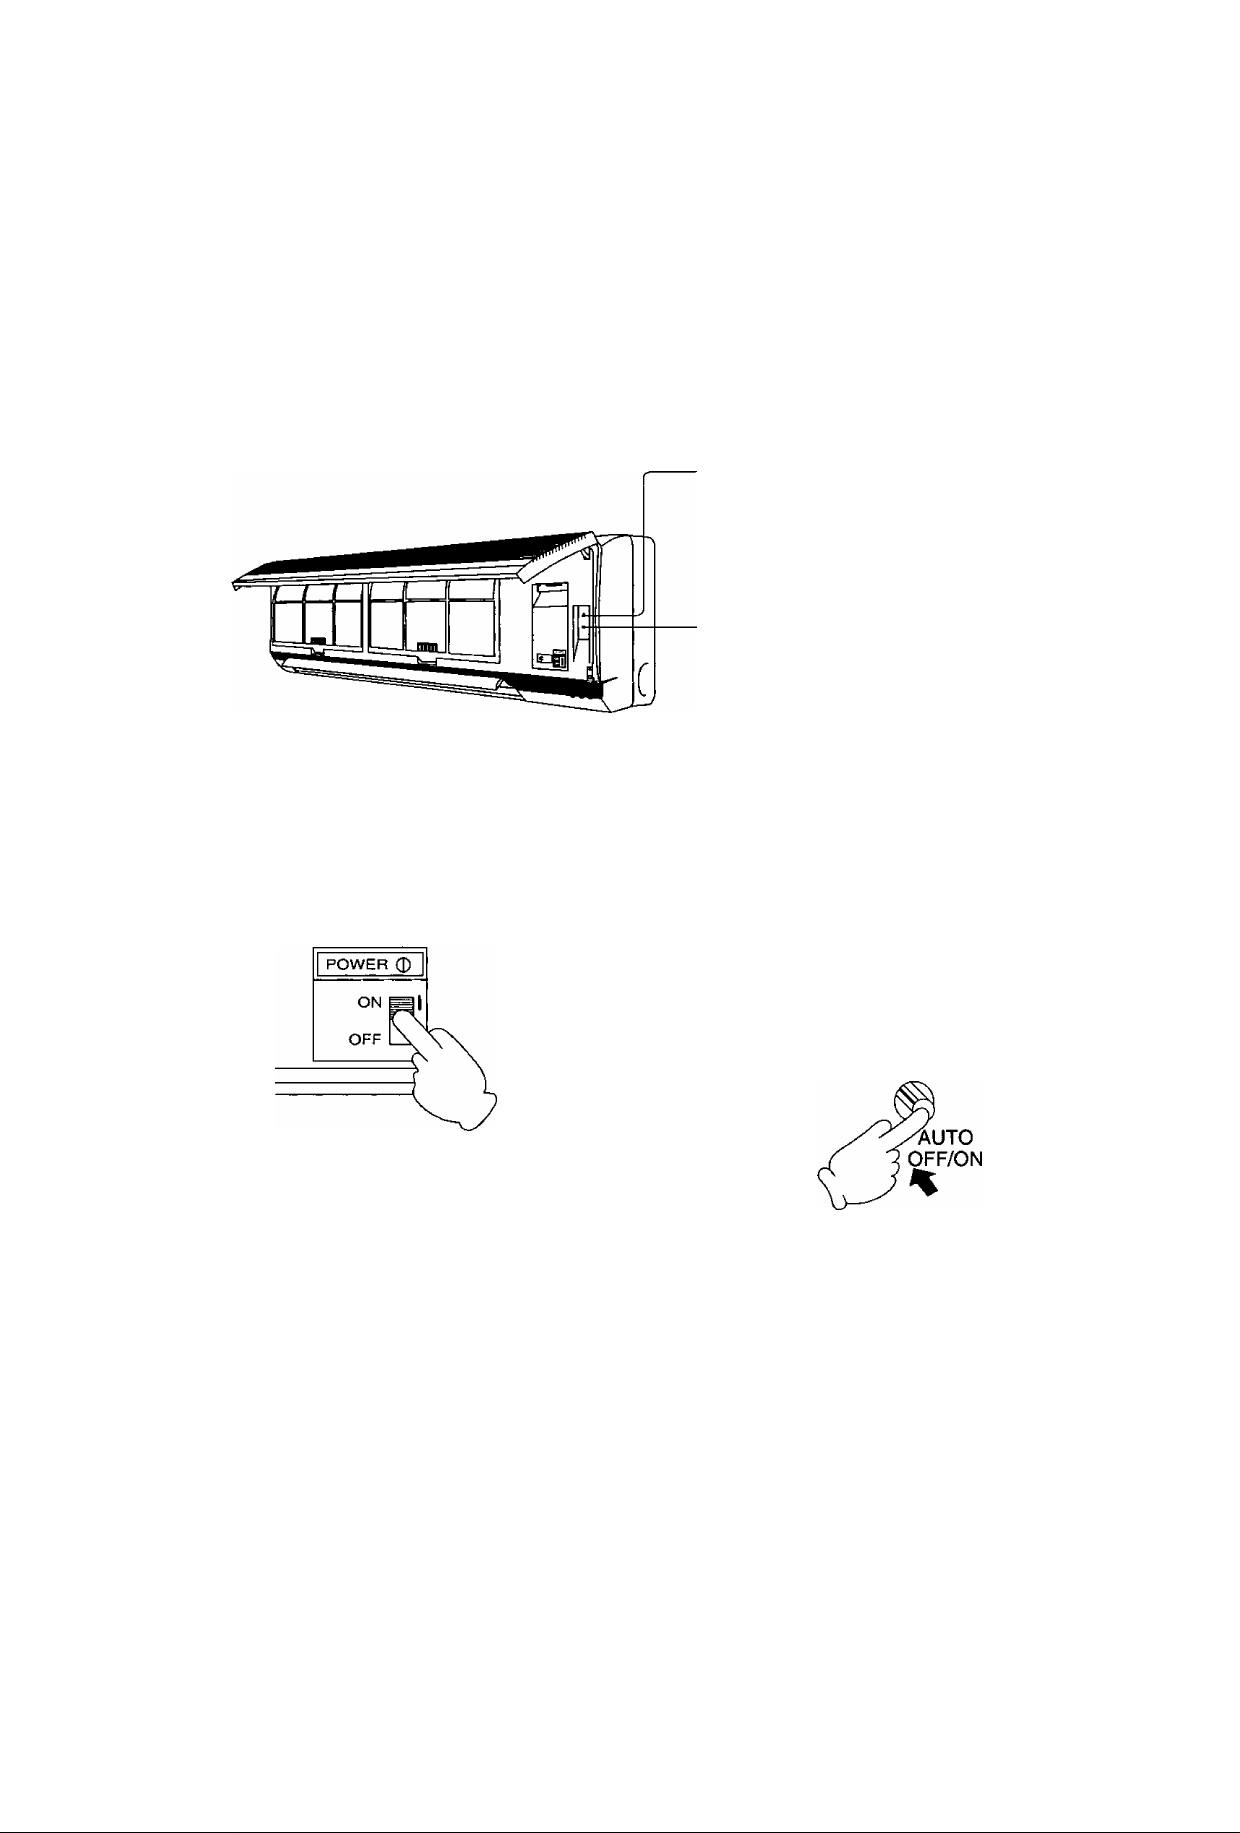
To set Auto Operation.
Test Run Button.
(Use when installing and moving)
Auto Operation Button.
■ When the remote control cannot be
used, press Auto Operation Button to run
Automatic Operation.
(Airflow direction setting will be automatic.)
■ Confirm the power switch is at “I” (ON).
Press Auto Operation Button.
(The operation indication lamp will blink for 20
seconds, and then light up)
• If the button is pressed once more, the
air conditioner will stop.
(The operation indication lamp will switch
off.)
The Remote Control Signal receiving sound can be omitted as desired.
To switch OFF the signal receiving sound, press Auto Operation Button for 10 seconds or more. At the
same time, Automatic Operation starts.
(To switch ON, press Auto Operation Button once more for 10 seconds or more.)
14
◄
Page 16
Operation Hints
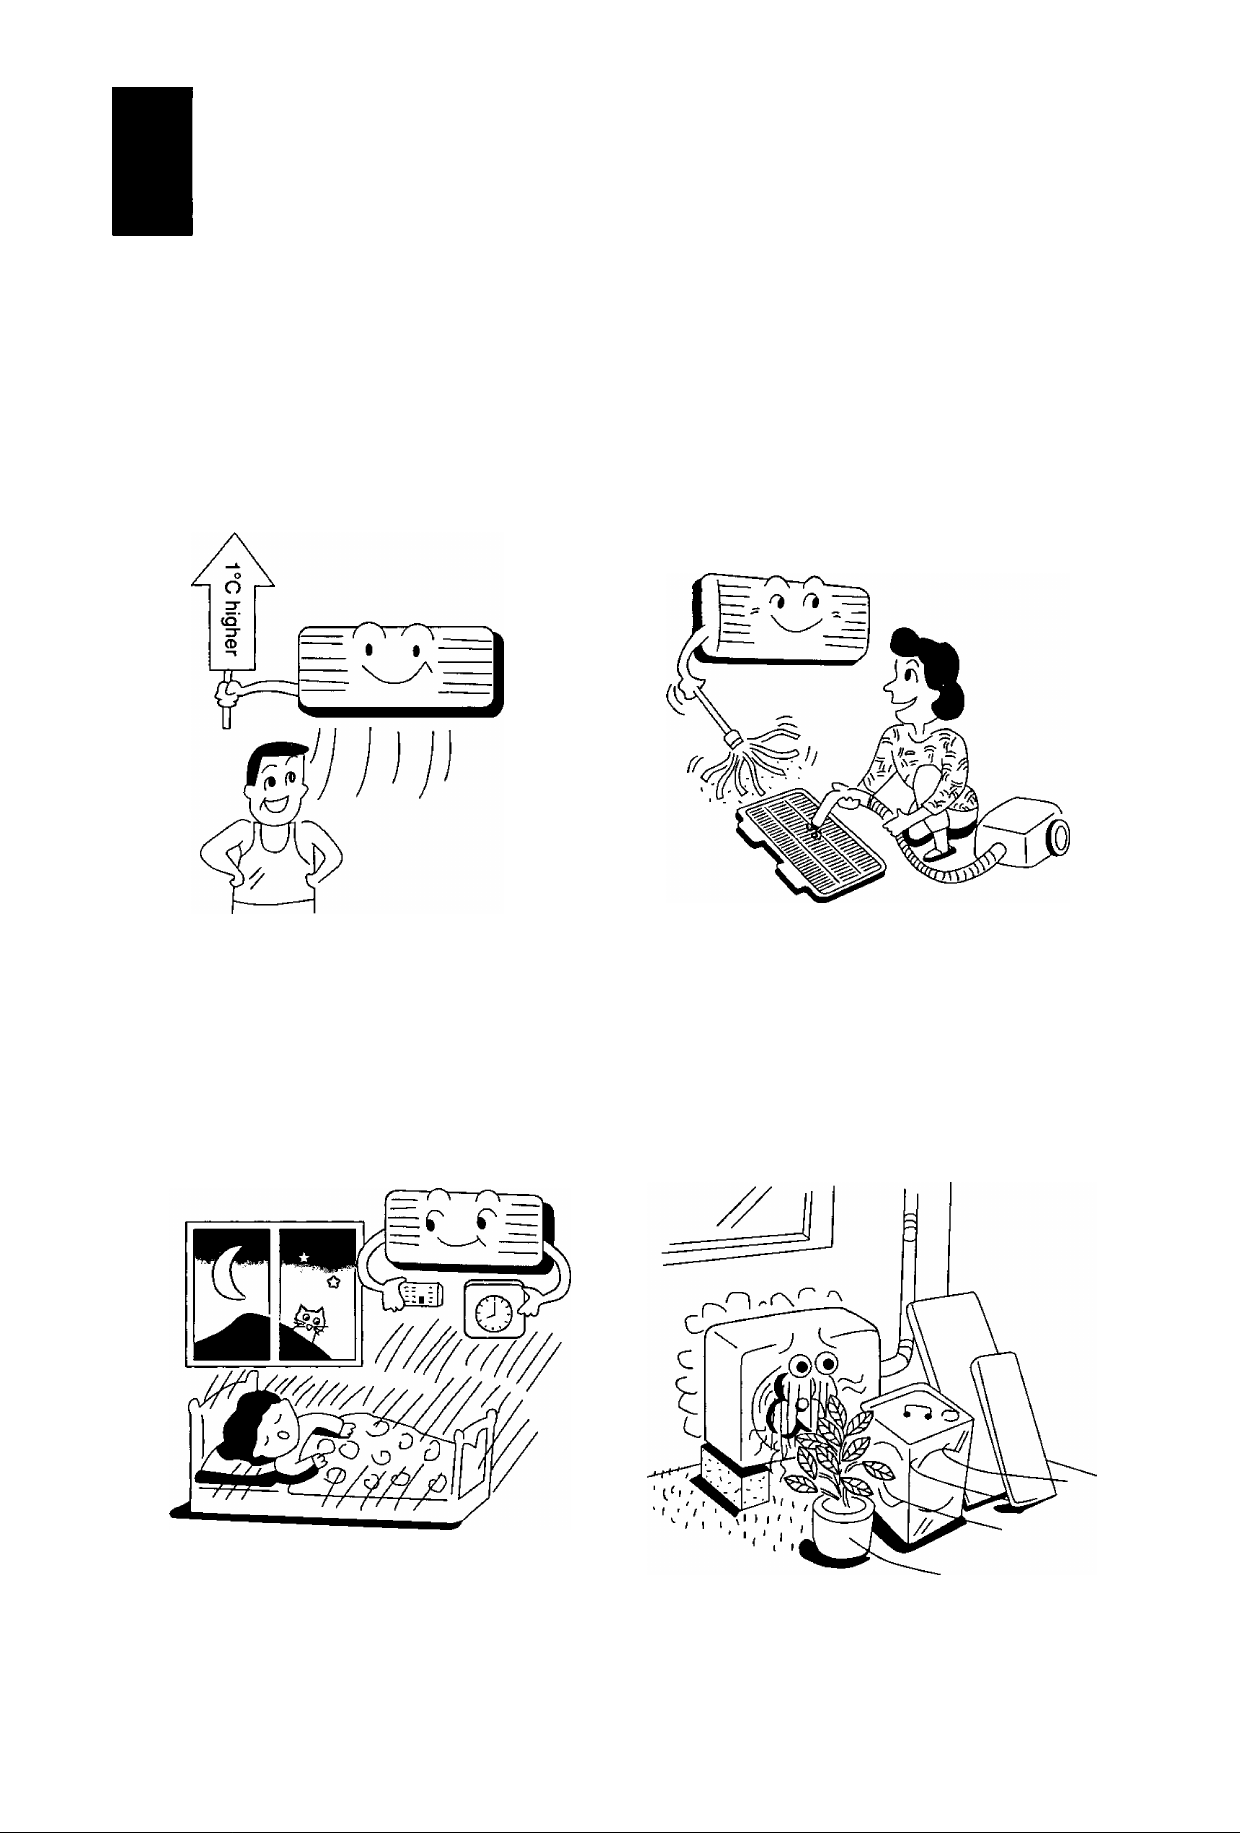
Adjust room temperature properly. Set the
temperature 1°C higher than actually desired.
Approximately 10% of electricity costs can be
saved.
Clean the air filter regularly. Blockage in the air
filter reduces the airflow and lowers the cooling.
Clean at least once every 2 weeks. Othenwise,
6% of electricity cost will be wasted.
Prevent waste with the Timer. Use Timer when
sleeping or going out to save electricity cost.
Do not block the air outlet vents at outdoor unit.
Otherwise, it will lower the cooling perform
ance.
►
15
Page 17
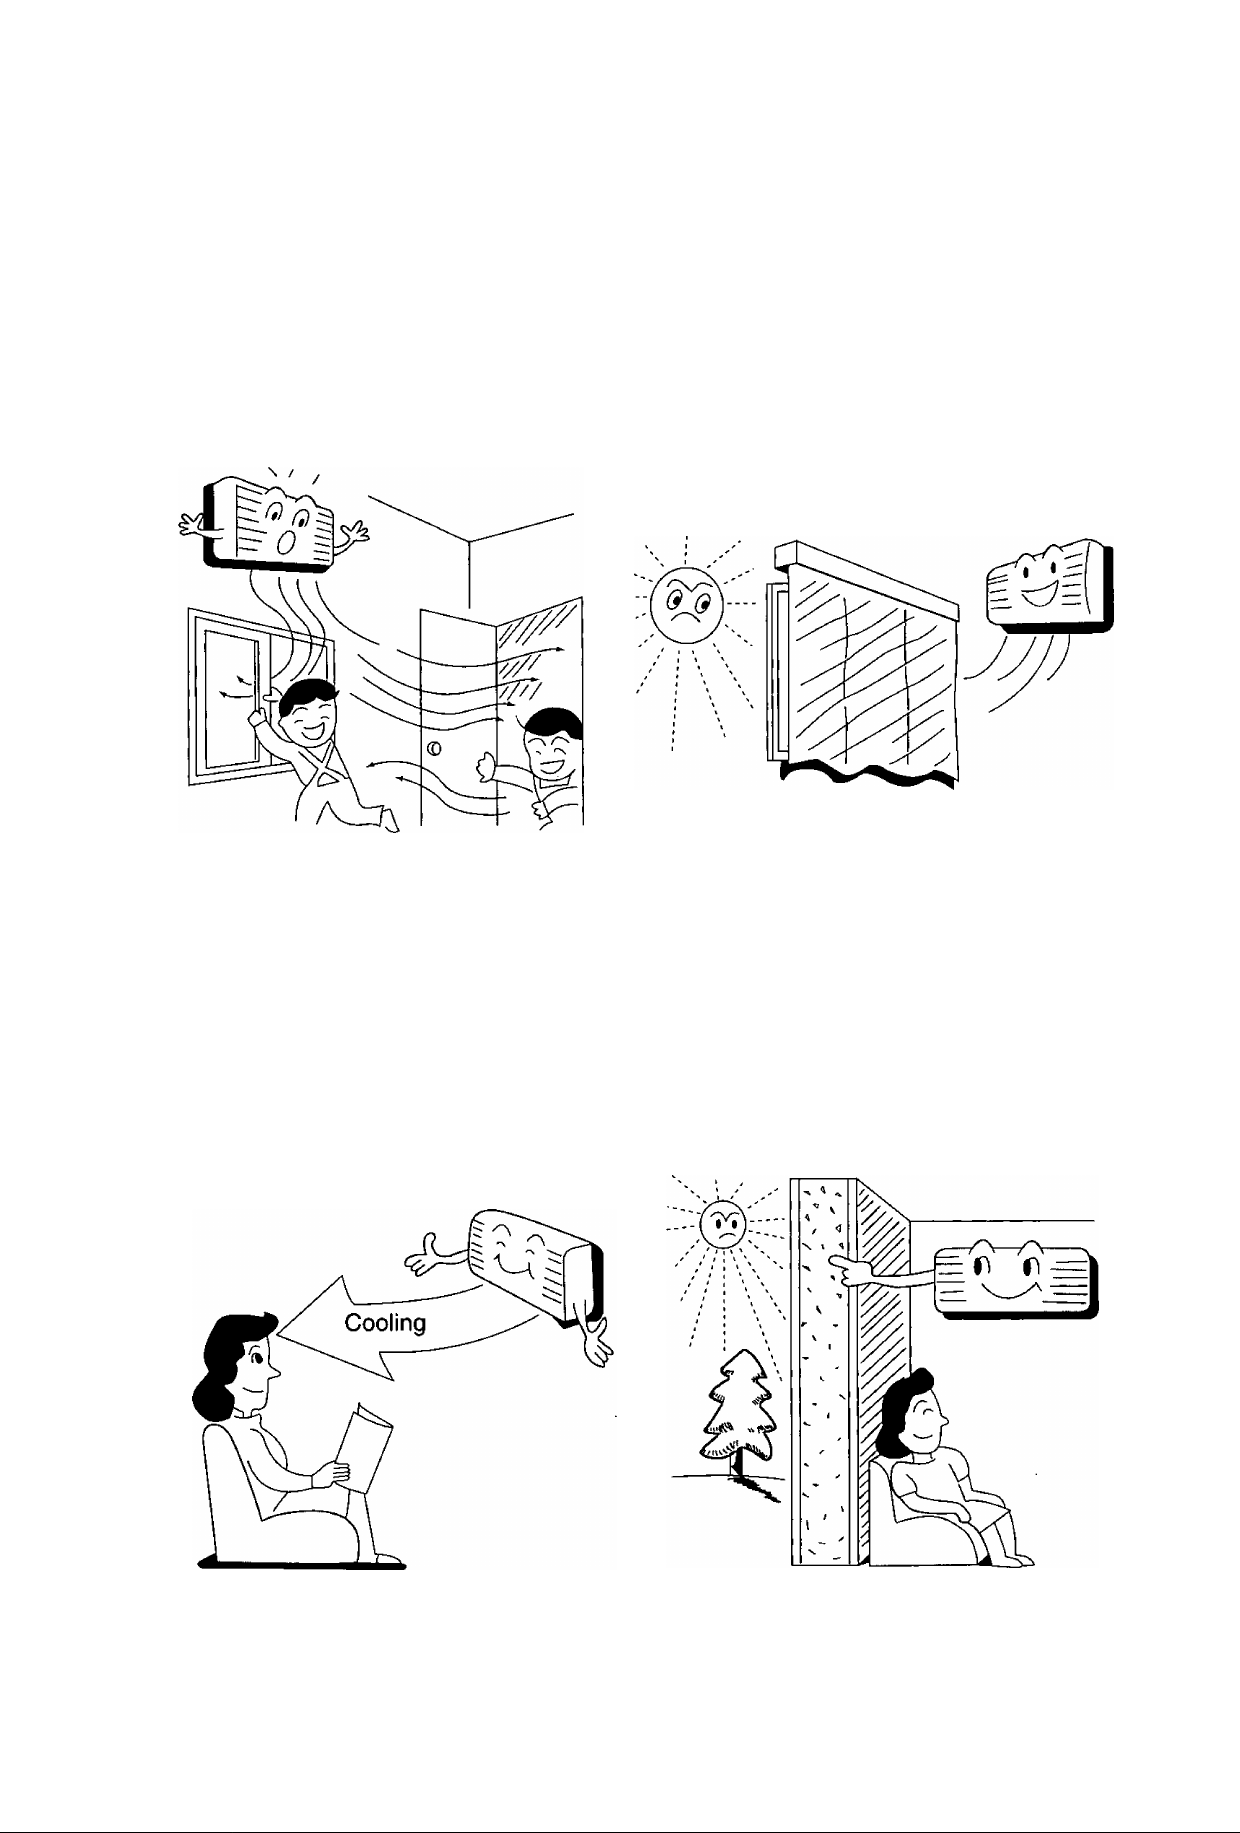
Make sure that the doors and windows are shut.
Othenwise, cooling performance will be reduced
and electricity cost is wasted.
Keep blinds or curtains closed. Do not let sun
shine enter the room directly. 5% of electricity
cost can be saved.
Proper airflow direction adjustment. Set the air
flow direction louvers horizontal for Cooling
Operation. Operation result will be better.
Use insulating material for better performance.
Use insulating material during construction or
renovations. It will save electricity cost.
16
◄
Page 18
Better Care and Maintenance
Regular care and maintenance will extend the life of the air conditioner and prevent wastage of electricity. Before
performing any maintenance procedure, be sure to switch off the main power supply.
Caution
©OSÊEifiro® iilOS gflr
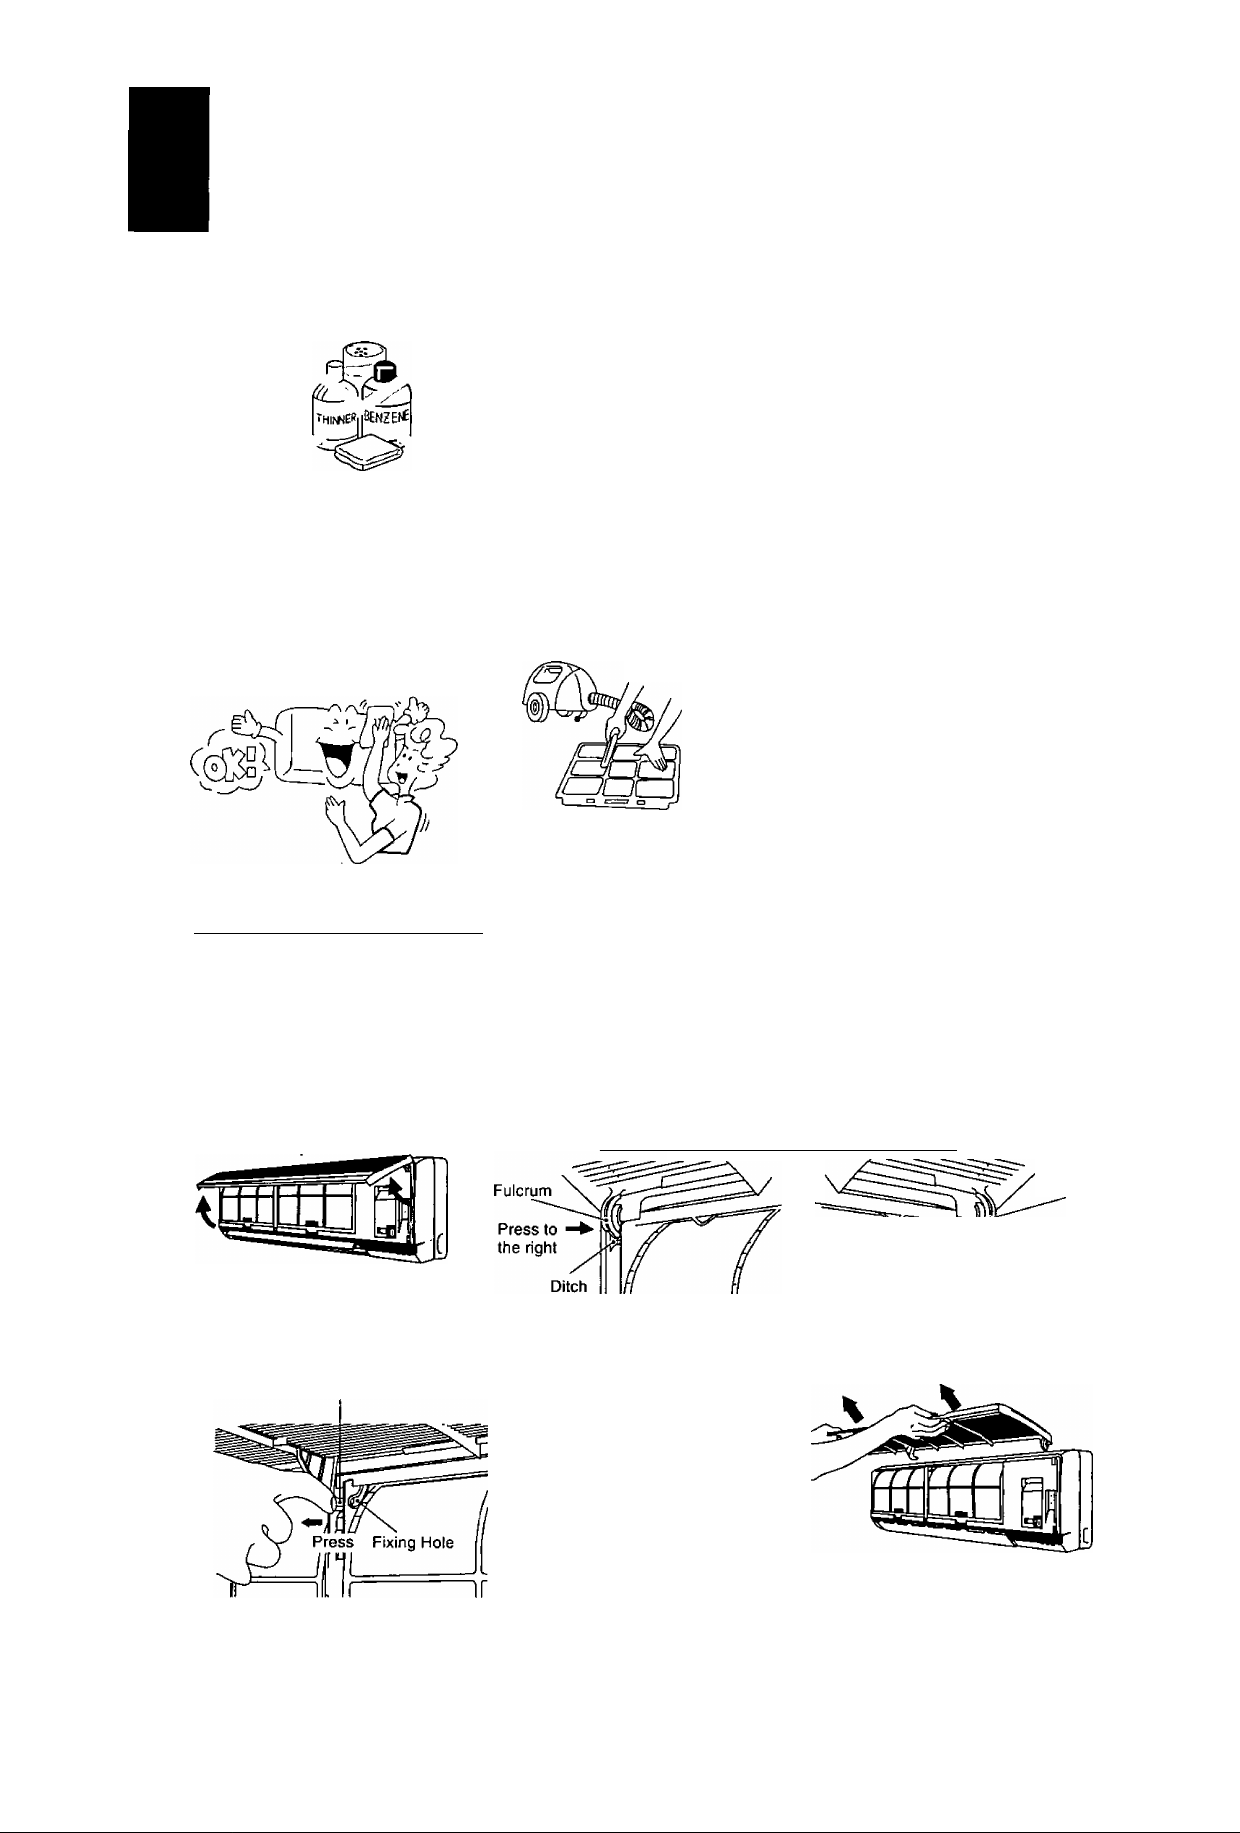
Once every 2 weeks is recommended.
■ Clean the air conditioner.
Wipe gently with a soft, dry cloth.
Do not use water or volatile liquids.
■ Do not make air conditioner wet, as there is the danger that it could cause
electric shocks.
Be sure not to apply water when cleaning or at any other time.
■ Using water above 40"C could cause deformation and/or discolouration.
■ Volatile liquids such as thinner or benzene may damage the air condi
tioner.
Clean the air filters.
■ To remove the dust adhering to the filters,
either use a vacuum cleaner, or wash them in
water and dry in the shade.
■ Re-insert the filters correctly at the left and right,
with the side marked [FRONT] facing forward.
■ Purchase replacement filters from your air con
ditioner dealer if the air filters become damage.
Air Filter No. CWD00231 (right)
CWD00232 (left)
©OgginiODDg (°)L? [ggiipaO [»^
To clean the front panel, gently wash with sponge. Wipe dry or dry in shade.
IMPORTANT: • It may lead to shaft damage if the front panel is removed or fixed without releasing the shaft.
• Be careful not to drop the front panel.
To remove front panel.
1. Raise the front panel.
3. Release the shaft from
the fixing hole.
Shaft
2. Release either one of the fulcrum from the ditch.
Left side Right side
4. Repeat step 2 to release
5. Remove the front panel.
the other fulcrum.
/ Illustration is shown \
\ as above /
Fulcrum
JjK Press to
the left
^ Ditch
►
To fix the front panel, reverse the above procedure accordingly.
17
Page 19
r
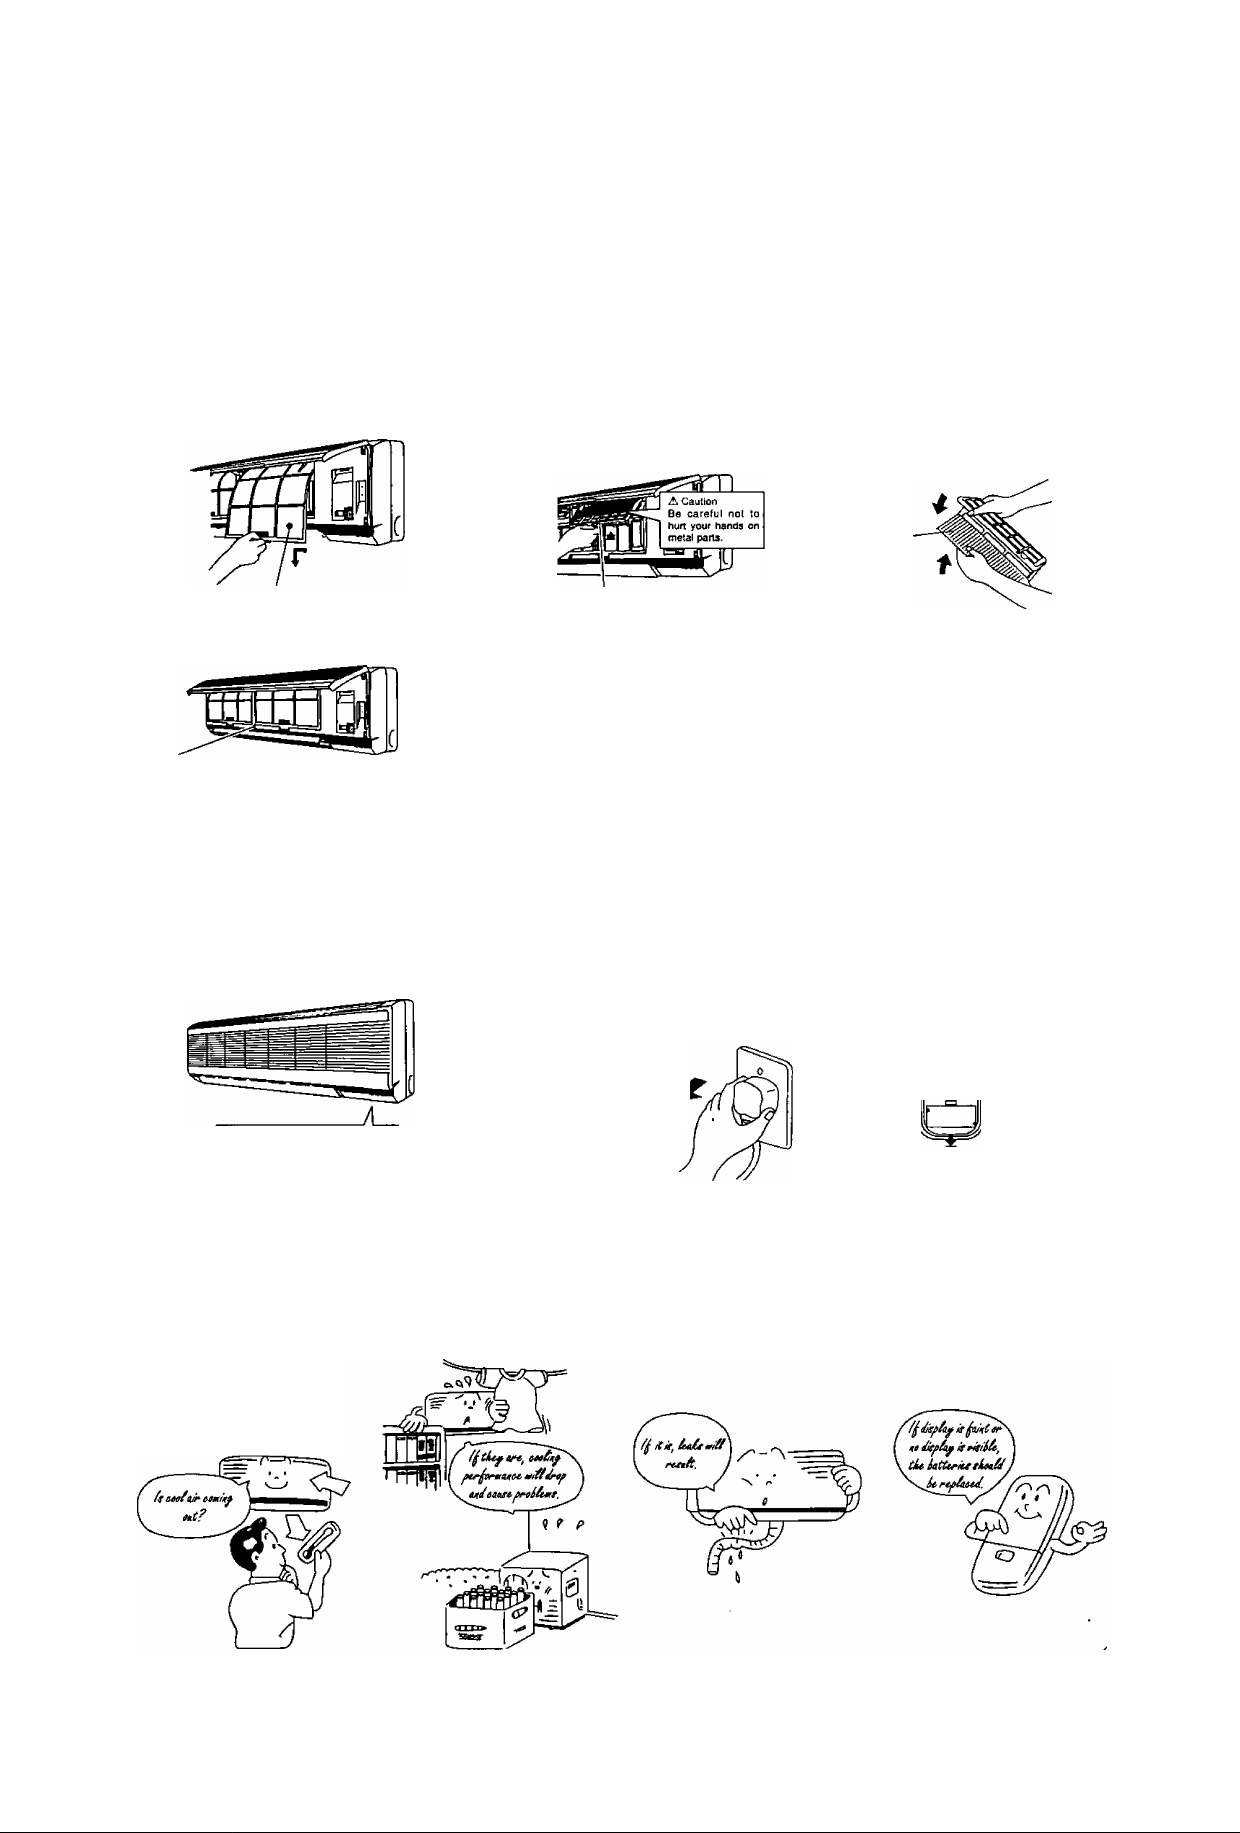
Recommended about once every 3 months.
(2^
Remove the air filters.
1
Air filter
<Note>
Sample colour
[Ml oMs]® ©0F
Operate the air condi
tioner for 2 to 3 hours.
■ Type of operation: Fan.
1
In order to dry out the
internal mechanisms
Remove the air purifying
filters.
2
Air purifying filter
If air purifying filters turn the same colour as the sample colour attached to
the indoor unit within a three month period, replace the filters.
Re-insert the filters correctly at the left and right with the side marked
[FRONT] facing forward.
Dusty filters cannot be re-used, even if they are cleaned and washed.
Purchase replacement filters from your air conditioner dealer.
Part number for air purifying filters: CZ-SF5N
For air conditioners with a
power plug, stop opera
tion by remote control and
2
pull out the power plug.
Note: If the unit is not off by
remote control, the unit
will operate when you
plug in (because ^
of Auto-restart ®
Control is provided).
3
3
Remove the filters from
the filter frame.
Filters
Remove the batteries
from the remote control.
HE
2
Operate for 15 min
utes.
If the difference in tem
perature between the air
outlet vent and air in
take vent is 8°C or more
when cooling, the unit is
normal.
Are the air outlet
vents and air intake
vents obstructed?
Is the drain hose
cracked or crushed?
Are the remote
control batteries in
good condition?
18
◄
Page 20
Troubleshooting
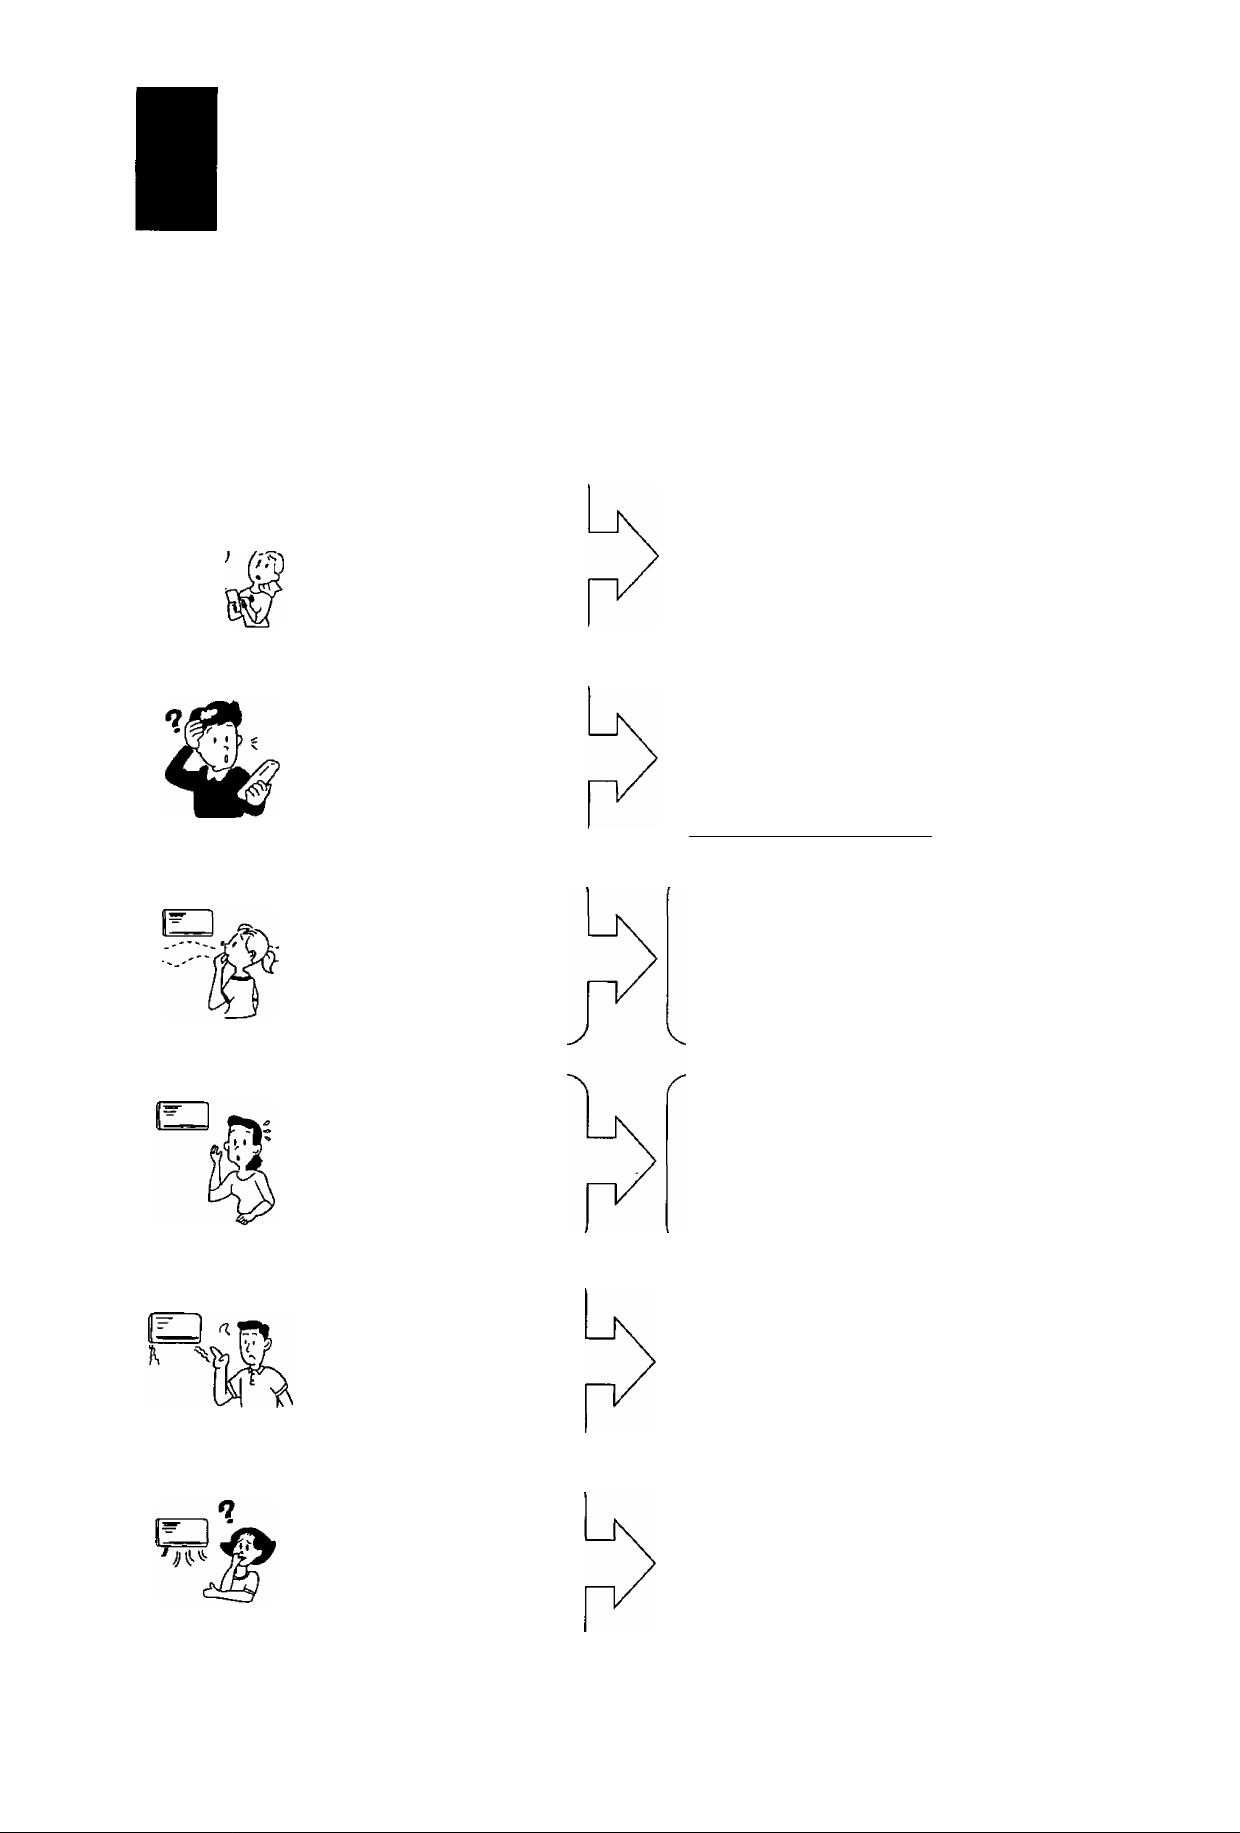
Is it okay?
Q
Air conditioner has been
Oi
restarted, but does not
operate for 3 minutes.
During Soft Dry Mode
Operation, the air condi
tioner stops.
RteXMfflgiO
This is the answer.
This is to protect the air conditioner. Wait until
the air conditioner begins operating.
Soft Dry Mode Operation is a very gentle
Cooling Operation consisting primarily of de-
humidifying. The air conditioner may stop for
approximately 6 minutes in order to prevent
overcooling.
If the room temperature rises again, the
operation will recommence.
______________
J
The room has a peculiar
odour.
A sound like water flowing
can be heard.
it seems that fog is coming
out from the air condi
tioner.
This may be a damp smell exuded by the
walls, carpet, furniture or clothing in the room.
This is the sound of refrigerant flowing inside
the air conditioner unit.
Condensation occurs when the airflow from
the air conditioner cools the room air.
►
19
During Automatic Airflow
Volume setting, indoor fan
stops occasionally.
This is to remove the smell exuded by the
surroundings.
Page 21
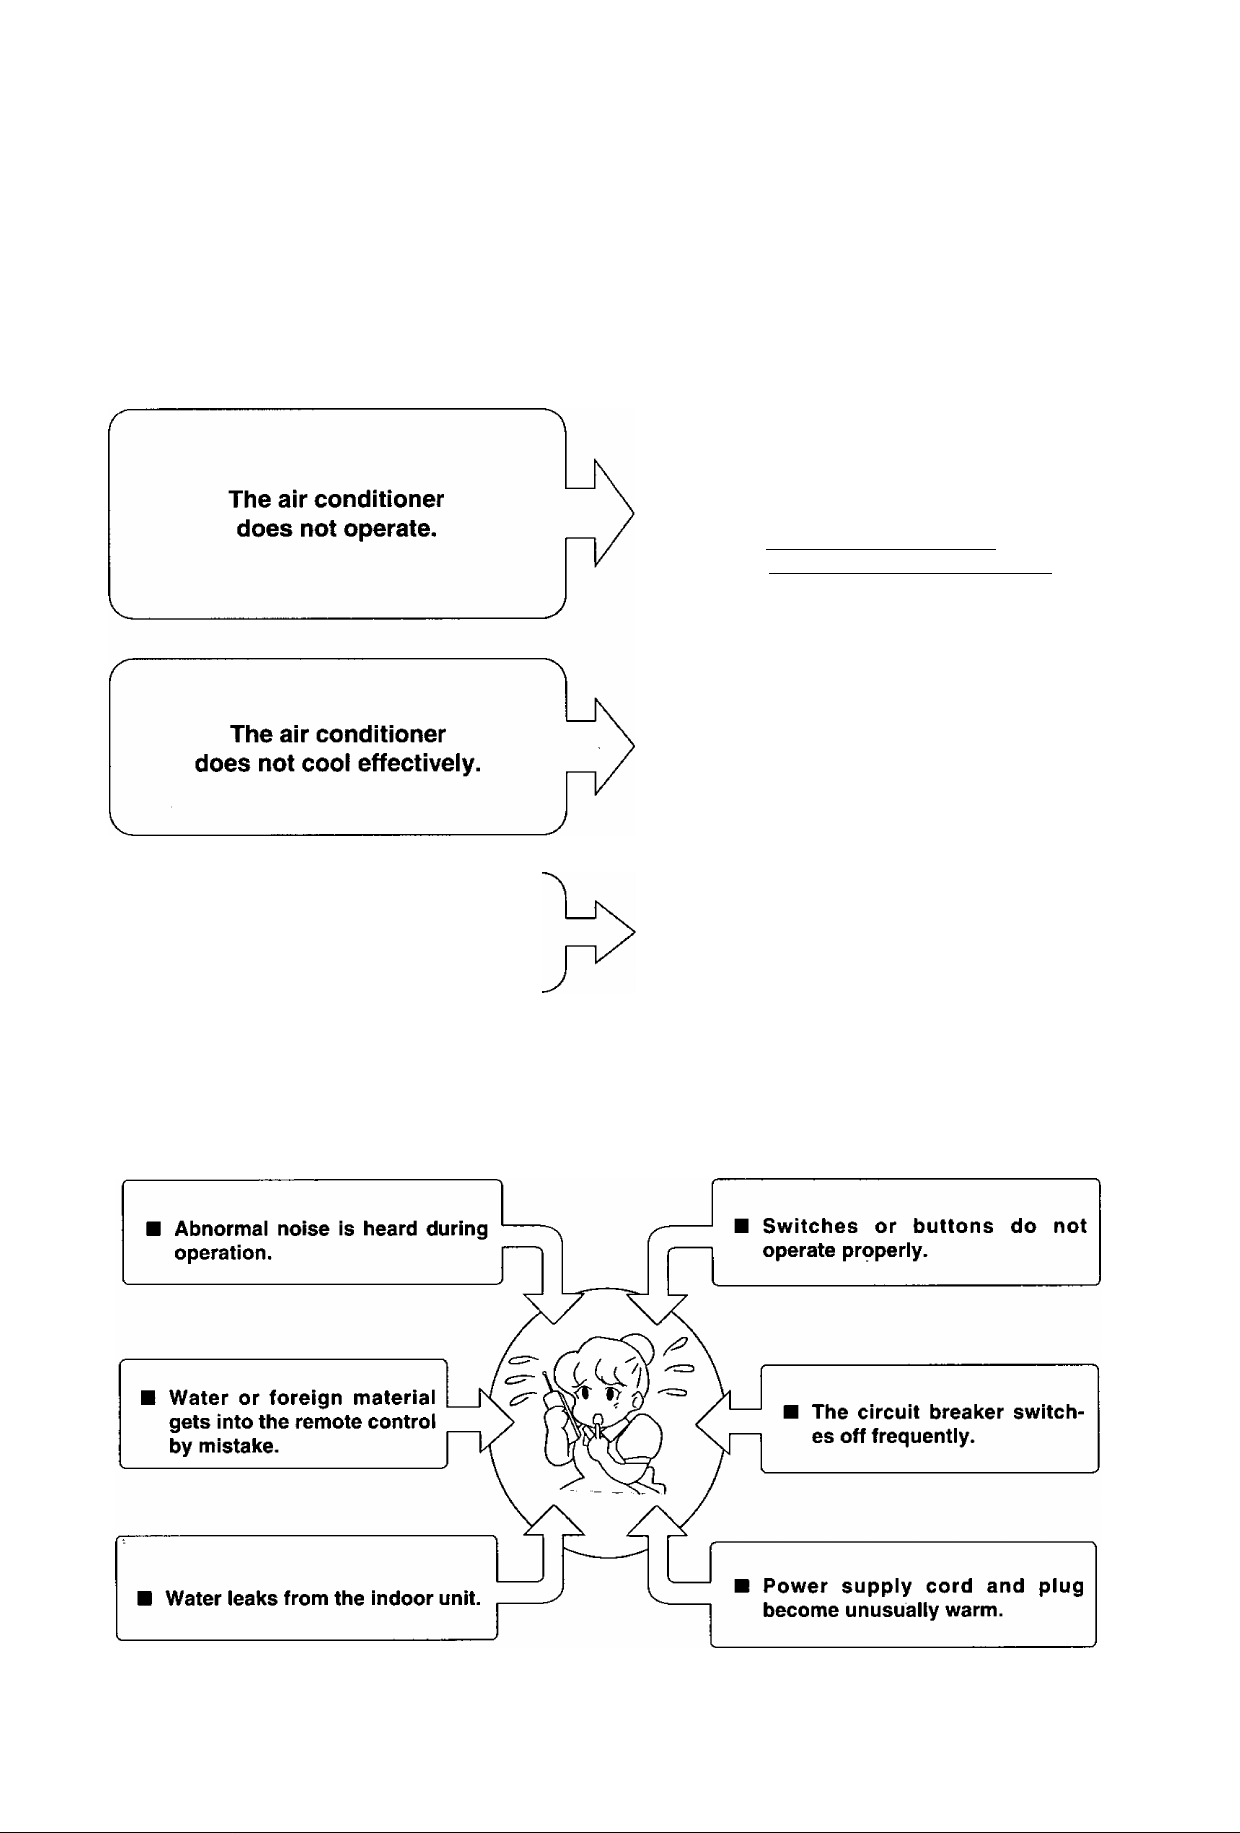
M&OOSMSSÌ
Has a circuit breaker been tripped?
Has the power plug been removed from the
wall outlet?
Is the power switch at “O” (OFF)?
Is the Timer being used correctly?
Has the [REMOTE CONTROLLER B A)
switch been set to “B”?
Has the temperature been set incorrectly?
Are the filters dirty?
Are the intake or outlet vents of the outdoor
unit obstructed?
Are all windows and doors closed?
_______
r
Air conditioner operation
noise too ioud.
Is the installation work slanted?
Is the front grille closed properly?
C
©a O O t l l o s ( S i o D a ? Q o i m ^
If the following conditions occur, immediately turn the power switch to “O” (OFF) and unplug.
20
◄
Page 22

WARNING
A
1) This appliance must be earthed.
2) If the supply cord is damaged, it must be replaced with a special cord obtainable at authorised
service/parts centers.
3) Remove power plug or disconnect from the mains before servicing this appliance.
4) Do not repair by yourself.
In case of malfunction of this appliance, do not repair by yourself.
Contact to the sales dealer or service dealer for a repair.
5) Airborne noise.
A-weighted sound pressure level of this appliance is less than 70dB (A) under the JIS C 9612
test conditions.
Maximum cooling operation
1 m from the unit
6) Do not use in an explosive atmosphere.
Do not use this appliance in a potentially explosive atmosphere.
7) Turn off the power (Isolation from main power supply).
Pull off the power plug from the receptacle, or switch off the breaker, or switch off the power
disconnecting mean to isolate the equipment from the main power supply in case of an
emergency.
iX CAUTION
A
Disconnect the mains plug from the supply socket when not in use, where supply connection is via
mains plug.
IMPORTANT
The wires in this mains lead are coloured in accordance with the following code:
Green and Yellow
Blue
Brown
As the colours of the wires in the mains lead of this appliance may not correspond with the coloured
markings identifying the terminals in your plug, proceed as follows:
The wire which is coloured green and yellow must be connected to the terminal in the plug which is
marked by the letter E or by safety earth symbol ® or coloured green or green and yellow.
The wire which is coloured blue must be connected to the terminal which is marked with letter N or
coloured black.
The wire which is coloured brown must be connected to the terminal which is marked with letter L or
coloured red.
Earth
Neutral
Live
►
21
Page 23

Note
Please remember to record the following:
• Model Number
• Serial Number
Dealer’s Name
Date Purchased
22
◄
Page 24
Contenido
Medidas de Seguridad
- Precauciones al instalar
- Precauciones al operar
Nombre de Cada Pieza
- Unidad interior
- Unidad exterior
- Accesorios
- Control remoto
Preparación Antes del Funcionamiento................ 29-30
- Antes de activar la unidad
- Cómo colocar las baterías
- Manejo del control remoto
Cómo Hacerlo Funcionar
Ajuste del Temporizador........................................ 33 - 34
Funcionamiento Conveniente
- Modo de dormir
- Cuando el control remoto no puede ser utilizado
- Sonido de recepción de señal OFF/ON
del control remoto
...........
..........................................
...................................
24-26
27-28
31-32
35-36
Consejos Para el Funcionamiento............................37 - 38
Mejor Cuidado y Mantenimiento
- Limpie el aire acondicionado y los filtros de aire
- Limpiando la parrilla delantera (Debe ser
removida antes de lavarla)
- Reemplazando los filtros de purificación del aire
- Al no usar el acondicionador de aire por un
período largo
- Inspección antes de tiempo (Mientras más
temprano mejor)
Lanzamiento de Problema
- Funcionamiento normal
- Funcionamiento anormal
- Comuniqúese con el distribuidor inmediatamente
...............................
.........................................
39-40
41 -42
►
23
Page 25

Medidas de Seguridad
orü tolo
QgB gOpfiaaSg©
Para prevenir heridas personales, heridas a otras personas y daños de la propiedad, se deben seguir las
siguientes instrucciones.
■ El uso incorrecto debido a no seguir las instrucciones causará daño o averías, su gravedad es clasificada
bajo las siguientes indicaciones:
__________________________________________________________
oToi, OTO O Piloro]
Advertencia : Esta indicación muestra la posibilidad de causar muerte o daños serios.
Cuidado
Las instrucciones a seguir están clasificadas mediante los símbolos siguientes:
Esta indicación muestra la posibilidad de causar daño o avería
solamente en la propiedad.
Símbolo (con el fondo blanco) denota una acción que está PROHIBIDA.
0
^
Símbolos (con el fondo negro) denotan una acción que es OBLIGATORIA
de hacer.
c
fvAdvertencia
No instale, remueva y reinstale la unidad usted mismo.
Una instalación incorrecta puede causar fugas de agua, descargas eléctrica o incendio. Por favor
consulte al distribuidor autorizado o a un especialista para el trabajo de instalación.
\Á
S. Cuidado
/1
■A J
Este acondicionador de aire de habitación
debe ser conectado a tierra.
Puede causar una sacudida
eléctrica si el contacto a tierra no
es perfecto.
O
No instale la unidad en un lugar donde pueda explotar.
Compruebe que las tuberías de drenaje están conectadas adecuadamente.
Sino habrá pérdidas de agua.
O
3
0
Las fugas de gas cerca de la
unidad pueden causar un incendio.
24
◄
Page 26
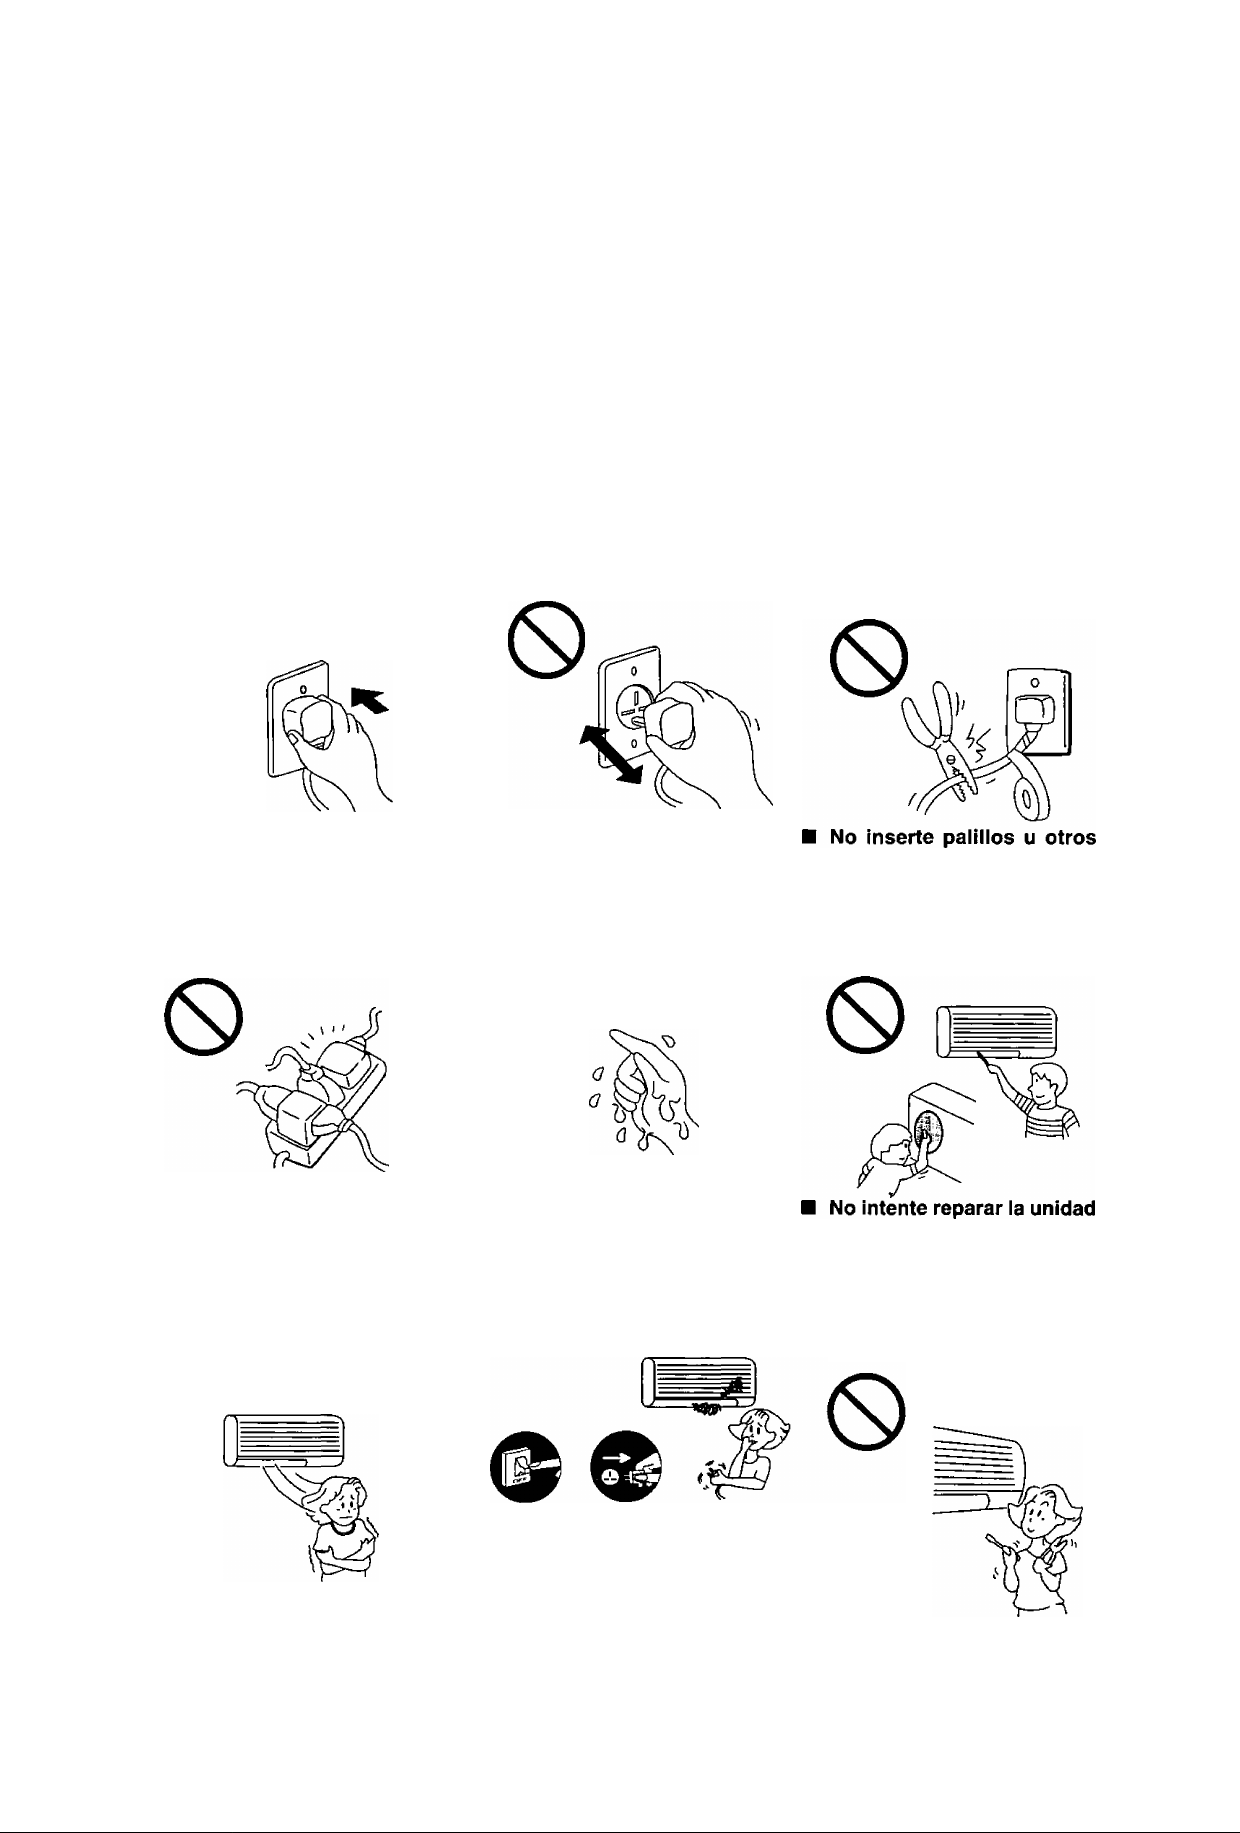
v_
©o (2pa^
fxAdvertencia
Ai
Conecte el enchufe de alimentación correctamente.
El calor generado por un
enchufe flojo puede causar
una descarga eléctrica o
incendio.
O
No modifique la largura del
cable eléctrico o use un ca
ble de extensión.
Puede causar una descarga
eléctrica o incendio.
No opere o pare la unidad
insertando o tirando del
enchufe.
Puede causar una descarga
eléctrica o incendio.
No opere la unidad con las
manos mojadas
Puede causar una descarga
eléctrica.
0
No dañe el cable eléctrico o
utilice un cable eléctrico
inadecuado.
Un cable dañado o
inadecuado puede causar una
descarga eléctrica o incendio.
objetos dentro de la las
unidades.
Puede producir daños físicos
y causar averías en las
unidades.
No se exponga directa
mente a la corriente de aire
durante mucho tiempo.
Le puede producir problemas
de salud.
0
►
25
Si hay olor a quemado, pare el
acondicionador de aire y
desconecte el suministro de
alimentación.
Por favor consulte al distribuidor
autorizado o centro de servicio.
Apague el
interruptor.
Desconecte
el enchufe.
usted mismo.
Se puede producir un
incendio o una descarga
eléctrica. Por favor llame al
distribuidor autorizado o
centro de servicio.
Page 27
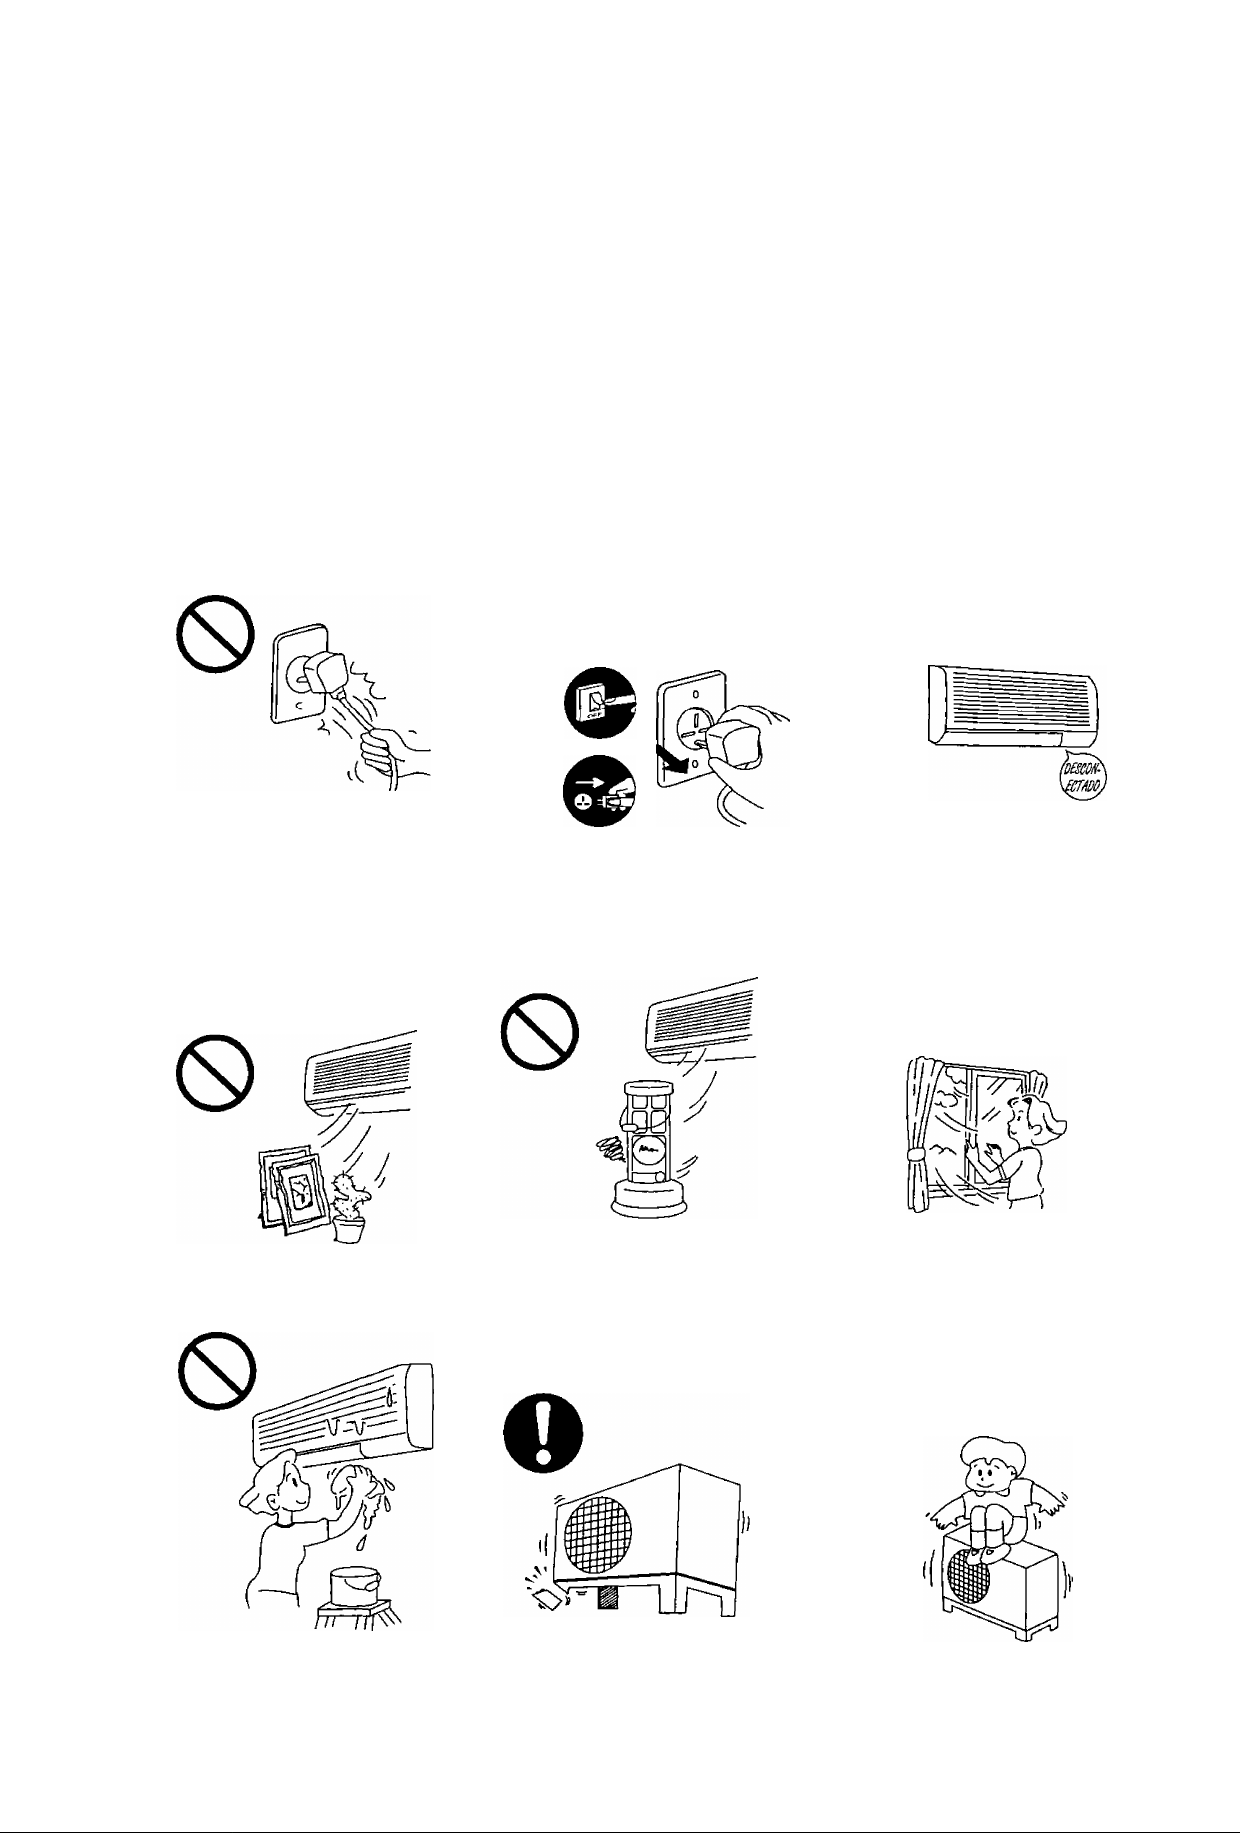
fXprecaución
âi
No desconecte el enchufe
tirando del cable.
Agarre del enchufe cuando
quiera desconectar el enchufe
del tomacorrriente.
No utilice el acondicionador
de aire para otros propósi
tos. No lo utilice con propó
sitos de conservación.
Podría causar deterioro en la
calidad de los alimentos, o
influencia negativa en los
animales o plantas.
Desconecte la corriente si la
unidad no va a ser utilizada
durante un período largo de
tiempo.
Si se acumula polvo en el
enchufe puede causar un in
cendio a causa de la generación
de calor.
Apague el
interruptor.
Desconecte
el enchufe.
No coloque ningún equipo de
combustión en el paso del
flujo de aire de la unidad.
La combustión incompleta pude
causar envenenamiento por gas
tóxico.
Cuando limpie la unidad, quite el énchufe.
Esto es para prevenir heridas
debido al ventilador rotativo
en la unidad.
O
Ventile la habitación regu
larmente.
Si no la ventila regularmente,
la falta de oxígeno puede
causar dolores de cabeza.
O
No lave la unidad con agua.
Puede ocasionar una des
carga eléctrica.
Inspeccione la unidad, que esté sin averías.
Asegúrese de que las re
paraciones necesarias han sido
realizadas.
No se siente o coloque
objetos sobre la unidad ex
terior.
Usted puede caerse o la
unidad puede desplomarse.
0
26
◄
Page 28
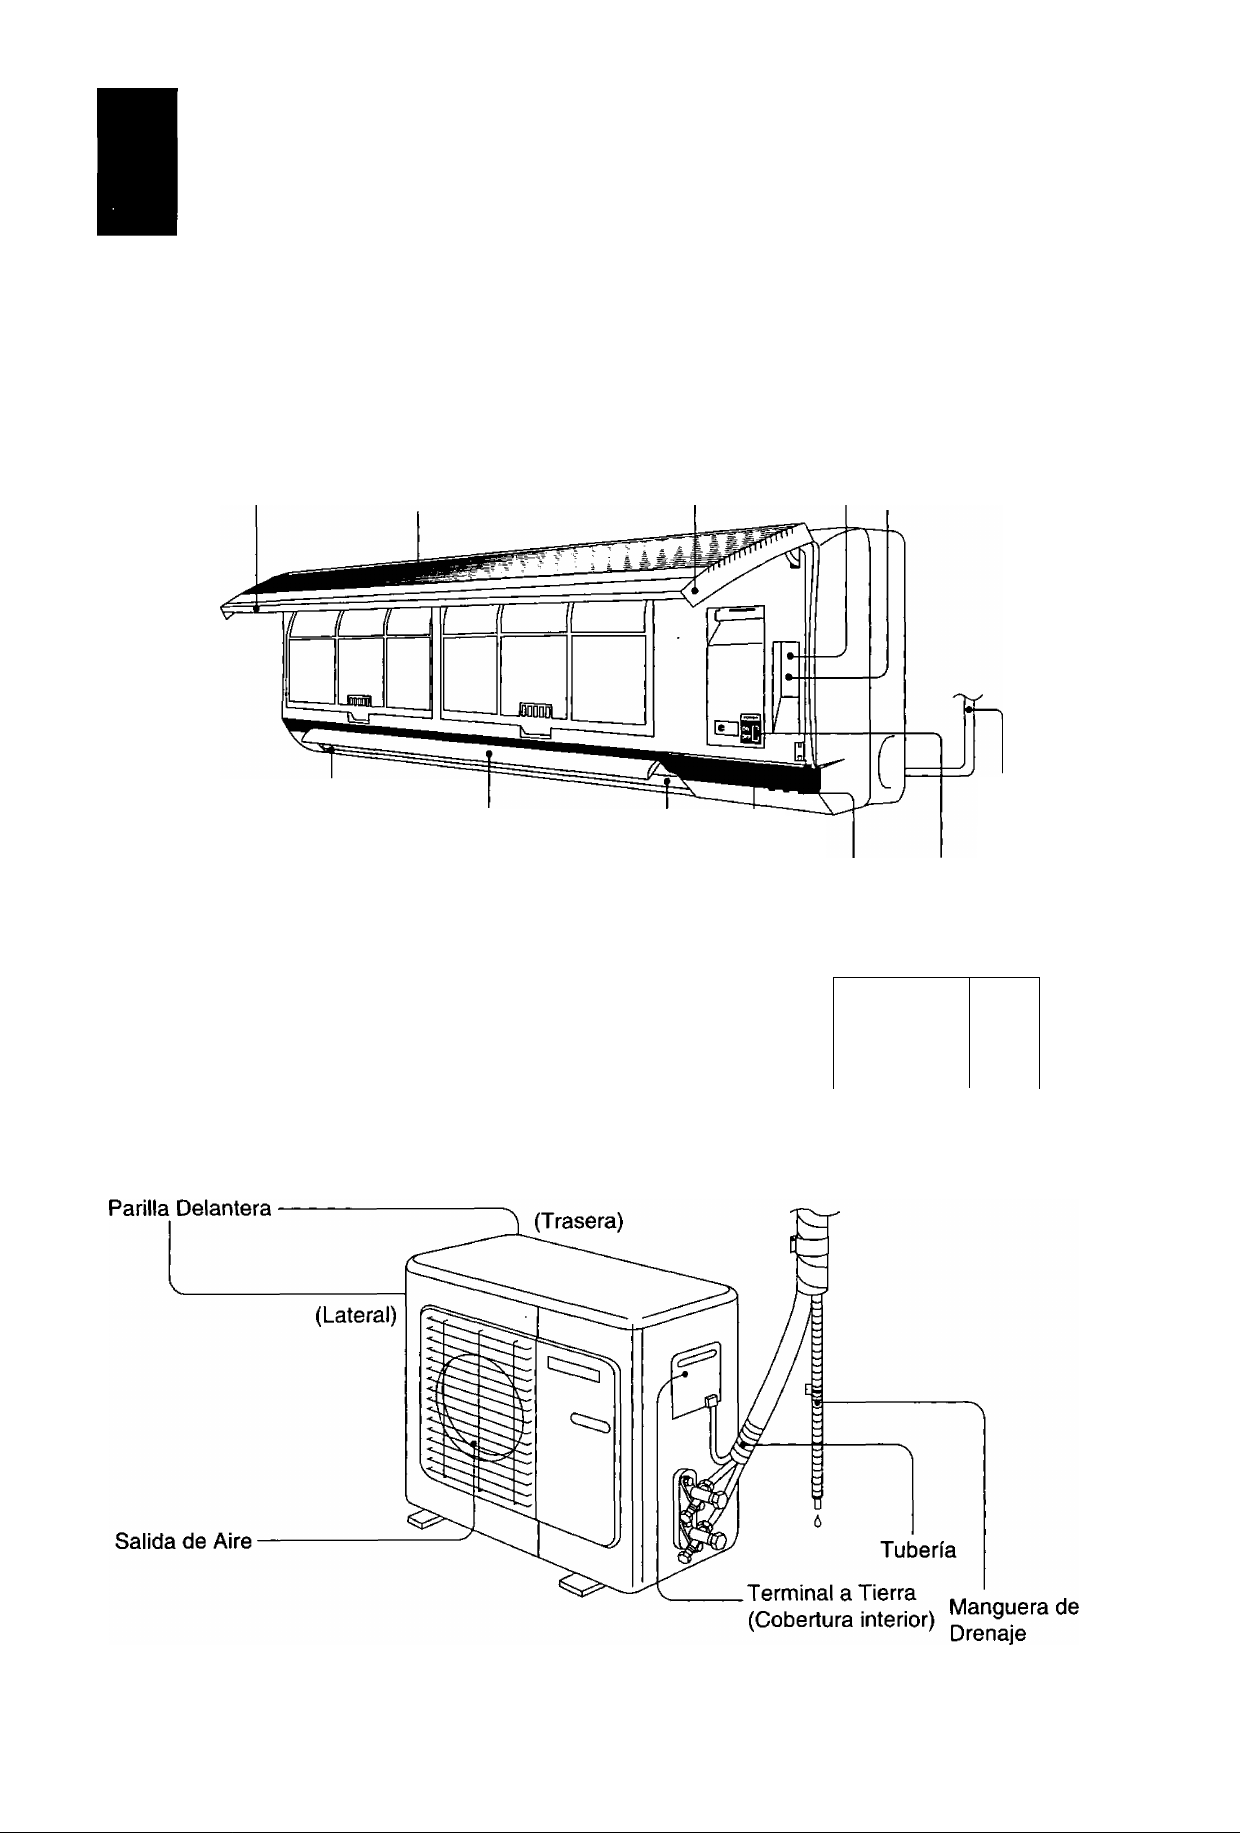
Nombre de Cada Pieza
( Qfliiftafeljl ¡faftateg ]
Parrilla Delantera Entrada del Aire
Botón de Prueba
Apertura de ^10 Enfriamiento
Parilla
Botón de Funcionamiento
Automático
Salida de Aire
Persiana Vertical
para el Flujo del
Aire
(ippiflaaá )
Cable de
Alimentación
Receptor de
Señales
Persiana Horizontal Lámparas de Indicación
para el Flujo del de Funcionamiento
Aire (Ajustada
manualmente)
Interruptor
Principal
1=1
POWER :
(PODER)
=1
SLEEP :
(DORMIR)
1=1
TIMER :
(TEMPORIZADOR)
Rojo
Naranja
Naranja
►
27
Page 29
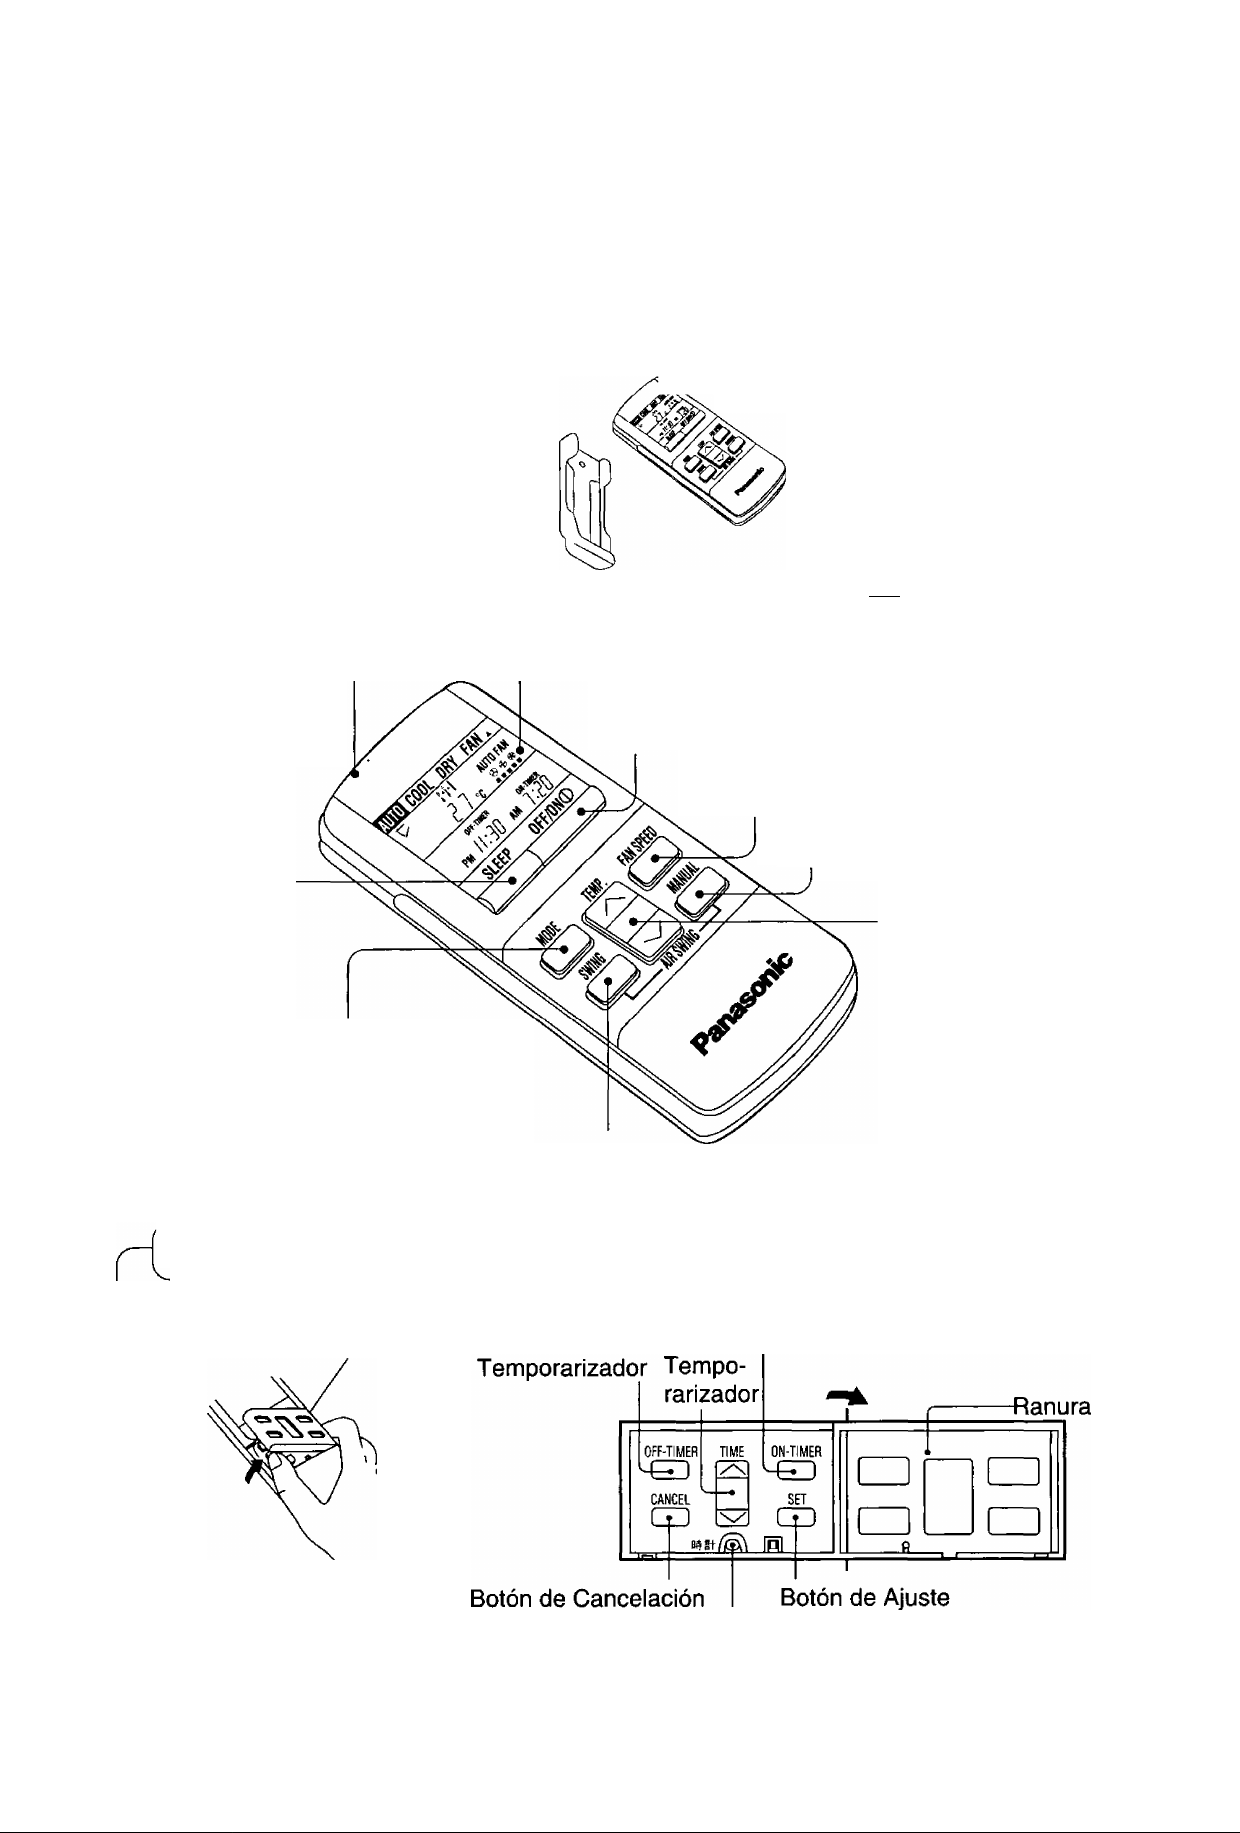
©!5M1í®Q oíaixií^
Control Remoto
Dos Pilas Secas R03 o
su equivalente
Filtros de Limpieza de Aire
(con función desodorizante)
Transmisor de Señales
Botón de
Funcionamiento de
Modo de Descanso
Botón de Selección de Modo
de Funcionamiento
Botón De Control Automático de
Dirección del Flujo del Aire
Soporto Del Control Remoto
Visualizador de Funcionamiento
Botón OFF/ON
Botón de Selección de Volumen
de Flujo del Aire
Botón de Control Manual de la
Dirección del Flujo del Aire
II—II
LJ=_U
Botón de Ajuste
de Temperatura
de la Habitación
Visualizaciones separadas y funciones se encuentran a su disposición al abrir la ranura
ON - Botón del
Ranura
OFF-Botón del Botón Temporarizador
Botón del Reloj
28
◄
Page 30
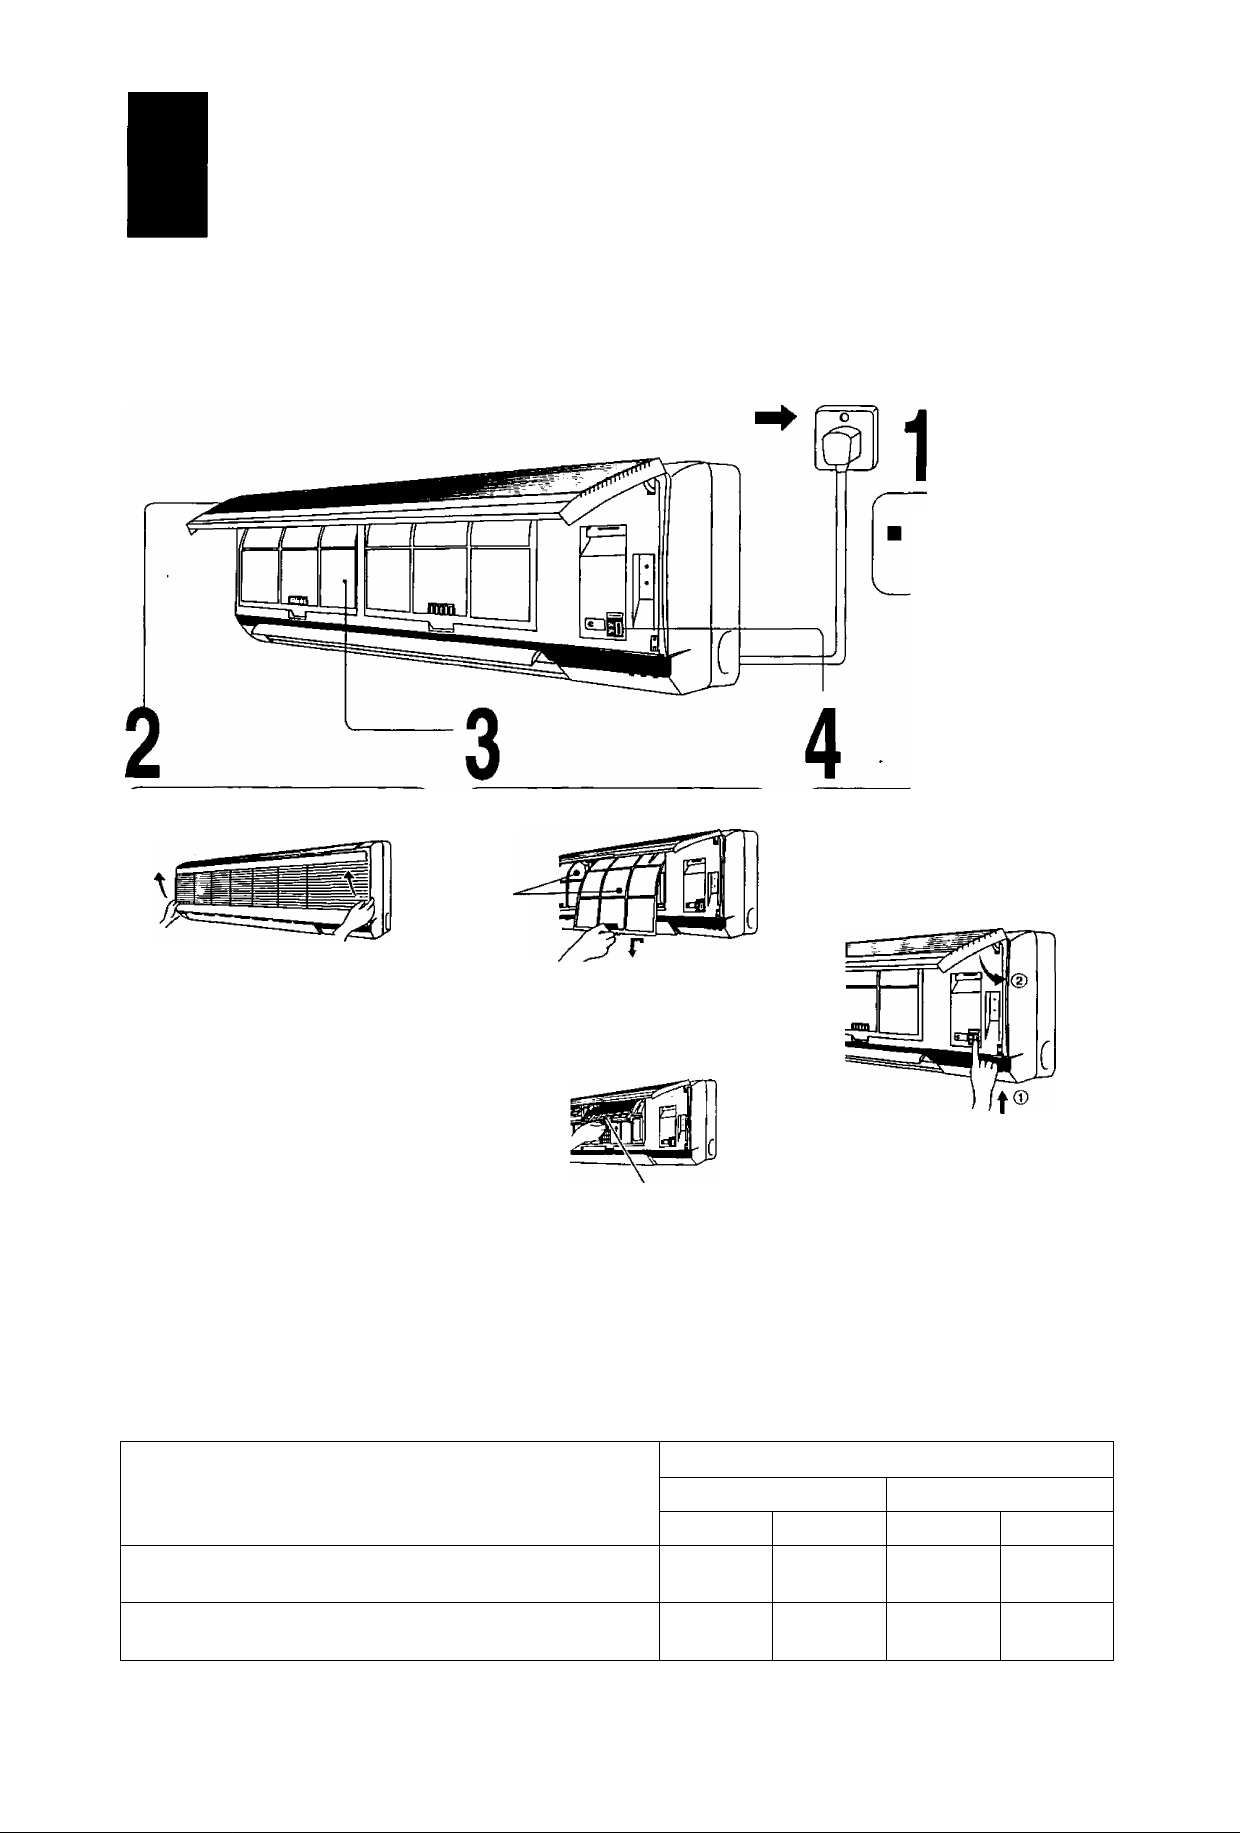
Preparación Antes del Funcionamiento
/Mte© (3® o@ (fflñiygía
Conecte el enchufle
a un tomacorriente.
Abra la parrilla delantera.
Sujete las aperturas de la
parrilla a ambos extremos
y tire hacia arriba la
parrilla delantera.
<Nota>
Retire el filtro del aire.
Filtro
dei Aire
Sujete la lengüeta alzandola un
poco y luego tire hacia abajo.
introduzca ei filtro de
purificación del aire.
Tenga cuidado de Filtro Purificador
no maltratar sus del Aire
manos con las
partes metálicas.
Encienda ei interruptor de
corriente y cierre la parrilla
delantera.
Utilizese bajo las siguientes condiciones:
DBT: Temperatura de foco seco
WBT: Temperatura de foco húmedo
Temperatura Máxima
V
►
29
Temperatura Mínima
(unidad en °C)
Enfriamiento ^
Unidad interior Unidad exterior
DBT
32
16
WBT
23
11
DBT
43
16
________
WBT
26
11
y
Page 31
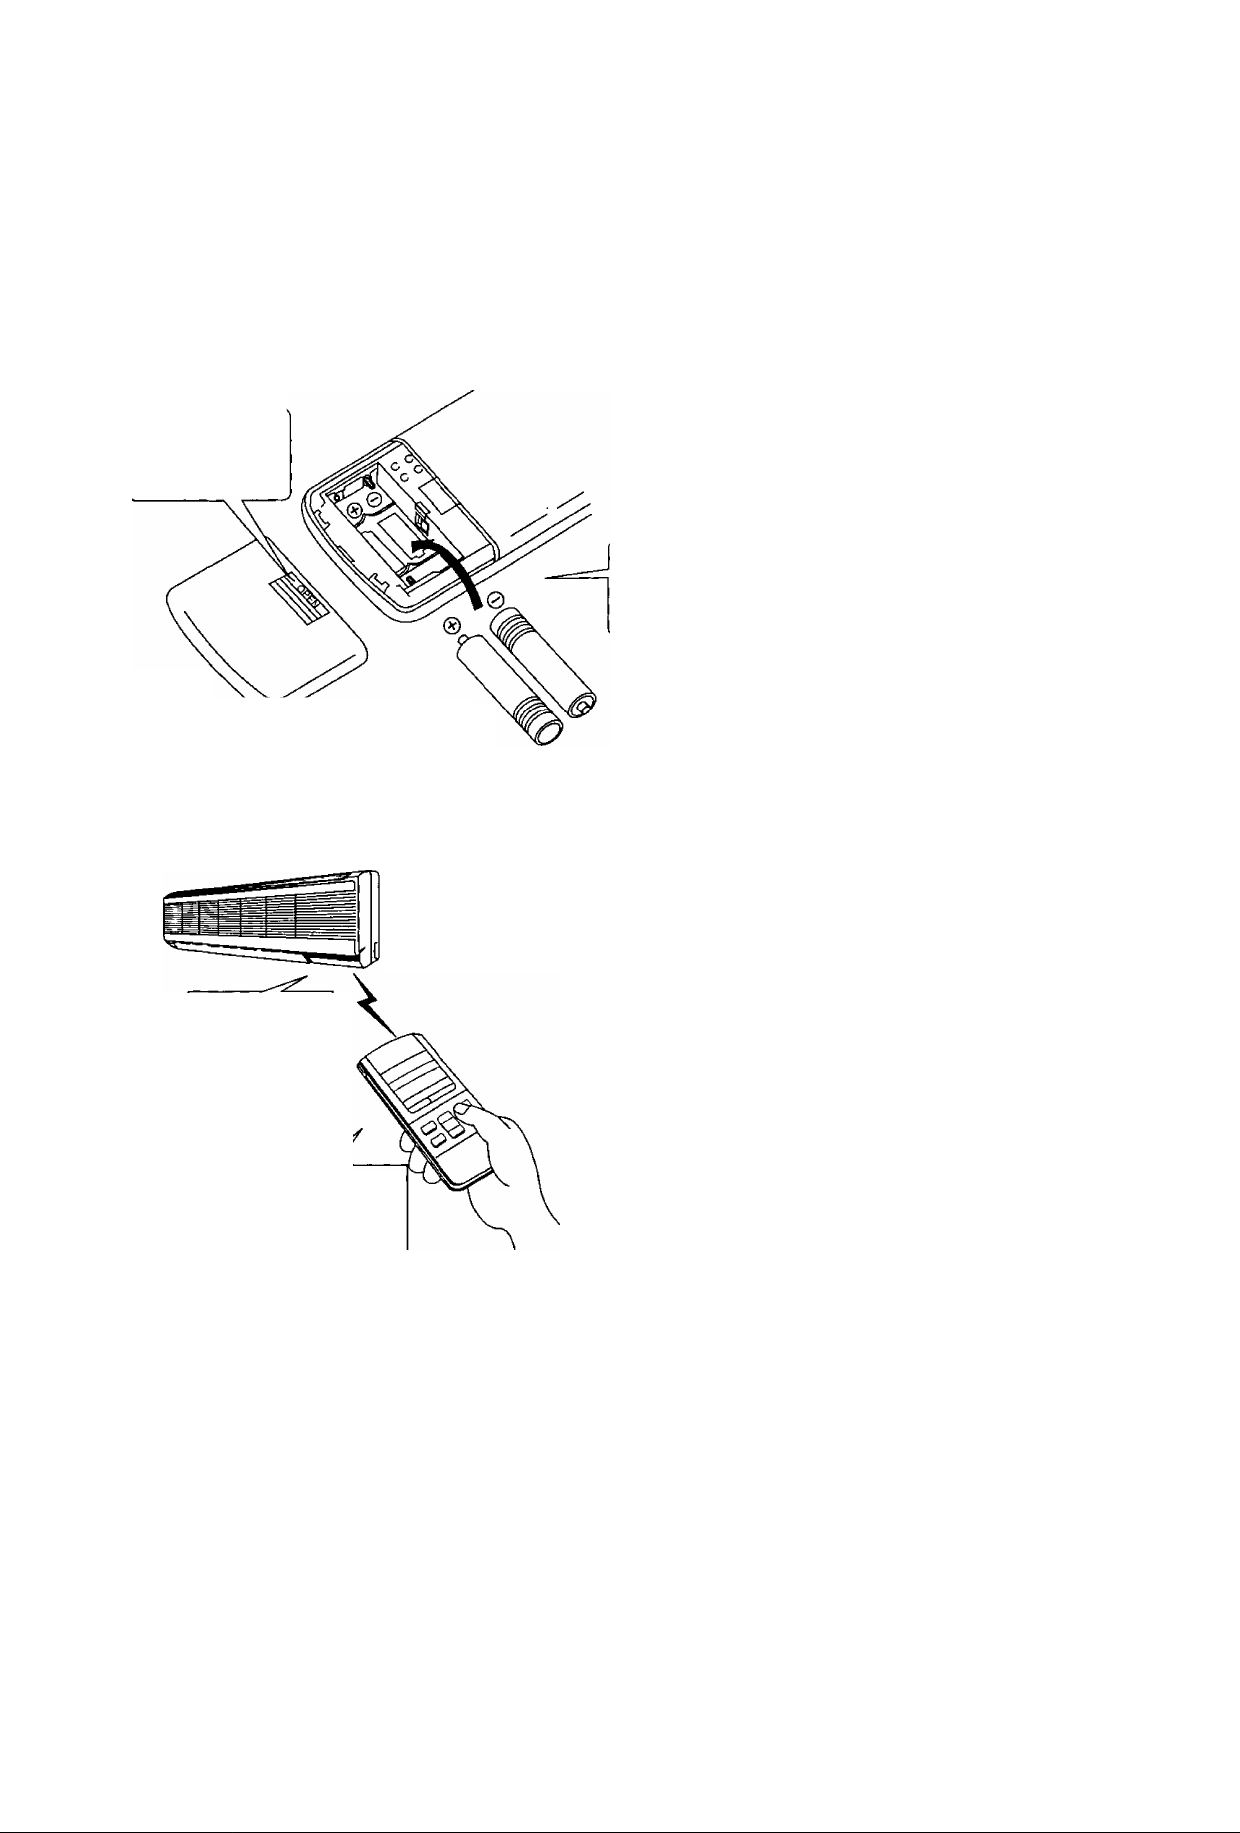
©tea) ©®0®g®’Oas
^Presione suava^mente el punto
marcado [OPEN] y
deslíze ía cubierta
hacia adelante.
r
Asegúrese de que
a trayectoria de la
señal no se
encuentra obstruida.
(Dos pilas secas
R03 o equivalente)
élsO
Coloque la cubierta en la parte trasera del control remoto (“12:00 PM” destellara én el visualizador de funcionamiento).
@© Asegúrese
de que las
direcciones (+)
V (-) sean las
correctas.
» f /
N \
I *1 . n n
PM IC . LI U
I \
Si el visualizador no se enciende al colocar las
pilas, retire las pilas y vuelva a colocarlas.
Apunte hacia el receptor de señales en el
acondicionador de aire cuando se encuentra en
funcionamiento.
No deje caer o golpee el control remoto.
No coloque e! control remoto en ningún lugar en
que se encuentre expuesto a luz solar directa o
cerca de un calentador u otra fuente de calor.
Sonido de recepción de la señal.
Un pitido corto o un pitido largo.
La distancia máxima
en la cual se puede
captar las señales es
de 10 metros.
Ajuste el interruptor en “O’' (APAGADO) Respecto a las pilas, cuando.
El acondicionador de aire no vaya a ser utilizado durante un período de tiempo largo.
Si el interruptor principal se deja en “i" (ENCENDIDO),
aproximadamente 3,25 vatios de energía eléctrica son
utilizados aún cuando la unidad principal es desactivada
por control remoto.
Existe peligro de relámpagos.
El acondicionador de aire cuenta con un artefacto de
protección interior, pero el equipo de control podría ser
afectado seriamente dependiendo de la duración de los
relámpagos.
tas pilas se pueden usar durante aproximadamente
un año.
No use pilas (Ni-Cd) recargables, porque esas pilas
difieren de las pilas secas en su forma, tamaño y
rendimiento.
Asegúrese de reemplazar las pilas con dos pilas nuevas
de la misma clase.
Retire las pilas si no va a usar el acondicionador de aire
por un largo tiempo.
30
◄
Page 32
Cómo Hacerlo Funcionar
Control De Reactivación Automática.
■ Si existe falla en el fluido eléctrico, el funciona
miento automáticamente cuando el fluido
eléctrico sea restablecido con modo de
función previo y dirección del flujo del aire.
(Al no ser interrumpida la función por medio
de control remoto).
■ Si no desea continuar con el funcionamiento
una vez restablecido el fluido éléctrico,
desconecte el interruptor en la unidad
principal o en la fuente do electricidad.
Cuando usted enciende el interruptor, el
funcionamiento será automáticamente
reactivado con modo de función previo Y
dirección del flujo del aire.
Nota: 1. Si usted no necesita un control de
Reactivación Automática sírvase
consultar a su distribuidor.
2. El control de Reactivación Automática
no se encuentra disponible al ajustar
el Temporizador o Modo de Descanso.
Temperatura recomendable para la salud y comodidad.
Para Enfriar : 26°C - 28”C
Para Deshumidificación Moderada :
1 ®C - 2°C menos que la temperatura de
ambiente.
<Detalles de Funcionamiento>
AUTO - Funcionamiento Automatico.
■ Cada vez que el botón de selección de modo de
función es presionado, el sensor de temperatura
interior funciona automaticamente para
seleccionar el modo de función deseado con
Enfriamiento o Deshumidificación Moderada.
Temperatura
fijada a 25°C
Temperatura
fijada a 22“C
►
ENFRIAMIENTO
DESHUMIDIFACIÓN
MODERADA
31
DRY - Funcionamiento de Deshumidifica
ción Moderada.
■ La Deshumidificación Moderada es una Función de
Enfriamiento consistente primeramente en des
humidificación. No reduce mucho la temperatura
dentro de la habitación.
Fundonamisnto de
Enfríamiento hasta que
Ja temperatura de la
tiabitaciorr alcance la
temperatura ajustada.
Temperatura ajustada
Cuando la temperatura de la habitación alcance la'
temperatura ajustada, el tunciortamiento se cambiará a
Humidiflcación Moderada.
Er Fundorumi^ritD terá ecMúa y
dicaayado por 10 iTitrUQeedlvada
y 6 minjIDi detactryaao duante la ¡
rw ü. .n. fih . Modani
Cantidad de Itujo
del aire Super Baja.
e>
Page 33
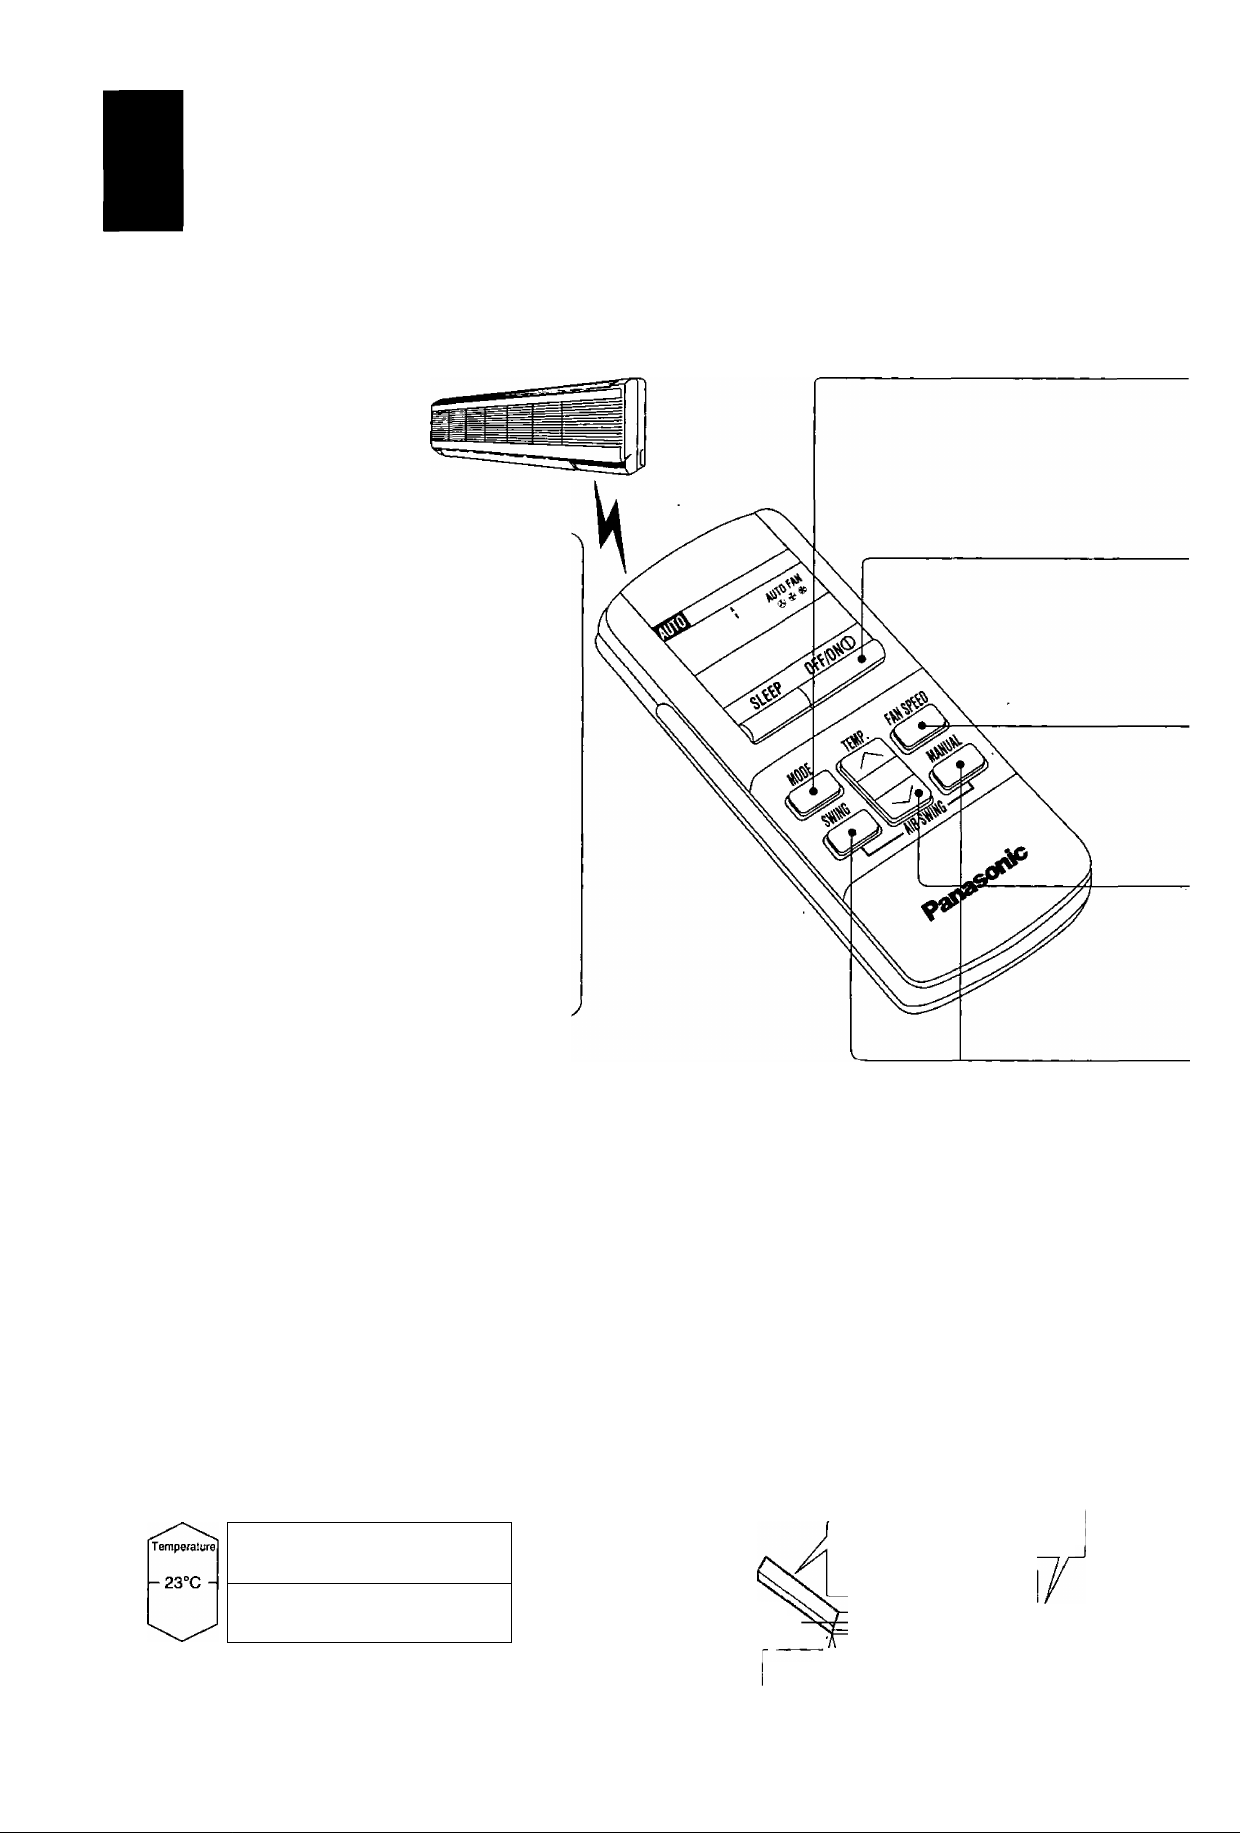
MODE
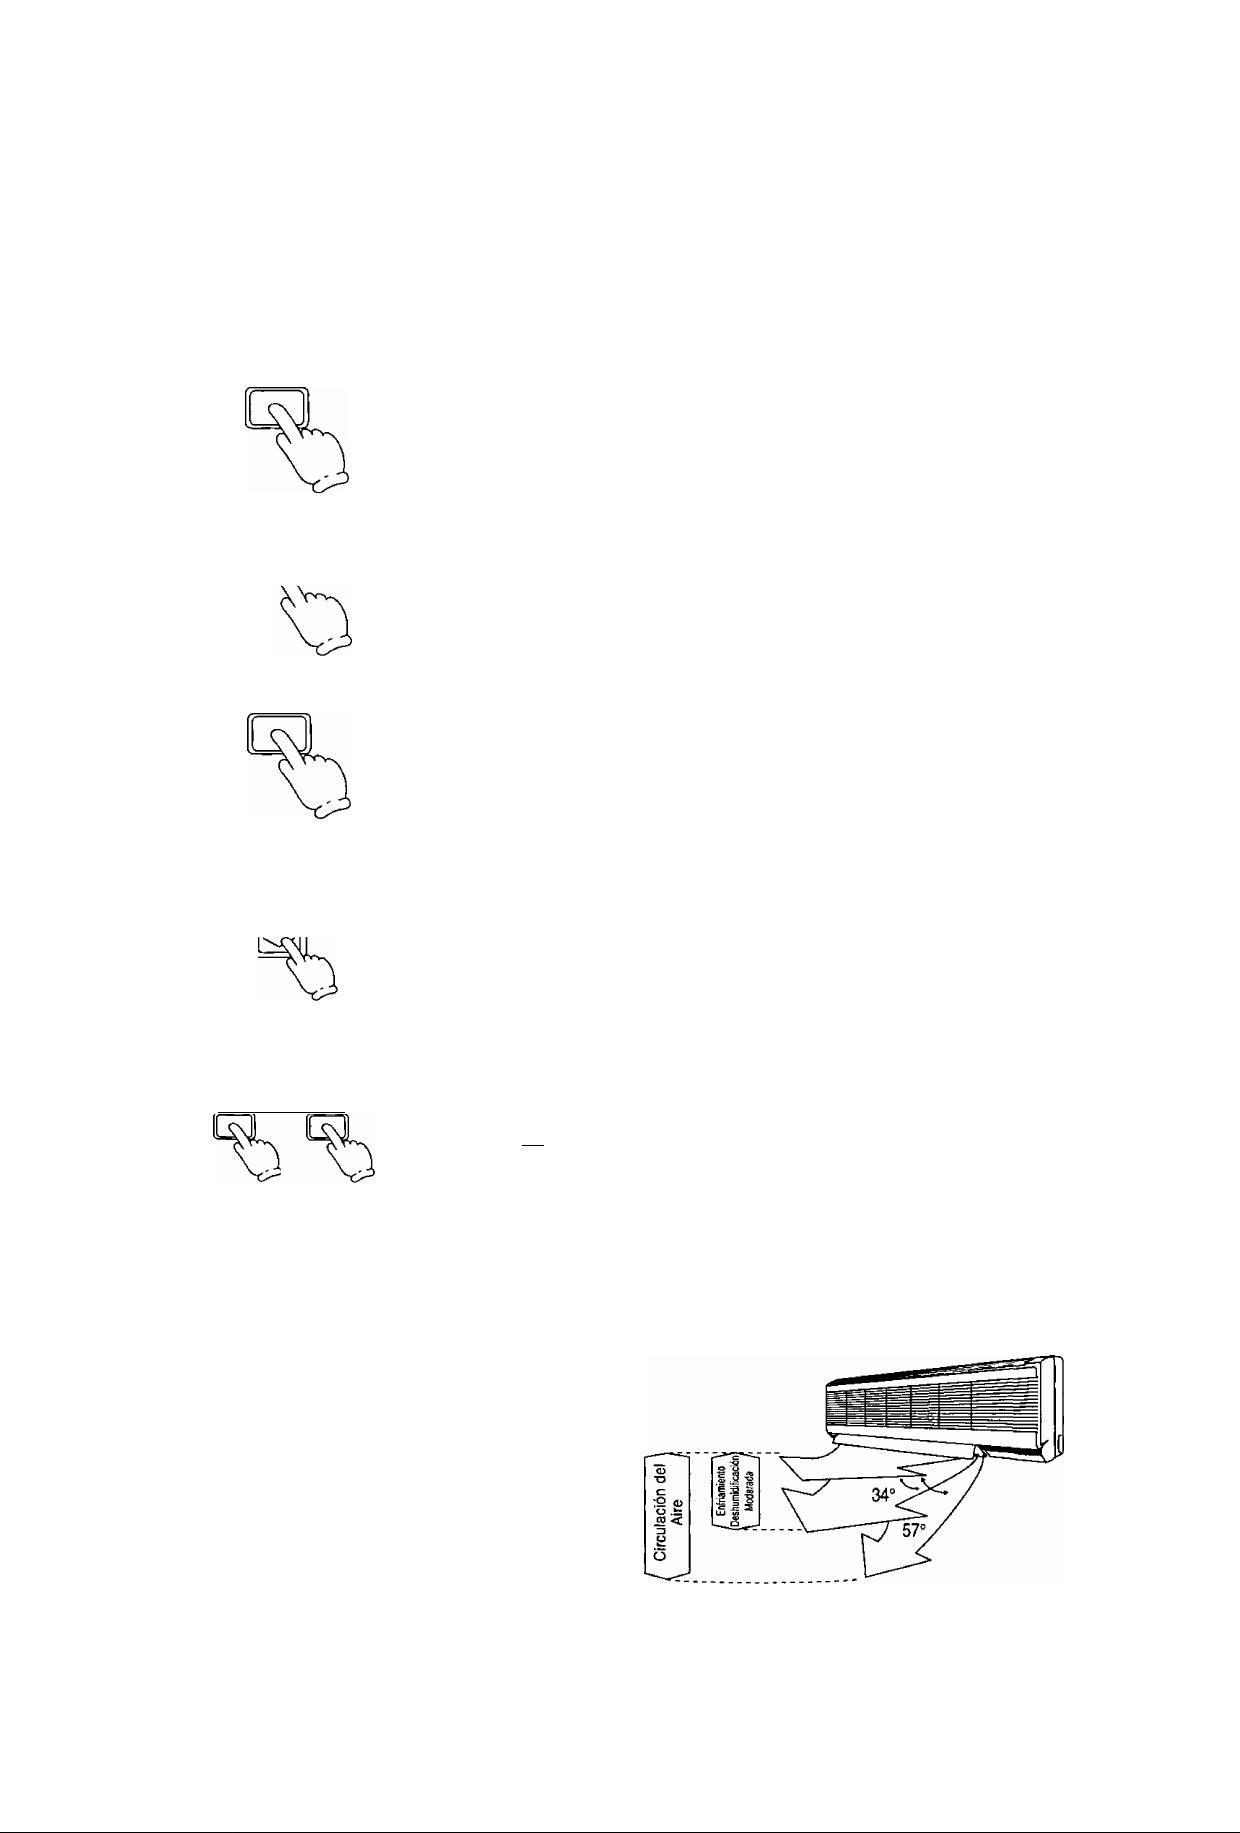
Presione para seleccionar el modo de funcionamiento.
■ La visualización cambia en el siguiente orden
1
2
3
AUTO -► COGL DRY -* FAN
cada vez que el botón sea presionado.
OFF/ON CD
Lc^
FAN SPEED
TEMP. Presione para seleccionar la temperatura de la habitación.
Presione para activar el funcionamiento.
■ La lámpara de indicación de función (ROJO) se encenderá.
■ Presione una vez más, para desactivar el funcionamiento.
Presione para seleccionar el volumen del flujo del aire.
■ La visualización cambia en el siguiente orden.
®@0
AUTO FAN ■■■
Automático Bajo Mediano Alto
■ Enfriamiento, Deshumidificación Moderada, Circulación del Aire —
Selecione la temperature a su gusto (16®C ~ 30“C).
■ Automático.
2°C menos de lo
normal
2®C mayor de lo
normal
I-I
Presione (Q continuamente.
■ La paleta de dirección del flujo del aire vertical se desplazará de arriba hacia
SWING MANUAL
5
FAN - Función de Circulación del Aire.
■ Cuando la temperatura de la habitación alcance la
temperatura de ajuste la función se inicia a un
volumen bajo de flujo del aire. Se detiene cuando
la temperatura de la habitación desciende
a 2“C abajo la temperatura de ajuste.
(Útil para cuando se usa un calentador.)
Volumen de Flujo de Aire Automático.
■ La velocidad del abanico interior es ajustada
automáticamente de acuerdo con el
funcionamiento. La velocidad del abanico interior
se apaga temporalmente durante el
funcionamiento de la modalidad de refrigeración.
abajo. Deje de presionar el botón cuando la paleta se encuentre en la
posición deseada.
SWING
Presione .
■ La paleta de dirección del flujo del aire vertical se desplazará de arriba
hacia abajo automáticamente. Cuando la función de dirección de flujo del
aire automática es liberada, presione el botón Q •
__________________
Alcance del ajuste de la paleta.
y
32
◄
Page 34
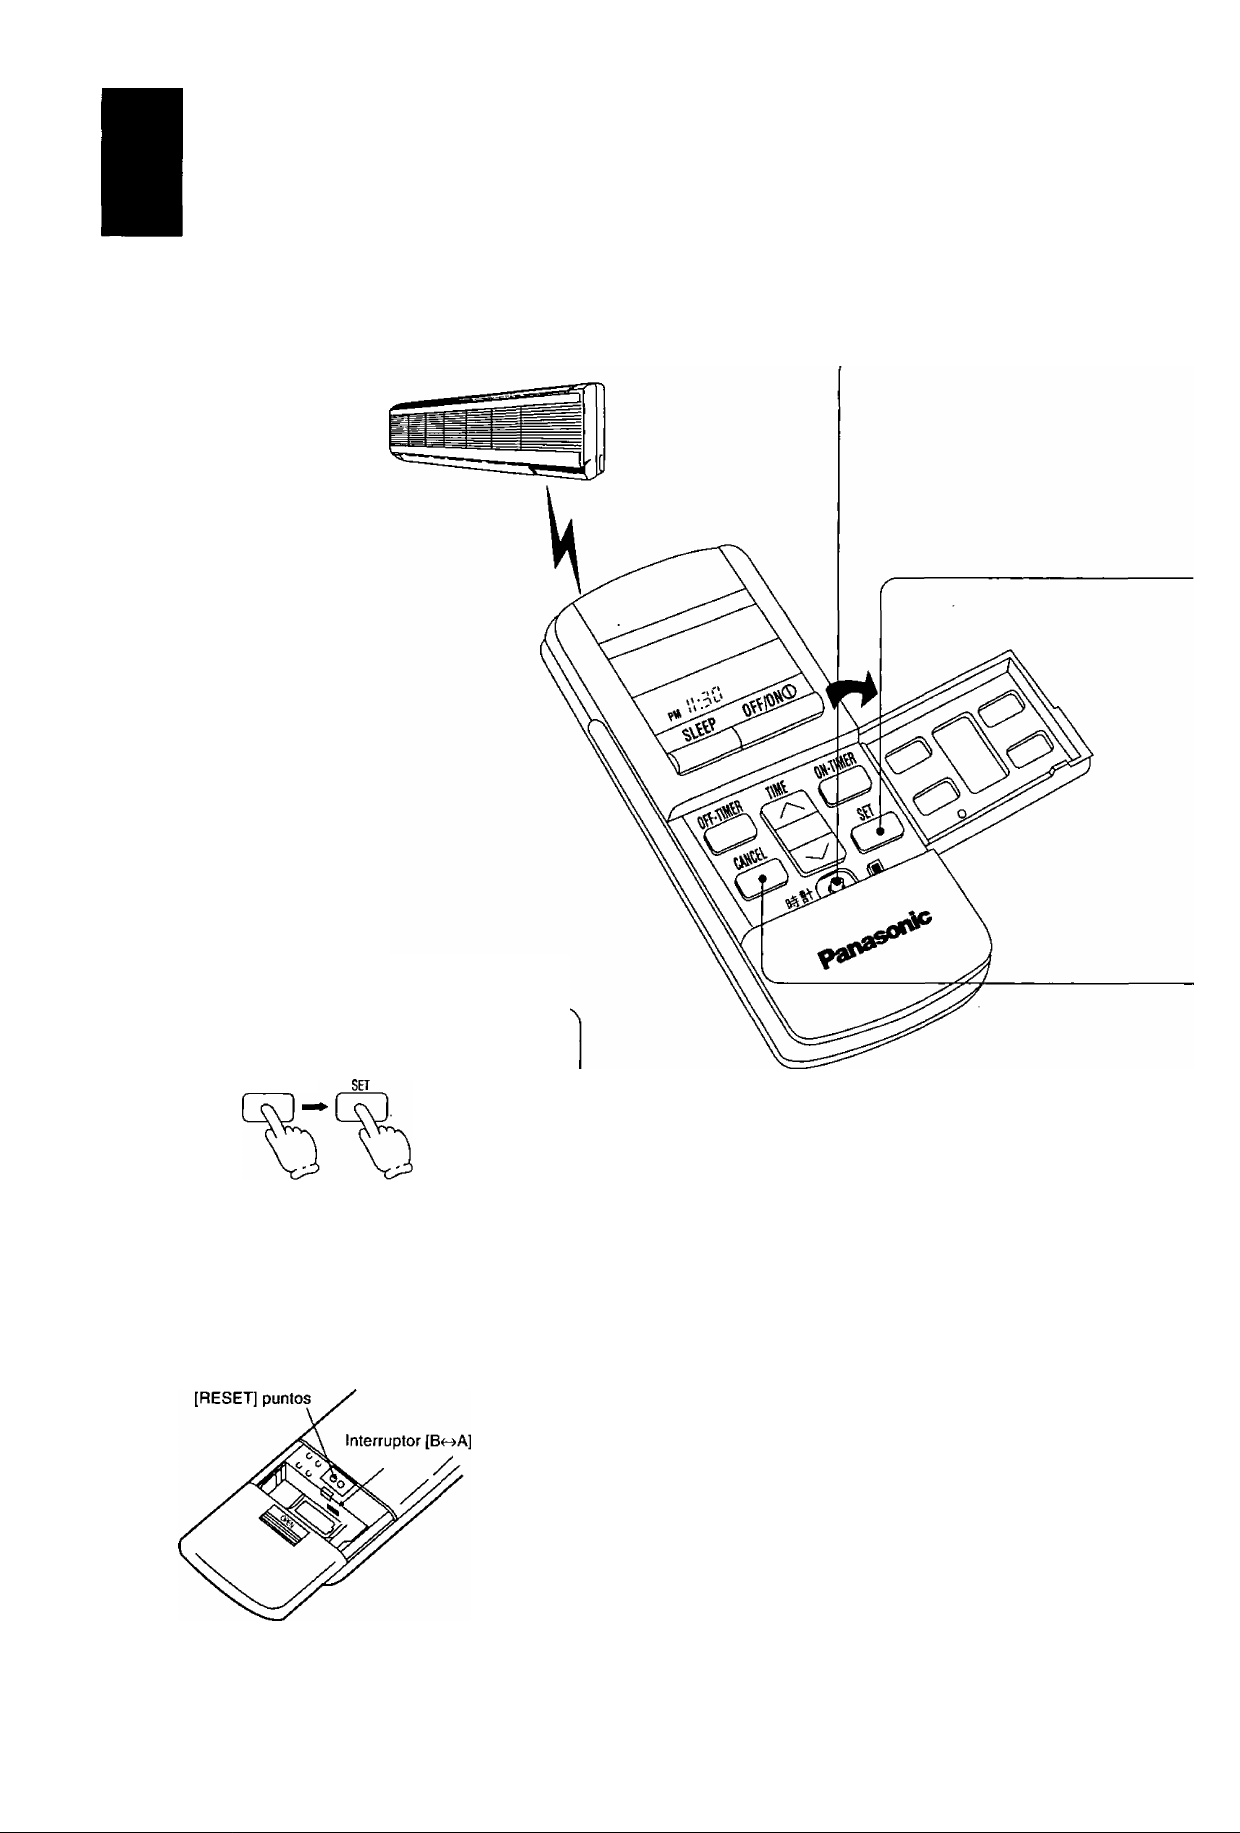
Ajuste del Temporizador
Si existe una falla de electricidad.
Para reajustar el temporizador.
(Ejemplo) Si el Temporizador en OFF ha sido ajustado.
OFF-TIMER
La hora fijada es grabada en la memoria ya
que el control remoto funciona con pilas.
<Nota>
En relación al control remoto.
Si la hora en curso no es ajustada de manera
correcta, la hora correcta no podrá ser ajustada.
Cuando el temporizador es ajustado, la
visualización de la hora en curso desaparecerá.
Los puntos [RESET] borraran la memoria una vez
presionados.
►
El interruptor [B A] es utilizado cuando más de
2 unidades de acondicionador de aire han sido
instalados en una habitación. Consulte a su
distribuidor.
33
Page 35
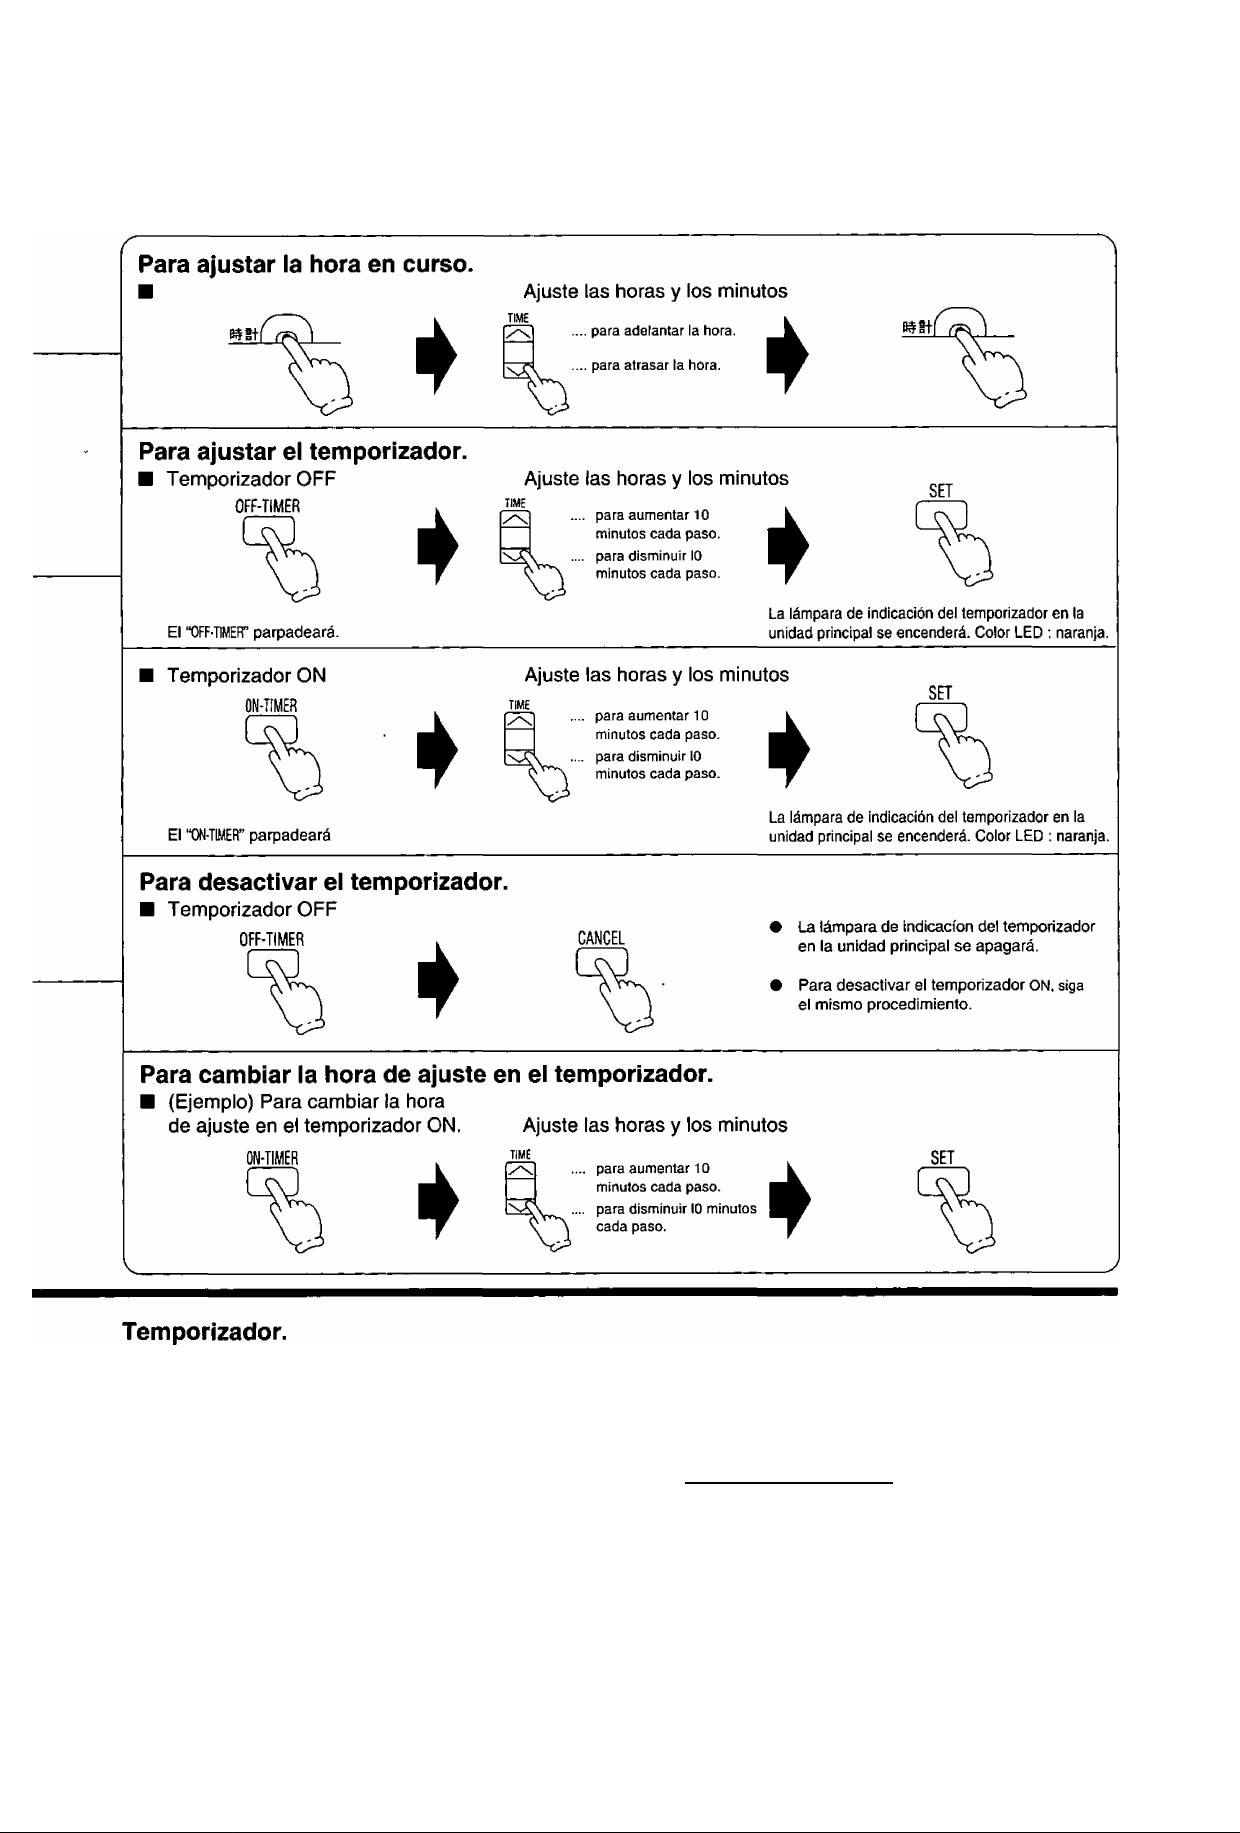
El Temporizador ON y el Tempo rizado r OFF
sólo pueden se ajustados una vez al día.
El funcionamiento comenzará antes de la
hora ajustada actual con el ajuste del
Temporizador ON.
✓
--------------------------------------------------------Automatico, Enfriamiento y los
Deshumidificación Moderada:
15 minutos antes
V __________________________________
Esto es para dar tiempo de lograr su
temperatura de ajuste deseada.
Ajustando el Temporizador OFF.
-------------------------------------------------------
Esto es útil para ahorrar costos de
eléctricidad incurridos al olvidar apagar el
acondicionador de aire._________________
X
Ajustando el Temporizador ON.
Si el acondicionador de aire es ajustado
antes de que usted salga, la temperatura de
la habitación será cercana a su temperatura
deseada cuando usted regrese.
34
-
◄
Page 36
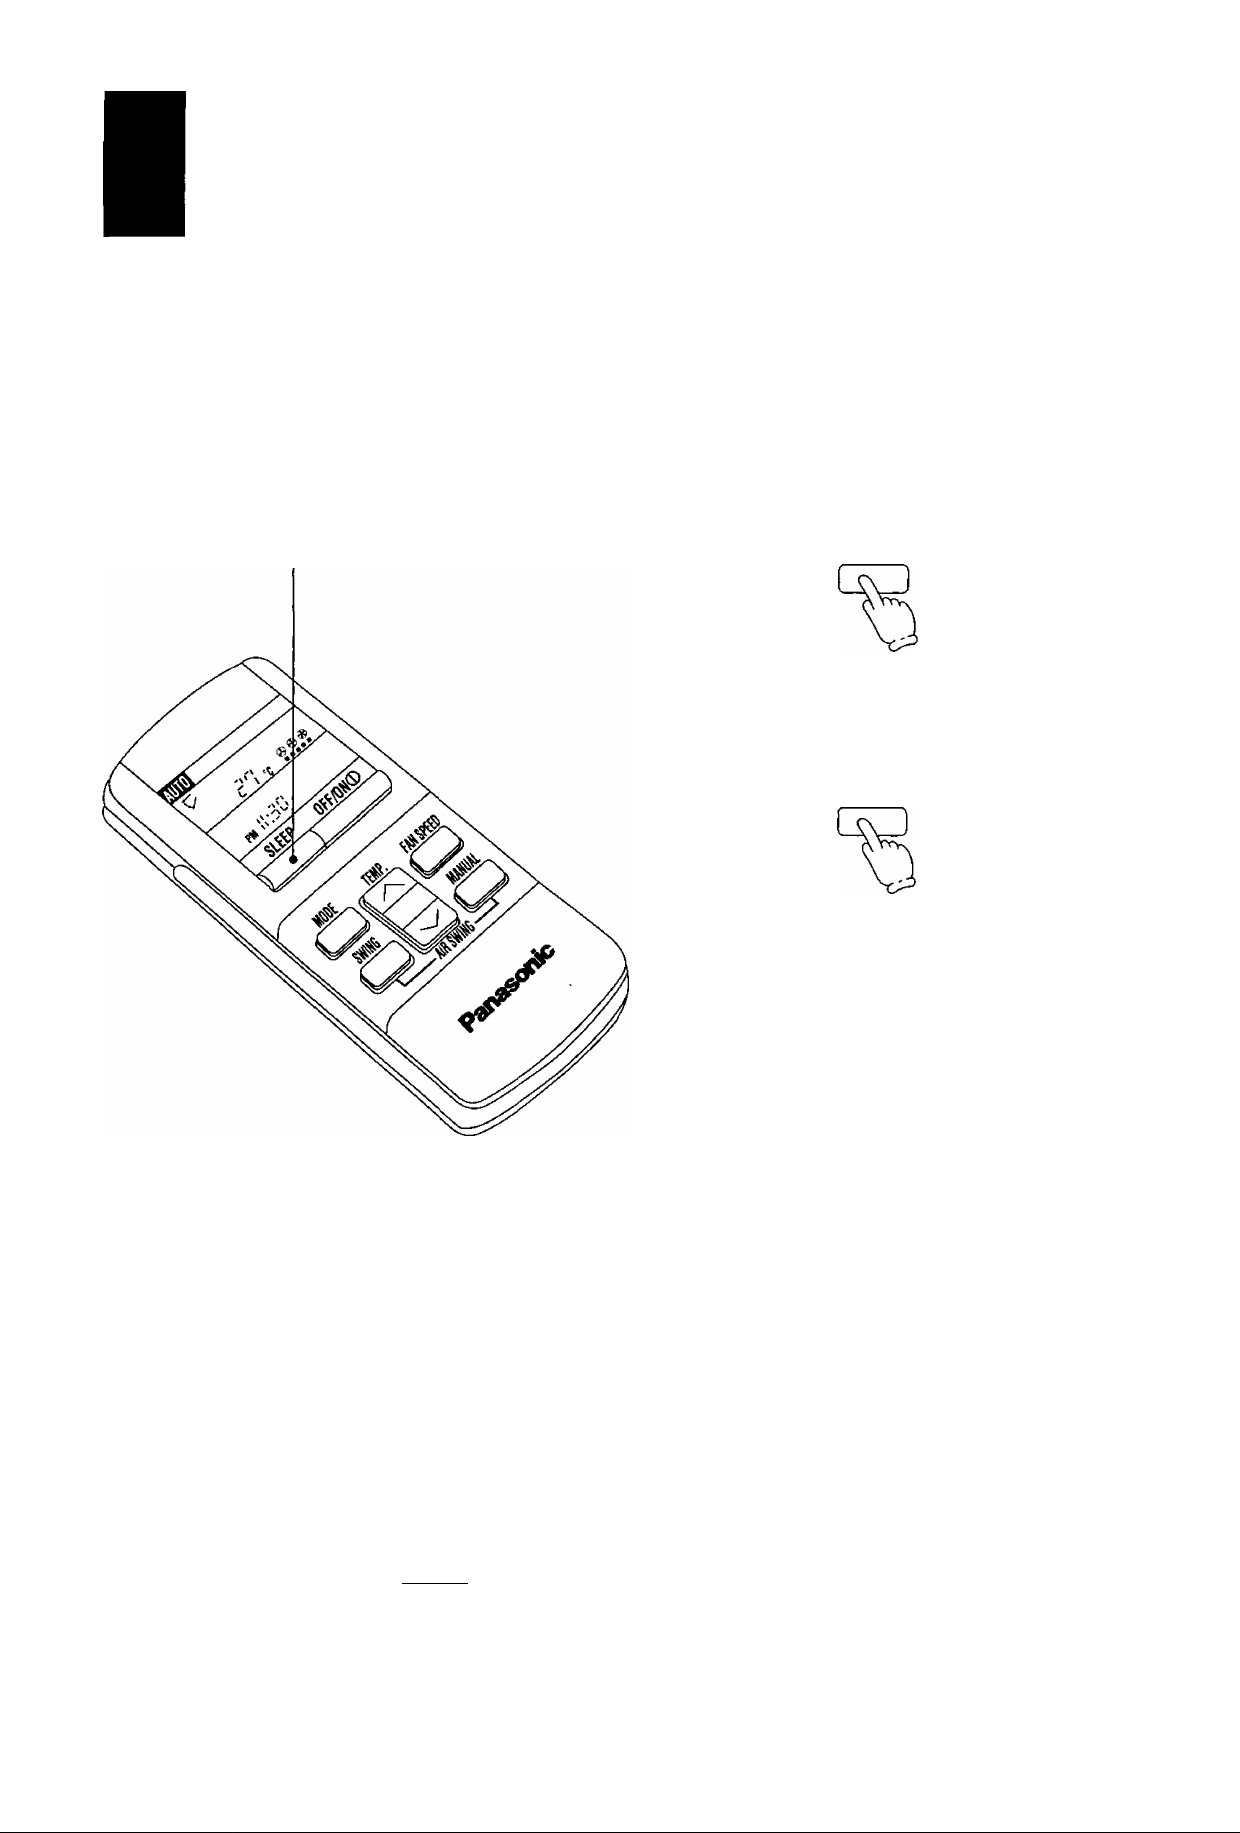
Funcionamiento Conveniente
Esto es para obtener una temperatura comfortable en la habitación mientrás se duerme.
Para activar el modo de dormir.
■ Presione.
(La lámpara de indicación de dormir
de la unidad principal se encenderá.)
Para desactivar el modo de dormir.
■ Presione desactivar el modo de
dormir. SLEEP
SLEEP
(La lámpara de indicación de la
unidad principal se apagará.)
Función de Modo de dormir.
■ Cuando la temperatura de la
habitación alcance la temperatura
fijada o después de 1 hora de
funcionamiento del aparato, se
activa el modo de dormir y el flujo
automáticamente descenderá.
■ El tiempo de la Función de Modo de
dormir es de 8 horas.
■ Al utilizarse junto con el temporizador, el temporizador tiene la
prioridad.
<lnformación>
■ La función de Enfriamiento o Deshumidificación Moderada para el movimiento de modo de dormir
comenzará a evitar sobreenfriamiento.
Aprox. aumento de 0
TEMP.
<
te
1- <
< Û
tr <
tu 3
Q- LL
UJ
N
Se aprieta ei botón de
funcionamiento en descanso.
Aprox. aumento de G.S^C
y} 0-1 hora
Luego de aprox, 8 horas
después de empezar a
1 hora
Función de conmutación
de descanso se activa.
funcionar en modo de
dormir, se detiene
automáticamente.
Hora
►
35
Page 37
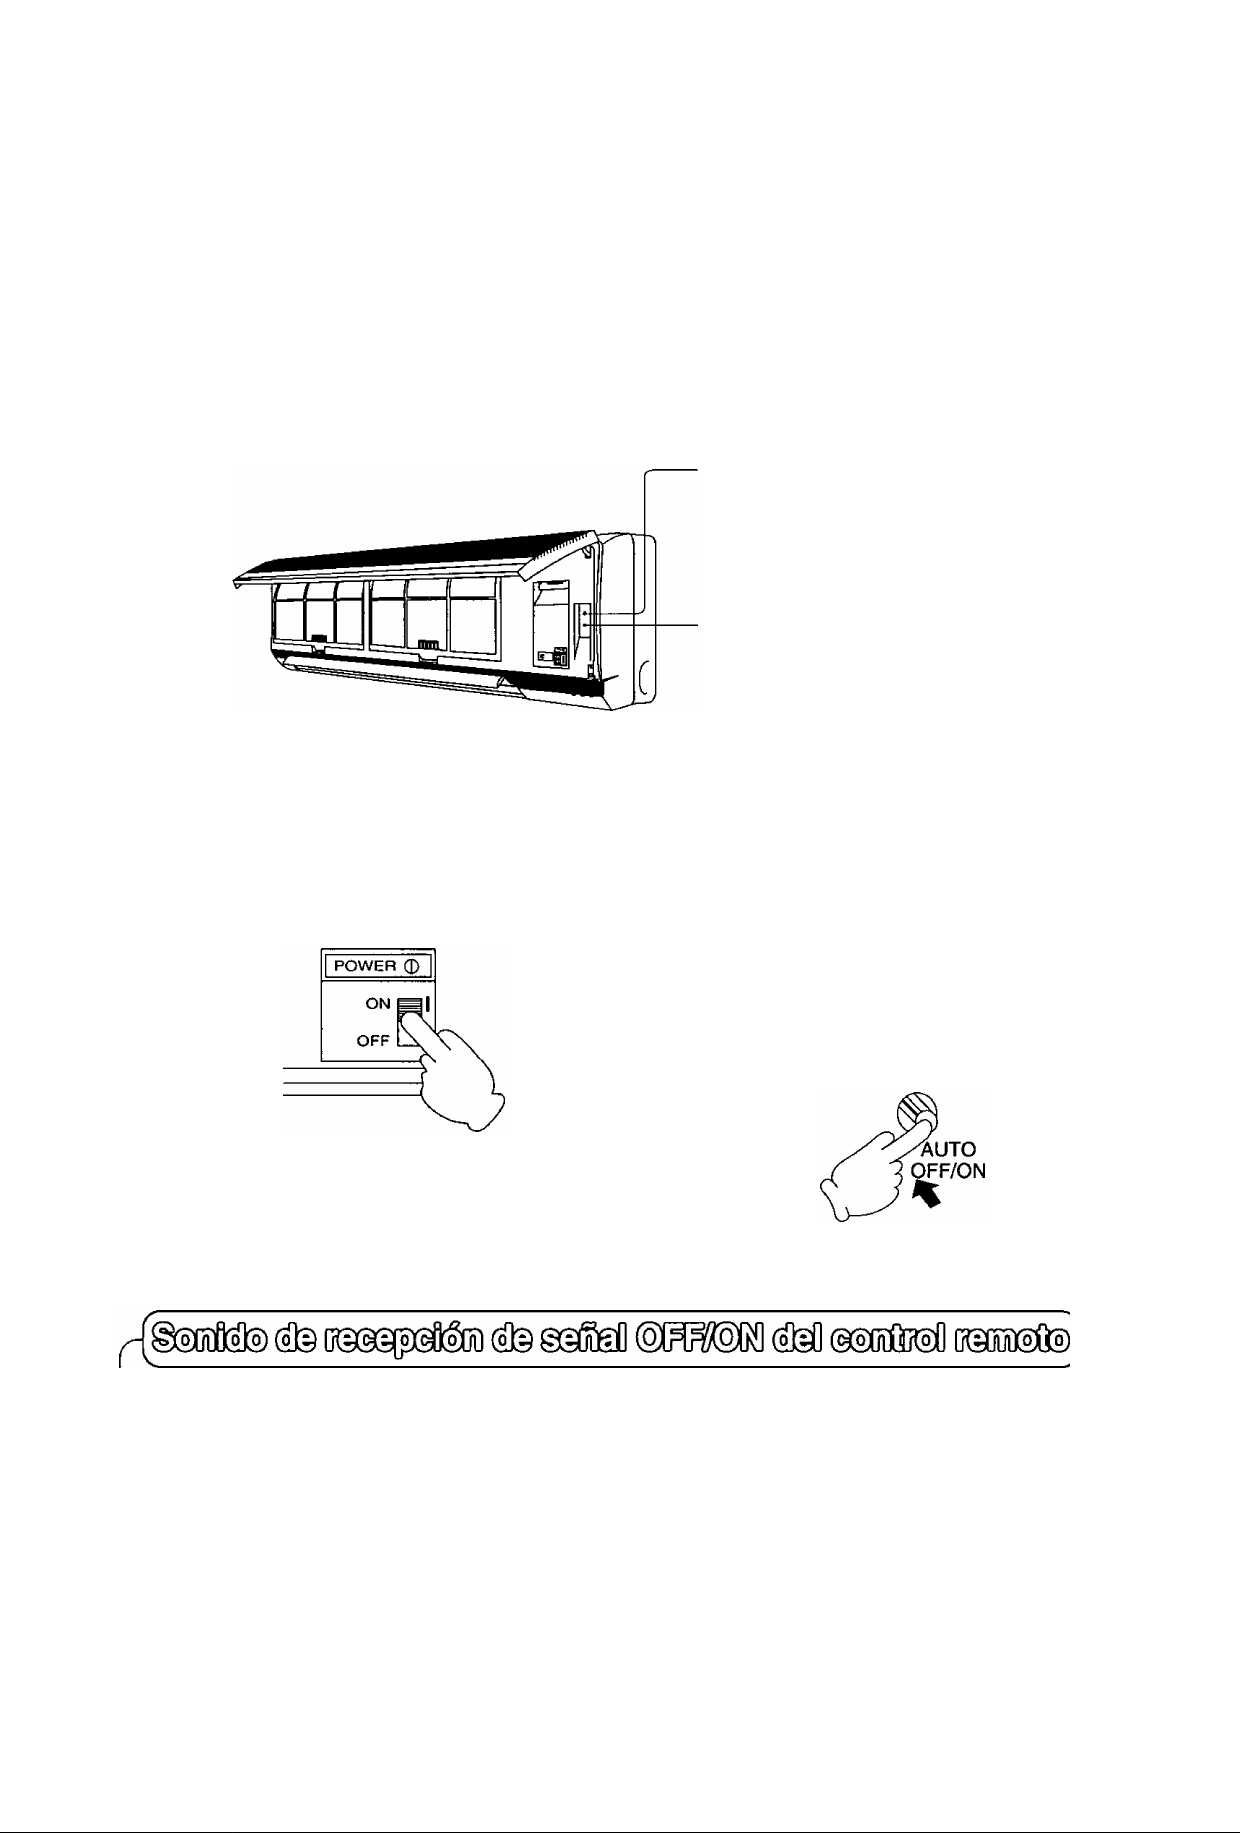
(Ml 1^^ ']
Para ajustar funcionamiento automático.
Botón de Prueba de Enfriamiento.
(Utilízese al instalar y movilizar)
Botón de Funcionamiento Auto
mático.
■ Cuando el control remoto no puede
ser utilizado, presione el botón de
funcionamiento automático para activar
la función automático.
(El ajuste de la dirección del flujo de!
aíre será automático.)
-----------------------------------------------------------
\
■ Confirme que el Interruptor principal se
encuentra en “I” (ENCENDIDO).
Presione el botón de Funcionamiento Automático.
(La lámpara de indicación de funcionamiento
parpadeará por 20 segundos, y luego se
encenderá)
• Sí el botón es presionado una vez más, el
acondicionador de aire se desactivará.
(La lámpara de indicación de funciona
miento se apagará.)
El sonido de recepción de Señal del Control Remoto puede ser desactivado a su gusto.
Para desactivar el sonido de recepción de señal, presione el botón de Funcionamiento Automático por 10
segundos. Al mismo tiempo, se activa el Funcionamiento Automático.
(Para encender, volver a apretar el Botón de Funcionamiento Automático durante al menos 10
segundos).
36
◄
Page 38
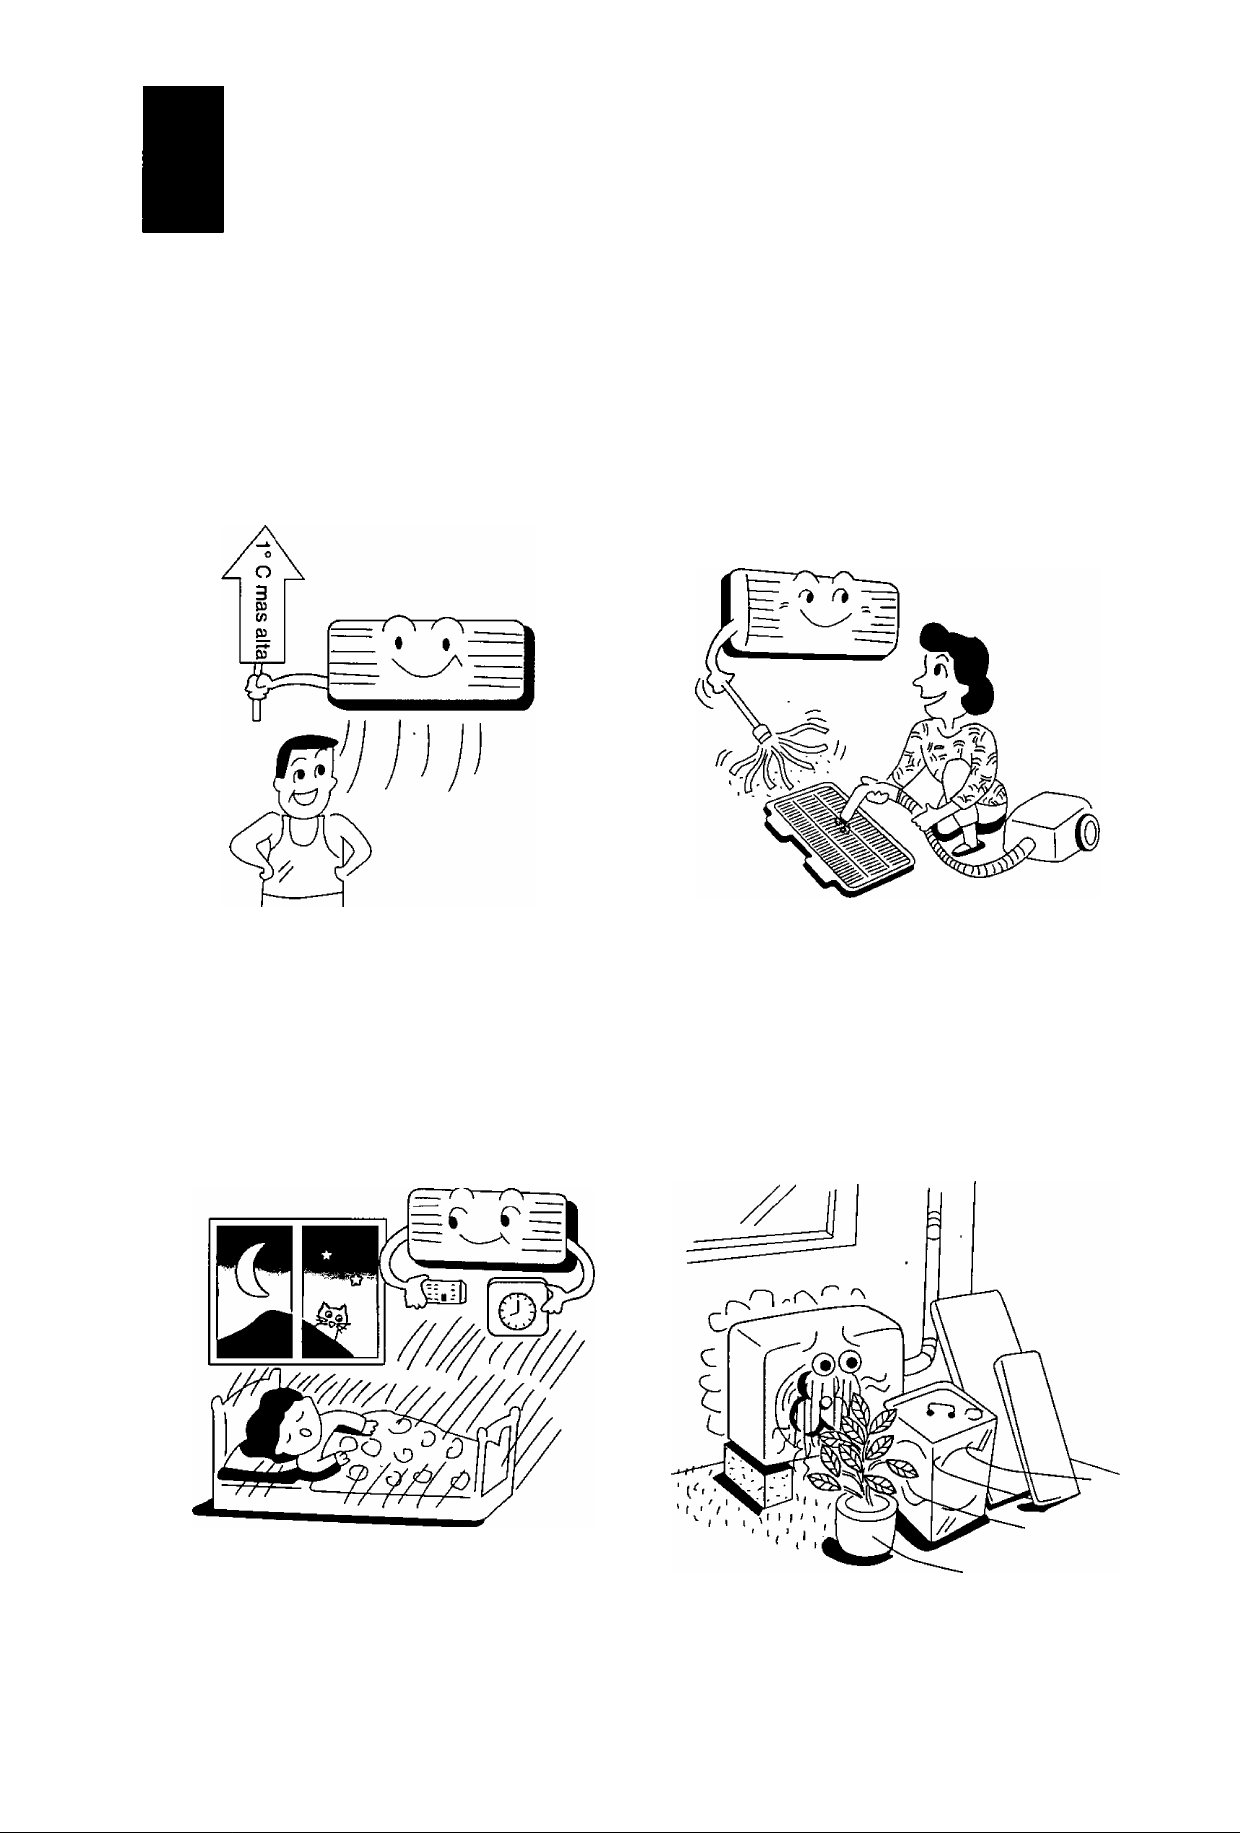
Consejos Para el Funcionamiento
Ajuste la temperatura de la habitación
correctamente. Ajuste la temperatura 1“C
mayor de la realmente deseada.
Aproximadamente 10% de los costos de
eléctricidad pueden ser ahorrados.
Limpie el filtro del aire regularmente. Cualquier
obstrucción en el filtro del aire reducirá el flujo
del aire y disminuirá el enfriado. Limpie por lo
menos una vez cada dos semanas. De otra
forma 6% de electricidad costo de sera
malgastado.
Evite malgastar con el temporizador. Utiliza el
temporizador a! dormir o al salir de su casa
para ahorrar eléctricidad.
No obstruya las salidas de aire en la unidad.
De otra forma, disminuiría la función de
enfriamiento.
►
37
Page 39
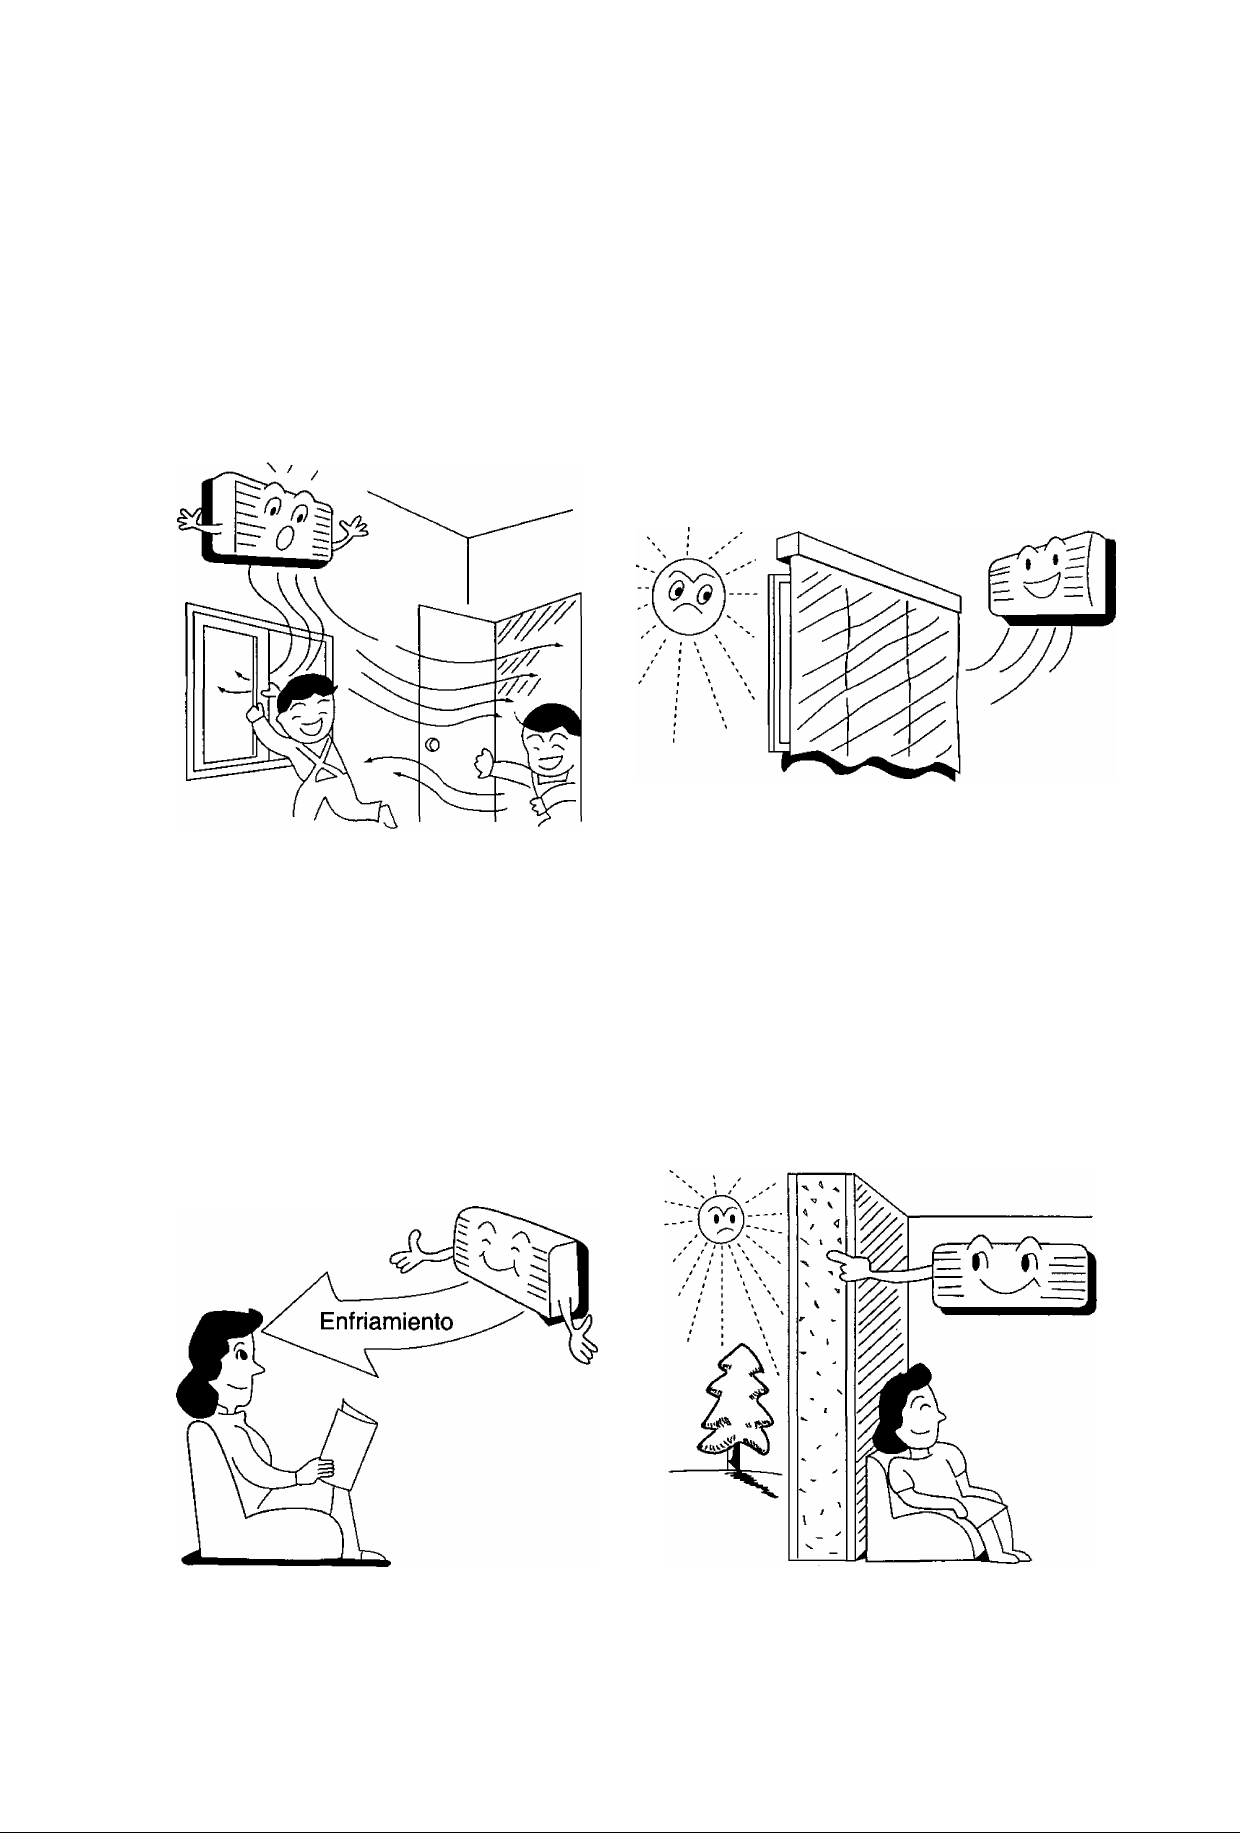
Asegúrese de que las puertas y ventanas esten
cerradas. De otra forma, la función de
enfriamiento será aminorada y el costo de
eléctricidad malgastado.
Mantenga persianas y cortinas cerradas. No
permita que el resplandor del sol entre
directamente a la habitación. 5% de los costos
de eléctricidad pueden ser ahorrados.
Ajuste apropiado de dirección de flujo del aire.
Ajuste las paletas de dirección del flujo del aire
horizontalmente para la función de enfriado el
resultado del funcionamiento serán mejores.
Utilize material aislante para mejor
funcionamiento. Utilize material aislante
durante construcciones o remodelaciones. Le
ayudará a ahorrar costos de eléctricidad.
38
◄
Page 40
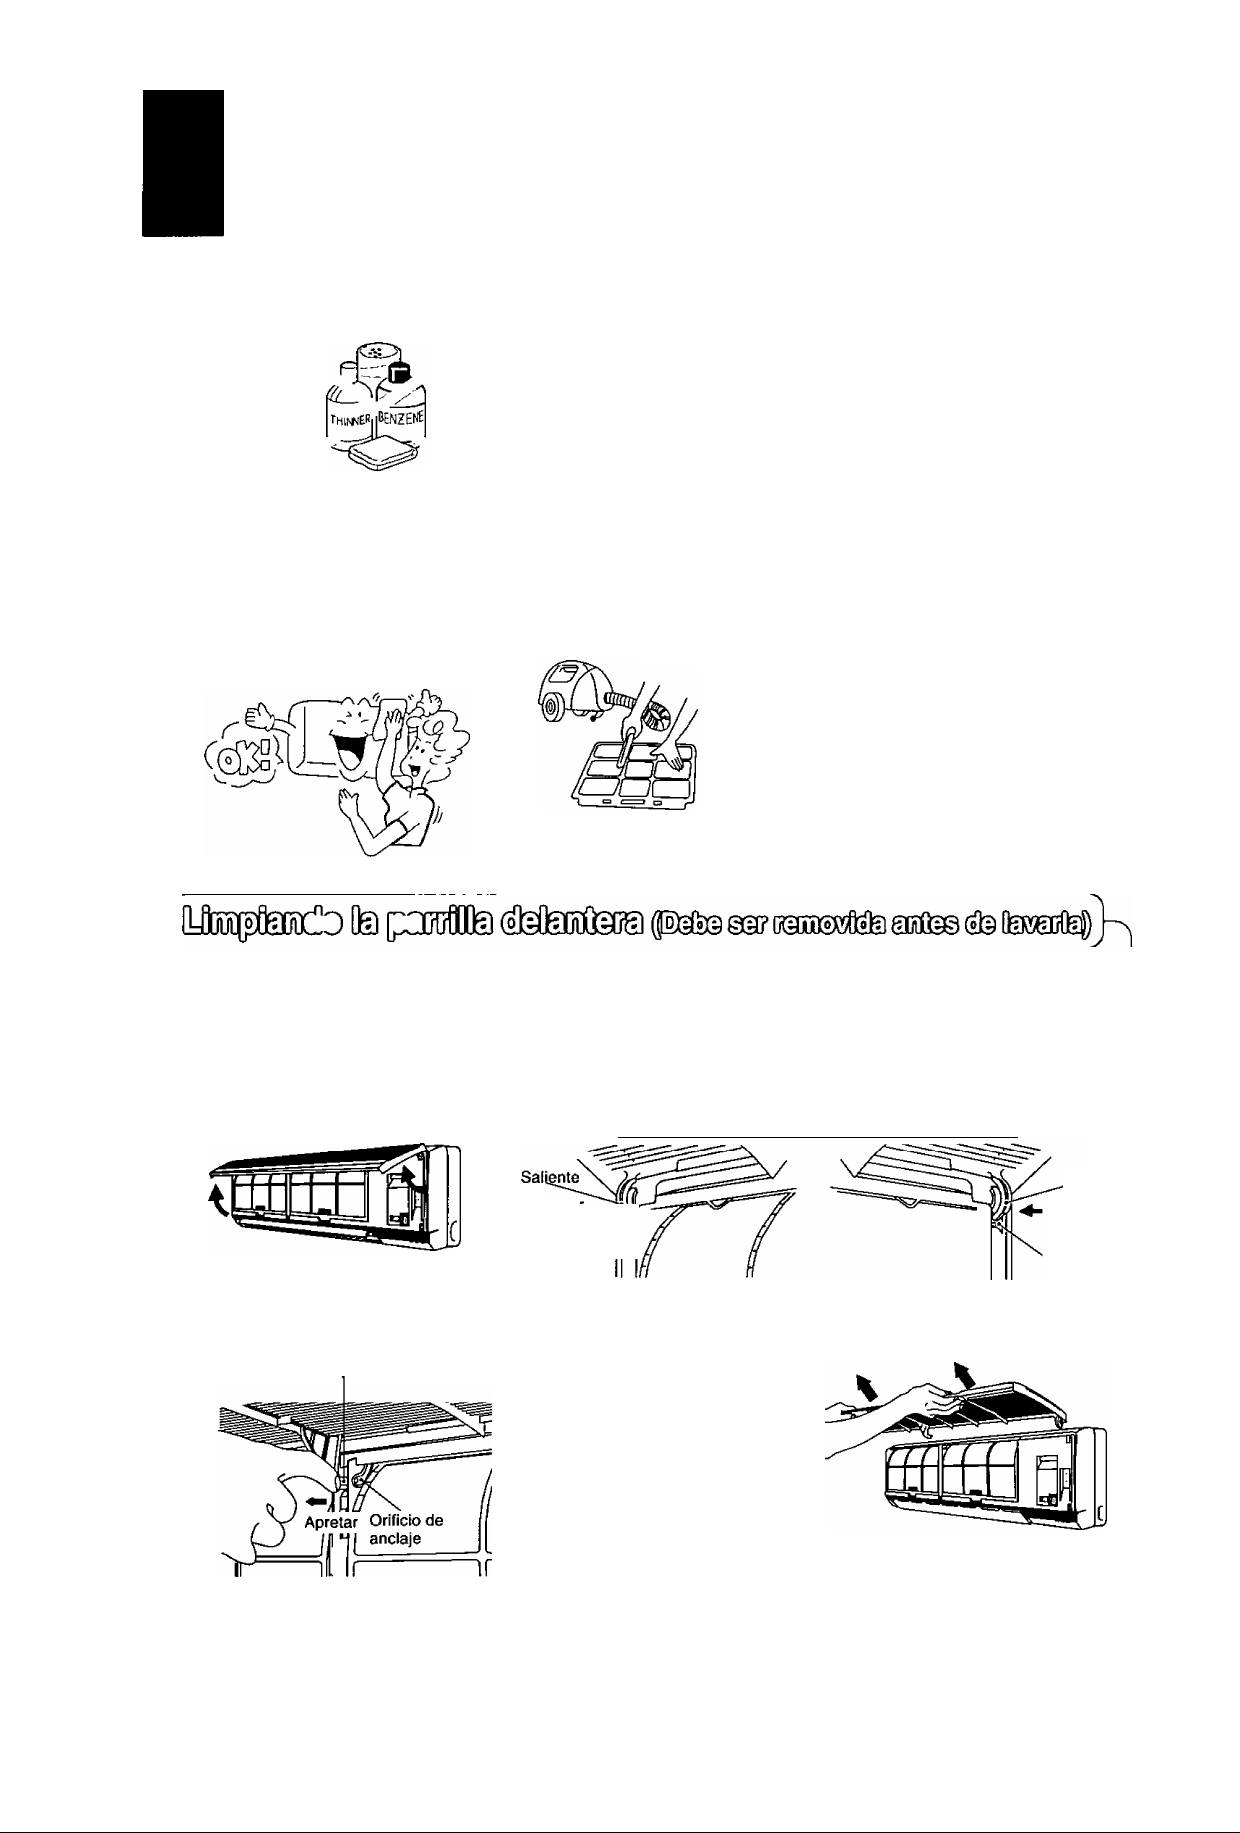
Mejor Cuidado y Mantenimiento
El cuidado y mantenimiento regular extenderá el periodo de vida del acondicionador de aire y evitará el desperdicio de electricidad.
Antes de llevar a cabo cualquier acción de mantenimiento, asegúrese de que el interruptor principal se encuentra en “O” (APAGADO).
Cuidado
[Lto](^ @0 gÜí© ШаШоМоХШХЗ®
Una vez cada 2 semanas es lo recomendable
No utilize agua o líquidos volátiles,
■ No moje el acondicionador de aíre, ya que existe el peligro de
que pueda causar descargas eléctricas.
Asegúrese de no utilizar agua al limpiarlo o en cualquier otro momento.
■ Si se utiliza agua sobre los 40 grados C podria ocasionar deformación
y/o decdoración.
■ Liquidos volatiles tales como diluyante o benzina podria ocasionar
graves daños al acondicionador de aire.
5
У Os©
■ Limpie el aire acondicionado.
Limpie gentilmente con un trapo
suave y seco.
Limpie los filtros del aire.
■ Para retirar el polvo adherido a los filtros,
utiliza una aspiradora, o lávelos en agua y
sequelos a la sombra.
■ Reinstale los filtros correctamente a la
izquierda y a la derecha, con el lado marcado
[FRONT] hacia el frente.
■ Adquiera los filtros de repuesto de su
distribuidor de aire acondicionado si los
filtros de aire se han dañado.
Filtro del Aire no. CWD00231 (derecho)
CWD00232 (izquierdo)
0[0 o к
Para limpiar la parrilla delantera, lávela suavemente con una esponja. Séquela o déjela a la sombra.
IMPORTANTE: • Sacar la parrilla delantera o colocarla sin soltar el eje puede dañar el propio eje.
• Tenga cuidado de no dejar caer la parrilla delantera.
Para retirar la parrilla delantera.
1. Levantar la parrilla
delantera.
3. Liberar el eje del orificio
de anclaje.
Eie
2. Sacar uno de los fulcros de su canalete.
Lateral Izquierdo Lateral derecho
Aoretai ^
hacia la
derecha
Canelete
4. Repetir el paso 2 para
sacar el otro fulcro de su
canalete.
/ La ilustración es la \
\misma que la anterior/
5. Sacar el panel delantero.
^líente
Apretar
'hacia la
izquierda
Canelele
►
Para colocar el panel frontal, siga exactamente el procedimiento contrario al seguido anteriormente.
39
Page 41
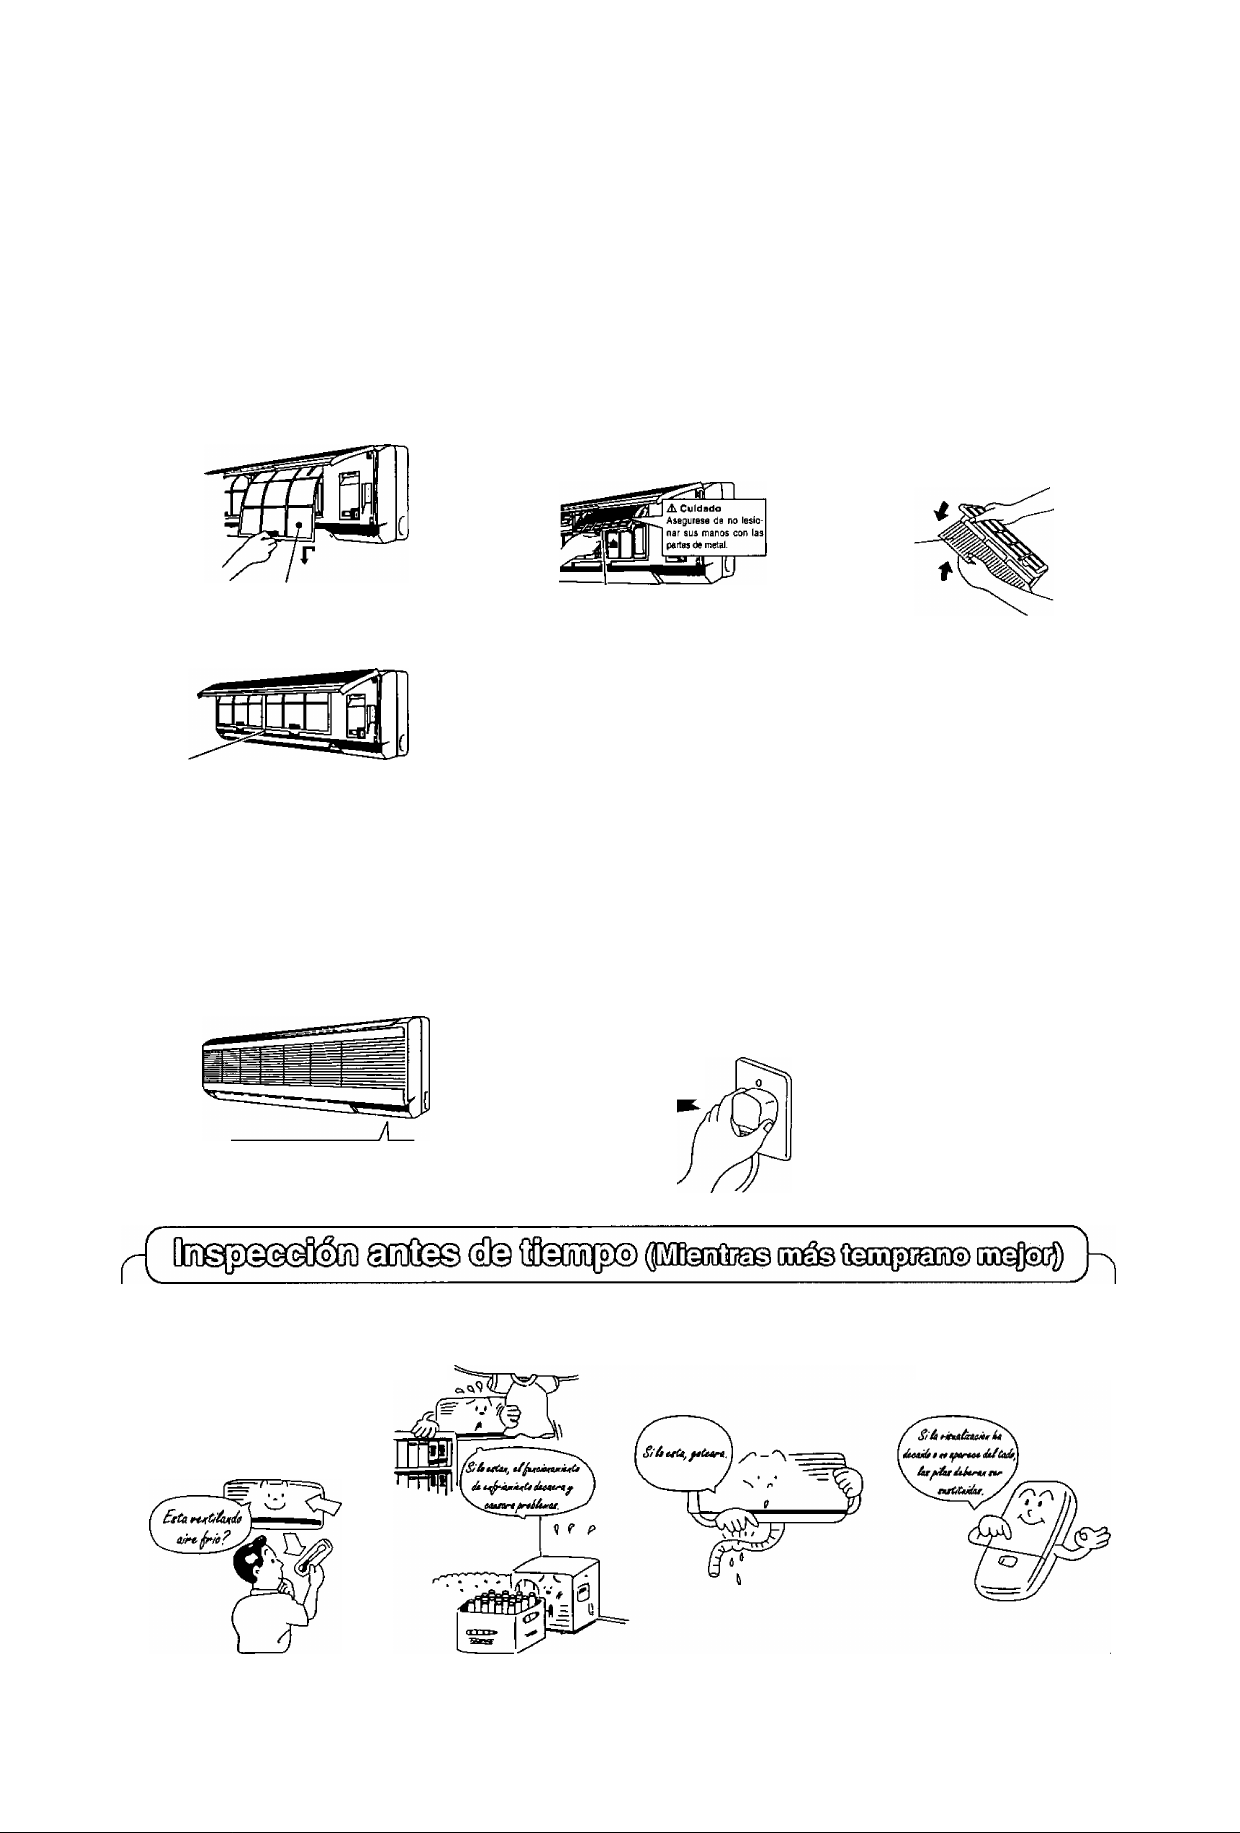
г
Recomendable casi una vez cada 3 meses.
Retire los filtros del aire.
1
Filtro del Aire
<Nota>
Color de muestra
Haga funcionar el acondi
cionador de aire de 2 a 3
horas.
1
■ Tipo de función; Ventilador.
Con el proposito de
secar los mecanismos
internos.
Retire los Filtros
Purificadores del Aire.
2
Filtro Puriíicador de Aire
Si los Filtros de Purificación de Aire cambian a igual color que
el color de muestra adherido a la unidad interior durante un
periodo de tres meses, sustituya los filtros.
Reinstale los filtros correctamente a la izquierda y a la derecha,
con el lado marcado [FRONT] hacia el frente.
Los filtros cubiertos de polvo no pueden ser reutilizados, ni aunque
se limpien y laven.
Compre los repuestos de sus filtros a su distribuidor de acondicionadores
de aire.
Numero de la pieza para Filtros de Purificación del Aire: CZ-SF5N
Para acondicionadores de
aire con un enchufe,
desactive la función y tire
2
del enchufe.
Nota; Sí la unidad no es
desactivada por control remoto,
la unidad funcionará a la
misma vez cuando se ^
enchufe {ya que un
Control de Auto
reactivación es
suministrado).
Retire los filtros de la
estructura del filtro.
3
Filtros
Retire las pilas del con
trol remoto.
3
В
Manéjelo por 15
minutos.
Si la diferencia en tem
peratura entre la venta
nilla de salida de aire y la
ventanilla de entrada de
aire es 8“C o mas al
enfriar, la unidad esta en
buenas condiciones.
Se encuentran las
ventanillas de salida y
entrada de aire obstrui
das?
Está rajada o rota la
manguera de drenaje?
Se encuentran las
pilas del control
remoto en buenas
condiciones?
40
◄
Page 42
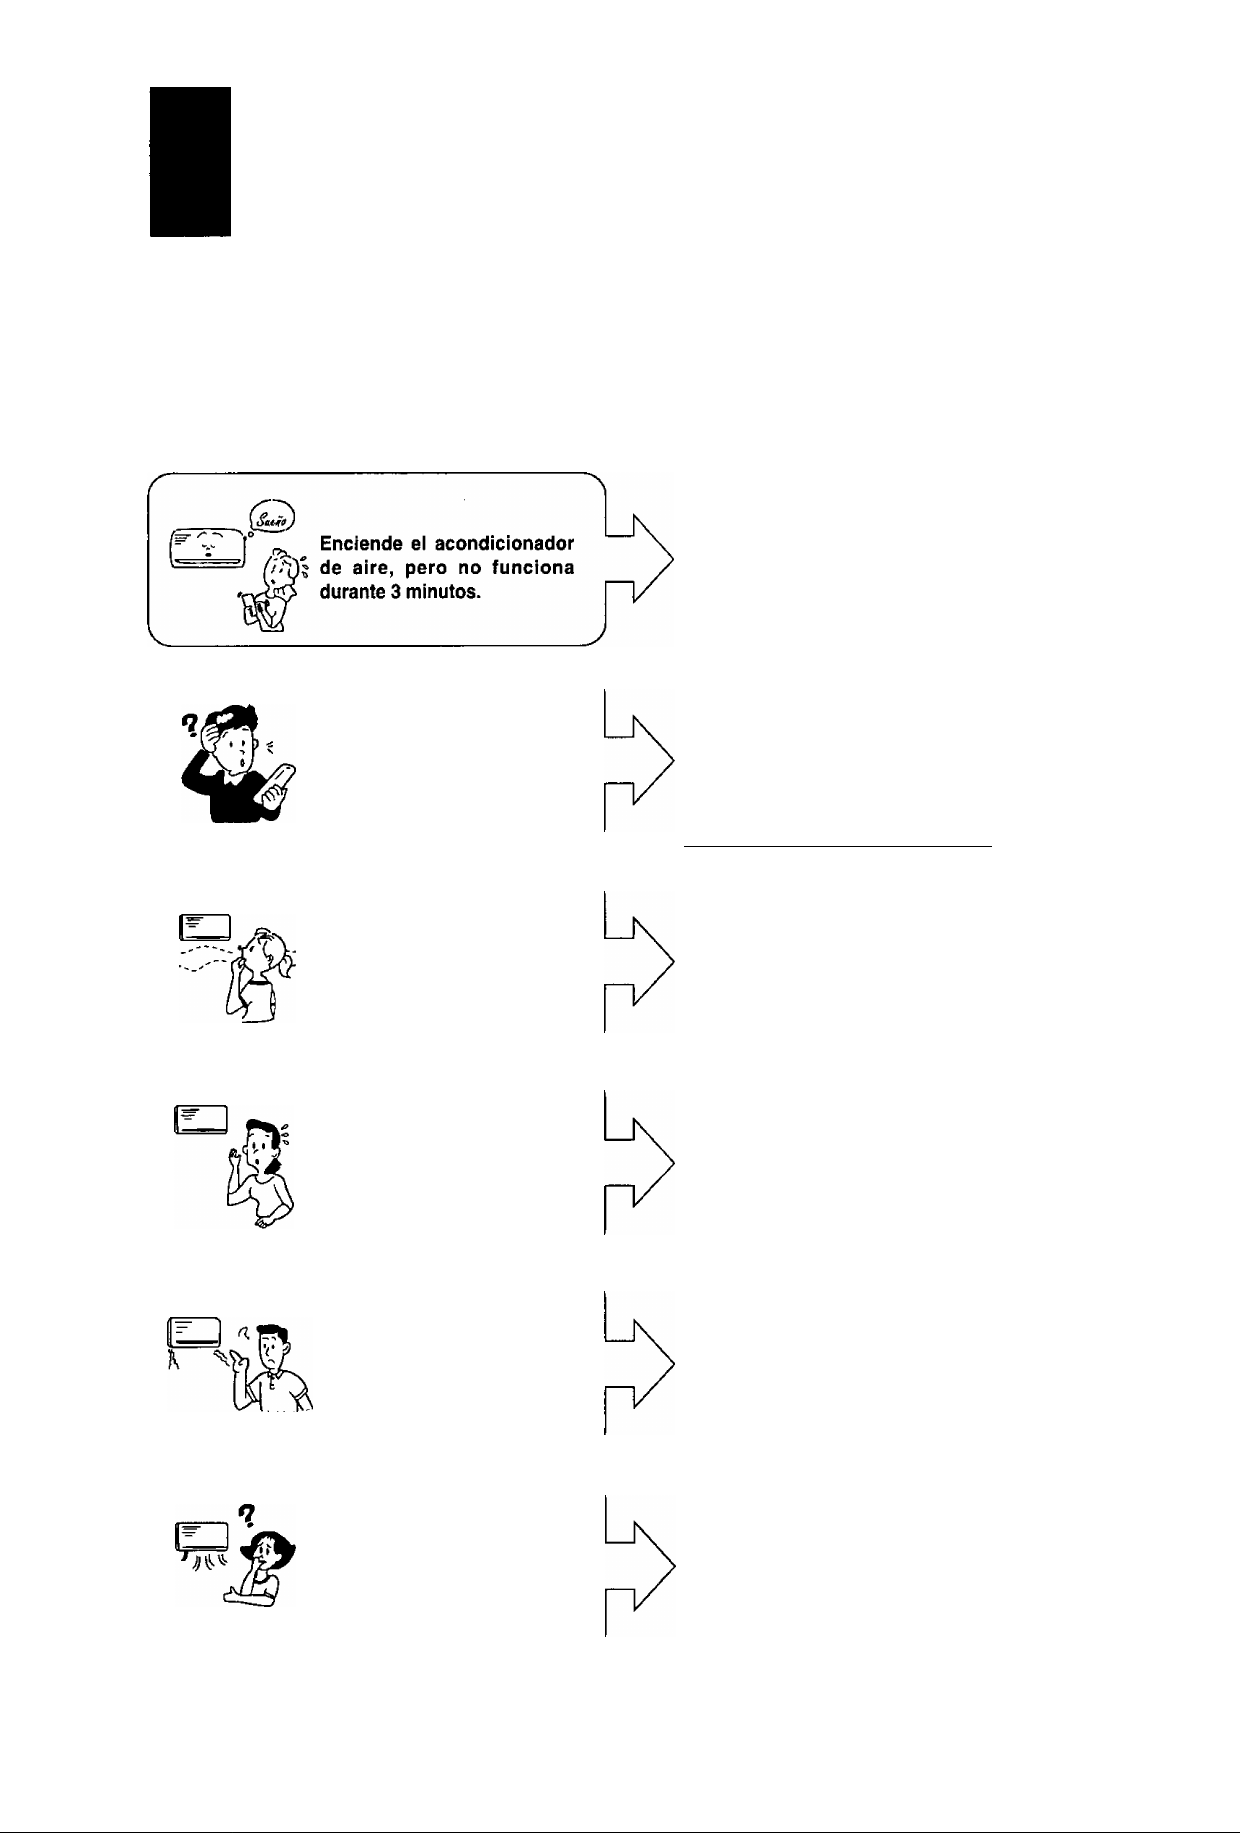
Lanzamiento de Problema
C
Ocurre esto?
El acondicionador de aire
deja de funcionar durante
el Modo de Deshumidificación Moderada.
ШХ5(Ж^
Esta es la respuesta.
Esto es para proteger el acondicionador de
aire. Espere a que el acondicionador de aire
comience a funcionar.
El funcionamiento en el modo de deshumidicacion moderada consiste prin- cipalmente
en reducir la humedad de la habitación. El
acondicionador de aire deja de funcionar por
periodos de hasta 6 minutos para no enfriar demasiado.
Si la temperatura de la habitación sube
V nuevamente, vuelve a funcionar.___________
J
La habitación tiene un olor
peculiar.
Se escucha un sonido
como de agua corriendo.
Pareciera que sale neblina
del acondicionador de aire.
Este puede ser un olor a humedad que
proviene de las paredas, alfombra, mobiliario
o ropa en la habitación.
J
Este puede ser un olor a humedad que
proviene de las paredas, alfombra, mobiliario
o ropa en la habitación.
La condensación ser da cuando el flujo del
aire del acondicionador de aire enfría el aire
de la habitación.
►
41
Durante el ajuste del Flujo
Automático de Aire, el
abanico interior se suele
parar.
Es para eliminar el olor circundante.
Page 43
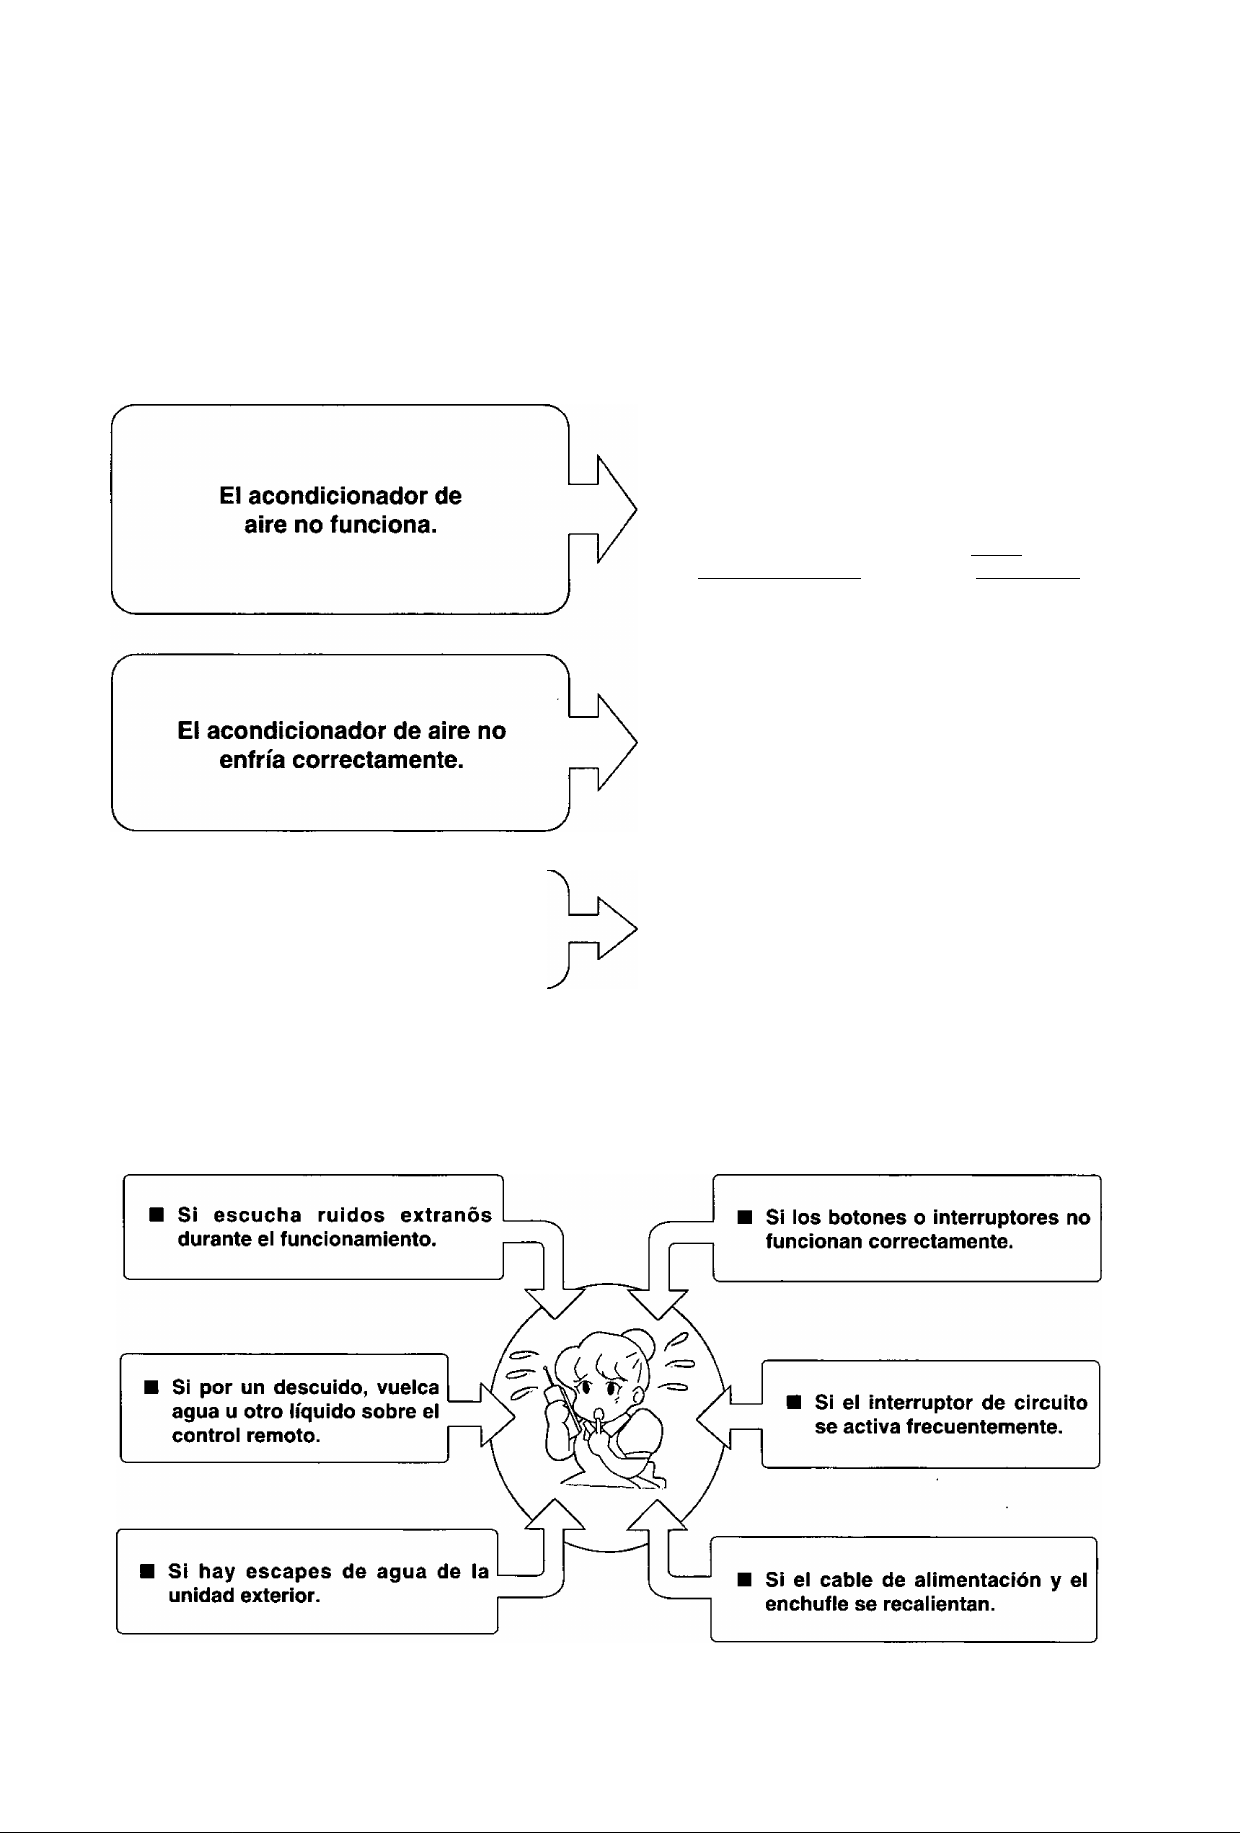
RlQOOS0®ñSiDD0^^
Se ha abierto un interruptor de circuito?
El enchufe está bien enchufado en el
tomacorriente?
El interruptor principal está en la posición
“O” (APAGADO)?
Usa correctamente el temporizador?
Ha cambiado el interruptor del (CONTROL
REMOTO B ^ A)a la posición “B”?
Ha fijado la temperatura correctamente?
Los filtros están sucios?
Está la entrada o salida de aire obstruida?
Están todas las ventanas y puertas bien
cerradas?
_____
Funcionamiento del acondiciona
dor de aire ruido muy alto.
Está inclinado el trabajo de instalación?
Está cerrada debidamente la parrilla
delantera?
( ©SffiMñlQí°|0O[g@© ®5X]D @0 )
Si una de las siguientes cosas sucede, desconecte inmediatamente e! interruptor principal “O” (APAGADO) y
desenchufe.
42
◄
Page 44

ADVERTENCIA
A
1) Este aparato debe estar conectado a tierra.
2) Si el cable de alimentación esta dañado, se debe reemplazar por un cable especial que se puede
obtener en un centro de servicio/repuestos autorizado.
3) Quitar el enchufe de alimentación o desconectar el aparato antes de realizar el mantenimiento.
4) No lo repare usted mismo
En caso que este aparato funcione mal, no lo repare usted mismo. Consulte en la tienda
donde lo compró o en un centro de servicio para que lo reparen.
5) Ruidos aéreos
El nivel de presión de sonido ponderado de este aparato es menor de 70dB (A) bajo las
condiciones de prueba JIS C 9612.
Funcionando al máximo de enfriamiento
A 1 metro del aparato
6) No lo use en un ambiente donde puedan existir gases volátiles
No use este aparato en un ambiente cuya atmósfera pudiera ser explosiva.
7) Desconecte la alimentación (corte del suministro principal de corriente)
Desconecte el enchufe del tomacorriente, desconecte el interuptor de circuito o desconecte
la alimentación desconectando el equipo del suministro principal de alimentación para
evitar accidentes.
PRECAUCION
A
SI EL ACONDICIONADOR DE AIRE ESTÁ CONECTADO A LA RED MEDIANTE UN
ENCHUFE, DESCONECTE EL ENCHUFE DEL TOMACORRIENTE CUANDO NO USE EL
ACONDICIONADOR DE AIRE.
IMPORTANTE
Los hilos del cable de alimentación han sido coloreados según el código siguiente:
Verde y amarillo
Azul
Marrón
Dado que los colores de los hitos en el cable de alimentación de este aparato puede que
no se correspondan con las marcas de color que identifican los terminales de su enchufe, conéctelos
de la forma siguiente:
El hilo de color verde y amarillo debe conectarse al terminal del enchufe que está marcado
con la letra E o, con el símbolo © de toma a tierra, o bien con el color verde o verde y amarillo.
El hilo de color azul debe conectarse al terminal que está marcado con la letra N o que está
coloreado de negro.
El hilo de color marrón debe conectarse al terminal que está marcado con la letra L o que está
coloreado en rojo.
Tierra
Neutro
Con corriente
►
43
Page 45

Anmerkung
Bitte notieren Sie die folgenden Daten:
• Modellnummer
Seriennummer
Händler
• Kaufedatum
44
◄
Page 46

Page 47

Page 48

F561637
Matsushita Electric Industrial Co., Ltd.
Osaka 542-8588, Japan
Printed in Malaysia
IP9811-0 I
 Loading...