

Panasonic CS-D24DTQ6, CU-D24DBQ6, CS-D28DTQ6, CU-D28DBQ6, CS-D34DTQ Operating Instructions Manual
...
Manufactured by:
Panasonic HA Air-Conditioning (M) Sdn. Bhd.
Lot 2, Persiaran Tengku Ampuan, Section 21, Shah Alam Industrial Site,
40300 Shah Alam, Selangor, Malaysia.
ENGLISH Before operating the unit, read these operating instructions thoroughly and keep them for future reference. 2 ~ 13
ESPAÑOL Antes de utilizar la unidad, sírvase leer atentamente estas instrucciones de funcionamiento y conservarlas
como futuro elemento de consulta. 14 ~ 25
PORTUGUÊS Antes de ligar a unidade, leia cuidadosamente este manual de utilização e guarde-o para futura referência. 26 ~ 37
© 2005 Panasonic HA Air-Conditioning (M) Sdn Bhd
(11969-T). All rights reserved. Unauthorized copying
and distribution is a violation of law.
F565221
Operating Instructions
Air Conditioner
CS-D24DTQ6 CU-D24DBQ6
CS-D28DTQ6 CU-D28DBQ6
CS-D34DTQ CU-D34DBQ7
CS-D43DTQ CU-D43DBQ7
CS-D50DTQ CU-D50DBQ7
2
To prevent personal injury,
injury to others, or property
damage, please observe
the following.
Incorrect operation due to
failure to follow instructions
may cause harm or damage,
the seriousness of which is
classifi ed as below:
■ Definition
This sign warns of death
or serious injury.
Warning
This sign warns of injury
or damage to property.
Caution
The instructions to be
followed are classifi ed by
the following symbols:
This symbol denotes
an action that is
PROHIBITED.
These symbols denote
actions that are
COMPULSORY.
Thank you for purchasing Panasonic Air Conditioner
SAFETY PRECAUTIONS
Caution
• Aerate the room regularly.
• After long periods of use, make sure the installation rack is not damaged.
• Use the specifi ed supply cord.
• If the supply cord is damaged, it must be
replaced by the manufacturer, its service
agent or similarly qualifi ed persons in
order to avoid a hazard.
• Remove the batteries if the unit is not
going to be used for a long period of
time.
• New batteries of the same type must
be inserted following the polarity stated
to prevent malfunction of the remote
control.
• In case of emergency or abnormal
conditions (burning, unusual odour, etc),
turn off the power supply.
Warning
During Installation
During Installation
• Do not share the same power outlet with
other equipment.
• Do not modify power cords.
• Do not use extension cords.
• Do not operate with wet hands.
• Do not insert your fi ngers or other objects
into the indoor or outdoor unit.
• Do not attempt to repair the unit by
yourself.
• Do not use rechargeable (Ni-Cd) batteries.
• Keep the remote control away from infants
and small children to prevent them from
accidentally swallowing the batteries.
• Do not install, remove and reinstall the unit by yourself; improper installation will cause leakage, electric
shock or fi re. Please consult an authorized dealer or specialist for the installation work.
• This equipment must be earthed and installed with ELCB. It may cause electrical shock or fi re in case of
malfunction
During Operation
During Operation
• Switch off the power supply before
cleaning or servicing.
• Turn off the power supply if the unit is not
used for a long period of time.
• This air conditioner is equipped with a
built-in surge protective device.
However, in order to further protect your
air conditioner from being damaged by
abnormally strong lightning activity, you
may want to disconnect it from the power
supply. Do not touch the air conditioner
during lightning, it may cause electric
shock.
• Do not wash the unit with water, benzene,
thinner or scouring powder.
• Do not use for other purposes such as
preservation of food.
• Do not use any combustible equipment in
front of the airfl ow outlet.
• Do not sit or place anything on the indoor
or outdoor unit.
• Do not expose directly to cold air for a
long period.
• Ensure that the drainage pipe is connected properly. Otherwise, leakage may occur.
• Do not install the unit in a potentially explosive atmosphere.
During Installation
During Installation
During Operation
During Operation
TABLE OF CONTENT
SAFETY PRECAUTIONS .......................................................................................................................2
REGULATORY INFORMATION .............................................................................................................3
PRODUCT OVERVIEW .................................................................................................................. 4 ~ 5
AUTO, FAN, COOL, DRY ................................................................................................................ 6 ~ 7
FAN SPEED, AIR SWING ......................................................................................................................8
ECONOMY, ODOUR WASH ..................................................................................................................9
DAILY TIMER .......................................................................................................................................10
WEEKLY TIMER ...................................................................................................................................11
CARE & CLEANING .................................................................................................................... 12 ~ 13

3
ENGLISH
REGULATORY INFORMATION
■ Operation Condition
Note:
The illustrations in this manual
are for explanation purposes only and
may differ from the actual unit. It is
subjected to change without notice for
future improvement.
Battery Disposal
The batteries must be recycled or disposed of properly.
“Instructions for end-user” for air conditioners:
Information on Disposal in other countries outside the European Union
This symbol is only valid in the European Union. If you wish to discard this product, please contact
your installer, dealer or local authority and ask for the correct method of disposal.
EEnvironmental Requirements
nvironmental Requirements
End-of-Life Disposal
End-of-Life Disposal
The appliance is not intended for use by young children or the infi rm person without supervision.
Young children should be supervised to ensure that they do not play with the appliance.
Cooling Operation
• Indoor temperature range
21°C ~ 32°C.
• Outside air temperature range from
5°C ~ 43°C.
4
PRODUCT OVERVIEW
■ About
• To operate the unit if the wireless
remote control is misplaced or
malfunctioning.
Auto OFF/ON Button
Action Mode
Press once. Auto
Press and hold until
you hear one beep,
then release.
Cooling
• To turn off, press the Auto OFF/ON
button again.
Address Setting - Wireless Remote Control
● To avoid unintentional operation, you can assign a different address to each indoor unit.
* Use a sharp end object to press this button.
Notes:
• By default, ADDRESS 1 is selected. You do not need to change
this setting for normal operation.
• If the address is set to GROUP, more than one indoor unit can
be operated at the same time.
Address 1
Address 2
Group
Address 3
* Press repeatedly to select your
desired address setting.
3%42%3%4 !$$2%33
4)-%2
3%4
#!.#%,
3%,%#4
#,/#+
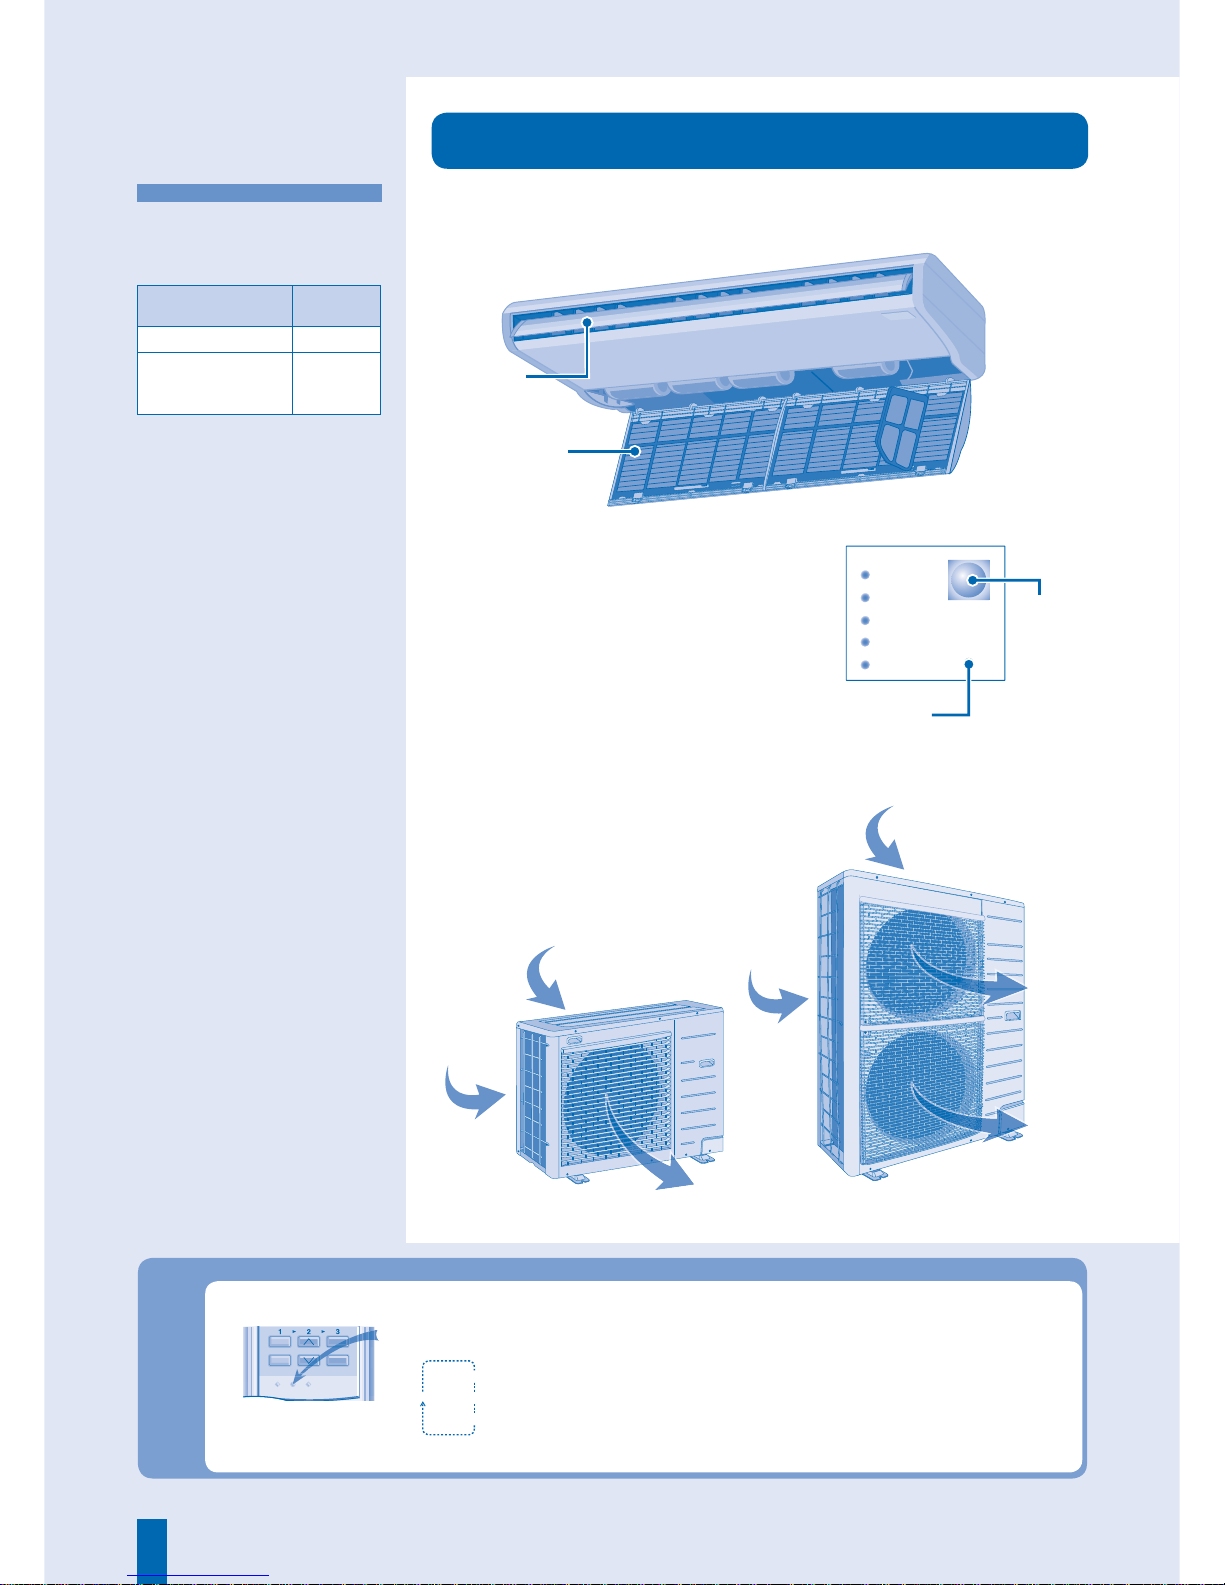
Indoor Unit
Indoor Unit
Outdoor Unit
Outdoor Unit
Air inlet (rear)
Air outlet
Air inlet
(rear)
Air inlet
(side)
Air
outlet
Air inlet
(side)
Air
outlet
Control Panel for
Wireless remote control
POWER
TIMER
FILTER
ECONOMY
AUTO
ODOUR WASH
Auto OFF/ON
button
Ray
receiver
Air filter
Airflow
direction
louver
5
ENGLISH
MODE
SELECT
SET
CANCEL
UP
DOWN
Notes:
• Make sure multiple buttons are not pressed simultaneously.
• For normal operation, those buttons marked with * are unnecessary. If
these buttons are pressed accidentally, press the same button again to
cancel.
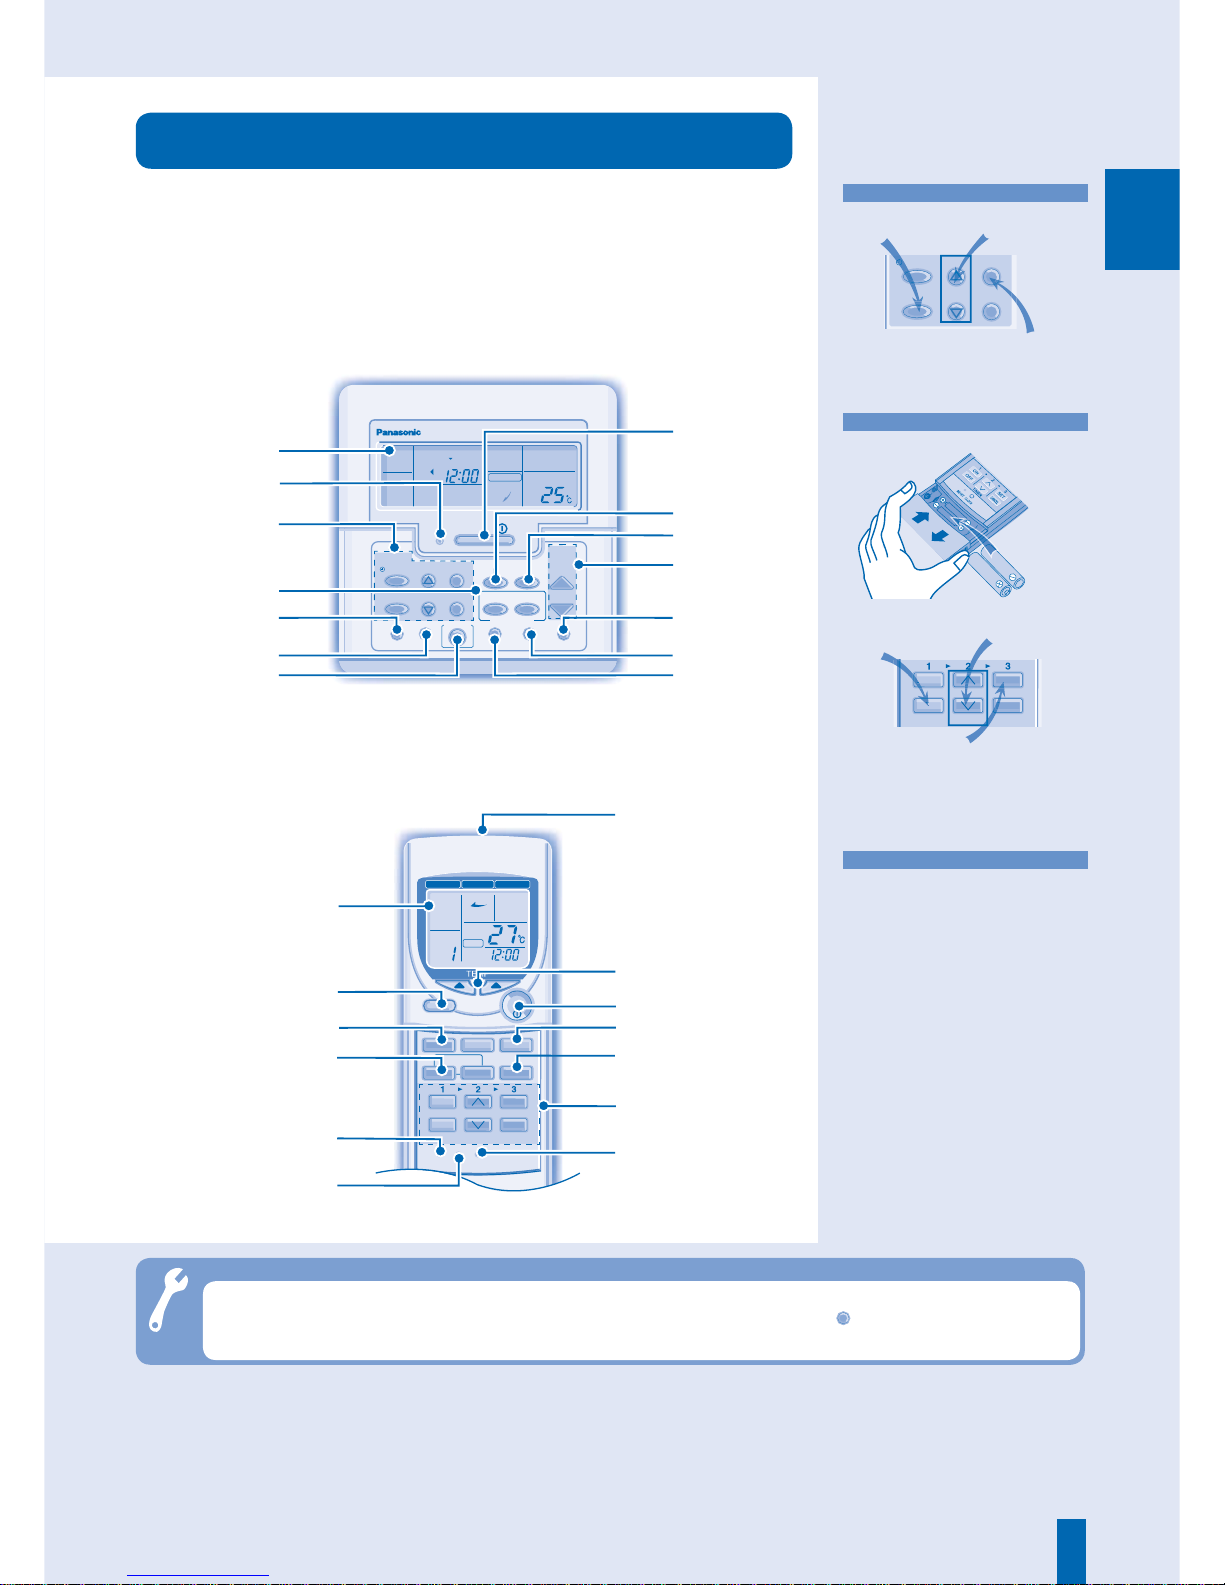
PRODUCT OVERVIEW
Wireless Remote Control
Wir eless Remote Control
!$$2%33
!54/!54/
4)-%2
/.
3%42%3%4 !$$2%33
-/$%
-/$%
!)237).'
&!.30%%$
!)237).'
4)-%2
/&&/.
3%4
#!.#%,
3%,%#4
#,/#+
&!.30%%$
&),4%22%3%4
-!.5!,
/$/527!3(
-/$%
!54/
%#/./-9
CZ-RL013T
Troubleshooting - Check Display on Wired Remote Control
● If the CHECK indicator fl ashes on the wired remote
control.
► Turn off the unit.
► Turn on again after 3 minutes.
► If CHECK continues to blink, press
CHECK
for error messages. If problem
persist, please consult your nearest authorized dealer.
Transmitter
Wired Remote Control
Wir ed Remote Control
CZ-RD513C
CHECK ODOUR WASH VENTILATION TEST RUN FILTER RESET
TEMP/
A/C No.
UP
DOWN
MODE
SELECT
SET
CANCEL
OFF
/
ON
TIMER/CLOCK
AIR SWING
ECONOMY
AUTO
AUTO
AUTO 123
FAN SPEED
AIR SWING
MON TUE WED THU FRI SAT SUN
ON
UP
DOWN
FAN
SPEED
AUTO
MODE
MANUAL
CZ-RD513C
LCD display
Timer setting
Air flow direction
adjustment
Check
Odour wash
Economy
operation
Off/On
Fan speed
selection
Operation mode
Temperature
setting
Filter reset
*Test run
*Ventilation
operation
Off/On
Filter reset
Fan speed selection
Timer setting
*Advance setting
LCD display
Economy operation
Operation mode
Airflow direction
adjustment
Memory reset
*Address setting
Operation
indicator
Temperature setting
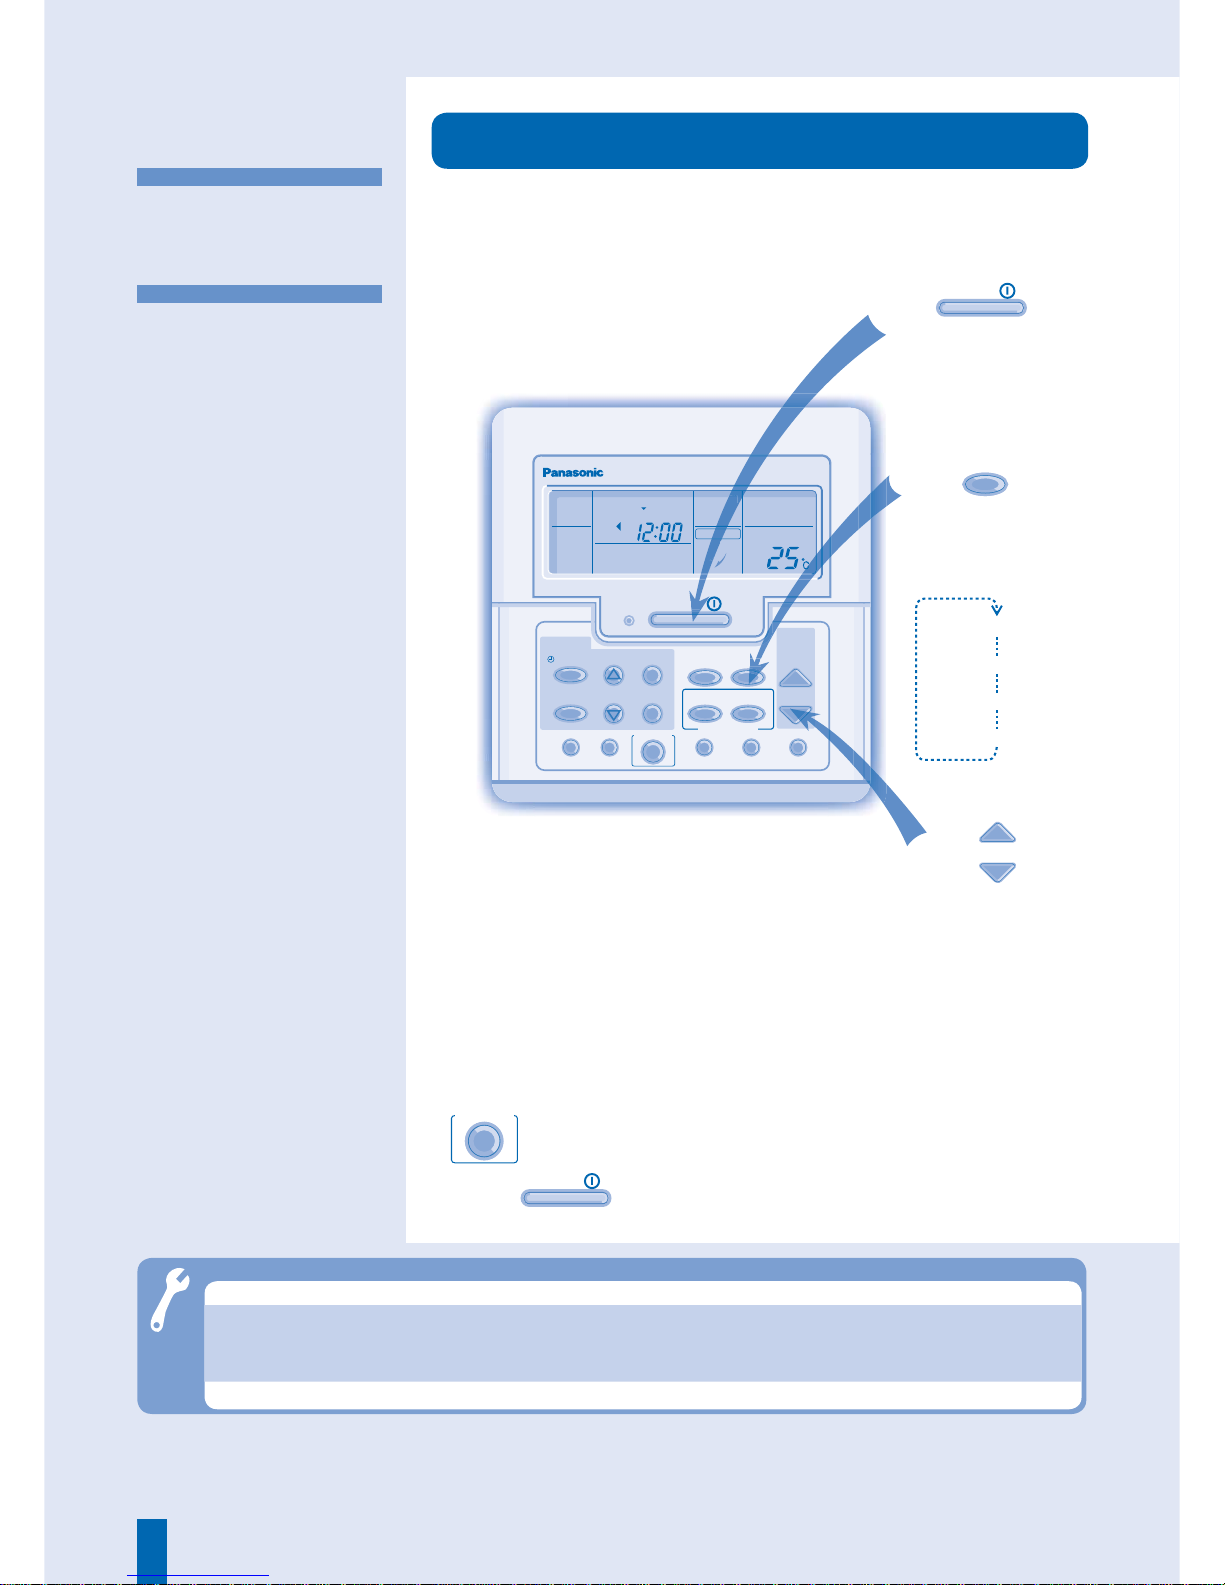
■ Preparations
Wired Remote Control
M
LEC
1. Press
2. Press to set
day.
3. Press to confi rm.
4)-%2
3%4
#!.#%,
3%,%#4
#,/#+
2. Insert
AAA
or R03
batteries.
• The batteries can be used for
approximately 1 year.
Wireless Remote Control
• Make sure the signal is not
obstructed.
• Maximum distance : 8m.
• Certain fluorescent lights may
interfere with signal transmission.
Please consult your nearest
authorized dealer.
Remote Control Signal
4. Press to set
current time.
3
3. Press
1. Press and
pull out.
■ About
4. Repeat steps 2 and 3 to set the
current time.
5. Press to confi rm.
#
6
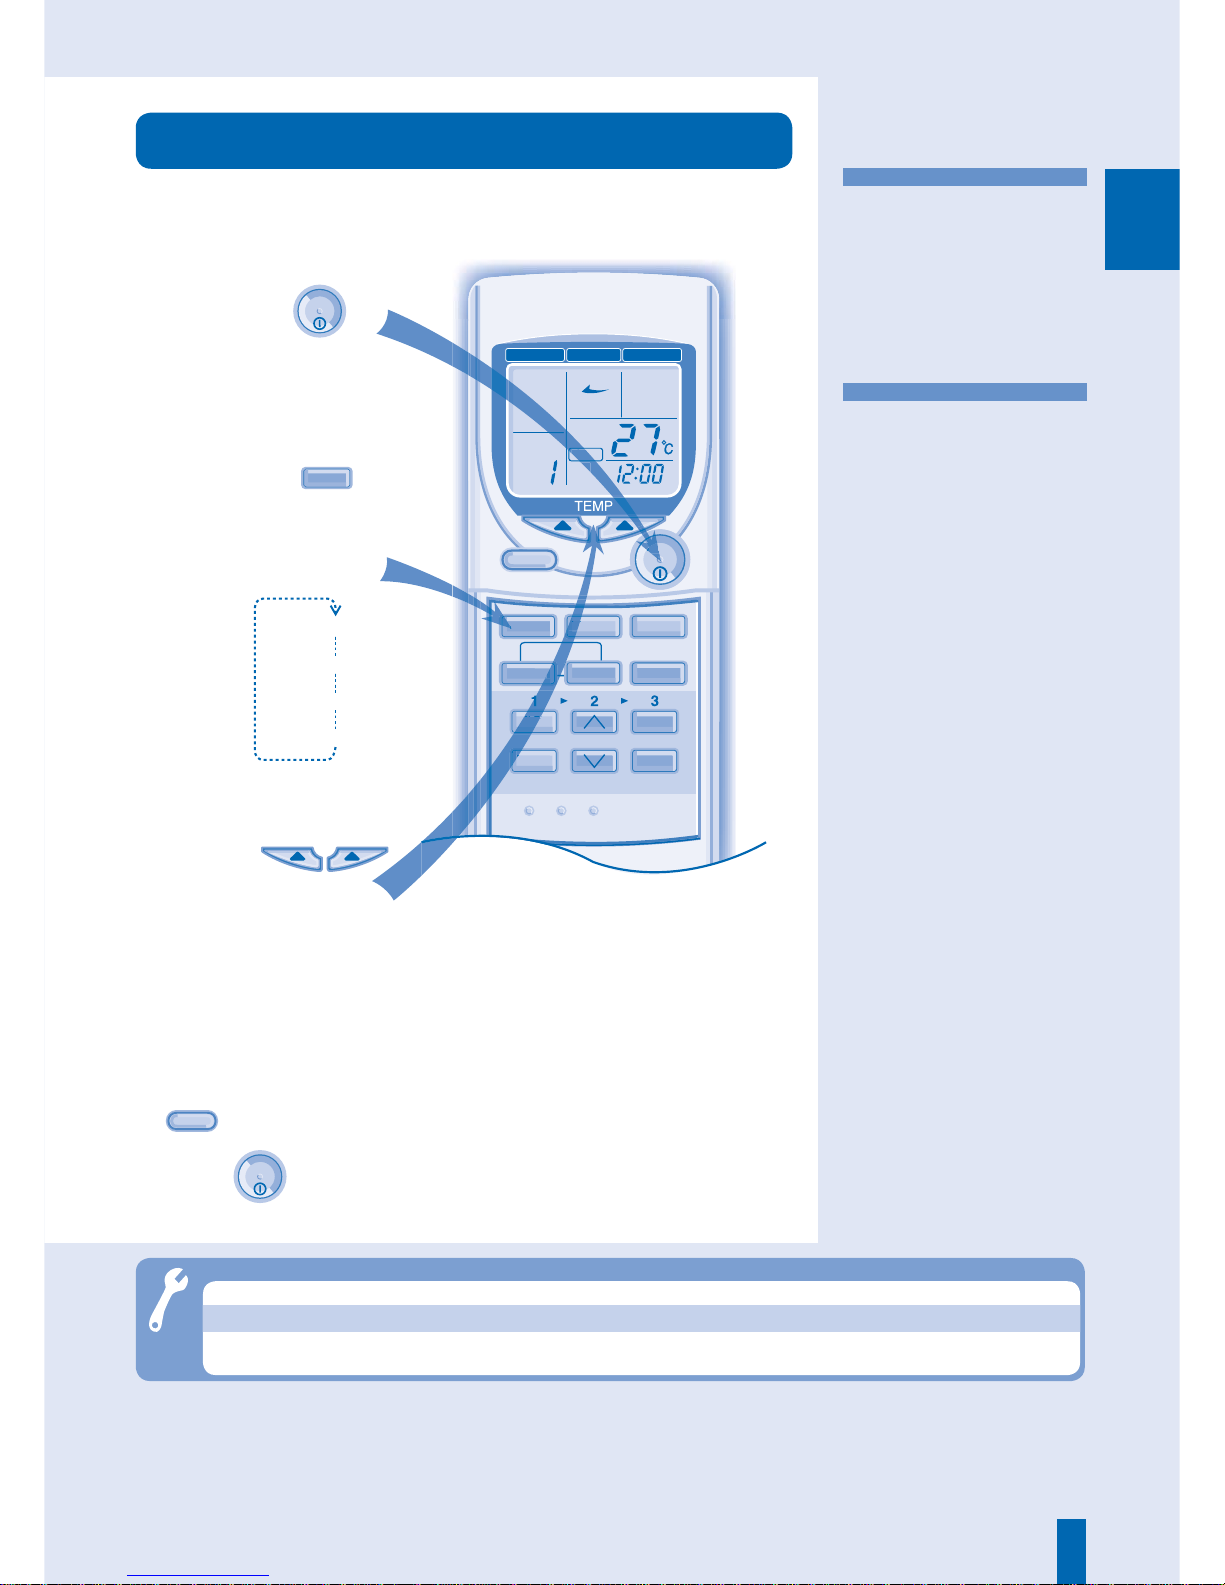
■ Operation Details
• Unit selects the operation mode
according to outdoor temperature,
room temperature and remote
control setting temperature.
AUTO - Automatic Mode
• Enjoy cool air at your desired
temperature.
COOL - Cooling Mode
AUTO, FAN, COOL, DRY
Troubleshooting
●
During Auto, Cooling and Drying modes, you can activate
ECONOMY
operation.
●
Press
OFF
/
ON
to stop the operation.
CHECK ODOUR WASH VENTILATION TEST RUN FILTER RESET
TEMP/
A/C No.
UP
DOWN
MODE
SELECT
SET
CANCEL
OFF
/
ON
TIMER/CLOCK
AIR SWING
ECONOMY
AUTO
AUTO
AUTO 1 23
FAN SPEED
AIR SWING
MON TUE WED THU FRI SAT SUN
ON
UP
DOWN
FAN
SPEED
AUTO
MODE
MANUAL
CZ-RD513C
TO
SWI
● Mist emerges from indoor unit.
► Condensation effect due to cooling process.
● Cooling does not work.
► Ensure temperature is set correctly.
► Make sure windows and doors are closed.
► Make sure fi lters are cleaned and replaced.
► Make sure inlet and outlet vents are cleared.
● Water fl owing sound during operations.
► Cause by refrigerant fl ow inside the unit.
1
1
OFF
/
ON
Start the
operation.
2
2
MODE
Select the
desired
mode.
3
3
UP
DOWN
Select the
temperature.
(16°C ~ 31°C)
DRY
AUTO
FAN
COOL
DE
7
ENGLISH
■ Operation Details
!$$2%33
!54/!54/
4)-%2
/.
3%42%3%4 !$$2%33
-/$%
-/$%
!)237).'
&!.30%%$
!)237).'
4)-%2
/&&/.
3%4
#!.#%,
3%,%#4
#,/#+
&!.30%%$
&),4%22%3%4
-!.5!,
/$/527!3(
-/$%
!54/
%#/./-9
Select the
temperature.
(16°C ~ 31°C)
/
• Keep your environment
dehumidifi ed by running a very
gently cooling operation.
• During soft dry operation, the
indoor fan operates at a low fan
speed.
• The louvers movement might
not align with the remote control
display.
DRY - Soft Dry Mode
• Enables air circulation in the room.
FAN - Fan Mode
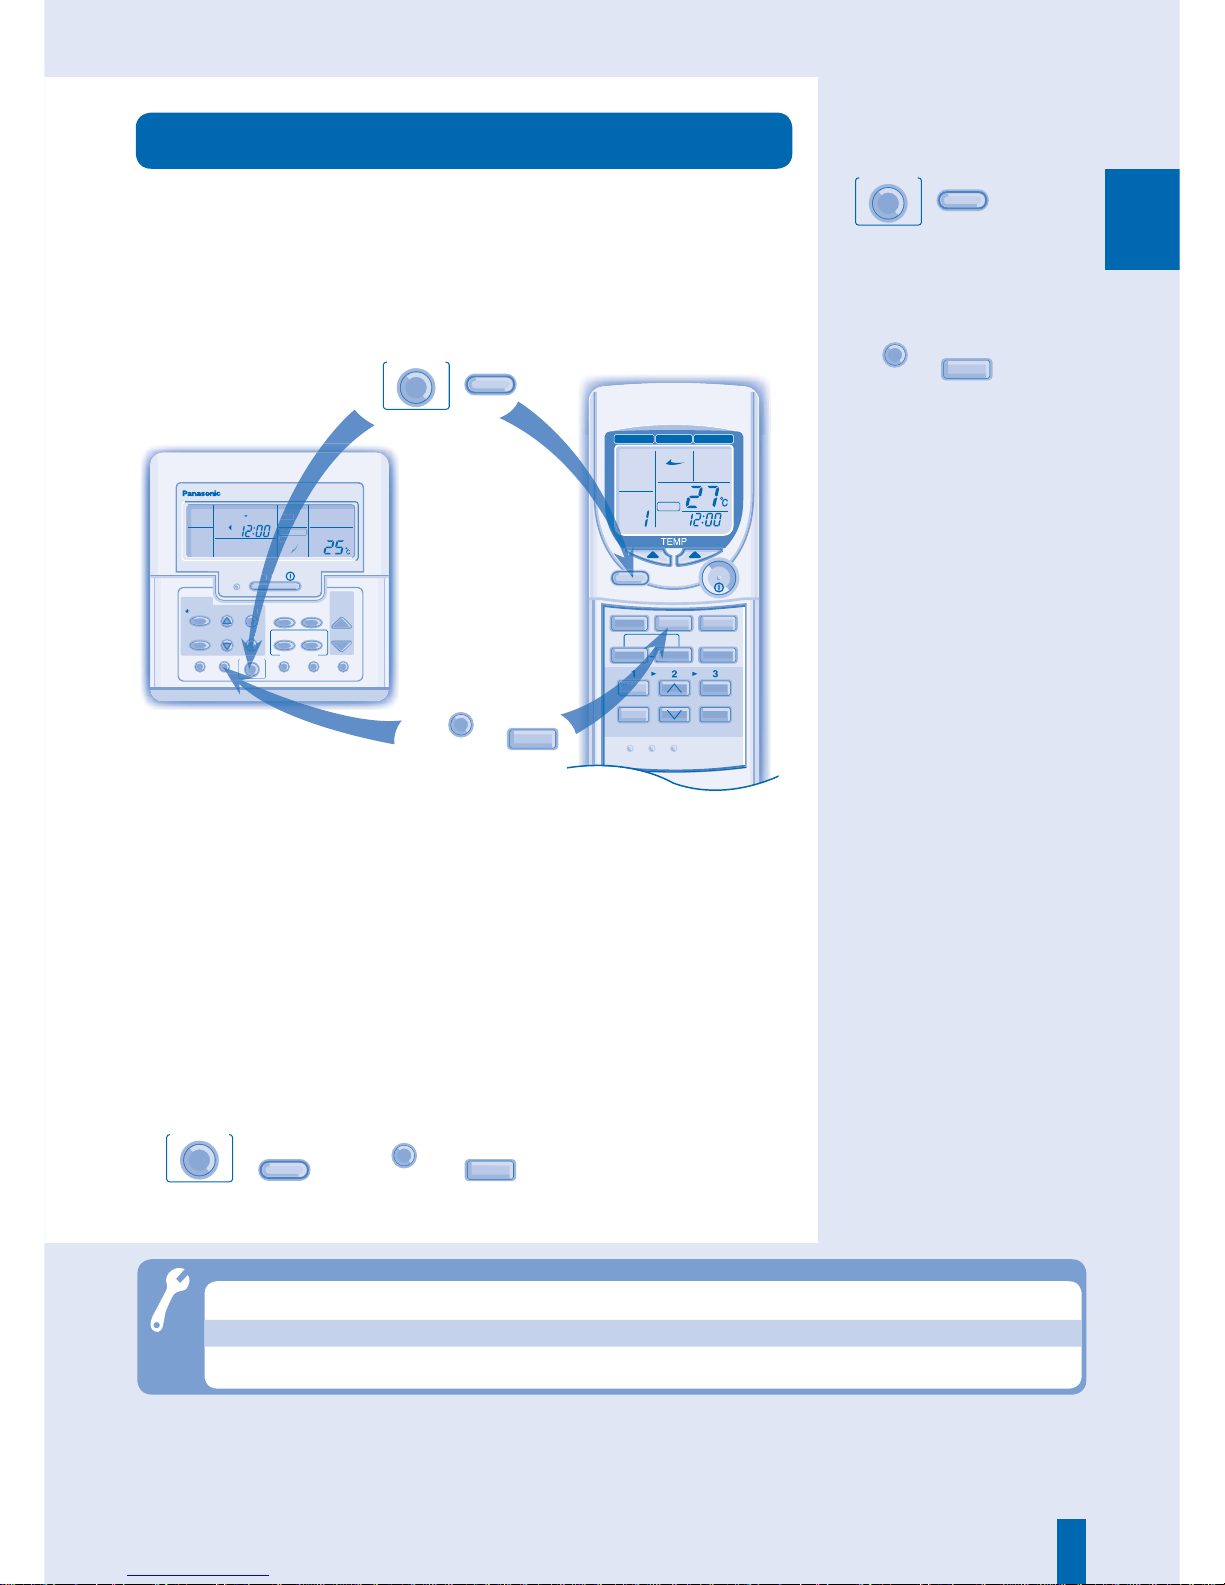
■ Hint
• A temperature setting 1°C higher
than the desired temperature
equates to a 10% power saving.
Start the
operation.
OFF/ON
1
1
Select the
desired
mode.
DRY
AUTO
FAN
COOL
MODE
2
2
3
3
●
During Auto, Cooling and Drying modes, you can activate
ECONOMY
operation.
●
Press
OFF/ON
to stop the operation.
Troubleshooting
● Cracking sound during operations.
► Changes of temperature causes the expansion/contraction of the unit.
● Operation is delayed a few minutes after restart.
► The delay is a protection to the unit’s compressor.
● Unit switch to FAN operation and air become humid.
► This happens when the room temperature reaches the set temperature,
operation switches to FAN mode and the humidity increase.
AUTO, FAN, COOL, DRY

8
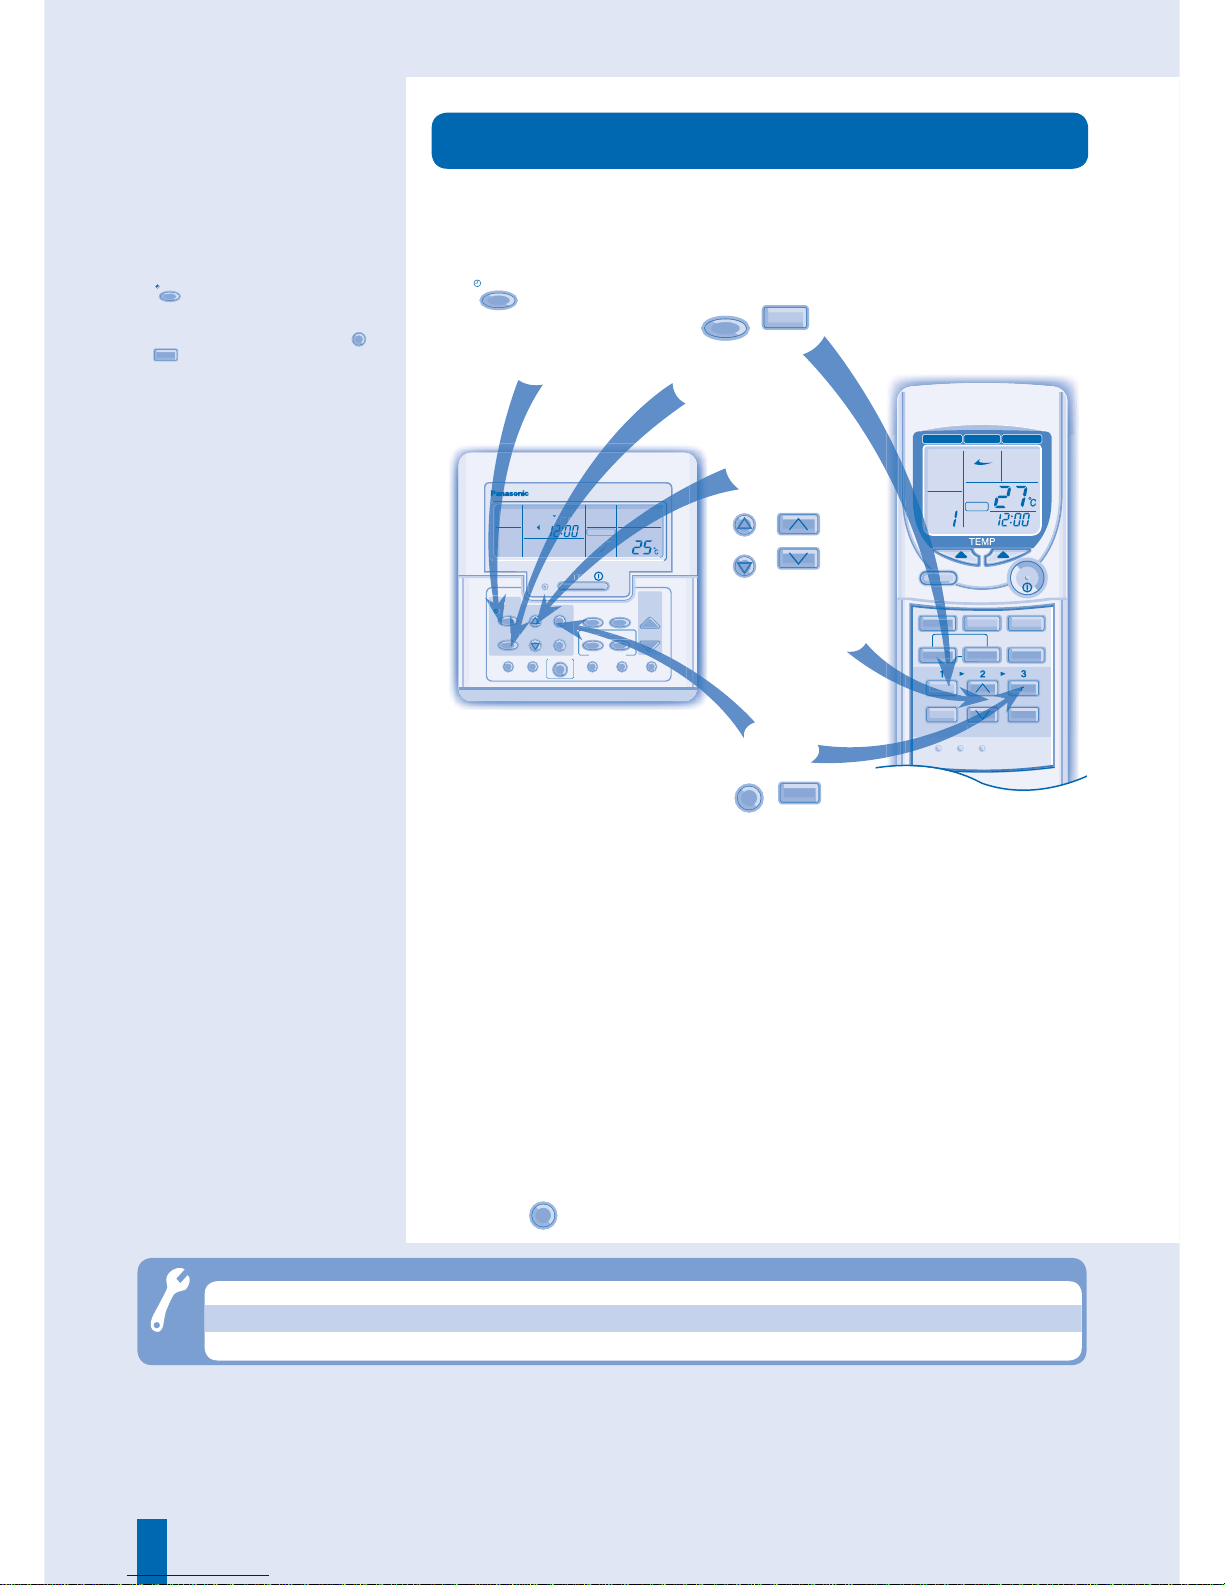
FAN SPEED, AIR SWING
■ Operation Details
FAN
SPEED
FAN SPEED
• There are 3 fan speeds, as well as
automatic*.
* For automatic fan speed, the
speed of the indoor fan is
automatically adjusted
according to the operation.
• If the operation mode is set to
Fan, the fan speed will be fi xed at
MED/MEDIUM regardless of the
temperature setting.
Air Swing
• If automatic vertical airfl ow direction
has been set, the louvers swing up
and down automatically.
AUTO
AUTO
MANUAL
MANUAL
• There are 4 options for manual
vertical airfl ow direction.
• Keeps the room ventilated.
• Do not adjust the vertical airfl ow
direction louver by hand.
• Horizontal airfl ow direction louver is
manually adjustable.
Troubleshooting
● Air Swing operation 1, 2, 3 are no variance in angle.
►
Only one blowing angle is available for Ceiling model.
● Indoor fan stops occasionally during automatic fan
speed setting.
► This helps to remove the surrounding odours.
● Remote control/display does not work.
► Check the battery insertion and address are correct.
► Signal transmission is out of range.
AIR SWING
AUTO
MANUAL
AIR SWING
MANUAL
AUTO
FAN
SPEED
FAN SPEED
Select fan
speed.
LO/LOW
MED/MEDIU
M
AUTO
HI/HIGH
CHECK ODOUR WASH VENTILATION TEST RUN FILTER RESET
TEMP/
A/C No.
UP
DOWN
MODE
SELECT
SET
CANCEL
OFF
/
ON
TIMER/CLOCK
AIR SWING
ECONOMY
AUTO
AUTO
AUTO 123
FAN SPEED
AIR SWING
MON TUE WED THU FRI SAT SUN
ON
UP
DOWN
FAN
SPEED
AUTO
MODE
MANUAL
CZ-RD513C
!$$2%33
!54/!54/
4)-%2
/.
3%42%3%4 !$$2%33
-/$%
-/$%
!)237).'
&!.30%%$
!)237).'
4)-%2
/&&/.
3%4
#!.#%,
3%,%#4
#,/#+
&!.30%%$
&),4%22%3%4
-!.5!,
/$/527!3(
-/$%
!54/
%#/./-9
TEST RU
/
,4%22
Adjust the airfl ow
direction louver.
9
ENGLISH
CHECK ODOUR WASH VENTILATION TEST RUN FILTER RESET
TEMP/
A/C No.
UP
DOWN
MODE
SELECT
SET
CANCEL
OFF
/
ON
TIMER/CLOCK
AIR SWING
ECONOMY
AUTO
AUTO
AUTO 123
FAN SPEED
AIR SWING
MON TUE WED THU FRI SAT SUN
ON
UP
DOWN
FAN
SPEED
AUTO
MODE
MANUAL
CZ-RD513C
ECONOMY
ECONOMY
■ Hints
• To reduce power consumption
during cooling operation, close the
curtains to prevent the sunlight and
heat from coming in.
• The odour persists even after
odour wash operation is used
continuously. Please consult your
nearest authorized dealer.
■ Operation Details
• To reduce power consumption.
• Use when desired room
temperature is reached.
• Remove unpleasant odour from
surrounding area during operation.
ODOUR WASH
ODOUR WASH
ECONOMY, ODOUR WASH
To enable
odour wash
operation.
!$$2%33
!54/!54/
4)-%2
/.
3%42%3%4 !$$2%33
-/$%
-/$%
!)237).'
&!.30%%$
!)237).'
4)-%2
/&&/.
3%4
#!.#%,
3%,%#4
#,/#+
&!.30%%$
&),4%22%3%4
-!.5!,
/$/527!3(
-/$%
!54/
%#/./-9
ODOUR WASH
ODOUR WASH
ECONOMY
ECONOMY
To enable
economy
operation.
/
AUTO
AUT
AN SPEE
AIR S
3%,
Troubleshooting
● Noisy during operation.
► The unit may have been installed at an incline, or the intake grille is not
closed properly.
● Outdoor unit emits water/steam.
► Condensation or evaporation occurs on pipes.
● The room has a peculiar odour.
► This may be a damp smell emitted by the wall, carpet, furniture or
clothing.
●
ECONOMY
/
ECONOMY
and
ODOUR WASH
/
ODOUR WASH
could be cancelled by
pressing the respective button again.
10
CHECK ODOUR WASH VENTILATION TEST RUN FILTER RESET
TEMP/
A/C No.
UP
DOWN
MODE
SELECT
SET
CANCEL
OFF
/
ON
TIMER/CLOCK
AIR SWING
ECONOMY
AUTO
AUTO
AUTO 123
FAN SPEED
AIR SWING
MON TUE WED THU FRI SAT SUN
ON
UP
DOWN
FAN
SPEED
AUTO
MODE
MANUAL
CZ-RD513C
!$$2%33
!54/!54/
4)-%2
/.
3%42%3%4 !$$2%33
-/$%
-/$%
!)237).'
&!.30%%$
!)237).'
4)-%2
/&&/.
3%4
#!.#%,
3%,%#4
#,/#+
&!.30%%$
&),4%22%3%4
-!.5!,
/$/527!3(
-/$%
!54/
%#/./-9
Troubleshooting
● Timer indicator always on.
► The timer setting repeats once set.
● The unit does not work.
► The circuit breaker is tripped or the timer is set incorrectly.
● Operation starts after power resumes.
► Auto restart is in function and operates under previous setting.
■ Operation Details
• The timer allows you to turn the air
conditioner on or off automatically.
• The set timer repeats daily once
set.
• For wired remote control, press
MODE
to change the display to daily
timer.
• If the timer is cancelled, press
SET
/
SET
to restore the previous setting.
• When the timer is activated, the
timer indicator appears on the
display.
• The timer closest to the current
time will be activated fi rst.
• If the main power is switched off
for an hour or more, the clock and
timer will need to be set again.
DAILY TIMER
●
The timer is valid only when the clock is set correctly.
●
You can set your preferred time for ON and OFF timers.
The unit will turn ON or OFF automatically, according to the
set timers.
●
Press
CANCEL
to cancel ON or OFF timer.
Select
OFF or ON
Timer.
SELECT
SELECT
1
1
To select
your desired
time.
UP
DOWN
2
2
To confi rm
the setting.
SET
SET
3
3
3%,%#
3
)2
$%
MODE
Enter Timer
mode.
MANUAL
FF
/
23
U
M
TIMER/C

11
ENGLISH
WEEKLY TIMER
■ Operation Details
• Weekly timer is only applicable for
wired remote control, press
MODE
for
3 seconds to select daily timer or
weekly timer.
• Daily timer and weekly timer could
not be set at the same time.
Weekly Timer
• Promotes energy saving by
allowing you to set up to 6 timers in
any given day.
• Same timer program cannot be set
on the same day.
Check Timer
MODE
SELECT
SET
CANCEL
TIMER/CLOCK
UP
DOWN
MO
2. Select the day.1. Enter timer
mode.
3. The display will show the program
for each of the selected day.
CHECK ODOUR WASH VENTILATION TEST RUN FILTER RESET
TEMP/
A/C No.
UP
DOWN
MODE
SELECT
SET
CANCEL
OFF
/
ON
TIMER/CLOCK
AIR SWING
ECONOMY
AUTO
AUTO
AUTO 123
FAN SPEED
AIR SWING
MONTUE WEDTHU FRI SAT SUN
ON
UP
DOWN
FAN
SPEED
AUTO
MODE
MANUAL
CZ-RD513C
CHECK ODOUR WASH VENTI
MODE
SELECT
SET
CANCEL
OFF
/
ON
TIMER/CLOCK
ECONOMY
UP
DOWN
FA
SP
AU
CZ-RD513C
ON
OFF
TIMER
1
MON TUE WED THU FRI SAT SUN
23456
Will light up if Timer
operation is selected
6 different programs can
be set in a day (1 ~ 6)
Day to be selected
Time to be
selected
(interval 10
minutes)
ON-Timer
To automatically
switch “ON”
the unit
OFF-Timer . To automatically
switch “OFF” the unit
Indicate the
selected day
●
Repeat steps 5 to 8 to set Timer 2 to 6, or press
CANCEL
to
cancel the related timers.
1
1
Change Display
2
2
3
3
Select days to run timer
Press
MODE
to change the display to weekly timer.
Press
to select your desired day. The selected day will be highlighted with .
Press
SET
to deselect or select mark.
Repeat this step include other day.
Press
SELECT
to enter day setting.
4
4
5
5
6
6
7
7
8
8
Select ON/OFF Timer
Set the Timer
Press to choose ON or OFF.
Press
SET
to confi rm the selection.
Press
to select your desired time.
If you want to set together with your desired temperature,
press
UP
DOWN
to select the temperature.
Press
SET
to comfi rm the setting.
Press
SELECT
to enter Timer 1.
Modify Or Add Timer
• Perform check timer operation to
select the day. Repeat steps 4 to 8
to modify existing timer program, or
add any new timer program.
Disable Weekly Timer
• To disable weekly timer setting,
press
MODE
, then press
CANCEL
.
Cancel Timer
• Perform the step below to cancel
the timer program for a particular
day.
MODE
SELECT
SET
CANCEL
TIMER/CLOCK
UP
DOWN
MO
2. Select the day.1. Enter timer
mode.
3. Press to enter
day setting.
4. Press to cancel
the timer set.
• To enable previous weekly timer
setting, press
MODE
, then press
SET
.
Enable Weekly Timer
12
CARE & CLEANING
1
2
1
2
Switch off the power supply
Switch off the power supply
before cleaning
before cleaning
• Cleaning is needed when:
“FILTER RESET” appears on the
remote control display. (For wired
remote control)
“FILTER” lights up on the indicator
display. (For wireless remote
control)
• lt is recommended to clean the
fi lter every 6 weeks.
• After the air fi lter is cleaned, press
FILTER RESET
/
FILTER RESET
to reset.
• Do not operate without an air fi lter.
• Wash/rinse the fi lter gently with
water to avoid damage to the fi lter
surface.
• Do not dry the part with a hair
dryer or a stove.
• Replace any damaged fi lter.
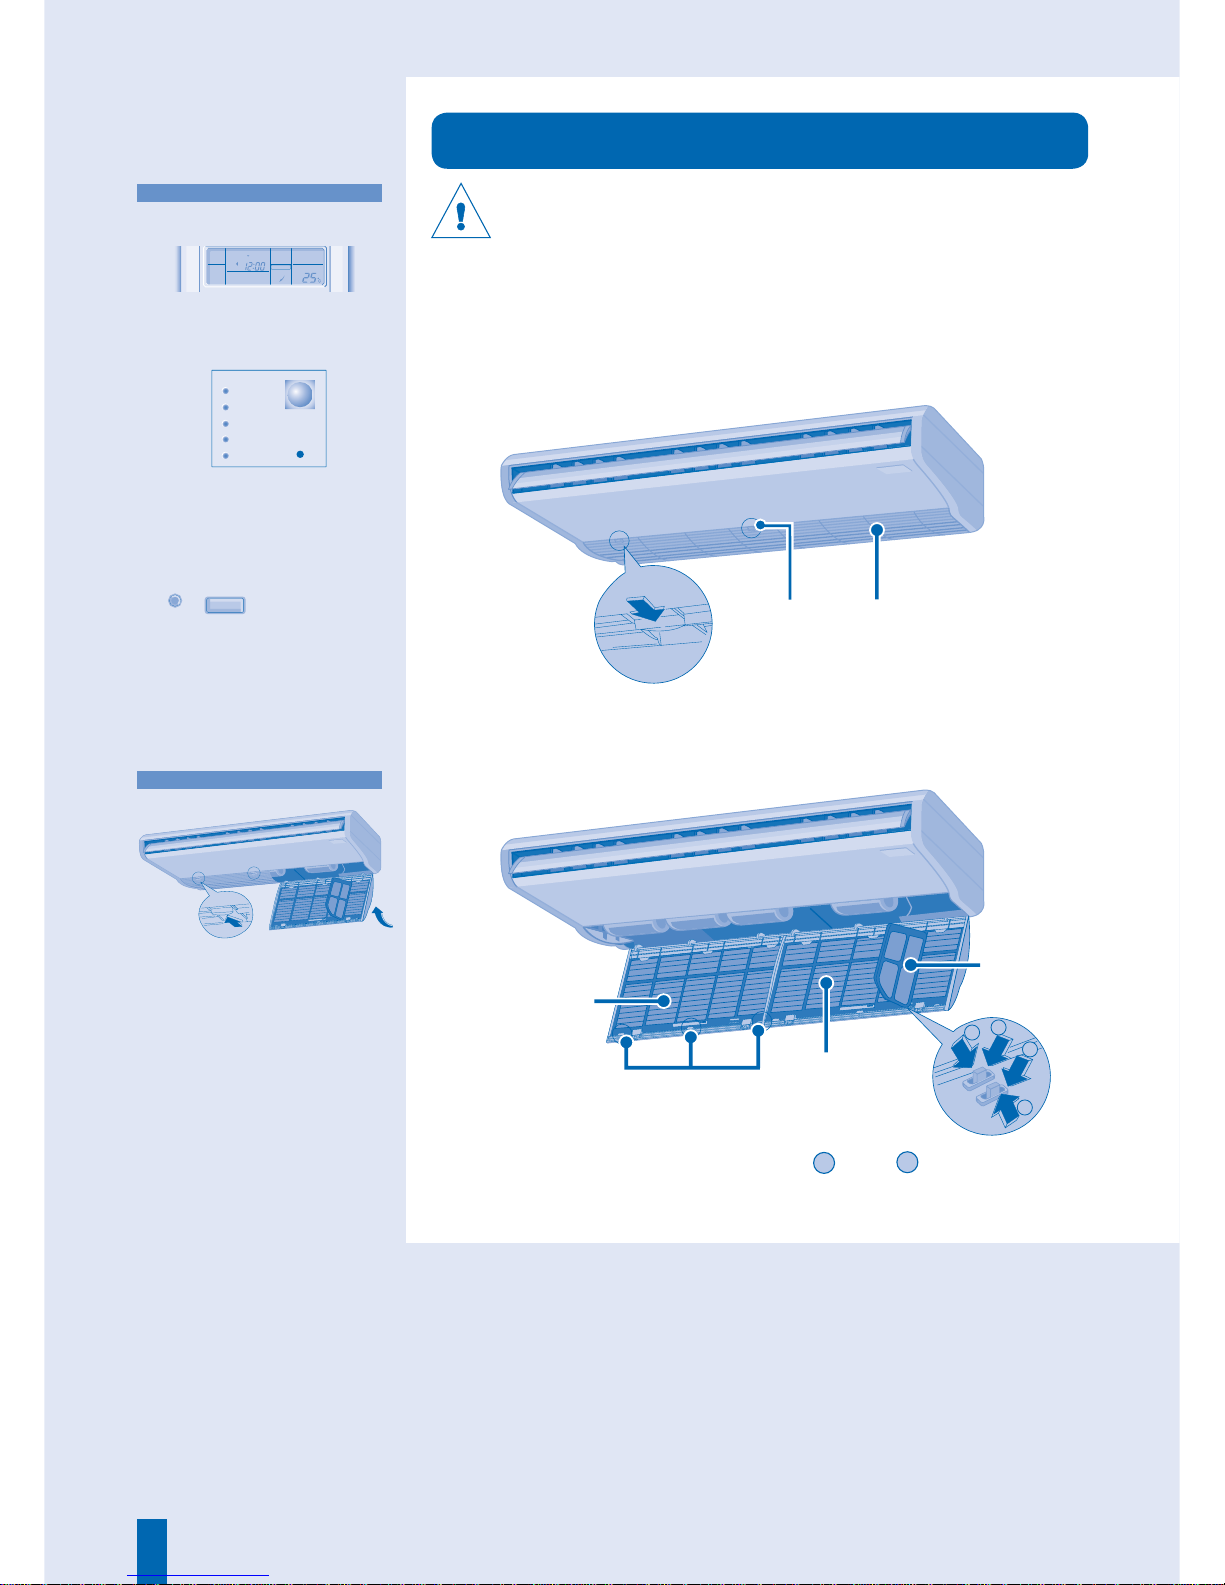
FILTER INSTALLATION
1
1
REMOVE AIR FILTERS
REMOVE AIR FILTERS
Push the knobs in the intake grille in the
direction of the arrow to open the intake grille.
2
2
Remove the main air fi lters from the intake grille
tabs.
3
3
Press the side air fi lter tab 1and 2in that
order to release the side air fi lter.
Knob
Intake Grille
Main air fi lter
Side
air fi lter
Knob
Push
Close
1. Install the air fi lters to the intake
grille by the reverse procedures of
removal.
2. Close and push the knobs to
secure the intake grille.
Push
Push
Push
■ About
AIR FILTER MAINTENANCE
AUTO FAN
COOL DRY
FILTER
RESET
AUTO
AUTO 123
FAN SPEED
AIR SWING
MON TUE WED THU FRI SAT SUN
ON
POWER
TIMER
FILTER
ECONOMY
AUTO
ODOUR WASH
Tabs
AIR
AIR
FILTERS
FILTERS
Vacuum,
wash and dry.
 Loading...