

Panasonic CQDF802 User Manual
Battery Notes
Remove and dispose of an old battery immediately.
Battery Information: ≥ Battery type: Panasonic lithium battery (CR2025) (included)
≥ Battery life: Approximately 6 months with normal use (at room temperature)
E
N
G
L
I
S
H
2
CQ-DF802W
17
E
N
G
L
I
S
H
1
CQ-DF802W
16
Before Use and Preparations
[PWR] (SOURCE)
≥ Switches on/off the power. (➡ page 20)
≥ Selects a source. (➡ page 20)
[BAND]
≥ Selects a band. (➡ page 22)
≥ Pause CD playing. (➡ page 25)
["] [#] (Hour/minute/disc)
≥ Selects (vertically) or adjusts an op-
eration or item.
≥ Adjusts the clock. (➡ page 21)
≥ Selects disc. (➡ page 28)
[%] [$] (Track/tune)
≥ Selects (horizontally) or adjusts an
operation or item.
≥ Selects or searches frequency/track.
(➡ pages 22, 25, 28)
[SET]
≥ Determines an operation or item.
["] [#] VOL (Volume)
≥ Adjusts the sound volume.
(➡ page 21)
[MUTE]
≥ Lowers the volume. (➡ page 21)
[RET] (RETURN)
≥ Returns to the previous display in menu setting
mode.
[MENU]
≥ Enters the menu setting mode.
≥ Returns to the regular mode during menu play setting.
[FACE]
≥ Selects the button color and display
brightness. (➡ page 33)
[S·A] (Spectrum Analyzer)
≥ Selects the Spectrum Analyzer display
pattern. (➡ page 37)
[DISP] (Display)
≥ Changes the display.
(➡ pages 22, 25, 29)
[DIM] (DIMMER)
≥ Changes the dimmer level.
(➡ page 37)
[„] (NUMBER)
≥ Enters the number input mode.
(➡ pages 25, 29)
(S·HDB)
≥ Sets the Super High Definition Bass
sound. (➡ page 33)
RANDOM
SCAN
REPEAT
Car Audio
PWR
DISP
NUMBER
123
456
789
0
DIM
BAND
RET
MENU
SET
SOURCE
FACE
S • A
MUTE
VOL
RETURN
DIMMER
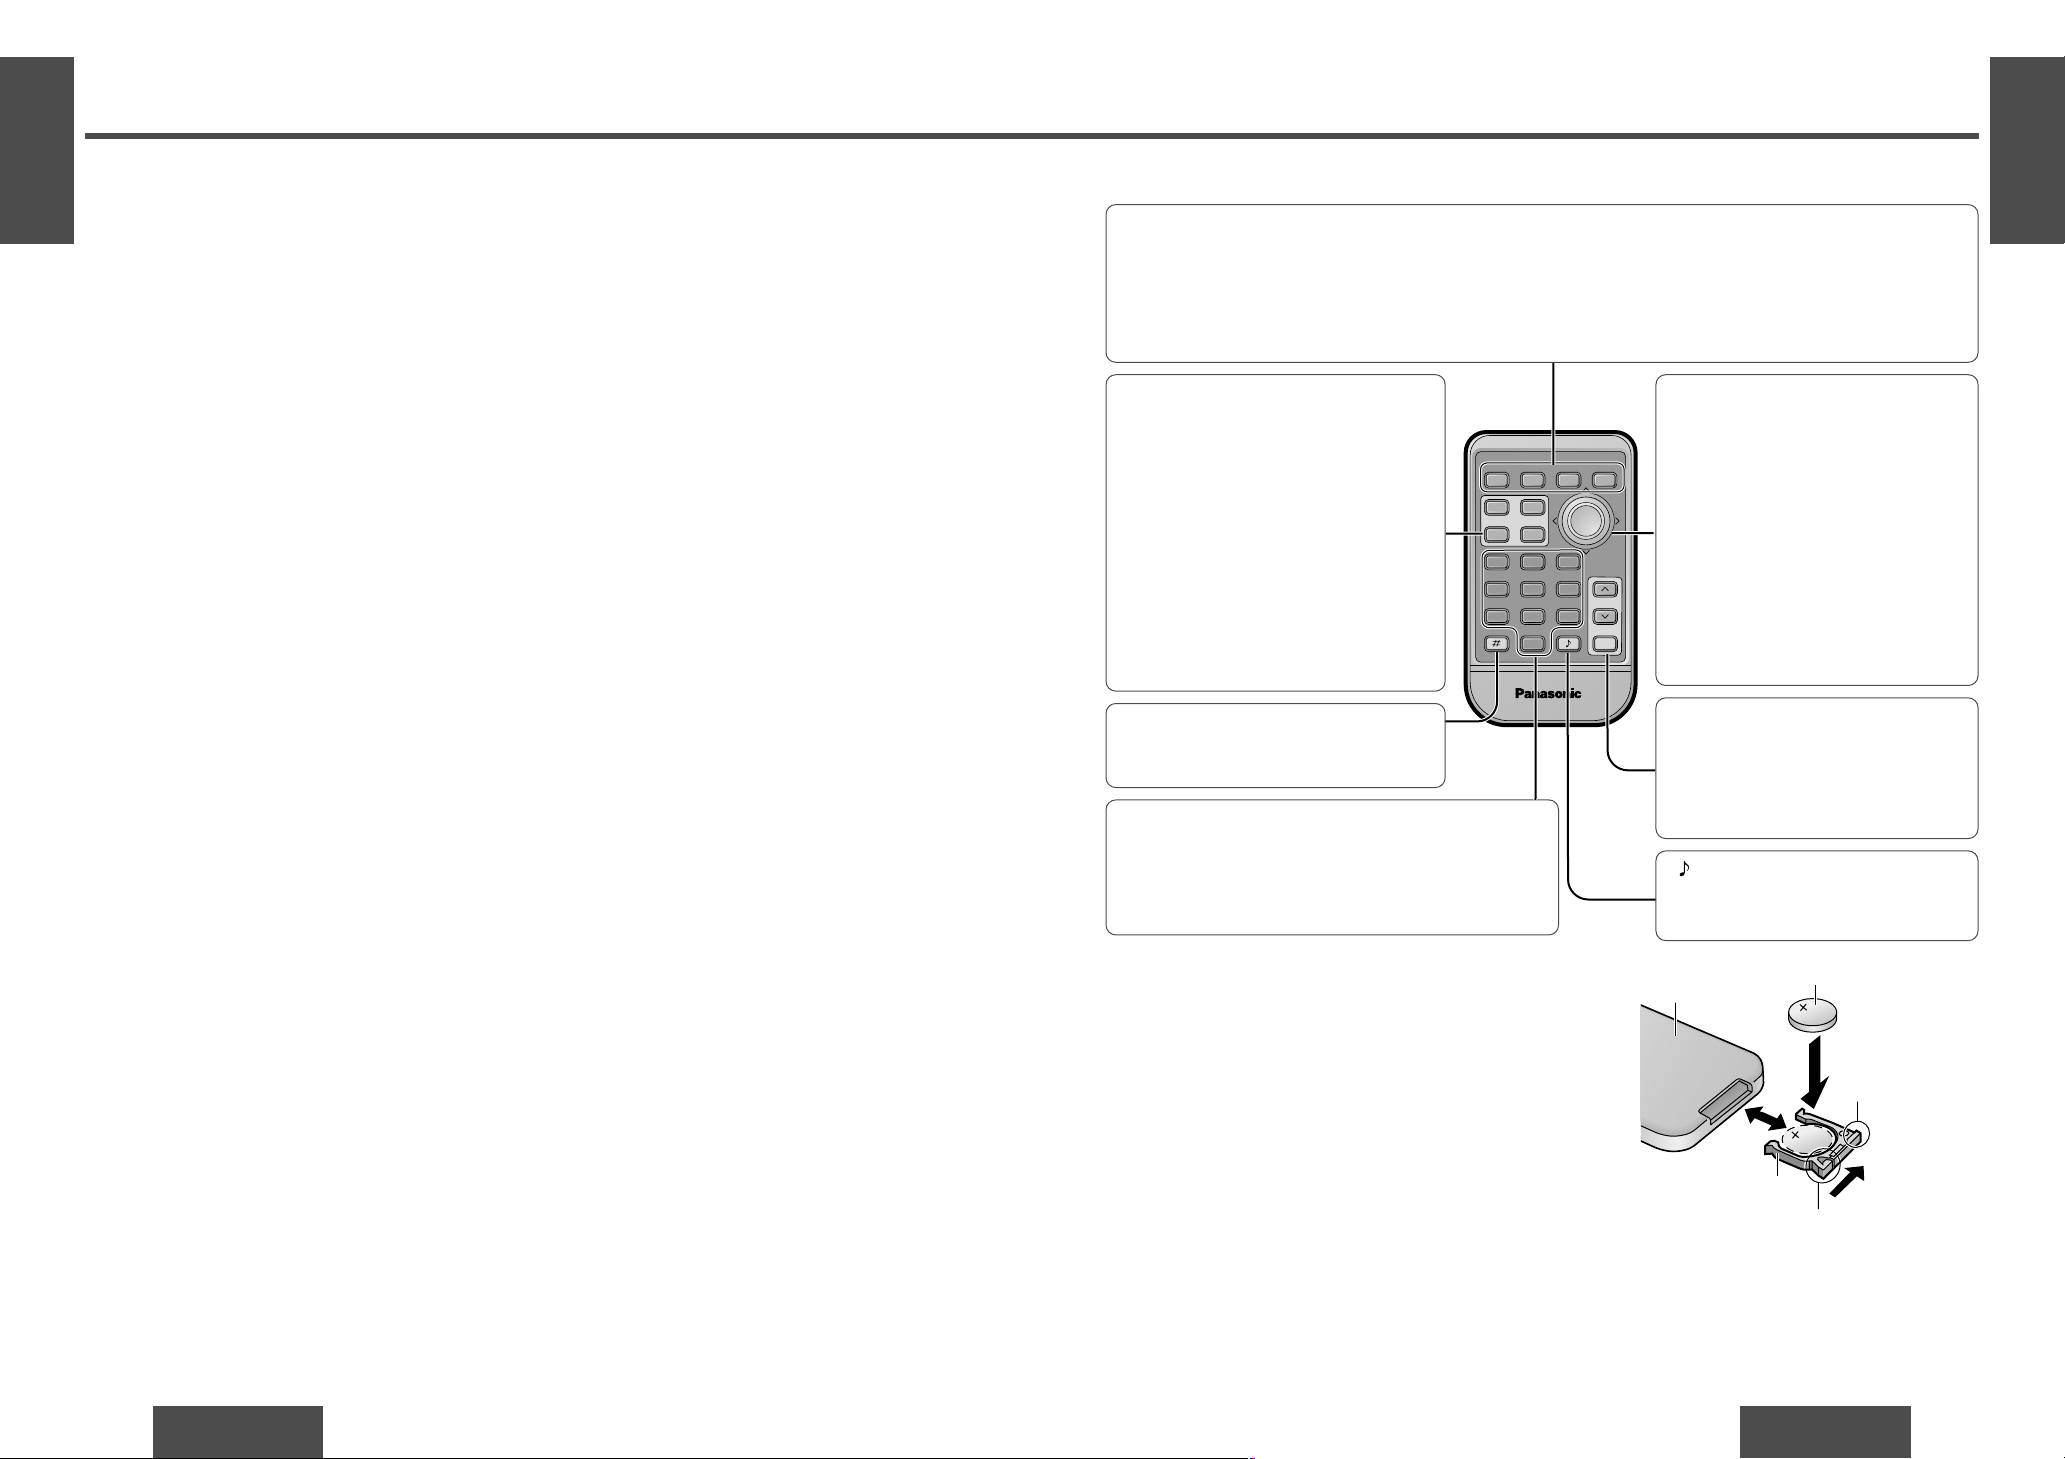
Battery Installation
1 Remove the battery holder.
Pull the battery holder by the position B while pushing position A in the direction indicated by the arrow.
2 Install the battery on the battery holder.
As shown in the figure on the right, fit the battery into the battery
holder with the “i” side facing up while pressing on position A.
3 Insert the battery holder.
Push the battery holder back into its original position.
Back side
Lithium battery (included)
Battery holder
Position A
Position B
≥ Do not disassemble or short the battery. Do not throw a battery into a fire.
≥ Keep batteries away from children to avoid the risk of accidents.
≥ Be careful to observe proper local disposal rules when you dispose of batteries.
Caution: Improper use of batteries may cause overheating, an explosion or ignition, resulting in injury or a
fire. Battery leakage may damage the unit.
Point the remote control unit at the main unit’s sensor. (➡ page 18)
[\ ]
Name of Controls Functions(Remote Control Unit)
[0] to [9]
≥ Memorizes broadcast stations. (➡ page 23)
≥ Selects track/disc. (➡ page 25, 29)
[4] (RANDOM)/[5] (SCAN)/[6] (REPEAT)
≥ Selects listening item. (➡ pages 26, 30)
❐ Notes for the touch panel
When operating
≥ You must use your fingers to touch the panel and perform operations.
≥ Do not press the buttons too forcefully. If you do so, you may damage or break the glass on the top surface
of the touch panel.
≥ Do not allow the top surface of the touch panel to be caught by your fingernails or any hard objects. If you
do so, you may damage or break the glass on the top surface of the touch panel.
≥ Do not use a pen or other sharp implement to perform touch panel operations. If you do so, you may dam-
age or break the glass on the top surface of the touch panel.
≥ Performing operations while the top surface of the touch panel is covered with dust may damage the glass
on the top surface of the touch panel.
When not operating
≥ Be sure to keep the front panel with the removable face plate case (included) when it has been detached
from the main unit.
≥ Take care not to drop the front panel when it has been detached from the main unit. Also take care not to
bump the top surface of the touch panel into anything. If you do so, you may break the glass on the top surface of the touch panel.
≥ Do not allow the top surface of the touch panel to be caught by your fingernails or any hard objects. If you
do so, you may damage or break the glass on the top surface of the touch panel.
When cleaning (➡ page 46)
❐ You can operate this unit by pressing buttons on the main unit and the remote control unit, and touch pan-
els on the main unit.
≥ Some operations can be activated by pressing buttons only on main unit or remote control unit.
Those cases are described in the instructions.
Example: Press [OPEN] on the main unit.
≥These instructions describe buttons that are concerned with operations as follows.
Example: Press [VOL "] or [VOL #]/["] or [#].
E
N
G
L
I
S
H
4
CQ-DF802W
19
(Display)
E
N
G
L
I
S
H
3
CQ-DF802W
18
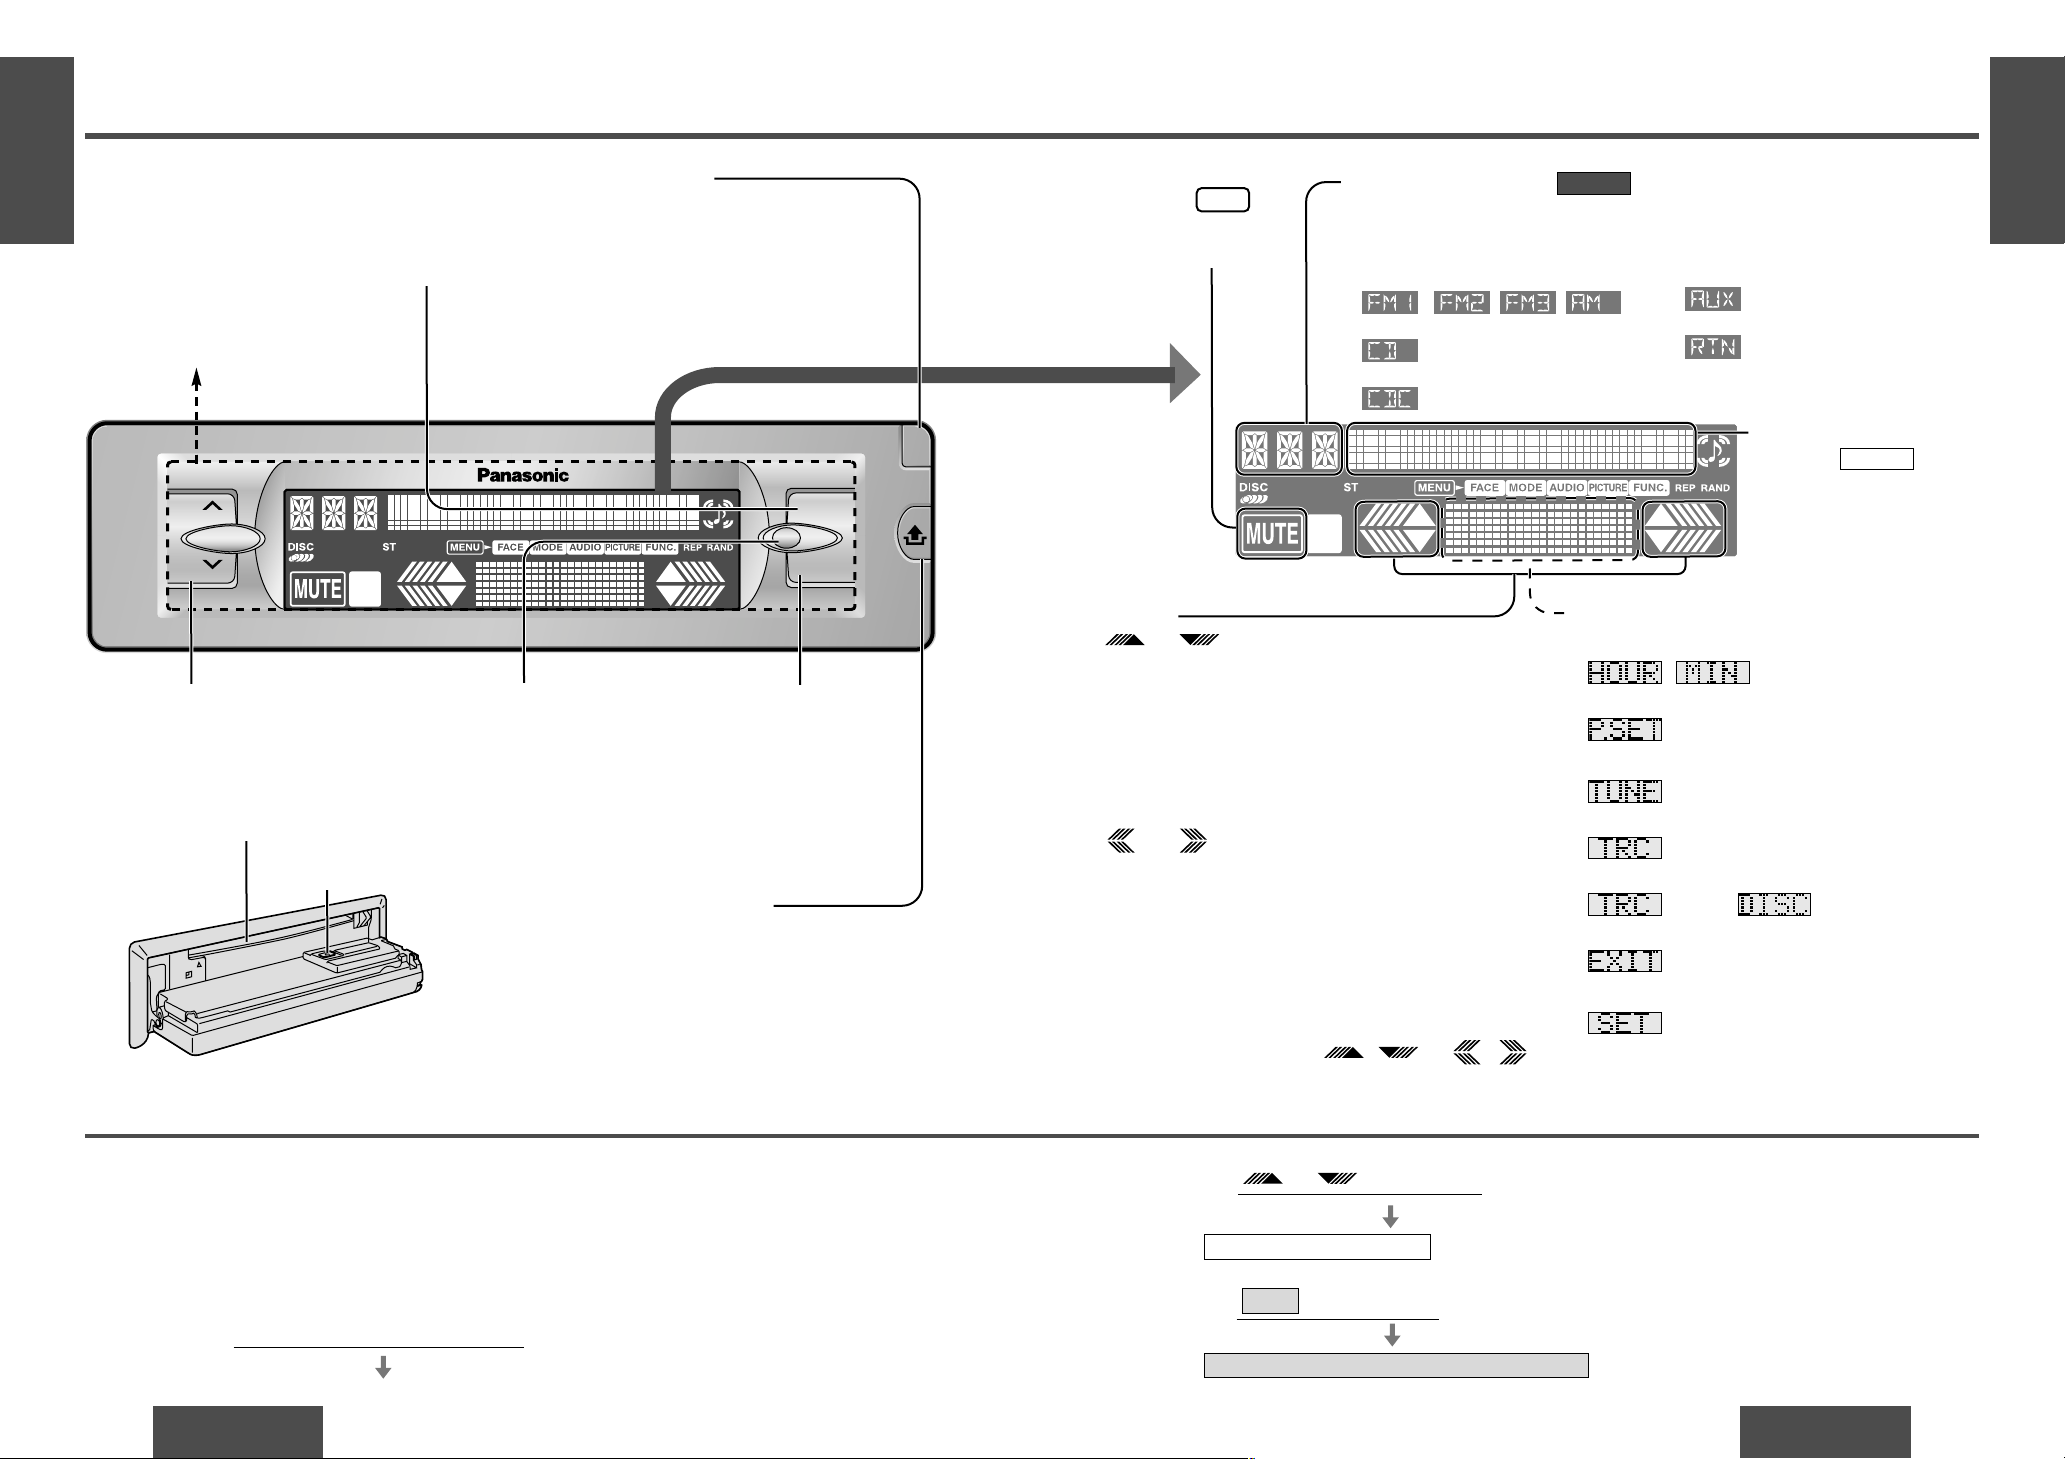
Name of Controls Functions(Main Unit and T ouch Panel)
Example: Press /["] or [#].
Example: Press /[MENU]/[DISP].
EXIT
[buttons on the main unit]/[remote control unit]
/[remote control unit]
(➡ above.)
cursor on the touch panel
or
/[buttons on main unit]/[remote control unit]
(➡ above.)
Spectrum Analyzer display on the touch panel
["] [#] VOL (Volume)
≥ Adjusts the sound volume.
(➡ page 21)
[MENU]
≥ Enters the menu setting
mode.
≥ Returns to the regular
mode during menu setting.
[BAND] (APM/;/1)
(Auto Preset Memory/Pause)
≥ Selects a band. (➡ page 22)
≥ Pause CD playing.
(➡ page 25)
≥ Sets the auto preset memory
(APM) mode. (➡ page 23)
[OPEN]
≥ Opens the front panel.
(➡ page 21)
['] (Release)
≥ Releases the front panel.
(➡ page 52)
MUTE
(Indicates . )
≥ Lowers the volume.
(➡ page 21)
Dot display
(Indicates .)
≥ Changes the display.
(➡ pages 22, 25, 29)
≥ Returns to the previous
display.
DISPLAY
Note:
≥ Press the Spectrum Analyzer display to active the
cursor of the touch panel
on
VOL
CQ-DF802W
MENU
OPEN
BAND
APM/ ;/
1
MOSFET
50W X 4
Display (➡ next page)
on
Source display (Indicates .)
• Switches off the power. (➡ page 20)
(Press and hold.)
• Selects a source. (➡ page 20)
≥ Radio
()
≥ CD player mode
≥ CD changer control
SOURCE
Spectrum Analyzer (S·A) display (➡page 36)
≥ Clock basics (➡ page 21)
,
(Minute)
≥ Radio mode (➡ page 22)
(Preset)
• Enters a preset memory mode. (➡page 23)
≥ CD player mode (➡ page 24)
(Track)
≥ CD changer control (➡ page 28)
(Track),
≥ Menu setting mode
• Returns to the previous display.
• Determines an operation or item in menu set-
ting mode.
Cursors
(Hour/minute/preset/disc/menu/submenu)
≥ Selects (vertically) or adjusts an operation or
item.
≥ Adjusts the clock. (➡ page 21)
≥ Selects a preset memory. (➡ page 23)
≥ Selects disc. (➡ page 28)
(Tune/track/setting)
≥ Selects (horizontally) or adjusts an operation or
item.
≥ Selects or searches frequency/track.
(➡ pages 22, 25, 28)
or
or
Disc slot
≥ Loading the disc. (➡ page 24)
[<] (Eject)
≥ Ejects the disc. (➡ page 24)
MUTE
Touch panel
≥ Switches on the power.
(➡ page 20)
Remote control sensor
Note:
≥ Operations can be performed no
matter which part of the touch
panel is pressed BUT ONLY
WHEN THE POWER IS ON.
§ The brightness of the screen illustrations in this manual is different from the actual screen brightness.
≥ AUX-IN setting
≥ Menu setting mode
• Returns to the previous display in
menu setting mode.
or
.
E
N
G
L
I
S
H
6
CQ-DF802W
21
E
N
G
L
I
S
H
5
CQ-DF802W
20
General
Mute/Attenuation
ON: Press /[
MUTE
]. ( indicator lights.)
OFF: Press /[
MUTE
] again.
Note:
≥ After turning off the ignition key, a security message is displayed, and the panel removable alarm that
reminds you to take the panel is activated. (When security function is set to on ➡ page 38)
≥ Operations can be performed no matter which part of the touch panel is pressed BUT ONLY WHEN
THE POWER IS ON.
Volume
[VOL "]: Up
[VOL #]: Down
Setting range: 0 to 40
ACC
ON
Open/Close the Front Panel
OPEN: Press [OPEN] on the front panel.
CLOSE: Raise the panel by hand.
: No sound.
Caution:
≥ To avoid damaging the front panel, do not push
it down or place objects on it while it is open.
≥ Do not pitch your finger or hand in the front
panel.
≥ Do not insert foreign matter into the disc slot.
["] [#]
VOL (Volume)
[PWR]
(SOURCE)
[DISP]
(Display)
[MUTE]
["] [#]
(Hour/minute)
RANDOM
SCAN
REPEAT
Car Audio
PWR
DISP
NUMBER
123
456
789
0
DIM
BAND
RET
MENU
SET
SOURCE
FACE
S • A
MUTE
VOL
RETURN
DIMMER
Power
Turn the key in the ignition until the accessory indicator lights.
∫ Power on
Press the touch panel on the main unit.
Press [PWR] (SOURCE) on the remote control unit.
∫ Power off
Press and hold on the main unit again for more than
1 second.
Press and hold [PWR] (SOURCE) on the remote control unit
again for more than 1 second.
SOURCE
1
Source
Press /(SOURCE) to change the source.
SOURCE
2
Note:
≥ The sound level for each source is stored in
memory.
(There is one volume setting for AM radio
band, and one volume setting for FM radio
band.)
: Decrease the volume to
1
/
10.
Close
Clock Basics
The 12-hour system is used for the clock.
Initial Time
1 Press /[DISP] (display).
2 Press and hold /[DISP] (display) for
more than 2 seconds.
3 Press /["] or [#].
4 Press /[DISP] (display).
5 Press /["] or [#].
6 Press /[DISP] (display).
DISPLAY
DISPLAY
DISPLAY
DISPLAY
Note:
≥ Press and hold /["] or [#]to
change numbers rapidly.
≥ You can select the clock display during the unit
off. (➡ page 38)
or
or
or
MUTE
on
MUTE
(Hours blink.)
(Hours set.)
(Minutes blink.)
(Minutes set.)
(End.)
Decreasing volume range depends on setting.
(➡ page 38)
on
(Hour/minute)
(Volume)
(Power off)
VOL
MENU
OPEN
SOURCE DISPLAY
[VOL "] [VOL #]
[OPEN]
Touch panel
(Power on)
BAND
APM/ ;/
1
MOSFET
50W X 4
ST
Radio
CD player
CD changer control
AUX-IN setting
(When a CD is in the player.)
(When a CD changer is
connected and magazine is in
the changer.) ( page 28)
(Clock display)
Time Reset
Press and hold /[DISP] (display) for more
than 2 seconds to activate the time setting mode to
reset the time. Then, repeat steps 3 to 6.
DISPLAY
SOURCE
DISPLAY
E
N
G
L
I
S
H
8
CQ-DF802W
23
E
N
G
L
I
S
H
7
CQ-DF802W
22
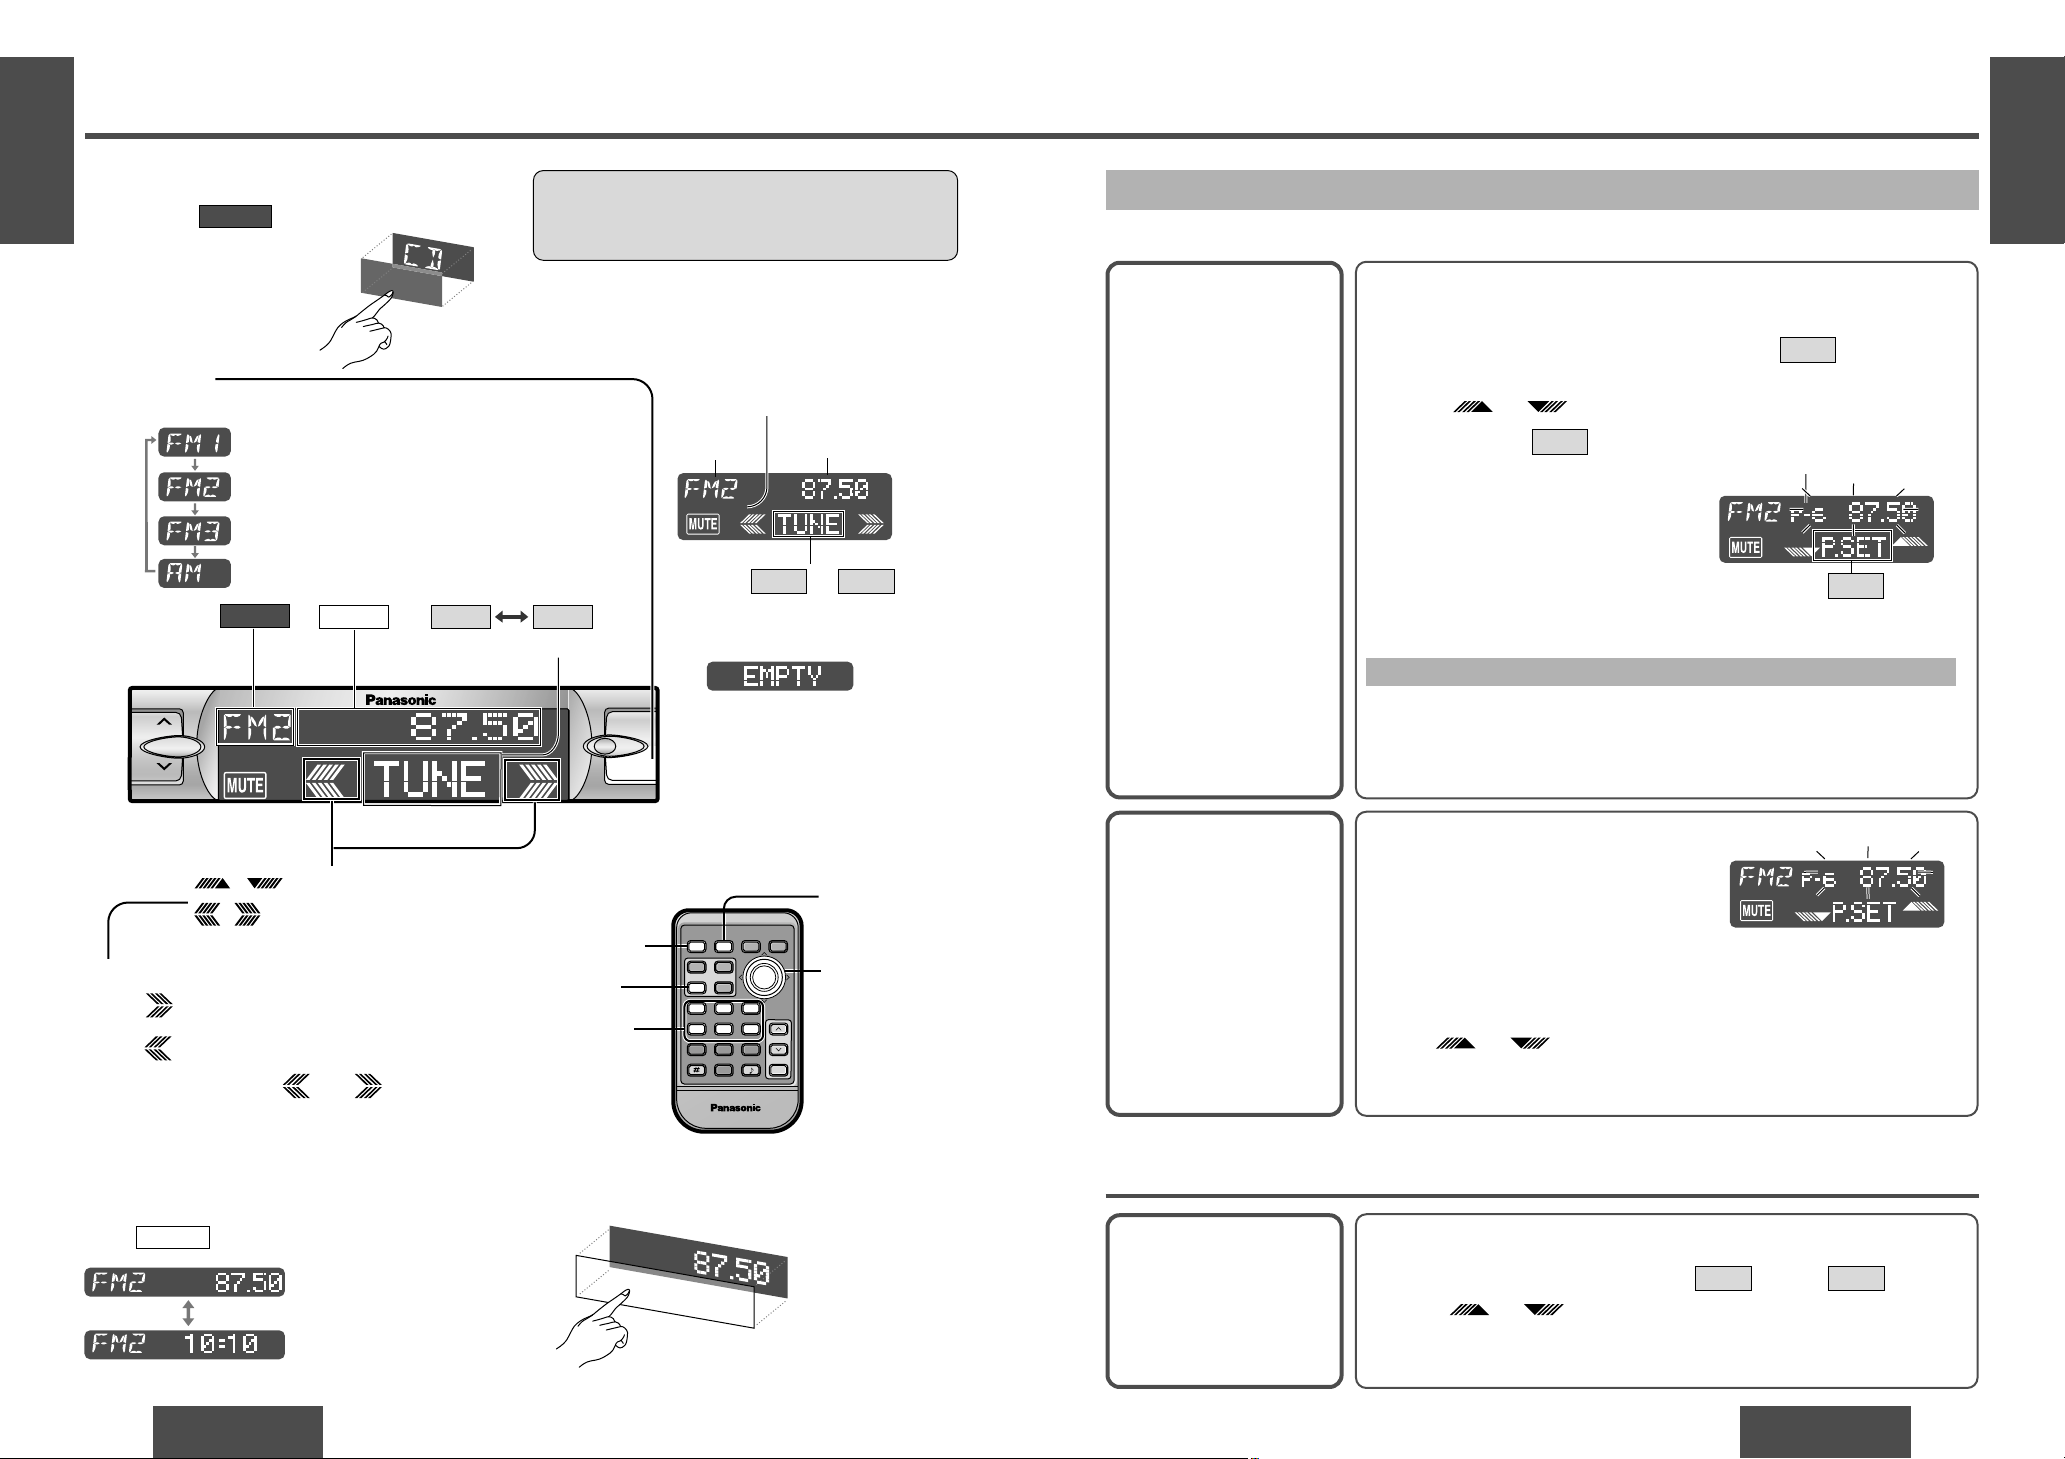
Radio
Band
Press [BAND] to change the band.
2
Radio Mode
Press /[SOURCE] to change to
the radio mode.
SOURCE
1
Tuning
/[$]: Up
/[%]: Down
Press and hold /[%] or [$] for
more than 0.5 seconds, then release.
Seeking will start.
3
ST
Radio mode display
FM stereo indicator
or
Display Change
Press /[DISP] (display) to change the display.
DISPLAY
Radio mode display
(Default)
Clock display
One-Touch Selection of a Station
Up to 6 stations each can be saved in the FM1, FM2, FM3 and AM preset station memories.
Manual Preset
Memory
Manually save a station in
the preset memory.
Entering numbers directly on the remote control unit
1 Select a band and frequency (step 1, 2 and 3 on the previous
page).
2 Press and hold [1] to [6] for more than 2 seconds to memorize.
Auto Preset
Memory (APM)
Automatically save relatively strong stations in
the preset memory.
1 Select a band (steps 1 and 2 on the
previous page).
2 Press and hold [BAND] (APM) for
more than 2 seconds.
Note:
≥ Existing saved stations are overwritten with new stations after following this procedure.
Preset Station
Calling
1 Select a band (steps 1 and 2 on the previous page).
2 Press the Spectrum Analyzer display to show (preset)
.
3 Press /["] or [#] to select the preset number for tuning
in the preset station.
(Press [1] to [6] on the remote control unit.)
P.SETTUNE
Note:
≥ Frequency setting can be performed even after selecting a preset num-
ber.
1 Select a band and frequency (steps 1, 2 and 3 on the previous
page).
2 Press and hold the Spectrum Analyzer display for more than
2 seconds until the preset number blinks.
3 Press /["] or [#] to select a preset number (1j6).
4 Press and hold (preset) for more than 2 seconds to memo-
rize.
P.SET
TUNE
Scanning:
≥ The display blinks once, and a re-
ceiving station is saved in the
memory.
Preset number
≥ The 6 strongest available stations will be automatically saved in the
memory under preset number 1 to 6.
≥ Once set, the preset stations are sequentially scanned for 5 seconds
each. (Scanning)
≥ Press /["] or [#] for the broadcast you want to listen
to.
(Press [1] to [6] on the remote control unit.)
ororor
Band
(SOURCE)
[DISP]
(Display)
[%] [$]
(Tune)
["] [#]
(Preset station/
select)
[BAND]
(Auto preset
memory)
[1] to [6]
(Preset station)
RANDOM
SCAN
REPEAT
Car Audio
PWR
DISP
NUMBER
123
456
789
0
DIM
BAND
RET
MENU
SET
SOURCE
FACE
S • A
MUTE
VOL
RETURN
DIMMER
Frequency
VOL
MENU
SOURCE DISPLAY
P.SET
(Preset)
(Preset station/select)
(Tune)
BAND
APM/ ;/
1
MOSFET
50W X 4
TUNE
Caution:
≥ To ensure safety, never attempt to preset sta-
tions while you are driving.
P.SET
Note:
≥ :
Displays when not have any
menu settings. Radio and AUXIN mode do not have any menu
settings.
≥ Press or to
change the cursor.
P.SETTUNE
Spectrum Analyzer display
SOURCE
DISPLAY
 Loading...